Review

Application of Rock Abrasiveness and Rock Abrasivity Test Methods—A Review

Faculty of Mechanical Engineering and Robotics, AGH University of Science and Technology, al. Mickiewicza 30, 30-059 Krakow, Poland
Sustainability 2023, 15(14), 11243; https://doi.org/10.3390/su151411243
Submission received: 23 June 2023 / Revised: 12 July 2023 / Accepted: 17 July 2023 / Published: 19 July 2023

Abstract

:
The processes of rock formation have long been known and widely described in many literature items worldwide. Due to the multitude of occurring rock types, they are distinguished by various properties. For many decades, scientists worldwide have been determining various parameters by which these properties of rocks can be described. Tests of these parameters are commonly performed in many research centres worldwide. Depending on the scientific discipline, some researchers focus on geological properties (colour, structure, texture, chemical composition). Other researchers focus on physical and mechanical properties: hardness, density, strength properties, compactness, etc. Among them, abrasiveness and abrasivity can also be distinguished. In terms of nomenclature, they are very similar and often confused. Even within the academic community, researchers often use the names interchangeably, which needs to be corrected. This article aims to explain the difference between rock abrasiveness and rock abrasivity, classify methods for their assessment and present their practical applications in the mining and construction industry. It should be emphasized here that abrasiveness is determined when we are interested in the abrasive wear of natural stone and abrasivity when we are interested in the wear of the tool with which we cut the stone. The purpose of this article is also to let the reader decide whether to carry out an abrasiveness or abrasivity test and which method to use.

1. Introduction

Rocks are characterised by various properties resulting from their structure. It later has a direct impact on the processes related to the destruction of their cohesion in order to obtain a product (output) irregular (energy raw materials, but also gravels, sands, clays, aggregates, hardcore, etc.) or regular (paving stones, kerbs, slabs, decorative materials, etc.) [1,2,3].
Rocks have anisotropic properties due to their discontinuity in the geometric sense (grain size, stratification, fractures, etc.) and the physical sense (variable properties in different directions). Therefore, describing their properties with only one parameter is not very accurate and, in many cases, even impossible. Hence, several or over a dozen parameters describing their properties are used to characterise rocks.
The procedure for determining the properties of a given rock begins with very preliminary tests, i.e., organoleptic tests (macroscopic analysis). On this basis, it is possible to determine properties such as colour, lustre, structure, texture, streak or transparency. Then, it is possible to proceed to the microscopic analysis. After preparing the appropriate preparations, it is possible to perform, among other things, a detailed analysis of the mineral composition, determine the grain size or colour of individual minerals (using a polarizing or scanning microscope) and even the exact chemical composition (e.g., using a spectrometer) [4,5].
Physical and chemical properties are also used to characterize rocks. They constitute an extensive range of properties, including hardness (Mosh scale), cleavage, density, porosity, water absorption, fire resistance, low-temperature resistance, permeability, heat conductivity, electric conductance, magneticity and many more [6,7,8,9].
Among the physical properties, the so-called mechanical properties can be distinguished. The largest group are strength properties, where compressive strength (USC), tensile strength (BTS) and bending or shear strength are determined. In addition, the mechanical properties include workability [10], compactness (point load compression by Protodiakonov [11]) and abrasive properties [12]. Regarding the abrasive properties of rocks, there are two very similar concepts—rock abrasiveness and rock abrasivity.
ABRASIVENESS is defined in different ways. In the case of natural and artificial materials, their susceptibility to abrasive wear is defined by abrasiveness. It can be said that the abrasiveness is responsible for the extent to which the rock will be “worn out” during the impact of the abrasive material on it.
In contrast with abrasiveness, ABRASIVITY describes the ability of rocks (minerals) to wear (frictionally) the surface of solid materials, primarily metal but not only. Such contact occurs during rock mining (digging tools, excavator buckets), drilling holes (drilling tools), loading (loader buckets) or its transport for short-distances (flight-bar conveyors, tractor-scrapers, dozers) and long-distances (haul truck’s boxes). Abrasivity is responsible for how much the element in contact with it wears out.
The definitions of rock abrasiveness and rock abrasivity are similar and, therefore, very often need clarification. Even within the academic community, researchers often use the names interchangeably, which needs to be corrected. Various methods determine the parameters defining them and at various test stands, the following article presents the methods of their determination and practical application in the construction industry and various other industries.

2. Rock Abrasiveness Test Methods

Among the rock abrasiveness test methods, Böhme, wide wheel, Amsler and micro-Deval are currently four commonly used methods.

2.1. Böhme Abrasion Test

The most common method of assessing rock abrasiveness is the Böhme abrasion test (BA) [13,14]. The test consists of placing the rock sample on the test track of the rotating disk, on which a standard abrasive is poured. The disc is rotated and the samples are pressed at approximately 294 N for several cycles. Artificial corundum is used as the standard abrasive material. At least six samples are required for the test: cubes of approximately 71 mm on an edge or cuboids with a square base of approximately 71 mm on each side. The front contact surface must be smooth and flat. Samples must be clean and dry. Before testing, the bulk density of the sample, ρb, is determined by measuring its sides and weighing it to determine the initial mass, mi. Wet or water-saturated samples can also be tested using this method. The device (Figure 1) consists of a rotating disc with a test track, a sample holder and a counterweight. The disc has a diameter of 750 mm, is flat and horizontal and should rotate at 30 rpm. In addition, the disc is equipped with a revolution counter and a device that turns it off automatically after 22 revolutions. The test track is ring-shaped with an internal diameter of 120 mm and an external diameter of 320 mm. The rotating disc is cast iron and must be replaced as its surface wears out during testing. The sample holder consists of a U-shaped frame of approx. 40 mm high, 5 mm distant from the test track. The counterweight consists of a lever with two arms of different lengths, a weight and a balance [13,14,15].
The test begins with pouring 20 g of abrasive onto the test track. Next, the sample in the holder is fixed and, after setting the front surface on the track, it is axially loaded with a force of about 294 N. The sample is subjected to 16 abrasion cycles, 22 turns each. After each cycle, both the disc and the face of the sample are cleaned, the sample is turned 90° in the same direction and 20 g of abrasive material is refilled into the apparatus. Before testing and after every four cycles, the sample should be weighed. The result of the tests is the calculation of wear due to abrasion after 16 cycles as the average decrease in the volume of the sample ΔV, from Formula (1).
V = m ρ b
where: ΔV—sample volume loss after 16 cycles, mm3; Δm = (mimf)—sample mass loss after 16 cycles, g; ρb—sample bulk density, g/mm3.

2.2. Wide Wheel Abrasion Test

The second most popular method of assessing rock abrasiveness is the wide wheel abrasion test (WWA). According to the PN-EN 14157:2017 standard [13], this method is considered a reference. It consists of wearing the upper surface of the sample with an abrasive material, which in the test is corundum (white alumina) with a grain size of 80. At least six samples with dimensions of at least 100 × 70 mm are needed for the test. Samples must be clean and dry. The test surface of the sample must be flat and smooth. Immediately before the test, the surface should be covered with a dye that facilitates the subsequent measurement of the groove [15].
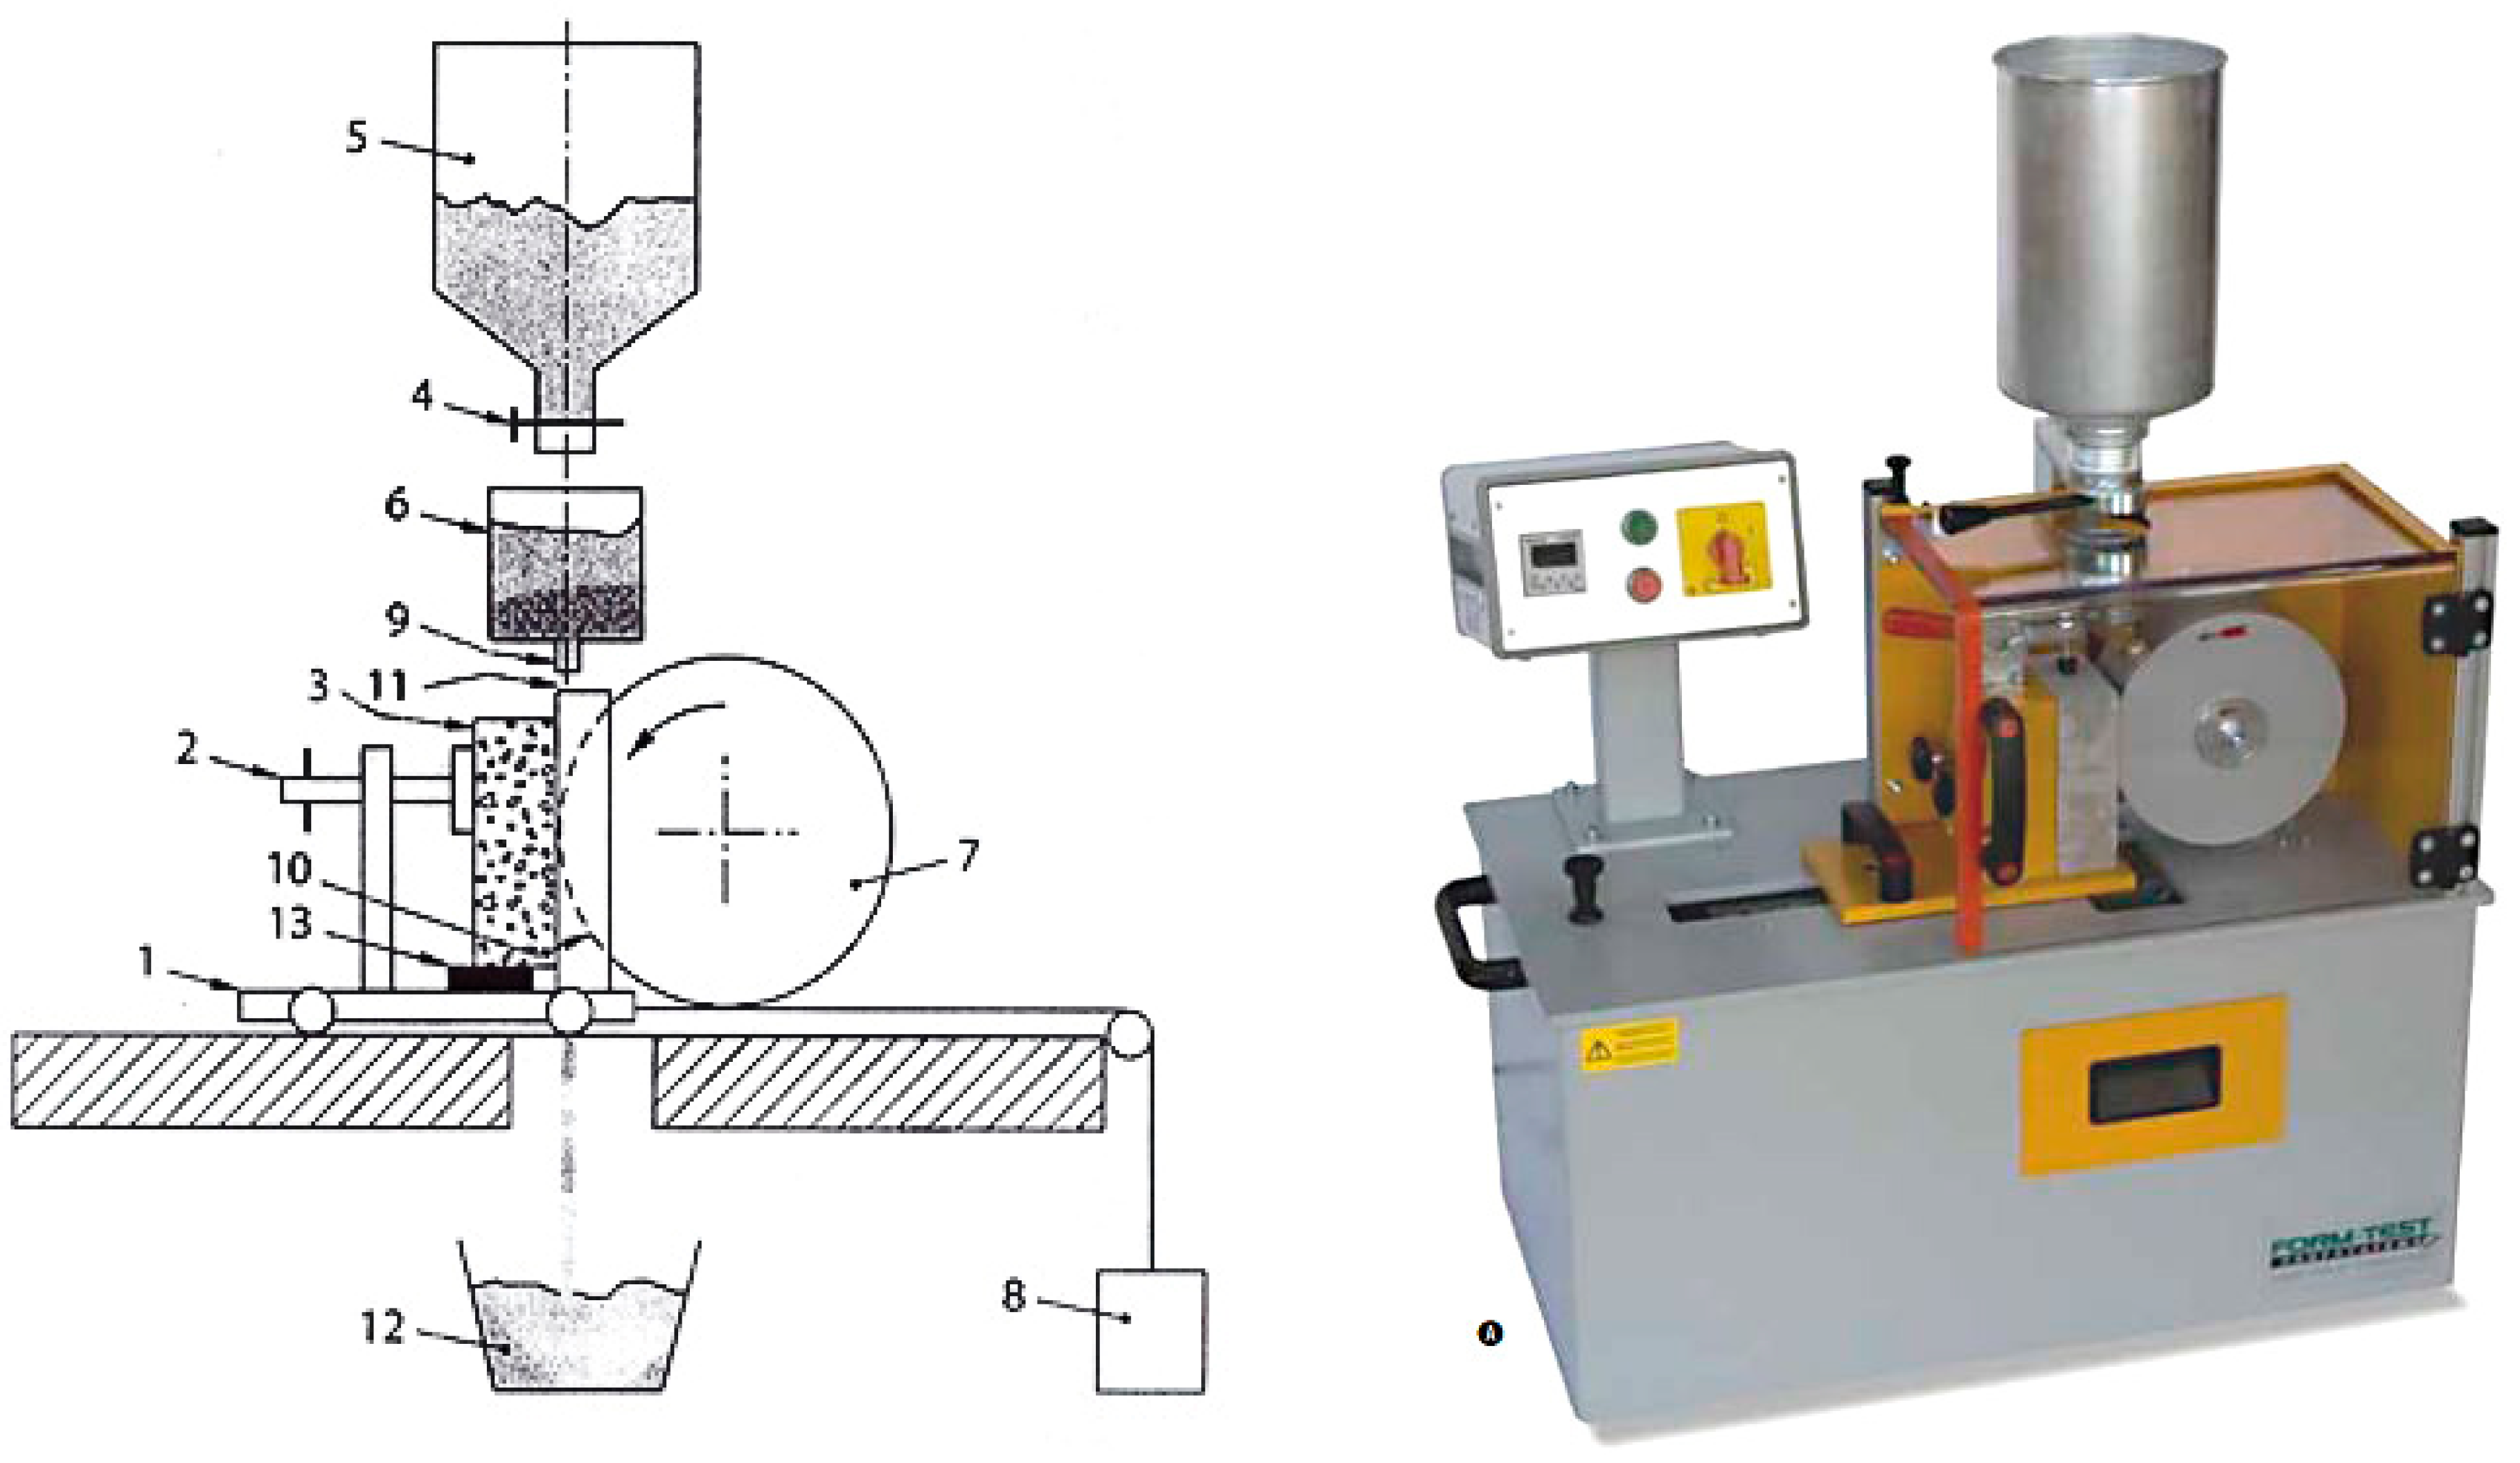
The WWA device (Figure 2) consists of a wide abrasion wheel, a storage hopper with one or two control valves to regulate the flow of abrasive material, a flow guidance hopper, a clamping trolley with a sample holder and a counterweight. The diameter of the steel wheel is 200 mm and its width is 70 mm. The clamping trolley with the sample holder is mounted on bearings. A 14 kg counterweight forces its movement towards the wheel. The storage hopper is used to supply abrasive material to the flow guidance hopper. A flow guidance hopper with a cylindrical or rectangular cross-section has a slotted outlet about 45 mm long and 4 mm wide [15].
During the test, the sample is fixed on the clamping trolley with a wedge to allow the abrasive to flow under it and is pressed against the wide abrasion wheel. The wheel makes 75 revolutions in 60 s. The abrasive material is fed from the flow guidance hopper onto the wide wheel with a constant stream at a speed of 2.5 L/min. After 75 revolutions, the wheel and the abrasive material flow must be stopped. The result of the test is the dimensions of the groove (Figure 3). The dimensions of the groove are measured with a digital calliper at points A and B, at the inner edge of the longitudinal groove boundaries l1 and l2. The measurement 10 ± 1 mm from the end of the groove (CD) must be repeated to calibrate and obtain three readings [13,15].

2.3. Amsler Abrasion Test

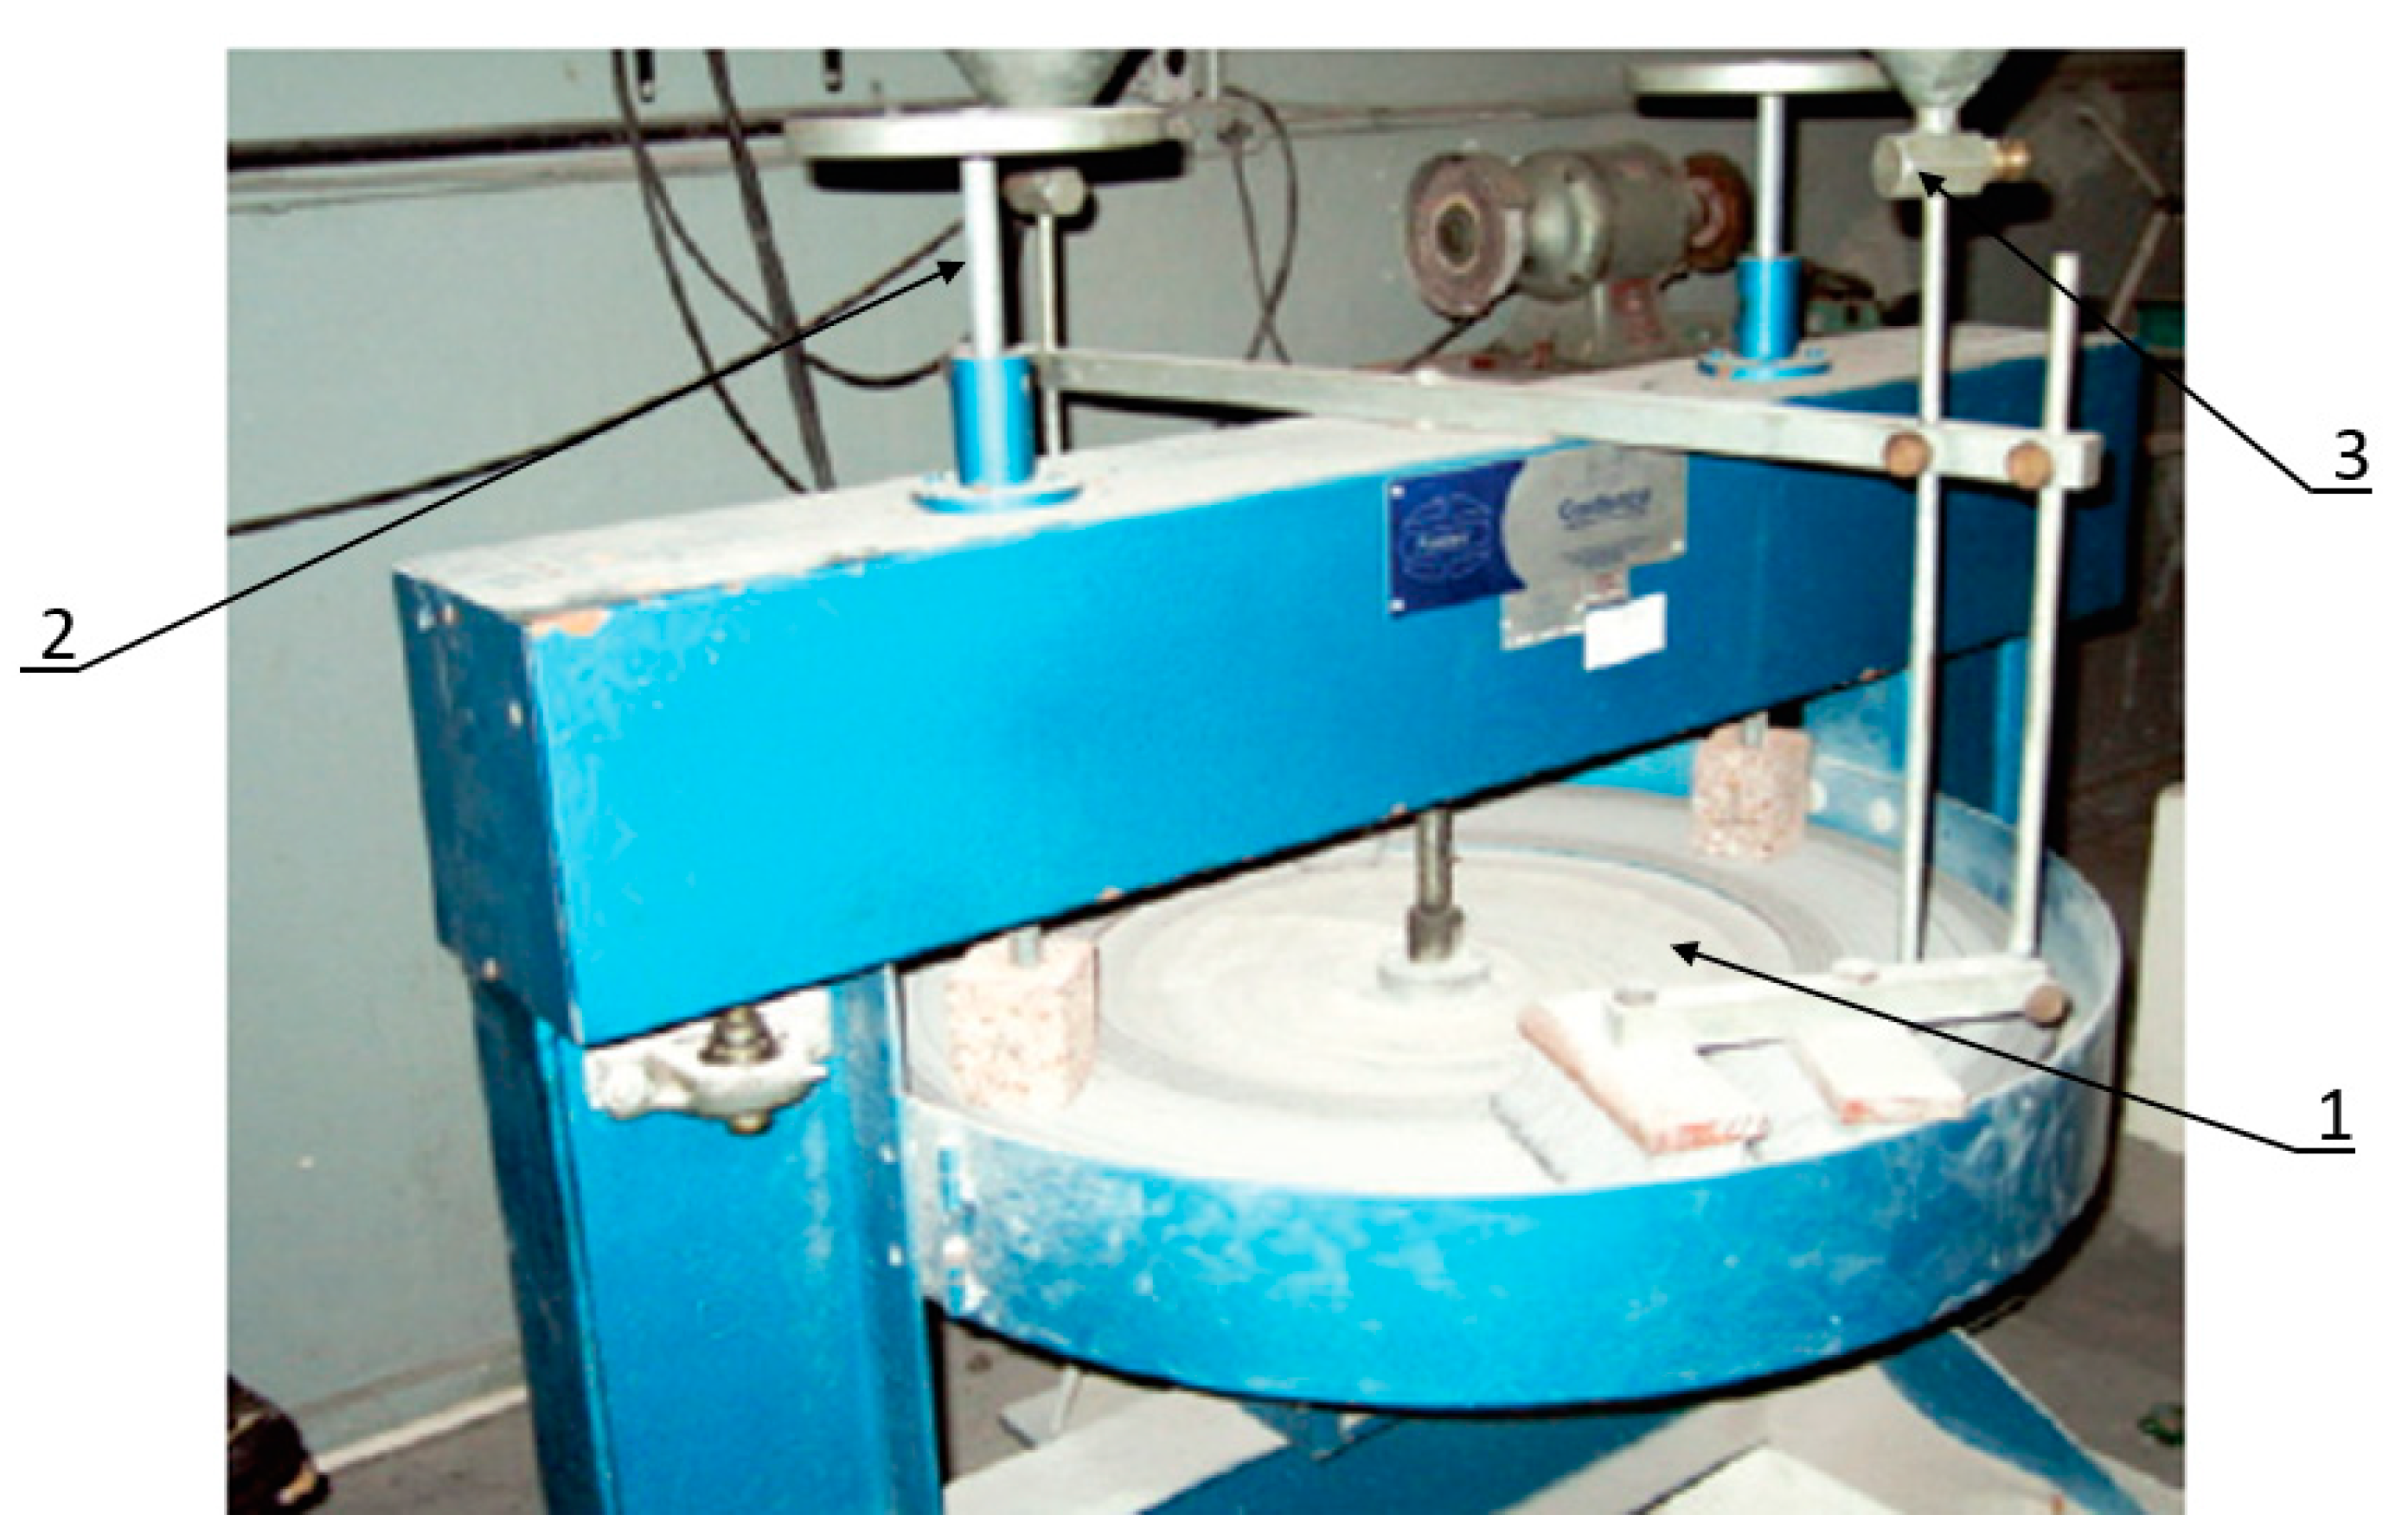
The third method of determining rock abrasiveness is the Amsler test. The test begins with placing the rock sample on the disc (Figure 4), where the abrasive material is scattered. The disc is then rotated and the rock sample is worn for several cycles. The abrasive material is medium silica sand (0.2 to 0.6 mm). At least six 60 mm × 60 mm × 25 mm samples are required for the test [13].
The testing machine consists of the following parts:
horizontal cast iron disc rotating around a vertical axis (Figure 4, position 1);
rock sample holder, which presses the sample to the rotating disc with a force of 335 N and allows it to rotate around its vertical axis at a rotational speed of 0.75 rpm (Figure 4, position 2);
devices for feeding water, drop by drop, and sand onto the rotating disc at 150 g/min (Figure 4, position 3) [13].
Before testing, the thickness of each sample is measured in the centre of each of the four side faces. After mounting the samples to holders, the stand is started. The test ends when each sample has made a distance of 200 m. The rock samples are removed, washed with clean water and cleaned with a cloth. The final thickness is measured as before the test. The result of the test is the wear of each sample and is calculated as follows:
A = lAlB
where: A—sample wear, mm; lA—average thickness of each sample before testing, mm; lB—average thickness of each sample after testing, mm.

2.4. Micro-Deval Abrasion Test

The micro-Deval abrasion test is the last method to assess rock abrasiveness [18]. The test determines the percentage loss of the initial mass of the sample during its abrasion to dimensions smaller than 1.6 mm. The micro-Deval testing machine is shown in Figure 5. It consists of one to four drums, closed at one end, with an internal diameter of 200 mm. The drums, which are arranged on two driving shafts rotating horizontally, are made of stainless steel and their wall thickness is at least 3 mm. The inside of the drums must not have unevenness due to welds or the method of joining. The drums should be closed with flat covers, at least 8 mm thick, and a gasket, ensuring they are water- and dust-tight. A typical motor drives the drums with a power of about 1 kW and a constant speed of about 100 rpm. The motor stops when a certain number of revolutions is reached, which is set using a counter or other device equipped with an automatic device [18].
The test is carried out on aggregate passing through a 14 mm sieve and remaining on a 10 mm sieve. A sample mass of at least 2 kg should be sieved through 10, 11.2 and 14 mm sieves to obtain a grain size of 10 to 11.2 mm and 11.2 to 14 mm. Then, each aggregate sample should be washed separately and dried at 110 ± 5 °C to constant mass. After cooling to ambient temperature, both samples should be mixed to obtain a modified sample with a 10 to 14 mm grain size. Two samples are needed for the test, each of 500 g in mass. The abrasive material is steel balls with a diameter of 10 mm.
Each sample is placed in a separate drum. An amount of 5000 g of steel balls is added to each drum. The drums are rotated at 100 rpm until 12,000 revolutions are reached. After the test, the aggregate is placed on a 1.6 mm sieve. Then, the aggregate grains remaining on the sieve are carefully separated from the steel balls, not losing any aggregate grains. The grains can be selected by hand and a magnet can remove the balls from the sieve. Finally, it is necessary to record the mass, m, of grains remaining on the 1.6 mm sieve. Each sample’s micro-Deval MDS factor is calculated using Formula (3).
M D S = 500 m 5
where: m—mass of dry aggregate remaining on the 1.6 mm sieve, g.
The mean value of the micro-Deval is calculated from the values obtained from the two test samples. The test can also be performed wet. They are carried out in the same way, only water is added to the drum. For distinction, the name of the MDS coefficient has been changed to MDE and it is also calculated using Formula (3) [18].

2.5. Summary

The WWA test is straightforward to perform. The stand has an uncomplicated structure. However, the test requires the preparation of abrasive material with the appropriate grain size, which is quite time-consuming and labour-intensive. In addition, the test’s result (the measurement of the linear dimensions of the groove) may need to be more precise.
In the case of the BA test, the only disadvantage is the very time-consuming and labour-intensive conduct of the test, which requires constant control by the person performing the test. However, a definite advantage is that the test result is based on the measurement of mass, which can be measured with much greater accuracy. In addition, the Böhme test, in contrast to the WWA test, can also test wet or water-saturated samples.
The result of the Amsler test is also a linear measurement of the samples, which can also be inaccurate, especially in the case of uneven sample wear.
Performing the micro-Deval test is also very time-consuming and labour-intensive. This is mainly related to the long and complicated process of preparing samples with the appropriate grain size. Additionally, the aggregate during testing in drums is also worn by crushing, not only abrasion. It should also be emphasized that the micro-Deval method is applied to determine the abrasiveness of grained material, not the natural stone.
Some researchers also qualify the Los Angeles (LA) test to assess rock abrasiveness. However, it should be emphasized here that this test is used to assess the fragmentation resistance of the aggregates [19,20], not abrasive wear. It is performed under the European standard EN 1097-2 [21].

3. Rock Abrasivity Test Methods

Among the rock abrasivity test methods, Cerchar, Shimazek, LCPC, SAT, RIAT, RSAI and AGH are currently seven commonly used methods.

3.1. Cerchar Scratch Test

The most commonly applied method is determining the Cerchar abrasivity index (CAI) value in the Cerchar scratch test. The test was originally developed by the Laboratoire du Centre d’Études et Recherches des Charbonnages (CERCHAR) de France for coal mining applications (Cerchar 1986) [22,23,24,25]. This test method is described by two French standards: AFNOR NF P 94-430-1 (2000) [26] and ASTM D7625-10 (2010) [27]. It is widely used in research and practice. The original testing stand was developed at the Cerchar Centre in 1973. Then, in 1989, West [28,29] proposed a modified testing stand.
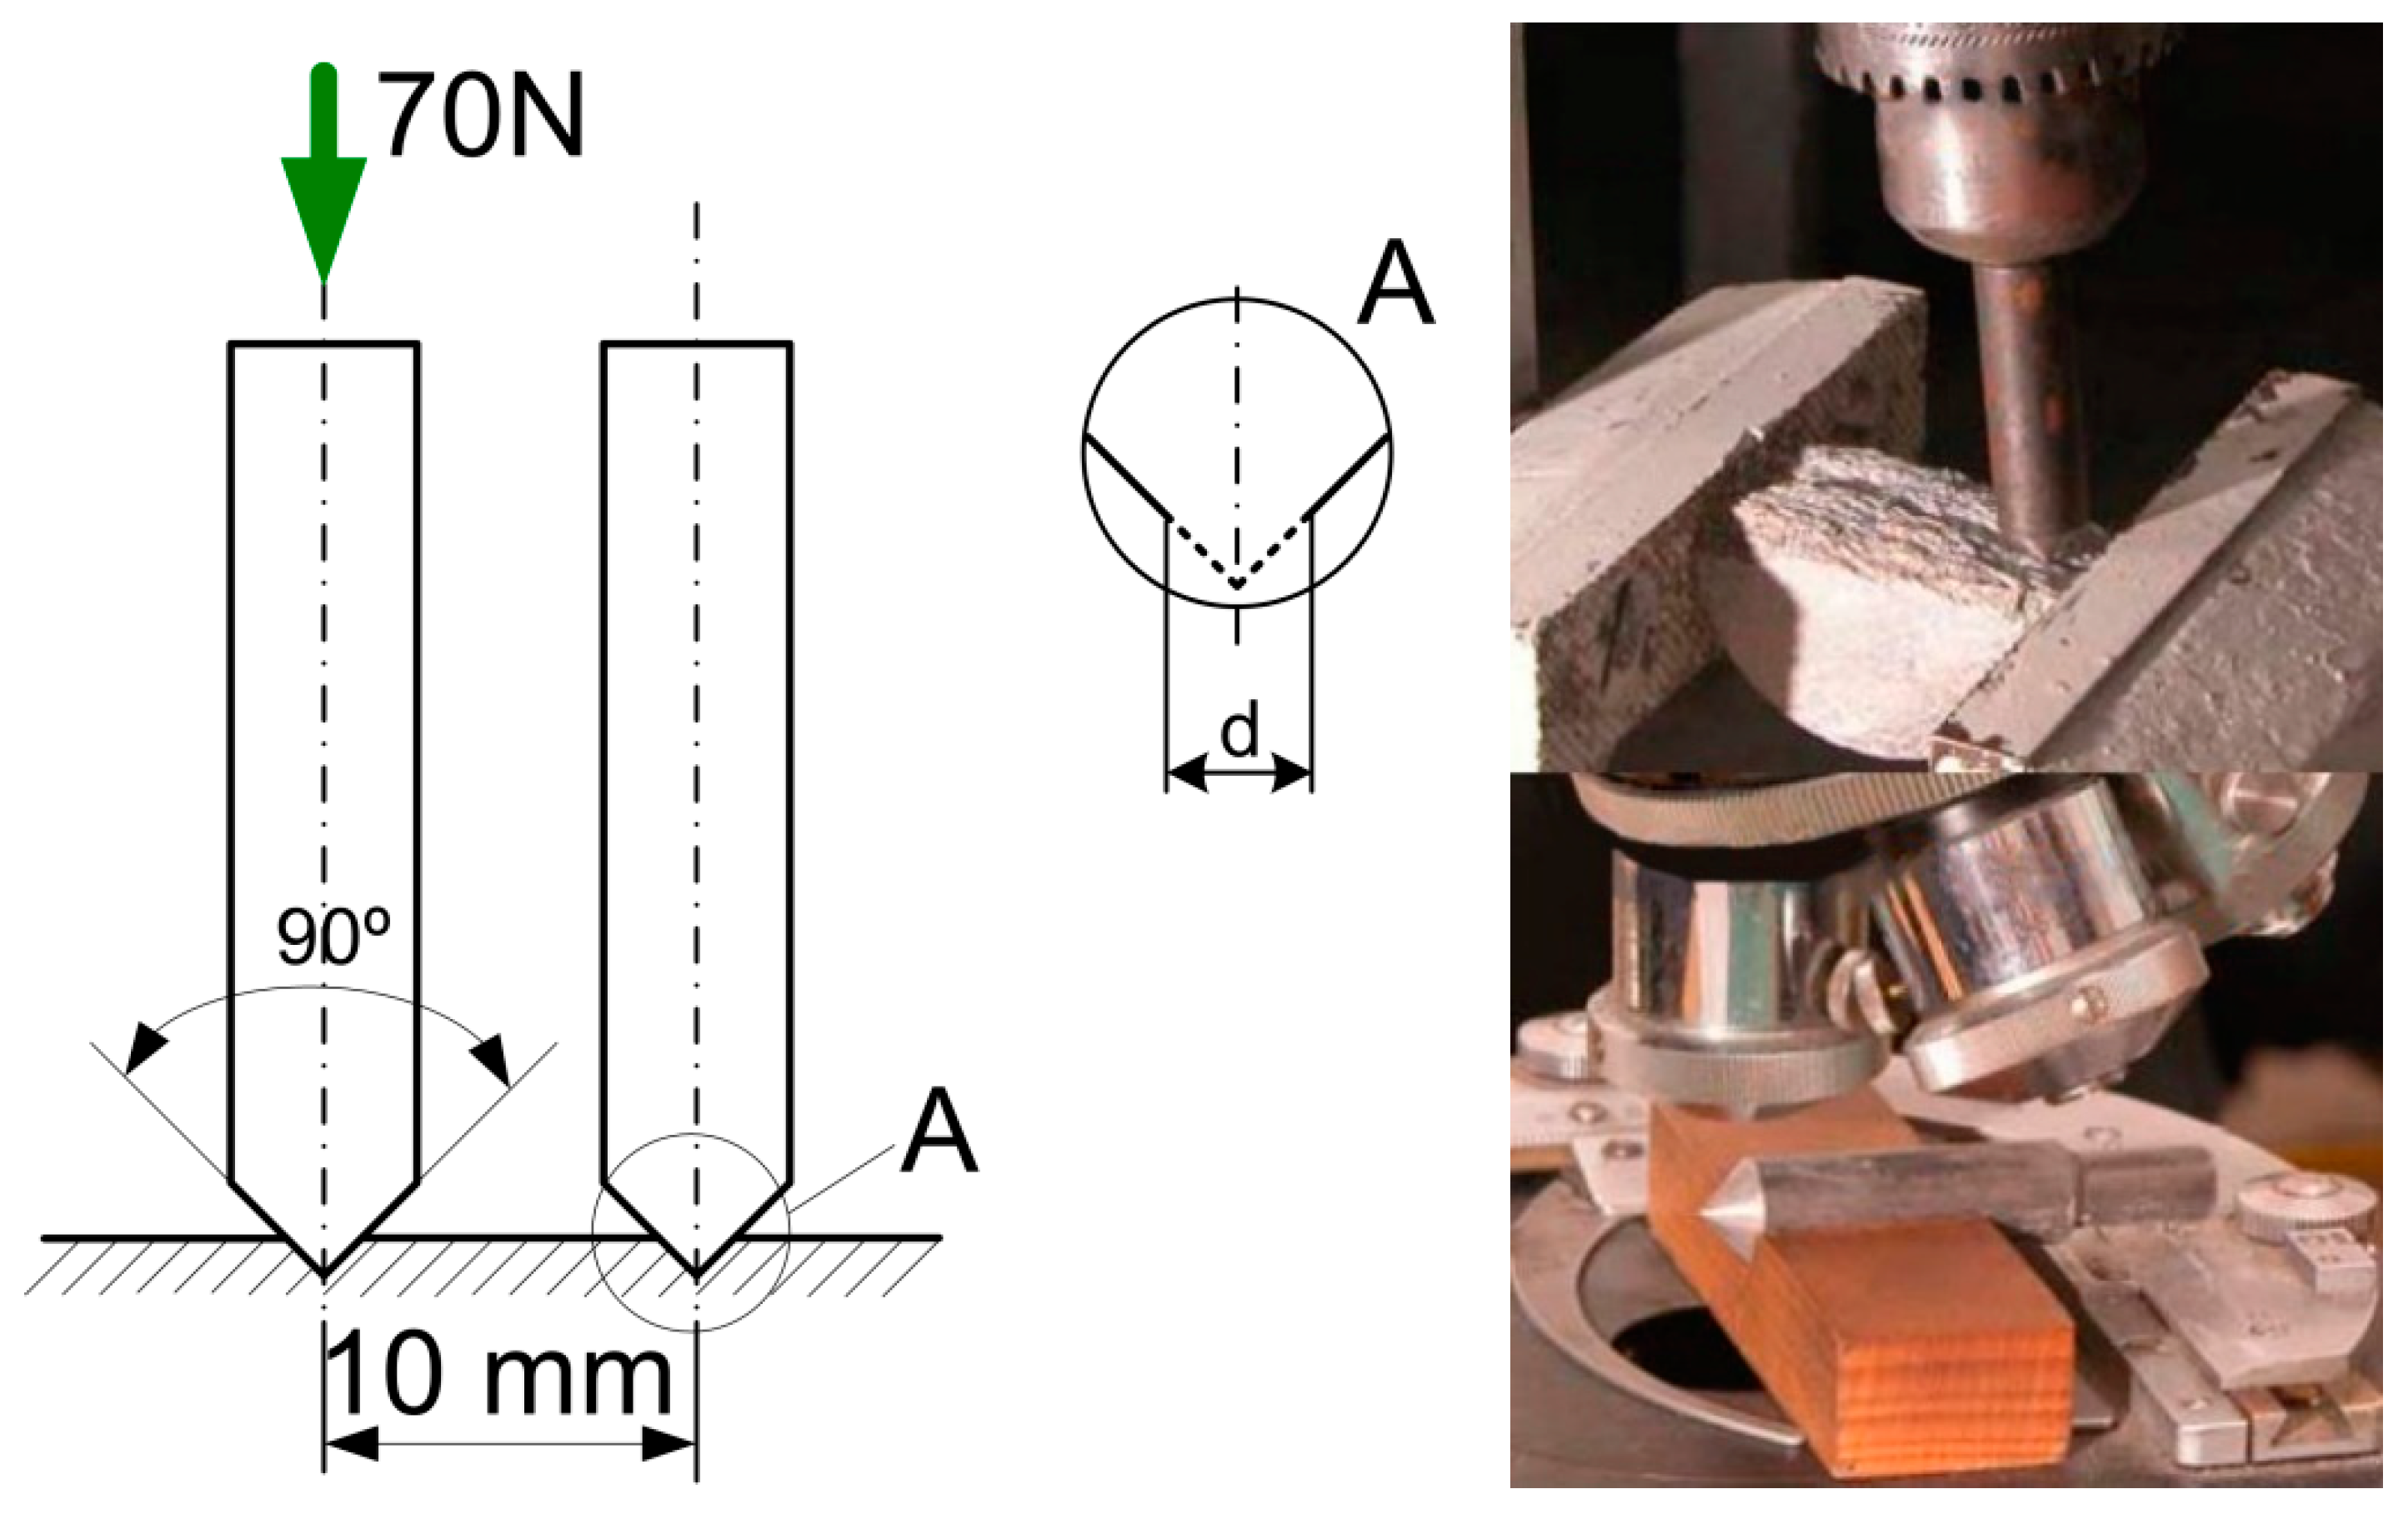
The test is carried out using a sharpened testing pin (Figure 6) with a conical tip angle of 90° and a diameter of 11 mm and a length of 60 mm. It should be made of 115CrV3 steel hardened to 55 HRC. The pin is pressed against the rock sample’s surface under a load of 70 N, with which a groove 10 mm long is drawn (Figure 7). The test is performed on the surface of a small piece of rock of natural roughness. The sample is mounted in the vice [22]. The test is repeated several times in different directions of the rock sample, using a new testing pin each time in order to take into account the anisotropy phenomenon when calculating the resultant diameter of the flattening testing pin in mm caused by friction with the surface of the sample [22,23,24,25].
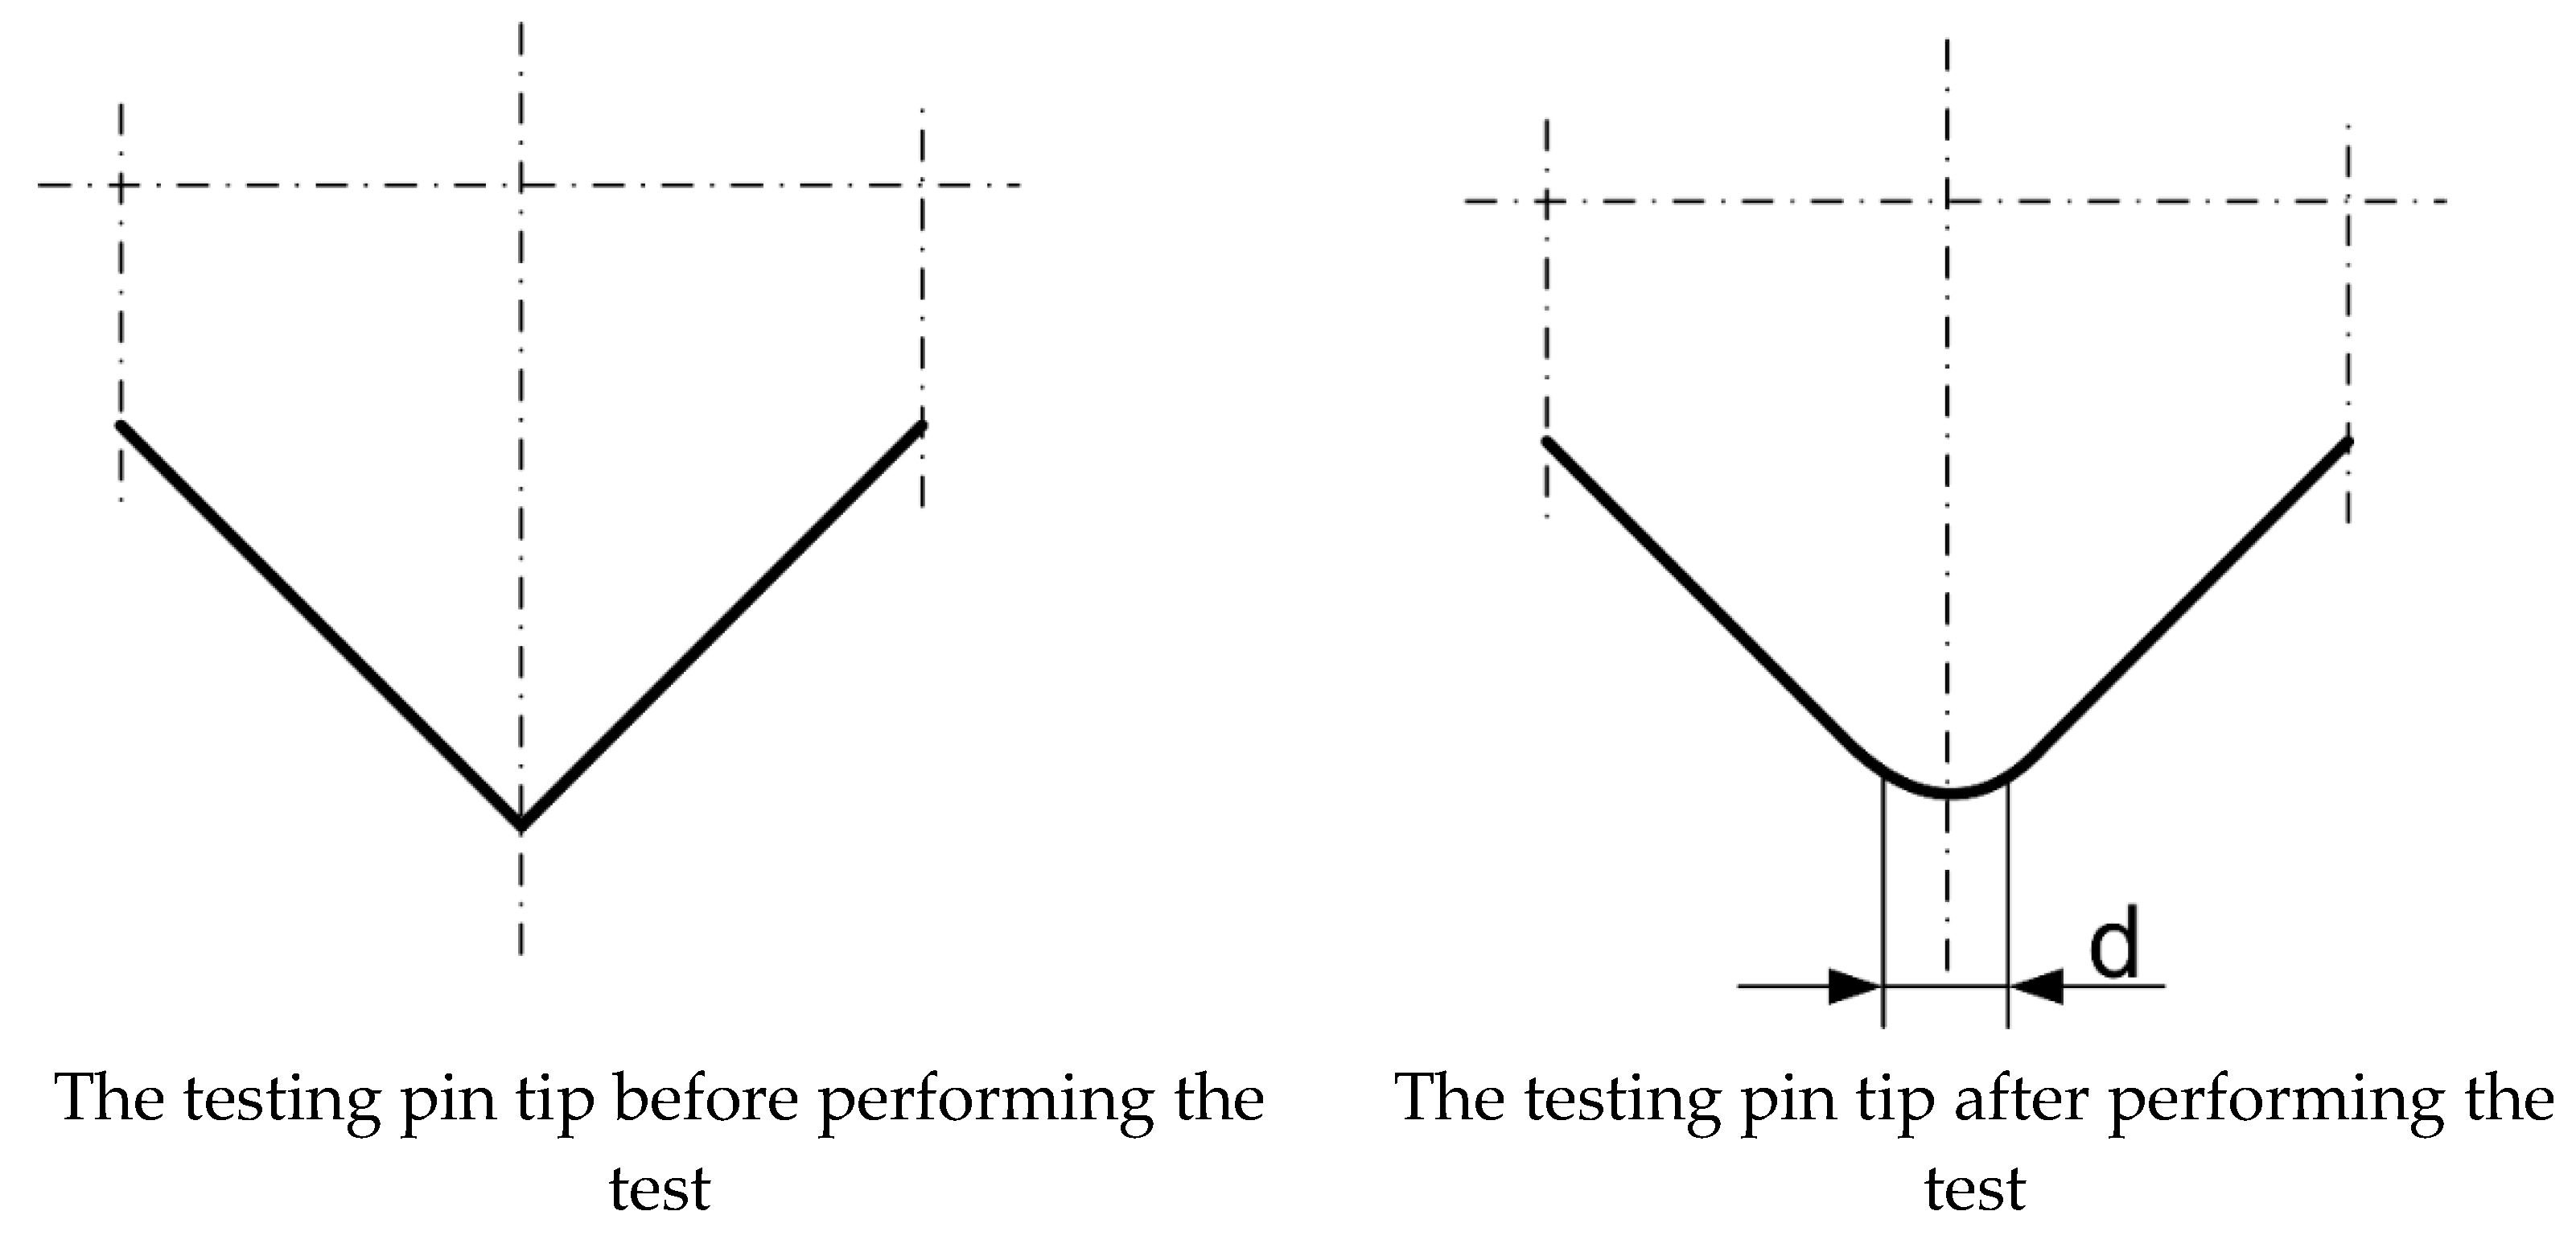
The CAI value is determined using the wear of the testing pin tip (flattening, rounding) caused by friction with the sample (Figure 8), measured using an optical microscope. The flattening diameter is measured in four positions, with the testing pin rotated 90° each time. Hence, the measurement is made at 0°, 90°, 180° and 270° of the circumferences of the steel testing pin tip. The CAI is calculated using Equation (4) [22,23,24,25].
C A I = 10   ·   1 n   ·   n d
where: n—number of measurements, d—the resultant diameter of the flattening testing pin, mm.
Based on many rock tests at the SMC (Sandvik Mining and Construction) petrography laboratory in Zeltweg, Austria, abrasivity grades expressed in CAI values were created. This classification is given in Table 1 [30].

3.2. SHIMAZEK Coefficient

The second indicator determining the rock abrasiveness is the SHIMAZEK F coefficient, calculated based on the tensile strength of the mineral (BTS), the average diameter of the quartz grains and the content of hard minerals referred to as quartz (percentage equivalent of quartz content) [31,32]. Then, the abrasivity value should be determined using the following Equation (5).
F S C H I M = R r   ·   d q u   ·   Q 100
where: Rr—tensile strength, dqu—average size of quartz grains, Q—percentage equivalent of quartz content, where:
Q = vk + 0.33 · vm
where: vk—percentage of quartz in a tested rock, vm—percentage of other abrasive minerals.
Grain size and mineralogical composition are determined on a thin rock sample under a polarizing microscope. First, the average grain size of the individual mineralogical components is determined. Depending on the size, 50, 100 or 200 grains are measured individually using an optical microscope. The final value is calculated as the average of the individual measurements. For rocks with one dominant orientation (stratification), calculations are performed in two directions, parallel and normal to the direction of this orientation. The determination is made only for quartz grains if the dominant mineral is quartz. It is easy to see that the above method is more challenging to implement and, therefore, more expensive. However, minerals with a low quartz content should be marked with FSCHIM, which can be converted into an abrasivity index CAI (7) and vice versa (8) [30].
C A I = 2.9   ·   F S C H I M 0.347
F S C H I M = 0.046   · C A I 2.88
Research and practical conclusions have shown that the value of the CAI is more suitable than FSCHIM for assessing the abrasivity of minerals in the aspect of wear of cutting tools (picks, discs, drilling tools). The disadvantage of this method is inaccuracy for low- to medium-abrasive minerals such as carbonates, shales, etc. However, these minerals are not critical for the wear of cutting tools [30]. The mineral classification according to abrasivity is presented in Table 1.

3.3. LCPC Abrasivity Test

The third method of determining rock abrasivity is the LCPC test. The method was developed in the 1980s by a French laboratory (Laboratoire Central des Ponts et Chaussées) to test soil abrasivity and is described in French Standard NF P18-579 [33]. Figure 9 shows the test stand for performing the LCPC abrasivity test. The main units of the test stand are the frame, the motor, the funnel tube, the metal impeller and the sample container. The 0.75 kW motor ensures the rotation of the axle.
A steel impeller (sample) is mounted to the end of the axle and immersed in a cylindrical sample container. The impeller has a rectangular shape of 50 mm × 25 mm × 5 mm and is made of standardised steel with a Rockwell hardness of HRB 60–75. The impeller must be replaced after each test [34,35]. To determine the LAC coefficient, measuring the weight loss of the rectangular metal impeller is necessary. It is rotated at 4500 rpm for 5 min, covered with 500 g of rock previously crushed into pieces with a 4.0 to 6.3 mm diameter. The LAC coefficient is calculated as the ratio of mass loss of the steel impeller and the sample mass.
L A C = m 0 m 1 M   g t
where: LAC—LCPC abrasivity coefficient, g/t; m0—mass of the steel impeller before test, g; m1—mass of the steel impeller after test, g; M—mass of the sample material (=0.0005 t), t.

3.4. SAT Abrasivity Test

Another of the currently used methods of testing the abrasiveness of rocks is the SAT test, also called the NTNU/SINTEF test, developed at the Norwegian University of Science and Technology in Trondheim (NTNU—Porges teknisk-naturvidenskabelige universitet) in cooperation with the SINTEF (Stiftelsen for industriell og teknisk forskning). Initially, the test measured the abrasive wear of a tungsten carbide specimen, while today, the specimen is made of steel [35,36,37].
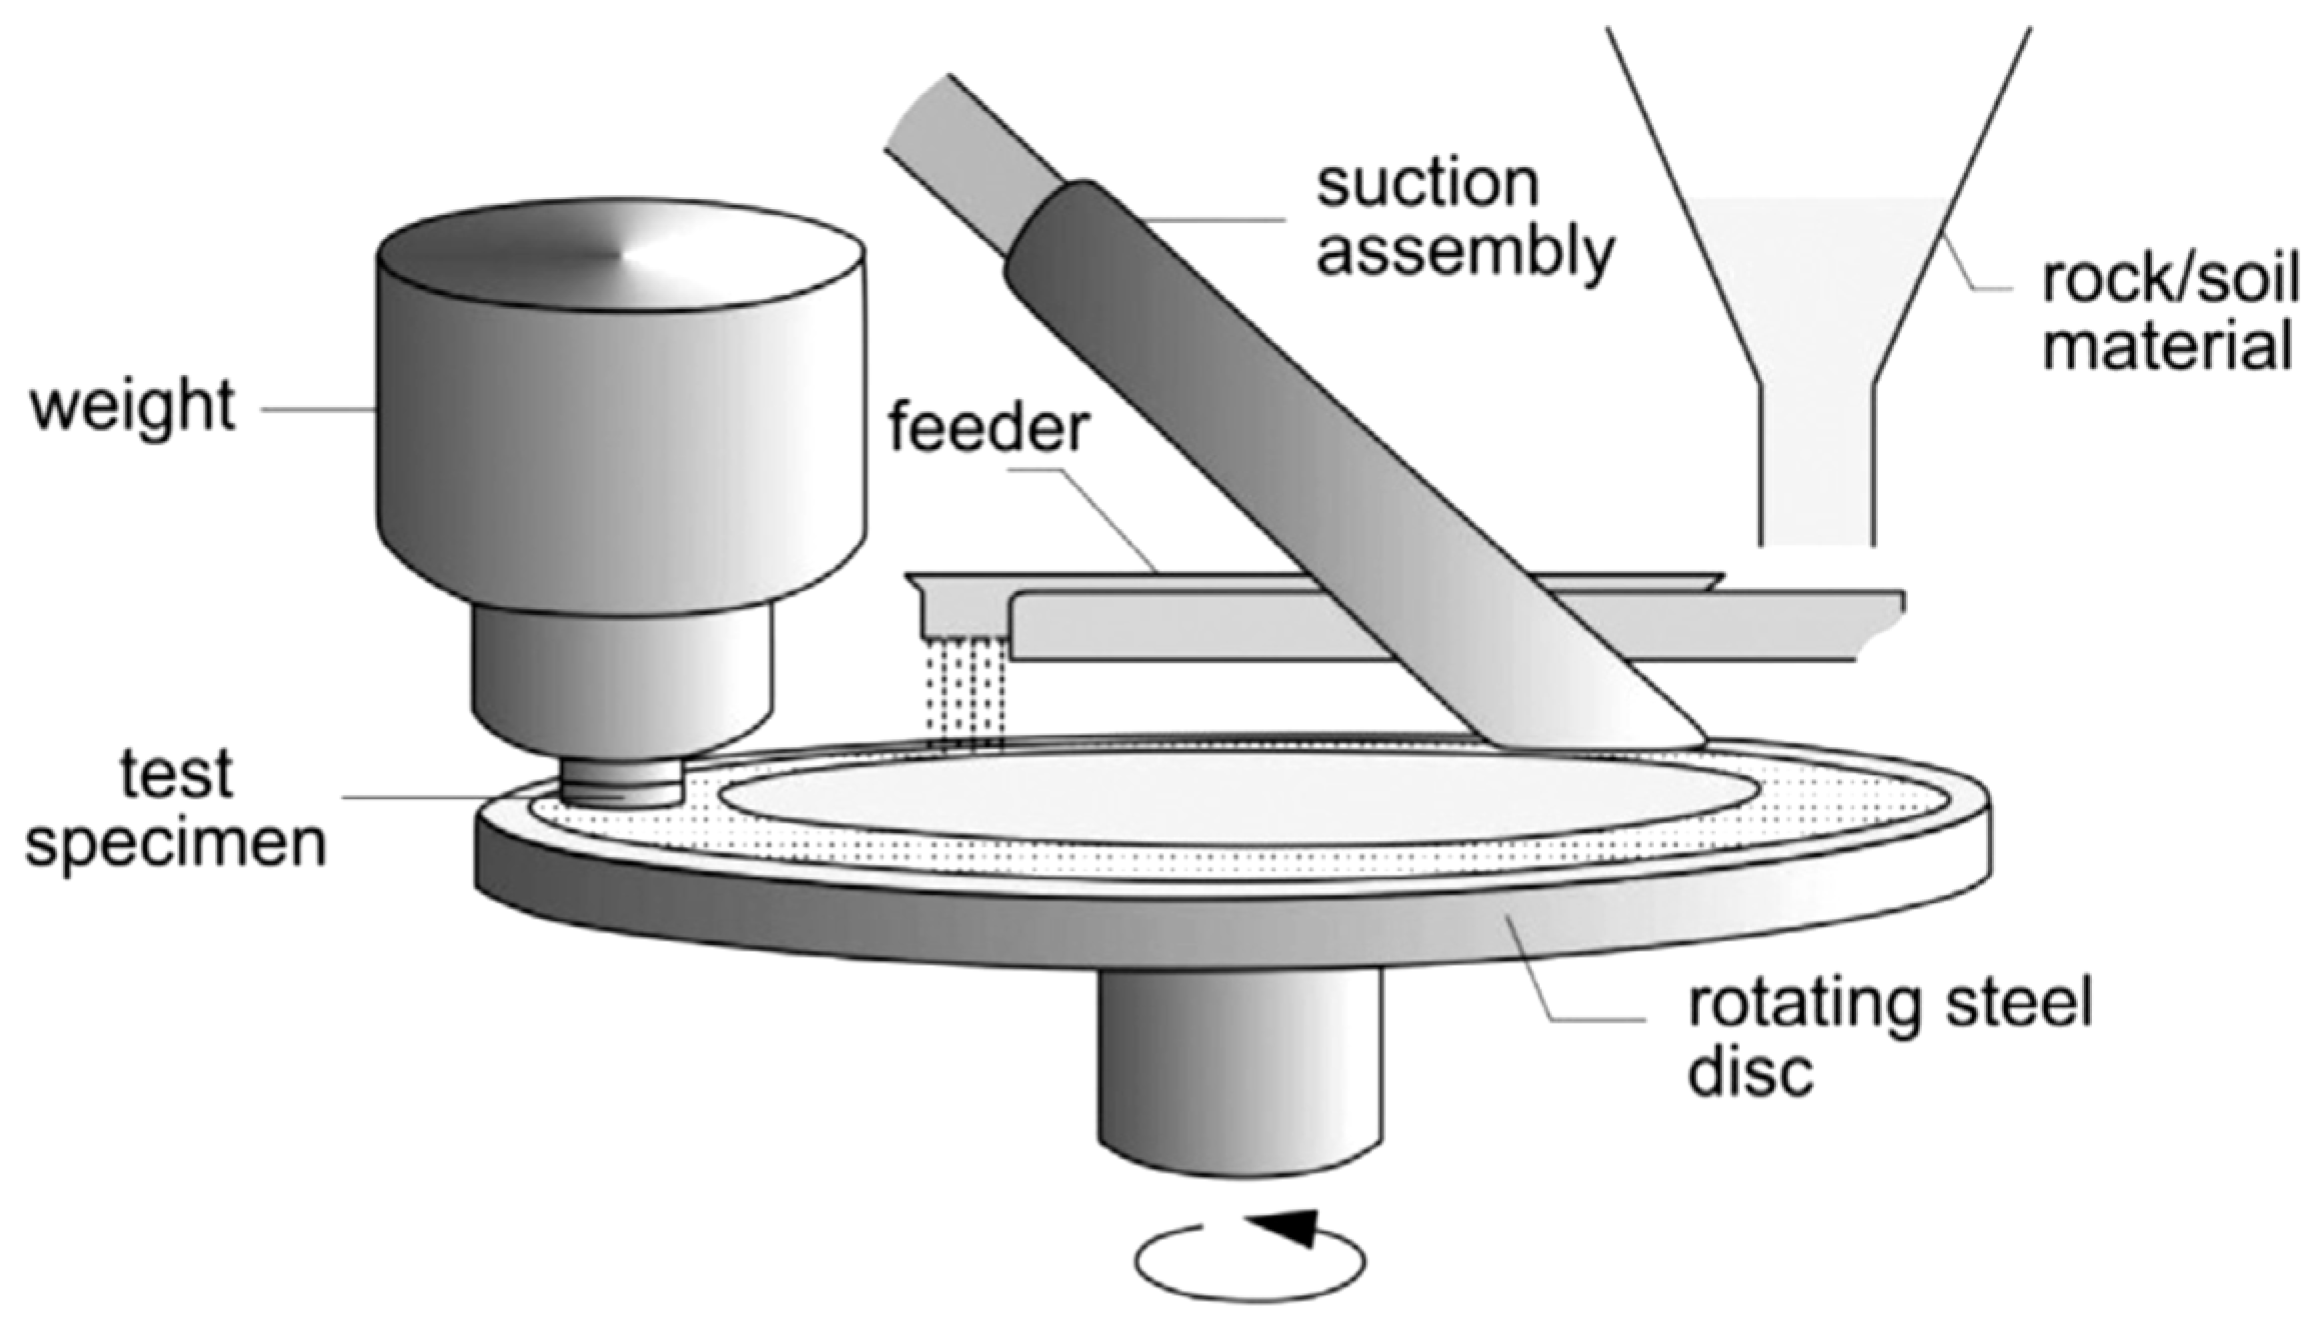
The test specimen (Figure 10) is a cube with a rounded surface shape. The length of the test specimen is 30 mm, the width 20 mm and the radius 15 mm. The soil sample must be dry and gently crushed with a grain size of less than 4 mm [35,36,37].
The test device for the soil abrasivity test, SAT, (Figure 11) consists of a drive, a rotating steel disc, a test specimen, a weight, a sample material feeder and a suction device.
The abrasivity test represents the time-dependent abrasion of steel test specimens caused by rock powder or soil grains. A circular steel disc with a circuit of 1000 mm is set horizontally and rotates around its axis at a speed of 20 rpm. A rock or soil sample falls through the feeder onto the steel disc and forms a material swath. The mass flow rate of the sample material is about 80 g/min. The test specimen is mounted in front of the feeder and loaded with a force of 100 N. The test specimen is rigidly clamped and immovable during the test. The contact between the test specimen and the soil sample causes abrasive wear on the test specimen. Behind the feeder, a suction device is installed to remove the soil sample from the steel disc. The test lasts 1 min or 20-disc rotations and usually is carried out on 2–4 test specimens. After the test, rock abrasivity is classified according to Table 2 [35,36,37].

3.5. RIAT Abrasivity Test

Another currently used method of testing abrasivity is the RIAT test developed by the Norwegian University of Science and Technology (NTNU), just like the SAT test. In the methods described above, the pin/specimen slid over the surface of the rock sample. In contrast to the tests described above, the RIAT is based on a rolling contact that is more pragmatic for assessing disc cutter wear. This contact method between the miniature rolling disc and the rock sample imitates the working conditions of the cutting discs used in TBM [38].
Miniature rolling discs are made of hot work tool steel X40CrMoV5-1, generally used for the real TBM cutter discs. The miniature discs have a constant tip width of 4 mm and a diameter of 30 mm. The steel’s Rockwell hardness is HRC 50 ± 1. The sample is a block of rock that can have any shape. Usually, a circular rock core is used for the test, with a minimum diameter of 100 mm. The rock sample surface is recommended to be smooth and horizontal [38].
The RIAT device is shown schematically in Figure 12. During the test, two miniature discs roll over a rock sample under the normal force of 1.25 kN at a speed of 40 rpm and a centre distance of 60 mm. The test duration is 30 min [38].
The RIAT test results are the RIAT abrasivity index (RIATa) and the RIAT indentation index (RIATi). The RIATa is defined as the mass loss of the miniature rolling disc, measured in milligrams after the test. A representative means at least three tests determine value. The RIATi is defined as the mean value of 10 evenly distributed measurements of the penetration depth of the miniature rolling disc into the rock surface in 1/100 mm. The RIATi value is an indication of the penetration resistance of the rock or the hardness of the rock surface.

3.6. RSAI Abrasivity Test

The rock and soil abrasivity index (RSAI) can be determined using a testing device schematically shown in Figure 13. The blade rotates in a soil or crushed rock medium when it has a specific pitch angle. It generates soil compaction and leads to wear of the blade under high contact stresses. The blade and soil interaction also generates a frictional torque on the test chamber, measured by a torque meter. By directly measuring weight loss on the blade cover and given the selected hardness of the cover, the calculation of ∫ Tδθ from the test allows for quantification of (K/μ) [39].
Based on extensive experimental work on the values of wear and friction indexes for soil and rock materials, the RSAI is suggested as follows (10):
R S A I = 10,000 K μ = 10,000 H V T δ θ

3.7. AGH Abrasivity Test

The last method to determine rock abrasivity was developed at the Polish AGH University of Science and Technology in Krakow. The AGH abrasivity test evaluates the mass abrasive wear of a testing pin in contact with a rock sample with a constant normal force of 300 N and moving uniformly around a circle at 50 rpm for 8 min. The testing pin is made of S235 steel, with a diameter of 8 mm and a length of 35 mm. Rock samples for testing are a core with a diameter of 70 mm or a cube with an edge length of 70 mm [40,41].
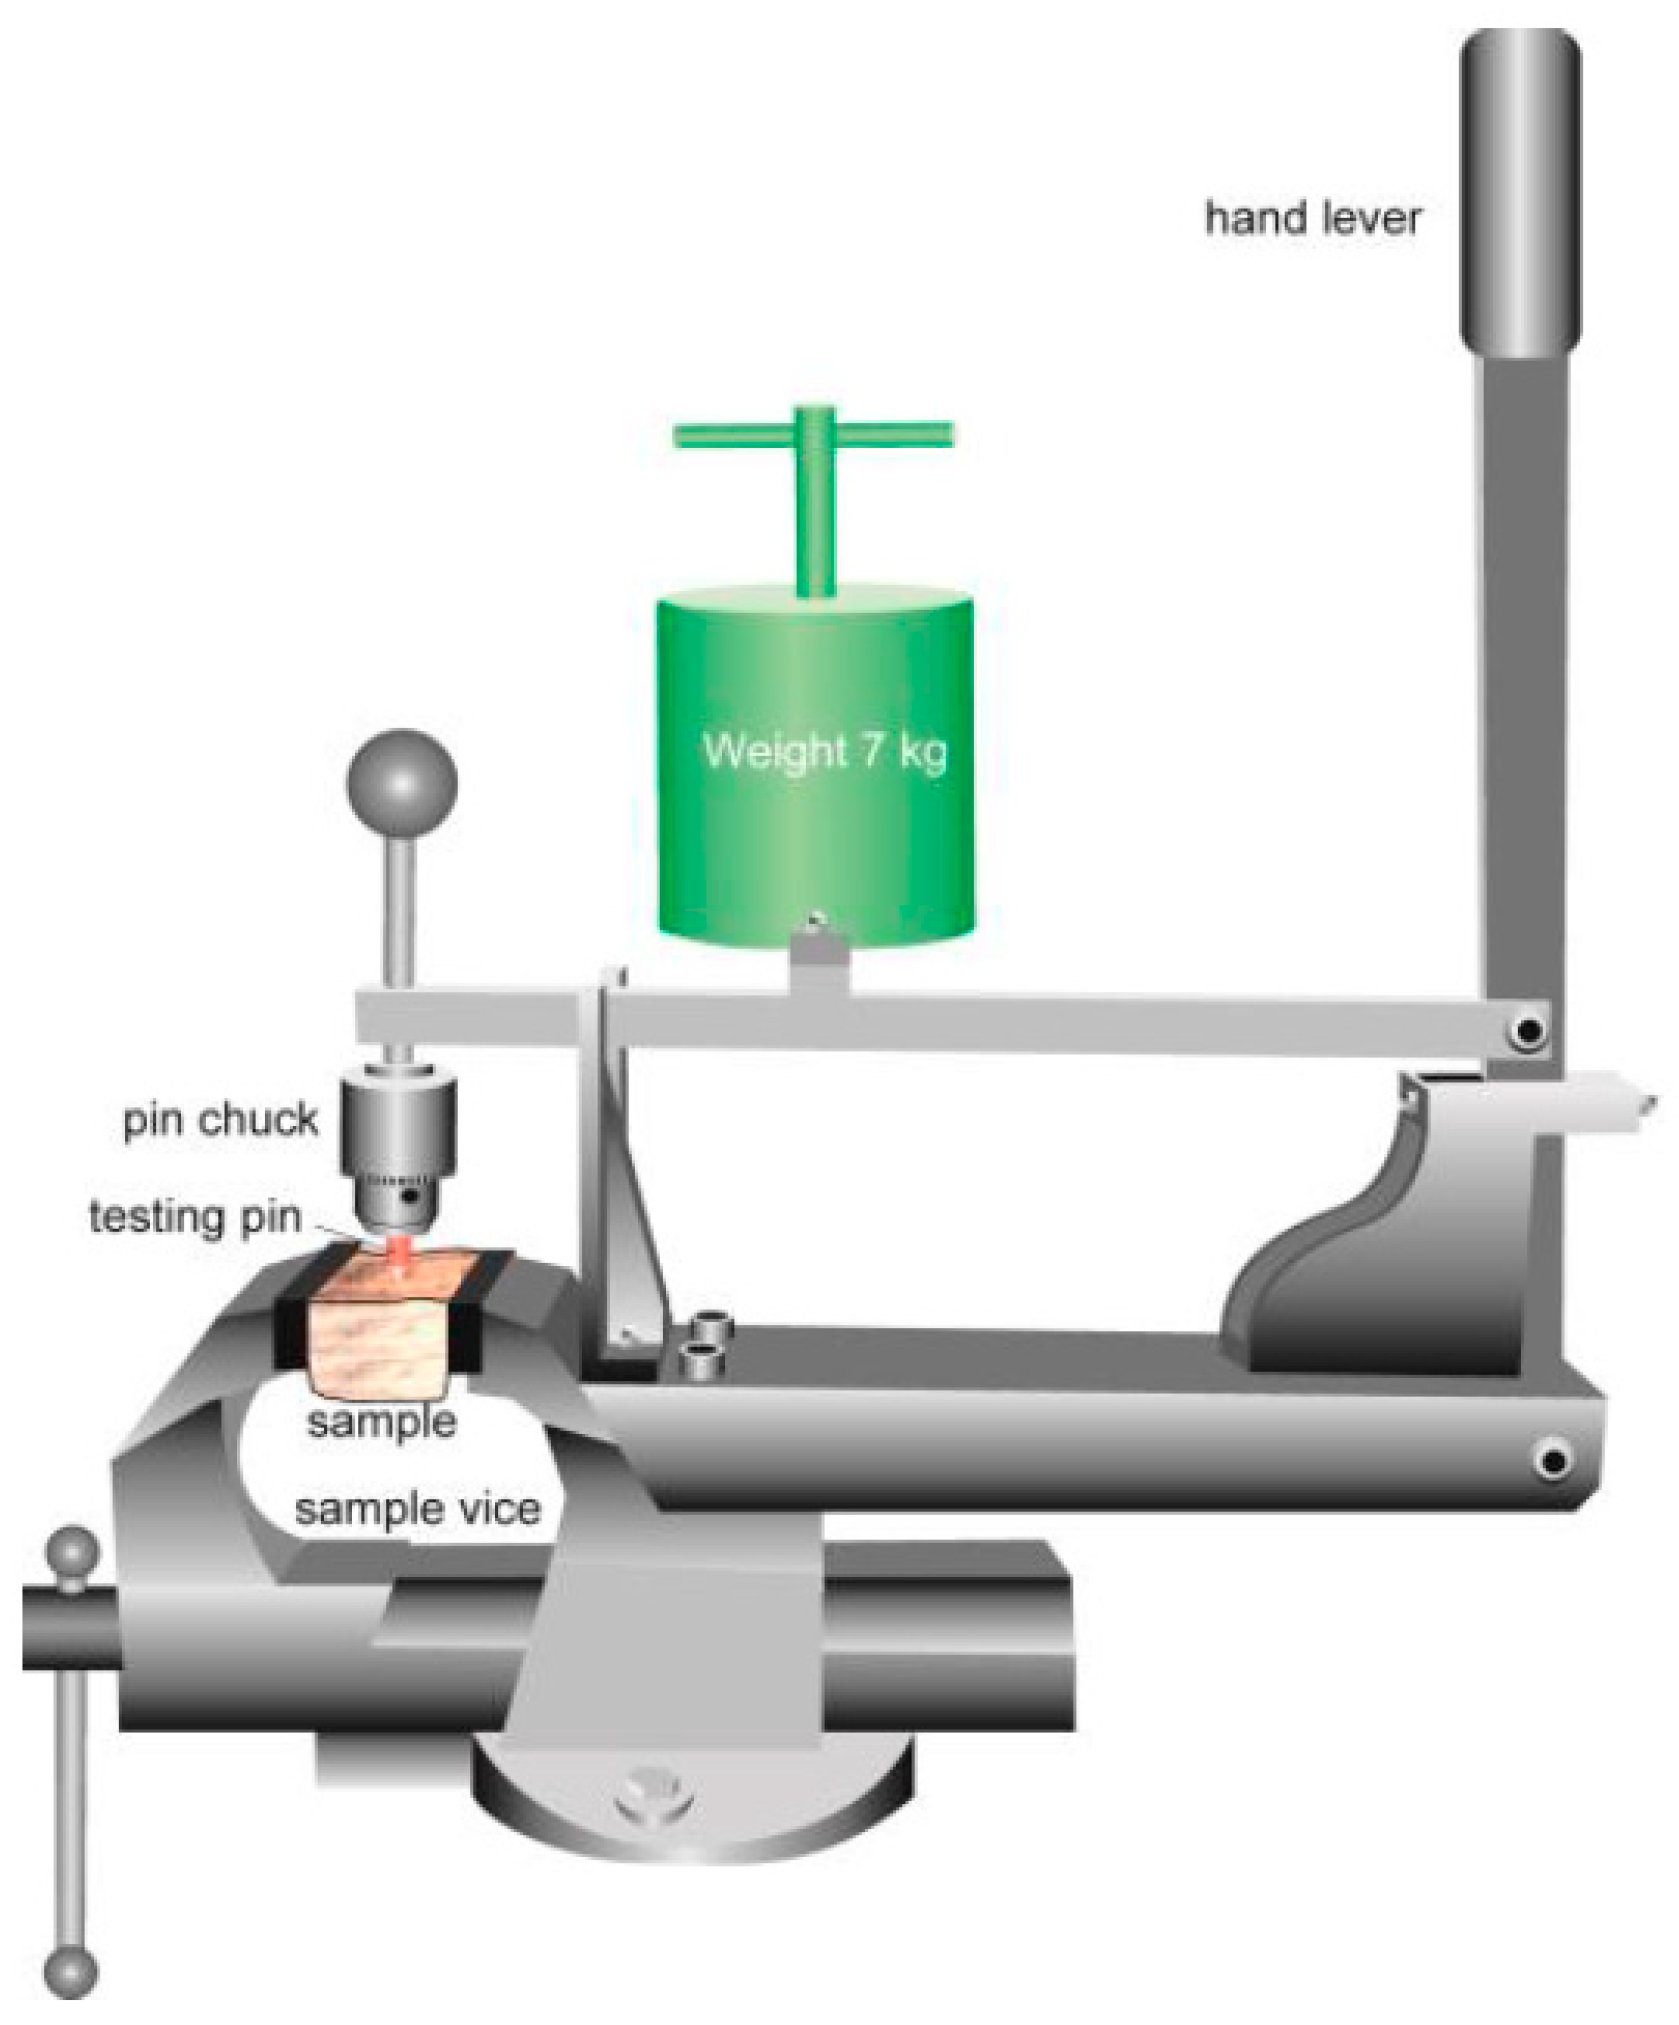
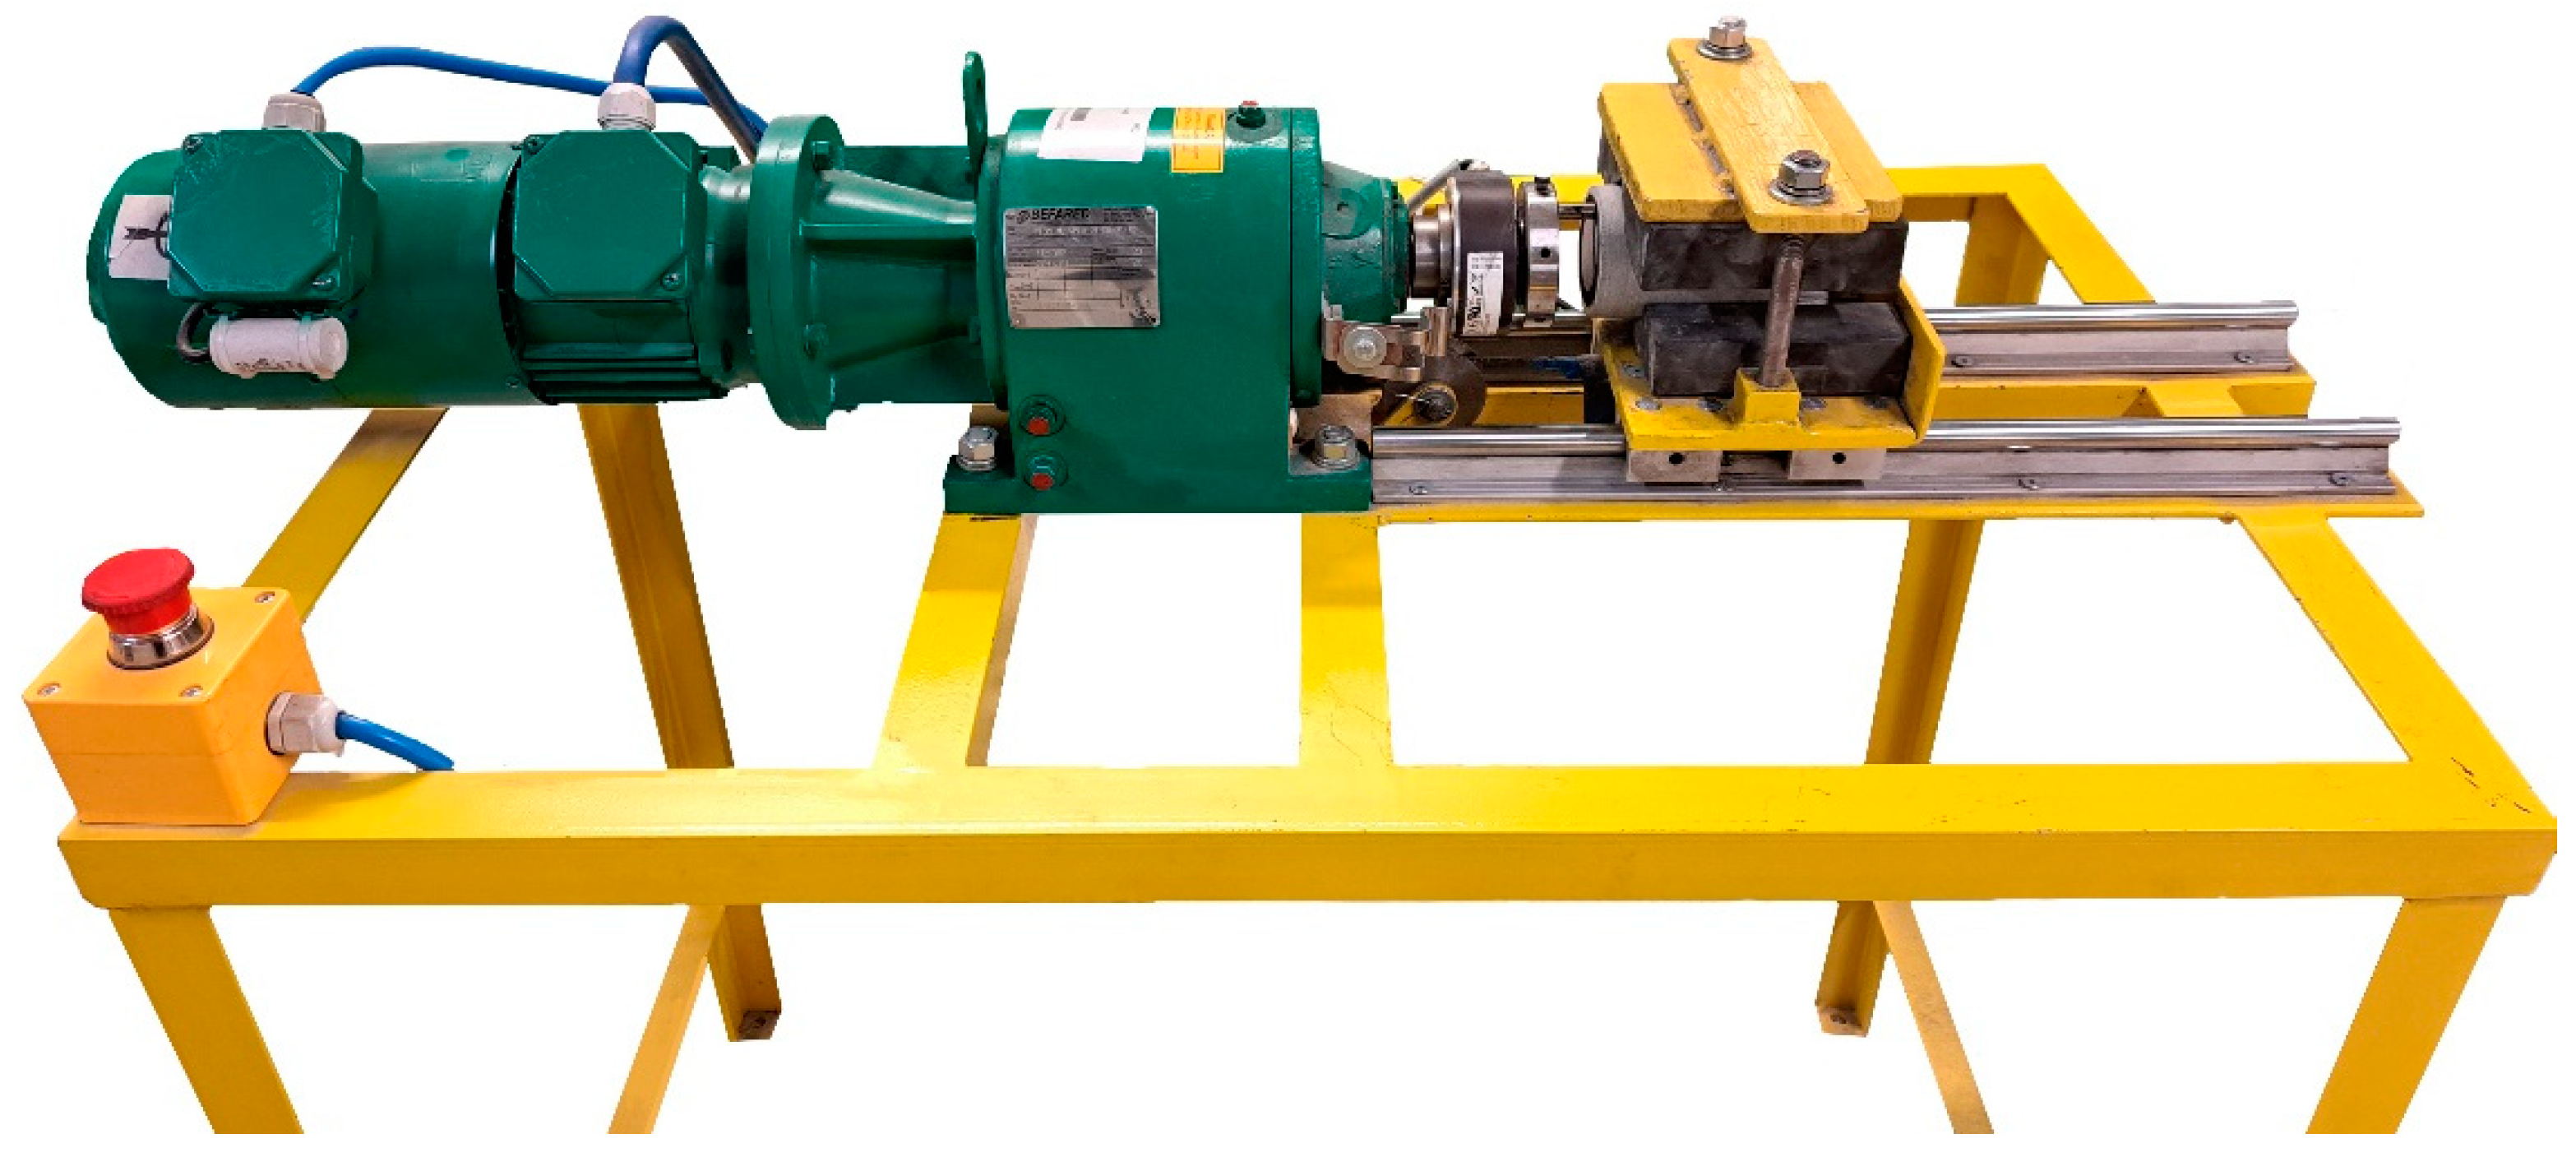
The test stand is equipped with a motor reducer, the shaft of which is fitted with a testing pin holder (Figure 14). The rock sample is fixed in a unique holder that ensures its immobilisation during the test. The testing pin with the rock sample forms a friction pair (Figure 15). The counterweight ensures the constant clamping of the rock sample face to the surface of the testing pin. The computer sets the rotational speed of the testing pin and time. Thanks to the control system, the motor stops compulsorily after a set time [40,41].
The mass of the testing pin and the rock sample is measured before and after the test. The parameter characterising the rock abrasivity is the abrasivity coefficient, Wz, which is defined as the ratio of the mass loss of the testing pin to the mass loss of the rock sample and is determined as follows (11):
W z = m p a m p i = m p a b m p a a m p i b m p i a
where: mpab—mass of testing pin before test, g; mpaa—mass of testing pin after test, g; mpib—mass of rock sample before test, g; mpia—mass of rock sample after test, g.

3.8. Summary

The main disadvantage of the Cerchar method is that the measurement can be conducted only on small rock pieces. This can lead to a large spread of the obtained results, depending on the test area chosen by the operator, for inhomogeneous and variable rock samples. Secondly, the veracity of this method primarily depends on the skills and experience of the operator. This person must have sufficient experience to identify the criteria for abrasion of the rock sample and then perform the test according to these criteria. In addition, the measurement of the pin flattening diameter requires specialised equipment. It can be challenging in the case of unsymmetrical or one-sided flats of the testing pin. Therefore, this test’s results are often unreliable or incomparable, which is pointed out by Käsling and Thuro [34].
The SHIMAZEK F coefficient is determined in exceptional cases for minerals with low quartz content or sedimentary rocks, but only when necessary. To calculate this coefficient, it is necessary to determine as many as three parameters, such as the uniaxial tensile strength, the average size of quartz grains and the percentage equivalent of quartz content, which requires time-consuming and costly tests.
The LCPC test is not a widely known way to determine rock abrasivity. Although it is standardised in France (AFNOR P18-579), work is still underway to implement it. In addition, the publication’s authors [34] emphasise that there are significant discrepancies between the results of the Cerchar and the LCPC test.
The SAT test proposes only three abrasivity classes because this method is relatively new and the amount of collected data is small.
During the RIAT test, rock dust and debris formed should be removed from the surface of the rock to be tested to ensure that the small rolling disc is in constant contact with the rock sample. For this purpose, compressed air and suction are used, which requires additional installation in the laboratory. In addition, this method is mainly dedicated to rock mining using discs.
The RSAI method is related mainly to the previously mentioned LCPC test and is only suitable for crushed rocks.
The stand’s essential advantage in the AGH abrasivity test is the rock sample’s horizontal arrangement. This enables the removal of detached rock grains from the road along which the testing pin moves. This solution eliminated the influence of loosened grains on the testing pin and the rock sample wear.

4. Discussion

The assessment of rock abrasiveness and rock abrasivity is carried out for different purposes, for different materials and in different industries, such as construction, road construction and mining. The scope of practical use of the above-described methods was analysed and presented to emphasise the importance of performing these tests. The analysis was conducted so the reader could decide whether to carry out an abrasiveness or abrasivity test and which method to use.

4.1. Rock Abrasiveness Test Methods Application

As previously mentioned, rock abrasiveness is assessed to check resistance to abrasive wear. The standard method in EN 14157:2017 standard [13] is the wide wheel abrasion test (WWA). However, the most commonly used method for evaluating rock abrasiveness is the Böhme abrasion test (BA). The BA test was used by Cobanoglu et al. [15] to assess the abrasion resistance of natural stones used as slabs in the construction sector. The tested materials included carbonate rocks, such as travertines, limestones and dolomites. Karaca et al. [42] also used the Böhme test to assess the abrasion resistance of different natural stones from sedimentary, metamorphic and igneous groups in terms of their use for paving slabs. Shagñay et al. [43] proposed using industrial (slag and fly ash) and ceramic wastes for the total or partial substitution of Portland cement in manufacturing both alkaline-activated and hybrid types of cement. Different mortars were manufactured to carry out this study and evaluate the behaviour of the new materials. The behaviour of all the mortars regarding mechanical resistance and endurance to abrasion was tested. After the Böhme abrasion test, their effectiveness was reiterated and even some had better durability to wear in comparison to the Portland cement. Bodnárová et al. [44] used the Böhme test to evaluate the abrasion resistance of concrete by adding different types of active and inert mineral additives. An abrasive effect is most noticeable in transport or water management structures and these structures are often designed for a substantially longer lifetime (usually 100 years). Alaskar et al. [45] performed a study to enhance concrete’s abrasion and skid resistance as a pavement material by reinforcing it with polypropylene (PP) fibres. The influences of waste PP fibres and palm oil fuel ash (POFA) on the abrasion resistance (using a Böhme surface abrasion machine) of the concrete were investigated. Strzałkowski and Köken [46] developed an alternative to the standard Böhme test method using neural networks to assess rock abrasiveness based on physical and mechanical properties such as dry density (ρd), water absorption by weight (wa), Shore hardness value (SHV), pulse wave velocity (Vp) and uniaxial compressive strength (UCS) of rocks.
The second most commonly used method of evaluating rock abrasiveness is the micro-Deval test [17]. Benjeddou and Mashaan [20] used this method to assess the abrasion resistance of aggregate obtained by crushing marble waste as a conventional aggregate for road construction. The test was performed to verify that the coarse aggregate obtained by crushing marble waste is resistant to abrasion actions between the grains themselves and between grains and external loads. Copetti Callai et al. [47] used this method to evaluate the geopolymer material’s resistance to abrasion obtained from a mix of activators and precursors. The materials used in these tests, as precursors, were metakaolin and powdered basalt. Đokić et al. [48] used the micro-Deval test to assess the abrasion resistance of the concrete aggregate (RCA) as a partial replacement of natural aggregate in road engineering in different flexible and rigid pavement layers and for various traffic loads. RCA was reached by crushing 30-year-old concrete slabs covered with a protective layer of asphalt. This concrete contained natural river aggregate with a maximum grain size of 16 mm. Courard et al. [49] dealt with the same topic. Authors claim that fine recycled aggregates are produced in large quantities when crushing construction and demolition waste (C&DW). However, even if coarse recycled aggregates are commonly used for road foundations, fine particles are often rejected as they are considered detrimental to the long-term behaviour of foundations. Micro-Deval tests are required according to road authority specifications for road foundation construction [50], where the micro-Deval coefficient maximum values of 35 and 50 are recommended. The micro-Deval test was also used by De Witt et al. [51] to determine the ability to predict aggregate performance during hauling. The correlation of the wear rates to standard material property tests may allow for improved prediction of the impacts from forest roads based on the selection of aggregate surfacing. Macro-encapsulated phase change material (PCM) lightweight aggregates (ME-LWA) were tested by Zhou et al. [52]. They were tested end assessed for their mechanical and thermal properties in road engineering applications. Many aggregates are more susceptible to wear when wet compared to dry. The micro-Deval test enables the use of water, in contrast to some other tests. The test results helped evaluate the toughness/abrasion resistance of coarse aggregate subject to wear. As mentioned earlier, the EN 14157:2017 [13] standard indicates the wide wheel abrasion test (WWA) as a model for assessing rock abrasiveness. However, among the available publications, this method is rare. Celik and Çobanoğlu [53] used the wide wheel abrasion test to assess building stone samples’ abrasiveness. Natural building stones constitute an essential economic input for countries with substantial reserves and international market share worldwide. It is a known fact that the continuous production of natural stone leads to a decrease or even the depletion of limited natural resources. The service life of rock materials used as natural building stones is controlled mainly by their physical and mechanical properties. Rock abrasiveness is an important parameter that should be considered, especially in areas subject to heavy pedestrian or vehicle traffic. Kolgitti and Çelik [54] used the WWA test to determine the abrasiveness of rocks used as natural building stones. Within the scope of this study, nine different rock types were selected (e.g., ignimbrites, dolomites, travertines, limestones, diabases and marbles). Sample groups were obtained as blocks from different regions of Turkey. According to European Standards, the WWA test is carried out on only prismatic samples. However, in the design of rock engineering structures such as tunnels, dams and investigations for various purposes, samples are supplied as cylindrical cores from exploration drillings. So, in this study, the WWA test on rock cores using a newly designed core holder apparatus was investigated.
The least used method for evaluating rock abrasiveness is the Amsler test, presented in the available publications only by Costa et al. [17], to assess the abrasiveness of concrete blocks produced with sinter feed tailings.

4.2. Rock Abrasivity Test Methods Application

As mentioned before, abrasivity is determined when we are interested in the wear of the tool with which we cut the stone or the wear of machine elements in direct contact with the rock.
The Cerchar abrasion index (CAI) is commonly used to represent rock abrasivity and estimate disc life and wear in tunnelling applications. This method was used, among others, by Ko and Lee [55], Rostami et al. [56] and Jeong et al. [57] to assess rock abrasivity in terms of disc wear. Currently, TBMs meet growing requirements, enabling tunnelling in hard-to-cut and abrasive rocks, such as granites, basalts, sandstones, melaphyres, porphyries and dolomites. Ko and Lee [55] also noted that rock abrasivity significantly affects not only the discs’ wear but also the discharge pipes and pumps of transport systems. Another area of application of the CAI is hard coal mining, which is carried out with road headers and longwall shearers. Rock mining is carried out by cutting (milling) with various mining tools. The most commonly used are conical picks that wear out in contact with the mined rock [58,59,60]. In the aspect of wear of mining tools, the CAI was used, among others, by Alber [61], Hamzaban et al. [62], Zhang et al. [63] and Teymen [64]. Zhang et al. [65], based on the test results of the CAI and physical and mechanical properties of 13 groups of rock samples collected from southwestern China, focused on the correlations of the CAI value with rock strength, petrographic characteristics and drilling parameters. The results provide a new method for rapidly and accurately determining rock abrasivity in the drilling field. Capik and Yilmaz [66] investigated the relationships between the CAI and drill bit lifetime. They even developed a way to model drill bit lifetime based on the CAI. The research was carried out for marl and andesitic-basaltic formation. Larsen-Basse and Perrott [67] focused on the impact of rock abrasivity on wear mechanisms during rotary drilling of sandstone with sintered tungsten carbide tools. The higher the rock’s abrasivity index, the finer the abrasive particles in the rock. This leads to selective cobalt removal and microfracture of the carbide skeleton. Hence, knowledge of rock abrasivity is essential in selecting the appropriate type of sintered carbide for drilling tools. Di Giovanni et al. [68] used the Cerchar test to assess the rock abrasivity of marble, which is extracted mainly using chainsaw cutting machines. These are currently used extensively due to their high-safety working conditions compared to other techniques and their extraordinary versatility, especially in underground mining. Although this cutting technique is well-known and widely used, an uncommon problem of tool wear was found in the quarry under study, which strongly acted on production. The assessment of rock abrasivity is also used in civil engineering. Figarska-Warchoł and Rembiś [2] used the Cerchar test to investigate the influence of the lithological diversification of thin layers—laminae present in terrigenous sandstones of various genesis on selected physical and mechanical properties of these rocks. The results collate with the velocities of the longitudinal ultrasonic waves and the apparent density and water absorbability of the sandstone samples. Thorough knowledge of the quality variation in laminated sandstones enables the management of rock material with different properties and reduces waste production. Thus, it significantly contributes to the protection of such rock deposits. Additionally, the authors point out that the designers’ disregard for the diversity of the stone’s technical parameters may lead to grave planning errors, damage to the stone elements and more severe construction disasters that risk human health and life. As an example, they give a way of anchoring elevation wallboards. There must be more than one mechanically resistant outer lamina to secure a firm stone setting. The construction stability depends on the deeper laminae in which the anchor bolts are fixed. Assuming that the mechanical resistance of such inner laminae happens to be weak, the resulting stress may finally lead to the defoliation of the wall-board and the peeling off of elevation fragments.
Majeed and Abu Bakar [69], in the aspect of disc wear in tunnel construction, first used the CAI to assess the abrasivity of rock samples taken from various places in Pakistan. However, later, in cooperation with Rostami [70], they used the LCPC method. The authors argue that the advantage of the LCPC test over the standard Cerchar test is that the LCPC method allows the test to also be performed on saturated samples with different water content. De Azevedo Barbosa et al. [71] used the LCPC test to evaluate the abrasivity of rocks from the iron oxide-copper-gold (IOCG) deposit of Sossego (Canaã dos Carajás, Brazil), where hydrothermal alterations in shear zones concentrated the metals of interest and added new characteristics to the metavolcanic-sedimentary and granite rocks. This information permitted the researchers to take preventive measures to minimise the influence of processing this highly abrasive material.
Additionally, de Azevedo Barbosa et al. [71] used the SAT test to understand the wear potential of the studied material firstly and, secondly, the desirable effect potentially obtained by using conditioning agents (water and other additives). Tang et al. [72] used the improved soil abrasion test (SAT) to study the impact mechanism of soil parameters on scraper wear. These tests enabled the assessment of the variation in scraper wear with quartz content, particle size, particle shape and water content.
The rolling indentation abrasion test (RIAT) [38] is used only for disk wear. This test procedure aims to simulate the wear behaviour of hard rock tunnel boring in a more realistic way than the generally used methods because wear by rolling contact on intact rock samples is submitted. Tunnels, e.g., subways, are often drilled in abrasive sandy soil. Hence, Rostami et al. [73] used the RSAI method, which simulates the working conditions of the cutting discs in the excavation chamber of pressurised face shields. There are high contact stresses between the cutting disc and the soil. This test assures the original soil size distribution, field moisture conditions and the possibility of applying high ambient pressures and soil conditioners. When TBM tunnelling in abrasive sandy ground, the cutting discs are subject to wear and the scrapers are loaded with heavy forces resulting from the extrusion and friction processes of sand. The wear of the scraper resulting in displacement or desquamation is related to soil parameters.
Khoshouei et al. [74] investigated the possibility of estimating rock abrasivity by processing the acoustic and vibration signals generated while drilling. Before the tests, the Schimazek abrasivity factor, F, of the samples of igneous rocks, classified as hard rocks, was obtained. Acoustic and vibration signals were analysed in time, frequency and time–frequency domains and a series of parameters related to the resulting spectra were extracted. After receiving the acoustic and vibration parameters for drilling, the relationship between them and the rock abrasivity was studied.
The AGH method is mainly used to assess rock abrasivity regarding the wear of conical picks used in underground mining [5,40,41]. This method is also used to assess the abrasivity of building materials, such as granite paving stones (Figure 15b), in terms of their cutting out.

5. Conclusions

The analysis of the behaviour in the extraction, transportation and utilization of hard-rock-type mineral substances determined that abrasive wear is one of the most extended and aggressive forms of wear. The effects of abrasive wear on the machine components and their economic implications are considerable, mainly due to the operational pauses in the technological flows.
The results of the performed experiments demonstrate that both the reconditioning and execution of spare parts, with the help of reusable materials, could be solutions for sustainability in many economic fields, especially in those where the production costs are immense [75]. For this reason, many methods exist for assessing rock abrasiveness and rock abrasivity.
All rock abrasiveness test methods are carried out under the standards that describe the method of preparing samples for testing, individual elements of the test stand and the test procedure itself. However, in the case of assessing rock abrasivity, some methods are described in standards (Cerchar, LCPC) and others only in publications. They are invented in different research centres worldwide depending on how the rock interacts with the wear element (picks, discs, drills, conveyor troughs, etc.). Therefore, the assessment of rock abrasivity is often performed using two methods for the same materials to compare the results.
Rock abrasiveness assessment is mainly used to evaluate various natural stones and concrete for their abrasion resistance in terms of their use for paving slabs. The assessment of rock abrasivity is most commonly used in tunnel construction, where the cutting shields of the TBM (tunnel boring machine) are equipped with cutting discs that excavate the rocks by static crushing. The effectiveness of the tunnelling process is influenced by rock abrasivity, which determines the rate of abrasive disc wear [75,76]. Rock abrasivity is also an essential factor affecting drilling tool wear used in many industries, such as drilling, mining and construction. Abrasivity is a vital rock property with a direct impact on the wear rate counting lifetime of drilling equipment and the rate of penetration. In addition, the assessment of rock abrasivity is also carried out in underground mining in terms of the wear of conical picks.
Many researchers are still looking for correlations between particular methods. Others seek a relationship between abrasiveness or abrasivity and other rock properties.
This manuscript proves that both these terms are notoriously used interchangeably, which needs to be corrected. The authors in one article use different nomenclature. Therefore, it should be emphasized once again that abrasiveness is the susceptibility to abrasive wear of rocks. At the same time, abrasivity describes the rock’s ability to destroy the surfaces of solid materials, mainly steel, but not only (WC-Co, PCD [77] etc.).

Funding

This research received no external funding.

Institutional Review Board Statement

Not applicable.

Informed Consent Statement

Not applicable.

Data Availability Statement

Data presented in the article are original and not inappropriately selected, manipulated, enhanced, or fabricated.

Conflicts of Interest

The author declares no conflict of interest.

References

  1. Zhang, G.; Konietzky, H.; Song, Z.; Zhang, M. Study of Cerchar abrasive parameters and their relations to intrinsic properties of rocks for construction. Constr. Build. Mater. 2020, 244, 118327. [Google Scholar] [CrossRef]
  2. Figarska-Warchoł, B.; Rembiś, M. Lamination and Its Impact on the Physical and Mechanical Properties of the Permian and Triassic Terrestrial Sandstones. Resources 2021, 10, 42. [Google Scholar] [CrossRef]
  3. Valentini, F.; Pallecchi, P.; Relucenti, M.; Donfrancesco, O.; Sottili, G.; Pettiti, I.; Mussi, V.; De Angelis, S.; Scatigno, C.; Festa, G. SiO2 Nanoparticles as New Repairing Treatments toward the Pietraforte Sandstone in Florence Renaissance Buildings. Crystals 2022, 12, 1182. [Google Scholar] [CrossRef]
  4. Jonczy, I.; Wieczorek, A.; Filipowicz, K.; Mucha, K.; Kuczaj, M.; Pawlikowski, A.; Nuckowski, P.; Pieczora, E. Impact Identification of Carbon-Containing Carboniferous Clays on Surfaces of Friction Nodes. Energies 2021, 14, 1422. [Google Scholar] [CrossRef]
  5. Jonczy, I.; Mucha, K. Relationships between the Petrographic and Abrasive Properties of Sandstones in the Aspect of Their Cutting. Energies 2022, 15, 2692. [Google Scholar] [CrossRef]
  6. Alzahrani, A.M.; Lasheen, E.S.R.; Rashwan, M.A. Relationship of Mineralogical Composition to Thermal Expansion, Spectral Reflectance, and Physico-Mechanical Aspects of Commercial Ornamental Granitic Rocks. Materials 2022, 15, 2041. [Google Scholar] [CrossRef]
  7. Ye, Z.; Zhang, L.; Zhou, Z.; Pan, K.; Liu, X.; Liu, W.; Wu, Q. Mechanical Properties of the Combination of Surrounding Rock and Primary Support under Impacting Load. Sustainability 2023, 15, 4410. [Google Scholar] [CrossRef]
  8. Wang, X.; Wei, W.; Niu, Y.; Xia, C.; Song, L.; Han, G.; Zhu, Z. Triaxial Creep Mechanical Behaviors and Creep Damage Model of Dolomitic Limestone Material under Multi-Stage Incremental Loading. Materials 2023, 16, 1918. [Google Scholar] [CrossRef]
  9. Li, Z.; Zhu, Y.; Song, Q.; Wang, P.; Liu, D. Dynamic Mechanical Properties and Failure Characteristics of Sandstone with Pre-Flaws Parallel to the Loading Direction. Sustainability 2023, 15, 3587. [Google Scholar] [CrossRef]
  10. Zhang, S.; Che, C.; Zhao, C.; Du, S.; Liu, Y.; Li, J.; Yang, S. Effect of Fly Ash and Steel Fiber Content on Workability and Mechanical Properties of Roadway Side Backfilling Materials in Deep Mine. Energies 2023, 16, 1505. [Google Scholar] [CrossRef]
  11. Guidicini, G.; Nieble, C.M.; de Cornides, A.T. Analysis of point load test as a method for preliminary geotechnical classification of rocks. Bull. Int. Assoc. Eng. Geol. 1973, 7, 37–52. [Google Scholar] [CrossRef]
  12. Šporin, J.; Mrvar, P.; Janc, B.; Vukelić, Ž. Expression of the Self-Sharpening Mechanism of a Roller Cone Bit during Wear Due to the Influence of the Erosion Protection Carbide Coating. Coatings 2021, 11, 1308. [Google Scholar] [CrossRef]
  13. EN 14157:2017; Natural Stone Test Methods—Determination of the Abrasion Resistance. BSI Standards: London, UK, 2017.
  14. PN-EN 1341:2013-05; Płyty z Kamienia Naturalnego do Zewnętrznych Nawierzchni Drogowych—Wymagania i Metody Badań. Polski Komitet Normalizacyjny: Warsaw, Poland, 2013.
  15. Cobanoglu, I.; Celik, S.B.; Alkaya, D. Correlation between “Wide wheel abrasion (capon)” and “Bohme abrasion” test results for some carbonate rocks. Sci. Res. Essays 2010, 5, 3398–3404. [Google Scholar]
  16. FORM+TEST Seidner&Co. GmbH. Available online: http://www.formtest.de (accessed on 16 January 2023).
  17. Costa, A.V.; Gumieri, A.G.; Brandao, P.R.G. Interlocking concrete blocks produced with sinter feed tailings. IBRACON Struct. Mater. J. 2014, 7, 228–259. [Google Scholar]
  18. EN 1097-1:2011; Tests for Mechanical and Physical Properties of Aggregates—Part 1: Determination of the Resistance to Wear (Micro-Deval); European Standard. CEN: Stockholm, Sweden, 2011.
  19. Strzałkowski, P.; Kaźmierczak, U. Wear and Fragmentation Resistance of Mineral Aggregates—A Review of Micro-Deval and Los Angeles Tests. Materials 2021, 14, 5456. [Google Scholar] [CrossRef] [PubMed]
  20. Benjeddou, O.; Mashaan, N. Experimental Study of the Usability of Recycling Marble Waste as Aggregate for Road Construction. Sustainability 2022, 14, 3195. [Google Scholar] [CrossRef]
  21. EN 1097-2; Tests for Mechanical and Physical Properties of Aggregates—Part 2: Methods for the Determination of Resistance to Fragmentation; European Standard. CEN: Stockholm, Sweden, 2020.
  22. Plinninger, R.; Käsling, H.; Thuro, K.; Spaun, G. Testing conditions and geomechanical properties influencing the CERCHAR abrasiveness index (CAI) value. Int. J. Rock Mech. Min. Sci. 2003, 40, 259–263. [Google Scholar] [CrossRef]
  23. Plinninger, R.J.; Restner, U. Abrasivity Testing, Quo Vadis?—A Commented Overview of Abrasivity Testing Methods. Geomech. Tunelling 2008, 1, 61–70. [Google Scholar] [CrossRef]
  24. Yaralı, O.; Yaşar, E.; Bacak, G.; Ranjith, P. A study of rock abrasivity and tool wear in Coal Measures Rocks. Int. J. Coal Geol. 2008, 74, 53–66. [Google Scholar] [CrossRef]
  25. Torrijo, F.J.; Garzón-Roca, J.; Company, J.; Cobos, G. Estimation of Cerchar abrasivity index of andesitic rocks in Ecuador from chemical compounds and petrographical properties using regression analyses. Bull. Eng. Geol. Environ. 2019, 78, 2331–2344. [Google Scholar] [CrossRef]
  26. NF P94-430-1; Rock—Determination of the Rock Abrasiveness—Part 1: Schratching—Test with a Pointed Tool. AFNOR: Paris, France, 2000.
  27. ASTM D7625-10; Standard Test Method for Laboratory Determination of Abrasiveness of Rock Using the CERCHAR Method. ASTM International: West Conshohocken, PA, USA, 2010.
  28. West, G. A relation between abrasiveness and quartz content for some Coal Measures sediments. Geotech. Geol. Eng. 1986, 4, 73–78. [Google Scholar] [CrossRef]
  29. Alber, M.; Yaralı, O.; Dahl, F.; Bruland, A.; Käsling, H.; Michalakopoulos, T.N.; Cardu, M.; Hagan, P.; Aydın, H.; Özarslan, A. ISRM Suggested Method for Determining the Abrasivity of Rock by the CERCHAR Abrasivity Test. Rock Mech. Rock Eng. 2014, 47, 261–266. [Google Scholar] [CrossRef]
  30. SANDVIK Mining and Construction G.m.b.H. Available online: https://www.rocktechnology.sandvik/en/ (accessed on 10 February 2023).
  31. Schimazek, J.; Knatz, H. Der Einfluss des Gesteinsaubaus auf die Schnittgeschwindigkeit und Meisselverschleiss von Streckenvortriebsmaschinen. Gluckauf 1970, 6, 274–278. [Google Scholar]
  32. Ziaei, J.; Ghadernejad, S.; Jafarpour, A.; Mikaeil, R. A Modified Schimazek’s F-abrasiveness Factor for Evaluating Abrasiveness of Andesite Rocks in Rock Sawing Process. J. Min. Environ. (JME) 2020, 11, 563–575. [Google Scholar] [CrossRef]
  33. NF P18-579; Aggregate—Abrasiveness and Grindability Tests. AFNOR: Paris, France, 2013.
  34. Käsling, H.; Thuro, K. Determing abrasivity of rock and soil in the laboratory. In Geologically Active, Proceedings of the 11th IAEG Congress, Auckland, New Zealand, 5–10 September 2010; CRC Press: Leiden, The Netherlands, 2010. [Google Scholar]
  35. Janc, B.; Jovicić, V.; Vukelić, Z. Laboratory Test Methods for Assessing the Abrasivity of Rocks and Soils in Geotechnology and Mining Applications. Min. Environ. 2020, 67, 103–117. [Google Scholar] [CrossRef]
  36. Dahl, F.; Bruland, A.; Jakobsen, P.D.; Nilsen, B.; Grøv, E. Classification of properties influencing the drillability of rocks, based on the NTNU/SINTEF test method. Tunn. Undergr. Space Technol. 2012, 28, 150–158. [Google Scholar] [CrossRef]
  37. Jakobsen, P.D.; Bruland, A.; Dahl, F. Review and assessment of the NTNU/SINTEF Soil Abrasion Test (SATTM) for determination of abrasiveness of soil and soft ground. Tunn. Undergr. Space Technol. 2013, 37, 107–114. [Google Scholar] [CrossRef]
  38. Macias, F.J.; Dahl, F.; Bruland, A. New Rock Abrasivity Test Method for Tool Life Assessments on Hard Rock Tunnel Boring: The Rolling Indentation Abrasion Test (RIAT). Rock Mech. Rock Eng. 2016, 49, 1679–1693. [Google Scholar] [CrossRef]
  39. Mosleh, M.; Hu, W.; Rostami, J. Introduction to Rock and Soil Abrasivity Index (RSAI). Wear 2019, 432–433, 202953. [Google Scholar] [CrossRef]
  40. Mucha, K. Ścierność skał w Aspekcie Prognozowania Zużycia Noży Kombajnowych (Rock Abrasivity in Terms of Forecasting the Abrasive Wear of Cutting Picks). Ph.D. Thesis, AGH University of Science and Technology, Kraków, Poland, 2019. [Google Scholar]
  41. Mucha, K. The new method for assessing rock abrasivity in terms of wear of conical picks. New Trends Prod. Eng. 2019, 2, 186–194. [Google Scholar] [CrossRef] [Green Version]
  42. Karaca, Z.; Günes Yılmaz, N.; Goktan, R.M. Considerations on the European Standard EN 14157 Test Methods: Abrasion Resistance of Natural Stones Used for Flooring in Buildings. Rock Mech. Rock Eng. 2012, 45, 103–111. [Google Scholar] [CrossRef]
  43. Shagñay, S.; Ramón, L.; Fernández-Álvarez, M.; Bautista, A.; Velasco, F.; Torres-Carrasco, M. Eco-Efficient Hybrid Cements: Pozzolanic, Mechanical and Abrasion Properties. Appl. Sci. 2020, 10, 8986. [Google Scholar] [CrossRef]
  44. Bodnárová, L.; Ťažký, M.; Ťažká, L.; Hela, R.; Pikna, O.; Sitek, L. Abrasive Wear Resistance of Concrete in Connection with the Use of Crushed and Mined Aggregate, Active and Non-Active Mineral Additives, and the Use of Fibers in Concrete. Sustainability 2020, 12, 9920. [Google Scholar] [CrossRef]
  45. Alaskar, A.; Alabduljabbar, H.; Mohamed, A.M.; Alrshoudi, F.; Alyousef, R. Abrasion and skid resistance of concrete containing waste polypropylene fibers and palm oil fuel ash as pavement material. Constr. Build. Mater. 2021, 282, 122681. [Google Scholar] [CrossRef]
  46. Strzałkowski, P.; Köken, E. Assessment of Böhme Abrasion Value of Natural Stones through Artificial Neural Networks (ANN). Materials 2022, 15, 2533. [Google Scholar] [CrossRef] [PubMed]
  47. Copetti Callai, S.; Tataranni, P.; De Rose, M.; Natali Murri, A.; Vaiana, R.; Sangiorgi, C. A Preliminary Laboratory Evaluation of Artificial Aggregates from Alkali-Activated Basalt Powder. Sustainability 2022, 14, 16653. [Google Scholar] [CrossRef]
  48. Đokić, O.; Radević, A.; Zakić, D.; Đokić, B. Potential of Natural and Recycled Concrete Aggregate Mixtures for Use in Pavement Structures. Minerals 2020, 10, 744. [Google Scholar] [CrossRef]
  49. Courard, L.; Rondeux, M.; Zhao, Z.; Michel, F. Use of Recycled Fine Aggregates from C&DW for Unbound Road Sub-Base. Materials 2020, 13, 2994. [Google Scholar] [CrossRef]
  50. SPW CCT. Cahier des Charges Type Qualiroutes; Service Public de Wallonie: Namur, Belgium, 2016. [Google Scholar]
  51. De Witt, A.; Boston, K.; Leshchinsky, B. Predicting Aggregate Degradation in Forest Roads in Northwest Oregon. Forests 2020, 11, 729. [Google Scholar] [CrossRef]
  52. Zhou, X.; Kastiukas, G.; Lantieri, C.; Tataranni, P.; Vaiana, R.; Sangiorgi, C. Mechanical and Thermal Performance of Macro-Encapsulated Phase Change Materials for Pavement Application. Materials 2018, 11, 1398. [Google Scholar] [CrossRef] [Green Version]
  53. Celik, S.B.; Çobanoğlu, I. Modelling and estimation of Wide Wheel abrasion values of building stones by multivariate regression and artificial neural network analyses. J. Build. Eng. 2022, 45, 103443. [Google Scholar] [CrossRef]
  54. Kolgitti, T.; Çelik, S.B. Investigation of the usability of wide wheel abrasion test on rock core samples. Environ. Earth Sci. 2022, 81, 540. [Google Scholar] [CrossRef]
  55. Ko, T.Y.; Lee, S.S. Effect of Rock Abrasiveness on Wear of Shield Tunnelling in Bukit Timah Granite. Appl. Sci. 2020, 10, 3231. [Google Scholar] [CrossRef]
  56. Rostami, J.; Ghasemi, A.; Alavi Gharahbagh, E.; Dogruoz, C.; Dahl, F. Study of Dominant Factors Affecting Cerchar Abrasivity Index. Rock Mech. Rock Eng. 2014, 47, 1905–1919. [Google Scholar] [CrossRef]
  57. Jeong, H.; Choi, S.; Lee, Y.-K. Evaluation of Cutting Performance of a TBM Disc Cutter and Cerchar Abrasivity Index Based on the Brittleness and Properties of Rock. Appl. Sci. 2023, 13, 2612. [Google Scholar] [CrossRef]
  58. Dewangan, S.; Chattopadhyaya, S.; Hloch, S. Wear Assessment of Conical Pick used in Coal Cutting Operation. Rock Mech. Rock Eng. 2015, 48, 2129–2139. [Google Scholar] [CrossRef]
  59. Krauze, K.; Mucha, K.; Wydro, T.; Pawlik, J.; Wróblewska-Pawlik, A. Mass and Volumetric Abrasive Wear Measurements of the Mining Conical Picks. Sustainability 2023, 15, 850. [Google Scholar] [CrossRef]
  60. Bołoz, Ł.; Biały, W. Methods and Test Benches for Cutting Tools Testing—A Review. Energies 2023, 16, 445. [Google Scholar] [CrossRef]
  61. Alber, M. Stress dependency of the Cerchar abrasivity index (CAI) and its effects on wear of selected rock cutting tools. Tunn. Undergr. Space Technol. 2008, 23, 351–359. [Google Scholar] [CrossRef]
  62. Hamzaban, M.-T.; Memarian, H.; Rostami, J.; Ghasemi-Monfared, H. Study of rock–pin interaction in cerchar abrasivity test. Int. J. Rock Mech. Min. Sci. 2014, 72, 100–108. [Google Scholar] [CrossRef]
  63. Zhang, G.; Konietzky, H.; Frühwirt, T. Investigation of scratching specific energy in the Cerchar abrasivity test and its application for evaluating rock-tool interaction and efficiency of rock cutting. Wear 2020, 448–449, 203218. [Google Scholar] [CrossRef]
  64. Teymen, A. The usability of Cerchar abrasivity index for the estimation of mechanical rock properties. Int. J. Rock Mech. Min. Sci. 2020, 128, 104258. [Google Scholar] [CrossRef]
  65. Zhang, S.-R.; She, L.; Wang, C.; Wang, Y.-J.; Cao, R.-L.; Li, Y.-L.; Cao, K.-L. Investigation on the relationship among the Cerchar abrasivity index, drilling parameters and physical and mechanical properties of the rock. Tunn. Undergr. Space Technol. 2021, 112, 103907. [Google Scholar] [CrossRef]
  66. Capik, M.; Yilmaz, A.O. Correlation between Cerchar abrasivity index, rock properties, and drill bit lifetime. Arab. J. Geosci. 2017, 10, 15. [Google Scholar] [CrossRef]
  67. Larsen-Basse, J.; Perrott, C.M. Abrasive wear of tungsten carbide—Cobalt composites. Mater. Sci. Eng. 1974, 13, 93–100. [Google Scholar] [CrossRef]
  68. Di Giovanni, A.; Todaro, C.; Cardu, M.; Bianchini, S.; Forfori, B. Laboratory Test Campaign Aimed at the Analysis of an Uncommon Wear Phenomenon in a Marble Quarry. Appl. Sci. 2022, 12, 2264. [Google Scholar] [CrossRef]
  69. Majeed, Y.; Abu Bakar, M.Z. Statistical evaluation of CERCHAR Abrasivity Index (CAI) measurement methods and dependence on petrographic and mechanical properties of selected rocks of Pakistan. Bull. Eng. Geol. Environ. 2016, 75, 1341–1360. [Google Scholar] [CrossRef]
  70. Abu Bakar, M.Z.; Majeed, Y.; Rostami, J. Influence of moisture content on the LCPC test results and its implications on tool wear in mechanized tunneling. Tunn. Undergr. Space Technol. 2018, 81, 165–175. [Google Scholar] [CrossRef]
  71. de Azevedo Barbosa, P.; Bergerman, M.G.; da Fonseca, E.; Kwitko-Ribeiro, R. Determination of Abrasiveness in Copper-Gold Sulfide Ores: A Contribution to the Geometallurgical Model of the Sossego Deposit. Minerals 2021, 11, 1427. [Google Scholar] [CrossRef]
  72. Tang, S.-H.; Zhang, X.-P.; Liu, Q.-S.; Xie, W.-Q.; Wang, H.-J.; Li, X.-F.; Zhang, X.-Y. New soil abrasion testing method for evaluating the influence of geological parameters of abrasive sandy ground on scraper wear in TBM tunnelling. Tunn. Undergr. Space Technol. 2022, 128, 104604. [Google Scholar] [CrossRef]
  73. Rostami, J.; Gharahbagh, E.A.; Palomino, A.M.; Mosleh, M. Development of soil abrasivity testing for soft ground tunneling using shield machines. Tunn. Undergr. Space Technol. 2012, 28, 245–256. [Google Scholar] [CrossRef]
  74. Khoshouei, M.; Bagherpour, R.; Sadeghisorkhani, H.; Jalalian, M.H. A New Look at Hard Rock Abrasivity Evaluation Using Acoustic Emission Technique (AET). Rock Mech. Rock Eng. 2022, 55, 2425–2443. [Google Scholar] [CrossRef]
  75. Florea, V.A.; Itu, R.-B. Potential Methods for Limiting the Consumption of Machine Components Exposed to Abrasive Wear. Sustainability 2022, 14, 12819. [Google Scholar] [CrossRef]
  76. Kotwica, K. Atypical and innovative tool, holder and mining head designed for roadheaders used to tunnel and gallery drilling in hard rock. Tunn. Undergr. Space Technol. 2018, 82, 493–503. [Google Scholar] [CrossRef]
  77. Liu, J.; Zheng, H.; Kuang, Y.; Xie, H.; Qin, C. 3D Numerical Simulation of Rock Cutting of an Innovative Non-Planar Face PDC Cutter and Experimental Verification. Appl. Sci. 2019, 9, 4372. [Google Scholar] [CrossRef] [Green Version]
Figure 1. Böhme abrasion test device: 1—counterweight, 2—test track, 3—loading weight, 4—sample holder, 5—tested sample, 6—rotating disc [13,15].
Sustainability 15 11243 g001
Figure 2. Wide wheel abrasion test device: 1—clamping trolley, 2—fixing screw, 3—tested specimen, 4—control valve, 5—storage hopper, 6—flow guidance hopper, 7—wide abrasion wheel, 8—counterweight, 9—slot, 10—groove, 11—abrasive material flow, 12—abrasive material collector, 13—wedge [13,16].
Sustainability 15 11243 g002
Figure 3. Measurement of groove geometry on the sample after the test [13].
Sustainability 15 11243 g003
Figure 4. Amsler abrasion testing machine: 1—cast iron disc, 2—rock sample holder, 3—device for feeding water [17].
Sustainability 15 11243 g004
Figure 5. Micro-Deval testing machine with four drums: 1—drums, 2—electric motor with reducer, 3—driving shaft, 4—shaft fixing, 5—frame, 6—flexible coupling [18].
Sustainability 15 11243 g005
Figure 6. Original testing stand for the Cerchar test [23].
Sustainability 15 11243 g006
Figure 7. The Cerchar scratch test [23].
Sustainability 15 11243 g007
Figure 8. The measurement of the steel testing pin tip.
Sustainability 15 11243 g008
Figure 9. LCPC abrasivity testing device [34,35].
Sustainability 15 11243 g009
Figure 10. Test specimen for soil abrasivity test SAT [36].
Sustainability 15 11243 g010
Figure 11. Test device for soil abrasivity test, SAT [36].
Sustainability 15 11243 g011
Figure 12. RIAT device [38].
Sustainability 15 11243 g012
Figure 13. Schematic drawing of the SAI tester for measuring RSAI and the frictional torque output [39].
Sustainability 15 11243 g013
Figure 14. Test stand to determine the rock abrasivity using AGH abrasivity test.
Sustainability 15 11243 g014
Figure 15. A friction pair in AGH abrasivity test: (a) core sample, (b) cube sample.
Sustainability 15 11243 g015
Table 1. Mineral classification in terms of abrasivity [23,30].
CAIRock AbrasivityFSCHIM Index
4.50 ≤ CAIextremely abrasive 3.50 ≤ F
3.0 ≤ CAI < 4.5highly abrasive1.00 ≤ F < 3.50
2.3 ≤ CAI < 3.0very abrasive0.50 ≤ F < 1.00
1.8 ≤ CAI < 2.3abrasive0.25 ≤ F < 0.50
1.3 ≤ CAI < 1.8considerably abrasive0.10 ≤ F < 0.25
1.0 ≤ CAI < 1.3moderately abrasive0.05 ≤ F < 0.10
0.5 ≤ CAI < 1.0slightly abrasive0.01 ≤ F < 0.05
CAI < 0.5not abrasiveF < 0.01
Table 2. Mineral classification in terms of abrasivity [35].
Specimen Weight Loss [mg]Abrasivity
≥22.0high
7.0 ÷ 22.0medium
≤7.7low
Disclaimer/Publisher’s Note: The statements, opinions and data contained in all publications are solely those of the individual author(s) and contributor(s) and not of MDPI and/or the editor(s). MDPI and/or the editor(s) disclaim responsibility for any injury to people or property resulting from any ideas, methods, instructions or products referred to in the content.