Article

Provenance in the Context of Metrological Traceability

Metrology Research Centre, National Research Council Canada, Ottawa, ON K1A 0R6, Canada
Metrology 2025, 5(3), 52; https://doi.org/10.3390/metrology5030052
Submission received: 21 May 2025 / Revised: 30 July 2025 / Accepted: 14 August 2025 / Published: 21 August 2025
(This article belongs to the Special Issue Metrological Traceability)

Abstract

This paper proposes using provenance information to describe processes in metrology. The PROV data model is used as an example to showcase a conceptual analysis about how to improve quality, reliability, and overall interoperability within cross-domain applications that require communicating measurement data and traceability information. The analysis considers various metrological processes and outputs that support traceability. The conceptual analysis will be used as a foundation for further contributions to the topic of improving the documentation of metrological traceability with provenance data models. Several use cases illustrate how provenance information can provide context for traceability claims, especially when the measurement result is the focal object of interest. The PROV family of specifications provides machine-actionable metadata and semantic interoperability when communicating measurement information in traceability chains. PROV supports various perspectives that arise in the context of metrological traceability.

1. Introduction

Provenance information is fundamental for assessing the quality, reliability, and trustworthiness of data or physical artifacts. Historically, provenance has been associated with establishing the authenticity and value of historical objects and works of art. In information technology, provenance describes the history of a piece of data, including its origin and modifications over time. Today, its role extends to science, where provenance ensures that stated conclusions are reproducible and that supporting data is trustworthy.
With the increasing reliance on digital information, provenance has become essential for establishing the integrity of digital artifacts, which are easily copied or altered. Research on digital provenance spans diverse fields such as healthcare [1], bioinformatics [2], and astronomy [3], as well as databases [4], scientific research workflows [5], business processes [6], and the Semantic Web [7]. As scientific conclusions increasingly draw from data aggregated from multiple sources, provenance plays a dual role—assessing the reproducibility of scientific claims and determining the quality and reliability of data. Most importantly, provenance enables data interoperability and supports cross-domain applications, making it indispensable in a digitally connected world.
The World Wide Web Consortium (W3C) defines provenance as “information about entities, activities, people, and institutions involved in producing, influencing, or delivering a piece of data or thing, which can be used to assess its quality, reliability, or trustworthiness” [7]. While no universal definition of provenance exists, contextualizing it for specific domains is critical for its effective application.
In metrology, provenance is inherently embedded in metrological traceability but is rarely formalized as structured metadata that can be systematically tracked, managed, and accessed. Calibration certificates—underpinned by recognized measurement capabilities maintained through quality assurance processes—serve as critical instruments for communicating scientific data and ensuring the reproducibility of measurement results [8]. Provenance metadata documenting measurement assurance and calibration activities thus underpins metrological traceability claims, enabling machine-actionable assessments of measurement data quality.
This paper proposes a provenance-based approach to documenting measurement assurance processes in metrology, aligning with the FAIR (Findability, Accessibility, Interoperability, and Reusability) data principles that drive global digital transformation in measurement science [9]. Utilizing the W3C PROV data model, key events and entities in metrological processes, such as the calibration and validation of measurement standards at various stages of a traceability chain, are captured.
By integrating provenance into metrology’s digital ecosystem—including digital documents for calibration certificates—this approach ensures compliance with traceability requirements while establishing a robust, machine-actionable framework for digital quality infrastructure [10]. Provenance-enabled systems enhance cross-disciplinary data usability, provide a scalable foundation for metrological traceability, and support the ongoing digital transformation of industry, where reliable measurement assurance data are critical for maintaining global standards and fostering innovation.
This article is structured as follows. Section 2 provides further background and relevance to the topic of traceability. Section 3 describes provenance and the W3C PROV family of specifications, highlighting elements of the model relevant to use cases in metrology. Section 4 analyzes several use cases in metrology that can be documented with provenance metadata. Section 5 discusses the relevance of semantic interoperability to enable digitalization in metrology.

2. Background and Relevance with Metrological Traceability

Metrological traceability ensures the comparability of measurement results across different times, locations, and measuring instruments, thus providing a foundation for reliable decision-making when dealing with information about physical quantities. Establishing traceability requires the coordination of metrological processes through a sequence of intermediate stages—called a traceability chain—ensuring that information is available where needed. The staged nature of a traceability chain enables stage-specific information to accumulate at each step, while intermediate results are passed along the chain. Nevertheless, downstream process participants typically lack access to details about activities carried out upstream. To ensure the reliability and integrity of staged activities in practice, metrological traceability stipulates that each stage must conform to international standards for the competence of testing and calibration laboratories, such as ISO/IEC 17025:2017 [11]. Conformance to such standards involves regular independent assessments of a laboratory’s capabilities, which, when deemed satisfactory, lead to accreditation. Such quality assurance requires meticulous documentation management. Maintaining a coherent system of traceable measurements requires sustainable, verifiable processes to assess quality and reliability.
Ehrlich and Rasberry noted that, at the turn of the 20th century, the National Institute of Standards and Technology defined traceability as follows [12]:
“The property of the result of a measurement or the value of a standard whereby it can be related to stated references, usually national or international standards, through an unbroken chain of comparisons all having stated uncertainties. It is noted that traceability only exists when scientifically rigorous evidence is collected on a continuing basis showing that the measurement is producing documented results for which the total measurement uncertainty is quantified.”
Recognizing the importance of the second sentence, Ehrlich and Rasberry introduced the concept of metrological timelines—explicit sequences of key measurement events—to strengthen the collection of evidence of traceability [13].
Timelines are used to gather data about the systems contributing to a traceable measurement. Results from independent measuring systems are compared with those obtained from systems within the traceability chain. This comparison helps assess whether the systems in the chain are under metrological control, a crucial requirement for ensuring that the accuracy of results is objectively justifiable.
Traceability is a scientific principle of metrology; however, there is a practical requirement for documenting traceability chains. In fact, documentation is referred to in the current definition of metrological traceability in the third edition of the International Vocabulary of Metrology (VIM): “property of a measurement result whereby the result can be related to a reference through a documented unbroken chain of calibrations, each contributing to measurement uncertainty” [14], §2.41. The documentation serves to meet real-world economic, safety, and health requirements to audit the reliability of stages along a traceability chain. Metrological timelines can facilitate visualization of measurement relationships as part of the documentation. Provenance metadata provides structured, machine-actionable information that enables visualization of timelines, illustrating the relationships between measurement standards, calibration, and measurement assurance results—objects of interest that can be exchanged and managed effectively over their lifetime.

3. Provenance and the W3C Family of Specifications

Provenance is a structured metadata set that provides comprehensive information about an object of interest, including its origins and the processes it has undergone over time. It encompasses the sources from which data have been derived and the justification for creation and transformation processes [15]. Provenance metadata form a graph that describes relationships among elements contributing to a piece of data or a thing [16]. This metadata is crucial for assessing quality, verifying authenticity, and evaluating trustworthiness [17]. The W3C PROV data model accommodates different provenance perspectives, allowing for diverse metadata records [18]. The PROV data model is built around the core classes: Entity, Agent, and Activity. Figure 1 illustrates the core components of the W3C PROV family of specifications, which describe the use and production of entities by activities, potentially influenced by agents [7,15].

3.1. Core Concepts of the PROV Data Model

Entities are the virtual or physical objects of interest within a provenance description. They can range from documents and files to physical artifacts and digital twins. In metrology, entities include document types like calibration certificates, physical objects such as measurement standards, digital objects like data files and software, and conceptual objects such as measurands and quantities.
Activities represent the digital or physical manipulations applied to objects of interest. Occurring over a defined period, activities act upon or involve entities. Examples include data processing actions such as acquisition and transformation, and physical actions like transporting artifacts. Metrology activities encompass calibration, characterization, testing, and measurement assurance. Notably, these activities often involve numerous steps that can be meticulously documented with provenance metadata.
Agents bear some form of responsibility for an activity taking place, for the existence of entities, or for influencing another agent’s activities. An agent may be a particular type of entity or activity, whether software, hardware, or human, involved in processes affecting the objects of interest. For many purposes, a key consideration for deciding the reliability of measurement information provided in a calibration certificate is knowing who or what organization was responsible for its production. Detailing the agents involved in measurement processes may extend to a number of types of agents, including metrologists, technicians, national metrology institutes, accredited calibration laboratories, and quality assurance managers.
The core classes possess the following attributes (data properties):
  • Identifier: Identifies an instance of a class. An identifier is required for entities, activities, and agents. Two entities (respectively, activities and agents) are equal if they have the same identifier.
  • Label: Provides a human-readable representation of an instance of a PROV data model type or relation.
  • Location: Defines an identifiable geographic or non-geographic place.
  • Type: Defines the type or subclass of an agent or entity. Multiple types can be defined.
  • Role: Defines the function of an agent or entity in an activity.
  • Value: Provides a direct representation of an entity.

3.2. Relationships in PROV-DM

Relationships link entities, agents, and activities together. Key relations in the PROV data model are:
  • wasGeneratedBy: relates an entity with the activity from which produces it (metrological example: a measurement result can be generated by a calibration).
  • used: connects an activity with an entity that plays a role in its occurrence (metrological example: calibration activity can use a collection of working measurement standards).
  • wasAssociatedWith: connects an agent with an activity for which it is responsible (metrological example: a NMI can be associated with report issuance).
  • wasAttributedTo: connects an agent with an entity to which it is attributed (metrological example: a calibration report can be attributed to a laboratory, or a measurement artifact can be attributed to a client).

3.3. Extended PROV Structures

The PROV data model defines subclasses of entities and agents, indicated with the prov:type attribute. The subclasses serve as a category of things having common characteristics, and PROV is agnostic to the representation of these subclasses. Several subclasses are pre-defined in PROV.
  • SoftwareAgent: A software agent is a subclass of an agent responsible for software execution (e.g., a specific server that executes data processing steps on data received from a data acquisition system).
  • Person: A person is a subclass of an agent specifying an individual responsible for activities.
  • Organization: An organization is a subclass of an agent responsible for activities or entities.
  • Plan: A subclass of an entity representing a set of actions intended by agents. (e.g., detailed documentation of a measurement procedure or method adhered to by a measurement technician).
  • Collection: An entity providing a structure to some constituent that must be an entity as well. The provenance of a collection can be expressed as well as its member entities (e.g., an ensemble of check standards used to validate the stability of a working standard).

3.4. Provenance in Calibration Certificates

The provenance of a calibration certificate captures essential information about the individuals involved in the calibration of a physical artifact, the organization attributed to the certificate, the authorizing individual, and the client associated with the artifact under test. Such provenance may include regulated administrative information, serving as relevant metadata accompanying a calibration certificate. An agent-centred provenance record could document the technician responsible for generating the measurement result, the software used to create the human-readable certificate, the authorizing individual, the issuing laboratory, and the attribution of the artifact under test.

3.5. Provenance of Document Creation and Editing

Provenance examples frequently emerge in the context of documents or data published on the web, where provenance metadata establishes trust and reliability. For instance, a document edited on the web would have a provenance record indicating its version, the editing activity, and the agents (authors) involved [7], §4.1. Provenance can also describe processes leading to revisions of documents that should follow processes described in a publication policy [7], §4.2. Provenance would similarly be applicable to regulated information in calibration certificates that arise due to processes that govern the creation and authorization of the certificate. In both cases, provenance metadata can be retained for auditors to check that due processes are followed.

4. Provenance Use Cases in Metrology

In this section, several use cases in metrology are presented to illustrate the applicability of provenance concepts to metrology. First, the metrological timeline is presented to introduce object-centred provenance for modelling provenance in metrology. The elements of the digital calibration certificate format are shown to map to provenance concepts. Calibration is generalized to concepts that are communicated in digital calibration certificates and presented as provenance classes. Finally, the calibration of a gauge block from lasers used as working standards for the SI (International System of Units) metre is examined against a national metrology institute’s realization of the second, from an object-centred provenance perspective.

4.1. Documenting a Metrological Timeline with PROV-O

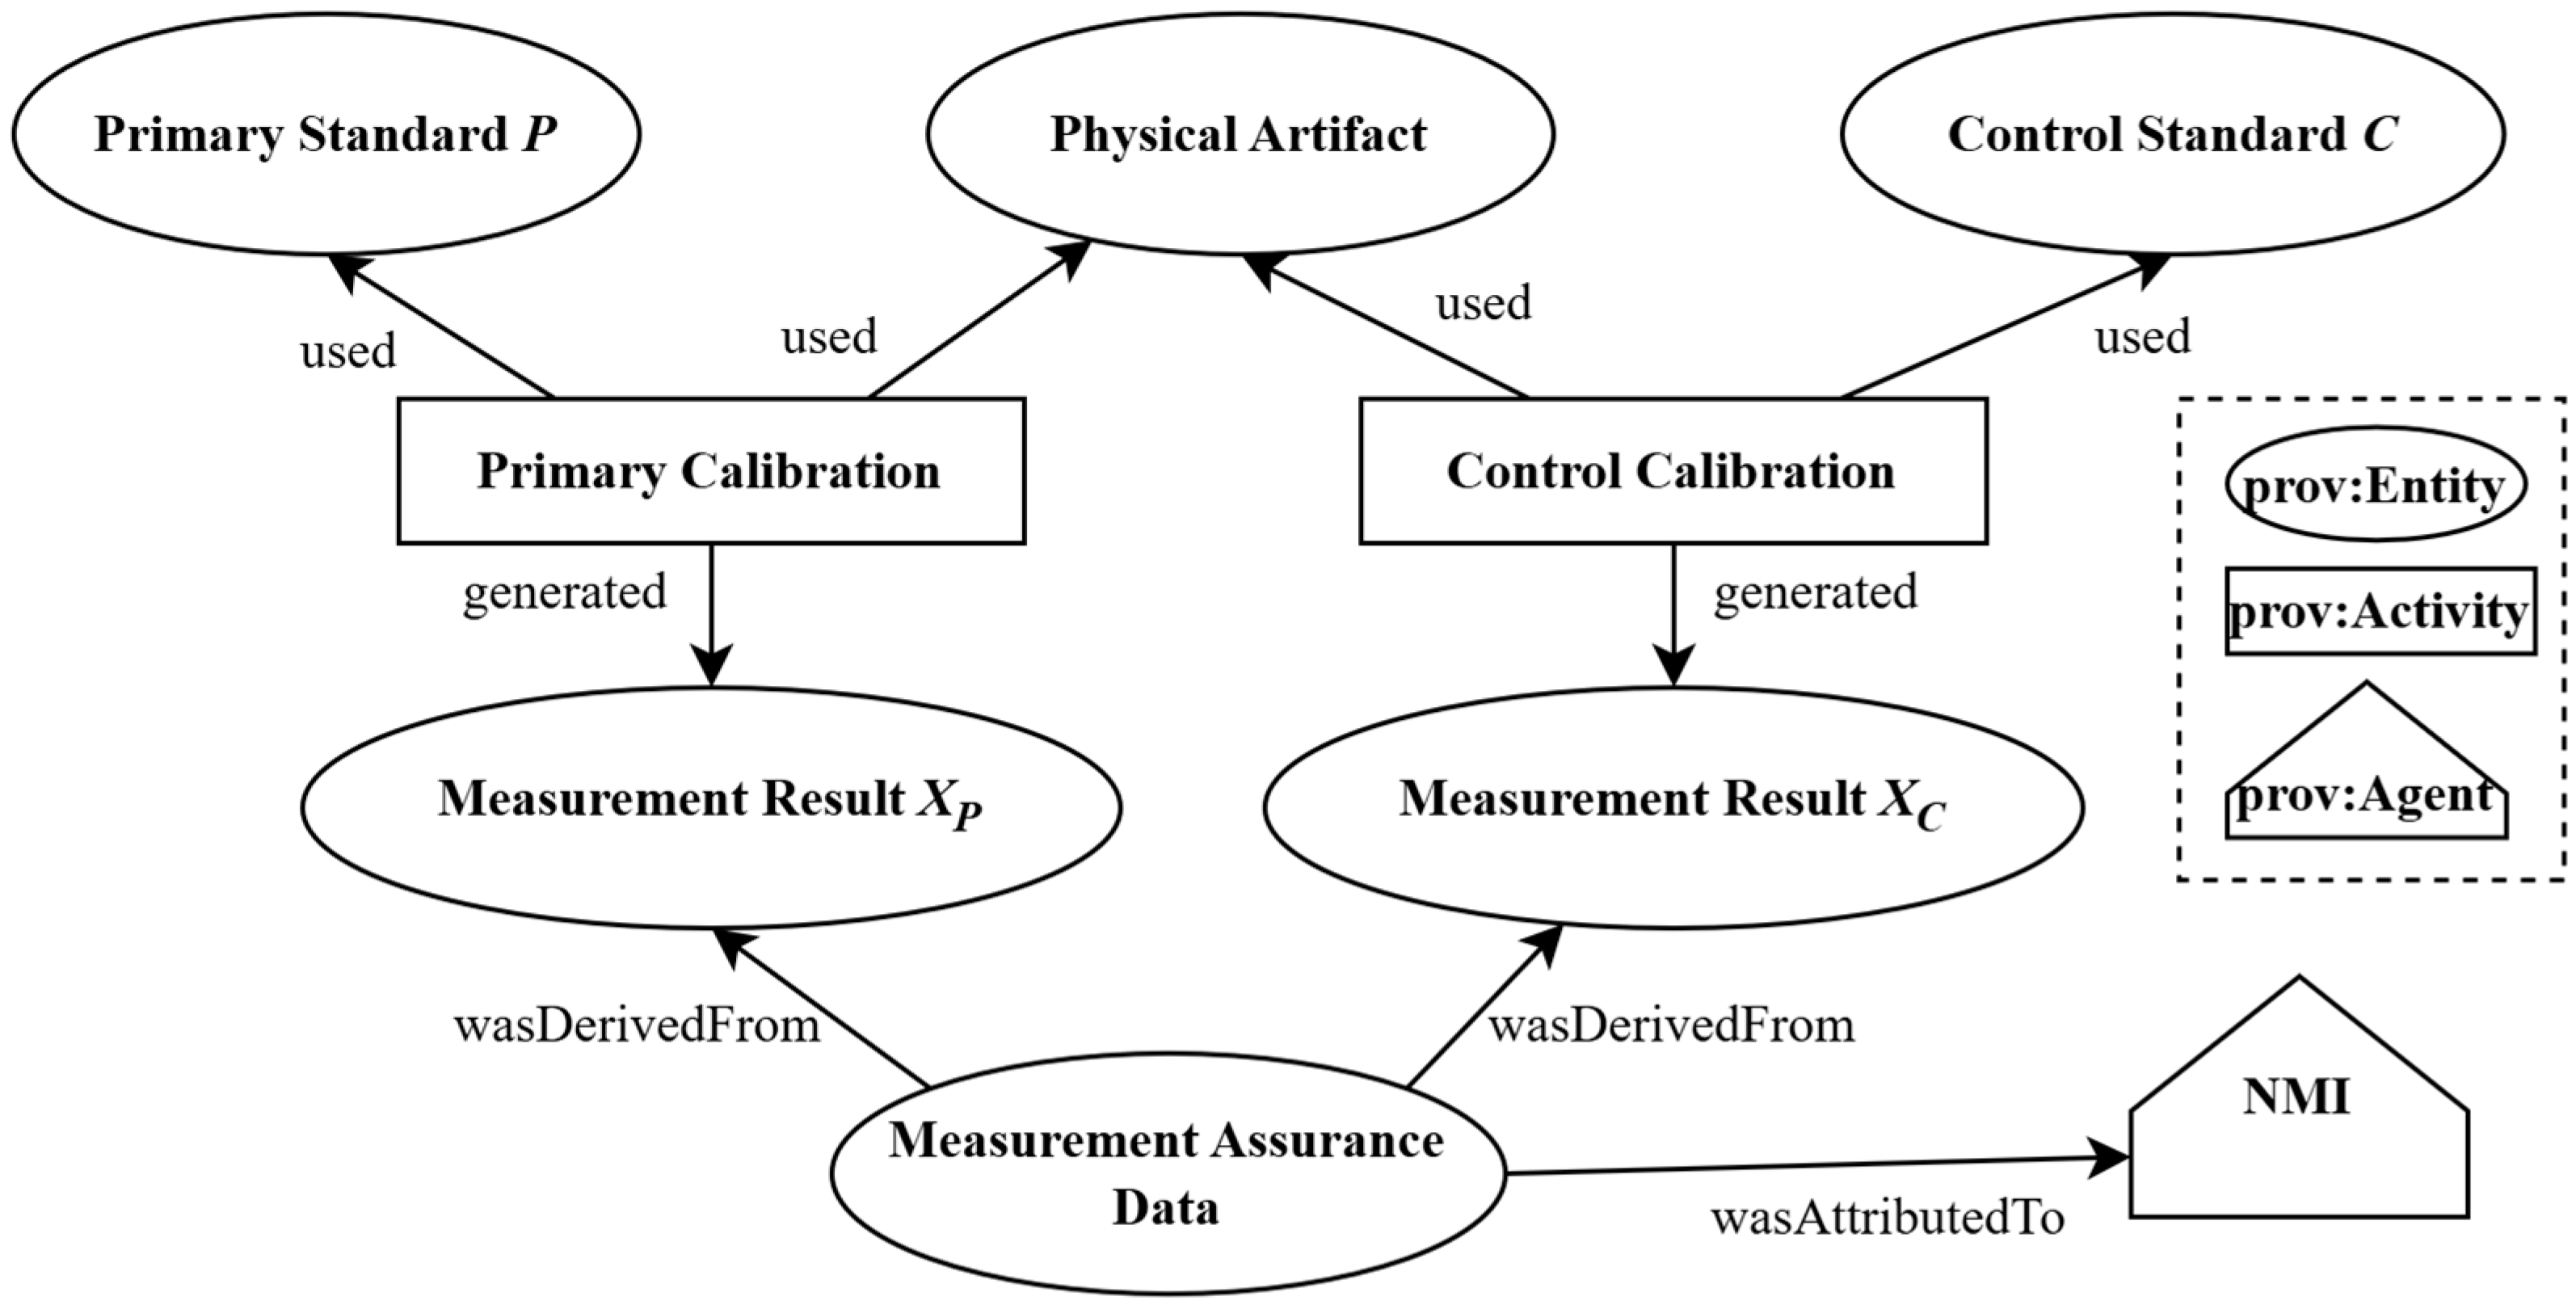
The scenario considered in this paper is a simple timeline described by Ehrlich and Rasberry [13]. It involves a primary measurement standard, P, maintained by a national metrology institute (NMI) and an ensemble of control standards that perform at a level commensurate with P but are not considered primary standards. For simplicity, a single control standard, C, is referenced. The NMI also has an artifact that can be characterized using the systems P and C.
The timeline of interest outlines a sequence of measurements of this artifact, using both C and P. The artifact is measured on two occasions using both systems P and C. The measurement results are retained by the NMI and used to check whether P is operating at a satisfactory level, providing evidence of traceability claims on an ongoing basis.
In measurement assurance, provenance could track the generation of, and updates to, a chart monitoring the stability of a measurement standard across its metrological timeline. Measurement assurance data provenance would include critical details of calibration activities, control standards, and associated measurement uncertainties. This metadata effectively describes a metrological timeline at a stage in a traceability chain, ensuring all relevant measurement and quality assurance activities are accurately represented, universally interpreted, and machine-actionable.
The use case details the provenance of internal measurement assurance data, supporting traceability to a primary standard. The provenance metadata links documented measurement results to a relevant quality assurance event from an object-centred perspective, documenting the origins of measurement assurance data to a reference.
The object-centred provenance of measurement assurance data for an event in a metrological timeline, shown in Figure 2, originates from the first stage of a traceability chain, measuring a quantity X. The primary standard, P, is used in a primary calibration activity to measure the value X of a physical artifact (entity), part of an NMI’s internal measurement assurance. This activity generated a measurement result, XP, linking the measured property of the artifact with the primary standard. A control standard, C (entity), is used in a control calibration activity to measure the value X of the physical artifact to serve as an independent check on the stability of P over time. This activity generated a second measurement result, XC. Together, XP and XC contribute measurement assurance data that can be displayed on a chart, the entity of interest in this provenance record, which was derived from (wasDerivedFrom) both the measurement results.

4.2. Representing the Digital Calibration Certificate Schema with PROV Classes and Attributes

4.2.1. Digital Calibration Certificate Model

The Digital Calibration Certificate (DCC) is a machine-readable document exchange format [10]. The DCC model is compliant with ISO/IEC 17025:2017 reporting requirements [11]. While primarily designed to provide regulated administrative data and calibration results in a standardized XML document, the DCC aims to be an integral component in the digitalization of traceable measurement systems [19]. This section explores how provenance can be used to enhance interoperability and machine-actionability of the DCC. DCC model concepts are mapped to provenance classes, identifying the key entities and agents that arise in a calibration process that can be captured as provenance information. Terminology from the International Vocabulary of Metrology (VIM) is used where relevant, enhancing the communication and accessibility of detailed measurement results and standards [14]. Utilizing provenance semantics allows for significant semantic interoperability and machine-actionability, addressing limitations of specific structures and serializations.
The DCC model consists of four elements: administrative data, measurement results, comments, and document details. DCC metadata terms in the administrative data and measurement results are modelled with the PROV concepts to serve as a starting point for a provenance representation of a calibration certificate. The latter elements, comments, and document details are not discussed here. The accepted definitions of the terms in the DCC, where relevant, are shown as well. Examples of PROV representations are given.

4.2.2. Administrative Data Elements and PROV Mappings

The administrative data of the DCC primarily aims to capture the provenance of a calibration certificate. The schema defines terms for identifying the calibration laboratory, the client that requested a calibration, and their object or objects of interest, as well as the responsible persons associated with the calibration activity or attributed to the calibration certificate. The administrative data defines an element for describing aspects of the calibration activity and the identification of the certificate. An additional element describes the provenance of the software used to generate a DCC XML document. Below, the DCC schema terms are defined and represented with PROV, including examples where relevant in PROV-N notation [20].
calibrationLaboratory: The organization associated with the calibration activity. An organization is a subclass of agent that can be specified using the type attribute prov:Organization. The schema defines the calibration laboratory code (calibrationLaboratoryCode) that can be used as the identifier in the provenance representation. The example below uses the Research Organization Registry identifier (ROR ID) that would also serve as the calibration laboratory code [21].
The following expression is about an agent identified by its ROR ID specified in an instance of the DCC, which is an organization, named the National Research Council Canada, with a contact, Bob:
  • agent(ror.org/04mte1k06, [dcc:contact= “Bob”, ex:name= “National Research Council Canada”, prov:type = ‘prov:Organization’])
respPersons: Personnel responsible for generating the certificate. A person is a type of agent. Any number of agents with various roles can be associated with activities. In order to represent the DCC concept for the responsible person, the provenance needs to associate the responsible person or persons with the calibration activity. The following example defines agents and associates the agent with calibration activities.
  • agent(ex:responsibleAgent1, [dcc:respPerson:person:name= “Alice”, prov:role= “technician”, prov:type= ‘prov:Person’])
  • agent(ex:responsibleAgent2, [dcc:respPerson:person:name= “Bob”, prov:role= “authoriser”, prov:type= ‘prov:Person’])
  • activity(ex:calibration, [prov:label= “Calibration activity”, prov:location=”National Research Council Canada Dimensional Laboratory”, prov:startedAtTime= “2012-04-02T13:35:23Z”, prov:endedAtTime = “2012-04-04T13:35:23Z”)
  • activity(ex:authorisation, prov:label =“Authorisation of certificate”)
  • wasAssociatedWith(ex:calibration, ex:responsbleAgent1, -, [ prov:role=“technician”])
  • wasAssociatedWith(ex:authorisation, ex:responsibleAgent2, -, [ prov:role=“authoriser”])
The association of agents with activities introduces several attributes for documenting activities. An activity specifies the role of an agent. The precise location (prov:location) where an activity occurs can be specified, referred to in the DCC as performanceLocation. The date and time at which a calibration activity started (prov:startedAtTime) and ended (prov:endedAtTime) can be specified, referred to in the DCC as beginPerformanceDate and endPerformanceDate.
Customer: The client requesting the calibration, which may be a person or organization.
The following example defines a primary calibration laboratory:
  • Agent(ex:customer1234, [ex:name= “Primary Calibration Laboratory”, prov:label= “Customer for calibration])
Items: Identification of the entities calibrated in a calibration activity and attributed to the customer specified in the calibration report. Each item has additional technical metadata, including an identifier that can be used in the provenance representation. The items can be represented as a prov:Collection. The attribution of a collection of items to a customer and the use of the collection in a calibration activity may specify these entities when there is a need to record the provenance of both the individual items and the collection.
  • Entity(ex:itemCollection, [prov:label= “Primary Calibration Laboratory items for calibration”, prov:type= ‘prov:Collection’])
  • wasAttributedTo(ex:itemCollection, ex:customer1234)
The administrative data contains technical details of calibration certificates that have regulatory requirements. The PROV data model provides context to those details and can provide interpretability of the specific metadata terms in a DCC document when accompanied by provenance metadata. As shown in the examples above, the PROV data model class attributes and qualified names provide the semantics for interpreting regulated administrative terminology, such as role, time, location, and type. The DCC terms that map to provenance class attributes include the following:
UniqueIdentifier: A unique identifier for the calibration certificate number shall be specified here. The provenance representation of the calibration certificate is an entity that uses the same identifier. In the PROV data model, the core classes have mandatory identifiers.
The following is an example that represents a calibration certificate as a document type entity. Note that the time the certificate was generated can be specified. This example shows how an entity is attributed to an agent with the use of the identifiers.
  • entity(LS–2024–0001, [prov:label= “Calibration certificate”, prov:type = ‘document’, prov:generatedAtTime = “2012-04-03T13:35:23Z”])
  • wasAttributeTo(LS–2024–0001, https://ror.org/04mte1k06 (accessed on 1 May 2025))
beginPerformance: Start time of the activity generating the measurement result. Activities in the PROV data model include an optional startTime.
endPerformance: End time of the activity generating the measurement result. Activities in the PROV data model include an optional endTime.
performanceLocation: Geographical location of the calibration. The PROV data model defines an attribute prov:location for the core classes.

4.2.3. Measurement Result Elements and PROV Mappings

The DCC element for the measurement results provides the quantity values and associated uncertainties. Uncertainties may arise from influence quantities [14], §2.52, which affect the relationship between the indication and the measurement result. The influence quantities may be included with the measurement result, along with other contextual information related to the calibration process, such as the measurement equipment and methods used to perform the calibration. The relevant terms in the DCC include the following:
measurementResult: A set of quantity values attributed to a measurand [14], §2.3, Note 1, represented as a prov:Collection or simply as a prov:Entity.
influenceConditions: Influence quantities and their values during calibration, represented as a prov:Entity or a prov:Collection. The entity attribute prov:value can be included in the provenance description that is a direct representation of an entity.
MeasuringEquipment: Measuring instruments [14], §3.1 or systems used during calibration, represented as a prov:Entity or a prov:Collection.
usedMethods: Measurement methods [14], §2.5, are broader than measurement procedures [14], §2.6. A measurement method may be represented as an entity, whereas measurement procedures can be represented with the entity subclass prov:Plan.

4.2.4. PROV Representation of the Digital Calibration Certificate

Figure 3 shows the provenance model for the DCC, demonstrating the applicability of measurement concepts typically described in calibration certificates, represented as provenance entities related through activities and agents. The PROV data model is suitable for describing a certificate’s origin by tracking its generation through a calibration activity, associating the persons responsible for generating the measurement result and the organization attributed to authorizing the certificate. The PROV data model also captures contextual details related to the generation of a measurement result, which may allow for capturing the provenance of documented measurement procedures and measurement equipment. In the next section, the provenance of the measurement result is analyzed to better understand how traceability claims can be supported with provenance information.

4.3. Calibration: Enhancing Traceability Information Through Detailed Provenance Modelling

While the provenance of calibration certificates provides semantic interoperability and enhances machine-actionability, it is insufficient for addressing traceability comprehensively. Further modelling of the measurement result is essential to achieve this goal, particularly when metrological timelines need to be captured to support claims of traceability [13], §2.41. This section highlights the necessary measurement concepts and other elements that can be incorporated through provenance to develop a more complete model for specific use cases, integrating metrological timeline information.
This analysis emphasizes representing information using the common conceptual model for provenance, rather than specific mappings from the DCC to PROV-DM. By introducing the measurement result as a distinct provenance entity, a conceptual foundation is established for describing its provenance through the generating activity of calibration. This approach allows for the inclusion of the measurement standards used during calibration, ensuring claims of traceability can be introduced through activities and entities and related to a calibration certificate with provenance metadata.
Calibration, as defined in the VIM, involves two distinct activities, as follows:
  • Characterization: This activity establishes the relationship between quantity values with measurement uncertainties provided by measurement standards, and the indications and associated uncertainties attributed to the artifact carrying the quantity. It results in the creation of a measurement model that defines the artifact’s behaviour and quantifies uncertainties, ensuring traceability to the standards.
  • Measurement Attribution: This activity applies the measurement model to produce a measurement result, consisting of a quantity value and an associated uncertainty. The measurement result is then attributed to a measurand, contextualizing the result within the calibration process.
By attributing the measurand to a measurement result within the provenance record, alongside the measurement standards associated with the characterization activity, additional linkages to quality assurance information are created. Measurement results generated through metrologically traceable calibration involve the use of measurement standards. Measurement standards represented as provenance entities can support claims of metrological traceability by documenting their metrological timelines with provenance metadata. The measurand attributed to a measurement result in provenance metadata can establish relationships with recognized calibration and measurement capabilities and scopes of accredited capabilities [8].
Table 1 summarizes calibration activity-related concepts and PROV core classes that represent those concepts. Depending on the particular scenario, extended PROV structures or subclasses may be relevant for metrology use cases. For example, there may be a need to record the provenance of software or measurement procedures used in a calibration activity and represented as a prov:Plan. Another example is the use of a collection of measurement standards routinely used in a calibration activity. The collection of measurement standards may have its own provenance (i.e., when the collection of standards was used, and who maintains the collection of standards), and each measurement standard may have its own provenance (i.e., each measurement standard in a collection has a different calibration interval and a separate traceability chain).

4.4. Gauge Block Calibration and Traceability

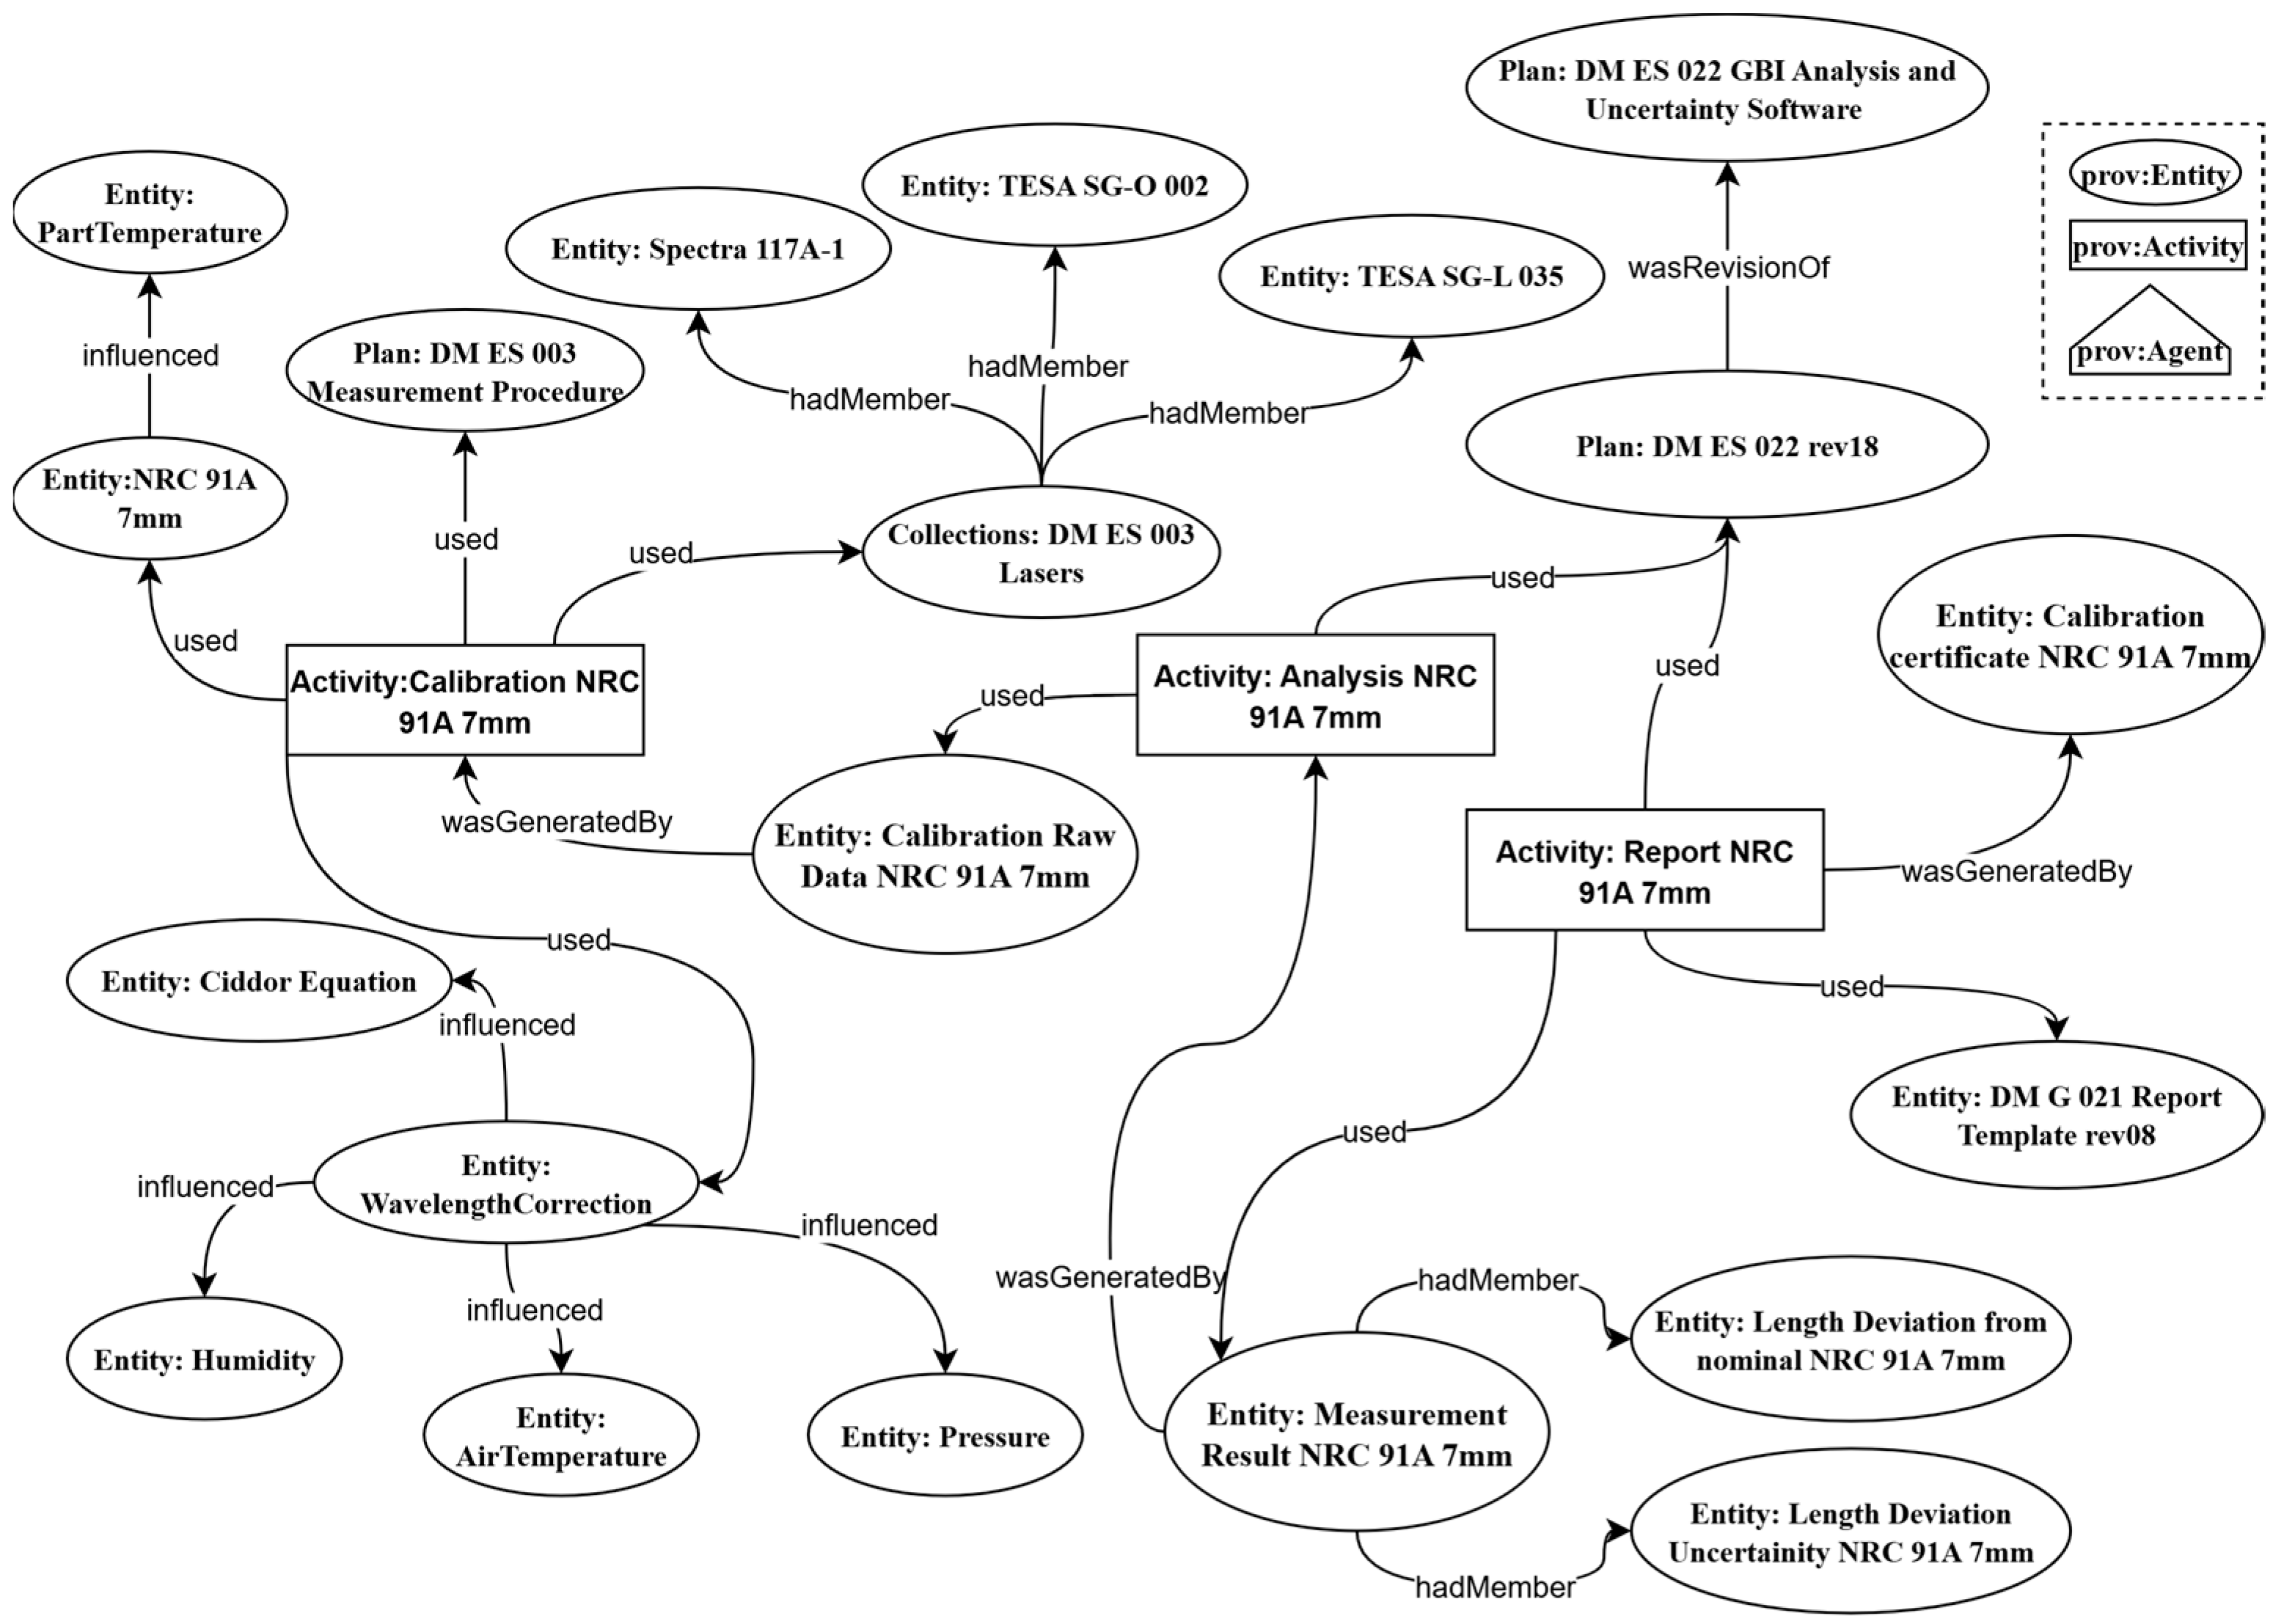
The National Research Council of Canada (NRC) disseminates the SI metre using optical interferometry techniques to calibrate a range of transfer standards. This involves the use of known wavelengths of light as discussed in the CIPM Mise en Pratique for the Definition of the Metre [22]. NRC’s principal length standard is based on laser emissions calibrated with an optical frequency comb, traceable to the NRC’s atomic clock ensemble and its realization of UTC (Universal Coordinated Time). Gauge blocks, among other physical artifacts, are used as transfer standards. Once calibrated, their length is traceable to the definition of the metre, and can serve to anchor a traceability chain for industrial applications.
Unlike some other laboratories that rely on the set of recommended frequencies for specified radiations published by the BIPM, NRC calibrates the lasers used as working standards for the SI metre against its realization of the second. This allows for regular internal calibration without requiring frequent international comparisons of a particular frequency realization.
The calibrated wavelengths are in vacuum, whereas measurements of gauge block lengths are influenced by several quantities due, in part, to the wavelength correction for the refractive index of air. The ambient conditions of temperature, humidity, and pressure influence the wavelength correction and introduce measurement uncertainty. The gauge block length is also temperature dependent with a known thermal expansion coefficient.
The gauge block calibration serves as an example to demonstrate how modelling the object-centred provenance of a measurement result in a calibration process offers a machine-actionable format for documenting traceability. The provenance document in Appendix B of the measurement result for an NRC gauge block paraphrases some PROV descriptions and expresses them in PROV-N notation [20]. The provenance metadata relates measurement standards through calibration and measurement assurance activities, documents quantities that influence the measurement result, the measurement standards used to generate the result, and the measurement method associated with the calibration. The relation of measurement standards to activities that generate measurement results serves as access to metrological timelines captured as provenance metadata. This can be seen in Figure 4, graphically, where the laser collection of working standards may each have their own provenance related to the calibrated wavelength value used at the time of the activity.

5. Discussion

Semantic interoperability is essential for advancing digitalization in metrology. However, the complexity and nuance of measurement data often necessitate specialized expertise for accurate interpretation, posing a barrier to effective interoperability. While progress has been made in representing quantities and units and developing controlled vocabularies for measurement concepts, these metadata primarily address individual data elements rather than comprehensively describing measurement processes.
Despite ongoing research in semantic interoperability, domain-specific context remains challenging due to limited formal knowledge representation. Integrating existing metrological terminology with digital measurement representations, augmented by provenance metadata, can significantly enhance semantic interoperability. This integration enables the exchange of measurement data along traceability chains, facilitating more meaningful data interpretation.
The W3C PROV data model extensibility has led to various domain-specific recommendations (International Virtual Astronomy Observatory provenance [3], ProvONE for scientific workflow provenance [5]), and the W3C specification was the result of earlier work on the Open Provenance Model [23]. The use cases described in this paper demonstrate applicability to metrology, and further research is warranted given PROV adoption in other domains that may result in a metrology-specific model.
Provenance core classes serve as extensible containers for domain-specific details. Domain-specific metadata that extend PROV activities, entities, and agents integrate metrology-specific details. Relevant metrological details include metadata descriptions for quantities and units, such as the D-SI model used in the DCC [24]. These metadata may reference unique identifiers to quantities and units, such as those provided by the SI Digital Framework or the M-Layer [25,26]. Taxonomies that describe measurands attributed to measurement results and calibration certificates, measurement capabilities, and instrument specifications help to link provenance information across these related quality infrastructure documents and metadata [27]. Ontologies describing measurement processes provide further description of activities and entities detailed in provenance metadata [28]. As a high-level concept, provenance enables digitalization in the scientific metrology community.
The PROV data model represents various perspectives applicable to metrology’s digitalization. Object-centred provenance provides a semantically interoperable information exchange mechanism, enhancing the reliability and utility of measurement data. This approach supports traceability claims and reflects insights from provenance analyses of various metrological use cases. Provenance would similarly be applicable to regulated information in calibration certificates that arise due to processes that govern the creation and authorization of the certificate. Agent-centred (responsibility view) provenance can be useful for auditors to check that due processes are followed.

6. Conclusions

The W3C PROV data model offers a domain-agnostic, extensible standard for describing metrological processes. Provenance metadata provides a digital-ready foundation to support metrological and quality processes by capturing the details of activities, agents, and entities involved in maintaining the stability of measurement standards over time, providing reliable, machine-actionable documentation of metrological traceability. Interoperability remains a challenge without the standardization of measurement concepts and their relationships with provenance concepts. Utilizing the PROV data model as a reference model can aid in developing a metrology-specific provenance model, addressing the need for standardized representation and integration of measurement information across diverse systems and perspectives.

Funding

This research received no external funding.

Data Availability Statement

Data is contained within the article.

Acknowledgments

The author acknowledges the members of the CIPM Forum on Metrology and Digitalization Task Group on Metrology Semantics. The author thanks Ian Leroux for reviewing the manuscript and contributing to the dimensional metrology use case. The author acknowledges the support of the National Research Council Canada.

Conflicts of Interest

The author declares no conflict of interest.

Appendix A. Provenance Information for a Calibration Certificate in PROV-N Notation

document
entity(ex:calibrationCertificate, [prov:type:“document”])
activity(ex:calibrationActivity, -, -, [ prov:location = “NMI X Measurement Laboratory Y” ])
activity(ex:certificateGeneration)
activity(ex:certificateAuthorization)
entity(dcc:dccSoftware, [ prov:type = “prov:Plan”])
entity(dcc:measurementResult)
entity(ex:signedCertificate)
entity(dcc:influenceConditions, [ prov:type = “prov:Collection”])
entity(dcc:measuringEquipment, [ prov:type = “prov:Collection ”])
entity(dcc:usedMethod, [ prov:type = “prov:Plan”])
agent(dcc:respAgent, [ prov:type=“Person”])
agent(ex:NMI, [ prov:type=“Organization”])
agent(ex:authorizingAgent, [ prov:type=“Person”])
wasGeneratedBy(dcc:measurementResult, ex:calibrationActivity, -)
wasGeneratedBy(ex:certificateGeneration, ex:calibrationCertificate, -)
wasGeneratedBy(ex:signedCertificate, ex:certificateAuthorization, -)
used(ex:certificateGeneration, dcc:measurementResult, -)
used(ex:certificateGeneration, dcc:dccSoftware, -)
used(ex:calibrationActivity, dcc:usedMethod, -)
used(ex:calibrationActivity, dcc:measuringEquipment, -)
used(ex:calibrationCertificate, ex:certificateAuthorization, -)
wasAssociatedWith(ex:calibrationActivity, ex:responsibleAgent, -, [ prov:role=“technician”])
wasAssociatedWith(ex:certificateGeneration,-, dcc:dccSoftware)
wasAssociatedWith(ex:certificateAuthorization, ex:authorizingAgent, -, [prov:role=“authority”])
wasDerivedFrom(ex:signedCertificate, ex:calibrationCertificate, ex:certificateAuthorization, [ prov:type = “signed”])
wasAttributedTo(ex:signedCertificate, ex:NMI, [ prov:type=“issuer”])
wasInfluencedBy(dcc:measurementResult, dcc:influenceConditions) endDocument

Appendix B. Provenance Information for the Measurement Result of Gauge Block Calibration Performed at NRC in PROV-N Notation

document
entity(ex:NRC91A_7mm,
     [ prov:label=“Select Short Gauge Block Tungsten Carbide
     7mm thermal expansion coefficient”,
     prov:type=“Calibrated Artifact”,
     prov:value=“4.23 × 10⁻⁶K−1”])
entity(ex:DM-ES-003, [ prov:label=“Method of exact fractions”,
     prov:type=“prov:Plan”])
entity(ex:TESA_SG-L_035_OFS-2024-0006_20240502,
        [ prov:label=“TESA SG-L Laser calibrated vacuum wavelength report OFS-2024-006 2024-05-02”, prov:type=“measurement standard”, prov:value=“+5.435153892E+2 nm”])
entity(ex:TESA_SG-O_002_OFS-2024-0005_20240430,
        [ prov:label=“TESA SG-O Laser calibrated vacuum wavelength report OFS-2024-0005 2024-04-30”, prov:type=“measurement standard”, prov:value=“+6.119703724E+2 nm”])
entity(ex:Spectra_117A-1_X082787_OFS-2024-0002_20240508,
        [ prov:label=“Spectra_117A-1 Laser calibrated vacuum wavelength report OFS-2024-0002 20240508”, prov:type=“measurement standard”, prov:value=“+6.329909778E+2 nm”])
entity(ex:DM-ES-003_Lasers,
     [ prov:label=“Laser collection”,
     prov:type=“prov:Collection”,
     prov:type=“measurement standard”])
hadMember(ex:DM-ES-003_Lasers,
       ex:TESA_SG-L_035_OFS-2024-0006_20240502)
hadMember(ex:DM-ES-003_Lasers,
       ex:TESA_SG-O_002_OFS-2024-0005_20240430)
hadMember(ex:DM-ES-003_Lasers,
       ex:Spectra_117A-1_X082787_OFS-2024-0002_20240508)
entity(ex:WavelengthCorrection,
     [ prov:label=“Vaccum Wavelength correction refractive index in air”, prov:type=“correction”])
entity(ex:AirTemperature,
     [ prov:label=“Influence quantity for wavelength correction”, prov:type=“influence quantity”])
entity(ex:PartTemperature,
     [ prov:label=“Influence quantity for thermal expansion of material”, prov:type=“influence quantity”])
entity(ex:Humidity,
     [ prov:label=“Influence quantity for wavelength correction”, prov:type=“influence quantity”])
entity(ex:Pressure,
     [ prov:label=“Influence quantity for wavelength correction”, prov:type=“influence quantity”])
entity(ex:Ciddor,
     [ prov:label=“Ciddor equation for refractive index in air”, prov:type=“document”])
wasInfluencedBy(ex:WavelengthCorrection, ex:AirTemperature)
wasInfluencedBy(ex:WavelengthCorrection, ex:Humidity)
wasInfluencedBy(ex:WavelengthCorrection, ex:Pressure)
wasInfluencedBy(ex:WavelengthCorrection, ex:Ciddor)
wasInfluencedBy(ex:NRC91A_7mm, ex:PartTemperature)
entity(ex:MeasurementResult_NRC91A_7mm_nominal,
     [ prov:label=“Deviation from nominal length”, prov:type=“prov:Collection”])
entity(ex:Length_Deviation_NRC91A_7mm_nominal,
     [ prov:label=“Quantity value for deviation from nominal length”, prov:type=“quantity value”, prov:value=“+2 nm”])
entity(ex:Length_Deviation_Uncertainty_NRC91A_7mm_nominal,
     [ prov:label=“Expanded Uncertainty for deviation from nominal length”, prov:type=“expanded uncertainty”, prov:value=“31 nm”])
hadMember(ex:MeasurementResult_NRC91A_7mm_nominal,
       ex:Length_Deviation_NRC91A_7mm_nominal)
hadMember(ex:MeasurementResult_NRC91A_7mm_nominal,
       ex:Length_Deviation_Uncertainty_NRC91A_7mm_nominal)
activity(ex:calibration_NRC91A_7mm, [ prov:type=“calibration”])
wasGeneratedBy(ex:MeasurementResult_NRC91A_7mm_nominal,
           ex:calibration_NRC91A_7mm, -)
used(ex:calibration_NRC91A_7mm, ex:WavelengthCorrection, -)
used(ex:calibration_NRC91A_7mm, ex:NRC91A_7mm, -)
used(ex:calibration_NRC91A_7mm, ex:DM-ES-003_Lasers, -)
endDocument
		

References

  1. Massimiliano, M.; Abdallah, M.; Andrea, M.; Sassone, V.; Jason, R. Using PROV and Blockchain to Achieve Health Data Provenance. 2020. Available online: https://www.researchgate.net/publication/342183389_Using_PROV_and_Blockchain_to_Achieve_Health_Data_Provenance?channel=doi&linkId=5ee7ca2b299bf1faac56a418&showFulltext=true (accessed on 1 May 2025).
  2. Kanwal, S.; Khan, F.Z.; Lonie, A.; Sinnott, R.O. Investigating reproducibility and tracking provenance—A genomic workflow case study. BMC Bioinform. 2017, 18, 337. [Google Scholar] [CrossRef]
  3. Servillat, M.; Riebe, K.; Boisson, C.; Bonnarel, F.; Galkin, A.; Louys, M.; Nullmeier, M.; Renault-Tinacci, N.; Sanguillon, M.; Streicher, O. IVOA Provenance Data model Version 1.0, IVOA Recommendation 11 April 2020. Available online: https://www.ivoa.net/documents/ProvenanceDM/ (accessed on 1 May 2025).
  4. Cheney, J.; Chiticariu, L.; Tan, W.-C. Provenance in Databases: Why, How, and Where. Found. Trends Databases 2009, 1, 379–474. [Google Scholar] [CrossRef]
  5. Cuevas-Vincenttin, V.; Ludäscher, B.; Missier, P.; Belhajjame, K.; Chirigati, F.; Wei, Y.; Dey, S.; Kianmajd, P.; Koop, D.; Bowers, S.; et al. ProvONE: A PROV Extension Data Model for Scientific Workflow Provenance. 2016. Available online: https://jenkins-1.dataone.org/jenkins/view/Documentation%20Projects/job/ProvONE-Documentation-trunk/ws/provenance/ProvONE/v1/provone.html (accessed on 17 July 2025).
  6. Curbera, F.; Doganata, Y.; Martens, A.; Mukhi, N.K.; Slominski, A. Business Provenance—A Technology to Increase Traceability of End-to-End Operations. In On the Move to Meaningful Internet Systems: OTM 2008; Lecture Notes in Computer Science; Meersman, R., Tari, Z., Eds.; Springer: Berlin/Heidelberg, Germany, 2008; Volume 5331. [Google Scholar] [CrossRef]
  7. Moreau, L.; Missier, P. PROV-DM: The PROV Data Model. W3C Recommendation. 30 April 2013. Available online: https://www.w3.org/TR/2013/REC-prov-dm-20130430/ (accessed on 2 May 2025).
  8. CIPM. Mutual Recognition of National Measurement Standards and of Calibration and Measurement Certificates Issued by National Metrology Institutes. 1999. Available online: https://www.bipm.org/documents/20126/43742162/CIPM-MRA-2003.pdf (accessed on 17 April 2023).
  9. Wilkinson, M.D.; Dumontier, M.; Jan Aalbersberg, I.J.; Appleton, G.; Axton, M.; Baak, A.; Blomberg, N.; Boiten, J.-W.; da Silva Santos, L.B.; Bourne, P.E.; et al. The FAIR Guiding Principles for Scientific Data Management and Stewardship. Sci. Data 2016, 3, 160018. [Google Scholar] [CrossRef]
  10. Haertig, F.; Hornig, J.; Wiedenhofer, T.; Hackel, S.G. The digital calibration certificate. PTB-Mitteilungen 2017, 127, 7. [Google Scholar] [CrossRef]
  11. ISO/IEC 17025:2017; General Requirements for the Competence of Testing and Calibration Laboratories, 3rd ed. International Standards Organisation: Geneva, Switzerland, 2017.
  12. Hebner, R.E. Calibration Traceability: A Summary of NIST’s View. In Proceedings of the 5th US–Italy Bilateral Seminar, Gaithersburg, MD, USA, 26–29 February 1996. [Google Scholar]
  13. Ehrlich, C.D.; Rasberry, S.D. Metrological Timelines in Traceability. Metrologia 1997, 34, 503–514. [Google Scholar] [CrossRef]
  14. Joint Committee for Guides in Metrology (JCGM). The International Vocabulary of Metrology—Basic and General Concepts and Associated Terms (VIM), 3rd ed.; JCGM: Sèvres, France, 2012. [Google Scholar]
  15. Missier, P.; Belhajjame, K.; Cheney, J. The W3C PROV Family of Specifications for Modelling Provenance Metadata. In Proceedings of the 16th International Conference on Extending Database Technology, Genoa, Italy, 18 March 2013; ACM: New York, NY, USA; pp. 773–776. [Google Scholar] [CrossRef]
  16. Carata, L.; Akoush, S.; Balakrishnan, N.; Bytheway, T.; Sohan, R.; Seltzer, M.; Hopper, A. A Primer on Provenance. Commun. ACM 2014, 57, 52–60. [Google Scholar] [CrossRef]
  17. Cheney, J.; Chapman, A.; Davidson, J.; Forbes, A.B. Data provenance, curation and quality in metrology. In Advanced Mathematical and Computational Tools in Metrology and Testing XII; World Scientific Publishing Co. Pte Ltd.: Singapore, 2022; Voluem 90, pp. 167–187. [Google Scholar] [CrossRef]
  18. Gil, Y.; Miles, S. (Eds.) PROV Model Primer. W3C Note. 30 April 2013. Available online: http://www.w3.org/TR/2013/NOTE-prov-primer-20130430/ (accessed on 1 May 2025).
  19. Physikalisch-Technische Bundesanstalt. DCC—Digital Calibration Certificate Version 3.3. 2024. Available online: https://gitlab.com/ptb/dcc/xsd-dcc/ (accessed on 28 July 2025).
  20. Moreau, L.; Missier, P. PROV-N: The Provenance Notation. W3C Recommendation. 30 April 2013. Available online: https://www.w3.org/TR/2013/REC-prov-o-20130430/ (accessed on 2 May 2025).
  21. Research Organization Registry. Available online: https://ror.org/ (accessed on 17 July 2025).
  22. Quinn, T.J. Mise en Pratique of the definition of the metre (1992). Metrologia 1992, 30, 523–541. [Google Scholar] [CrossRef]
  23. Moreau, L.; Clifford, B.; Freire, J.; Futrelle, J.; Gil, Y.; Groth, P.; Kwasnikowska, N.; Miles, S.; Missier, P.; Myers, J.; et al. The open provenance model core specification (v1.1). Future Gener. Comput. Syst. 2010, 27, 743–756. [Google Scholar] [CrossRef]
  24. Physikalisch-Technische Bundesanstalt. D-SI—Digital System of Units Version 2.2.1. 2024. Available online: https://gitlab1.ptb.de/d-ptb/d-si/xsd-d-si/ (accessed on 28 July 2025).
  25. Bureau International des Poids et Mesures. SI Digital Framework—Digital References for FAIR Measurement Data. Available online: https://si-digital-framework.org/ (accessed on 28 July 2025).
  26. Hall, B.; Kuster, M. Metrological support for quantities and units in digital systems. Meas. Sens. 2021, 18, 100102. [Google Scholar] [CrossRef]
  27. Kuster, M. A guide to standardizing digital calibration and measurement capabilities. Metrologist 2022, 15, 36–47. [Google Scholar]
  28. Bharti, P.; Yang, Q.; Forbes, A.; Romanchikova, M.; Hippolyte, J.-L. Ontology Development for Measurement Process and Uncertainty of Results. Meas. Sens. 2021, 18, 100325. [Google Scholar] [CrossRef]
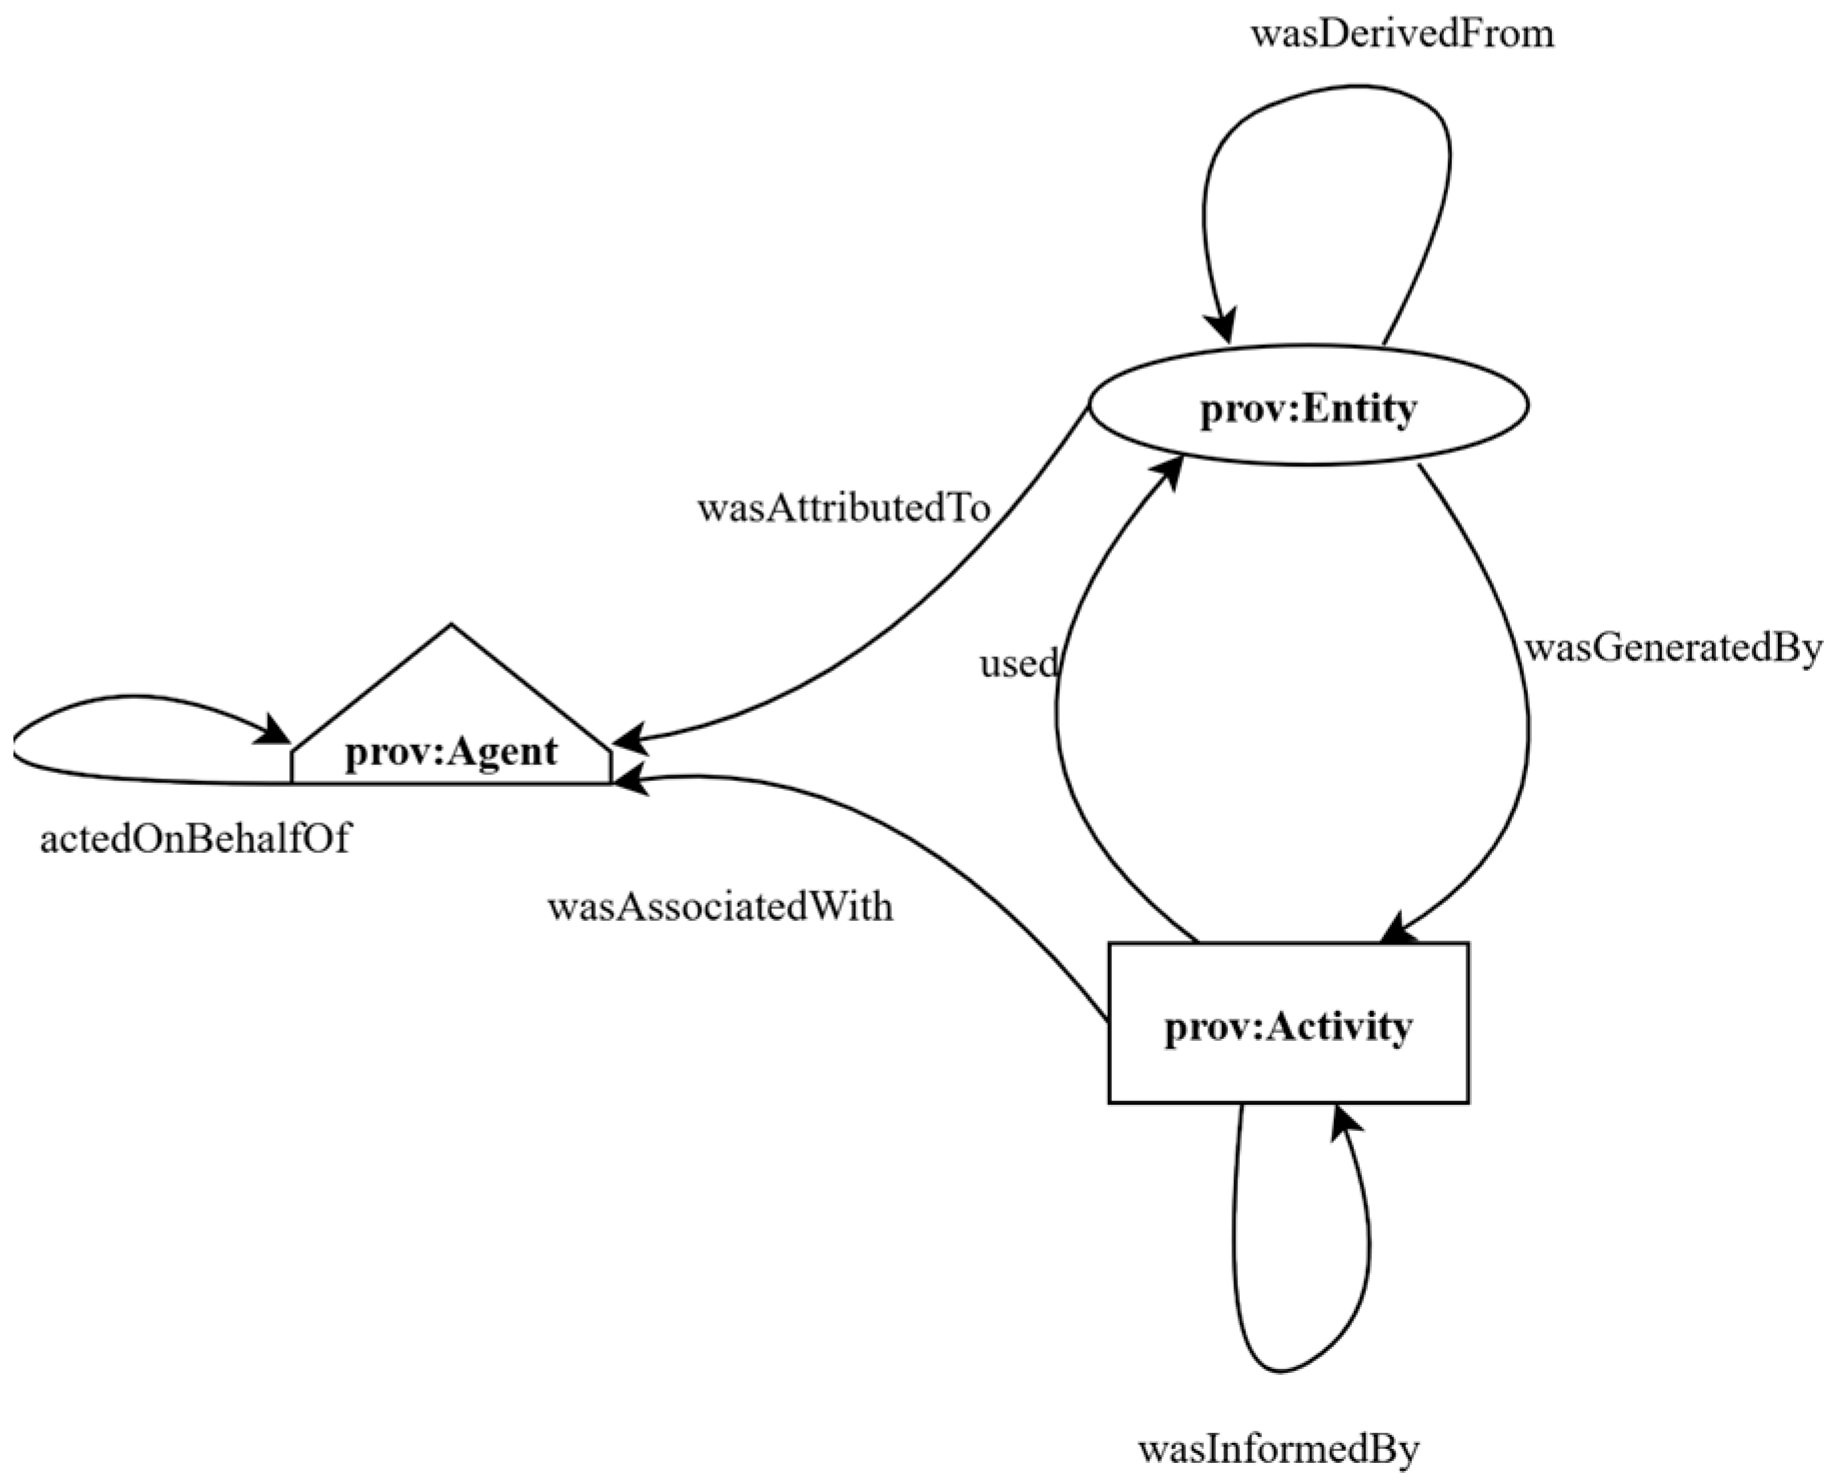
Figure 1. Provenance starting point classes based on the PROV data model [7].
Metrology 05 00052 g001
Figure 2. PROV-O data model example applied to a metrological timeline describing the provenance of measurement assurance data. The subscripts P and C denote primary and control standards, which are used to measure the property X of a physical artifact.
Metrology 05 00052 g002
Figure 3. Provenance representation of the Digital Calibration Certificate (DCC) data model. Appendix A details the PROV-N notation used to describe the DCC elements and their relationships.
Metrology 05 00052 g003
Figure 4. Graphical illustration depicting the object-centred provenance of the entity representing the measurement result for NRC 91A 7mm gauge block. Appendix B details the PROV-N notation of the provenance record that captures information of the working standards used, the measurement method detailed in the plan DM ES 003, the influencing entities, and the software used to analyze the measurement data and produce the result and calibration certificate (represented as prov:Plan DM ES 022).
Metrology 05 00052 g004
Table 1. General concepts and metrology concepts, as defined in the VIM, relevant to the object-centred provenance of a measurement result.
VIM/DCC ConceptPROV-DM Class
ClientAgent
Calibration LaboratoryAgent
Responsible PersonAgent
Software/Hardware systemAgent
CharacterizationActivity
CalibrationActivity
AuthorisationActivity
SoftwareEntity
Calibration CertificateEntity
Calibrated ArtifactEntity
Measurement ResultEntity
Quantity ValueEntity
Measurement UncertaintyEntity
Measurement StandardEntity
Influence QuantityEntity
MeasurandEntity
CorrectionEntity
Measurement CapabilityEntity
Measurement MethodEntity
Measurement ProcedureEntity
Disclaimer/Publisher’s Note: The statements, opinions and data contained in all publications are solely those of the individual author(s) and contributor(s) and not of MDPI and/or the editor(s). MDPI and/or the editor(s) disclaim responsibility for any injury to people or property resulting from any ideas, methods, instructions or products referred to in the content.