Article

Residual Strength of Adhesively Bonded Joints Under High-Velocity Impact: Experimental and Numerical Investigation of Impact-Induced Degradation

1
Department of Aerospace Engineering, Ankara Yildirim Beyazit University, Ankara 06010, Turkey
2
College of Engineering and Technology, American University of the Middle East, Egaila 54200, Kuwait
*
Authors to whom correspondence should be addressed.
Submission received: 5 October 2025 / Revised: 26 November 2025 / Accepted: 11 December 2025 / Published: 19 December 2025

Abstract

Adhesively bonded joints are extensively utilized in structural assemblies involving metals, composites, and hybrid materials due to their favorable mechanical and manufacturing characteristics. However, their performance under high-velocity impacts—common in aerospace, automotive, and defense applications—remains insufficiently understood. This work investigates the high-velocity performance and subsequent tensile response of adhesively bonded single-lap joints (SLJs) by integrating experimental testing with numerical simulations. High-velocity impacts were applied to SLJs fabricated from 4 mm aluminum adherends with overlap lengths of 15 mm and 25 mm, using a 1.25 g projectile at 288 m/s, followed by quasi-static tensile assessment. Experimental findings revealed substantial degradation in tensile strength for the 15 mm overlap configuration (reduced the load-bearing capacity by about 33% (from ~12 kN to ~8 kN)), while the 25 mm overlap retained its structural integrity. Finite element simulations conducted in ABAQUS 2021 employed the Johnson–Cook constitutive model for the adherends and a cohesive zone model for the adhesive layer, successfully replicating damage evolution and stress distributions. The results highlight the critical role of geometric parameters—particularly overlap length and adherend thickness—in determining the damage tolerance and residual load-bearing capacity of SLJs subjected to high-velocity impacts. These insights contribute to the development of more robust bonded joint designs for impact-prone environments.

1. Introduction

The application of structural adhesives has been rapidly growing in the aerospace and automotive sectors due to their ability to bond advanced materials such as polymer matrix composites, sandwich panels, and high-strength aluminum alloys. Compared to conventional fastening techniques like bolting and riveting, adhesive bonding offers more uniform stress distribution and improved joint performance [1]. Moreover, adhesive bonding facilitates lightweight design by eliminating the need for additional mechanical fasteners, which not only add mass but can also act as stress concentrators that reduce fatigue life. This is particularly crucial in modern transportation industries, where stringent environmental regulations and customer demands for fuel efficiency have intensified the push for weight reduction. Additionally, adhesive bonding allows for the joining of dissimilar materials and complex geometries, providing greater flexibility in structural design and manufacturing. These advantages explain why adhesives have become a cornerstone of next-generation lightweight structures.
While many studies have addressed the behavior of adhesively bonded joints under quasi-static and fatigue loading conditions, research focused on their response to impact loading remains relatively scarce. This gap is noteworthy because, in service, bonded joints are often exposed to sudden or unexpected high-rate events such as tool drops during maintenance, debris impact during flight or driving, and even crash scenarios. The lack of sufficient understanding of adhesive joint performance under such dynamic conditions can hinder their broader adoption in critical load-bearing applications, especially where crashworthiness or damage tolerance is paramount. Furthermore, dynamic events often involve a combination of high strain rates, rapid stress wave propagation, and complex failure mechanisms, making it essential to investigate these phenomena beyond traditional quasi-static approaches [2].
Among the few studies performed, Goglio and Rossetto [3] evaluated lap joints under impact conditions using an instrumented Charpy pendulum, concluding that impact loading—especially with thinner adhesive layers—could lead to higher joint strengths than under quasi-static loads. This somewhat counterintuitive result suggests that at elevated strain rates, adhesive materials may exhibit increased resistance to crack initiation and propagation, thereby enhancing joint strength. Similarly, Komorek and Godzimirski [4] investigated adhesively bonded single-lap joints (SLJs) and riveted and hybrid joints using a modified pendulum hammer, revealing that impact speed significantly affects joint performance due to the deformation behavior of the test apparatus and connected structures at different rates. Kadioglu and Adams [5] studied flexible adhesive tapes in SLJs, showing that the adhesive’s high strain-to-failure and moderate strength characteristics contribute positively to energy absorption during crashes. Their tests showed improved joint strength under impact compared to quasi-static loading. Together, these studies underline the importance of strain rate-dependent material behavior and demonstrate that adhesives, when carefully selected, can improve crash energy dissipation, a critical requirement for occupant safety in automotive applications.
Li et al. [6] conducted both experimental and computational investigations into the impact-induced cohesive failure, energy absorption, and post-impact strength of bonded lap joints under various energy levels (4 to 16 J) and temperatures (−30 °C to 80 °C). Their findings indicated that simulations based on cohesive zone modeling (CZM) effectively predicted test outcomes, especially at temperatures below the adhesive’s glass transition. This work highlighted how thermal effects can drastically alter impact performance, reinforcing the necessity of considering realistic service environments. Valente et al. [7] numerically explored tensile-loaded SLJs under impact using CZM and evaluated three adhesives with differing properties. Their findings aligned well with experimental data, aiding in the selection of optimal adhesives for impact-resistant joints. Machado et al. [8] extended this work to dissimilar joints with composite and aluminum adherends under a broad temperature range (−30 to 80 °C), showing that such joints, when paired with modern crash-tough adhesives, are well-suited for automotive use due to their energy-absorbing capabilities under impact. These contributions collectively demonstrate the power of simulation-driven design in predicting and optimizing joint performance under dynamic events, while also underscoring the influence of adhesive chemistry and adherend pairing.
In another line of research, Yokoyama and Nakai [9] employed hat-shaped samples and a modified split Hopkinson pressure bar (SHPB) to analyze the dynamic tensile strength of butt joints bonded with a two-part structural epoxy (Scotch-Weld DP-460), joining titanium and aluminum 6061-T6. Their results showed that tensile strength decreased with adhesive thickness up to 180 μm and increased significantly with loading rate, peaking at 106 MPa/s. Raykhere et al. [10] utilized a torsional SHPB to measure dynamic shear strength of butt joints using four commercial adhesives, concluding that dynamic strength can be two to four times higher than static values, depending on the adhesive and adherend pairings (aluminum–aluminum or aluminum–glass fiber reinforced polymer (GFRP)). Sato and Ikegami [11] evaluated butt joints under combined tension and torsion, confirming good agreement between experimental data and analytical predictions. Together, these studies provide critical insights into high-rate testing methodologies and reveal that adhesive performance at high strain rates is strongly governed by adhesive thickness, loading mode, and adherend stiffness.
In the realm of ballistic impact, Gollin’s et al. [12,13] were among the few who investigated adhesive joints under direct projectile strikes, comparing methacrylate and epoxy adhesives. Despite similar static responses, their dynamic performance diverged notably. They also employed finite element (FE) simulations to estimate dynamic parameters, track contact forces, map stress fields, and evaluate energy partitioning within the bonded assemblies. These results demonstrated how high-velocity impacts generate localized stress concentrations and complex failure sequences that differ markedly from those observed under low-velocity impact or quasi-static loading, emphasizing the need for ballistic-level studies to capture realistic failure mechanisms.
Structural adhesives exhibit optimal load-bearing behavior under shear-dominated conditions. Sato and Ikegami [14], along with Challita et al. [15], examined SLJs under dynamic loading, with a focus on detailed stress–strain characterization. Further insights can be found in other works [16,17,18], which emphasize the critical role of strain rate effects. One key difference between impact and quasi-static loading is the increase in yield strength with higher strain rates. This phenomenon is well-documented in metals but equally relevant in adhesives, where molecular mobility becomes restricted at high deformation speeds, leading to an apparent stiffening effect. However, additional studies [19,20] have demonstrated that beyond a threshold strain rate (around 103 s−1), this yield strength enhancement tends to plateau. Likewise, Goglio et al. [21] observed that an epoxy adhesive’s yield strength increased significantly—up to threefold in compression and fivefold in tension—as strain rate increased, though the elastic modulus remained largely unaffected across both low- and high-rate conditions.
Among recent studies, Karimi [22] highlighted that incorporating z-pins into single-lap adhesive joints significantly enhanced their post-impact load-bearing capacity (by up to ~19%) and energy absorption (by ~21%) compared to conventional joints. The improved residual strength arose from the hybrid joint’s ability to distribute and absorb impact energy through additional composite layers and pin reinforcement, reducing delamination and improving structural integrity after impact. Yang et al. [23] investigated the post-impact performance of CFRP single-lap joints (SLJs) using experiments and finite element analysis (FEA) based on the Hashin criterion and cohesive zone modeling. The results showed a marked reduction in tensile strength after impact (from 4088 N to 2902 N at 4 J), while increasing the overlap length improved residual strength by about 10%. The FEA predictions closely matched experiments, with residual strength errors within 3–12%, confirming the model’s accuracy in capturing impact-induced degradation in CFRP joints. Gomes et al. [24] investigated the impact behavior and residual strength of composite double-lap joints (DLJs) using finite element analysis and cohesive zone modeling, validated with single-lap joint data. The results confirmed the model’s reliability under impact loads and offer practical design guidelines for improving bonded joint performance. Demiral et al. [25] examined the multi-impact response of adhesively bonded SLJs through a combination of controlled experiments and FE simulations. Joints with 4.0 mm adherends and a 15 mm overlap were subjected to one, two, and three successive impacts, followed by quasi-static tensile tests to assess post-impact performance relative to pristine specimens. The work aimed to clarify damage development under repeated impacts, quantified the corresponding degradation in mechanical performance, and determine how overlap length influenced the retained strength.
Among the most commonly adopted methods to test adhesives and joints at elevated loading rates are pendulum impact devices, drop weight testers, and SHPB systems [26]. These setups are generally effective for moderate-speed impacts (typically under 10 m/s for drop tests and about 5 m/s for pendulums). However, structural adhesive joints in real-world applications may encounter much higher loading rates due to blast waves, high-speed debris, bird impacts, or collision with moving objects. The challenge is further compounded by the fact that experimental replication of such extreme scenarios is complex, often requiring specialized high-speed equipment and robust safety measures. Consequently, despite notable advancements in medium-rate testing, research into ballistic or near-ballistic loading of adhesive joints remains very limited.
To the best of our knowledge, adhesively bonded SLJs have not been rigorously assessed under ballistic conditions. This lack of empirical data represents a significant barrier for industries that aim to implement adhesives in safety-critical structures exposed to potential high-velocity impacts. Without such data, predictive modeling of joint survivability under realistic accident or threat scenarios remains uncertain.
Addressing this knowledge gap, the current study explores the dynamic response of SLJs subjected to high-strain-rate loading. A custom-designed ballistic apparatus was employed to subject single-lap joints, fabricated with 4 mm aluminum adherends and overlap lengths of 15 mm and 25 mm, to impact from a lead projectile at a velocity of about 288 m/s. The damaged joints were subsequently characterized through quasi-static tensile tests to assess their residual load-bearing capacity. To gain a deeper understanding of the mechanical degradation, the ballistic-impacted joints were compared with non-impacted specimens. Complementary to the experiments, detailed FE simulations were performed using ABAQUS 2021. The Johnson–Cook material model was employed to describe the plastic behavior of the metallic adherends and projectile, while the adhesive layer was represented using a cohesive zone model, enabling comprehensive analysis of damage initiation and propagation. This dual experimental-numerical approach provides a rare, holistic view of bonded joint performance under ballistic loading, bridging the critical gap between laboratory testing and real-world service demands.

2. Experimental Work

In this work, the single-lap joints were manufactured using 6061 aluminum alloy (AA6061) adherends bonded with a modified epoxy film adhesive (AF163-2K) provided by 3M Scotch-Weld™ (3M Türkiye, Istanbul, Türkiye). To enhance bonding quality, the adherend surfaces were pretreated by abrasion with 500# sandpaper. Following abrasion, the adherends were treated with dichloromethane (methylene chloride) to remove debris and contaminants, then left to dry. The adhesive film was subsequently placed with attention to uniform distribution, ensuring consistent bond quality. A custom-designed jig was employed during assembly to accommodate variations in adherend thickness and overlap length. The bonding process was conducted in a digitally controlled oven at 125 °C under a pressure of 2 bars for 60 min, in line with the manufacturer’s guidelines. The resulting joints were produced with 4 mm thick adherends, adhesive layers of about 0.2 mm, and two overlap configurations, namely a shorter (15 mm) and a longer (25 mm) length (see Figure 1a). Further manufacturing details and material specifications are available in Section 3 and Ref. [16].
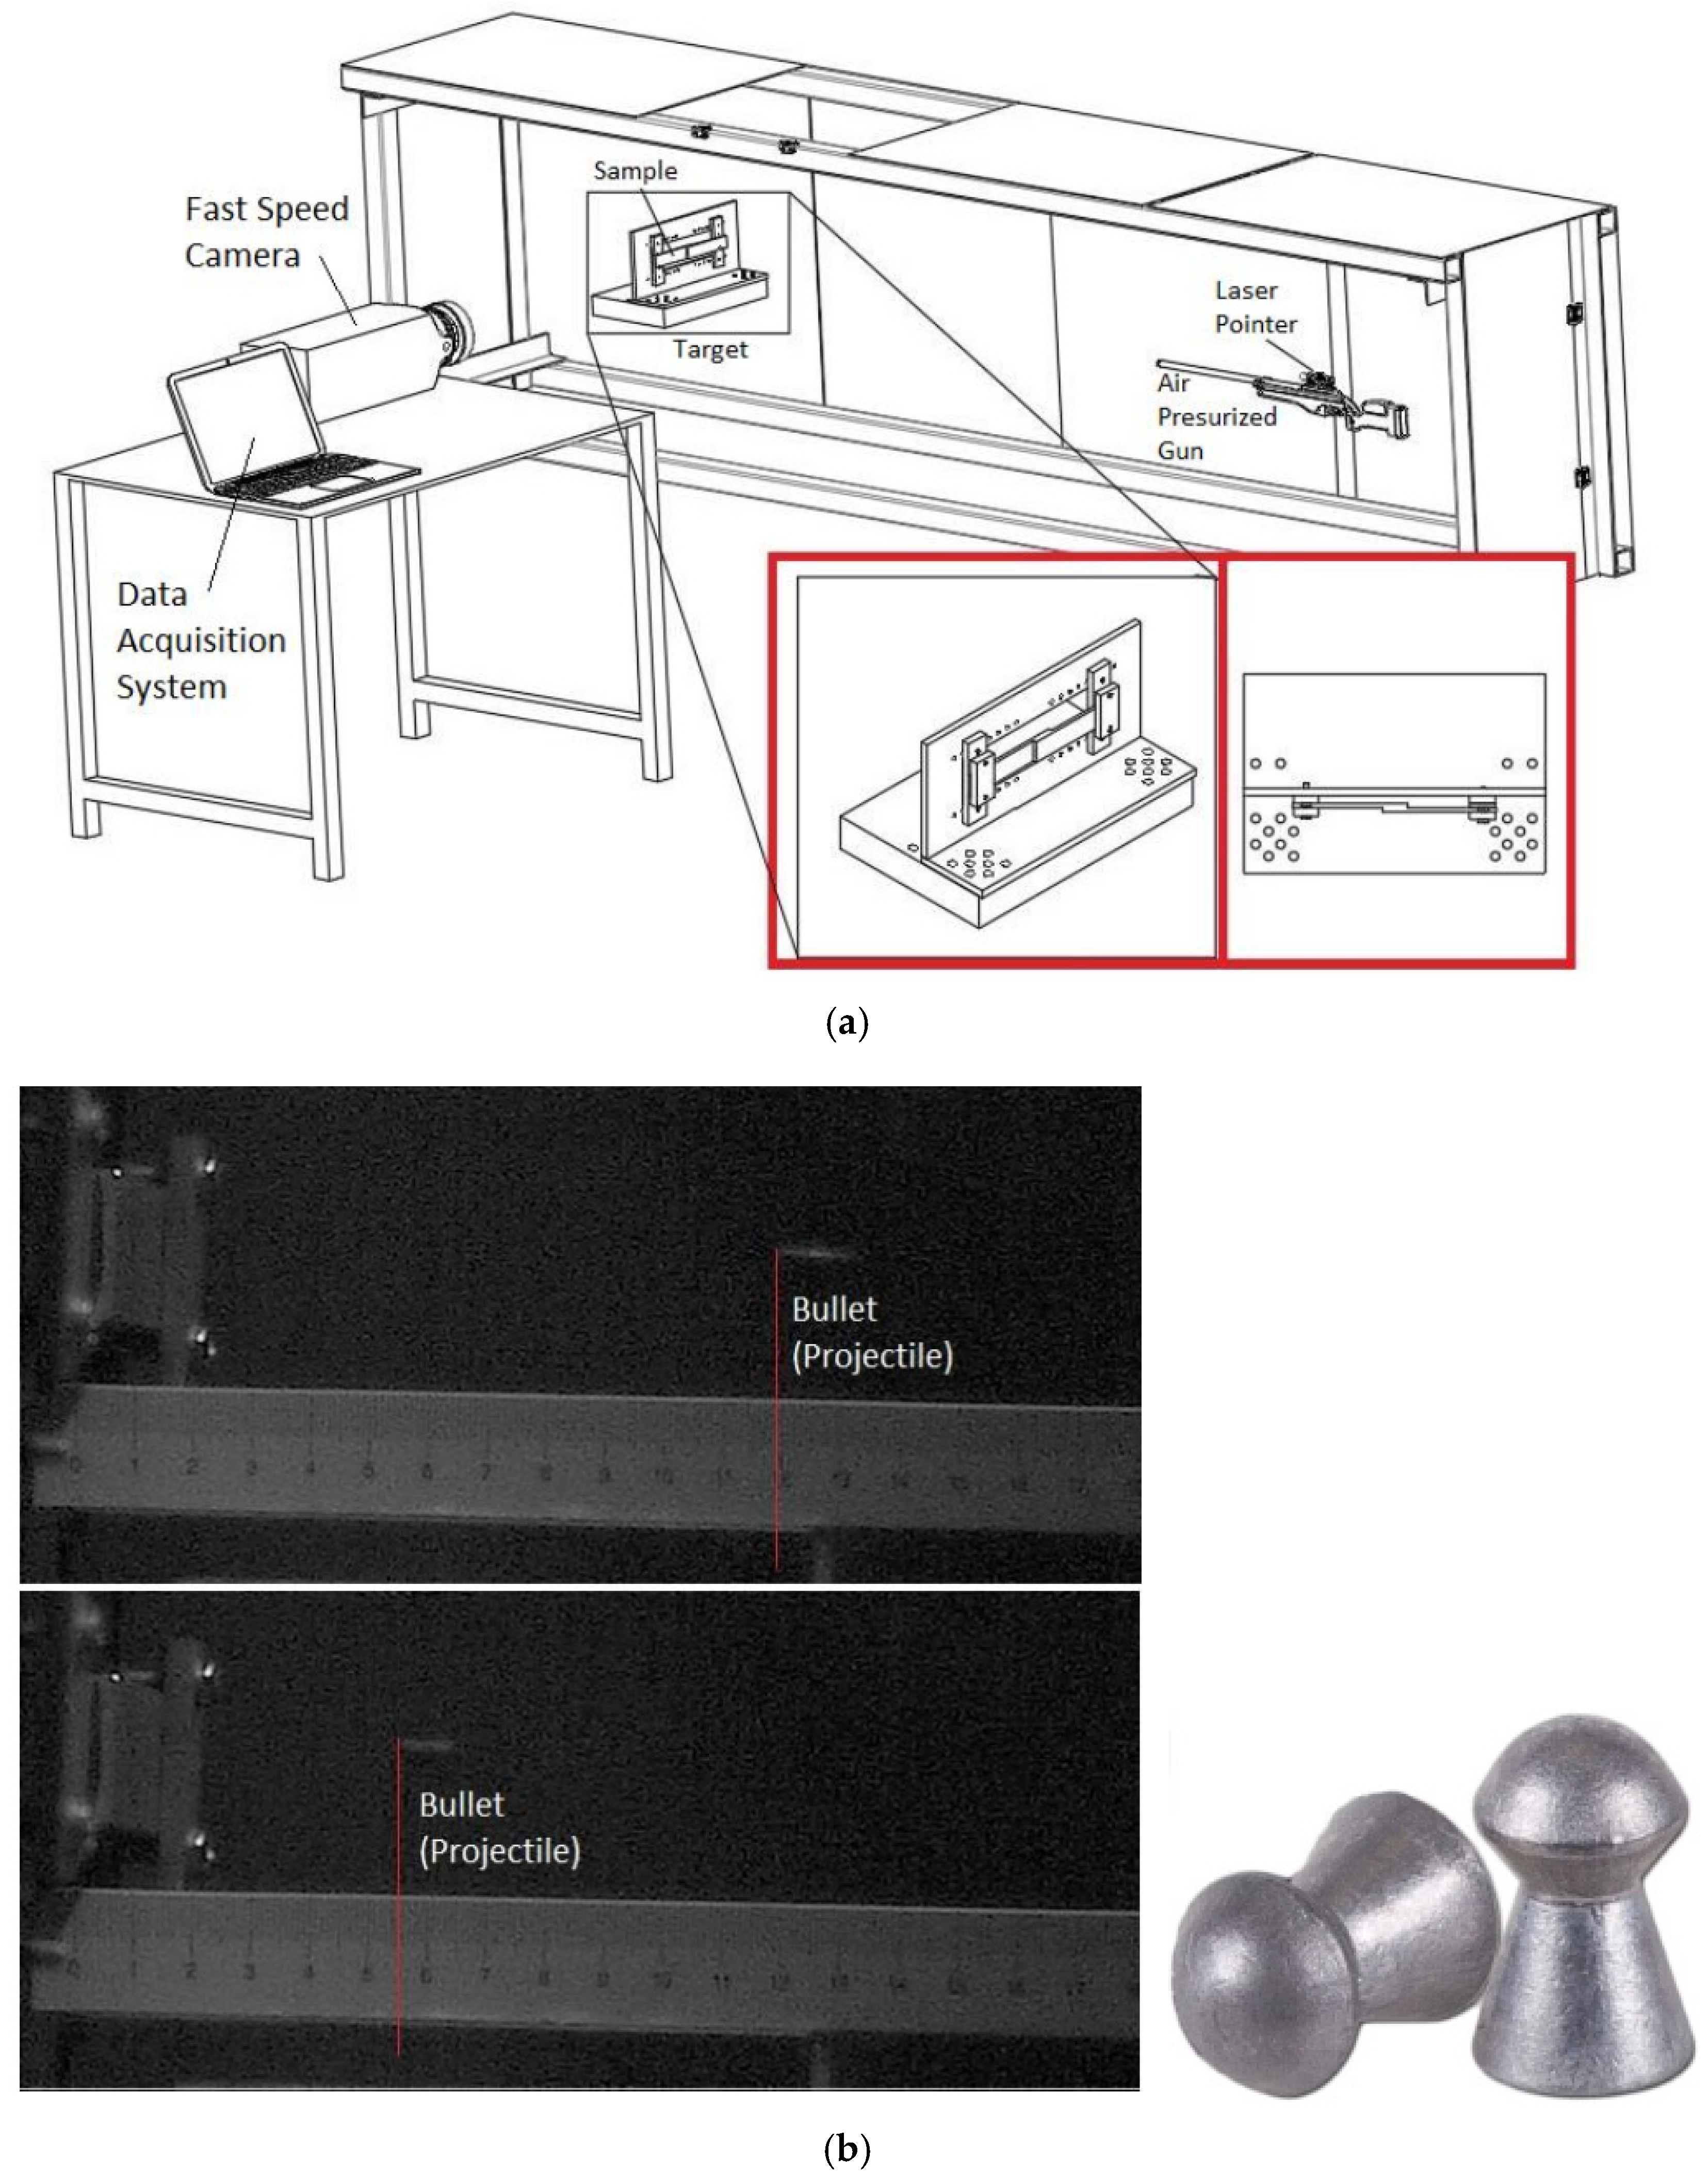
The high-velocity test setup consisted of a pressurized air gun, a high-speed imaging system, data acquisition equipment, and a custom clamping fixture to securely hold the test specimens, as illustrated in Figure 1b. A schematic overview of the experimental setup is illustrated in Figure 2a. The pneumatic gun employed in the experiments was capable of launching projectiles at velocities approaching 300 m/s; in the present study, the average projectile velocity was maintained at approximately 288.0 m/s, as determined from the recordings of a high-speed camera system operating at 30,000 fps to accurately capture the projectile’s motion between two fixed reference points near the impact zone. The measured velocities across repeated tests showed only minor variations, with an estimated uncertainty below ±2%, confirming the high consistency and repeatability of the impact conditions throughout the experimental campaign. Figure 2b displays a photograph of the lead projectile placed beside a ruler to indicate its dimensions. The projectiles consisted of 5.5 mm (0.22 caliber) round-nose (domed) lead pellets, each weighing 1.25 g with a material density of 11.3 g/cm3. The distance from the projectile to the target was 210 cm. Following the high-velocity impact tests, the single-lap joints were subjected to quasi-static tensile loading using a Besmak BMT-S (BESMAK, Ankara, Türkiye) universal testing machine with a maximum load capacity of 100 kN. To assess the extent of performance degradation, the results obtained from the impacted joints were compared against those from pristine, unimpacted specimens. All tensile experiments were conducted under controlled environmental conditions of 23 °C temperature and 50% relative humidity, with a constant crosshead displacement rate of 1 mm/min and three repeated tests for each configuration to ensure reliability.

3. Numerical Modeling

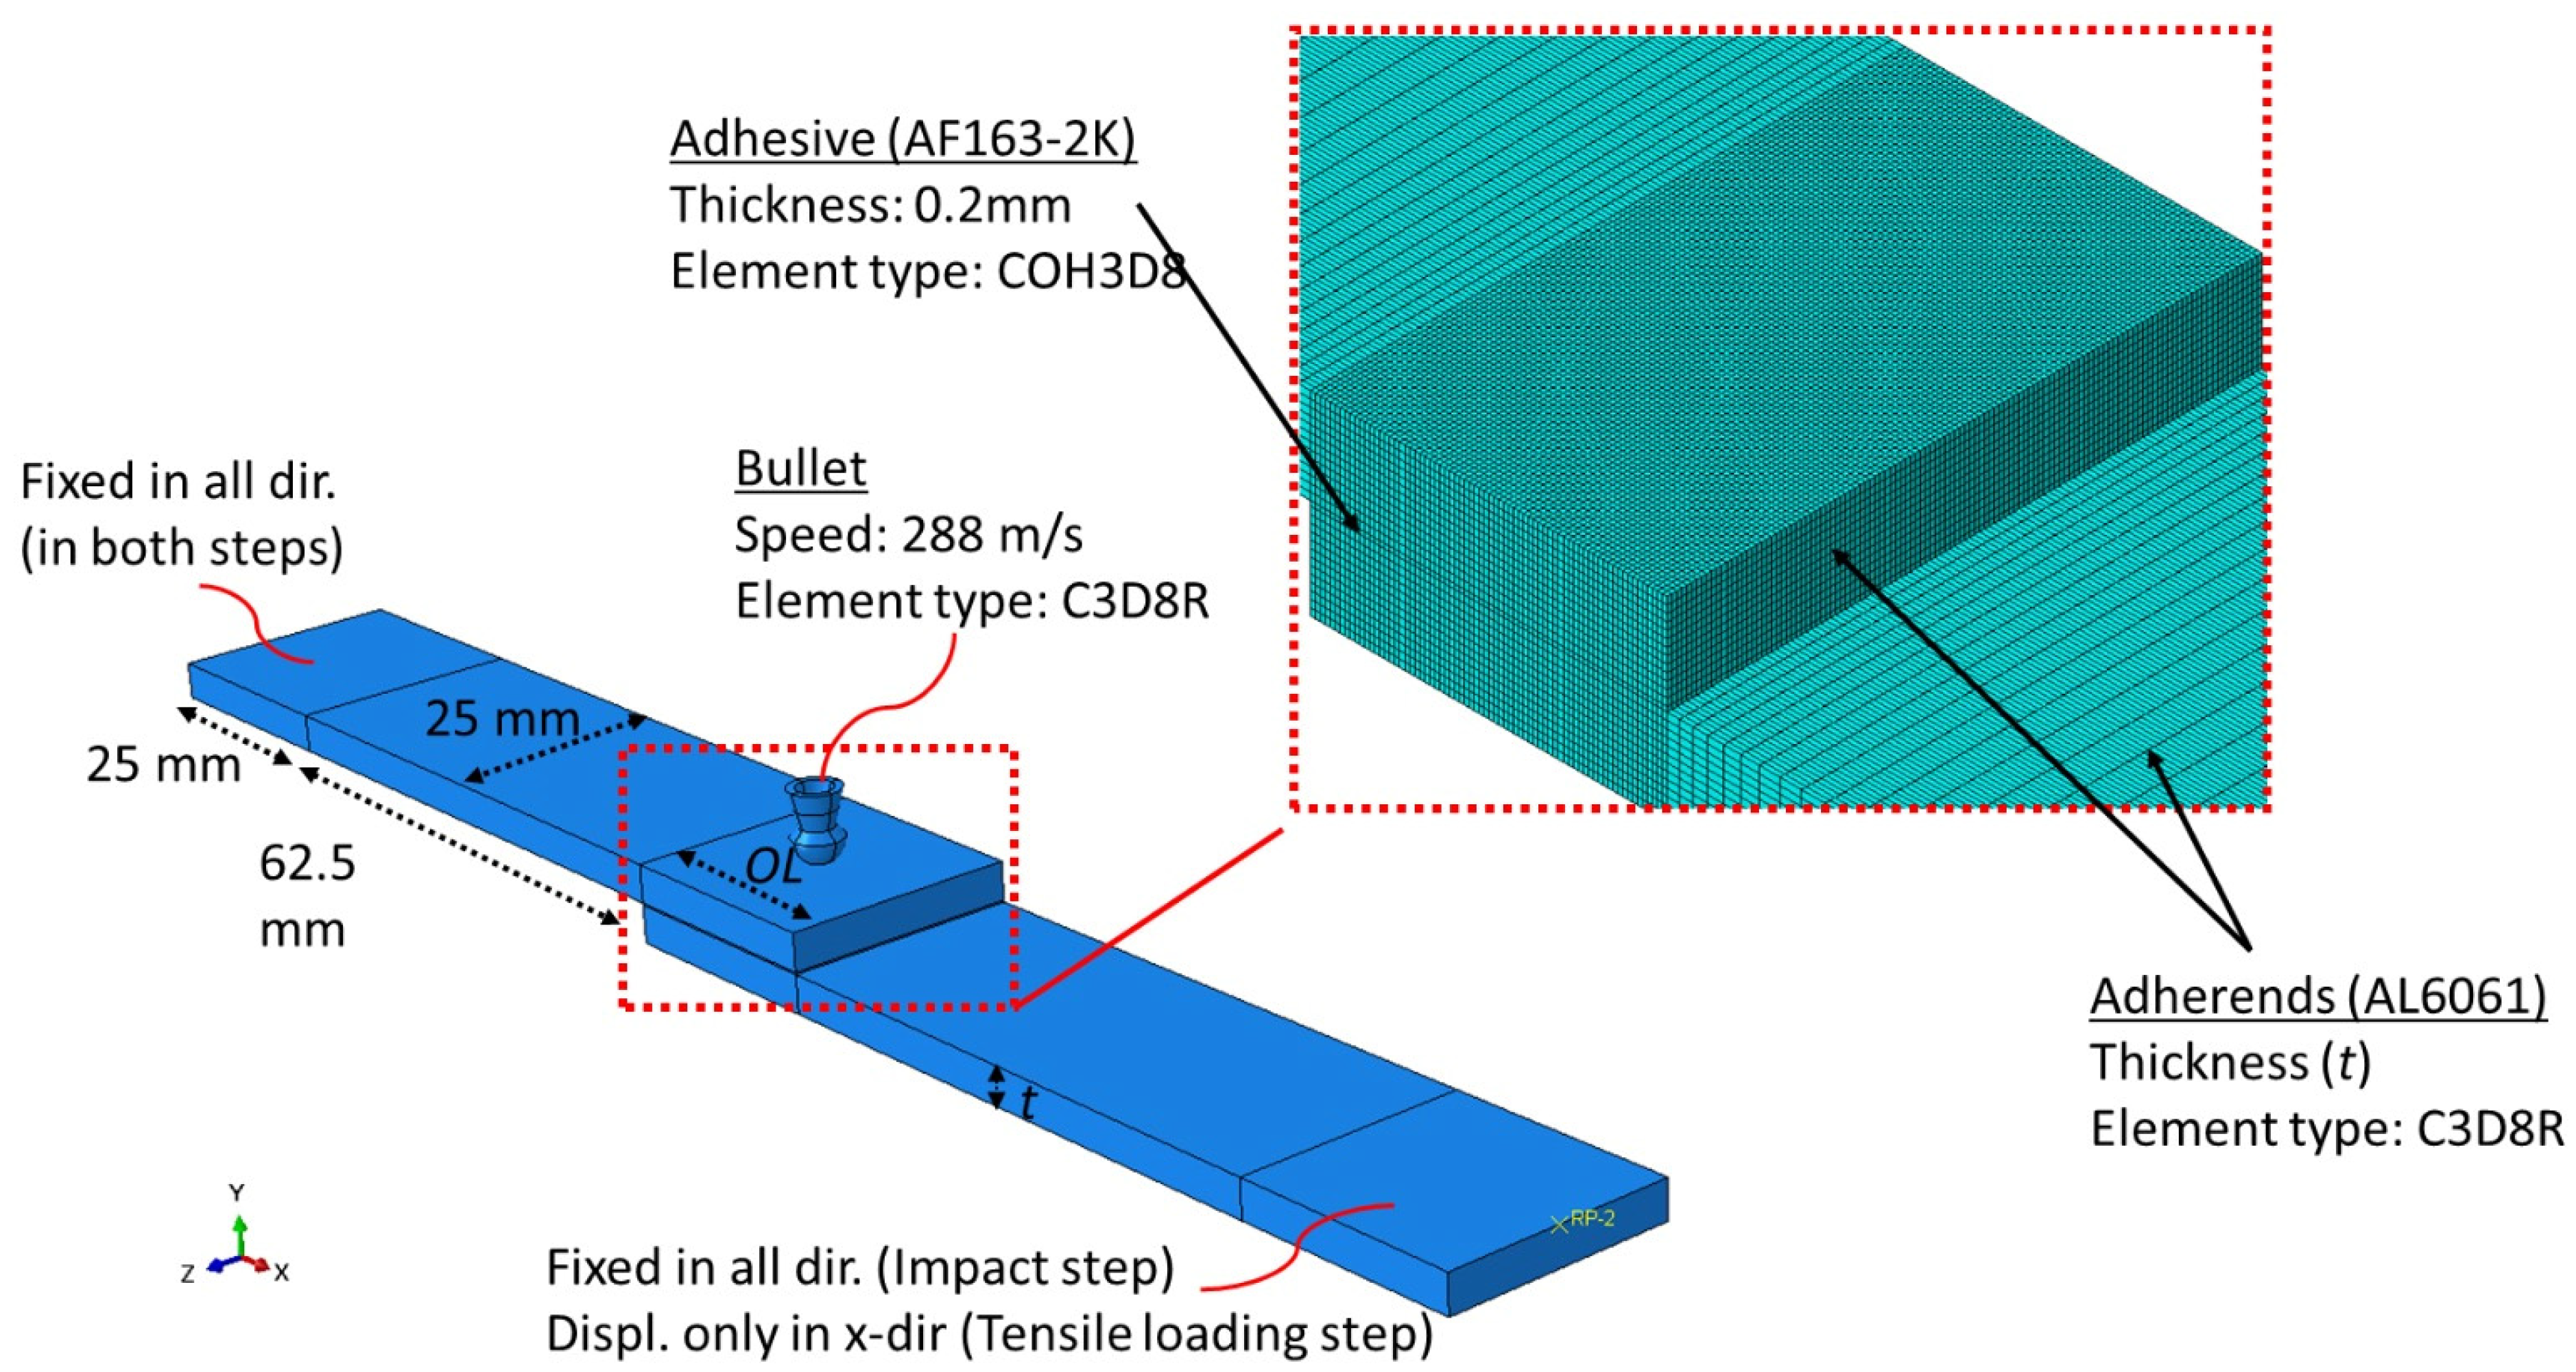
Numerical analyses were conducted using ABAQUS/Explicit [27] to investigate the dynamic response of single-lap joints (SLJs) with varying configurations under impact conditions. A detailed three-dimensional finite element (FE) model was developed, as shown in Figure 3. The aluminum adherends were represented by eight-node linear brick elements (C3D8R) incorporating reduced integration and hourglass control to improve both computational efficiency and numerical stability. To ensure accurate prediction of stress concentration and progressive damage, a highly refined mesh was applied in the overlap zone, featuring element dimensions of roughly 150 µm × 150 µm × 150 µm for the adherends and slightly coarser elements of 150 µm × 200 µm × 150 µm for the adhesive layer, resulting in approximately 16,666 elements within the adhesive for an overlap length (OL) of 15 mm. Beyond the overlap region, a graded mesh with a bias ratio of 2.0 along the joint length was employed for the adherends. Mesh convergence was validated by comparing the predicted force–displacement curves, which exhibited deviations of less than 5% relative to results obtained from finer discretizations [28]. This mesh configuration was also examined for the damaged area after the impact test, and the difference compared to a finer mesh was found to be less than 3%.
The adhesive layer—generated by separating the overlap section from the adherends—was simulated using linear cohesive elements (COH3D8). The thickness values were kept consistent with those defined in Section 2, where the adherends and adhesive were assigned thicknesses of 4 mm and 0.2 mm, respectively.
The simulation procedure was carried out in two consecutive stages. In the first stage, the single-lap joint (SLJ) was impacted by a deformable projectile modeled with solid elements and assigned an initial velocity of 288.0 m/s. The second stage simulated the tensile loading of the deformed configuration obtained from the preceding impact analysis. Figure 3 presents the corresponding boundary conditions. During both stages, one end of the SLJ was fully constrained in all degrees of freedom, whereas the opposite end remained fixed during the impact phase and was subsequently released to allow axial displacement in the tensile loading step.
To model the adherends and the projectile (i.e., the lead bullet), the Johnson–Cook (JC) material model [29] was employed, as it is widely recognized for its suitability in capturing the behavior of materials subjected to high-strain-rate deformations. This constitutive model encapsulates strain hardening, strain rate sensitivity, and thermal softening effects within its formulation. It is mathematically expressed as:
σ = A + B ε n 1 + C ln ε ˙ ε ˙ 0 1 T T r T m T r m .
The first multiplicative term describes how the material’s stress response evolves with increasing plastic strain ( ε ), while the second term introduces the influence of strain rate ( ε ˙ ) on the yield stress. The third term accounts for the reduction in yield strength due to elevated temperatures ( T ), commonly referred to as thermal softening. More details about JC can be found elsewhere [29,30]. The specific material constants (A, B, C, n, m, Tr and Tm) used for the JC model in this study are listed in Table 1. The simulations were performed at room temperature (T = 298 K) in accord with the experiments. For aluminum, the elastic modulus (E) and Poisson’s ratio (v) were 69 GPa and 0.33, respectively, while for lead, these values were 14 GPa and 0.42 [31,32].
For simulating the adhesive layer between the adherends, a cohesive zone modeling (CZM) approach was adopted. In this method, surface tractions are governed by the relative displacements (separations) across cohesive elements. A triangular bilinear traction–separation law was implemented to describe this behavior as follows:
t = σ n σ s σ t = K n n 0 0 0 K s s 0 0 0 K t t δ n δ s δ t ,
where the symbols σ n ,   σ s and σ t correspond to the normal and the two orthogonal shear tractions, respectively, acting on the interface. δ i and K i i (i = n, s, t) are the separation and initial stiffness of the cohesive element in each direction.
Damage initiation is assumed to occur when a quadratic nominal stress criterion—defined as a combination of the stress ratios across different failure modes—reaches unity [32]. The damage initiation condition is mathematically described by the expression:
σ n σ n 0 2 + σ s σ s 0 2 + σ t σ t 0 2 = 1 ,
where 〈a〉 denotes the Macaulay bracket defined as ((a + |a|)/2). Meanwhile, σ i 0 (for i = n, s, t) denotes the respective mode-dependent strength limits.
Once damage is initiated, a linear softening behavior is triggered, reducing the traction in each direction to zero upon reaching a critical separation ( δ c , i ). This critical displacement is derived from the corresponding fracture toughness ( G c , i ) and interfacial strength, using the relation δ c , i = 2 G c , i / σ i 0 . The evolution of damage is further governed by a second quadratic interaction involving energy dissipation, expressed as
G n G c , n 2 + G s G c , s 2 + G t G c , t 2 = 1 ,
where G i is the energy dissipated through separation δ i under mode-i traction σ i . In the damage evolution phase, the constitutive relationships for mixed-mode loading employ a single damage variable, SDEG, which characterizes the reduction in material stiffness across all loading modes. The corresponding equations are expressed as follows:
t n = K n n 1 S D E G δ n K n n δ n , t s = K s s 1 S D E G δ s , t t = K t t 1 S D E G δ t
In the analysis, the SDEG is calculated using an equivalent traction–separation curve as follows:
S D E G = δ s e p a r a t i o n ( δ e q u i v a l e n t δ i n i t i a t i o n ) δ e q u i v a l e n t ( δ s e p a r a t i o n δ i n i t i a t i o n ) , δ e q u i v a l e n t = δ n 2 + δ s 2 + δ t 2 .
Here the equivalent damage onset displacement ( δ i n i t i a t i o n ) and critical displacement ( δ s e p a r a t i o n ) for the mixed mode loading are calculated as functions of direction cosines ( B i ), mode ratios ( i ) as follows:
δ i n i t i a t i o n 2 = K n n B n t n 0 2 + K s s B s t s 0 2 + K t t B t t t 0 2 1 δ s e p a r a t i o n = 2 δ i n i t i a t i o n K n G n 0 + s G s 0 + t G t 0 1 K = K n n B n 2 + K s s B s 2 + K t t B t 2 i = G i / ( G n + G n + G n ) , f o r   i = n , s , t
The progression of damage within the adhesive layer was tracked in the simulations using the SDEG parameter. This parameter ranges from 0.0, indicating no damage, to 1.0, indicating full damage at an integration point within the cohesive elements. Once SDEG reaches a value of 1.0 at all integration points of a cohesive element, the element loses its load-bearing capacity entirely and is subsequently removed from the model. More details about the CZM can be found in [27,33,34].
For the AF163-2K adhesive used in this study, the input parameters for stiffness (Knn, Kss, Ktt), interfacial strengths ( σ n 0 ,   σ s 0 , σ t 0 ), and critical fracture energies ( G c , n , G c , s , G c , t ) are detailed in Table 2. It is important to emphasize that both stiffness and fracture energy values remain constant across different loading rates, as reported in prior studies [7,21]. Accordingly, material properties obtained under quasi-static test conditions were applied uniformly in all numerical simulations.

4. Results and Discussion

This section provides both experimental and numerical assessments of the force–displacement responses and damage features of SLJs sequentially subjected to high-velocity impact followed by tensile loading, considering different overlap lengths and adherend thicknesses, along with relevant observations and discussions.

4.1. Calibration of the Material Constants

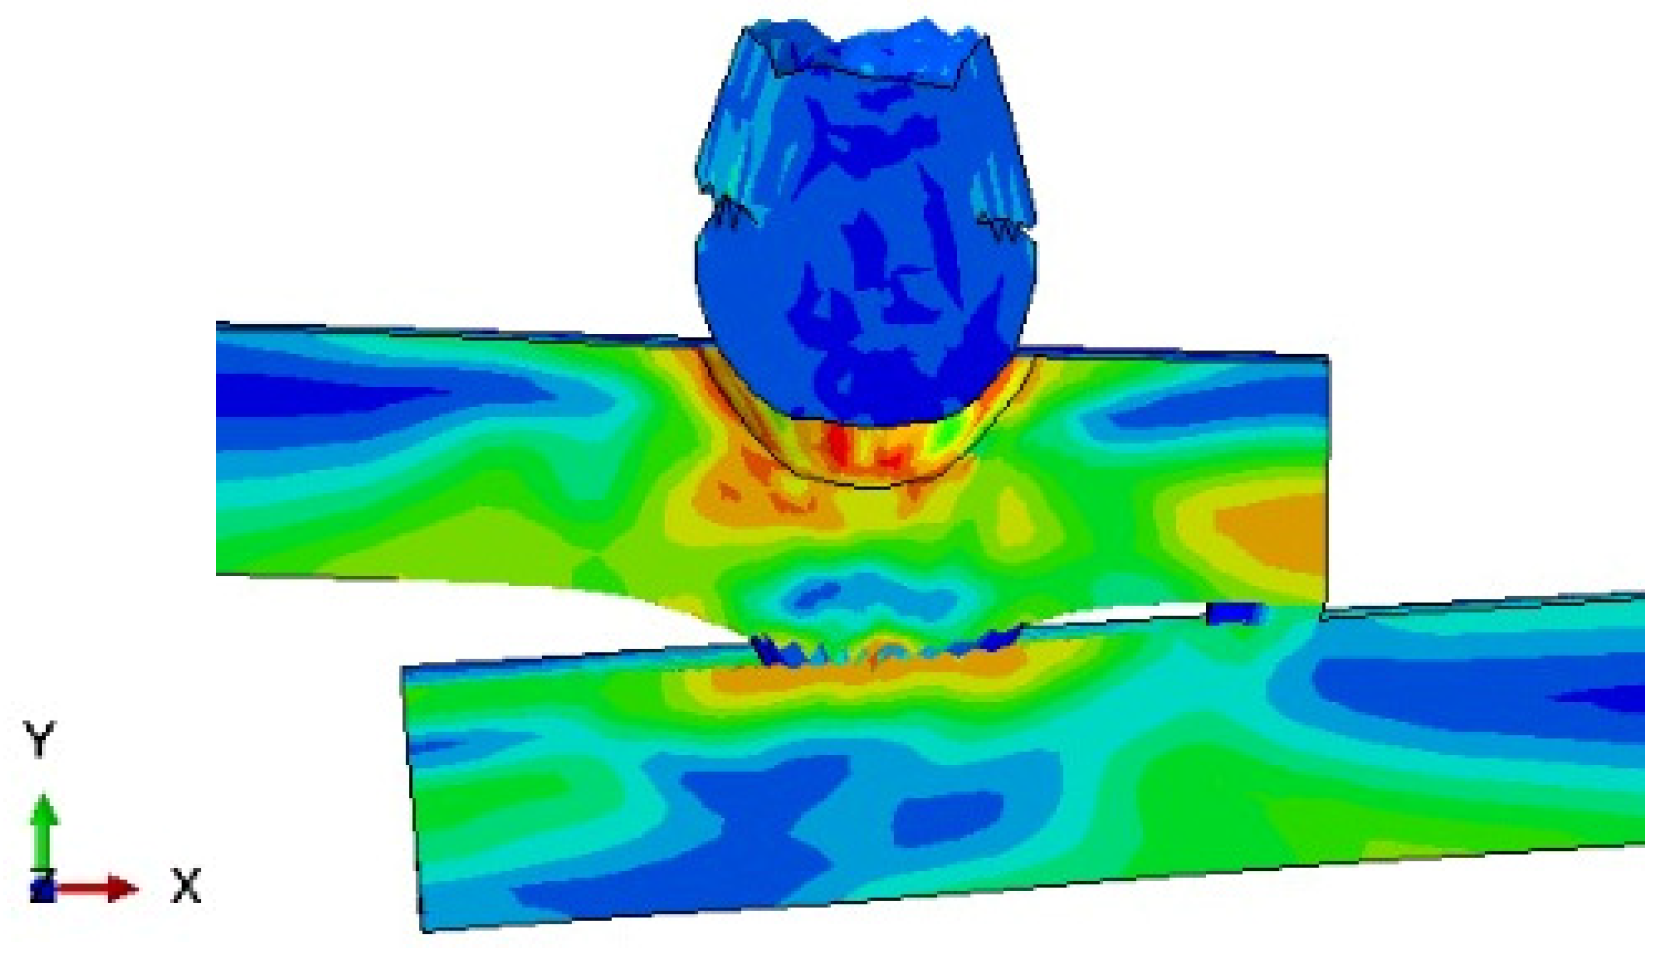
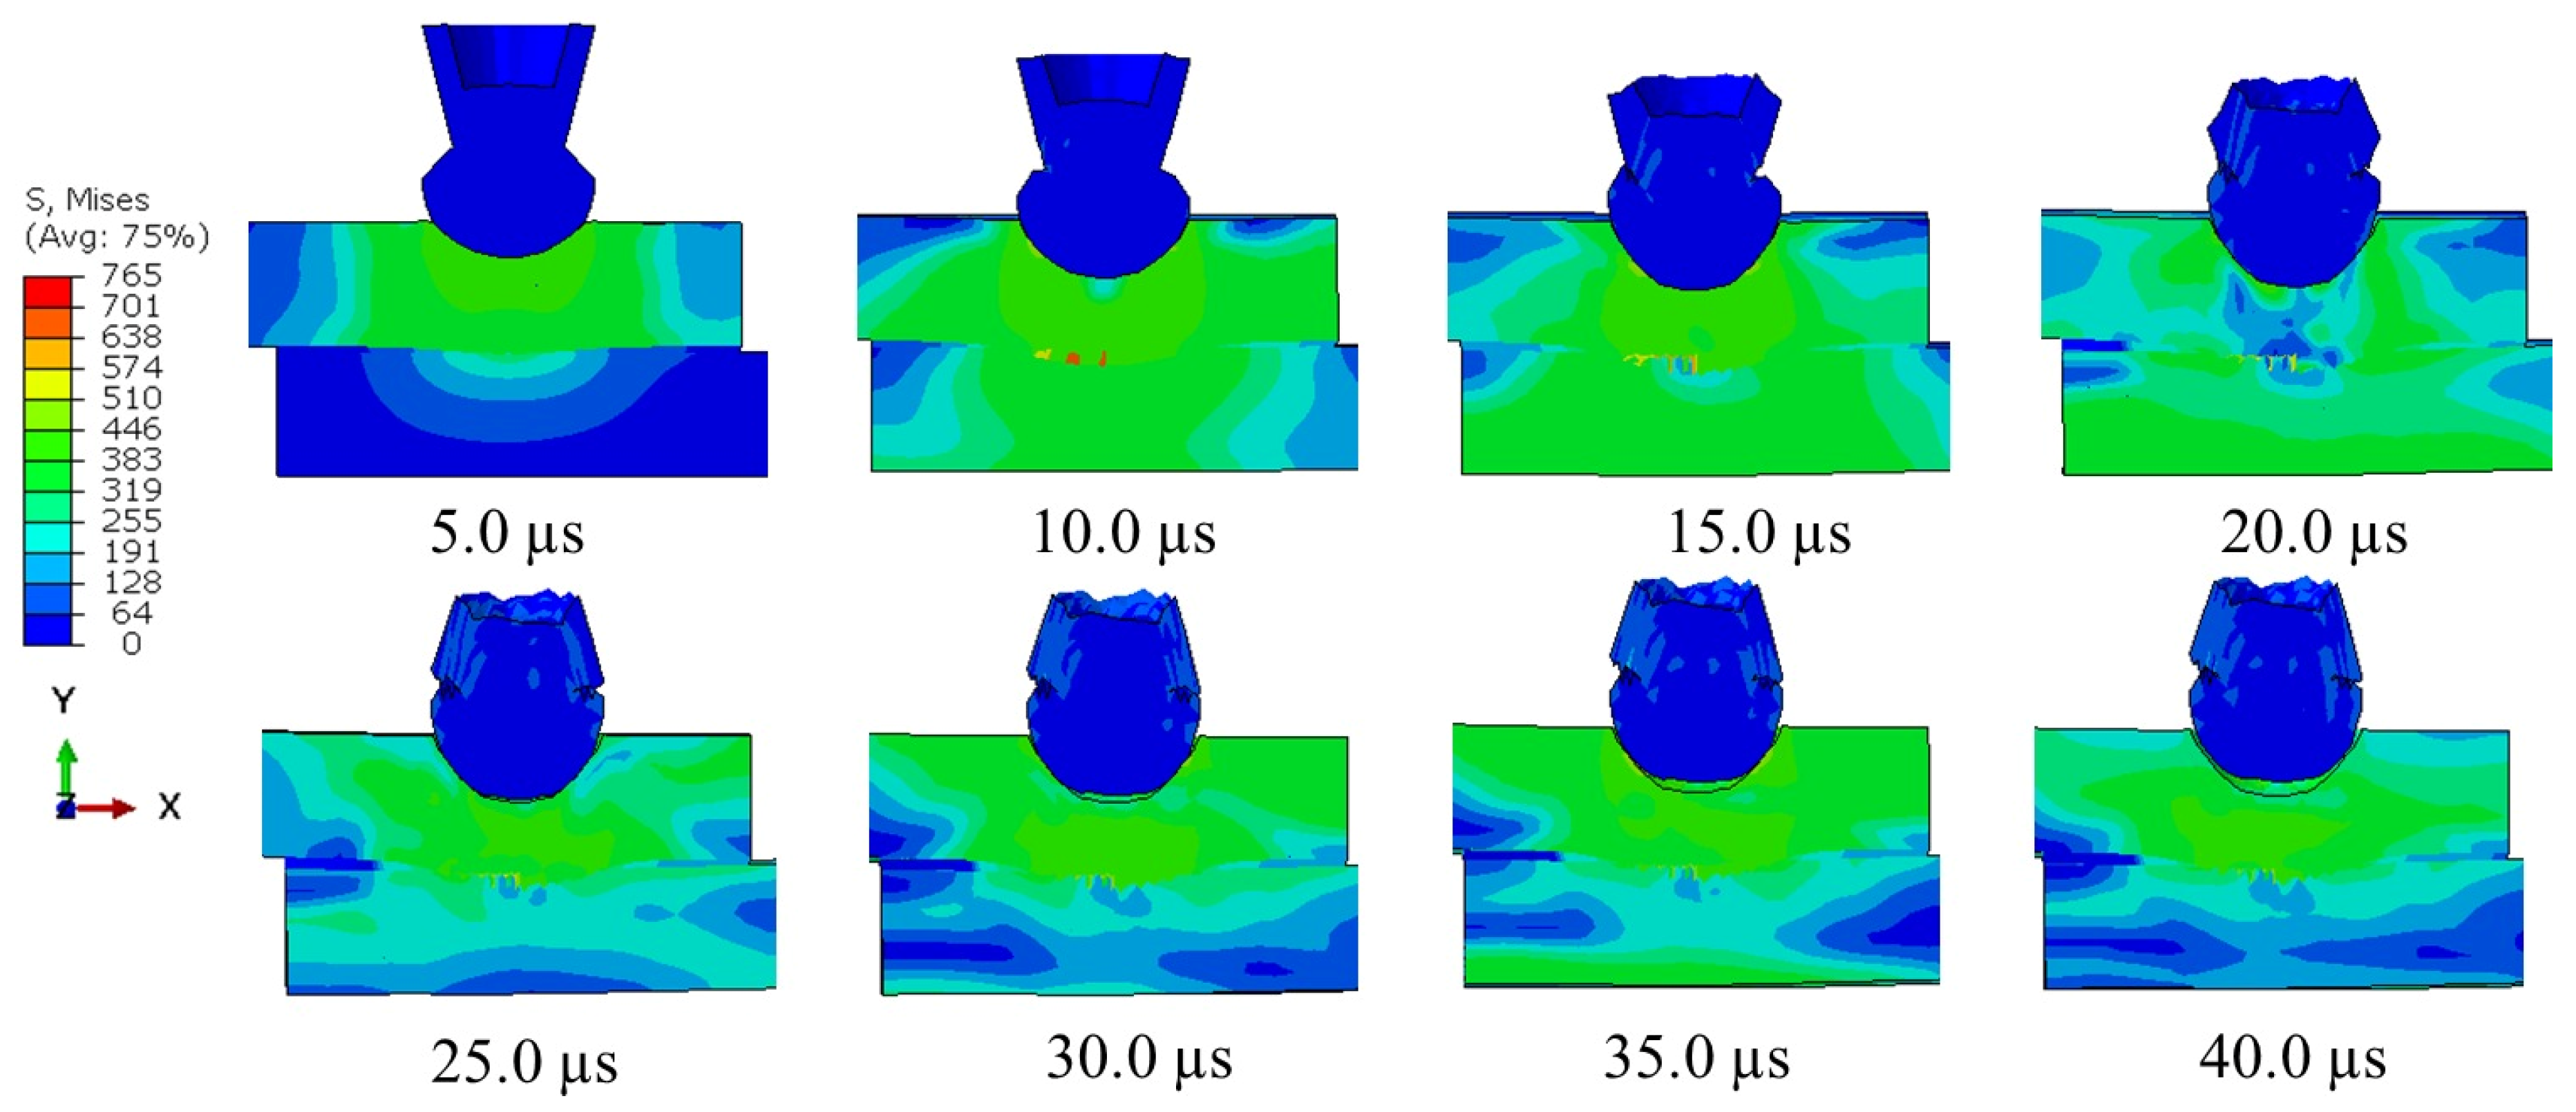
The adhesive layer exhibits distinct mechanical behavior under high-speed impact loading compared to quasi-static tensile loading. In this context, the quasi-static data (Model1) shown in Table 2 are not recommended to be used in the current study. This can clearly be seen in Figure 4 which shows that if the SLJ incorporating adhesive Model1 is subjected to impact loading, the adhesive layer experiences a complete failure. This is evident from the deformed configuration of the SLJ modeled using the quasi-static material data 4 at t = 6.0 µs (see Figure 4). As a result, these joints could not withstand any subsequent tensile loading, contradicting experimental observations. Due to the lack of experimental data on material strength at elevated strain rates, the corresponding parameters were determined through FE based calibration. This procedure followed the methodology outlined in a previous investigation [21], which demonstrated that the yield strength of epoxy adhesives increases markedly with rising strain rate—reaching nearly threefold under compressive loading and up to fivefold under tensile loading—at strain rates approaching 103 s−1. Importantly, this increase in strength occurs while the adhesive’s elastic modulus remains nearly unchanged between high-strain-rate and quasi-static loading conditions. Thus, the elevated cohesive strength values incorporated in Model2 are consistent with the strain-rate sensitivity trends previously documented in the literature. The adhesive Model2 successfully preserved joint integrity during the impact event. Figure 5 illustrates the interaction between the bullet and the overlap region of the joint at various time steps throughout the impact sequence. The bullet penetrates the joint within the first 15–20 µs and then rebounds after undergoing severe deformation. Figure 6 presents a comparison of the force–displacement curves from post-impact tensile tests, obtained both experimentally (from three different tests) and through the numerical simulation using Model2. The agreement between the simulation using the dynamic data (Model2) and experimental data is notable. Consequently, the parameter set from Model2 was selected for subsequent analyses. It is also important to highlight that the normal cohesive strength ( σ n 0 ) used in Model2 is 240 MPa, which is approximately five times greater than the value reported for quasi-static conditions (46.93 MPa [34]). This observation supports findings from a previous research [21].
Since the extremities of the overlap region are predominantly subjected to peeling stresses [36,37,38,39], initial damage typically initiates at these ends and propagates inward under quasi-static tensile loading [40]. Therefore, damage confined to the middle section of the adhesive had limited influence on overall joint performance. Figure 7a shows the experimentally observed indentation on the overlap surface post-impact, and a similar deformation pattern was replicated in the FE simulation results (Figure 7b). The failed SLJ specimen shown in Figure 7c, following the impact and tensile tests, clearly illustrates failure within the adhesive layer.

4.2. Influence of the Overlap Length

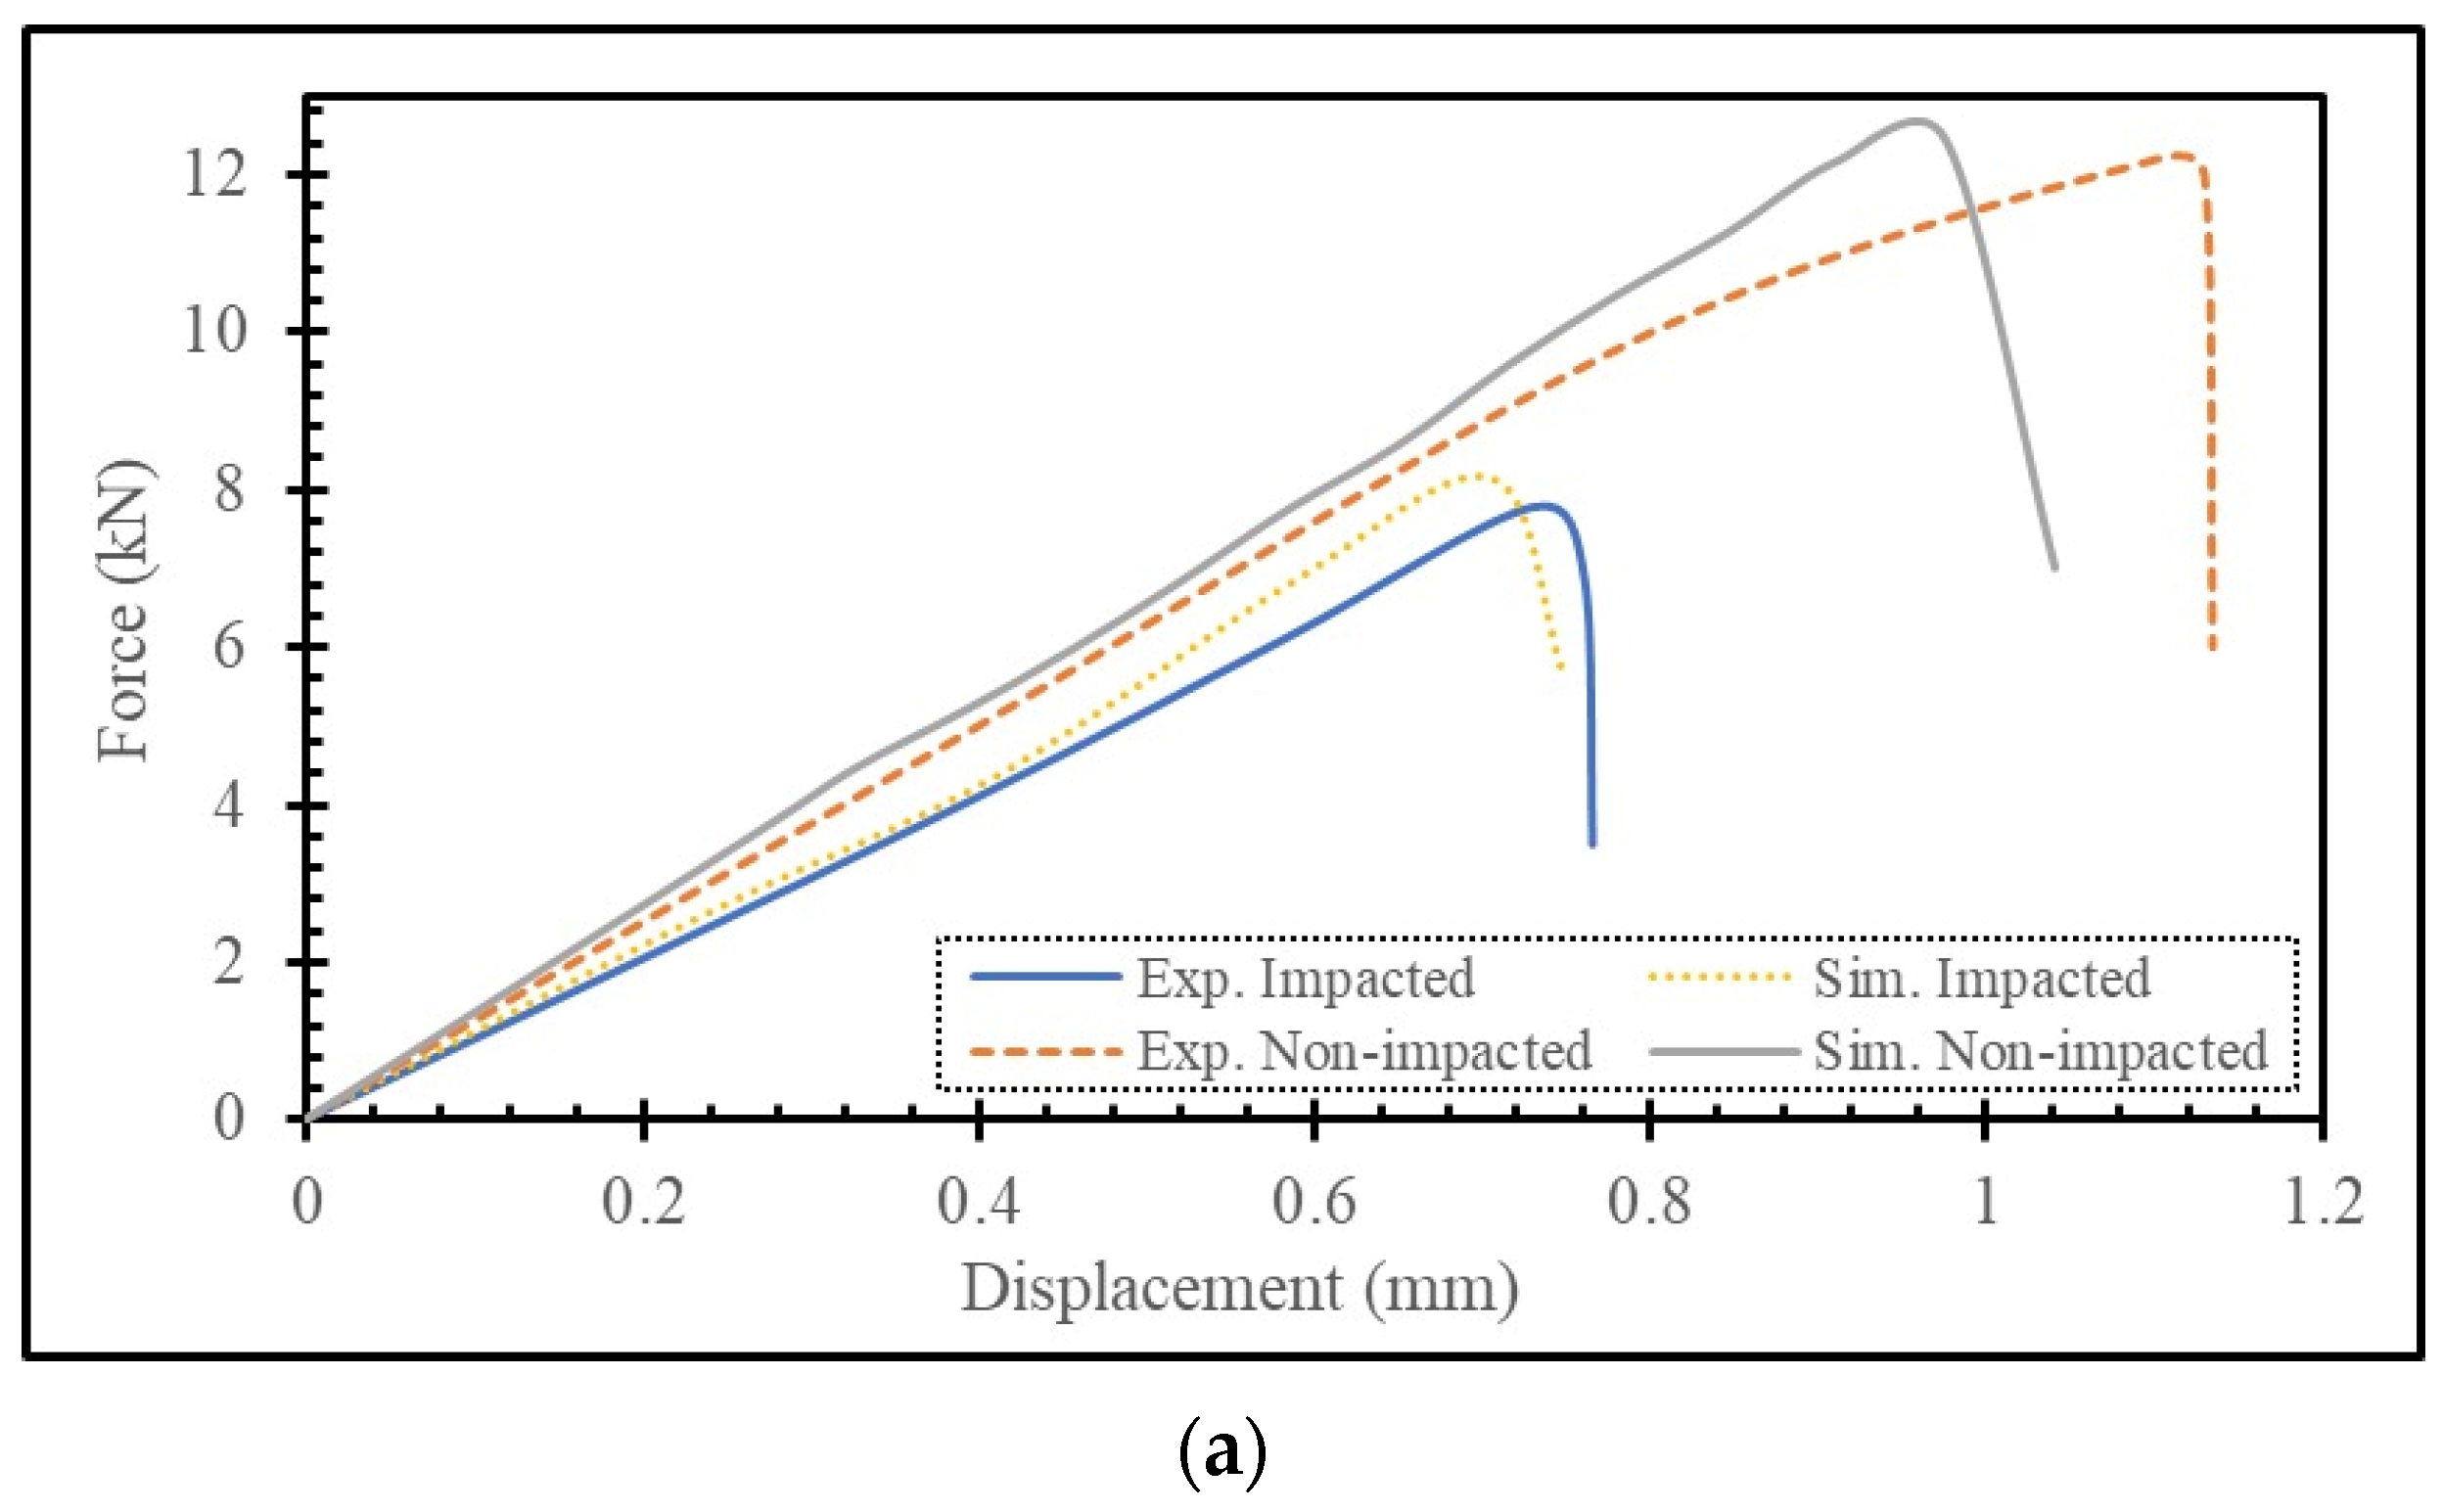
The influence of overlap length on the tensile response of impacted single-lap joints was examined using two configurations: a shorter overlap of 15 mm and a longer one extended by 10 mm, giving a total overlap length of 25 mm. Figure 8 compares the experimental and numerical load–displacement responses for both impacted and pristine (non-impacted) specimens under tensile loading, demonstrating generally good agreement. Table 3 presents the values for the experiments (with standard deviations) and simulations and their difference in (%). The deviations observed between the experimental and numerical load–displacement curves may be attributed to several contributing factors. First, the material model for the adhesive (Model2—Dynamic) was calibrated rather than direct high-strain-rate tests on the specific adhesive used in this study. This may introduce uncertainties in cohesive strength at very high loading rates. Second, in the numerical model, the adherends were assumed to be perfectly bonded to the adhesive layer without considering possible interfacial defects, voids, or surface preparation issues that can exist in real specimens and influence residual strength after impact. Third, experimental scatter is inevitable in impact testing due to variations in impact energy transfer, local damage morphology, and adhesive thickness distribution, whereas the numerical model represents an idealized configuration. Despite these limitations, the general trend of the residual strength and stiffness is captured reasonably well, which provides confidence in the modeling approach for comparative analyses.
To clearly isolate the effect of impact, reference results from the non-impacted samples were also included. For the 15 mm OL configuration, impact loading caused a significant reduction in load-bearing capacity, decreasing from approximately 12.0 kN in the pristine case to around 8.0 kN after impact. Additionally, the maximum load was reached at lower displacements—dropping from over 1.0 mm to less than 0.8 mm, as shown in Figure 8a. In contrast, the joints with 25 mm overlap length exhibited minimal variation in tensile strength due to impact. Both pristine and impacted specimens sustained loads near 15.0 kN, although the impacted sample reached its peak load at slightly reduced displacements, as depicted in Figure 8b. These findings suggest that increased overlap length mitigates the adverse mechanical effects of impact loading on the joint’s tensile performance.
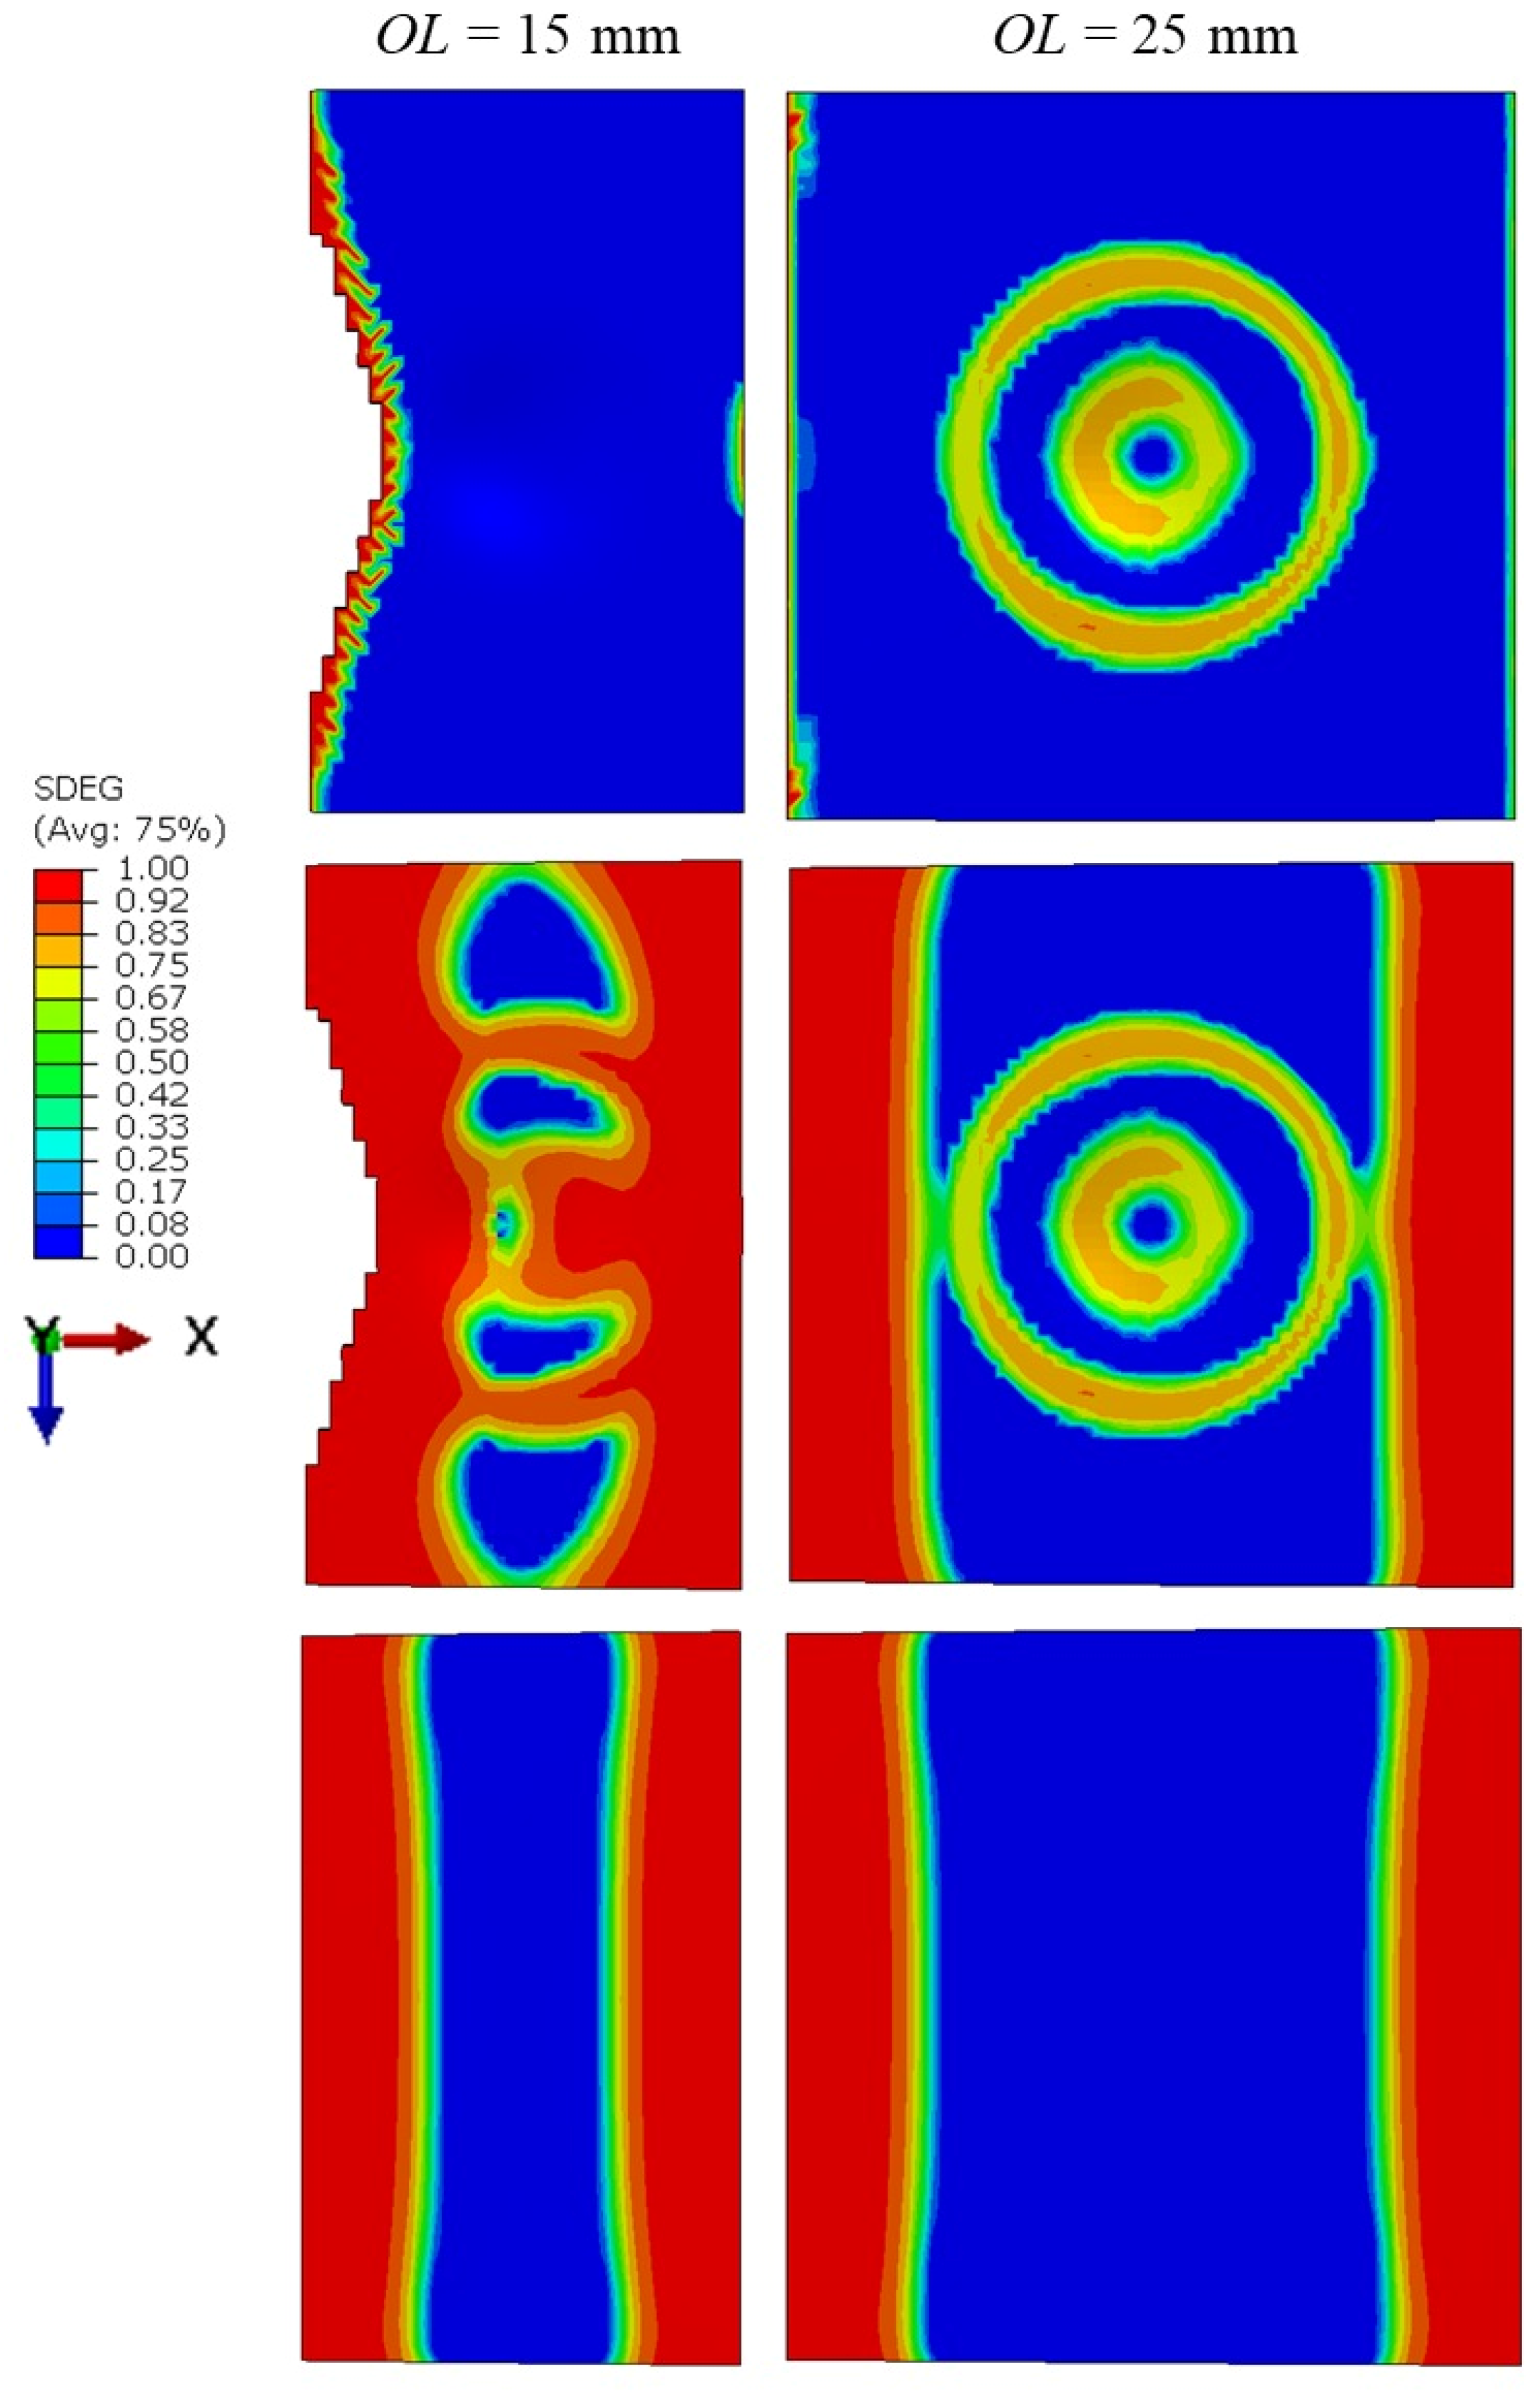
To achieve a more comprehensive insight into the deformation behavior of impacted joints subjected to tensile loading, the progression of damage within the adhesive layer was investigated throughout both the impact event and the subsequent tensile test, considering different OLs. Figure 9 illustrates the distribution of SDEG—a parameter indicating material degradation, with SDEG = 1 representing complete failure—within the adhesive layer both immediately after impact and just before final failure under tensile loading, for overlap lengths of 15 mm and 25 mm. To provide a reference, results from unimpacted (pristine) joints are also shown. As seen in Figure 9 (top), impact on the 15 mm overlap joint triggered damage mainly near the left edge of the adhesive, whereas in the 25 mm configuration, the damage was localized around the central region of the bondline. The more severe edge damage in the shorter overlap joint can be explained by the increased influence of end effects [36,37,38], which become more prominent with decreasing OL. This phenomenon is largely attributed to bending deformation caused by lateral impact forces, introducing out-of-plane stresses at the bond edges that promote early damage initiation. As illustrated in Figure 9 (middle), the damage pattern resulting from impact significantly reduced the tensile capacity of the 15 mm OL joint. Since one end of the adhesive was already critically damaged by the impact, only the intact region on the opposite end contributed to load bearing during the tensile test, thereby reducing the maximum force (Fmax) relative to the pristine joint (see Figure 8a). Conversely, the 25 mm OL joint showed negligible post-impact damage at the adhesive edges, allowing it to retain tensile performance nearly equal to that of the undamaged configuration.
The damage distribution within the adhesive layer showed a significant contrast between the impacted and non-impacted SLJ samples. In the non-impacted specimens, damage gradually developed from the central region toward the ends of the adhesive layer (Figure 9 (bottom)), exhibiting a relatively uniform progression also observed along the width of the joint. However, in the impacted samples, the presence of pre-existing damage localized at the center—resulting from the projectile strike—led to a more heterogeneous damage pattern, with prominent damage concentrated in both the central and end regions of the adhesive layer.
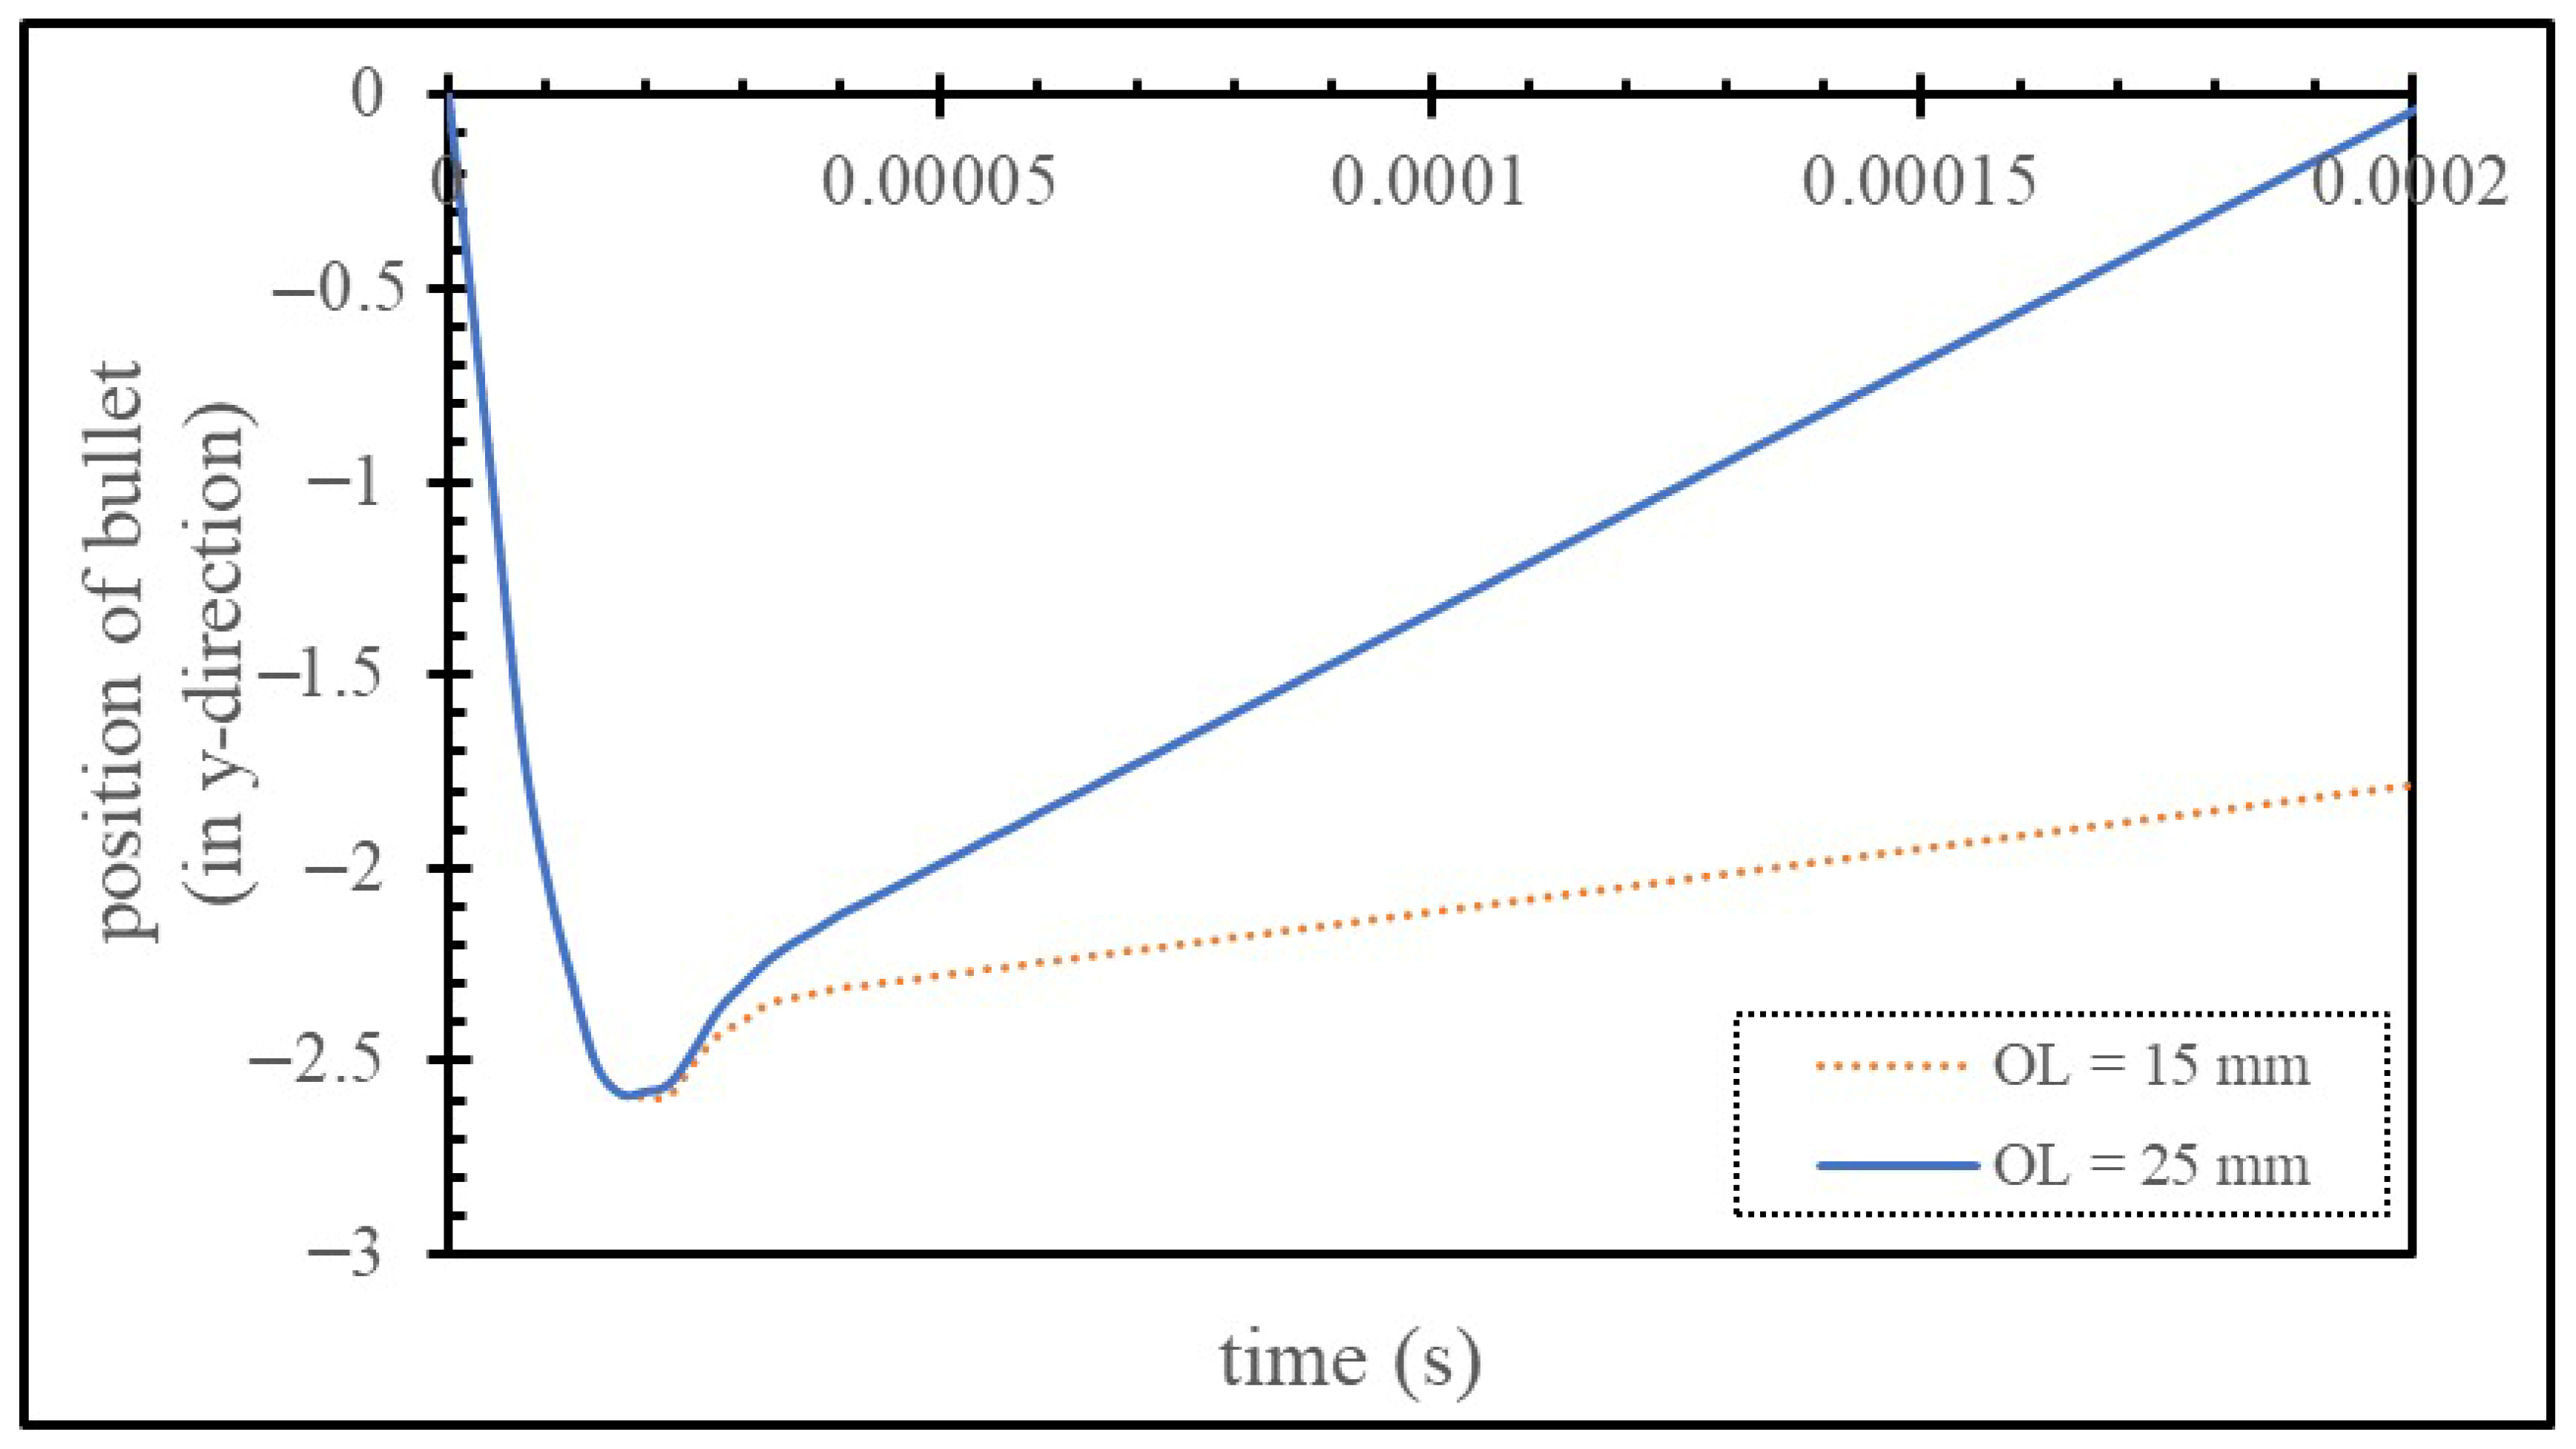
Upon initial deformation caused by impact, the projectile decelerated and subsequently rebounded, producing a spring-back effect once it struck the SLJ specimens. Figure 10 presents a comparison of the projectile’s displacement along the y-axis over time for both overlap lengths of 15 mm and 25 mm. It is evident that for both OL configurations, the maximum penetration depth of approximately 2.6 mm occurred around 20 µs after impact. However, the retreat velocity of the projectile differed significantly: for the 25 mm OL, it retracted at an average velocity of 14 m/s, whereas for the 15 mm OL, the retreat speed was approximately 2 m/s. This disparity is attributed to the increased stiffness of the SLJ configuration with the larger overlap length, which provides greater resistance to deformation and facilitates a more pronounced rebound response following impact.

4.3. Influence of Adherend Thickness

In this section, the influence of adherend thickness on the mechanical response of impacted SLJs is numerically examined. Three different thickness values—3 mm, 4 mm, and 5 mm—were considered for the adherends. Table 4 summarizes the Fmax values obtained from tensile tests for both impacted and pristine (non-impacted) SLJs across the specified thicknesses. For the impacted specimens, a notable reduction in Fmax was observed as adherend thickness increased from 3.0 mm to 5.0 mm, with Fmax decreasing from 10.07 kN to 6.42 kN. Conversely, the non-impacted samples showed a modest increase in Fmax—from 12.23 kN to 12.86 kN—over the same thickness range. This latter trend is consistent with the findings of El Zaroug et al. [36], which indicated that increasing adherend thickness leads to higher peak loads while reducing failure displacements, thus maintaining comparable energy absorption.
To better understand the behavior observed in impacted joints, the post-impact deformation patterns of SLJs with different adherend thicknesses were analyzed, as shown in Figure 11. For adherend thickness of 4.0 mm, damage in the adhesive layer extended from the left edge toward the center. However, for the 3.0 mm and 5.0 mm cases, the damage was localized only near the left end. Figure 11 also quantifies the percentage of the adhesive layer affected by damage across the three thickness values. As thickness increased from 3.0 mm to 4.0 mm, the damaged area nearly doubled—from 3.33% to 6.48%. Interestingly, a further increase in thickness from 4.0 mm to 5.0 mm led to a decrease in the damaged area to 0.84%. Typically, thinner adherends are expected to result in greater damage to the adhesive layer due to increased flexibility and higher displacements under impact loading. However, in this study, an unexpected trend was observed: as the adherend thickness increased from 3.0 mm to 4.0 mm, the extent of adhesive damage also increased.
This counterintuitive observation can be attributed to the growing mismatch in bending stiffness between the adhesive layer and the adherends as the latter become thicker. The adhesive layer possesses significantly lower stiffness compared to the adherends, and this disparity intensifies with increasing adherend thickness. A similar phenomenon was reported in [41], where delamination area in composite plates subjected to impact grew with plate thickness. Since the SLJ can be regarded as a composite-like structure, this analogy holds relevance.
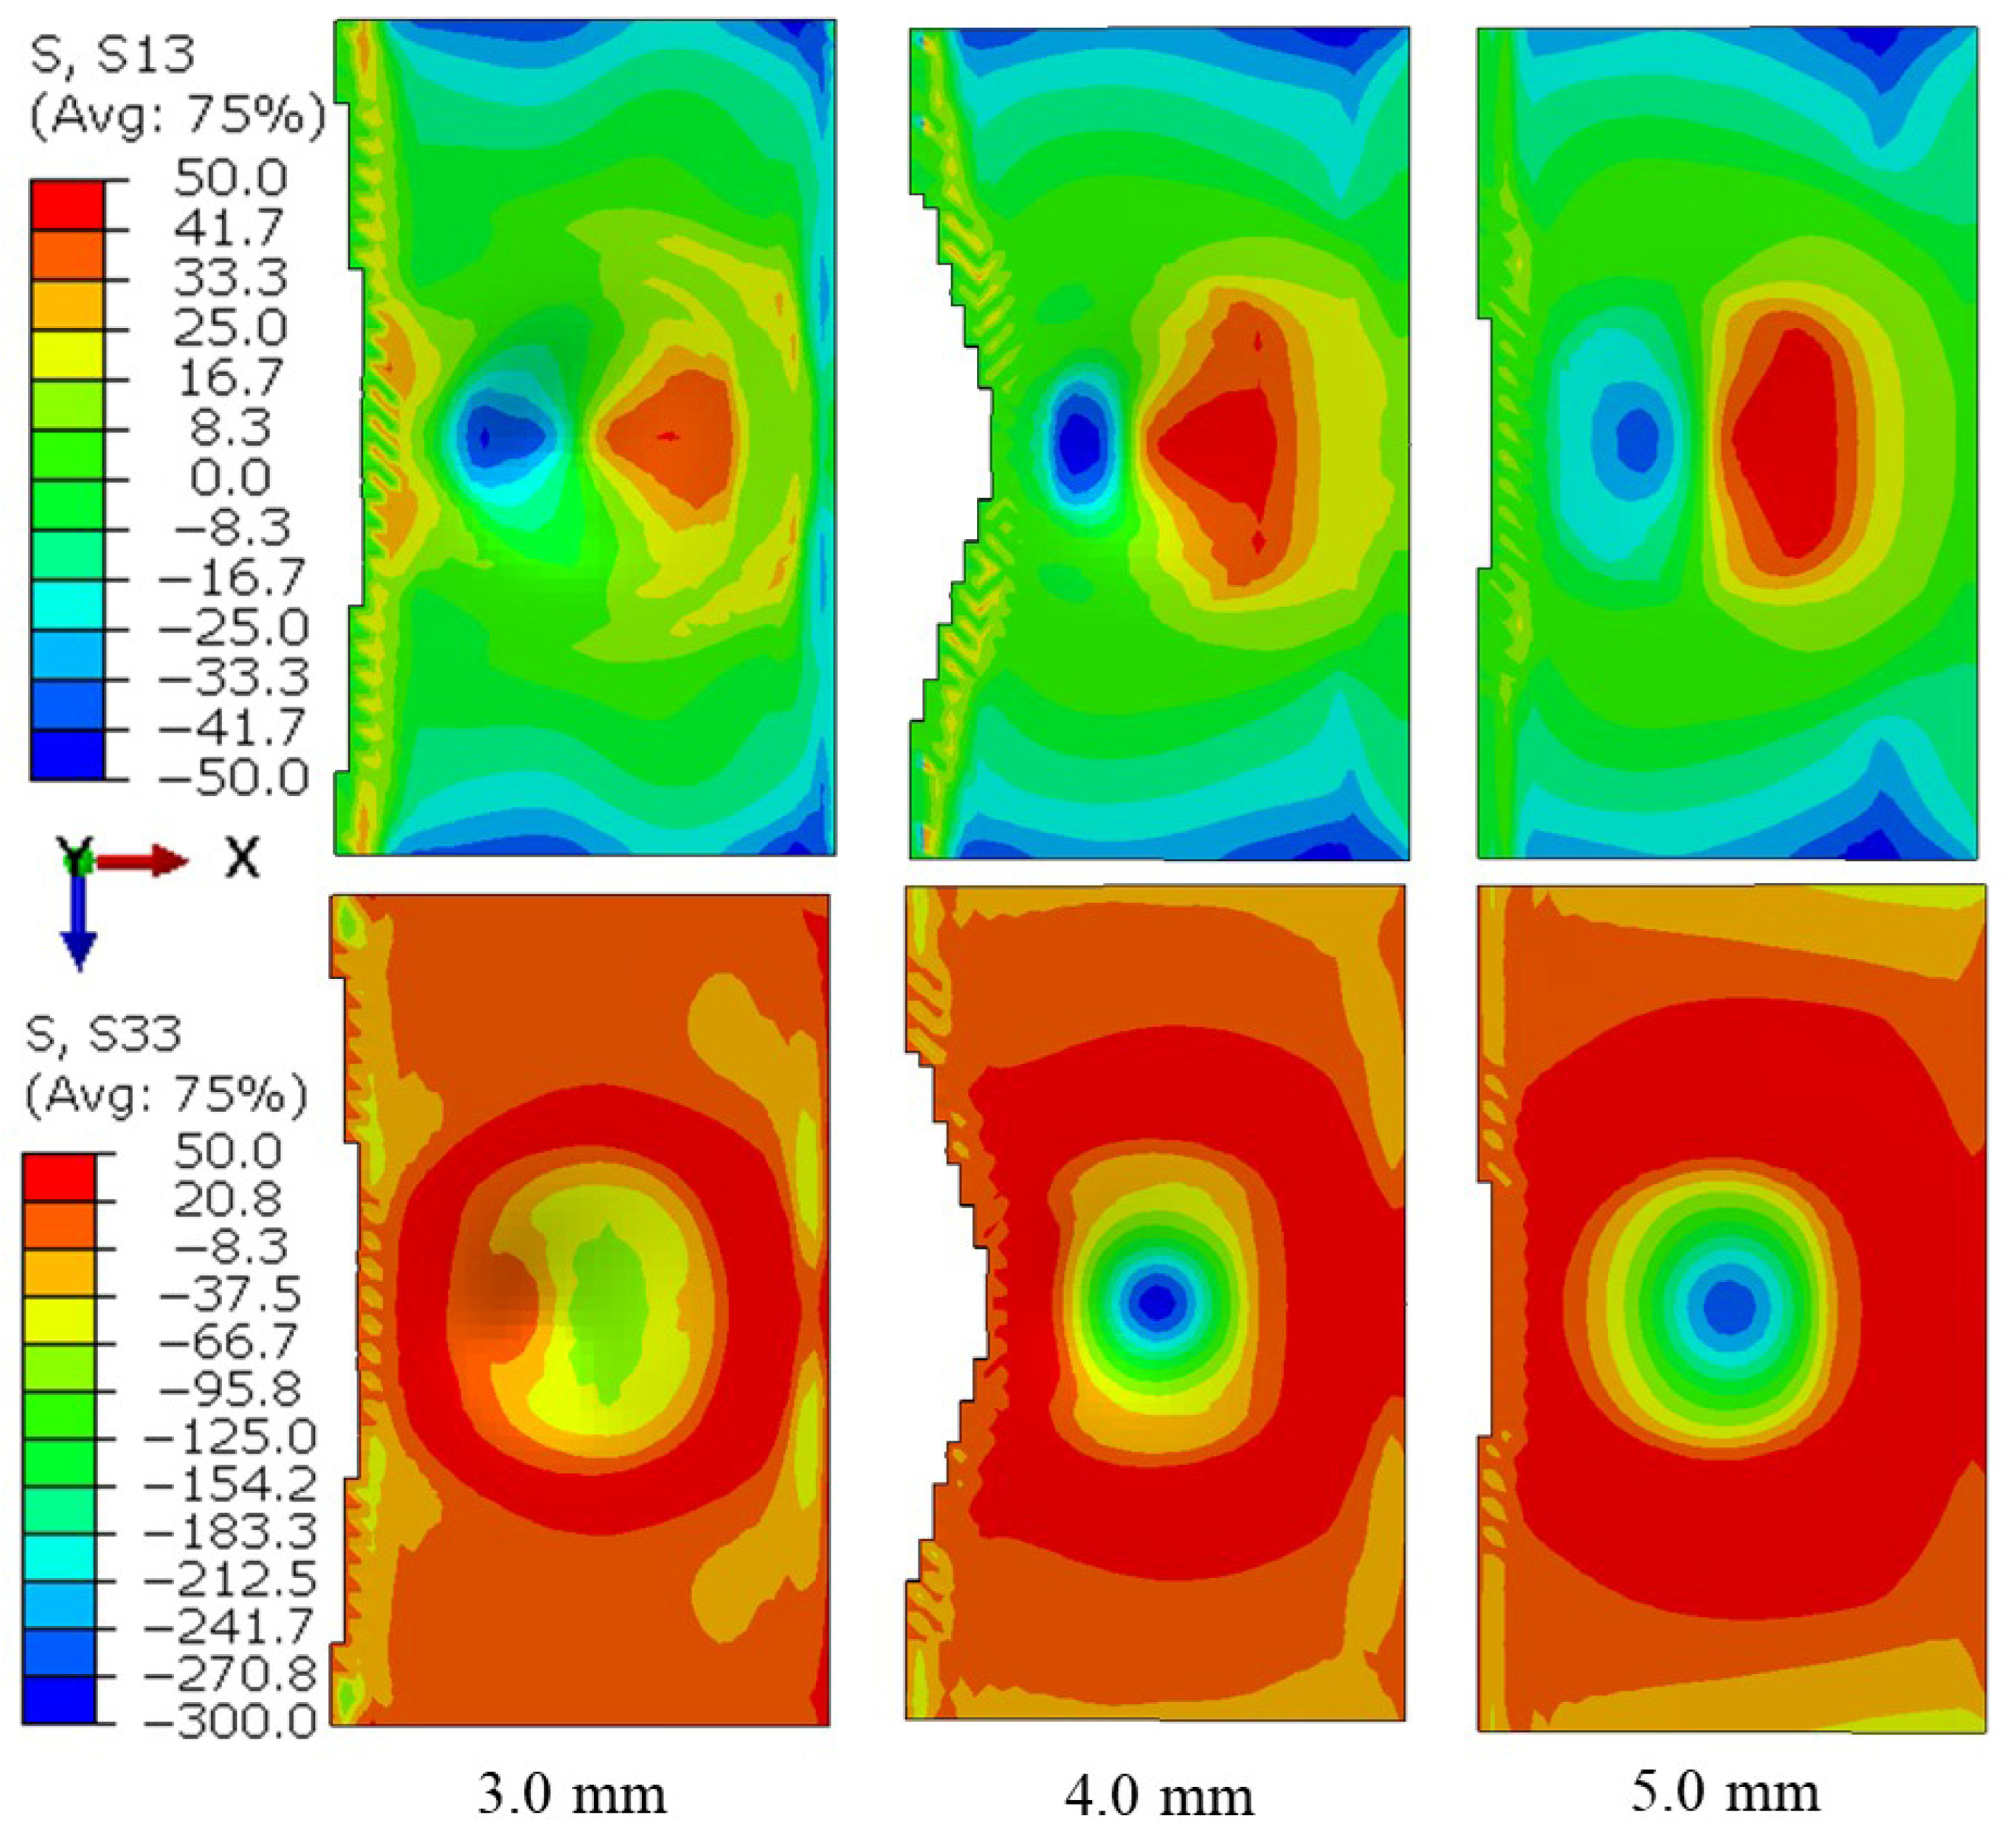
Nonetheless, the decrease in adhesive damage when thickness increases from 4.0 mm to 5.0 mm requires further explanation. This may be due to the increased distance between the adhesive layer and the impact surface for thicker adherends. As this distance grows, the resulting deformation within the adhesive becomes more uniform and less concentrated, effectively reducing localization in the stresses and hence the damage. This is visually illustrated in Figure 12, which presents the distributions of S33 ( σ n ) on the adhesive layer. The figure indicates that a larger portion of the adhesive layer is subjected to higher stresses in the 5.0 mm case, whereas in the 4.0 mm case, the high-stress region is more confined, affecting a smaller, more localized area.
In conclusion, the damage response of SLJs under impact is governed by two competing factors: the increasing stiffness mismatch between the adherend and adhesive layers, and the tendency toward more homogenized deformation patterns in the adhesive layer at greater adherend thicknesses. The observed behavior suggests a delicate balance between these opposing influences during high-velocity impact loading.
The damage pattern observed in the adhesive layer, as illustrated in Figure 11, does not sufficiently explain the reduction in Fmax across different adherend thicknesses. Interestingly, although the damaged area is the smallest—only 0.84% for the configuration with t = 5.0 mm—this case exhibits the most significant reduction in Fmax compared to its non-impacted counterpart, with a decrease of 50.08% (refer to Table 4). To clarify this unexpected outcome, the distributions of peel stress (S33, i.e., σ n ), first shear stress (S13, i.e., σ s ), QuadScrt and SDEG within the adhesive layer at the initial stage of the tensile test were analyzed, as depicted in Figure 12 and Figure 13. QuadScrt refers to the quadratic nominal stress-based criterion used to predict the onset of cohesive failure. It highlights areas within the adhesive layer where damage is expected to initiate, with damage beginning once QuadScrt reaches its critical value of 1.0. It is worth mentioning that second shear stress (S23, i.e., σ t ) values were omitted from this analysis due to their relatively minor magnitude compared to S13 and S33.
Because the adhesive layer exhibits weakened behavior under quasi-static tensile conditions (as shown in Table 2), residual stresses remaining from the prior impact test contribute to a measurable degree of initial damage in the adhesive layer at the start of the tensile test, as evidenced by the QuadScrt and SDEG distributions in Figure 13. As previously discussed, the deformation becomes more uniform with t = 5.0 mm, which causes the stress distribution within the adhesive to also become more even—yet with higher stress magnitudes compared to the cases with t = 3.0 mm and t = 4.0 mm. In the latter two, the deformation remains localized around the central region of the adhesive layer. For t = 5.0 mm, however, this more evenly distributed stress causes early damage initiation in the midsection of the right end of the adhesive layer towards to central region, even at the beginning of the tensile loading.
This explains why the Fmax value drops most sharply for the thickest adherend, despite the minimal visible damage post-impact. Since the central region of the adhesive layer contributes minimally to the overall load-bearing capacity during quasi-static tensile testing, the damage localized in this area for the 3.0 mm adherend configuration—apart from minor damage at the left end—has a limited effect on the joint’s tensile performance. In the case of the 4.0 mm adherend thickness, however, the damage observed at both ends of the adhesive layer is attributed to the increased mismatch in bending stiffness between the adhesive and the thicker adherends, which contributes to the relatively diminished tensile strength. For the 5.0 mm configuration, despite having a smaller overall damaged area, premature failure occurs in structurally critical regions due to stress concentration. This early-stage failure significantly undermines the joint’s ability to sustain tensile loads, resulting in the poorest mechanical performance among all tested configurations.

5. Conclusions

This research focused on assessing the mechanical response of adhesively bonded single-lap joints (SLJs) exposed to high-velocity impact. A combination of experimental investigations and finite element simulations was employed to obtain a comprehensive understanding of their structural behavior. The key findings of the study can be summarized as follows:
  • Experimental results indicated that the post-impact tensile strength of the 15 mm overlap configuration exhibited significant degradation, with the load-bearing capacity decreasing by approximately 33%, whereas the 25 mm overlap configuration largely maintained its post-impact structural integrity.
  • The FE simulations demonstrated that the adhesive layer behaved about 5 times stronger under the imposed high-velocity impact loading than under the quasi-static one.
  • The FE analysis of damage progression in the adhesive layer indicated that bullet impact caused damage at the ends for shorter overlap lengths, while for longer overlap lengths, damage was confined to the center. Since the ends of the overlap length bore more tensile loading compared to the central region, joints with an overlap length of 15 mm experienced mechanical degradation, whereas those with a 25 mm overlap length did not.
  • Contrary to predictions, a larger stiffness mismatch between the adherends and the adhesive caused more damage to the adhesive layer when the adherend thickness was increased from 3.0 mm to 4.0 mm. However, by raising the thickness to 5.0 mm, more uniform deformation and less overall damage were achieved as the adhesive layer moved away from the impact surface, reducing the damaged area.
  • The damaged pattern in the adhesive layer left from the pre-impact did not fully explain the reduction in Fmax from the tensile test for different adherend thicknesses. Despite having the lowest damaged area (0.84%) for t = 5.0 mm, this configuration showed the largest decrease in Fmax (50.08%) compared to non-impacted specimens due to the homogeneous distribution of higher stresses in the adhesive layer, leading to early damage onset during tensile testing.
Looking forward, future studies will aim to achieve a more thorough understanding by exploring the damage mechanisms associated with repeated impacts, evaluating the progressive degradation of mechanical performance under varying impact energies and loading sequences, and examining how different overlap lengths influence the residual strength of the joints.

Author Contributions

Conceptualization, F.K. and M.D.; Methodology, F.K., M.D. and A.M.; Software, F.K. and A.M.; Validation, M.D.; Formal analysis, M.D.; Investigation, F.K. and M.D.; Writing—original draft, F.K. and M.D.; Writing—review & editing, A.M.; Project administration, F.K. All authors have read and agreed to the published version of the manuscript.

Funding

This research received no external funding.

Institutional Review Board Statement

Not applicable.

Informed Consent Statement

Not applicable.

Data Availability Statement

The raw data supporting the conclusions of this article will be made available by the authors on request.

Conflicts of Interest

The authors declare no conflicts of interest.

References

  1. Maggiore, S.; Banea, M.D.; Stagnaro, P.; Luciano, G. A review of structural adhesive joints in hybrid joining processes. Polymers 2021, 13, 3961. [Google Scholar] [CrossRef]
  2. Mendoza, F.; Chiquito, M.; Castedo, R.; Yenes, J.I.; Almajano, S.M.; Lopez, L.M.; Santos, A.P. Experimental study on the energy absorption capacity of concrete masonry unit under ballistic impact. Results Eng. 2025, 27, 106065. [Google Scholar] [CrossRef]
  3. Goglio, L.; Rosetto, M. Impact rupture of structural adhesive joints under different stress combinations. Int. J. Impact Eng. 2008, 35, 635–643. [Google Scholar] [CrossRef]
  4. Komorek, A.; Godzimirski, J. Modified pendulum hammer in impact tests of adhesive, riveted and hybrid lap joints. Int. J. Adhes. Adhes. 2021, 104, 102734. [Google Scholar] [CrossRef]
  5. Kadioglu, F.; Adams, R.D. Flexible adhesives for automotive application under impact loading. Int. J. Adhes. Adhes. 2015, 56, 73–78. [Google Scholar] [CrossRef]
  6. Li, Y.; Yuancheng, Y.; Li, J.; Wang, B.; Liao, Y. Experimental-numerical analysis of failure of adhesively bonded lap joints under transverse impact and different temperatures. Int. J. Impact Eng. 2020, 140, 103541. [Google Scholar] [CrossRef]
  7. Valente, J.P.A.; Campilho, R.D.S.G.; Marques, E.A.S.; Machado, J.J.M.; da Silva, L.F.M. Adhesive joint analysis under tensile impact loads by cohesive zone modelling. Compos. Struct. 2019, 222, 110894. [Google Scholar] [CrossRef]
  8. Machado, J.J.M.; Nunes, P.D.P.; Marques, E.A.S.; da Silva, L.F.M. Adhesive joints using aluminum and cfrp substrates tested at low and high temperatures under quasi-static and impact conditions for the automotive industry. Compos. B Eng. 2019, 158, 102–116. [Google Scholar] [CrossRef]
  9. Yokoyama, T.; Nakai, K. Determination of the impact tensile strength of structural adhesive butt joints with a modified split hopkinson pressure bar. Int. J. Adhes. Adhes. 2015, 56, 13–23. [Google Scholar] [CrossRef]
  10. Raykhere, S.L.; Kumar, P.; Singh, R.K.; Parameswaran, V. Dynamic shear strength of adhesive joints made of metallic and composite adherents. Mater. Des. 2010, 31, 2102–2109. [Google Scholar] [CrossRef]
  11. Sato, C.; Ikegami, K. Strength of adhesively-bonded butt joints of tubes subjected to combined high-rate loads. J. Adhes. 1999, 70, 57–73. [Google Scholar] [CrossRef]
  12. Gollins, K.; Elvin, N.; Delale, F. Characterization of adhesive joints under high-speed normal impact: Part ii—Numerical studies. Int. J. Adhes. Adhes. 2020, 98, 102530. [Google Scholar] [CrossRef]
  13. Galliot, C.; Rousseau, J.; Verchery, G. Drop weight tensile impact testing of adhesively bonded carbon/epoxy laminate joints. Int. J. Adhes. Adhes. 2012, 35, 68–75. [Google Scholar] [CrossRef]
  14. Sato, C.; Ikegami, K. Dynamic deformation of lap joints and scarf joints under impact loads. Int. J. Adhes. Adhes. 2000, 20, 17–25. [Google Scholar] [CrossRef]
  15. Challita, G.; Othman, R.; Casari, P.; Khalil, K. Experimental investigation of the shear dynamic behaviour of double-lap adhesively bonded joints on a wide range of strain rates. Int. J. Adhes. Adhes. 2011, 31, 146–153. [Google Scholar] [CrossRef]
  16. Kadioglu, F. Mechanical behaviour of adhesively single lap joint under buckling conditions. Chin. J. Aeronaut. 2021, 34, 154–164. [Google Scholar] [CrossRef]
  17. Adams, R.D.; Peppiatt, N.A. Stress analysis of adhesive-bonded lap joints. J. Strain Anal. Eng. Des. 1974, 9, 185–196. [Google Scholar] [CrossRef]
  18. Soltannia, B.; Duke, K.; Taheri, F.; Mertiny, P. Quantification of the effects of strain rate and nano-reinforcement on the performance of adhesively bonded single-lap joints. Rev. Adhes. Adhes. 2020, 8, S1–S19. [Google Scholar] [CrossRef]
  19. Tu, Z.G.; Lu, Y. Evaluation of typical concrete material models used in hydrocodes for high dynamic response simulations. Int. J. Impact Eng. 2009, 36, 132–146. [Google Scholar] [CrossRef]
  20. Zhou, X.; Kuznetsov, V.; Waschl, J.; Hao, H. Numerical calculation of concrete slab response to blast loading. Trans. Tianjin Univ. (Engl. Ed.) 2006, 12, 94–99. [Google Scholar]
  21. Goglio, L.; Peroni, L.; Peroni, M.; Rossetto, M. High strain-rate compression and tension behaviour of an epoxy bi-component adhesive. Int. J. Adhes. Adhes. 2008, 28, 329–339. [Google Scholar] [CrossRef]
  22. Karimi, S. Enhancing mechanical properties of GFRP–aluminum joints through Z pinning: A low velocity shear impact study. J. Adhes. Sci. Technol. 2024, 38, 4391–4404. [Google Scholar] [CrossRef]
  23. Yang, M.; Xuan, H.; Qin, T.; Wang, Y.; Zhou, Y.; Zhang, W. Numerical and experimental study of the residual strength of CFRP laminate single-lap joint after transverse impact. Int. J. Adhes. Adhes. 2024, 130, 103593. [Google Scholar] [CrossRef]
  24. Gomes, L.A.; Campilho, R.D.; Valente, J.P.; Queirós, M.J.; Madani, K. Impact loading analysis of double-lap composite bonded joints. Int. J. Adhes. Adhes. 2024, 128, 103547. [Google Scholar] [CrossRef]
  25. Demiral, M.; Kadioglu, F. Residual strength and failure evolution of adhesively bonded joints under successive ballistic impacts. Eng. Fail. Anal. 2025, 182, 110021. [Google Scholar] [CrossRef]
  26. Gollins, K.; Elvin, N.; Delale, F. Characterization of Adhesive Joints under High-Speed Normal Impact: Part I—Experimental Studies. Int. J. Adhes. Adhes. 2020, 98, 102529. [Google Scholar] [CrossRef]
  27. ABAQUS. Abaqus Unified FEA-3DEXPERIENCE; R2018; Dassault Systèmes: Vélizy-Villacoublay, France, 2018. [Google Scholar]
  28. Demiral, M.; Abbassi, F.; Muhammad, R.; Akpinar, S. Service life modelling of single lap joint subjected to cyclic bending load. Aerospace 2022, 10, 8. [Google Scholar] [CrossRef]
  29. Johnson, G.R.; Cook, W.H. A Constitutive Model and Data for Metal Subjected to Large Strains, High Strain Rates and High Temperature. In Proceedings of the 7th International Symposium on Ballistics, Hague, The Netherlands, 19–21 April 1983. [Google Scholar]
  30. Oshima, S.; Koyanagi, J. Review on Damage and Failure in Adhesively Bonded Composite Joints: A Microscopic Aspect. Polymers 2025, 17, 377. [Google Scholar] [CrossRef]
  31. Akram, S.; Jaffery, S.H.I.; Khan, M.; Fahad, M.; Mubashar, A.; Ali, L. Numerical and experimental investigation of Johnson–Cook material models for aluminum (Al 6061-T6) alloy using orthogonal machining approach. Adv. Mech. Eng. 2018, 10, 1687814018797794. [Google Scholar] [CrossRef]
  32. Mishra, V.; Kukshal, V. Numerical analysis for estimating ballistic performance of armour material. Mater. Today Proc. 2021, 44, 4731–4737. [Google Scholar] [CrossRef]
  33. Demiral, M.; Kadioglu, F.; Silberschmidt, V.V. Size effect in flexural behaviour of unidirectional GFRP composites. J. Mech. Sci. Technol. 2020, 34, 5053–5061. [Google Scholar] [CrossRef]
  34. Kadioglu, F.; Demiral, M.; El Zaroug, M. Effects of overlap length on the strength of bolted, bonded and hybrid single lap joints with different adherend materials and thicknesses. J. Adhes. Sci. Technol. 2019, 33, 2191–2206. [Google Scholar] [CrossRef]
  35. Dos Santos, D.G.; Carbas, R.J.; Marques, C.E.A.S.; Da Silva, L.F.M. Reinforcement of CFRP joints with fibre metal laminates and additional adhesive layers. Compos. Part B Eng. 2019, 165, 386–396. [Google Scholar] [CrossRef]
  36. El Zaroug, M.; Kadioglu, F.; Demiral, M.; Saad, D. Experimental and numerical investigation into strength of bolted, bonded and hybrid single lap joints: Effects of adherend material type and thickness. Int. J. Adhes. Adhes. 2018, 87, 130–141. [Google Scholar] [CrossRef]
  37. Renton, W.J.; Vinson, J.R. The efficient design of adhesive bonded joints. J. Adhes. 1975, 7, 175–193. [Google Scholar] [CrossRef]
  38. Goland, M.; Reisaner, E. The stresses in cemented joints. J. App. Mech. 1944, 11, A17–A27. [Google Scholar] [CrossRef]
  39. Hart-Smith, L.J. Stress Analysis; a Continuum Mechanics Approach in Developments in Adhesives 2; Elsevier Applied Science Publishers: London, UK, 1981; pp. 1–44. [Google Scholar]
  40. Adams, R.D.; Comyn, J.; Wake, W.C. Structural Adhesive Joints in Engineering, 2nd ed.; Elsevier Applied Science Publishers: London, UK, 1997. [Google Scholar]
  41. Amaro, A.M.; Reis, P.N.B.; de Moura, M.; Santos, J.B. Influence of the specimen thickness on low velocity impact behavior of composites. J. Polym. Eng. 2012, 32, 53–58. [Google Scholar] [CrossRef]
Figure 1. The produced single-lap joints (with 15 mm OL) used in the tests (a), the apparatus in which the specimens are fixed in a clamp-clamp configuration and the measurement ruler fixed before the test (b).
Eng 07 00001 g001
Figure 2. A representative drawing of the experimental set-up used for the SLJ under the high-velocity test (a). A real image of the fired bullet and its captured image using a fast-speed camera to obtain the test speed (b).
Eng 07 00001 g002
Figure 3. Detailed description of 3D finite element model of an SLJ subjected to initial high-speed impact followed by quasi-static tensile loading.
Eng 07 00001 g003
Figure 4. The deformed shape of the SLJ under the bullet impact at t = 6.0 µs when the material Model1 (see Table 2) was used in the simulations.
Eng 07 00001 g004
Figure 5. Change in the distributions of von Mises stress on the SLJ with OL = 15 mm and t = 4 mm during the high-speed impact of the lead bullet.
Eng 07 00001 g005
Figure 6. The force–displacement curve from the tensile tests obtained experimentally (Experiment 1–3) and when material 2 was used in the pre-impact simulations for OL = 15 mm.
Eng 07 00001 g006
Figure 7. Top-view comparison of the deformed shape of the single-lap joint (SLJ) after the high-speed impact test, obtained (a) experimentally and (b) numerically, along with (c) the top view of the SLJ deformation following the tensile test.
Eng 07 00001 g007
Figure 8. Load–displacement curves obtained from both experimental tests and numerical simulations for pre-impacted SLJs under tensile loading are presented for overlap lengths of 15 mm (a) and 25 mm (b).
Eng 07 00001 g008aEng 07 00001 g008b
Figure 9. SDEG distribution on the adhesive layer is shown for impacted specimens immediately after impact (top), just before failure during tensile testing (middle), and for non-impacted specimens just before failure during tensile testing (bottom), for overlap lengths of 15 mm and 25 mm.
Eng 07 00001 g009
Figure 10. The location of the bullet in y-direction during the high-speed impact of the SLJ with OL equals to 15 and 25 mm.
Eng 07 00001 g010
Figure 11. Distribution of SDEG on the adhesive layer including the ratio of damaged area (in %) for different adherend thicknesses of the SLJ with OL = 15 mm just after the impact test.
Eng 07 00001 g011
Figure 12. Distributions of S13 (top row) and S33 (bottom row) on the adhesive layer for different adherend thicknesses of the SLJ with OL = 15 mm at the very beginning of the tensile test.
Eng 07 00001 g012
Figure 13. Distributions of QuadScrt (top row) and SDEG (bottom row) on the adhesive layer for different adherend thicknesses of the SLJ with OL = 15 mm at the very beginning of the tensile test.
Eng 07 00001 g013
Table 1. Material constants of lead bullet and AA6061 aluminum adherends used in the simulations [31,32].
MaterialsA (MPa)B (MPa)CnmTr (K)Tm (K)
Lead24210.0010.71298925
Aluminum3241140.0020.421.34293893
Table 2. Material constants of adhesive layer (AF163-2K) used in the cohesive zone modeling for the high-speed impact and tensile loading tests.
Knn, Kss, Ktt (N/mm3) σ n 0 (MPa) σ s 0 = σ t 0 (MPa) G c , n (N/mm) G c , s = G c , t (N/mm)
Model1-Quasi-static [35]100,00046.9346.864.059.77
Model2—Dynamic240240
Table 4. The Fmax values (and their percentage differences) obtained from the tensile test for various adherend thicknesses of the impacted and non-impacted SLJs.
3.0 mm4.0 mm5.0 mm
Non-Impacted12.2312.4312.86
Impacted10.078.146.42
Reduction in Fmax (%)17.6634.5150.08
Table 3. The Fmax values obtained from experiments (with standard deviations) and simulations (and their percentage differences) for various OLs of the impacted and non-impacted SLJs.
SpecimenOLExpFEDifference (%)
Non-Impacted1512.2 ± 0.7812.421.80
Impacted157.81 ± 0.518.154.17
Non-Impacted2515.51 ± 0.9114.635.67
Impacted2515.03 ± 0.9715.170.93
Disclaimer/Publisher’s Note: The statements, opinions and data contained in all publications are solely those of the individual author(s) and contributor(s) and not of MDPI and/or the editor(s). MDPI and/or the editor(s) disclaim responsibility for any injury to people or property resulting from any ideas, methods, instructions or products referred to in the content.