Article

Nonuniform Deformation of Cell Structures Owing to Plastic Stress Wave Propagation

1
Department of Mechanical Engineering, Ritsumeikan University, 1-1-1 Nojihigashi, Kusatsu 525-8577, Japan
2
Department of Mechanical Engineering, National Defense Academy, 1-10-20, Hashirimizu, Yokosuka 239-8686, Japan
*
Author to whom correspondence should be addressed.
Appl. Mech. 2021, 2(4), 911-931; https://doi.org/10.3390/applmech2040053
Submission received: 16 September 2021 / Revised: 1 November 2021 / Accepted: 3 November 2021 / Published: 5 November 2021
(This article belongs to the Special Issue Mechanics, Design, and Manufacture of Soft Lattices)

Abstract

:
In cell structures, unlike in dense bodies, nonuniform deformation occurs from the impact end, even at velocities in the order of tens to hundreds of meters per second. In this study, we experimentally examine the nonuniform deformation mechanism of cell structures. They prepared two kinds of specimens: nickel foam (Ni foam) and silicone-rubber-filled nickel foam (Ni/silicone foam). As a dynamic and impact test method (compression velocity of 20 m/s or more), we used a dynamic and impact load-measuring apparatus with opposite load cells to evaluate the loads on both ends of the specimen in one test. At compression velocities of 20 m/s or less, no nonuniform deformations were observed in the Ni foam and the Ni/silicone foam, and the loads on the impact and the fixed ends achieved force equilibrium. The Ni foam showed no change with an increasing strain rate, and the Ni/silicone foam showed a strong strain rate dependence of the flow stress. At a compression velocity of approximately 26 m/s, the loads differed at the two ends of the Ni/silicone foam, and we observed nonuniform deformation from the impact end. The results of the visualization of the load and deformation behavior obtained from both ends of the specimen revealed that the velocity of the plastic stress wave and the length of the specimens are important for nonuniform deformation.

1. Introduction

Such cell structures as foam or honeycomb formations are widely used in shock-absorbing materials owing to their low weight and excellent shock-absorbing capacities. Unlike dense bodies, cell structures undergo plateau deformation, whereby a strain increase is not accompanied by a stress increase [1,2]. Plateau deformation occurs from the collapse of cells (voids). However, the mechanical properties of cell structures change with geometrical conditions, including the shape, size, and number of cells. Therefore, many studies have investigated the mechanical properties of various cell structures. For example, a constitutive law for a material was formulated by treating cell structure as a material [1,2]. The effect of the cell structure’s shape on its mechanical properties has also been reported [3,4,5,6] and the effect of the substance (typically air) that fills the cells [7,8]. Studies have conducted impact tests, such as the split Hopkinson pressure bar (SHB) method, to investigate the strain rate dependence [9,10]. However, these tests are only valid if the material is deformed uniformly, and different tests are required if nonuniform deformation, which means the deformation from the impact end, occurs due to the inertia effect.
Studies have described that when a hyper-velocity impact load in the order of several kilometers per second is applied to a dense solid body, a discontinuity surface is generated inside it and propagates as a wave (shock wave), producing a nonuniform deformation in the body [11,12]. This shock wave was generated in a solid. However, unlike in dense bodies, in cell structures, nonuniform deformation occurs from the impact end, even at velocities in the order of tens to hundreds of meters per second. For example, Elnasri et al. [13] and Pattofatto et al. [14] used the direct-impact Hopkinson pressure bar (DHB) method to evaluate large deformations in a cell structure and clarified that a foamed aluminum (Al) alloy shows nonuniform deformation. They presented a method for acquiring the wavefront of a nonuniform deformation by visually expressing the deformation behavior with digital image correlation. Wang et al. [15] also used DHB and digital image correlation to demonstrate that when an impact load is applied to a foamed Al alloy, nonuniform deformation occurs sequentially from the impact end, and the loads on the impact and fixed ends might not achieve force equilibrium. Gaitanaros and Kyriakides [16] built a numerical analysis model by correlation between the propagation speed of the leading edge of the nonuniform deformation generated from the impact end and the deformation rate. Their experiment analytically showed that when a nonuniform deformation occurs from the impact end in a foamed Al alloy, the Rankine–Hugoniot relation [12], which is used for discussing shock waves in solid bodies, is satisfied at the boundary between the nonuniformly deformed and undeformed areas. Although these studies reported the transition velocity, which is the boundary velocity between the uniform and nonuniform deformations, a more detailed explanation of the nonuniform deformation mechanism is necessary. Under conditions where force equilibrium is not achieved, most studies using the DHB method require the following two tests to obtain the load history at both the impact and fixed ends: (1) attaching the specimen to a projectile and launching it, and (2) attaching the specimen to a transmitted bar and fixing it. However, since these tests must be performed twice with different specimens, the load at both ends of the specimen cannot be measured in a one-time test.
In this study, we overcame the drawbacks of the DHB method using a test apparatus that can evaluate the load state at the impact and fixed ends in a one-time test. We focused on the stress waves propagating in the specimen and clarified the nonuniform deformation mechanism of the cell structure from our obtained test results.

2. Specimen

2.1. Nickel Foam

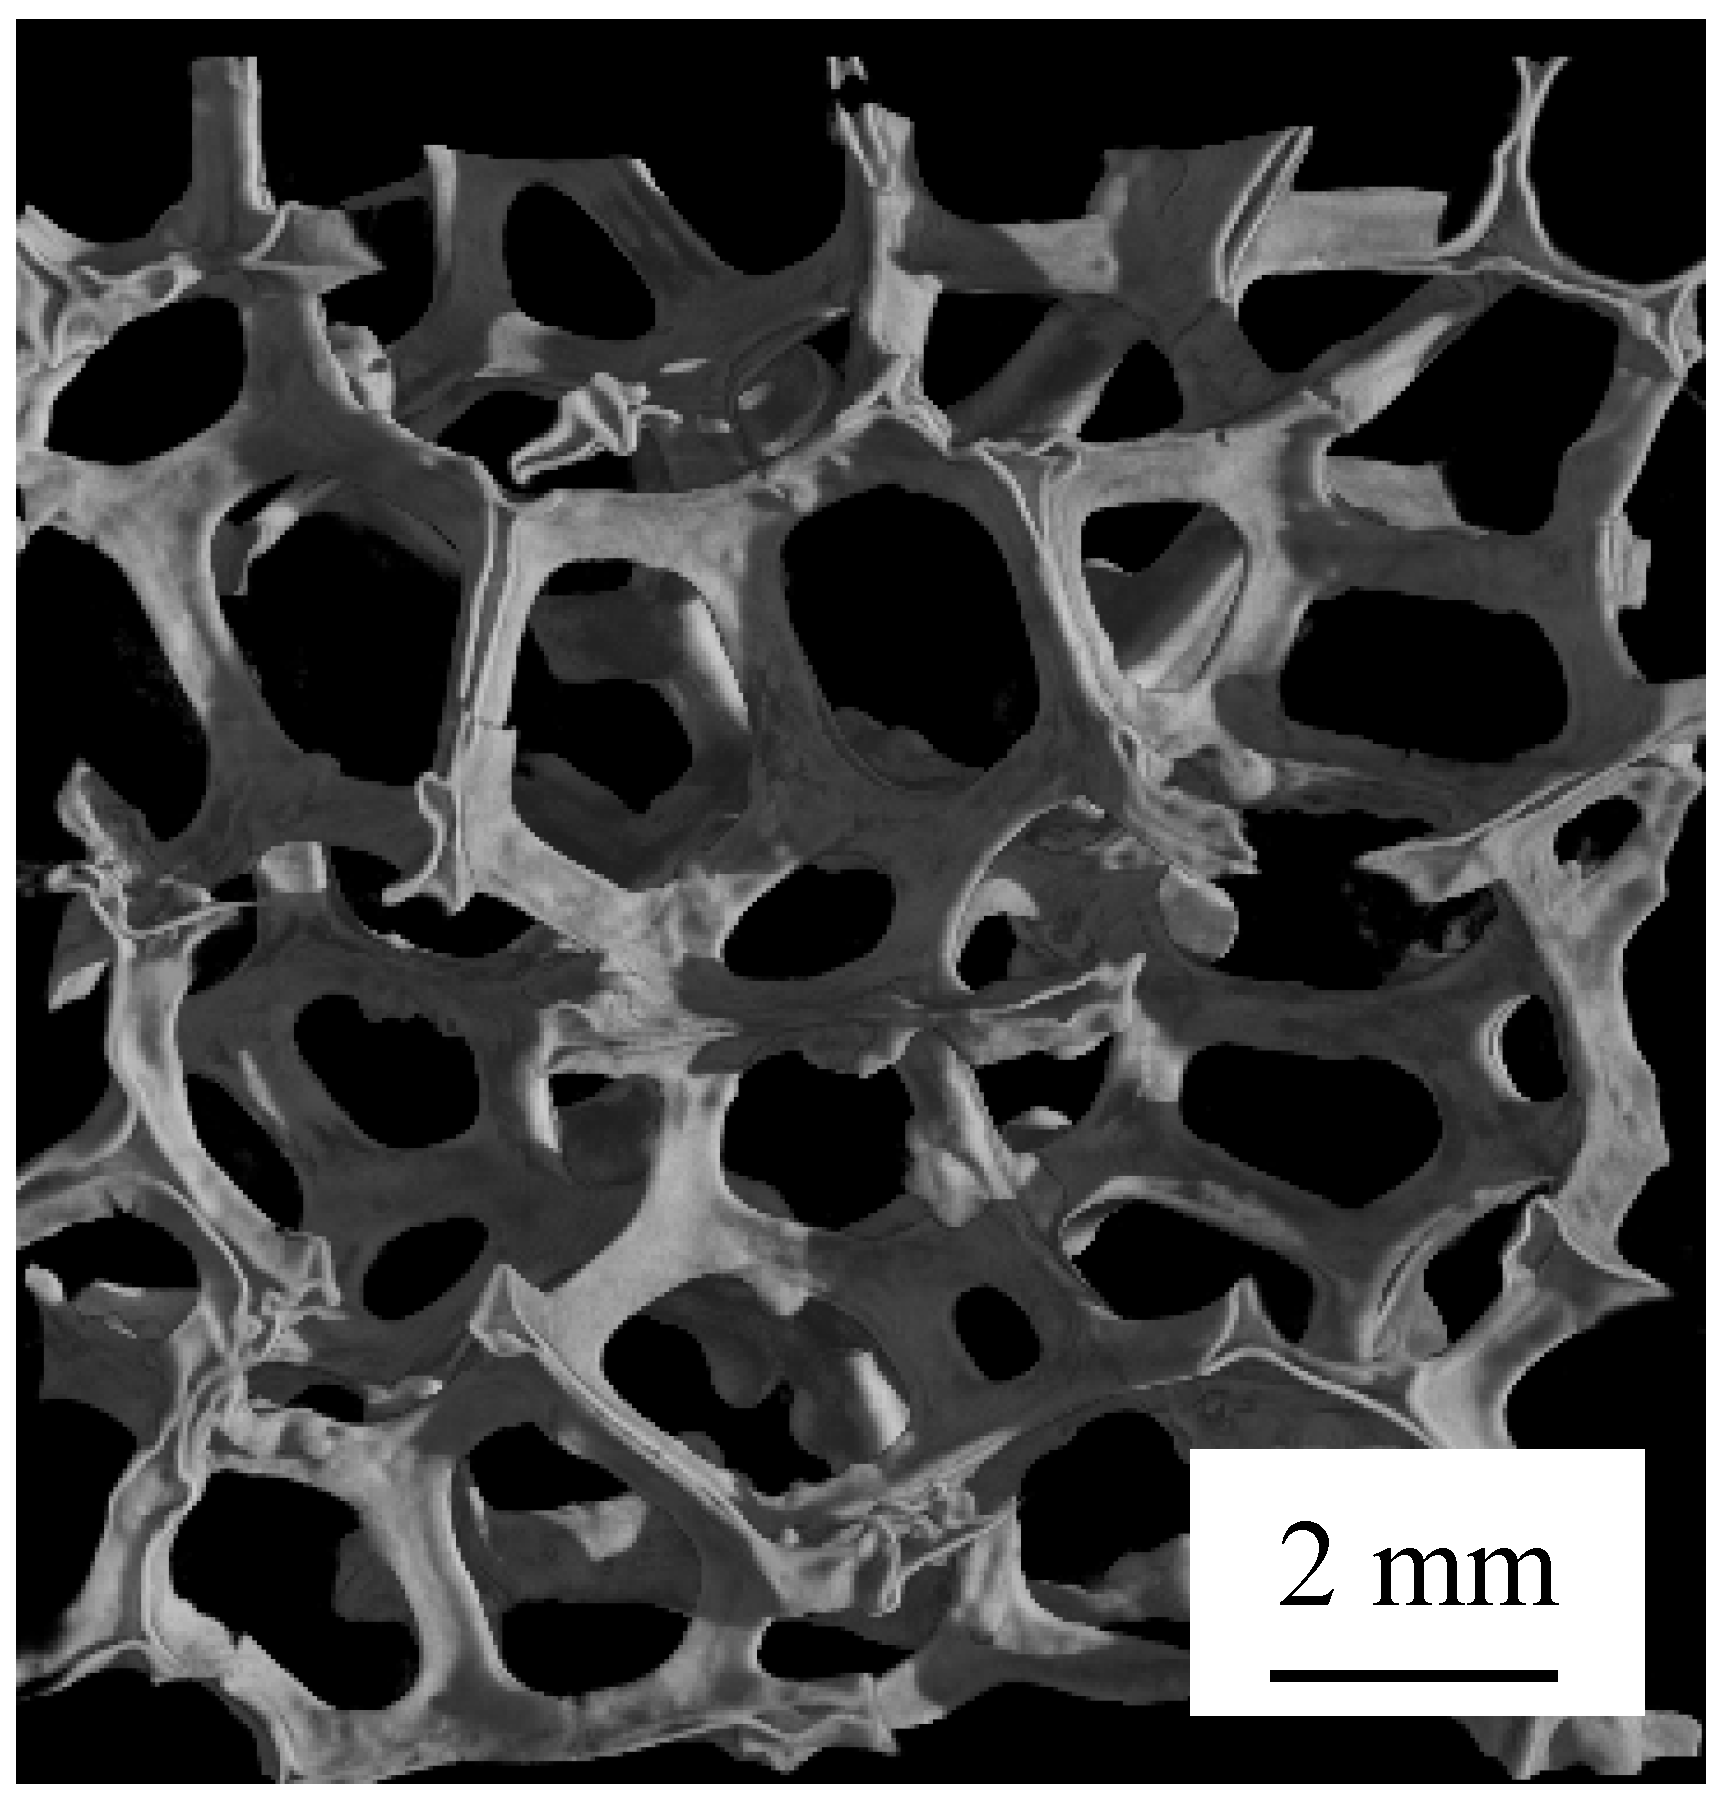
In this study, we used nickel foam with an open cell (Sumitomo Electric Industries, Figure 1) as a specimen for observing the nonuniform deformation of the cell structure. The specimens were cut into rectangular parallelepipeds with a 20 mm long, 10 mm × 10 mm cross-section using a wire discharge. Figure 2 shows a 3D image of the cell shape of a typical Ni foam observed by an X-ray computed tomography system. Table 1 lists the cell shape parameters observed by X-ray CT. The cells are composed of dense solid columns (pillars), nodes, and pores. They have an open cell structure and are connected in three dimensions. In addition, the Ni foam has an irregular cell structure with nonuniform cell shapes. Bulk density ρcell of the Ni foam was approximately 450 kg/m3.

2.2. Silicone Rubber-Filled Nickel Foam

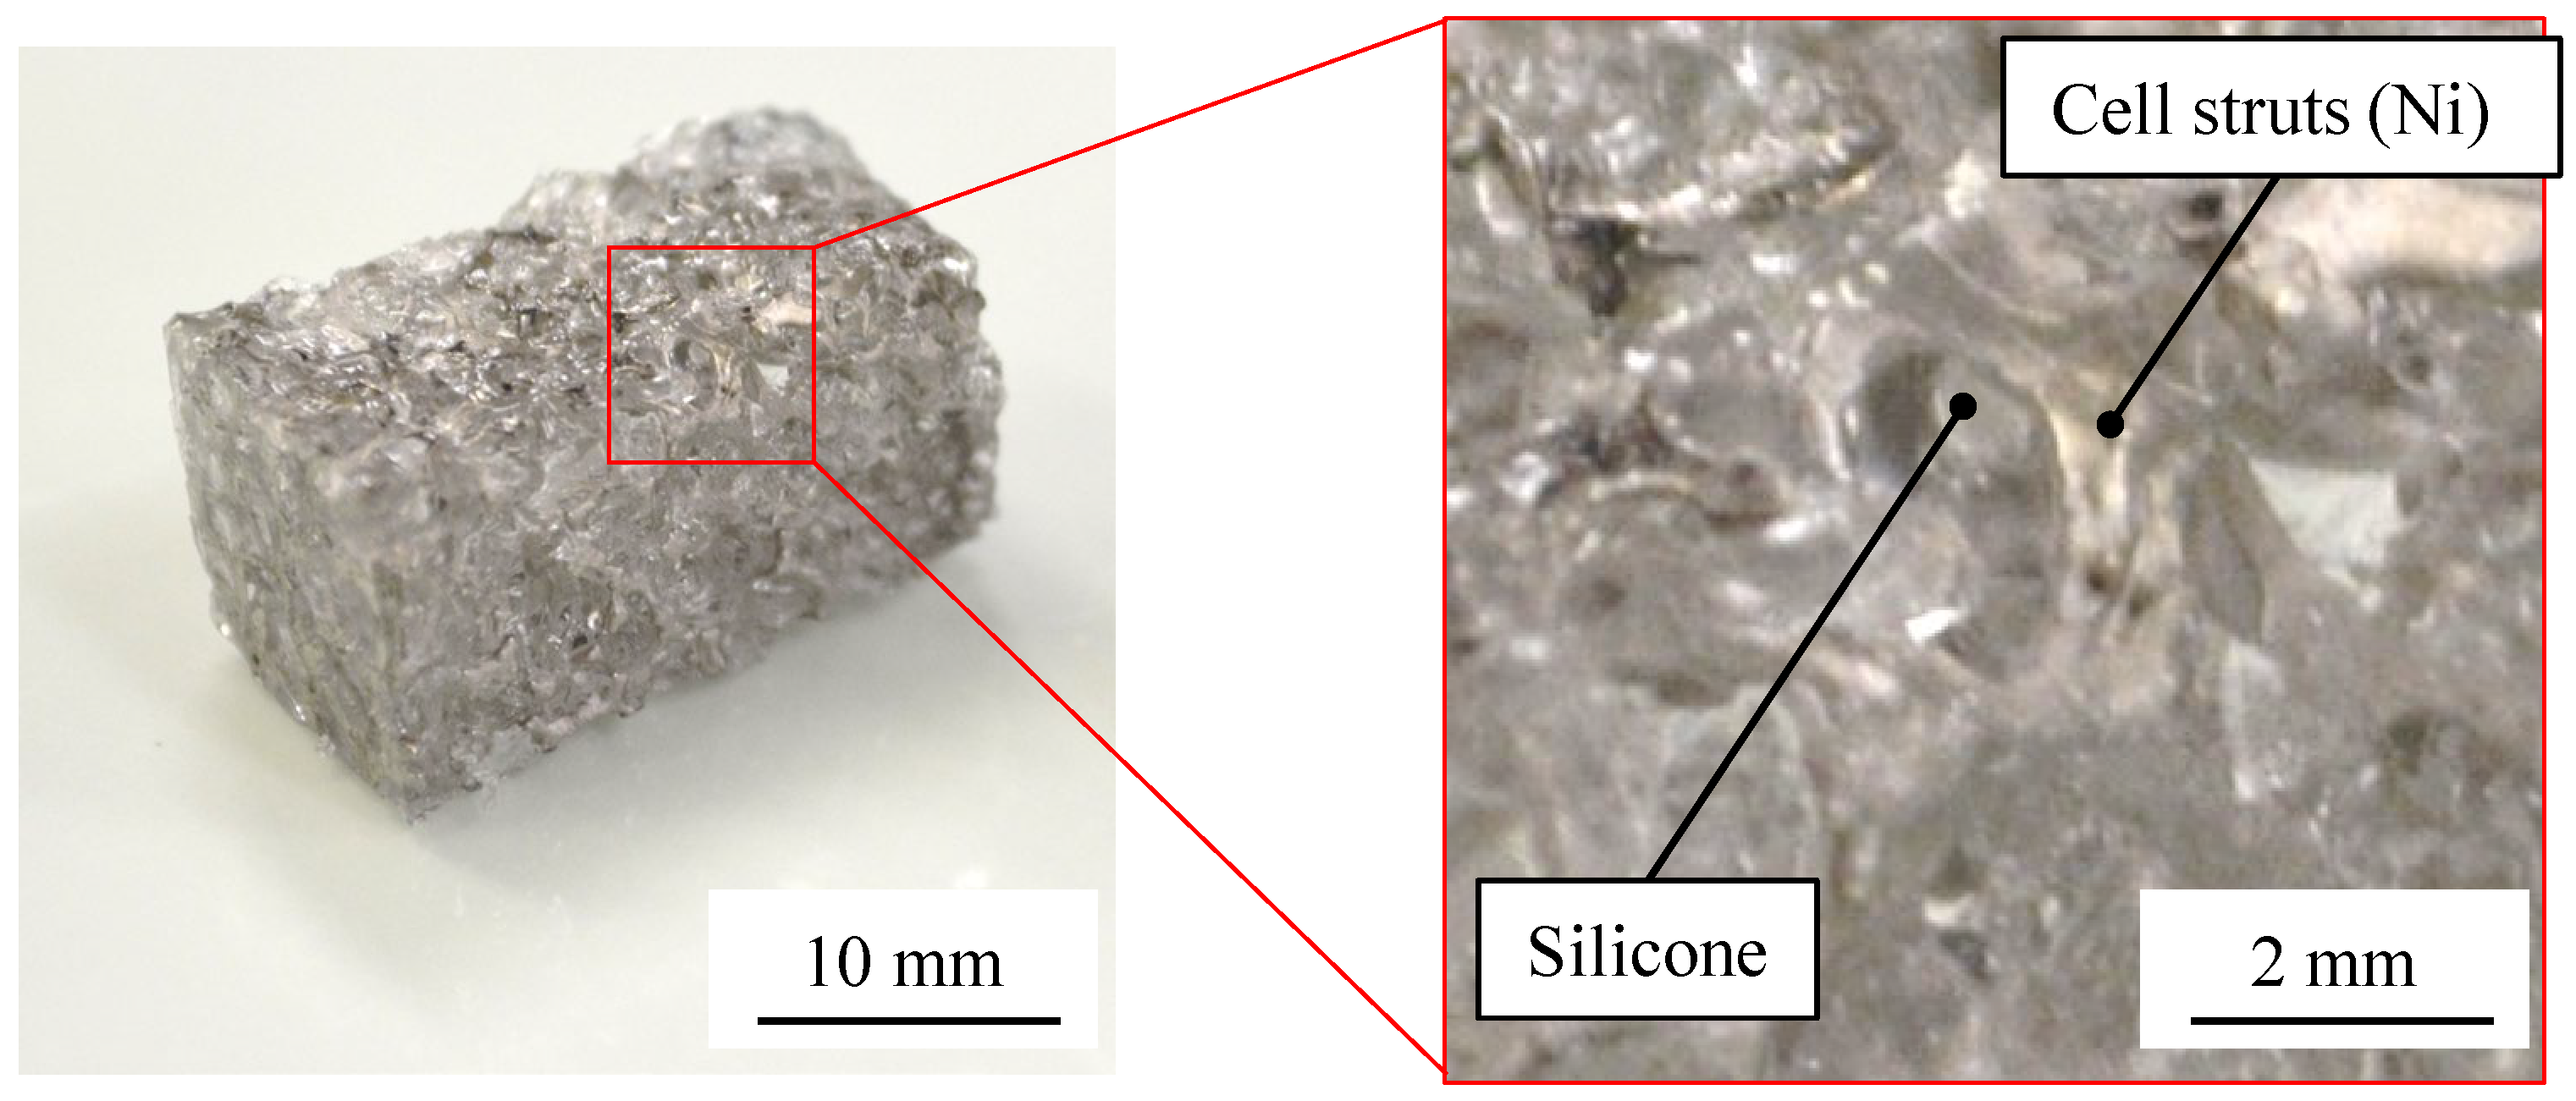
We changed the compressive deformation behavior of the Ni foam and the silicone-rubber-filled nickel foam (Ni/silicone foam) by filling the former with silicone rubber and heat-curing it at 423 K for 2100 s in a vacuum oven (ESPEC Co. (Osaka, Japan), VAC-301). Figure 3 shows the Ni/silicone foam. As shown in Table 1, the specimen’s shape resembles those described in the previous section, and its density was approximately 1300 kg/m3. The silicone rubber (Dow Corning (Midland, MI, USA), Sylgard 527) used for the filling consisted of a main agent and a curing agent in a 1:2 ratio. The density of the silicone rubber alone was approximately 1000 kg/m3. Although Ni/silicone foam has the same cell structure as Ni foam, it has a different strain rate dependence because they have different parameters of Young’s modulus, density, and stress wave speed. Therefore, we clarified the compressive deformation behavior of the cell structure by performing compression tests on the Ni foam and the Ni/silicone foam in a wide strain rate range.

2.3. Pure Nickel

To investigate the effect of the base material of Ni foam, a dense body of pure nickel (99.7%) were prepared as a specimen. The 4 mm-diameter cylindrical specimen was 6 mm high.

2.4. Silicone Rubber

To investigate the mechanical properties of silicone rubber, we prepared a specimen made of silicone rubber used in 2.2, which is the filling material for Ni/silicone foam. The dimensions of the specimen were 10 mm × 10 mm (cross section) and 10 mm (height). The dimensions and density of the Ni and the silicone rubber are summarized in Table 2.

3. Compression Test

3.1. Quasi-Static Test

A quasi-static test was performed using a universal testing machine (INSTRON (Norwood, MA, USA), 5500R) at room temperature. The compression velocities were 3.4 × 10⁻³, 3.4 × 10⁻², and 3.4 × 10⁻¹ s−1 (strain rates: 1.7 × 10⁻⁴, 1.7 × 10⁻³, and 1.7 × 10⁻² s−1). The test was performed three times at each velocity.

3.2. Dynamic/Impact Test

3.2.1. SHB Method

The SHB method [17,18] is a typical test method in which an elastic stress bar is used as an impact load sensor. We used it for pure Ni. This method is widely recognized as a rapid deformation test method with high reliability for solid materials. The average strain rates obtained in it were 1.4 × 10² and 8.3 × 10² s−1.

3.2.2. Dynamic and Impact Load-Measuring Apparatus with Opposite Load Cells

Generally, the SHB method is also used to evaluate the impact compression characteristics of dense materials. However, because the cell structure used in this study undergoes large deformation over a long period of time, a sufficient amount of strain cannot be obtained by the SHB method, resulting in a deformation of constant duration, depending on the bar length. In such cases, the DHB method is often used because, compared to the SHB method, it has no incident bar and can be used to measure a large deformation by lengthening the transmitted bar. However, as mentioned above, when the DHB method is used, the loads on the fixed and impact ends must be obtained from different specimens, and the force equilibrium cannot be evaluated using the same specimen.
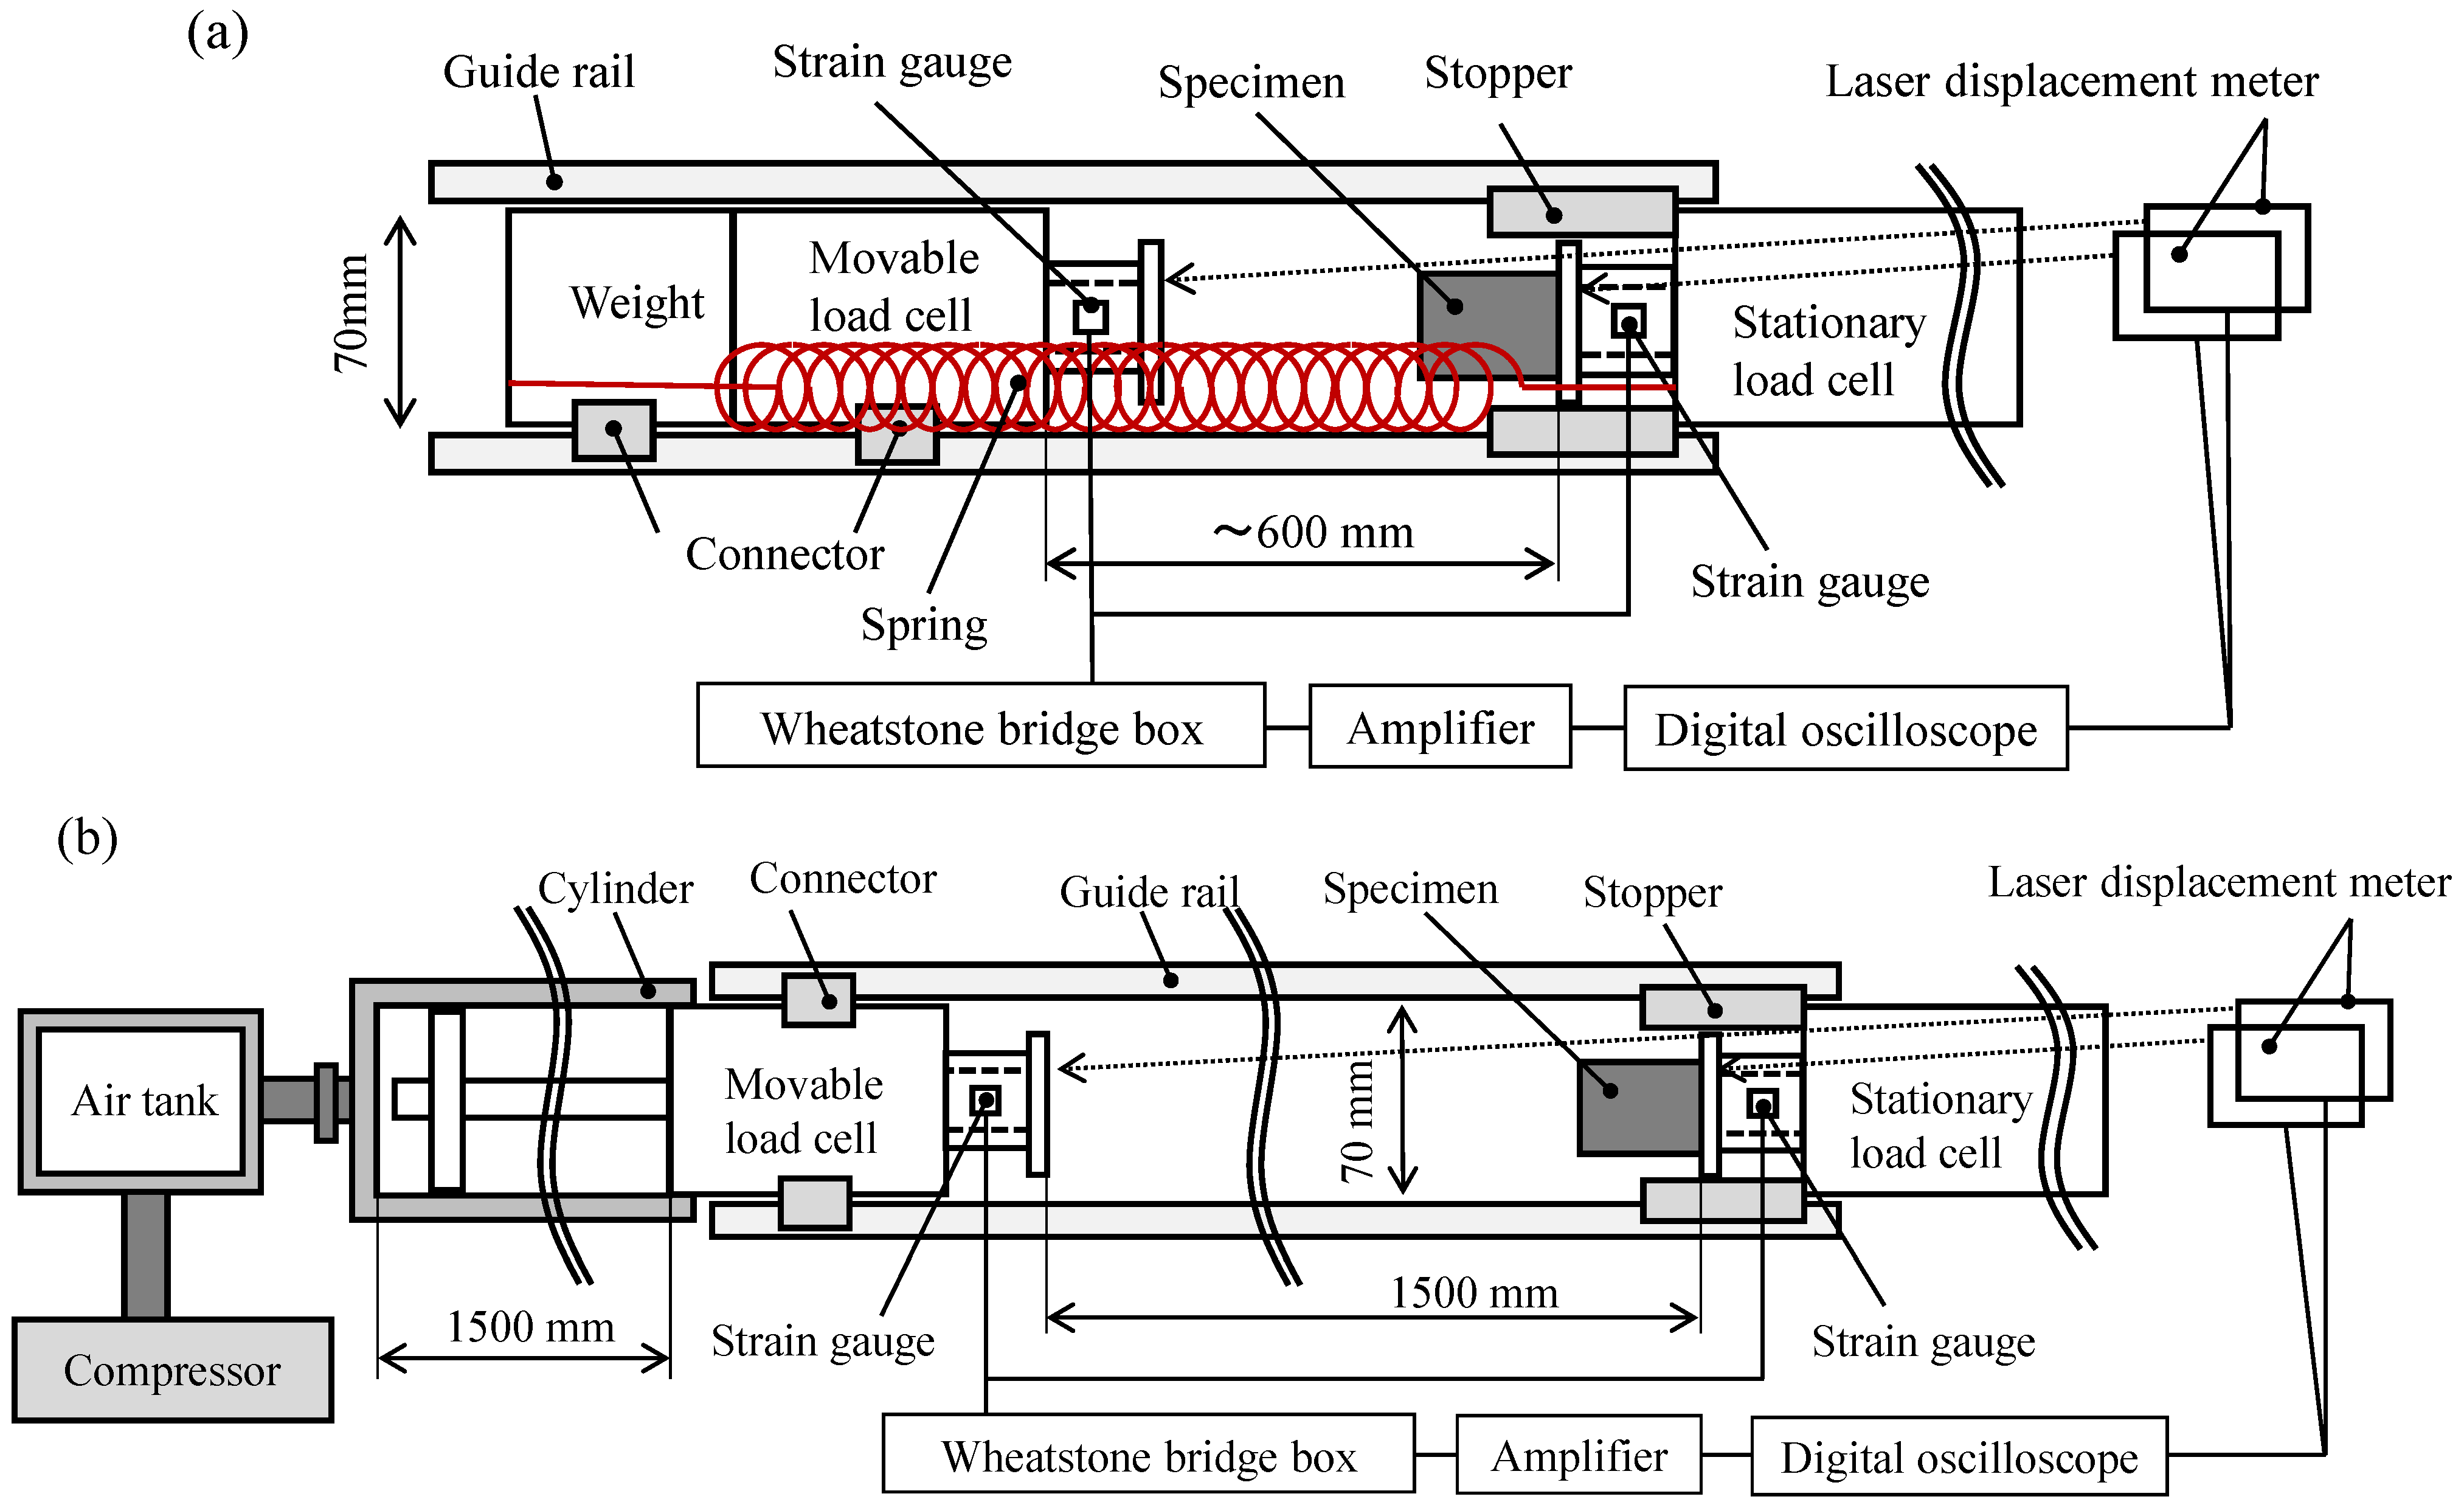
To overcome these issues, in a previous study, we developed dynamic and impact load-measuring apparatus with opposite load cells that can evaluate the force equilibrium and large deformations of a specimen in a one-time test [19,20]. Figure 4 shows their schematics. The test apparatus consists of a load measurement section, a movable mechanism, and a displacement measurement section. For the load measurement section, a universal rate range load cell [21] measured the load over a long period by reducing the disturbance due to the reflection and the interference of stress waves even at a dynamic strain rate. Figure 5 shows a schematic view of the universal rate range load cell (hereafter URR load cell). The URR load cell is composed of a stress detection part and a stress transmission part. The stress waves were measured using a semiconductor strain gauge with a gauge factor of 164 ± 3% (Kyowa Electronic Instruments (Tokyo, Japan), KSP-1-350-E4) attached to the center of the stress detection part. In this configuration, a 1 MHz low-pass filter was used to remove electrical noise. The URR load cell has a capacity of 12 kN and a theoretical natural period of 0.013 ms. With URR load cell, the reflected stress waves can be reduced by increasing the cross-sectional area ratio between the measurement and transmission sections. In this apparatus, URR load cells are used for all movable load cells and stationary load cells.
The movable mechanism allows the use of two loading methods, depending on the strain rate. As shown in Figure 4a, the loading method given by a tension spring was used for the dynamic compression test. In addition, for the impact compression test, the injection method with compressed air was used as shown in Figure 4b. By selecting the movable mechanism, it is possible to test in a wide compression velocities range. Two laser displacement meters (KEYENCE (Osaka, Japan), LK-G5000) with a sampling rate of 200 kHz were used in the displacement measurement section. We measured the displacements of the movable and stationary load cells and calculated the specimen’s displacement by their differences. The deformations of the movable and stationary load cells (the stiffness of the test apparatuses) were also measured in advance and subtracted from the test results.
The compression velocities obtained using this test apparatus was 1.0 m/s (strain rate: 4.7 × 101 s−1) in the dynamic test and 7.6 m/s (strain rate: 3.8 × 10² s−1) and 26.0 m/s (strain rate: 1.3 × 10³ s−1) in the impact test. In the dynamic test, we confirmed that the movable load cell can compress the specimen at a constant velocity without deceleration. The deformation behavior of the specimen during the test was captured using a high-speed camera (nac Image Technology (Tokyo, Japan), HX-3) at a frame rate of 100,000 fps, a shutter interval of 3.0 μs, and an image size of 384 × 184 pixels. The field of view is a single plane.

4. Results of Compression Tests of Constituent Materials

4.1. Pure Ni

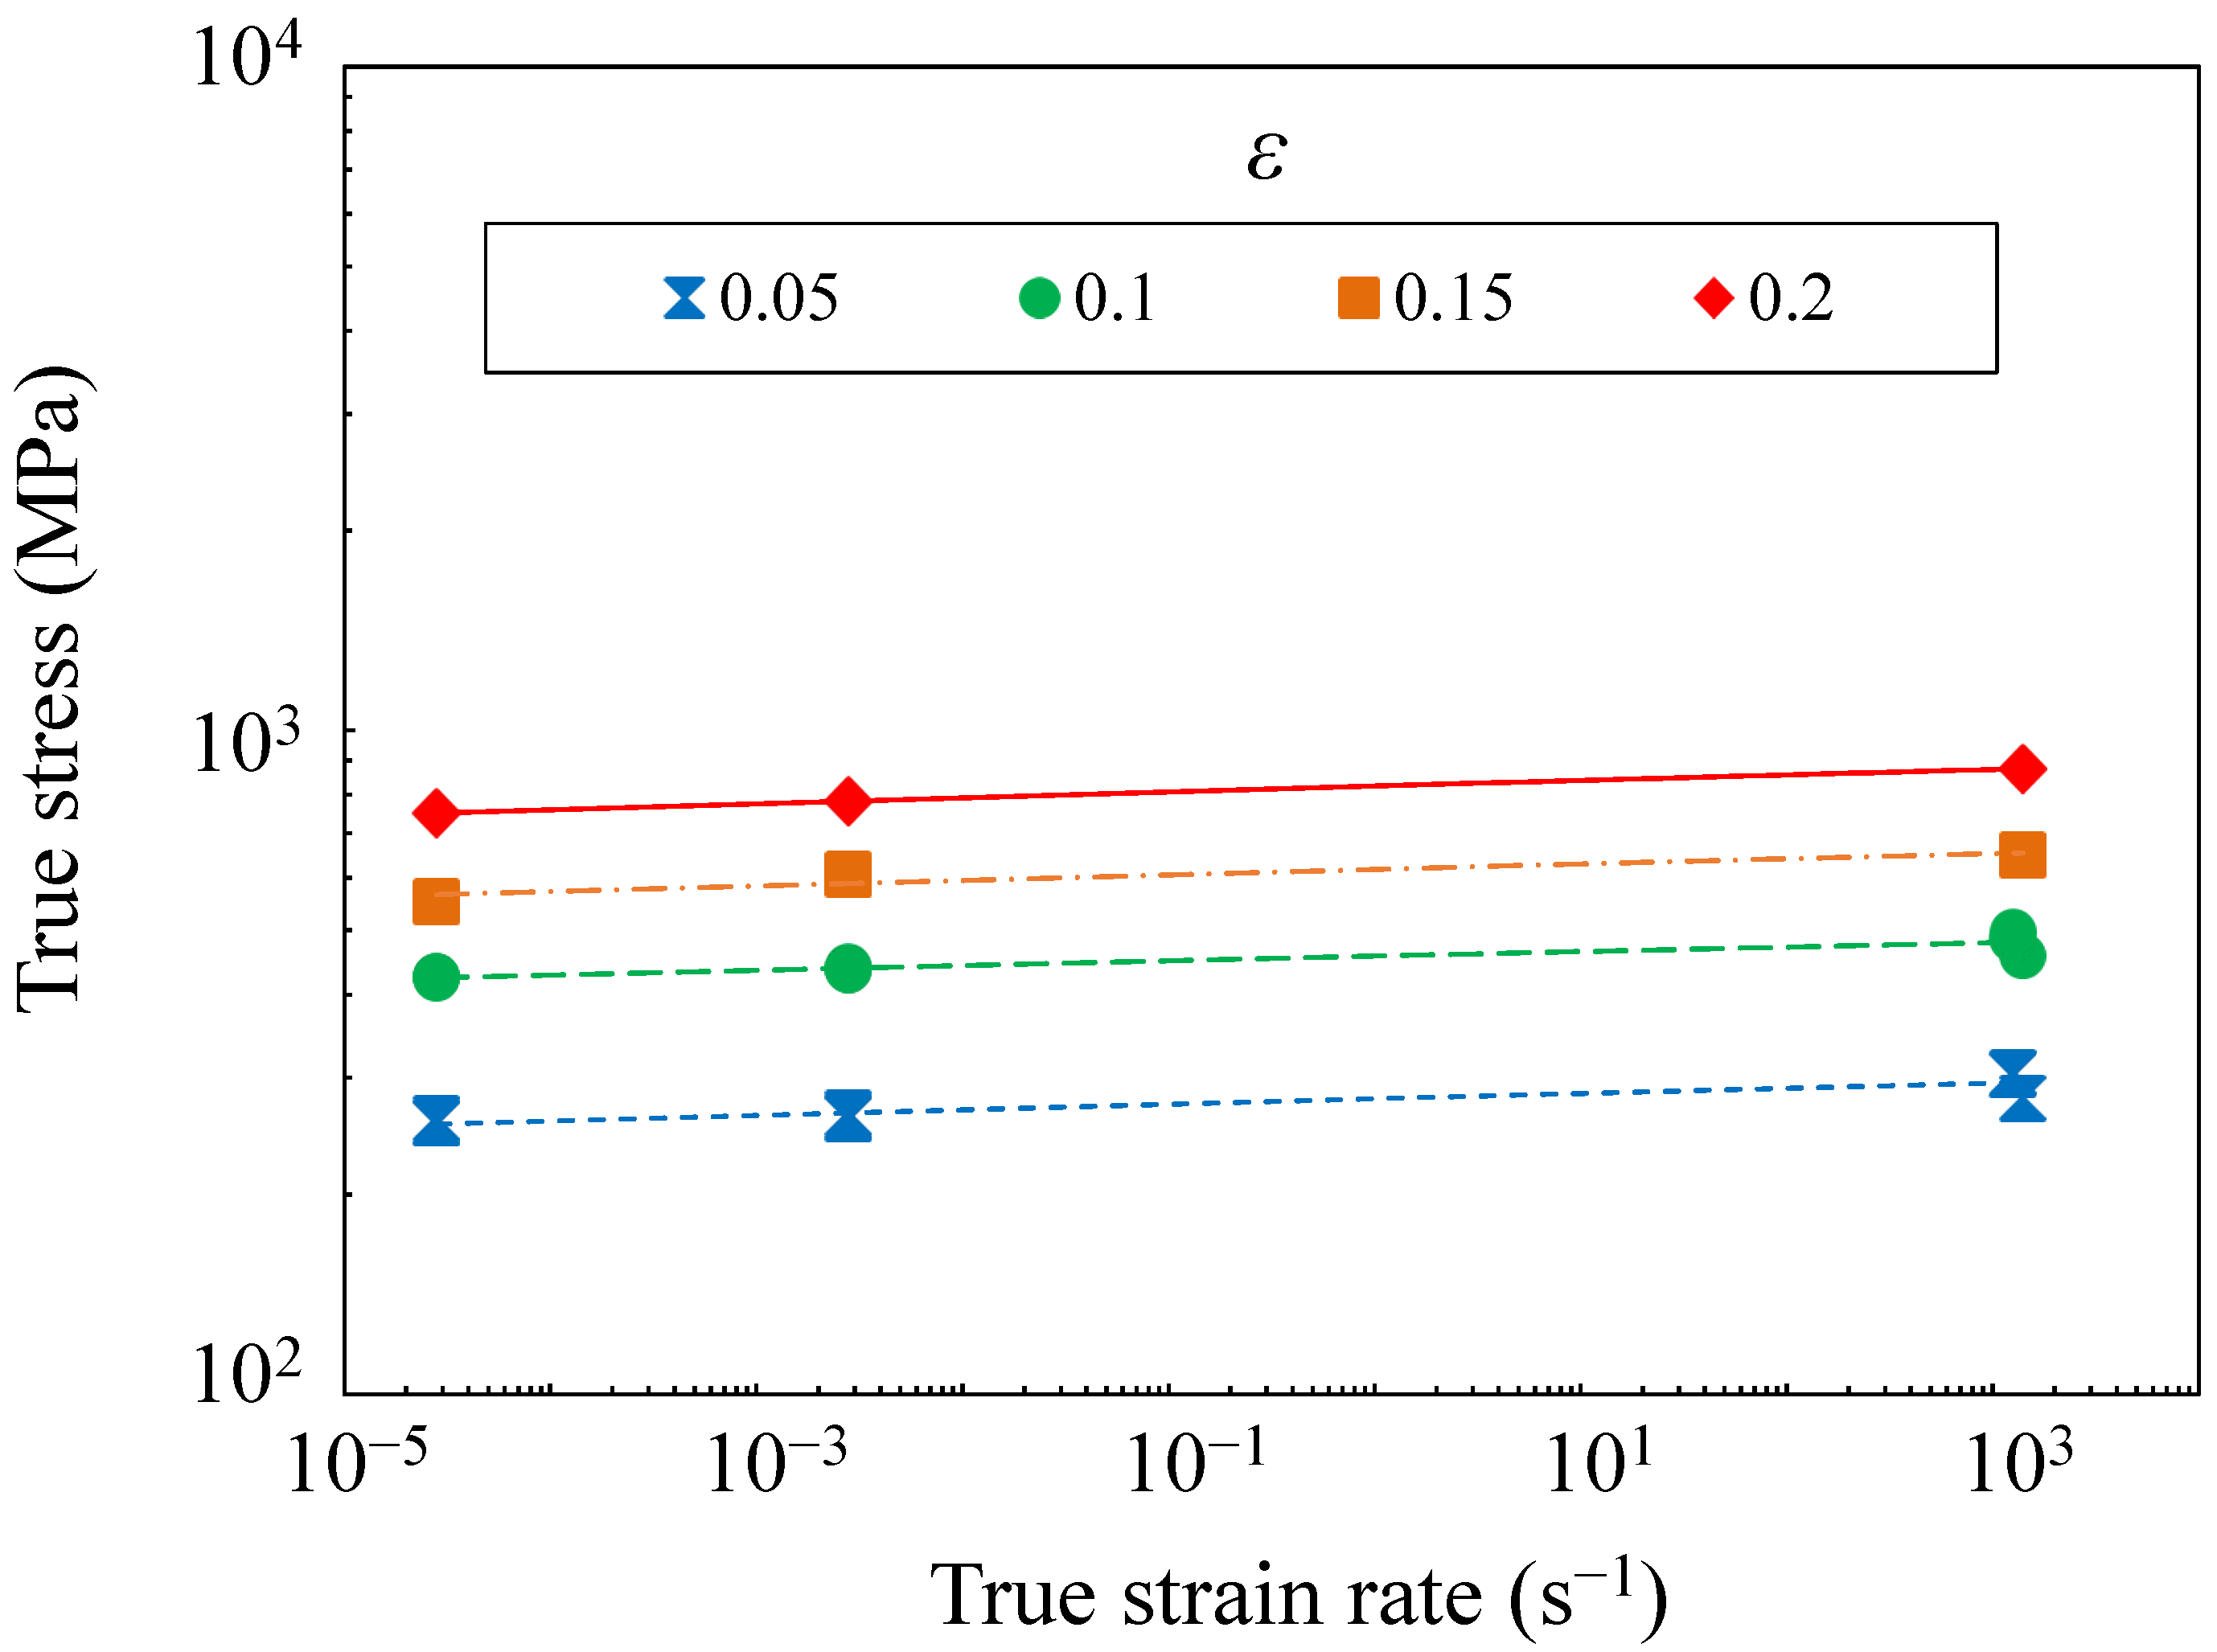
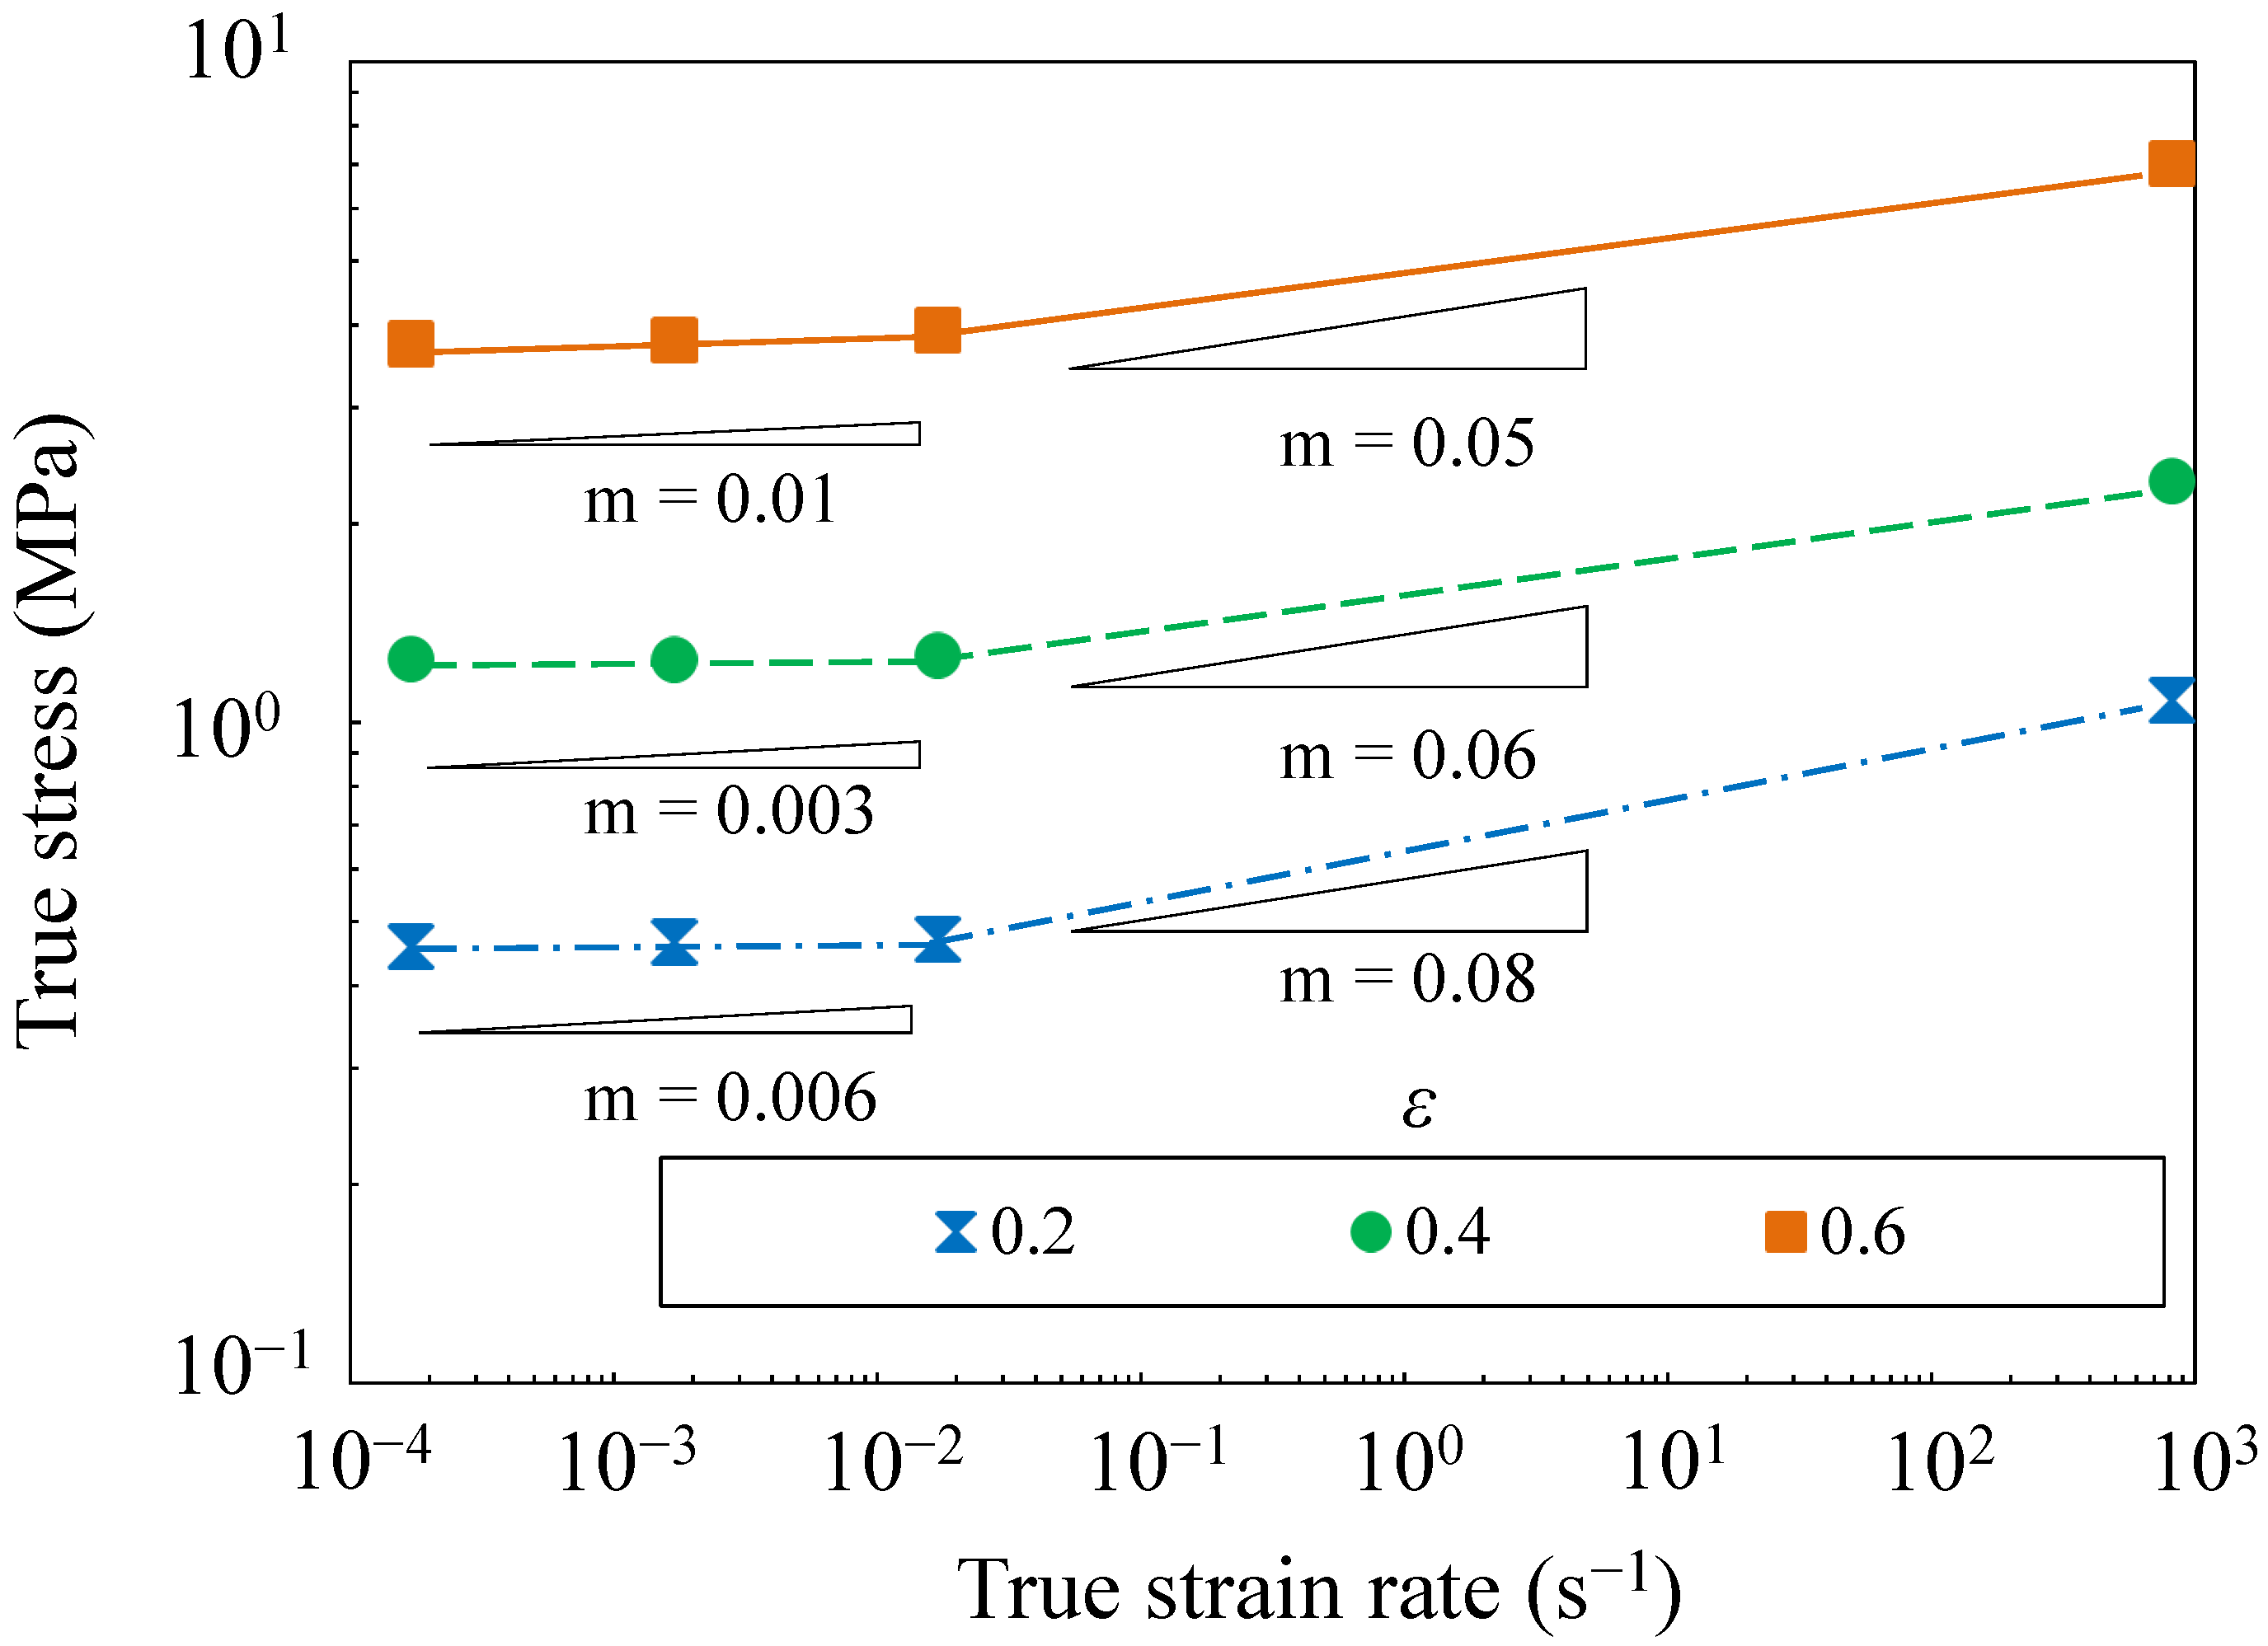
The compression characteristics of pure Ni were investigated through quasi-static and impact compression tests (SHB method). Figure 6 shows the obtained true stress–true strain rate relationships. Here, true stress σ increases at each true strain, caused by true strain rate ε ˙   increase:
σ = K ε ˙ m ,
where K is a constant and m is the strain rate sensitivity index, which determines the increase in the true stress with a growing true strain rate and is represented by a slope in the double logarithmic graph. The results indicate m ≤ 0.009, which is an exceedingly small value. Therefore, the strain rate dependence of the stress between the true strains of 0.05 and 0.2 is small for pure Ni.

4.2. Silicone Rubber

As with pure Ni, quasi-static and impact compression tests (with the load-measuring apparatus with opposite load cells) were performed to determine the compression characteristics of the silicone rubber. The obtained true stress–true strain rate relationships are shown in Figure 7. Although there is no change in the true stress with the quasi-static true strain rate, Figure 7 shows that the silicone rubber alone had a higher strain rate sensitivity between 1.7 × 10⁻² and 8.2 × 10² s−1 than during the quasi-static test. This finding confirmed that silicone rubber has a strain rate dependence of the stress.

5. Results of Compression Tests of Cell Structure

5.1. Compression Velocity of 20.0 m/s or Less

5.1.1. Ni Foam

In this study, the stress was corrected to suppress the variation caused by the differences in specimen density [20]:
σ n = σ × ( ρ r e f ρ c e l l ) x ,
where σn is the flow stress after correction (normalized stress), ρcell is the bulk density of individual specimens, ρref is the average bulk density of all specimens (in case of Ni foam, ρref = 479 kg/m3), and x is the density sensitivity index. Density sensitivity index x of the Ni foam in this study was 2.19.
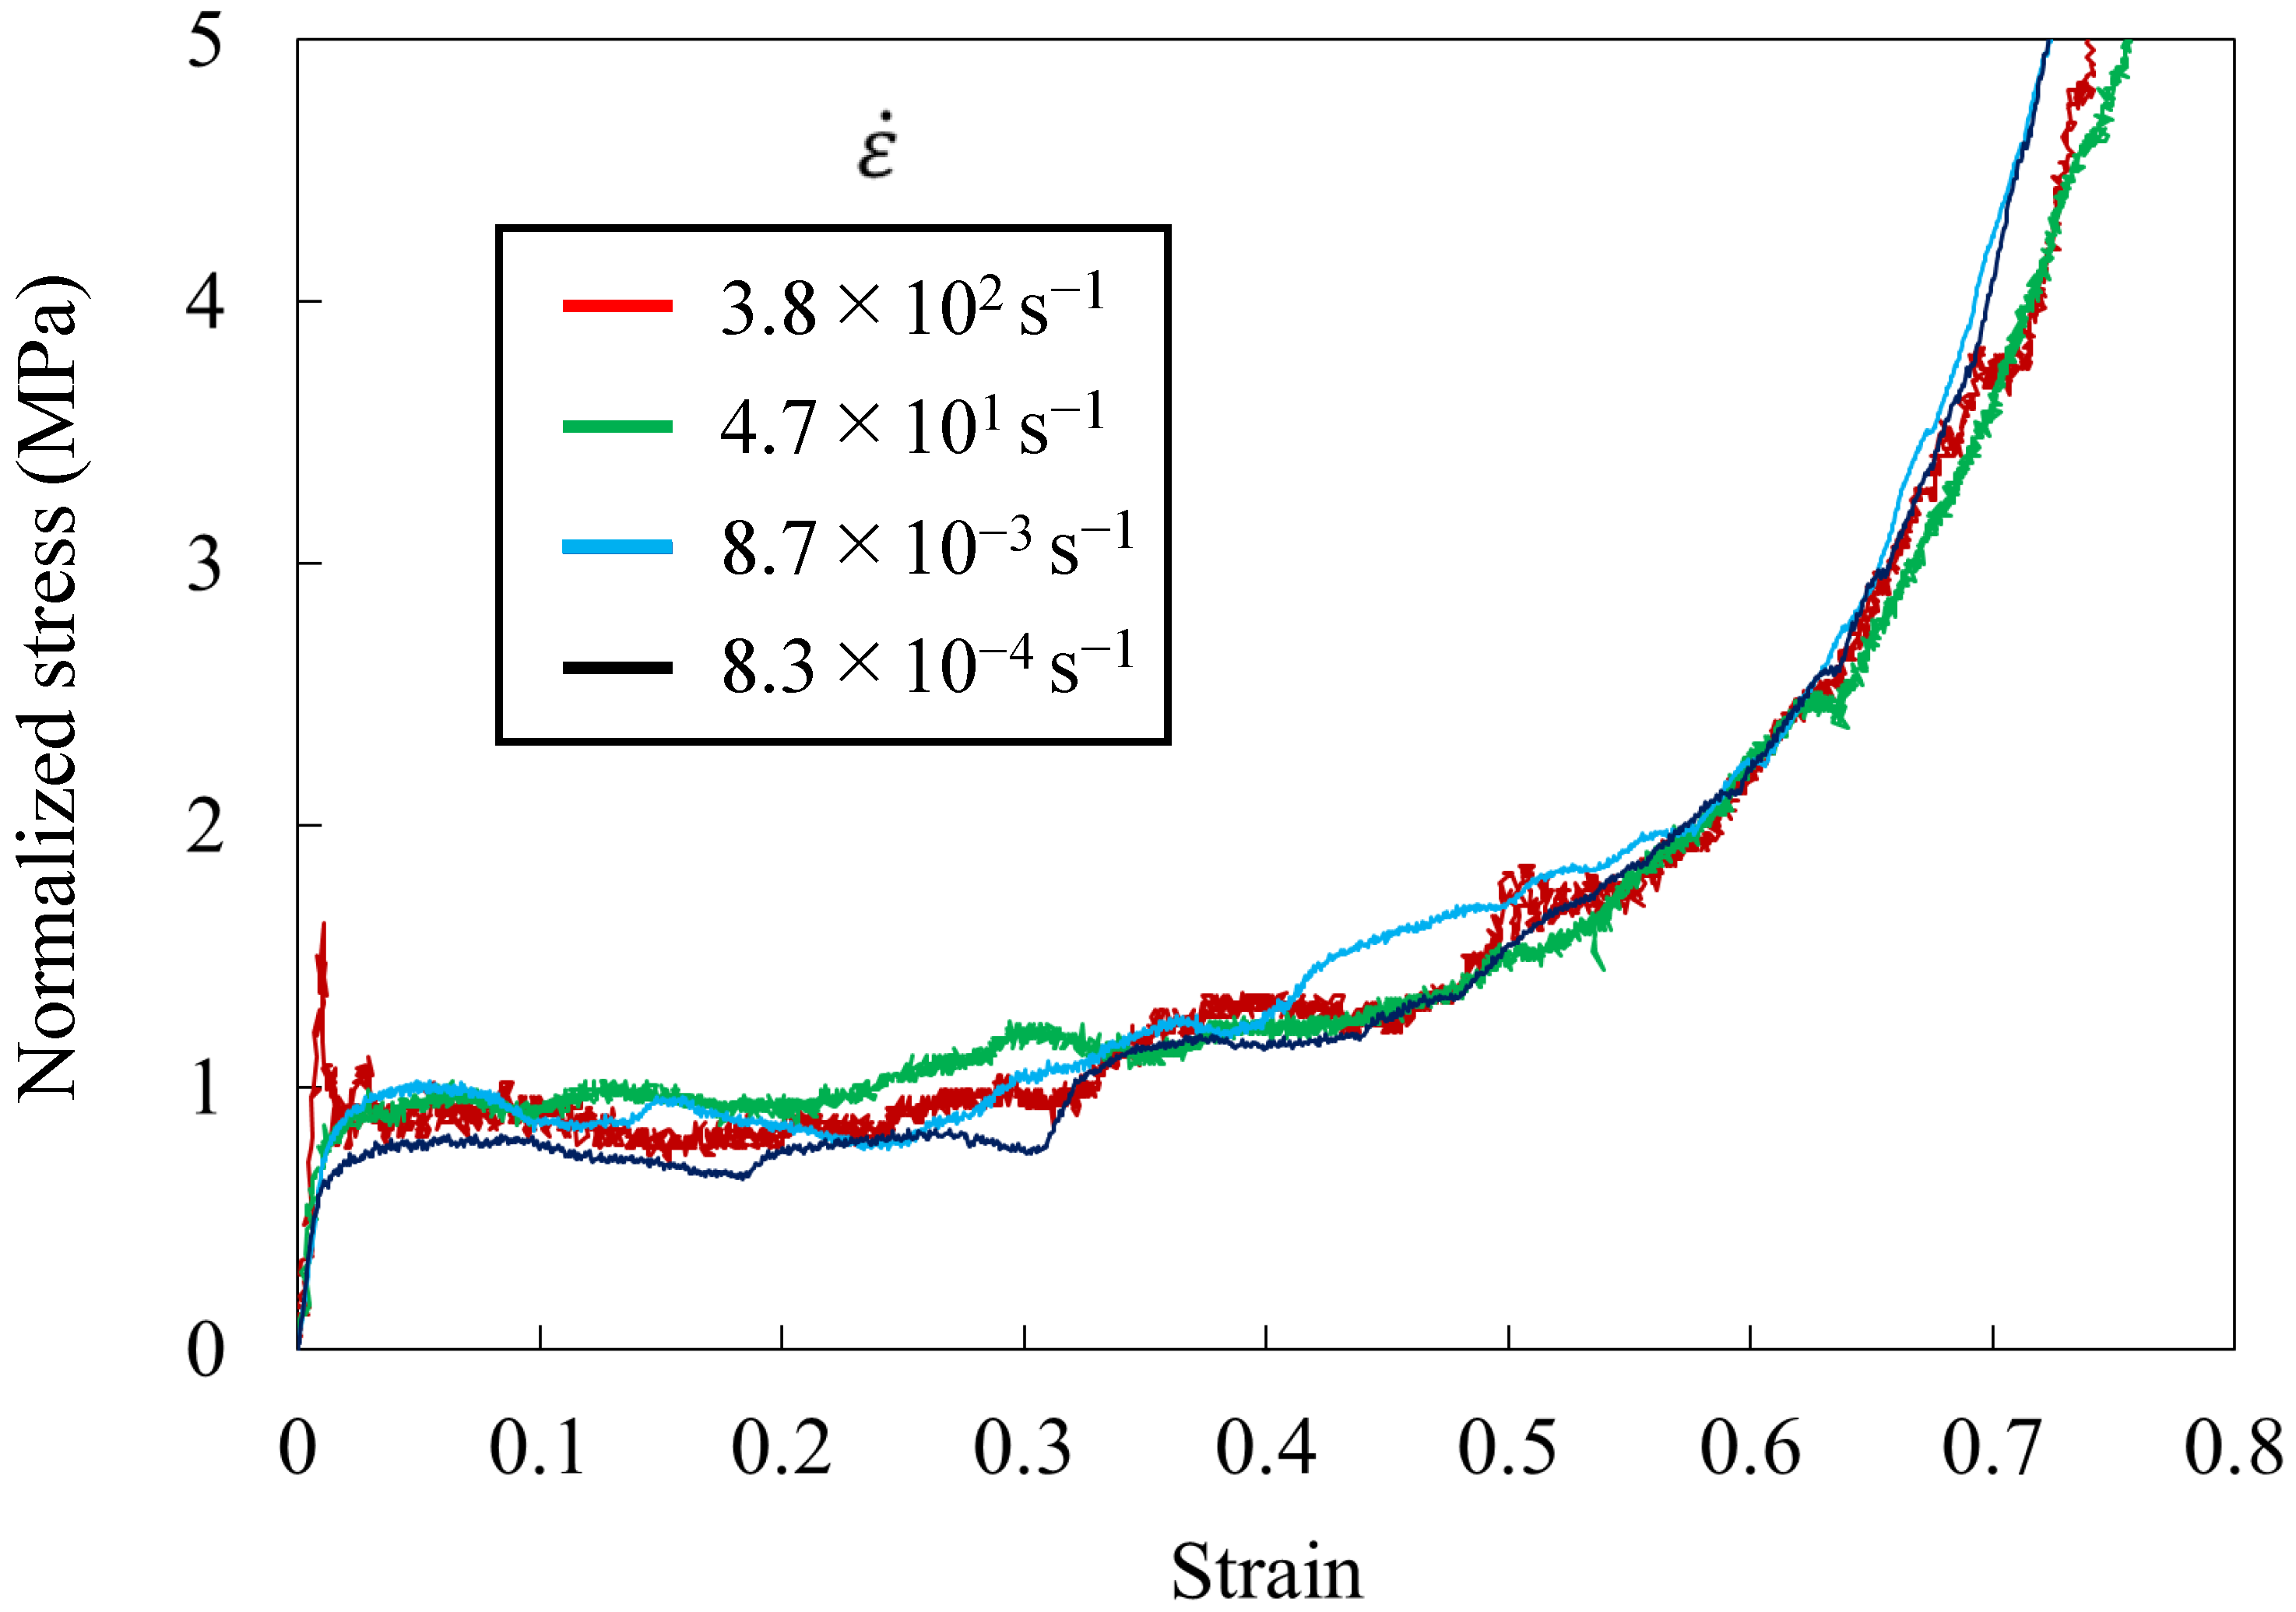
Figure 8 shows the typical normalized stress–strain relationship of Ni foam at strain rates between 8.3 × 10⁻⁴ and 3.8 × 10² s−1, which correspond to compression velocities of 20.0 m/s or less. Since the figure confirms no difference in the time history of the loads on both ends of all specimens at a compression velocity of 20.0 m/s or less, only the values of the movable load cell are shown here. Regardless of the strain rate, we observed elastic, plateau, and densification regions corresponding to the three stages in the general deformation processes of a cell structure [2]. No change in the normalized stress with an increasing strain rate was confirmed. This tendency is identical as that of the strain rate dependence in the base metal Ni. For the Ni foam, the pores are filled with air, and because it is an open cell, hardly any air compression occurs. Therefore, this structure clearly shows no strain rate dependence.
No nonuniform deformation due to high-speed deformation was observed at compression velocities of 20.0 m/s or less, and deformation occurred throughout the entire specimen. In other words, local deformation, which occurred sequentially from the part with the lowest normalized stress inside the specimen, occurred simultaneously throughout. Because the load histories of the movable and stationary load cells were identical, the load at both ends of the specimen clearly reached force equilibrium at a compression velocity of 20.0 m/s or less.

5.1.2. Ni/Silicone Foam

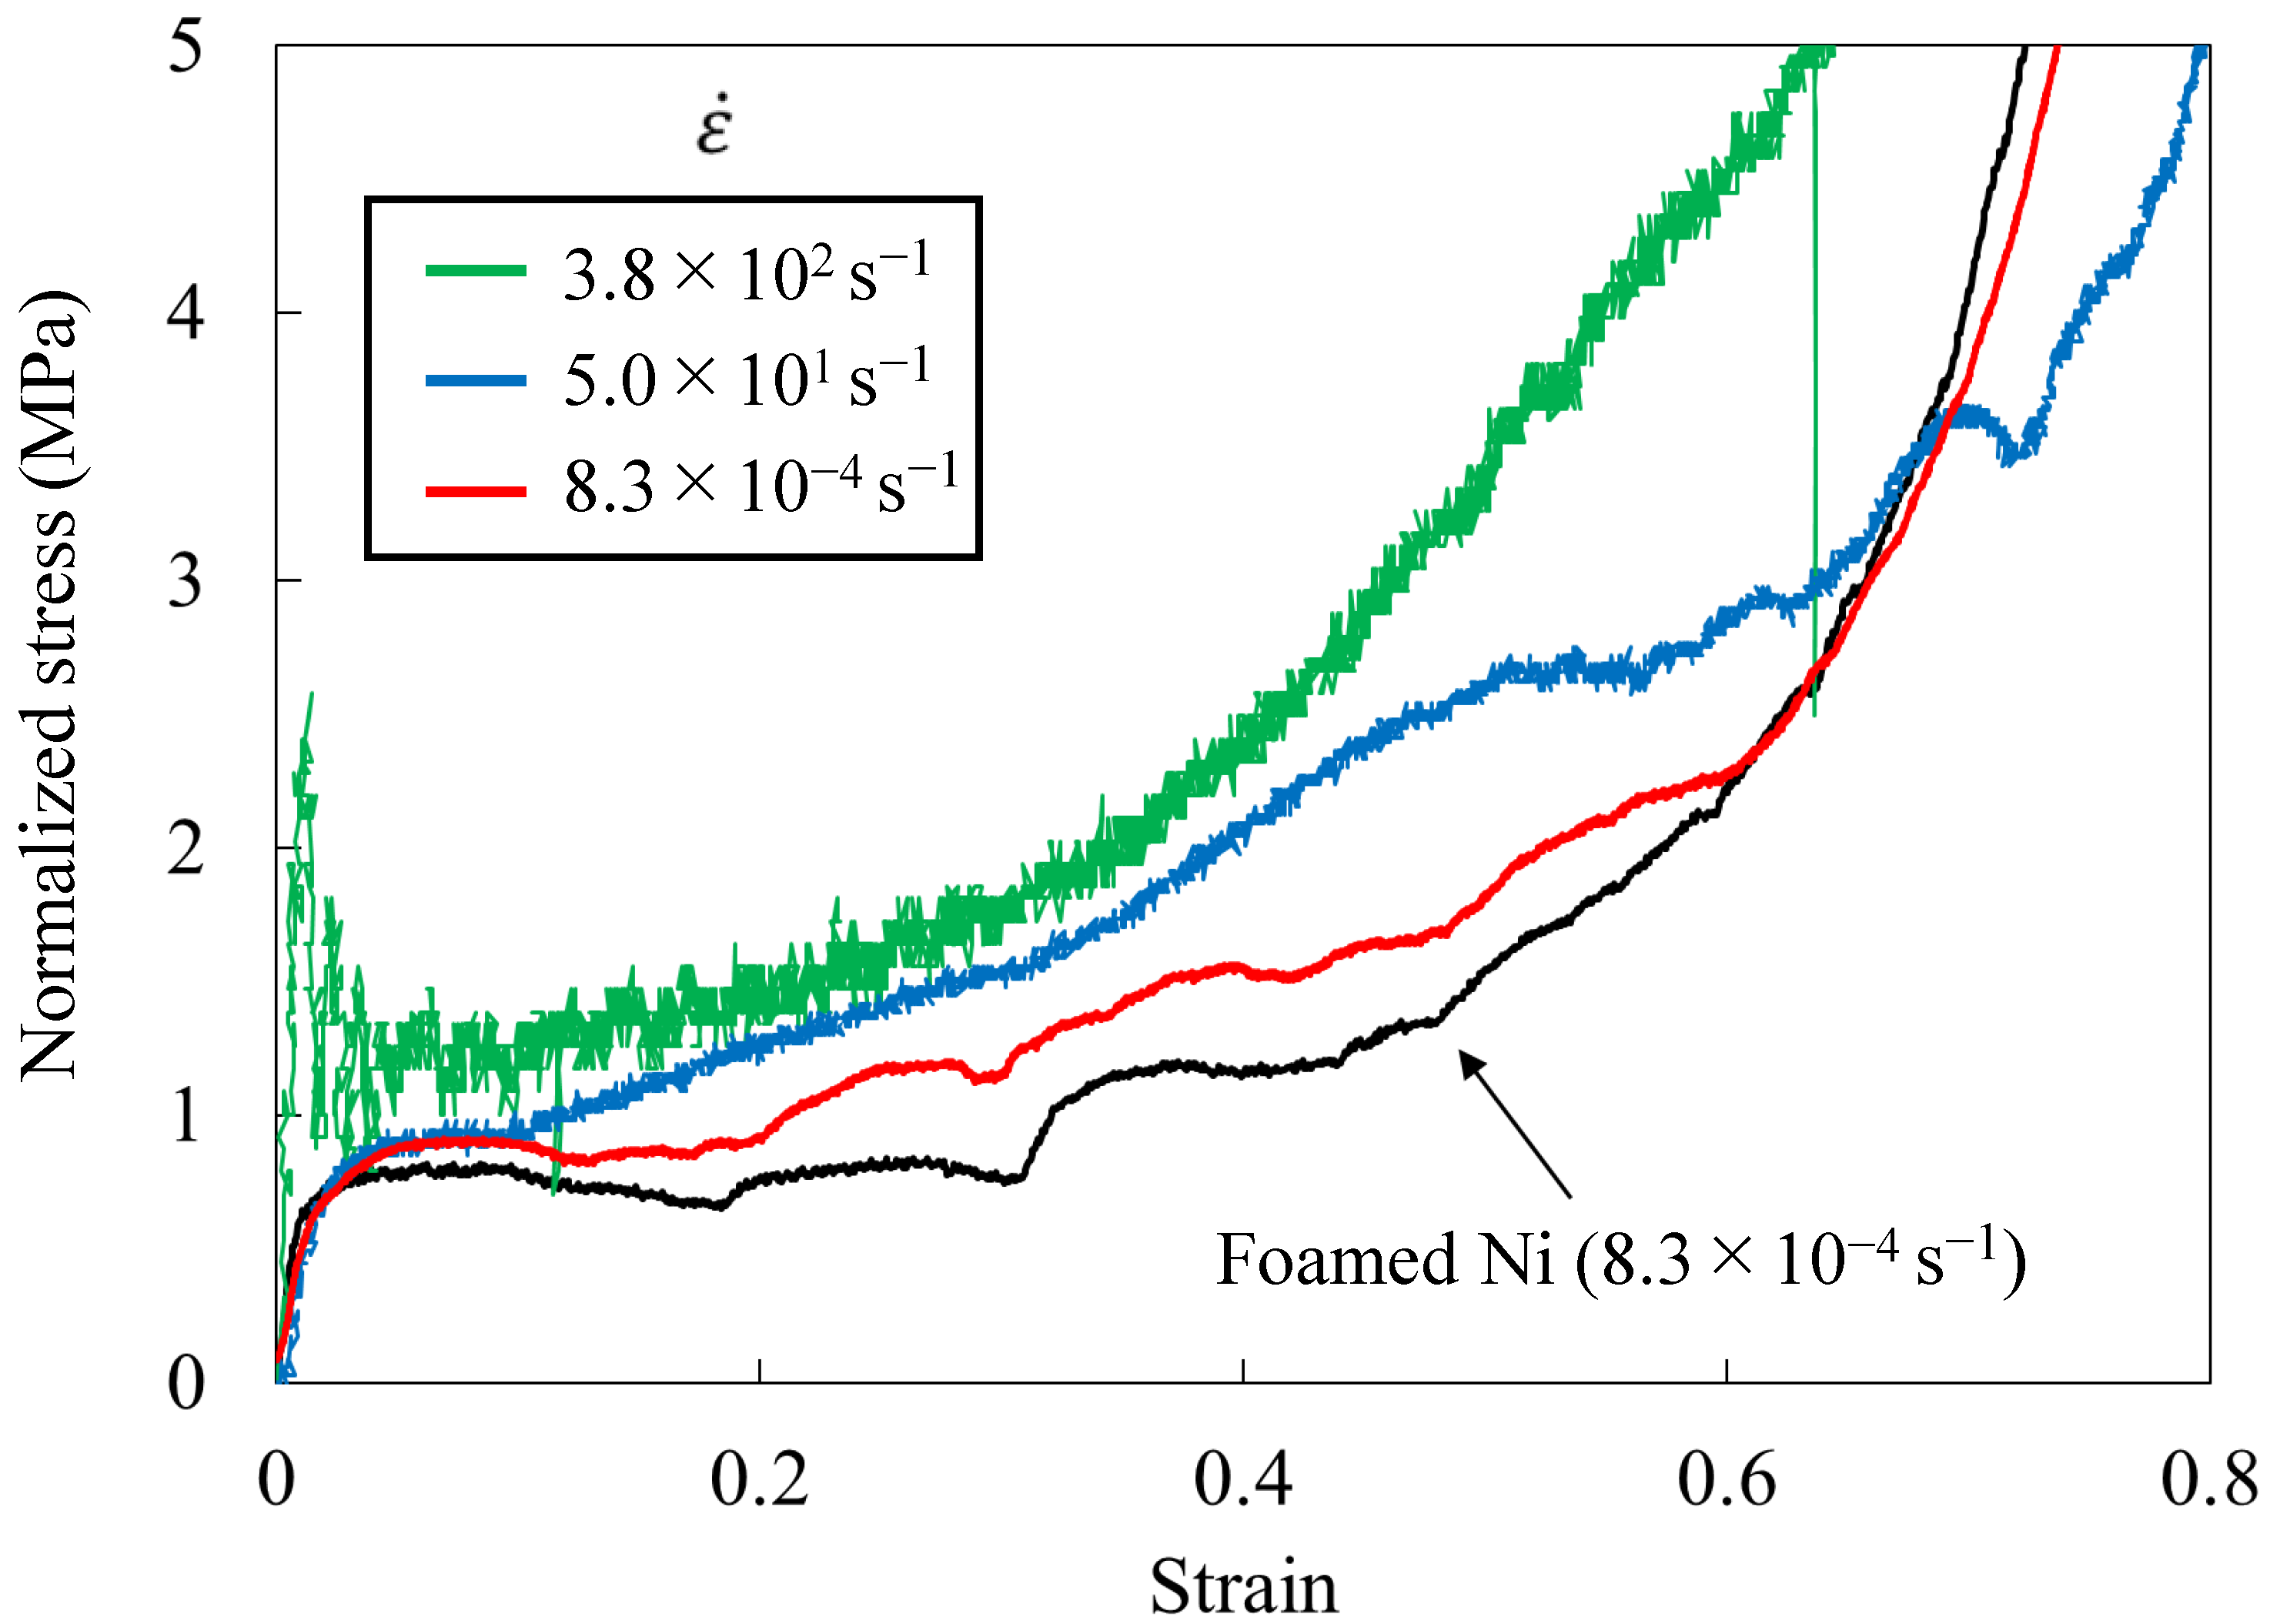
Figure 9 shows a typical normalized stress-strain relationship for Ni/silicone foam at strain rates between 8.3 × 10⁻⁴ and 3.8 × 10² s−1. For comparison, the Ni results at a strain rate of 8.3 × 10⁻⁴ s−1 are also shown. The load at both ends in all the Ni/silicone foam for this strain rate range was identical when the compression velocity was 20.0 m/s or less; only the values of the movable load cell are shown here. A comparison of the quasi-static test results of the Ni foam and the Ni/silicone foam confirmed that the latter shows increased normalized stress in the plateau region because the silicone rubber inside the structure was also compressed. The normalized stresses again coincide in the densified region because the silicone rubber flows out with densification.
Next, the normalized stress was confirmed to increase remarkably with a higher strain rate in the Ni/silicone foam, clarifying that the Ni/silicone foam with silicone rubber void-filling material has a strain rate dependence of normalized stress. This includes the strain rate dependence of the normalized stress confirmed for the silicone rubber alone but also the normalized stress increase due to the silicone rubber’s flow. In the densified region, the quasi-static test identified the same tendency as that observed in the Ni foam. To investigate the increase in the normalized stress with an increasing strain rate and the change in the densification start time in detail, we focused on the deformation behavior of the Ni/silicone foam.
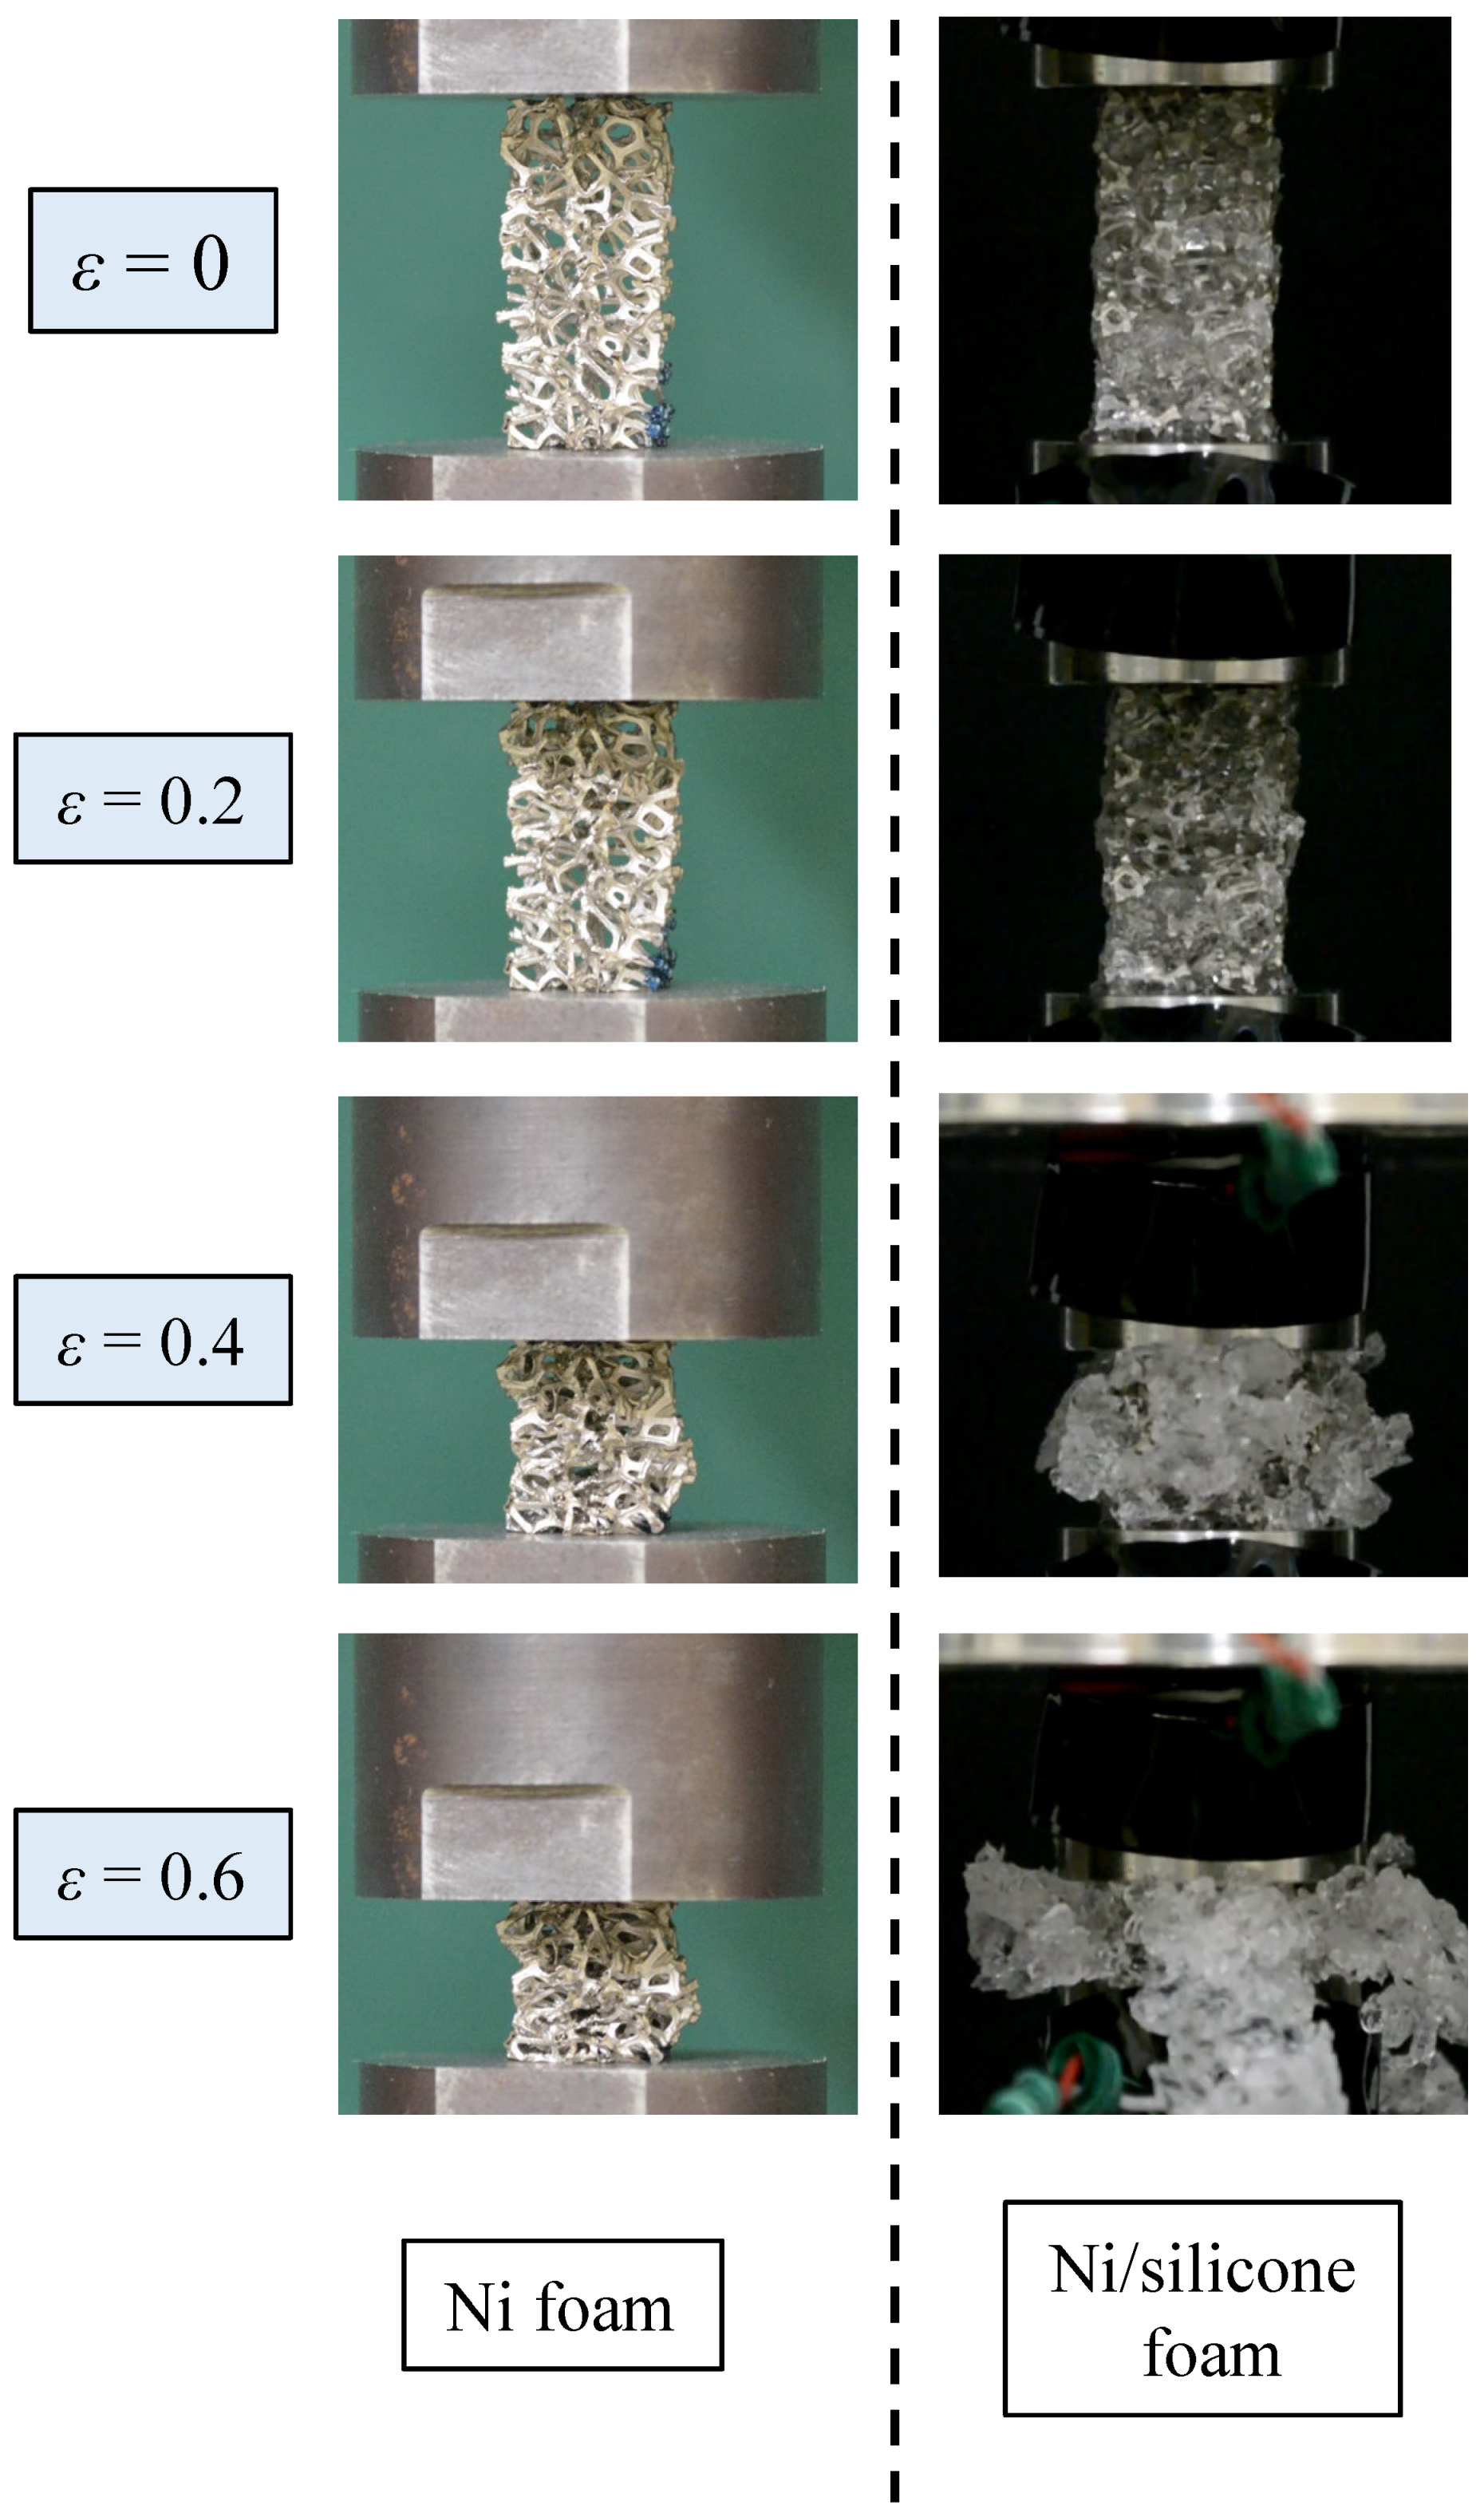
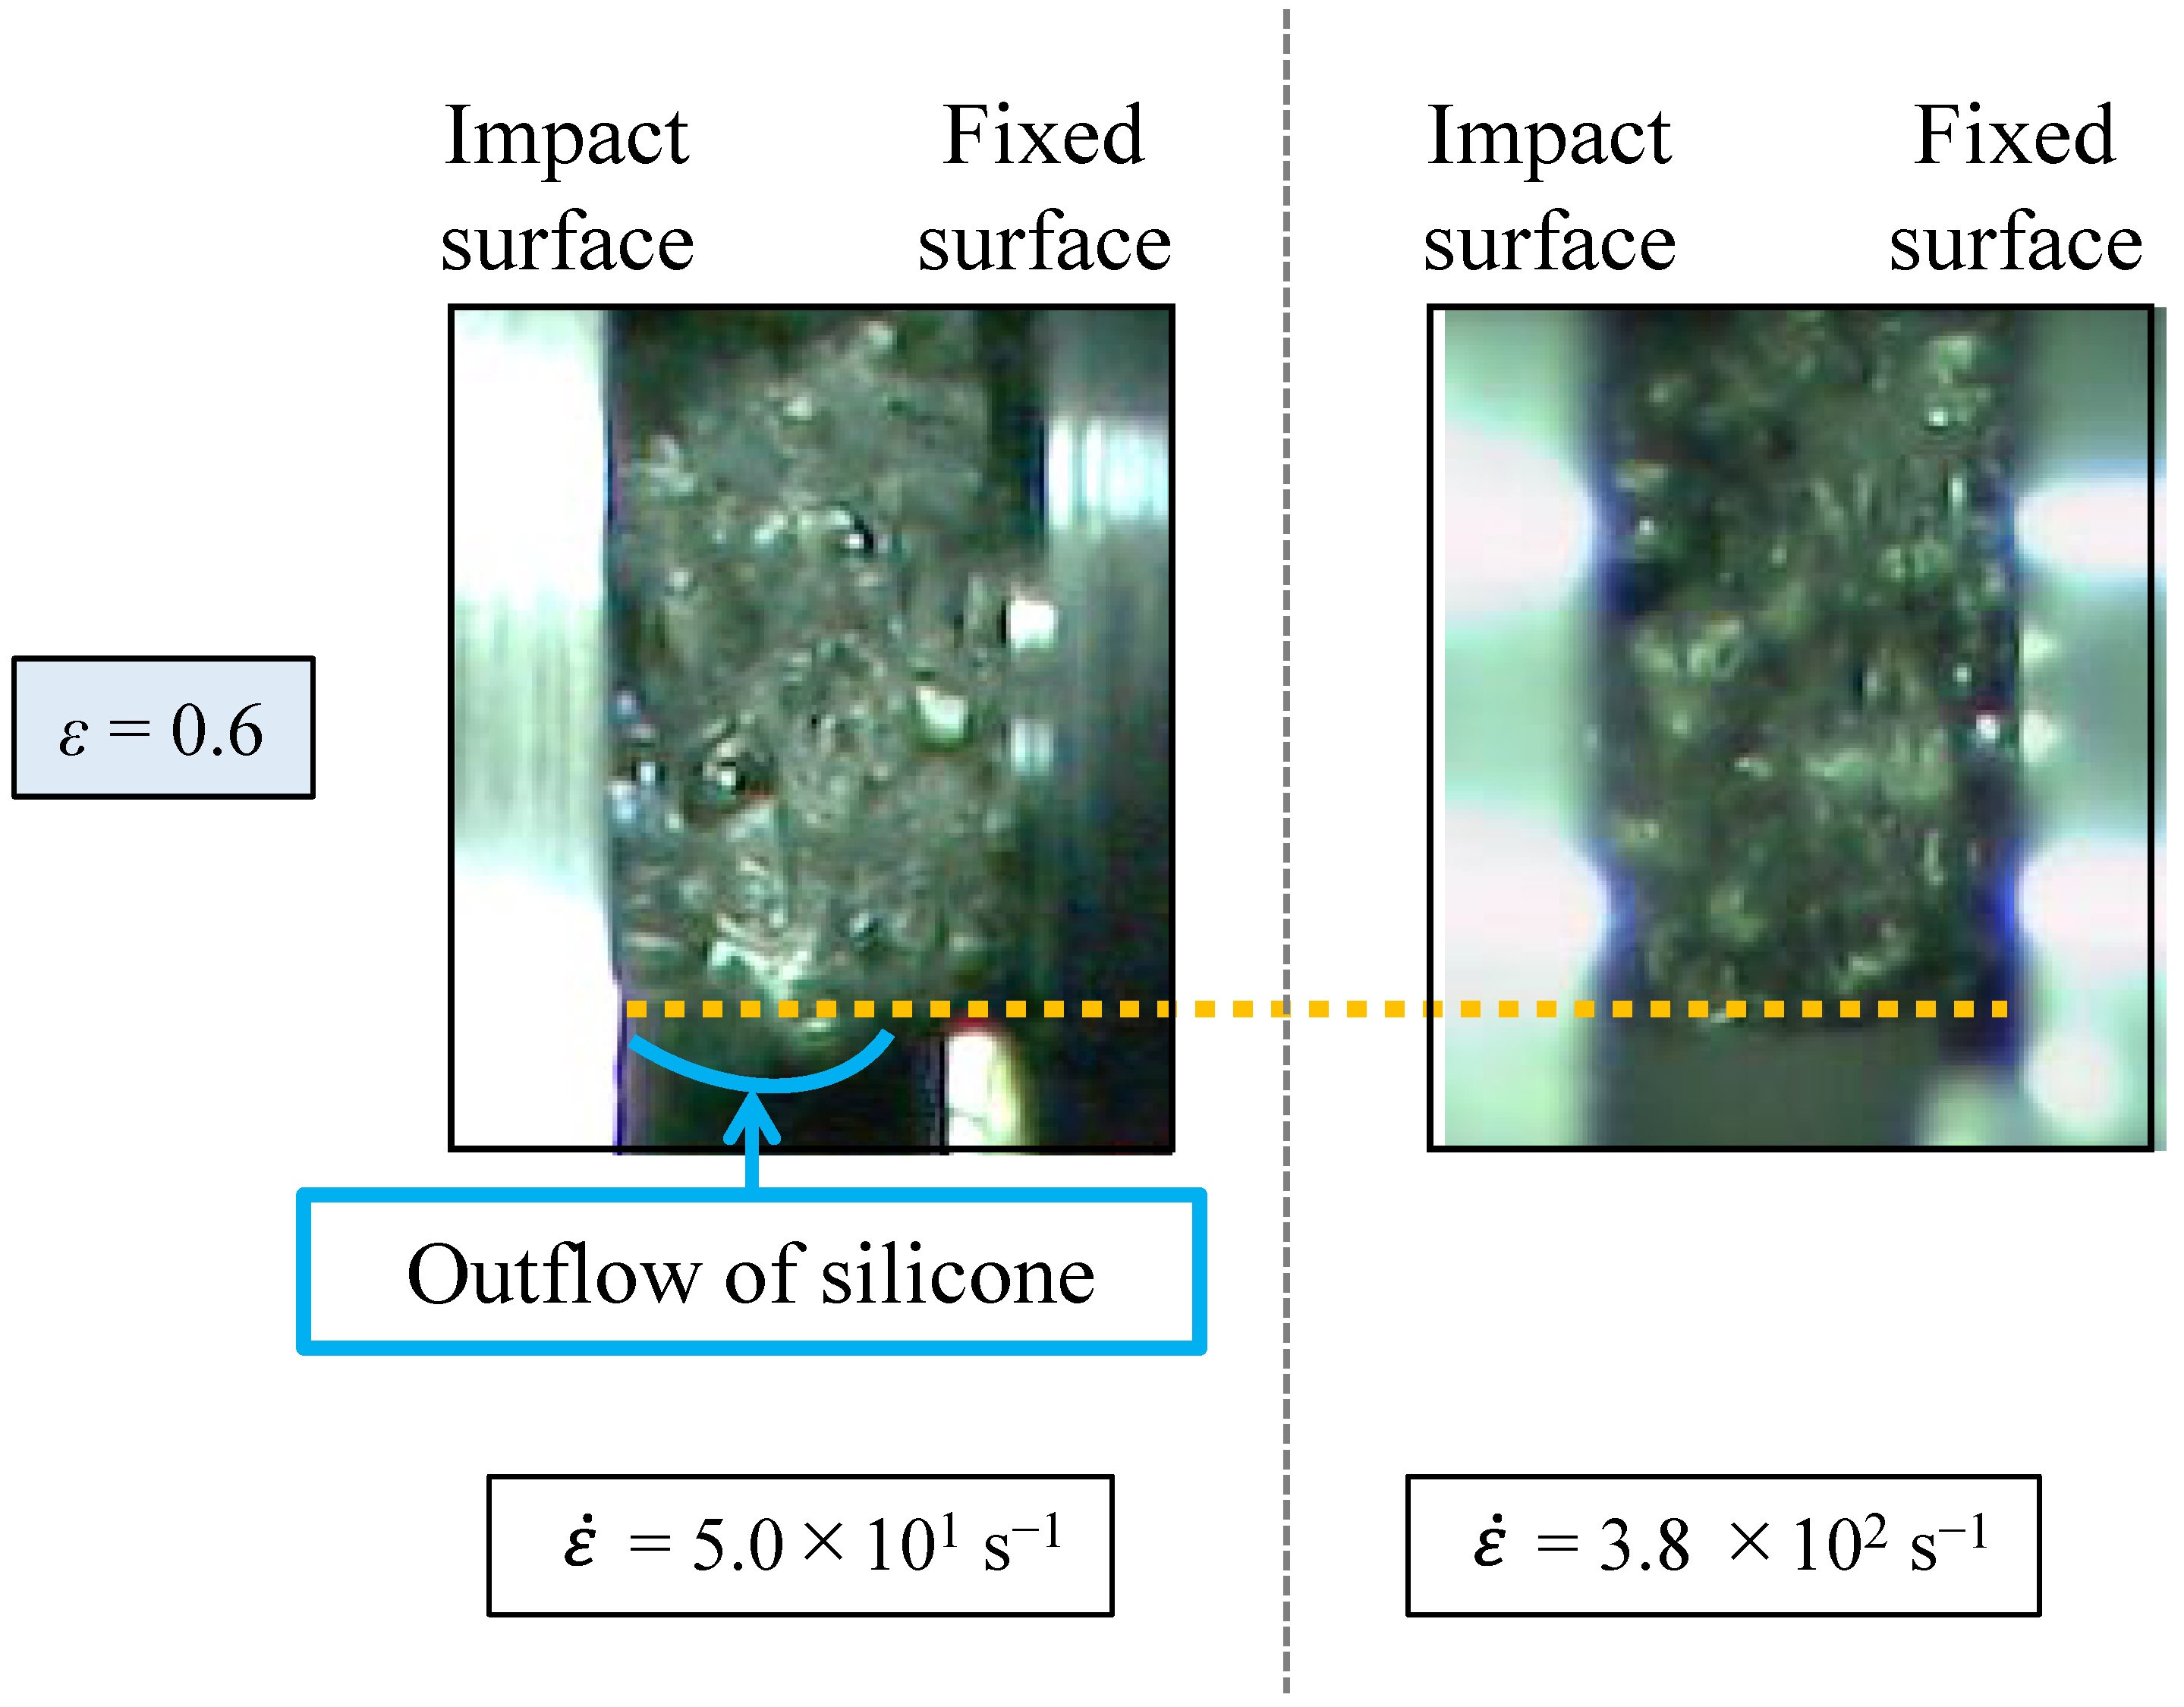
Figure 10 shows the deformation behavior of the Ni foam and the Ni/silicone foam at a strain rate of 8.3 × 10⁻⁴ s−1. In the quasi-static test of Ni foam, no nonuniform deformation was observed from the end of the specimen, although random deformation was observed from the weak part of the cell struts. At this time, no swelling was observed in the direction perpendicular to the compression direction, and the sample exhibited a compressive deformation behavior with a Poisson’s ratio of almost zero. In the Ni/silicone foam quasi-static test, as the deformation progressed, the silicone rubber flowed out at a strain of 0.4, and most flowed out at a strain of 0.6. The results of the quasi-static test for the Ni/silicone foam indicate that the resistance due to the compression of the silicone rubber might contribute to an increase in the normalized stress at the initial stage of deformation. However, because silicone rubber extrudes from inside the cell as it densifies, it stops contributing to the normalized stress increase in the densified region. Figure 11 shows the deformation of the Ni/silicone foam at a strain of 0.6 for strain rates of 5.0 × 101 and 3.8 × 10² s−1. Despite the equal strain, as the strain rate increases, the outflow of the silicone rubber filler decreases and more rubber remains inside. This may be because the compression velocity is higher than the outflow velocity of the silicone rubber, so the silicone rubber lacks sufficient time to flow out. The remaining silicone rubber may have contributed to the increase in the normalized stress under compressive deformation.
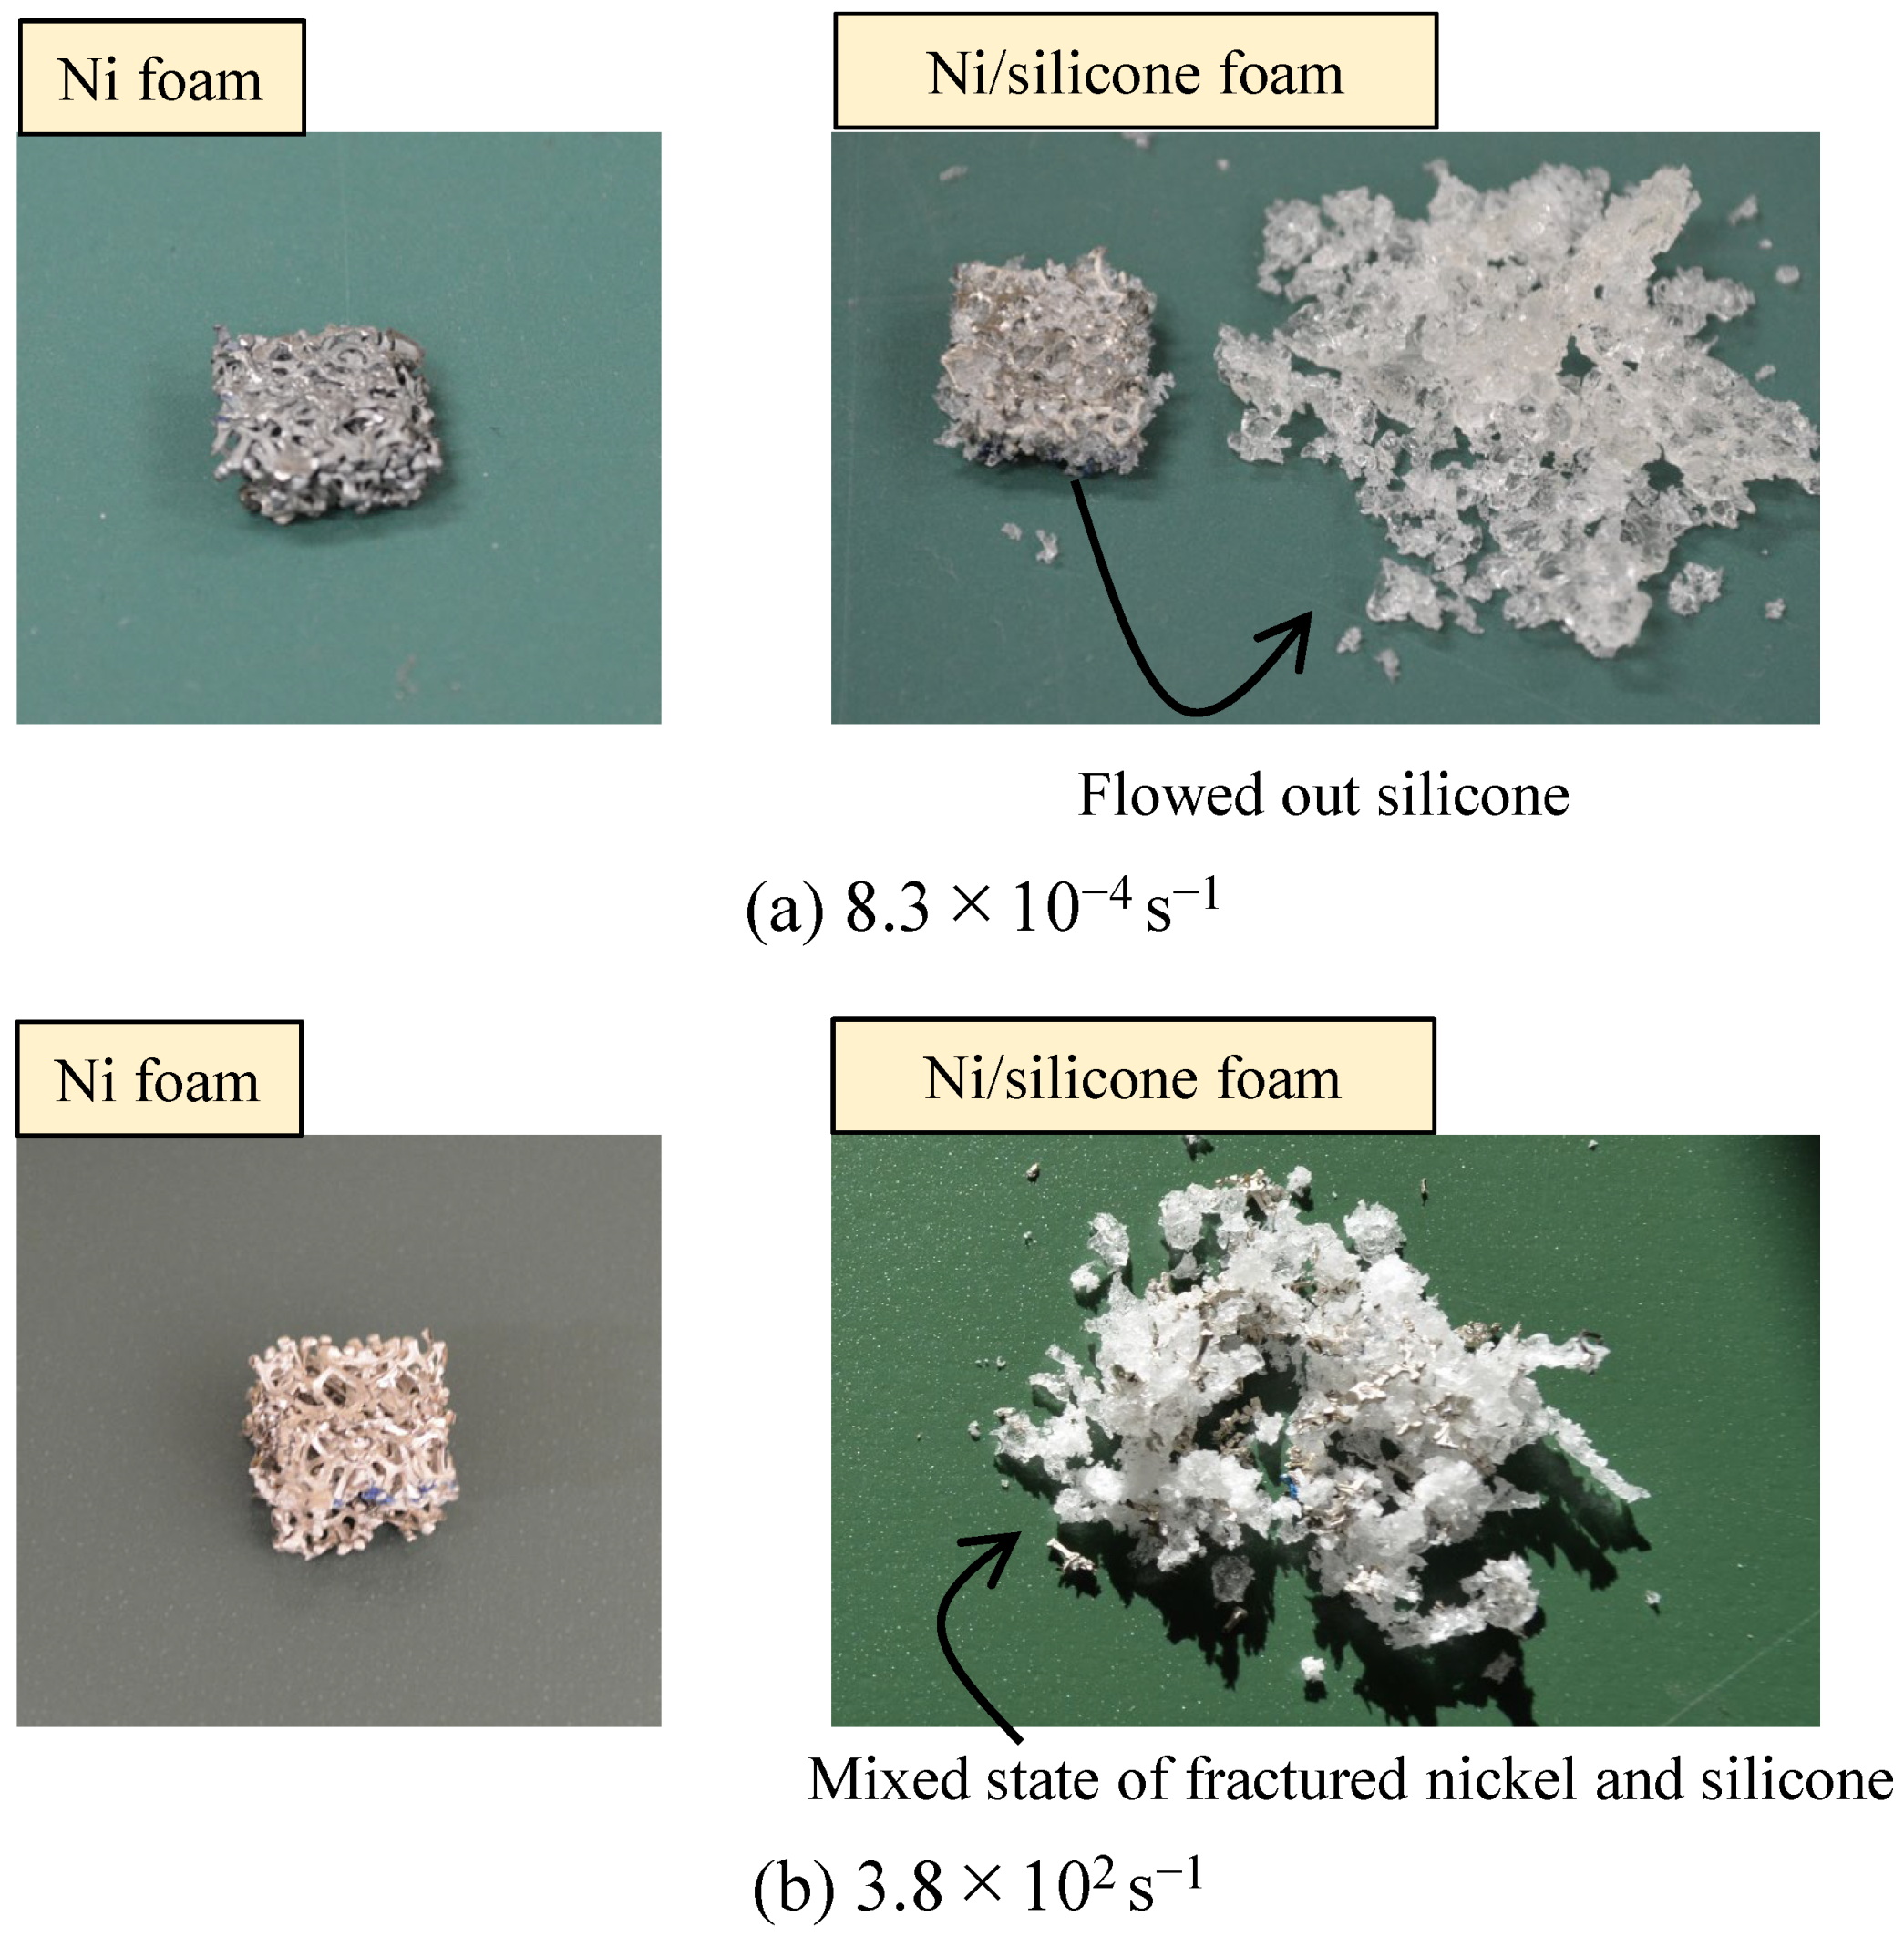
Next, we focused on the specimen state after each compression test because the deformation can be tracked to only a limited extent from the moving images captured using the high-speed camera. Figure 12 shows each specimen after the compression test at strain rates of 8.3 × 10⁻⁴ and 3.8 × 10² s−1. After the quasi-static test, the Ni foam showed almost no deformation perpendicular to the compression direction and exhibited folded deformation. The Ni/silicone foam showed almost the same deformation of the cell structure as the Ni foam, excluding silicone rubber outflow. By contrast, in the impact test, the Ni foam and the Ni/silicone foam showed significantly different deformation states. With Ni foam, since the specimen shape was almost the same as that in the quasi-static test, the deformation behavior remain unchanged. On the other hand, with the Ni/silicone foam, the cell struts formed by Ni was caught in the deformation of the silicone rubber, and it fractured and scattered in all directions. Perhaps the silicone rubber did not flow out and was subjected to compressive deformation, causing expansion perpendicular to the compression direction owing to a high Poisson’s ratio. The outflow of silicon is pushing the structs to deform in a random direction, causing easier failure.
In the dynamic test, the start of densification after a strain of 0.7 was slower than that in the quasi-static compression test (Figure 9). Perhaps the silicone rubber flowed out at a strain of 0.7. The out-flowing silicone rubber incorporated cell struts, decreasing the ratio of the Ni foam occupied by the Ni/silicone foam. By contrast, in the impact test, since the compression velocity of the silicone rubber was higher than its outflow rate, it did not flow out before densification; the relative density was increased due to the space occupied by this silicone, and the start of densification occurred at a low strain. This clearly indicates that the void-filling material significantly affects the deformation behavior of the cell structure. Generally, when the void-filling material is a low-viscosity fluid, such as air, it is hardly affected by the strain rate at a compression velocity of 20 m/s or less, although the velocity largely influences highly viscous silicone rubber.

5.2. Compression Velocity of 20.0 m/s or More

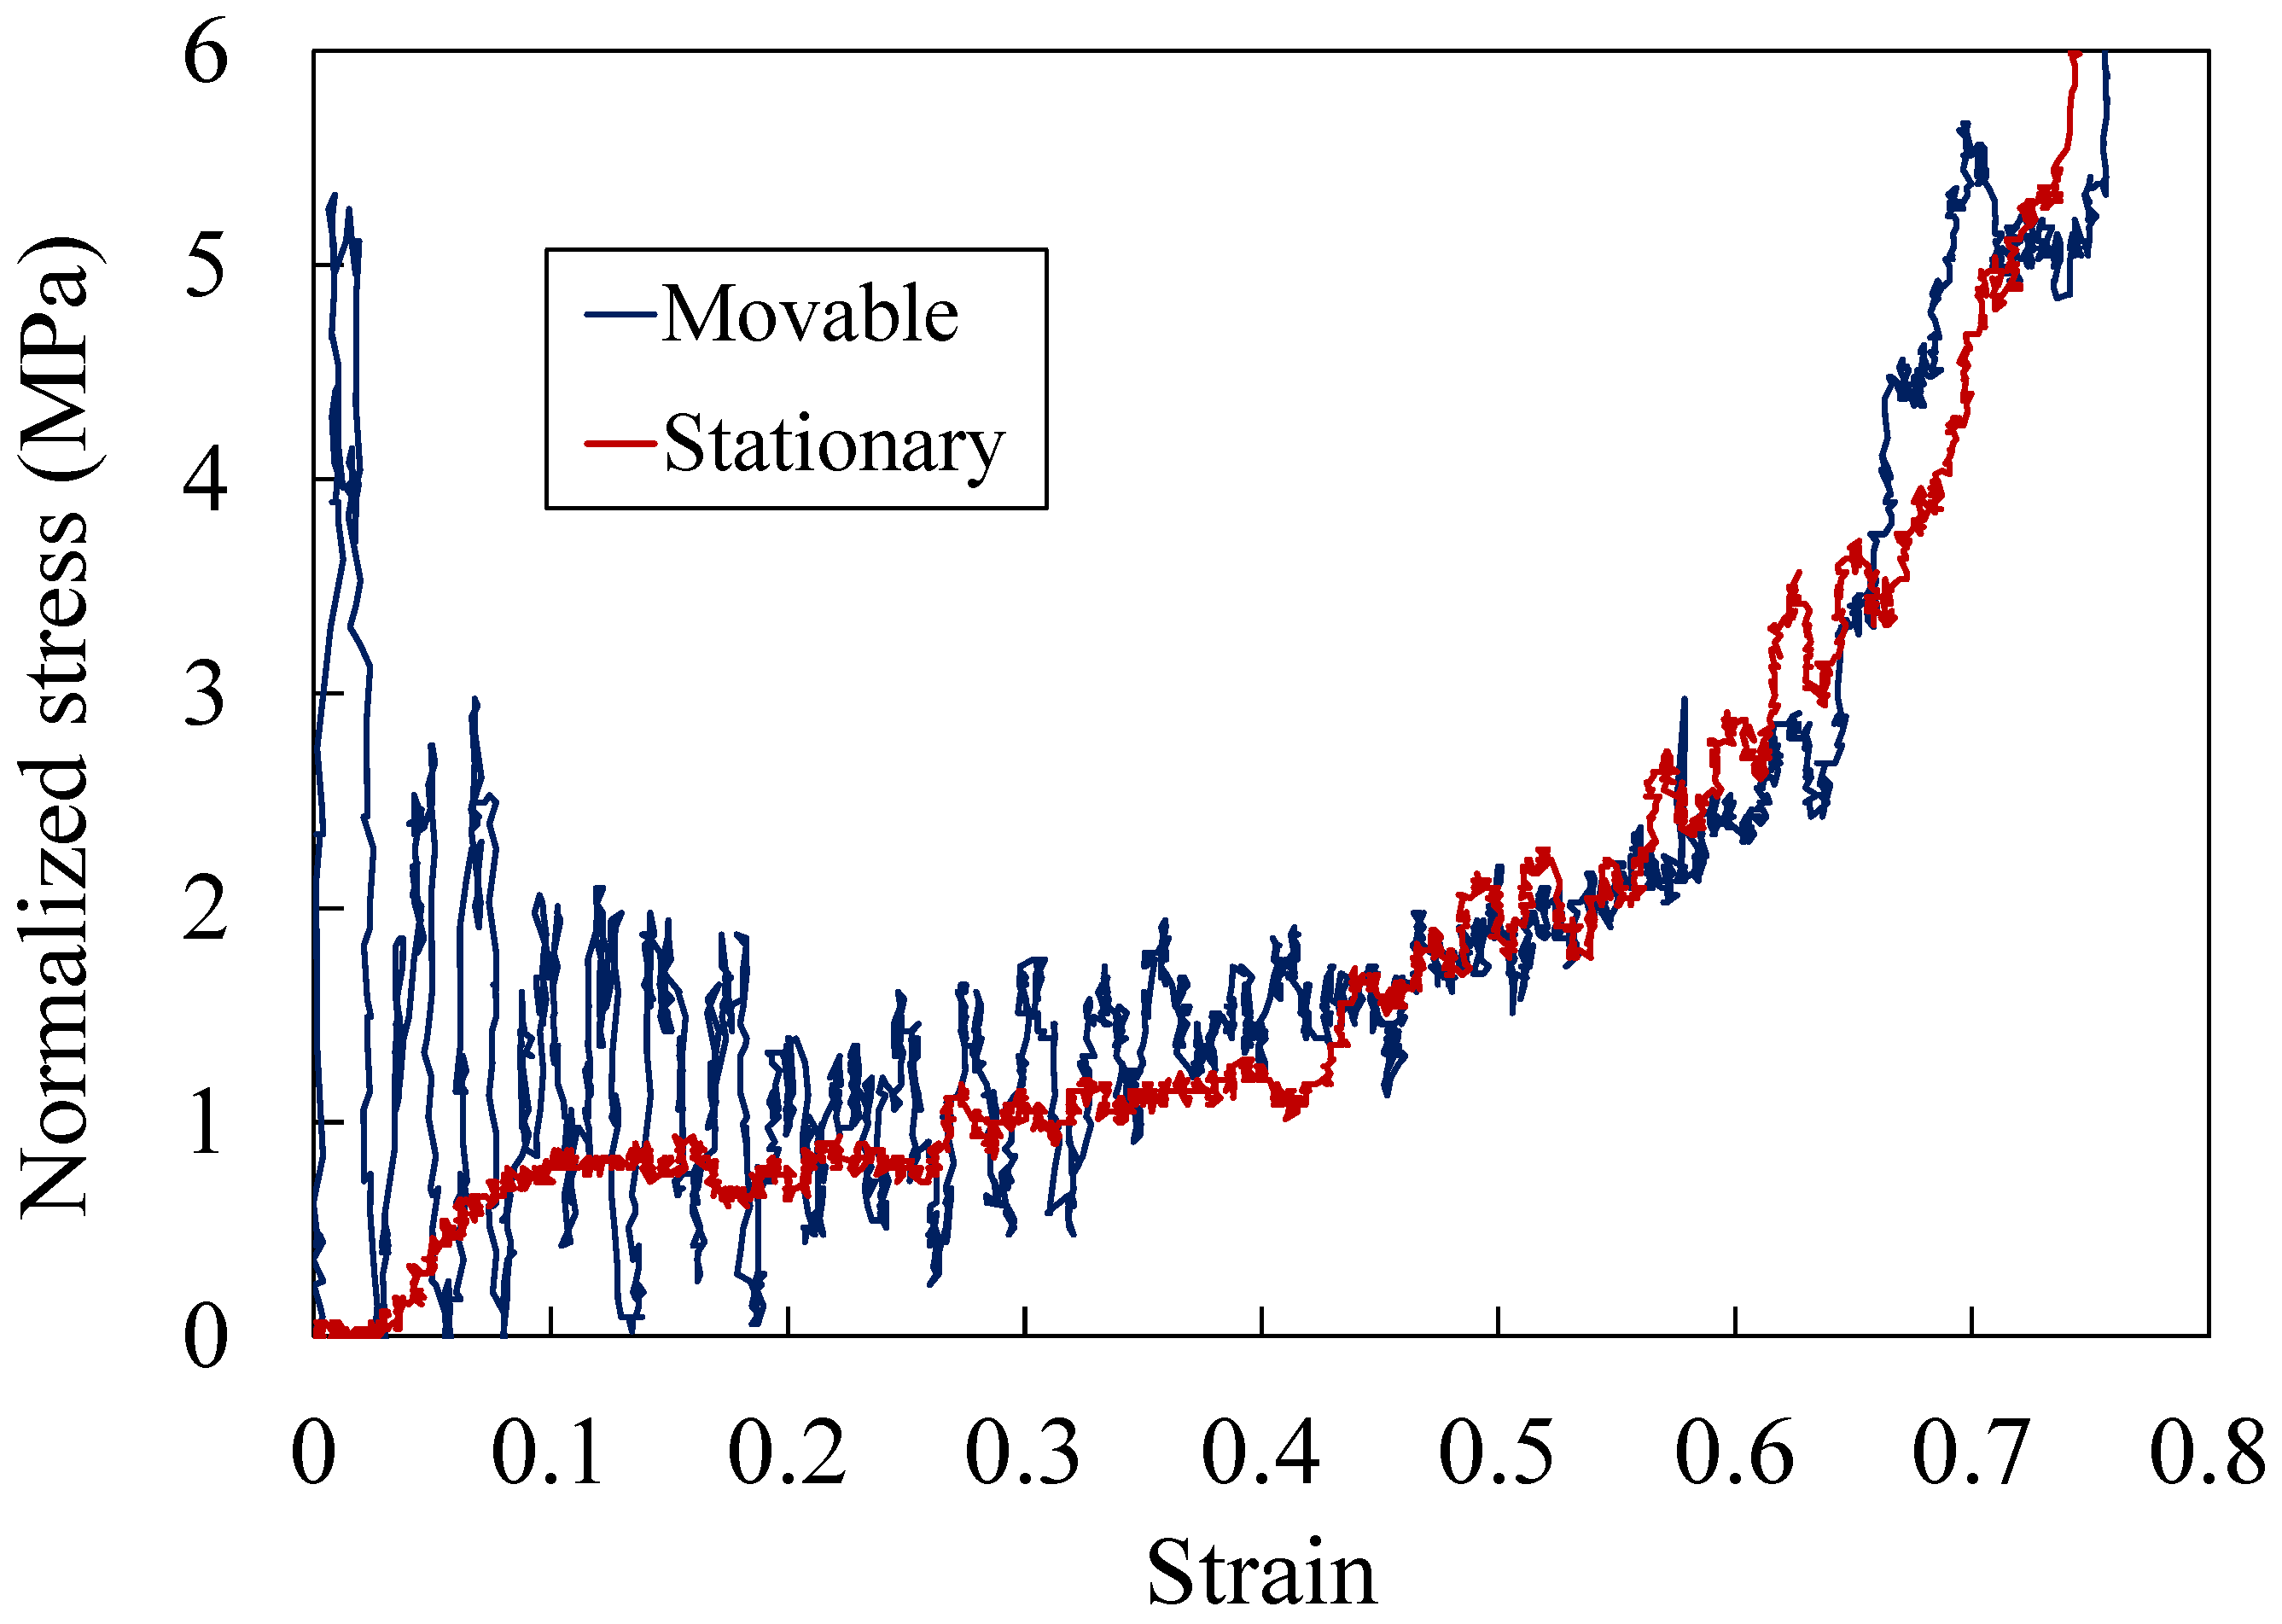
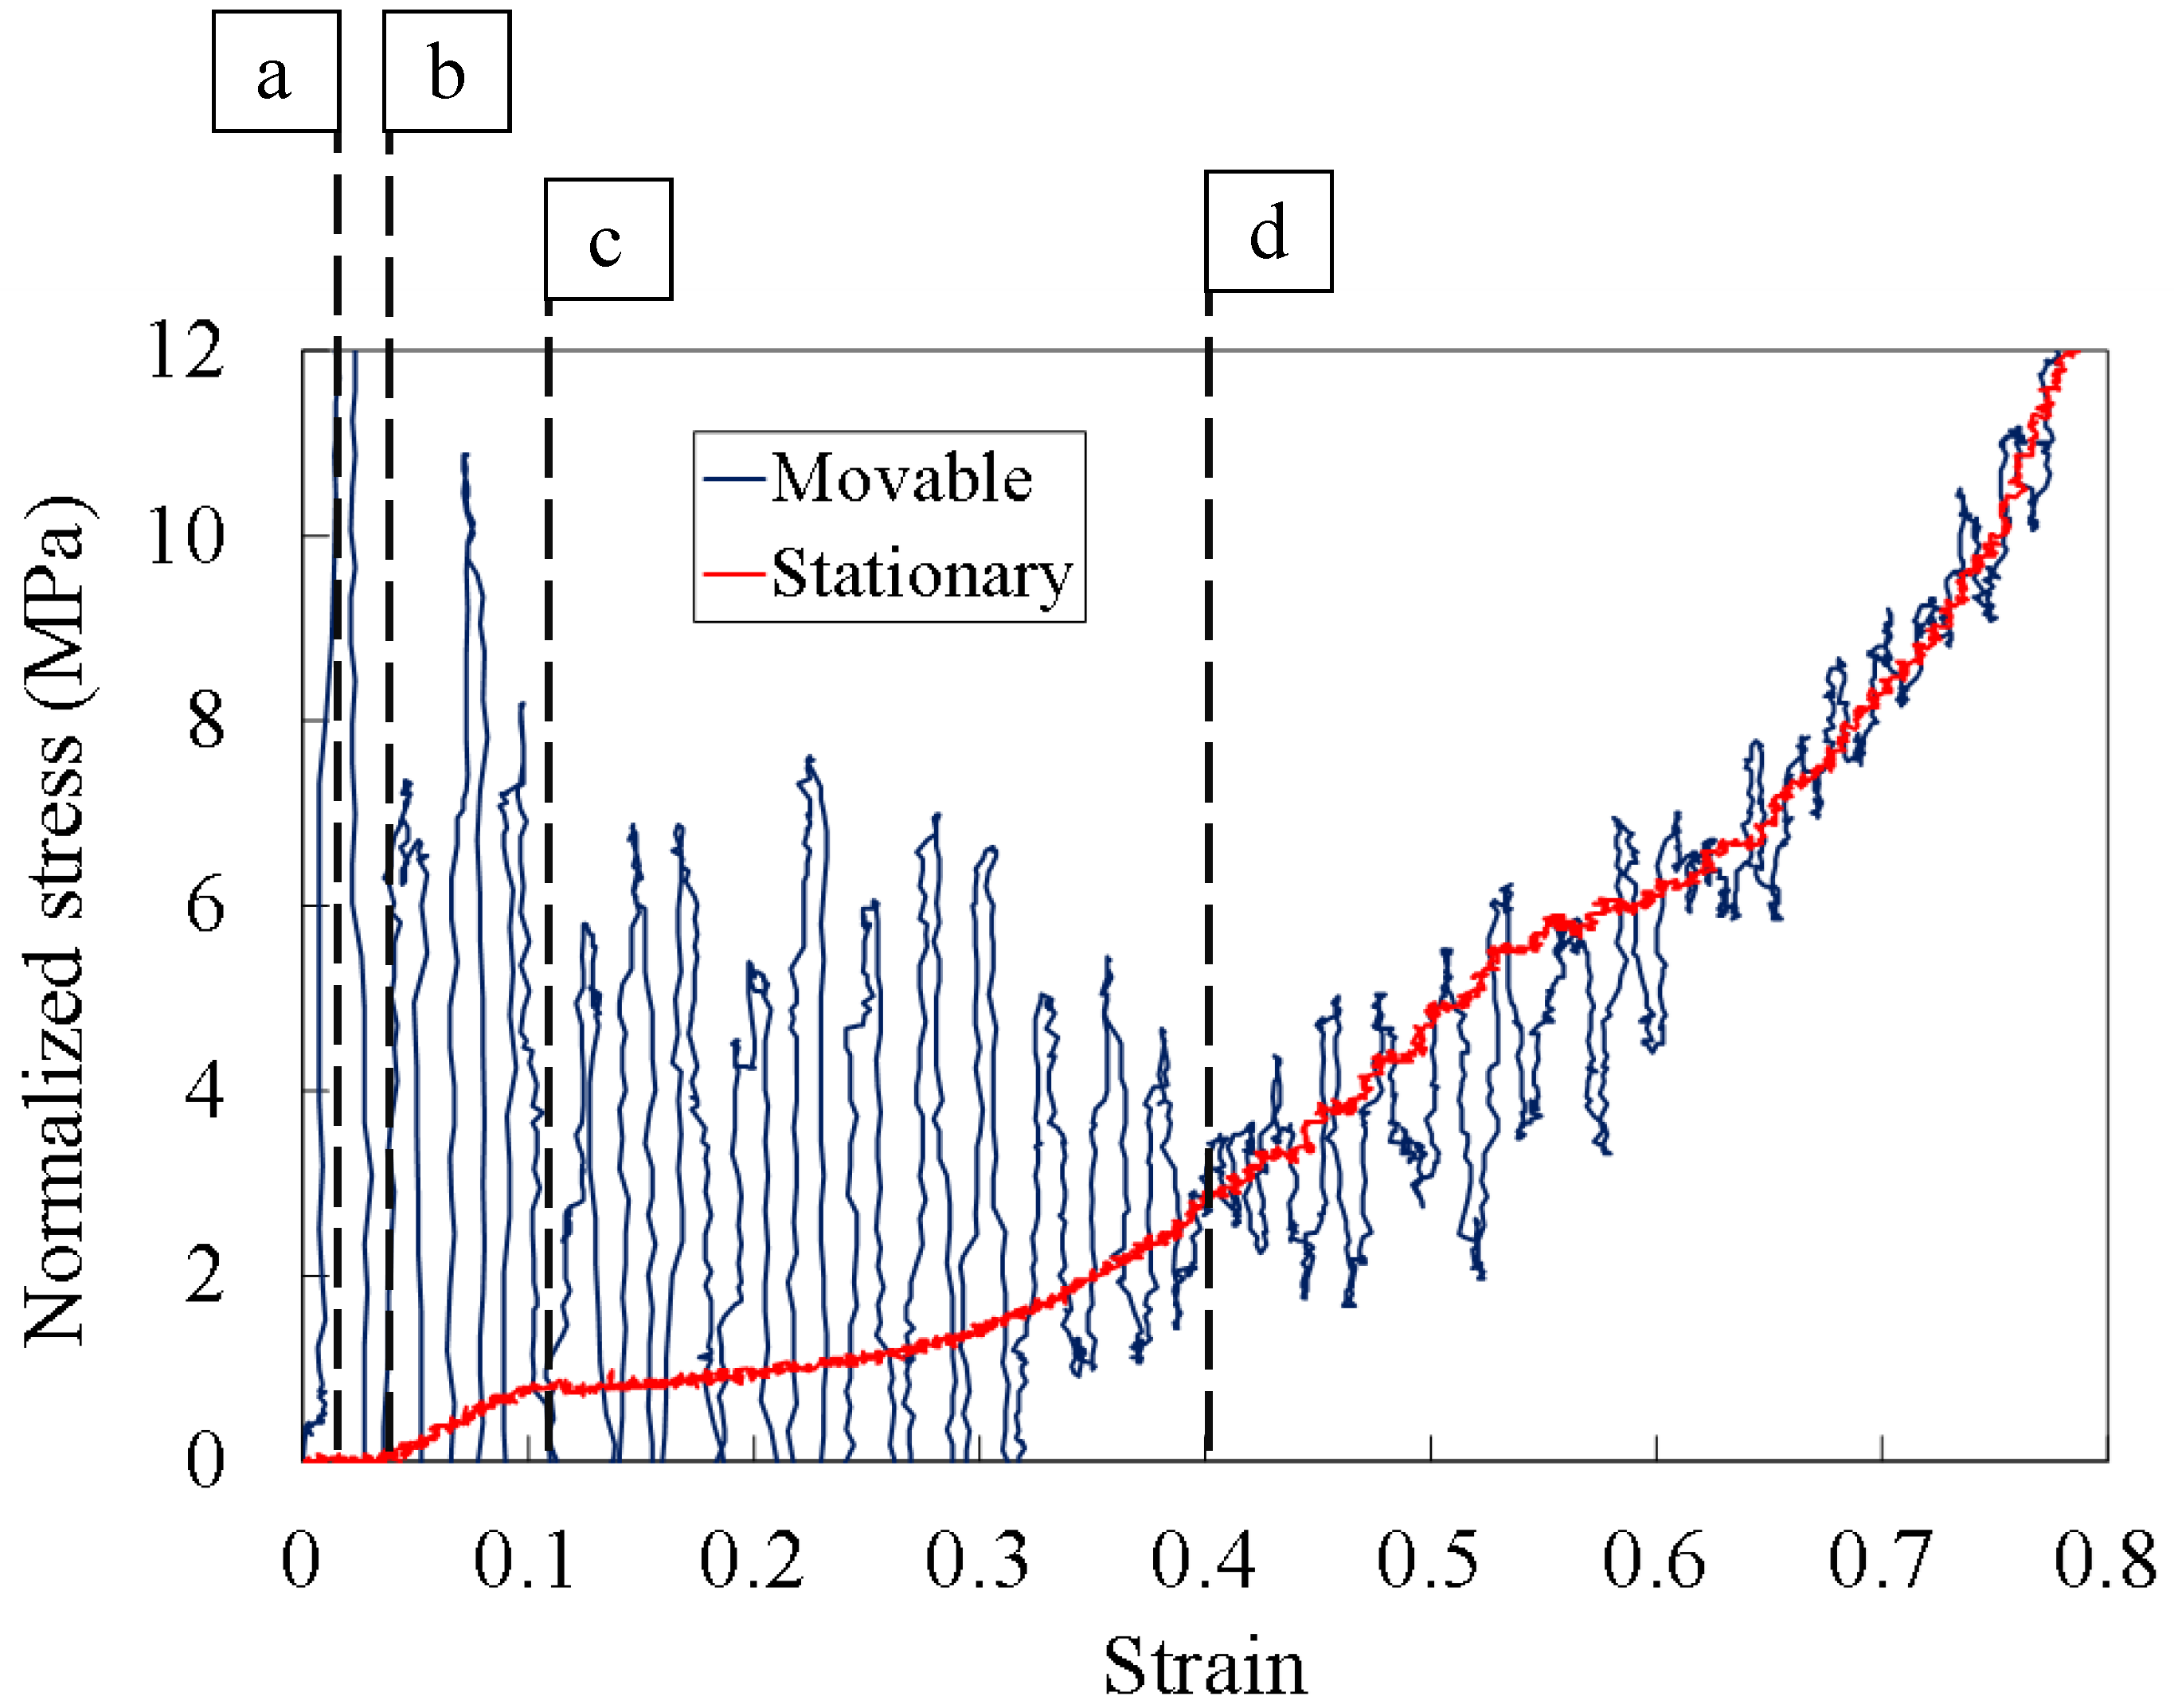
Figure 13 and Figure 14 show the normalized stress–strain relationship of the Ni foam and the Ni/silicone foam during impact tests conducted at the maximum compression velocity of the test apparatus: approximately 26.0 m/s (strain rate: 1.3 × 10³ s−1). When the compression velocity was 26.0 m/s, since the load histories obtained from the load cells at both ends of the specimen differed, the normalized stresses of the movable and stationary load cells are shown. The strain was calculated by dividing the displacement generated in the specimen by its original length. Similar to the dense material described above, the vibration of the movable load cell is a natural period. The normalized stress increase in the stationary load cell was delayed with respect to the normalized stress increase in the movable load cell due to the propagation of elastic waves.
In the plateau region, the load value of the movable load cell exceeded that obtained from the stationary load cell, and the normalized stresses at the two ends almost matched as the deformation proceeded for a Ni foam strain of up to 0.25; the Ni-silicone strain reached 0.4. These results indicate that the stress applied to the two ends of the specimens did not match at the initial stage of deformation at a compression velocity of approximately 26.0 m/s, and no force equilibrium was achieved for either specimen. The normalized stress increase of the movable load cell was larger than that of the stationary load cell for the Ni/silicone foam.
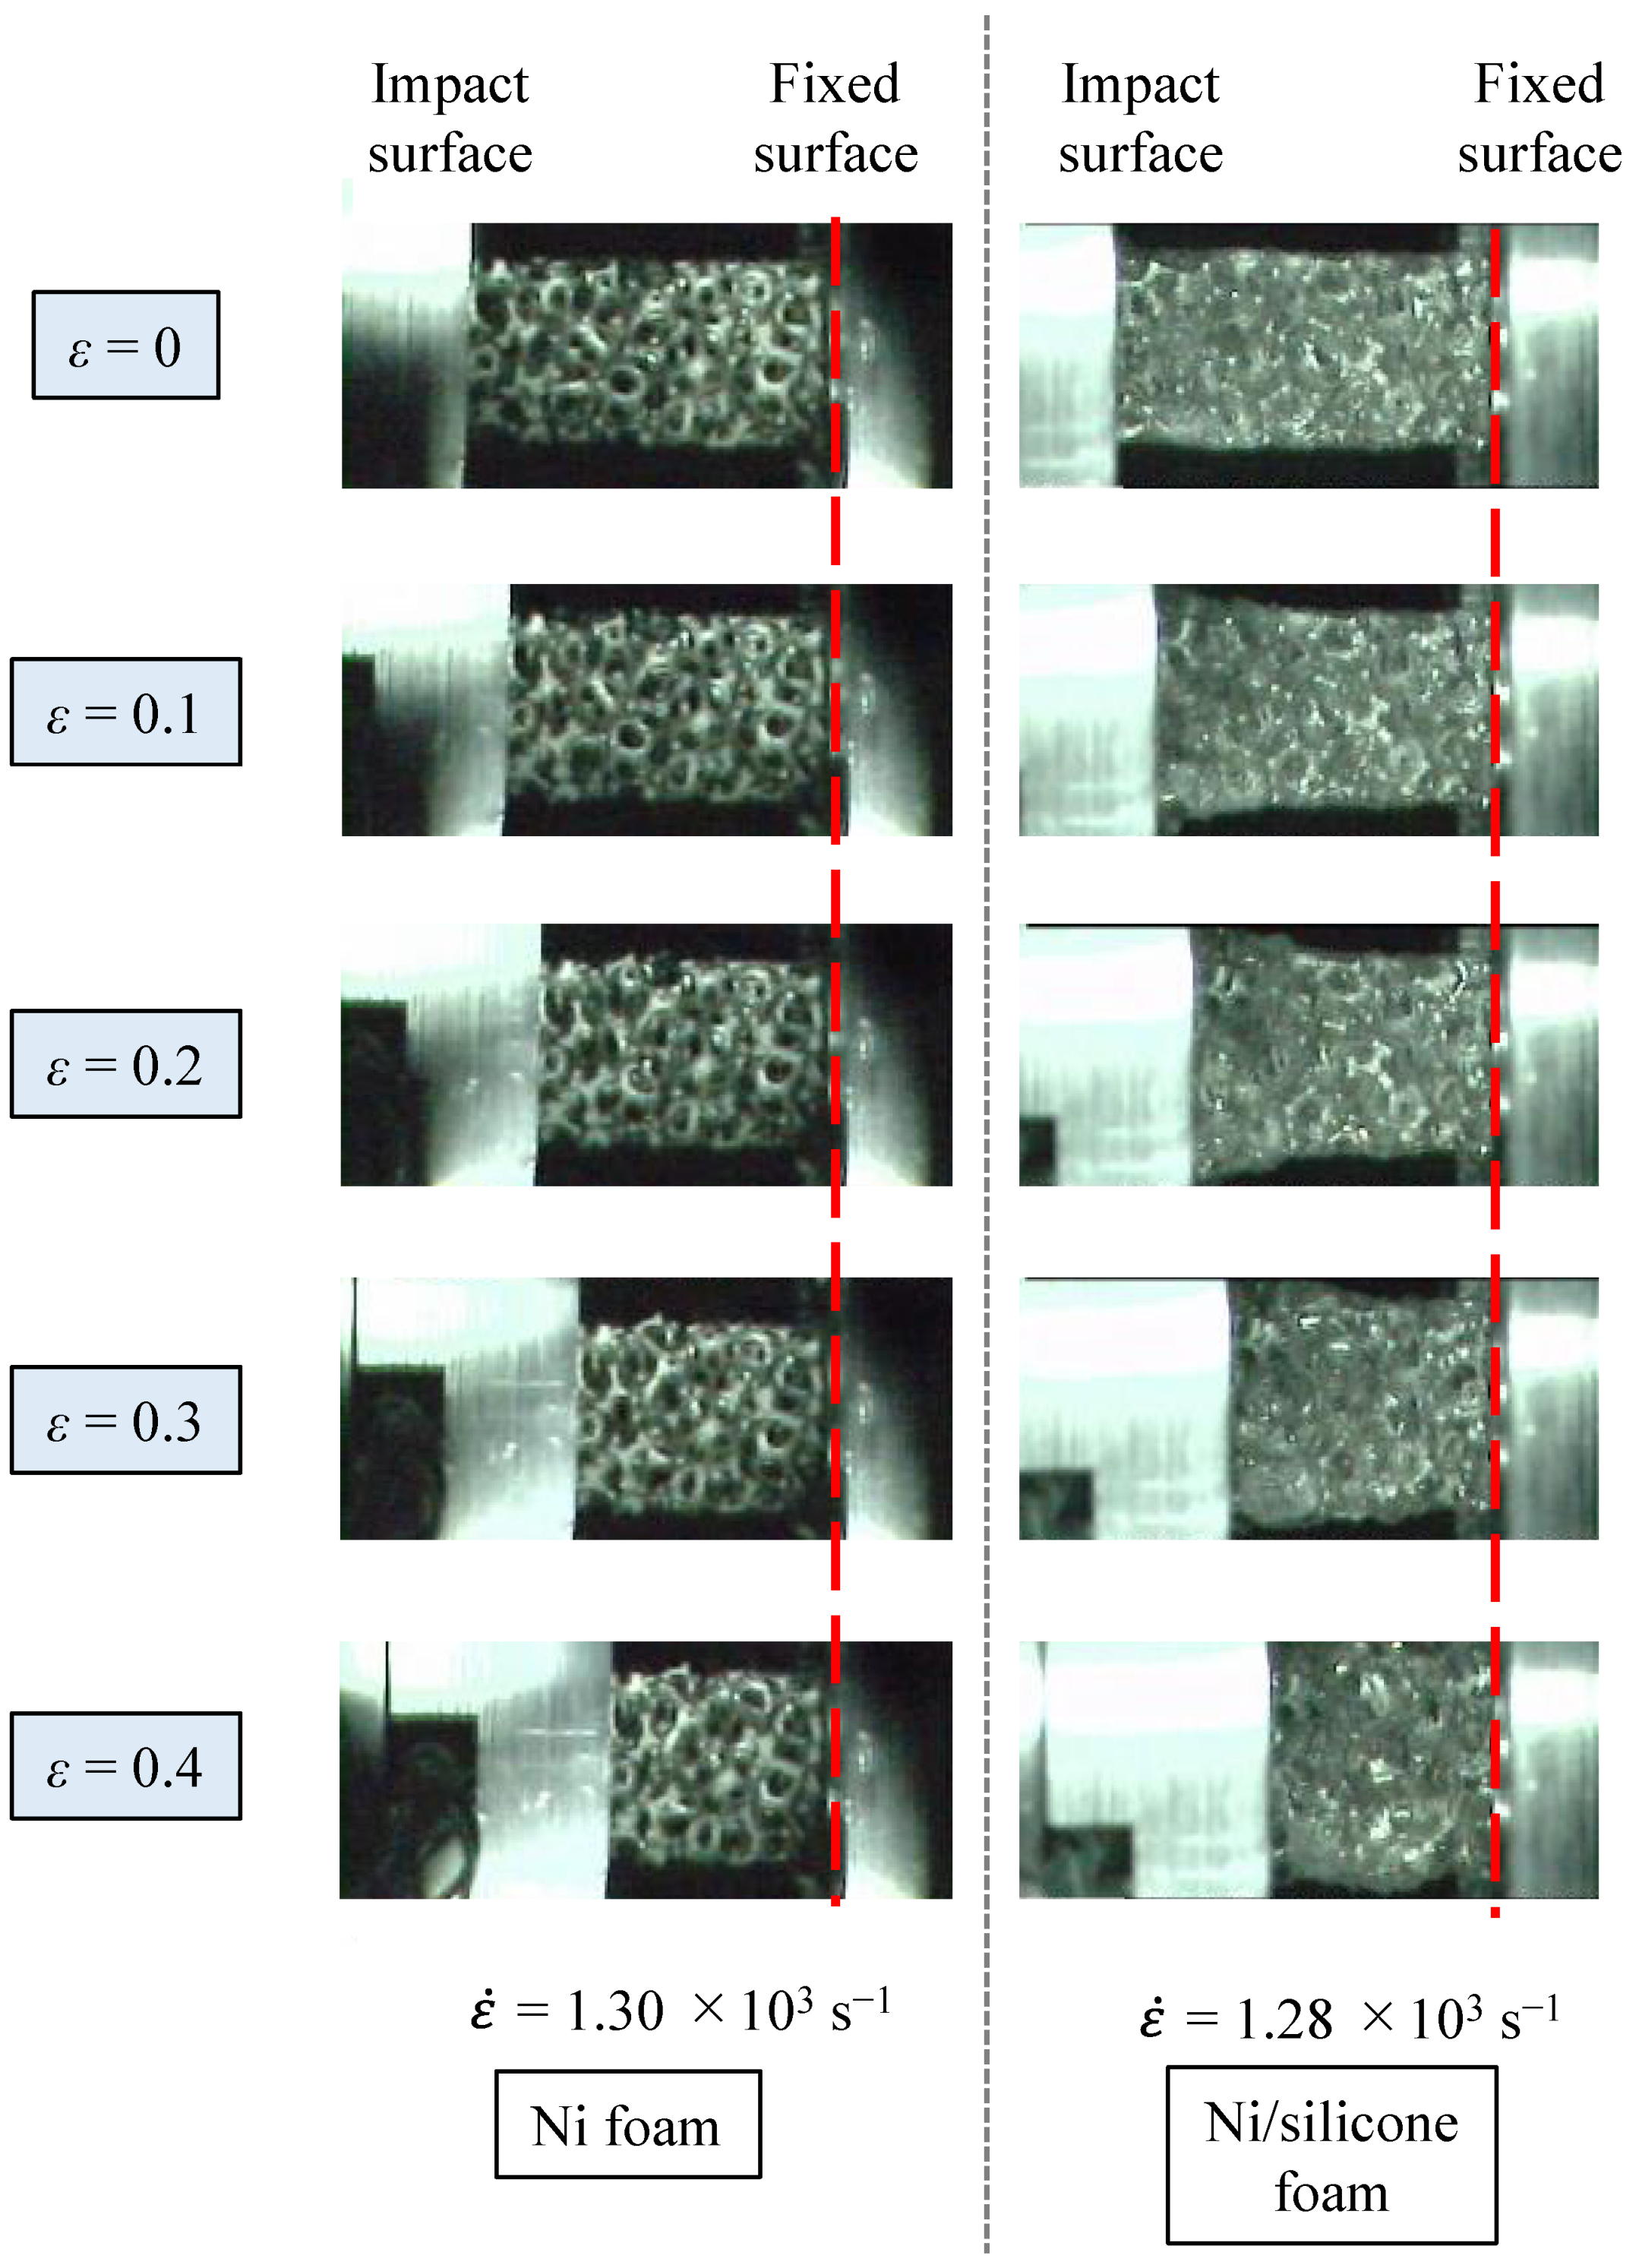
Figure 15 shows the deformation behavior of the Ni foam and the Ni/silicone foam at a compression velocity of approximately 26.0 m/s (strain rate: 1.3 × 10³ s−1). For the Ni foam, the nonuniform deformation could not be observed clearly from the impact end, where the compression velocity was 26.0 m/s or less. In addition, for the Ni/silicone foam, no clear wavefront of nonuniform deformation was observed in the process. Observing the wavefront only by visualization is difficult. However, silicone rubber greatly expanded owing to the compressive deformation on the impact end at the beginning of deformation (ε = 0.1 and 0.2 in Figure 15), and this expansion was transmitted from the impact end to the fixed end; similar observations for Ni foam were unclear. At this time, the Ni/silicone foam showed uniform deformation at a strain of 0.4 or more. The load history of the movable and stationary load cells did not match in the Ni/silicone foam compression test at a compression velocity of 26.0 m/s, possibly due to this nonuniform deformation. However, no clear nonuniform deformation was observed in the Ni foam, despite the fact that the normalized stress at the two ends of the specimen was not in equilibrium. Perhaps the transition velocities at which nonuniform deformation occurs differ between the Ni foam and the Ni/silicone foam.
As discussed above, we experimentally confirmed the nonuniform deformation and reproduced the transition velocity at which it occurred. The specimens with identical cell structure suggested various deformation behaviors due to different void-filling materials. The next section discusses the mechanism of nonuniform deformation based on these results.

6. Discussion of Mechanism of Nonuniform Deformation
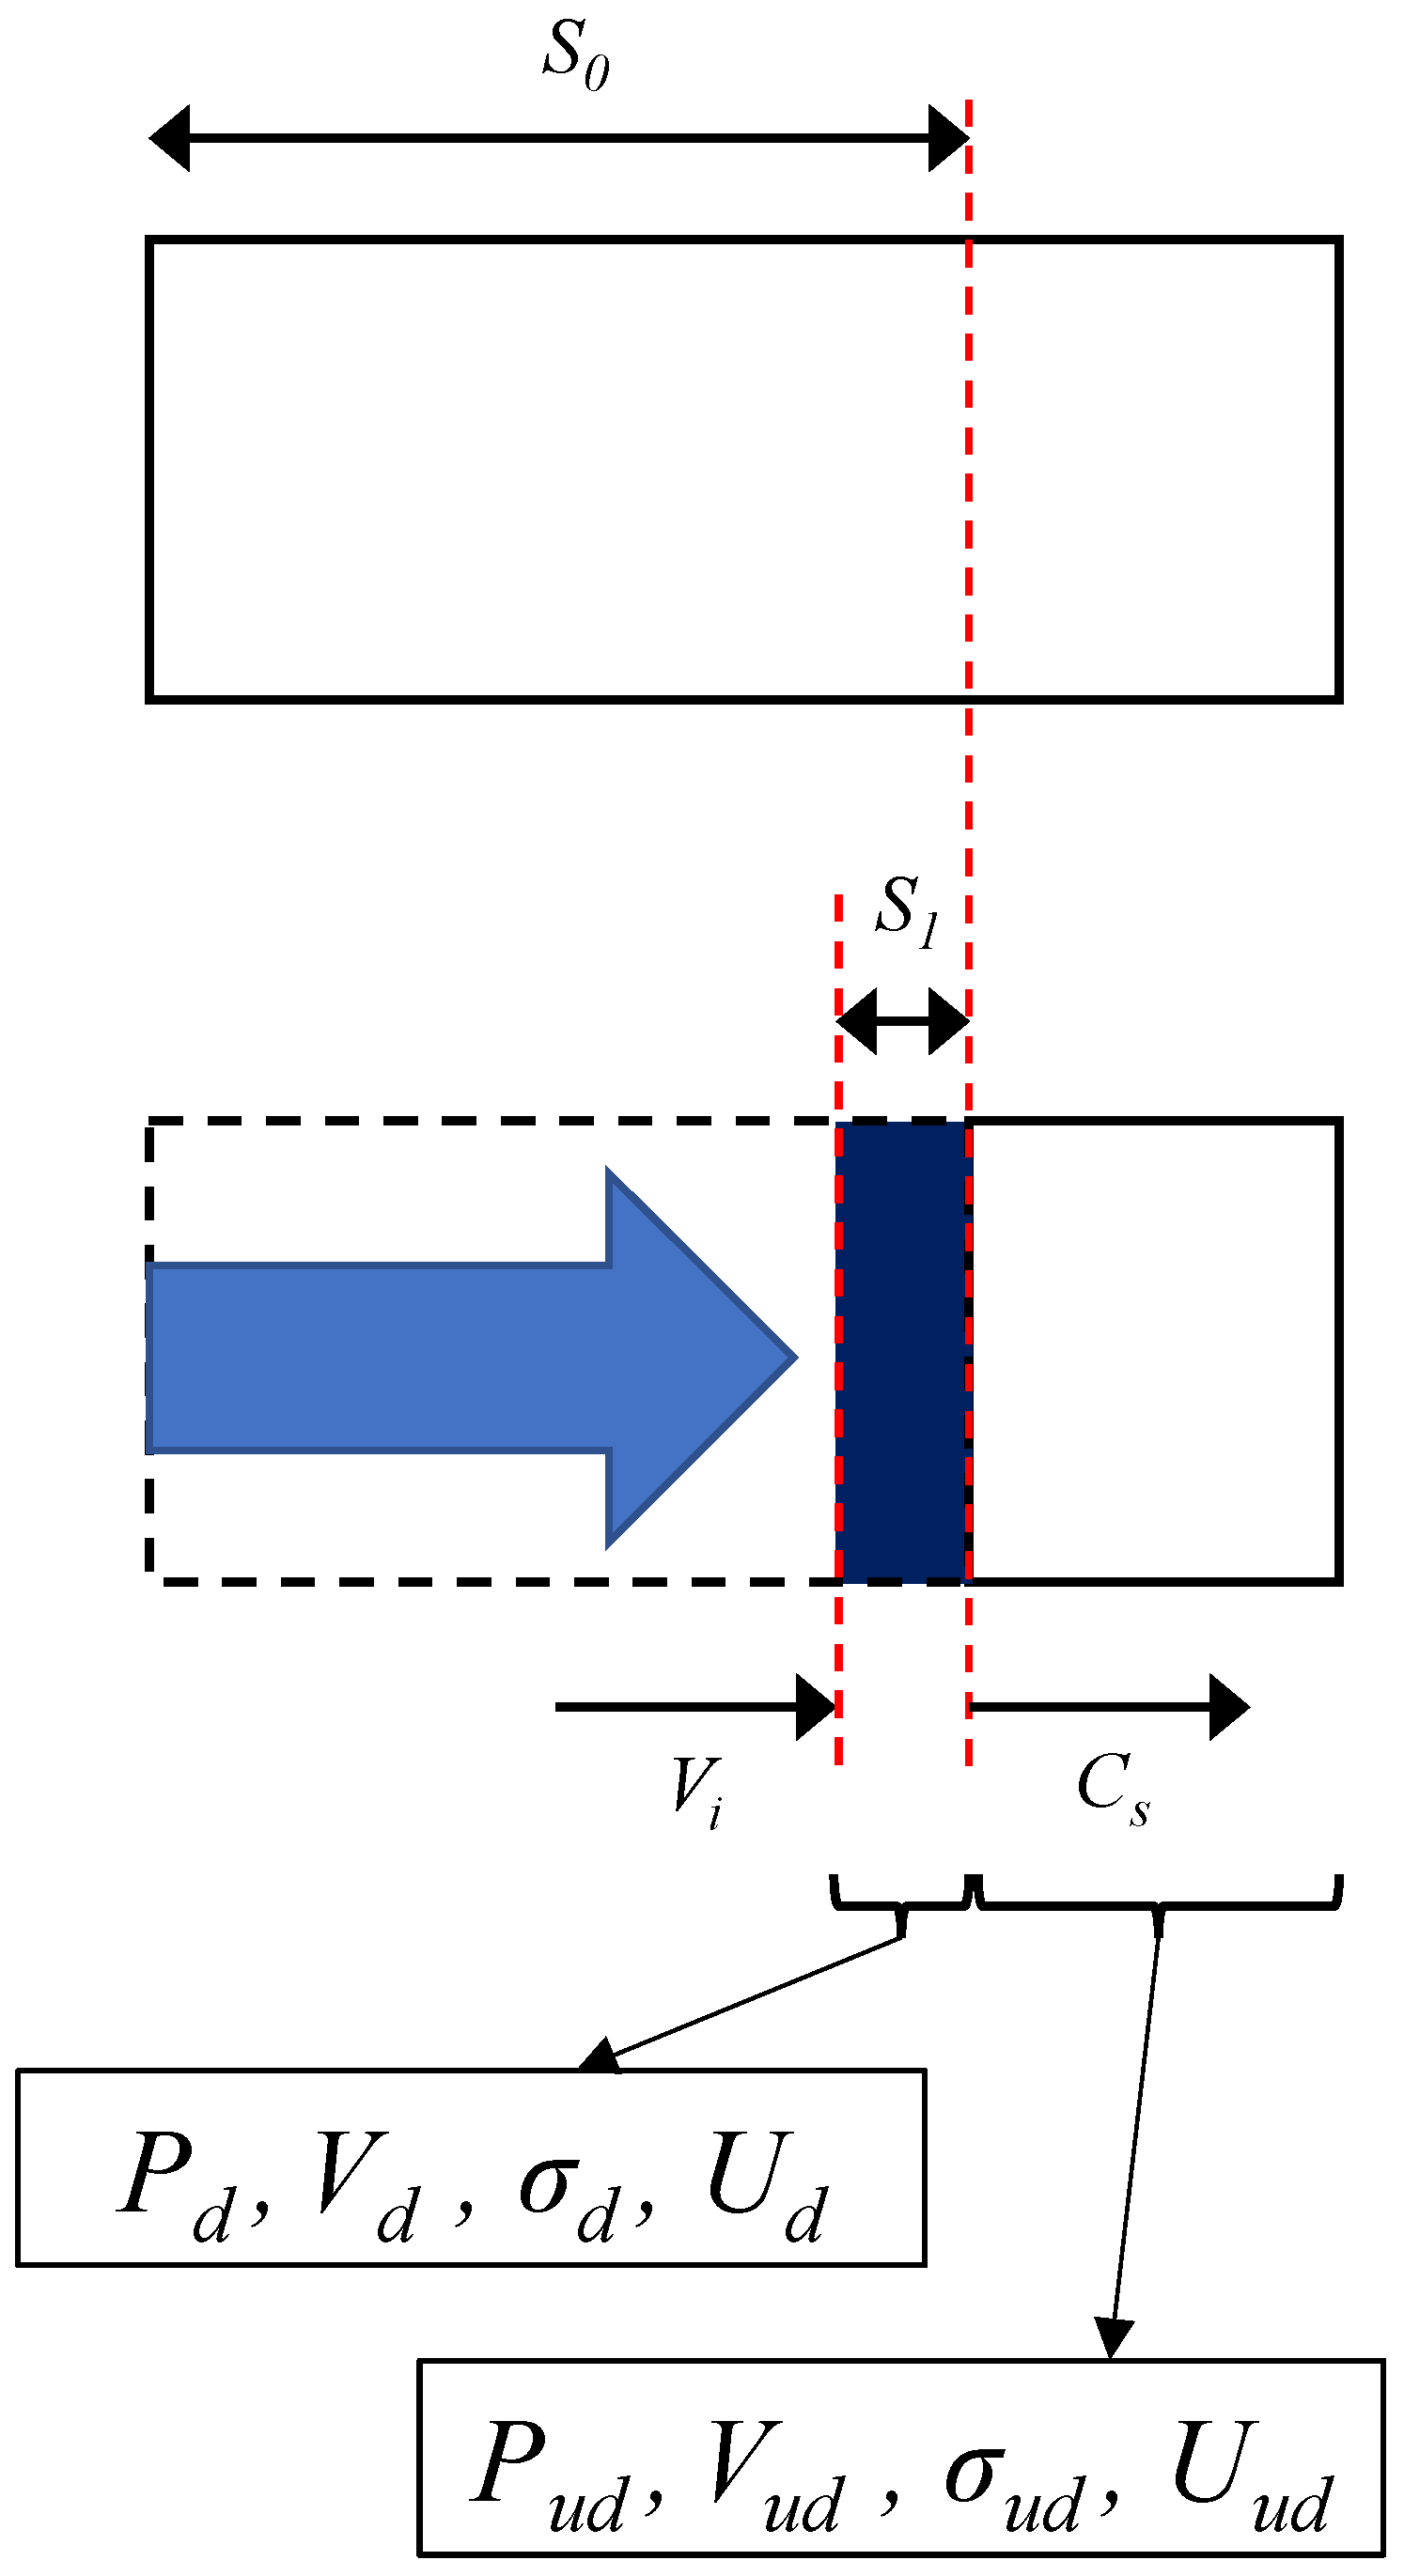
The discontinuous state, which occurs in solids, was evaluated in previous studies using the Rankine–Hugoniot relation based on the mass conservation law, the momentum conservation law, and the energy conservation law. For example, Barns et al. showed that the following relations are satisfied before and after the discontinuity surface [22]:
ε H = ( S 0 S 1 ) S 0
C s = V i ε H
σ d = σ u d + ρ u d V i 2 ε H .
As shown in Figure 16, the density, particle velocity, stress, and energy of the undeformed part are denoted as ρud, Vud, σud, and Uud, respectively, and those of the deformed part are denoted as ρd, Vd, σd, and Ud, respectively. In the above equations, S0 is the length of the deformed part before the deformation, S1 is its length after the deformation, Vi is the compression velocity of the striking bar, Cs is the speed of the wavefront of an inhomogeneous deformation (hereafter discontinuity surface) generated inside the specimen, and εH is the strain before the discontinuity, also called the Hugoniot strain. The stress of the deformed part (the impact end of the deformed part of the specimen) can be obtained by calculating εH by empirically finding Cs and Vi from Equations (3) and (4) and substituting it into Equation (5). An almost linear tendency is obtained between Cs and Vi in the cell structure:
C s = A + B V i .
Here A and B are constants. A corresponds to the bulk sound speed of a solid, as observed in many solid materials [22].
Figure 16. Physical quantity inside material during nonuniform deformation.
Applmech 02 00053 g016
However, it is essential to measure the compression velocity and the speed of the discontinuity surface from the captured image of the deformation behavior to conduct an evaluation with the Rankine–Hugoniot relation with the above method. The above method is suitable if the collision velocity is sufficiently high and a nonuniform deformation is clearly generated. As shown in Figure 15, observing a clear discontinuity is difficult, especially near the transition velocity. Even when using a digital image correlation, accurate observation was complicated by the coarse cell structure and the transparent silicone rubber. Therefore, confirming whether the Rankine–Hugoniot relation is satisfied near the transition velocity is hard with conventional methods. In this study, the deformation mechanism is discussed based on the test and observation results on the same time axis obtained using the load-measuring apparatus with opposite load cells.
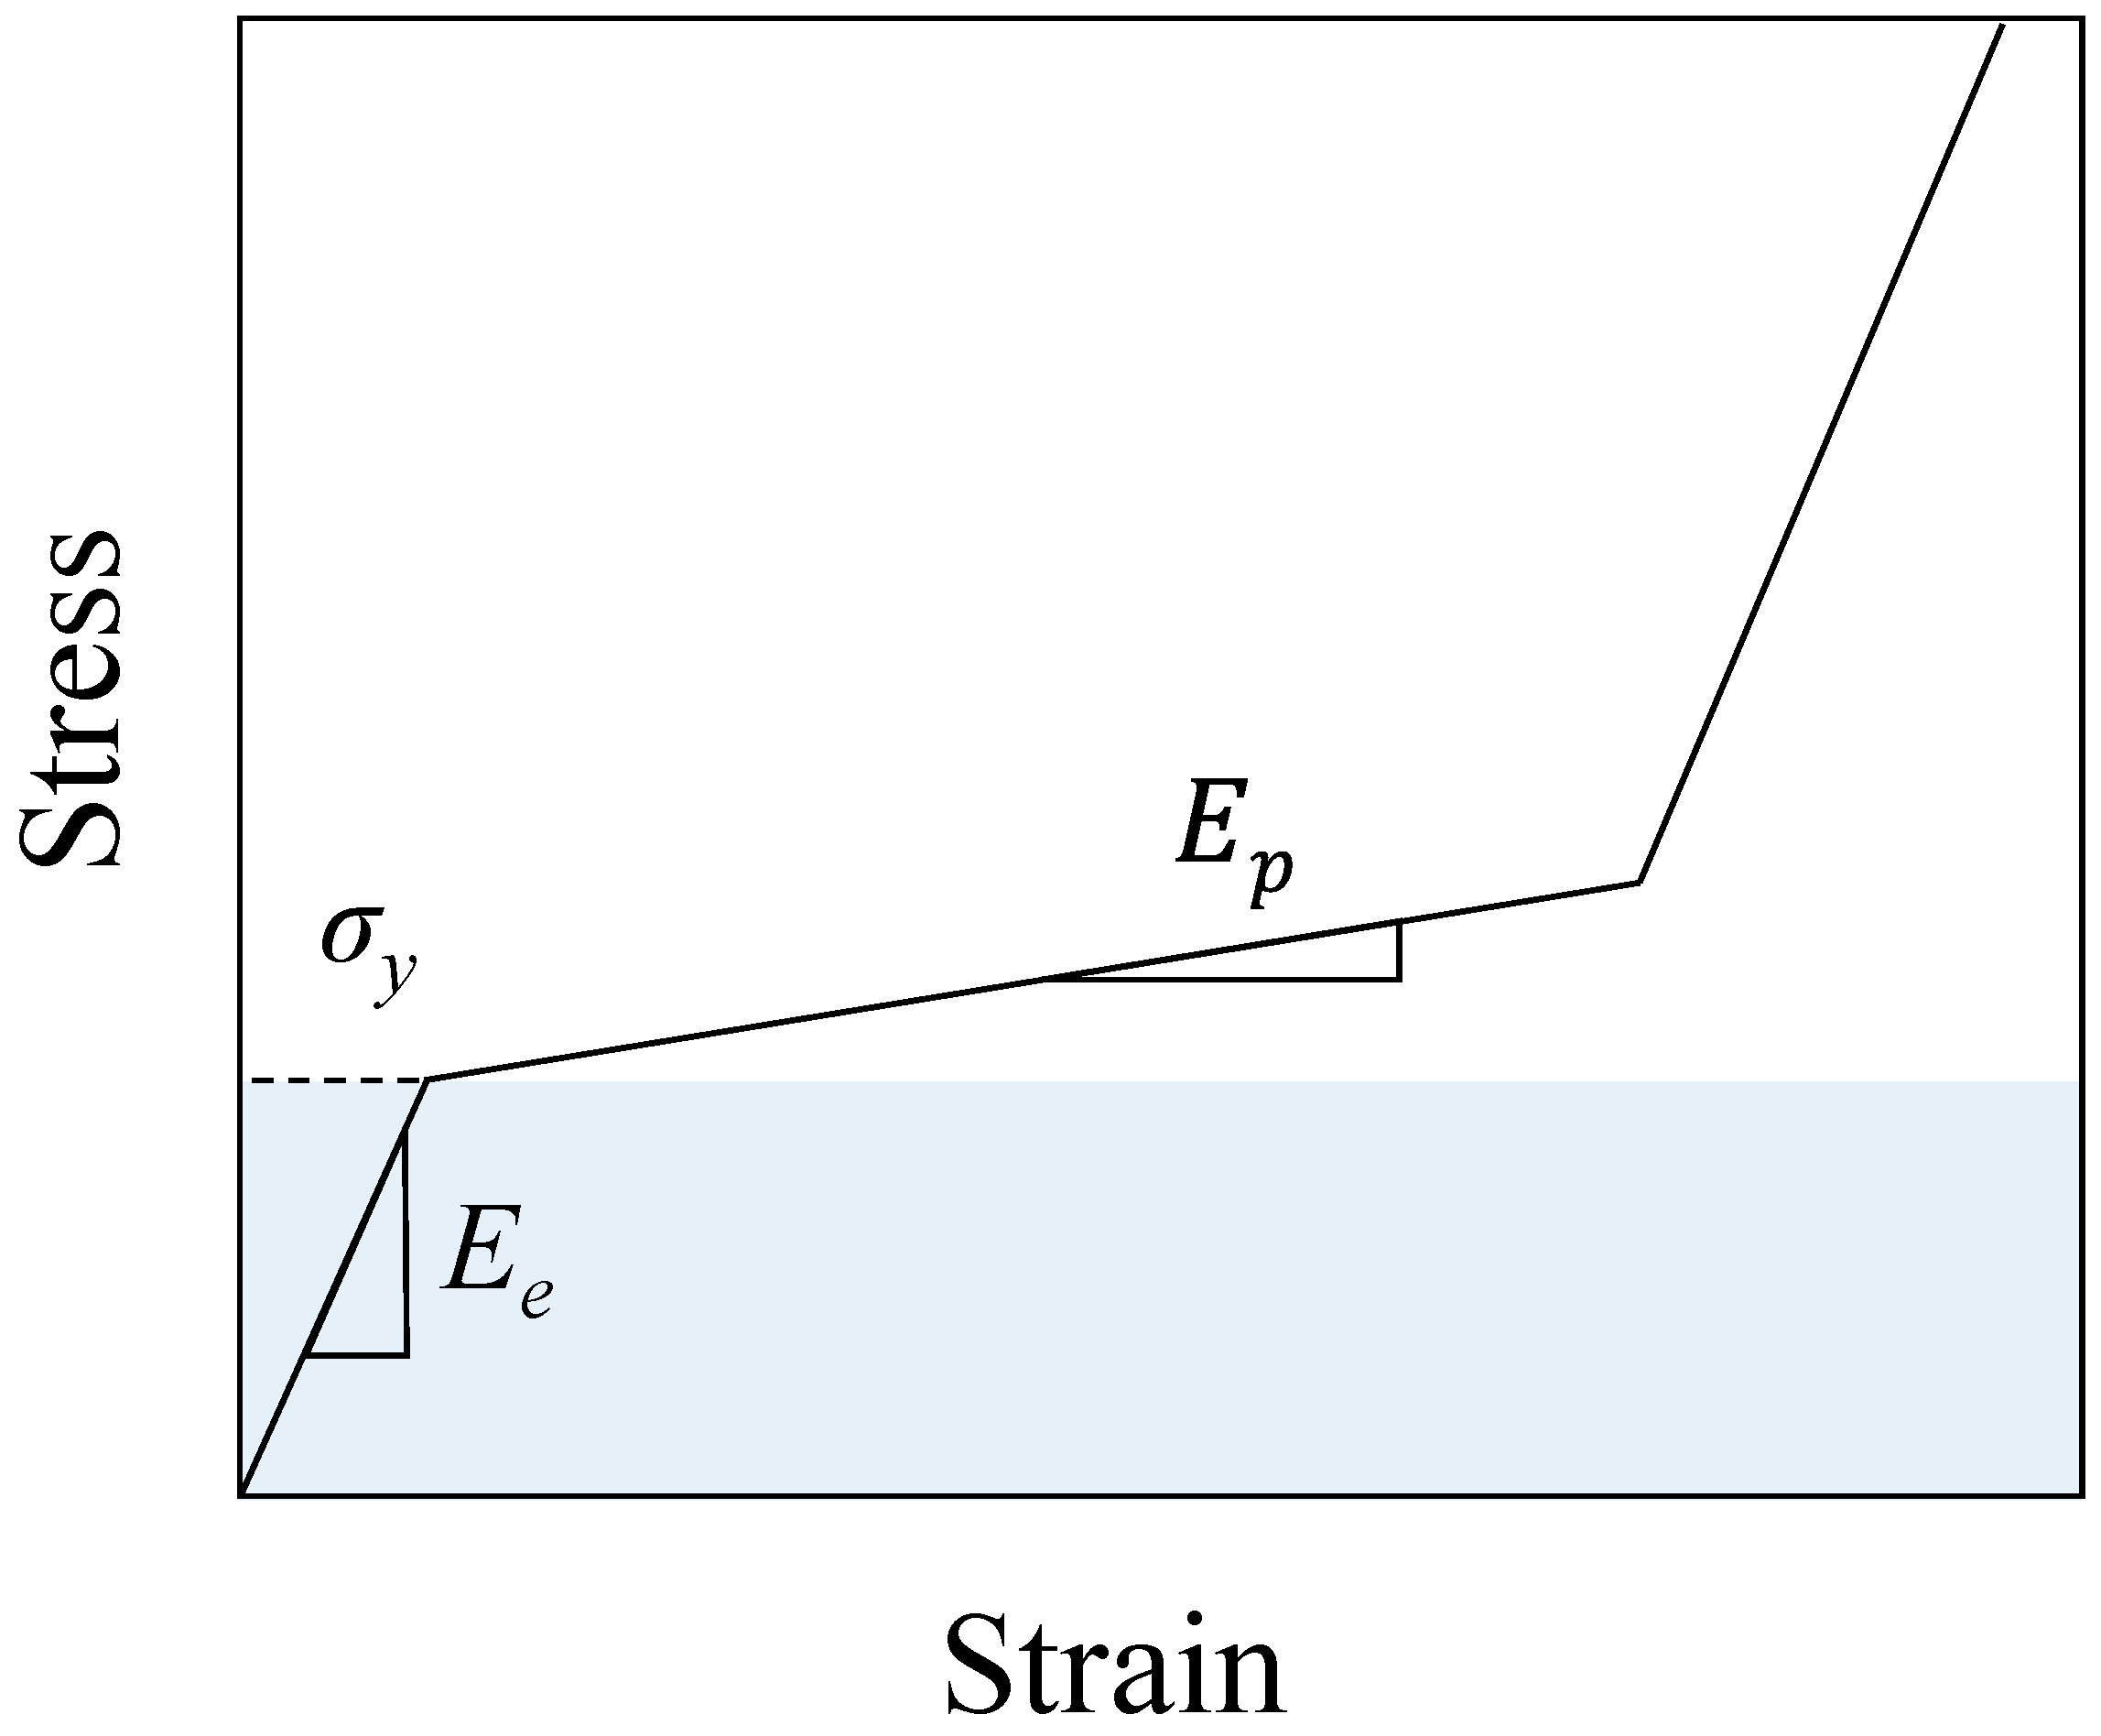
Figure 17 shows the simple stress–strain relationship of a typical cell structure. The elastic modulus of cell structure Ee is the slope of the elastic response, and strain-hardening exponent Ep is the slope of the plateau region. In other words, when the bulk density of the specimen is ρcell, plastic stress wave speed Cp is expressed as:
C p = E p ρ cell .
We calculated the plastic stress wave speed from the plateau region in the stress–strain relationship, and the results are reported in Figure 13 and Figure 14. For Ni foam, Ep = 250 kPa in the initial stage of the plateau region, and Cp = 23.0 m/s for specimen density ρcell of 471.7 kg/m3. For Ni/silicone foam, Ec = 325 kPa in the initial stage of the plateau region, and Cp = 15.7 m/s for specimen density ρcell of 1314.4 kg/m3. In other words, the compression velocity of the impact test was higher than the plastic stress wave speed in the initial stage of the plateau region in both specimens. As shown in Figure 8, Figure 9, Figure 13 and Figure 14, strain-hardening exponent n is not constant, and the stress–strain curve has a convex shape down from the plateau region with increasing densification. Here, we examined cases where the compression velocity is sufficiently high and slightly higher than the plastic stress wave speed.
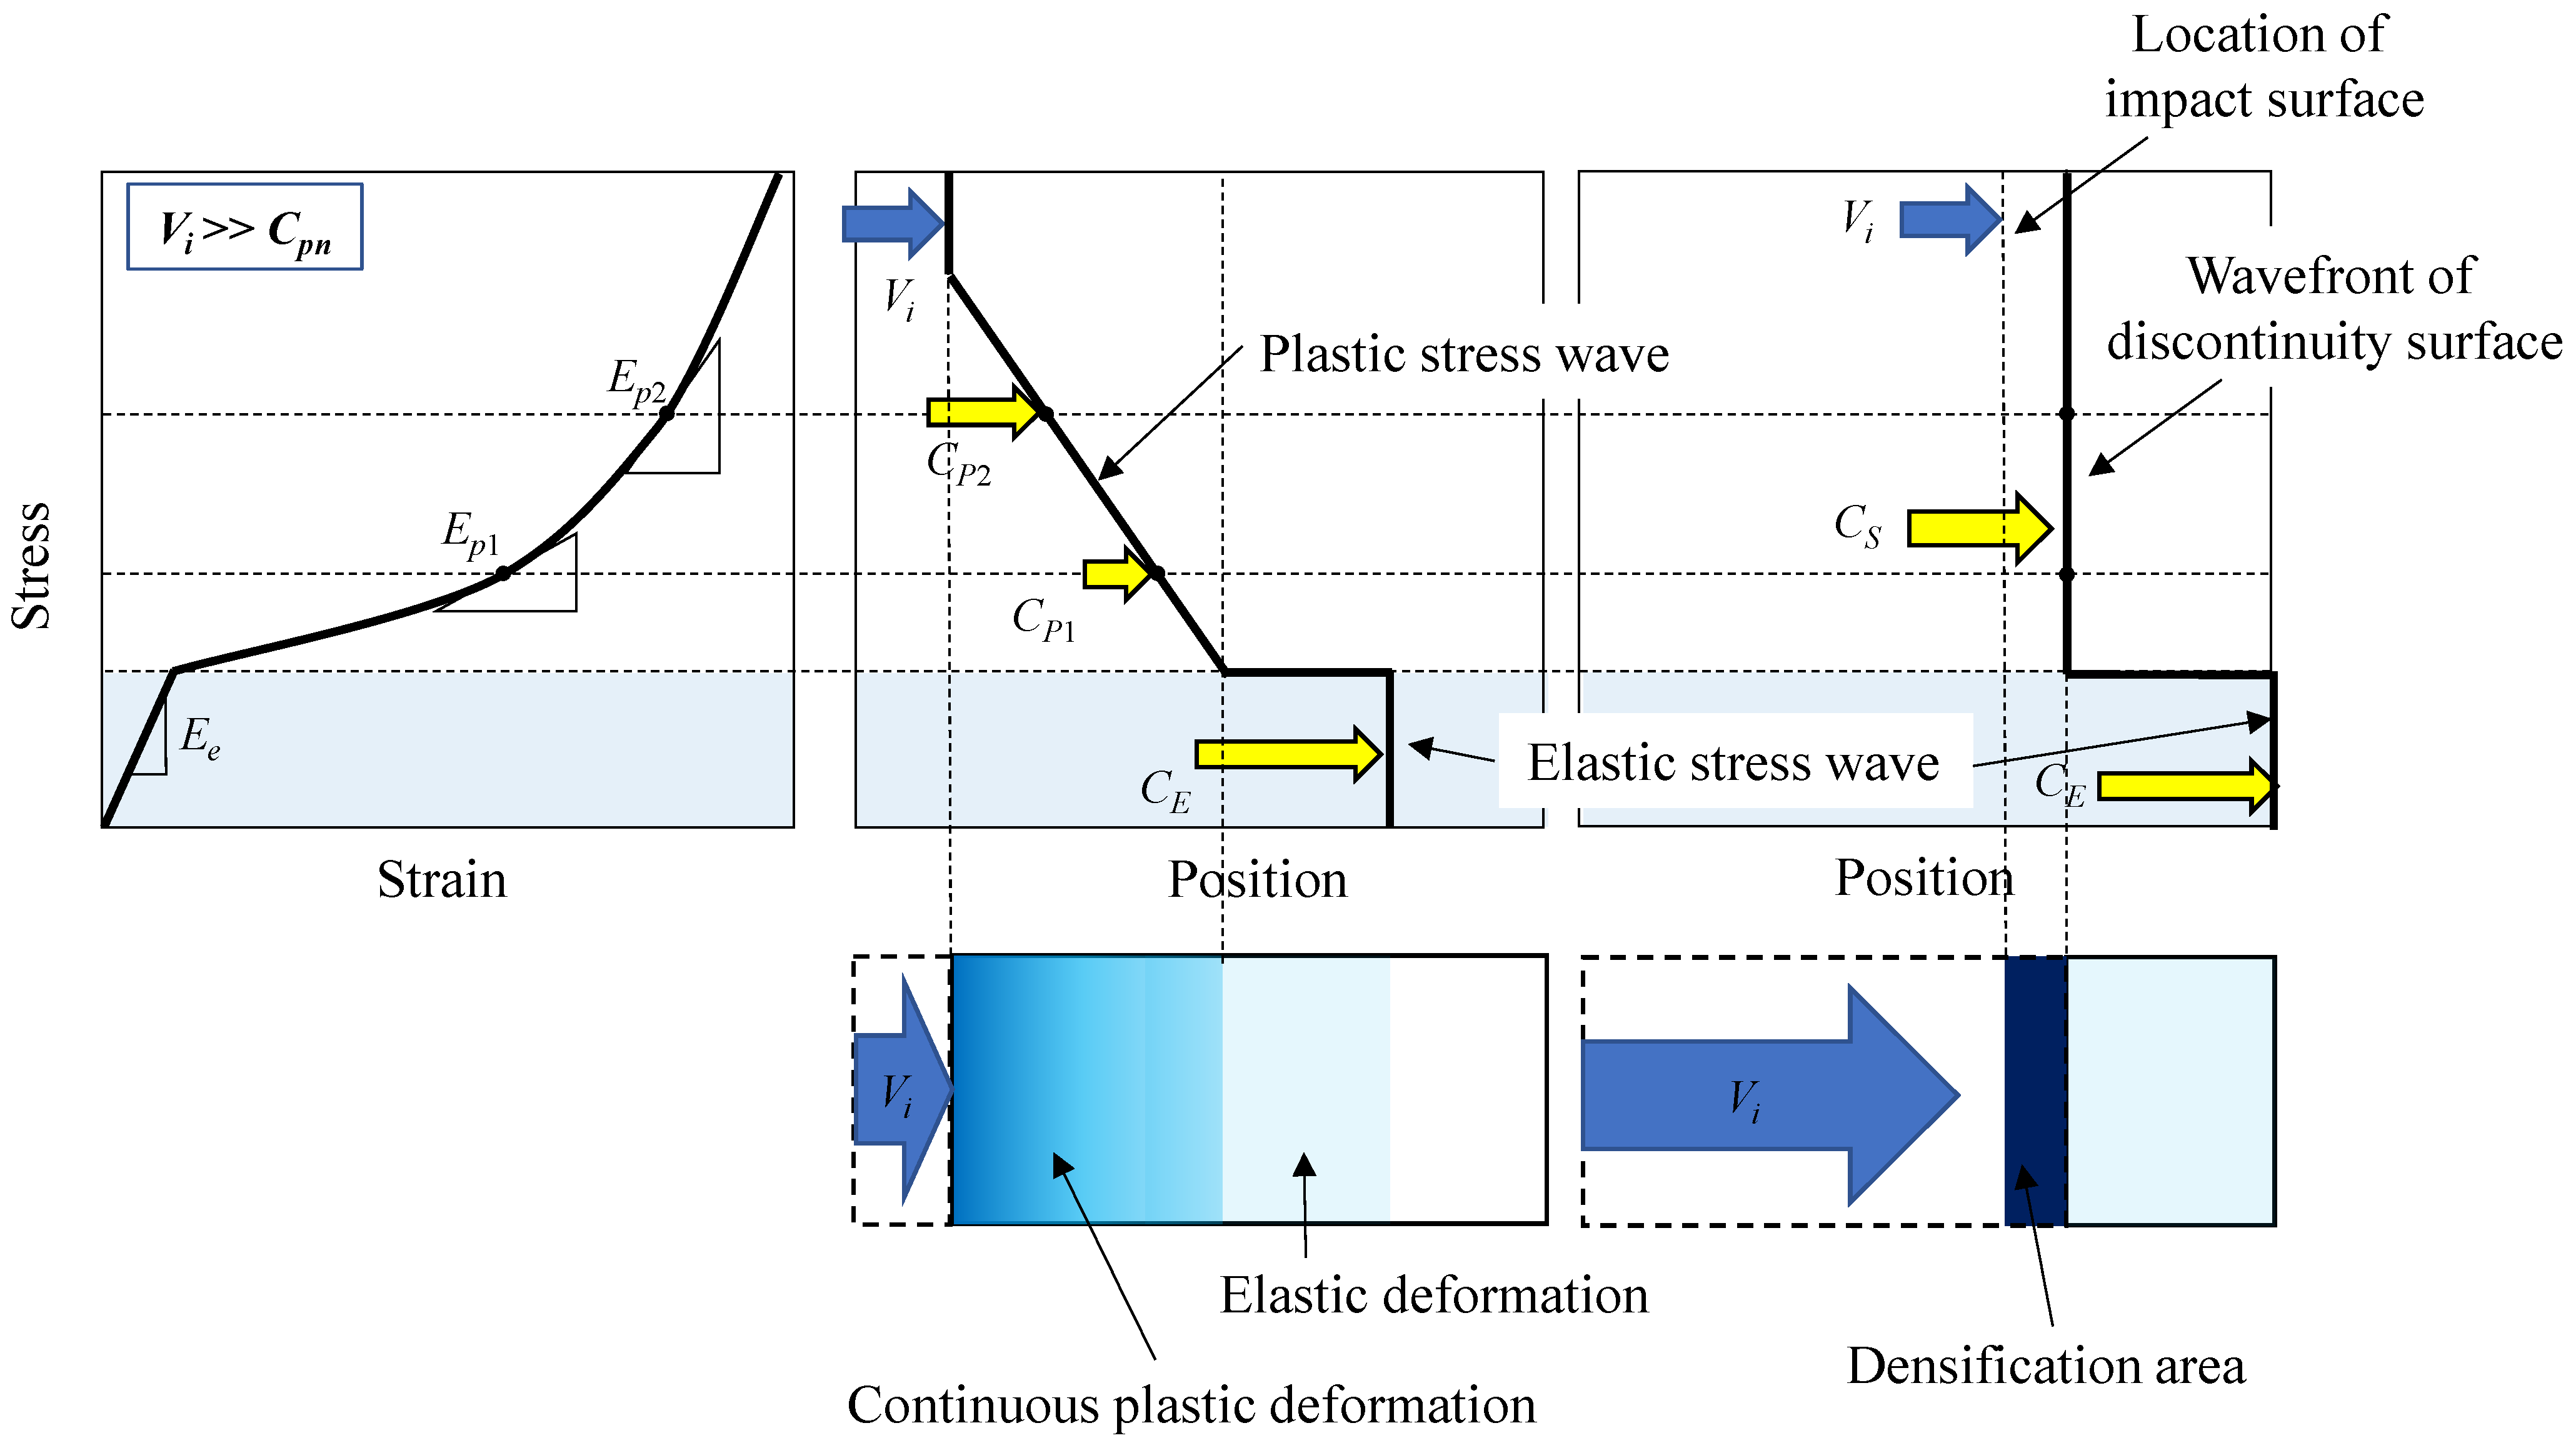
When the compression velocity is sufficiently higher than the plastic stress wave speed, the impact surface catches up with the wavefront of the plastic stress wave over time, and a clear discontinuity surface is generated (Figure 18). Therefore, when the compression velocity is sufficiently higher than the plastic stress wave speed that causes deformation, a discontinuity surface is formed due to the accumulation of plastic stress waves as deformation progresses, and nonuniform deformation occurs from the impact end. At this time, the speed of the discontinuity surface from the accumulation of plastic stress waves corresponds to CS in a shock wave in a solid. This condition was experimentally confirmed at a discontinuity surface speed in the order of tens to hundreds of meters per second [16]. Because the elastic stress wave speed is much higher than the plastic stress wave speed, an elastic stress wave was found in the front of the discontinuity surface, although the ratio of the elastic deformation is very small compared to the deformation of the cell structure. The effect is considered very small.
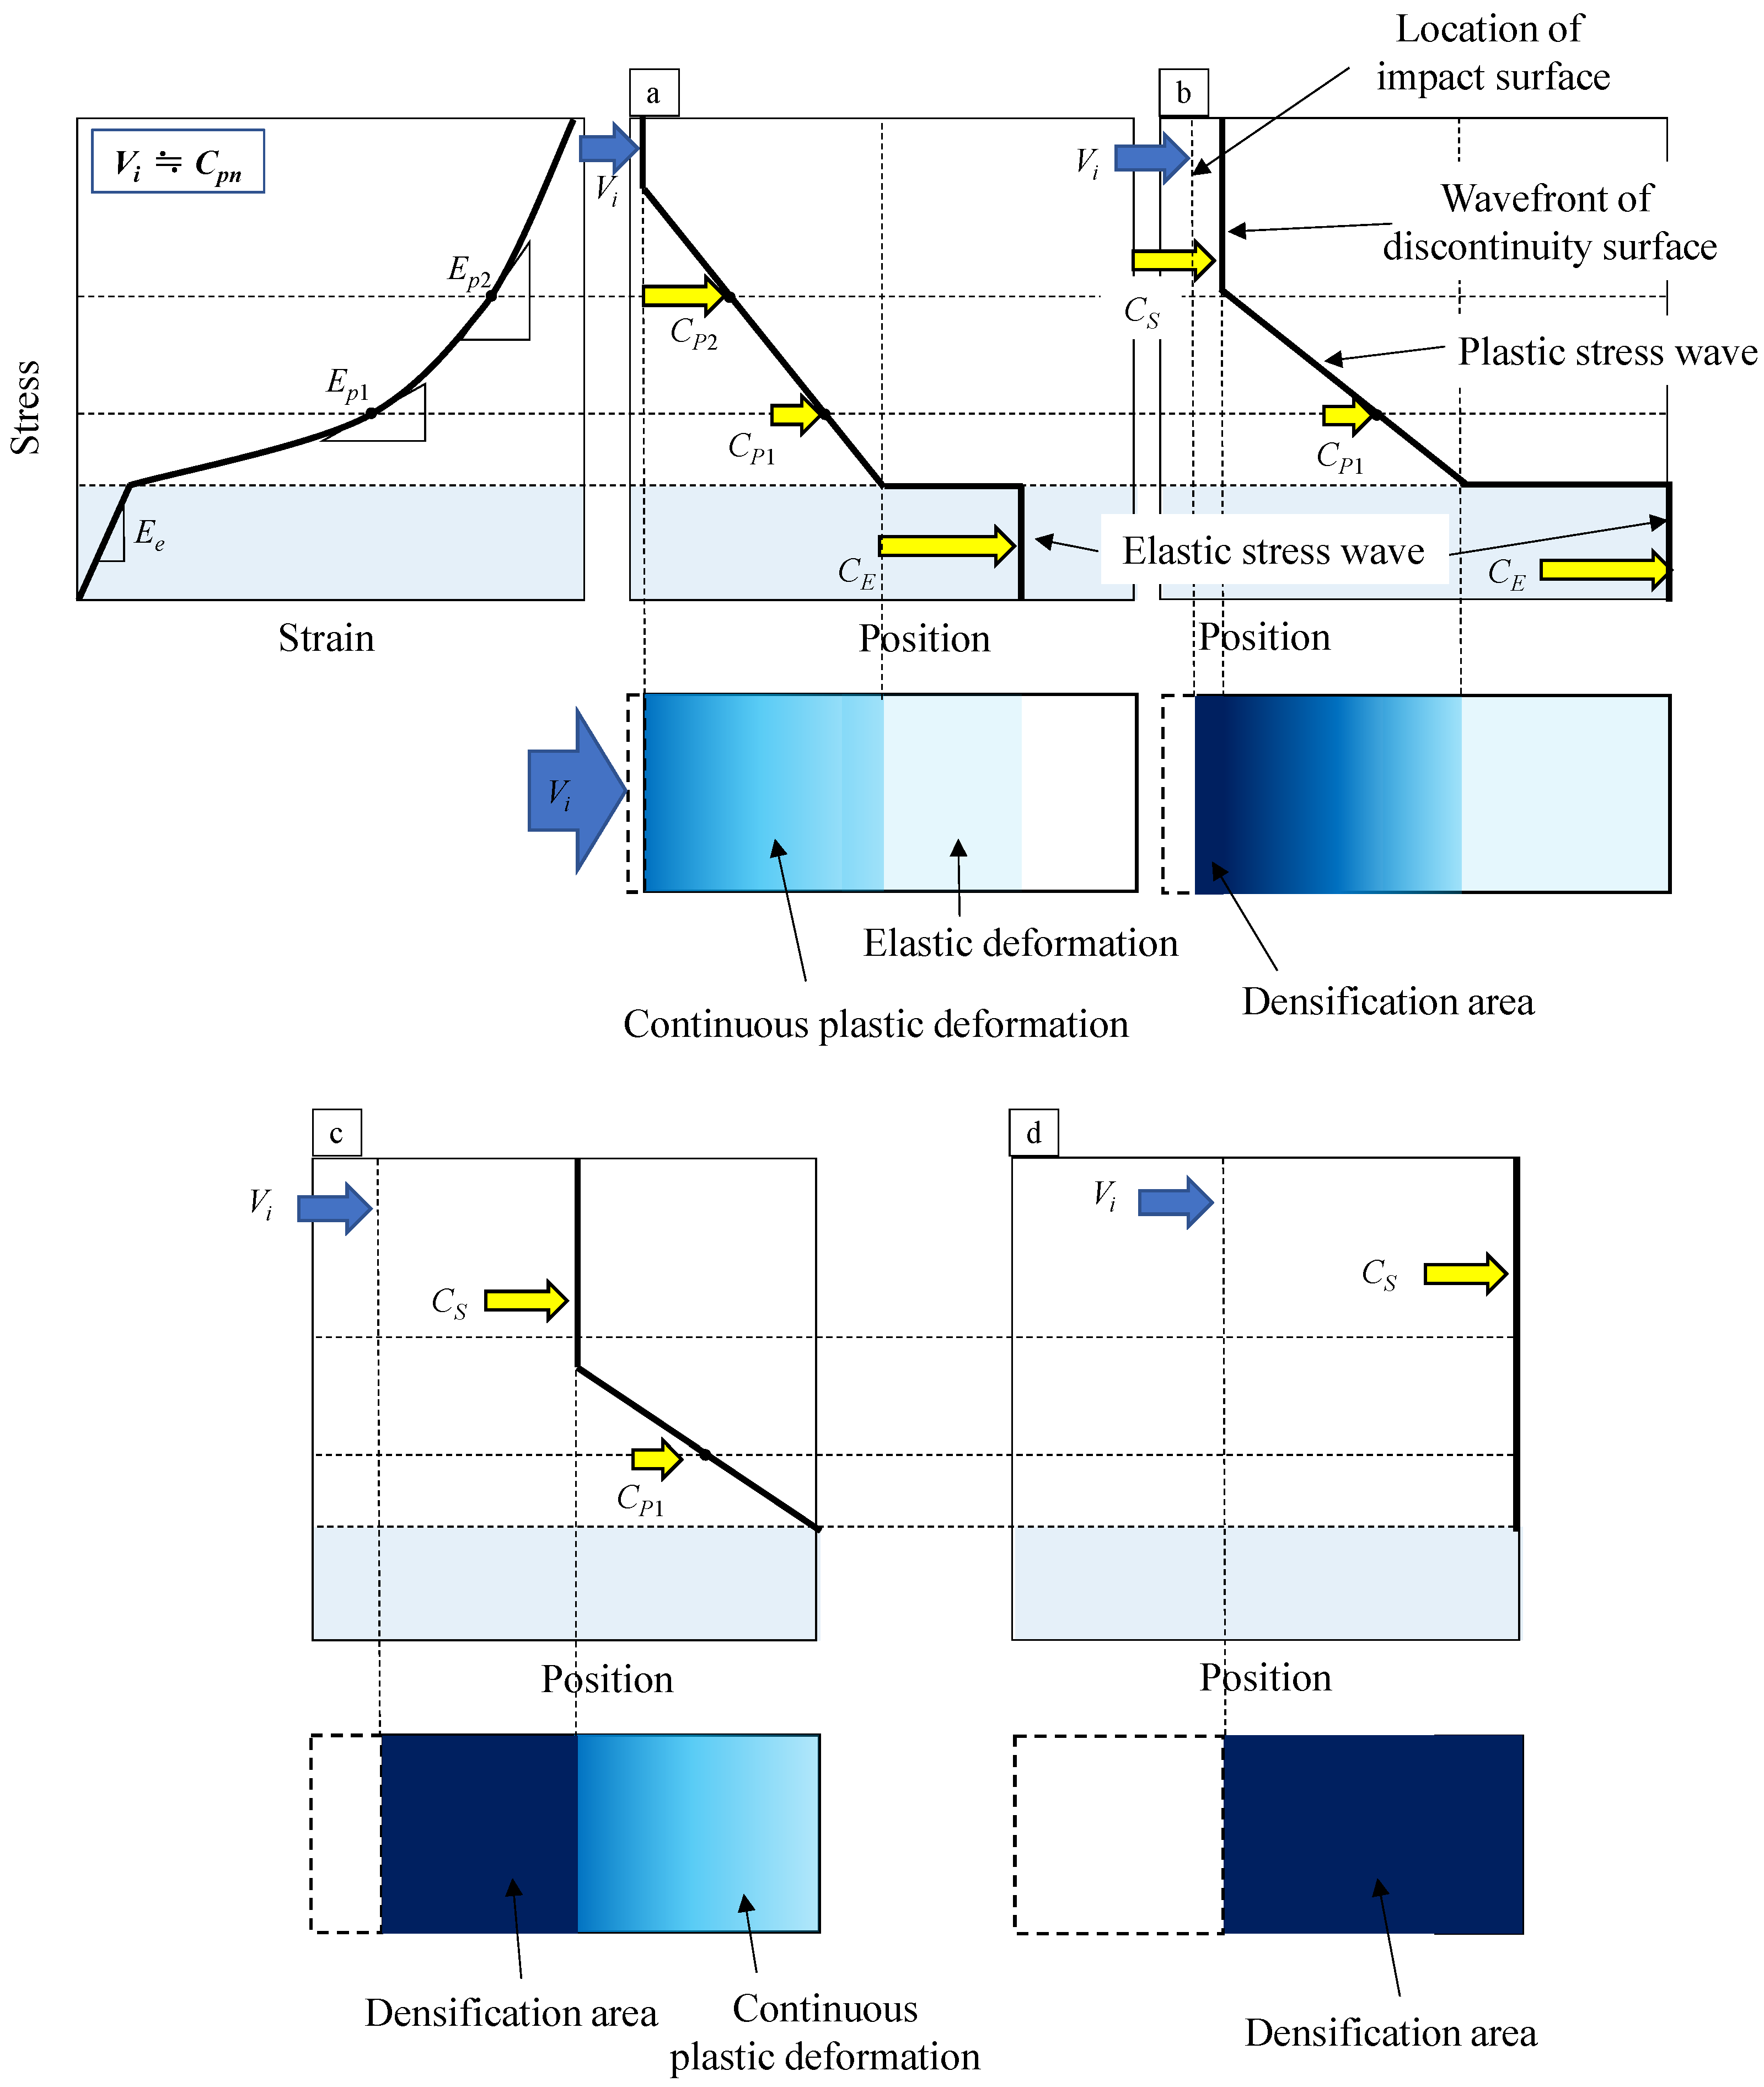
Next, we consider the case where the compression velocity is slightly higher than the plastic stress wave speed, as shown in Figure 19. Figure 19a–d corresponds to the history of the experimental results shown in Figure 14. The impact surface approaches the wavefront of the plastic stress wave over time and forms a discontinuity surface owing to the accumulation of the plastic stress wave (Figure 19a,b). In Figure 19b, because only the elastic stress wave reaches the fixed end, the elastic region can be confirmed from the stress–strain relationship. At this time, because the compression velocity is almost the same as the plastic stress wave speed, the discontinuity surface due to the accumulation of plastic stress waves does not catch up with the wavefront of the plastic stress wave, and only the plastic stress wave arrives at the fixed end (Figure 19c). Therefore, a plastic deformation region (plateau region) was observed at the fixed end, even with the stress–strain relation shown in Figure 14, despite the fact that the stresses at the two ends did not achieve force equilibrium. Finally, the stresses at the two ends of the specimen were considered to have achieved force equilibrium when the discontinuity surface due to the accumulation of plastic stress waves reached the fixed end, as shown in Figure 19d. Strictly speaking, the discontinuity surface due to the accumulation of plastic stress waves is not a clear discontinuity surface because plastic deformations occur even in front of it. Further, random deformation is speculated to occur in the part where the front surface deforms, in the same way as in the deformation mode of 20 m/s or less. Therefore, a clear observation is difficult using high-speed camera images.
The nonuniform deformation of the cell structure probably occurred owing to the accumulation of plastic stress waves. In contrast to the speed of the discontinuity surface from the accumulation of plastic stress waves, their speed depends on the shape of the plateau region and the density of the specimen; plastic stress wave speed is not constant and changes with time. Near the transition velocity, plastic deformation may occur even in front of the discontinuity surface from the accumulation of plastic stress waves, treating the deformation behavior as a distinct discontinuity surface.

7. Conclusions

We used a new test apparatus that could evaluate load state at the impact and fixed ends in a one-time test and investigated stress wave propagation and clarified the nonuniform deformation mechanism of the cell structure of Ni foam and Ni/silicone foam. They obtained the following results:
  • At a compression velocity of 20.0 m/s or less (strain rate from 8.3 × 10⁻⁴ to 3.8 × 10² s−1), no nonuniform deformation was observed in either the Ni foam or the Ni/silicone foam, and the loads on the impact and fixed ends achieved force equilibrium.
  • The flow stress of the Ni foam did not show any change with an increasing strain rate; by contrast, the flow stress of the Ni/silicone foam showed remarkable strain rate dependence. Perhaps this result was caused by the outflow resistance when silicone flows out from the inside and the pressure rises owing to the residual silicone.
  • At a compression velocity of approximately 26.0 m/s (strain rate: 1.3 × 10³ s−1), the loads at both ends of the Ni/silicone foam differed, and we observed nonuniform deformation from the impact end. The plastic stress wave propagation speed in the Ni/silicone foam, derived from the slope of the plateau region, was 15.7 m/s, suggesting that nonuniform deformation occurs when the compression velocity becomes higher than the plastic stress wave propagation speed.
  • Nonuniform deformation of the cell structure was probably caused by the accumulation of plastic stress waves. However, near the transition velocity, plastic deformation can occur even in front of the discontinuity surface owing to the accumulation of plastic stress waves. Therefore, deformation behavior cannot be considered a distinct discontinuity surface.

Author Contributions

Conceptualization, K.T. and H.Y.; methodology, K.T. and H.Y.; validation, K.T. and H.Y.; investigation, K.T.; resources, H.Y.; data curation, K.T.; writing—original draft preparation, K.T.; writing—review and editing, H.Y.; visualization, K.T. All authors have read and agreed to the published version of the manuscript.

Funding

This work was supported by JSPS KAKENHI Grant Number 20K14615.

Acknowledgments

The authors thank Nagahisa Ogasawara and Chihiro Kakuno for their discussion and comments. The authors also thank Sekisui Chemical Co., Ltd. for their support in making the specimen.

Conflicts of Interest

The authors declare no conflict of interest.

References

  1. Avalle, M.; Belingardi, G.; Montanini, R. Characterization of Polymeric Structural Foams under Compressive Impact Loading by Means of Energy-Absorption Diagram. Int. J. Impact Eng. 2001, 25, 455–472. [Google Scholar] [CrossRef]
  2. Gibson, L.J.; Ashby, M.F. Cellular Solids: Structure and Properties, 2nd ed.; Cambridge University Press: Cambridge, UK, 1988; ISBN 9781139878326. [Google Scholar]
  3. Saha, M.C.; Mahfuz, H.; Chakravarty, U.K.; Uddin, M.; Kabir, M.E.; Jeelani, S. Effect of Density, Microstructure, and Strain Rate on Compression Behavior of Polymeric Foams. Mater. Sci. Eng. A 2005, 406, 328–336. [Google Scholar] [CrossRef]
  4. Bouix, R.; Viot, P.; Lataillade, J.L. Polypropylene Foam Behaviour under Dynamic Loadings: Strain Rate, Density and Microstructure Effects. Int. J. Impact Eng. 2009, 36, 329–342. [Google Scholar] [CrossRef] [Green Version]
  5. Liao, S.; Zheng, Z.; Yu, J. On the Local Nature of the Strain Field Calculation Method for Measuring Heterogeneous Deformation of Cellular Materials. Int. J. Solids Struct. 2014, 51, 478–490. [Google Scholar] [CrossRef] [Green Version]
  6. Gasparetto, V.E.L.; ElSayed, M.S.A. Multiscale Modelling and Mechanical Anisotropy of Periodic Cellular Solids with Rigid-Jointed Truss-Like Microscopic Architecture. Appl. Mech. 2021, 2, 331–355. [Google Scholar] [CrossRef]
  7. Adachi, H.; Hasegawa, T. Effects of Cell Destruction on Compression Moduli of Closed-Celled Polyethylene Foams. Nihon Reoroji Gakkaishi 2003, 31, 105–108. [Google Scholar] [CrossRef] [Green Version]
  8. Chakravarty, U.; Mahfuz, H.; Saha, M.; Jeelani, S. Strain Rate Effects on Sandwich Core Materials: An Experimental and Analytical Investigation. Acta Mater. 2003, 51, 1469–1479. [Google Scholar] [CrossRef]
  9. Ouellet, S.; Cronin, D.; Worswick, M. Compressive Response of Polymeric Foams under Quasi-Static, Medium and High Strain Rate Conditions. Polym. Test. 2006, 25, 731–743. [Google Scholar] [CrossRef]
  10. Song, B.; Chen, W.; Lu, W.Y. Compressive Mechanical Response of a Low-Density Epoxy Foam at Various Strain Rates. J. Mater. Sci. 2007, 42, 7502–7507. [Google Scholar] [CrossRef]
  11. Fowles, R.; Williams, R.F. Plane Stress Wave Propagation in Solids. J. Appl. Phys. 1970, 41, 360–363. [Google Scholar] [CrossRef]
  12. Meyers, M.A. Dynamic Behavior of Materials; Wiley: Hoboken, NJ, USA, 1994; ISBN 9780471582625. [Google Scholar]
  13. Elnasri, I.; Pattofatto, S.; Zhao, H.; Tsitsiris, H.; Hild, F.; Girard, Y. Shock Enhancement of Cellular Structures under Impact Loading: Part I Experiments. J. Mech. Phys. Solids 2007, 55, 2652–2671. [Google Scholar] [CrossRef] [Green Version]
  14. Pattofatto, S.; Elnasri, I.; Zhao, H.; Tsitsiris, H.; Hild, F.; Girard, Y. Shock Enhancement of Cellular Structures under Impact Loading: Part II Analysis. J. Mech. Phys. Solids 2007, 55, 2672–2686. [Google Scholar] [CrossRef] [Green Version]
  15. Wang, P.; Xu, S.; Li, Z.; Yang, J.; Zhang, C.; Zheng, H.; Hu, S. Experimental Investigation on the Strain-Rate Effect and Inertia Effect of Closed-Cell Aluminum Foam Subjected to Dynamic Loading. Mater. Sci. Eng. A 2015, 620, 253–261. [Google Scholar] [CrossRef]
  16. Gaitanaros, S.; Kyriakides, S. Dynamic Crushing of Aluminum Foams: Part II—Analysis. Int. J. Solids Struct. 2014, 51, 1646–1661. [Google Scholar] [CrossRef] [Green Version]
  17. Hopkinson, B.X. A Method of Measuring the Pressure Produced in the Detonation of High, Explosives or by the Impact of Bullets. Philos. Trans. R. Soc. Lond. Ser. Contain. Pap. Math. Phys. Character 1914, 213, 437–456. [Google Scholar] [CrossRef]
  18. Kolsky, H. An Investigation of the Mechanical Properties of Materials at Very High Rates of Loading. Proc. Phys. Soc. Sect. B 1949, 62, 676–700. [Google Scholar] [CrossRef]
  19. Tateyama, K.; Kakuno, C.; Ogasawara, N.; Yamada, H. Development of Universal Rate Range Load-Cell. J. Jpn. Soc. Exp. Mech. 2017, 17, 131–138. [Google Scholar] [CrossRef]
  20. Yamada, H.; Kakuno, C.; Tateyama, K.; Ogasawara, N. Development of Dynamic and Impact Load-Measuring Apparatus with Opposite Load-Cells. J. Jpn. Soc. Exp. Mech. 2017, 17, 117–123. [Google Scholar] [CrossRef]
  21. Tateyama, K.; Yamada, H.; Ogasawara, N. Effect of Strain Rate on Compressive Properties of Foamed Polyethylene Film. Polym. Test. 2016, 52, 54–62. [Google Scholar] [CrossRef]
  22. Barnes, A.T.; Ravi-Chandar, K.; Kyriakides, S.; Gaitanaros, S. Dynamic Crushing of Aluminum Foams: Part I—Experiments. Int. J. Solids Struct. 2014, 51, 1631–1645. [Google Scholar] [CrossRef] [Green Version]
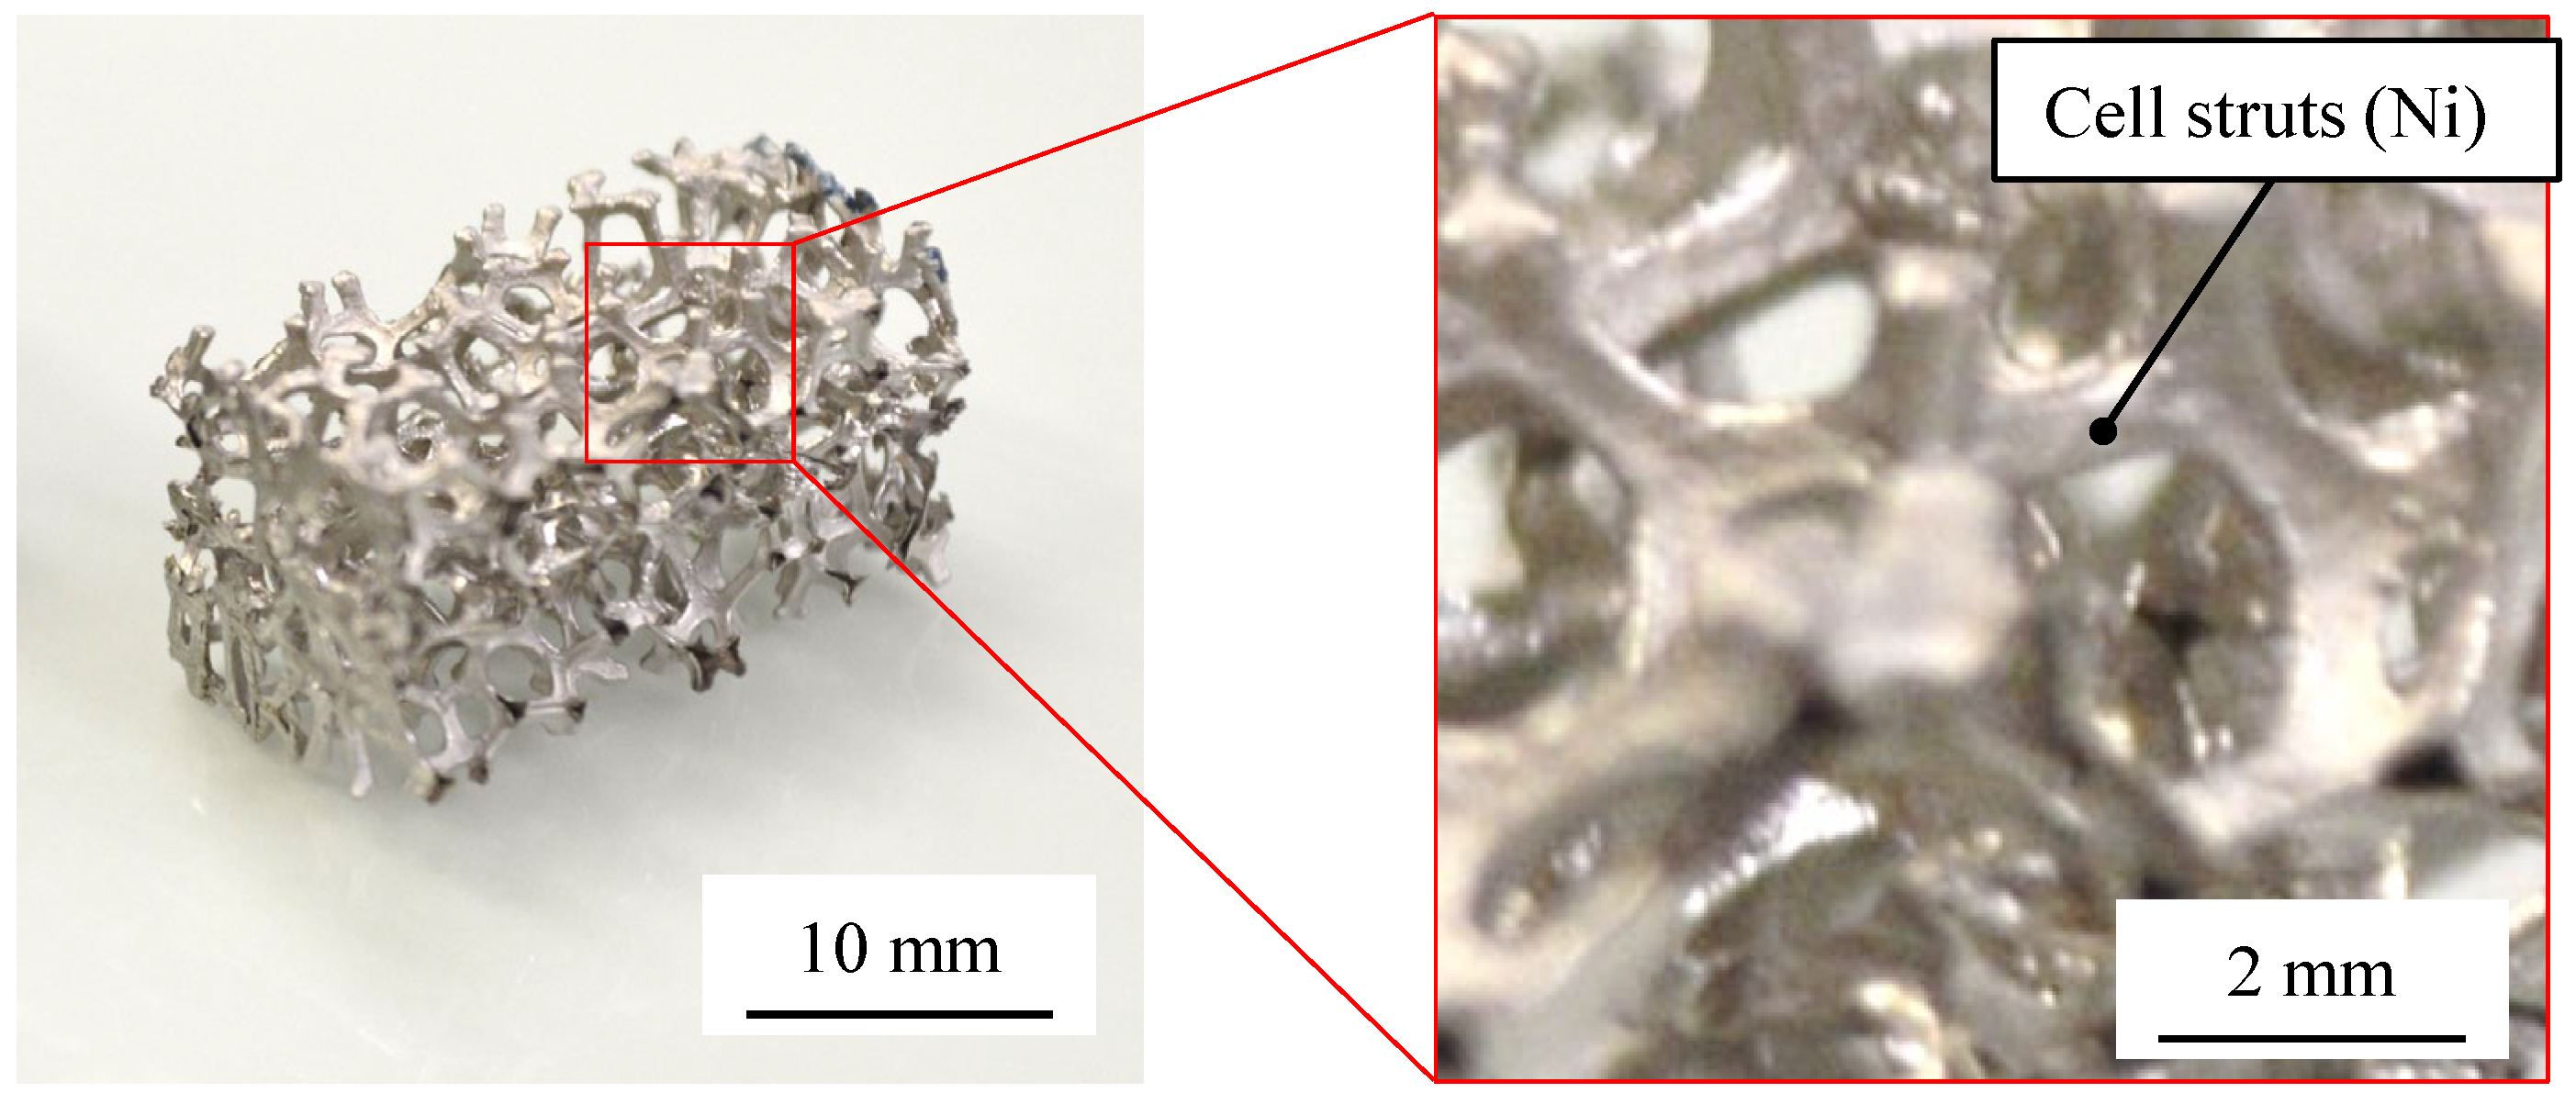
Figure 1. External view of foamed Ni.
Applmech 02 00053 g001
Figure 2. 3D image of typical Ni foam.
Applmech 02 00053 g002
Figure 3. External and enlarged view of Ni/silicone foam.
Applmech 02 00053 g003
Figure 4. Schematics of dynamic (a) and impact (b) load-measuring apparatus with opposite load cells.
Applmech 02 00053 g004
Figure 5. Schematic view of universal rate range load cell.
Applmech 02 00053 g005
Figure 6. True stress–true strain rate relationships at strains of 0.05 to 0.2 for pure Ni: Results indicate m ≤ 0.009: an exceedingly small value.
Applmech 02 00053 g006
Figure 7. True stress–true strain rate relationships at strains of 0.2 to 0.6 for silicone rubber.
Applmech 02 00053 g007
Figure 8. Typical normalized stress–strain relationship of Ni foam at a strain rate between 8.3 × 10⁻⁴ and 3.8 × 10² s−1.
Applmech 02 00053 g008
Figure 9. Typical normalized stress–strain relationship of Ni/silicone foam at strain rates between 8.3 × 10⁻⁴ and 3.8 × 10² s−1.
Applmech 02 00053 g009
Figure 10. Deformation behavior of Ni foam and Ni/silicone foam at strain rate of 8.3 × 10⁻⁴ s−1.
Applmech 02 00053 g010
Figure 11. Deformation of Ni/silicone foam at strain of 0.6 for strain rates of 5.0 × 101 and 3.8 × 10² s−1.
Applmech 02 00053 g011
Figure 12. Each specimen after compression test at strain rates of 8.3 × 10⁻⁴ (a) and 3.8 × 10² s−1 (b).
Applmech 02 00053 g012
Figure 13. Typical normalized stress–strain relationship of Ni foam in an impact test conducted at compression rate of approximately 26.0 m/s.
Applmech 02 00053 g013
Figure 14. Typical normalized stress–strain relationship of Ni/silicone foam in an impact test conducted at a compression rate of approximately 25.6 m/s: (a–d) correspond to the stress wave propagation behavior in Figure 19.
Applmech 02 00053 g014
Figure 15. Deformation behavior of Ni foam and Ni/silicone foam at compression rate of approximately 26.0 m/s.
Applmech 02 00053 g015
Figure 17. Simple stress–strain relationship of a typical cell structure.
Applmech 02 00053 g017
Figure 18. Stress wave propagation behavior when compression velocity is sufficiently higher than plastic stress wave speed.
Applmech 02 00053 g018
Figure 19. Stress wave propagation behavior where compression velocity is slightly higher than plastic stress wave speed: (ad) correspond to the history of experimental results in Figure 14.
Applmech 02 00053 g019
Table 1. Cell shape parameters of Ni foam and Ni/silicone foam.
SpecimenNi FoamNi/Silicone Foam
Expansion ratioAverage value: 18.7 (Standard deviation: 1.91)
PorosityAverage value: 95% (Standard deviation: 0.16)
Dimensions20 × 10 × 10 mm3
Bulk density450 kg/m31300 kg/m3
Filling in the poresAirSilicone rubber
Cell size3.2 mm
Aperture length1.2 mm
Cell struts thickness0.05 mm
Cell shapeDodecahedron
AnisotropyIsotropic
Table 2. The dimensions and density of the Ni and silicone rubber.
SpecimenDimensionsDensity
Pure Niϕ4 × 6 mm38900 kg/m3
Silicone rubber10 × 10 × 10 mm31000 kg/m3
Publisher’s Note: MDPI stays neutral with regard to jurisdictional claims in published maps and institutional affiliations.