Reinventing the Trochoidal Toolpath Pattern by Adaptive Rounding Radius Loop Adjustments for Precision and Performance in End Milling Operations
Abstract
1. Introduction
2. Experimental Setup
2.1. Material Selection
2.2. Experimental Details
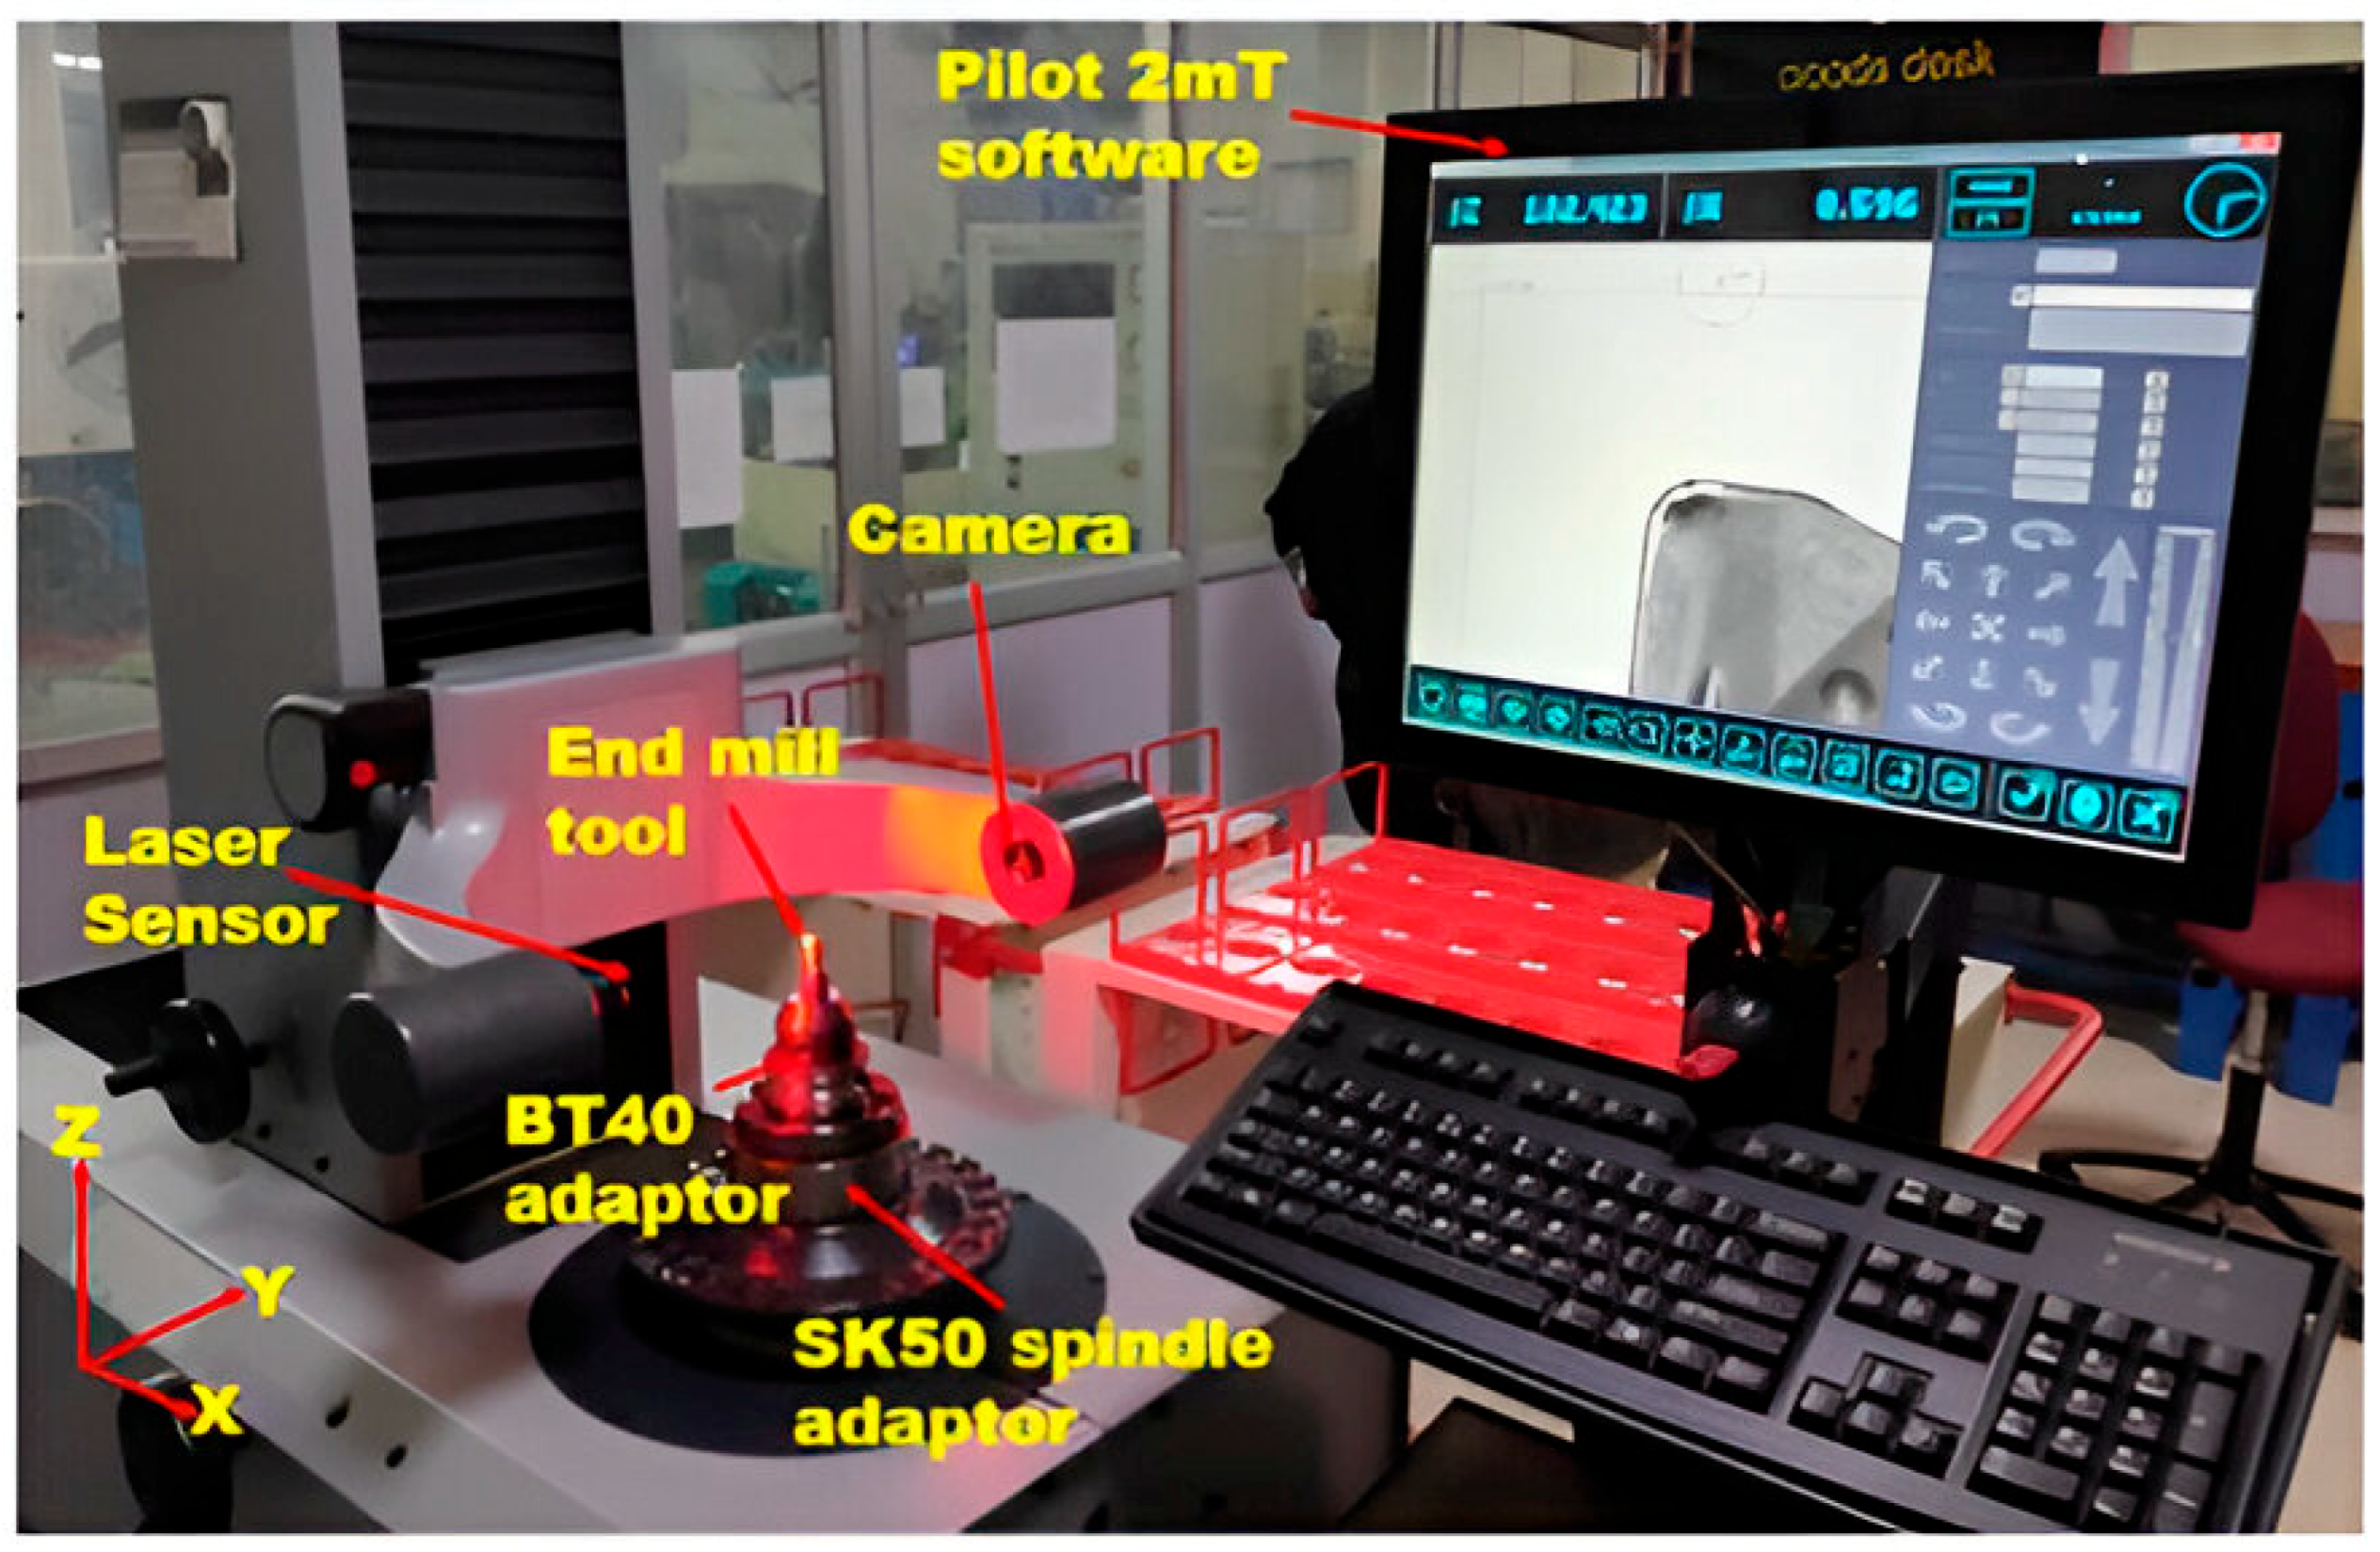
2.3. Measurement of Output Responses
3. Results and Discussion
3.1. ANN
3.2. Effect of Rounding Radius on Ra
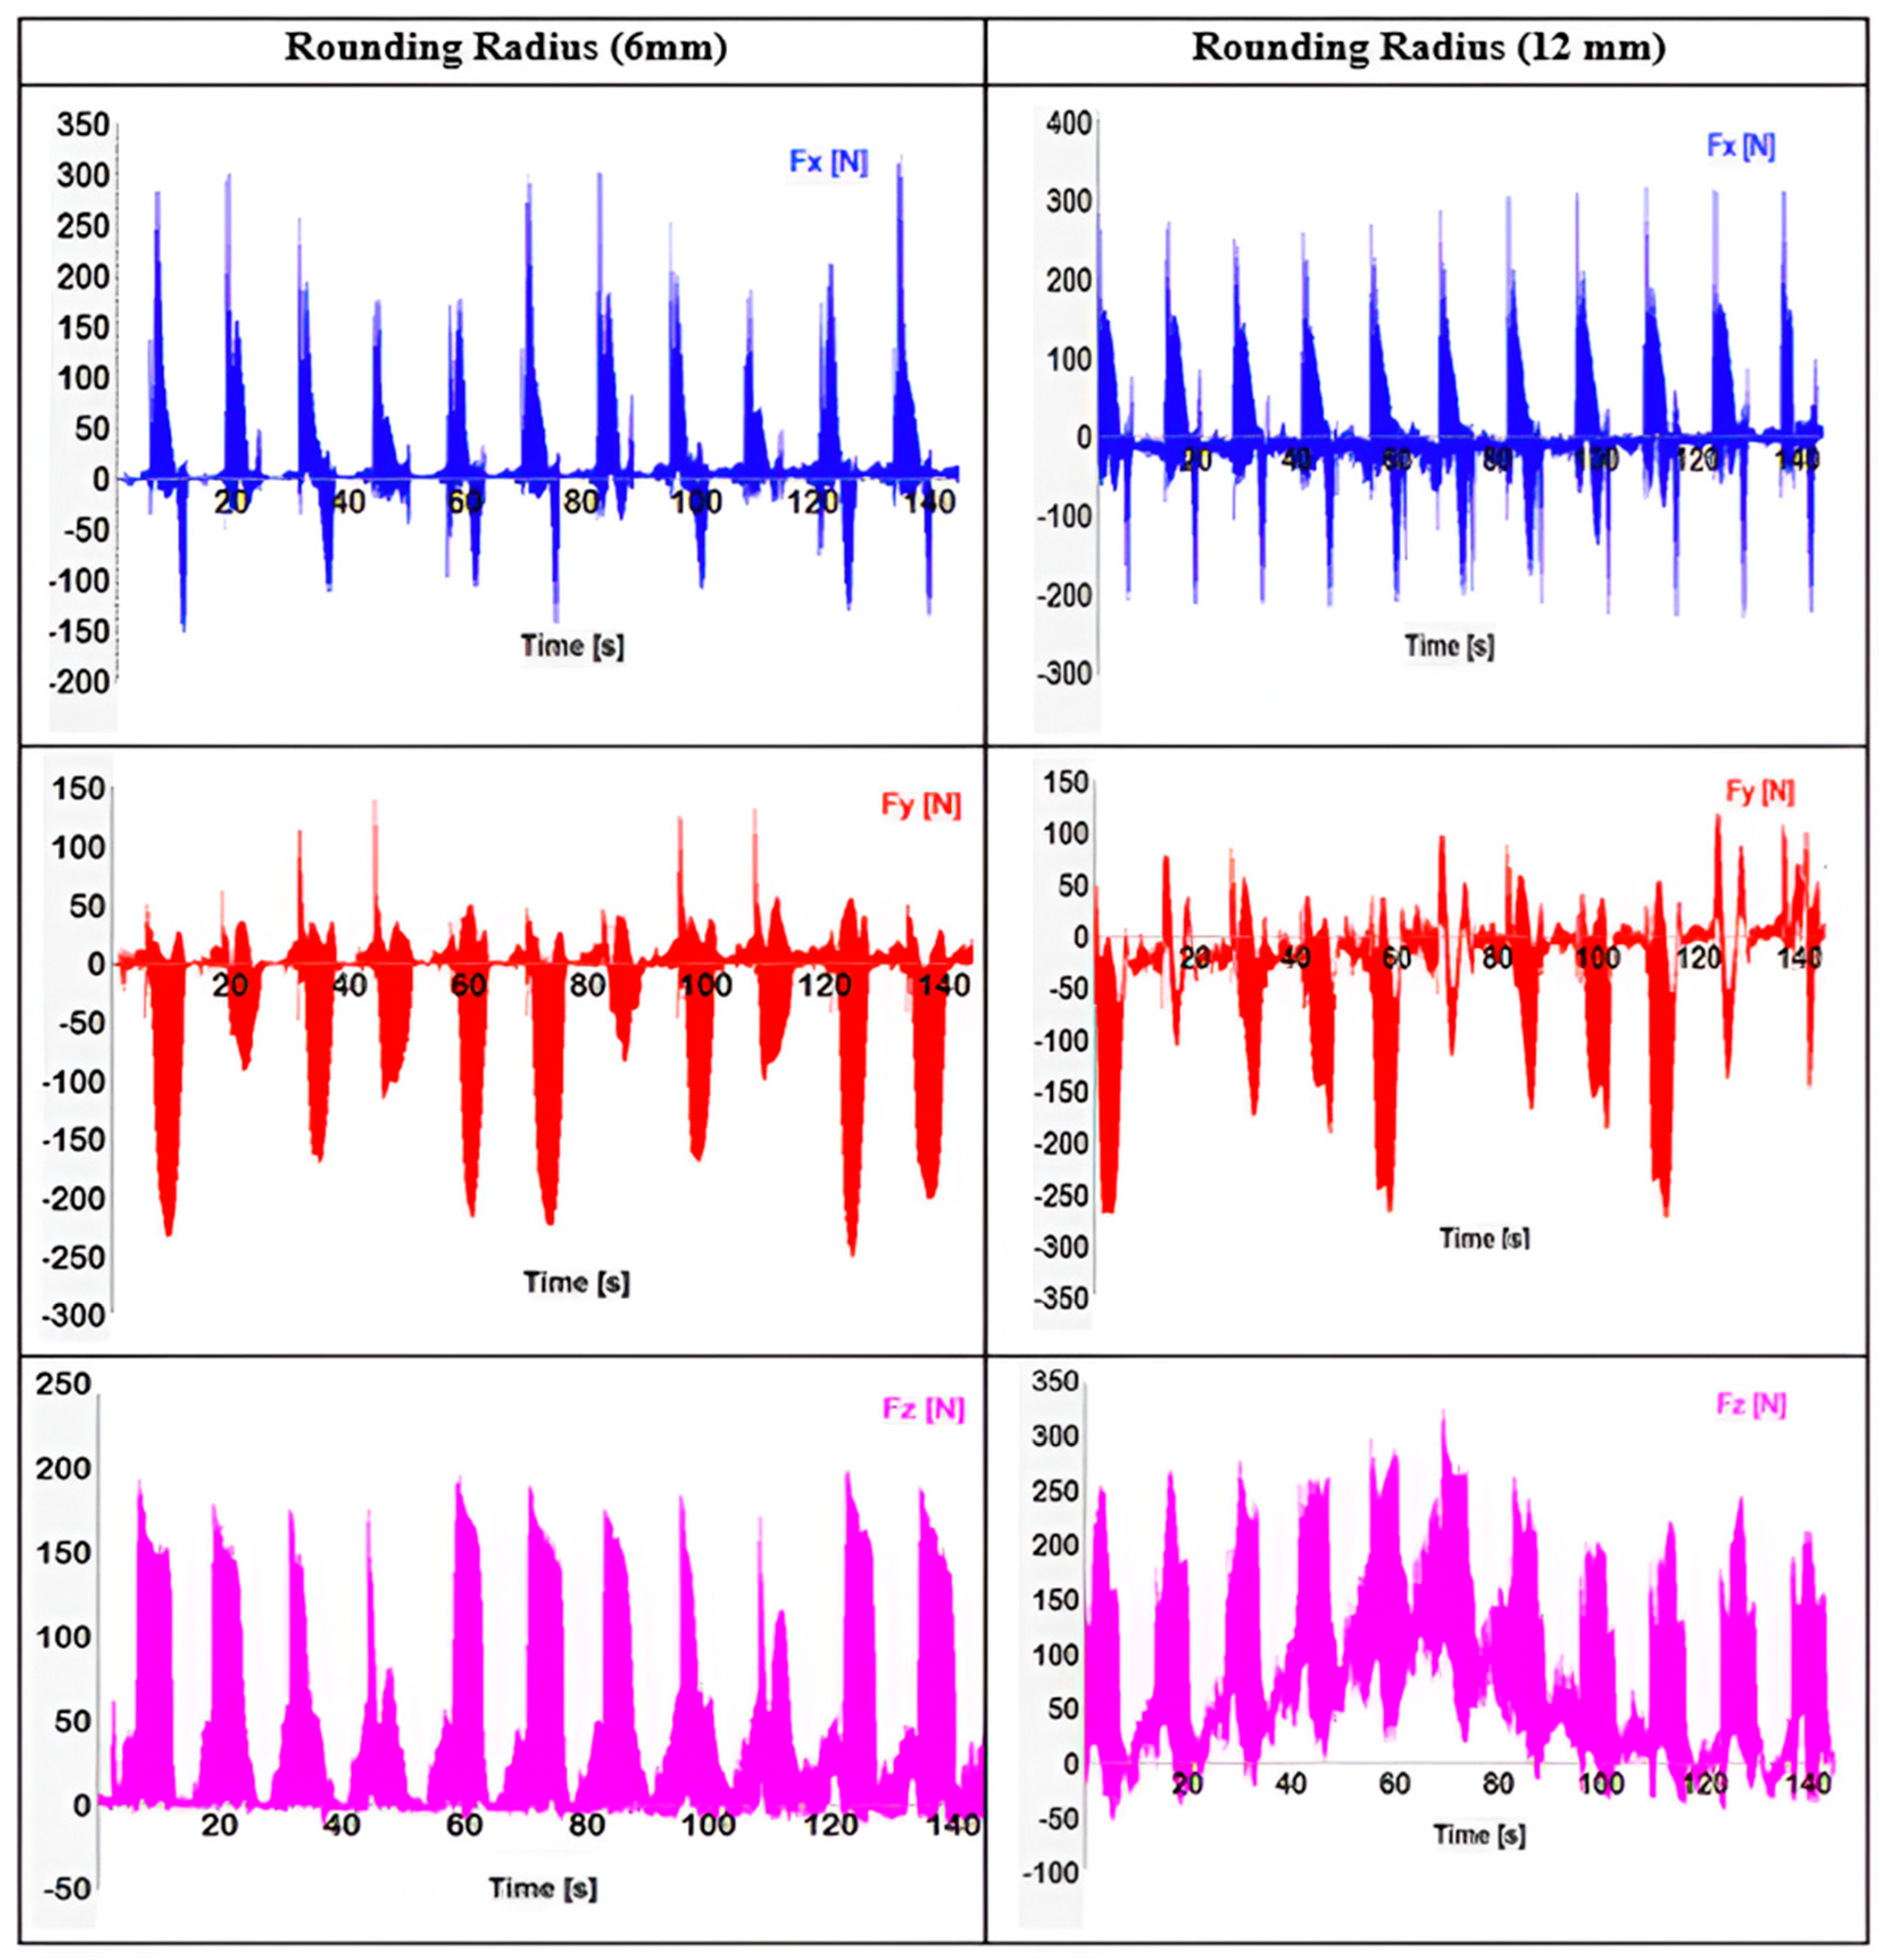
3.3. Effect of Rounding Radius on Resultant Cutting Force
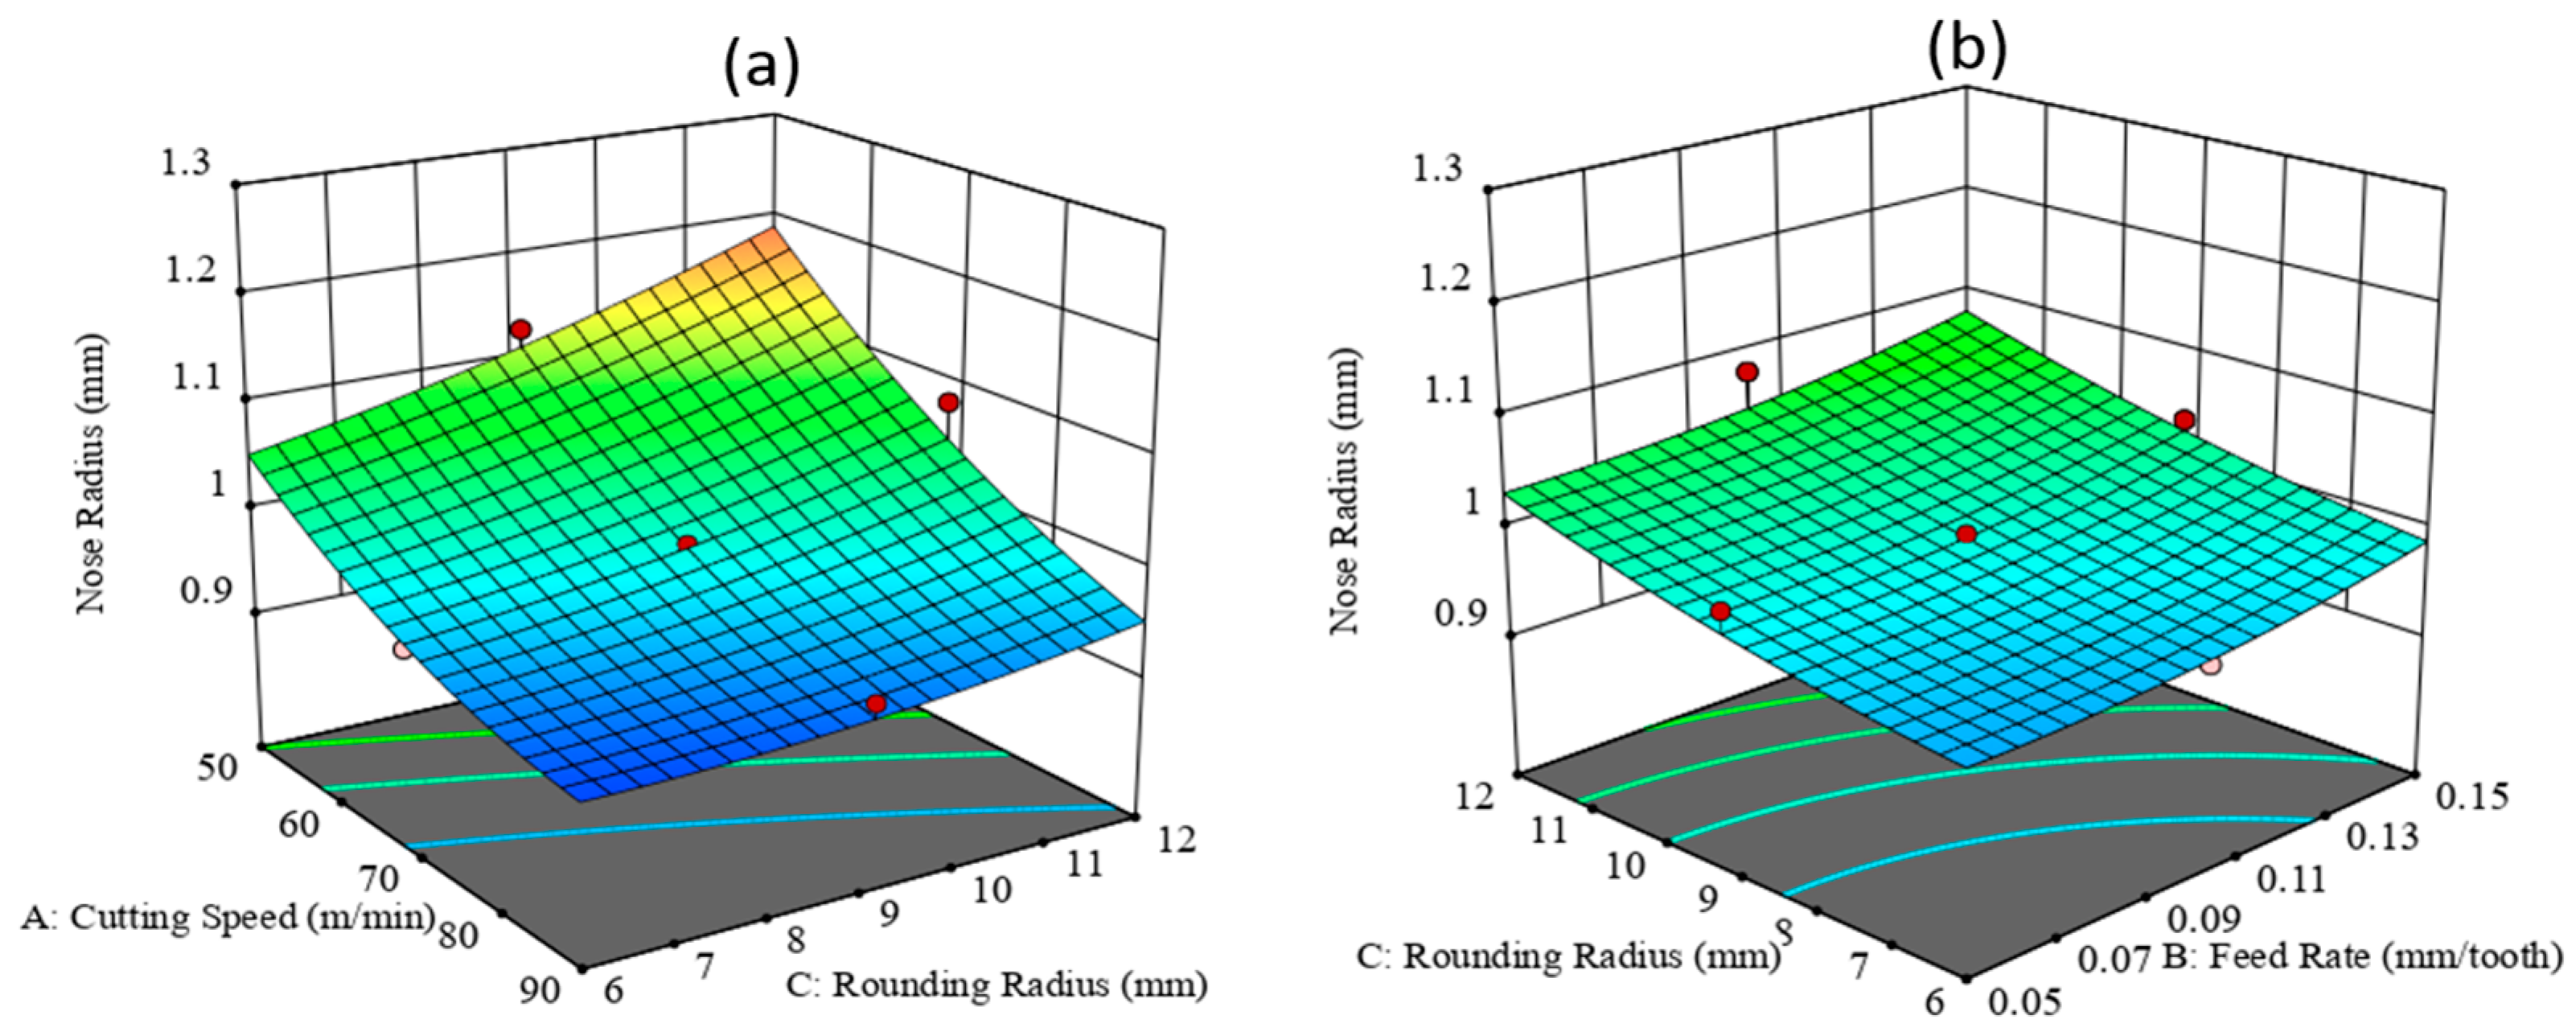
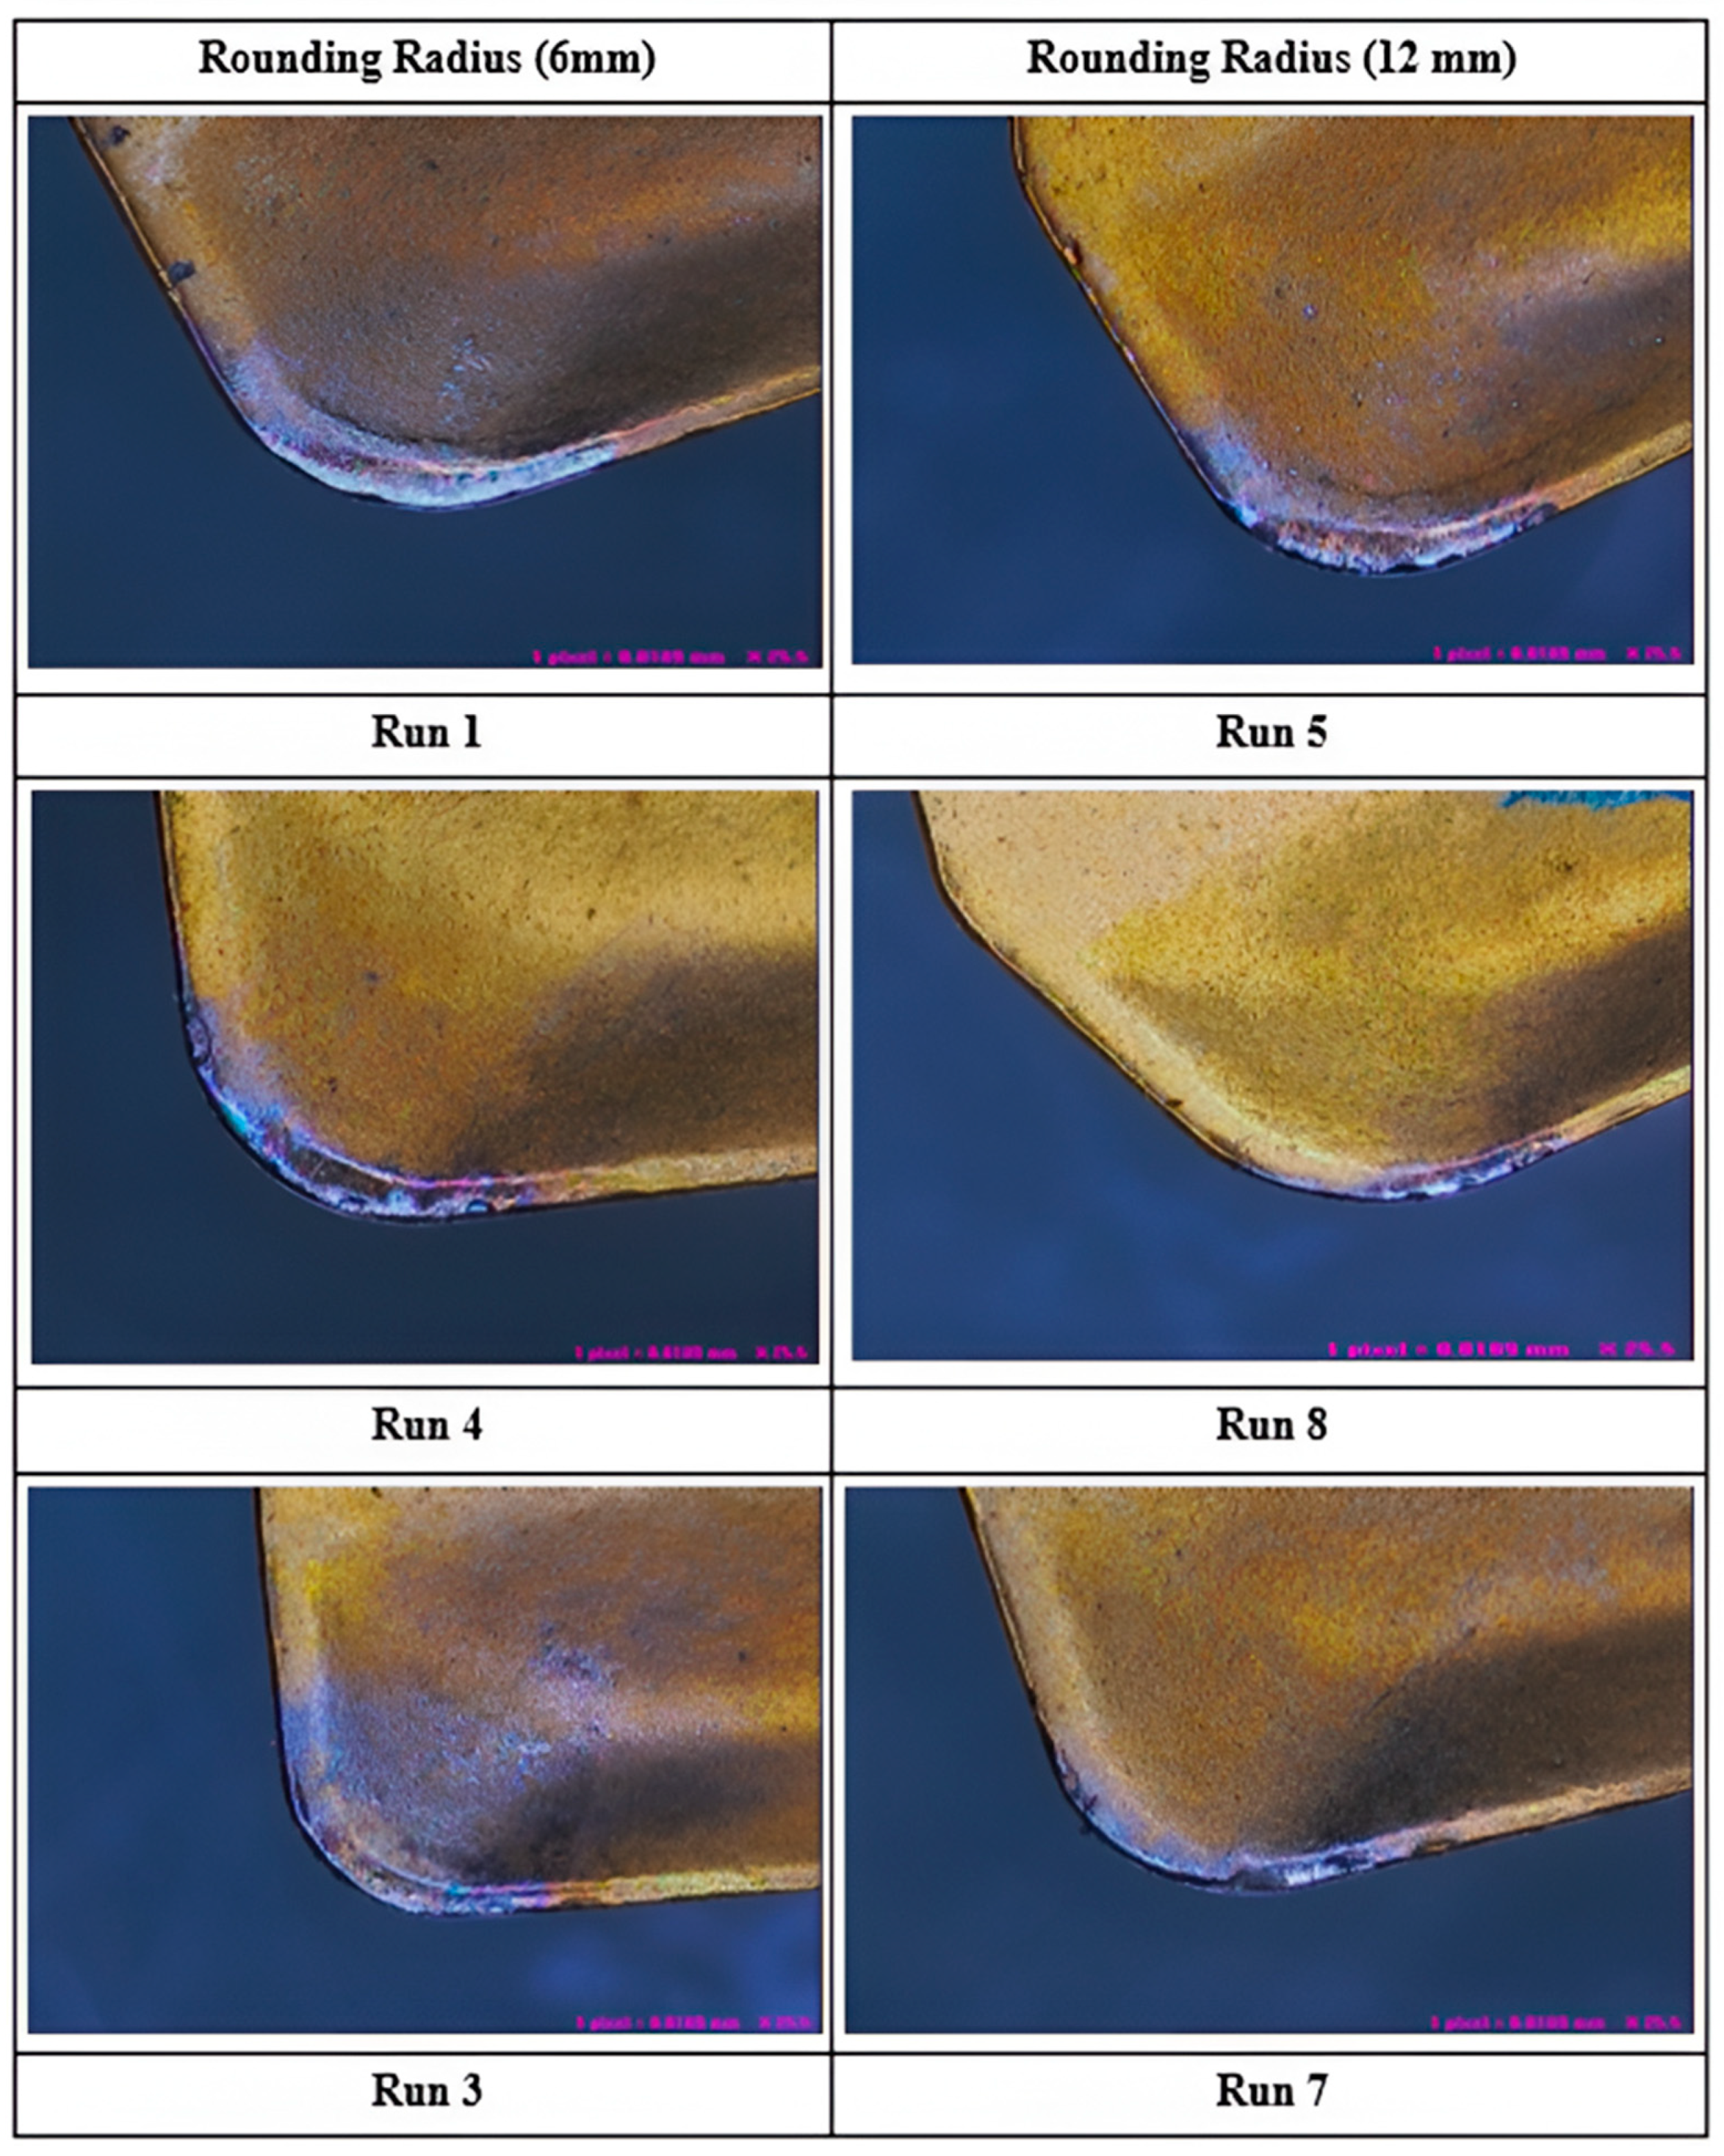
3.4. Effect of Rounding Radius on Nose Wear
3.5. Chip Morphology Studies
3.6. Genetic Algorithm Optimization
- A random population is initialized;
- Objective function estimation;
- Fitness function determination;
- The optimization process runs until termination criteria become met where GA operators, including reproduction, crossover rate, and mutation, are activated.
3.7. Confirmation Test
4. Conclusions
- The combination of the LMBP learning algorithm with ten neurons in the hidden layer produced the lowest 0.40388 RMSE value from all considered ANN learning methods. Simulation results showed that the model inside its trained boundaries demonstrated effective performance as a prediction tool for output responses.
- The experimental results indicated that the feed rate along with trochoidal rounding radius and cutting speed established 42%, 26%, and 28% as the key parameters for the study.
- The tool edge micro-geometry caused irregularities on the tooltip surface which led to a 33.82% deviation of initial nose radius.
- Surface roughness deteriorated because of defective conditions that included cracks, feed marks, and side flow marks of the machined surface.
- Increasing of trochoidal rounding radius affects both chip formation and evacuation while machining takes place. The basic feature of the back surface chip structure appeared rough and jagged due to shearing action. The back surface of the chip undergoes high pressure and friction with the tool rake face due to this chip motion which produces non-uniform lamellar structures.
- The tool engagement angle was reduced throughout the process when the trochoidal rounding radius had low distance travel which resulted in reduced cutting load.
- The GA enabled the finding of optimal parameters consisting of 85 m/min for cutting speed and 0.07 mm/tooth for feed rate as well as 7 mm for trochoidal rounding radius which resulted in a minimal 6.49% error between experimental and predicted values for surface roughness, 4.26% for cutting force, and 4.1% for nose radius wear.
- The application of the adaptive trochoidal toolpath in combination with the Artificial Neural Network-Gentile algorithm enables several practical advantages for such industries as die and mold production, aerospace, automobile manufacture, etc. With this toolpath technology, machining of difficult materials and complex designs becomes a possibility, leading to faster machining processes, prolonged tool life, and enhanced surface quality when it comes to slotting, pocketing, and cavity milling. The implementation of this method will lead to more reliable, economical, and superior manufacturing results in vibrating environments with high demands of production output. Adoption of these optimum settings results in greater machined component quality.
Author Contributions
Funding
Data Availability Statement
Acknowledgments
Conflicts of Interest
References
- Varghese, A.; Kulkarni, V.; Joshi, S.S. Modeling cutting edge degradation by chipping in micro-milling. Wear 2022, 488, 204141. [Google Scholar] [CrossRef]
- Reddy, N.S.K.; Rao, P.V. Selection of an optimal parametric combination for achieving a better surface finish in dry milling using genetic algorithms. Int. J. Adv. Manuf. Technol. 2005, 28, 463–473. [Google Scholar] [CrossRef]
- Santhakumar, J.; Iqbal, U.M. Parametric optimization of trochoidal step on surface roughness and dish angle in end milling of AISID3 steel using precise measurements. Materials 2019, 12, 1335. [Google Scholar] [CrossRef]
- Ferreira, J.C.E.; Ochoa, D.M. A method for generating trochoidal tool paths for 2½D pocket milling process planning with multiple tools. Proc. Inst. Mech. Eng. B J. Eng. Manuf. 2013, 227, 1287–1298. [Google Scholar] [CrossRef]
- Niaki, F.A.; Pleta, A.; Mears, L. Trochoidal milling: Investigation of a new approach on uncut chip thickness modeling and cutting force simulation in an alternative path planning strategy. Int. J. Adv. Manuf. Technol. 2018, 97, 641–656. [Google Scholar] [CrossRef]
- Yan, R.; Li, H.; Peng, F.; Tang, X.; Xu, J.; Zeng, H. Stability prediction and step optimization of trochoidal milling. J. Manuf. Sci. Eng. 2017, 139, 091006. [Google Scholar] [CrossRef]
- Wang, S.; Mei, W.; Liu, B.; Wang, C. Trochoidal machining for the high-speed milling of pockets. J. Mater. Process. Technol. 2016, 233, 29–43. [Google Scholar]
- Uhlmann, E.; Fürstmann, P.; Rosenau, B. The potential of reducing the energy consumption for machining TiAl6V4 by using innovative metal cutting processes. In Proceedings of the 11th Global Conference on Sustainable Manufacturing, Berlin, Germany, 23–25 September 2013; pp. 593–598. [Google Scholar]
- Pleta, A.; Ulutan, D.; Mears, L. Investigation of trochoidal milling in nickel-based superalloy Inconel 738 and comparison with end milling. In Proceedings of the ASME 2014 International Manufacturing Science and Engineering Conference, MSEC2014-4151, Detroit, MI, USA, 9–13 June 2014; p. V002T02A058. [Google Scholar]
- Pleta, A.; Ulutan, D.; Mears, L. An investigation of alternative path planning strategies for machining of nickel-based superalloys. Procedia Manuf. 2015, 1, 556–566. [Google Scholar] [CrossRef][Green Version]
- Otkur, M.; Lazoglu, I. Trochoidal milling. Int. J. Mach. Tools Manuf. 2007, 47, 1324–1332. [Google Scholar] [CrossRef]
- Edem, I.F.; Balogun, V.A.; Mativenga, P.T. An investigation on the impact of toolpath strategies and machine tool axes configurations on electrical energy demand in mechanical machining. Int. J. Adv. Manuf. Technol. 2017, 92, 2503–2509. [Google Scholar] [CrossRef]
- Zeroudi, N.; Fontaine, M.; Necib, K. Prediction of cutting forces in 3-axes milling of sculptured surfaces directly from CAM tool path. J. Intell. Manuf. 2012, 23, 1573–1587. [Google Scholar] [CrossRef]
- Topal, E.S. The role of stepover ratio in prediction of surface roughness in flat end milling. Int. J. Mech. Sci. 2009, 51, 782–789. [Google Scholar] [CrossRef]
- Palanisamy, P.; Rajendran, I.; Shanmugasundaram, S. Prediction of tool wear using regression and ANN models in end-milling operation. Int. J. Adv. Manuf. Technol. 2008, 37, 29–41. [Google Scholar] [CrossRef]
- Mia, M.; Khan, M.A.; Dhar, N.R. Study of surface roughness and cutting forces using ANN, RSM, and ANOVA in turning of Ti-6Al-4V under cryogenic jets applied at flank and rake faces of coated WC tool. Int. J. Adv. Manuf. Technol. 2017, 93, 975–991. [Google Scholar] [CrossRef]
- Kannan, T.D.B.; Ramesh, T.; Sathiya, P. Application of artificial neural network modeling for optimization of Yb: YAG laser welding of Nitinol. Trans. Indian Inst. Met. 2017, 70, 1763–1771. [Google Scholar] [CrossRef]
- Babu, K.K.; Panneerselvam, K.; Sathiya, P.; Haq, A.N.; Sundarrajan, S.; Mastanaiah, P.; Murthy, C.V.S. Parameter optimization of friction stir welding of cryo-rolled AA2219 alloy using artificial neural network modeling with genetic algorithm. Int. J. Adv. Manuf. Technol. 2018, 94, 3117–3129. [Google Scholar] [CrossRef]
- Pimenov, D.; Bustillo, A.; Mikolajczyk, T. Artificial intelligence for automatic prediction of required surface roughness by monitoring wear on face mill teeth. J. Intell. Manuf. 2018, 29, 1045–1061. [Google Scholar] [CrossRef]
- Quintana, G.; Garcia-Romeu, M.L.; Ciurana, J. Surface roughness monitoring application based on artificial neural networks for ball-end milling operations. J. Intell. Manuf. 2011, 22, 607–617. [Google Scholar] [CrossRef]
- Zagórski, I.; Kulisz, M.; Kłonica, M.; Matuszak, J. Trochoidal milling and neural networks simulation of magnesium alloys. Materials 2019, 12, 2070. [Google Scholar] [CrossRef]
- Munoz-Escalona, P.; Maropoulos, P.G. Artificial neural networks for surface roughness prediction when face milling Al 7075-T7351. J. Mater. Eng. Perform. 2010, 19, 185–193. [Google Scholar] [CrossRef]
- Zain, A.M.; Haron, H.; Sharif, S. Integrated ANN–GA for estimating the minimum value for machining performance. Int. J. Prod. Res. 2012, 50, 191–213. [Google Scholar] [CrossRef]
- Öktem, H. An integrated study of surface roughness for modeling and optimization of cutting parameters during the end milling operation. Int. J. Adv. Manuf. Technol. 2009, 43, 852–861. [Google Scholar] [CrossRef]
- Zain, A.M.; Haron, H.; Sharif, S. Application of GA to optimize cutting conditions for minimizing surface roughness in end milling machine process. Expert Syst. Appl. 2010, 37, 4650–4659. [Google Scholar] [CrossRef]
- Liu, Z.Y.; Guo, Y.B.; Sealy, M.P.; Liu, Z.Q. Energy consumption and process sustainability of hard milling with tool wear progression. J. Mater. Process. Technol. 2016, 229, 305–312. [Google Scholar] [CrossRef]
- Abdu, H.; Mohamed, S.; Morad, A.A.E.M.; Elhameed, A.; Wazeer, A.E.; Moustafa, M.M. Modeling and optimization of process parameters for surface roughness and cutting forces on end milling using RSM and Taguchi method. J. Mod. Res. 2024, 6, 14–20. [Google Scholar] [CrossRef]
- Zhou, K.; Zhang, C.; Du, S. Cutting force prediction for trochoid milling of 300M ultra-high strength steel. Processes 2022, 10, 2617. [Google Scholar] [CrossRef]
- Shiva, P.N.; Padmakumar, M.; Sarada, B.N. Experimental investigation to assess the effects of trumpet hone on tool life and surface quality in milling of AISI4140 steel. FME Trans. 2019, 47, 437–441. [Google Scholar] [CrossRef]
- Anand, B.K.; Barik, B.K.; Tamilmannan; Sathiya, P. Artificial neural network modeling studies to predict the friction welding process parameters of Incoloy 800H joints. Eng. Sci. Technol. Int. J. 2015, 18, 394–407. [Google Scholar] [CrossRef]
- Ktema, O.H.; Erzurumlu, T.; Kurtaran, H. Application of response surface methodology in the optimization of cutting conditions for surface roughness. J. Mater. Process. Technol. 2005, 170, 11–16. [Google Scholar]


| Element | Vanadium (V) | Silicon (Si) | Chromium (Cr) | Manganese (Mn) | Carbon (C) | Nickel (Ni) | Iron (Fe) |
|---|---|---|---|---|---|---|---|
| Presence (wt. %) | 0.25 | 0.3 | 11.5 | 0.4 | 2.1 | 0.31 | Balance |
| Workpiece Materials | Hardness, (HRC) | Tensile Strength, (N/mm2) | Density, (kg/cm3) | Yield Strength, (N/mm2) | Heat Conductivity, (W/mK) |
|---|---|---|---|---|---|
| AISI D3 | 30–35 | 970 | 7.7 | 850 | 20 |
| Factors | Level | ||
|---|---|---|---|
| (−1) | (0) | (+1) | |
| A. Cutting speed, (m/min) | 50 | 70 | 90 |
| B. Feed rate, (mm/tooth) | 0.05 | 0.1 | 0.15 |
| C. Rounding radius, (mm) | 6 | 9 | 12 |
| Run | Input Parameters | Output Responses | ||||
|---|---|---|---|---|---|---|
| A (m/min) | B (mm/tooth) | C (mm) | (µm) | (N) | (mm) | |
| 1 | 50 | 0.05 | 6 | 0.8468 | 560.03 | 1.045 |
| 2 | 90 | 0.05 | 6 | 0.8792 | 412.06 | 0.9 |
| 3 | 50 | 0.15 | 6 | 1.0259 | 937.81 | 1.081 |
| 4 | 90 | 0.15 | 6 | 1.0483 | 674.24 | 0.949 |
| 5 | 50 | 0.05 | 12 | 0.9283 | 555.46 | 1.173 |
| 6 | 90 | 0.05 | 12 | 0.9506 | 457.20 | 0.921 |
| 7 | 50 | 0.15 | 12 | 1.1074 | 1066.9 | 1.209 |
| 8 | 90 | 0.15 | 12 | 1.1797 | 864.58 | 0.987 |
| 9 | 50 | 0.1 | 9 | 0.9771 | 713.78 | 1.127 |
| 10 | 90 | 0.1 | 9 | 0.9994 | 560.14 | 0.935 |
| 11 | 70 | 0.05 | 9 | 0.8887 | 438.72 | 0.999 |
| 12 | 70 | 0.15 | 9 | 1.0678 | 881.25 | 1.034 |
| 13 | 70 | 0.1 | 6 | 0.9375 | 550.32 | 0.952 |
| 14 | 70 | 0.1 | 12 | 1.019 | 665.96 | 1.08 |
| 15 | 70 | 0.1 | 9 | 0.9449 | 600.81 | 0.963 |
| 16 | 70 | 0.1 | 9 | 0.9324 | 620.84 | 0.99 |
| 17 | 70 | 0.1 | 9 | 0.9532 | 619.37 | 0.981 |
| 18 | 70 | 0.1 | 9 | 0.9286 | 624.16 | 0.971 |
| 19 | 70 | 0.1 | 9 | 0.9178 | 608.15 | 0.982 |
| 20 | 70 | 0.1 | 9 | 0.9456 | 622.37 | 0.994 |
| No. of Neurons in the Hidden Layer | RMSE Average Values | |||
|---|---|---|---|---|
| BBP | IBP | QP | LMBP | |
| 5 | 0.49193 | 0.46710 | 0.69710 | 0.42564 |
| 6 | 0.54781 | 0.51548 | 0.74548 | 0.44437 |
| 7 | 0.43771 | 0.60604 | 0.73604 | 0.41869 |
| 8 | 0.54071 | 0.45842 | 0.68842 | 0.41421 |
| 9 | 0.48584 | 0.54138 | 0.67138 | 0.43606 |
| 10 | 0.51780 | 0.48920 | 0.71920 | 0.40388 |
| 15 | 0.49408 | 0.48265 | 0.71265 | 0.46184 |
| 20 | 0.51470 | 0.44379 | 0.67379 | 0.42925 |
| Run No. | Surface Roughness (µm) | Resultant Cutting Force (N) | ||||
|---|---|---|---|---|---|---|
| Observed | ANN Data | Difference | Observed | ANN Data | Difference | |
| 2 | 0.8792 | 0.87964 | 0.00043626 | 412.06 | 408.01 | 4.046 |
| 3 | 1.0259 | 1.0259 | 3.15 × 10⁻⁵ | 937.81 | 936.79 | 1.0254 |
| 4 | 1.0483 | 1.0484 | 6.58 × 10⁻⁵ | 674.25 | 673.6 | 0.64862 |
| 5 | 0.9283 | 0.92838 | 8.24 × 10⁻⁵ | 555.46 | 555.43 | 0.035938 |
| 6 | 0.9506 | 0.95081 | 0.00021217 | 457.2 | 457.69 | 0.48653 |
| 8 | 1.1797 | 1.1785 | 0.0011514 | 864.59 | 863.3 | 1.2851 |
| 9 | 0.9771 | 0.97731 | 0.00020665 | 713.78 | 714 | 0.21404 |
| 10 | 0.9994 | 0.99954 | 0.00014145 | 560.15 | 562.33 | 2.1865 |
| 11 | 0.8887 | 0.88767 | 0.001028 | 438.73 | 439.13 | 0.40022 |
| 12 | 1.0678 | 1.0681 | 0.00025878 | 881 | 882.77 | 1.7724 |
| 13 | 0.9375 | 0.93744 | 6.33 × 10⁻⁵ | 550.33 | 551.25 | 0.92892 |
| 15 | 0.9449 | 0.93537 | 0.0095293 | 600.82 | 614.4 | 13.581 |
| 16 | 0.9324 | 0.93537 | 0.0029707 | 620.85 | 614.4 | 6.4465 |
| 17 | 0.9532 | 0.93537 | 0.017829 | 619.38 | 614.4 | 4.9785 |
| 18 | 0.9286 | 0.93537 | 0.0067707 | 624.16 | 614.4 | 9.7625 |
| 19 | 0.9178 | 0.93537 | 0.017571 | 608.15 | 614.4 | 6.2475 |
| Run No. | Nose Radius Wear (mm) | ||
|---|---|---|---|
| Observed | ANN Data | Difference | |
| 2 | 0.9 | 0.90211 | 0.002109 |
| 3 | 1.081 | 1.0813 | 0.000307 |
| 4 | 0.949 | 0.95006 | 0.001063 |
| 5 | 1.173 | 1.1737 | 0.000721 |
| 6 | 0.921 | 0.92065 | 0.00035 |
| 8 | 0.987 | 0.98766 | 0.000661 |
| 9 | 1.127 | 1.1264 | 0.000583 |
| 10 | 0.935 | 0.93211 | 0.002894 |
| 11 | 0.999 | 0.99892 | 7.62 × 10⁻⁵ |
| 12 | 1.034 | 1.0332 | 0.000809 |
| 13 | 0.952 | 0.951 | 0.000998 |
| 15 | 0.963 | 0.97778 | 0.014782 |
| 16 | 0.99 | 0.97778 | 0.012218 |
| 17 | 0.981 | 0.97778 | 0.003218 |
| 18 | 0.971 | 0.97778 | 0.006782 |
| 19 | 0.982 | 0.97778 | 0.004218 |
| Run No. | Ra (µm) | Fc (N) | ||||
|---|---|---|---|---|---|---|
| Observed | ANN Data | Difference | Observed | ANN Data | Difference | |
| 1 | 0.8468 | 0.8791 | 0.0323 | 560.03 | 565.53 | 5.5 |
| 7 | 1.1074 | 1.244 | 0.1366 | 1066.9 | 1071.48 | 4.58 |
| 14 | 1.019 | 0.9051 | 0.1139 | 665.969 | 671.44 | 5.471 |
| 20 | 0.9456 | 1.0353 | 0.0897 | 622.377 | 629.77 | 7.393 |
| Run No. | Nose Radius Wear (mm) | ||
|---|---|---|---|
| Observed | ANN | Difference | |
| 1 | 1.045 | 1.099 | 0.054 |
| 7 | 1.209 | 1.249 | 0.04 |
| 14 | 1.08 | 1.18 | 0.1 |
| 20 | 0.994 | 1.04 | 0.046 |
| Subject | Values |
|---|---|
| Population size | 100 |
| Selection type: | Roulette method |
| Crossover type: | Single Point Crossover |
| Mutation rate | 0.01 |
| Cross overrate | 0.5 |
| Constrained range for cutting speed | 50 and 90 m/min |
| Constrained range for feed rate | 0.05 and 0.15 mm/tooth |
| Constrained range for rounding radius | 6 to 12 mm |
| Objective function | Minimization |
| Experiment | Cutting Speed (m/min) | Feed Rate (mm/tooth) | Rounding Radius (mm) | Surface Roughness (µm) | Cutting Force (N) | Nose Wear (mm) |
|---|---|---|---|---|---|---|
| GA solution | 85.01 | 0.0713 | 7.314 | 0.879 | 426.019 | 0.90 |
| Feasible solution | 85 | 0.07 | 7 | - | - | - |
| Confirmation test results | 85 | 0.07 | 7 | 0.94 | 445.14 | 0.93 |
| Percentage error (%) | 6.49 | 4.26 | 4.1 |
Disclaimer/Publisher’s Note: The statements, opinions and data contained in all publications are solely those of the individual author(s) and contributor(s) and not of MDPI and/or the editor(s). MDPI and/or the editor(s) disclaim responsibility for any injury to people or property resulting from any ideas, methods, instructions or products referred to in the content. |
© 2025 by the authors. Licensee MDPI, Basel, Switzerland. This article is an open access article distributed under the terms and conditions of the Creative Commons Attribution (CC BY) license (https://creativecommons.org/licenses/by/4.0/).
Share and Cite
Jayakumar, S.; Kannan, S.; Ganeshkumar, P.; Iqbal, U.M. Reinventing the Trochoidal Toolpath Pattern by Adaptive Rounding Radius Loop Adjustments for Precision and Performance in End Milling Operations. J. Manuf. Mater. Process. 2025, 9, 171. https://doi.org/10.3390/jmmp9060171
Jayakumar S, Kannan S, Ganeshkumar P, Iqbal UM. Reinventing the Trochoidal Toolpath Pattern by Adaptive Rounding Radius Loop Adjustments for Precision and Performance in End Milling Operations. Journal of Manufacturing and Materials Processing. 2025; 9(6):171. https://doi.org/10.3390/jmmp9060171
Chicago/Turabian StyleJayakumar, Santhakumar, Sathish Kannan, Poongavanam Ganeshkumar, and U. Mohammed Iqbal. 2025. "Reinventing the Trochoidal Toolpath Pattern by Adaptive Rounding Radius Loop Adjustments for Precision and Performance in End Milling Operations" Journal of Manufacturing and Materials Processing 9, no. 6: 171. https://doi.org/10.3390/jmmp9060171
APA StyleJayakumar, S., Kannan, S., Ganeshkumar, P., & Iqbal, U. M. (2025). Reinventing the Trochoidal Toolpath Pattern by Adaptive Rounding Radius Loop Adjustments for Precision and Performance in End Milling Operations. Journal of Manufacturing and Materials Processing, 9(6), 171. https://doi.org/10.3390/jmmp9060171


