Article

Novel Development of FDM-Based Wrist Hybrid Splint Using Numerical Computation Enhanced with Material and Damage Model

by
Loucas Papadakis
1,
Stelios Avraam
1,2,
Muhammad Zulhilmi Mohd Izhar
3,
Keval Priapratama Prajadhiana
3,
Yupiter H. P. Manurung
3 and
Demetris Photiou
2,*
1
Department of Mechanical Engineering, Frederick University, Nicosia 1036, Cyprus
2
Simlead, Nicosia 2043, Cyprus
3
Smart Manufacturing Research Instutite, Universiti Teknologi MARA (UiTM), Shah Alam 40450, Malaysia
*
Author to whom correspondence should be addressed.
J. Manuf. Mater. Process. 2025, 9(12), 408; https://doi.org/10.3390/jmmp9120408
Submission received: 6 November 2025 / Revised: 27 November 2025 / Accepted: 8 December 2025 / Published: 12 December 2025

Abstract

Additive manufacturing has increasingly become a transformative approach in the design and fabrication of personalized medical devices, offering improved adaptability, reduced production time, and enhanced patient-specific functionality. Within this framework, simulation-driven design plays a critical role in ensuring the structural reliability and performance of orthopedic supports before fabrication. This research study delineates the novel development of a wrist hybrid splint (WHS) which has a simulation-based design and was additively manufactured using fused deposition modeling (FDM). The primary material selected for this purpose was polylactic acid (PLA), recognized for its biocompatibility and structural integrity in medical applications. Prior to the commencement of the actual FDM process, an extensive pre-analysis was imperative, involving the application of nonlinear numerical models aiming at replicating the mechanical response of the WHS in respect to different deposition configurations. The methodology encompassed the evaluation of a sophisticated material model incorporating a damage mechanism which was grounded in experimental data derived from meticulous tensile and three-point bending testing of samples with varying FDM process parameters, namely nozzle diameter, layer thickness, and deposition orientation. The integration of custom subroutines with utility routines was coded with a particular emphasis on maximum stress thresholds to ensure the fidelity and reliability of the simulation outputs on small scale samples in terms of their elasticity and strength. After the formulation and validation of these computational models, a comprehensive simulation of a full-scale, finite element (FE) model of two WHS design variations was conducted, the results of which were aligned with the stringent requirements set forth by the product specifications, ensuring comfortable and safe usage. Based on the results of this study, the final force comparison between the numerical simulation and experimental measurements demonstrated a discrepancy of less than 2%. This high level of agreement highlights the accuracy of the employed methodologies and validates the effectiveness of the WHS simulation and fabrication approach. The research also concludes with a strong affirmation of the material model with a damage mechanism, substantiating its applicability and effectiveness in future manufacturing of the WHS, as well as other orthopedic support devices through an appropriate selection of FDM parameters.

1. Introduction

The use of three-dimensional (3D) printing is expanding quickly as a result of its increasing application for innovative industrial products. Nowadays, engineers can create prototypes and print them at their own workshops, and this increase in demand has sped up the development of various 3D-printing methods [1]. Additive manufacturing (AM) is a layer-by-layer production which holds numerous advantages over the conventional manufacturing processes, including flexibility in design, reduction in wastage of materials unlike subtractive manufacturing, production of complex shapes within the tolerance and customization of every product [2], as well as adaptivity of products’ mechanical and thermal properties on operational demands [3,4]. The scope of research and application of AM is expanding as the need for rapid prototyping and customization in manufacturing industries is increasing. AM has also found a wide range of applications that include the construction and industry sectors, biotechnological applications, automotive sectors, and even the medical sector [5,6].
According to ISO standards (ISO 52900) [7], material extrusion (MEX) is a 3D-printing technique in which continuous filament or pellets of material are heated and selectively deposited layer by layer to construct a three-dimensional object. In the case of FDM, the printer extrudes thermoplastic filament in successive layers onto a build plate to form a three-dimensional structure [8]. In order to promote sustainable growth, this technology makes use of a variety of materials, such as thermoplastic polymers and composites, as well as recycled filaments and pellets. FDM is a rapid prototyping technique that is applied in many industrial domains, such as automotive, biomedical, and textiles, to create products with intricate patterns and high precision while also cutting costs and production times [9]. Due to the flexibility of the design as well as the ability to allow rapid prototyping, FDM is an emerging technique for biomedical use where usually the fabrication of anatomical models is involved, and implants for orthopedics as well as supporting devices allow for more comfortable movement for a person with certain musculoskeletal limitations by adapting elasticity accordingly [10].
Due to the complex nature of additively manufactured plastic components, numerical computation methods are often the most-preferred alternative during product development instead of time- and cost-consuming trial-and-error testing on real components [11,12,13]. The utilization of numerical analysis using FEM on investigating the stress and deformation behavior of FDM components has been performed by numerous researchers within the last few years [14]. One of the most recent research projects by Samy et al. [15] where the numerical analysis study on examining the FDM processes revolving the correlation of ambient temperature and nozzle speed on predicting the residual stress of FDM where the potential of numerical simulation was investigated for its ability to predict the decrease in residual stresses by increasing the nozzle speed with an error percentage of 13–15%. An effort of predicting the final component shape distortion and stress induced by FDM process was performed by Zhang and Chou [16], where the average error of deformations is less than 20%; the significant factors which cause the difference between results were analyzed further by ANOVA method. Comprehensive research which involves the usage of FEM on developing the numerical model of FDM for shape optimization was presented by Zur et al. [17], where an FE optimization in terms of shape and material modeling allowed a reduction in effective stress by 76%.
The implementation of customized user subroutine in modeling AM processes has been performed by engineers in the past few years in order to obtain a more comprehensive and optimized result, which is beyond the capability of the commercial FEM software. One of the recent results concerns modeling the electron-beam machining (EBM) to facilitate future design and thermal analysis and promoting the use of the AM Modeler plugin using UFLUX-coded subroutine in ABAQUS 2020 [18].
Moreover, the objective of further research was to define an optimized strategy for the wire arc additive manufacturing (WAAM) process with a numerical tool. A series of FE analyses was conducted by using ABAQUS CAE user subroutines in which, thermal, metallurgical, and mechanical models for the gas metal arc welding (GMAW) process were implemented [19]. Another example of research on WAAM is the implementation of the UWELDFLUX subroutine in order to model the rectangular heat source model based on WAAM geometrical modeling in MSC Marc/Mentat. The result was obtained by modifying the source code of the heat source modeling formula in MSC Marc/Mentat from standard Goldak’s double ellipsoid model to the rectangular model [20]. Behseresht et al. [21] performed a subroutine modification on numerical FDM process in the ABAQUS software by implementing the UMATHT subroutine for analyzing thermal orthotopic constitutive behavior, UEPACTIVATIONVOL for progressive activation of elements, and ORIENT for material orientation, which led to an optimized result in a comparison to unmodified FEM models.
The mechanical properties on material modeling in numerical model development are the key to determining the overall quality of the numerical model in predicting the outcome of the actual manufacturing process [22]. One of the techniques that is widely used on obtaining the modulus of elasticity, flexural stress, and flexural strain is three-point bending, which also applicable for additively manufactured components [23]. Three-point bending was utilized in testing the strength of 3D-printed PLA samples [24], where the maximum tensile strength obtained was between 60 MPa and 125 MPa. To determine the mechanical properties in FEM simulation, numerical three-point bending analyzes were conducted by Singh et al. [25] for an Inconel alloy, where the relationship between equivalent von-Mises stress and equivalent elastic strain distribution were modeled based on experimentally recorded stresses and strains.
Several physical testing methods for determining the mechanical properties of PLA-based FDM were executed in AM field. The research performed by Chacon et al. [26] showed the influence of process parameters on mechanical properties and their optimal selection, where tensile and three-point bending tests were executed to determine the mechanical response of specimens. Layer thickness has been one of the most deciding factors affecting the mechanical properties of PLA AMed components, which was also seen in the research performed by Nugroho et al. [27] that utilized three-point bending based on ASTM standard; the research showed that layer thickness had a significant influence on maximum flexural strength. A comprehensive mathematical model using a statistical approach on modeling the bending behavior of PLA FDM components was executed by Ahmad and Ishak [28], where the results exhibited an average deviation of 3% for tensile strength and 2% for bending strength compared to experimental measurements. Zhao et al. [29] introduced two novel theoretical models built to predict durability and Young’s modulus of FDM PLA material with different printing angles and layer thicknesses.
Moreover, Jaya Christiyan et al. [30] evaluated the flexural strength of PLA material using three-point bending testing, as per ASTM D790 (ISO 178) [31] standard. Maximum flexural strength of 68 MPa was observed for horizontal (0)-orientation specimens made of 0.2 mm layer thickness with a printing speed of 38 mm/s. This is due to high bonding between the layers and a greater number of layers. Another research which concerns the flexural strength of the PLA component was performed by Rajpurohit and Dave [32], in which flexural strength decreased with increasing raster angle and layer height.
Nonetheless, the uniformity and strength of the filament are crucial for successful FDM printing. For example, composite filament preparation is difficult because of potential manufacturing flaws and uneven filler and matrix mixing. Hence, tensile test is also a crucial method to test the overall durability of FDM components [33]. In recent trends of studies which involve FDM, tensile testing has been chosen as one of the methods for performing structural investigation of FDM’s properties, as performed by Dave et al. [34], where several parameters which influenced the mechanical behavior of FDM samples were investigated. The influence of numerical FEA analysis on modeling the tensile test of the FDM component was investigated by Karad et al. [35], where different patterns were used to determine the toughness of material properties.
Based on the presented literature review, it can be observed that there is an increasing need to replicate the mechanical response more accurately by means of adapted material modeling for PLA-based FDM in the design phase of orthopedic support devices. Additionally, there is currently only limited studies on the comparison of stresses between simulation and experiment for similar components, where the experimental results of tensile and three-point bending are considered for FE models’ evaluation. This research incorporates the results of numerical tensile and three-point bending as a crucial element of an FE model to determine the mechanical properties of PLA-based FDM splints that will be applied for orthopedic applications. The novelty of this research lies in the integration of a damage mechanism subroutine model into MSC Marc Mentat based on tensile and three-point bending experimental and numerical analyses, which enhances the material model and improves the accuracy of predictions for determining the mechanical properties of PLA-based FDM splints intended for orthopedic applications.

2. Preliminary Testing Process

The research commenced with a preliminary experimental phase aimed at establishing an accurate material model for the WHS component to be implemented in finite element method (FEM) simulations. To support both uniaxial tensile and three-point bending tests, PLA specimens were fabricated with predefined geometrical dimensions, ensuring consistency and relevance to the intended numerical modeling. The force vs. displacement relationship was captured during testing. The specimens were prepared using FDM, ensuring the final dimensions conformed to the ASTM D638-14 (ISO 527-2) [36] standard for tensile testing and ASTM D790 (ISO 178) [31] for three-point-bending. The fabrication of samples and WHS components was performed using the dedicated FDM printer, RAISE3D, illustrated in Figure 1. The samples and WHS components were initially designed using the built-in CAD software ideaMaker 4.1.1 provided by RAISE3D. This printer was selected due to its large build volume (300 × 300 × 600 mm), which accommodates the size of splints and casts. It also features an enclosed chamber and air filtration system, ensuring controlled printing conditions and safe operation in office environments. RAISE3D supports high-temperature printing—up to 300 °C at the nozzle and 110 °C at the build plate—allowing the use of advanced materials.

2.1. Preliminary Tensile Testing and Three-Point Bending Setup

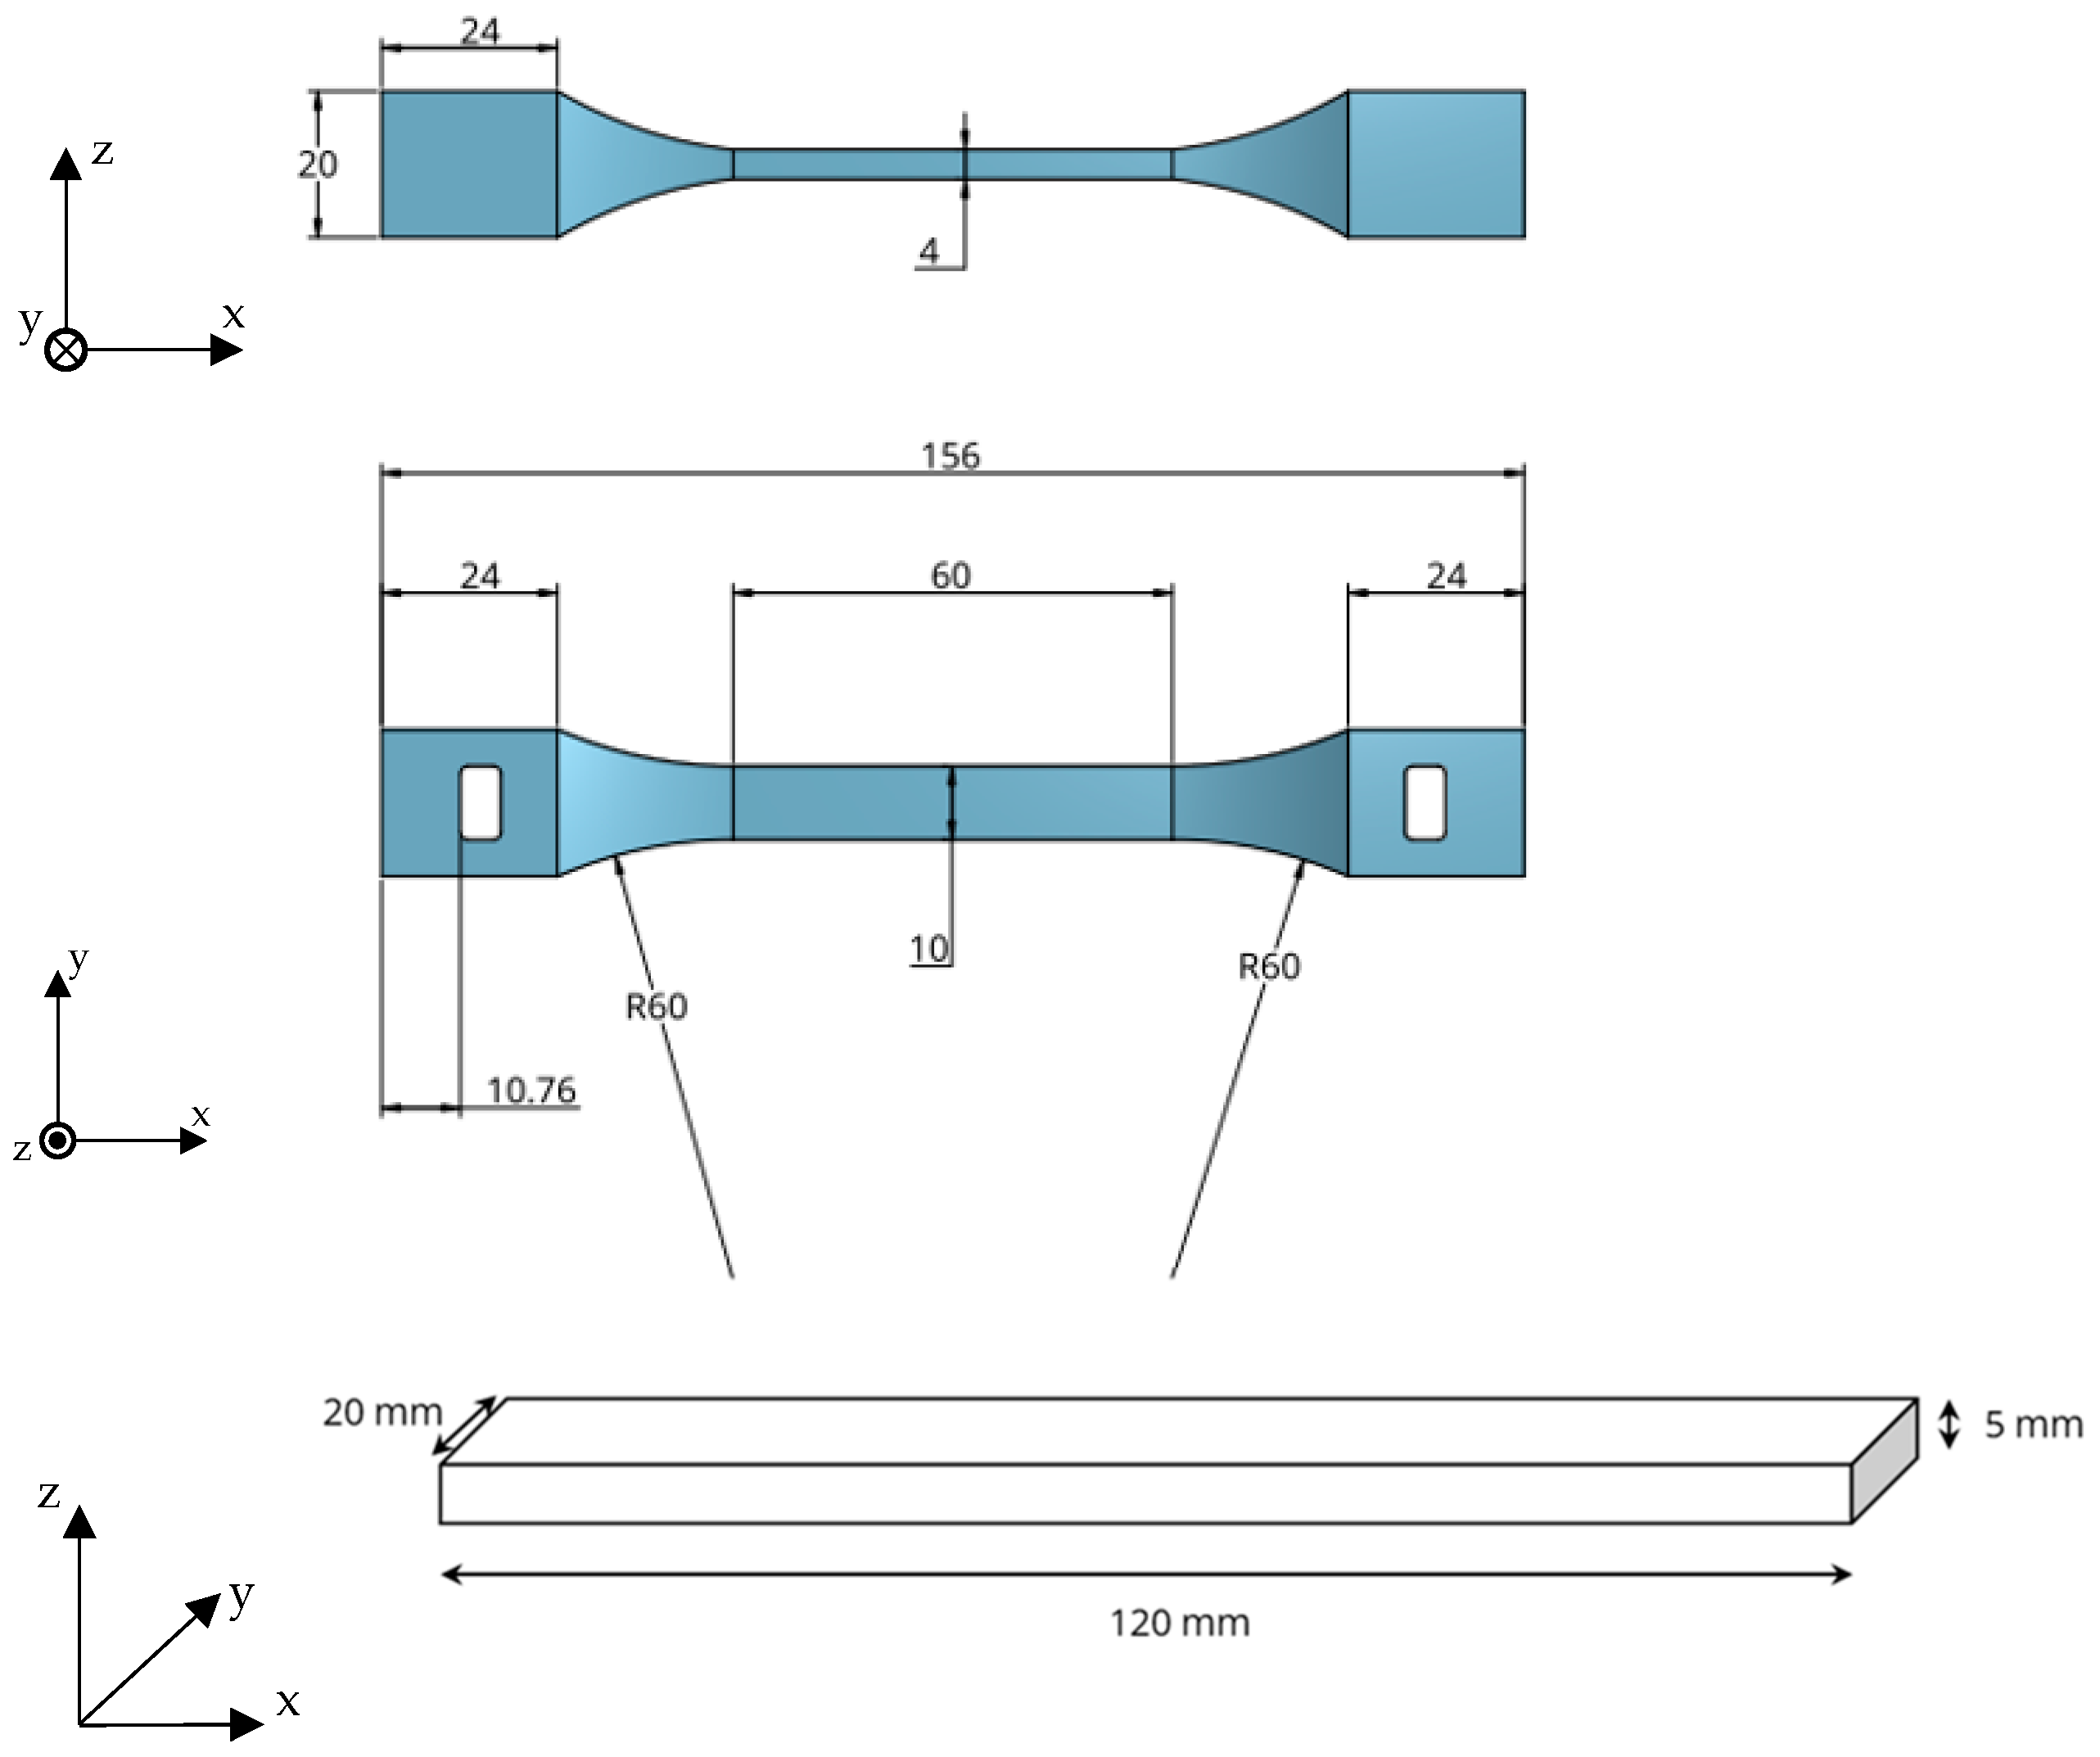
The tests were conducted under quasi-static loading conditions using a custom-made testing machine equipped with an extensometer to record the elongation and a load sensor was equipped to capture the testing force simultaneously. Figure 2 illustrates the dog-bone specimen used for the tensile testing with the corresponding engineering drawing. A bulk Raise3D Premium PLA filament was utilized for fabricating tensile and three-point bending specimens via FDM. This PLA material serves as the basis for experimental investigation and will subsequently inform the material definition in the numerical simulations. Three sets of samples were tested for each deposition angle, resulting in a total of nine samples for tensile specimens and nine samples for bending. Table 1 presents the physical and mechanical datasheet specifications of the Raise3D Premium PLA filament used for the investigation and Table 2 presents the FDM process parameters used for the fabrication of the samples.
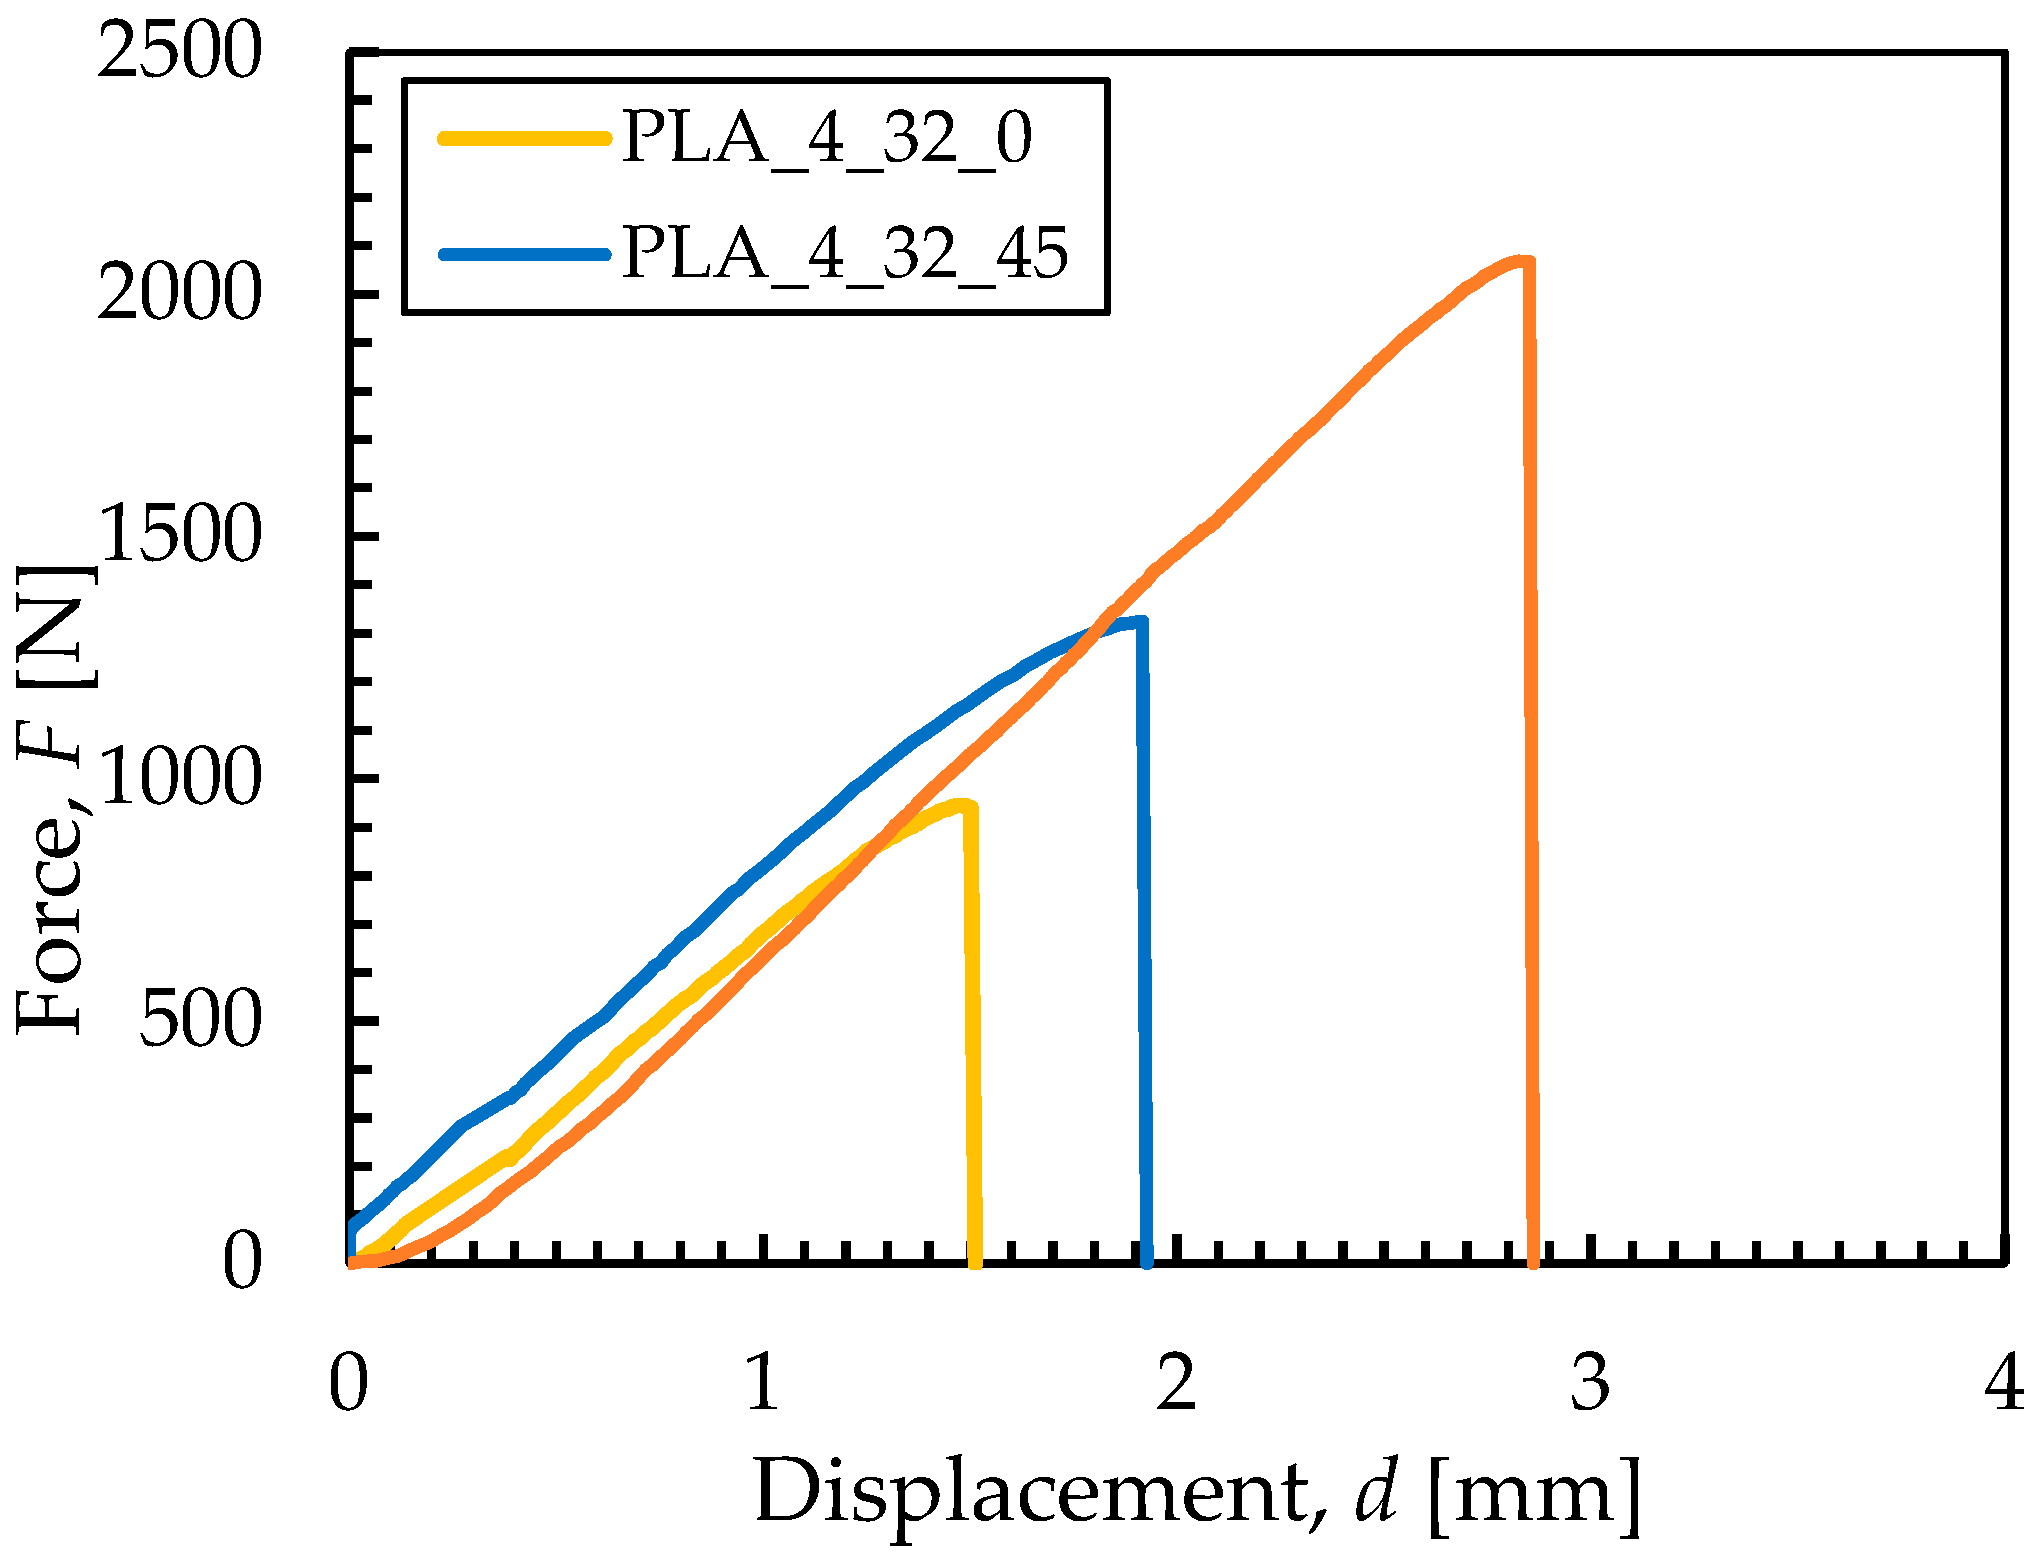
The tensile tests were performed with a constant crosshead speed of 5 mm/min on a hydraulic custom-made machine of 5 tons maximum load capability, recording force, and displacements. The resulting force–displacement curve obtained from the preliminary tensile tests is presented in Figure 3.
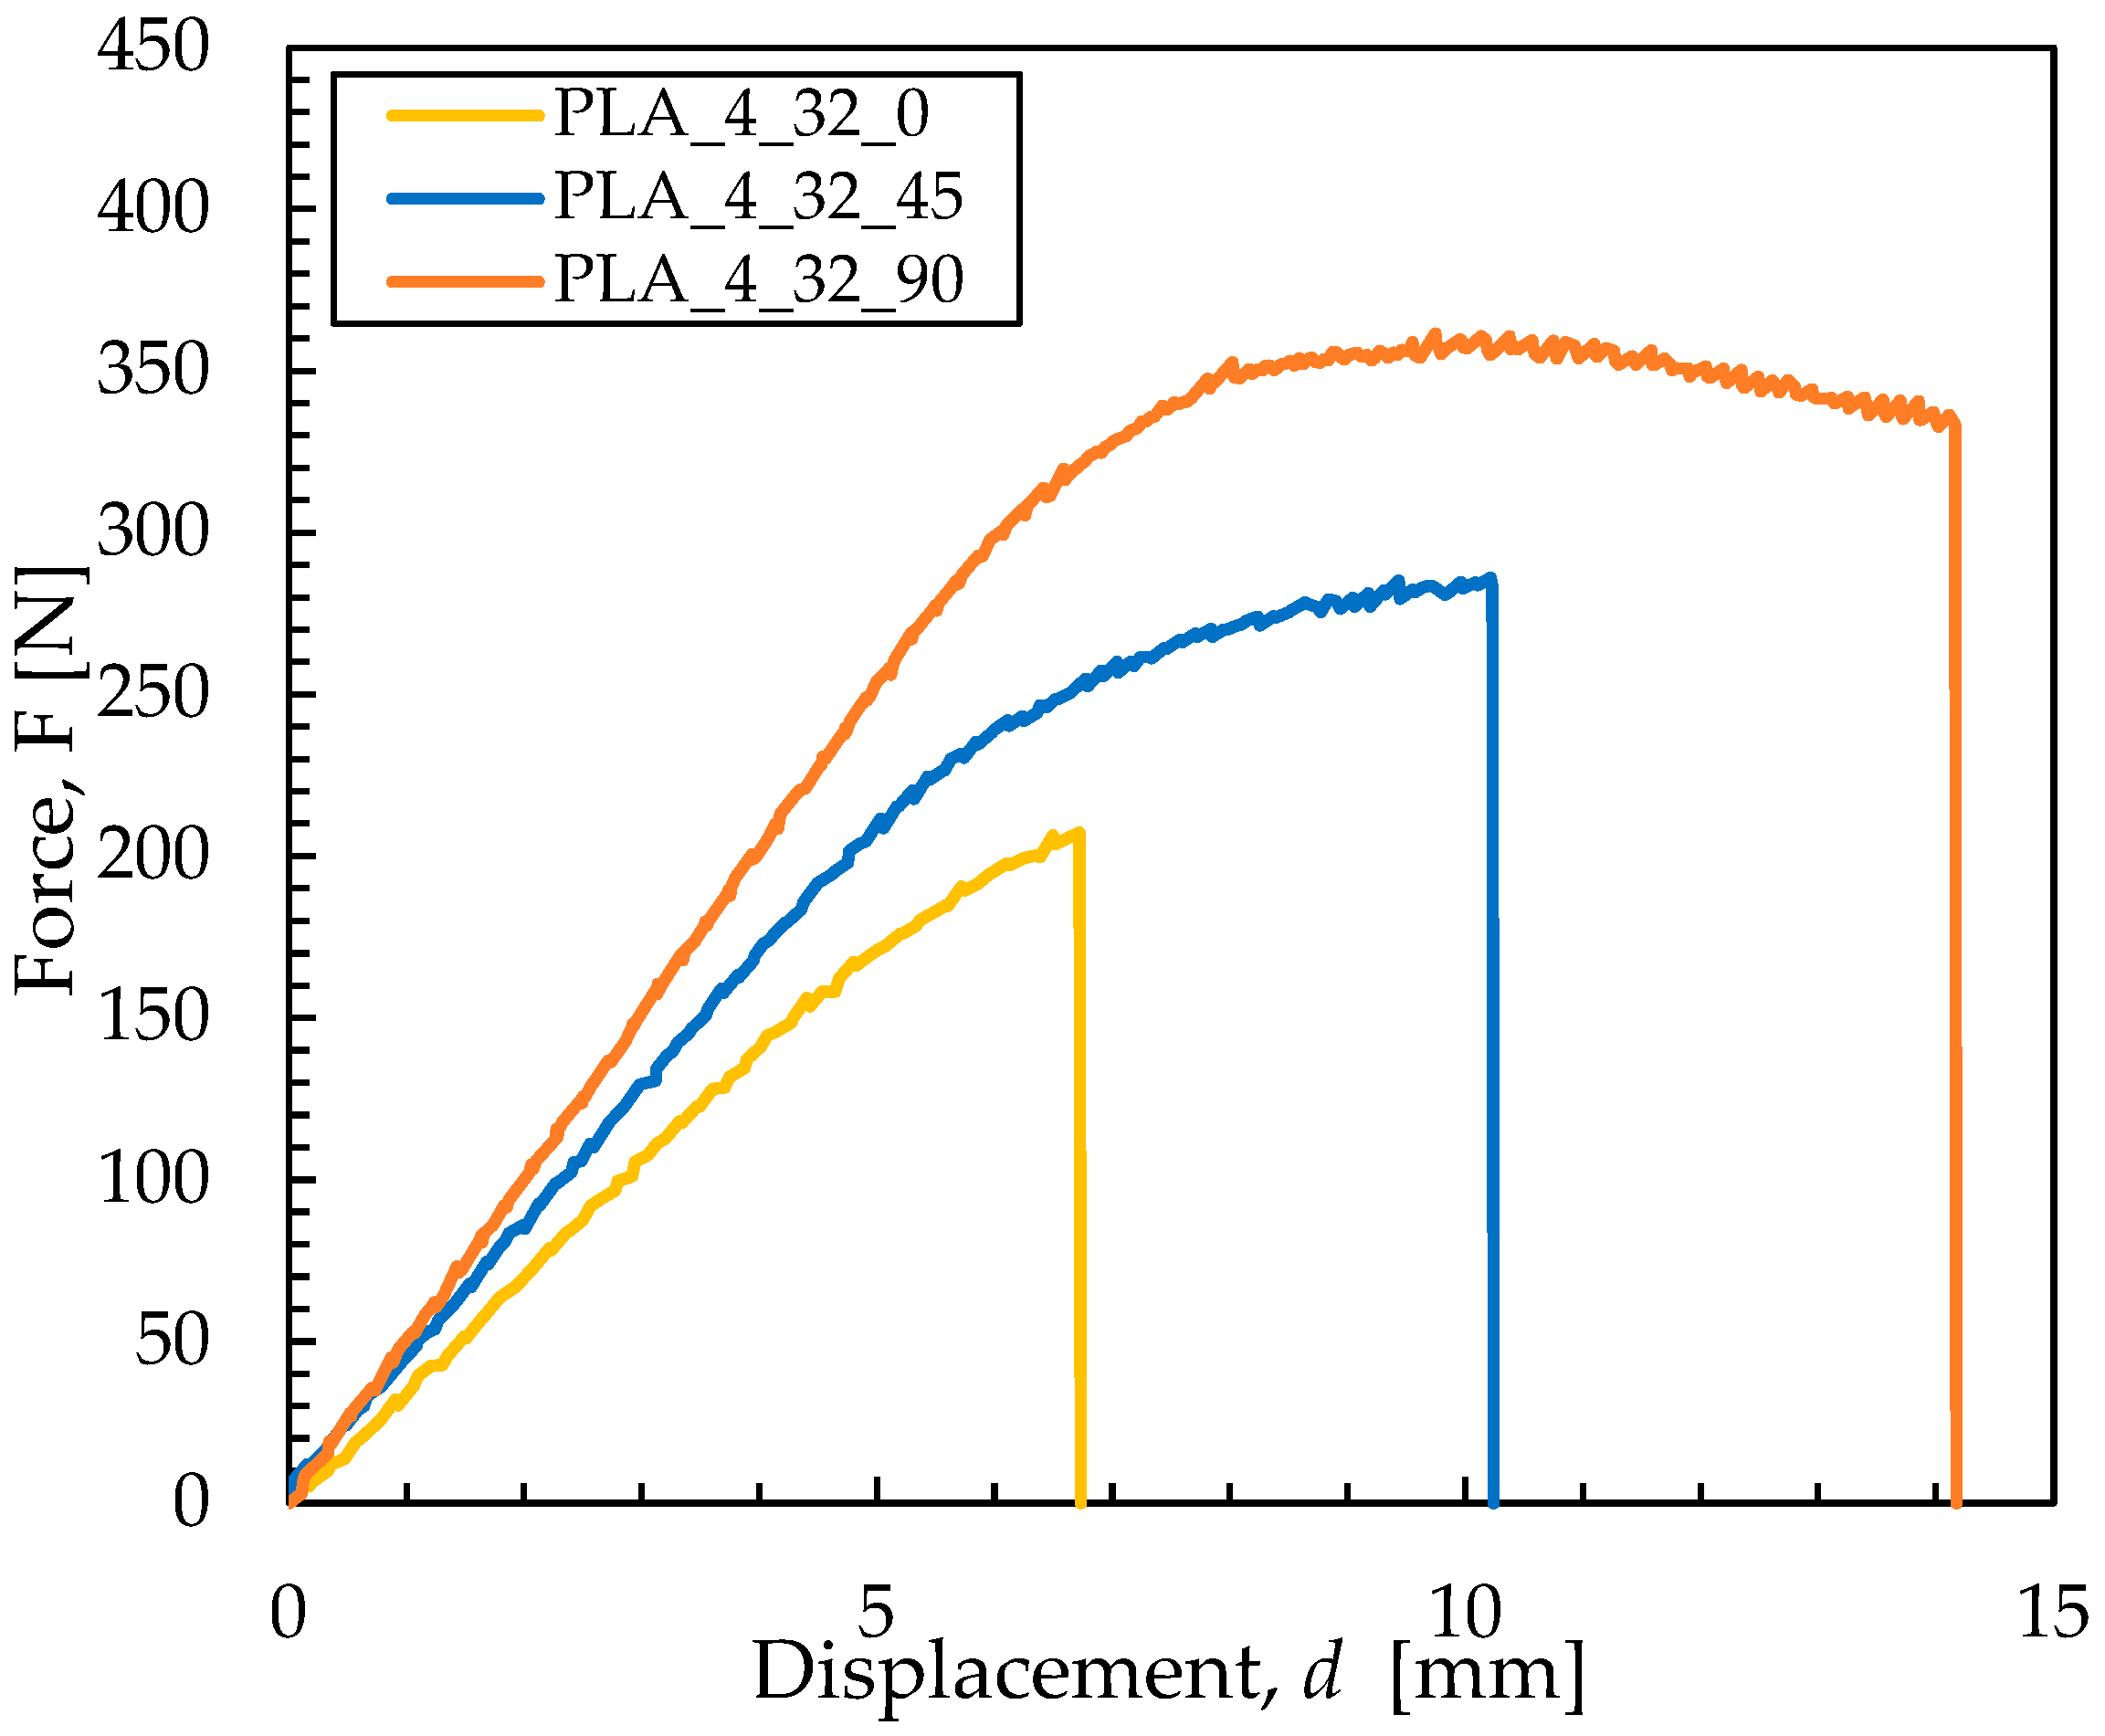
For the three-point bending test, rectangular PLA specimens were fabricated in compliance with ASTM D790 (ISO 178) [31] standards, maintaining identical deposition orientations and layer thickness parameters as in the tensile specimens. The bending tests were performed with a constant crosshead speed of 5 mm/min similar to tensile tests, and the resulting force–displacement data were recorded for subsequent analysis and validation of the numerical model. The result force vs. displacement obtained by three-point bending (Figure 4) were converted into an engineering flow–stress curve by utilizing the equation based on flexural stress of mechanical properties (Equation (1)). The mechanical modeling process starts from the data obtained from the preliminary bending experiment/ previous works from the author which obtained the stress and strain diagram on a PLA-based testing component. The determination of flexural stress and strain became the basis of the mechanical property model, defined by following equations:
σ e n g = 3 F L 2 b h 2
ε e n g = 6 D h L 2
where σ e n g is engineering stress, ε e n g is engineering strain, F is applied load (N), L is length (mm), b is a specimen height, and D is a deflection (mm). True stress is calculated by converting from the engineering flow curve by following equation. Additionally, the results gained were applied to the material attributes that were incorporated into MSC. Marc/Mentat. The equation to obtain true stress is illustrated in Equation (2):
σ t r u e =   σ e n g   1 + e n g
ε t r u e = l n   ( 1 + e n g )
where σ t r u e   is true stress; ε t r u e is true strain. These graphical tables are included within the material modeling feature provided by MSC MARC/Mentat.
The tensile test results show that PLA specimens perform differently depending on orientation: the 90° specimen demonstrated the highest strength and toughness (~360 N with gradual failure), the 45° specimens showed an elastic–plastic behavior with a max force of ~280 N at 10 mm displacement, and the 0° specimens exhibited lower strength of ~200 N max force at break. The experimental force–displacement diagrams for varying deposition orientations are shown in Figure 3, providing useful information on how the deposition angle effects the stiffness, strength, and plasticity of the FDMed sample under three-point bending.

2.2. Numerical Simulation of Tensile Simulation in MSC Marc/Mentat

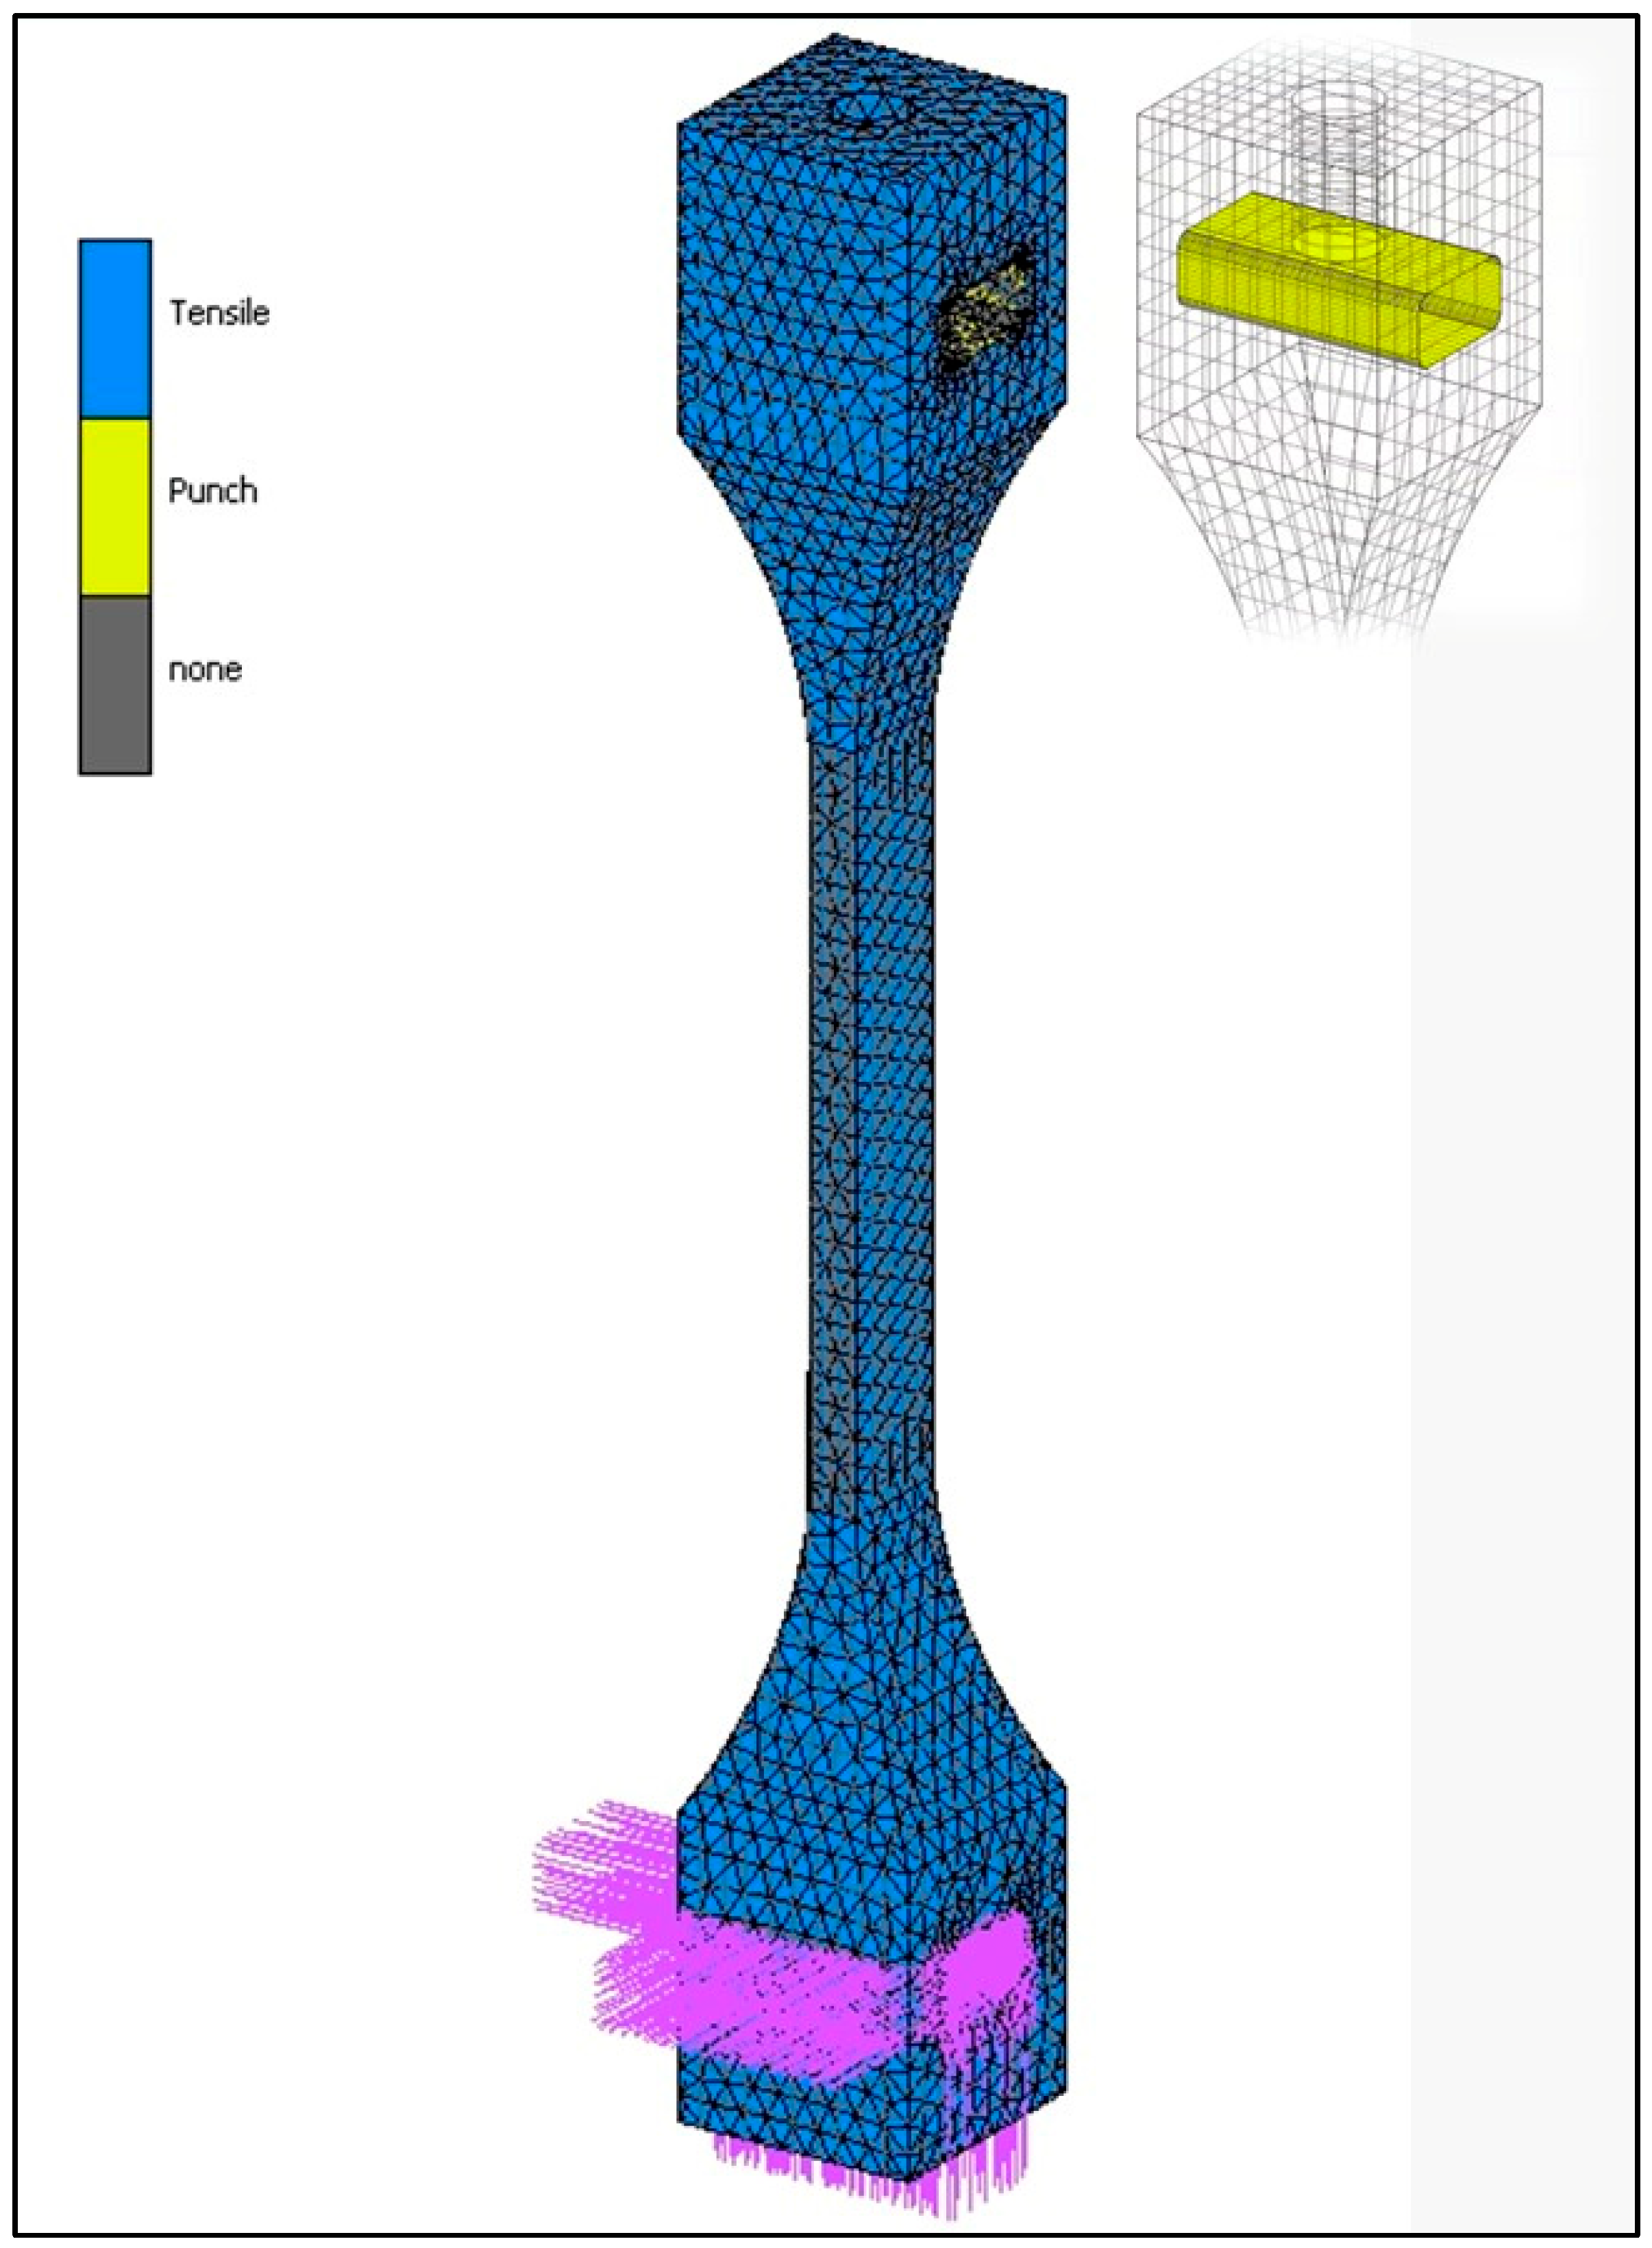
In this subchapter, numerical simulation was implemented to replicate a tensile test setup. Figure 5 illustrates the FE model of the dog bone specimen used in the numerical simulation. This model is crucial for analyzing material behavior under tensile testing conditions. The lower section of the specimen is defined as being fixed to prevent any unwanted movement and rotation during the testing process. In contrast, the center-upper section is designed with a non-uniform rational B-spline (NURBS) component acting as a punch, programmed to ascend at a controlled rate of 5 mm/min, effectively simulating the force typically applied during tensile testing scenarios.
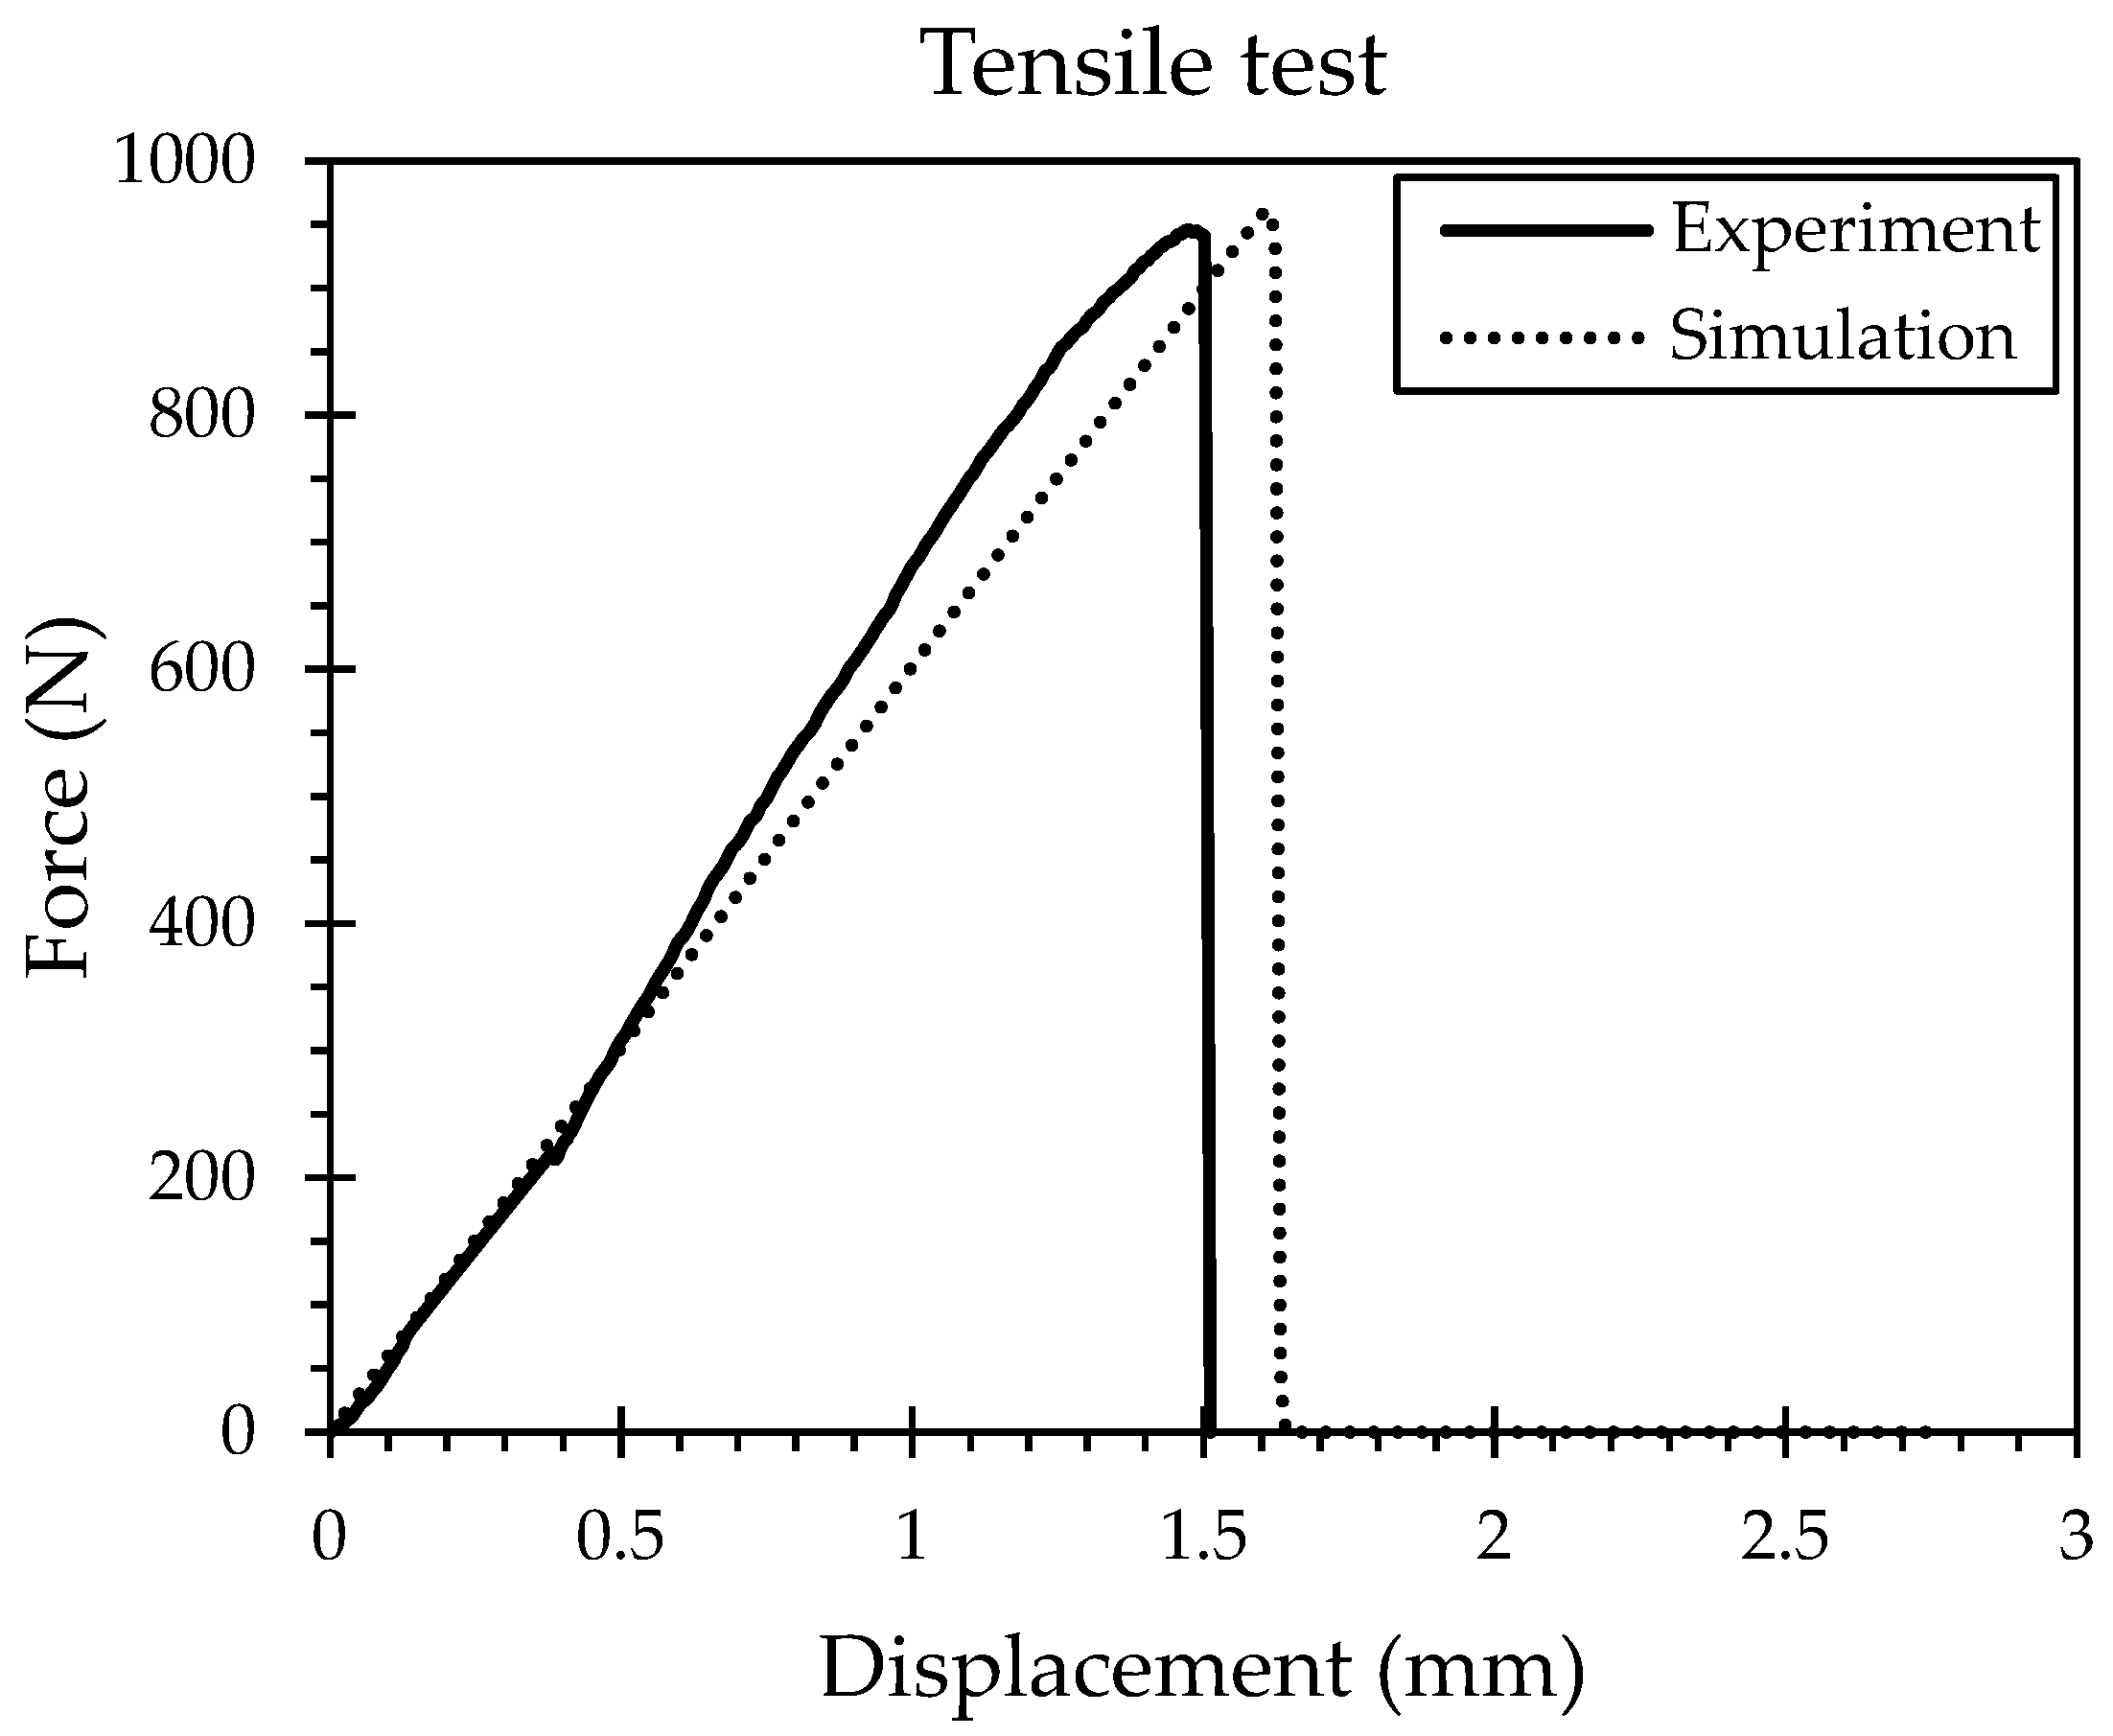
The applied force is directed upward toward the NURBS component to ensure uniform load distribution. Table 3 presents the material properties including the corresponding plasticity properties for the tensile–FDM deposition with 0° orientation (PLA_4_32_0). Figure 6 shows force vs. displacement, proving a very good agreement between simulation and experiment for the 0° deposition orientation with an error of only 1.6% for the maximum force and 9.7% for the displacement at failure point.

2.3. Numerical Simulation of Three-Point Bending in MSC Marc/Mentat

This section describes the development of an FE model in MSC Marc/Mentat to investigate the bending response of the material. Following the determination of yield stress, Young’s modulus was subsequently derived from the experimental results. Mass density and Poisson’s ratio values were defined as per the data sheet of PLA. The material properties of PLA utilized in the simulation are provided in Table 4.
The sample is modeled as a standard PLA-based beam for preliminary testing to determine its mechanical properties. The specimen has dimensions of L = 120 mm (length) × w = 20 mm (width) × t = 5 mm (thickness) and is created within MSC Marc/Mentat 2022. This software environment facilitates both the generation of solid geometry and the application of FE meshing, enabling the development of a comprehensive solid-body model without reliance on third-party CAD software. The FDM beam specimen is modeled as solid hexahedral elements, accompanied by punch and lower supports—each defined with a radius of 12 mm—for simulating the three-point bending test (Figure 7). This numerical setup is categorized under the solid-shell analysis mode.
Upon defining the mechanical boundary conditions prior to running the load case, a contact body definition was used in MSC Marc/Mentat to determine the behavior of the element interactions with each body. In both cases, the tensile test consists of an NURBS solid shell as a die acting as a punch, while the three-point bending consists of a single upper solid cylindrical die, two lower solid cylindrical supports and the workpiece, where the workpiece model represents the FDMed specimens. Table 5 displays the contact body definition for each major element body utilized in MSC Marc/Mentat.
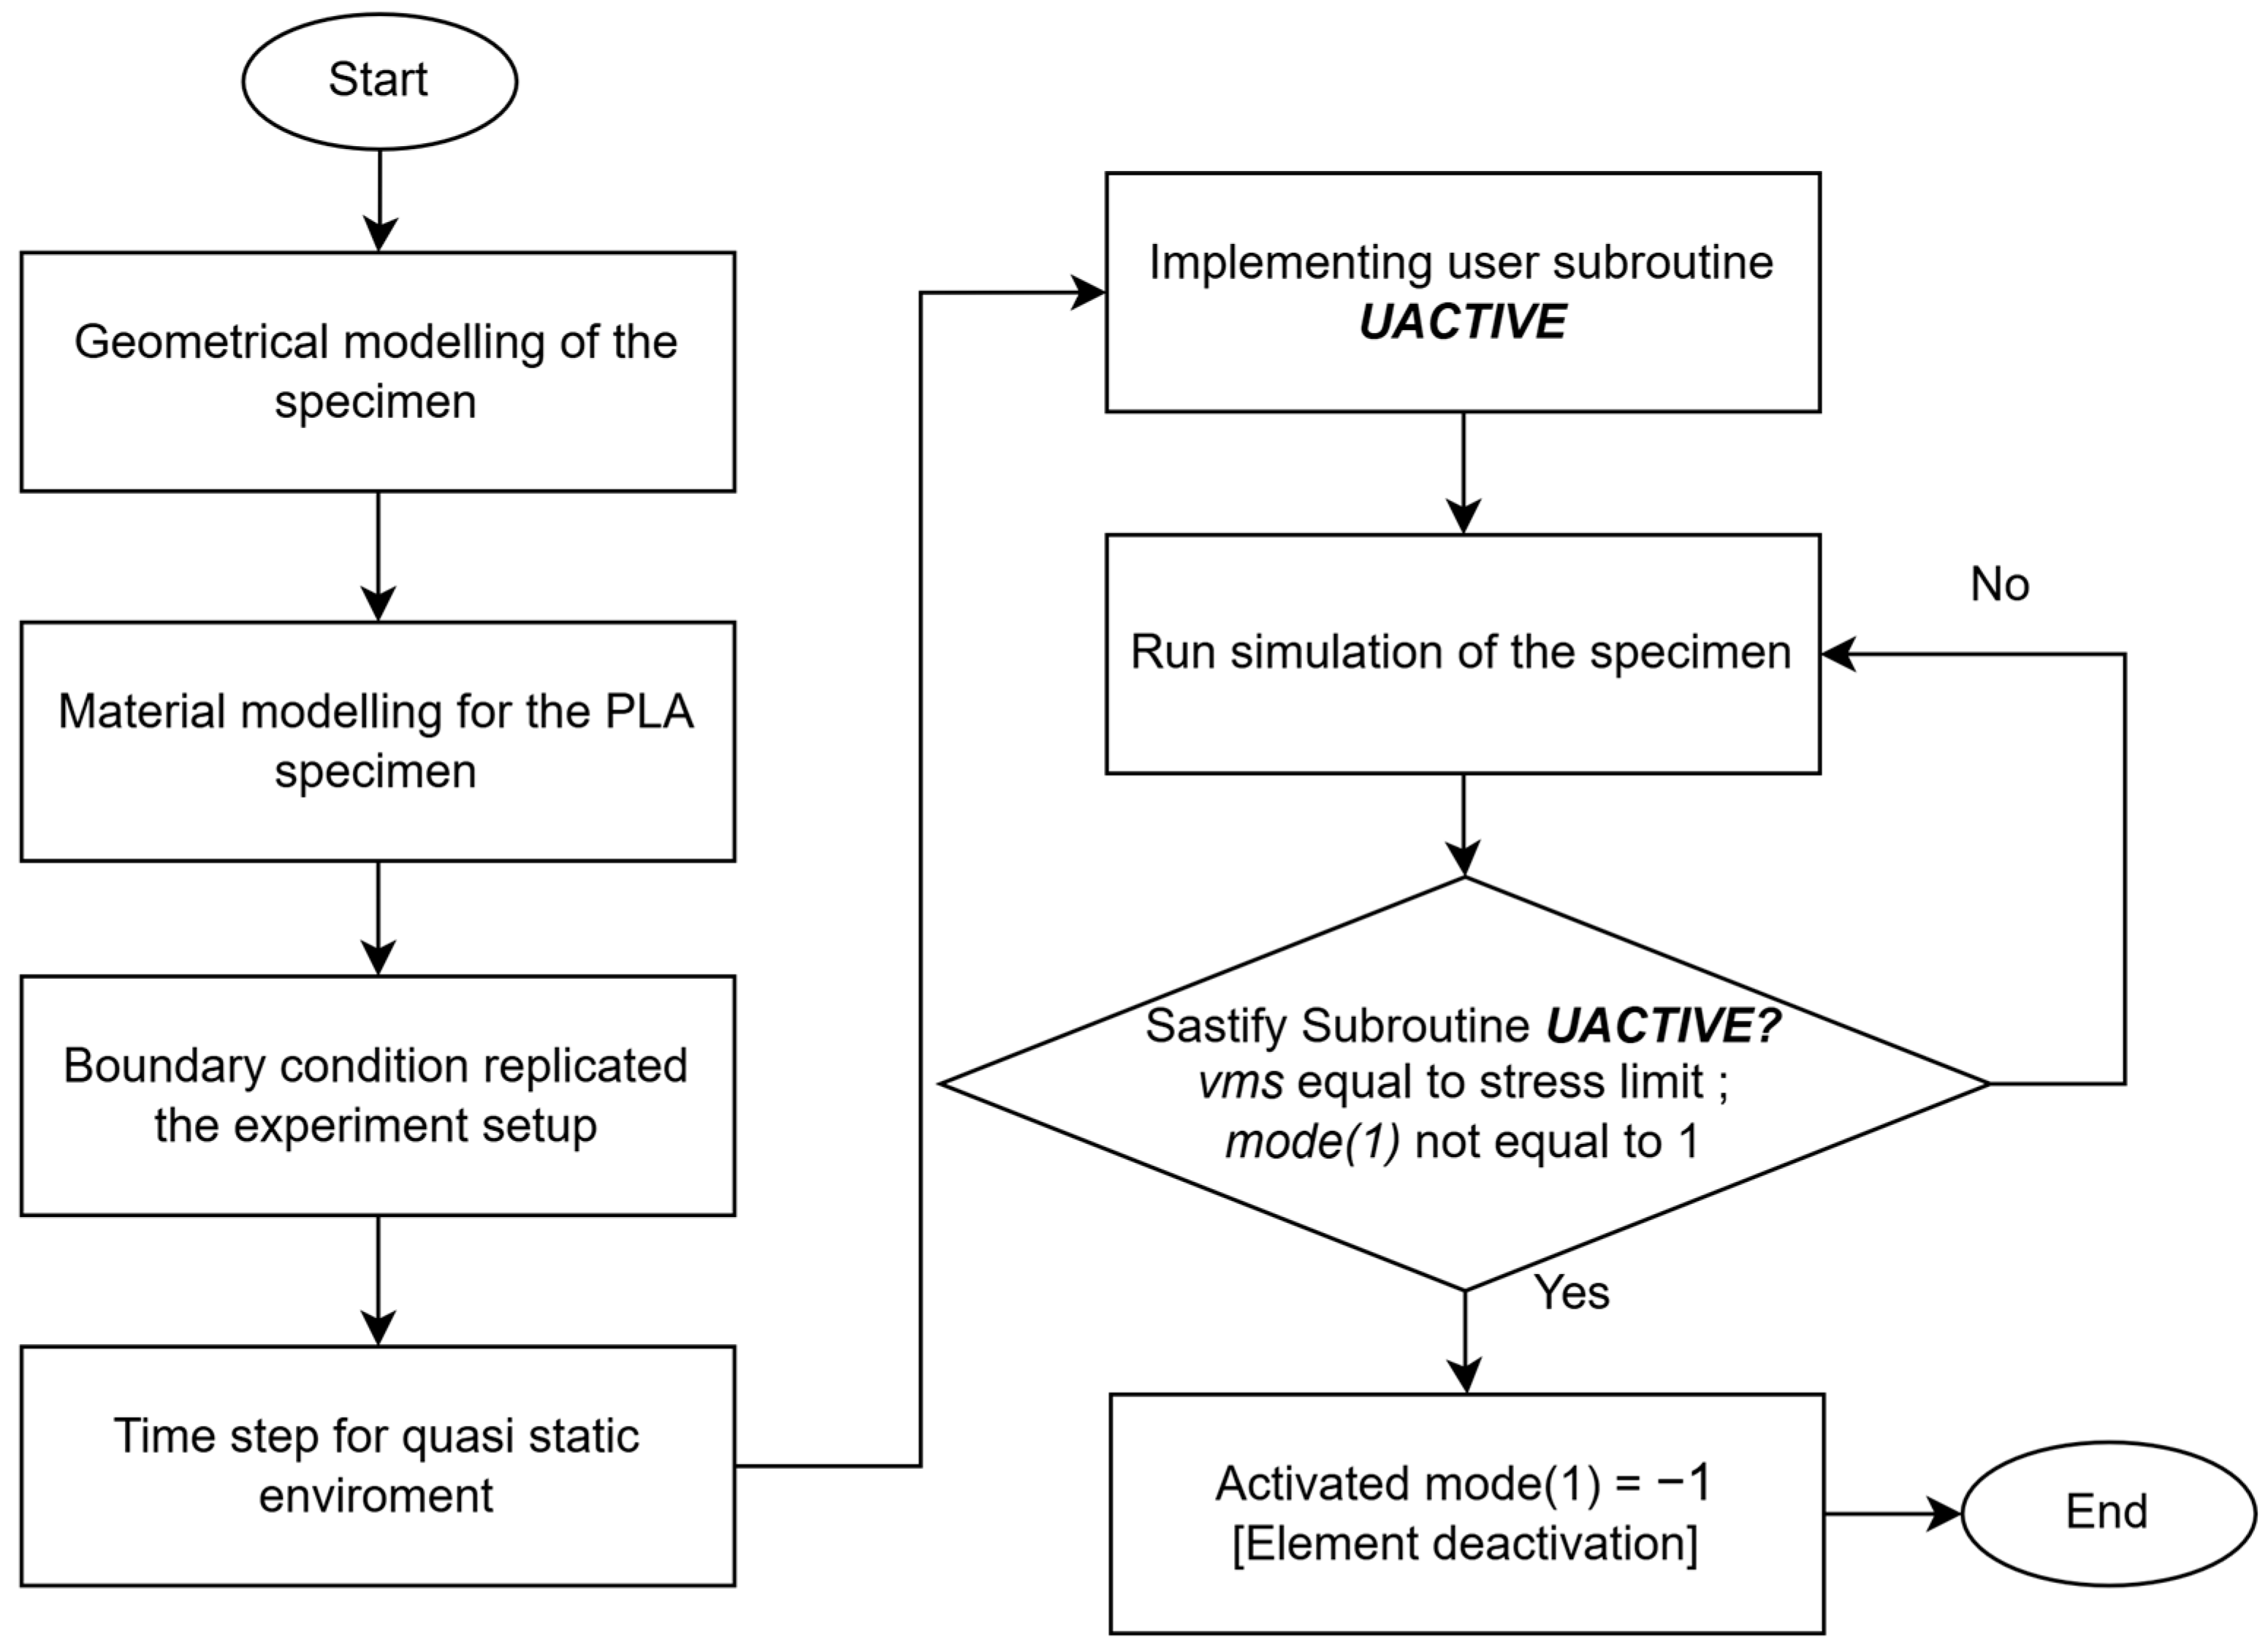
After defining the contact body interactions and applying a quasi-static time-stepping scheme, adaptive meshing was employed to enhance solution accuracy by refining the mesh in regions experiencing high deformation or stress concentration. To further improve the mechanical representation of material degradation, a fully customized UACTIVE user subroutine was incorporated within MSC Marc/Mentat. This subroutine enables the selective deactivation of finite elements once they exceed a maximum stress threshold, thereby allowing the simulation to realistically capture progressive material failure and damage evolution. Figure 8 illustrates the configuration procedure for implementing the UACTIVE subroutine in MSC Marc/Mentat.
The subroutine implementation is configured to be executed prior to the commencement of the numerical simulation. MSC Marc/Mentat enables the integration of the user-defined .dat file containing the subroutine algorithm, through the load–case interface. This integration finalizes the setup of the numerical model for the three-point bending analysis. The detailed algorithmic structure of the UACTIVE subroutine is provided in Algorithm 1 below.
Algorithm 1. User Subroutine UACTIVE
1:Variable subroutine uactive (m, n, mode, irststr, irststn, inc, time, timinc)
2: Define integer inc, irststn, irststr, m, mode, n, ielem, ie
3: real * 8 time, timin, common /mydata/ ielem(60,000)
4: dimension m(2), mode(3) // Assign dimension for post result data
5:Call integer ie = m(1)
6:if ielem(ie) not equal to the stress threshold and mode(1) not equal to 1
7:then, mode(1) = -1 // The deactivation of element
8:else mode(1) = 2 // The remain post element will be calculated
9:end
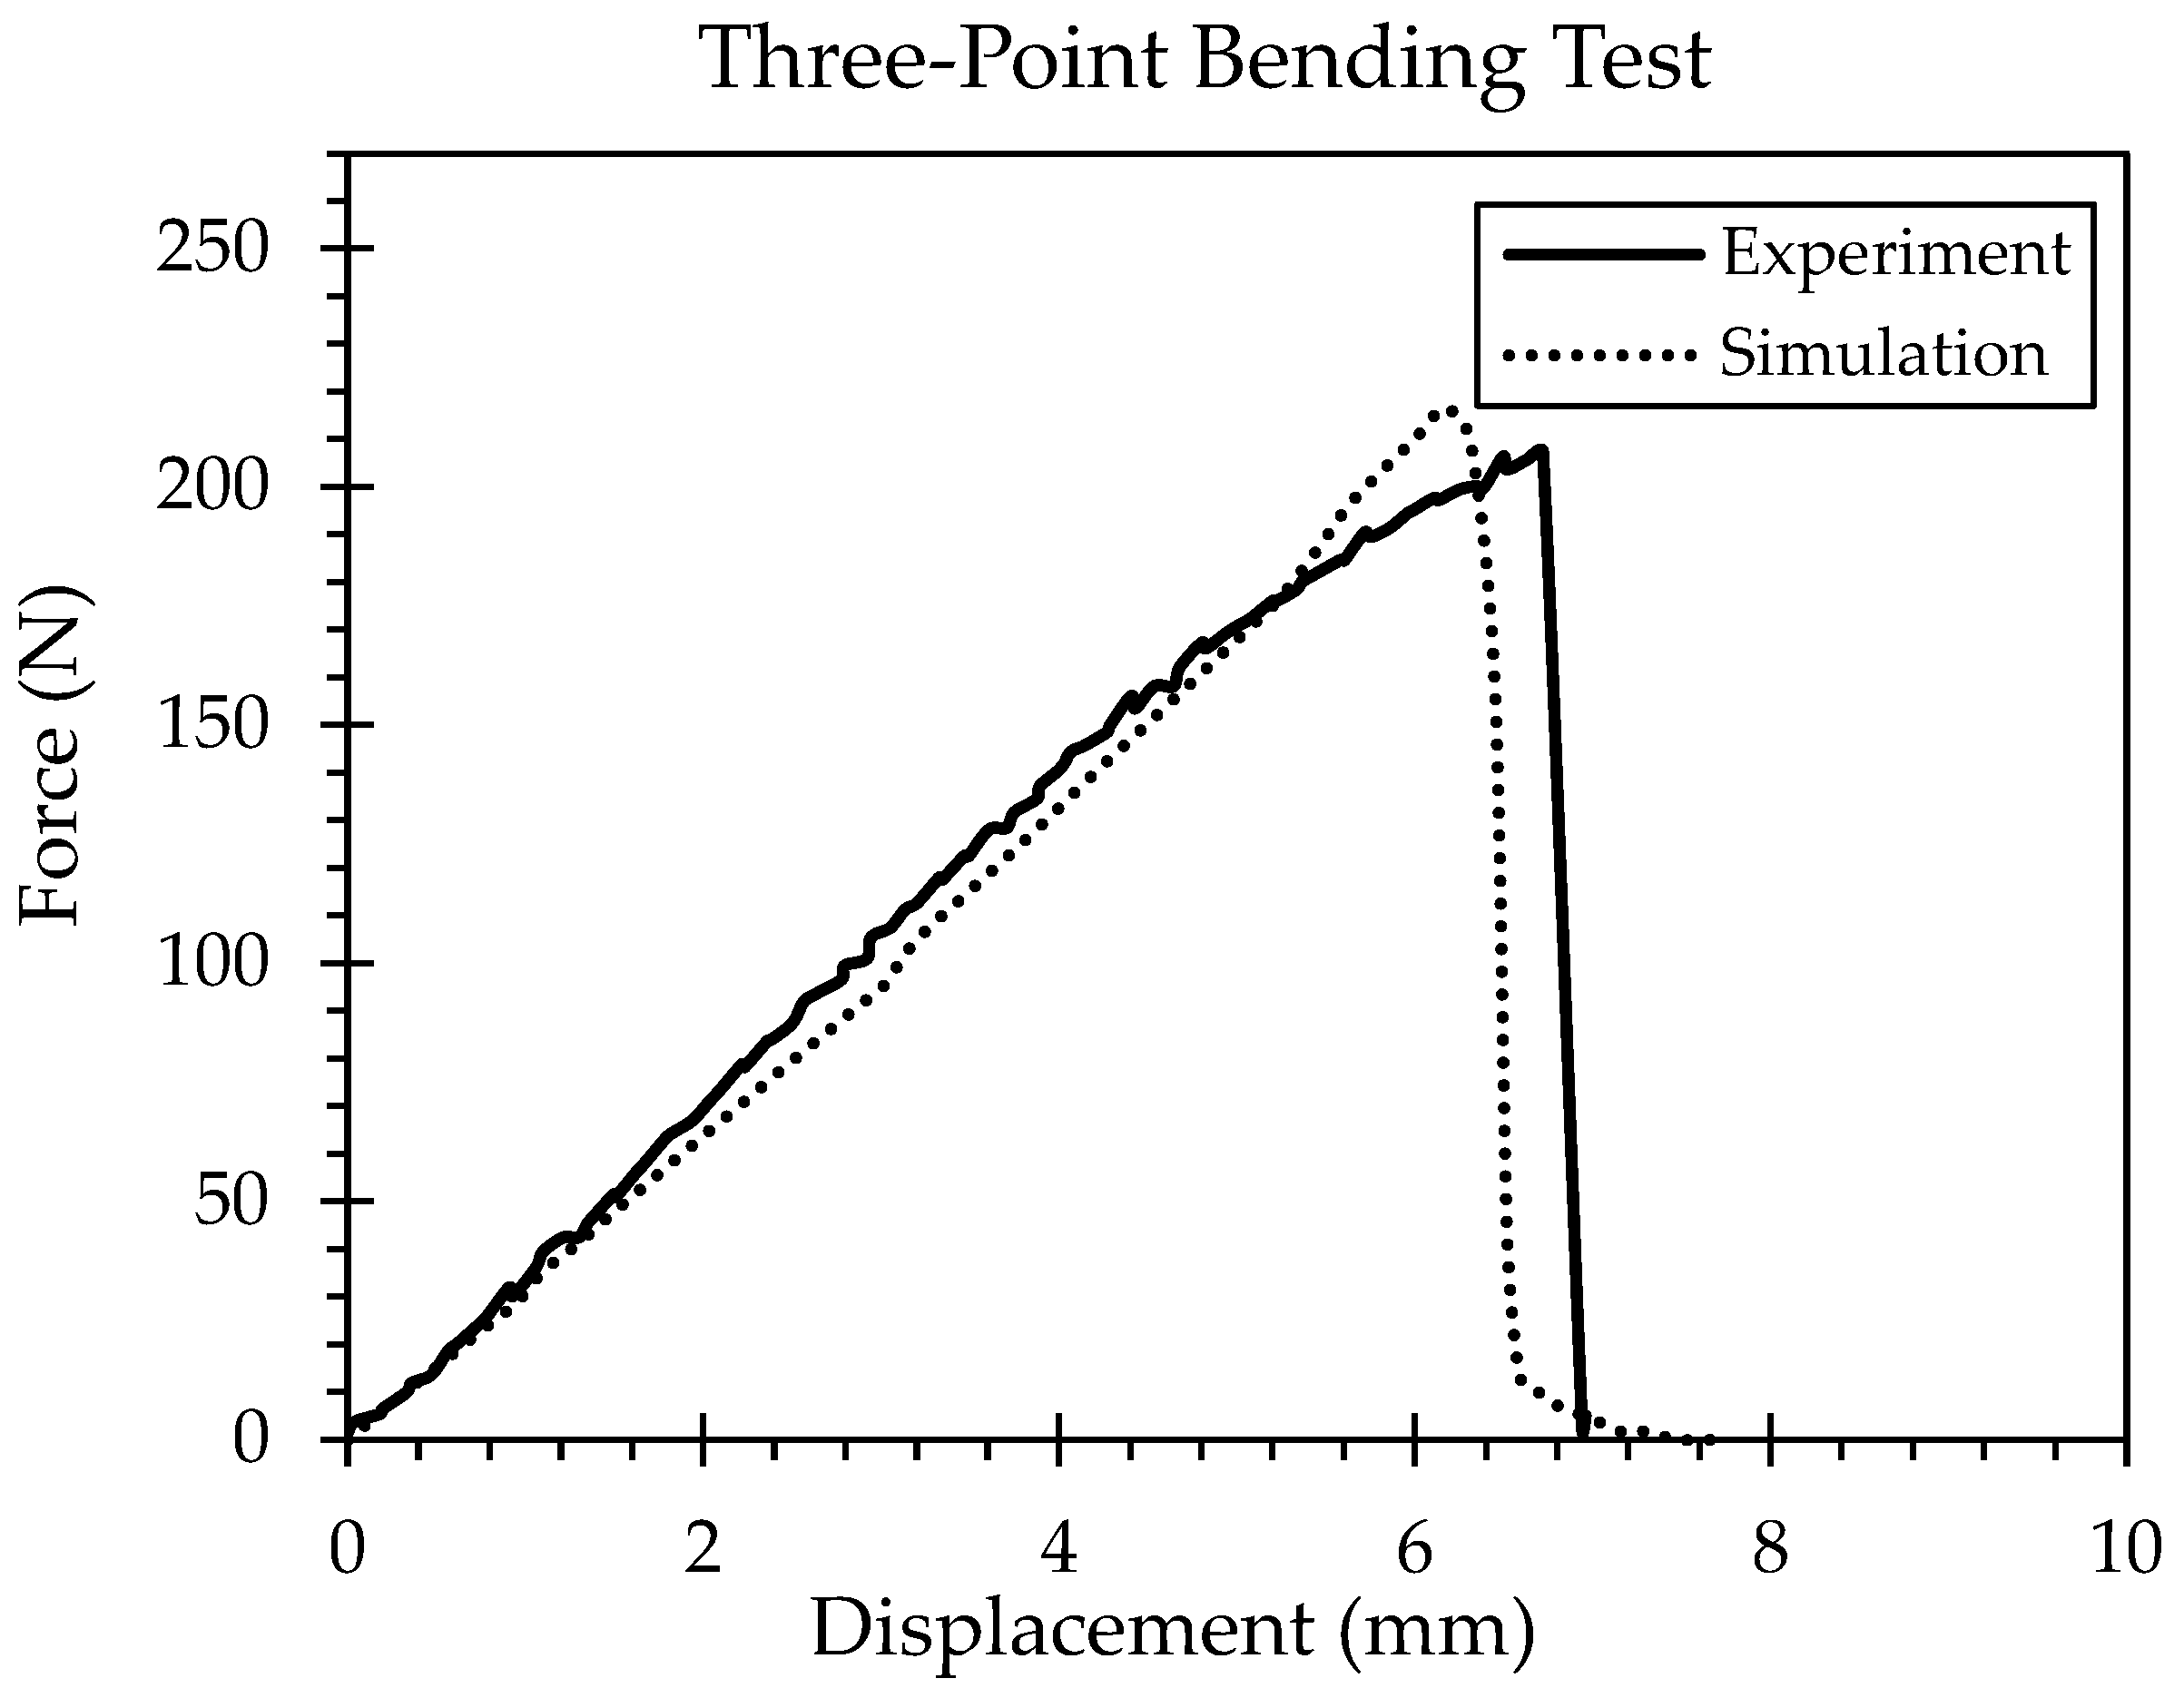
The three-point bending test results for the FDMed samples with 0° deposition orientation (PLA_4_32_0) were selected for evaluation, proving a very good agreement between experiment and simulation, exhibiting similar stiffness and overall trends as illustrated in Figure 9. The simulation slightly overestimates the peak force (216 N vs. 206 N) with an error of solely 5% and predicts failure at a marginally lower displacement of 6.3 mm instead of 6.6 mm in the experiment (4.5% error), therefore successfully replicating the bending behavior and load–displacement response. These results demonstrate that the model provides a reliable representation of the experimental performance, with only minor refinements needed for improved fracture prediction.

3. Numerical Simulation and Experimental Process of WHS Model

This chapter focuses on the development of the numerical simulation for the WHS component, based on the parameters and material properties obtained from the previous chapter. Additionally, it provides a technical description of the equipment and procedures used for the experimental verification of the WHS component fabrication.

3.1. Experimental Setup Testing of WHS Component

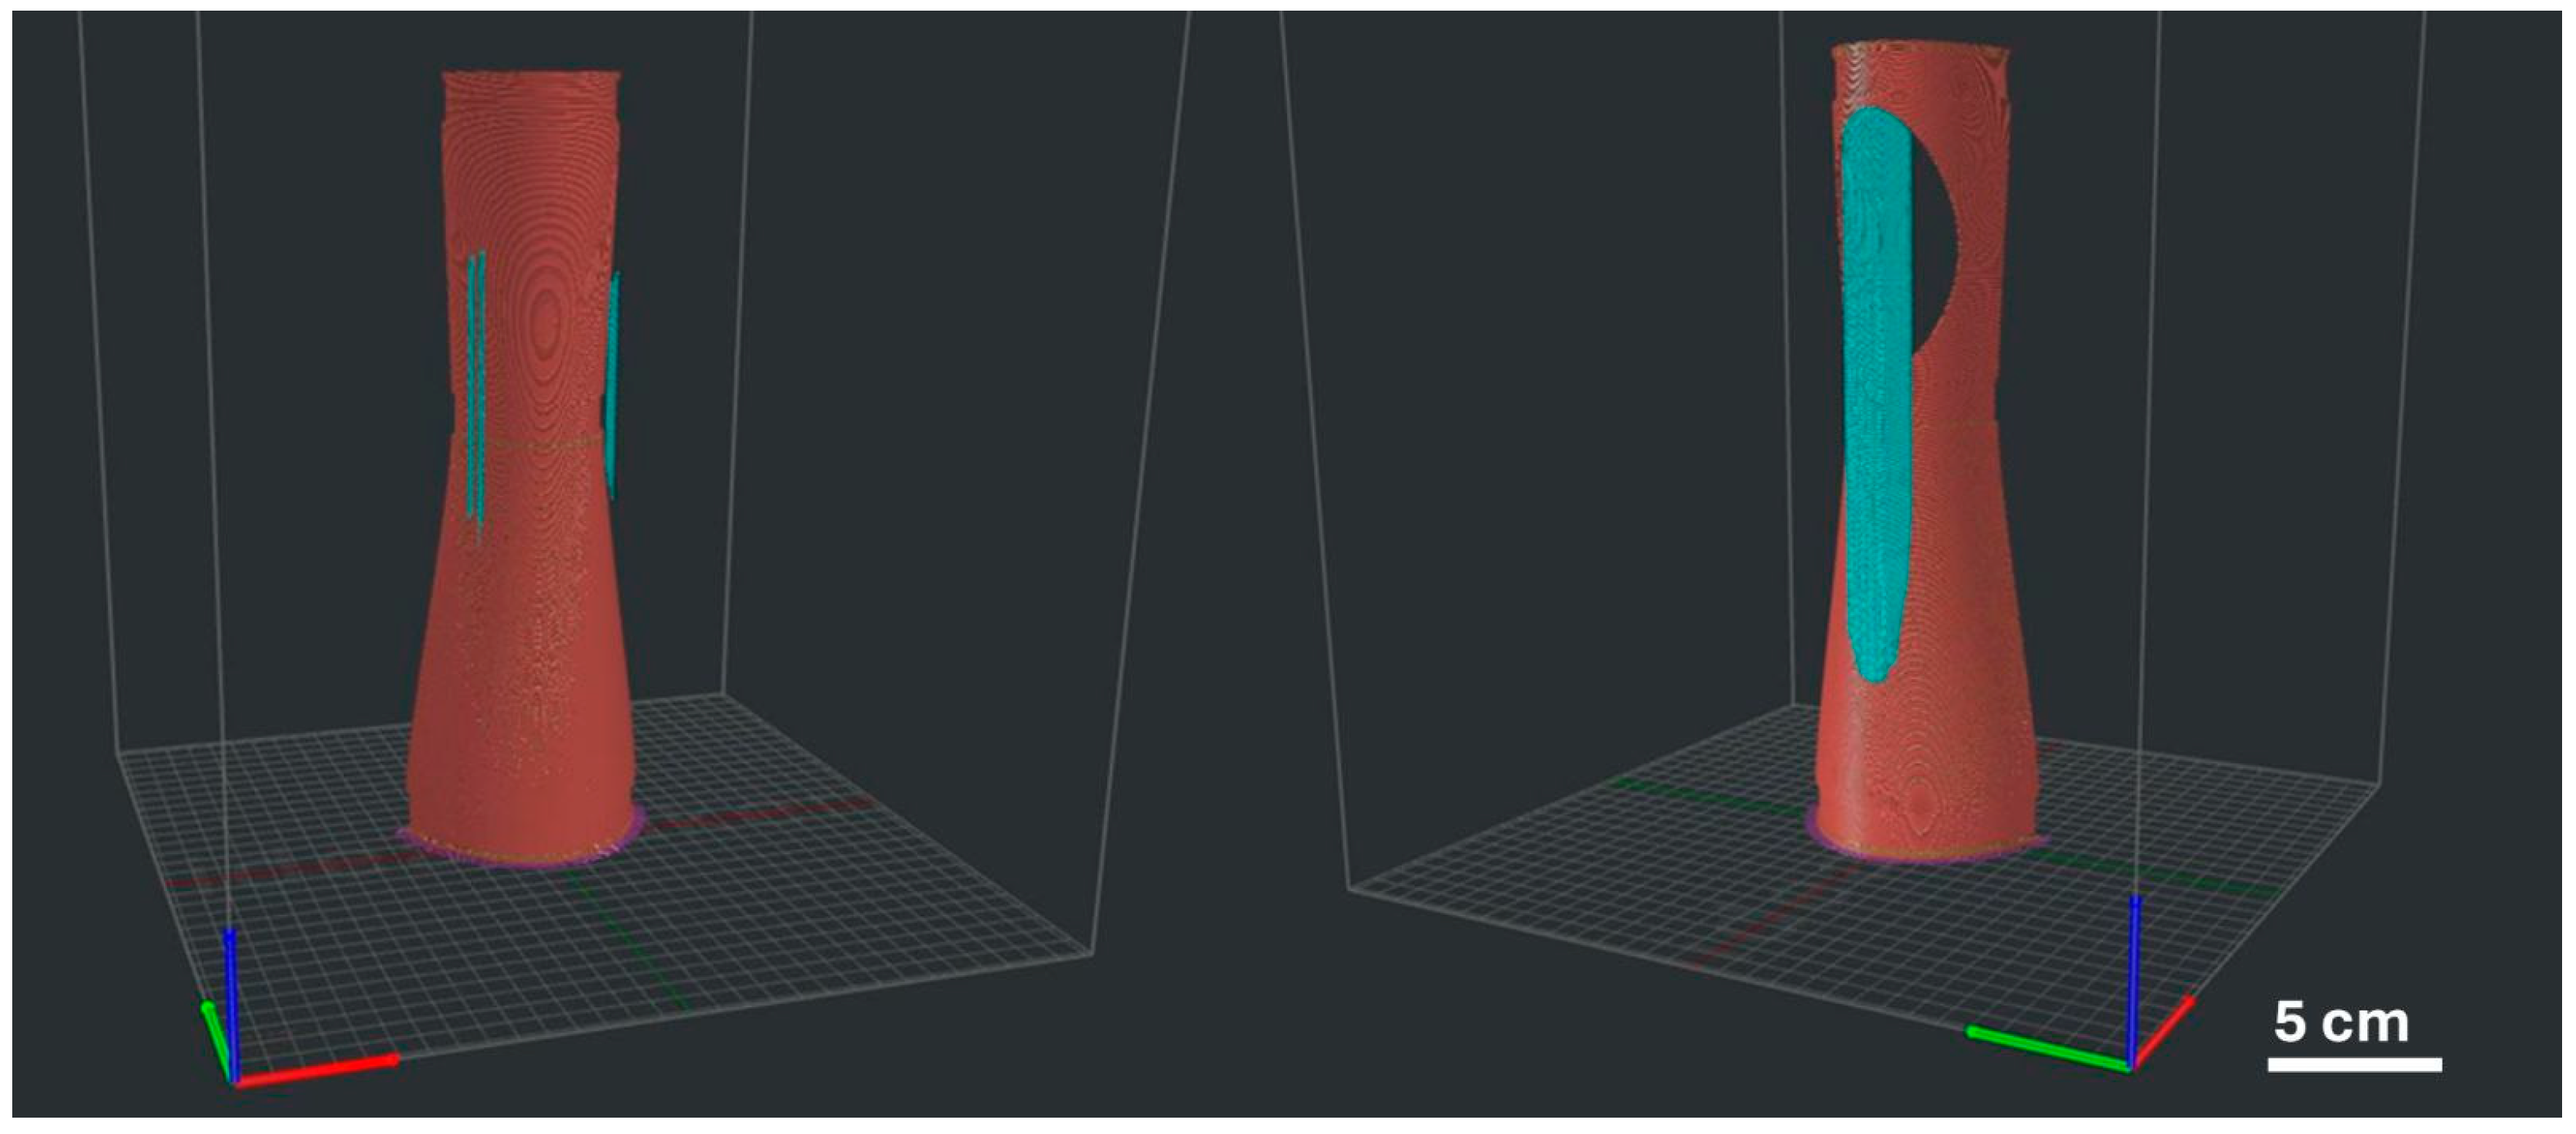
To verify the results of the numerical simulation for the FDM model, an experimental process was conducted to fabricate the WHS product intended for biomedical application. A comprehensive multi-layer modeling approach, involving layer-by-layer deposition via 3D printing, was performed using an RAISE3D FDM printer. Figure 10 presents the geometry and slicing settings used prior to WHS component fabrication.
The WHS components were fabricated vertically with a nozzle temperature of 205 °C, a build plate temperature of 60 °C, and a printing speed of 5 mm/s, similar to the samples (cp. Table 2). These parameters were chosen based on the PLA and FDM machine manufacturer’s recommendations to ensure consistent layer adhesion, dimensional accuracy, and mechanical performance. The precision and material compatibility of the RAISE3D printer allowed reliable production of the WHS components, which was essential for the subsequent evaluation of their mechanical properties.
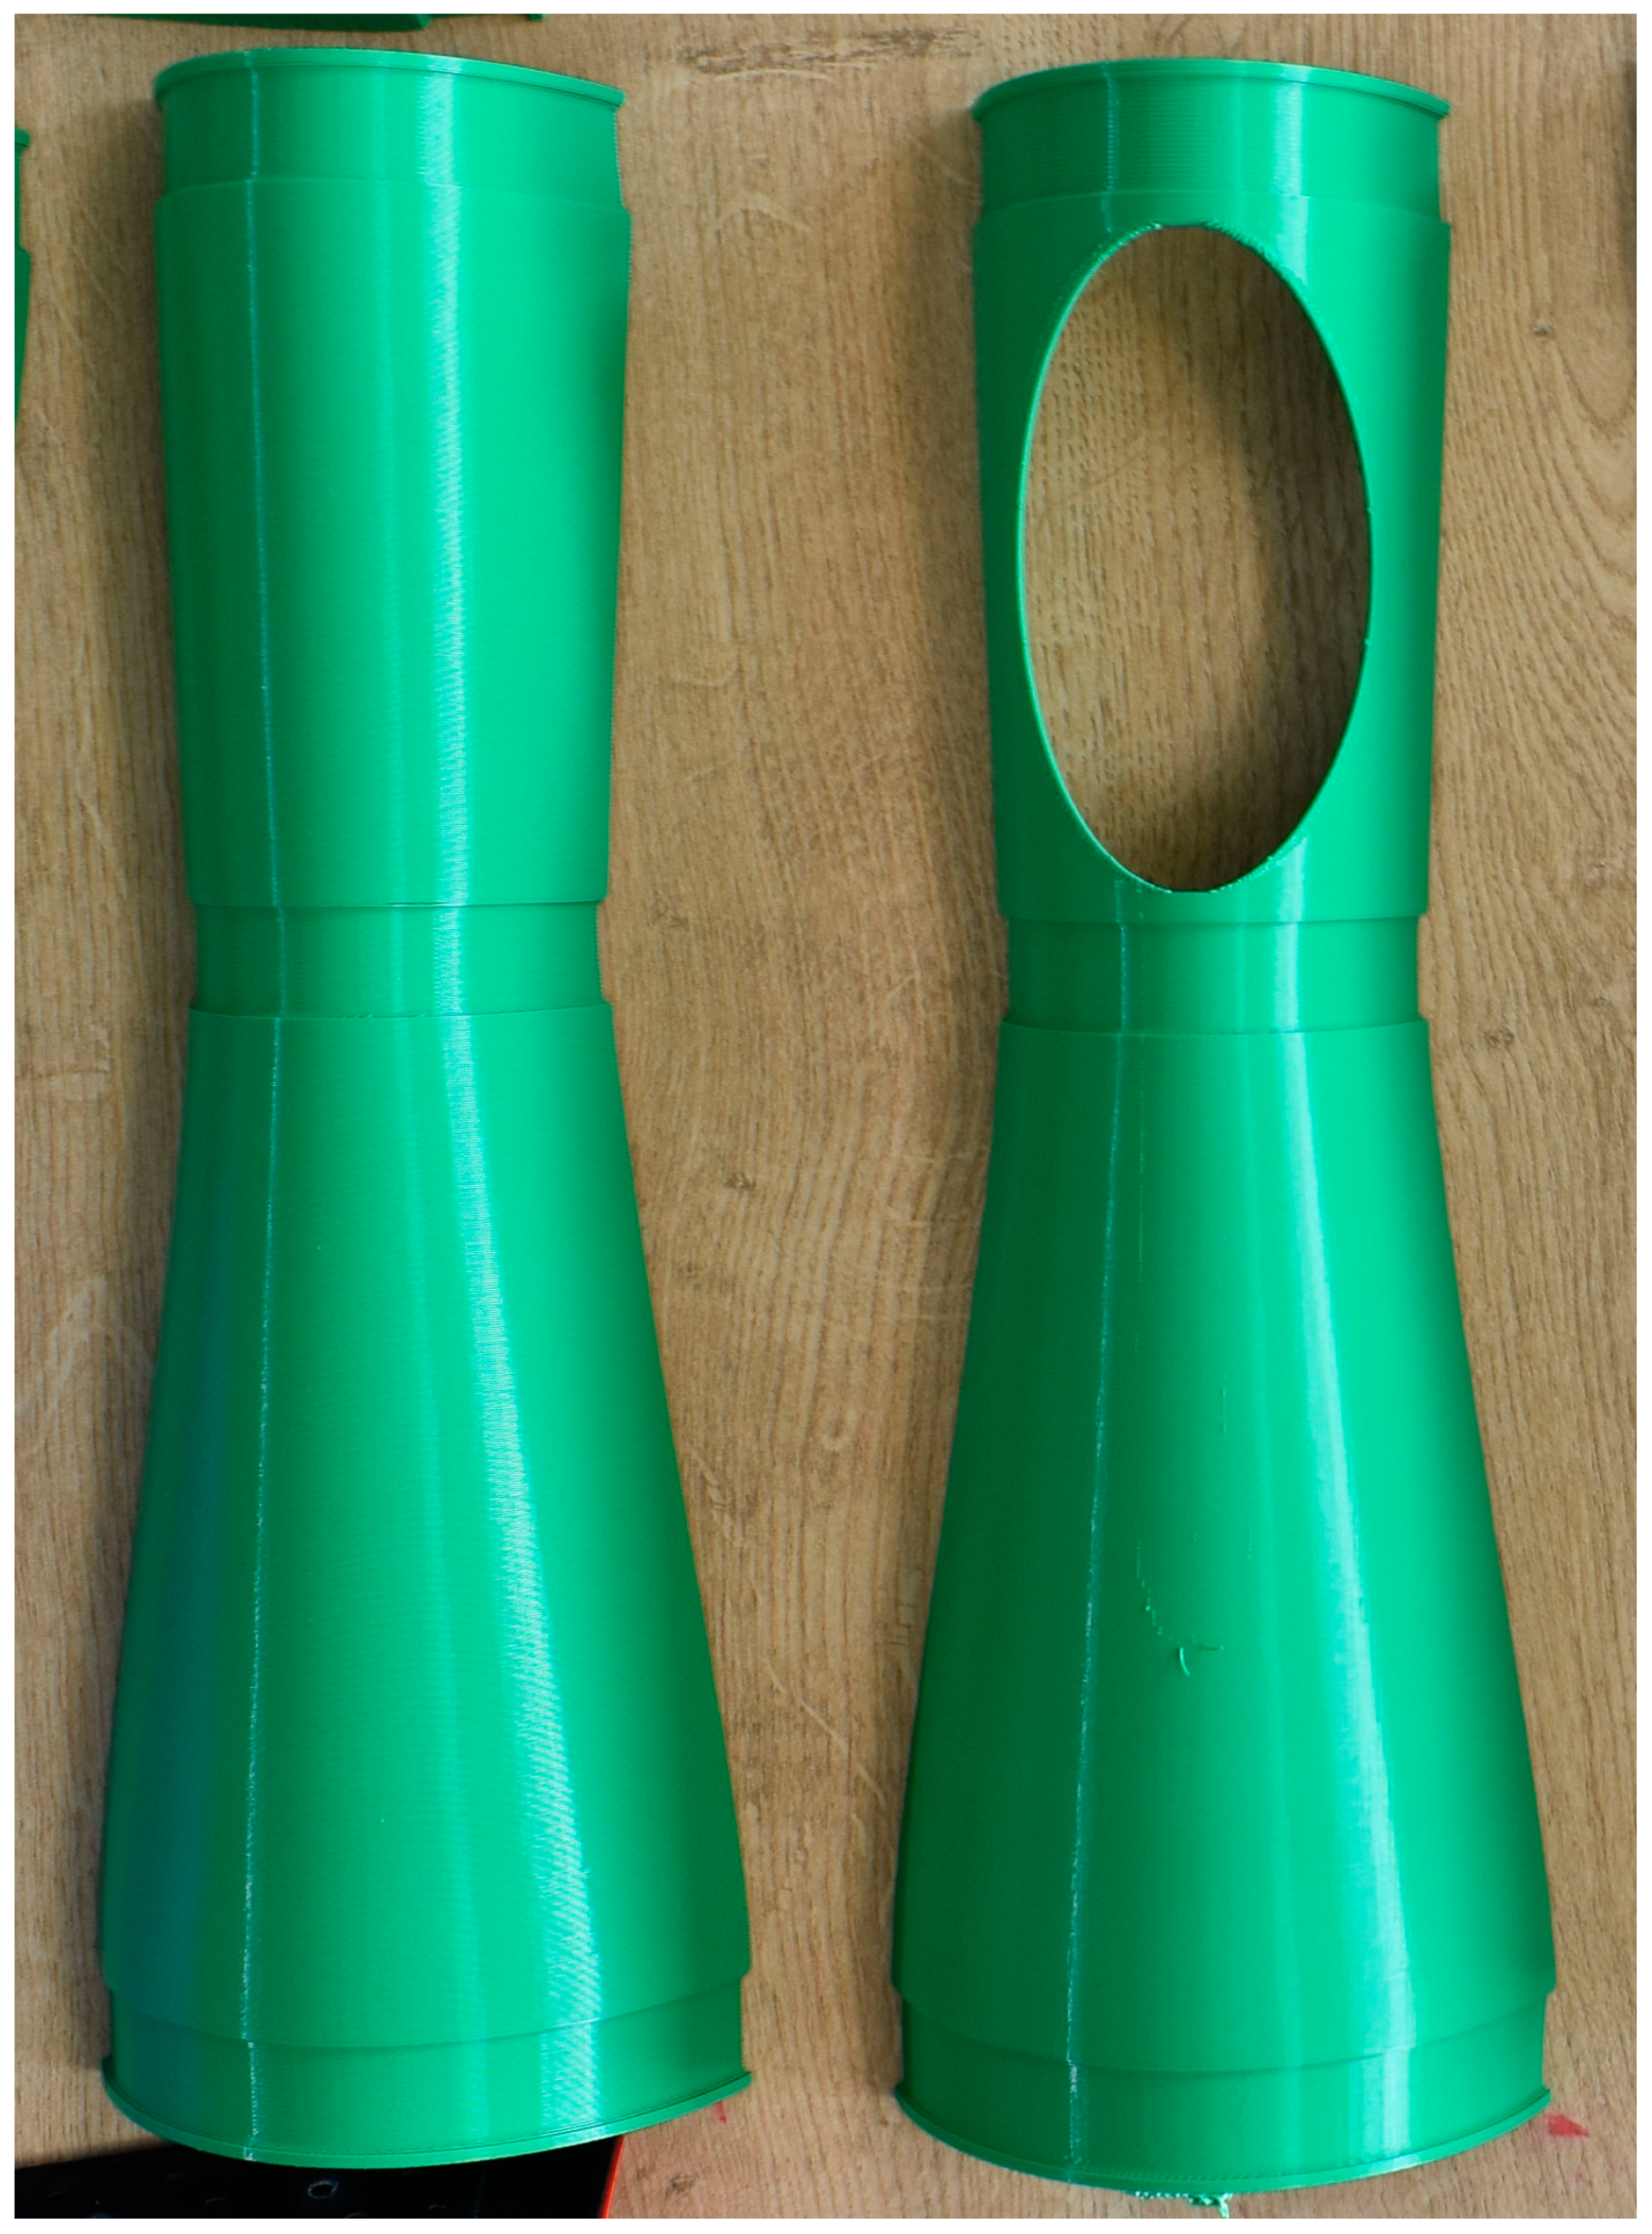
Once the slicing parameters are defined, the slicer converts the .STL file into G-code, which serves as the basis for the deposition layer trajectories during WHS fabrication. The PLA component is fabricated using the slicing parameters configured in the built-in software ideaMaker 4.1.1 provided by RAISE3D. A total of four (4) WHS components were fabricated components, including two full WHS and two with a hole as shown in Figure 11.
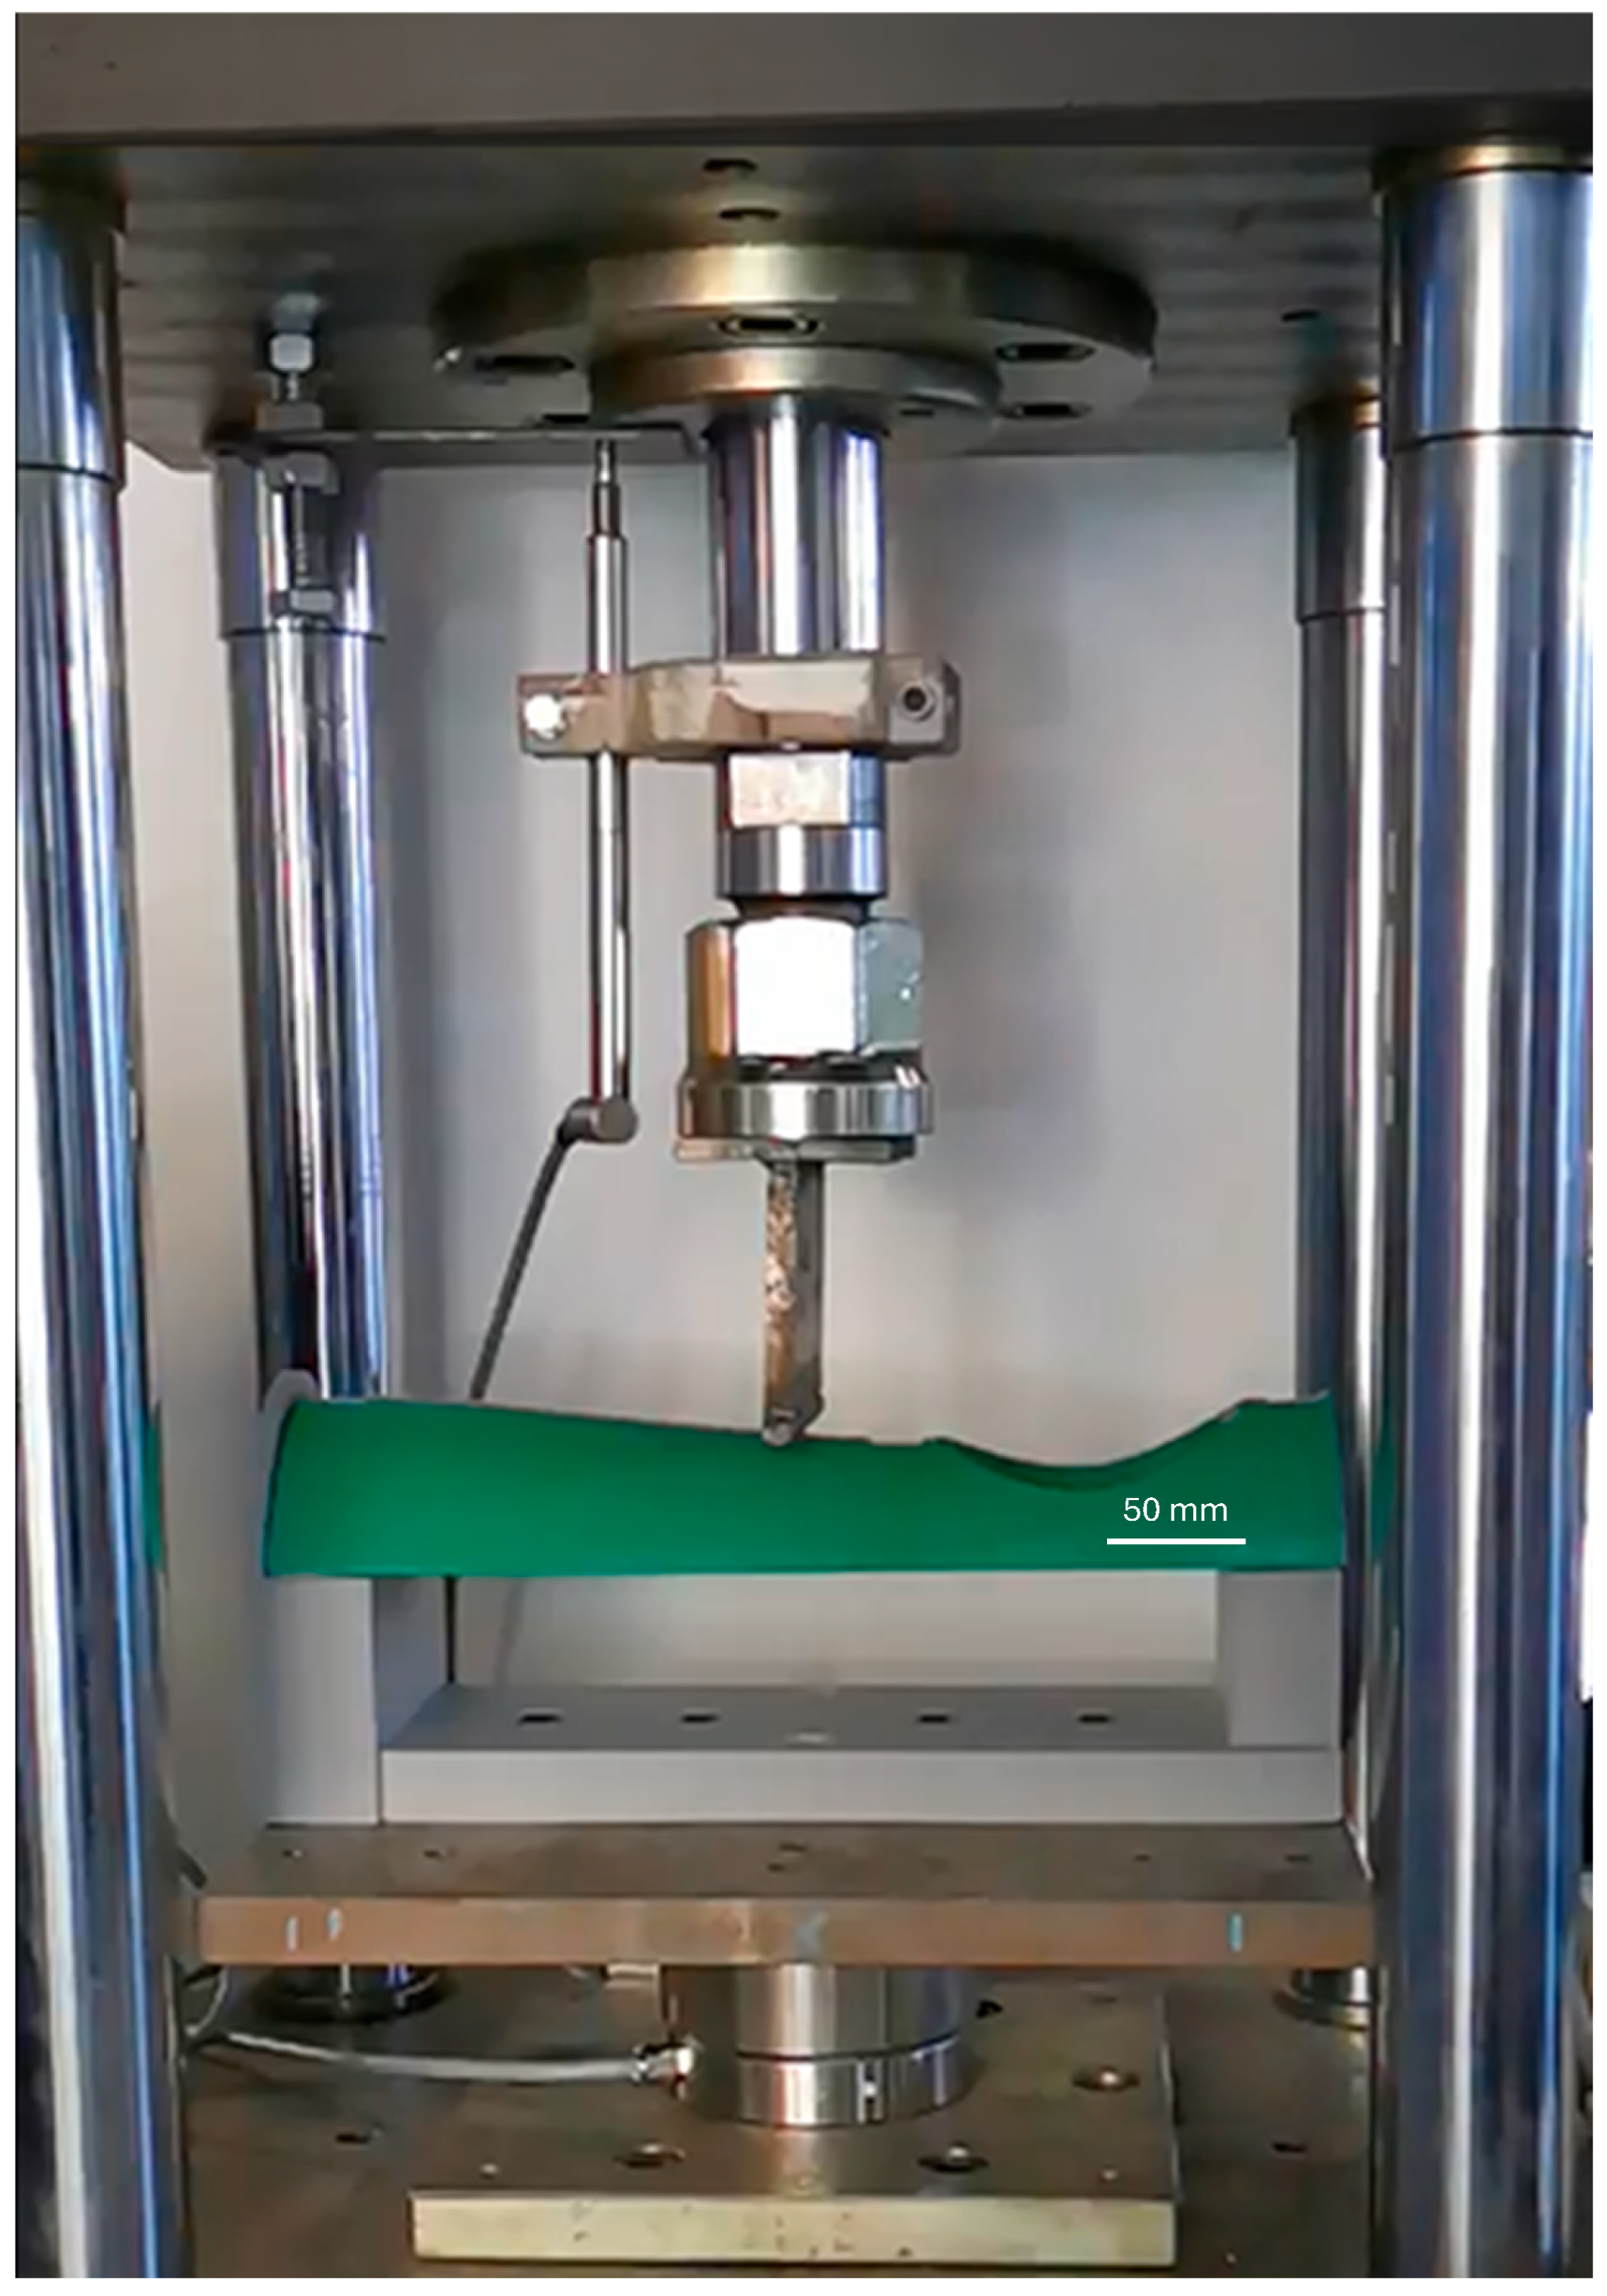
The three-point bending test evaluates a material’s flexural stress, strain, and modulus by applying a load to a simply supported specimen. This method was used to assess the behavior of multi-layered PLA strips under conditions similar to sheet metal forming. Specimens were fabricated according to the design shown above, with critical dimensions cut using a milling machine to meet ASTM D790 standards [31]. During the test, the sample is subjected to significant shear stresses—maximum at the neutral axis and zero at the outer surfaces—along with in-plane tensile and compressive loads. In this study, the experimental three-point bending of the WHS component was performed using a custom-made bending testing machine shown in Figure 12.

3.2. Numerical Simulation of Three-Point Bending on WHS Component

The simulation began with geometric modeling to replicate the experimental setup, followed by calibration of Young’s modulus and yield stress to improve accuracy. Initial results indicated that both Young’s modulus and yield strength were reduced by approximately 50% compared to manufacturer data. The material properties of the WHS specimen show slight deviations from the preliminary stage values. This difference arises mainly from the geometric characteristics of the WHS design, which introduces a combination of tensile and compressive stress fields around the critical fracture region during the three-point bending test. In this design, the presence of the hole alters the local stiffness distribution and promotes stress concentration, leading to a more complex stress–strain response compared to the homogeneous reference specimen. As a result, the initial elastic slope and yielding behavior observed experimentally could not be replicated using the same preliminary parameters. To achieve a more accurate correlation between the experimental and simulated force–displacement curves, material properties, such as flexural modulus and flexural yield stress for numerical calibration, were determined by an iterative fitting procedure that best reproduced the experimental force–displacement response. The optimized parameters are summarized in Table 6 from this fitting procedure for both full WHS and WHS with hole configurations. These parameters were determined based on the experimental results of tensile and three-point bending tests for each deposition orientation. From these tests, the maximum principal stress at the onset of damage and the corresponding failure stress were identified from the load–displacement curves. Experimentally measured values have been used as reference thresholds for the numerical model. These parameters were further confirmed in preliminary trial simulations to ensure stable convergence and good representation of the material behavior. Thereafter, they were implemented into the Fortran-based UACTIVE subroutine, which governs the activation and deactivation operation for every element. This ensures that the simulated damage evolution approximates the experimentally observed degradation patterns.
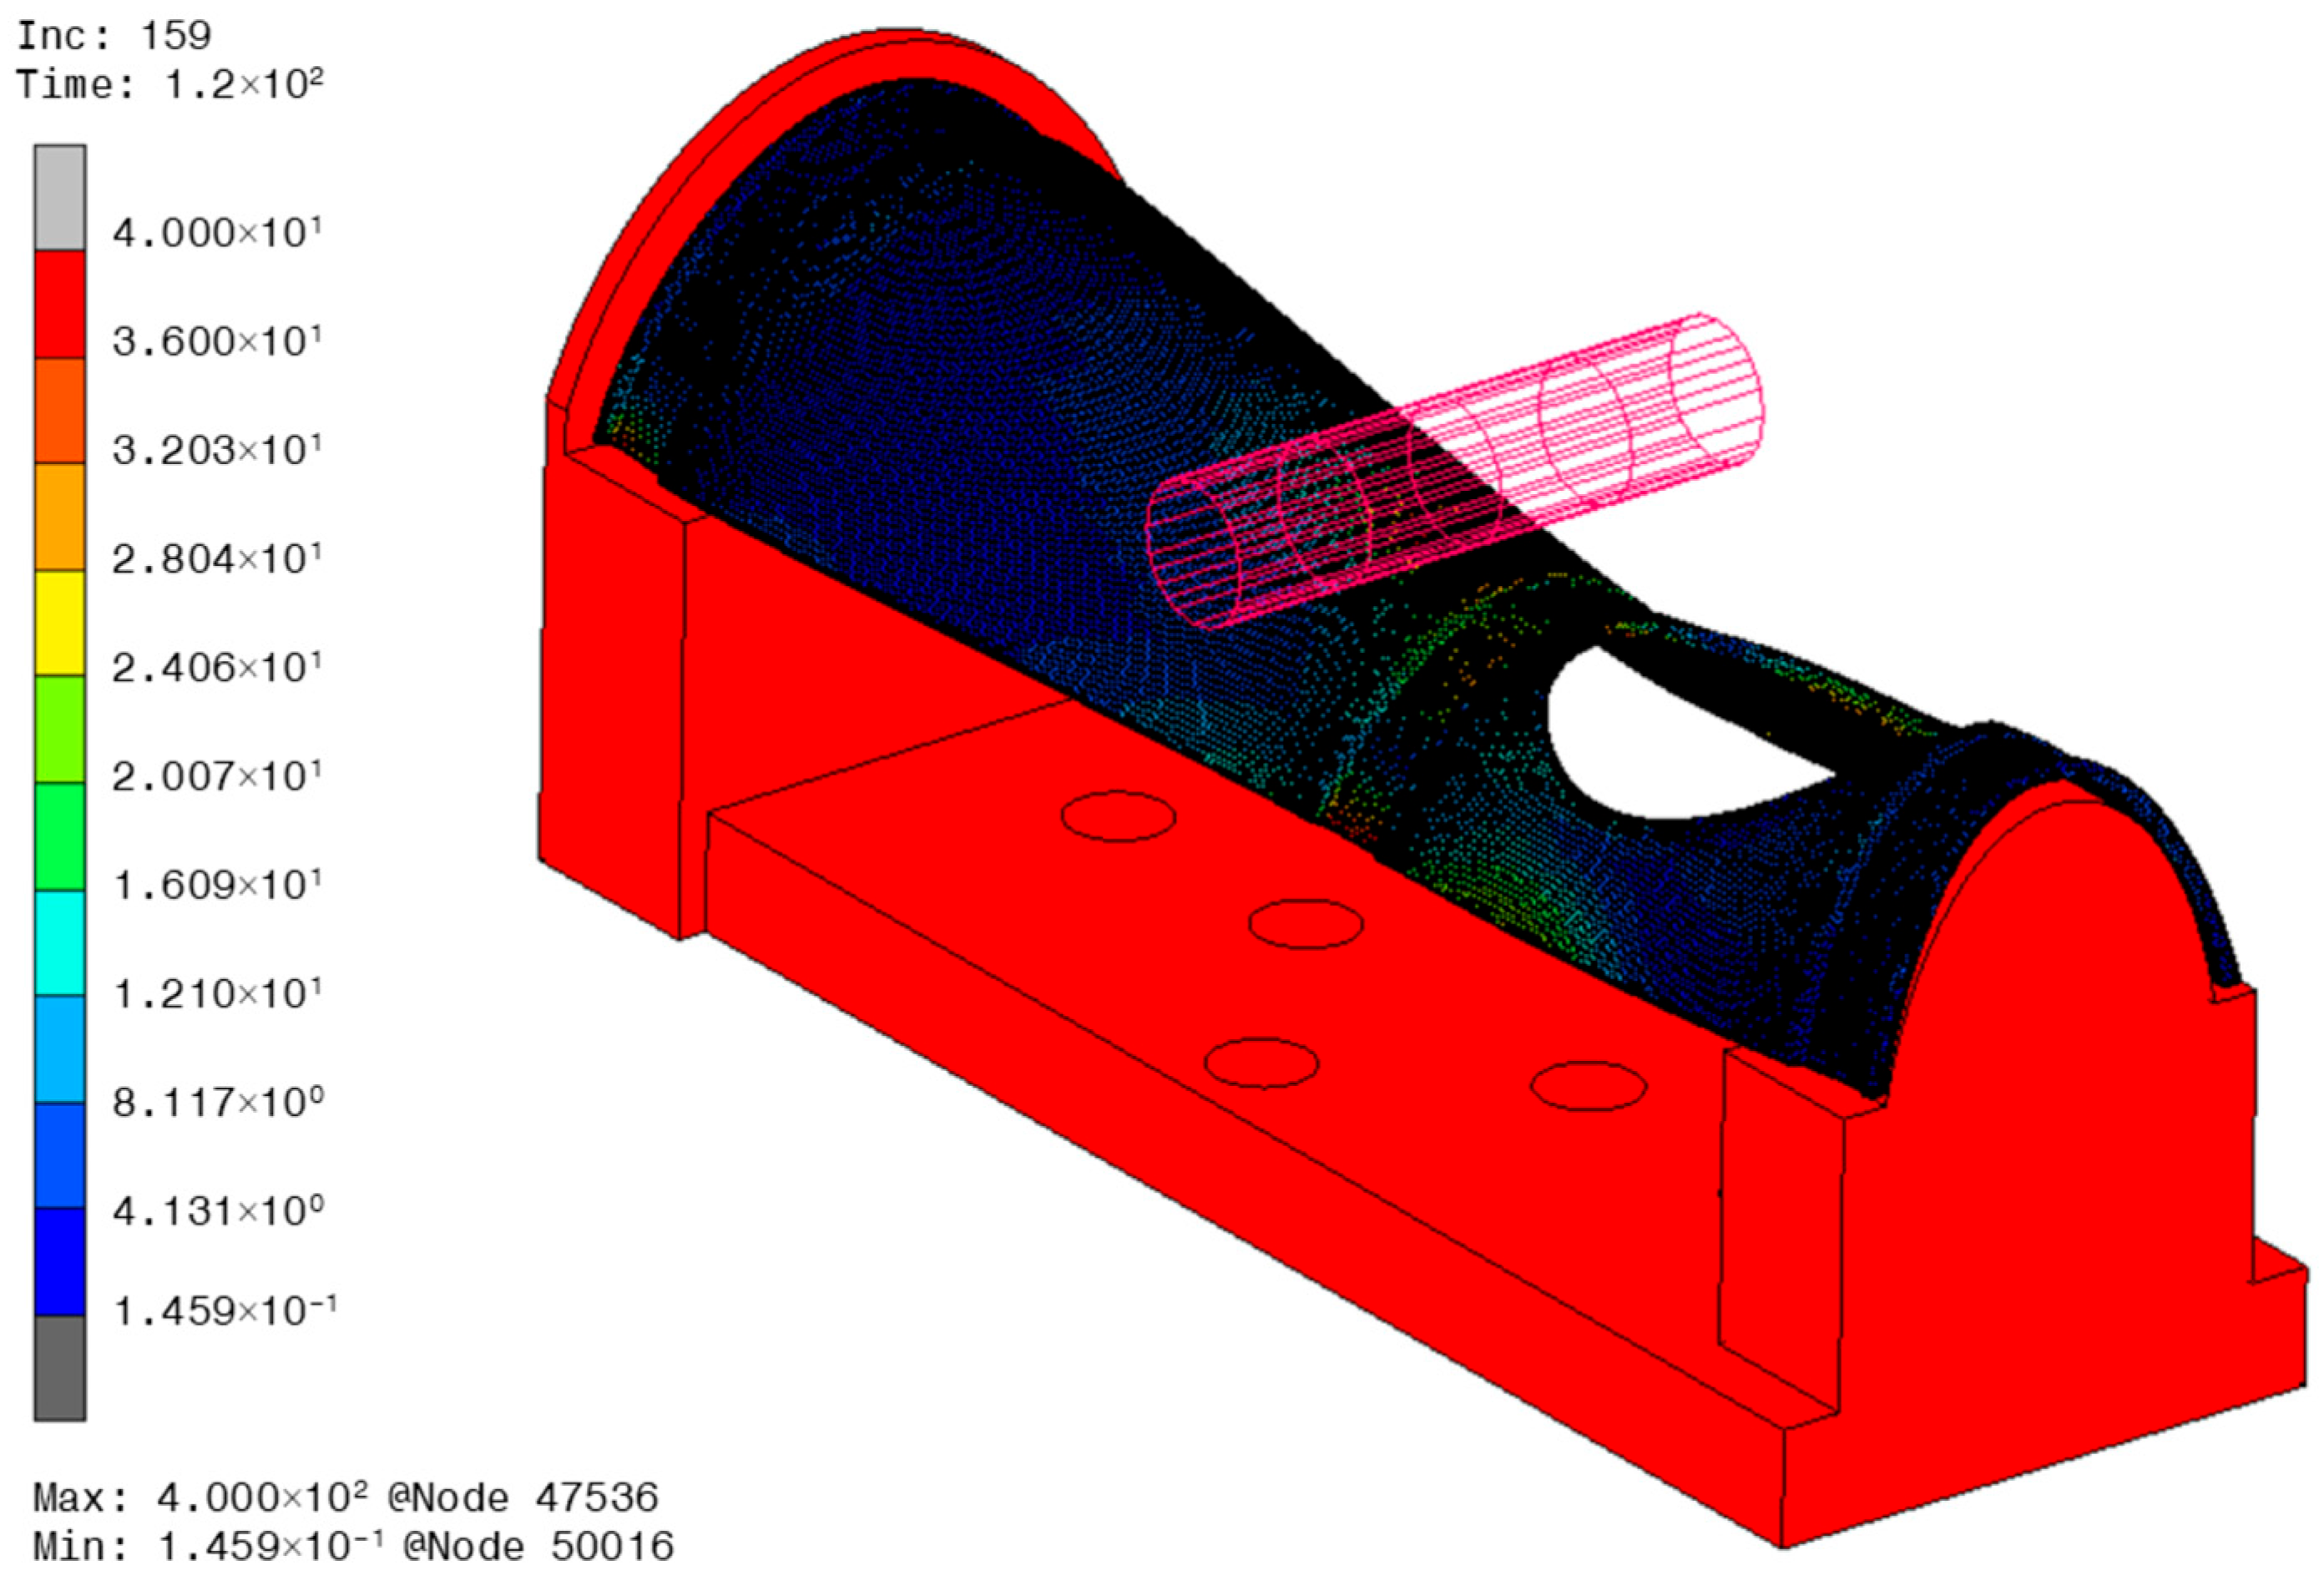
Once the material properties were defined, boundary conditions were applied, including fixed displacements at the bottom center jig and upward displacement at the upper center jig using NURBS. To capture fracture behavior during global adaptive meshing, the user subroutine UACTIVE was implemented in MSC Marc Mentat as described in the previous sections for the tensile and three-point bending cases. This subroutine enables selective deactivation of elements within the FE model, invoked at the start of the analysis and at each increment. Deactivated elements do not contribute to load, mass, stiffness, or internal force calculations, thus replicating the fracture effect. The numerical simulation setup for the WHS component with full and hole geometry is illustrated in Figure 13.
The UACTIVE subroutine model, developed following the same implementation procedures established during the preliminary stage, was integrated into the numerical simulation environment of MSC Marc/Mentat prior to execution. This integration allowed the subroutine to interact directly with the solver during each increment in the analysis. The subroutine was designed to monitor element stress levels and automatically deactivate those that reached the specified maximum stress limit, effectively simulating the initiation and progression of material failure. The flow of the subroutine implementation and its integration within the FE model are illustrated in Figure 8. Additionally, the complete script and key control parameters utilized in the UACTIVE subroutine are summarized in Algorithm 1.

4. Numerical Simulation Results of WHS Components

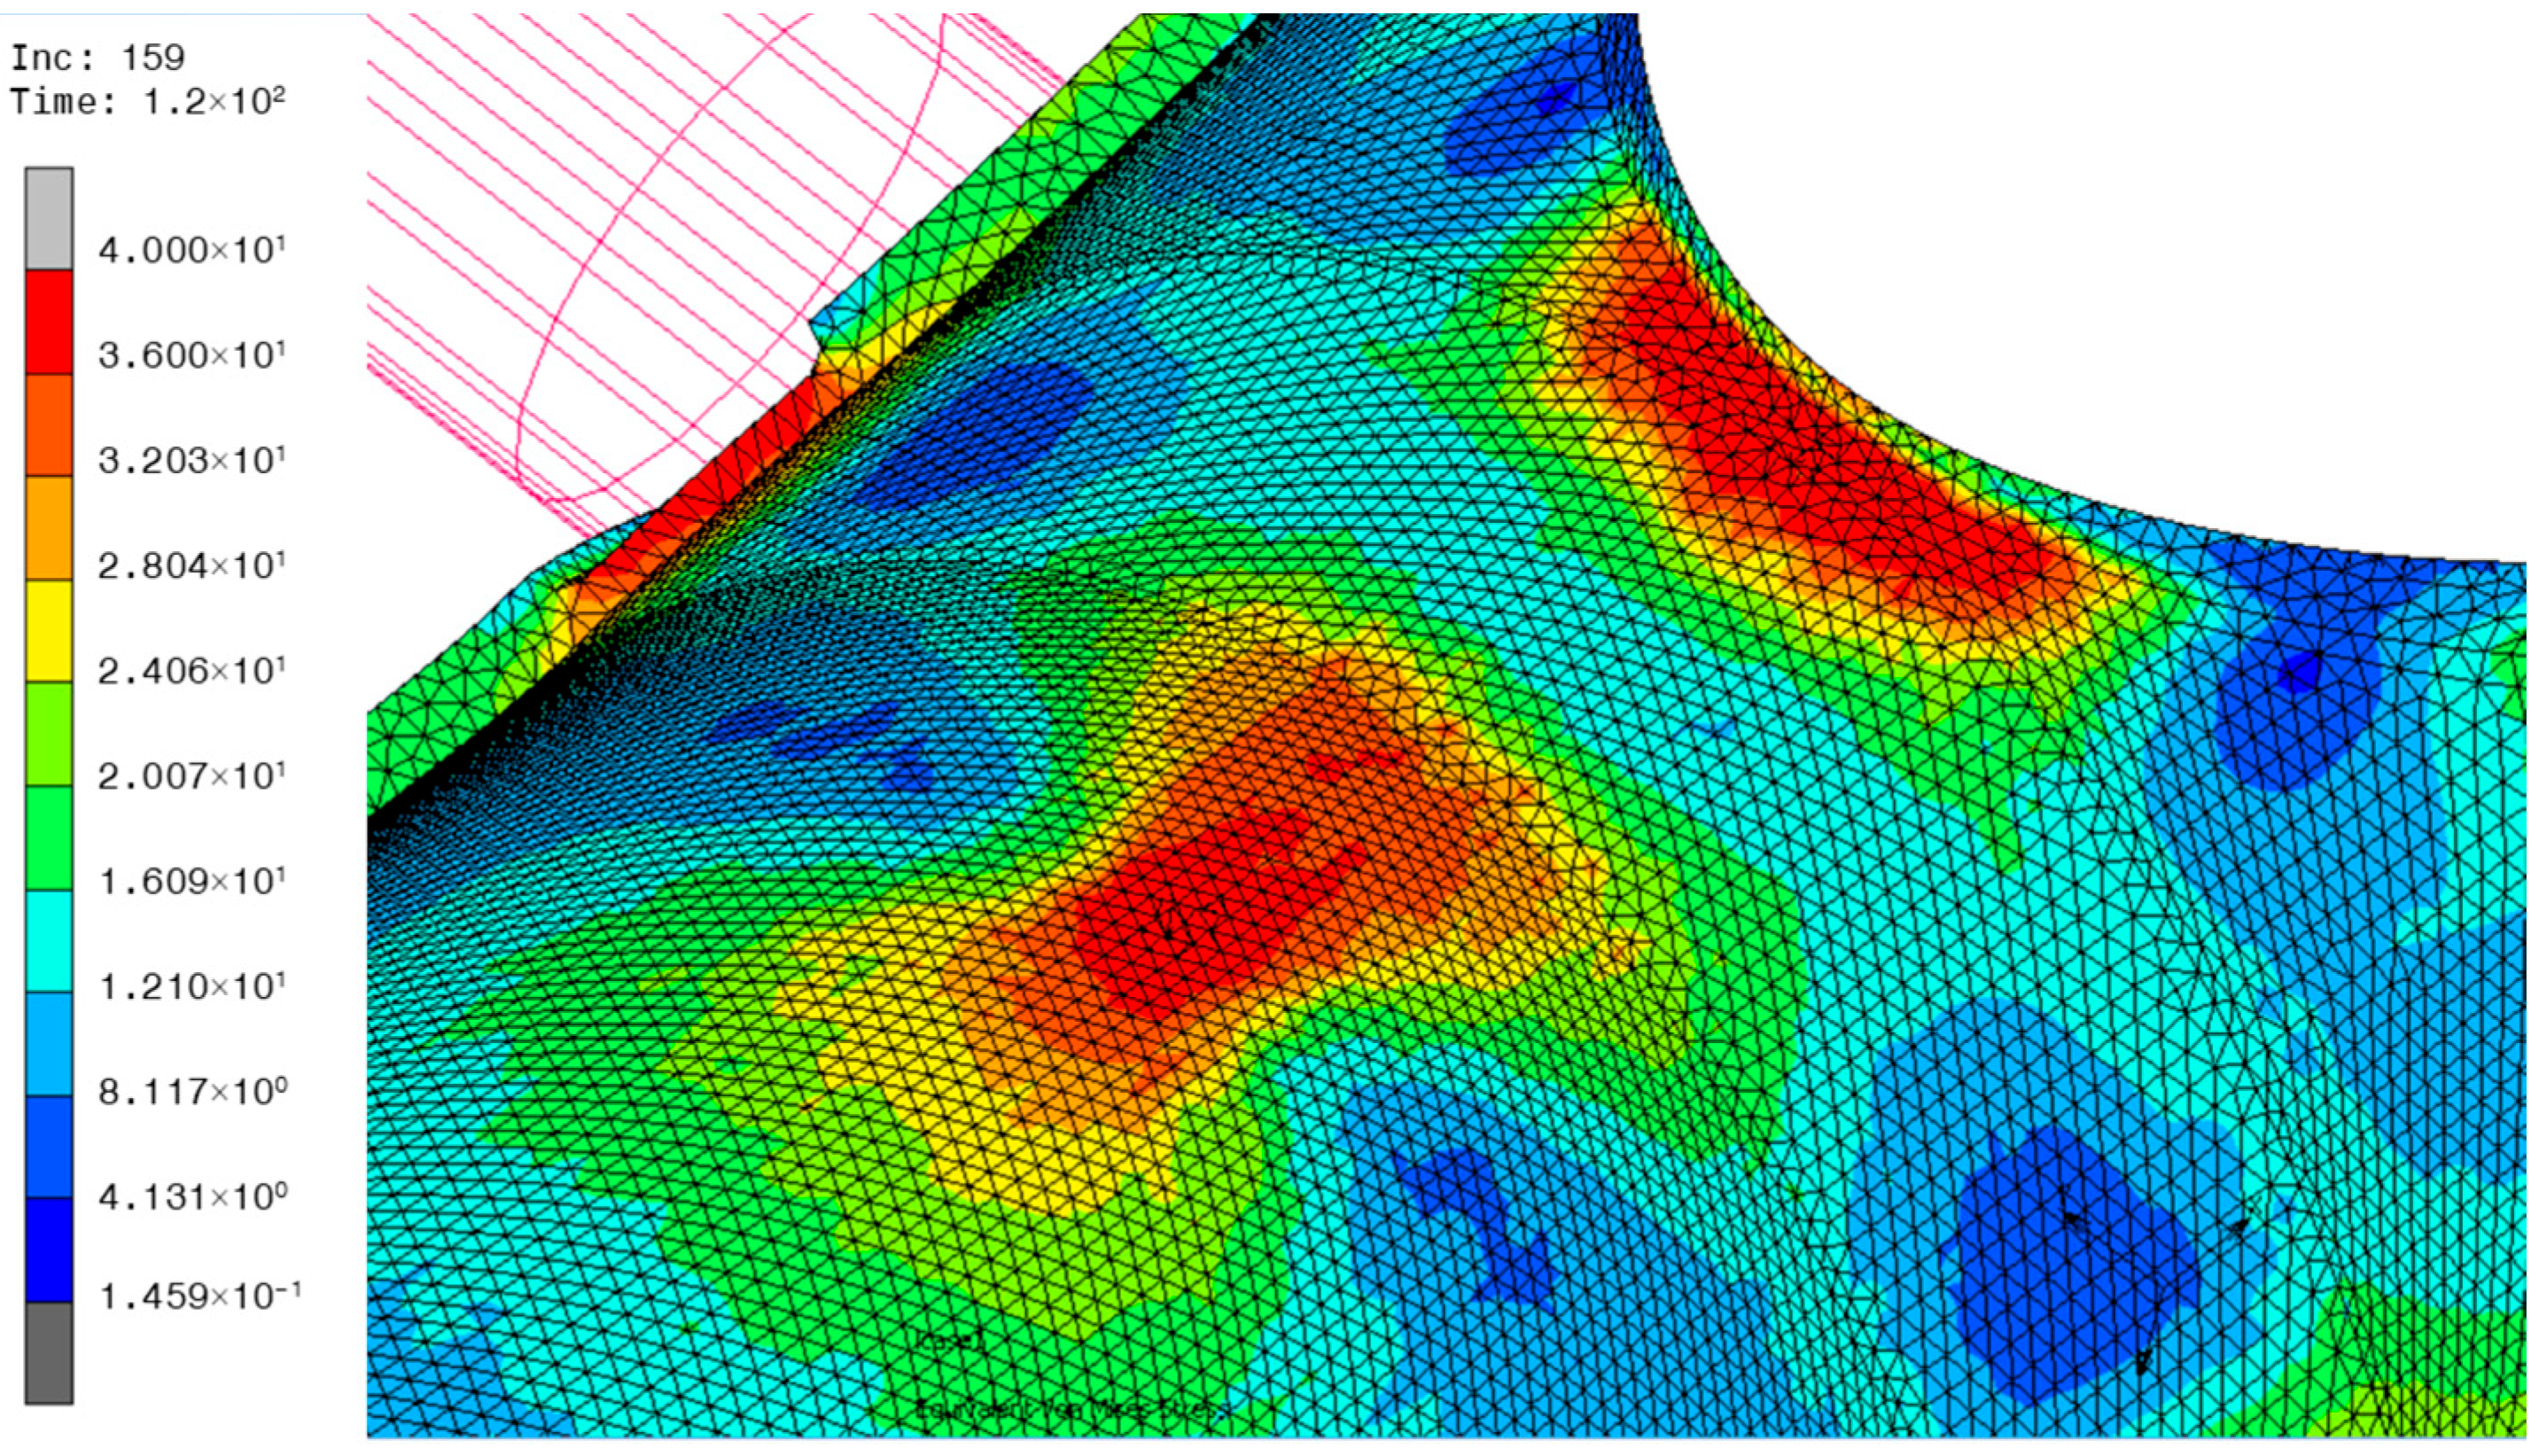
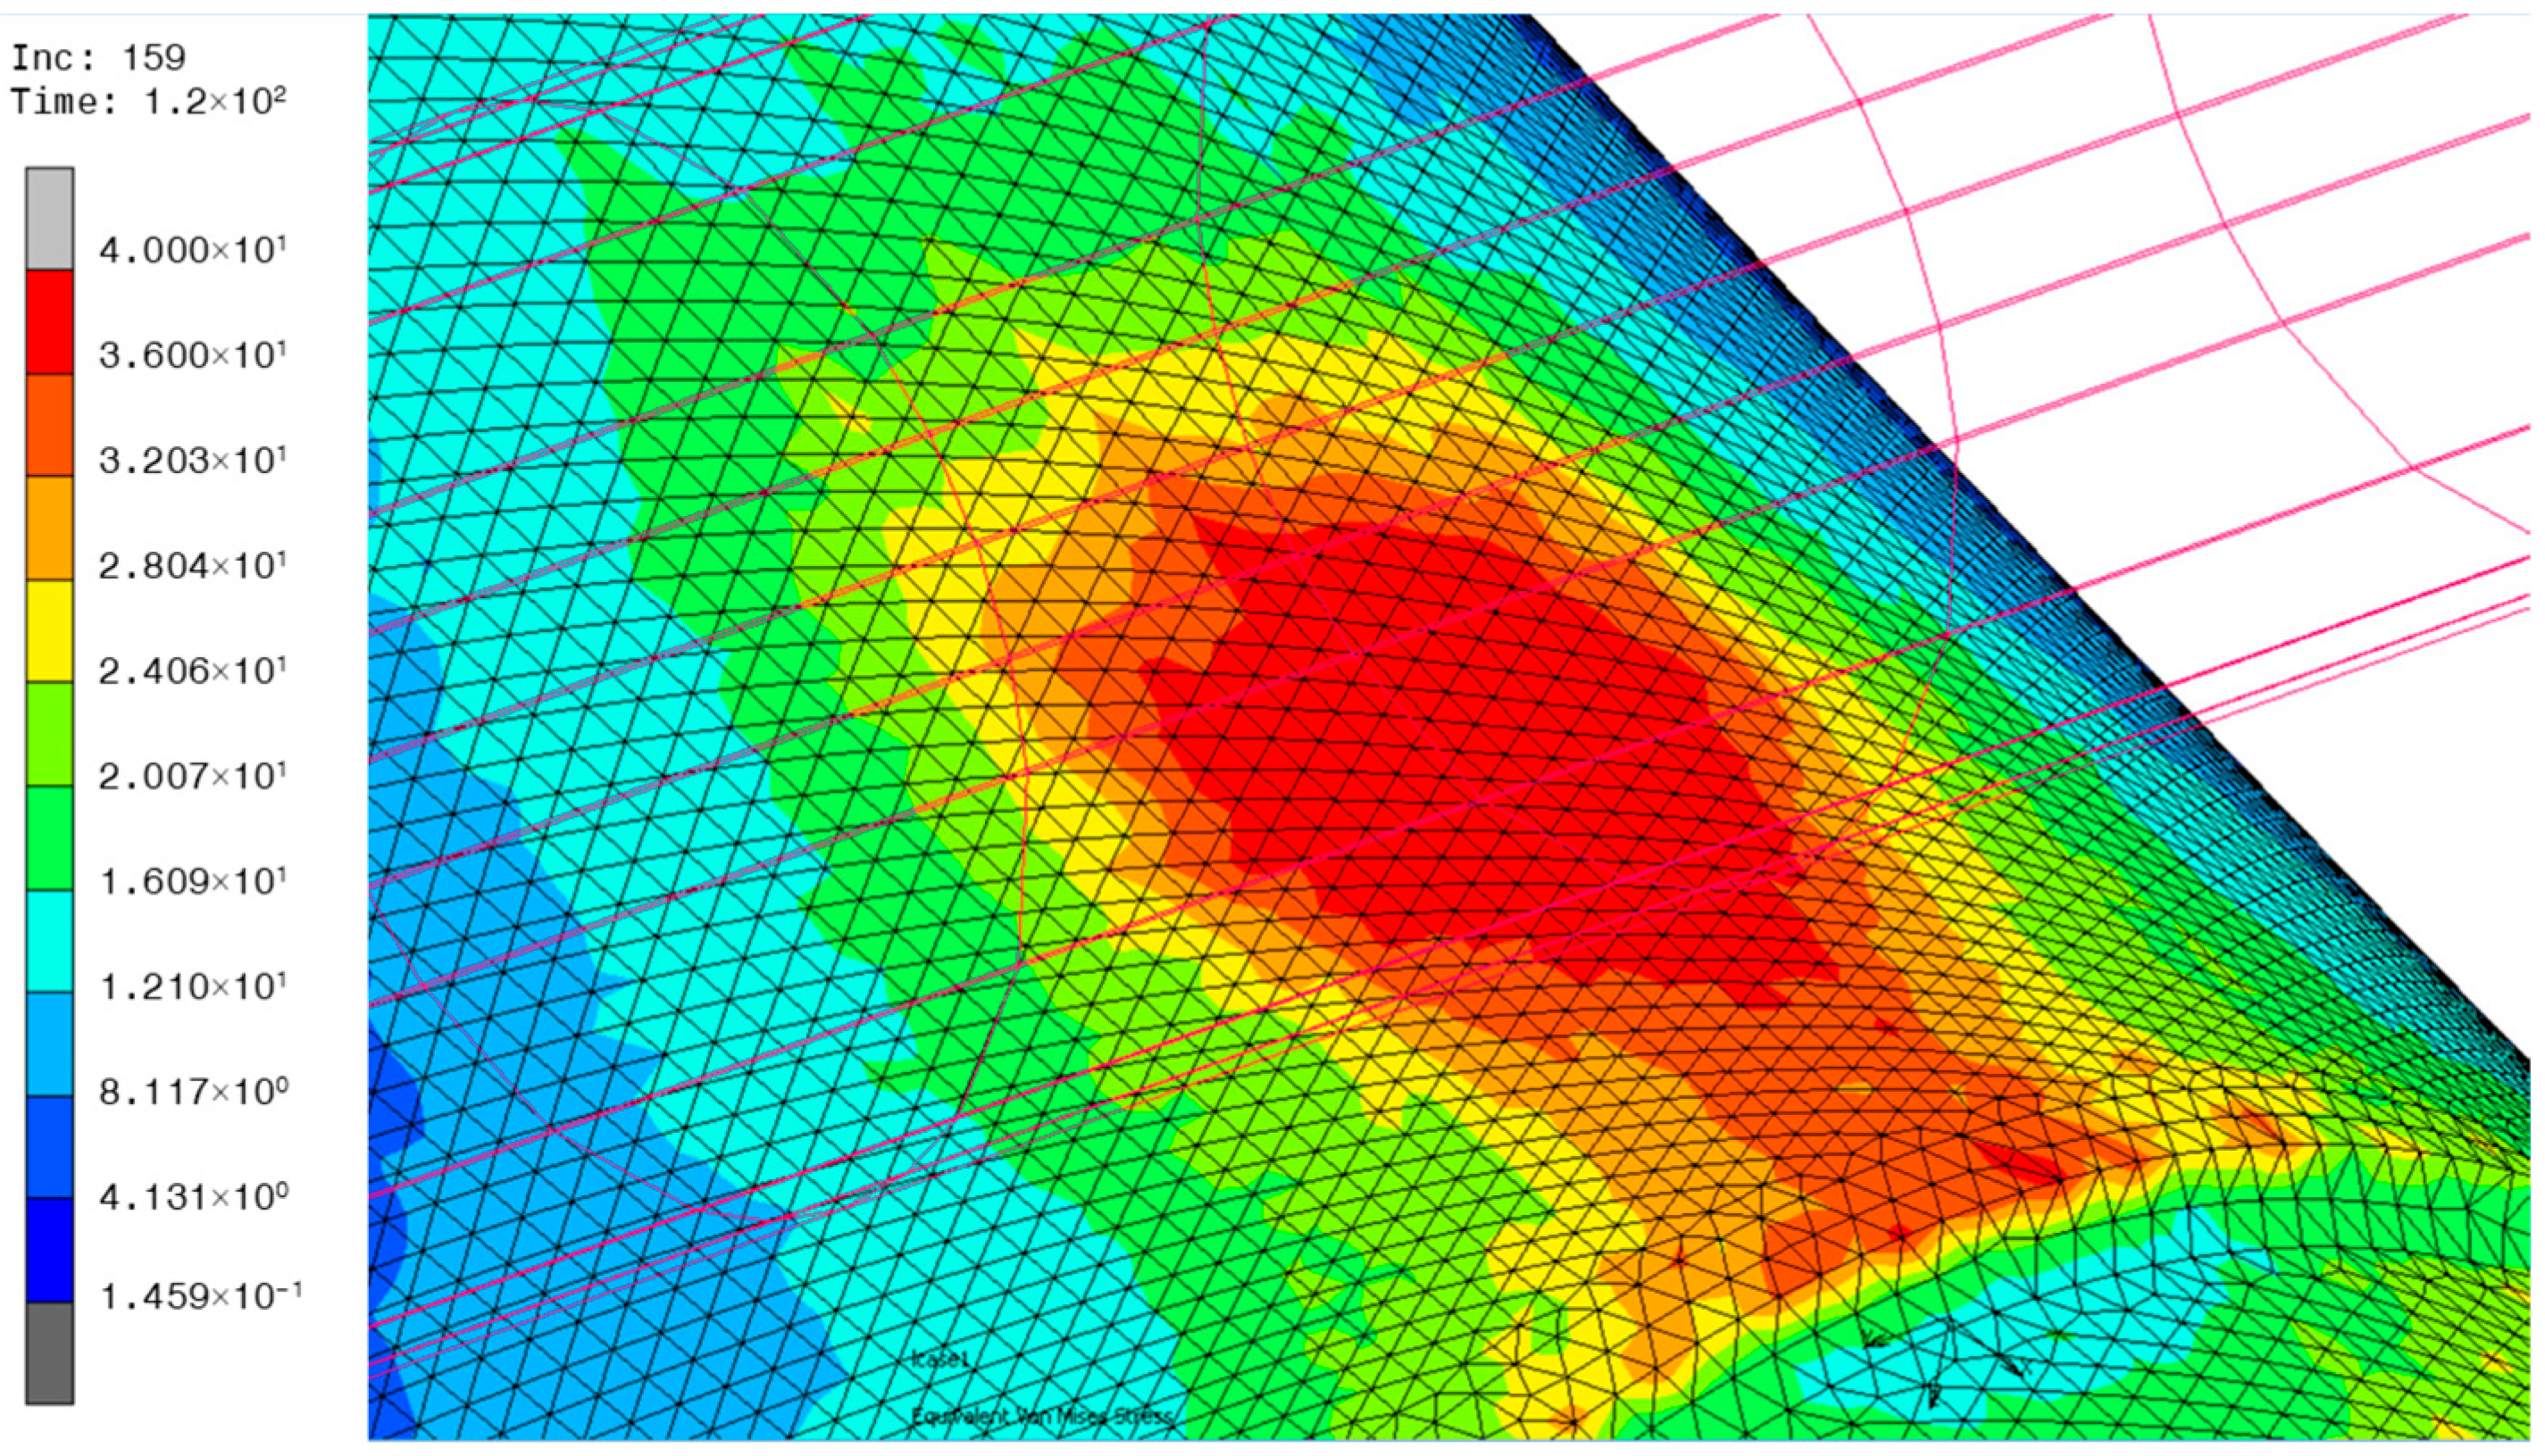
This section presents a comparison of the results for the WHS components in terms of the final effective stress calculation. The results calculated from MSC Marc/Mentat are validated by the actual three-point bending test of the WHS component to ensure the optimization of parameters produced by the subroutine implemented in MSC Marc/Mentat as described in the previous chapter. The figure below shows the preliminary stress results obtained by running the simulation without the user’s subroutine first. This allows for the determination of the stress values, which will later be implemented within the UACTIVE subroutine script. The numerical simulation of the WHS result is displayed in Figure 14.
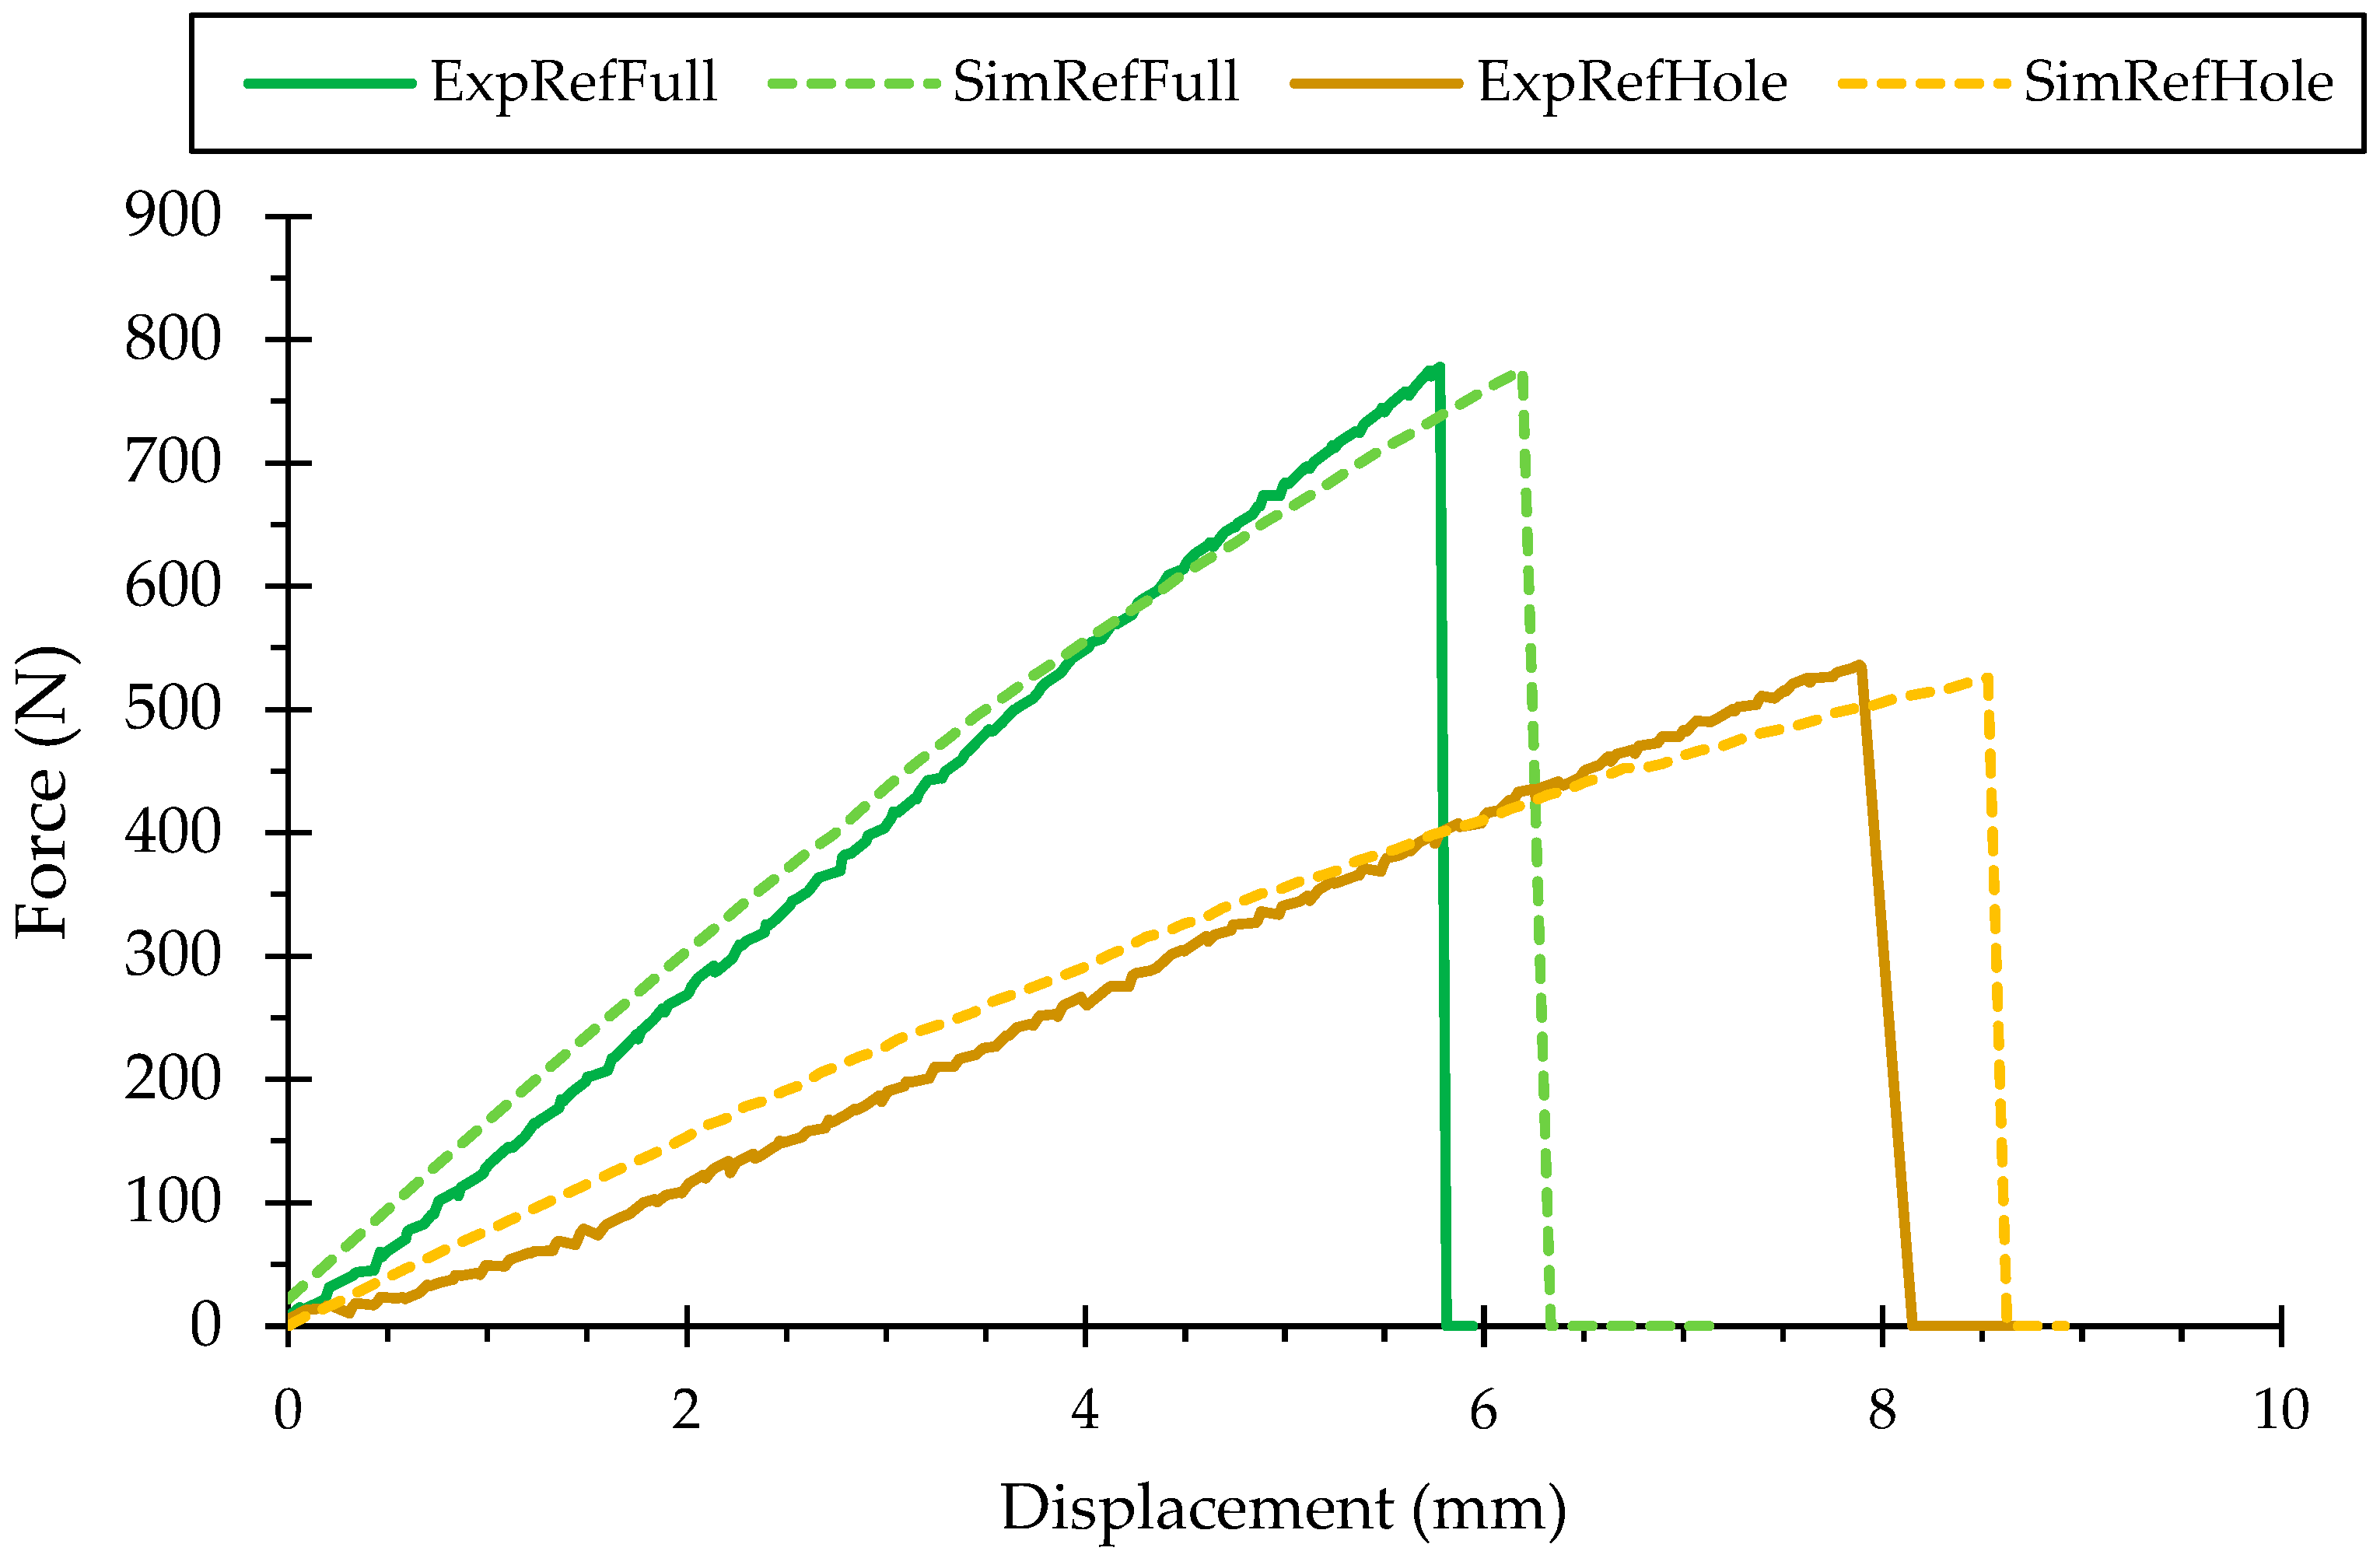
It was calculated by the FE model that the maximum stress in the WHS specimen is 86.7 MPa. This value serves as an input for user’s subroutine UACTIVE. Figure 15 shows the stress result displayed in MSC Marc/Mentat by involving the UACTIVE subroutine as well as the nodal result for the highest stress concentration displayed by numerical simulation. Furthermore, the graphical result comparison of forces between MSC Marc/Mentat and experiment is illustrated in Figure 16 with detailed values provided in Table 7.
The force–displacement behavior of both the full specimen (RefFull) and the specimen with a hole (RefHole) demonstrates an excellent agreement between the experimental and simulation results. For the full specimen, the experimental peak force reached approximately 780 N at a displacement of about 6.0 mm, while the corresponding simulation recorded a peak force of 770 N at 6.1 mm. This results in a very small deviation of 1.28% between simulation and experiment. Similarly, for the specimen with a hole, the experimental test exhibited a maximum force of 520 N at a displacement of around 8.0 mm, whereas the simulation reached 510 N at 8.1 mm, corresponding to a deviation of 1.92%. These minimal differences indicate that the simulation accurately captures both the stiffness and the failure characteristics of the materials. Furthermore, the presence of the hole led to a significant reduction in load-bearing capacity, with the RefHole specimen showing approximately 33.3% lower peak force compared to the RefFull specimen. Overall, the numerical model demonstrates strong predictive capability, with average force error below 2%, validating its reliability for simulating the mechanical response of both intact and perforated specimens.

5. Conclusions and Recommendations

This study demonstrates the experimental validation of a novel WHS fabricated using FDM and enhanced through FE simulations with advanced material and damage models. The integration of experimental mechanical testing—via tensile and three-point bending experiments—into the material modeling process provided a reliable foundation for calibrating numerical simulations. The findings highlighted the following key conclusions:
  • Material characterization and modeling: PLA specimens fabricated under varying deposition orientations exhibited distinct mechanical responses. Both tensile and three-point bending tests revealed orientation-dependent strength, stiffness, and fracture behavior. The incorporation of experimental data of the 0° deposition orientation, which approximates the FDM process of the WHS component more closely, into the FE model yielded highly consistent results, with simulation errors remaining within acceptable limits (≤10%), thus validating the robustness of the material and damage models.
  • Numerical–experimental congruence: The implementation of customized subroutines, particularly the UACTIVE algorithms, allowed for effective simulation of stiffness, plasticity, and fracture in PLA-based splints. The force–displacement responses of the WHS obtained from simulations closely matched experimental outcomes, with deviations in peak load and displacement remaining marginal (TB updated). This congruence underscores the predictive capability of the proposed modeling approach.
  • WHS simulation and experiment result comparison: The simulation results showed excellent agreement with experimental data, with maximum force deviations of only 1.28% for the full specimen (RefFull) and 1.92% for the specimen with a hole (RefHole). These findings confirm that the numerical model accurately predicts both stiffness and failure behavior.
  • Contribution to additive manufacturing in orthopedics: The results substantiate the feasibility of employing FDM with biocompatible PLA for the production of orthopedic support devices. By integrating advanced computational modeling into the design workflow, the iterative trial-and-error process can be significantly reduced, thereby lowering costs and accelerating development cycles.
Building upon these conclusions, the following recommendations are proposed for future work and broader application:
  • Fatigue and durability studies: Long-term performance under cyclic loading and environmental exposure (humidity, body temperature, wear) should be investigated to ensure reliability during extended clinical use.
  • Patient-specific customization: The integration of medical imaging data (e.g., CT or MRI scans) into the design pipeline could enable highly personalized splints, tailored to individual patient anatomy and functional requirements.
  • Broader numerical framework: Expanding the simulation framework to include viscoelasticity, time-dependent degradation, and multi-material deposition strategies will improve predictive accuracy and enable the design of next-generation orthopedic devices.
In summary, the presented methodology offers a validated pathway for the simulation-driven design and AM of orthopedic support devices. Its adaptability and precision provide a strong foundation for translating FDM-based splinting solutions from laboratory-scale development to clinical practice.

Author Contributions

Conceptualization, S.A. and D.P.; data curation, M.Z.M.I.; formal analysis, M.Z.M.I.; investigation, S.A.; methodology, L.P., S.A. and Y.H.P.M.; resources, K.P.P.; software, M.Z.M.I.; supervision, L.P., Y.H.P.M. and D.P.; validation, Y.H.P.M.; writing—original draft, L.P. and K.P.P.; writing—review and editing, L.P., K.P.P., Y.H.P.M. and D.P. All authors have read and agreed to the published version of the manuscript.

Funding

This work is part of the research conducted under the project PRE_SEED/0719/0107, which is funded by the European Union—NextGenerationEU, through the Research and Innovation Foundation.

Data Availability Statement

The data presented in this study are available on request from the corresponding author due to commercial product sensitivity.

Conflicts of Interest

Authors Stelios Avraam and Demetris Photiou were employed by Simlead Ltd. Other authors declare no conflict of interest.

References

  1. Bekas, D.; Hou, Y.; Liu, Y.; Panesar, A. 3D printing to enable multifunctionality in polymer-based composites: A review. Compos. Part B Eng. 2019, 179, 107540. [Google Scholar] [CrossRef]
  2. Yap, C.Y.; Chua, C.K.; Dong, Z.L.; Liu, Z.H.; Zhang, D.Q.; Loh, L.E.; Sing, S.L. Review of selective laser melting: Materials and applications. Appl. Phys. Rev. 2015, 2, 041101. [Google Scholar] [CrossRef]
  3. Gonabadi, H.; Chen, Y.; Yadav, A.; Bull, S. Investigation of the effect of raster angle, build orientation, and infill density on the elastic response of 3D printed parts using finite element microstructural modeling and homogenization techniques. Int. J. Adv. Manuf. Technol. 2022, 118, 1485–1510. [Google Scholar] [CrossRef]
  4. Vanaei, S.; Rastak, M.; El Magri, A.; Vanaei, H.R.; Raissi, K.; Tcharkhtchi, A. Orientation-Dependent Mechanical Behavior of 3D Printed Polylactic Acid Parts: An Experimental–Numerical Study. Machines 2023, 11, 1086. [Google Scholar] [CrossRef]
  5. Haleem, A.; Javaid, M. Additive Manufacturing Applications in Industry 4.0: A Review. J. Ind. Integr. Manag. 2019, 4, 1930001. [Google Scholar] [CrossRef]
  6. Raziyan, M.S.; Palevicius, A.; Perkowski, D.; Urbaite, S.; Janusas, G. Development and Evaluation of 3D-Printed PLA/PHA/PHB/HA Composite Scaffolds for Enhanced Tissue-Engineering Applications. J. Compos. Sci. 2024, 8, 226. [Google Scholar] [CrossRef]
  7. ISO 52900; Terminology for Additive Manufacturing—General Principles—Terminology. ASTM International: West Conshohocken, PA, USA, 2022.
  8. Kishore, R.; Moorthy, M.V.; Gokul, P.S.; Mugilan; Mugundhan. Additive manufacturing composites of poly lactic acid (PLA). J. Phys. Conf. Ser. 2021, 2027, 012008. [Google Scholar] [CrossRef]
  9. Bikas, H.; Koutsoukos, S.; Stavropoulos, P.A. Decision support method for evaluation and process selection of Additive Manufacturing. Procedia CIRP 2019, 81, 1107–1112. [Google Scholar] [CrossRef]
  10. Awasthi, P.; Banerjee, S.S. Fused Deposition Modeling of Thermoplastics Elastomeric Materials: Challenges and Opportunities. Addit. Manuf. 2021, 46, 102177. [Google Scholar] [CrossRef]
  11. Ali Abotiheen, M.H. Finite element analysis is a powerful approach to predict manufacturing parameters. J. Univ. Babylon Pure Appl. Sci. 2018, 26, 229–238. [Google Scholar]
  12. García-Dominguez, A.; Claver, J.; Sebastián, M.A. Integration of Additive Manufacturing, Parametric Design, and Optimization of Parts Obtained by Fused Deposition Modeling (FDM). A Methodological Approach. Polymers 2020, 12, 1993. [Google Scholar] [CrossRef]
  13. Almonti, D.; Salvi, D.; Mingione, E.; Vesco, S. Lightweight and Sustainable Steering Knuckle via Topology Optimization and Rapid Investment Casting. J. Manuf. Mater. Process. 2025, 9, 252. [Google Scholar] [CrossRef]
  14. Paul, S. Finite Element Analysis in Fused Deposition Modeling Research: A Literature Review. Measurement 2021, 178, 109320. [Google Scholar] [CrossRef]
  15. Samy, A.A.; Golbang, A.; Harkin-Jones, E.; Archer, E.; Tormey, D.; McIlhagger, A.T. Finite element analysis of residual stress and warpage in a 3D printed semi-crystalline polymer: Effect of ambient temperature and nozzle speed. J. Manuf. Process. 2021, 70, 389–399. [Google Scholar] [CrossRef]
  16. Zhang, Y.; Chou, K. A parametric study of part distortions in fused deposition modelling using three-dimensional finite element analysis. Proc. Inst. Mech. Eng. Part B J. Eng. Manuf. 2018, 222, 959–968. [Google Scholar] [CrossRef]
  17. Zur, P.; Kołodziej, A.; Baier, A. Finite Elements Analysis of PLA 3D-printed Elements and Shape Optimization. Eur. J. Eng. Sci. Technol. 2019, 2, 59–64. [Google Scholar] [CrossRef]
  18. An, N.; Yang, G.; Yang, K.; Wang, J.; Li, M.; Zhou, J. Implementation of Abaqus User Subroutines and Plugin for Thermal Analysis of Powder-bed Electron-Beam-Melting Additive Manufacturing Process. Mater. Today Commun. 2021, 27, 102307. [Google Scholar] [CrossRef]
  19. Ling, Y.; Ni, J.; Antonissen, J.; Hamouda, H.B.; Voorde, J.V.; Wahab, M.A. Numerical prediction of Microstructure and Hardness for Low Carbon Steel Wire Arc Additive Manufacturing Components. Simul. Model. Pract. Theory 2022, 122, 102664. [Google Scholar] [CrossRef]
  20. Ahmad, S.N.; Manurung, Y.H.P.; Mat, M.F.; Minggu, Z.; Jaffar, A.; Prueller, S.; Leitner, M. FEM Simulation Procedure for Distortion and Residual Stress Analysis of Wire Arc Additive Manufacturing. IOP Conf. Ser. Mater. Sci. Eng. 2020, 834, 012083. [Google Scholar] [CrossRef]
  21. Behseresht, S.; Park, H.P. Additive Manufacturing of Composite Polymers: Thermomechanical FEA and Experimental Study. Materials 2024, 17, 1912. [Google Scholar] [CrossRef] [PubMed]
  22. Boisse, P.; Colmars, J.; Hamila, N.; Naouar, N.; Steer, Q. Bending and wrinkling of composite fiber preforms and prepregs. A review and new developments in the draping simulations. Compos. Part B Eng. 2018, 141, 234–249. [Google Scholar] [CrossRef]
  23. Wang, X.; Yang, Z.H.; Cheng, F.; Han, N.X.; Zhu, G.M.; Tang, J.N.; Xing, F. Evaluation of the mechanical performance recovery of self-healing cementitious materials—Its methods and future development: A review. Constr. Build. Mater. 2019, 212, 400–421. [Google Scholar] [CrossRef]
  24. Atakok, G.; Kam, M.; Koç, H. Tensile, three-point bending and impact strength of 3D printed parts using PLA and recycled PLA filaments: A statistical investigation. J. Mater. Res. Technol. 2022, 18, 1542–1554. [Google Scholar] [CrossRef]
  25. Singh, A.; Tyagi, R.; Ranjan, V.; Sathujoda, P. FEM simulation of three-point bending test of Inconel 718 coating on stainless steel substrate. Vibroengineering PROCEDIA 2018, 21, 248–252. [Google Scholar] [CrossRef]
  26. Chacón, J.M.; García-Plaza, E.; López, P. Additive manufacturing of PLA structures using fused deposition modelling: Effect of process parameters on mechanical properties and their optimal selection. Mater. Des. 2017, 124, 143–157. [Google Scholar] [CrossRef]
  27. Nugroho, A.; Ardiansyah, R.; Isna, L.; Larasati, I. Effect of layer thickness on flexural properties of PLA (PolyLactid Acid) by 3D printing. J. Phys. Conf. Ser. 2018, 1130, 012017. [Google Scholar] [CrossRef]
  28. Ahmad, M.; Ishak, M. The Effect of Fused Deposition Modeling Parameters (FDM) on the Mechanical Properties of Polylactic Acid (PLA) Printed Parts. Adv. Appl. Mech. 2024, 123, 238–246. [Google Scholar] [CrossRef]
  29. Zhao, Y.; Chen, Y.; Zhou, Y. Novel mechanical models of tensile strength and elastic property of FDM AM PLA materials: Experimental and theoretical analyses. Mater. Des. 2019, 181, 108089. [Google Scholar] [CrossRef]
  30. Jaya Christiyan, K.G.; Chandrasekhar, U.; Venkateswarlu, K. Flexural Properties of PLA Components Under Various Test Condition Manufactured by 3D Printer. J. Inst. Eng. Ser. C 2018, 99, 363–367. [Google Scholar] [CrossRef]
  31. ASTM D790-20; Standard Test Methods for Flexural Properties of Unreinforced and Reinforced Plastics and Electrical Insulating Materials. ASTM International: West Conshohocken, PA, USA, 2020.
  32. Rajpurohit, S.; Dave, H.; Bodaghi, M. Classical laminate theory for flexural strength prediction of FDM 3D printed PLAs. Mater. Today Proc. 2024, 101, 51–58. [Google Scholar] [CrossRef]
  33. Garg, A.; Bhattacharya, A. An Insight to the Failure of FDM Parts Under Tensile Loading: Finite Element Analysis and Experimental Study. Int. J. Mech. Sci. 2017, 120, 225–236. [Google Scholar] [CrossRef]
  34. Dave, H.; Prajapati, A.; Rajpurohit, S.; Patadiya, N.; Raval, H. Investigation on tensile strength and failure modes of FDM printed part using in-house fabricated PLA filament. Adv. Mater. Process. Technol. 2020, 8, 576–597. [Google Scholar] [CrossRef]
  35. Karad, A.; Sonawwanay, P.; Naik, M.; Thakur, D. Experimental study of effect of infill density on tensile and flexural strength of 3D printed parts. J. Eng. Appl. Sci. 2023, 70, 104. [Google Scholar] [CrossRef]
  36. ASTM D638-14; Standard Test Method for Tensile Properties of Plastics. ASTM International: West Conshohocken, PA, USA, 2014.
Figure 1. Raise3D printing machine.
Jmmp 09 00408 g001
Figure 2. Dog-bone sample geometry for tensile testing (top) and three-point bending sample dimensions (bottom).
Jmmp 09 00408 g002
Figure 3. Experimental results of tensile testing with alternate deposition orientation.
Jmmp 09 00408 g003
Figure 4. Result of the preliminary three-point bending experiment.
Jmmp 09 00408 g004
Figure 5. Tensile test FE model of dog bone component using MSC Marc/Mentat using tetrahedral mesh.
Jmmp 09 00408 g005
Figure 6. Comparison of tensile test results between simulation and experiment.
Jmmp 09 00408 g006
Figure 7. Numerical model (left) and experimental setup (right) of PLA-based beam specimen for preliminary three-point bending test.
Jmmp 09 00408 g007
Figure 8. Implementation of user subroutine in MSC Marc/Mentat.
Jmmp 09 00408 g008
Figure 9. Comparison of three-point bending results between simulation and experiment.
Jmmp 09 00408 g009
Figure 10. Slicing model for WHS component.
Jmmp 09 00408 g010
Figure 11. Fabricated full WHS (left) and WHS with hole (right).
Jmmp 09 00408 g011
Figure 12. Three-point bending testing machine and setup for WHS at Frederick University.
Jmmp 09 00408 g012
Figure 13. Display of WHS simulation models with hole (left) and full (right) in MSC Marc/Mentat.
Jmmp 09 00408 g013
Figure 14. Preliminary effective stress result of the WHS component in MSC Marc/Mentat.
Jmmp 09 00408 g014
Figure 15. Effective stress result of the WHS component displayed using UACTIVE subroutine.
Jmmp 09 00408 g015aJmmp 09 00408 g015b
Figure 16. Graphical comparison result of forces for the WHS component.
Jmmp 09 00408 g016
Table 1. Physical and mechanical datasheet specifications of Raise3D Premium PLA filament.
Physical PropertyTypical Value
Density1.2 g/cm3
Glass transition temperature62.3 °C
Melting temperature150.9 °C
Young’s modulus (X–Y)2681 ± 215 MPa
Tensile strength (X–Y)40 ±1 MPa
Elongation at break (X–Y)2.5 ± 0.6%
Flexural modulus (X–Y)2700 ± 154 MPa
Flexural strength (X–Y)68 ± 2 MPa
Young’s modulus (Z)2551 ± 335 MPa
Tensile strength (Z)36 ± 5 MPa
Elongation at break (Z)6 ± 2.4%
Table 2. FDM process parameters for the fabrication of the tensile and three-point bending samples.
Process ParametersValue
Printing speed50 mm/s
Extrusion temperature205 °C
Bed temperature60 °C
Nozzle diameter0.4 mm
Layer thickness0.32 mm
Deposition angle0, 45, 90
Table 3. Material and plasticity properties for tensile simulation in MSC Marc/Mentat.
Material PropertiesValue
Mass Density1.24 g/cm3
Young’s Modulus1318 MPa
Poisson’s Ratio0.3
Tensile Yield Stress25 MPa
Table 4. Material and plasticity properties for three-point bending simulation in MSC Marc/Mentat.
Material PropertiesValue
Mass Density1.24 g/cm3
Flexural Modulus1640 MPa
Poisson’s Ratio0.3
Flexural Yield Stress65 MPa
Table 5. Contact body definition for each element body for tensile and three-point bending.
Contact BodyContact Definition
NURBS (punch die)Rigid body
Upper die (punch die)Rigid body
WorkpieceMeshed (deformable)
Lower supportsRigid body
Table 6. Optimized material properties for WHS specimen in MSC Marc/Mentat.
Material PropertiesValue
Full WHSWHS with Hole
Mass density1.24 g/cm31.24 g/cm3
Poisson’s ratio0.30.3
Flexural modulus2040 MPa1840 MPa
Flexural yield stress65 MPa55 MPa
Table 7. Comparison result summary of WHS experiment and simulation.
SpecimenPeak Force
Experiment (N)
Peak Force
Simulation (N)
Displacement
Experiment (mm)
Displacement
Simulation (mm)
Full specimen780 ± 157705.9 ± 0.26.1
With hole520 ± 105108.3 ± 0.38.6
Disclaimer/Publisher’s Note: The statements, opinions and data contained in all publications are solely those of the individual author(s) and contributor(s) and not of MDPI and/or the editor(s). MDPI and/or the editor(s) disclaim responsibility for any injury to people or property resulting from any ideas, methods, instructions or products referred to in the content.