1. Introduction
One of the major concerns of the transportation industries is the weight reduction of vehicles [
1]. Lighter vehicles consume less fuel, resulting in economic savings and reduced CO
2 emissions [
2,
3]. An effective manner of achieving this goal is to replace all-metal structures with hybrid structures composed of lightweight metals, such as aluminium and magnesium alloys, and polymer-based materials, whether a reinforced or a non-reinforced polymer [
3,
4,
5]. Overall, polymeric materials offer good design freedom and low production costs, are less dense than metals, and present good specific strength, demonstrating great aptitude for structural and engineering applications [
6,
7,
8,
9].
The main challenge of implementing hybrid structures in industrial applications resides in the difficulty of efficiently joining these dissimilar materials, since metals and polymers present great chemical, physical, thermal and mechanical differences [
2,
4,
10,
11]. Adhesive bonding and mechanical fastening are the technologies traditionally used to produce hybrid structures. Compared to other technologies, adhesive joints have a more uniform stress distribution over the joined area [
11]. Additionally, adhesives are often used to bond thin or flexible substrates and allow waterproof joints since the adhesive can act as a sealant. In turn, mechanical joints typically permit the assembly and disassembly of the joined parts, either for maintenance purposes or for the replacement of damaged components [
6]. Despite all the pros, these two technologies have disadvantages that must be considered. Normally, adhesive joints require detailed surface preparation and long processing times, and are susceptible to thermal and environmental degradation. On the other hand, mechanical fastening uses components such as rivets and bolts, which increase the total weight of the structures. Thus, the mechanical components typically work through predrilled holes, leading to stress concentration problems. To overcome some of the difficulties of adhesive bonding and mechanical fastening, different welding techniques have been investigated for joining metals and polymers, such as induction welding, resistance welding, laser welding, ultrasonic welding and friction stir welding (FSW) [
12,
13,
14,
15].
The FSW was developed and patented in The Welding Institute by Thomas et al. [
16,
17] in 1991 as an alternative to overcome the difficulties of joining aluminium alloys using conventional welding techniques. Since then, the FSW has been used to perform the joining of a variety of other metals, such as magnesium, steel, copper and titanium [
18], and for joining reinforced and non-reinforced polymers, where the reinforcements used are typically glass fibre (GF) or carbon fibre (CF) [
7,
19]. In the past few years, the joining of metals to polymer-based materials has been given a lot of attention, with particular emphasis on the friction stir spot welding (FSSW) process.
Most of the published work on FSSW for joining aluminium and polymers was carried out using pinless or short pin tools, the overlap joint configuration, the metal plate on top of the polymer and with only partial penetration of the top plate, which means that the tool typically does not reach the polymeric material. Under these conditions, Yusof et al. [
20,
21] joined aluminium alloy AA5052 to polyethylene terephthalate and studied the influence of plunge depth and plunge speed on tensile-shear strength while testing different surface states for the metal plate. Lambiase et al. [
11,
22] studied the joining of aluminium AA5053 to polyvinyl chloride using similar principles, naming the process as friction assisted joining (FAJ), and evaluated the influence of axial force, dwell time and clamping frame material on FAJ. Furthermore, Lambiase and Paoletti [
23] studied the mechanical performance of AA5053 and polyetheretherketone joints produced by FAJ. Recently, the key factors influencing the formation of welding defects and the optimisation of welding times on the FAJ of aluminium alloy AA7075 and polyamide 66 were studied by Lambiase et al. [
24,
25].
Due to the remarkable differences in physical and chemical properties of metals and polymers, material mixing does not occur, leading to sharp interfaces [
14]. According to the literature, there are three main joining mechanisms on hybrid joints, which are the macro-mechanical interlocking, the micro-mechanical interlocking and adhesion forces. The macro-mechanical interlocking occurs by the deformation of the metallic material under the tool into the polymer, while the entrapment of polymer in the rugosities of the metal surface is responsible for the micro-mechanical interlocking. Finally, the adhesive forces are created during the reconsolidation of the softened polymer [
26,
27].
Furthermore, the surface state of the metal in contact with the polymer was found to be very important for the efficiency of the mechanical performance of hybrid joints. Several authors demonstrated that the increase of surface rugosity of the aluminium by grinding, sandblasting [
14], chemical etching [
21], laser texturing [
11,
22], plasma electrolytic oxidation [
28,
29] or anodizing pre-treatments [
30] is crucial for the improvement of the mechanical performance of the joints, as it improves the efficiency of the micro-mechanical interlocking mechanisms [
14,
27].
Additionally, the plunging of the tool during welding directly affects the quality of the welds produced [
31], which can be controlled using position or force control. Using position control, Yusof et al. and [
20,
21] Geng et al. [
31] observed that because the increase in plunge depth results in an increase in plunge time, there is a longer period for heat transfer, which contributes to the formation of larger joining areas, despite the increase in the size of the internal pores in the polymeric material. Overall, the increase in joining area benefited the increase in tensile shear force. On the other hand, while studying the joining of AA6061-T6 and carbon fibre-reinforced polymer, Geng et al. [
31] observed that the increase of porosity resulted in the reduction of tensile shear strength. Similarly, Lambiase et al. [
22,
25] observed that the increase in plunge force also resulted in an increase in tensile shear force and size of the joining area. However, the effect of the increase in plunge force on tensile shear strength was different in both studies, since while joining aluminium AA7075 and polyamide 66, the tensile shear strength decreased [
25]. Moreover, when working with aluminium AA5053 and polyvinyl chloride, the tensile shear strength increased [
22]. Regardless of the case, the increase in tool penetration, whether by increasing the plunge depth or the plunge force, consistently resulted in an increase in tensile shear force.
Finally, although there are several studies in the literature on FSSW for joining polymers and metals addressing innovative and complex approaches and the optimisation of welding parameters, there are some fundamental aspects of the process that have not been sufficiently investigated so far. Understanding these aspects is essential in order to get the most out of studying more complex strategies. For example, although the importance of the way in which the materials are positioned and clamped is often overlooked, it has a major influence on the production of sound joints. When comparing the different clamping methodologies, it can be seen that there are large differences in the way the plates are clamped, which certainly affects the performance of the welding process. With regard to metal-polymer joining by FSSW, the study of the influence of the clamping procedure has rarely been reported. Still, Lambiase et al. [
11] compared the performance of wooden and steel clamping frames and observed that the wooden frame promoted better results as the use of a clamping frame with lower thermal conductivity reduces heat dissipation, which in turn promotes faster heating, higher temperatures and a more uniform temperature distribution. These improvements resulted in an increase in joint strength from 16 MPa in welds produced using the steel clamping frame to about 20.5 MPa in welds produced using the wooden clamping frame while joining AA5053 to polyvinyl chloride using FAJ.
One of the main objectives of this work is to study how the clamping frame geometry affects the quality of the joining of the aluminium alloy AA6082-T6 to polyamide 6 (PA6) using the pinless FSSW. The study of the geometry of the clamping frame is a topic that has not yet been addressed in metal-polymer joining by FSSW, which is why this study complements a gap in the literature regarding the study of the influence of the clamping of the materials during welding. For this, the performance of three clamping frame geometries was compared. Furthermore, the influence of plunge depth was evaluated for the clamping geometry with the best mechanical performance.
3. Results
3.1. Interface Temperature Analysis
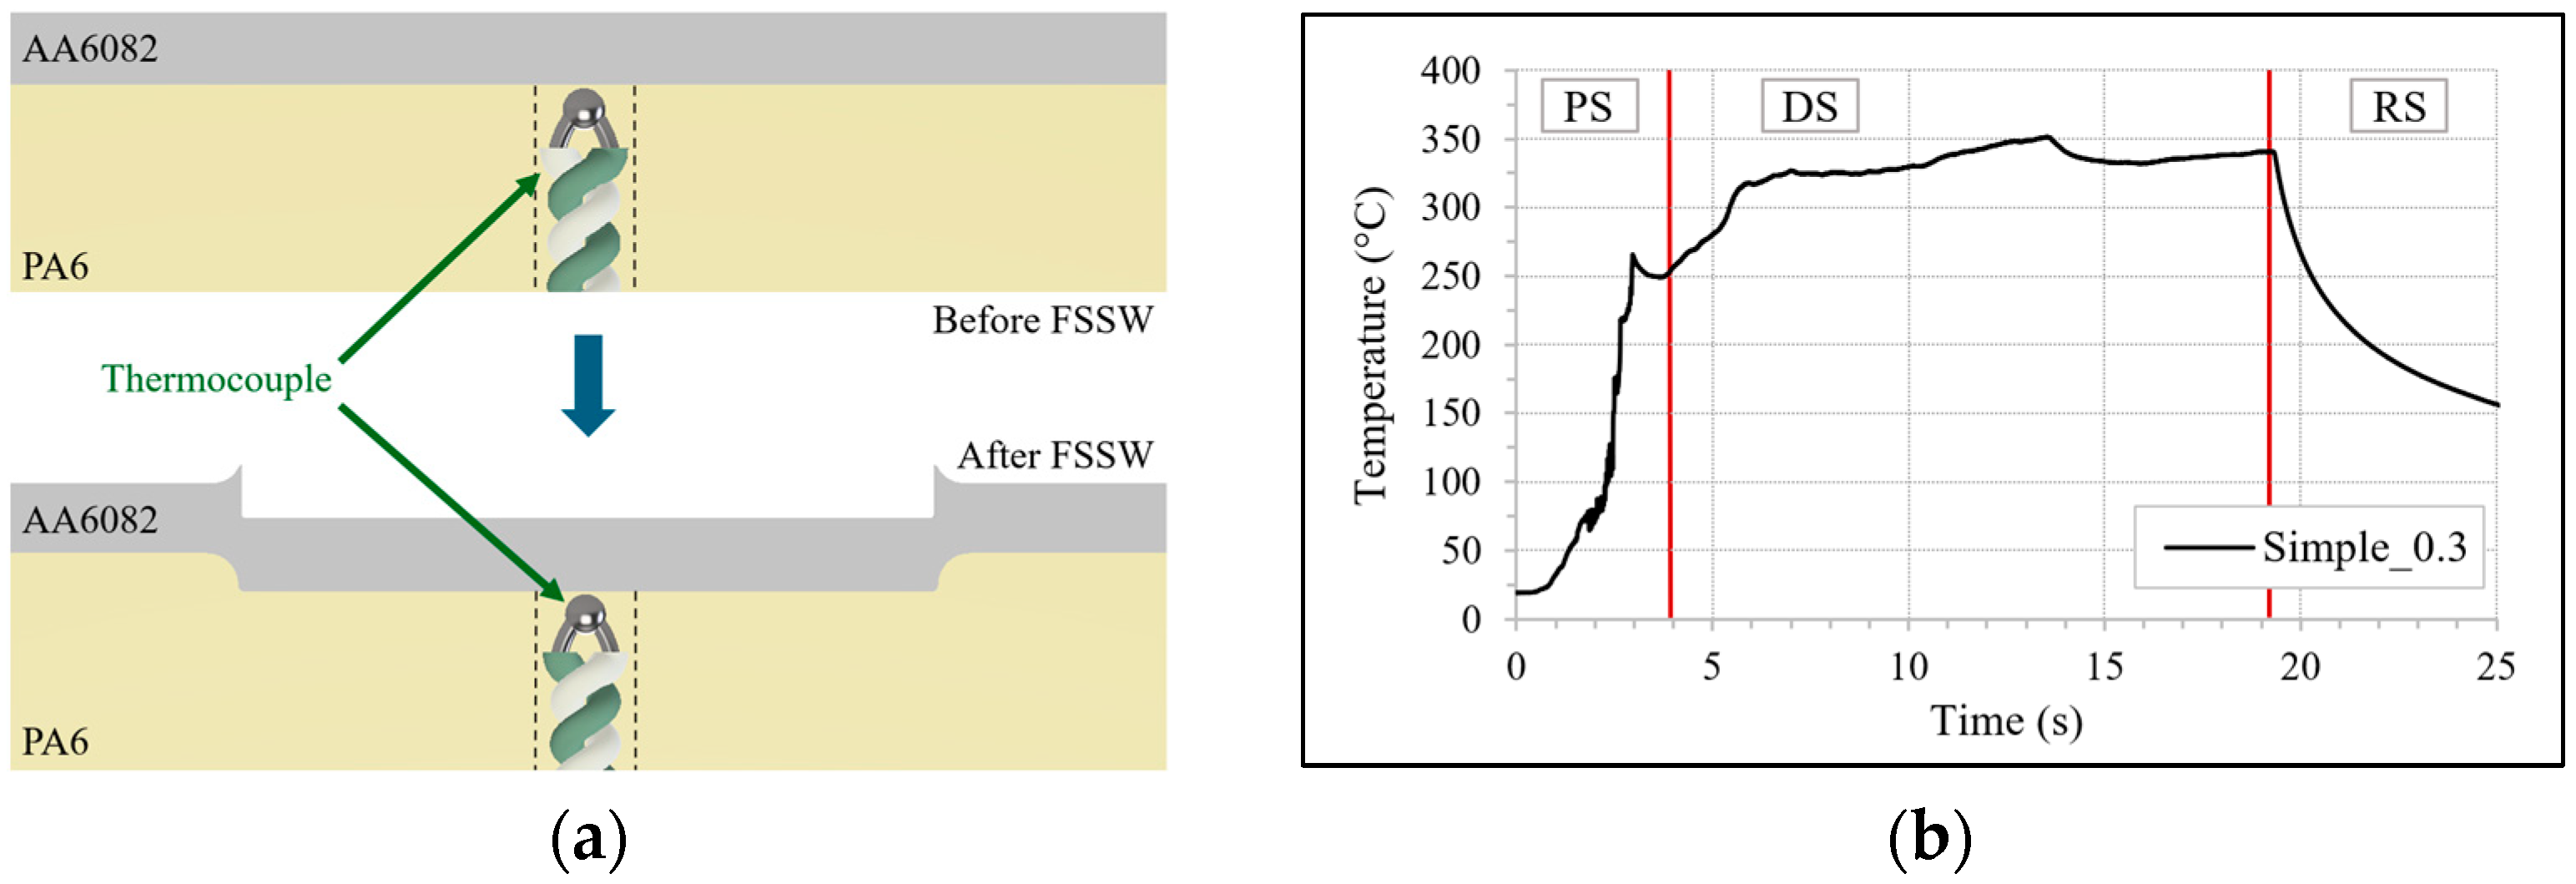
The FSSW initiates with the plunging stage, where the rotating tool is pressed against the upper plate, penetrating the aluminium, and pushing it towards the polymer. Simultaneously, heat is generated between the rotating tool and the aluminium substrate, which is transferred via conduction through the metal to the interface of the materials, leading to the softening of a thin layer of PA6. The temperature of the softened polymer under the shoulder actuation zone (SAZ) was acquired using thermocouples.
Figure 5a illustrates the positioning of the thermocouples in the assembly before and after welding, and
Figure 5b contains an example of the evolution of temperature acquired using the referred thermocouples at the interface of the materials in the SAZ during the different welding stages: the plunging stage (PS), dwell stage (DS) and retraction stage (RS).
The temperatures measured at the metal-polymer interface were typically above 250 °C and up to 400 °C. Considering that the PA6 has a melting temperature of about 222 °C, it can be concluded that regardless of the welding condition, the softened polymer must be in a molten state during welding.
3.2. Morphological Analysis
When the aluminium is pushed and deformed against the molten layer of PA6, it anchors itself to the polymer, creating a macro-mechanical interlocking mechanism [
26,
27]. The referred joining mechanism is schematically illustrated in
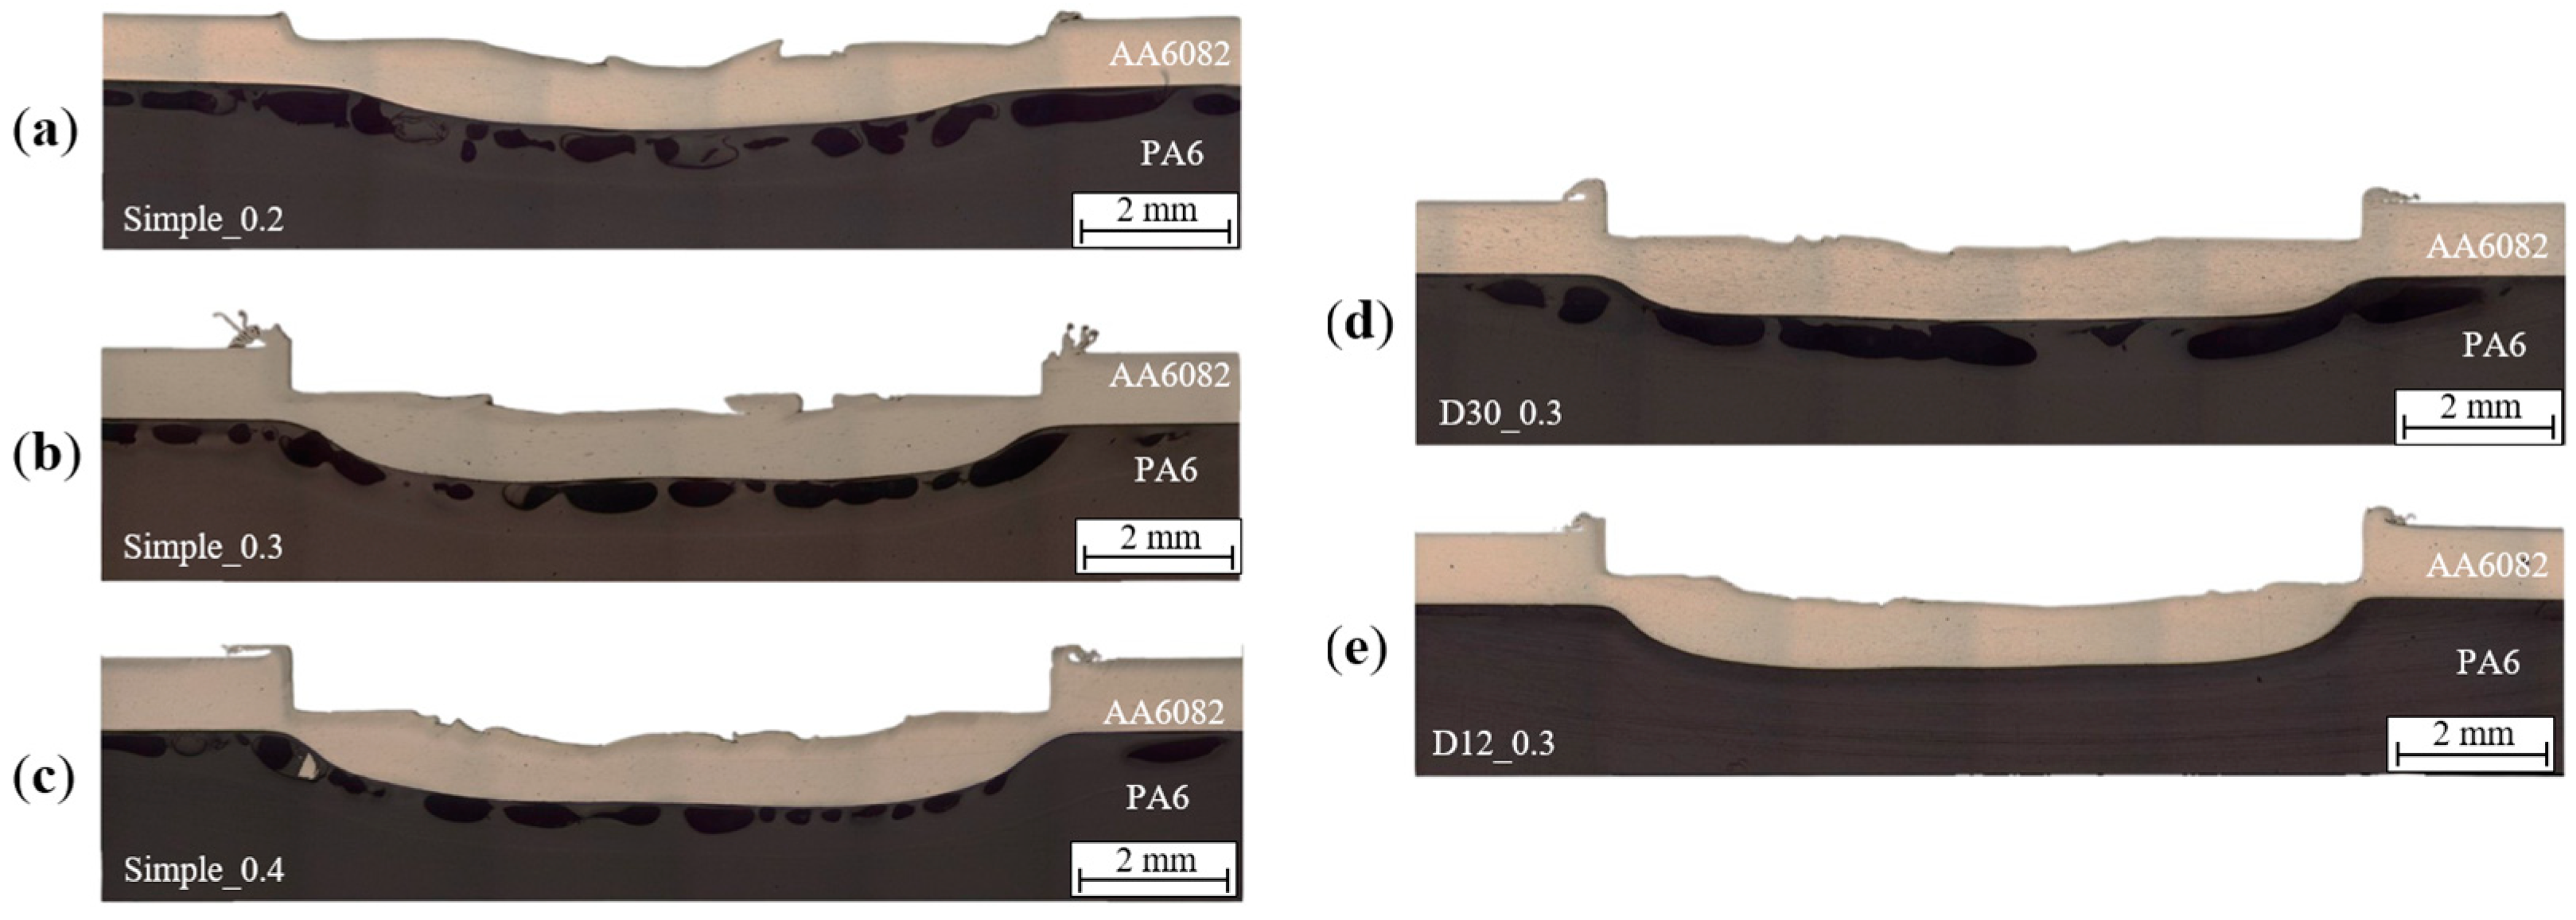
Figure 6 and the cross-sections of the five tested conditions are represented in
Figure 7. Furthermore, the plunging of the aluminium into the polymer (p
ap), which is schematically explained in
Figure 6, was quantified for each condition. The plunging of the aluminium into the polymer can be correlated with the macro-mechanical interlocking mechanism, as the deeper the plunging, the more aluminium is anchored into the polymer, and the more efficient is the macro-mechanical interlocking mechanism.
By comparing the cross-sections of the welds produced with the Simple_0.3, D30_0.3 and D12_0.3 conditions illustrated in
Figure 7b,
Figure 7d and
Figure 7e, respectively, it can be noted that the plunging of the aluminium into the polymer (p
ap) is similar in all three cases, around 700 μm. Therefore, it can be deduced that the variation in the clamping frame geometry had no influence on the macro-mechanical interlocking mechanism. On the other hand, increasing the plunge depth parameter increased the plunging of the aluminium into the polymer (p
ap), as can be understood by comparing the cross-sections of the conditions, Simple_0.2 (p
ap = 580 μm), Simple_0.3 (p
ap = 700 μm) and Simple_0.4 (p
ap = 820 μm), represented in
Figure 7a,
Figure 7b and
Figure 7c, respectively. The increase of aluminium plunged into the polyamide implies an improvement of the macro-mechanical interlocking mechanism, due to the increase of aluminium anchored into the polymer surface, which may improve the mechanical performance of the joints under tensile-shear solicitations [
26,
27].
Nevertheless, the analysis of the cross-sections shown in
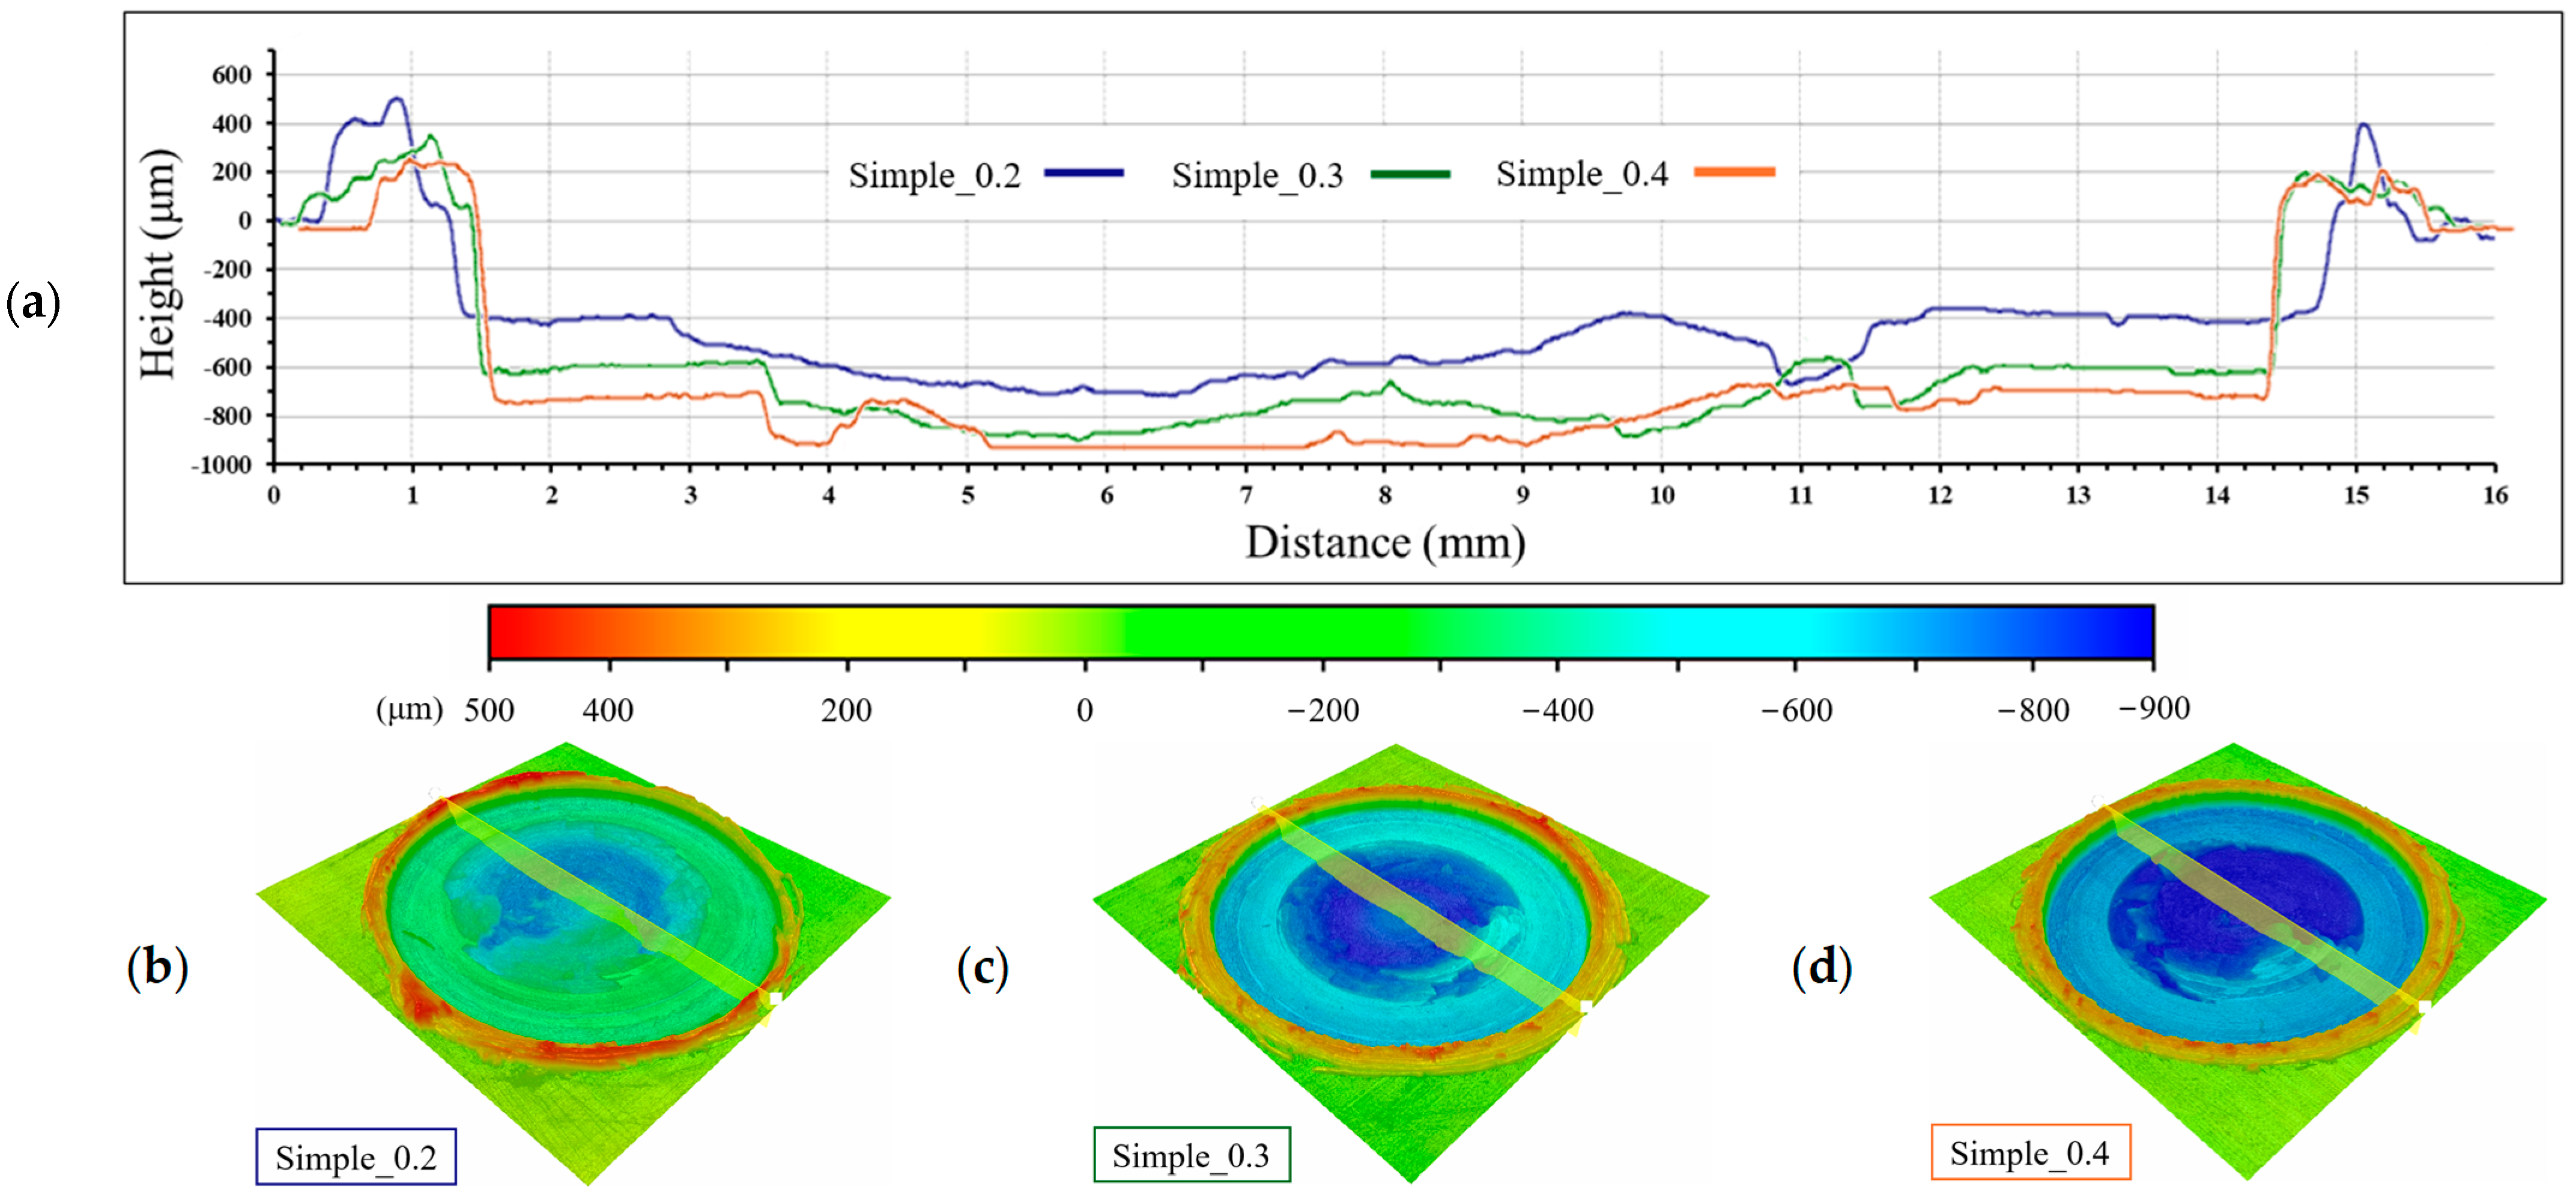
Figure 7 indicates that the tool may have penetrated into the aluminium more than the plunge depth value defined for each condition. In order to confirm this suspicion, the topography of the weld surfaces was acquired, and the resulting topographic images of the conditions Simple_0.2, Simple_0.3 and Simple_0.4 are represented in
Figure 8. Furthermore, the figure illustrates the topographic profile identified in the 3D representation obtained in the transverse direction passing through the centre of the weld for each of the three aforementioned conditions.
Based on the topography analysis, it can be seen that the shape of the indentation left by the tool is similar in all tested conditions. Generally, the centre of the indentation has a more irregular profile than the region close to the periphery. The greater irregularity of the surface in the centre of the indentation occurs because the aluminium adheres to the shoulder during welding, and, consequently, part of the aluminium is removed during the retraction of the tool, leaving an irregular topography. On the other hand, close to the periphery, the aluminium does not adhere to the tool, leaving a flat surface. This information is important when analysing the penetration of the tool, as it confirms that the flat area is the appropriate region to measure the true depth reached by the shoulder during welding.
Based on
Figure 8, it is confirmed that the tool penetrates deeper into the aluminium than the value set for the plunge depth. For the conditions Simple_0.2, Simple_0.3 and Simple_0.4, which were produced with 0.2, 0.3 and 0.4 mm of plunge depth, the penetrations measured were respectively 0.4, 0.6 and 0.7 mm, which corresponds to a difference between 0.2 and 0.3 mm. The reason that supports the higher tool penetration into the aluminium is the lifting of the aluminium around the indentation during welding. The lifting of the upper plate is a phenomenon observed in the FSSW of thin metal plates, especially when using top plates with relatively high ductility. This occurs due to the thermal deformation of the upper plate around the tool action zone, resulting in the separation of adjoining plates around the weld spot, as schematically illustrated in
Figure 9a. In this work, simultaneously with the lifting of the aluminium plate, the plunging of the aluminium forces the molten polymer of the centre to flow to the periphery, filling part of the space created by the lifting of the aluminium plate, as schematically illustrated in
Figure 9b. The resolidification of the polymer on the ground surface of the aluminium allows the materials to be joined by means of a micro-mechanical interlocking mechanism [
26,
27], as illustrated in
Figure 10.
3.3. Joining Area Analysis
Regardless of the tested condition, the joining area is composed of resolidified polymer at the interface and can be divided into three main zones: shoulder actuation zone (SAZ), intermediate zone (IZ) and external zone (EZ). The schematics in
Figure 9b illustrates the distribution of the three zones. In turn, the top view of the resolidified polymer of the five conditions tested is shown in
Figure 11, and the quantification of the size of respective joining areas is included in
Table 4.
The central region of the joining area is the SAZ, which is the region where the aluminium pressed by the tool plunges into the polymer. The polymer and the metal are joined via micro and macro-mechanical interlocking mechanisms in the SAZ. As the same tool was used in all the experiments, the SAZ has about the same diameter in all welds performed in this study. Then, the IZ is composed of a resolidified polymer that adheres to the aluminium surface, mainly by micro-mechanical interlocking mechanisms. Finally, the EZ is composed of polymer extruded from the IZ into the gap existing between the materials due to the lifting of the aluminium plate. The resolidified polymer from the EZ is only joined to the aluminium surface by micro-mechanical interlocking mechanisms, as the molten polymer does not adhere to the polymeric substrate/base material (BM) during the extrusion.
Apart from the fact that the SAZ is equivalent in all welds due to the use of the same tool, it is possible to identify differences by comparing the joining areas of welds produced with different frame geometries. The joining area is directly influenced by the temperature at the interface during welding, which in turn is influenced by the clamping frame geometry used. The welds produced with the simple frame geometry have similar joining areas, as can be understood by comparing the joining areas of the conditions Simple_0.2, Simple_0.3 and Simple_0.4, which are illustrated in
Figure 11a,
Figure 11b and
Figure 11c, respectively, with areas ranging between 6.5 and 6.7 mm
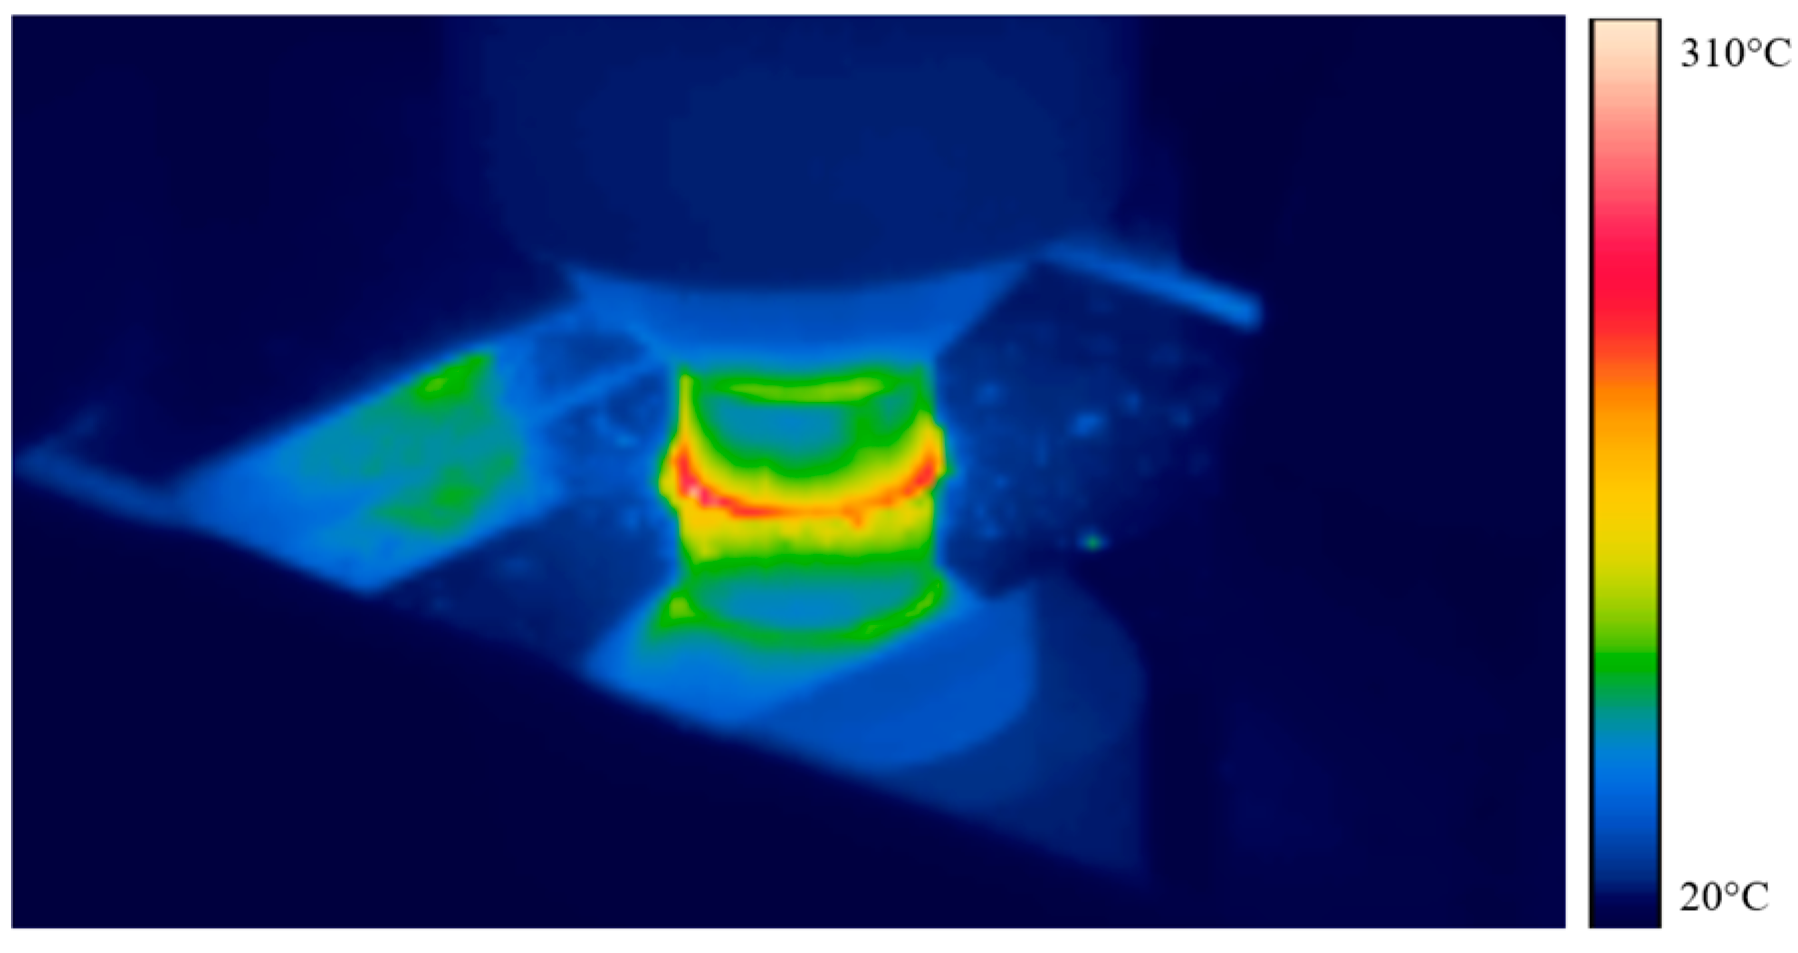
2. Furthermore, the thermal images acquired using the thermal camera (ε = 0.70) showed that the region with the greatest temperature is the periphery of the tool-aluminium interface, as shown in
Figure 12.
The temperatures measured using the thermal camera for the three conditions with the simple frame geometry indicate that the maximum temperature at the periphery of the interface tool-aluminium interface is not significantly affected by the increase in plunge depth, as the maximum temperatures of the Simple_0.2, Simple_0.3 and Simple_0.4 conditions were of about 300 °C for the three conditions. Although the temperatures measured with the thermal camera are not the temperatures of the metal-polymer interface, they are important to demonstrate that the plunge depth may not influence the temperature generated during the process as much as other parameters. Since the size of the joining area is influenced by the temperature of the interface of the materials, the fact that the temperatures measured with the thermal camera are similar for the three conditions using the simple frame geometry indicates that the temperature of the metal-polymer interface should be similar, justifying the similarity of the joining areas. That being the case, the joining area was not influenced by the plunge depth parameter, as it is more dependent on dwell time and rotational speed, since these two parameters have a higher impact on heat generation [
22,
32].
When the simple frame geometry is used, there is a better heating of the aluminium around the SAZ, since the heat manages to easily spread to a larger area, softening a larger region of polymer and resulting in a larger IZ. When using the D30 and D12 frame geometries, a significant temperature increase of the clamping frames during welding was observed. Furthermore, the heating of the clamping system due to thermal conduction represents a loss of thermal energy at the interface of the materials [
11,
22]. The reduction of the IZ is a consequence of the temperature decrease at the interface of the materials around the SAZ, due to the loss of thermal energy to the clamp. The temperature of the clamping frames was measured using the thermal camera (ε = 0.98). The thermal images obtained at the peak temperature when using the conditions Simple_0.3, D30_0.3 and D12_0.3 are illustrated in
Figure 13. The temperature measurements revealed that the clamp temperature was higher when using the D12_0.3 condition (about 160 °C) than when the D30_0.3 condition (80 °C) was used. As the D12 frame geometry covers a larger area around the welding spot, the contact area between the aluminium plate and the clamp is greater, resulting in a higher loss of thermal energy, and consequently resulting in lower temperatures at the metal-polymer interface, which culminates in a smaller IZ and therefore in a smaller joining area of about 3.5 mm
2. As the D30 frame geometry has less contact area between the clamp and the aluminium, the heat loss to the clamp is less than when using the D12 frame geometry, but higher than when using the simple frame geometry, resulting in intermediate joining areas of about 4.5 mm
2. The typical joining areas obtained when using the conditions D30_0.3 and D12_0.3 are represented in
Figure 11d,e.
3.4. Pore Defects Analysis
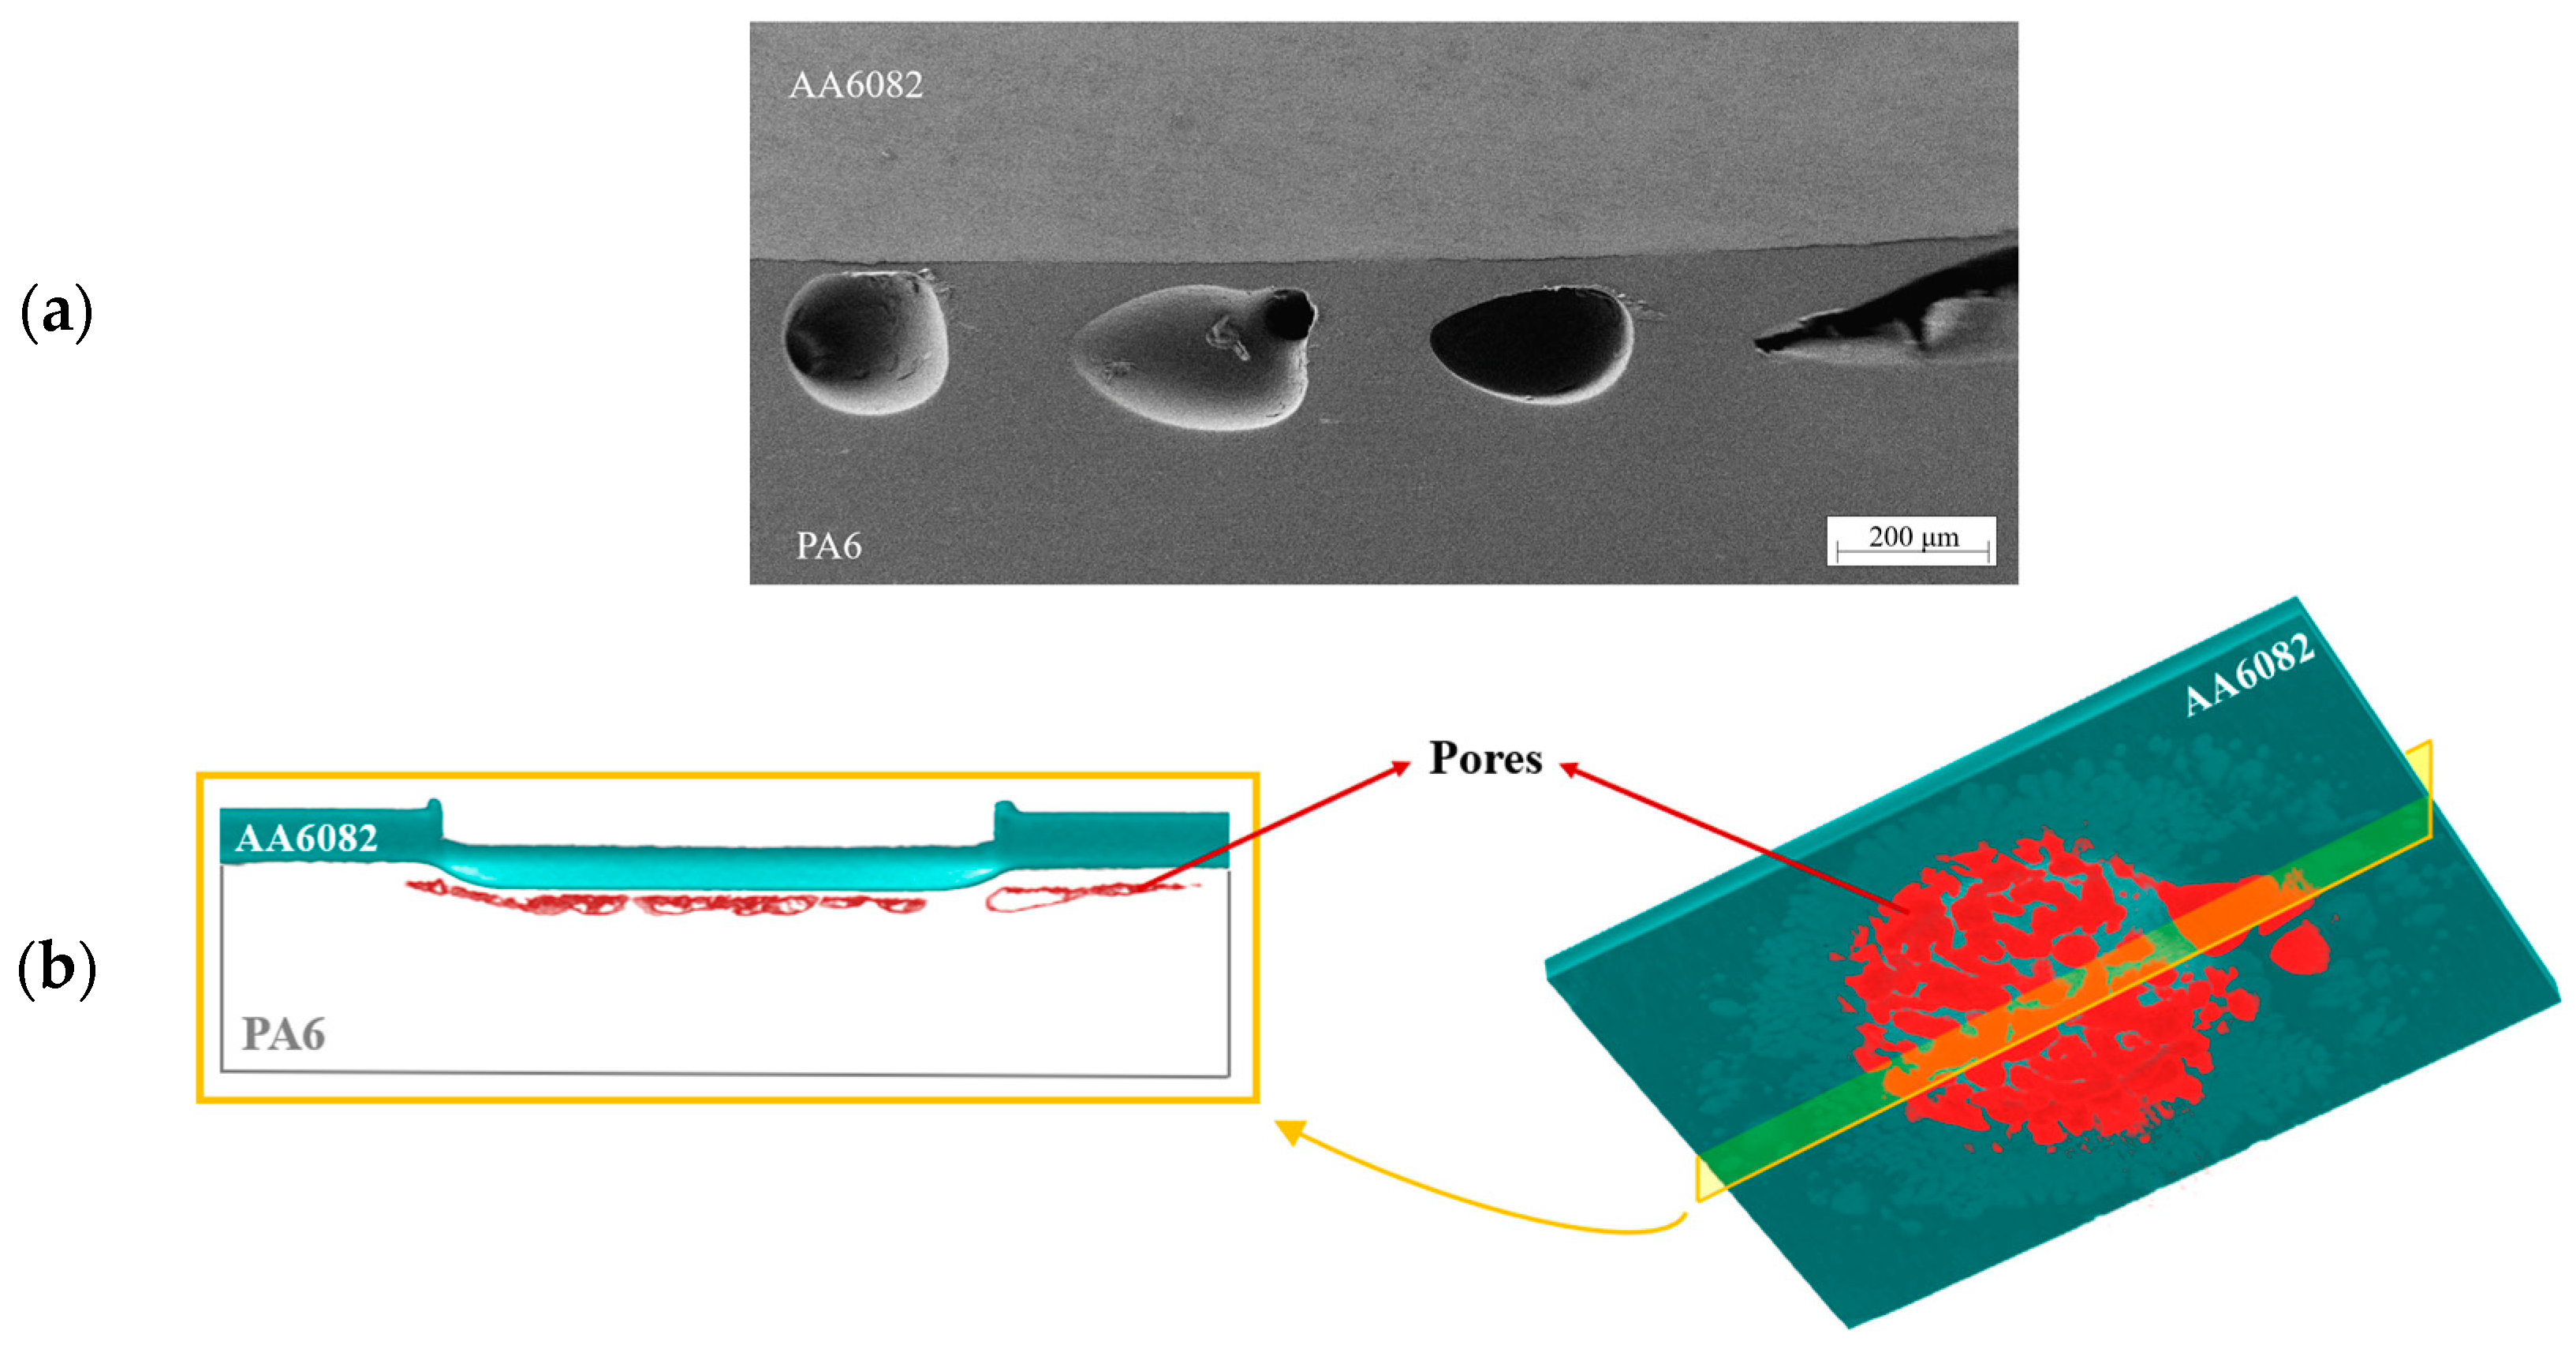
Another point that needs to be addressed is the existence of pores in the polymeric material, as can be observed in most of the cross-section images illustrated in
Figure 6. These pores are the result of the thermal degradation of the polymer, and probably a result of the accumulation of pyrolysis gases such as CO
2, H
2O, and NH
3 [
31,
34,
35]. The TGA test carried out to characterise the PA6 (
Figure 1a), shows that the thermal degradation of the polymer increases significantly at around 350 °C. As in most cases, the maximum temperatures measured at the metal/polymer interface exceeded this temperature, thus the hypothesis that the pores are a result of the thermal degradation of the PA6 is corroborated. Additionally, at the melting temperature of 222 °C, which is most certainly surpassed during welding, there is already a loss of weight of about 5%, as indicated in
Figure 1a. Part of this loss of mass could be associated with the release of water vapour, since the PA6 is a hygroscopic polymer [
36], meaning that the pores can also be the result of the accumulation of water vapour. Since these pores do not reach the surface of the polymer, as can be observed in
Figure 14a, which is a SEM image obtained from the interface of the materials, it can be considered that even when the pores are present, all the aluminium is in contact with PA6 in the interior of the joining area. Furthermore, considering that the pores are high pressure points, Yusof et al. [
20] claimed that the pores push the soften polymer against the aluminium, which benefits the micro-mechanical interlocking mechanism. On the other hand, these authors also mentioned that the pores act as crack origins, potentially reducing the mechanical strength of the joints.
The simple frame geometry condition results in the formation of numerous pores distributed through the joining area. As the process temperature appears to not be affected by the increase in plunge depth, the Simple_0.2, Simple_0.3 and Simple_0.4 conditions resulted in the formation of pores of similar size and shape. Although not widely used in previous studies, the use of tomography is an asset for characterising internal defects, especially in order to understand their three-dimensional distribution.
Figure 14b illustrates a tomography obtained from a sample produced with the Simple_0.3 condition, in which it is possible to see the three-dimensional distribution of the pores inside the sample. The polymer is invisible in the image so that the pores can be perceived. The aluminium is illustrated in blue, while the pores inside the polymer are represented in red. From the figure, it can be seen that most of the pores present an irregular shape and that most are interconnected.
The welds produced with the D30 frame geometry (
Figure 7d) resulted in the formation of fewer pores than with the simple frame geometry (
Figure 7a–c). In addition, the pores tend to concentrate only in the SAZ for the D30_0.3 condition, while the pores in the welds produced using the simple frame geometry are also present in the IZ. This could mean that the material of the IZ of the welds produced with the D30 frame geometry is cooler than the same zones on the simple frame geometry, which in turn is a result of the loss of thermal heat to the clamping frame. Finally, the D12_0.3 condition does not show the presence of pores, as can be seen in
Figure 7e. As the pores are a result of the thermal degradation of the polymer, one of the reasons for the absence of pores in the D12_0.3 condition must be related to the higher loss of thermal energy to the clamp, resulting in lower temperatures at the interface, which results in a lower temperature of the softened material during welding. Additionally, as the D12_0.3 is the condition that restricts the most the softened polymer, there is greater compression of the polymer, which further reduces the formation of the pores.
3.5. Tensile-Shear Testing Analysis
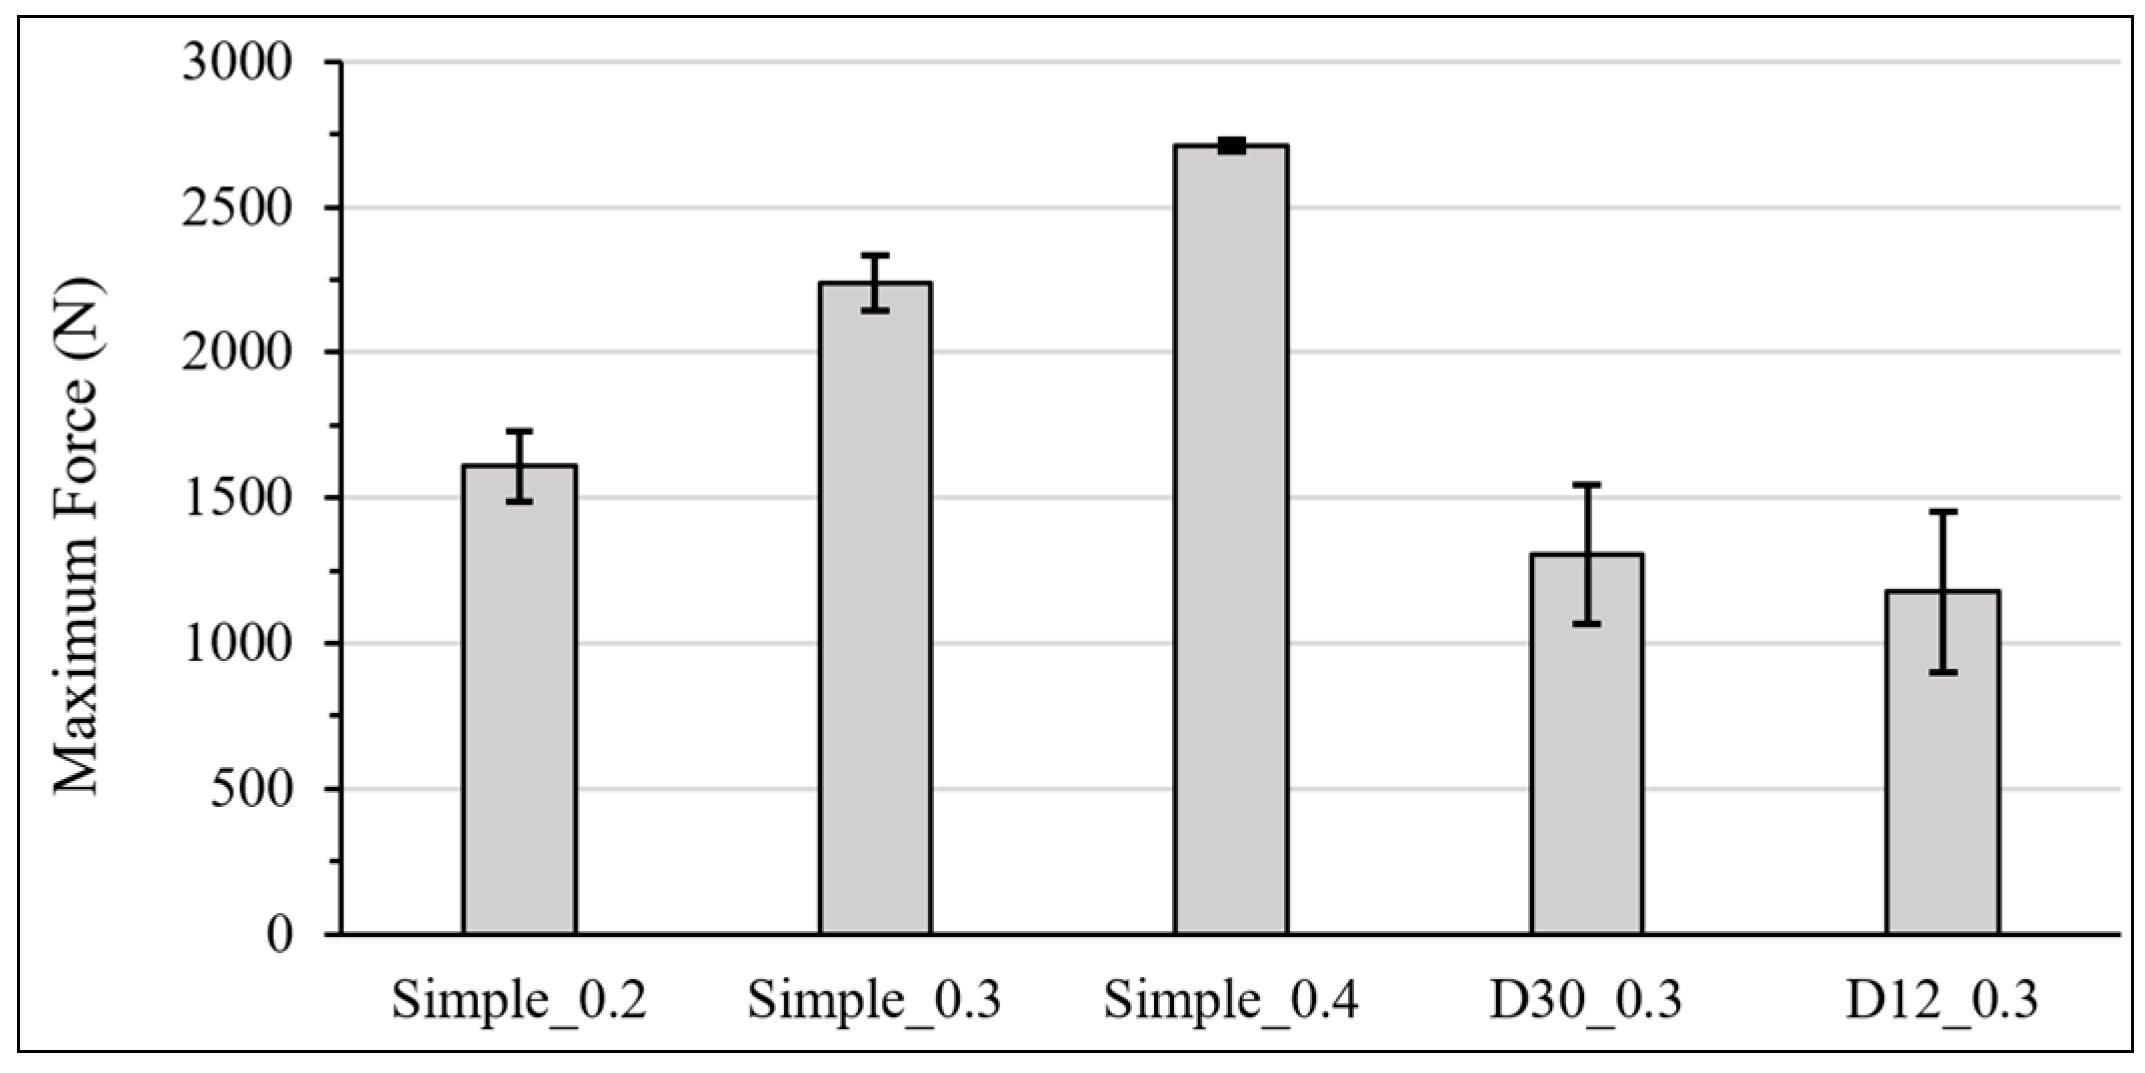
The results of the tensile-shear testing are displayed in
Figure 15, which shows the average of maximum force of the tested specimens and the standard deviation of each condition. The analysis of the results for the simple frame geometry condition (Simple_0.2, Simple_0.3 and Simple_0.4) shows that increasing the plunge depth resulted in an increase in weld strength. As mentioned previously, although increasing the plunge depth does not lead to a significant increase in the joining area, it increases the aluminium plunged into the polymer. Therefore, even though the areas of micro-mechanical interlocking are approximately equivalent, the increase in plunge depth leads to the increase of the macro-mechanical interlocking mechanism, therefore improving the strength of the joints produced with greater plunge depths.
Furthermore, when comparing the Simple_0.3, D30_0.3 and D12_0.3 geometries, it can be understood that the strength of welds produced with the Simple_0.3 condition is greater than that of the specimens produced with the other two conditions, despite the interfacial failure of all the welds. Although the simple frame geometry resulted in more pores in the resolidified polymer, this configuration resulted in a larger joining area, having a higher contribution of the micro-mechanical interlocking mechanism. On the other hand, the D30_0.3 condition has a slightly larger joining area than the D12_0.3 condition, which explains the slightly greater strength due to the increase in the contribution of the micro-mechanical interlocking mechanism. The contribution of the macro-mechanical interlocking mechanism is equivalent in the Simple_0.3, D30_0.3 and D12_0.3 conditions, as the plunging of aluminium into the polymer was also equivalent in these conditions.
Finally, it should be emphasised that the elimination of the pores did not result in an improvement in the mechanical performance of the welds, which was expected. Pores are empty spaces within the polymer and are typically preferential locations through which the fracture path propagates. Therefore, the existence of porosity indicates a loss of polymer strength, which could indicate the possibility of failure occurring through the voids, leading to cohesive or mixed adhesive-cohesive failure of the joint. However, the analysis of the fracture surfaces shows that the failure of the tensile specimens is purely adhesive. In other words, although the joint has porosity defects, the failure does not propagate along the voids because this is not the region of the joint with the least strength. The weakest part of the joint is the interface zone, which is why failure is characterised by the separation of materials at the interface and not through the pores. Therefore, in the welds of this study, strength is not directly affected by porosity, but by the quality of the joint at the interface and, in turn, the joining area. The strength of the welds is influenced by the macro-mechanical interlocking mechanism, which is directly influenced by the plunge depth parameter, and by the micro-mechanical interlocking mechanism, and which is mainly dependent on the size of the joining area. In turn, the size of the joining area is controlled by the temperature of the interface of the materials, which is greatly influenced by the clamping frame geometry. Higher interface temperatures result in larger joining areas, although they promote the formation of pores. This way, although the pores represent a welding defect that is typically undesired, in this case, their presence is related to better joints. Overall, it can be stated that for the same welding parameters, less constraining clamping structures result in stronger welds due to reduced heat loss, as it results in higher interface temperature and consequent larger joining areas despite the increase in porosity.


