Abstract
This paper presents a comprehensive analysis of the utilization of 3D printing technology for the fabrication of ceramic shells in the context of investment casting. This study encompasses an exploration of various 3D printing techniques such as binder jetting technology and lithography-based ceramic manufacturing applied to ceramic materials tailored for investment casting applications for different materials. Comparative analyses between conventionally manufactured shells and those produced through 3D printing techniques are presented, shedding light on the potential advantages and challenges associated with the adoption of additive manufacturing in investment casting processes. The findings of this study reveal that both methods offer viable solutions for creating ceramic materials suitable as shells for investment casting. Both lithography-based ceramic manufacturing and binder jetting technology exhibit unique advantages and challenges. Lithography-based ceramic manufacturing demonstrates a superior surface finish and resolution, making it particularly suitable for intricate designs and fine details. On the other hand, binder jetting technology presents advantages in terms of speed and scalability, allowing for the rapid production of larger components.
1. Introduction
High-performance parts utilized in aviation applications are traditionally produced by investment casting in ceramic molds, which is a widely used technique for modern metal casting [1]. The investment casting process is based on a wax pattern to form a ceramic shell that serves as the foundry mold. The wax pattern closely resembles the final part, accounting for the thermal shrinkage of the metal. During processing, several wax patterns are assembled in a tree around a common sprue and feeder system. Subsequently, a ceramic slurry is applied to the assembled wax pattern surface to create the inner walls of the ceramic mold [2]. The sequence of the investment casting process is presented in Figure 1. The most difficult, time-consuming, and expensive parts of investment casting are (i) the production of the mold for the wax pattern itself, which is achieved through the manufacturing of a metal die, which usually takes several months; and (ii) the production of ceramic shell mold through extensive manual work required and the use of complex and costly equipment and tooling [3]. A ceramic mold is typically created by immersing the wax model into a slurry consisting of finely ground refractory material. This process yields a smooth surface texture similar to that of the final workpiece. Subsequently, a coarse ceramic material is applied through a process called stuccoing. This sequence of steps—dipping, stuccoing, and drying—may be repeated multiple times to achieve the final ceramic mold structure. Thus, the reduction in both the cost and time associated with fabricating investment casting molds is an actual challenging task. Moreover, the incorporation of ceramic cores in the investment casting process introduces additional challenges and complexities to the investment casting process. Producing ceramic cores involves intricate molding and firing processes that require additional manufacturing steps and, accordingly, adds to the additional production costs. Ceramic cores require careful handling and assembly to ensure precise alignment within the investment mold. Concurrently novel processes such as 3D printing may lead to the manufacturing of ceramic molds or ceramic cores more cost-effectively.
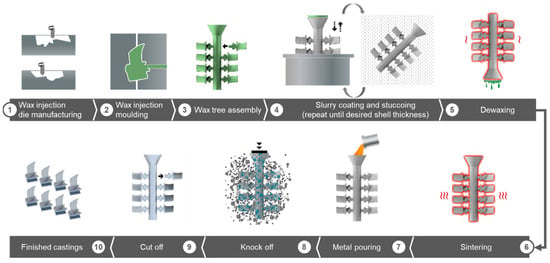
Figure 1.
Schematic illustration of a conventional investment casting process.
The investment casting process employing 3D printing shares similarities with traditional casting but eliminates the use of a wax pattern entirely. Instead, the ceramic shell is directly 3D printed. The result goes beyond just a modification of the investment casting process. Using a wax pattern is constrained in terms of complexity. If there is too much intricate detail, tooling is not possible or will be too expensive, and the ceramic coating during the dipping stage may not adequately cover it. Conversely, a ceramic form that is 3D printed directly does not encounter this limitation. It offers greater freedom in achieving complex geometries without concerns about coating limitations during the casting process. Furthermore, 3D printing offers a promising route for enhancing the sustainability of investment casting processes. Ahmad et al., in their study on the sustainability of investment casting, revealed that the energy consumption of traditional mold making surpasses that of the melting process itself [4]. The utilization of 3D printing allows for the near-net-shape fabrication of ceramic molds using ceramic resins that can be cured with light or heat. This translates to a cleaner production environment with reduced air pollution. This technique significantly reduces material waste compared to conventional layering methods. Consequently, there is considerable potential for decreasing material waste, energy consumption, and the use of hazardous materials. The capabilities of 3D printing in manufacturing are widely acknowledged. However, it is important to note that these technologies are not devoid of limitations and disadvantages. There are many documented 3D printing techniques that are employed for printing ceramics, although most of them have been applied only in academic and small-scale settings [5]. In commercial and industrial settings, only two methods are currently in use: Binder Jetting Technology and Vat Photopolymerization (VPP, in the form of Stereolithography and Digital Light Processing). During Binder Jetting Technology (BJT), a binder is deposited on a bed of ceramic powder as a way to generate each layer of the part. Thus, there is no necessity for specific support structures to correctly print any overhangs or undercuts. Moreover, the amount of binder in the green body is low, and debinding is much easier compared to VPP. BJT is also easily scalable for fabricating large parts. However, BJT has limitations, such as high porosity and the relatively rough surface of printed parts [6]. In VPP, an ultraviolet laser or digital light processing projector are used to solidify a liquid ceramic suspension. The liquid suspension contains fine-grained ceramic powder and a UV-sensitive monomer. The green body is incrementally constructed layer by layer through selectively exposing liquid ceramic suspension to a light source. VPP offers excellent resolution and accuracy, a smooth surface, and a high density of manufactured parts [7]. However, the parts’ dimensions are very limited compared to BJT. In summary, both technologies, BJT and VPP, have advantages and disadvantages regarding printing ceramic parts. Research on the 3D printing of ceramic cores has increased significantly in recent years. However, only limited studies were found that have investigated BJT or VPP for the 3D printing of ceramic for investment casting applications, especially for high-temperature alloys.
Within the scope of research on BJT, the following investigations are of particular interest. In research by Curodeau et al., the BJT process was used to produce ceramic molds with embedded surface macro-textures to cast functional orthopedic implants out of a high-resistance cobalt-chrome alloy [8]. Cast parts were successfully produced and tested for orthopedic application. Kim et al. printed ceramic quartz cores using BJT. It was found that BJT material exhibits a flexural strength of about 12.5 ± 0.9 MPa and shows appropriate elution properties in a NaOH solution [9]. Controlling the elution properties of ceramic cores in investment casting is essential for producing high-quality cast parts with consistent dimensional accuracy, surface finish, metallurgical integrity, and compliance with regulatory requirements. Huang et al. analyzed binder-jetted alumina ceramic cores [10]. The effects of different binder compositions of zirconium basic carbonate on the printability of the binder and the performance characteristics of the ceramic cores by binder jetting were investigated. An increase in sintered density by about 44% and an increase in bending strength from 60 to 79 MPa was reported. Rodríguez-Gonzalez et al. investigated the BJT for casting shell parts [11]. A case study was carried out, consisting of the casting of an AlSi7Mg aluminum alloy using a calcium sulfate mold obtained by the BJT technique.
Stereolithography was employed for the first time by Griffith and Halloran for the production of a silica part intended for investment casting applications [12]. An adequate interlayer adhesion in a box-shaped component was reported, and the viability of the process was validated. Firstly, the majority of studies focused on the fabrication of ceramic shells specifically designed for aluminum castings. Corcione et al. used silica suspension in the stereolithographic apparatus to build molds of different shapes for aluminum casting [13]. A characterization of mechanical properties of green and sintered ceramic materials was performed. Zhou et al. fabricated an integral ceramic mold by stereolithography using silica suspension [14]. A thin-walled aluminum part was produced using casting in the sintered ceramic mold, which indicated that the stereolithography for an integral ceramic mold is feasible. Bae and Halloran fabricated a ceramic investment casting mold with an integral core within a ceramic mold shell, produced in a single pattern-less construction from refractory-grade fused silica, using ceramic stereolithography [15]. The dimension accuracy and shrinkage behavior were examined. The sintering shrinkage was found as 10.7 ± 0.2% in both directions, and dimensions were approximately 0.3–0.7% smaller than the design. Wang et al. manufactured a complex-shaped zirconia mold using DLP stereolithography [16]. Successful aluminum casting was performed in the ceramic molds obtained after sintering. Magerramova et al. manufactured ceramic shell molds by stereolithography with refractory ceramic pastes for casting applications with a high-temperature alloy [17]. Trial casting by the directional crystallization method of an uncooled blade made from a heat-resistant nickel-base alloy, ZhS-32, was performed, which produced satisfactory results. Ozkan et al. demonstrated the possibility of developing silica-, alumina-, and zircon-based photocurable ceramic suspensions and performed a study to develop different binder formulations to provide the 3D-printed components with different dimensions and designs with additional strength [18,19]. Layher et al. developed ceramic-filled resin (based on aluminum oxide) for the stereolithographic production of investment casting molds from commercially available materials [20]. It was shown that the 3D-printed molds can be successfully transferred to the investment casting process, and a metallic casting can be performed. Furthermore, stereolithography was investigated for its application in the production of ceramic cores. Hu et al. fabricated hollow silica-based ceramic cores with lattice structures inside for investment casting using ceramic stereolithography [21]. The dimensional accuracy and properties of the green and sintered bodies were evaluated, and practical casting processes using the hollow cores were carried out. The key dimensions of the cores were controlled within ±0.25 mm. The bending strength reached 11.94 MPa at room temperature. Moreover, a smooth casting surface was obtained, with surface roughness within 2 μm. Li et al. investigated the VPP technique for the production of ceramic SiO2-ZrO2-Al2O3 cores [22]. The microstructure and properties of core samples were studied and compared to samples from conventional injection molding process. The results indicated that the microstructure and properties of the 3D-printed cores were anisotropic, and open porosity was low. However, no significant difference in the leaching rate of cores prepared by the two techniques was observed.
In summary, research on the 3D printing of ceramic molds and cores for investment casting has increased significantly in recent years. However, there is still a lack of consistent information, e.g., on the dimensional accuracy of 3D-printed molds, reactivity of molds with different alloys, surface roughness of molds, and of final metal castings. The main aim of this study is to close these knowledge gaps regarding the viability of process chains combining ceramic 3D printing, such as VPP and BJT, and investment casting. For this purpose, ceramic molds were produced by VPP and BJT techniques and analyzed during the standard investment casting process. This paper is organized as follows. In the subsequent section, the materials and methods used are introduced, i.e., specimen production by means of VPP and BJT, surface roughness measurements, and the procedure for the investment casting process. The procedure is applied to a case study consisting of casting shells for the casting of different materials. Components with different geometries were used in order to verify the casting performance of the 3D-printed shells. Subsequently, in Section 3, the results are presented and discussed.
2. Materials and Methods
2.1. Lithography-Based Ceramic Manufacturing (VPP)
CeraFab S65 System, manufactured by Lithoz GmbH (Vienna, Austria), was utilized in this study to produce the ceramic samples. This system employs technology known as lithography-based ceramic manufacturing. Silica-, alumina-, and zircon-based samples of different geometries were fabricated using a commercially available photosensitive suspension known as LithaCore 450, supplied by Lithoz GmbH, Vienna, Austria.
The applied process was a bottom–up technique that utilized photosensitive suspensions containing ceramic particles as fillers. In our application, powder with particle sizes of below 50 µm was used. The suspension was loaded into a transparent vat and equally distributed through rotation and the use of a stable doctor blade. Below the vat, there was a light source emitting light at a specific wavelength of roughly 460 nm. Such devices, called Digital Mirror Devices (DMDs), contain many micro-mirrors—2560 × 1600 (X, Y) in our case—which can be readily tilted at high frequencies to project the resulting light pattern into the resin. Exposure to this light initiates photopolymerization, causing the layer with the desired geometry to solidify. By repetition, a three-dimensional green part was created layer by layer. Each layer had a thickness of 100 µm, and other printing parameters were configured based on recommendations found in the data sheets provided for the specific suspension being used. Once the three-dimensional structure has been formed, the resulting part is referred to as a “green body”. In this stage, the ceramic particles are enveloped within a polymer network. Following the printing process, the samples underwent a cleaning procedure equipped with LithaSol 20, a proprietary cleaning fluid (Lithoz GmbH, Vienna, Austria), to eliminate any adhered non-polymerized suspensions. Subsequently, they were treated in a drying furnace at a temperature of 120 °C prior to the debinding process. To remove the polymeric material from the 3D-printed samples, a thermal treatment at a temperature range of 120–420 °C was carried out. For debinding and sintering processes, a high-temperature furnace, Nabertherm LHTCT 08/16 (Nabertherm, Lilienthal, Germany), was employed. The sintering procedure involved subjecting the samples to elevated temperatures, with a maximum temperature reaching 1225 °C. The samples were held at this temperature for a duration of 9 h, after which they were gradually cooled at a rate of about 1 °C per minute. No mechanical postprocessing was conducted. Samples with following geometries were produced: (i) cup samples (Figure 2a), (ii) slope test samples, and (iii) large ceramic shells with a stepped geometry.
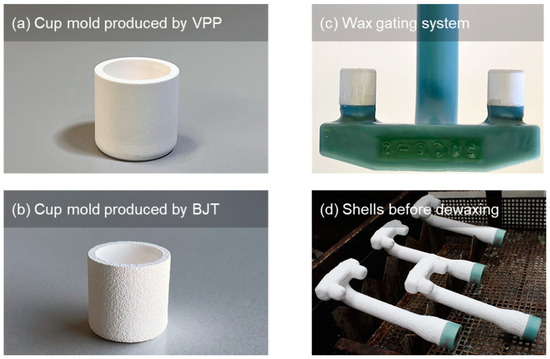
Figure 2.
Cup-shaped ceramic shells produced by means of different 3D printing techniques: (a) VPP, (b) BJT, (c) mounted cup-shaped ceramic shells on a wax gating system, and (d) the casting shells before the dewaxing process.
2.2. Binder Jetting Technology (BJT)
During the BJT process, samples with similar geometries were manufactured, i.e., (i) cup samples (Figure 2b) and (ii) slope test samples. Specimens were manufactured using VX1000 model ceramic 3D printer (Voxeljet AG company, Friedberg, Germany). The VX1000 was modified by Voxeljet for the use of a newly developed alumina-based ceramic powder called Brightorb, provided by AGC Ceramics Co. (Japan, Tokyo). The ceramic powder was applied and printed layer by layer, with the powder bed moving down one layer in the z direction after each printing process. The ceramic powder used with a chemical composition of Al2O3 = 80%, ZrO2 = 10%, and SiO2 = 9% and with a grain size of 50 µm (median) already contains an inorganic binder composed mainly of Al2O3 and CaO. When mixed with the water-based ‘Ink’ from the print head, it causes a hydration reaction and cures. The thickness of the layer was about 100 µm during the printing process. A three-dimensional green part was produced layer by layer. After the last layer was printed, the components were dried in the powder (2 to 8 h depending on the size). The loose powder was removed with a brush and compressed air. In order to obtain finished ceramic parts, infiltration in colloidal silica, provided by Voxeljet, is mandatory. During the subsequent sintering, the colloidal silica acted as an additional binder for the alumina-based powder particles. The sintering started with a low heating rate, increasing the temperature to 1290 °C. The samples were held at this temperature for a duration of 3 h, after which they were naturally cooled down in the oven.
2.3. Surface Roughness and Dimensional Accuracy Analysis
For measurements of surface quality, the slope test samples were manufactured by means of both technologies, VPP and BJT. The slope test samples were aligned in two different ways during the printing process: normal and overhang. These alignments are shown in Section 3.1 in Figure 5. VPP samples in normal alignment consisted of a series of nine parallelepipeds manufactured at different angles to the horizontal built plane, including angles ranging from 5° to 85° in 5° increments. Samples in the overhang alignment represented a series of six artifacts with different inclination angles, varying from 20° to 70° in 5° increments. BJT samples in normal alignment consisted of nine interconnected parallelepipeds manufactured at different angles to the horizontal built plane, including angles ranging from 5° to 85° in 5° increments. Samples in overhang alignment represented the same geometry with different inclination angles, varying from 5° to 85° in 5° increments.
For each printed surface of a given angle, measurements were taken in two directions: one parallel to the layers resulting from the additive manufacturing process, commonly known as the ‘layer lines’, and another perpendicular to these layers. The surface roughness of the sintered slope test samples was measured tactilely using a profilometer with a 2.5 mm cutoff value (Feed device Mahr Surf SD 26 C with BFW- feeler arm A 10-135-2/90°, Mahr, Germany), which is an instrument designed to measure the vertical deviations of a surface profile. The specified vertical measuring range of the profilometer feeler arm was 750 µm. The specified tactile path was 17.5 mm (measuring length 12.5 mm + 2 × 2.5 mm cutoff). The constant measuring speed of 0.5 mm/s was used to determine an average roughness profile. Mean roughness (Ra) was used, which was quantified as the arithmetical average of all absolute values of the vertical deviations from the mean line across the surface.
The measurements of dimensional accuracy were carried out manually on cup-shaped ceramic shells. Height and internal and external diameters, as well as wall thickness, were measured and documented at least on three measuring points per cup.
2.4. Investment Casting Experiments with Different Materials
Three highly relevant alloys utilized in aviation applications, (i) nickel-based alloy Inconel 718, (ii) aluminum alloy F357, and (iii) stainless steel 17/4 PH, were examined in this research. These materials were selected based on the specific requirements of the scientific project. Furthermore, their significant differences enable the demonstration of the feasibility of using 3D-printed ceramic molds across a range of material classes. The chemical compositions of all three alloys are detailed in Table 1. The chemical compositions were taken from the raw material quality certificates from suppliers.

Table 1.
Chemical compositions of all 3 materials (weight %).
Before proceeding with the final casting experiments involving large 3D-printed ceramic shells with stepped geometry, preliminary investigations were conducted using small cup-shaped ceramic shells to analyze contributing factors. The dimensions of the cup-shaped ceramic shells were 16 mm for the internal diameter, 20 mm for the external diameter, and a height of 20 mm. The cup-shaped ceramic shells were mounted on a manufactured wax gating system. Two cups were attached to each sprue, and the designed casting with the gating system is shown in Figure 2c. Twelve layers of refractory slurry were applied to the entire gating system, including the 3D-printed cup-shaped ceramic shells, and aluminum oxide was stuccoed. Then, the forms were dewaxed and debinded. Sintering was performed following a standard regime—stepwise heating to a temperature of T = 1200 °C, holding for 2 h, and cooling to 150 °C with a furnace.
The finished ceramic shells were attached in a standard way to a machine Linn Supercast (Linn High Therm GmbH, Hirschbach, Germany), equipped with a vacuum chamber, for melting and casting by the centrifugal casting method. This system allows for the positioning of both the aluminum oxide crucible and the ceramic shell in a centrifugal arm (see Figure 3b), which rotates around a central axis. Melt weights and specific casting parameters for each material are presented in Table 2.
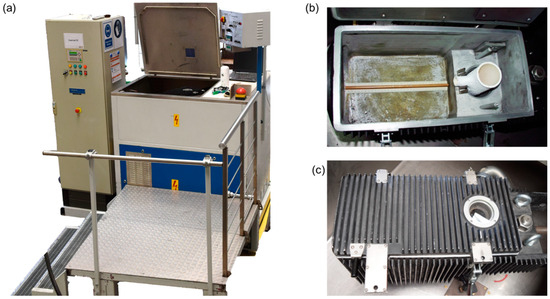
Figure 3.
Centrifugal casting process: (a) Linn Supercast equipment and (b,c) centrifugal chamber with crucible.

Table 2.
Casting parameters and melt weight for all 3 materials (cup samples).
The large 3D-printed ceramic shells with stepped geometry (Figure 4) were tested in a similar manner using centrifugal casting with Inconel 718 alloy. Because of the limited time and resources, these large shells were examined only using the VPP process. The chosen geometry is relatively standard. The steps were designed to demonstrate edge reproduction and the impact of wall thickness on the microstructure. The main objective was to demonstrate the feasibility of producing large ceramic shells and to compare the material performance of castings obtained from them with those from conventionally produced ceramic shells.
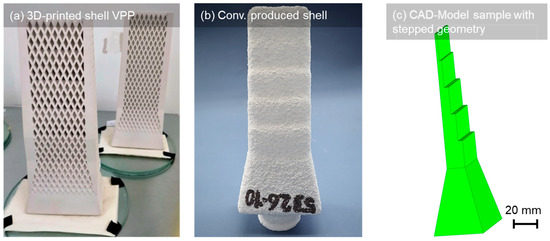
Figure 4.
Sintered ceramic shells with stepped geometry; (a) 3D-printed VPP, (b) conventionally produced shell, and (c) three-dimensional (3D) model of the test samples with stepped geometry.
These shells were produced using the VPP process and feature a geometry that provides additional stability. Due to the significant centrifugal forces involved in the centrifugal casting process, the 3D-printed ceramic shells were additionally placed in sleeves made of ceramic crucibles filled with Al2O3 sand. This precautionary step was taken to protect the casting system from potential melt leakage. The samples with stepped geometry were also cast using conventionally produced ceramic shells to enable a comparison of material performance. Melt weights and specific casting parameters are presented in Table 3.

Table 3.
Casting parameters and melt weight for samples with stepped geometry.
2.5. Microstructure Analysis
The microstructure of the stepped samples was examined after the casting. All the specimens analyzed underwent the standard procedure for microstructure observation. The samples were cut and mounted in phenolic resin (Polyfast Struers) with the cut cross-sections on top. The samples were ground flat with silicon carbide (SiC) papers, gradually decreasing from 320 to 1200 grit. Subsequently, the specimens were polished using a diamond suspension in two steps (6 µm and 3 µm), and finally, oxide polish (0.05 µm silica solution, Struers OP-S Suspension) was applied. To characterize microstructural details such as grain size and chemical composition, Zeiss Scanning Electron Microscopes (SEMs: 1540XB, ULTRA55, and LEO1550), equipped with Gemini columns and Oxford Instruments EDX (Energy-dispersive X-ray spectroscopy) detectors (UltimMax170, X-MaxN150, and INCA Xact), were utilized, along with the application of electron backscattering diffraction (EBSD) on the specimens.
3. Results and Discussion
3.1. Surface Roughness of 3D-Printed Ceramic Slope Samples
As was described above, the slope test samples were produced in normal and overhang alignments. The manufactured slope test samples are shown in Figure 5. The average surface roughness (Ra) values are shown in Figure 6 as polar diagram graphs for samples with slope geometry with two test directions, vertical and horizontal, to the print direction. As expected, average surface roughness of the BJT samples was significantly higher when compared to the samples processed using VPP.
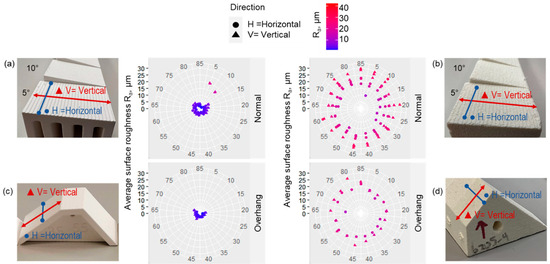
Figure 6.
Impact of manufacturing angle on average surface roughness: (a,c) samples produced by VPP and (b,d) samples produced by BJT.
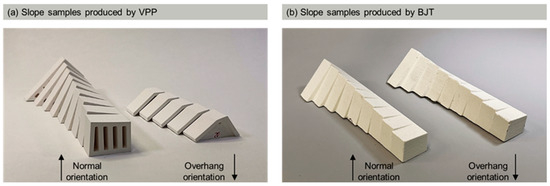
Figure 5.
Manufactured slope test samples built in different alignments (normal and overhang orientations): (a) samples produced by VPP and (b) samples produced by BJT. The build direction is indicated with an arrow.
In the case of VPP samples, the average results from all trials indicated that the surface roughness (Ra) was approximately 4.1 µm, observed in all samples printed at angles greater than 10°. The roughest surface with a Ra value of 15 µm was found in a low-inclination angle of 5°. The surfaces of samples at low-inclination angles had evident steps, as can be seen in Figure 5a. This was to be expected, as roughness can be mainly attributed to the staircase effect during the manufacturing process for angles lower than 10°. When the slope is increased, the stair-step edges become smaller, thus leading to a higher contribution of specific process settings to the roughness of the samples. Generally, the ceramic VPP process involves the bonding mechanism, occurring both between and within layers, driven by the chemical reactions of the organic binder, specifically photopolymerization [7]. Using smaller layer thickness settings can improve resolution and reduce the visibility of the stepping effect, albeit at the cost of increased printing time [23]. It is important to note that the stepping effect is inherent to the additive manufacturing process due to its layer-to-layer nature, and finding an optimal balance between layer thickness, print orientation, and post-processing techniques is essential to achieving the desired surface quality in VPP 3D-printed parts. The formation of the bond during VPP depends on light intensity, the duration of irradiation, and the reactivity of the binder formulation of the ceramic suspension. Additional influencing factors include the homogeneity of ceramic particles within and between layers, along with solid loading, indicating green density [24]. The optimal combination of these parameters significantly contributes to achieving the desired surface quality.
For BJT samples, the average results from all trials indicated that the surface roughness (Ra) was approximately 38 µm. No clear correlation with manufacturing angles was evident. The highest roughness, with a Ra value of 80 µm, was observed in samples measured in the vertical direction, corresponding to the Z-axis in the 3D printer. These elevated values can be attributed to the grooves generated during the layer-by-layer construction of the powder-bed process. Conversely, the lowest roughness values, around 20 µm, were found on surfaces measured horizontally to the build direction, i.e., in an X/Y-axis direction in the printer. The surface roughness in binder jetting processes can vary with different build orientations due to several factors inherent to the printing method. One significant factor is the layer-by-layer construction process in binder jetting, where powder layers are selectively deposited and bound together. The orientation of these layers in relation to the build direction can influence the final surface finish. Additionally, the projection of binder droplets onto the powder bed and the distribution of powder particles can vary based on the orientation, leading to differences in surface roughness [24]. Overall, the interplay of process parameters and powder disposition among oriented surfaces contributes to the observed variations in surface roughness in different build orientations.
To compare the surface roughness values of ceramic samples produced using VPP and BJT processes in this research, examples from the existing literature are provided here. In an investigation by Curadeau et al., the surface roughness of BJT 3D-printed molds was measured to be approximately 20 µm in the layer plane [8], showing a consistent correlation with the findings of this study. Huang et al. conducted an analysis of the surface characteristics of alumina ceramic cores produced by BJT [10]. Surface roughness values in the range of 18–22 µm were reported for samples with different chemical compositions. Similar surface roughness values of VPP samples were identified in previous studies conducted by Li et al. [22]. Specifically, the surface roughness of the VPP 3D-printed ceramic core was determined to be 4.88 μm. Furthermore, Hu et al. presented data on the roughness of VPP 3D-printed ceramic cores, mostly below 3 μm [20]. Notably, the literature suggests that surface roughness can be enhanced through the optimization of sintering and printing process parameters. In summary, the surface roughness values obtained for VPP and BJT samples in this study align well with those reported in the existing literature.
3.2. Three-Dimensional-Printed Cup-Shaped Ceramic Shells: Dimensional Accuracy and Inspection of Casting Parts
Cup-shaped ceramic shells were chosen for investigating the dimensional accuracy of 3D-printed and sintered parts. The cup-shaped ceramic samples, after sintering, are presented above in Figure 2a,b for VPP and BJT, respectively. The nominal cups’ outer diameter is 20 mm, the internal diameter is 16 mm, the height is 20 mm, and the wall thickness is 2 mm. Table 4 lists the measured dimensions of the cups and their deviations from nominal values.

Table 4.
Comparison between the measured and the nominal values for the cup-shaped ceramic shells produced by means of VPP and BJT.
It can be observed that the measured values closely approximate the nominal values. Nonetheless, the dimensional variations exhibited by the BJT samples are somewhat more pronounced when compared to those of the VPP samples. The dimensional accuracy of BJT ceramic is often perceived as being less precise compared to VPP ceramic due to inherent differences in the printing processes and material behaviors. Several factors contribute to the perceived difference in dimensional accuracy. BJT typically utilizes larger layer thicknesses compared to VPP. Larger layer increments can result in a step-like effect, leading to reduced dimensional accuracy, especially on sloping or curved surfaces. Moreover, in BJT, the ceramic powder particles are selectively bonded together by a liquid binder. The particle size and distribution can impact how well the powder compacts, affecting the precision of the final part. VPP generally offers finer resolution and detailing capabilities compared to BJT. The precision of light-based curing in VPP contributes to a smoother surface finish and better reproduction of intricate features. This distinction may have an impact not only on dimensional accuracy but also on surface quality, as demonstrated above in Section 3.1. Although BJT may be perceived as exhibiting lower dimensional accuracy when compared to VPP, it is frequently selected for its economic advantage in producing larger ceramic parts.
The surface quality of castings is a crucial aspect in the investment casting process. High surface quality is essential, as it reduces the need for additional post-casting machining or finishing processes. The ceramic shell plays a crucial role in determining the surface finish of the casting. The interaction between the ceramic shell and the metal during the casting process can impact features such as surface smoothness, detail reproduction, and the occurrence of defects. Moreover, the reaction of metal melt with the ceramic shell leads to the formation of an undesirable reaction layer on the surface. This occurs, for instance, by extracting active elements from the solidifying melt and facilitating diffusion at the ceramic interface, thereby modifying the elemental composition within the bulk of the alloy [25]. Therefore, understanding these interactions are essential for achieving the desired surface quality in cast parts. Thus, preliminary cup-shaped ceramic shells were used for the investigation of the reactivity of the 3D-printed ceramic with the casting melt. To evaluate the appropriateness, their interactions with three different materials were analyzed. Figure 7 shows the result of investment casting of all three alloys using the VPP and BJT cup-shaped ceramic shells.

Figure 7.
Casting parts of all three material, i.e., F357, Inconel 718, and steel 17/4 PH produced using 3D-printed cup-shaped ceramic shells: (a) ceramic shells manufactured by VPP and (b) ceramic shells manufactured by BJT.
As demonstrated, all three materials, i.e., F357, Inconel 718, and steel 17/4 PH, were successfully cast, exhibiting no signs of oxidation or irregularities on the surface. Surface roughness analysis revealed an average value of approximately 6 µm for castings poured in VPP shells (what is within the tolerance for investment casting surfaces according to VDG P690 (Ra ≤ 6.3 μm)), while those from BJT shells showed an average roughness of about 40 µm. This was expected, as the surface of BJT ceramic is inherently rougher compared to VPP ceramic material. As mentioned earlier, this contrast can be attributed to variations in manufacturing settings. Moreover, it can be observed that all cast samples accurately represent the cap geometry. Basically, both 3D printing processes are viable for producing ceramic material suitable as a shell for investment casting.
3.3. Casting Experiments with Large 3D-Printed and Conventionally Produced Ceramic Shells with Stepped Geometry
As was mentioned above in Section 2.4, because of limited time and resources, the large shells with a stepped geometry were examined only using the VPP process. The selected stepped geometry is relatively conventional. The design of the steps is intended to demonstrate edge reproduction and assess the influence of wall thickness on the microstructure. The primary goal is to illustrate the feasibility of manufacturing sizable ceramic shells and to compare the material characteristics of castings obtained from these shells with those produced through conventional ceramic shell manufacturing methods. The ability of 3D-printed ceramic shells to endure the velocities and pressures generated during spinning was not previously investigated, and there were concerns that these shells might crack under the influence of higher forces. However, during pouring, the 3D-printed ceramic shells were not damaged. Figure 8 shows the results of the casting. The samples with a stepped geometry were successfully cast, displaying no indications of surface irregularities. To analyze the microstructure, samples were sectioned from the casting specimens following the schematic representation in Figure 8c.
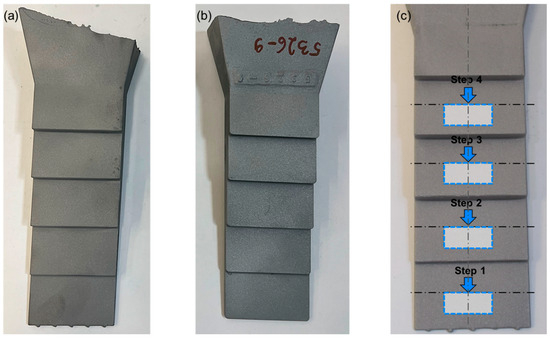
Figure 8.
Views of the casting samples obtained from the investment casting process of Inconel 718: (a) 3D-printed ceramic shell, (b) conventionally manufactured ceramic shell, and (c) schematic representation of samples for the metallographic examination of microstructure.
The microstructure observed in the samples fabricated through investment casting in 3D-printed shells resembles that observed in cast parts poured into conventionally manufactured ceramic shells (Figure 9). Generally, in both samples, solidification begins with the formation of Nb-lean austenitic dendrites. Such a dendritic structure is characteristic of the typical microstructure for the IN718 alloy achieved under slow solidification rates [26]. The microstructure comprises a γ-nickel matrix, prominent Laves phases rich in Nb and Mo, and irregularly segregated δ-phases within the interdendritic zones.

Figure 9.
SEM micrographs (SE—images) of the microstructure of the samples manufactured through investment casting (a) in 3D-printed ceramic shells and (b) in conventionally produced ceramic shells. EDS chemical composition analysis was performed near the surface. The white lines indicate the distances from the surface at which the measurements were taken in both samples.
The chemical compositions of cast samples were analyzed using the EDX technique. Table 5 summarizes the results from EDS scans that determine the main chemical composition of the samples near the surface. As can be seen, the chemical composition obtained in the samples manufactured through investment casting in 3D-printed shells is very similar to that found in samples poured into conventionally produced ceramic shells. No signs of reactions and, accordingly, of oxidation were found on the surfaces of stepped samples.

Table 5.
Main chemical compositions of investment cast samples from Inconel 718 (wt.%). The mean measurement deviations exhibit a tolerance of ±5%.
In both samples, the grains exhibit directional dendritic growth at the edges, typically nucleating on the mold wall and growing inward as the rest of the metal solidifies (Figure 10). In samples poured into a conventional ceramic shell, equiaxial grains are observed near the surface. These differences can be ascribed to the different cooling rates during solidification. As described above, the 3D-printed ceramic shells were additionally placed in sleeves made of ceramic crucibles filled with Al2O3 sand. This precautionary step was taken to protect the casting system from potential melt leakage. Thus, the cooling rate of the 3D-printed shell was remarkably slower compared to conventional ceramic shells.
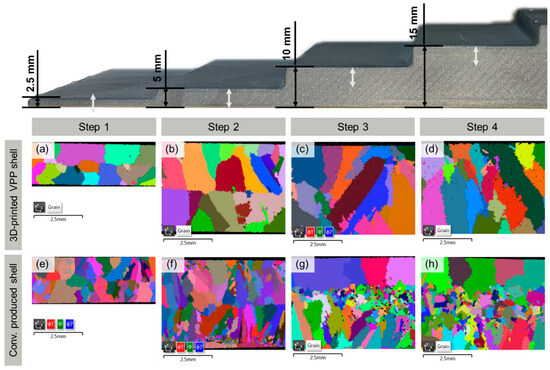
Figure 10.
Results of EBSD analysis of grain sizes in samples at different steps manufactured through investment casting (a–d) in a 3D-printed ceramic shell and (e–h) in conventionally produced ceramic shell. The average grain sizes are shown in Table 6.
The analysis of grain sizes is crucial for cast components, as they significantly impact the mechanical properties of materials, including strength, ductility, toughness, and resistance to fatigue. In the case of Inconel 718, finer grains enhance both tensile strength and yield strength. Moreover, fine-grained Inconel 718 exhibits better fatigue resistance due to reduced susceptibility to crack initiation and propagation compared to alloys with larger grains [27]. The choice of an optimal grain size for practical applications of Inconel 718 depends on specific factors such as operating temperature, mechanical loads, and environmental conditions. The consistently measured average grain size across various steps yields the results presented in Table 6. As evident, the average grain sizes of samples cast in 3D-printed shells are noticeably coarser compared to those cast in conventionally manufactured shells. These distinctions are attributed to variations in cooling behavior. Additional analysis is required to establish comparable cooling conditions, facilitating a meaningful directional comparison between ceramic shells produced through 3D printing and conventional methods, respectively.

Table 6.
Results of measurement of average grain sizes.
4. Conclusions
This investigation described a hybrid method for manufacturing ceramic shell molds using 3D printing. A trial casting of small cups and larger samples with stepped geometry was performed using different alloys that produced satisfactory results.
The following conclusions can be drawn from the presented study:
- Ceramic shells with different shapes and proper properties can be fabricated through VPP and BJT technologies. The average surface roughness of BJT samples was significantly higher compared to those processed using VPP. VPP samples exhibited a Ra of approximately 4.1 µm, found in all samples printed at angles greater than 10°, with the roughest surface having a Ra value of 15 µm at a low inclination angle of 5°. For BJT samples, the average surface roughness Ra, determined across all trials, was approximately 38 µm, showing no clear correlation with manufacturing angles.
- Three materials, namely F357, Inconel 718, and steel 17/4 PH, were successfully cast without signs of oxidation or surface irregularities. Surface roughness analysis revealed an average value of about 6 µm for castings poured into VPP shells (within the tolerance for investment casting surfaces according to VDG P690, Ra ≤ 6.3 μm), while BJT shells exhibited an average roughness of approximately 40 µm.
- VPP technology was employed to manufacture large ceramic shells with a stepped geometry, demonstrating the feasibility of producing sizable ceramic shells. A comparison of the material characteristics between castings obtained from these 3D-printed shells and those produced through traditional ceramic shell manufacturing methods revealed a similar behavior.
A comparative analysis of VPP and BJT as additive manufacturing techniques for the production of ceramic reveals that both methods are viable for producing ceramic material suitable as a shell for investment casting, and both offer unique advantages and challenges. The choice between VPP and BJT for ceramics depends on specific project requirements. VPP excels in precision and detail, while BJT offers economic viability for larger components. A thorough understanding of process intricacies and material behavior is imperative and needs to be improved for successful implementation in ceramic additive manufacturing.
Author Contributions
I.S.: Methodology, Visualization, Writing—Original Draft. H.H.: Conceptualization, Supervision, Writing—Review and Editing. W.T.: Formal analysis, Investigation, Writing—Review and Editing. A.K.: Investigation, Formal analysis, Writing—Review and Editing. C.M.T.: Investigation, Writing—Review and Editing. All authors have read and agreed to the published version of the manuscript.
Funding
The authors gratefully acknowledge the financial support provided by the Federal Ministry for Economic Affairs and Climate Action (BMWK) for the LUFO FAST Project—‘Konzeption und Entwicklung von integrierten, innovativen und digital vernetzten Prozessketten mit extrem schnellen Fertigungszyklen als Basis einer agilen Produktion für zukünftige hybridelektrische Luftfahrtantriebe’ (20L2105C). The authors gratefully acknowledge the financial support provided by the European Regional Development Fund (ERDF) for the ProFIT Project—‘Erforschung ganzheitlicher, hybrid-elektrischer Antriebskomponenten für die Luftfahrt’ (80257642).
Data Availability Statement
Data are contained within the article.
Conflicts of Interest
Author Christian Mendieta Terán was employed by the company Lithoz GmbH. The remaining authors declare that the research was conducted in the absence of any commercial or financial relationships that could be construed as a potential conflict of interest.
Abbreviations
| VPP | Vat Photopolymerization |
| BJT | Binder Jetting Technology |
| DMD | Digital Mirror Device |
| EDX | Energy-Dispersive X-ray Spectroscopy |
| EBSD | Electron Backscattering Diffraction |
References
- Campbell, J. Complete Casting Handbook: Metal Casting Processes, Metallurgy, Techniques and Design; Butterworth-Heinemann: Oxford, UK, 2015. [Google Scholar]
- Horton, R.A. Investment Casting. In ASM Handbook; Casting: 2008; ASM International: Almere, The Netherlands; Volume 15.
- Beeley, P.R.; Smart, R.F. Investment Casting; CRC Press: Boca Raton, FL, USA, 2023. [Google Scholar]
- Ahmad Mehrabi, H.; Salonitis, K.; Jolly, M. Sustainable Investment Casting. In Proceedings of the 14th World Conference in Investment Casting, Paris, France, 19 April 2016. [Google Scholar]
- Gibson, I.; Rosen, D.W.; Stucker, B.; Khorasani, M.; Rosen, D.; Stucker, B.; Khorasani, M. Additive Manufacturing Technologies; Springer: Cham, Switzerland, 2021. [Google Scholar]
- Du, W.; Ren, X.; Pei, Z.; Ma, C. Ceramic binder jetting additive manufacturing: A literature review on density. J. Manuf. Sci. Eng. 2020, 142, 040801. [Google Scholar] [CrossRef]
- Halloran, J.W. Ceramic stereolithography: Additive manufacturing for ceramics by photopolymerization. Annu. Rev. Mater. Res. 2016, 46, 19–40. [Google Scholar] [CrossRef]
- Curodeau, A.; Sachs, E.; Caldarise, S. Design and fabrication of cast orthopedic implants with freeform surface textures from 3-D printed ceramic shell. J. Biomed. Mater. Res. Off. J. Soc. Biomater. Jpn. Soc. Biomater. Aust. Soc. Biomater. Korean Soc. Biomater. 2000, 53, 525–535. [Google Scholar] [CrossRef]
- Kim, E.H.; Choi, H.H.; Jung, Y.G. Fabrication of a ceramic core for an impeller blade using a 3D printing technique and inorganic binder. J. Manuf. Process. 2020, 53, 43–47. [Google Scholar] [CrossRef]
- Huang, S.; Ye, C.; Zhao, H.; Fan, Z. Additive manufacturing of thin alumina ceramic cores using binder-jetting. Addit. Manuf. 2019, 29, 100802. [Google Scholar] [CrossRef]
- Rodríguez-González, P.; Zapico, P.; Robles-Valero, P.E.; Barreiro, J. Novel post-processing procedure to enhance casting molds manufactured by binder jetting AM. Addit. Manuf. 2022, 59, 103142. [Google Scholar] [CrossRef]
- Griffith, M.L.; Halloran, J.W. Freeform fabrication of ceramics via stereolithography. J. Am. Ceram. Soc. 1996, 79, 2601–2608. [Google Scholar] [CrossRef]
- Corcione, C.E.; Greco, A.; Montagna, F.; Licciulli, A.; Maffezzoli, A. Silica moulds built by stereolithography. J. Mater. Sci. 2005, 40, 4899–4904. [Google Scholar] [CrossRef]
- Zhou, W.Z.; Li, D.; Chen, Z.W.; Chen, S. Direct fabrication of an integral ceramic mould by stereolithography. Proc. Inst. Mech. Eng. Part B J. Eng. Manuf. 2010, 224, 237–243. [Google Scholar] [CrossRef]
- Bae, C.J.; Halloran, J.W. Integrally cored ceramic mold fabricated by ceramic stereolithography. Int. J. Appl. Ceram. Technol. 2011, 8, 1255–1262. [Google Scholar] [CrossRef]
- Wang, L.; Liu, X.; Wang, G.; Tang, W.; Li, S.; Duan, W.; Dou, R. Partially stabilized zirconia moulds fabricated by stereolithographic additive manufacturing via digital light processing. Mater. Sci. Eng. A 2020, 770, 138537. [Google Scholar] [CrossRef]
- Magerramova, L.A.; Kozlov, B.G.; Protasov, V.E. Development of a method for manufacturing ceramic tooling for precision casting of blades made of heat-resistant alloys using additive technologies. J. Phys. Conf. Ser. 2021, 1891, 012043. [Google Scholar] [CrossRef]
- Ozkan, B.; Sameni, F.; Bianchi, F.; Zarezadeh, H.; Karmel, S.; Engstrøm, D.S.; Sabet, E. 3D printing ceramic cores for investment casting of turbine blades, using LCD screen printers: The mixture design and characterisation. J. Eur. Ceram. Soc. 2022, 42, 658–671. [Google Scholar] [CrossRef]
- Basar, O.; Veliyath, V.P.; Tarak, F.; Sabet, E. A Systematic Study on Impact of Binder Formulation on Green Body Strength of Vat-Photopolymerisation 3D Printed Silica Ceramics Used in Investment Casting. Polymers 2023, 15, 3141. [Google Scholar] [CrossRef] [PubMed]
- Layher, M.; Hopf, A.; Just, D.; Eckhardt, L.; Bliedtner, J.; Reichenbächer, H.; Antonow, F. Near-Net-Shape Production of Ceramic Investment Casting Molds Using Stereolithography. Interceram-Int. Ceram. Rev. 2022, 71, 24–29. [Google Scholar] [CrossRef]
- Hu, K.H.; Wang, H.Y.; Lu, K.; Feng, Q.; Yang, D.D.; Cao, J.; Ran, X. Fabrication of silica-based ceramic cores with internal lattice structures by stereolithography. China Foundry 2022, 19, 369–379. [Google Scholar] [CrossRef]
- Li, Q.; Chen, T.; Liang, J.; Zhang, C.; Li, J.; Zhou, Y.; Sun, X. Manufacturing of ceramic cores: From hot injection to 3D printing. J. Mater. Sci. Technol. 2023, 134, 95–105. [Google Scholar] [CrossRef]
- Zimbeck, W.; Rice, R. Stereolithography of ceramics and metals. In Proceedings of the IS&T’s 50th Annual Conference, Cambridge, MA, USA, 18–23 May 1997; The Society for Imaging Science and Technology: Fribourg, Switzerland, 1997; pp. 649–655. [Google Scholar]
- Kollenberg, W. Additive Fertigung keramischer Komponenten: Grundlagen und Anwendung; Vulkan-Verlag GmbH: Essen, Germany, 2020. [Google Scholar]
- Yao, J.; Dong, L.; Wu, Z.; Wang, L.; Shen, B.; Yang, X. Interfacial Reaction Mechanism between Ceramic Mould and Single Crystal Superalloy for Manufacturing Turbine Blade. Materials 2022, 15, 5514. [Google Scholar] [CrossRef] [PubMed]
- Antonsson, T.; Fredriksson, H. The effect of cooling rate on the solidification of INCONEL 718. Metall. Mater. Trans. B 2005, 36, 85–96. [Google Scholar] [CrossRef]
- Moiz, M. The Influence of Grain Size on Mechanical Properties of Inconel 718. Master Thesis, Linköping University, Linköping, Sweden, 2013. URN: urn:nbn:se:liu:diva-113148. Available online: https://liu.diva-portal.org/smash/record.jsf?pid=diva2%3A779274&dswid=8132 (accessed on 24 July 2024).
Disclaimer/Publisher’s Note: The statements, opinions and data contained in all publications are solely those of the individual author(s) and contributor(s) and not of MDPI and/or the editor(s). MDPI and/or the editor(s) disclaim responsibility for any injury to people or property resulting from any ideas, methods, instructions or products referred to in the content. |
© 2024 by the authors. Licensee MDPI, Basel, Switzerland. This article is an open access article distributed under the terms and conditions of the Creative Commons Attribution (CC BY) license (https://creativecommons.org/licenses/by/4.0/).