Article

Strain-Induced Surface Roughening of Thin Sheets and Its Effects on Metal Forming and Component Properties

by
Úlfar Arinbjarnar
1,*,
Rune Juul Christiansen
2,
Maximilian Knoll
1,
Karen Pantleon
1,
Morten Stendahl Jellesen
1 and
Chris Valentin Nielsen
1,*
1
Department of Civil and Mechanical Engineering, Technical University of Denmark, 2800 Kgs. Lyngby, Denmark
2
AH Metal Solutions, 3450 Alleroed, Denmark
*
Authors to whom correspondence should be addressed.
J. Manuf. Mater. Process. 2023, 7(5), 174; https://doi.org/10.3390/jmmp7050174
Submission received: 31 August 2023 / Revised: 22 September 2023 / Accepted: 25 September 2023 / Published: 27 September 2023

Abstract

:
Straining of sheet metal leads to surface roughness changes. In this study, foils of AISI 201 and AISI 304 stainless steel were strained in uniaxial tension to impose roughening of their surfaces. Thereafter, the corrosion resistance, electrical resistivity, magnetic field density, and lubricated friction of the resulting surfaces were evaluated. The effect of strain-rate on the surface roughening, and thereby on the friction against tools, corrosion resistance, and occurrence of deformation-induced martensite was investigated. The AISI 304 material showed higher roughening than AISI 201 at low strain-rate. Lubricated friction is clearly affected by the changes to the surface of the strained foils that occur. When simulating a micro-forming process, the effect of strain-induced changes should be included where possible to maintain a high fidelity of the simulation. Strain-rate, in the range tested in this work, had only a minor effect on corrosion properties; however, the martensite fraction was reduced for material elongated at higher strain-rates.

1. Introduction

The topography of metallic surfaces changes when subjected to plastic deformation. This typically leads to roughening of the surface, impeding a fine finish of free surfaces after deformation-based processes. This is especially a challenge if high degrees of deformation are needed as the extent of surface roughening is proportional to the applied strain [1]. The effects of various parameters and factors on the roughening of free surfaces have been investigated previously. Dai and Chiang [2] studied the roughening of aluminum with grain sizes from tens of micrometers to millimeters for a constant material thickness. They found that the rate of surface roughening is positively correlated to the average grain size of the material. Shimizu et al. [3] investigated the effect of different specimen thicknesses on the roughening behavior of hot-rolled iron with between 10 and 36 grains through the specimen thickness. They found that with increasing strain, the difference in strain between individual grains grows. This was further exacerbated for specimens that had few grains through the thickness. Guangnan et al. [4] investigated the effect of initial roughness and strain-state on roughening and roughening rate as a function of applied strain. They used three types of steel and two types of aluminum in their study. They found that the strain-state has minimal effect on roughening, indicating that the mechanism behind the roughening remains the same, thereby suggesting that the extent of roughening is primarily dependent on the equivalent strain. They concluded that the specimen thickness did not affect the magnitude of roughening. Azushima and Miyagawa [5] explored various parameters and determined that the roughening is independent of strain-state, hydrostatic pressure, and stress type. They showed that it was dependent on the grain size and grain orientation. Mahmudi and Mehdizadeh [6] studied the roughening of surfaces of 70–30 brass sheets in uniaxial and equibiaxial stretching. They found that the rate of roughening was dependent on the grain size and a factor they termed the roughening rate. Baydogan et al. [7] performed tests on two types of austenitic stainless steel and found that they showed different roughening behavior. They theorized that this is due to both a difference in grain size, and the roughening rate, which they suggest may be a material property. Furushima et al. [8] investigated the influence of grain size and material thickness on surface roughening. They showed that, for approximately the same grain size, pure aluminum foils roughen at a considerably higher rate than pure copper foils of the same thickness under equibiaxial stretching. This shows that the grain size is not the only factor and that other material-dependent parameters contribute to the roughening.
The roughening of the surface has been linked to the formability of metals. Yamaguchi and Mellor [9] investigated the effect of thickness and grain size on fracture strain. They found that the fracture strain is dependent on both factors through their influence on surface roughening. As the grain size increases, or the thickness decreases, there is a reduced capacity for deformation and a higher risk of fracture. Chen et al. [10] showed that this is caused by localization of deformation, which becomes even more localized as the thickness of the foil decreases. Yamaguchi et al. [11] showed how the formability of a material can be increased by reducing the surface roughness intermittently by polishing of the material surface. The polishing decreased the effect of deep valleys that could have otherwise caused the onset of local necking. This was particularly noticeable for thinner specimens, indicating that the effect of surface roughening is more pronounced as thickness decreases. Sundaram [12] also found that intermittent polishing can improve the formability due to its effect on the surface topography. Ottenklev et al. [13] showed how polishing of the surface changes the relation between strain and surface roughness. The relation was no longer approximately monotonic, and instead led to a decrease in surface roughness after a strain of 0.14. In progressive forming, surfaces roughen in each forming step as the workpiece material is strained. For the blankholder region in deep drawing, the surface roughness has been shown to affect friction, which influences material flow into the formed part. Kasuga et al. [14] showed how the friction in lubricated deep drawing increases with grain size. Surface roughening increases with grain size. This led to a direct effect on the real contact area, which increased for the larger grain sizes as valleys were deeper. Their material therefore needed to be compressed further before entrapped lubricant could be pressurized. This was corroborated by Wu et al. [15], who showed how the roughening of the surface of a galvanized stainless steel leads to an increase in friction. They explained this by lubricant starvation at surface asperity peaks after applying a certain areal concentration of lubricant. The increase in valley density and depth led to an increased capacity for the surface to store lubricant, which was not squeezed out to lubricate the surface when pressure was applied.
The behavior of the surface during straining is dependent on whether the surface is free or not. Tool contact will lead to flattening of asperities, making the surface smoother with increasing normal pressure, while surface roughening will counteract this. Saha and Wilson [16] compared the roughening of surfaces in tool contact and free surfaces. They found that the difference in surface roughening was in the order of 10% when testing aluminum alloy 1100-H14 in bending under tension with elongation. The level of applied contact pressure was not stated. Typical blankholder pressures that are applied in micro-deep drawing are in the range of 5–10 MPa, and supposedly smaller than in bending under testing, and may therefore be low enough to have only a small effect on the surface roughening behavior.
In this work, only free surface roughening is considered to isolate the effect of surface roughening on the various parameters investigated. A correlation is drawn between (1) the strain-induced surface roughening and the frictional conditions of the new surface lubricated by flooding, (2) between the surface changes and the corrosion resistance of the material, and (3) between the surface changes and the electrical contact resistance of the foil surface. The aim of this work is to determine how micro-formed parts of two different stainless steels are affected by the strain-rate at which they are formed, the resulting surface roughness evolution, and the performance tested in terms of friction against tool steel, electrical contact resistance and corrosion.

2. Materials and Methods

The materials that were tested in this work were received from AH Metal Solutions A/S; a company based in Alleroed, Denmark that manufactures parts through micro-sheet forming. The material would otherwise be used as is in their production. In this way, the surface roughening effect is investigated in the context of industrial micro-sheet forming. The specific process in which the material would be used is a micro-deep drawing process that is run at a production rate of 350 strokes per minute. Cups of 2.6 mm height are formed in a progressive forming process to create studs, shown in Figure 1, for use in ECG electrodes. The process is lubricated through flooding by spraying the lubricant onto the forming area, which ensures abundant lubrication in all process steps. The effect of lubricant starvation at asperity peaks on the friction should therefore be reduced or entirely removed compared to using a set areal density of lubricant. Based on the production conditions, the strain-rates applied to the material would be in the order of 100/s. Other investigations [5,17] have shown that surface roughening is not dependent on strain-rate. However, in the interest of exploring the effect of strain-rate on other properties, three strain-rates (0.0002/s, 0.02/s, and 20/s) were applied in this work.
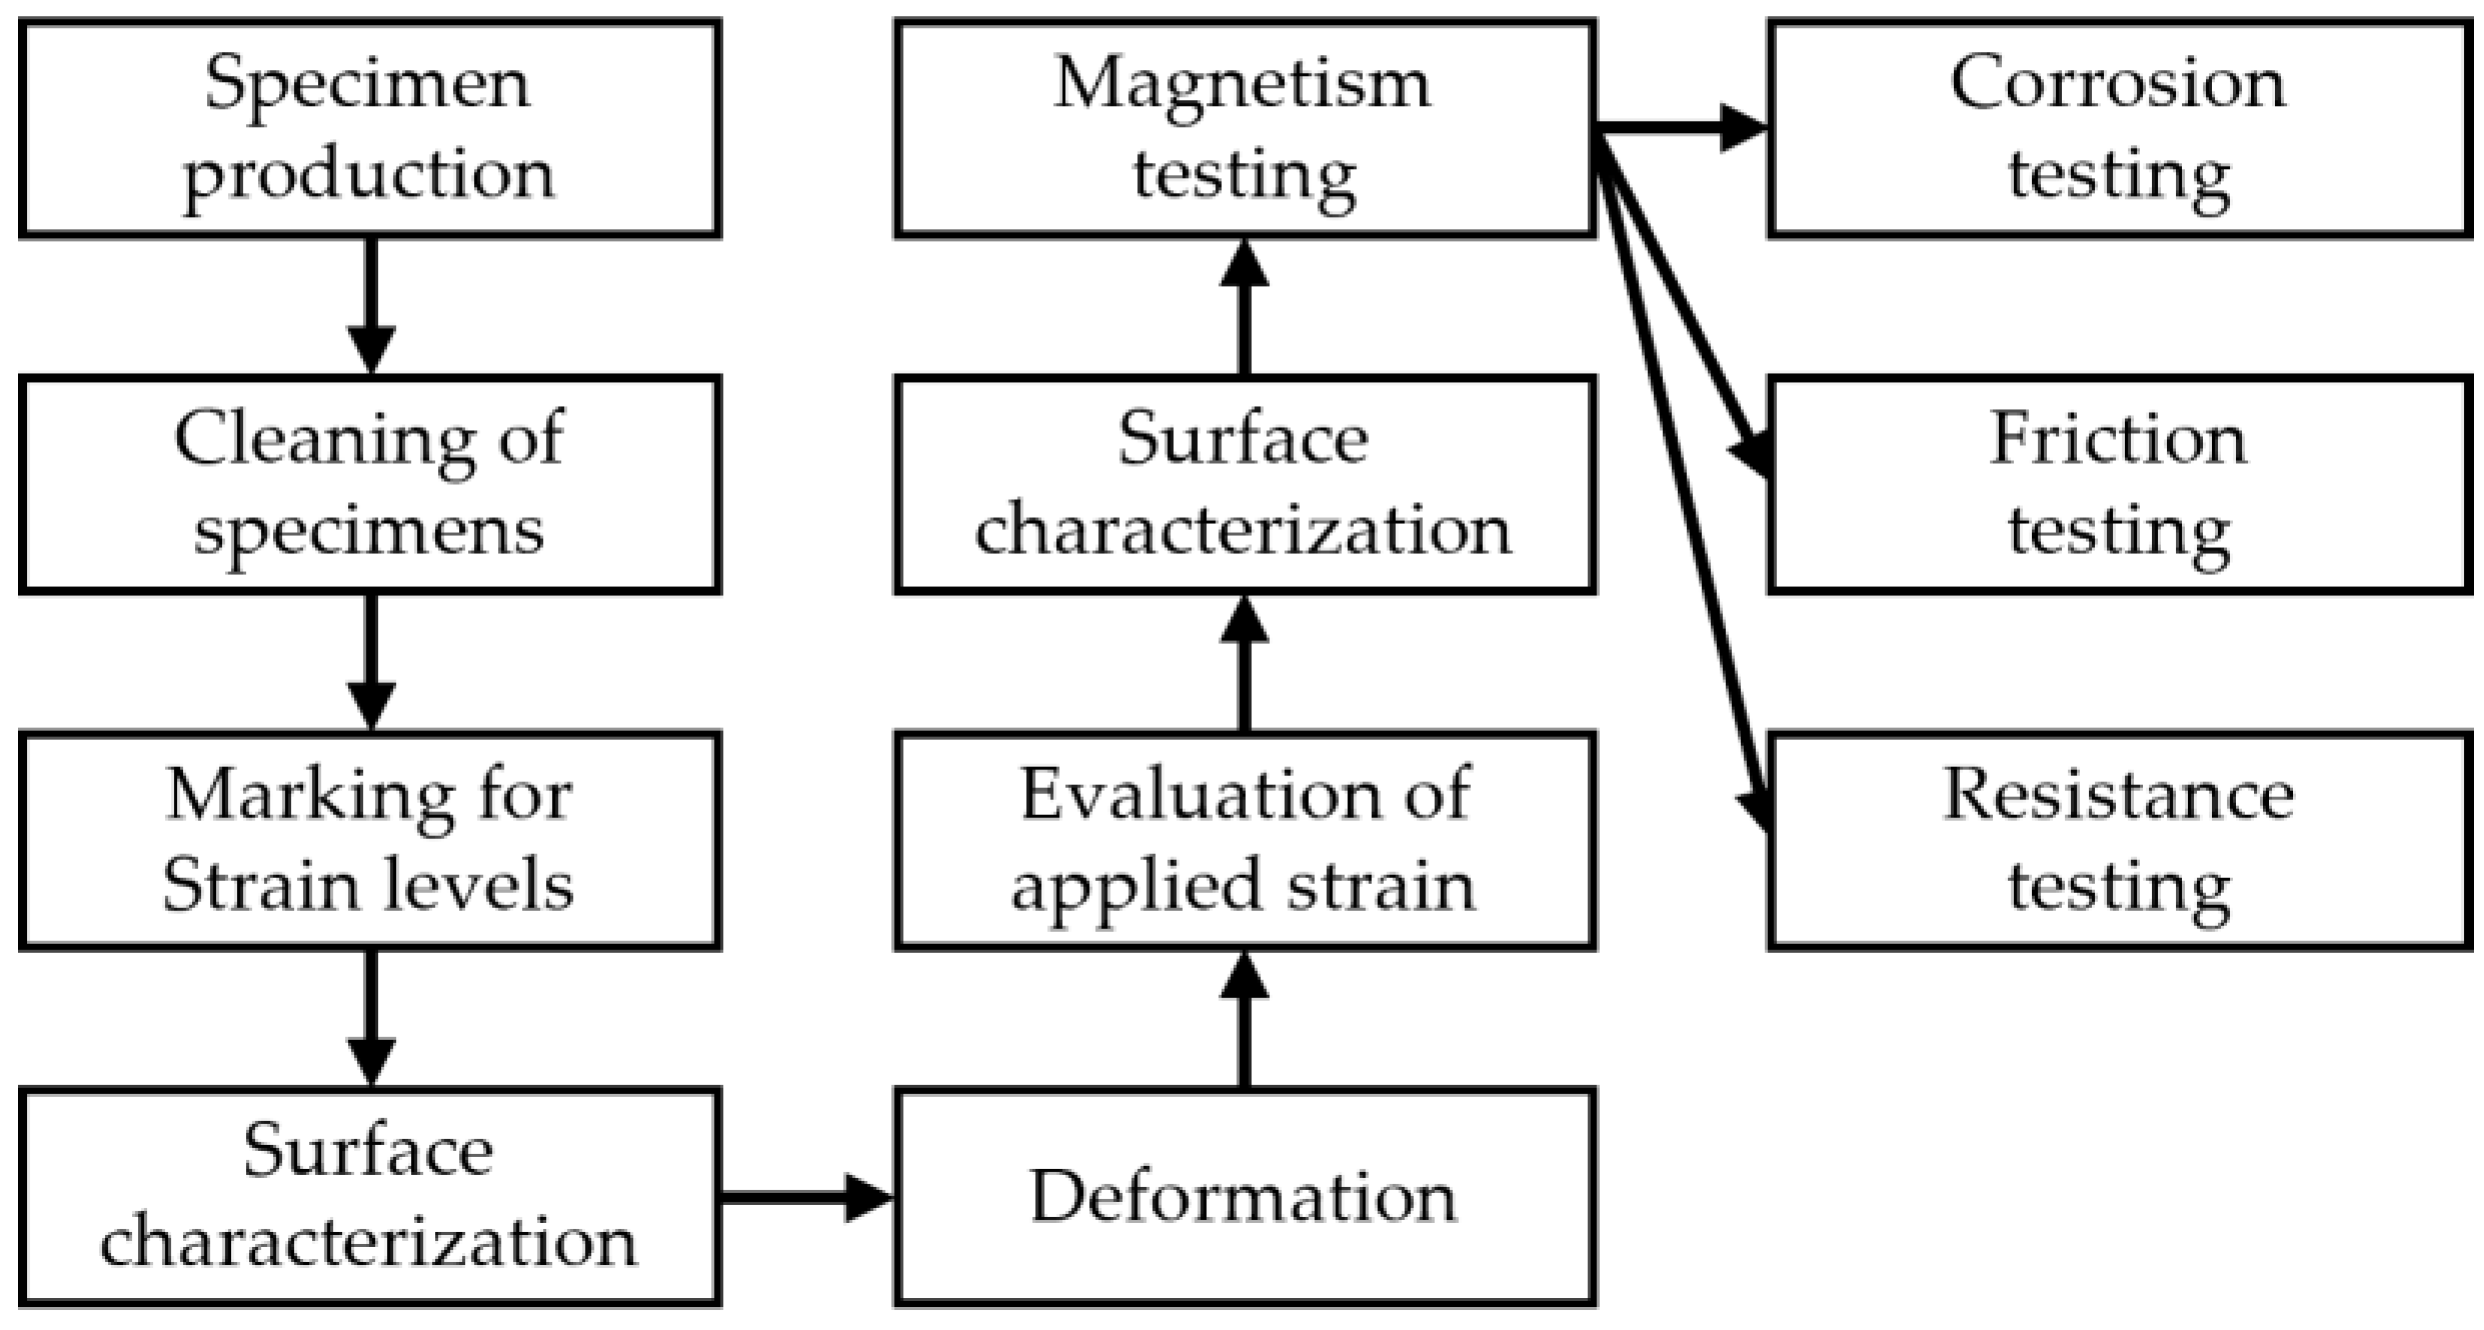
An overview of the workflow applied in this work, from the production of specimens to testing of the specific properties, is given in Figure 2.

2.1. Materials and Sample Geometry

Standard tensile test specimens were prepared from coils of 0.2 mm thick AISI 201 and two different coils of AISI 304 that had been solution annealed in H2. Both materials are austenitic stainless steels in the as-delivered form. The AISI 304 specimens will be referred to as belonging to coil 1 or coil 2 from here on. The chemical composition of the two materials is shown in Table 1, and selected mechanical properties are shown in Table 2. These two materials are widely used in sheet metal forming as they have high formability and good mechanical properties. The average grain size of both materials was observed using light-optical microscopy (LOM) and found to be similar, with an average grain size diameter of 18–19 µm. This is in accordance with material certificates supplied by the producers of the material specifying grain size number 8.5 according to ASTM E112.
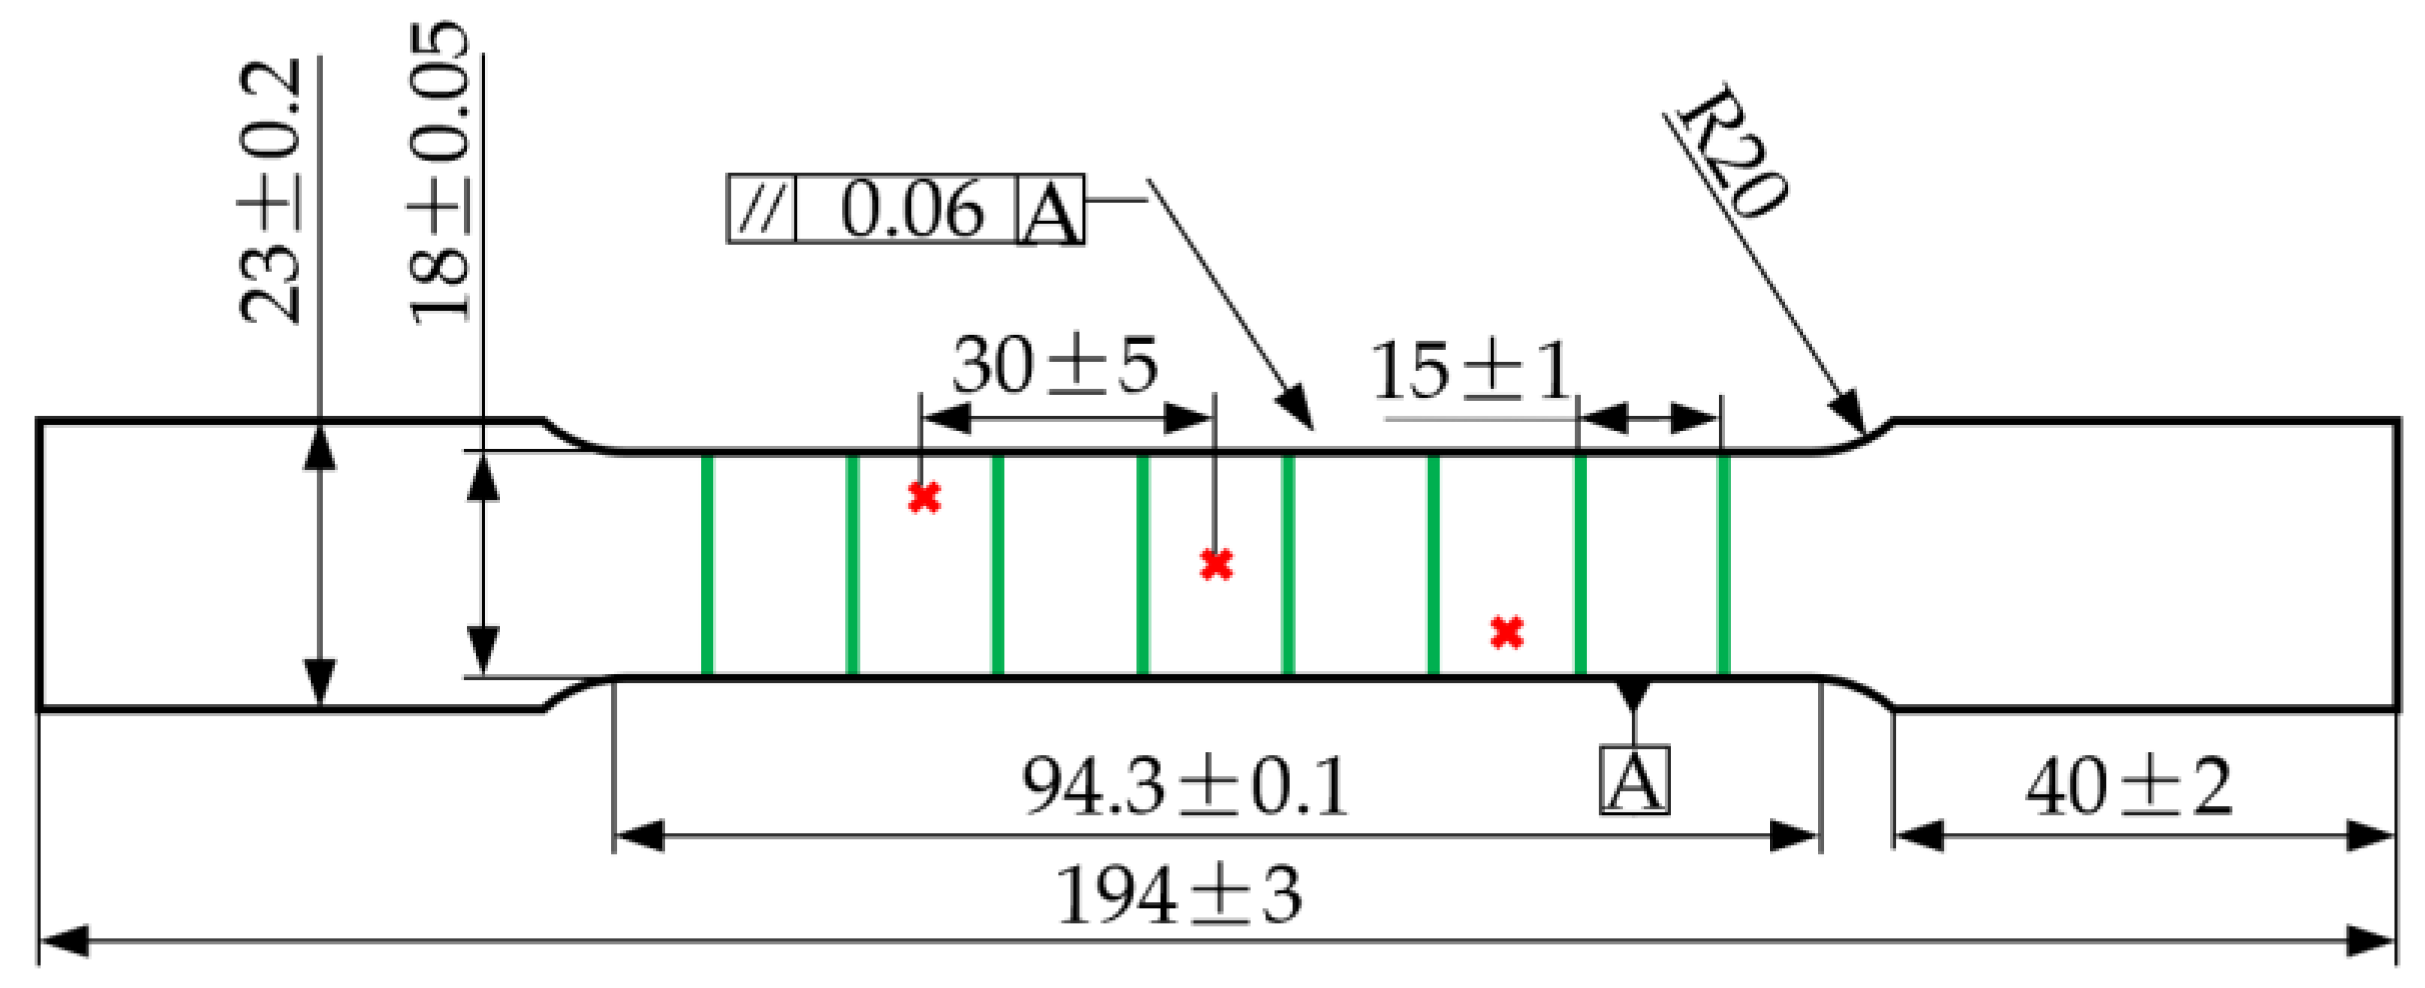
A technical drawing of the specimens is shown in Figure 3, which was produced according to specification for non-proportional specimens outlined in ISO6892. Specimens were prepared by stacking sections rough-cut from coils, and the specimen geometry then produced by EDM wire cutting. Each specimen was marked with lines along the reduced section, and the distances between the lines were measured using a DeMeet 220 coordinate measuring machine before and after elongation. This was necessary as physical extensometers would have introduced uncertainties in measuring how such thin specimens deform.

2.2. Uniaxial Tension at Different Strain-Rates

Two machines were used to elongate the material in uniaxial tension. For the smaller strain-rates, referred to as slow and medium from here on, an Instron 8872 universal testing machine with a load capacity of 10 kN was used. The two strain-rates were applied through different, constant crosshead velocities, 0.02 mm/s for the slow strain-rate and 2.0 mm/s for the medium strain-rate. The strain-rate varied over the duration of straining as the crosshead velocity was constant, but the instantaneous strain-rate was different by a factor of 100 at any given strain. The mean strain-rates in the tests were in the order of 0.0002/s and 0.02/s for the slow and medium strain-rates, respectively. After a specimen was pulled, it was unloaded at a rate of 1.0 mm/min until the stored elastic energy had dissipated.
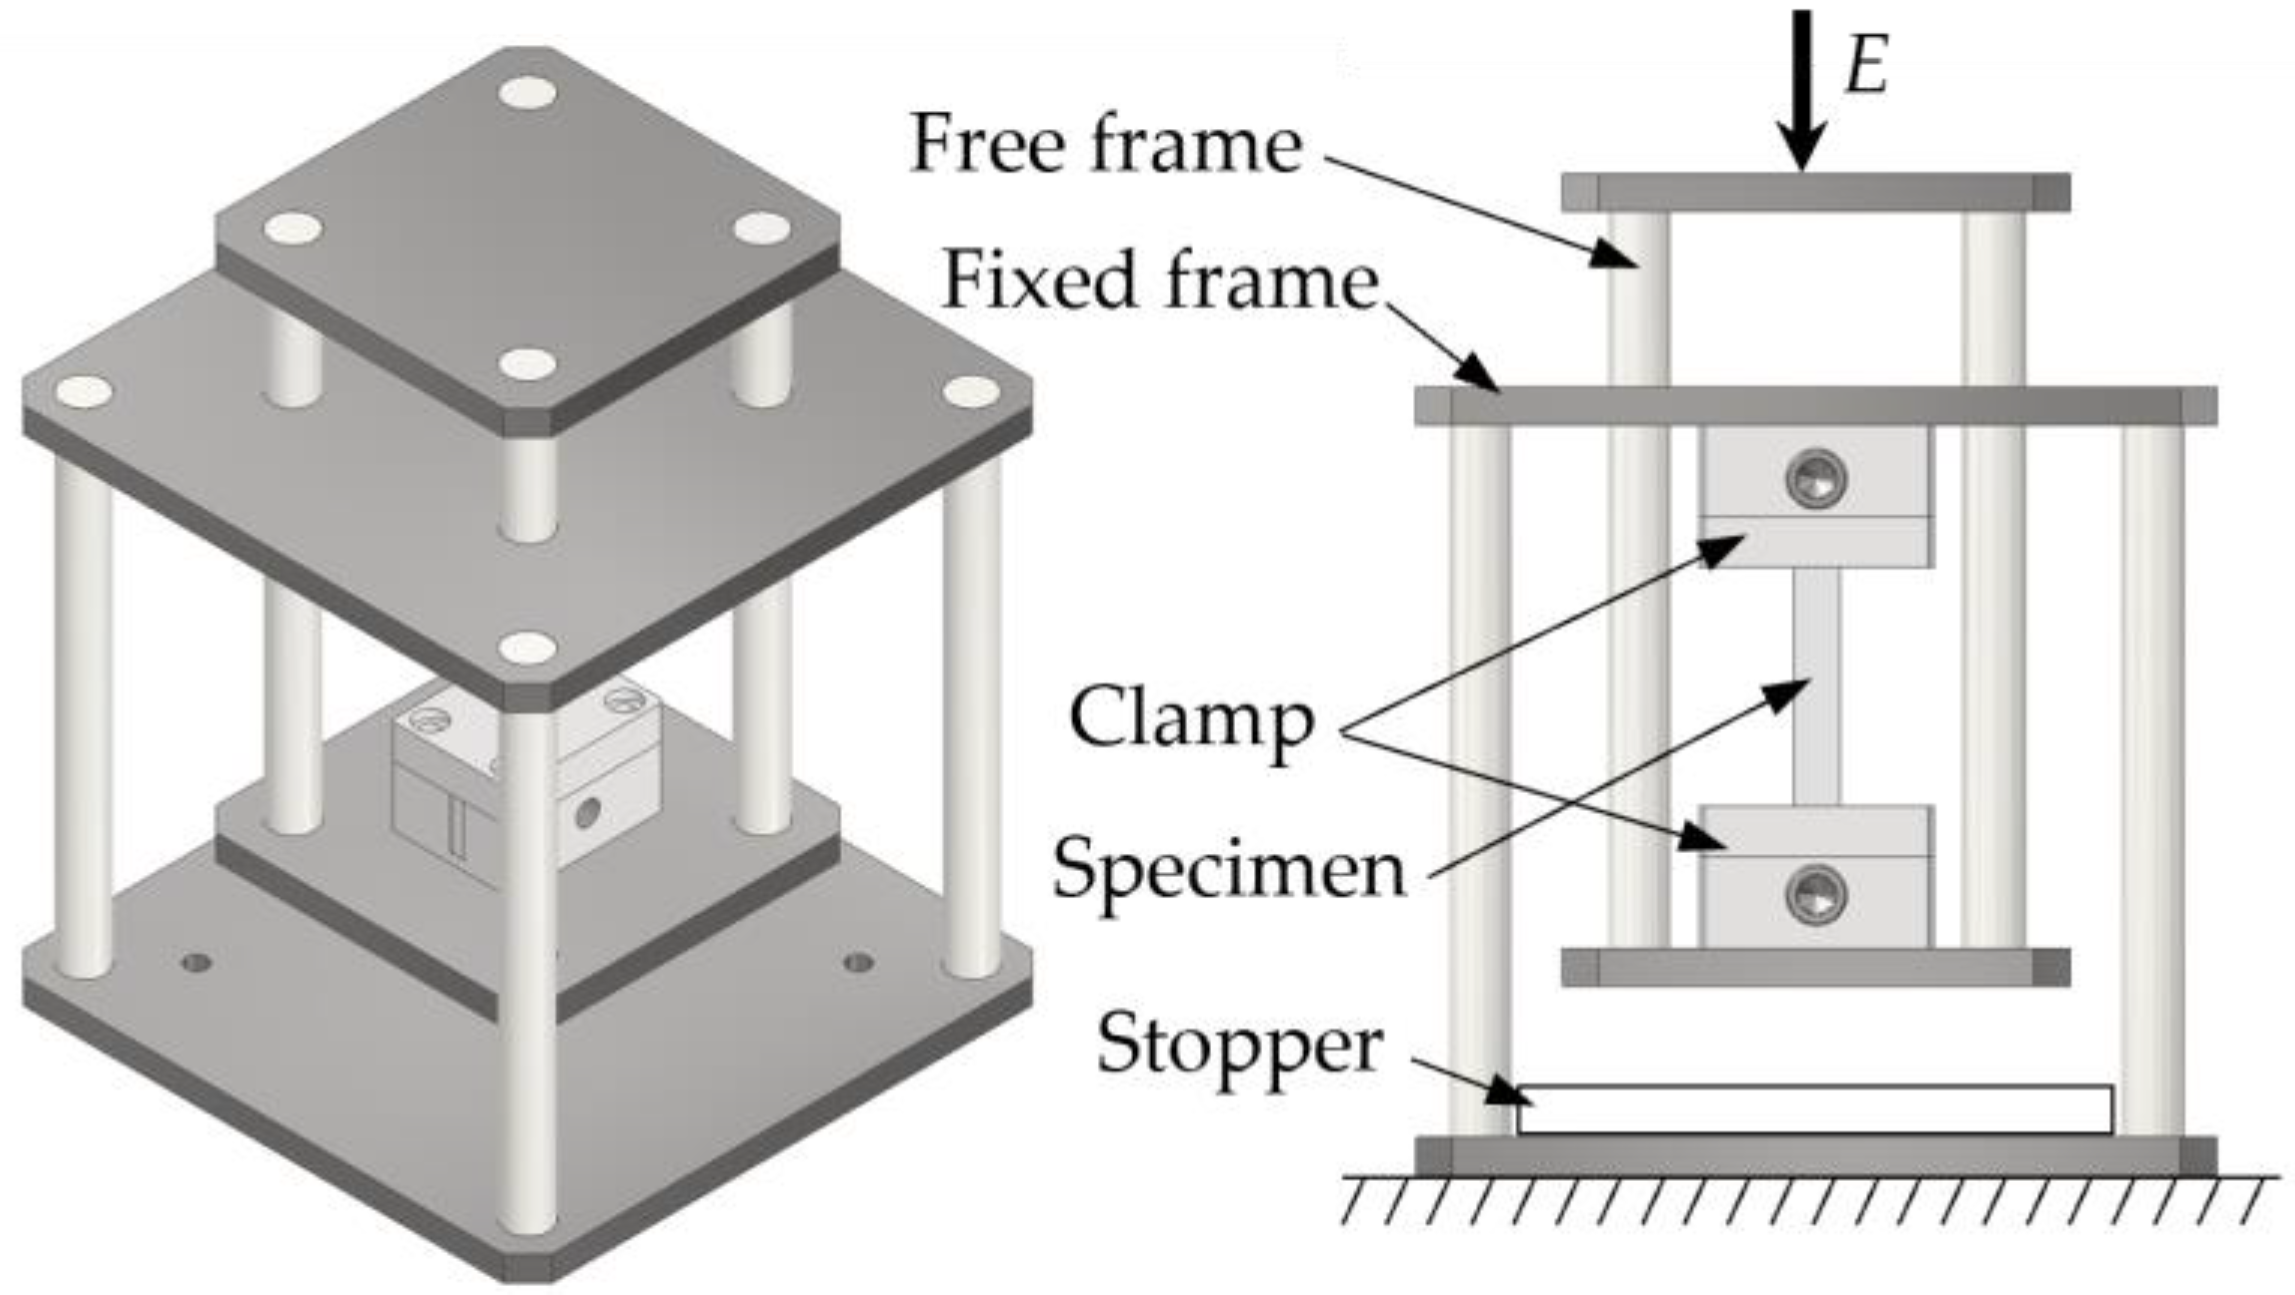
An Instron Dynatup 9750 drop-tower was used to apply a higher strain-rate. The machine works by dropping a weight from a defined height, unleashing the potential energy of the weight as it strikes the fixture, shown in Figure 4. This imposes acceleration of the free part relative to the fixed part and thereby elongation of the specimen. A total weight of 39.8 kg ± 0.1 kg was used, which was suspended at a height of 700 mm ± 5 mm above the fixture. The weight of the free part, including gripper, was 16.4 kg ± 0.5 kg. Based on an energy balance, the initial velocity of the free part of the fixture was between 3.2 m/s (perfectly inelastic collision) and 5.8 m/s (perfectly elastic collision), giving an initial strain-rate between 39/s and 72/s. As the strain-rate is not controlled through compensation for the increasing length of the specimen, it reduces across the test to between 25/s and 46/s. Despite the strain-rate not being constant, it was larger at any given strain compared to the medium strain-rate by a factor of at least 1000. Testing was consistently conducted, ensuring that each specimen, when pulled to the same strain, experienced consistent strain-rate development.
Five levels of intended strain (ε) were used in this work, 0.05, 0.08, 0.16, 0.25, and 0.33, to determine how the surface topography of the materials develops as a function of strain. The actual strain was measured based on the distance between marked lines on the samples (green lines in Figure 3). For each set of strain, strain-rate, and material, three specimens were elongated to allow for evaluation of the reproducibility of the straining.

2.3. Surface Characterisation

The surfaces of the specimens were characterized using an Olympus LEXT4100 confocal laser microscope, after surfaces were cleaned with ethanol. The roughness was determined in three locations on each side of the specimens so that a statistical average could be found. The locations of measurement followed a diagonal line across the surface, as shown by the red crosses in Figure 3. Measurements were processed using SPIP 6.7.7, with the Sa and Sds values being found by applying EUR 15178N and the S10z value being found by applying ISO 25178.

2.4. Testing of Friction

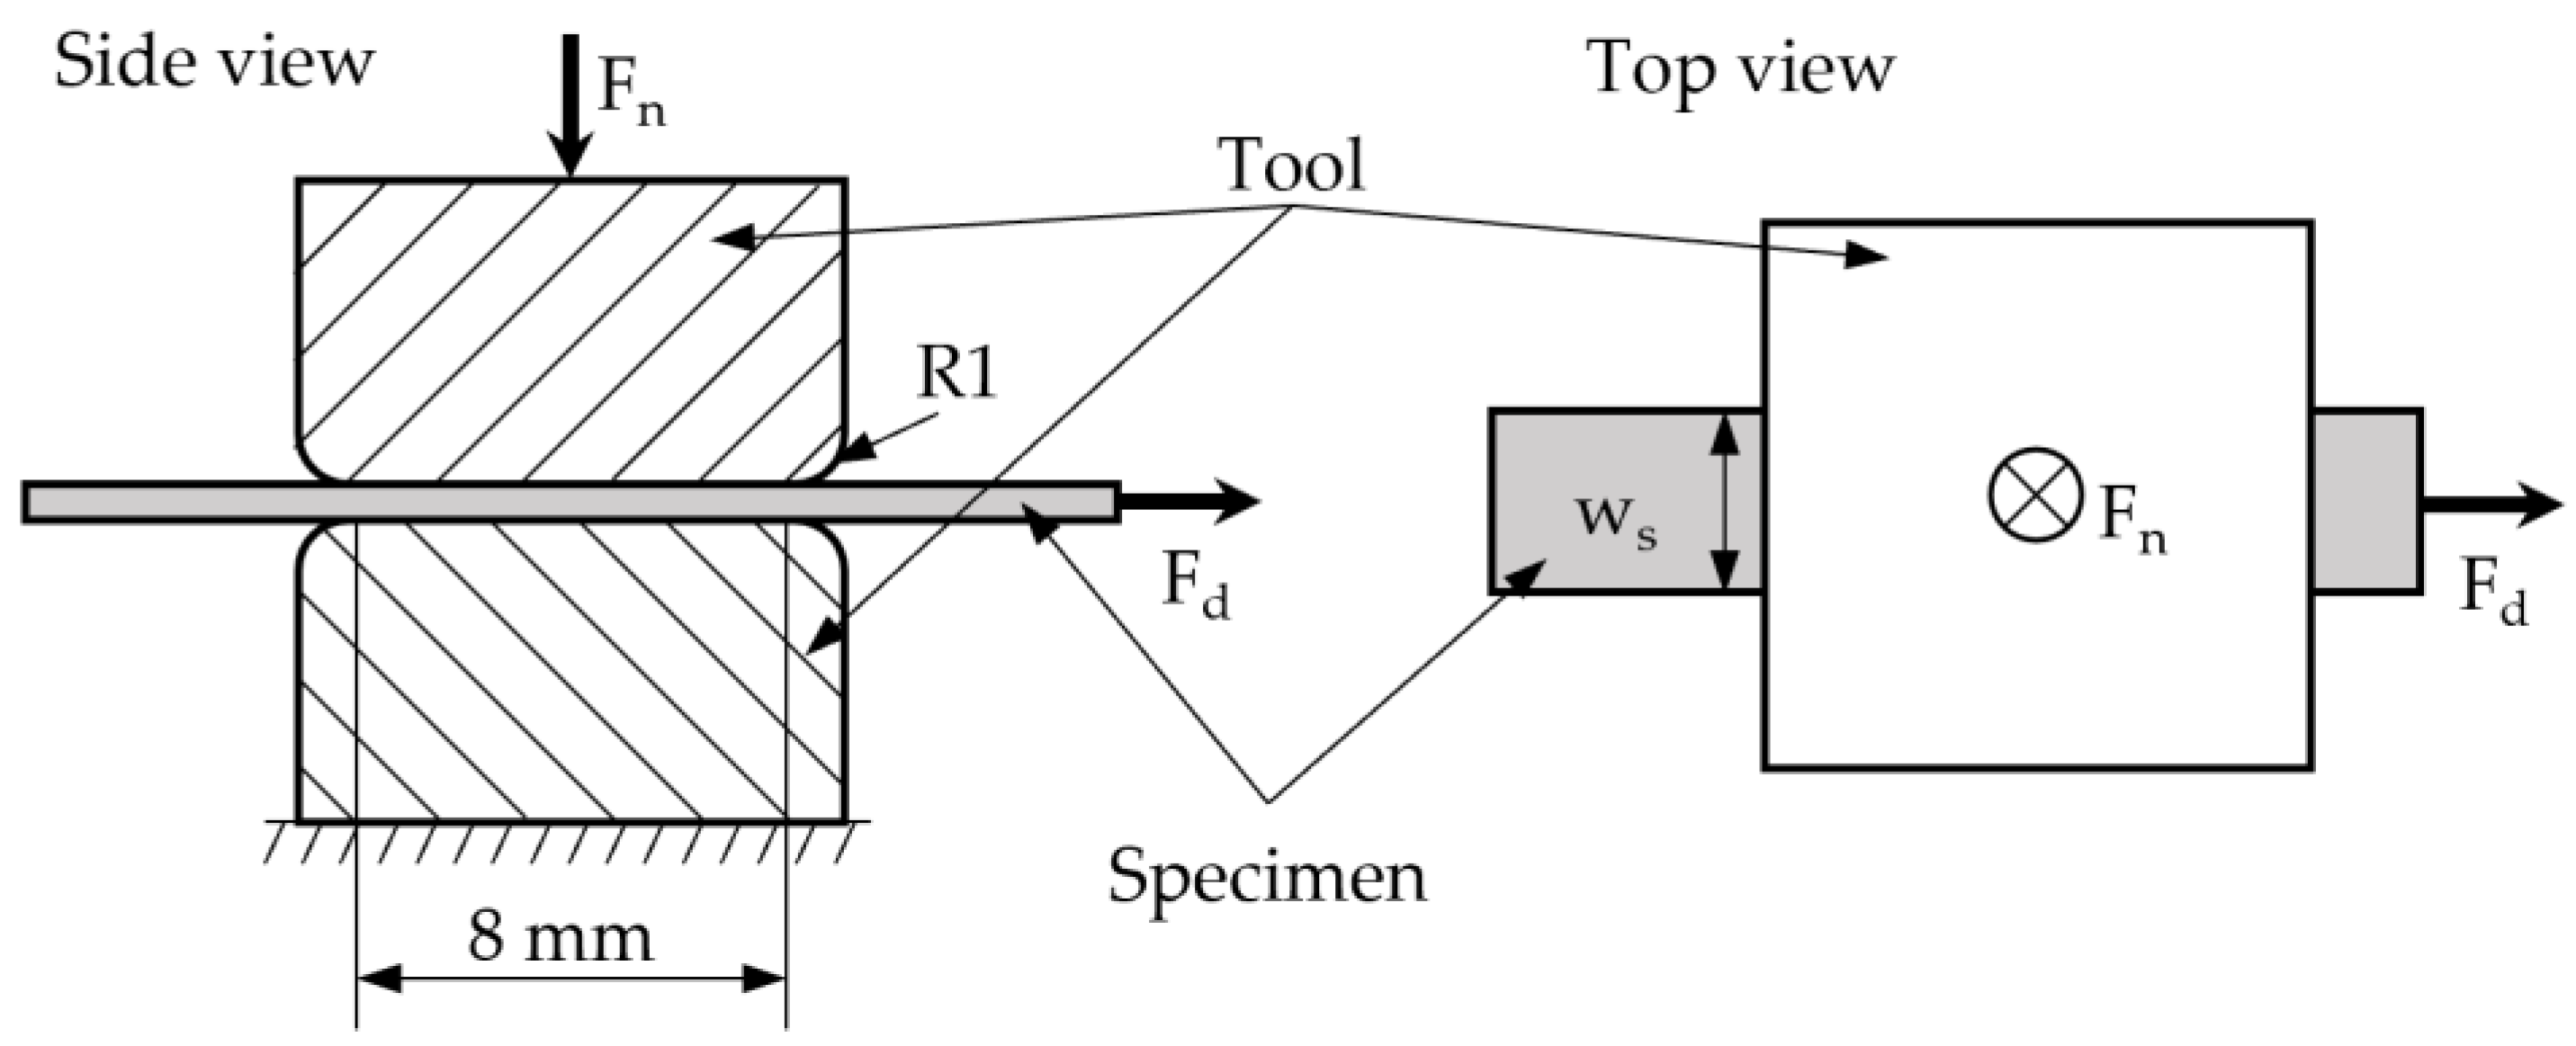
Friction was determined in a strip drawing test. The principle of this test is shown in Figure 5, where two tools are pressed together with a specimen between them under a load, Fn. The specimen was then pulled while the drawing force, Fd, was recorded. The normal pressure was 4.9 MPa ± 0.2 MPa to reflect the one seen in the industrial case [19]. The applied normal load was therefore based on the width of the specimens, which was measured with calipers before testing, and the width of the tools which was 8 mm. The tools were made by wire-EDM from Vanadis 8, a tool steel from Uddeholm [20], which had a hardness of 64 HRC. The surface was left as-received after wire-EDM and had an isotropic surface with a roughness of Ra = 0.154 µm ± 0.017 µm. The normal load was acquired at the same time as the drawing load, allowing for the coefficient of friction to be calculated at any time during the test using Equation (1).
µ = Fd/2Fn
The drawing speed was constant at 5 mm/s for all tests, with slight acceleration and deceleration at the beginning and end of tests. The drawing length was enough to ensure a region of stable friction, typically between 75 mm and 100 mm. Before lubricant application, specimens were cleaned with ethanol. Lubricant was applied using a sponge-brush in an amount that would ensure abundant lubrication. The lubricant that was used was rhenus FU60, an emulsion of oil in water, consisting of 10 v/v% ± 0.5 v/v% of oil to demineralized water. The drawing force was measured by a Burster 8614-6002 load cell that was attached to the moving element in the universal tribotester applied in this work [21]. The normal load was measured using a Kistler 9101C load cell. The calibration of both load cells was validated before testing. Tests for each strain level were repeated at least three times.

2.5. Evaluation of Corrosion Resistance

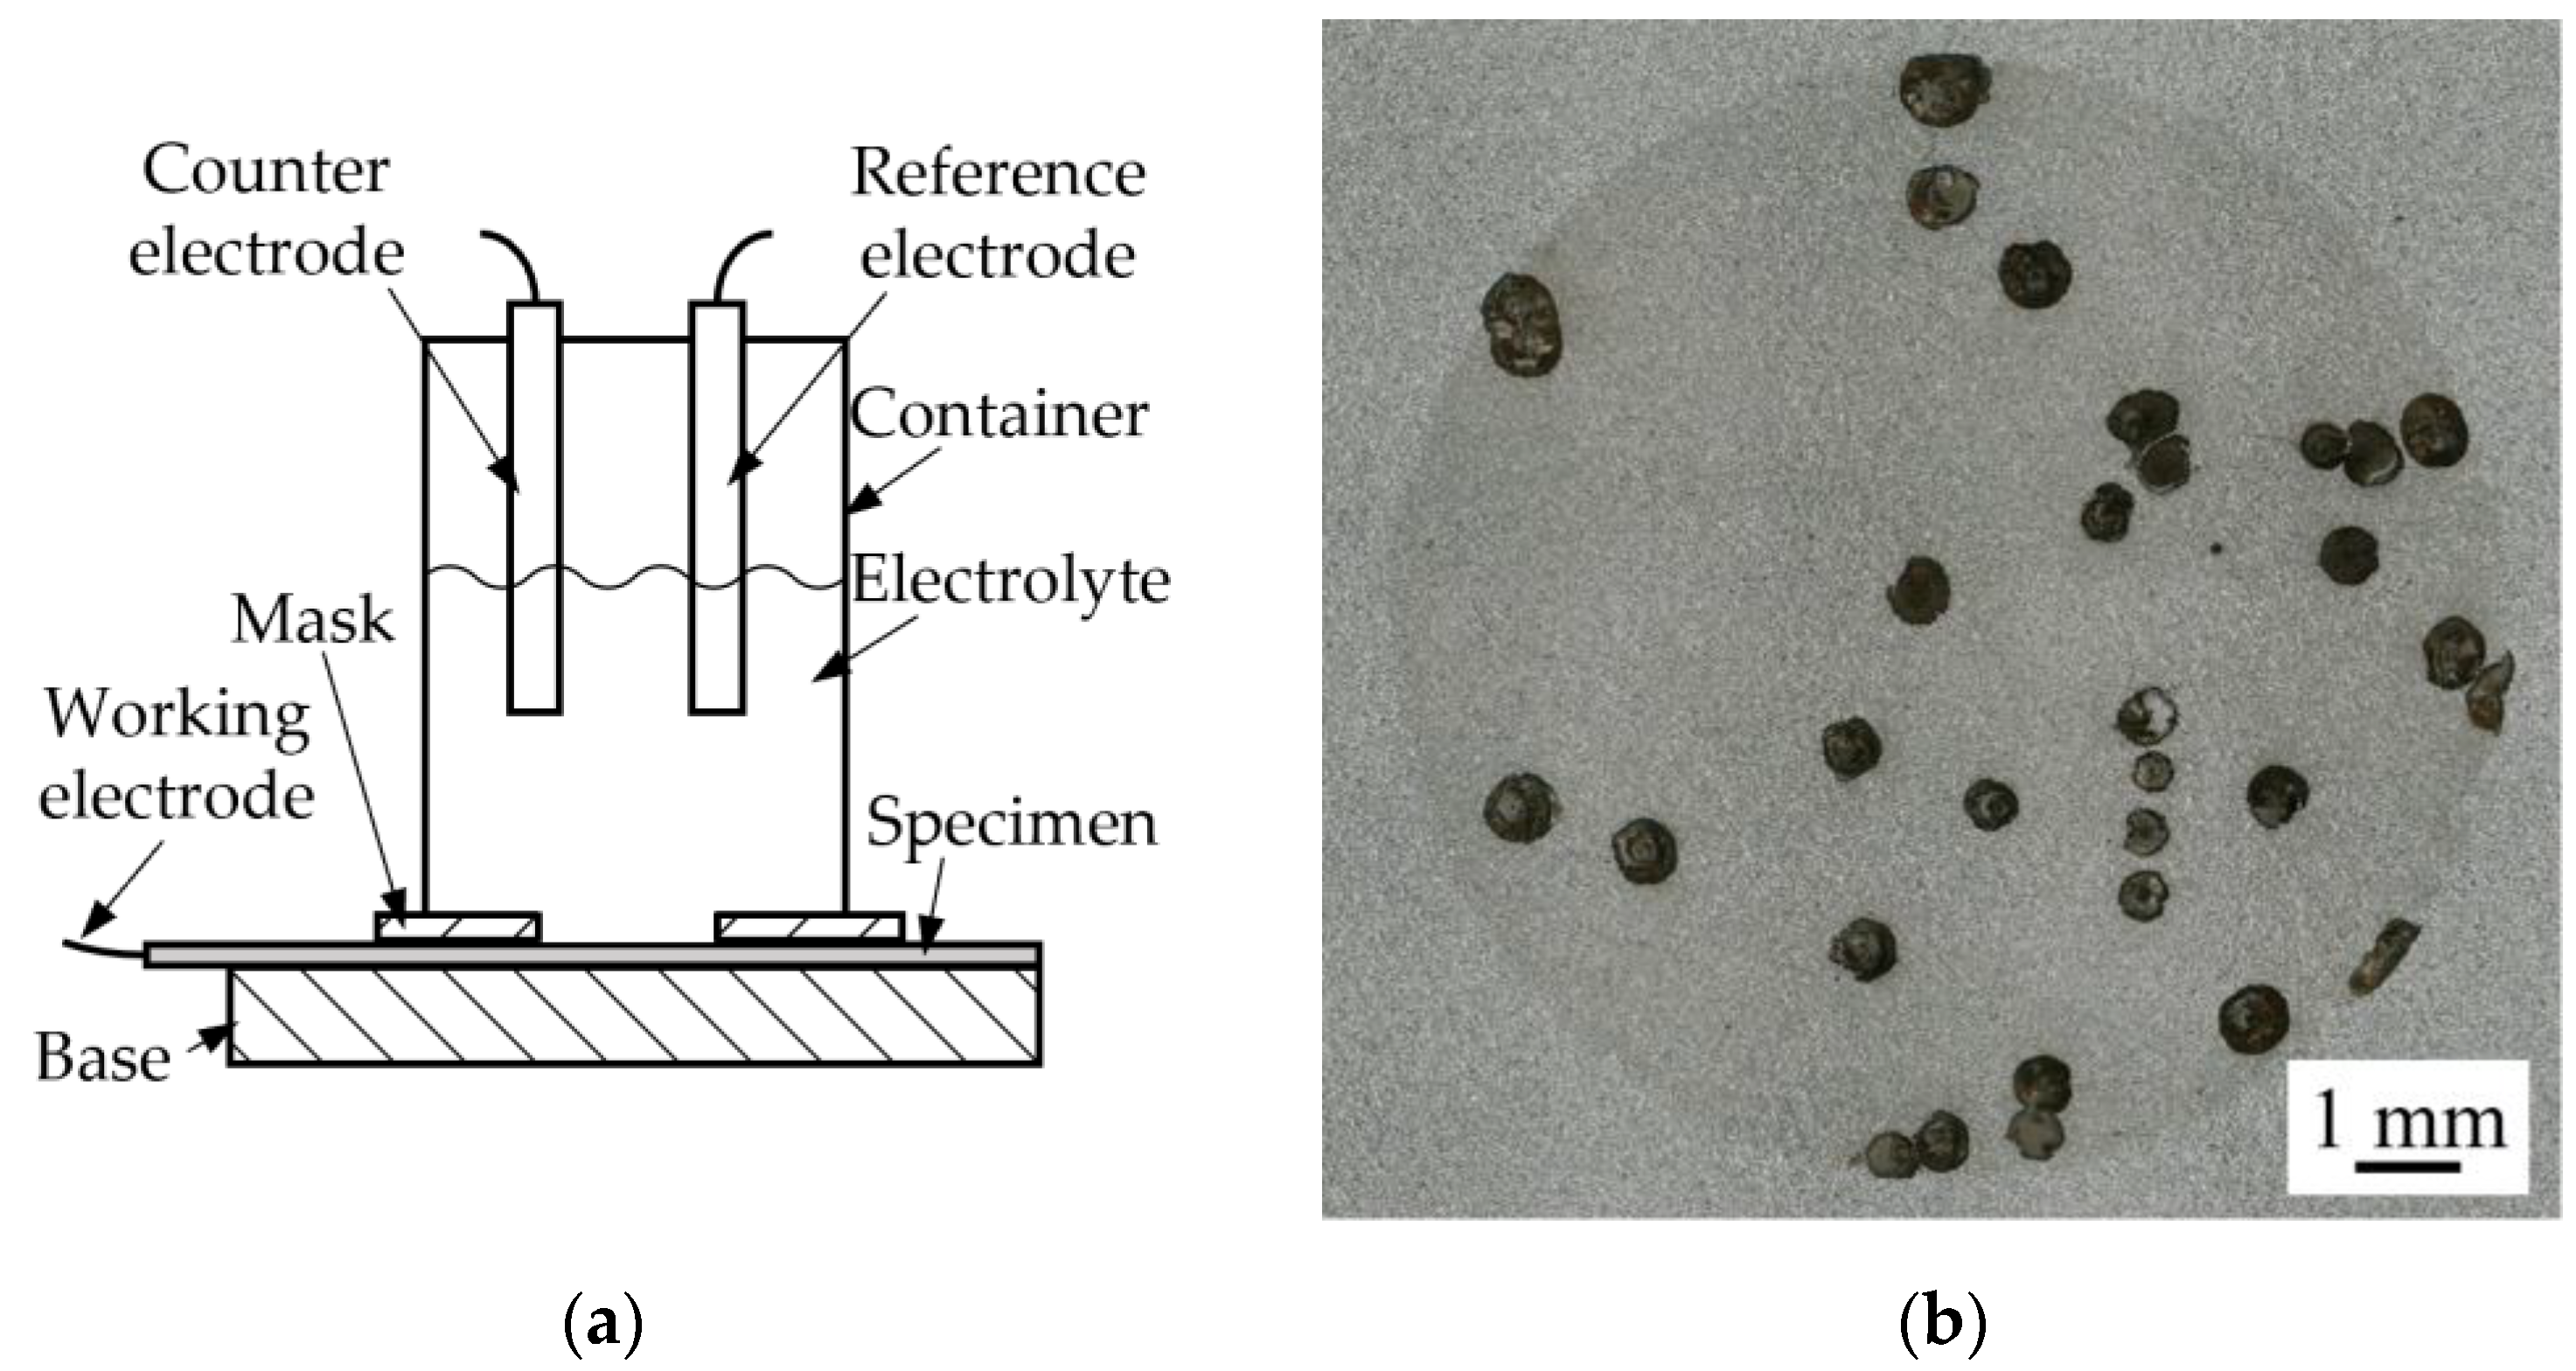
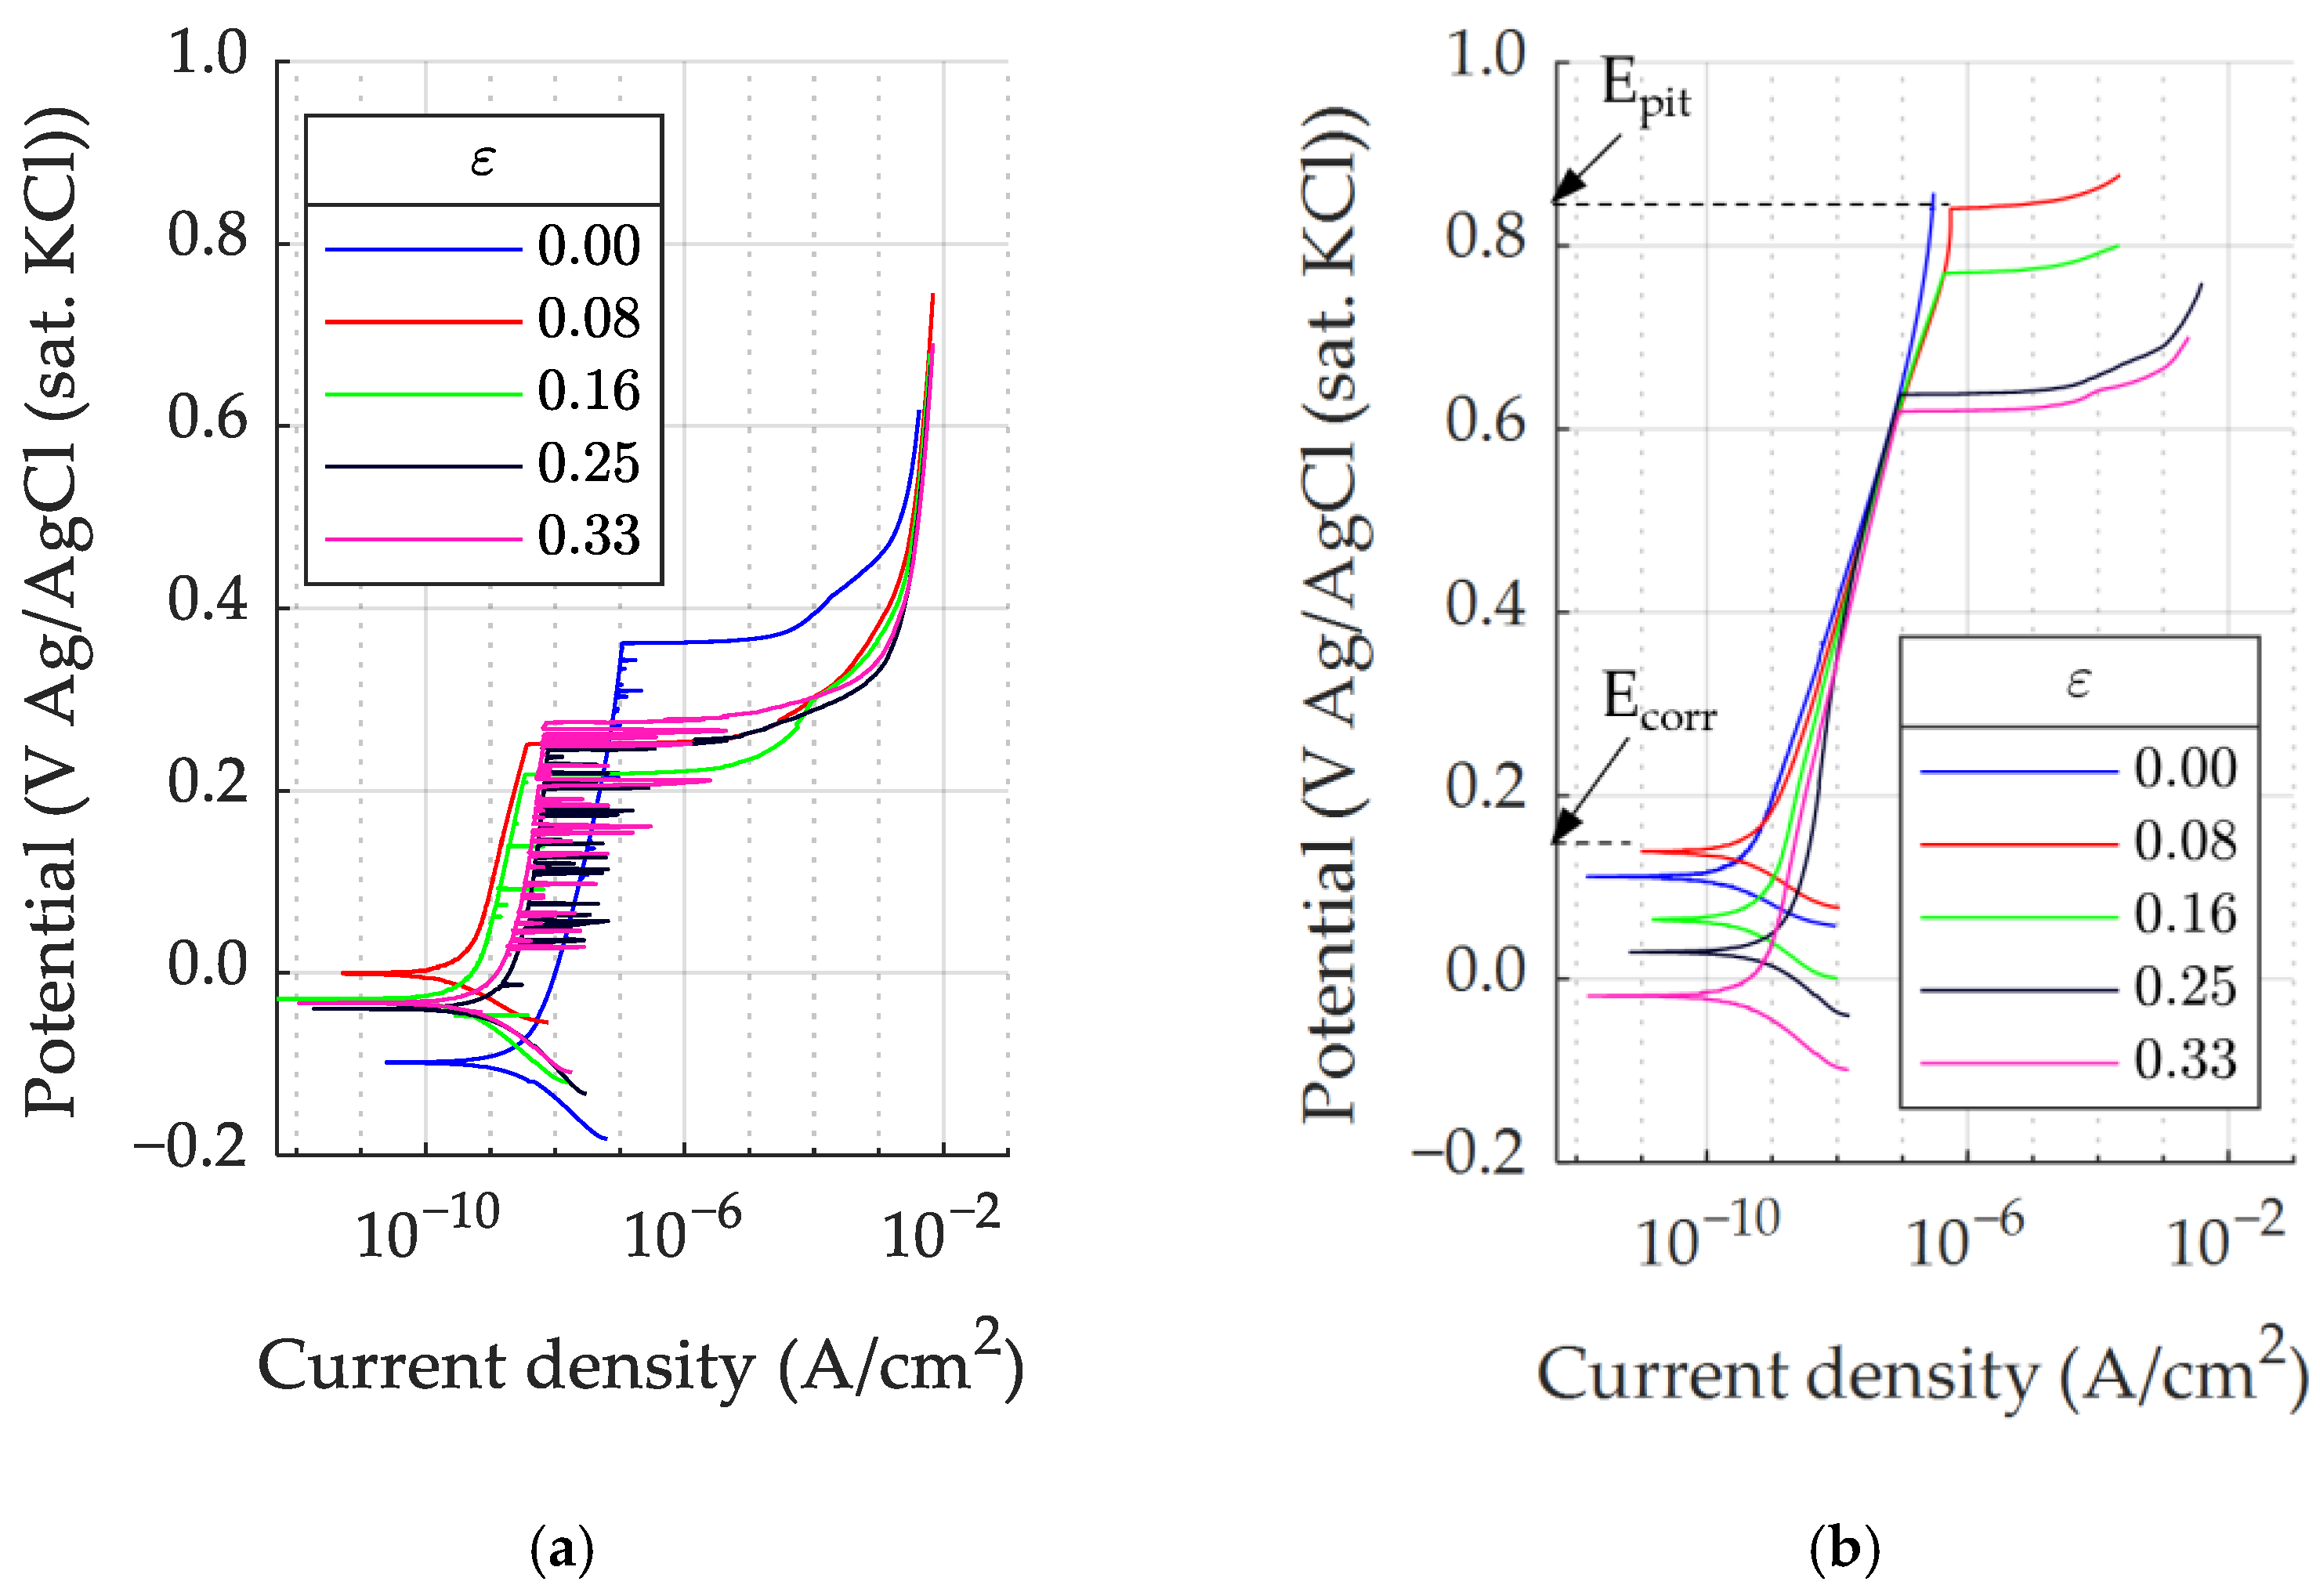
Electrochemical experiments were carried out to evaluate how the corrosion properties of the metals change as a function of strain. The tests were performed using a Gamry Reference 600 potentiostat and standard PTC1 paint test cell, also from Gamry. An Ag/AgCl electrode (saturated KCl) was used as reference electrode and a graphite rod as a counter electrode. An aqueous solution of 3.5 wt% NaCl was used as electrolyte. All specimens used in corrosion testing were cleaned prior to straining with ethanol and then immersed in 10 v/v% nitric acid (10 min at 60 °C). They were finally rinsed with demineralized water for 15 min according to ASTM G1-90 as a method for specimen preparation for corrosion testing. Specimens were rinsed in deionized water and then in ethanol to clean away built-up dirt or oil from the straining procedure. The test area was defined by a 1 cm2 circular hole in a non-conductive mask. The basic configuration for these tests is shown in Figure 6a, with Figure 6b showing a typical surface resulting from the corrosion testing. The test was repeated three times for each combination of strain and material to account for the reproducibility of the method. An example of the resulting polarization curves for both materials is shown in Figure 7. The polarization curves for AISI 201 show fluctuations in current which are the results of the nucleation, growth, and repassivation of metastable pits on the surface. This tendency increases with increasing strain and indicates that AISI 201 is more prone to pitting after straining than AISI 304.
The corrosion potential (Ecorr) and pitting potential (Epit) were used to indicate the corrosion resistance of the material. The corrosion potential is identified as the point at which minimal current flows between the electrodes, i.e., the potential with the lowest current in the polarization curve. The magnitude of the corrosion potential value indicates the nobility of the metal, a higher corrosion potential signifying better corrosion resistance. The pitting potential is identified as the potential value where the current density level suddenly increases due to pit formation. A higher pitting potential correlates to a better resistance towards pitting corrosion. The corrosion and pitting potential for the AISI 304 material from coil 1 are indicated for ε = 0.08 in Figure 7b. In cases where the current density levels did not suddenly increase, e.g., the profile for ε = 0 in Figure 7b, the pitting potential is outside of the tested range.

2.6. Evaluation of Phase Fractions

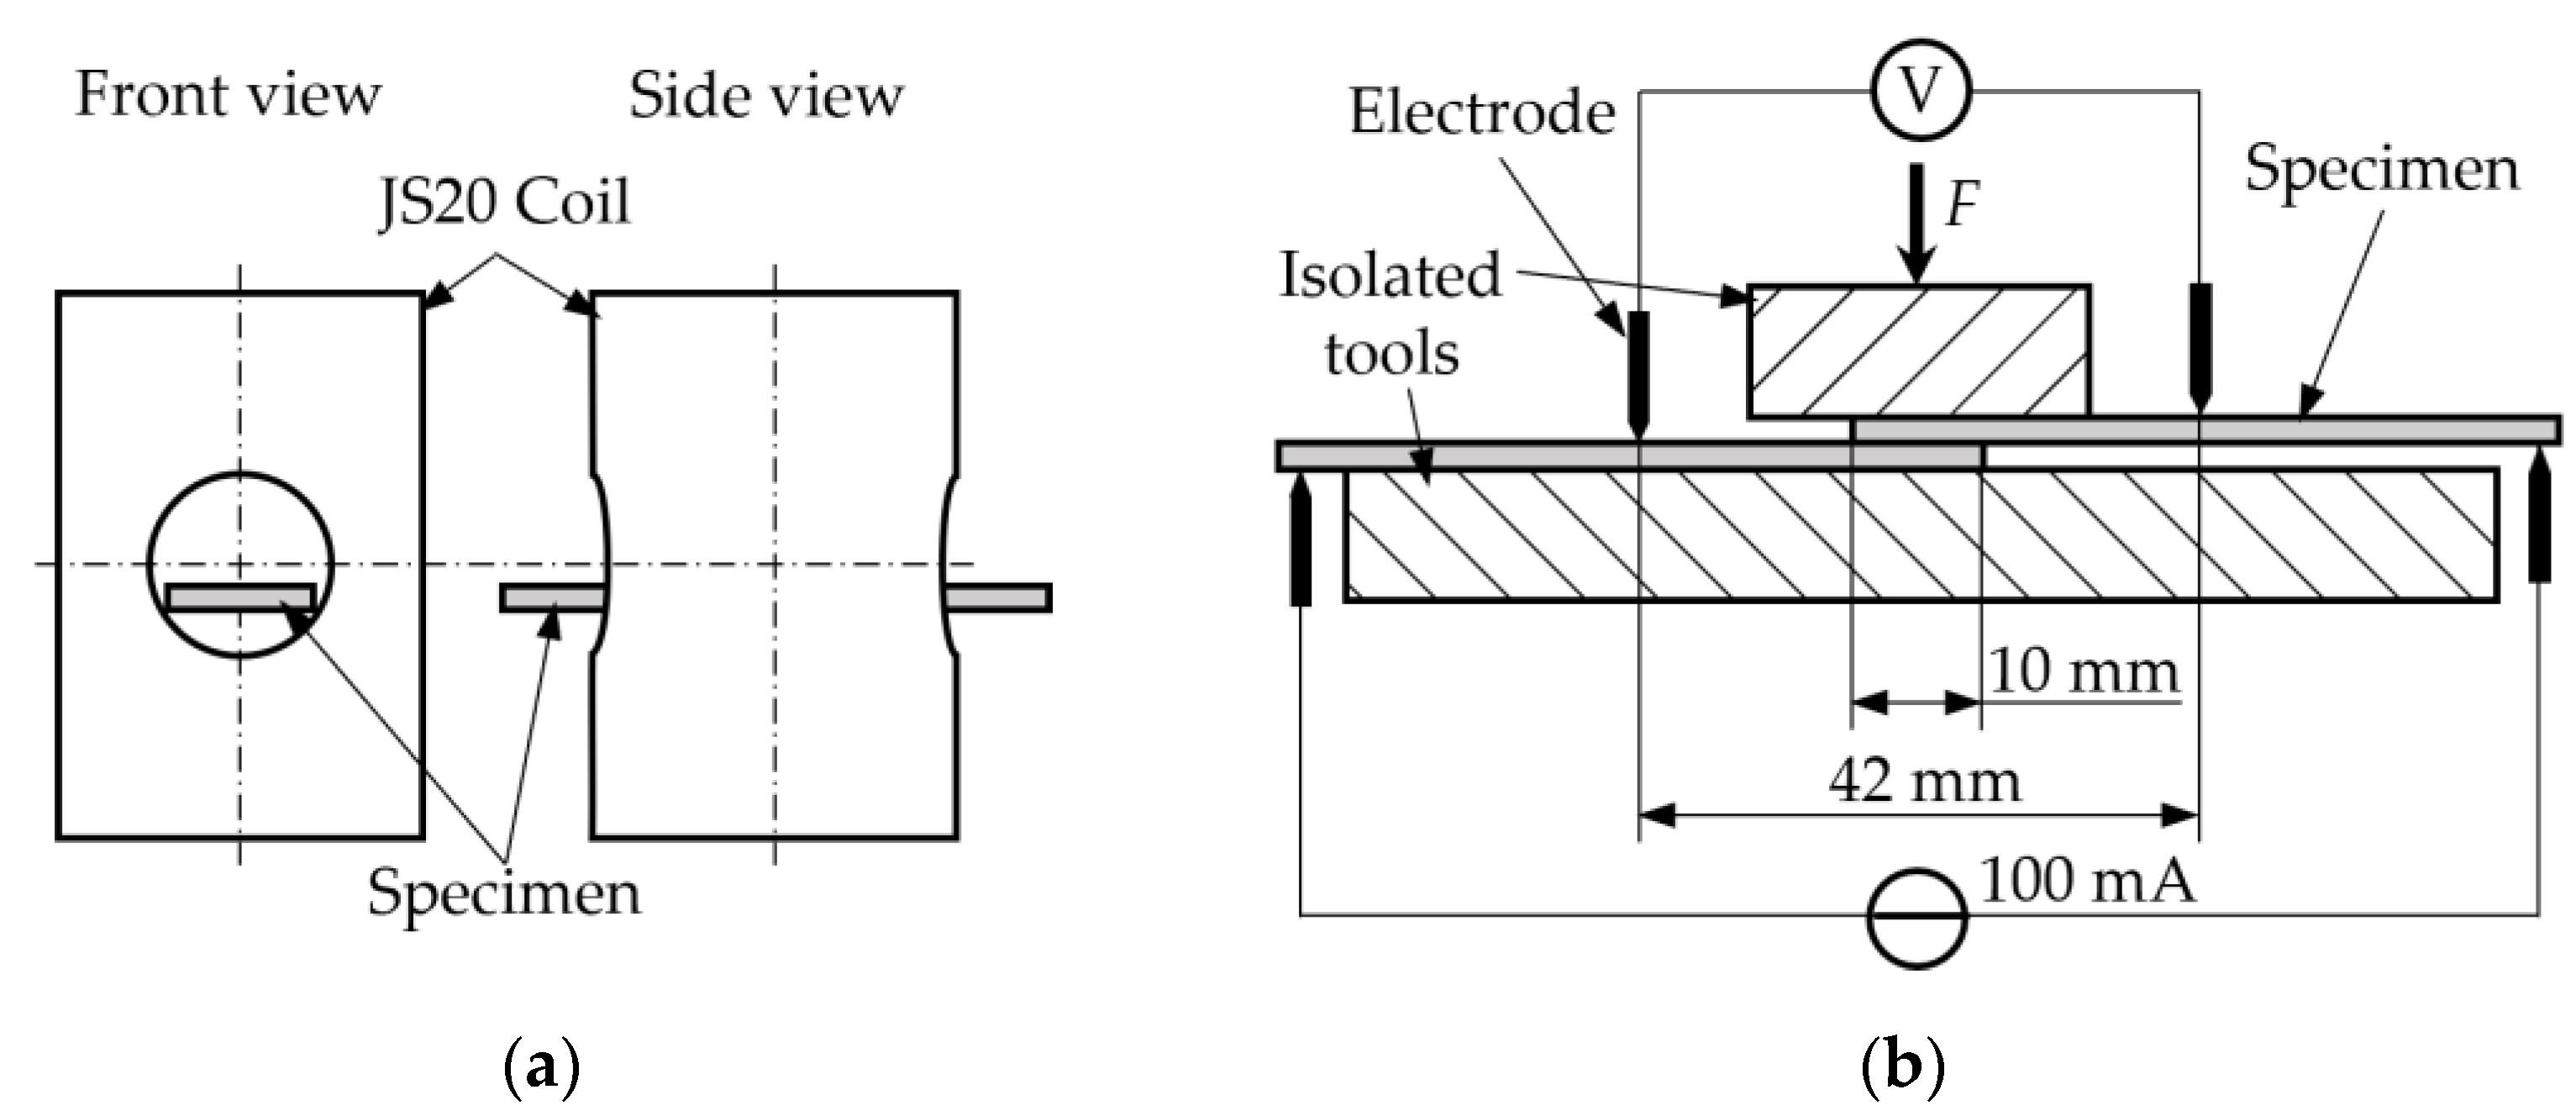
X-ray diffraction (XRD) analysis was performed to identify which phases were present in the material. A Bruker D8 Discover diffractometer with a Cu-radiation source was used, giving X-rays at a wavelength of 1.5418 Å. To supplement XRD, the magnetic dipole moment was evaluated, because possible phase transformation from austenite to martensite due to plastic deformation being associated with changes of the magnetic properties. An electronic fluxmeter of type EF14 from Magnet-Physik and a JS20 saturation coil were used to determine the magnetic flux, which was then divided by the volume of the specimens that was held inside the coil to arrive at the magnetic dipole moment. An illustration of the coil that was used, and how the specimen is placed in the coil, is shown in Figure 8a. The magnetic field density of each specimen was determined three times. The actual martensite fraction was not quantitatively stated, but the magnetic field density measurements were used as a qualitative measure for the formation of deformation-induced martensite.

2.7. Evaluation of Electrical Contact Resistance

The electrical contact resistance was evaluated as a function of strain to evaluate the influence of strain on electrical properties important for components such as ECG electrodes. The electrical resistance was tested using the 4-point measurement method. A LakeShore Model 121 direct current source was used to apply a constant 100 mA through the circuit. The resulting voltage was measured at two points separated by a constant distance of 42 mm using a National Instruments NI-9215 module. The load was applied by electrically isolated tools actuated by a manually operated lead screw, whereby the force was measured by using a Kistler 9001A load cell. A sketch of the setup is shown in Figure 8b. Strips of 10 mm × 60 mm were prepared from virgin and strained foils by EDM. The test was repeated three times for each specimen couple.
The resistivity ρ of the material changes with plastic deformation due to, e.g., lattice defects [22], and so had to be determined by measurements on single sheets in the same test rig using Equation (2).
ρ = R A l
where R is the measured electric resistance, A is the cross-sectional area of the specimen and l is the measurement distance.
To determine the effect of contact resistance, the resistance of the idealized lap connection was subtracted. With 10 mm wide samples, the idealized resistance, Rideal, was calculated by Equation (3) by assuming ideal contact and ignoring the geometrical restriction to the current flow.
R i d e a l = ρ ε t 10   m m 32   m m t + 10   m m 2 t
As a measure of the effect of contact resistance, the idealized resistance, Rideal, was subtracted from the total resistance Rmeasured of the lap connection measured in the setup. Denoting the resistance stemming from contact resistance and restriction to the current flow through the lap connection, RC, Equation (4) is established.
R C F = R m e a s u r e d R i d e a l

3. Results and Discussion

3.1. Strain-Induced Surface Development

The surfaces visually changed during straining, from having a reflective surface to a matte surface appearance. This change was quantified by surface roughness parameters, the arithmetic mean height (Sa), the density of summits (Sds), the ten-point height (S10z), and the root-mean-square of slope of surface features (Sdq). Selected acquisitions of the surfaces are shown in Figure 9, which shows that any surface appearance that exists in the surface from rolling quickly changed into a more randomized topography.
The Sa roughness that was measured on the surfaces of the elongated specimens is plotted against the strain for both materials in Figure 10. Linear fits were also drawn for each dataset. There was a difference in the roughening rate (slope of linear fit) between the two materials, with the AISI 304 from coil 1 roughening at a higher rate than the AISI 201. As the initial average grain size of both materials was approximately similar, this may be due to a difference in the material behavior caused by effects such as heterogeneous and different distribution of crystal orientation [23]. Considering the relation of the linear fit to the last points, i.e., at the highest strain, shows that this point falls under the linear fit for both materials. Ottenklev et al. [13] found the same behavior for an AISI 316L stainless steel deformed to higher strains. This can be explained by considering the contribution of grain rotation to the surface roughening. The grain size sets an upper limit on the surface roughening, as the size of new features is limited to the grain size. Romanova et al. [24] investigated this effect numerically, showing that in any poly-crystalline material, some grains are favorably oriented or soft and can accommodate deformation, whereas others are unfavorably oriented and experience rotation, or hard and experience translation that can be normal to the surface, thereby leading to surface roughening.
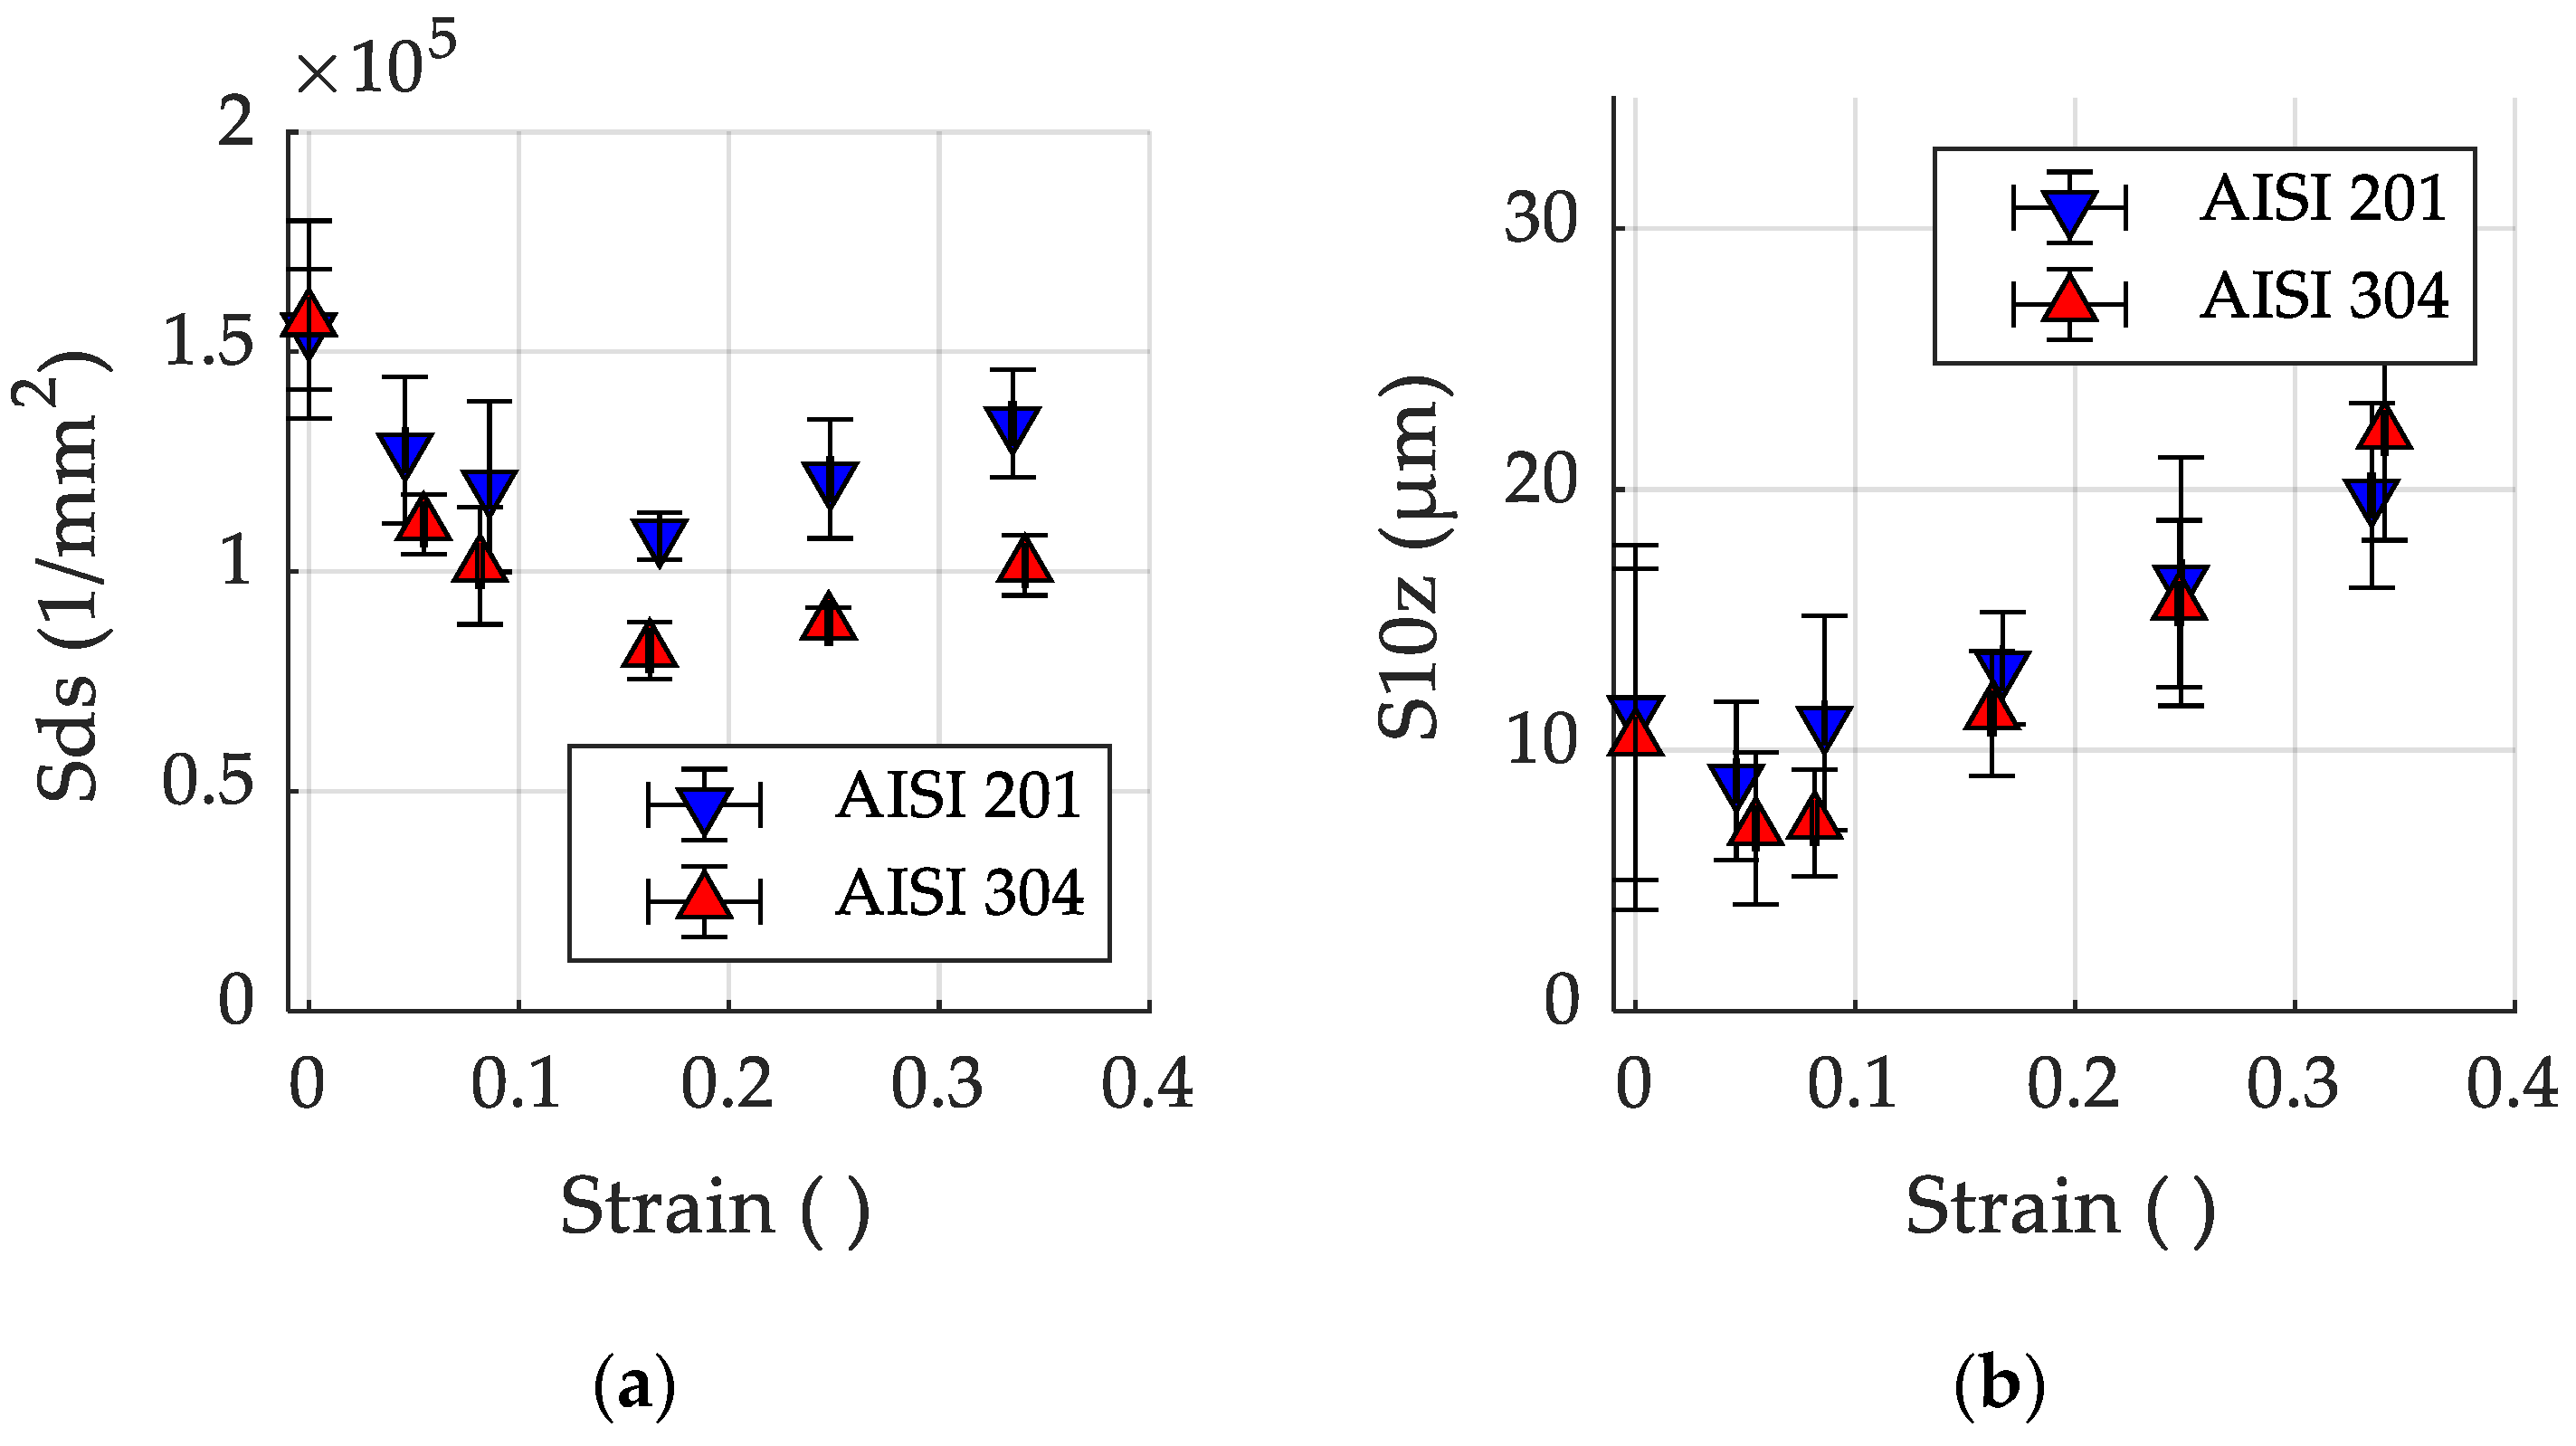
The Sds parameter is plotted in Figure 11a as a function of the mean true strain for each strain level for both materials. The Sds value decreased for values of small strain, indicating a smaller density of peaks, and therefore stretching of the surface without generation of new features. For increasing strain, the summit density decreased less as function of strain and eventually reversed direction and increased instead. This indicates that either the generation of new features only started after some amount of strain had accumulated, or that the generation rate increased until it exceeded the effect of stretching of the surface. This occurs between 0.16 and 0.24 true strain. The change in summit density followed the same general behavior for both materials. However, the change was larger in the case of the AISI 304 due to the higher roughening rate.
The ten-point height (S10z), shown in Figure 11b, reduced slightly in the beginning, remaining within the standard deviation of the initial surface, and then started to grow. This could mean that surface features, such as asperity peaks, are being stretched and flattened out in the beginning, as was inferred from the Sds parameter. The generation and growth of new surface features eventually exceeded the stretching of the surface, as indicated by the growth of the S10z parameter. This parameter takes both the valley depth and the peak height into account, so separation between the highest peaks and lowest valleys was growing.
The root-mean-square of the slope of the surface (Sdq) is shown in Figure 12. Consistent with the prior discussion of the S10z and Sds parameters, the surface is clearly being stretched in the beginning as can be seen in the decrease in the surface slope. Later, new features are generated which lead to an increase in the slope of surface features.

3.2. Effect of Strain-Induced Surface Development

This section discusses results derived from testing specimens of AISI 201 and coil 1 of AISI 304 that were deformed at strain-rates of 0.02/s or 0.0002/s.

3.2.1. Friction

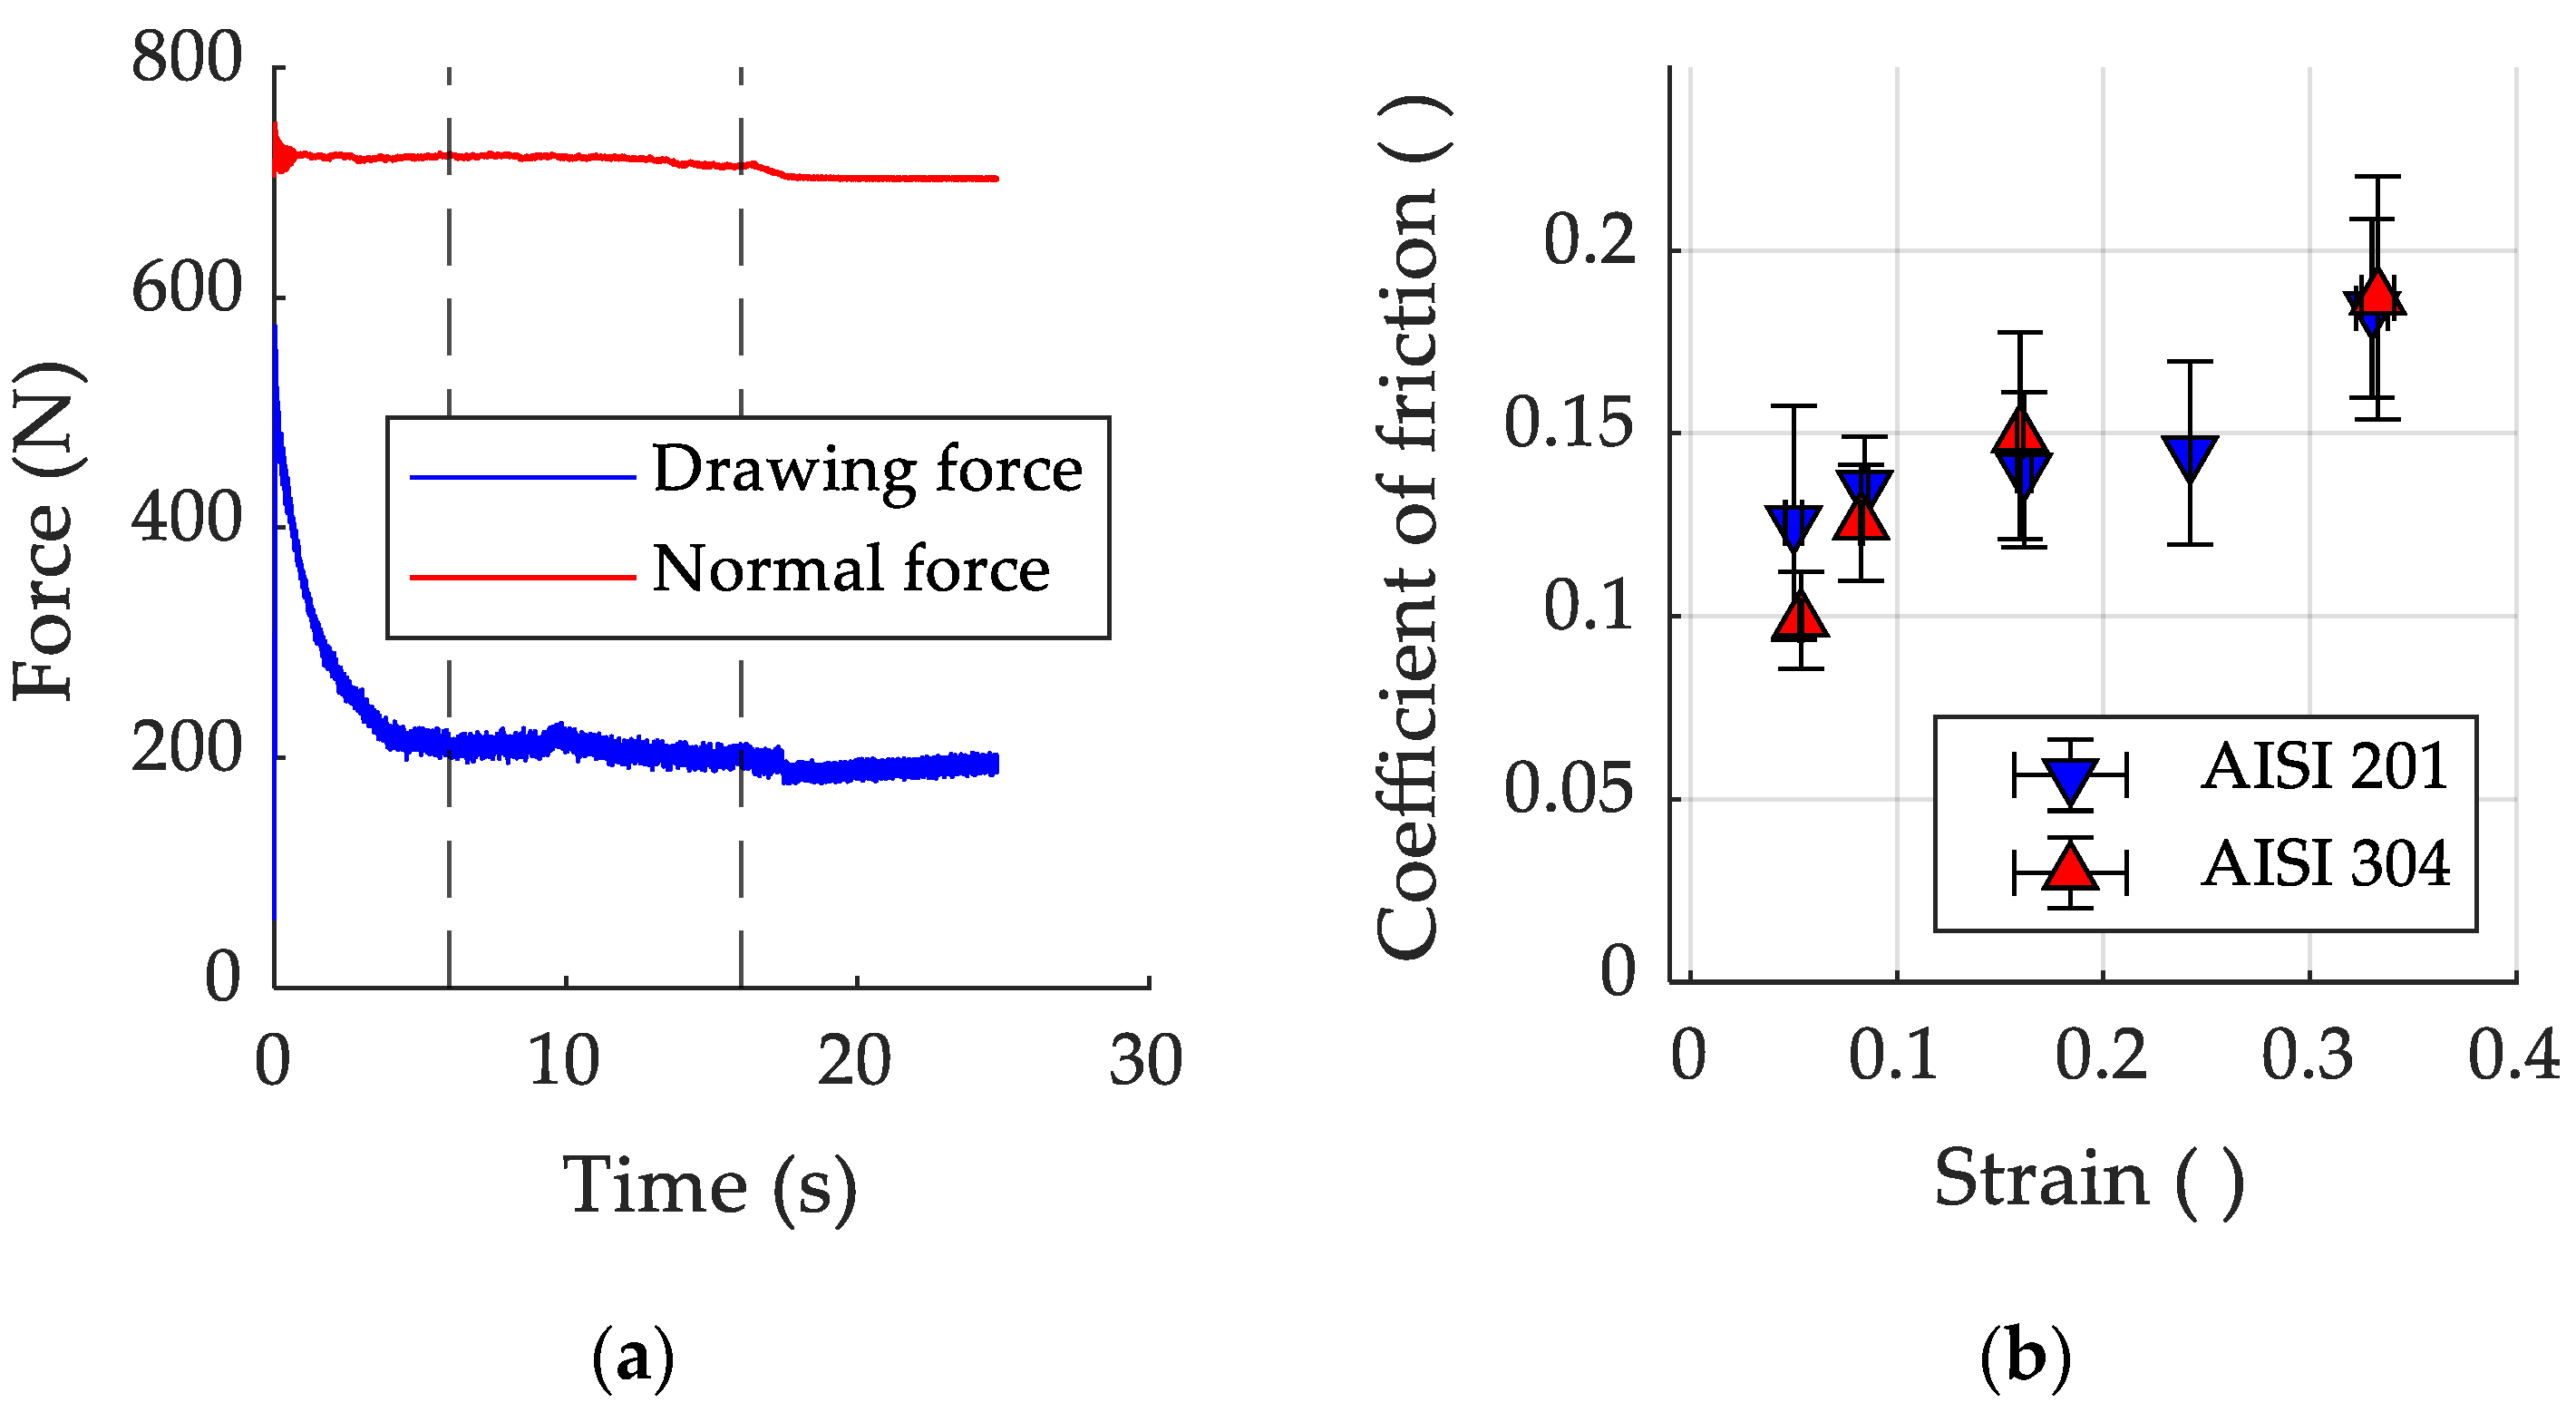
Figure 13a shows a typical pair of measured drawing force and normal force profiles from one test. The average coefficient of friction as function of strain is shown in Figure 13b. Strip-drawing tests revealed that the coefficient of friction was affected by the strain-induced surface changes. With increasing strain, the coefficient of friction in the interface generally increased. The coefficient of friction was similar for both materials.
With increasing surface roughness, the height of asperity peaks and depth of asperity valleys increases. This is shown in Figure 11b, in which the ten-point height (S10z) of the surface grows with increasing applied strain. Wu et al. [15] showed that development of the surface directly led to increased friction due to lubricant starvation at asperity peaks. As flooding lubrication was used in this work, lubricant starvation should not be a factor. Instead, the increase in the asperity peak height likely led to a decreasing number of closed lubricant pockets for a given contact pressure, as metal-to-metal contact is established at fewer and fewer points. This is consistent with the findings of other researchers [14,15].

3.2.2. Martensite Fraction

Figure 14 shows diffraction patterns for as-received AISI 201 and AISI 201 deformed to ε = 0.33. Also shown are powder diffraction files (PDFs) for austenite (33_0397) and ferrite (06_0696) to allow comparison. Comparing the non-strained material to the two PDFs shows that the material is entirely austenitic before deformation. After deformation, BCC peaks can be seen. As deformation does not induce ferrite in the material, the peaks belong to the martensite phase. Figure 15 shows how both materials clearly become more magnetic with increasing strain, indicating the formation of deformation-induced martensite. The AISI 201 steel shows very little increase in magnetic field density for small strains, but then quickly increases for larger strains. The AISI 304 steel shows a similar behavior up to a higher strain, but at a much smaller scale than the AISI 201 steel. In total, the increase in magnetic field density for the AISI 201 steel was a factor of 10 larger than for the AISI 304 steel. This indicates that AISI 201 is much more prone to deformation-induced martensitic transformation. This was to be expected as AISI 201 is a relatively unstable austenitic steel due to its lower content of nickel, which is an austenite stabilizer [25].

3.2.3. Corrosion Resistance

The corrosion potential (Ecorr) and pitting potential (Epit) of both materials, shown in Figure 16a and Figure 16b, respectively, were evaluated as an effect of increasing strain. The corrosion potential increased slightly for the AISI 304 and AISI 201 material for small strains. Increasing strain led to a slight decrease in corrosion potential, showing that the corrosion resistance decreases, potentially as the passivated layer is affected by deformation or due to the increased martensite fraction in the bulk material. The pitting potential of both materials decreased as a function of increasing strain. This may be due to changes in the surface roughness, as Hong and Nagumo [26] showed a higher surface roughness of a surface exposed to a corrosive environment will lead to more corrosion. Changes to the passive layer may also be the reason for the decrease in corrosion resistance, as shown by Chunchun and Gang [27] who found that changes in the passive layer of a high-nitrogen stainless steel subjected to deformation led to increased corrosion. Another cause might be the increase in martensite fraction with strain, as shown by Monrrabal et al. [28] to decrease the resistance of the material to pitting.

3.2.4. Electrical Contact Resistance

The contact resistance was measured between strips of AISI 304 that had not been strained, and between material that had been elongated to strains of ε = 0.16 and ε = 0.33 at a strain-rate of 0.02/s. The change in resistivity due to strain is shown in Table 3 and was used to calculate the ideal resistance according to Equation (3).
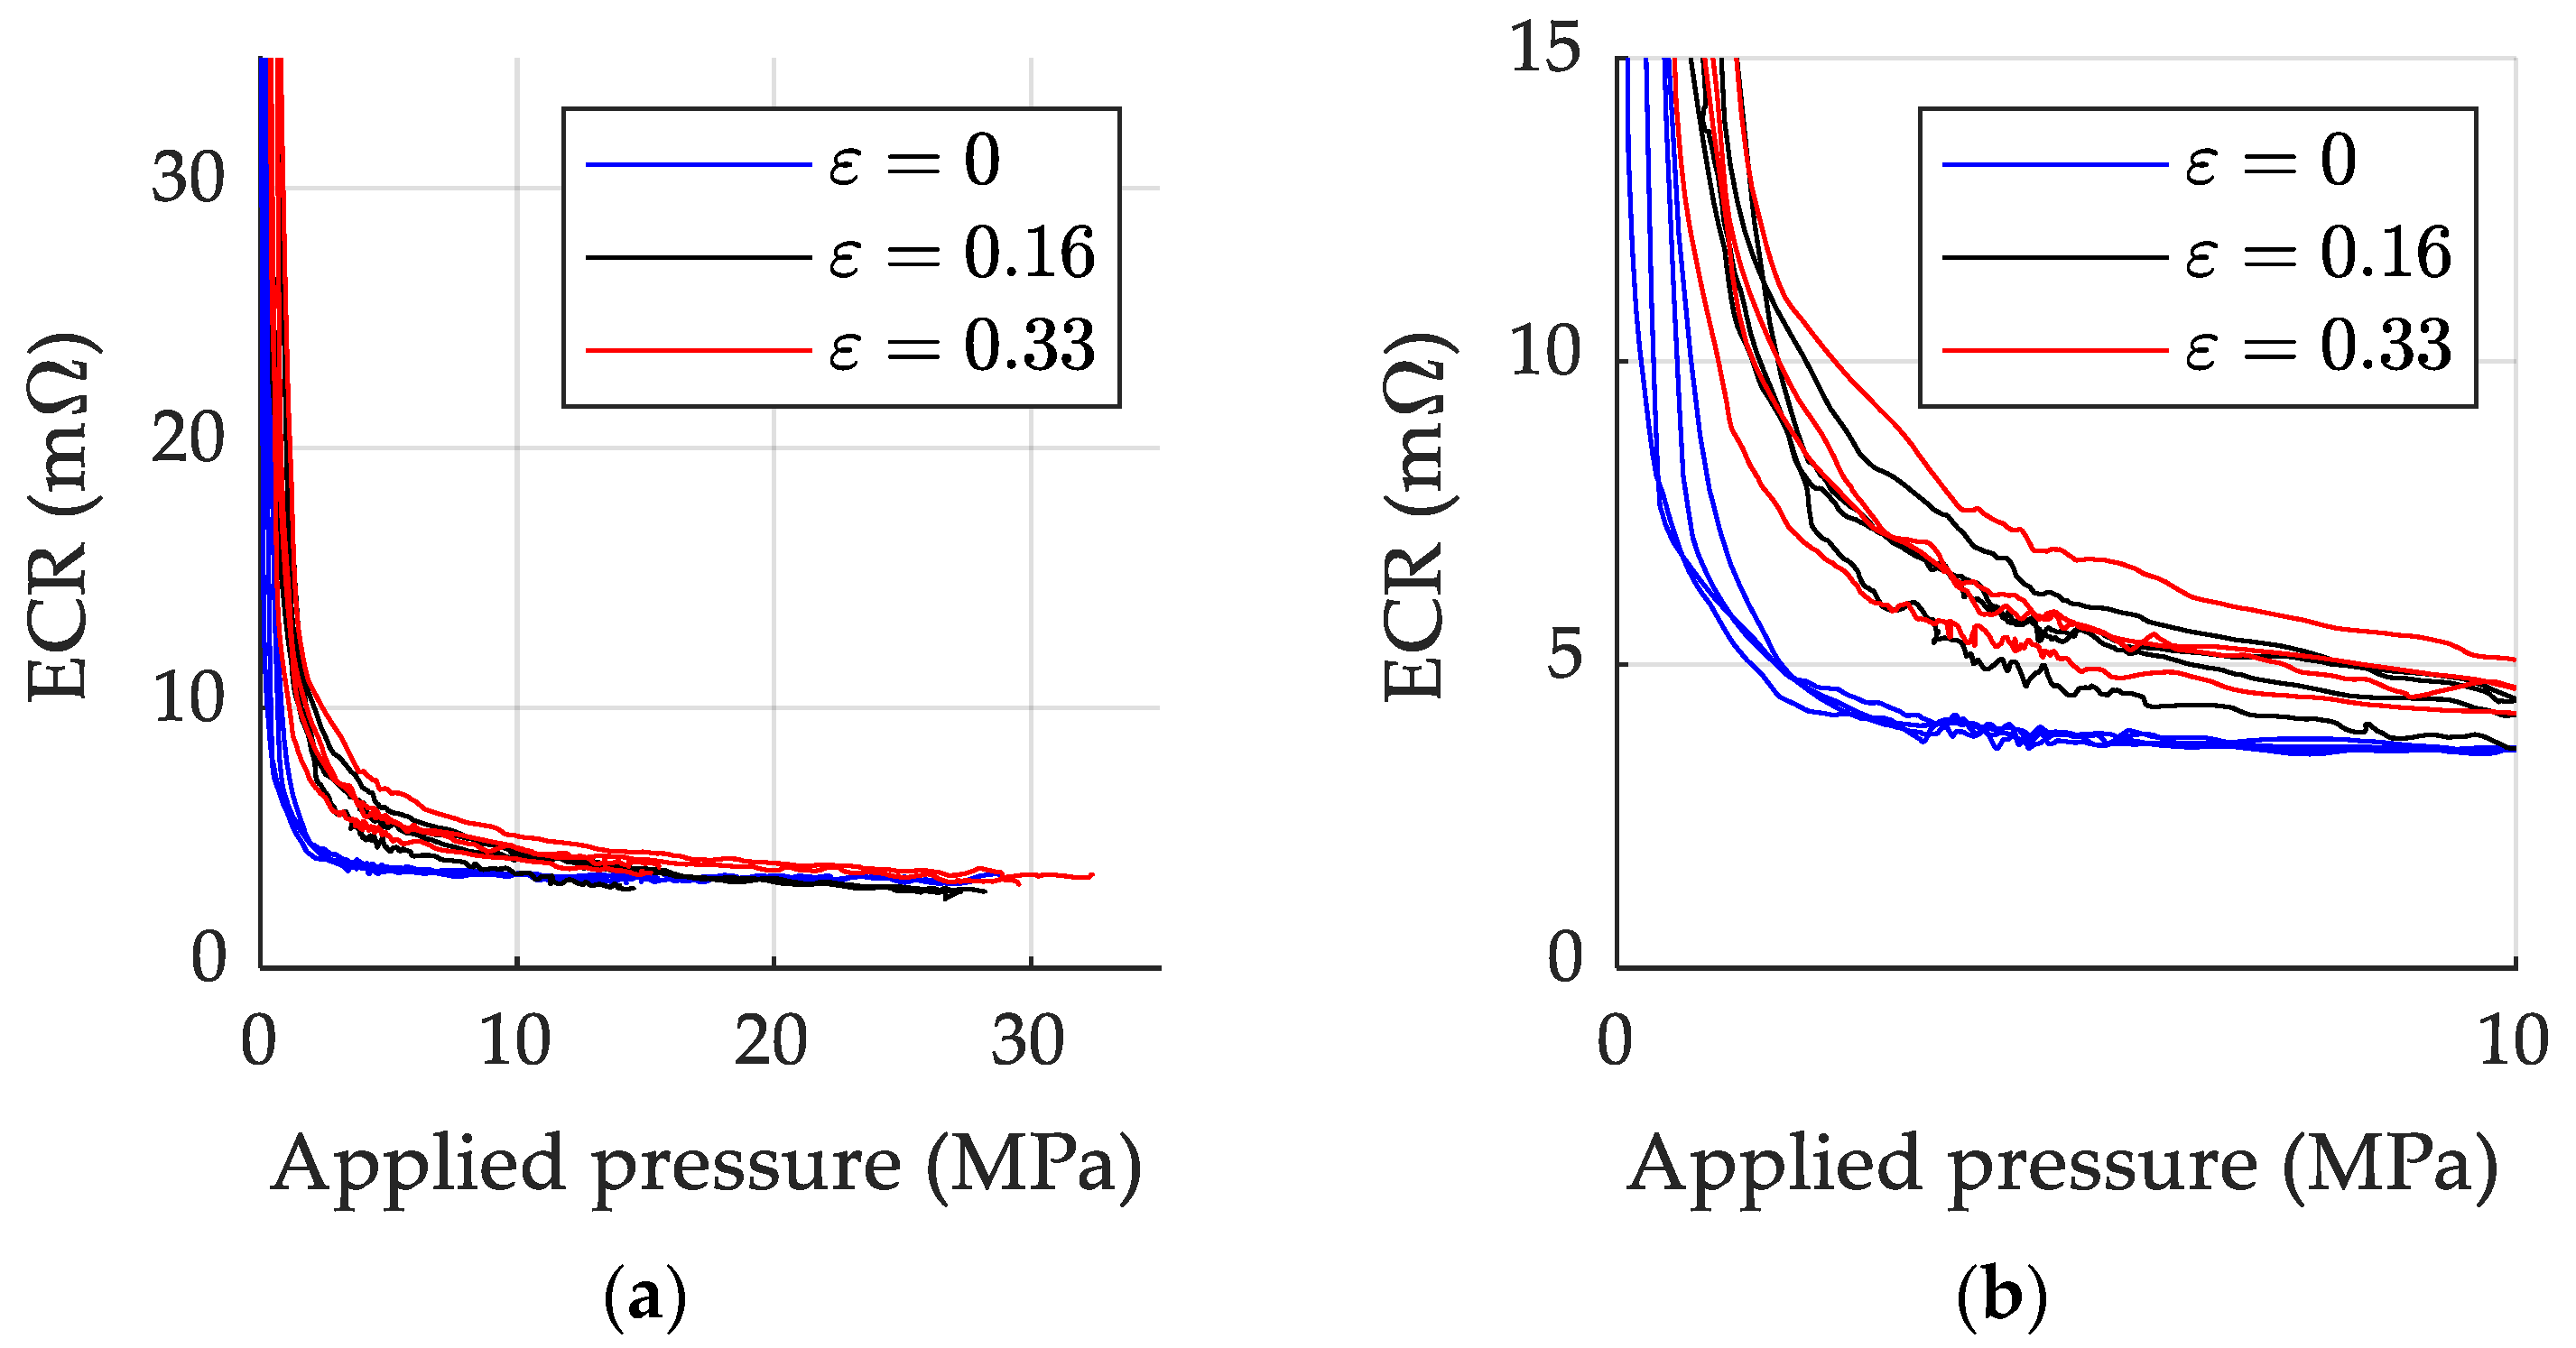
The measurement results, shown in Figure 17a, do not indicate a large difference between the test conditions. The electrical contact resistance for small values of applied pressure, as shown in Figure 17b, is influenced by the surface roughness and the strain-hardening of the material. Considering measurement uncertainties in the test execution, all investigated strain states show a constant contact resistance above 10 MPa. The influence of the surface roughness on the contact resistance decreases with increasing pressure as the real contact area increases due to flattening of asperities. The root-mean-square slope of peaks, given by the Sdq parameter shown in Figure 12, increases for the 0.33 strain compared to the 0 and 0.16 strains. Generally, larger surface slopes lead to smaller real contact area [29] and hence increased electrical contact resistance. If this effect occurs, it is within the experimental scatter. At very high pressures, the surface roughness would have no effect, leading to changes in the bulk properties of the material being the only contributors to the change in resistance. The resistance for different strains, and therefore different surface roughness, converges and so the influence of the bulk properties on the measured contact resistance is minimal.

3.3. Effect of Strain-Rate

This section presents results found for different strain-rates. A comparison is made between the results of tests performed on specimens strained at strain-rates of 0.02/s and 20/s. A larger number of specimens were deformed at 20/s with only a few being deformed at 0.02/s and only to allow for comparison. All specimens discussed in this section are made of AISI 304 from coil 2.

3.3.1. Surface Roughness and Friction

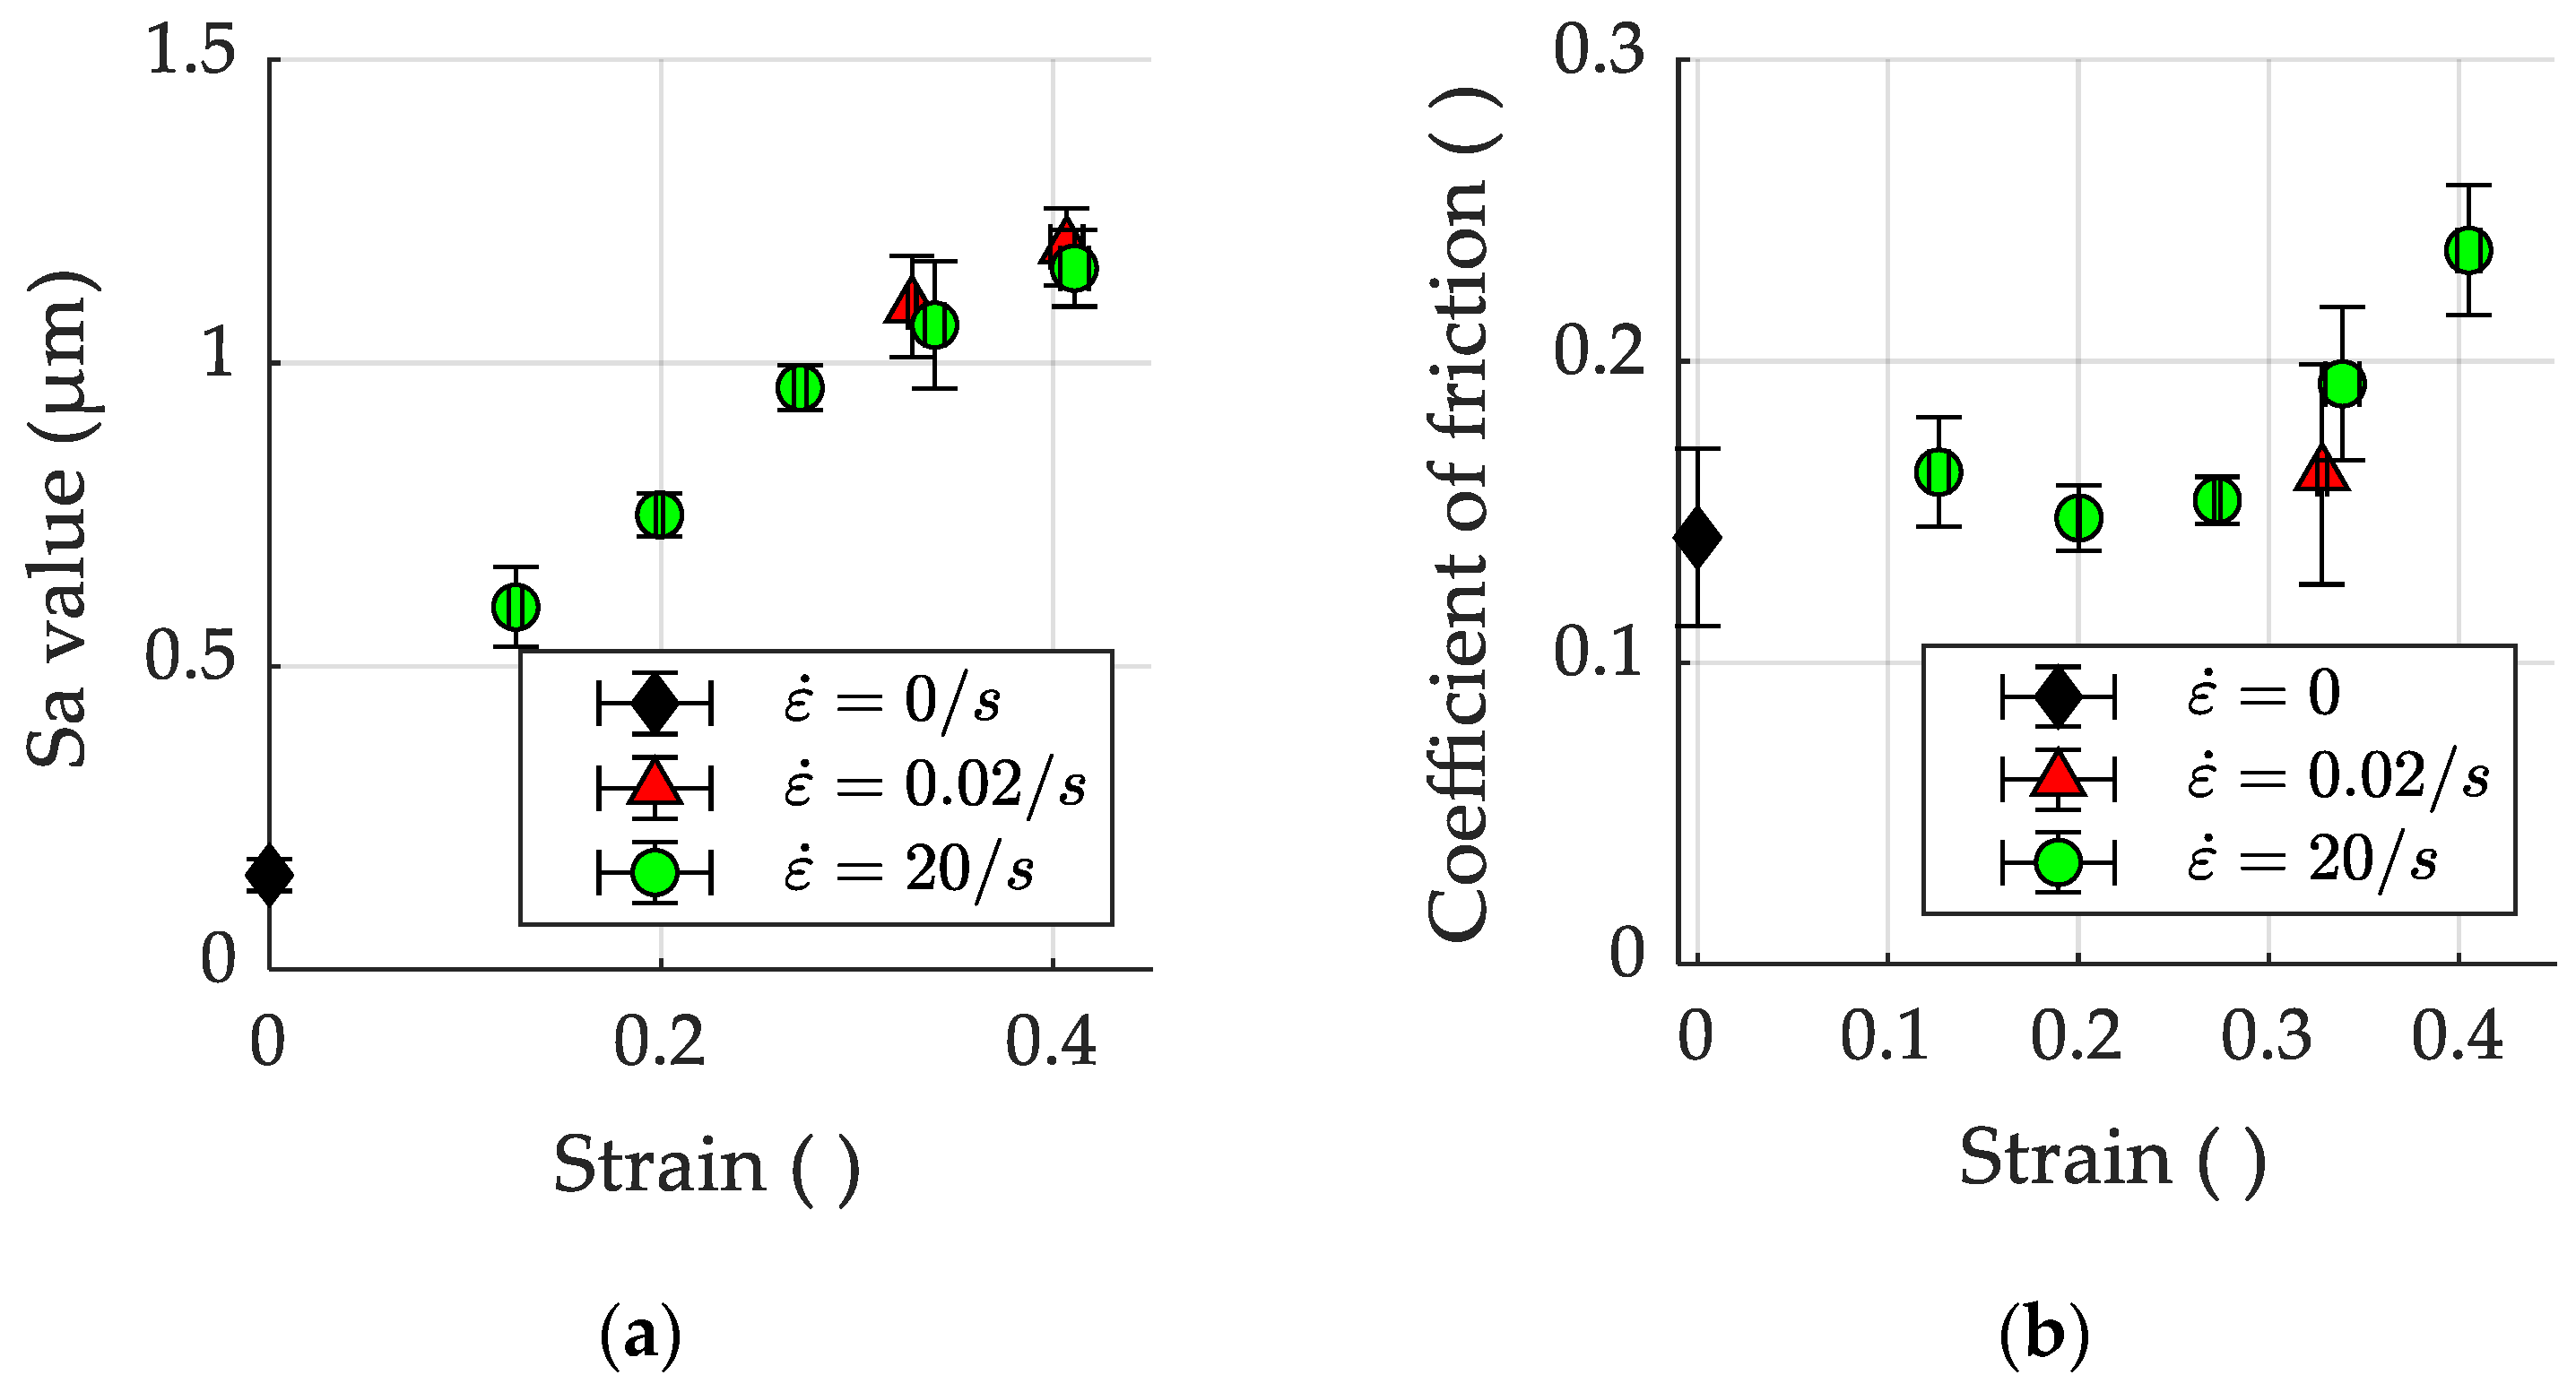
No significant differences were found in surface roughness, shown in Figure 18a, as also shown by Azushima and Miyagawa [5] for aluminum sheets. No significant effect of strain-rate on the friction of the resulting surface, shown in Figure 18b, was found either. The comparison was made at larger strain levels where effects could be expected to be more visible.

3.3.2. Martensite Fraction

For a given strain, the specimen that was deformed using a lower strain-rate shows a higher magnetic field density, as shown in Figure 19. This is consistent with the results reported by Sohrabi et al. [25], who reviewed the effects of various parameters on the occurrence of deformation-induced martensite. The high speed used in the drop-tower testing is expected to induce adiabatic heating in the thin material, which then leads to a suppression of the deformation-induced martensitic transformation. Similar to the lower strain-rate testing of both materials, shown in Figure 15, the magnetic field density does not increase for small strain, but after some point, it quickly increases.

3.3.3. Corrosion Resistance

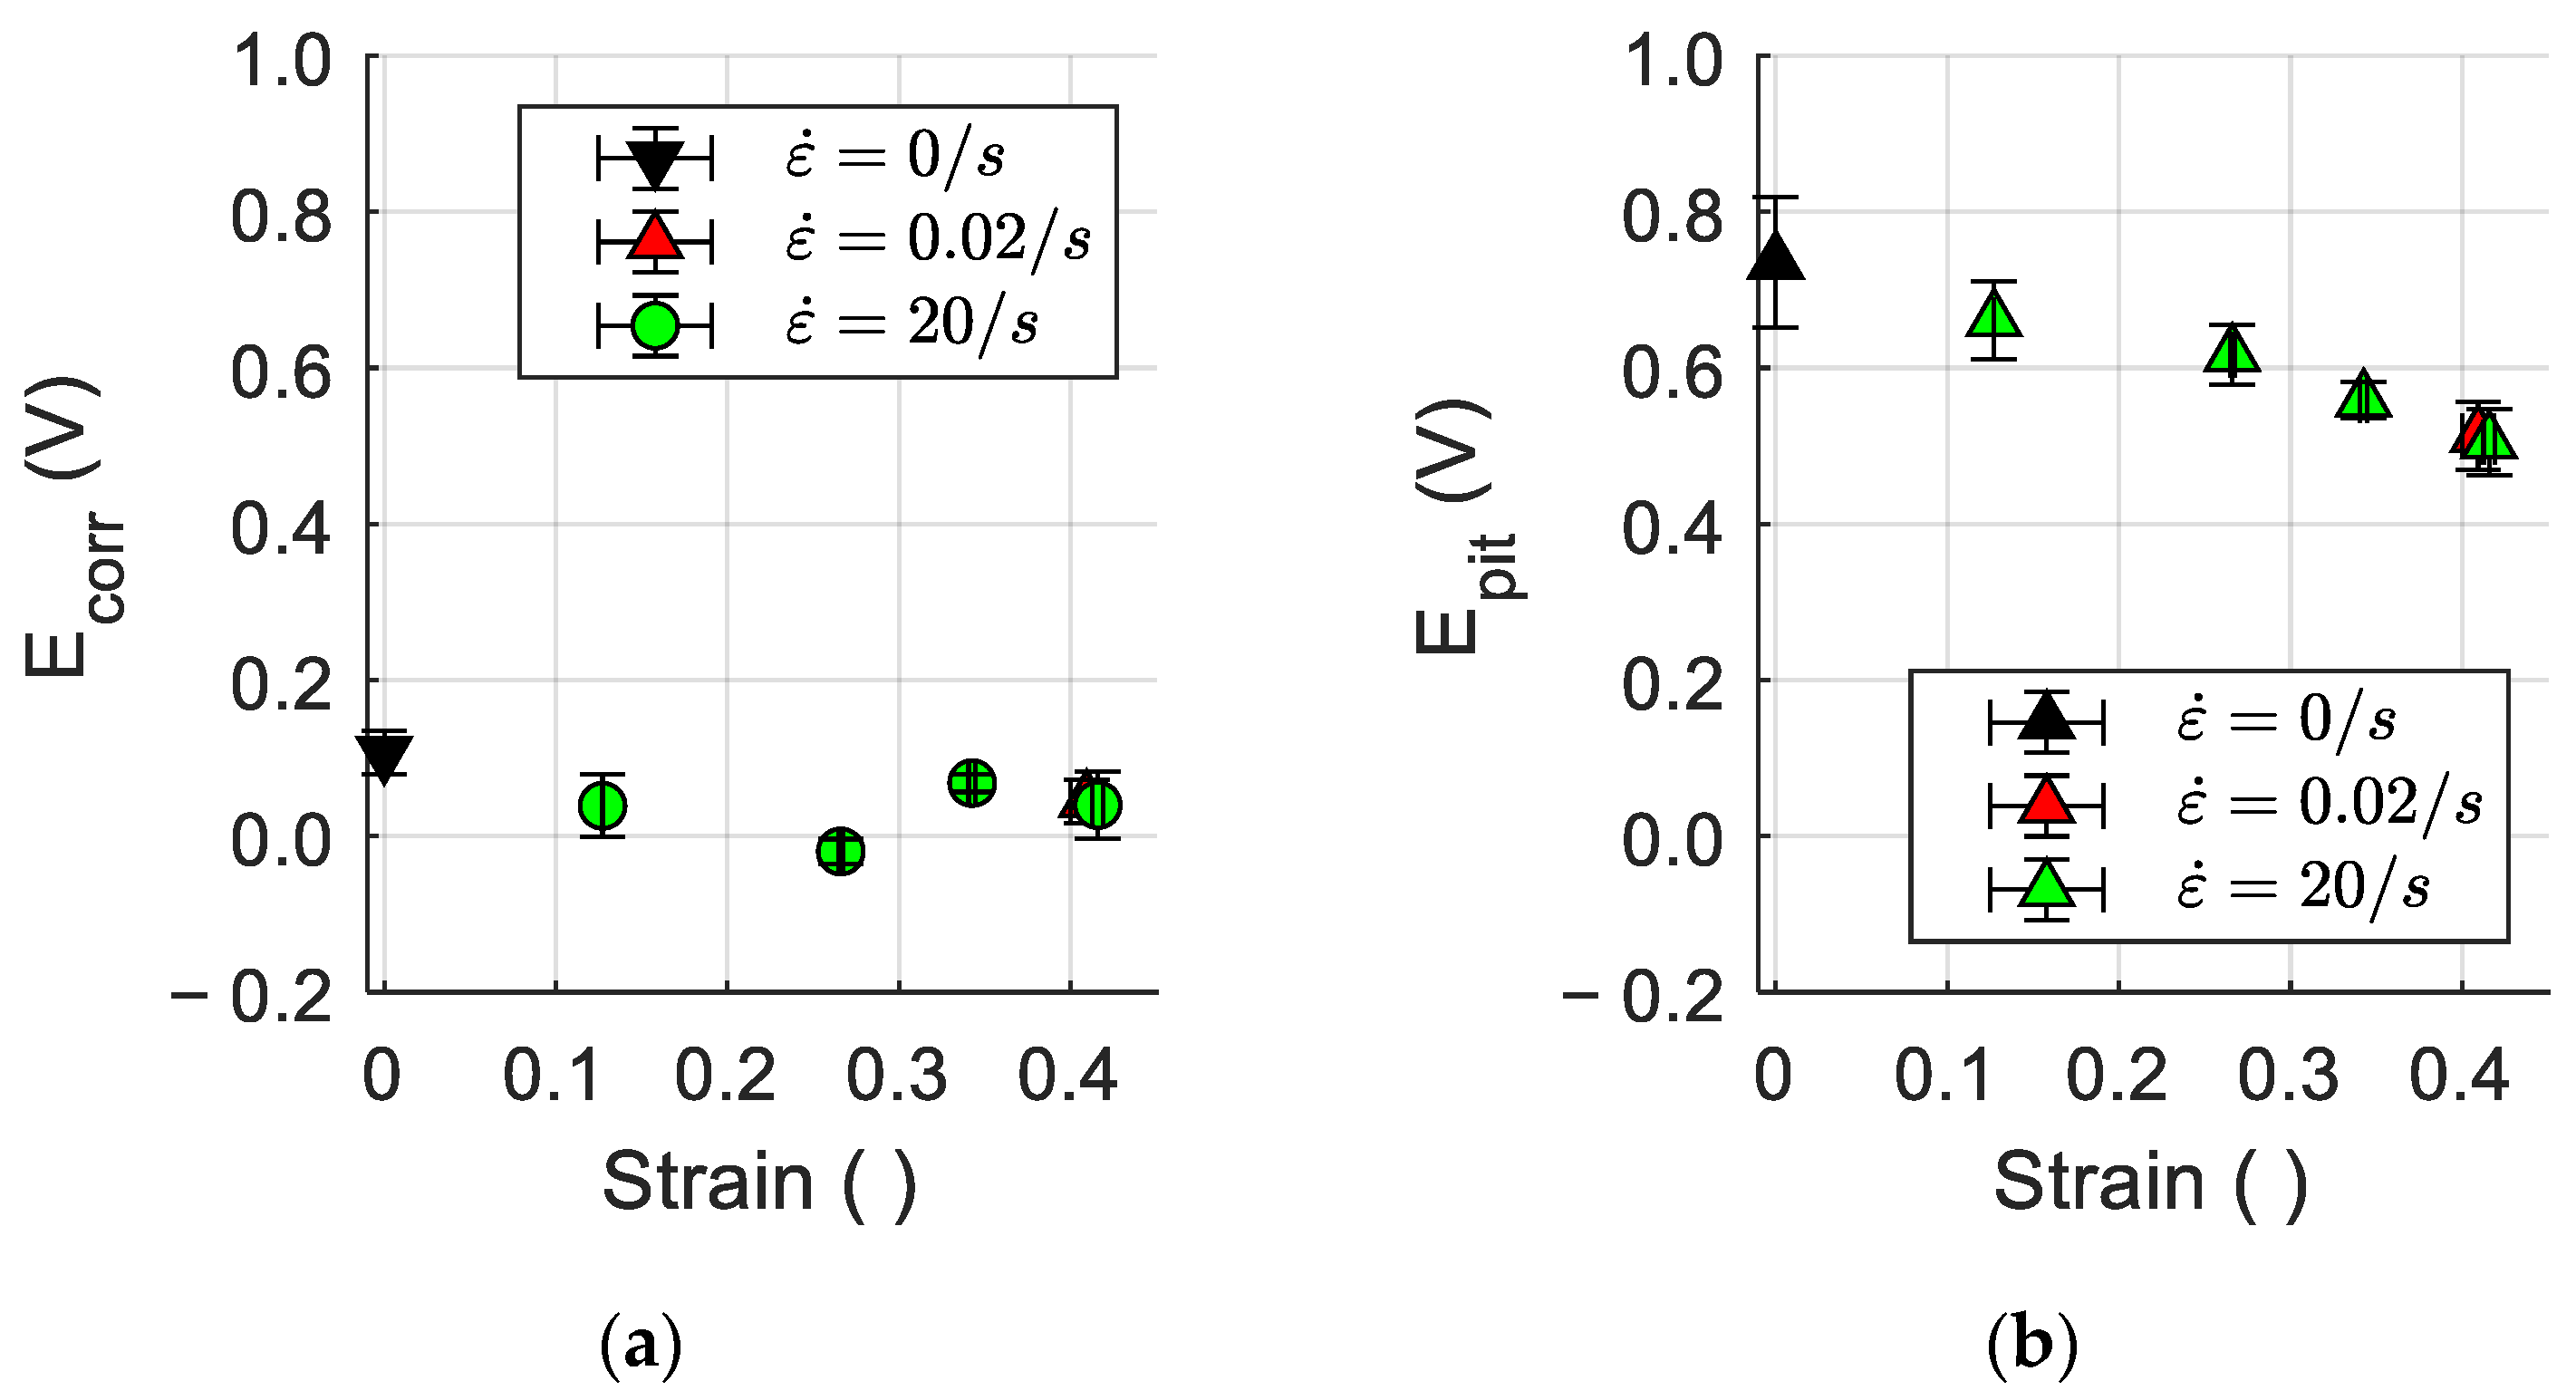
The corrosion potential after testing the AISI 304 material from coil 2 at different strain-rates is shown in Figure 20a, and the pitting potential in Figure 20b. No evidence of increasing corrosion potential for small strains was found here, likely as the smallest strain applied was larger than that used in the earlier discussion in Section 3.2.3. The corrosion potential becomes slightly lower at a strain of approximately 0.26, but then increases again. As shown in Figure 16a, the corrosion potential of AISI 304-coil 1 did not alter much. Comparing the same material elongated to the same strain at different strain-rates shows no significant difference between the corrosion potential. The pitting potential follows the same behavior as for AISI 304-coil 1 elongated at smaller strain-rates, where it decreases as function of strain. The change in strain-rate was not found to affect the corrosion resistance of the deformed material as shown by there being no significant difference between the medium and high strain-rate specimens at ε = 0.41. As the martensite fraction is higher in the specimens deformed at a lower strain-rate, the corrosion resistance of the specimens was expected to deteriorate. However, this was not found to be the case. Surface changes of the passivated layer thus seem to be independent of strain-rate as the corrosion potential seems largely unaffected.

4. Conclusions

Two austenitic stainless steels were deformed uniaxially at three strain-rates. The influence of the resulting surface-roughening on friction, martensite formation, corrosion resistance, and electrical contact resistance was evaluated. Based on the findings shown in this paper, the following conclusions can be drawn:
  • The development of surface roughness as function of strain is not dependent on the strain-rate that is applied for the materials tested in this work, between strain-rates of 0.0002/s and 20/s.
  • Friction increases with increasing strain, and hence with increasing surface roughness.
  • AISI 201 is more prone to deformation-induced martensitic transformation than AISI 304. Increased strain-rate suppressed martensitic transformation, leading to low strain-rates exhibiting a higher magnetic field density after straining.
  • The corrosion resistance, determined by evaluation of the pitting potential, of all materials decreased with increasing strain. No effect of strain-rate on the pitting potential could be detected and effects on corrosion potential were minimal.
  • No effect from the strain-induced surface development on the contact resistance could be detected.
Strain, and thereby surface roughness, influences various properties of workpiece surfaces in micro-sheet metal forming. During the process, friction is affected and may become different than expected. The influence of strain-induced surface roughening on friction should therefore be included when simulating a metal forming process. After forming, strain degrades the corrosion resistance of the materials, and increases the martensite fraction making the formed part magnetic. This may be important for specific applications where high corrosion resistance or paramagnetism is important for the function of the formed part.
The main difference between materials tested in this work was their propensity for martensitic transformation, a further study of the influence of the tendency for martensitic transformation on the various properties such as corrosion resistance should be performed. The influence of asperity flattening in terms of slope and work-hardening should be considered in future investigations of the effect of strain-induced surface-roughening on electrical contact resistance. As shown in this work, a small increase in the surface slope was not enough to allow for more asperity flattening due to strain-hardening.

Author Contributions

Conceptualization, Ú.A., R.J.C., K.P., M.S.J. and C.V.N.; methodology, Ú.A., R.J.C., M.K., K.P., M.S.J. and C.V.N.; validation, Ú.A. and M.K.; formal analysis, Ú.A. and M.K.; investigation, Ú.A. and M.K.; resources, R.J.C., K.P., M.S.J. and C.V.N.; data curation, Ú.A. and M.K.; writing—original draft preparation, Ú.A.; writing—review and editing, Ú.A., R.J.C., M.K., K.P., M.S.J. and C.V.N.; visualization, Ú.A. and M.K.; supervision, R.J.C., K.P., M.S.J. and C.V.N.; project administration, C.V.N.; funding acquisition, R.J.C. and C.V.N. All authors have read and agreed to the published version of the manuscript.

Funding

This research was funded by Independent Research Fund Denmark, grant number DFF—0136-00159B.

Data Availability Statement

Data supplied on request.

Acknowledgments

The authors would like to thank M. Wulff for his part in the experimental work on corrosion testing and XRD.

Conflicts of Interest

The authors declare no conflict of interest.

References

  1. Osakada, K.; Oyane, M. On the roughening of free surface in deformation processes. Bull. JSME 1971, 14, 171–177. [Google Scholar] [CrossRef]
  2. Dai, Y.Z.; Chiang, F.P. On the mechanism of plastic deformation induced surface roughness. Trans. ASME 1992, 114, 432–438. [Google Scholar] [CrossRef]
  3. Shimizu, I.; Okuda, T.; Abe, T.; Tani, H. Surface roughening and deformation of grains during uniaxial tension of polycrystalline iron. JSME Int. J. Ser. A 2001, 44, 499–506. [Google Scholar] [CrossRef]
  4. Guangnan, C.; Huan, S.; Shiguang, H.; Baudelet, B. Roughening of the free surfaces of metallic sheets during stretch forming. Mater. Sci. Eng. A 1990, 128, 33–38. [Google Scholar] [CrossRef]
  5. Azushima, A.; Miyagawa, M. Effect of working factors and metallurgical factors on roughening phenomenon on free surface of sheets. J. Jpn. Soc. Technol. Plast. 1986, 27, 1261–1267. [Google Scholar]
  6. Mahmudi, R.; Mehdizadeh, M. Surface roughening during uniaxial and equi-biaxial stretching of 70-30 brass sheets. J. Mater. Process. Technol. 1998, 80, 707–712. [Google Scholar] [CrossRef]
  7. Baydogan, M.; Akoy, M.A.; Kayali, E.S.; Cimenoglu, H. Deformation induced surface roughening of austenitic stainless steels. ISIJ Int. 2003, 43, 1795–1798. [Google Scholar] [CrossRef]
  8. Furushima, T.; Tsunezaki, H.; Hirose, Y. Fracture and surface roughening behaviours in micro metal forming. Procedia Manuf. 2018, 15, 1481–1486. [Google Scholar] [CrossRef]
  9. Yamaguchi, K.; Mellor, P.B. Thickness and grain size dependence of limit strains in sheet metal stretching. Int. J. Mech. Sci. 1976, 18, 85–90. [Google Scholar] [CrossRef]
  10. Chen, J.Q.; Gao, H.T.; Hu, X.L.; Yang, L.Q.; Ke, D.W.; Liu, X.H.; Yan, S.; Lu, R.H.; Misra, R.D.K. The significant size effect on nucleation and propagation of crack during tensile deformation of copper foil: Free surface roughening and crystallography study. Mat. Sci. Eng. A 2020, 790, 139678. [Google Scholar] [CrossRef]
  11. Yamaguchi, K.; Takakura, N.; Hnatani, S. Increase in forming limit of sheet metals by removal of surface roughening with plastic strain. J. Mater. Process. Technol. 1995, 48, 27–34. [Google Scholar] [CrossRef]
  12. Sundaram, P.A. Deformation-induced surface roughening studies in an AISI 1090 spheroidized steel. Scr. Metall. Mater. 1995, 33, 1093–1099. [Google Scholar] [CrossRef]
  13. Ottenklev, F.; Adell, M.; Orlov, D. Non-monotonic evolution of surface roughness in a stainless steel during cold deformation. Mater. Sci. Eng. A 2021, 799, 140150. [Google Scholar] [CrossRef]
  14. Kasuga, Y.; Yamaguchi, K.; Kato, K. Friction and lubrication in the deformation processing of metals—3rd report, Effect of grain-size of material on lubrication. Bull. JSME 1968, 11, 361–365. [Google Scholar] [CrossRef]
  15. Wu, Y.; Recklin, V.; Groche, P. Strain induced surface change in sheet metal forming: Numerical prediction, influence on friction and tool wear. J. Manuf. Mater. Process. 2021, 5, 29. [Google Scholar] [CrossRef]
  16. Saha, P.K.; Wilson, W.R.D. Influence of plastic strain on friction in sheet metal forming. Wear 1994, 172, 167–173. [Google Scholar] [CrossRef]
  17. Shi, Y.; Zhao, P.Z.; Jin, H.; Wu, P.D.; Lloyd, D.J. Analysis of surface roughening in AA6111 automotive sheet under pure bending. Metall. Mater. Trans. A Phys. Metall. Mater. Sci. 2016, 47, 949–960. [Google Scholar] [CrossRef]
  18. Hansen, C.M. The Effect of Deformation on the Corrosion Properties of Stainless Steel. Master’s Thesis, Technical University of Denmark, Kongens Lyngby, Denmark, 2019. [Google Scholar]
  19. Petersen, S.R. Numerical Simulation of ECG Studs Manufactured by Multistep Forming. Master’s Thesis, Technical University of Denmark, Kongens Lyngby, Denmark, 2020. [Google Scholar]
  20. Uddeholm. Uddeholm Vanadis® 8 SuperClean. 2020. Available online: https://www.uddeholm.com/denmark/da/products/uddeholm-vanadis-8-superclean/ (accessed on 1 August 2023).
  21. Ceron, E. New Tribo-Systems for Sheet Metal Forming of Advanced High Strength Steels and Stainless Steels. Ph.D. Thesis, Technical University of Denmark, Kongens Lyngby, Denmark, 2013. [Google Scholar]
  22. Tanaka, K.; Watanabe, T. An electrical resistivity study of lattice defects in deformed iron. Jpn. J. Appl. Phys. 1972, 11, 1429–1439. [Google Scholar] [CrossRef]
  23. Kubo, M.; Hama, T.; Tsunemi, Y.; Nakazawa, Y.; Takuda, H. Influence of strain ratio on surface roughening in biaxial stretching of IF steel sheets. ISIJ Int. 2018, 58, 704–713. [Google Scholar] [CrossRef]
  24. Romanova, V.; Balokhonov, R.; Emelianova, E.; Sinyakova, E.; Kazachenok, M. Early prediction of macroscale plastic strain localization in titanium from observation of mesoscale surface roughening. Int. J. Mech. Sci. 2019, 161–162, 105047. [Google Scholar] [CrossRef]
  25. Sohrabi, M.J.; Naghizadeh, M.; Mirzadeh, H. Deformation-induced martensite in austenitic stainless steels: A review. Arch. Civ. Mech. Eng. 2020, 20, 124. [Google Scholar] [CrossRef]
  26. Hong, T.; Nagumo, M. Effect of surface roughness on early stages of pitting corrosion of Type 301 stainless steel. Corros. Sci. 1997, 39, 1665–1672. [Google Scholar] [CrossRef]
  27. Chunchun, X.; Gang, H. Effect of deformation-induced martensite on the pit propagation behavior of 304 stainless steel. Anti-Corros. Methods Mater. 2004, 51, 381–388. [Google Scholar] [CrossRef]
  28. Monrrabal, G.; Bautista, A.; Guzman, S.; Gutierrez, C.; Velasco, F. Influence of the cold working induced martensite on the electrochemical behavior of AISI 304 stainless steel surfaces. J. Mater. Res. Technol. 2019, 8, 1335–1346. [Google Scholar] [CrossRef]
  29. Wanheim, T. Friction at high normal pressures. Wear 1973, 25, 225–244. [Google Scholar] [CrossRef]
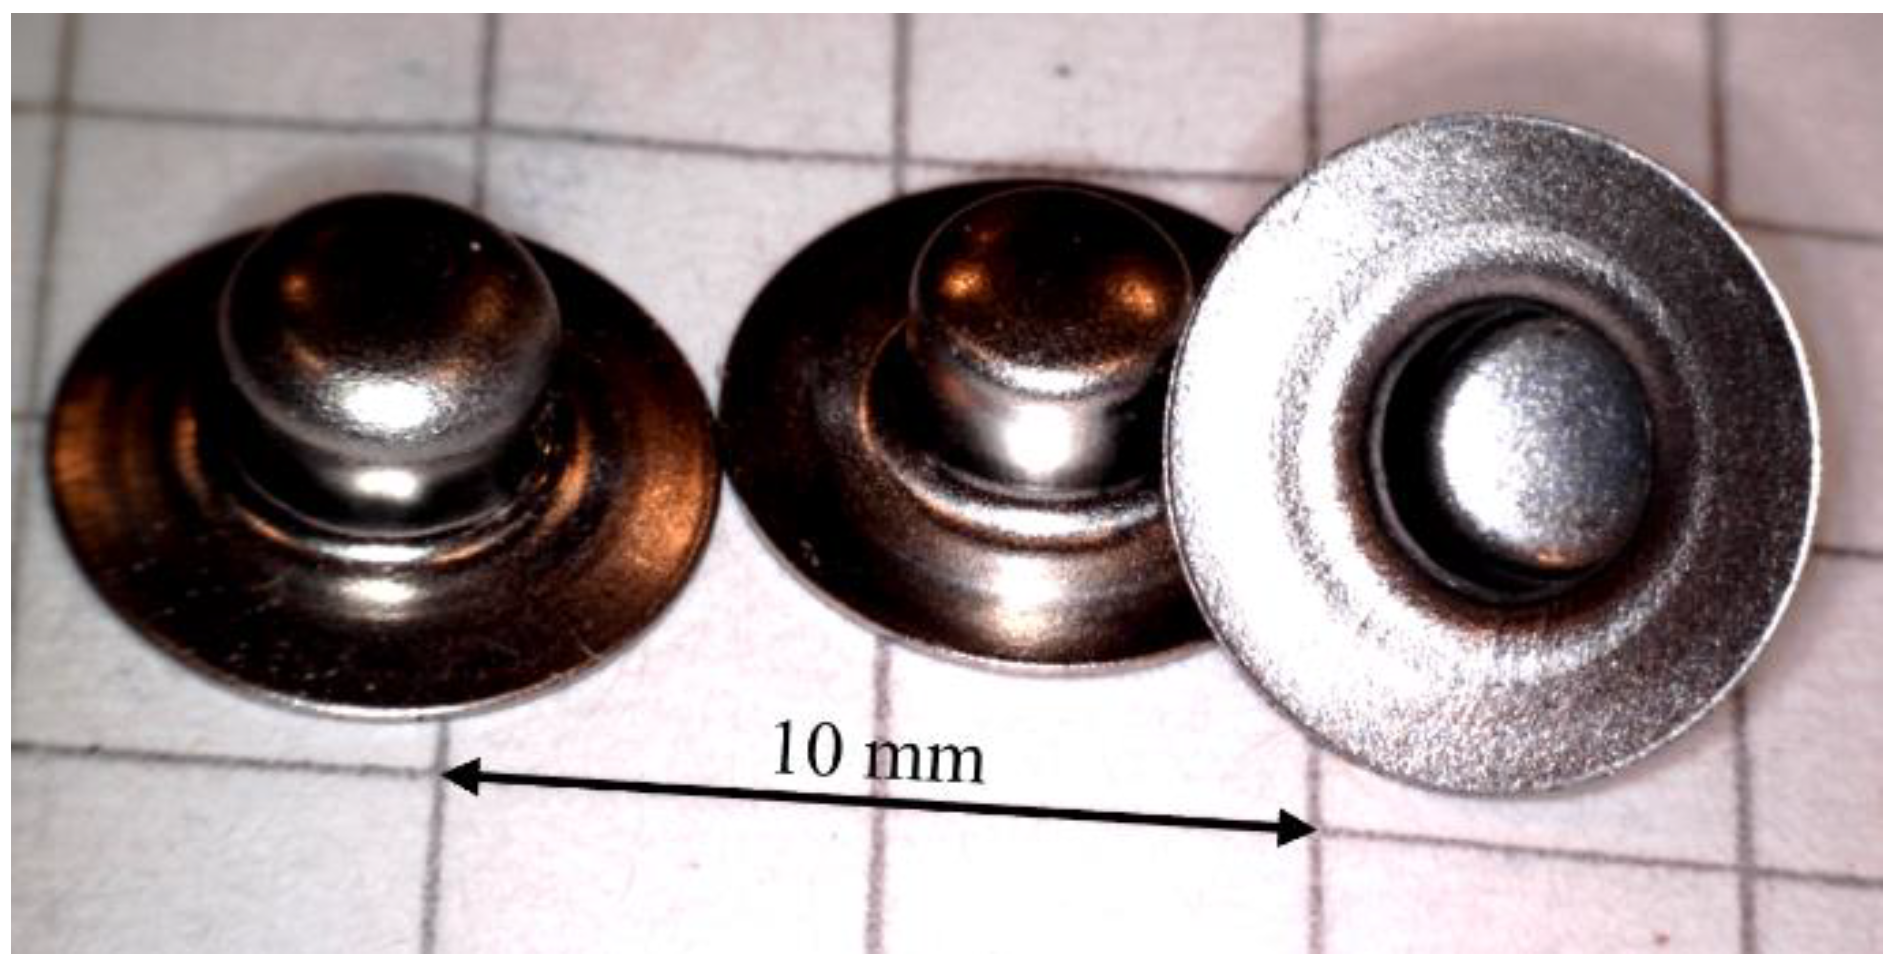
Figure 1. ECG studs produced by micro-sheet forming.
Jmmp 07 00174 g001
Figure 2. Overview of workflow.
Jmmp 07 00174 g002
Figure 3. Dimensions (mm) of tensile test specimens. Also marked are surface characterization locations (red crosses) and location of marks used to determine applied strain (green lines).
Jmmp 07 00174 g003
Figure 4. Fixture used in drop-tower tester. It consists of two frames, one of which can freely move and the other of which is placed on a solid surface. The specimen is held by two clamps, so that on impact, the specimen is elongated. A stopper was used to control the elongation.
Jmmp 07 00174 g004
Figure 5. Principle of strip-drawing test. The specimen width wS is variable, depending on the strain that the specimen has been exposed to between 15 mm and 18 mm.
Jmmp 07 00174 g005
Figure 6. Illustration of experimental set-up used for (a) electrochemical measurements of corrosion properties and (b) typical surface appearance after corrosion testing.
Jmmp 07 00174 g006
Figure 7. Polarization curves for (a) AISI 201 and (b) AISI 304, coil 1, elongated at a strain-rate of 0.02/s.
Jmmp 07 00174 g007
Figure 8. Illustrations of (a) coil used for testing of magnetic dipole moment and (b) test configuration for measuring contact resistance using 4-point method.
Jmmp 07 00174 g008
Figure 9. Acquisitions of specimen surface at different strains for a strain-rate of 0.0002/s.
Jmmp 07 00174 g009
Figure 10. Surface roughness of (a) AISI 201 and (b) AISI 304, coil 1 specimens as function of strain for strain-rate of 0.02/s. Dashed line is a linear fit to the whole dataset, the equation of which is included in the plot. Error bars denote one standard deviation of measured values.
Jmmp 07 00174 g010
Figure 11. Surface characteristics as function of strain, (a) density of summits and (b) ten-point height for material deformed at strain-rate of 0.02/s. AISI 304 material is from coil 1. Error bars denote one standard deviation of measured values.
Jmmp 07 00174 g011
Figure 12. Surface characteristics as function of strain shown by root-mean-square of surface slope for material deformed at strain-rate of 0.02/s. AISI 304 material is from coil 1. Error bars denote one standard deviation of measured values.
Jmmp 07 00174 g012
Figure 13. Results from strip-drawing shown by (a) an example of force profiles, where dashed lines show the region of averaging the friction coefficient and (b) the coefficient of friction as function of strain for the two materials deformed at 0.0002/s and 0.02/s. Error bars denote one standard deviation of measured values.
Jmmp 07 00174 g013
Figure 14. Diffraction pattern for AISI 201 at ε = 0 and ε = 0.33, overlaid by PDF data for FCC Fe (austenite) and BCC Fe (ferrite).
Jmmp 07 00174 g014
Figure 15. Results of magnetism evaluation for (a) AISI 201 and (b) AISI 304 after deformation at 0.02/s. Error bars denote one standard deviation of measured values. Note on the scale that the magnetic field density of the AISI 201 is a factor of 10 larger than that of the AISI 304.
Jmmp 07 00174 g015
Figure 16. Results of corrosion testing of AISI 201 and AISI 304 material from coil 1, both deformed at 0.02/s, shown by (a) corrosion potential and (b) pitting potential. It should be noted that the pitting potential for the AISI 304 at ε = 0 was larger than the range tested, and it was therefore not plotted. Error bars denote one standard deviation of measured values.
Jmmp 07 00174 g016
Figure 17. Electric contact resistance (ECR) as function of applied pressure (a) for pressure of 0 MPa to 35 MPa and (b) for pressure of 0 MPa to 10 MPa for as-received AISI 304 and AISI 304 strained by different amounts at a strain-rate of 0.02/s.
Jmmp 07 00174 g017
Figure 18. (a) Surface roughness (Sa) as function of strain for coil 2 of the AISI 304 material. (b) Coefficient of friction as function of strain for coil 2 of the AISI 304 material. Error bars denote one standard deviation of measured values.
Jmmp 07 00174 g018
Figure 19. Results of magnetic flux measuring for different strain-rates of AISI 304 from coil 2. Error bars denote one standard deviation of measured values.
Jmmp 07 00174 g019
Figure 20. Graphs showing (a) corrosion potential of AISI 304, coil 2 having undergone deformation at different strain-rates and (b) pitting potential of AISI 304 material from coil 2 having undergone deformation at different strain-rates. Error bars denote one standard deviation of measured values.
Jmmp 07 00174 g020
Table 1. Material compositions based on material certificates from MK Metal Foils (AISI 201) and from optical emission spectroscopy (AISI 304).
Material (wt%)AISI 201AISI 304 Coil 1AISI 304 Coil 2
FeBal.Bal.Bal.
C0.0980.0770.065
Cr16.3318.3118.25
Ni3.6608.608.64
Mn6.6401.071.23
Si0.5600.360.24
P0.0350.0450.054
S0.004<0.0010<0.0010
N0.1030.0750.061
Other (trace amount)Ti, Mo, Al, Co, Cu, NbTi, Mo, Al, CuTi, Mo, Al, Cu
Table 2. Properties of the as-received materials based on material certificates from MK Metal Foils (AISI 201) and Otelinox (AISI 304) [18].
MaterialAISI 201AISI 304
Yield strength (MPa)344–345273–275
Tensile strength (MPa)736–740633–636
Hardness (HV1)210150
Table 3. Changes to thickness (t) due to strain, measured resistivity, and resulting ideal resistance.
εt
( )
t
(mm)
ρ
(µΩ mm)
Rideal
(mΩ)
0.000.20068012.6
0.1670.18470814.2
0.3340.16972815.9
Disclaimer/Publisher’s Note: The statements, opinions and data contained in all publications are solely those of the individual author(s) and contributor(s) and not of MDPI and/or the editor(s). MDPI and/or the editor(s) disclaim responsibility for any injury to people or property resulting from any ideas, methods, instructions or products referred to in the content.