Article

The Performance of Polycrystalline Diamond (PCD) Tools Machined by Abrasive Grinding and Electrical Discharge Grinding (EDG) in High-Speed Turning

1
School of Engineering, RMIT University, Mill Park 3072, Australia
2
School of Computing and Engineering, University of Huddersfield, Huddersfield HD1 3DH, UK
3
School of Engineering, Swinburne University of Technology, Hawthorn 3122, Australia
4
DMTC Limited, Hawthorn 3122, Australia
*
Author to whom correspondence should be addressed.
J. Manuf. Mater. Process. 2021, 5(2), 34; https://doi.org/10.3390/jmmp5020034
Submission received: 25 February 2021 / Revised: 3 April 2021 / Accepted: 8 April 2021 / Published: 12 April 2021
(This article belongs to the Special Issue Advances in Multi-Axis Machining)

Abstract

:
Polycrystalline diamond (PCD) tools are widely used in industry due to their outstanding physical properties. However, the ultra-high hardness of PCD significantly limits the machining efficiency of conventional abrasive grinding processes, which are utilized to manufacture PCD tools. In contrast, electrical discharge grinding (EDG) has significantly higher machining efficiency because of its unique material removal mechanism. In this study, the quality and performance of PCD tools machined by abrasive grinding and EDG were investigated. The performance of cutting tools consisted of different PCD materials was tested by high-speed turning of titanium alloy Ti6Al4V. Flank wear and crater wear were investigated by analyzing the worn profile, micro morphology, chemical decomposition, and cutting forces. The results showed that an adhesive-abrasive process dominated the processes of flank wear and crater wear. Tool material loss in the wear process was caused by the development of thermal cracks. The development of PCD tools’ wear made of small-sized diamond grains was a steady adhesion-abrasion process without any catastrophic damage. In contrast, a large-scale fracture happened in the wear process of PCD tools made of large-sized diamond grains. Adhesive wear was more severe on the PCD tools machined by EDG.

1. Introduction

Due to the ultra-high hardness (up to 10,000 HV) and excellent thermal conductivity (around 1000 W/mK), polycrystalline diamond (PCD) tools have been extensively applied in the manufacturing of turbine blades, blade disks, fuselage, and medical implants, which are made of hard-to-machine materials such as titanium alloys, carbon fiber reinforced plastics, tungsten carbide, and various metal matrix composites [1,2,3,4,5,6]. However, the ultra-high hardness of PCD makes the manufacturing of PCD tools with conventional abrasive grinding very difficult. The material removal rate (MRR) of abrasive grinding of PCD tools is only 0.002 mm3/s [7]. To improve the machining efficiency, electrical discharge grinding (EDG), which is a variation of electrical discharge machining (EDM), has been used as an alternative method for the machining of PCD. The material removal mechanism of EDG is similar to that of EDM in which facial PCD material are eroded by continuous sparks. Instead of using static electrodes, which are typical in conventional die-sink EDM, a rotating metallic (generally made of copper-nickel alloy) wheel is used as the electrode in EDG. The rotation of the electrode improves the machining efficiency and reduced the wear rate of the electrode because the rotating wheel electrode is able to not only drag dielectric into the gap but also eject the debris out of the gap more effectively, which reduces the possibility of abnormal discharges including arc, a short circuit, and an open circuit [8,9]. Compared with the material removal rate (MMR) of abrasive grinding, the MMR of PCD in EDM is increased from 2 to 400 mm3/min, depending on the types of PCD materials, electrode materials, the selection of eroding parameters, and the function of power supplies [10,11,12].
Surface integrity is the most important factor in examining the quality of PCD tools. Generally, the sharpness of PCD tools machined by EDG (eroded tools) can reach values within 10 µm, which is similar to that of the PCD tools machined by abrasive grinding (ground tools). The surface roughness of eroded tools is often higher than that of ground tools because a porous “black layer” (reconsolidated layer) consisting of debris and re-solidified workpiece materials formed on the eroded surface [13]. The surface roughness of eroded tools is influenced by different factors including electrical parameters, polarities, and materials of the electrode as well as the type of PCD materials. In essence, it is the energy of the spark that dominates the surface roughness, i.e., the lower the spark energy, the lower the surface roughness [14]. For example, because the energy of sparks exerted on the cathode is much smaller than the energy exerted on the anode, it was found that negative polarity erosion produced a better surface finish than positive polarity in finishing processes even though similar parameters were used. Besides the surface roughness and the sharpness of edges of the tools, thermally-induced residual stress and graphitization should be considered as well. Since a reconsolidation layer is formed on the machined surface, graphitization of PCD is severe within this layer. According to experimental results [15], PCD would lose 36% of its original hardness when heated from a normal temperature to 500 K because of the graphitization of the diamond structure. Furthermore, a heat-affected zone (HAZ) of the thickness of up to 0.05 mm is formed due to the high temperature beneath the reconsolidated layer, and a significant residual stress existed within the HAZ [16,17]. External heat and load are the main causes contributing to the generation of residual stress. Compressive residual stress of the ground tools was caused by the normal load of the grinder wheel during the abrasive grinding process. In contrast, tensile stress can be found on the surface of eroded tools due to the mismatch of thermal expansion coefficients [18]. The level of residual stress needs to be controlled within a proper range because large residual stress could lead to inner cracks at the interface of diamond and binding material, weaken the strength of the polycrystalline structure, and reduce the wear resistance of PCD tools [19].
Wear resistance of PCD tools is another aspect that has been extensively investigated. Although the hardness of PCD is ultra-high, abrasion, adhesion, chipping, and chemical diffusion could be found on the worn PCD tools in the machining of Ti alloys due to the severe cutting conditions. It is well-known that the cutting forces are relatively larger in the machining of Ti alloys because of the high yield strength and high tensile strength, which lead to a high cutting temperature and severe abrasion during the cutting process [20]. In continuous cutting processes such as turning and drilling, adhesive-abrasive wear is the predominant wear mechanism, which is thermally activated by the high temperature. According to da Silva et al. [21], adhesion wear initiates at the tool/chip and tool/workpiece interfaces because of the chemical affinity of titanium alloy at a high cutting temperature. Meanwhile, the high temperature at the interfaces stimulates the chemical diffusion, resulting in the formation of a build-up edge (BUE) and build-up layer (BUL). Finally, the adhered workpiece material and the adhered tool material are removed by a plucking action, which accelerates tool wear on the tool surface. In contrast, chipping of the cutting and fracture are commonly found in the milling of titanium alloys. PCD is fragile even though it is the hardest tool material. The high-frequency dynamic load and the vibration of the tooling system in the milling process tends to cause chipping along the cutting edge and fracture of the tool tip, especially at the higher cutting speed [22]. For example, Li et al. found that the fracture of tool tips and large-scale chipping of cutting edge were predominant in the milling of Ti6Al4V at high cutting speeds of up to 1000 m/min. In contrast, adhesive wear could hardly be found on the tool surface due to the thermal-mechanical impacts in the intermittent cutting operations [23]. Similarly, in the research conducted by Su et al. severe chipping and abrasion were found on the cutting edge and the flank face of PCD tools in the milling of TA15 at the cutting speed of 350 m/min [24].
Most of the current studies are focused on investigating the general wear mechanism of PCD tools. Few studies are focused on the comparison of the performance of ground tools and eroded tools in a practical cutting process. Rahim et al. [25] and Li et al. [26] compared the performance of PCD tools finished by abrasive grinding and EDG through grooving tests. The sharp tip of different PCD tools were used to make scratches on a tungsten carbide surface. By examining the profiles of the grooves, it was found that the wear amount of ground tools was larger than that of eroded tools, indicating the better wear resistance of the eroded tools. In addition, the residual stress did not have clear effects on the tool wear of ground tools, while the wear resistance of eroded tools was improved significantly by the reduction of residual stress. Li et al. [27] further investigated the wear mechanism of the PCD tools machined by different grinding methods in turning of Ti6Al4V. By testing the performance of the cutting tools via turning Ti6Al4V at 160 m/min, it was found that flank wear width (VB) of the ground PCD tool was the largest, followed by those of the tools machined by “two-step” and “three-step” EDG.
In general, it can be found that PCD tools are promising in machining titanium alloys, and EDG is an efficient way in the manufacturing of PCD tools. However, there are few studies focused on the performance of PCD tools machined by different grinding methods. Furthermore, the microstructure of different PCD material (grain size and volume fraction of binding material, etc.) could influence the wear performance of PCD tools machined by different grinding methods. Therefore, the performance of PCD tools finished by abrasive grinding and electrical discharge grinding should be further investigated. In this study, the performance of different PCD tools in high-speed machining of titanium alloy was comprehensively investigated. The PCD tools were made of small-sized diamond grains and mix-sized diamond grains, and the flank faces of the PCD tools were processed by conventional abrasive grinding and EDG. The performance of different tools was tested in high-speed turning of Ti6Al4V at the cutting speed of 240 m/min. After machining, the worn profile, micro morphology, chemical decomposition, and cutting forces were analyzed to compare the performance of the different PCD tools in the cutting processes.

2. Experiment and Methodology

The performance of different PCD tools were investigated experimentally, and the methodology of the research is presented in Figure 1. Specifically, the PCD tools were manufactured with different grinding methods, and the performance of the tools were tested in high-speed cutting of titanium alloy. After machining, the wear mechanism of different PCD tools was investigated by analyzing the cutting forces, tool geometry, and worn morphology.

2.1. Preparation of Cutting Tools

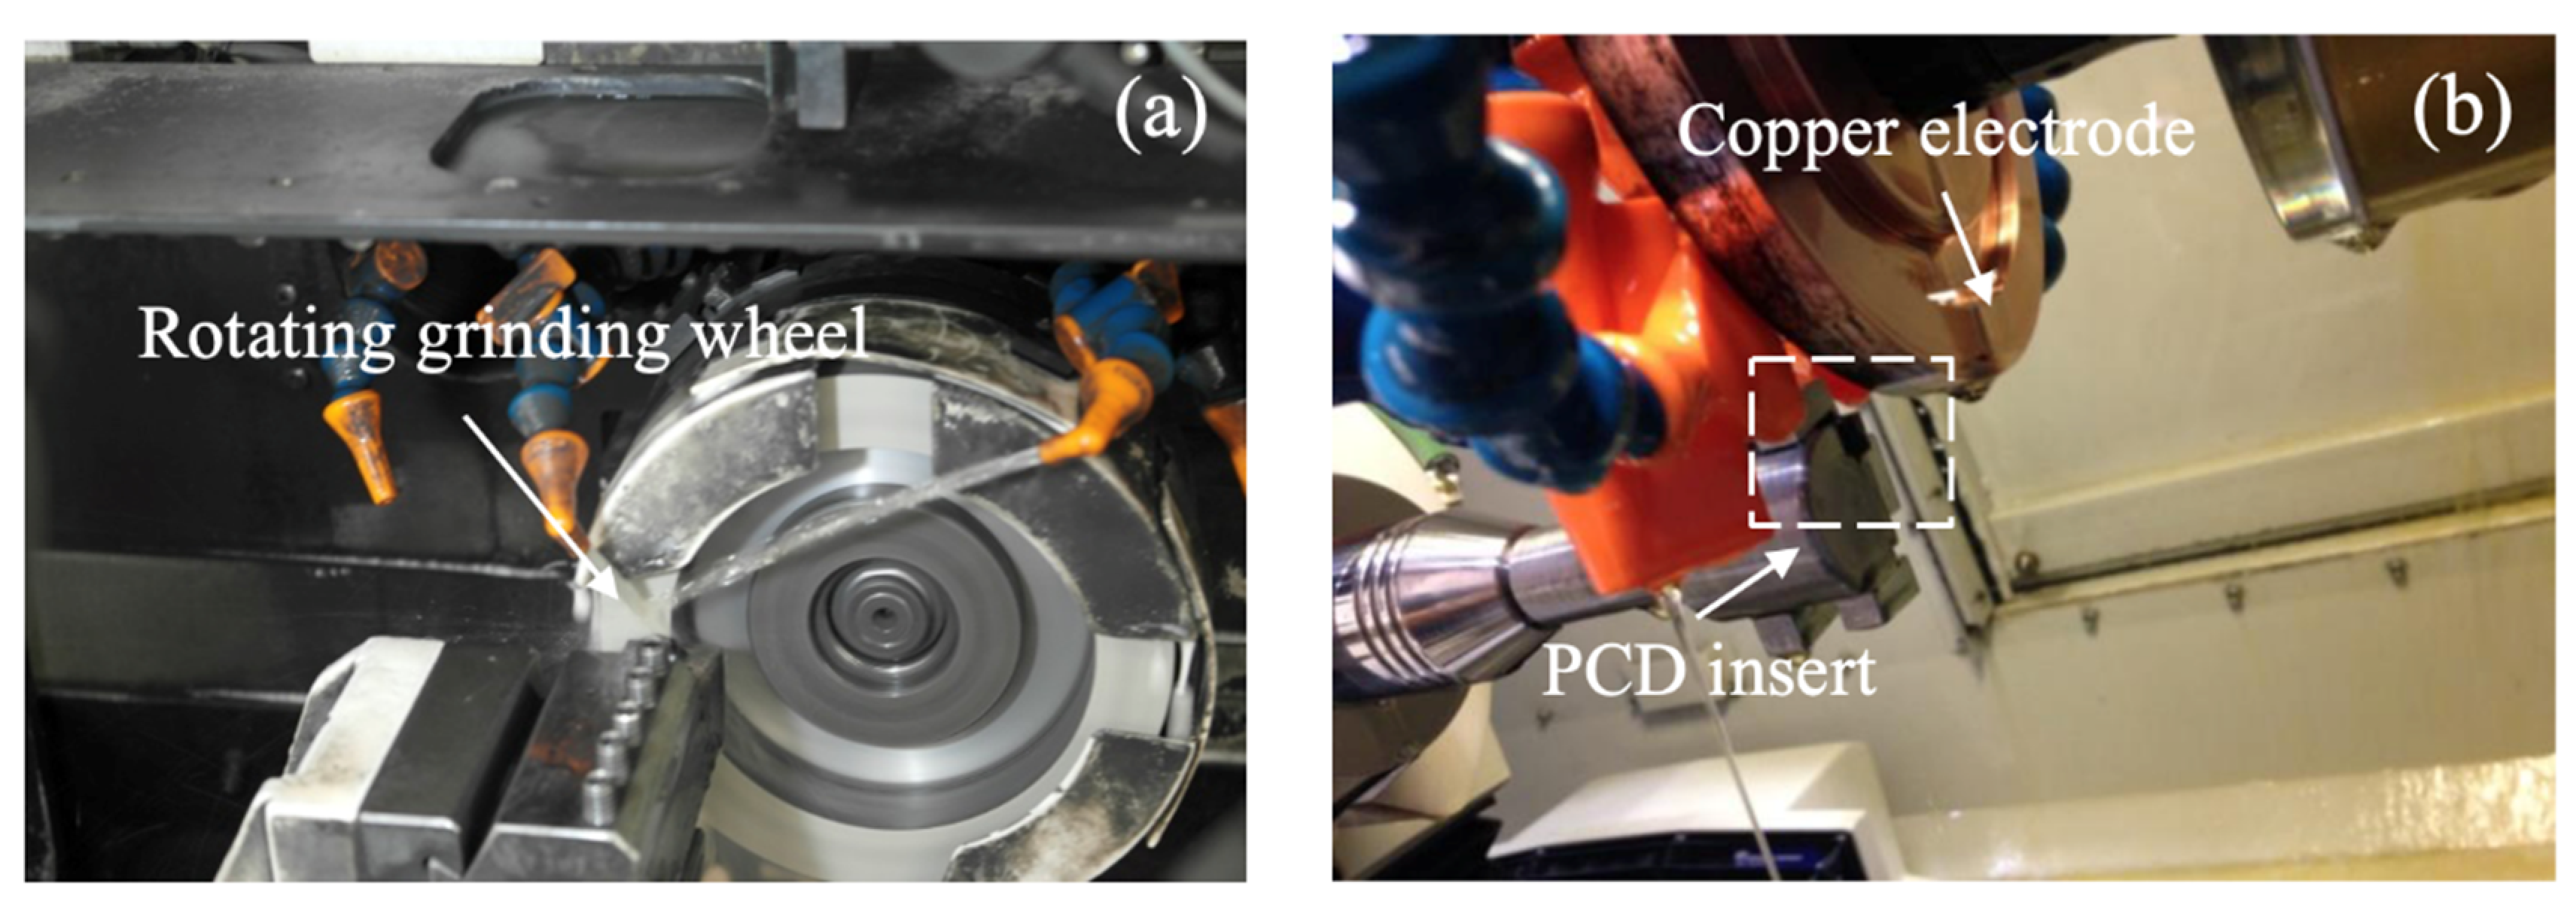
The PCD materials used in this study were CTB002 and CTM302, which were made by Element Six. The physical properties of the PCD materials are listed in Table 1. The inserts were firstly shaped into 7 mm × 7 mm squares via wire-cut EDM. Then, the flank faces of the inserts were processed by two grinding methods: abrasive grinding and electrical discharge grinding (EDG). The cutting parameters used in abrasive grinding and EDG, respectively, are listed in Table 2. Abrasive grinding of the PCD inserts was conducted on a computer-numerical-control (CNC) grinding machine COBORN RG6-FE (Figure 2a). To remove the “heat-affected zone” (HAZ) generated in the wire-cut EDM process, the total infeed of the grinding was 100 μm. The feed rate was 0.2 mm/min and the wheel speed was 20 m/s. Both of the parameters were optimized in the previous study, which could remove the HAZ without inducing excessive compressive stress [25]. Coolant was applied in the grinding process in order to avoid thermal defects on the machined surface. The EDG process was conducted on a 5-axis CNC EDG machine (ANCA EDGe, Figure 2b). The whole EDG process consisted of a roughing process and a finishing process. The 12 A current and 40 ms pulse duration were applied in the roughing process to rapidly remove the HAZ. The infeed of the roughing process was 100 μm. In contrast, the current and pulse duration were 1 A and 1 ms in the finishing process, which could eliminate the stressed and graphitized PCD structure. The infeed of the finishing process was 50 μm.

2.2. Turning Experiments

The turning experiment was conducted on a CNC lathe (OKUMA GENOS L200E-M). Four Grade 5 Ti6Al4V rods were used as the workpiece, and the physical properties of the workpiece material are listed in Table 3. The dimension of the rod was 200 mm in length and 50 mm in diameter. The cutting parameters are listed in Table 4. The cutting depth and feed rate were fixed as 0.2 mm and 0.15 mm/rev, which were parameters practically used in semi-finishing processes in the industry [29]. The cutting speed was 240 m/min, which was similar to the high-speed turning tests conducted by da Silva et al. [21]. The workpiece would be machined with one type of PCD inserts in six turning paths, and the machining time of each turning path was 35 s. During the cutting process, high-pressure coolant was adopted in order to reduce the excessive graphitization and chemical diffusion caused by a high cutting temperature. The insert was clamped on the tool holder (KORLOY DSDNN2020) with a −10° rake angle and a 6° relief angle. For every turning path, the main cutting force, feed force, and thrust force exerted on the PCD tool were measured by a force measurement system, which includes a three-axis dynamometer (PCB260A), an amplifier (PCB Piezotronics 480A22), and a data acquisition (DAQ) card (National Instrument 6036E). The sensitivities of the dynamometer in three axes are:
  • Z axis: 0.56 mv/N.
  • X and Y axes: 2.25 mv/N.
The force signals were collected at the 10 kHz sampling frequency and the 1000 sample to read, and the signals were presented using the software LabView SignalExpress.

2.3. Wear Analysis

Wear of the PCD tools were analyzed comprehensively. Worn geometry of the cutting tools including the width of flank wear (VB), the blunt of cutting edge, and the roughness of the worn surface were measured by an Alicona optical microscope with the module IF-EdgeMaster Module 4.1 & LaboratoryMeasurement Module 5.1 with a 10× lens. The micro morphology of the machine surface of the PCD inserts were observed via the Philips XL30 SEM at the acceleration voltage of 30 kV. The residual element on the worn faces were quantified by the electron diffraction spectroscopy (EDS) equipped with the detector X-MaxN of Oxford Instrument. The spectrum of EDS was generated and analyzed by AZTEC 4.13.

3. Results

3.1. Geometric Characteristics of the PCD Tools

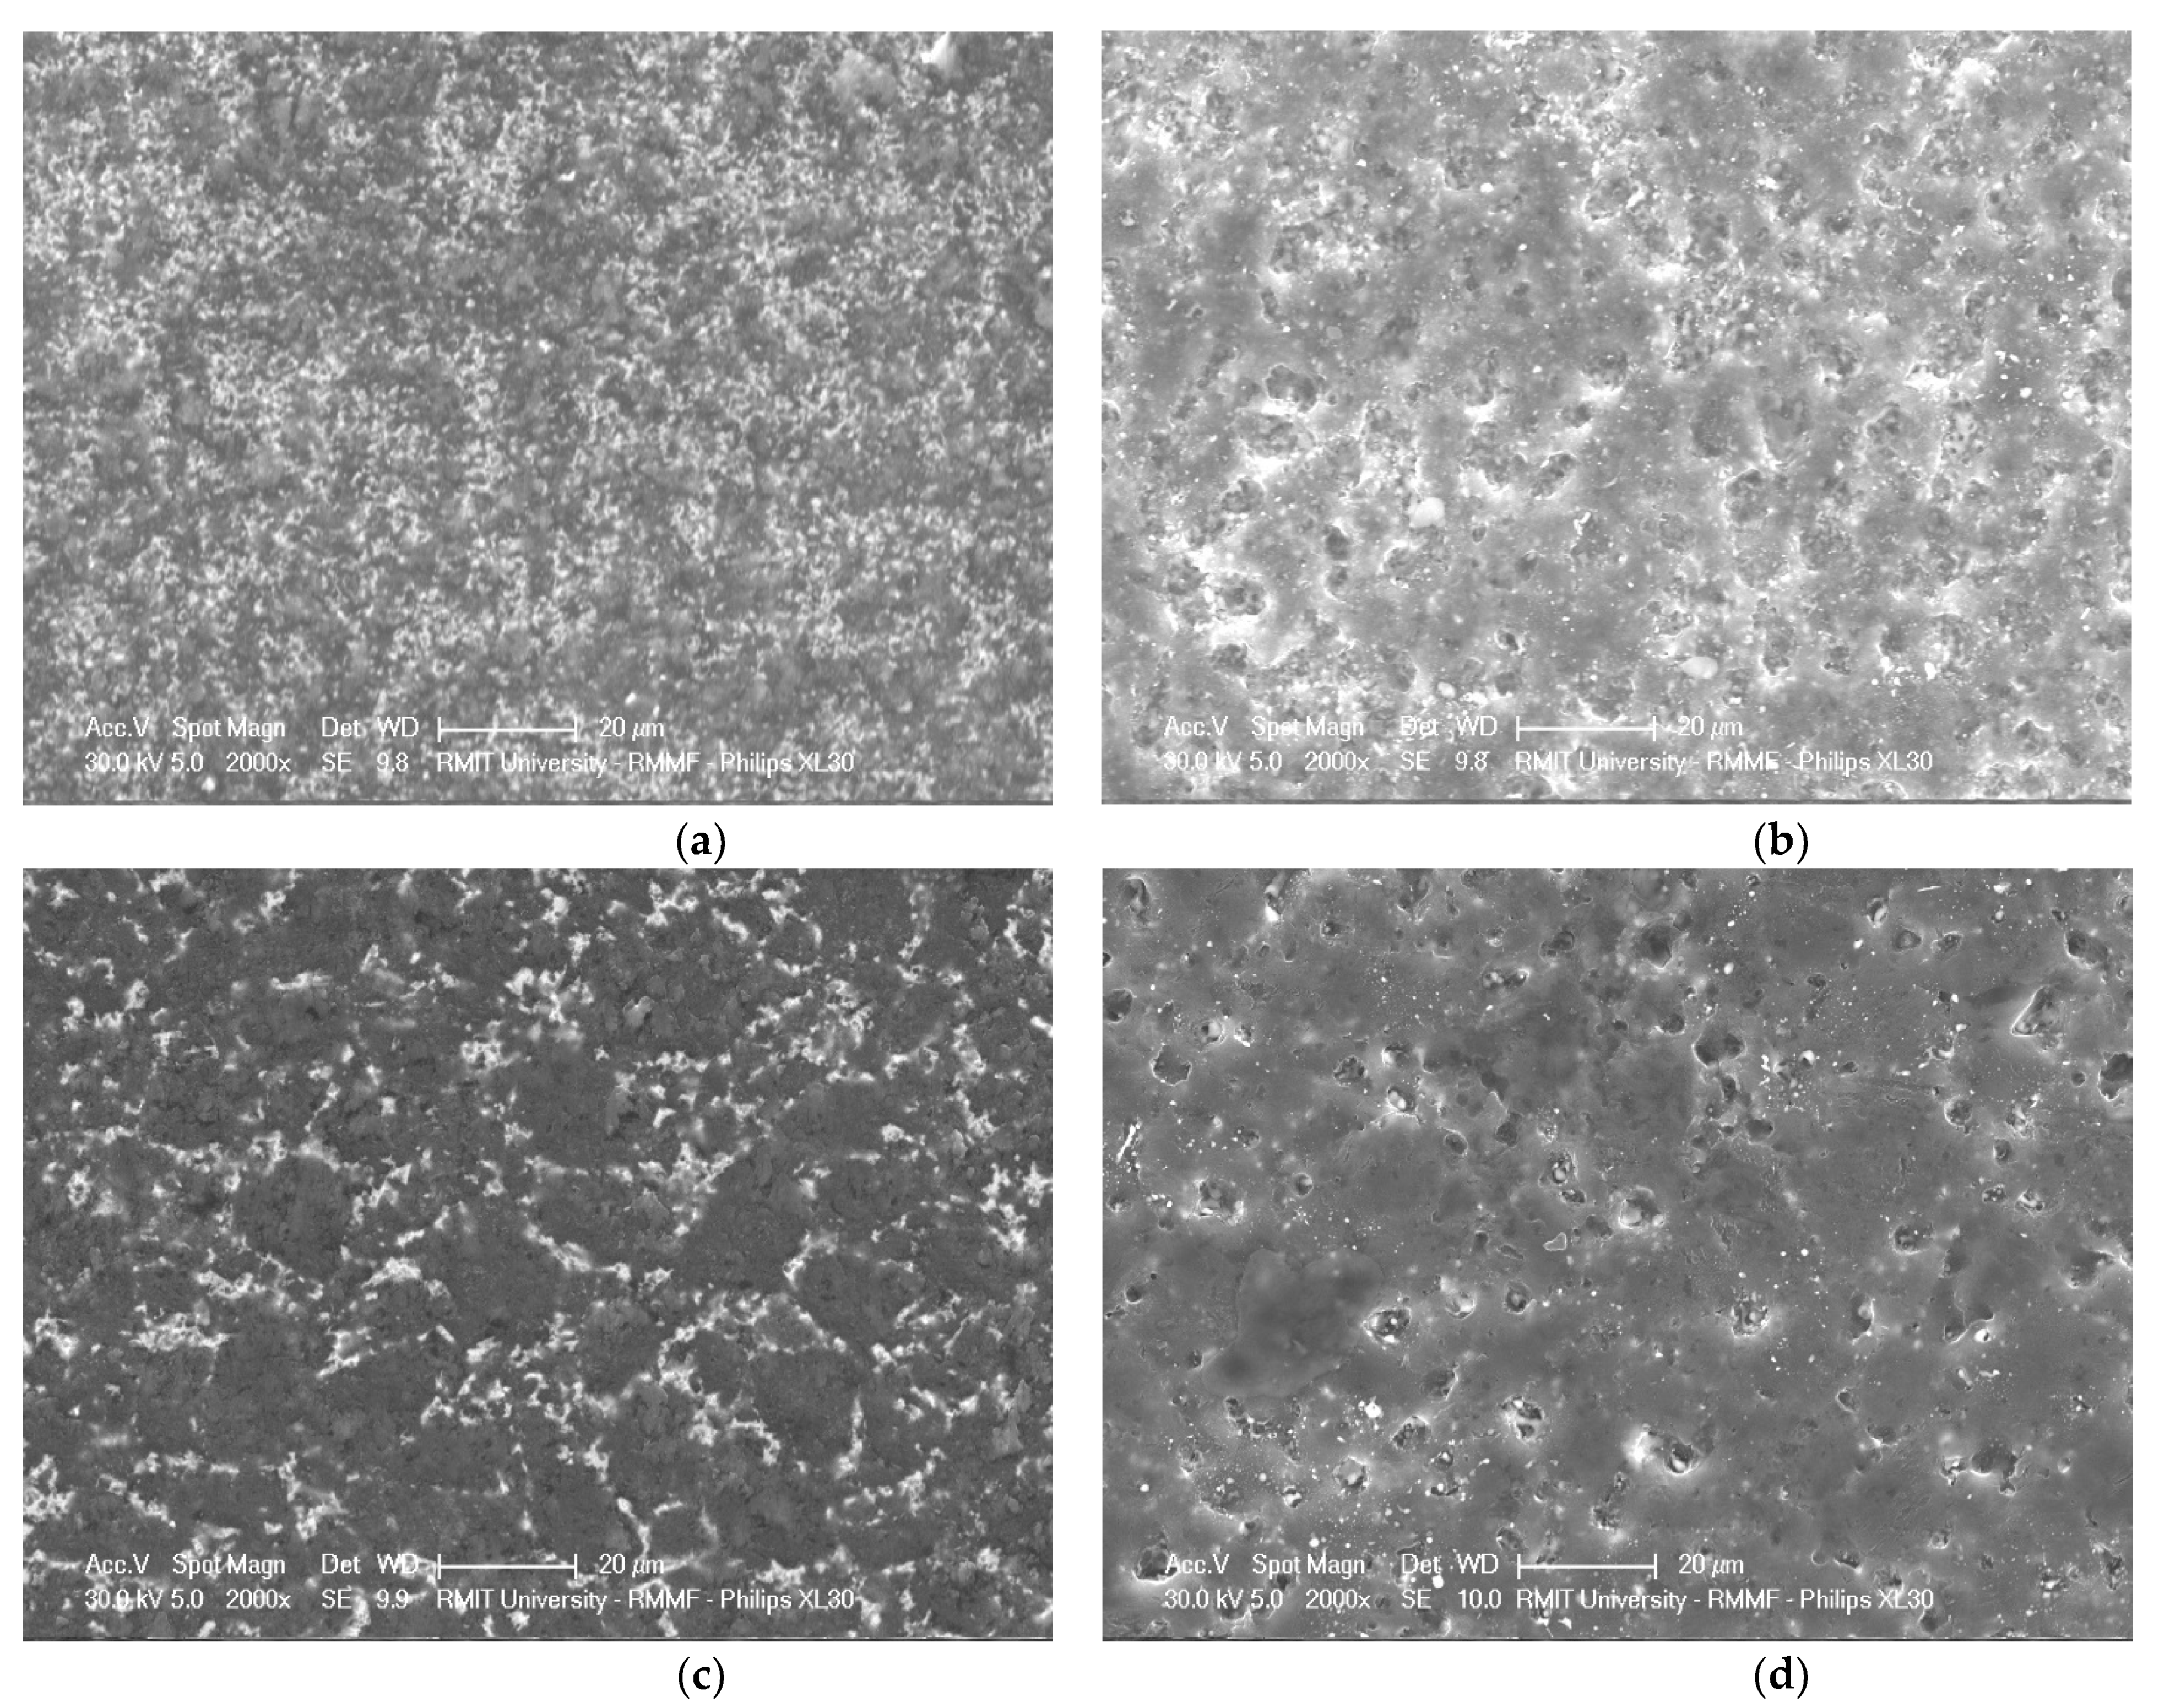
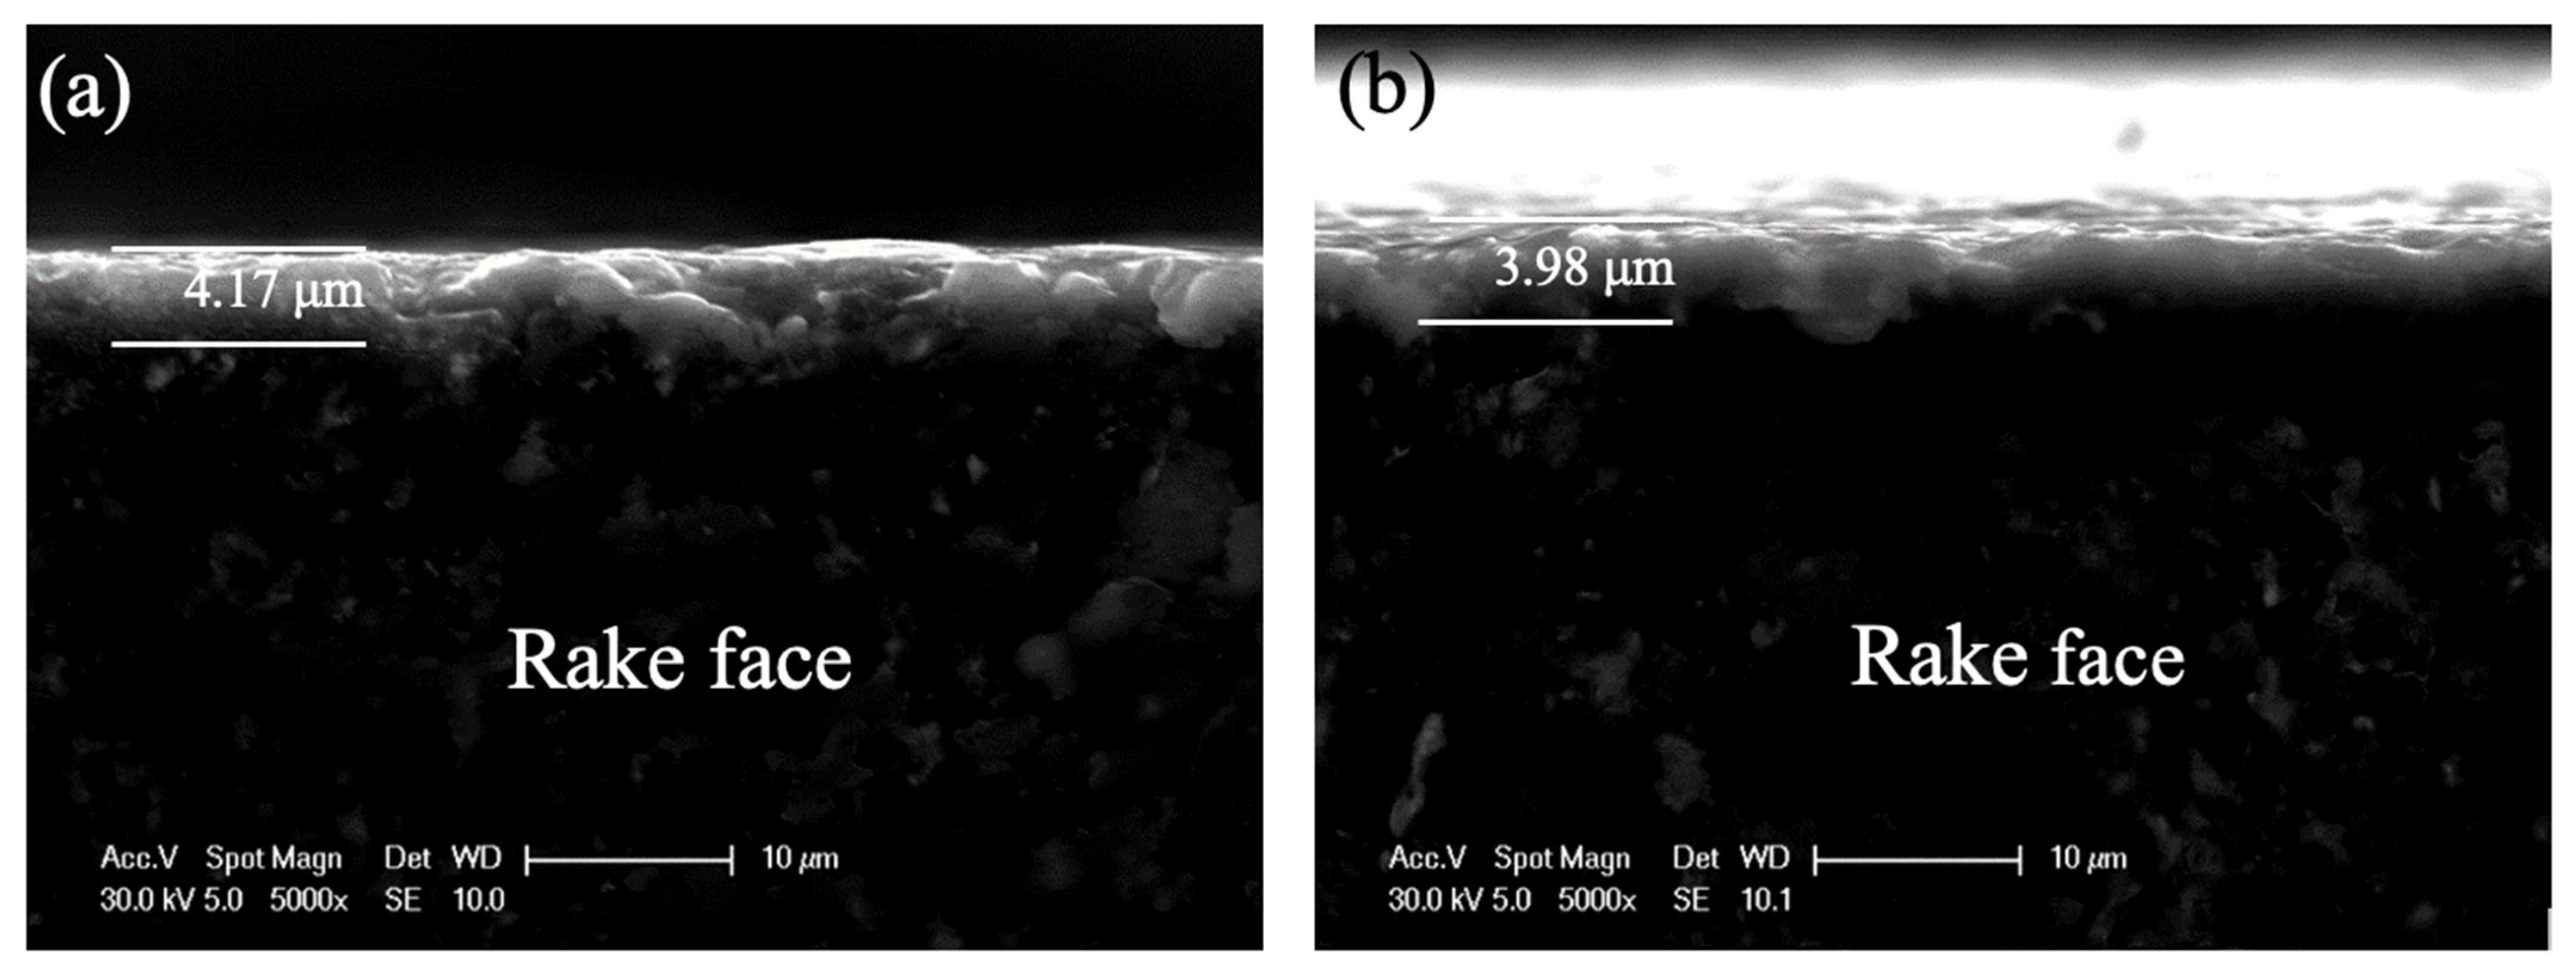
Table 5 presents the roughness of the flank faces and the sharpness of the cutting edge after different grinding methods. It was found that the sharpness of the four PCD inserts ranged from 5 to 7 μm. The sharpness of the tools made of CTM302 was slightly larger than that of CTB002. The surface roughness of the tools machined by EDM was about 100 nm larger than that machined by abrasive grinding. Figure 3 shows the detailed morphology of the cutting tools. Specifically, cobalt can be found on the surface of tool 002A (Figure 3a), while large-sized diamond grains were found on the surface of tool 302A, and pool-like cobalt was found between the diamond grain boundaries (Figure 3c). No clear cracks or scratches were found on the flank faces of tools machined by abrasive grinding. In comparison, a “reconsolidated layer” with craters and voids was found on the surface of the tool surface machined by EDG (Figure 3b,d). This layer contributed to the larger surface roughness of the eroded tools. The thickness of the two reconsolidated layers was similar, which were both around 4 μm regardless of the type of PCD materials (Figure 4).
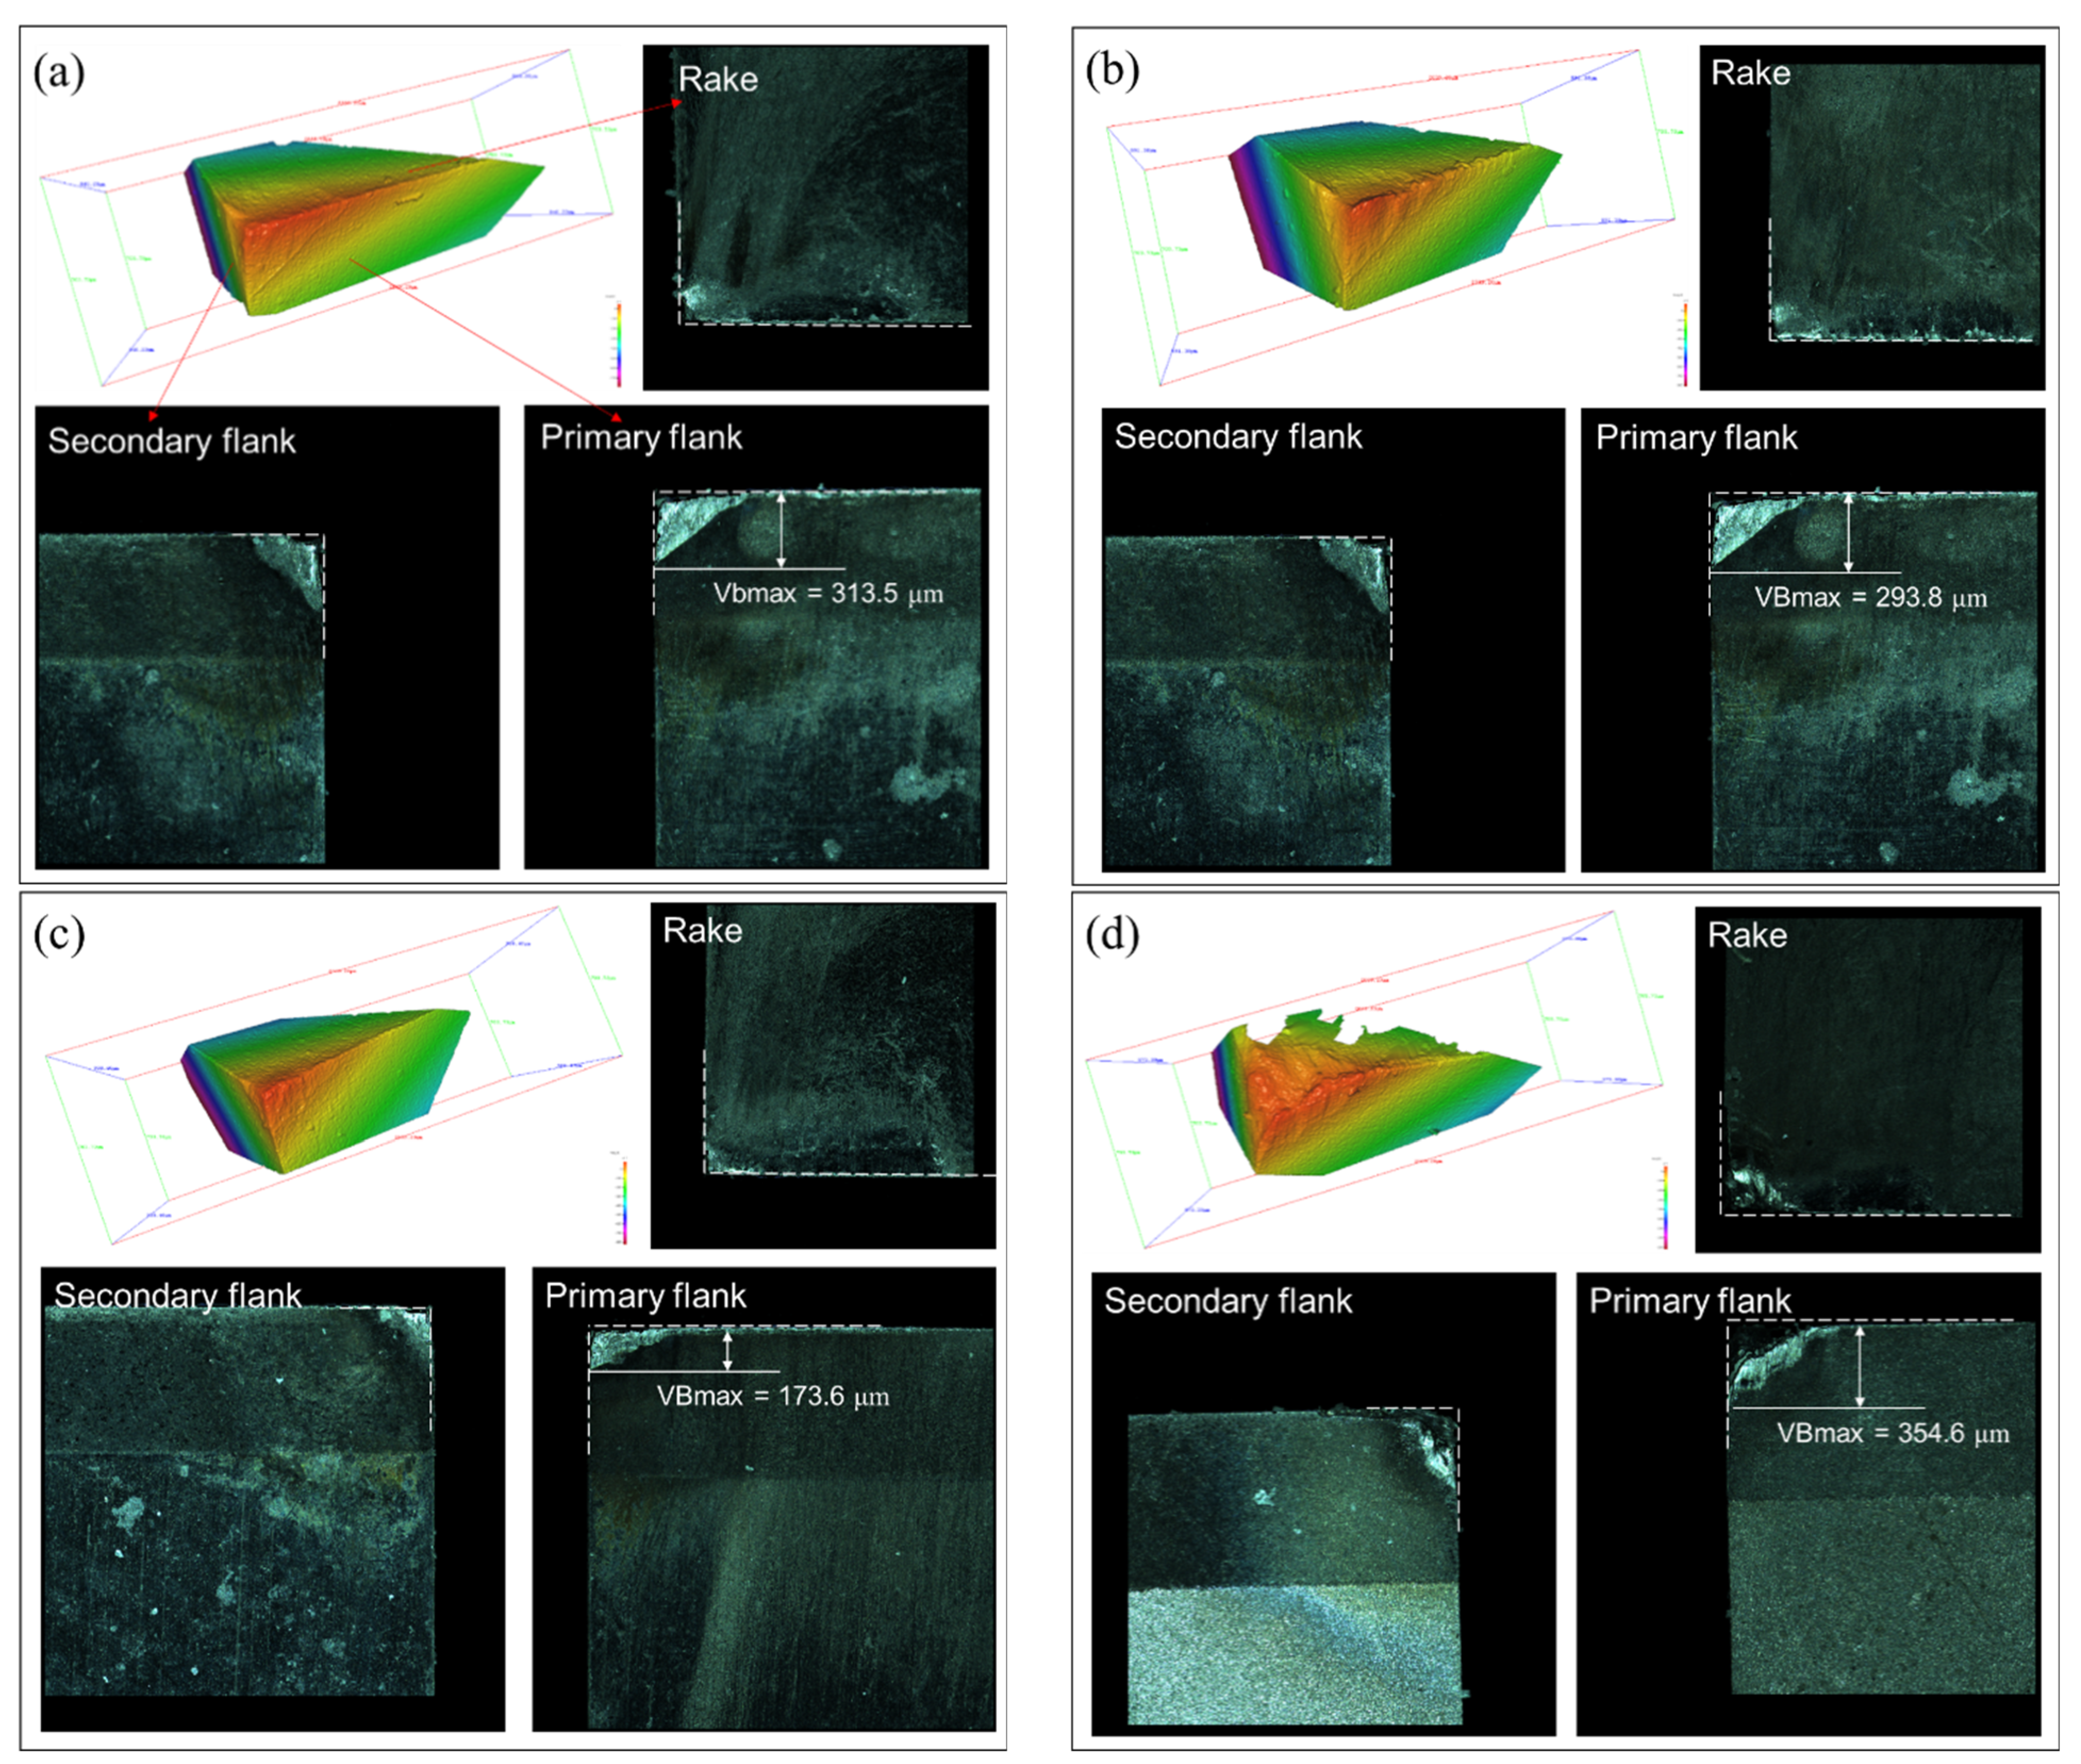
After the turning experiments, tool materials on primary flank face, secondary flank face, and rake faces were removed in the wear processes, as shown in Figure 5. A relatively intact tool tip could be found on tools 002A, 002E, and 302A. Clear triangular worn areas were found on the primary flank faces and sub flank faces because of the sharp tip of the PCD inserts. The maximum VBs of tools 002A, 002E, and 302A are 313.5 μm, 293.8 μm, and 173.6 μm, respectively. The VB of 302A is significantly smaller than those of tools made of CTB002 because of the better abrasion resistance of PCD with large-sized diamond grains. Apart from the results obtained by Li et al. [27] that the VB of eroded tools made of CTB010 was about 35% less than the ground tools, in this study, the difference between the VB of ground tools and eroded tools were not clear (less than 10%). This is because the abrasive resistance of PCD tools made of CTB002 is weaker than the tool made of CTB010 due to the smaller-sized diamond grains. The effects of finishing methods on tool wear development was insignificant at the high cutting speed. The wear of 302E was catastrophic. Specifically, the tip of 302E was totally fractured, leaving a huge crater in the worn area. The area of flank wear was strip-like because the fracture of the tool nose changed the geometry of the tool tip, which limited the increment of the tool/chip contact region. A similar phenomenon was found in the experiments conducted by Li et al. that the tool made of CTM302 experienced tip fracture after six cutting paths and the fracture became catastrophic after 14 cutting paths [28]. This proved that CTM302 was brittle and vulnerable to fracture even though it had the best performance in abrasive resistance.
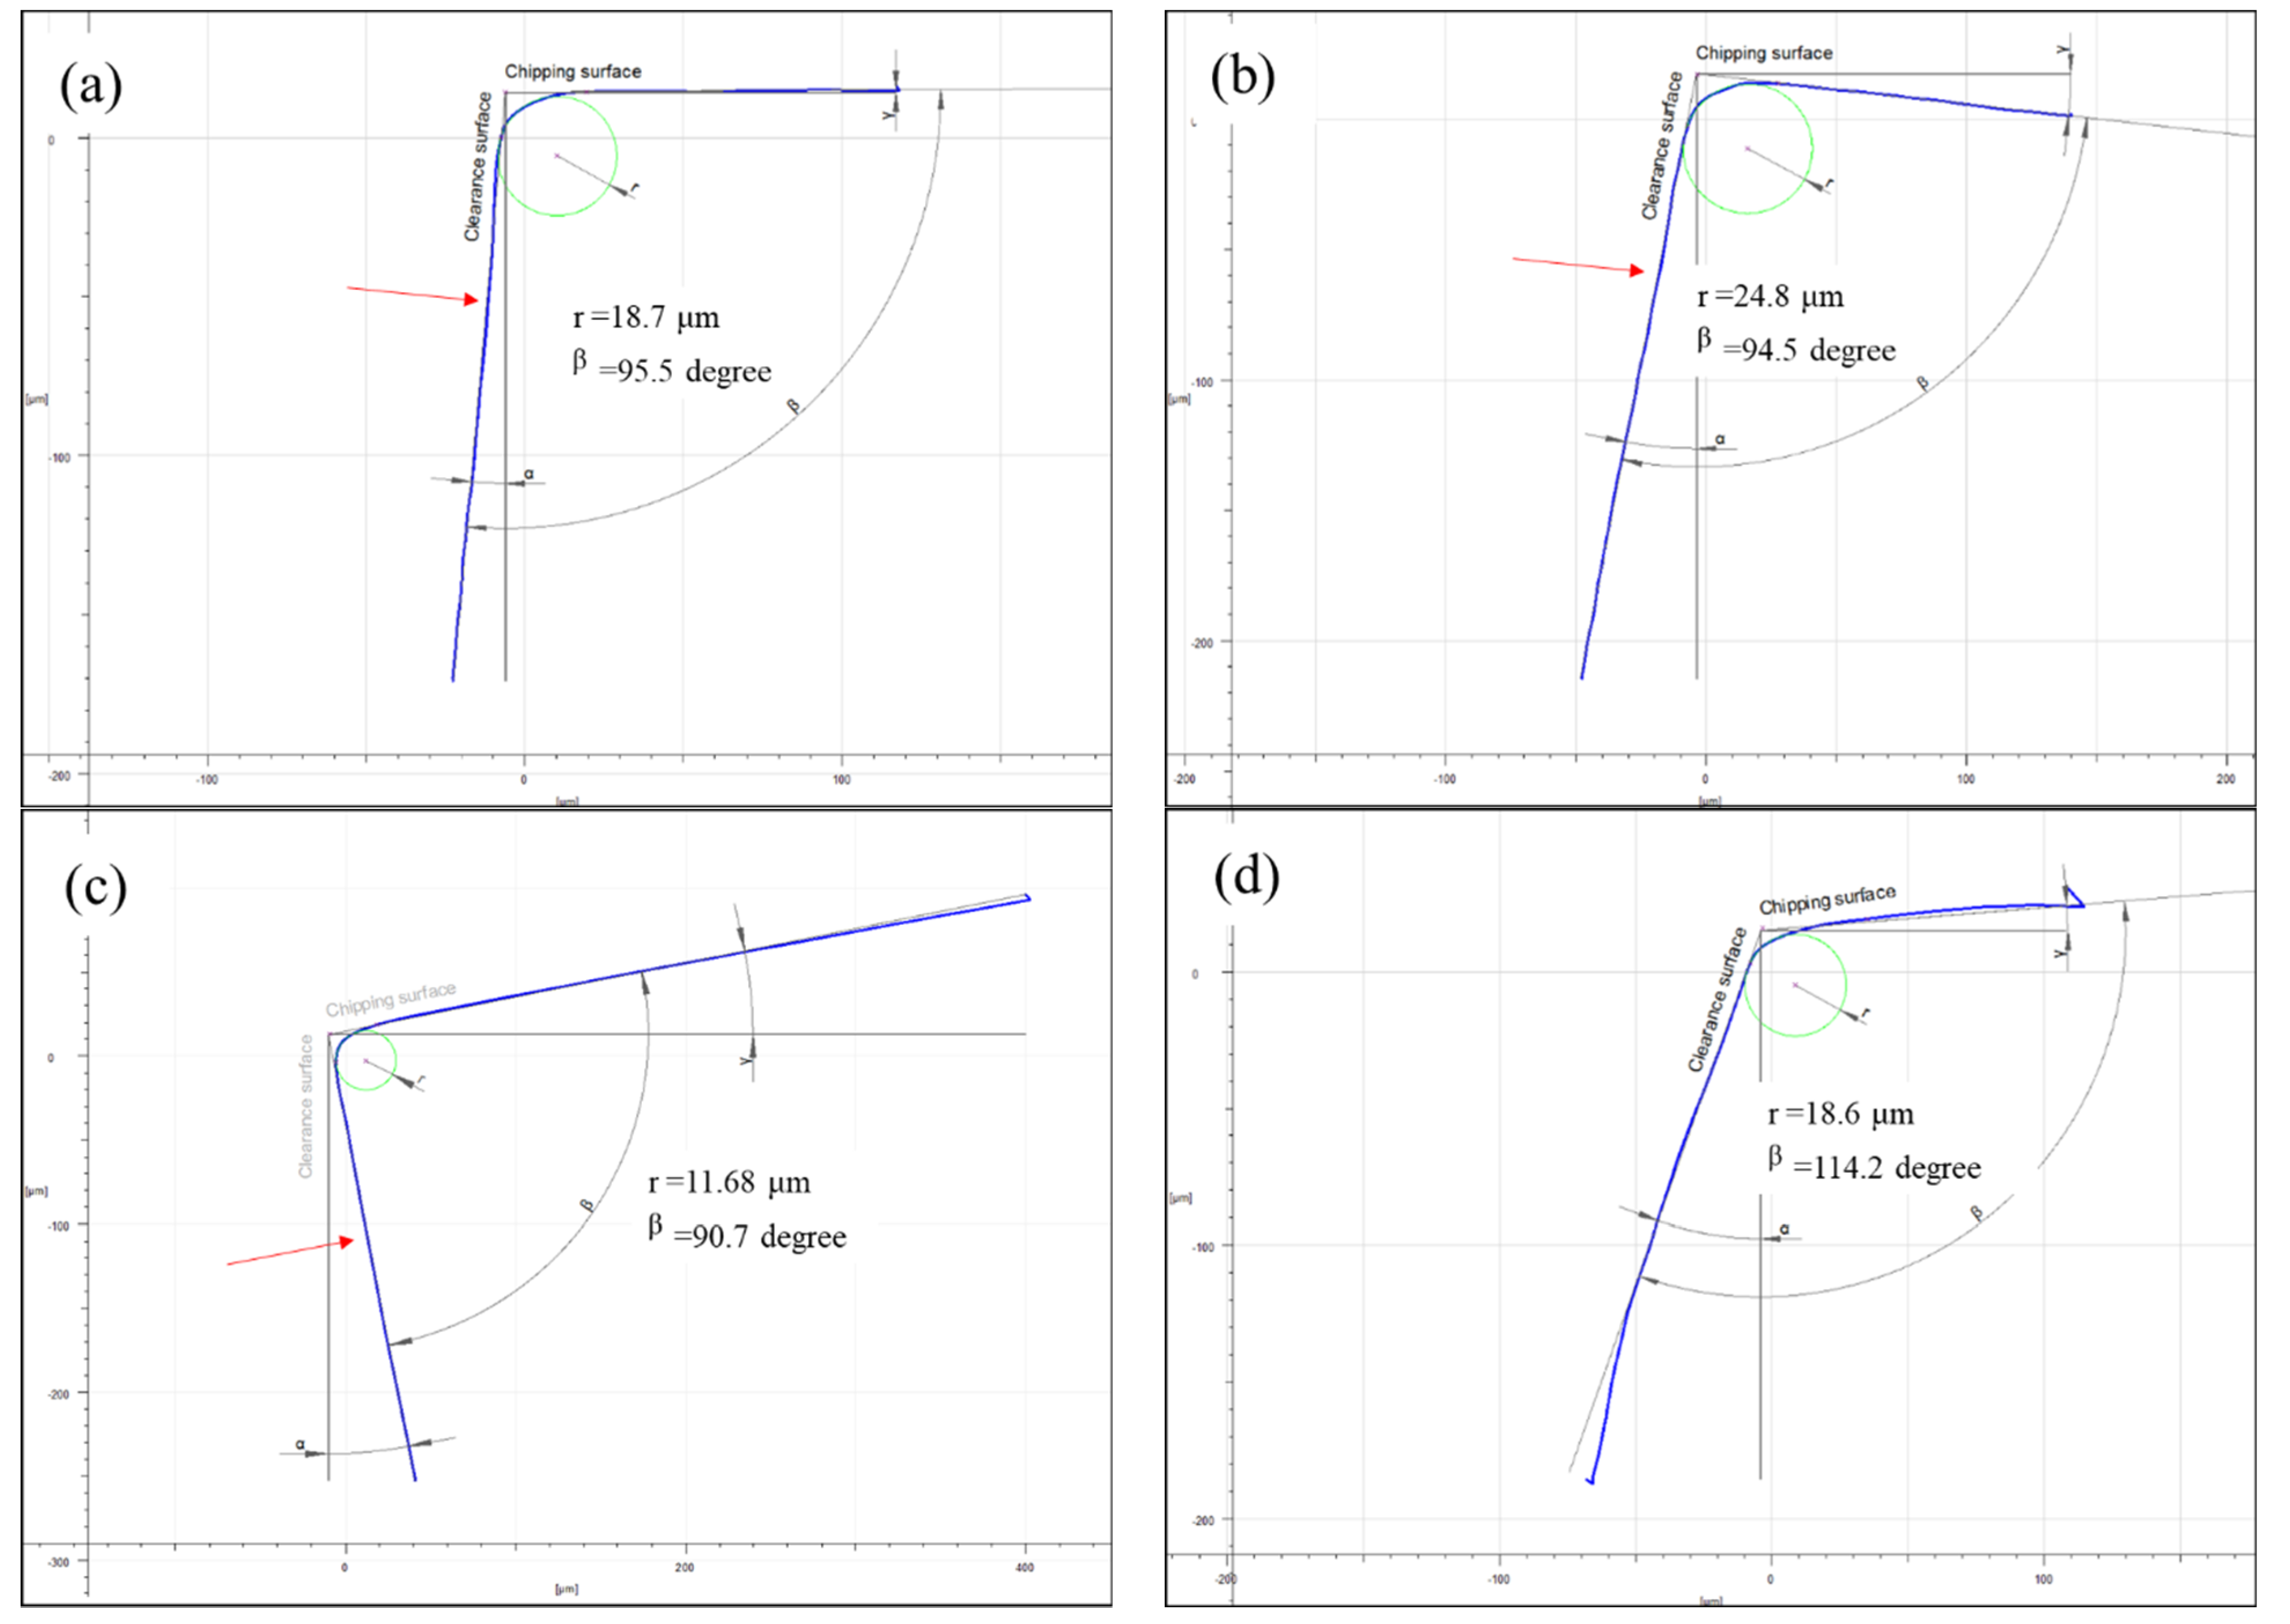
Figure 6 shows the radius of cutting edge (“r”, the sharpness) of different PCD tools. Similar to the maximum VBs, the edge radiuses of 002E and 002A were larger than the edge radius of 302A, which further reflects the better wear resistance of the tools made of CTM302 at a high cutting speed. In addition, it can be seen that the edge radius of 002E was slightly larger than the edge radius of 002A. β is the angle between the clearance surface and chipping surface (rake face and flank face, respectively), which should be 90° ± 0.5° when the cutting edge is sharp. After machining, the angles of β on the tools made of CTB002 increased by about 5° due to the material loss on the tool surface, which was reflected by the curved profiles (blue lines in the figures) of the flank face (clearance surface) and crater face (chipping surface). Angle β of 002A was still within the range of the sharp edge, indicating less tool wear. With regard to 302E, β has been significantly increased due to the newly formed rake face caused by the catastrophic fracture of the tool nose.
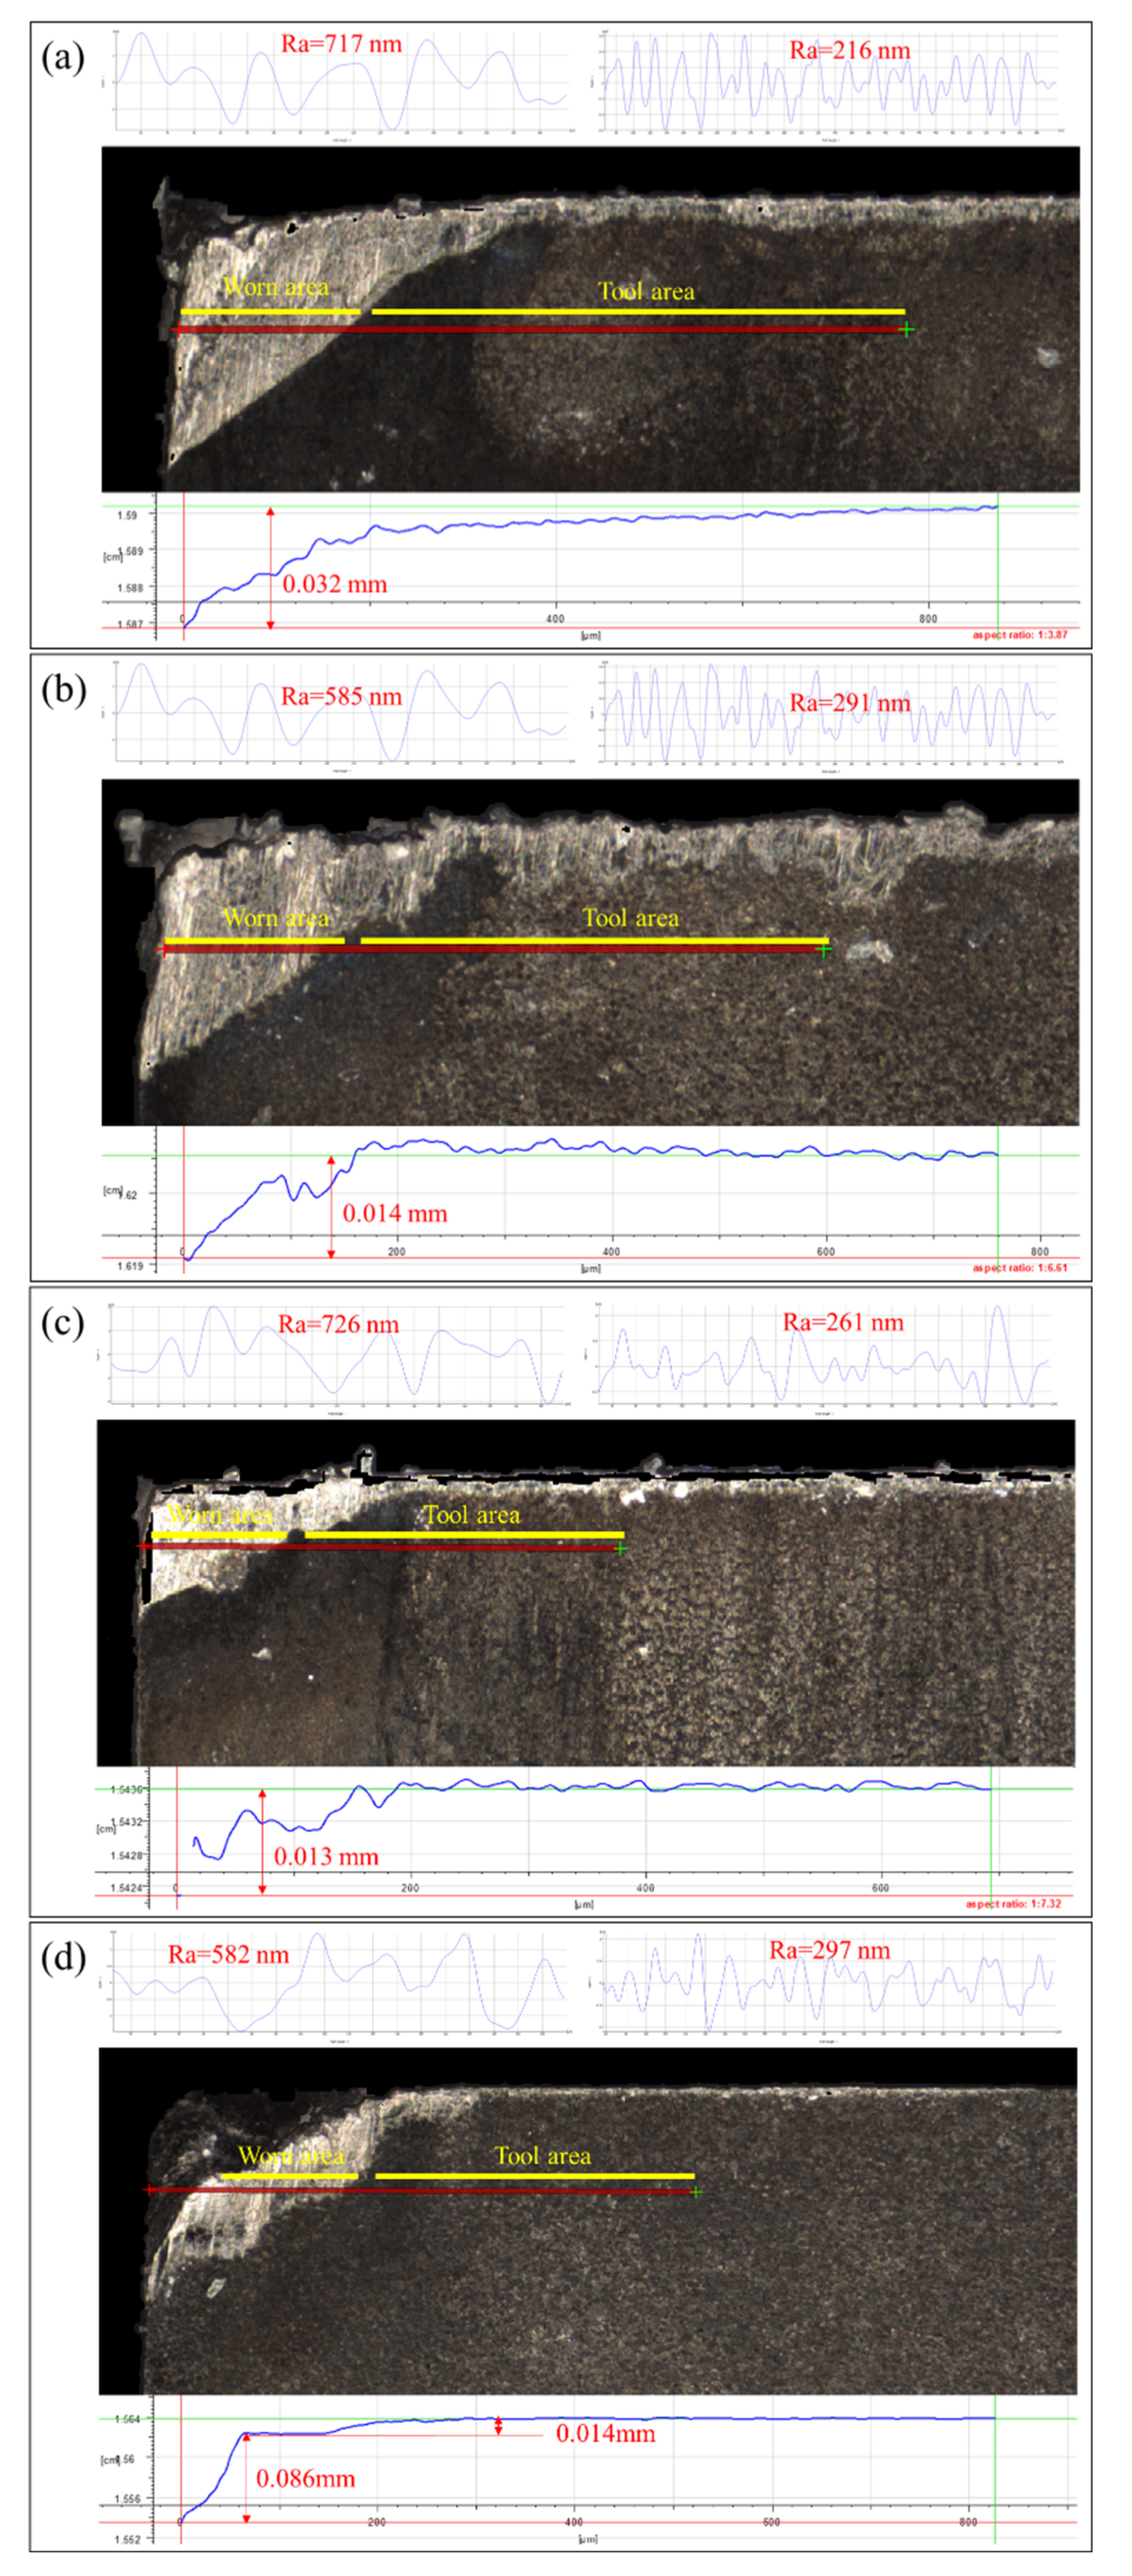
The profiles of the worn flank faces are presented by Abbott-Firestone curves, as shown in Figure 7. Generally, the surface roughness in the worn areas is about 600 to 700 nm due to the adhesive-abrasive process during flank wear. Within the measured regions (the red lines in the microscopic images), it is found that the facial material near the tool tip was removed by the tool/workpiece abrasion during the flank wear process. The amount material loss can be reflected by the gaps between the red line and green line in the diagram beneath the microscopic images. For the tools made of CTB002, the wear amount of 002A (0.032 mm) was twice larger than that of 002E (0.014 mm), indicating a better abrasive resistance of the tools machined by EDG. In comparison, the wear amount of 302E (0.1 mm) was much larger than the wear amount of 302A (0.014 mm). The breakage of the tool tip of 302E significantly changed the geometry nearby, and the material loss near the broken tip was huge (0.086 mm). However, the material loss of the residual flank wear area was similar to that of 302A (0.014 mm). This means the abrasive resistance of the ground tool and the eroded tool are similar, when the tools are made of large-sized diamond grains.
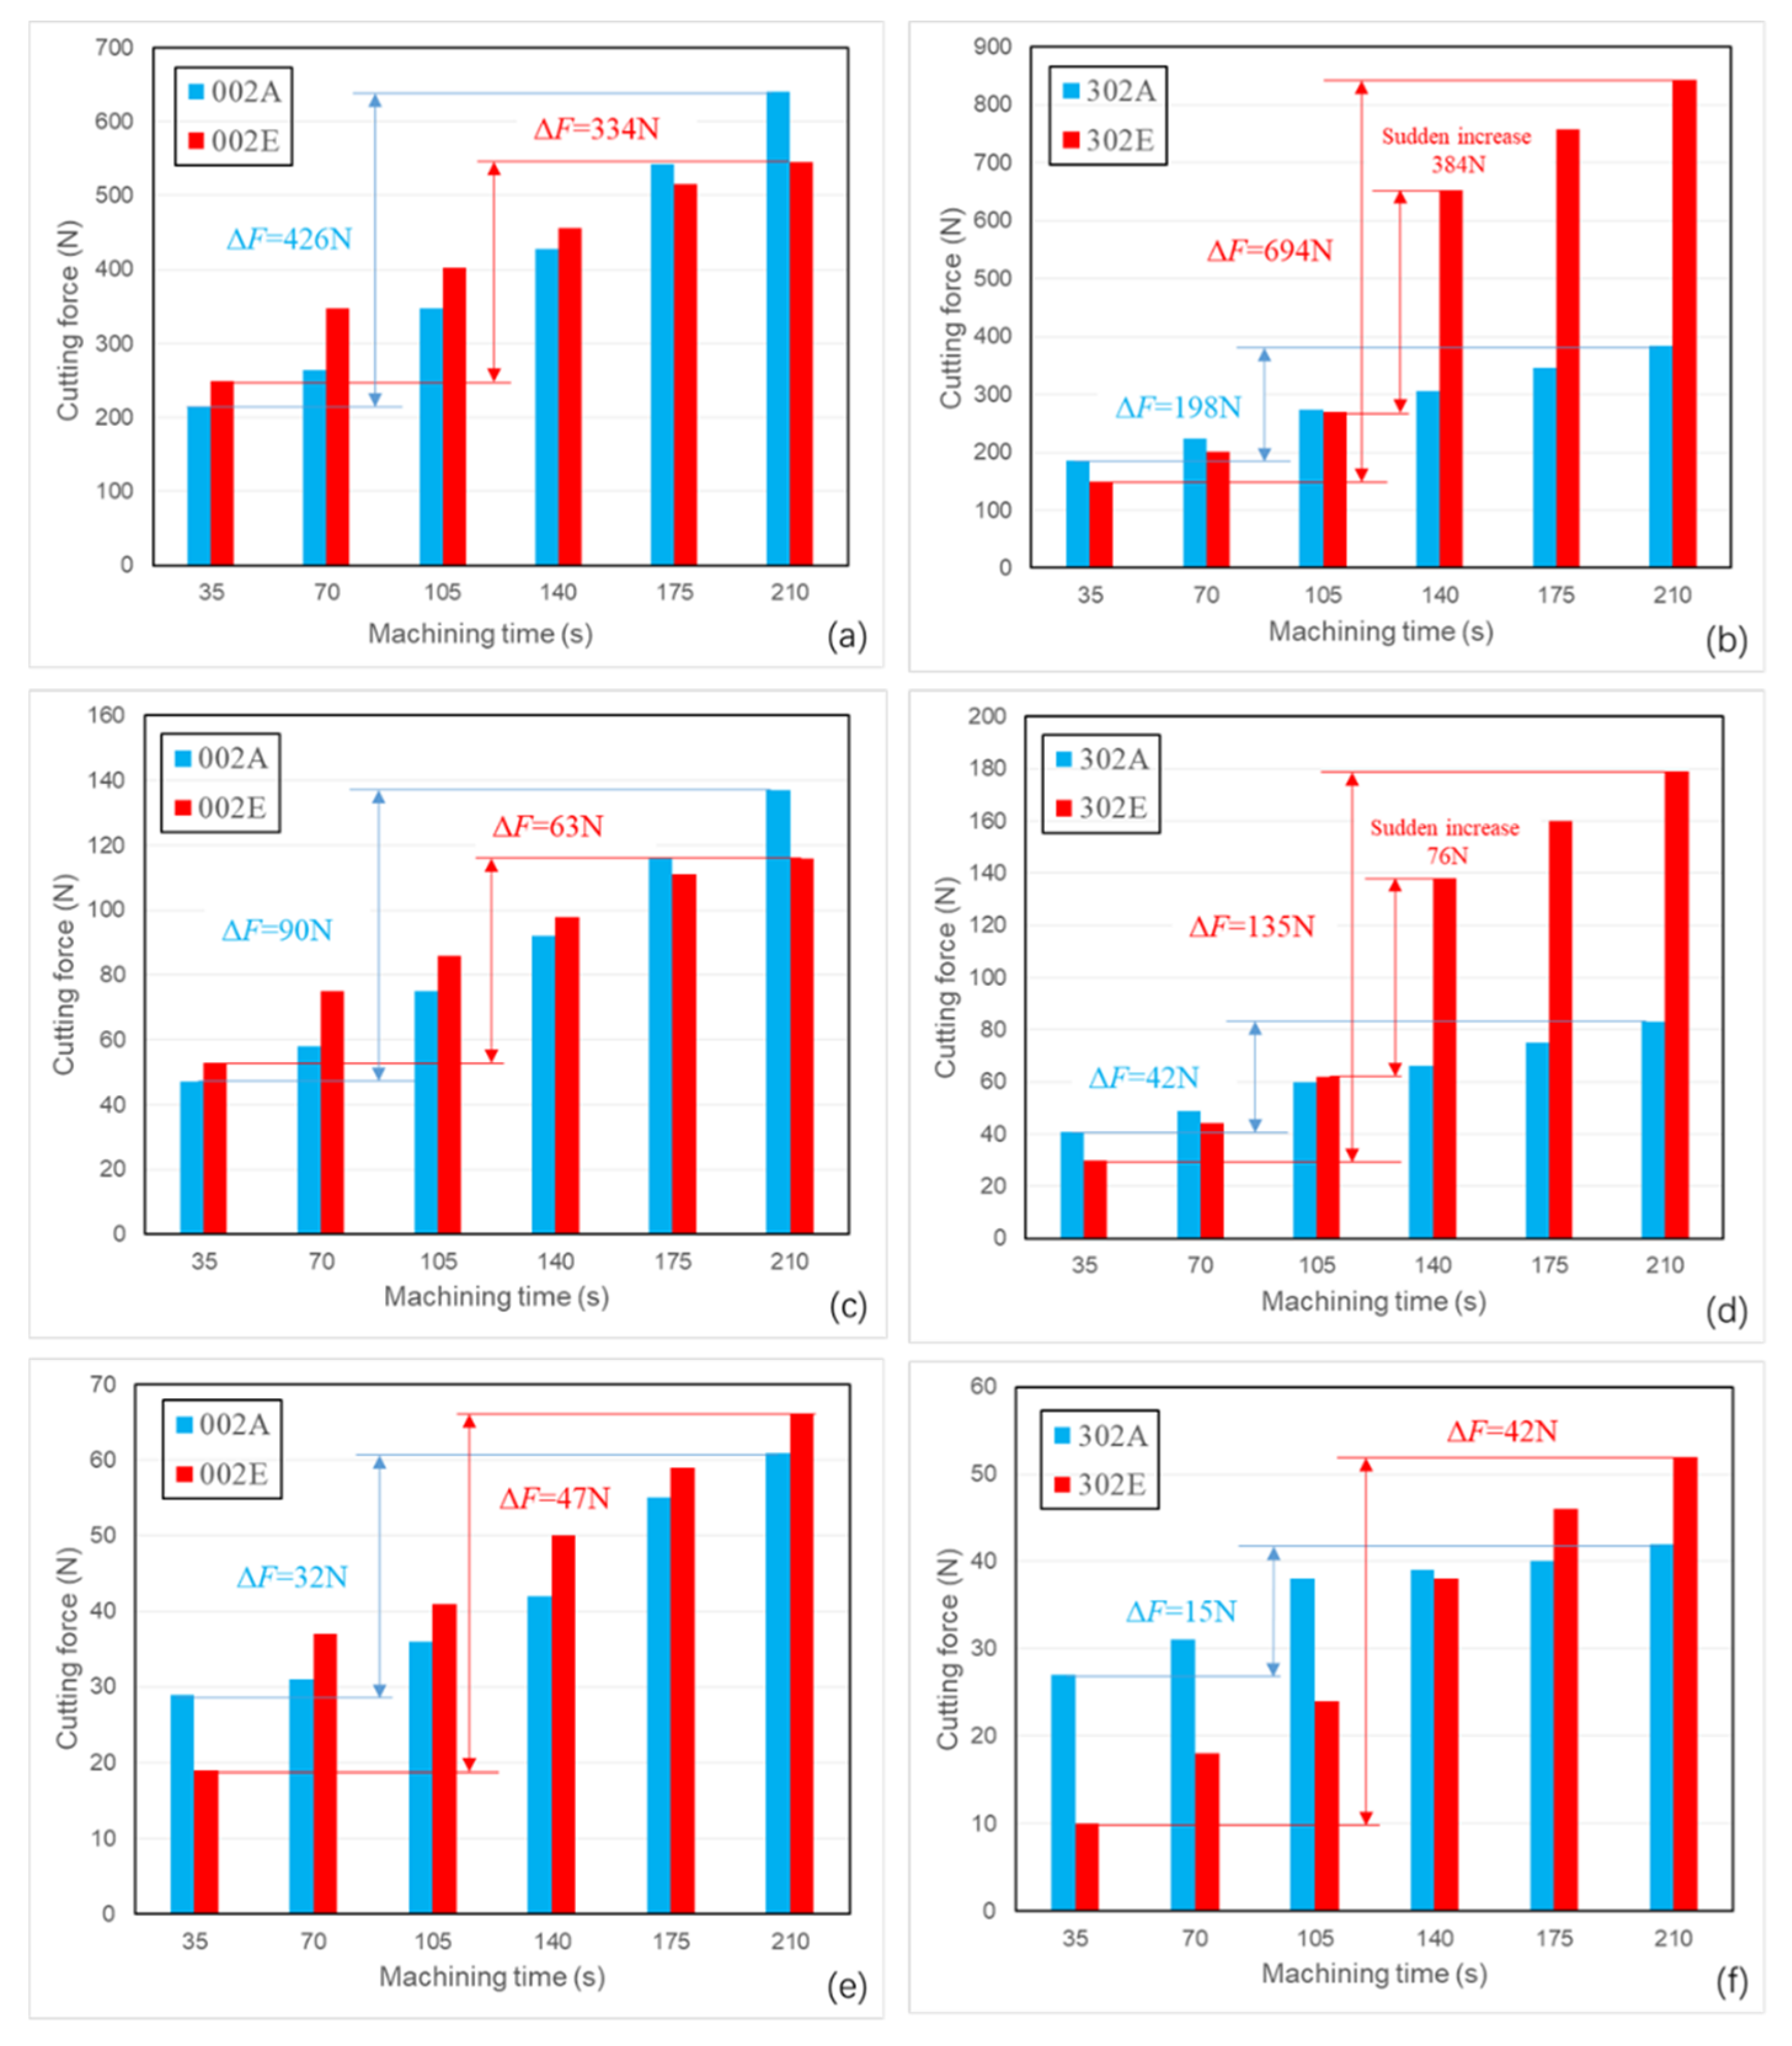
Figure 8 presents the change of cutting forces of different PCD tools in tangential direction, axial direction, and radial directions, respectively. Cutting forces of tools made of CTB002 increased steadily in a linear trend. The thrust force of 002E was slightly larger than the force of 002A due to the larger radius of the cutting edge and tool nose. However, the main cutting force and feed force of 002A were larger even though the cutting edge of 002A was sharper. Furthermore, it can be found that the average increment of main cutting force and feed force per cutting path were 85 N and 18 N when using 002A, which was larger than the average force increments of 002E (59 N and 13 N). This indicates the better performance of 002E in the high-speed cutting of Ti6Al4V. The increments of cutting forces of 302A were the smallest because of the smallest VB and sharpness. In contrast, the forces of 302E were even smaller than those of 302A in the first three cutting paths, proving the best wear resistance of tools made of CTM302. The increment of 400 N in the main cutting force (from 105 s to 150 s) indicates the catastrophic fracture happened in this cutting path.

3.2. Flank Wear of the Cutting Tools

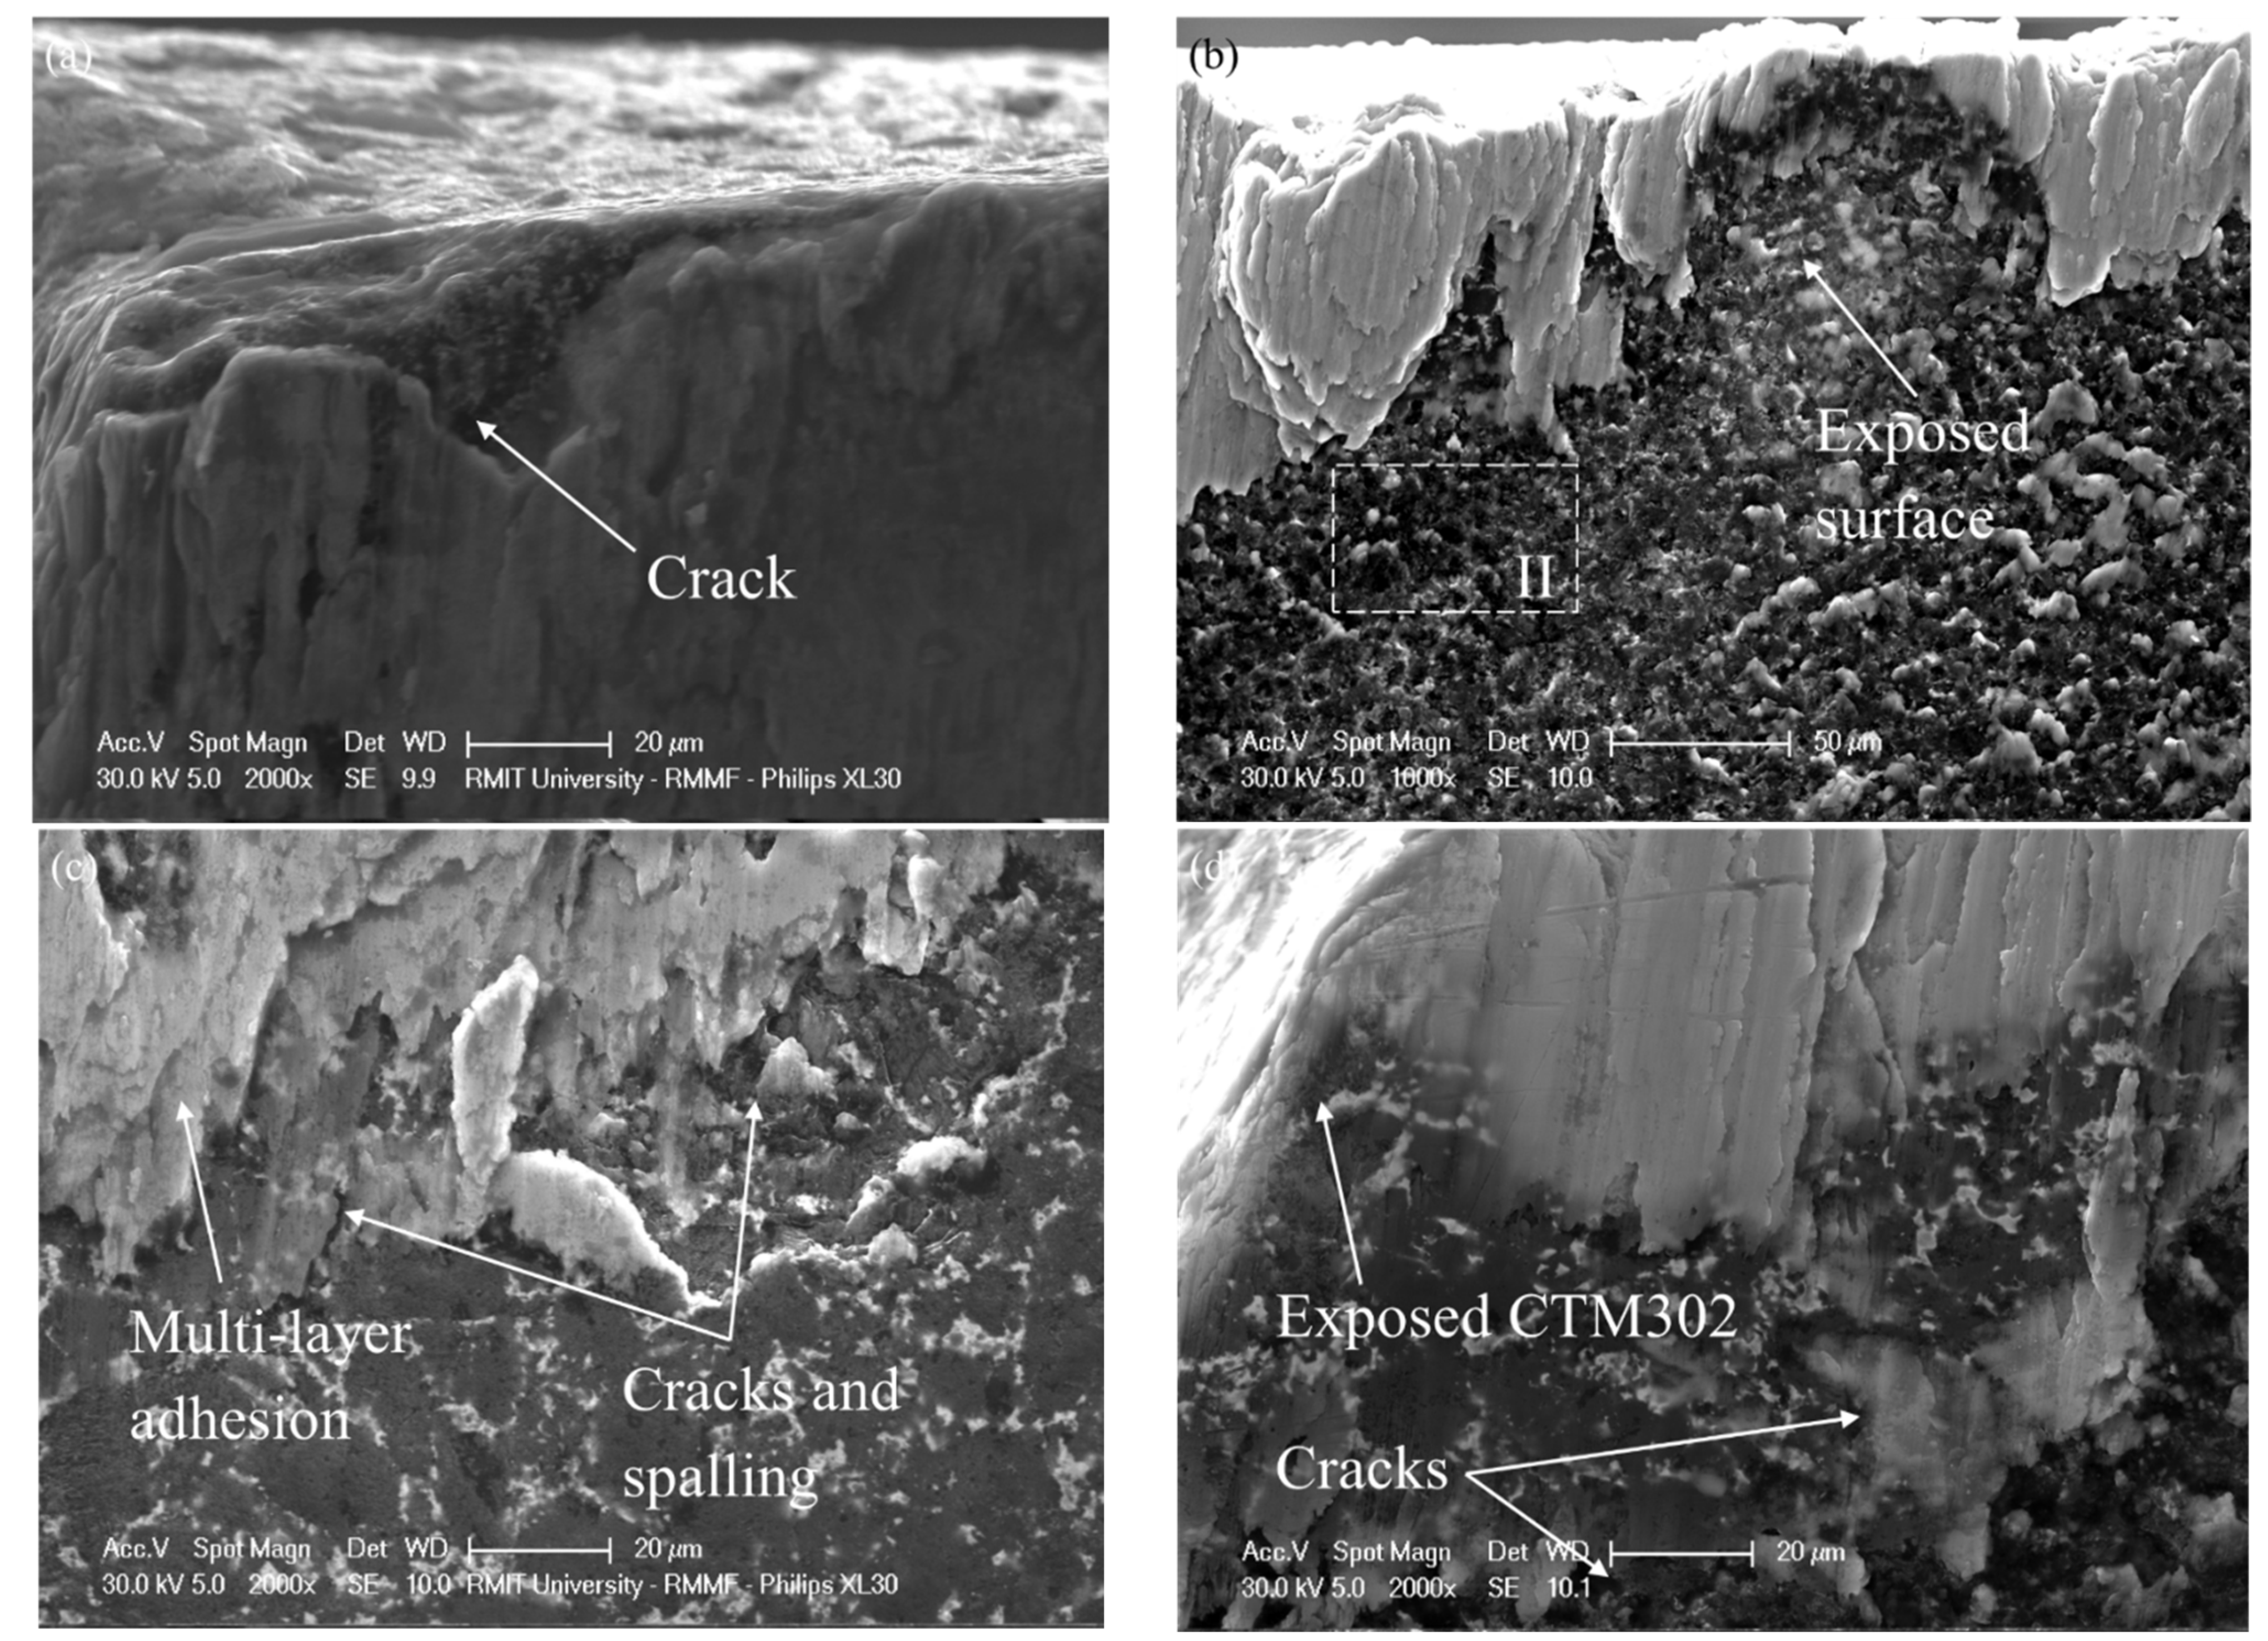
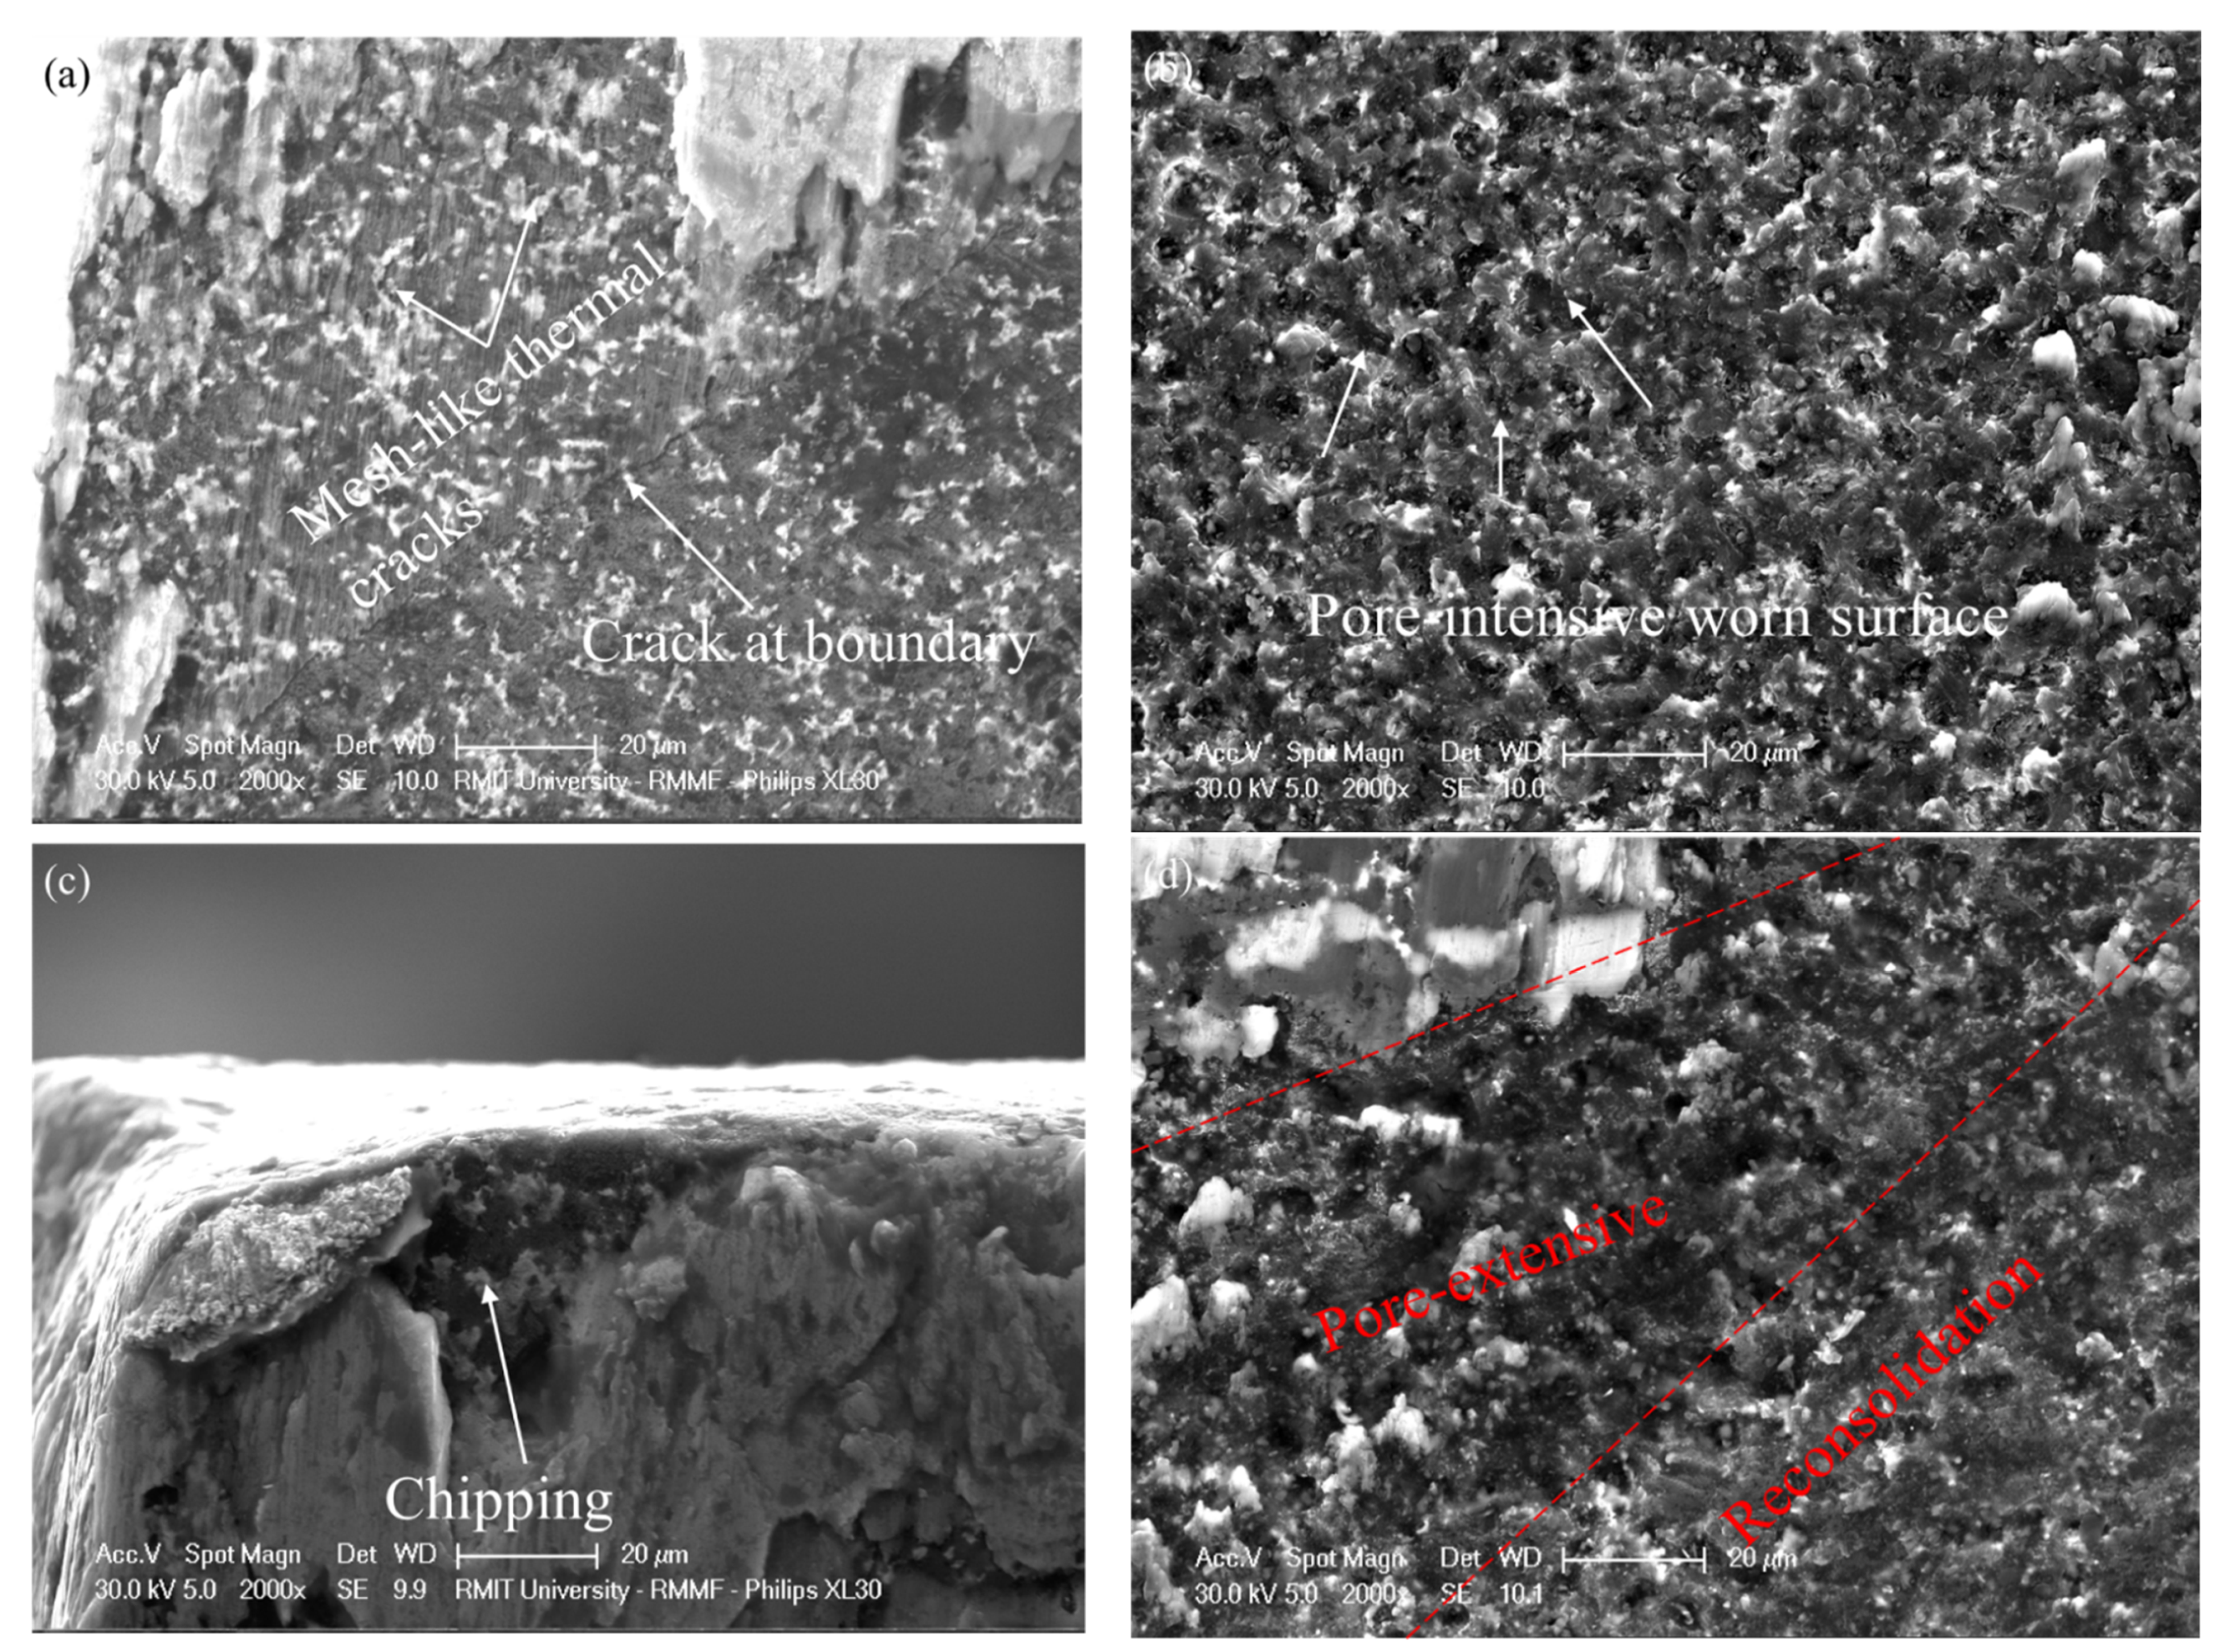
The micro morphology of flank wear of different PCD tools is presented in Figure 9. It was reported that the flank wear of PCD tools made of 2 μm diamond grains was a steady “spalling process” of the facial PCD material at the cutting speed of 160 m/min [31]. At higher cutting speeds, a part of the adhesive layer was removed during the cutting process in the worn area of 002A and 002E, exposing the worn PCD surface. Compared with the adhesion of 002A, the adhesion on the cutting edge and flank face of 002E was thicker (Figure 10b), and this contributed to its larger edge radius. Meanwhile, the existence of the adhesive layer could limit the direct abrasion between the flank face and workpiece surface [32]. Due to this reason, the VB and cutting force of 002E were slightly smaller than those of 002A. Furthermore, it could be seen that the adhesion on the flank face of 002E was accumulated layer by layer and the area of the adhesion was larger than that of 002A, which indicated that the eroded tool had better resistance to the spalling process. At higher magnification (Figure 11a Region II), it could be seen that extensive thermal-cracks within the worn area exist on the flank face of 002A, which could be ascribed to the high temperature and severe tool/workpiece abrasion at high-speed cutting. The development of cracks was detrimental to the stability of the PCD structure, causing the loss of facial material during the flank wear process. As for 002E, it can be found that the facial morphology of the worn surface was different. Specifically, the reconsolidated layer as well the as the partial adhesive layer were removed during the flank wear process (Figure 10b Region I), exposing a pore-extensive surface within the worn area (Figure 11b, Region II).
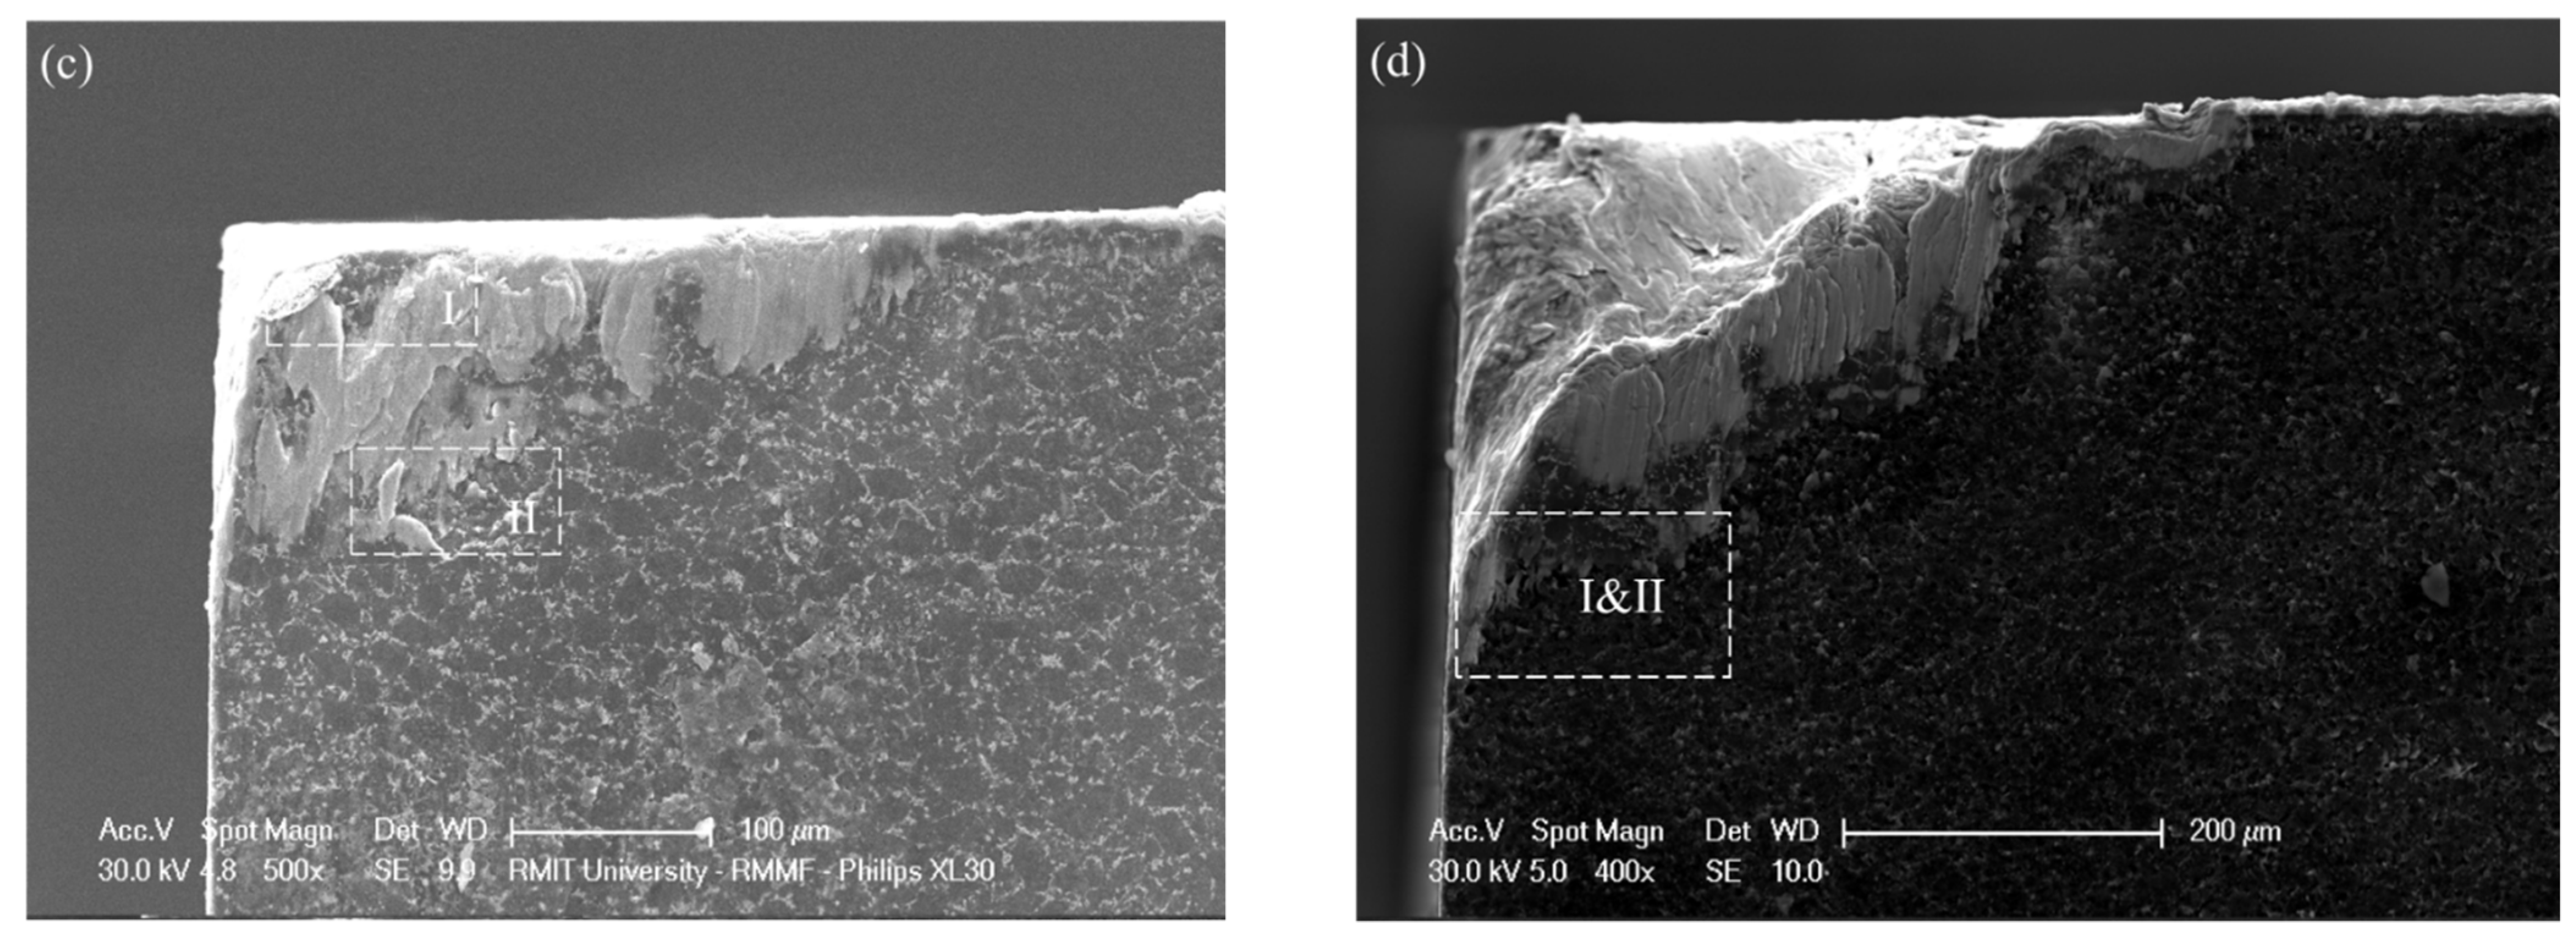
Compared to PCD inserts made of CTB002, PCD inserts made of CTM302 were more resistant to abrasive wear due to the larger-sized diamond grains (30 μm). As shown in Figure 9c, the tool tip of 302E was generally intact. Only minor chipping was found near the tip region (Region II). However, the polycrystalline structure of CTM302 was more vulnerable to a large-scale fracture. The tool tip of 302E was totally removed, leaving a huge fracture at the tip position, which was similar to the fractured CTM302 inserts at the cutting speed of 160 m/min [28]. Furthermore, large cracks were found in regions I of 002A and 302A near the tool tip, which means that the fracture of bulk PCD structure could be a dominant factor for the catastrophic damage of PCD tools. Within the worn area of 302E (Figure 9d, Region I and Region II), it was shown that the worn areas consisted of three different regions. Near the region of the tool tip, the morphology of PCD was similar to that of after-abrasive grinding (Figure 3c), which was the raw material of CTM302. A pore-extensive region was located next to the exposed raw surface. The surface with a covered reconsolidated layer could be found next to the pore-extensive region. From the distribution of the regions, it can be predicted that the wear process of eroded tools was the removal process in the sequence of the reconsolidated layer, pore-extensive region, and the raw PCD material. Both the temperature and the tool/workpiece contact load were the highest near the tool tip. Under this condition, the reconsolidated layer and pore-extensive structure could not last for a long time, which would be removed during the cutting processes. Away from the tip region, the pore-extensive structure was preserved due to the reduced external load and cutting temperature.

3.3. Analysis of the Residual Elements

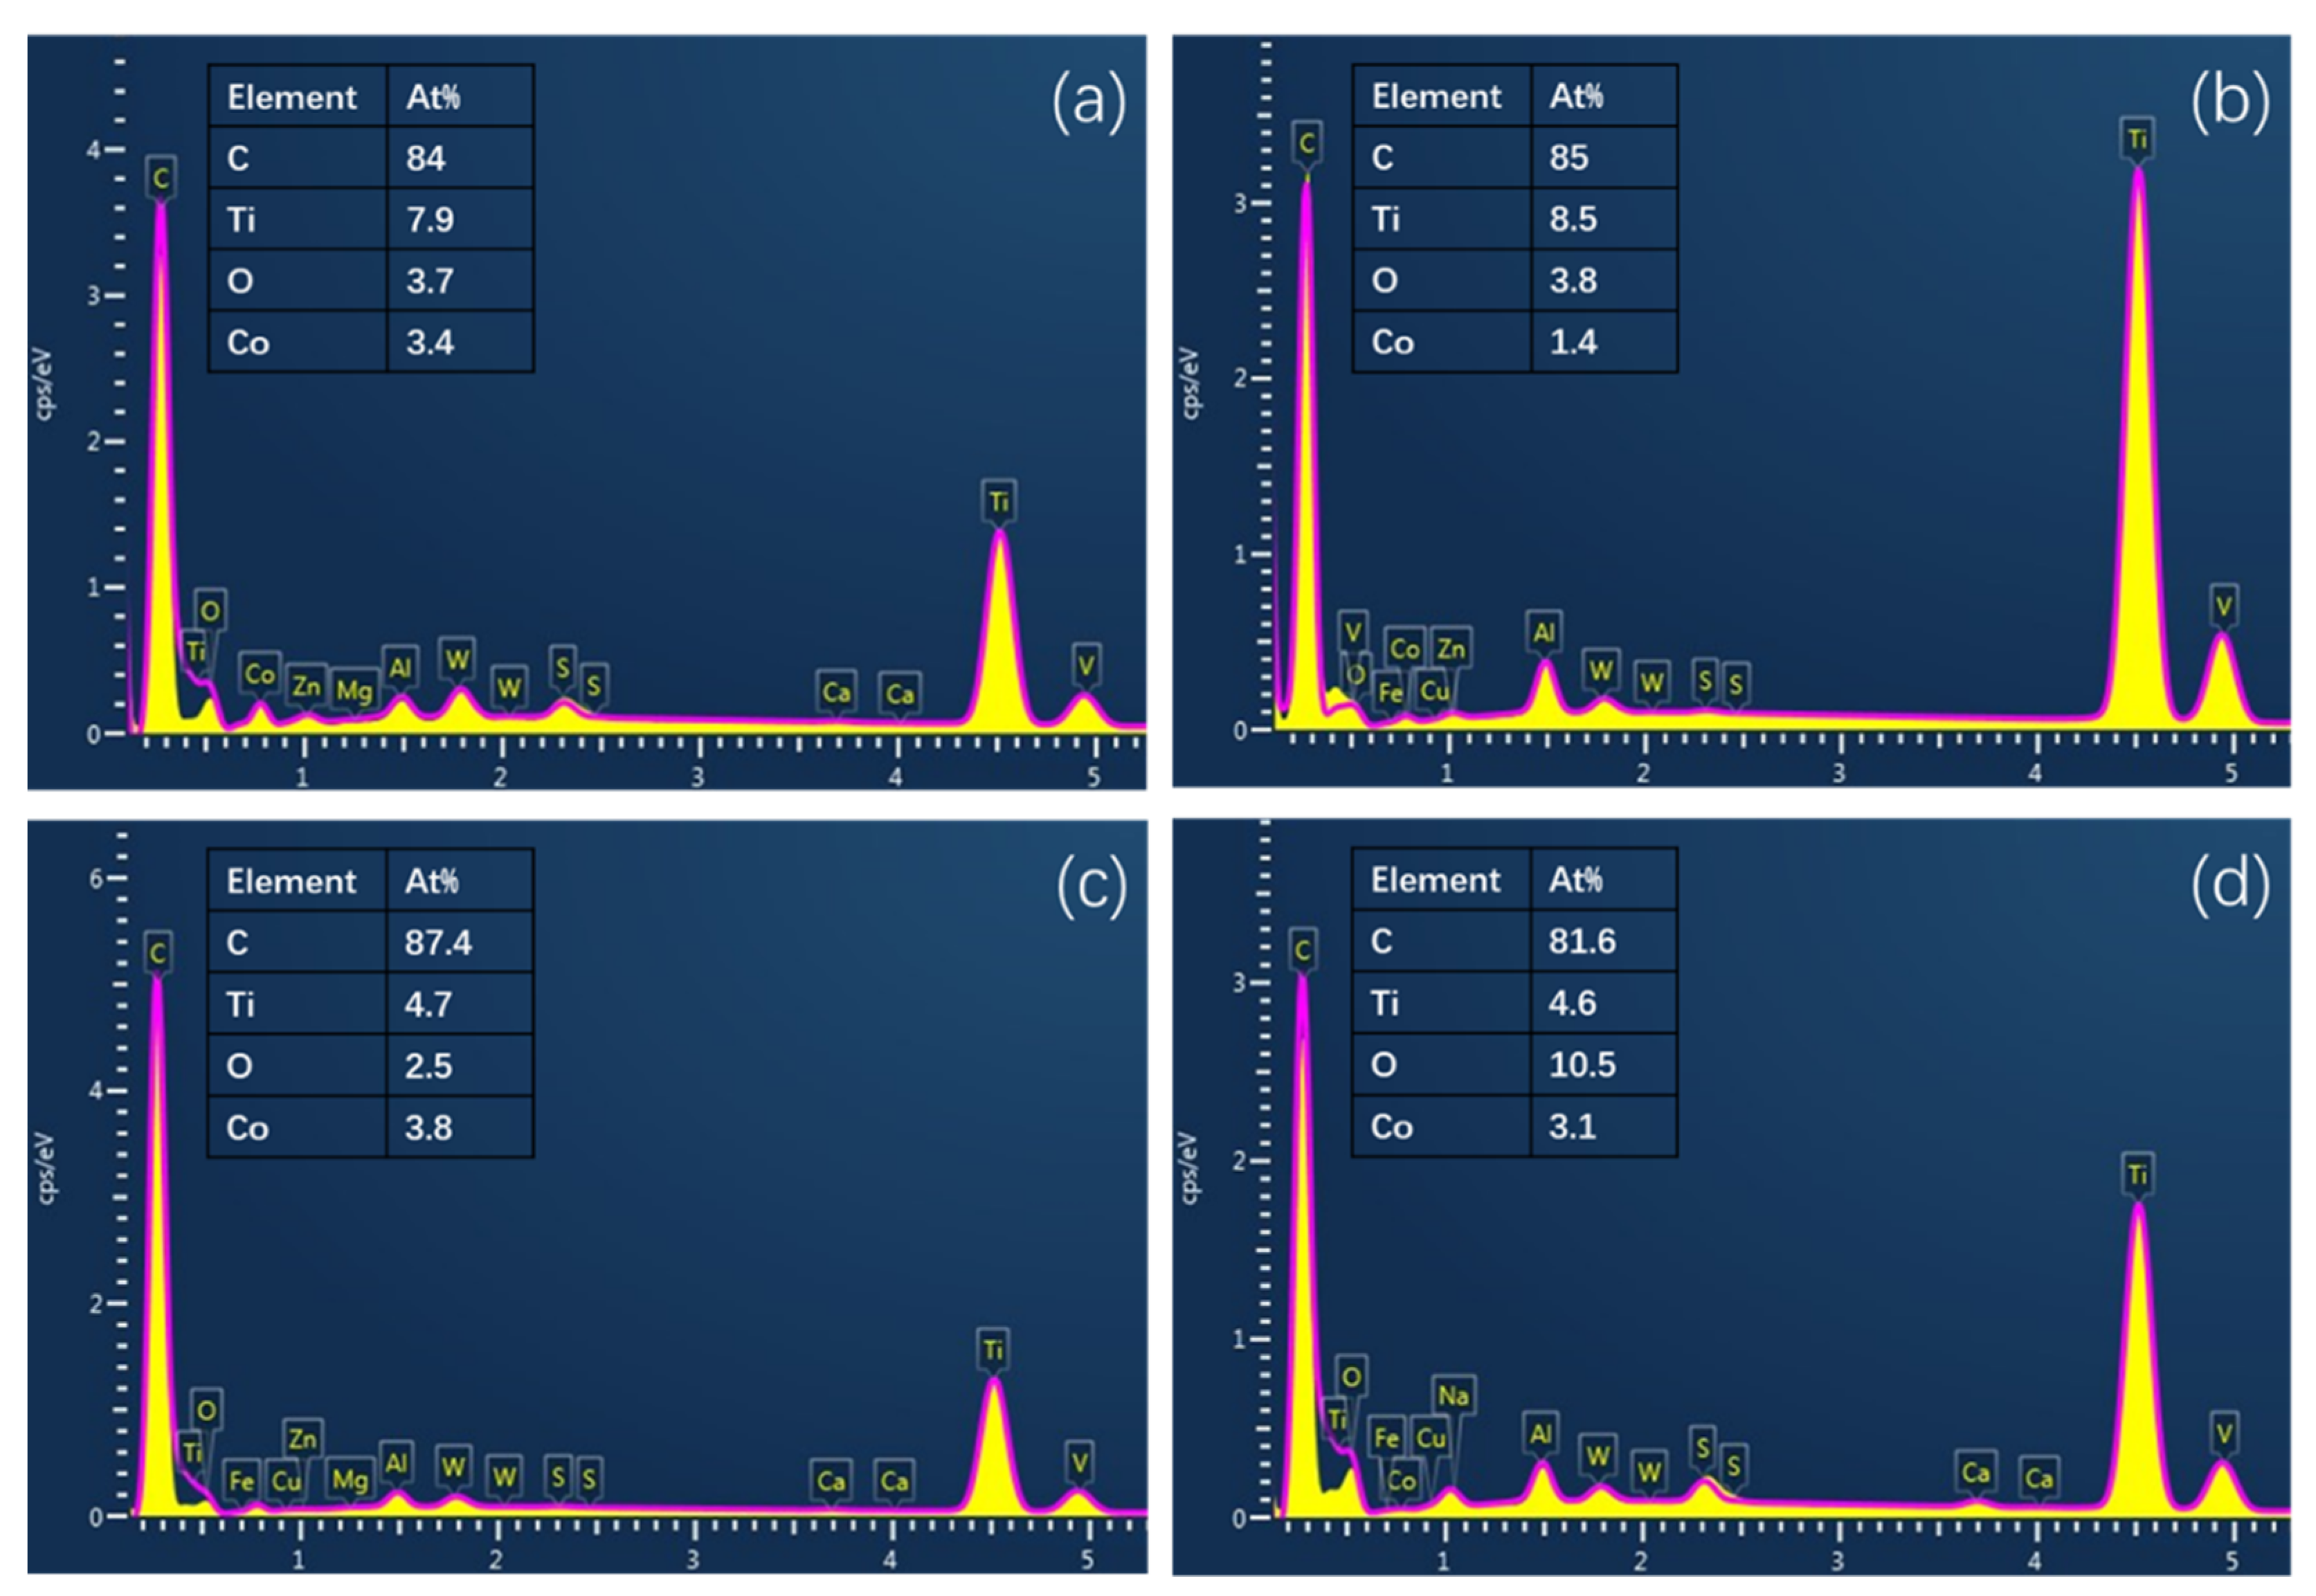
To further investigate the flank wear process of different PCD tools, residual elements on flank faces were analyzed by the EDS mapping scan. As shown in Figure 12, carbon (C), titanium (Ti), cobalt (Co), and oxygen (O) were the major elements found on the faces. Figure 13 presents the distribution of Ti, Co, and O within the scanned area, which can be divided into two sections. The appearance of Ti was caused by the adhesion-abrasion process at the tool/workpiece interface. Ti was mainly distributed in Section 1. This is because the cutting temperature and normal/shear stresses are higher in this region, stimulating the adhesion of workpiece materials. It could be seen that more Ti was found on the tools made of CTB002 because of the multi-adhesive layer. No titanium was found in Section 2, which means no tool/workpiece abrasion happened in that section. The existence of O indicates the oxidation of the tool surface in the worn process. By applying the models of List et al. [33], the average cutting temperatures in the sixth cutting path of 002A, 002E, 302A, and 302E were calculated to be 1278K, 1159K, 1013K, and 1985K, respectively. Considering that both titanium and cobalt had a higher oxidation rate when the temperature was over 900K, it can be determined that the oxygen found on the worn tool surface was caused by the oxidation of the adhered titanium alloy and facial cobalt.
Cobalt was the binding material of CTB002 and CTB010, and it could be found that Co was mainly distributed in Section 2. In ground tools, the distribution of Co was more significant, which were caused by the extrusion of binding material in abrasive grinding. Less Co was found on the surface of 002E, and the atom percentage of Co was similar to that on the as-received surface. Therefore, it can be concluded that the pore-intensive surface was of the binder-less PCD structure, which was located beneath the reconsolidated layer after EDG. The binder-less structure could be more resistant to abrasion. It had been reported in some studies that tools made of binder-less cubic boron nitride (CBN) had better resistance to abrasion [34]. Although no study investigated the wear resistance of binder-less PCD tools, it was reported in the study of Lu et al. [35] that the Vickers hardness of binder-less PCD (125 Gpa) was higher than the average hardness of PCD materials (78 Gpa), which could improve the resistance to the spalling of facial material in the flank wear process. Therefore, the multi-layer adhesion could be accumulated on the flank face of the eroded tool 002E, which reduced the tool/workpiece abrasion and slightly reduced the development of flank wear.
The At% of Co on 302E was higher than that of on 002E, and this could be ascribed to the much higher cutting temperature. The phenomenon of cobalt-extrusion had been found in the crater wear of PCD tools at higher cutting speed due to the high cutting temperature [31]. Generally, cutting temperature on the flank face was relatively lower than the temperature on the rake face due to the abrasion of the high-temperature chip flow. In this case, the cutting temperature of 302E was significantly higher than the temperature of the other three cutting tools, which was reflected by the At% of O. The percentage was around three times higher than those of the other three tools because the highest cutting force caused the broken tool tip to significantly increase the cutting temperature and stimulated the oxidation process. As a result, the temperature on the flank face of 302E was high enough to cause the extrusion of cobalt.

3.4. Crater Wear Analysis

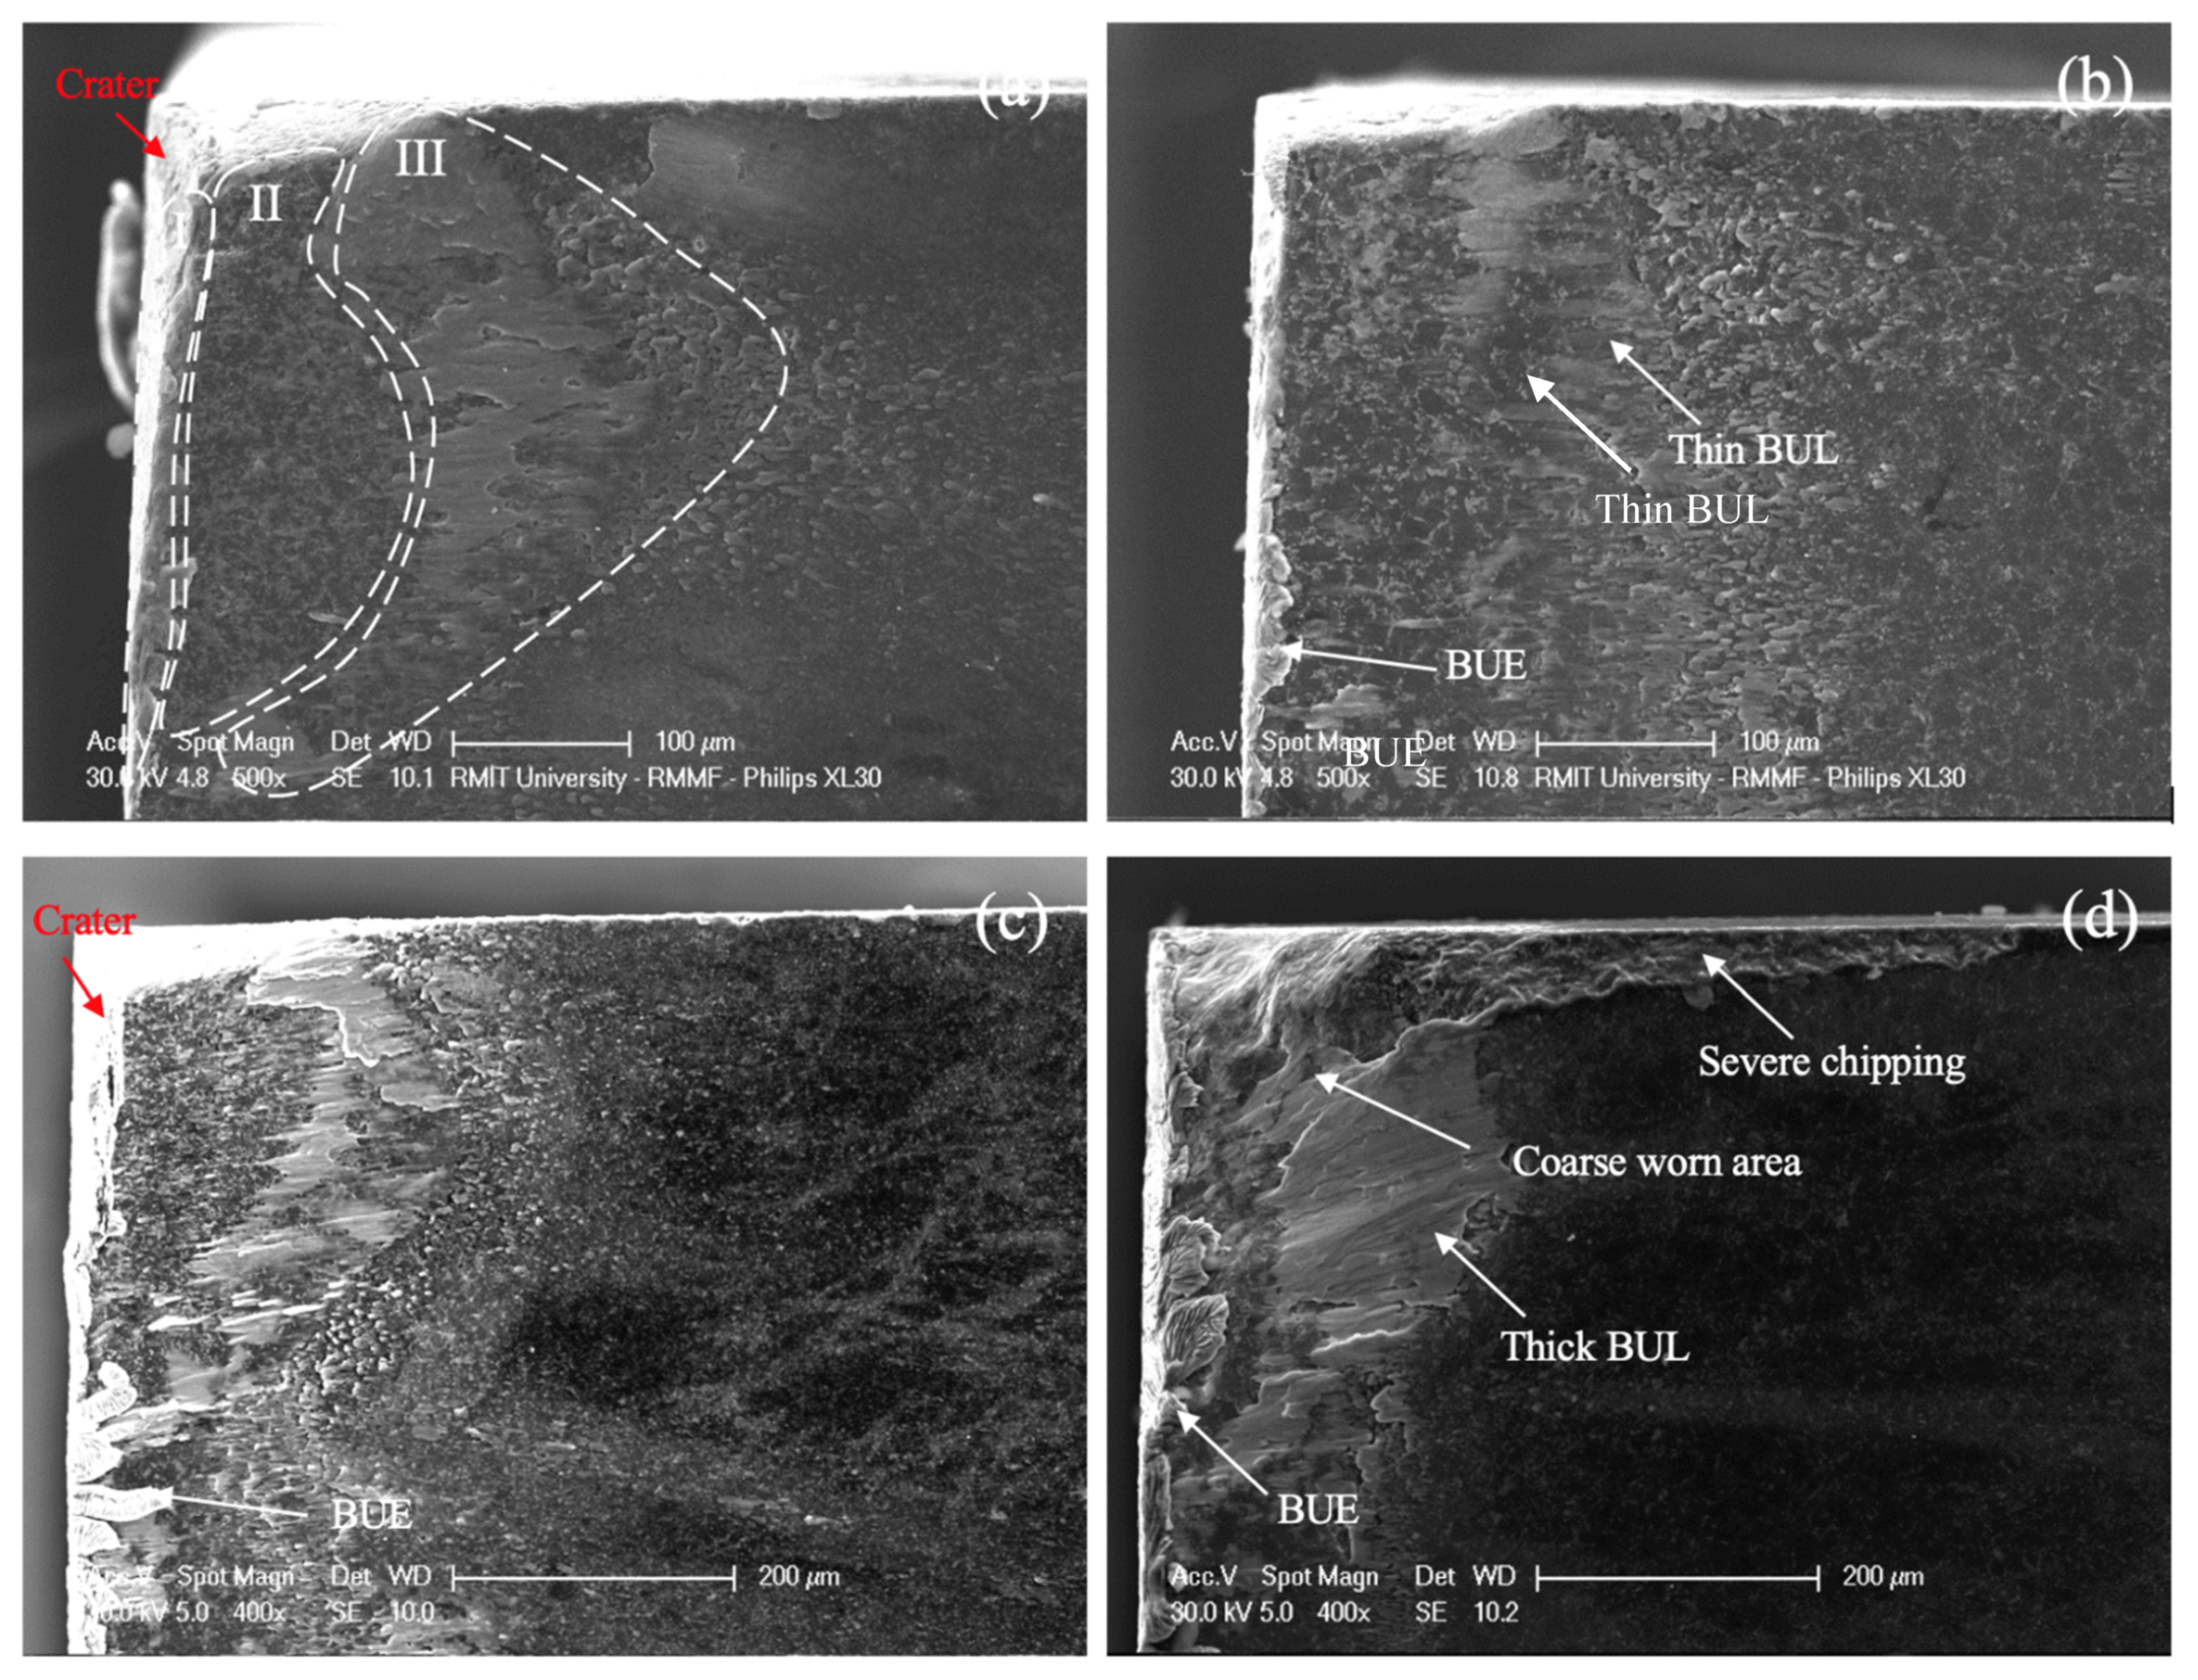
High temperature and tool/chip abrasion on the rake face are the key factors inducing crater wear. As shown in Figure 14, the four PCD inserts suffered severe crater wear. Besides the craters on the rake faces, it could be found that craters were formed on the primary flank faces and the secondary flank faces within the tip region, which explained the appearance of the curved line (red arrows in Figure 6a,b) near the tool tips. This indicated that the mechanism of flank wear within this region was similar to the mechanism of crater wear at a high cutting temperature.
According Li et al. [31], the worn area on the tool rake face can be divided into three tribological zones: sticking zone (Region I), transition zone (Region II), and sliding zone (Region III). In Region I, the formation build-up edge (BUE) is the predominant. More BUE were found away from the tip region because the temperature and shear stress within this region were the largest, which limited the accumulation of the BUE. Compared with ground tools, the formation of BUE on eroded tools was more severe. Abrasive wear and adhesive wear are the main wear modes in Region II and Region III. An exposed PCD structure and layered adhesion (BUL) were found in Regions II and III of 002A, 302A, and 002E, respectively. The worn areas on the surface of 302E was irregular due to the large-scale fracture of the tool tip. A coarse surface was formed on the crater face and severe chipping was found on the primary cutting edge and secondary cutting edge. The irregular tool tip of 302E prevented the flow of chips on the rake face, and caused the stacking of the workpiece material on the worn surface, which was the cause leading to the formation of thick BUL.

4. Conclusions

The wear mechanisms of tools made of two different types of PCD materials were investigated. The flank faces of PCD tools were finish-machined by abrasive grinding and EDG, and the performance of different PCD tools were tested by turning Ti6Al4V at 240 m/min. By analyzing the profile, cutting forces, micro-morphological characters, and residual elements of worn areas, following conclusions about the performance of the PCD tools finished by different methods, are drawn.
The edge radius of different PCD tools were similar after grinding. The roughness of eroded tools was larger than those of ground tools because of the existence of a reconsolidated layer. After machining, the VB of 002E was slightly smaller than that of 002A, whereas the edge radius of 002E was larger than the edge radius of 002A. Furthermore, 302A had the best resistance to abrasive wear, while catastrophic breakage of the tool tip was found on 302E.
By analyzing the micro-morphology of the worn areas, thermal cracks were found on the ground tools. For tool 002A, cracks were the indicator causing the spalling of facial PCD material during the high-speed cutting process. As for tool 302A, a thermal crack caused the spalling of bulk PCD material and the chipping of the cutting edge. The breakage of the tool tip of 302E changed the geometry of the tool tip, leading to a larger cutting force and limited the development of flank wear.
The adhesive wear on 002E was severe, contributing to the larger cutting forces and sharpness of cutting edge. A reconsolidated layer was formed on the flank faces of the eroded tools. Beneath the layer, the PCD structure was binder-less. During the cutting process, the reconsolidated layer within the tool/chip contact region was removed first by tool/workpiece abrasion, which was followed by the binder-less structure and, finally, the as-received PCD structure.
The worn area on rake faces showed three different tribological regions. The BUE of the eroded tools were severe compared with that of ground tools. The BUL on 302E was thicker due to the formation of the huge crater caused by tip breakage.

Author Contributions

Investigation, Methodology, G.L., Data curation, Validation, G.W.; Software, W.P.; Project administration, Supervision, Resources, S.D., Writing—original draft, G.L., Writing—review & editing, W.P., R.A.R.R., S.P. and S.D. All authors have read and agreed to the published version of the manuscript.

Funding

This research is partially supported by the Australian Research Council Discovery Project (DP180100762). The devices for microscopic analysis are supported by RMIT Microscopy and Microanalysis Facility. This paper includes research that was supported by DMTC Limited (Australia). The authors have prepared this paper in accordance with the intellectual property rights granted to partners from the original DMTC project.

Institutional Review Board Statement

Not Applicable.

Informed Consent Statement

Not Applicable.

Data Availability Statement

Not Applicable.

Conflicts of Interest

The authors declare no conflict of interest.

References

  1. Nath, C.; Rahman, M.; Neo, K. Machinability study of tungsten carbide using PCD tools under ultrasonic elliptical vibration cutting. Int. J. Mach. Tools Manuf. 2009, 49, 1089–1095. [Google Scholar] [CrossRef]
  2. Al-Wandi, S.; Ding, S.; Mo, J. An approach to evaluate delamination factor when drilling carbon fiber-reinforced plastics using different drill geometries: Experiment and finite element study. Int. J. Adv. Manuf. Technol. 2017, 93, 4043–4061. [Google Scholar] [CrossRef]
  3. Li, G.; Li, N.; Wen, C.; Ding, S. Investigation and modeling of flank wear process of different PCD tools in cutting titanium alloy Ti6Al4V. Int. J. Adv. Manuf. Technol. 2018, 95, 719–733. [Google Scholar] [CrossRef]
  4. Li, G.; Yi, S.; Li, N.; Pan, W.; Wen, C.; Ding, S. Quantitative analysis of cooling and lubricating effects of graphene oxide nanofluids in machining titanium alloy Ti6Al4V. J. Mater. Process. Technol. 2019, 271, 584–598. [Google Scholar] [CrossRef]
  5. Ding, S.; Yang, H.; Han, Z. Boundary-conformed machining of turbine blades. Proc. Inst. Mech. Eng. Part B J. Eng. Manuf. 2005, 219, 255–263. [Google Scholar] [CrossRef]
  6. Liu, S.; Mahdavian, S.; Aswin, D.; Ding, S. Experimental study of temperature and clamping force during Nd:YAG laser butt welding. Opt. Laser Technol. 2009, 41, 794–799. [Google Scholar] [CrossRef]
  7. Zhang, G.; Zhang, B.; Deng, Z.; Chen, J. An experimental study on laser cutting mechanisms of polycrystalline diamond compacts. CIRP Ann. 2007, 56, 201–204. [Google Scholar] [CrossRef]
  8. Li, G.; Rahim, M.; Pan, W.; Wen, C.; Ding, S. The manufacturing and the application of polycrystalline diamond tools—A comprehensive review. J. Manuf. Process. 2020, 56, 400–416. [Google Scholar] [CrossRef]
  9. Zulafif Rahim, M.; Ding, S.; Mo, J. Electrical discharge grinding of polycrystalline diamond-effect of wheel rotation. Mach. Sci. Technol. 2016, 20, 62–78. [Google Scholar] [CrossRef]
  10. Skoczypiec, S.; Bizoń, W.; Żyra, A. Research on electrodischarge drilling of polycrystalline diamond with increased gap voltage. In Proceedings of the AIP Conference Proceedings; AIP Publishing: College Park, MD, USA, 2018; p. 100015. [Google Scholar]
  11. Tang, J.; Zhang, H.; Ye, P.; Wang, C. Research on Electronic Discharge Grinding of Polycrystalline Diamond Based on Response Surface Method. Key Eng. Mater. 2018, 764, 123–132. [Google Scholar]
  12. Ong, P.; Chong, C.; Rahim, M.; Lee, W.; Sia, C.; Ahmad, M. Intelligent approach for process modelling and optimization on electrical discharge machining of polycrystalline diamond. J. Intell. Manuf. 2018, 31, 1–21. [Google Scholar] [CrossRef]
  13. Jia, Y.H.; Li, J.G.; Lu, X. Study on EDM machining technics of polycrystalline diamond cutting tool and PCD cutting tool’s life. Adv. Mater. Res. 2011, 268, 309–315. [Google Scholar]
  14. Chris, J.; Vallance, R.; Eric, R. Micro machining glass with polycrystalline diamond tools shaped by micro electro discharge machining. J. Micromech. Microeng. 2004, 14, 1687. [Google Scholar]
  15. Cai, M.; Li, X.; Rahman, M. Study of the mechanism of groove wear of the diamond tool in nanoscale ductile mode cutting of monocrystalline silicon. J. Manuf. Sci. Eng. 2007, 129, 281–286. [Google Scholar] [CrossRef]
  16. Shu, K.; Tu, G. Study of electrical discharge grinding using metal matrix composite electrodes. Int. J. Mach. Tools Manuf. 2003, 43, 845–854. [Google Scholar] [CrossRef]
  17. Kalyanasundaram, D.; Schmidt, A.; Shrotriya, P.; Molian, P. Understanding Thermo-Chemical Machining of Polycrystalline Diamond by Hybrid Laser/Waterjet System. Mechanics Guided Design of Hybrid Laser/Waterjet System for Machining Hard and Brittle Materials. Ph.D. Thesis, Iowa State University, Ames, IA, USA, 2009. [Google Scholar]
  18. Li, G.; Rahim, M.; Ding, S.; Sun, S.; Mo, J. Experimental study on quality of PCD tools machined by different electric discharge grinding processes. Cogent Eng. 2016, 3, 1228234. [Google Scholar] [CrossRef]
  19. Yadav, V.; Jain, V.K.; Dixit, P.M. Thermal stresses due to electrical discharge machining. Int. J. Mach. Tools Manuf. 2002, 42, 877–888. [Google Scholar] [CrossRef]
  20. Pan, W.; Ding, S.; Mo, J. Thermal characteristics in milling Ti6Al4V with polycrystalline diamond tools. Int. J. Adv. Manuf. Technol. 2014, 75, 1077–1087. [Google Scholar] [CrossRef]
  21. De Silva, R.B.; Machado, Á.; Ezugwu, E.; Bonney, J.; Sales, W. Tool life and wear mechanisms in high speed machining of Ti–6Al–4V alloy with PCD tools under various coolant pressures. J. Mater. Process. Technol. 2013, 213, 1459–1464. [Google Scholar] [CrossRef] [Green Version]
  22. Cantero, J.; Díaz-Álvarez, J.; Miguélez, M.; Marín, N. Analysis of tool wear patterns in finishing turning of Inconel 718. Wear 2013, 297, 885–894. [Google Scholar] [CrossRef] [Green Version]
  23. Li, A.; Zhao, J.; Wang, D.; Zhao, J.; Dong, Y. Failure mechanisms of a PCD tool in high-speed face milling of Ti–6Al–4V alloy. Int. J. Adv. Manuf. Technol. 2013, 67, 1959–1966. [Google Scholar] [CrossRef]
  24. Su, H.; Peng, L.; Yucan, F.; Jiuhua, X. Tool life and surface integrity in high-speed milling of titanium alloy TA15 with PCD/PCBN tools. Chin. J. Aeronaut. 2012, 25, 784–790. [Google Scholar] [CrossRef] [Green Version]
  25. Rahim, M.; Li, G.; Ding, S.; Mo, J.; Brandt, M. Electrical discharge grinding versus abrasive grinding in polycrystalline diamond machining—tool quality and performance analysis. Int. J. Adv. Manuf. Technol. 2016, 85, 263–277. [Google Scholar] [CrossRef] [Green Version]
  26. Li, G.; Rahim, M.Z.B.; Yi, S.; Ding, S.; Sun, S.; Mo, J.; Rahman, M. Wear Mechanism of pcd tools of different grain sizes manufactured by conventionally abrasive grinding and electrical discharge grinding. Mater. Today Proc. 2017, 4, 5248–5258. [Google Scholar] [CrossRef]
  27. Li, G.; Rahim, M.Z.; Ding, S.; Sun, S. Performance and wear analysis of polycrystalline diamond (PCD) tools manufactured with different methods in turning titanium alloy Ti-6Al-4V. Int. J. Adv. Manuf. Technol. 2016, 85, 825–841. [Google Scholar] [CrossRef]
  28. Li, G.; Yi, S.; Sun, S.; Ding, S. Wear mechanisms and performance of abrasively ground polycrystalline diamond tools of different diamond grains in machining titanium alloy. J. Manuf. Process. 2017, 29, 320–331. [Google Scholar] [CrossRef]
  29. Oosthuizen, G.; Akdogan, G.; Dimitrov, D.; Treunicht, N. A review of the machinability of titanium alloys. R & D J. S. Afr. Inst. Mech. Eng. 2010, 26, 43–52. [Google Scholar]
  30. Arrazola, P.; Garay, A.; Iriarte, L.; Armendia, M.; Marya, S.; Maitre, F. Machinability of titanium alloys (Ti6Al4V and Ti555. 3). J. Mater. Process. Technol. 2009, 209, 2223–2230. [Google Scholar] [CrossRef] [Green Version]
  31. Li, G.; Yi, S.; Wen, C.; Ding, S. Wear mechanism and modeling of tribological behavior of polycrystalline diamond tools when cutting Ti6Al4V. J. Manuf. Sci. Eng. 2018, 140, 121011. [Google Scholar] [CrossRef]
  32. Sartori, S.; Moro, L.; Ghiotti, A.; Bruschi, S. On the tool wear mechanisms in dry and cryogenic turning Additive Manufactured titanium alloys. Tribol. Int. 2017, 105, 264–273. [Google Scholar] [CrossRef]
  33. List, G.; Sutter, G.; Bouthiche, A. Cutting temperature prediction in high speed machining by numerical modelling of chip formation and its dependence with crater wear. Int. J. Mach. Tools Manuf. 2012, 54, 1–9. [Google Scholar] [CrossRef]
  34. Wang, Z.; Rahman, M.; Wong, Y. Tool wear characteristics of binderless CBN tools used in high-speed milling of titanium alloys. Wear 2005, 258, 752–758. [Google Scholar] [CrossRef]
  35. Lu, J.; Kou, Z.; Liu, T.; Yan, X.; Liu, F.; Ding, W.; Zhang, Q.; Zhang, L.; Liu, J.; He, D. Submicron binderless polycrystalline diamond sintering under ultra-high pressure. Diam. Relat. Mater. 2017, 77, 41–45. [Google Scholar] [CrossRef]
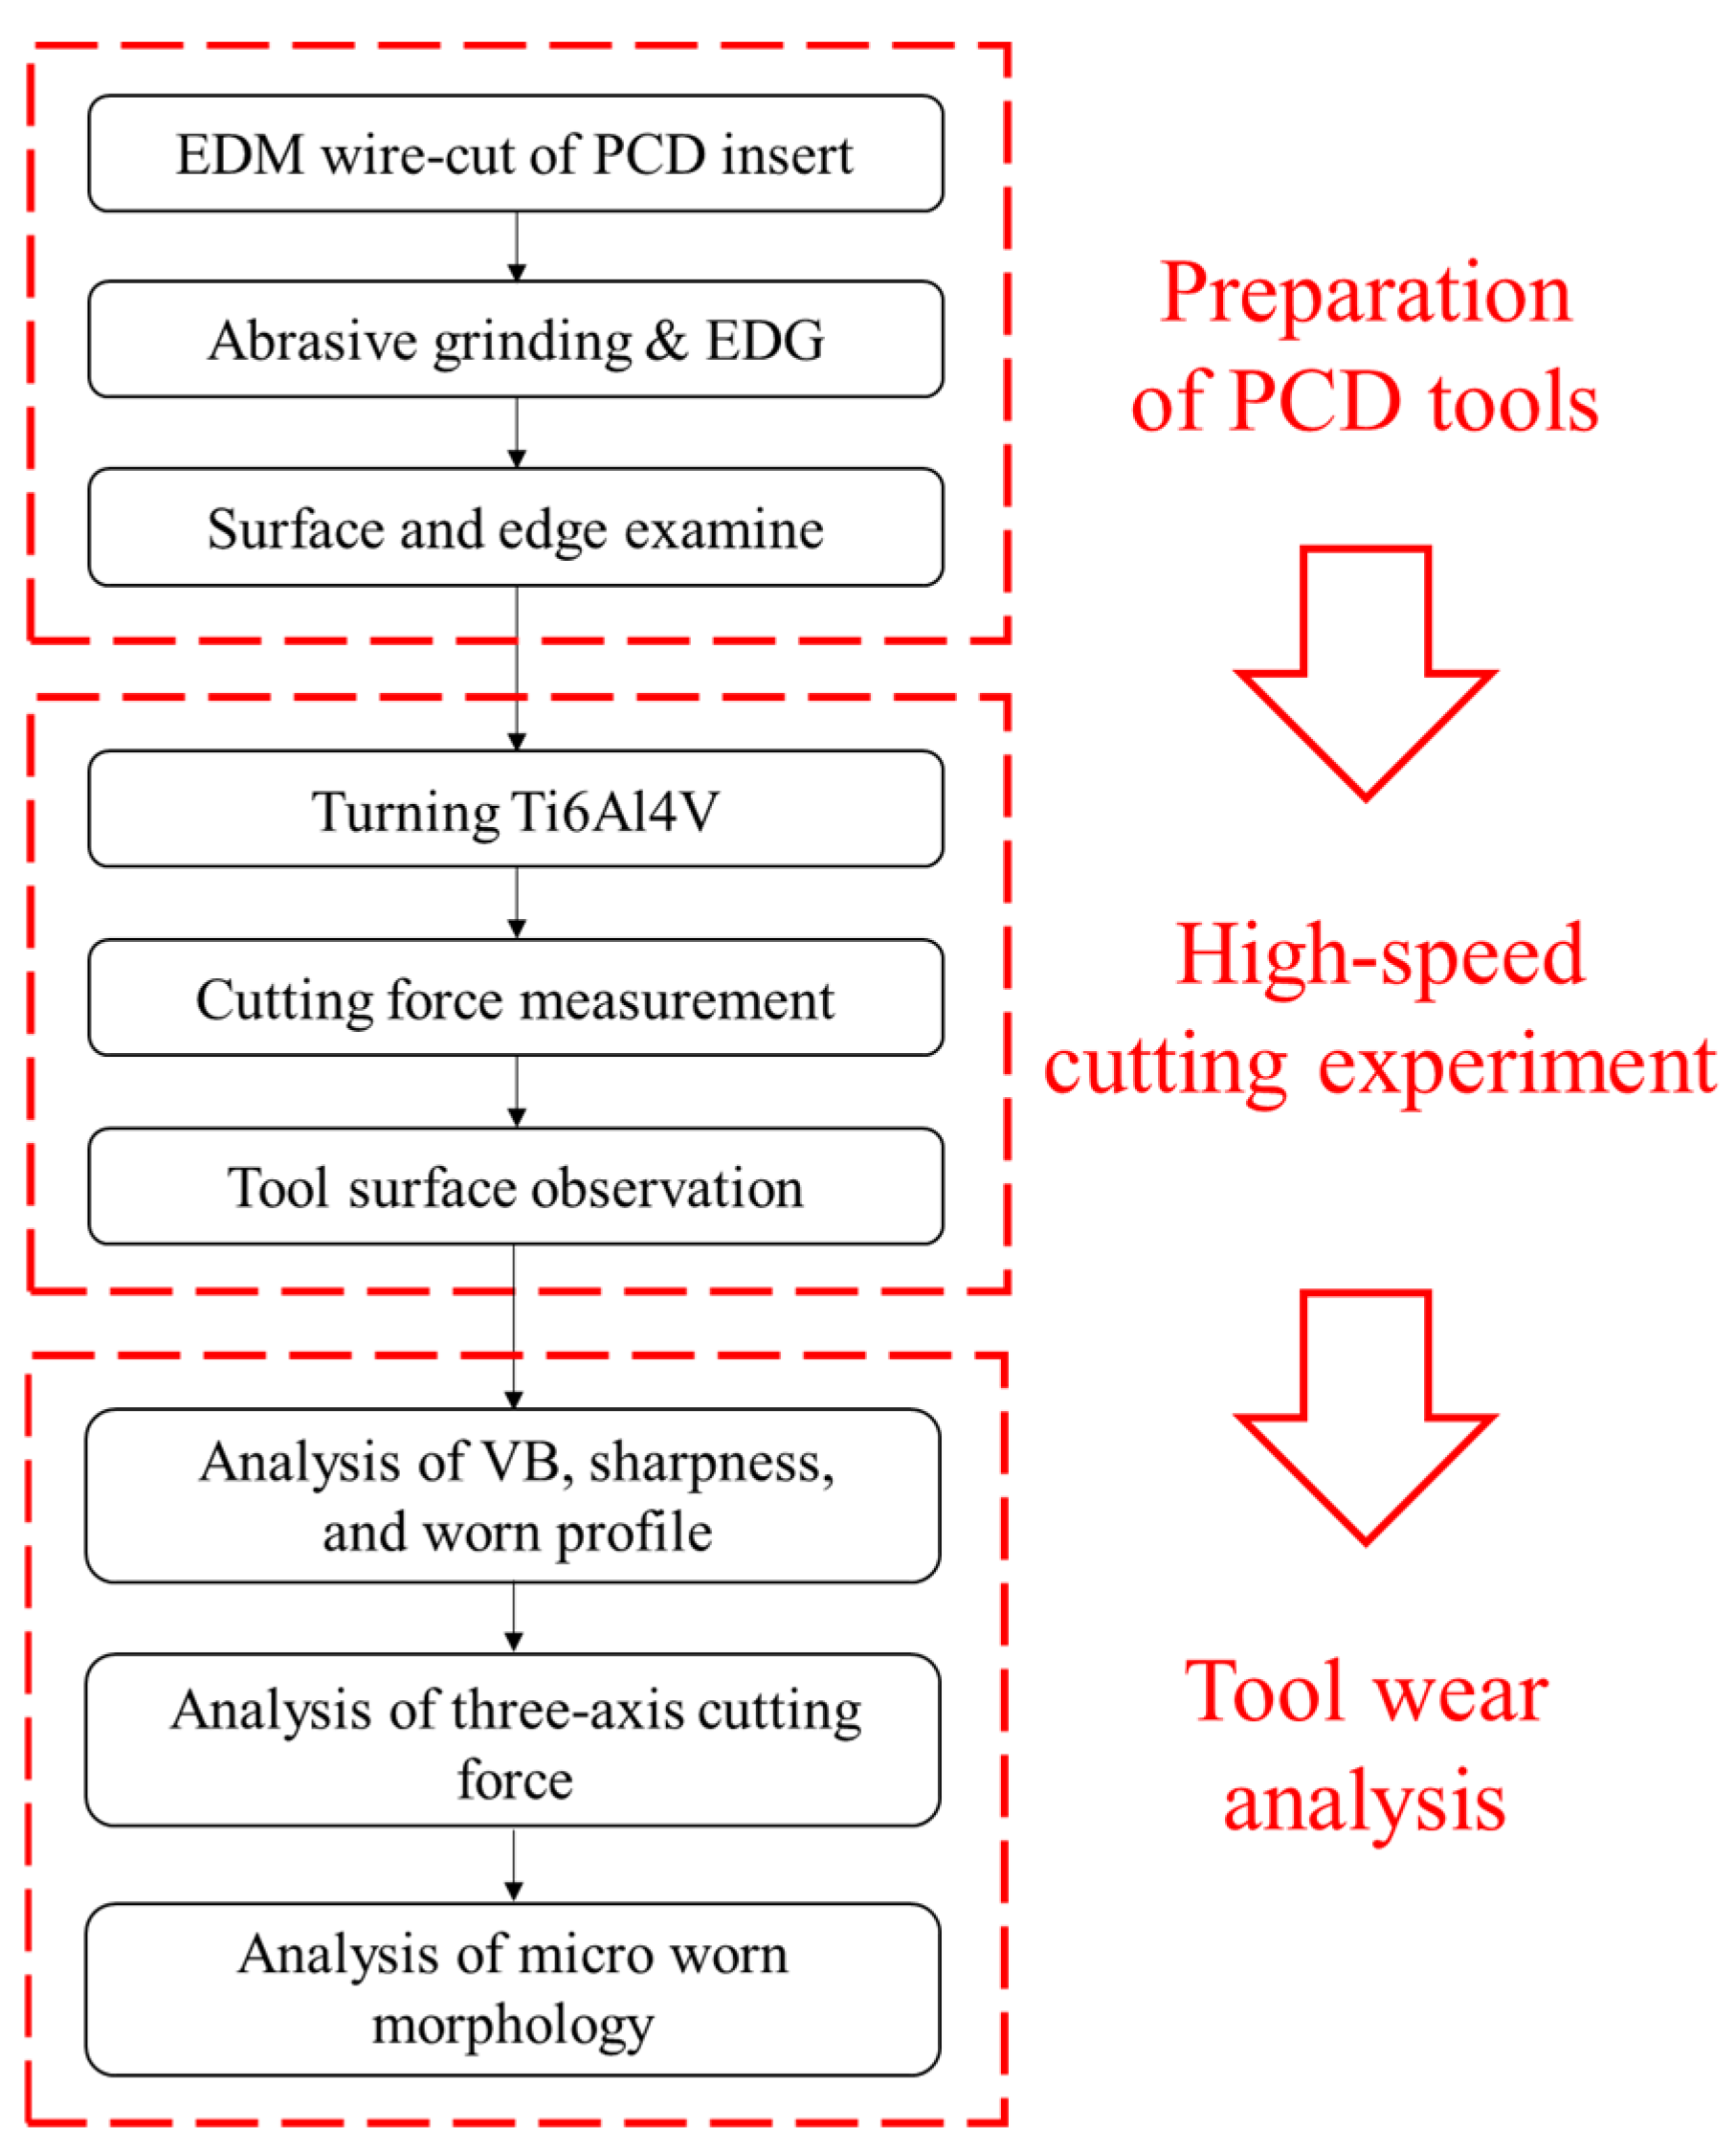
Figure 1. The flow chart of research methodology
Jmmp 05 00034 g001
Figure 2. (a) Abrasive grinding of polycrystalline diamond (PCD) on COBORN RG6-FE. (b) Electrical discharge grinding (EDG) of PCD on ANCA EDGe.
Jmmp 05 00034 g002
Figure 3. The flank face of PCD inserts after grinding: (a) CTB002, abrasive grinding, (b) CTB002, EDG, (c) CTM302, abrasive grinding, (d) CTM302, EDG.
Jmmp 05 00034 g003
Figure 4. Side view of the reconsolidated layer on the eroded PCD inserts: (a) 002A (b) 302E.
Jmmp 05 00034 g004
Figure 5. Three-dimensional images of the worn areas of different PCD inserts: (a) 002A, (b) 002E, (c) 302A, and (d) 302E.
Jmmp 05 00034 g005
Figure 6. Sharpness of the worn cutting edges of different PCD inserts: (a) 002A, (b) 002E, (c) 302A, and (d) 302E.
Jmmp 05 00034 g006
Figure 7. Profile and roughness of the primary flank faces of different PCD inserts: (a) 002A, (b) 002E, (c) 302A, and (d) 302E.
Jmmp 05 00034 g007
Figure 8. The change of cutting forces when using different PCD tools: (a,b) main cutting force, (c,d) feed force, and (e,f) thrust force.
Jmmp 05 00034 g008
Figure 9. Micro-morphology of the flank wear on the four PCD inserts: (a) 002A, (b) 002E, (c) 302A, and (d) 302E.
Jmmp 05 00034 g009aJmmp 05 00034 g009b
Figure 10. Micro-morphology of the regions I on the worn surface of different PCD tools: (a) 002A, (b) 002E, (c) 302A, and (d) 302E.
Jmmp 05 00034 g010
Figure 11. Micro-morphology of the regions II on the worn surface of different PCD tools: (a) 002A, (b) 002E, (c) 302A, and (d) 302E.
Jmmp 05 00034 g011
Figure 12. Residual elements on the worn areas of the four PCD inserts: (a) 002A, (b) 002E, (c) 302A, and (d) 302E.
Jmmp 05 00034 g012
Figure 13. Distribution of titanium, cobalt and oxygen on the worn areas of the four PCD inserts: (a) 002A, (b) 002E, (c) 302A, and (d) 302E.
Jmmp 05 00034 g013
Figure 14. Crater wear after the turning experiment: (a) 002A (b) 302A (c) 002E (d) 302E.
Jmmp 05 00034 g014
Table 1. Basic physical properties of polycrystalline diamond (PCD) tool materials [28].
MaterialCTB002CTB302
Grain Size (µm)22 and 30
Binder Materialcobaltcobalt
Diamond Fraction (%)84.8 91.4
Density (g/mm3)4.353.99
Young’s Modulus (Gpa)883901
Poisson’s Ratio0.10.11
Hardness (Gpa)5050
Table 2. The machining parameters of abrasive grinding and electrical discharge grinding (EDG).
Conventional Abrasive GrindingElectrical Discharge Grinding
Machine tool: COBORN RG6-FE
Feed rate: 0.2 mm/min
Grinding speed: 20 m/s
Total infeed: 100 μm
Machine tool: ANCA EDGe
Electrode: Cu-Ni alloy
Voltage: 120 V
Current: 12 A, 1 A
Time on/off: 40/20 ms, 1/4 ms
Total infeed: 150 μm
Table 3. Mechanical properties of workpiece material [30].
MaterialDensityHardnessElastic ModulusPoisson’s RatioThermal Conductivity
Ti6Al4V4.43 g/mm3349113.8 GPa0.3426.7 W/m.K
Table 4. Parameters applied in turning experiments.
Cutting ParametersValues
Cutting Speed240 m/min
Feed Rate0.15 mm/rev
Cutting Depth0.2 mm
Time Interval35 s
Cutting Paths6
Coolant8 MPa
Table 5. Cutting edge radius of three PCD inserts after machining.
LabelPCD MaterialGrinding MethodSharpness (μm)Roughness (nm)
002ACTB002Abrasive grinding5.42111
002ECTB002EDG5.87233
302ACTM302Abrasive grinding6.48129
302ECTM302EDG7.11227
Publisher’s Note: MDPI stays neutral with regard to jurisdictional claims in published maps and institutional affiliations.