Article

Scanning Three-Dimensional X-ray Diffraction Microscopy with a Spiral Slit

Toyota Central R&D Labs., Inc., 41-1, Yokomichi, Nagakute 480-1192, Aichi, Japan
*
Author to whom correspondence should be addressed.
Current address: RIKEN SPring-8 Center, 1-1-1 Kouto, Sayo-cho, Sayo-gun 679-5148, Hyogo, Japan.
Quantum Beam Sci. 2023, 7(2), 16; https://doi.org/10.3390/qubs7020016
Submission received: 14 February 2023 / Revised: 26 April 2023 / Accepted: 16 May 2023 / Published: 29 May 2023

Abstract

:
Recently, nondestructive evaluation of the stresses localized in grains was achieved for plastically deformed low-carbon steel using scanning three-dimensional X-ray diffraction (S3DXRD) microscopy with a conical slit. However, applicable metals and alloys were restricted to a single phase and evaluated stress was underestimated due to the fixed Bragg angles of the conical slit optimized to αFe. We herein propose S3DXRD with a rotating spiral slit adaptable to various metals and alloys and accurate stress evaluation with sweeping Bragg angles. Validation experiments with a 50-keV X-ray microbeam were conducted for low-carbon steel as a body-centered cubic (BCC) phase and pure Cu as a face-centered cubic (FCC) phase. As a result of orientation mapping, polygonal grain shapes and clear grain boundaries were observed for both BCC and FCC metals. Thus, it was demonstrated that S3DXRD with a rotating spiral slit will be applicable to various metals and alloys, multiphase alloys, and accurate stress evaluation using a X-ray microbeam with a higher photon energy within an energy range determined by X-ray focusing optics. In principle, this implies that S3DXRD becomes applicable to larger and thicker metal and alloy samples instead of current miniature test or wire-shaped samples if a higher-energy X-ray microbeam is available.

1. Introduction

The localized stresses in the polycrystalline metals and alloys produced due to fabrication processes and fatigue in service are crucial study objects in engineering and in many industries. Three-dimensional X-ray diffraction (3DXRD) microscopy (also called high-energy diffraction microscopy or HEDM) with synchrotron-based high-energy X-rays allows us to nondestructively evaluate grain-resolved stresses called type II stresses [1,2,3,4,5,6,7,8,9,10,11,12,13]. The mapping of type II stresses has successfully led to the visualization of macroscopic (type I) stress fields, such as crack-tip stress fields, and to the deviation of type II stresses from type I stresses [14,15]. Three-dimensional type II stress mapping combined with computed tomography has demonstrated that fatigue crack initiations from inclusions occur at grain boundaries, showing high stress gradients [16].
The determination of type II stresses is based on the detection of diffracted beams from multiple grains as diffraction spots on area detectors. The diffraction spots can be assigned to multiple grains with known crystallographic parameters, which is called multigrain indexing. If multiple diffraction spots per grain are assigned, orientation is determined for individual grains. Type II stresses are determined as follows. First, lattice parameters are calculated for individual grains. The lattice parameters can be converted into an elastic strain tensor in a crystallographic coordinate system if stress-free lattice parameters are defined using reference samples, e.g., annealed powders. An elastic strain tensor is converted into a stress tensor in a crystallographic coordinate system through elastic stiffness constants. Then, the stress tensor is converted into a stress tensor in the sample coordinate system through orientation. Three-dimensional mapping of determined stress tensors is achieved by reconstructing the positions of individual grains, including or excluding grain shapes with spatial resolutions, which is called grain mapping. In 3DXRD with monochromatic X-rays, multiple diffraction spots per grain are acquired by rotating samples, and grain maps are reconstructed from diffraction spots at near fields detected with a high-spatial-resolution detector.
Similar to type II stresses compared with type I stresses, intragranular (type III) stresses may deviate from grain-averaged type II stresses [17,18,19,20,21,22,23,24]. Recently, the evaluation of type III stresses has been achieved using a 3DXRD modality termed scanning 3DXRD (also called point-focused HEDM) with a monochromatic point-focused (pencil) beam [25,26,27]. In scanning 3DXRD, a voxel-resolved stress tensor with a voxel size smaller than a grain size can be obtained by illuminating a pencil beam and rotating a sample. Grain mapping with grain boundaries can be achieved by a three-dimensional scan of a sample, including sample rotations at the expense of measurement time [28]. Unsurprisingly, voxel-resolved stresses showed deviations from grain-averaged stresses in a plastically deformed metal and alloy [27,29]. It was also shown that deviation exceeded macroscopic tensile strength and voxel-resolved stresses were in highly triaxial stress states even under uniform elongation. Reconstructions with high fidelity have revealed the expectations of the larger deviations of voxel-resolved stresses from grain-averaged stresses [30,31].
Very recently, a high-spatial-resolution modality of 3DXRD, called high-resolution 3DXRD (HR-3DXRD), has been proposed [32]. In HR-3DXRD, if diffracted beams from submicrometer-sized crystallites or subgrains in a deformed grain are detected as diffraction spots by locating a high-resolution area detector at a sample-to-detector distance with a balance of real and reciprocal resolutions, multiple diffraction spots are assigned for individual crystallites or subgrains in a grain. Therefore, type III stress can be evaluated for plastically deformed metals and alloys without the time-consuming three-dimensional scans.
The limitations of the type II and type III stress evaluation methods, including HR-3DXRD, come from the overlap of diffraction spots, which gives rise to stress evaluation errors. Diffraction spot overlaps are caused by the existence of a large number of grains in an illuminated volume and the spread of diffraction spots brought due to mosaicity, subgrains, and intragranular misorientations. Therefore, 3DXRD-based experiments are limited to small samples, such as miniature test or wire-shaped samples. Sample miniaturization causes size effects that lead to different mechanical material behaviors, which depend on surface conditions, sample fabrication methods, microstructure inhomogeneity, grain size, etc. [33]. In fact, industrial standardizations of miniature test samples are unavailable. The limitation on applicable sample sizes comes from the overlap of diffraction spots due to a large number of grains and subgrains rather than the availability of synchrotron-based X-rays with higher photon energy.
The introduction of conical slits [34] to 3DXRD-based experiments is meaningful from the viewpoint of applicable sample sizes. Conical slits can significantly reduce the overlap of diffraction spots by shielding detection instruments from the diffracted beams of many grains, except for the diffracted beams from the grains inside regions of interest (i.e., gauge volumes). 3DXRD with a conical slit was demonstrated to observe crystallographic rotations of individual grains in mm-sized pure aluminum during plastic deformation [35,36]. Scanning 3DXRD with a conical slit was demonstrated to evaluate type III stress in plastically deformed mm-sized low-carbon steel [29]. 3DXRD-based techniques, including HR-3DXRD, can be combined with conical slits and then applied to larger and thicker metallic samples if higher-energy X-rays are available. However, the conical slit in such 3DXRD-based experiments needs to be optimized for a single crystalline phase, because thicker metallic samples require synchrotron-based X-rays with the photon energy of almost the upper limit of a tunable X-ray energy range restricted by X-ray sources, beamline optics, and focusing optics. Therefore, it is difficult to apply 3DXRD-based techniques with conical slits to larger and thicker samples of various metals and alloys.
The limitation of the conical slit is caused by fixed Bragg angles 2 θ . A solution to the limitation is the use of a 2 θ -sweepable rotating spiral slit [37]. Using the rotating spiral slit, diffraction spots could be detected independently of crystalline phases from grains inside a gauge volume in a thick metallic sample. Here, we introduced a rotating spiral slit to scanning 3DXRD. As the first step of scanning 3DXRD with a spiral slit, we demonstrated orientation mapping for non-deformed single-phase metals without significant intragranular misorientations. The orientation mapping for metals of body-centered cubic (BCC) and face-centered cubic (FCC) lattices was achieved by scanning 3DXRD with a compact rotating spiral slit and a 50-keV X-ray microbeam. The X-ray energy was determined as the upper limit of the tunable energy range determined by focusing optics.

2. Materials and Methods

2.1. Data Acquisition

In scanning 3DXRD, a monochromatic X-ray pencil beam with a beam size smaller than a grain size illuminates a polycrystalline sample. While the sample rotates around the z-axis, diffracted beams from multiple grains are detected as diffraction spots on a far-field area detector, as shown in Figure 1a, where x y z is the laboratory coordinate system and the incoming pencil beam is parallel to the y-axis. Diffraction images from the far-field detector are continuously acquired every ω step from ω = 0° to ω = ω max , where ω is the rotation angle of the sample around the z-axis. Because of tomographic reconstruction stated below with a computed tomography-like geometry, 180° at least is needed for ω max . After this ω scan, the sample is translated by Δ X in the x direction using a translation stage located under an ω rotation stage. Although the X scan step Δ X should be matched to the beam size, Δ X slightly larger than the beam size is acceptable for scan time saving because slight sampling errors are negligible as long as Δ X is much smaller than a grain size. The ω scan is repeated from X = X m to X = X m , where X is the sample translation in the x direction, and the incoming microbeam penetrated the ω rotation axis at X = 0. From this ω -X scan data, an orientation map with a spatial resolution of 2 Δ X and a field-of-view (FoV) with a diameter of 2 X m in the x y plane can be reconstructed using the scanning 3DXRD method [28].

2.2. Reconstruction

Here, we summarize the reconstruction procedures of the scanning 3DXRD method [28] as follows.
  • Extraction. Certain specific diffraction images are extracted from the ω -X scan data. The extracted specific diffraction images correspond to the acquired images when the incoming beam penetrates an arbitrary point Q. In this condition, only the point Q is always illuminated by the incoming beam during the ω max rotations. A region with a center of Q and a diameter of 2 Δ X is also illuminated during the ω max rotations due to the beam size, which corresponds to a spatial resolution to determine orientation.
  • Multigrain indexing. Multiple grains can be produced as candidate grains that occupies the point Q by applying multigrain indexing for the extracted diffraction images. Orientations and N are determined for each candidate grain, where N is the number of detected diffraction spots for a grain. If the sample consists of multiple crystalline phases, multigrain indexing is conducted for each phase.
  • Normalization. A normalization factor, M, for the dependency of N on orientation and crystalline phases is calculated, where M is the theoretically expected maximum of N. The normalization factor M is calculated considering not only a sample-to-detector distance and the active area size of the detector but also non-detectable (shadow) areas due to the holder of a beam stop, the rotation mechanism of a spiral slit, etc.
  • Repetition. An arbitrary point can be selected anywhere within FoV with a diameter of 2 X m and a center matched with an ω rotation center in the x y plane. The above extraction, multigrain indexing, and normalization are repeated for all of voxels within FoV. The voxel size is set to Δ X for simplicity.
Thus, we obtained an orientation map with multiple candidates of orientation per voxel with a spatial resolution of 2 Δ X and FoV of a diameter of 2 X m .

2.3. Postprocess

For ideal cases without significant experimental errors, an orientation map with single orientation per voxel is obtained by simply selecting orientation with the highest N = N / M among candidates at each voxel. For cases with experimental errors due to insufficient diffraction intensities, etc., a better orientation map can be obtained by applying postprocesses using the information on the orientation of neighboring voxels in addition to N . Here, we proposed a simple postprocess as follows.
First, a voxel was randomly selected from an orientation map. Misorientations were evaluated between orientation with the highest N in the selected voxel and orientation with first, second, and third highest N in first neighboring voxels. If the misorientations were smaller than δ , the first neighboring voxels and the selected voxel were regarded as voxels in the same grain. The same judgment was conducted with misorientations between the first and second neighboring voxels. These steps were repeated until no new neighboring voxels were found. When the number of voxels regarded as voxels in the same grain was larger than a threshold, the voxels were extracted as a single grain and deleted from the original orientation map. Next, a voxel was randomly selected from the orientation map in which a single grain was deleted in the previous process. The same series of judgments with misorientations between neighboring voxels was conducted. Then, a next single grain might be extracted. The extractions of a single grain were repeated until no new grain was found. Thus, an orientation map with single orientation per voxel was obtained.

2.4. Role of a Spiral Slit

Multigrain indexing is based on the detection of diffraction spots from a polycrystalline sample. One of the limitations comes from the overlap of diffraction spots due to the detection of diffracted beams from a large number of strained grains. This situation mostly happens for thick strained metallic samples. We conquered the limitation of multigrain indexing-based techniques by developing scanning 3DXRD with a high-energy microbeam and a conical slit for single-phase alloys. Because a conical slit can form a gauge volume in a thick sample, a high-energy microbeam and the gauge volume allowed us to reduce the overlap of diffraction spots by restricting the number of detectable grains, as shown in Figure 1b. In addition, the conical slit can accept peak shifts Δ θ of Bragg angles 2 θ due to elastic strains for grains existing around the center of the gauge volume, as long as the conical slit can be located close to the sample. We achieved the evaluation of type III stress in 1-mm-sized plastically-deformed low-carbon ferrite steel using a microbeam with a photon energy of 50 keV and a conical slit designed for ferrite [29]. However, Bragg angles of the conical slit needed to be optimized for BCC ferrite and a photon energy of 50 keV. Although a conical slit designed for BCC can be applied to FCC if X-ray photon energy can be tuned, the scanning 3DXRD experiments with the conical slit were restricted to only BCC ferrite, because the X-ray photon energy range was limited by focusing optics and X-rays of the upper limit of 50 keV in the energy range were needed for the 1-mm-thick steel sample. Additionally, observed Δ θ values were underestimated because it was difficult to locate the conical slit very close to the sample due to an in-situ stress rig, and then acceptable Δ θ values were restricted.
A rotating spiral slit allowed us to overcome the obstacles of conical slits (Figure 2a). The rotating spiral slit has the functions of the sweeping of 2 θ by rotating the spiral slit and the formation of a gauge volume (Figure 2b). Diffracted beams from various metals and alloys become acceptable by sweeping 2 θ . Additionally, unlimited Δ θ and strain are acceptable for all the grains in the gauge volume.

2.5. Experiments and Materials

Scanning 3DXRD experiments with a rotating spiral slit were performed using an undulator beamline BL33XU at SPring-8. Undulator radiation was monochromatized to 50 keV with a liquid nitrogen-cooled Si 311 double-crystal monochromator. The monochromator was calibrated with the K-edge of Cu. The monochromatic beam was focused into 1 × 1 μm using 400-mm-long Pt-coated Kirkpatrick-Baez mirrors with incident angles of <1.3 mrad. The focused microbeam was irradiated to a sample mounted on an ω rotation stage. The sample was rotated around the z-axis with a constant rotation speed of 1.2 °/s. Diffracted beams were detected through a rotating spiral slit using a flat-panel X-ray detector (2923NDT, Dexela, London, UK) with an active image area of 291 mm wide and 230 mm high and a sample-to-detector distance of 346 mm. The rotating spiral slit with a minimum aperture of 20 μm covered 2 θ from 3.5° to 20°. Diffraction images were continuously recorded every 0.6° from 0° to ω max = 180 ° during ω rotations. The exposure time of the images corresponds to 500 ms. Assuming that the mean grain size of the sample was more than 10 μm, the X scan step was set to Δ X = 1.2 μm.
Single-phase BCC and FCC polycrystalline samples were prepared. The BCC sample was extracted from a commercially available cold-rolled steel sheet defined as SPCC according to the Japanese industrial standard [38]. The steel sheet with a thickness of 1 mm was cut using a wire cutter to have the shape of a tensile test piece with a width of 1 mm at a gauge section. The αFe sample with a tensile test piece shape was mounted on the ω stage with the longitudinal direction parallel to the z axis. Therefore, the cross-sectional area of the αFe sample in the observed x y plane was 1 × 1 mm2. The FCC sample was cut from a commercially available pure Cu wire with a diameter of 1 mm. The Cu wire sample was mounted on the ω stage with the axial direction parallel to the z axis. Therefore, the cross-sectional area of the Cu sample in the observed x y plane was 0.79 mm2.

2.6. Rotating Spiral Slit

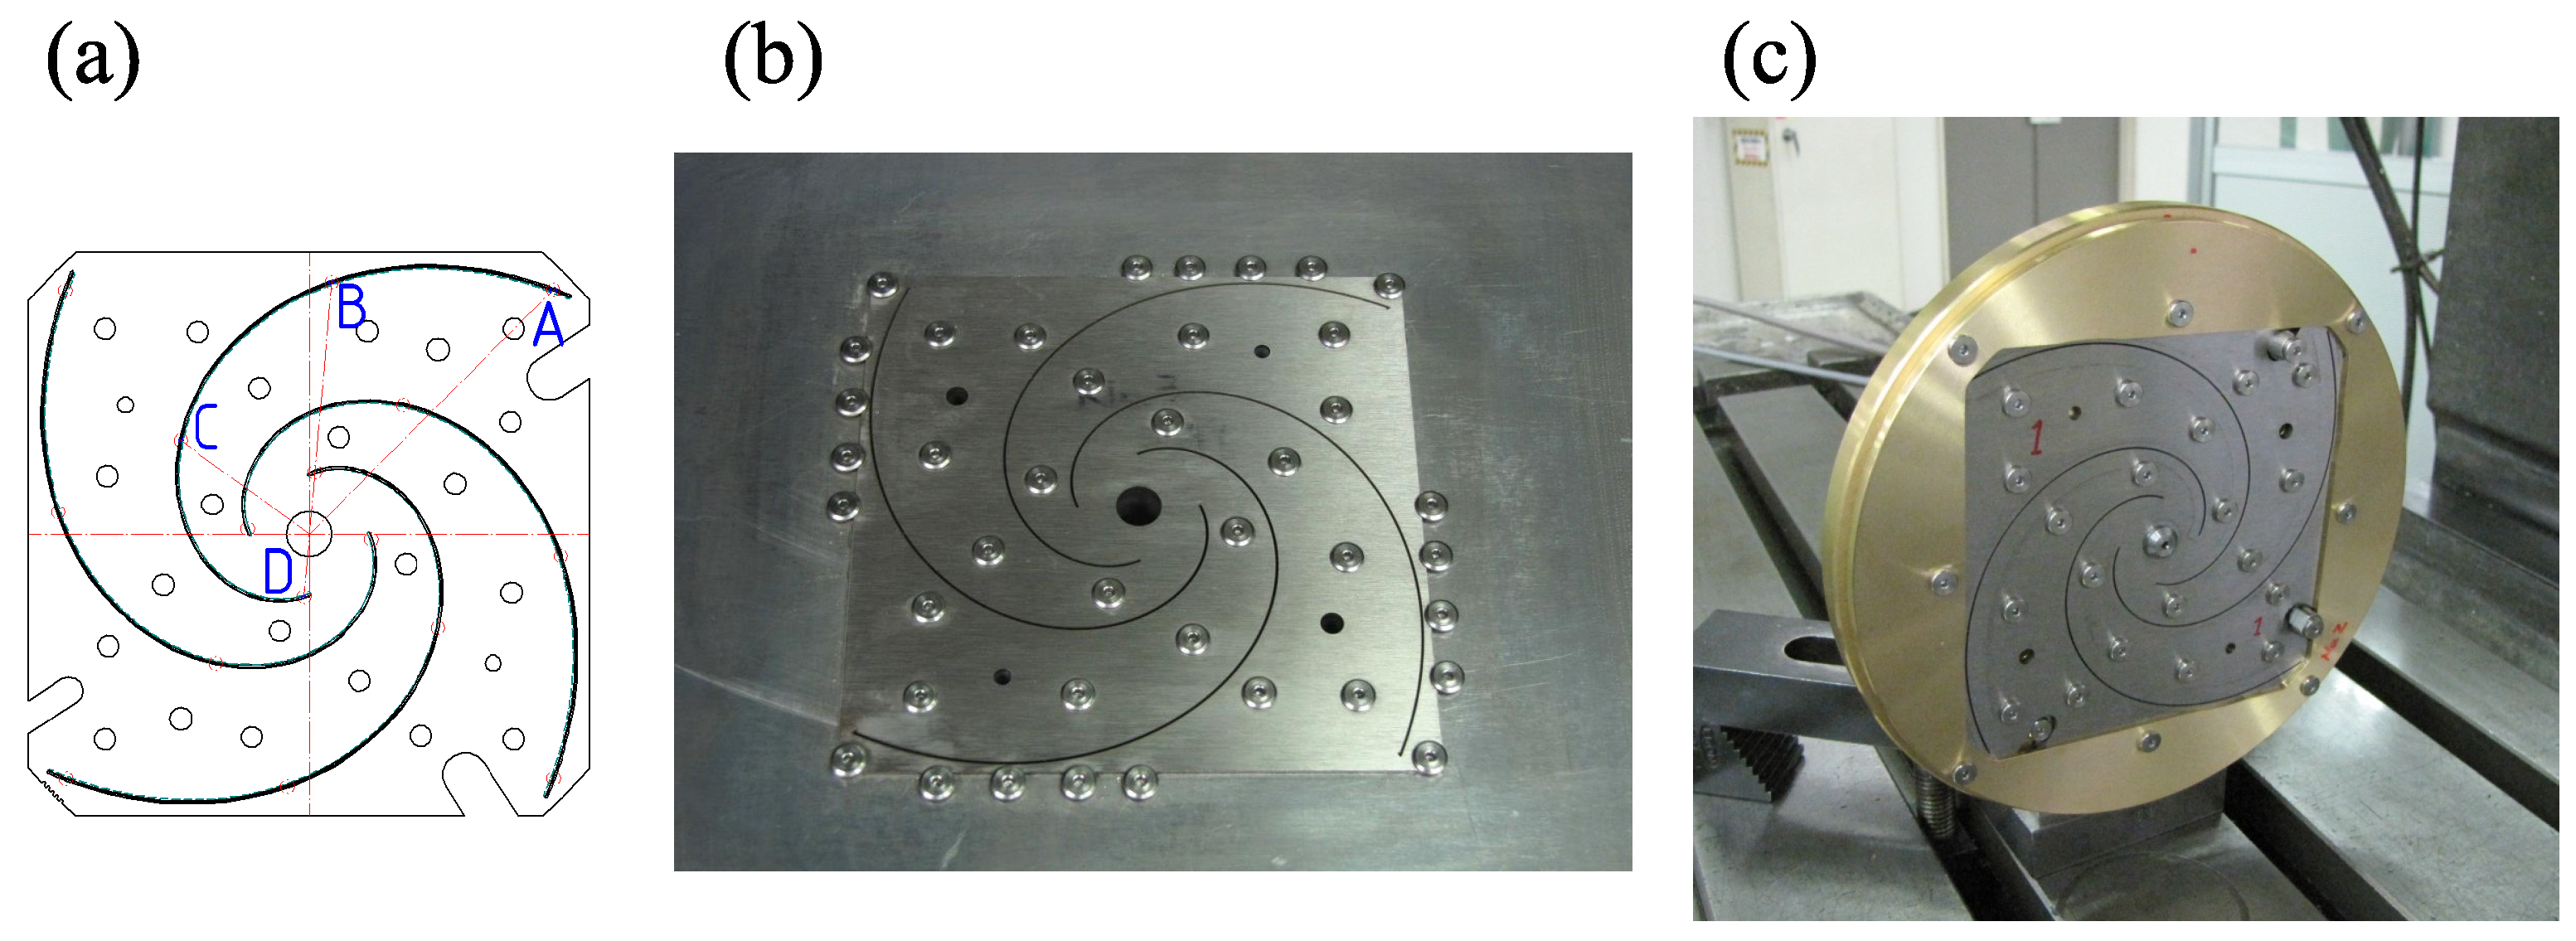
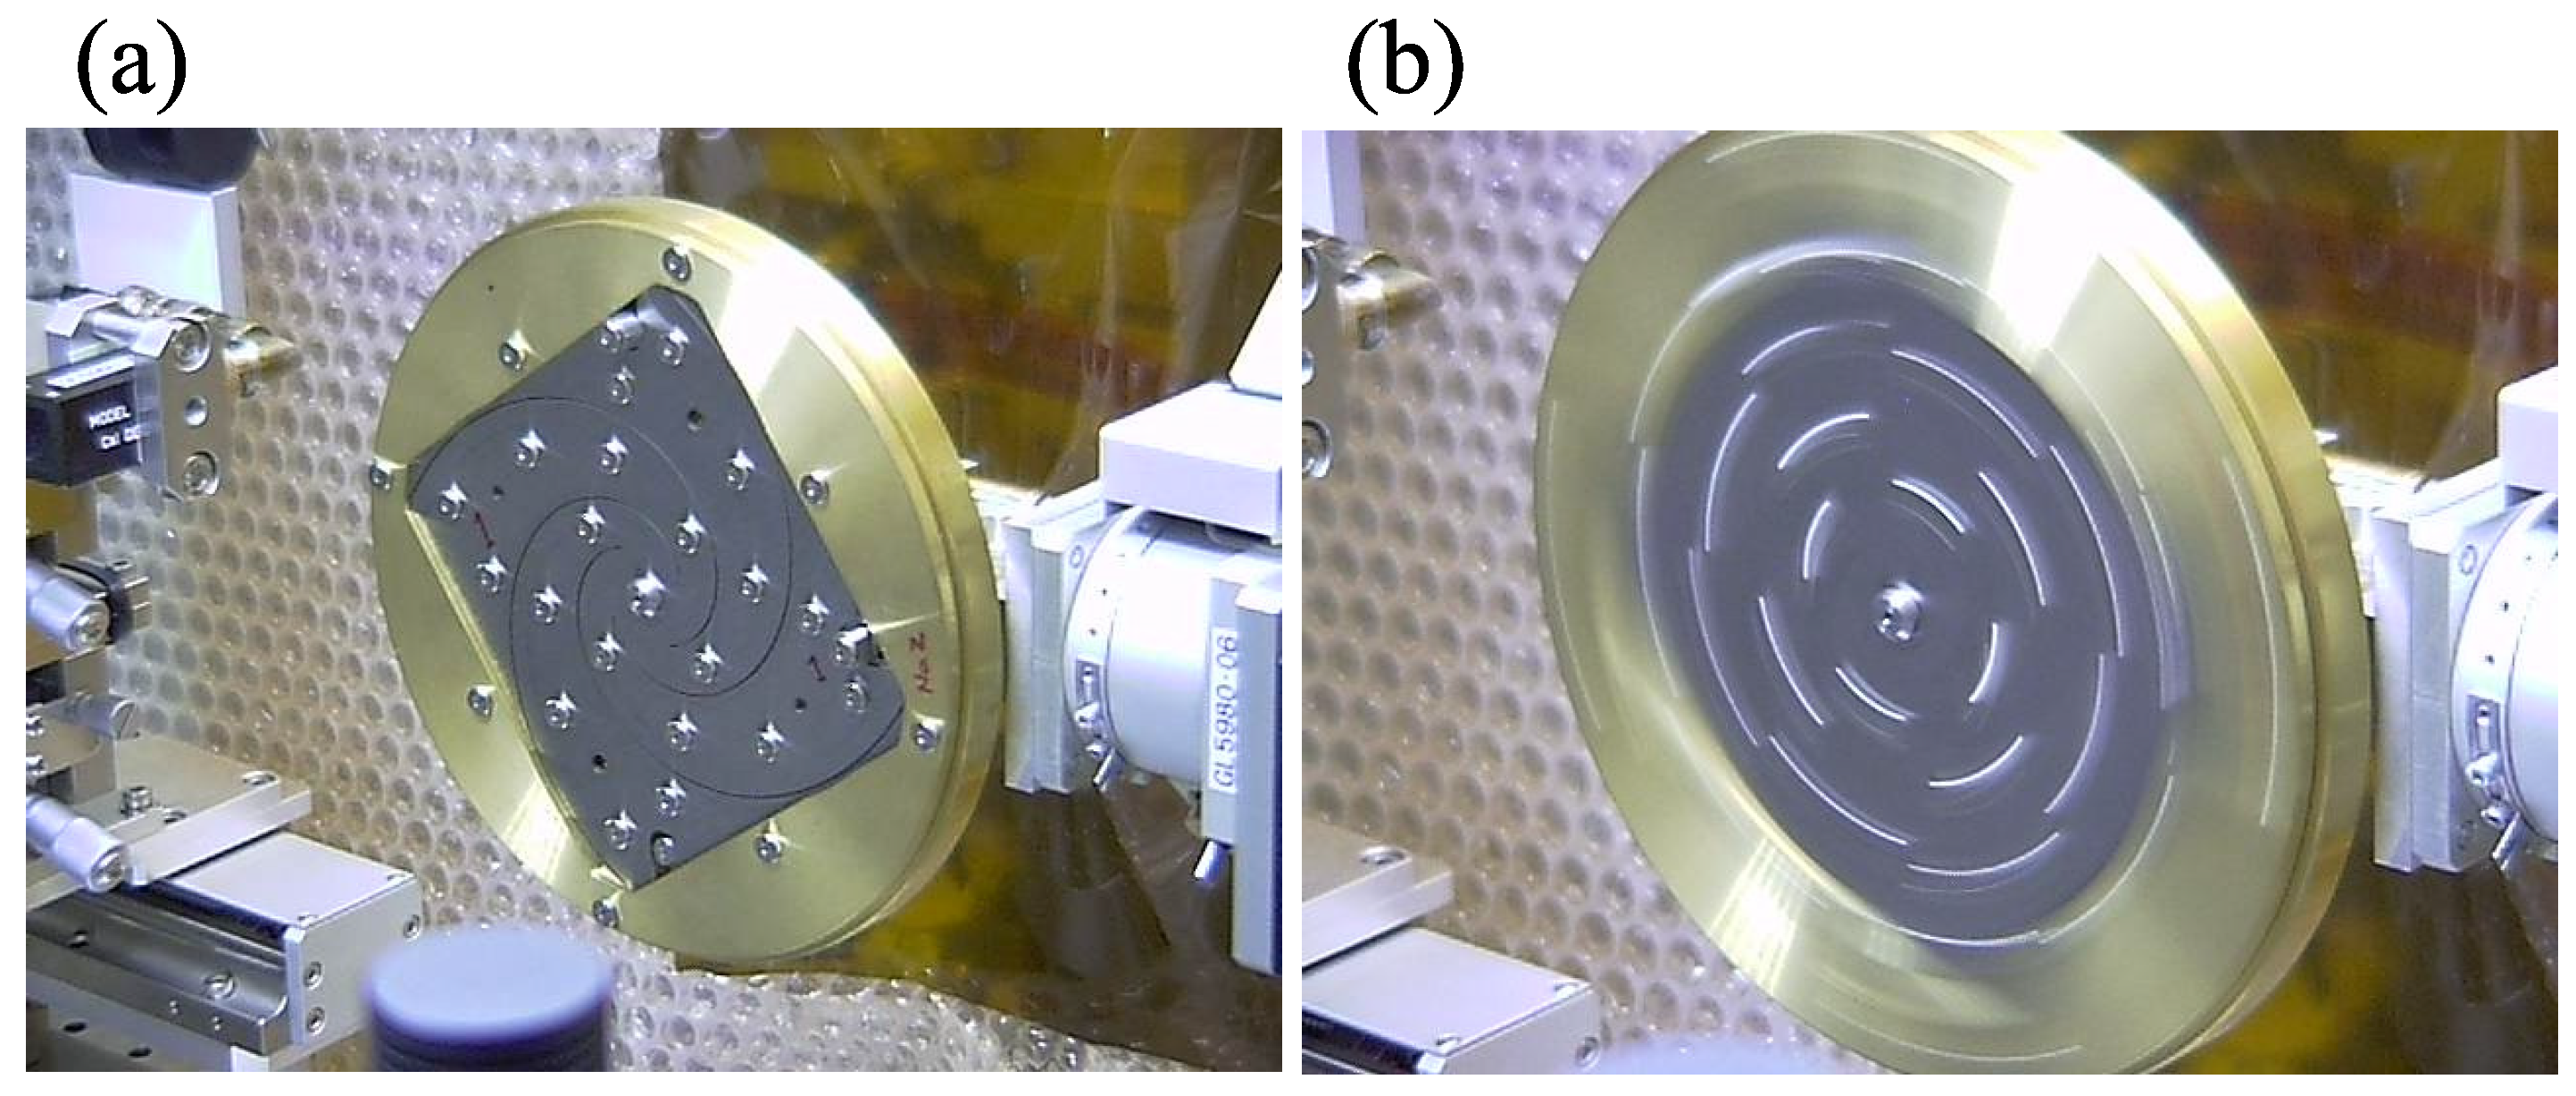
A compact rotating spiral slit was fabricated so that the rotating spiral slit was located between the sample and the detector. The compact spiral slit with a diameter of 150 mm and a depth of 95 mm (external dimensions) was composed of parts of slit blades on a blade holder and a rotation mechanism with a compact motor, as shown in Figure 3. The blades were fabricated from three thin tungsten plates with a thickness of 1 mm and a width of 100 mm. Inclined through-grooves with a width of 0.5 mm were machined into the tungsten plates using a wire cutter, and inclined gaps were formed by stacking the three blades. Each blade had four spiral-shaped, 0.5-mm-wide grooves and a center bore, as shown in Figure 4a,b. The blades were mounted on a rigid holder made of brass with a center bore and a function of the alignment of each blade (Figure 4c). A pipe shaft was inserted into the center bore of the holder from the rear side and fixed to the holder. Using an appropriate hole shaft fit tolerance, the blades were mounted on the holder from the front side through the pipe shaft. Each blade was independently and slightly rotated around the y axis, where the pipe shaft was parallel to the y axis. Then, four spiral-shaped inclined gaps were formed. The gap widths, i.e., slit apertures, were designed as L G tan 2 θ so that L G was independent of 2 θ , where L G was the length of the gauge volume in the y direction. A minimum gap of 20 μm was formed at 2 θ = 3.5°, corresponding to L G = ∼330 μm. After the alignment, the three blades were fixed to the pipe shaft through the holder. The pipe shaft was linked to a compact motor using reduction and bevel gears. The mechanical errors of the assembled rotating spiral slit were estimated to be about 15 μm and 35 μm at most for runout and deflection, respectively. The rotating spiral slit was mounted on a five-axis stage for three translations and two tilts and was located at a designed position with a working distance of 170 mm between the omega axis and surface of the first blade. The compact spiral slit was aligned so that the incoming beam passed through the internal bore of the pipe shaft (Figure 5a). The pipe shaft was rotated at 8400 rpm with an acceleration time of a few minutes (Figure 5b). The beam stop and detector were located at the downstream of the spiral slit. A reference powder sample in a capillary with a diameter similar to L G was mounted at the rotation center of the omega stage with the longitudinal direction of the capillary parallel to the omega rotation axis. At first, Debye–Sherrer rings were partially observed from the rotating reference sample. Finally, the rotating spiral slit was aligned with the five-axis stage so that the whole Debye–Sherrer rings were observed.

3. Results and Discussion

The ω -X scans were conducted for X m = 108 and 90 μm with measurement times of 8.5 and 7 h for the α Fe and Cu samples, respectively. Orientations were analyzed with 110, 200, 211, 220, 310, and 222 reflections for α Fe and 200, 220, 311, 400, 331, and 422 reflections for Cu. The postprocess for reconstruction was conducted with the misorientation parameter of δ = 2 ° .
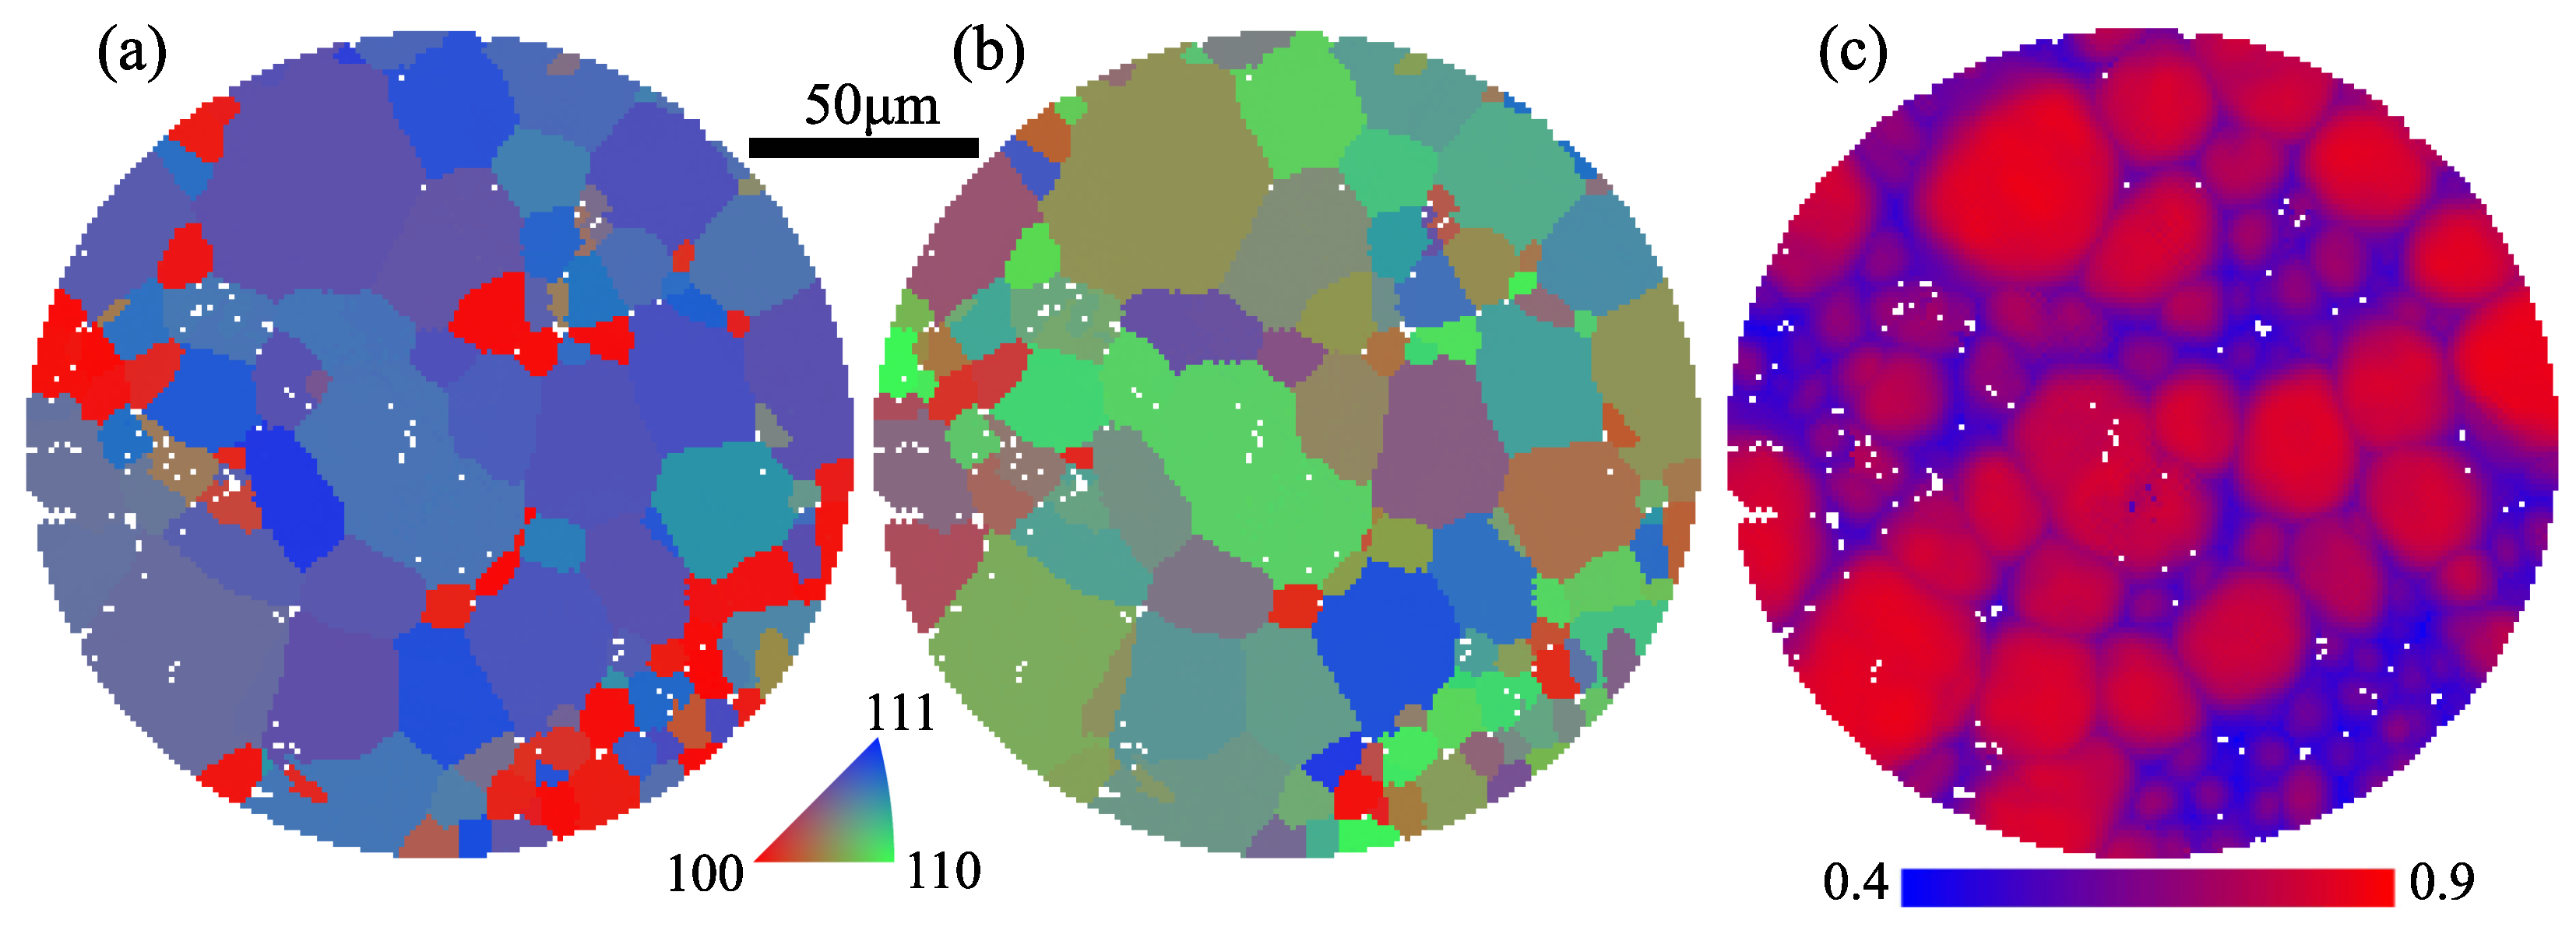
Figure 6 shows the orientation and N maps obtained from the cold-rolled α Fe steel sheet sample with a field-of-view of 216 μm in diameter. Each pixel with a pixel size of 1.2 × 1.2 μm has an orientation represented as the longitudinal direction of the tensile test shape sample in the basic triangle of the pole figure of BCC. In the orientation map, grains and grain boundaries are indicated by regions enclosed by the same orientations (or the same colors) and boundaries between different orientations (or different colors), respectively. Intragranular misorientations were estimated to be less than 1° for the grains. Uncolored white pixels imply reconstruction errors, not fine spheroidal cementite particles or voids. Polygonal grain shapes and clear grain boundaries are observed, which are commonly seen for annealed polycrystalline metals and alloys.
The mean of N and the range of M were estimated to be 0.70 and 81–86, respectively, from the N map (Figure 6b). It can be seen that the N values reach about 0.9 at the centers of grains, which indicates that about 90% of the theoretically expected number of diffraction spots per grain were detected. This result implies that the compact rotating spiral slit functioned and its mechanical errors were acceptable for orientation mapping.
Figure 7 shows orientation and N maps obtained from the Cu wire sample with a field-of-view of 180 μm in diameter. In the orientation maps, the orientation is represented as the axial and radial directions in the basic triangle of the pole figure of FCC because of the wire texture. Although N of small grains did not reach 0.9, it is obvious that polygonal grain shapes and grain boundaries were also successfully reconstructed for the FCC sample. Thus, the reconstruction of BCC/BCC and FCC/FCC grain boundaries was achieved for the BCC and FCC respective samples using a reconstruction parameter, N , independent of crystalline phases and the same experimental setup. This implies that BCC/FCC grain boundaries can be reconstructed with similar completeness.
Orientation mapping was achieved for different metals by sweeping 2 θ with a rotating spiral slit. In addition to orientation mapping, the spiral slit could let us evaluate type II and III stresses more quantitatively compared with conical slits, as Δ θ is also acceptable by sweeping 2 θ . The evaluation of type II and III stresses is interesting, especially for the multiphase alloys consisting of grains with different Young’s moduli and yield strengths, such as TRIP steel, which contains BCC and FCC grains. The reconstruction of BCC/BCC, FCC/FCC, and BCC/FCC grain boundaries is important, as stress redistributions for BCC and FCC grains depend on neighboring grains. Scanning 3DXRD with a spiral slit is especially suitable for cases in which both grain mapping and type II and III stress evaluations are necessary.
Historically, a conical slit was reported in 2000 [34] and applied to 3DXRD in 2003 [35]. A rotating spiral slit and scanning 3DXRD were reported in 2014 [37] and 2015 [28]. Eventually, a rotating spiral slit has been applied to scanning 3DXRD in this work (2023). Although we used 1-mm-thick non-deformed metallic samples without significant intragranular misorientation, scanning 3DXRD with a rotating spiral slit has been successfully demonstrated as the first step. In principle, the method will be applicable to plastically-deformed thicker metallic samples and quantitative stress evaluation using X-rays with higher photon energy, which are important next steps.
The drawback of using a rotating spiral slit is the long measurement time. The exposure time in the measurements with the spiral slit is almost 10 times (and the sample rotation speed was decreased by approximately 10 times) that in the measurements with a conical slit [29]. Nevertheless, uncolored white pixels without orientations appeared not only at grain boundaries but also in grains, which implies that the intensities of diffraction spots were insufficient. Noisy diffraction images due to low diffraction intensities give rise to experimental errors for the evaluation of N. The errors decrease the completeness of an orientation map. A solution for the drawback is to increase in the aperture ratio of the spiral slit. Although the four spiral-shaped inclined gaps were prepared in this demonstration, the aperture ratio can be increased by adding the number of the spiral-shaped inclined gaps. The decrease in stiffness of the tungsten blade plates due to additional spiral-shaped inclined through-grooves can be prevented because the blades are fixed to the rigid holder.

4. Conclusions

We herein proposed a scanning 3DXRD method with a rotating spiral slit. By sweeping Bragg angles using the rotating spiral slit, we can obtain diffraction images with patterns of diffraction spots from multiple grains in a gauge volume in a thick metallic sample independently of crystalline phases. From such diffraction images, orientation and stress maps can be reconstructed for various metals and alloys. Validation experiments were conducted with a 50-keV X-ray microbeam for two single-phase metals, low-carbon steel for BCC, and pure Cu for FCC. As a result of orientation mapping with a pixel size of 1.2 × 1.2 μm, polygonal grain shapes and clear grain boundaries were successfully observed for both BCC and FCC metals. This implies that scanning 3DXRD with a rotating spiral slit is adaptable to various metals and alloys, multiphase alloys, and quantitative stress evaluation. Furthermore, if a higher-energy microbeam is available, scanning 3DXRD with a rotating spiral slit will be applicable to larger and thicker deformed metallic samples instead of current miniature test or wire-shaped samples.

Author Contributions

Y.H. and D.S. designed the research. K.F., K.O. and N.K. fabricated the rotating spiral slit. Y.H. performed the experiments. Y.H. and H.K. wrote the manuscript. All authors discussed the results and commented on the manuscript. All authors have read and agreed to the published version of the manuscript.

Funding

This research received no external funding.

Data Availability Statement

The data presented in this study are available on request from the corresponding author. The data are not publicly available due to the policy of the authors’ affiliation (an incorporated company).

Acknowledgments

The synchrotron radiation experiments were performed at the BL33XU beamline of SPring-8 with the approval of the Japan Synchrotron Radiation Institute (JASRI) (Proposal No. 2019A7002).

Conflicts of Interest

The authors declare no conflict of interest.

References

  1. Margulies, L.; Lorentzen, T.; Poulsen, H.F.; Leffers, T. Strain tensor development in a single grain in the bulk of a polycrystal under loading. Acta Mater. 2002, 50, 1771–1779. [Google Scholar] [CrossRef]
  2. Aydıner, C.C.; Bernier, J.V.; Clausen, B.; Lienert, U.; Tomé, C.N.; Brown, D.W. Evolution of stress in individual grains and twins in a magnesium alloy aggregate. Phys. Rev. B 2009, 80, 024113. [Google Scholar] [CrossRef]
  3. Oddershede, J.; Schmidt, S.; Poulsen, H.F.; Sørensen, H.O.; Wright, J.; Reimers, W. Determining grain resolved stresses in polycrystalline materials using three-dimensional X-ray diffraction. J. Appl. Crystallogr. 2010, 43, 539–549. [Google Scholar] [CrossRef]
  4. Wang, L.; Lind, J.; Phukan, H.; Kenesei, P.; Park, J.-S.; Suter, R.M.; Beaudoin, A.J.; Bieler, T.R. Mechanical twinning and detwinning in pure Ti during loading and unloading? An in situ high-energy X-ray diffraction microscopy study. Scr. Mater. 2014, 92, 35–38. [Google Scholar] [CrossRef]
  5. Shade, P.A.; Blank, B.; Schuren, J.C.; Turner, T.J.; Kenesei, P.; Goetze, K.; Suter, R.M.; Bernier, J.V.; Li, S.F.; Lind, J.; et al. A rotational and axial motion system load frame insert for in situ high energy X-ray studies. Rev. Sci. Instrum. 2015, 86, 093902. [Google Scholar] [CrossRef]
  6. Schuren, J.C.; Shade, P.A.; Bernier, J.V.; Li, S.F.; Blank, B.; Lind, J.; Kenesei, P.; Lienert, U.; Suter, R.M.; Turner, T.J.; et al. New opportunities for quantitative tracking of polycrystal responses in three dimensions. Curr. Opin. Solid State Mater. Sci. 2015, 19, 235–244. [Google Scholar] [CrossRef]
  7. Wong, S.L.; Obstalecki, M.; Miller, M.P.; Dawson, P.R. Stress and deformation heterogeneity in individual grains within polycrystals subjected to fully reversed cyclic loading. J. Mech. Phys. Solids 2015, 79, 157–185. [Google Scholar] [CrossRef]
  8. Juul, N.Y.; Winther, G.; Dale, D.; Koker, M.K.A.; Shade, P.; Oddershede, J. Elastic interaction between twins during tensile deformation of austenitic stainless steel. Scr. Mater. 2016, 120, 1–4. [Google Scholar] [CrossRef]
  9. Turner, T.; Shade, P.; Bernier, J.; Li, S.F.; Schuren, J.; Kenesei, P.; Suter, R.; Almer, J. Crystal plasticity model validation using combined high-energy diffraction microscopy data for a Ti-7Al specimen. Metall. Mater. Trans. A Phys. Metall. Mater. Sci. 2016, 48, 627–647. [Google Scholar] [CrossRef]
  10. Renversade, L.; Borbély, A. Evaluation of grain-average stress tensor in a tensile-deformed Al–Mn polycrystal by high-energy X-ray diffraction. J. Appl. Crystallogr. 2017, 50, 1144–1157. [Google Scholar] [CrossRef]
  11. Pagan, D.C.; Shade, P.A.; Barton, N.R.; Park, J.-S.; Kenesei, P.; Menasche, D.B.; Bernier, J.V. Modeling slip system strength evolution in Ti-7Al informed by in-situ grain stress measurements. Acta Mater. 2017, 128, 406–417. [Google Scholar] [CrossRef]
  12. Abdolvand, H.; Wright, J.; Wilkinson, A.J. Strong grain neighbour effects in polycrystals. Nat. Commun. 2018, 9, 171. [Google Scholar] [CrossRef]
  13. Guillen, D.P.; Pagan, D.C.; Getto, E.M.; Wharry, J.P. In situ tensile study of PM-HIP and wrought 316L stainless steel and Inconel 625 alloys with high energy diffraction microscopy. Mater. Sci. Eng. A 2018, 738, 380–388. [Google Scholar] [CrossRef]
  14. Oddershede, J.; Camin, B.; Schmidt, S.; Mikkelsen, L.P.; Sørensen, H.O.; Lienert, U.; Poulsen, H.F.; Reimers, W. Measuring the stress field around an evolving crack in tensile deformed Mg AZ31 using three-dimensional X-ray diffraction. Acta Mater. 2012, 60, 3570–3580. [Google Scholar] [CrossRef]
  15. Sedmák, P.; Pilch, J.; Heller, L.; Kopeček, J.; Wright, J.; Sedlák, P.; Frost, M.; Šittner, P. Grain-resolved analysis of localized deformation in nickel-titanium wire under tensile load. Science 2016, 353, 559–562. [Google Scholar] [CrossRef]
  16. Naragani, D.; Sangid, M.D.; Shade, P.A.; Schuren, J.C.; Sharma, H.; Park, J.-S.; Kenesei, P.; Bernier, J.V.; Turner, T.J.; Parr, I. Investigation of fatigue crack initiation from a non-metallic inclusion via high energy X-ray diffraction microscopy. Acta Mater. 2017, 137, 71–84. [Google Scholar] [CrossRef]
  17. Pagan, D.C.; Beaudoin, A.J. Utilizing a novel lattice orientation based stress characterization method to study stress fields of shear bands. J. Mech. Phys. Solids. 2019, 128, 105–116. [Google Scholar] [CrossRef]
  18. Shen, Y.-F.; Liu, H.; Suter, R.M. Voxel-based strain tensors from near-field high energy diffraction microscopy. Curr. Opin. Solid State Mater. Sci. 2020, 24, 100852. [Google Scholar] [CrossRef]
  19. Reischig, P.; Ludwig, W. Three-dimensional reconstruction of intragranular strain and orientation in polycrystals by near-field X-ray diffraction. Curr. Opin. Solid State Mater. Sci. 2020, 24, 100851. [Google Scholar] [CrossRef]
  20. Naragani, D.; Shade, P.; Musinski, W.; Boyce, D.; Obstalecki, M.; Pagan, D.; Bernier, J.; Beaudoin, A. Interpretation of intragranular strain fields in high-energy synchrotron X-ray experiments via finite element simulations and analysis of incompatible deformation. Mater. Des. 2021, 210, 110053. [Google Scholar] [CrossRef]
  21. Poulsen, H.F.; Cook, P.K.; Leemreize, H.; Pedersen, A.F.; Yildirim, C.; Kutsal, M.; Jakobsen, A.C.; Trujillo, J.X.; Ormstrup, J.; Detlefs, C. Reciprocal space mapping and strain scanning using X-ray diffraction microscopy. J. Appl. Crystallogr. 2018, 51, 1428–1436. [Google Scholar] [CrossRef]
  22. Yildirim, C.; Jessop, C.; Ahlström, J.; Detlefs, C.; Zhang, Y. 3D mapping of orientation variation and local residual stress within individual grains of pearlitic steel using synchrotron dark field X-ray microscopy. Scr. Mater. 2021, 197, 113783. [Google Scholar] [CrossRef]
  23. Yu, T.; Du, Y.; Fan, G.; Barabash, R.; Juul Jensen, D.; Zhang, Y. In situ synchrotron X-ray micro-diffraction investigation of elastic strains in laminated Ti-Al composites. Metals 2021, 11, 668. [Google Scholar] [CrossRef]
  24. Zhang, Y.; Yu, T.; Xu, R.; Thorborg, J.; Liu, W.; Tischler, J.; Godfrey, A.; Juul Jensen, D. Local residual stresses and microstructure within recrystallizing grains in iron. Mater Charact. 2022, 191, 112113. [Google Scholar] [CrossRef]
  25. Hayashi, Y.; Setoyama, D.; Seno, Y. Scanning three-dimensional X-ray diffraction microscopy with a high-energy microbeam at SPring-8. Mater. Sci. Forum 2017, 905, 157–164. [Google Scholar] [CrossRef]
  26. Hektor, J.; Hall, S.; Henningsson, N.; Engqvist, J.; Ristinmaa, M.; Lenrick, F.; Wright, J. Scanning 3DXRD measurement of grain growth, stress, and formation of Cu6Sn5 around a tin whisker during heat treatment. Materials 2019, 12, 446. [Google Scholar] [CrossRef]
  27. Li, W.; Sharma, H.; Peter, K.; Ravi, S.; Sehitoglu, H.; Bucsek, A. Resolving intragranular stress fields in plastically deformed titanium using point-focused high-energy diffraction microscopy. J. Mater. Res. 2023, 38, 165–178. [Google Scholar] [CrossRef]
  28. Hayashi, Y.; Hirose, Y.; Seno, Y. Polycrystal orientation mapping using scanning three-dimensional X-ray diffraction microscopy. J. Appl. Crystallogr. 2015, 48, 1094–1101. [Google Scholar] [CrossRef]
  29. Hayashi, Y.; Setoyama, D.; Hirose, Y.; Yoshida, T.; Kimura, H. Intragranular three-dimensional stress tensor fields in plastically deformed polycrystals. Science 2019, 366, 1492–1496. [Google Scholar] [CrossRef]
  30. Henningsson, N.A.; Hall, S.A.; Wright, J.P.; Hektor, J. Reconstructing intragranular strain fields in polycrystalline materials from scanning 3DXRD data. J. Appl. Crystallogr. 2020, 53, 314–325. [Google Scholar] [CrossRef]
  31. Henningsson, A.; Hendriks, J. Intragranular strain estimation in far-field scanning X-ray diffraction using a Gaussian process. J. Appl. Crystallogr. 2021, 54, 1057–1070. [Google Scholar] [CrossRef]
  32. Kutsal, M.; Poulsen, H.F.; Winther, G.; Sørensen, H.O.; Detlefs, C. High-resolution 3D X-ray diffraction microscopy: 3D mapping of deformed metal microstructures. J. Appl. Crystallogr. 2022, 55, 1125–1138. [Google Scholar] [CrossRef]
  33. Sergueeva, A.V.; Zhou, J.; Meacham, B.E.; Branagan, D.J. Gage length and sample size effect on measured properties during tensile testing. Mater. Sci. Eng. A 2009, 526, 79–83. [Google Scholar] [CrossRef]
  34. Nielsen, S.F.; Wolf, A.; Poulsen, H.F.; Ohler, M.; Lienert, U.; Owen, R.A. A conical slit for three-dimensional XRD mapping. J. Synchrotron Rad. 2000, 7, 103–109. [Google Scholar] [CrossRef]
  35. Poulsen, H.F.; Margulies, L.; Schmidt, S.; Winther, G. Lattice rotations of individual bulk grains: Part I: 3D X-ray characterization. Acta Mater. 2003, 51, 3821–3830. [Google Scholar] [CrossRef]
  36. Winther, G.; Margulies, L.; Schmidt, S.; Poulsen, H.F. Lattice rotations of individual bulk grains Part II: Correlation with initial orientation and model comparison. Acta Mater. 2004, 52, 2863–2872. [Google Scholar] [CrossRef]
  37. Suzuki, K.; Shobu, T.; Shiro, A.; Toyokawa, H. Evaluation of Internal Stresses Using Rotating-Slit and 2D Detector. Mater. Sci. Forum 2014, 772, 15–19. [Google Scholar] [CrossRef]
  38. JIS G 3141; Cold-Reduced Carbon Steel Sheet and Strip. Japanese Standards Association: Tokyo, Japan, 2011.
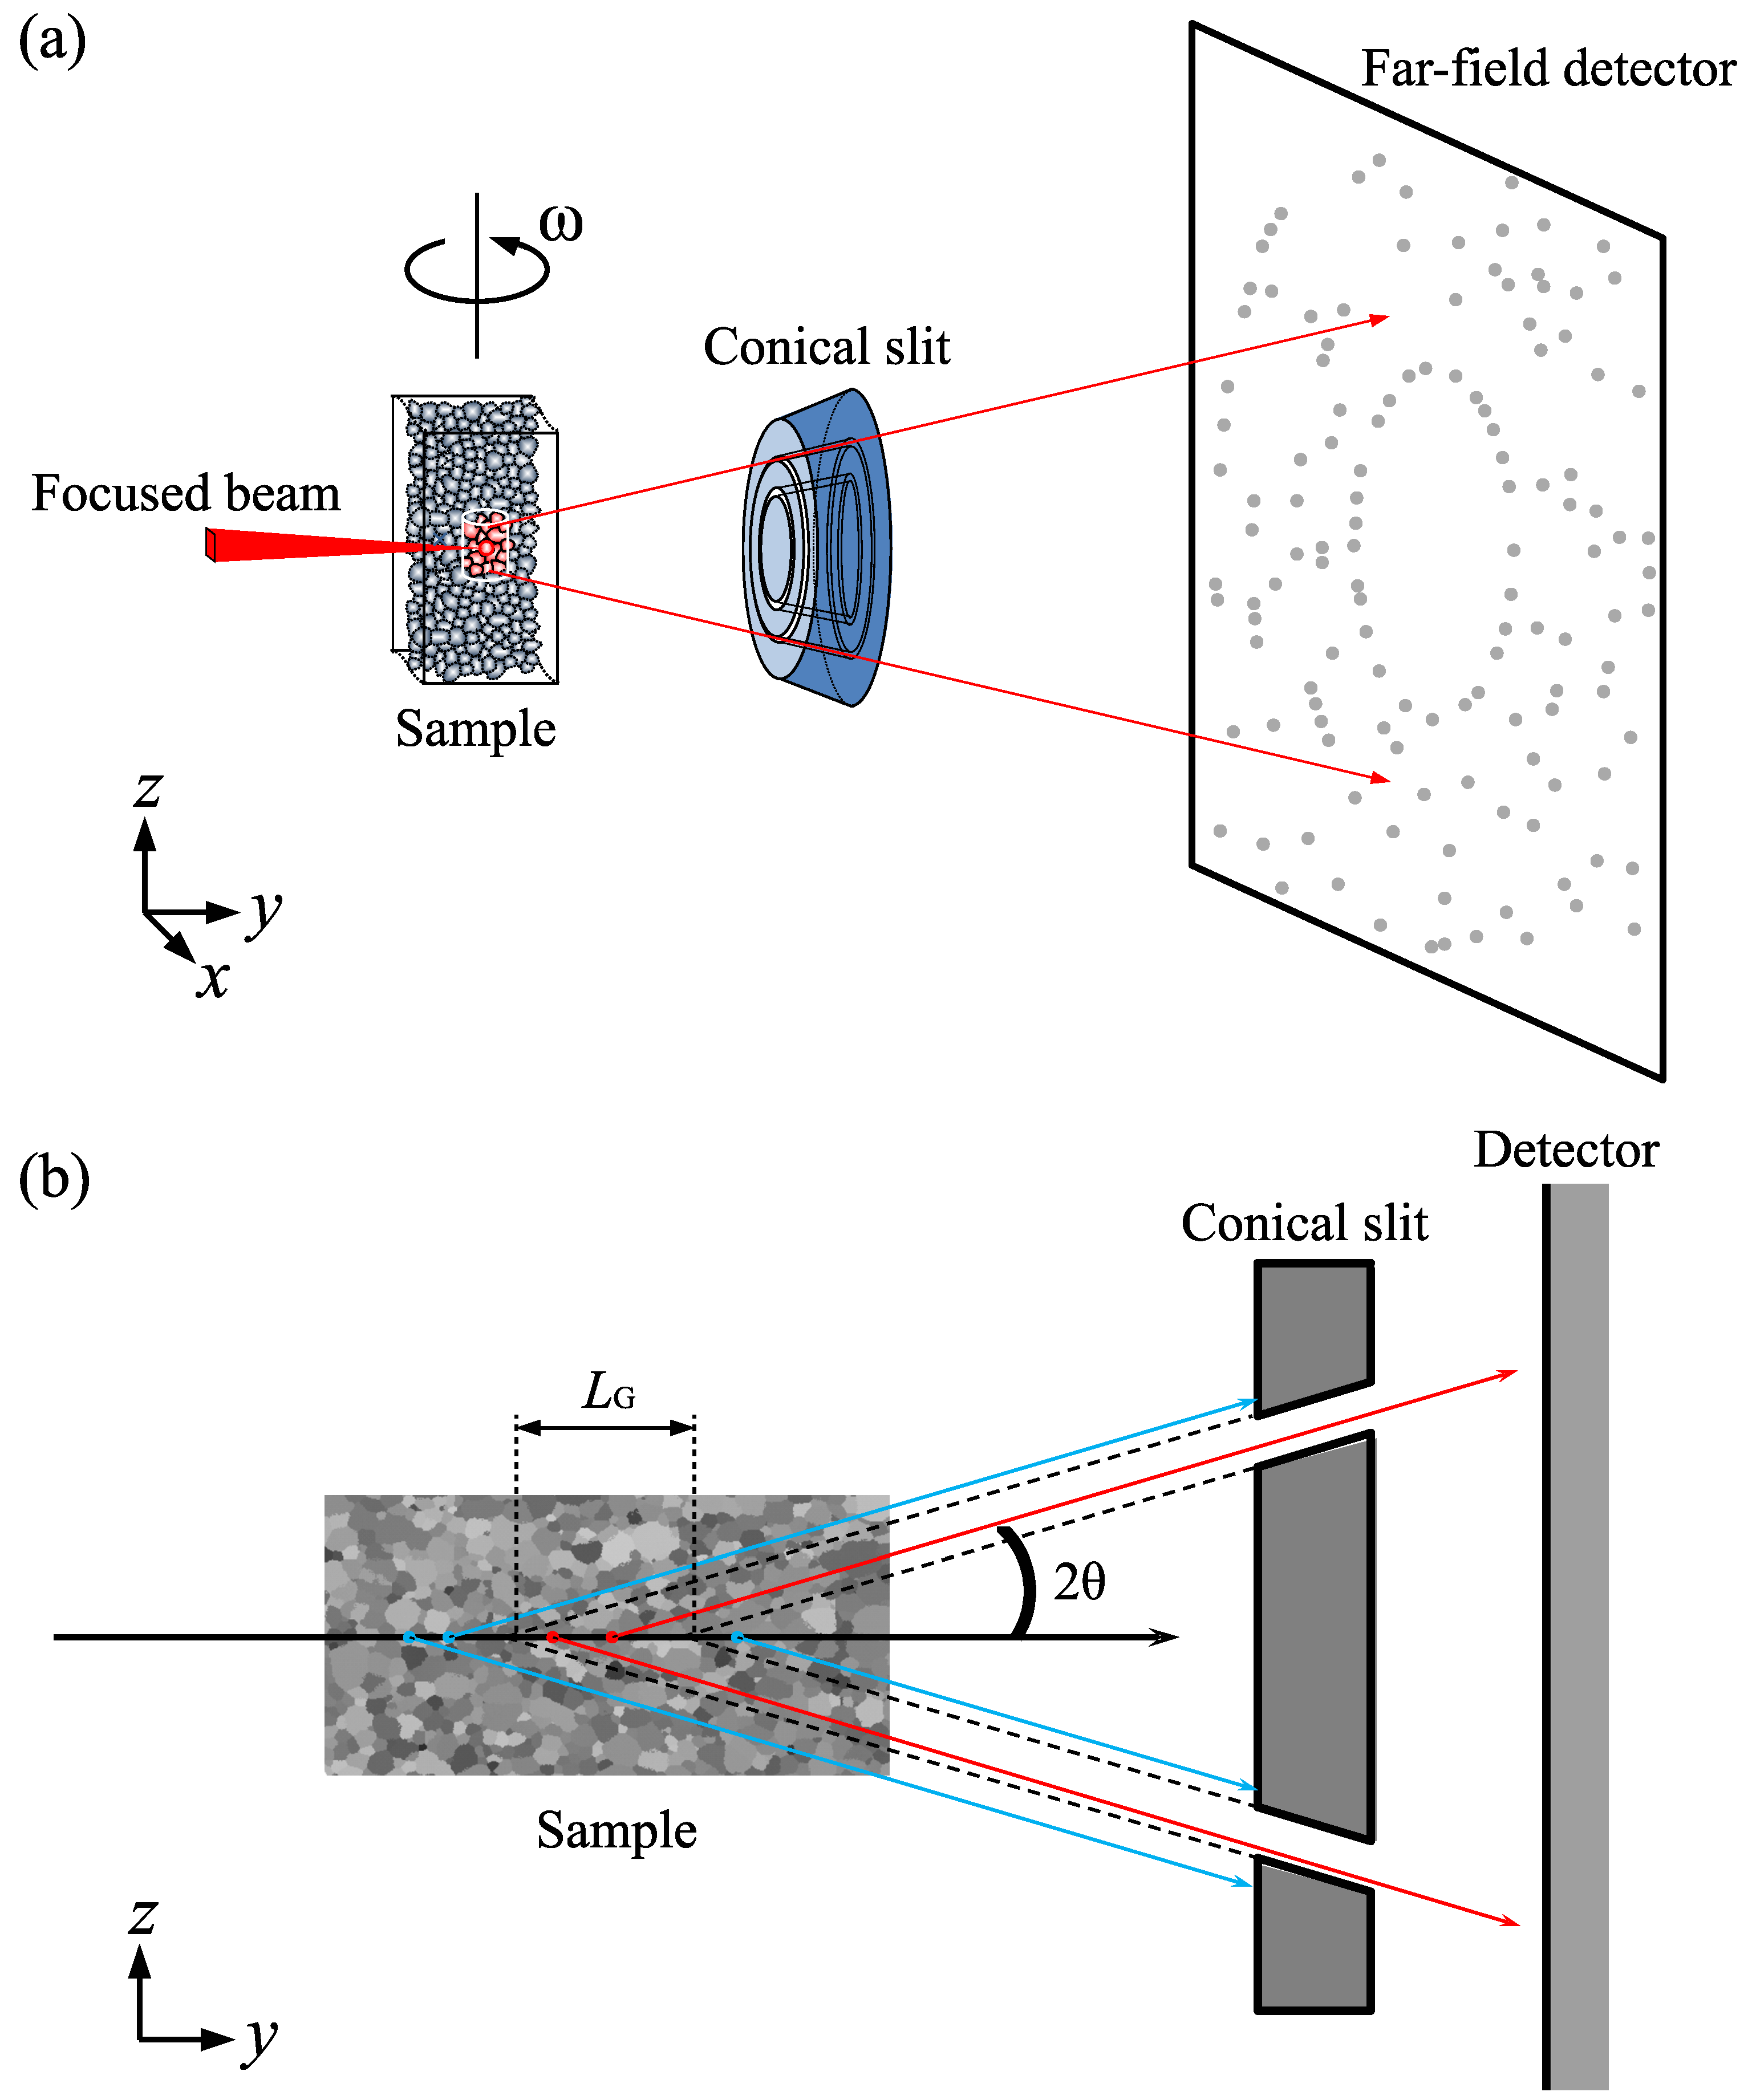
Figure 1. (a) Schematic of the experimental setup of scanning 3DXRD with a conical slit and (b) an illustration showing the role of the conical slit. Diffraction spots from multiple grains are detected through the conical slit with a far-field detector. The conical slit forms a gauge volume ( L G ) in the sample, which allows us to reduce the overlap of diffraction spots by restricting the number of detectable grains. Generally, acceptable Bragg angles ( 2 θ ) need to be optimized for a single crystalline phase and use X-ray photon energy.
Qubs 07 00016 g001
Figure 2. (a) Schematic of the experimental setup of scanning 3DXRD with a spiral slit and (b) an illustration showing the role of the spiral slit. Diffraction spots from multiple grains are detected through the spiral slit with a far-field detector. The spiral slit is rotated with a compact motor. The rotating spiral slit has the function of the sweeping of 2 θ . Diffracted beams from multiple crystalline phases become acceptable by sweeping 2 θ . In addition, Δ θ and strain are acceptable, where Δ θ is the deviation of Bragg angles due to strain. The spiral slit also forms a gauge volume ( L G ) in the sample to reduce the overlap of diffraction spots by restricting the number of detectable grains. Scanning 3DXRD with the rotating spiral slit is applicable to multiple crystalline phases.
Qubs 07 00016 g002
Figure 3. (a) External and (b) cross-sectional views of the design of the compact rotating spiral slit composed of tungsten blade plates (1), a blade holder (2), a pipe shaft (3), and a compact motor (4). (c) Schematic of the cross section of the tungsten blade plates with 0.5-mm-wide inclined through-grooves. An inclined slit aperture with a minimum gap of 20 μm is formed by aligning the first (1.1), second (1.2), and third (1.3) blade plates with a thickness of 1 mm.
Qubs 07 00016 g003
Figure 4. (a) Design drawing and (b) a photograph of a 100-mm-wide tungsten blade plate with four 0.5-mm-wide spiral-shaped inclined through-grooves. The inclination angles were ∼20°, 14.5°, 9°, and 3.5° at parts A, B, C, and D, respectively. (c) Photograph of the assembled blades on the rigid holder made of brass.
Qubs 07 00016 g004
Figure 5. Photographs of (a) the assembled spiral slit located between the sample and detector and (b) the rotating spiral slit with a rotation speed of 8400 rpm.
Qubs 07 00016 g005
Figure 6. (a) Orientation and (b) N maps obtained from the low-carbon steel sample. The field-of-view and the pixel size are 216 μm in diameter and 1.2 × 1.2 μm, respectively. Orientation is represented as the longitudinal direction of the tensile test shape sample in the basic triangle of the pole figure of BCC. The longitudinal direction is parallel to the z axis. Grains and grain boundaries are indicated by regions enclosed by the same orientations (or the same colors) and boundaries between different orientations (or different colors), respectively. Uncolored white pixels imply reconstruction errors.
Qubs 07 00016 g006
Figure 7. (a,b) Orientation and (c) N maps obtained from the Cu wire sample. The field-of-view and the pixel size are 180 μm in diameter and 1.2 × 1.2 μm, respectively. Orientation is represented as the (a) axial and (b) radial directions of the wire sample in the basic triangle of the pole figure of FCC. The axial direction is parallel to the z axis. Uncolored white pixels imply reconstruction errors.
Qubs 07 00016 g007
Disclaimer/Publisher’s Note: The statements, opinions and data contained in all publications are solely those of the individual author(s) and contributor(s) and not of MDPI and/or the editor(s). MDPI and/or the editor(s) disclaim responsibility for any injury to people or property resulting from any ideas, methods, instructions or products referred to in the content.