Integrating CAD and Orthographic Projection in Descriptive Geometry Education: A Comparative Analysis with Monge’s System
Abstract
1. Introduction
2. Theoretical Framework
3. Materials and Methods
4. Results
4.1. Descriptive Geometry Baseline Knowledge Survey
4.1.1. Survey Statements
4.1.2. Survey Results
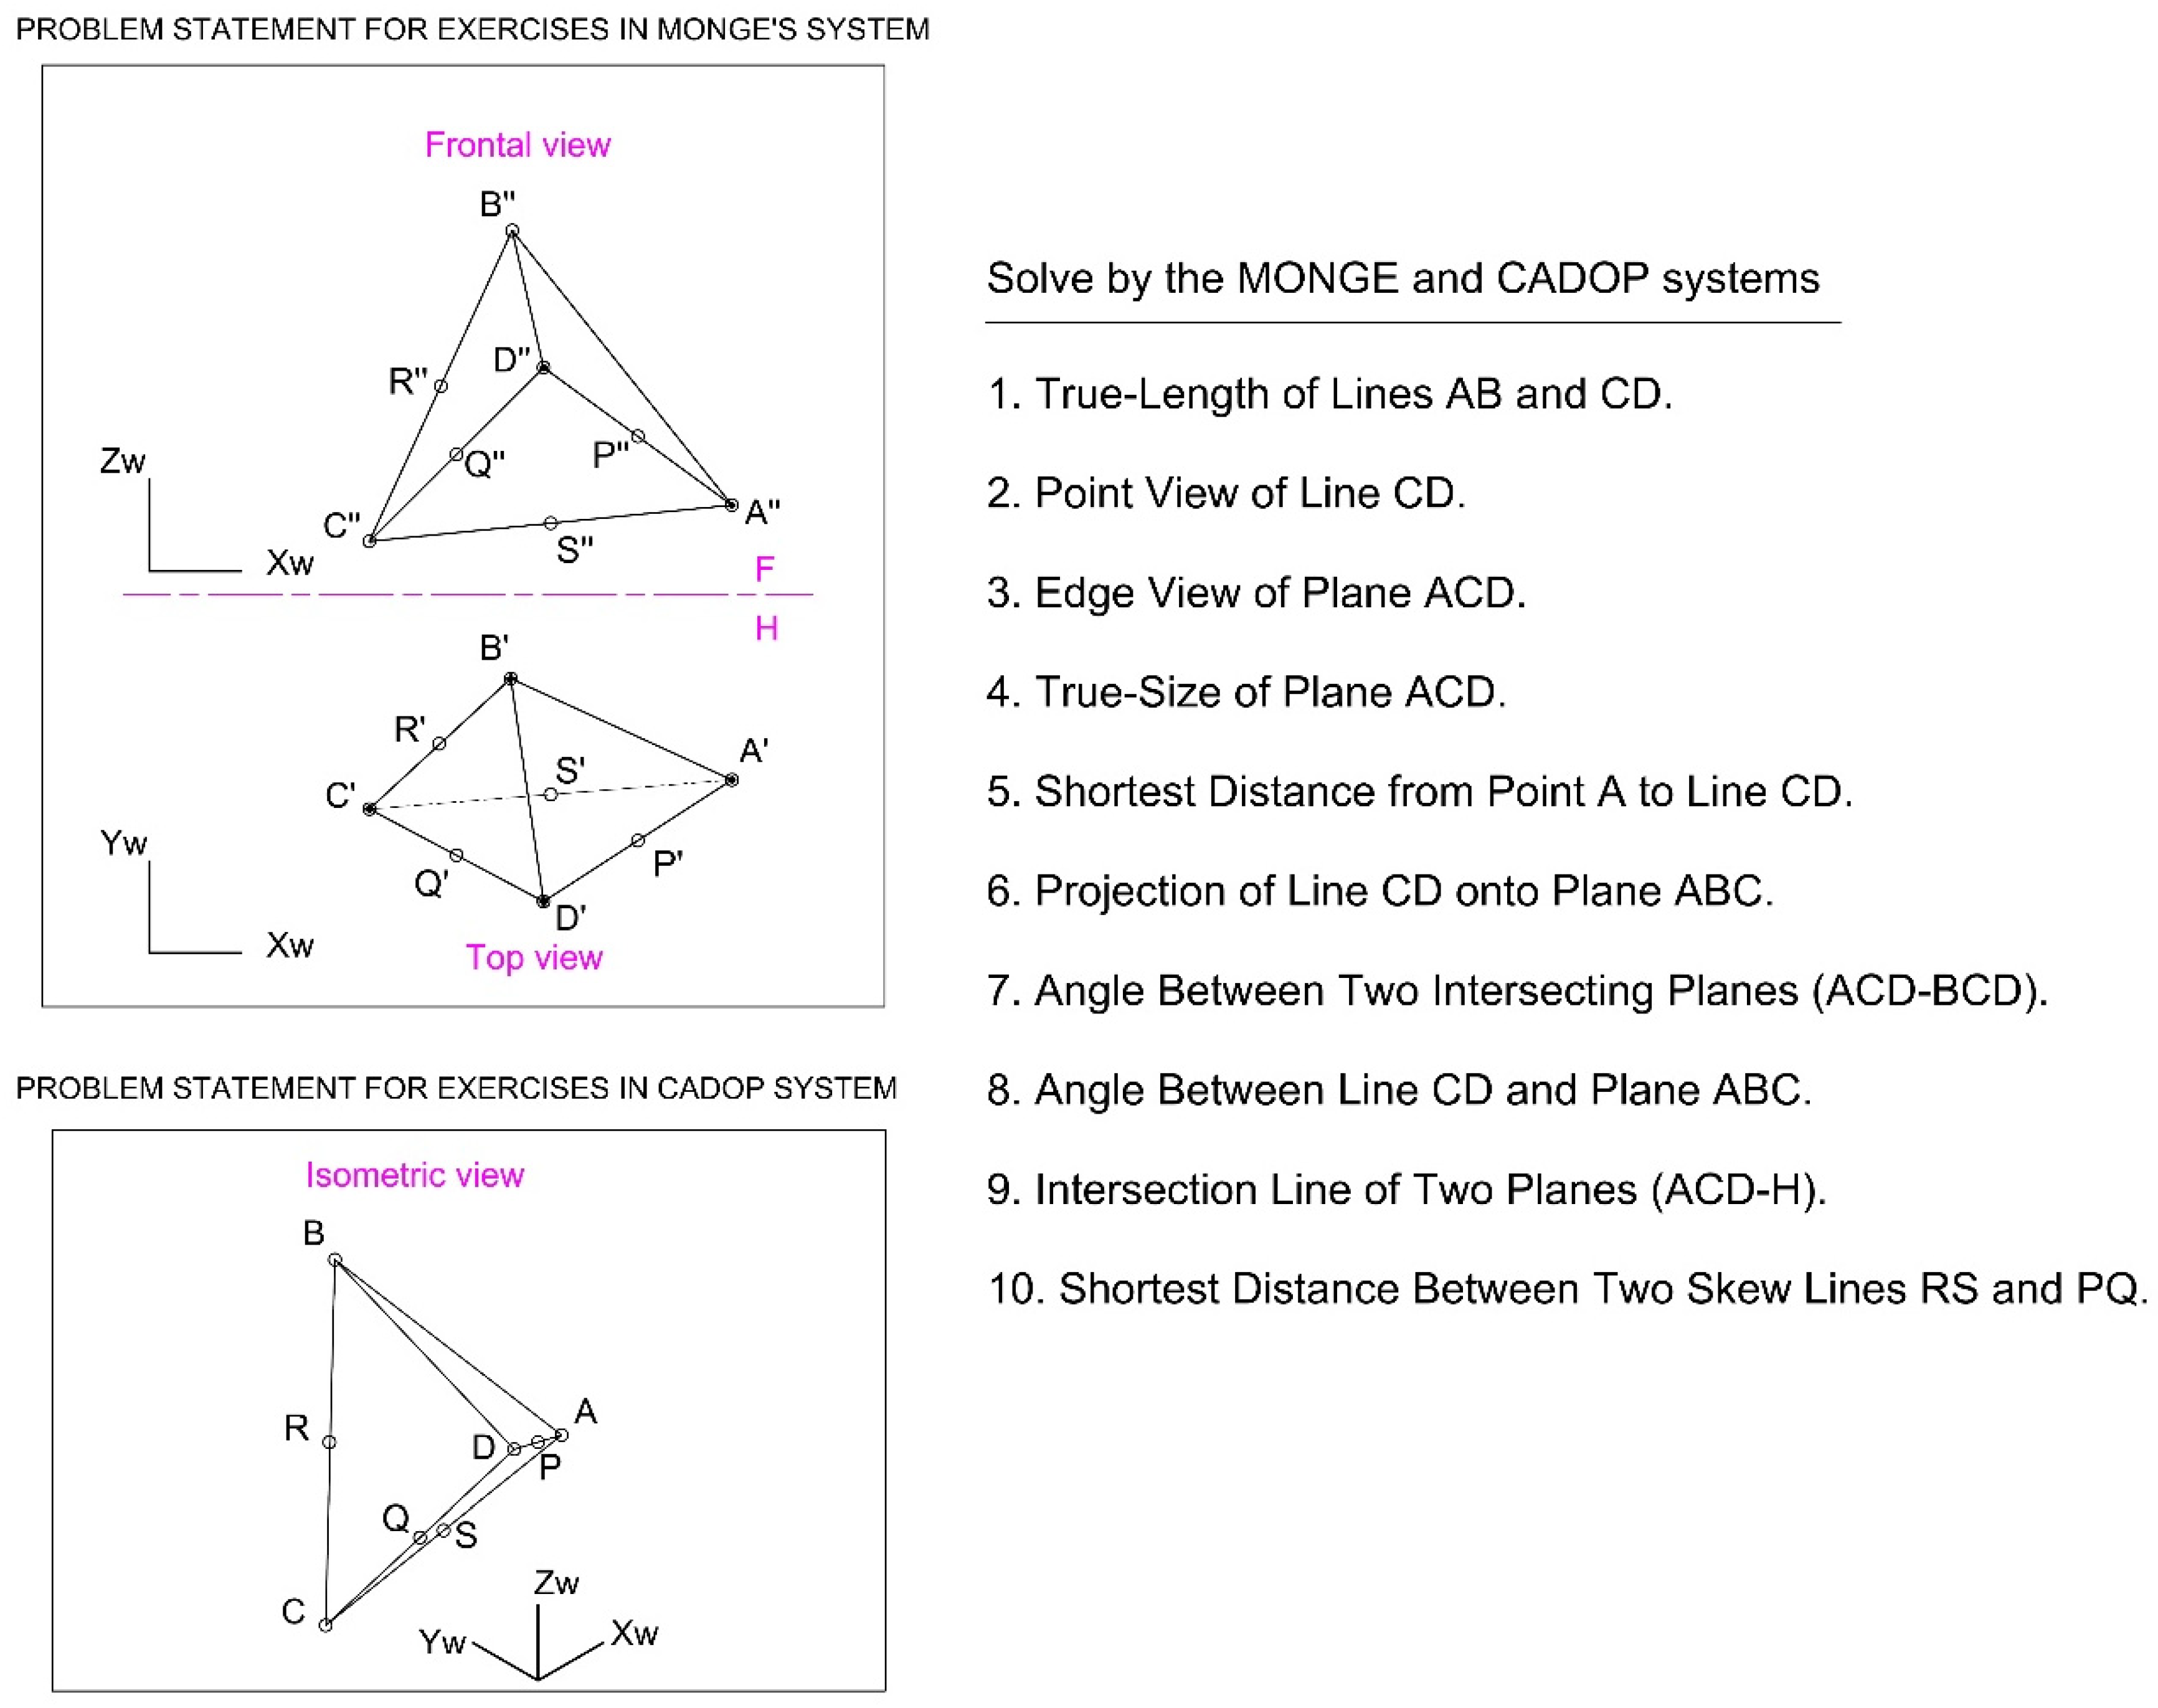
4.2. Training Exercises Statements
4.3. Training Exercises Implementation
4.4. Test Tasked to the Students
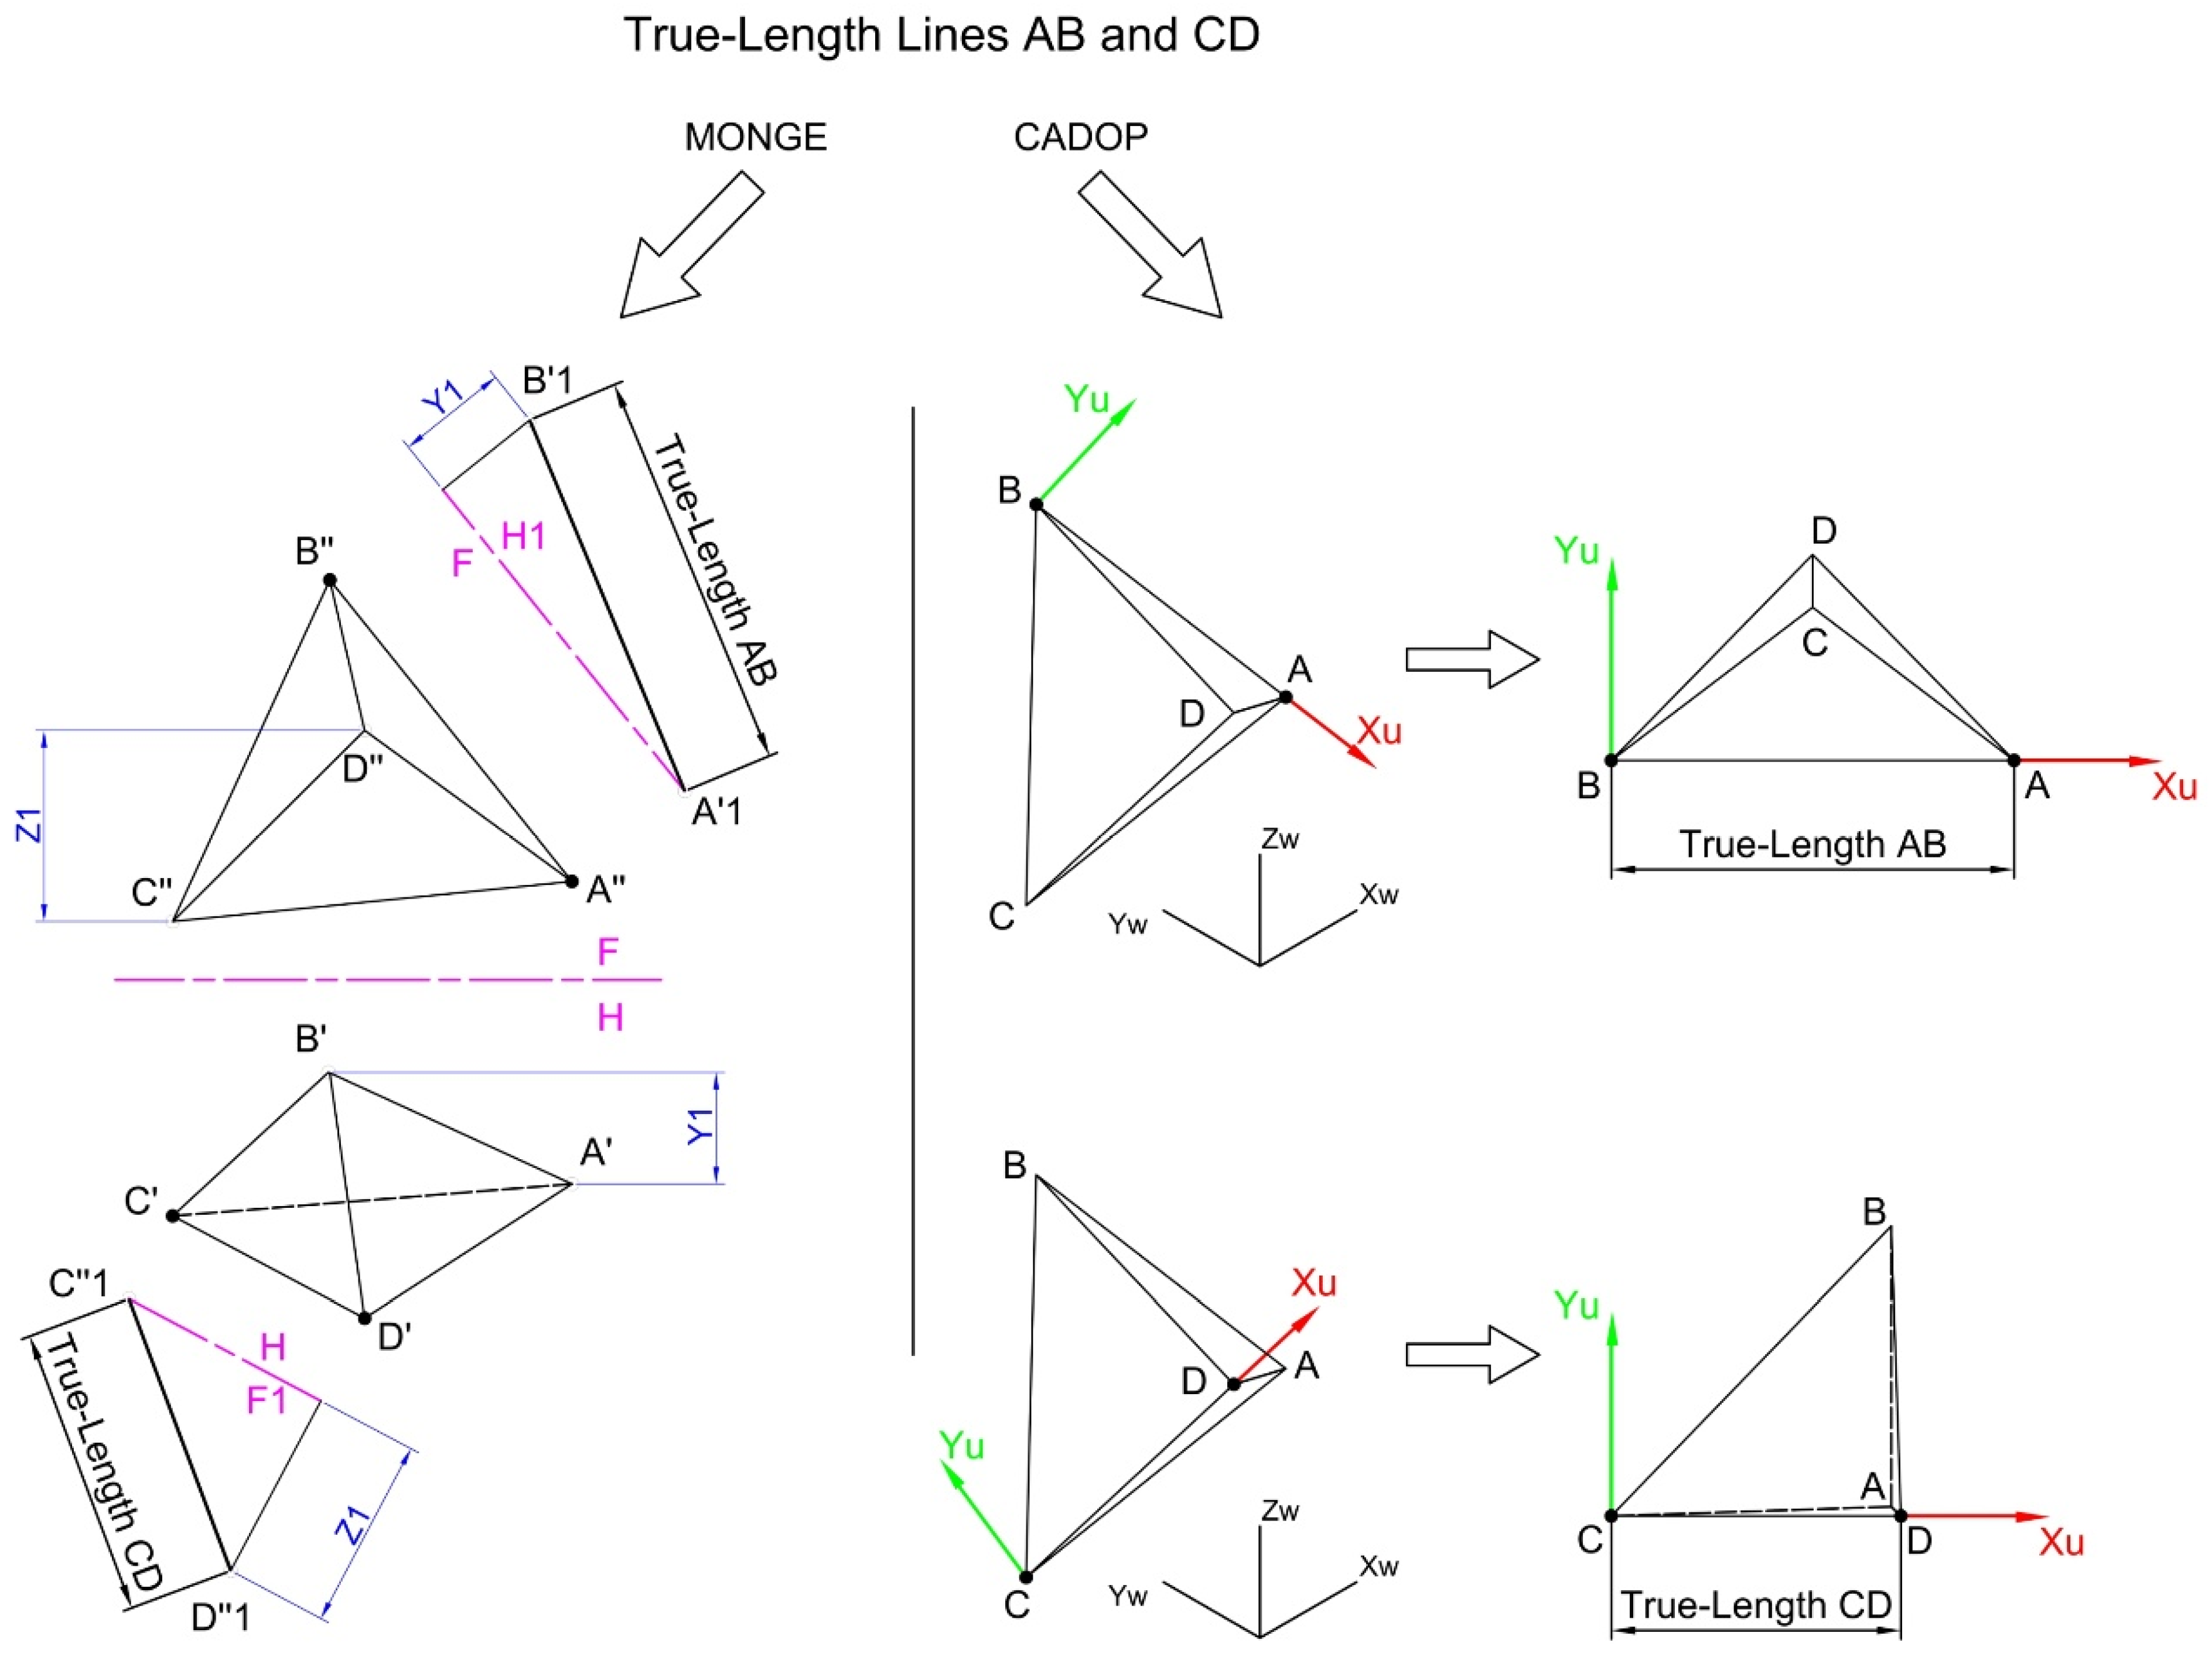
4.4.1. Exercise 1: Determining True Lengths of Lines
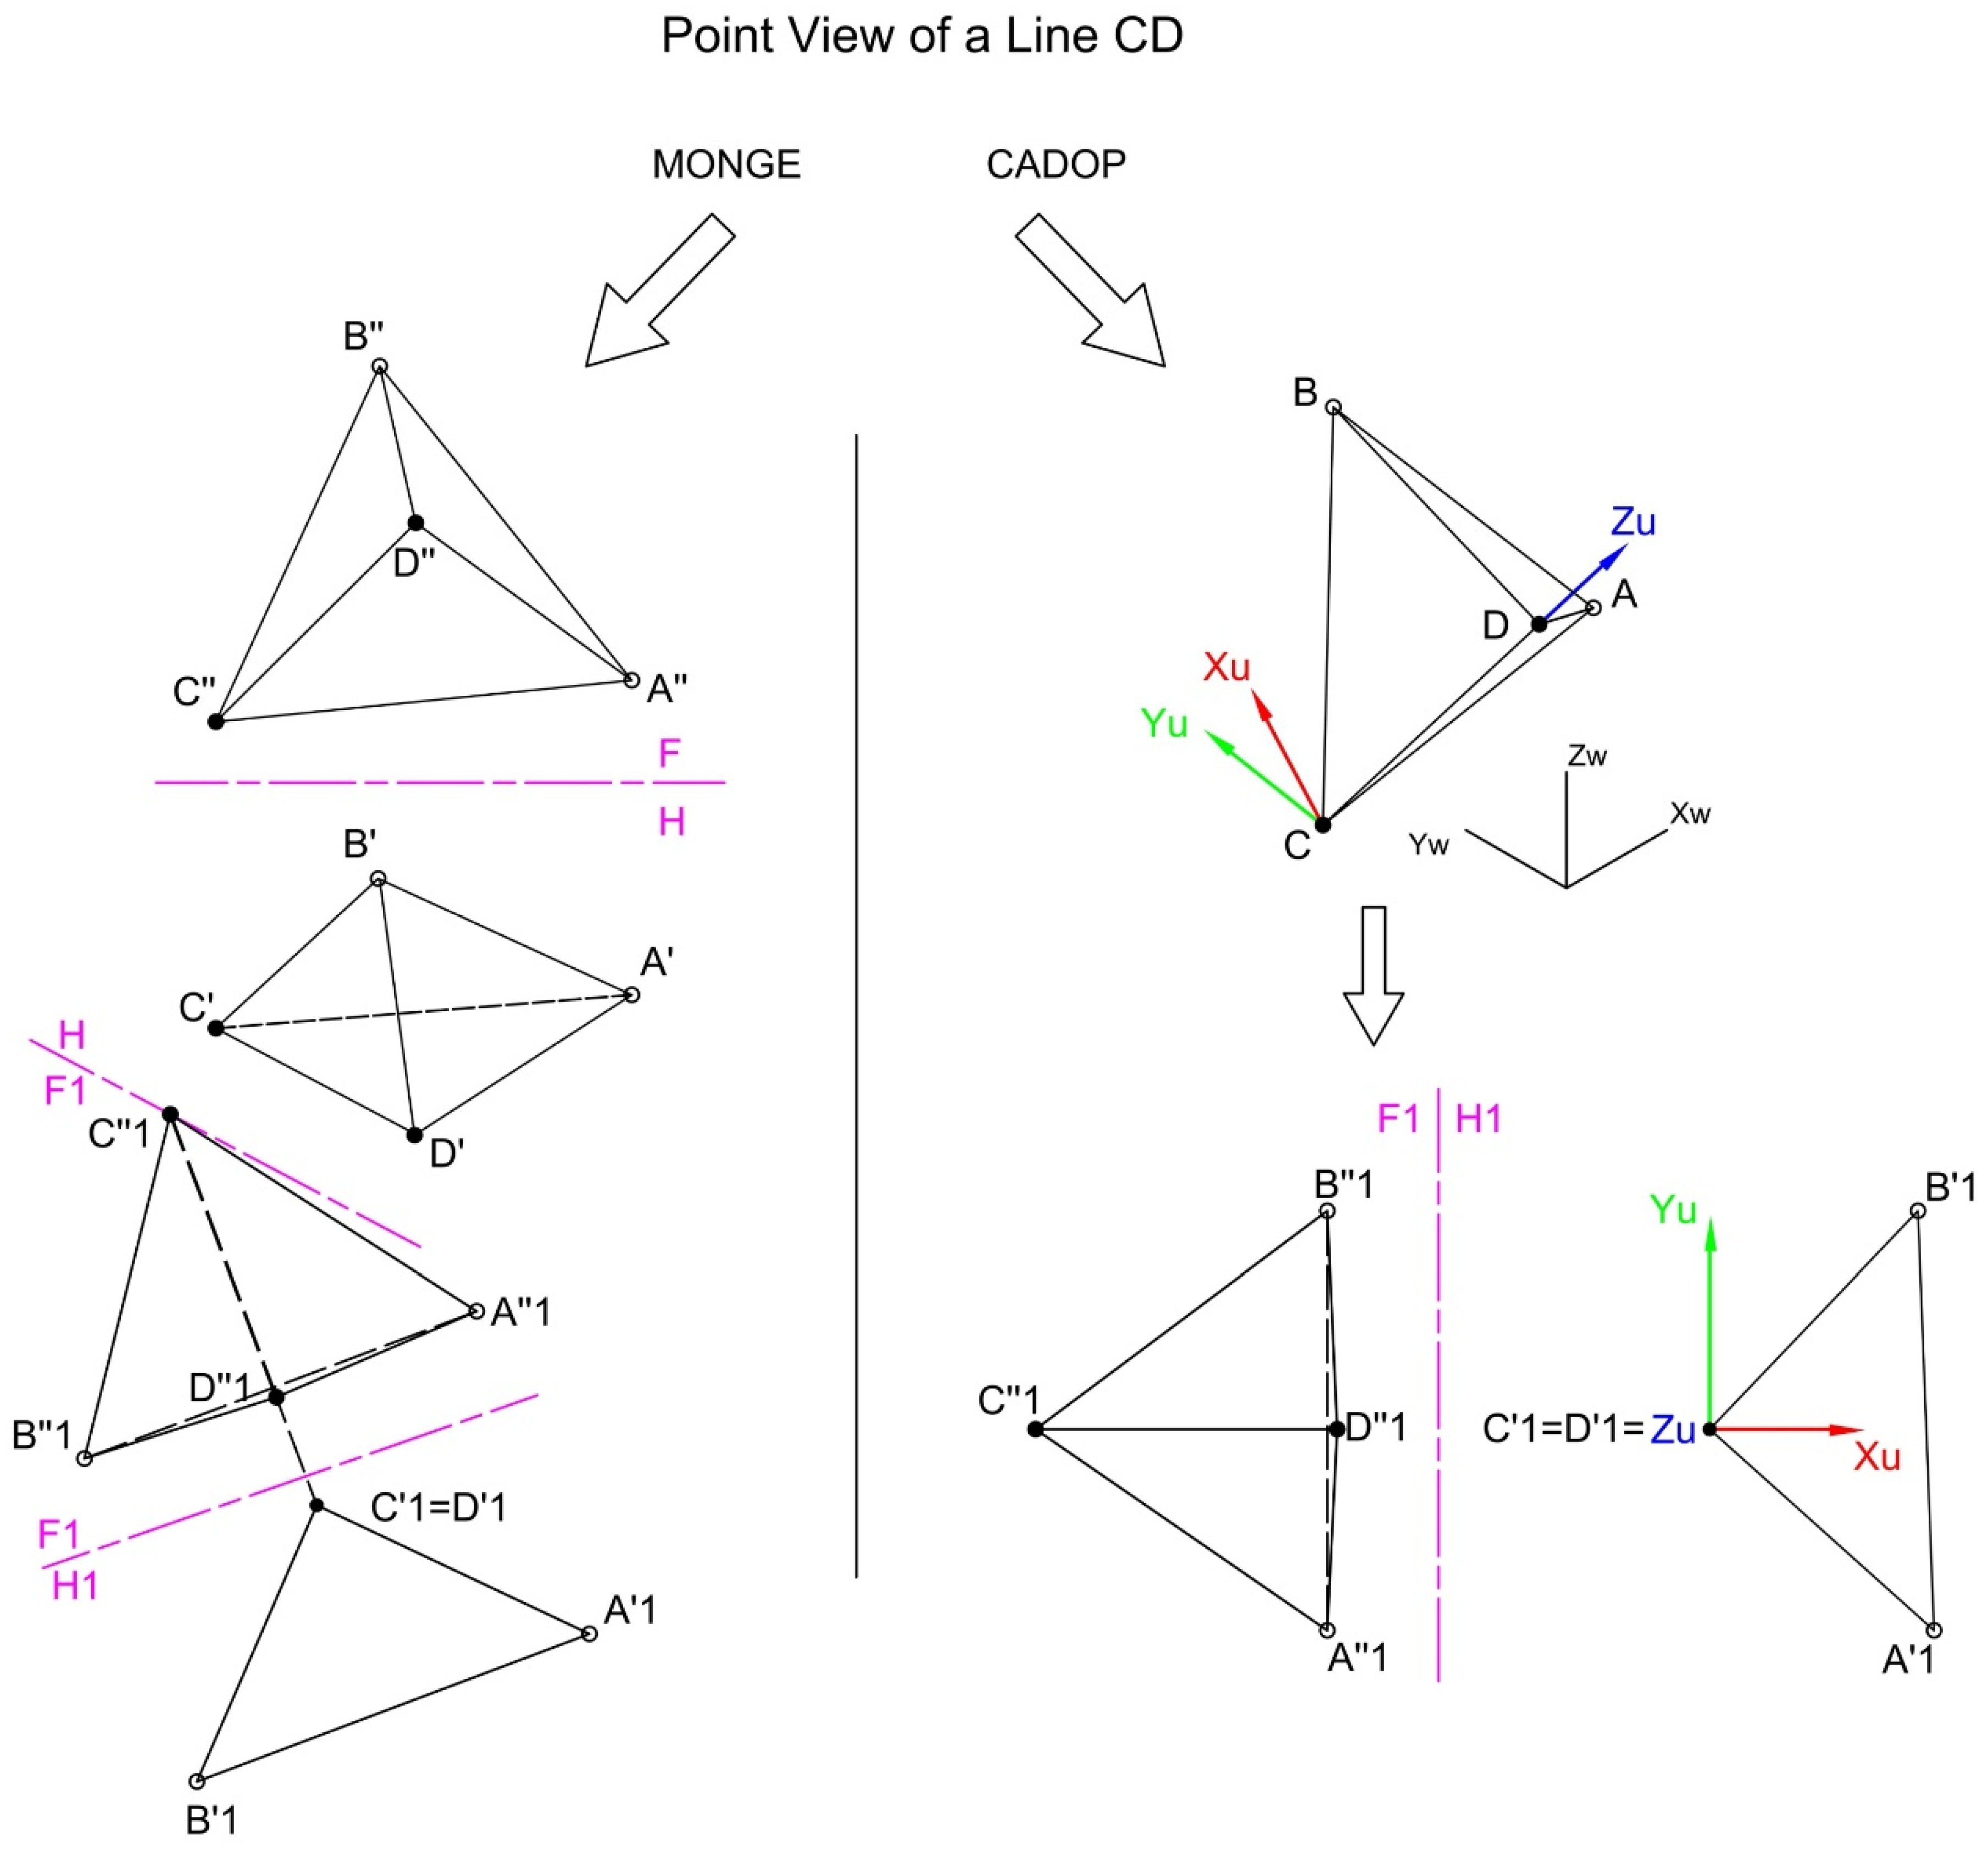
4.4.2. Exercise 2: Point View of a Line
4.4.3. Exercise 3: Edge View of a Plane
4.4.4. Exercise 4: True-Size View of a Plane
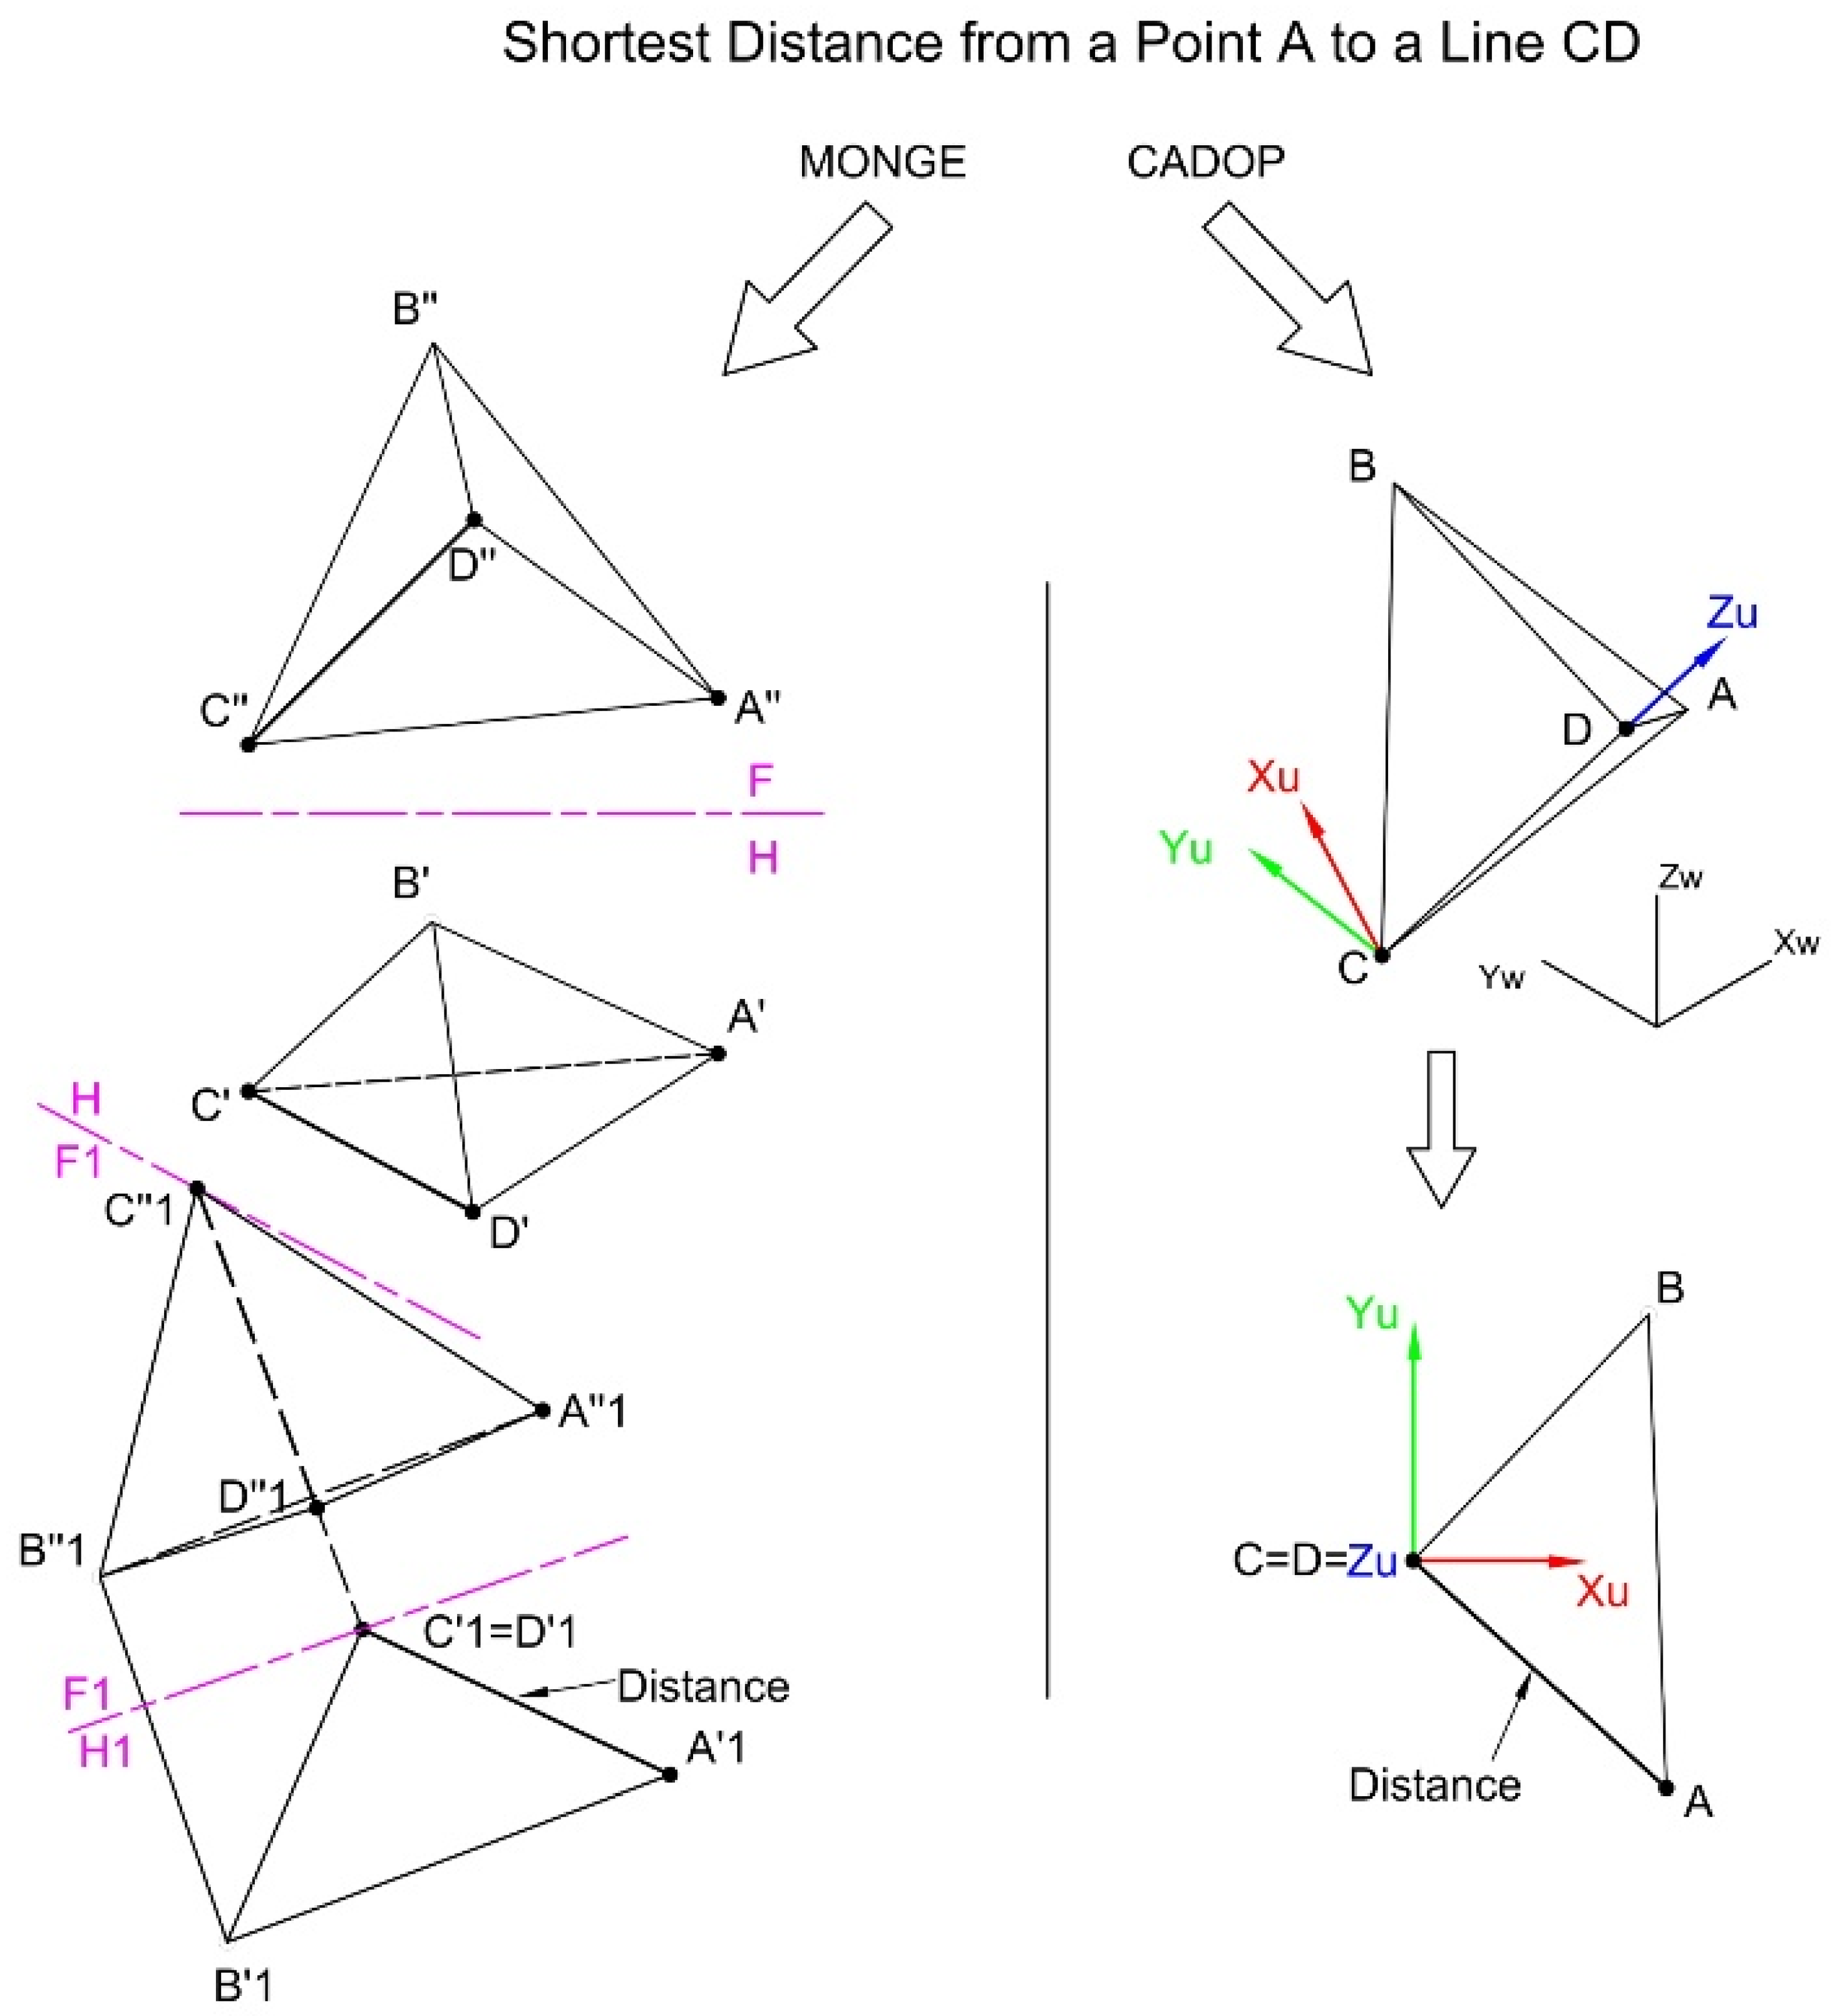
4.4.5. Exercise 5: Shortest Distance from a Point to a Line
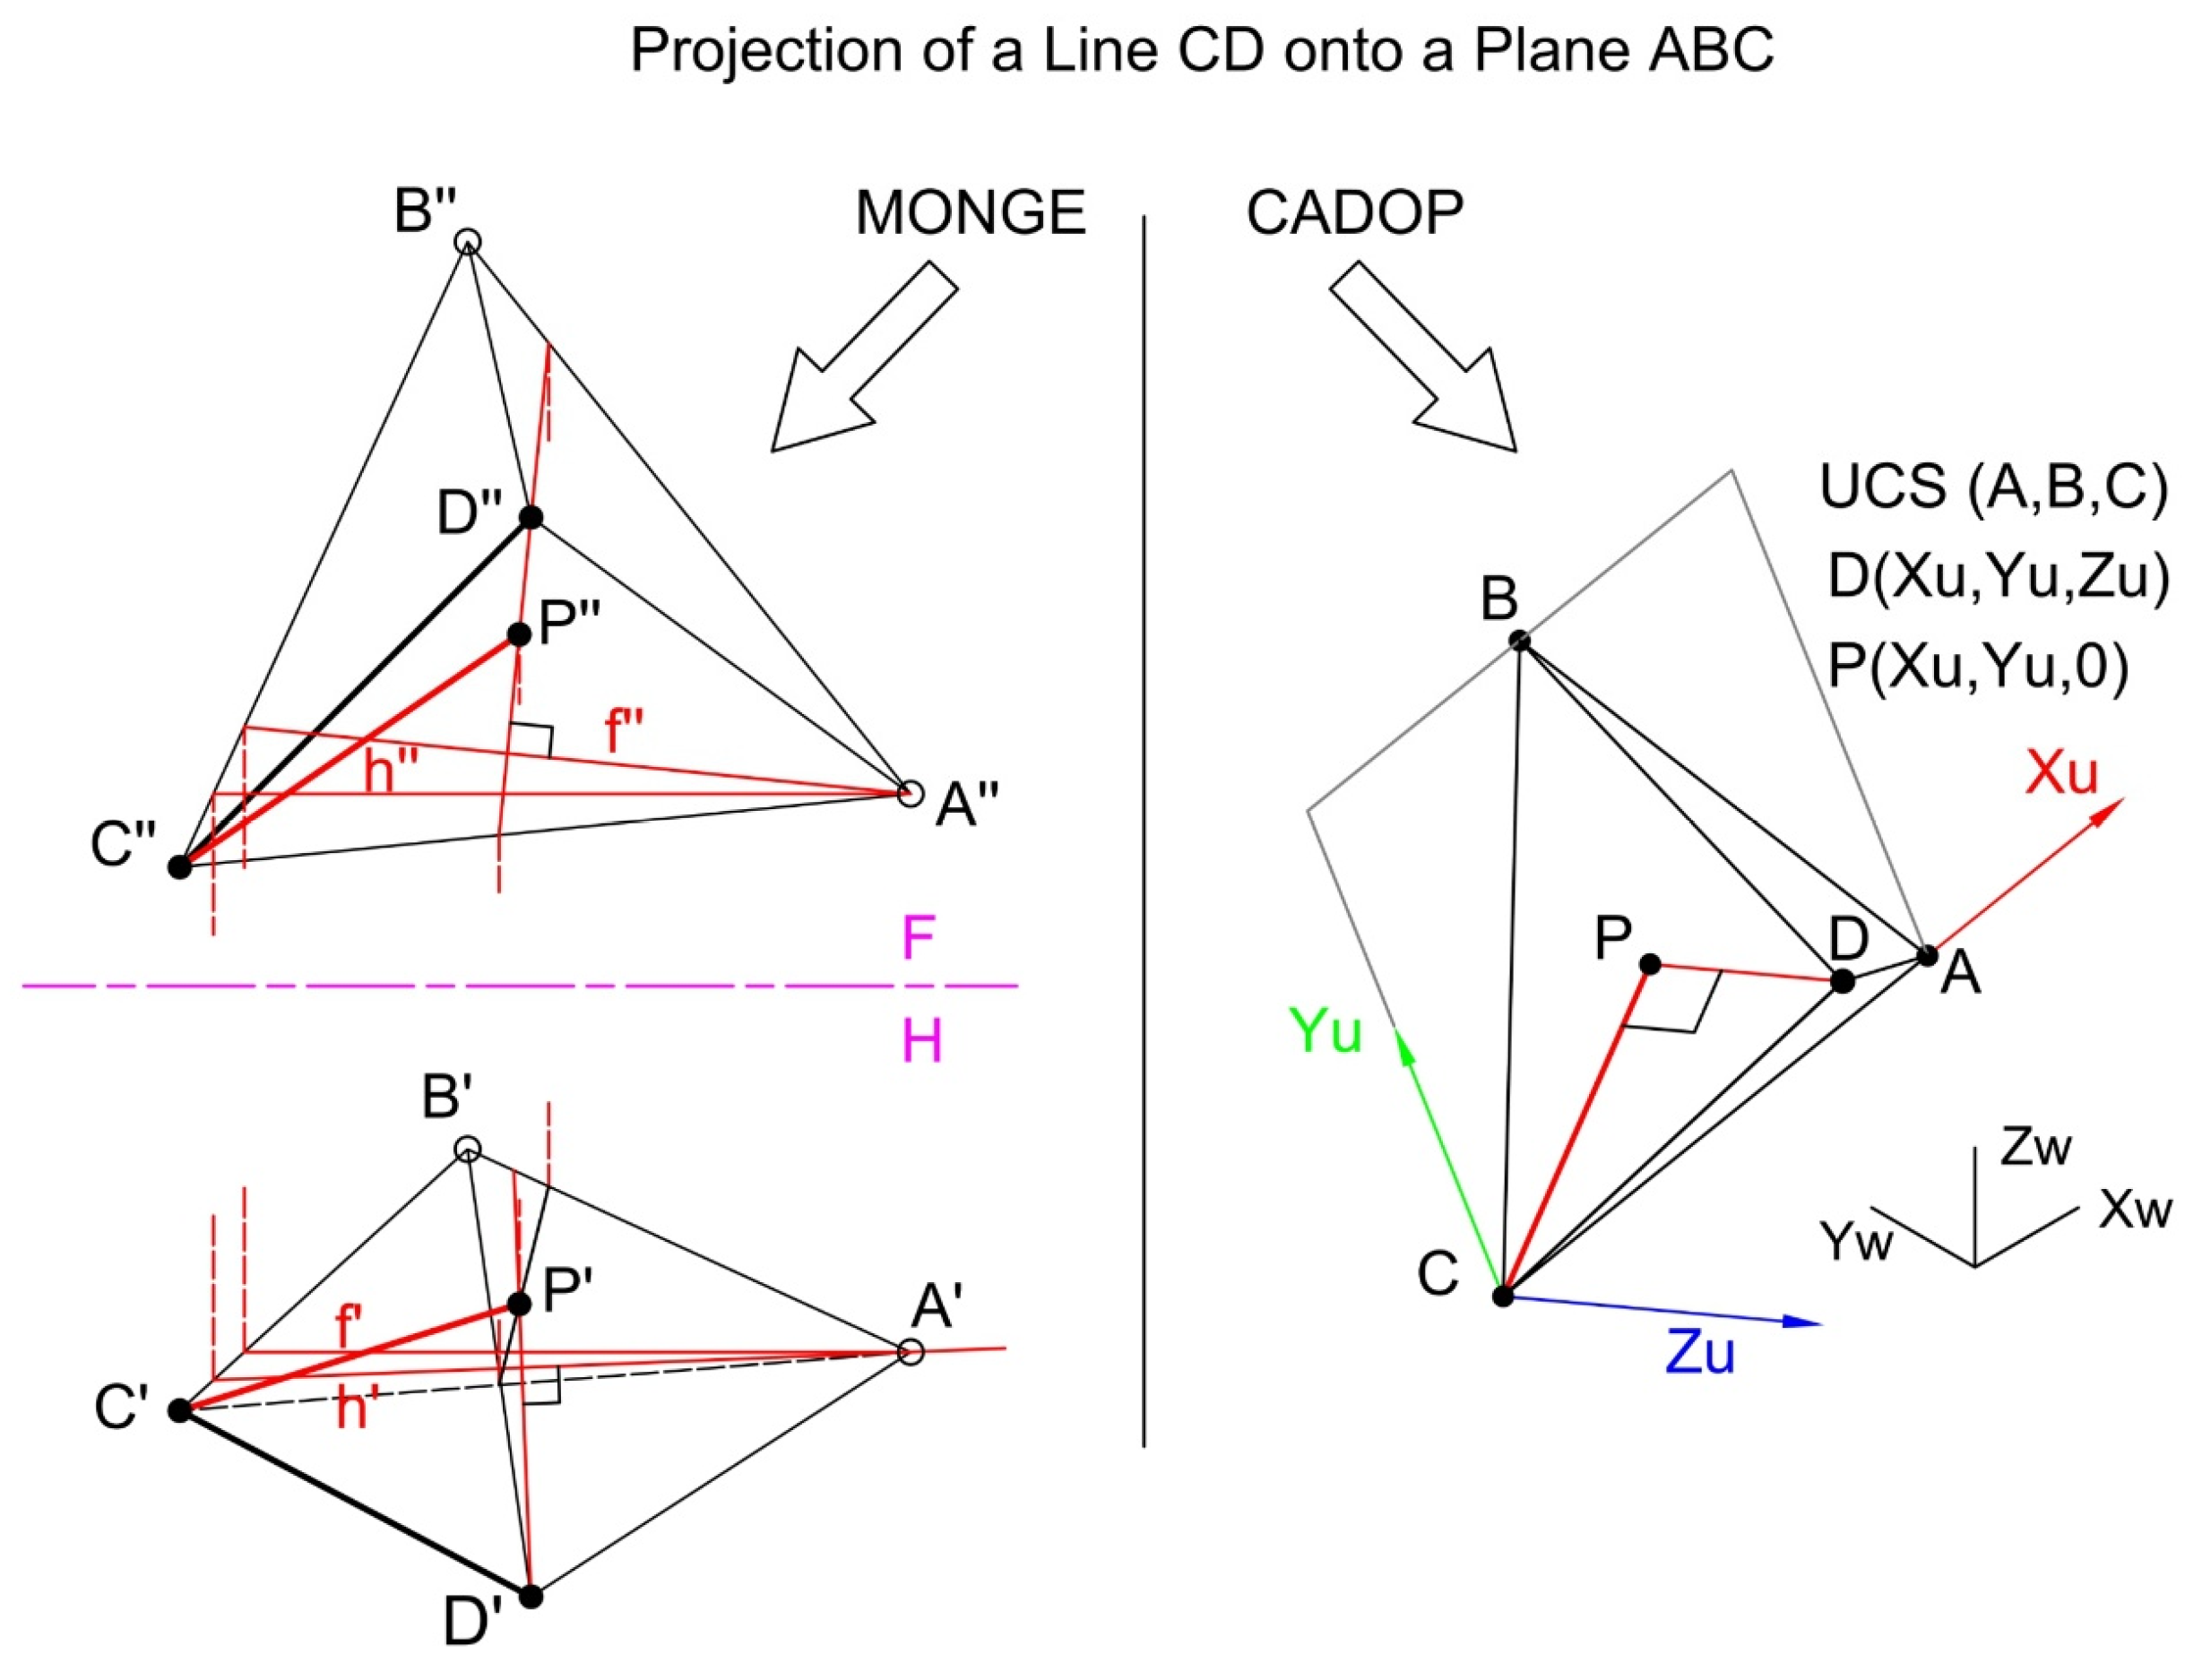
4.4.6. Exercise 6: Projecting a Line onto a Plane
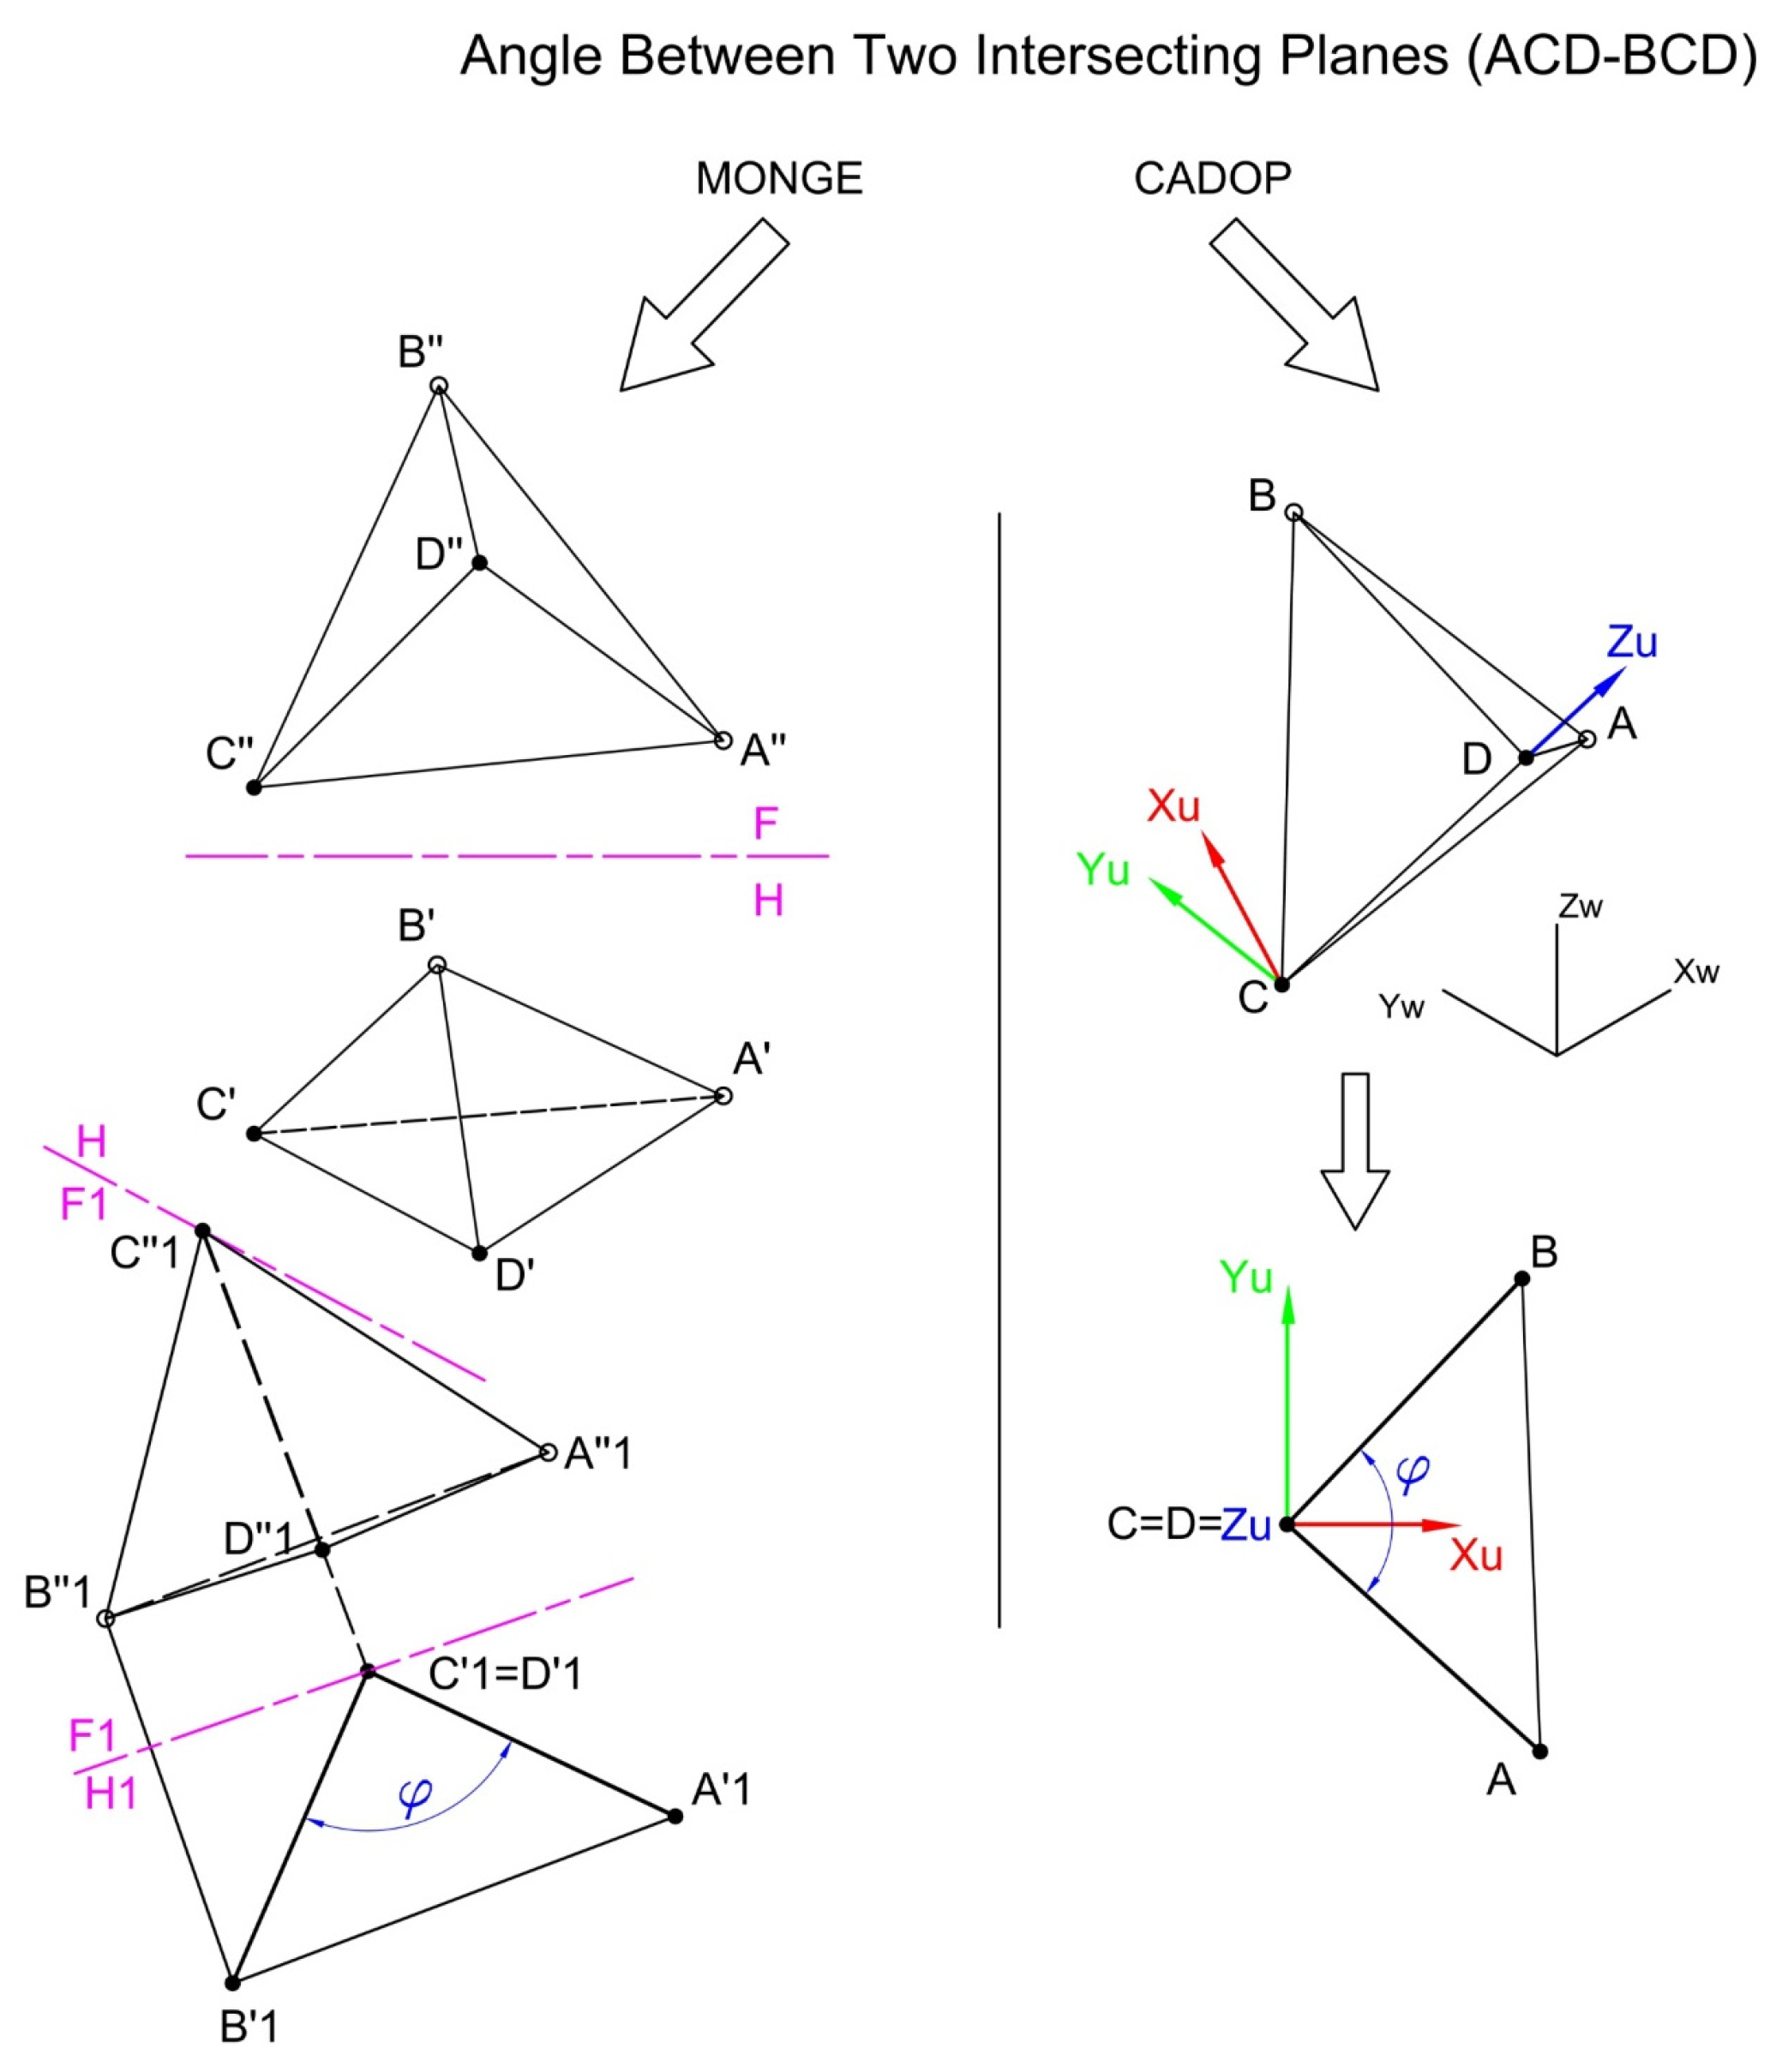
4.4.7. Exercise 7: Angle Between Two Intersecting Planes
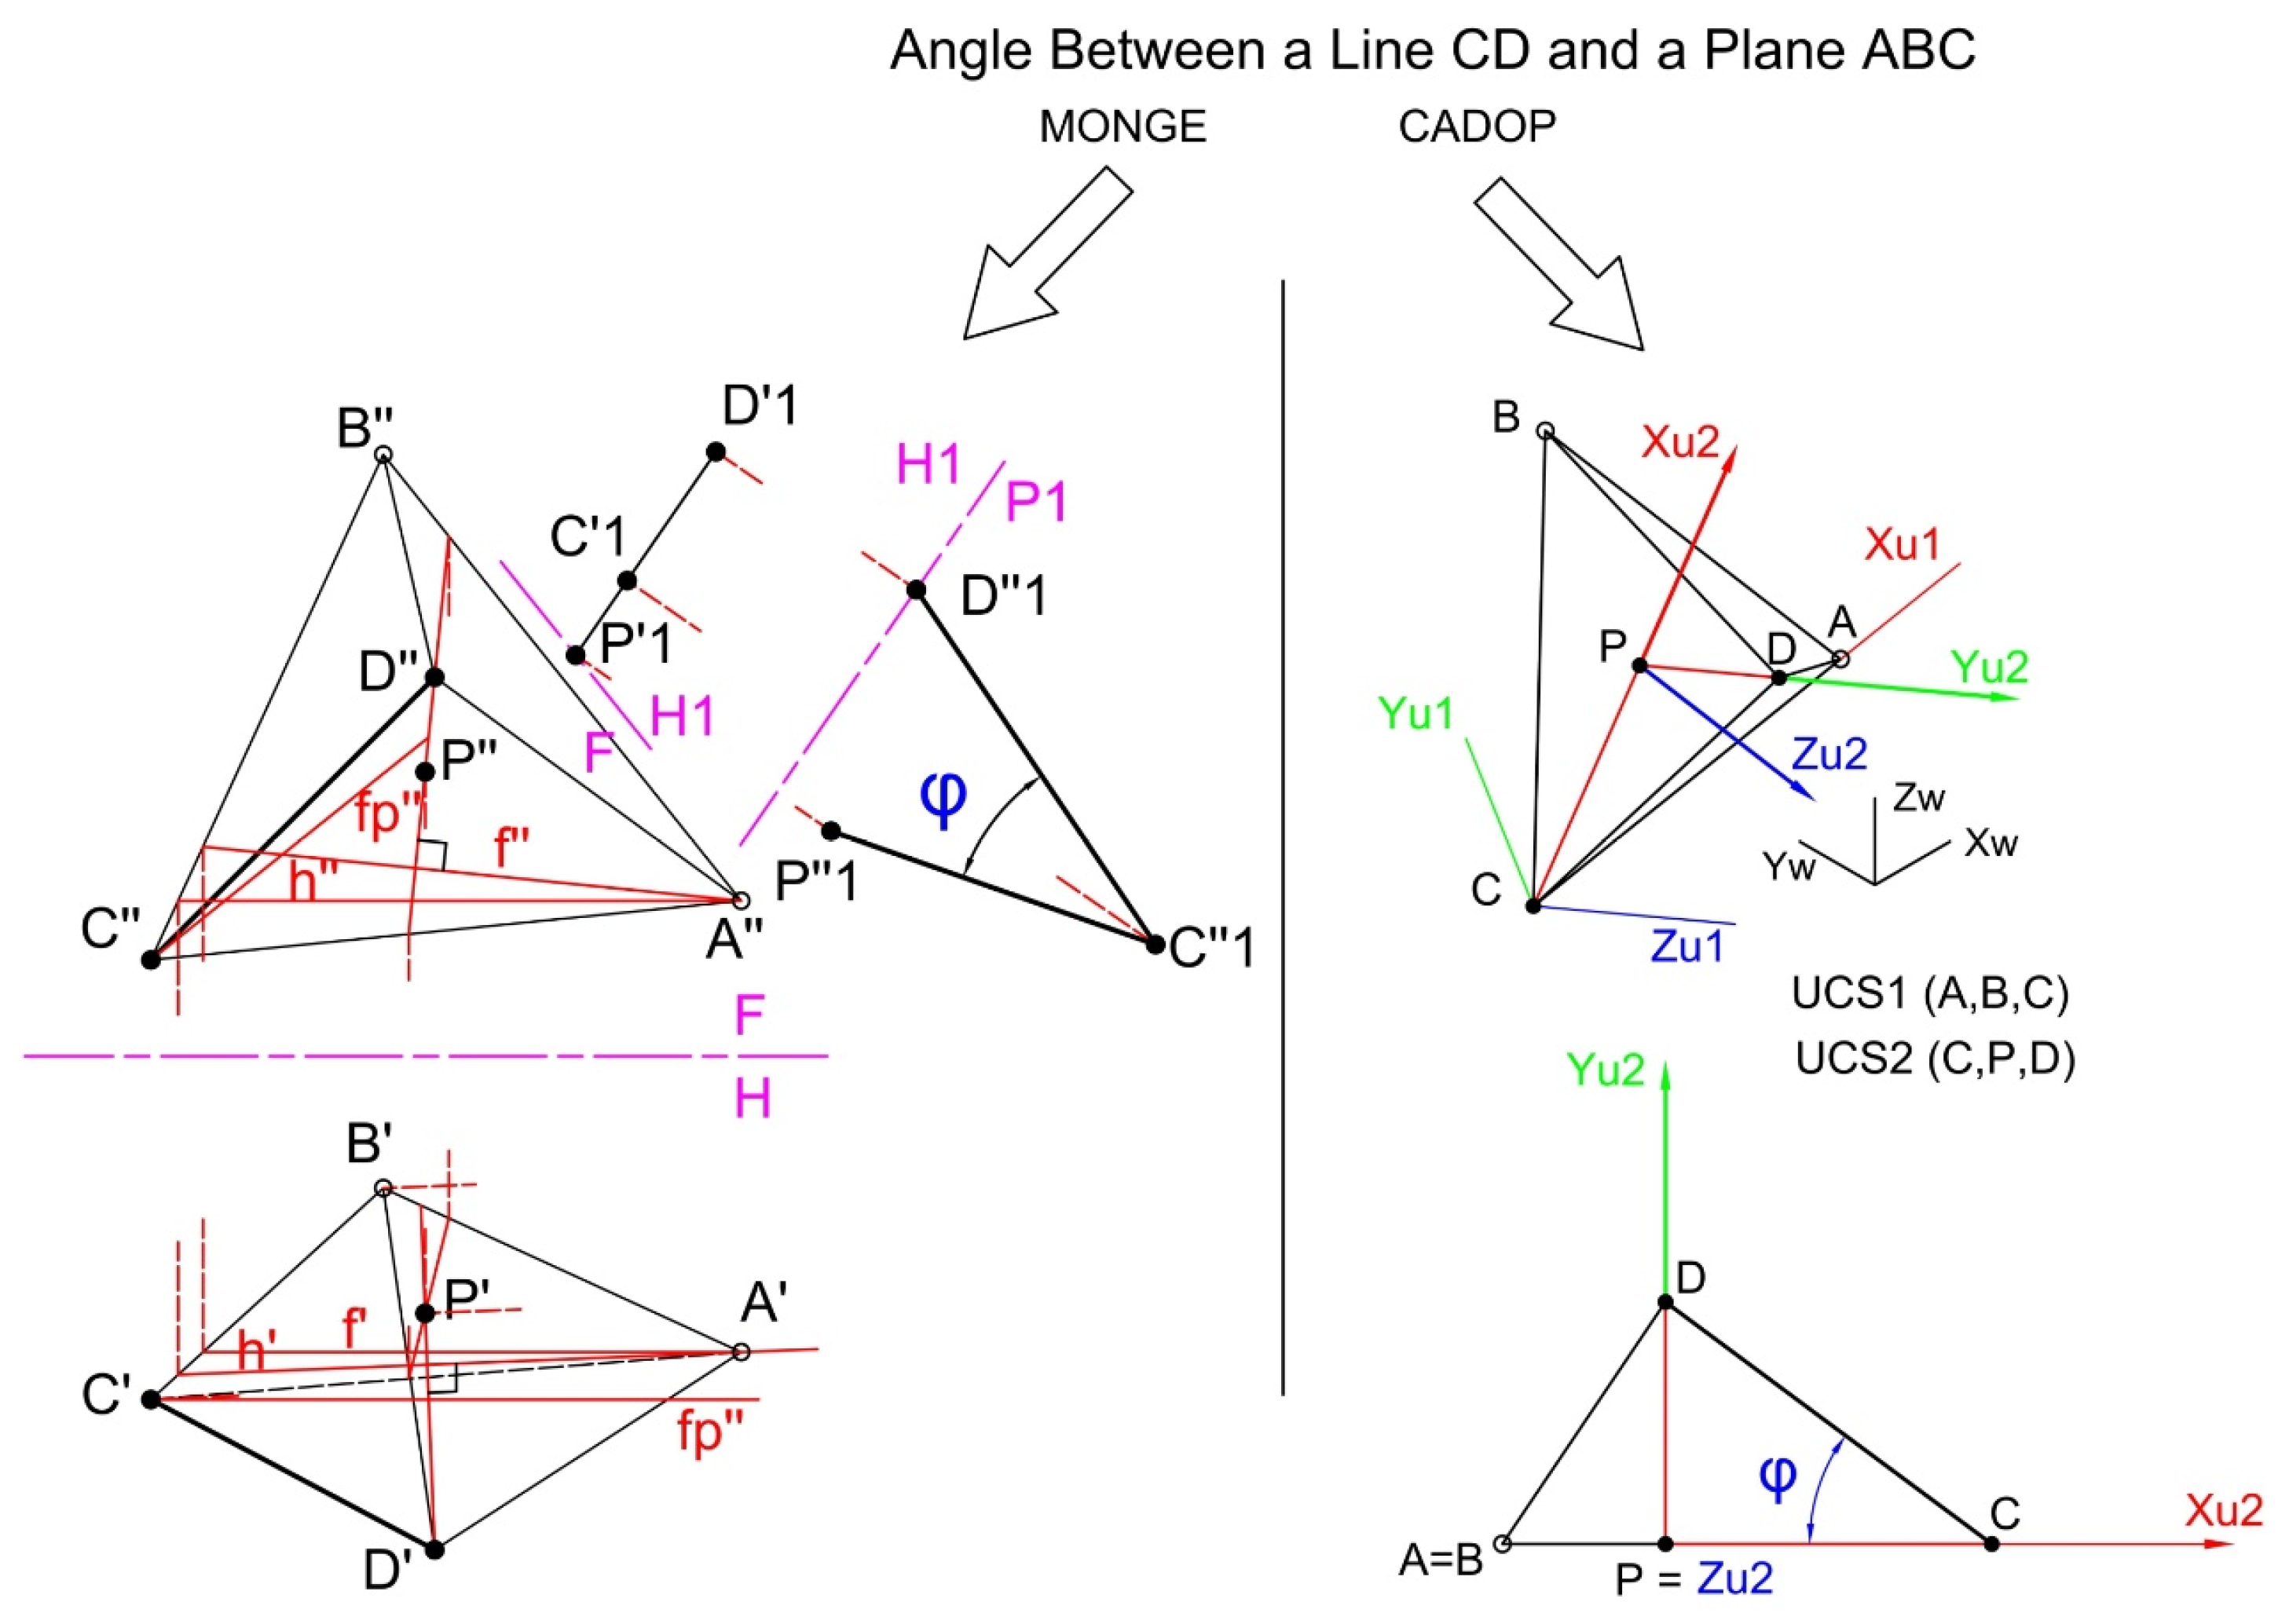
4.4.8. Exercise 8: Angle Between a Line and a Plane
4.4.9. Exercise 9: Intersection Line Between Two Planes
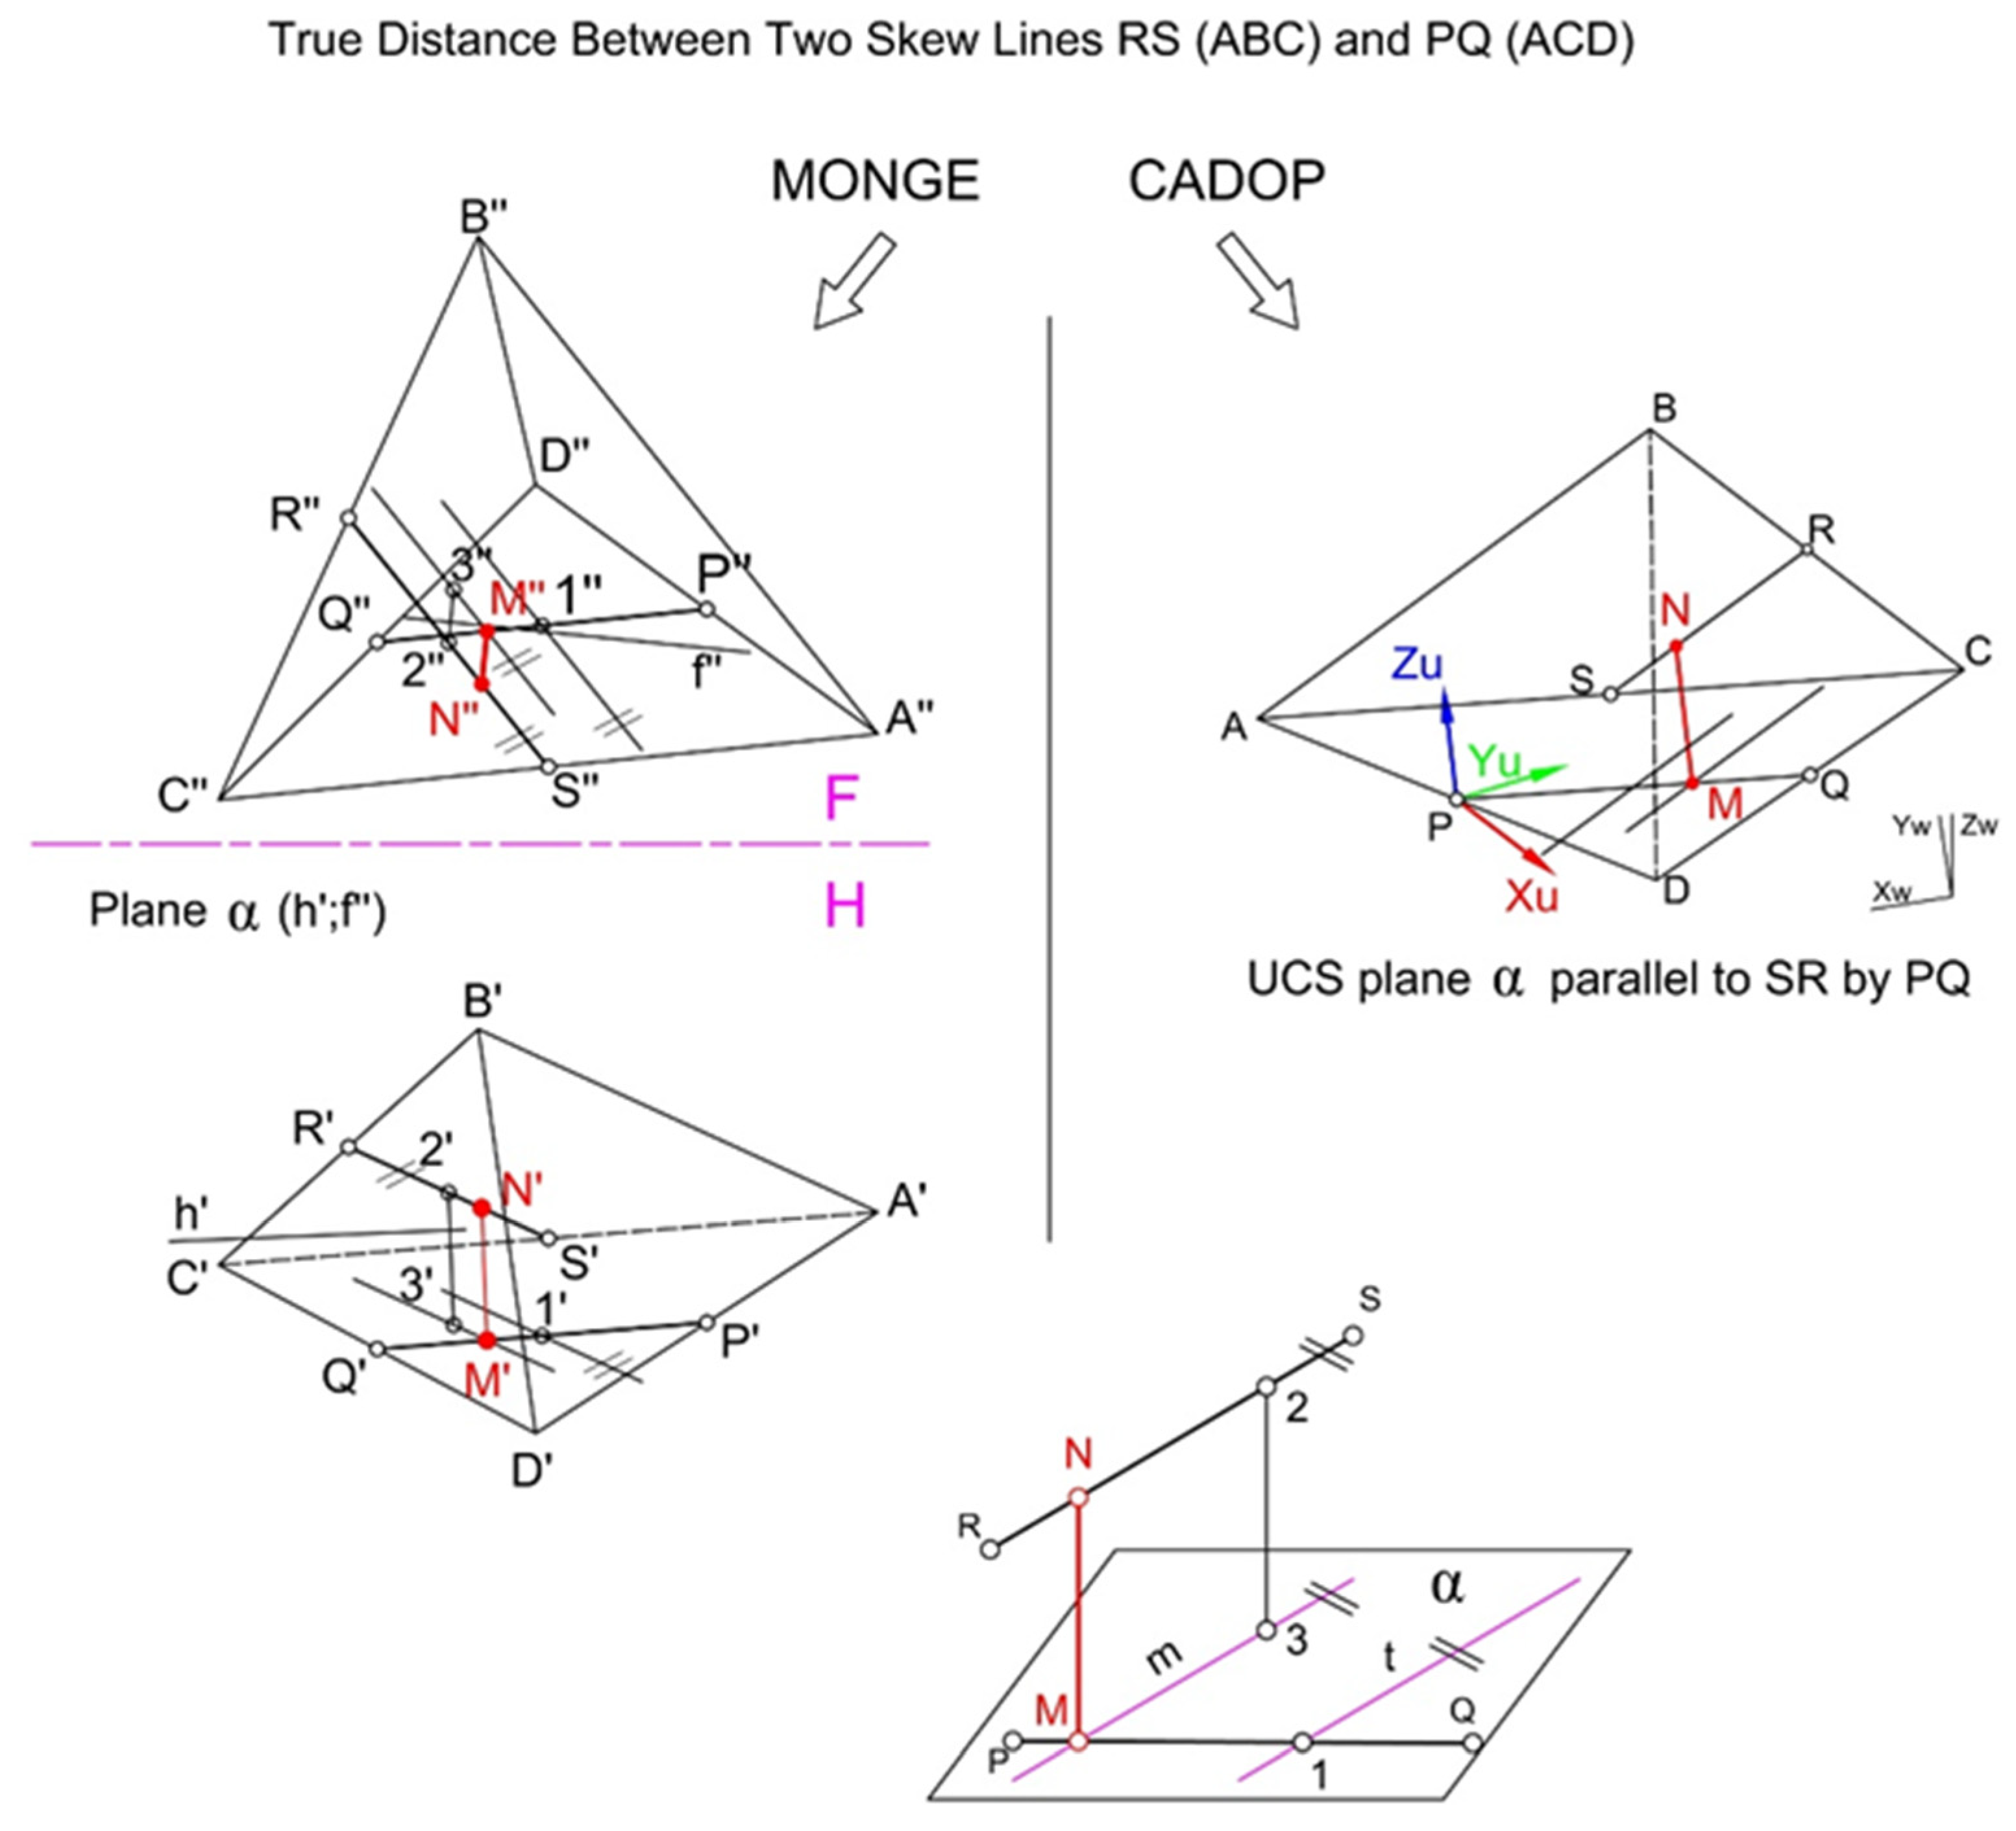
4.4.10. Exercise 10: Shortest Distance Between Two Skew Lines
4.5. Rubric-Based Assessment
5. Discussion
Future Research Directions
6. Conclusions
Author Contributions
Funding
Informed Consent Statement
Data Availability Statement
Acknowledgments
Conflicts of Interest
Abbreviations
| CAD | Computer-Aided Design |
| CADOP | CAD and Orthographic Projection |
| DG | Descriptive Geometry |
References
- Abrahamzon, L., Galantini, K., & Luna, A. (2024). Augmented reality for the development and reinforcement of spatial skills: A case applied to civil engineering students. International Journal of Engineering Pedagogy, 14(5), 88–108. [Google Scholar] [CrossRef]
- Agbanglanon, S. L., Lecorre, T., Komis, V., & Jaillet, A. (2024). Spatial skills and observed leadership behaviour: A case study of dyadic teamwork in mechanical design. European Journal of Engineering Education, 49(6), 1227–1245. [Google Scholar] [CrossRef]
- Bairaktarova, D. (2017). Coordinating mind and hand: The importance of manual drawing and descriptive geometry instruction in a CAD-oriented engineering design graphics class. Engineering Design Graphics Journal, 81(3), 1–16. [Google Scholar] [CrossRef]
- Balajti, Z. (2024). Challenges of engineering applications of descriptive geometry. Symmetry, 16(1), 50. [Google Scholar] [CrossRef]
- Bertoline, G. R., Wiebe, E. N., Hartman, N. W., & Ross, W. A. (2009). Fundamentals of graphics communication (4th ed.). McGraw-Hill Higher Education. [Google Scholar]
- Bokan, N., Ljucovic, M., & Vukmirovic, S. (2009). Computer-aided teaching of descriptive geometry. Journal for Geometry and Graphics, 13(2), 221–229. [Google Scholar]
- Cohen, J. (1988). Statistical power analysis for the behavioral sciences (2nd ed.). Lawrence Erlbaum Associates. [Google Scholar]
- Deng, Y., Mueller, M., Rogers, C., & Olechowski, A. (2022). The multi-user computer-aided design collaborative learning framework. Advanced Engineering Informatics, 51, 101446. [Google Scholar] [CrossRef]
- Dilling, F., & Vogler, A. (2021). Fostering spatial ability through computer-aided design: A case study. Digital Experiences in Mathematics Education, 7, 323–336. [Google Scholar] [CrossRef]
- Gutiérrez de Ravé, E., & Jiménez-Hornero, F. J. (2024). A 3D descriptive geometry problem-solving methodology using CAD and orthographic projection. Symmetry, 16(4), 476. [Google Scholar] [CrossRef]
- Hunde, B. R., & Woldeyohannes, A. D. (2022). Future prospects of computer-aided design (CAD)—A review from the perspective of artificial intelligence (AI), extended reality, and 3D printing. Results in Engineering, 14, 100478. [Google Scholar] [CrossRef]
- Ileri, Ç., Güler, Ö., Atit, K., & Uttal, D. H. (2023). Malleability of spatial skills: Bridging developmental studies and mental rotation training. Frontiers in Psychology, 14, 1137003. [Google Scholar] [CrossRef]
- Katona, J., & Nagy Kem, G. (2019). The CAD 3D course improves students’ spatial skills in the technology and design education. YBL Journal of Built Environment, 7, 26–37. [Google Scholar] [CrossRef]
- Kösa, T., & Karakuş, F. (2018). The effects of computer-aided design software on engineering students’ spatial visualization skills. European Journal of Engineering Education, 43(2), 296–308. [Google Scholar] [CrossRef]
- Kuna, P., Hašková, A., Palaj, M., Skačan, M., & Záhorec, J. (2018). How to teach CAD/CAE systems. International Journal of Engineering Pedagogy (iJEP), 8(1), 148–162. [Google Scholar] [CrossRef]
- Ladrón-de-Guevara-Muñoz, M. C., Alonso-García, M., de-Cózar-Macías, O. D., & Blázquez-Parra, E. B. (2023). The place of descriptive geometry in the face of industry 4.0 challenges. Symmetry, 15(12), 2190. [Google Scholar] [CrossRef]
- Landis, J. R., & Koch, G. G. (1977). The measurement of observer agreement for categorical data. Biometrics, 33(1), 159–174. [Google Scholar] [CrossRef]
- Markova, T., Shirokova, S., Rostova, O., & Misbakhova, C. (2024). Possibilities of using computer-aided design systems to improve the quality of technical specialists training. Lecture Notes in Networks and Systems, 951, 93–105. [Google Scholar] [CrossRef]
- Migliari, R. (2012). Descriptive geometry: From its past to its future. Nexus Network Journal, 14(3), 555–571. [Google Scholar] [CrossRef]
- Monge, G. (1799). Géométrie descriptive. Baudouin. [Google Scholar]
- Moreno, R., & Bazán, A. M. (2017). Automation in the teaching of descriptive geometry and CAD. High-level CAD templates using script languages. IOP Conference Series: Materials Science and Engineering, 245(6), 062040. [Google Scholar] [CrossRef]
- Paas, F. G. W. C., & van Merriënboer, J. J. G. (1994). Instructional control of cognitive load in the training of complex cognitive tasks. Educational Psychology Review, 6(4), 351–371. [Google Scholar] [CrossRef]
- Paivio, A. (1990). Mental representations: A dual coding approach. Oxford University Press. [Google Scholar]
- Shepard, R. N., & Metzler, J. (1971). Mental rotation of three-dimensional objects. Science, 171(3972), 701–703. [Google Scholar] [CrossRef]
- Sorby, S. A. (2009). Educational research in developing 3-D spatial skills for engineering students. International Journal of Science Education, 31(3), 459–480. [Google Scholar] [CrossRef]
- Suzuki, K. (2014). Traditional descriptive geometry education in the 3D-CAD/CG era. Journal for Geometry and Graphics, 18(2), 249–258. [Google Scholar]
- Sweller, J. (1988). Cognitive load during problem solving: Effects on learning. Cognitive Science, 12(2), 257–285. [Google Scholar] [CrossRef]
- Taleyarkhan, M., Dasgupta, C., García, J. M., & Magana, A. J. (2018). Investigating the impact of using a CAD simulation tool on students’ learning of design thinking. Journal of Science Education and Technology, 27, 334–347. [Google Scholar] [CrossRef]
- Tomiczková, S., & Lávicka, M. (2013). Computer-aided descriptive geometry teaching. Computers in the School, 30(1–2), 48–60. [Google Scholar] [CrossRef]
- Torner, J., Alpiste, F., & Brigos, M. (2014). Spatial ability in computer-aided design courses. Computer-Aided Design and Applications, 12(1), 36–44. [Google Scholar] [CrossRef]



| Survey Section | Item | Statement |
|---|---|---|
| True/False | 1 | A line appears as true length when it is parallel to the projection plane. |
| 2 | Parallel lines always appear parallel in all orthographic views. | |
| 3 | A point view of a line can be obtained when the observer’s line of sight is parallel to that line. | |
| 4 | Planar figures can be viewed as edges. | |
| 5 | A horizontal line appears true length in the profile or side view. | |
| 6 | If two planes are perpendicular, the normal view of either one will show an edge view of the other. | |
| 7 | An inclined plane never appears true size in any principal view. | |
| 8 | A line perpendicular to a plane appears perpendicular to the plane’s edge view. | |
| Multiple choice | 1 | To obtain the true length of an inclined line, you must: A. View it parallel to the line. B. View it perpendicular to a projection plane. C. View it from an oblique angle. D. Project it on a frontal plane. |
| 2 | Which of the following is true regarding an edge view of a plane? A. It occurs when the plane is perpendicular to the line of sight. B. It is always visible in the top view. C. It occurs when a line on the plane appears as a point. D. It never occurs in orthographic projection. | |
| 3 | The angle between two intersecting planes can be found by: A. Constructing an edge view of both planes. B. Constructing a true-length view of one plane. C. Constructing a point view of the intersection line. D. All of the above. | |
| 4 | How can you identify if two lines intersect in space? A. They intersect in at least one view. B. They share a common point in all views. C. They are parallel in all views. D. They appear perpendicular in one view. |
| Survey Section | Item | Statement |
|---|---|---|
| Short answer | 1 | Define what is meant by a “point view” of a line. |
| 2 | Explain how to determine the shortest distance between a point and a line. | |
| 3 | Describe how you would obtain the true-size view of a plane figure. | |
| 4 | Explain when a line is considered oblique and how it appears in orthographic projection. | |
| Practical Application | 1 | Describe the steps necessary to determine the distance between two skew lines. |
| 2 | Outline the steps needed to find the true angle between a line and a plane. | |
| 3 | Given two intersecting planes, explain how both planes can be seen in edge view in the same projection. | |
| Visualization and Spatial Reasoning | 1 | How do you visualize the intersection line of two planes? |
| 2 | When given an inclined plane figure, explain your strategy to find its true size and shape. | |
| 3 | Describe your method for visualizing the orientation of a line in space based on orthographic projections. | |
| 4 | Explain the process to visualize the true-length of a line. |
| Survey Section | Item | Correct Answer | Percentage |
|---|---|---|---|
| True/False | 1 | True: A line parallel to a projection plane always appears as its true length. | 58% (52 students) |
| 2 | True: Parallel lines remain parallel in every orthographic view, as parallelism is preserved through projection. | 50% (45 students) | |
| 3 | True: A line appears as a point when viewed parallel to its length (the line of sight aligns with the line). | 45% (41 students) | |
| 4 | True: Planar figures in orthographic projections appear as edges when they are parallel to the line of sight. | 53% (48 students) | |
| 5 | False (Correction): A horizontal line appears as true length in the top view, not the side view. This is a common misconception. | 40% (36 students) | |
| 6 | True: If two planes are perpendicular, the orthographic (normal) view of one will display the other as an edge. | 47% (42 students) | |
| 7 | True: An inclined plane, by definition, is not parallel to any principal projection plane and thus will never appear true size in standard principal views. | 52% (47 students) | |
| 8 | True: If a line is perpendicular to a plane, it will appear perpendicular in the edge view of that plane. | 49% (44 students) | |
| Multiple choice | 1 | B. View it perpendicular to a projection plane: To determine the true length of an inclined line, the observer’s line of sight must be perpendicular to a plane that is parallel to the line | 35% (32 students) |
| 2 | C. It occurs when a line on the plane appears as a point: An edge view of a plane is obtained when you view along a line within the plane, making that line appear as a single point. | 33% (30 students) | |
| 3 | D. All of the above: All methods listed—constructing an edge view of both planes, a true-length view of one plane, or a point view of the intersection line—can be used to find the angle between two intersecting planes | 26% (23 students) | |
| 4 | B. They share a common point in all views: Two lines intersect in space only if they share a common intersection point consistently across all orthographic views. | 38% (34 students) |
| Survey Section | Item | Ideal Answer | Percentage |
|---|---|---|---|
| Short answer | 1 | Point view of a line: A “point view” of a line is the view obtained when the observer’s line of sight is parallel to the line, causing the line to appear as a single point. | Correct: 34% (31 students) |
| 2 | Shortest distance between a point and a line: To determine the shortest distance between a point and a line, construct a view where the line appears as a point (end view), and then measure the perpendicular distance from the given point to this line. | Correct explanation: 30% (27 students) | |
| 3 | True-size view of a plane: A true-size view of a plane is obtained by looking at the plane perpendicularly—that is, along a line normal to the plane. This is typically done using an auxiliary view aligned with the plane’s normal direction. | Correct method described: 31% (28 students) | |
| 4 | Oblique line and its appearance in orthographic projection: A line is oblique if it is not parallel to any principal plane. It will appear foreshortened (shorter than its true length) in all principal views. | Correct description: 33% (30 students) | |
| Practical Application | 1 | Shortest distance between two skew lines:
| Clearly explained: 28% (25 students) |
| 2 | True angle between a line and a plane:
| Correct methodology: 27% (24 students) | |
| 3 | Given two intersecting planes, explain how both planes can be seen in edge view in the same projection:
| Correct steps: 32% (29 students) | |
| Visualization and Spatial Reasoning | 1 | Intersection line of two planes: Find two points that belong to the line of intersection of both planes. These points are determined by intersecting each plane with an auxiliary plane (horizontal or vertical) and then finding the intersection of the resulting lines. | Correct visualization: 30% (27 students) |
| 2 | True size and shape of an inclined plane figure: First, find an edge view of the figure. Then, create an auxiliary view perpendicular to this edge view, providing the true size and shape. | Correct strategy: 33% (30 students) | |
| 3 | Visualizing the orientation of a line in space: Use orthographic projections (front, top, side) to observe how the line changes length and angle. Combining these views mentally helps visualize its spatial orientation and true length. | Accurate visualization: 29% (26 students) | |
| 4 | True length of a line: To visualize the true length of a line, create an auxiliary view where the line is parallel to the projection plane. In this view, the line appears in its true size because the line of sight is perpendicular to it. | Correct method: 35% (32 students) |
| Training Exercise | Reason for Improving Knowledge | Survey Finding Addressed |
|---|---|---|
| True-Length Line Construction | Develops understanding of how line orientation affects projection and when a line appears in its true length. | Only 35% of students correctly identified the condition for obtaining true length of a line. |
| True-Size View of a Plane | Reinforces the two-step auxiliary view method and shows when a plane appears in true size. | Just 31% could describe how to construct a true-size view of a plane. |
| Point View of a Line | Builds spatial reasoning by helping students reduce a line to a point for further construction (e.g., distances). | Only 34% correctly defined the point view of a line. |
| Edge View of a Plane | Introduces critical projection skill used in determining plane size, angles, and intersections. | Just 33% knew the requirements for an edge view of a plane. |
| Shortest Distance from a Point to a Line | Applies point-view techniques and perpendicular projection to determine shortest paths. | Only 30% of students described the correct method to find this distance. |
| Angle Between Two Intersecting Planes | Reinforces edge view construction and angle measurement between planes—important for multi-surface analysis. | Only 26% correctly identified the method to determine this angle. |
| Projection of a Line onto a Plane | Helps visualize line-plane interaction and prepare for angle measurement by projecting geometry onto the plane. | Students showed limited understanding of projection interactions between lines and planes. |
| Angle Between a Line and a Plane | Develops combined skills in projection, perpendicular construction, and auxiliary viewing to find angles. | Only 27% could correctly explain the steps to find this angle. |
| Shortest Distance Between Two Skew Lines | Integrates point view and auxiliary view techniques to measure perpendicular distance between non-intersecting lines. | Only 28% could describe the process correctly, showing difficulty with spatial relationships. |
| Intersection Line of Two Planes | Strengthens the use of projecting auxiliary planes to solve descriptive geometry problems. | Just 30% could accurately visualize or explain this intersection. |
| Training Exercise | Monge’s System Procedure | CADOP Procedure |
|---|---|---|
| True-Length Line Construction | A view perpendicular to a given view of that line. | Define a UCS aligned to the line and use a top or front view to reveal its true length. |
| True-Size View of a Plane | Construct an edge view of the plane, then create a second view perpendicular to this edge. | Create a UCS on the plane using three non-aligned points; the UCS top view reveals true size. |
| Point View of a Line | Construct a view where the observer’s line of sight is parallel to the line. | Match UCS Z-axis to the line; the UCS top view shows the line as a point. |
| Edge View of a Plane | Find a line in the plane to appear as a point view; then construct the plane’s edge view. | Align the UCS XY-plane with the target plane; an orthogonal view to the UCS Z-axis will show the plane in edge view. |
| Shortest Distance from a Point to a Line | Construct a point view of the line and drop a perpendicular from the point. | Align UCS on the plane defined by the point and the line; draw perpendicular and measure the distance. |
| Angle Between Two Intersecting Planes | Construct edge views of both planes; measure the angle between them. | Match UCS Z-axis to the intersection line; measure angle from top view. |
| Projection of a Line onto a Plane | The endpoints of the line are projected orthogonally onto the plane; the projected points define the line’s projection on the plane. | Align the UCS XY-plane with the target plane; then set the UCS Z-coordinate (Zu) of the line’s endpoints to zero to obtain its projection on the plane. |
| Angle Between a Line and a Plane | Display the line in true length and the plane in edge view, then measure the angle. | Project line onto the plane in UCS; measure angle between original and projected lines. |
| Shortest Distance Between Two Skew Lines | Construct point view of one line and measure perpendicular distance to the other. | Construct point view of one line by matching UCS Z-axis to that line; measure perpendicular distance to the other line. |
| Intersection Line of Two Planes | The cutting planes method finds the intersection line of two planes by introducing one or more auxiliary planes that intersect both given planes. The lines of intersection between the cutting planes and each original plane are then projected; their intersection points define the true intersection line of the original planes. | Two lines from one plane are considered, and the point of intersection of each with the other plane is determined. The intersection line between both planes is found by connecting the two resulting points. |
| Criterion | 5—Excellent | 4—Good | 3—Developing | 2—Fair | 1—Poor |
|---|---|---|---|---|---|
| Conceptual Understanding | Demonstrates thorough understanding of all relevant geometric concepts with accurate application. | Demonstrates good understanding with minor conceptual inaccuracies. | Shows basic understanding but includes some conceptual errors. | Limited understanding with multiple errors or misconceptions. | Lacks understanding of key concepts; work is mostly incorrect. |
| Graphical/Model Accuracy | Drawings/models are precise, neat, and completely accurate. | Drawings/models are mostly accurate with few minor errors. | Drawings/models have some inaccuracies or imprecision. | Frequent graphical errors; unclear or inconsistent representation. | Drawings/models are largely incorrect or missing. |
| Use of Method (Monge/CADOP) | Applies the method flawlessly and appropriately for the task. | Applies the method correctly with minor procedural flaws. | Uses the method with moderate success; some steps missed. | Applies the method incorrectly or inconsistently. | Does not use or misuses the assigned method entirely. |
| Spatial Reasoning | Consistently demonstrates strong spatial reasoning across all tasks. | Generally strong spatial reasoning with rare misinterpretations. | Moderate spatial reasoning; occasional confusion evident. | Spatial reasoning is weak; multiple misinterpretations. | Little or no evidence of spatial reasoning. |
| Completion and Consistency | All tasks are fully completed and consistent throughout. | Most tasks completed with good consistency. | Some tasks completed but inconsistencies present. | Incomplete tasks and inconsistent execution. | Tasks mostly missing or incoherent. |
| Criterion | ||||||||||
|---|---|---|---|---|---|---|---|---|---|---|
| Conceptual Understanding | Graphical/ Model Accuracy | Use of Method (Monge/CADOP) | Spatial Reasoning | Completion & Consistency | ||||||
| Monge | CADOP | Monge | CADOP | Monge | CADOP | Monge | CADOP | Monge | CADOP | |
| Mean (Std. Dev.) | Mean (Std. Dev.) | Mean (Std. Dev.) | Mean (Std. Dev.) | Mean (Std. Dev.) | Mean (Std. Dev.) | Mean (Std. Dev.) | Mean (Std. Dev.) | Mean (Std. Dev.) | Mean (Std. Dev.) | |
| Exercise 1 | 2.56 (0.48) | 2.98 (0.30) | 3.09 (0.47) | 3.61 (0.24) | 3.29 (0.50) | 3.75 (0.23) | 2.94 (0.49) | 3.42 (0.40) | 3.25 (0.42) | 3.87 (0.34) |
| Exercise 2 | 3.13 (0.45) | 3.81 (0.37) | 3.06 (0.59) | 3.53 (0.28) | 2.73 (0.41) | 3.52 (0.25) | 2.95 (0.41) | 3.54 (0.26) | 3.06 (0.46) | 3.53 (0.37) |
| Exercise 3 | 2.89 (0.52) | 3.36 (0.29) | 3.11 (0.60) | 3.71 (0.33) | 2.85 (0.60) | 3.49 (0.36) | 3.20 (0.60) | 3.80 (0.25) | 3.17 (0.42) | 3.52 (0.22) |
| Exercise 4 | 2.97 (0.53) | 3.41 (0.35) | 2.87 (0.50) | 3.56 (0.39) | 3.26 (0.43) | 3.97 (0.39) | 2.89 (0.59) | 3.64 (0.30) | 2.72 (0.45) | 3.11 (0.33) |
| Exercise 5 | 3.40 (0.60) | 3.72 (0.35) | 3.39 (0.52) | 4.04 (0.38) | 2.94 (0.44) | 3.49 (0.23) | 2.79 (0.48) | 3.29 (0.28) | 3.05 (0.44) | 3.96 (0.28) |
| Exercise 6 | 3.23 (0.48) | 3.75 (0.34) | 3.18 (0.52) | 3.89 (0.28) | 3.34 (0.54) | 3.74 (0.37) | 2.92 (0.50) | 3.61 (0.37) | 3.01 (0.46) | 3.44 (0.21) |
| Exercise 7 | 3.06 (0.52) | 3.76 (0.26) | 2.64 (0.49) | 3.34 (0.4) | 2.81 (0.47) | 3.17 (0.21) | 3.20 (0.46) | 3.94 (0.30) | 3.19 (0.44) | 3.91 (0.39) |
| Exercise 8 | 2.89 (0.49) | 3.55 (0.36) | 3.30 (0.50) | 3.92 (0.26) | 2.58 (0.58) | 3.18 (0.32) | 2.66 (0.55) | 3.17 (0.29) | 2.59 (0.55) | 3.11 (0.32) |
| Exercise 9 | 2.86 (0.48) | 3.20 (0.38) | 2.83 (0.47) | 3.49 (0.31) | 3.00 (0.53) | 3.88 (0.30) | 2.85 (0.54) | 3.39 (0.26) | 3.32 (0.42) | 4.19 (0.25) |
| Exercise 10 | 2.57 (0.43) | 3.17 (0.31) | 2.75 (0.49) | 3.34 (0.22) | 3.09 (0.43) | 3.69 (0.33) | 2.60 (0.59) | 3.17 (0.36) | 3.07 (0.57) | 3.60 (0.39) |
| Criterion | Monge Mean (Std. Dev.) | CADOP Mean (Std. Dev.) |
|---|---|---|
| Conceptual Understanding | 2.96 (0.27) | 3.47 (0.29) |
| Graphical/Model Accuracy | 3.02 (0.24) | 3.64 (0.24) |
| Use of Method (Monge/CADOP) | 2.99 (0.26) | 3.59 (0.27) |
| Spatial Reasoning | 2.90 (0.20) | 3.50 (0.26) |
| Completion & Consistency | 3.04 (0.23) | 3.62 (0.36) |
| Criterion | t-Statistic | p-Value |
|---|---|---|
| Conceptual Understanding | −4.12 | 0.0006 |
| Graphical/Model Accuracy | −5.72 | <0.0001 |
| Use of Method (Monge/CADOP) | −5.10 | 0.0001 |
| Spatial Reasoning | −5.83 | <0.0001 |
| Completion & Consistency | −4.32 | 0.0004 |
| Criterion | d |
|---|---|
| Conceptual Understanding | 1.82 |
| Graphical/Model Accuracy | 2.58 |
| Use of Method (Monge/CADOP) | 2.26 |
| Spatial Reasoning | 2.59 |
| Completion & Consistency | 1.92 |
Disclaimer/Publisher’s Note: The statements, opinions and data contained in all publications are solely those of the individual author(s) and contributor(s) and not of MDPI and/or the editor(s). MDPI and/or the editor(s) disclaim responsibility for any injury to people or property resulting from any ideas, methods, instructions or products referred to in the content. |
© 2025 by the authors. Licensee MDPI, Basel, Switzerland. This article is an open access article distributed under the terms and conditions of the Creative Commons Attribution (CC BY) license (https://creativecommons.org/licenses/by/4.0/).
Share and Cite
Gutiérrez de Ravé, S.; Gutiérrez de Ravé, E.; Jiménez-Hornero, F.J. Integrating CAD and Orthographic Projection in Descriptive Geometry Education: A Comparative Analysis with Monge’s System. Educ. Sci. 2025, 15, 1492. https://doi.org/10.3390/educsci15111492
Gutiérrez de Ravé S, Gutiérrez de Ravé E, Jiménez-Hornero FJ. Integrating CAD and Orthographic Projection in Descriptive Geometry Education: A Comparative Analysis with Monge’s System. Education Sciences. 2025; 15(11):1492. https://doi.org/10.3390/educsci15111492
Chicago/Turabian StyleGutiérrez de Ravé, Simón, Eduardo Gutiérrez de Ravé, and Francisco J. Jiménez-Hornero. 2025. "Integrating CAD and Orthographic Projection in Descriptive Geometry Education: A Comparative Analysis with Monge’s System" Education Sciences 15, no. 11: 1492. https://doi.org/10.3390/educsci15111492
APA StyleGutiérrez de Ravé, S., Gutiérrez de Ravé, E., & Jiménez-Hornero, F. J. (2025). Integrating CAD and Orthographic Projection in Descriptive Geometry Education: A Comparative Analysis with Monge’s System. Education Sciences, 15(11), 1492. https://doi.org/10.3390/educsci15111492


