Article

Modified Method for Surface Probabilistic Risk Assessment of Aero Engine Compressor Disks Considering Shot Peening

1
School of Energy and Power Engineering, Beihang University, Beijing 100083, China
2
Tianmushan Laboratory, Hangzhou 311312, China
*
Author to whom correspondence should be addressed.
Aerospace 2023, 10(7), 621; https://doi.org/10.3390/aerospace10070621
Submission received: 4 June 2023 / Revised: 6 July 2023 / Accepted: 7 July 2023 / Published: 8 July 2023
(This article belongs to the Special Issue Aero-Engine Design)

Abstract

:
Aero engine compressor disks are typically life-limited parts and it is necessary to secure them through the implementation of an engineering plan and a manufacturing plan. Specifically, the engineering plan recommends the quantification of the safety of life-limited parts on the basis of probabilistic risk assessment (PRA). However, the direct correlation between plans is limited, and the effect of manufacturing parameters on the safety of life-limited parts remains to be investigated. Shot peening, as a typical method of surface manufacturing, can significantly improve the safety of life-limited parts. Therefore, a modified mathematical surface PRA method considering shot peening parameters is developed in this paper to further bridge the design and manufacturing processes. Additionally, a general database is established using the response surface method to overcome the simulation complexity. On the basis of this method and the general database, an innovative direct and efficient determination of key shot peening parameters through failure risk in the design stage is proposed. The results indicate that failure risk decreased by 3.26%, 11.31%, and 9.71%, respectively, with increasing number, diameter, and velocity of shots, with the effect of diameter being the greatest. In addition, the method improves the efficiency of determining the key parameters by 75.80%, thus satisfying the requirements of abundant and efficient iterations during the design stage.

1. Introduction

Life-limited engine parts are those rotating and major static structural parts of engines whose primary failure is likely to result in a hazardous effects on the engine. To ensure the safety of life-limited parts, the Federal Aviation Administration (FAA) has proposed life management [1], in which engineering, manufacturing, and service management plans are adopted in order to form a closed-loop system. Probabilistic risk assessment (PRA) is performed on the key parts of the engine’s rotors in order to improve engine safety and reliability when compared to historical data.

1.1. Engineering Plan and PRA

The engineering plan includes the assumptions, technical data, and actions required to establish and maintain the life capability of life-limited engine parts [1]. After the two plane accidents occurring in Sioux City [2] and Pensacola [3], the FAA requested that the effects of defects on service performance be considered, recommending PRA for life-limited parts. To further improve engine life, the FAA gradually improved the evaluation of surface defects introduced during the manufacturing and maintenance of life-limited parts, which was approved by the FAA and written in AC33.70-2 [4]. At the same time, The Southwest Research Institute developed the surface hole feature PRA and designed an evaluation tool [5,6]. Since then, the application of the PRA model has been extended to microscopic models of the fatigue cracking of materials [7], simulation algorithms [8], and the influence of residual stress caused by shot peening [9] on the probability of failure of the disks.

1.2. Association of Manufacturing and Engineering Plans

The manufacturing plan identifies the part-specific process constraints that must be incorporated into the manufacturing process [1]. Specifically, it should be ensured that the attributes stipulated in the engineering plan are substantially valid during the manufacturing process. Therefore, it is necessary to study the correlation between the manufacturing and engineering plan. In September 1988, the FAA issued AC33.15-1 and AC33.15-2, which provide detailed guidance on the requirements regarding the manufacture of aircraft engines. Millwater [10] experimentally analyzed the influence of residual stress caused by shot peening on the failure risk of a compressor disk. Singh [11] proposed the probabilistic sensitivity analysis of laser peening fatigue life. Mcclung [12] simulated the manufacturing-induced residual stresses, and found them to have a significant effect on fracture risk. Therefore, the relationship between the manufacturing and engineering plans should be considered in further detail to improve the safety of life-limited parts.

1.3. Shot Peening during Manufacturing

Shot peening is an effective surface treatment for improving the fatigue strength of metallic materials. Strengthening is achieved by introducing compressive residual stress, surface hardening, and a gradient-refined structure, among which compressive residual stress is considered to be the dominant factor [13]. As a result of the experimental complexity of this process [14], numerous new approaches have been developed through simulation. Wang [15] used the symmetrical cell model for simulation. Okan [16] investigated the optimization of the shot peening parameters directly affecting the arc height of Almen strips. Mohamed [17] developed a new discrete continuum coupling model. Su [18] demonstrated that the contribution of residual stress during experimental testing was in good agreement with the results of simulation using the random multi-shot model. Iheb [19] presented a finite-element-based approach that took into consideration the random aspect of the shot peening in association with numerous shots; however, the problem of computational complexity still remains.
Therefore, the relationship between the manufacturing plan and engineering plan should be considered during the design stage, which can be achieved by directly illustrating the relationship between the probability of failure (POF) and the manufacturing parameters during the part’s lifetime. Specifically, the probability of failure of life-limited parts will be affected by shot peening, which is a typical manufacturing process, in a manner that is closely related to the selection of shot peening parameters. Although the combination of the residual stress obtained by experiments and the failure risk has been studied before [10], the method developed in this paper can extend this combination even further. Moreover, great practical value can be obtained by judging the appropriate parameters directly on the basis of failure risk, such as reduced costs, and an easier indication of compliance. According to the cost and complexity of experiments and simulations, the database is effectively able to satisfy the requirement for abundant and efficient iterations during the design stage. Laser shot peening is another surface peening process [20], and its impact on risk is also of concern. However, the main focus of this paper is on the shot peening process, and the proposal of an applicable method that could be further applied to other processes as well. Therefore, the novelty of this study lies in the following three aspects: (1) a database is formed using the verified shot peening simulation method, in order to improve the efficiency of the method and (2) replace the criterion for key shot peening parameters with failure risk during the manufacturing process, in order to integrate design and manufacturing; and (3) the direct and high-efficiency determination of key parameters is realized through failure risk, thus meeting the requirements of abundant and efficient iterations during the design stage.
This paper is structured as follows. In Section 2, a modified surface PRA method is proposed that takes shot peening parameters into consideration based on a database. Section 3 introduces the method for establishing a database for efficient simulation. Section 4 describes a typical case for the modified surface PRA process using a database, together with the database established for these specific conditions. Finally, Section 5 summarizes the main conclusions drawn with respect to the two purposes of this paper.

2. Modified Surface PRA with Efficient Consideration of Shot Peening Parameters

This section initially presents the modified surface PRA process with efficient consideration of shot peening parameters, where the efficiency is accomplished by substituting time-consuming simulation with the use of a database (established in Section 3). Subsequently, the various components and calculations of the modified surface PRA are introduced in the subsections below.

2.1. Modification of the Surface PRA

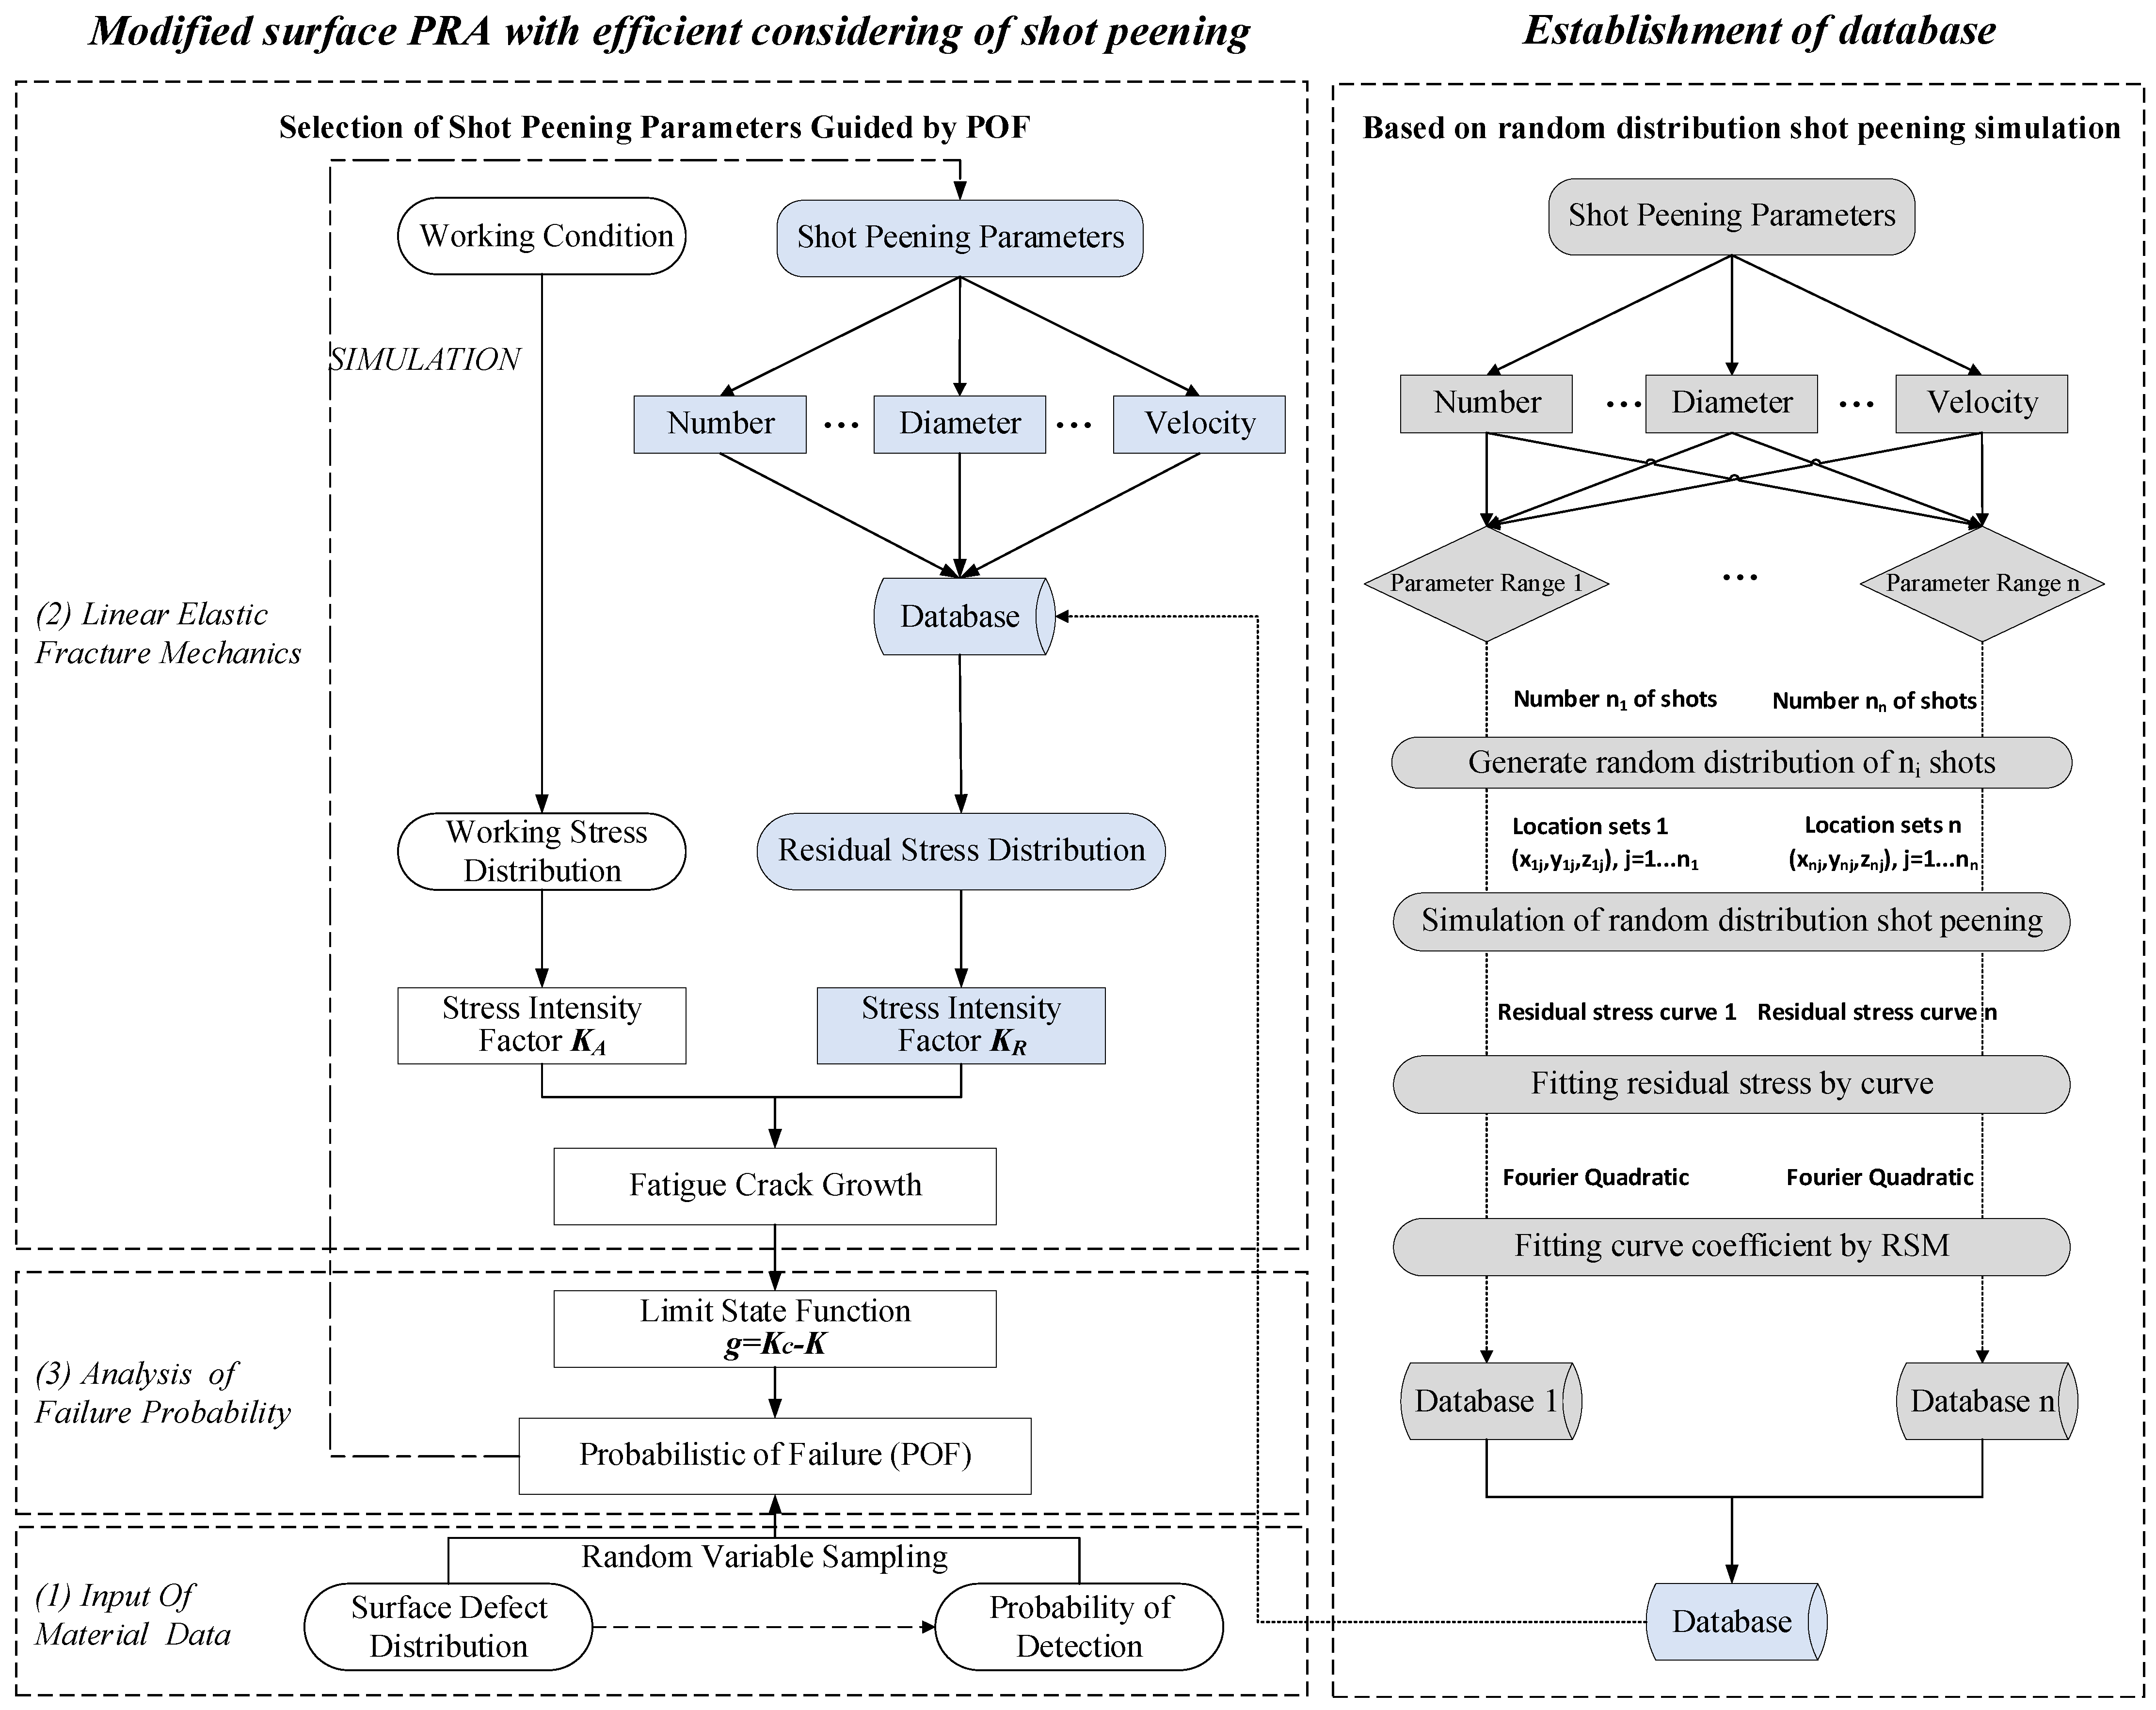
The safety of life-limited aero engine parts is characterized by their probabilistic failure risk. Specifically, probabilistic failure risk is determined by applying the probabilistic method to fracture-mechanics-based life prediction. The probability represents the possibility of fracture failure of life-limited parts with initial defects during their life cycle, considering the randomness of defect distribution and probability of detection. Surface probabilistic risk assessment is the focus of this research, due to the surface characteristics being affected by shot peening. Surface probabilistic risk assessment [21] can mainly be divided into three parts, corresponding to the white parts in Figure 1, namely, the input of material data, the linear elastic fracture mechanics, and the analysis of the probability of failure.
The variation in residual stress caused by shot peening is the main factor when considering the difference in life before and after shot peening in this paper, since the compressive residual stress is the dominant factor when the surface roughness is not abnormally high [14]. Therefore, the effect on probabilistic risk assessment caused by shot peening residual stress is considered, and the modified surface probabilistic risk assessment based on a database is shown in Figure 1. In the figure, the shaded part is the impact of considering shot peening. Additionally, a corresponding database is established for the specific research parameter range, in order to directly extract the residual stress distribution for efficient failure analysis.

2.2. Modified Surface PRA Process

2.2.1. Input of Material Data

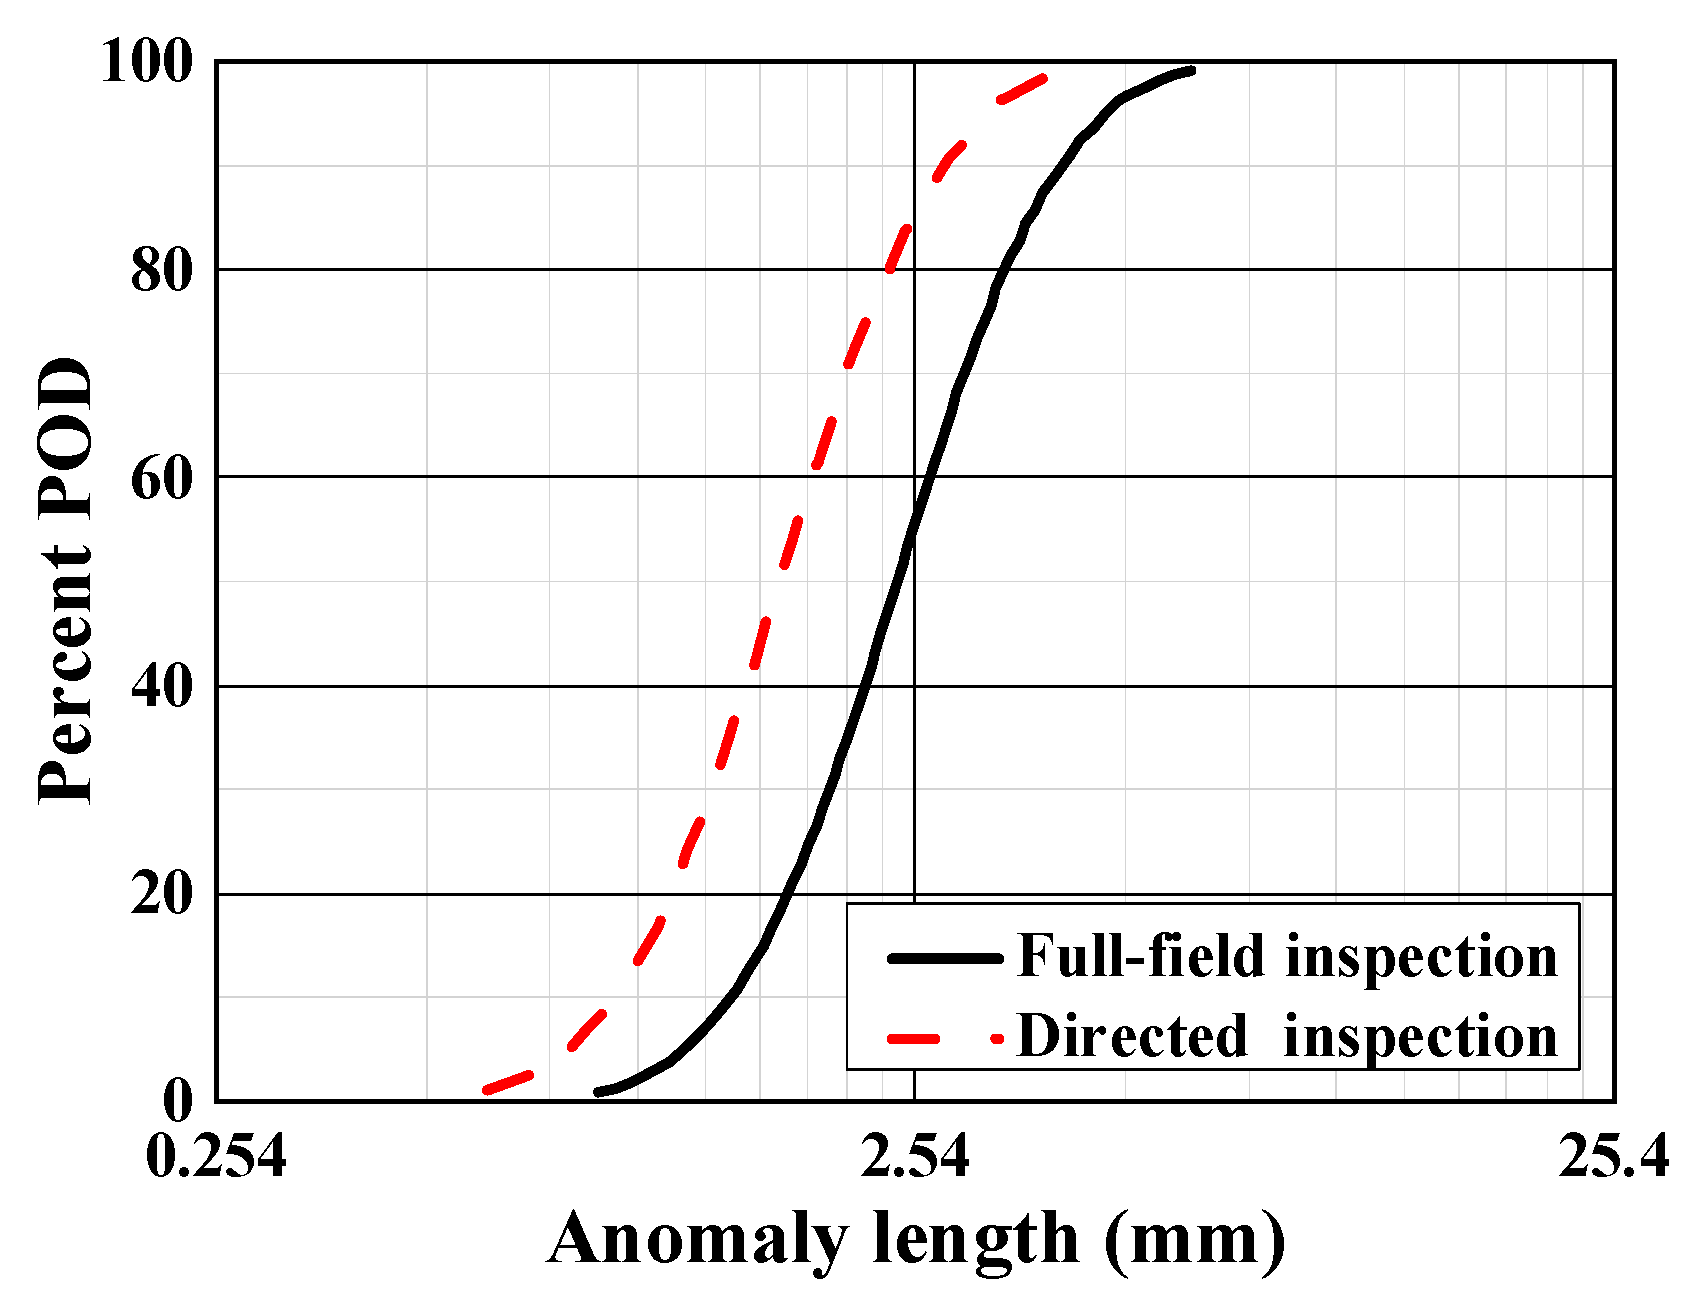
As can be seen from the modified surface PRA in Figure 1, the material data that is input consists of two parts, including surface defect distribution and the probability of detection, which characterize the probability of an anomaly being introduced during manufacturing and processing and the likelihood of the defect being detected, respectively. Specifically, the distribution of defects and the probability of defect detection when employing specific techniques can be quantitatively analyzed [22] by accumulating material data. The FAA has published data on the induction of surface defects during the machining process of titanium, steel, nickel (alloy), or powdered nickel (alloy) round hole features that was gathered by the US industry during the early 21st century [4], as shown in Figure 2 (defect distribution), and Figure 3 (detection probability). Defects described quantitatively as having an extremely low probability of occurring served as the initial size distribution of the cracks. Similar data collections have been performed in other countries [23] to realistically characterize the status of field services in the context of local conditions. Publicly available data [4] were chosen to provide input for the surface PRA to analyze the fracture mechanics and probabilities, while taking into consideration the fact that the purpose of this paper is to present a method of research. Specifically, a crack size of 0.0254 mm to 2.54 mm was considered as the initial value for the purposes of crack growth calculation.

2.2.2. Linear Elastic Fracture Mechanics

After efficiently obtaining the shot peening residual stress from the database, the linear elastic fracture mechanics is used to analyze whether defects appearing with an extremely small probability can cause life-limited parts to fail. Specifically, the defect is analyzed on the basis of the low-cycle fatigue crack growth of the cracked bodies in order to determine the failure of the life-limited part during its lifetime. Based on a considerable number of studies, it can be stated that crack length a increases with accumulating numbers of load cycles, and fatigue crack growth rates are usually obtained by the empirical law. The most common form of the empirical law is
d a d N = f ( Δ K , R )
where ΔK is the stress intensity factor range, and R is the stress ratio. A series of models [24] have been proposed to calculate K. Notably, the purpose of this paper is to identify the key sensitive process parameters based on failure risk, and therefore, the issue of residual stress relaxation due to factors such as the temperature during service is disregarded, as the sensitivity ranking of different process parameters is not affected [25]. The prediction of the fatigue crack growth rate and the calculation of the stress intensity factors considering the residual stress obtained by shot peening will be described in detail below.
Residual stress from shot peening affects the failure risk in the surface area by affecting fatigue crack propagation [26]. Many studies have been performed that address the effect of residual stress on fatigue crack growth. In these, superposition techniques [27] have often been adopted to assess the effect of a known residual stress field on fatigue crack propagation. Additionally, for linear elastic materials, the applicability of the superposition method has been mathematically demonstrated by Bueckner [28]. Moreover, for the TC4 material analyzed in this paper, the superposition method has also been applied in order to consider the effect of residual stress on crack growth [29]. Therefore, the combination of the stress intensity factor superposition method with the weight function method is employed in this paper due to its general applicability and simplicity compared to the integral stress intensity factor calculation using the finite element method.
Specifically, the superposition involves the computation of a stress intensity factor KR that is associated with the initial pre-existing residual stress field. This factor is then superposed onto the stress intensity factor resulting from the applied loading KA in order to give the total resultant stress intensity factor for the maximum and minimum loads [30,31]:
K T , m a x = K A , m a x + K R K T , m i n = K A , m i n + K R
where KT,max and KT,min are the total stress intensity factors for the maximum and minimum loads, including the contribution of the residual stress intensity factor to the applied loading stress intensity factor in a compensated manner. The stress intensity factor range and the effective stress ratio are then respectively calculated as shown below.
Δ K T = K T , m a x K T , m i n = ( K A , m a x + K R ) ( K A , m i n + K R ) = Δ K A
R e f f = K T , m i n K T , m a x = ( K A , m i n + K R ) ( K A , m a x + K R )
The stress ratio is mainly affected by residual stress. Therefore, the calculation of the crack growth rate needs to reflect the influence of the stress ratio in the empirical law, for example, the Walker [32], Harter T-method [33], or NASGRO [34] equations. The NASGRO equation, which takes the effect of plasticity-induced crack closure into consideration, is used here. Notably, the nominal stress ratio RA should be replaced with the effective stress ratio Reff in the original equation in order to calculate the crack growth rate. The NASGRO equation can be expressed as follows:
d a d N = C [ ( ( 1 f ) ( 1 R e f f ) ) Δ K T ] n ( 1 Δ K th / Δ K T ) p ( 1 ( K A , m a x + K R ) K C ) q
where ΔKth is the threshold below which the ΔK values are too low to cause crack growth; KC denotes the toughness of the fracture; C, n, p, and q are constants determined by experiments; and f is the ratio of the crack opening stress intensity factor and the maximum stress intensity factor. The crack size obtained from the defect distribution sampling is considered to be the initial value of a in Equation (5), thereby influencing the calculation of crack growth. The material constants used in the NASGRO equation are listed in Table 1.
KA and KR are used to calculate superposition-based crack growth, and are obtained from two separate analyses. KA results from applied loading, whereas KR is associated with the initial residual stress field. Both can be determined by the weight function stress intensity factor algorithm [24], which can be expressed as follows:
K = σ π a h F ( a h , W , L , )
where ah is the crack half length, σ is the stress distribution when the region does not contain any cracks, F is the geometric correction coefficient of the cracked body, W is the width of the cracked body geometry, and L is the length of the cracked body geometry. Then, the total stress intensity factor is obtained by adding the stress intensity factors due to the applied load and residual stress.

2.2.3. Analysis of the Probability of Failure

Surface PRA is based on generalized stress–strength interference theory, with the stress intensity factor K denoting generalized stress and the fracture toughness KC denoting generalized strength. The limit state function is obtained by calculating the difference between the fracture toughness of the material and the stress intensity factor, as follows:
g = K K c
where KC is the fracture toughness of the material, K is the stress intensity factor of the component, and g is the limit state function.
For failure, the stress–strength interference model describes the probability of the generalized stress amplitude being greater than the generalized strength amplitude. Correspondingly, crack destabilization can occur, and fatigue fracture is judged as occurring when the stress intensity factor at the tip of the crack is greater than or equal to the fracture toughness, that is, when g ≤ 0; in such cases, the component is considered to fail, as shown by shading in Figure 4b. If the probability density functions of the generalized stress amplitude K and the generalized intensity amplitude KC are known to be f(K), and h(KC), respectively, the probability that KC is less than K for any stress amplitude K is given by the following equation:
F ( K ) = P ( g 0 ) = K h ( K C ) d K C
Since the generalized intensity is normally positive, the lower limit of integration can be taken as 0. From statistical theory, F(K) is a monotonic function of K and a random variable with the probability of occurrence f(K)dK. Therefore, the differential of the failure risk can be expressed using the following equation:
d p = F ( K ) f ( K ) d K
The risk of failure is obtained by bringing Equation (8) into Equation (9) and integrating, as shown below.
p n = P ( g 0 ) = K max [ K h ( K c ) d K c ] f ( K ) d K
where h(KC) and f(K) are the probability density distribution functions of fracture toughness and the stress intensity factor, respectively. The equation is usually solved via Monte Carlo simulation or numerical integration [35]. Simultaneously, the probability failure risk is calculated by combining the crack growth rate equation and stress intensity factor equation. In this study, via an integral-based method called the fast NI method [27,36], the probability of disk failure is computed while taking multiple variables into consideration, e.g., the initial defect size, the load, the crack growth velocity, and the fracture toughness. Since the research method in this study connects the manufacturing plan directly with the engineering plan, the analysis of random variables can be ignored here. In summary, the effect of potential defects on the safety of life-limited parts is assessed on the basis of the probabilistic failure risk. Specifically, the probabilistic risk assessment is adopted to address the low-cycle fatigue failure of life-limited parts with initial cracks introduced by surface features during manufacturing.
3. Method for Establishing a Database for Efficient Assessment

The relationship between the shot peening parameters and the surface PRA is established as a result of the effect of any residual stress on cracks, as shown in previous research. Therefore, a database can be used, replacing the performance of complex simulations to obtain the residual stress, and thereby achieving efficient calculation. This section first introduces the analysis of shot peening parameters and the simulation method employing multiple randomly distributed shots. Then, the method by which the database is established is introduced.

3.1. Determination of Shot Peening Parameters

The factors affecting shot peening can be characterized as belonging to the categories of either shot peening intensity or coverage. Shot peening intensity is usually measured using the arc height test method, and coverage is expressed as the multiple of shot peening time compared to the full coverage rate (98%). The parameters that affect shot peening intensity and coverage include the material, the diameter, the velocity of the shot, the time of shot peening, the hardness of the target [37], etc. Only some of the parameters of the shot peening mechanism are selected for analysis in this paper, since the focus is on method innovation. Furthermore, the relationship established between shot peening parameters and the risk of disk failure provides guidance on shot peening intensity and coverage in actual production. Specifically, the process by which shots hitting the target surface requires the consumption of kinetic energy to deform the target surface [38]. Based on the kinetic energy theorem,
E K = 1 2 m v 2
where EK is the kinetic energy, m is the shot mass, and v is the shot velocity, the velocity and mass directly affect the kinetic energy of a single shot. On the basis of the equation for mass, that is,
m = 4 3 π ρ R 3
where m is the mass, ρ is the shot density, and R is the shot radius, it can be seen that the calculation of shot mass is more affected by variations in radius R than by density. In addition, the range shot peen materials that can be selected is limited, since the target in this paper is titanium alloy. Therefore, the effect of shot material variation is not considered. In the future, the effect of shot material could be considered with respect to two aspects, density and mechanical properties, in addition to the introduction of surface defects and roughness to the target.
Moreover, it is necessary to consider the duration of shot peening. Different durations of shot peening are obtained by varying the number of shots, while maintaining a constant velocity of shots during the simulation [39].
Therefore, the velocity, diameter, and number of shots are taken as the key shot peening parameters for analysis and discussion in the following sections. The method proposed in this study is also applicable to the analysis of the more complicated and more numerous parameters relevant to the actual process.

3.2. Simulation Method of Shot Peening with Random Distribution of Multiple Shots

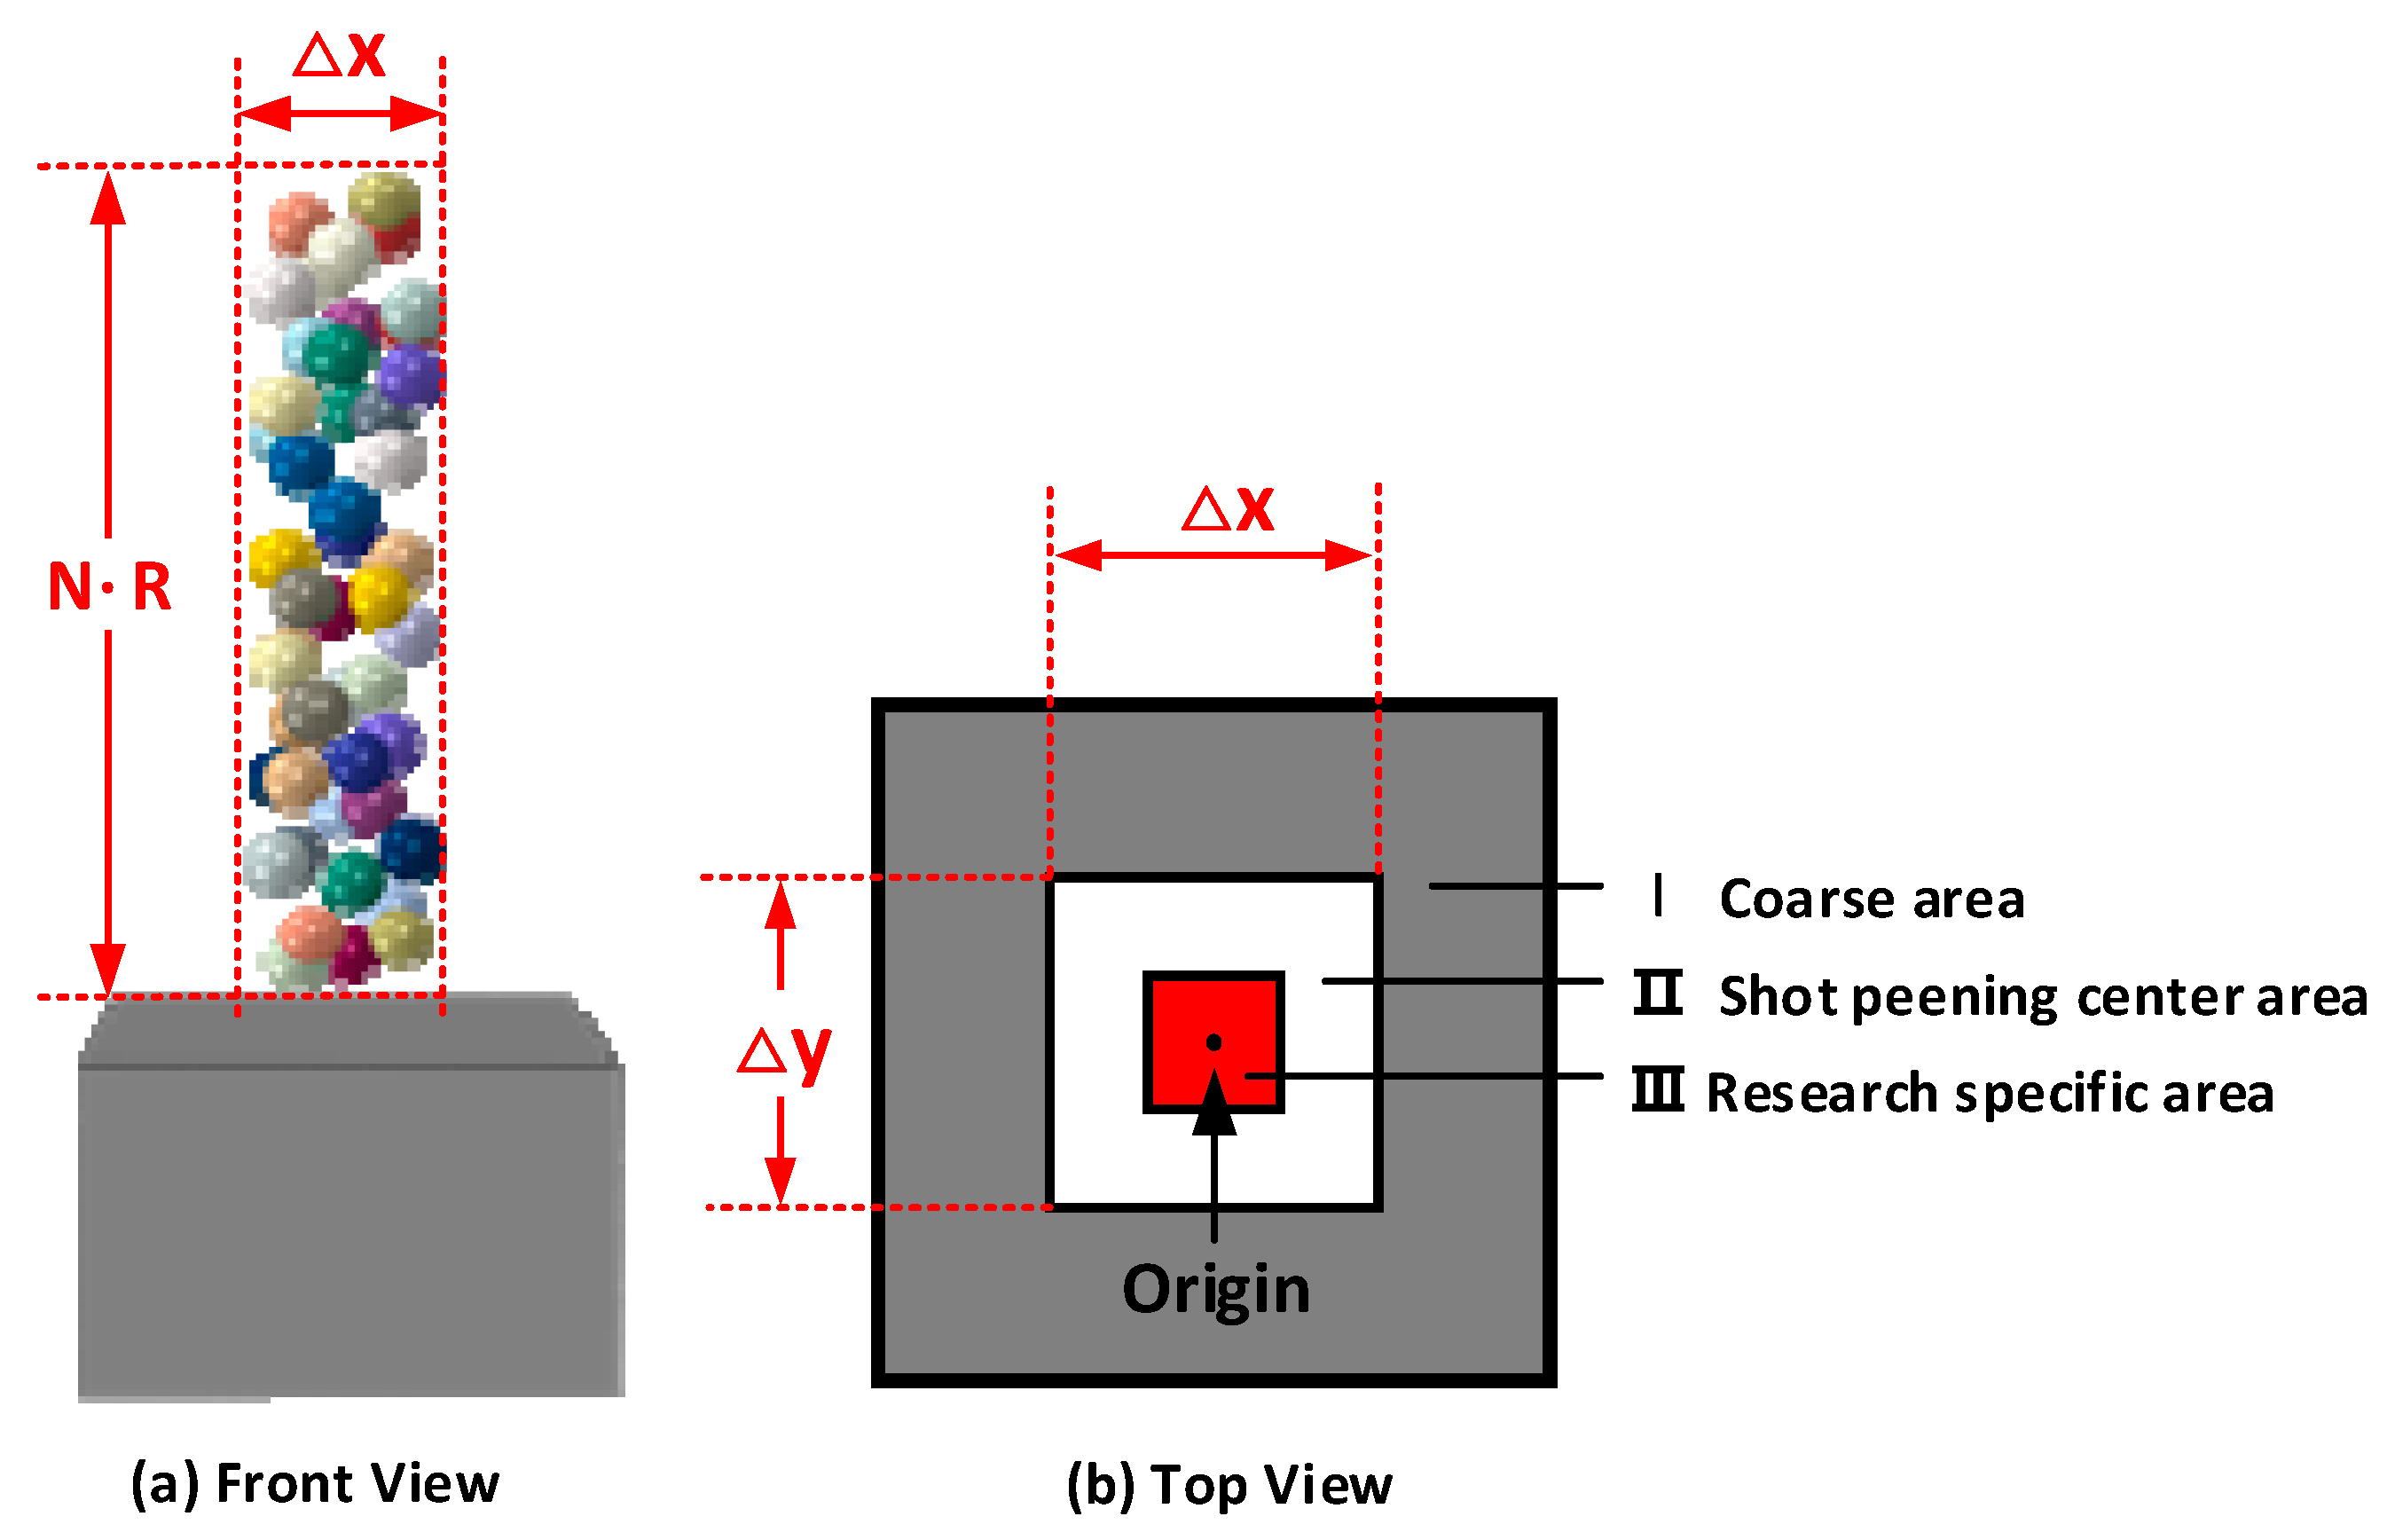
Numerical simulation of shot peening can be performed using the finite element method (FEM) in order to simplify the test and quickly determine reasonable shot peening parameters [40]. Notably, the effects of shot peening are determined by multiple random interactions of the shots considered, rather than the simple superposition of single shots. Therefore, in order for the simulation study to reflect the actual process, a random distribution model of multiple shot peening is elaborated, as shown in Figure 5. Specifically, a schematic diagram of the distribution considering the randomness of the shot position is shown in Figure 5a, and the range of the random distribution of the shot position on the target surface is presented in Figure 5b.
To simplify the simulation of shot peening, the following assumptions are employed in this study: each shot hits the material only once, and collisions between shots are ignored. The center of the shot peening center area is defined as the coordinate origin, and the initial positioning coordinates of n random shots are as follows:
{ x m i n < x i < x m a x y m i n < y i < y m a x   z m i n < z i < z m a x
where (xi, yi, zi) denotes the coordinates of the ith shot, and xmin, xmax, ymin, ymax represent the boundary of the sprayed area. The value of zmin is equal to the shot radius R, and zmax varies with the number of shots N employed, and is specifically equal to (N + 1)R. Specifically, the positioning coordinates (xi, yi, zi) of the random shots generated follow an algorithm, as shown in Figure 6. A random generator is adopted in the form of the “random” module in Python. Notably, the distance between any shots is controlled by the algorithm to be larger than the diameter in order to ensure independence.
After the establishment of the shot peening model, the calculation is performed by adding the corresponding boundary conditions. Klemenz [41] found that the average stress value in the shot peening area was closer to the test results when studying the effect of the incident sequence on the residual stress. Therefore, a similar method [41] is used in this study. Residual stress values at different depths are extracted by averaging the stresses in the specified shot peening area. Circumferential residual stress plays a major role in preventing the growth of type I fatigue cracks [26], which is important for analyzing the safety of life-limited parts. Therefore, the stress distribution in this paper is characterized as the average circumferential stress at different depths below the surface.

3.3. Method for Establishing the Database

The number, diameter, and velocity of shots are selected as key parameters, in accordance with the analysis in Section 3.1. A database is established with these key parameters as input conditions and the residual stress distribution obtained by shot peening simulation as the output result. In addition, the sensitivity pattern of the process parameters determined using the database is affected by variations in the material. Therefore, the database is established with the target and shot materials specified, but could be extended by adding material parameters as input variables in the future. The specific method flow is as follows.
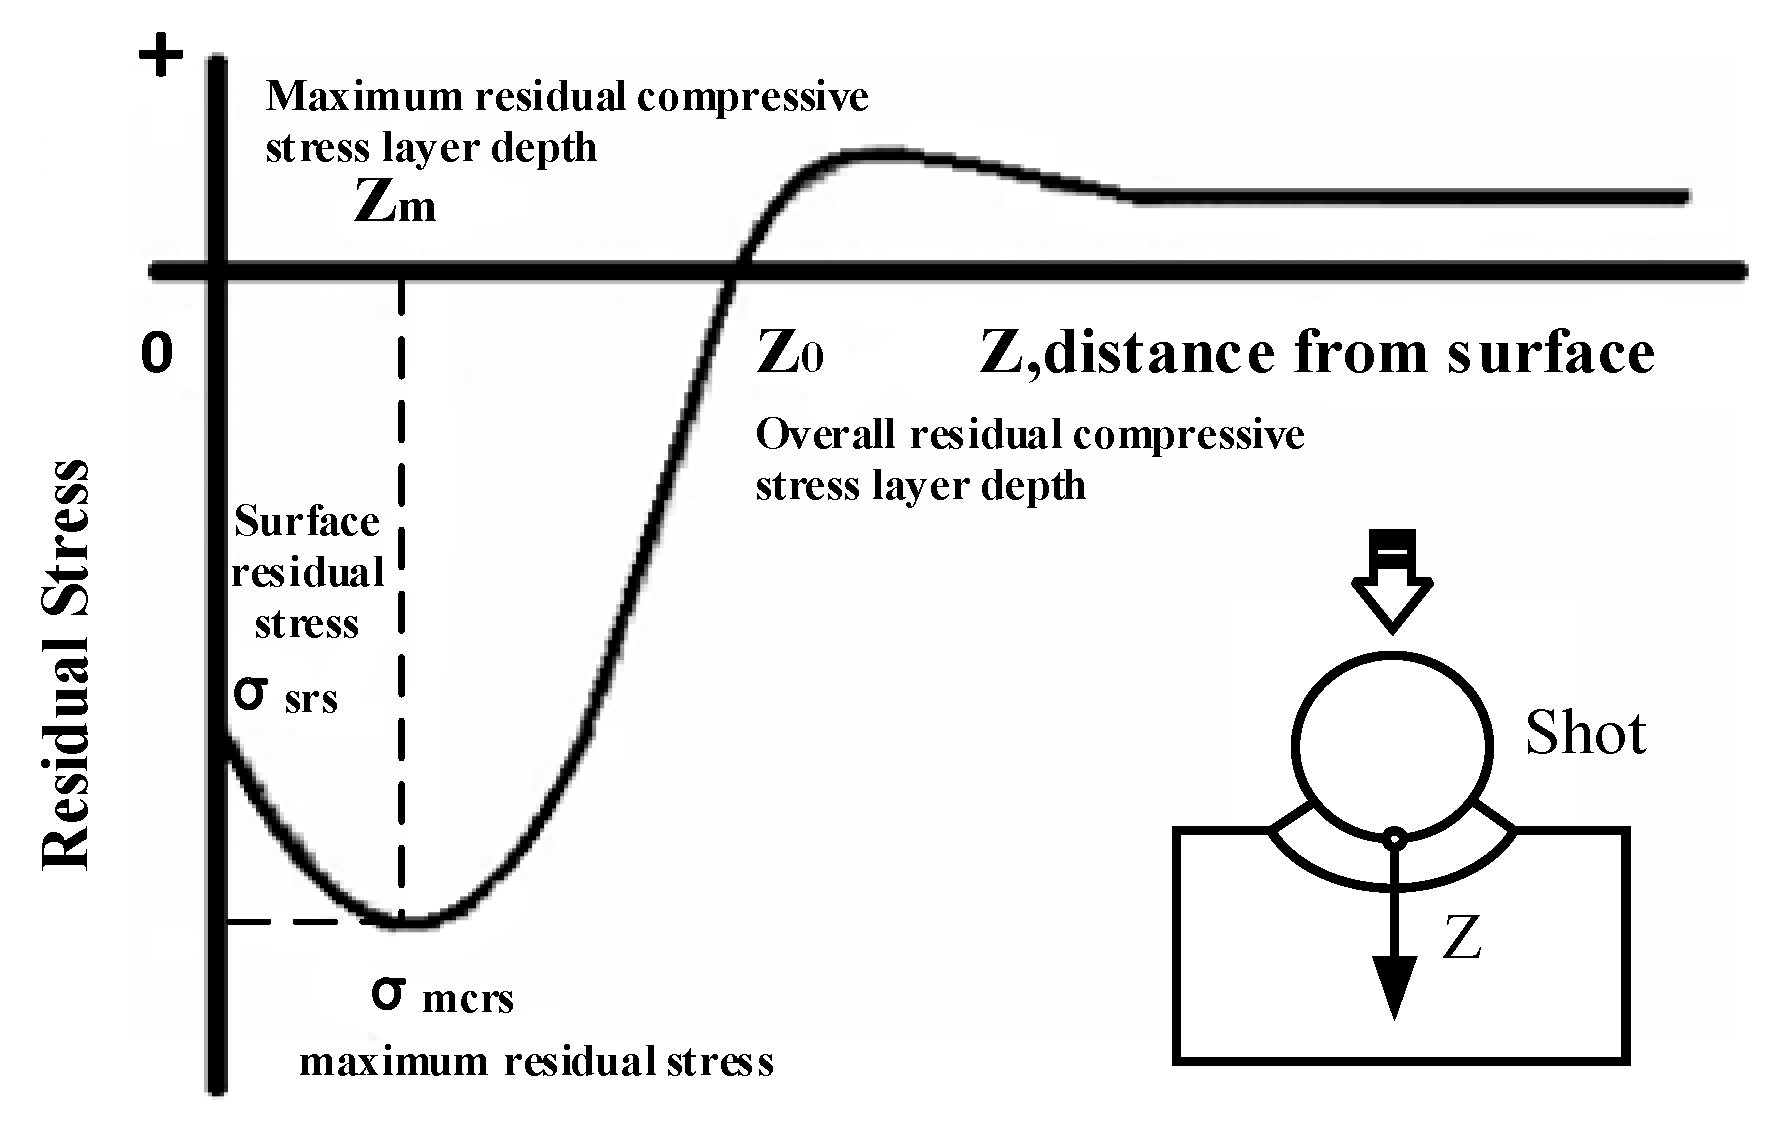
The response surface method (RSM) was selected to solve the difficulty whereby numerical simulation is not able to satisfy the efficiency requirements at all sampling points [42]. For most metallic materials, the distribution curve trend of residual stress produced by shot peening in the depth direction is shown in Figure 7. In the figure, σsrs represents the surface residual stress, σmcrs denotes the maximum residual compressive stress, Z represents the distance from the surface, Zm represents the maximum residual compressive stress layer depth, and Z0 is the overall residual compressive stress layer depth. As can be seen from the figure, the failure risk cannot be calculated on the basis of the residual stress on the surface alone, but rather using the curve as a function of depth.
Therefore, an innovative method is proposed to form the response surface model by fitting the residual stress curve using MATLAB code. Specifically, the response surface model between the key parameters and the coefficients of the residual stress fitting curve is fitted through the reasonable design response surface test. The response surface models of different key parameter ranges are summarized in a complete database, effectively providing residual stresses.
The curve is divided into two sections for fitting, in accordance with the form of the residual stress curve shown in Figure 7. The three curves with the best fitting properties when comparing numerous fitting curves were Rational 42, Fourier 3, and Fourier 4, as shown in Equations (14)–(16), respectively. The coefficients in the equations are fitted experimental coefficients for the independent variable x.
R a t 42 ( x ) = ( p 1 x 4 + p 2 x 3 + p 3 x 2 + p 4 x + p 5 ) / ( x 2 + q 1 x + q 2 )
F o u r i e r 3 ( x ) = a 0 + a 1 cos ( x w ) + b 1 sin ( x w ) + a 2 cos ( 2 x w ) + b 2 sin ( 2 x w ) + a 3 cos ( 3 x w ) + b 3 sin ( 3 x w )
F o u r i e r 4 ( x ) = a 0 + a 1 cos ( x w ) + b 1 sin ( x w ) + a 2 cos ( 2 x w ) + b 2 sin ( 2 x w ) + a 3 cos ( 3 x w ) + b 3 sin ( 3 x w ) + a 4 cos ( 4 x w ) + b 4 sin ( 4 x w )
In addition, Figure 8 shows a comparison of the variation of the fitting curves for the same number, diameter, and velocity of shots in order to compare the goodness-of-fit of the different curves. Specifically, the comparison is performed on the basis of the sum of squared errors (SSE), i.e., the sum of squared errors of the corresponding points of the fitted data y i ^ and the original data y i , as follows:
S S E = i = 1 N ( y i y ^ i ) 2
The closer the SSE is to zero, the better the model fitting is. Therefore, the Fourier 4 fitting curve is selected to fit the residual stress, on the basis of the SSE results. The first half, the curved part, uses the Fourier 4 curve form, as shown in Equation (16). The second half, the straight part, has a constant form. The first section of the curve is the focus, since the factor having the greatest effect on fatigue is compressive stress, which is greater in magnitude in the first section than in the second.
Fitting the functional relationship between the coefficients of the Fourier 4 curve and the shot peening parameters by selecting the appropriate test design points is the essence of the response surface problem. Specifically, the corresponding Fourier 4 curves are first fitted by residual stress from each of the experimental design points, including the number, diameter and velocity of the shots. Secondly, the coefficients of the Fourier 4 curve are extracted and summarized in a form corresponding to the design points. Finally, the relationship between each coefficient and the design point is fitted by the response surface, and is assumed to be as follows:
R i = f ( e 1 , e 2 , e 3 )
where Ri represents each coefficient (a0, a1, b1, a2, b2, a3, b3, a4, and b4) in the Fourier 4 curve; and e1, e2, and e3 represent the parameters of the number, diameter, and velocity at the experimental design points of the RSM.

3.4. Cumulative Method and Method of Using the Database

The first step of the cumulative method is to fit the shot peening parameter range using the RSM. Simultaneously, the relationship between the key parameters and the coefficients of the residual stress fitting curve is extracted. Secondly, a sub-database is established with key parameters as the input and residual stress distribution as the output within this range. Finally, the sub-databases are summarized in a complete database using different parameter ranges, which is convenient for the subsequent rapid calculation of failure risk.
The method of calling the database to calculate the probability of failure risk is as follows. First, the corresponding database is determined on the basis of the range of the shot peening parameters. Then, the parameters of the mathematical model in the database are extracted in order to obtain the coefficients of the residual stress fitting curve. In this paper, the residual stress curve called from the database is used for surface PRA.

4. Typical Case for the Modified Surface PRA Process with Database

In this section, a general database is established for a typical case using the method described in Section 3, and the probabilistic failure risk is calculated based on the database. Specifically, the residual stress required by the database is initially introduced, which is obtained using the simulation model. Then, the sub-database model is summarized into the corresponding situation using RSM, and the accuracy is verified. Finally, the probabilistic failure risk of the typical case is calculated based on the modified surface PRA.

4.1. Simulation Model of Shot Peening with Random Distribution of Multiple Shots

4.1.1. Material Model

Shot peening is a highly nonlinear transient dynamic event, and the present work employs ABAQUS/Explicit to simulate the collision between the shot and the structure [43]. For dynamic mechanical problems with high degrees of deformation and high strain rate, many strain-rate-related material models have been proposed to describe the dynamic deformation behavior of metallic materials [18]. In particular, the Johnson–Cook (J-C) model is widely utilized, due to its simple form and low number of parameters, and the fact that it can easily be obtained by fitting experimental data [18]. The J-C constitutive model is expressed as follows,
σ y = ( A + B ε p n ) ( 1 + C ln ε ˙ ) ( 1 T m )
where A, B, n, C, and m are the material parameters. Specifically, A denotes yield stress, B denotes the power index factor, n denotes the hardening factor, C denotes the strain rate sensitivity factor, and m denotes the temperature sensitivity factor. εp is the equivalent plastic strain, ε ˙ is the dimensionless equivalent plastic strain rate, and T is the dimensionless temperature. The parameters of the J-C constitutive model of Ti6Al4V employed in this paper are presented in Table 2 [43]. In addition, the basic material mechanical parameters of the Ti6Al4V target are shown in Table 3 [43]. Therefore, the material properties of the target are defined on the basis of relevant parameters in ABAQUS.
The shot is assumed to be a rigid body and automatically meshed, due to the high hardness of the shot material and the fact that its mechanical response is not the focus of this study. Common materials for shot include cast iron, cast steel, stainless steel, glass, and ceramic. Cast steel shot is used for methodological research [44], and its basic mechanical properties are shown in Table 4.

4.1.2. Geometric Model

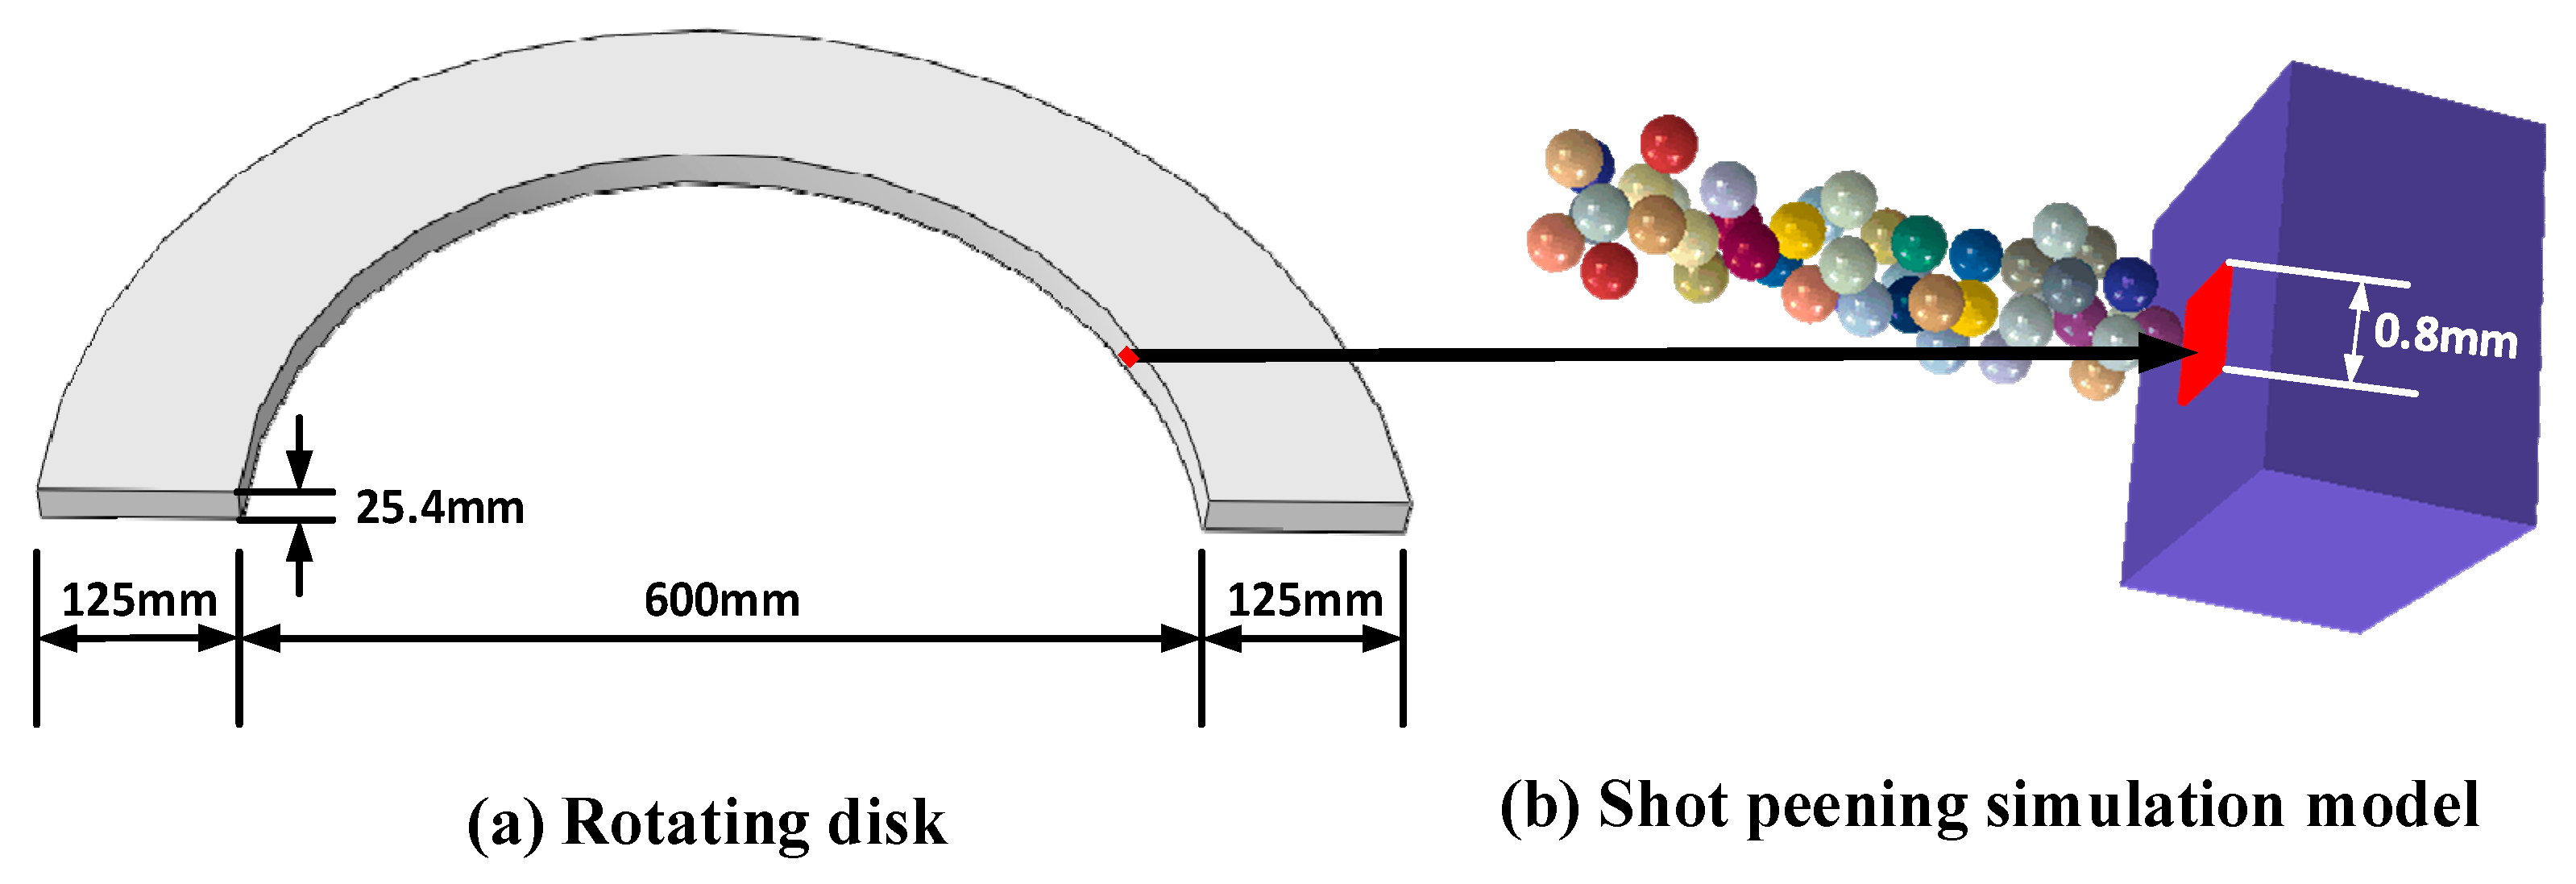
A simplified hollow disk model with equal thickness is selected in this study as the research structure, as shown in Figure 9a. The equal-thickness disk has an invariance of stress along the circumferential direction at the same radius with rotating load. Therefore, the shot peening simulation model can be simplified to become small in size, since the focus is on the variation in residual stress along the depth direction. Furthermore, the variation in the curvature of the shot peening model compared with the disk thickness of 25.4 mm is very small; thus, the sample shape can be simplified to a flat surface, as shown in Figure 9b. For other more complicated geometric structures, it would be necessary to adjust the sample size and shape accordingly.
In addition, the random distribution of multiple shots is implemented through the secondary development interface provided by ABAQUS, as shown in Figure 9b. The algorithm used to generate the random distribution of shots is described in Section 3.2.

4.1.3. Mesh Information

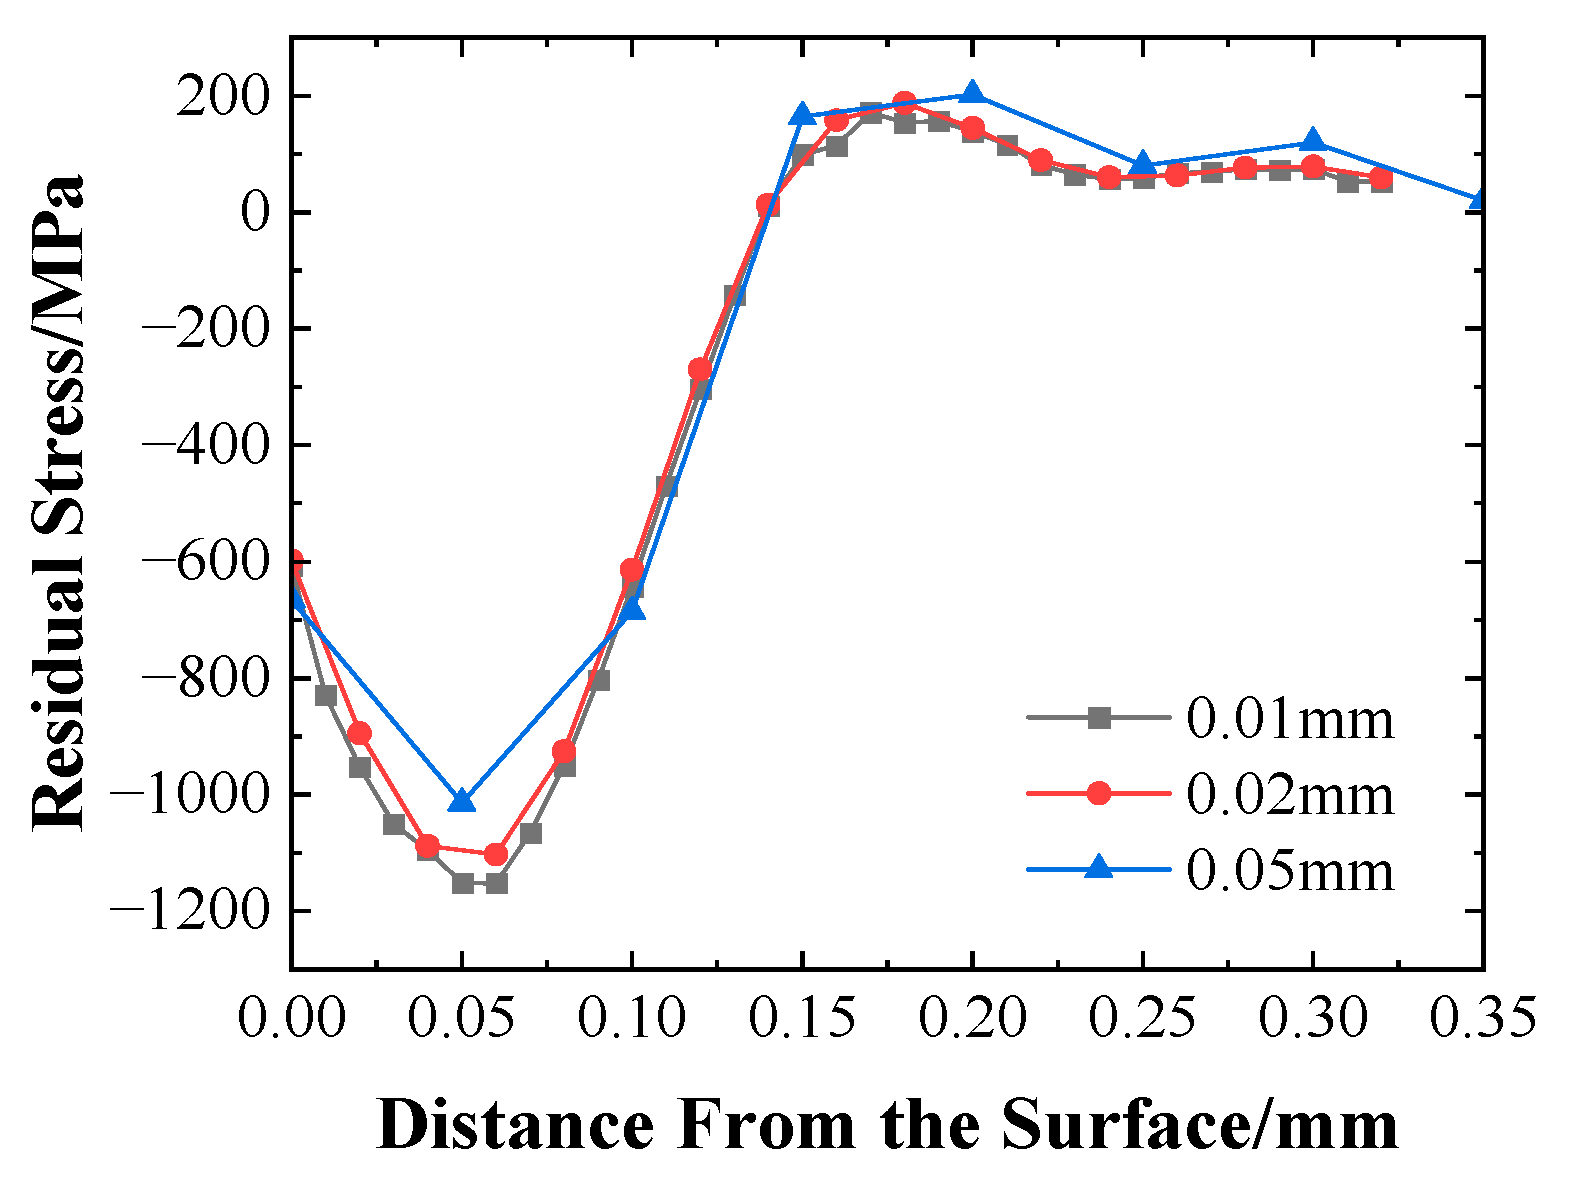
The target surface is divided into three parts for meshing, in consideration of calculation efficiency and accuracy, as shown in Figure 10b. Area I is the coarse area, with a size of 1.5 mm × 1.5 mm; area II is the shot peening center area, with a size of 0.6 mm × 0.6 mm; area III is the specific area under study, i.e., the post-treatment residual stress area, with a size of 0.4 mm × 0.4 mm. The mesh element type is C3D8R, and convergence analysis is performed on the refined mesh of the area under study, as shown in Figure 11. Specifically, the variations in residual stress at different depths required for the calculation of probabilistic failure risk are integrated by averaging the residual stress on all meshes at the same depth within the study area. Therefore, the variation of residual stress with depth is adopted for evaluation during the mesh convergence analysis by plotting refined meshes of different sizes—0.01 mm, 0.02 mm, and 0.05 mm—in area III for comparison. As shown in the figure, accuracy and efficiency can be satisfied with a grid size of 0.02 mm, which also satisfies the necessity of controlling the hourglass problem [45]. Correspondingly, the mesh sizes of the shot peening center area and the coarse area are roughened to 0.06 mm and 0.1 mm, respectively.
The meshing of the shot is shown in Figure 10a. A 0.02 mm C3D8R mesh is used for the automatic mesh division of the shot, as the mechanical response of shot is not the research focus.

4.1.4. Boundary Conditions

The normal displacement of the four sides of the target, the normal displacement, and the rotation of the bottom surface around three axes are constrained according to the real situation. The shot is assumed to be rigid, and the elastic–plastic deformation of the shot is not considered in the finite element model, due to its high hardness and lack of focus. In addition, the shot peening generates force when the shot hits the target surface at a certain velocity; thus, the boundary conditions of the shot include a certain initial velocity.
The kinematic contact model provided in ABAQUS/Explicit is adopted to define the interaction between the shot and the target. Specifically, the shot surface is the master contact surface, and the target is the slave contact surface. In addition, Coulomb friction is used to determine the relative motion between the shot and the target, and the friction coefficient is set at 0.2 [46].

4.1.5. Model Validation

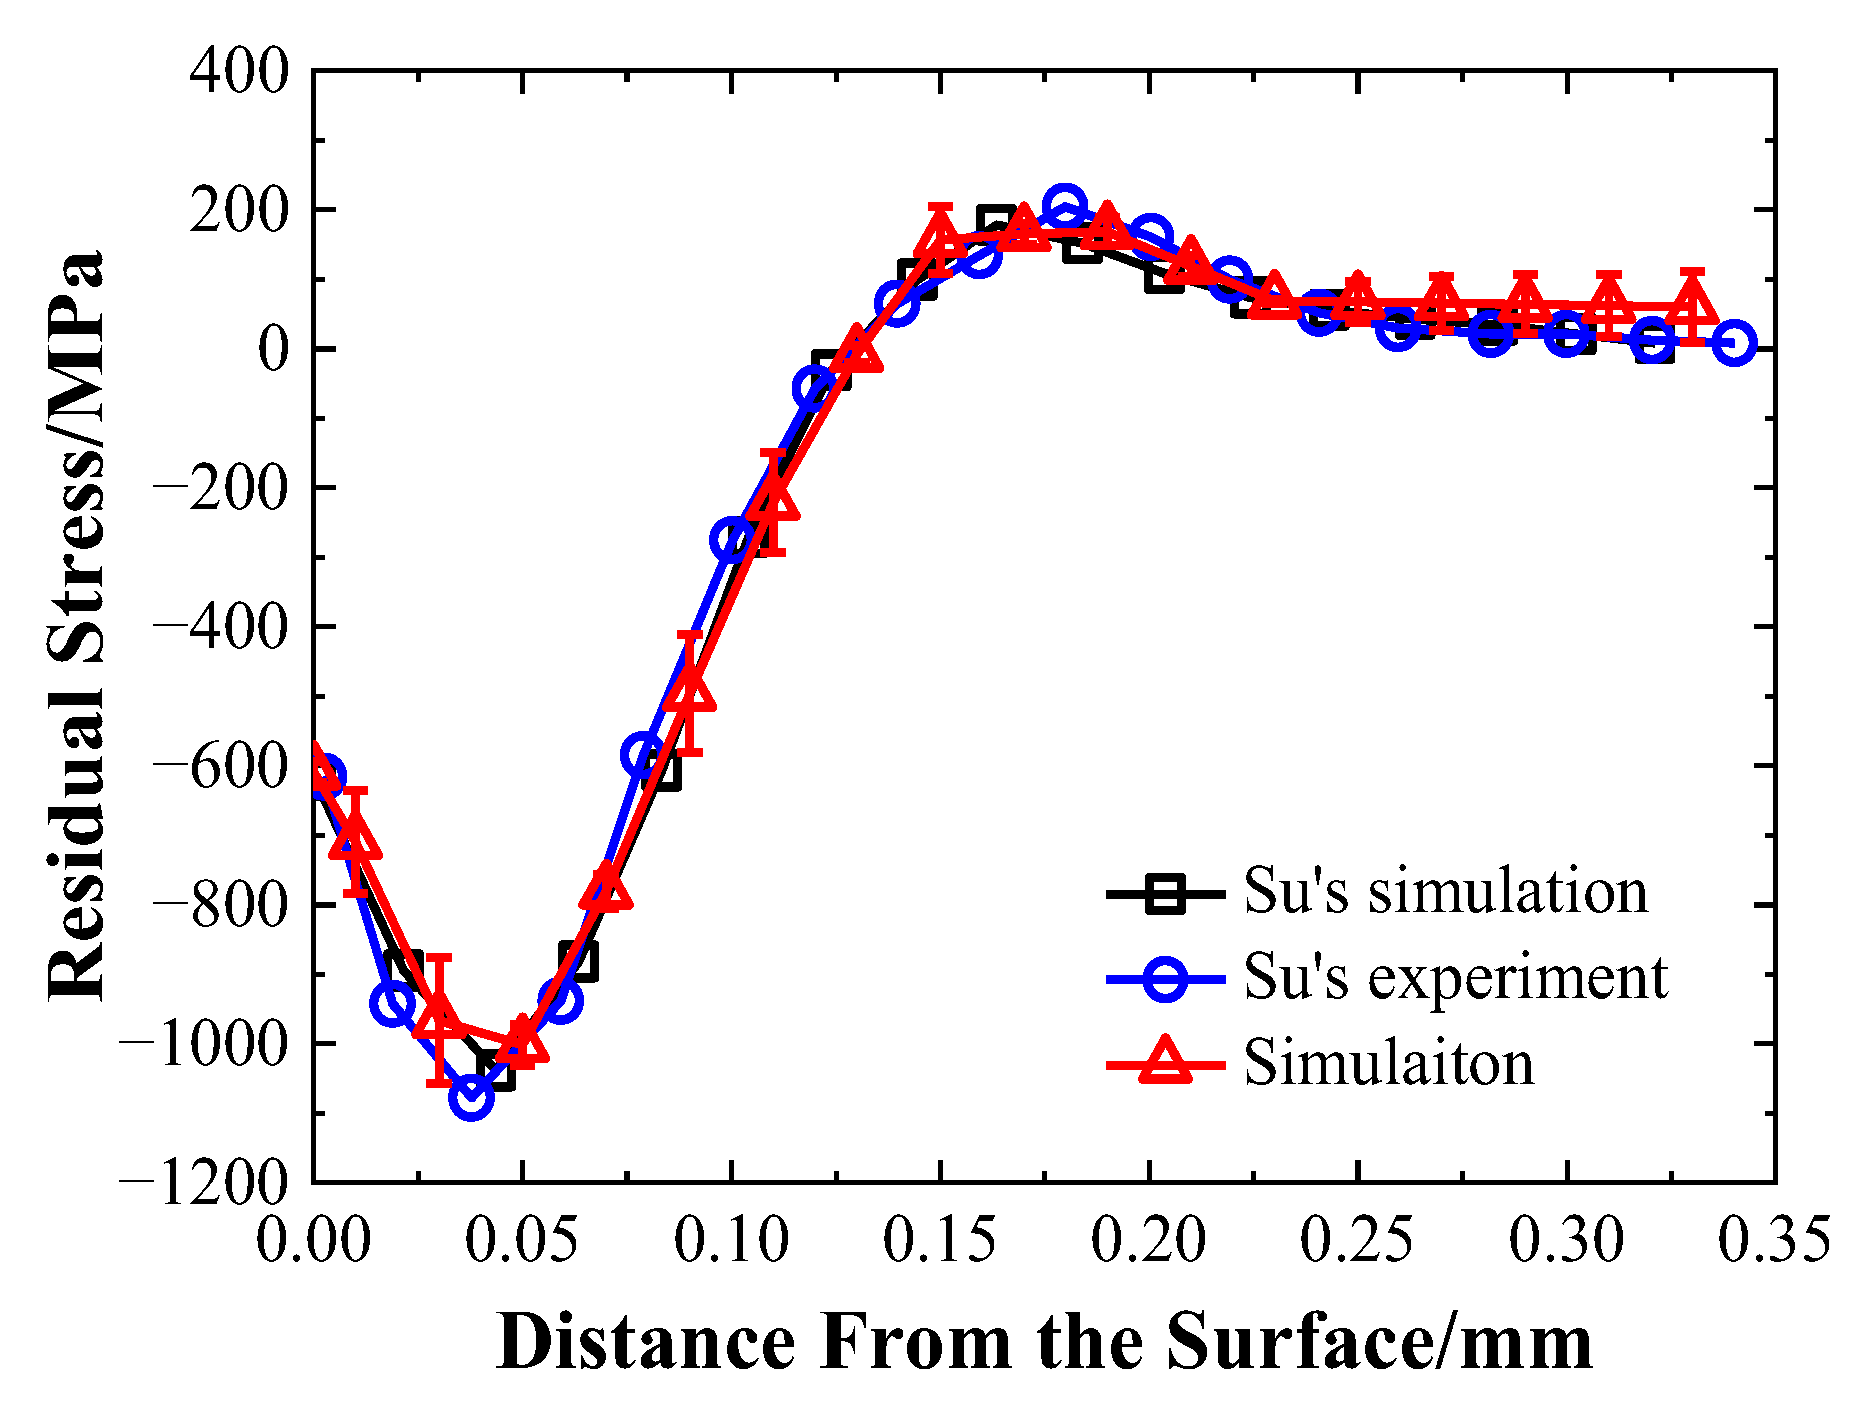
The accuracy of the finite element model of shot peening employed in this study is compared with the results presented in Su’s [18] work, as shown in Figure 12. The simulation method used by Su is similar to that used in this study, where a shot peening model is established that uses a random distribution of multiple shots for simulation. Moreover, the reliability of the simulation model is verified by experiments with detailed parameters.
Figure 12 presents a comparison between the results obtained using the established finite element model of shot peening, and the simulation and experimental results reported in [18]. As can be seen in Figure 12, the simulation results and the experimental results are in good agreement. The value of compressive residual stress obtained in the experiment is higher than that determined via simulation, and the depth of the residual compressive layer is greater. The main reasons for these errors are as follows: First, the contact between the shots was ignored in the simulation analysis, causing the number of shots hitting the target to be significantly lower than in the case of the experiment. Second, the shot peening was characterized in the experiment by measuring shot peening intensity, whereas in the simulation this was calculated on the basis of the parameters using an empirical formula. In summary, the simulation model used in this study can adequately predict the residual stress distribution in shot peening, which is then used to calculate the probability of failure.

4.2. Database Model

The method for establishing the database described in Section 3 is applied for the shot peening model. A case of a sub-database based on certain ranges [47] is presented for the subsequent analysis, with similar sub-databases for other ranges. Notably, the sub-databases are most suitable for use in their respective ranges, and can be implemented in any combination. The ranges of shot peening parameters used are shown in Table 5, and a three-factor, three-level test case is designed.
Specifically, 17 groups of designs with three factors and three levels are obtained. A previously validated simulation method is adopted for the 17 groups of designs, due to the cost of performing shot peening experiments and measuring residual stress with depth. Then, the Fourier 4 curve coefficients fitted from the simulation results are used as response values, as shown in Table 6. The relationships between the coefficients of the Fourier 4 curve and the shot peening parameters are shown in Appendix A.
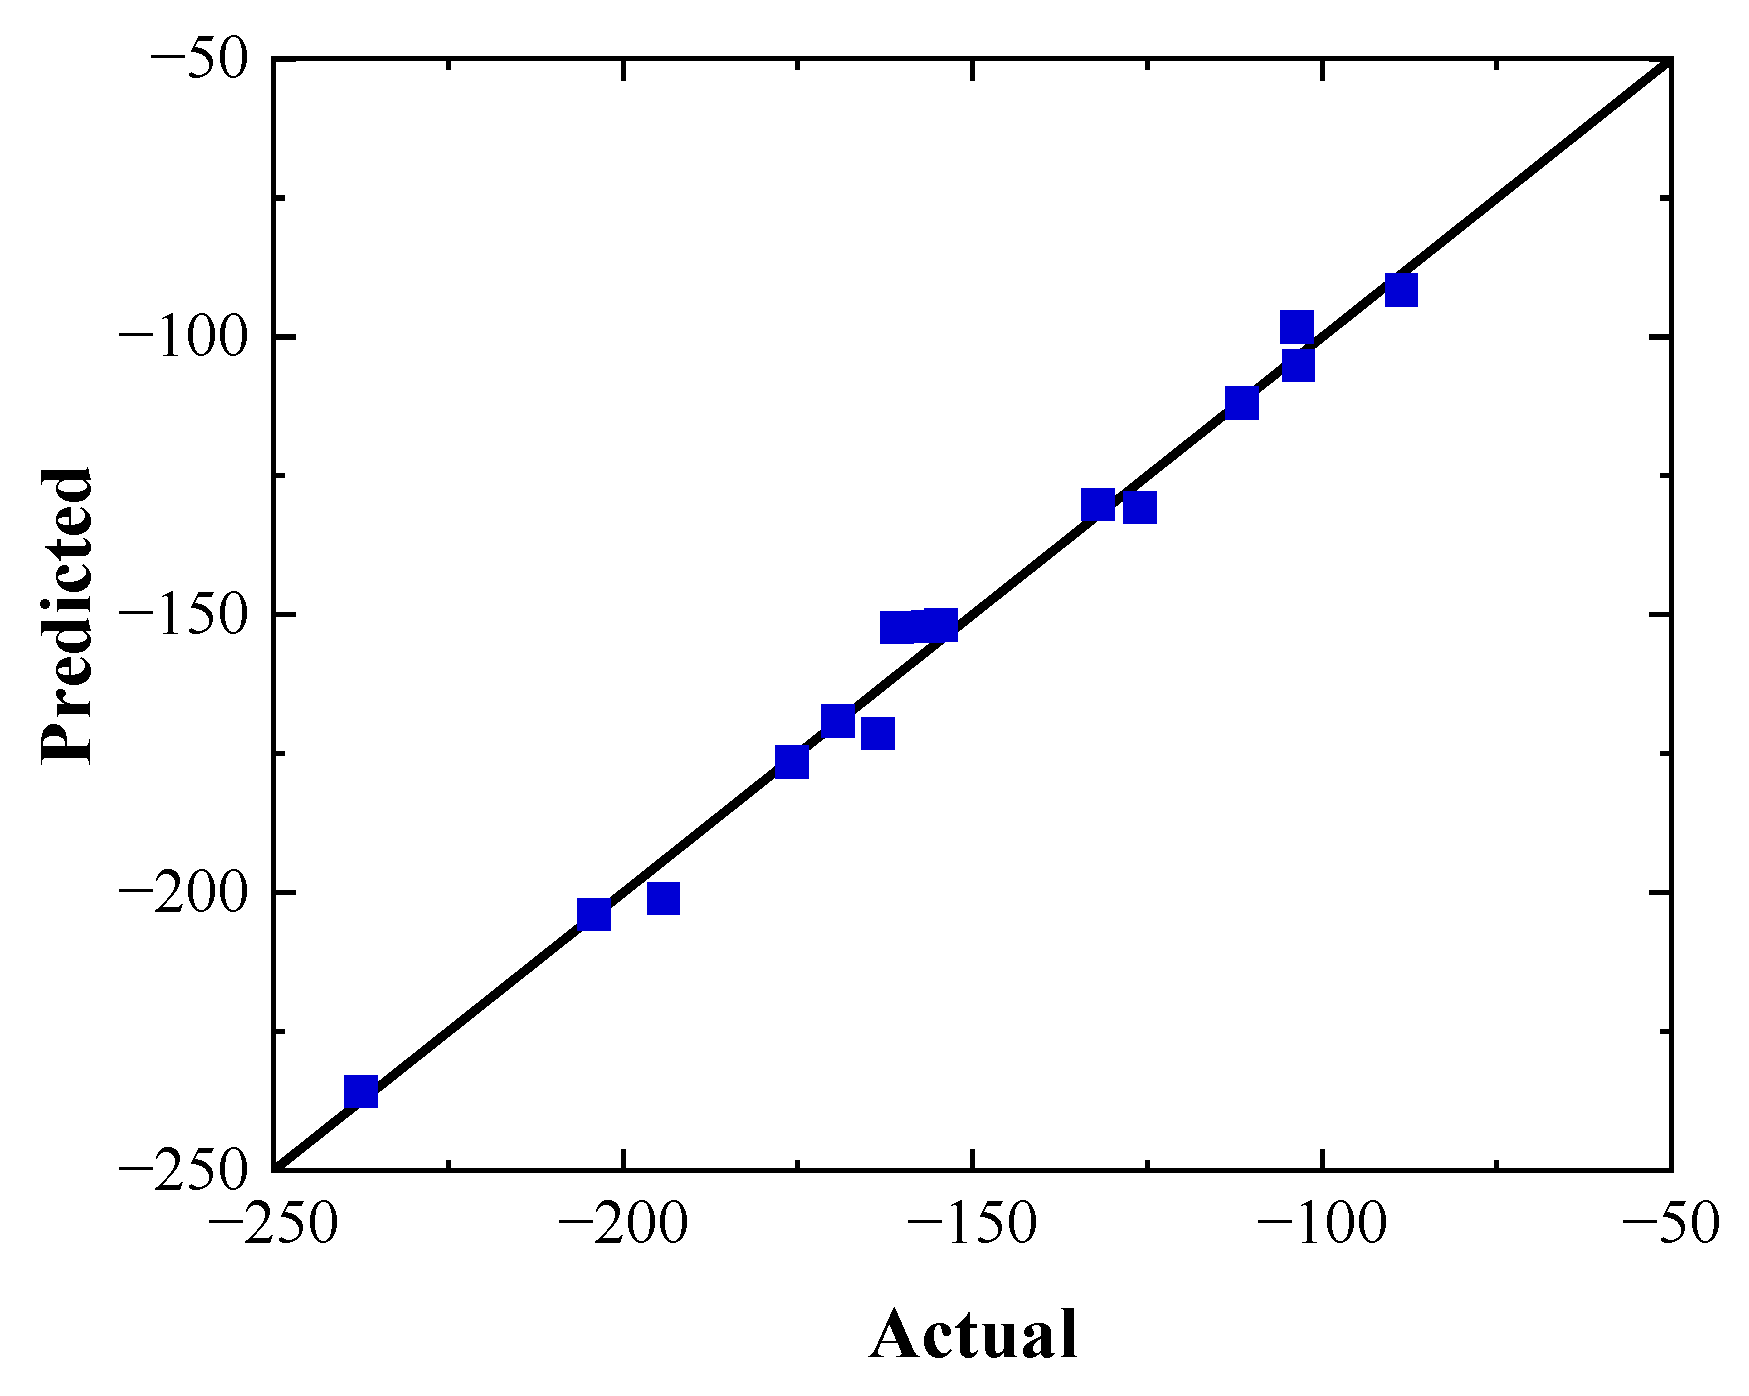
The fitting degrees of the parameters are shown in Figure 13, exemplified by a0. The normal probability distribution of the residual consists of a straight line, which proves the good adaptability of the model. In addition, the relative error between the results obtained using the response surface model and those obtained using the simulation is determined in order to ensure the usability of the subsequent studies, as shown in Figure 14. The average relative error between the results calculated using the response surface model and those using the simulation is 5.3% for the curve parameters. Therefore, the mathematical model established by RSM is reliable and reasonable. Finally, the mathematical model established using RSM is summarized in the form of a sub-database under this parameter range.

4.3. Probability of Failure in the Typical Case Based on the Database

This section initially presents the input data required for the typical case, followed by the calculation process and the results obtained when calculating the probabilistic failure risk.
The essential inputs for the modified surface PRA are the basic material database and the special material database, which contain reference material properties, stress distributions, and initial defect distributions. The assessment performed in this study does not incorporate the nondestructive inspection performed during in-service maintenance. According to the published defect distribution data [4], presented in Figure 2, the defect can be analyzed as a crack. Specifically, crack propagation analysis was carried out for the most dangerous point on the surface and at the deepest point of the semicircular defect. The change of defects caused by shot peening and the impact caused by excessive shot or velocity is ignored, since the aim of this paper is mainly a methodological study to directly connect with risk assessment through shot peening. Hence, the stress distribution and material property are introduced in detail as follows.
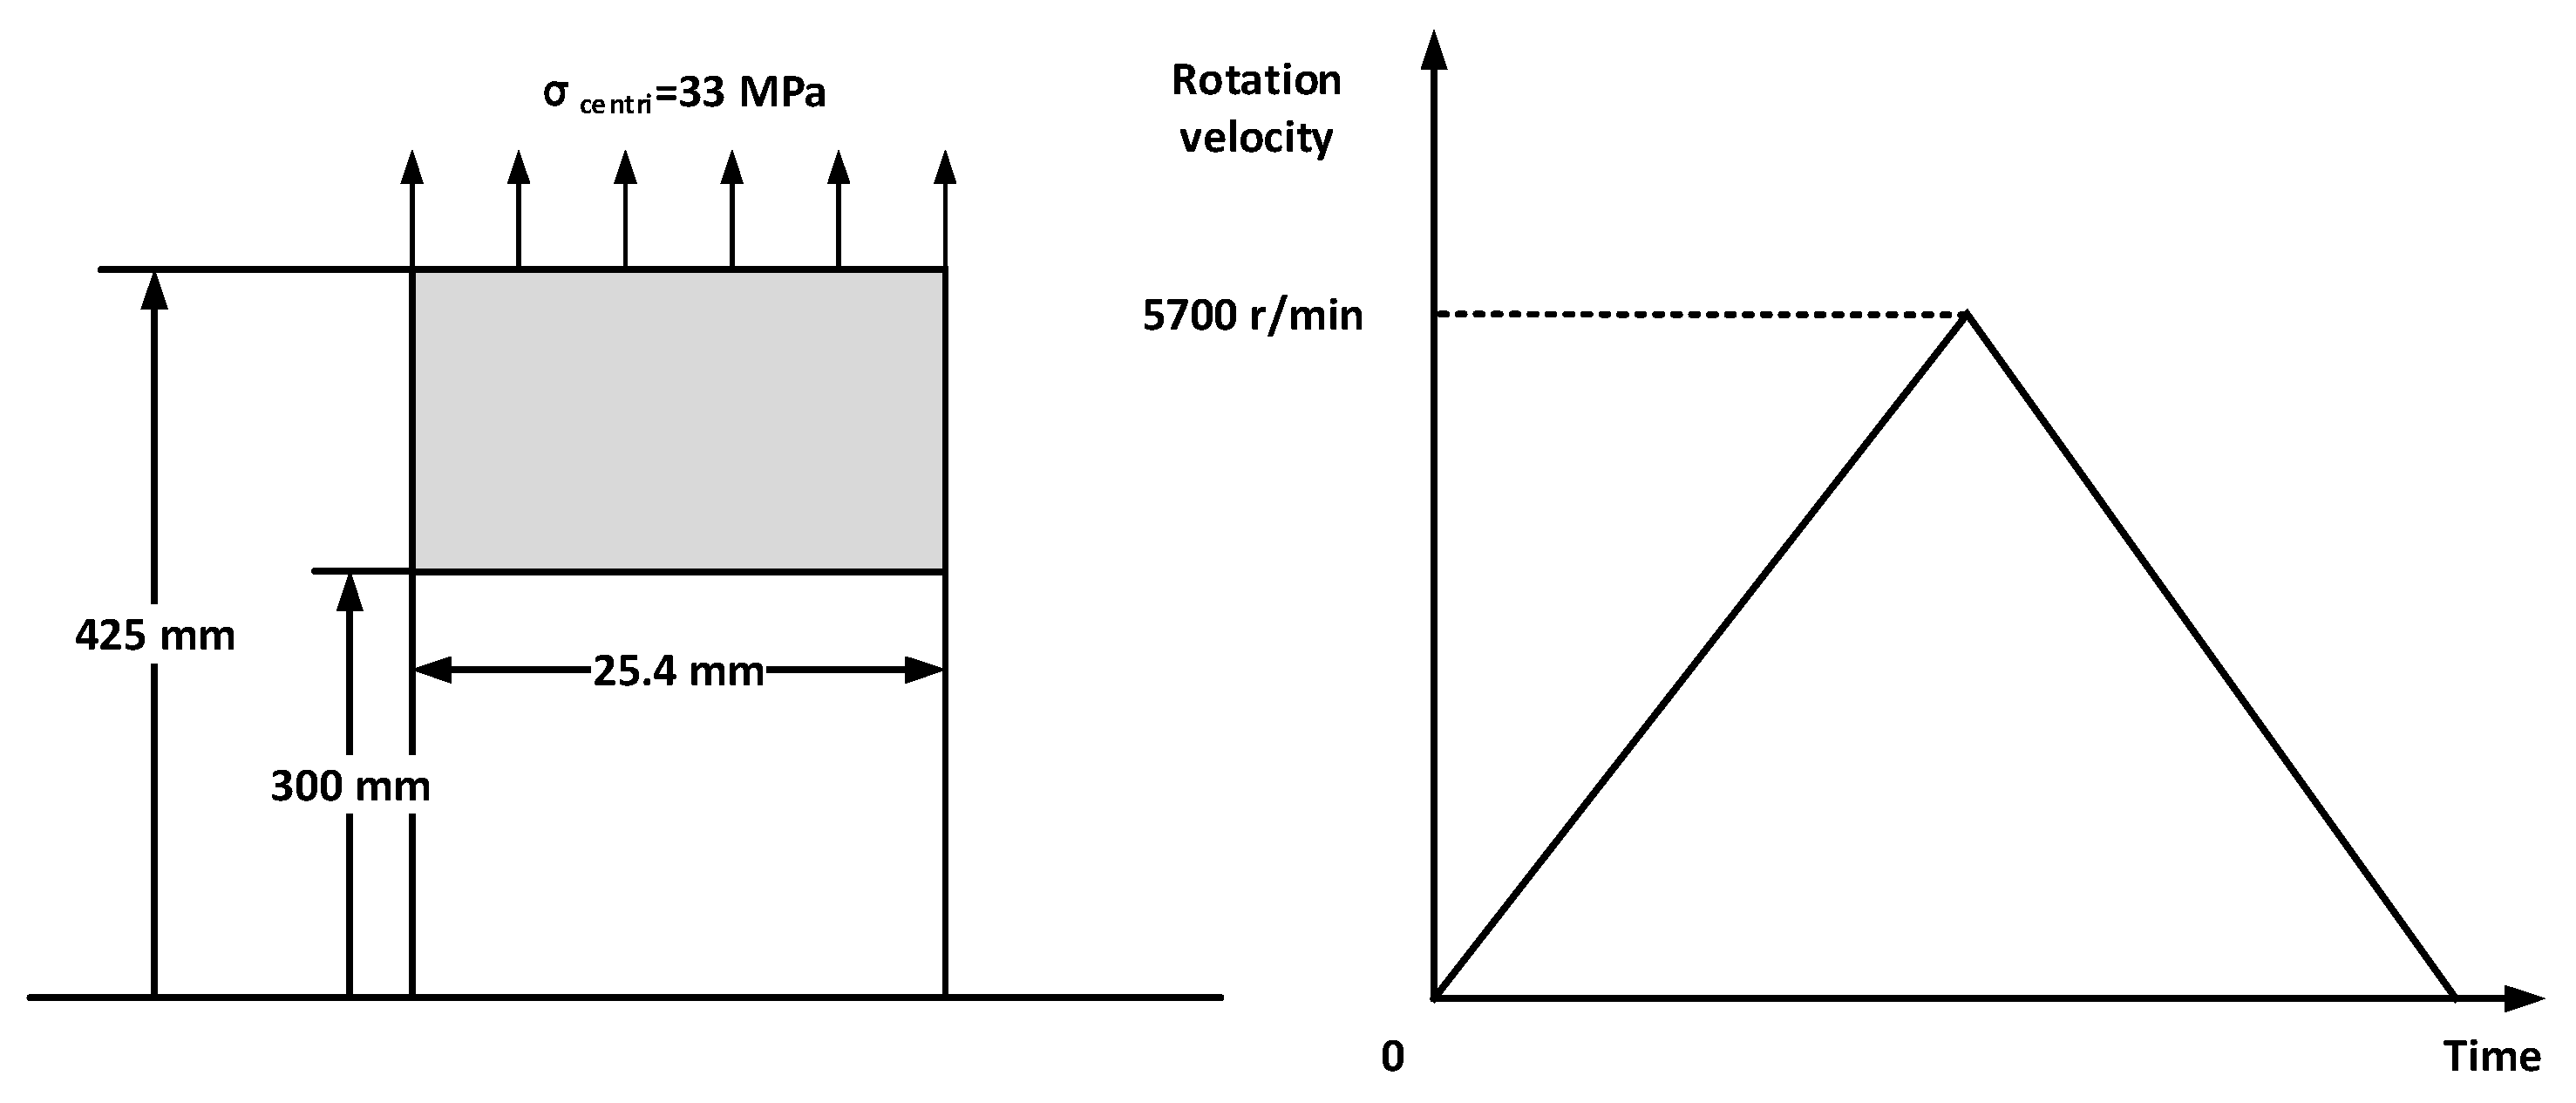
As can be seen from the evaluation process in Figure 1, the probability of failure after shot peening is considered in conjunction with the working stress distribution of the disk. Specifically, the working stress on the equal-thickness compressor disk is generated in two parts, as shown in Figure 15. The first is the centrifugal stress generated by rotation, which occurs at a maximum speed of 5700 r/min, and the second is the centrifugal force on the peripheral blades, with a magnitude of 33 Mpa, directed radially outward along the disk [21]. The characteristic stress is determined using ABAQUS, as shown in Figure 16.
The stress in the thickness direction remains substantially unchanged, and the maximum stress in the disk is employed in order to realize a conservative analysis. Notably, it is necessary to consider the effect of the tensile stress generated by the disk nullifying the residual stress from shot peening on the probability of failure. Specifically, the nullifying effect is considered by calculating the working stress intensity factor and the residual stress intensity factor separately. In other words, the probability of failure is calculated by superimposing both stress intensity factors, thus taking into account the effect of centrifugal stress on the residual stress in the disk. A group of shot peening parameters (number: 70; diameter: 0.3 mm; velocity: 70,000 mm/s) are selected in order to obtain the fitted residual stress curve from the general database, as follows:
f ( x ) = 152.93 353.00 cos ( 1.03 x E 4 ) 140.02 sin ( 1.03 x E 4 ) 171.69 cos ( 2.06 x E 4 ) 261.50 sin ( 2.06 x E 4 ) + 5.90 cos ( 3.09 x E 4 ) 192.58 sin ( 3.09 x E 4 ) + 52.13 cos ( 4.12 x E 4 ) 65.30 sin ( 4.12 x E 4 )
where x represents the depth from the surface. The residual stress curve is used as the input condition for surface PRA calculation.
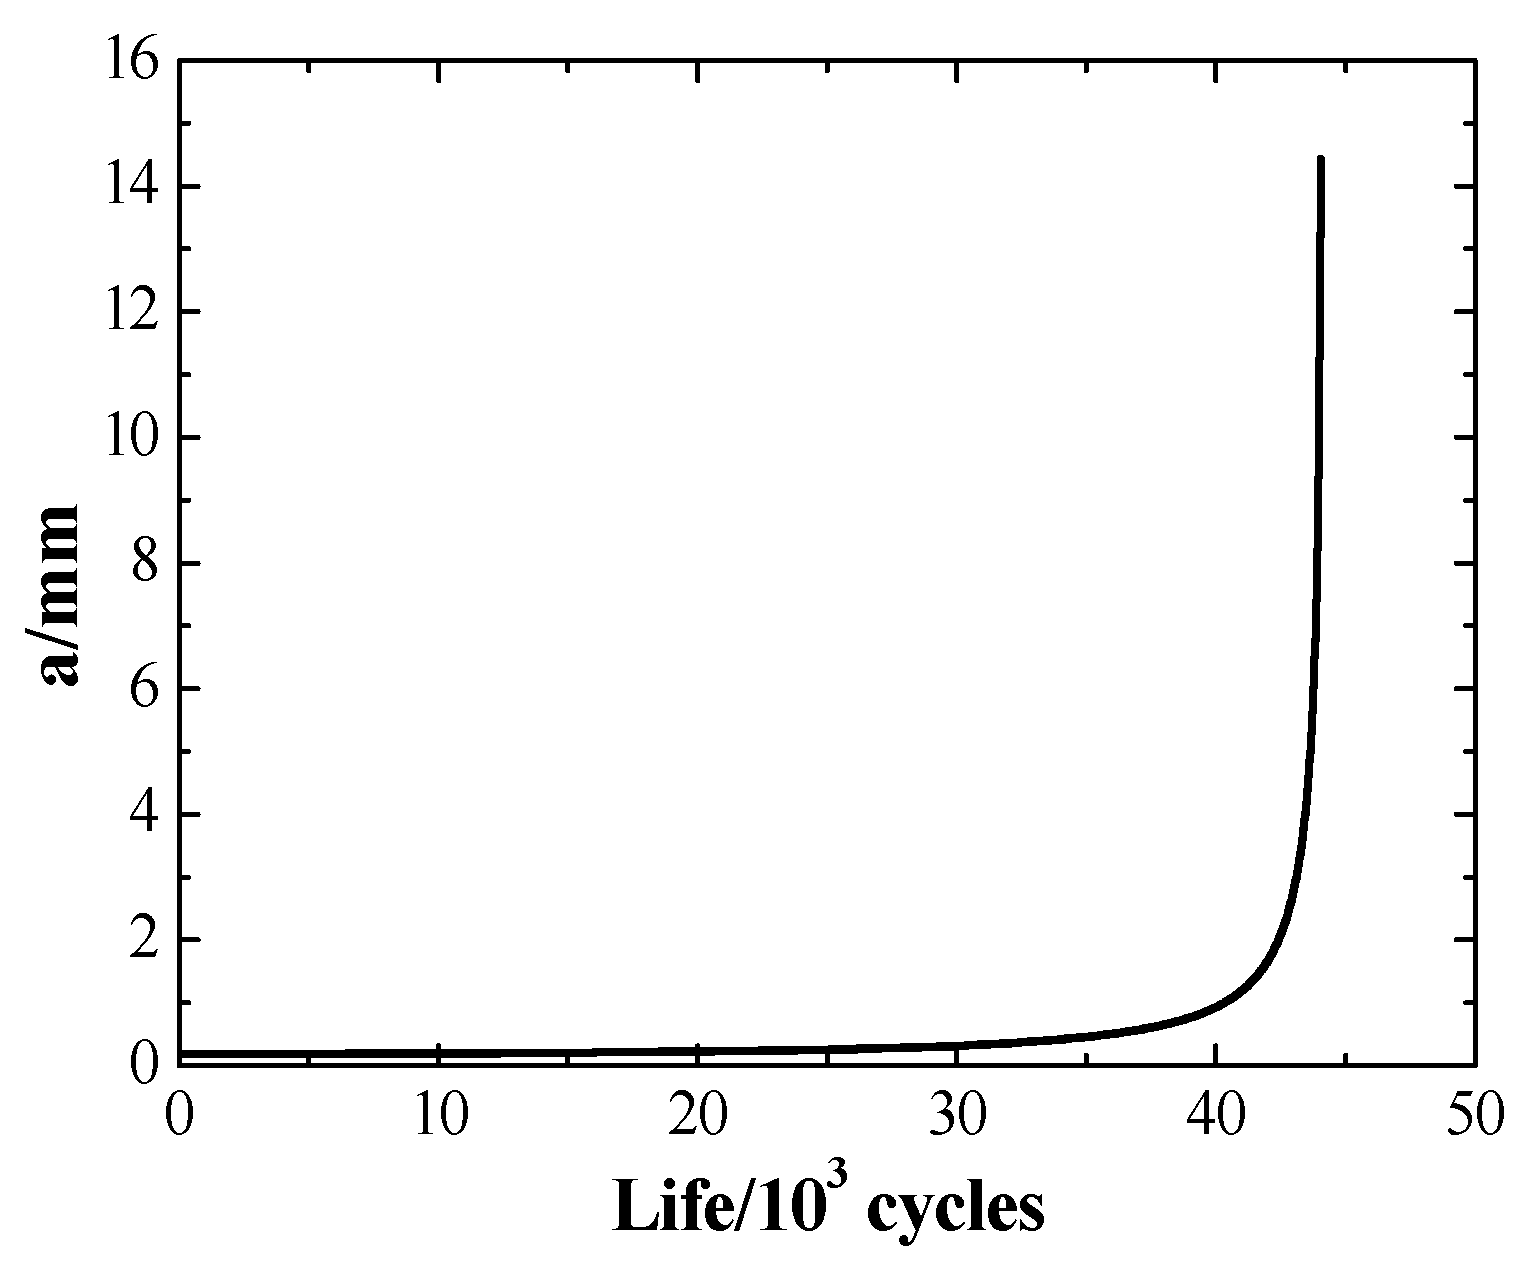
The SIFs are calculated using the universal weight function method, which is able to take the residual stress distribution into consideration [26]. The compressive residual stress in the shot peening results in a negative value of KR at the initial crack tip, whereas KR rises rapidly to zero along the crack propagation path due to the residual tensile stresses around the crack. In comparison with KA, KT is reduced, due to the superposition of KR. Therefore, the NASGRO is used while considering residual stress to calculate the residual stress required in order to reduce the propagation rate of cracks during shot peening and to increase the fracture flight cycles (Figure 17).
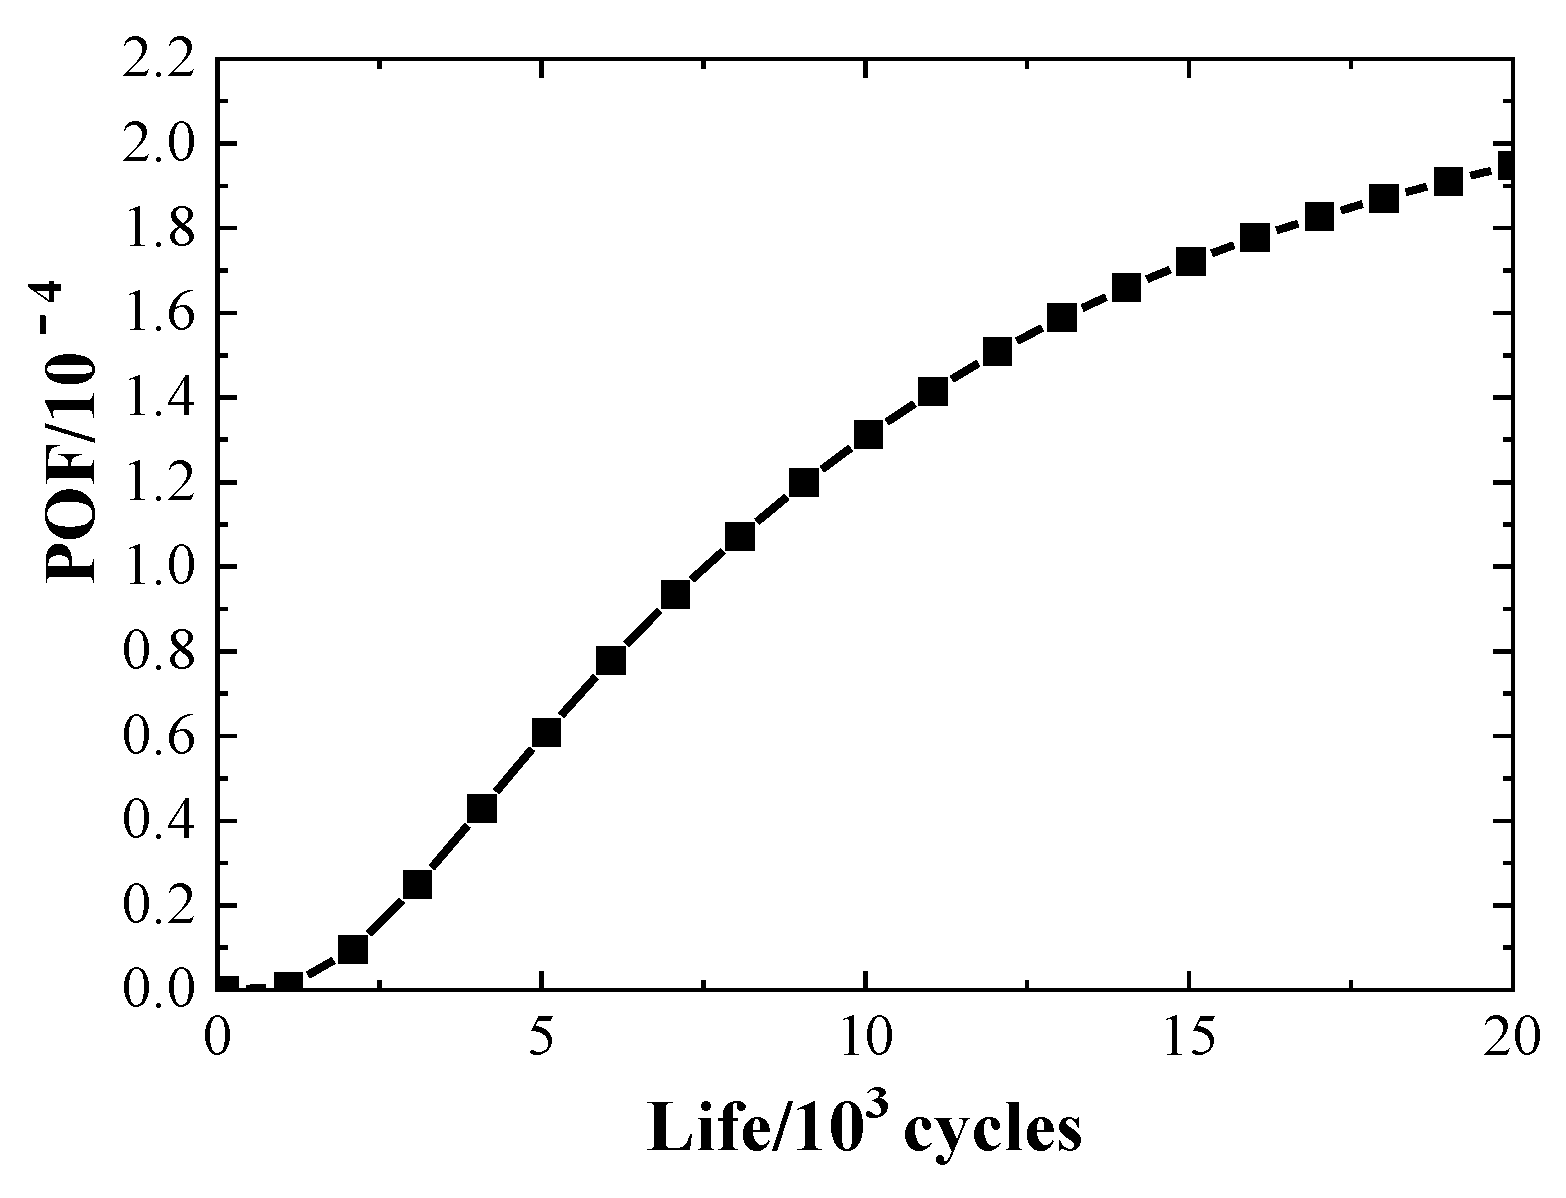
The crack propagation rate and stress distribution obtained from shot peening parameters are taken as the input of the surface PRA, and the the POF results for a typical case are presetned in Figure 18. The sensitivity of failure risk to the key parameters is determined by comparing the percentage changes in the POF with different combinations.

5. Results and Discussion

In this paper, a modified surface PRA taking efficient consideration of shot peening parameters is proposed, with the purpose being to rapidly determine the key manufacturing parameters from the perspective of probabilistic failure risk, thus providing guidance for design. Consequently, efficiency and sensitivity will be analyzed and discussed in this section, in line with the purpose of this paper.

5.1. Efficiency of the Modified Surface PRA with the General Database

The impact of the database established by the key shot peening parameters on efficiency is studies by considering failure risk with and without a database. Specifically, under the same essential inputs, the failure risk of the disk is evaluated using the general surface PRA and the modified surface PRA using the database. The efficiency is compared, and a discussion is presented, below.
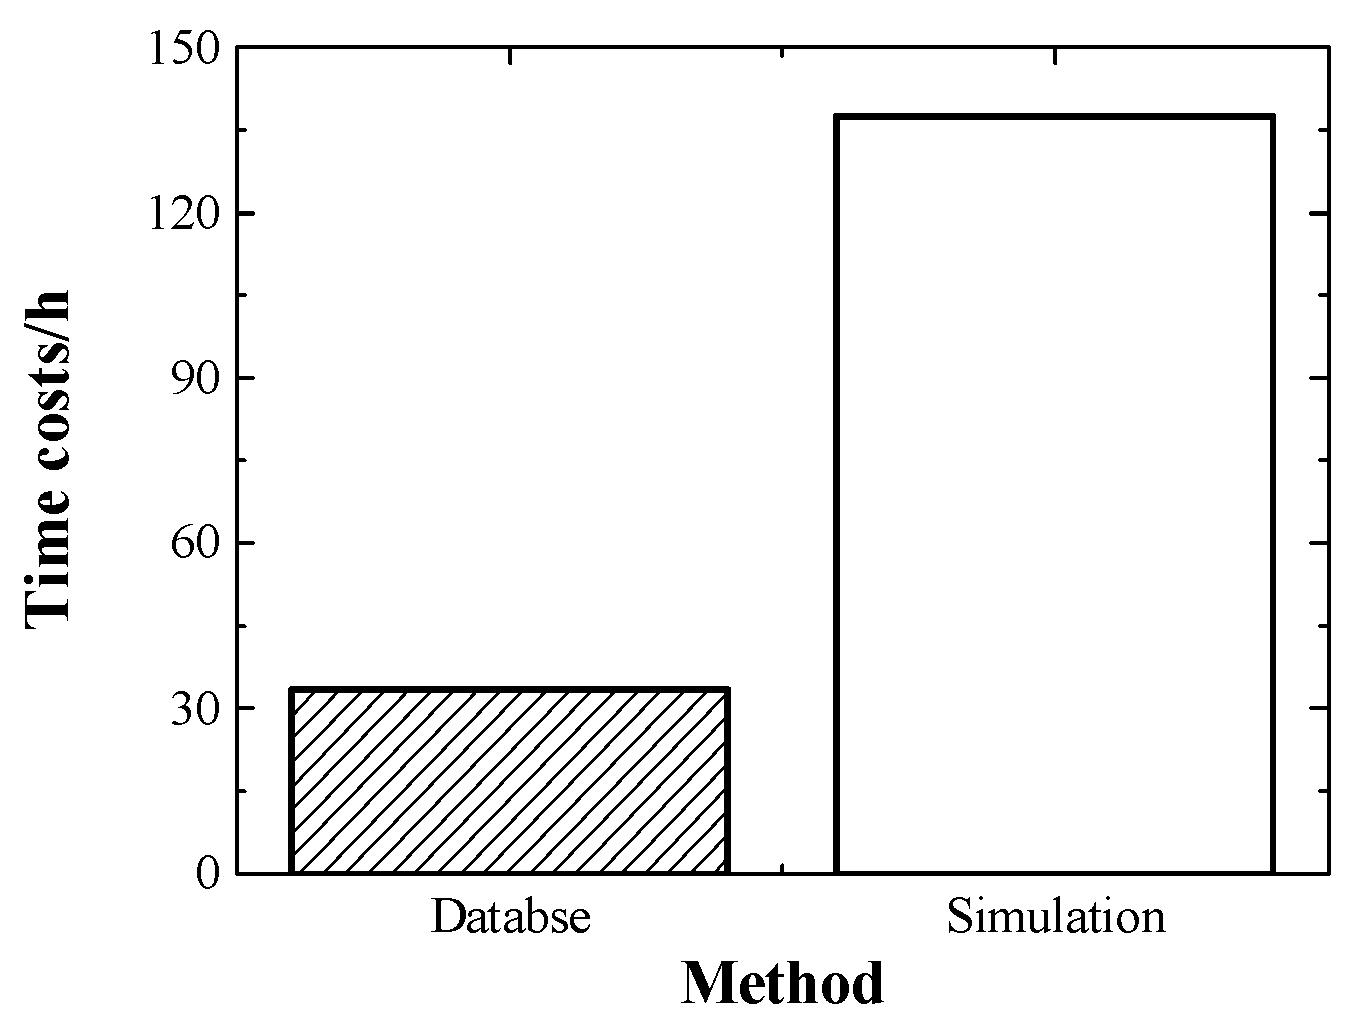
The difference between the calculation flow with and without the database lies in the residual stress obtained from the shot peening parameters. The establishment and post-processing analysis of a multi-shot random distribution model can be performed automatically by PYTHON with the same essential input conditions as described in Section 3.2. However, performing simulation calculations in the finite element software is time consuming. Notably, the simulation takes approximately 0.98 h longer than extracting the curve directly from the database. Furthermore, as seen in Figure 14, the error between the results obtained via simulation and those obtained using the database does not exceed 5.3%, and the impact on POF does not exceed 0.75%, thus proving that the curve extracted from the database is not only efficient, but also acceptable in terms of accuracy.
A visualization of the efficiency of the surface PRA when performing the analysis with and without using the database is presented in Figure 19. Specifically, the database time cost includes a build estimate of 17 h. The total example evaluation corresponds to 5 × 5 × 5, for conducting an analysis of three parameters in five categories. As can be seen from the figure, the efficiency of the surface PRA is greatly improved with the use of the database, by 75.80%. Therefore, the key manufacturing parameters can be judged efficiently and directly during the design stage with the use of the database, which is the advantage of the method presented in this study.

5.2. Determination of Key Shot Peening Parameters from Probabilistic Failure Risk

In this section, different parameter variations are considered, as well as a sensitivity analysis. Specifically, the POF is calculated by rapidly extracting the residual stress in the specified range using a database. The percentage variation in POF is adopted in the sensitivity analysis, thus achieving the objective of the rapid judgment of critical parameters during the design stage. Based on this objective, in this section, the full lifetime POFs are plotted with different shot peening parameters (i.e., number, diameter, and velocity of shots), and a sensitivity analysis is performed using the POF values over the design life of the engine (20,000 cycles). Other variables, such as the geometric nature of the crack and initial assumed size, are considered to be fixed, and will be investigated for sensitivity in future.

5.2.1. Variation of POF under Different Shot Peening Parameter Conditions

POF of Different Shot Numbers

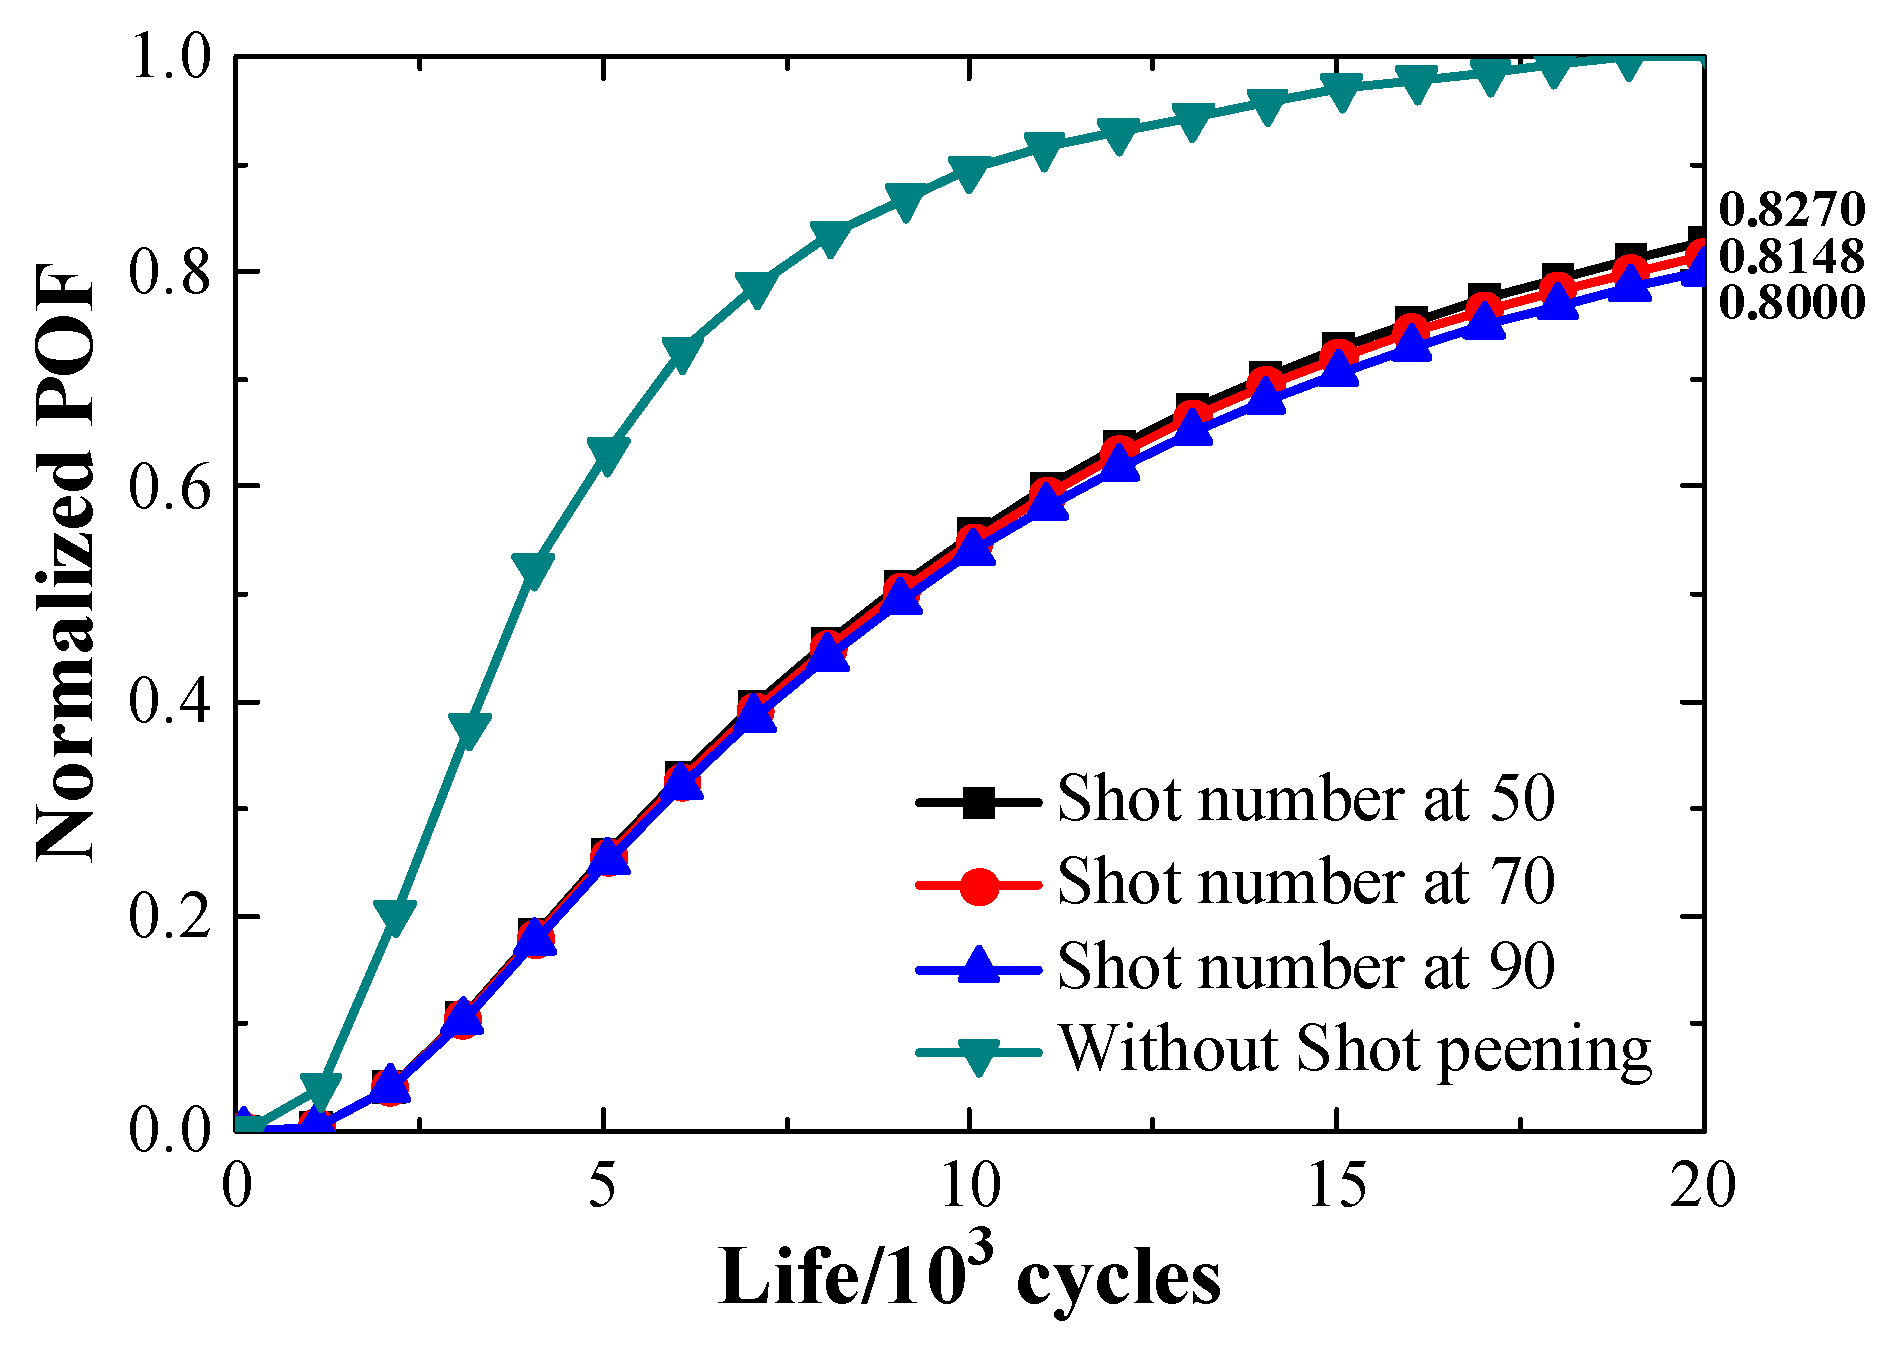
For comparison, the POF curves of the disk for different numbers of shots are presented in Figure 20. The subscripts “Shot number at 50”, “Shot number at 70”, and “Shot number at 90” are used to refer to the probabilistic failure risk assessments when considering numbers of shots equal to 50, 70, and 90, respectively. In addition, the POF without considering shot peening is plotted as the green curve, in order to reveal the effect of residual stress, the maximum level of which is in the range from 948.75 MPa to 1148.00 MPa when the number of shots varies from 50 to 90. Comparing the green curve with the other colors, it can be seen that the probability of failure decreases with numbers of shots equal to 50, 70, and 90. In particular, the failure risk is reduced the most when the number of shots is 90, by about 17.30%, which proves that shot peening increases the lifetime. When N > Ns, the failure risk of the disk increases with additional flight cycles. In addition, the failure risk decreases when the number of shots is increased from 50 to 90 for the same number of flight cycles.This comparison indicates that the POF of the disk is approximately 3.26% lower when the number of shots is equal to 90 than when it is equal to 50.

POF of Different Shot Diameters

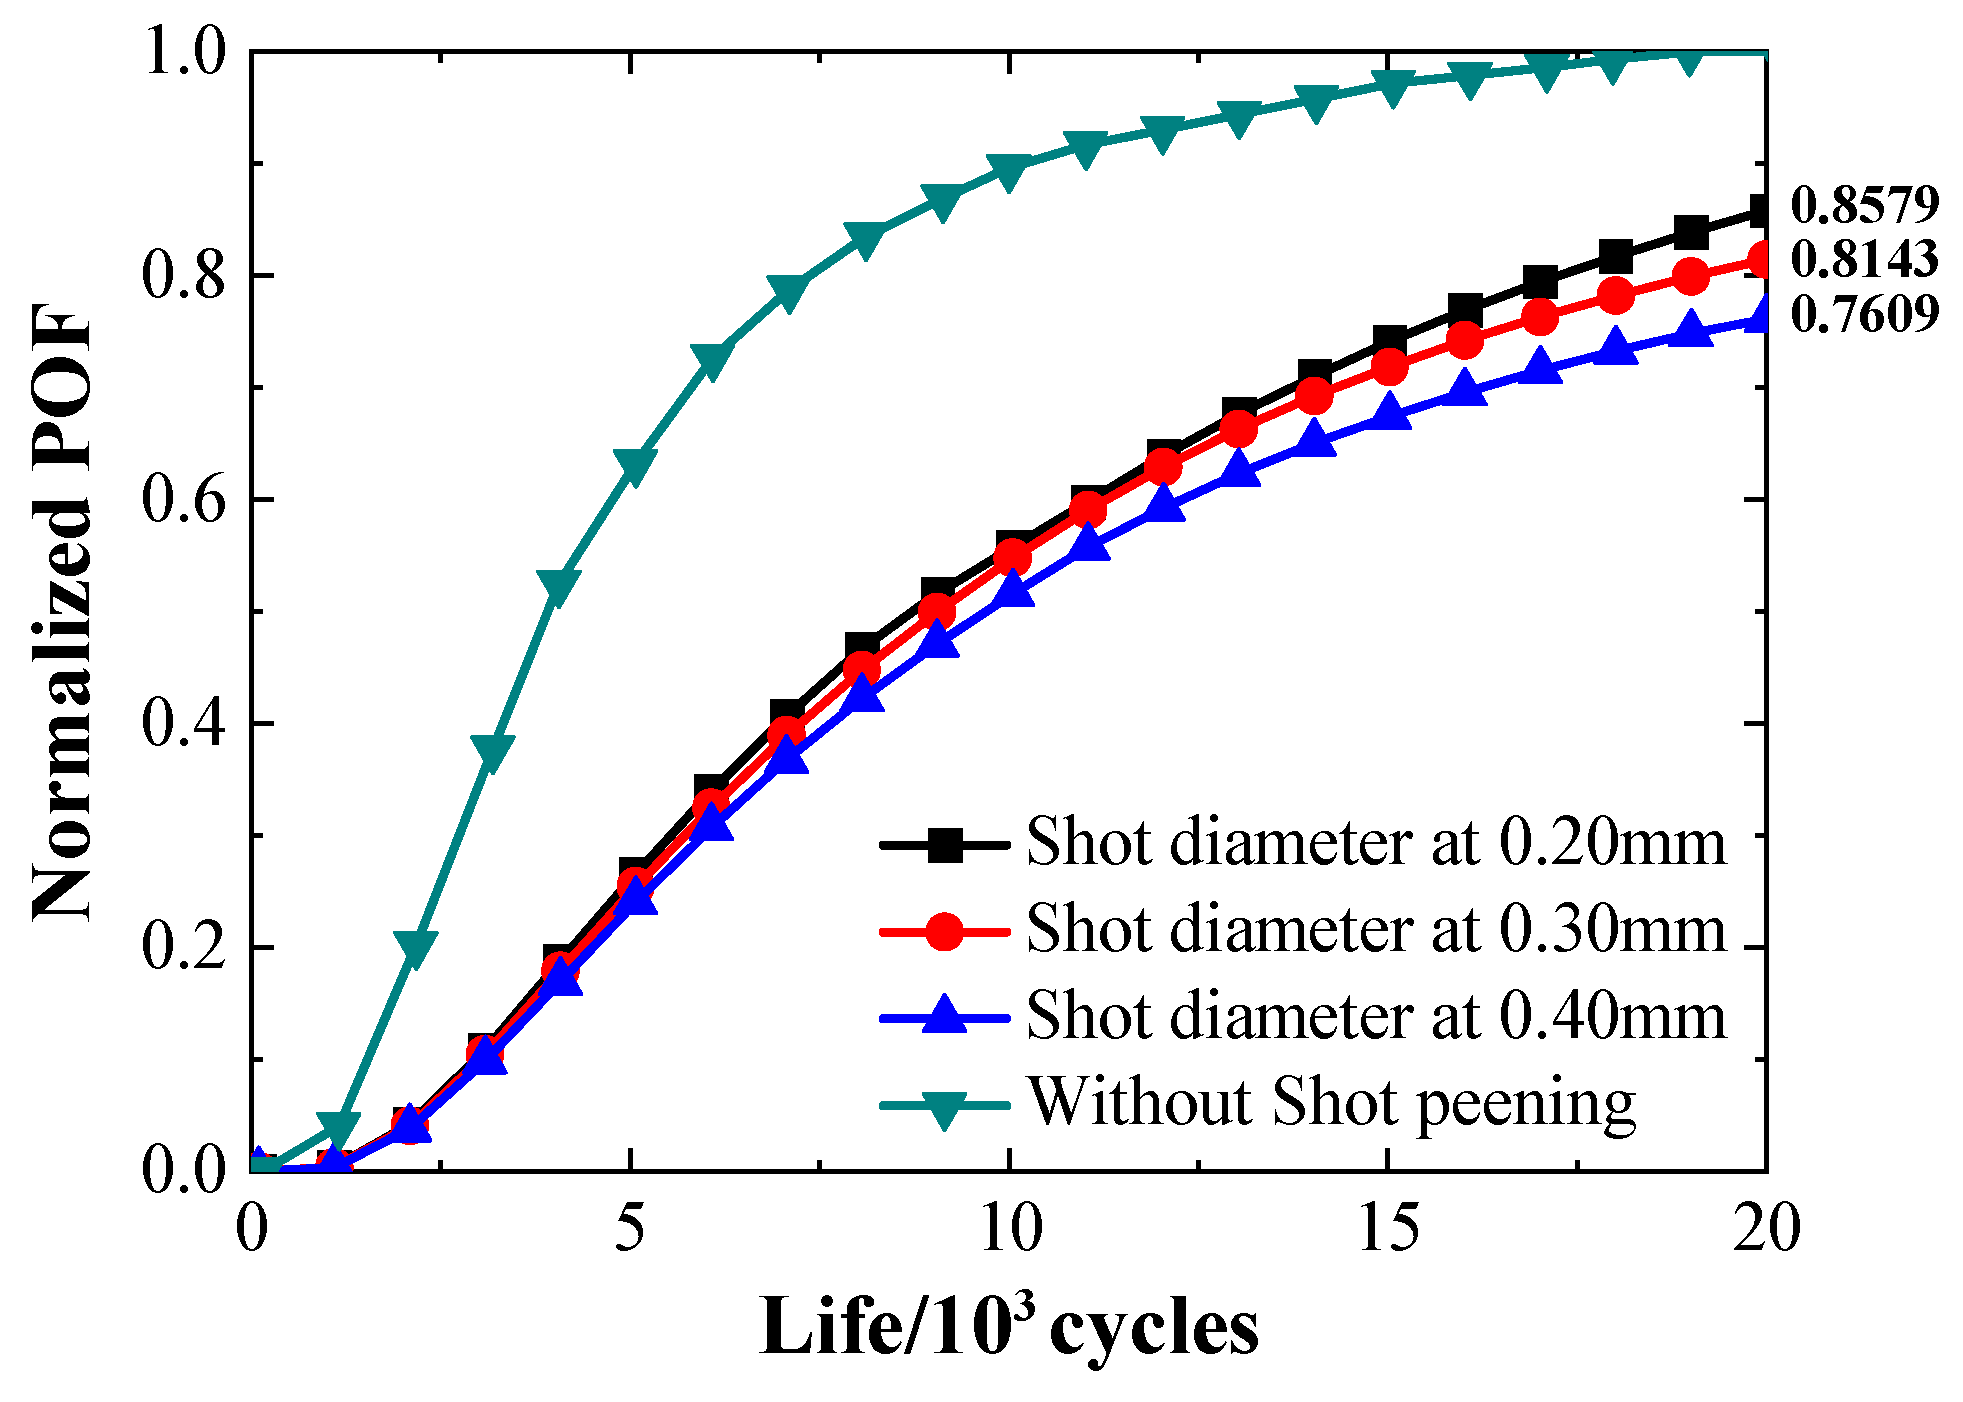
For comparison, the POF curves of the disk for different shot diameters are presented in Figure 21. The subscripts “Shot diameter at 0.20 mm”, “Shot diameter at 0.30 mm”, and “Shot diameter at 0.40 mm” are used to refer to the probabilistic failure risk assessments considering shot diameters of 0.20, 0.30, and 0.40 mm, respectively. According to the analysis presented in Section 3.1, the mass of the shot is the decisive factor affecting kinetic energy. Specifically, the mass is proportional to the cube of the diameter of the shot; thus, the diameter has a greater effect than the number of shots. Furthermore, the POF without considering shot peening is also plotted as the green curve in order to reveal the effect of residual stress, the maximum level of which is in the range from 869.61 MPa to 1059.37 MPa when the diameter varies from 0.20 to 0.40. It can be seen that the probability of failure decreases at shot diameters of 0.20, 0.30, and 0.40, which proves that shot peening improves the lifetime. In particular, the failure risk is reduced the most at a diameter of 0.40 mm, by about 23.91%. When N > Ns, the POF of the disk increases with additional flight cycles. In addition, the failure risk decreases when the diameter of shots is increased from 0.20 mm to 0.40 mm for the same number of flight cycles. This comparison indicates that the POF of disks with a shot peening diameter of 0.40 mm is approximately 11.31% lower than that of disks with a shot peening diameter of 0.20 mm.

POF of Different Shot Velocities

For comparison, the POF curves of the disk for different shot velocities are presented in Figure 22. The subscripts “Shot velocity at 50,000 mm/s”, “Shot velocity at 70,000 mm/s”, and “Shot velocity at 90,000 mm/s” are used to refer to the probabilistic failure risk assessments when considering shot velocities of 50,000, 70,000, and 90,000 mm/s, respectively. The kinetic energy of the shots is quadratically proportional to the velocity. There is a significant positive correlation between velocity and kinetic energy with invariant mass. Additionally, the POF without considering shot peening is also plotted by the green curve in the figure, and the effect is about 21.84% lower at a shot velocity of 90,000 mm/s, where the maximum level of residual compressive stress ranges from 926.42 MPa to 1199.03 MPa. Similar to other parameters, shot peening has a beneficial impact on lifetime, characterized by a reduction in the risk of failure. When N > Ns, the failure risk of the disk increases with additional flight cycles. In addtion, the failure risk decreases when the velocities of shots is increased from 50,000 mm/s to 90,000 mm/s for the same number of flight cycles. This comparison indicates that the POF of disks with a shot velocity of 90,000 mm/s is approximately 9.71% lower than that of disks with a shot velocity of 50,000 mm/s.

5.2.2. Sensitivity Analysis Based on Probabilistic Failure Risk

The POF results for the different shot peening parameters show that, within the parameters specified in this section, as the number, diameter, and velocity increase, the POF decreases. The figures show that the parameters are related to the probability of failure of the disk surface, and can be used to quickly analyze the impact of different parameters on the POF during the design stage.
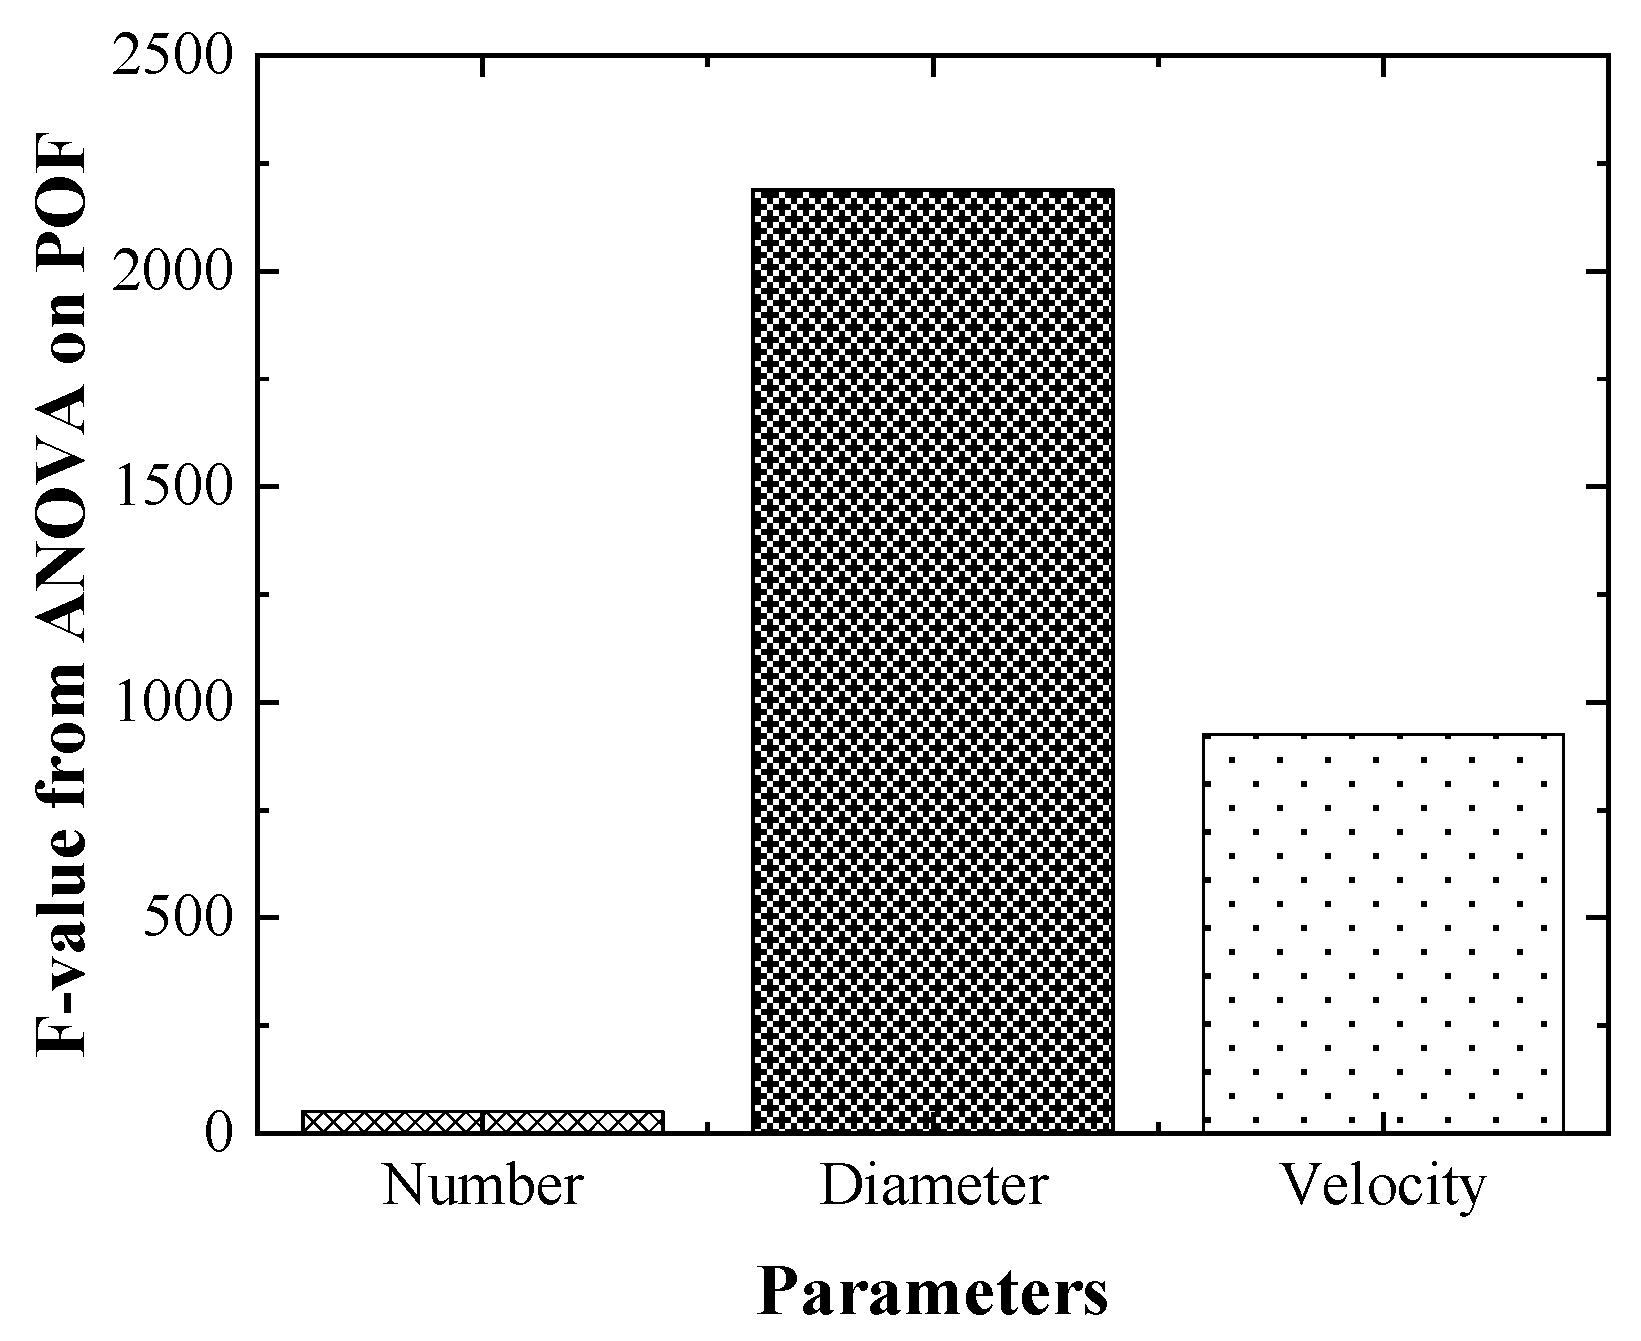
Analysis of variance (ANOVA) is performed for the POF, in order to analysis the magnitude of the effect of the different parameters (number: 50–70, diameter: 0.2–0.28 mm, velocity: 50,000–70,000 mm/s), as shown in Table 7.
As can be seen from Table 7, the p-values for each variable are less than 0.0001, indicating that the fits for ANOVA with respect to number, diameter and velocity are extremely significant. Moreover, the R2 values above 0.98 indicate that the fitting has a high degree of accuracy and predictive adequacy.
Therefore, the F-value, which measures the effect of factors on POF, is visualized in Figure 23. Specifically, greater F-values indicate that a quality factor has a greater impact; conversely, small values indicate a smaller impact. The results presented in Figure 23 show that in the current range of variation, the POF change rate for “diameter” is the greatest, and thus it can be quickly “determined” in the design stage that diameter is the most critical parameter. The effects of different parameters can also be obtained for other ranges without affecting the applicability of the method. Here, only the trend analysis and treatment method with the introduction of the effects on POF of three shot peening parameters are discussed. Finally, the manufacturing plan and engineering plan can be connected by the method described in this study. In particular, the key shot peening parameters within the given range are judged in the design stage by analyzing the changing trend of POF.

6. Conclusions

In this work, a modified surface PRA was proposed that takes shot peening parameters into consideration and achieves high efficiency through the establishment of a general database using numerical procedures. Notably, the method is able to meet the requirements of abundant and efficient iterations during the design stage. Exemplarily, the effects of shot peening parameters on the failure risk of disks were studied by analyzing an aero engine disk. The major results are summarized below.
(1)
A modified surface PRA was proposed that takes into consideration the shot peening parameters based on a database for aero engine disks. Notably, the method links directly to the POF on the basis of the parameters, rather than via residual stress, thus enabling the straightforward and highly efficient determination of key shot peening parameters on the basis of the failure risk. Specifically, the method can determine the key parameters of greatest concern during the manufacturing process in the design stage, which is of great practical value for the safety assessment and processing guidance for aero engine disks.
(2)
A general database was established to realize the rapid simulation of shot peening with multiple randomly distributed shots. The general database takes shot peening parameters as the input and the residual stress distribution required by surface PRA as the output. Notably, not only were the results obtained when using the database in good agreement with the simulation results, the efficiency was improved by 75.80%. This efficient method is able to achieve rapid response to failure caused by manufacturing and satisfies the requirement for abundant and efficient iterations during the design stage.
(3)
On the basis of the general database and the modified surface PRA method, a case was presented in which different shot peening parameters were directly connected to the failure risk. The results showed that with increasing number, diameter, and velocity of shot peening, the failure risk of the disk decreased to varying degrees, with diameter having the greatest effect. Finally, a combination of shot peening parameters and failure risk was achieved.
However, this study has some limitations. Specifically, the analysis presented in this study was based on a simplified treatment derived from the actual situation of an actual aero engine disk, and was performed for the case where the target material was TC4 and the shot material was cast steel. Our results are context dependent, and it is expected that other analyses with different inputs will produce different results. Due to the limitations of the method used in this study, the specific variations in defect distribution due to roughness or cross-thickness, stress relaxation from thermal or Gamma precipitation, subsequent surface treatment, and re-emergence caused by shot peening will need to be addressed in further studies, by improving the corresponding parts of the surface PRA framework proposed in this paper. Moreover, limitations also arise from the variables considered when analyzing crack growth, including the geometric nature of crack and initial size assumption, and this will require further research with greater sensitivity.
However, the method presented here provides an effective approach for assessing the effects of shot peening parameters on the failure risk of disks based on the use of a general database. In addition, the method could also be applied to other surface peening treatments, such as laser shot peening. Specifically, the applicability of the method could be extended by considering the effect of different numerical simulation methods on the database input parameters, and the limitations of the method could be further mitigated by introducing processing effects, such as surface roughness and stress relaxation.

Author Contributions

Conceptualization, G.L. and Y.T.; methodology, Y.T. and H.Z.; software, Y.T. and H.Z.; validation, G.L., Y.T. and H.Z.; formal analysis, Y.T.; investigation, G.L.; resources, H.Z.; data curation, H.Z.; writing—original draft preparation, Y.T.; writing—review and editing, G.L. and H.Z.; visualization, Y.T.; supervision, H.Z.; project administration, G.L.; funding acquisition, G.L. All authors have read and agreed to the published version of the manuscript.

Funding

The research was funded by the National Natural Science Foundation of China [grant number U2233213]. The work was supported by the Innovation Team of Complex System Safety and Airworthiness of Aero-Engine from the Co-Innovation Center for Advanced Aero-Engine of China.

Data Availability Statement

Not applicable.

Conflicts of Interest

The authors declare no conflict of interest.

List of Nomenclature, Abbreviation, and Notations

Life-limited partRotor and major static structural parts whose primary failure is likely to result in hazardous engine effects
PRAProbabilistic risk assessment
SIFStress intensity factor
aCrack length (unit: m)
ΔKStress intensity factor range (unit: MPa·m1/2)
KAApplied loading stress intensity factor (unit: MPa·m1/2)
ΔKthFatigue crack growth threshold (unit: MPa·m1/2)
RANominal stress ratio
C, n, p, qNASGRO experiment constants
FGeometric correction coefficient
LLength of cracked geometry (unit: m)
vShot velocity (unit: mm/s)
nTotal number of shots
anFourier curve coefficient (n = 0–4)
wFourier curve coefficient
RSMResponse surface method
POFProbability of failure
RStress ratio
KTTotal stress intensity factor (unit: MPa·m1/2)
KRResidual stress intensity factor (unit: MPa·m1/2)
KCFracture toughness of material (unit: MPa·m1/2)
ReffEffective stress ratio
fStress intensity factor ratio
WWidth of cracked geometry (unit: m)
gLimit state function
dShot diameter (unit: mm)
EKKinetic energy (unit: J)
bnFourier curve coefficient (n = 0–4)
enRSM design factors (n = 1–3)

Appendix A

The functional relationship between the coefficients of the Fourier 4 curve used to fit the residual stress and the shot peening parameters is shown below. Specifically, the matrix is employed to characterize this relationship. Here, two significant digits are retained for simplicity of expression.
[ a 0 , a 1 , b 1 , a 2 , b 2 , a 3 , b 3 , a 4 , b 4 , w ] T = A [ d , v , n ] T + B [ d v , d n , v n ] T + C [ d 2 , v 2 , n 2 ] T + D
In these equations, a0, a1, b1, a2, b2, a3, b3, a4, b4, and w indicate the coefficients of the Fourier 4 fitting curve, respectively, and n, d, and v represent the number, the diameter, and the velocity of the shots, respectively, where A is denoted as
A = [ 35.71 72.71 768.16 41.38 420.69 324.24 66.22 21.31 167.12 1.14 E 5 1.03 E 3 3.11 E 3 9.59 E 3 1.47 E 3 0.018 0.01 0.02 0.01 3.72 E 3 0.08 0.31 1.94 0.54 0.36 2.56 0.05 3.32 1.20 1.54 7.50 ] T
B is denoted as
B = [ 8.42 E 4 1.34 E 3 1.20 E 3 0 4.83 E 4 1.17 E 5 1.50 E 4 2.28 E 4 3.03 E 4 0.06 0.48 0.42 0.89 0 1.10 1.09 0.90 0.74 0.54 2.25 1.27 E 5 1.22 E 5 7.16 E 6 0 1.48 E 5 3.91 E 6 2.64 E 5 1.12 E 5 1.5 E 5 1.86 E 4 ] T
C is denoted as
C = [ 0 71.25 970.48 0 529.63 326.13 250.37 190.60 388.23 1.22 E 5 0 1.12 E 8 4.84 E 8 0 9.68 E 8 6.15 E 8 9.19 E 8 7.42 E 8 2.89 E 8 6.96 E 7 0 0.01 8.28 E 4 0 4.62 E 3 4.17 E 3 7.76 E 3 2.29 E 3 2.54 E 3 0.12 ] T
and D is denoted as
D = [ 37.54 , 47.90 , 462.30 , 261.25 , 657.62 , 577.92 , 460.57 , 493.46 , 42.75 , 31017.40 ] T

References

  1. US Department of Transportation, Federal Aviation Administration. Advisory Circular 33.70-1: Guidance Material for Aircraft Engine Life Limited Parts Requirements; FAA: Washington, DC, USA, 2009. [Google Scholar]
  2. National Transportation Safety Board. Aircraft Accident Report—United Airlines Flight 232 McDonnell Douglas DC-10-10 Sioux Gateway Airport; NTSB: Sioux City, IA, USA, 1989. [Google Scholar]
  3. National Transportation Safety Board. Aircraft Accident Report—Uncontained Engine Failure, Delta Airlines Flight 1288, Mcdonnell Douglas MD-88, N927DA; NTSB: Pensacola, FL, USA, 1996. [Google Scholar]
  4. US Department of Transportation, Federal Aviation Administration. Advisory Circular 33.70-2: Damage Tolerance of Hole Features in High-Energy Turbine Engine Rotors; FAA: Washington, DC, USA, 2009. [Google Scholar]
  5. Enright, M.P.; Mcclung, R.G.; Liang, W.; Lee, Y.D.; Moody, J.P.; Fitch, S. A tool for probabilistic damage tolerance of hole features in turbine engine rotors. In Proceedings of the ASME Turbo Expo, Copenhagen, Denmark, 11 June 2012. [Google Scholar]
  6. Mcclung, R.C.; Wawrzynek, P.; Lee, Y.D.; Carter, B.J.; Moody, J.P.; Enright, M.P. An integrated software tool for high fidelity probabilistic assessments of metallic aero-engine components. In Proceedings of the ASME Turbo Expo, Seoul, Republic of Korea, 13 June 2016. [Google Scholar]
  7. Chan, K.S.; Enright, M.P.; Moody, J.; Fitch, S. A microstructure-based time-dependent crack growth model for life and reliability prediction of turbopropulsion systems. Met. Mater. Trans. A 2014, 45, 287–301. [Google Scholar] [CrossRef]
  8. Enright, M.P.; Jonathan, P.M.; James, C.S. Optimal automated fracture risk assessment of 3D gas turbine engine components. In Proceedings of the ASME Turbo Expo, Seoul, Republic of Korea, 13 June 2016. [Google Scholar]
  9. Enright, M.P.; Chan, K.S.; Moody, J.P.; Golden, P.J.; Chandra, R.; Pentz, A.C. Influence of random residual stress on fretting fatigue risk of engine disk. AIAA J. 2011, 49, 881–889. [Google Scholar] [CrossRef]
  10. Millwater, H.R.; Larsen, J.; John, R. Effects of residual stresses on probabilistic lifting of engine disk materials. MSEA 2007, 468, 129–136. [Google Scholar] [CrossRef]
  11. Singh, G.; Cortina, M.; Millwater, H.R.; Clauer, A. Probabilistic sensitivity analysis of a laser peening fatigue life enhancement process. Int. J. Struct. Integr. 2012, 3, 210–235. [Google Scholar] [CrossRef]
  12. Mcclung, R.C.; Enright, M.P.; Liang, W.; Chan, K.; Jonathan, M.; Weitsu, W.; Ravi, S.; Weiqi, L.; Jinyong, O.; Simeon, F. Integration of manufacturing process simulation with probabilistic damage tolerance analysis of aircraft engine components. In Proceedings of the 53rd AIAA/ASME/ASCE/AHS/ASC Structures, Structural Dynamics and Materials Conference 20th, Honolulu, HI, USA, 23 April 2012. [Google Scholar]
  13. Liu, C.; Liu, D.; Zhang, X.; Ao, N.; Xu, X.; Liu, D.; Yang, J. Fretting fatigue characteristics of Ti-6Al-4V alloy with a gradient nanostructured surface layer induced by ultrasonic surface rolling process. Int. J. Fatigue 2019, 125, 249–260. [Google Scholar] [CrossRef]
  14. Bagherifard, S.; Pariente, I.F.; Ghelichi, R.; Guagliano, M. Effect of severe shot peening on microstructure and fatigue strength of cast iron. Int. J. Fatigue 2014, 65, 64–70. [Google Scholar] [CrossRef]
  15. Wang, C.; Hu, J.; Gu, Z.; Xu, Y.; Wang, X. Simulation on residual stress of shot peening based on a symmetrical cell model. Chin. J. Mech. Eng. 2017, 30, 344–351. [Google Scholar] [CrossRef]
  16. Okan, U. Optimization of shot peening parameters by response surface methodology. Surf. Coat. Technol. 2016, 305, 99–109. [Google Scholar]
  17. Mohamed, J.; Gakwaya, A.; Levewque, J.; Mechri, O. Robust methodology to simulate real shot peening process using discrete-continuum coupling method. Int. J. Mech. Sci. 2016, 107, 21–33. [Google Scholar]
  18. Su, N.; Chen, M.; Xie, L.S.; Shi, W.; Luo, F. Dynamic characterization of Ti-4Al-1.5Mn titanium alloy and a simplified approach for shot peening simulation. Int. J. Adv. Manuf. Technol. 2020, 111, 2733–2747. [Google Scholar] [CrossRef]
  19. Iheb, C.; Moussa, N.B.; Fredj, N.B. An innovative contactless finite element simulation of the shot peening process. Int. J. Adv. Manuf. Technol. 2021, 113, 2121–2136. [Google Scholar]
  20. Li, S.B.; Liang, W.; Yan, H.Z.; Wang, Y.H.; Gu, C. Prediction of fatigue crack propagation behavior of AA2524 after laser shot peening. Eng. Fract. Mech. 2021, 244, 107525. [Google Scholar] [CrossRef]
  21. Ding, S.T.; Zhou, H.M.; Li, G. Probabilistic damage tolerance assessment of surface features of aero engine life limited parts in China. JASP 2021, 36, 421–430. [Google Scholar]
  22. Rentala, V.K.; Mylavarapu, P.; Kumar, A.; Gautam, J.P.; Gopinath, K.; Jayakumar, T. POD of NDT Techniques Using High Temperature Oxidized Fatigue Cracks in an Aero Engine Alloy. J. Nondestruct. Eval. 2021, 41, 1–22. [Google Scholar] [CrossRef]
  23. Ding, S.T.; Zhou, H.M.; Pan, B.C.; Ji, H.B.; Guo, X.J.; Li, G. An experimental method to obtain the hard alpha anomaly distribution for titanium alloy aeroengine disks. Chin. J. Aeronaut. 2021, 34, 67–82. [Google Scholar] [CrossRef]
  24. Wu, X.R.; Zhao, X.C.; Xu, W.; Tong, D.H. Discussions on weight functions and stress intensity factors for radial crack(s) emanating from a circular hole in an infinite plate. Eng. Fract. Mech. 2018, 192, 192–204. [Google Scholar] [CrossRef]
  25. Cao, W.; Khadhraoui, M.; Brenier, B.; Guedou, J.Y.; Castex, L. Thermomechanical relaxation of residual stress in shot peened nickel base superally. Mater. Sci. Technol. 1994, 10, 947–954. [Google Scholar] [CrossRef]
  26. Zhou, H.M.; Ding, S.T.; Li, G. Universal weight function method on the probabilistic surface damage tolerance assessment of aeroengine rotors. In Proceedings of the ASME International Mechanical Engineering Congress and Exposition, Online, 16 November 2020. [Google Scholar]
  27. Liu, J.B.; Ding, S.T.; Li, G. Influence of random variable dimension on the fast-numerical integration method of aero engine rotor disk failure risk analysis. In Proceedings of the ASME International Mechanical Engineering Congress and Exposition, Online, 16 November 2020. [Google Scholar]
  28. Bueckner, H.F. The propagation of crack and the energy of elastic deformation. J. Fluids Eng. 1958, 80, 1225–1229. [Google Scholar] [CrossRef]
  29. Li, G.; Wu, H.Y.; Ding, S.T.; Bao, M.Y.; Zhou, Y. Probabilistic Risk of Titanium Disks Considering Residual Stresses of Hard Alpha Inclusions. AIAA J. 2021, 59, 1–13. [Google Scholar] [CrossRef]
  30. Larue, J.E.; Daniewicz, S.R. Predicting the effect of residual stress on fatigue crack growth. Int. J. Fatigue 2007, 29, 508–515. [Google Scholar] [CrossRef]
  31. Servetti, G.; Zhang, X. Predicting fatigue crack growth rate in a welded butt joint: The role of effective R ratio in accounting for residual stress effect. Eng. Fract. Mech. 2009, 76, 1589–1602. [Google Scholar] [CrossRef] [Green Version]
  32. Walker, K. The Effect of the Stress Ratio During Crack Propagation and Fatigue for 2024-T3 and 7075-T6 Aluminum; Effects of environment and complex load history on fatigue life; Rosenfeld, M., Ed.; ASTM International: West Conshohocken, PA, USA, 1970. [Google Scholar]
  33. Garcia, C.; Lotz, T.; Martinez, M.; Artemev, A.; Alderliesten, R.; Benedictus, R. Fatigue crack growth in residual stress fields. Int. J. Fatigue 2016, 87, 326–338. [Google Scholar] [CrossRef] [Green Version]
  34. Fracture Analysis Consultants, Inc. Franc3D Reference Manual, 6th ed.; Fracture Analysis Consultants, Inc.: Ithaca, NY, USA, 2011. [Google Scholar]
  35. Ding, S.T.; Wang, Z.Y.; Qiu, T.; Zhang, G.; Li, G.; Zhou, Y. Probabilistic failure risk assessment for aeroengine disks considering a transient process. Aerosp. Sci. Technol. 2018, 78, 696–707. [Google Scholar] [CrossRef]
  36. Yang, L.; Ding, S.T.; Wang, Z.; Li, G. Efficient probabilistic risk assessment for aero-engine turbine disks using probability density evolution. AIAA J. 2017, 55, 2755–2761. [Google Scholar] [CrossRef]
  37. Lin, Q.J.; Liu, H.J.; Zhu, C.C.; Chen, D.; Zhou, S. Effects of different shot peening parameters on residual stress, surface roughness and cell size. Surf. Coat. Technol. 2020, 38, 126054. [Google Scholar] [CrossRef]
  38. Sheng, X.F.; Li, Z.; Zhao, K.Y.; Cheng, X.Q. Numerical simulation research on strengthening effect of shot peening at Identical Intensity. Surf. Technol. 2018, 47, 42–48. [Google Scholar]
  39. Miao, H.Y.; Larose, S.; Perron, C.; Levesque, M. On the potential applications of a 3D random finite element model for the simulation of shot peening. Adv. Eng. Softw. 2009, 40, 1023–1038. [Google Scholar] [CrossRef]
  40. Wang, X.L.; Wang, Z.; Wu, G.; Gan, J.; Yang, Y.; Huang, H.; He, J.; Zhong, H. Combining the finite element method and response surface methodology for optimization of shot peening parameters. Int. J. Fatigue 2019, 129, 105231. [Google Scholar] [CrossRef]
  41. Klemenz, M.; Schulze, V.; Otmar, V.; Detlef, L. Finite element simulation of the residual stress states after shot peening. Mater. Sci. Forum 2016, 524, 349–354. [Google Scholar]
  42. Nam, Y.S.; Jeong, Y.I.; Sin, D.C.; Byun, J.H. Enhancing surface layer properties of an aircraft aluminum alloy by shot peening using response surface methodology. Mater. Des. 2015, 83, 566–576. [Google Scholar] [CrossRef]
  43. Guo, B. The Numerical Simulation of tc4 Titanium Alloy Shot Peening. Master’s Thesis, Nanjing University of Aeronautics and Astronautics, Nanjing, China, 2016. [Google Scholar]
  44. Liu, Y.G.; Li, M.Q.; Liu, H.J. Surface nanocrystallization and gradient structure developed in the bulk TC4 alloy processed by shot peening. J. Alloys Comp. 2016, 685, 186–193. [Google Scholar] [CrossRef]
  45. Han, K.; Owen, D.; Peric, D. Combined finite/discrete element and explicit/implicit simulations of peen forming process. Eng. Comput. 2002, 19, 92–118. [Google Scholar] [CrossRef]
  46. Zhao, J.Y.; Tang, J.Y.; Zhou, W.H.; Jiang, T.T.; Wu, H.; Liao, X.G.; Guo, M.Z. Surface integrity of gear shot peening considering complex geometric conditions: A sequential coupled DEM-FEM method. Surf. Coat. Technol. 2022, 449, 128943. [Google Scholar] [CrossRef]
  47. Abdalla, E.; Vishal, R.; Jyothi, H. A sensitivity analysis of shot peening parameters. In Proceedings of the DETC/CIE 2006, Philadelphia, PA, USA, 10 September 2006. [Google Scholar]
Figure 1. Parameters of the modified surface PRA with efficient consideration of shot peening.
Aerospace 10 00621 g001
Figure 2. Distribution of anomalies in circular holes [4].
Aerospace 10 00621 g002
Figure 3. Probability of detection for nondestructive inspection [4].
Aerospace 10 00621 g003
Figure 4. Interference model for stress intensity distribution.
Aerospace 10 00621 g004
Figure 5. Illustration of the random distribution of multiple shots.
Aerospace 10 00621 g005
Figure 6. Development process of random shot model.
Aerospace 10 00621 g006
Figure 7. Distribution of the shot peening residual stress field [41].
Aerospace 10 00621 g007
Figure 8. Comparison of curve fitting of residual stress with Rational 42, Fourier 3, and Fourier 4.
Aerospace 10 00621 g008
Figure 9. Finite element model of shot peening.
Aerospace 10 00621 g009
Figure 10. Meshing diagram of shot and target.
Aerospace 10 00621 g010
Figure 11. Mesh convergence for the residual stress in specific area under study.
Aerospace 10 00621 g011
Figure 12. Numerical verification of the finite element model of multiple shot peening (TC2 target, ceramics shot with number = 210, diameter = 0.425 mm, velocity = 50 m/s) [18].
Aerospace 10 00621 g012
Figure 13. Fitting degree of actual vs. predicted values of a0 in Fourier 4.
Aerospace 10 00621 g013
Figure 14. Relative error between RSM/database and simulation (diameter = 0.30 mm, velocity = 70,000 mm/s, number = 70).
Aerospace 10 00621 g014
Figure 15. Load distribution of disk.
Aerospace 10 00621 g015
Figure 16. Characteristic stress profile of a disk.
Aerospace 10 00621 g016
Figure 17. Crack propagation rate determined by NASGRO (azero = 0.025 mm).
Aerospace 10 00621 g017
Figure 18. Probability of failure of a typical case considering shot peening.
Aerospace 10 00621 g018
Figure 19. Comparison of database and simulation methods for surface PRA for 125 samples.
Aerospace 10 00621 g019
Figure 20. Failure risk of different numbers of shots (diameter = 0.30 mm, velocity = 70,000 mm/s).
Aerospace 10 00621 g020
Figure 21. Failure risk of different shot diameters (nunber = 70, velocity = 70,000 mm/s).
Aerospace 10 00621 g021
Figure 22. Failure risk of different shot velocities (diameter = 0.30 mm, number = 70).
Aerospace 10 00621 g022
Figure 23. POF sensitivity of different parameters.
Aerospace 10 00621 g023
Table 1. Material constants in the NASGRO equation for titanium [34].
ParametersMeaningValue
KcToughness of the fracture 3475   MPa mm
CExperimental constant2.244 × 10−13 mm/cycle
nExperimental constant3.25
pExperimental constant0.25
qExperimental constant0.75
Table 2. Johnson–Cook model parameters of Ti6Al4V [43].
ParameterA/MPaB/MPanCm
Ti6Al4V109810920.930.0141.1
Table 3. Mechanical parameters of the target [43].
Parameterρ/g·cm−3E/GPaνσ0/MPaσb/MPa
Ti6Al4V4.431140.3428271215
Table 4. Mechanical parameters of shot [43].
Parameterρ/g·cm−3E/GPaνσ0/MPaσb/MPa
Cast steel7.82100.3--
Table 5. Value range of design factors.
Design FactorsRange
Number e1/pcs40–100
Diameter e2/mm0.2–0.4
Velocity e3/mm·s−140,000–100,000
Table 6. Design and results using the response surface method.
RUNFactorsResponses
No.dballvballnumballa0a1b1a2b2a3b3a4b4w
10.440,00070−103.5−256.7−5.564−224.3−77.91−143.1−105.6−60.87−90.317584
20.370,00070−154.7−350.6−144.3−162.8−266.313.45−194.156.46−64.6610,330
30.370,00070−156.1−346.8−137.7−156.2−260.516.18−184.353.67−56.5610,280
40.4100,00070−194.6−430−161.4−144.6−267.343.29−124.839.493.2036989
50.240,00070−103.2−262.5−4.908−228.7−73.71−148.7−100.9−66.16−87.7915,130
60.370,00070−161.1−355.3−145.1−173.4−265.64.446−195.151.45−65.7210,260
70.370,00070−156.4−350.1−139−170.4−257.81.998−192.250.41−67.9110,290
80.2100,00070−204.4−419.7−175.1−144.4−257.337.55−118.336.932.09213,820
90.3100,000100−237.7−466.3−215.6−137.4−277.337.9−98.4614.729.7959249
100.470,00040−132.3−310−121.5−147.8−245.412.88−194.460.41−79.818000
110.340,00040−88.87−218.611.3−197.5−36.37−136.4−59.89−68.16−56.89953
120.270,000100−164.1−369.2−143−172.1−265.36.454−187.248.07−57.2215,250
130.340,000100−111.4−273.7−11.01−236.6−92.32−146.3−121.4−57.9−101.310,150
140.470,000100−176−372.5−160−162.4−275.515.37−188.851.39−56.017653
150.3100,00040−169.6−367.4−167.5−109.1−274.861.88−131.944.610.18639723
160.370,00070−159.6−362.2−134−184−257.3−6.574−197.248.65−71.6610,260
170.270,00040−126.2−311.7−93.78−167−222−9.154−18248.25−74.5415,570
Table 7. Analysis of variance for POF.
SourceSum of SquaresMean SquareF-Valuep-Value
Number6.105 × 10−116.105 × 10−1150.77<0.0001
Diameter2.632 × 10−92.632 × 10−92188.72<0.0001
Velocity1.113 × 10−91.113 × 10−9925.53<0.0001
Disclaimer/Publisher’s Note: The statements, opinions and data contained in all publications are solely those of the individual author(s) and contributor(s) and not of MDPI and/or the editor(s). MDPI and/or the editor(s) disclaim responsibility for any injury to people or property resulting from any ideas, methods, instructions or products referred to in the content.