Article

An Integrated Experimental-Numerical Study on the Thermal History-Graded Microstructure and Properties in Laser-Clad Carburized Gear Steel

1
School of Mechanical and Power Engineering, Zhengzhou University, Zhengzhou 450001, China
2
ZRIME Gearing Technology Co., Ltd., Zhengzhou 450001, China
*
Author to whom correspondence should be addressed.
Coatings 2025, 15(12), 1467; https://doi.org/10.3390/coatings15121467 (registering DOI)
Submission received: 4 November 2025 / Revised: 29 November 2025 / Accepted: 8 December 2025 / Published: 10 December 2025

Abstract

Laser additive manufacturing shows great promise for repairing high-value carburized gears, but the underlying relationships among thermal history, microstructure, and properties remain insufficiently quantified. This study uniquely integrates finite-element modeling with microstructural mapping to decipher thermo-mechanical coupling during gear repair. A thermal simulation model that combines a double-ellipsoidal heat source with phase-transformation kinetics achieves 91.1% accuracy in predicting melt pool depth and hardened-layer depth. The cladding process induces a substantial increase in subsurface hardness, primarily due to phase-transformation-induced refinement and regeneration of martensite during rapid thermal cycling. This results in a peak hardness of 64 HRC and a tensile strength of 2856 MPa in the secondary-hardened layer, both exceeding those of the original carburized substrate. The presence of beneficial compressive residual stresses further improves fatigue resistance. Spatial gradients in elastic modulus, strength, and hardness, measured by flat indentation and microhardness testing, are quantitatively correlated with simulated peak temperatures and predicted phase distributions. These correlations establish a causal link from the thermal history to phase transformations, microstructural evolution, and the resulting local hardness and strength. These findings provide a mechanistic foundation for precision repair and service-life prediction of high-carbon gear steels using laser additive manufacturing.

1. Introduction

Gear transmission is widely employed in mechanical systems due to its high transmission efficiency, strong load-bearing capacity, broad power range, and long service life. In particular, carburized and quenched gears are the preferred choice for critical transmission components in high-end applications, such as aerospace, rail transportation, wind power, and new energy vehicles, owing to their superior surface hardness and comprehensive mechanical properties [1,2,3]. However, under long-term service, these hardened gears are susceptible to failure modes, including fatigue pitting, wear, and scuffing [4], which can compromise the performance and reliability of the entire mechanical system. Given the high manufacturing cost and extended production cycles associated with carburized and quenched gears, repair is often more economically and socially viable than replacement. Conventional welding repair methods, however, are prone to thermal distortion and failures induced by phase transformations [5]. In contrast, laser cladding (LC) offers significant advantages, such as a high energy density, controllable dilution, low distortion, and excellent metallurgical bonding [6], making it a promising technique for the life extension of critical components [7,8].
Current research on laser cladding for gear repair remains at an early stage. Zhang et al. [9] reported that a hybrid process combining laser cladding with boronizing improved the wear resistance of repaired 45 steel gears by 2.62 times compared with untreated gears. Du et al. [10] applied a NiCr20–ZrO2 composite coating onto 18CrNiMo7-6 gear steel, increasing its scuffing resistance load by 44.86%. Zhou et al. [11] deposited a WC-reinforced Fe-based alloy onto 35CrMo steel and observed that the clad layer exhibited 4.1 times the wear resistance of the substrate. These studies confirm the technical feasibility of LC for gear surface repair. Nevertheless, most existing work has focused on medium-carbon steels with relatively low surface hardnesses. For carburized and quenched gear steels, research attention has primarily been directed toward the properties of the clad layer, with limited investigation into the microstructural and mechanical evolution of the substrate following cladding.
Carburized and quenched gear steel exhibits high thermal sensitivity due to its high-carbon surface martensitic structure. The thermal cycles introduced during LC trigger complex microstructural transformations that critically influence the service performance of repaired components. Studies indicate that low-temperature tempering (150–200 °C) enhances strength while retaining moderate toughness, whereas exposure to high temperatures (500–650 °C) may reduce strength but improve toughness [12]. Similarly, Kim et al. [13] observed the formation of tempered martensite and ferrite in the heat-affected zone (HAZ) during the laser welding of martensitic steels, resulting in a 10–20% reduction in the joint strength. Moreover, the rapid cooling inherent to LC can lead to the formation of hard and brittle martensite in the HAZ, as documented in studies on U71Mn rail steels, raising concerns regarding structural integrity [14]. Therefore, systematically evaluating microstructural and mechanical evolution in carburized and quenched gear steels after LC is essential. A fundamental understanding of these thermally induced transformations is critical for ensuring an extended service life and reliable performance under high loads.
Current fundamental research on laser cladding mainly targets key physical processes such as energy transfer, fluid flow, and stress evolution, using numerical modeling combined with experiments to clarify intrinsic “material–process–structure–property” relationships. Wang et al. [15] identified laser power as the dominant factor controlling energy input, linking increased power to higher molten pool specific energy, substrate dilution, and corresponding changes in temperature field and pool geometry. Ye et al. [16] established a COMSOL-based multiphysics model to reveal the role of Marangoni convection in regulating melt pool flow uniformity. Gao et al. [17] showed that residual stress is the main cause of coating cracking, correlating its distribution with crack morphology. Li et al. [18] applied response surface methodology (RSM) to optimize laser power, scanning speed, and powder feed rate, achieving defect-free coatings and quantifying the relationship between process parameters and coating performance. Overall, these studies provide a theoretical basis for advancing laser cladding, with coupled multiphysics modeling emerging as a key approach for describing complex thermo-mechanical behavior.
Accurate prediction of substrate behavior requires coupled thermo-mechanical-metallurgical modeling integrated with experimental validation [19,20,21]. For instance, Liu et al. [22] developed a 3D transient finite-element model using sequentially coupled thermo-mechanical analysis (SCTMA) to simulate the evolution of temperature, stress, and clad geometry, revealing that the heating rate in the clad layer is significantly higher than that in the substrate. Li et al. [23] established a comprehensive 3D multiphysics model for Fe60 powder cladding on ASTM 1045 steel, incorporating laser energy and powder flow to elucidate the influence of energy distribution on molten pool dynamics. Zhang and Kovacevic [24] proposed a 3D decoupled thermo-mechanical finite-element model to analyze stress development during LC of a Co-based coating on A36 steel, validating temperature histories via thermocouple measurements. Although these models have largely focused on the clad layer, they provide a foundational framework for developing multiphysics simulations aimed at substrate behavior during laser cladding.
The cladding material strongly affects the hardness, wear, and corrosion resistance of repaired gears. Co-based alloys (such as Stellite, CoCrMo) form γ-Co solid solutions and carbides, achieving 800–1000 HV [25]. Nil-based alloys (e.g., Inconel 718, NiCrBSi) possess an FCC γ-Ni matrix [26], and Nb, Ti, or W additions promote hard phases (e.g., NbC, TiC, WC), enhancing the hardness and corrosion resistance [27,28]. However, the high cost of Co and Ni and their sensitivity to process parameters (affecting dilution and residual stress) limit large-scale use. Fe-based alloys thus represent a more economical alternative with comparable performance [29]. Compatibility with the carburized and quenched substrate is another crucial factor in material selection, as mismatches in the coefficient of thermal expansion (CTEs) may lead to residual stresses, cracking, or deformation [30]. The advantage of iron-based alloys lies in their highly matched CTE with the substrate [31], thereby minimizing interfacial stresses. Furthermore the typical martensitic structure of iron-based clads helps alleviate thermal shrinkage-induced cladding layer mitigates thermal contraction-induced stresses by generating beneficial compressive residual stresses, thereby enhancing its resistance to deformation and fatigue crack propagation [32]. Thus, iron-based powders offer a balanced combination of affordability and high interfacial compatibility, making them highly suitable for the laser cladding repair of gears.
This study employed a single-layer, multi-track laser additive manufacturing (LAM) process utilizing Fe–Cr–Mo–V alloy powder to repair 18CrNiMo7-6 carburized gear steel. The microstructural and mechanical evolution induced by thermal cycling across the depth of the substrate was systematically characterized using optical microscopy (OM), scanning electron microscopy (SEM), microhardness profiling, and flat indentation testing. A transient thermal model incorporating a double-ellipsoidal heat source and accounting for phase-transformation latent heat was developed to simulate the temperature field and thermal gradients during cladding. The correlations between peak temperature, microstructure evolution, microhardness distribution, and strength were rigorously established. This work elucidates the mechanism by which thermal cycling governs gradient microstructure formation and corresponding properties, offering critical insights for the high-performance laser repair of carburized gear steels.

2. Materials and Methods

2.1. Equipment, Process and Materials

Single-layer multi-channel laser cladding was carried out on 18CrNiMo7-6 steel substrate using by ultra-high-speed laser-cladding equipment, using NHT.22.A01-type Fe-based self-fluxing stainless steel alloy powder. The laser-cladding equipment system mainly consisted of Laserline LDF-6000 high-power diode laser, a GTV 800 laser head, a multi-flow coaxial powder-feeding nozzle, a double barrel powder feeder, and a water cooler, etc. A zigzag scanning path was employed for multi-track deposition during the coaxial powder-feeding process, and a representative in situ process photograph is shown in Figure 1. The laser wavelength was 975 nm and the spot diameter was 3 mm. The experimental parameters are listed in Table 1, where a 60% overlap was selected from a preliminary screening comparing 40%, 60%, and 73.3% overlaps based on surface quality and cracking behavior. The 60% overlap yielded the best overall performance on the composite metric and was adopted as the baseline parameter for subsequent experiments.
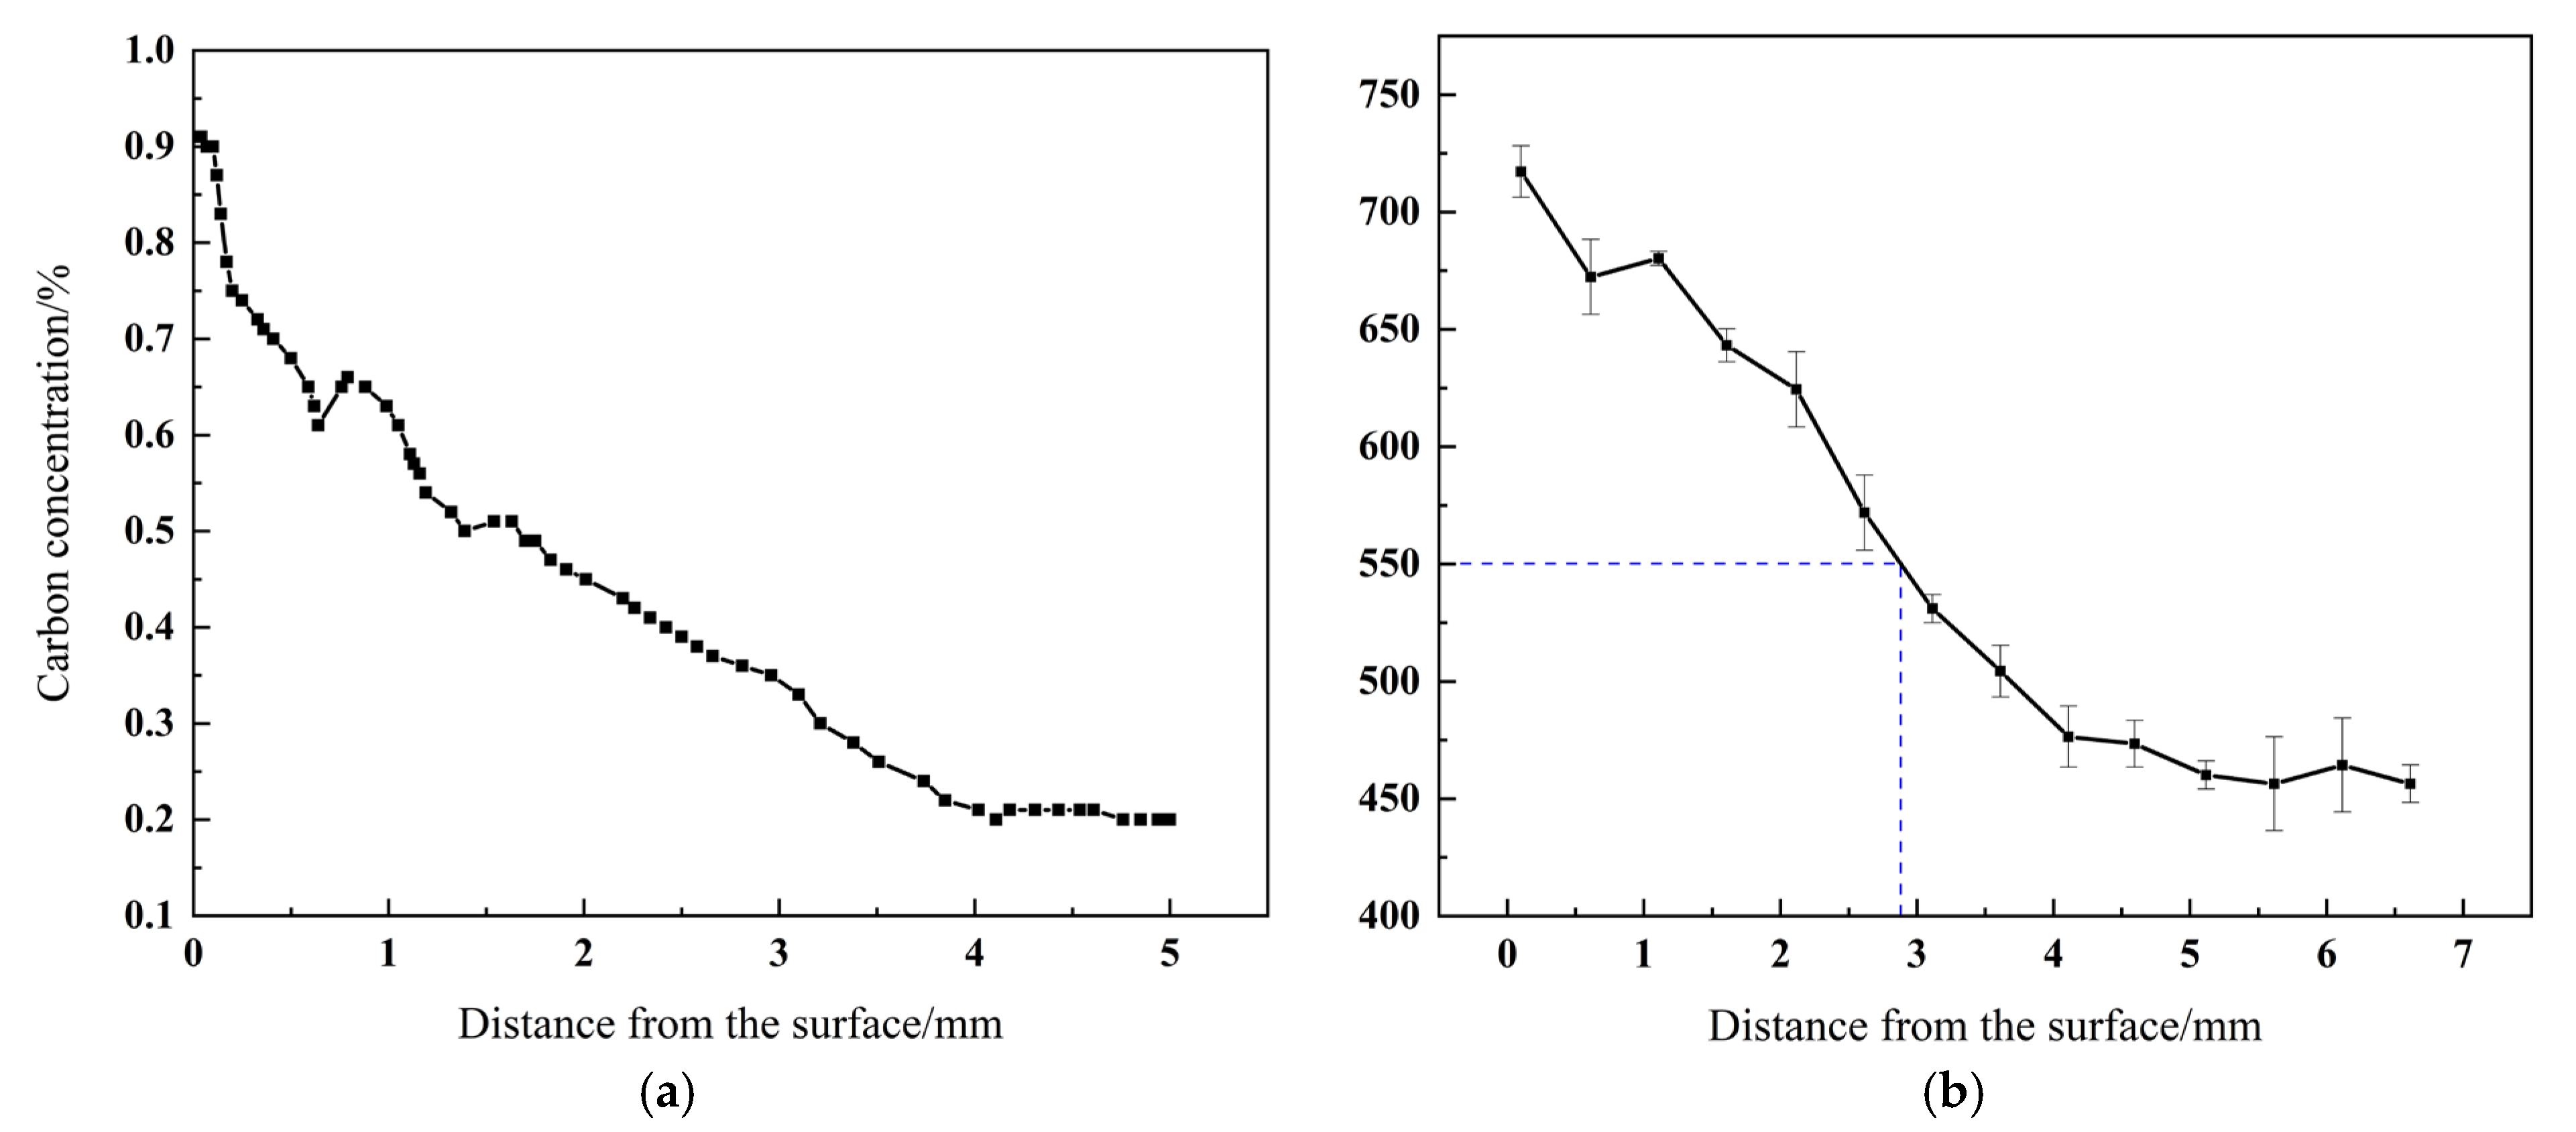
The flat 18CrNiMo7-6 steel specimens measuring 200 × 100 × 20 mm were prepared. The specimens were tested for chemical composition, carbon content, and hardness. Table 2 presents the chemical data, and Figure 2a shows the carbon concentration, while Figure 2b shows the surface hardness gradients. Based on Figure 2b, the case hardening depth (CHD), defined as the depth corresponding to HV = 550, was measured to be 2.8 mm.
As provided by the manufacturer Höganäs, Shanghai, China, the chemical composition of the Fe-based alloy powder NHT.22.A01 is given in Table 3. The powder was produced using vacuum atomization. After testing the powder samples, we obtained the particle-size distribution and particle morphology. The powder exhibits particle-size distribution of 20–65 μm (Figure 3b), and its particle morphology is shown in Figure 3a.

2.2. Performance Characterization

After completing the laser-cladding test, the surface morphology was detected using a 3D contourer. The chemical composition was analyzed using the MAXx spectrometer from SPECTRO. Then, the metallographic specimens of the cross-section 15 mm × 15 mm were prepared according to the standard procedure and then etched using ferric chloride (FeCl3) solution for 10 s. Afterward, the microstructures of the cladding, cladding–BM interface, and substrate HAZ were observed using a Nikon MA200 metallurgical optical microscope (OM) and a SU3500 scanning electron microscope (SEM). SEM was also used to detect powder particle size and obtain particle-size testing spectra. Using an HXD-1000 microhardness tester, the distribution characteristics of the specimens’ microhardnesses were tested under the load of 300 gf and holding time of 15 s.
The IMTS-R instrument was employed to evaluate the mechanical properties at specific depths within the clad sample (Figure 4). The experimental procedure was conducted as follows: First, sample blocks with dimensions of 10 × 10 × 10 mm3 were sectioned using wire electrical discharge machining. The top surface of each block was ground and polished to a series of predetermined depths to create parallel planar surfaces for indentation testing. These surfaces, corresponding to Samples 1–7, lay at depths of 0.3, 0.9, 1.1, 1.3, 1.7, 2.6, and 3.3 mm below the cladding surface, representing regions with different microstructures. Finally, indentation testing was performed at each exposed micro-region to characterize the local mechanical properties.
Residual stress measurements were conducted using a Proto LXRD1200w diffractometer along the horizontal and depth directions. The clad layer was analyzed using Mn-target Kα radiation with a Cr filter, while the substrate was examined with Cr-target Kα radiation and a V filter. A φ3 mm collimator was employed for all measurements. The electrochemical corrosion peeling method was applied for layer removal, with stress evaluations performed in two orthogonal directions: parallel (y-direction) and perpendicular (x-direction) to the cladding direction (Figure 5). Measurements were taken at 0.2 mm intervals using specimens with dimensions of 10 × 10 × 20 mm.
For each test (microhardness, indentation, and residual stress), measurements were performed at the same location on a single specimen and repeated at least three times.

2.3. Thermal Simulation Analysis

To systematically evaluate the effect of laser-cladding thermal cycles on a carburized–quenched layer, a 3D finite-element model was developed to simulate the thermal history during multi-track cladding. The substrate dimensions were 200 mm × 30 mm × 10 mm, with a clad length of 175 mm, matching the experimental values (Figure 6). To balance the computational cost and accuracy, the number of tracks was reduced to six and the substrate width correspondingly narrowed, while still reliably capturing key thermal physical processes. The element birth and death technique was applied to simulate the multi-pass cladding process by activating elements in each track sequentially. To simplify the model and reduce the computational resource consumption, we focused on core thermal behavior and made the following simplifications:
  • The fluid flow of molten pool, chemical reactions, heat loss due to evaporation, and heat transfer of unmolten powders were ignored. This may affect the residual stress predictions, but Ref. [33] states the model remains reliable for temperature evolution.
  • Heat conduction between the cladding sample and the test table was neglected; only convective and radiative heat transfer between the geometric boundary and the surrounding air was considered [34]. The test bed’s large thermal mass means this neglect has a negligible impact on the cladding’s transient temperature field.
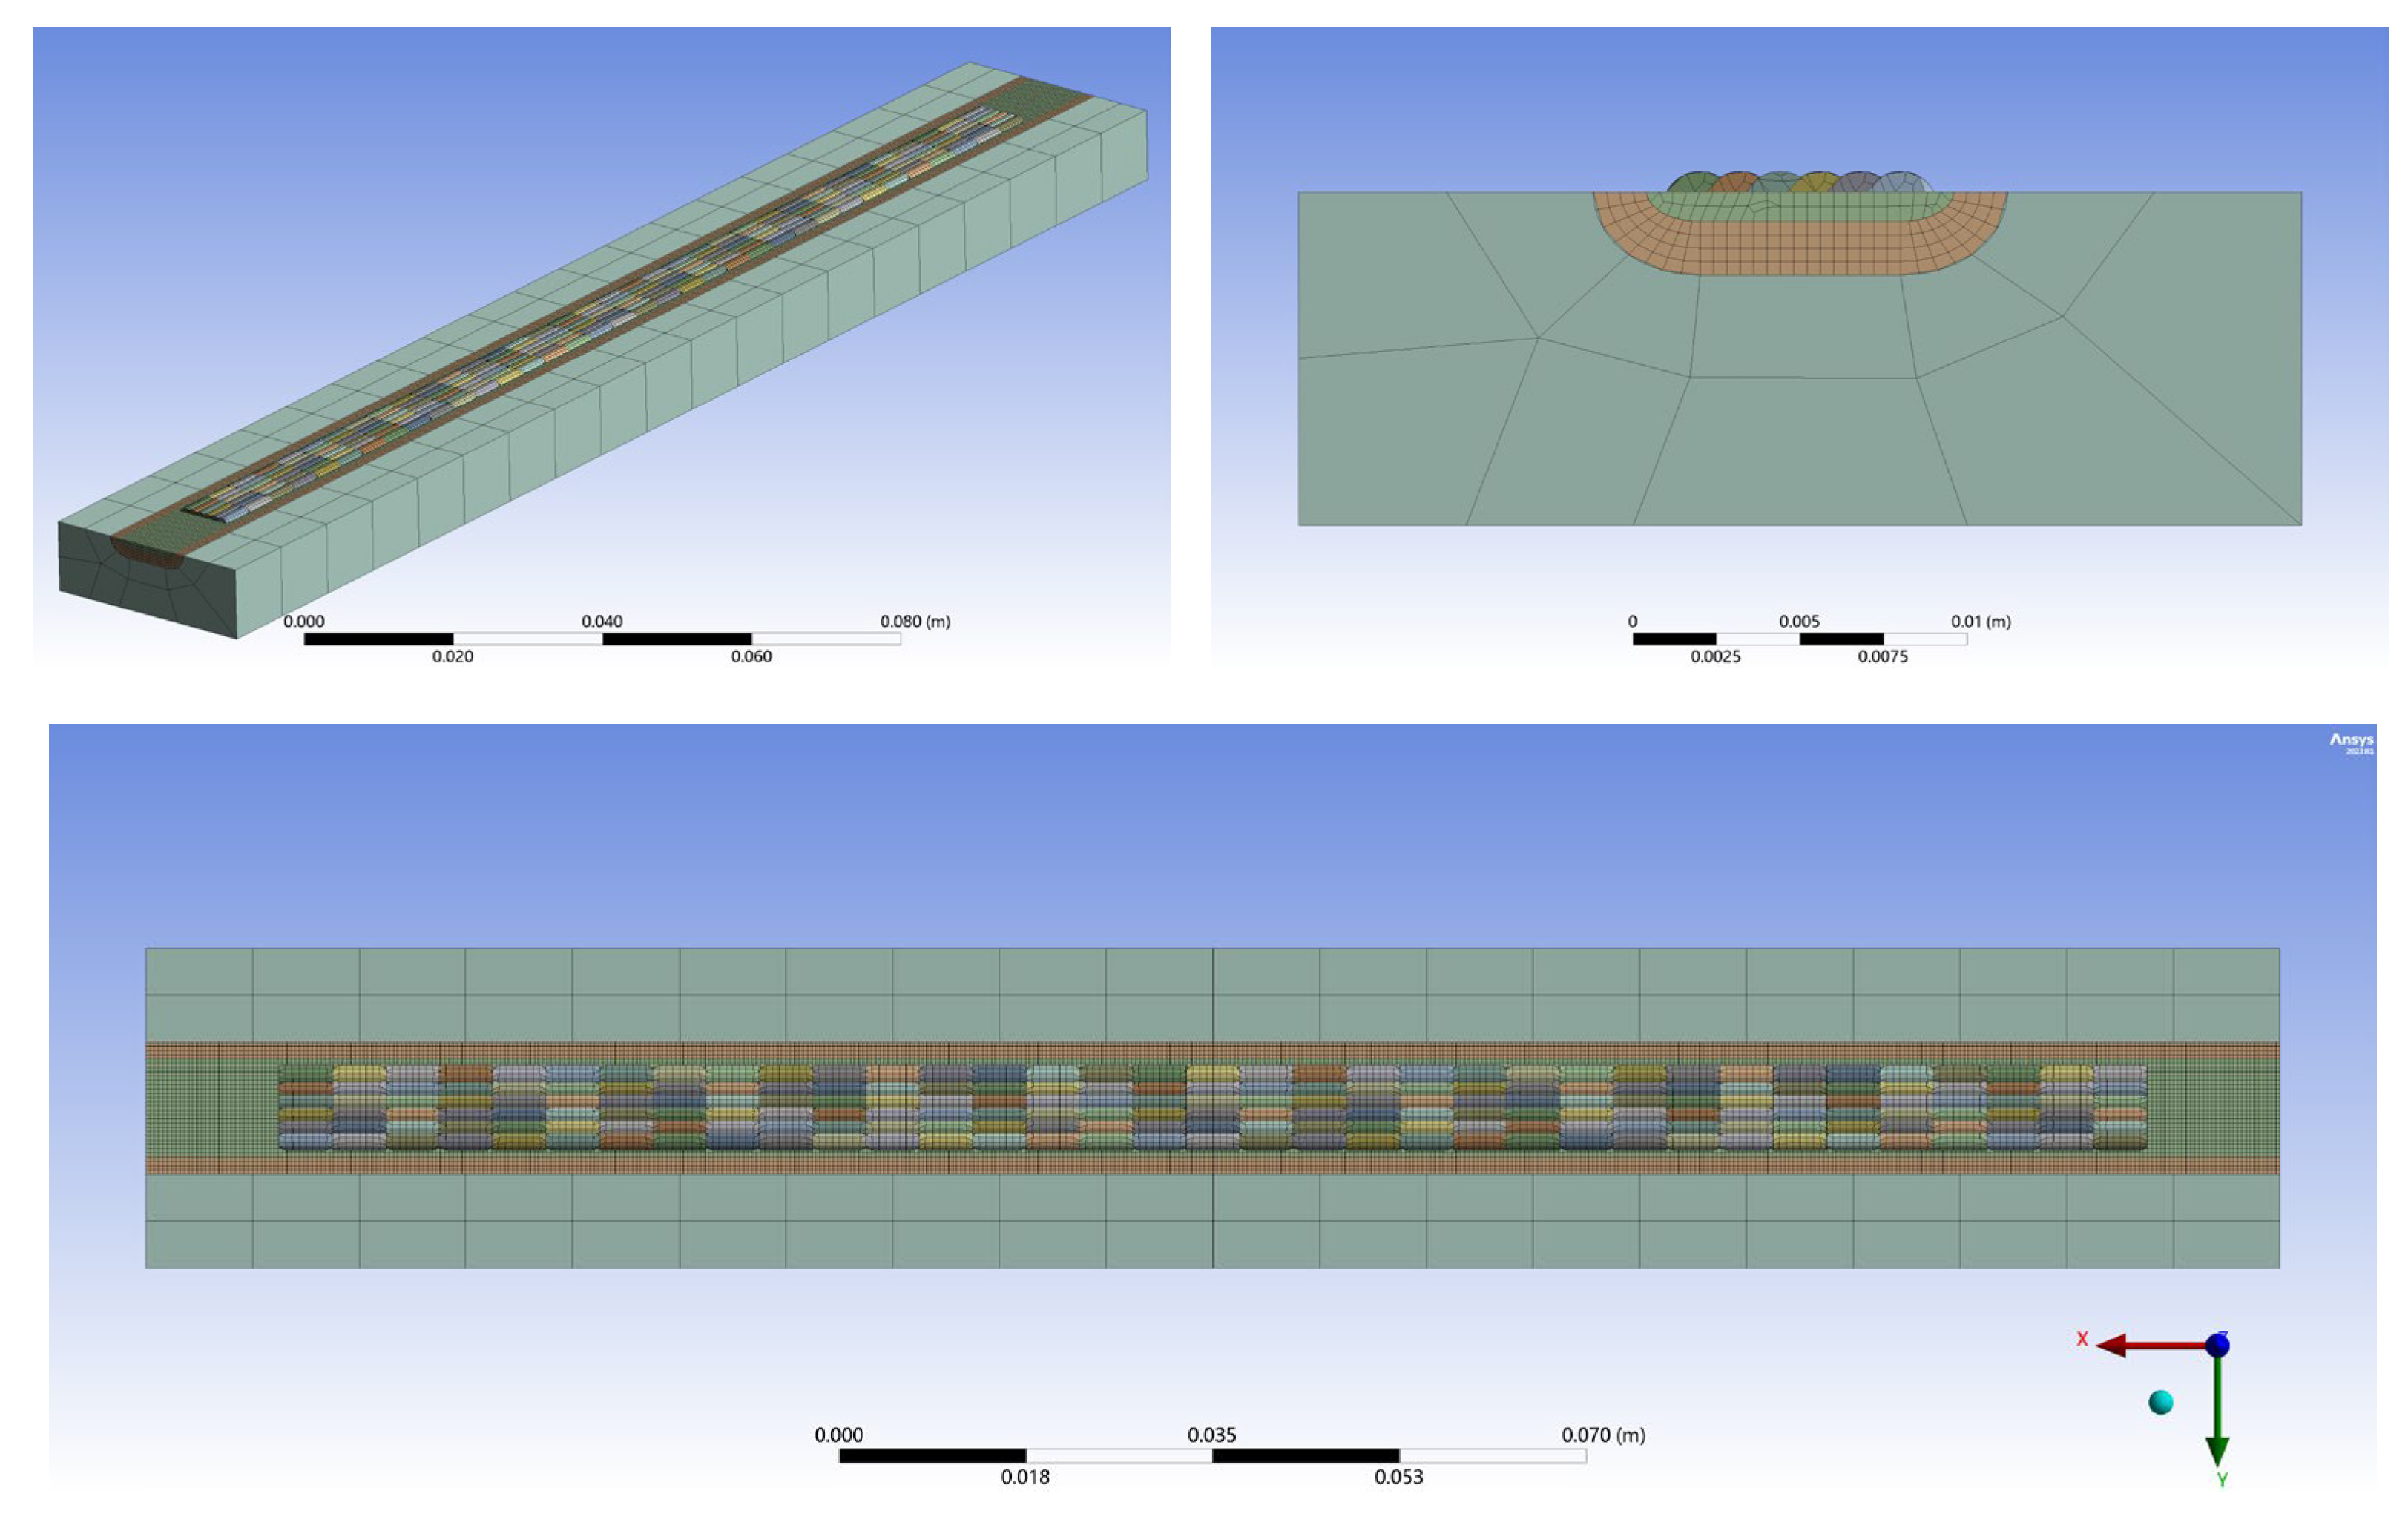
During modeling, the cladding-layer geometry was defined by the actual dimensions observed in the experiment. The effects of metallurgical phase transformations and their latent heat were included. The initial temperature of the finite-element model (FEM) was set to 22 °C.
Figure 6. Transient thermal simulation model.
Coatings 15 01467 g006

2.3.1. Governing Equations for Heat Transfer and Metallurgical Phase Transformation

The numerical simulation of the laser-cladding process was fundamentally based on the principles of transient heat transfer and metallurgical kinetics. The model’s core is the three-dimensional nonlinear heat conduction equation, which is derived from Fourier’s law and energy conservation.
To accurately capture the complex physics involved, a modified heat conduction equation that accounts for the latent heat effects during solid–solid phase transformations (e.g., austenization, martensitic transformation) and solid–liquid phase change (melting and solidification) was employed. The governing equation is expressed as follows [35,36,37].
i P i ( ρ c p ) i T t i P i k i T + i < j L i j ( T ) A i j = Q l a s e r
where T is the temperature (K), t is the time (s), P i is the volume fraction of phase i (e.g., austenite, ferrite, martensite, liquid), ρ is the density (kg·m−3), c p is the specific heat capacity at constant pressure (J·kg−1·K−1), k is the thermal conductivity (W·m−1·K−1), L i j ( T ) is the latent heat content released or absorbed between phases i and j (J·m−3), A i j is the rate of phase transformation from i to j (s−1), and Q l a s e r is the volumetric heat input from the laser source (W·m−3).
For a generalized anisotropic material, Equation (1) can be expanded in Cartesian coordinates ( x , y , z ) as
i P i ( ρ c p ) i T t x k x T x y k y T y z k z T z + L i j A i j = Q l a s e r
where kx, ky, and kz are the thermal conductivity coefficients along the principal axes.

2.3.2. Heat Source Model

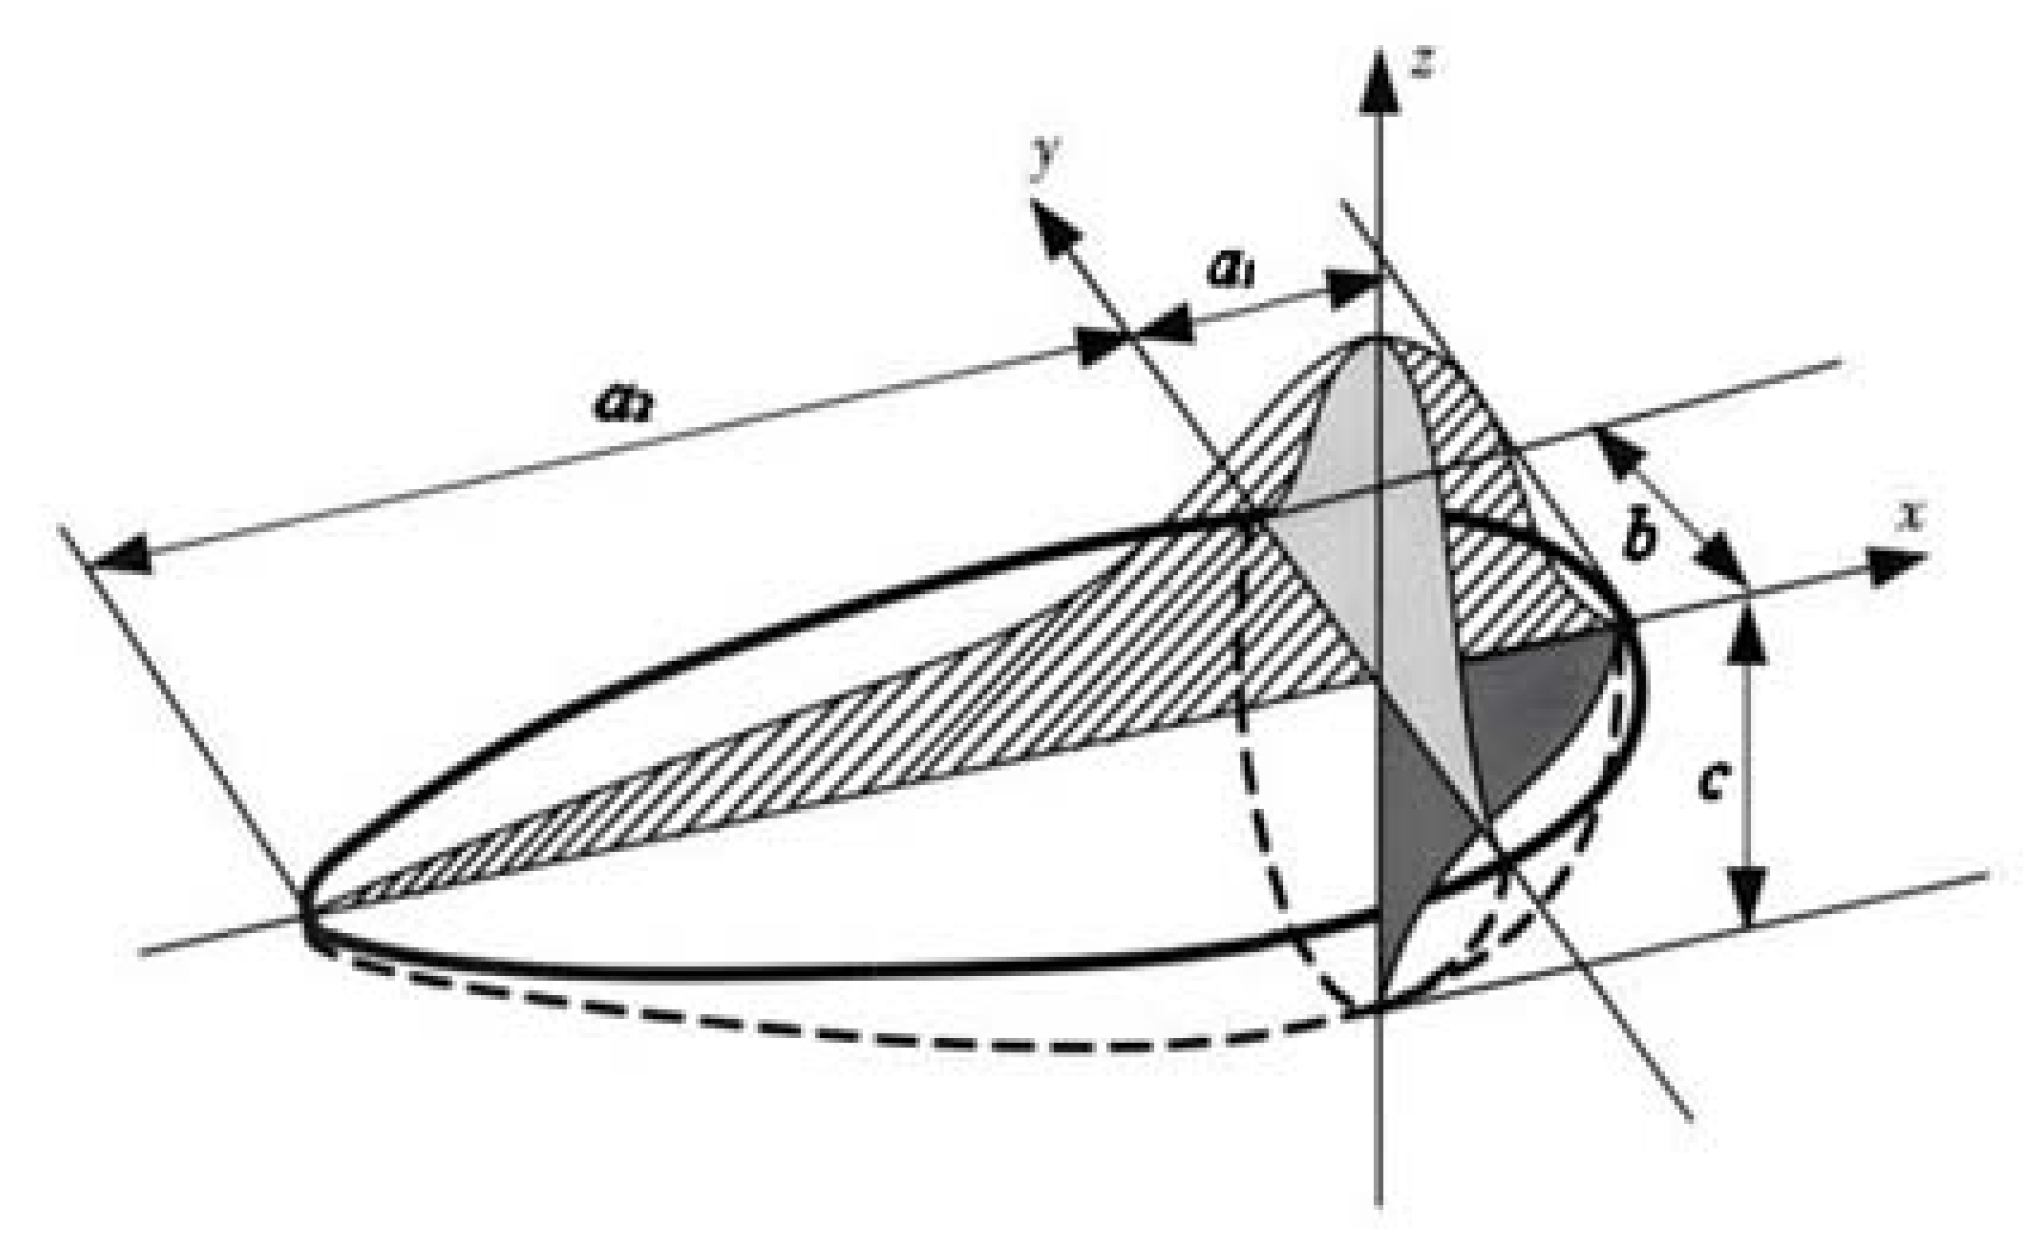
The volumetric heat input Q l a s e r is typically modeled using a moving heat source model. In this study, the double-ellipsoidal Goldak heat source model was employed, as illustrated in Figure 7, which is widely adopted for laser-cladding simulations due to its superior representation of the actual energy distribution [38] and its ability to precisely capture the molten pool morphology [39]. The heat flux distribution is described by the following equations [35,40].
Q l a s e r 1 ( x , y , z ) = 12 3 P η f f a 1 b c π π exp 3 x 2 a 1 2 3 y 2 b 2 3 z 2 c 2 Q l a s e r 2 ( x , y , z ) = 12 3 P η f p a 2 b c π π exp 3 x 2 a 2 2 3 y 2 b 2 3 z 2 c 2 .
where P denotes the laser power (W); η represents the thermal efficiency (dimensionless, taken as 0.4); and f f   and f p are the energy distribution coefficients for the front and rear quarters of the molten pool, set to 0.6 and 0.4, respectively. The geometric parameters a 1 ,   a 2 , b ,   a n d   c , corresponding to the semi-axes of the ellipsoid (Figure 7), were determined as 3, 6, 1.5, and 2 mm, respectively, based on an inverse calculation from experimentally measured molten pool dimensions.

2.3.3. Initial and Boundary Conditions

To obtain a unique solution for the second-order partial differential equation (Equation (2)), appropriate initial and boundary conditions [37] must be prescribed as follows:
T ( x , y , z , t ) = T ¯ ( t ) ( Γ 1 )
k x T x n x + k y T y n y + k z T z n z = q ¯ f ( t ) ( Γ 2 )
k x T x n x + k y T y n y + k z T z n z = h c ¯ ( T e T ) ( Γ 3 )
k x T x n x + k y T y n y + k z T z n z = ε σ ( T e 4 T 4 ) ( Γ 4 )
where T ¯ ( t ) is the assigned temperature on the boundary Γ 1 , q ¯ f ( t ) is the density of the given heat source on the boundary Γ 2 , h c ¯ is the heat transfer coefficient, ε is the emissivity, and σ is the Stefan–Boltzmann constant.
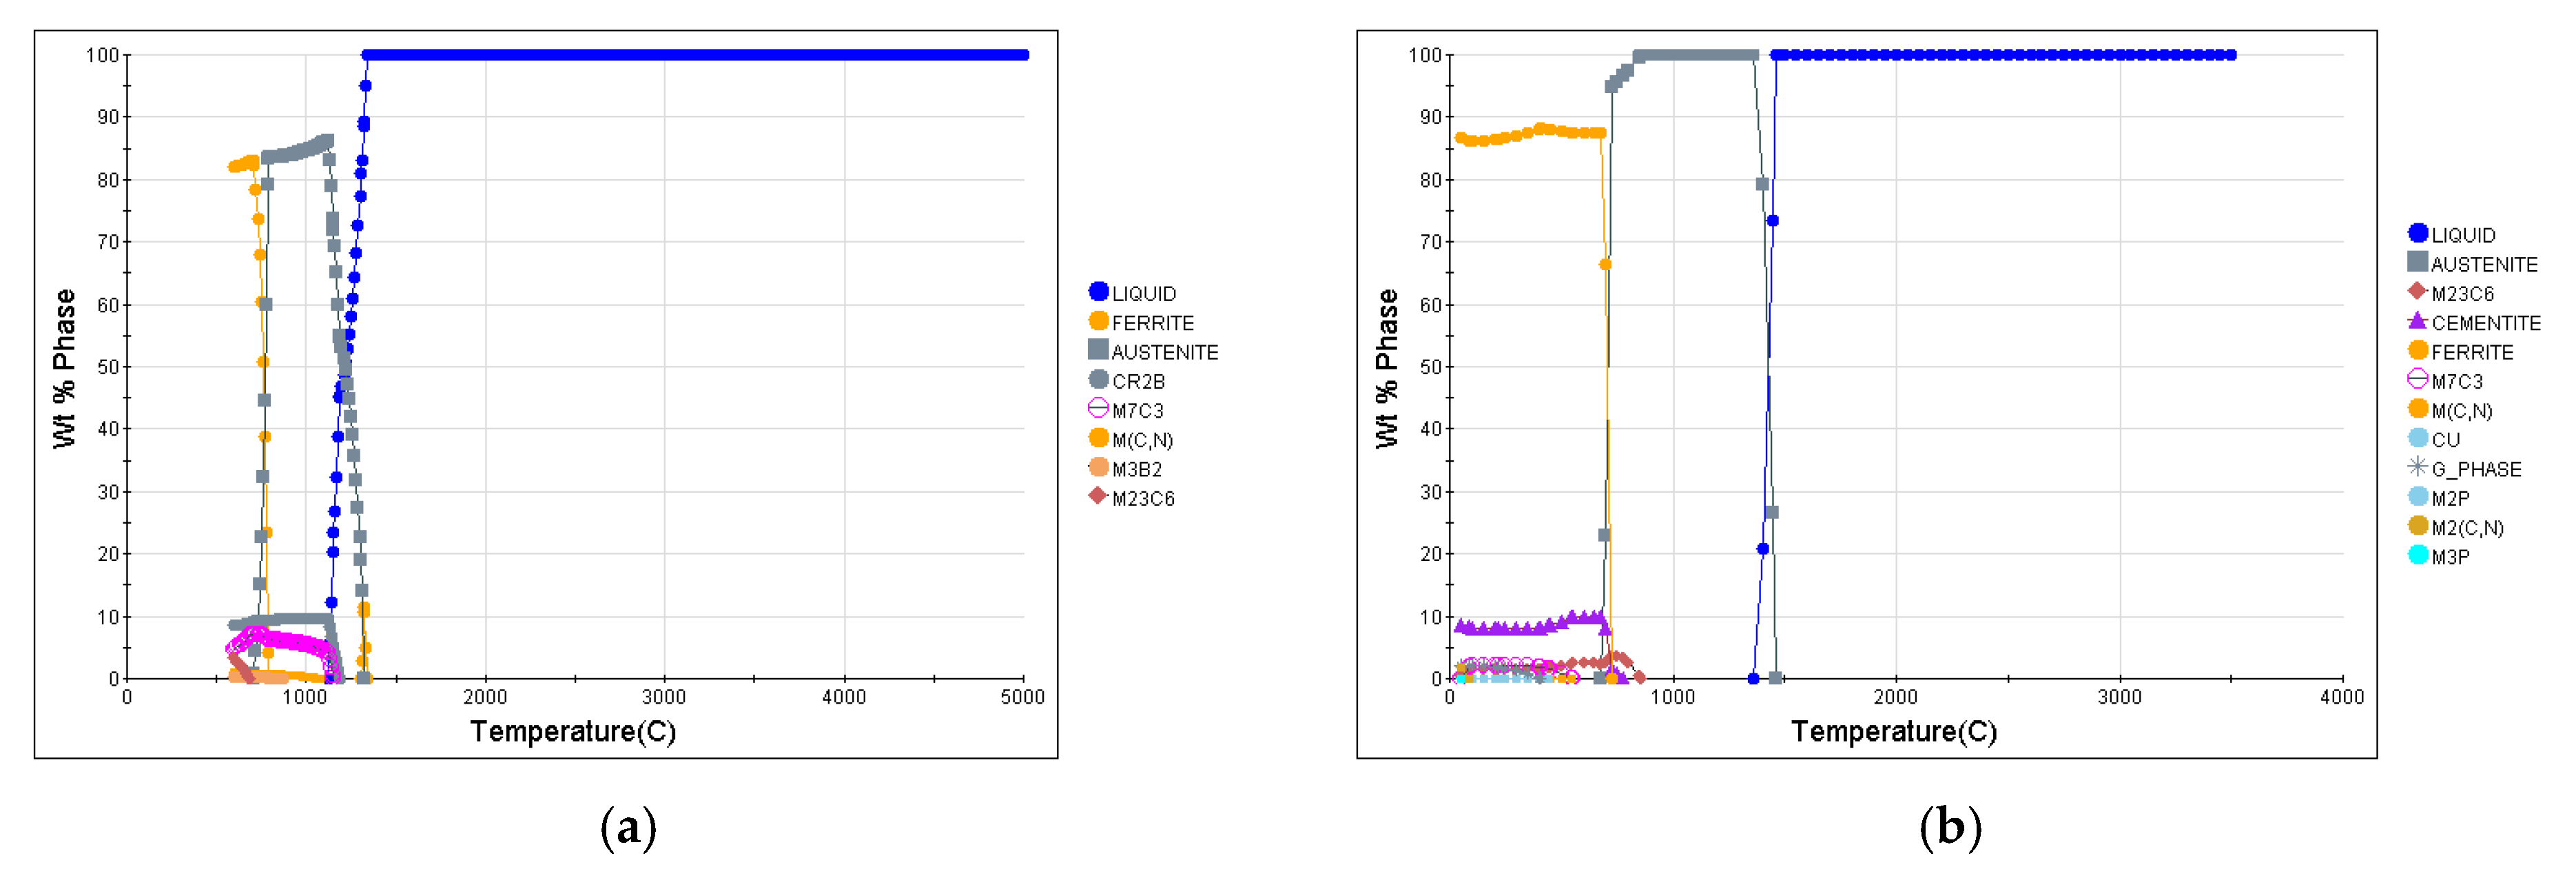
Critical thermophysical properties and phase-transformation temperatures (e.g., solidus, liquidus, Ac1, Ac3) for the substrate and clad material, calculated using JMatPro based on their chemical compositions, are summarized in Figure 8 and Figure 9. These parameters define the temperature-dependent material behavior and phase-transformation rules in the coupled thermo-metallurgical model.

3. Results and Discussion

3.1. Surface Morphology

The surface quality and three-dimensional morphology of the cladding after single-layer multi-channel laser cladding are shown in Figure 10. The surface is flat after cladding, with a surface roughness Ra = 5 μm and maximum rough contour height Rz = 31 μm.

3.2. Microstructures Evolution

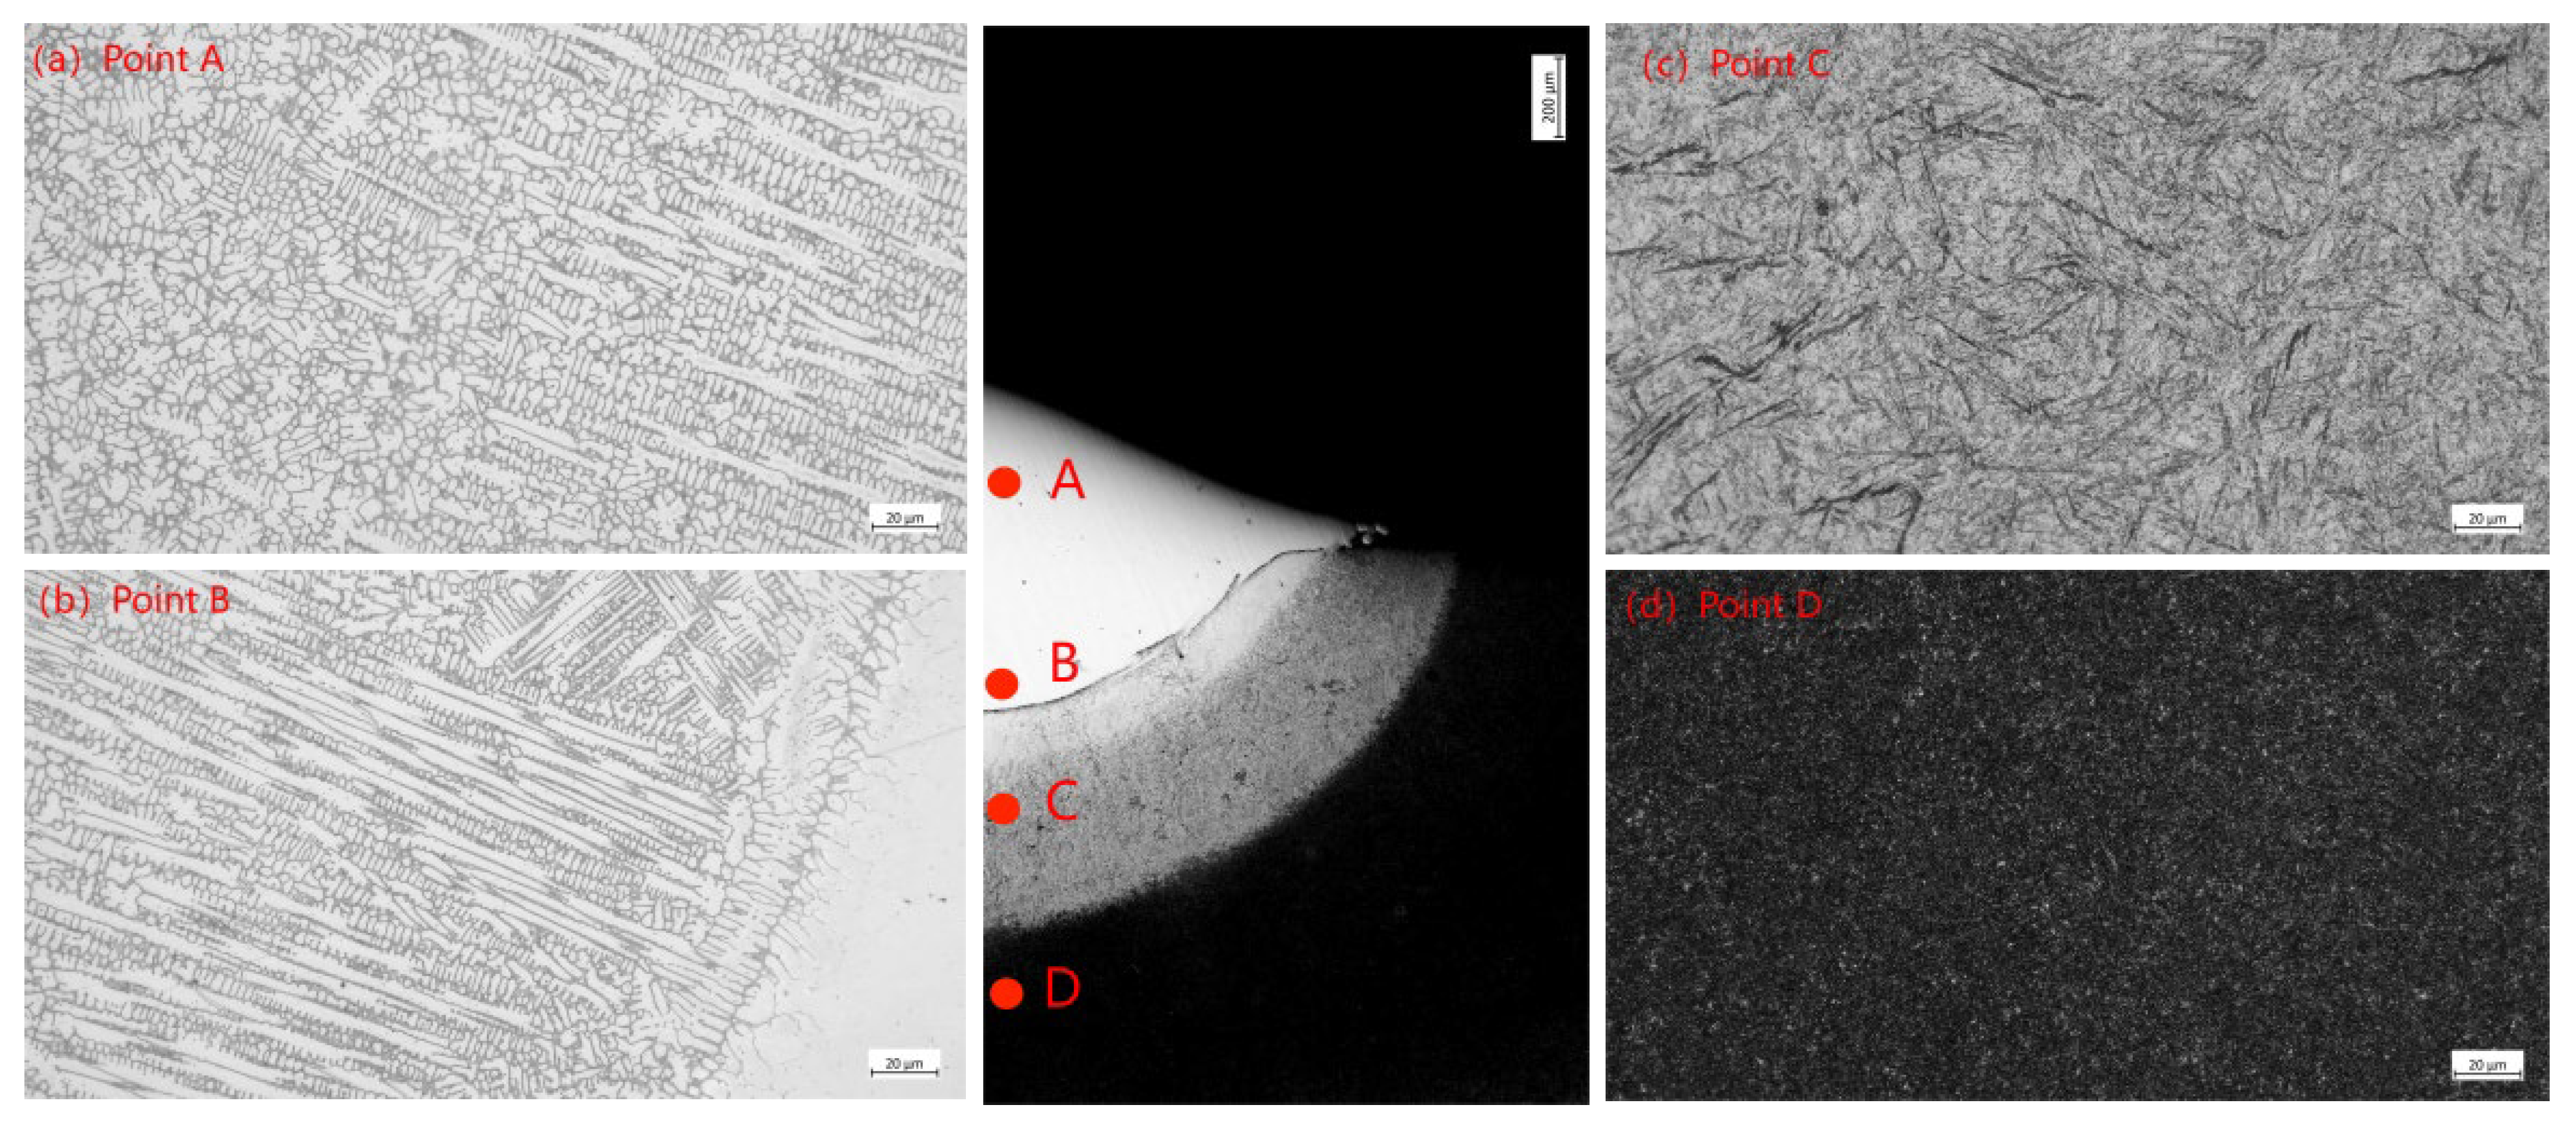
Cross-sectional specimens were prepared perpendicular to the cladding direction for metallographic examination. Figure 11 presents an optical microscopy (OM) image of the transverse section of the last cladding track. Microstructural analysis indicates that under the employed process parameters, the clad layer exhibits a uniform and dense morphology without defects such as cracks. Furthermore, a sound metallurgical bond is achieved between the cladding layer and the substrate.
The coating consists primarily of dendritic and cellular crystals. Notably, coarser cellular crystals are observed near the fusion line, which are gradually refined toward the surface owing to improved heat dissipation conditions. This structural evolution can be attributed to the influence of the ratio of the temperature gradient (G) to the solidification rate (R), i.e., G/R. As the G/R value decreases, the microstructure transitions from planar and cellular crystals to columnar and equiaxed grains [41,42,43,44].
Notably, two distinct bright bands with differing contrast levels are observed within the substrate adjacent to the fusion line after etching with nitric acid alcohol. The band immediately adjacent to the interface lacks resolvable microstructural features and exhibits a narrow width of approximately 0.15 mm and higher reflectivity. In contrast, the adjoining darker band comprises coarse acicular martensite along with retained austenite, with a width of approximately 0.4 mm. Beneath these two bright zones, the microstructure is characterized by a granular morphology that is preferentially etched, resembling tempered martensite.
Scanning electron microscopy (SEM) was performed at seven cross-sectional points (B, E, C, F, D, G, H) to investigate the microstructural evolution of the carburized and quenched steel after cladding. The locations of these points, at depths of 0.9, 1.1, 1.3, 1.5, 1.7, 2.6, and 3.3 mm below the cladding surface, are indicated in Figure 12a,d.
Point B is located in the fusion zone, which is formed by the melting and subsequent solidification of the substrate material, indicating that the temperature it experienced exceeded the melting point of the substrate. According to the data shown in Figure 9, the melting temperature of the surface high-carbon layer is approximately 1460 °C. Higher-magnification images in Figure 12b,c reveal sound metallurgical bonding in this region. The carbon-supersaturated state observed adjacent to the fusion line is attributed to the dissolution of carbon from the melted carburized substrate and its subsequent retention during rapid solidification.
The presence of abundant secondary-quenched zone martensite with a typical lath morphology in Region E (Figure 12e,f), consistent with Ref. [45], indicates that the local peak temperature rose well above the Ac3 temperature—the temperature at which the transformation to austenite is completed during heating (~820 °C for 18CrNiMo7-6 steel; Deutsche Edelstahlwerke data), resulting in the formation of coarse prior-austenite grains.
The microstructure in Region C (Figure 12g), comprising uniform fine acicular martensite with clearly etched prior-austenite grain boundaries, suggests reheating above the Ac3 temperature. The revealed boundaries result from chemical heterogeneity caused by solute segregation or proeutectoid phase precipitation during austenitization.
The microstructural contrast in Region F (Figure 12f,h) reveals a distinct phase boundary, resulting from the differential etch response between the untempered martensite and the adjacent transformed zone. This adjacent region exhibits a spheroidized cementite–ferrite microstructure, which is characteristic of high-temperature tempering within the Ac1 range—the temperature at which austenite begins to form during heating (~730 °C for 18CrNiMo7-6 steel; Deutsche Edelstahlwerke data). This microstructure confirms that the initial martensite was reheated into the intercritical temperature range.
In Region D (Figure 12j), cementite spheroidized along the prior-austenite grain boundaries, and the subsequent preferential etching of the ferrite matrix left relief-like cementite chains—a hallmark of tempered sorbite indicative of tempering at 500–650 °C. The microstructure in Region G (Figure 12k) consists primarily of tempered troostite, as evidenced by dark-etching lath bundles and fine granular carbides, which resulted from the medium-temperature tempering (350–500 °C) of quenched martensite. In addition, several feathery lower bainite structures are observed, which are attributable to the bainitic transformation of retained austenite within the same medium-temperature regime.
In Region H (Figure 12l), the microstructure exhibits extremely fine carbide precipitates while retaining the original martensite outline. This characteristic microstructure is consistent with tempered martensite, indicating that the region underwent low-temperature tempering between 150 and 350 °C.

3.3. Microhardness Evolution

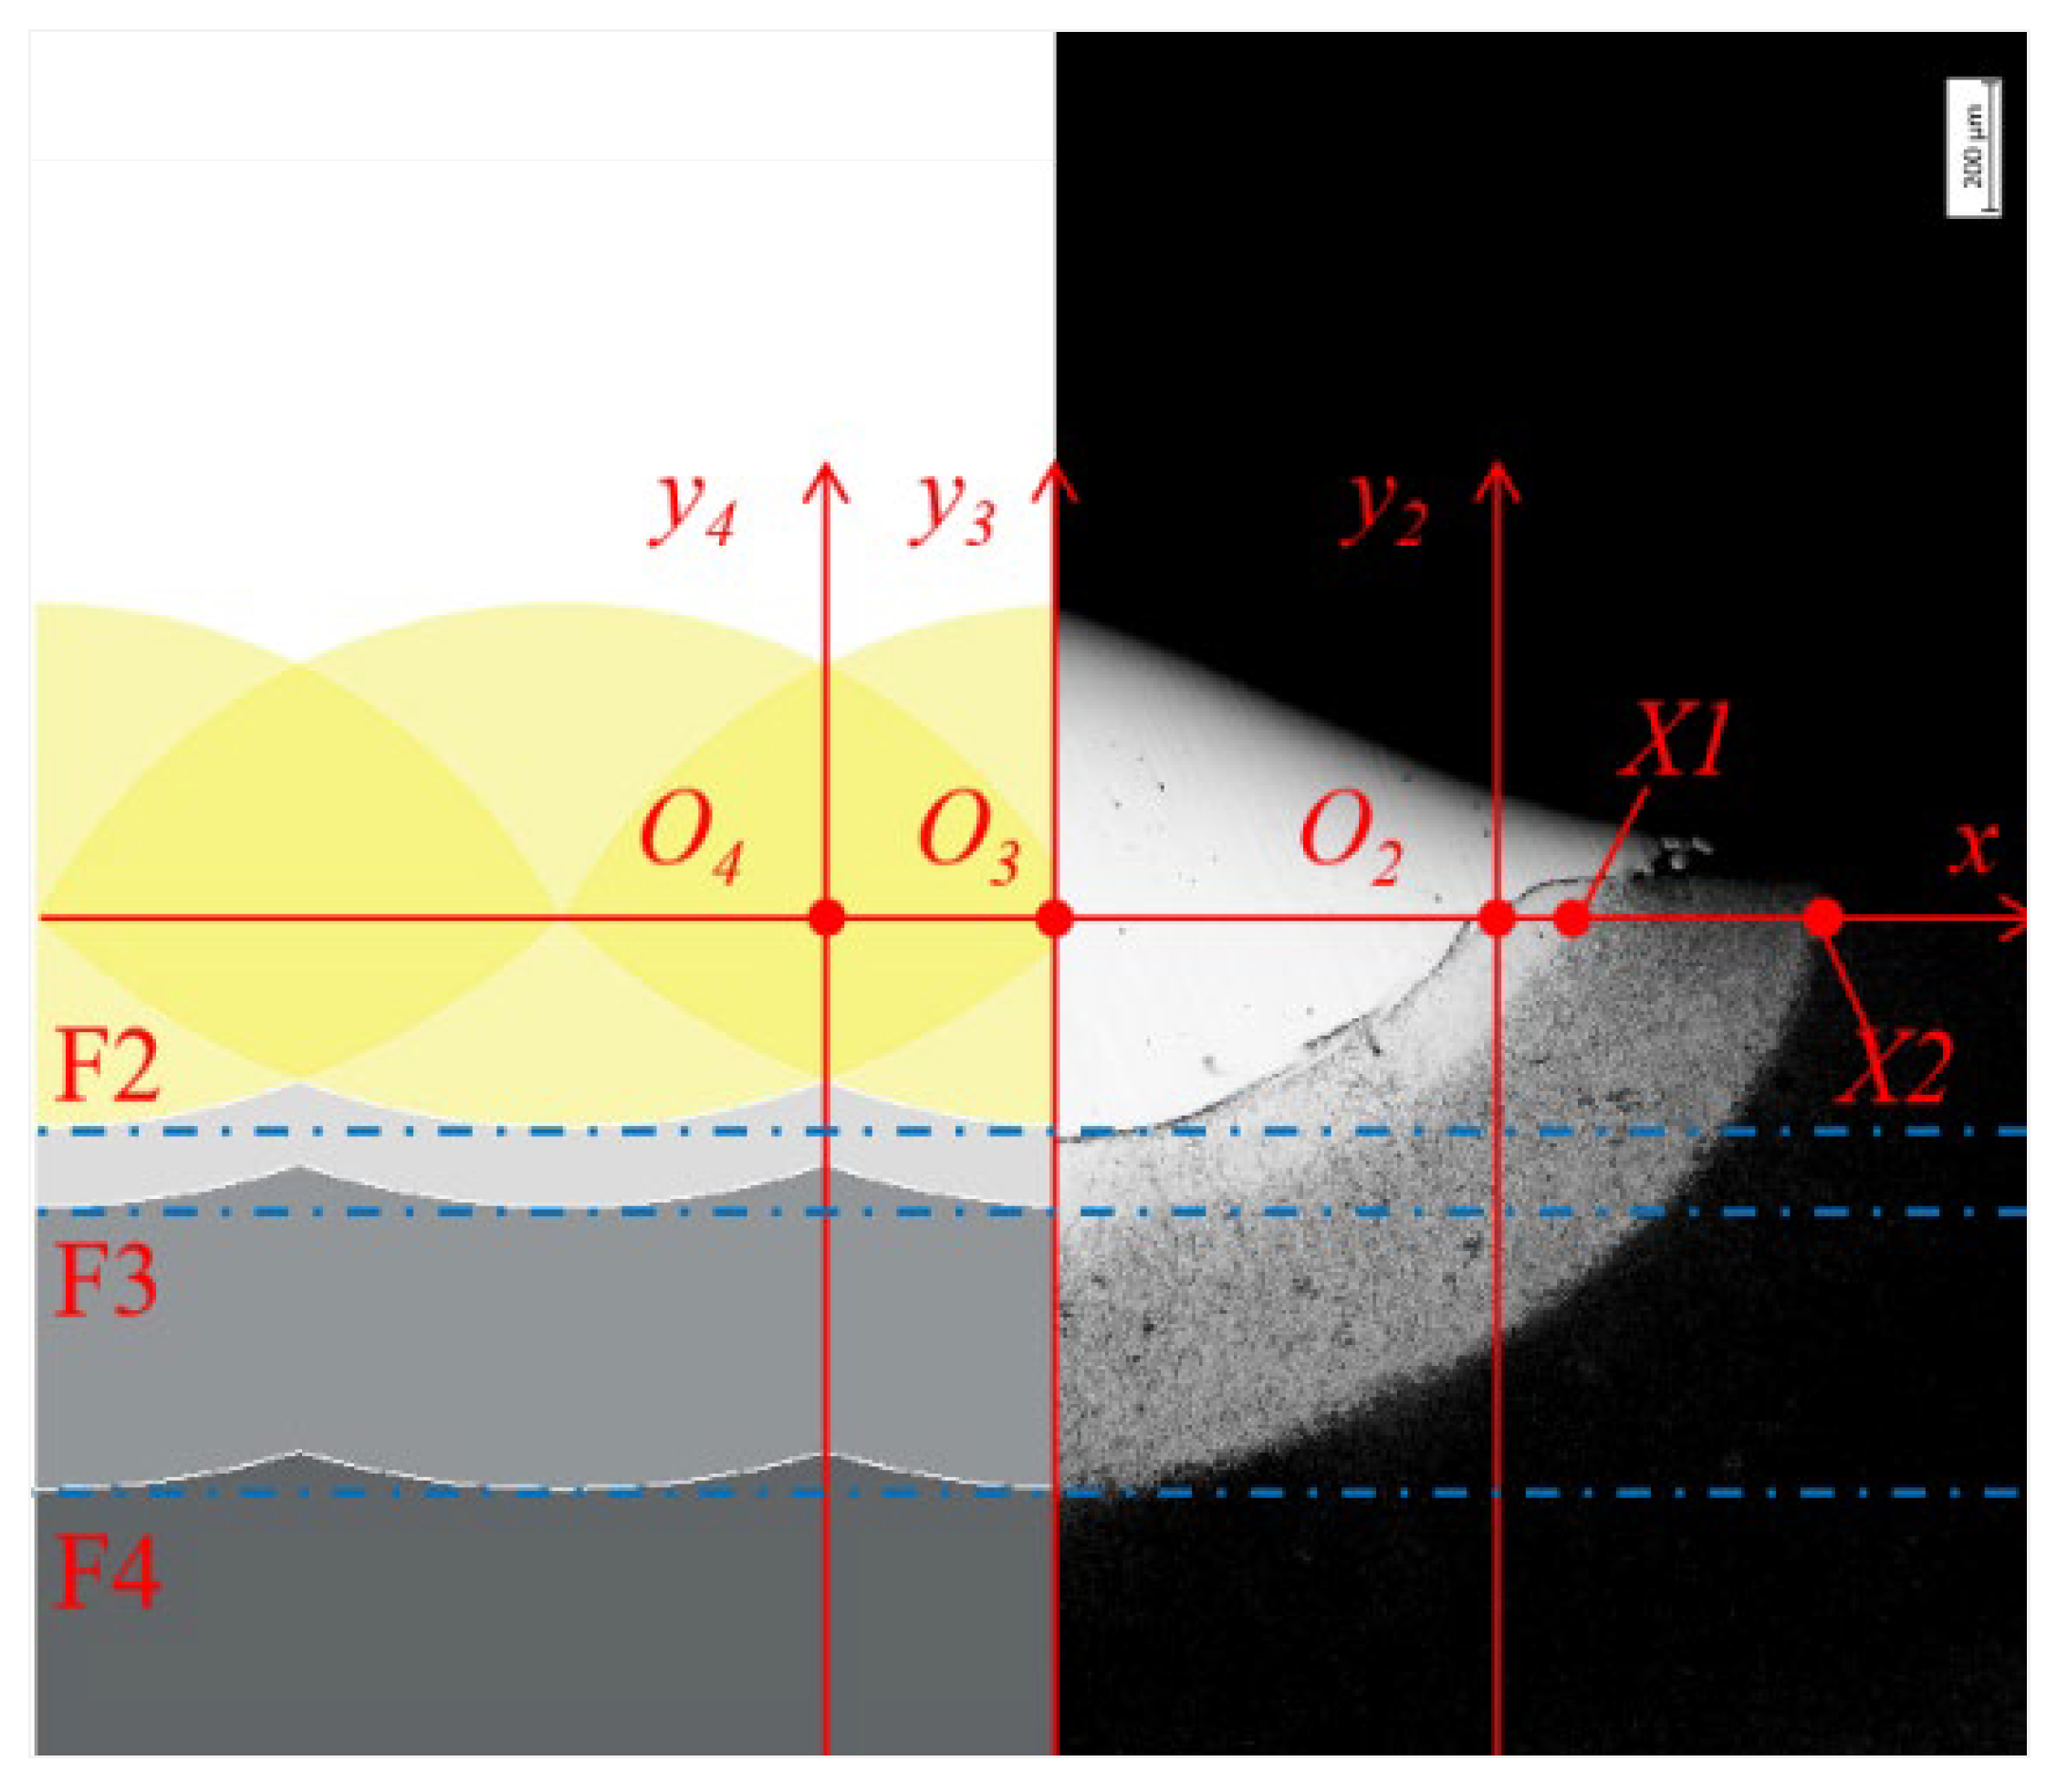
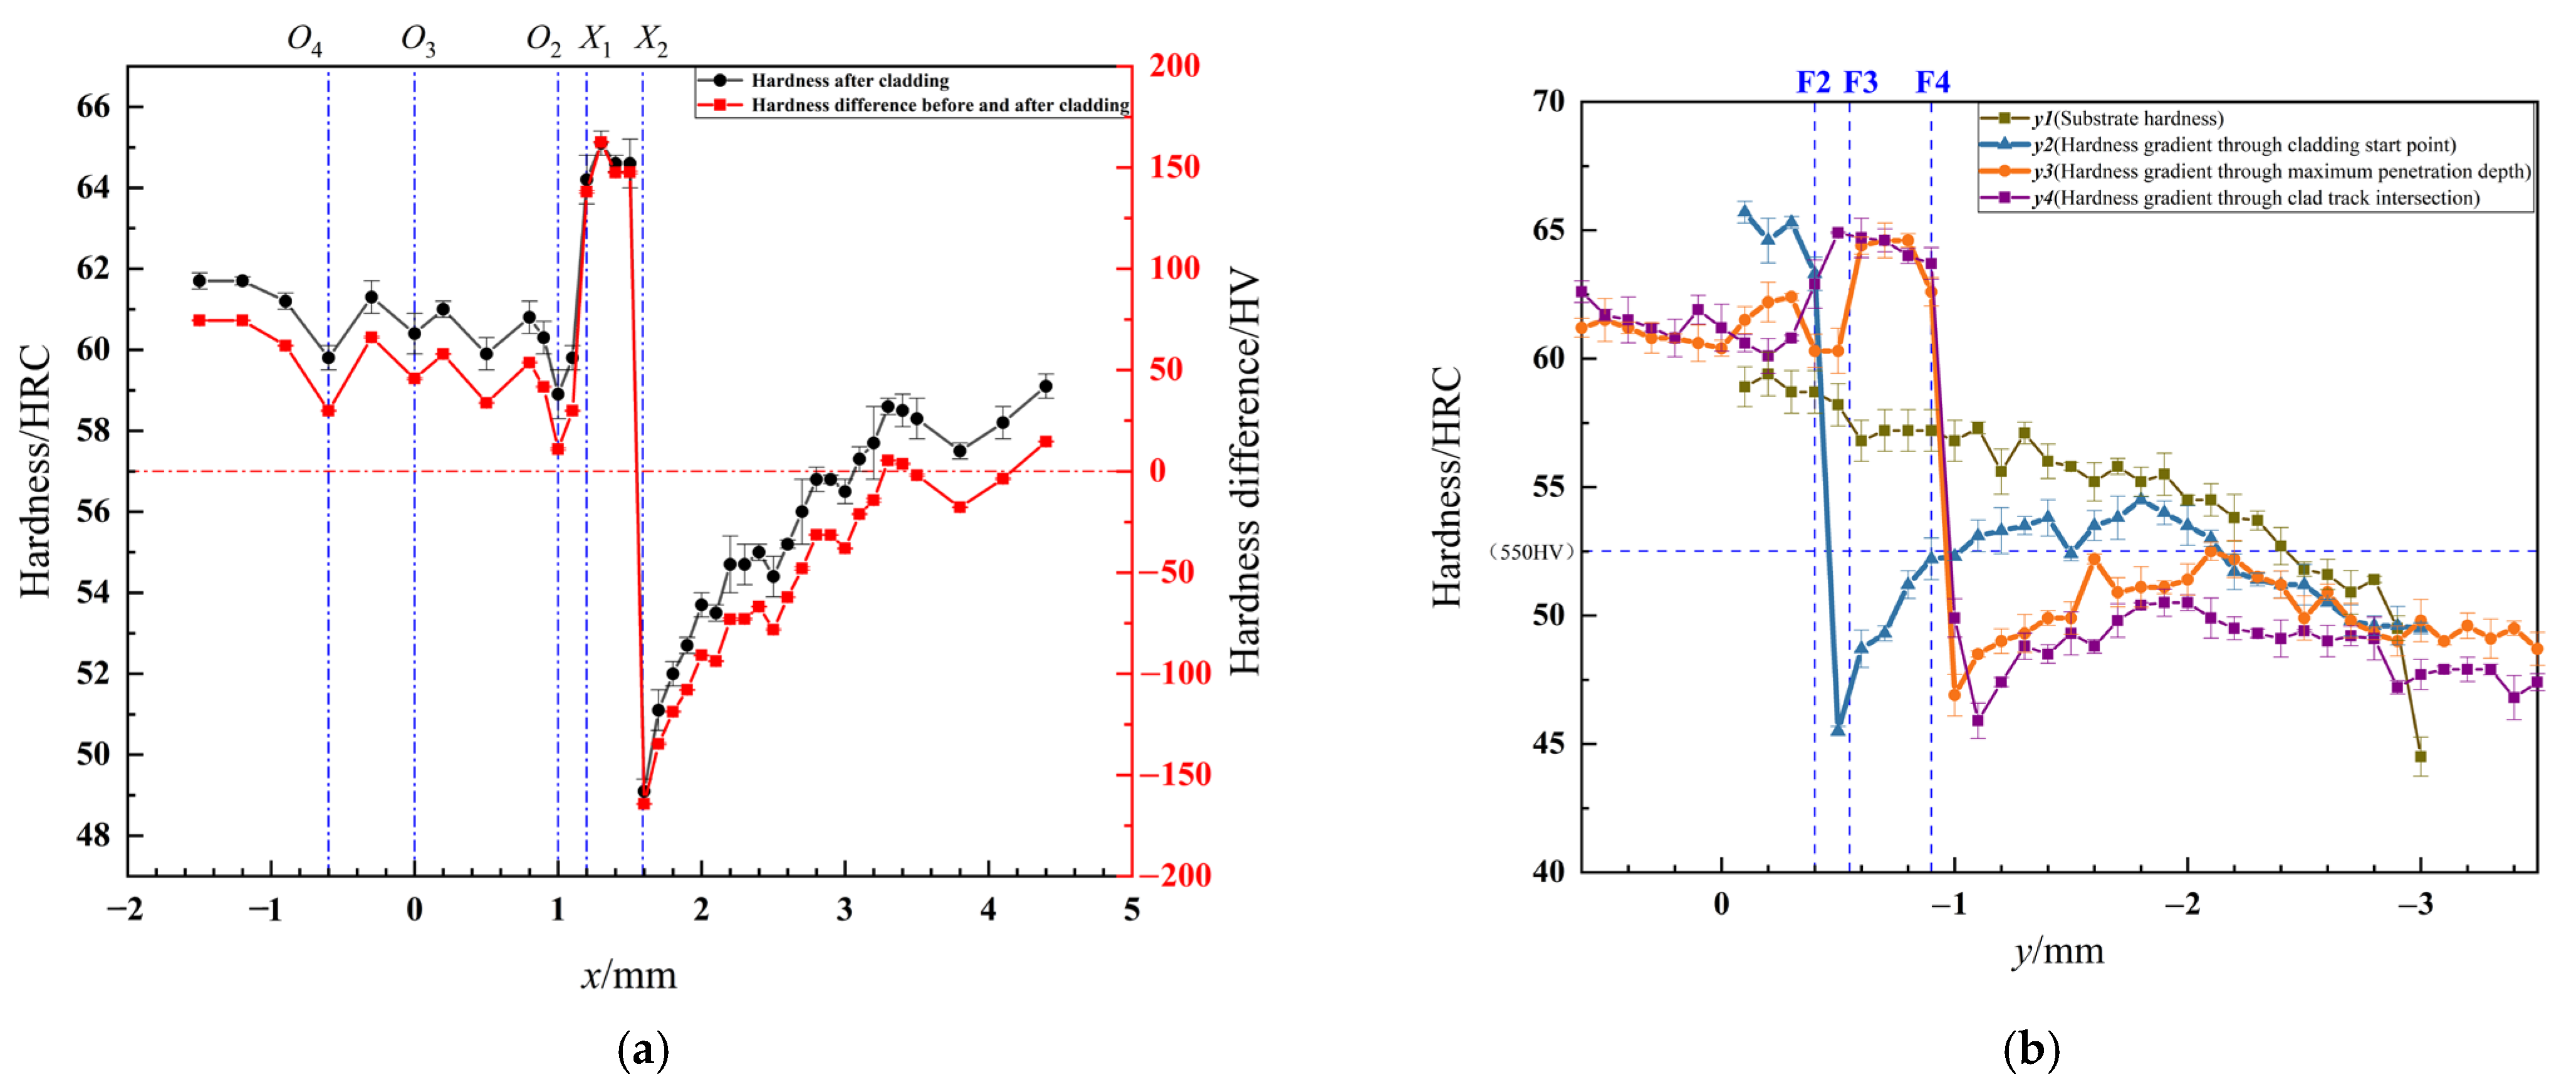
To characterize the microhardness distribution in different regions of carburized and quenched steel after laser cladding, microhardness tests were conducted along the horizontal and vertical directions. The measurement locations are indicated in Figure 13, where O2 denotes the interface between the cladding layer and the substrate, O3 represents the center of the last clad track, and O4 corresponds to the junction between two adjacent clad tracks. Along the horizontal (X) axis in Figure 13, the measurement was centered at position O3, with the result presented in Figure 14a. Vertically, measurements were taken at positions O2, O3, and O4; the resulting profiles are denoted as y2, y3, and y4 in Figure 14b, respectively. For reference, y1 in Figure 14b represents the original hardening gradient of the carburized layer. It can be observed that the maximum surface hardness of the clad layer reaches 720 HV (approximately 61 HRC), which is about 5% higher than that of the carburized and quenched substrate (58 HRC) and 16% higher than the hardness of the nickel-based clad layer reported in Ref. [10] (620 HV). The hardness gradients along the vertical and horizontal directions exhibit similar trends: an initial increase followed by a sharp decrease and then a gradual recovery.
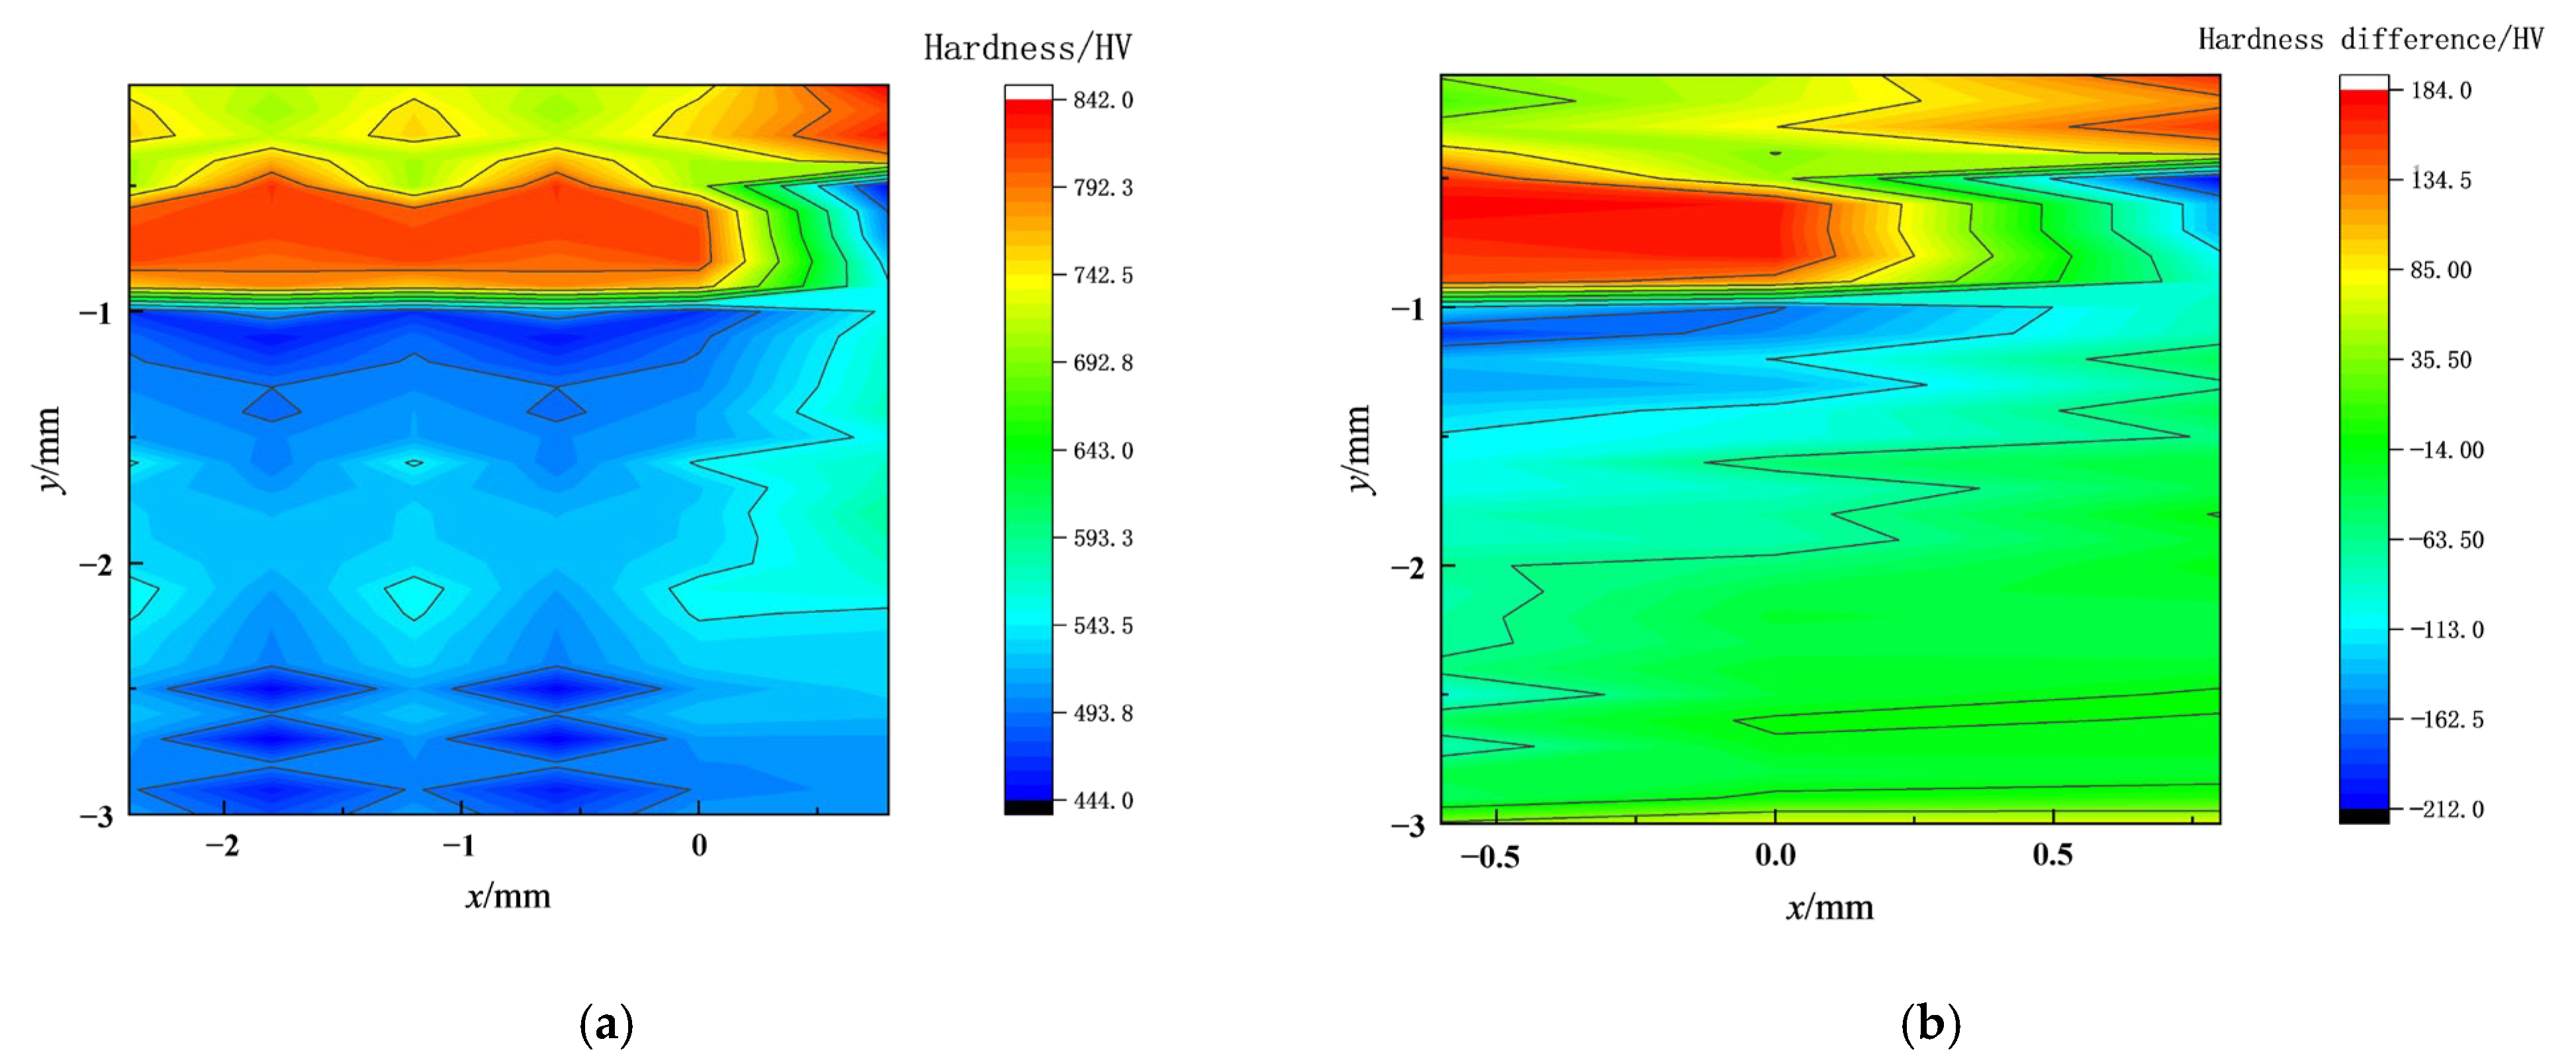
To delineate the extent of the high-, medium-, and low-temperature tempering zones, hardness contour maps and the hardness difference relative to the original substrate were plotted (Figure 15a and Figure 15b, respectively). Figure 15 indicates a significant hardness increase in the near-surface region but a notable decrease in the subsurface region. Based on this analysis, the tempering zones were defined as follows: a hardness reduction > 100 HV was designated as the high-temperature zone, a reduction of 50–100 HV as the medium-temperature zone, and a reduction < 50 HV as the low-temperature zone. Accordingly, the widths of Region D, G, and H in Figure 12, corresponding to these defined zones were measured to be 0.6, 0.5, and 0.8 mm, respectively.
Furthermore, the high-hardness layer, with a total depth of 1.55 mm beneath the surface, comprises four distinct regions corresponding to Points A, B, E, and C in Figure 11 and Figure 12. Under the present process conditions, their respective depths are 0.6, 0.4, 0.15, and 0.4 mm, resulting in a cumulative thickness that satisfies the technical specification for the hardened depth in carburized and quenched steel.

3.4. Mechanical Properties Evolution

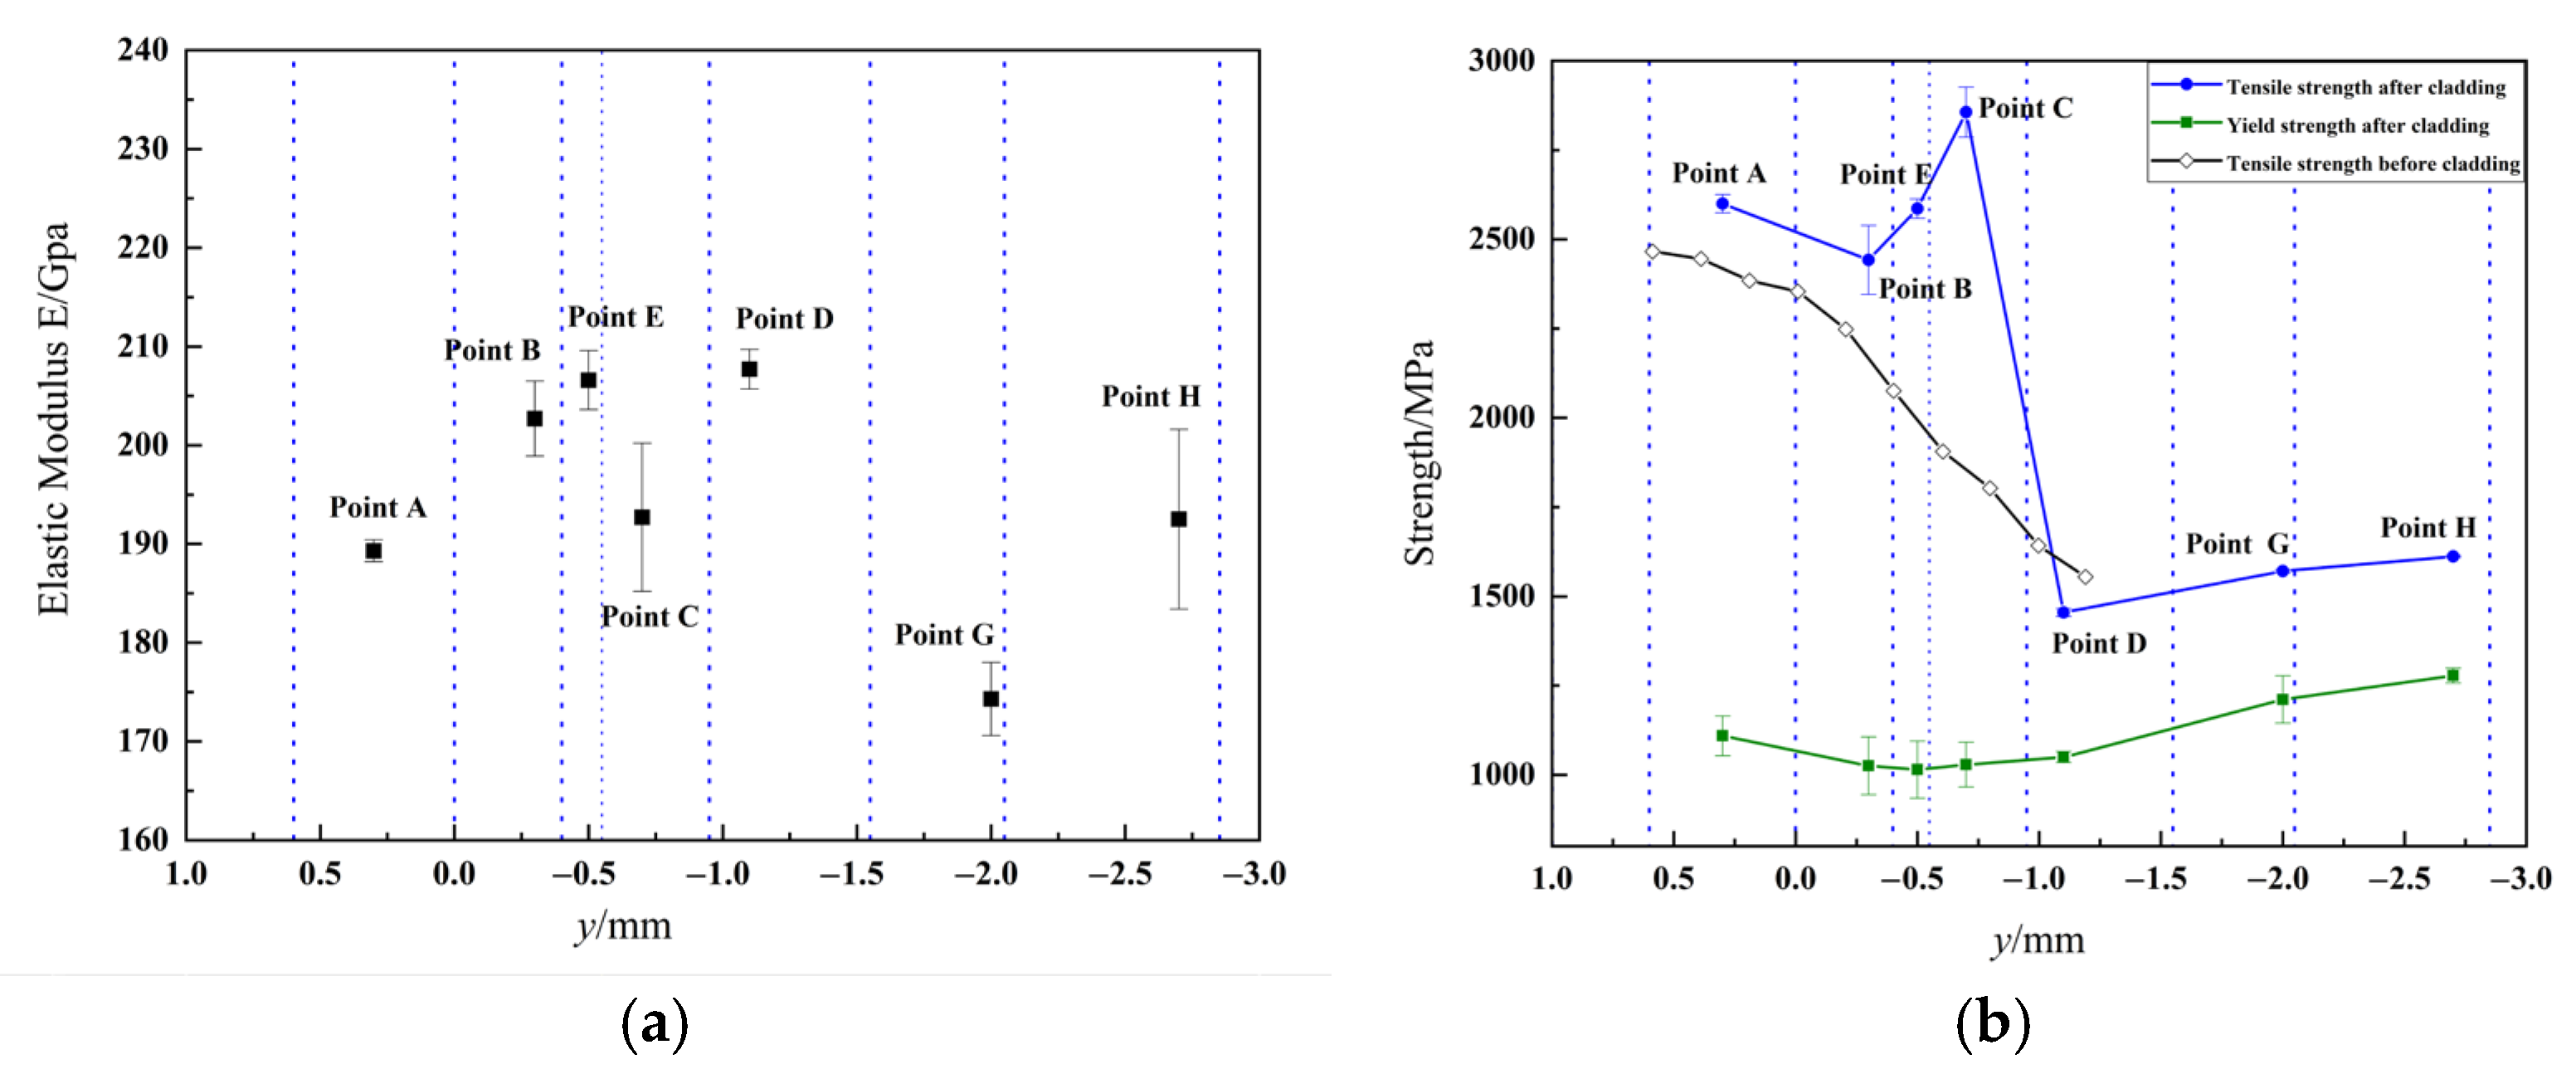
The mechanical properties across different regions were evaluated using the flat indentation method. Indentation tests were conducted at seven locations (Samples 1–7 in Figure 5), corresponding to y-axis coordinates in the coordinate system of Figure 13 at 0.3, −0.3, −0.5, −0.7, −1.1, −2.0, and −2.7 mm, respectively. These locations align with the microstructural regions labeled A, B, E, C, D, G, and H in Figure 11 and Figure 12. The resulting elastic modulus distribution is shown in Figure 16a, and the corresponding mechanical property measurements are summarized in Figure 16b.
As shown in Figure 16a, the elastic modulus exhibits a distinct spatial distribution governed by region-specific microstructures formed during cladding. The modulus measured in the substrate’s heat-affected zone ranges between 190 and 210 GPa, in agreement with values reported by Xu et al. (2020) [46], confirming the reproducibility of mechanical behavior under similar thermal cycles.
Microstructural analysis reveals the origin of this spatial variation: the peak modulus in the secondary-quenched zone (Point E) originates from fresh martensite with a relatively coherent crystal structure. By contrast, the critically reheated zone (Point C) shows a markedly lower modulus due to severe lattice distortion and high dislocation density caused by carbon supersaturation. The lower elastic modulus at Point G is intrinsically linked to its tempered microstructure, where matrix softening from carbon depletion and the precipitation of transition carbides are the primary contributors. Conversely, modulus recovery is observed in the high-temperature tempered zone (Point D), which consists of a stable ferrite–cementite aggregate with equilibrated internal stresses.
The clad layer (Point A) exhibits a lower modulus consistent with its intrinsic phase assembly, while the fusion zone (Point B) displays an intermediate value closer to the substrate, attributable to elemental interdiffusion and the formation of a compositionally graded transition region.
These findings underscore that the elastic modulus is governed not only by phase constitution, but more critically by the lattice coherence, defect density, and internal stress state.
The mechanical property results (see Figure 16b) indicate that the tensile strength is highest in Region C after laser cladding, reaching 2856 MPa—an increase of 14% compared with the carburized and quenched substrate (2500 MPa). The average tensile strength of the surface high-hardness layer (including regions represented by Region A, B, E, and C) is 2621 MPa, exceeding that of the original carburized and quenched layer. This demonstrates that laser cladding can form a strengthened surface layer with excellent tensile properties on carburized and quenched steel. The tensile strength in Region D is relatively low, resulting from a significant hardness reduction induced by excessively high-tempering temperatures, but it gradually recovers with increasing depth. The yield strength of the laser-clad specimen exhibits minimal fluctuation, with an average value of 1045 MPa in the surface high-hardness layer, meeting the strength requirements for carburized and quenched gear steel.

3.5. Residual Stress Testing

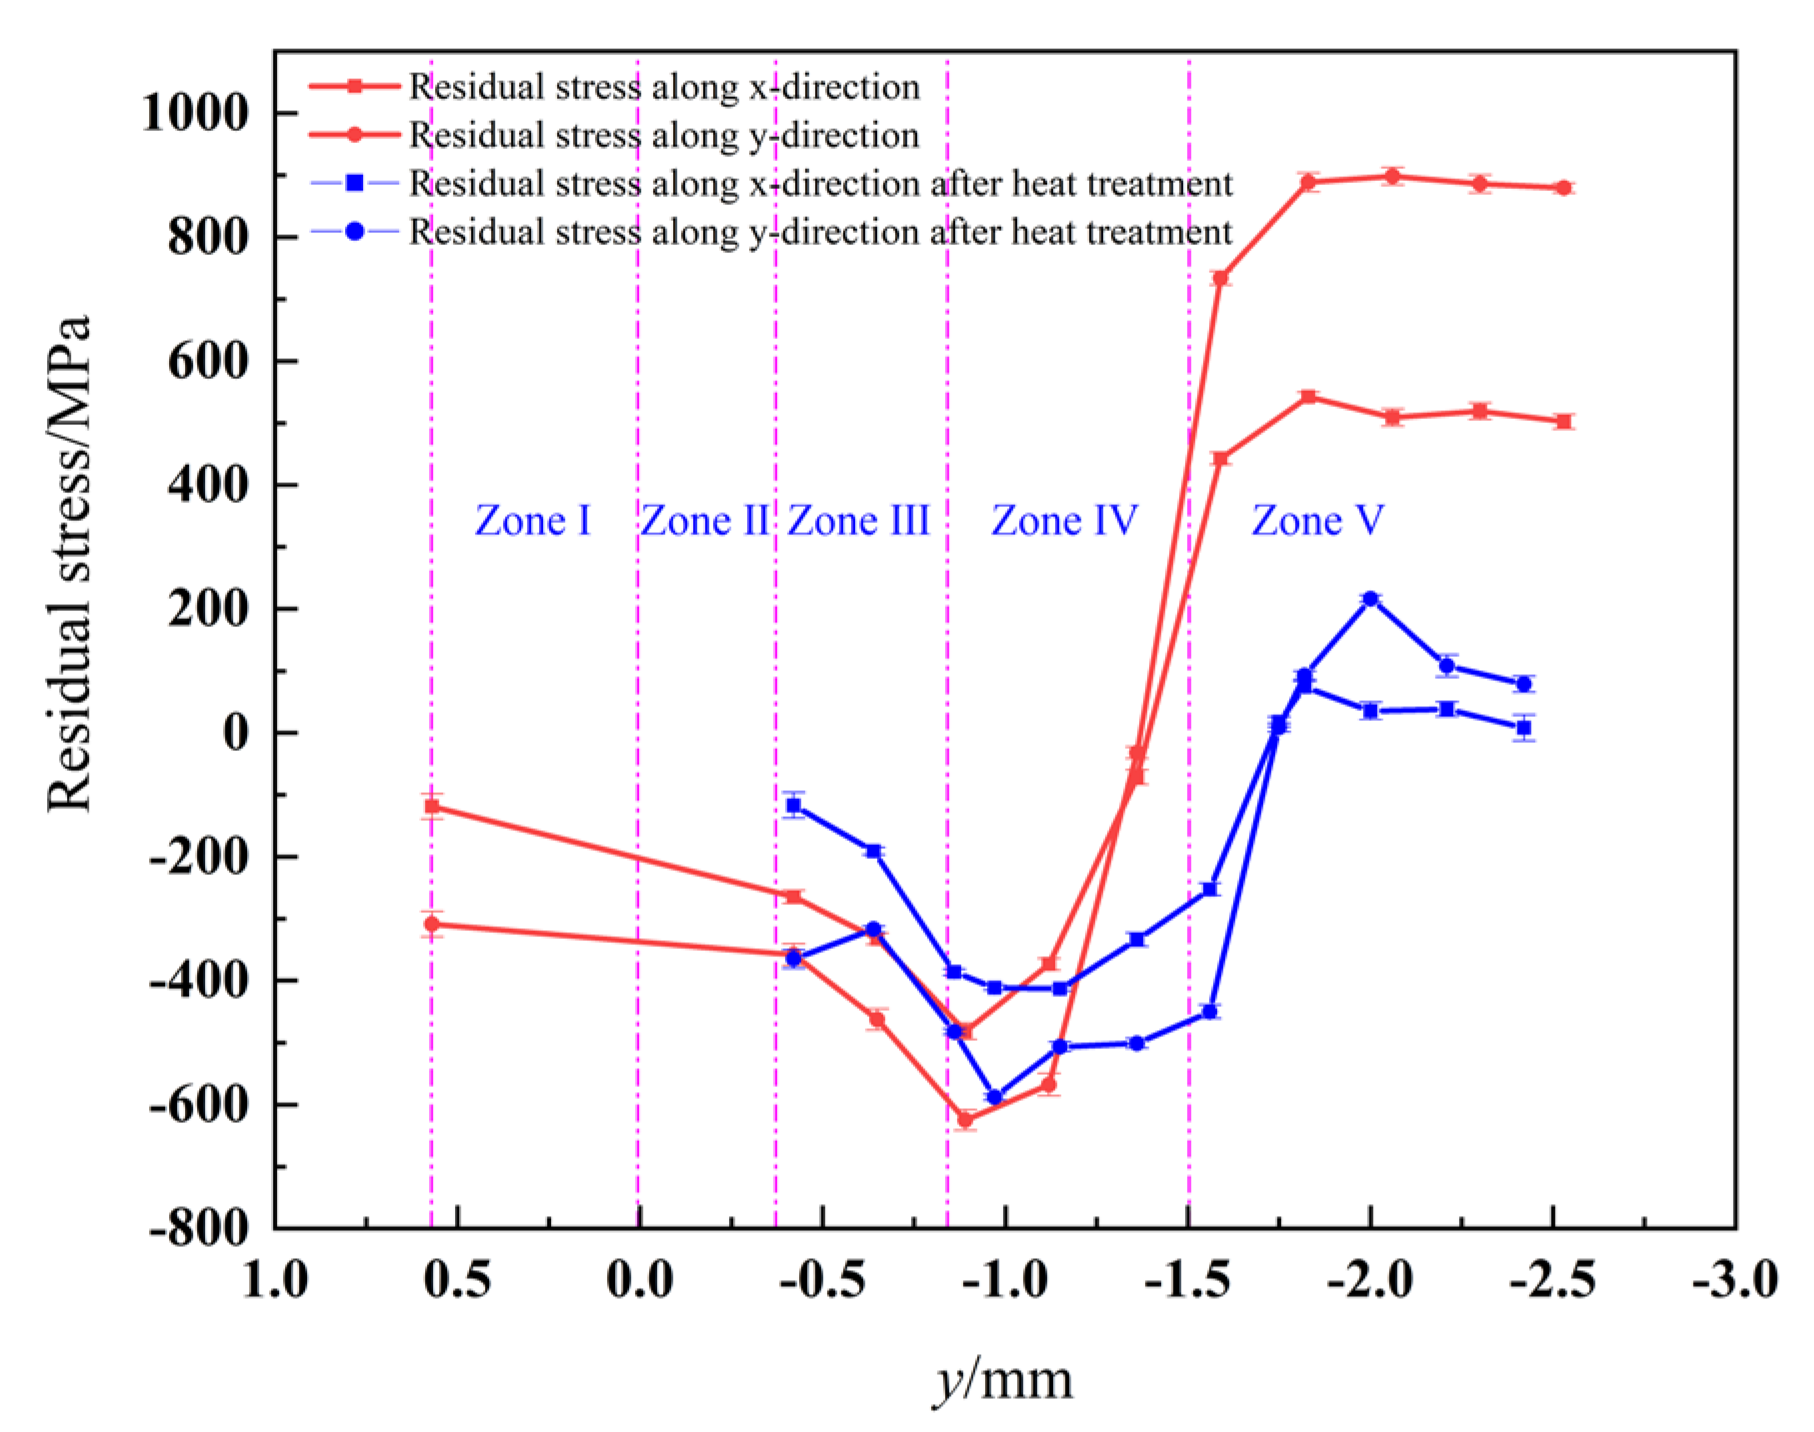
Residual stress distribution in the laser-clad, carburized, and quenched gear steel was characterized through layer-by-layer corrosion and measurement along the depth direction, following the procedure described in Section 2.2. As shown in Figure 17 red line, the residual stress profile exhibits a characteristic distribution of surface compressive stress transitioning to subsurface tensile stress—a pattern consistent with conventional carburized and quenched gear steels. However, the laser-clad sample displays a greater surface compressive depth and a higher compressive magnitude, with a maximum value of 625 MPa. The peak compressive stress occurs at the sharp hardness gradient between the critically reheated zone and the high-tempering zone. Additionally, the residual stress in the y-direction (parallel to the cladding direction) is greater than that in the x-direction (perpendicular to the cladding direction), indicating anisotropy induced by the directional thermal history. The surface compressive layer effectively counteracts externally applied tensile stresses under cyclic loading, thereby delaying fatigue crack initiation and enhancing the contact fatigue life of the gear.
It is also noted that the residual stress transitions from compressive to tensile in the high-temperature tempered zone, with a relatively high tensile stress (up to 800 MPa) maintained in the medium-tempering region. The high residual tensile stress present in this zone can induce local micro-yielding during indentation, providing a complementary explanation for the further reduction in the measured apparent modulus in Section 3.4 Point G. However, such high tensile stresses may lead to notable stress concentration, necessitating further process optimization. To mitigate this, a preheating treatment at 180 °C for 3 h was applied prior to cladding, followed by a post-cladding tempering at 180 °C for 3 h. This treatment promoted sufficient stress relaxation, reducing the tensile stress in the medium-temperature tempered zone to below 200 MPa, while retaining a high surface compressive stress of about −600 MPa (see Figure 17, blue line). These results demonstrate that optimized laser cladding on carburized and quenched steel can produce a superior stress profile with high surface compression and low internal tension, enabling high-quality anti-fatigue restoration.

3.6. Thermal Simulation Results

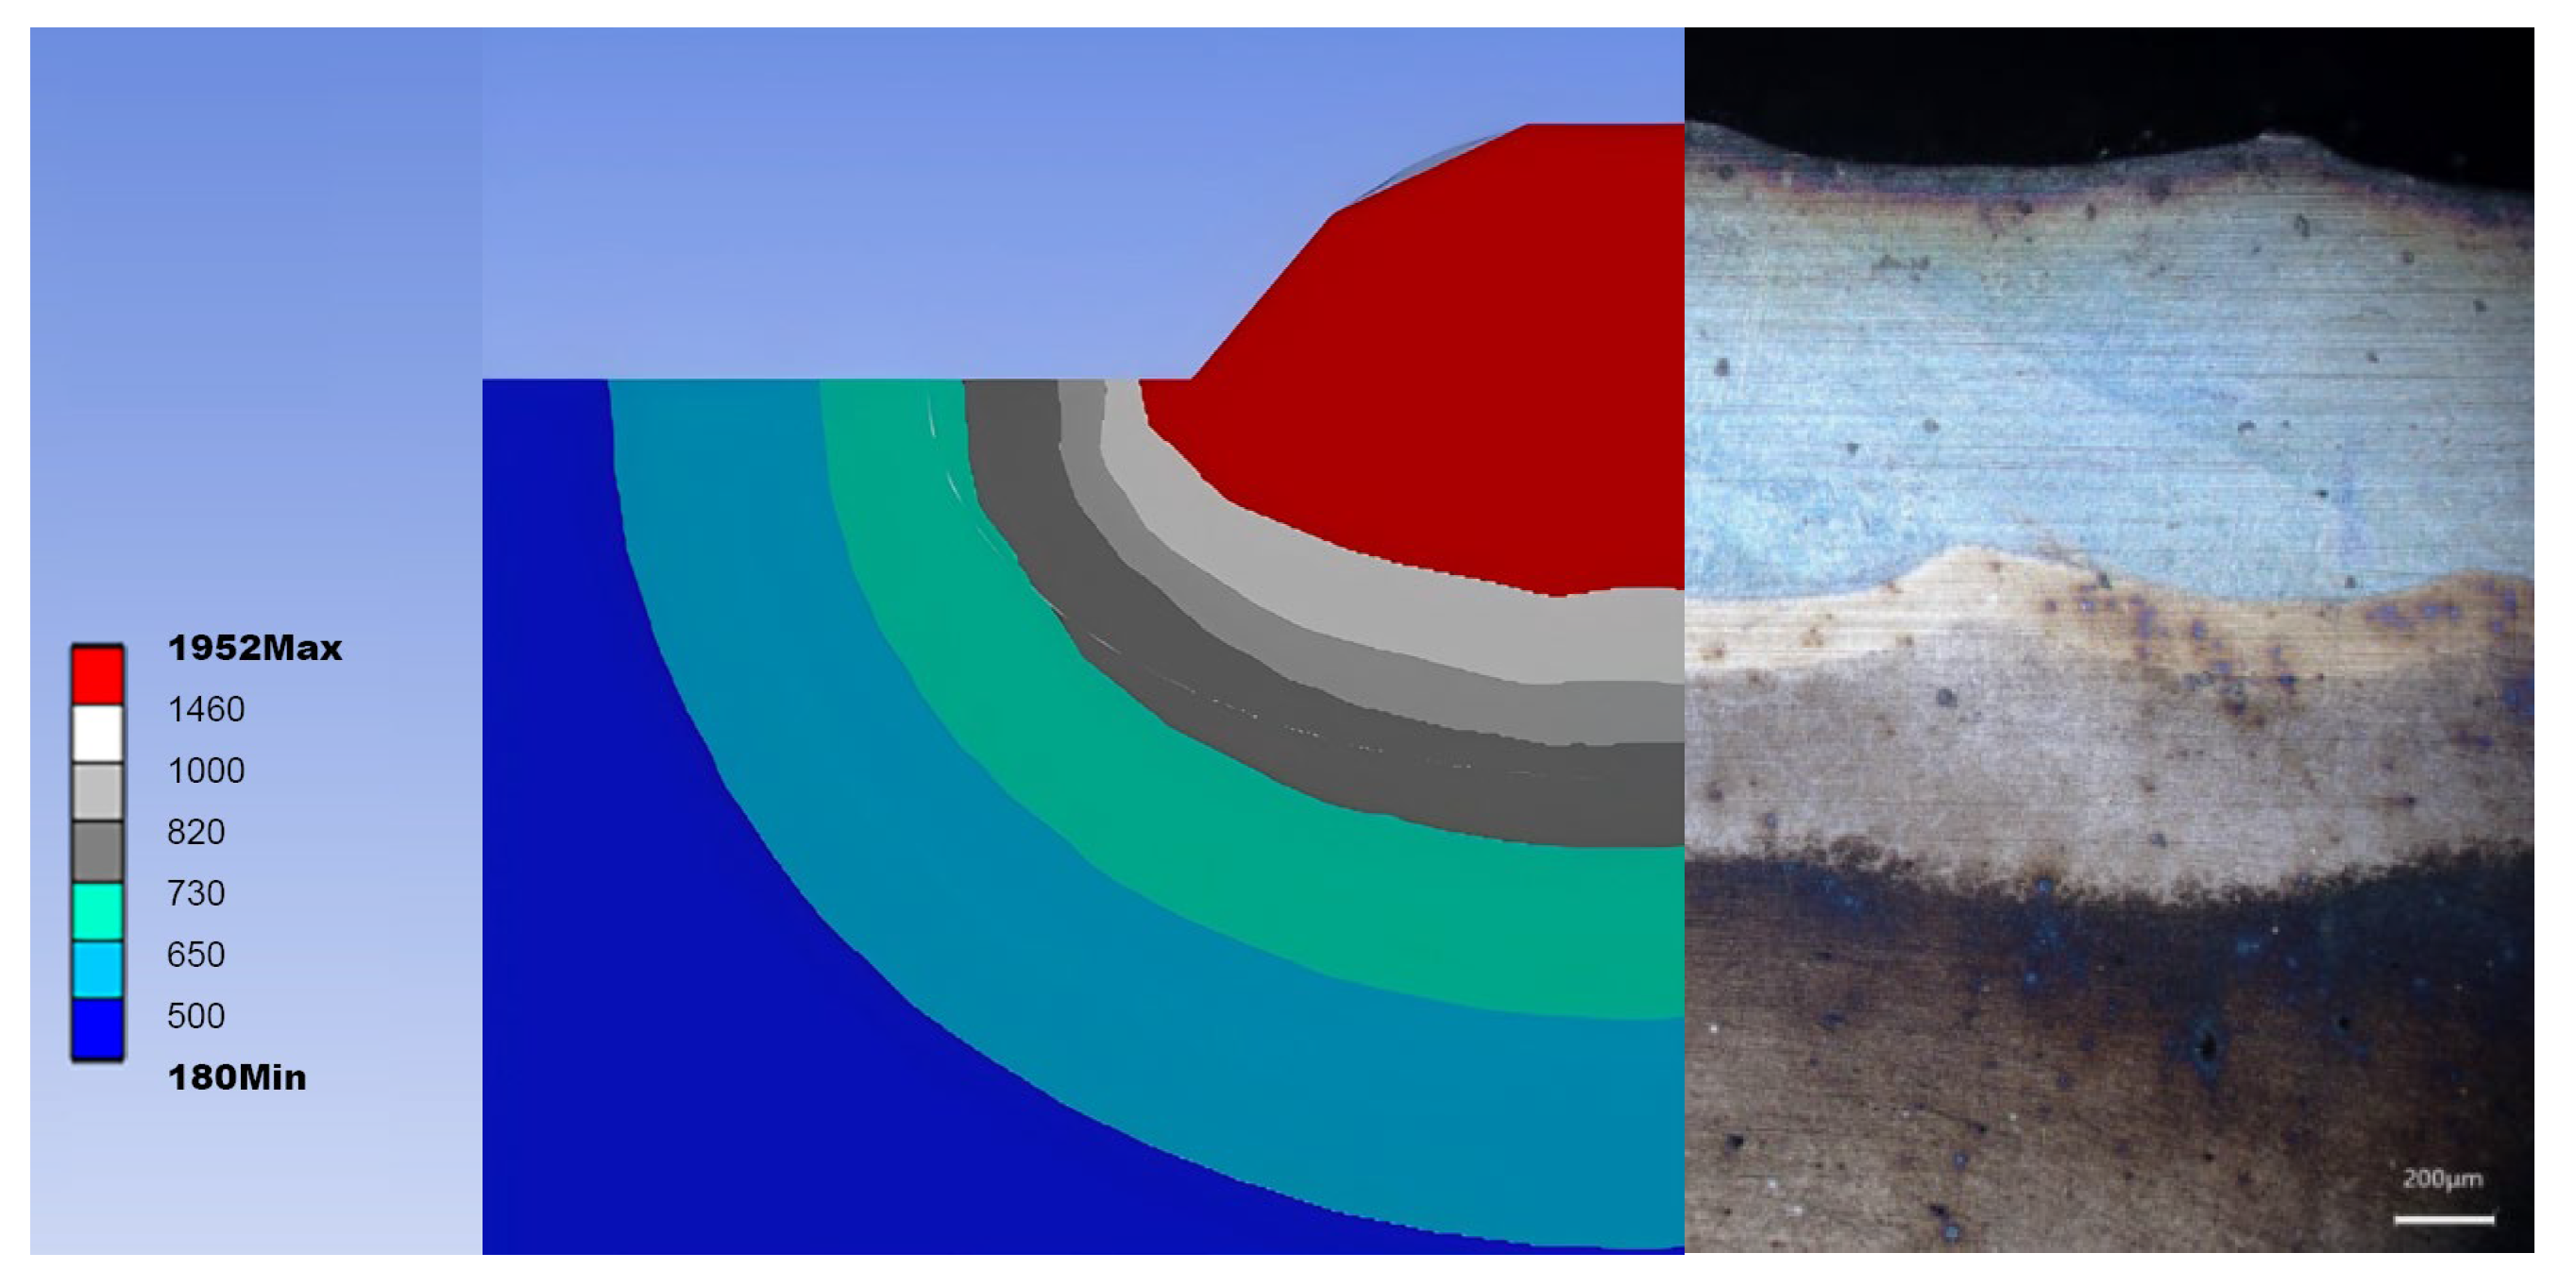
Figure 18 (left) shows the contour distribution of the peak temperature field at the mid-length of the first clad track during the laser cladding process. A direct comparison with the corresponding macroscopic morphology (right side of Figure 18) reveals a remarkable congruence in the shape and extent between the simulated molten pool and heat-affected zone, providing initial macroscopic validation of the thermal model’s reliability.
For quantitative validation, the simulated depths corresponding to the melt pool depth and Point F location (Figure 12a) were extracted. As described in Section 3.2, these locations correspond to temperatures of 1460 °C and 730 °C, respectively. The simulated depths from the matric surface were 0.35 and 0.9 mm, respectively. These results show excellent agreement with the experimentally measured depths of 0.4 and 0.95mm obtained from microhardness testing described in Section 3.3. The prediction accuracy is approximately 91.1%. This value was obtained by first calculating the relative error between each simulated value and its corresponding experimental measurement and then taking the arithmetic mean of these errors. Specifically, the relative errors for the two depth data points were 12.5% and 5.26%, respectively, yielding an average error of 8.88% and thus an overall prediction accuracy of 91.1%. This high level of accuracy can be attributed to the modeling approach that incorporated the actual measured geometry of the cladding layer and the reverse calibration of the laser heat source model.
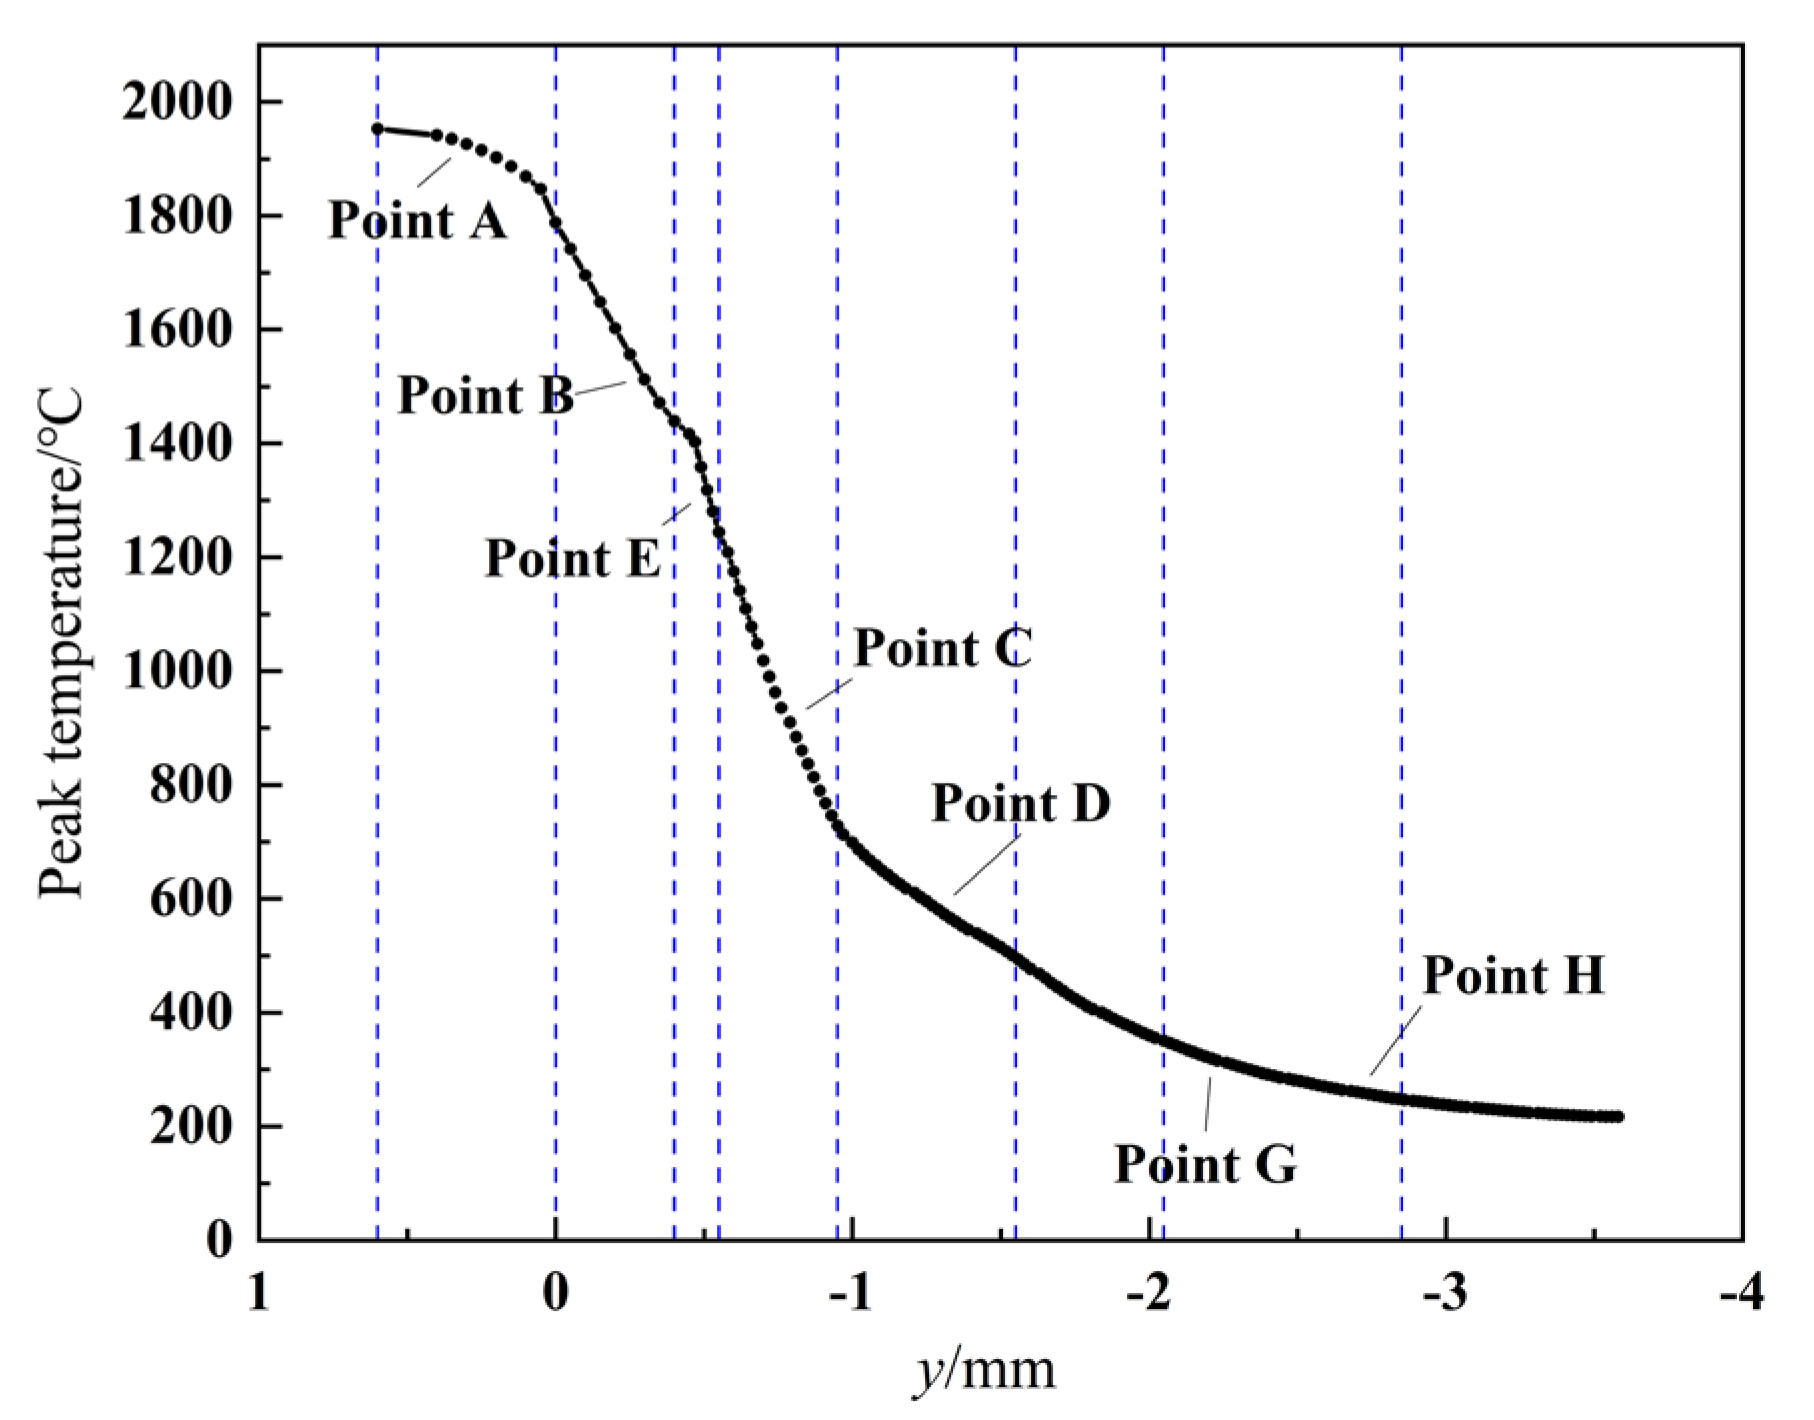
Furthermore, the peak temperature distribution along the clad centerline (coordinate system y 3 defined in Figure 13) was extracted and is plotted in Figure 19. The peak temperatures at specific depths (locations A, B, E, C, D, G, and H, as defined in Figure 12) were extracted and correlated with the microstructurally characterized phase-transformation regions, as determined by microhardness measurements and microstructural analysis (Section 3.3 and Section 3.4). As summarized in Table 4, the simulated peak temperatures at each location fall precisely within the corresponding experimentally derived temperature ranges associated with specific microstructural zones. For instance, the peak temperatures at Points A and B exceed the melting points of the substrate and clad material. Points E and C experienced temperatures above AC3, while Points D, G, and H correspond to high-, medium-, and low-temperature tempering regimes, respectively. These results strongly corroborate the phase-transformation temperatures inferred from microstructural characterization in Section 3.3.
Notably, the model successfully captured the temperature ranges associated with two critical zones: 1460–1240 °C for the secondary-quenched zone (Zone E) and 500–730 °C for the high-temperature tempering zone. This capability effectively addresses the challenge of directly measuring such highly transient thermal phenomena in experiments.
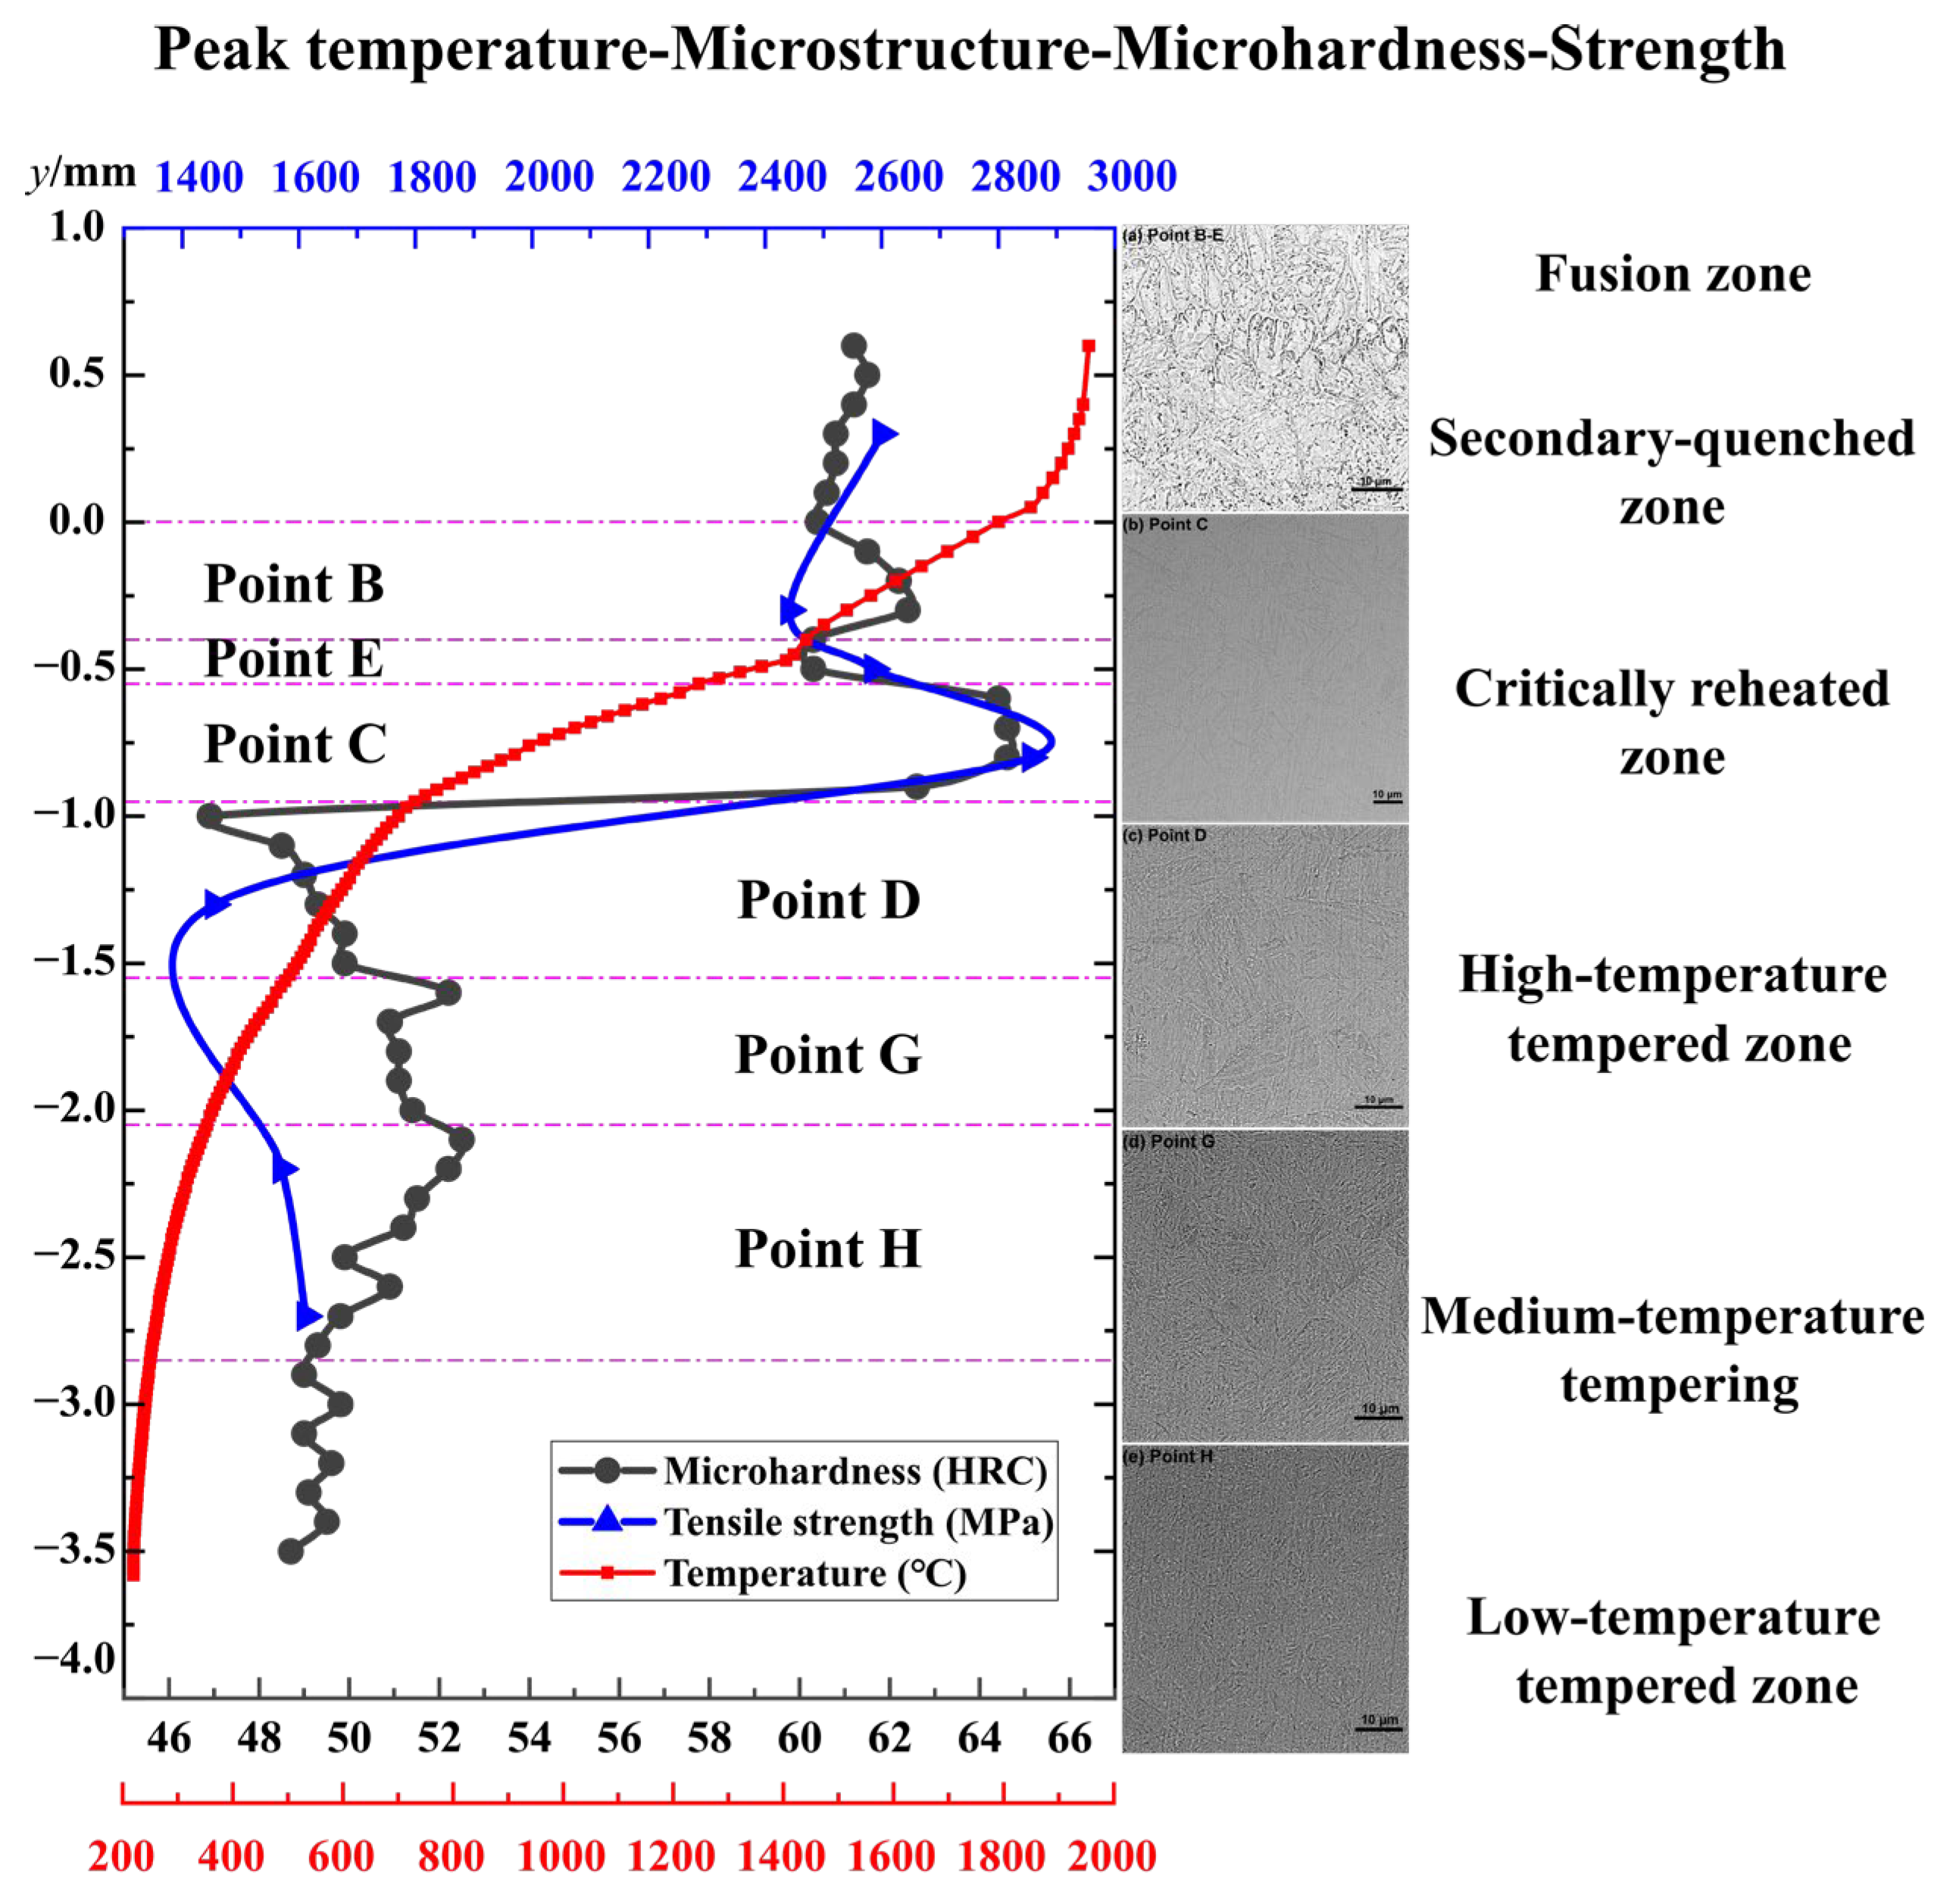
This precise spatial matching successfully reconstructs and validates, through simulation, the complete causal chain of “peak temperature—phase-transformation behavior—microstructure.” Furthermore, Figure 20 reveals a clear mapping relationship between peak temperature, microstructure, microhardness, and mechanical properties, providing an intuitive demonstration of how peak temperature governs microstructural evolution and resultant mechanical properties. These findings establish a theoretical foundation for the precise control of laser-cladding process parameters and for reliably achieving targeted hardened-layer depths.

4. Conclusions

(1)
Laser cladding with an Fe-based alloy produces a gradient hardened layer on carburized gear steel, thereby enhancing the performance of highly loaded gears. This layer comprises two distinct zones: a critically reheated zone exhibiting superior hardness, attributed to its refined acicular martensite, and a secondary-quenched zone consisting of fresh lath martensite. The repaired region consequently achieved hardness and tensile strength surpassing those of the original carburized substrate and outperformed Ni-based repair systems Ref. [10], demonstrating the efficacy of this laser-cladding repair strategy.
(2)
We developed and validated a coupled numerical–experimental framework that combines a double-ellipsoidal heat source with phase-transformation kinetics. The model explicitly links the thermal history to the spatial extent of the microstructural zones and achieves high predictive accuracy. It also captures the key temperature regimes responsible for secondary quenching, thereby providing insight into transient thermal phenomena that are difficult to access experimentally.
(3)
This work uniquely combined finite-element simulations, microstructural characterization, and flat indentation testing to establish a quantitative causal chain among the local thermal history, phase transformations, microstructure, and mechanical properties. The measured gradients in elastic modulus and hardness across the heat-affected zone agreed with the simulated thermal fields and predicted phase distributions, confirming the link between the thermal simulations and the localized mechanical response.
(4)
The validated thermal–metallurgical model serves as a predictive tool for process and performance optimization. It enables accurate prediction of hardened-layer characteristics and identifies the high-temperature tempering–softening zone as the critical region for potential property degradation, providing a basis for tailoring cladding parameters and assessing the service life of repaired gears. Future work will include fatigue testing and further process optimization to evaluate how these relationships translate into long-term service performance.

Author Contributions

P.Z. and Z.L. acquired the grant and revised the paper; Y.X. performed the modeling and wrote the paper; L.S. and H.Z. extracted and analyzed the data; Z.Z. and L.D. checked the grammar. All authors have read and agreed to the published version of the manuscript.

Funding

This work was supported by the Three Gorges Ship Lift Project of Changjiang River Administration of Navigational Affairs, Mot, China (Grant No. SXHXGZ-SCJ-2020-1) and by the Natural Science Foundation of Henan Province (Grant No. 242300420014).

Institutional Review Board Statement

Not applicable.

Informed Consent Statement

Not applicable.

Data Availability Statement

The data that supports the findings of this study are available within the article.

Conflicts of Interest

Author Zhongming Liu, Zhihong Zhang, Lubing Shi and Heng Zhang were employed by the company ZRIME Gearing Technology Co., Ltd. The remaining authors declare that the research was conducted in the absence of any commercial or financial relationships that could be construed as a potential conflict of interest.

References

  1. Li, Q.; Wang, J.; Cheng, G.; Tao, Q. Low-Temperature Tempering to Tailor Microstructure, Mechanical and Contact Fatigue Performance in the Carburized Layer of an Alloy Steel for Heavy-Duty Gears. Metals 2025, 15, 934. [Google Scholar] [CrossRef]
  2. Koyama, T.; Kubota, M.; Yoshida, S. Effect of Si concentration on carbon concentration in surface layer after gas carburizing. ISIJ Int. 2016, 56, 1638–1645. [Google Scholar] [CrossRef]
  3. Mohrbacher, H. Metallurgical concepts for optimized processing and properties of carburizing steel. Adv. Manuf. 2016, 4, 105–114. [Google Scholar] [CrossRef]
  4. Wang, W.; Liu, H.; Zhu, C.; Tang, J.; Jiang, C. Evaluation of contact fatigue risk of a carburized gear considering gradients of mechanical properties. Friction 2020, 8, 1039–1050. [Google Scholar] [CrossRef]
  5. Khedr, M.; Hamada, A.; Järvenpää, A.; Elkatatny, S.; Abd-Elaziem, W. Review on the solid-state welding of steels: Diffusion bonding and friction stir welding processes. Metals 2022, 13, 54. [Google Scholar] [CrossRef]
  6. Tang, J.; Wang, K.; Fu, H. Laser cladding in situ carbide-reinforced iron-based alloy coating: A review. Metals 2024, 14, 1419. [Google Scholar] [CrossRef]
  7. Han, T.; Zhou, K.; Chen, Z.; Gao, Y. Research progress on laser cladding alloying and composite processing of steel materials. Metals 2022, 12, 2055. [Google Scholar] [CrossRef]
  8. Fang, T.; Huang, F.; Qian, X.; Zhan, W. The microstructure and properties of laser-cladded Ni-based and co-based alloys on 316L stainless steel. Metals 2024, 14, 698. [Google Scholar] [CrossRef]
  9. Zhang, D.; Suo, X.; Liu, J.; Li, Z.; Zhang, Y.; Wu, H. Study on tribological performances of in situ -boriding laser cladding FeCoCrNiMn layers and its implementation in gear repair. Tribol. Int. 2024, 194, 109503. [Google Scholar] [CrossRef]
  10. Du, J.; Mi, J.; Shi, L.; Chen, C.; Liu, Z.; Wang, W.; Ding, H. Laser Cladding on Surface of 18CrNiMo7-6 Gear Steel and Its Scuffing Resistance Capacity. Surf. Technol. 2023, 52, 420–429. [Google Scholar] [CrossRef]
  11. Zhou, H.; Zhang, H.; Qin, H. 35CrMo steel surface by laser cladding Fe-based WC composite coating performance analysis. In Proceedings of the International Symposium on Optoelectronic Technology and Application 2014: Laser Materials Processing; and Micro/Nano Technologies, Beijing, China, 13–15 May 2014; p. 92950C. [Google Scholar] [CrossRef]
  12. Krauss, G. Quench and tempered martensitic steels: Microstructures and performance. Compr. Mater. Process. 2014, 12, 363–378. [Google Scholar] [CrossRef]
  13. Kim, K.; Kang, N.; Kang, M.; Kim, C. Assessment of heat-affected zone softening of hot-press-formed steel over 2.0 GPa tensile strength with bead-on-plate laser welding. Appl. Sci. 2021, 11, 5774. [Google Scholar] [CrossRef]
  14. Zhu, B.; Hu, Q.; Zeng, X.; Meng, L.; Liu, X.; Xu, G. Effect of intrinsic thermal cycles on the microstructure and mechanical properties of heat affect zones in laser cladding coatings on full-scale rails. Surf. Coat. Technol. 2023, 473, 130032. [Google Scholar] [CrossRef]
  15. Wang, Q.; Shu, X.; Xu, H.; Xu, S.; Zhang, S. Study on the Effect of Laser Power on the Microstructure and Properties of Cladding Stellite 12 Coatings on H13 Steel. Materials 2024, 17, 6098. [Google Scholar] [CrossRef]
  16. Ye, W.-L.; Sun, A.-D.; Zhai, W.-Z.; Wang, G.-L.; Yan, C.-P. Finite Element Simulation Analysis of Flow Heat Transfer Behavior and Molten Pool Characteristics during 0Cr16Ni5Mo1 Laser Cladding. J. Mater. Res. Technol. 2024, 30, 2186–2199. [Google Scholar] [CrossRef]
  17. Gao, Z.; Wang, L.; Wang, Y.; Lyu, F.; Zhan, X. Crack Defects and Formation Mechanism of FeCoCrNi High Entropy Alloy Coating on TC4 Titanium Alloy Prepared by Laser Cladding. J. Alloys Compd. 2022, 903, 163905. [Google Scholar] [CrossRef]
  18. Li, T.; Long, H.; Qiu, C.; Wang, M.; Li, D.; Dong, Z.; Gui, Y. Multi-Objective Optimization of Process Parameters of 45 Steel Laser Cladding Ni60PTA Alloy Powder. Coatings 2022, 12, 939. [Google Scholar] [CrossRef]
  19. Li, C.; Gao, H.; Chen, X.; Liu, Z.; Han, X. Study on Multi-Field Coupled Evolution Mechanism of Laser Irradiated 40Cr Steel Quenching Process Based on Phase Change Induced Plasticity. Met. Mater. Int. 2022, 28, 1919–1937. [Google Scholar] [CrossRef]
  20. Fu, K.; Zhong, C.; Zhang, L.; Wang, X.; Nie, B.; Xue, Y.; Gui, W.; Luan, B. Effect of multiple thermal cycling on the microstructure and microhardness of Inconel 625 by high-speed laser cladding. J. Mater. Res. Technol. 2023, 24, 1093–1107. [Google Scholar] [CrossRef]
  21. Zhang, X.; Qian, Y.; Zhang, Y.; Zhao, P.; Bian, S.; Zhang, W.; Ke, K.; Zhang, B.; Zheng, X.; Yuan, Q. Synergistic enhancement of microstructure and properties in 304/TC4 cold metal transfer joints via laser pre-melting of FeCoNiCr medium-entropy alloys. J. Mater. Res. Technol. 2025, 37, 2554–2566. [Google Scholar] [CrossRef]
  22. Wu, S.; Liu, Z.; Gong, Y.; Liang, X.; Wu, Y.; Zhao, X. Analysis of the sequentially coupled thermal–mechanical and cladding geometry of a Ni60A-25%WC laser cladding composite coating. Opt. Laser Technol. 2023, 167, 109595. [Google Scholar] [CrossRef]
  23. Li, C.; Yu, Z.; Gao, J.; Zhao, J.; Han, X. Numerical Simulation and Experimental Study of Cladding Fe60 on an ASTM 1045 Substrate by Laser Cladding. Surf. Coat. Technol. 2019, 357, 965–977. [Google Scholar] [CrossRef]
  24. Zhang, Z.; Kovacevic, R. A Thermo-Mechanical Model for Simulating the Temperature and Stress Distribution During Laser Cladding Process. Int. J. Adv. Manuf. Technol. 2019, 102, 457–472. [Google Scholar] [CrossRef]
  25. Anghel, I.-M.; Pascu, A.; Hulka, I.; Woelk, D.H.; Uțu, I.-D.; Mărginean, G. Characterization of Cobalt-Based Composite Multilayer Laser-Cladded Coatings. Crystals 2025, 15, 970. [Google Scholar] [CrossRef]
  26. Li, N.; Wang, C.; Li, C. Microstructures and High-Temperature Mechanical Properties of Inconel 718 Superalloy Fabricated via Laser Powder Bed Fusion. Materials 2024, 17, 3735. [Google Scholar] [CrossRef] [PubMed]
  27. Aliye, A.; Xiao, Z.; Gao, C.; Shi, W.; Huang, J. Preparation of WC + NbC Particle-Reinforced Ni60-Based Composite Coating by Laser Cladding on Q235 Steel. Coatings 2025, 15, 670. [Google Scholar] [CrossRef]
  28. Yang, J.; Zhang, Z.; Chen, X.; Wu, Y.; Liu, H.; Dong, Z.; Hui, X. Effect of Ti Content on Microstructure and Properties of Laser-Clad Fe-Cr-Ni-Nb-Ti Multi-Principal Element Alloy Coatings. Materials 2025, 18, 3985. [Google Scholar] [CrossRef]
  29. Guo, C.; Ding, S.; Xue, X.; Li, M.; Yan, J.; Wang, S.; Wang, D.; Zhang, X.; Chen, S.; Yang, L.; et al. Comparative Study on the Microstructure and Simulation of High-Speed and Conventional Fe-Based Laser-Cladding Coatings. Crystals 2025, 15, 545. [Google Scholar] [CrossRef]
  30. Brand, M.; Hohe, J.; Siegele, D. Numerical Investigations on the Residual Stress Field in a Cladded Plate Due to the Cladding Process. Weld. World 2012, 56, 107–113. [Google Scholar] [CrossRef]
  31. Sood, A.; Schimmel, J.; Bosman, M.; Goulas, C.; Popovich, V.; Hermans, M.J.M. Fabrication of Low Thermal Expansion Fe–Ni Alloys by in-Situ Alloying Using Twin-Wire Arc Additive Manufacturing. Mater. Des. 2024, 240, 112837. [Google Scholar] [CrossRef]
  32. Ge, P.; Liu, Z.-M. Numerical Studies on the Parameter Effect and Controlling Method of the Residual Stress in the Remanufactured 17CrNiMo6 Heavy-Duty Gear by the Laser Cladding Deposition. Int. J. Adv. Manuf. Technol. 2024, 130, 887–901. [Google Scholar] [CrossRef]
  33. Gao, J.; Wu, C.; Hao, Y.; Xu, X.; Guo, L. Numerical Simulation and Experimental Investigation on Three-Dimensional Modelling of Single-Track Geometry and Temperature Evolution by Laser Cladding. Opt. Laser Technol. 2020, 129, 106287. [Google Scholar] [CrossRef]
  34. Jiang, P.; Wang, C.; Zhou, Q.; Shao, X.; Shu, L.; Li, X. Optimization of laser welding process parameters of stainless steel 316L using FEM, kriging and NSGA-II. Adv. Eng. Softw. 2016, 99, 147–160. [Google Scholar] [CrossRef]
  35. Kik, T. Heat source models in numerical simulations of laser welding. Materials 2020, 13, 2653. [Google Scholar] [CrossRef] [PubMed]
  36. Kik, T.; Moravec, J.; Novakova, I. New method of processing heat treatment experiments with numerical simulation support. IOP Conf. Ser. Mater. Sci. Eng. 2017, 227, 12069. [Google Scholar] [CrossRef]
  37. Shen, C.; Li, C.; Guo, Y.; Liu, C.; Zhang, X.; Feng, X. Modeling of temperature distribution and clad geometry of the molten pool during laser cladding of TiAlSi alloys. Opt. Laser Technol. 2021, 142, 107277. [Google Scholar] [CrossRef]
  38. Luo, X.; Liu, M.; Li, Z.; Li, H.; Shen, J. Influence of Different Heat Source Models on Calculated Temperature Field in Selective Laser Melting of 18Ni300. Chin. J. Lasers 2021, 48, 52–62. [Google Scholar]
  39. Hocine, S.; Van Swygenhoven, H.; Van Petegem, S. Verification of selective laser melting heat source models with operando X-ray diffraction data. Addit. Manuf. 2021, 37, 101747. [Google Scholar] [CrossRef]
  40. Luo, J.; Zhu, G.; Li, J.; Xie, G.; Wang, L.; Shi, S. Research Progress in Numerical Simulation of Temperature Field and Flow Field in Laser Cladding Molten Pool. Surf. Technol. 2023, 52, 67–84. [Google Scholar] [CrossRef]
  41. Shao, J.; Yu, G.; He, X.; Li, S.; Chen, R.; Zhao, Y. Grain size evolution under different cooling rate in laser additive manufacturing of superalloy. Opt. Laser Technol. 2019, 119, 105662. [Google Scholar] [CrossRef]
  42. Cui, Y.; Xie, C.; Liu, J.; Guo, S.; Cui, L. Mechanical and corrosion resistance analysis of laser cladding layer. Sci. Eng. Compos. Mater. 2022, 29, 358–363. [Google Scholar] [CrossRef]
  43. Kim, G.; Kim, Y.-C.; Cho, J.-E.; Yim, C.-H.; Yun, D.-S.; Lee, T.-G.; Park, N.-K.; Chung, R.-H.; Hong, D.-G. Microstructural evolution, hardness and wear resistance of WC-Co-Ni composite coatings fabricated by laser cladding. Materials 2024, 17, 2116. [Google Scholar] [CrossRef]
  44. Zhou, S.; Huang, Y.; Zeng, X.; Hu, Q. Microstructure characteristics of Ni-based WC composite coatings by laser induction hybrid rapid cladding. Mater Sci. Eng. A 2008, 480, 564–572. [Google Scholar] [CrossRef]
  45. Matlock, D.K.; Bräutigam, V.E.; Speer, J.G. Application of the quenching and partitioning (Q&P) process to a medium-carbon, high-Si microalloyed bar steel. Mater. Sci. Forum 2003, 426–432, 1089–1094. [Google Scholar] [CrossRef]
  46. Xu, G.; Hao, M.; Qiao, Y.; Zhang, Y.; Wang, G.; Zhao, M. Characterization of elastic-plastic properties of surface-modified layers introduced by carburizing. Mech. Mater. 2020, 144, 103364. [Google Scholar] [CrossRef]
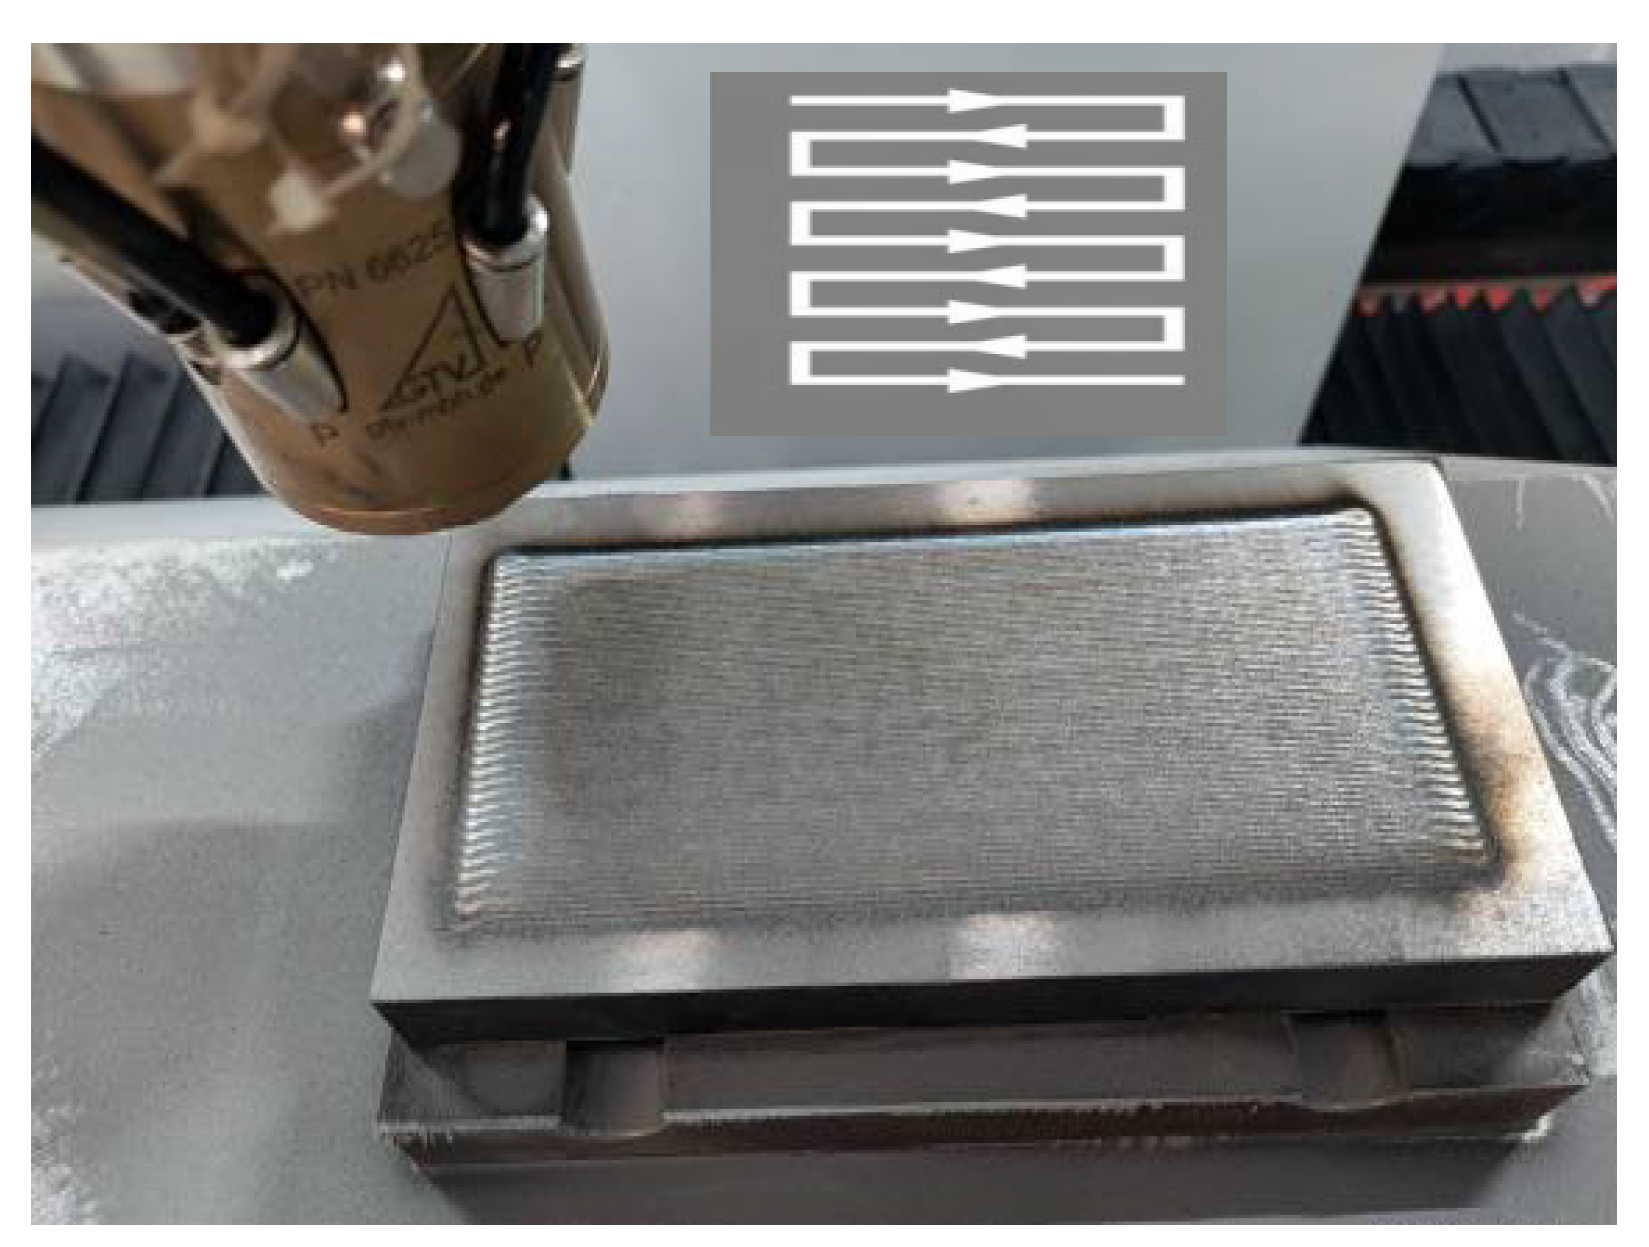
Figure 1. On-site laser-cladding process.
Coatings 15 01467 g001
Figure 2. Surface characteristics of 18CrNiMo7-6 substrate. (a) Carbon concentration profile; (b) hardness gradient profile.
Coatings 15 01467 g002
Figure 3. Characterization of the alloy powder. (a) Particle morphology; (b) particle-size distribution.
Coatings 15 01467 g003
Figure 4. IMTS-R indentation tester and sample blocks (No. 1–7).
Coatings 15 01467 g004
Figure 5. Remaining stress detection equipment and detection direction.
Coatings 15 01467 g005
Figure 7. Double-ellipsoidal heat source reprinted with permission from [40]. Copyright 2023 surface technology.
Coatings 15 01467 g007
Figure 8. Thermophysical properties calculated using JMatPro. (a) Clad layer; (b) 18CrNiMo7-6 substrate.
Coatings 15 01467 g008
Figure 9. Phase transition temperature curve calculated using JMatPro. (a) Clad layer; (b) 18CrNiMo7-6 substrate.
Coatings 15 01467 g009
Figure 10. Cladding surface morphology.
Coatings 15 01467 g010
Figure 11. Metallographic examination.
Coatings 15 01467 g011
Figure 12. SEM of 18CrNiMo7-6 matrix after heating.
Coatings 15 01467 g012
Figure 13. The measurement locations of microhardness tests.
Coatings 15 01467 g013
Figure 14. Hardness distribution curve along the distance from the interface. (a) Transverse hardness variation. (b) Longitudinal hardness variation.
Coatings 15 01467 g014
Figure 15. Near-surface hardness distribution contour map. (a) Hardness distribution after cladding. (b) Hardness difference before and after cladding.
Coatings 15 01467 g015
Figure 16. Mechanical properties of the different regions. (a) Elastic modulus. (b) Tensile strength and yield strength.
Coatings 15 01467 g016
Figure 17. Distribution of residual stress across the different zones of the laser-clad sample: Zone I (cladding zone), Zone II (fusion zone), Zone III (secondary hardening zone), Zone IV (high-temperature tempering zone), and Zone V (medium-temperature tempering zone).
Coatings 15 01467 g017
Figure 18. Comparison of simulated temperature with microstructure.
Coatings 15 01467 g018
Figure 19. Thermal cycles extracted from simulation at locations A–H.
Coatings 15 01467 g019
Figure 20. Thermo-mechanical coupling map.
Coatings 15 01467 g020
Table 1. The laser-cladding process parameters.
Laser Power
(W)
Scanning Speed
(mm/s)
Powder Feed Rate
(mg/s)
Spot Diameter
(mm)
Overlap Ratio
450075500360%
Table 2. Chemical composition (wt.%) of 18CrNiMo7-6 substrate.
MaterialCCrNiMoMnSipSFe
18CrNiMo7-6Varied with depth (see Figure 3a)1.81.50.30.760.290.0072<0.002Balance
Table 3. Chemical composition (wt.%) of the laser-cladding powder.
MaterialCBCrNiMoMnSiVFe
NHT.22.A010.70.915.51.70.40.30.91.2Balance
Table 4. Simulated peak temperature ranges in the microstructural zone.
LocationPeak Temperature (°C)Corresponding Microstructural ZoneZone Temperature Range (°C)
Point A1926Clad Zone1950–1780
Point B1512Fusion Zone1780–1460
Point E1358Secondary-quenched zone1460–1240
Point C1018Critically reheated zone1240–730
Point D650High-Temperature Tempering zone730–500
Point G360Medium-Temperature Tempering zone500–350
Point H260Low-Temperature Tempering zone350–150
Disclaimer/Publisher’s Note: The statements, opinions and data contained in all publications are solely those of the individual author(s) and contributor(s) and not of MDPI and/or the editor(s). MDPI and/or the editor(s) disclaim responsibility for any injury to people or property resulting from any ideas, methods, instructions or products referred to in the content.