Abstract
Inconel 718 alloy has a wide range of applications in the aerospace sector because of its superior mechanical properties and its weldability. The machining of such higher strength materials with complex shapes is possible with wire electrical discharge machining. In the present research, an endeavor was made to enhance the machining process by utilizing zinc-diffused coating brass wire electrode and Taguchi-Data Envelopment Analysis-based Ranking (DEAR) methodology in the process while machining Inconel 718 alloy. Material removal rate, kerf width, and surface roughness were considered as the quality measures. The optimal arrangement of input factors in the Wire Electrical Discharge Machining (WEDM) process were found as 140 µs (Ton), 50 µs (Toff), 60 V (SV), and 5 kg (WT) among the elected factors with the error accuracy of 1.1%. The pulse-off time has the most significance on formulating the quality measures owing to its importance on deionization in the process.
1. Introduction
Even though nickel super alloys are classified as difficult-to-cut materials, they have gained popularity based on their excellent mechanical properties in increased temperatures, including creep, fatigue, and corrosion resistance [1,2]. Thus, several industries use nickel-based alloys, including aerospace, nuclear, automotive, and chemical [3]. Nickel-based alloys such as Face Cantered Cubic (FCC) Structures are becoming increasingly important due to their ability to format Topological Close Packed (TCP) phases, which is the largest group of intermetallic compounds with complex crystallographic structures [4]. These phases increase their strength and can withstand temperatures up to 1500 °C [5]. Since nickel-based alloys are difficult-to-cut materials, the manufacturing cost of conventional machining is increased [6]. This may dramatically challenge the economic feasibility of the machining process due to their abrasive nature and the increased mechanical properties, which may lead to excessive cutting forces, tool wear, and temperatures [7]. Thus, as a cost-effective solution using unconventional machining methods such as the Wire Electrical Discharge Machining (WEDM) process, the exotic materials can be machined with the ability to produce complicated shapes [8]. WEDM removes the material by melting and vaporizing cavities using electric discharges that come from a scrolling electrical wire. During machining, the inter-electrode gap is flushed with a dielectric under a certain pressure, which removes erosion products in the machining zone, provides the appropriate conditions necessary for electrical erosion to occur, and insulates and cools the electrodes [9,10]. The dielectric is usually demineralized and deionized water, and the electrode is brass or copper wire with a zinc jacket. WEDM is a variation of EDM machining, where the main difference is the type of working electrode used. WEDM wire cutting is the most precise method of metal cutting, allowing dimensional accuracy much higher than laser cutting (thermal cutting) [11].
Electrical discharges have been established to affect the surface integrity of work pieces for many years [12,13]. Several studies have shown that the roughness of the surface of wire-EDM varies with the duration of the current pulse (Ton) [14,15,16], the peak discharge current (Ip) [17,18,19,20], and the average energy per spark [21,22]. Using a Response Surface Methodology (RSM), a mathematical model was proposed in order to evaluate the WEDM process parameters during the machining of Inconel 627 alloy [23]. Based on their results, the Material Removable Rate (MRR) can be increased up to 85% as the pulse-on time is increased, but we can achieve the same result by decreasing the pulse-off time. The dimensional accuracy of machining Inconel 718 by WEDM and producing fir tree slots were investigated [24]. By using nickel-coated electrodes, the authors tried to avoid the contamination of the workpiece and the possibility of creating intermetals. Using the composite electrodes, the machining time was reduced by 33%, but the standard brass wire electrodes produced better surface roughness. There are a lot of publications focused on the formation of the recast layer [25,26,27,28], and the surface crack density [29,30]. The formation of the recast layer on Inconel 718 using a vibration-assisted WEDM was also investigated [31]. The results revealed that within 15 to 20 μm of the wire-EDM cut surface, residual stresses changed from tensile to compressive and the recast layer thickness formed between 5 to 9 μm. Another study investigated the surface integrity and performance of WEDM cutting an Inconel 718 using coated and uncoated electrodes [32]. It was observed that by analyzing the variables, i.e., recast layer characteristics, wire feed rate, and kerf width, the zinc-coated copper electrodes have higher performance compared to the brass wire. More specifically, using the optimal machining parameters, the zinc-coated copper wire feed rate was increased by 35% while the wire consumption was reduced by 40%. Utilizing the same nickel alloy, the wire material performance in the productivity and surface integrity of the workpiece machined by WEDM was analyzed [33]. The authors have drawn several conclusions from the current study, particularly, that the discharge energy significantly influenced surface roughness and cutting speed, and when discharge energy mode was changed from the highest to the lowest, surface roughness was reduced by 46.9%. Additionally, the coating of the wire electrodes reduced the cutting time by 22%. Finally, extensive investigation of the WEDM process on precision machining of Nimonic C 236 alloy was performed [34]. The authors performed a detailed analysis of the machined surface by using Scanning Electron Microscopy (SEM) and Transmission Electron Microscopy (TEM). The results revealed that there was a diffusion process between the electrode material and the workpiece, in particular, an adhesive film of 15 wt.% Cu and 2 wt.% Zn adheres to the subsurface and surface of the sample. It was observed that zinc-diffused brass wire electrodes can produce better machinability in the WEDM process [35]. However, the implementation of optimization algorithms is important for enhancing the process mechanism [36].
As it can be seen from the above-mentioned literature review, there are limited studies that perform an optimization study of Inconel alloys and especially of the Inconel 718, by using a coated electrode. More specifically, in the present study, there is an extensive analysis of the occurred mechanisms during the machining and the relationship between the electrode conductivity and the machining performance. Although many research attempts are available on the machining of nickel-based alloy specimens, only a few research works were available to examine the influence of process control factors on quality measures while cutting this kind of alloy using the WEDM process. Only a few research endeavors were made to adopt Taguchi-DEAR as a Multi-Response Optimization Techniques (MCDT) method in the WEDM process. Hence, this experimental investigation is carried out to employ this method to optimize the WEDM cutting of chosen specimens to achieve the following goals:
- Employing Taguchi-DEAR method as a new MCDT tool to obtain optimal arrangement of process control factors of the machining process.
- Analyzing the influence of process control factors in WEDM process using different performance measures.
- To identify the most significant factors in performance measures.
2. Experiments and Methods
2.1. Selection of Workpiece Specimens and Wire Electrodes
In the present study, the utilized material was an Inconel 718 nickel-based alloy (Bibus Metals, Krakow, Poland). Inconel 718 has a wide range of applications in the aerospace sector because of its superior mechanical properties and its weldability, and it is a nickel-ferrous-chromium-based super alloy capable of withstanding temperatures up to 650 °C [37]. Due to the γ prime and γ double prime phases, the Inconel 718 alloy achieves high thermal strength [38]. Thus, this alloy is extensively used for gas turbine blades [39]. In order to achieve its strength, refractory alloying elements are added to achieve the well-known γ austenite nickel solid solution. Typical workpieces are rectangular specimens (10 mm × 10 mm × 25 mm) with a dimension of 10 mm × 10 mm and a length of 25 mm to be used as workpiece specimens.
The selection of wire electrode material plays an important role in the WEDM process. Due to their superior physical properties as depicted in Table 1, zinc-diffused brass wire electrode (DWE) was utilized as tool electrodes with a diameter of 0.25 mm. The following Table 2 contains the chemical composition of the Inconel 718 alloy using X-ray fluorescence spectroscopy (XRF) manufactured by Bruker Corporation, Massachusetts, United States. Figure 1 shows the diffused wire electrodes for machining the workpiece in the WEDM process. The brass wire electrode coated with a zinc layer of 25 µm thickness was used as coating thickness to reduce electrode wear and wire breakage [40]. The zinc-coated brass wire electrode was treated with heat for making the coated zinc to melt and attach tightly to the brass wire electrode [41]. Figure 1 shows that the zinc material was uniformly distributed around the brass wire electrode. The three-dimensional views of the machined surface wire electrode were acquired using Atomic Force Microscope (AFM), manufactured by NTEGRA PRIMA, Amsterdam, The Netherlands. The quantification of morphology and surface roughness can be crucial to formulate a quality control metric for the end product or to verify a distinct processing step. It is essentially more critical to measure surface roughness at the scale of microns. AFM has the ability to quantify three-dimensional spatial resolutions. The AFM offers total 3D surface measurement by imaging topography-based height analysis.

Table 1.
Survey performed in the present study.

Table 2.
Chemical composition (wt.%) of the 718 alloy.
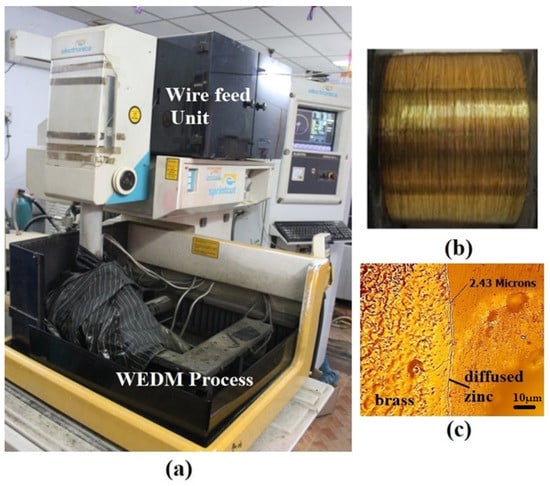
Figure 1.
WEDM process arrangement: (a) Experimental setup; (b) Zinc-diffused brass wire electrode, and (c) Micro structure of wire electrode.
2.2. WEDM Cutting of Inconel 718 Alloy Specimens
In order to machine the specimens, an Electronica Sprintcut Electra ELPULS 40A WEDM machine (Electronica India Limted, Kolkata, India) has been used. Due to their importance on determining the machining characteristics, pulse-on time (Ton), pulse-off time (Toff), servo voltage (SV), and wire tension (WT) are chosen as the input process parameters. Pulse-on time is the duration of applying electrical energy between the workpiece and wire electrode. Since the performance measures such as material removal rate (MRR), surface roughness (Ra), and kerf width (Kw) influence the process efficiency, these parameters are taken as the performance measures of the WEDM process in the study. Deionized water was used as the insulating medium for conducting machining in the EDM process with a peak current of 16 Amps. The dielectric flow rate was chosen as 1, 2 MPa as constant throughout all the experiments with a wire feed rate as 4 m/min. The consolidated selection of process variables for this study is shown in Table 3.

Table 3.
Influence of tool electrodes in the WEDM process.
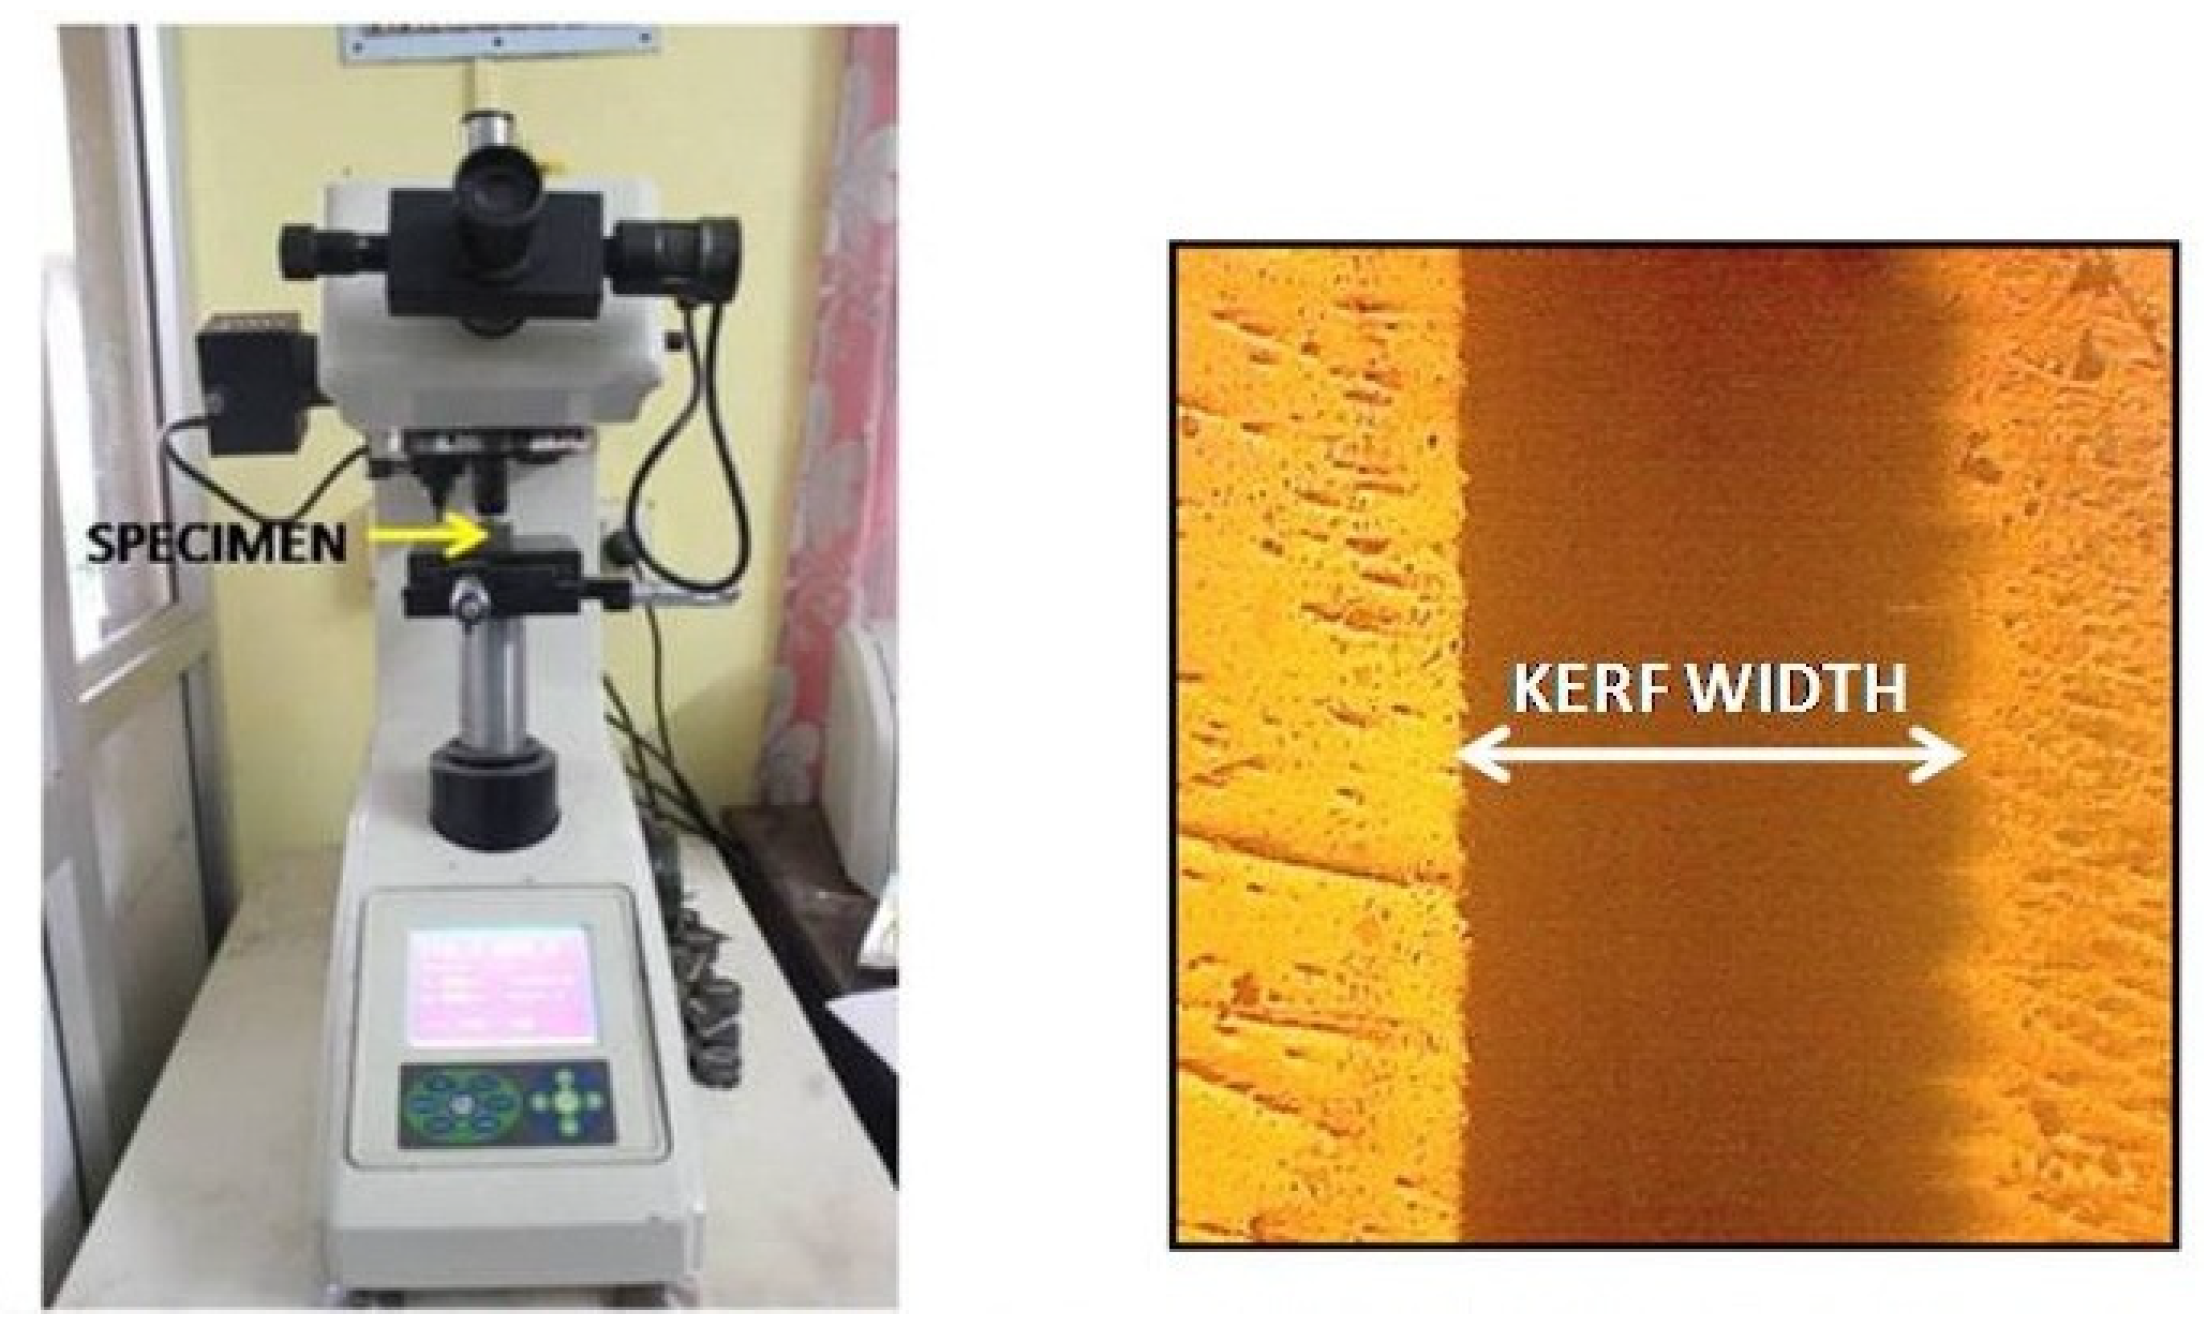
In order to calculate the MRR, for each test run, the weight was measured before and after the experiment using a precision scale. It can be denoted by 3 mm/min. The Ra of the machined specimen was evaluated by a non-contact surface roughness tester (TALYSURF CCI LITE manufactured by Taylor Hobson Ltd., Leicester, UK) with high-pass filtering based on the ISO 4287 standard. The measurement was made in the perpendicular direction to the cutting direction. The kerf width (Kw) of all machined specimens was measured using the Instron Tukon 2100B microscope from Wilson Instruments, MA, USA. Figure 2 shows the measurement approach for kerf width. It was calculated by measuring the distance between the two edge lines made by the wire passage, as shown in Figure 2. The surface topography of the machined surface was obtained using a Scanning Electron Microscope (SEM S-3400N) from Hitachi Limited, Ibaraki, Japan.

Figure 2.
Measurement of Kw of machined specimen using the microscope.
2.3. Taguchi—DEAR Technique
Since the present study involves the four input factors with three levels and two-factor interactions between them, the L27 orthogonal array (OA) was selected for conducting experiments in the WEDM process according to the Taguchi technique [42]. Since the present investigation was performed with three performance measures, it was required to implement MCDT in the process.
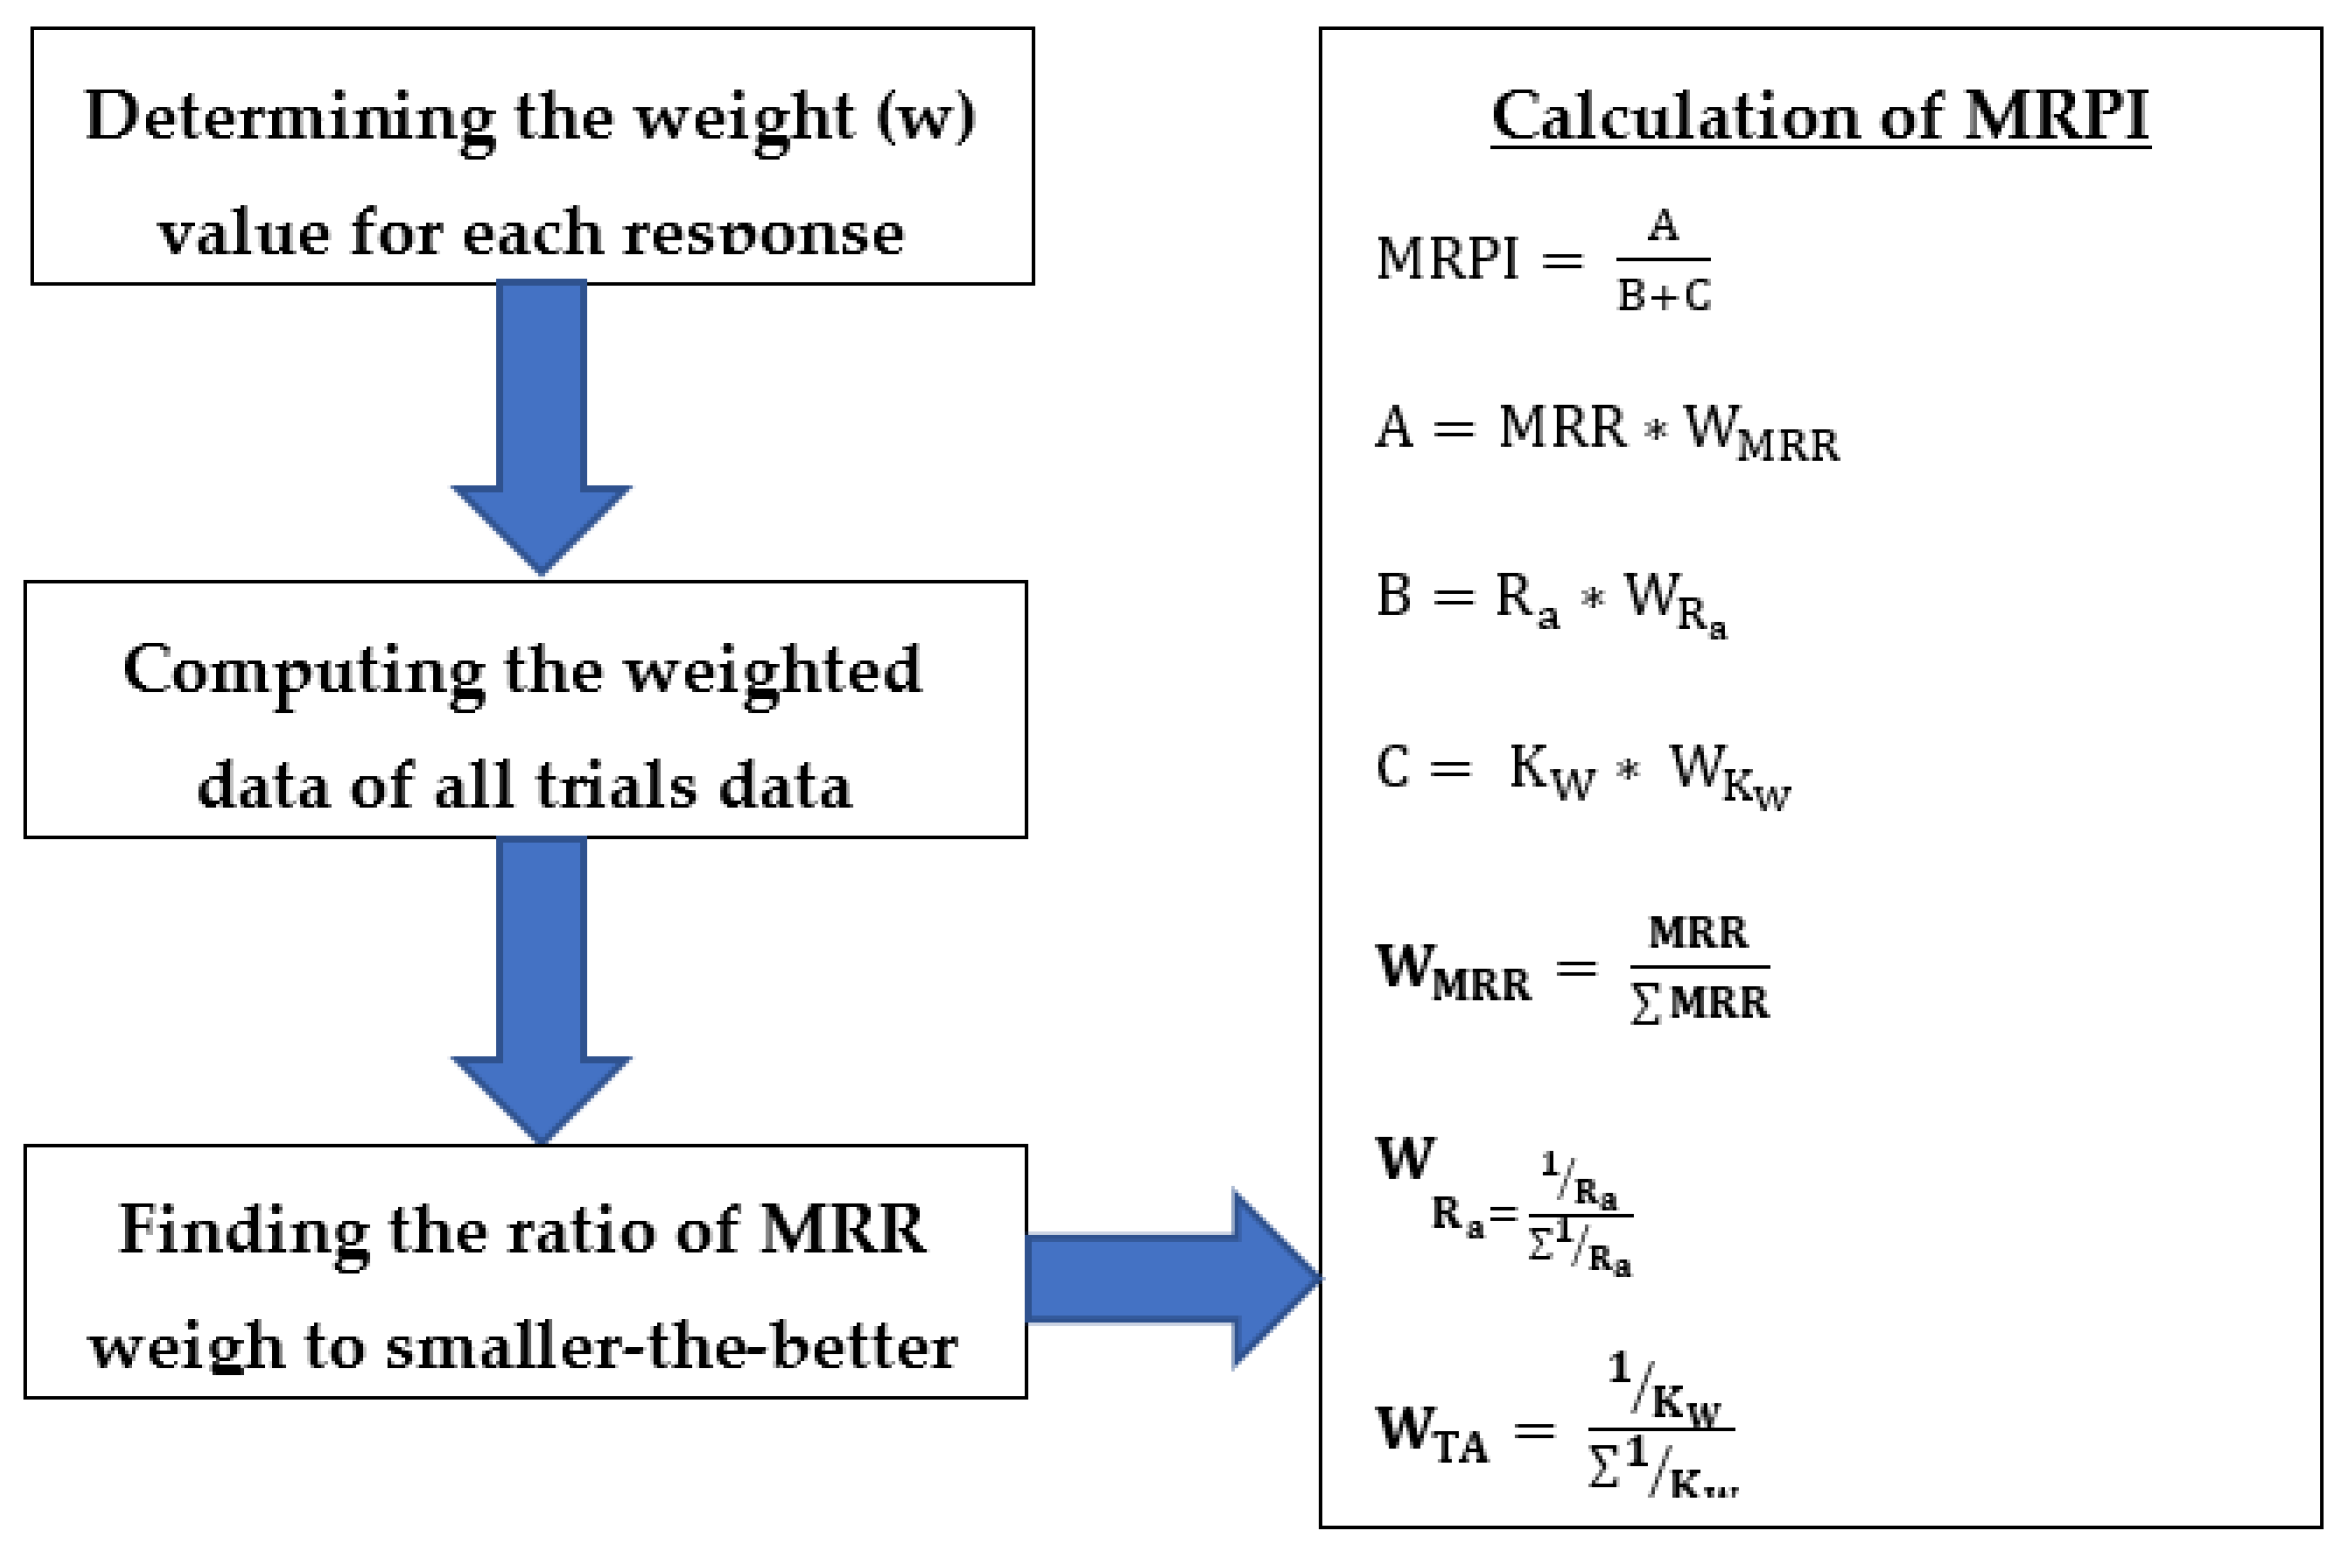
In the proposed DEAR approach, the optimal levels of control factors can be computed using a computed ratio depending on a certain mapping process between a set of original responses and this ratio. This computed ratio is defined as the Multi-Response-Performance-Index (MRPI) value to obtain the optimal arrangement of the control factors [43,44]. Figure 3 illustrates the steps involved in the analysis.

Figure 3.
Steps involved in Taguchi-DEAR.
3. Results and Discussion
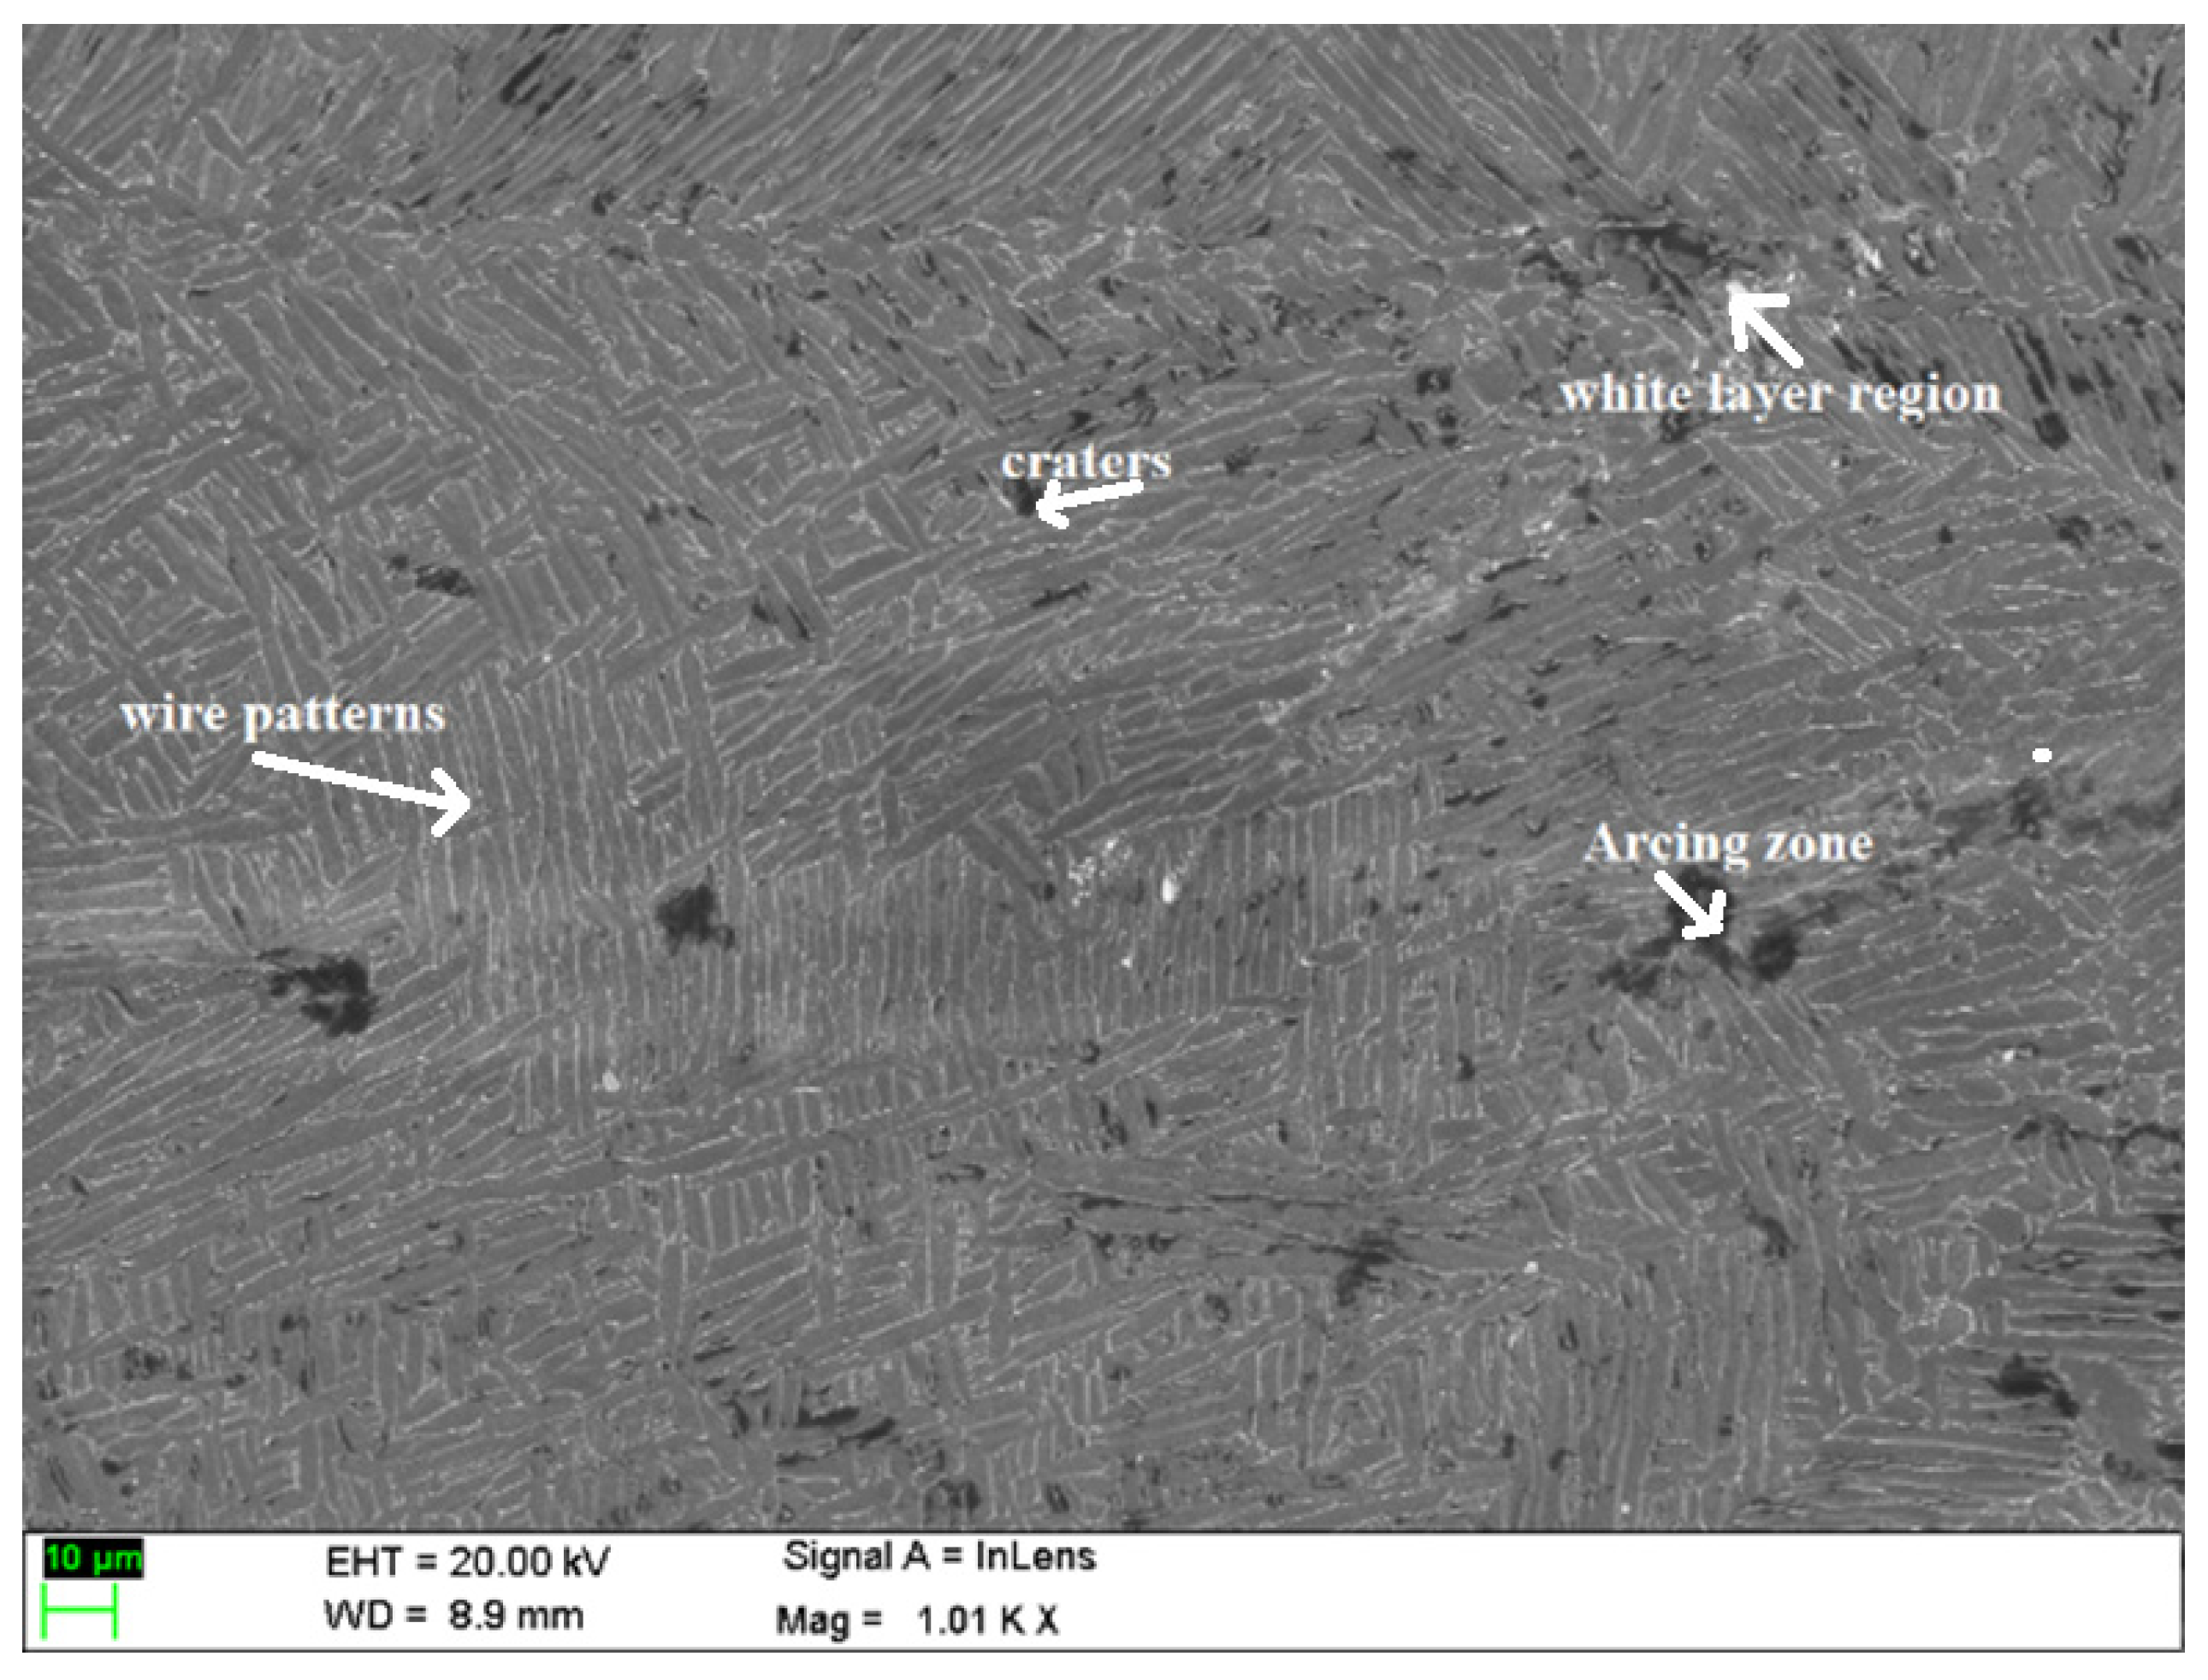
In the current work, 27 cutting trials were performed according to the proposed design of experiments to examine WEDM parameters’ effects on workpiece specimens’ machinability. Each trial was conducted three times, and the average was considered the final measured value. Table 4 lists the experimental outcome of all the conducted trials. Totally, 81 trials were performed using the WEDM process to analyze the influence of wire electrodes and process parameters on performance measures in such a process. Figure 4 shows the microstructure analysis of machined specimens using DWE in the WEDM process. The patterns of the wire electrodes are visible in specimens with a recast white-layer region, craters and an arcing region.

Table 4.
Calculation of performance measures in the WEDM.
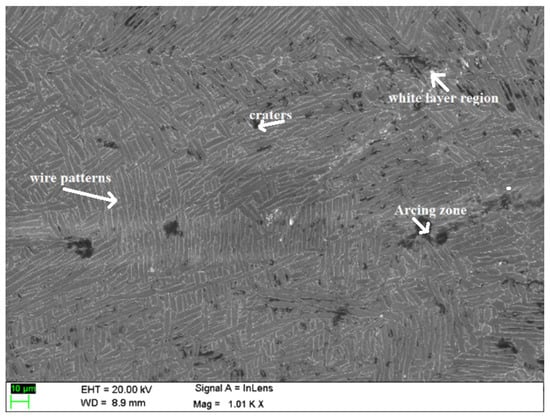
Figure 4.
Machined surface of specimens in WEDM.
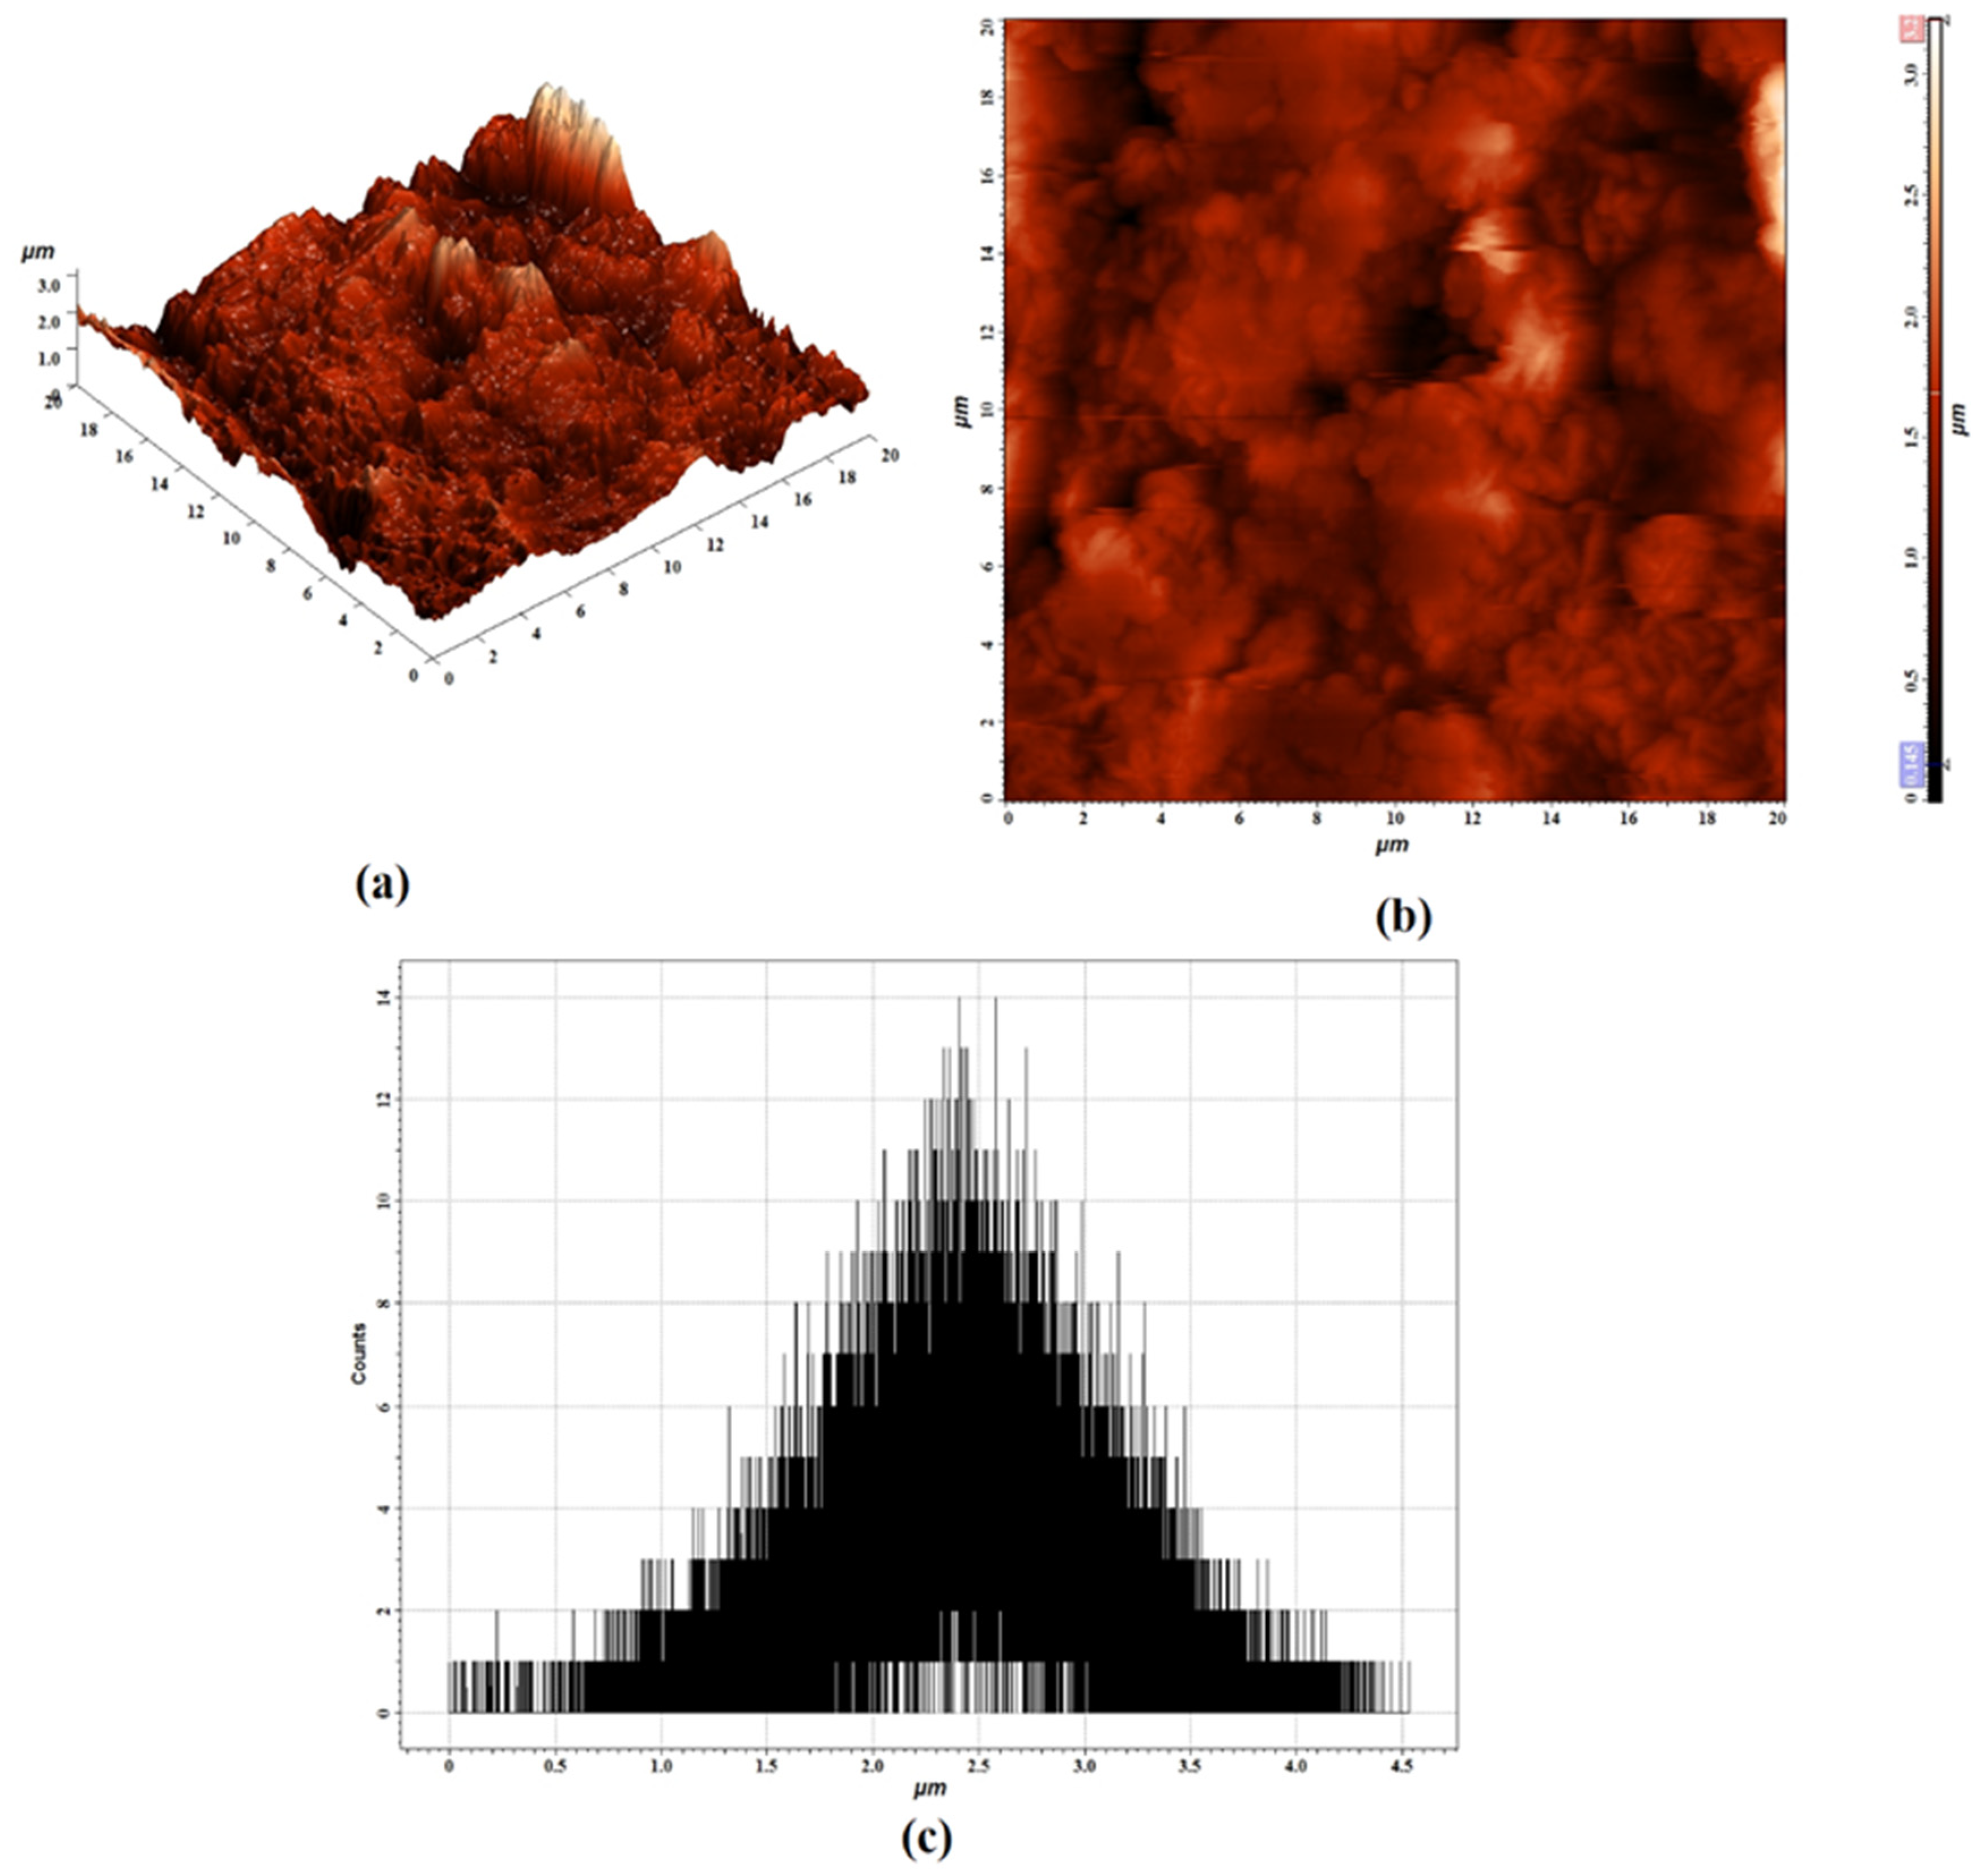
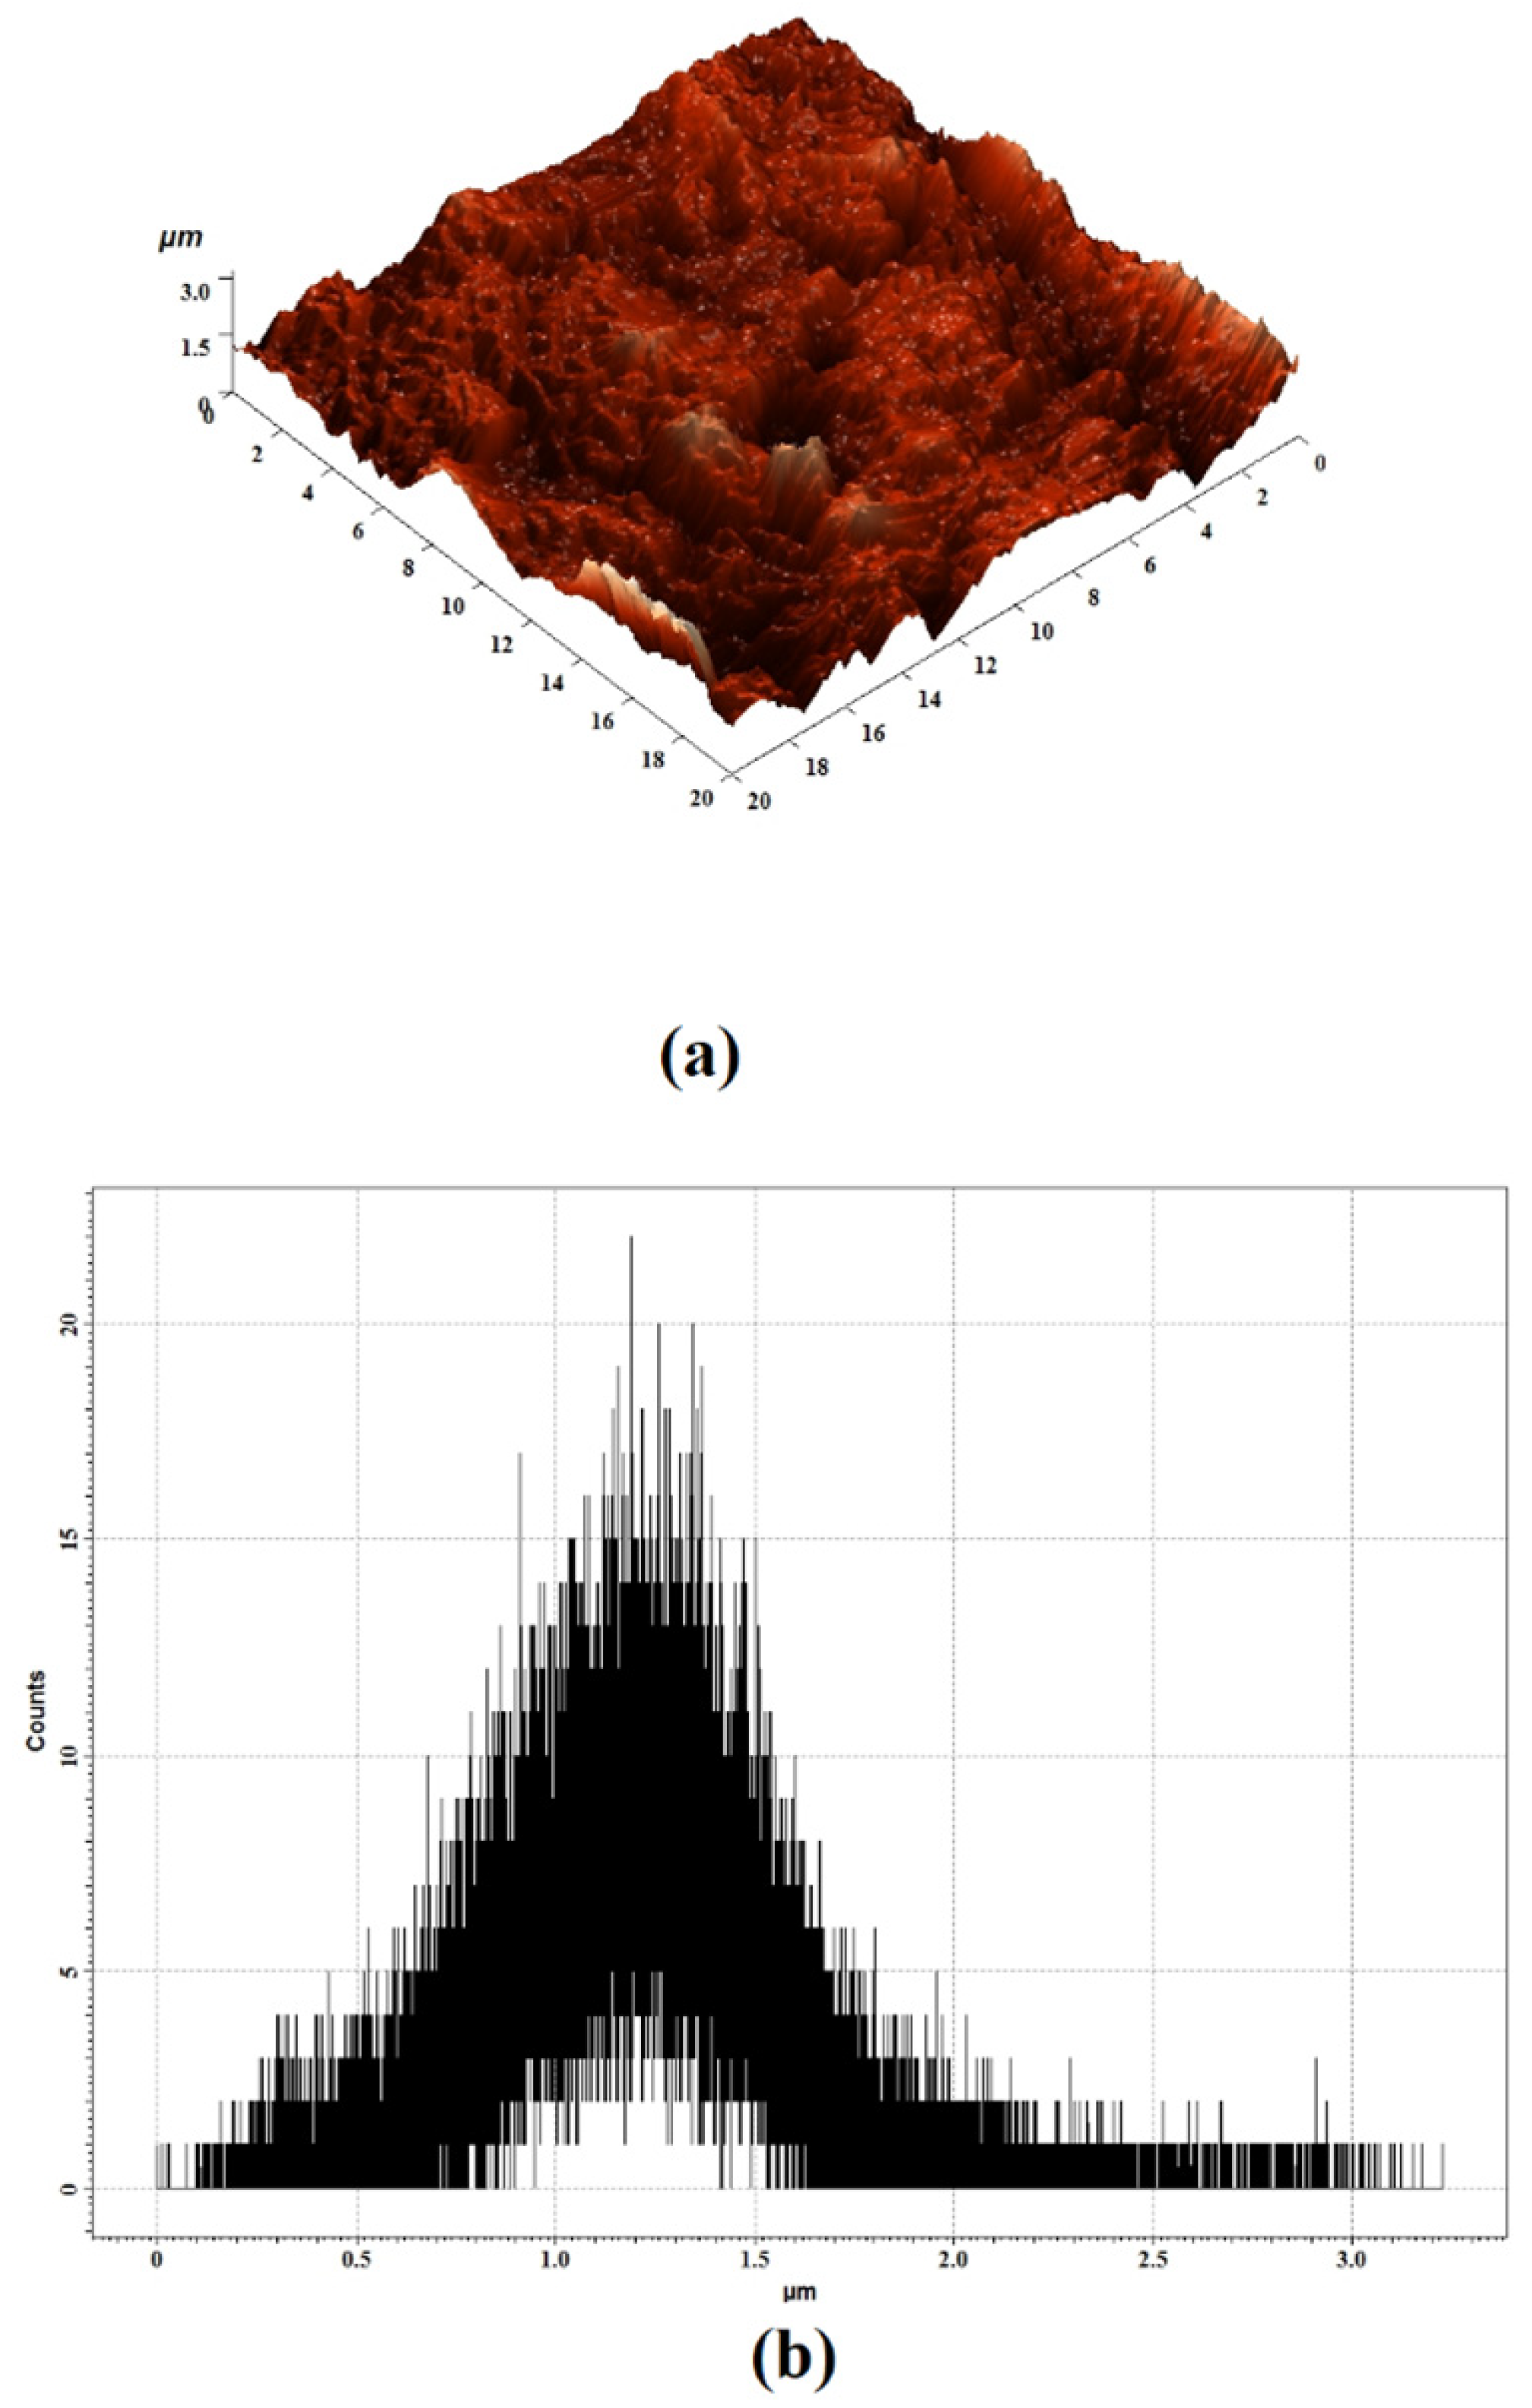
Figure 4 shows the microstructure analysis of machined specimens using DWE in the WEDM process. The patterns of the wire electrodes are visible with specimens with a negligible recast-white layer region, craters and an arcing region. Figure 5 shows the surface morphology of the machined specimen using the WEDM process with DWE under trial 26. It shows the peak and valley over the machined surface. The white region indicates the presence of the zinc content deliberated from the diffused wire electrode as per both 3D and 2D views of the surface. The zinc particles were deposited over the machined surface. The surface roughness can also be interpreted from the two-dimensional view of the surface. The histogram analysis shows a higher occurrence of surface roughness over the machined surface. From the analysis, it is possible to analyze an average surface roughness value from the higher occurrence of peaks and valleys of the machined surface using the WEDM process.

Figure 5.
Surface morphology analysis of machined specimen under the factors of trial 26: (a) Three dimensional view; (b) Two dimensional view, and (c) Histogram analysis.
3.1. Effects of Process Factors on Performance Measures
Table 5 shows the weights of each outcome parameter along with the MRPI values. It was inferred that trial number 26 could remove more material with lower Ra and KW. The material removal is directly proportional to the pulse-on time. Hence, the larger pulse-on time could produce a higher MRR. Since the pulse-off time contributes for the deionization process after the machining mechanism, the larger pulse-off time could produce lower surface roughness. The servo voltage can highly contribute to the overcut [42]. The moderate servo voltage can produce lower kerf width. Hence, trial number 26 could produce a higher MRR with lower surface roughness and kerf width over the machined surface of workpiece specimens using the WEDM process with DWE.

Table 5.
Calculation of weights and MRPI.
3.2. Computation of Significant Process Factors
In order to identify the optimal factors using the consolidated MRPI concept [43,44], another combination of input process factors may provide better performance measures than trial 26. The consolidated MRPI of all control variables with the corresponding levels is shown in Table 6. The maximum-level value of each process factor specifies the optimal level of input factors in formulating the quality measures. From Table 5, it was inferred that Ton (level 3), Toff (level 3), SV (level 2), and WT (level 1) are the optimal arrangement of process factors in the current investigation. The MRPI values with different combinations of process control variables of the WEDM process were calculated using the Taguchi-DEAR technique. The maximum value of each control variable indicates the optimal level of input control variable of any machining process based on different quality measures. It was inferred that the optimal arrangement of process control variables in the process of the current study is 140 µs (Ton), 50 µs (Toff), 60 V (SV), and 5 kg (WT) as shown in Table 7. The material removal is directly proportional to the pulse-on time. Hence, the larger pulse-on time could produce a higher MRR [45]. Since the pulse-off time contributes to the deionization process after the machining mechanism, the larger pulse-off time could produce lower surface roughness. The shape of the wire electrode can highly contribute to the overcut. The lower wire tension creates a smooth and straight wire which has approached the specimens. Hence, it can produce a lower kerf width. The highest value of max–min reveals the larger importance of process control variables on machining characteristics. It was observed that pulse-off time has higher significance in determining the quality measures due to its importance on deionization [46]. The deionization has to be performed after every pulse discharge. Then, only the next cycle of charging will be effectively performed to enhance the process mechanism. Since the flushing process performs during the pulse-off time, it can positively influence quality measures in the WEDM process.

Table 6.
Computation of average MRPI values.

Table 7.
Identification of optimum factors.
3.3. Confirmation of the Optimized Parameters
A confirmation trial needs to check the conclusions derived from the investigation. The experimental trial was again performed using the optimal levels of significant factors [47]. The outcome values obtained from the confirmation experiments under the computed setting are 218.234 mm3/min (MRR), 2.345 µm (Ra), and 0.31 mm (KW). The DEAR approach-based MRPI value of the confirmation experiment deviated by 1.1% from the mean value. Hence, the accuracy of the prediction was verified.
3.4. Surface Analysis under Optimal Control Variables
As shown in Figure 6, the surface topography was investigated using AFM under the optimal input factors in WEDM. The three-dimensional analysis showed that the lower peaks and valleys were observed over the machined surface as compared with trial 26. The histogram analysis proved that a higher occurrence of lower surface roughness points was observed over the machined surface than the surface obtained with the process factors of trial 26 in the WEDM process. Figure 7 shows the SEM-based surface morphology under optimal factors in the WEDM process. The melted particles are resolidified over the machined surface, which can be termed a white-layer thickness. The thickness of the layer can affect the surface quality of the specimens [46]. It was observed that only a little thickness of resolidified thickness was observed over the machined surface.

Figure 6.
Surface morphology analysis of machined specimen under optimal process factors: (a) Three-dimensional view and (b) Histogram analysis.
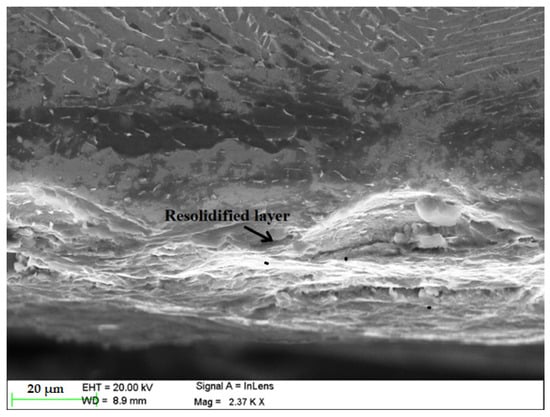
Figure 7.
SEM-based surface morphology under optimal factors.
4. Conclusions
In the current investigation, an effort was made to introduce Taguchi-DEAR methodology in the WEDM process while machining Inconel 718 alloy using a zinc-diffused coating brass wire electrode. The following conclusions were drawn from it:
- ➢
- The zinc-diffused coating brass wire electrode can effectively machine the Inconel 718 alloy in the process.
- ➢
- The patterns of the wire electrodes are visible with specimens with negligible recast white-layer region, craters, and arcing region.
- ➢
- The optimal arrangement of input factors in the WEDM process were found as 140 µs (Ton), 50 µs (Toff), 60 V (SV), and 5 kg (WT) among the elected factors with the error accuracy of 1.1%.
- ➢
- The pulse-off time has the most significance on formulating the quality measures owing to its importance on deionization in the process.
- ➢
- The significance of other suitable coated electrodes can be analyzed on performance measures using the WEDM process in the future.
Author Contributions
Conceptualization, M.T. and P.K.-O.; methodology, M.T. and P.K.-O.; software, M.T.; validation, L.L. and Y.Z.; formal analysis, R.A. and R.M.; investigation, M.T. and A.E.; resources, A.P.M.; writing—original draft preparation, M.T. and A.E.; project administration, M.T. and P.K.-O.; funding acquisition, M.T. and P.K.-O. All authors have read and agreed to the published version of the manuscript.
Funding
This research project was Supported By Open Fund (PLN2022-17) of the State Key Laboratory of Oil and Gas Reservoir Geology and Exploitation (Southwest Petroleum University).
Institutional Review Board Statement
Not applicable.
Informed Consent Statement
Not applicable.
Data Availability Statement
Not applicable.
Acknowledgments
This research project was partly supported by the program “Excellence initiative—research university” from the A.G.H. University of Science and Technology, grant number IDUB: 4480.
Conflicts of Interest
The authors declare no conflict of interest.
References
- Thakur, D.G.; Ramamoorthy, B.; Vijayaraghavan, L. Study on the machinability characteristics of superalloy Inconel 718 during high speed turning. Mater. Des. 2009, 30, 1718–1725. [Google Scholar] [CrossRef]
- Sharma, S.; Jain, V.; Shekhar, R. Electrochemical Drilling of Inconel Superalloy with Acidified Sodium Chloride Electrolyte. Int. J. Adv. Manuf. Technol. 2002, 19, 492–500. [Google Scholar] [CrossRef]
- Chen, Y.C.; Liao, Y.S. Study on wear mechanisms in drilling of Inconel 718 superalloy. J. Mater. Process. Technol. 2003, 140, 269–273. [Google Scholar] [CrossRef]
- Rettig, R.; Singer, R.F. Numerical modelling of precipitation of topologically close-packed phases in nickel-base superalloys. Acta Mater. 2011, 59, 317–327. [Google Scholar] [CrossRef]
- Wilson, A.S. Formation and effect of topologically close-packed phases in nickel-base superalloys. Mater. Sci. Technol. 2017, 33, 1108–1118. [Google Scholar] [CrossRef]
- Ezugwu, E.O. Key improvements in the machining of difficult-to-cut aerospace superalloys. Int. J. Mach. Tools Manuf. 2005, 45, 1353–1367. [Google Scholar] [CrossRef]
- Wang, Z.Y.; Rajurkar, K.P. Cryogenic machining of hard-to-cut materials. Wear 2000, 239, 168–175. [Google Scholar] [CrossRef]
- Kumar, V.; Jangra, K.K.; Kumar, V.; Sharma, N. WEDM of nickel based aerospace alloy: Optimization of process parameters and modelling. Int. J. Interact. Des. Manuf. 2017, 11, 917–929. [Google Scholar] [CrossRef]
- Mahapatra, S.S.; Patnaik, A. Optimization of wire electrical discharge machining (WEDM) process parameters using Taguchi method. Int. J. Adv. Manuf. Technol. 2007, 34, 911–925. [Google Scholar] [CrossRef]
- Kumar, A.; Kumar, V.; Kumar, J. Multi-response optimization of process parameters based on response surface methodology for pure titanium using WEDM process. Int. J. Adv. Manuf. Technol. 2013, 68, 2645–2668. [Google Scholar] [CrossRef]
- Thangaraj, M.; Annamalai, R.; Moiduddin, K.; Alkindi, M.; Ramalingam, S.; Alghamdi, O. Enhancing the Surface Quality of Micro Titanium Alloy Specimen in WEDM Process by Adopting TGRA-Based Optimization. Materials 2020, 13, 1440. [Google Scholar] [CrossRef] [PubMed]
- Hewidy, M.S.; El-Taweel, T.A.; El-Safty, M.F. Modelling the machining parameters of wire electrical discharge machining of Inconel 601 using RSM. J. Mater. Process. Technol. 2005, 169, 328–336. [Google Scholar] [CrossRef]
- Newton, T.R.; Melkote, S.N.; Watkins, T.R.; Trejo, R.M.; Reister, L. Investigation of the effect of process parameters on the formation and characteristics of recast layer in wire-EDM of Inconel 718. Mater. Sci. Eng. A. 2009, 513, 208–215. [Google Scholar] [CrossRef]
- Han, F.; Jiang, J.; Yu, D. Influence of machining parameters on surface roughness in finish cut of WEDM. Int. J. Adv. Manuf. Technol. 2007, 34, 538–546. [Google Scholar] [CrossRef]
- Devarasiddappa, D.; Chandrasekaran, M.; Arunachalam, R. Experimental investigation and parametric optimization for minimizing surface roughness during WEDM of Ti6Al4V alloy using modified TLBO algorithm. J. Braz. Soc. Mech. Sci. Eng. 2020, 42, 128. [Google Scholar] [CrossRef]
- Kavimani, V.; Prakash, K.S.; Thankachan, T. Multi-objective optimization in WEDM process of graphene—SiC-magnesium composite through hybrid techniques. Measurement 2019, 145, 335–349. [Google Scholar] [CrossRef]
- Soundararajan, R.; Ramesh, A.; Mohanraj, N.; Parthasarathi, N. An investigation of material removal rate and surface roughness of squeeze casted A413 alloy on WEDM by multi response optimization using RSM. J. Alloys Compd. 2016, 685, 533–545. [Google Scholar] [CrossRef]
- Roy, A.; Narendranath, S.; Pramanik, A. Effect of peak current and peak voltage on machined surface morphology during WEDM of TiNiCu shape memory alloys. J. Mech. Sci. Technol. 2020, 34, 3957–3961. [Google Scholar] [CrossRef]
- Chaudhary, A.; Sharma, S.; Verma, A. Optimization of WEDM process parameters for machining of heat treated ASSAB ’88 tool steel using Response surface methodology (RSM). Mater. Today 2022, 50, 917–922. [Google Scholar] [CrossRef]
- Dabade, U.A.; Karidkar, S.S. Analysis of response variables in WEDM of Inconel 718 using Taguchi technique. Procedia CIRP 2016, 41, 886–891. [Google Scholar] [CrossRef]
- Grigoriev, S.N.; Nadykto, A.B.; Volosova, M.A.; Zelensky, A.A.; Pivkin, P.M. WEDM as a replacement for grinding in machining ceramic Al2O3-TiC Cutting Inserts. Metals 2021, 11, 882. [Google Scholar] [CrossRef]
- Maher, I.; Sarhan, A.A.D. Proposing a new performance index to identify the effect of spark energy and pulse frequency simultaneously to achieve high machining performance in WEDM. Int. J. Adv. Manuf. Technol. 2017, 91, 433–443. [Google Scholar] [CrossRef]
- Garg, M.P.; Kumar, A.; Sahu, C.K. Mathematical modeling and analysis of WEDM machining parameters of nickel-based super alloy using response surface methodology. Sadhana 2017, 42, 981–1005. [Google Scholar] [CrossRef]
- Klocke, F.; Welling, D.; Klink, A.; Veselovac, D.; Nöthe, T.; Perez, R. Evaluation of Advanced Wire-EDM Capabilities for the Manufacture of Fir Tree Slots in Inconel 718. Procedia CIRP 2014, 14, 430–435. [Google Scholar] [CrossRef]
- Aspinwall, D.K.; Soo, S.L.; Berrisford, A.E.; Walder, G. Workpiece surface roughness and integrity after WEDM of Ti–6Al–4V and Inconel 718 using minimum damage generator technology. CIRP Annals. Manuf. Technol. 2008, 57, 187–190. [Google Scholar] [CrossRef]
- Bisaria, H.; Shandilya, P. Experimental investigation on wire electric discharge machining (WEDM) of Nimonic C-263 superalloy. Mater. Manuf. Process. 2019, 34, 83–92. [Google Scholar] [CrossRef]
- Sharma, P.; Chakradhar, D.; Narendranath, S. Analysis and Optimization of WEDM Performance Characteristics of Inconel 706 for Aerospace Application. Silicon 2018, 10, 921–930. [Google Scholar] [CrossRef]
- Zhang, M.; Liu, Z.; Pan, H.; Deng, C.; Qiu, M. Effect of no-load rate on recast layer cutting by ultra fine wire-EDM. Chin. J. Aeronaut. 2021, 34, 124–131. [Google Scholar] [CrossRef]
- Kumar, A.; Kumar, V.; Kumar, J. Surface crack density and recast layer thickness analysis in WEDM process through response surface methodology. Mach. Sci. Technol. 2016, 20, 201–230. [Google Scholar] [CrossRef]
- Reddy, B.S.; Rao, A.B.K.; Janardhana, G.R. Multi-objective optimization of surface roughness, recast layer thickness and surface crack density in WEDM of Al2124/SiCp using desirability approach. Mater. Today 2021, 39, 1320–1326. [Google Scholar]
- Zhang, Z.; Huang, H.; Ming, W.; Xu, Z.; Huang, Y.; Zhang, G. Study on machining characteristics of WEDM with ultrasonic vibration and magnetic field assisted techniques. J. Mater. Process. Technol. 2016, 234, 342–352. [Google Scholar] [CrossRef]
- Reolon, L.W.; Laurindo, C.A.H.; Torres, R.D.; Amorim, F.L. WEDM performance and surface integrity of Inconel alloy IN718 with coated and uncoated wires. Int. J. Adv. Manuf. Technol. 2019, 100, 1981–1991. [Google Scholar] [CrossRef]
- Abhilash, P.M.; Chakradhar, D. Effect of wire material and discharge energy on productivity and surface integrity of WEDM-processed Inconel 7180. Adv. Mater. Process. Technol. 2022, 1–22. [Google Scholar] [CrossRef]
- Mouralova, K.; Benes, L.; Bednar, J.; Zahradnicek, R.; Prokes, T.; Fiala, Z.; Fries, J. Precision Machining of Nimonic C 263 Super Alloy using WEDM. Coatings 2020, 10, 590. [Google Scholar] [CrossRef]
- Muthuramalingam, T.; Ramamurthy, A.; Sridharan, K.; Ashwin, S. Analysis of surface performance measures on WEDM processed titanium alloy with coated electrodes. Mater. Res. Express. 2018, 5, 126503. [Google Scholar] [CrossRef]
- Ramamurthy, A.; Sivaramakrishnan, R.; Muthuramalingam, T. Taguchi-Grey Computation Methodology for Optimum Multiple Performance Measures on machining Titanium alloy in WEDM Process. Indian J. Eng. Mater. Sci. 2015, 22, 181–186. [Google Scholar]
- Sonar, T.; Balasubramanian, V.; Malarvizhi, S.; Venkateswaran, T.; Sivakumar, D. An overview on welding of Inconel 718 alloy—Effect of welding processes on microstructural evolution and mechanical properties of joints. Mater. Charact. 2021, 174, 110997. [Google Scholar] [CrossRef]
- Ling, L.-S.; Yin, Z.; Hu, Z.; Liang, J.-H.; Wang, Z.-Y.; Wang, J.; Sun, B.-D. Effects of the γ″-Ni3Nb Phase on Mechanical Properties of Inconel 718 Superalloys with Different Heat Treatments. Materials 2019, 13, 151. [Google Scholar] [CrossRef]
- Popovicha, V.A.; Borisovb, E.V.; Popovichb, A.A.; Sufiiarovb, V.S.H.; Masaylob, D.V.; Alzina, L. Impact of heat treatment on mechanical behaviour of Inconel 718 processed with tailored microstructure by selective laser melting. Mater. Des. 2017, 131, 12–22. [Google Scholar] [CrossRef]
- Phan, N.H.; Thangaraj, M. Multi criteria decision making of vibration assisted EDM process parameters on machining silicon steel using Taguchi-DEAR methodology. Silicon 2021, 13, 1879–1885. [Google Scholar] [CrossRef]
- Ramamurthy, A.; Sivaramakrishnan, R.; Muthuramalingam, T.; Venugopal, S. Performance analysis of wire electrodes on machining Ti-6Al-4V alloy using wire electrical discharge machining process. Mach. Sci. Technol. 2015, 19, 577–593. [Google Scholar] [CrossRef]
- Thangaraj, M.; Ahmadein, M.; Alsaleh, N.A.; Elsheikh, A.H. Optimization of Abrasive Water Jet Machining of SiC Reinforced Aluminum Alloy Based Metal Matrix Composites Using Taguchi–DEAR Technique. Materials 2021, 14, 562–578. [Google Scholar] [CrossRef] [PubMed]
- Phan, N.H.; Dong, P.V.; Dung, H.T.; Thien, N.V.; Muthuramalingam, T.; Shirguppikar, S.; Tam, N.C.; Ly, N.T. Multi-object optimization of EDM by Taguchi-DEAR method using AlCrNi coated electrode. Int. J. Adv. Manuf. Technol. 2021, 116, 1429–1435. [Google Scholar] [CrossRef]
- Muthuramalingam, T.; Vasanth, S.; Vinothkumar, P.; Geethapriyan, T.; Rabik, M.M. Multi criteria decision making of abrasive flow oriented process parameters in abrasive water jet machining using Taguchi-DEAR Methodology. Silicon 2018, 10, 2015–2021. [Google Scholar] [CrossRef]
- Phan, N.H.; Muthuramalingam, T.; Minh, N.D.; Duc, N.V. Enhancing surface morphology of machined SKD61 die steel in EDM process using DEAR approach based multi criteria decision making. Int. J. Interact. Des. Manuf. 2022, 16, 1155–1161. [Google Scholar] [CrossRef]
- Muthuramalingam, T. Measuring the influence of discharge energy on white layer thickness in electrical discharge machining process. Measurement 2019, 131, 694–700. [Google Scholar] [CrossRef]
- Sakthivel, G.; Saravanakumar, D.; Muthuramalingam, T. Application of failure mode and effects analysis in manufacturing industry—an integrated approach with FAHP-FUZZY TOPSIS and FAHP-FUZZY VIKOR. Int. J. Product. Qual. Manag. 2018, 24, 398–423. [Google Scholar] [CrossRef]
Publisher’s Note: MDPI stays neutral with regard to jurisdictional claims in published maps and institutional affiliations. |
© 2022 by the authors. Licensee MDPI, Basel, Switzerland. This article is an open access article distributed under the terms and conditions of the Creative Commons Attribution (CC BY) license (https://creativecommons.org/licenses/by/4.0/).


