Article

Methodology for Optical Engine Characterization by Means of the Combination of Experimental and Modeling Techniques

CMT-Motores Térmicos, Universitat Politècnica de València, Camino de Vera s/n, 46022 Valencia, Spain
*
Author to whom correspondence should be addressed.
Appl. Sci. 2018, 8(12), 2571; https://doi.org/10.3390/app8122571
Submission received: 19 November 2018 / Revised: 3 December 2018 / Accepted: 7 December 2018 / Published: 11 December 2018

Abstract

:
Optical engines allow for the direct visualization of the phenomena taking place in the combustion chamber and the application of optical techniques for combustion analysis, which makes them invaluable tools for the study of advanced combustion modes aimed at reducing pollutant emissions and increasing efficiency. An accurate thermodynamic analysis of the engine performance based on the in-cylinder pressure provides key information regarding the gas properties, the heat release, and the mixing conditions. If, in addition, optical access to the combustion process is provided, a deeper understanding of the phenomena can be derived, allowing the complete assessment of new injection-combustion strategies to be depicted. However, the optical engine is only useful for this purpose if the geometry, heat transfer, and thermodynamic conditions of the optical engine can mimic those of a real engine. Consequently, a reliable thermodynamic analysis of the optical engine itself is mandatory to accurately determine a number of uncertain parameters among which the effective compression ratio and heat transfer coefficient are of special importance. In the case of optical engines, the determination of such uncertainties is especially challenging due to their intrinsic features regarding the large mechanical deformations of the elongated piston caused by the pressure, and the specific thermal characteristics that affect the in-cylinder conditions. In this work, a specific methodology for optical engine characterization based on the combination of experimental measurements and in-cylinder 0D modeling is presented. On one hand, the method takes into account the experimental deformations measured with a high-speed camera in order to determine the effective compression ratio; on the other hand, the 0D thermodynamic analysis is used to calibrate the heat transfer model and to determine the rest of the uncertainties based on the minimization of the heat release rate residual in motored conditions. The method has been demonstrated to be reliable to characterize the optical engine, providing an accurate in-cylinder volume trace with a maximum deformation of 0.5 mm at 80 bar of peak pressure and good experimental vs. simulated in-cylinder pressure fitting.

1. Introduction

The restricted emissions regulations imposed and special issues related with CO2 reduction are some of the challenges that the automotive industry has faced in the last few decades [1,2,3]. As a result, car manufacturers have focused their research into new combustion concepts such as low temperature combustion (LTC) [4] and partially premixed combustion (PPC) [5]. Consequently, a good understanding of the combustion process is extremely important for the optimization of different engine systems and a better comprehension of the phenomena.
In this context, optical engines are a very important tool to visualize and obtain information about the combustion process that is not available in metal engines [6,7]. During the last few years, it has become one of the most important and common experimental undertakings to study and develop new combustion strategies and injection systems [8]. This kind of test bench permits the use of a wide variety of techniques that can be either thermodynamically based (in-cylinder pressure measurements) and/or non-intrusive optical ones such as PIV [9], Mie scattering, natural emission of the flame [10], etc.
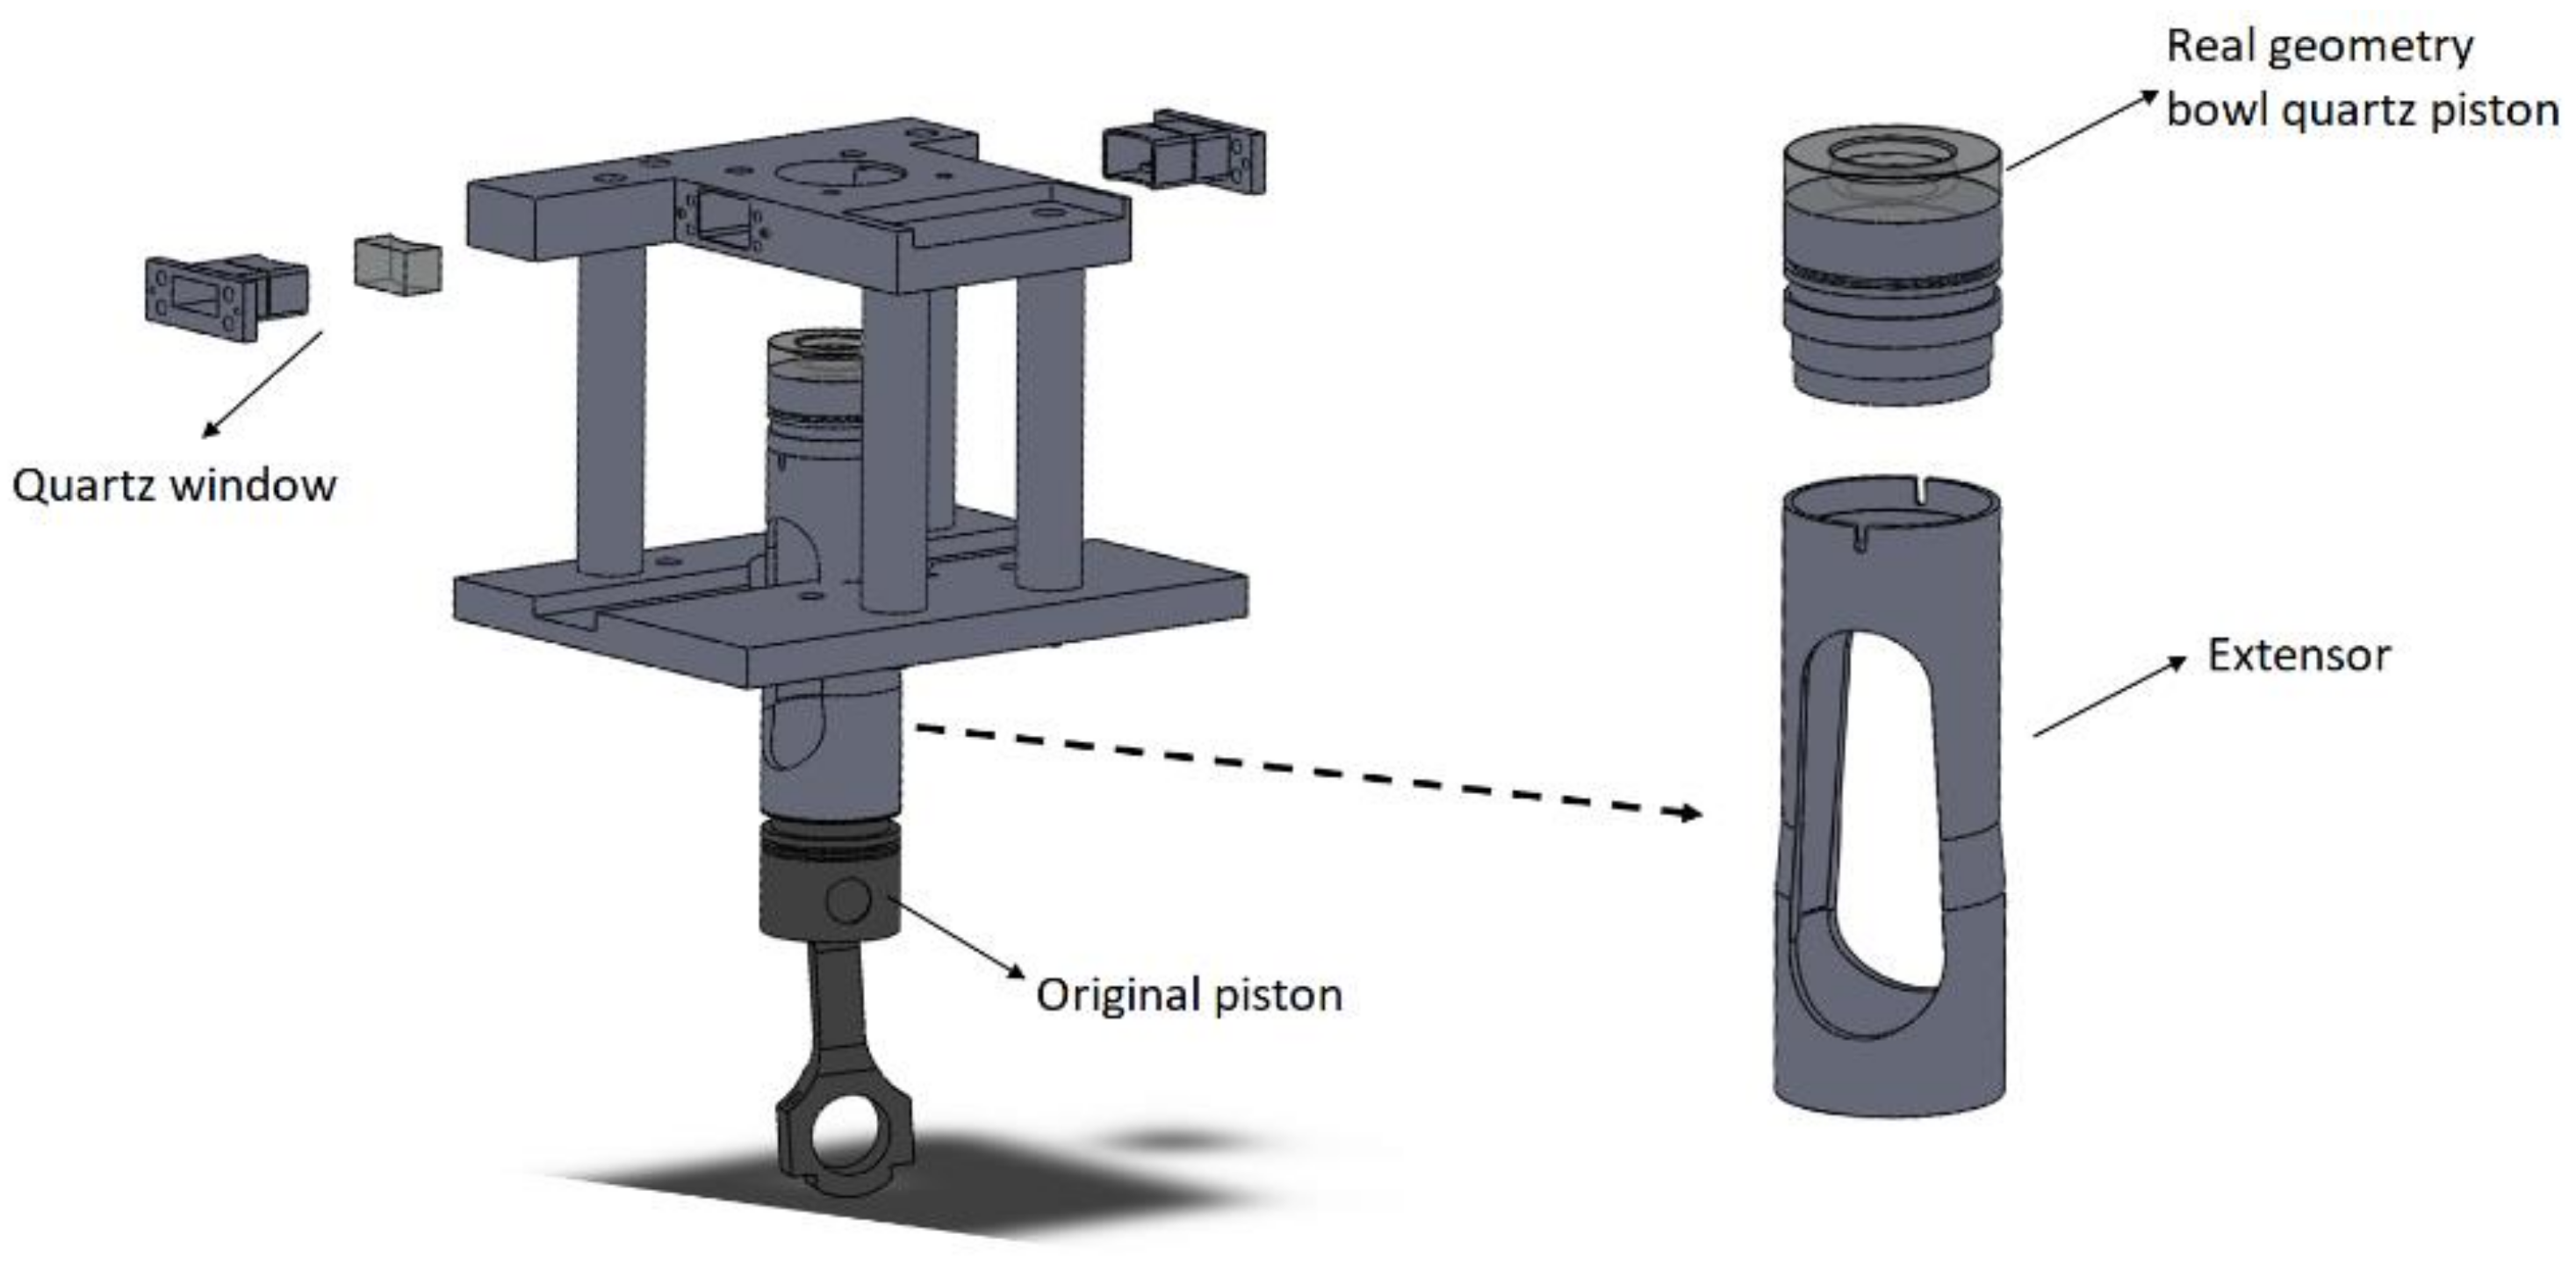
Basically, an optical engine is a metal engine rebuilt with optical access either in the side of the chamber, through the cylinder liner, or from below through the piston, or both. Furthermore, it is necessary to have a piston extension for access from below (Bowditch design) [11]. In this way, to obtain optical access, some modifications are required in the standard engine, which can affect the thermodynamic evolution inside the cylinder. The thermodynamic evolution is the link between optical and metal engines, thus it has great importance to relate physical and chemical phenomena observed via optical techniques to the real behavior inside metal engines.
Thermodynamic analysis can be performed either by in-cylinder pressure measurements through rate of heat release (RoHR) calculations or predictive models that provide an estimation of the pressure and temperature evolution inside the chamber for each operating condition [11,12]. This kind of analysis is directly affected by some uncertainties such as the effective compression ratio, heat transfer coefficient, top dead center (TDC) position, etc. Thus, it is necessary to minimize errors, and for this purpose, different methodologies have been carried out to more accurately estimate these parameters [13,14]. However, when dealing with optical engines, it is more difficult to estimate these uncertainties due mainly to differences in heat transfer and mechanical deformations. Differences in heat transfer are basically caused by the optical access and this is related to the lower heat conductivity of quartz in comparison with aluminum and steel. Mechanical deformations occur in several parts of the engine but they are mainly related to the elongated piston caused by the high values of in-cylinder pressure, thermal expansion, and to a lesser extent, the acceleration due to piston movement.
Cylinder volume is affected directly by mechanical deformations due to different forces (inertial, thermal, and pressure) that actuate expanding or compressing different engine parts while it is running. Pressure forces act to compress the moving parts and they are higher near the TDC. Inertial forces act to expand the moving engine parts near the TDC and compresses them near the BDC. Considering that cylinder volume is critical to the RoHR calculation, quantifying the deformation is extremely important to obtain the correct instantaneous volume. Furthermore, mechanical deformation impairs the compression ratio. Some authors have already developed simple models of mechanical deformation to include in the thermodynamic analysis [15,16]. Aronsson et al. [17] obtained the deformation in a piston of an optical engine measuring the variation of piston position with a high speed camera.
The poor conductivity of quartz and the absence of cooling water channels in the quartz parts as well as oil lubrication on the piston contribute to changing the characteristics of heat transfer in optical engines. These two factors lead to low heat losses and high wall temperatures that lead to shorter ignition delays [11]. Optical engines tend to present smaller temperature gradients between the surface and the gas inside the cylinder. Aronsson et al. [18] developed a study that compared the heat release of an optical engine with a metal engine. Results showed that the lower heat losses from the optical engines directly impacted the combustion phasing, and consequently the combustion process and emissions. This effect can be compensated or minimized by adjusting different intake temperatures and pressures for each kind of engine (optical and metal).
Furthermore, the presence of crevices due to changes in the position of piston rings impact directly on the compression ratio and in-cylinder flow. Thus, blow-by also needs to be taken into account in the thermodynamic analysis to consider an accurate in-cylinder trapped mass.
The main objective of this work was to develop a specific methodology to reduce the uncertainties in the thermodynamic analysis in a single cylinder optical engine. These uncertainties are much higher than those in metal engines due to the particular characteristics of optical engines. The methodology is based on the combination of experimental measurements and 0D thermodynamic modeling. A high speed camera was used to measure the piston position at firing and valve overlap TDC in order to determine the effective compression ratio considering the mechanical deformation. It also measured the in-cylinder pressure to be used as input data in the 0D model. 0D thermodynamic analysis was used to calibrate the heat transfer model and to determine the rest of the uncertainties based on the minimization of the heat release rate residual at motored conditions.

2. Tools and Methods

2.1. Cell Test

The optical engine was installed in an instrumented test cell containing all facilities needed for the operation, control, and acquisition data of the engine. Figure 1 shows the test cell setup. The intake air flow was supplied by a screw compressor. Temperature and air humidity were controlled by a heat exchanger and a dryer. Just before the air entered inside the cylinder, there was a heater controlled by a PID, which provided a constant intake air temperature.
In the exhaust line, in the same way as in the intake line, a settling chamber was mounted with the objective to reduce pressure pulses. In addition, an exhaust backpressure valve was installed in the line to maintain a fixed relative pressure to the intake pressure.

2.2. Optical Engine

The measurements were performed in a single-cylinder optical direct injection (DI) diesel engine with a Bowditch-type design [11]. The engine was derived from a GM 1.6 L commercial diesel engine (General Motors Corporation, Detroit, MI, USA). As shown in Figure 1, instantaneous pressure sensors were installed in the intake and exhaust ports as well as inside the cylinder. Additionally, thermocouples were positioned just inside the intake and exhaust ports. Temperatures of cooling water and oil were kept constant by a PID control.
The engine was connected to an electric dynamometer, which allows us to control the load and speed engine. The in-cylinder pressure was measured during 50 consecutive cycles with an AVL GH13P glow-plug piezoelectric transductor (AVL LIST GmbH, Graz, Styria, Austria) coupled to a Kistler 4603B10 charge amplifier (Kistler Holding AG, Winterthur, Switzerland). The pressure signal was measured by a Yokogawa DL708E oscillographic recorder (Yokogawa Electric Corporation, Tokyo, Japan) with a 16 bit A/D converter module. A shaft encoder with 1800 pulses per revolution was used, which allowed for a 0.2 CAD resolution. The mean variables were acquired at a low sampling frequency of 100 Hz using SAMARUC, a home-developed test system that collects the signals of different sensors and controls the electric dynamometer. Table 1 shows the accuracy of the different elements of the test cell.
The engine contained four valves per cylinder and a centrally located injector. It is equipped with a real bowl quartz piston that allows optical access to the combustion chamber from below while maintaining an in-cylinder flow similar to the flow in the metal engine. In addition, two windows on the partially extended liner permit optical access into the combustion chamber from the side as shown in Figure 2. The engine parameters can be seen in Table 2.
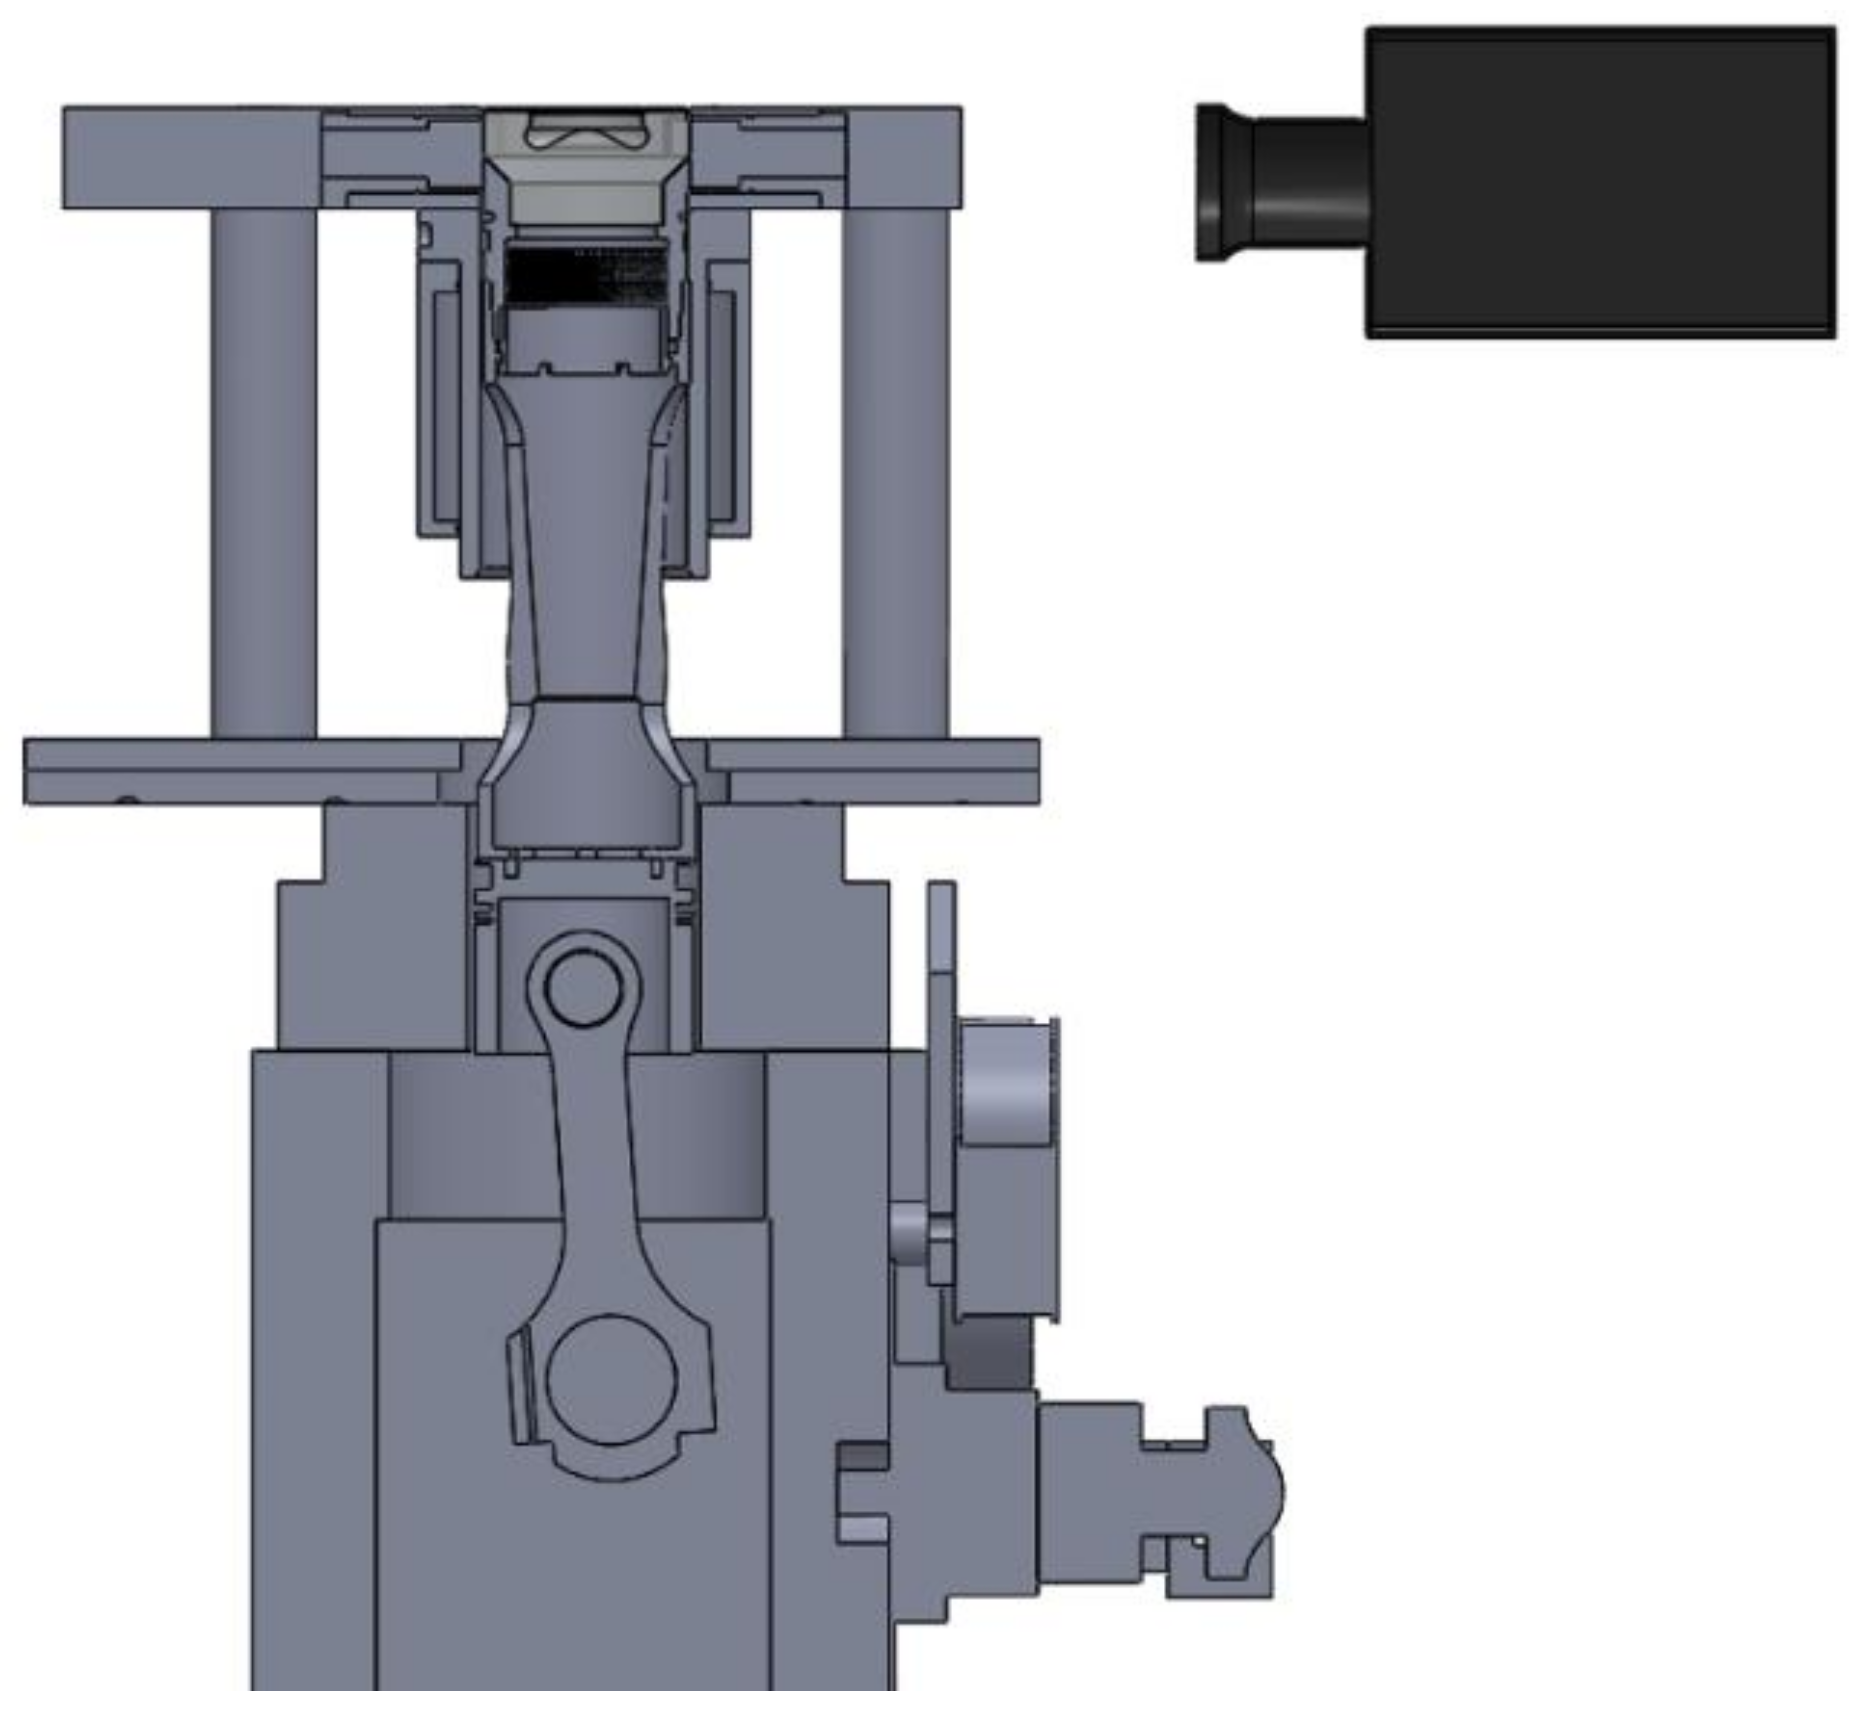
A high speed camera, Photron SA-X2, was used to record the piston positions in relation to the cylinder head surface. The camera lens was a ZEISS Makro Plana with a 50 mm focal length. The frame rate used was 21,000 fps, with a resolution of 588 × 588 pixels.

2.3. Engine Operating Conditions and Test Matrix

The optical engine was operated at motored conditions for five different intake pressures and constant speed. However, the measurements of mechanical deformations were performed only for the two extreme intake pressure: 1.1 and 2.7 bar. Exhaust pressure was kept 0.2 bar higher than the intake pressure. The engine speed was 1200 rpm for all operating conditions. Furthermore, the intake temperature and oil temperature were set at 50 °C and remained the same during all tests. The cooling water temperature was kept between 15 and 25 °C in order to preserve the piston rings. The experiments were performed in a randomized order after the engine reached a steady thermal state. The operating conditions are summarized in Table 3.

2.4. Mechanical Deformations Measurements

In order to measure the mechanical deformation, the camera was mounted just in front of the side window as shown in Figure 3 and a fixed reference was used in order to obtain the piston displacement in relation to the cylinder head. Furthermore, as the piston displacement measurement from the camera was performed in pixels, a target paper in the form of a grid was used to perform the calibration from pixel to millimeter. Images were taken during the firing and valve overlap strokes for the two extreme engine conditions described above. A similar methodology was used by Aronsson et al. [17] to measure the deformation from pressure force.
Images were processed using the methodology of particle image velocimetry (PIV) through the PIVlab Software [19]. The software basically searches a reference area in the piston for the first frame and tries to search, through a correlation function, for this same reference area in the second frame. The cross correlation for a pair of images was done in three passes with distinct interrogation areas: 128 × 128 pixels, 64 × 64 pixels, and 32 × 32 pixels, respectively. In the case of deformation measurements, the algorithm tries to find the same reference in the piston for each frame. For example, the roughness pattern in a part of the piston, that is present in frame 1, frame 2, and so on, can be used like references to calculate the displacement. Therefore, it is possible to know the displacement in pixels from frame 1 to frame 2 that will later be converted to millimeters. Considering that images taken during the valve overlap TDC do not have mechanical deformation caused by pressure, these images are considered as reference images (without deformation). It is important to consider that the reference image has mechanical deformations induced by thermal and inertial forces, so when a comparison is made between the image with deformation (combustion TDC) and the reference image, the influence of inertial and thermal forces is eliminated and the deformation measured is only the result of the pressure effect. In addition, for this study, the deformations caused by thermal and inertial forces were neglected. Considering the case where an engine is operating at firing conditions, there will only be 1 firing cycle every 20 cycles at the motored conditions, thus keeping the cooling water at low temperature and consequently very low thermal expansion. Near TDC, the impact of inertial forces on volume variation is much smaller than that of the pressure [11,15]. Furthermore, tests were developed at low engine speed, thus the deformation caused by inertial forces was much smaller than the one caused by pressure forces.

2.5. Theoretical Tools

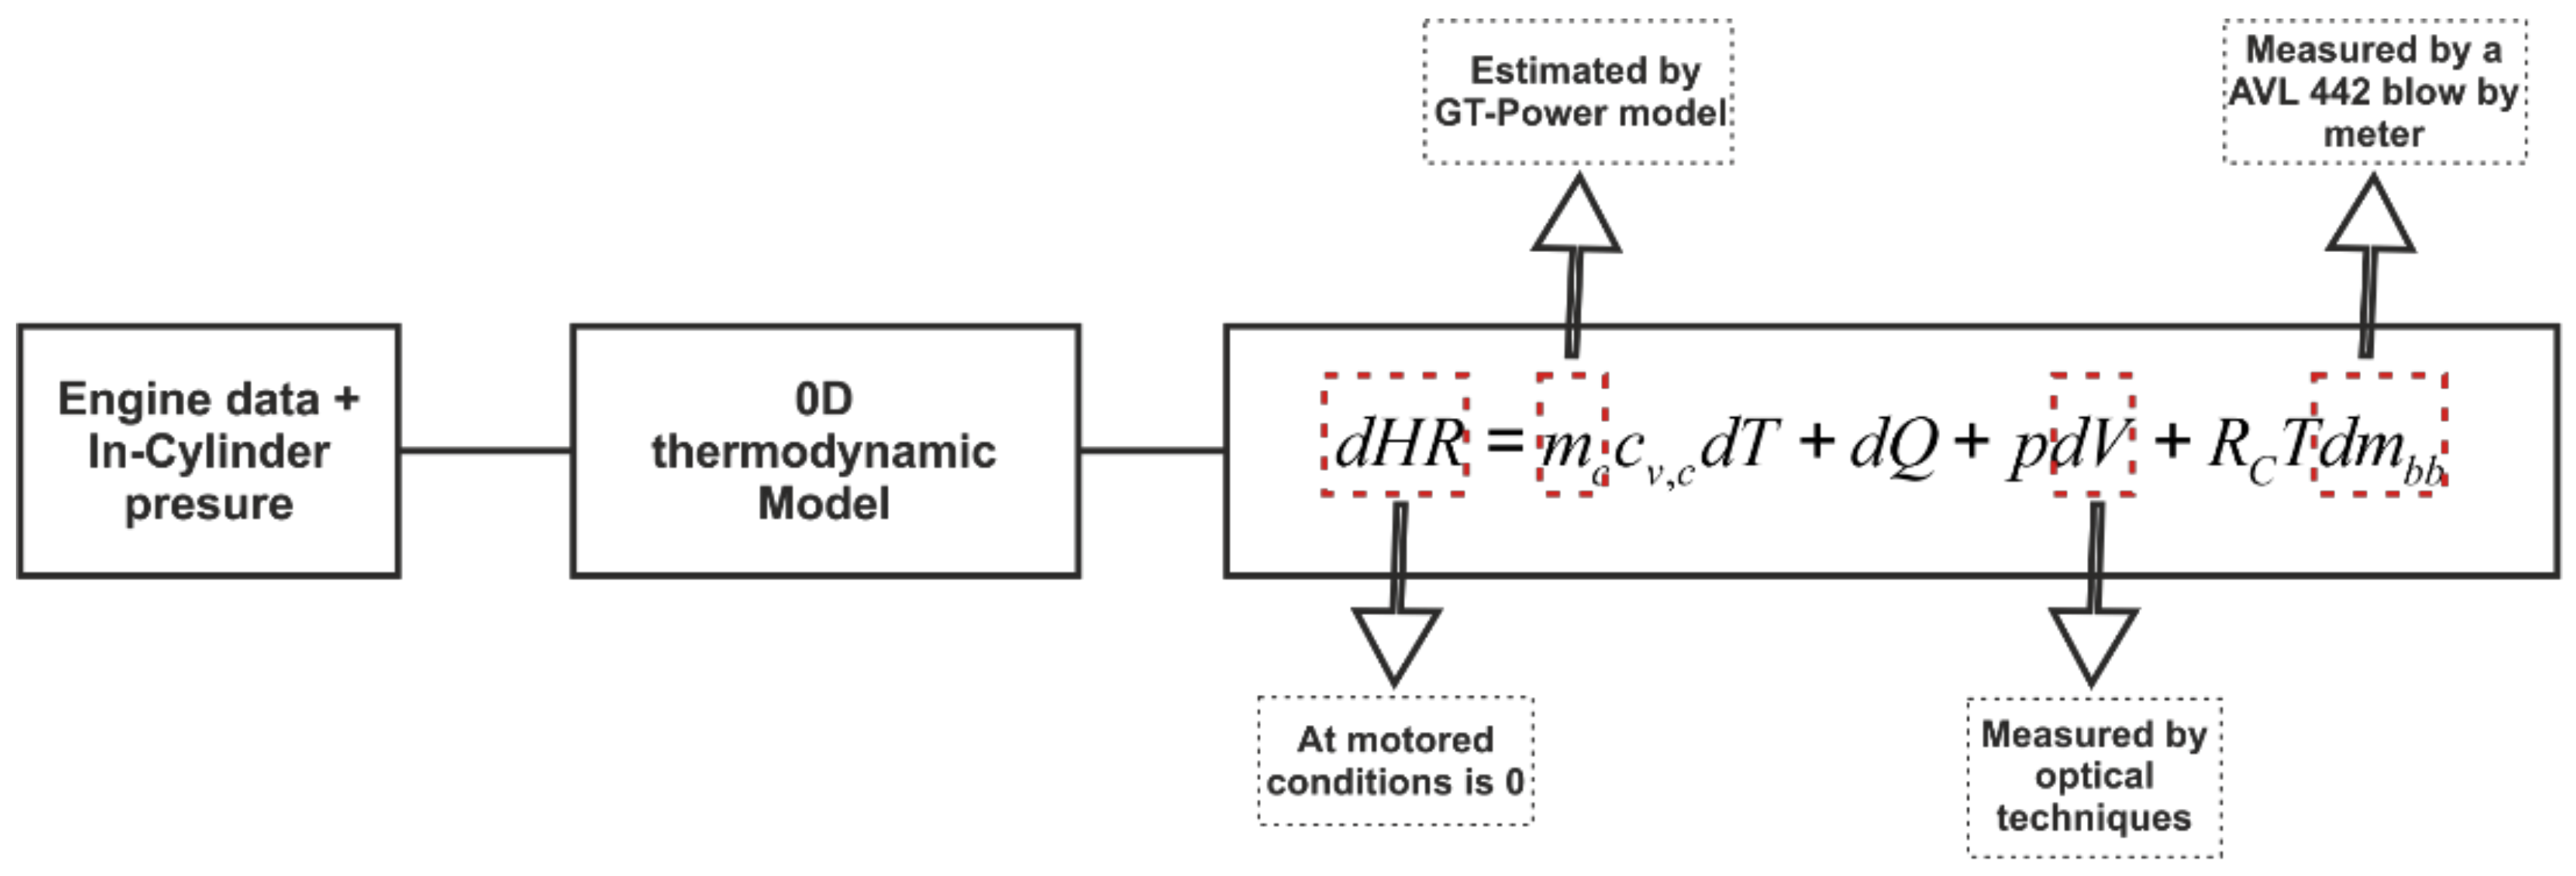
For the thermodynamic characterization in motored conditions, the study was based on the First Law of Thermodynamics and is summarized in Figure 4, where dHR represents the heat release rate, which is considered zero at motored conditions. The mc is the trapped mass at the inlet valve closing (IVC). The specific heat of the gas, which at motored conditions is only air, is represented by cv,c. T is the in-cylinder temperature. Q is the heat transferred to the wall. In addition, p is the instantaneous in-cylinder pressure, V is the instantaneous volume, RC is the gas constant, and finally mbb is the mass related with blow-by. The general model used was a home-developed 0D single zone thermodynamic model for calculating the closed cycle, which followed the methodology developed by Benajes et al. [13]. The idea of this methodology is to perform engine characterization trying to get the minimum residual heat release rate and a good fit between the measured and calculated in-cylinder pressure at motored conditions.
For this purpose, some parameters present in Figure 4 were set as model inputs. These parameters were either estimated by other theoretical tools (1D GT-Power) or measured directly in the engine during the tests. The model and tools will be detailed in the following paragraphs.

2.5.1. 0D Thermodynamic Model

The methodology [13] applied in the thermodynamic characterization was performed with CALMEC-SICICLO [15]. The main assumptions for the thermodynamic model are:
  • Chamber pressure and temperature are assumed to be spatially uniform.
  • Three species are considered: air, fuel vapor, and stoichiometric combustion products.
  • The chamber volume deformation due to pressure and inertia is calculated by means of a simple deformation model [20]. However, for this study, the chamber volume deformation was measured and imposed in the model.
  • The specific heat of the gas depends on both the temperature and composition [21].
  • Heat transfer is calculated with the modified Woschni-like model [22], where the convective heat transfer is calculated using Equation (1), simplified for a motored condition:
    h = C D 0.2 p 0.8 T 0.53 [ C W 1 c m + C W 2 c u ] 0.8
  • Finally, a filling and emptying model is normally used to calculate the trapped mass at IVC (mc) in the original methodology, however, for this study, the trapped mass was calculated by a GT-Power model.
where cm is the mean piston speed; cu is the instantaneous tangential velocity of the gas chamber adjusted using CFD calculations [15]; p and T are instantaneous pressure and temperature respectively; C is a constant whose value is 0.012; D is the cylinder diameter; and CW1 and CW2 are constants to be adjusted for each engine. Effective compression ratio (CR), TDC position, and CW1 must be adjusted simultaneously during the calculation.
Even though the measured piston position trace was developed from −50 aTDC to 50 aTDC for both TDC in the cycle, the instantaneous volume curve was calculated quantifying only the maximum deformation at firing TDC. This takes into account that the impact of mechanical deformation near the TDC is more significant in the volume change because the volume is the smallest and the deformation is the largest. It is a good approximation to assume that the deformation at the TDC can be scaled with the forces during the rest of the cycle. In the case of this study, these forces come from in-cylinder pressure.
Thus, the instantaneous volume in the model is calculated by Equation (2). It is the sum of the combustion chamber volume (VCC), the volume displaced by the piston (Vd,int) (function of crank angle), and the volume changes caused by the mechanical deformations (Vdef). The first term is a function of CR and Vd,inst is calculated taking into account the engine geometry.
V = V C C + V d , i n s t + Δ V d e f
Mechanical deformation is calculated by means of Equation (3). The constant Kdef is adjusted in order for the model to obtain the same volume deformation at TDC that was measured in the experiments. ∆Vp is the volume variation due to in-cylinder pressure for each crank angle degree.
Δ V d e f = K d e f [ Δ V p ]
Trapped mass, as shown in Equation (4), is considered as the sum of fresh air mass (ma), residual mass (mres) from the previous cycle, and the short circuit mass (mSC) that occurs during the valve overlap event. As above-mentioned, this part will be input data on the model and will be estimated by GT-Power.
m c = m a + m r e s + m S C

2.5.2. GT-Power Model

A 1D model of the optical engine, shown in Figure 5, was developed by using the commercial software GT-Power from Gamma Technologies® (v2016, Gamma Technologies, LLC., Westmont, IL, USA, 2016). For this model, the methodology of three pressure analysis (TPA) was used. Basically, the model requires three measured pressures: intake, cylinder, and exhaust. As a result, the trapped mass (and other thermodynamic conditions at IVC) will be estimated and used as input data in the 0D model, as previously explained. In addition, it is also necessary to set in the model some geometric data for the cylinder, valves, ports, and crank train as well as the average temperature of the intake port and the flow characteristics of the valves [23]. All calculations were done at motored conditions.
The model was adjusted for each condition considered by verifying some of the measured parameters such as the maximum cylinder pressure (pcyl_max) and air mass flow rate ( m ˙ air). The difference between the simulated and measured results was lower than 5%. Furthermore, for every in-cylinder pressure trace, the best fit between the measured and simulated data mainly was calculated in the low pressure (pumping) part of the cycle.

2.5.3. Blow-By Measurement

Another important parameter to be considered is the blow-by leakage. Normally the blow-by in most engines is small [24] and is usually not taken into account during the thermodynamic characterizations [15]. Nevertheless, blow-by in optical engines can be higher than that in metal engines due to crevices as well as piston rings, which are composed of a synthetic material. To measure mbb, an AVL 442 blow-by meter was installed in the optical engine. As the equipment is made to be used in metallic engines, an adaptation was necessary. A cylinder made from PVC, which is detailed in Figure 6, was perfectly fitted between the cylinder line and the bottom flange with only one access to the blow-by meter. The cylinder was attached to the seals perfectly to avoid any leakage. The measured quantity of blow-by in these tests was found to be lower than the detection threshold of the equipment. In this way, for the calculations in the model, the blow-by was considered zero.

3. Results and Discussion

This section is divided into three subsections. The first one presents and discusses the results related to the mechanical deformation measurements and processing. The second part presents the results of the trapped mass estimated by GT-Power and the comparison between the simulated and measured parameters, which were used to adjust the model. The last part shows the final results of the characterization imposing the results of the previous steps in the 0D model.

3.1. Mechanical Deformations Due to Gas Pressures

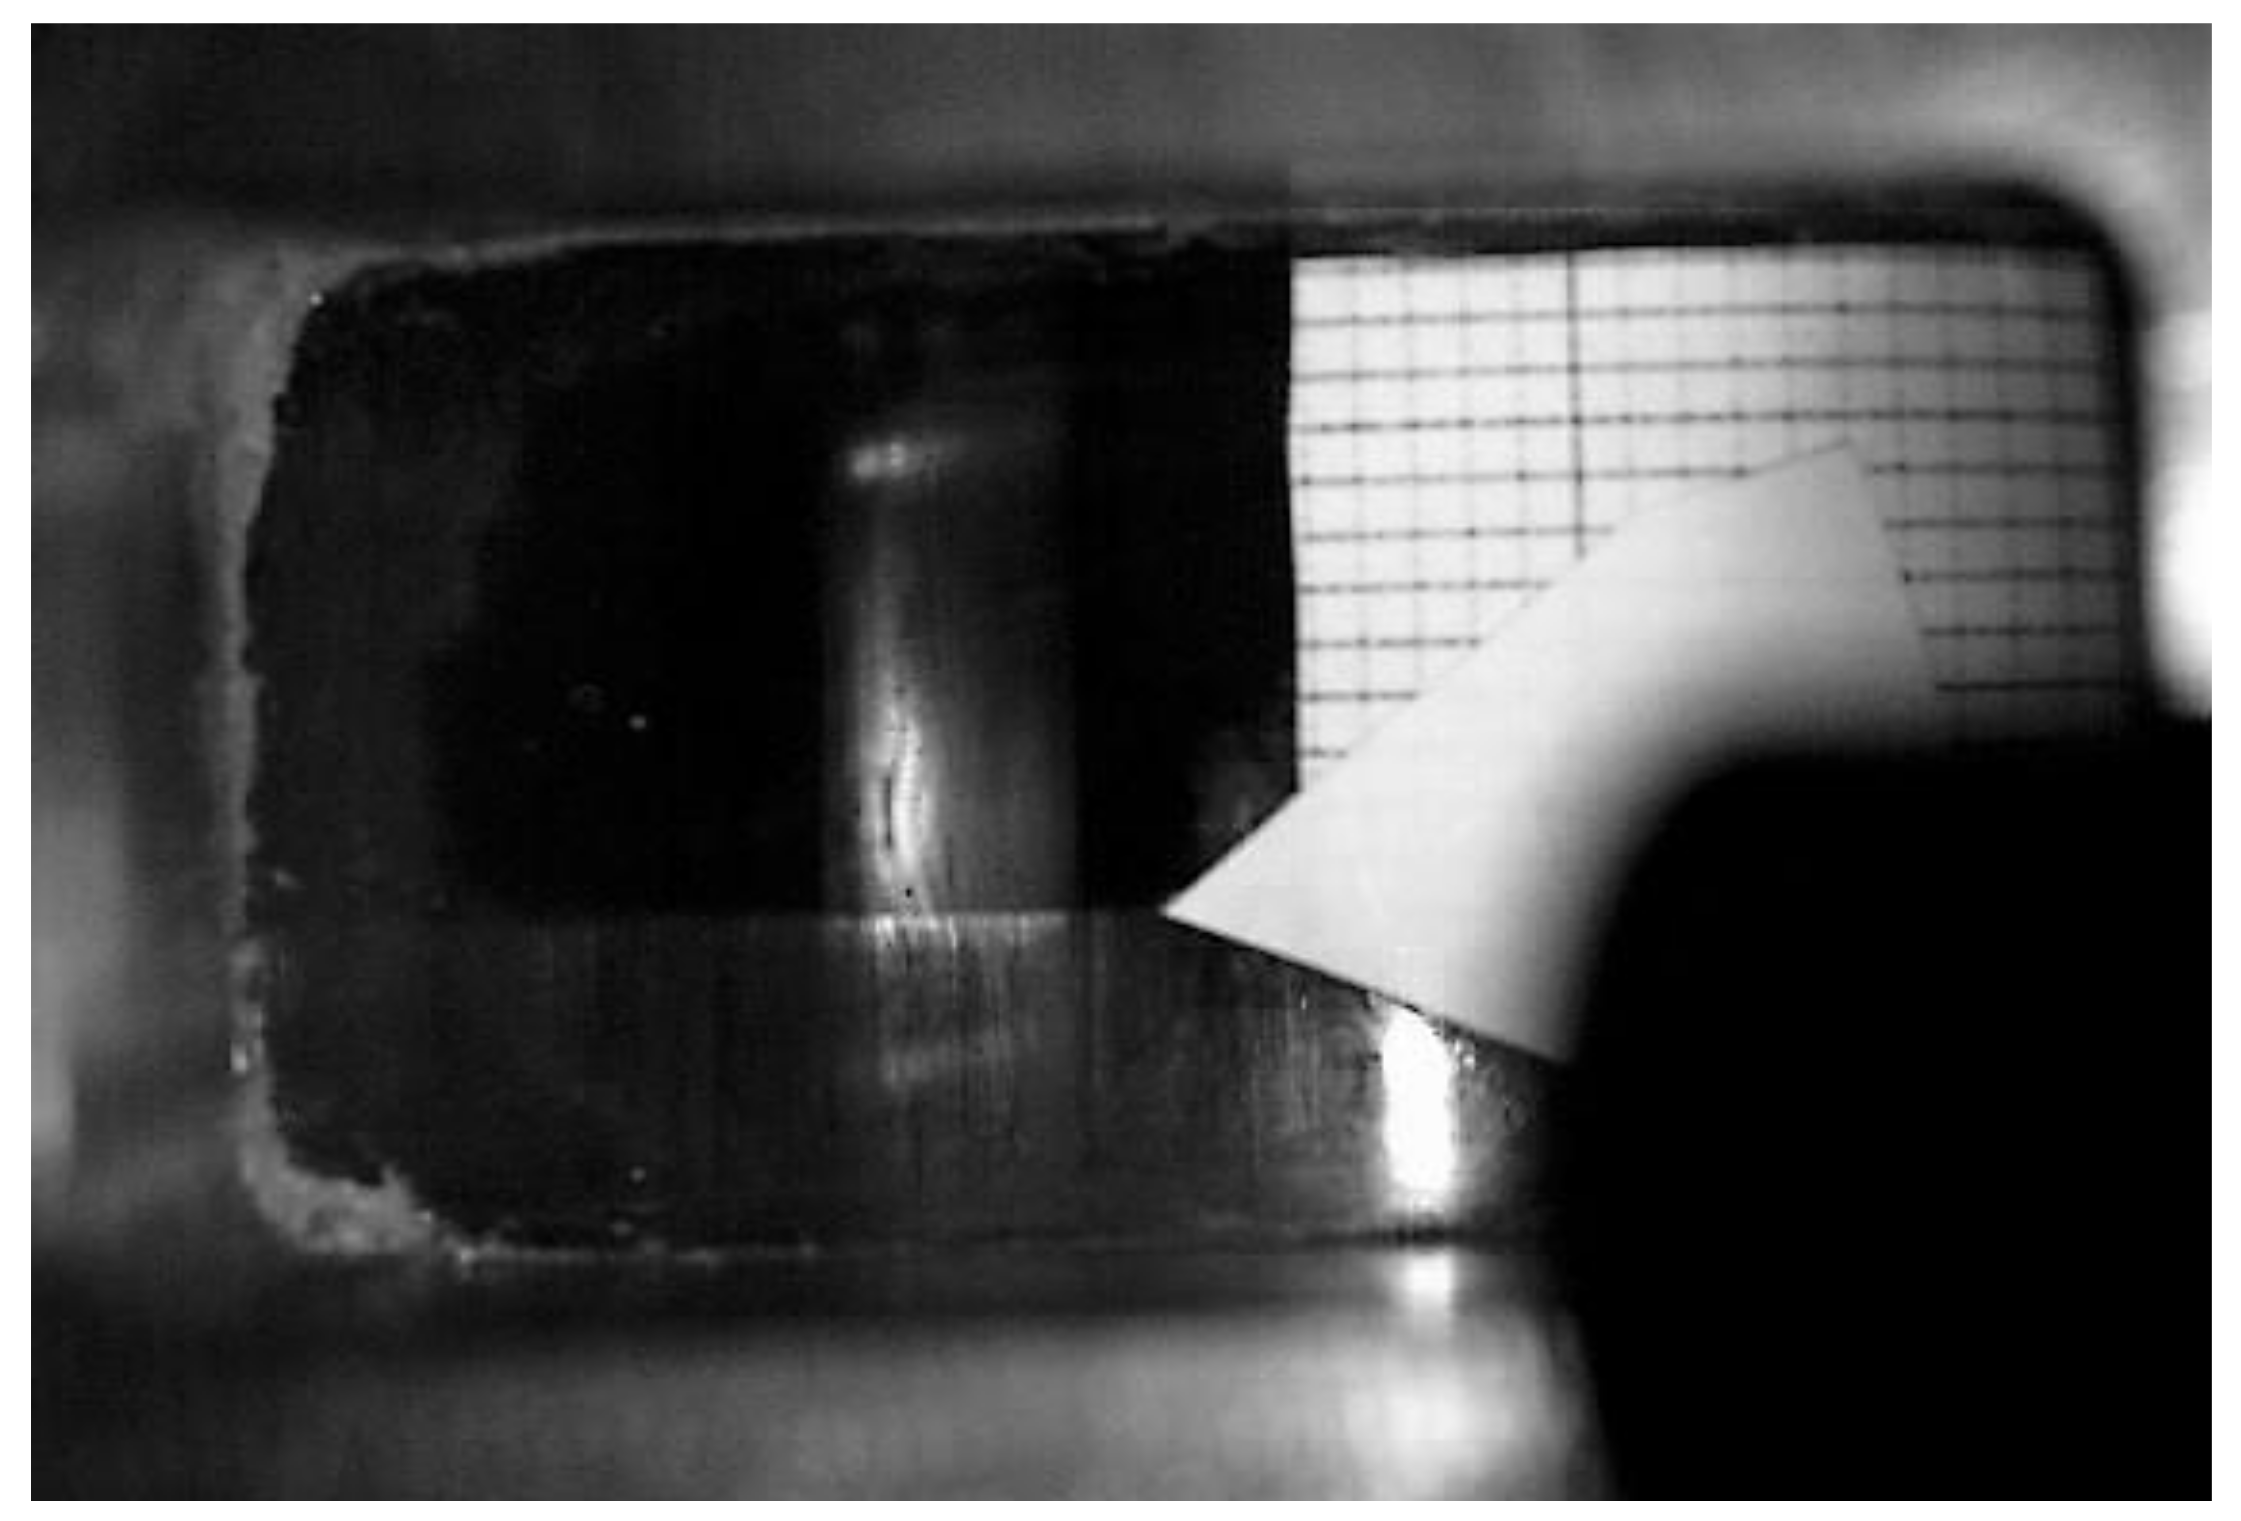
First, a piston displacement curve was measured. For that purpose, a fixed reference is taken, which for this case, was the white paper shown in Figure 7. This reference was considered as the zero position of the piston and this is the first frame of the processing. From this frame to the next one, the piston displacement was calculated by the PIV methodology [25] through a correlation function. In this way, the displacement curve was developed frame by frame until the piston returned to the initial reference point.
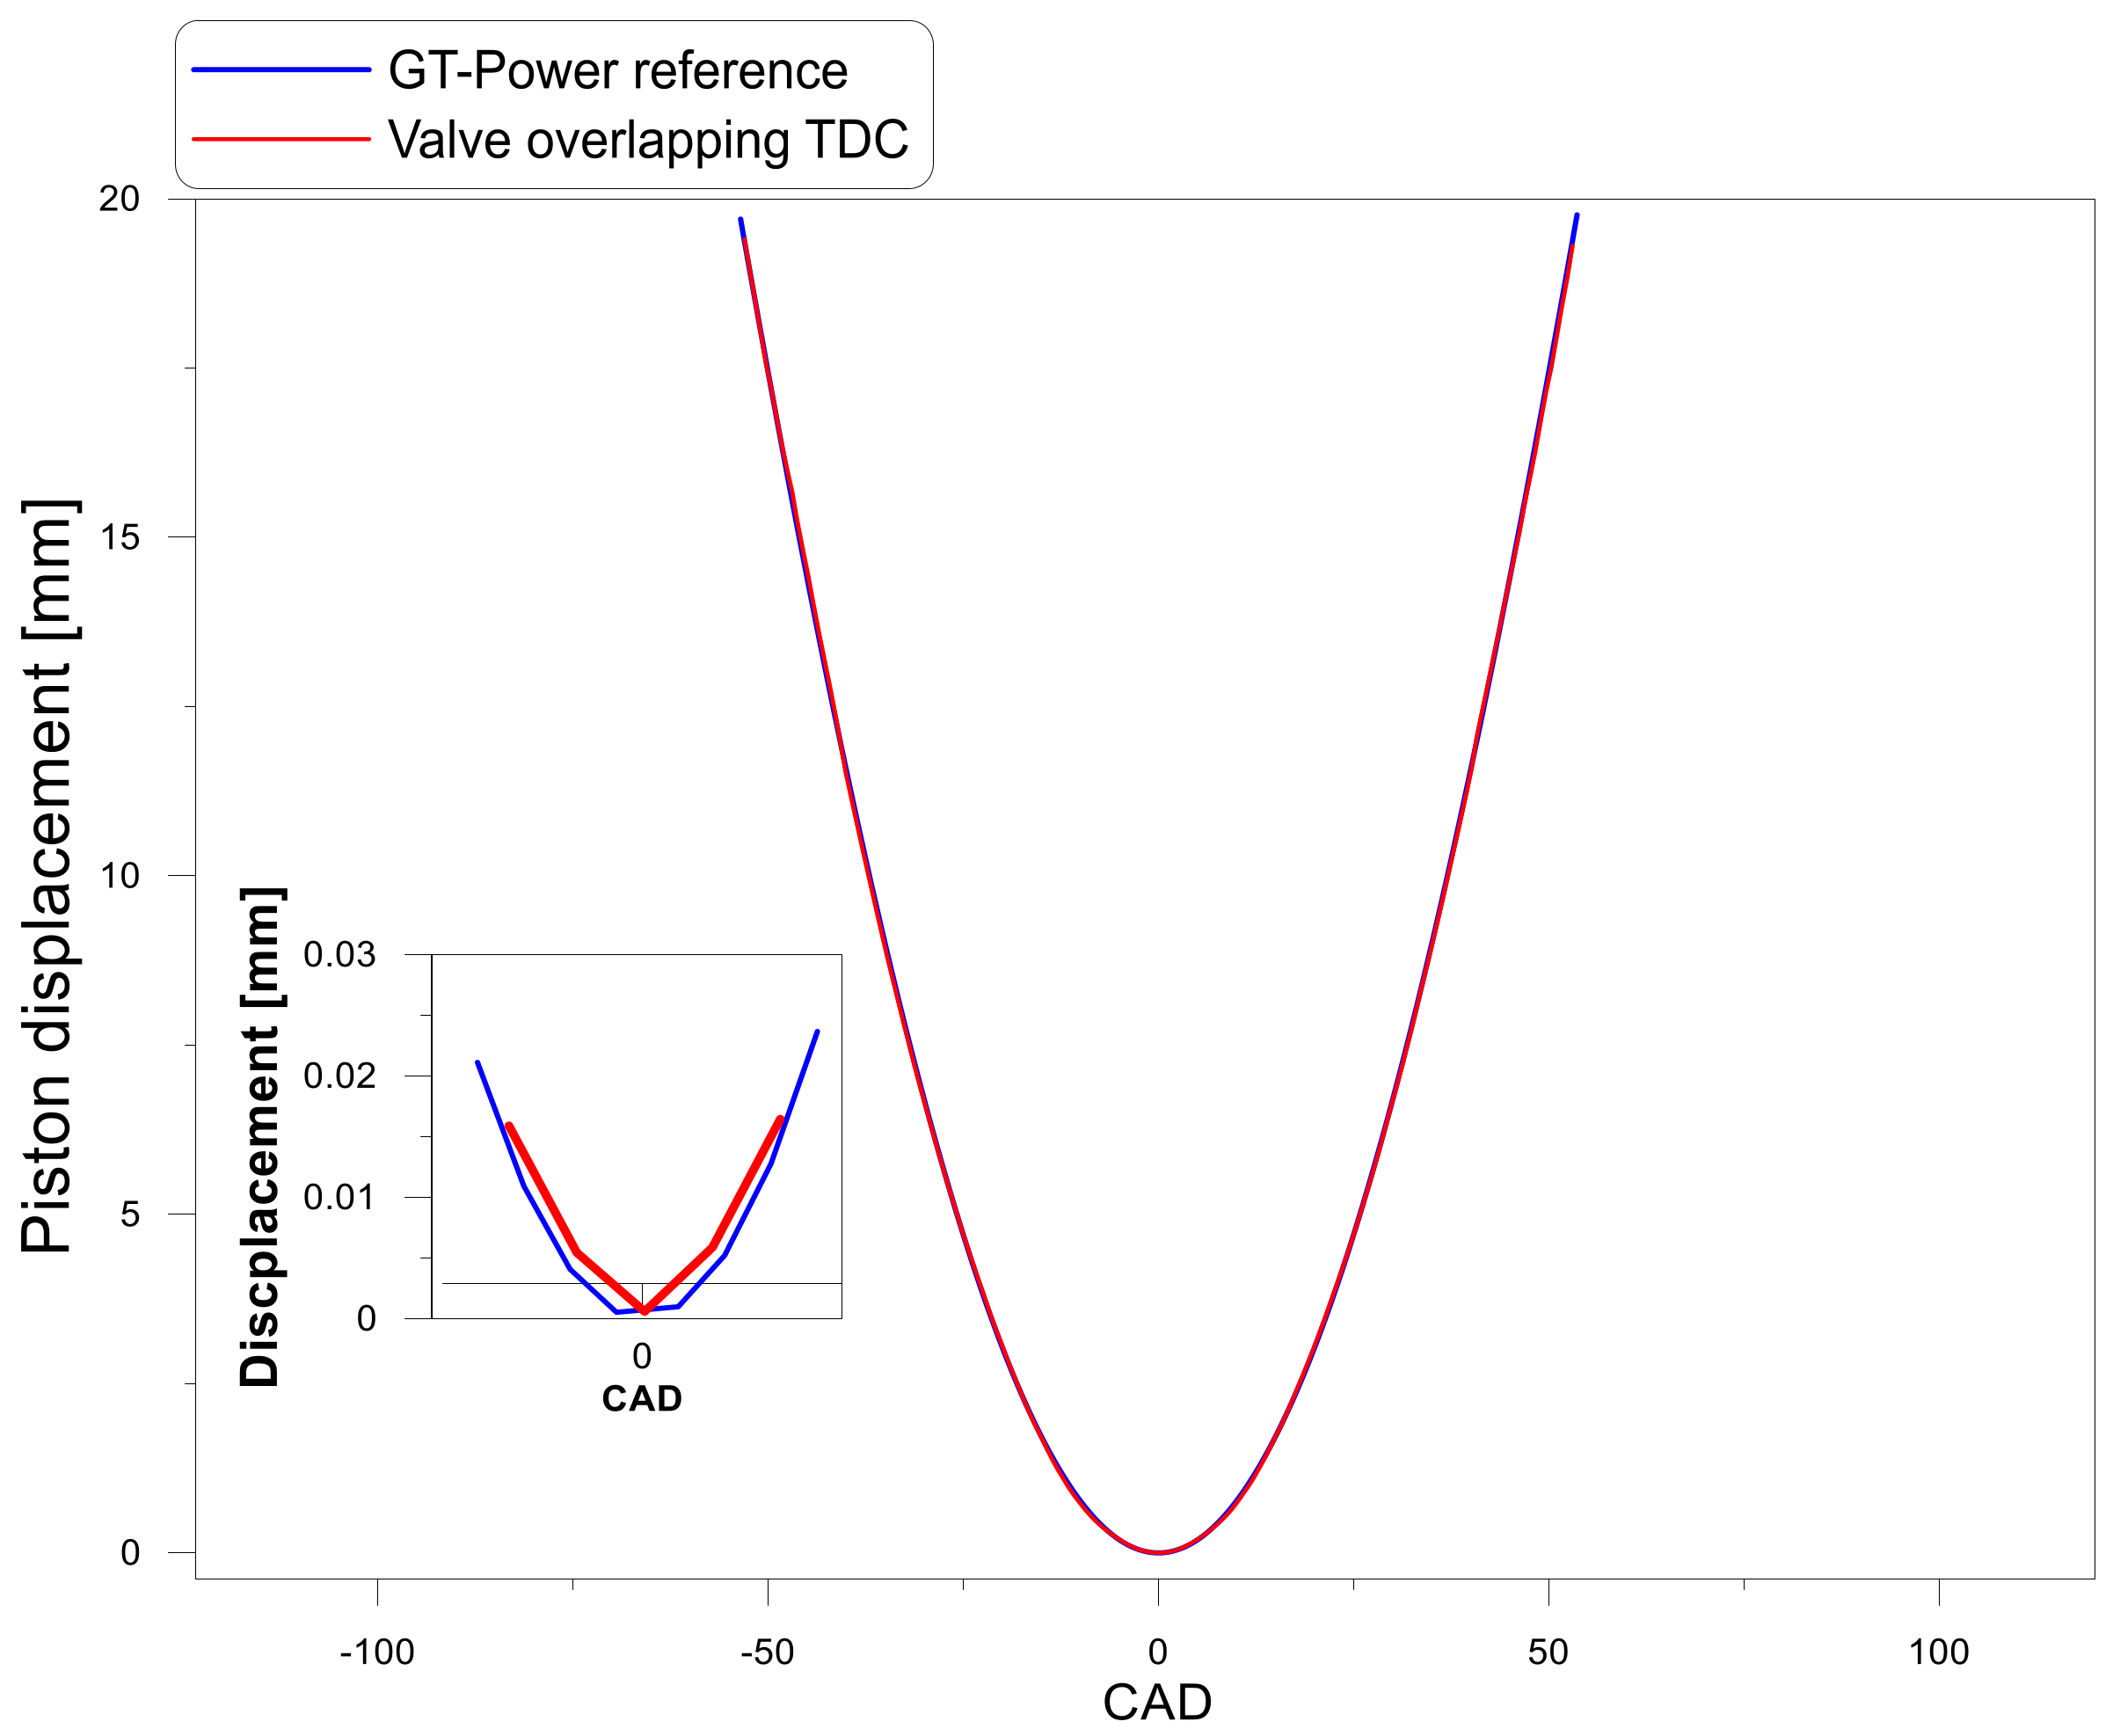
To verify that the measured piston position was correct, a comparison was performed between the measured trace at valve overlap TDC and the calculated trace from GT-Power. We used a correction factor of 11% to the measured displacement curve because the grid paper and piston were in different planes, inducing a perspective error in the transformation from pixels to millimeters. In Figure 8, a good fit can be seen between the piston displacement trace calculated from GT-Power (without deformation) and the measured one at valve overlap TCD (which was used during the study as the reference without deformation.)
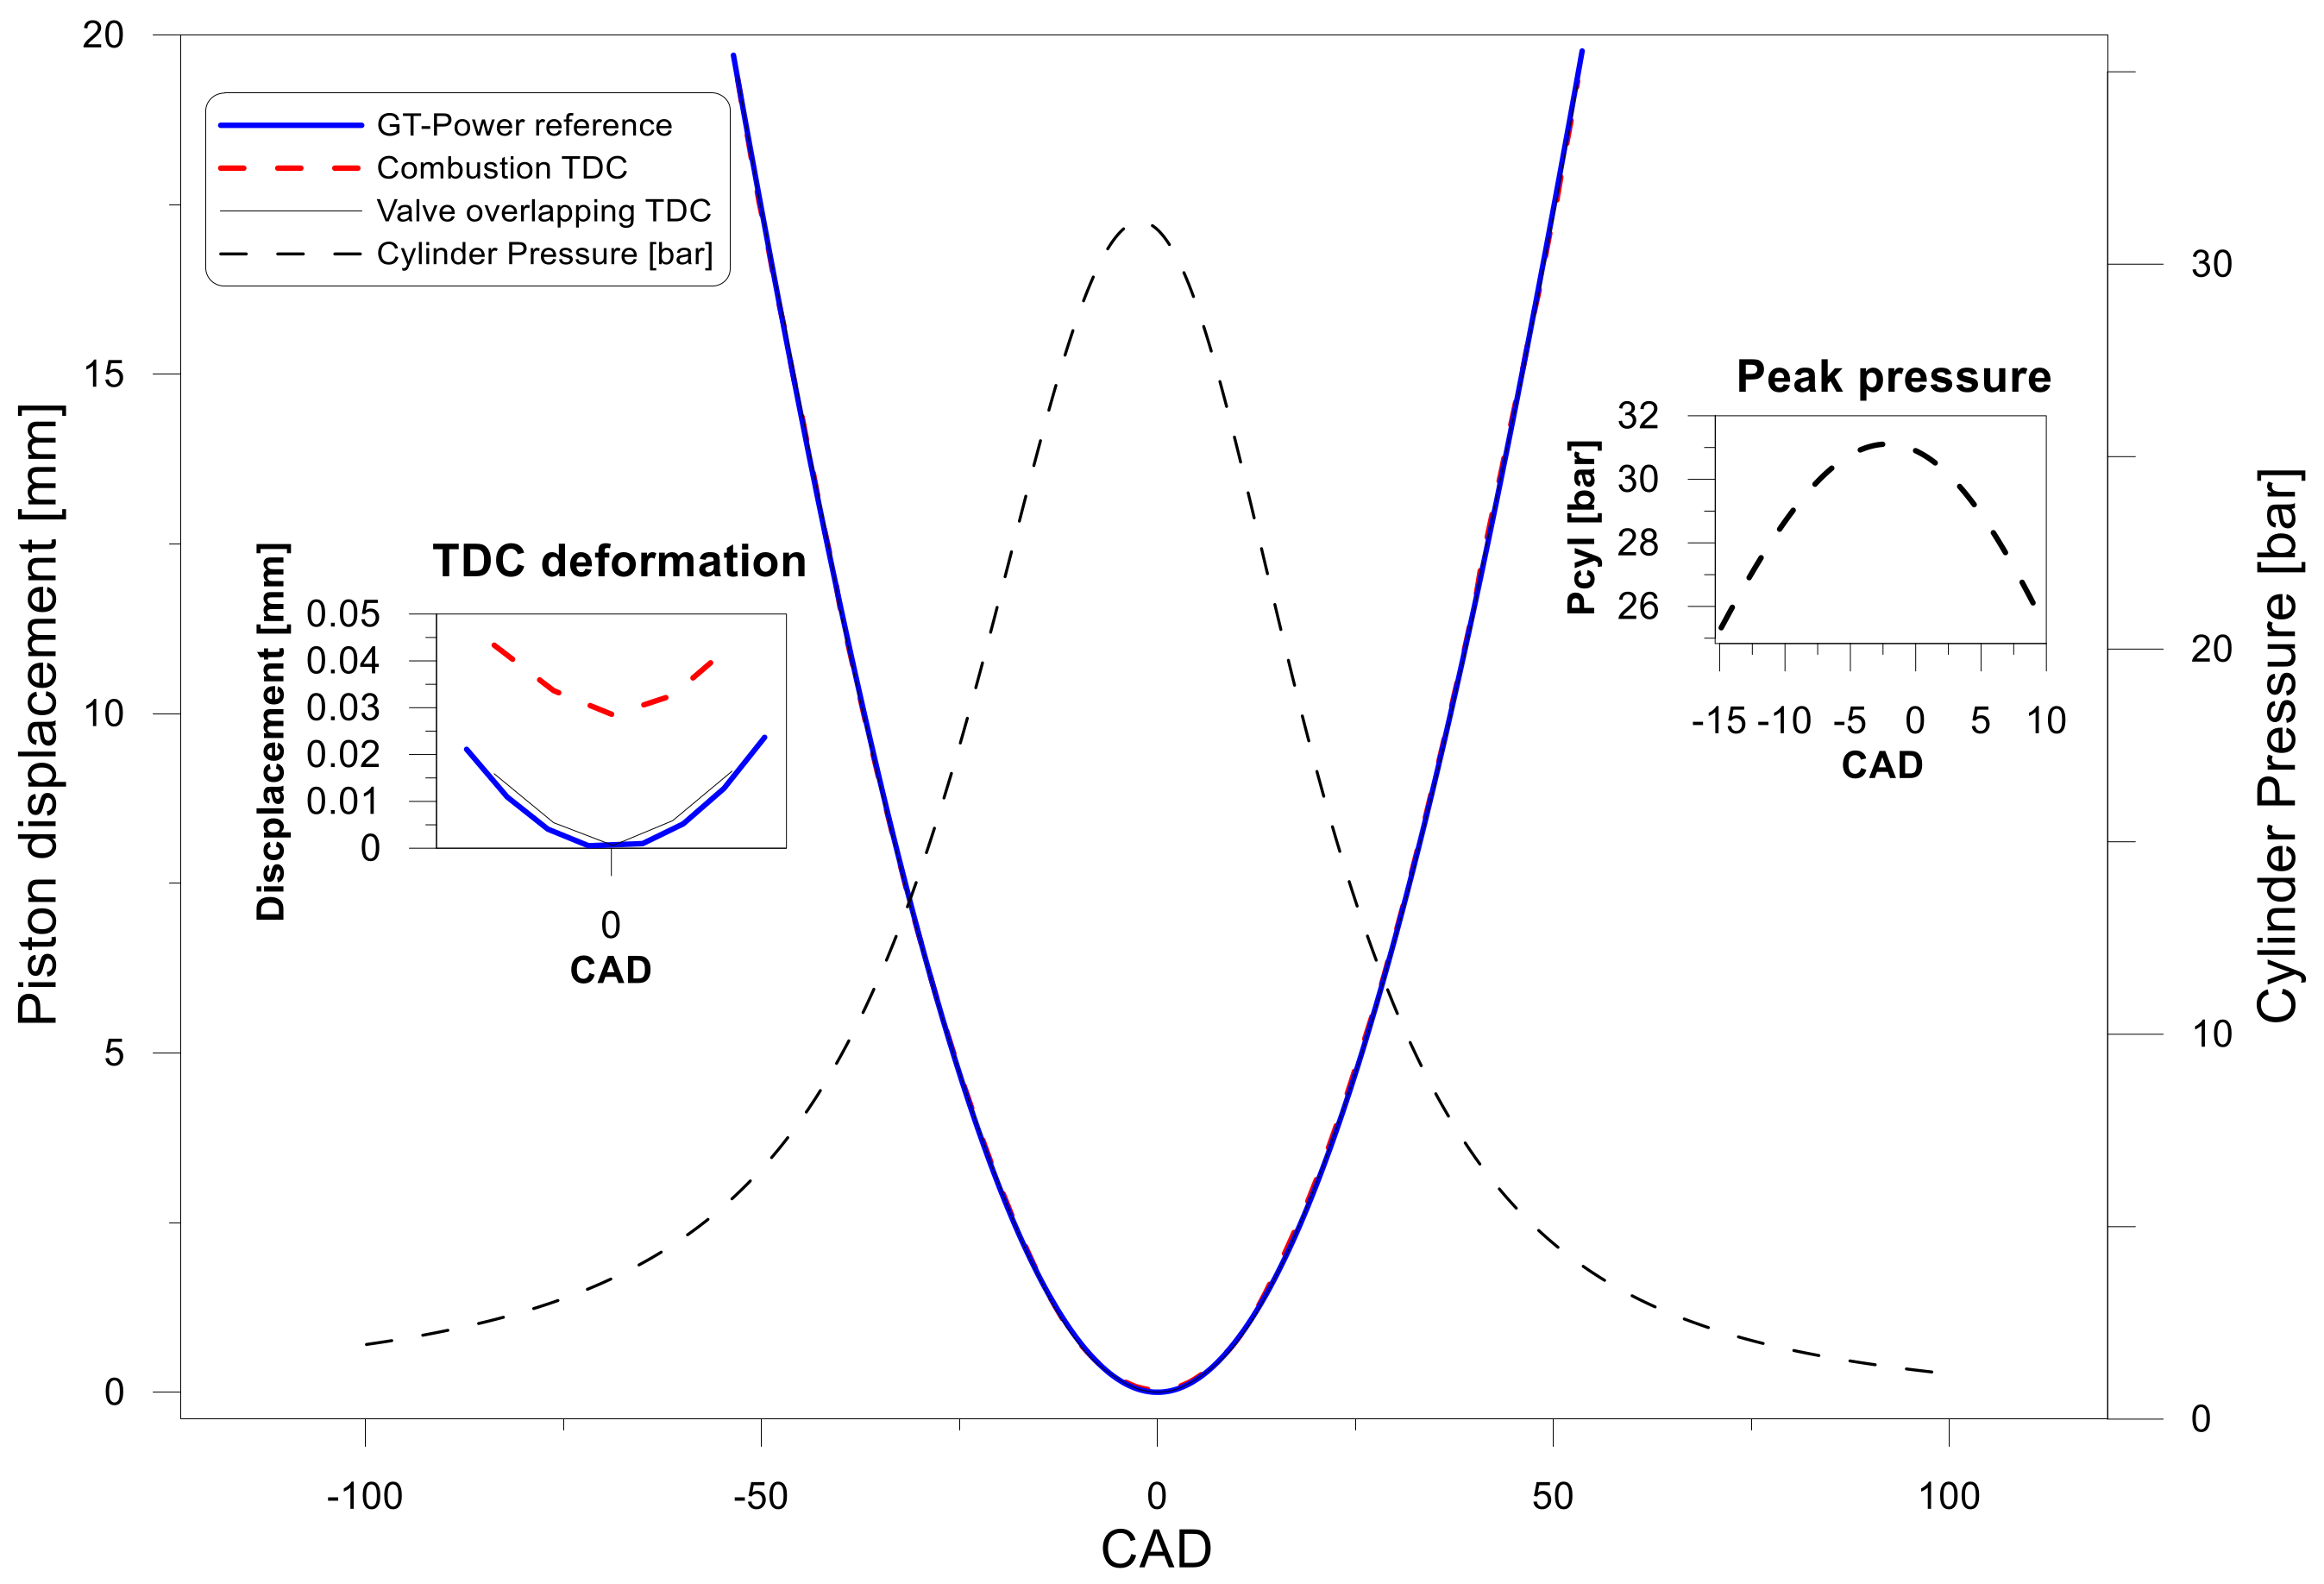
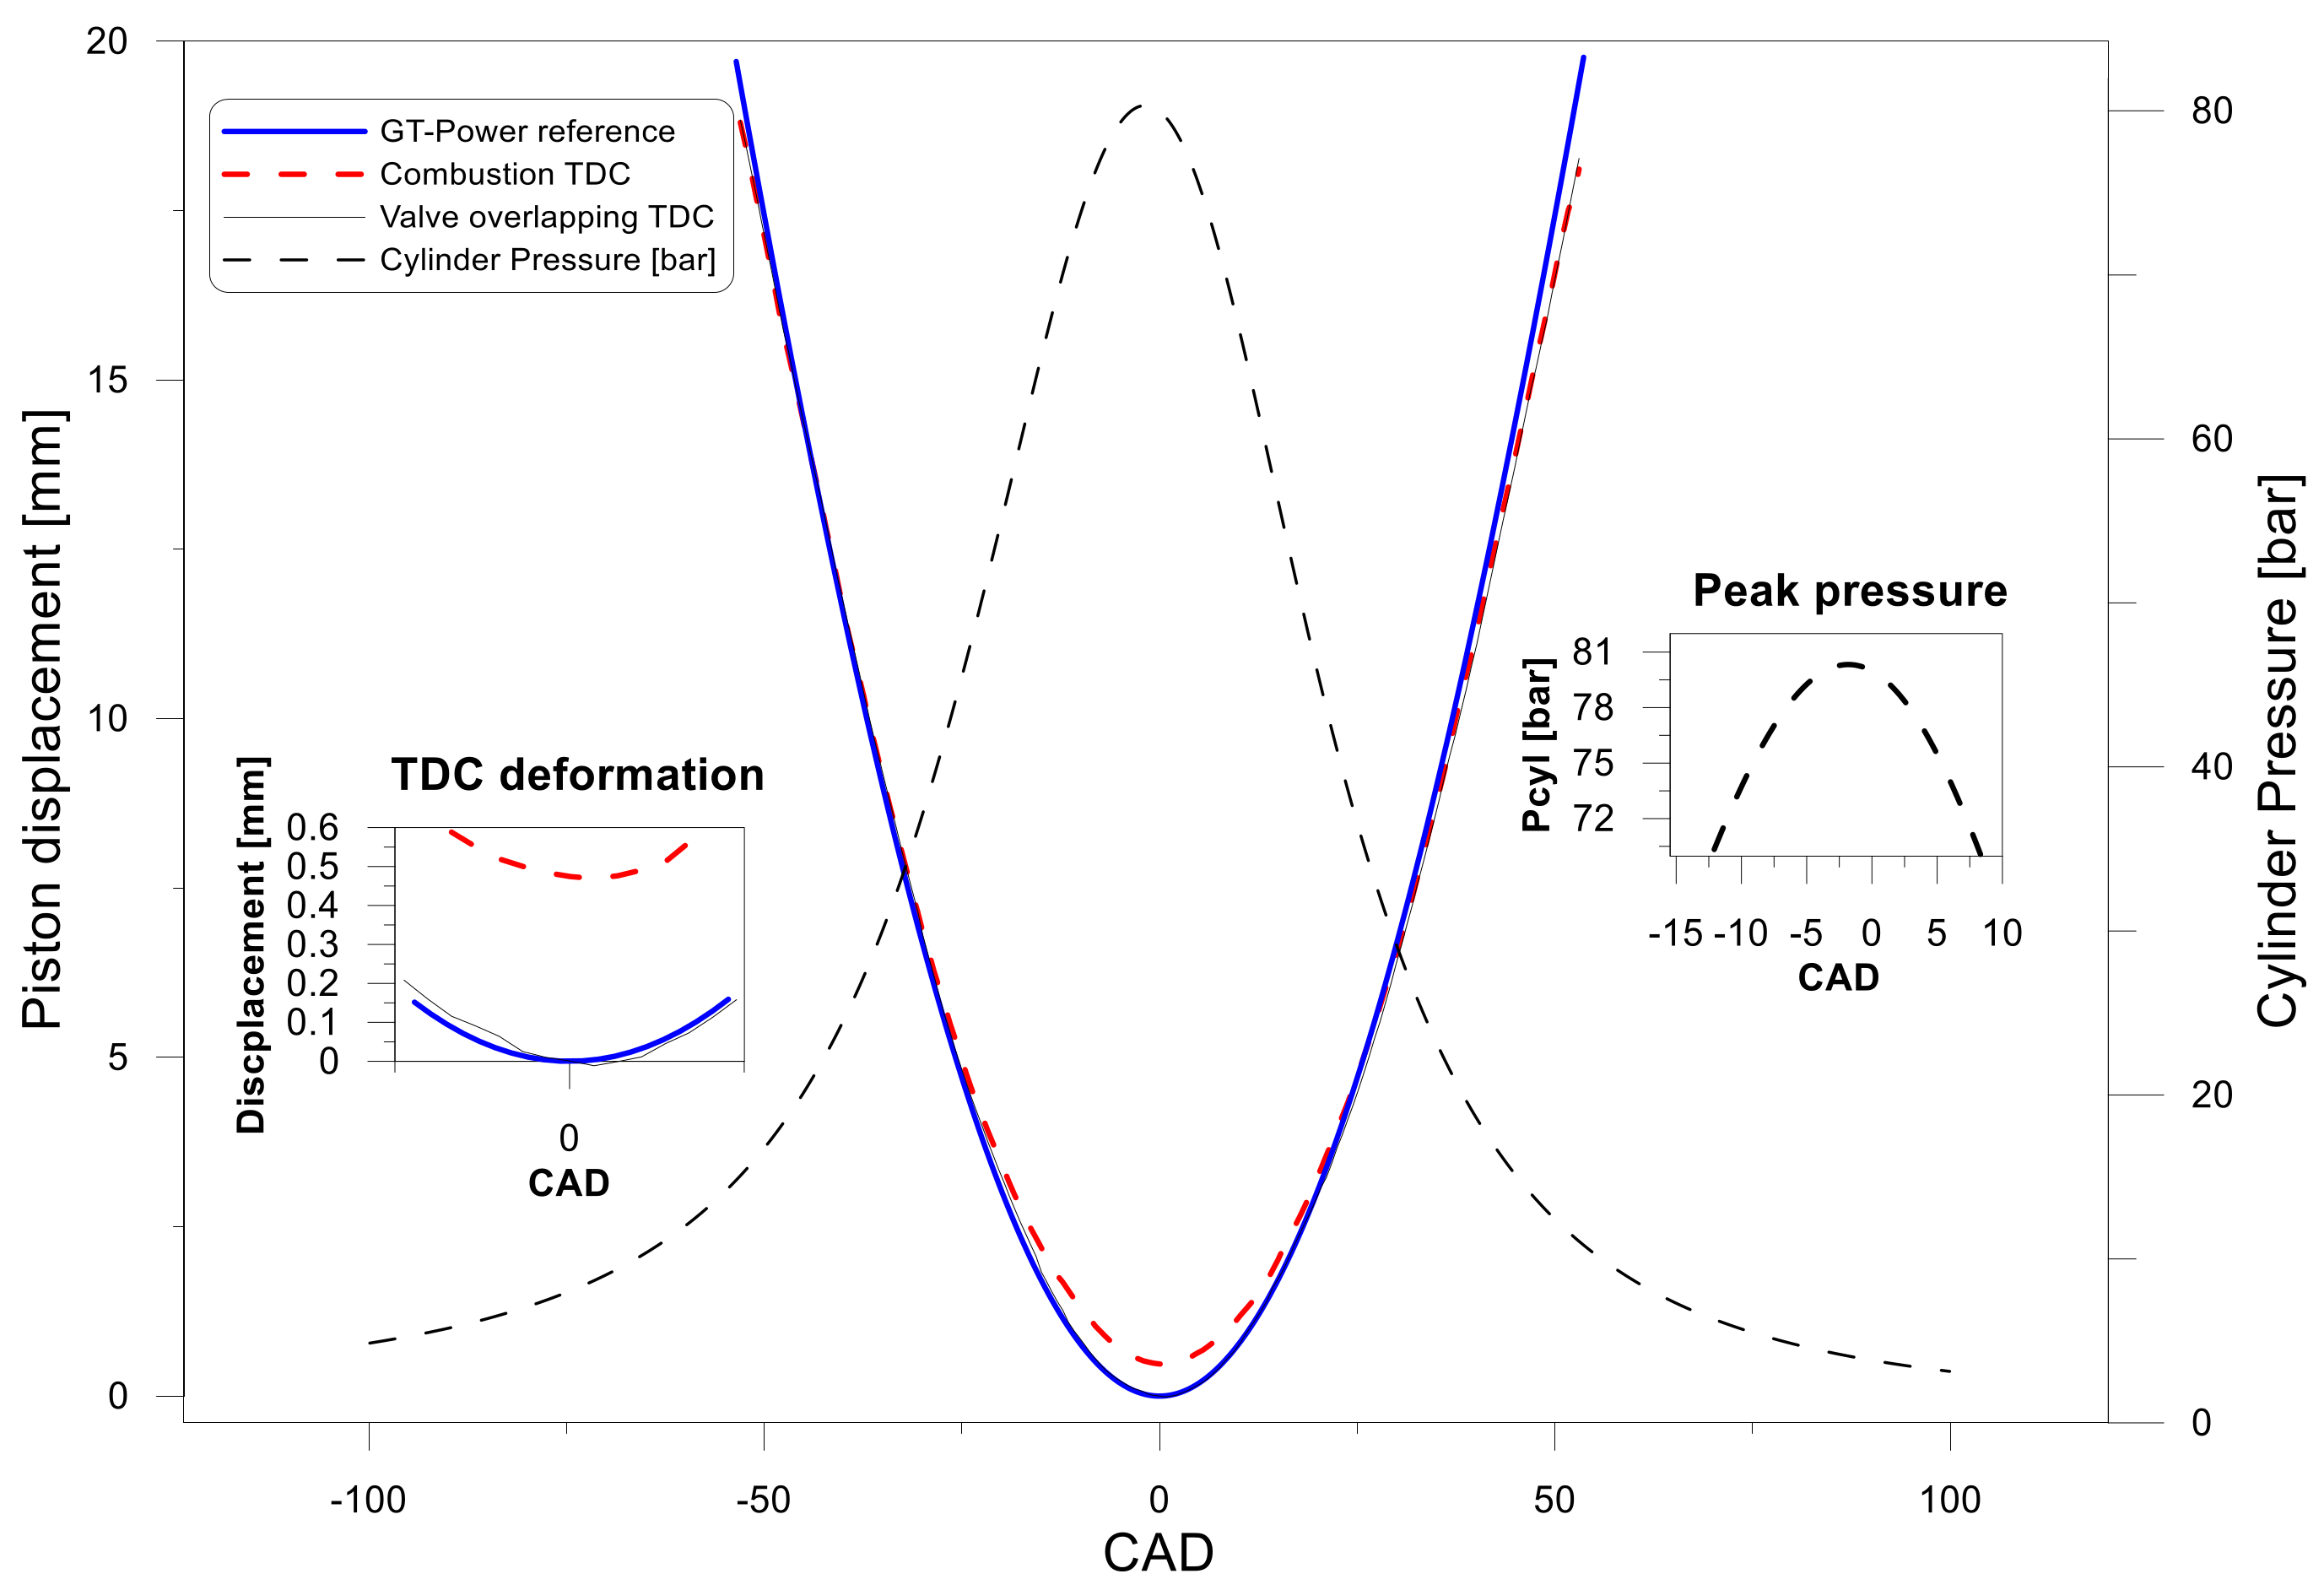
The same correction factor was used in the piston displacement at firing TDC. Figure 9 shows that the deformation occurred at 1.1 bar of intake pressure. The maximum in-cylinder pressure was 31 bar and the deformation found at TDC was less than 0.03 mm. It can be seen that for this engine condition, the mechanical deformation was negligible, and the in-cylinder volume was not significantly affected. On the other hand, Figure 10 shows the deformation at 2.7 bar. For this case, the maximum in-cylinder pressure was 80 bar and the maximum deformation at TDC was 0.5 mm. It is possible to note that as the cylinder pressure increases, the deformation becomes significant. It is important to take into account that a deformation of 0.5 mm is enough to induce an error in the instantaneous volume trace of around 8% and consequently in the heat release rate and thermodynamic characterization. Considering that deformation increases linearly with pressure, as proven by Aronsson et al. [17], it is possible to develop a linear function where deformation is directly dependent on cylinder pressure as presented earlier in Equation (3).

3.2. Trapped Mass Estimation

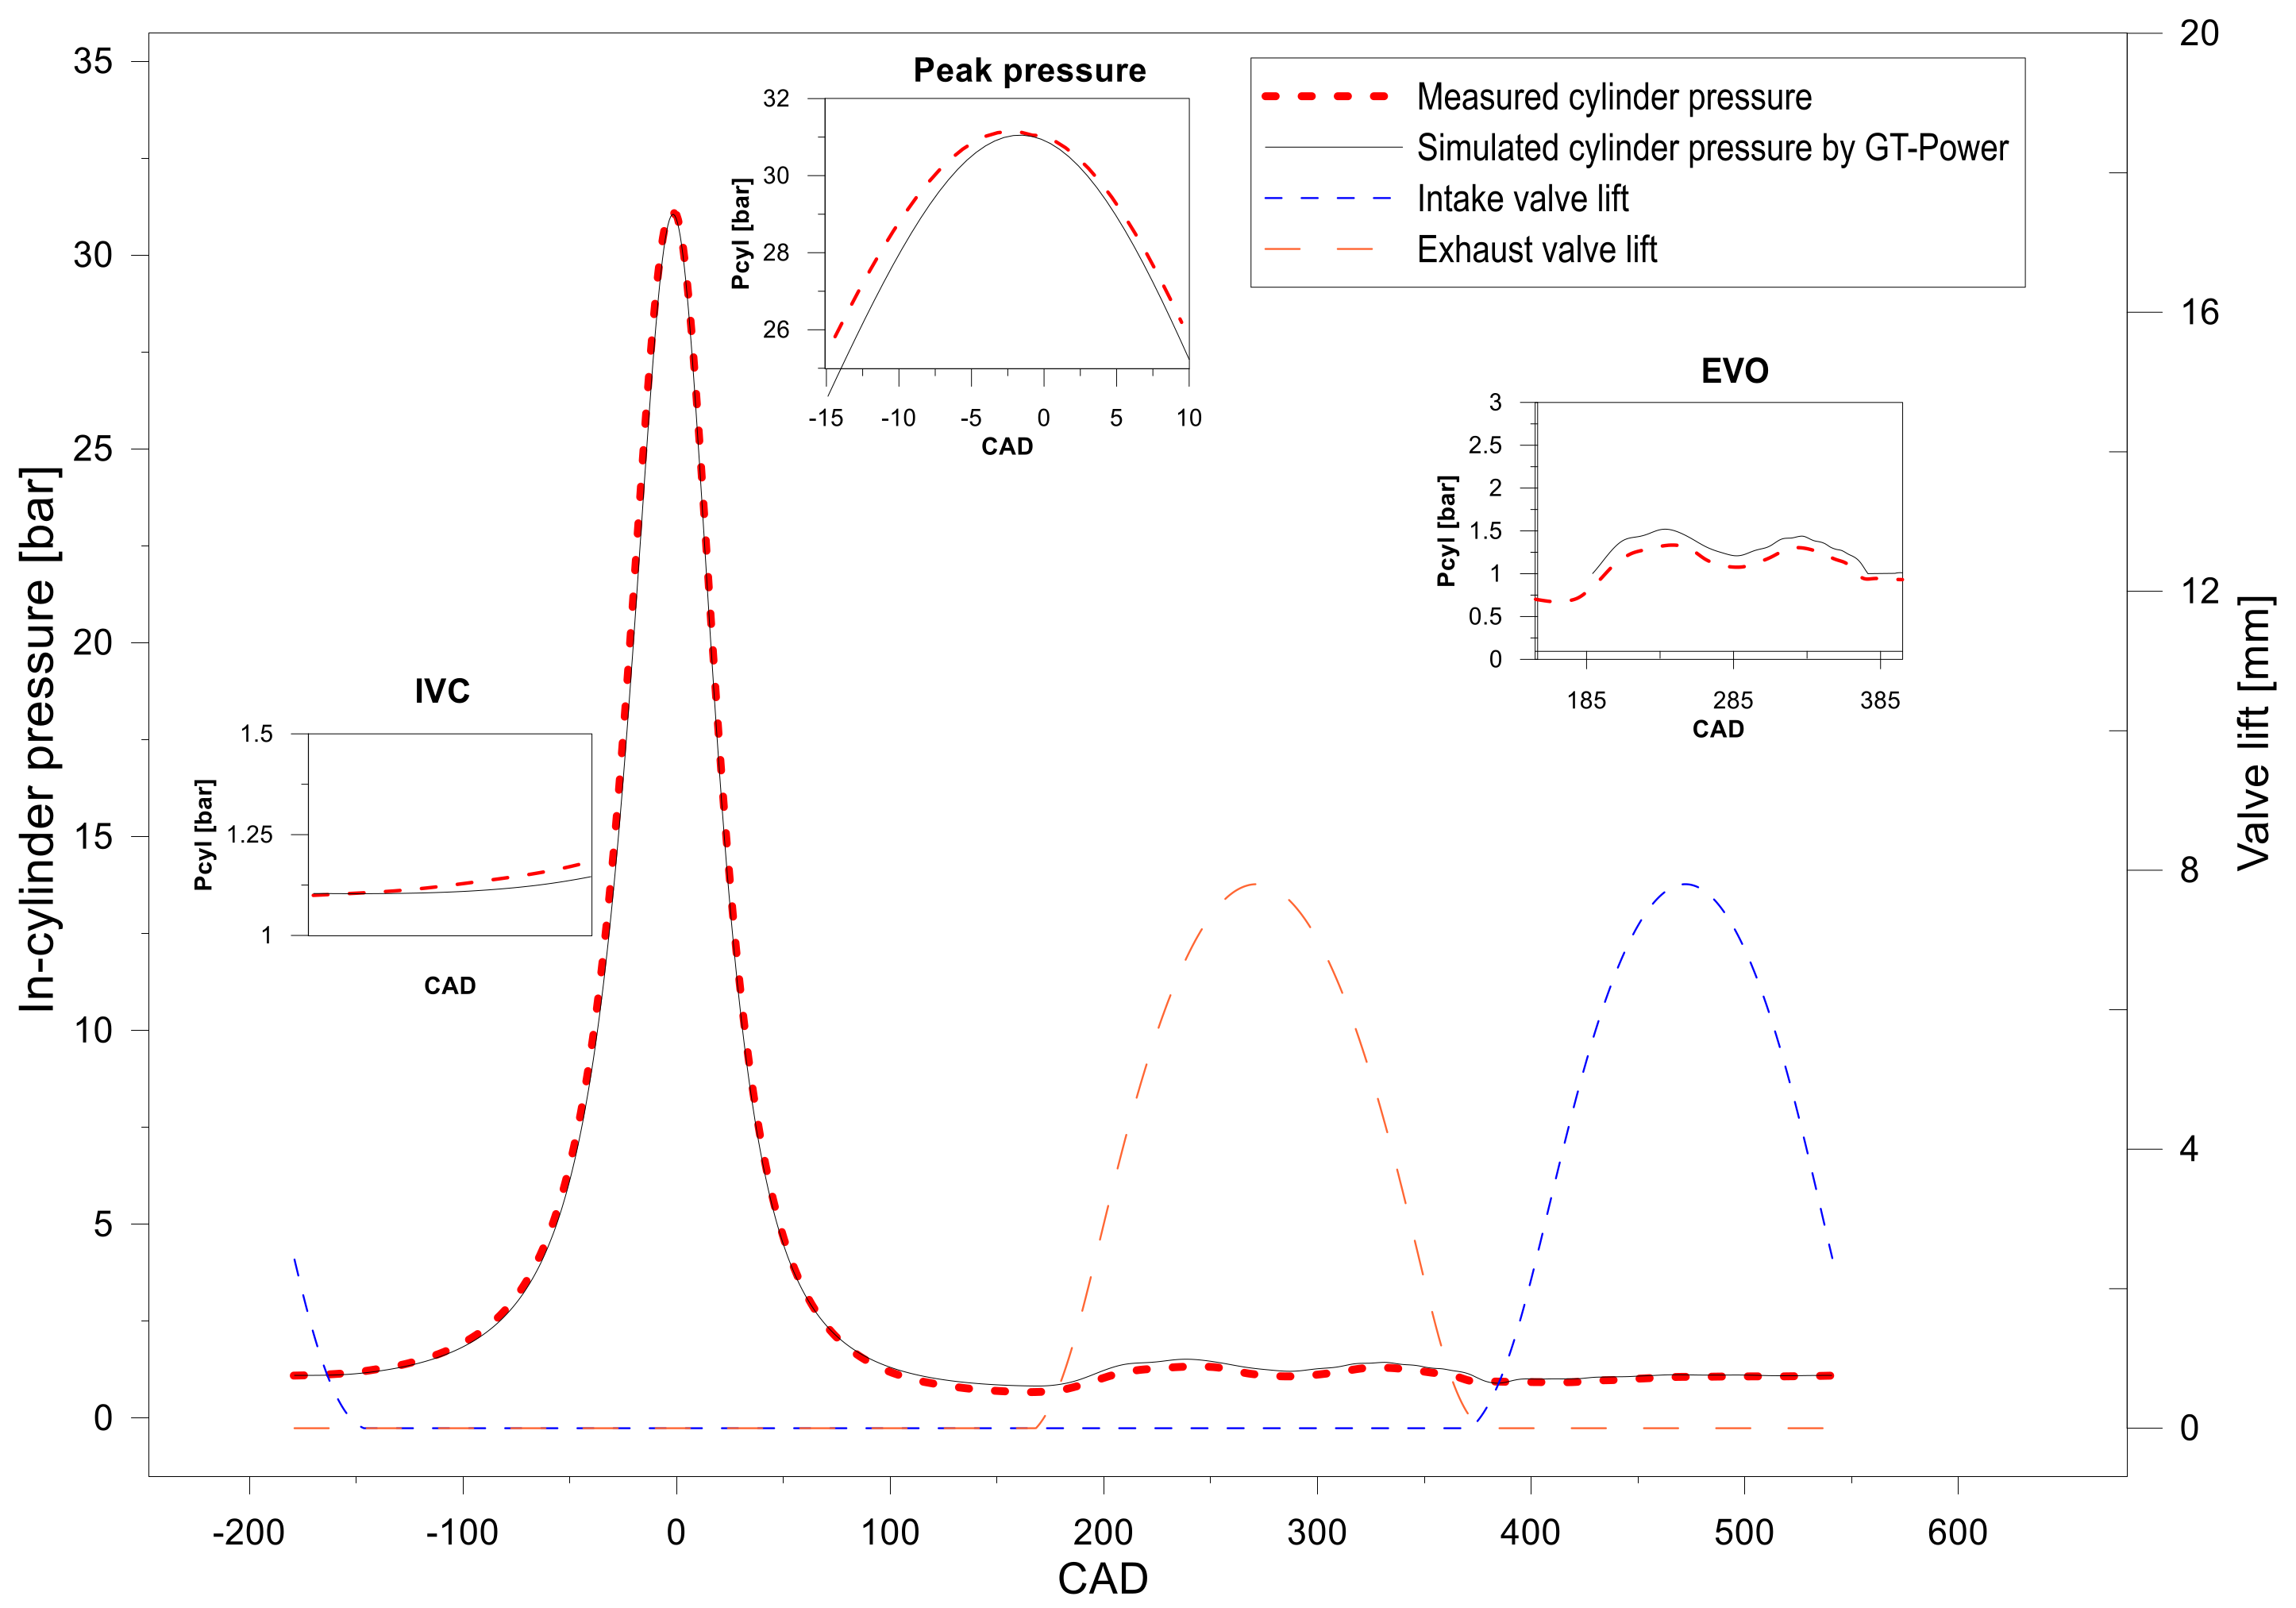
The second characterization step was to estimate the trapped mass at IVC. For this purpose, as previously stated, a model was developed in GT-Power. For each operating condition, the model was adjusted by considering measured parameters such as intake and exhaust temperatures, air mass flow, and maximum in-cylinder pressure. Compression ratio, valve timing, and the heat transfer coefficient were refined in an iterative process to obtain the optimum adjustment between the simulated and measured in-cylinder pressure as well as air mass flow. Special attention was paid to the pumping loop in the cycle, which is extremely important to guarantee good estimation of the trapped mass. For this purpose, it is very important to have an accurate valve timing and valve profile as well as intake and exhaust pressures and intake air temperature. Figure 11 shows a comparison between the simulated and measured in-cylinder pressure trace. It can be seen that the model was capable of capturing, with good agreement, the behavior in the low-pressure part of the cycle. In addition, the pressure in the closed cycle (compression and expansion) was also well predicted by the model.
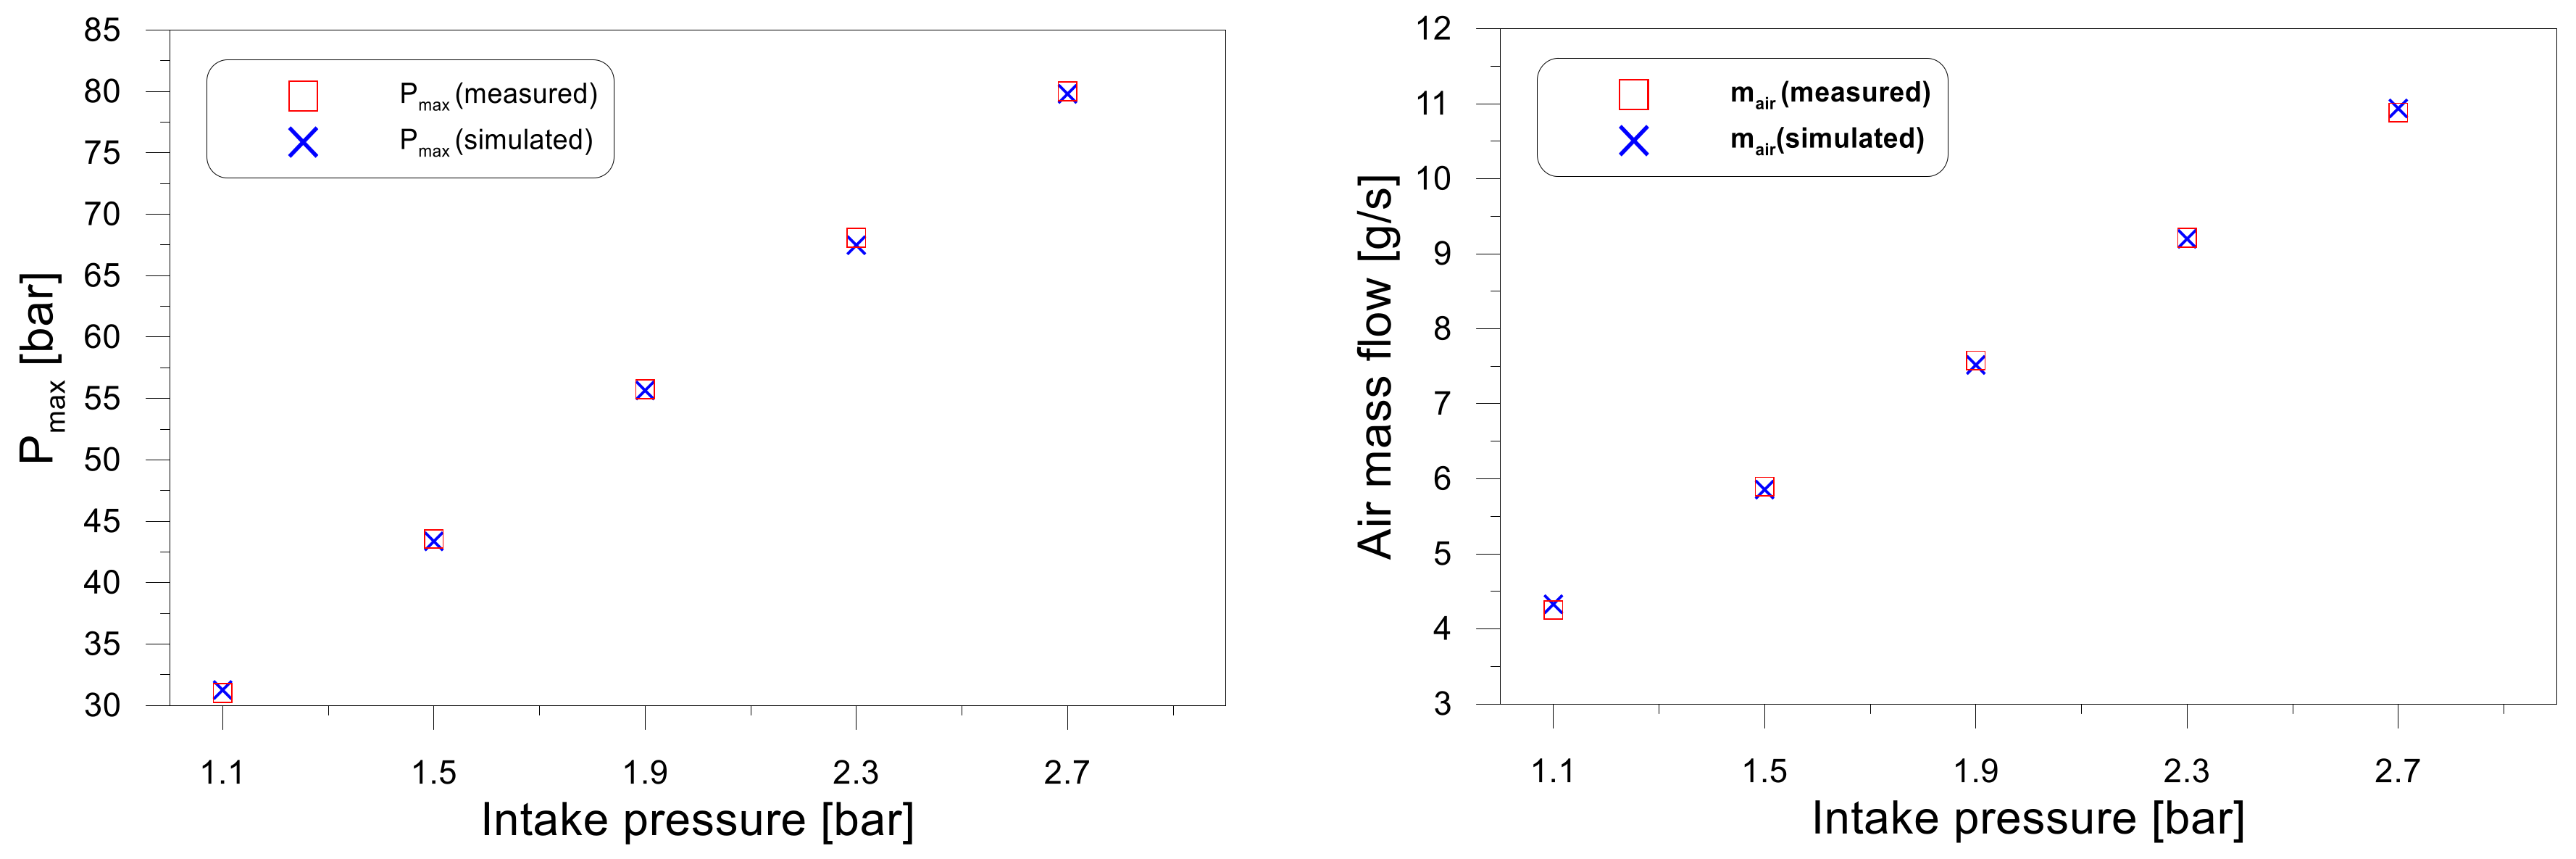
Figure 12 shows the comparison between the measured and simulated peak pressure and air mass flow used to verify the reliability of the model. The largest difference for the air mass flow was 2% and was less than 1% for the maximum cylinder pressure. These comparisons confirmed the prediction capability of the model. In this way, the main objective of this step could finally be achieved by obtaining the in-cylinder trapped mass for each engine condition, which are presented in Table 4. These values were used as input in the next step of the characterization.

3.3. 0D Thermodynamic Analysis

The last part of the characterization consisted of using the results obtained in the previous steps as input for the final 0D model in order to obtain the uncertain parameters (CR, CW1) and the information regarding the gas thermodynamic conditions. The methodology applied in the model aimed at simultaneously finding the uncertainties by applying two criteria at the same time: the minimum residual heat release rate as well as the minimum difference between the real and simulated in-cylinder pressure.
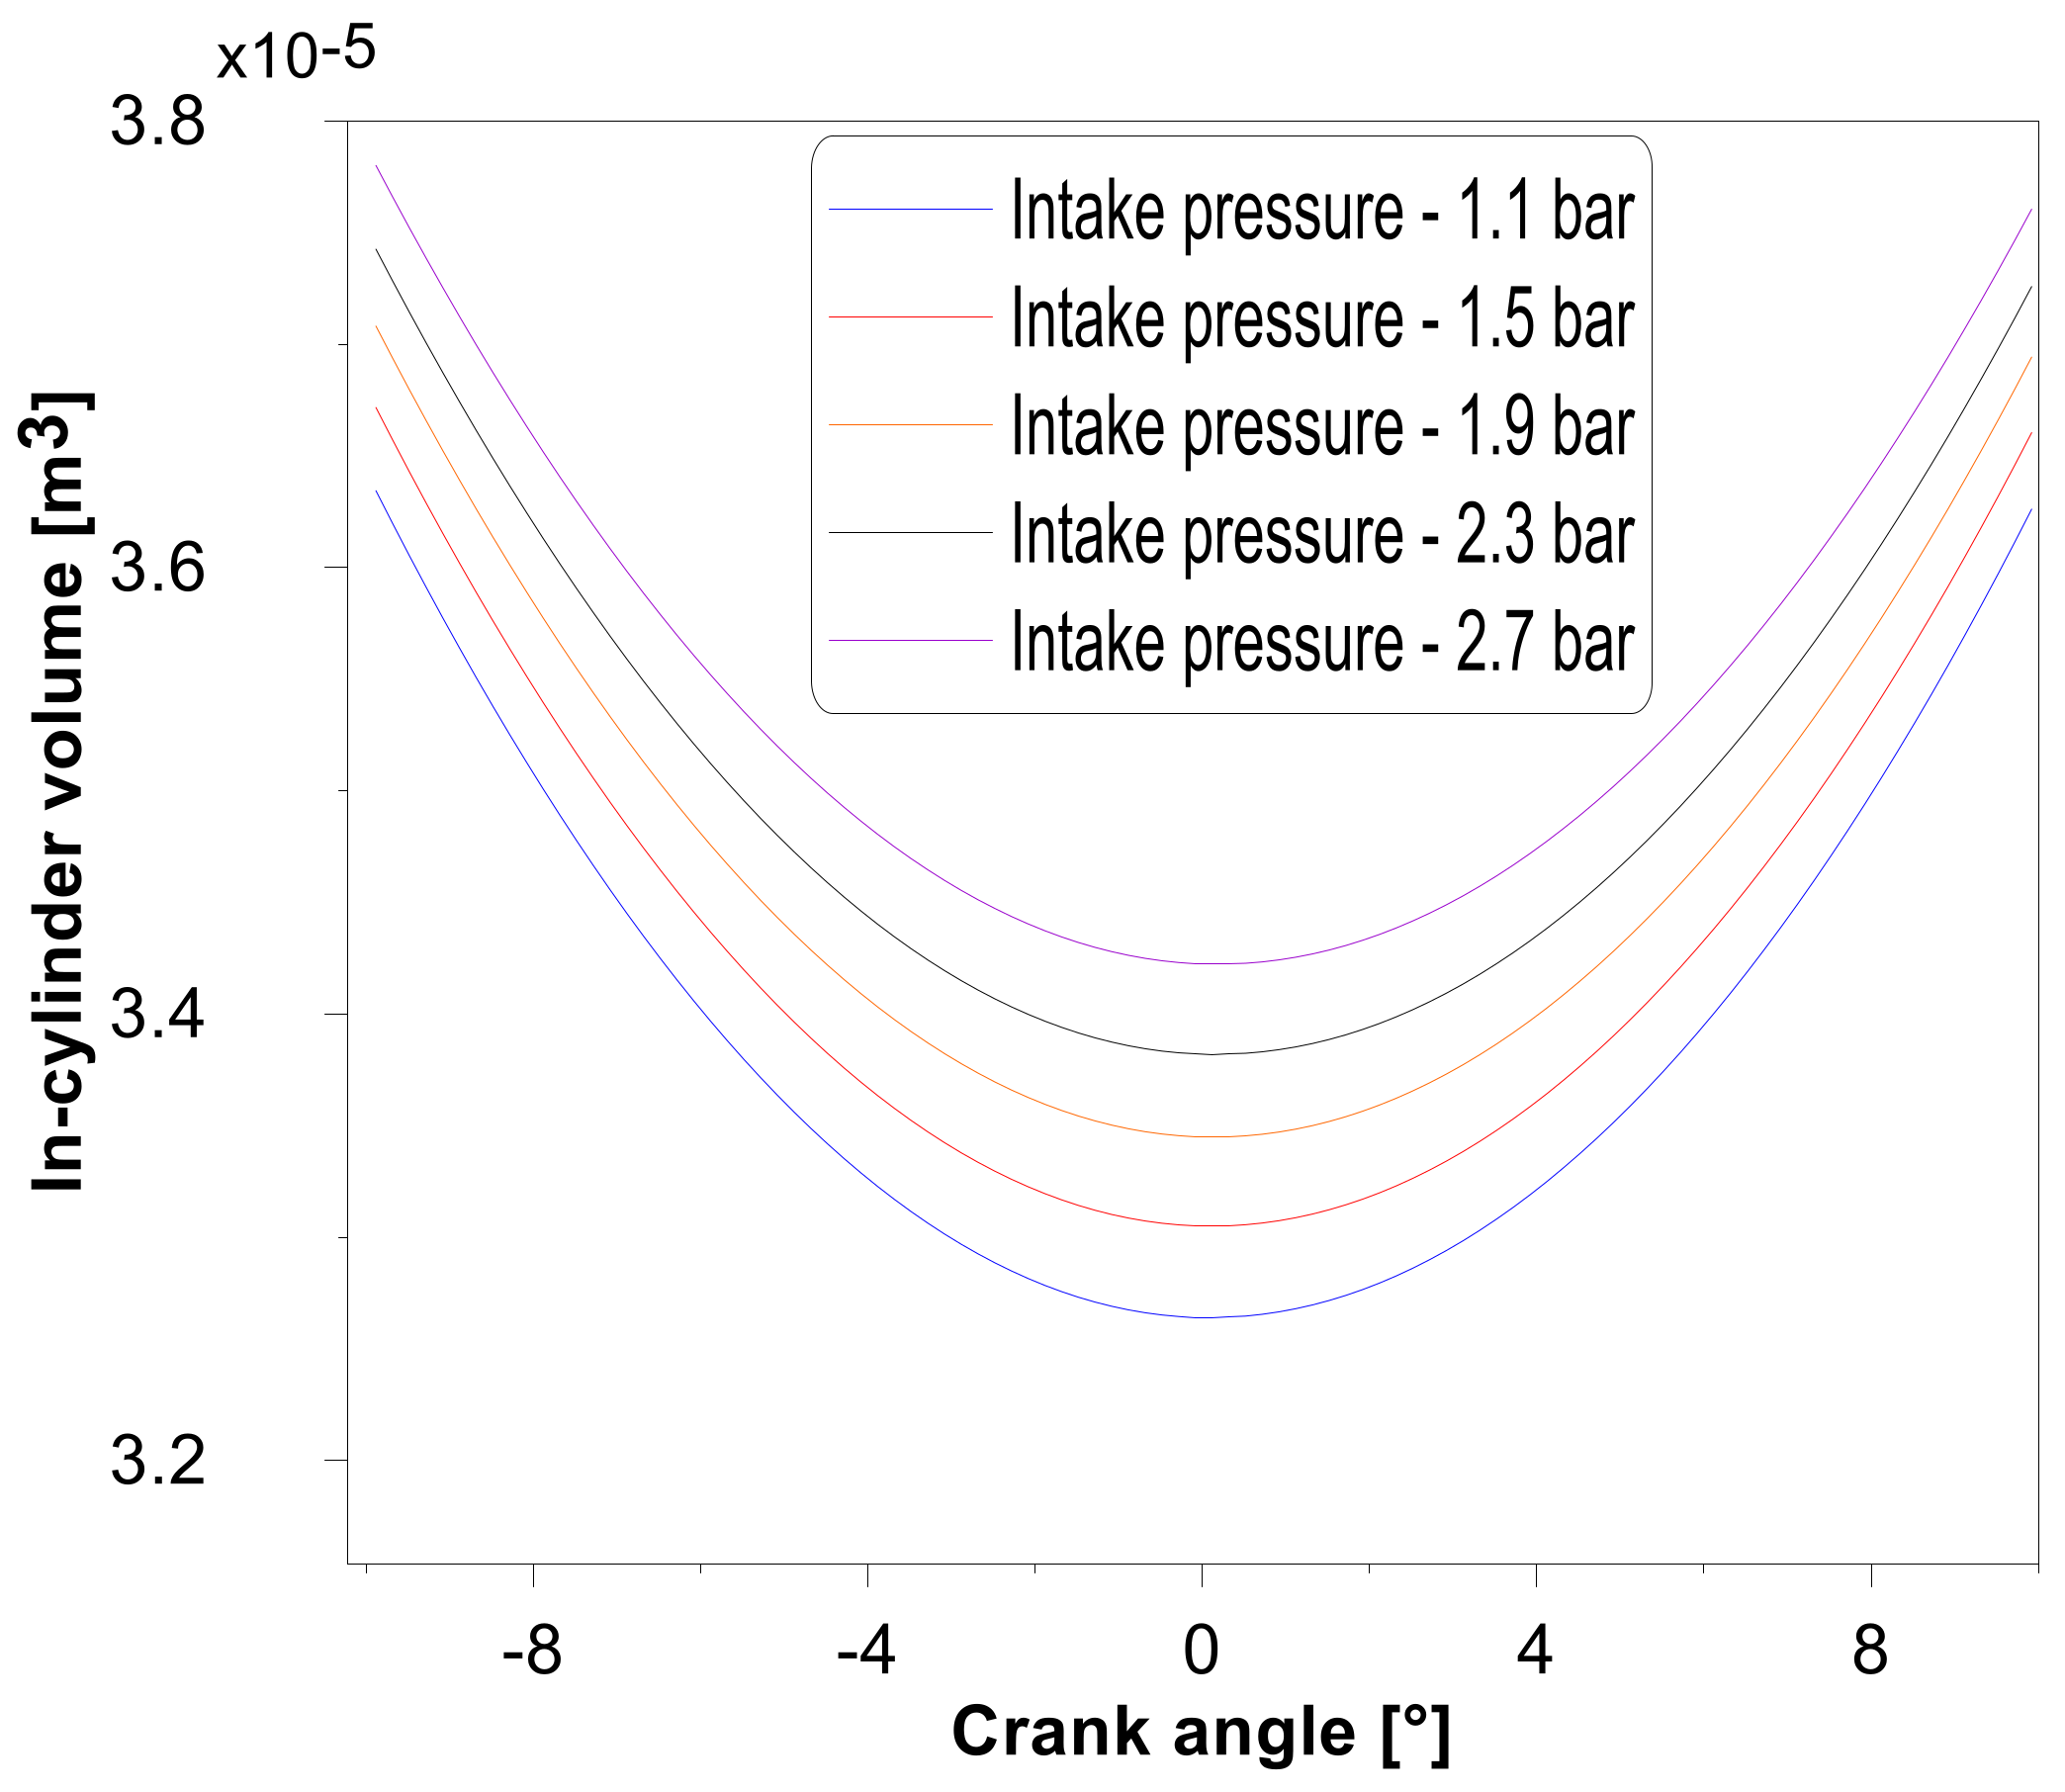
The deformation constant Kdef was adjusted in the model to obtain the same experimentally measured TDC volume deformation at 1.1 and 2.7 bar of intake pressure. In this way, considering that deformation increases linearly with cylinder pressure, the same Kdef was used for the other engine conditions. In Figure 13, it is possible to see the instantaneous cylinder volume near TDC for each condition considering the Kdef obtained from the measurements. It is possible to note how the volume is affected by the increases in cylinder pressure and the importance of considering the changes in instantaneous volume trace for each condition to avoid errors in the heat release rate calculation as well as to get a correct estimation of uncertain parameters.
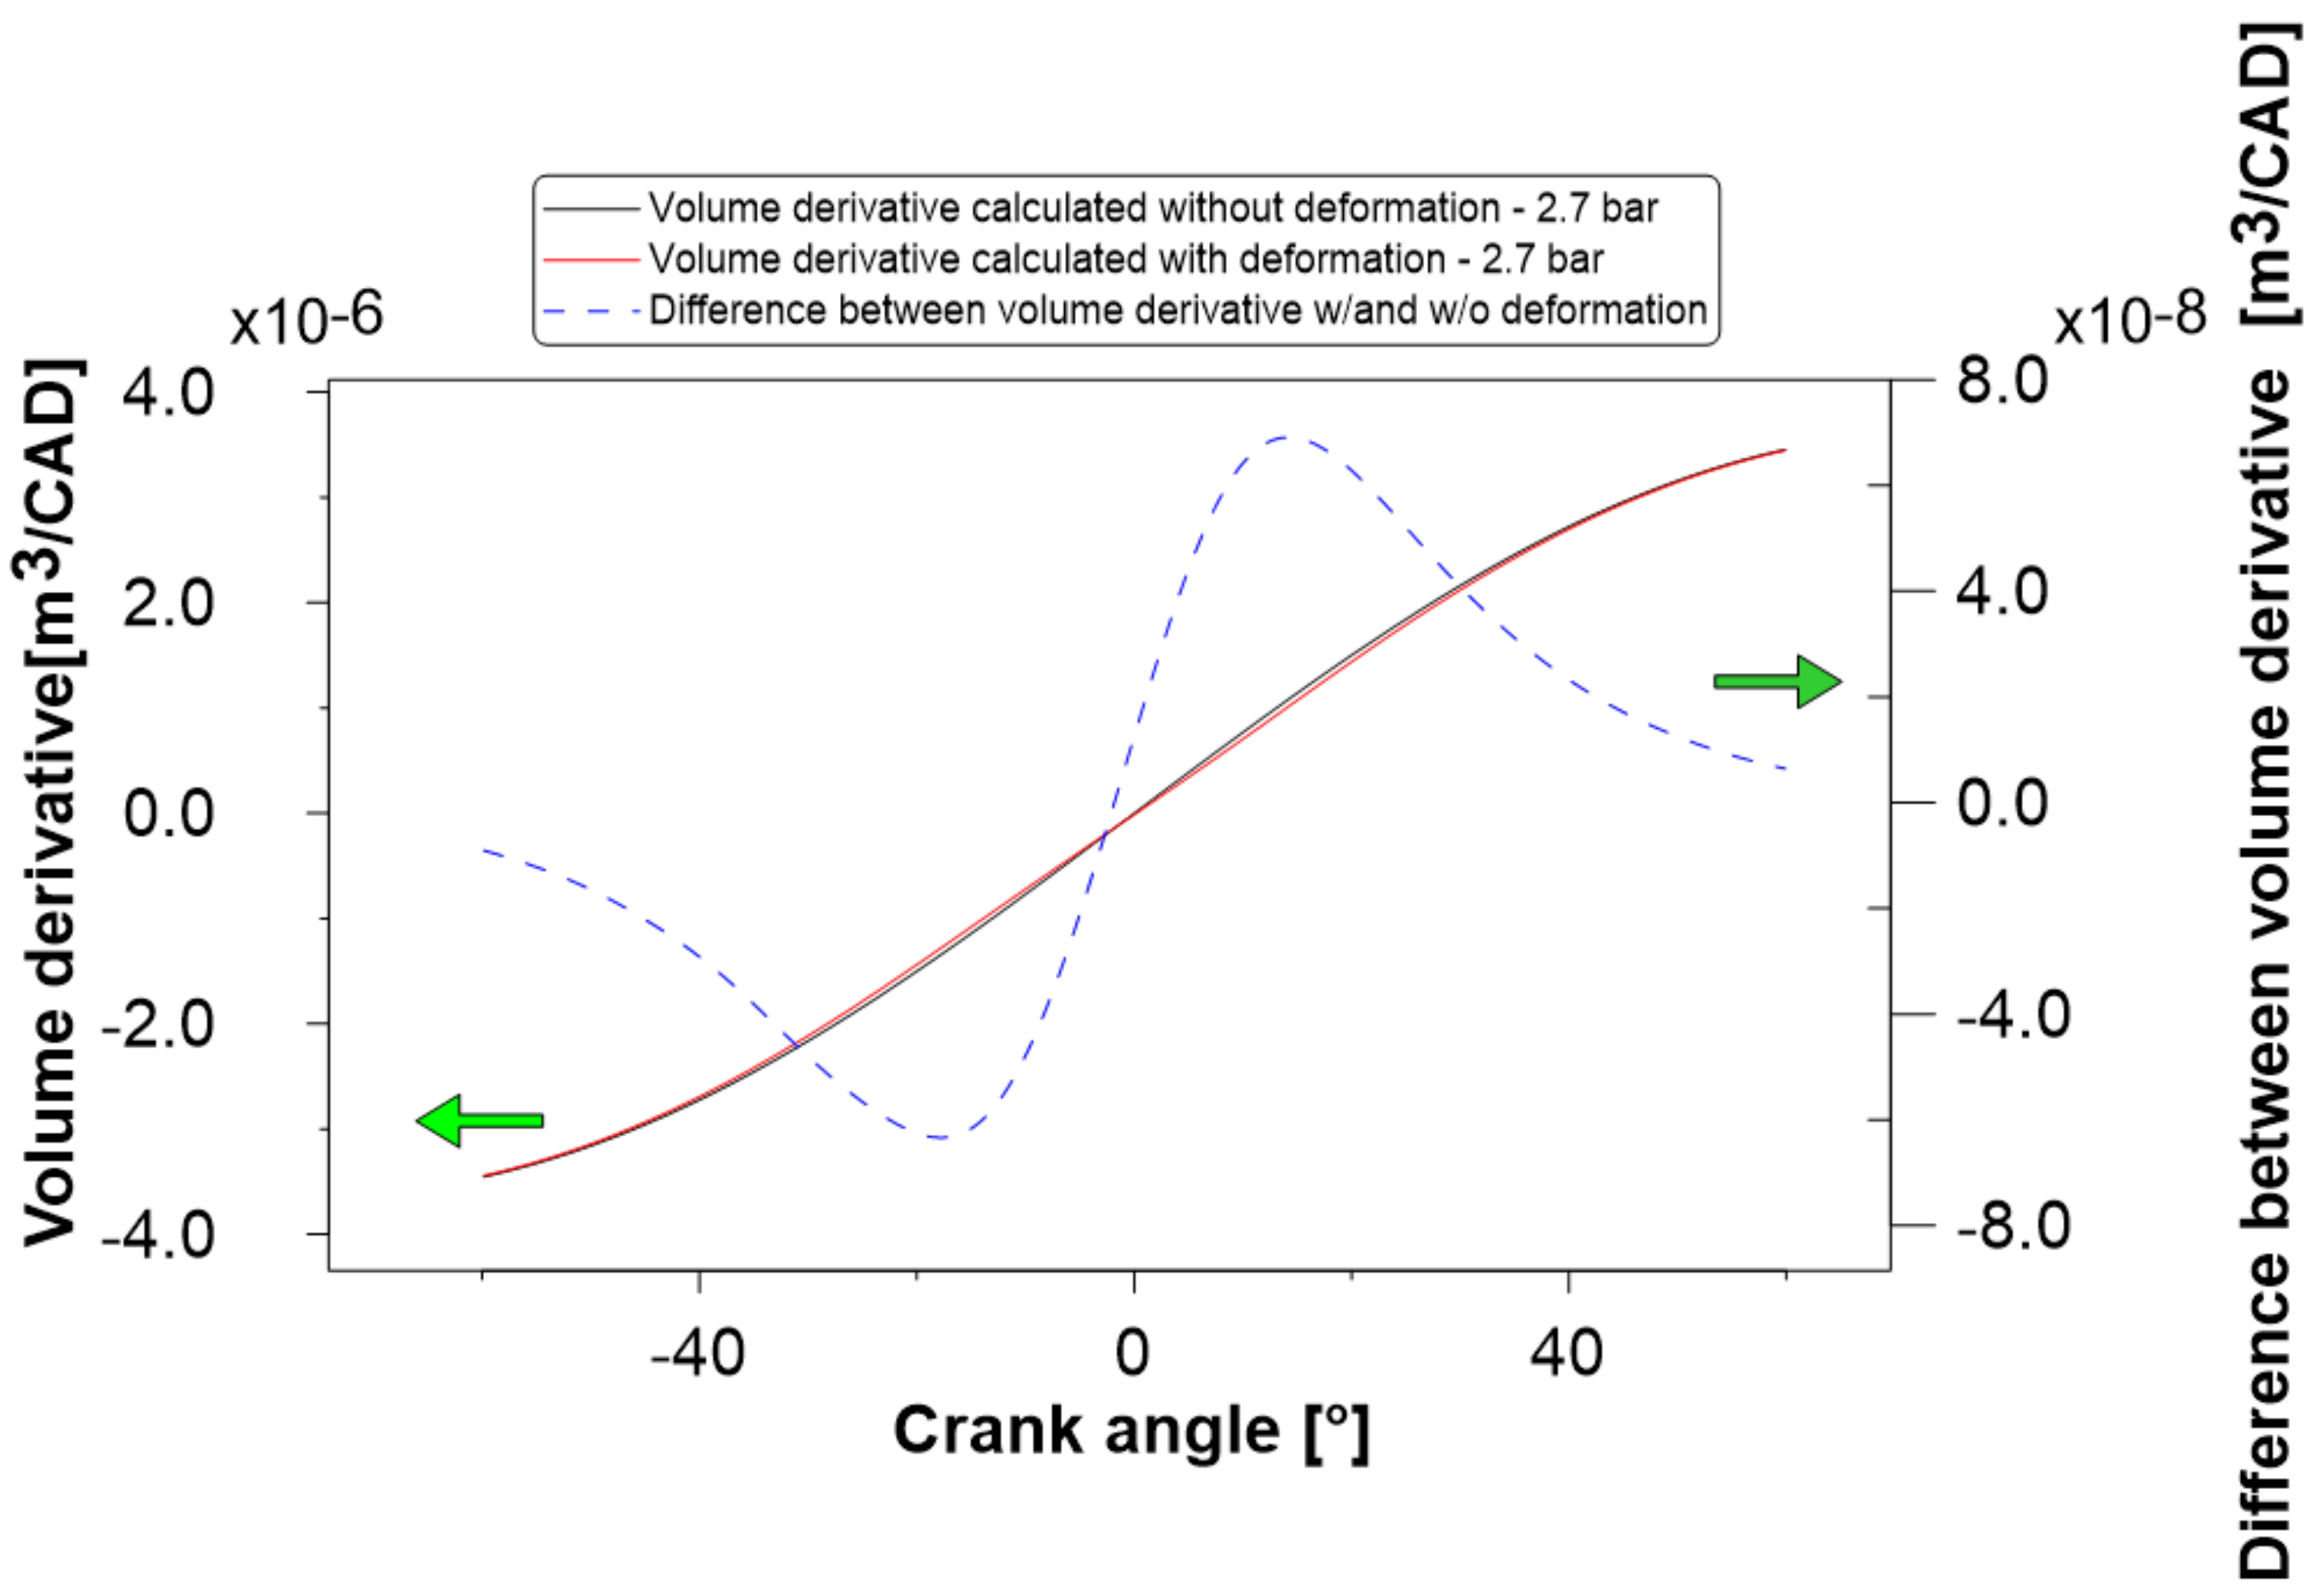
The volume derivative is also of interest because it directly affects both the heat release rate calculation as well as the IMEP calculation. Figure 14 shows the volume derivative with and without deformation as well as the difference between the two derivative volumes at an intake pressure of 2.7 bar. The biggest difference between the curves occurred from −20° to 20° aTDC.
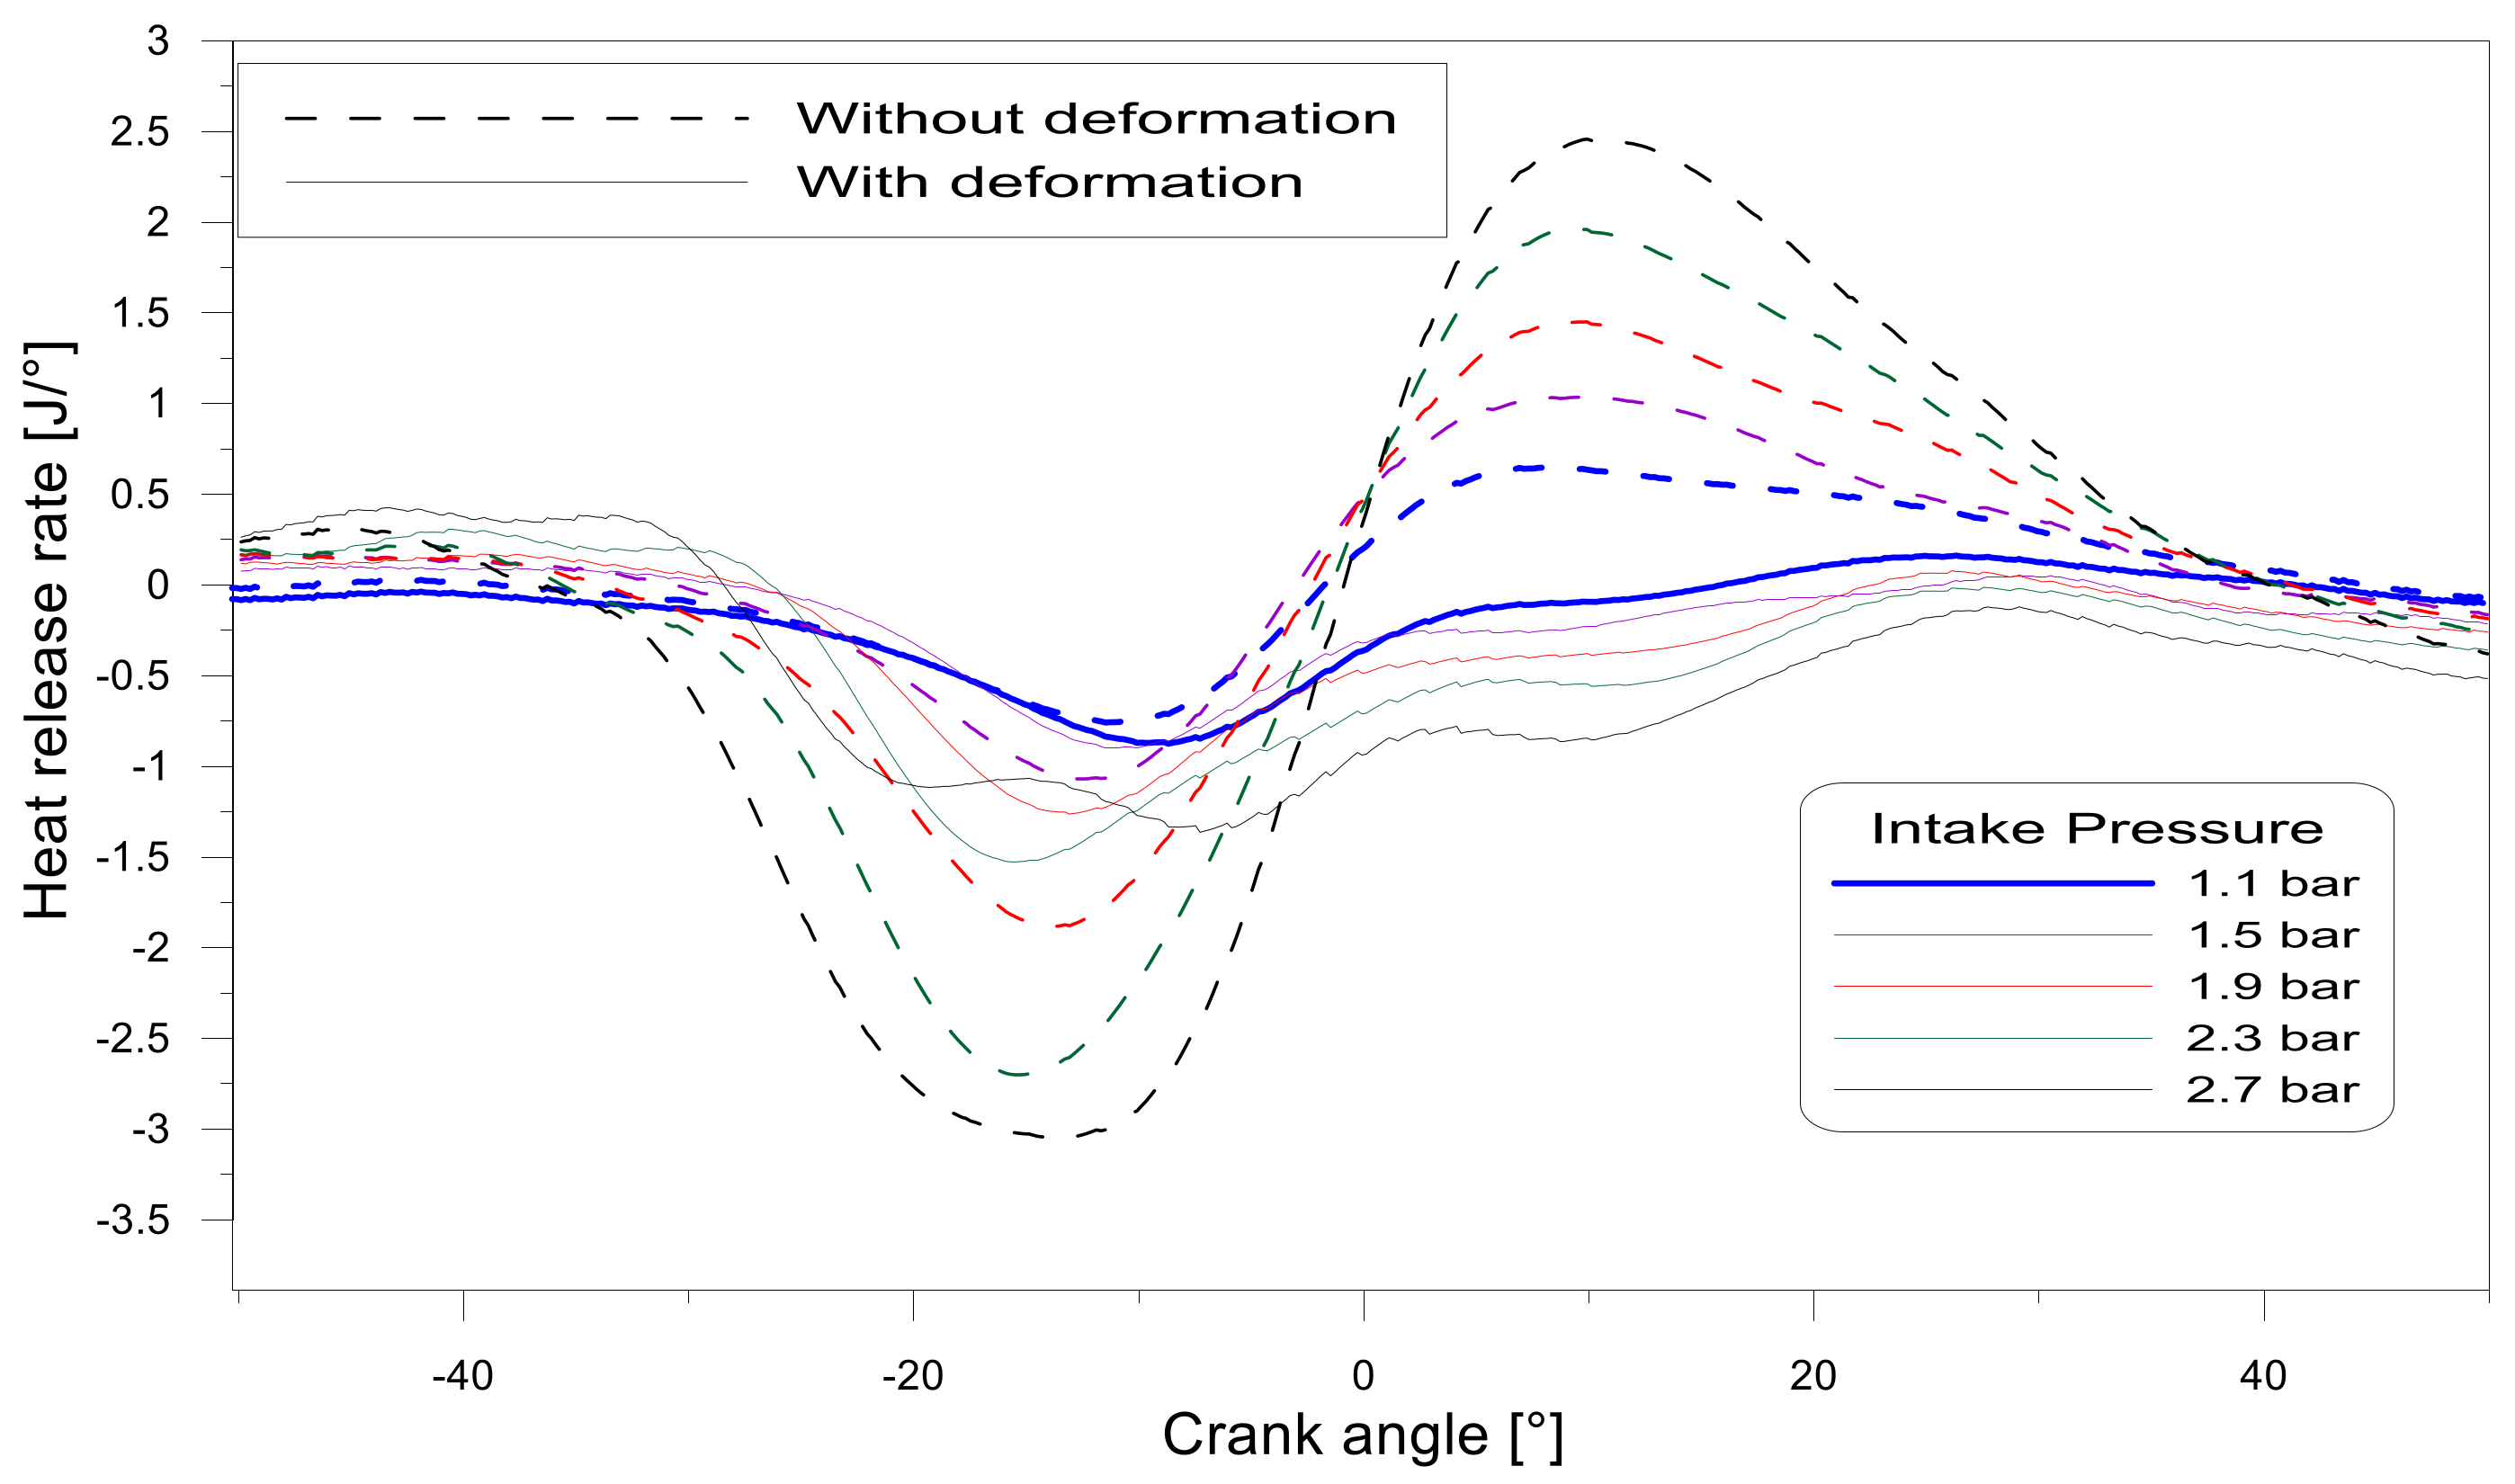
Figure 15 shows the impact of the volume change in the heat release rate trace. It is known that the heat release rate in motored conditions is zero. However, some residuals in the trace are inevitable and the main idea is to try to reduce these residuals as much as possible. It is clear that the RoHR trace for the adjusted instantaneous volume was more accurate and realistic as the solid curves were closer to zero. On the other hand, the dashed curves deviation from zero increased as the intake pressure increased, indicating that there were larger errors in the RoHR calculation. The RoHR shape for the dashed lines was very similar to the difference in the volume derivative shown above. These results present good agreement with the results found in the previous study developed by Aronsson et al. [18].
As previously mentioned, the methodology used in the 0D model takes into account not only the minimum error of heat release rate, but also the optimum fitting between the measured and simulated cylinder pressure. The good agreement can be seen in Figure 16, where the pressure at the inlet valve closing (IVC) and exhaust valve opening (EVO) were well estimated as well as the peak pressure. Finally, from the well-adjusted model, it was possible to extract the main uncertain parameters of the engine. The results are presented in Table 5. The deformation coefficient kdef was defined as 2.25, which corresponded to the deformations measured at conditions of 1.1 and 2.7 bar of intake pressure. Effective CR was a mean of the optimal value of all conditions tested. This was smaller than the geometric CR, which was 14.9, due mainly to the crevices in the cylinder, which were higher than in the metal engines and the mechanical deformations. The value to the heat transfer coefficient CW1 was 4.80. This value was higher than the normal coefficient values found for metal engines. However, this can be explained by the different behavior of optical engines with regard to heat transfer. It is important to consider that the optical engine concerned had a cylinder liner which was kept around 20 °C, thus the temperature gradient between the piston and wall was much larger than in the metal engine. This is one of the reasons why the current methodology is only applicable for the optical engine. Furthermore, the table shows, only as a comparison, the values of a metal engine with the same geometry (bore and stroke) as the optical engine. As shown in this table, the value of the Kdef is very similar in the optical and metal engines, however, the deformation will be much larger in the optical engine due to the extensor (it is an implicit term in ∆Vp in Equation (3)).

4. Conclusions

In this work, a specific methodology to thermodynamically characterize an optical engine by combining experimental and modeling techniques was proposed. For this characterization, the mechanical deformations in two extreme intake pressure conditions were measured and consequently, the volume change due to deformations was estimated and used in the thermodynamic analysis. Trapped mass at the IVC was successfully estimated by the GT-Power model calculations. Finally, a 0D thermodynamic model was used that considered the results obtained previously (deformation and trapped mass) as input parameters. For the uncertain parameters adjusted by the 0D model, we applied the methodology developed by Benajes et al. [13], which aimed to obtain the minimum residual HRR as well as good agreement between the measured and simulated cylinder pressure. Thus, the main results can be summarized as follows:
  • Mechanical deformations were measured at 1.1 and 2.7 bar of intake pressure with 31 and 80 bar of TDC cylinder pressure, respectively. The deformation for the low intake pressure was insignificant, less than 0.05 mm. On the other hand, for the highest intake pressure, the deformation was 0.5 mm.
  • From the deformation results, it was possible to obtain a mechanical deformation coefficient Kdef, whose value was 2.25.
  • The impact of mechanical deformation on the instantaneous volume trace was investigated by including the mechanical deformation in the volume expression. The difference between the minimum volume calculation with and without deformation was 8% at 2.7 bar of intake pressure.
  • Residuals in the heat release rate calculation were investigated by a comparison of HRR trace calculated from a normal in-cylinder volume equation and another one that considered the volume change caused by the deformations. The results showed that the adjusted volume expression provided a more accurate shape to the HRR trace.
  • Uncertain parameters were adjusted considering the minimum residual in the HRR that means to obtain more reliable values to these parameters as well as to the gas properties. The effective compression ratio CR was 13.66 and the heat transfer coefficient CW1 was 4.8.
Thus, the method was demonstrated to be a reliable and useful tool to characterize the optical engine at motored conditions.

Author Contributions

All authors discussed and agreed on the contents of the manuscript. J.V.P. coordinated the experimental work, defined the objectives of the tasks, and guided the technical discussion of the results and manuscript writing. J.M. and P.O. provided technical guidance in the experimental and theoretical parts of the project, analyzed the results, and collaborated in the manuscript preparation. F.L. designed and performed the theoretical study and experimental tests, discussed the results, and contributed to the manuscript writing.

Funding

This research was partially funded by General Motors Propulsion Systems—Torino S.r.I.

Acknowledgments

The authors gratefully acknowledge General Motors Propulsion Systems—Torino S.r.I. for providing some engine parts used to develop the optical engine as well as Daniel Lérida for his laboratory work on the engine maintenance, operation, and control.

Conflicts of Interest

The authors declare no conflict of interest. The founding sponsors had no role in the design of the study; in the collection, analyses, or interpretation of data; in the writing of the manuscript, and in the decision to publish the results.

Nomenclature

CRCompression ratio
PIVParticle Image Velocimetry
RoHRRate of Heat Release
TDCTop Dead Center
BDCBefore Top Dead Center
IVCInlet valve closing
EVOExhaust valve opening
DCylinder diameter
cuTangential velocity of the gas chamber
cmMean piston speed
KdefMechanical deformation constant
∆VpVolume variation due to in-cylinder pressure
maFresh air mass
mresResidual mass
m ˙ airMass flow rate
mcTrapped mass
cv,cSpecific heat of the gas
TIn-cylinder temperature
QHeat transferred to the walls
pIn-cylinder pressure
VInstantaneous in-cylinder volume
RcGas constant
mbbBlow-by mass
CW1Woschni coefficient 1
CW2Woschni coefficient 2
VCCCombustion chamber volume
Vd,intVolume displaced by the piston
∆VdefVolume changes by mechanical Deformations.
mSCShort circuit mass
TPAThree pressure analysis

References

  1. El-Adawy, M.; Heikal, M.R.; Rashid, A.; Aziz, A.; Siddiqui, M.I.; Abdul Wahhab, H.A. Experimental study on an IC engine in-cylinder flow using different steady-state flow benches. Alex. Eng. J. 2017, 56, 727–736. [Google Scholar] [CrossRef]
  2. Seo, J.; Kim, H.; Park, S. Estimation of CO2 emissions from heavy-duty vehicles in Korea and potential for reduction based on scenario analysis. Sci. Total. Environ. 2018, 636, 1192–1201. [Google Scholar] [CrossRef] [PubMed]
  3. Tixeira, A.C.; Sodré, J.R. Impacts of replacement of engine powered vehicles by electric vehicles on energy consumption and CO2 emissions. Transp. Res. Part D 2018, 59, 375–384. [Google Scholar] [CrossRef]
  4. Colban, W.; Ekoto, I.; Kim, D.; Miles, P.C. In-cylinder PIV measurements in an Optical Light-Duty Diesel at LTC conditions. In Proceedings of the THIESEL, Valencia, Spain, 9–12 September 2008. [Google Scholar]
  5. Wang, Z.; Tanov, S.; Wang, H.; Richter, M. High-Speed Particle Image Velocimetry Measurement of Partially Premixed Combustion (PPC) in a Light Duty Engine for a Different Injection Strategies; SAE Technical Paper; SAE International: Warrendale, PA, USA, 2015. [Google Scholar]
  6. Liu, H.; Tang, Q.; Yang, Z. A comparative study on partially premixed combustion (PPC) and reactivity controlled compression ignition (RCCI) in an optical engine. Proc. Combust. Inst. 2018, in press. [Google Scholar] [CrossRef]
  7. Liu, J.; Dumitrescu, C.E. Flame development analysis in a diesel optical engine converted to spark ignition natural gas operation. Appl. Energy 2018, 230, 1205–1217. [Google Scholar] [CrossRef]
  8. Irimescu, A.; Merola, S.S.; Di Iorio, S.; Vaglieco, B.M. Investigation on the effects of butanol and ethanol fueling on combustion and PM emissions in an optically accessible DISI engine. Fuel 2018, 216, 121–141. [Google Scholar] [CrossRef]
  9. Tanov, S.; Pachano, L.; Andersson, Ö.; Wang, Z.; Richter, M.; Pastor, J.V.; García-Oliver, J.M.; García, A. Influence of spatial and temporal distribution of turbulent kinetic energy on heat transfer coefficient in a light duty CI engine operating with partially premixed combustion. Appl. Therm. Eng. 2018, 129, 31–40. [Google Scholar]
  10. Garcia-Oliver, J.M.; Garcia, A.; Novella, R.; Morales López, A. An Investigation of the Engine Combustion Network ‘Spray B’ in a Light Duty Single Cylinder Optical Engine; SAE Technical Paper; SAE International: Warrendale, PA, USA, 2018. [Google Scholar]
  11. Aronsson, U. Processes in Optical Diesel Engines: Emissions Formations and Heat Release. Ph.D. Thesis, Lund University, Lund, Sweden, 2011. [Google Scholar]
  12. Irimescu, A.; Marchitto, L.; Merola, S.S.; Tornatore, C.; Valentino, G. Evaluation of different methods for combined thermodynamic and optical analysis of combustion in spark ignition engines. Energy Convers. Manag. 2014, 87, 914–927. [Google Scholar] [CrossRef]
  13. Benajes, J.; Olmeda, P.; Martín, J.; Carreño, R. A new methodology for uncertainties characterization in combustion diagnosis and thermodynamic modelling. Appl. Therm. Eng. 2014, 71, 389–399. [Google Scholar] [CrossRef] [Green Version]
  14. Lapuerta, M.; Armas, O.; Bermúdez, V. Sensitivity of diesel engine thermodynamic cycle calculation to measurement errors and estimated parameters. Appl. Therm. Eng. 2000, 20, 843–861. [Google Scholar] [CrossRef]
  15. Payri, F.; Molina, S.; Martín, J.; Armas, O. Influence of measurement errors and estimated parameters on combustion diagnosis. Appl. Therm. Eng. 2006, 26, 226–236. [Google Scholar] [CrossRef]
  16. Garcia-Oliver, J.M.; Garcia, A.; Gil, A.; Pachano, L. Study of air flow interaction with pilot injections in a Diesel Engine by means of PIV measurements. In SAE International Journal of Engines; SAE International: Warrendale, PA, USA, 2017. [Google Scholar]
  17. Aronsson, U.; Solaka, H.; Charter, C.; Andersson, O. Impact of Mechanical Deformation Due to Pressure, Mass and Thermal Forces on the In-Cylinder Volume Trace in Optical Engines of Bowditch Design; SAE Technical Paper; SAE International: Warrendale, PA, USA, 2011. [Google Scholar]
  18. Aronsson, U.; Solaka, H.; Lequien, G.; Andersson, O.; Johansson, B. Analysis of Errors in Heat Release Calculations Due to Distortion of the In-Cylinder Volume Trace from Mechanical Deformation in Optical Diesel Engines. SAE Int. J. Engines 2012, 5, 1561–1570. [Google Scholar] [CrossRef]
  19. Thielicke, W.; Stamhuis, E.J. PIVlab—Towards User-friendly, Affordable and Accurate Digital Particle Image Velocimetry in MATLAB. J. Open Res. Softw. 2014, 2, e30. [Google Scholar] [CrossRef]
  20. Payri, F.; Olmeda, P.; Martín, J.; García, A. A complete 0D thermodynamic predictive model for direct injection diesel engines. Appl. Energy 2011, 88, 4632–4641. [Google Scholar] [CrossRef]
  21. Lapuerta, M.; Armas, O.; Hernandez, J.J. Diagnosis of DI diesel combustion from in-cylinder pressure signal by estimation of mean thermodynamic properties of the gas. Appl. Therm. Eng. 1999, 19, 513–529. [Google Scholar] [CrossRef]
  22. Payri, F.; Margot, X.; Gil, A.; Martín, J. Computational Study of Heat Transfer to the Walls of a DI Diesel Engine; SAE Technical Paper; SAE International: Warrendale, PA, USA, 2005. [Google Scholar]
  23. GT-Suite. Engine Performance Application Manual; Gamma Technologies: Westmont, IL, USA, 2016. [Google Scholar]
  24. Busch, S.; Zha, K.; Kurtz, E.; Warey, A. Experimental and Numerical Studies of Bowl Geometry Impacts on Thermal Efficiency in a Light-Duty Diesel Engine; SAE Technical Paper; SAE International: Warrendale, PA, USA, 2018. [Google Scholar]
  25. Zha, K.; Busch, S.; Miles, P.; Wijeyakulasuriya, S.; Mitra, S.; Senecal, P.K. Characterization of flow asymmetry during the compression stroke using swirl-plane PIV in a light-duty optical diesel engine with the re-entrant piston bowl geometry. SAE Int. J. Engines 2015, 84, 1837–1855. [Google Scholar] [CrossRef]
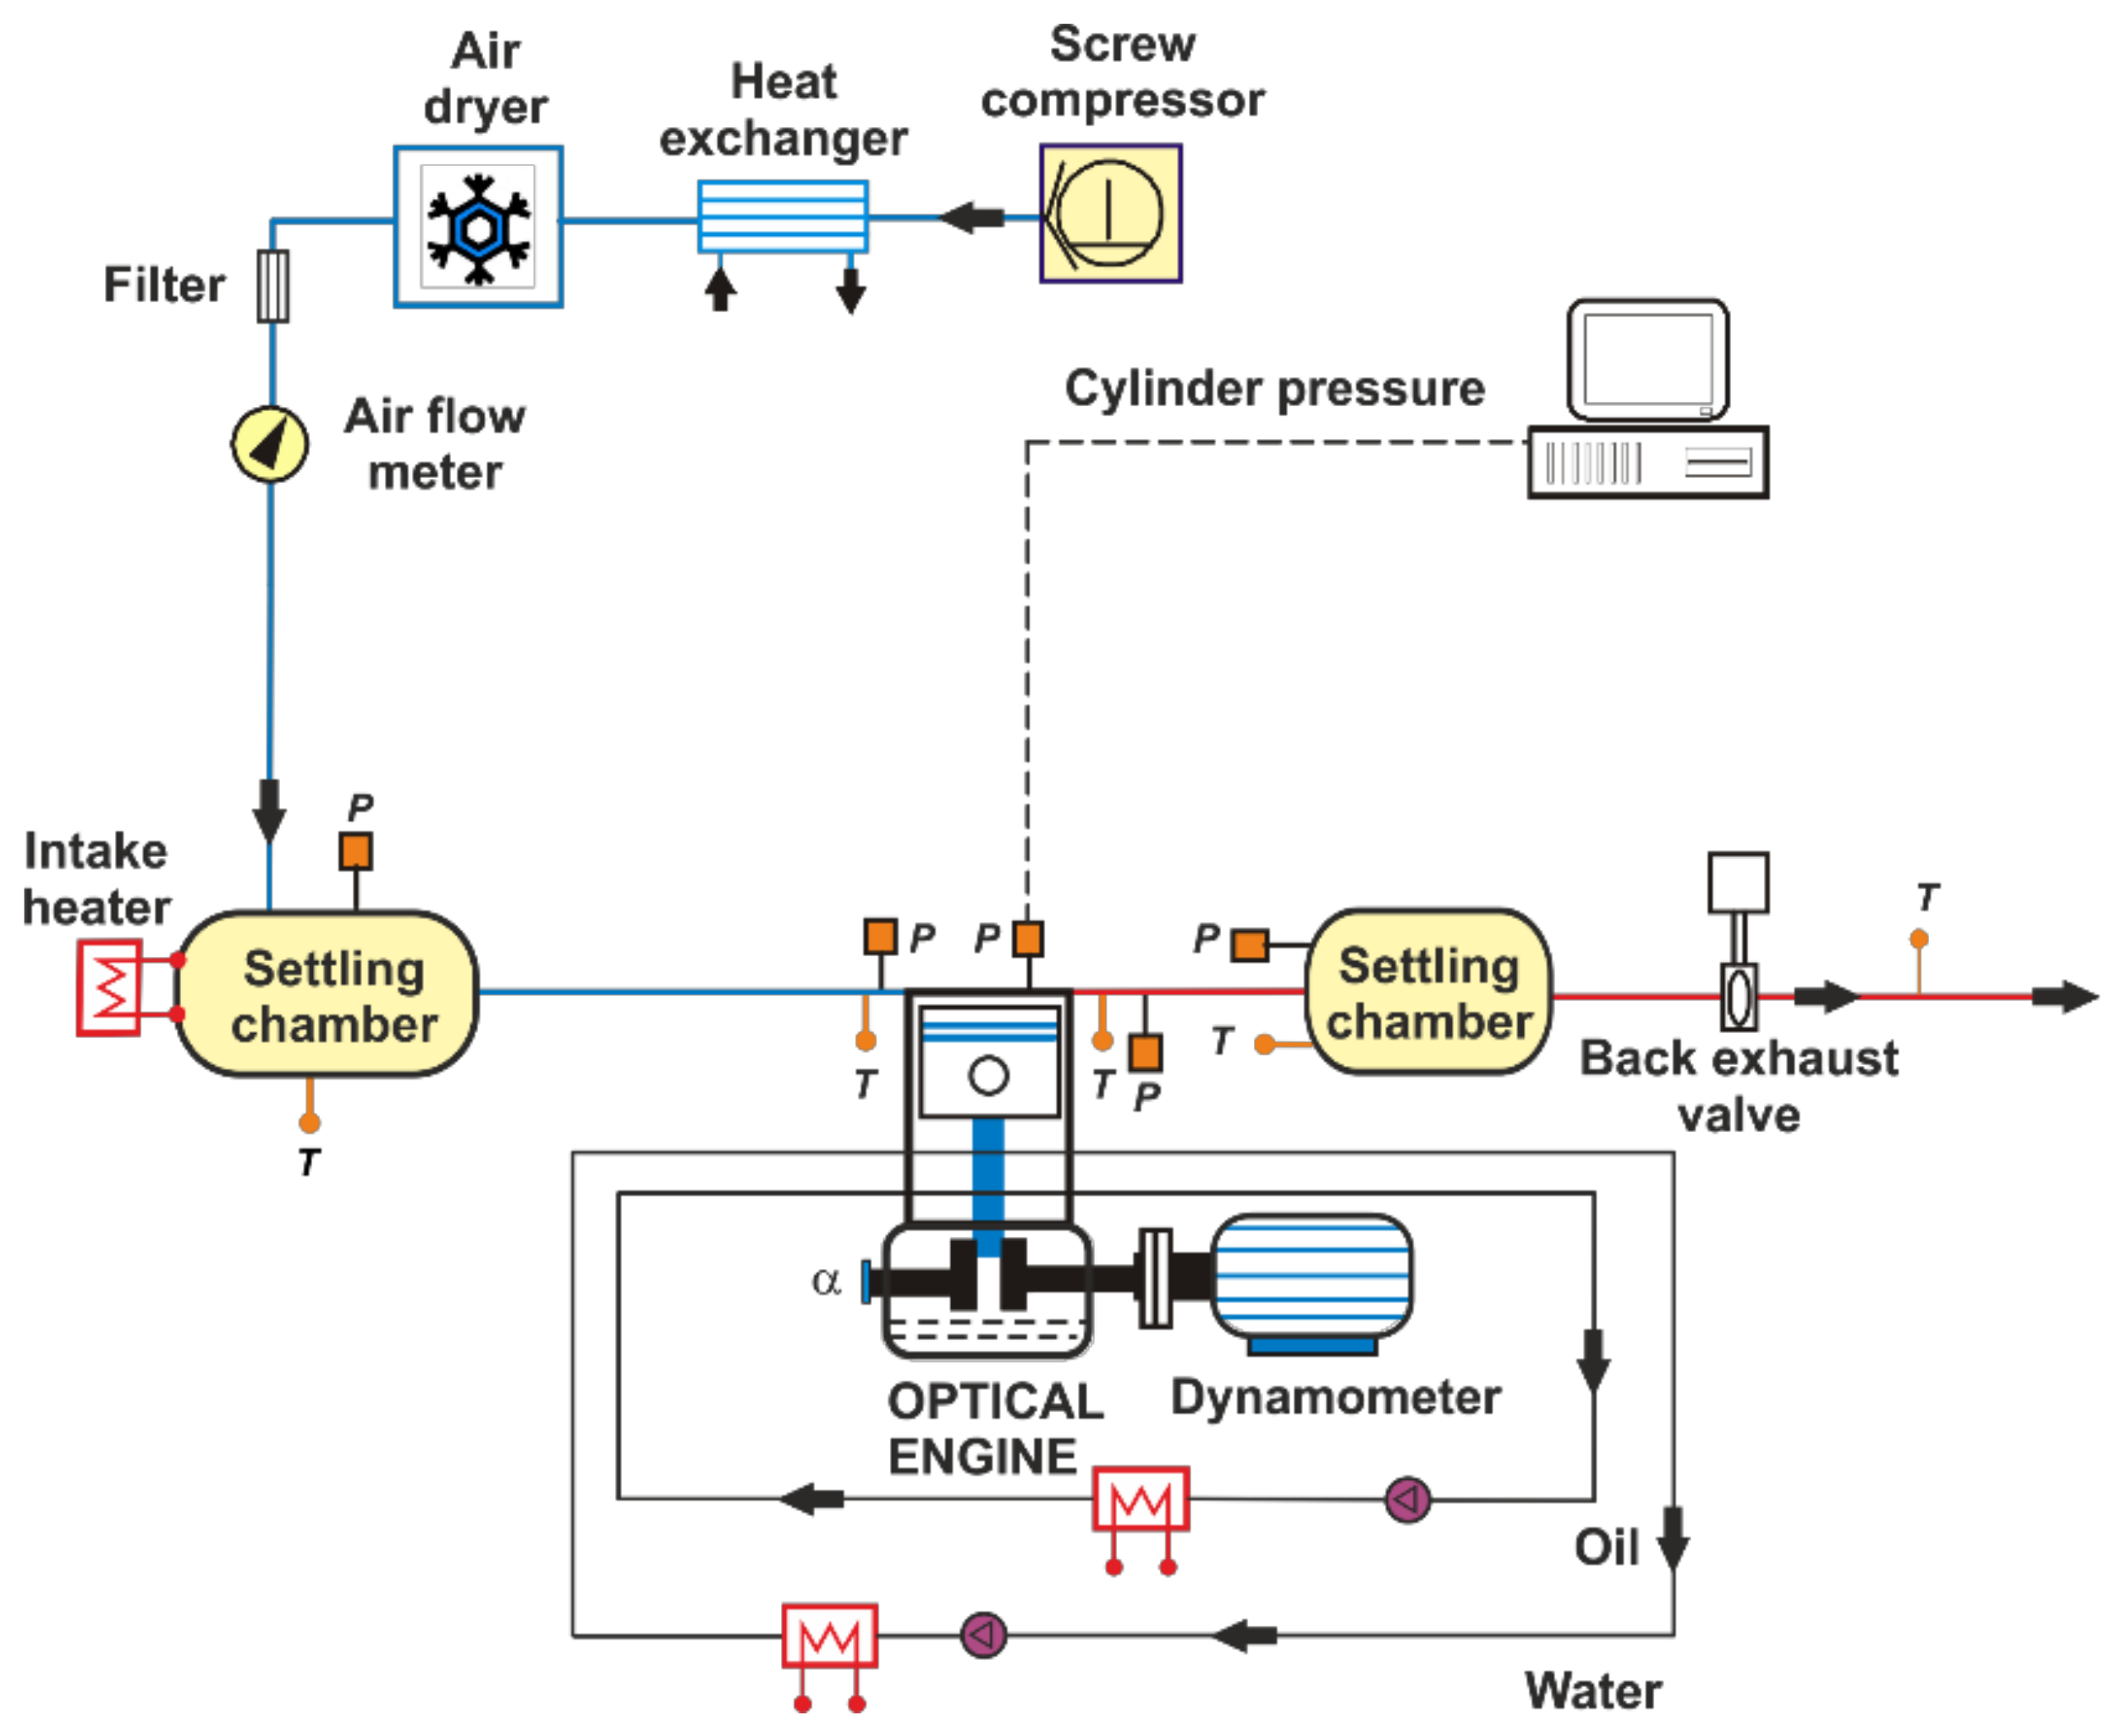
Figure 1. Test cell scheme.
Applsci 08 02571 g001
Figure 2. Optical engine.
Applsci 08 02571 g002
Figure 3. Side view of the camera and engine configuration.
Applsci 08 02571 g003
Figure 4. Scheme of the thermodynamic characterization model.
Applsci 08 02571 g004
Figure 5. Optical engine model built in GT-Power.
Applsci 08 02571 g005
Figure 6. Setup of blow-by measurement.
Applsci 08 02571 g006
Figure 7. Reference used in the piston position measurements.
Applsci 08 02571 g007
Figure 8. Measured piston displacement versus the calculated one.
Applsci 08 02571 g008
Figure 9. Maximum deformation at 1.1 bar of intake pressure.
Applsci 08 02571 g009
Figure 10. Maximum deformation at 2.7 bar of intake pressure.
Applsci 08 02571 g010
Figure 11. GT-Power simulation versus the measured cylinder pressure.
Applsci 08 02571 g011
Figure 12. Maximum cylinder pressure (left) and air mass flow (right) for each tested condition.
Applsci 08 02571 g012
Figure 13. Instantaneous volume for each condition taking into account the measured deformation.
Applsci 08 02571 g013
Figure 14. Volume derivative difference between the cases with and without deformation.
Applsci 08 02571 g014
Figure 15. Heat release rate trace with and without volume change.
Applsci 08 02571 g015
Figure 16. Cylinder pressure comparison: the OD model versus the Measured.
Applsci 08 02571 g016
Table 1. Test cell instrumentation.
VariableDeviceManufacturer/ModelAccuracy
In-cylinder pressurePiezoelectric transducerAVL/GH13P±1.25 bar
Intake/exhaust pressurePiezorresistive transducersKistler/4603B10±25 mbar
Temperature in settling chambers and manifoldsThermocoupleTC direct/type K±2.5 °C
Crank angle, engine speedEncoderAVL/364±0.02 CAD
Air mass flowAir flow meterSensyflow/FTM700-P<±1%
Table 2. Engine parameters.
Engine Type4 Stroke, Direct Injection
Number of cylinders [-]1
Number of Valves [-]4
Bore [mm]80
Stroke [mm]80.1
Compression ratio [-]13.7:1
Bowl TypeRe-entrant
Displacement [l]0.402
Table 3. Operating conditions.
Intake Pressure [bar]1.11.51.92.12.7
Exhaust Pressure [bar]1.31.72.12.52.9
Engine speed [rpm]12001200120012001200
Intake temperature [°C]5050505050
Cooling water temperature [°C]15–2515–2515–2515–2515–25
Oil temperature [°C]5050505050
Table 4. The in-cylinder trapped mass estimated for each tested engine condition.
Intake Pressure [bar]Trapped Mass [g]
1.10.479
1.50.644
1.90.825
2.11.009
2.71.198
Table 5. Thermodynamic parameters adjusted by the 0D model.
EngineCW1KdefCR
Optical4.82.2513.66
Metal1.712.1716.06