1. Introduction
Quality assurance is critical in aluminum die casting, as internal porosity—such as gas and shrinkage pores—can compromise structural integrity and significantly shorten component lifetime. X-ray inspection is therefore a cornerstone of non-destructive testing (NDT), enabling the identification of defective parts before machining or assembly, thereby preventing costly rework, recalls, and downstream failures.
Currently, inspection remains largely manual. Visual judgment is highly dependent on operator experience and fatigue, making subtle porosity patterns easy to overlook. This variability leads to inconsistent decision-making, increased scrap rates, and higher production costs. Recent advances in deep learning (DL) offer a promising solution: convolutional neural networks (CNNs) and modern one-stage object detectors achieve high accuracy in industrial imaging with low inference latency. State-of-the-art studies report detection accuracies of up to 95.9% on specific datasets, with multiple works demonstrating that DL-based approaches outperform classical image processing methods in complex defect scenarios [
1,
2,
3].
Economic pressures further underscore the need for robust and efficient inspection. The global market for X-ray inspection systems is expanding rapidly, while energy prices remain high for the German industry—amplifying the financial and environmental cost of scrap in energy-intensive die casting processes. Reducing false negatives and rework not only improves profitability, but also contributes directly to sustainability goals. For context, the market for X-ray inspection systems is estimated at USD 2.50 billion in 2024 and projected to reach USD 3.85 billion by 2032 [
4]; in Germany, electricity prices for industrial consumers averaged approximately 0.178 €/kWh in 2025 [
5].
This study develops and evaluates a deep learning-based object detection system for automated porosity detection in X-ray images of aluminum die-cast components. The solution is specifically tailored to project requirements at Hengst SE, Germany: real-time processing (<2 s per image) on a standard industrial PC without a discrete GPU, and seamless integration into the existing X-ray inspection workflow. The approach is validated in a real-world industrial case study under actual production conditions, and the methodology and results are detailed in
Section 2 and
Section 3, respectively.
This study addresses the following research questions:
(RQ1) Can a one-stage deep learning detector meet real-time constraints (<2 s) on standard industrial hardware without a discrete GPU?
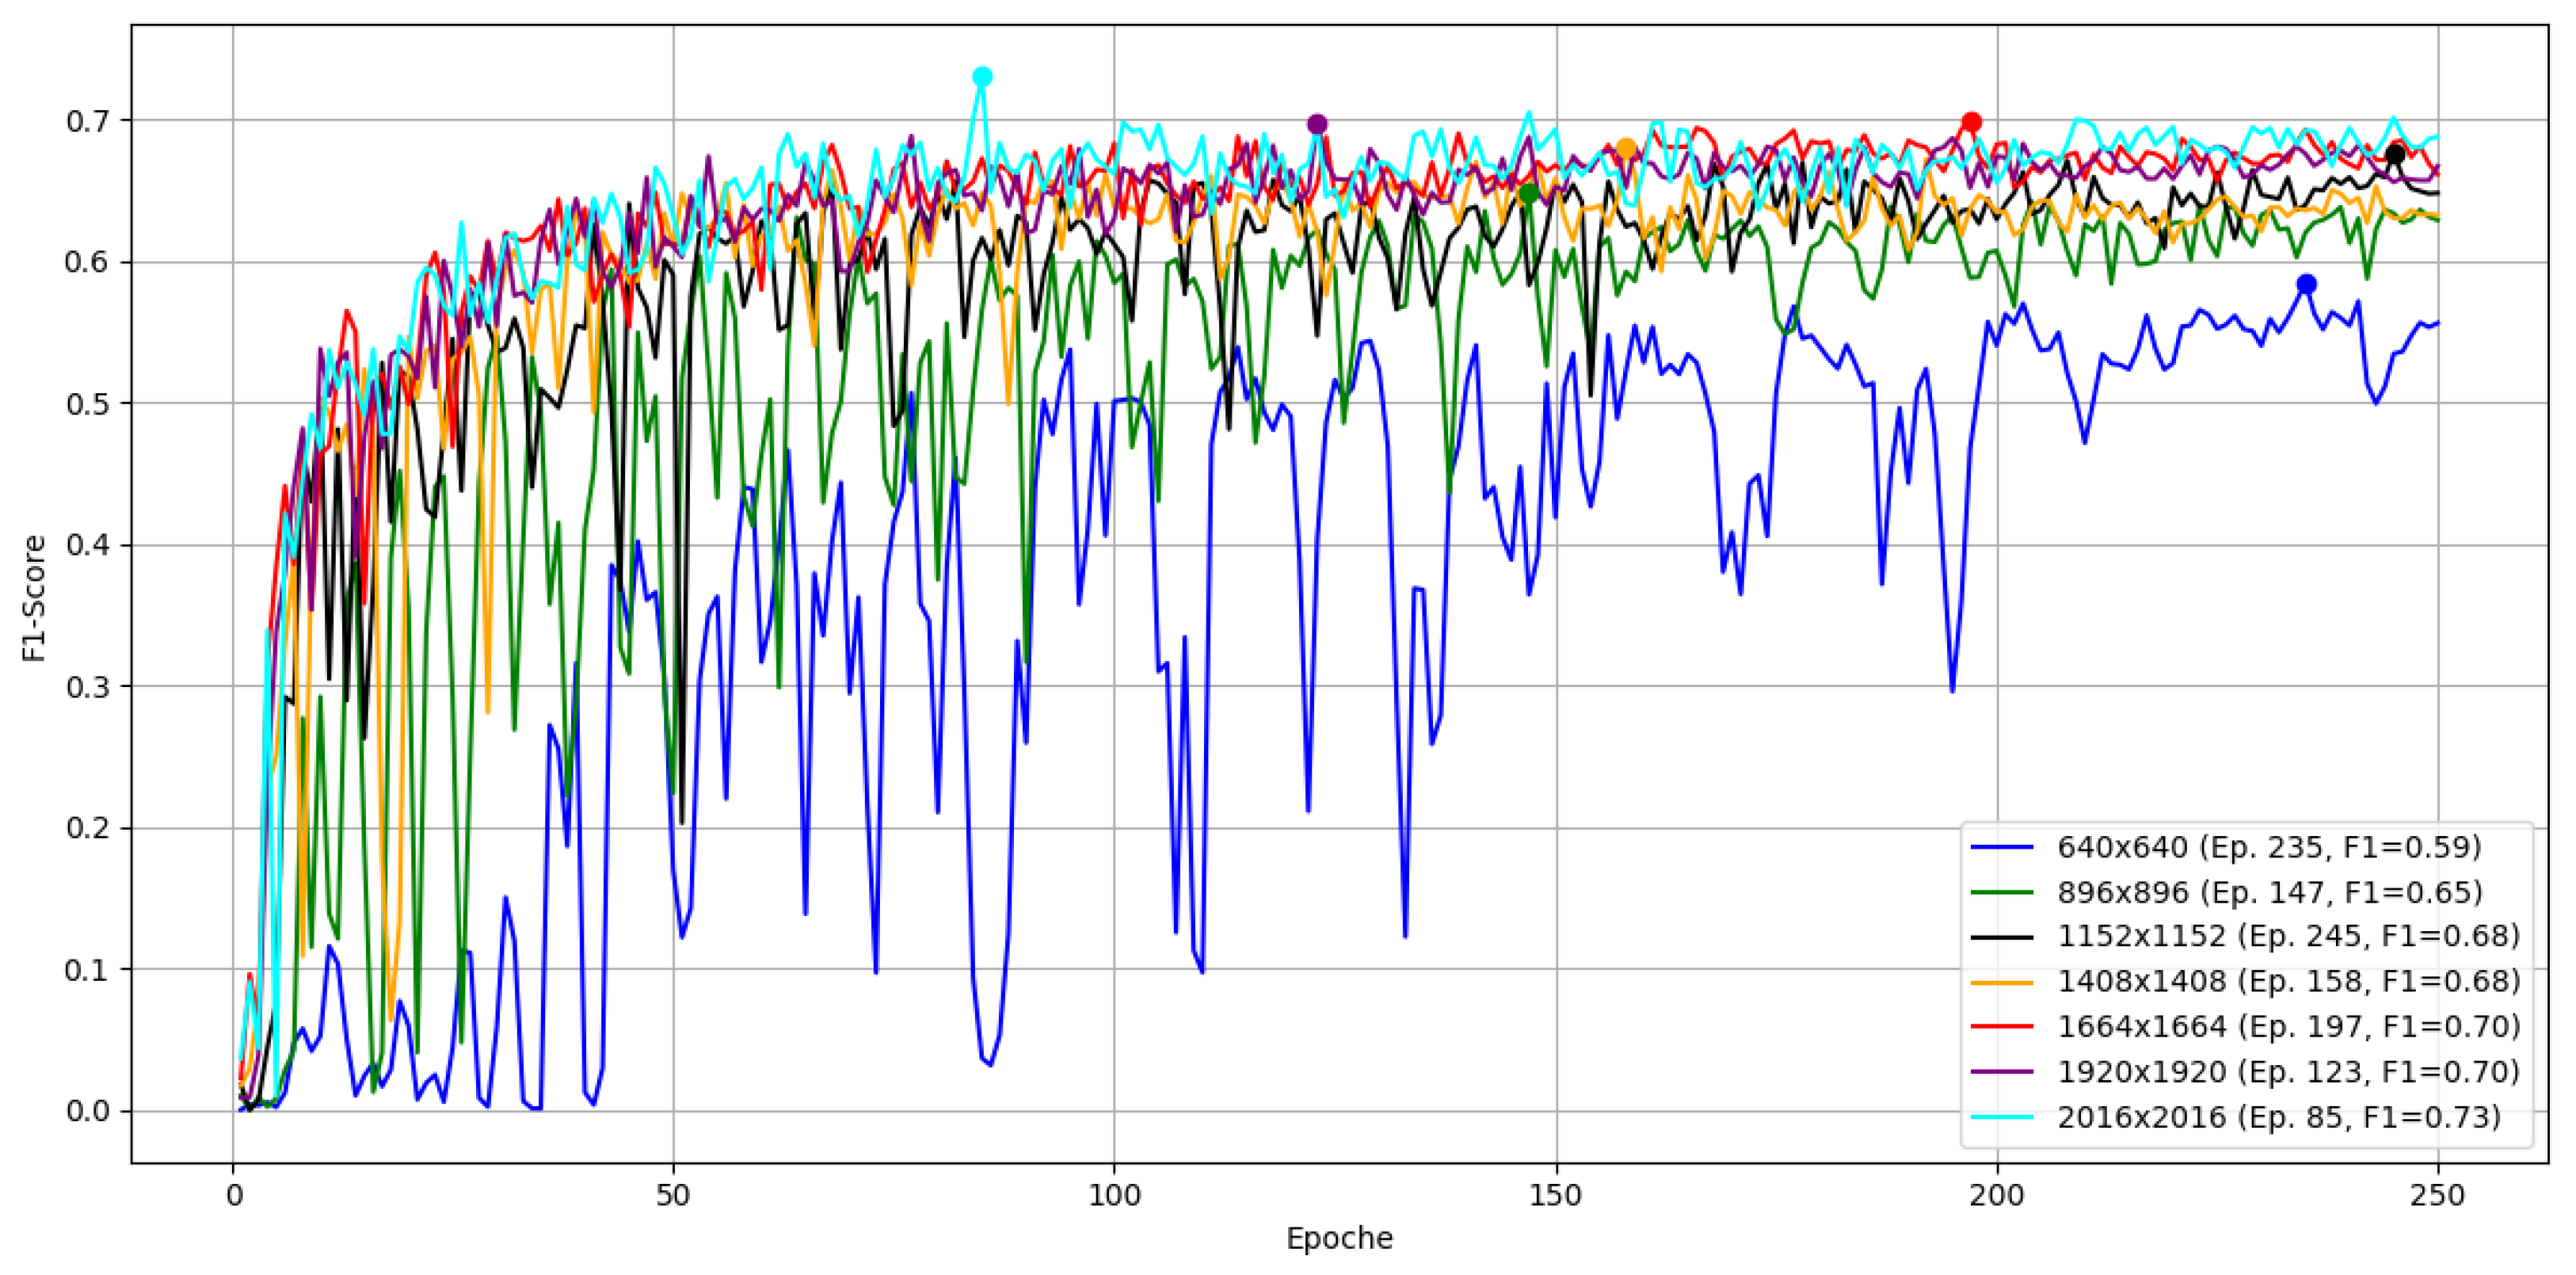
(RQ2) How does input resolution affect detection accuracy for small porosity defects in aluminum die-cast X-ray images?
(RQ3) Does model granularity (position-specific vs. part-level) impact detection performance and generalization in real-world production conditions?
Based on these questions, we formulate the following hypotheses:
(H1) A one-stage detector (e.g., YOLOv5) will satisfy real-time constraints, while a two-stage detector (e.g., Faster R-CNN) will not.
(H2) Preserving native image resolution (2016 × 2016) will significantly improve detection accuracy compared to downscaling.
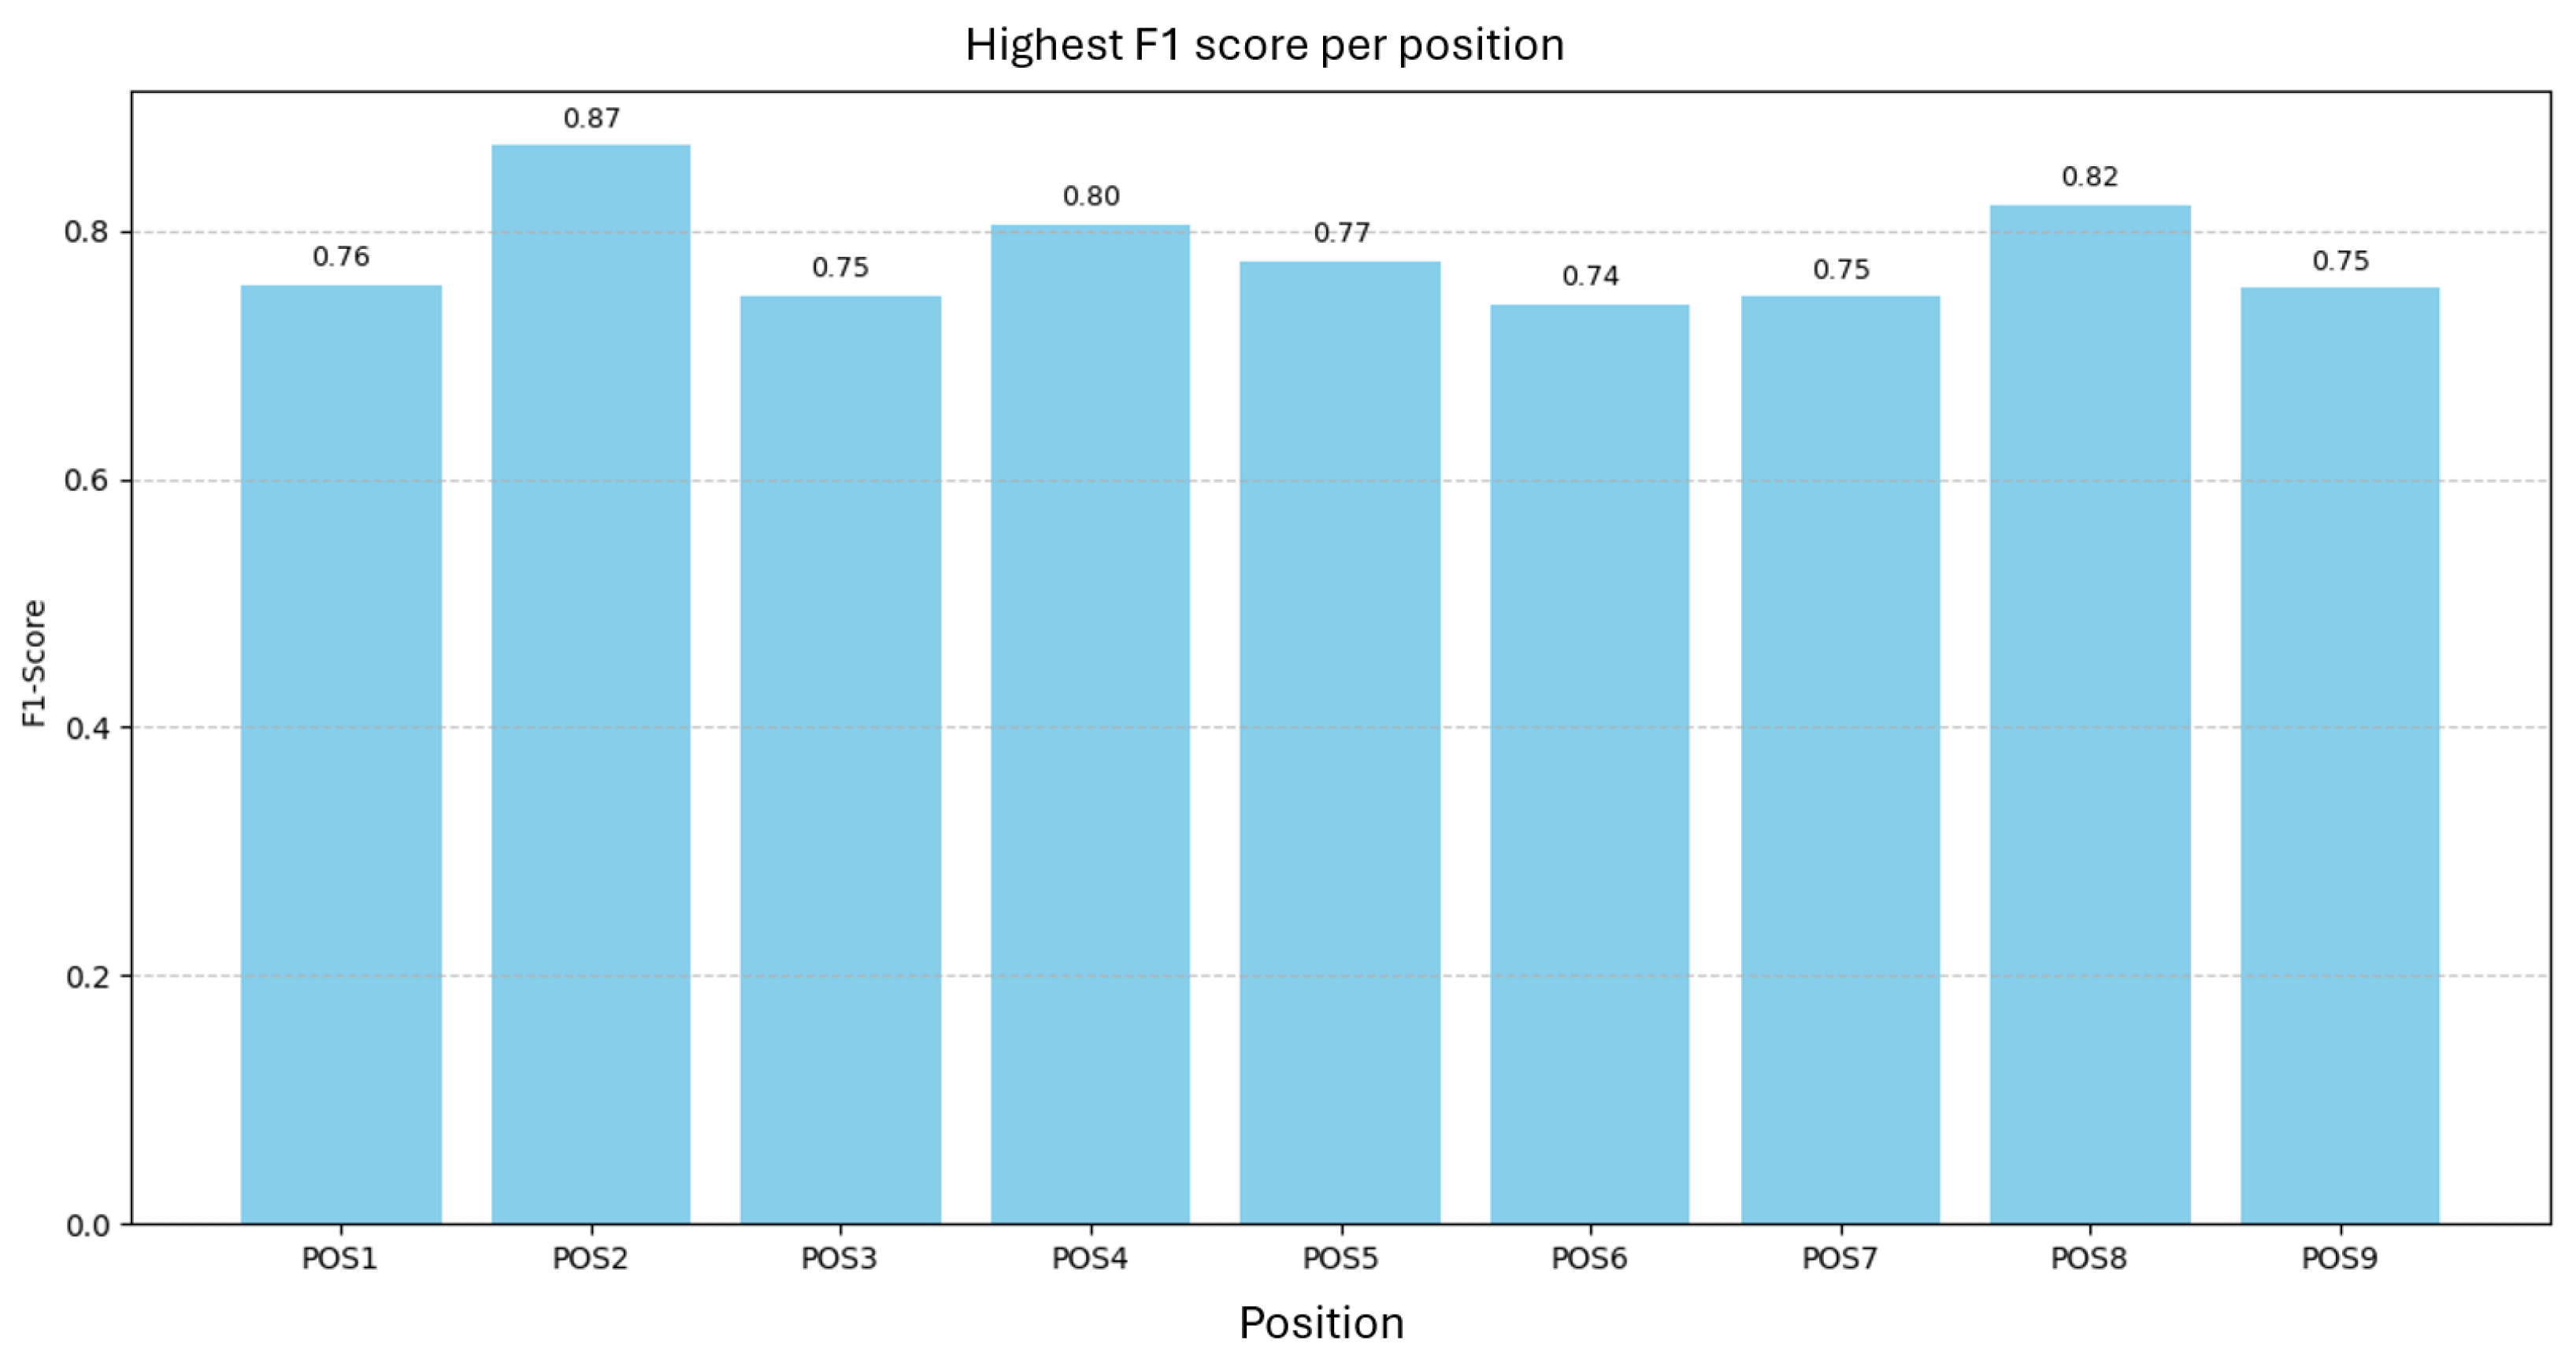
(H3) Position-specific models will outperform a Part-Level model in localization accuracy, but the Part-Level model may generalize better across inspection positions.
Beyond the formal research questions and hypotheses, this work contributes a deployment-oriented perspective that is absent from existing aluminum X-ray inspection studies. Specifically, the study examines how a high-resolution deep learning pipeline can be executed under strict CPU-only constraints on legacy industrial hardware, reflecting real production restrictions rather than laboratory conditions. In addition, the work investigates model granularity within a TRL-7 environment, where position-specific and part-level training strategies must interact with fixed inspection routines, operator workflows, and repeatability requirements. These aspects position the study as a practice-oriented contribution that complements existing YOLO-based research and extends it toward near-deployment applicability.
The remainder of this paper is structured as follows:
Section 2 details the industrial context, dataset curation, and methodological framework, including model preselection, hyperparameter optimization, and evaluation protocol.
Section 3 presents the quantitative and qualitative results, including runtime performance, F1-scores, and live test outcomes.
Section 4 discusses the implications of the findings for industrial practice, limitations, and future work. Finally,
Section 5 concludes with practical recommendations for deploying AI in industrial inspection workflows.
2. Related Work
Deep learning-based visual inspection has become a central approach across manufacturing, construction, and structural health monitoring. In aluminum casting, Parlak et al. [
2] showed that CNN-based analysis of X-ray images can detect porosity and inclusion defects more reliably than classical image-processing pipelines. Yılmaz et al. [
3] used YOLO-based detectors for multi-class defect localization and highlighted the difficulty of identifying small, low-contrast pores, motivating work on high-resolution inference and deployment-oriented architectures.
Outside casting, recent studies have demonstrated the robustness of YOLO-style one-stage detectors in safety-critical, real-world environments. Wang [
6] evaluated transformer-augmented YOLO models for personal protective equipment detection using surveillance and body-worn cameras, reporting stable accuracy across changing viewpoints and illumination conditions. A related study by Wang [
7] applied similar architectures to helmet monitoring and emphasized real-time performance under hardware-limited deployment settings. Although these applications differ from radiographic inspection, both studies reinforce that lightweight one-stage detectors remain suitable where inference speed and resource constraints dominate system design.
In structural health monitoring (SHM), machine learning and deep learning are increasingly used for defect identification and condition assessment. Khatir et al. [
8] reviewed ML/DL-based SHM methods for mechanical and civil structures and summarized advantages in automated feature extraction and real-time monitoring, while noting challenges such as limited labeled data and model interpretability. More specialized SHM work investigated physics-driven and optimization-based damage detection. Mansouri et al. [
9] analyzed vibration-based defect localization in beam systems using finite-element modeling and metaheuristic optimization algorithms, illustrating how hybrid computational methods address uncertainty and structural variability.
Across these domains, two patterns recur: high-resolution inputs improve sensitivity to small defects, and models adapted to specific structural or positional contexts often outperform generic variants. These trends motivate the present work, which evaluates model granularity and resolution effects for aluminum X-ray inspection under strict CPU-only constraints in a TRL-7 industrial setting.
5. Discussion
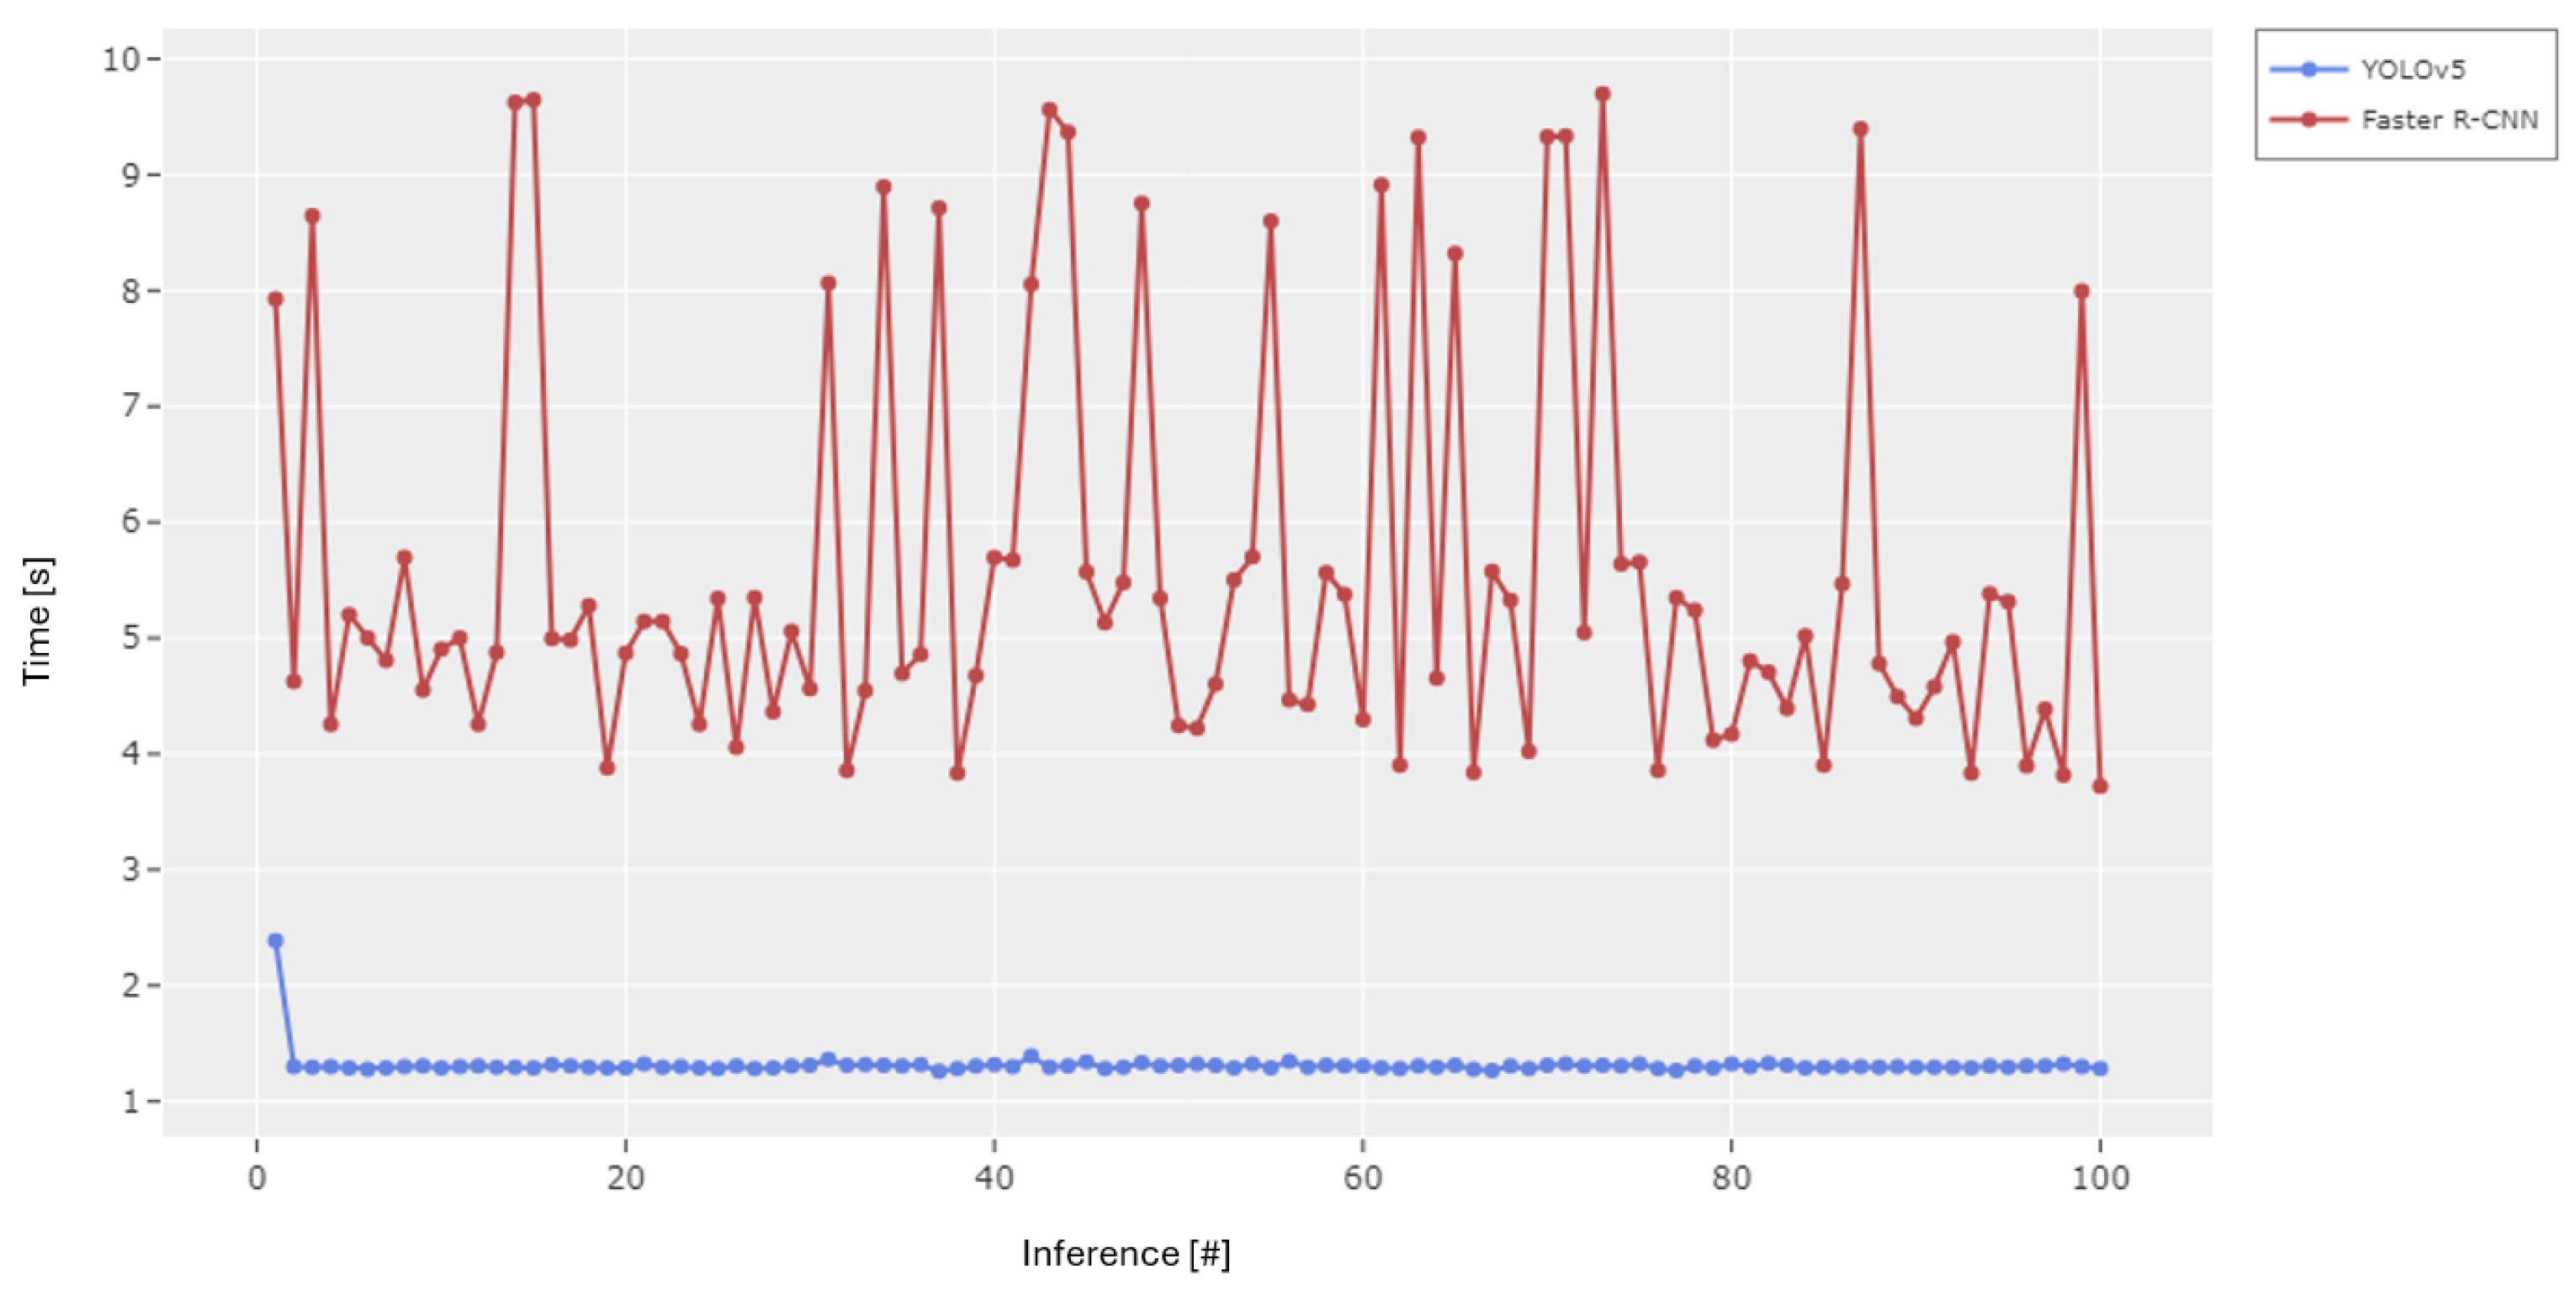
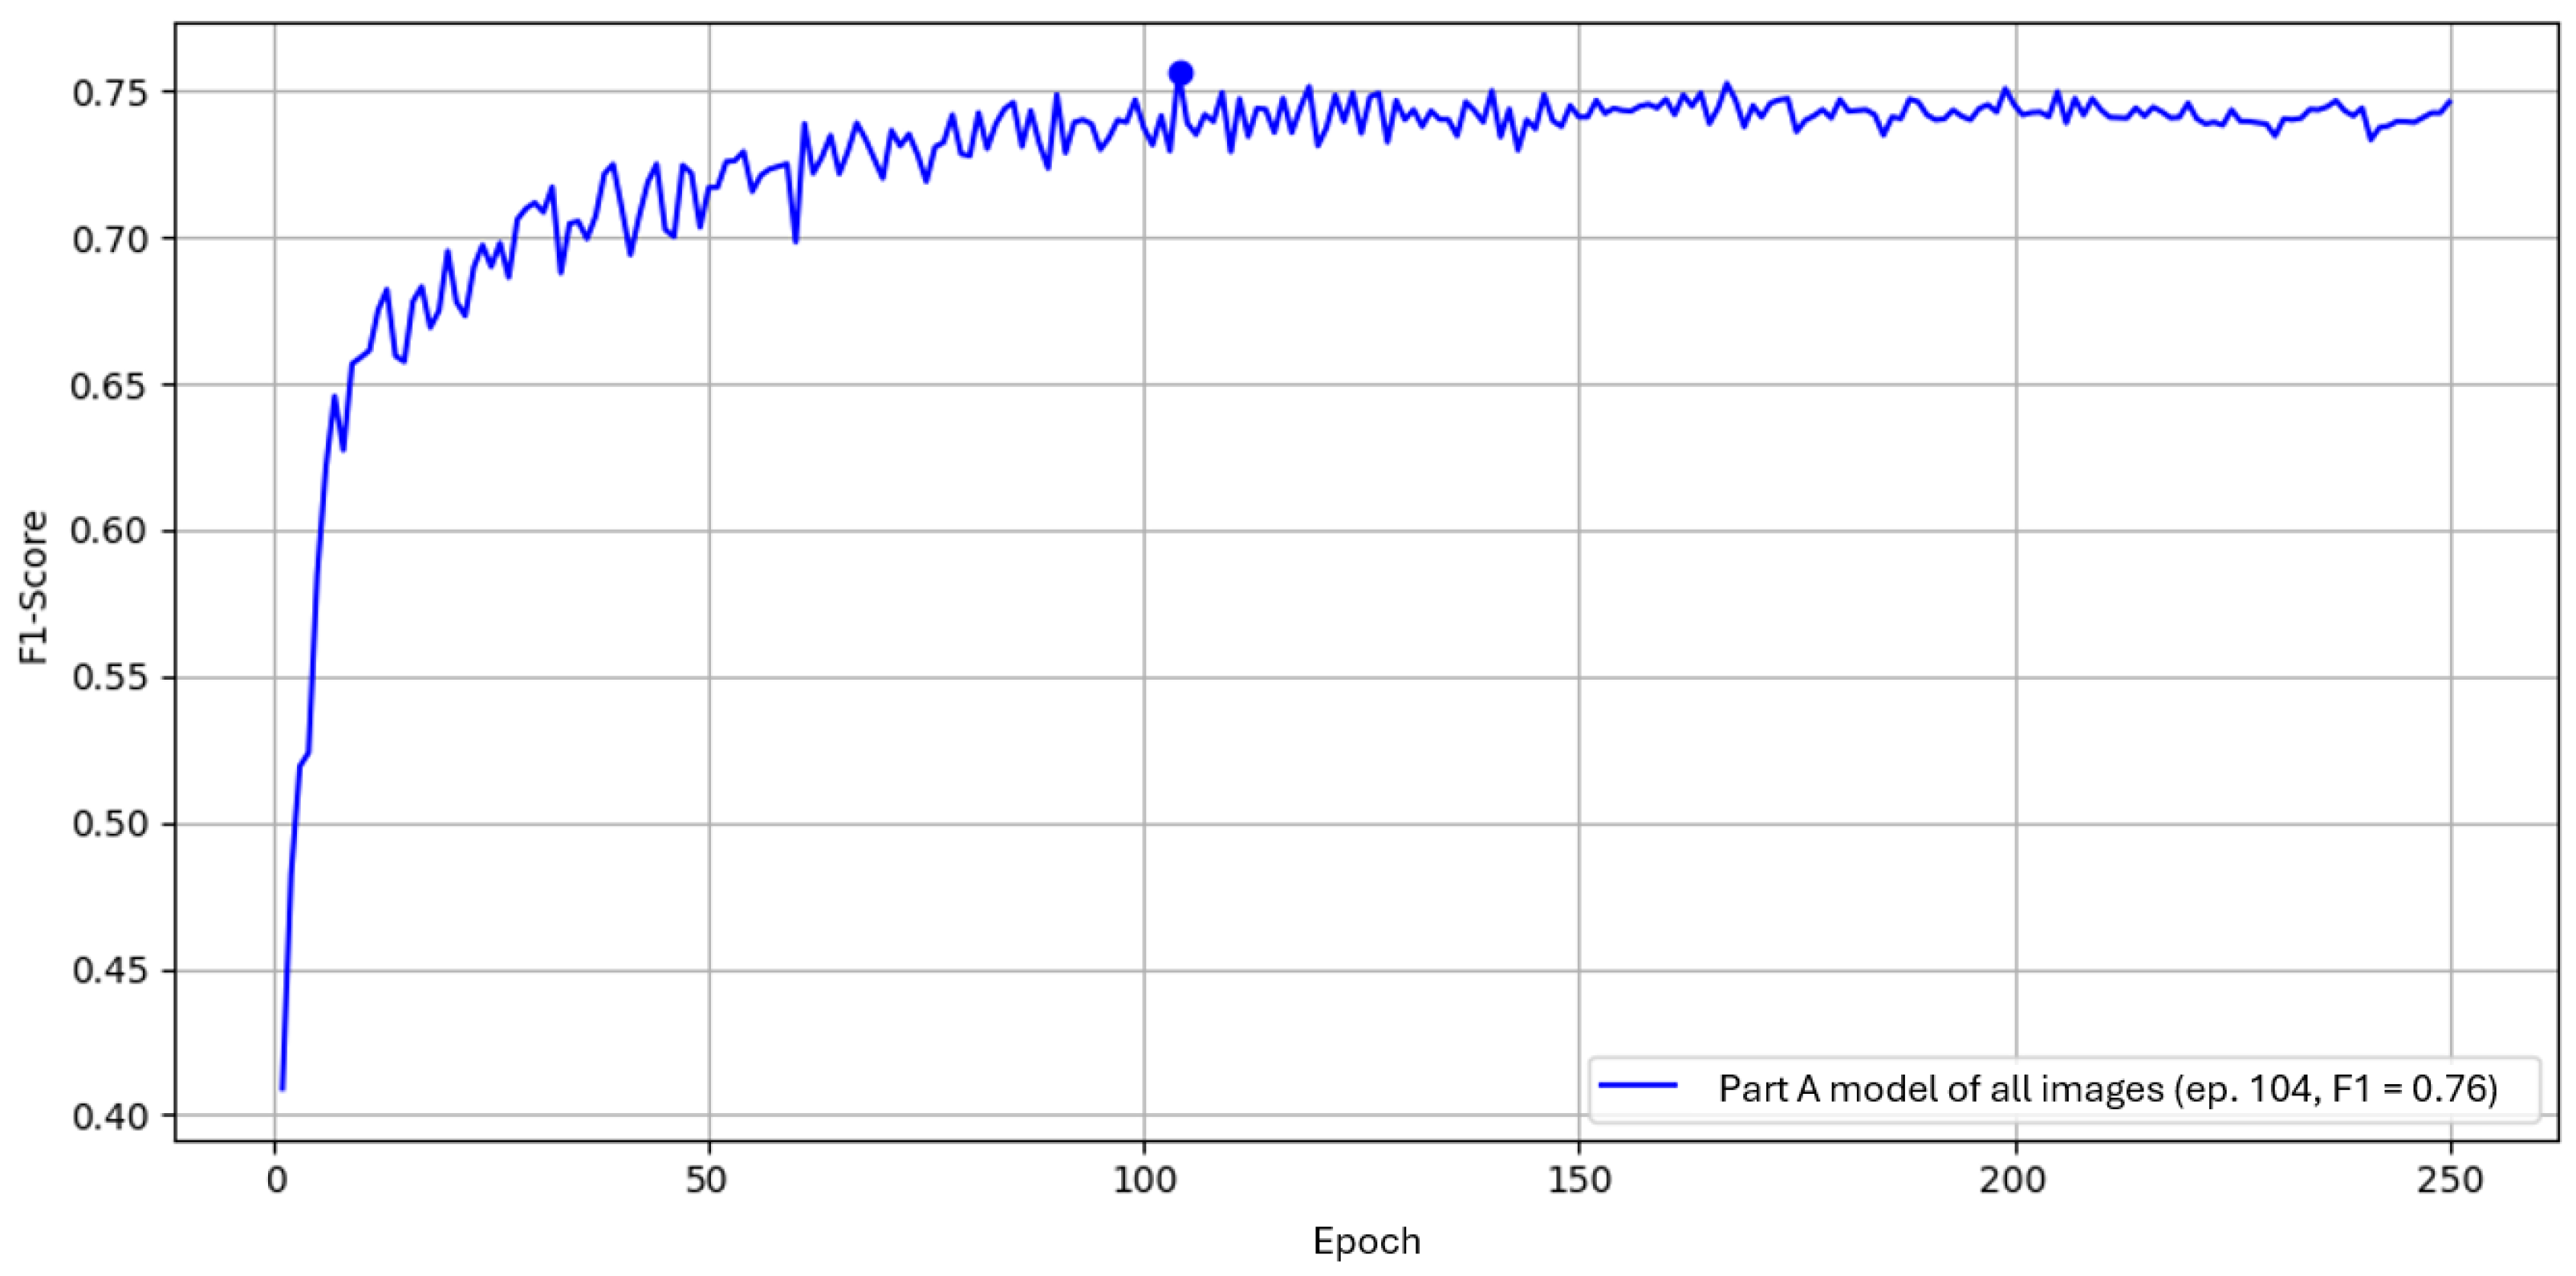
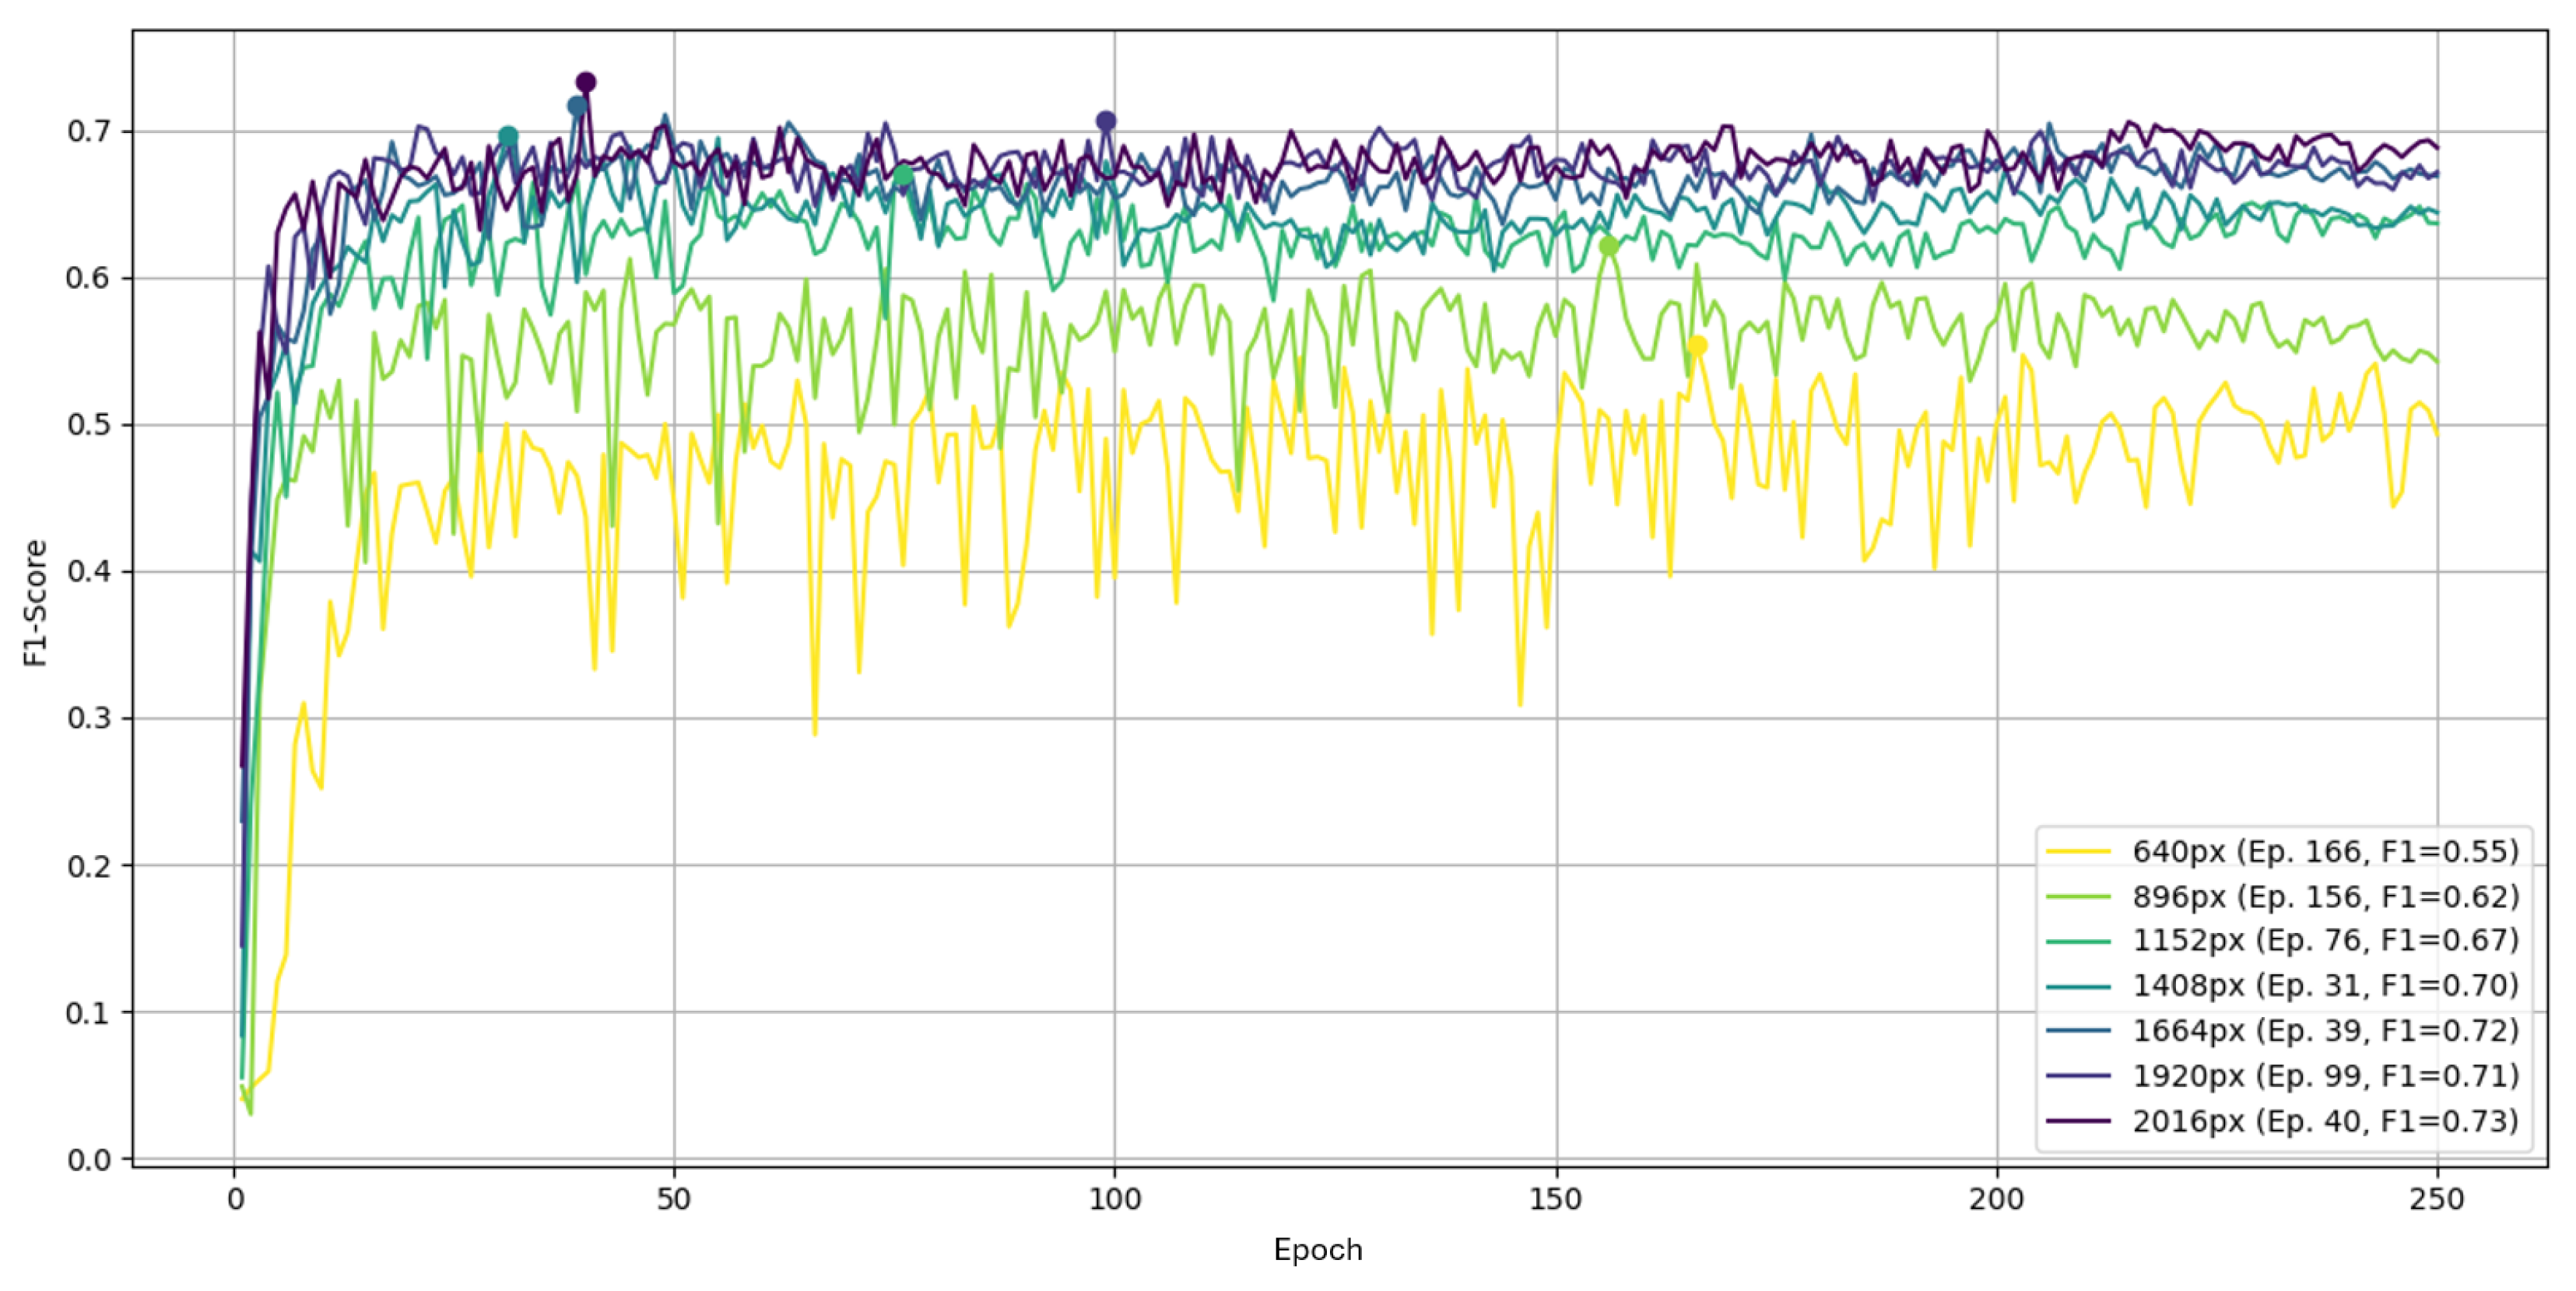
This study demonstrates that a one-stage detector can satisfy stringent shop-floor constraints for porosity detection in aluminum die-cast radiographs while achieving competitive accuracy relative to certified inspectors. The three central outcomes—real-time CPU feasibility, strong resolution sensitivity, and the granularity trade-off between position-specific and part-level models—directly address RQ1–RQ3. Under CPU-only deployment, YOLOv5 met the <2 s latency target, whereas the two-stage baseline did not, aligning with prior findings that one-stage architectures provide superior throughput on non-GPU hardware [
2,
3]. Maintaining the native spatial resolution (
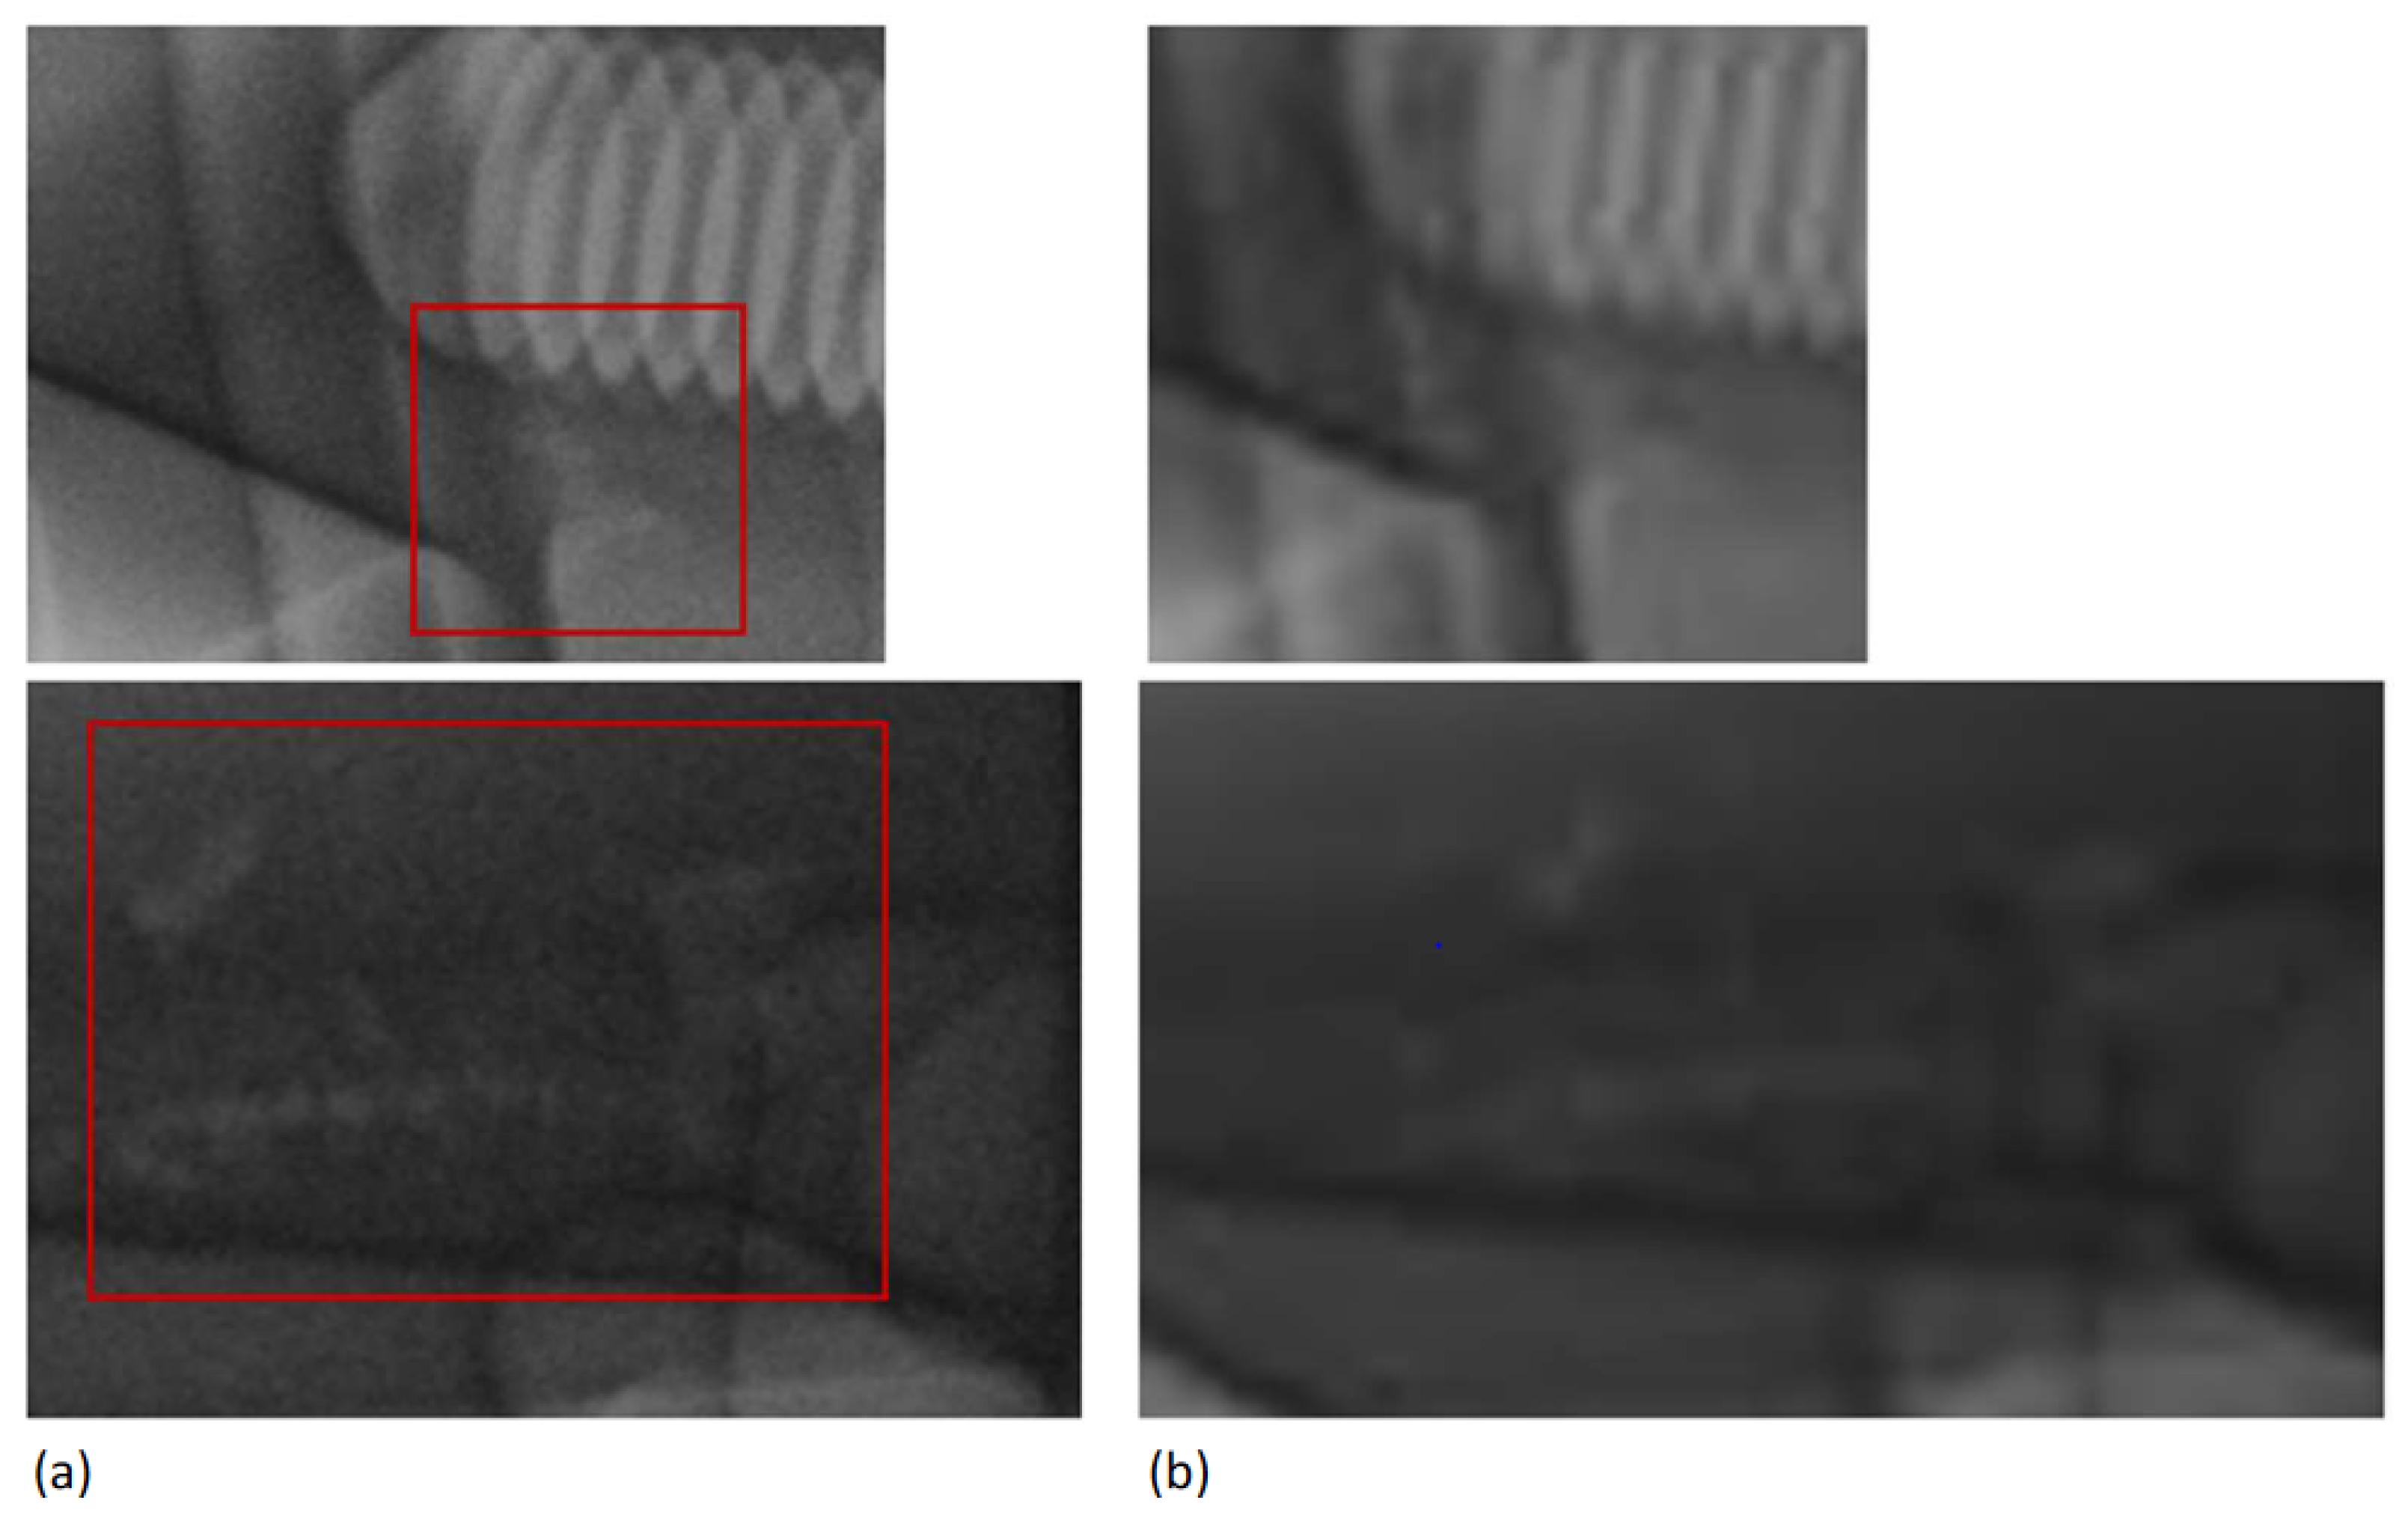
) delivered the largest accuracy gains, confirming that small, low-contrast porosity signatures require high-resolution inputs [
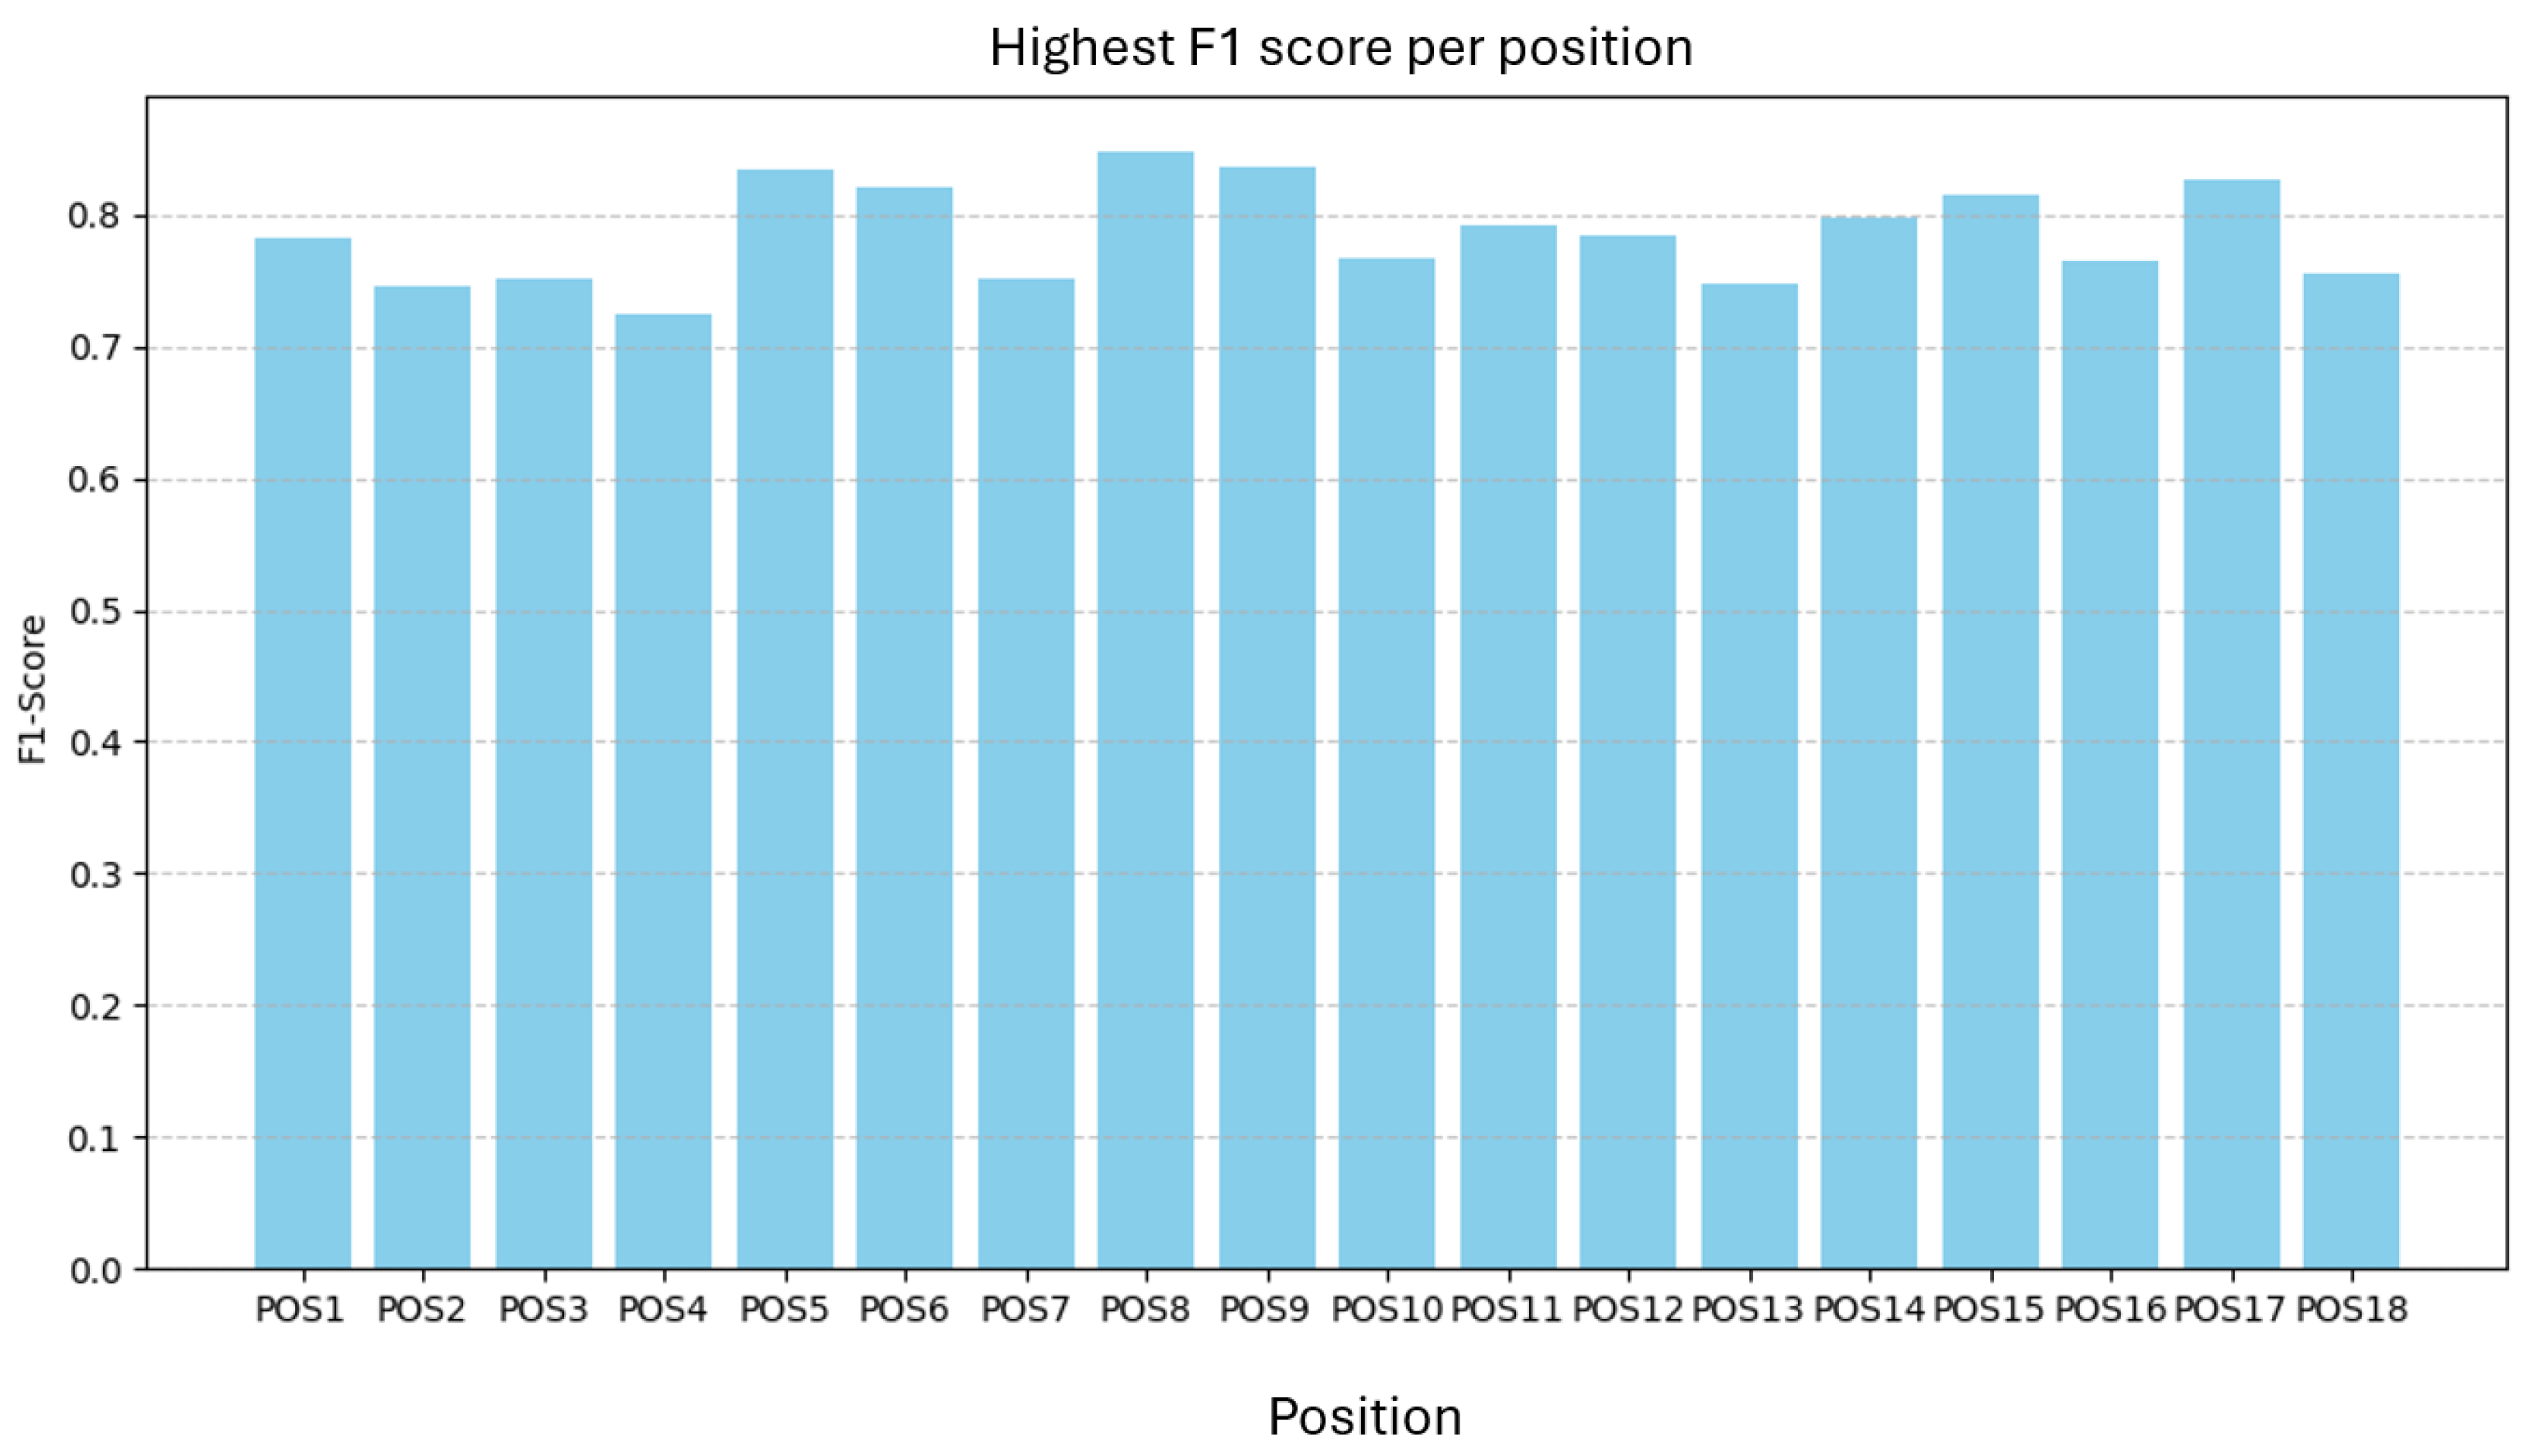
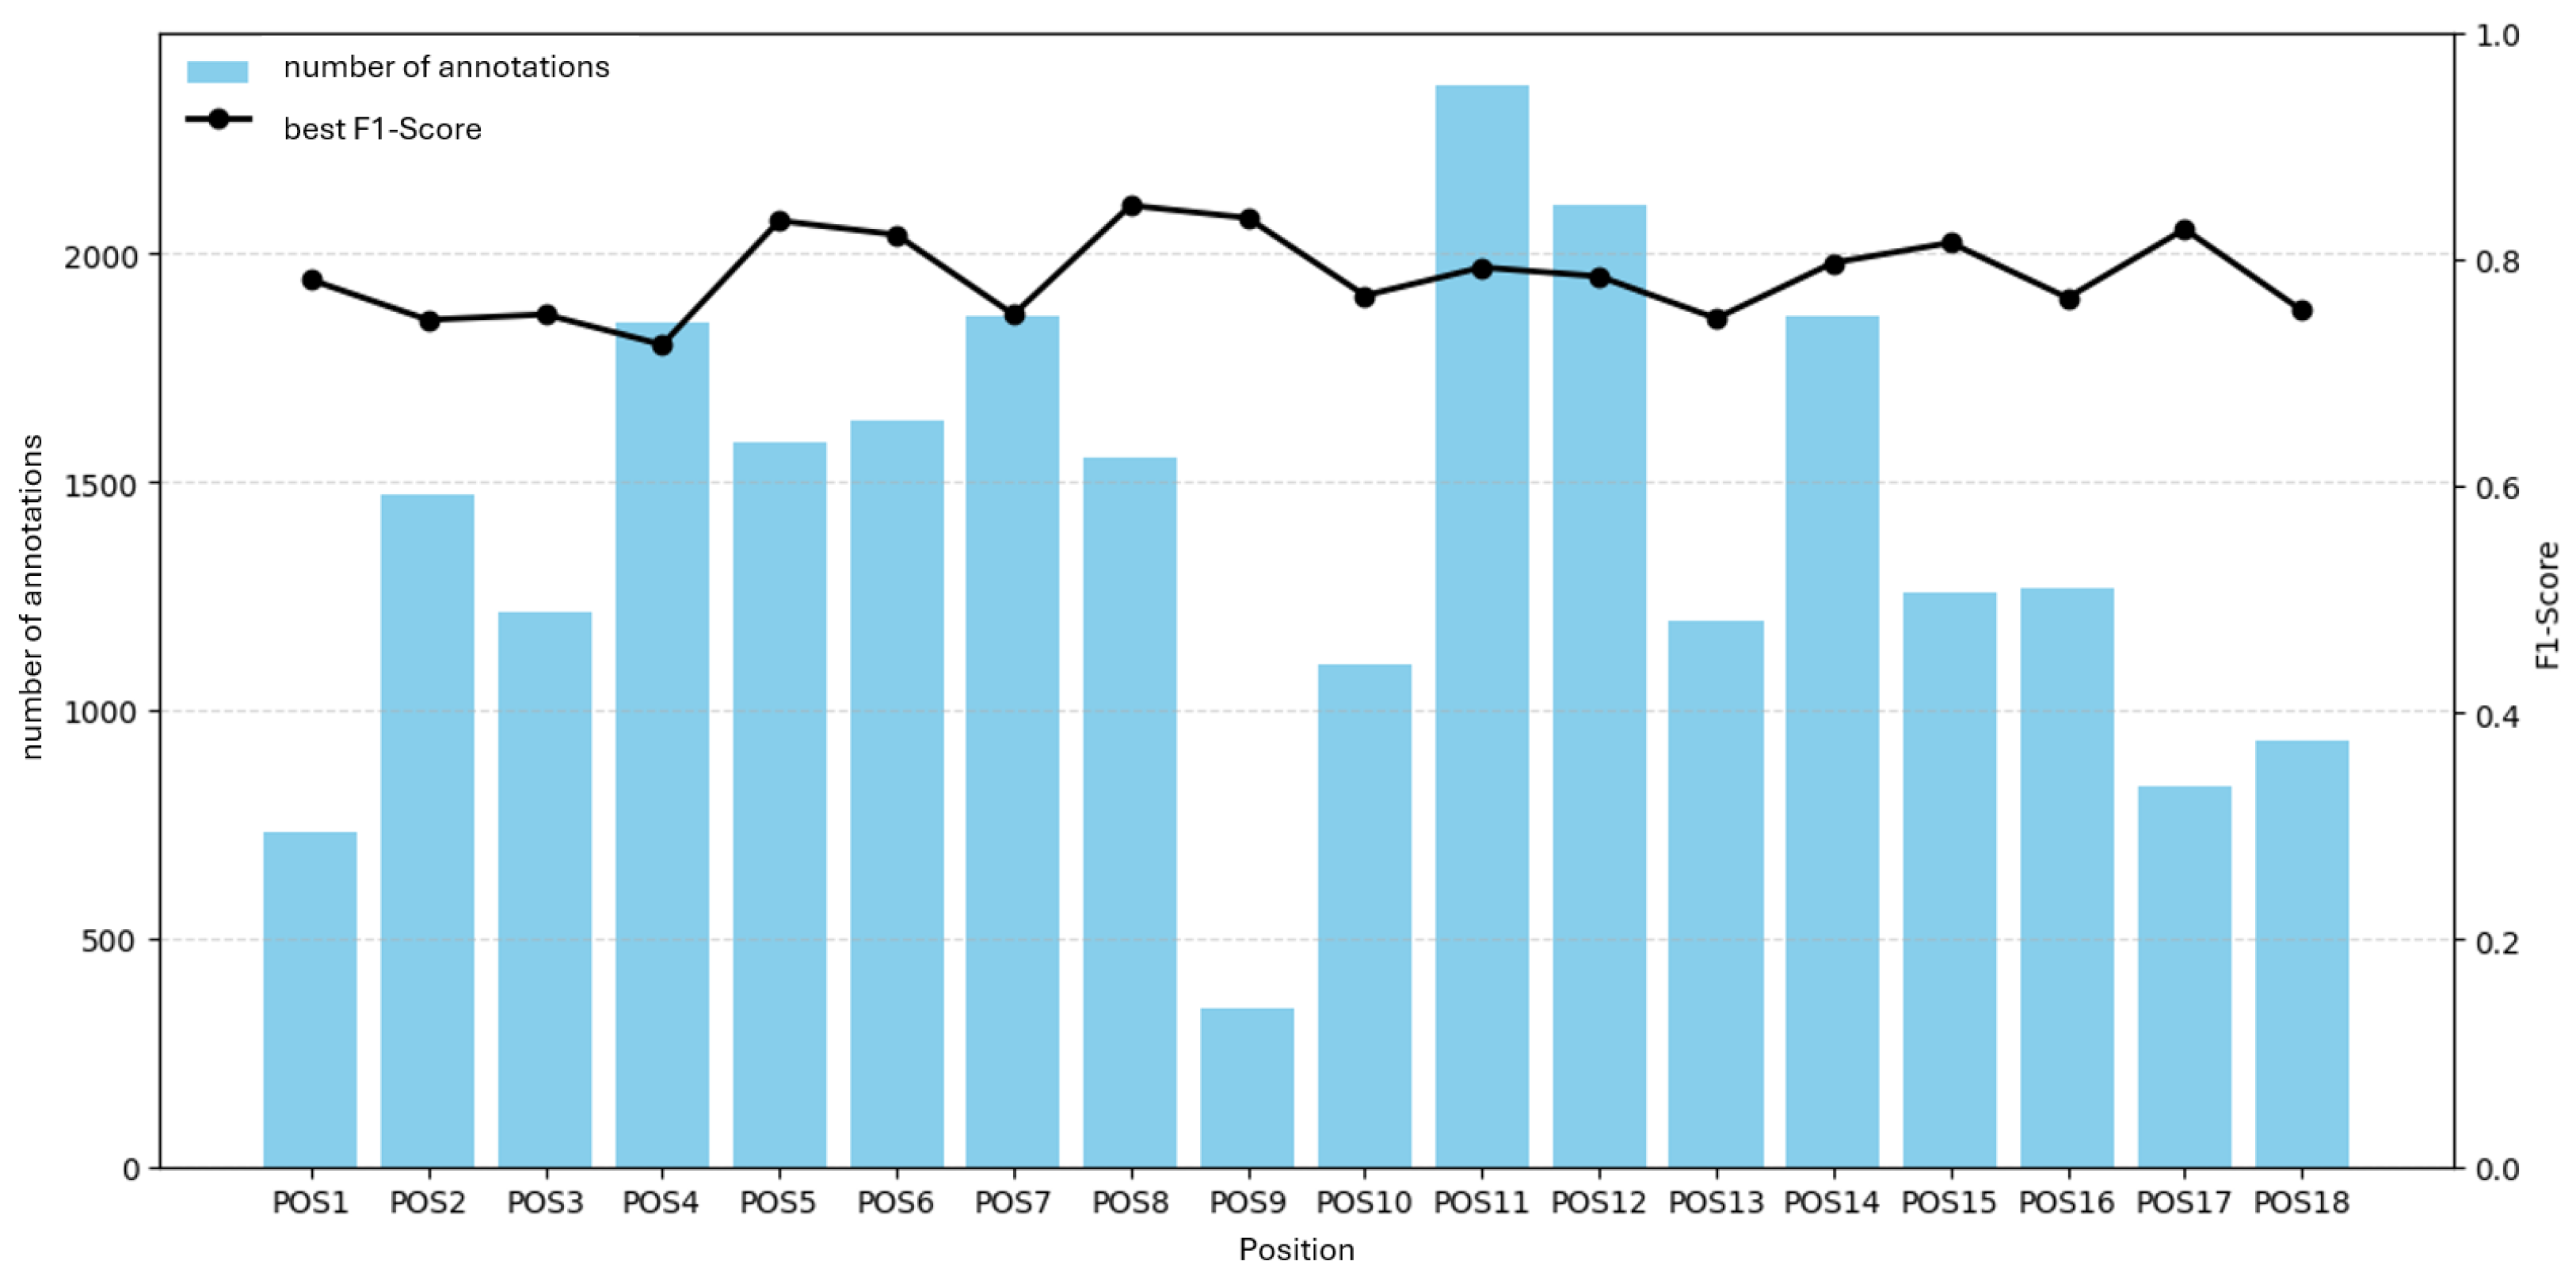
1]. Model granularity shaped performance: position-specific models yielded sharper localization at the trained pose, while the part-level model generalized better across poses and slightly exceeded inspectors on one part.
Comparable patterns are reported in other industrial and medical DL applications. In industrial surface-inspection systems, Lu and Lee demonstrate real-time defect detection using a lightweight YOLO-based network, though their deployment relies on GPU acceleration, highlighting that many industrial workflows meet throughput requirements via dedicated hardware rather than CPU-only execution [
13]. In medical imaging, by contrast, object-detection models such as Faster R-CNN, RetinaNet, or YOLOv5 are commonly used in offline diagnostic pipelines, where inference times of several seconds are acceptable and accuracy is prioritized over strict latency constraints, as reviewed by Elhanashi et al. [
14]. These cross-domain observations emphasize that the <2 s requirement addressed in this study is domain-specific and significantly stricter than typical inspection or diagnostic settings.
5.1. Interpretation Relative to Hypotheses and Prior Work
The results support all hypotheses without requiring restatement of the findings. H1 is validated by the clear latency separation between one-stage and two-stage models, consistent with analyses attributing throughput advantages to shared backbone computation and simplified detection heads. H2 is supported by the strong dependency of detection quality on input resolution, extending prior work by demonstrating that this effect persists under strict CPU-only deployment constraints. H3 is reflected in the observed trade-off between specialization and generalization: view-specific training sharpens decision boundaries but reduces robustness, whereas pooled training broadens coverage at the cost of localization precision. These interpretations position the present findings as aligned with, and extending, established theoretical and empirical work in industrial vision.
5.2. Methodological Contribution
Beyond the empirical results, the study introduces several methodological elements that are not addressed in prior work on aluminum X-ray inspection. First, the evaluation focuses on a deployment-constrained setting in which high-resolution radiographs must be processed under strict CPU-only latency requirements; such constraints are rarely examined in existing studies, which typically assume GPU availability or rely on substantially downsampled images. Second, the comparison between position-specific and part-level training strategies provides a systematic analysis of model granularity in a multi-view industrial environment, a factor that has practical relevance but is not explicitly investigated in the previous aluminum-casting literature. Third, the pipeline employs deterministic preprocessing and hyperparameter tuning tailored to real-time shop-floor execution, clarifying which design choices remain stable under TRL-7 conditions. These elements define the methodological scope of the work and differentiate it from studies that focus primarily on model accuracy under laboratory conditions.
5.3. Implications for Industrial Practice
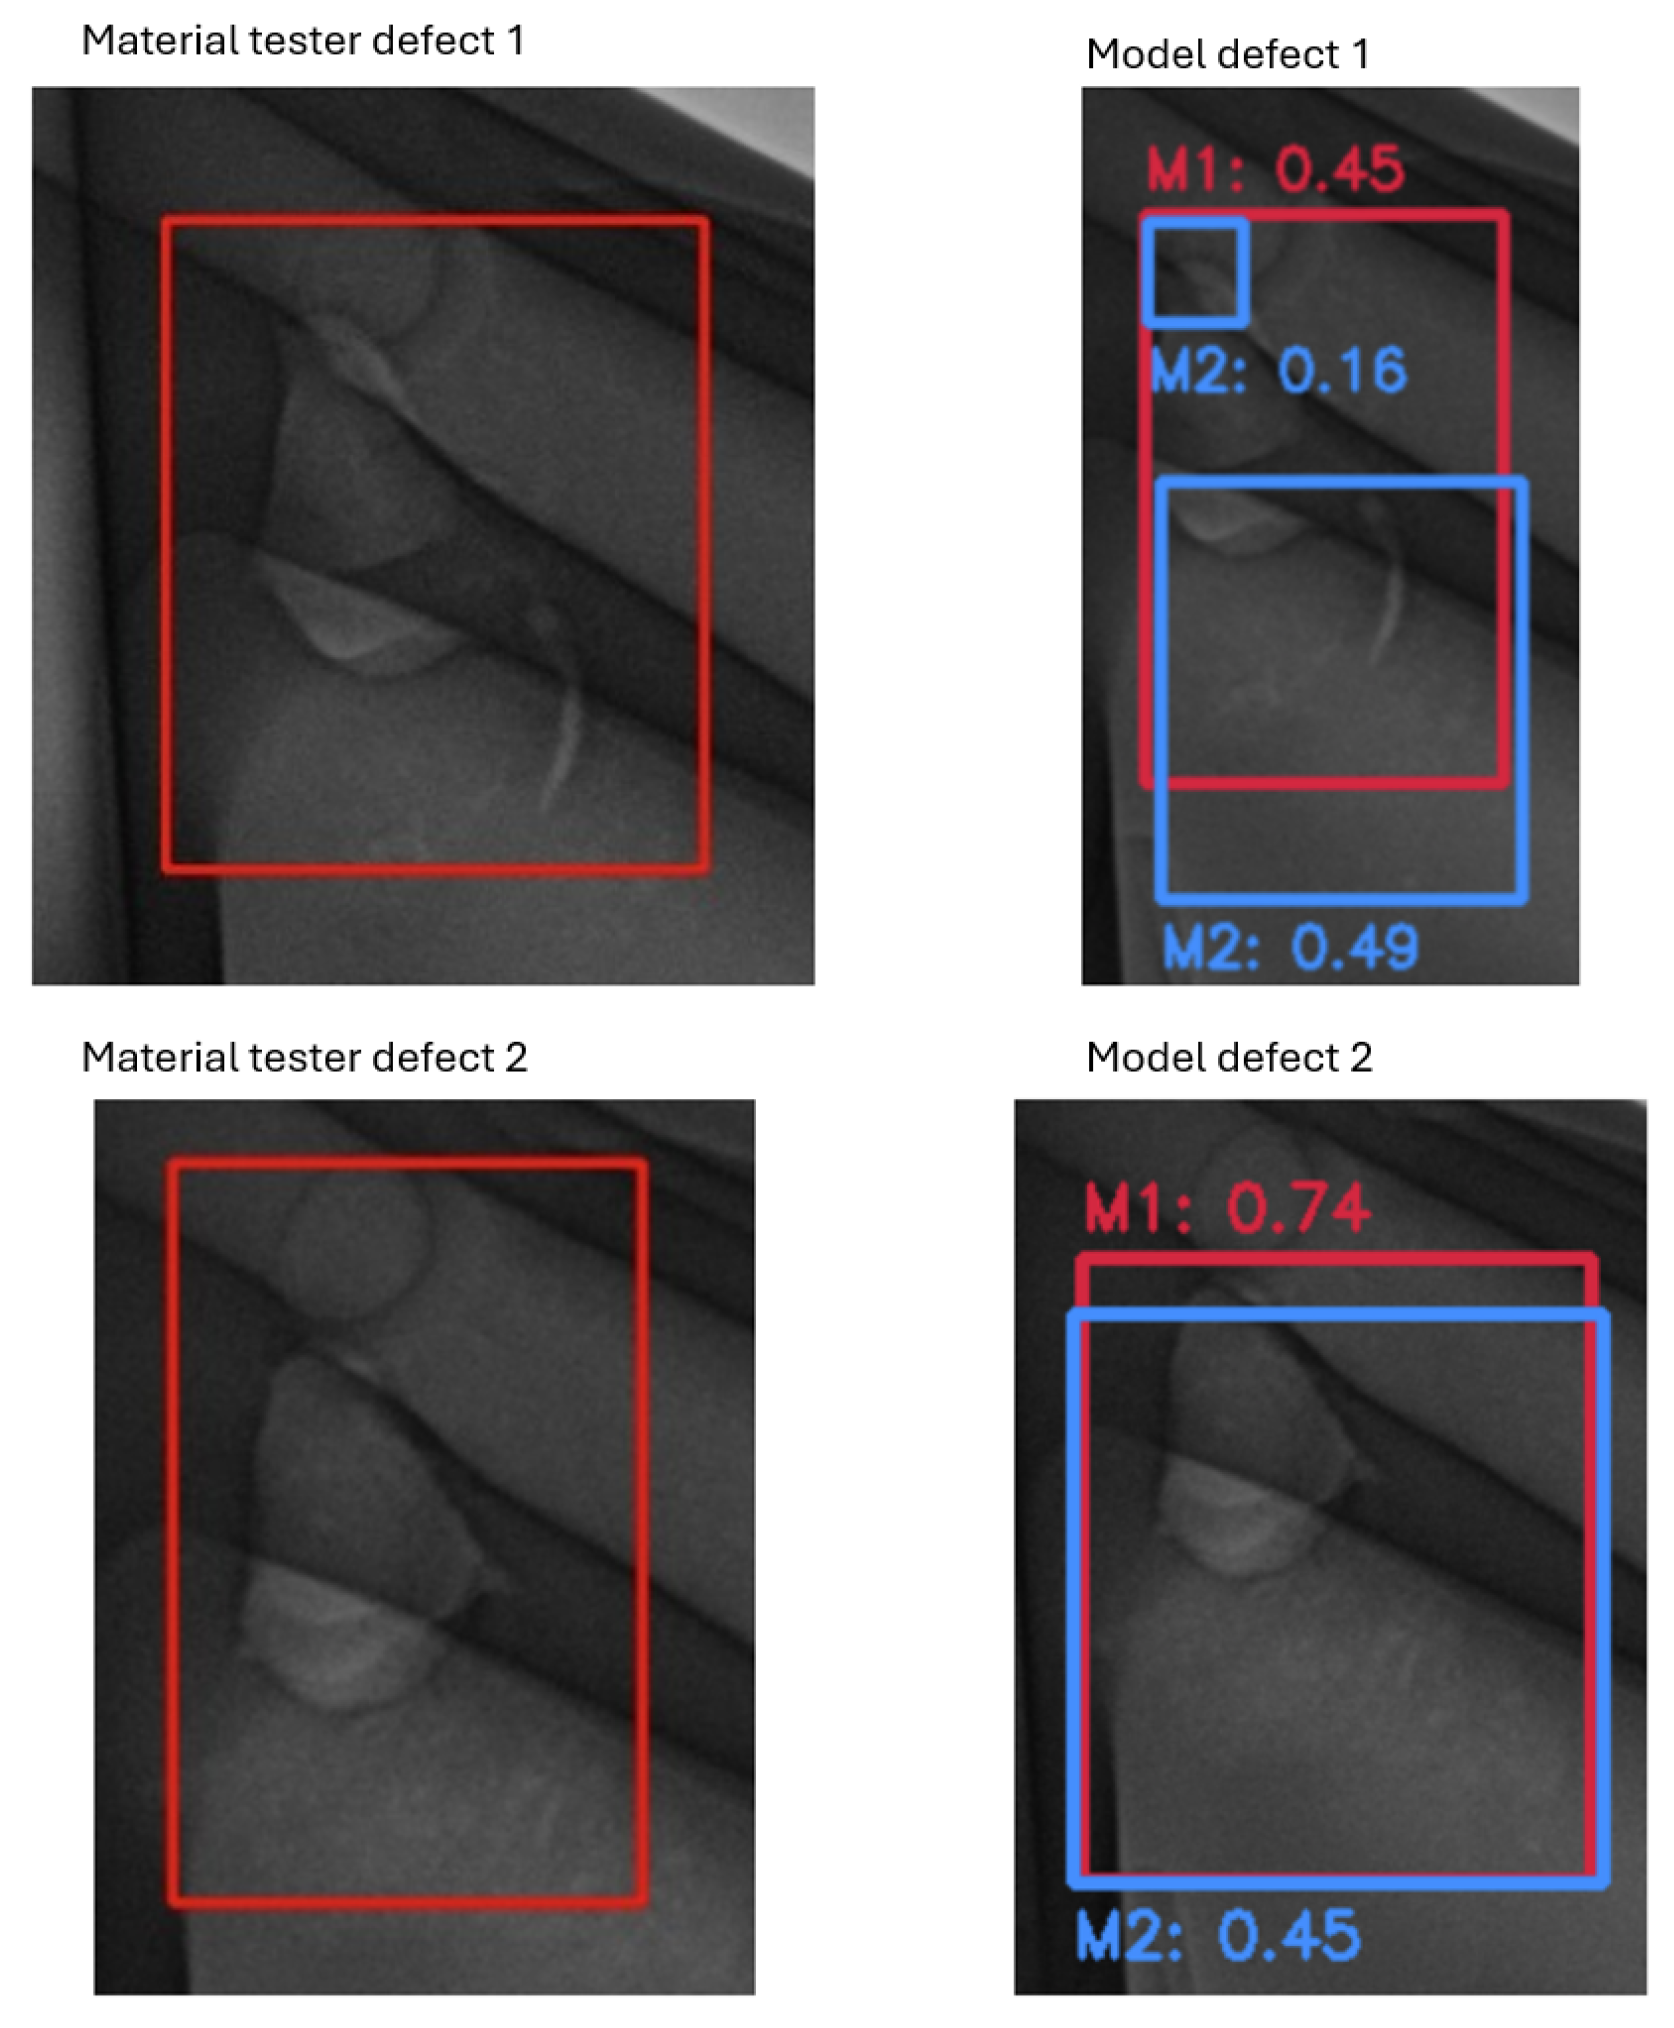
For safety-critical inspection, the live-test analysis indicates that the risk of missing critical defects can be controlled with a CPU-feasible pipeline when the operating point is fixed from validation and when high-resolution inputs are used. Counting rules materially affect perceived performance. Merging split detections into single physical defects (“cleaning”) produced a modest decrease in inspector F1 and a concomitant increase in model recall and F1, suggesting that detectors tend to fragment extended porous regions. Consequently, operational KPIs should be reported on physical defects, rather than raw mark counts, to avoid bias against automated systems that intentionally over-segment for safety.
5.4. Sustainability Considerations
Beyond technical performance, the proposed inspection approach has implications for sustainable manufacturing in economic, ecological, and social dimensions. Economically, automated detection reduces the likelihood that defective castings progress into machining or assembly, avoiding unnecessary processing costs and downstream scrap. Although no quantitative model was available within the scope of this work, industrial experience suggests that preventing the machining of defective parts and reducing manual inspection load both generate measurable operational benefits.
Ecologically, early rejection of defective components avoids energy- and material-intensive downstream steps in aluminum die casting, where remelting or repeated processing contributes noticeably to CO2 emissions. While precise energy or emission savings could not be quantified under project constraints, the mechanisms are well established within die-casting operations.
Socially, automated decision support reduces cognitive load, visual fatigue, and shift-to-shift variability for inspectors. Stabilizing borderline decisions and reducing time pressure contribute to more consistent working conditions and improved operator well-being in high-throughput inspection cells.
Overall, although quantitative sustainability metrics were beyond the scope of the present study, the qualitative pathways through which automated inspection supports economic, ecological, and social sustainability are evident and align with the broader motivation of sustainable manufacturing.
5.5. Generalization and Deployability Considerations
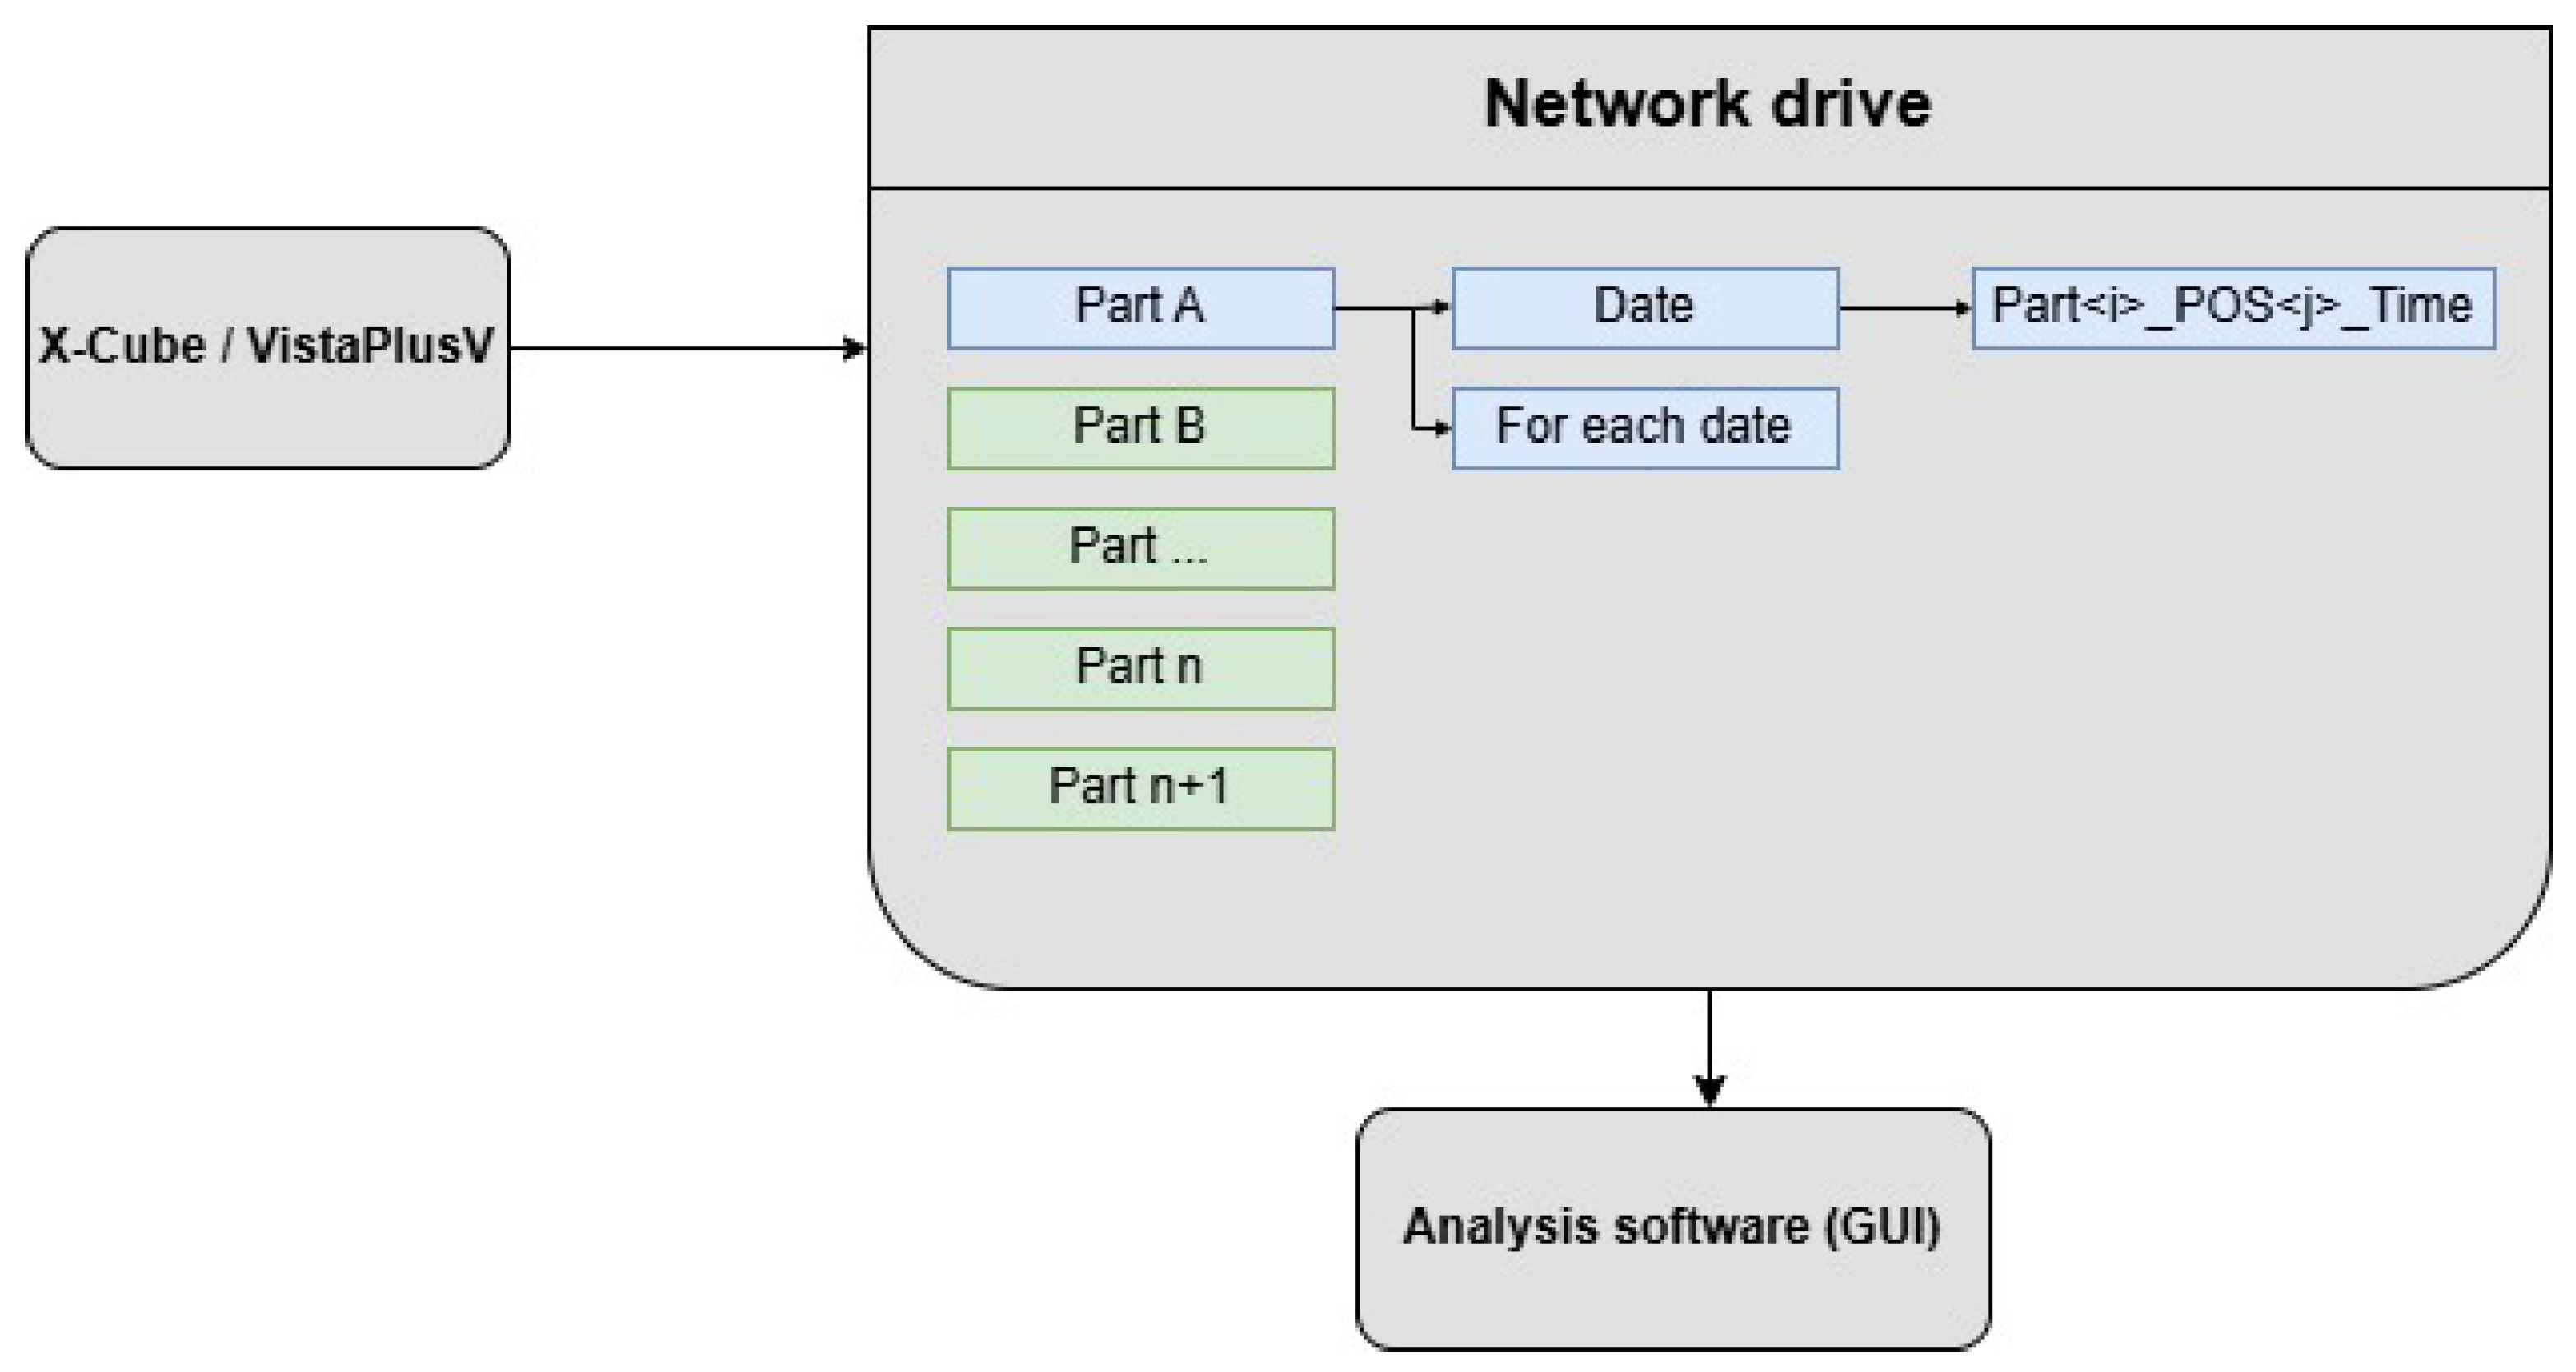
The deployability of the proposed inspection pipeline depends on how well its components transfer to new parts, exposure conditions, and defect types. The current system integrates cleanly into an existing TRL-7 industrial workflow because it satisfies the operational constraints of the inspection cell: CPU-only inference, fixed latency requirements, deterministic preprocessing, and a file-based interface compatible with existing PLC routines. These elements can be transferred to other inspection scenarios with limited adaptation, suggesting that the core pipeline is deployable in environments with similar hardware and timing constraints.
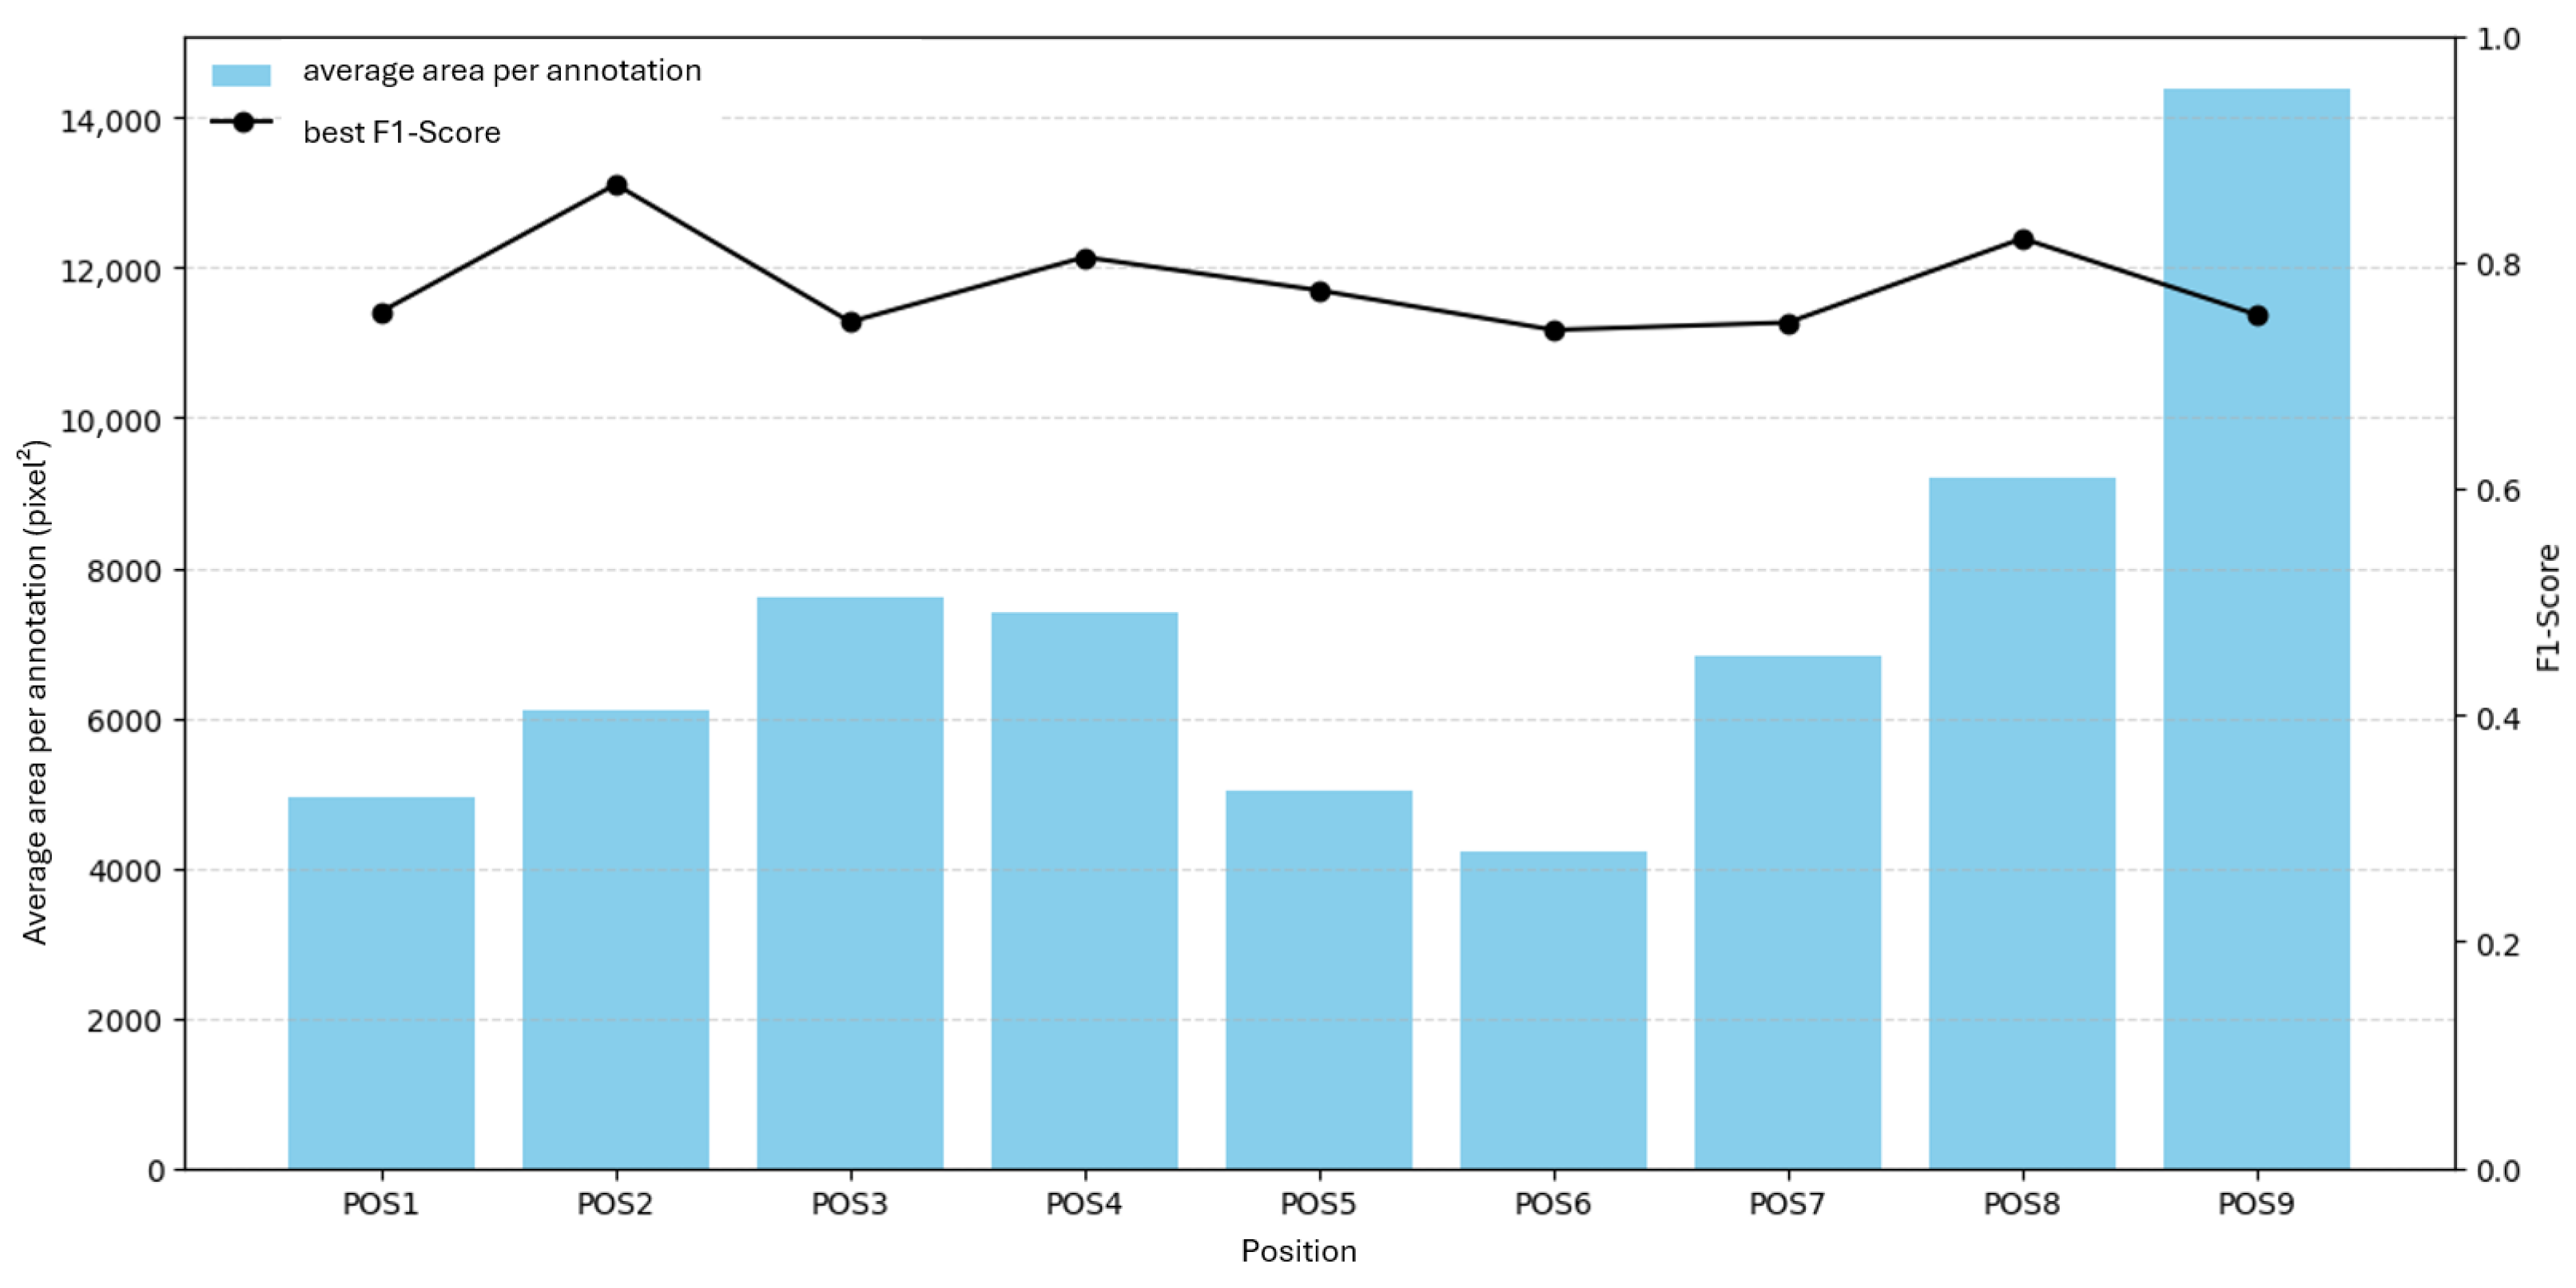
Generalization to new parts or exposure recipes, however, requires additional model adaptation. Because detector performance depends strongly on the spatial appearance and contrast of porosity, new parts with different geometries or material thicknesses would require at least partial re-annotation and fine-tuning. Similarly, changes in X-ray exposure parameters can alter noise characteristics or contrast levels, which may reduce performance without incremental retraining. Extending the system to multi-class defect detection would further require additional labeled data and task-specific training, as the present model is optimized only for porosity.
Some aspects of the workflow are therefore ready for deployment, including the inference pipeline, deterministic preprocessing steps, high-resolution CPU-feasible model configurations, and the integration concept with the inspection cell. Other components—particularly the training procedure, data curation, and domain adaptation steps—remain research-oriented and would need controlled re-training for each new part or recipe. These distinctions clarify which elements of the system can be reused directly and which must be revalidated when applied beyond the current TRL-7 environment.
5.6. Model Robustness and Maintenance Strategies
Robust long-term operation of an automated inspection system requires mechanisms to detect and mitigate performance drift. In production environments, gradual changes in exposure conditions, part geometry, tooling wear, or noise characteristics can shift the distribution of radiographs and weaken detector performance over time. The present study did not assess such effects, but several maintenance strategies are relevant for practical deployment.
Periodic retraining or fine-tuning on newly collected, adjudicated samples is the most direct mitigation strategy and can adapt the detector to slow distributional changes in exposure settings or casting quality. Incremental learning approaches may further reduce retraining cost by updating only subsets of model weights or by leveraging replay buffers to avoid catastrophic forgetting. Active-learning pipelines offer another avenue: low-confidence predictions or disagreements between the model and human inspectors can be forwarded for annotation to systematically expand the dataset where the model is least reliable.
In addition, monitoring the distribution of prediction scores and bounding-box statistics can provide early warning indicators of drift, allowing operators to trigger model review or retraining before accuracy degradation becomes operationally relevant. While such robustness mechanisms were outside the scope of the present implementation, they are essential components of a deployable inspection workflow and represent practical extensions for future industrial deployments.
5.7. Limitations
The study analyzes two parts in one production cell and one defect class (porosity) on 2D radiographs; external validity to other parts, exposure recipes, or CT data remains untested. The live-test samples for critical defects were small, so uncertainty is non-negligible. For non-critical findings, ground truth required adjudication and thus retains residual subjectivity. Throughput and latency were not instrumented during the live test; only qualitative real-time behavior was observed.
A further limitation is that no repeated training or inference runs were conducted, and therefore no variability estimates or confidence bounds are reported for F1-scores, latency, or operator–model differences. Access to the production hardware and compute resources was limited to a single training and deployment window, which prevented systematic repetition or controlled variance analysis. As a consequence, small numerical differences between models (for example, variations of approximately 0.02 in F1) should be interpreted cautiously, as they may fall within run-to-run or sampling variability.
Annotation uncertainty introduces an additional source of noise. Although adjudication procedures were applied, borderline cases and differing interpretations of extended porous regions cannot be fully eliminated. Future studies with dedicated experimental time and instrumented logging should quantify run-to-run variation, inference-time variance, and inter-annotator agreement to more precisely assess statistical significance and robustness.
A further methodological limitation is the absence of k-fold cross-validation and structured cross-position generalization experiments. Because the dataset is position-dependent and access to the production system was restricted, it was not feasible to retrain models across multiple folds or to train on a subset of positions and test on unseen views. As a result, the extent to which the observed performance reflects position-specific overfitting versus true generalization cannot be fully quantified.
5.8. Future Directions
Three extensions are immediate. First, broader prospective studies with instrumented logging should quantify end-to-end latency, cold-start effects, and operator interaction time. Second, small-budget automated tuning constrained to deterministic hyperparameters may reduce calibration effort across parts and positions. Third, post-processing that learns to consolidate neighboring boxes could reduce split detections without degrading recall. Additional opportunities include calibrated uncertainty for triage, periodic active learning from adjudicated disagreements, and evaluation on multi-class defect scenarios and CT volumes.
Future work should also include k-fold cross-validation for each inspection position and structured cross-position generalization experiments. Training on a subset of positions and testing on held-out views would provide a more rigorous assessment of robustness to pose-specific variation and clarify whether performance gains originate from true generalization or position-specific memorization. These experiments were not feasible within the project due to limited access to hardware and annotation resources but represent essential next steps for establishing broader generalization.
