Article

Study on the Mechanism and Interpretability of Defect Features on Fatigue Damage in 6061 Aluminum Alloy

1
School of Mechanical and Automotive Engineering, Shanghai University of Engineering Science, Shanghai 201620, China
2
Chinese Academy of Agricultural Mechanization Sciences, Beijing 100083, China
*
Author to whom correspondence should be addressed.
Appl. Sci. 2025, 15(24), 13021; https://doi.org/10.3390/app152413021
Submission received: 20 November 2025 / Revised: 7 December 2025 / Accepted: 8 December 2025 / Published: 10 December 2025

Abstract

In order to obtain a damage assessment method that can clearly express the influence mechanism of defect characteristics on fatigue damage, an integrated analytical framework combining the Shapley Additivity Interpretation (SHAP) method with the Extreme Gradient Boosting (XGBoost) model is established. Based on this framework, a high-accuracy fatigue damage prediction model was first established using the XGBoost model. Its accuracy and reliability are rigorously evaluated using the coefficient of determination R2 and root mean square error RMSE. Results demonstrate that the model performs exceptionally well on both the training and test datasets (R2 values of 0.999 and 0.846, respectively, with RMSE values of 0.0136 and 0.3727), establishing a reliable foundation for subsequent damage mechanism interpretation. Furthermore, by comparing defect feature importance between the XGBoost model and the SHAP interpretability model, it is revealed and cross-validated that the dominance order of defect features affecting the stress concentration factor k is Smax > P > Sarea > N > Vmax, confirming the physical stability of this dominance relationship. Additionally, leveraging the powerful local interpretability of the SHAP method, the contribution of each defect feature to the value in any sample was quantitatively analyzed, establishing a mathematical relationship between defect feature variables and the stress concentration factor k. Ultimately, based on the results of interpretability analysis and guided by fracture mechanics theory, the damage variable D is constructed by coupling multiple defect characteristics. This approach quantitatively reveals the intrinsic relationship between this variable and material fatigue damage. It provides a scientific basis for maintenance and repair decisions of aluminum alloy components in engineering applications, significantly enhancing their safety and reliability during use.

1. Introduction

Aluminum alloys are widely used in critical sectors such as aerospace and rail transportation due to their outstanding specific strength, corrosion resistance, and machinability [1,2,3]. However, during material preparation and processing, microscopic porosity defects such as gas holes and shrinkage porosity inevitably form internally [4,5,6]. Under cyclic loading, these defects act as stress concentration points, significantly reducing the performance of materials under fatigue conditions and directly impacting the operational safety and service life of engineering components [7]. Therefore, precisely revealing the intrinsic relationship between the internal defect feature and material fatigue damage is a key issue for enhancing the reliability design of aluminum alloy structures.
Extensive research has demonstrated that the extent of fatigue damage in materials is not determined by a single defect parameter but rather by the synergistic influence of multidimensional characteristics such as defect size, morphology, and spatial distribution [8,9]. Scholars have generally focused on geometric features like projected area, maximum size, perimeter, and volume of defects, as well as interactions between neighboring defects [10,11,12]. To investigate the underlying mechanisms of these characteristics, traditional research primarily relies on the following approaches: First, fracture mechanics-based theoretical models derive analytical solutions for stress concentration by constructing simplified defect models, yet these struggle to accurately capture the irregularity and complexity of real defects [13,14]. Second, detailed experimental observations, such as in situ fatigue testing combined with micro-CT scanning, can visually capture damage evolution but are costly and difficult to generalize [15]. Third, numerical simulation methods [16], such as finite element analysis, can compute stress fields for specific defect configurations, yet computational efficiency becomes a bottleneck when dealing with large numbers of randomly distributed defects. Despite their significant achievements, these traditional approaches share a common limitation: they struggle to efficiently and systematically address multi-feature coupled nonlinear problems. Consequently, they fail to establish a universal, quantitative mapping relationship from multidimensional defect characteristics to macroscopic fatigue damage.
To overcome these challenges, data-driven machine learning approaches demonstrate significant potential. In recent years, models such as support vector machines, random forests, and artificial neural networks have been applied to predict material fatigue life or damage states [17,18,19]. These studies validate the advantages of machine learning in capturing complex nonlinear patterns. However, existing work still suffers from significant shortcomings: On one hand, most models experience significant degradation in predictive performance and stability when input feature dimensions are high or multicollinearity exists among features, indicating limited capability in handling multi-factor coupling problems; More critically, while these “black-box” models may achieve high predictive accuracy, their decision-making processes lack transparency. This obscures fundamental questions such as “which defect features play a dominant role” and “how do they collectively influence damage,” severely limiting the credibility and practical guidance value of these models in engineering applications.
To address the opacity of traditional models, the materials science community has recently shifted towards Interpretable Machine Learning (IML). Notable progress has been made in establishing quantitative structure-property relationships (QSPRs) for complex alloys using this paradigm. For instance, recent work has utilized the XGBoost-SHAP framework to decouple the nonlinear effects of aging treatment and micro-alloying elements (e.g., Zr, Cr) on the mechanical properties of copper alloys, revealing precipitation strengthening mechanisms consistent with metallurgical theories [20]. Similarly, in the development of high-entropy alloys, multi-level ensemble models combined with SHAP analysis have proven effective in identifying key features governing yield strength and elongation from high-dimensional datasets [21]. These studies indicate that integrating game-theoretic interpretability with gradient boosting algorithms offers a viable pathway to uncover intrinsic physical mechanisms from data, yet its specific application in parsing fatigue damage induced by micro-defects remains to be fully explored.
Against this backdrop, the XGBoost algorithm stands out among numerous machine learning models due to its exceptional predictive accuracy, efficient learning capabilities for complex data relationships, and outstanding anti-overfitting properties when handling high-dimensional features [22]. Meanwhile, to address the challenge of model interpretability, the Shapley-based explainability framework (SHAP) has proven to be a stable and consistent game-theoretic approach for quantifying each of the contributions of individual features to the output of a model. This provides clear global and local explanations for “black-box” models [23]. The integration of XGBoost and SHAP has demonstrated remarkable success in constructing high-accuracy, highly interpretable models across fields such as finance and bioinformatics [24,25], offering a novel technical pathway for quantitatively analyzing material damage mechanisms from a multi-feature perspective.
Based on this, this paper innovatively constructs a fusion analysis framework integrating the XGBoost prediction model and the SHAP interpretation model, aiming to systematically investigate the influence of multiple defect features on fatigue damage in aluminum alloy materials. First, a high-precision fatigue damage prediction model is established using the XGBoost model. Subsequently, the SHAP method is employed to globally reveal the hierarchical relationships among different defect features affecting stress concentration. Local explanations are then used to quantitatively analyze the contribution values of each feature within individual samples, thereby clearly establishing mathematical correlations from defect features to mechanical responses at both global and local levels. Finally, based on this analysis, a damage variable capable of comprehensively reflecting the coupled effects of multiple defect features is constructed, quantitatively characterizing the damage level of each sample group. This study not only deepens the understanding of defect-induced damage mechanisms but also provides a scientific decision-making basis for intelligent maintenance and safety assessment of engineering structures through the constructed damage variable.

2. Research Methods and Data Sources

To quantitatively investigate the influence of internal porosity defects in 6061 aluminum alloy on fatigue damage, this study employs a comprehensive analytical framework integrating XGBoost prediction with SHAP interpretation. The specific research workflow is illustrated in Figure 1.
(1)
First, 15 sets of damaged specimens are prepared through staged fatigue testing, and their internal defect information is obtained using CT non-destructive testing technology. Using AVIZO v9.2.0 software, the defect data underwent screening, simplification, and 3D reconstruction to extract key pore feature parameters as independent variables for the model. Subsequently, an equivalent numerical model of the defect features is constructed in ABAQUS v2022. Through finite element analysis, the stress concentration factor k—representing the material of damage level—is obtained as the dependent variable. To mitigate the issue of limited original sample size, data augmentation methods are employed to generate additional representative samples.
(2)
The overall sample is randomly divided into a training set and a test set at a 4:1 ratio. An XGBoost model is constructed using the training set to predict the stress concentration factor k for aluminum alloy materials, yielding a weighted ranking of defect features based on their influence on k. To evaluate model performance, the coefficient of determination R2 and root mean square error (RMSE) are selected as metrics for accuracy validation.
(3)
The SHAP interpretation framework is introduced to perform global and local interpretability analysis on the XGBoost model. Through global interpretation, the importance ranking of defect features corresponding to the stress concentration factor k is obtained based on the SHAP mean. This ranking is then compared with the feature weights output by the XGBoost model to achieve mutual validation. Through local explanations, the contribution values of defect features to the stress concentration factor k are calculated for any specific sample. Summing these contribution values yields the k value, which is then compared with the k value predicted by the XGBoost model to validate the accuracy of the local explanations.
(4)
By integrating the predicted values from the XGBoost model with the defect feature contribution revealed by SHAP analysis, a damage variable analysis model under the synergistic influence of multiple defect features is constructed. This model not only effectively predicts the stress concentration factor but also elucidates the quantitative mechanisms of different defect features, providing a theoretical basis and methodological support for fatigue damage assessment and risk control in aluminum alloy structures.

2.1. Acquisition of the Dataset

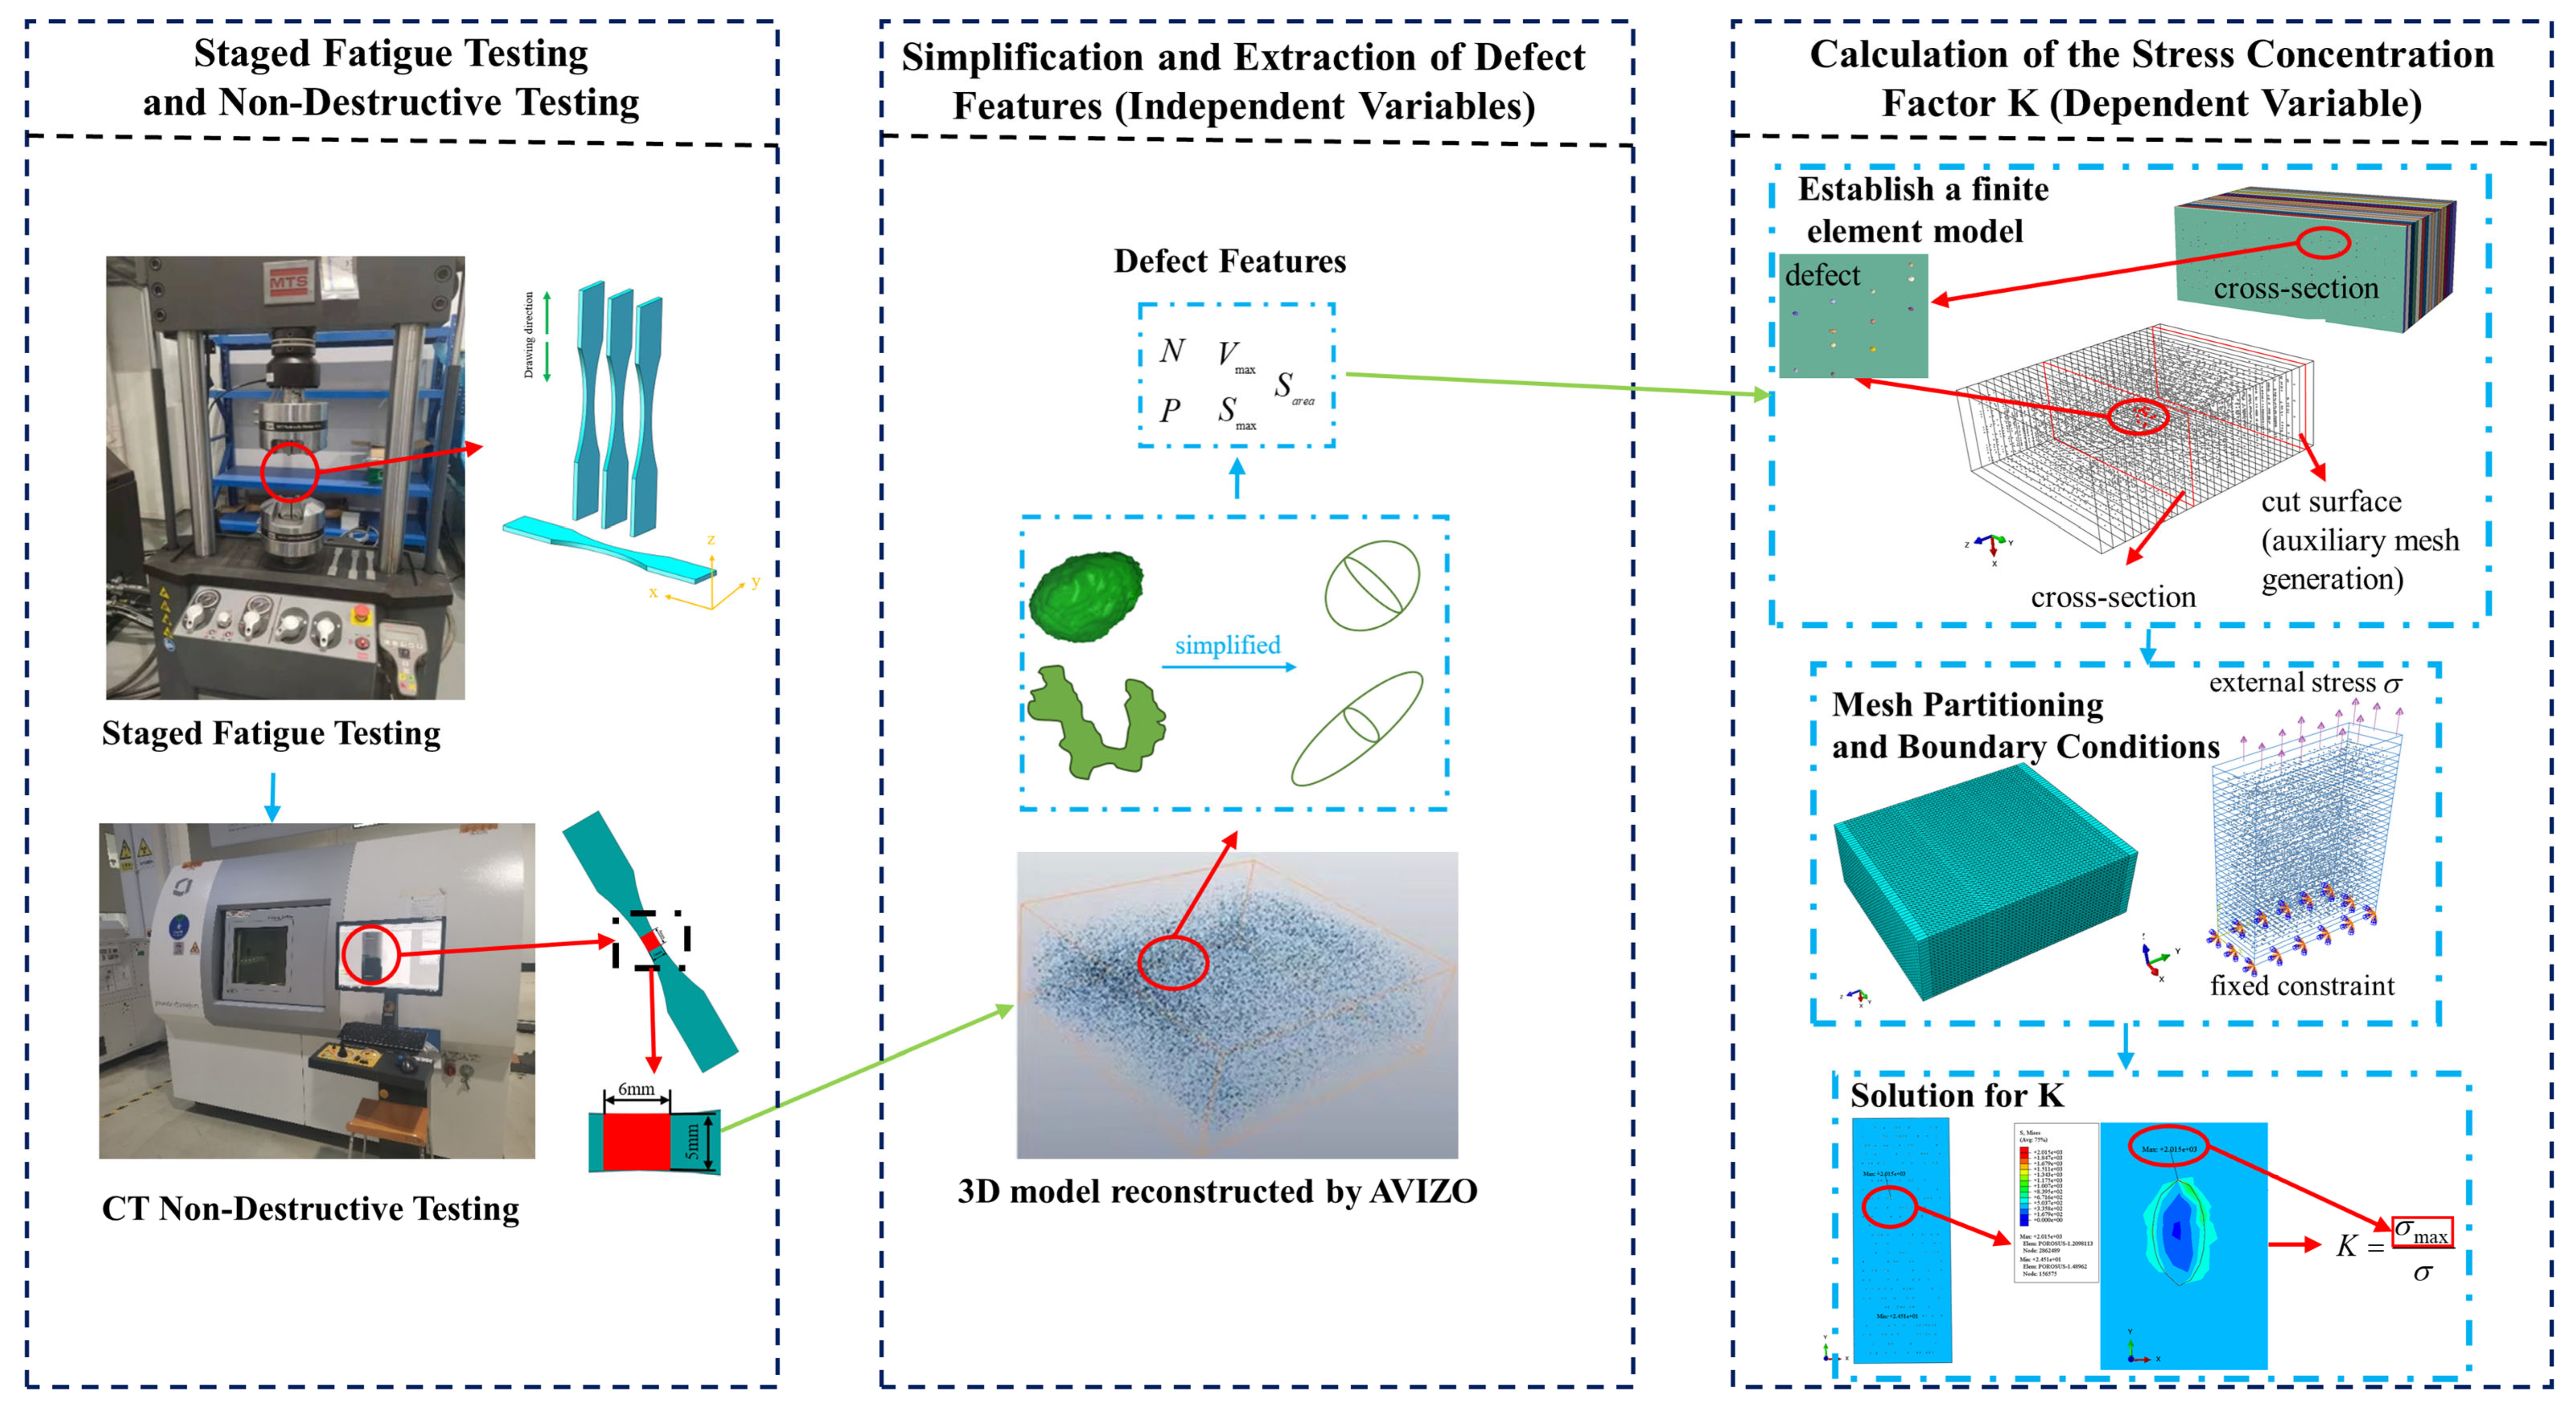
To establish a quantitative mapping relationship between microdefects and macroscopic damage, this study designed and implemented a data acquisition workflow from physical experiments to numerical simulations, as shown in Figure 2.
(1)
To obtain specimens with varying damage states, fatigue specimens are machined from 6061-T6 aluminum alloy according to ASTM E8/E8M-15a standards [26]. Axial tensile-tensile fatigue tests are conducted at room temperature using an MTS809 hydraulic servo testing system, with a stress ratio R = 0.1, frequency of 50 Hz, and sinusoidal waveform control. Five loading stages are established at 20,000, 40,000, 60,000, 80,000, and 100,000 cycles, with three replicate specimens per stage, totaling 15 specimens. This staged loading strategy enabled the acquisition of specimens exhibiting varying degrees of fatigue damage.
(2)
To obtain defect features within the specimens, this study employed an X-ray micro-computed tomography system for non-destructive testing of fatigue specimens. By scanning a specific region (6 mm × 5 mm × 2 mm) in the center of the specimen, approximately 1600 two-dimensional slices containing defect information are obtained and converted into TIF format images. Subsequently, AVIZO 9.2.0 software is employed for three-dimensional reconstruction and feature extraction of this region, enabling precise localization and quantification of defect geometric parameters across different damage stages of the specimens.
(3)
The initial defect features obtained using AVIZO 9.2.0 software include the number of holes N , maximum hole volume Vmax, maximum damaged surface area Smax, maximum projected area Sarea, and porosity P. To establish an effective finite element model, the reconstructed defect information requires screening and simplification. The screening process primarily relies on two parameters: hole tendency and defect volume. Holes with a hole tendency greater than 1 and a volume exceeding 1000 μ m 3 are identified as valid holes and retained for modeling. To further enhance the convergence and accuracy of numerical calculations, the irregular geometries of identified defects are uniformly simplified into regular ellipsoids. This simplification strategy preserves key geometric features while significantly improving the efficiency and stability of subsequent finite element analysis.
(4)
The stress concentration factor k is a key parameter characterizing the local stress amplification effect at geometric discontinuities in structures. This study employs it as an intermediate variable for assessing material damage levels. By utilizing the finite element method (FEA) based on ABAQUS 2022 software, the k values for each specimen are calculated to quantify the degree of stress concentration induced by defects. To ensure physical rigor, the simulation was formulated as a quasi-static boundary value problem, as inertial effects were considered negligible at the experimental loading frequency of 50 Hz. The mechanical response is governed by the equilibrium equation neglecting body forces, σ = 0 , subject to the isotropic linear elastic constitutive law σ = C : ε , where σ and ε denote the stress and strain tensors, respectively. To guarantee the numerical accuracy of the calculated k values, a mesh sensitivity analysis was conducted. The defect regions were discretized using second-order tetrahedral elements (C3D10M) to capture the curvature of the simplified ellipsoids. The local mesh density was iteratively refined until the variation in the maximum Von Mises stress was less than 5%, ensuring that the numerical solution converged to a stable, mesh-independent result.
(5)
To address the issue of limited sample size in the original experimental data, this study employed a data augmentation method based on statistical distribution. The initial 15 sample groups were synthetically expanded using the NumPy library (version 1.23.5) within the Python 3.10 environment. While ensuring the synthetic data maintained consistent statistical characteristics with the original data, this approach effectively increased the dataset size, providing robust support for subsequent machine learning modeling. The augmented portion of the dataset is shown in Table 1.

2.2. Establishing the Prediction Model

2.2.1. Establishment of the XGBoost Model

As a forward-stacking machine learning model, the core of XGBoost lies in combining multiple weak learners (decision trees) into a strong learner through a specific strategy. Specifically, XGBoost employs multiple decision trees for collective decision-making, where each tree outputs the residual between the target value and the cumulative predictions of all preceding trees. Ultimately, by aggregating the predictions from all these trees, it generates the final prediction output, thereby significantly enhancing the overall prediction performance of the model.
The dataset contains 300 samples, namely: D x 1 , k 1 , x 2 , k 2 , , x 300 , k 300 , where is the input defect feature variable vector; x i = N i , V max i , S max i , S a r e a i , P i , i = 1 , 2 , , n ; k i is the output variable, representing the stress concentration factor indicating fatigue damage in aluminum alloy specimens. The prediction results of the XGBoost model can be expressed as:
k ^ i = ϕ ( x i ) = m = 1 M f m ( x i )
In the equation, k ^ i represents the predicted value of k i ; ϕ denotes the prediction model; f m signifies the predicted value of the m-th tree model; M indicates the total number of tree models.
Based on the XGBoost model, the error between the sample of predicted value k ^ i and its simulated value k i is defined as the loss function L:
L = i = 1 240 l ( k i , k ^ i ) + m = 1 M Ω ( f m )
l ( k i , k ^ i ) = k i k ^ i 2
Ω ( f m ) = α G + 1 2 β ω m 2
In the equation, l represents the training loss between actual and predicted values; Ω denotes the model of complexity; G indicates the number of leaf nodes; ω m corresponds to the weights of the tree model; α and β are hyperparameters with default values of 1 and 0, respectively. At iteration step t, L t can be expressed as:
L t = i = 1 240 l ( k i , k ^ i t ) + m = 1 t Ω ( f m )   = i = 1 240 l ( k i , k ^ i t 1 + f t x i ) + Ω ( f t ) + C
In the equation, C = m = 1 t 1 Ω ( f m ) is a constant.

2.2.2. Establishment of the Evaluation Model

To evaluate the predictive performance of machine learning models, this study selected root mean square error RMSE and coefficient of determination R2 as core assessment metrics to quantify model reliability and prediction accuracy. Specifically, RMSE physically represents the square root of the sum of squared deviations between predicted and actual values divided by the number of samples. It primarily characterizes the dispersion of model predictions, thereby reflecting model reliability. R2 measures the goodness of linear fit between predicted and actual values to assess predictive accuracy. From an evaluation perspective: Conversely, an R2 closer to 0 indicates lower predictive accuracy. An RMSE closer to 0 signifies a smaller average deviation between predicted and actual values, indicating higher predictive accuracy; conversely, a larger RMSE indicates greater error in the model of predictions and lower accuracy. The mathematical expressions for each evaluation metric are as follows:
R 2 = 1 i = 1 n k i k ^ i 2 i = 1 n k i k ¯ 2
R M S E = 1 n i = 1 n k i k ^ i 2
In the equation, k ¯ represents the mean of k i , and n denotes the sample size.

2.2.3. Establishment of SHAP Explainable Models

SHAP is a classic method for interpreting machine learning model predictions, with its core principle being the quantitative assessment of how much each defect feature variable contributes to the results of the predictions. Grounded in the Shapley value from game theory, this approach calculates and assigns SHAP values to each defect feature variable during the prediction process, ultimately generating a quantitative score reflecting feature importance. The specific form of the SHAP interpretability model is as follows [27]:
ϕ ( x ) g x = φ 0 + i = 1 S φ i x i
This method approximates each predicted value ϕ ( x ) by the function g x , where g x is a linear function of binary variables, x is a selected variable from the defect feature variable x; S denotes the number of selected variables; φ 0 is the mean of the XGBoost model prediction results; φ i is the contribution value of the i-th defect feature variable to the model prediction results, i.e., the SHAP value, expressed as [27]:
φ i = z x z ! M z 1 ! M ! ϕ z ϕ z \ i
In the equation, z denotes the subset of the selected variable x ; ϕ z ϕ z \ i represents the deviation between the Shapley value and its mean in each individual prediction, i.e., the contribution of the i-th variable to the prediction value.
In this paper, the core idea of the SHAP algorithm lies in decomposing the prediction results of the XGBoost model into the sum of contributions from each defect feature variable. For a given prediction value k, the algorithm calculates the contribution of each defect feature variable to the prediction result by considering all permutations and combinations of defect feature variables, thereby determining whether the contribution of each input feature to the prediction result is positive or negative.

3. Analysis of the Results

3.1. Analysis of Hyperparameter Optimization for Predictive Models

In the XGBoost model, the number of decision trees (n_estimators), the maximum tree depth (max_depth), and the learning rate (learning_rate) are three key hyperparameters that influence model performance [28]. To determine the optimal parameter combination, this study employs a systematic optimization approach combining grid search with k-fold cross-validation. Parameter learning curves are plotted using Python 3.10, as shown in Figure 3: A small number of decision trees leads to model underfitting, while an excessive number increases computational complexity and may cause overfitting. Tree depth directly impacts model complexity—too shallow a depth fails to capture data features, while excessive depth increases overfitting risk. The learning rate controls the contribution weight of each tree; a smaller learning rate combined with more trees typically yields better generalization performance. Therefore, the decision tree model parameters are set to n_estimators = 200, max_depth = 20, and learning_rate = 0.28.

3.2. Evaluation Model Analysis

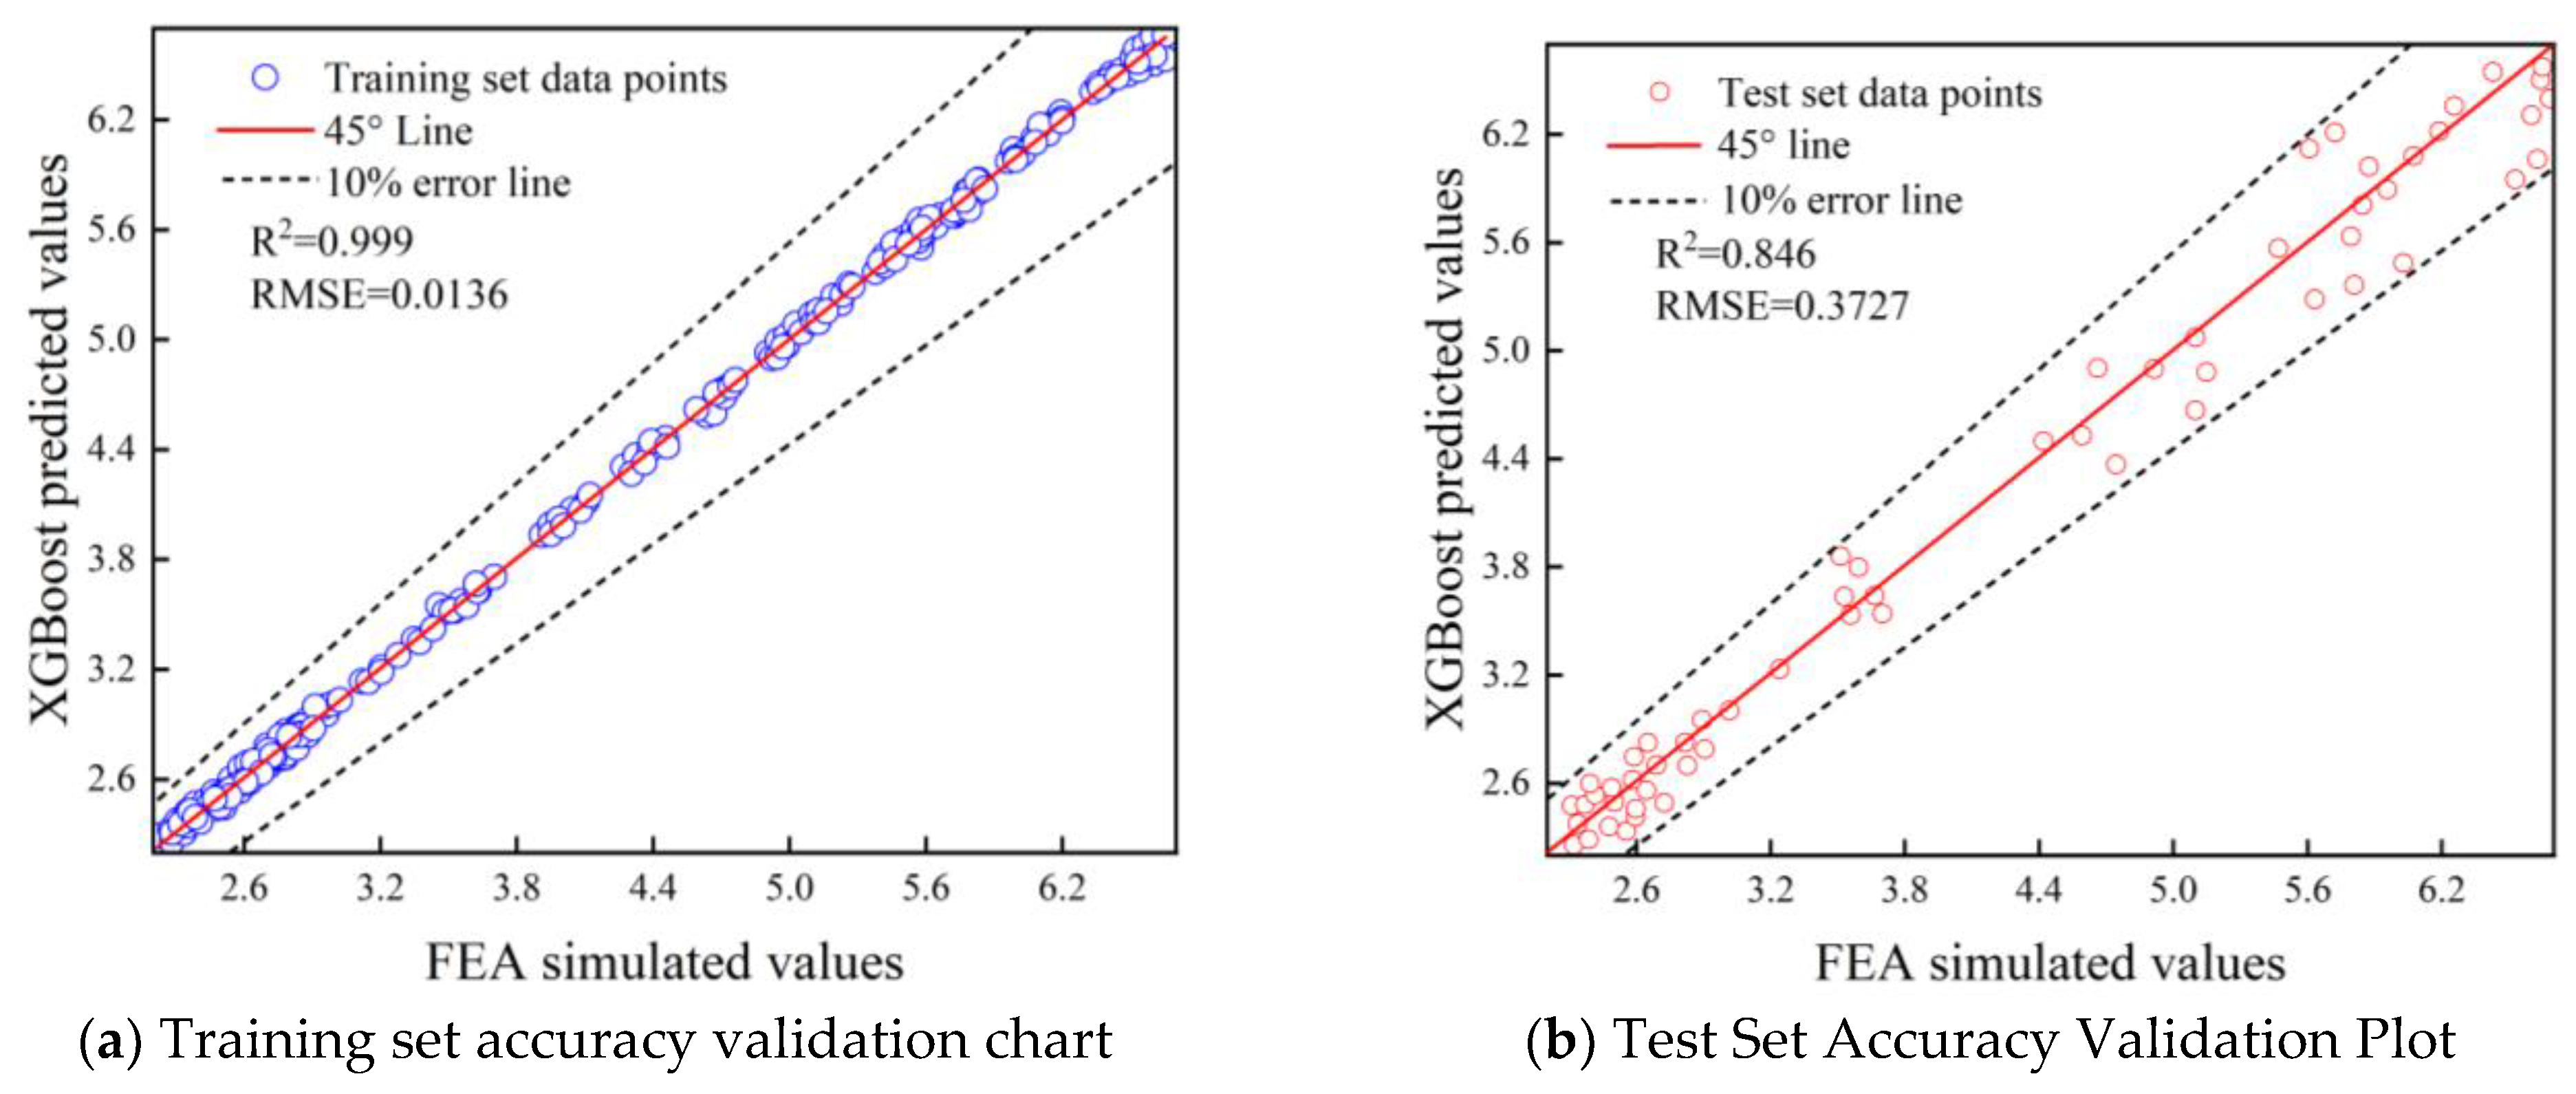
To evaluate the predictive accuracy of the constructed XGBoost model, a precision validation plot visualizes the fit between the prediction values from the model on the training and test sets and the finite element analysis (FEA) simulation values, as shown in Figure 4.
In Figure 4a, the scatter plot of the training set shows blue data points representing the “predicted value—simulated value” pairing relationship densely clustered and closely clustered around the 45° reference line (which represents the ideal scenario where predicted and simulated values perfectly align). Regarding evaluation metrics, the coefficient of determination R2 reaches an exceptionally high 0.999, indicating the model explains 99.9% of the variation in training data, with a goodness-of-fit approaching theoretical optimality. The RMSE value is only 0.0136, indicating extremely small average deviation between the prediction values of the model and the finite element analysis (FEA) simulation values for the training data. This further confirms the high accuracy of the fitting capability during the training phase from an error quantification perspective. Furthermore, the vast majority of data points fall within the 10% error boundary (dashed line in the figure), further demonstrating the minimal prediction error of the model for training data and exhibiting exceptional reliability and stability during the data fitting stage.
In Figure 4b, the scatter plot of the test set shows that while the red data points still exhibit a pronounced tendency to cluster along the 45° reference line, their dispersion has slightly increased compared to the training set. This aligns with the performance expected of a model when encountering unseen data. Regarding evaluation metrics, the test set R2 value is 0.846, indicating the model explains 84.6% of the variation in test data. Although this value is lower than that of the training set, it remains at a high level, suggesting the model is not seriously overfitted. The RMSE value of 0.3727, while higher than that of the training set, remains within an acceptable range for engineering or comparable research. Combined with the R2 value of 0.846, this demonstrates that the model maintains relatively stable and acceptable prediction accuracy on data not used in training, further supporting the conclusion that the model possesses good generalization capabilities.

3.3. Model Interpretability Analysis

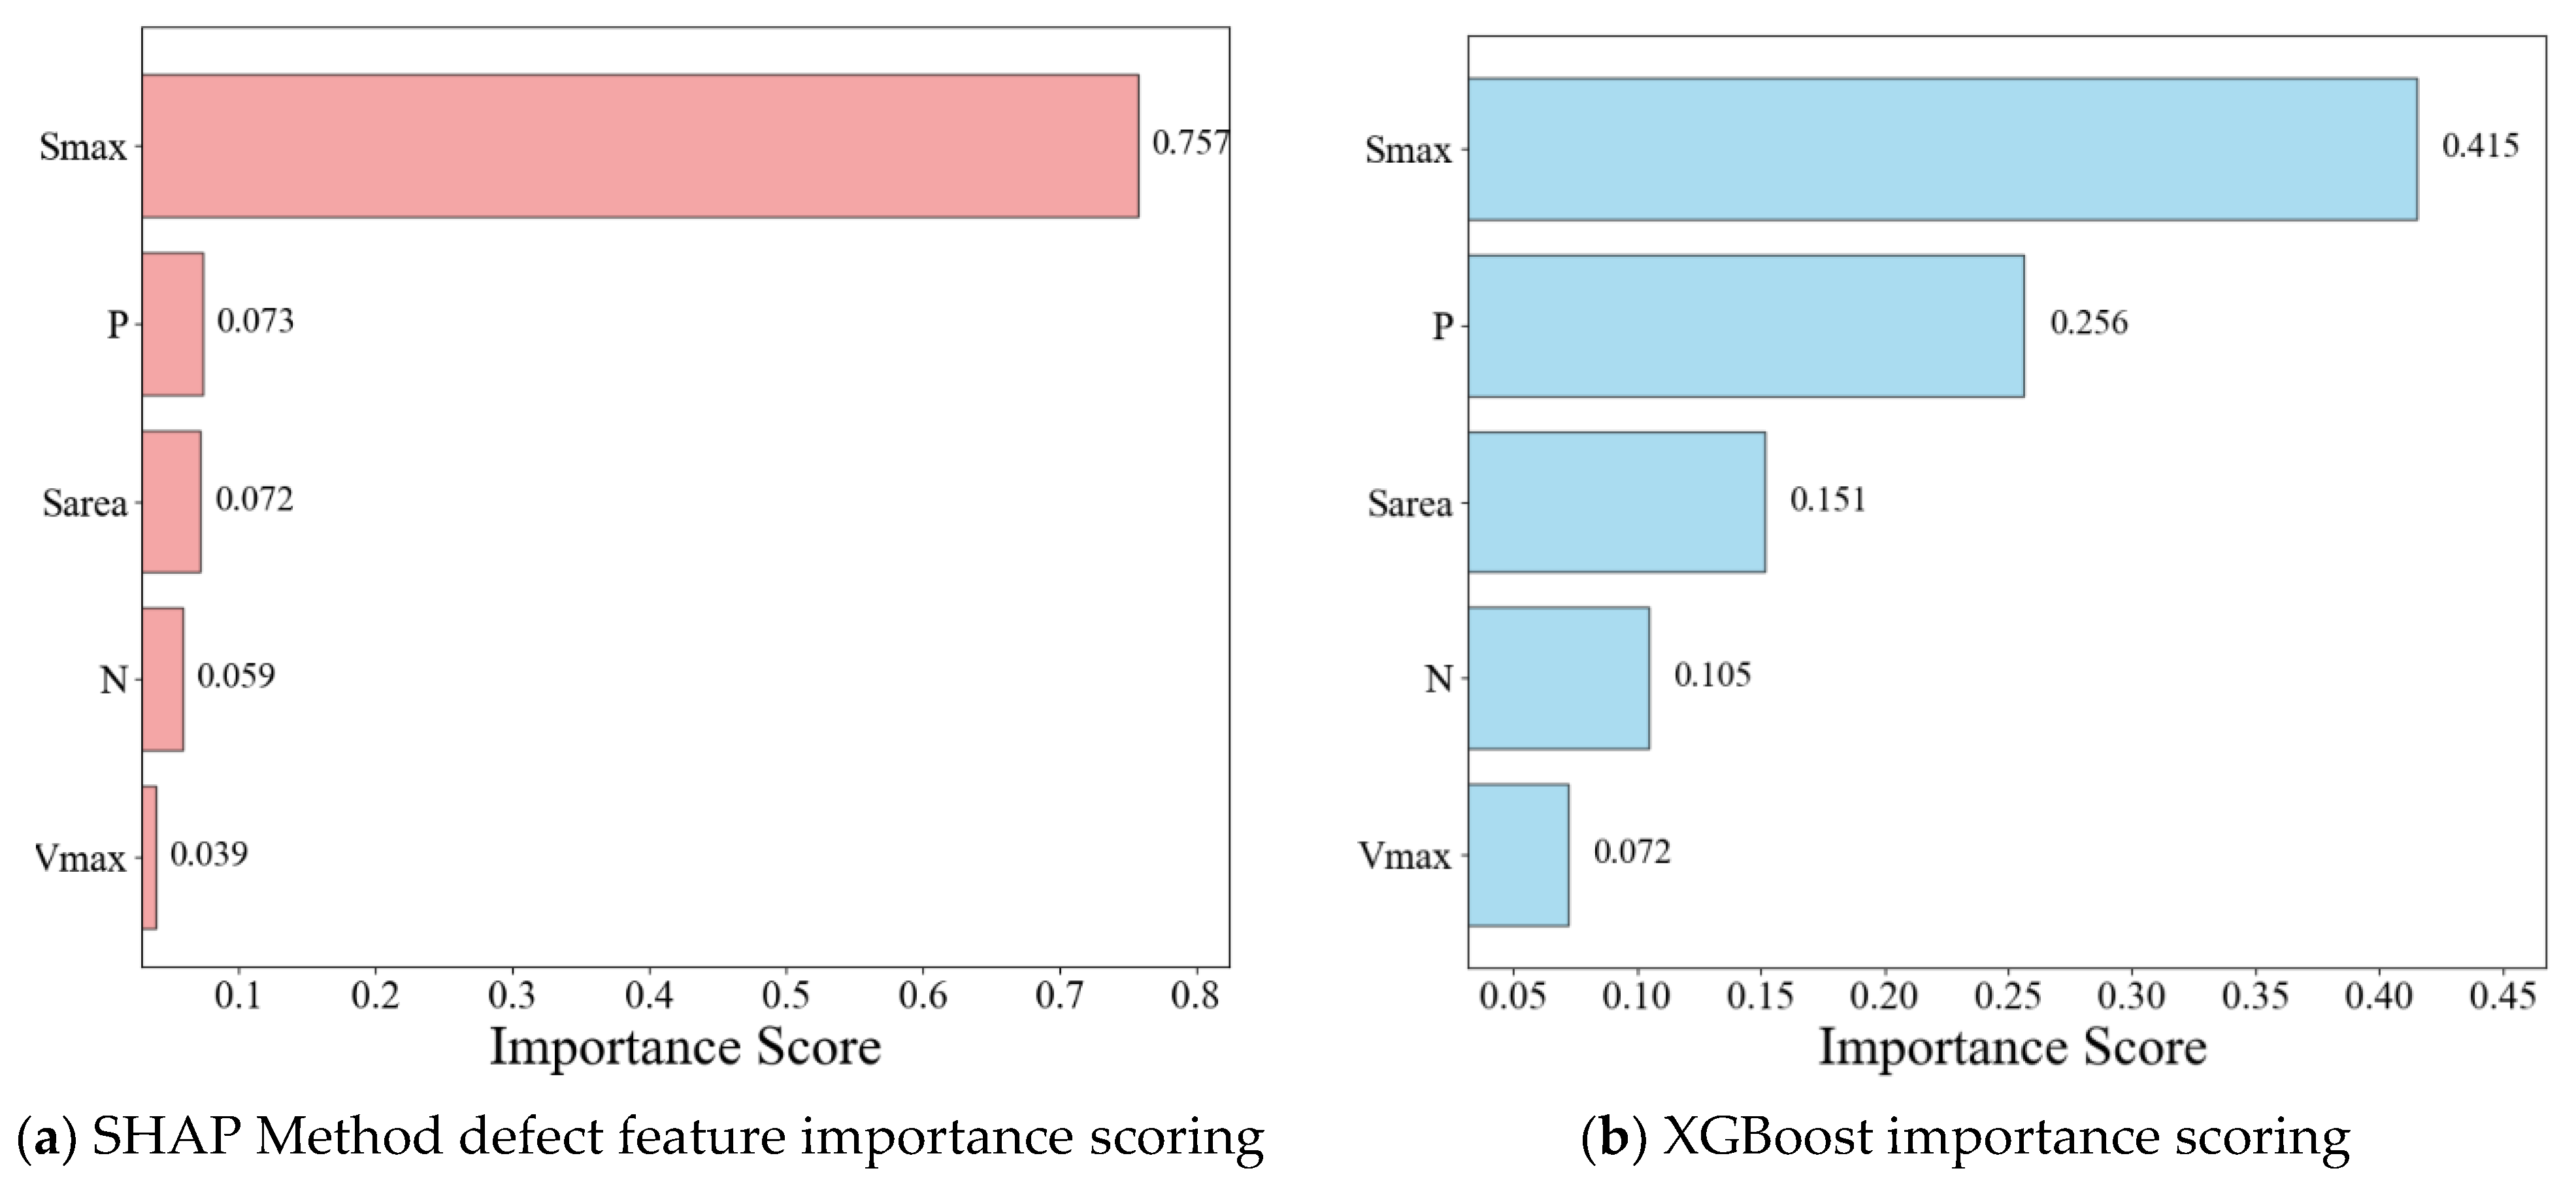
To reveal the interpretability of the XGBoost prediction for the stress concentration factor k, the SHAP method is employed to analyze the importance of defect feature variables in aluminum alloy materials and quantify their impact. Figure 5 presents the global interpretation of the XGBoost model prediction.
Figure 5a presents the importance ranking based on the SHAP method, illustrating the overall influence of different defect feature variables on the prediction results of the stress concentration factor k. The importance levels of the defect feature variables are Smax > P > Sarea > N > Vmax. Among these, the maximum damaged surface area Smax has the greatest impact, accounting for 75.7% of the total sum of the average absolute SHAP values. Porosity P, projected area Sarea, and number of holes N follow with 20.4% of the total average absolute SHAP values. Maximum hole volume Vmax has the least impact on prediction results, accounting for only 3.9% of the total average absolute SHAP values.
From the perspective of physical principles, the maximum damage surface area Smax is directly related to the scale of the interface between defects and the matrix material. The larger the interface, the more severe the interruption and redistribution of stress transmission at the defect site, and the more pronounced the local stress concentration effect. Therefore, it dominates the influence on material stress concentration. Porosity P reflects the overall density of defects within the material. High porosity indicates numerous and densely distributed defects, readily inducing stress superposition and concentration, making it the second most significant factor; projected area Sarea and the number of holes N reveal defect features from different dimensions. Projected area influences stress distribution patterns within the material, while hole count relates to the overall defect quantity. Both jointly affect the local stress field, though their influence is weaker than the preceding factors. Maximum hole volume Vmax reflects the scale of individual defects. However, in the formation of overall stress concentration within the material, its influence is relatively limited compared to factors like surface area and overall defect density. Consequently, it holds the lowest importance.
Figure 5b shows the importance ranking of defect feature variables obtained through the feature importance analysis inherent to the XGBoost model. The results align with the feature importance trend of the SHAP method but exhibit significant score discrepancies, stemming from their differing principles: SHAP quantifies importance fairly based on the Shapley value from game theory, considering the marginal contribution of feature combinations; XGBoost measures importance by evaluating the optimization effect of features on the loss function within the tree structure. The divergence in absolute importance scores between these methods reflects the complementary nature of different interpretability tools in characterizing feature influence.
The consistency between SHAP values and XGBoost importance rankings in Figure 5a,b validates the accuracy of the SHAP method employed in this study. It also confirms the physically stable hierarchical relationship between defect features and their influence on mechanical response.
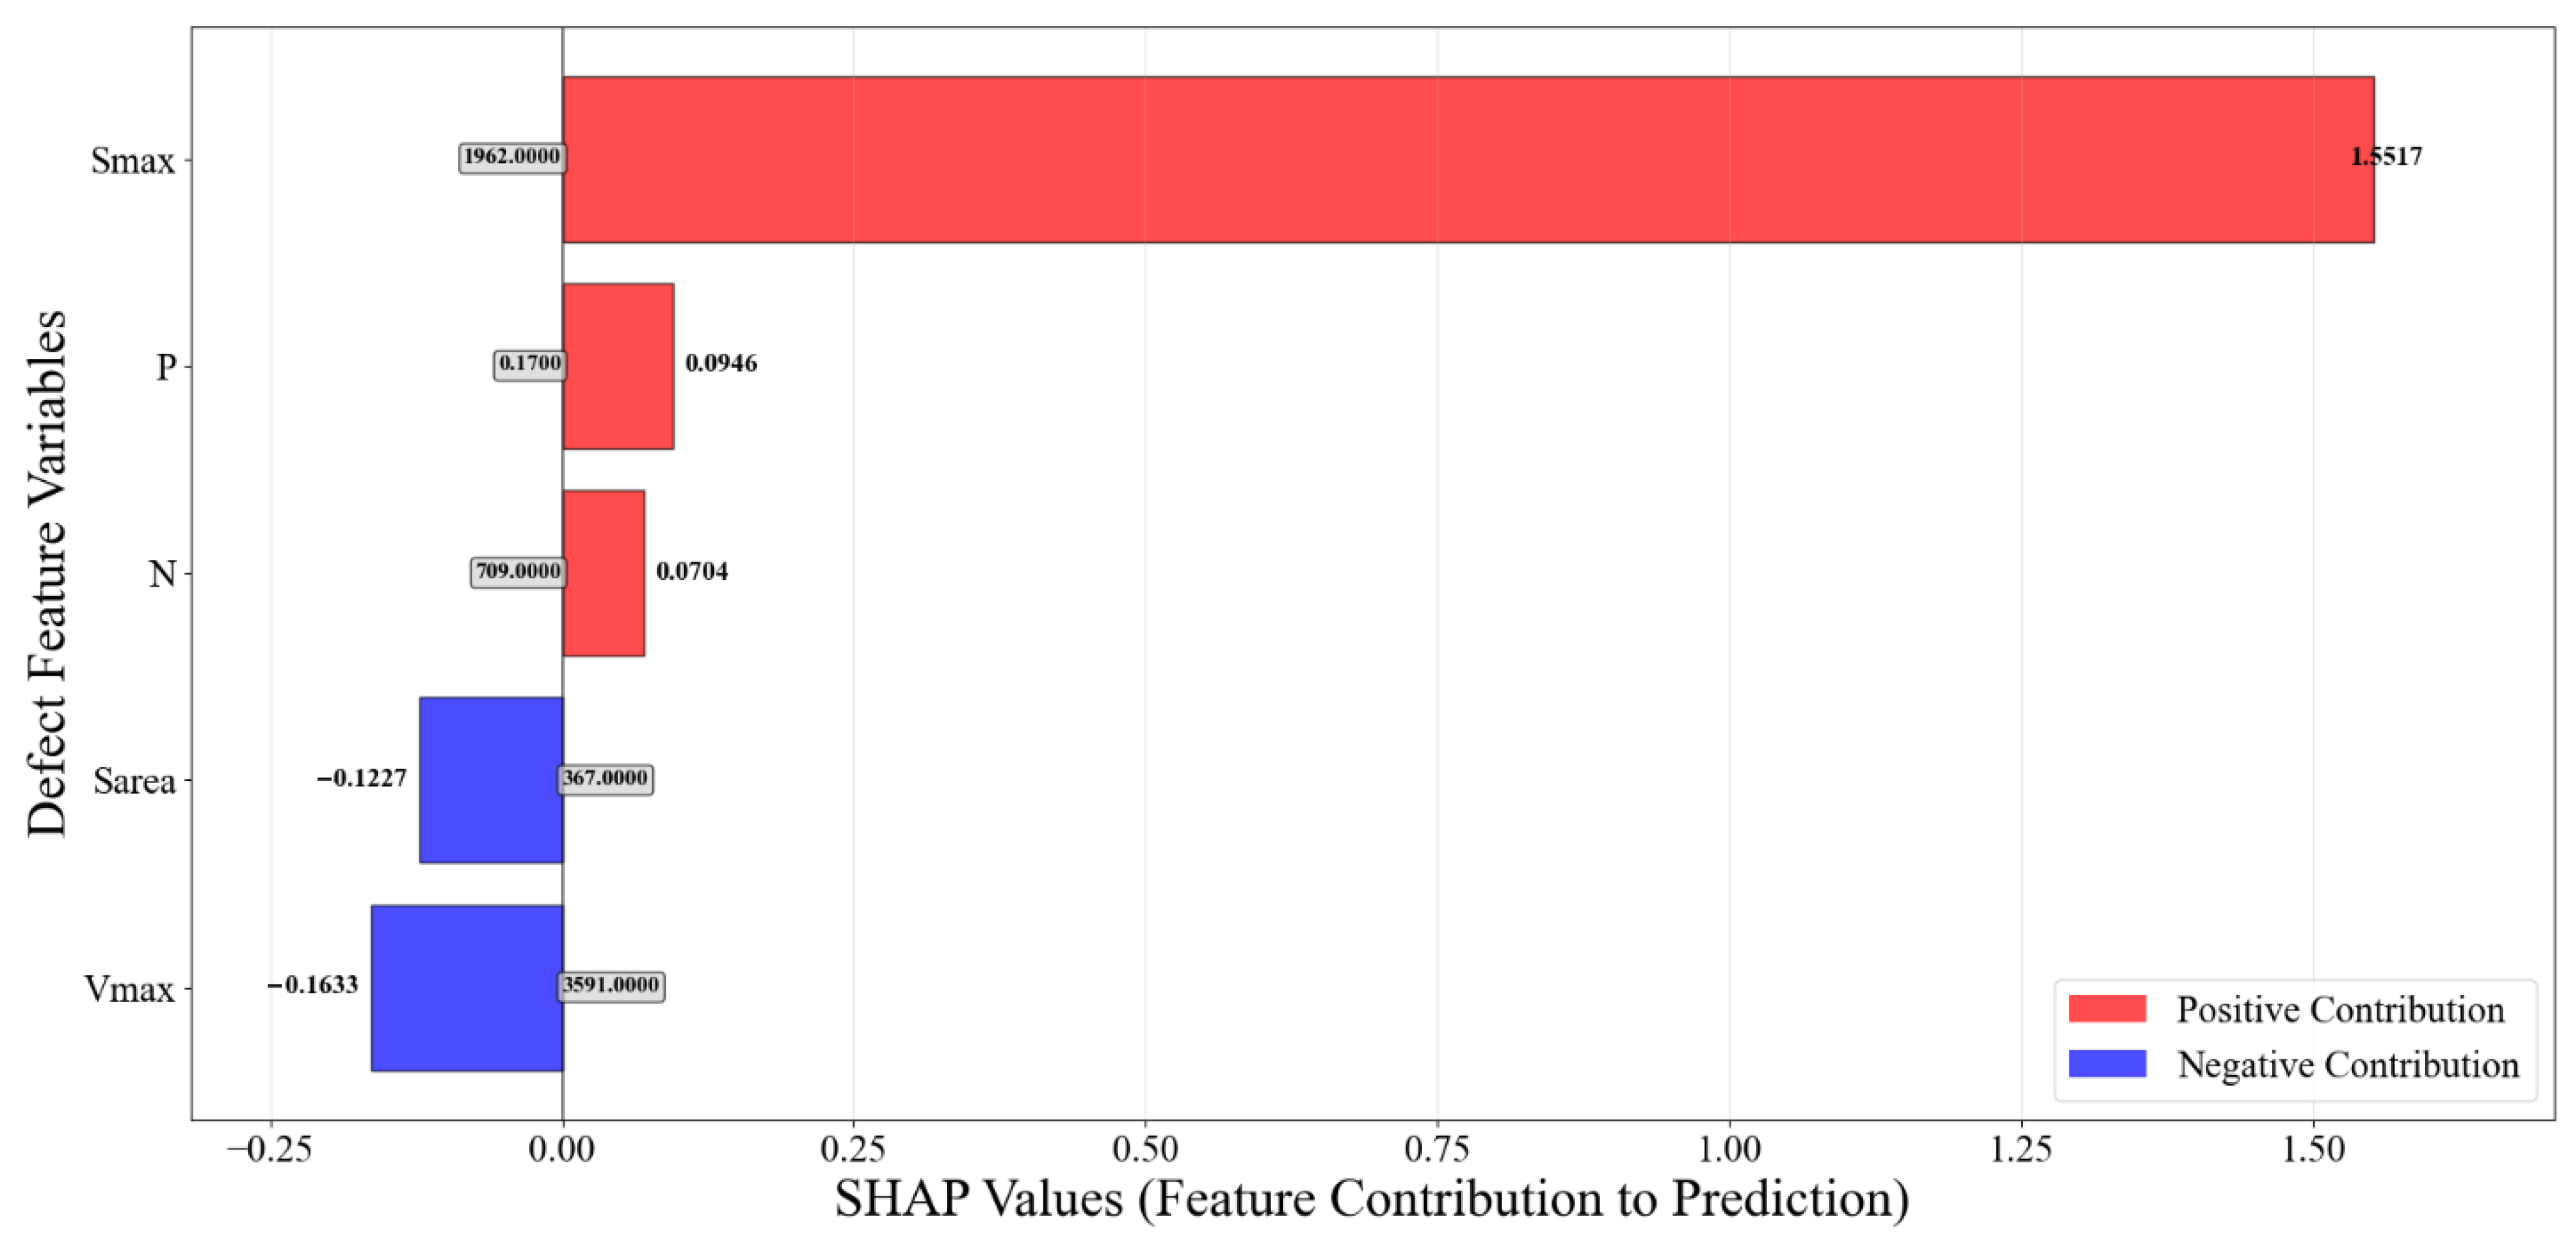
The SHAP Method not only provides global explanations for model predictions but also offers local explanations for individual samples. Figure 6 shows the local explanation plot for sample 36, illustrating how each defect feature contributes to the predicted stress concentration factor k. Here, the histogram bars to the left of the zero axis indicate that the contributions (SHAP values) of the maximum hole volume Vmax and projected area Sarea to the predicted stress concentration factor k are negative for this sample. Conversely, the histogram bars to the right of the zero axis indicate that the contributions (SHAP values) of the maximum damage surface area Smax, porosity P, and number of holes N to the predicted stress concentration factor k are positive for this sample. The mean of the XGBoost model of prediction results is k ¯ , yielding the predicted stress concentration factor value for this sample as:
k 36 = k ¯ + S N + S V max + S S max + S S a r e a + S P
In the equation, k 36 represents the predicted stress concentration factor k for the 36th sample group; S x denotes the contribution value (SHAP value) of each defect feature variable to the predicted stress concentration factor k for the 36th group, where x denotes the defect feature. Substituting the SHAP values of each defect feature from Figure 6 into Equation (10) yields:
k 36 = 3.6323 + 0.0704 + 0.1633 + 1.5517 + 0.1227 + 0.0946 = 5.063
This value falls within the permissible error range of the model for the stress concentration factor k = 4.78 obtained from the FEA simulation. The above analysis explains the influence of different defect feature variables on the prediction of the stress concentration factor k from the perspective of a single sample.

4. Construction of the Damage Variable

To achieve precise quantification of fatigue damage prediction in aluminum alloy materials, this study constructs damage variables coupling multiple defect features based on the XGBoost model and SHAP interpretability analysis. First, by analyzing the contribution of each defect feature (maximum damaged surface area Smax, porosity P, number of holes N, projected area Sarea, maximum hole volume Vmax) to the stress concentration factor k using SHAP values, and combining this with the predictive logic of the XGBoost model, the relationship between the stress concentration factor k and each defect feature variable is obtained (Equation (10)). Building upon this, the relationship between the damage variable D and the stress concentration factor k is defined based on fracture mechanics theory as:
D = k k 0
where k is the linear elastic stress concentration factor predicted by the XGBoost model. k 0 represents the critical stress concentration factor, defined as the threshold at which the local peak stress at the defect tip reaches the ultimate tensile strength of the material ( σ U T S ) under the applied nominal load ( k 0 = σ U T S / σ n o m ). It is important to clarify that while fatigue damage involves local elastoplastic behavior, this study targets the linear elastic k as the primary output. The validity of this approach is grounded in the Local Strain Approach (e.g., Neuber’s rule), which establishes that the elastic stress concentration factor determines the total strain energy density at the defect tip regardless of material yielding. Therefore, by accurately predicting the elastic k the model provides the governing geometric parameter required to analytically derive the local elastoplastic strains and assess fatigue damage, ensuring the physical rigor of the proposed framework.
The damage variable established by combining multiple feature variables in the combined (10) and Japanese (12) models is:
D = k ¯ + S N + S V max + S S max + S S a r e a + S P k 0
The damage variable D comprehensively evaluates the coupled effects of multiple defect features: when D approaches 1, it indicates that the material of stress concentration is nearing the critical state for fatigue failure, signifying high fatigue damage; when D is significantly less than 1, it indicates that the material still possesses good resistance to fatigue damage.
In engineering practice, this multi-defect feature coupling damage variable provides a critical basis for fatigue damage prediction and health monitoring of aluminum alloy structures. By continuously monitoring defect features within the material (Smax, P, N, Sarea, Vmax) and applying the aforementioned damage variable equation, the current fatigue damage level of the structure can be rapidly assessed. This facilitates early detection of potential fatigue failure risks, providing scientific support for maintenance and inspection decisions of engineering structures. Consequently, it enhances the safety and reliability of aluminum alloy components in applications such as aerospace and rail transportation.

5. Conclusions

This study established an integrated interpretable machine learning framework (XGBoost-SHAP) to bridge the gap between complex defect features and fatigue damage in aluminum alloys. The major findings and implications are summarized as follows:
(1)
High-Fidelity Prediction beyond “Black Boxes”: The constructed XGBoost model demonstrated superior predictive capability compared to traditional empirical methods. More importantly, by integrating SHAP analysis, this study successfully overcame the opacity of conventional machine learning. The framework not only predicts damage accurately but also visualizes the decision-making process, ensuring the physical consistency required for engineering applications.
(2)
Decoupling Defect Morphology Mechanisms: The SHAP-based global interpretation quantitatively revealed that defect morphology (specifically the maximum damaged surface area, Smax) exerts a more critical influence on fatigue damage than total defect volume (Vmax). This finding challenges the traditional volume-centric assessment criteria, suggesting that quality control should prioritize the geometric sharpness of defects. The consistency between SHAP rankings and mechanical stress concentration theories confirms the physical validity of the data-driven model.
(3)
Generalizability and Engineering Impact: A quantitative damage variable was constructed to facilitate real-time safety assessment. Although the experiment was conducted at a nominal frequency of 50 Hz, the proposed framework is inherently robust for fatigue durability tasks. Given the low strain-rate sensitivity of aluminum alloys at room temperature, the identified intrinsic correlations between defect features and damage accumulation remain valid across typical engineering frequency ranges (10–100 Hz). Consequently, this framework provides a generalized, scientific basis for intelligent maintenance and decision-making in aerospace and rail transit sectors.

Author Contributions

Y.Z.: data curation, formal analysis, software, validation, visualization, writing—original draft preparation, writing—review and editing. Y.Y.: data curation, formal analysis, writing—review and editing, conceptualization, funding acquisition. H.C.: data curation, methodology, writing—review and editing, conceptualization, supervision, resources. T.Z.: data curation, validation. R.Z. and S.L.: investigation, validation. All authors have read and agreed to the published version of the manuscript.

Funding

This research was sponsored by Shanghai Oriental Talent Top Project (Hao Chen); Project of Promoting Research Paradigm Reform and Empowering Disciplinary Leap through Artificial Intelligence (2024AI011) from Shanghai Municipal Education Commission (Hao Chen).

Institutional Review Board Statement

Not applicable.

Informed Consent Statement

Not applicable.

Data Availability Statement

The original contributions presented in this study are included in the article. Further inquiries can be directed to the corresponding author.

Conflicts of Interest

The authors declare that they have no known competing financial interests or personal relationships that could have appeared to influence the work reported in this paper.

References

  1. Yong, Y. Research on properties and applications of new lightweight aluminum alloy materials. Highlights Sci. Eng. Technol. 2024, 84, 99–107. [Google Scholar] [CrossRef]
  2. Sharma, S.K.; Gajević, S.; Sharma, L.K.; Pradhan, R.; Sharma, Y.; Miletić, I.; Stojanović, B. Progress in aluminum-based composites prepared by stir casting: Mechanical and tribological properties for automotive, aerospace, and military applications. Lubricants 2024, 12, 421. [Google Scholar] [CrossRef]
  3. Montanari, R.; Palombi, A.; Richetta, M.; Varone, A. Additive manufacturing of aluminum alloys for aeronautic applications: Advantages and problems. Metals 2023, 13, 716. [Google Scholar] [CrossRef]
  4. Sassu, N. Prevention of Casting Defects in An Aluminum Alloy Component. Ph.D. Thesis, Politecnico di Torino, Turin, Italy, 2023. [Google Scholar]
  5. Samuel, A.M.; Samuel, E.; Songmene, V.; Samuel, F.H. A review on porosity formation in aluminum-based alloys. Materials 2023, 16, 2047. [Google Scholar] [CrossRef]
  6. Xu, Y.; Li, G.; Jiang, W.; Zhan, J.; Yu, Y.; Fan, Z. Investigation on characteristic and formation mechanism of porosity defects of Al–Li alloys prepared by sand casting. J. Mater. Res. Technol. 2022, 19, 4063–4075. [Google Scholar] [CrossRef]
  7. Nezhadfar, P.D.; Thompson, S.; Saharan, A.; Phan, N.; Shamsaei, N. Structural integrity of additively manufactured aluminum alloys: Effects of build orientation on microstructure, porosity, and fatigue behavior. Addit. Manuf. 2021, 47, 102292. [Google Scholar] [CrossRef]
  8. Nadot, Y. Fatigue from defect: Influence of size, type, position, morphology and loading. Int. J. Fatigue 2022, 154, 106531. [Google Scholar] [CrossRef]
  9. Zhu, S.-P.; Ai, Y.; Liao, D.; Correia, J.A.F.O.; De Jesus, A.M.P.; Wang, Q. Recent advances on size effect in metal fatigue under defects: A review. Int. J. Fract. 2022, 234, 21–43. [Google Scholar] [CrossRef]
  10. Peng, X.; Wu, S.; Qian, W.; Bao, J.; Hu, Y.; Zhan, Z.; Guo, G.; Withers, P.J. The potency of defects on fatigue of additively manufactured metals. Int. J. Mech. Sci. 2022, 221, 107185. [Google Scholar] [CrossRef]
  11. Shao, S.; Poudel, A.; Shamsaei, N. A linear elastic finite element approach to fatigue life estimation for defect laden materials. Eng. Fract. Mech. 2023, 285, 109298. [Google Scholar] [CrossRef]
  12. Karakaş, Ö.; Kardeş, F.B.; Foti, P.; Berto, F. An overview of factors affecting high-cycle fatigue of additive manufacturing metals. Fatigue Fract. Eng. Mater. Struct. 2023, 46, 1649–1668. [Google Scholar] [CrossRef]
  13. Naimark, O.; Oborin, V.; Bannikov, M.; Ledon, D. Critical dynamics of defects and mechanisms of damage-failure transitions in fatigue. Materials 2021, 14, 2554. [Google Scholar] [CrossRef]
  14. Lee, H.W.; Basaran, C. A review of damage, void evolution, and fatigue life prediction models. Metals 2021, 11, 609. [Google Scholar] [CrossRef]
  15. Dastgerdi, J.N.; Jaberi, O.; Remes, H.; Lehto, P.; Toudeshky, H.H.; Kuva, J. Fatigue damage process of additively manufactured 316 L steel using X-ray computed tomography imaging. Addit. Manuf. 2023, 70, 103559. [Google Scholar] [CrossRef]
  16. Sedmak, A. Fatigue crack growth simulation by extended finite element method: A review of case studies. Fatigue Fract. Eng. Mater. Struct. 2024, 47, 1819–1855. [Google Scholar] [CrossRef]
  17. Horňas, J.; Běhal, J.; Homola, P.; Senck, S.; Holzleitner, M.; Godja, N.; Pásztor, Z.; Hegedüs, B.; Doubrava, R.; Růžek, R.; et al. Modelling fatigue life prediction of additively manufactured Ti-6Al-4V samples using machine learning approach. Int. J. Fatigue 2023, 169, 107483. [Google Scholar] [CrossRef]
  18. Palaniappan, R. Comparative analysis of support vector machine, random forest and k-nearest neighbor classifiers for predicting remaining usage life of roller bearings. Informatica 2024, 48, 39–52. [Google Scholar] [CrossRef]
  19. He, L.; Wang, Z.; Ogawa, Y.; Akebono, H.; Sugeta, A.; Hayashi, Y. Machine-learning-based investigation into the effect of defect/inclusion on fatigue behavior in steels. Int. J. Fatigue 2022, 155, 106597. [Google Scholar] [CrossRef]
  20. Atiea, M.A.; Reda, R.; Ataya, S.; Ibrahim, M. Explainable AI and Feature Engineering for Machine-Learning-Driven Predictions of the Properties of Cu-Cr-Zr Alloys: A Hyperparameter Tuning and Model Stacking Approach. Processes 2025, 13, 1451. [Google Scholar] [CrossRef]
  21. Zhao, S.; Li, Z.; Yin, C.; Zhang, Z.; Long, T.; Yang, J.; Cao, R.; Guo, Y. An interpretable stacking ensemble model for high-entropy alloy mechanical property prediction. Front. Mater. 2025, 12, 1601874. [Google Scholar] [CrossRef]
  22. Ben Jabeur, S.; Stef, N.; Carmona, P. Bankruptcy prediction using the XGBoost algorithm and variable importance feature engineering. Comput. Econ. 2023, 61, 715–741. [Google Scholar] [CrossRef]
  23. Wang, H.; Liang, Q.; Hancock, J.T.; Khoshgoftaar, T.M. Feature selection strategies: A comparative analysis of SHAP-value and importance-based methods. J. Big Data 2024, 11, 44. [Google Scholar] [CrossRef]
  24. Abbas, Z.; Rehman, M.U.; Tayara, H.; Zou, Q.; Chong, K.T. XGBoost framework with feature selection for the prediction of RNA N5-methylcytosine sites. Mol. Ther. 2023, 31, 2543–2551. [Google Scholar] [CrossRef]
  25. Kim, H.-S.; Kim, D.-H.; Choi, S.-Y. Baltic dry index forecast using financial market data: Machine learning methods and SHAP explanations. PLoS ONE 2025, 20, e0325106. [Google Scholar] [CrossRef] [PubMed]
  26. ASTM E8/E8M-15a; Standard Test Methods for Tension Testing of Metallic Materials. ASTM International: West Conshohocken, PA, USA, 2015. [CrossRef]
  27. Alabi, R.O.; Elmusrati, M.; Leivo, I.; Almangush, A.; Mäkitie, A.A. Machine learning explainability in nasopharyngeal cancer survival using LIME and SHAP. Sci. Rep. 2023, 13, 8984. [Google Scholar] [CrossRef] [PubMed]
  28. Alamsyah, N.; Budiman, B.; Yoga, T.P.; Alamsyah, R.Y.R. Xgboost hyperparameter optimization using randomizedsearchcv for accurate forest fire drought condition prediction. J. Pilar Nusa Mandiri 2024, 20, 103–110. [Google Scholar] [CrossRef]
Figure 1. Research workflow diagram.
Applsci 15 13021 g001
Figure 2. Dataset acquisition flowchart.
Applsci 15 13021 g002
Figure 3. Hyperparameter learning curve of the predictive model.
Applsci 15 13021 g003
Figure 4. Accuracy validation of the XGBoost model against FEA simulation results. The axes represent the stress concentration factor (k) of the aluminum alloy specimens. The FEA ground truth values (x-axis) were derived from quasi-static simulations using C3D10M tetrahedral elements with a refined mesh size of 0.1 mm to ensure numerical convergence. The red solid line indicates the ideal 1:1 prediction, while the dashed lines represent the 10% error bounds.
Applsci 15 13021 g004
Figure 5. Global explanation of XGBoost model predictions based on the HSAP Method.
Applsci 15 13021 g005
Figure 6. Local explanation for sample 36.
Applsci 15 13021 g006
Table 1. Partial results of the data augmentation.
Input DataOutput Data
N Vmax
( μ m 3 )
Smax
( μ m 2 )
Sarea
( μ m 2 )
P
( × 10 4 )
k
122223492106375.80.053
262178218182520.012.49
2996573584.432111.5378.410.152.62
30010682677.892130.48332.680.242.81
Disclaimer/Publisher’s Note: The statements, opinions and data contained in all publications are solely those of the individual author(s) and contributor(s) and not of MDPI and/or the editor(s). MDPI and/or the editor(s) disclaim responsibility for any injury to people or property resulting from any ideas, methods, instructions or products referred to in the content.