Article

Fabrication and Evaluation of Large Alumina Crucibles by Vat Photopolymerization Additive Manufacturing for High-Temperature Actinide Chemistry

1
Lawrence Livermore National Laboratory, 7000 East Avenue, Livermore, CA 94550, USA
2
University of California Irvine, Irvine, CA 92697, USA
3
Department of Chemical Engineering, Bringham Young University, Provo, UT 84602, USA
*
Author to whom correspondence should be addressed.
Appl. Sci. 2025, 15(23), 12742; https://doi.org/10.3390/app152312742
Submission received: 31 October 2025 / Revised: 26 November 2025 / Accepted: 29 November 2025 / Published: 2 December 2025

Abstract

Additive manufacturing (AM) offers opportunities to advance the design and function of ceramic tooling in high temperature actinide pyrochemistry. In technical ceramics such as alumina, conventional forming techniques often restrict design flexibility and can limit experimental progress. In this study, we investigate the use of vat photopolymerization (VP) with commercial resins to fabricate large-scale alumina crucibles, reaching dimensions up to 125 mm, which is significantly larger than typically reported for dense VP ceramics. Notably, these additively manufactured components are produced using consumer-grade hardware, which limits process control, but offers significant upside in scalability and accessibility. Using microscopy and X-ray computed tomography, the VP alumina parts have high bulk densities above 95%, but also the prevalence of AM-induced artifacts and surface defects. Mechanical testing showed these defects to significantly reduce flexural strength and compromise part reliability. Electrorefining trials under sustained exposure to molten salts and metals reveal mixed results, with the AM material exhibiting high chemical compatibility, but mechanical failures due to the reduced strength were prevalent. Our findings illustrate both the promise and current limitations of AM ceramics for actinide chemistry, and point toward future improvements in process optimization, design strategies, and part screening to enhance performance and reliability.

1. Introduction

Actinide chemistry contributes to the research and development of nuclear fuel cycles and advanced materials research. In addition to the radiological and toxicity hazards, the electronic structures of the f-elements makes them highly reactive, creating challenges and opportunities in their chemistry and science [1,2]. Pyrochemistry techniques, including casting, oxide reduction, and electrorefining (ER), are common practices used for actinide chemistry [3,4,5]. These high temperature processes are used in the nuclear fuel cycle, and are essential to maintaining fuel quality in molten salt reactors [6,7]. The high temperatures, reactivity, and potential hazards of these pyrochemical techniques requires significant infrastructure such as furnaces, gloveboxes, and containment barriers. The containment barriers play key roles from secondary safety to crucial operational equipment. Among such equipment, those made from ceramics often face limitations to supply and design flexibility.
The thermal resistance and low reactivity of ceramics often makes them the preferred material for direct contact with hot or molten actinides and salts [8,9,10]. Among these ceramics, aluminum oxide is one of the most widely available and used [11,12], though dozens of others have been used and studied [13,14,15,16]. Examples of ceramic pyrochemistry tooling include: crucibles, stirrers, sheathes, and filters [4]. In all cases, the traditional manufacturing of these ceramics into pyrochemistry tooling relies on significant upfront capital. Assuming a powder or slip has already been identified, this capital may include mold design and testing, drying and sintering development, and machining development [17]. Despite this upfront capital, even well understood ceramic techniques can often result in broken or failed parts. These requirements make the modification of ceramic pieces slow and costly, if possible at all, and thus typically removes tooling modification from the experimental design matrix in actinide chemistry.
Here, we propose and investigate the use of additive manufacturing (AM) for pyrochemistry tooling. AM, colloquially 3D printing, allows for rapid design iteration and testing. This flexibility makes AM a strong candidate to quickly modify, test, and improve ceramic pyrochemistry tooling. Ceramic AM has been long studied and includes dozens of direct and indirect approaches [18,19,20]. One such process, vat photopolymerization (VP), utilizes a ceramic laden photocurable resin, cured selectively to produce a ceramic-polymer bonded green body. This green body is then thermally treated to remove the polymer and densify the ceramic particles contained within, as shown in Figure 1. The shrinkage shown in Figure 1b is due to the lost polymer mass during thermal treatment.
Among other ceramic AM techniques, VP stands out for its long history, and dense directly produced ceramics [21,22]. Despite this advantage, the majority of VP results for dense alumina have shown relatively small final parts ~40 mm or less in any given dimension [19,23]. Outside of review papers, process scale up is not often discussed, though there are some recent publications highlighting large VP alumina builds. In 2022 Schwarzer-Fischer published on a high density, low-defect VP alumina aerospike nozzle roughly 40 mm in height [24]. A recent industrial white paper from Lithoz GmbH showed a very large, >300 mm diameter ring, assembled from six separate VP pieces [25]. An important step to testing the applicability of VP to actinide pyrochemistry is also scaling up the process, as the ceramic tooling within is often large scale, on the order of 120 mm tall or greater [4]. As ceramic VP continues to develop, commercial photocurable resins with higher stability and more rapid curing become more readily available. These features make the resins compatible with a wider range of AM hardware, and the stability of the ceramic suspension allows for longer print times and thus larger parts. Crucially, the newest commercial resins examined here were found to be compatible with consumer-grade VP hardware, which is typically used for polymer AM. The low cost and wide distribution of this hardware makes these new ceramic resins attractive for AM of consumable actinide tooling, as well as expanding the accessibility of ceramic VP. In this study we examine the microstructure and properties of large alumina crucibles (~125 mm tall) enabled by these new resin and consumer-grade hardware.

2. Materials and Methods

2.1. Ceramic Vat Photopolymerization

Additively manufactured aluminum oxide ceramics for this study were sourced from Tethon3D (Omaha, NE, USA). These ceramics were produced using the newest generation of photocurable ceramic resins formulated by Tethon3D. The new combination of organic (photoinitiator, oligomers, surfactants, etc.) and inorganic (ceramic powder) components is specifically designed to minimize the required ultraviolet exposure for curing, and maintain resin stability over long print times. These features allow the resin to be used on a wider variety of VP hardware. To this end, all parts produced in this study were formed on Elegoo Mars (Elegoo Inc., Shenzhen, China) VP machines. These machines are typically considered as hobbyist, or consumer grade machines, and are two to three orders of magnitude less expensive than most dedicated ceramic VP machines at the time of study. All parts were printed at a layer height of 100 microns, with a layer exposure time of 4 s per layer. The printed green bodies underwent a continuous burnout and sintering process. For binder burnout they were heated to 700 °C at 1 °C/minute and held for 2 h, then sintered by heating to 1700 °C at 5 °C/min and held for 1 h, reduced to 1675 °C and held for 6 h, then furnace cooled to room temperature.
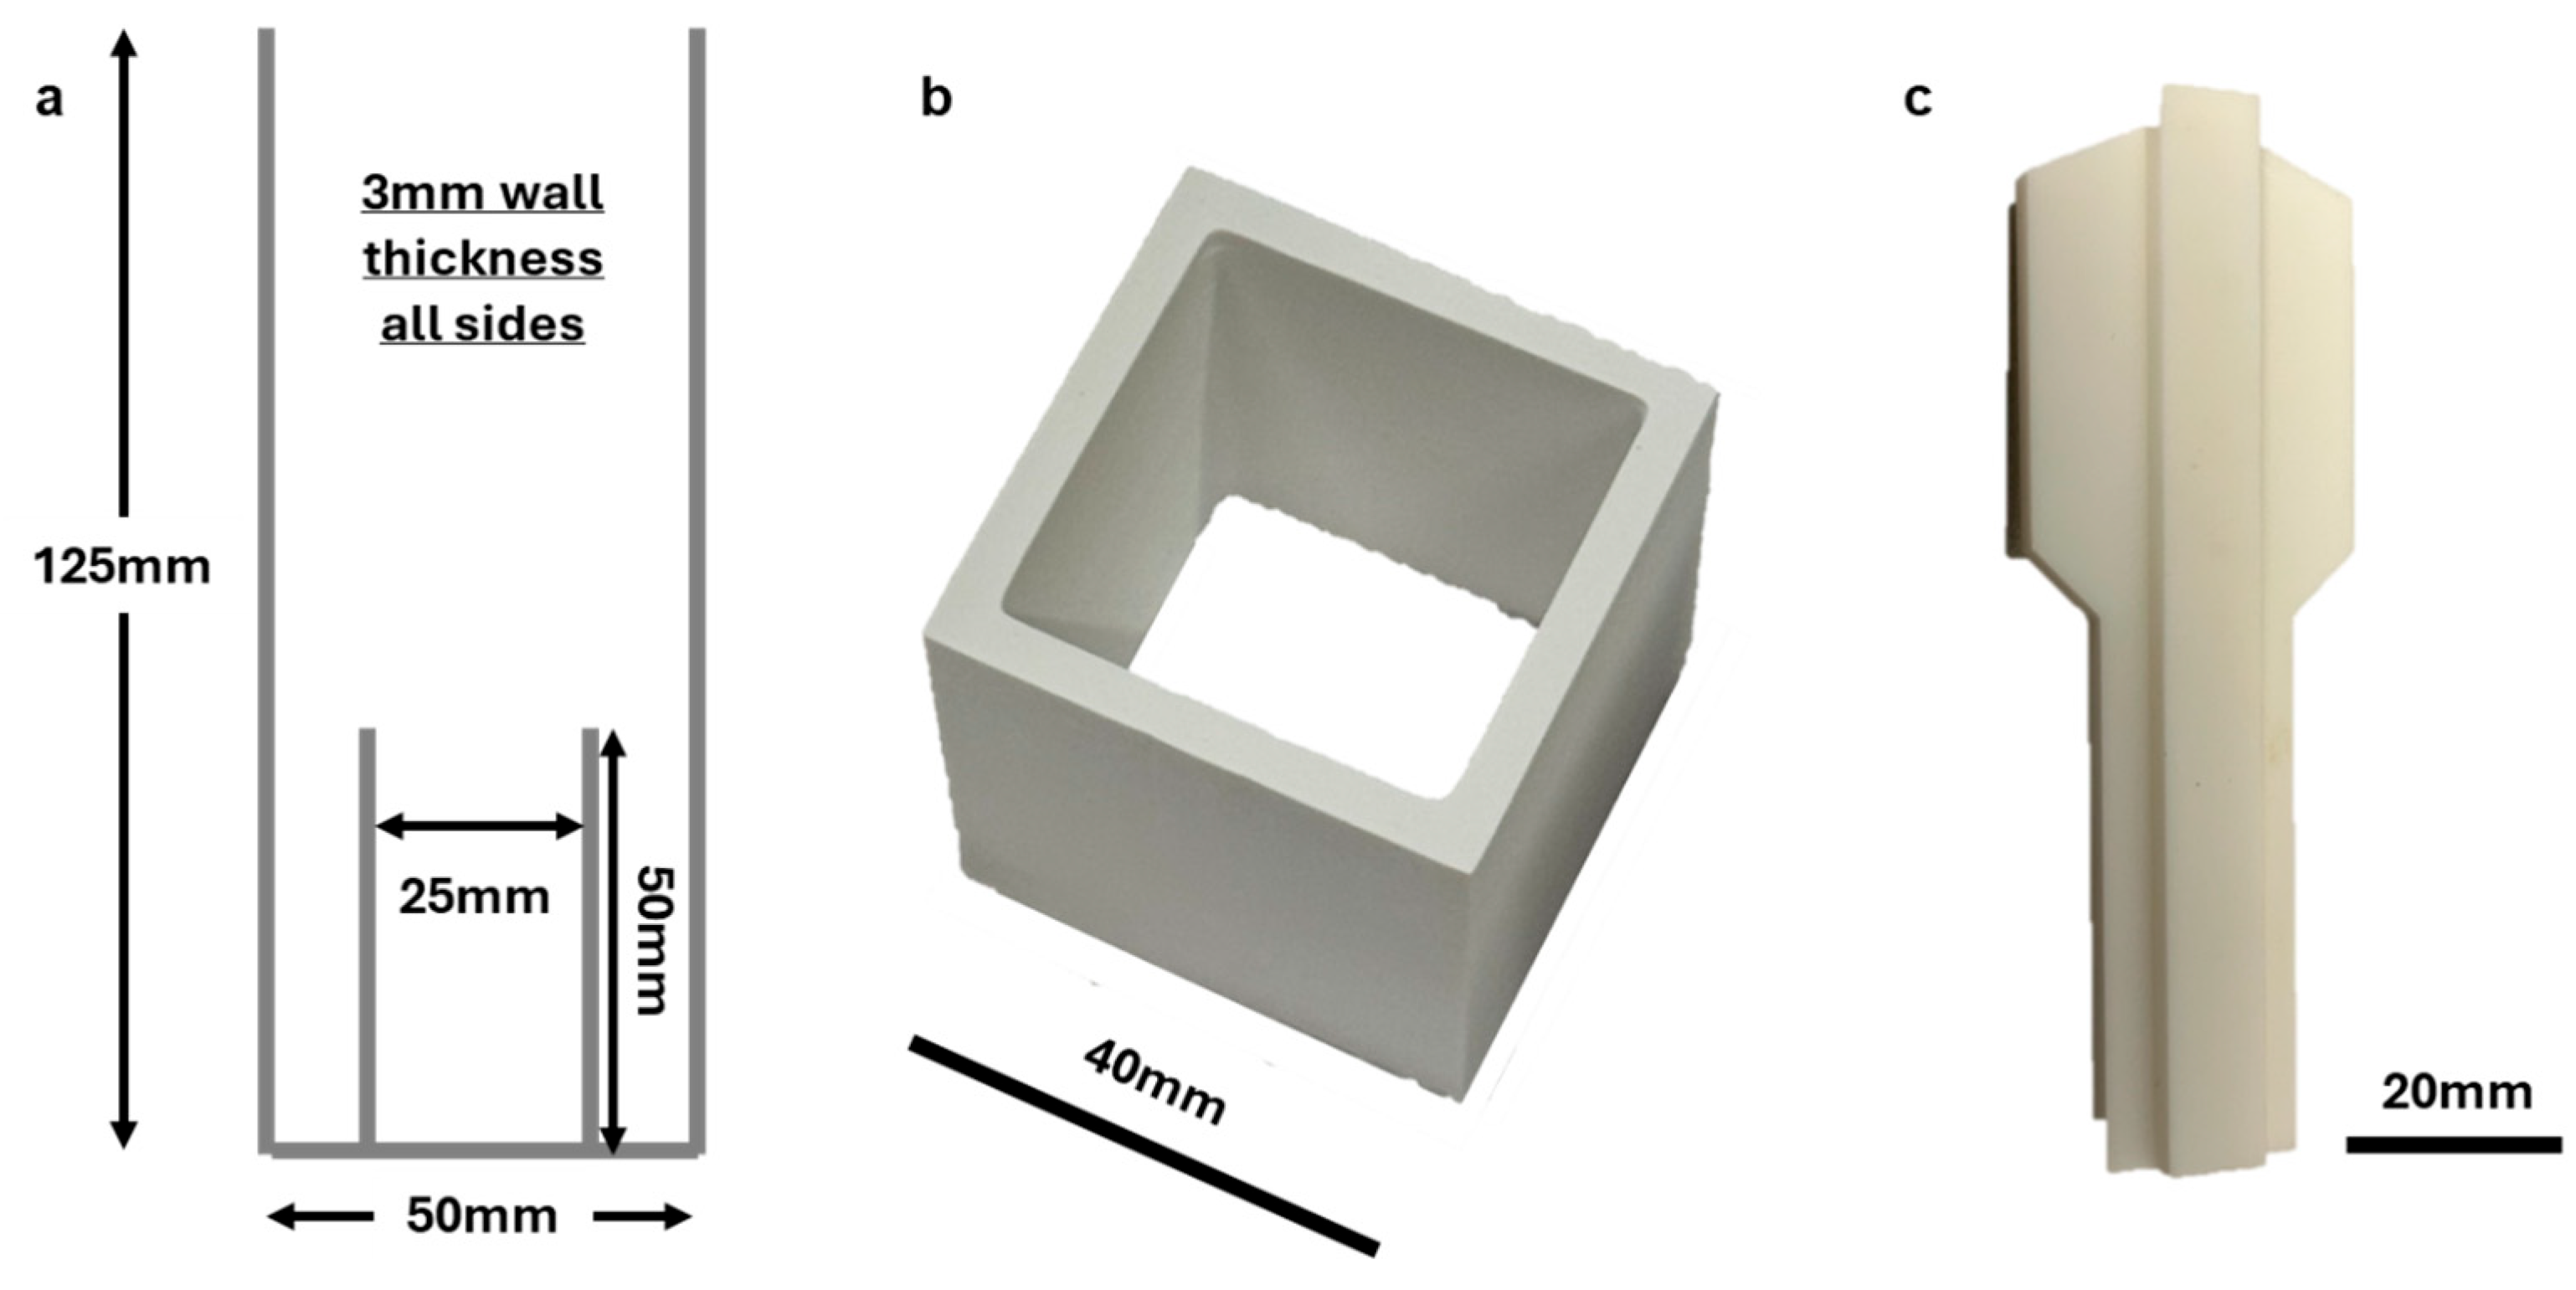
Two main geometries were produced via VP for this investigation. Several crucibles, design in Figure 2a, were fabricated. These crucibles are designed for use in ER, where the separate internal and external portions of the crucible can house the anode and cathode. Traditionally this geometry requires the bonding of separate ceramic pieces, and thus provides a good test for AM, which can produce these more complex features monolithically. In addition to the secondary features, the crucible provides a test of AM capabilities due to its relatively large scale. Though ER equipment can get much larger, these crucibles still represent some of the largest VP produced ceramics the authors could identify in publication, and are at a similar scale to many binder jet and extrusion based AM ceramics [26,27]. In addition to the crucibles, square “frame” structures were produced, shown in Figure 2b. These frames were more readily sectioned into bending coupons for mechanical testing, including samples cut horizontally and vertically aligned from the build direction. In addition to these AM pieces, a conventionally manufactured aluminum oxide ER stirrer (Coorstek, Golden, CO, USA), shown in Figure 2c, was sectioned for characterization. This part is actively used in actinide pyrochemistry, and provides a valuable baseline for required alumina structure and properties.

2.2. Characterization

To assess the surface structure, grain characteristics, porosity, and defects of the ceramics, several pieces were prepared for electron microscopy. Cross-sections were polished with grinding papers, and all surfaces were sputter coated with either carbon or Au-Pd prior to imaging. Electron microscopy was performed on an Apreo S (ThermoFisher Scientific, Waltham, MA, USA) equipped with an EDAX Octane Elite energy dispersive X-ray spectrometer (EDAX, Pleasanton, CA, USA).
For three dimensional density analysis a Nikon Metrology MCT 225 X-ray computed tomography (XCT) instrument (Nikon Metrology, Brighton, MI, USA) was used. The reconstructed tomography data was analyzed using ImageJ software (Fiji-1.53c) package version Fiji-1.53c (National Institutes of Health, Bethesda, MD, USA) [28].
Mechanical testing was performed on an Instron 5966 Universal Testing System (Norwood, MA, USA). Testing was performed according to ASTM C1161-18 [29] under four-point bending, with nominal bar size and loading conditions given in Table 1.
The AM crucibles performance was tested via ER trials. ER is often one of the most time intensive pyrochemical processing steps, resulting in longer sustained salt and metal exposure at high temperatures. Additionally, the unique geometry of double-cupped ER crucibles marks a good use case for AM. These trials used a LiCl-KCl-CaCl2 electrolyte, tungsten anode and cathode, and Sn-Ni metal charge agitated at temperatures of 410–510 °C using the same alumina stirrer shown in Figure 2c.

3. Results

3.1. Additive Manufacturing Observations

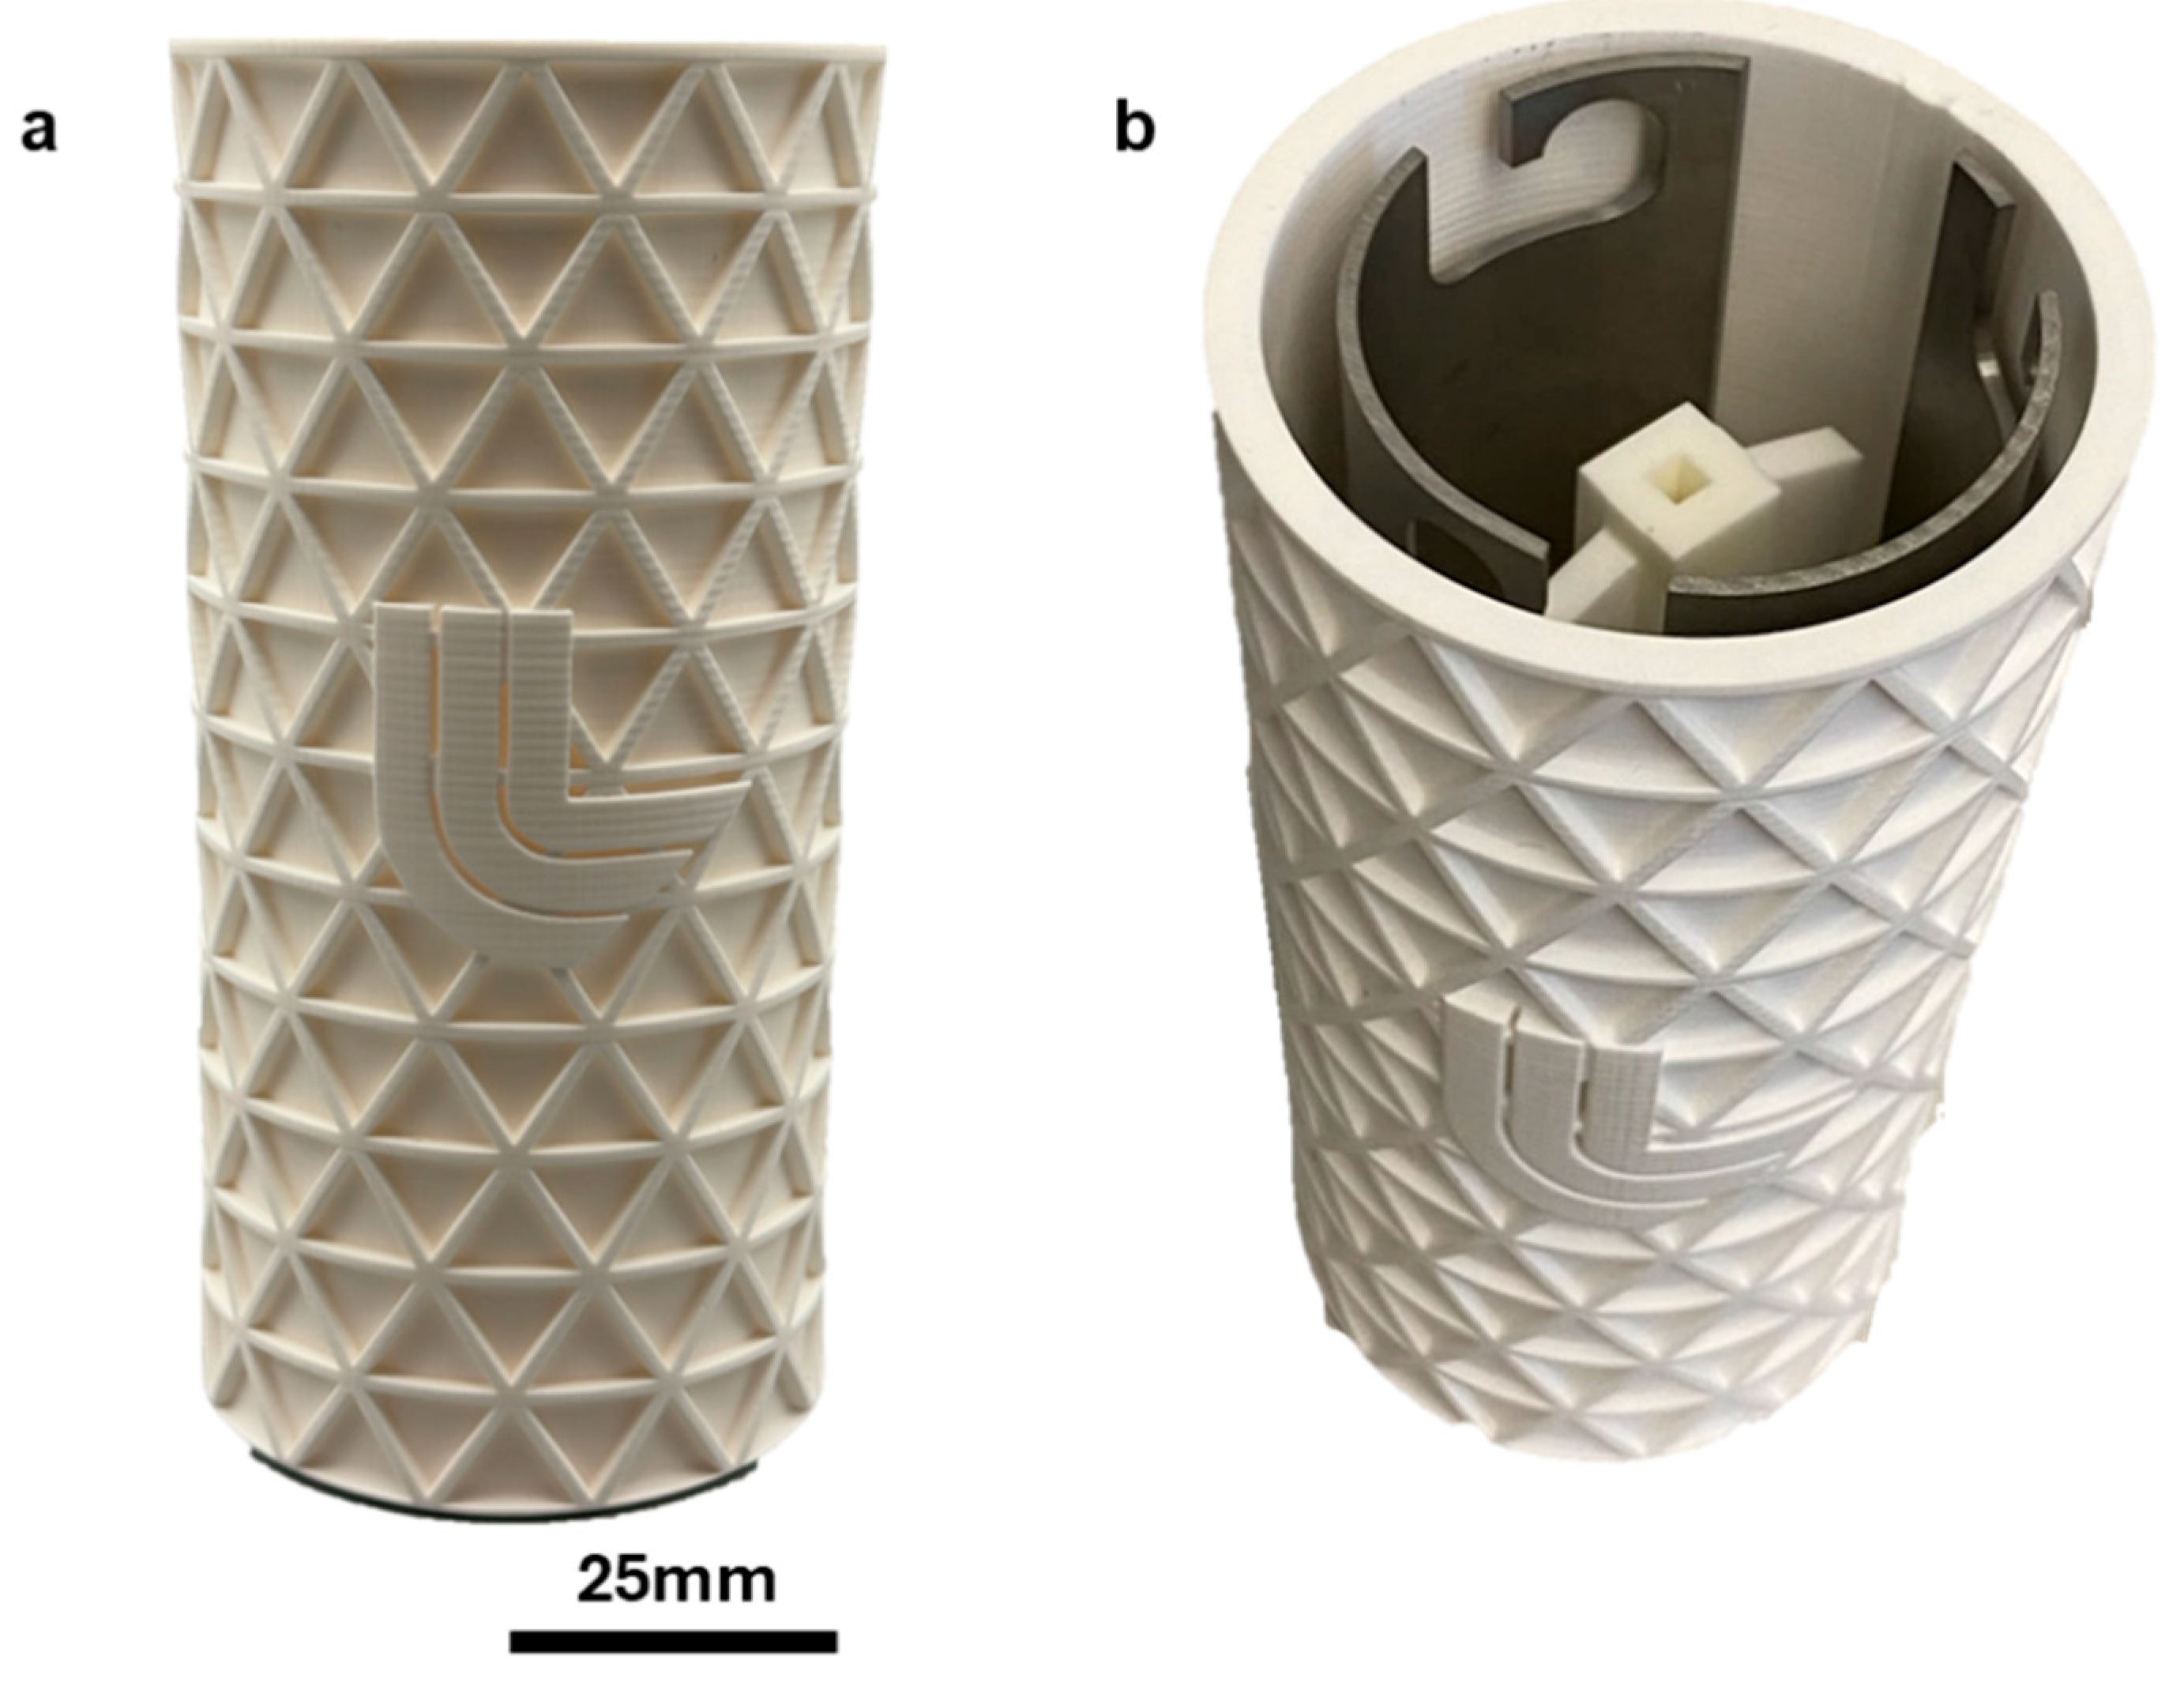
At the core of this study, the alumina ER crucibles were able to be successfully produced using the newest generation of photocurable ceramic resin. Crucially, these large pieces were produced on consumer grade AM hardware, not specifically designed for ceramic VP. Figure 3a shows one of these crucibles assembled with the stirrer and electrode. The fit of these components defines the dimensional requirements shown in Figure 2a. Initial prints did not meet these specifications, partially due to unexpectedly large shrinkage in the vertical direction ~25% during burnout and sintering, while the horizontal saw ~15% shrinkage. The exact nature of this anisotropic shrinkage was not identified, but could be due to the added part weight due to its large size, or a compounding effect any inter-layer density gradients given the large number of layers in such a tall piece. An advantage of AM is that the digital model can be readily scaled and reprinted to compensate for this shrinkage, which was done for those discussed in this study. Notably, the final successful crucibles also have a different appearance than the basic dimension requirements defined in Figure 2a due to the tessellated truss structure wrapped around the exterior. The initial smooth walled crucibles that were printed were found to fail often mid-print, or warp substantially during sintering. This warpage often left the sintered tool oblong and oval shaped instead of round. Off tolerance dimensions can results in improper tool fixturing and furnace fit for the ER hardware, prohibiting use. The exterior truss structure added to the crucible design was found to resolve both of these issues.
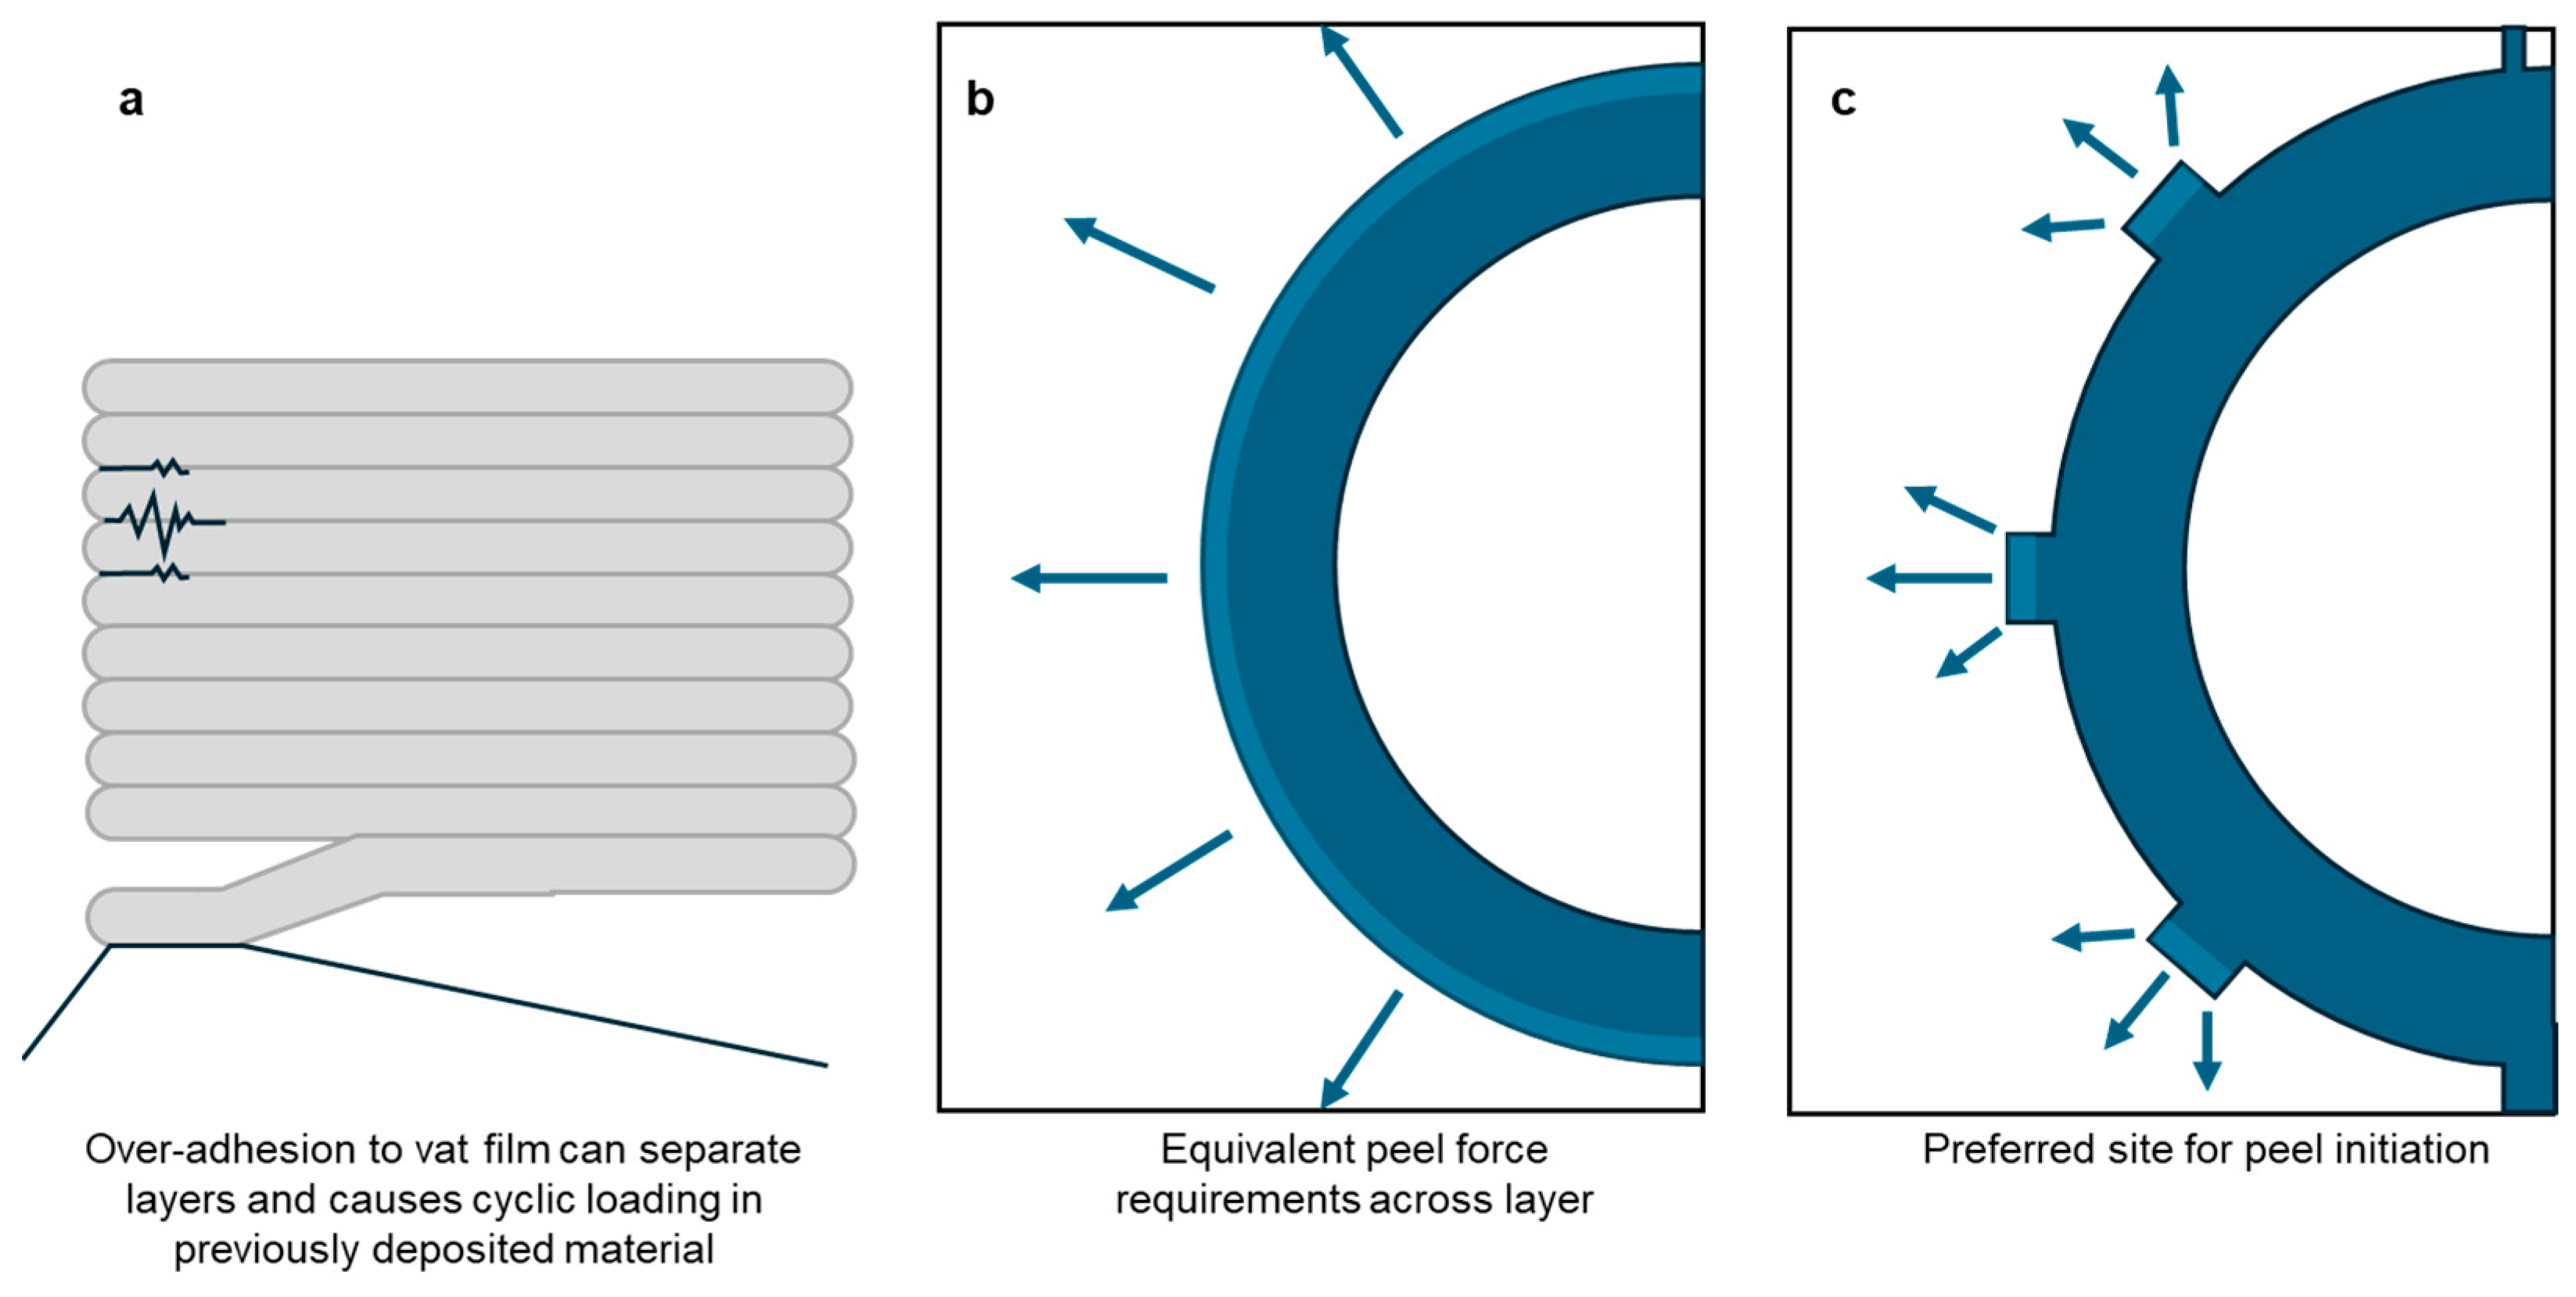
The sintered truss reinforced crucibles were found to maintain the as-printed roundness of the crucible without lateral significant warpage. The trusses increase the effective wall thickness of the crucible, helping resist warpage from the shrinkage and residual stress, and improvements to printability may have reduced these stresses and subsequent warpage as well. To this end, the primary goal of the truss design was to improve printability by reducing layer-to-layer peel forces during AM. Peel forces occur in top-down VP processes, like that used here, when a new layer of material is cured onto the build. Most commonly, there is a thin polymeric screen (fluorinated ethylene propylene in the case of this study) which separates the build and resin vat from the UV source. When a new layer is successfully cured, it adheres to both the polymer screen and the previous layer of the build. The build must then be retracted away until it is broken away from the screen, then repositioned for the next layer. This layer change process is the most prone to part failure. If the layer over-adheres to the plastic film, it can rip off the build or be repositioned [30,31]. Normally, a relatively thin-walled part like these crucibles, without a high surface area of cured region per-layer would not be expected to have particularly high peel forces; however the contained round design of the crucible creates significant suction forces which could prevent the plastic film from peeling off a newly cured layer, or even damage the plastic film. This facet of the design is highlighted in Figure 4a. Additionally, these larger forces are experienced over thousands of layers for large prints such as the crucibles, so fatigue failure of earlier printed layers can occur as well. For smaller parts, altering the orientation could reduce or eliminate these issues, however the preferred build axis shrinkage prohibits any major shift in build orientation for the crucibles. The external truss struts of the crucible provided small protrusions that break the surface tension of the film-build seal, relaxing the layer-to-layer peel forces, and resulted in a higher success of prints. Peel initiation details for the crucible is shown in Figure 4c.
Although successful printing of the crucibles required adjustments to the geometry, features, and AM setting, the burnout and sintering was not found to require any special considerations outside of the higher observed vertical shrinkage. Similarly, the square frame pieces printed without substantial issue, but these lacked the layer suction effect that the crucibles had due to being open-ended on both sides. Without a bracing structure, these did warp slightly during burnout and sintering, but the walls were straight enough to harvest both vertical and horizontally aligned bending coupons.

3.2. Structure

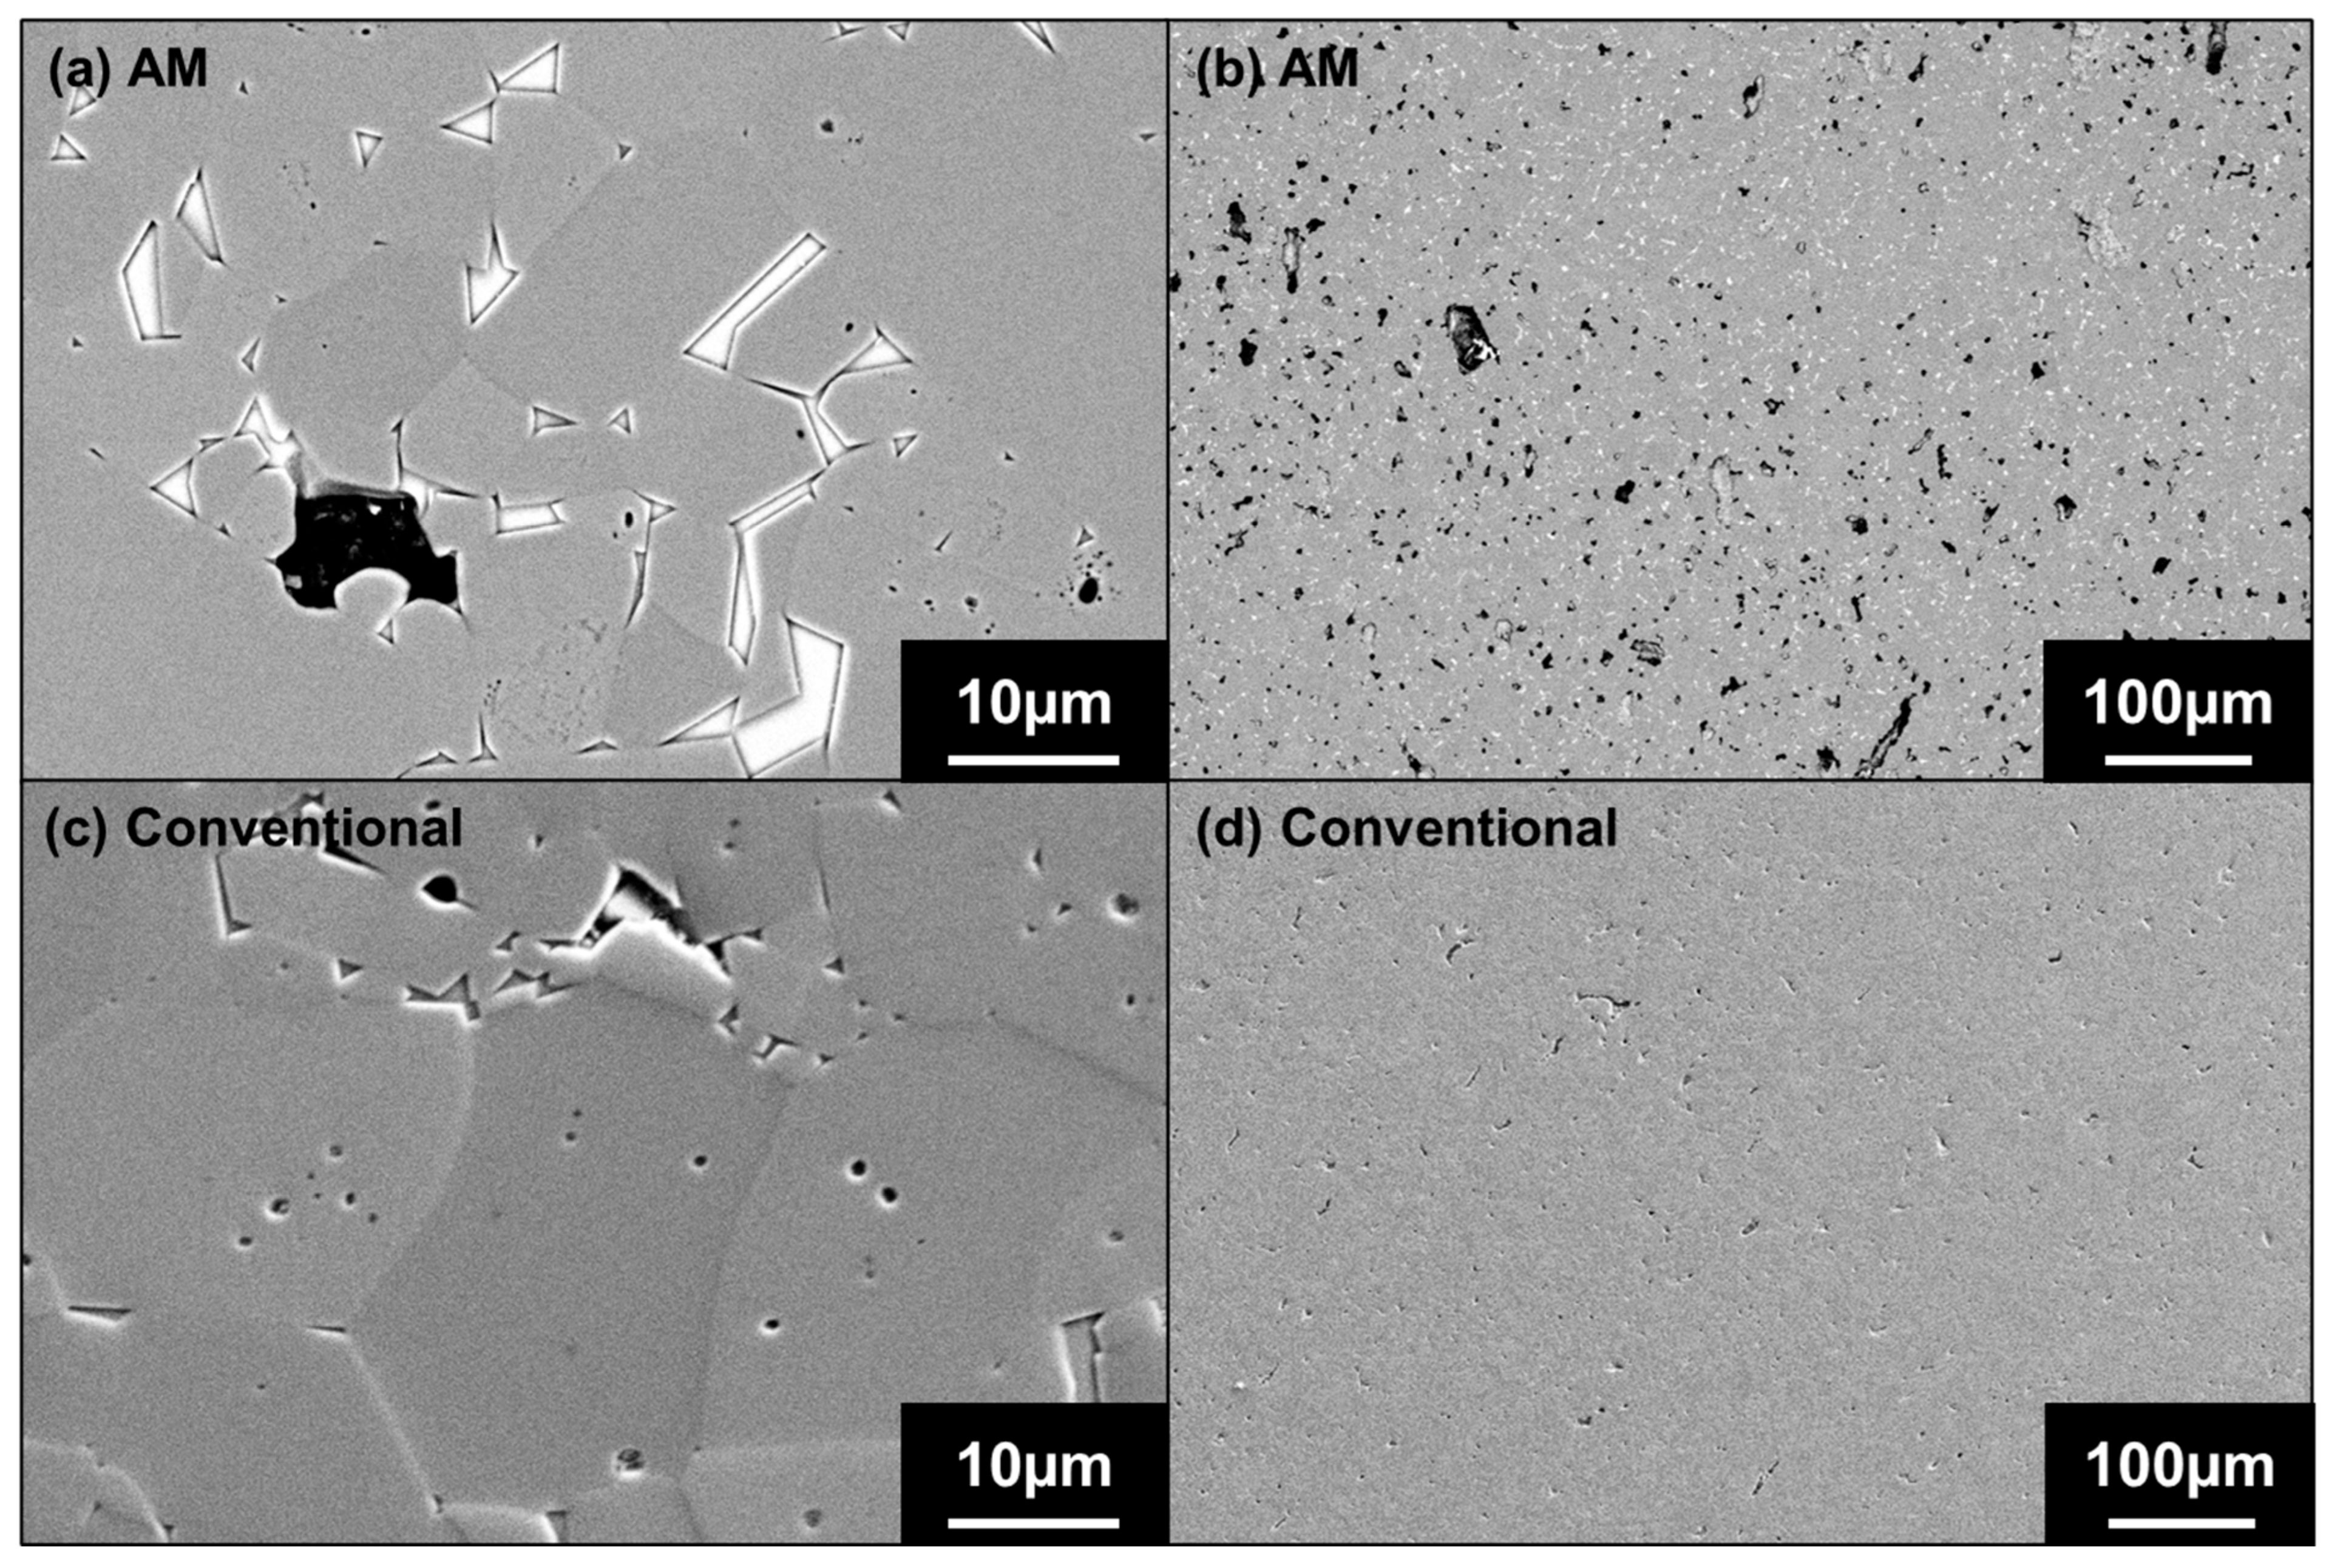
The surface and cross-sections of the AM material and conventionally produced ceramic from the stirrer were examined and compared. Figure 5 shows the cross-section microscopy of these two materials. Both the conventional and AM are shown to be dense, polycrystalline ceramics, though the AM material has notably higher porosity. The conventionally produced material has an area measured porosity of 0.2%, though it is important to note that some of this may be due to grain pullout from cutting and polishing for both materials. In the conventional material the grains range in size from ~3–30 µm and are not particularly elongated. The AM material is similar in appearance, with dense equiaxed grains ~5–20 µm in size. The observed porosity, 4.3% by area, is larger and the individual voids tend to be larger than in the conventional alumina. A major difference is the presence of a grain boundary phase in the AM material, seen as the bright regions between grains in Figure 5a. Electron dispersive spectroscopy spot analysis of this grain boundary phase, shows that these boundary phases are rich in P (1.3%), Na (1.3%), Mg (1.3%), Al (21.8%), Si (15.8%), Ca (17.3%) and O (34.5%), likely making them some type of feldspar. These weight percentages were calculated using standardless EDS and are estimates only. Feldspars are known to act as a sintering aid in aluminum oxide, and the presence of this material likely contributes to the high density of the final part [32].
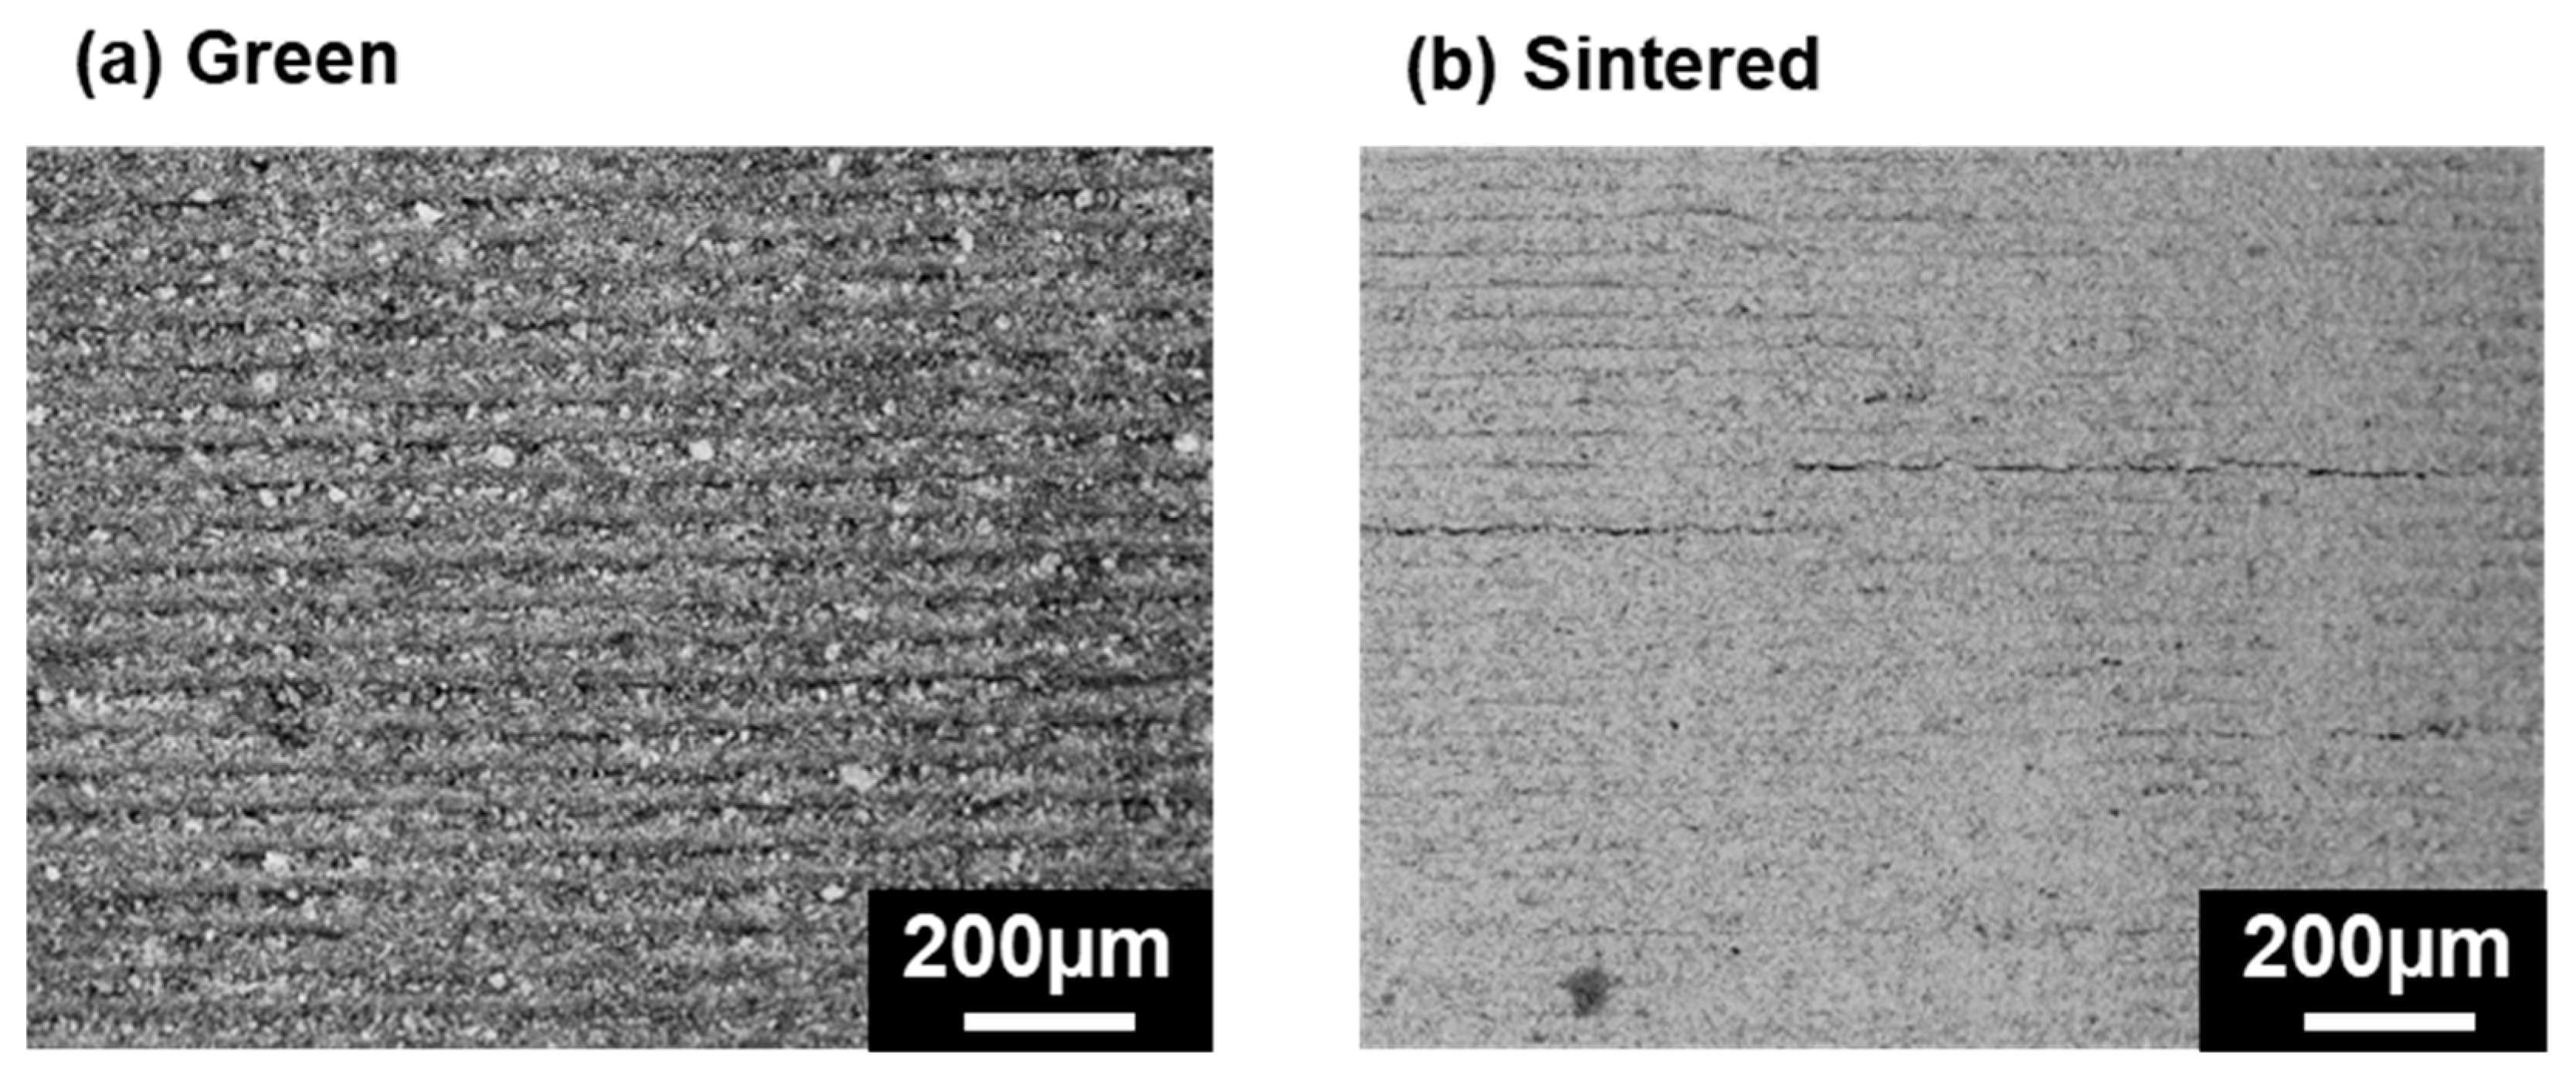
Although the cross-section characterization shows a relatively similar polycrystalline bulk structure, the two materials vary more greatly in the surface structure. As shown in Figure 6, the layer-to-layer interfaces in the AM material create significant ridges and valleys across the surface of the part. Furthermore, in some areas these valleys form cracks at the surface of the material. These cracks are more readily observed in the sintered part, Figure 6b, than the as-printed green body, Figure 6a. This suggests the material evolution during burnout and sintering is contributing to the formation of the surface cavities. This makes it most likely that they are print defects, caused by incomplete layer curing or peel forces, though the shrinkage during post-processing may accentuate the cracks and open them further.
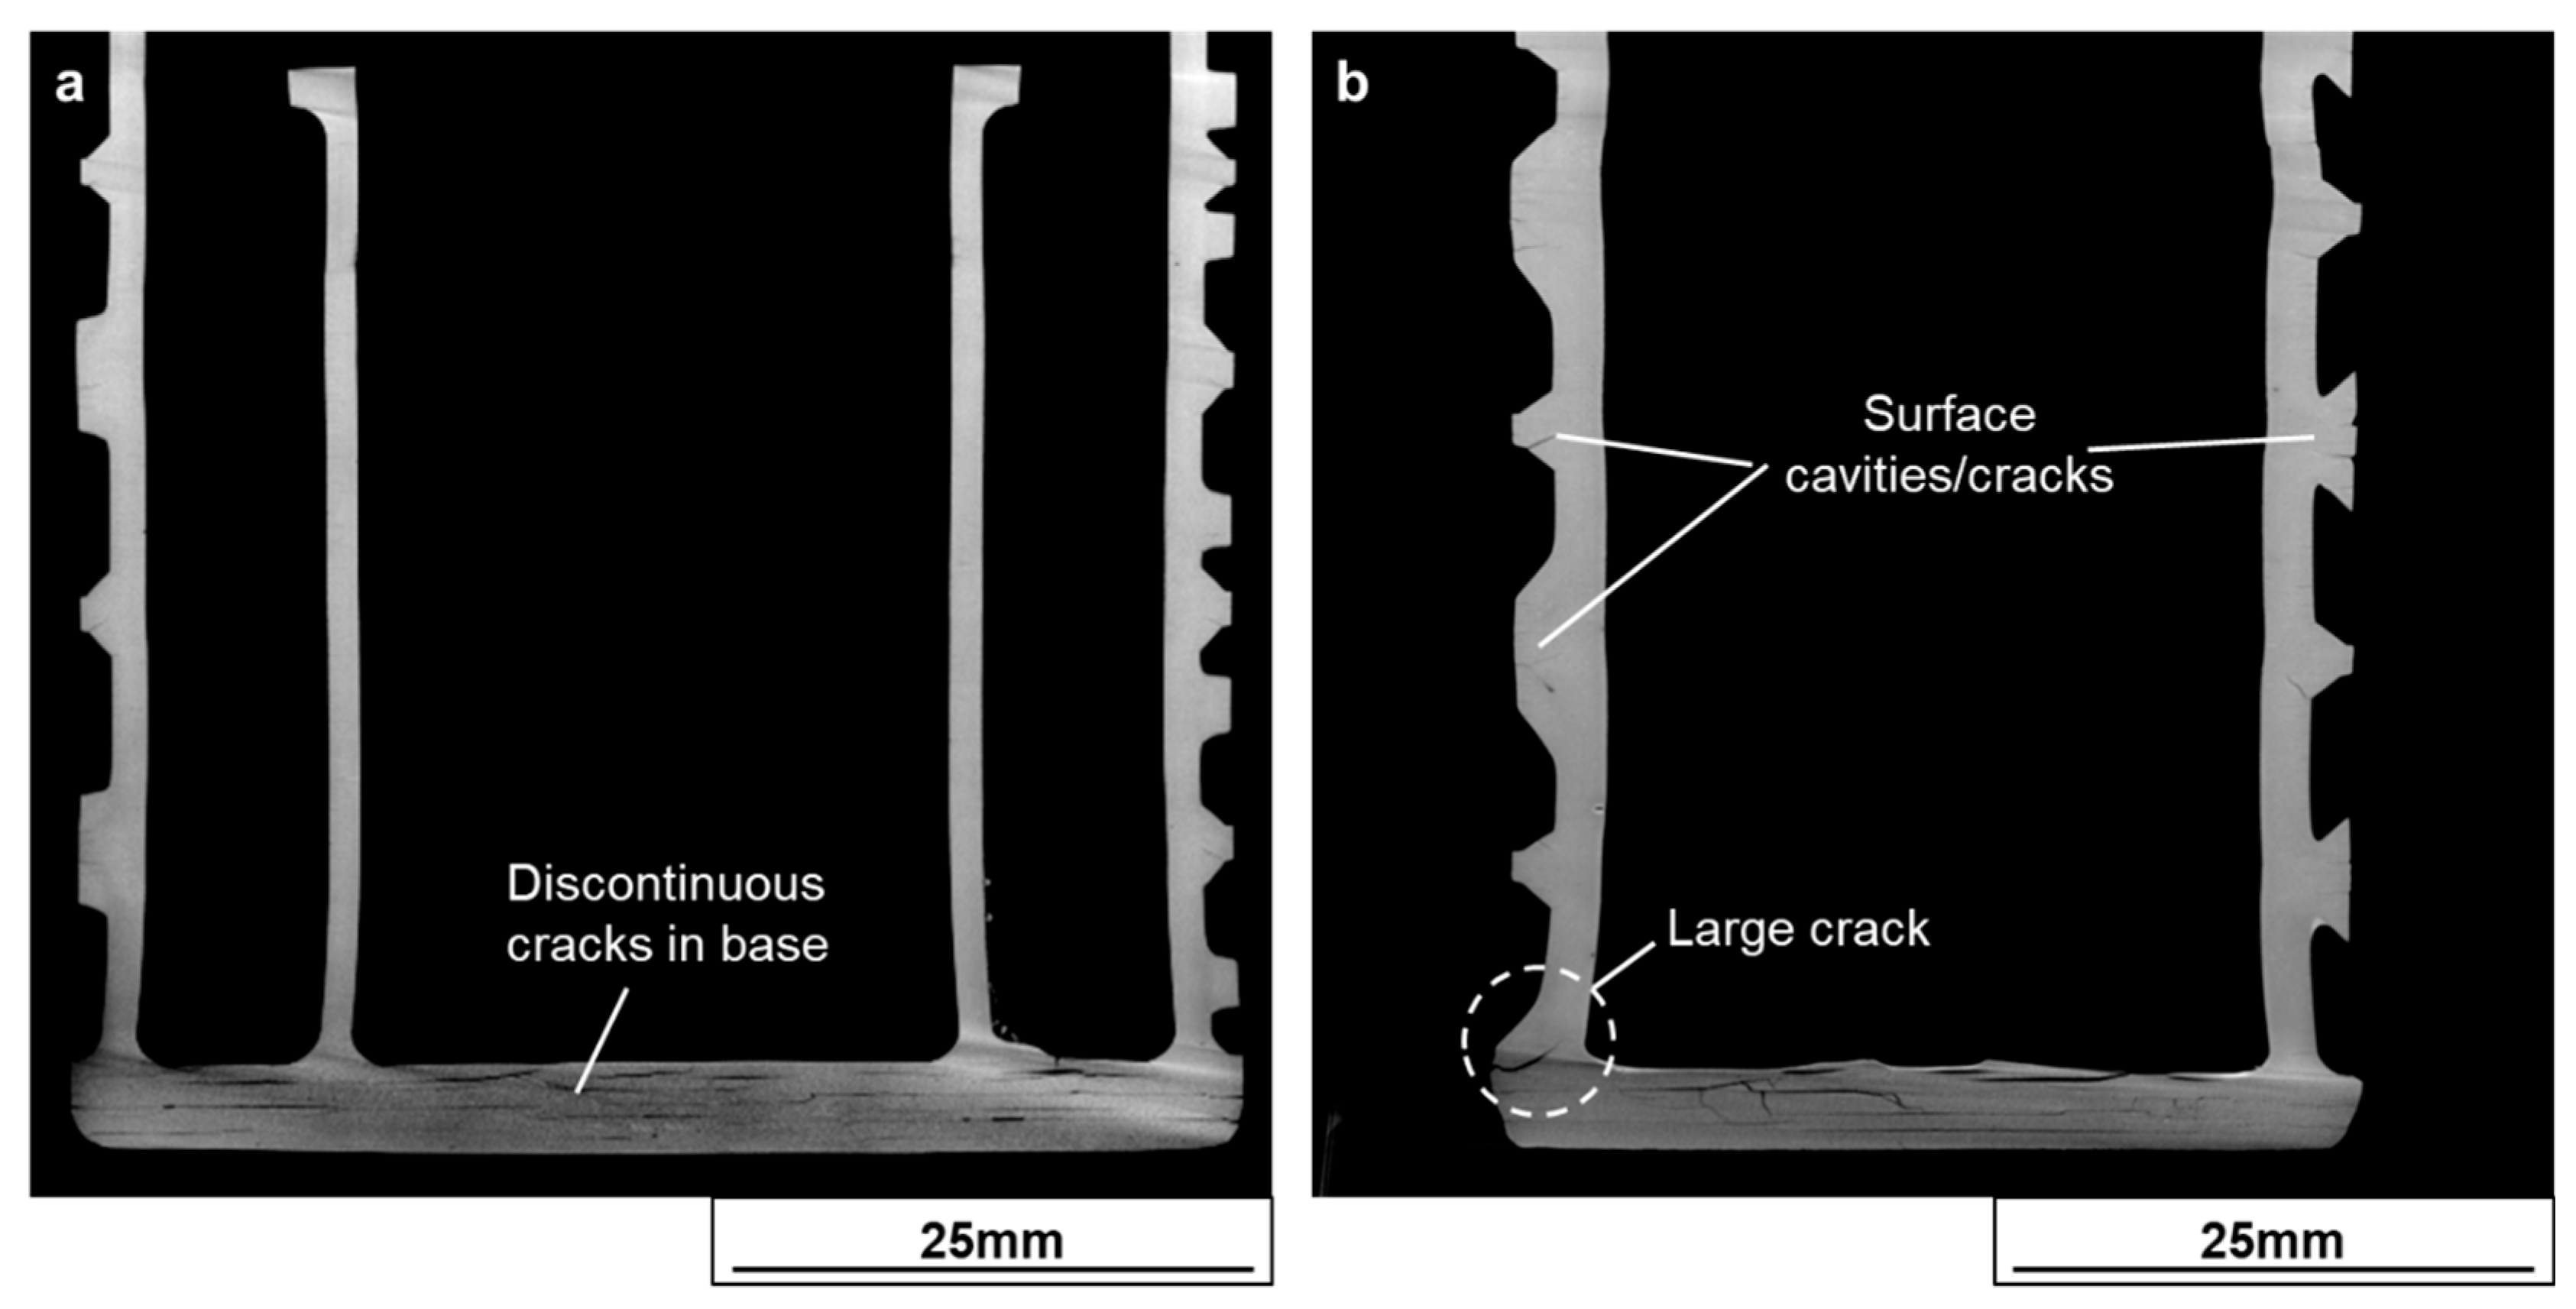
The AM samples were also characterized through-thickness via XCT. The resolution of full part scans over the full part is lower than achievable with microscopy, limiting the detection of fine voids and small features. However it is well for identifying large cracks and voids. Figure 7 shows two slices from XCT reconstructions of printed ER crucibles. Figure 7a is representative of a “good” crucible. Here, the walls and entire crucible are cohesive. There are some surface cracks, especially at the concentric portion of the surface truss structure. Additionally, the thick base of the crucible has numerous small cracks running throughout, however three-dimensional data reveals that none of these cracks are continuous through the entire base. Figure 7b shows a crucible which was cosmetically a successful print, but upon inspection with XCT shows a large crack in the wall section, nearly through the entire cross section of the part.
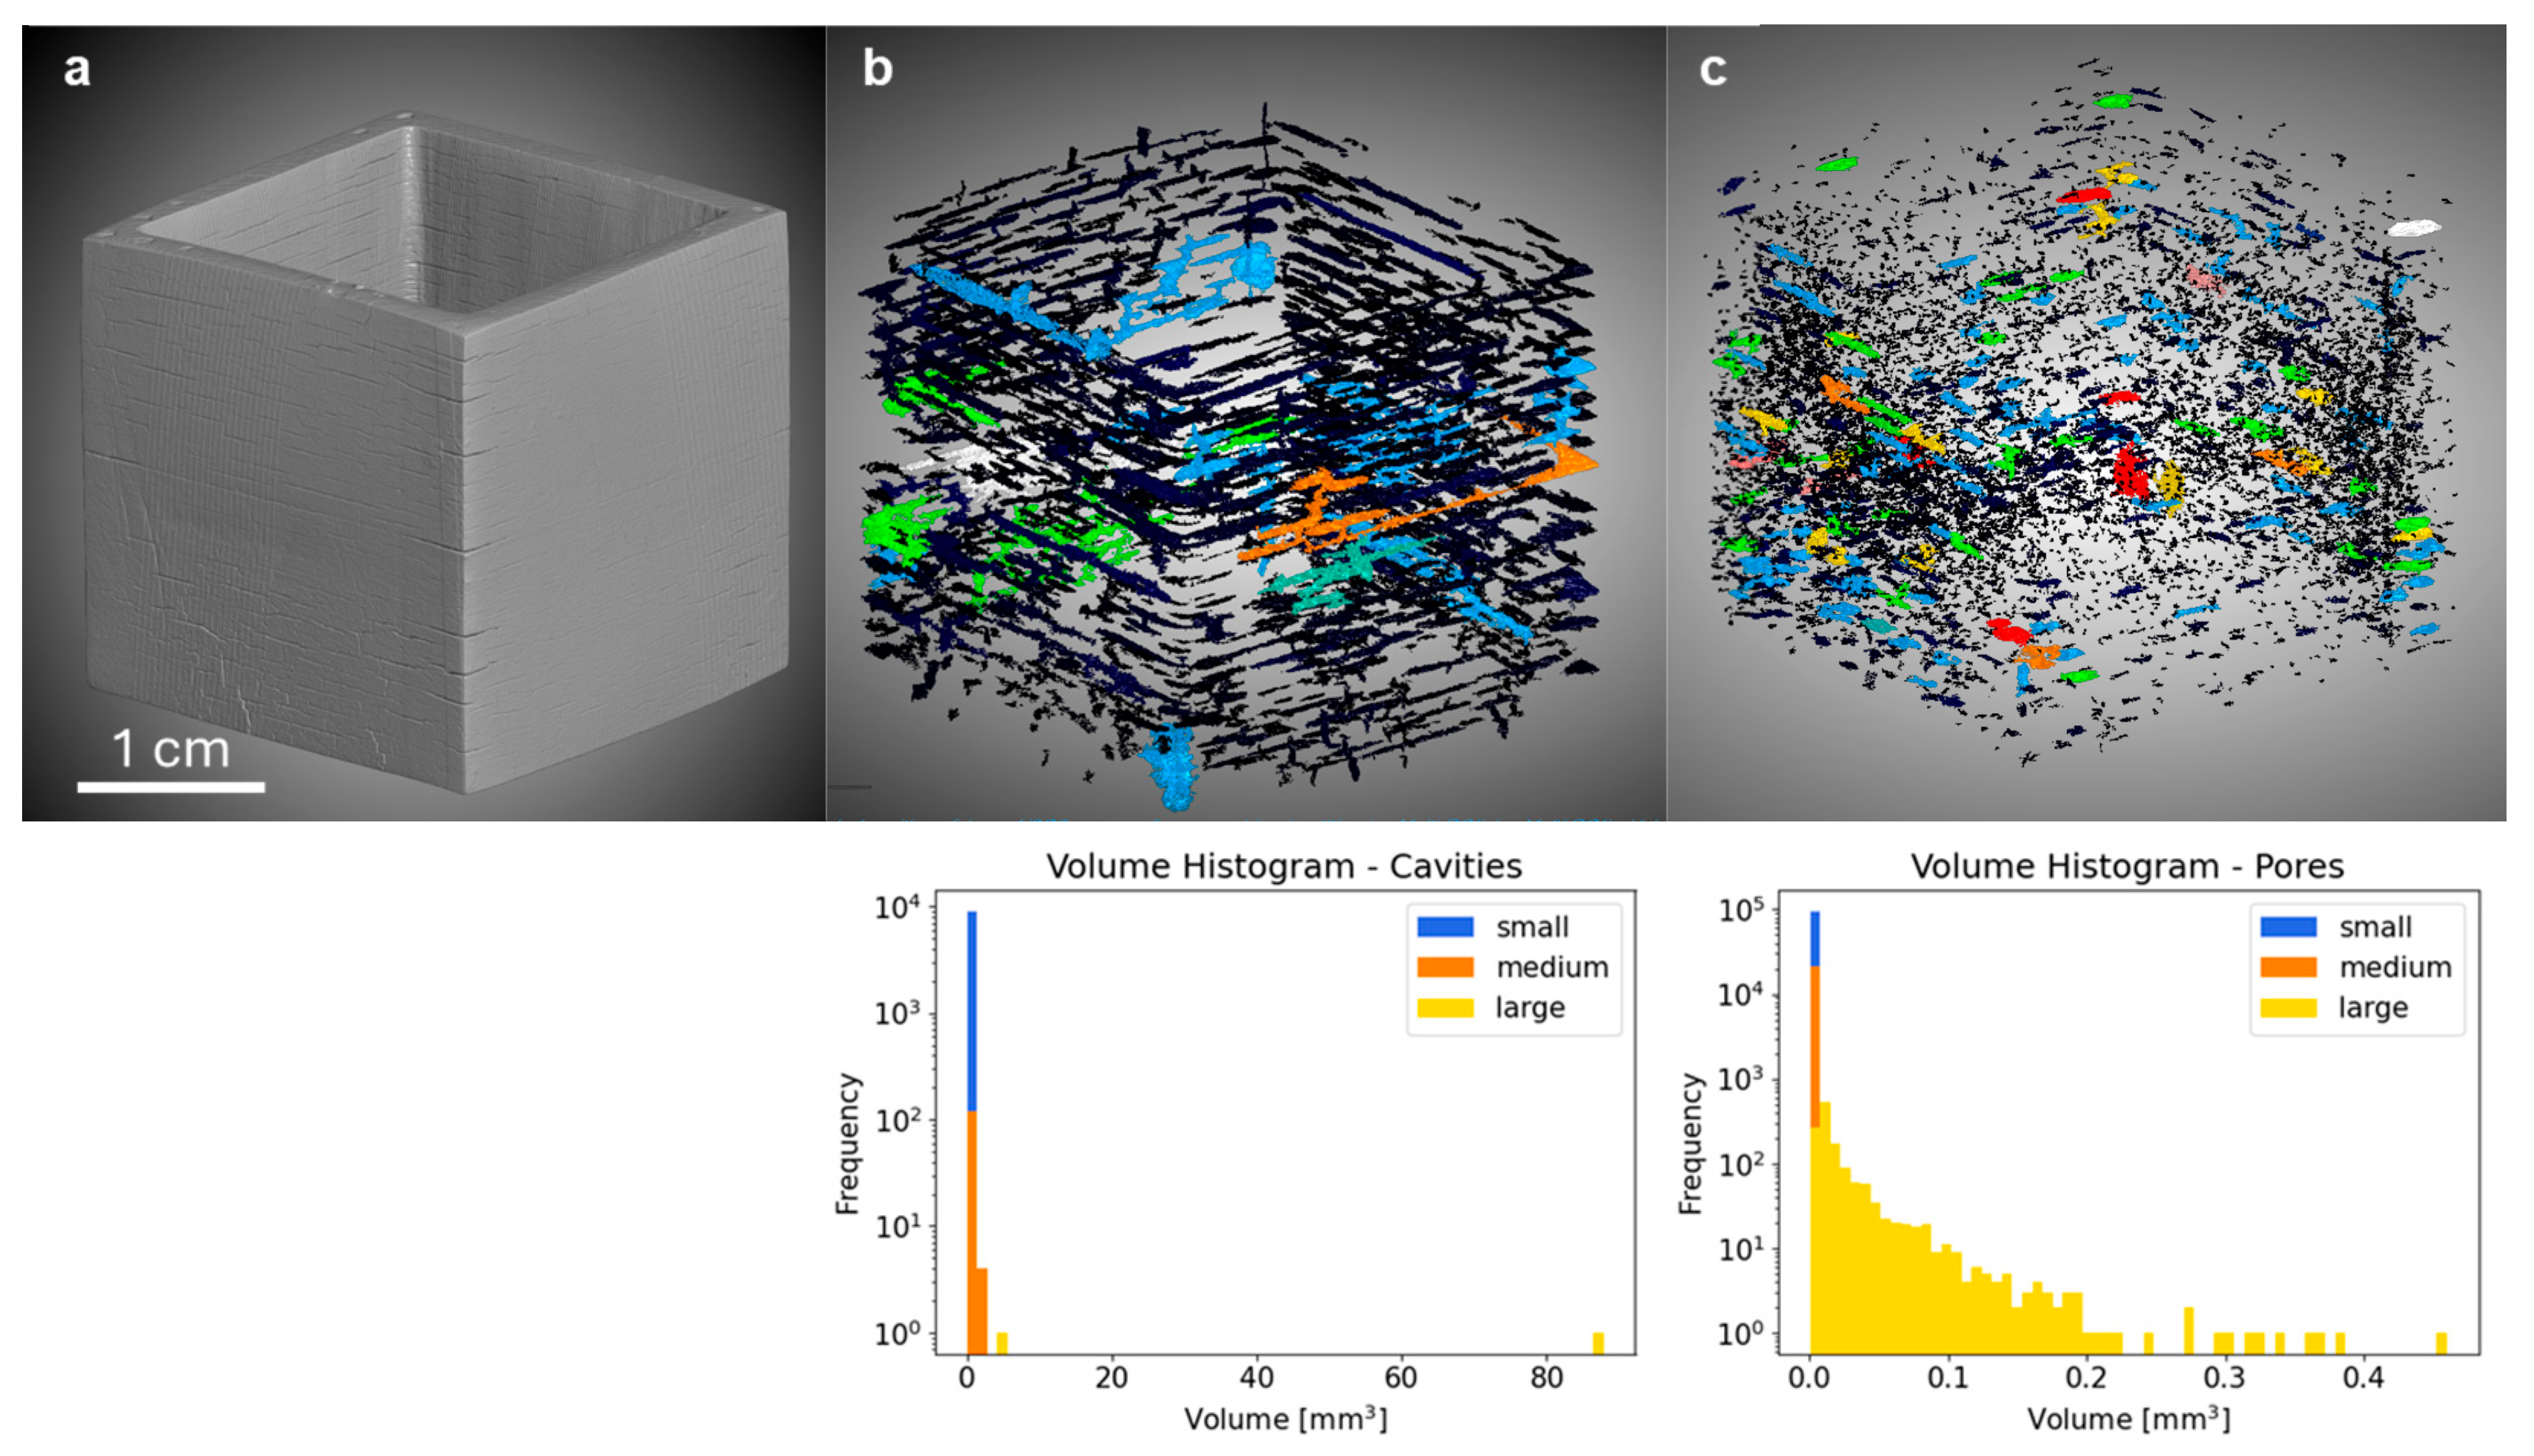
In addition to screening, the XCT can be applied more analytically. This is more straightforward in basic geometries such as the frame structures. Figure 8 shows the analysis of a full resolution XCT scan of one of the window frame pieces. The smallest, middle, and largest third of the sampled cavity and void populations are defined as small, medium, and large respectively. Using this approach surface cavities from layer line separation can be distinguished from internal voids and porosity. Only assessing the voids, the XCT analysis here overestimates the density of the part due to limited resolution at scale. Via XCT the bulk density was found to be 94.2%, with 3.82% surface cavity volume, and 1.9% internal pore volume.

3.3. Properties

Bend testing was performed on coupons excised from the AM crucible, AM frame, and conventional stirrer. Due to the curvature of the crucible walls, only vertically aligned coupons could be extracted. Horizontally aligned bars were cut from the base, however all but one broke from the crucible during cutting or grinding due to the cracks seen in Figure 7. It is key to note that the measured values here are engineering stresses, in particular for the AM samples where it was not viable to measure every surface crack and their effect on true cross section dimensions. The material sectioned from the conventional alumina stirrer had consistent bending performance of 296 MPa and a standard deviation of 25 MPa.
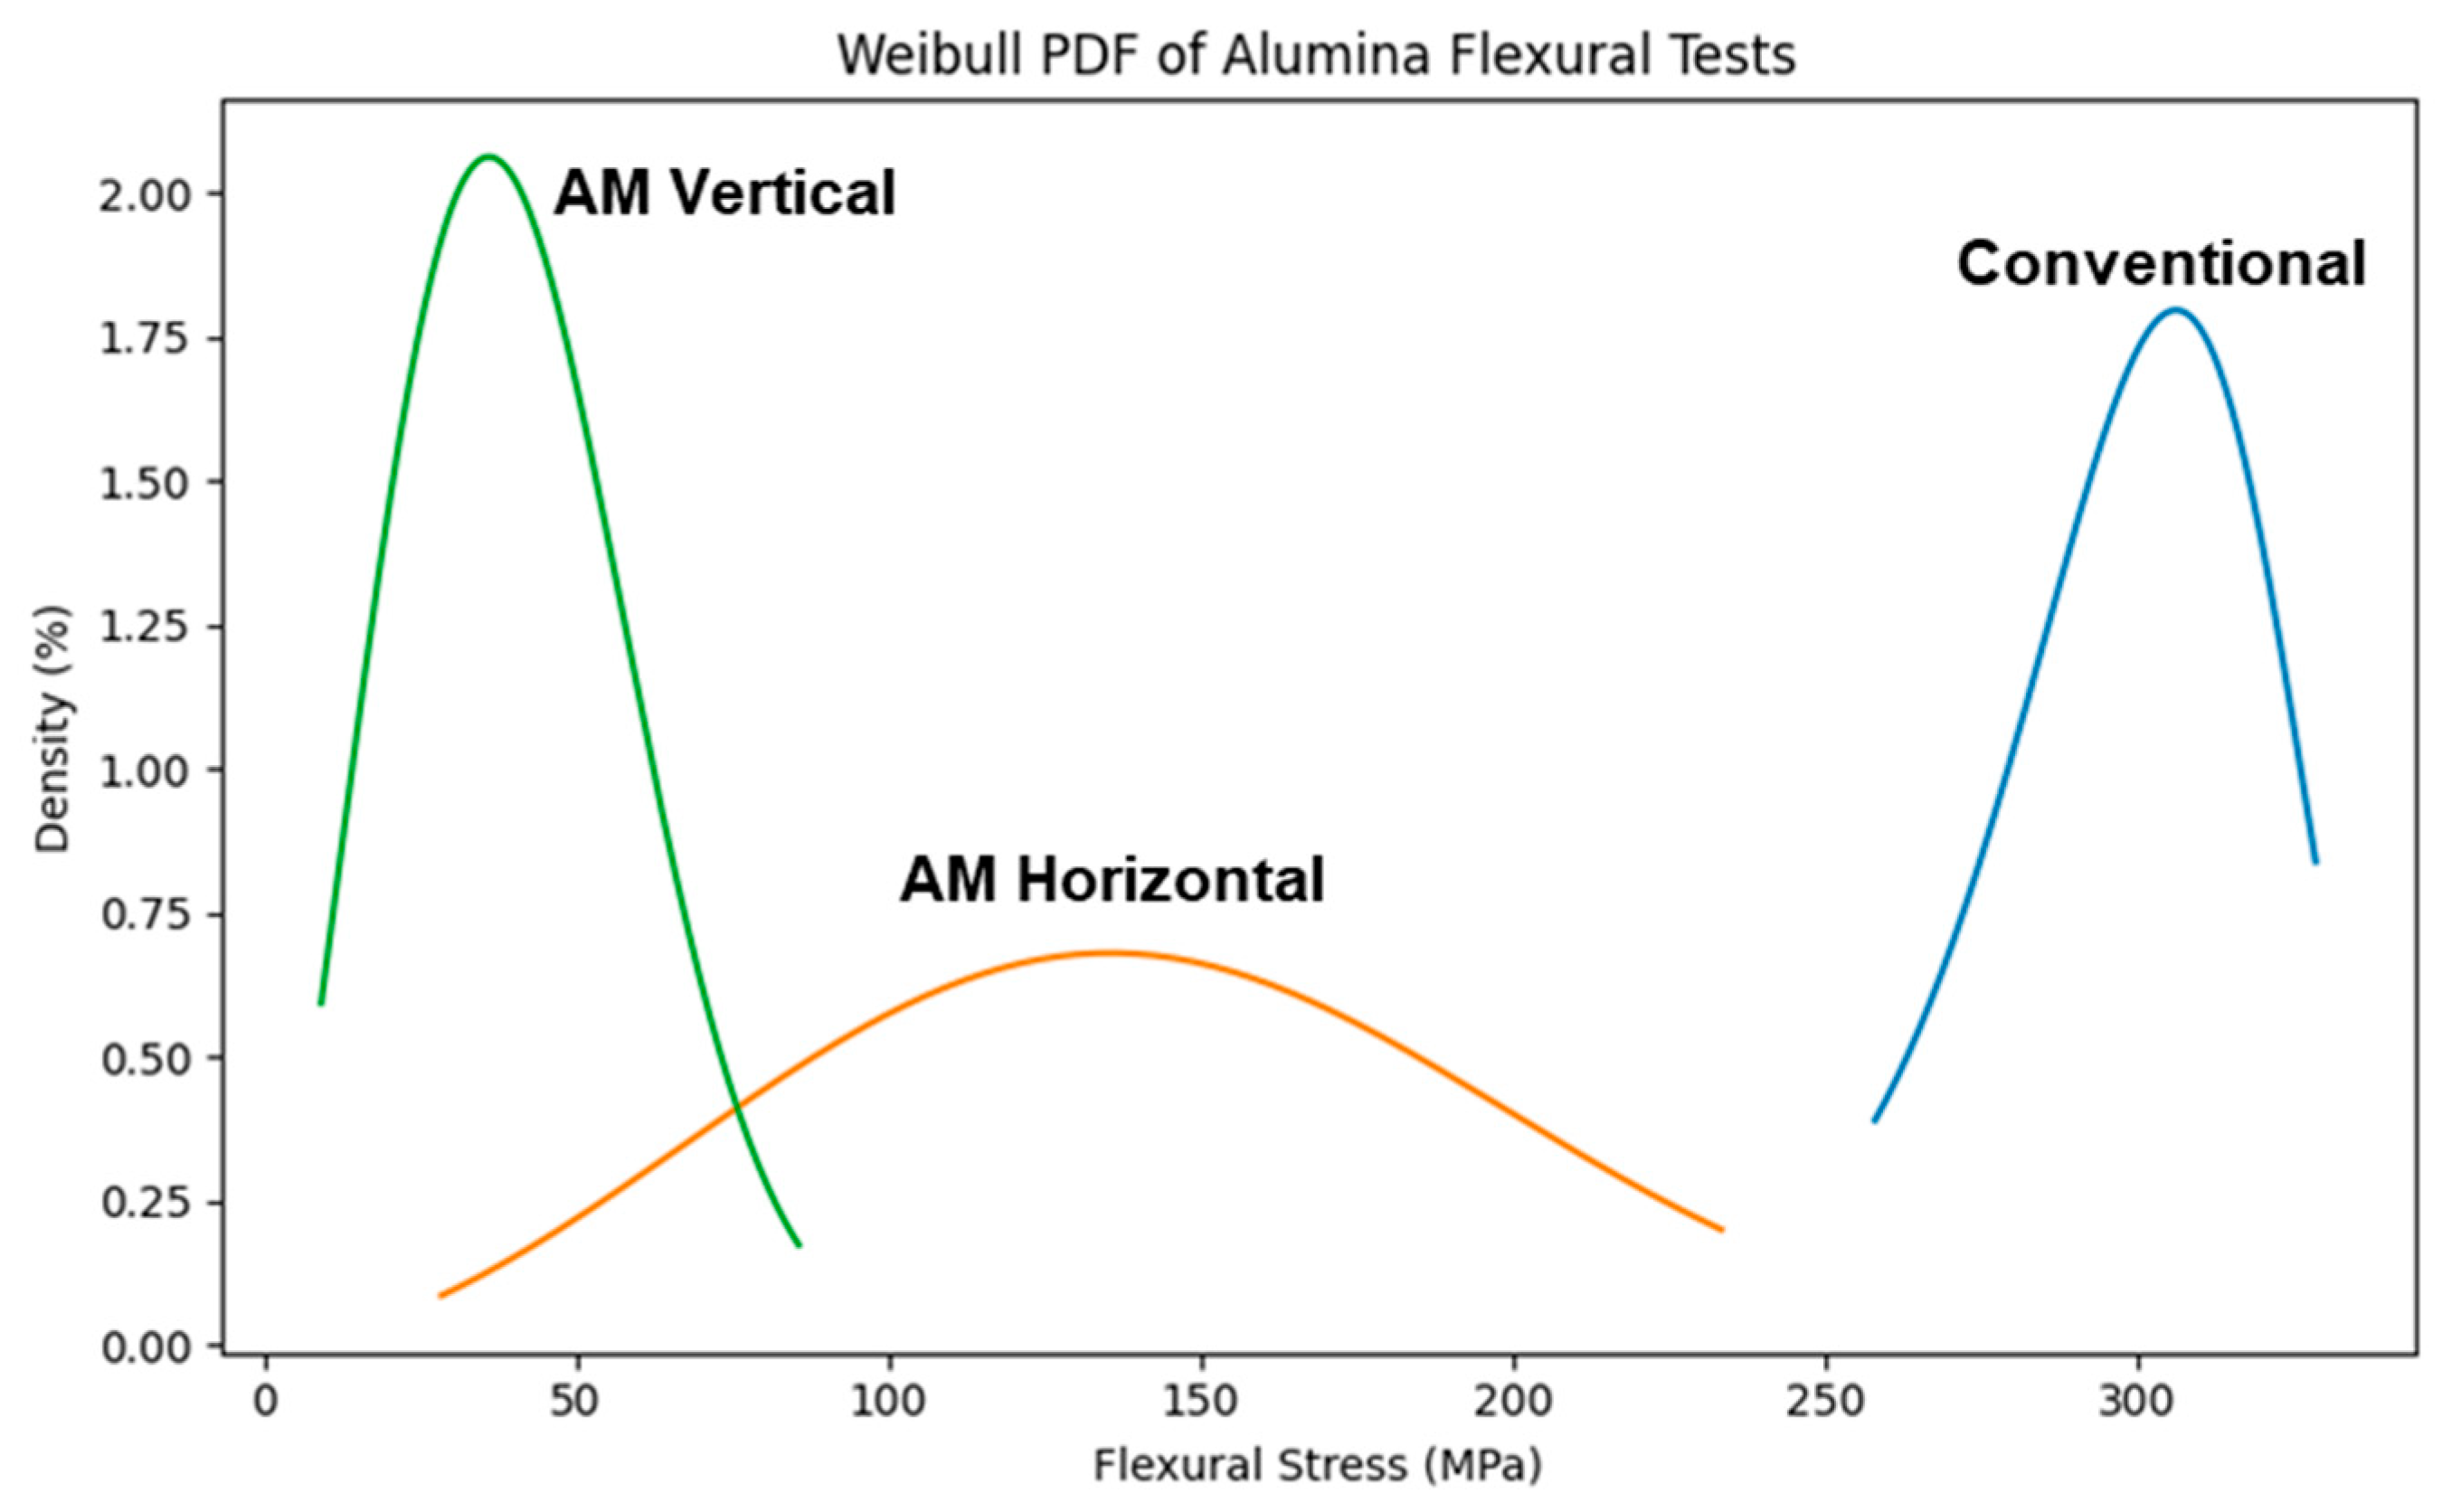
Figure 9 plots the Weibull distribution of the flexural strength for the AM material and conventional stirrer material. Here the vertical “density” axis plots the probability of failure at any given load. Each sample type had 10 separate bend bars tested and included in the sample population. The average strength and standard deviation of the horizontally aligned frame samples was 143 ± 57 MPa, and the vertically aligned frame coupons 40.9 ± 18 MPa. For the samples extracted from the crucible, the lone base coupon had a flexural strength of 27 MPa, and the five vertically aligned coupons removed from the wall had an average strength and standard deviation of 35 ± 11 MPa. The Weibull modulus of the conventional alumina was calculated to be 14.96, while the horizontal and vertically aligned AM material moduli were 2.73 and 2.31 respectively.
Two main failure modes were observed during flexural testing of the AM material. In some cases samples would fail dynamically, with the halves of the bend coupon flying off of the fixture upon breaking. In other cases, the failure was only marked by a loss of load on the frame, and when the coupon was removed it had two loosely stuck together halves. This often occurred in samples which failed outside of the loading gauge, presumably due to defect dominated failure, and never occurred in the conventional coupons harvested from the stirrer. These results show the horizontal orientation AM coupons are roughly half the strength of the conventional stirrer pieces, and the vertically aligned AM coupons are ~15% the strength of the conventional stirrer material. This lower strength can be attributed to the higher defect density of the AM ceramic, and possibly the feldspar grain boundary phase acting as a sintering aid, but reducing overall strength [32]. In the vertically aligned coupons, the shear stresses during bending act directly on the interlayer gaps and cracks, resulting in defect dominated failure, and a lower apparent flexural strength. Ceramic bend strength is known to be highly sensitive to surface quality [29,33]. Since the goal is to use these ceramic parts as produced, care was taken not to eliminate surface cracks and other defects so that their influence would be reflected in the material testing. Additionally, the low Weibull moduli of the AM parts is also indicative of defect dominated failure modes [34]. To this end, it is also important to note that the small scale flexural testing performed here is very concentrated loading, and not fully representative of the loading condition a crucible might experience in use, which primarily comes from handling, thermal stress, and positioning of pyrochemistry tooling. Though alumina typically retains good properties at elevated temperatures, there is concern that repeated use may cause the parts to fail due to thermal stress. This thermal cycling could also extend the surface cracks and reduce the overall material performance. Notably, in many pyrochemical processes, the tooling is single use, being broken apart to harvest the processes materials, which relaxes the cyclic performance requirements for the ceramic material.

3.4. Performance

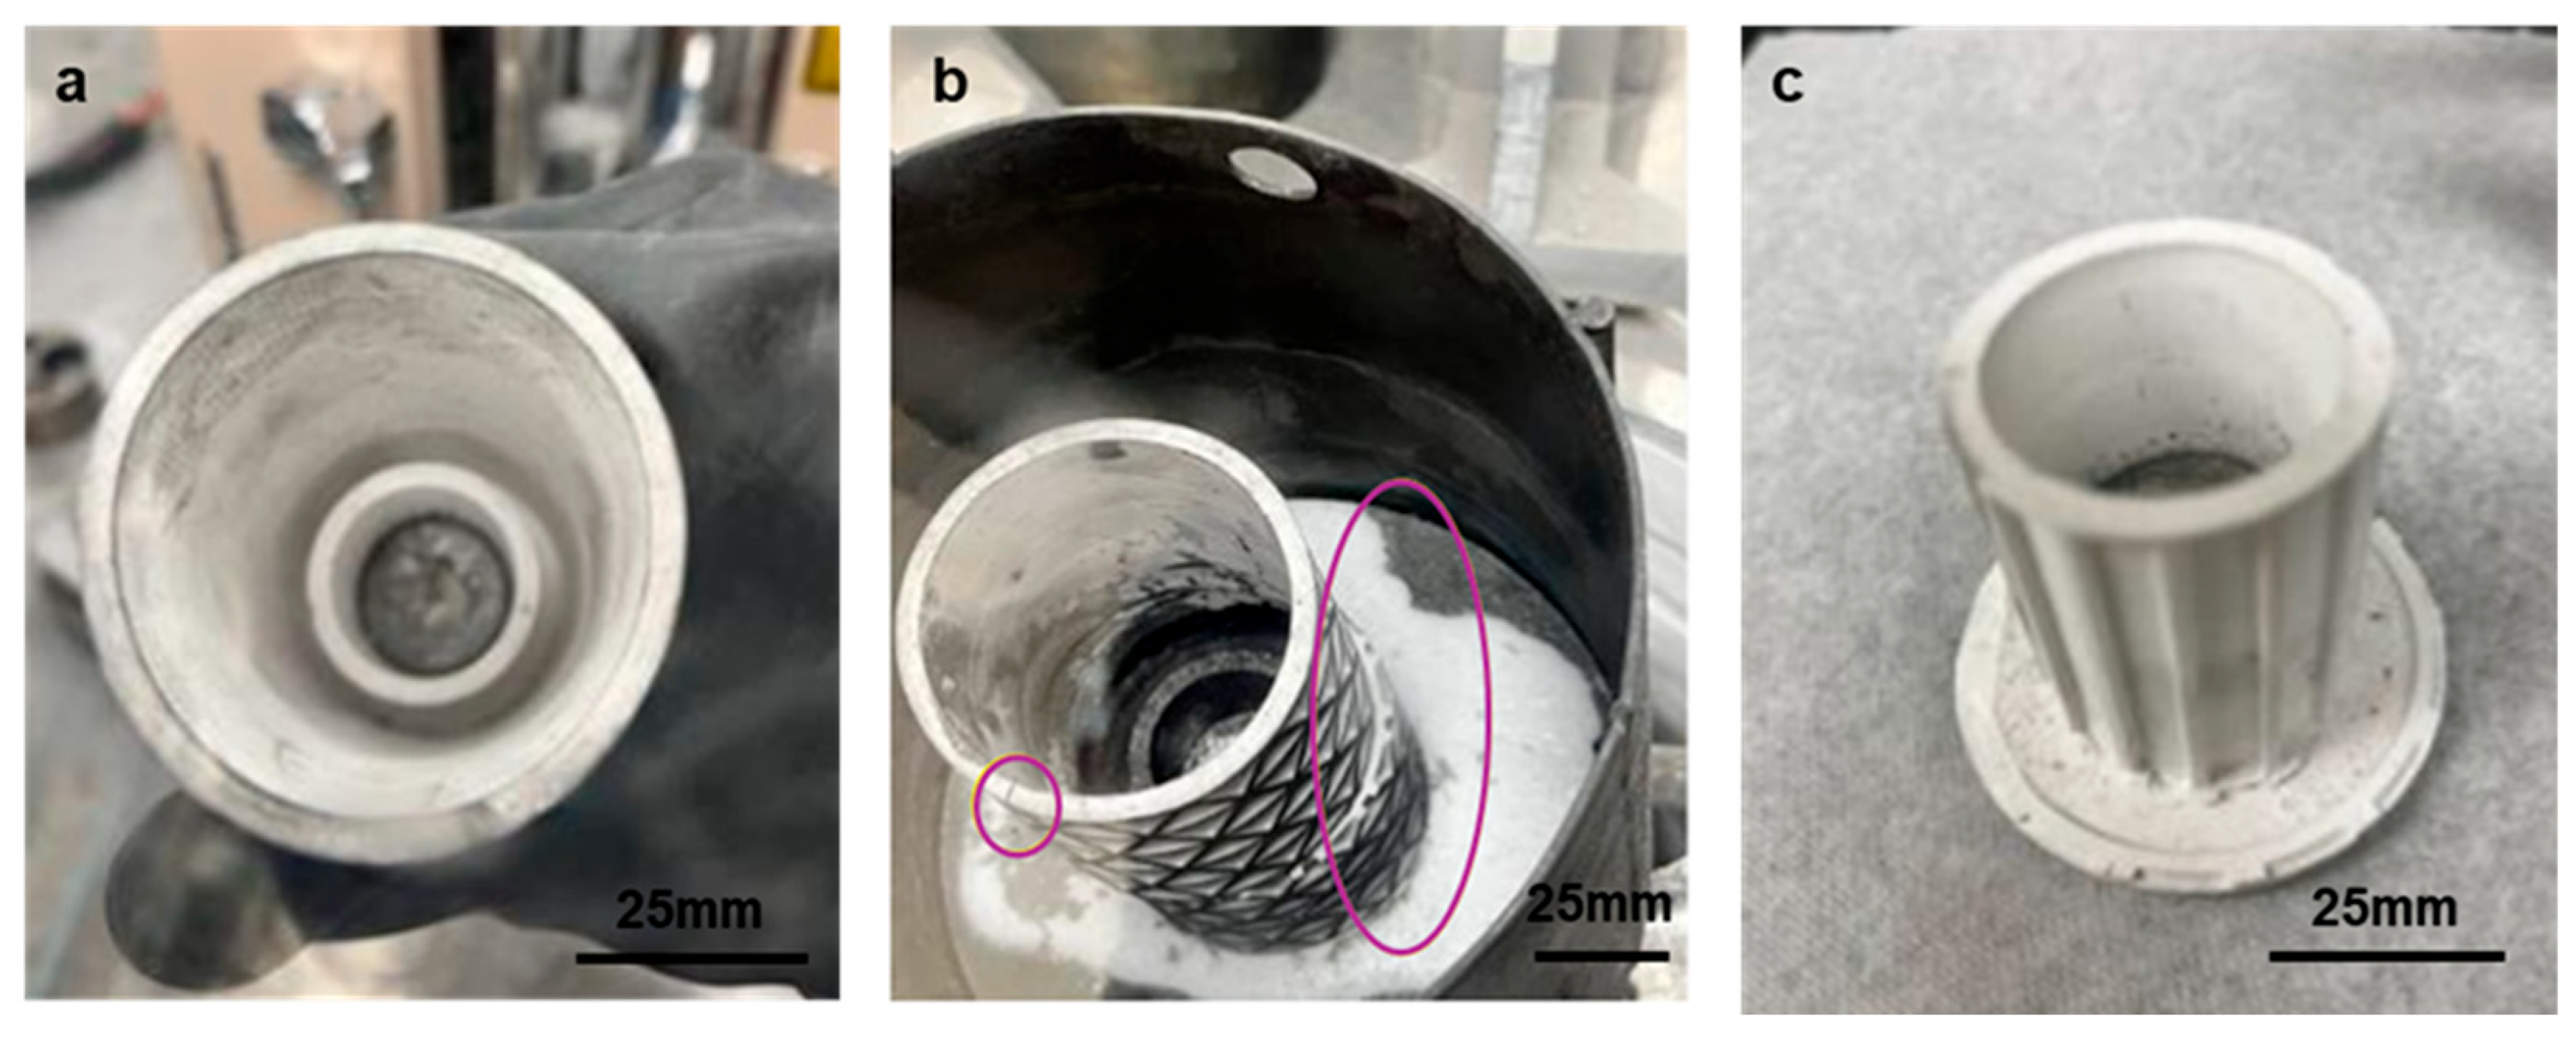
Three AM crucibles were selected for ER testing. Before use, each crucible was screened via XCT to look for critical defects, such as large voids or cracks running through the thickness of the crucible wall. Two of the crucibles, one of which is shown previously in Figure 7a, showed no concerning defects. The third crucible, shown in Figure 7b, had a large crack running through most of the crucible wall near its base.
The defect free crucibles were loaded with metal and salt and run through ER operations. For the first crucible, the ER operation ran for 5 h at 410 °C, shown in Figure 10a after the ER. This crucible functioned properly through the operation, and did not break or have any observable effect on the process. An electrical short prevented the ER from completing properly during this run, however the contact with stirring molten metal and salt still occurred. The second crucible was heated to 510 °C for its ER trial, but early on the anode rod which drives the stirrer became jammed and the trial was halted early. Post-ER, the AM crucible was found to have broken, as shown in Figure 10b, with some of the salt content leaking out. This jamming of the stirrer can occur if the crucible contents are not fully melted, or the assembly is misaligned in the crucible, wedging the stirrer into a wall. Additionally, the crucible could have failed and a fragment of the crucible could have jammed the stirrer. The exact method of failure was not able to be determined from the trial, however similar jams on using conventionally produced crucibles have not been found to break the crucible, so it is likely that the lower strength of the AM material and concentrated force from the jammed stirrer resulted in the ER failure. The crucible with a large crack was first tested without any charge, heated to and from 1000 °C to test its response to thermal load. After this thermal cycle, the crucible broke while being handled for inspection. This thermally induced failure highlights the importance of screening the AM tooling for defects, outside of the surface cavities and porosity, as these have a more catastrophic effect on usability.

4. Discussion

At the core of this study, a large 125 mm tall alumina crucible was produced using vat photopolymerization additive manufacturing, and was successfully used for high temperature ER. Furthermore, this part was produced on consumer grade VP hardware, with a commercially available photocurable resin, and is among the largest pieces published in literature to date [22,24,25,35]. At present, the large, but relatively simple geometries demonstrated in this study would only serve to supplement conventionally produced tooling, rather than improve upon it. Access ports, sheaths, or channels designed to fit various sensing tools are anticipated targets for future crucible or stirrer designs. In addition to the scientific gains these would provide, there are also opportunities in modifying tooling ergonomics which can be considered given the use of gloveboxes in actinide chemistry. Despite these interesting topics, the low strength and frequent failure of the parts studied here shows the need for considerable improvement, most notably to the surface artifacts produced. A large contribution to these failures can also be attributed to our rapid path towards scaling to large geometries required for actinide chemistry, and as even larger geometries are targeted new challenges may arise.
Addressing these surface defects, it is important to note that VP has been shown capable of producing significantly higher strength alumina, albeit using industrial hardware and producing smaller parts [24]. Schwentenwein et al. produced a VP alumina with a surface roughness average of only ~1.08 µm across the layer lines and flexural strength of 427 MPa tested across the layer lines, roughly 10× stronger than observed from the ceramics produced here [23]. The peel forces, layer splitting, porosity, and anisotropic reduced strength are well documented features of VP and substantial research effort has gone into solving for various materials and part geometries. Hardware modifications such as heated, tilting, or agitated resin vats can help reduce peel forces and maintain ceramic suspension viability over longer print times [21,30,31]. Bottom-up style hardware with wiper blades largely eliminate peel forces [36]. Novel polymer films can be used to control curing and permeate air to reduce suction forces between layers [37]. Various light sources and curing strategies can also affect the inter-layer bonding and residual stress in a part [38]. Additionally, as shown in this work, ceramic resin formulations continue to be improved through careful control of powder, organic components, and mixing technique, which can improve compatibility with varied VP hardware and an overall higher quality finished ceramic [39,40]. Many of these hardware and technology advantages are applicable to the work shown here, and future efforts can implement these tools to improve upon the results presented here. Prioritizing part design and VP strategy optimization, such as through the truss network demonstrate here, has the potential to create usable parts without the most advanced hardware [41]. It is expected that improvements to part reliability will require some level of hardware improvement, or at a minimum the use of sensor monitored hardware to optimize part design, AM, and post-processing steps for improved reliability.
Integral to part reliability, is the ability to test and screen the parts. In this study, XCT was used. This powerful technique provides full resolution of density gradients in a part, allowing for holistic assessment of defects or damage prior to use. While this is valuable for research, the time and effort required for this analysis makes the investigation of other non-destructive evaluation (NDA) screening tools desirable. Among these, acoustic emission and ultrasonic techniques can be performed more rapidly, and are well suited for detecting large defects, like the crack which caused failure in one of the tested crucibles [42,43]. For the meantime, XCT will likely remain the most appropriate technique for process development, due to its full volume resolution. In addition to screening techniques, it will be essential to define quantitative metrics for part qualification and acceptance.
Alternative to hardware modification, different post-processing steps could also be considered to improve the quality and reliability of the AM ceramics. In these cases, the screening will also provide a valuable tool for testing the efficacy of new approaches. Although the higher porosity of the AM material contributes to its reduced strength, the defect dominated failure observe makes remediation of the surface cracks the most pressing challenge. Outside of AM optimization, this leaves two major routes to improvement: the addition or removal of material. In the case of material addition, the goal would be to fill surface voids and cracks, ideally bonding them fully with the new part exterior. To the authors’ knowledge this has not been attempted with VP ceramics, though the process would be somewhat similar to the secondary infiltration of binder jet AM parts, albeit limited to the surface of the sample [44]. On the subtractive side, the surface level of the AM part could be machined away, with the goal of removing surface cavities and leaving behind a smooth surface. The part design can be easily scaled up to accommodate the lost material, however it may be difficult to retain complex features such as the surface truss structure of the crucibles. This may be a more substantial if additional unique features and geometries are included to leverage the capabilities of AM. An advantage here is the wealth of resources and strategies surrounding ceramic subtractive manufacturing [45,46]. For both additive or subtractive routes, another consideration is whether to apply these modifications before or after sintering. For example, coating an as-printed greenbody may allow the two to fuse together during burnout and sintering, but as-printed material may be too delicate to fixture or machine effectively. Looking to the future of this research, it is likely that more advanced hardware will be required to produce the quality of ceramic needed for actinide chemistry, however the produced pieces are not without significance to ceramic AM academia. The truss structure modification was just one possible solution, and the other solutions hypothesized here are much more easily accessible to the research or even hobby communities given the low upfront cost of the VP hardware used in this study.

5. Conclusions

The primary findings of this work are as follows:
-
New generations of photocurable resins were found to be compatible with consumer grade vat photopolymerization hardware, and produced functioning alumina ceramics at scales up to 125 mm in height.
-
These parts achieved high bulk densities (>95%), but had a high density of surface cavities and surface undulations attributed to poor interlayer bonding and artifacts of the vat photopolymerization process.
-
The bending strength of these ceramics was low, ~50% of conventional alumina in-plane, and ~12% of conventional out-of-plane with the build direction. This low strength and anisotropy are attributed to artifacts of the additive manufacturing process.
-
Some crucibles were able to be used in electrorefining experiments, though others failed either during testing or due to thermal stresses. This is attributed to the lower strength or manufacturing defects, and can be improved with technique optimization.
-
There is significant opportunity for study of process and post-process optimization of ceramics produced using these consumer-grade tools, in particular due to their low upfront cost.
In summary, these results highlight the potential of AM ceramics for insertion in actinide chemistry processing workflows. The main barrier to this lies in part reliability, which can be targeted through process optimization. Individual parts will likely require screening as the process is refined and ultimately qualified. The low cost of the AM hardware demonstrated here assists with scalability and per-part cost for future exploration of actinide tooling manufacturing.

Author Contributions

Conceptualization, R.J.G., A.J.S., A.A.M. and K.H.; methodology, R.J.G.; investigation, R.J.G., C.S., J.-B.F., B.C., A.C., A.W.-H. and G.A.; resources, B.C. and D.R.; data curation, R.J.G. and A.C.; writing—original draft preparation, R.J.G.; writing—review and editing, all authors; visualization, R.J.G., J.-B.F., A.W.-H. and A.A.M.; supervision, A.A.M., D.R., K.H. and J.J.; project administration, A.A.M.; funding acquisition, A.A.M., K.H. and J.J. All authors have read and agreed to the published version of the manuscript.

Funding

This work was performed under the auspices of the U.S. Department of Energy (DOE) at Lawrence Livermore National Laboratory (LLNL) under Contract No. DE-AC52-07NA27344.

Data Availability Statement

The original contributions presented in this study are included in the article; further inquiries can be directed to the corresponding author/s.

Conflicts of Interest

The authors declare no conflicts of interest.

References

  1. Morrell, J.S.; Jackson, M.J. (Eds.) Uranium Processing and Properties; Springer: New York, NY, USA, 2013. [Google Scholar] [CrossRef]
  2. Morss, L.R.; Edelstein, N.M.; Fuger, J. The Chemistry of the Actinide and Transactinide Elements, 3rd ed.; Springer Science & Business Media: Berlin/Heidelberg, Germany, 2007; Volumes 1–5. [Google Scholar]
  3. Willit, J.L.; Miller, W.E.; Battles, J.E. Electrorefining of uranium and plutonium—A literature review. J. Nucl. Mater. 1992, 195, 229–249. [Google Scholar] [CrossRef]
  4. Rappleye, D.; McNeese, J.; Torres, R.; Holliday, K.; Jeffries, J.R. Development of small-scale plutonium electrorefining in molten CaCl2. J. Nucl. Mater. 2021, 552, 152968. [Google Scholar] [CrossRef]
  5. Gibilaro, M.; Cassayre, L.; Lemoine, O.; Massot, L.; Dugne, O.; Malmbeck, R.; Chamelot, P. Direct electrochemical reduction of solid uranium oxide in molten fluoride salts. J. Nucl. Mater. 2011, 414, 169–173. [Google Scholar] [CrossRef]
  6. Fredrickson, G.L.; Cao, G.; Gakhar, R.; Yoo, T.-S. Molten Salt Reactor Salt Processing—Technology Status; INL/EXT--18-51033-Rev000; Idaho National Laboratory (INL): Idaho Falls, ID, USA, 2018. [Google Scholar] [CrossRef]
  7. Serp, J.; Allibert, M.; Beneš, O.; Delpech, S.; Feynberg, O.; Ghetta, V.; Heuer, D.; Holcomb, D.; Ignatiev, V.; Kloosterman, J.L.; et al. The molten salt reactor (MSR) in generation IV: Overview and perspectives. Prog. Nucl. Energy 2014, 77, 308–319. [Google Scholar] [CrossRef]
  8. Westphal, B.R.; Marsden, K.C.; Price, J.C. Development of a Ceramic-Lined Crucible for the Separation of Salt from Uranium. Metall. Mater. Trans. A 2009, 40, 2861–2866. [Google Scholar] [CrossRef]
  9. Ch, J.R.; Vetrivendan, E.; Madhura, B.; Ningshen, S. A review of ceramic coatings for high temperature uranium melting applications. J. Nucl. Mater. 2020, 540, 152354. [Google Scholar] [CrossRef]
  10. Ananthapadmanabhan, P.V.; Sreekumar, K.; Thiyagarajan, T.; Satpute, R.; Krishnan, K.; Kulkarni, N.; Kutty, T. Plasma spheroidization and high temperature stability of lanthanum phosphate and its compatibility with molten uranium. Mater. Chem. Phys. 2009, 113, 417–421. [Google Scholar] [CrossRef]
  11. Lee, S.H.; Cho, C.H.; Lee, Y.S.; Lee, H.S.; Kim, J.-G. Chemical reactivity of oxide materials with uranium and uranium trichloride. Korean J. Chem. Eng. 2010, 27, 1786–1790. [Google Scholar] [CrossRef]
  12. Zhang, T.; Wang, D.; Luo, L.; Shen, S.; Niu, S.; Cai, S. Characterization of Mg–Y co-doped ZrO2/MgAl2O4 composite ceramic and the corrosion reaction in molten uranium. J. Radioanal. Nucl. Chem. 2016, 310, 239–246. [Google Scholar] [CrossRef]
  13. Sharma, S.K.; Saify, M.T.; Majumdar, S.; Mollick, P.K. Interaction study of molten uranium with multilayer SiC/Y2O3 and Mo/Y2O3 coated graphite. Nucl. Eng. Technol. 2023, 55, 1855–1862. [Google Scholar] [CrossRef]
  14. Jang, J.; Lee, H.-S.; Lee, S. Stability of plasma-sprayed TiN and ZrN coatings on graphite for application to uranium-melting crucibles for pyroprocessing. J. Radioanal. Nucl. Chem. 2016, 310, 1173–1180. [Google Scholar] [CrossRef]
  15. Eastman, E.D.; Brewer, L.; Bromley, L.A.; Gilles, P.W.; Lofgren, N.L. The Melting and Casting of Uranium in Sulfide Crucibles. Other Information: Decl. Mar. 6, 1957. Orig. Receipt Date: 31-DEC-58. Available online: https://digital.library.unt.edu/ark:/67531/metadc1020559/ (accessed on 21 December 2023).
  16. Rauch, H.A.; Cui, H.; Knight, K.P.; Griffiths, R.J.; Yoder, J.K.; Zheng, X.; Yu, H.Z. Additive manufacturing of yttrium-stabilized tetragonal zirconia: Progressive wall collapse, martensitic transformation, and energy dissipation in micro-honeycombs. Addit. Manuf. 2022, 52, 102692. [Google Scholar] [CrossRef]
  17. Ayode Otitoju, T.; Ugochukwu Okoye, P.; Chen, G.; Li, Y.; Okoye, M.; Li, S. Advanced ceramic components: Materials, fabrication, and applications. J. Ind. Eng. Chem. 2020, 85, 34–65. [Google Scholar] [CrossRef]
  18. Pelz, J.S.; Ku, N.; Meyers, M.A.; Vargas-Gonzalez, L.R. Additive manufacturing of structural ceramics: A historical perspective. J. Mater. Res. Technol. 2021, 15, 670–695. [Google Scholar] [CrossRef]
  19. Yang, L.; Miyanaji, H. Ceramic Additive Manufacturing: A Review of Current Status and Challenges. 2017. Available online: https://hdl.handle.net/2152/89871 (accessed on 15 September 2025).
  20. Travitzky, N.; Bonet, A.; Dermeik, B.; Fey, T.; Filbert-Demut, I.; Schlier, L.; Schlordt, T.; Greil, P. Additive Manufacturing of Ceramic-Based Materials. Adv. Eng. Mater. 2014, 16, 729–754. [Google Scholar] [CrossRef]
  21. Zakeri, S.; Vippola, M.; Levänen, E. A comprehensive review of the photopolymerization of ceramic resins used in stereolithography. Addit. Manuf. 2020, 35, 101177. [Google Scholar] [CrossRef]
  22. Halloran, J.W.; Griffith, M.L. Ultraviolet Curing of Highly Loaded Ceramic Suspensions for Stereolithography of Ceramics. 1994. Available online: http://hdl.handle.net/2152/68676 (accessed on 15 September 2025).
  23. Schwentenwein, M.; Homa, J. Additive Manufacturing of Dense Alumina Ceramics. Int. J. Appl. Ceram. Technol. 2015, 12, 1–7. [Google Scholar] [CrossRef]
  24. Schwarzer-Fischer, E.; Abel, J.; Sieder-Katzmann, J.; Propst, M.; Bach, C.; Scheithauer, U.; Michaelis, A. Study on CerAMfacturing of Novel Alumina Aerospike Nozzles by Lithography-Based Ceramic Vat Photopolymerization (CerAM VPP). Materials 2022, 15, 3279. [Google Scholar] [CrossRef]
  25. “15” LCM-Printed Gas Distribution Ring for the Semiconductor Industry. Lithoz GmbH, Apr. 2025. Available online: https://www.lithoz.com/en/resources-lithoz/ (accessed on 17 November 2025).
  26. Ghazanfari, A.; Li, W.; Leu, M.C.; Hilmas, G.E. A novel freeform extrusion fabrication process for producing solid ceramic components with uniform layered radiation drying. Addit. Manuf. 2017, 15, 102–112. [Google Scholar] [CrossRef]
  27. Du, W.; Ren, X.; Ma, C.; Pei, Z. Binder Jetting Additive Manufacturing of Ceramics: A Literature Review. Presented at the ASME 2017 International Mechanical Engineering Congress and Exposition, Tampa, FL, USA, 3–9 November 2017; American Society of Mechanical Engineers Digital Collection: New York, NY, USA, 2018. [Google Scholar] [CrossRef]
  28. Schindelin, J.; Arganda-Carreras, I.; Frise, E.; Kaynig, V.; Longair, M.; Pietzsch, T.; Preibisch, S.; Rueden, C.; Saalfeld, S.; Schmid, B.; et al. Fiji: An open-source platform for biological-image analysis. Nat. Methods 2012, 9, 676–682. [Google Scholar] [CrossRef]
  29. ASTM C1161-18; Standard Test Method for Flexural Strength of Advanced Ceramics at Ambient Temperature. ASTM International: Washington, DC, USA, 2018.
  30. Pagac, M.; Hajnys, J.; Ma, Q.-P.; Jancar, L.; Jansa, J.; Stefek, P.; Mesicek, J. A Review of Vat Photopolymerization Technology: Materials, Applications, Challenges, and Future Trends of 3D Printing. Polymers 2021, 13, 598. [Google Scholar] [CrossRef] [PubMed]
  31. Zhang, F.; Zhu, L.; Li, Z.; Wang, S.; Shi, J.; Tang, W.; Li, N.; Yang, J. The recent development of vat photopolymerization: A review. Addit. Manuf. 2021, 48, 102423. [Google Scholar] [CrossRef]
  32. Stumpf, A.S.G.; Bergmann, C.P.; Vicenzi, J.; Fetter, R.; Mundstock, K.S. Mechanical behavior of alumina and alumina-feldspar based ceramics in an acetic acid (4%) environment. Mater. Des. 2009, 30, 4348–4359. [Google Scholar] [CrossRef]
  33. Staudacher, M.; Lube, T.; Glettler, J.; Scheithauer, U.; Schwentenwein, M. A novel test specimen for strength testing of ceramics for additive manufacturing. Open Ceram. 2023, 15, 100410. [Google Scholar] [CrossRef]
  34. Osuchukwu, O.A.; Salihi, A.; Ibrahim, A.; Audu, A.A.; Makoyo, M.; Mohammed, S.A.; Lawal, M.Y.; Etinosa, P.O.; Isaac, I.O.; Oni, P.G.; et al. Weibull analysis of ceramics and related materials: A review. Heliyon 2024, 10, e32495. [Google Scholar] [CrossRef] [PubMed]
  35. Wu, X.; Teng, J.; Ji, X.; Xu, C.; Ma, D.; Sui, S.; Zhang, Z. Research progress of the defects and innovations of ceramic vat photopolymerization. Addit. Manuf. 2023, 65, 103441. [Google Scholar] [CrossRef]
  36. Hu, K.; Wei, Y.; Lu, Z.; Wan, L.; Li, P. Design of a Shaping System for Stereolithography with High Solid Loading Ceramic Suspensions. 3D Print. Addit. Manuf. 2018, 5, 311–318. [Google Scholar] [CrossRef]
  37. Paral, S.K.; Lin, D.-Z.; Cheng, Y.-L.; Lin, S.-C.; Jeng, J.-Y. A Review of Critical Issues in High-Speed Vat Photopolymerization. Polymers 2023, 15, 2716. [Google Scholar] [CrossRef]
  38. Mitteramskogler, G.; Gmeiner, R.; Felzmann, R.; Gruber, S.; Hofstetter, C.; Stampfl, J.; Ebert, J.; Wachter, W.; Laubersheimer, J. Light curing strategies for lithography-based additive manufacturing of customized ceramics. Addit. Manuf. 2014, 1–4, 110–118. [Google Scholar] [CrossRef]
  39. Zhang, K.; He, R.; Ding, G.; Bai, X.; Fang, D. Effects of fine grains and sintering additives on stereolithography additive manufactured Al2O3 ceramic. Ceram. Int. 2021, 47, 2303–2310. [Google Scholar] [CrossRef]
  40. Kirihara, S. Systematic Compounding of Ceramic Pastes in Stereolithographic Additive Manufacturing. Materials 2021, 14, 7090. [Google Scholar] [CrossRef]
  41. Liang, H.; Hu, B.; Li, R.; Sun, J.; Wang, Y.; Zhou, P.; Cai, P.; Bai, J. Enhancing mechanical integrity of vat photopolymerization 3D printed hydroxyapatite scaffolds through overcoming peeling defects. J. Eur. Ceram. Soc. 2024, 44, 116642. [Google Scholar] [CrossRef]
  42. Liu, C.-H.; Jeyaprakash, N.; Yang, C.-H. Material characterization and defect detection of additively manufactured ceramic teeth using non-destructive techniques. Ceram. Int. 2021, 47, 7017–7031. [Google Scholar] [CrossRef]
  43. Zhao, Z. Review of non-destructive testing methods for defect detection of ceramics. Ceram. Int. 2021, 47, 4389–4397. [Google Scholar] [CrossRef]
  44. Porter, Q.; Moghadasi, M.; Pei, Z.; Ma, C. Dense and strong ceramic composites via binder jetting and spontaneous infiltration. Ceram. Int. 2023, 49 Pt A, 17363–17370. [Google Scholar] [CrossRef]
  45. Tsutsumi, C.; Okano, K.; Suto, T. High quality machining of ceramics. J. Mater. Process. Technol. 1993, 37, 639–654. [Google Scholar] [CrossRef]
  46. Bharathi, V.; Anilchandra, A.R.; Sangam, S.S.; Shreyas, S.; Shankar, S.B. A review on the challenges in machining of ceramics. Mater. Today Proc. 2021, 46, 1451–1458. [Google Scholar] [CrossRef]
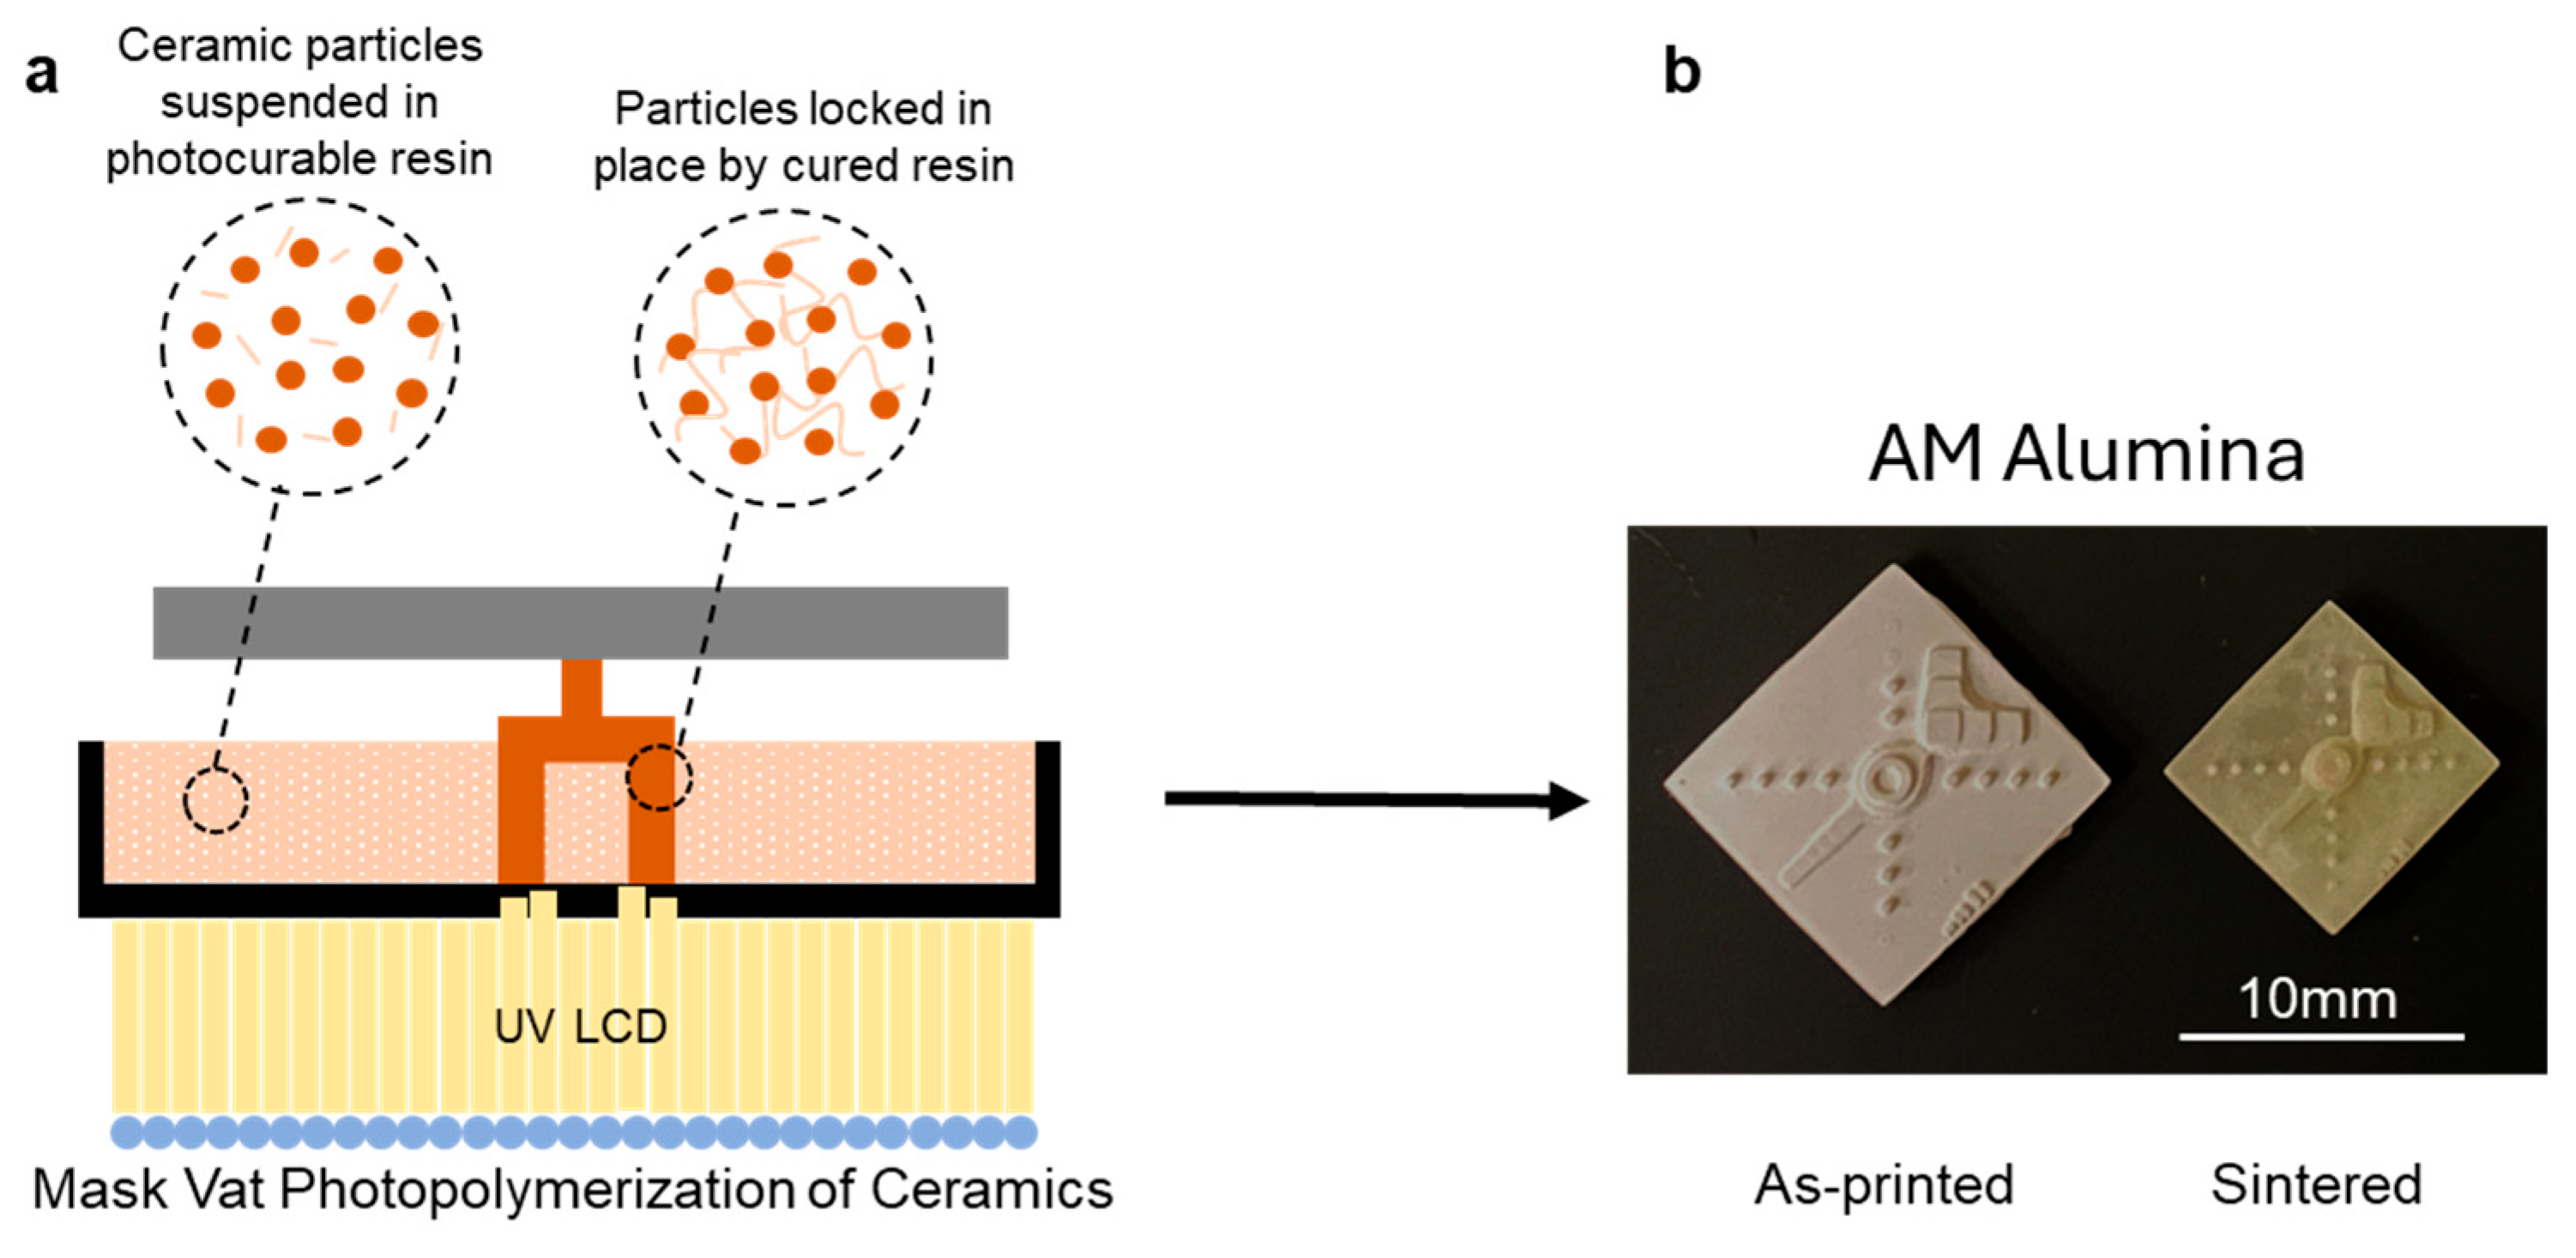
Figure 1. (a) Schematic of vat photopolymerization of ceramics process. (b) AM fabricated alumina pieces as-printed and sintered.
Applsci 15 12742 g001
Figure 2. (a) Nominal dimensions of the electrorefining crucible produced in this study. (b) photograph of as-printed AM alumina frame structure. (c) Conventionally manufactured alumina ceramic stirrer produced by slip casting and machining.
Applsci 15 12742 g002
Figure 3. (a) Photograph of sintered alumina ER crucible. (b) Crucible assembled with stirrer and electrode tooling.
Applsci 15 12742 g003
Figure 4. (a) Exaggerated diagram highlighting the peel forces which act to separate individual layers during vat photopolymerization. Diagrams overviewing distribution of these forces in a (b) smooth-walled and (c) truss-support-walled crucible.
Applsci 15 12742 g004
Figure 5. (a) High and (b) low magnification cross section micrographs of the AM fabricated alumina. (c) High and (d) low magnification cross section micrographs of the conventional alumina.
Applsci 15 12742 g005
Figure 6. Electron microscope images showing the surface structure of the (a) green “as-printed” alumina and (b) the sintered alumina ceramic.
Applsci 15 12742 g006
Figure 7. (a) XCT slice near the mid-point of the crucible showing cracks within the thick base, but no observable large cracks or voids in the wall section. (b) XCT slice of a different crucible, closer to an edge, showing a large crack running through a majority of the wall thickness, as well as several other cracks in the walls and base.
Applsci 15 12742 g007
Figure 8. (a) 3D reconstruction of the scanned frame structure. (b,c) Color coded 3D reconstructions (top) and histograms (bottom) of the (b) surface cavities and (c) internal pores in the scanned frame shown in (a).
Applsci 15 12742 g008
Figure 9. Weibull PDF fit for vertical and horizontally aligned AM frame bend bars, and bars sectioned from conventionally produced ceramic.
Applsci 15 12742 g009
Figure 10. (a) An undamaged AM crucible following ER processing. (b) A different AM crucible which is believed to have broke during ER by a jammed stirrer, with visible breaks outlined. (c) Another AM crucible with a known defect (Figure 7b) which broke following thermal cycling without additional ER components.
Applsci 15 12742 g010
Table 1. Four point bend test parameters.
WidthHeightSupport LengthLoad SpanLoading Rate
2 mm1.5 mm20 mm10 mm0.2 mm/min
Disclaimer/Publisher’s Note: The statements, opinions and data contained in all publications are solely those of the individual author(s) and contributor(s) and not of MDPI and/or the editor(s). MDPI and/or the editor(s) disclaim responsibility for any injury to people or property resulting from any ideas, methods, instructions or products referred to in the content.