Article

Proposes Geometric Accuracy and Surface Roughness Estimation of Anatomical Models of the Pelvic Area Manufactured Using a Material Extrusion Additive Technique

1
Department of Manufacturing Techniques and Automation, Rzeszów University of Technology, 35-959 Rzeszów, Poland
2
Orthopedics and Traumatology Department, University Hospital, 35-301 Rzeszów, Poland
3
Institute of Medical Science, University of Rzeszów, 35-959 Rzeszów, Poland
4
Department of Mechanical Engineering, Rzeszów University of Technology, 35-959 Rzeszów, Poland
5
Department of Machining, Assembly and Engineering Metrology, VŠB-Technical University of Ostrava, 708 00 Ostrava, Czech Republic
*
Author to whom correspondence should be addressed.
Appl. Sci. 2025, 15(1), 134; https://doi.org/10.3390/app15010134
Submission received: 27 October 2024 / Revised: 19 December 2024 / Accepted: 26 December 2024 / Published: 27 December 2024
(This article belongs to the Section Additive Manufacturing Technologies)

Abstract

:
One of the main benefits of using 3D printing in orthopedics is the ability to create custom solutions tailored to a patient’s specific anatomical and functional needs. Conducting a reliable evaluation of the accuracy of the manufacture of anatomical structure models is essential. However, particular standards or procedures still need to be implemented to control the surface quality of anatomical models manufactured using additive manufacturing techniques. Models of pelvic parts made of polylactic acid (PLA) material were manufactured using the Material Extrusion (MEX) additive technique. Subsequently, guidelines were developed to reliably verify the geometric and surface roughness of the 3D printed models using Computer-Aided Inspection (CAI) systems. For this purpose, a measuring arm system (MCA-II) with a mounted laser head and Atos II Triple Scan was used. To inspect surface roughness parameters, procedures were developed for an Alicona InfiniteFocusG4 optical microscope. The results of the geometrical verification of the models are within the tolerance limits of ±0.22 mm to ±0.6 mm. In the case of surface roughness measurement, the highest values for the arithmetical mean height Sa were obtained on the side of the support material, while the smallest values were found along the applied layers. After the metrological control process, the models were used in the planning process for hip surgery.

1. Introduction

The hip joint has a unique structure that effectively carries static and dynamic loads [1,2]. However, the bony structures that make up the joint are often damaged. Various conditions, such as advanced degeneration [3,4], rheumatoid disease [3], femoral neck fracture [5], dysplasia [6,7], or primary or metastatic tumors of the hip joint [8], can cause joint degradation. In cases of critical and irreversible joint damage, advanced hip replacement surgery using artificial joints is used [2,5]. Developments in medicine and technology in the field of orthopedics have led to significant advances in the area of research into hip replacement design and manufacturing methods [9]. To ensure the best fit for individual patients, doctors increasingly seek custom-made products manufactured for a specific patient [10]. Because of the unique geometry of models of anatomical structures, surgical templates, or implants, additive methods are often used in manufacturing [11,12]. However, such devices must be characterized by a certain accuracy of manufacture. So far, no specific procedures have been developed for controlling the geometric accuracy and surface roughness of anatomical models made by additive methods for planning procedures in the hip bone area [11,13,14].
During anatomical models’ reconstruction and manufacturing stages, errors can affect geometrical accuracy [15,16,17] and surface roughness [18]. Currently, the ISO/ASTM TR 52916 [19], ISO/IEC 3532-1 [20], and ISO/IEC 3532-2 [21] standards offer fundamental information on errors occurring during the diagnosis and modeling of anatomical structures. Literature also includes studies that estimate the errors encountered during diagnosing and modeling anatomical structures within the hip joint [22,23]. Furthermore, some studies assess the accuracy of model manufacturing using additive methods [24,25]. Presently, additive methods, specifically MEX, are widely used in manufacturing models for hip surgery planning [25,26,27,28]. To ensure the accuracy and quality of the manufactured model surface using this method, special attention should be given to factors such as the temperature around the 3D printer workspace [29], the nozzle and the work platform [29], the layer thickness [30,31], the manufacturing speed [32], the orientation of the model in the 3D printer space [33,34], the degree of filling of the model [35], and the type of material used in manufacturing process.
In the evaluation process of an anatomical structure model’s geometrical accuracy and surface roughness, contact [17,18,36,37] and optical [25,38,39] measurement tools and systems are commonly used. It is crucial to reliably assess the metrological accuracy of the manufactured anatomical structure, as it provides comprehensive information about the precision of the final model’s development. This information can significantly enhance the accuracy of procedure planning. Currently, the guidelines outlined in ISO/ASTM 52902 [40] are utilized to determine the accuracy of models produced using additive methods. The standard also provides information on selecting CAI systems. However, it’s important to note that ISO/ASTM 52902 only offers suggestions for dimensional evaluation and partially covers the evaluation of profile parameters of surface roughness. Unfortunately, ISO/ASTM 52902 does not address the selection of systems and measurement parameters when evaluating anatomical structure models’ geometrical accuracy and surface roughness. It is essential to include discussions on the potential challenges in inspecting the accuracy of anatomical models manufactured using MEX additive methods. This research aspect is crucial, especially considering that, based on the current literature, models of anatomical structures made of polymeric materials are most commonly used for planning procedures within the hip joint area. These materials have different properties, often making conducting a reliable metrological evaluation during measurement difficult. The most frequently used material in manufacturing models of anatomical structures of the hip joint is PLA [15,16,18,41]. PLA is made from renewable raw materials, such as cornmeal, and is fully biodegradable. Its hardness and low shrinkage make it suitable for 3D printing high-quality parts and consumer products.
Our research used a part of the pelvic model to assess its geometrical accuracy and surface roughness using CAI systems. First, we improved the geometry reconstruction process of pelvic models. In the next step, we manufactured models of pelvic parts using the MEX additive technique. Additionally, we selected standard measurement systems for macro and micro geometric evaluation. We then developed guidelines for selecting measurement parameters and data processing to ensure reliable results for assessing geometrical accuracy and surface roughness. We used a measuring arm with a mounted laser head and an Atos II Triple Scan system to evaluate geometry accuracy and an Alicona InfiniteFocusG4 optical microscope for surface roughness measurement. In the next step, the anatomical models of the pelvic bones were used in the surgical planning process.

2. Materials and Methods

The research process was developed using three patients as examples. The selection of patients concerned non-standard pathologies that significantly posed a problem with the choice of surgical technique and implant selection within the hip joint area. Figure 1 presents X-ray images of the analyzed patient cases.
Patient 1 is a 24-year-old with Down syndrome who was diagnosed with congenital dysplasia of the right hip joint. Despite undergoing multiple surgeries during childhood, the patient’s hip components could not be properly aligned. As a result, the patient’s acetabulum was vertically positioned and shallow, which led to instability of the femoral head, causing subluxation and mechanical pain. Patient 2, a 75-year-old woman, was diagnosed with post-traumatic acetabular detachment of the right hip endoprosthesis after falling from her bicycle. Despite experiencing pain, the patient continued to walk and did not seek medical attention for many months. During this time, the loose cement-plastic acetabulum damaged the bone acetabulum, enlarging its lumen and thinning its walls. The third patient, a 75-year-old man, is a patient with the most complicated anatomical situation. Crowe type IV developmental dysplasia of the hip is one of the most complex and difficult types of hip deformities to reconstruct. Here, the 3D model was particularly useful. In this patient, the femoral head has always been above its natural position, which significantly shortened the limb, disturbed gait motor skills, and led to degenerative changes with a flat acetabulum and a narrow femoral canal. Surgical treatment involves bringing the hip joint down a few centimeters, where it should be but never was, and reconstructing the correct anatomy after 75 years of the deformity.

2.1. Procedure to Obtain a Digital Pelvic Model

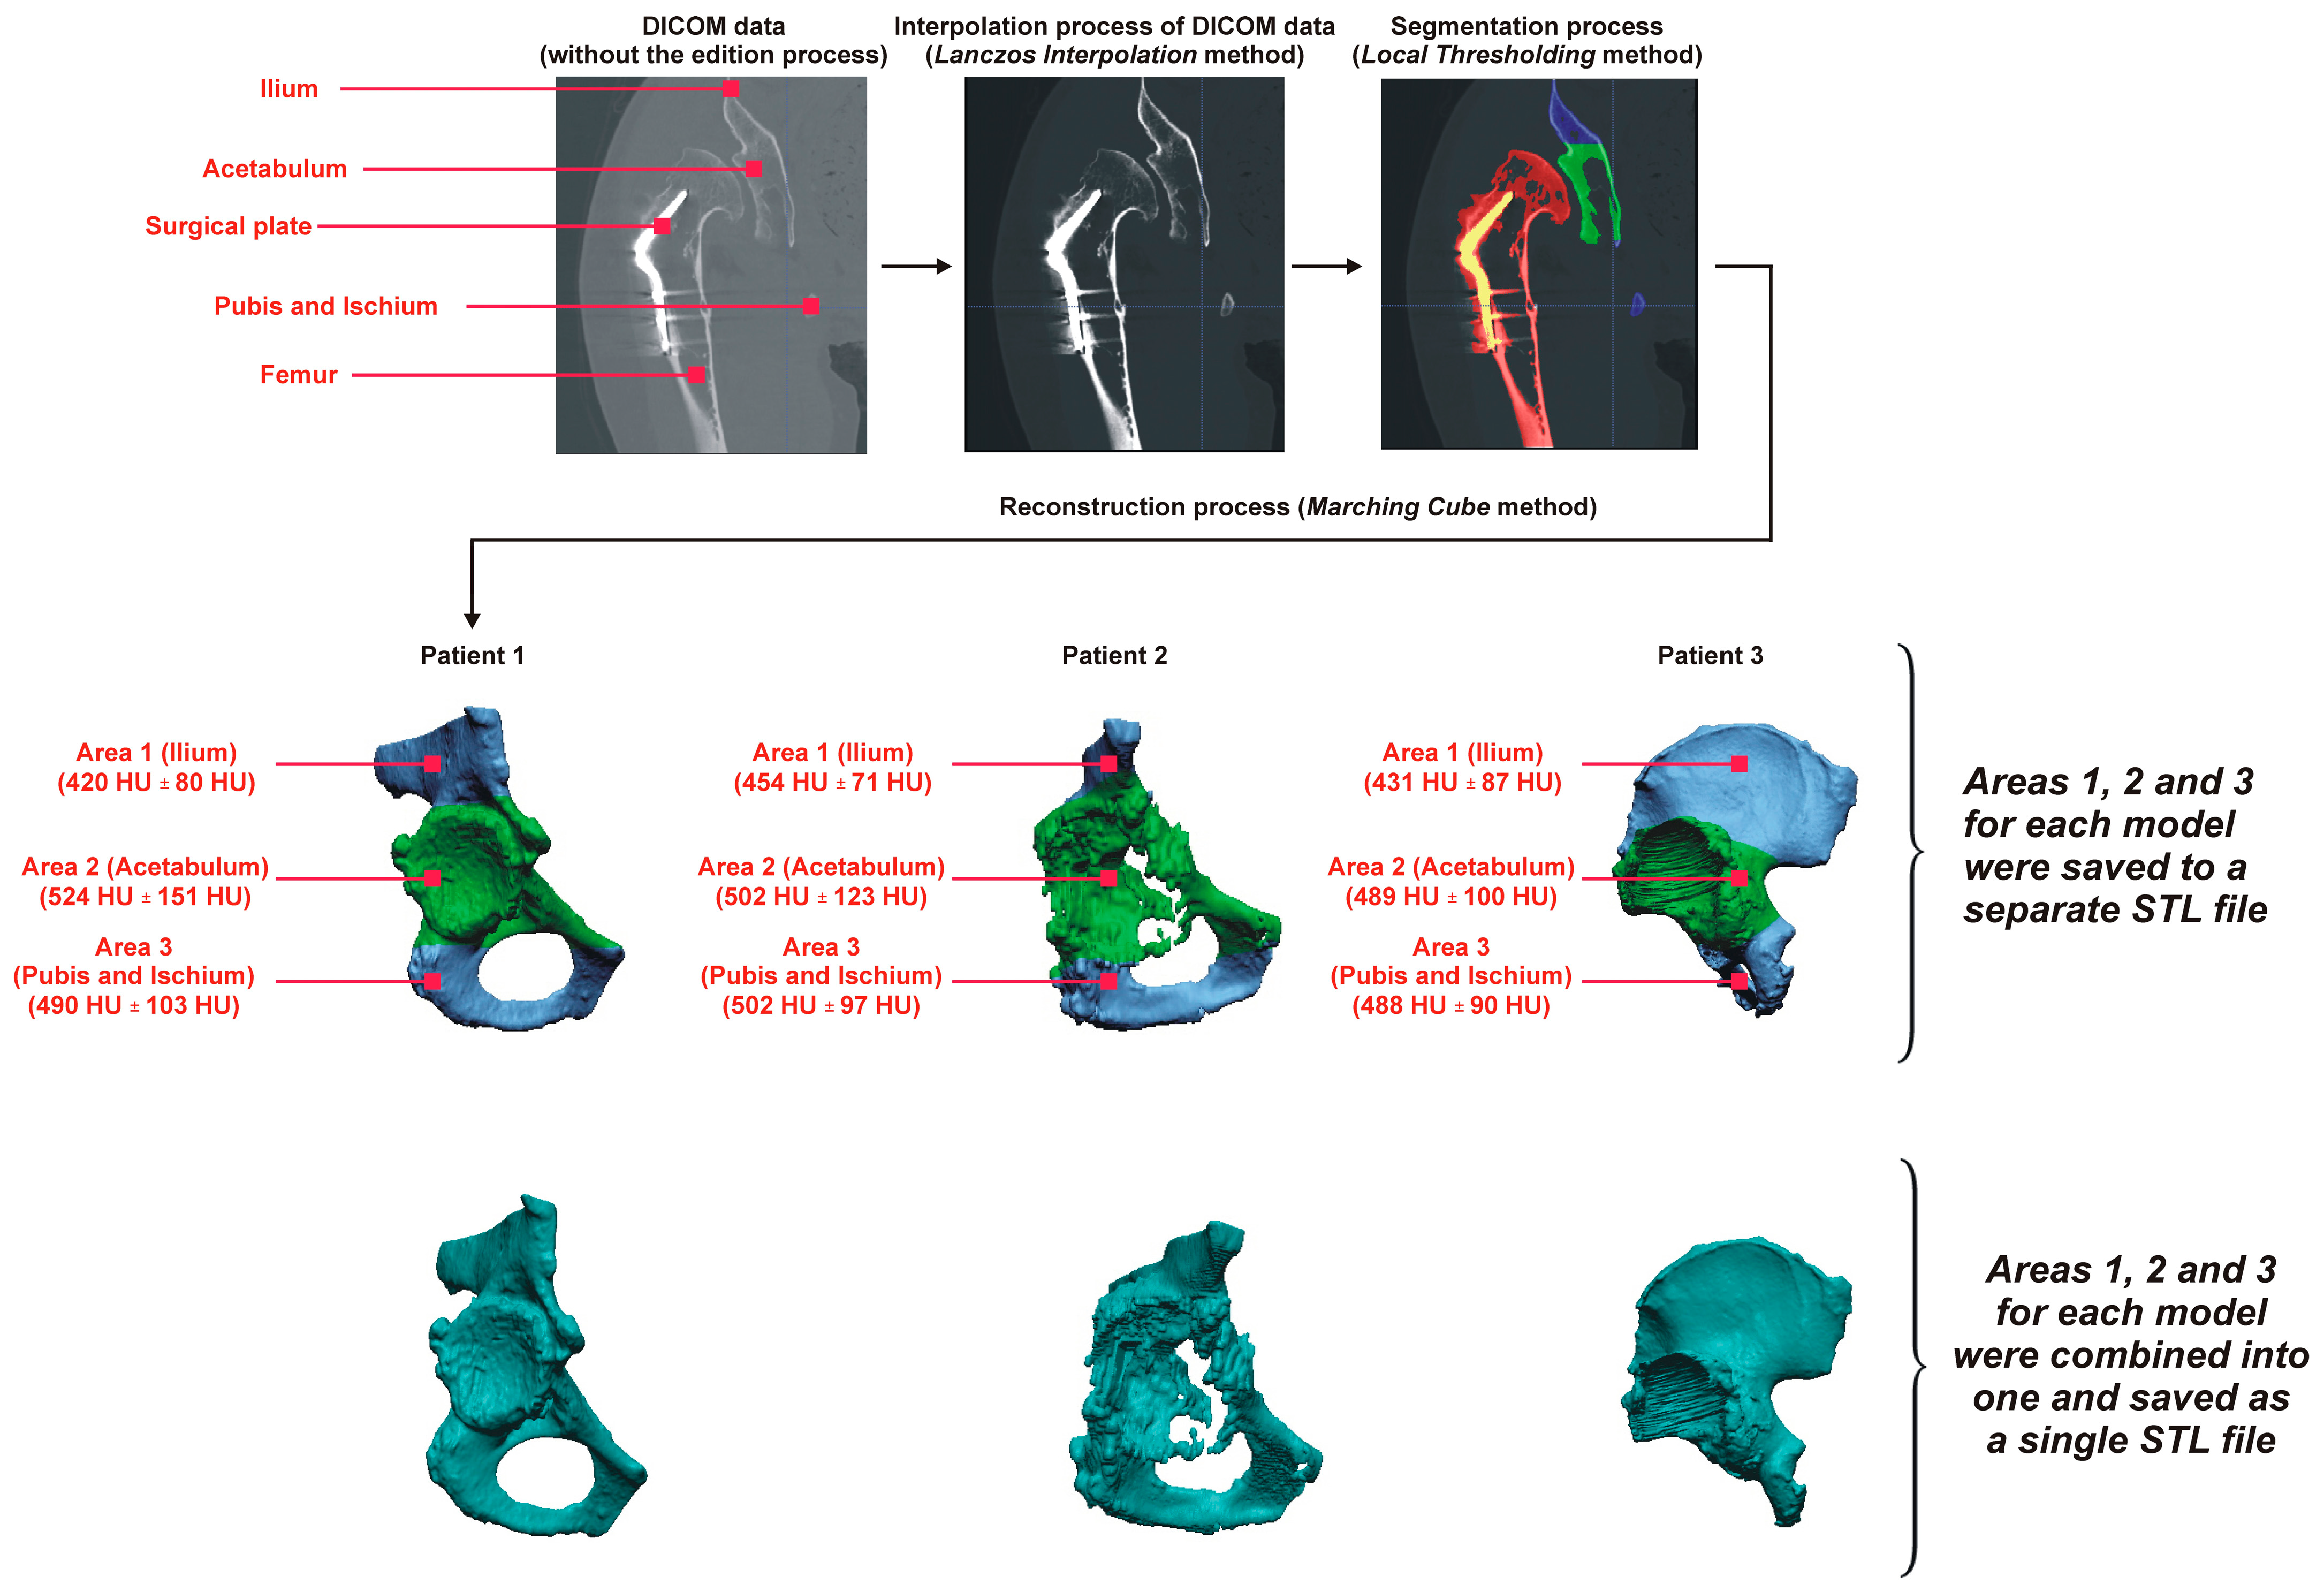
The Digital Imaging and Communications in Medicine (DICOM) data of the patients were obtained from the GE-MS Revolution CT multidetector tomograph—Discovery750HD (GE Medical Systems, Buckinghamshire, UK) at St. Jadwiga Queen Clinical Regional Hospital No. 2 in Rzeszów. The traditional scanning protocol for the hip joint area was used, with the following parameters: helical mode; Tube voltage: 120 kV; Tube current-time product: 90 mAs; Total Collimation width: 40 mm; Convolution Kernel: Soft; Matrix size: 512 × 512; Pixel size: 0.5 mm × 0.5 mm; Slice thickness: 0.625 mm. Due to some limitations in the obtained DICOM data, a patented procedure for numerical processing was implemented in Amira 5.4 software, as detailed in the publication [25]. This procedure also involved removing noise created by metal artifacts using a noise reduction minimum filter, increasing the spatial resolution of the DICOM data by applying the Lanczos interpolation method, and sharpening the boundary between bone structure and soft tissue using an unsharpening filter. Furthermore, the segmentation process was improved by dividing the pelvic region into three sub-areas based on local thresholding in the numerical segmentation process. The entire process is illustrated in Figure 2.
This procedure aimed to improve the accuracy of segmenting the extracted bone structure by selecting an individual threshold expressed in the Hounsfield [HU] unit scale in the desired area. This was determined based on information about the average grey shade values of the pixels assigned to the bone structure. By developing local segmentation thresholds, three separate areas of the pelvis were segmented, i.e., Ilium, Acetabulum, Pubis, and Ischium. During the segmentation process for patients no.1 and no.3, the implant was separated from the bone structures. This process was enhanced by adjusting the pixel visibility thresholds in the 2D image. The iso-surface method was used to create the 3D model. It is an indirect surface method based on the marching cube algorithm. This algorithm divides the space into a series of cubes, each encompassing one or more voxels. The values at the nodes of each designated cube are then evaluated against a specified iso-value. Based on whether a node’s value is higher or lower than the iso-value, polygons representing the iso-surface that intersects between these points are generated within the cube. There are 256 possible cube orientations relative to the surface; however, only 15 unique canonical orientations can be recognized. Considering the whole algorithm, the following main steps can be distinguished:
  • Cell selection (iso-voxel);
  • Classification of the position of each vertex (internal/external);
  • Creation of an index i;
  • Finding the edges intersected by the contour surface according to the case table for the index i of the cell;
  • Determination of intersection points, linear interpolation;
  • Attaching the determined points (triangles) to the contour surface;
  • Transfer to the next cell.
The final models obtained during reconstruction were saved in a StereoLitography (STL) file. The research process involved testing two options. The first option focused on selecting measurement procedures to assess geometric accuracy and surface roughness in the pelvic part’s three distinct areas (ilium, acetabulum, pubis, and ischium). The second option aimed to verify and measure the geometry of a pelvic part model created as a single piece.

2.2. Procedure to Manufacture a Pelvic Model

In the next step, we used the MEX process to manufacture models, which involved applying thermoplastic material to form a finished model. The research models were manufactured using a Prusa MK3s printer (Prusa Research, Prague, Czech Republic). A spool of material is pushed through a heated nozzle in a continuous stream and selectively deposited layer by layer. A numerically controlled device applied the model and support material to the worktable in successive section levels until the entire model was completed. The whole process is illustrated in Figure 3.
We used Prusa Slicer 2.7.0 software to prepare the digital file for 3D printing with the Prusa MK3s printer. During data preparation, models with 80% infill were chosen. The infill pattern selected was the grid option, and a contiguous style was used for the supports. The orientation of the models in the 3D printer space was adjusted to improve the accuracy within the acetabulum area. The nozzle with a diameter 0.4 mm was heated to approximately 210 °C for manufacturing models with PLA material. PLA material is one of the most popular and widely used materials in 3D printing. It is odorless and biodegradable. It is recommended by many 3D printer manufacturers as a starting material—not least because of its low shrinkage and lack of need for special pads and table heating, which greatly simplifies printing with this material. Cooling is recommended during 3D printing. The table temperature was set to around 60 °C. The manufacturing process occurred in an open space with a temperature of 23 °C, and the 3D printing speed was 80 mm/s. The layer thickness was set to 0.3 mm. The support material was removed mechanically. Two pelvic bone model production options were tested using CAI systems to evaluate manufacturing accuracy. The first involved manufacturing the model in one piece, and the second involved manufacturing three areas as separate models.

2.3. Development of Procedures for Verifying Geometrical Accuracy

In developing procedures for verifying the accuracy of the geometry of the part of a pelvic model manufactured in one piece and in three separate fragments, two coordinate optical systems were used: a measuring arm with laser head (Nikon Metrology, Leuven, Belgium) and an Atos II Triple Scan (Carl Zeiss AG, Jena, Germany). The entire process consisted of three steps:
  • Conducting the systems calibration process;
  • Development of a geometry measurement procedure that enables accurate and complete digitization of the geometry of anatomical structures;
  • Development of a procedure to evaluate the geometrical accuracy.
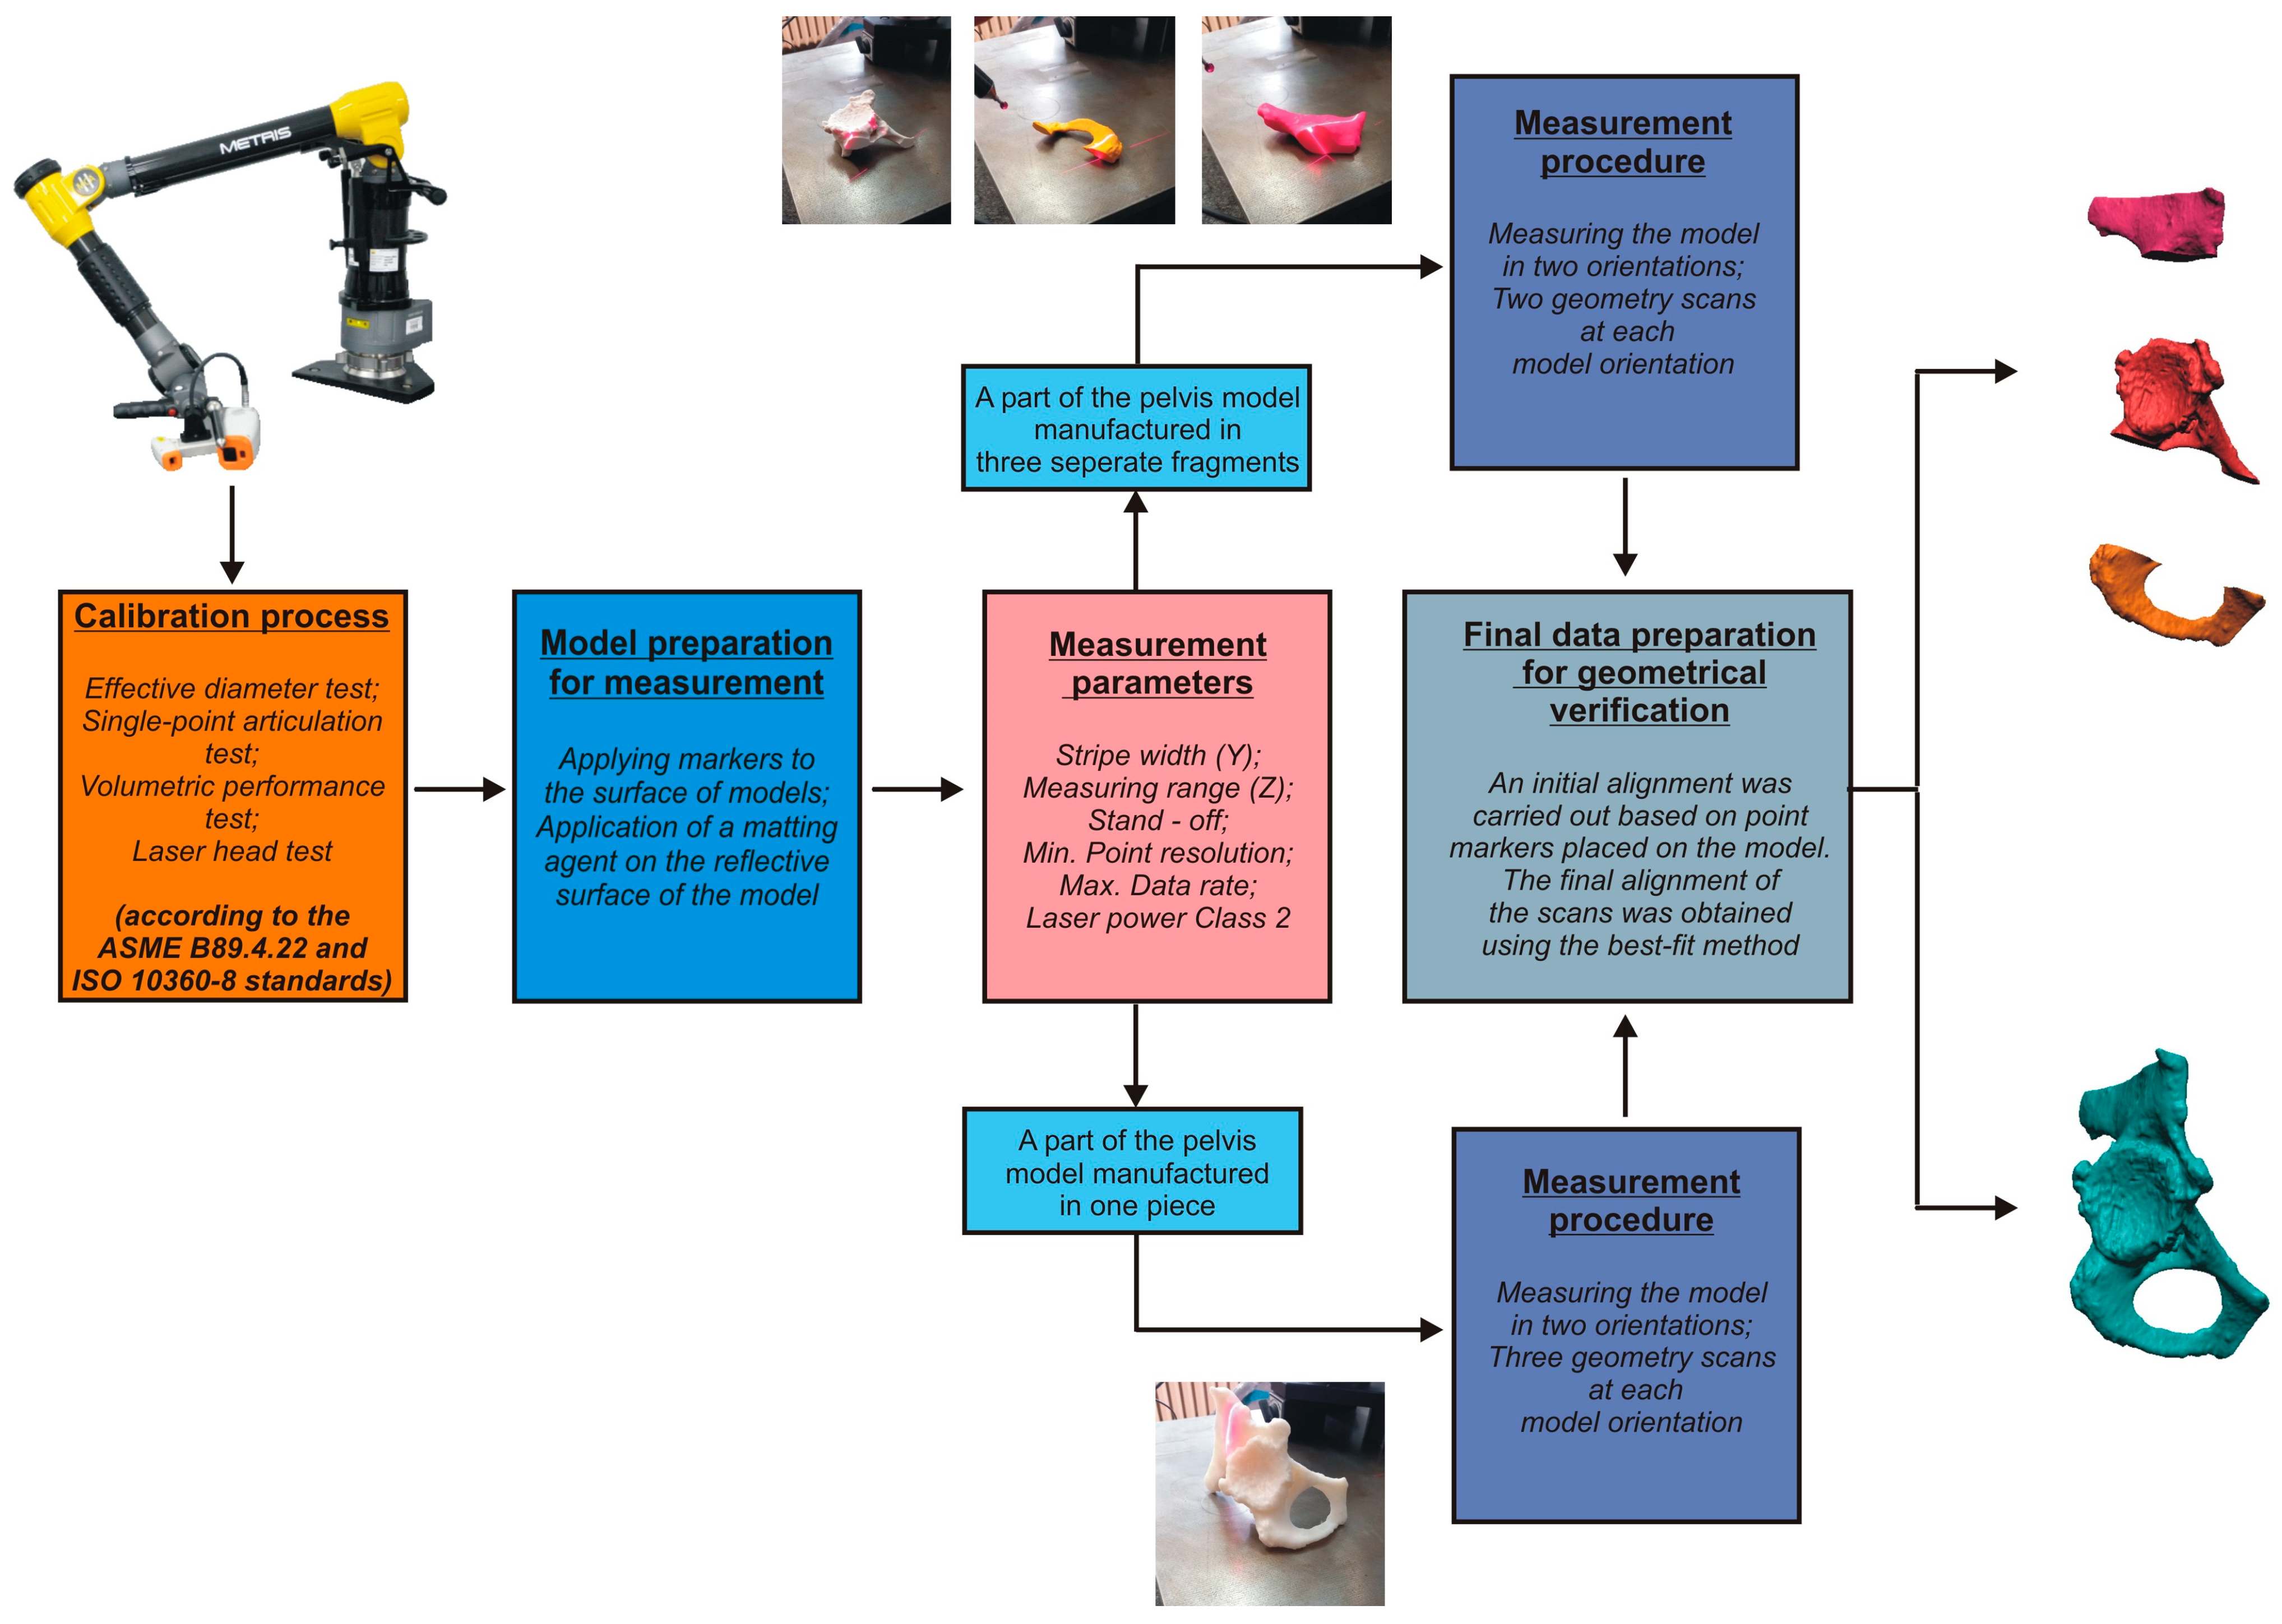
The laser head measurement is based on the laser triangulation method, one of the best-known techniques for measuring 3D object geometry. With the measurements performed, we directly obtain data representing a 3D point cloud, which can be saved to STL format [16,42]. The calibration process used three tests to check the measuring arm under the American standard ASME B89.4.22 [43] and one to check the laser head under ISO 10360-8 [44]. Effective Diameter Test (EDT) measured nine points on a standard sphere’s surface. The procedure was performed three times, and the maximum absolute deviation from the certified value given on the standard was noted as the test result. The final deviation between the measured diameter of the sphere and the standard value was determined using the method of least squares based on Equation (1):
E D T = D m e a s u r e d D c a l i b r a t e d ,
The Single Point Articulation Performance Test (SPA) probe is placed in a conical socket. Individual points were measured from multiple angular positions of the arm. Each point measurement was analyzed as a range of deviation from the mean value using Equation (2):
S P A = R a n g e / 2 ,
The Volumetric Performance Test (VPT) is the most suitable test for determining the accuracy and repeatability of a coordinate measuring arm. It consisted of repeatedly measuring a certified length standard at several locations and orientations and comparing the resulting measurements with the actual length. The result was the maximum deviation between the measured and standard length values, which was determined according to Equation (3):
V P T = L m e a s u r e d L c a l i b r a t e d ,
In the case of the laser head, its accuracy was checked by scanning the calibration plate from different directions. The procedure result was the maximum standard deviation of the scanned data relative to the matched plane elements. The final value was determined by using the least squares method.
After calibrating the system, we measured the models manufactured using 3D printing. We first selected the measurement parameters for the laser head (Table 1).
It was crucial to match the measurement resolution to the accuracy of the manufactured models. We established a condition that the measurement resolution should not exceed 10% of the tolerance range of the scanned model. Based on available data, the maximum deviation values are usually within ±0.3 mm for models manufactured on the Prusa MK3s 3D printer using PLA material [16]. Therefore, we assumed a tolerance of 0.6 mm for the accuracy of the manufactured models. With this in mind, we set an acceptable measurement resolution of 0.06 mm. To minimize errors in fitting individual scans, markers were applied to the surface of the measured models (made as a single piece and three separate pieces) before measurement. Additionally, due to the nature of the material from which the models were made, a matting layer was required to be applied to their surface. The thickness of the matting layer was measured on Alicona’s InfiniteFocusG4 microscope and was about 10 µm. The measurements of the models were carried out manually (Figure 4). To obtain the complete geometry of a part of the pelvic model made as a single piece, measuring it in two orientations was necessary, as simultaneously measuring the model’s surfaces in one position was impossible. Three geometry scans were taken at each model orientation, requiring six scans to obtain the model’s geometry fully. Attempts to measure with fewer scans were unsuccessful in fully reconstructing a part of the pelvic model geometry. The two-point clouds obtained in positions one and two were aligned. First, an initial alignment was carried out based on feature point markers placed on the model. The final alignment was obtained using the best-fit method. This iterative process minimizes the square of the distance between the nominal and measured data to achieve convergence in the solution. The iterative process continued until the alignment of point clouds reached a value of 0.005 mm. The result was a complete representation of the model surface. When scanning three pelvic fragments, measurements were carried out at two different orientations of the models. However, it was sufficient to perform three scans in each model orientation to visualize the complete geometry of the models. Subsequently, the individual scans were adjusted similarly to a part of the pelvis model manufactured in one piece. The entire process is illustrated in Figure 4.
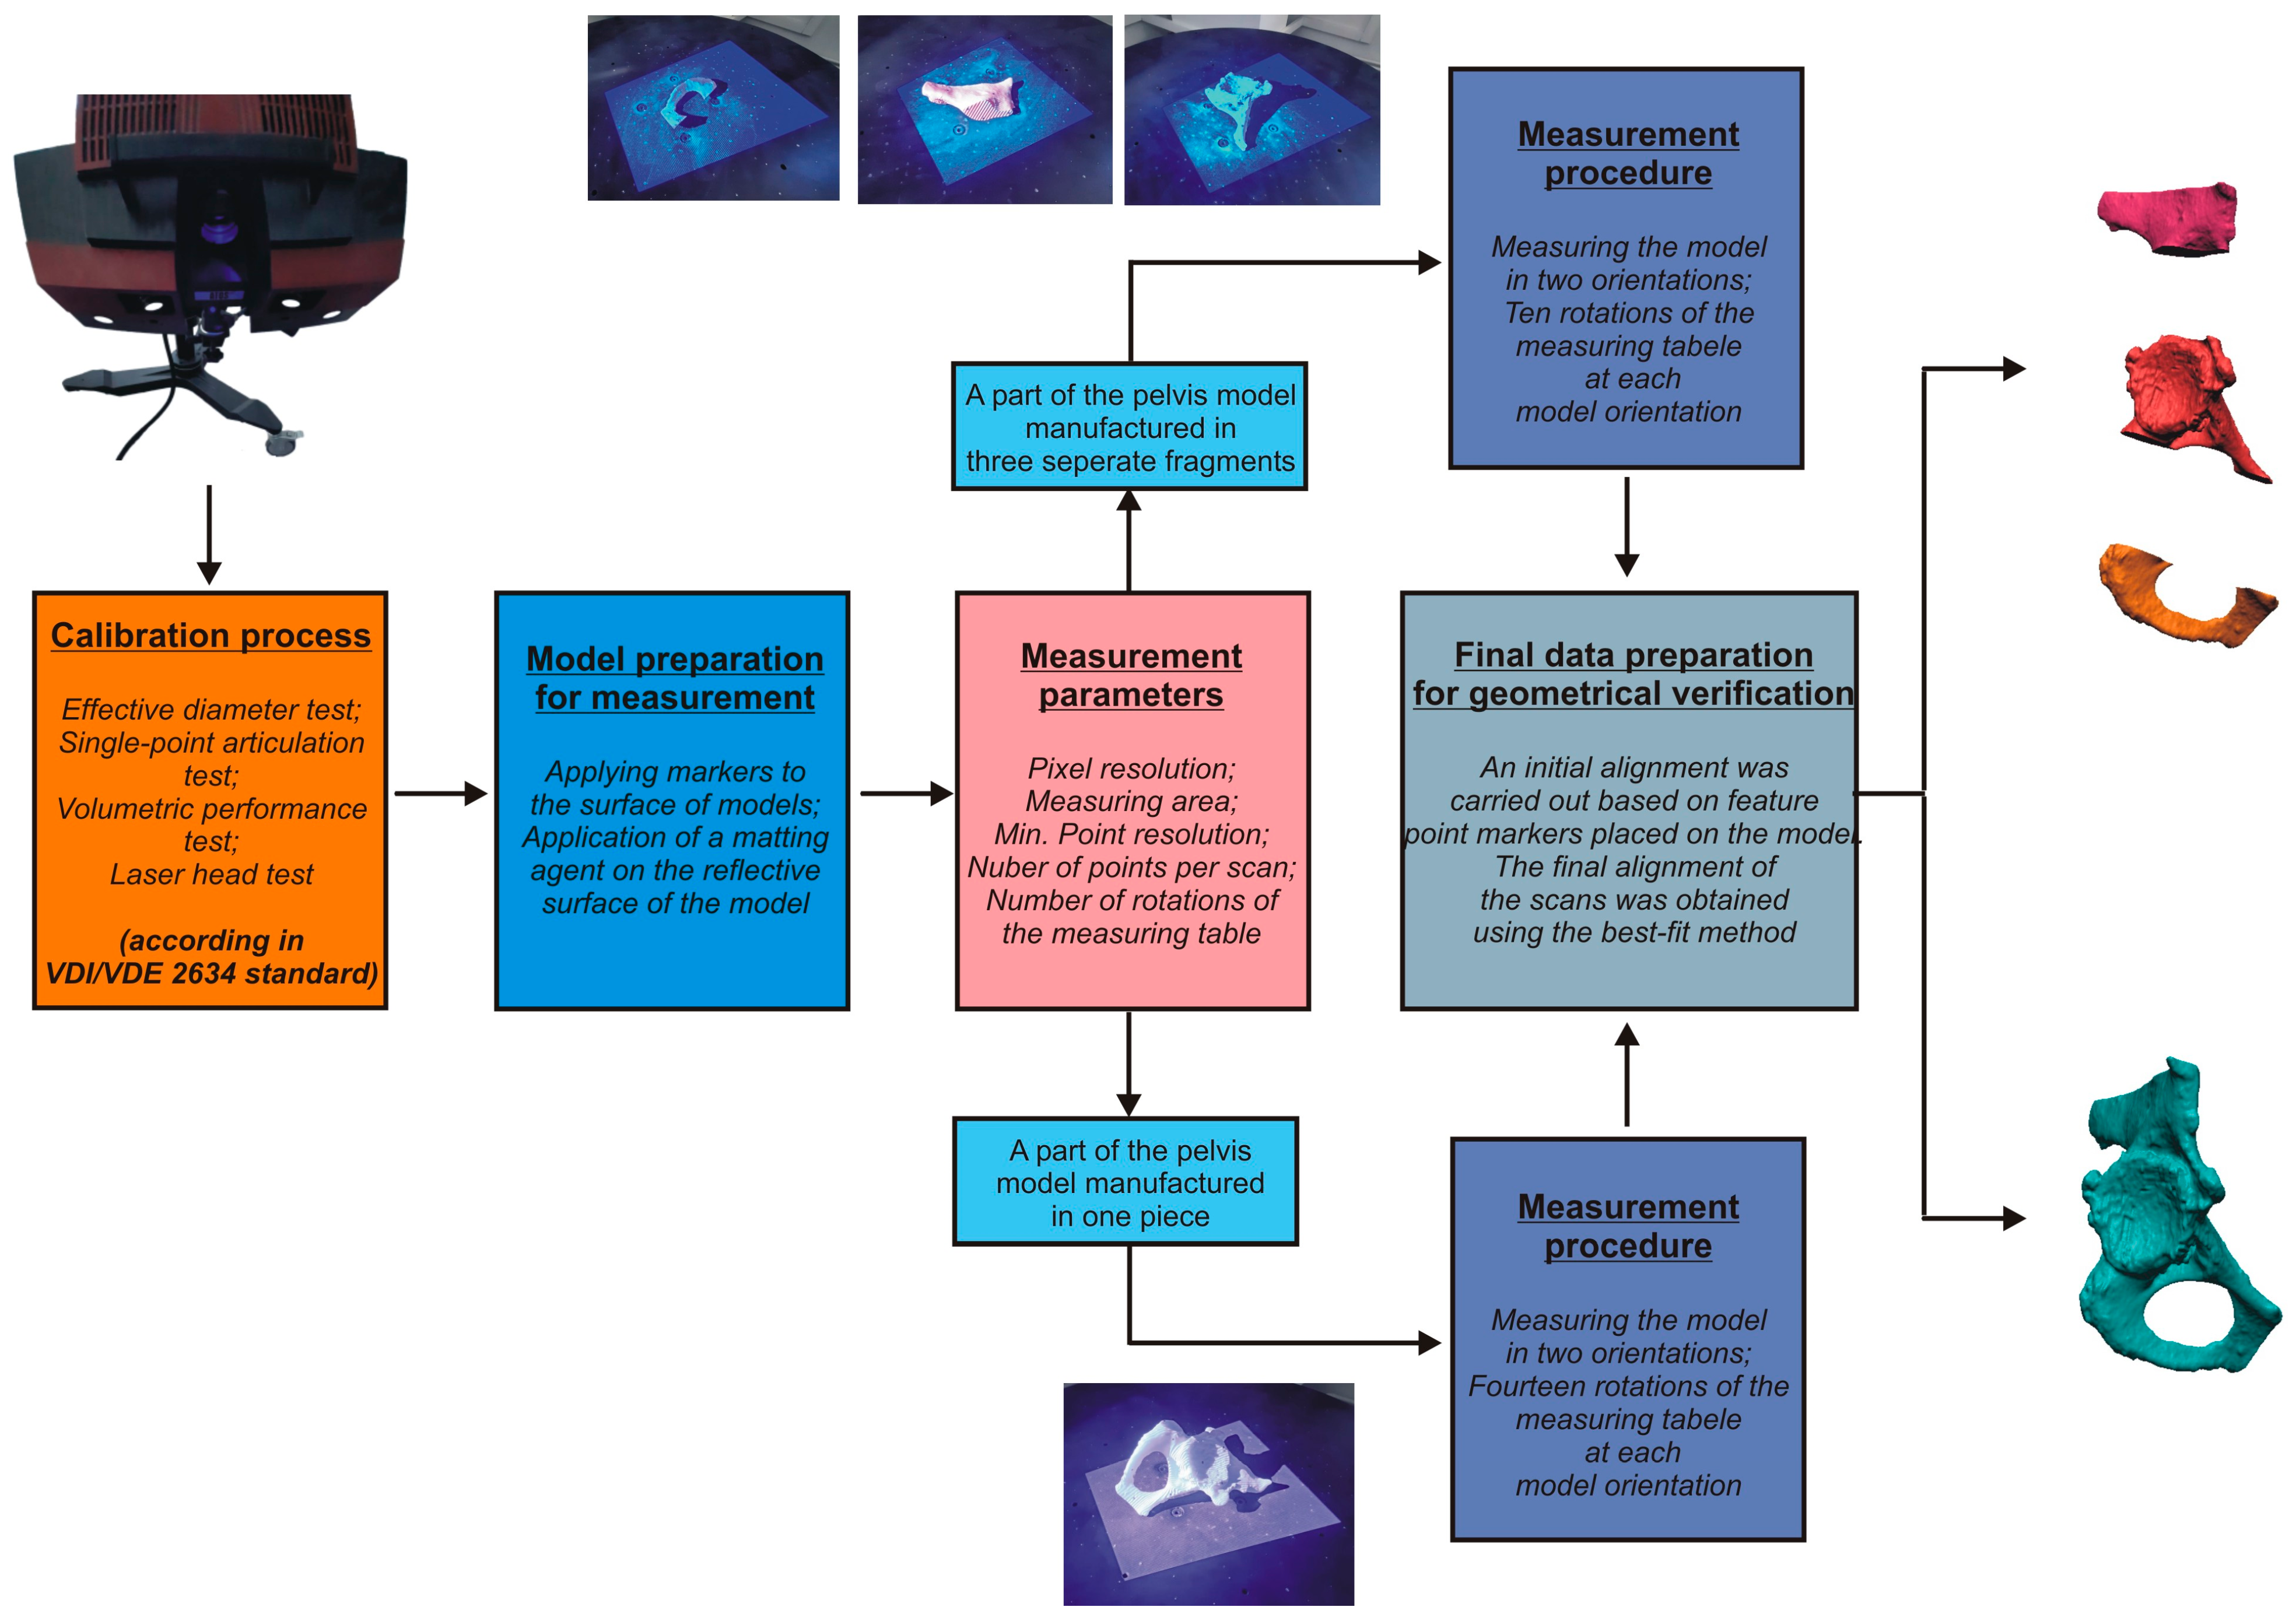
Structured light methods can obtain information about the entire area of a measured model using Gray’s stripe projection. The Atos II Triple Scan is a measurement system based on this method [45,46,47]. It comprises a stand with a measuring head, a projector, and two 5,000,000-pixel resolution cameras. The system includes a rotary table and a computer system for processing measurement data. The scanner uses triangulation to capture information about the position of points in space. The measurement result is a three-dimensional representation of the scanned geometry saved in STL format. During the calibration process of the Atos II Triple Scan system, three tests were conducted under the VDI/VDE 2634 standard [48]. Ceramic spheres were the standard for the optical head (Ps) test. The deviation between the measured diameter of the sphere and the calibrated value was determined using the least squares method, as per Equation (4).
P s = D m e a s u r e d D c a l i b r a t e d ,
A standard was used to study the distance error (SD), in which two ceramic spheres were placed at a known distance. The error was calculated as the difference between the estimated and calibrated distance between the centers of the two spheres. The distance was determined as the average of the measured values obtained from multiple soundings and calculated using Equation (5).
S D = L m e a s u r e d L c a l i b r a t e d ,
A ceramic rectangular plate standard was used to check the flatness error, which was determined using the least squares method.
After calibrating the equipment, we tested the manufactured models. The entire process is illustrated in Figure 5.
For methods using structured light, the resolution of the point cloud that reconstructs the measured geometry depends on various factors, including the measurement area’s size and the measurement head’s technical parameters (Table 2).
The number of rotation steps of the measuring table also plays a crucial role. In our case, we selected a measurement field to ensure a point cloud resolution of 0.058 mm. Models made from reflective PLA material have been coated with a matting layer. The thickness of the matting layer was measured on Alicona’s InfiniteFocusG4 microscope and was about 10 µm. Since digitizing the entire geometry in one orientation was not feasible, we measured the models in two positions. The number of rotation steps for the measuring table was determined by measuring the models in each position. It was 14 for a part of the pelvic model and 10 for three separate fragments. To improve the process of merging the individual point clouds into a single entity, we attached markers to the scanned models. The merging of the point clouds obtained in each position was carried out similarly to the laser scanner. First, we merged the measurement data by identifying the feature points marked on the models’ surfaces. Then, to obtain the final 3D model, we applied the best-fit method. In this process, the accuracy of point cloud matching was set at 0.005 mm.

2.4. Development of Procedures for Verifying Surface Roughness Parameters

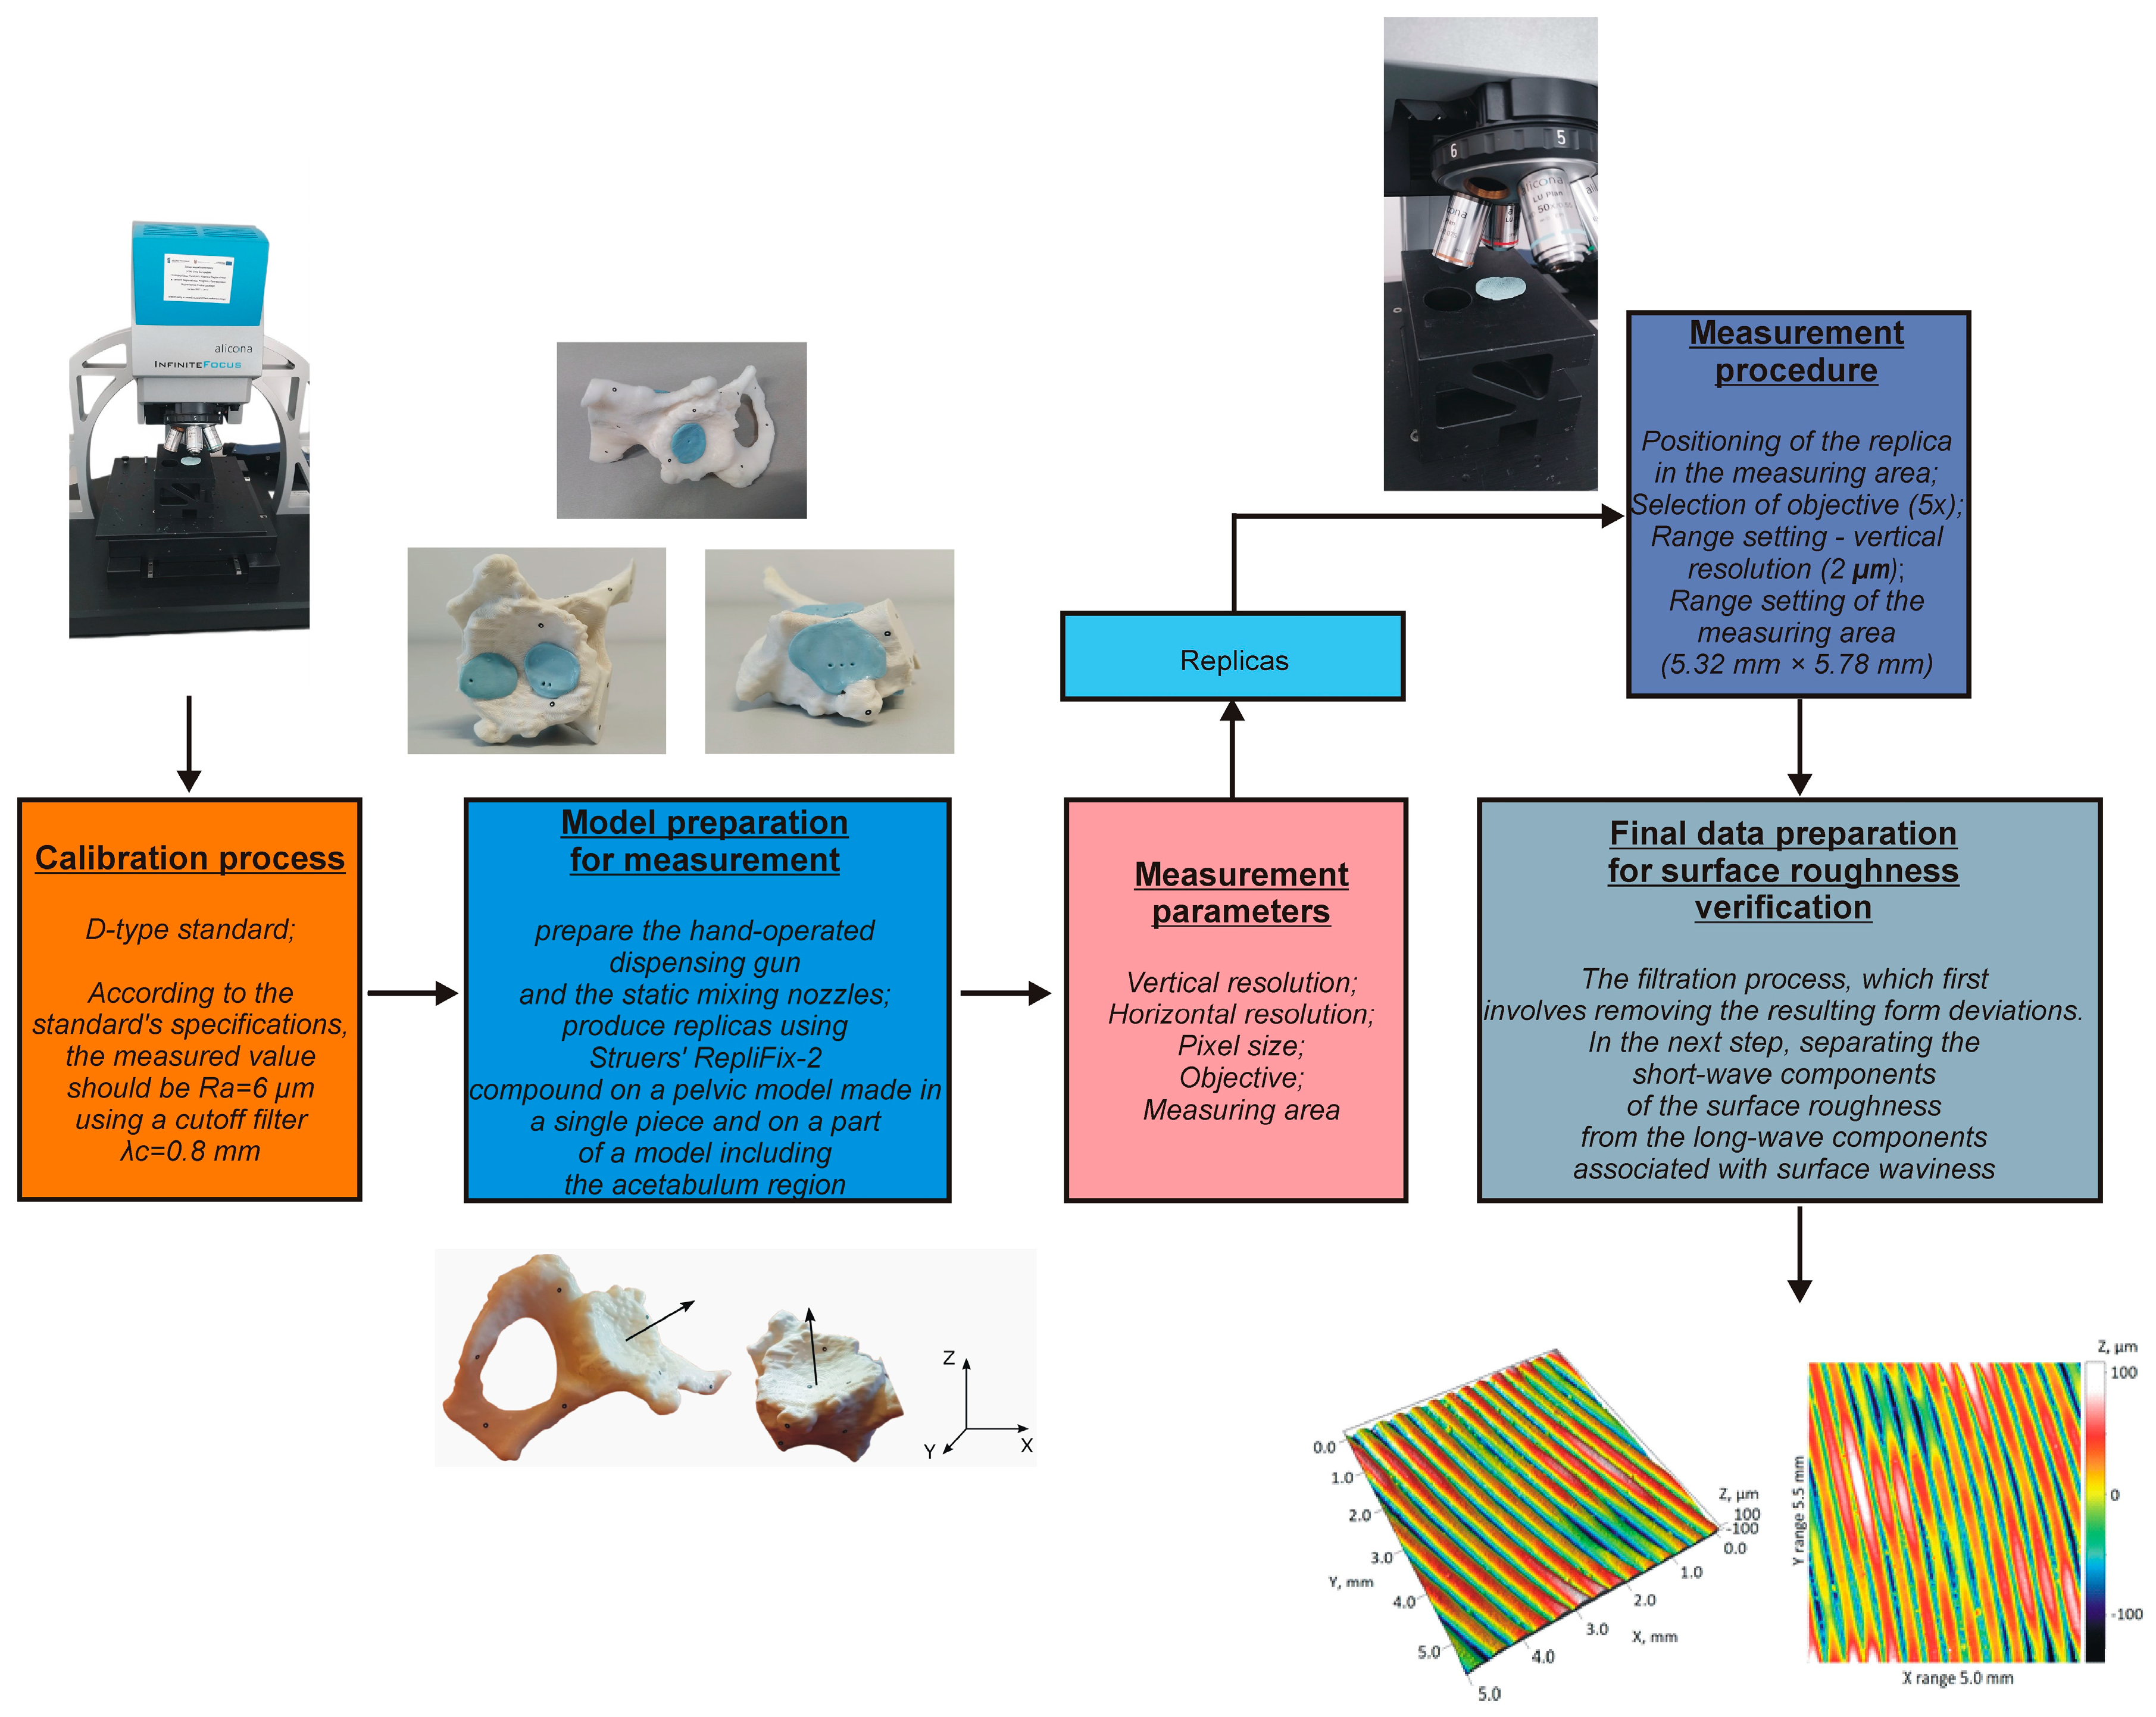
The layer thickness selection for 3D printing was based on the required accuracy of the anatomical structure models. The literature must provide a specific acceptable accuracy for creating models of anatomical structures within the hip joint. However, it indicates that a maximum deviation of ±0.25 mm from the model geometry is acceptable for surgical planning in the craniofacial region. As a result, a layer thickness of 0.3 mm was chosen for the 3D printing process. This, however, involves increasing the height parameters of the surface roughness. High roughness, conversely, can affect the deviations of macrogeometry. Therefore, this surface roughness was taken into account in the study. If the geometric deviations of the models were close to the assumed tolerance, it would be necessary to check to what extent such a condition is influenced by surface roughness. An optical microscope, Alicona’s InfiniteFocusG4 (Vexcel Imaging GmbH, Graz, Austria), was used to determine surface roughness parameters. The entire process consisted of three main steps (Figure 6):
  • Conducting the systems calibration process;
  • Development of a surface roughness measurement procedure;
  • Development of a procedure to evaluate the surface roughness parameters.
The repeatability of the measurement system for an Alicona InfiniteFocusG4 optical microscope was assessed at the beginning of the study to ensure accurate results. The system calibration process utilizes a D-type standard, which controls the instrument calibration overall. This standard is known for its periodic surface structure, which is similar to additive manufacturing models. According to the standard’s specifications, the measured value should be Ra = 6 µm (Ra—arithmetical mean height of 2D roughness profile) using a cut-off filter λc = 0.8 mm. The value of the cut-off filter length was determined following the procedure in ISO 21920-1 [49]. Consequently, the length of the measuring section was set at 5 × λc. As a result, it was established that for the 3D measurements, the measuring length along the X-axis would be a minimum of 4 mm. Due to the optical properties of the PLA material, surface topography measurements were carried out on replicas. These replicas were produced using Struers’ RepliFix-2 compound on a pelvic model made in a single piece and on a part of a model, including the acetabulum region. The measurements were performed using the settings presented in Table 3. Surfacing roughness studies were carried out in areas of characteristic topography, which can most generally be described as along applied layers and from the side of the surface contact with the support material. However, in the context of the usefulness of the models in the surgical planning process, the acetabulum area was key. In the conducted studies, the acetabulum area was 3D printed in two orientations: on the part of the pelvis model manufactured in one piece, the resultant normal vector of the acetabulum area is inclined at a greater angle to the Z axis of the printer (Figure 7) compared to an acetabulum model (smaller model), where the resultant normal vector of the acetabulum area is almost parallel to the Z axis, i.e., to the direction of building the model.
In the measurement process, the microscope, an Alicona InfiniteFocusG4, illuminates the object with modulated white light. Coaxial illumination is achieved by directing the light into the optics and focusing it through the lens onto the sample using a translucent mirror. The sample reflects the light, and the resulting image is projected onto a digital sensor through precision optics. The image produced is similar to that of conventional light microscopy, displaying a small depth of field. The distance between the sample and the lens is then altered while maintaining constant image registration. Subsequently, the reflected focus is calculated for each object position. Finally, the depth is determined by varying the focus value. This method provides a detailed 3D view of the surface [50,51,52].
Data processing was carried out in SPIP software 6.4.2 to determine the surface roughness parameters of the anatomical structure. First, the analysis area was cropped to 5 mm × 5.5 mm due to numerous artifacts at the edges of the scans. Then, the process of form removal was carried out. Then, due to the visible measurement noise, the number of pixels was halved, and the noise-reduction process was carried out using a 15 × 15 median filter. A Gaussian filter λc = 0.8 mm was applied to separate the long-wave components, marking the transition from roughness to waviness. The result was a 3D and 2D visualization of the surface roughness and statistical parameters. During the research, three 3D parameters were analyzed:
  • Sa—the arithmetical mean height of the surface (6):
S a = 1 A A z ( x , y ) d x d y
  • Sq—root mean square height of the surface (7):
S q = 1 A A z 2 ( x , y ) d x d y
  • Spk + Sk + Svk—the sum of reduced peak height (Spk), core height (Sk), and reduced dale depth (Svk). Spk, Sk, and Svk are parameters related to the material ratio curve (Figure 8)

3. Results

Table 4 presents the results based on the procedures used to verify the measurement systems’ accuracy for macrogeometry assessment. The error values were obtained in GOM Inspect for the Atos II Scan and Focus Inspection 9.3 software for the measuring arm with a laser head.
Figure 9 presents the results based on the procedures used to verify the measurement systems’ accuracy for microgeometry assessment. The Ra value for the standard was 6 µm. When measured on the Alicona InfiniteFocusG4, the parameter value was 5.815 µm. The system’s accuracy was verified using SPIP 6.4.2 software.
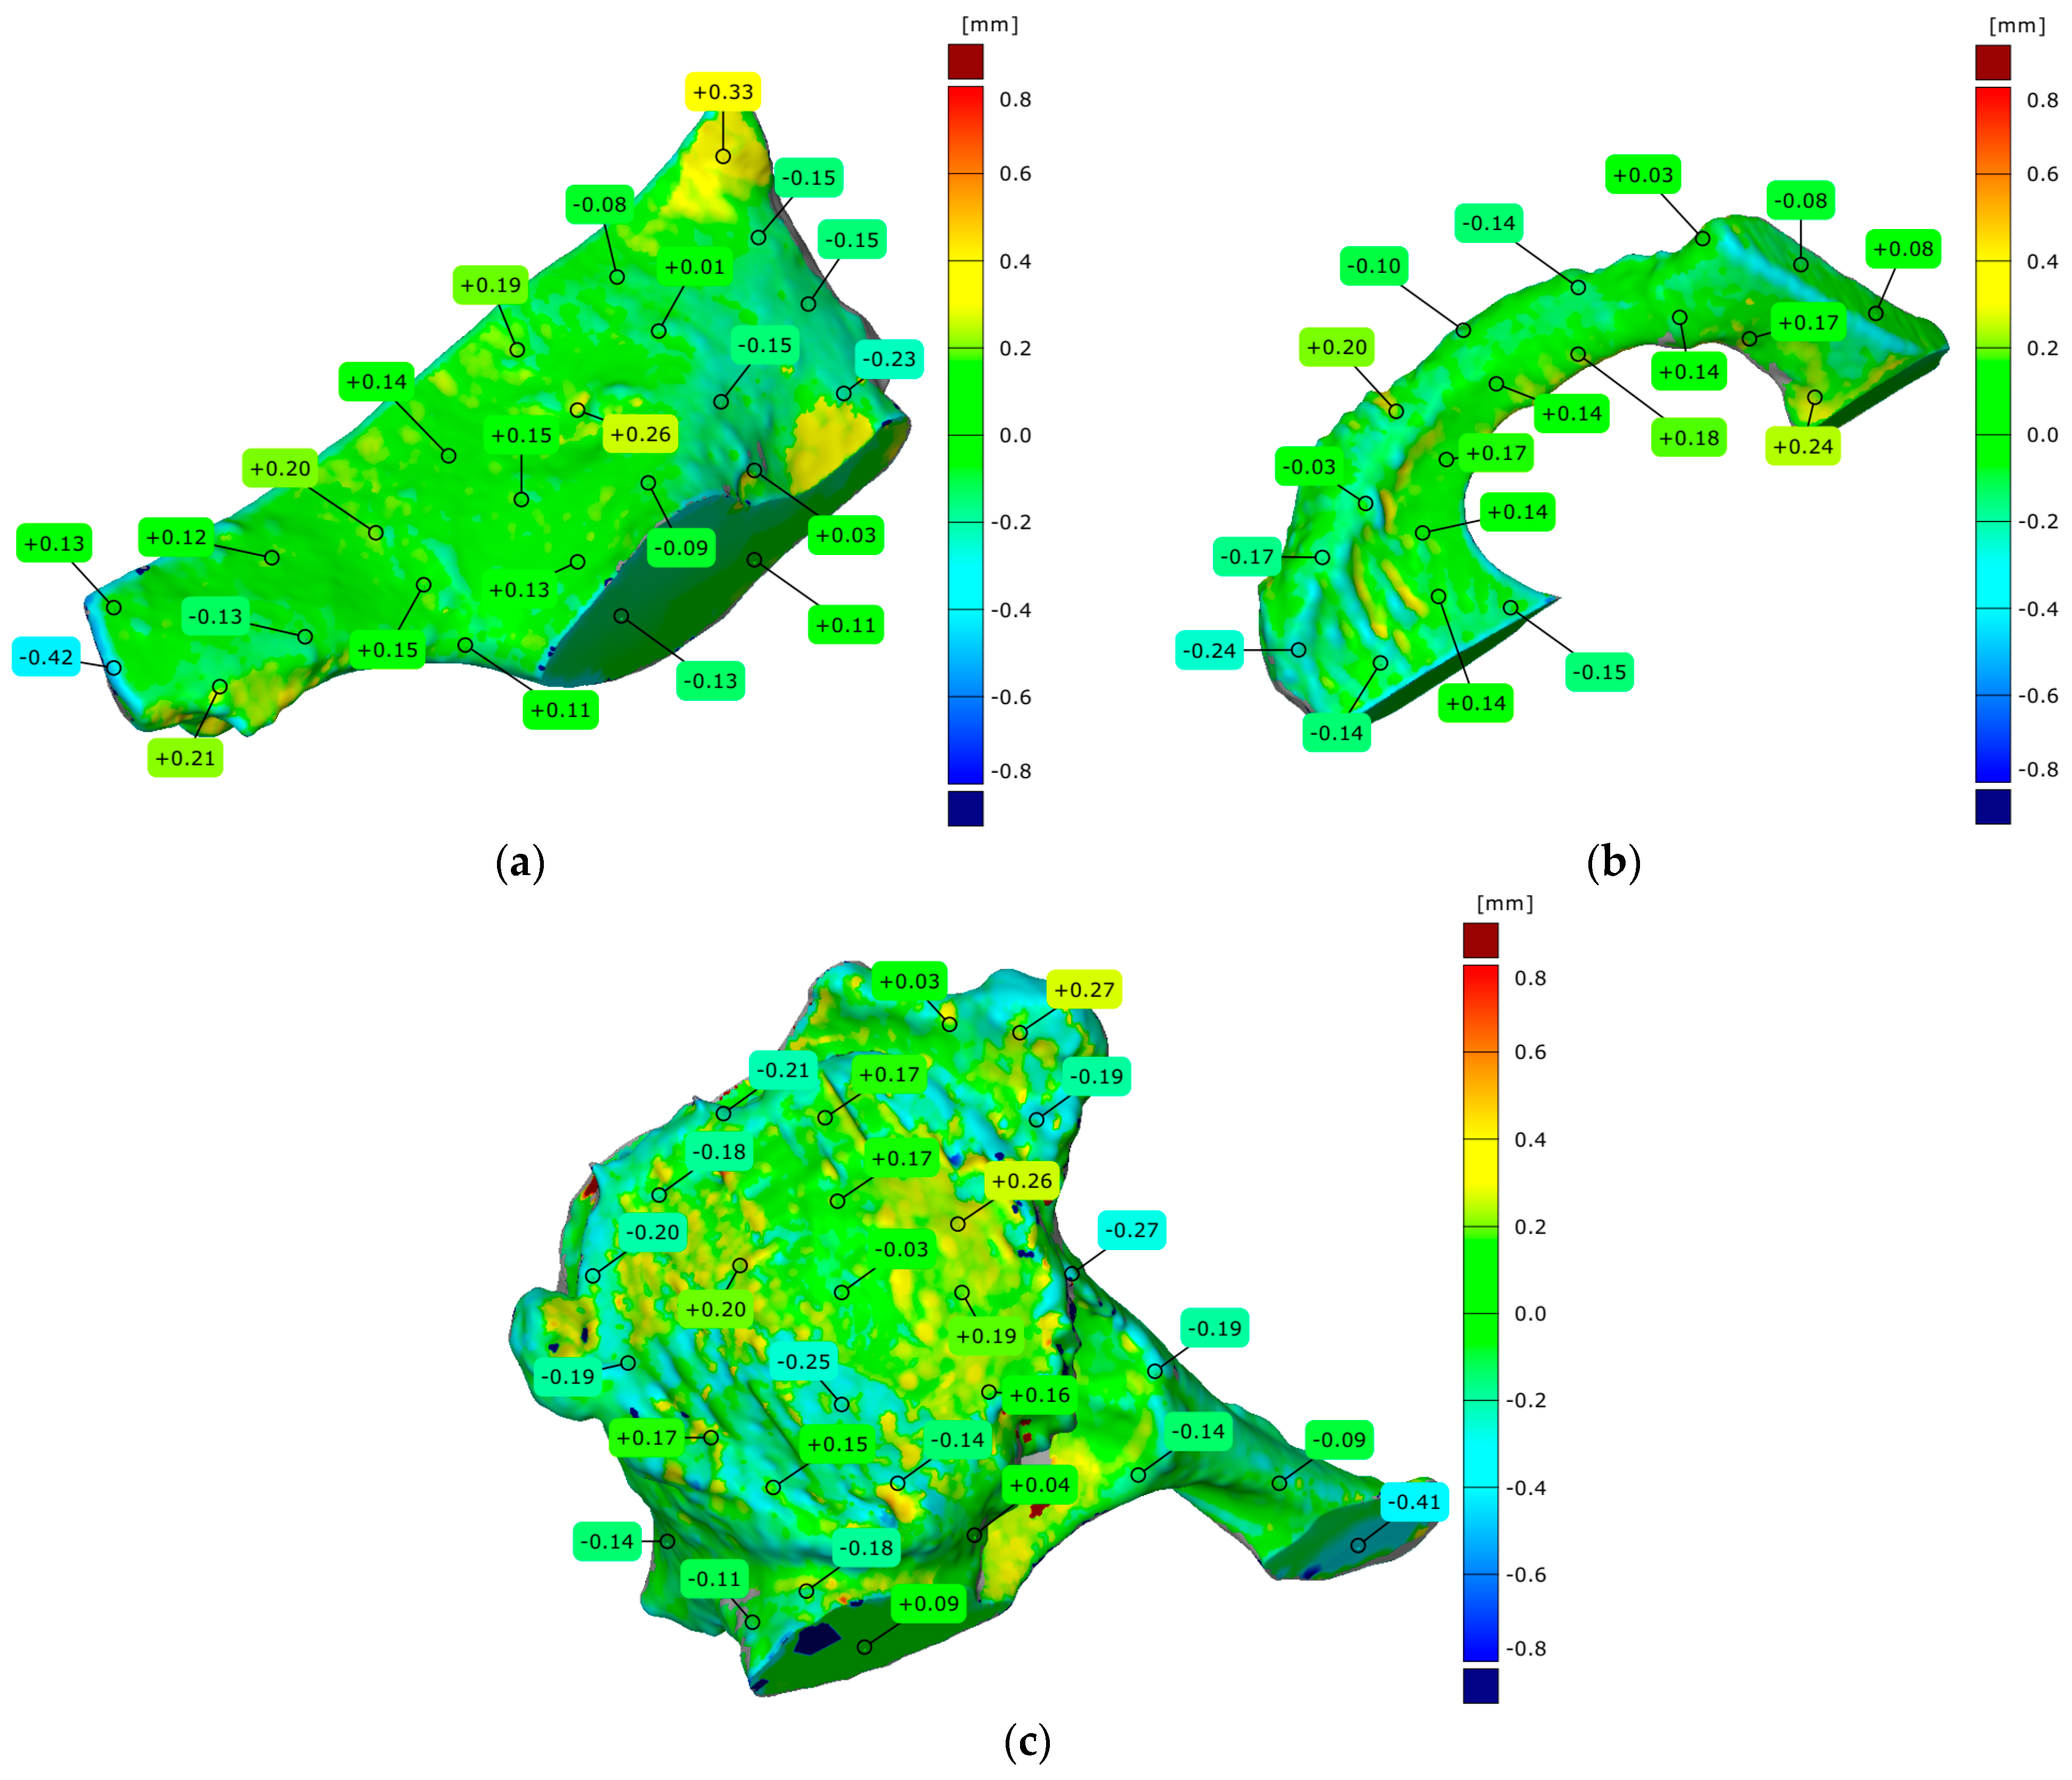
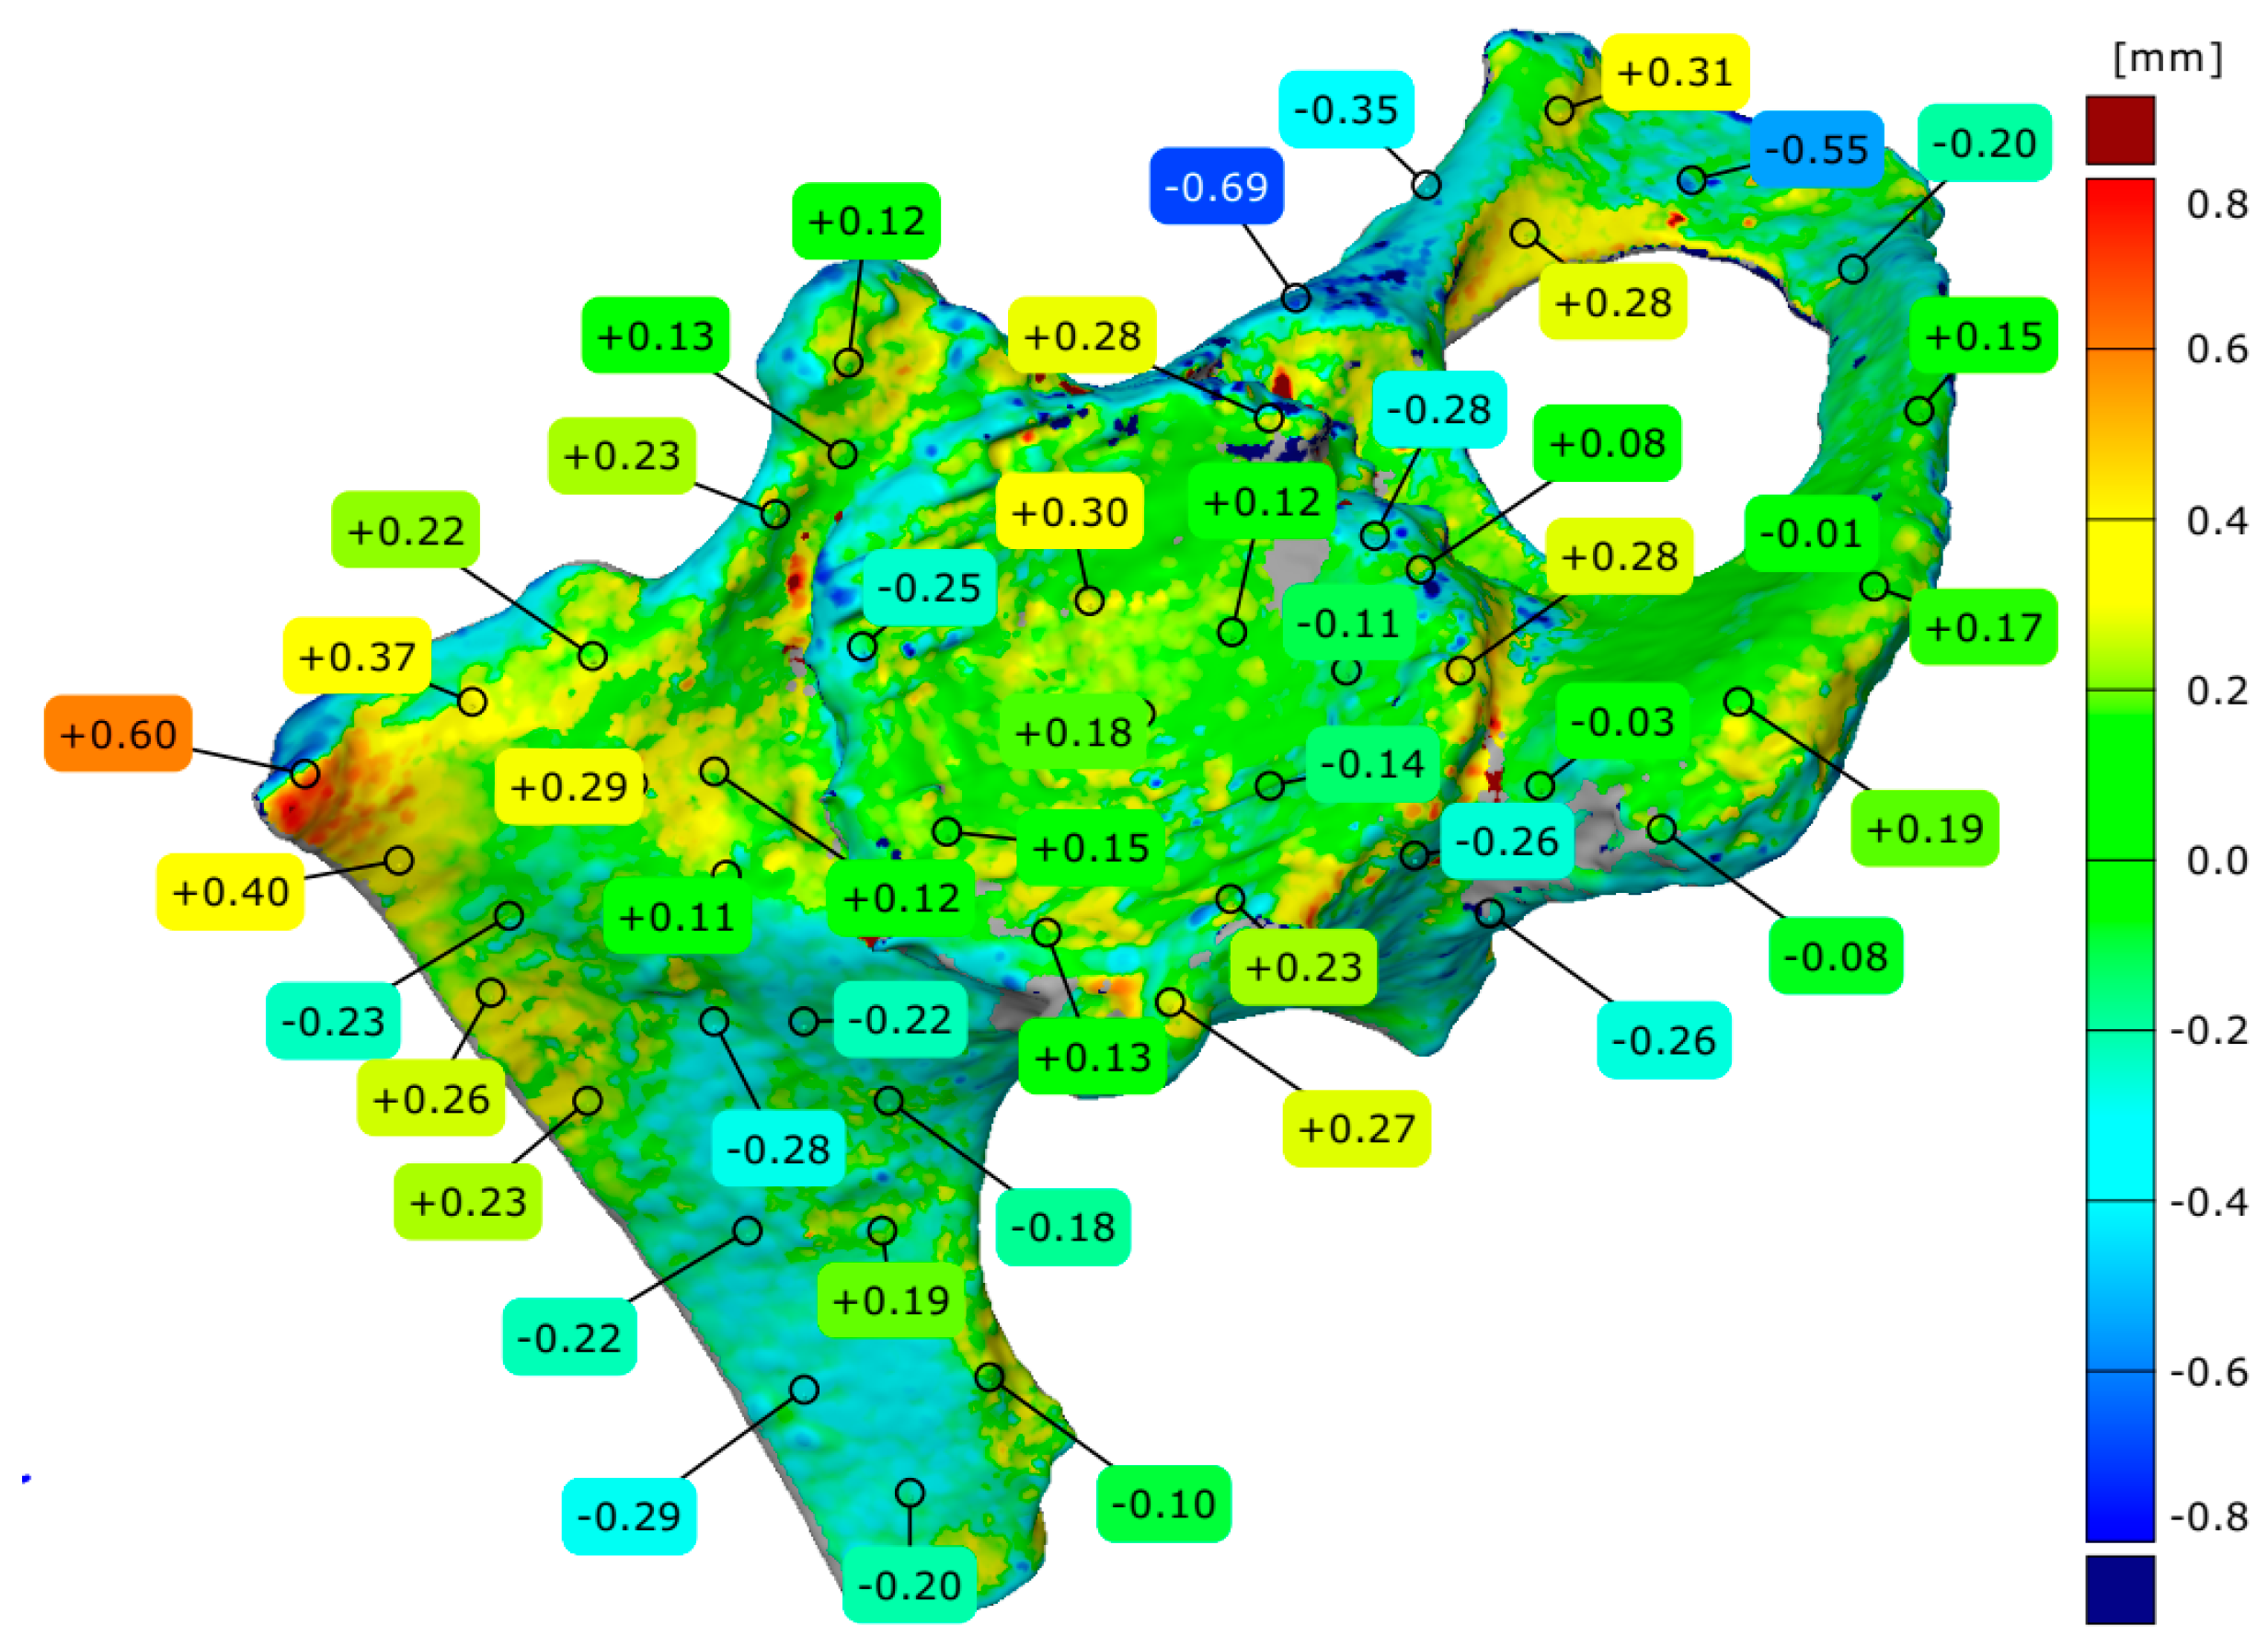
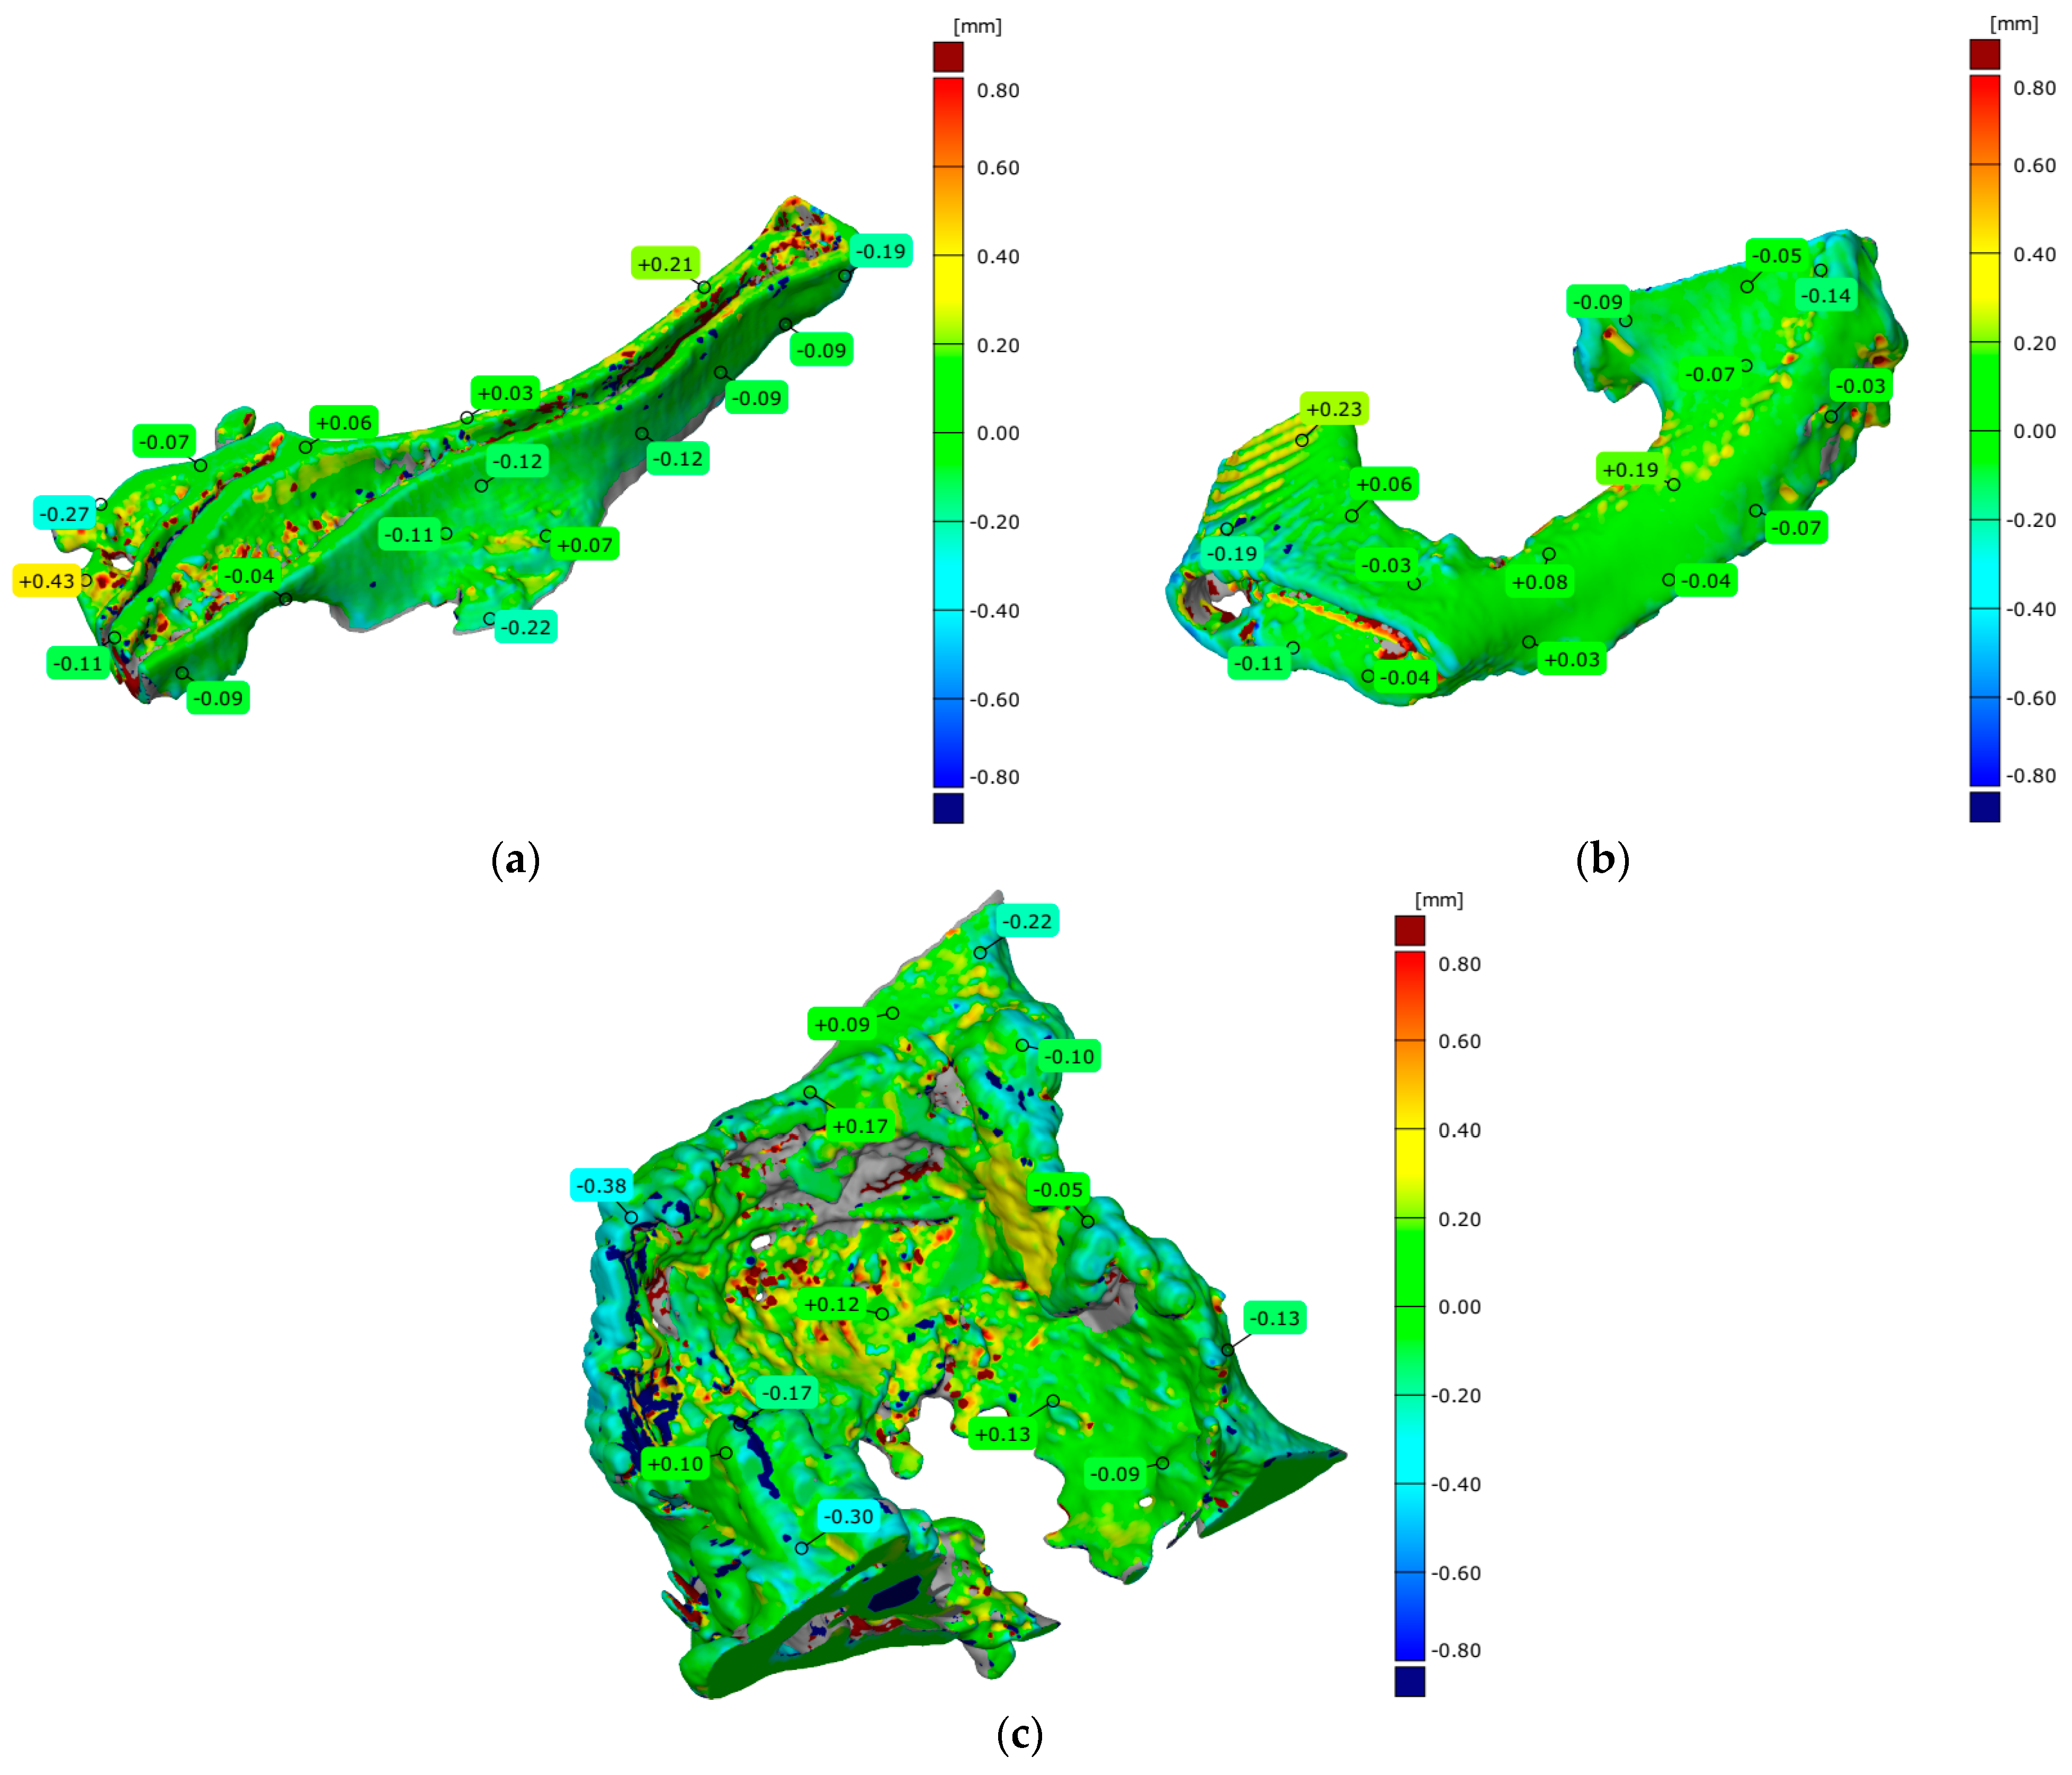
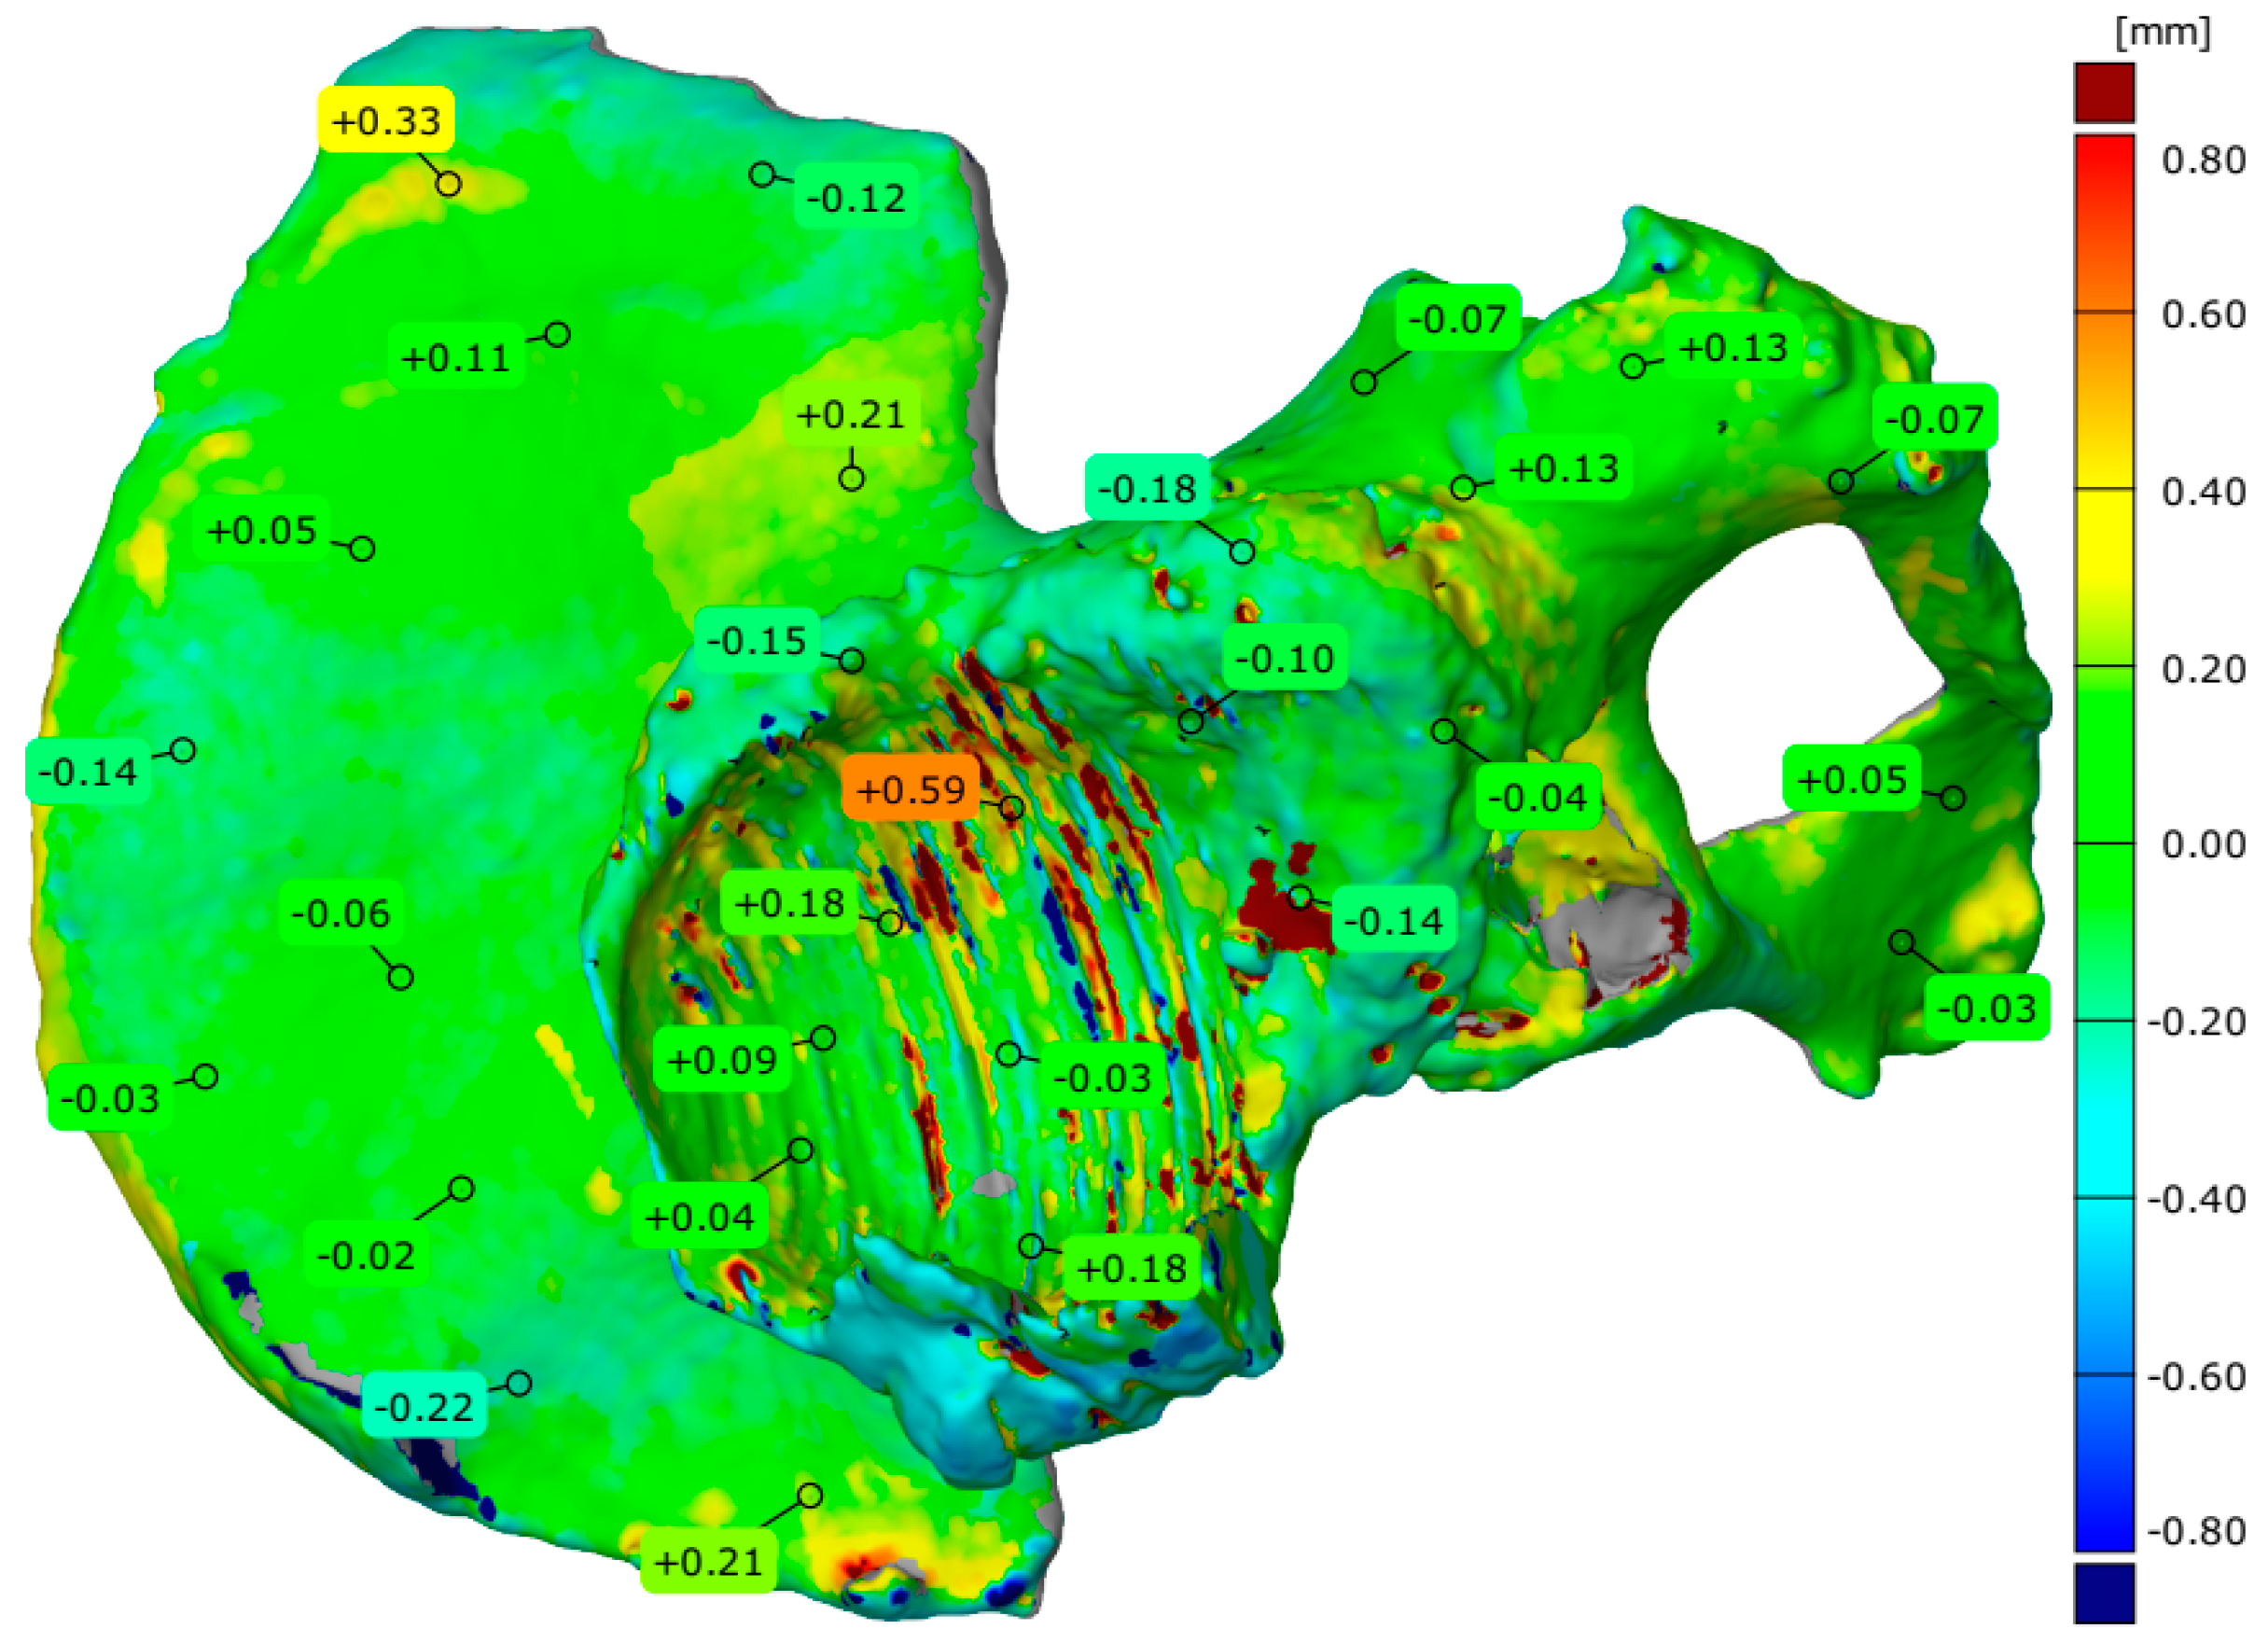
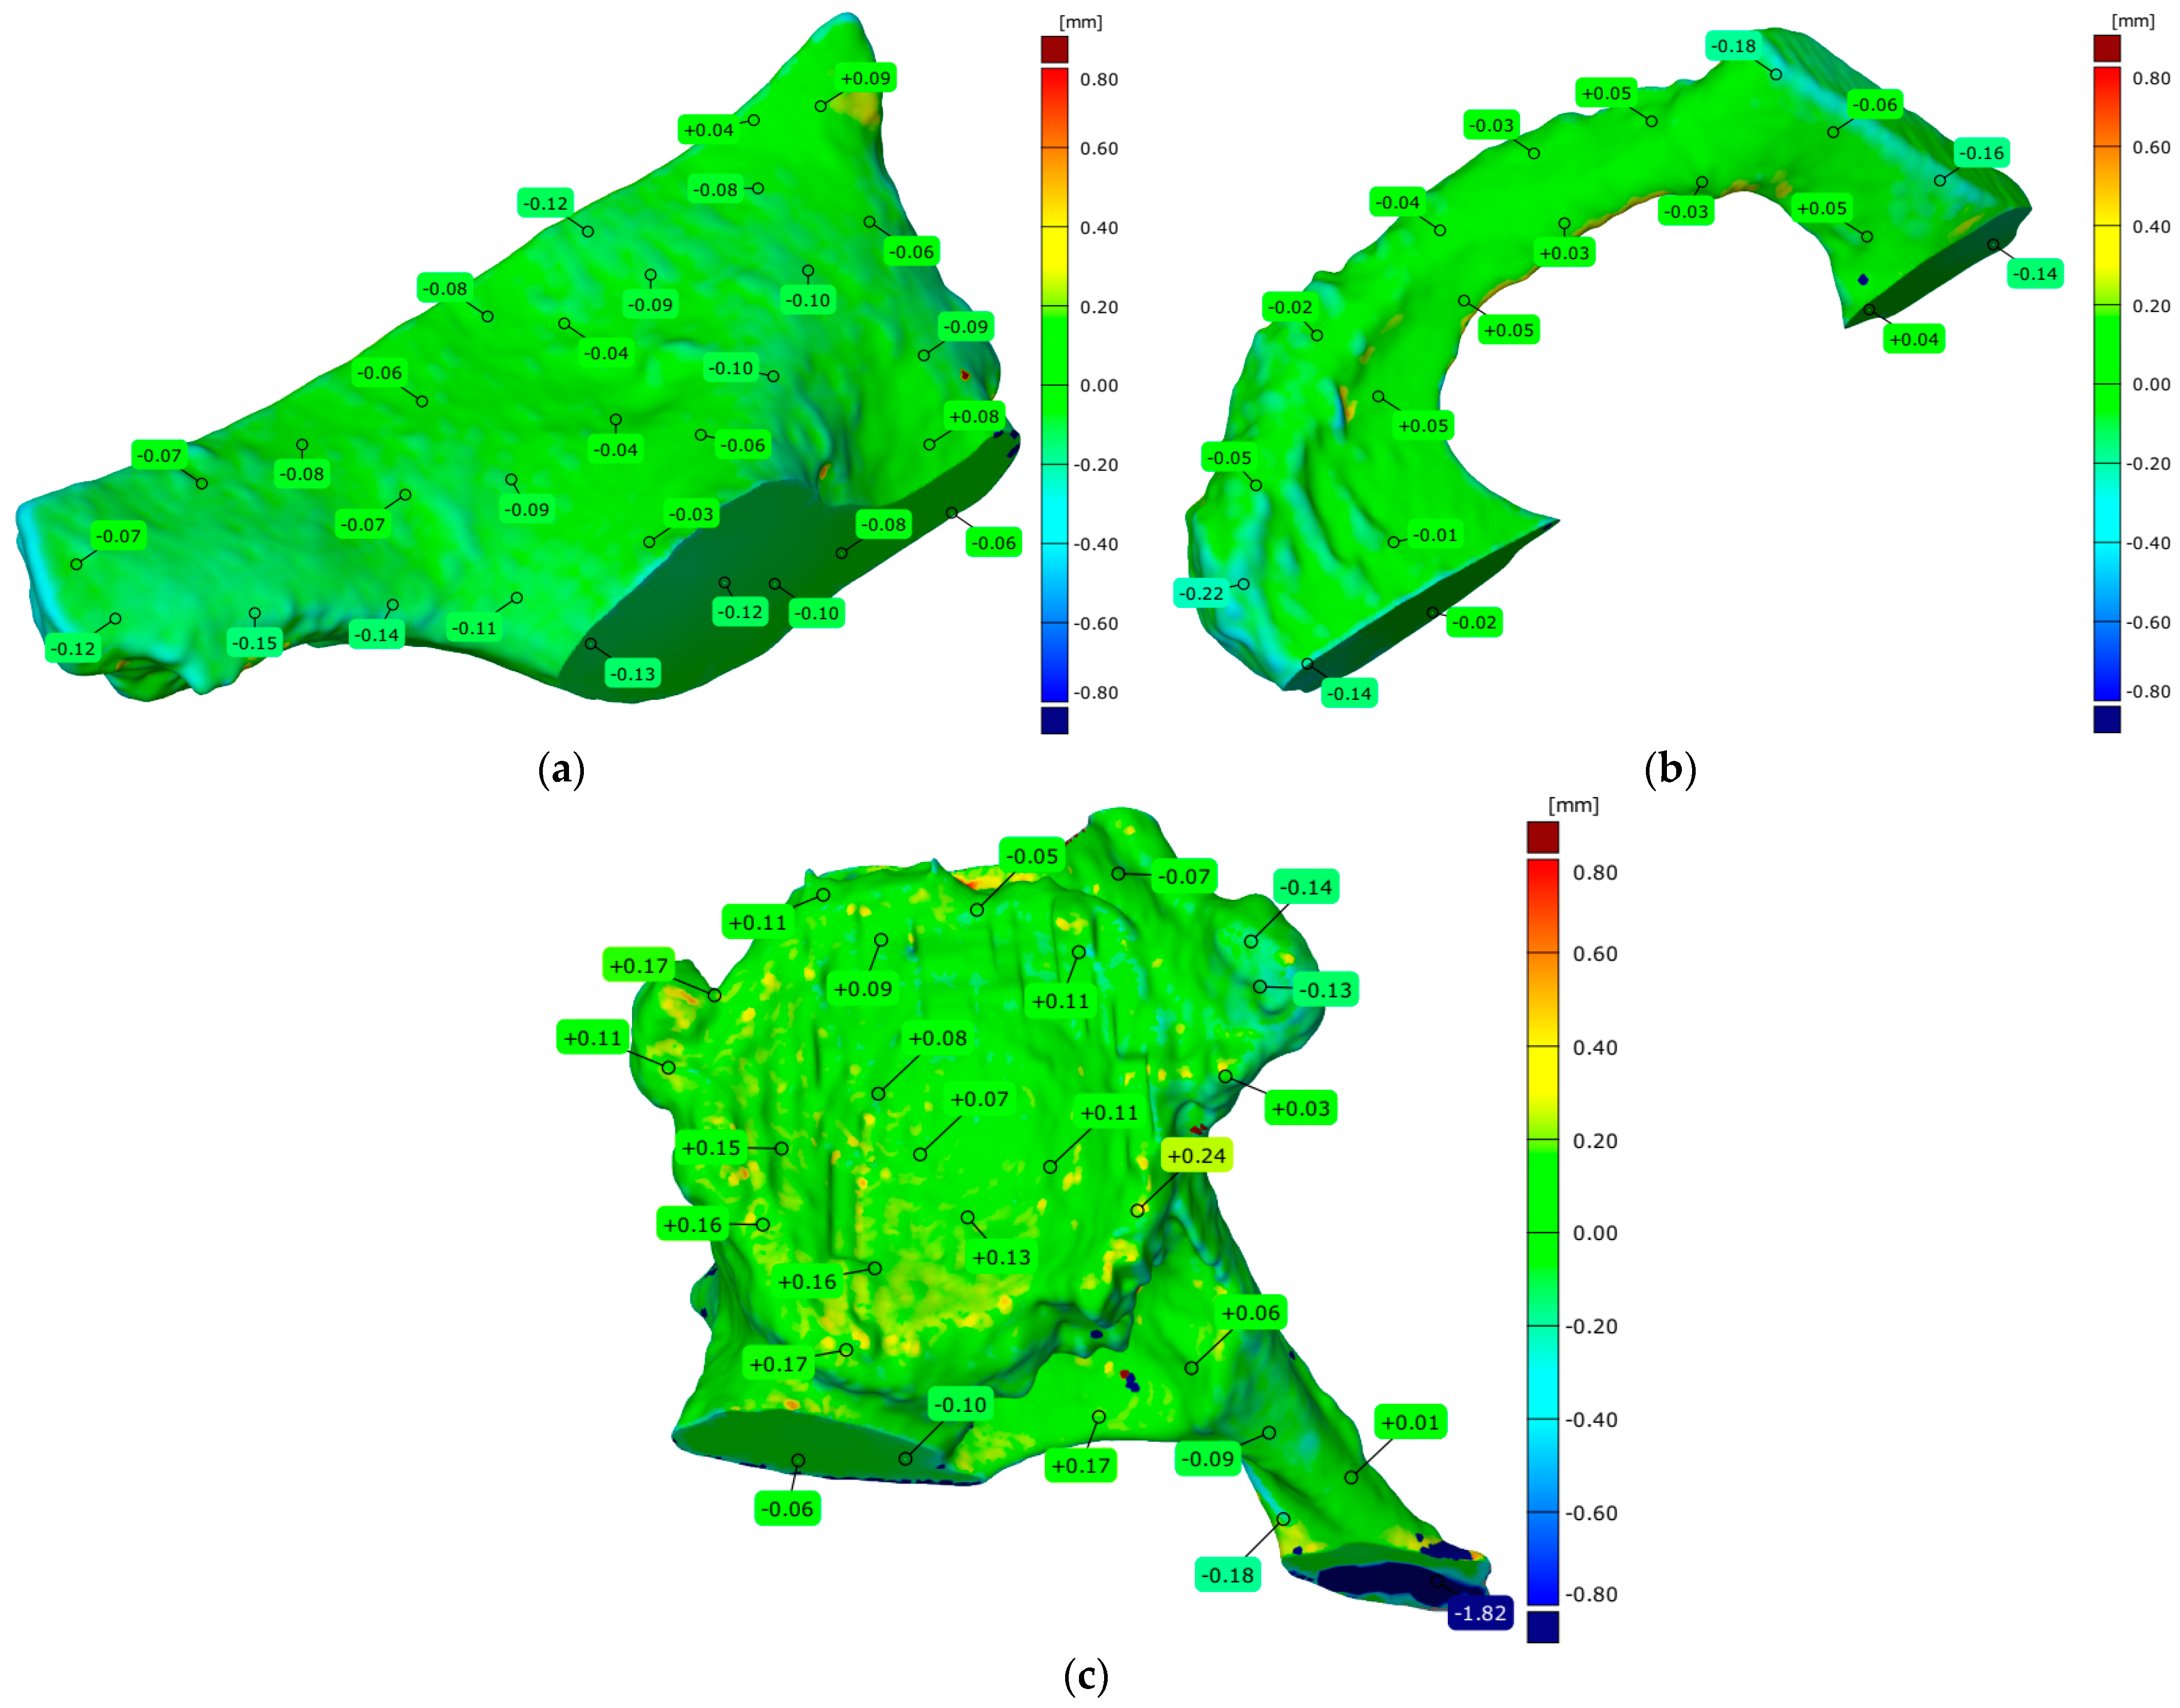
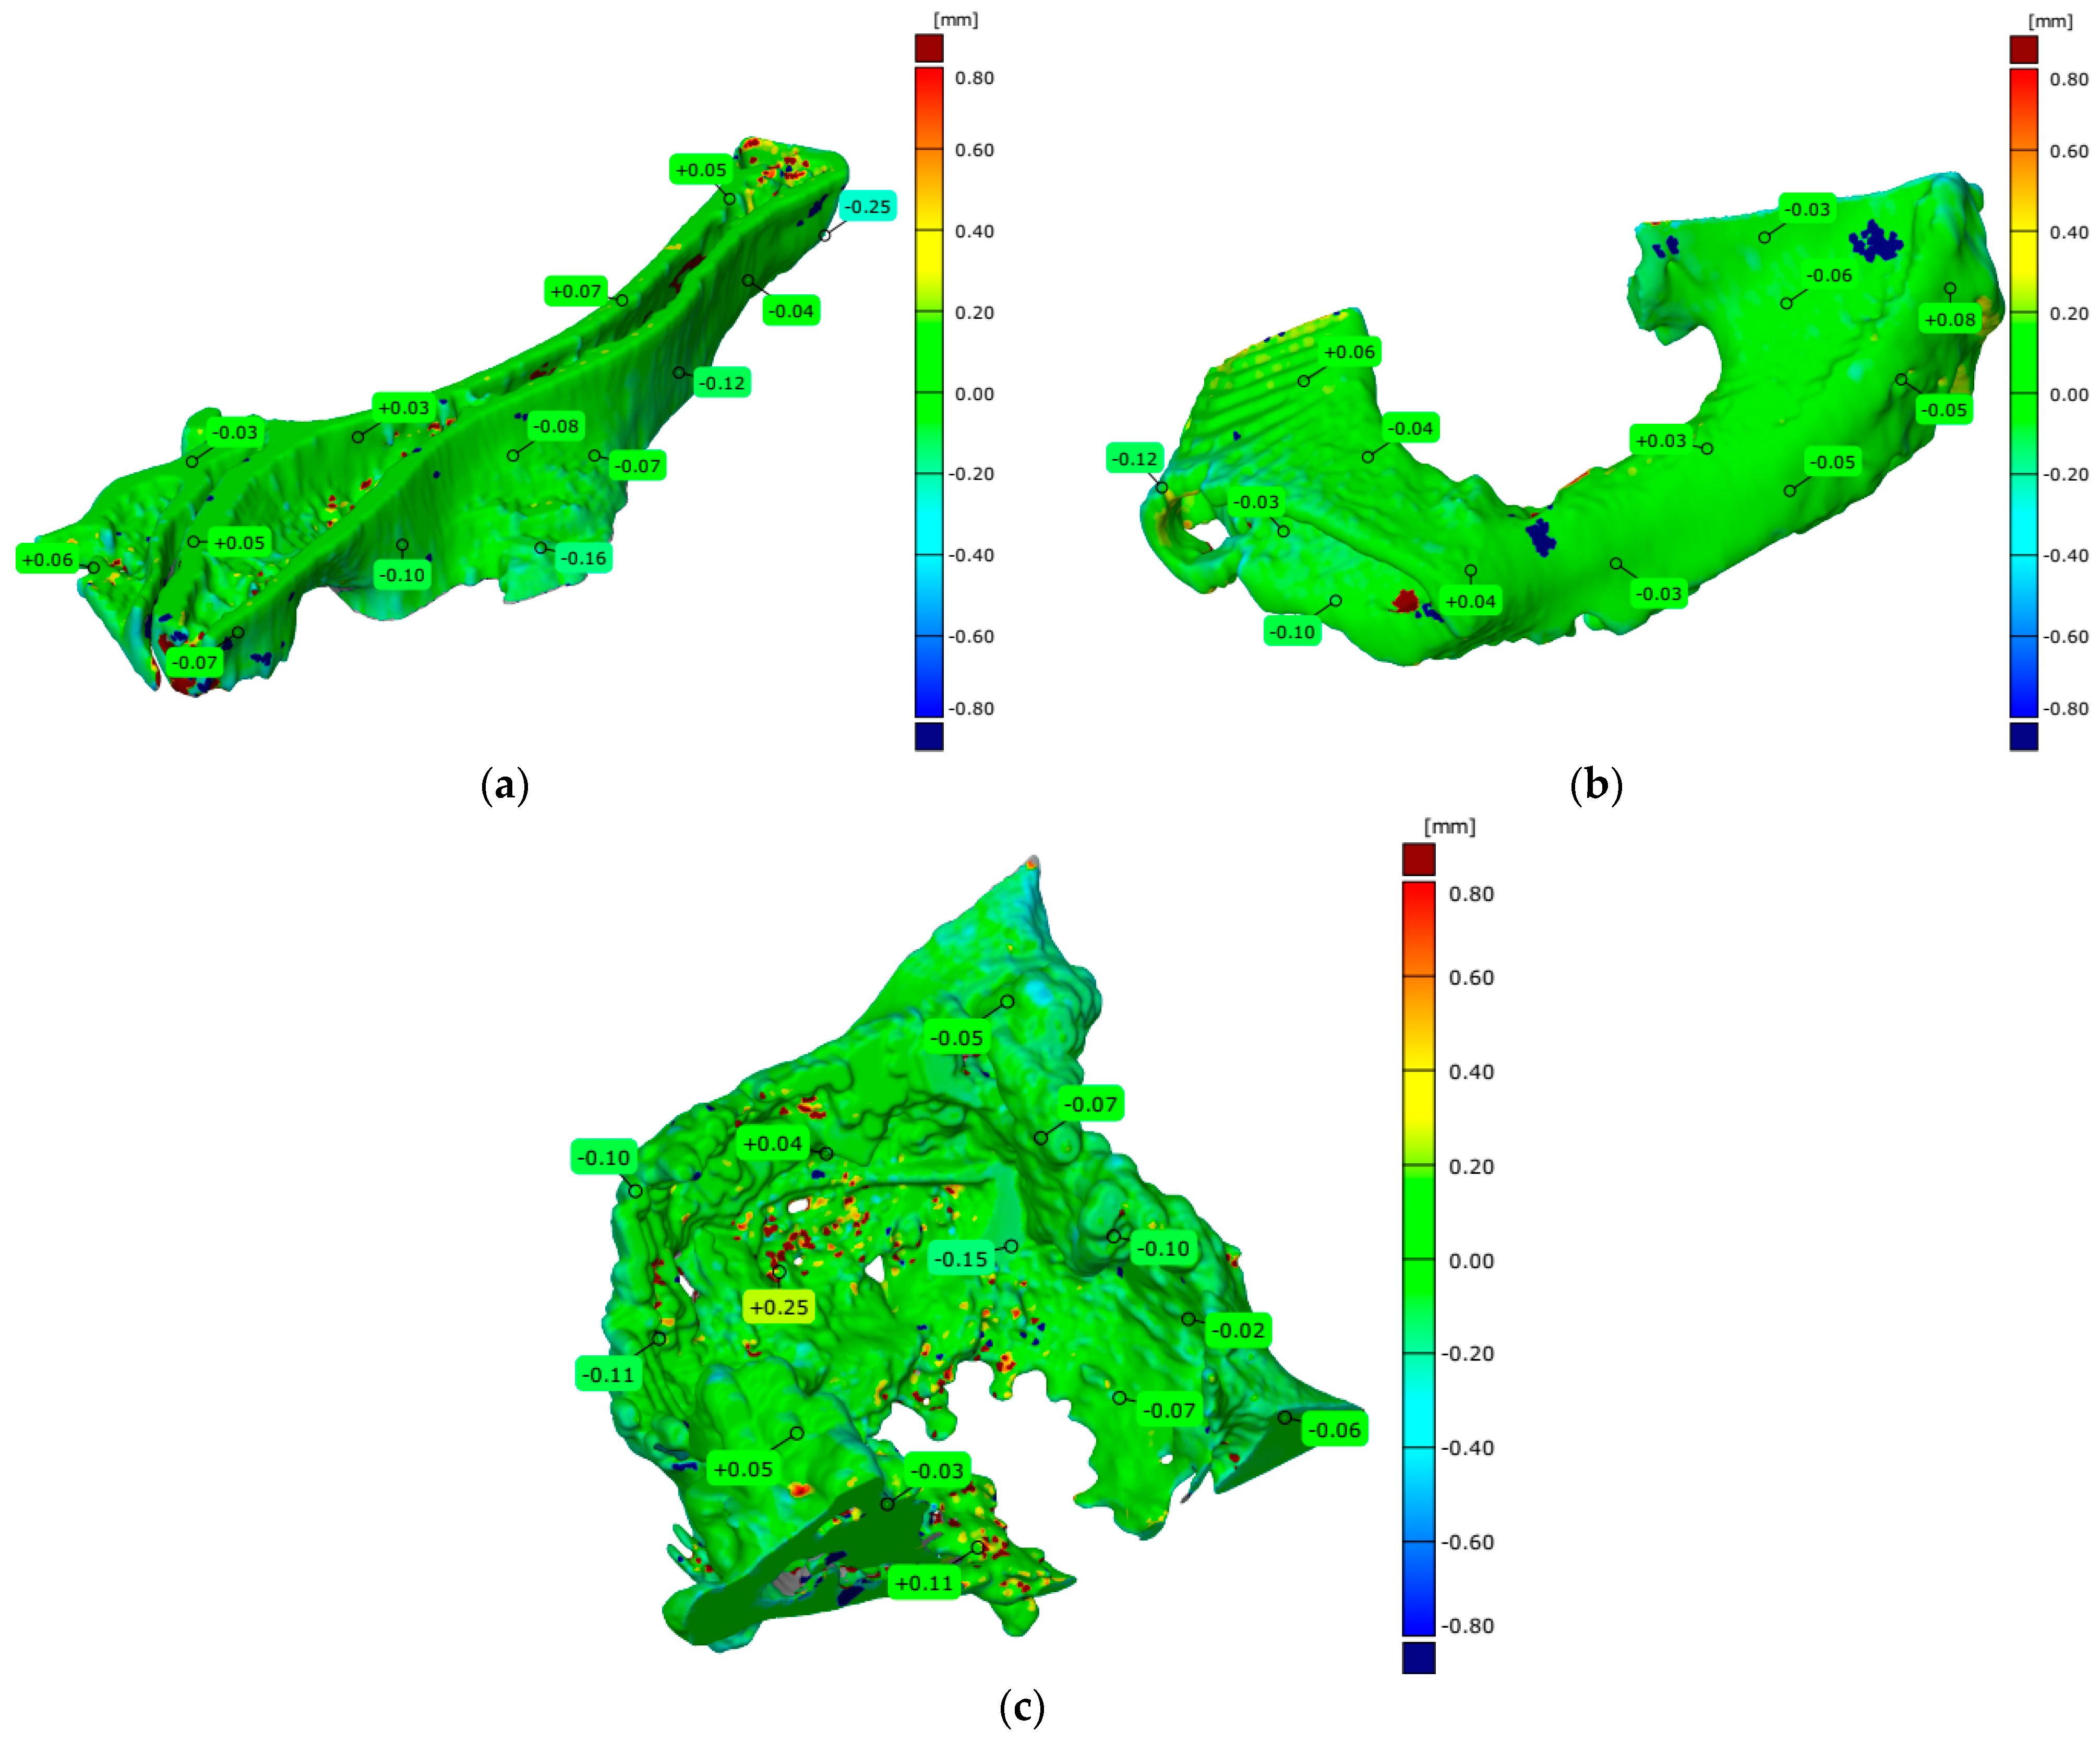
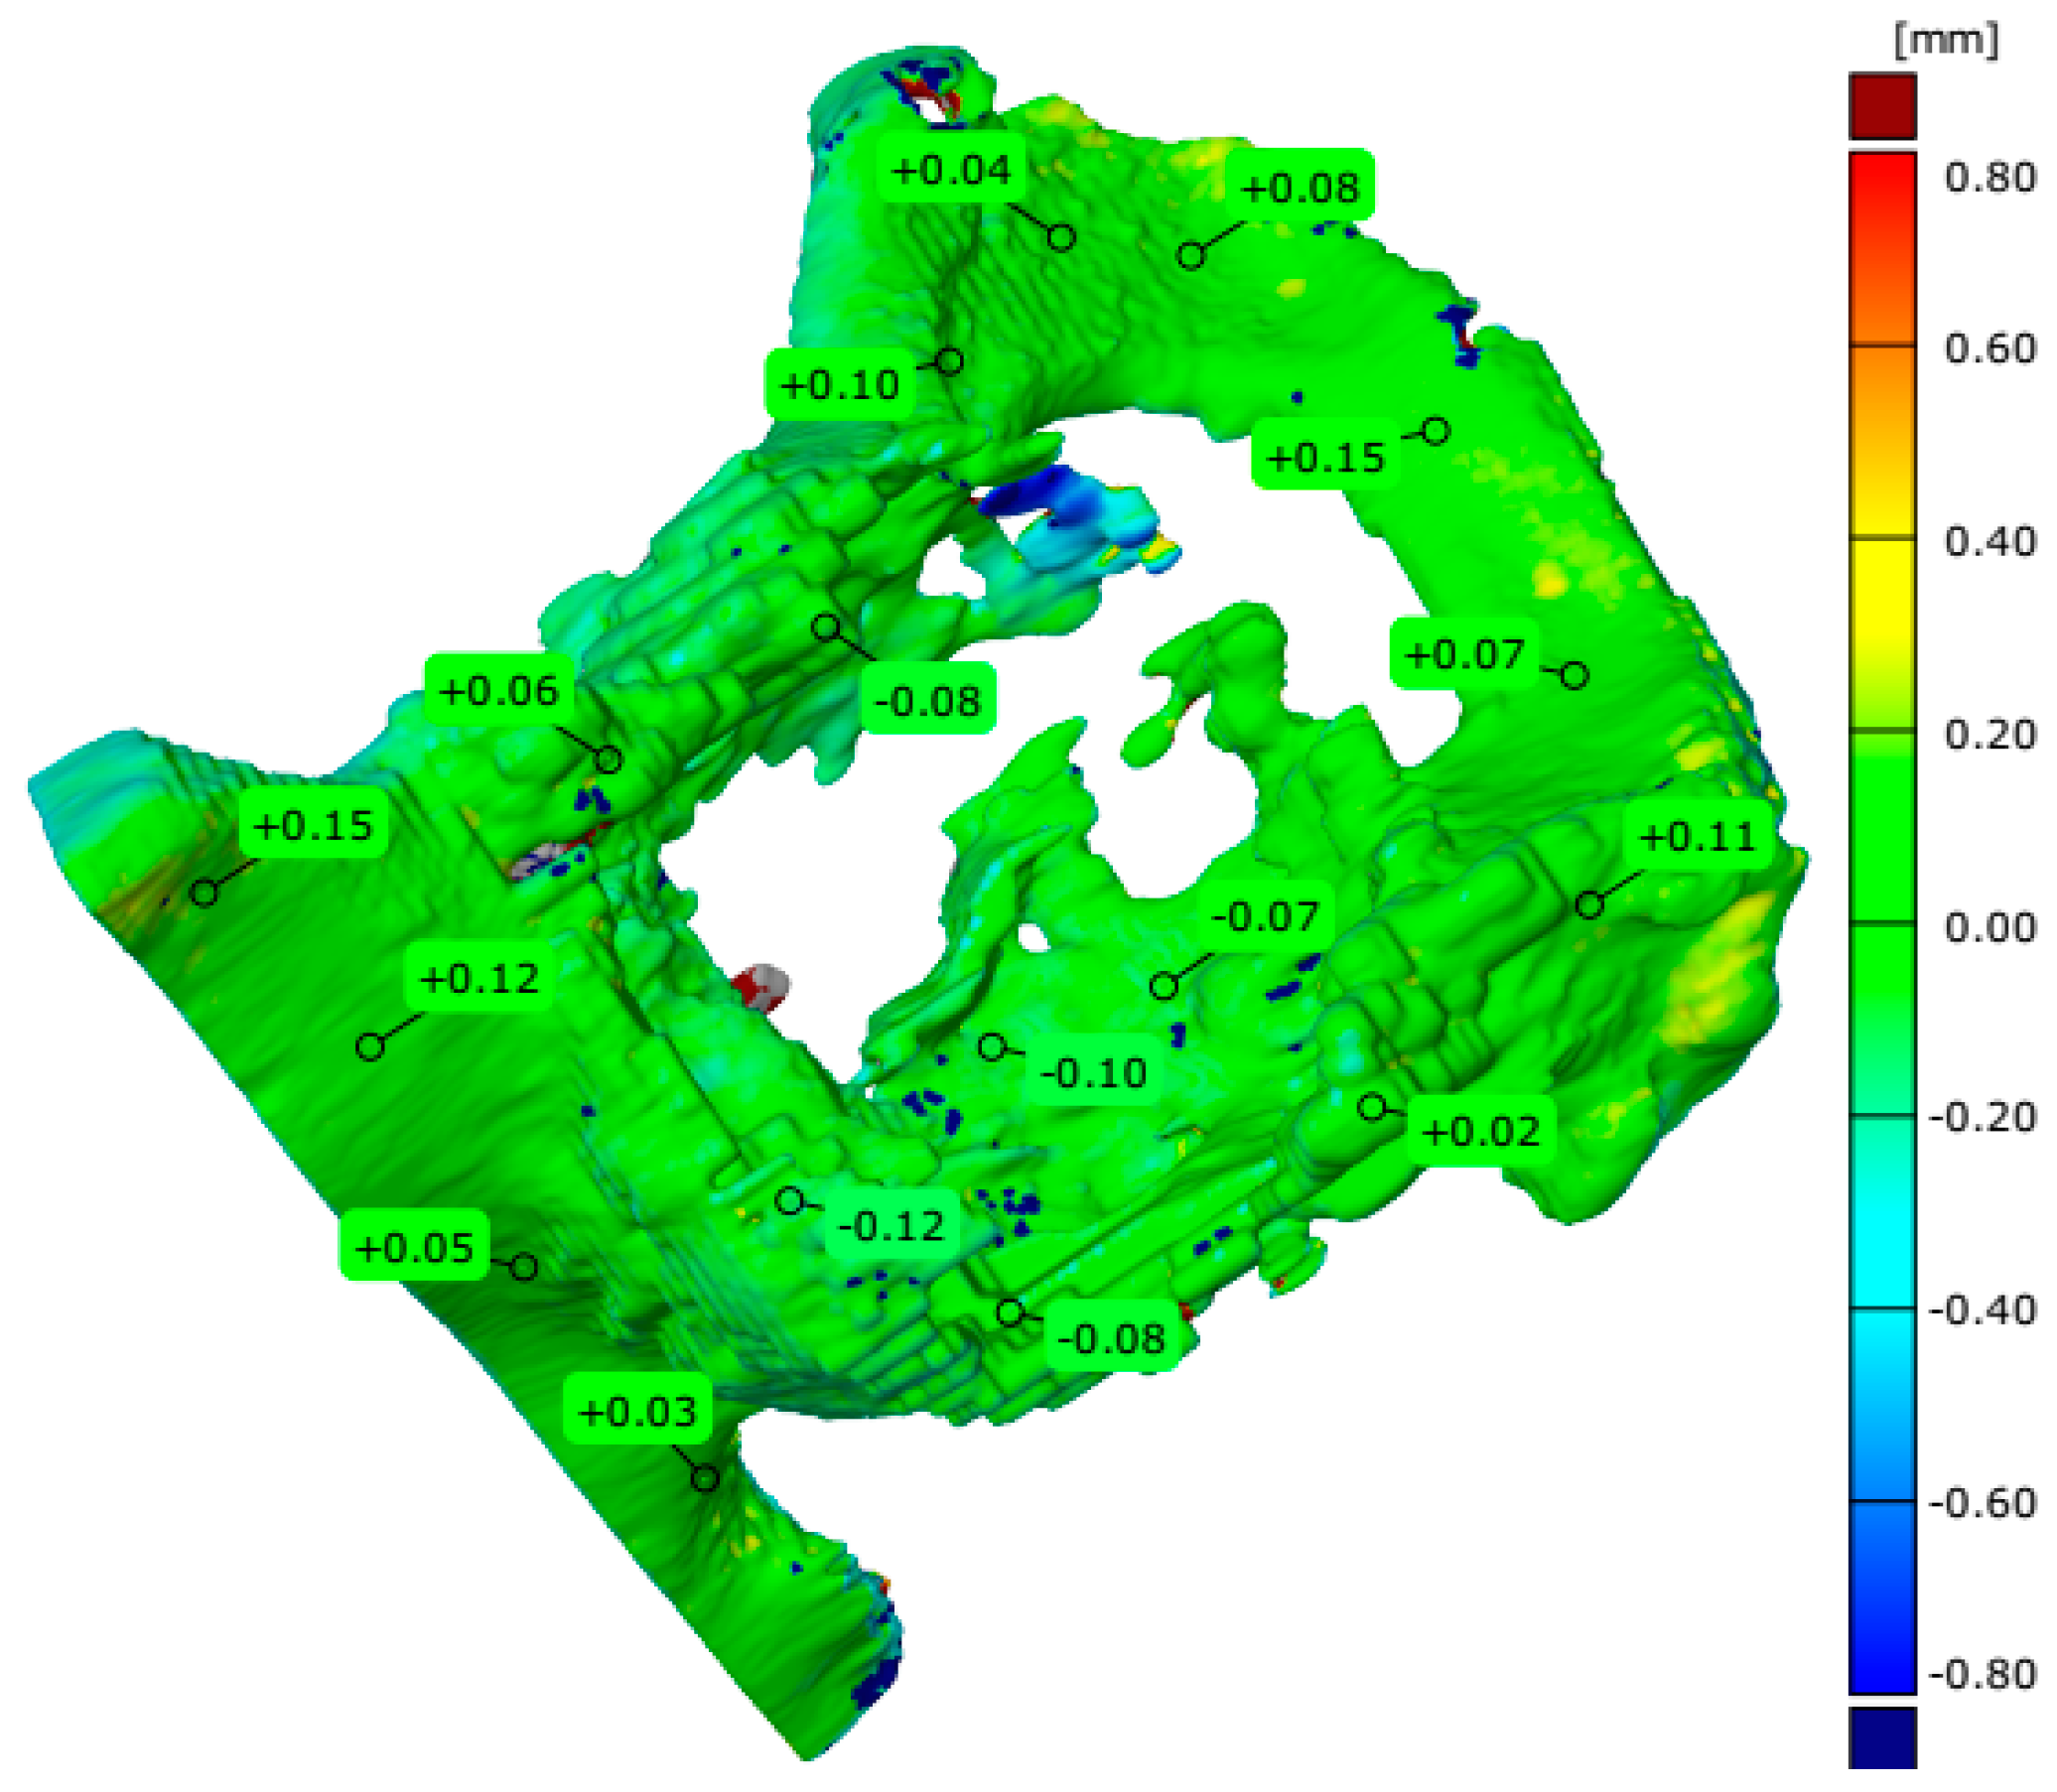
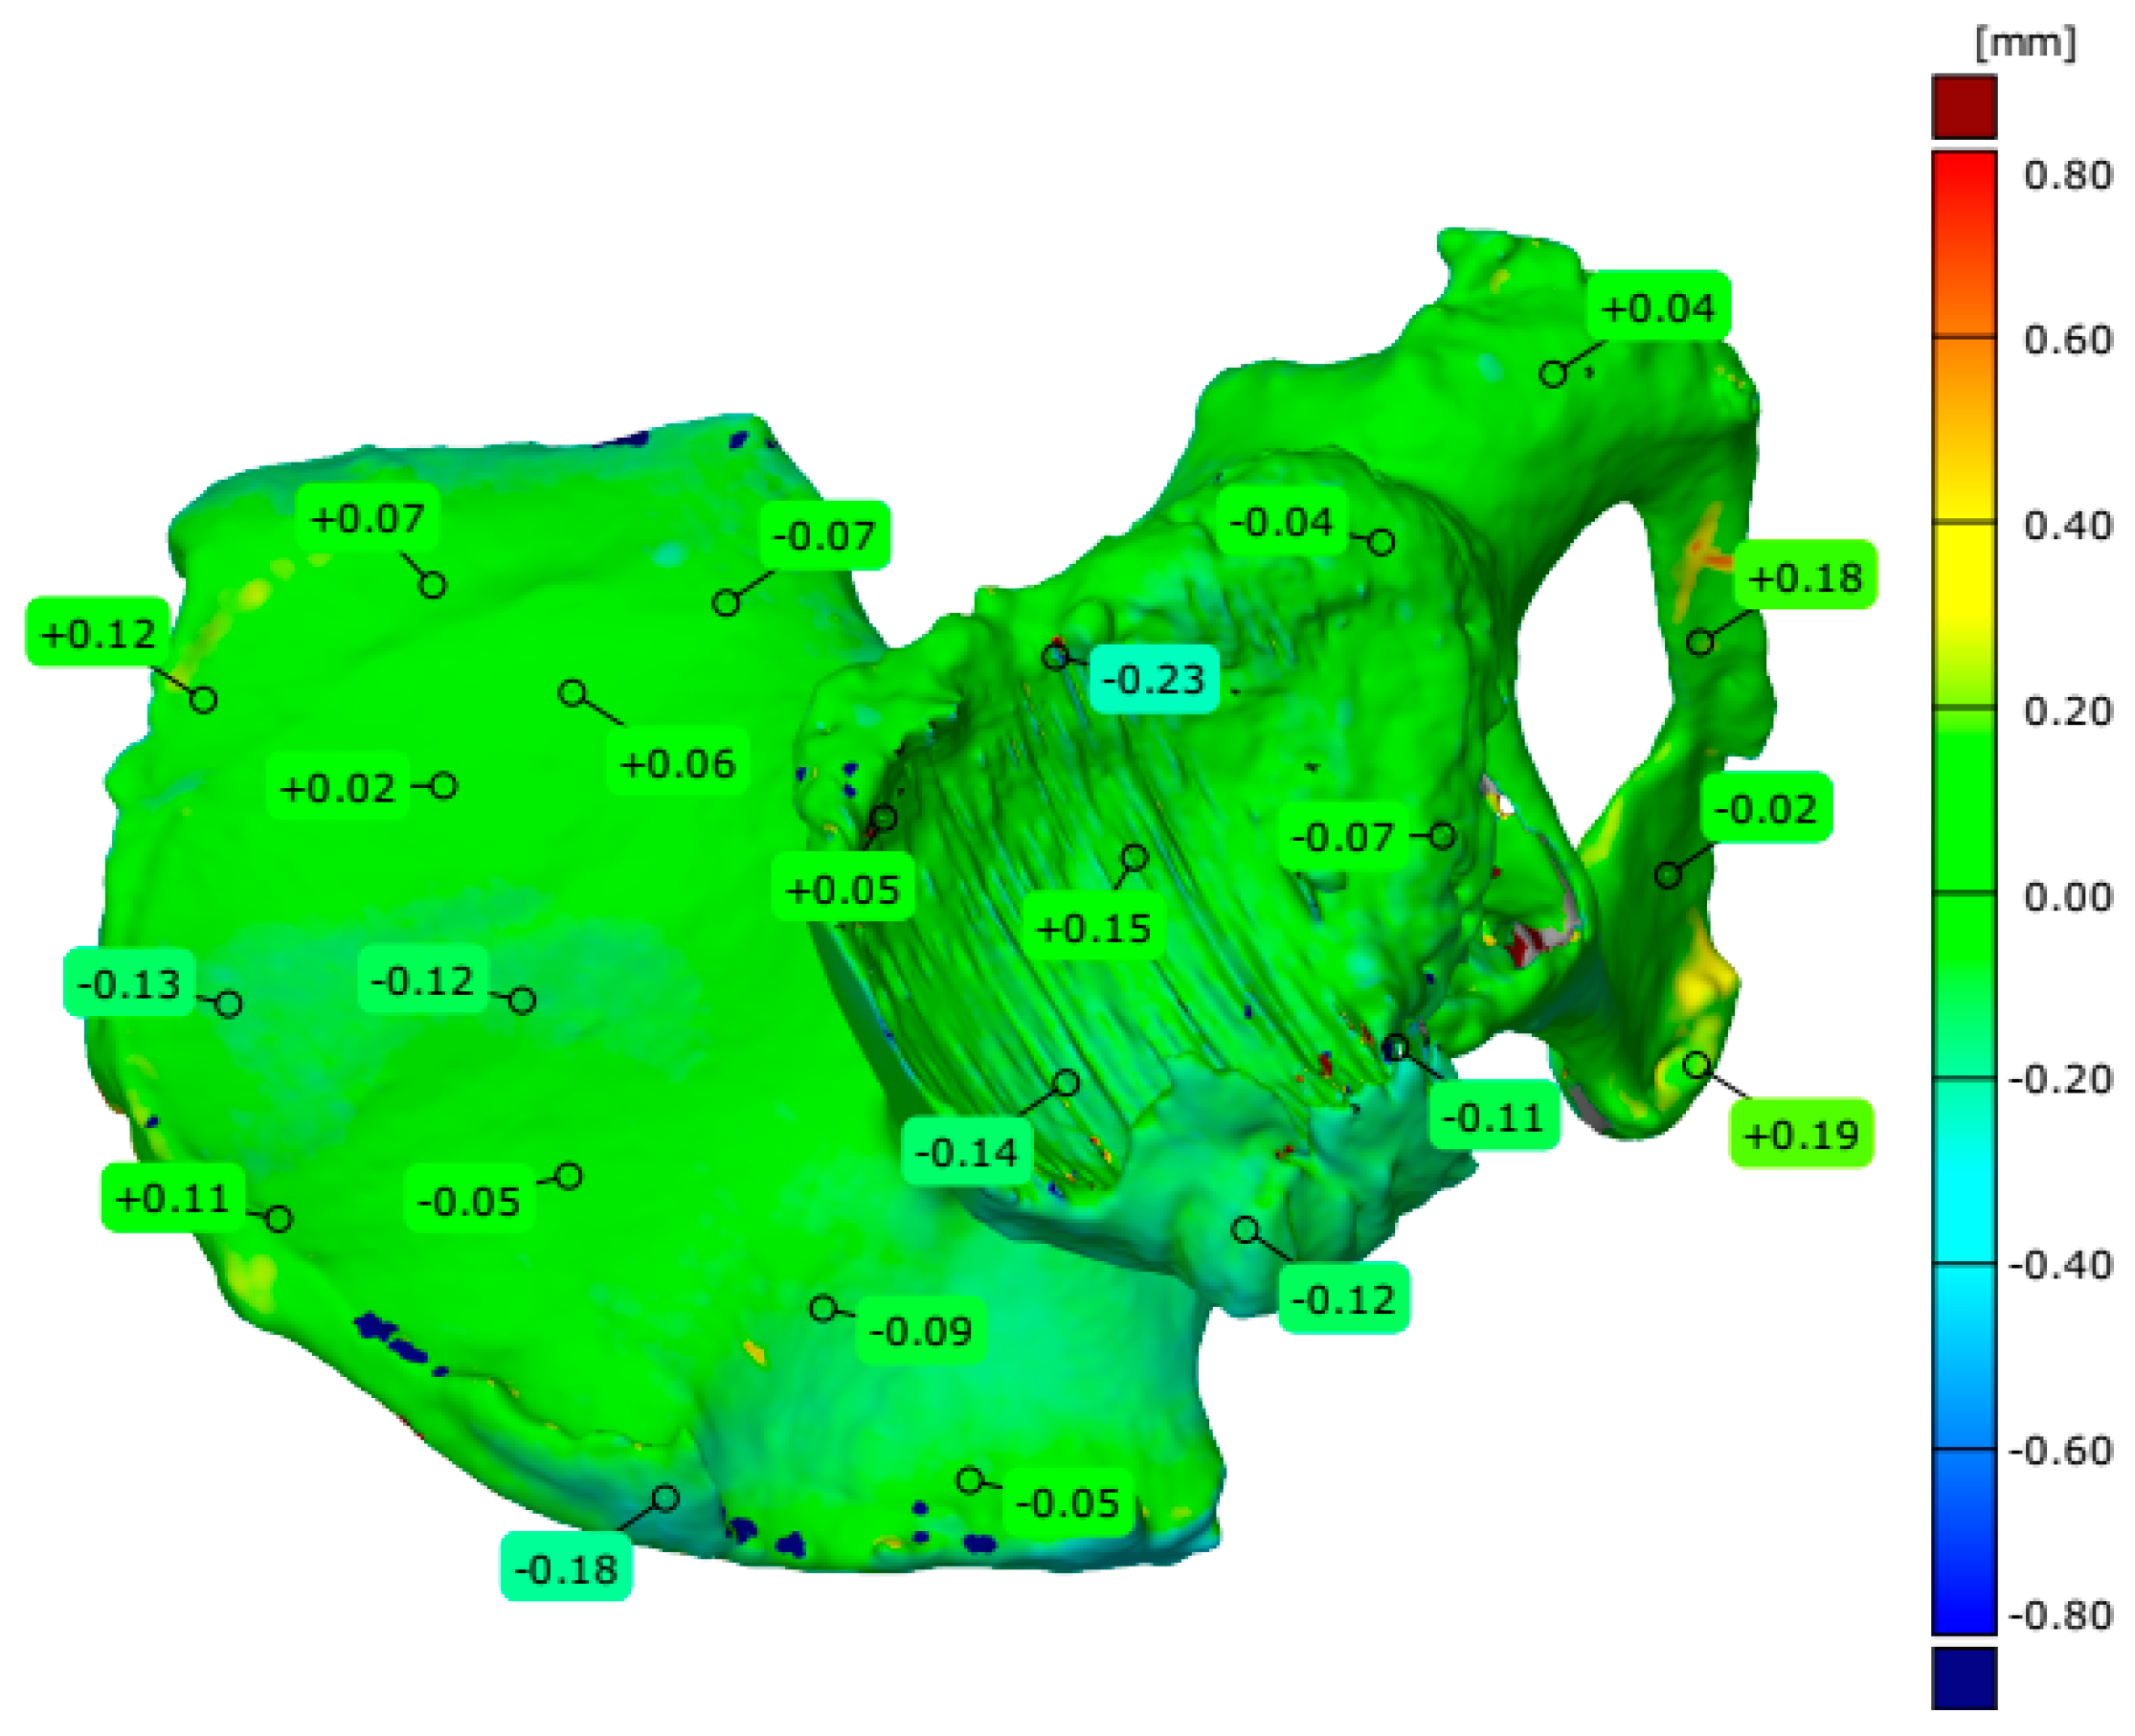
The accuracy of the anatomical models was verified using GOM Inspect 2019 software. Using best-fit methods, the nominal model from the design stage was aligned with the reference model created during the measurement stage using the measuring arm system with a laser head and Atos II Triple Scan. Based on the data, three-dimensional deviation maps were made for the pelvis model manufactured in one piece and three parts. The 3D deviation maps for all patients are presented in Figure 10, Figure 11, Figure 12, Figure 13, Figure 14 and Figure 15 from measurements using the measuring arm with a laser head system and in Figure 16, Figure 17, Figure 18, Figure 19, Figure 20 and Figure 21 from measurements using the Atos II Triple Scan system. The averaged statistical parameters are presented in Table 5.
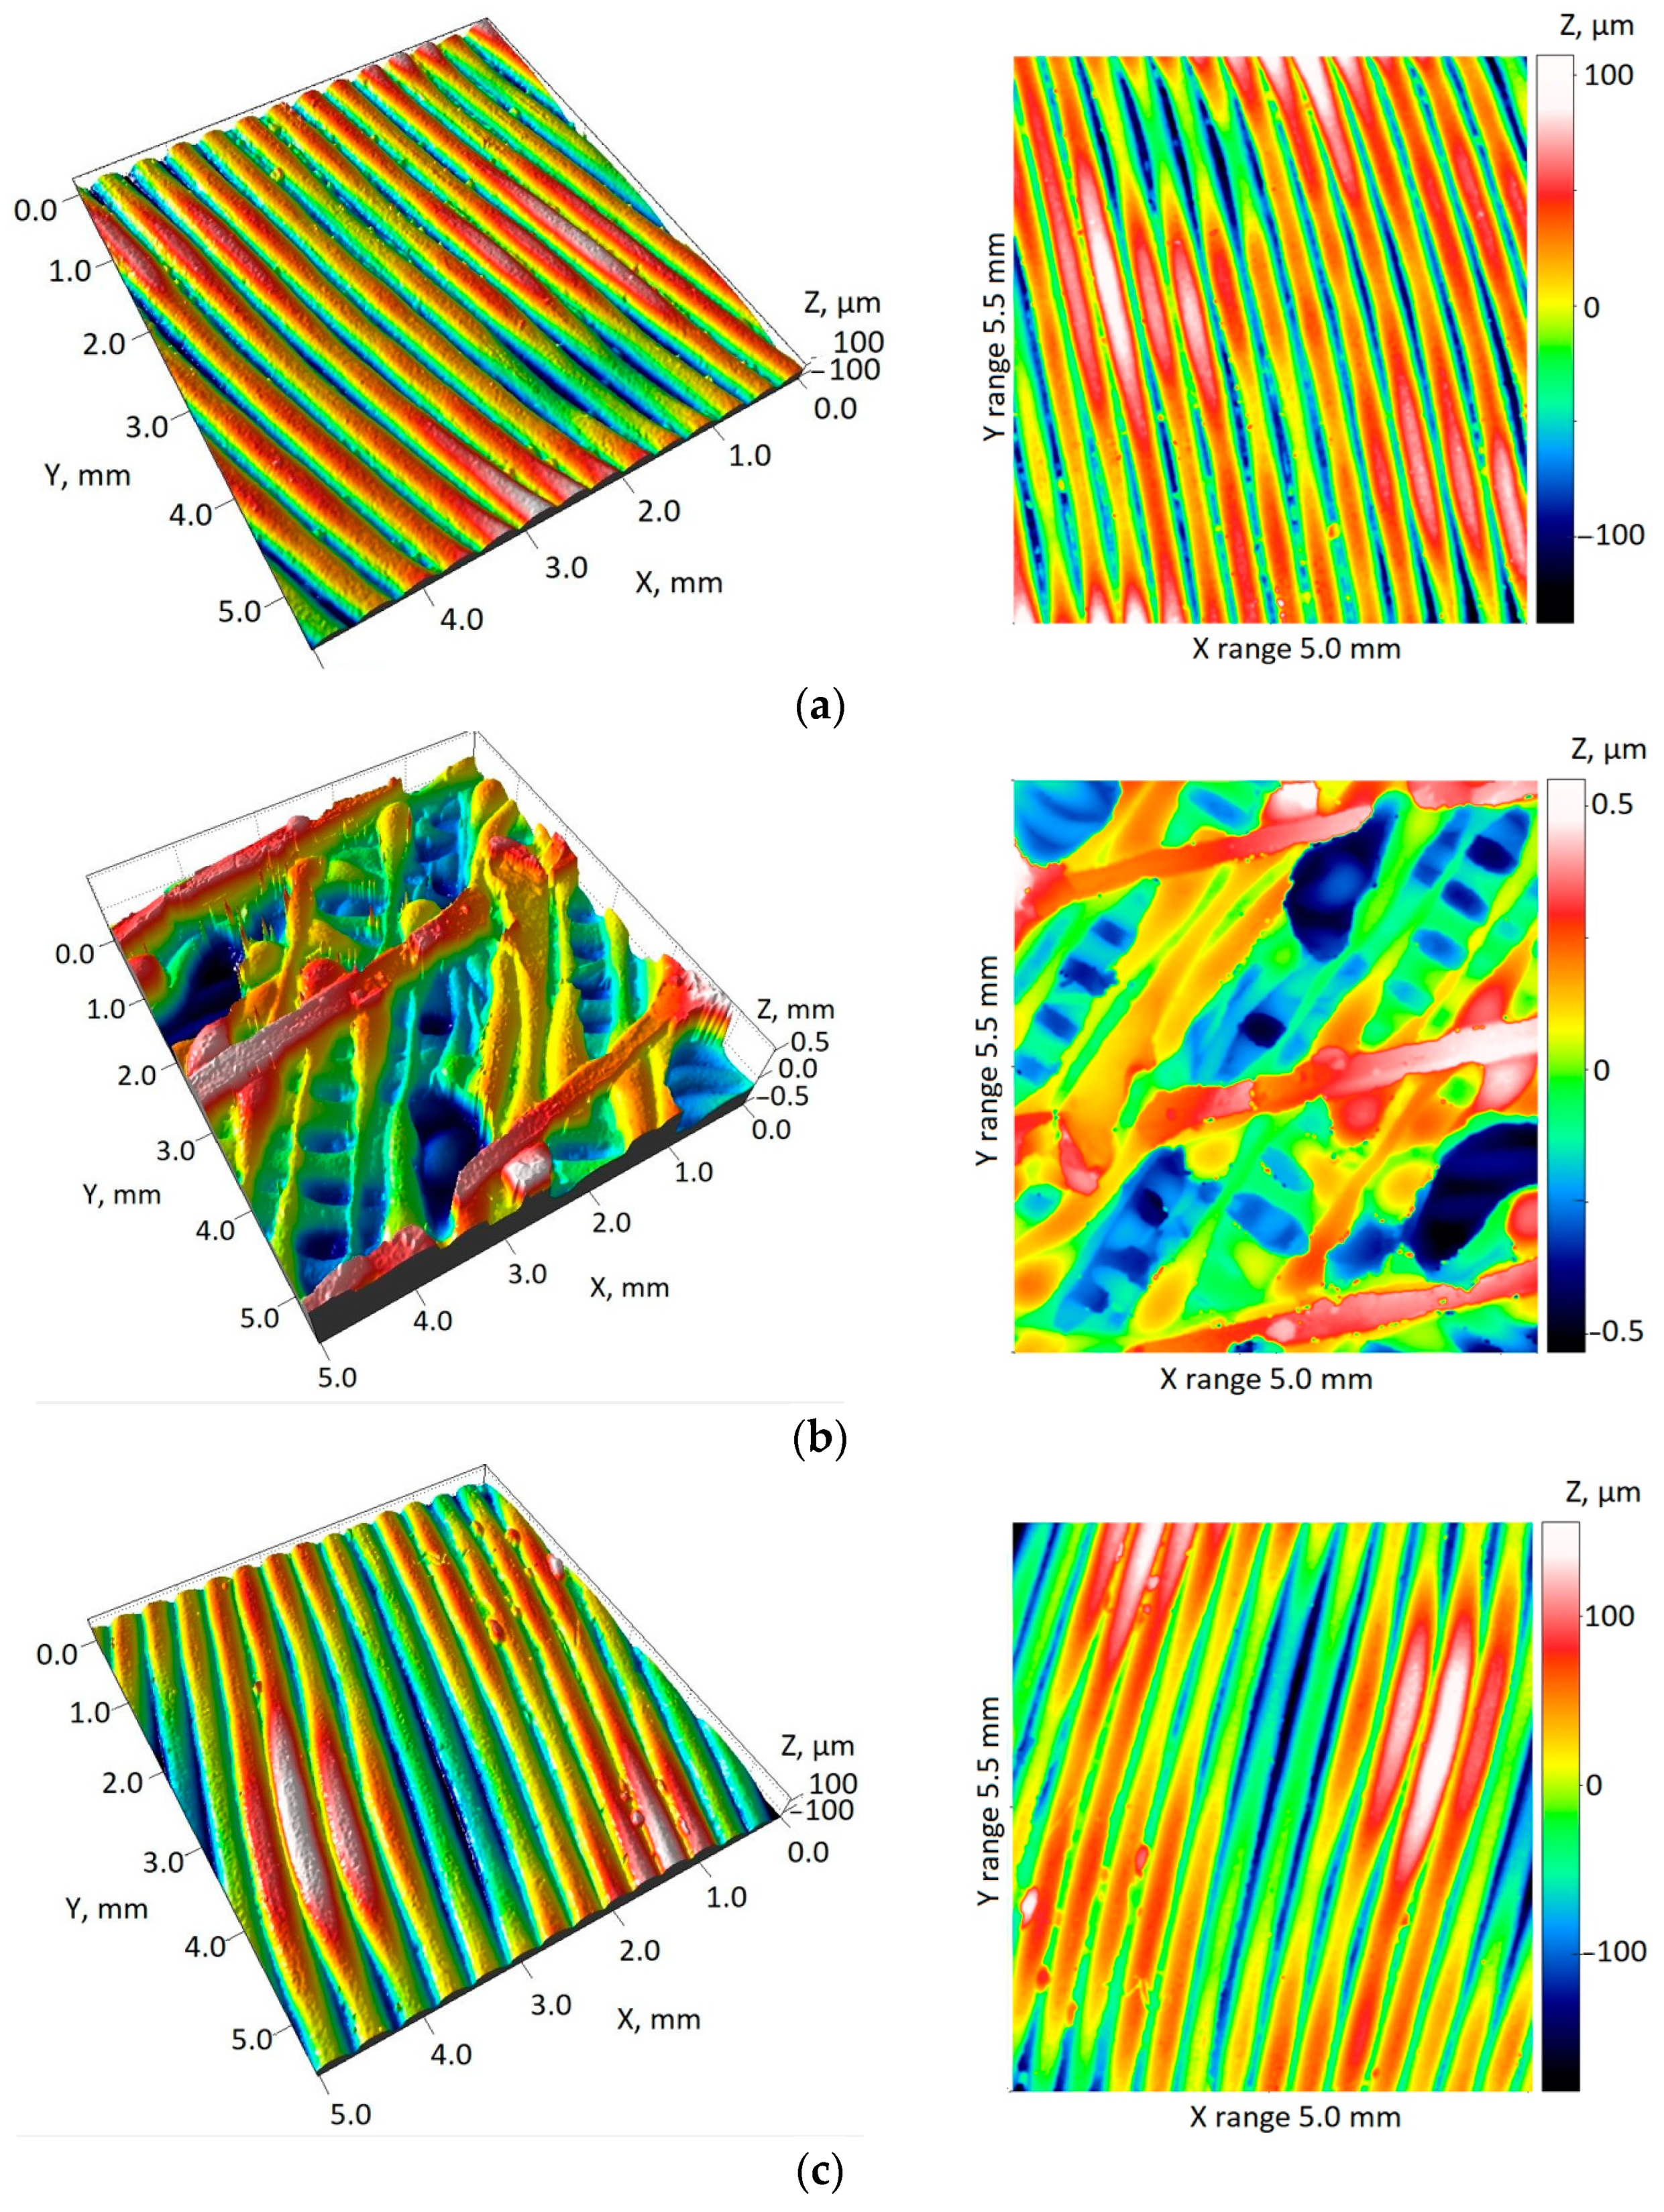
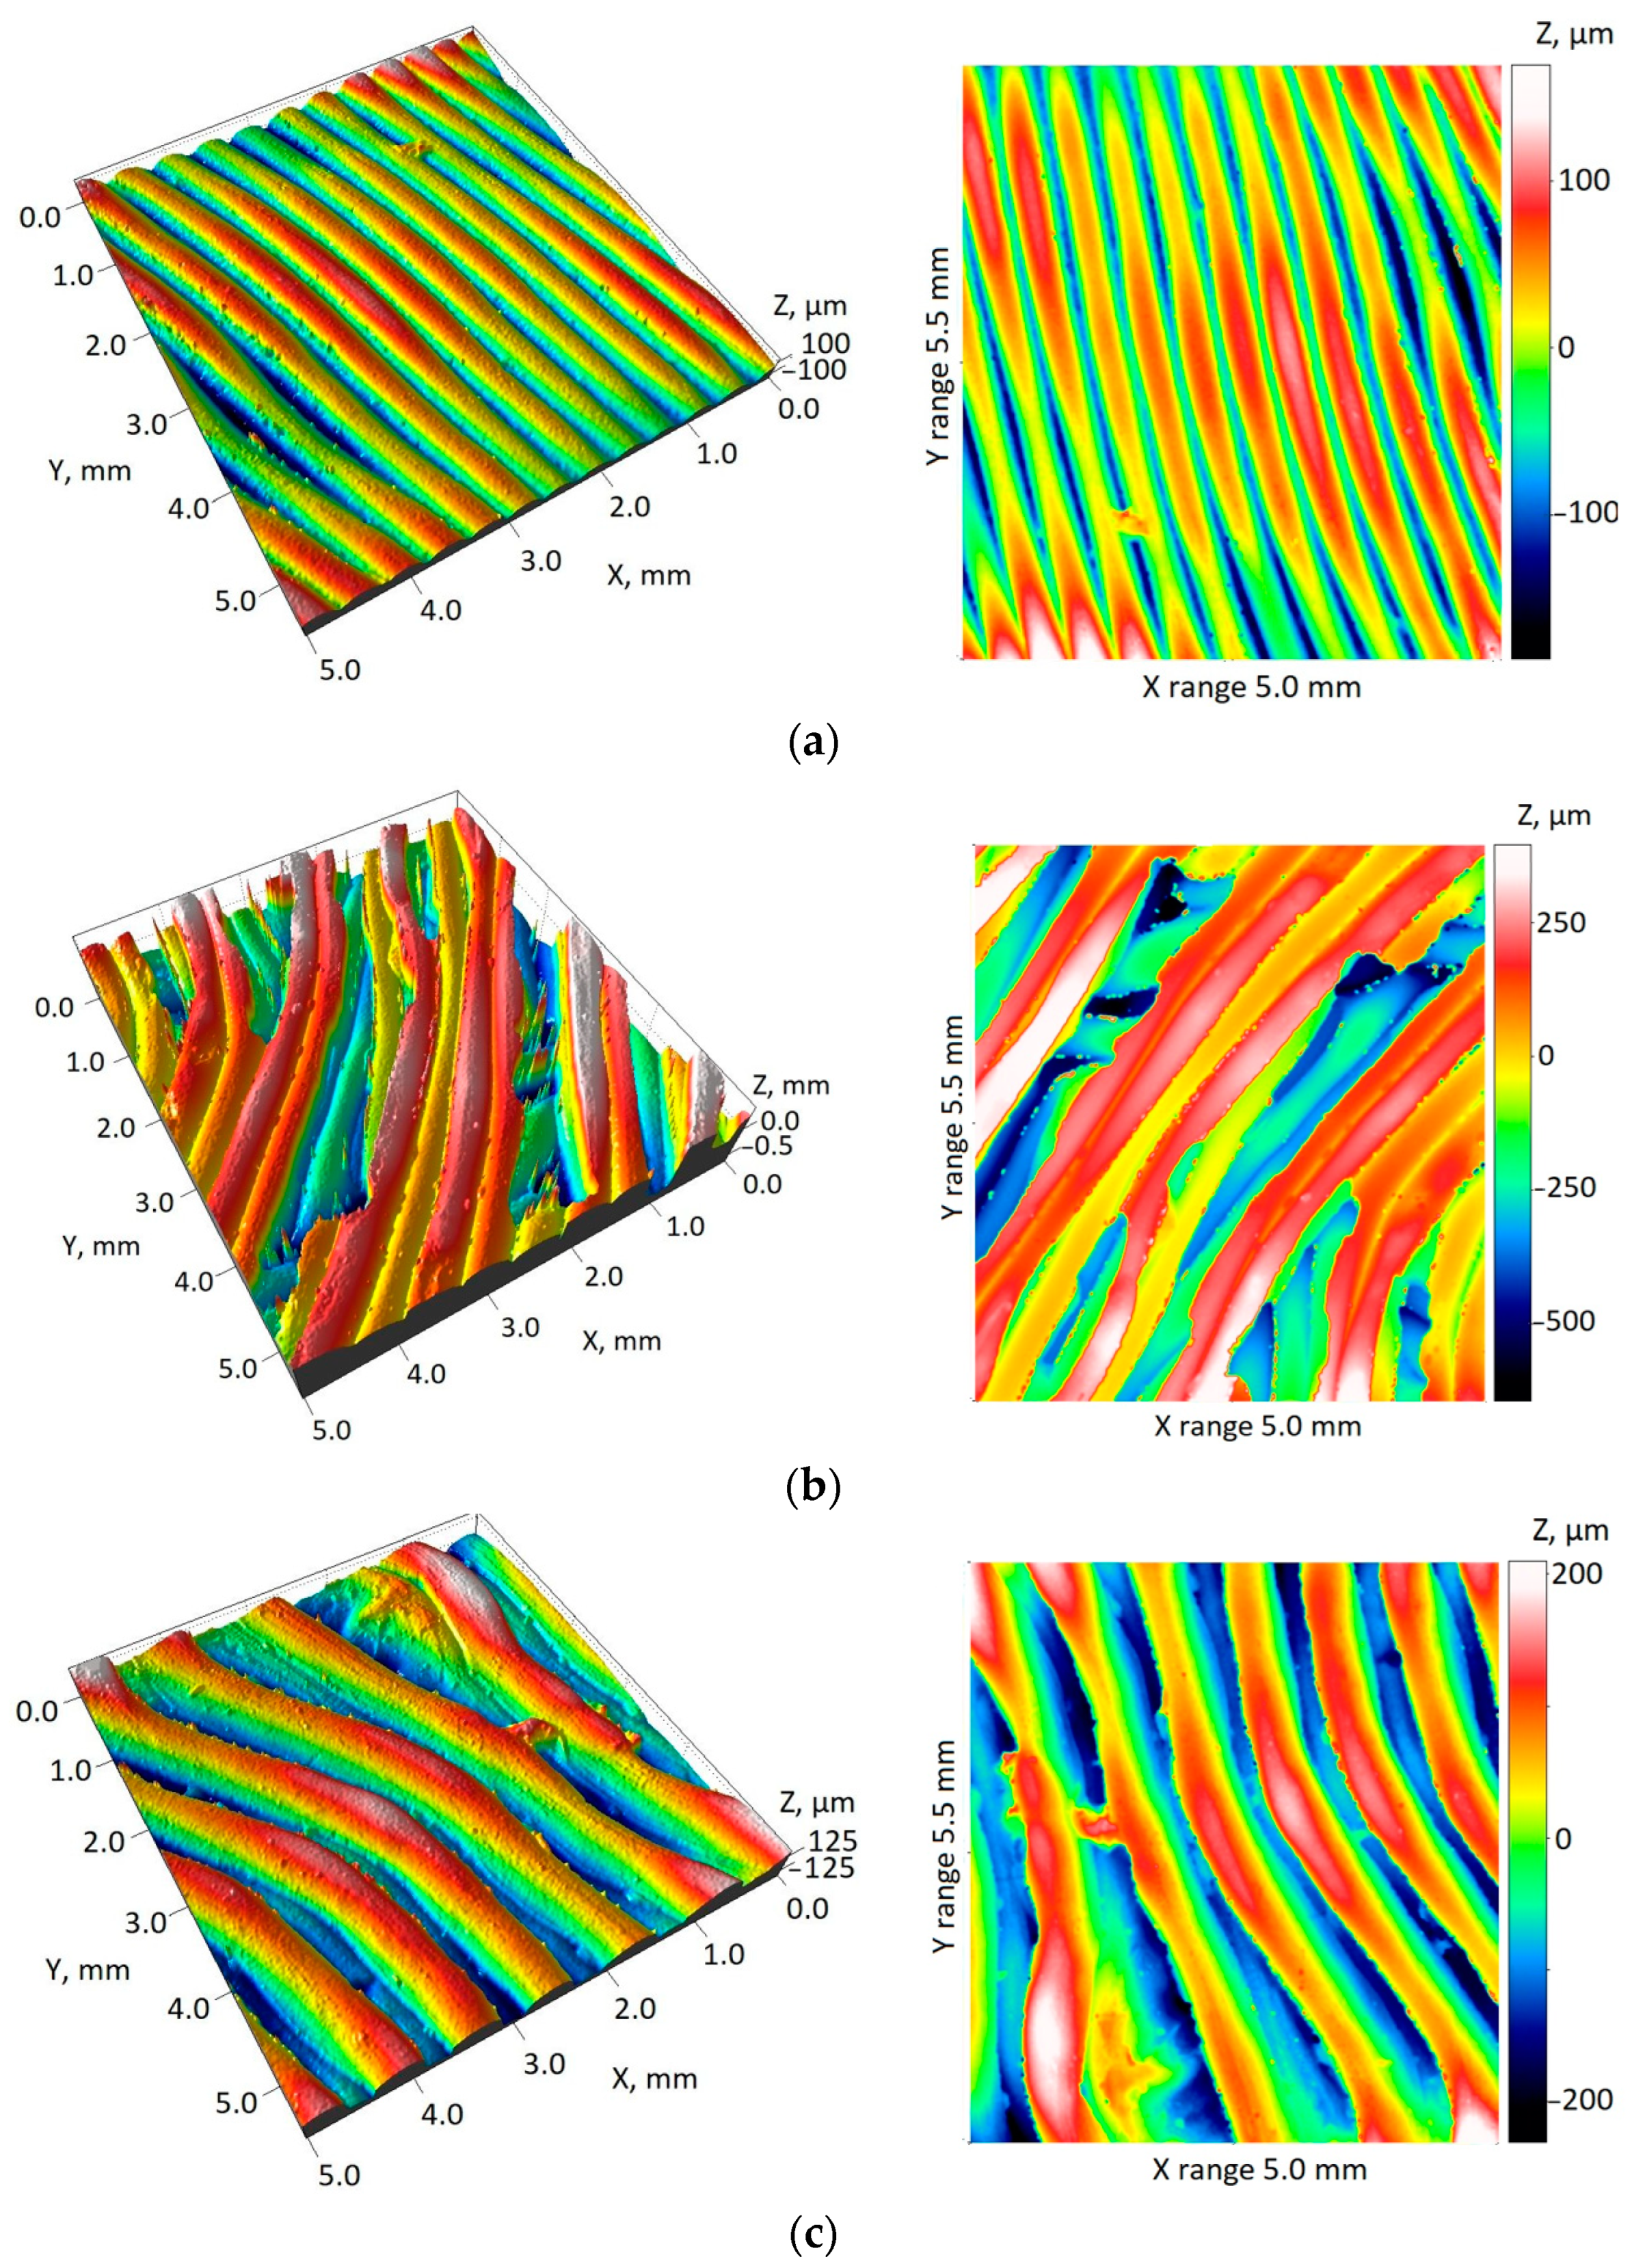
Figure 22 and Figure 23 show the results of the surface roughness assessment in the form of 2D and 3D visualizations. In addition, selected statistical parameters are presented in Table 6. It is noticeable that the values of the analyzed height parameters of surface roughness are of the same order as the deviations of macrogeometry described above. Thus, the surface texture will significantly affect the observed 3D deviations. Thus, it will be an important factor in assessing the suitability of a given model in the surgical planning process. In the context of the usefulness of the models in the surgical planning process, the acetabulum area was the most important. A more favorable orientation from the point of view of surface roughness was the one where the normal vector to the acetabulum surface was directed at a significant angle to the direction of the model building. Compared to the model where the normal vector of the acetabulum surface was almost parallel with the Z axis, the analyzed height parameters were approximately 30–40% smaller. When printing a model, it is therefore important to consider two key aspects that determine the surface roughness, i.e., the thickness of the layer and the appropriate orientation of the model. The orientation of the model and the thickness of the layer also affect printing time and are, therefore, related to economic aspects.

4. Discussion

Designing and manufacturing a model of an anatomical structure for a surgical procedure is a complex task. This is particularly true in the hip joint area, which consists of bone tissues with very complex geometries [53,54,55] and implants that produce noise in the diagnostic area due to metallic artifacts [56,57]. At each stage of digital reconstruction of the anatomical structure and 3D printing, errors arise that can affect the accuracy of the model geometry [58,59,60].

4.1. Analysis of the Reconstruction Process and Additive Manufacturing of Models

Currently, several solutions have been presented in the literature to improve the reconstruction of the geometry of the anatomical structure. These processes combine with the development of algorithms to minimize the impact of metallic artifacts [57], improve the spatial resolution of DICOM data [25], and improve the accuracy of the segmentation process [61]. The publication [25] describes a procedure developed to improve the accuracy of anatomical structures within the hip joint. The publication focuses mainly on segmenting implant structures, the head, and the femoral shaft. Since surgical planning often requires the complete development of the left or right side of the pelvic bone. Precise reconstruction of this area is essential [62,63,64]. To enhance the procedure in publication [25], an algorithm was developed to improve the segmentation capabilities of the three sub-areas, including the critical acetabulum. This involved using data interpolation and local thresholding to establish precise segmentation thresholds expressed in HU units. In manufacturing the models, we focused on nozzle and work platform temperature, layer thickness, manufacturing speed, model orientation in the 3D printer space, and the degree of model filling. The parameters indicated are the basic and most important ones. They are often readily available in software dedicated to the process and device. A filling density of 80% in the form of a grid is intended to simulate a similar resistance across the entire volume of the anatomical structure when instruments are being prepared for surgery. The layer height of 0.3 mm speeds up the 3D printing process and is sufficient to mimic the anatomical structure, while the stepped effect is low. The temperatures of the extruder and the working table were chosen according to the experience of the machine operator and the manufacturer’s recommendations. The print speed of 80 mm/s is not high and could be higher, but it is correct for cooling the research model on the build layer and guarantees the correctness of the additive process. As the accuracy of the anatomical structure models is in the range of approx. ±0.3 mm, we used a layer thickness of 0.3 mm. Our previous studies [25] on models made with a thinner layer for surgical planning purposes indicated that the deviations were also within a similar range. Therefore, it was not decided to decrease the layer thickness but to pay attention to the economic aspect of manufacturing the models. During the manufacturing stage, we analyzed two aspects. One involved manufacturing the pelvic parts in one piece, while the other involved manufacturing three pelvic sub-areas (developed in the segmentation process) on three Prusa MK3s 3D printers simultaneously. We also conducted this test to compare different measurement strategies using CAI system procedures and to analyze the accuracy, time, and material costs of manufacturing the models. The literature provides no results regarding the time and cost of manufacturing a 3D-printed pelvic model from PLA material. Taking an average time based on the three patients analyzed, it shows that the 3D printing of the entire pelvic area took 15 h and 3 min. The model depicting the Ilium area took 3 h and 12 min, the Acetabulum took 9 h and 35 min, and the Pubis and Ischium area took 2 h and 3 min. Based on the results presented in this paper, manufacturing a pelvic model in one piece or three separate parts takes approximately 15 h. The production times were comparable when using only one 3D printer. However, the publication’s authors have access to a range of Prusa MK3s 3D printers. By manufacturing three separate sections of the pelvic part simultaneously across three 3D printers, the overall production time for the entire pelvic model was significantly reduced. The acetabulum area, which took the longest to manufacture (approximately 9 h and 30 min), resulted in a time savings of over 5 h and 30 min. The overall significant reduction in time was also due to the possibility for operators to optimize the orientation of the pelvic part fragments in the 3D printer space, which was not reasonably possible with a model of the whole pelvic part. Materials cost around $125 for both manufacturing concepts.

4.2. Analysis of Adopted Measurement Procedures Implemented on the Atos II Triple Scan, the Measuring Arm with a Laser Head System and Alicona InfiniteFocusG4 Optical Microscope

Two optical coordinate measuring systems illuminating the object with laser and structured light were used to develop procedures to check the geometry accuracy. For both systems, we had to use different methods to measure the geometry of the pelvic part when it was manufactured in one piece and three separate parts. To date, no such guidelines have been developed for checking the accuracy of anatomical structures of pelvic bone. When using the Atos II Triple Scan system, the choice of the measuring field and the number of steps of rotation of the measuring table significantly affected the quality of the acquired data. The measurement field is closely linked to the point cloud’s resolution. A larger field decreases the resolution, while a smaller area increases it. Selecting the optimal measurement area can be challenging. This publication establishes a condition to ensure that the resolution of the obtained point cloud aligns with the manufacturing tolerance of the model created using additive technology. This condition, set at 10% of the tolerance (10% T), significantly simplifies determining the appropriate measurement parameters. When selecting the number of rotations for the measuring table, increasing the rotations resulted in more data contributing to the geometry mapping. However, this also led to increased programming errors within the 3D-STL model. The increase in rotations caused an overscan on the 3D-STL model, making it challenging to assess shape deviations accurately. Several measurement tests showed that lint generation significantly decreases when the number of table rotations is kept below 15. Therefore, for the research presented here, the number of rotations for the model created as a single piece was set at 14, while the number of rotations for the three separate fragments was set at 10.
When using the laser head, it was crucial to determine the laser power and the measurement resolution. The laser power setting was critical for the efficiency of making geometry measurements. If the laser power was not precisely adjusted, each measurement generated cavities in the triangle mesh structure of the 3D-STL model. Additional measurements of the cavity area geometry further generated the overscan formation. In the case of measurement resolution, as with the Atos II Triple Scan system, we ensured that the measurement resolution for both systems was better than 0.06 mm to adjust with the manufacturing tolerance of the scanned object. Additionally, we placed markers on the surfaces of the models before scanning them with both systems. This process helped to streamline the measurement and enabled the alignment of the scans afterward. To reduce reflectivity, the surface of the scanned model was coated with a matting agent—3D Helling. The publication specifies that the maximum thickness of the matting agent applied to the model surfaces should not exceed 0.016 mm [65]. However, the article’s authors verified the layer thickness using an Alicona InfiniteFocusG4 optical microscope. Its average value was 0.01 mm. The choice of optical digitizing method affects the number of scans obtained during the measurement. Because the measurements on the measuring arm—laser head system were carried out manually and without configuration with a rotary table, a considerable amount of time was spent aligning the scans into one single-point cloud.
The profile method is commonly used to evaluate surface roughness. However, using a profilometer can lead to technical limitations when dealing with complex geometric models like pelvic ones. To address this, an Alicona InfiniteFocusG4 optical microscope measurement procedure was developed. Due to the optical properties of the PLA material used, surface replicas were created to reduce measurement errors. Although replicas were produced, some errors at the edges of the scans were only partially mitigated. To address the noise generated during measurement, a 15 × 15 median filter was applied. Additionally, the precise value of the Gaussian filter, λc = 0.8 mm, was determined. This allowed for the effective separation of long-wave components, facilitating the distinction between roughness and waviness.

4.3. Evaluation of Geometrical Accuracy and Surface Roughness

After evaluating the geometrical accuracy of the models, we observed differences in the 3D deviation maps and the statistical parameters. Manufacturing the models as three separate fragments significantly improved their accuracy. The deviations for these models ranged from ±0.22 mm to ±0.32 mm when measured using the measuring arm-laser head system and from ±0.26 mm to ±0.32 mm when measured using the Atos II Triple Scan system. However, the deviation range for the pelvic part model manufactured in one piece was more significant, at ±0.6 mm for the measuring arm-laser head system and ±0.5 mm for the Atos II Triple Scan system. The increase in deviation values for models manufactured in one piece led to the generation of more support material, which was then mechanically removed after the manufacturing process. Moreover, manufacturing the model in the open workspace of the 3D printer significantly raises material shrinkage. Differences also arise from using two different systems and digitization methods. The increase in deviation values for the single-piece manufactured pelvic model is linked to the challenges encountered in the measurement process. It was notably simpler and faster to perform the measurement process on three pieces of pelvic geometry. This was also due to the more favorable orientation of the model in the measurement space of the systems. Based on current research, the maximum deviations in the accuracy of manufactured anatomical models from PLA material are consistent with those reported in publications [66,67] when the models are made in three separate fragments. However, when a pelvic model is made in one piece, the deviation values differ significantly from the typical range of ±0.25 mm to ±0.3 mm. However, this publication’s comparisons of geometrical accuracy results mainly concern anatomical structures made of PLA material for planning procedures in the craniofacial region. To date, no such analyses have been developed for pelvic anatomical structures. When manufacturing models using the additive MEX method, the researchers identified the most critical parameters responsible for PLA surface roughness as layer thickness [68], build orientation [69], printing speed [68], nozzle diameter [69], and temperature [69]. We carefully selected the best 3D printing parameters based on published research to accurately represent the surface roughness of the models. This was incredibly challenging for the pelvic parts model, which was manufactured as a single piece. In the conducted studies, the acetabulum area was 3D printed in two orientations: on the part of the pelvis model manufactured in one piece. As a result, the amplitude parameters used to assess surface roughness were higher compared to a single model covering only the acetabulum area. The surface roughness of surgical templates made of PLA material and used in the pelvic region has not been evaluated yet. Previous research on PLA materials has mainly focused on simple geometric models and typically uses 2D [70,71] or 3D profile methods [72,73] to assess the surface roughness of such specimens.

4.4. Evaluation of the Surgical Procedure

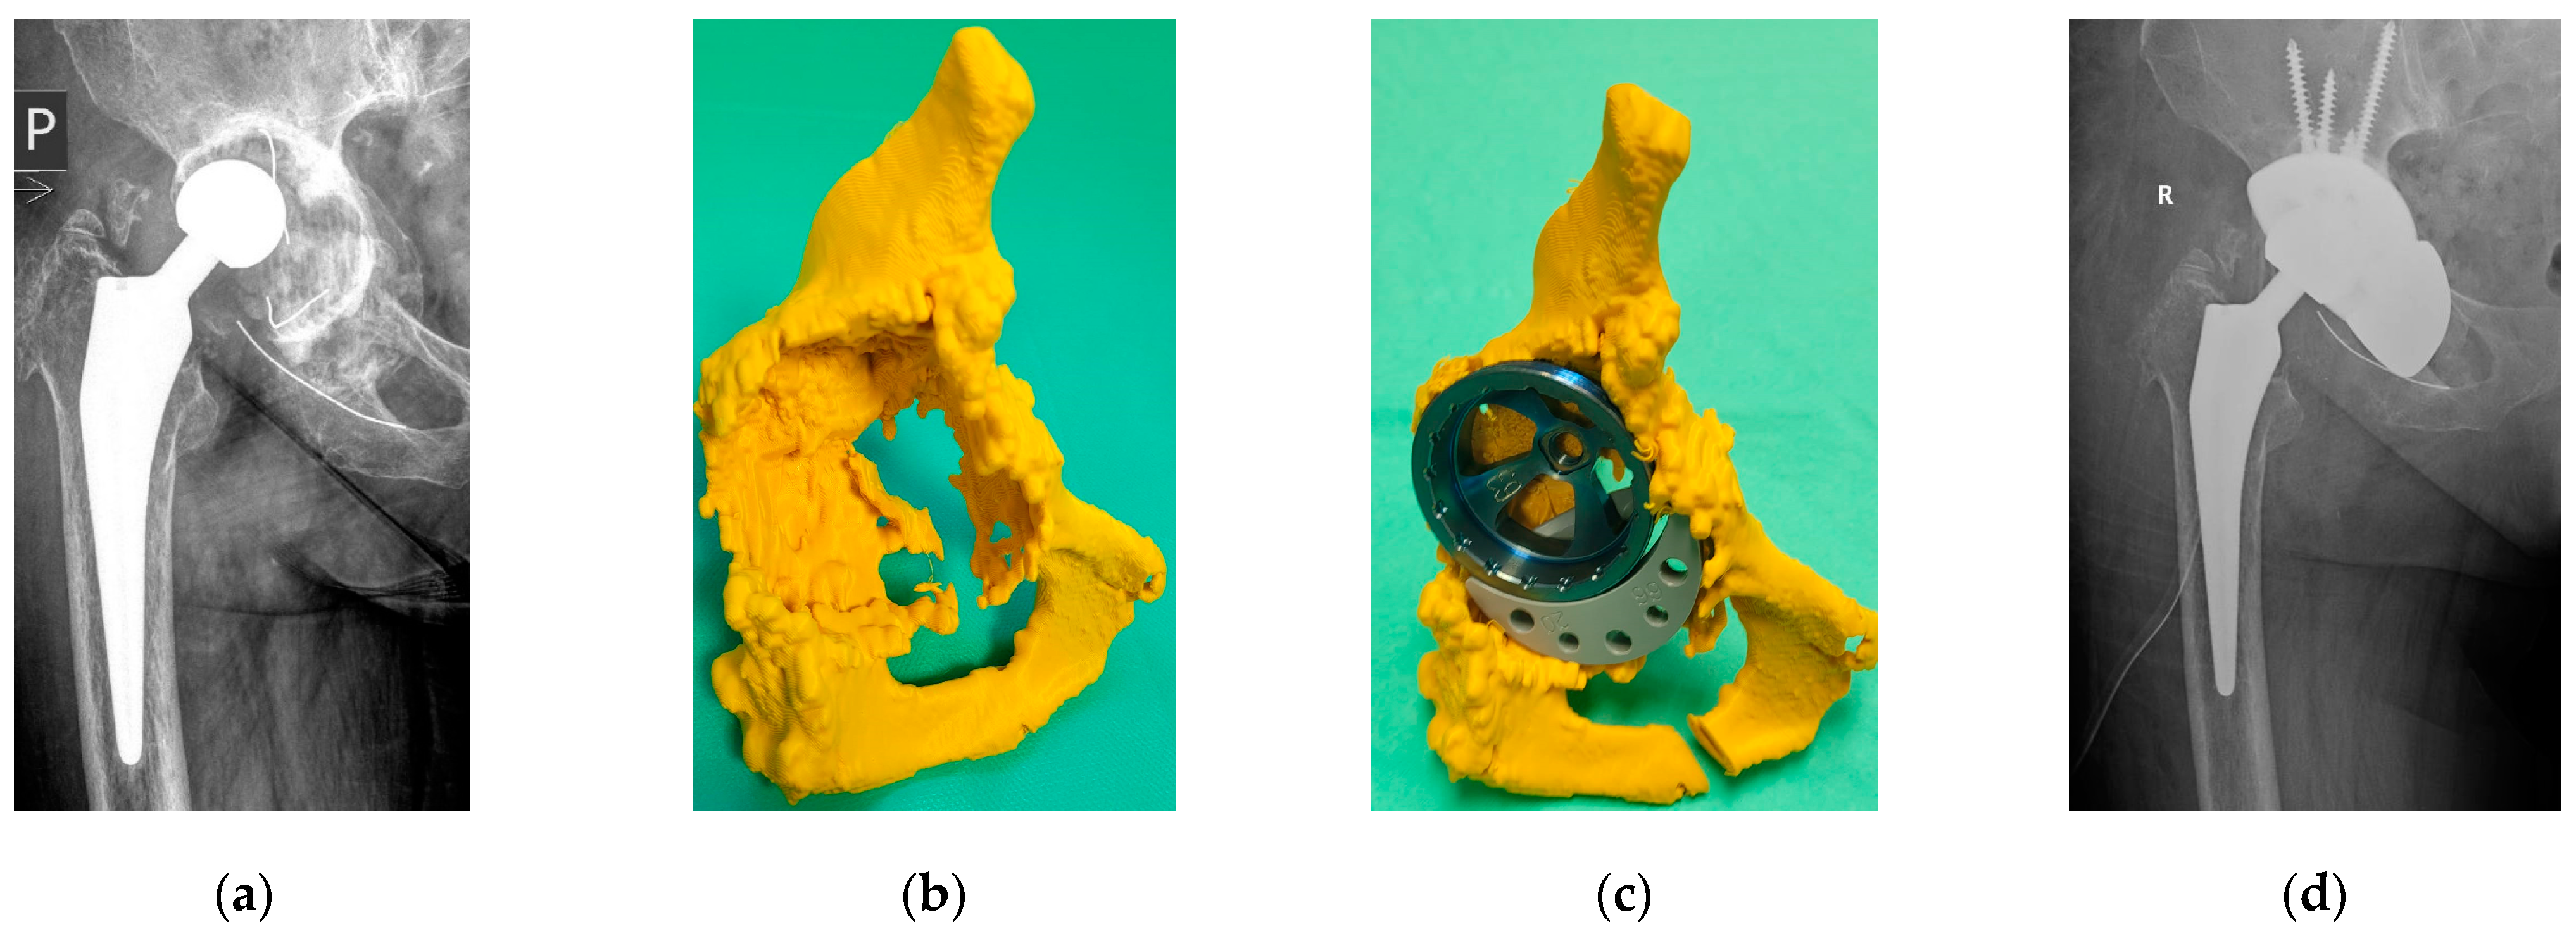
After 3D printing and verifying accuracy with CAI systems, surgical procedures were planned and performed on three patients. For patient no. 1, the surgery involved deepening the acetabulum bone and inserting a prosthesis (Figure 24a–d). The procedure also included removing a plate from the upper part of the femur and inserting a stem. The bone where the implant was placed had cysts, which weakened its ability to support the prosthesis. Wires were used to provide additional stability for the implant. The model made for patient no.1 was used to implant a trial acetabular prosthesis. First, it allowed for a more accurate assessment of its size and the most favorable positioning within the pelvic bone area. It was also used during surgery for better orientation in a small operating field. In the case of patient no.2, the model allowed us to determine the size of the endoprosthesis acetabulum and the size and place of collocation of the so-called augment, i.e., an implant that will tightly fill the bone defect and provide strong support for the new acetabular prosthesis being implanted (Figure 25a–d). Additionally, the model was used for better orientation in a narrow operating field. The model made for patient no.3 created a cavity where the acetabulum should have been initially located (Figure 26a–d). This will also allow the surgeon to select the most favorable acetabular dimensions and better orient himself during the procedure.

5. Conclusions

The research presented in this article enhances the accuracy of reconstructing the geometry of pelvic components through the application of 2D digital image processing techniques and local thresholding segmentation methods. The developed procedures resulted in average Hounsfield Unit (HU) values being determined for the ilium, acetabulum, pubis, and ischium regions. Thanks to simultaneous manufacturing on three 3D printers, the time required to produce these models was significantly reduced compared to manufacturing a pelvic model in one piece. The established parameters and measurement techniques for geometric accuracy and surface roughness evaluation led to more precise reports assessing the metrological accuracy of the PLA material models. What should be emphasized is that, at the stage of the surgical procedure, models made using 3D printing techniques allowed the surgeon to have a better orientation during the procedure and, in the case of patient no.3, the location of the new acetabulum location in the pelvis. Based on the studies presented by the authors in this article, an accuracy of approx. ±0.5 mm has been established for the hip joint region. Because models of pelvic fragments were made with higher accuracy and, more importantly, in a much shorter time than a pelvic model produced in a one-piece, future research should focus on refining the procedure outlined in this article. This will aim to develop a method for combining these models into a unified whole and conducting strength and additional metrological analyses. Conducting this research may allow the development of a much more cost-effective solution in producing models of anatomical structures within the hip joint to plan surgical procedures in this area.

Author Contributions

Conceptualization, P.T., R.W., G.B. and S.S.; methodology, P.T. and R.W.; software, P.T., Ł.P., T.D. and A.B.; formal analysis, G.B., S.S., J.J. and J.P.; investigation, P.T., G.B., Ł.P., T.D. and A.B.; writing—original draft preparation, P.T., R.W., J.J., Ł.P., T.D. and A.B.; writing—review and editing, P.T., J.J. and R.W.; visualization, P.T.; supervision, G.B., S.S. and J.P. All authors have read and agreed to the published version of the manuscript.

Funding

This research received no external funding.

Institutional Review Board Statement

Not applicable.

Informed Consent Statement

Not applicable.

Data Availability Statement

The original contributions presented in the study are included in the article; further inquiries can be directed to the corresponding author.

Conflicts of Interest

The authors declare no conflicts of interest.

References

  1. Ng, K.G.; Jeffers, J.R.; Beaulé, P.E. Hip joint capsular anatomy, mechanics, and surgical management. JBJS 2019, 101, 2141–2151. [Google Scholar] [CrossRef]
  2. Zaghloul, A.; Mohamed, E.M. Hip joint: Embryology, anatomy and biomechanics. Biomed. J. Sci. Tech. Res. 2018, 12, 9304–9318. [Google Scholar] [CrossRef]
  3. Zilkens, C.; Tiderius, C.J.; Krauspe, R.; Bittersohl, B. Current knowledge and importance of dGEMRIC techniques in diagnosis of hip joint diseases. Skelet. Radiol. 2015, 44, 1073–1083. [Google Scholar] [CrossRef] [PubMed]
  4. Yamate, S.; Hamai, S.; Lyman, S.; Konishi, T.; Kawahara, S.; Yamaguchi, R.; Motomura, G. Clinical evaluation of hip joint diseases: Total hip arthroplasty to support patients’ quality of life. J. Jt. Surg. Res. 2023, 1, 18–25. [Google Scholar] [CrossRef]
  5. Song, J.; Zhang, G.; Liang, J.; Bai, C.; Dang, X.; Wang, K.; Liu, R. Effects of delayed hip replacement on postoperative hip function and quality of life in elderly patients with femoral neck fracture. BMC Musculoskelet. Disord. 2020, 21, 487. [Google Scholar] [CrossRef] [PubMed]
  6. Harsanyi, S.; Zamborsky, R.; Krajciova, L.; Kokavec, M.; Danisovic, L. Developmental dysplasia of the hip: A review of etiopathogenesis, risk factors, and genetic aspects. Medicina 2020, 56, 153. [Google Scholar] [CrossRef] [PubMed]
  7. Sziver, E.; Nagy, E.; Preszner-Domján, A.; Pósa, G.; Horvath, G.; Balog, A.; Tóth, K. Postural control in degenerative diseases of the hip joint. Clin. Biomech. 2016, 35, 1–6. [Google Scholar] [CrossRef] [PubMed]
  8. Sun, C.W.; Lau, L.C.; Cheung, J.P.; Choi, S.W. Cancer-Causing Effects of Orthopaedic Metal Implants in Total Hip Arthroplasty. Cancers 2024, 16, 1339. [Google Scholar] [CrossRef]
  9. Saikko, V.; Shen, M. Wear comparison between a dual mobility total hip prosthesis and a typical modular design using a hip joint simulator. Wear 2010, 268, 617–621. [Google Scholar] [CrossRef]
  10. Guo, L.; Naghavi, S.A.; Wang, Z.; Varma, S.N.; Han, Z.; Yao, Z.; Liu, C. On the design evolution of hip implants: A review. Mater. Des. 2022, 216, 110552. [Google Scholar] [CrossRef]
  11. Hilton, T.L.; Campbell, N.; Hosking, K. Additive manufacturing in orthopaedics: Clinical implications. SA Orthop. J. 2017, 16, 63–67. [Google Scholar] [CrossRef]
  12. Cortis, G.; Mileti, I.; Nalli, F.; Palermo, E.; Cortese, L. Additive manufacturing structural redesign of hip prostheses for stress-shielding reduction and improved functionality and safety. Mech. Mater. 2022, 165, 104173. [Google Scholar] [CrossRef]
  13. Javaid, M.; Haleem, A. Current status and challenges of Additive manufacturing in orthopaedics: An overview. J. Clin. Orthop. Trauma 2019, 10, 380–386. [Google Scholar] [CrossRef] [PubMed]
  14. Paramasivam, V.; Singh, G.; Santhanakrishnan, S. 3D printing of human anatomical models for preoperative surgical planning. Procedia Manuf. 2020, 48, 684–690. [Google Scholar] [CrossRef]
  15. Ravi, P.; Chepelev, L.L.; Stichweh, G.V.; Jones, B.S.; Rybicki, F.J. Medical 3D printing dimensional accuracy for multi-pathological anatomical models 3D printed using material extrusion. J. Digit. Imaging 2022, 35, 613–622. [Google Scholar] [CrossRef]
  16. Turek, P.; Budzik, G. Estimating the accuracy of mandible anatomical models manufactured using material extrusion methods. Polymers 2021, 13, 2271. [Google Scholar] [CrossRef] [PubMed]
  17. Salmi, M.; Paloheimo, K.S.; Tuomi, J.; Wolff, J.; Mäkitie, A. Accuracy of medical models made by additive manufacturing (rapid manufacturing). J. Cranio-Maxillofac. Surg. 2013, 41, 603–609. [Google Scholar] [CrossRef] [PubMed]
  18. Turek, P. Evaluation of surface roughness parameters of anatomical structures models of the mandible made with additive techniques from selected polymeric materials: Rapid communication. Polimery 2022, 67, 162–167. [Google Scholar] [CrossRef]
  19. ISO/ASTM TR 52916:2022; Additive Manufacturing for Medical—Data—Optimized Medical Image Data. ISO: Geneva, Switzerland, 2022.
  20. ISO/IEC 3532-1:2023; Information Technology—Medical Image-Based Modeling for 3D Printing—Part 1: General requirements. ISO: Geneva, Switzerland, 2023.
  21. ISO/IEC 3532-2: 2024; Information Technology—Medical Image-Based Modeling for 3D Printing—Part 2: Segmentation. ISO: Geneva, Switzerland, 2024.
  22. Ng, K.G.; Lamontagne, M.; Labrosse, M.R.; Beaulé, P.E. Comparison of anatomical parameters of cam femoroacetabular impingement to evaluate hip joint models segmented from CT data. Comput. Methods Biomech. Biomed. Eng. Imaging Vis. 2018, 6, 293–302. [Google Scholar] [CrossRef]
  23. Liu, H.; Qian, H.; Zhao, J. Automatic extraction of 3D anatomical feature curves of hip bone models reconstructed from CT images. Bio-Med. Mater. Eng. 2015, 26, S1297–S1314. [Google Scholar] [CrossRef]
  24. Salazar, D.A.; Cramer, J.; Markin, N.W.; Hunt, N.H.; Linke, G.; Siebler, J.; Zuniga, J. Comparison of 3D printed anatomical model qualities in acetabular fracture representation. Ann. Transl. Med. 2022, 10, 391. [Google Scholar] [CrossRef]
  25. Turek, P.; Filip, D.; Przeszłowski, Ł.; Łazorko, A.; Budzik, G.; Snela, S.; Paszkiewicz, A. Manufacturing polymer model of anatomical structures with increased accuracy using cax and am systems for planning orthopedic procedures. Polymers 2022, 14, 2236. [Google Scholar] [CrossRef] [PubMed]
  26. Kantaros, A.; Petrescu, F.I.T.; Abdoli, H.; Diegel, O.; Chan, S.; Iliescu, M.; Ungureanu, L.M. Additive Manufacturing for Surgical Planning and Education: A Review. Appl. Sci. 2024, 14, 2550. [Google Scholar] [CrossRef]
  27. Solórzano-Requejo, W.; Ojeda, C.; Díaz Lantada, A. Innovative design methodology for patient-specific short femoral stems. Materials 2022, 15, 442. [Google Scholar] [CrossRef] [PubMed]
  28. Mendonça, C.J.A.; Guimarães, R.M.D.R.; Pontim, C.E.; Gasoto, S.C.; Setti, J.A.P.; Soni, J.F.; Schneider, B., Jr. An overview of 3D anatomical model printing in orthopedic trauma surgery. J. Multidiscip. Healthc. 2023, 16, 875–887. [Google Scholar] [CrossRef] [PubMed]
  29. Chohan, J.S.; Singh, R. Pre and post processing techniques to improve surface characteristics of FDM parts: A state of art review and future applications. Rapid Prototyp. J. 2017, 23, 495–513. [Google Scholar] [CrossRef]
  30. Haque, M.E.; Banerjee, D.; Mishra, S.B.; Nanda, B.K. A numerical approach to measure the surface roughness of FDM build part. Mater. Today Proc. 2019, 18, 5523–5529. [Google Scholar] [CrossRef]
  31. Reddy, V.; Flys, O.; Chaparala, A.; Berrimi, C.E.; Amogh, V.; Rosen, B.G. Study on surface texture of fused deposition modeling. Procedia Manuf. 2018, 25, 389–396. [Google Scholar] [CrossRef]
  32. Gibson, I.; Rosen, D.; Stucker, B.; Khorasani, M.; Gibson, I.; Rosen, D.; Khorasani, M. Material extrusion. In Additive Manufacturing; Springer International Publishing: Berlin/Heidelberg, Germany, 2021; pp. 171–201. [Google Scholar] [CrossRef]
  33. Wang, T.M.; Xi, J.T.; Jin, Y. A model research for prototype warp deformation in the FDM process. Int. J. Adv. Manuf. Technol. 2007, 33, 1087–1096. [Google Scholar] [CrossRef]
  34. Gordon, E.R.; Shokrani, A.; Flynn, J.M.; Goguelin, S.; Barclay, J.; Dhokia, V. A surface modification decision tree to influence design in additive manufacturing. In Sustainable Design and Manufacturing; Springer International Publishing: Berlin/Heidelberg, Germany, 2016; pp. 423–434. [Google Scholar] [CrossRef]
  35. Srinivasan, R.; Ruban, W.; Deepanraj, A.; Bhuvanesh, R.; Bhuvanesh, T. Efect on infll density on mechanical properties of PETG part fabricated by fused deposition modelling. Mater. Today Proc. 2020, 27, 1838–1842. [Google Scholar] [CrossRef]
  36. Maier, R.; Bucaciuc, S.-G.; Mandoc, A.C. Reducing Surface Roughness of 3D Printed Short-Carbon Fiber Reinforced Composites. Materials 2022, 15, 7398. [Google Scholar] [CrossRef] [PubMed]
  37. Melentiev, R.; Harakály, G.; Stögerer, J.; Mitteramskogler, G.; Wagih, A.; Lubineau, G.; Grande, C.A. High-resolution metal 3D printing via digital light processing. Addit. Manuf. 2024, 85, 104156. [Google Scholar] [CrossRef]
  38. Shin, S.; Ko, B.; So, H. Structural effects of 3D printing resolution on the gauge factor of microcrack-based strain gauges for health care monitoring. Microsyst. Nanoeng. 2022, 8, 12. [Google Scholar] [CrossRef]
  39. Zhang, K.; Wang, H.; Yao, K.; He, G.; Zhou, Z.; Sun, D. Surface roughness improvement of 3D printed microchannel. J. Micromechanics Microeng. 2020, 30, 065003. [Google Scholar] [CrossRef]
  40. ISO/ASTM 52902:2023; Additive Manufacturing—Test Artefacts—Geometric Capability Assessment of Additive Manufacturing Systems. ISO: Geneva, Switzerland, 2023.
  41. Barcena, A.J.R.; Ravi, P.; Kundu, S.; Tappa, K. Emerging Biomedical and Clinical Applications of 3D-Printed Poly (Lactic Acid)-Based Devices and Delivery Systems. Bioengineering 2024, 11, 705. [Google Scholar] [CrossRef] [PubMed]
  42. Šljivić, M.; Pavlović, A.; Ilić, J.; Stanojević, M.; Todorović, S. Comparing the accuracy of professional and consumer grade 3D printers in complex models production. FME Trans. 2017, 45, 348–353. [Google Scholar] [CrossRef]
  43. B89.4.22; Methods for Performance Evaluation of Articulated Arm Coordinate Measuring Machines (CMM). American Society of Mechanical Engineers (ASME): New York, NY, USA, 2004.
  44. ISO 10360-8:2013; Geometrical Product Specifications (GPS)—Acceptance and Reverification Tests for Coordinate Measuring Systems (CMS)—Part 8. CMMs with Optical Distance Sensors. ISO: Geneva, Switzerland, 2013.
  45. Rokicki, P.; Budzik, G.; Kubiak, K.; Dziubek, T.; Zaborniak, M.; Kozik, B.; Bernaczek, J.; Przeszlowski, L.; Nowotnik, A. The assessment of geometric accuracy of aircraft engine blades with the use of an optical coordinate scanner. Aircr. Eng. Aerosp. Technol. 2016, 88, 374–381. [Google Scholar] [CrossRef]
  46. Dziubek, T.; Oleksy, M. Application of ATOS II optical system in the techniques of rapid prototyping of epoxy resin-based gear models. Polimery 2017, 62, 44–52. [Google Scholar] [CrossRef]
  47. Brajlih, T.; Tasic, T.; Valentan, B.; Hadžistevi’c, M.; Pogacar, V.; Drstvenšek, I.; Balic, J.; Acko, B. Possibilities of Using ThreeDimensional Optical Scanning in Complex Geometrical Inspection. Stroj. Vestn. J. Mech. Eng. 2011, 57, 826–833. [Google Scholar] [CrossRef]
  48. VDI/VDE 2634 Blatt 3. Available online: https://www.vdi.eu/guidelines/vdivde_2634_blatt_3-optische_3_d_messsysteme_bildgebende_systeme_mit_flaechenhafter_antastung/ (accessed on 28 September 2024).
  49. ISO 21920-1:2021; Geometrical Product Specifications (GPS)—Surface Texture: Profile, Part 1: Indication of Surface Texture. ISO: Geneva, Switzerland, 2021.
  50. Newton, L.; Senin, N.; Gomez, C.; Danzl, R.; Helmli, F.; Blunt, L.; Leach, R. Areal topography measurement of metal additive surfaces using focus variation microscopy. Addit. Manuf. 2019, 25, 365–389. [Google Scholar] [CrossRef]
  51. Bazan, A.; Turek, P.; Przeszłowski, Ł. Comparison of the contact and focus variation measurement methods in the process of surface topography evaluation of additively manufactured models with different geometry complexity. Surf. Topogr. Metrol. Prop. 2022, 10, 035021. [Google Scholar] [CrossRef]
  52. Bazan, A.; Turek, P.; Przeszłowski, Ł. Assessment of InfiniteFocus system measurement errors in testing the accuracy of crown and tooth body model. J. Mech. Sci. Technol. 2021, 35, 1167–1176. [Google Scholar] [CrossRef]
  53. Liu, K.; Li, Z.; Ma, Y.; Lian, H. 3D-printed pelvis model is an efficient method of osteotomy simulation for the treatment of developmental dysplasia of the hip. Exp. Ther. Med. 2020, 19, 1155–1160. [Google Scholar] [CrossRef]
  54. Fang, C.; Cai, H.; Kuong, E.; Chui, E.; Siu, Y.C.; Ji, T.; Drstvenšek, I. Surgical applications of three-dimensional printing in the pelvis and acetabulum: From models and tools to implants. Der Unfallchirurg 2019, 122, 278. [Google Scholar] [CrossRef]
  55. Hughes, A.J.; DeBuitleir, C.; Soden, P.; O’Donnchadha, B.; Tansey, A.; Abdulkarim, A.; Hurson, C.J. 3D printing aids acetabular reconstruction in complex revision hip arthroplasty. Adv. Orthop. 2017, 1, 8925050. [Google Scholar] [CrossRef] [PubMed]
  56. Di Laura, A.; Henckel, J.; Wescott, R.; Hothi, H.; Hart, A.J. The effect of metal artefact on the design of custom 3D printed acetabular implants. 3D Print. Med. 2020, 6, 23. [Google Scholar] [CrossRef] [PubMed]
  57. King, J.; Whittam, S.; Smith, D.; Al-Qaisieh, B. The impact of a metal artefact reduction algorithm on treatment planning for patients undergoing radiotherapy of the pelvis. Phys. Imaging Radiat. Oncol. 2022, 24, 138–143. [Google Scholar] [CrossRef]
  58. Santarelli, C.; Argenti, F.; Uccheddu, F.; Alparone, L.; Carfagni, M. Volumetric interpolation of tomographic sequences for accurate 3D reconstruction of anatomical parts. Comput. Methods Programs Biomed. 2020, 194, 105525. [Google Scholar] [CrossRef] [PubMed]
  59. Akmal, J.S.; Salmi, M.; Hemming, B.; Teir, L.; Suomalainen, A.; Kortesniemi, M.; Lassila, A. Cumulative inaccuracies in implementation of additive manufacturing through medical imaging, 3D thresholding, and 3D modeling: A case study for an end-use implant. Appl. Sci. 2020, 10, 2968. [Google Scholar] [CrossRef]
  60. Budzik, G.; Turek, P.; Traciak, J. The influence of change in slice thickness on the accuracy of reconstruction of cranium geometry. Proc. Inst. Mech. Eng. Part H J. Eng. Med. 2017, 231, 197–202. [Google Scholar] [CrossRef] [PubMed]
  61. Bonaldi, L.; Pretto, A.; Pirri, C.; Uccheddu, F.; Fontanella, C.G.; Stecco, C. Deep learning-based medical images segmentation of musculoskeletal anatomical structures: A survey of bottlenecks and strategies. Bioengineering 2023, 10, 137. [Google Scholar] [CrossRef]
  62. Liang, H.; Ji, T.; Zhang, Y.; Wang, Y.; Guo, W. Reconstruction with 3D-printed pelvic endoprostheses after resection of a pelvic tumour. Bone Jt. J. 2017, 99, 267–275. [Google Scholar] [CrossRef] [PubMed]
  63. Bastawrous, S.; Wake, N.; Levin, D.; Ripley, B. Principles of three-dimensional printing and clinical applications within the abdomen and pelvis. Abdom. Radiol. 2018, 43, 2809–2822. [Google Scholar] [CrossRef] [PubMed]
  64. Wu, J.; Luo, D.; Xie, K.; Wang, L.; Hao, Y. Design and Application of 3D Printing Based Personalised Pelvic Prostheses. J. Shanghai Jiaotong Univ. (Sci.) 2021, 26, 361–367. [Google Scholar] [CrossRef]
  65. Mendřický, R. Impact of applied anti-reflective material on accuracy of optical 3D digitisation. Mater. Sci. Forum 2018, 919, 335–344. [Google Scholar] [CrossRef]
  66. Msallem, B.; Sharma, N.; Cao, S.; Halbeisen, F.S.; Zeilhofer, H.-F.; Thieringer, F.M. Evaluation of the Dimensional Accuracy of 3D-Printed Anatomical Mandibular Models Using FFF, SLA, SLS, MJ, and BJ Printing Technology. J. Clin. Med. 2020, 9, 817. [Google Scholar] [CrossRef]
  67. El-Katatny, I.; Masood, S.H.; Morsi, Y.S. Error analysis of FDM fabricated medical replicas. Rapid Prototyp. J. 2010, 16, 36–43. [Google Scholar] [CrossRef]
  68. Yang, L.; Li, S.; Li, Y.; Yang, M.; Yuan, Q. Experimental investigations for optimizing the extrusion parameters on FDM PLA printed parts. J. Mater. Eng. Perform. 2019, 28, 169–182. [Google Scholar] [CrossRef]
  69. Hooshmand, M.J.; Mansour, S.; Dehghanian, A. Optimization of build orientation in FFF using response surface methodology and posterior-based method. Rapid Prototyp. J. 2021, 27, 967–994. [Google Scholar] [CrossRef]
  70. Mendricky, R.; Fris, D. Analysis of the accuracy and the surface roughness of fdm/fff technology and optimisation of process parameters. Teh. Vjesn. 2020, 27, 1166–1173. [Google Scholar] [CrossRef]
  71. Jiang, S.; Hu, K.; Zhan, Y.; Zhao, C.; Li, X. Theoretical and experimental investigation on the 3D surface roughness of material extrusion additive manufacturing products. Polymers 2022, 14, 293. [Google Scholar] [CrossRef] [PubMed]
  72. García, E.; Núñez, P.J.; Chacón, J.M.; Caminero, M.A.; Kamarthi, S. Comparative study of geometric properties of unreinforced PLA and PLA-Graphene composite materials applied to additive manufacturing using FFF technology. Polym. Test. 2020, 91, 106860. [Google Scholar] [CrossRef]
  73. García Plaza, E.; López, P.J.N.; Torija, M.Á.C.; Muñoz, J.M.C. Analysis of PLA geometric properties processed by FFF additive manufacturing: Effects of process parameters and plate-extruder precision motion. Polymers 2019, 11, 1581. [Google Scholar] [CrossRef] [PubMed]
Figure 1. 2D visualizations of the hip joint area for the 3 patients analyzed: (a) patient no.1; (b) patient no.2; (c) patient no.3.
Applsci 15 00134 g001
Figure 2. Procedure for increasing the accuracy of numerical model development within the part of a pelvic bone area.
Applsci 15 00134 g002
Figure 3. Additive manufacturing is a part of the pelvic model for patient no.1 in one piece and is divided into three parts.
Applsci 15 00134 g003
Figure 4. Developed geometry measurement procedure using a measuring arm-laser head system on the example of models manufactured for the surgery of patient no.1.
Applsci 15 00134 g004
Figure 5. Developed geometry measurement procedure using an Atos II Triple Scan system on the example of models manufactured for the surgery of patient no.1.
Applsci 15 00134 g005
Figure 6. Developed geometry measurement procedure using an Alicona InfiniteFocusG4 on the example of models manufactured for the surgery of patient no.1.
Applsci 15 00134 g006
Figure 7. Orientation of acetabulum area of models manufactured for the surgery of patient no.1.
Applsci 15 00134 g007
Figure 8. Material ratio curve and associated parameters.
Applsci 15 00134 g008
Figure 9. Standard measurement data obtained on an Alicona InfiniteFocusG4.
Applsci 15 00134 g009
Figure 10. Examples of 3D deviation maps obtained from measurements using the measuring arm with laser head system for patient no.1 for the area: (a) One; (b) Two; (c) Three.
Applsci 15 00134 g010
Figure 11. Examples of 3D deviation maps obtained from measurements using the measuring arm with a laser head system for patient no.1 for a part of the pelvis model manufactured in one piece.
Applsci 15 00134 g011
Figure 12. Examples of 3D deviation maps obtained from measurements using the measuring arm with laser head system for patient no.2 for the area: (a) One; (b) Two; (c) Three.
Applsci 15 00134 g012
Figure 13. Examples of 3D deviation maps obtained from measurements using the measuring arm with a laser head system for patient no.2 for a part of the pelvis model manufactured in one piece.
Applsci 15 00134 g013
Figure 14. Examples of 3D deviation maps obtained from measurements using the measuring arm with laser head system for patient no.3 for the area: (a) One; (b) Two; (c) Three.
Applsci 15 00134 g014
Figure 15. Examples of 3D deviation maps obtained from measurements using the measuring arm with a laser head system for patient no.3 for a part of the pelvis model manufactured in one piece.
Applsci 15 00134 g015
Figure 16. Examples of 3D deviation maps obtained from measurements using the Atos II Triple Scan system for patient no.1 for the area: (a) One; (b) Two; (c) Three.
Applsci 15 00134 g016
Figure 17. Examples of 3D deviation maps obtained from measurements using the Atos II Triple Scan system for patient no.1 for a part of the pelvis model manufactured in one piece.
Applsci 15 00134 g017
Figure 18. Examples of 3D deviation maps obtained from measurements using the Atos II Triple Scan system for patient no.2 for the area: (a) One; (b) Two; (c) Three.
Applsci 15 00134 g018
Figure 19. Examples of 3D deviation maps obtained from measurements using the Atos II Triple Scan system for patient no.2 for a part of the pelvis model manufactured in one piece.
Applsci 15 00134 g019
Figure 20. Examples of 3D deviation maps obtained from measurements using the Atos II Triple Scan system for patient no.3 for the area: (a) One; (b) Two; (c) Three.
Applsci 15 00134 g020
Figure 21. Examples of 3D deviation maps obtained from measurements using the Atos II Triple Scan system for patient no.3 for a part of the pelvis model manufactured in one piece.
Applsci 15 00134 g021
Figure 22. 3D and 2D visualization of surface roughness on the part of the pelvis model manufactured in one piece measured: (a) Along applied layers; (b) From the side of the surface contact with the support material; (c) In the acetabulum area.
Applsci 15 00134 g022
Figure 23. 3D and 2D visualization of surface roughness on an acetabulum model measured: (a) Along applied layers; (b) From the side of the surface contact with the support material; (c) In the acetabulum area.
Applsci 15 00134 g023
Figure 24. Procedure for planning and performing the procedure for patient no.1: (a) X-ray image before surgery; (b) 3D printed model of the right pelvis; (c) Model-developed cavity with a fitted acetabular endoprosthesis; (d) X-ray image after surgery.
Applsci 15 00134 g024
Figure 25. Procedure for planning and performing the procedure for patient no.2: (a) X-ray image before surgery; (b) 3D printed model of the right pelvis; (c) Model-developed cavity with a fitted acetabular endoprosthesis; (d) X-ray image after surgery.
Applsci 15 00134 g025
Figure 26. Procedure for planning and performing the procedure for patient no.3: (a) X-ray image before surgery; (b) 3D printed model of the right pelvis; (c) Model-developed cavity with a fitted acetabular endoprosthesis; (d) X-ray image after surgery.
Applsci 15 00134 g026
Table 1. Established measurement parameters for the measuring arm-laser head system.
ParametersValue
Stripe width (Y)100 mm
Measuring range (Z)100 mm
Stand-off100 mm
Min. point resolution0.050 mm
Max. data rate150 Hz
Laser power Class 2660 nm
Table 2. Established measurement parameters for the Atos II Triple Scan.
ParametersValue
Pixel resolutions cameras5,000,000
Measuring area150 mm × 100 mm × 100 mm
Min. point resolution0.058 mm
Number of points per scan5,000,000
Number of rotations of the measuring table
(model manufactured in one piece/in three separate parts)
14/10
Table 3. Established measurement parameters for the Alicona InfiniteFocusG4.
ParametersValue
Vertical resolution2 µm
Horizontal resolution7.8 µm
Pixel size1.75 µm × 1.75 µm
ObjectiveObjective 5×
Measuring area5.32 mm × 5.78 mm
Table 4. The results of verification of optical systems for macrogeometry assessment.
Measuring Arm with a Laser Head
Acceptance Test According to ASME B89.4.22Measured Value/Maximum Permission Error (2σ)
Effective diameter test±0.005 mm/±0.008 mm
Single-point articulation test ±0.020 mm/±0.024 mm
Volumetric performance test±0.030 mm/±0.035 mm
Laser head test (flat plate)±0.018 mm
Atos II Triple Scan
Acceptance test according to VDI/VDE 2634 Measured value/Maximum permission error (2σ)
Probing error±0.004 mm/±0.006 mm
Sphere–spacing error±0.008 mm/±0.020 mm
Maximum error (2σ)
Flatness measurement error±0.022 mm
Table 5. Averaged results assessing geometric accuracy developed on 3 patients.
ParametersThe Pelvis Models Manufactured in Three Separate PartsA Part of the Pelvis Models Manufactured in One PieceMeasuring System
Area OneArea TwoArea Three
Number of valid points405,012373,325406,635970,494Measuring arm with a laser head
Maximum deviation [mm]0.8601.0652.0874.926
Minimum deviation [mm]−0.550−0.446−0.704−1.157
Range [mm]1.4101.5112.7916.083
Mean deviation [mm]−0.0410.007−0.013−0.090
Standard deviation [mm]0.1560.1190.1390.295
Root Mean Square [mm]0.1610.1190.1390.308
Number of valid points373,737227,964280,525717,041Atos II
Triple Scan
Maximum deviation [mm]1.2200.6801.3383.024
Minimum deviation [mm]−0.571−0.496−0.821−0.949
Range [mm]1.7921.1762.1593.973
Mean deviation [mm]−0.091−0.034−0.010−0.010
Standard deviation [mm]0.1610.1330.1690.251
Root Mean Square [mm]0.1850.1370.1690.251
Table 6. Averaged surface roughness results were obtained from measurements using an Alicona InfiniteFocusG4.
ParametersSurface Roughness on the Part of the Pelvis Model Manufactured in One Piece,
Normal Vector of the Acetabulum Area at a Significant Angle to the Z Axis
Along Applied LayersFrom the Side of the Surface Contact with the Support MaterialIn the Acetabulum Area
SaMean48.17 µm201.96 µm52.08 µm
Std. Dev.13.70 µm24.44 µm5.76 µm
SqMean58.59 µm243.86 µm65.77 µm
Std. Dev.16.39 µm28.48 µm7.60 µm
Spk + Sk + SvkMean245.45 µm1028.09 µm307.21 µm
Std. Dev.71.11 µm103.03 µm36.71 µm
Surface roughness on an acetabulum model,
normal vector of the acetabulum area almost parallel to the Z axis
SaMean29.29 µm160.64 µm85.21 µm
Std. Dev.2.08 µm22.09 µm8.34 µm
SqMean36.04 µm192.32 µm102.45 µm
Std. Dev.2.76 µm25.68 µm11.15 µm
Spk + Sk + SvkMean149.94 µm768.75 µm427.96 µm
Std. Dev.17.96 µm74.18 µm62.84 µm
Disclaimer/Publisher’s Note: The statements, opinions and data contained in all publications are solely those of the individual author(s) and contributor(s) and not of MDPI and/or the editor(s). MDPI and/or the editor(s) disclaim responsibility for any injury to people or property resulting from any ideas, methods, instructions or products referred to in the content.