Article

A Novel Disassembly Strategy of Hexagonal Screws Based on Robot Vision and Robot-Tool Cooperated Motion

1
Institute of Advanced Manufacturing and Intelligent Technology, Beijing University of Technology, Beijing 100124, China
2
Machinery Industry Key Laboratory of Heavy Machine Tool Digital Design and Testing Technology, Beijing University of Technology, Beijing 100124, China
3
Key Laboratory of CNC Equipment Reliability, Ministry of Education, School of Mechanical and Aerospace Engineering, Jilin University, Changchun 130012, China
*
Author to whom correspondence should be addressed.
Appl. Sci. 2023, 13(1), 251; https://doi.org/10.3390/app13010251
Submission received: 28 November 2022 / Revised: 16 December 2022 / Accepted: 19 December 2022 / Published: 25 December 2022

Abstract

:
Disassembly plays an important role in the production process. Screw automatic unfastening guided by a robot has been widely used in the fields of industrial manufacturing and maintenance. Different from the previous studies that have used a flexible effector and expensive sensors, this paper presents a novel unfastening strategy based on robot vision for a hexagonal screw with an arbitrary loose state. In a robotic system, an industrial camera and a servo unfastening tool are installed at a robotic end-effector. The main contributions of this work are as follows. A camera pose adjustment method is proposed to obtain high-quality images of a target screw. The hexagonal screw pose calculation method based on the geometric analysis is developed to complete the screw–tool engagement. The cooperated motion of a robot and an unfastening tool is planned for the screw unfastening action. The effectiveness of the proposed control strategy is verified by experiments, and the influence of the motion speed on the unfastening quality is analyzed using the torque data collected by the unfastening tool. The analysis results can provide a significant foundation for the motion parameter selection in the proposed strategy.

1. Introduction

In recent years, robots have been increasingly applied to the field of automated manufacturing, thus improving both working efficiency and quality. In the assembly process of mechanical manufacturing, threaded assembly is one of the most common methods [1]. In particular, the screw-unfastening process is always performed when workpieces require maintenance to extend the product life through re-manufacturing effectively [2]. In modern industry, screw fastening and unfastening tasks have been typically completed in three ways: through manual operation using a wrench or screwdriver, as shown in Figure 1a; through automatic operation using a Cartesian robot, as shown in Figure 1b; and through automatic operation using an articulated robot, as shown in Figure 1c. Disassembly tasks in complex three-dimensional (3D) structured and unstructured environments have been mostly completed by humans. As humans perceive information on environmental parameters and screw pose mainly by eyes, the peg-in-hole, fastening, and unfastening states are typically analyzed through a sense of touch by hands [3,4]. Although humans can perform the loosening of screws under different complex states, this approach has the disadvantages of low efficiency, massive labor, and difficult control of the disassembly effect. To address these problems, automatic operation methods have been developed. Compared to a Cartesian robot, an articulated robot is more applicable to complex 3D environments, for instance, for different loose states located on the same surface and screws located on different surfaces, as shown in Figure 2. A force or torque sensor has been commonly used to perceive interaction information during the operation. Moreover, to improve the automation level, many studies have adopted control methods of automatic peg-in-hole, fastening, and unfastening actions guided by industrial robots. In the following, some of the recent representative studies are presented to show the contributions of this work.
To address the peg-in-hole problem, some studies have installed passive compliance devices at the end effector of a robot to perform the action [5], thus compensating for the location error between the peg and hole. However, the complaint mechanism has a complex, difficult, and high-cost design and cannot be used for the precise control of the force and torque due to high structural flexibility, which limits screw assembly operation. A number of studies used robotic vision sensors to measure relative posture between the peg and hole or other workpieces in a 3D environment. Suszyński [6] presented an industrial robotic system of industrial robot equipped with a triangulation scanner in the assembly process. And accurate positioning of the elements in 3D was recognized based on point clouds. Wang [7] proposed a robotic assembly system under the guidance of the 3D models over the internet, which used a monocular camera to collect a sequence of images in different poses. Yan [8] developed a robot assembly system with two manipulators and a structured light camera. The component pose at the end of a manipulator is calculated in 3D space. The peg-in-hole action is performed using a robotic rigid end effector based on geometric and physical models, as well as the position or force feedback [9,10]. In addition to the peg-in-hole problem, the control of fastening and unfastening operations represents the core limitation to the successful and high-quality system operation. Certain studies have solved this problem using a combination of vision and force and torque sensors, obtaining a good effect in the screw-fastening tasks [11,12].
Compared with the screw-fastening process, a robotic vision-based screw-unfastening process requires measuring the screw pose with a hexagonal shape, not a circular hole. The measurement accuracy is crucial for the success and quality of the unfastening process. Additionally, automatic processes of the assembly and disassembly actions are not completely the opposite. Jia [13] and Jiang [14] analyzed and reviewed a large number of automatic fastening actions, which cannot be directly conducted or adjusted. Some of the related studies focused on operational tools, which are different for the fastening and unfastening actions. Seliger [15] proposed a detachable tool consisting of a modified drill with a movable needle, which can be used to grab the top of fasteners. Chen [16] designed an unfastening tool that can be fixed on the end of a robot and applied to fasteners of the same shape. There are four main methods for screw unfastening, including human operation, artificial teaching control, human–robot cooperation, and sensor-based intelligent control methods. For instance, Vongbunyong [17] proposed a human dismantling platform, which can assist a computer in learning the dismantling process of an LCD display rear cover, including tool locations and the key process. Bdiwi [18] completed the repeated disassembly automation operation of motor bolts by robots using the artificial control-based method. Liu [19] built a hybrid human–robot cooperation unit to complete the automatic disassembly work for the Diaphragm coupling structure. DiFilippo [20] and Schumacher [21] developed a robotic system based on a Kinect sensor, which has three motion axes, and applied it to the notebook disassembly. Experimental results [20] have shown that the success rate of the assembly work guided by this system can reach 96.5 % (251/260). Actually, robots with three motion axes have been widely used in the automated assembly and disassembly tasks in the field of electronic assembly. However, their application is limited for workpieces with high requirements for size and shape requirements, as well as for that with screws located on multiple planes. Li [22] proposed a spiral method for a robot to search for screws and adjust the tool–screw engagement based on sensing data of a force or torque sensor, as well as completing the screw unfastening operation through human–robot cooperation (HRC). Still, the working efficiency and success rate of this method cannot meet practical requirements for key components in the field of aerospace and rail transit.
In summary, the existing methods have been limited in screw removal in complex 3D environments. To address this limitation, this work presents a low-cost and high-adaptability disassembly strategy based on robot vision for a robot with six degrees of freedom (DOFs) equipped with a special screw tightening tool at its end effector, as shown in Figure 3. The comparison of representative recently-proposed methods and the strategy proposed in this study is given in Table 1.
The main contributions of this work can be summarized as follows:
(1) A camera pose adjustment method is proposed for obtaining high-quality images of a target screw. In this method, the camera orientation is adjusted based on the geometric feature analysis results of the characteristic circle, aiming to make the image plane parallel to the screw head. Meanwhile, the camera position is adjusted based on the rough location of a screw relative to the image center, aiming to make the screw located approximately in the center of the image plane. This can help to improve the measurement accuracy of the screw pose.
(2) For the screw–tool engagement, a calculation method is developed to determine the hexagonal screw pose rapidly and accurately based on image information. In this method, 3D locations of hexagonal vertexes can be obtained through an accurate description of screw edges. Compared with the machine-learning-based method [23], this method reduces the location uncertainty caused by sample training and meets the application requirements of ordinary bolts, which can help to increase the success rate of the screw-unfastening operation significantly.
(3) An unfastening control method is proposed for the cooperated motion of an unfastening tool and a robot to ensure the disassembly quality. Additionally, variation curves of the torque under different motion speeds are analyzed based on sensing data of the unfastening tool, which provides a significant data foundation for the value selection of motion parameters.
(4) A strategy based on vision feedback and methods of the imaging process and coordinated motion control of a robotic system is proposed. Compared with the methods based on force and torque information, it largely reduces the operating cost of a system, as well as the data size and processing complexity.
From the main contributions of this work, the novelty lies in new methods proposed for screw–tool engagement and unfastening action. The new method for screw–tool engagement is composed of a camera pose adjustment method and a screw pose calculation method, which are proposed to improve the engagement success rate and reduce the system cost. The unfastening action is realized by the cooperated control of the axial motion of the robotic end effector and the rotational motion of the unfastening tool with proper speeds, which can be taken according to their influence analysis on the disassembly quality. Based on the above methods, an automatic disassembly strategy of hexagonal screws based on robot vision is finally obtained. Compared with the methods based on force and torque information, it largely reduces the system cost since there is no need for high-cost sensors, such as a six-axis wrist force sensor, as well as the data size and computing complexity.
The rest of this article is organized as follows. Section 2 introduces a disassembly strategy based on robot vision, including four steps—camera pose adjustment, screw–tool engagement, hexagonal screw unfastening, and moving screw away from a workpiece—and describes the hexagon screw pose calculation based on the camera pose adjustment, as well as the geometry analysis. Section 3 presents the experiments conducted to verify the effectiveness of the proposed control strategy and discusses the experimental results in terms of the screw–tool engagement. Section 4 gives the main conclusions and future work directions.

2. Proposed Screw Unfastening Strategy

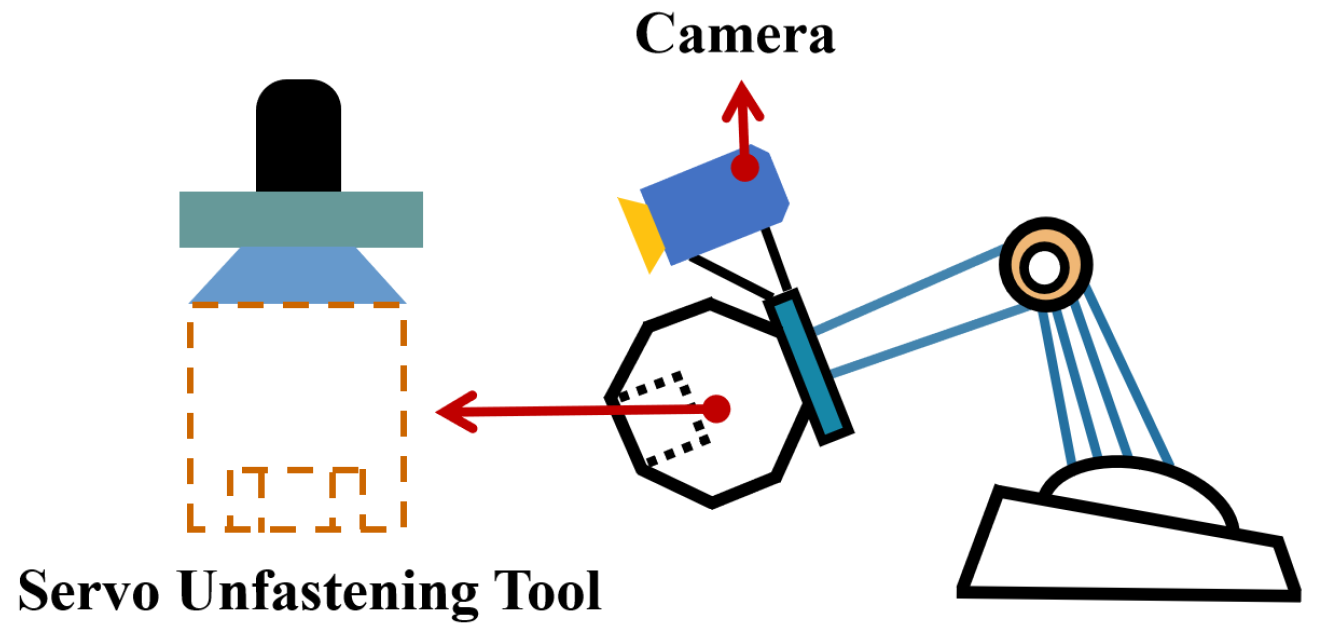
As introduced above, this study presents an effective screw unfastening system for a six-DOFs robot equipped with an end effector composed of a special screw-tightening tool and a camera, as shown in Figure 4. In this system, a servo unfastening tool consists of a motor, a reducer, inner displacement and torque sensors, and an output rotation shaft. There is a regular hexagonal groove at the end of the rotation shaft, having a slightly larger size than the target screw head and an elastic mechanism, as shown in Figure 5. To realize the disassembly operation, the tool is mounted at the end of the robot so that it can guide it to the target screw. It has its control system, which communicates with the robot through the Beckhoff module and exchanges messages with a PC through the TCP/IP protocol. During the operation, a signal for performing the unfastening operation is sent to the unfastening tool when a robot arrives at the desired location. Namely, the screw-unfastening operation is performed through the cooperated motion of the tool and robot. The signals for stopping motions are sent to the tool and robot at the same time. Finally, the robot finishes the disassembly operation and prepares for the next unfastening task.
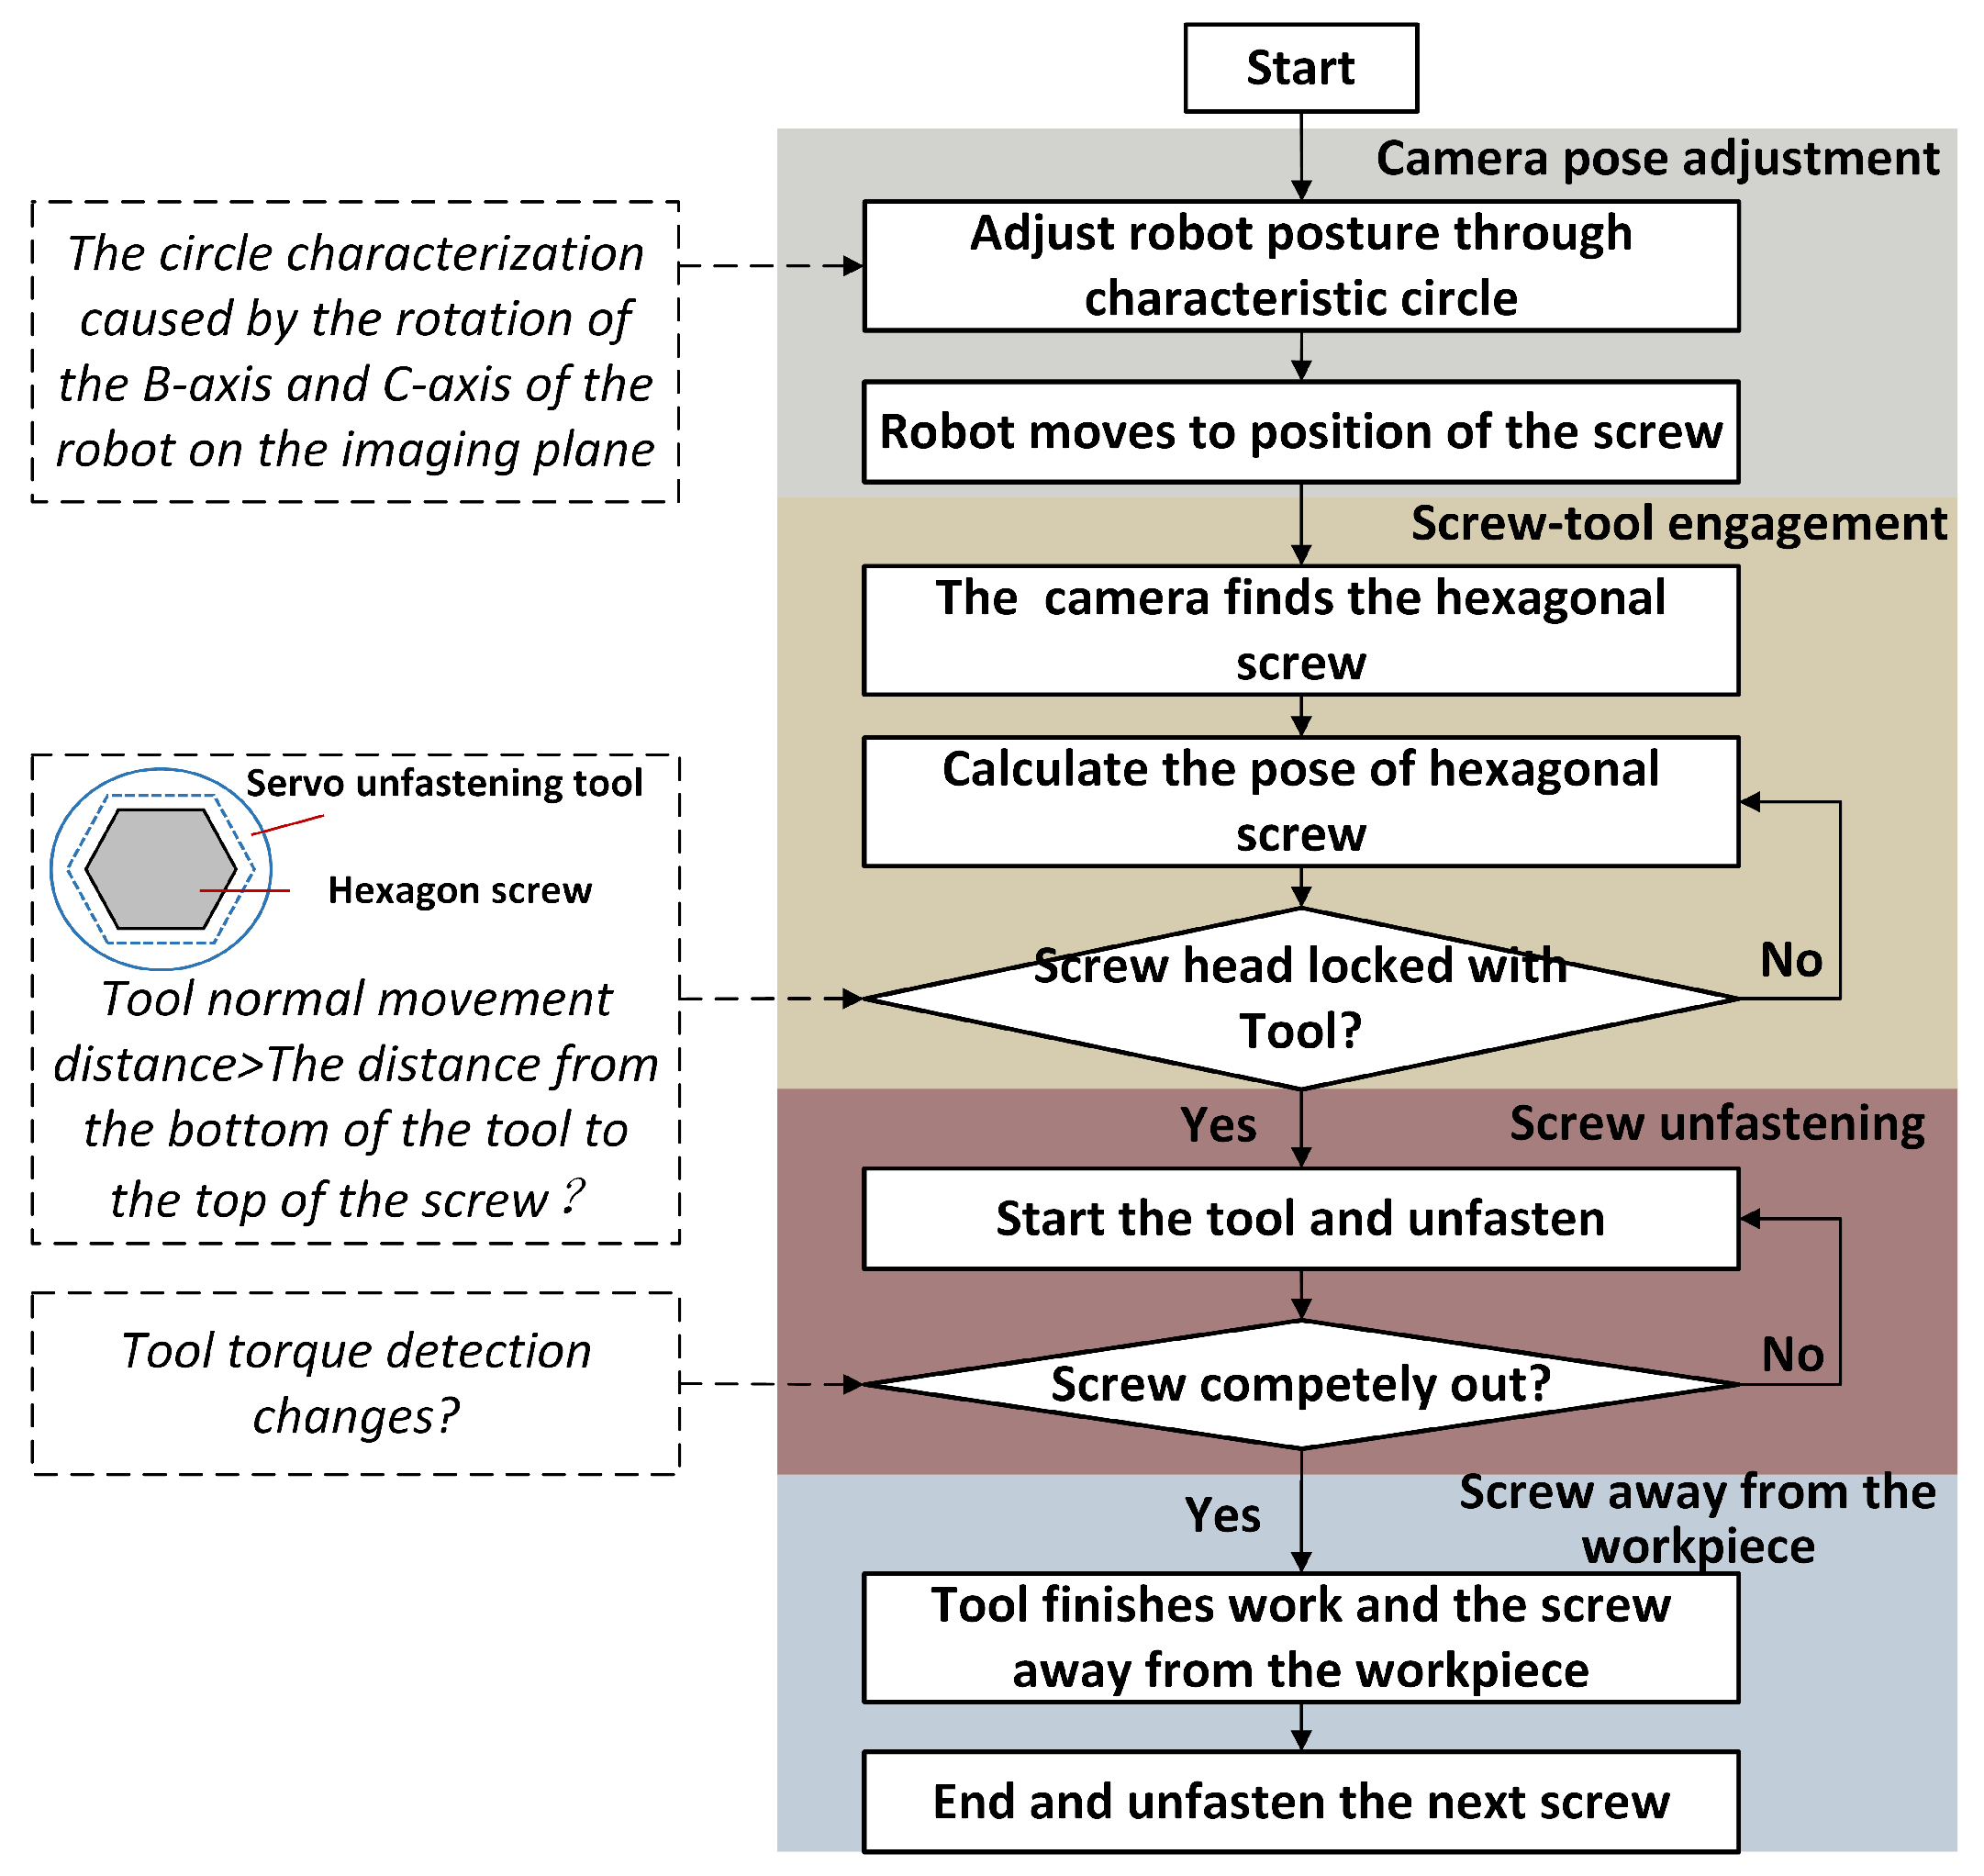
In the proposed strategy, the unfastening operation of a hexagonal screw is divided into four steps, as shown in Figure 6. The first step is to adjust the pose of an end-effector camera to obtain high-quality images of a hexagonal screw, which is necessary for the accurate calculation of its pose. In this step, the robotic pose relative to the workpiece is first measured through a characteristic circle to determine the start and target poses of the robotic end effector. Then, based on the measurement result, the robotic motion is planned for the subsequent process of camera pose adjustment. In this study, the robot’s target pose is calculated to ensure that the end effector is parallel and stays at a certain distance above the screw, which is helpful to improve the screw image quality for the second step.
The second step is to calculate the screw pose and then move the robotic end effector forward and lock the screw, which is a pre-action for the third step. In this step, a hexagon screw’s pose in the robotic base frame is calculated based on the geometry analysis results of a hexagonal shape. The calculated pose is used to plan the robotic motion in the locking action of a screw by the end-effector tool. This step makes the proposed strategy adaptable to the disassembly operation of screws with different loose states by providing the correct feedback on the target screw’s pose for the robotic motion.
The third step is to unfasten a screw through the cooperated motion of the robot and unfastening tool. In this step, the disassembly quality can be improved by selecting proper values of the motion parameters, which can be obtained by the analysis of the torque variation over time during the unfastening action.
The fourth step is to move a screw away from the workpiece. In this step, the robot continues its motion along a planned trajectory; the tool stops its rotating motion but maintains the normal force so that the screw does not fall. Finally, the robot puts the screw into a container and proceeds to the next unfastening operation.
The proposed strategy aims to improve the efficiency and quality of screw disassembly, as well as the adaptability of a robotic system at a reduced cost. Particularly, the screw pose calculation method based on a vision system is proposed to provide accurate information for the one-time engagement action of a tool and a hexagonal screw. The engagement duration has a major impact on the bolt disassembly efficiency. In the previously reported methods [24], the screw–tool engagement has been achieved through the location adjustment using a vision sensor and the orientation search using a force sensor. Compared with the previous methods, the proposed vision-based method can avoid repeated trial-and-error actions during the orientation search, thus providing higher operational efficiency.
Except for affecting the efficiency, the reduced disassembly quality may damage the thread and make it impossible to reuse, which can significantly increase the manufacturing cost. Therefore, in this study, the disassembly quality is improved by setting proper values of motion parameters of the robot and unfastening tool, which are obtained through the torque variation analysis over time. The torque variation analysis results indicate that the motion parameters’ values depend on the trade-off between efficiency and quality. Therefore, the torque monitoring aims to determine the proper values of motion parameters during the process planning stage, which is not a necessary step for all disassembly actions, so the actual disassembly speed could be significantly increased. However, in the previous studies, torque monitoring was used for the orientation search for the screw–tool engagement. For instance, Li [22] proposed a hexagon screw spiral searching method for a robot, which monitors the feedback on force or torque to realize the screw–tool engagement, as shown in Figure 7.
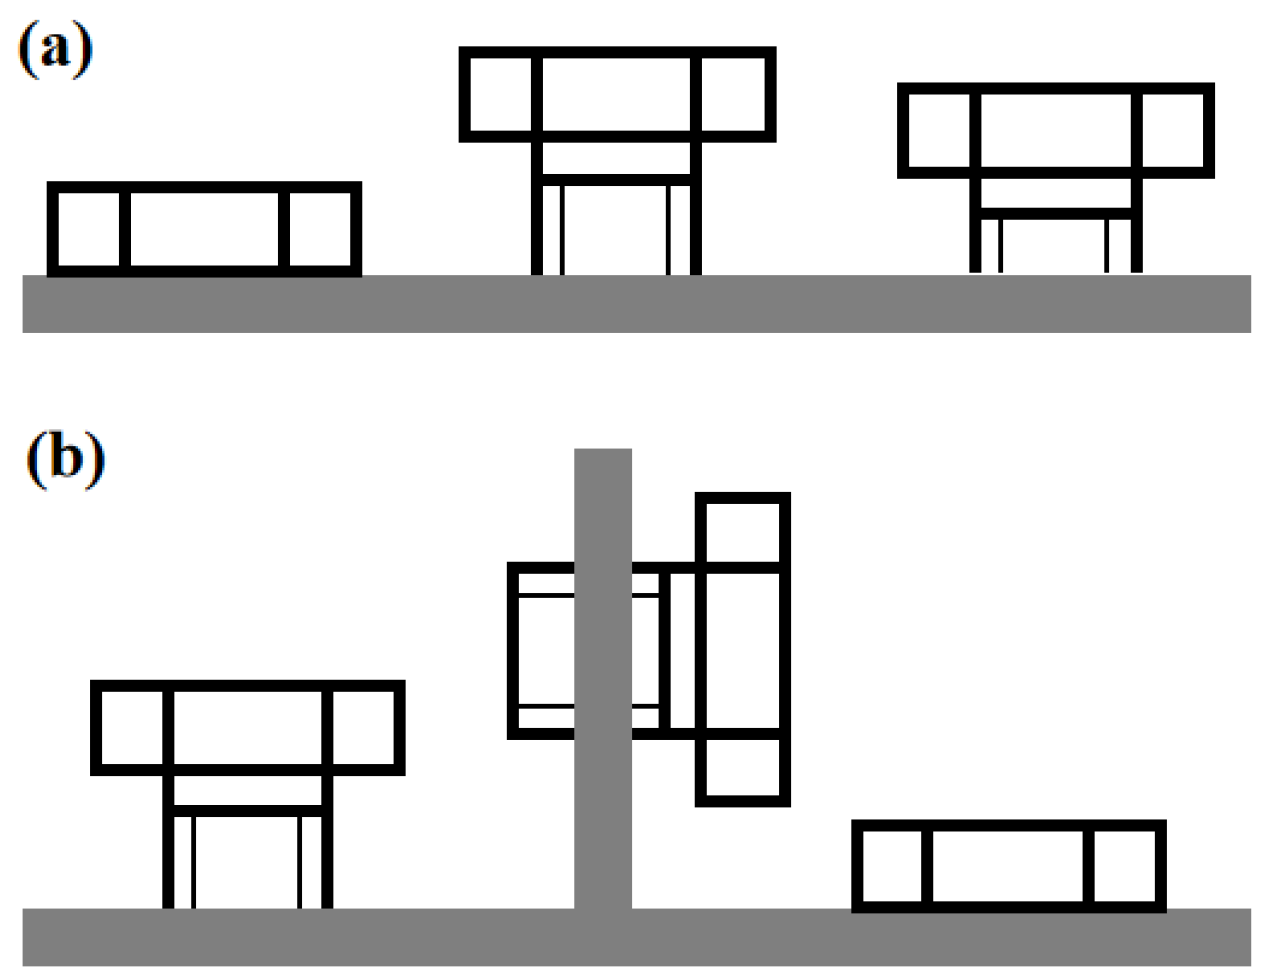
In addition to the efficiency and quality, applicability is also an important feature of a disassembly technique. Obviously, the vision-torque-based methods are limited when there exist obstacles between target screws, as shown in Figure 8a. This makes it impossible for a robot to complete the spiral motion smoothly and also makes it less efficient for screws with different loose states because more time is needed to search a screw along the axial direction, as shown in Figure 8b. In addition, some of the latest studies have used vision-based methods to perform the disassembly task using a Cartesian robot when screws are located on a plane [21,25]. Therefore, the existing studies have certain limitations in complex environments. To extend the applicability, this work uses a vision system to determine the 3D pose of a target screw accurately [26]. The identification and positioning of target can be realized by global recognition and positioning using binocular camera system. The screws were searched and matched by the Gaussian pyramid hierarchical method and greedy algorithm, and the optimal matching results were obtained based on vision calibration and picture correction. However, the pose of the screws obtained by this method [23] are not accurate enough, so the strategy proposed in this paper is needed to accurately obtain the pose of screws. Then, the system performs the engagement and unfastening actions based on the calculated pose using a robot, which can effectively avoid problems existing in the previous studies.
For the above steps, the motion planning of a robot is a significant task, which has been presented in the previous research on obstacle avoidance and other motion performance constraints [27]. Moreover, the camera pose adjustment, screw–tool engagement, and screw unfastening are the main problems considered in this study. The advanced methods proposed to address the three listed problems are introduced in the following sections.

2.1. Robotic Motion-Guided Camera Pose Adjustment Method

This work aims to develop an effective vision-based disassembly strategy for screws located in 3D complex structures, including different working planes. The measurement accuracy of a vision system has a major impact on the effectiveness and efficiency of the proposed strategy. This section proposes a camera pose-adjustment method guided by robotic motion, aiming to improve the image quality of a screw. To solve this problem, a characteristic circle needs to be placed on the structure to be disassembled. The image processing of the characteristic circle aims to realize the camera pose adjustment to obtain high-quality images of the target screw, which has a significant impact on the calculation accuracy of a screw pose. In the proposed strategy, there is one characteristic circle on each working plane, and screws on the same plane can be disassembled.
The camera pose adjustment is completed by three steps: the initial camera view adjustment, the orientation adjustment and the position adjustment. These are presented as follows in detail.
(1) Initial camera view field adjustment: The camera view is firstly adjusted by regular searching of the characteristic circle through the robotic motion based on the global recognition and positioning, aiming to make a screw and the characteristic circle located in the same image. According to the imaging principle, the object distance is positively related to the camera view field but negatively to the area covered by the target in an image, which means that the object distance adjustment should consider both the camera view field and the image quality. In this study, the general adjustment is performed by the robotic motion based on the above principle, which makes the characteristic circle and the target screw be located in the same image and their image area as large as possible.
Generally, when the distance between the characteristic circle and a screw is very long, the image quality will be greatly affected, which will reduce the location accuracy of a screw and can result in a failure of the engagement of the screw and unfastening tool. To analyze the allowable distance range of the proposed robotic system, experimental tests were performed. In these tests, the distance between the hole and a screw was set to be in a range from 20 mm to 300 mm. Testing results are given in Table 2, from which it can be seen that the accuracy was greatly affected by the distance L h t s and area percentage R a t i o A . Therefore, the strategy is only applicable to cases when the distance is less than a certain value, which is defined by a specific requirement for the measurement accuracy.
For realizing the unfastening action successfully, the sizes of the screw and tool end should satisfy the condition of d 1 < d 2 , as shown in Figure 9. Accordingly, the minimal gap g is limited by the following condition,
g < e s / 2
where values of two parameters e and s are defined by the nut size specification standard.
In this study, the target screws’ parameters are as follows: e = 17.77 mm and s = 16 mm. The minimal gap satisfies the condition of g < 0.885 mm according to the standard GB/T5783-2000. In the proposed robotic system, g = 0.88 mm, which indicates that the location error cannot exceed the minimal gap of 0.88 mm. Therefore, aiming to improve the reliability of the proposed strategy, based on the test results in Table 2, the distance between the hole and a screw cannot be larger than 200 mm. For most industrial robots, such as the KUKA robot used in this work, their positioning accuracy is always high enough considering structural flexibility and control resolution, and can reach ±0.02 mm to ±0.05 mm. The accuracy of the positioning of the robot is far less than the minimal gap when performing screw unfastening. Therefore, the robot positioning accuracy has little influence on screw–tool engagement.
After achieving the camera view field adjustment, the characteristic circle and a screw are located in the same camera view field, as shown in Figure 10. This adjustment can help the subsequent camera pose adjustment.
(2) Camera orientation adjustment: During the camera pose adjustment step, the recognition and positioning of the characteristic circle and a target screw are completed in the image coordinate system first, as shown in Figure 10. The camera pose can be adjusted by the end-effector motion guided by a robot. For accurate adjustment, the motion of the robotic end effector is divided into three rotational motions along the A-axis, B-axis, and C-axis, as shown in Figure 4.
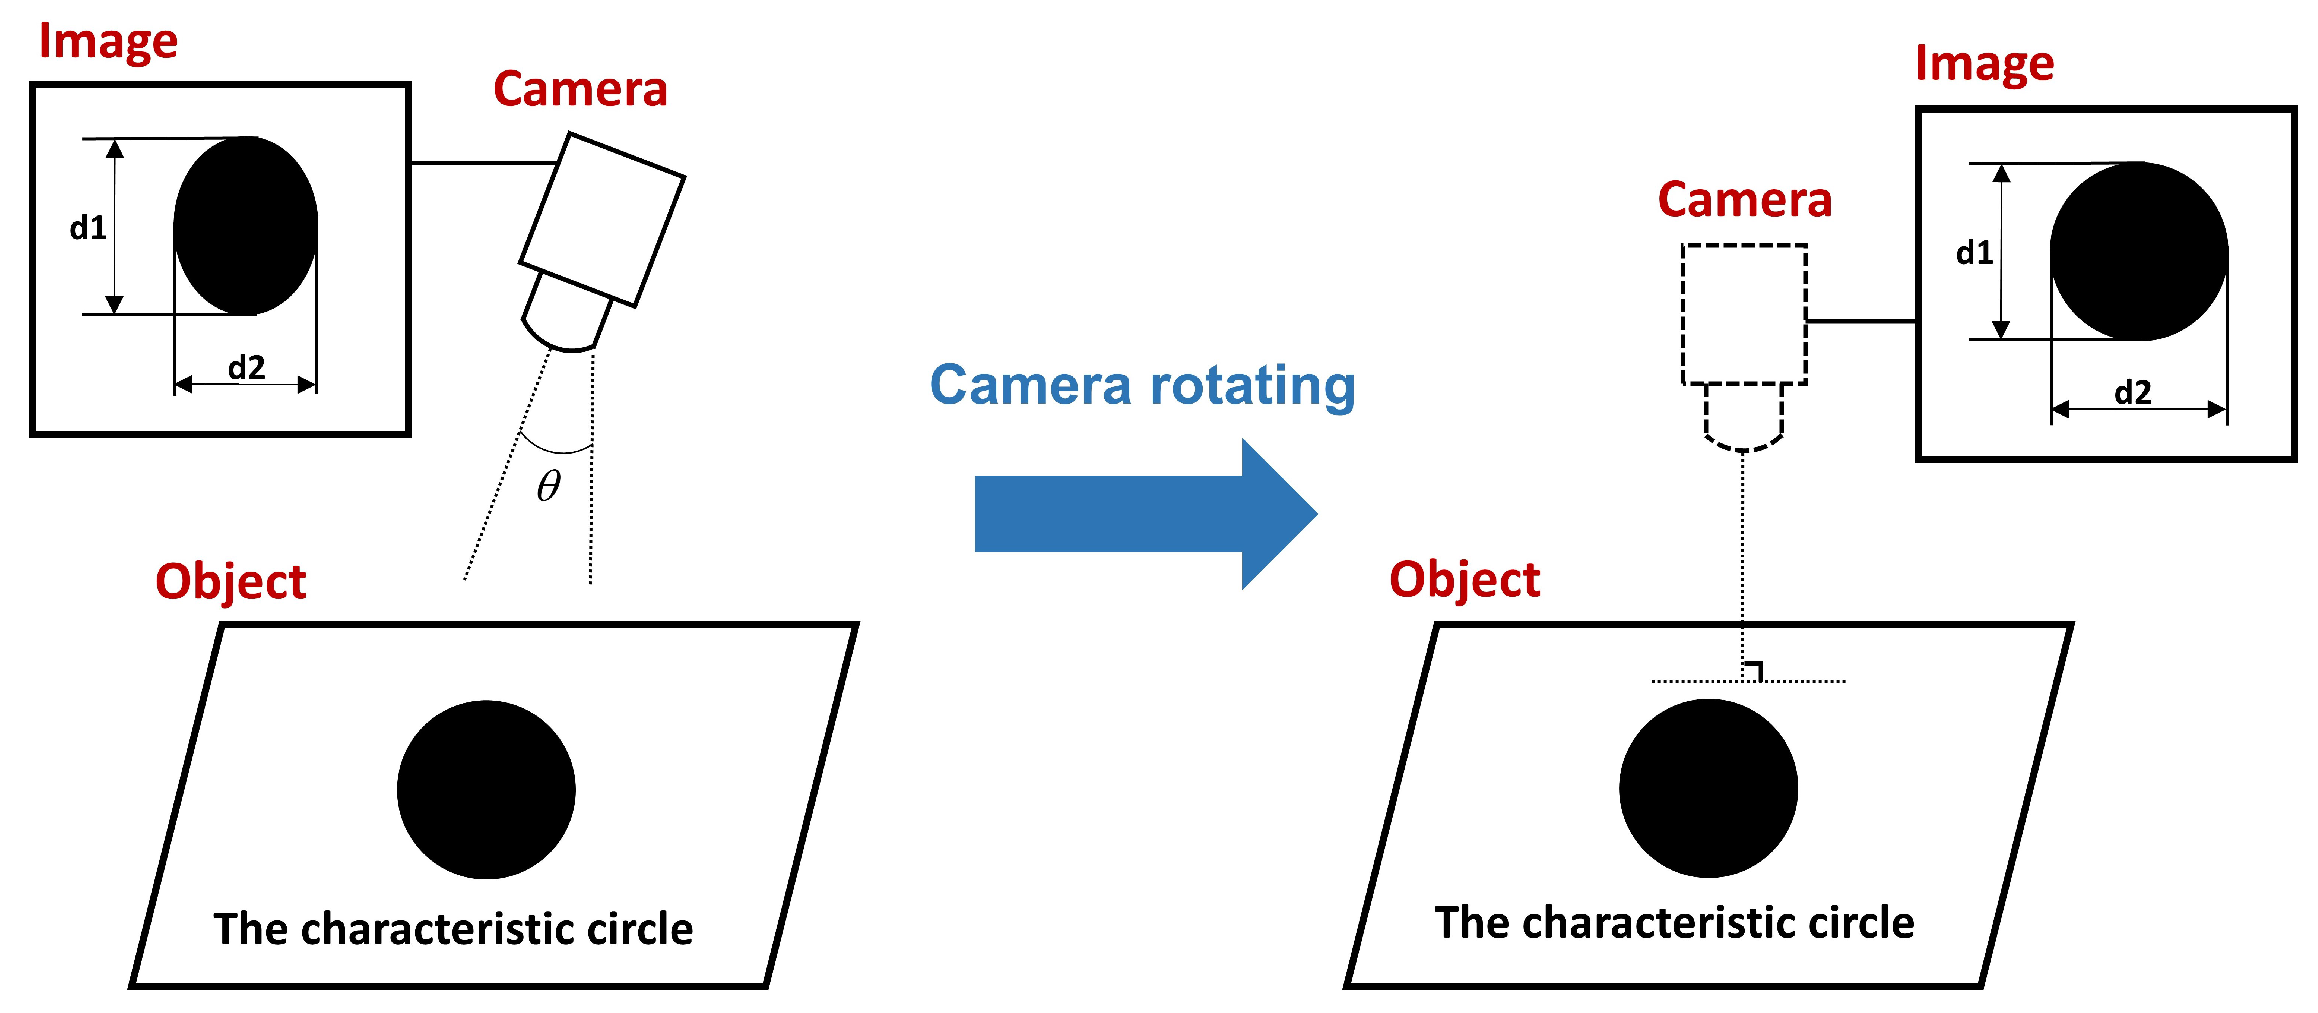
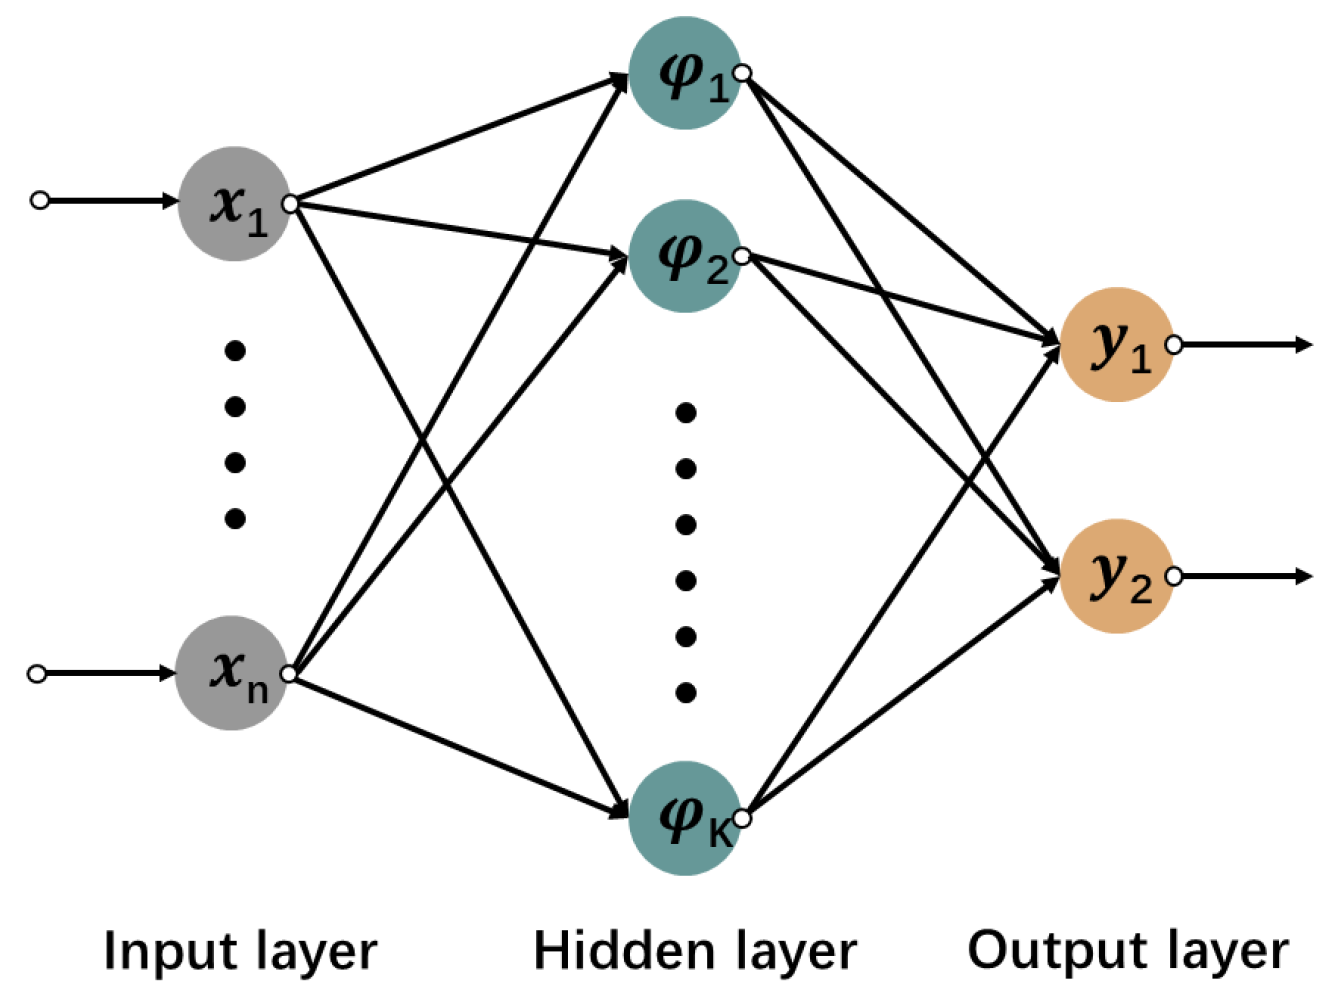
Particularly, when an image of the characteristic circle is taken by a camera under a certain imaging angle θ , the circle edge will be an ellipse curve, as shown in the left scheme in Figure 11. However, when θ = 0 , the edge of the circle will be a circle, as shown in the right scheme in Figure 11. Therefore, this parameter is used for the camera orientation adjustment based on the robotic motion. In the proposed strategy, the rotational motions along the B-axis and C-axis of a robotic tool are planned to complete this adjustment by establishing the radial basis forward network (RBF) neural network [28]. The RBF neural network has strong nonlinear mapping ability, fast computing speed, and good prediction ability. The RBF network is different from other neural networks, which has only one hidden layer [28,29]. The network is composed of an input layer, hidden layer and output layer, as shown in Figure 12. The activation function of the hidden layer is a Gaussian function. The specific form of RBF neural network algorithm is
φ j = e x p x c j 2 2 σ j 2
y = j = 1 K φ j w j
where x and φ j denote the input of the network and the output of the hidden layer. c j and σ j mean the Gaussian basis center, the base width parameter of the hidden layer node. y and w j represent the output of the network and the connection weight between the j t h neuron of the hidden layer and the network output. The good convergence of the results is the premise of the neural network. Therefore, the gradient descent method is used to adjust the center, width and weight of the RBF network so as to speed up its convergence.
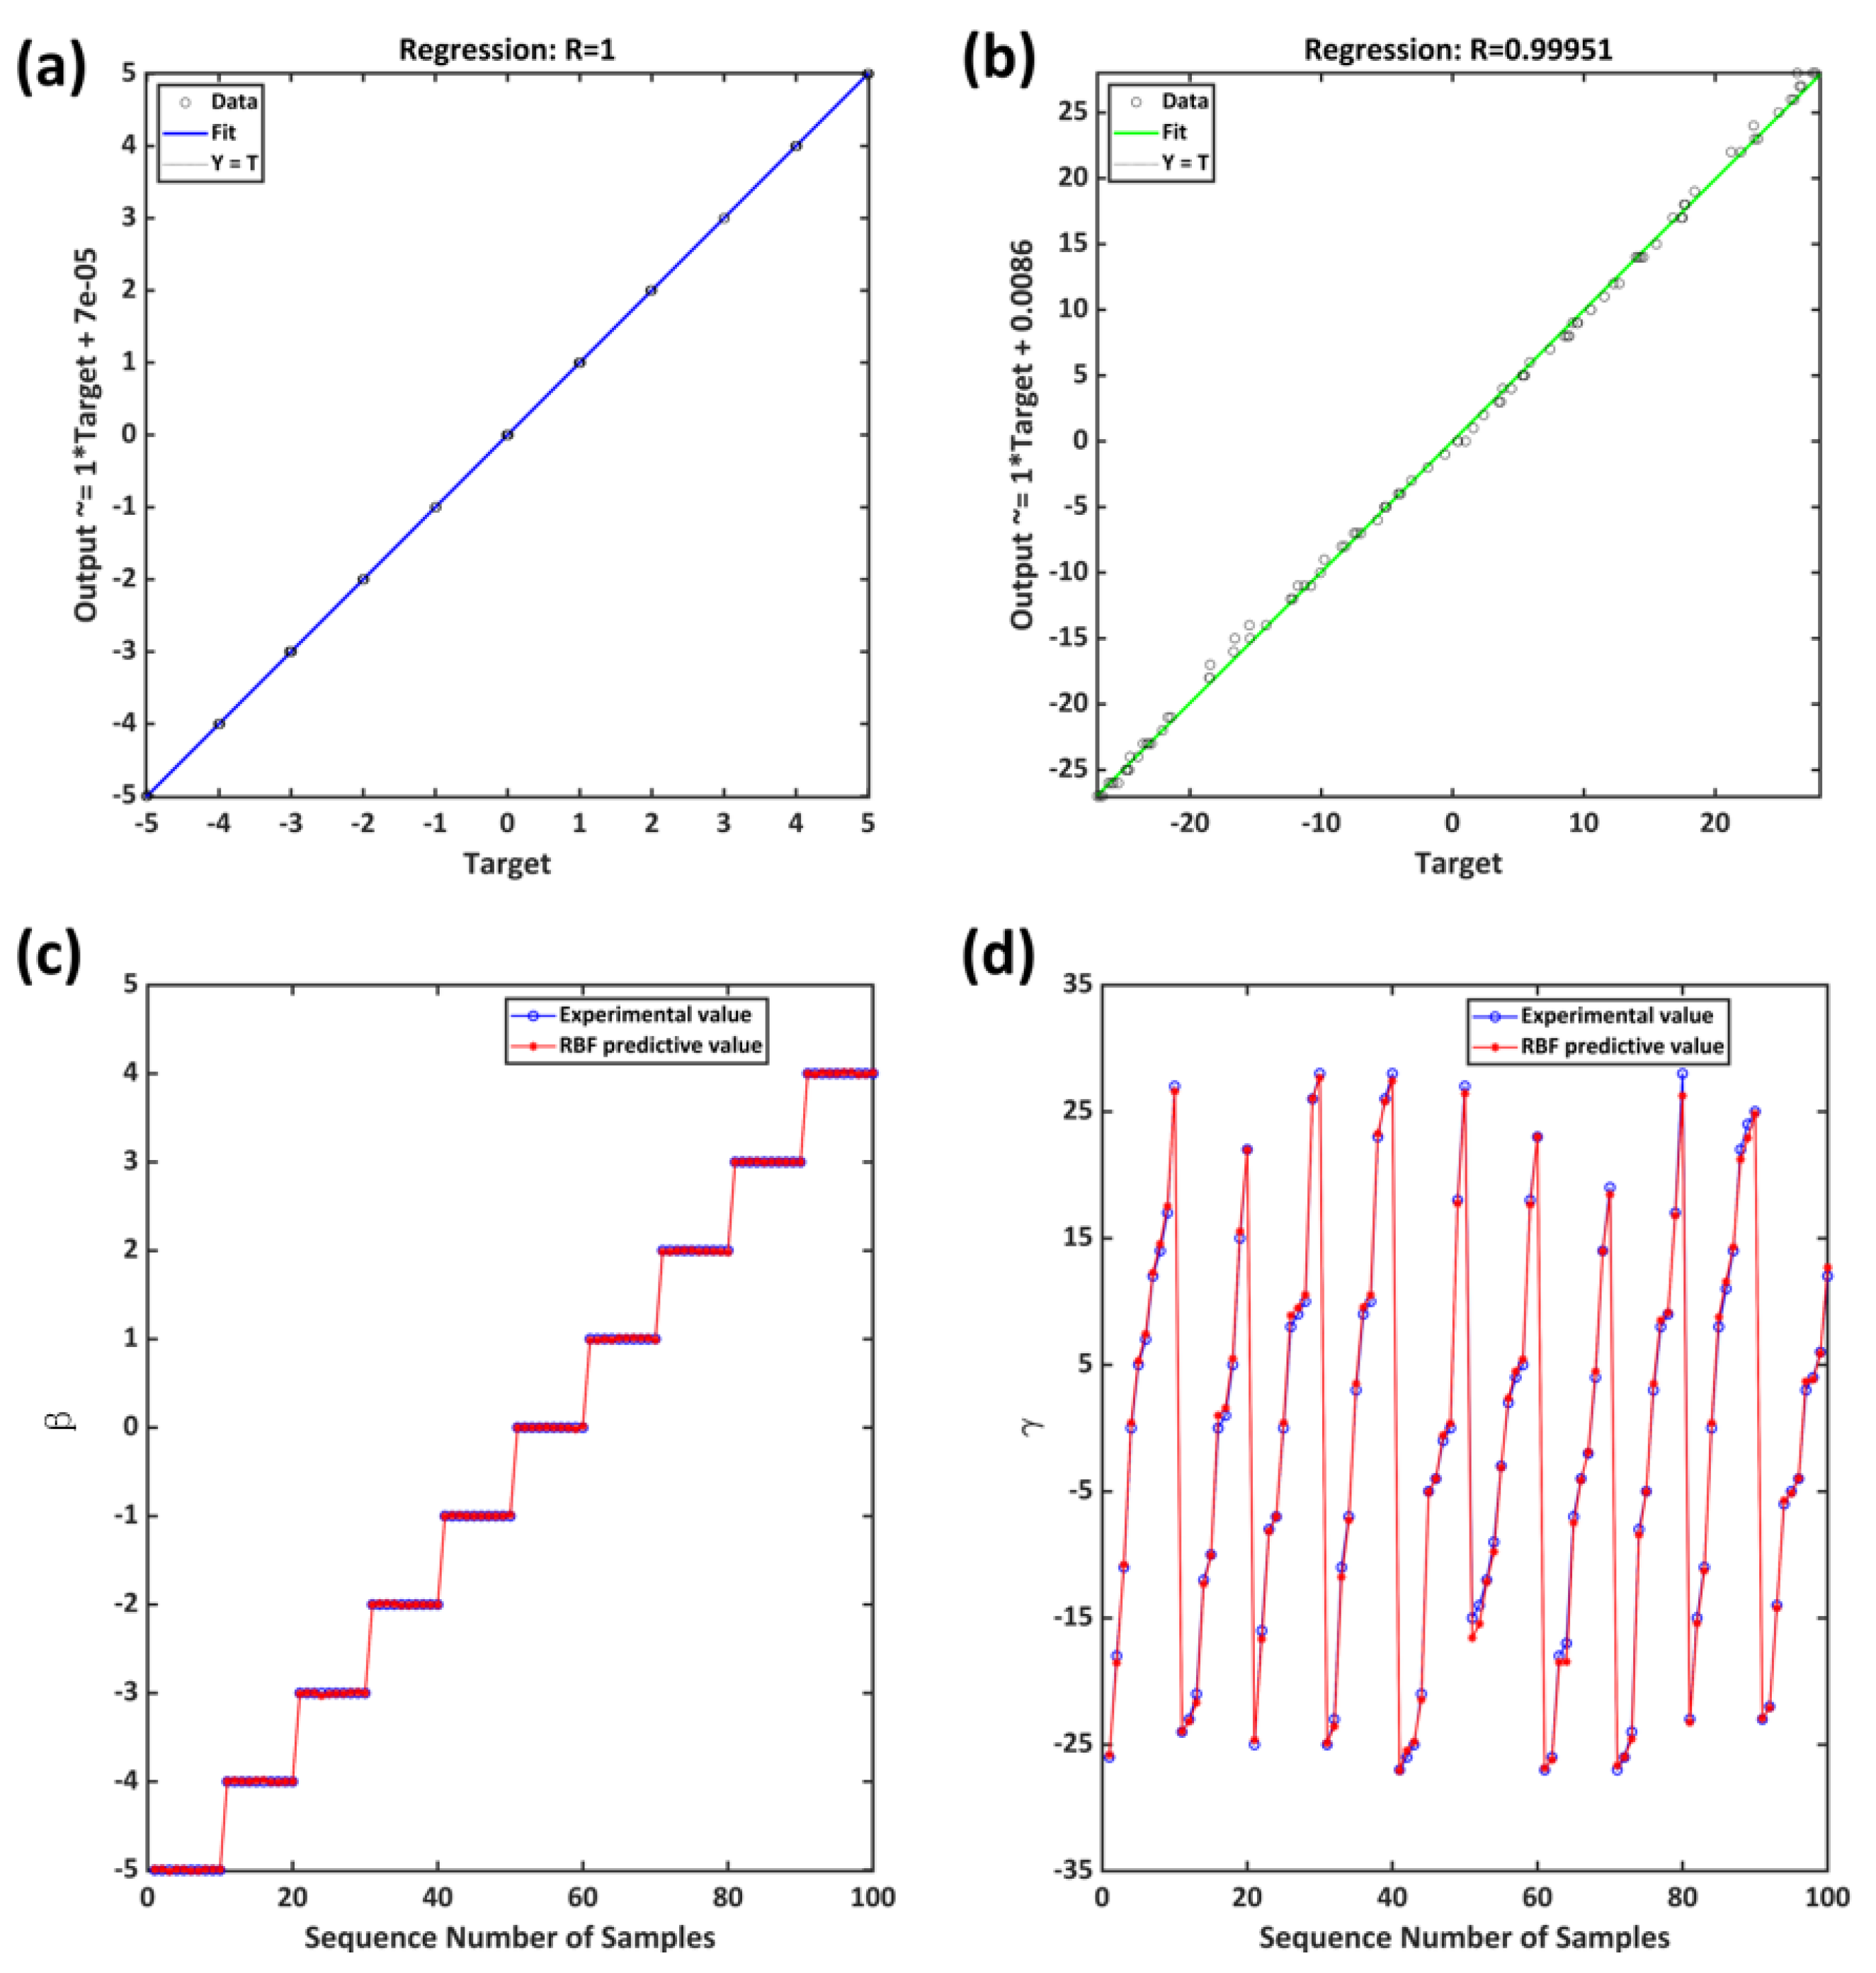
The serial number, major axis, and minor axis of characteristic circle are considered the input, and rotational angles β and γ are considered the output. In this paper, the number of hidden layers is one, and the final number of neurons is three. The experimental data (Table 3) used in this paper are from the real screw removal platform. In the data sample, 855 groups were randomly selected, 755 groups were used as the training set, and the remaining 100 groups were used as the prediction set. After network training and testing, linear regression analysis is conducted between the desired target and the actual output of the network model. The weight from the input layer to the hidden layer is n e t . I W 3 × 3 = [ 1 , 0.924 , 0.94 ; 0.6 , 0.901 , 0.962 ; 0.1 , 0.873 , 0.963 ] . The weight from the hidden layer to the output layer is n e t . L W 2 × 3 = [ 0.127 , 0.156 , 0.3 ; 1.559 , 2.812 , 1.251 ] × 10 5 . As shown in Figure 13a,b, the regression coefficient between the expected output and the actual output is very close to 1, which indicates that the network has a good prediction effect. Figure 13c,d show the comparison between the predicted results and the experimental results. The maximum relative errors of β and γ are 0.2% and 1.7%, the average absolute errors are 0.02 and 0.31. Based on the obtained neural network, values of β and γ can be predicted. Then, the camera orientation adjustment can be completed.
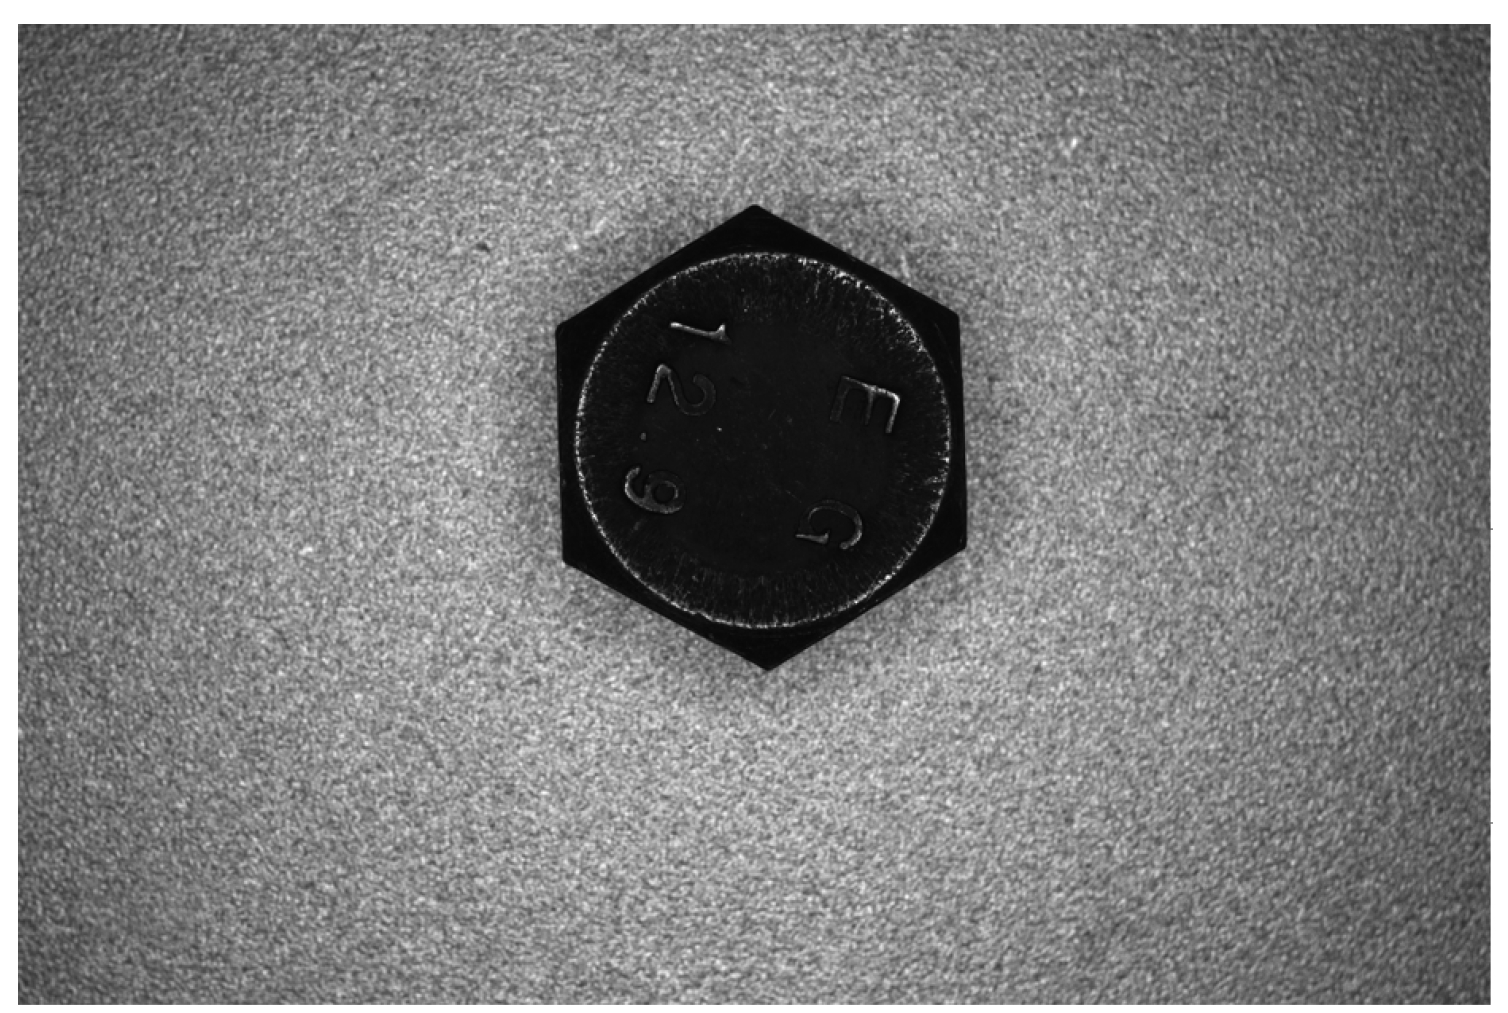
(3) Camera position adjustment: A rough position of a screw relative to the characteristic circle is determined to adjust the camera position relative to the screw. In this step, real distances X c t s and Y c t s of the end effector travelled in two axial directions of an image can be obtained based on the corresponding image distance and the pixel physical size d p , as follows X c t s = d p x c t s and Y c t s = d p y c t s . The current object distance d i s is calculated based on the ratio of the real size to the image size of the characteristic circle. Then, this distance is used to adjust the camera shooting distance d i s s of a screw to achieve a high-quality image, which can be realized by moving the robotic end effector along the direction of the camera optical axis by a distance of D I S = d i s d i s s . Based on the above adjustments, a screw can appear in the image field of a camera completely and clearly, as shown in Figure 14, which can help the screw location calculation in the next step.
The robotic motions needed for the camera orientation and position adjustments can be obtained based on the elliptical feature of the characteristic circle image and the rough position of a screw relative to the characteristic circle in the image coordinate system. Therefore, a 3D model can help to locate a screw that is difficult to appear in the same camera view with the characteristic circle but is not necessary for all screw disassembly tasks. In the experimental tests of this study, all adjustment motions are performed based on the image processing of an image that includes both the characteristic circle and the target screw.

2.2. Screw–Tool Engagement Method Based on Screw Pose Calculation

The screw–tool engagement includes two steps—the screw pose calculation and the engagement motion guided by a robot—which are presented in detail in the following.
(1) Screw pose calculation: The screw pose is calculated based on feature points of its pixel image, which can be extracted and located using the HALCON [30]. The pose calculation accuracy directly determines the success rate and efficiency of the engagement operation.
In this work, a Canny filter [31] is used to extract the hexagonal edge of a target screw from the whole image. For this algorithm, the filter value, which is in the range of 1∼200, has a crucial impact on the effect of the image noise removal and affects the accuracy of the edge extraction. In this work, the artificial experience is obtained from the previous image processing tests, and it can be described as follows: the more elements in an image exist, the larger the filter value should be, and the more calculations are required. In the experimental tests of this work, there existed only screws and the background with a single feature, so the filter value was set to 20, which could ensure the edge detection accuracy at an acceptable computing cost.
It should be noted that a proper filter value is determined based on the artificial experience mainly because the structure is simple. However, in real applications, there always exist complex assembly structures with bolted connections, so an adaptive adjustment method for the filter value should be selected according to the structural features. Therefore, an adaptive image processing method of screws is further studied to improve the effectiveness of the proposed control strategy.
After the edge extraction, all edges E d g e i of an image can be extracted, and the longest among them E d g e i m a x is selected as an edge of a hexagonal screw head. Edges of an image before and after the edge selection are shown in Figure 15. The length L s c r e w of the target edge can be obtained as follows:
L s c r e w = m a x { L e n g t h E d g e i , 0 < i I }
where i denotes the number of edges extracted from the image, and L e n g t h ( · ) represents the length calculation function of an edge.
The target edge is divided into several parts based on the point number of the edge contour. The maximum and minimum distances between the contour and the approximate line are set to 10 pixels and 5 pixels, respectively. As shown in Figure 16a, the set of lines and curves is used as an approximate contour, and this contour is further divided into sub-contours using the contour length as a feature. Finally, some of the curves are removed to make a screw have at least one line on each edge, setting the lower and upper limits of the contour length to 100 pixels and 1000 pixels, respectively. Hexagon edges of the screw head obtained by the presented procedures are shown in Figure 16b.
The obtained multiple sub-contours are linearly fitted using the ordinary least squares linear fitting operator of Tukey [32]. The abscissa R o w B e g i n i and ordinate C o l B e g i n i of the starting point, as well as the abscissa R o w E n d i and ordinate C o l E n d i of the end point, in the pixel coordinate system are obtained by applying the linear fitting operator. A line between a beginning point and the corresponding end point can be fitted using a linear equation, which can form six sides of a hexagon through extensions. The linear equation includes the following relations:
y i = k i x i + b i y i = r i / n i b i = R o w B e g i n i k i C o l B e g i n i
r i = R o w B e g i n i R o w E n d i n i = C o l B e g i n i C o l E n d i
where k i and b i means function parameters of the i-th line.
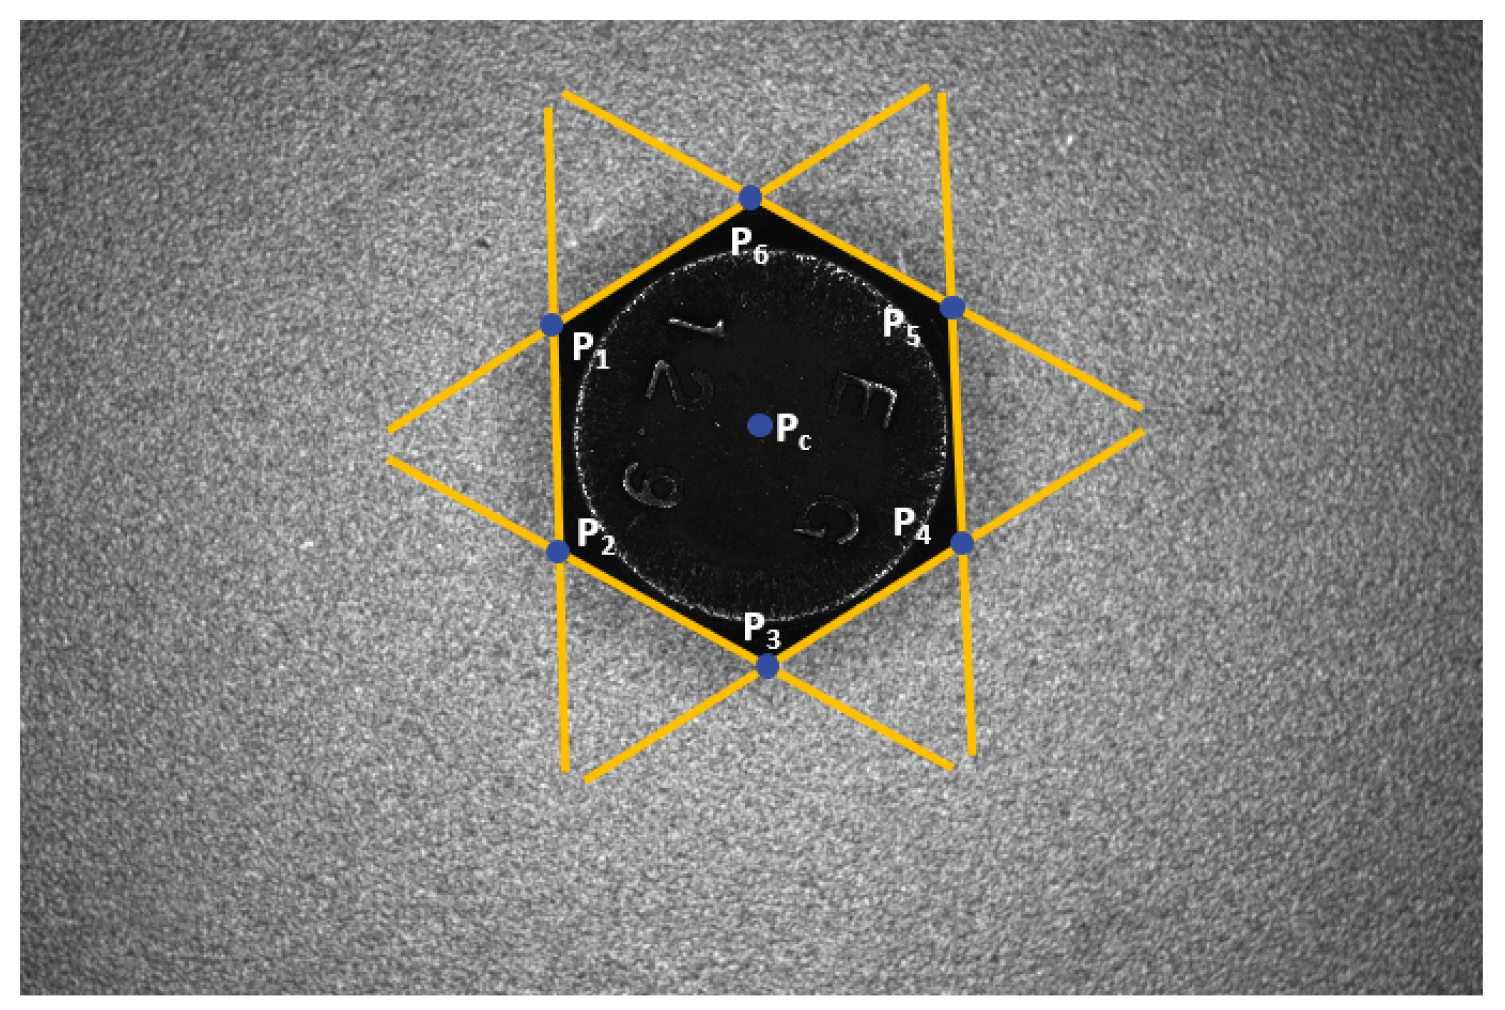
As shown in Figure 17, an intersection P i and its 2D location denoted by P i P i x , P i y can be obtained by Equations (3) and (4), based on which the hexagonal center P c P c x , P c y can be determined as follows:
P c x = P i x / i P c y = P i y / i
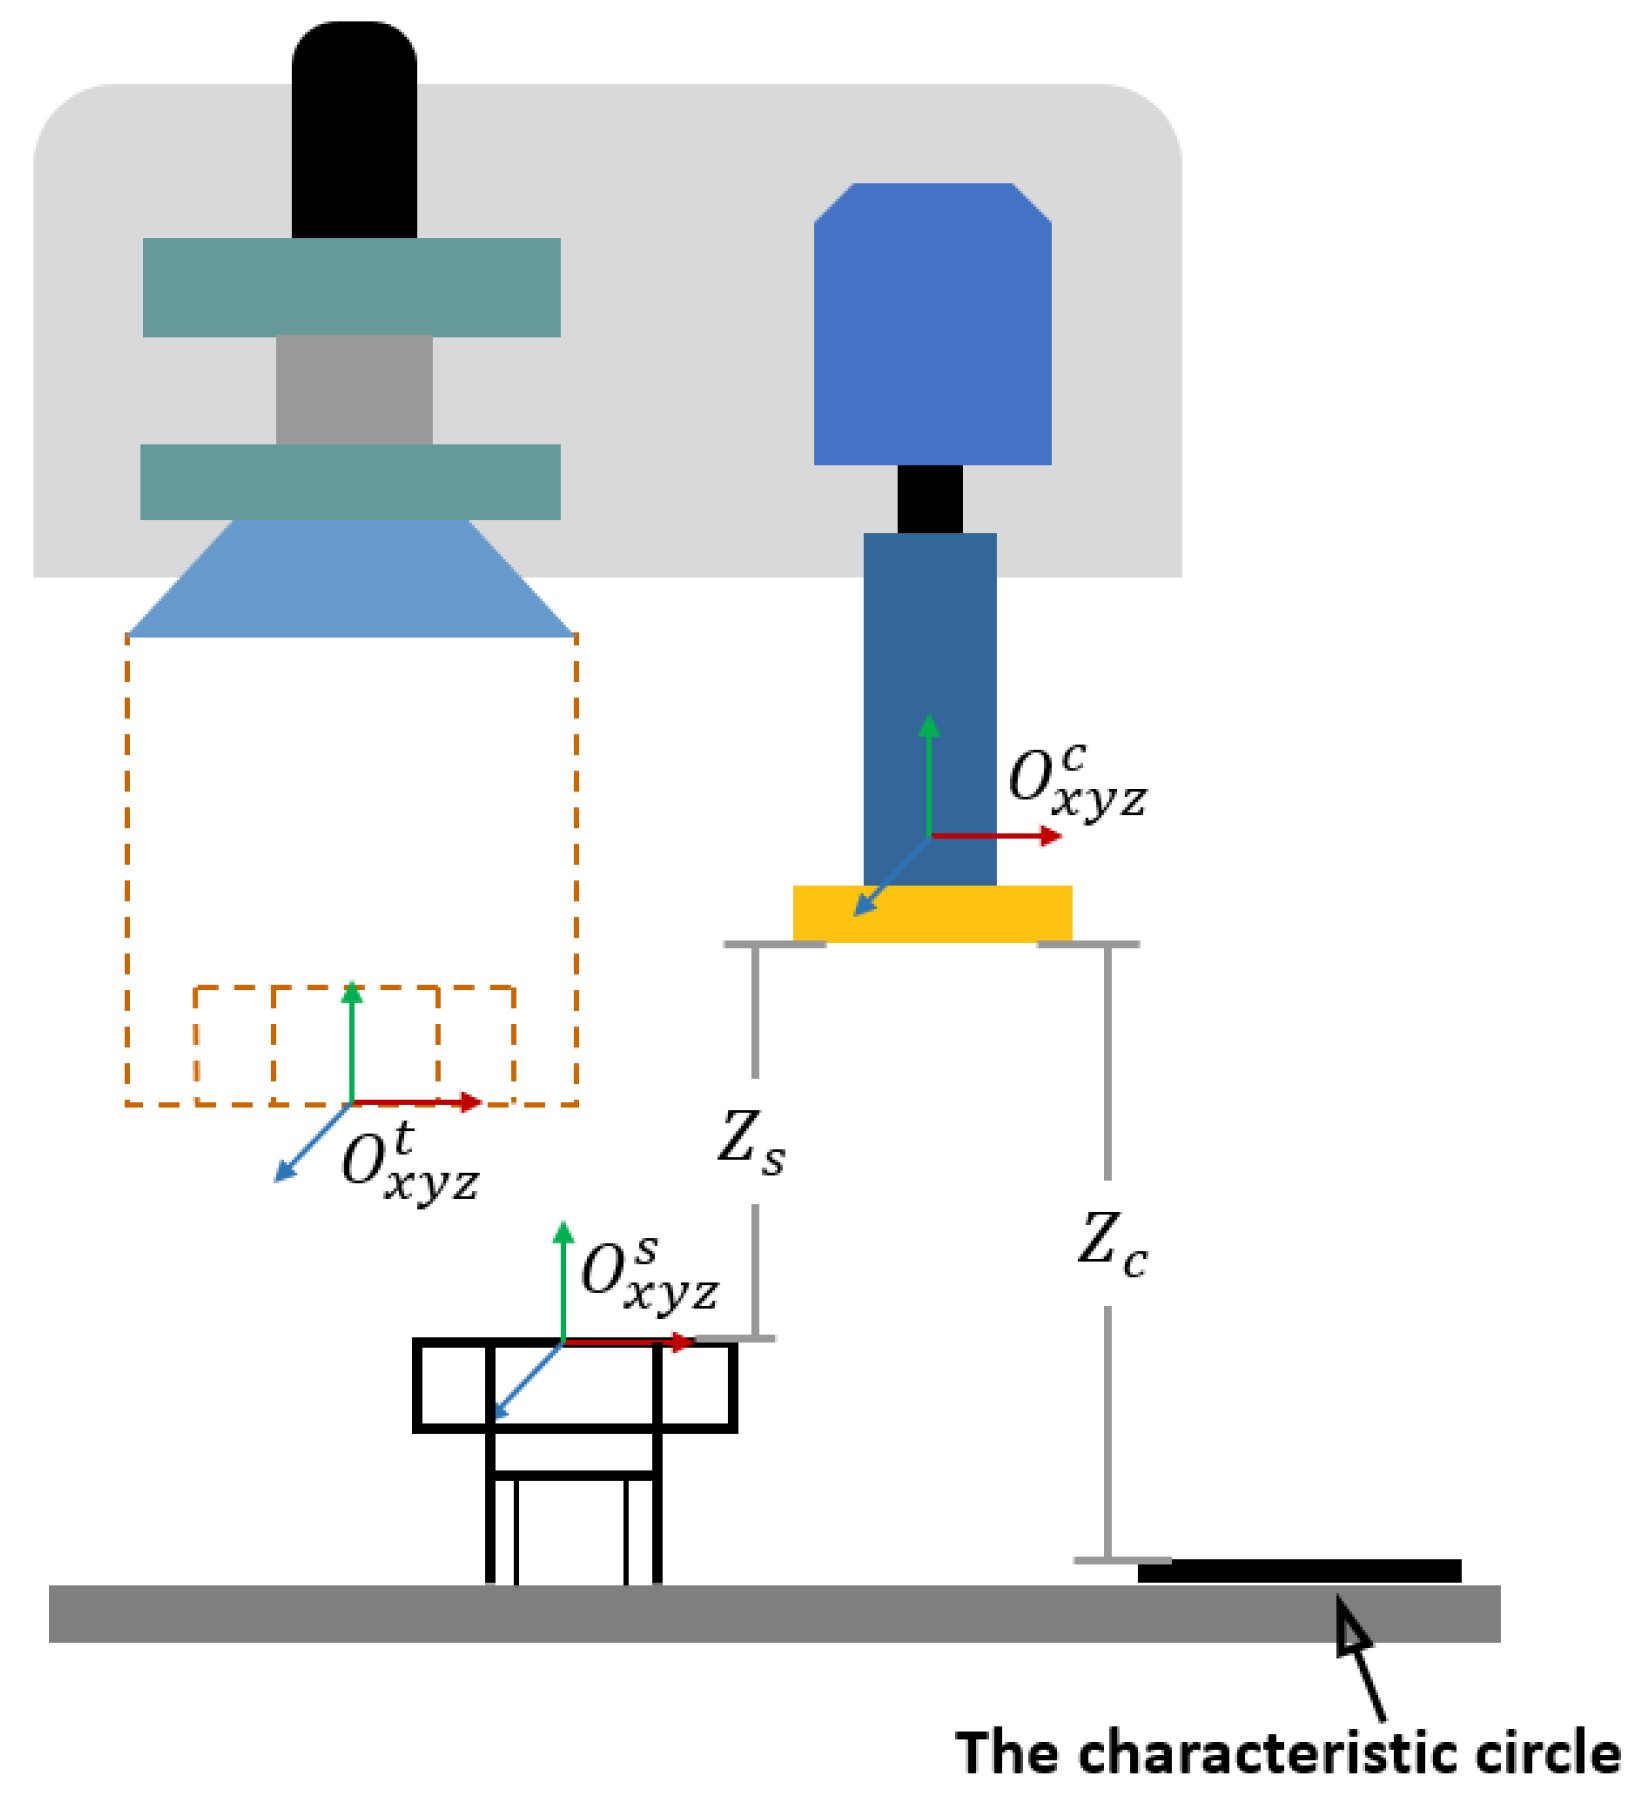
Based on the above-presented processing and calculations, a 2D location of a screw O x y s in the camera frame can be obtained. Relative relationships between the centers of the screw, tool frame, and camera frame are shown in Figure 18.
(2) Engagement motion guided by robot: In real situations, the bottom of loose screws is always not tightly close to the top surface of a workpiece, which means that it is difficult to estimate the distance between the bottom of the robotic tool and the top of the screw precisely based only on the above calculation equations. To solve this problem, an estimation method of distance Z s is proposed to avoid the damage of the end effector on a screw or workpiece. In the proposed method, the length of a hexagonal side is used to represent the screw size, and its value S i m a g e in the image plane can be calculated as an average length of six sides based on 2D locations of intersections P i P i x , P i y . Then, the distance Z s between the screw and the camera can be calculated according to the imaging principle of a monocular camera as follows:
Z s = f · S r e a l / S i m a g e
where S r e a l and f denote the real length of one side and the camera focus, respectively.
Then, a 3D location of a screw O x y z s = [ O x y s , Z s ] in the camera frame can be obtained. Based on the conversion matrix R s c a m t o o l obtained from the hand-eye calibration of the monocular camera [33], the screw position O x y z t = R s c a m t o o l · O x y z s in the tool frame can be calculated. Based on the screw position calculation result, the tool center can reach the position of the screw head. However, six vertexes P i of the screw cannot correspond to points P i t of the tool, which is significant for the screw–tool engagement, as shown in Figure 19. To achieve a perfect engagement of the screw head and the tool, an angular offset θ between the coordinate systems of the screw and tool is introduced and calculated based on the directional vectors of x o y and x t o y t , which can be determined by the location of the screw center and one intersection P i , and by the forward kinematics of the robot, respectively. Then, the screw can engage with the tool by rotating θ along the tool axis. Based on the screw pose O x y z t and the rotational angle θ , joint angles JA of a robot can be calculated based on its inverse kinematics model, which was presented in detail by Xu [34].
Finally, the following condition is used to determine if the screw–tool engagement is achieved:
S m o v e > S s c r e w t o o l
where S m o v e and S s c r e w t o o l denote the axial distance the tool travels and the distance between the top of the screw and the bottom of the tool end in the same direction, respectively.

2.3. Screw Unfastening Method Based on Cooperated Motion

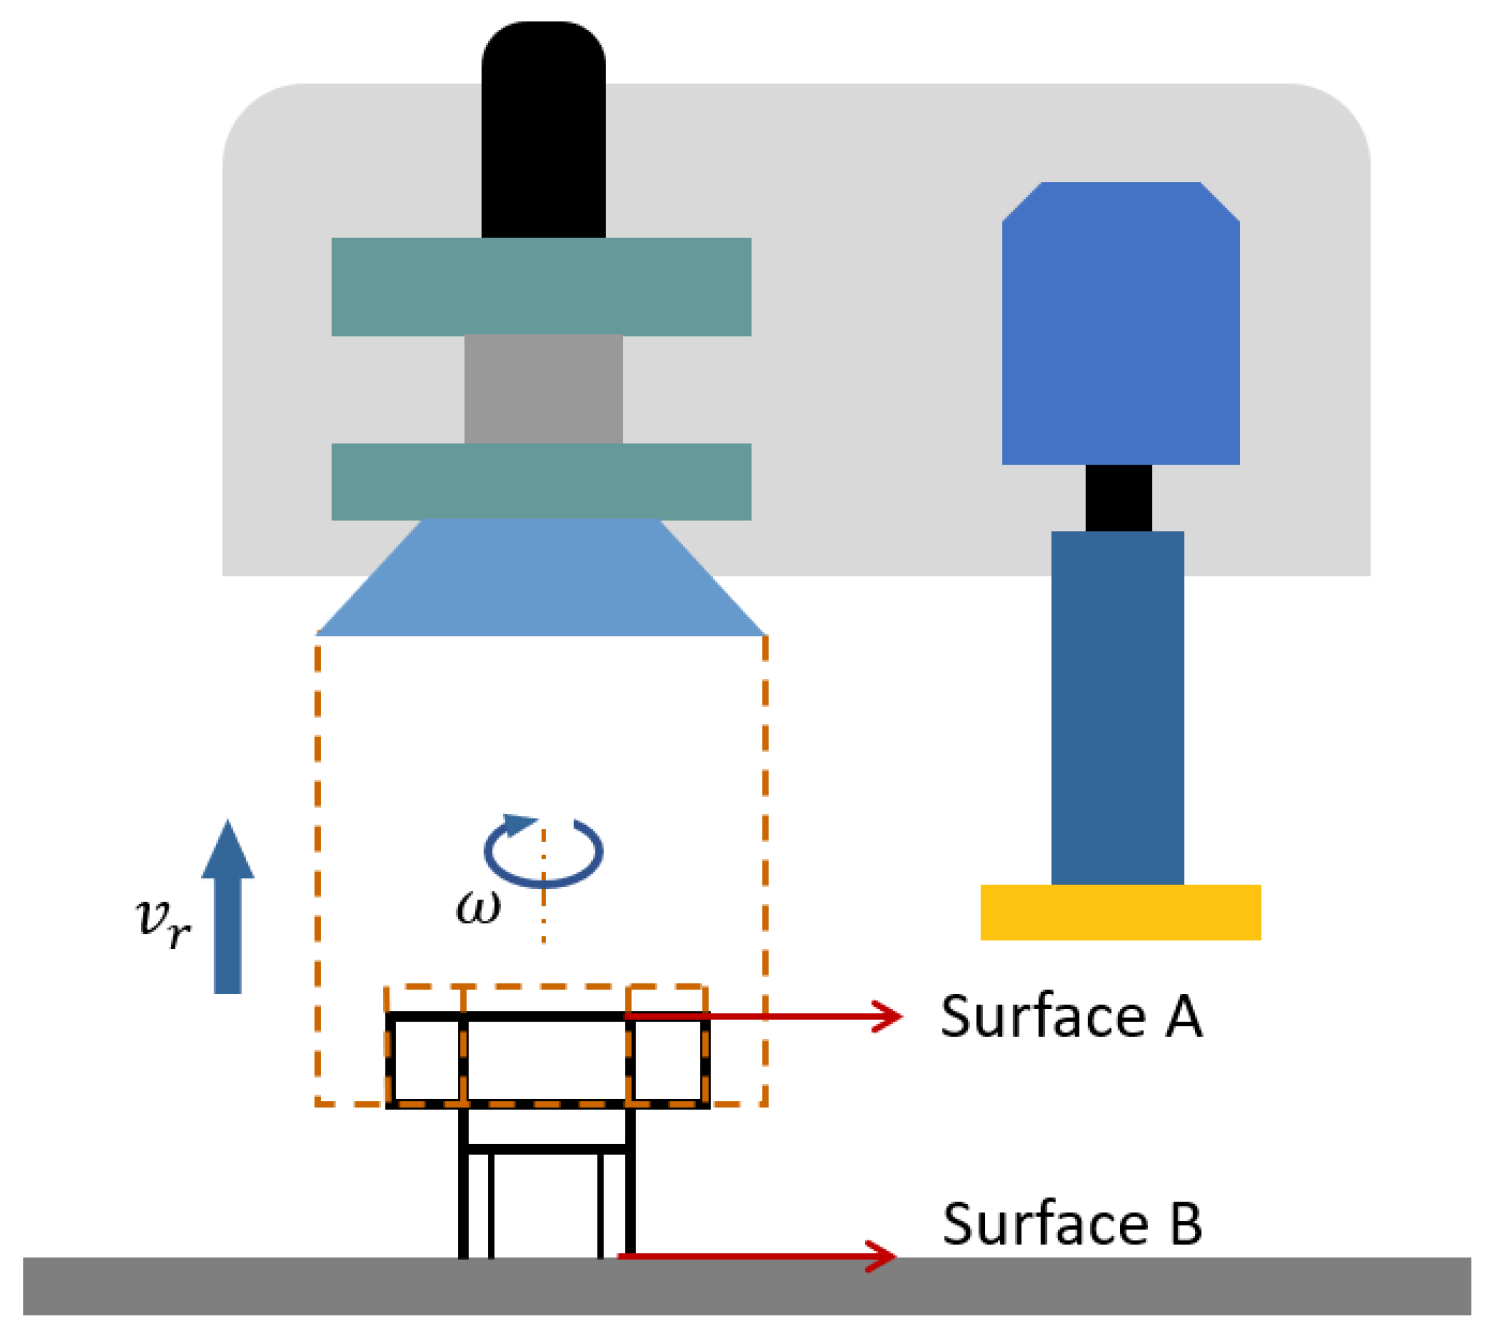
As shown in Figure 20, the unfastening motion is realized through the cooperation of the rotational motion of the unfastening tool and the robotic motion along the axial direction of a screw. For the cooperated motion, the angular velocity w of the unfastening tool and the linear velocity v r of the robotic end effector should be set properly. If the value of v r is much higher than the normal speed v s of a screw, the screw will break away from the tool before the screw leaves the hole. In contrast, if the value of v r is too small, there can be two negative effects. First, the spinning of the hexagonal screw may seriously damage the hole. Second, the normal force F can be generated between the tool and the workpiece, which can severely damage the thread surface quality of a workpiece. In this work, values of w and v r are set based on Equation (8), which can help to improve the motion stability. Using Equation (8), the cooperated motion of a robot and the unfastening tool is planned based on the screw pitch, which is determined according to the national standard gb/t 5783-2000 and a specific type of screw. Therefore, in the proposed strategy, the screw type needs to be known in advance. Additionally, the proposed system is applicable only to screws with the same size ( M 10 ) since the end size of the unfastening tool is fixed.
v r = w / 360 × P
In Equation (8), P denotes the pitch of a screw.
It should be noted that if a target structure includes different types of threaded components, disassembly can be realized using a combination of the two following techniques: fuzzy decision, which is introduced for the adaptive determination of the screw pitch according to the vision measurement result and applicable conditions, and an advanced unfastening tool, which is designed to be applicable to screws with a wide size range.
The rotational angle of the unfastening tool can be determined based on the distance from surface A to surface B, which can be estimated based on values of heights Z c and Z s , as shown in Figure 18. The length L s of the engaged thread can be calculated by L s = L Z c Z s , where L denotes the total length of a screw. To ensure the complete removal of the screw, the unfastening angle θ t of the tool can be determined by
θ t = L s / P × 360 + θ s
where θ s is the safety rotational angle of the unfastening tool, which represents the increased angle based on the calculated angle determined by the cooperated motion planning of the robot and the unfastening tool. The definition angle θ s aims to ensure complete screw disassembly. In this work, the value of θ s is set to 960 deg, which means the unfastening tool will rotate three more times after the cooperated motion. Based on the experimental test results, the assembly reliability can be improved based on this strategy.
The rotational orientation of the disassembly screw can be determined based on the screw thread rotational direction, including the left-handed and right-handed cases. In most applicable cases, screws with the same rotational direction are used. Most industrial applications use right-handed screws, which are also used in this work.

3. Experimental Results and Discussion

In this study, real experiments were designed and implemented to validate the effectiveness of the proposed strategy. In the following sections, the platform setup and the flowchart of the disassembly are presented, and the results are discussed in detail.

3.1. Experimental Platform Setup

The robotic system included a 6-DOF industrial robot (KUKA KR16 R1610), a servo screw unfastening tool (AND ENGINGEERING, ACT-64XX) for unfastening M 10 screws, and a monocular camera (HIKVISION, MV-CE200-10GM), whose the internal parameters were as follows: the focus was 25 mm, S x was 2.4 μm, S y was 2.4 μm, and resolution was 5472 × 3648 ). The repetitive positioning accuracy of the robot is ±0.04 mm (ISO 9283) [35]. The accuracy has little influence on screw–tool engagement. Therefore, in this work, the positioning accuracy of the robot is not taken into account during the engagement accuracy analysis.
A hexagonal screw removal platform was constructed, as shown in Figure 21. The workpiece to be disassembled denoted a T-shaped plate with seven M 10 screw holes and a size of 700 × 450 × 300 mm. Three screws were located on the horizontal plane with a spacing of 50 mm. The other screws were located on the vertical plane with a spacing of 50 mm. The three screws were set up, and distances from their bottoms to the workpiece surface were 15 mm (#1), 10 mm (#2), and 5 mm (#3).
In the proposed strategy, during the camera pose adjustment step, the characteristic circle was used to determine the camera orientation and position relative to a screw, which provided the necessary information for the pose adjustment whose purpose was to improve the screw image quality. This step aimed to increase the calculation accuracy of the screw pose. Therefore, the number of planes determined the number of characteristic circles needed for the pose adjustment. Namely, the proposed system only needed to have one single characteristic circle for each of the surfaces. Therefore, in the experimental platform, characteristic circles were located on the horizontal and vertical planes of the workpiece and were generally far away from obstacle surfaces of the workpiece to avoid collisions during the rotational and translational motions.
The screw-unfastening system used the Visual Studio Platform, and the program was written in the C# programming language.

3.2. Detailed Experimental Unfastening Procedure

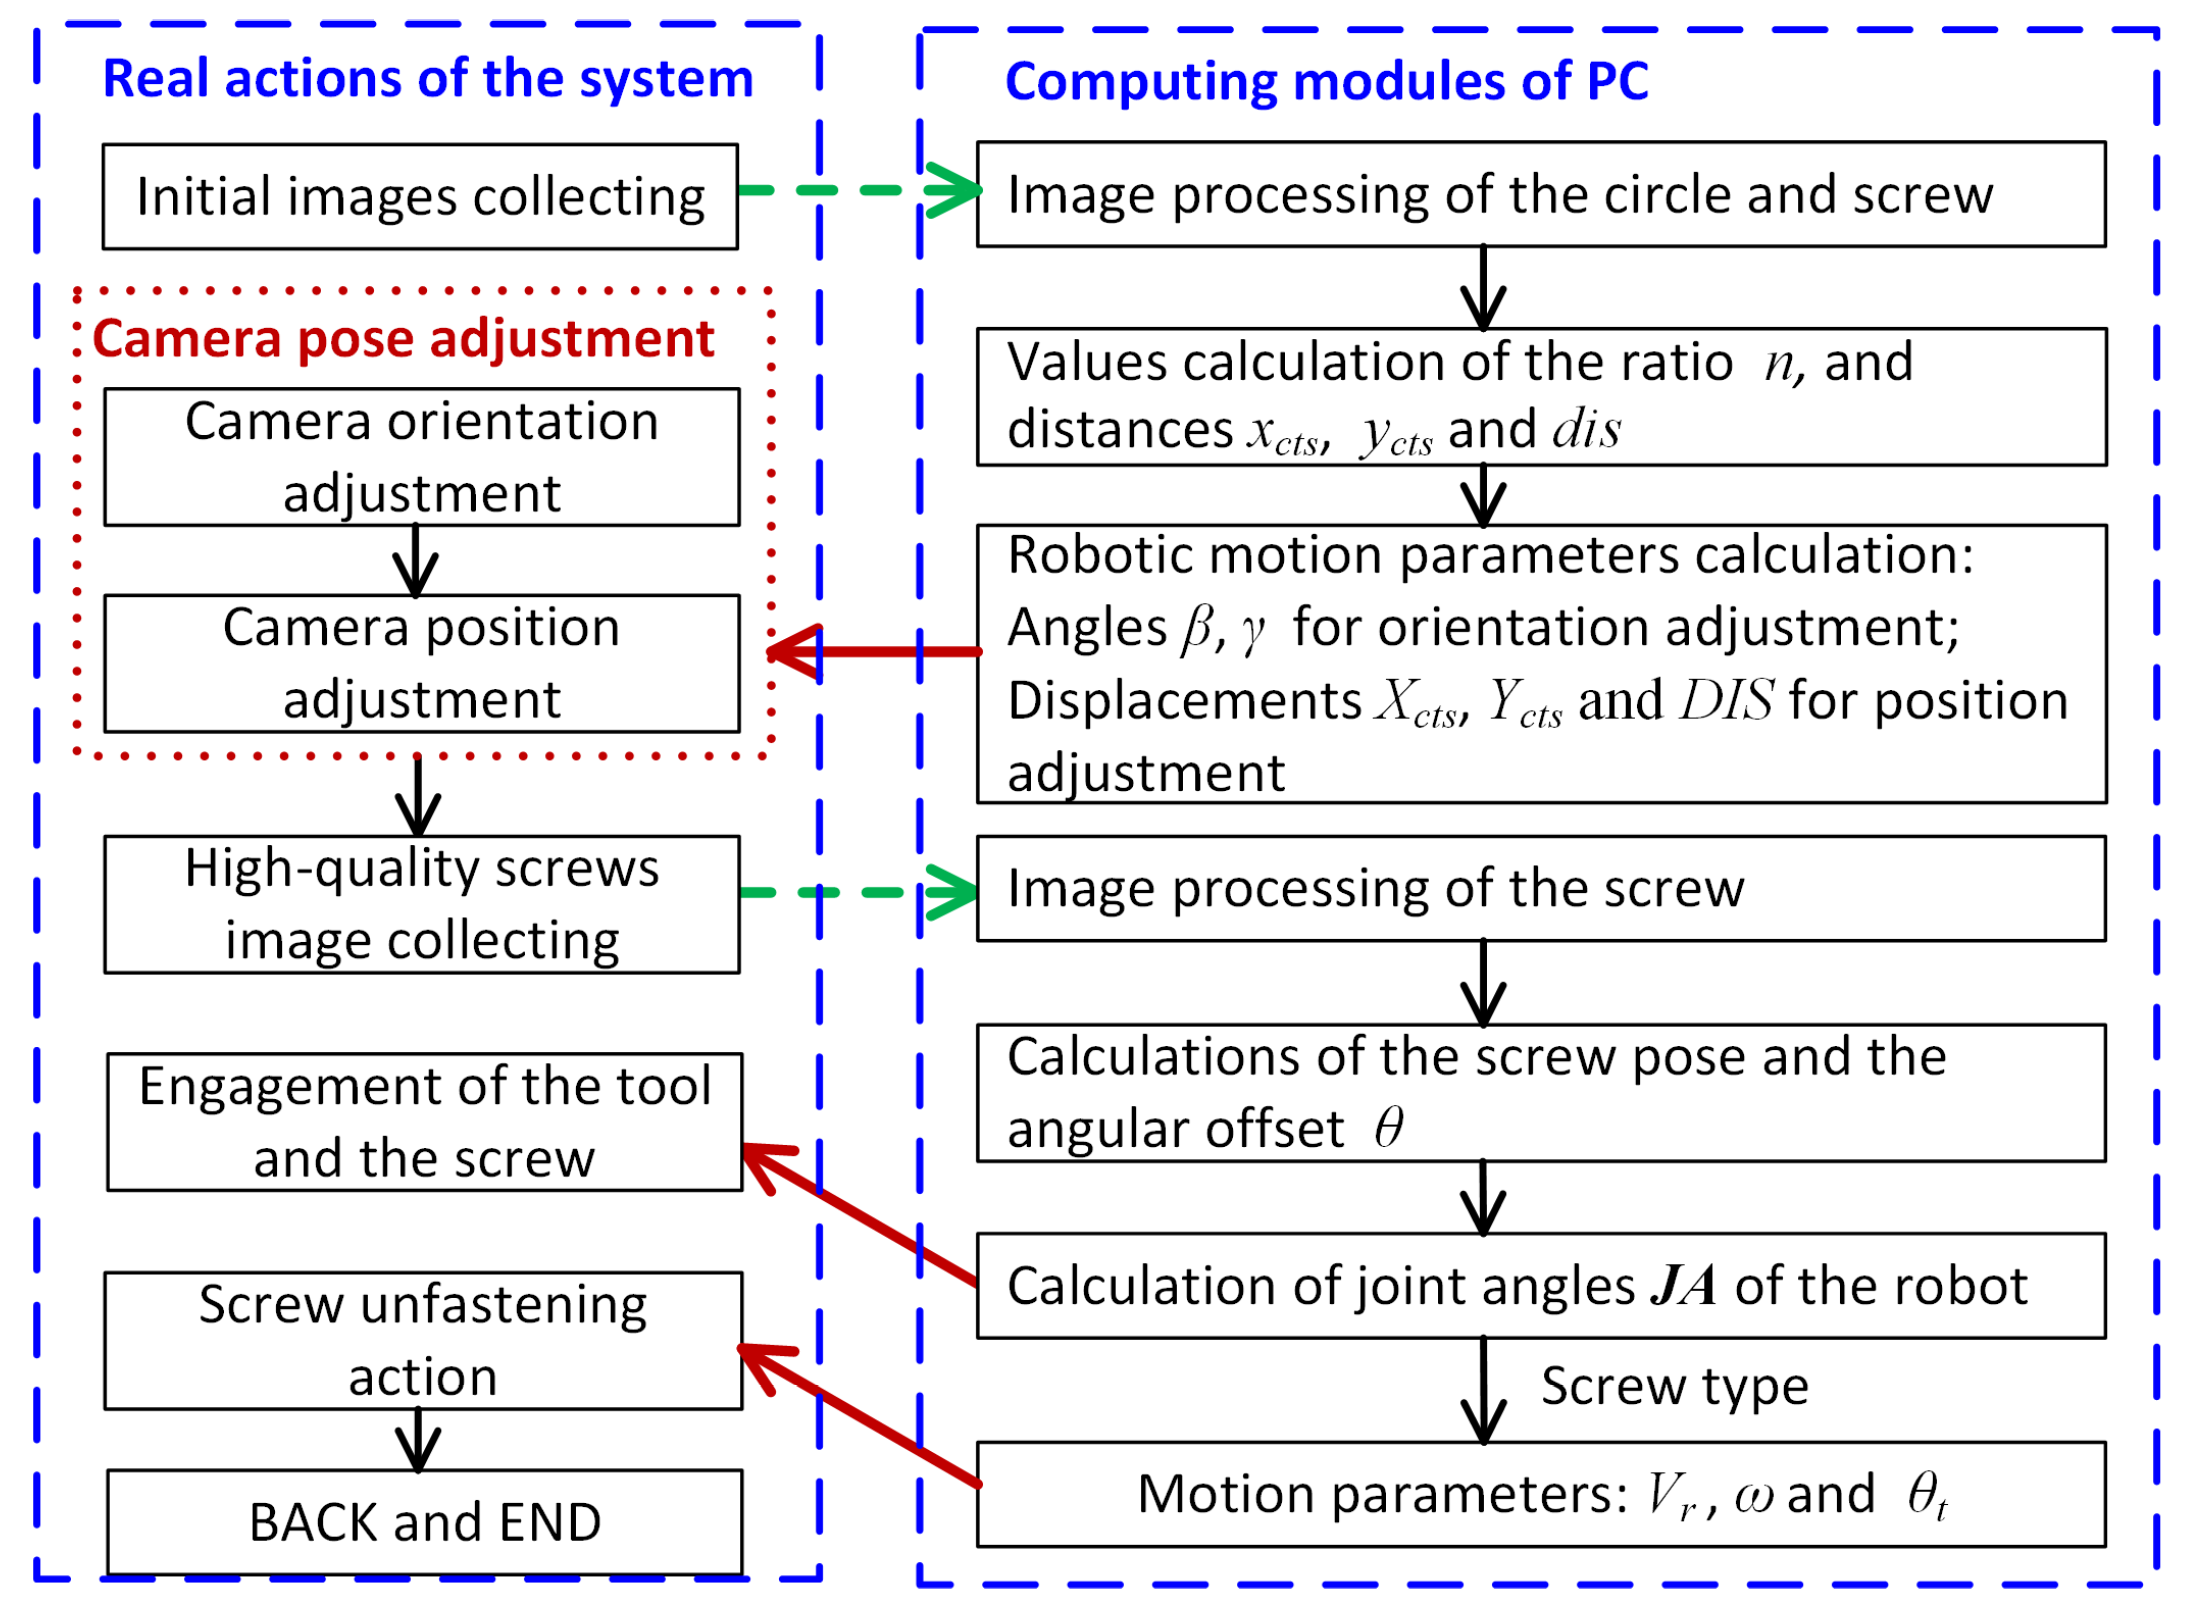
The detailed flowchart of the proposed unfastening strategy is shown in Figure 22. In Figure 22, parameters are defined and calculated in the context of the motion control of a robotic system, which clearly shows the use of these parameters and the whole control process. In Figure 22, the left column shows real actions of a robotic system, including image collection using a camera and motions of the robot and unfastening tool. The real actions were controlled by the parameters obtained by computing modules of PC, which are presented in the right column in Figure 22. The modules in the right column denoted imaging processing in HALCON and parameter calculations programmed in the C# environment. The left column provided images as input of the right column.
For the proposed strategy, the working efficiency could be improved by setting the high motion speeds for the unfastening tool and the robotic end effector. However, high speeds could easily cause mechanical vibration, which could further severely affect the stability of thread engagement and reduce the thread quality of the workpiece during the unfastening operation. Therefore, in this experiment, the torque values obtained under different values of the rotational velocity w were collected by sensors mounted on the tool and used to analyze the effect of the motion speed on the unfastening quality.

3.3. Results and Discussion

To analyze the measurement accuracy of the experimental vision system, the screw–tool engagement based on a robot vision was performed 20 times in the same manner for each screw # 1 , # 2 a n d # 3 in a random position. The desired position x r e a l , y r e a l , z r e a l and the angular offset θ r e a l of each screw were calibrated by the manually teaching of a robot and used to calculate the corresponding error between the calculated and desired values, i.e., x c a l , y c a l , z c a l and θ c a l . The largest errors are listed in Table 4, where Δ x = x r e a l x c a l , Δ y = y r e a l y c a l , Δ z = z r e a l z c a l , Δ = Δ x 2 + Δ y 2 , and Δ θ = θ r e a l θ c a l . Error Δ indicates a displacement offset between the calculated and desired positions of the screw center on the plane it was located on, which directly demonstrated whether the engagement succeed or not.
According to the obtained results, the largest value of the error Δ was 0.856 mm. It should be noted that there must exist the measurement error due to affecting factors such as uncertainties during the procedures of camera calibration and image processing. However, there was a gap of 0.88 mm between the bottom of the unfastening tool and the screw head, which could guarantee the next engagement and unfastening actions. In addition, the results in Table 4 show that errors in the normal direction were generally larger than in the other directions, which was mainly because the normal position acquisition based on robot vision did not completely rely on image processing, and also the object distance estimation of the monocular camera.
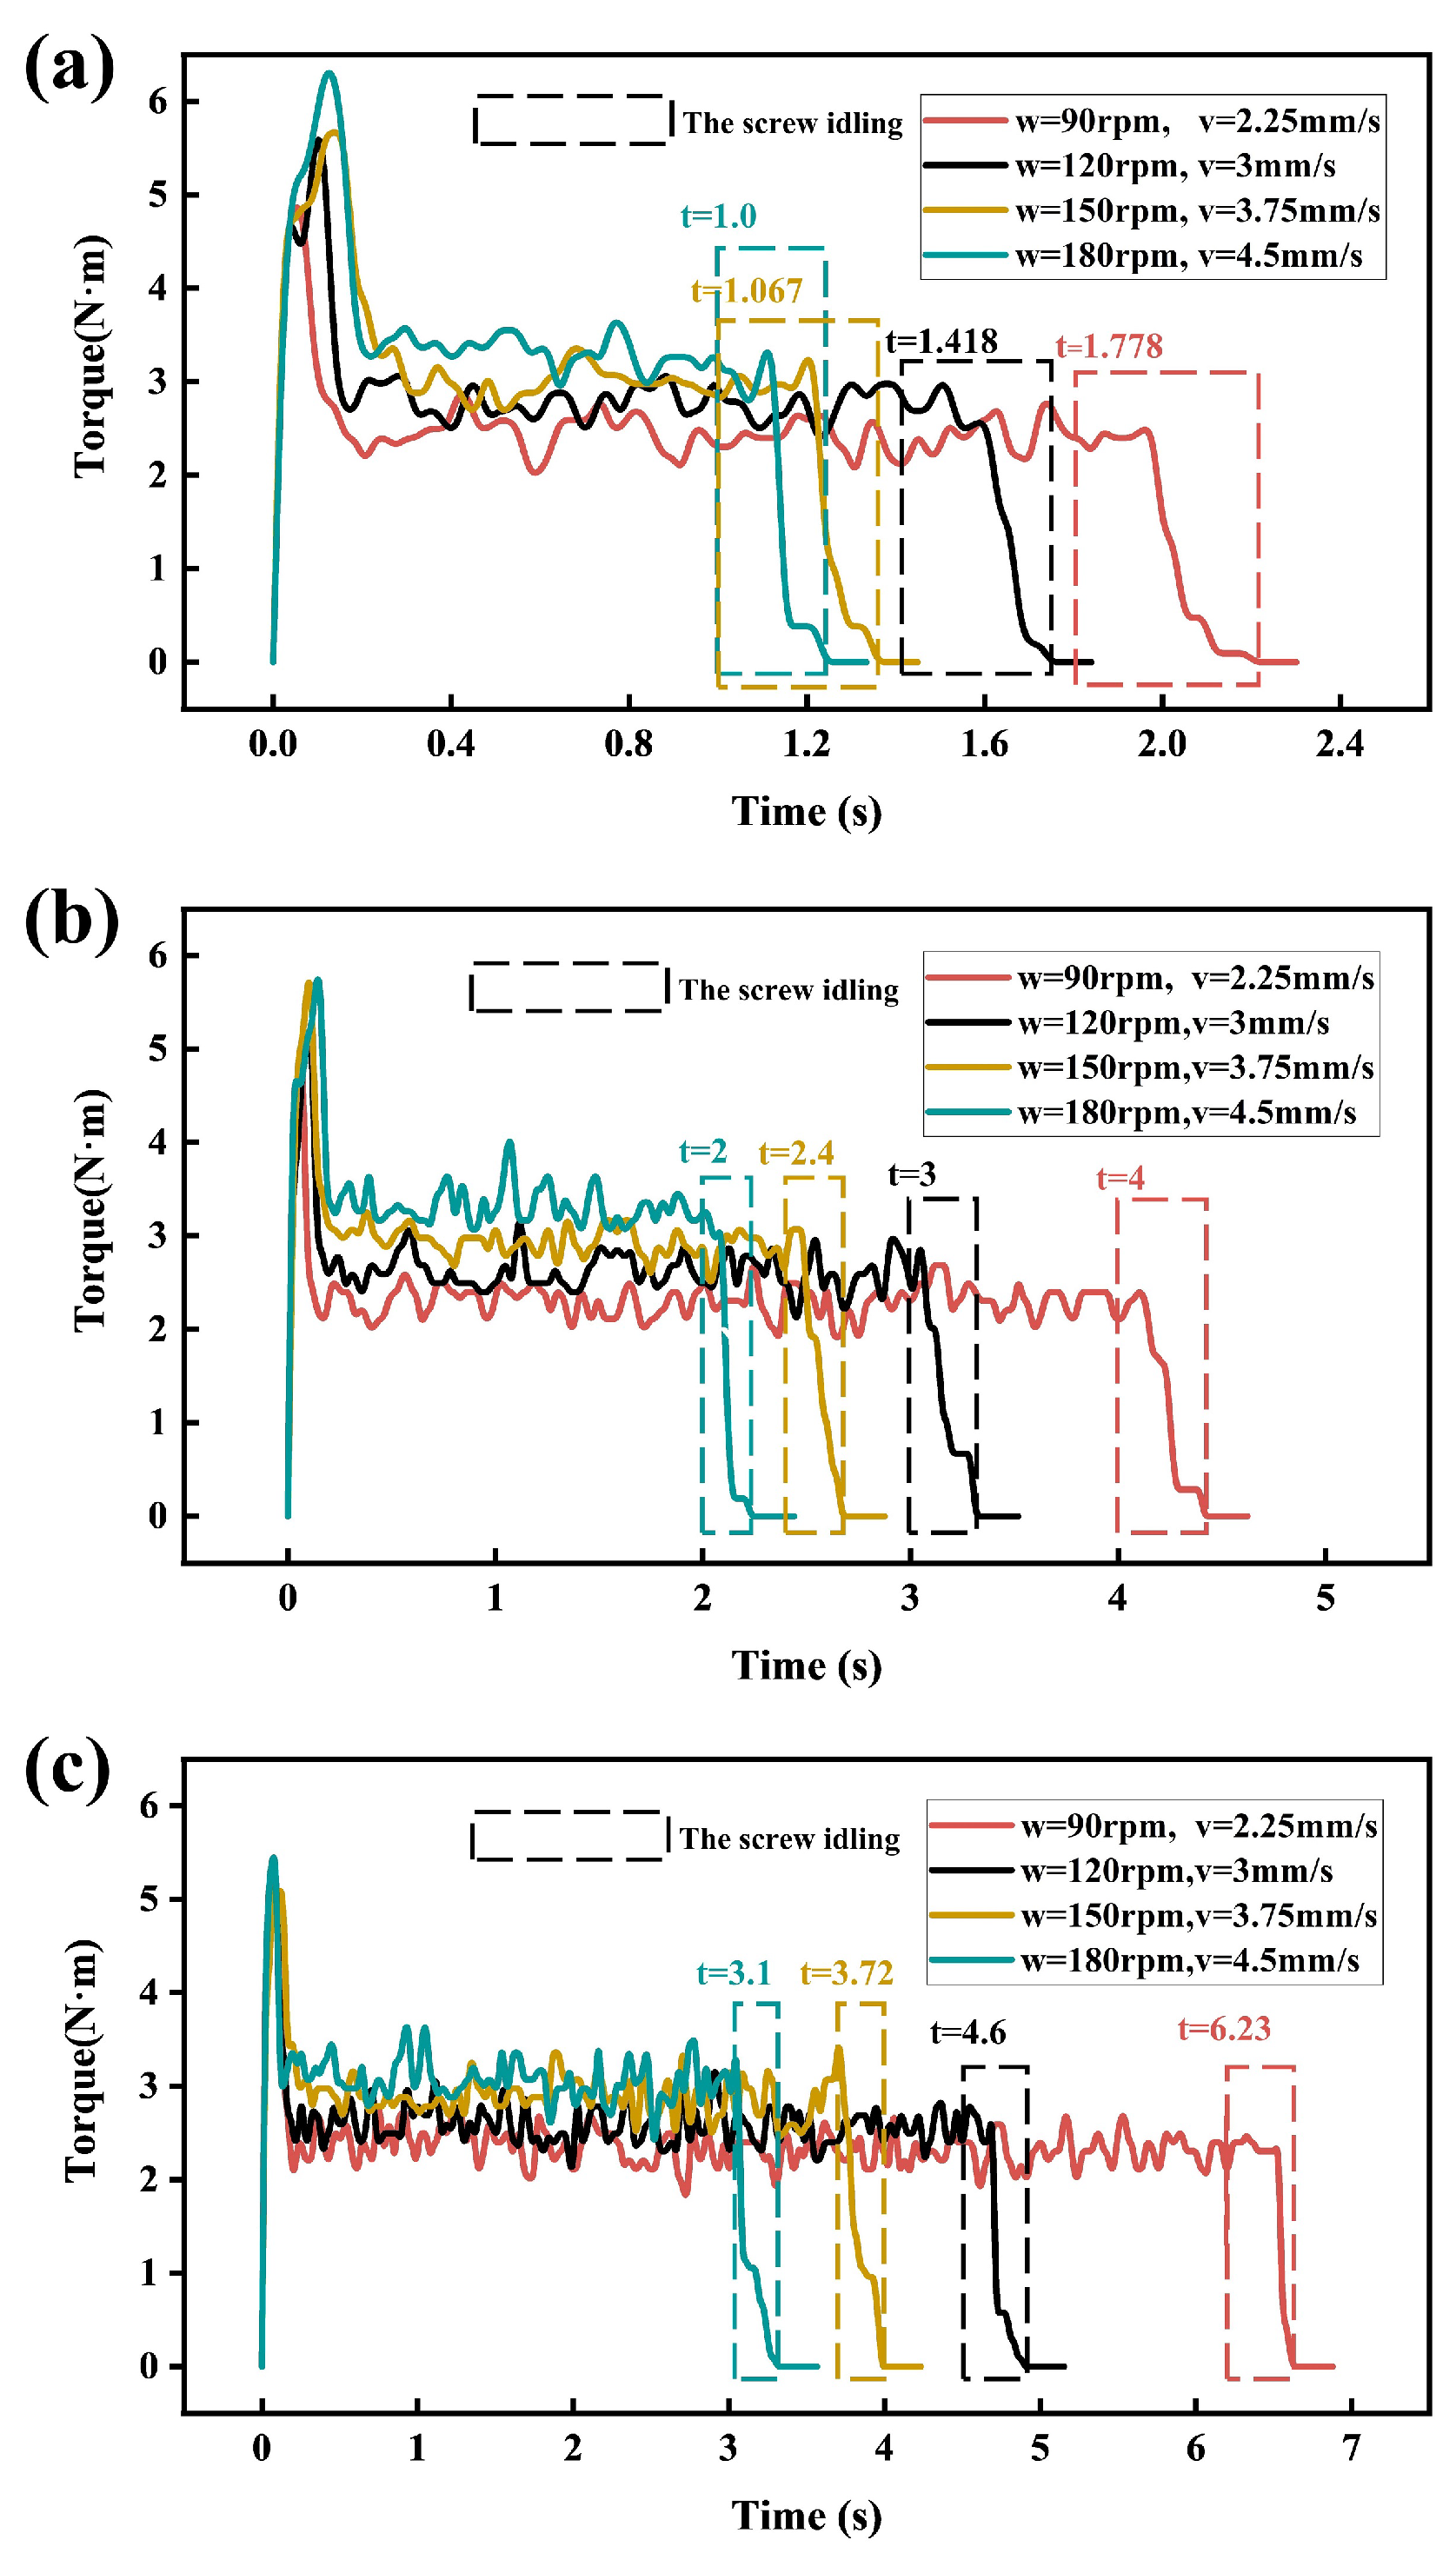
Variations in the torque of the three screws with the time under different settings are shown in Figure 23. The screws were disassembled at different rotating velocity values of 90 rpm, 120 rpm, 150 rpm, and 180 rpm. After engaging between the tool and the screw, it took 1.778 s, 1.418 s, 1.067 s, and 1.0 s to unfastening # 1 screw under the cooperation motion of the manipulator and tool. The curve of # 1 screw in Figure 23a shows that the torque firstly reached 4.9 N·m after the tool had started working and then rapidly decreased to approximately 2.4 mm/s when w = 90 rpm. The average unfastening torque increased from 2.44 mm/s to 3.27 mm/s when the rotating speed of the tool increased from 90 rpm to 180 rpm.
For the curves of # 2 and # 3 screws, variations in the torque showed a similar trend. Since the wear of holes and screws differed, curves obtained under three cases were not identical.
The thread contact between the screw and the hole was intensified due to higher motion speeds, so a larger torque was generated. Also, a greater vibration was generated under the higher speeds, which could cause higher instability of the torque. The standard deviation was used to evaluate torque fluctuations. As shown Figure 24, the standard deviation of the torque of the three screws increased with the rotating speed. For instance, the standard deviation of # 1 , # 2 , and # 3 screws increase by 20.49%, 30.37%, and 25.85%, respectively, when the speed increase from 90 rpm to 180 rpm. The results indicated that the torque fluctuation had a negative effect on the thread quality of the workpiece, which is important for some reusable and long-serving workpieces. The results indicated that the torque fluctuation had a negative effect on the thread quality of the workpiece, which is important for some reusable and long-serving workpieces. According to the results, the motion speed of the unfastening work can be determined considering the actual requirements for the working efficiency and unfastening quality, and the variation curve of the torque can provide a useful data foundation for the value selection of the motion parameter.

4. Conclusions and Future Works

(1) Conclusions: This work proposes an automated disassembly strategy based on robot vision for a hexagonal screw with arbitrary loose states. The robotic system is composed of a 6-DOF robot, a monocular camera, and a servo unfastening tool. In the proposed strategy, advanced methods are employed to complete tasks of the camera pose adjustment, screw–tool engagement, and screw unfastening, which increase system adaptation and reduce the hardware and software costs. Finally, real experiments are performed to verify the effectiveness of the proposed strategy. Based on the experimental results, the following conclusions can be drawn:
(1) The screw–tool engagement is achieved using only a vision system, which can significantly reduce the system cost. However, achieving a successful engagement requires high certain measurement accuracy of the vision system. Through the experiment, the largest positioning error on the plane where the screw is located is calculated as 0.856 mm, which is less than the preset gap between the screw head and tool sleeve. This result indicates that the measurement accuracy is high enough to ensure successful screw disassembly.
(2) The unfastening operations of the three tested screws are successfully completed through the cooperation motion of the manipulator and unfastening tool. The experimental results show that the proposed strategy can be used to perform the screw disassembly work effectively and reliably.
(3) Variations in the torque values of the three screws under different settings are similar, which indicates the unfastening process at the micro level. Results show that the torque and its standard deviation increase with the rotating speed, which demonstrates that the motion speed of the unfastening work can be determined considering both the actual requirements of the working efficiency and the unfastening quality. Moreover, the variation curve of the torque can provide a data foundation for the value selection of the motion parameter.
(2) Limitations and future works: This work mainly aims to develop a whole control strategy based on a vision system for screw disassembly, including the camera pose adjustment strategy for high-quality images of a screw, the screw–tool engagement strategy, and the unfastening strategy with properly set motion parameters. However, there exist cases with a poor contract between the target screw and the background. In these types of cases, the effectiveness of the proposed strategy will be reduced since the accuracy and robustness of the screw edge detection can be significantly affected by a poor contract. In this work, a screw is recognized based on the geometric features of a hexagonal shape of a screw head, which can be totally distinguished from other markings surrounding the screw but cannot effectively solve the above-mentioned problem. To overcome this problem, the machining learning-based algorithms can be used to improve the robustness of the screw edge detection under a poor contract, which could be costly during the training but may not increase the running cost during the screw disassembly. In future work, the machining learning-based algorithms will be introduced to improve the proposed strategy further, and more complex cases with high reliability will be discussed.

Author Contributions

Methodology, formal analysis, validation, resources, writing—original draft, J.C.; funding acquisition, writing—review and editing, Z.L.; supervision, writing—review and editing, funding acquisition, J.X.; validation, formal analysis, C.Y.; validation, formal analysis, H.C.; data processing, funding acquisition, Q.C. All authors have read and agreed to the published version of the manuscript.

Funding

This research was supported by the National Natural Science Foundation of China (No. 51975019), Scientific Research Project of Beijing Educational Committee (No. KM202210005031), China Postdoctoral Science Foundation (No. 2021M700301), and Beijing Nova Program Interdisciplinary Cooperation Project (No. Z191100001119010).

Institutional Review Board Statement

Not applicable.

Informed Consent Statement

Not applicable.

Data Availability Statement

Not applicable.

Acknowledgments

The authors would like to thank the research team members for their contributions to this work.

Conflicts of Interest

The authors declare no conflict of interest.

References

  1. Izumi, S.; Yokoyama, T.; Iwasaki, A.; Sakai, S. Three-dimensional finite element analysis of tightening and loosening mechanism of threaded fastener. Eng. Fail. Anal. 2005, 12, 604–615. [Google Scholar] [CrossRef]
  2. Mironov, D.; Altamirano, M.; Zabihifar, H.; Liviniuk, A.; Liviniuk, V.; Tsetserukou, D. Haptics of Screwing and Unscrewing for its Application in Smart Factories for Disassembly. In Proceedings of the International Conference on Human Haptic Sensing and Touch Enabled Computer Applications, Pisa, Italy, 13–16 June 2018; pp. 428–439. [Google Scholar]
  3. Suárez-Ruiz, F.; Pham, Q. A Framework for Fine Robotic Assembly. In Proceedings of the 2016 IEEE International Conference on Robotics and Automation (ICRA), Stockholm, Sweden, 16–21 May 2016; pp. 421–426. [Google Scholar]
  4. Park, H.; Park, J.; Lee, D.; Park, J.; Baeg, M.; Bae, J. Compliance-Based Robotic Peg-in-Hole Assembly Strategy Without Force Feedback. IEEE Trans. Ind. Electron. 2017, 64, 6299–6309. [Google Scholar] [CrossRef]
  5. Pitchandi, N.; Subramanian, S.; Irulappan, M. Insertion Force Analysis of Compliantly Supported Peg-In-Hole Assembly. Assem. Autom. 2017, 37, 285–295. [Google Scholar] [CrossRef]
  6. Suszyński, M.; Wojciechowski, J.; Żurek, j. No Clamp Robotic Assembly with Use of Point Cloud Data from Low-Cost Triangulation Scanner. Tehnicki Vjesnik 2018, 25, 904–909. [Google Scholar]
  7. Wang, l.; Mohammed, A.; Onori, M. Remote robotic assembly guided by 3D models linking to a real robot. CIRP Ann.-Manuf. Technol. 2014, 63, 1–4. [Google Scholar] [CrossRef]
  8. Yan, S.; Tao, X.; Xu, D. High-precision robotic assembly system using three-dimensional vision. Int. J. Adv. Robot. Syst. 2021, 18, 1–4. [Google Scholar] [CrossRef]
  9. Song, J.; Chen, Q.; Li, Z. A peg-in-hole robot assembly system based on Gauss mixture model. Robot. Comput.-Integr. Manuf. 2021, 67, 101996. [Google Scholar] [CrossRef]
  10. Wyk, K.; Culleton, M.; Falco, J.; Kelly, K. Comparative Peg-in-Hole Testing of a Force-Based Manipulation Controlled Robotic Hand. IEEE Trans. Robot. 2018, 34, 542–549. [Google Scholar]
  11. Sága, M.; Bulej, V.; Uboňova, N.; Kuric, L.; Virgala, L.; Eberth, M. Case study: Performance analysis and development of robotized screwing application with integrated vision sensing system for automotive industry. Int. J. Adv. Robot. Syst. 2020, 17, 1–23. [Google Scholar] [CrossRef]
  12. Müller, R.; Vette, M.; Hörauf, L. An adaptive and automated bolt tensioning system for the pitch bearing assembly of wind turbines. Robot. Comput.-Integr. Manuf. 2015, 36, 119–126. [Google Scholar] [CrossRef]
  13. Jia, Z.; Bhatia, A.; Aronson, R.; Bourne, D.; Mason, T. A Survey of Automated Threaded Fastening. IEEE Trans. Autom. Sci. Eng. 2018, 16, 298–310. [Google Scholar] [CrossRef]
  14. Jiang, J.; Huang, Z.; Bi, Z.; Ma, X.; Yu, G. State-of-the-Art control strategies for robotic PiH assembly. Robot. Comput.-Integr. Manuf. 2020, 65, 101894. [Google Scholar] [CrossRef]
  15. Seliger, G.; Keil, T.; Rebafka, U.; Stenzel, A. Flexible disassembly tools. In Proceedings of the 2001 IEEE International Symposium on Electronics and the Environment, Denver, CO, USA, 9 May 2001; pp. 30–35. [Google Scholar]
  16. Chen, W.; Wegener, K.; Dietrich, F. A robot assistant for unscrewing in hybrid human-robot disassembly. In Proceedings of the 2014 IEEE International Conference on Robotics and Biomimetics (ROBIO), Bali, Indonesia, 5–10 December 2014; pp. 536–541. [Google Scholar]
  17. Vongbunyong, S.; Vongseela, P.; Sreerattana-aporn, J. A process demonstration platform for product disassembly skills transfer. Procedia CIRP 2017, 61, 281–286. [Google Scholar] [CrossRef]
  18. Bdiwi, M.; Rashid, A.; Pfeifer, M.; Putz, M. Disassembly of Unknown Models of Electrical Vehicle Motors Using Innovative Human Robot Cooperation. In Proceedings of the IEEE International Conference on Human-Robot Interaction, Vienna, Austria, 6–9 March 2017; pp. 85–86. [Google Scholar]
  19. Liu, Q.; Liu, Z.; Xu, W.; Tang, Q.; Zhou, Z.; Pham, D. Human-Robot Collaboration in Disassembly for Sustainable Manufacturing. Int. J. Prod. Res. 2019, 57, 4027–4044. [Google Scholar] [CrossRef]
  20. DiFilippo, N.; Jouaneh, M. A System Combining Force and Vision Sensing for Automated Screw Removal on Laptop. IEEE Trans. Autom. Sci. Eng. 2018, 15, 887–895. [Google Scholar] [CrossRef]
  21. Schumacher, P.; Jouaneh, M. A System for Automated Disassembly of Snap-Fit Covers. Int. J. Adv. Manuf. Technol. 2013, 69, 2055–2069. [Google Scholar] [CrossRef]
  22. Li, R.; Pham, D.; Huang, J.; Tan, Y.; Qu, M.; Wang, Y.; Kerin, M.; Jiang, K.; Su, S.; Ji, C.; et al. Unfastening of Hexagonal Headed Screws by a Collaborative Robot. IEEE Trans. Autom. Sci. Eng. 2020, 17, 1455–1468. [Google Scholar] [CrossRef]
  23. Wu, W.; Zhou, H.; Guo, Y.; Wu, Y.; Guo, J. Peg-in-Hole Assembly in Live-Line Maintenance Based on Generative Mapping and Searching Network. Robot. Auton. Syst. 2021, 143, 103797. [Google Scholar] [CrossRef]
  24. Kim, Y.; Song, H.; Song, J. Hole Detection Algorithm for Chamferless Square Peg-in-Hole Based on Shape Recognition using F/T Sensor. Int. J. Precis. Eng. Manuf. 2014, 15, 425–432. [Google Scholar] [CrossRef]
  25. DiFilippo, N.; Jouaneh, M. Using the Soar Cognitive Architecture to Remove Screws From Different Laptop Models. IEEE Trans. Autom. Sci. Eng. 2019, 16, 767–780. [Google Scholar] [CrossRef]
  26. Liu, Z.; Wang, Z.; Zhao, Y.; Cheng, Q. Method of Bolt Pose Estimation in Open Environment. J. Beijing Univ. Technol. 2020, 46, 734–742. [Google Scholar]
  27. Xu, J.; Liu, Z.; Zhang, C.; Yang, C.; Li, L.; Pei, Y. Minimal Distance Calculation between the Industrial Robot and its Workspace Based on Circle/Polygon-Slices Representation. Appl. Math. Model. 2020, 87, 691–710. [Google Scholar] [CrossRef]
  28. Moody, J.; Darken, C. Fast Learning in Networks of Locally-Tuned Processing Units. Neural Comput. 1989, 1, 281–294. [Google Scholar] [CrossRef]
  29. Yu, L.; Lai, K.; Wang, S. Multistage RBF neural network ensemble learning for exchange rates forecasting. Neurocomputing 2008, 71, 3295–3302. [Google Scholar] [CrossRef]
  30. Zou, Y.; Li, J.; Chen, X. Seam Tracking Investigation via Striped Line Laser Sensor. Ind. Robot 2017, 44, 609–617. [Google Scholar] [CrossRef]
  31. Li, N.; Huo, H.; Zhao, Y.; Chen, X.; Fang, T. A Spatial Clustering Method with Edge Weighting for Image Segmentation. IEEE Geosci. Remote Sens. Lett. 2013, 10, 1124–1128. [Google Scholar]
  32. Pimentel, S.; Small, D.; Rosenbaum, P. An Exact Test of Fit for the Gaussian Linear Model Using Optimal Nonbipartite Matching. Technometrics 2017, 59, 330–337. [Google Scholar] [CrossRef] [Green Version]
  33. Sun, J.; Wang, P.; Qiu, Z.; Qiao, H. Effective Self-calibration for Camera Parameters and Hand-eye Geometry Based on Two Feature Points Motions. IEEE/CAA J. Autom. Sin. 2017, 12, 370–380. [Google Scholar] [CrossRef]
  34. Xu, J.; Liu, Z.; Cheng, Q.; Zhao, Y.; Pei, Y. Models for Three New Screw-Cased IK Sub-Problems Using Geometric Descriptions and Their Applications. Appl. Math. Model. 2019, 67, 399–412. [Google Scholar] [CrossRef]
  35. Available online: https://www.kuka.com/en-us/products/robotics-systems/industrial-robots/kr-cybertech (accessed on 19 October 2022).
Figure 1. Three ways of performing the screw fastening and unfastening tasks. (a) Manual operation using a wrench or screwdriver. (b) Automatic operation using a Cartesian robot. (c) Automatic operation using an articulated robot.
Applsci 13 00251 g001
Figure 2. Screws in a complex environment. (a) Screws under different loose states located on the same surface. (b) Screws located on different surfaces.
Applsci 13 00251 g002
Figure 3. Scheme of the proposed screw disassembly system.
Applsci 13 00251 g003
Figure 4. Structure of the robotic end effector.
Applsci 13 00251 g004
Figure 5. Servo unfastening tool with an elastic mechanism.
Applsci 13 00251 g005
Figure 6. The flowchart of the screw unfastening process.
Applsci 13 00251 g006
Figure 7. The spiral-motion-based screw–tool engagement scheme.
Applsci 13 00251 g007
Figure 8. Examples of a complex disassembly environment. (a) Obstacles between target screws. (b) Target screws with different loose states.
Applsci 13 00251 g008
Figure 9. Engagement of the tool and screw.
Applsci 13 00251 g009
Figure 10. Initial image of the characteristic circle and a screw, where o x i y i denotes the image coordinate system; P c and P s represent the centers of the characteristic circle and screw, respectively, which can be roughly located in the image plane of a camera; D and D c denote the pixel lengths of the major and minor axes of the elliptical edge of the characteristic circle image, respectively; x c t s and x c t s denote the pixel distances along x and y coordinate axes from the image center to the screw center, respectively.
Applsci 13 00251 g010
Figure 11. Illustration of the characteristic circles with different imaging angles.
Applsci 13 00251 g011
Figure 12. The structure of the RBF neural network.
Applsci 13 00251 g012
Figure 13. Analysis of RBF network output. (a) Regression analysis of β . (b) Regression analysis of γ . (c) The error comparison of β . (d) The error comparison of γ .
Applsci 13 00251 g013
Figure 14. A screw image obtained by a camera.
Applsci 13 00251 g014
Figure 15. Edges extracted from screw images. (a) Edges extracted with Canny filter. (b) Edges used to describe the screw-head feature.
Applsci 13 00251 g015
Figure 16. Edges processing of the screw head image. (a) Set of lines and curves. (b) Hexagonal edges of the screw after the removal.
Applsci 13 00251 g016
Figure 17. Lines, intersections, and center point used to describe the screw head.
Applsci 13 00251 g017
Figure 18. Locations of centers of the screw, tool frame, and camera frame.
Applsci 13 00251 g018
Figure 19. Relative relation between a screw and the tool.
Applsci 13 00251 g019
Figure 20. Unfastening motion after the engagement.
Applsci 13 00251 g020
Figure 21. A hexagonal screw-removal platform.
Applsci 13 00251 g021
Figure 22. Detailed flowchart of the unfastening strategy used in the experiment.
Applsci 13 00251 g022
Figure 23. Variations in the torque of the three screws under different settings. (a) # 1 screw. (b) # 2 screw. (c) # 3 screw.
Applsci 13 00251 g023
Figure 24. The standard deviation of the torque of three screws under different settings.
Applsci 13 00251 g024
Table 1. Comparison between the previously reported methods and the proposed method.
MethodSensorDOFsControl TypeScene AdaptabilityIntelligenceDisassembly Quality
Vongbunyong [17]No-ManpowerAny sceneLowNot considered
Bdiwi [18]No6Robot teachingLowLowNot considered
Liu [19]No6HRCLowLowNot considered
DiFilippo [20]Camera3Automation2D sceneHighNot considered
Li [22]F/T sensor6HRCFlat surfacesHighConsidered
This studyCamera6Automation3D sceneHighConsidered
Table 2. Test results of the distance: L h t s denotes the distance between a hole and a screw, R a t i o A denotes the percentage of the image area of a screw, and E r r o r s means the positional error of the screw.
Test Number L hts (mm) Ratio A (%) Error s (mm)
12012.140.073
2407.220.138
3802.860.29
41201.810.508
51500.990.636
62000.720.857
72500.490.954
83000.281.115
Table 3. Parameters of sample.
Serial Number D c D β γ
1721.777628.073−5−28
1693.03618.731−2−26
1395.214383.869322
2470.899468.667−45
2503.24501.746−2−2
Table 4. Errors between the calculated and desired screw poses.
Screws Δ x (mm) Δ y (mm) Δ z (mm) Δ (mm) Δ θ (deg)
# 1 0.4830.3762.1360.6120.41
# 2 0.2650.8142.4690.8560.73
# 3 0.3270.6590.1960.7350.65
Disclaimer/Publisher’s Note: The statements, opinions and data contained in all publications are solely those of the individual author(s) and contributor(s) and not of MDPI and/or the editor(s). MDPI and/or the editor(s) disclaim responsibility for any injury to people or property resulting from any ideas, methods, instructions or products referred to in the content.