Review

Wire Arc Additive Manufacturing of Stainless Steels: A Review

1
Shanghai Key Laboratory of Digital Manufacture for Thin-Walled Structures, School of Mechanical Engineering, Shanghai Jiao Tong University, Shanghai 200240, China
2
School of Materials Science and Engineering, Wuhan University of Technology, Wuhan 430070, China
3
School of Aerospace, Transport and Manufacturing, Cranfield University, College Road, Cranfield, Bedfordshire MK43 0AL, UK
4
Department of Engineering, Lancaster University, Bailrigg, Lancaster LA1 4YW, UK
5
Department of Engineering, University of Cambridge, Cambridge CB3 0FS, UK
*
Author to whom correspondence should be addressed.
These authors contributed equally to this work.
Appl. Sci. 2020, 10(5), 1563; https://doi.org/10.3390/app10051563
Submission received: 22 January 2020 / Revised: 20 February 2020 / Accepted: 21 February 2020 / Published: 25 February 2020
(This article belongs to the Special Issue Additive Manufacturing in Industry)

Abstract

:

Featured Application

Wire arc additive manufacturing has been applied in aerospace (such as stiffened panels, wing ribs), nuclear energy, marine (such as ship’s propeller) and architecture (such as steel bridge) industries.

Abstract

Wire arc additive manufacturing (WAAM) has been considered as a promising technology for the production of large metallic structures with high deposition rates and low cost. Stainless steels are widely applied due to good mechanical properties and excellent corrosion resistance. This paper reviews the current status of stainless steel WAAM, covering the microstructure, mechanical properties, and defects related to different stainless steels and process parameters. Residual stress and distortion of the WAAM manufactured components are discussed. Specific WAAM techniques, material compositions, process parameters, shielding gas composition, post heat treatments, microstructure, and defects can significantly influence the mechanical properties of WAAM stainless steels. To achieve high quality WAAM stainless steel parts, there is still a strong need to further study the underlying physical metallurgy mechanisms of the WAAM process and post heat treatments to optimize the WAAM and heat treatment parameters and thus control the microstructure. WAAM samples often show considerable anisotropy both in microstructure and mechanical properties. The new in-situ rolling + WAAM process is very effective in reducing the anisotropy, which also can reduce the residual stress and distortion. For future industrial applications, fatigue properties, and corrosion behaviors of WAAMed stainless steels need to be deeply studied in the future. Additionally, further efforts should be made to improve the WAAM process to achieve faster deposition rates and better-quality control.

1. Introduction

Additive manufacturing (AM) techniques adopt layer-by-layer accumulation with the aid of CAD/CAM model to develop three dimensional (3D) products. Based on the ISO/ASTM 52900-15 standard, AM processes include vat photo-polymerization (VP), binder jetting (BJ), material extrusion (ME), material jetting (MJ), sheet lamination (SL), powder bed fusion (PBF), and directed energy deposition (DED) [1]. Compared with traditional manufacturing, AM (abbreviations used in the paper are summarized in Table 1) techniques have the ability to produce complex components with less waste of materials and energy, and shorter processing cycle [2,3]. To date, AM has successfully processed a variety of metal components [4,5,6,7,8,9]. Metal additive manufacturing processes utilize laser beam, electron beam, or arc as the heat source and the feedstock material is in the form of powder, wire, or sheet [1,10]. AM processes used for metals mainly include powder bed fusion (PBF) [11,12,13,14,15], directed energy deposition (DED) and sheet lamination (SL) [10]. The commonly used metal AM processes include PBF-L (powder bed fusion utilizing a laser as the heat source) [16,17,18,19,20,21,22,23,24,25], DED-GMA (directed energy deposition with gas metal arc), and DED-L (directed energy deposition using laser beam as the heat source) [26,27]. According to the material feedstock, commonly used metal AM processes can be classified as powder-based and wire-based systems [28]. Additive manufacturing processes based on metal powders, which mainly use an electron beam or laser as the heat source, are usually confined in a sealed chamber due to the high reactivity of the melt pool and the health and safety issues with the fine powders, which limits the dimension of the parts that can be built. In addition, the cost of the fine powder is much higher than wires and the build rate is rather slow, so that it is only suitable for small to medium sized high value components which require a better resolution [29]. As compared to the powder-based AM process, the wire arc additive manufacturing (WAAM) technique, which employs an electric arc as the heat source and the building capacity can be expanded to tens of meters, has the potential to fabricate fully dense and large dimensional parts with relatively low forming costs and high manufacturing efficiencies [30]. In general, the primary cost of metal wire is roughly ten percent of the same weight of metal powder [28]. Besides, WAAM machines can be easily adapted from arc welding robots, which are usually much cheaper than L-PBF machines and laser-DED machines. In the WAAM process, the wire is heated, then melted and transferred to the melt pool, thereby solidifies at the boundary of the melt pool and forms the designed parts layer by layer [28], as shown in Figure 1 [31]. WAAM is derived from traditional arc welding technology and belongs to the direct energy deposition (DED) techniques [10]. WAAM, also known as shape welding (European name) and structural weld build up (American name), has been in use for a long time [32]. Early in 1926 “Application of electric arc as the heat source to produce bulk objects by spraying molten metal into the deposited layers” was patented by Baker [32]. In 1983 Kussmaul employed shape welding to manufacture large-scale products from high strength 20MnMoNi5 steel of 79 ton weight [32]. WAAM (shape welding) was used to manufacture primary nuclear components by the German in the late 20th century [32]. Up to now, WAAM has been applied in aerospace (such as stiffened panels, wing ribs), nuclear energy, marine (such as ship’s propeller) and architecture (such as steel bridge) industries [33]. Some commercial WAAM machines have been developed, as listed in Table 2. WAAM technology has attracted the attention of different research institutions around the world [34,35,36,37,38,39,40,41,42,43,44,45,46,47,48,49], as listed in Table 3.
The WAAM process can be achieved through gas metal arc welding (GMAW), gas tungsten arc welding (GTAW), plasma arc welding (PAW), or cold metal transfer welding (CMT) for melting metal wires and constructing a 3D component layer by layer [50,51,52,53,54]. Among these, GMAW is limited by the minimum wall thickness and coarse sidewall surface owing to its relatively large melt pool and heat input [50,55,56]. To surpass the limitations, cold metal transfer welding (CMT) [57,58,59] can be adopted to achieve a very smooth droplet detachment by minimizing the arc burn time and moving the wire electrode back and forth at frequencies up to 150 Hz [60,61]. TIG-WAAM has very clean deposition and can manufacture metal components with high quality [62,63]. In theory, metals with good weldability could be potentially used for WAAM process and so far researchers have successfully fabricated 3D objects in Ti-based [64,65,66,67], Al-based [68,69], steel-based [70,71], and Ni-based [72] alloys. Stainless steels—such as austenitic, martensitic, and duplex stainless steels—are good candidates for WAAM due to their excellent mechanical properties and high corrosion resistance [73]. Moreover, studies on AM of stainless steel 316 indicate that the arc power of WAAM (also known as directed energy deposition with gas-metal-arc, DED-GMA) is 5–10 times higher than that of laser in PBF-L and DED-L [74,75,76,77,78,79,80,81,82,83,84,85,86,87,88], which leads to much higher printing speed of WAAM, as shown in Figure 2 [26].
Recently, there have been a number of investigations on wire arc additive manufacturing of stainless steels, including filler metals’ chemical composition, process parameters, process modeling, defects, residual stress and distortion, microstructure, and mechanical properties. Stainless steels are usually classified as: ferritic stainless steel (409, 430, etc.), austenitic stainless steel (316, 304, etc.), austenitic–ferritic duplex stainless steel (2205, 2209) and martensitic stainless steel (420, 17-4). Their microstructure features and mechanical properties are quite different after WAAM. Stützer et al. found that mixing different filler metals can reduce the nickel equivalent and increase the ferrite content in GMAW duplex stainless steel specimens [89]. Moreover, appropriate process parameters can help to achieve a high-quality WAAM structure. Heat input, cooling rate and reheating effect can impact the morphology, microstructure, and mechanical properties in WAAM components [86,90]. Caballero et al. found that the cooling rate during deposition has an essential influence on retained austenite formation. Direct ageing on the as-deposited condition leads to a reduction of ductility by nearly 50% [91]. Mukherjee and DebRoy et al. studied the printability of 316 stainless steel by heat transfer fluid flow model. They concluded that DED-GMA has deep penetration, which makes DED-GMA components have the lowest probability of lack of fusion defects compared to PBF-L and DED-L parts [26].
Although successful WAAM builds of various stainless steel parts have been reported in the literature, there is still lack of a holistic view on this topic. This paper is to provide a systematic review on WAAM of stainless steels regarding the macroscopic characteristics and the microstructure of the steels undergoing different WAAM processes and parameters. The causes and morphology of defects, residual stress, and distortion in the WAAM parts will be discussed as well. Then, the mechanical properties, including hardness and tensile strength, and the correlation with process parameters will be explored. Finally, some suggestions on the future study of WAAM of stainless steels were put forward.

2. Macroscopic Characteristics of Samples

WAAM process parameters determine the heat input and thermal accumulation, thereby impact the macro morphology [92,93]. Zhang et al. [52] indicated that the forming efficiency and precision could be improved by starting and ending the arc of each layer through a back-and-forth scanning strategy. In the study of GMAW forming characteristics, Xiong et al. [94,95] found that higher wire feeding rate reduces the stability of the molten pool and larger scanning speed makes the arc less stable. Both can lead to an increase in surface roughness. However, a lower interlay temperature could decrease surface roughness. The research of Ding et al. [92], Yang et al. [93], Zhang et al. [52], and Xiong et al. [94,95] showed that the macroscopic morphology of WAAM varies with different forming parameters. The process parameters and their influence on macroscopic morphology of WAAM stainless steel parts will be introduced in detail later.
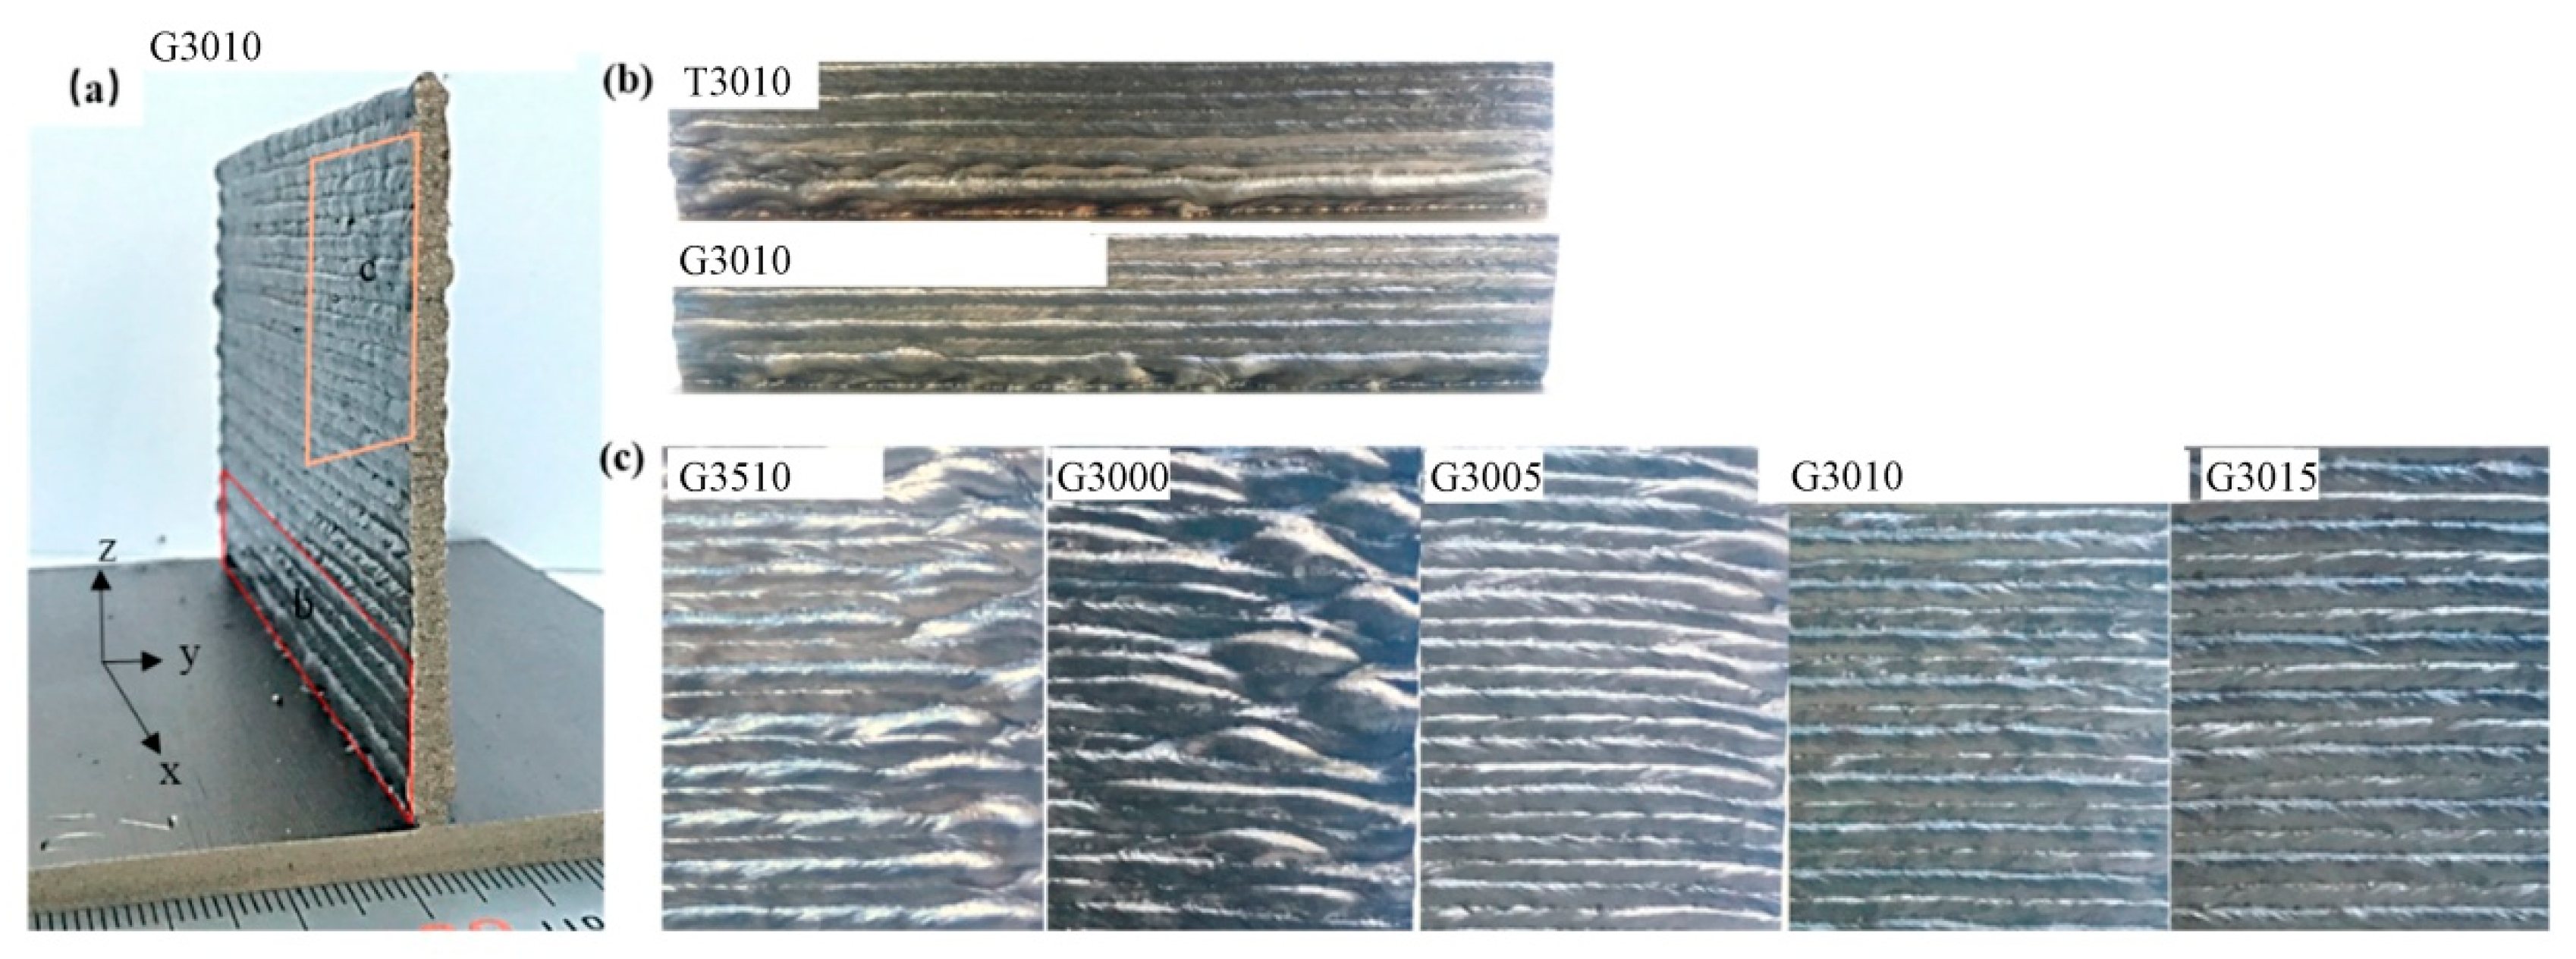
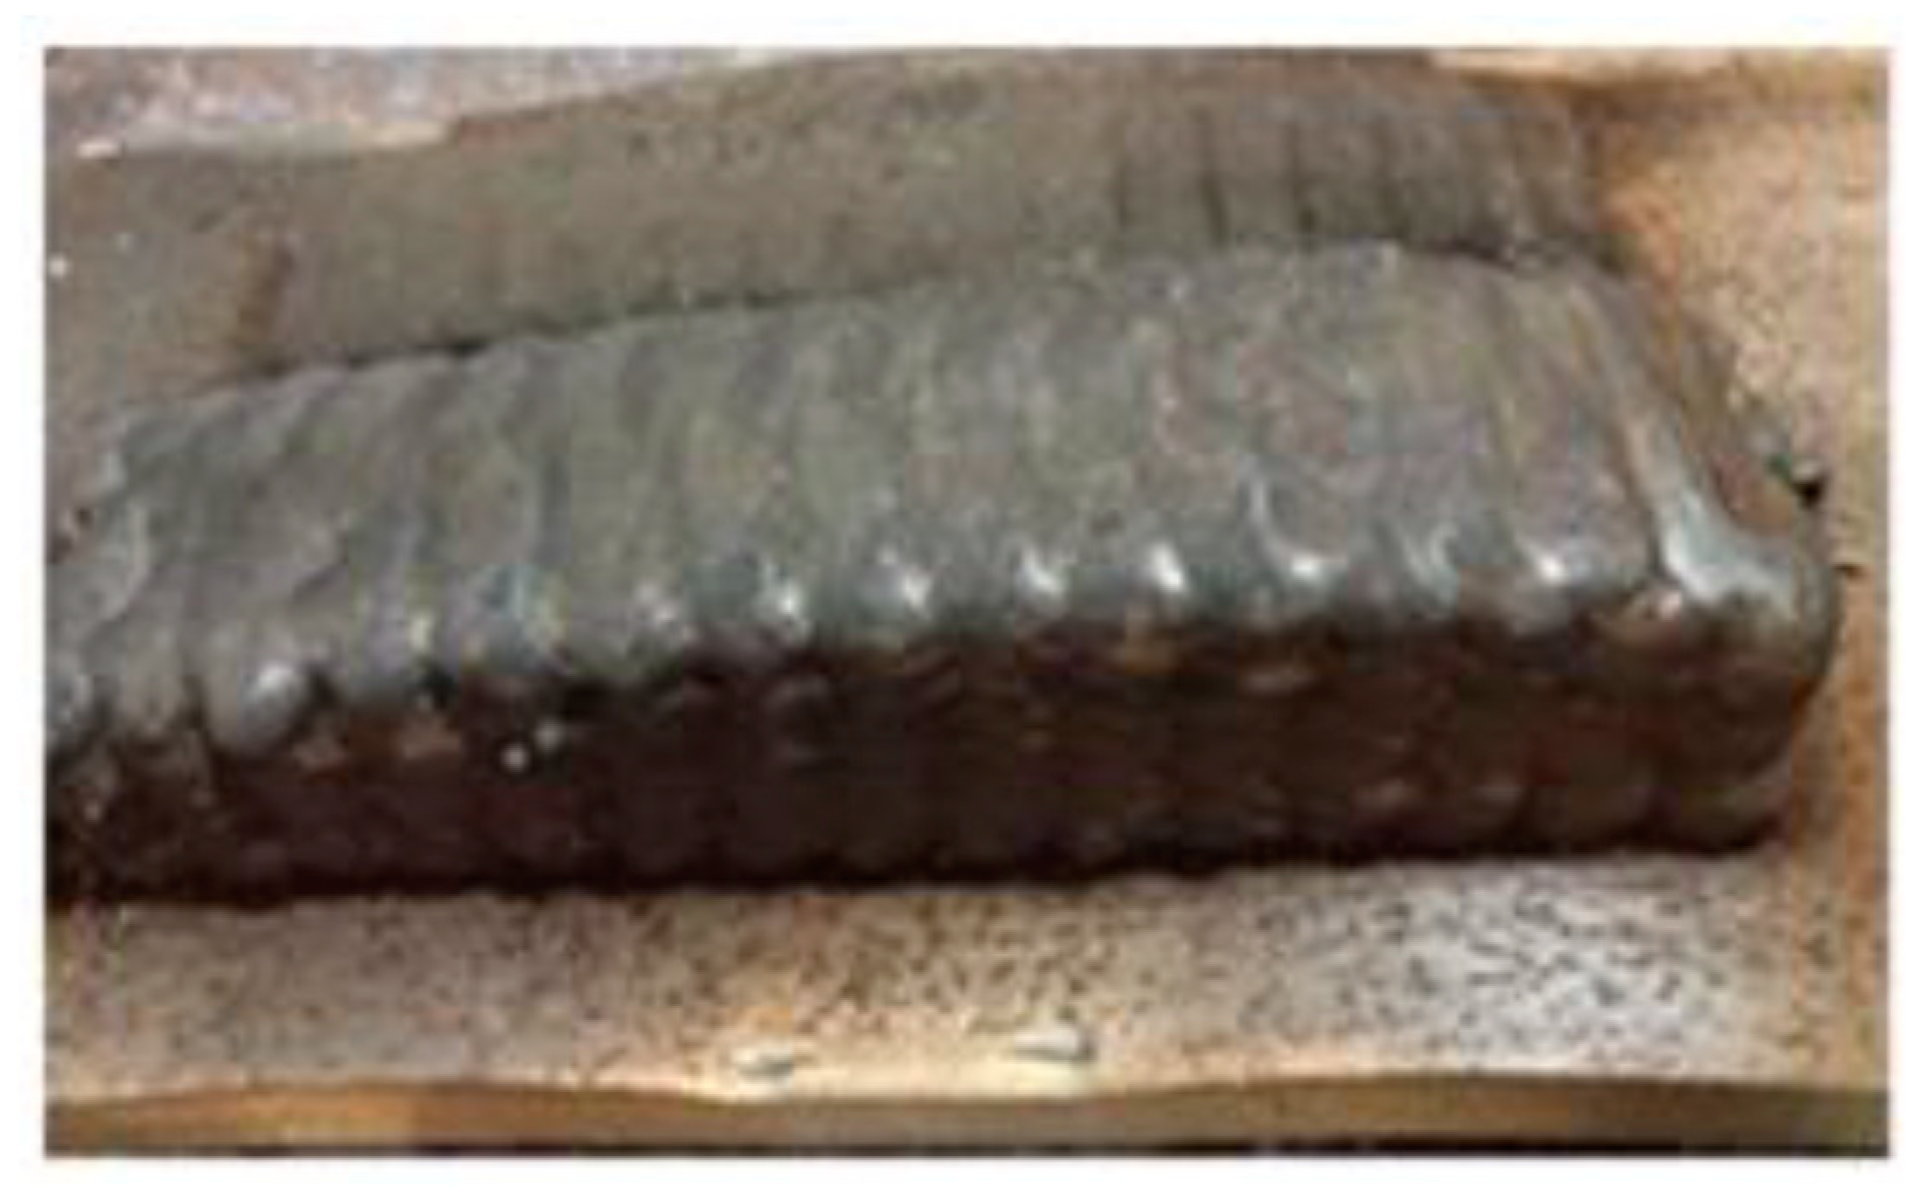
Wu et al. [96] studied the influence of the bottom current mode, scanning speed, and interlayer cooling time on the macro morphologies of 316L stainless steel samples using MIG (metal inert gas) welding additive manufacturing. The process parameters of different samples are listed in Table 4. As presented in Figure 3, there were no significant defects between the layers of the samples. A thin and tall sample, G3010 (gradual reduction of bottom current, scanning speed was 30 cm/min, cooling time was 10 s), had uniform layer height, as demonstrated in Figure 3a. Through the samples in Figure 3b, Wu et al. [96] found that gradual reduction of current improves bottom formation.
As shown in Figure 3a,c (samples G3010and G3510), the increase in scanning speed leads to a decrease in the deposition rate, resulting in the unevenness on the outer surface. Compared with sample G3000 whose cooling time is 0 s, the morphology of sample G3005 was improved; however, both ends of the layers collapsed due to the extremely high temperature. However, formation of the ends got better if cooling time was increased to 10 or 15 s [96].
Compared to GMAW and GTAW, plasma arc welding based additive manufacturing technology has a more concentrated arc, relatively higher energy density (as listed in Table 5), and shaping precision.
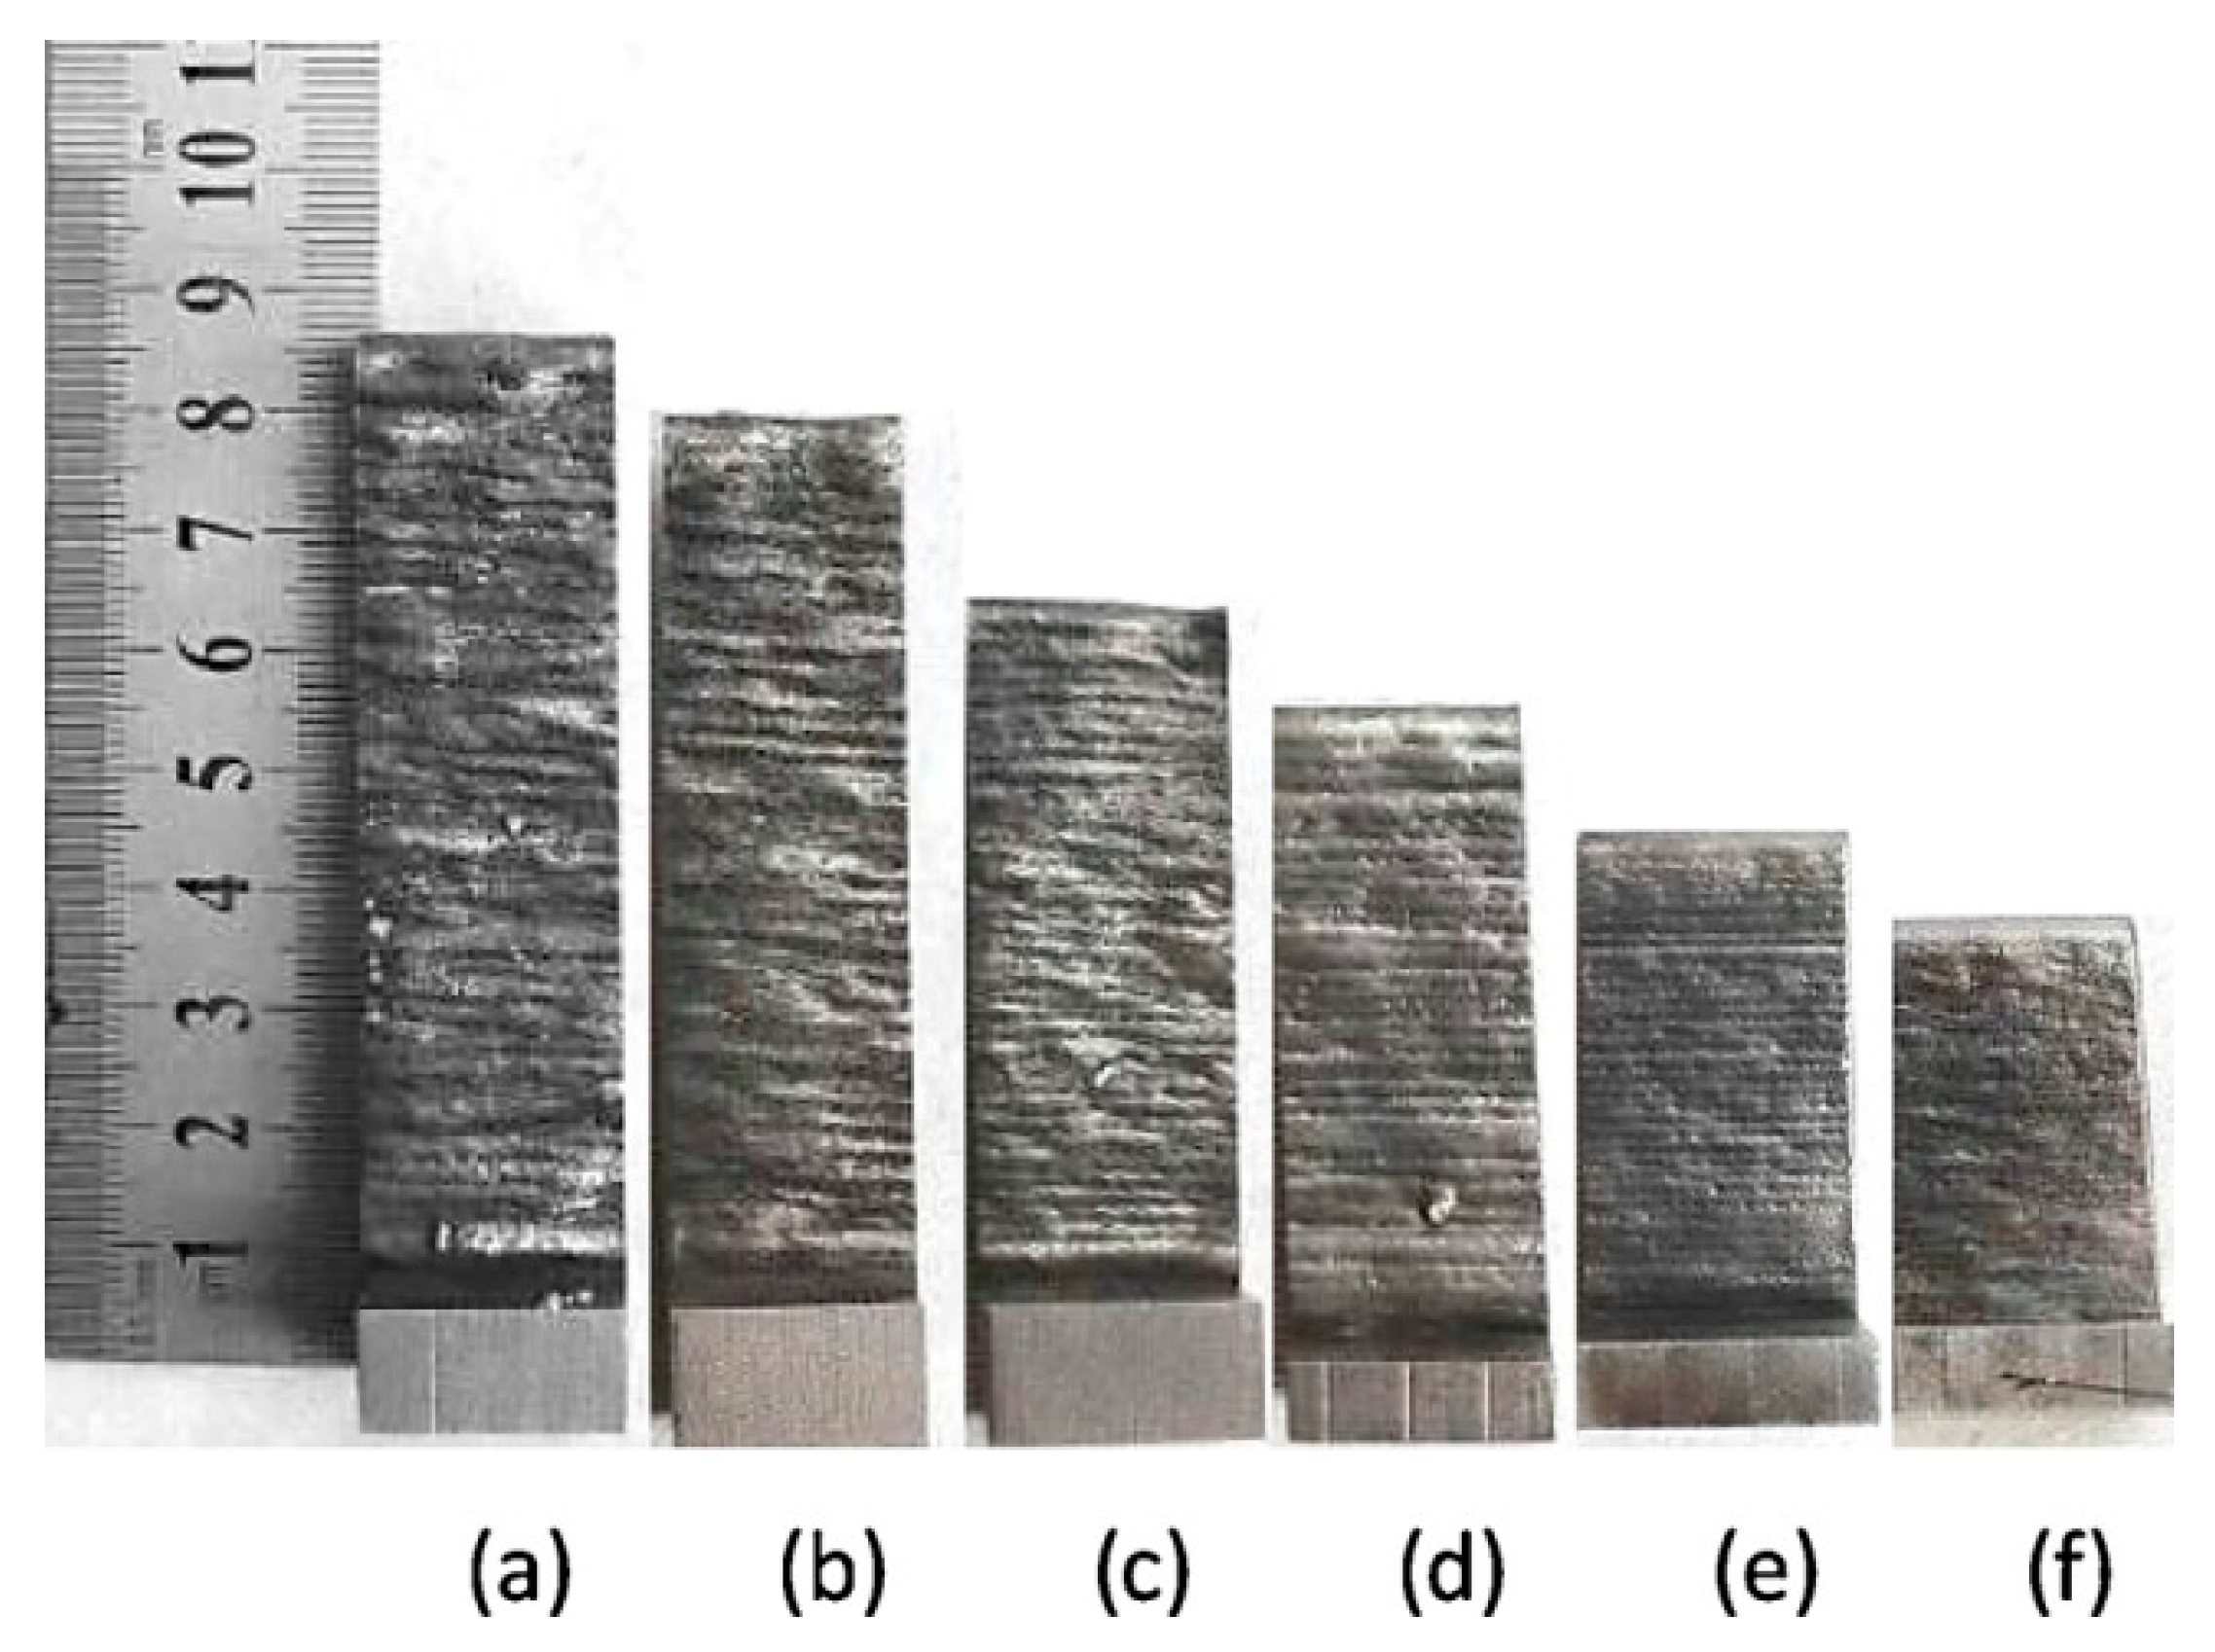
Feng et al. [100] investigated the forming quality of SWF-PAM (single-wire feed and plasma additive manufacturing) and DWF-PAM (double-wire feed and plasma additive manufacturing) processes. When using the same deposition current 130 A to prepare Cr-Ni (H00Cr21Ni10) stainless steel samples, an increase in scanning speed decreases the layer height of the deposited walls but improves the surface-quality and reduces waviness. The macrographs of the deposited samples are presented in Figure 4. Although with the same deposition current and scanning speed, the surface waviness of SWF-PAM samples was slightly better than that of DWF-PAM samples. However, the detailed surface condition of SWF-PAM and DWF-PAM samples was not studied.
The surface of CMT- base additive manufacturing parts is rather smooth as mentioned by the work of Fronius International GmbH [57,58], Bruckner et al. [59], Zhang et al. [60], and Pickin et al. [61]. To investigate the ability of CMT in terms of surface condition, Posch et al. [55] adopted CMT to manufacture blade-like geometries of duplex stainless steel. With consistent welding parameters for all layers, they achieved quite smooth surface comparable to that obtained by hot rolling, flame cutting, or sand casting. The absolute surface roughness (Ra) of duplex stainless steel geometry was 24.5 μm, and the average distance between the highest peak and lowest valley (Rz) was 135.3 μm, which can be seen in Figure 4 of [55].
Other factors, such as deposition path and wire material, also affect the surface condition. During wire-arc additive manufacturing of duplex stainless steel blocks, an alternating direction path generated the uniform layer height, while a one-direction deposition path yielded uneven sides due to the heat accumulation at the stop point during the deposition of each layer [101]. Rodriguez et al. [88] applied multi-bead CMT deposition parameters to build 316L stainless steel walls. The Rz of CMT-based WAAM parts was 220 μm.
In summary, macroscopic characteristics are closely related to wire feeding speed and scanning speed, welding current mode, cooling time, and interlay temperature. The influences of main process parameters on the macroscopic morphology of WAAM stainless steel parts are listed in Table 6. Further studies on optimizing the above-mentioned process parameters are needed for achieving better dimensional accuracy and surface quality of WAAM parts.

3. Microstructure

The microstructures of WAAM stainless steel are largely determined by the thermal history during the processes. During WAAM processing, the thermal cycle—including repeated heating and cooling [102,103]—creates non-equilibrium microstructures in the deposited parts [104].
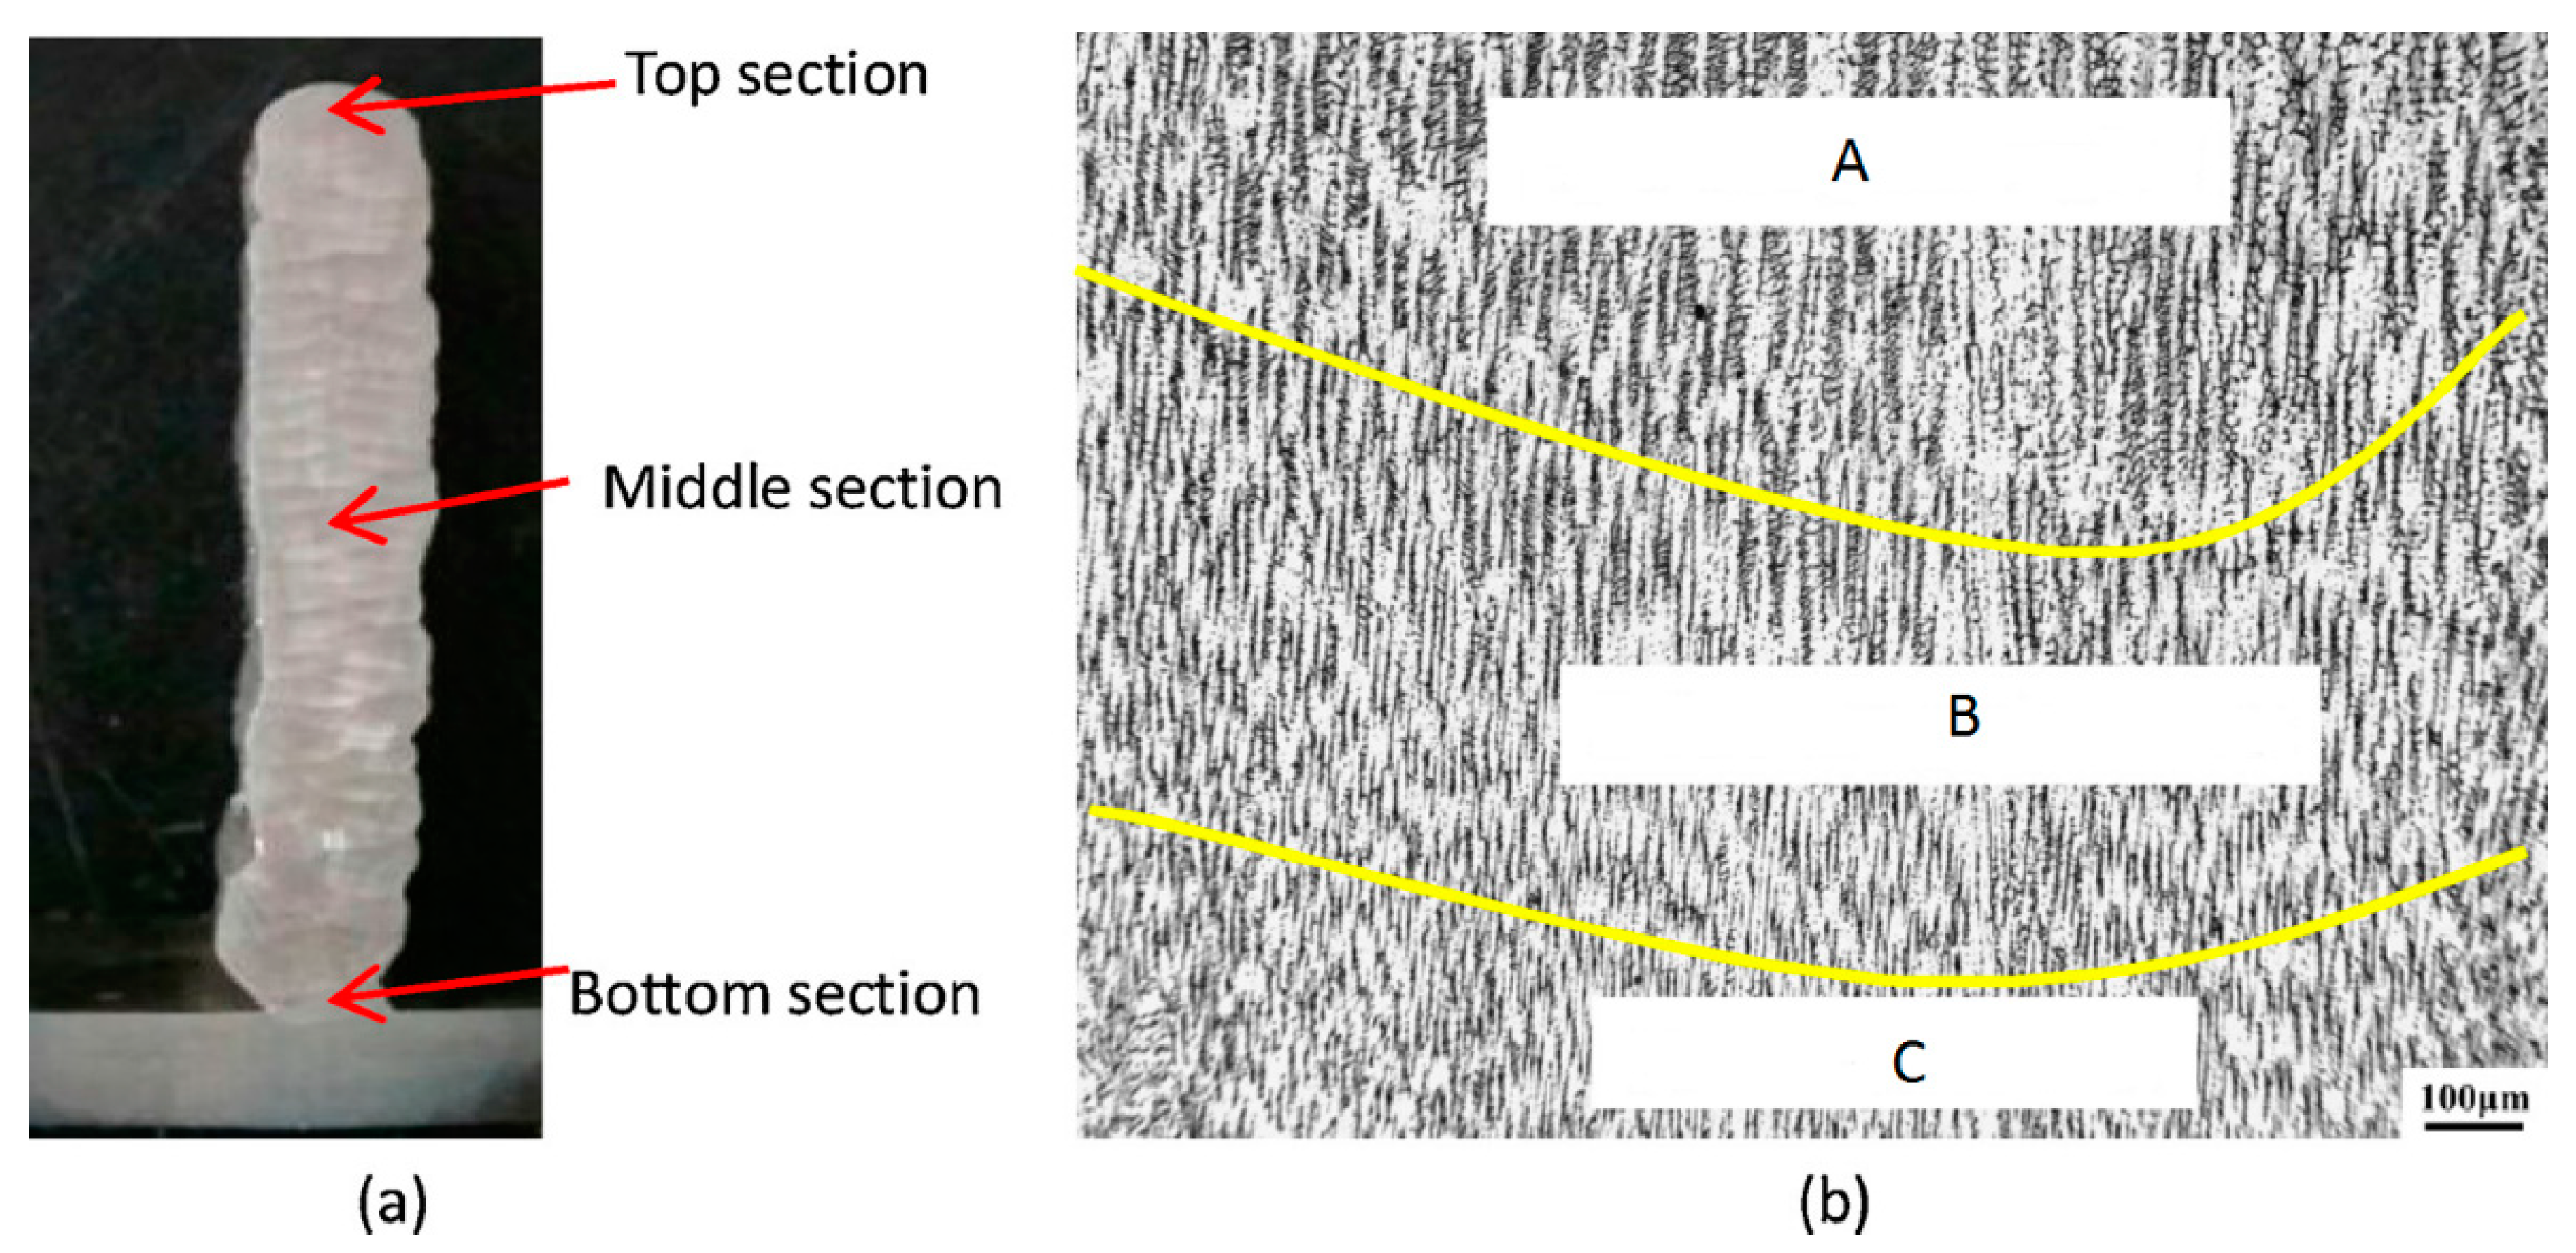
Table 7 summarizes the microstructure, tensile strength, yield strength, and elongation of stainless steels manufactured by different WAAM technologies. The process factors affecting microstructure and mechanical properties are listed in Table 7. The microstructures of a H00Cr21Ni10 stainless steel part prepared by DWF-PAM are illustrated Figure 5 [100]. Owing to different heating state and thermal cycles in different areas of the deposited samples, the microstructures are characterized by three different regions: the top, middle, and bottom sections. The macrostructure, microstructure, and mechanical properties of the middle section are critical to the manufactured components. As presented in Figure 5b, the ferrite (δ-Fe) phase are embedded on the fine austenite matrix and each layer consists of a sequence of fine grain (C), columnar grain (B), and equiaxed grain (A) regions from the bottom to the top. In SWF-PAM samples, the above microstructures were also observed.
Feng et al. [100] investigated the microstructure in the adjacent area between the 35th layer and 36th layer of DWF-PAM and SWF-PAM processed parts (Figure 6). They pointed out that increased scanning speed can produce better grain structures (finer complete grown equiaxed ferrite (CGEF) grain structures), and two wires melting in the same melt pool can augment the cooling rate, resulting in the formation of a finer complete grown equiaxed ferrite (CGEF) grain structure. As shown in Figure 6, as the scanning speed increased from 30 cm/min to 60 cm/min, the number of complete grown equiaxed ferrite (CGEF) grains significantly increases in DWF-PAM samples. However, in SWF-PAM samples, there are some incomplete grown equiaxed ferrite (IGEF) grains when the scanning speed increases from 30 cm/min to 50 cm/min. As the scanning speed increases to 60 cm/min, the IGEF grains quantity reduces, and only a few CGEF grains appear. Due to the CGEF grains distributed in the interface region adjacent to next layer, the ultimate strength of DWF-PAM samples is higher than that of SWF-PAM specimens. The ultimate tensile strength of DWF-PAM samples increases by an average of 10.2%, roughly by 52.98 MPa, when compared with those of SWF-PAM specimens [100].
Similarly, Hejripour et al. used GMA-WAAM to fabricate 2209 duplex stainless steel (DSS) walls and tubes, and indicated that calculation of cooling rates in deposited layers could help forecast the formation of the phases [105]. Their numerical and experimental results revealed that austenite formation could be significantly promoted by slow cooling rates in the layers at elevated temperatures. Wang et al. reported that cooling rate significantly affected the scale of the solidification structure [90]. The relationship between cooling rate (GR, the cooling rate in K/s) and secondary dendrite arm spacing (λ2) is given in Equation (1).
λ2 = 50(GR)−0.4
According to Equation (1), SpeedArc WAAM could produce smaller secondary dendrite arm spacing in 316L stainless steel components than SpeedPulse WAAM because of the higher cooling rate [90]. (SpeedArc: the primary metal transfer mode is the short-circuited transfer mode. SpeedPulse: the primary metal transfer mode is a projected spray transfer mode.)
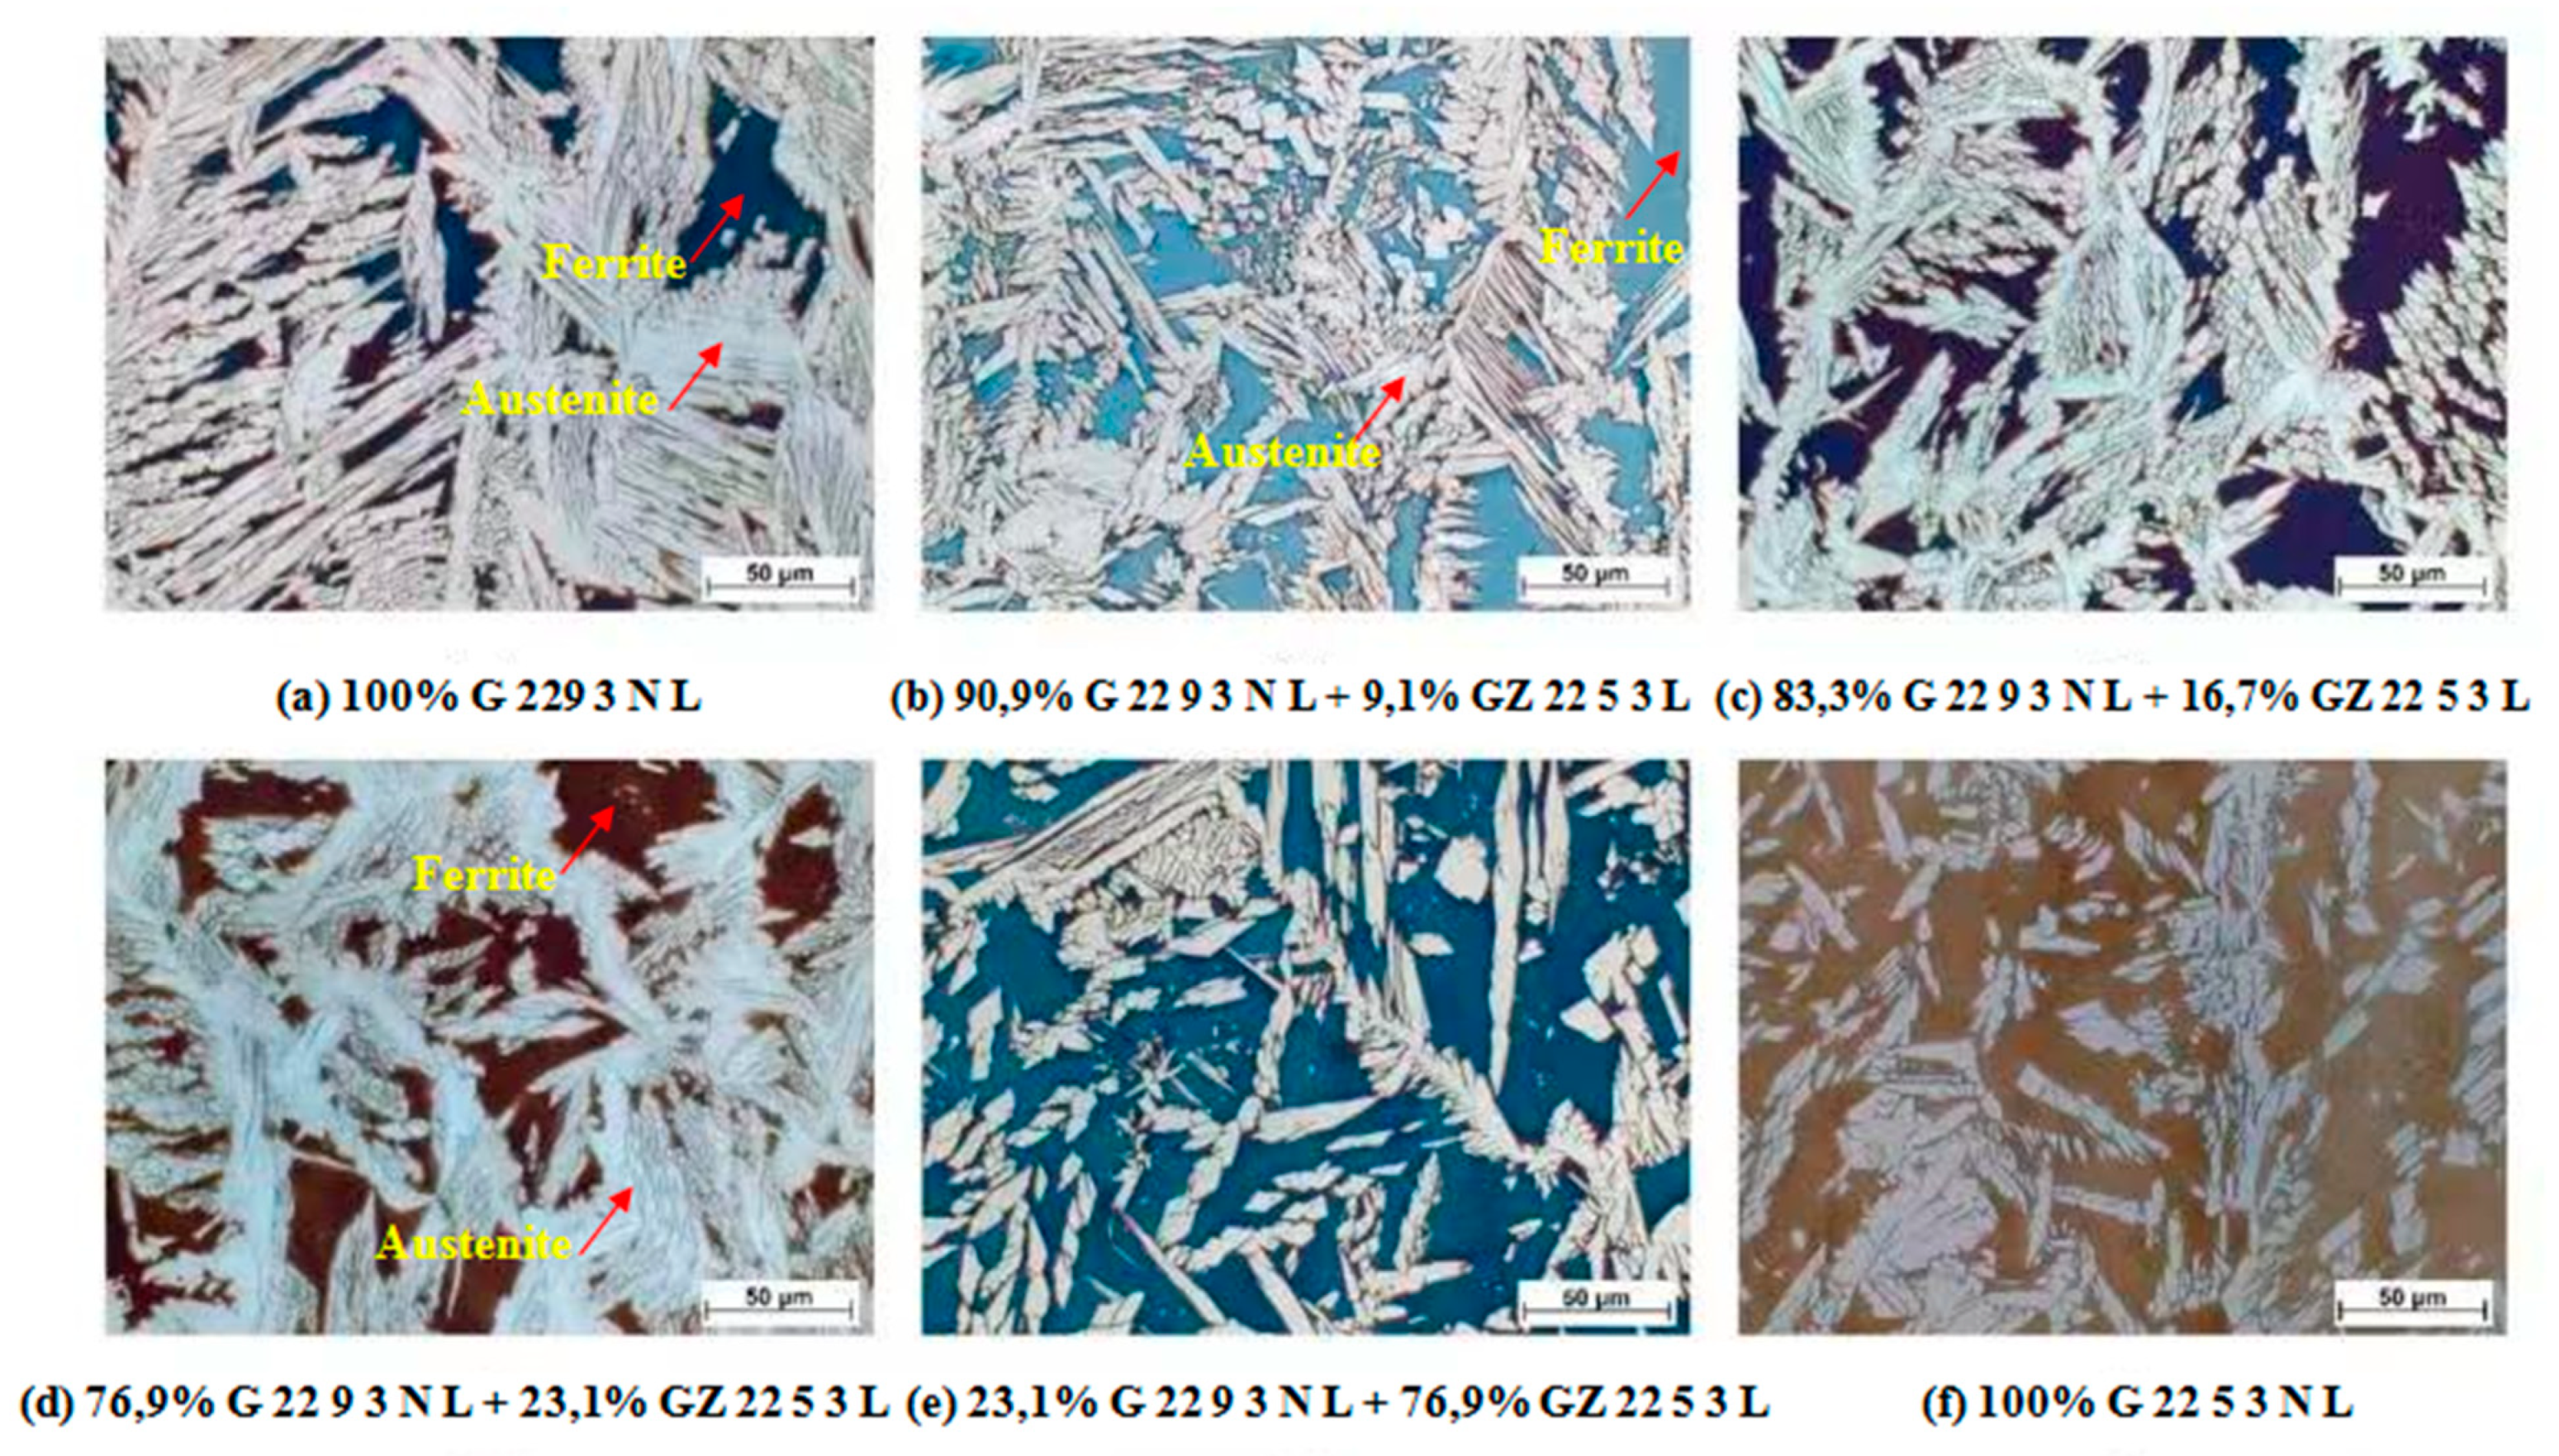
Other factors also have specific effects on phase balance, including material composition [105] and heat treatments [91]. For instance, in the investigation of adjusting the ferrite–austenite ratio of WAAM duplex stainless steel components, Stützer et al. [89] mixed two different filler metals to decrease the nickel equivalent, thus increased the ferrite content in the specimens. The sample fabricated with 100% of the filler metal G 22 9 3 (see Figure 7a) contains large austenitic side plates. From Figure 7a–f, as the percentage of the filler metal GZ 22 5 3 increases, the nickel content reduces, and the austenite plates become smaller in size and less in content. The sample fabricated with 100% of the filler metal GZ 22 5 3 (see Figure 7f) contains relatively small austenite platelets. However, the investigations carried out by Stützer et al. did not involve any post processing heat treatments.
Caballero et al. [91] researched the microstructures of CMT 17-4 PH stainless steel samples under four different heat treatment conditions, including as-deposited (AD), as-deposited plus H900 ageing treatment (AD + H900), and as-deposited followed by solution treatment and H900 ageing (ST + H900; solution treatment: 1040 °C for 30 min; H900 ageing treatment: 480 °C for 1 h), as presented in Figure 8. The shielding gas was comprised of 38% He and 2% CO2 in argon (SG1). The Creq/Nieq ratio of 17-4 PH stainless steel is greater than 1.55, which yields a primary ferrite solidification mode. Under equilibrium cooling, phase transformation sequence of alloy 17-4 PH is as follows: L → δ-ferrite → γ-austenite + δ-ferrite → martensite + δ-ferrite [106]. However, the high cooling rates during WAAM processing limit the amount of δ-ferrite that can convert to γ-austenite. Thus, some of the δ-ferrite will remain at room temperature. This is why a dendritic martensite-δ ferrite microstructure can be observed in the AD condition sample (Figure 8a).
Additionally, most δ-ferite is transformed into austenite which thereafter transformed into martensite due to the slower cooling rate when temperatures are above A3. As a result, the microstructure is mainly composed of martensite, as shown in Figure 8c (sample under ST+H900 condition) [91]. Caballero et al. [91] also reported the influence of shielding gas (SG) composition on the final microstructure. They found that a higher percentage of retained austenite was observed when using SG1 (Shielding gas 1: 38% He + 2% CO2 + Ar) compared with using SG2 (Shielding gas 2: 2.5% CO2+Ar).
Different heating cycles in different areas produce an inconsistent solid phase transformation, leading to different microstructures of H00Cr21Ni10 stainless steel part [100]. Cooling rates and temperatures of different heat treatments have a significant impact on phase transformation of alloy 17-4 PH [91]. For duplex stainless steels, the ratio of austenite to ferrite phase crucially affects the properties in strength and corrosion resistance [107]. The high content of austenite and the formation of secondary austenite can significantly lower corrosion resistance and strength of stainless steel [89].
In summary, thermal history in WAAM processes play an important role in controlling the microstructure, such as the ratio of austenite and ferrite phases. It is feasible to control the microstructure, such as promoting the nucleation and growth of precipitates in δ-ferrite, which can influence the mechanical properties [91], by controlling the process parameters. Modifying the material compositions, such as using double wires [89], is another effective approach to achieve desirable final microstructures. Post heat treatments also can significantly influence and change the final microstructure. Therefore, in order to obtain desirable microstructures in WAAM stainless steel parts, it is very necessary to thoroughly understand the solidification behaviors [105] and phase transformations in complex WAAM thermal cycles, and the correlation between material compositions, process parameters, heat treatment parameters and the final microstructure. Besides, the WAAM samples often show considerable anisotropy in terms of tensile strength and microstructure due to the directionality of the layer wise deposition process. It is useful to develop new processes, such as in-situ rolling + WAAM, to solve the anisotropy problems caused by the coarse columnar crystals in the deposition direction.

4. Residual Stresses and Distortion

Similar to welding and other additive manufacturing process, residual stress and distortion are inevitable to WAAM processes [33,108,109]. Ding et al. [108] reported that the stresses generated during the WAAM process led to large distortion of the parts after clamp removal. Post heat treatment is usually necessary to relieve these stresses. Besides, high residual stresses can have a substantial effect on mechanical properties of the manufactured structures. The residual stresses higher than the local UTS (ultimate tensile strength) of the material can lead to cracking, while the ones between the local YS (yield strength) and UTS can cause warpage or plastic deformation [110]. According to Ding et al. [108], the residual stress distribution across the WAAM fabricated wall was uniform and the residual stress in the former layer rarely affected the subsequent layers. However, after the clamping was released, the value of the rebalanced internal stress at the top of the integral component became much lower than that at the interface to the substrate because of bending deformation of the sample.
Apart from the above-mentioned residual stresses caused by the thermal history of WAAM process, for WAAM of steels, solid-state phase transformation is an important factor that one must consider in studying stress evolution [111]. In multi-pass laser metal powder deposition (LMPD) process of martensitic stainless steel (16 wt % Cr-4.5 wt % Ni-1.6 wt % Mo-0.9 wt % B-0.6 wt % Mn-0.12 wt % C), Fang et al. [111] studied the influences of solid-state phase transformation on residual stress by the numerical simulation and XRD residual stress measurement. When phase transformation is ignored, the simulated residual longitudinal stress is around 1100 MPa. However, it is just about 253 MPa when phase transformation is considered. The residual longitudinal stress measured by XRD method is 390 MPa. With phase transformation and stress influence considered, the longitudinal residual stress is about 296 MPa, which is closer to the measured data (390 MPa). The results show that phase transformation can result in lower residual stresses. The austenite (high temperature phase) is the weaker phase. As the temperature decreases, the strain induced or stresses assisted martensitic transformation occurs. Transformation induced plasticity (TRIP) and the density change can result in the large stress reduction [111].
There are several types of distortion in WAAM parts, including bending deformation, shrinkage in the longitudinal and transverse directions [112]. The repeated heating and cooling can cause thermal expansion and shrinkage of the deposited parts, leading to deformation, especially in large thin-walled components [109]. Residual stresses and distortion are closely related to deposition paths in WAAM [113,114]. Lee et al. [114] reported that a bidirectional tool path with 180° rotation decreased the residual stress by around 50% at the bottom corner of the sample, which potentially reduces the cracking susceptibility. When fabricating martensitic stainless steel samples by the oscillation pass (Figure 9) [115], high distortion occurred in the substrate because of high heat input, as shown in Figure 10. Gordon et al. [116] reported that when deposition path was one-direction from left to right, the residual stresses resulted in a distinctive curvature of a single-bead wall, which can be seen in Figure 1 of [116]. The cooler left-end at the beginning makes the sample beginning a little higher than desired. However, the right-end of the build is lower than anticipated, because residual heat from the previous deposited layers causes the metal to flow more [116]. In general, proper deposition paths can notably reduce residual stresses and deformation, particularly in large scale WAAM fabrication [33,114].
In summary, thermal history and residual stresses have a significant impact on the distortion of WAAM parts, and the effect of both becomes more pronounced as the component volume increases [116]. The residual stresses can cause deformation, decrease in dimensional accuracy, defects, as well as worsening of mechanical properties of the components. Phase transformation (especially martensitic phase transformation) has a significant impact on reducing residual stress [111]. In theory, if the martensite transformation is controlled to occur within a certain temperature and time domain, the residual stress can be controlled to a lower level [111]. Proper deposition path planning can significantly reduce residual stresses [114]. Therefore, further efforts should be made to optimize the WAAM deposition path, the thermal history and control the phase transformation during WAAM to reduce the residual stress and distortion through both modelling and experimental studies. Besides, in-situ rolling + WAAM is an effective approach for reducing the residual stress in WAAM parts.

5. Defects

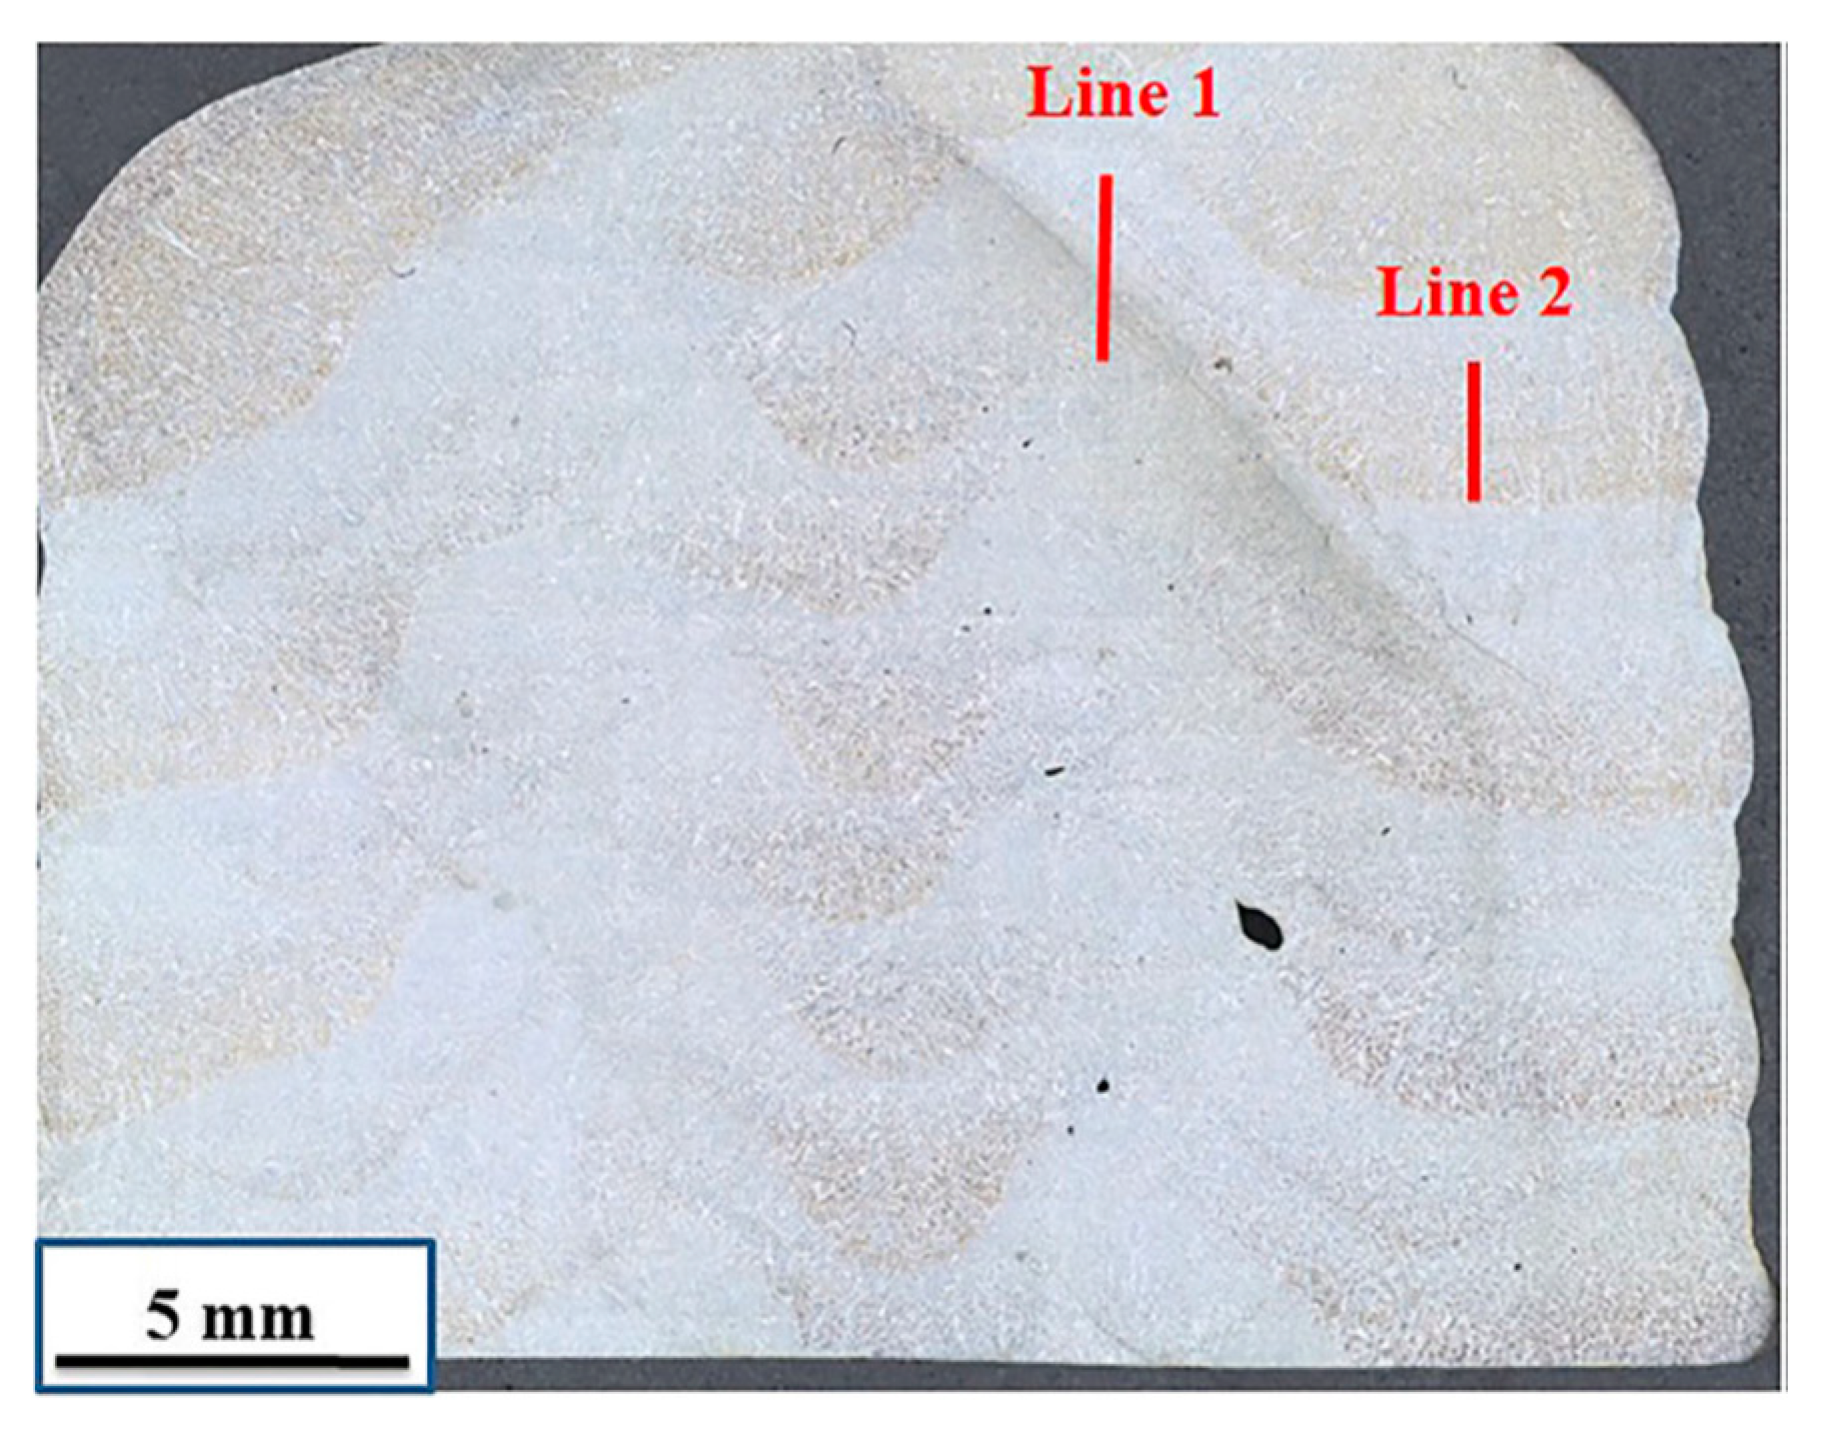
Common defects and their formation reasons in WAAM metallic parts are listed in Table 8. Porosity [116], cracks, and lack of fusion [101] are the typical defects found in stainless steel parts produced by WAAM. Process parameters, such as deposition paths and heat input, cause defects during deposition. A complex deposition path is more likely to produce the spatter ejection or insufficient fusion, creating voids or gaps in the affected areas [33]. Compared to GTAW- and PAW-based WAAM, GMAW have more problems of excessive heating, spattering, or porosity, because the electric current acts directly on the feedstock [88]. Some porosities and lack of fusion appears on the cross section of GMAW duplex stainless steel samples, especially between the beads, as shown in Figure 11 [101]. Gordon et al. [116] investigated porosity data for three different locations in the WAAM stainless steel 304 build. Thermal history causes different porosity for top-right, top-left, and bottom-right locations. The data for the three locations show obvious multimodality (see Figure 4 in [116]) because of gas generation or the insufficient energy for complete melting the layers during the process.
The raw material factor, such as contamination of the substrate and filler metal, is another cause of defects. Dirt, moisture, and grease on the surface of substrate and filler metal can be easily absorbed into the molten pool, thereby producing porosity after solidification [33].
In summary, defects—such as lack of fusion, cracks, and porosity—need to be controlled to a minimum level to achieve sound mechanical properties. Precise control of heat input and thermal history, proper shielding gas and tight gas seals, high quality feedstock, and clean substrate surfaces are helpful to reduce defects during stainless steel WAAM process.

6. Mechanical Properties

Current studies on mechanical properties of stainless steel structures fabricated by WAAM mainly focus on hardness and tensile strength. Although, in many cases, the mechanical properties of WAAM parts can be comparable to those of conventional machined components, there is still a need to well understand the correlation between process parameters and the mechanical properties of WAAM manufactured parts [119].
Studies indicated that heat input during WAAM process has a significant impact on macro morphology, microstructure of the parts, and mechanical properties [90]. Although the wire feeding rate remains the same, the heat input will vary when using different arc modes [90]. Another factor that affects mechanical properties of WAAM components is metal transfer mode, which leads to different rate of liquid droplet transfer, even though the wire feeding rate remains the same [120,121,122]. In this sense, Wang et al. [90] studied the effects of arc modes on mechanical properties during wire arc additive manufacturing of 316L stainless steel. The relationship between forming parameters of WAAM technique and hardness, tensile strength, and elongation rates of stainless steel parts has been investigated [88,96,100].

6.1. Hardness Distribution

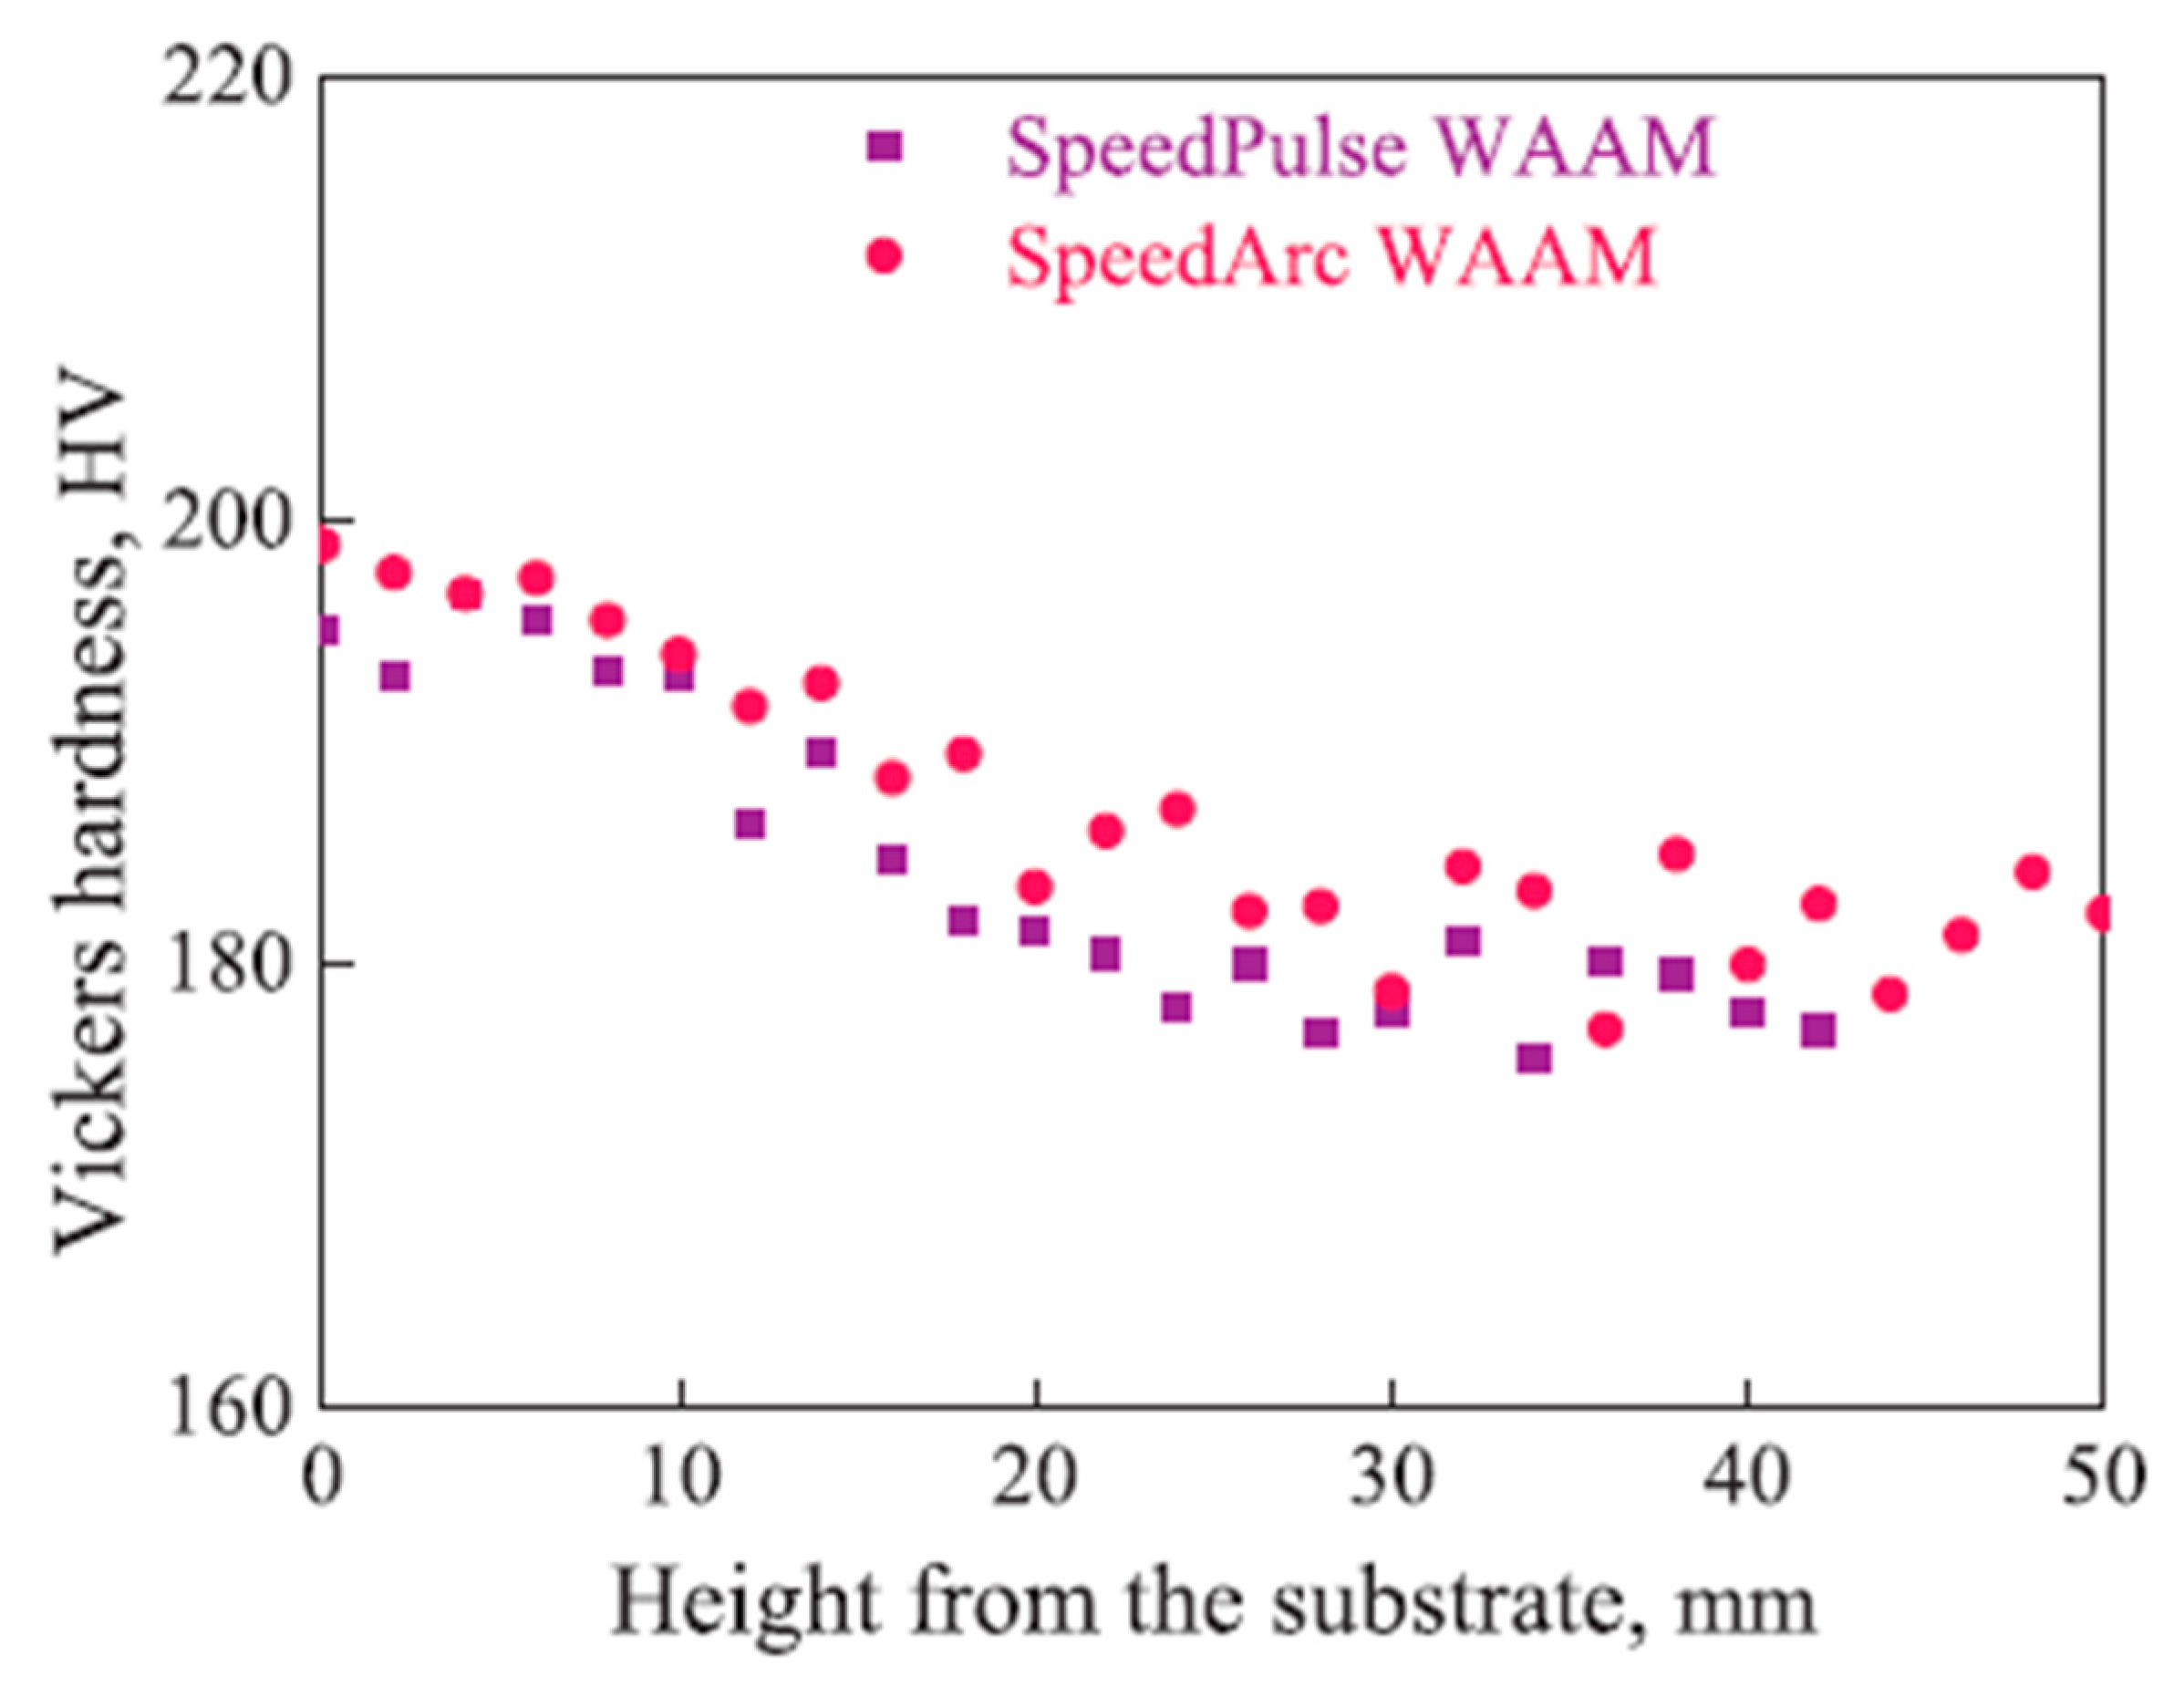
Hejripour et al. concluded that duplex stainless steel (wire 2209) WAAM-made parts had a lower hardness value than the base metal (a 2205 duplex stainless steel substrate) due to the lower ferrite content in the layers [105]. According to Wang et al., the Vickers hardness values of 316L stainless steel components exceed 175 HV, obtained by both SpeedArc (the primary metal transfer mode is the short-circuited transfer mode) and SpeedPulse (the primary metal transfer mode is a projected spray transfer mode) additive manufactured process [90], as shown in Figure 12. Though scanning speeds and deposition rates are the same for both processes, the SpeedArc WAAM can provide a more exceptional solidified structure (smaller secondary dendrite arm spacing) in the deposition parts owing to a lower heat input and higher cooling rate. As a result, the hardness values of SpeedArc WAAM parts are higher than those of SpeedPulse WAAM parts. However, this article does not address the hardness distribution of different layers of the same component.
Wu et al. found that the hardness value of the 316L stainless steel sample reduced slowly from the bottom to top because of the heat accumulation. As described in Figure 13, the average hardness in the bottom region ranges from 177.9 HV to 182.75 HV, which is slightly higher than that in the top region, i.e., in the range of 169–174.35 HV [96].
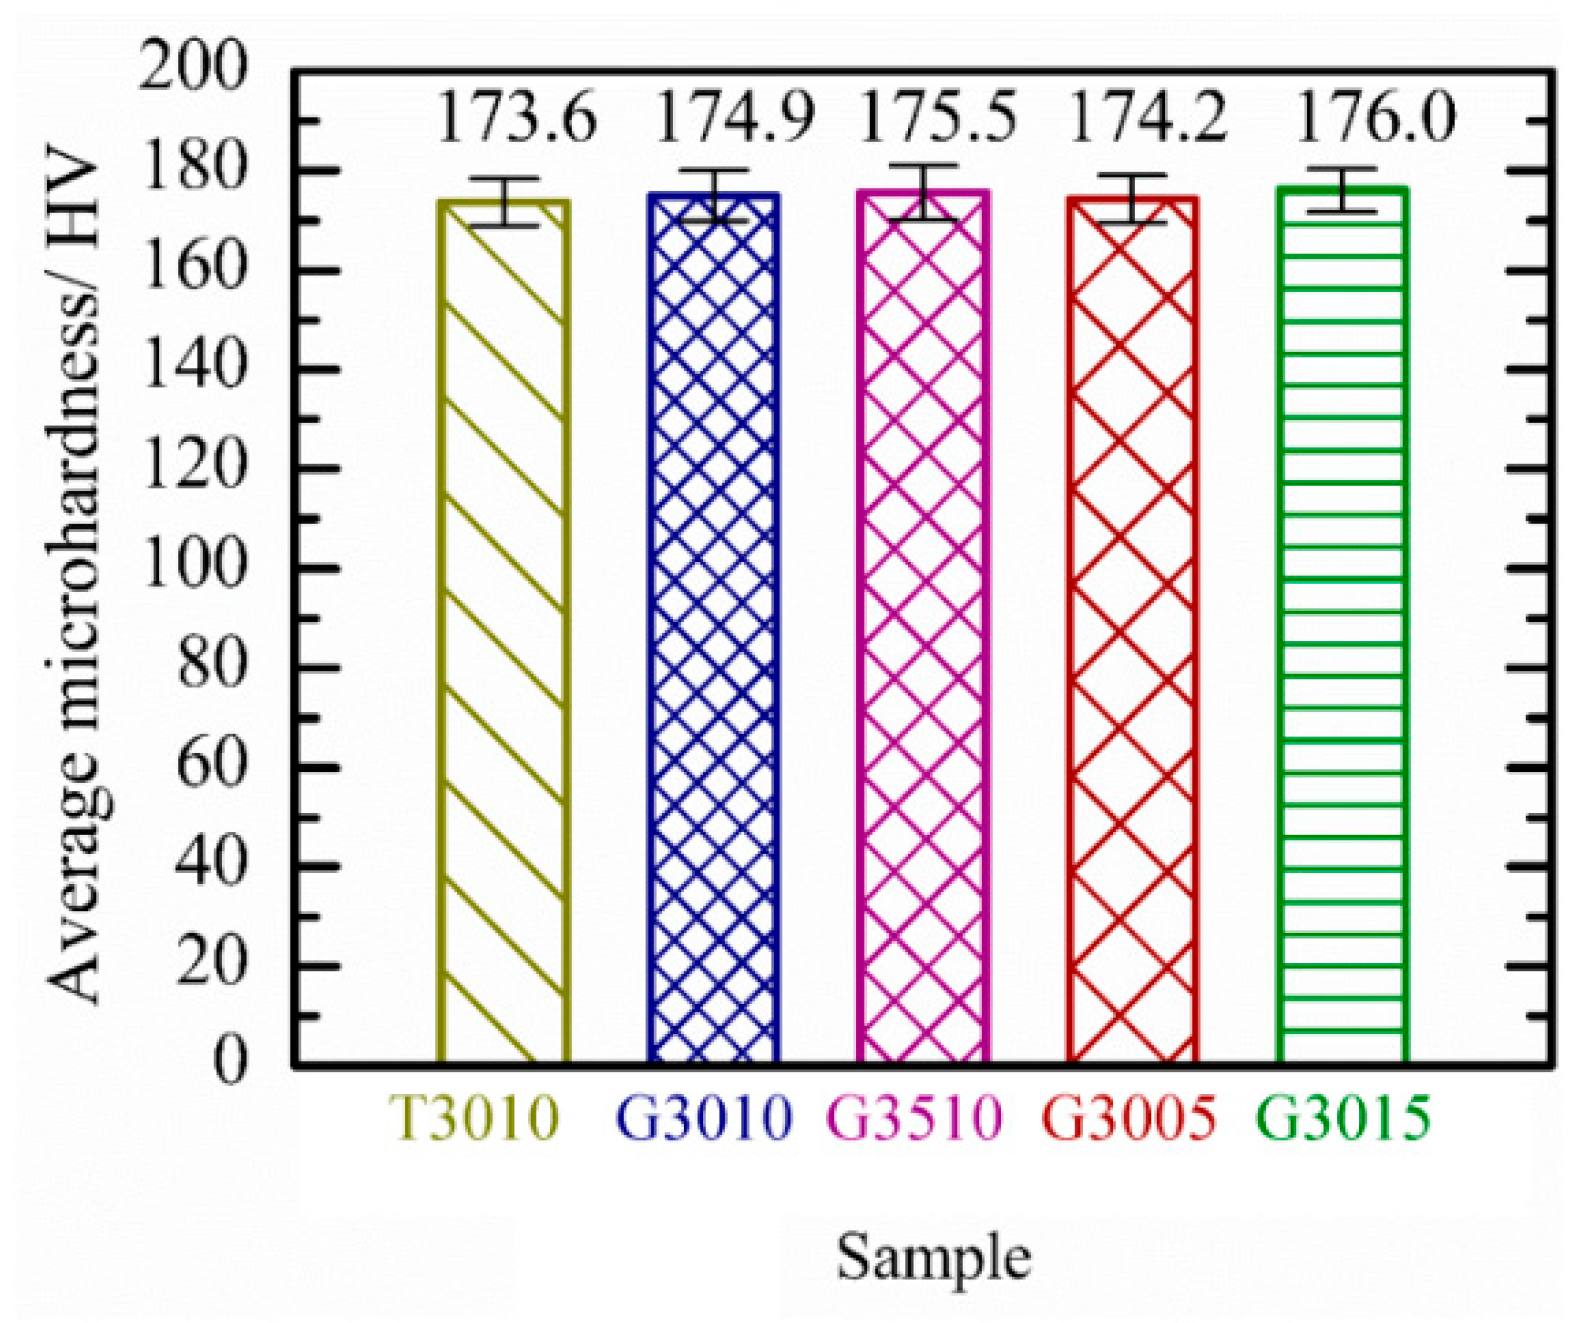
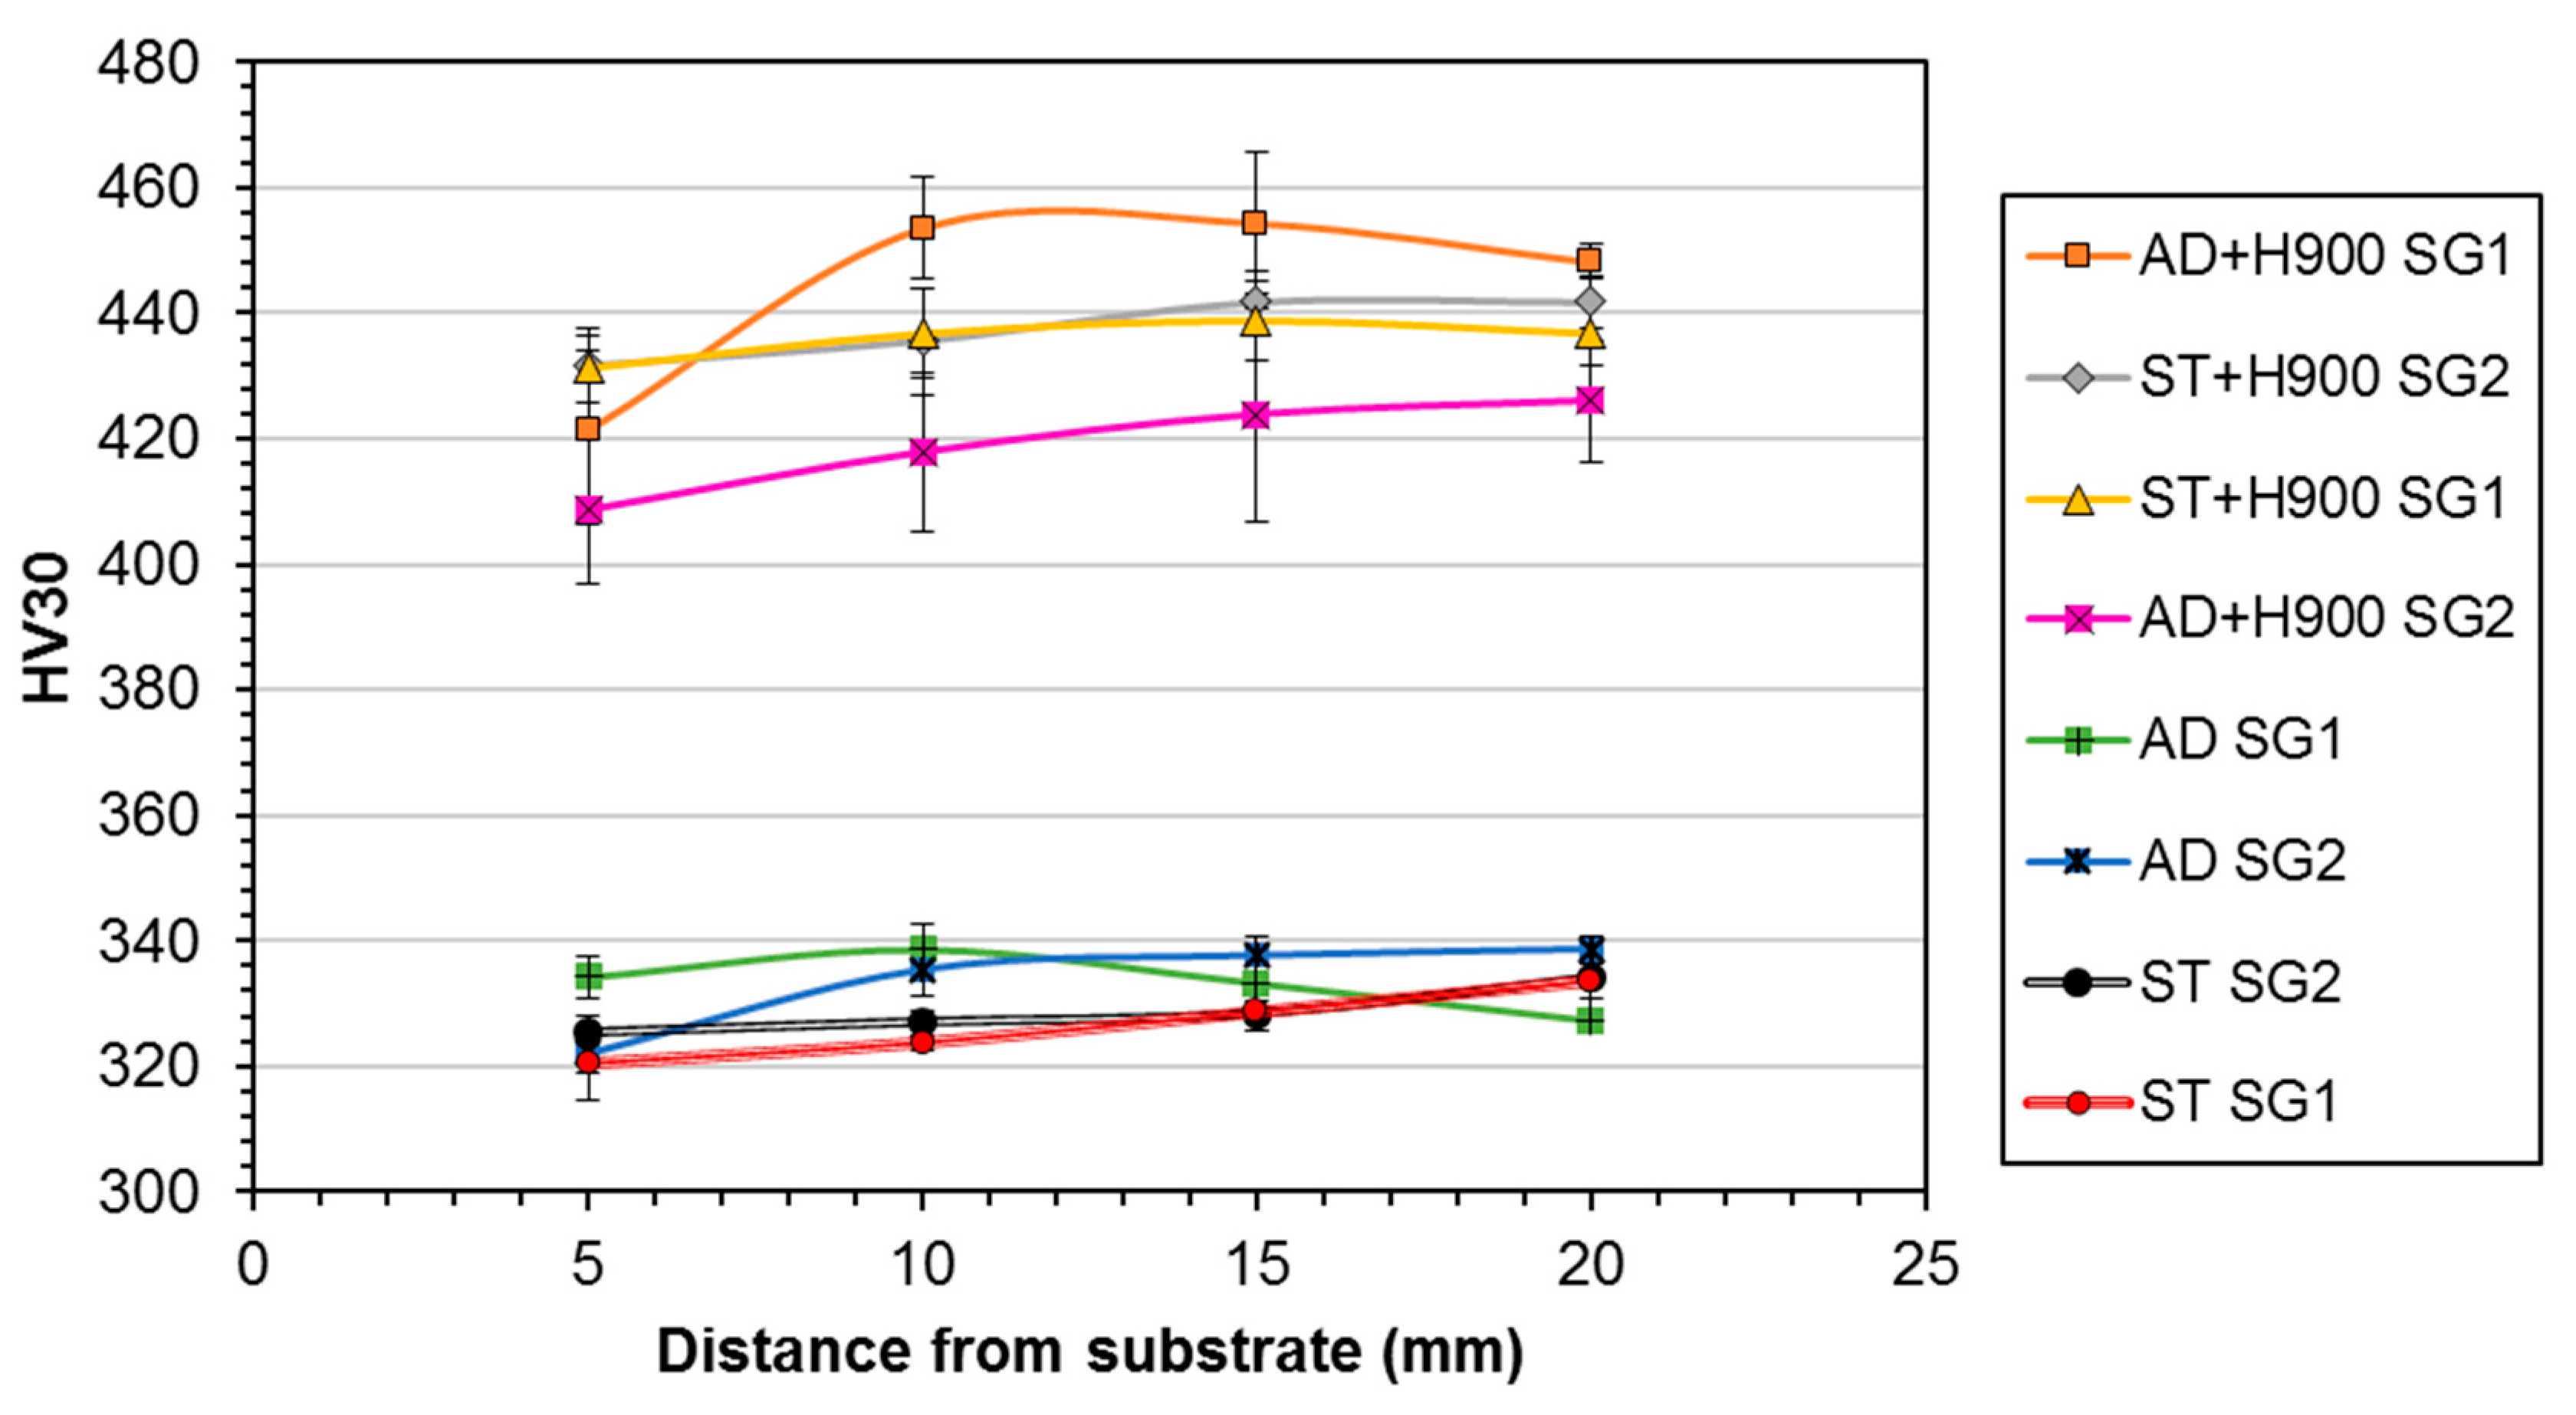
On the other hand, process parameters—such as the transient and gradual reduction of bottom current, scanning speed, and cooling time—have little influences on the hardness of the deposited samples. As seen in Figure 14, there is no significant difference in hardness values between different samples (316L stainless steel) [96]. In the study of Feng et al. [100], the scanning speed also barely affect the hardness of WAAMed stainless steel samples (H00Cr21Ni10 stainless steel) (see Figure 13 in [100]). However, the average microhardness values of samples G3510 and G3015 are slightly higher than that of others, since these two samples have relatively small heat inputs [96]. As reported by Caballero et al. [91], post processing heat treatment could adjust the final hardness of WAAM 17-4 PH stainless-steel components., specimens underwent H900 ageing treatment (AD+H900 and ST+H900) have higher hardness than the ones treated without further ageing (as presented in Figure 15 [91]). The maximum hardness value acquired for H900 ageing treatment is 448 HV30, while the maximum hardness value obtained for AD or ST treatment is about 340 HV30, the hardness value increased 32% after heat treatment [91].
In summary, post heat treatments usually have much more significant influence on the hardness of WAAMed samples than printing process parameters.

6.2. Tensile Strength

High quality WAAM components can be achieved with proper process parameters and a comprehensive understanding of the solidification phenomenon [105]. Thompson et al. [123] stated that geometry of the final part, the thermal history, and the localized solidifications phenomena have an essential influence on the microstructure, which in turn affects the mechanical properties of the deposited parts. In this sense, studies have been carried out on the influence of process parameters on tensile strength.
Feng et al. [100] studied the relationship between the scanning speed, microstructure and ultimate tensile strength. They found that CGEF grains contributed to an increase in the ultimate tensile strengths and elongation rates of the Cr-Ni stainless steel samples manufactured by DWF-PAM or SWF-PAM, while the scanning speeds were ranging from 30 cm/min to 60 cm/min. Yield strengths and ultimate tensile strengths are also dependent on the deposition direction, which leads to the upward growth of the coarse columnar crystals resulting in anisotropy [124,125]. As stated by Wu et al. [96], there is no obvious difference in the mean values of the horizontal and vertical tensile strengths between samples. However, the tensile strengths are indeed different in the horizontal and vertical orientations in the same build [88,96].
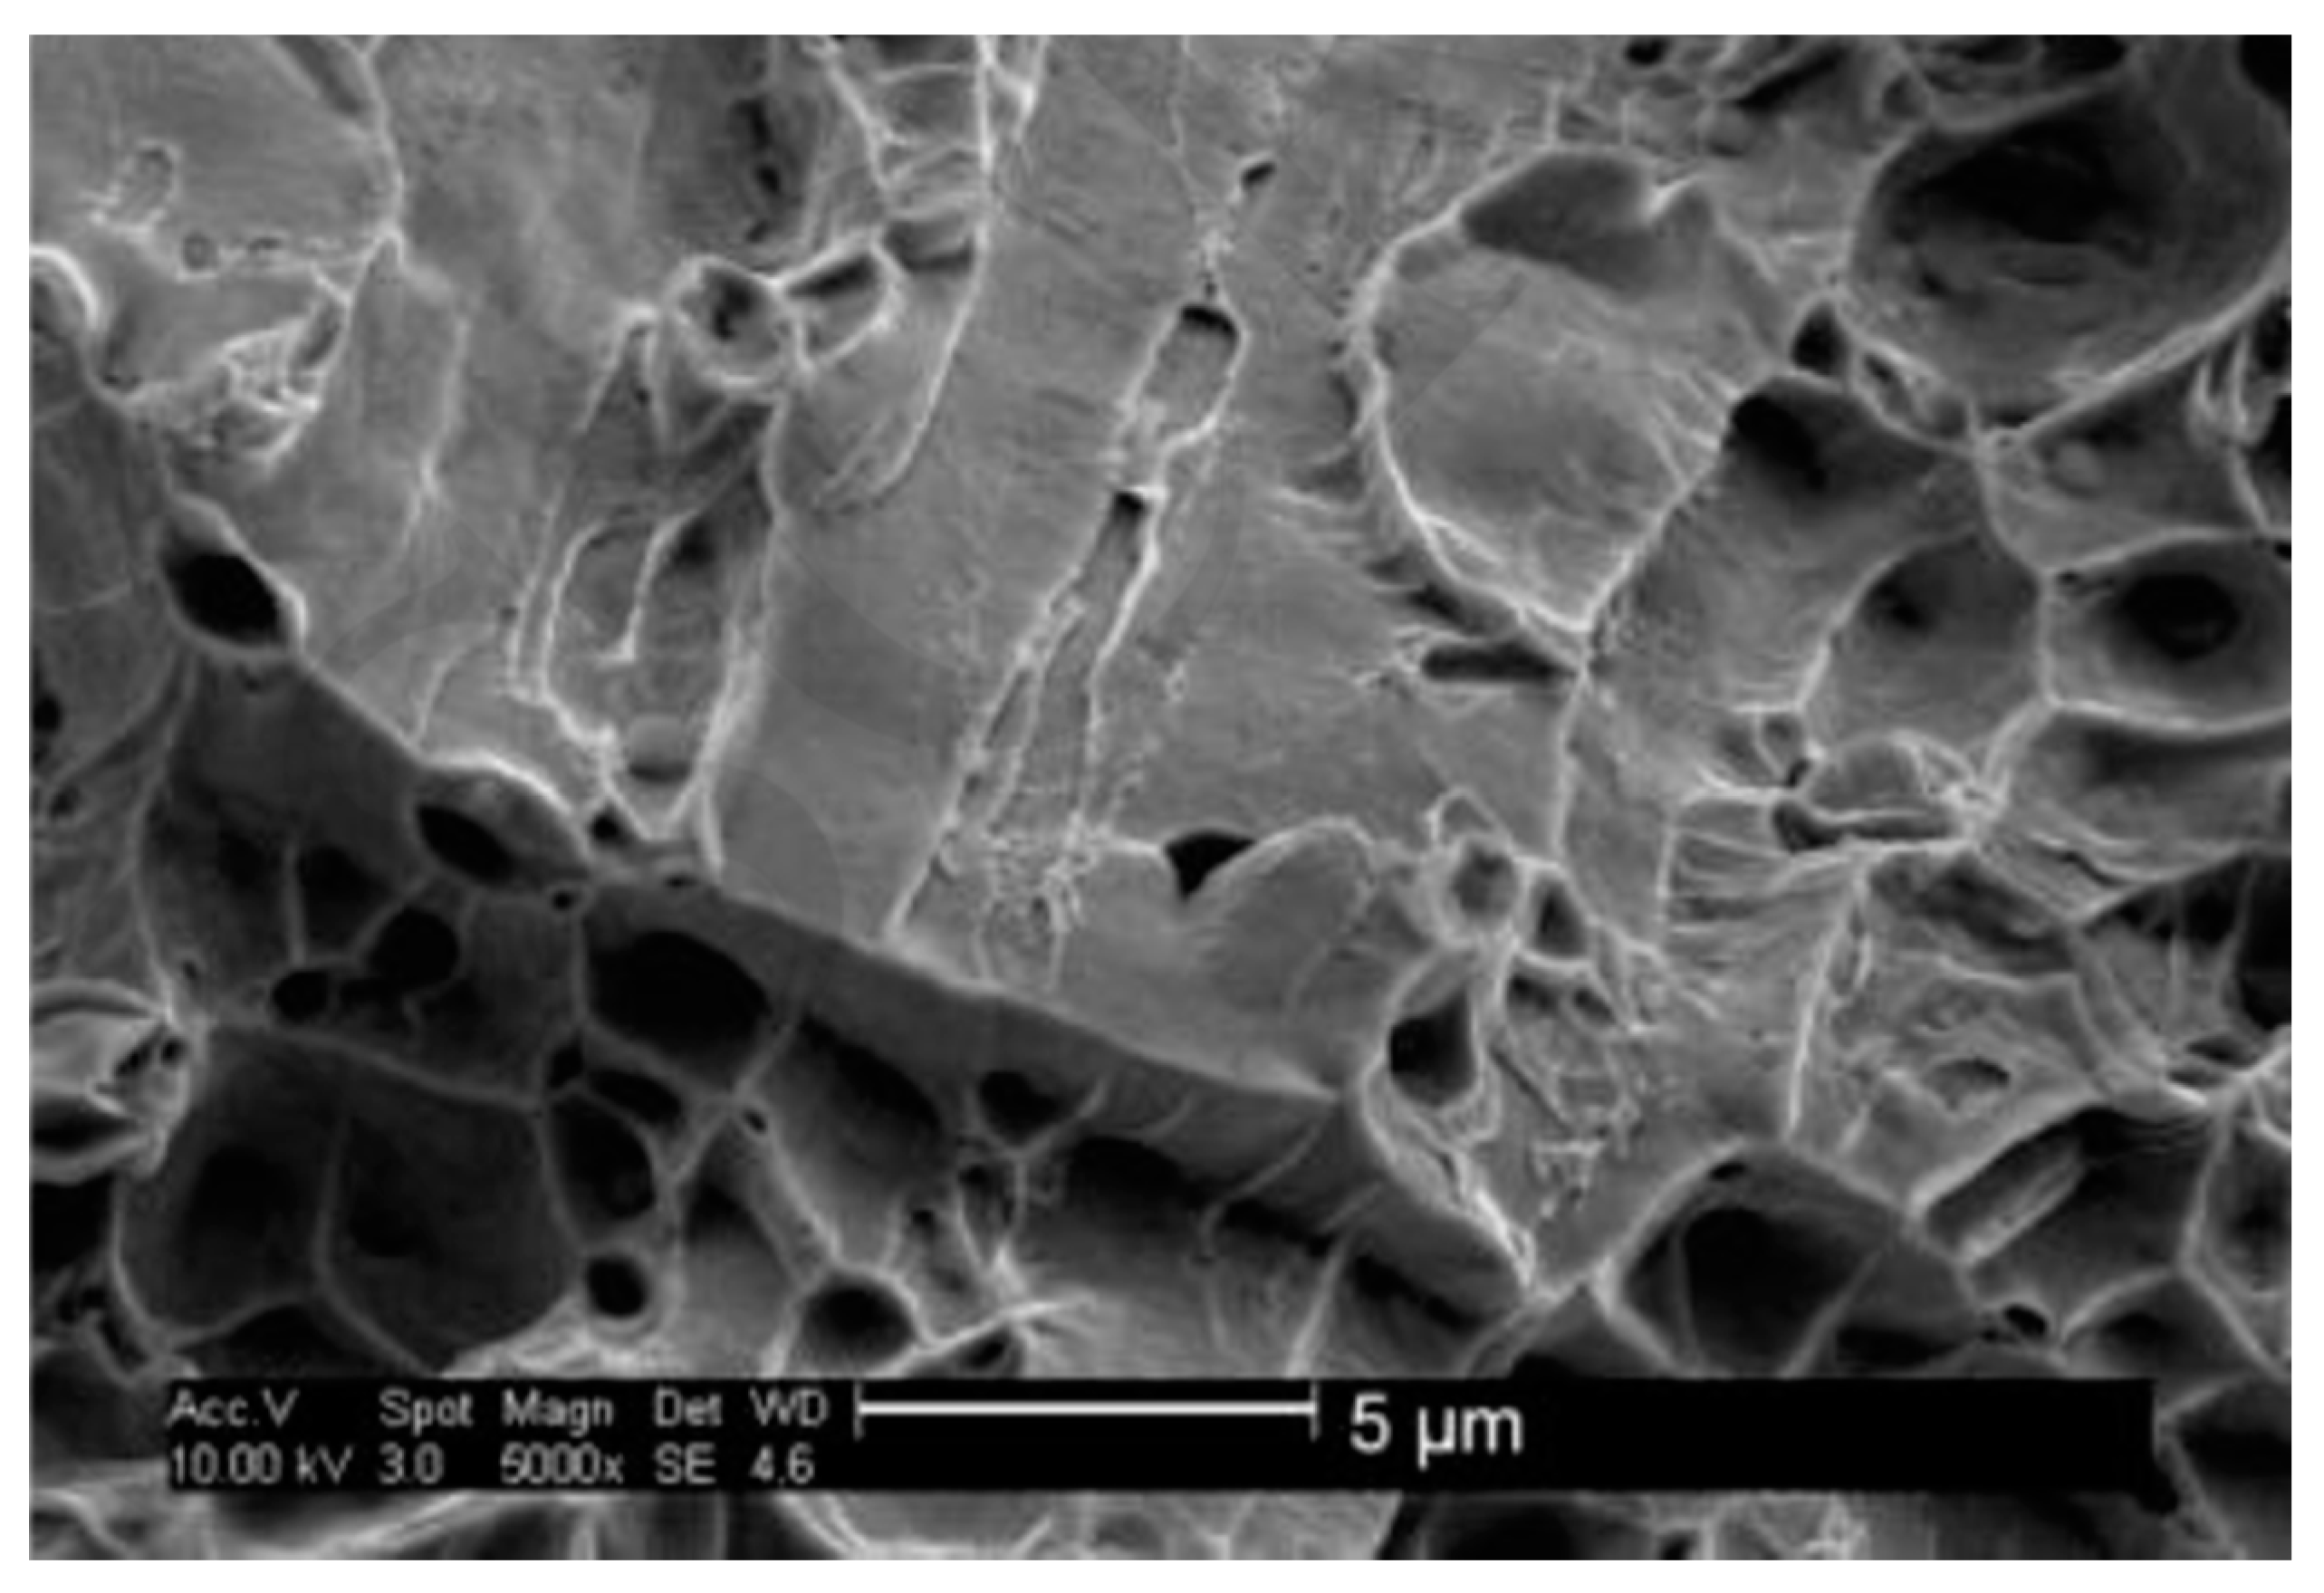
Table 7 and Table 9 list the tensile strength of stainless steel structures from different WAAM processes. The tensile strength of WAAM 316L steel is comparable to the wrought one. The 316 stainless steel samples fabricated by CMT and TopTIG with different current programs (continuous or pulsed) have comparable elongations (EL). Besides, the elongation is similar in horizontal (X) and vertical (Z) orientations [88]. However, samples deposited by MIG welding [96], CMT, and TopTIG based WAAM [88] are anisotropic in terms of yield strength (YS) and ultimate tensile strength (UTS). Yield strength of CMT samples in vertical orientation is lower than that in horizontal orientation owing to preferential growth of austenite grains [88]. Furthermore, research on anisotropy of MIG welding depositions shows that short heat dissipation time, severe heat accumulation, and cooling rate decline made the structure more uniform. A higher scanning speed can accelerate the cooling rate, leading to distinct anisotropy in sample G3510. Moreover, the relatively low thermal input of the bottom transient current (sample T3010) can cause a more pronounced anisotropy [96]. According to Caballero et al. [91], post-deposition heat treatment can help to obtain the required tensile properties. However, direct aging (without prior solution treatment) on as-deposited condition can lead to δ-ferrite phase embrittlement, making the martensitic stainless-steel (17-4 PH stainless-steel) parts brittle. The localized brittle facets found in the fractographs can serve as evidence of possible localized δ-ferrite embrittlement (see Figure 16).
The anisotropy of tensile strength has an important effect on the performance of additive manufacturing components. Even though some studies have been conducted on the anisotropy of mechanical properties of WAAM stainless steels, further studies are needed for deeper understanding its mechanism and then properly control it. WAAM+in-situ rolling and post heat treatments could be useful approaches to reduce the anisotropy.
In summary, WAAM techniques, material compositions, process parameters, shielding gas composition, post heat treatments, and the microstructure and defects can significantly influence the mechanical properties of WAAM stainless steels. Further understanding on the correlation between the above-mentioned factors and precise control of them, especially the final microstructure, are important for better controlling the mechanical properties of WAAM stainless steels.

7. Summary and Outlook

WAAM has been proved to be a low-cost, high efficiency AM process (compared with PBF AM processes) for producing large-scale stainless steel parts. Recent studies on WAAM of various stainless steels have been reviewed from the aspects of macroscopic characteristics, microstructure evolution, post heat treatments, residual stress and distortion, defects, and mechanical properties.
(1)
Macroscopic characteristics of WAAMed stainless steel parts are closely related to wire feeding speed and scanning speed, welding current mode, cooling time, and interlay temperature. Further studies on optimizing the above-mentioned process parameters are needed for achieving better dimensional accuracy and surface quality of WAAM parts.
(2)
Thermal history in WAAM processes plays an important role in controlling the microstructure, such as the ratio of austenite and ferrite phases. Thus, it is feasible to control the microstructure by controlling the process parameters. Modifying the material compositions, such as using double wires, is another effective approach to achieve desirable final microstructures. Post heat treatments can also significantly influence and change the final microstructure. Therefore, in order to obtain desirable microstructures in WAAM stainless steel parts, it is very necessary to thoroughly understand the solidification behaviors [104] and phase transformations in complex WAAM thermal cycles, and the correlation between material compositions, process parameters, heat treatment parameters, and the final microstructure.
(3)
Residual stresses and thermal history have a significant impact on the distortion of WAAM parts. The effect of both becomes more pronounced as the component volume increases [116]. The residual stresses can cause deformation, decrease in dimensional accuracy, defects, as well as worsening of mechanical properties of the components. Phase transformation (especially martensitic phase transformation) has a significant impact on reducing residual stress [111]. Proper deposition path planning can also significantly reduce residual stresses [114]. Therefore, further efforts should be made to optimize the WAAM deposition path, the thermal history, and control the phase transformation during WAAM to reduce the residual stress and distortion through both modelling and experimental studies.
(4)
Defects, such as lack of fusion, cracks, and porosity, need to be controlled to a minimum level to achieve sound mechanical properties. Precise control of heat input and thermal history, proper shielding gas and tight gas seals, high quality feedstock, and clean substrate surfaces are helpful to reduce defects during stainless steel WAAM process.
(5)
WAAM techniques, material compositions, process parameters, shielding gas composition, post heat treatments, microstructure, and defects can significantly influence the mechanical properties of WAAM stainless steels. Further understanding on the correlation between these factors and precise control of them, especially the final microstructure, are important for better controlling the mechanical properties of WAAM stainless steels.
(6)
WAAM samples often show considerable anisotropy in terms of tensile strength and microstructure due to the directionality of layer wise deposition process. It is useful to develop new processes, such as in-situ rolling + WAAM, to solve the anisotropy problems caused by the coarse columnar crystals in the deposition direction. In-situ rolling + WAAM also can reduce the residual stress in WAAM parts.
(7)
The main limitation of the paper is that the numerical modelling of the WAAM process was not sufficiently discussed in this paper.
(8)
For future industrial applications, fatigue properties, and corrosion behaviors of WAAMed stainless steels need to be deeply studied.
(9)
Additionally, further efforts should be made to improve the WAAM process to achieve faster deposition rates and better quality control.

Author Contributions

Writing—original draft, W.J.; Writing—outline of the paper, review and editing, supervision, funding acquisition, C.Z., W.J., and C.Z. contributed equally to this paper; Review and editing—S.J., Y.T., D.W., and W.L. All authors have read and agreed to the published version of the manuscript.

Funding

This work was supported by National Natural Science Foundation of China, grant number 51605287, and Natural Science Foundation of Shanghai, grant number 16ZR1417100. This work was also supported by the fund of State Key Laboratory of Long-Life High Temperature Materials.

Conflicts of Interest

The authors declare no conflict of interest.

References

  1. ASTM-International. ISO/ASTM52900-15 Standard Terminology for Additive Manufacturing—General Principles—Terminology; ASTM-International: West Conshohocken, PA, USA, 2015; Volume 3, p. 5. [Google Scholar]
  2. Ding, D.; Pan, Z.; Cuiuri, D.; Li, H. A multi-bead overlapping model for robotic wire and arc additive manufacturing (WAAM). Robot. Comput. Manuf. 2015, 31, 101–110. [Google Scholar] [CrossRef] [Green Version]
  3. Chen, B.; Mazumder, J. Role of process parameters during additive manufacturing by direct metal deposition of Inconel 718. Rapid Prototyp. J. 2017, 23, 919–929. [Google Scholar] [CrossRef]
  4. Yusuf, S.M.; Cutler, S.; Gao, N. Review: The Impact of Metal Additive Manufacturing on the Aerospace Industry. Metals 2019, 9, 1286. [Google Scholar] [CrossRef] [Green Version]
  5. Martin, A.A.; Calta, N.P.; Khairallah, S.A.; Wang, J.; Depond, P.J.; Fong, A.Y.; Thampy, V.; Guss, G.M.; Kiss, A.M.; Stone, K.H.; et al. Dynamics of pore formation during laser powder bed fusion additive manufacturing. Nat. Commun. 2019, 10, 1987. [Google Scholar] [CrossRef] [Green Version]
  6. Seede, R.; Shoukr, D.; Zhang, B.; Whitt, A.; Gibbons, S.; Flater, P.; Elwany, A.; Arroyave, R.; Karaman, I. An ultra-high strength martensitic steel fabricated using selective laser melting additive manufacturing: Densification, microstructure, and mechanical properties. Acta Mater. 2020, 186, 199–214. [Google Scholar] [CrossRef]
  7. Polonsky, A.; Lenthe, W.C.; Echlin, M.P.; Livescu, V.; Gray, G.T.; Pollock, T.M. Solidification-driven orientation gradients in additively manufactured stainless steel. Acta Mater. 2020, 183, 249–260. [Google Scholar] [CrossRef]
  8. Smith, T.; Sugar, J.D.; Marchi, C.S.; Schoenung, J.M. Strengthening mechanisms in directed energy deposited austenitic stainless steel. Acta Mater. 2019, 164, 728–740. [Google Scholar] [CrossRef]
  9. Hou, H.; Simsek, E.; Ma, T.; Johnson, N.S.; Qian, S.; Cissé, C.; Stasak, D.; Al Hasan, N.; Zhou, L.; Hwang, Y.; et al. Fatigue-resistant high-performance elastocaloric materials made by additive manufacturing. Science 2019, 366, 1116–1121. [Google Scholar] [CrossRef] [Green Version]
  10. Thapliyal, S. Challenges associated with the wire arc additive manufacturing (WAAM) of aluminum alloys. Mater. Res. Express 2019, 6, 112006. [Google Scholar] [CrossRef]
  11. Segura-Cárdenas, E.; Ramirez-Cedillo, E.; Robles, J.A.S.; Ruiz-Huerta, L.; Caballero-Ruiz, A.; Siller, H. Permeability Study of Austenitic Stainless Steel Surfaces Produced by Selective Laser Melting. Metals 2017, 7, 521. [Google Scholar] [CrossRef] [Green Version]
  12. Antunes, F.; Santos, L.; Capela, C.; Ferreira, J.; Costa, J.; Jesus, J.; Prates, P. Fatigue Crack Growth in Maraging Steel Obtained by Selective Laser Melting. Appl. Sci. 2019, 9, 4412. [Google Scholar] [CrossRef] [Green Version]
  13. Everhart, W.; Newkirk, J. Grain Size Effects in Selective Laser Melted Fe-Co-2V. Appl. Sci. 2019, 9, 3701. [Google Scholar] [CrossRef] [Green Version]
  14. Nguyen, D.-S.; Park, H.-S.; Lee, C.-M. Applying Selective Laser Melting to Join Al and Fe: An Investigation of Dissimilar Materials. Appl. Sci. 2019, 9, 3031. [Google Scholar] [CrossRef] [Green Version]
  15. Santos, L.; Jesus, J.A.D.S.D.; Ferreira, J.; Costa, J.; Capela, C. Fracture Toughness of Hybrid Components with Selective Laser Melting 18Ni300 Steel Parts. Appl. Sci. 2018, 8, 1879. [Google Scholar] [CrossRef] [Green Version]
  16. Barros, R.; Silva, F.; Gouveia, R.; Saboori, A.; Marchese, G.; Biamino, S.; Salmi, A.; Atzeni, E. Laser Powder Bed Fusion of Inconel 718: Residual Stress Analysis Before and After Heat Treatment. Metals 2019, 9, 1290. [Google Scholar] [CrossRef] [Green Version]
  17. Denti, L.; Sola, A. On the Effectiveness of Different Surface Finishing Techniques on A357.0 Parts Produced by Laser-Based Powder Bed Fusion: Surface Roughness and Fatigue Strength. Metals 2019, 9, 1284. [Google Scholar] [CrossRef] [Green Version]
  18. Shi, X.; Ma, S.; Liu, C.; Chen, C.; Wu, Q.; Chen, X.; Jiping, L. Performance of High Layer Thickness in Selective Laser Melting of Ti6Al4V. Materials 2016, 9, 975. [Google Scholar] [CrossRef] [Green Version]
  19. Tian, Z.; Zhang, C.; Wang, D.; Liu, W.; Fang, X.; Wellmann, D.; Zhao, Y.; Tian, Y. A Review on Laser Powder Bed Fusion of Inconel 625 Nickel-Based Alloy. Appl. Sci. 2019, 10, 81. [Google Scholar] [CrossRef] [Green Version]
  20. Chen, H.; Zhang, C.; Jia, D.; Wellmann, D.; Liu, W. Corrosion Behaviors of Selective Laser Melted Aluminum Alloys: A Review. Metals 2020, 10, 102. [Google Scholar] [CrossRef] [Green Version]
  21. Mohr, G.; Altenburg, S.J.; Ulbricht, A.; Heinrich, P.; Baum, D.; Maierhofer, C.; Hilgenberg, K. In-Situ Defect Detection in Laser Powder Bed Fusion by Using Thermography and Optical Tomography—Comparison to Computed Tomography. Metals 2020, 10, 103. [Google Scholar] [CrossRef] [Green Version]
  22. Debroy, T.; Mukherjee, T.; Milewski, J.O.; Elmer, J.W.; Ribic, B.; Blecher, J.J.; Zhang, W. Scientific, technological and economic issues in metal printing and their solutions. Nat. Mater. 2019, 18, 1026–1032. [Google Scholar] [CrossRef] [PubMed]
  23. Lin, T.-C.; Cao, C.; Sokoluk, M.; Jiang, L.; Wang, X.; Schoenung, J.M.; Lavernia, E.J.; Li, X. Aluminum with dispersed nanoparticles by laser additive manufacturing. Nat. Commun. 2019, 10, 4124–4129. [Google Scholar] [CrossRef] [PubMed] [Green Version]
  24. Zai, L.; Zhang, C.; Wang, Y.; Guo, W.; Wellmann, D.; Tong, X.; Tian, Y. Laser Powder Bed Fusion of Precipitation-Hardened Martensitic Stainless Steels: A Review. Metals 2020, 10, 255. [Google Scholar] [CrossRef] [Green Version]
  25. Yang, Y.; Zhang, C.; Wang, D.; Nie, L.; Wellmann, D.; Tian, Y. Additive manufacturing of WC-Co hardmetals: A review. Int. J. Adv. Manuf. Technol. 2020, in press. [Google Scholar]
  26. Mukherjee, T.; Debroy, T. Printability of 316 stainless steel. Sci. Technol. Weld. Join. 2019, 24, 412–419. [Google Scholar] [CrossRef]
  27. Todaro, C.J.; Easton, M.A.; Qiu, D.; Zhang, D.; Bermingham, M.J.; Lui, E.W.; Brandt, M.; StJohn, D.H.; Qian, M. Grain structure control during metal 3D printing by high-intensity ultrasound. Nat. Commun. 2020, 11, 142–149. [Google Scholar] [CrossRef]
  28. Frazier, W.E. Metal Additive Manufacturing: A Review. J. Mater. Eng. Perform. 2014, 23, 1917–1928. [Google Scholar] [CrossRef]
  29. Sing, S.L.; An, J.; Yeong, W.Y.; Wiria, F.E. Laser and electron-beam powder-bed additive manufacturing of metallic implants: A review on processes, materials and designs. J. Orthop. Res. 2015, 34, 369–385. [Google Scholar] [CrossRef]
  30. Syed, W.U.H.; Pinkerton, A.; Li, L. A comparative study of wire feeding and powder feeding in direct diode laser deposition for rapid prototyping. Appl. Surf. Sci. 2005, 247, 268–276. [Google Scholar] [CrossRef]
  31. McAndrew, A.; Rosales, M.A.; Colegrove, P.; Hönnige, J.R.; Ho, A.; Fayolle, R.; Eyitayo, K.; Stan, I.; Sukrongpang, P.; Crochemore, A.; et al. Interpass rolling of Ti-6Al-4V wire + arc additively manufactured features for microstructural refinement. Addit. Manuf. 2018, 21, 340–349. [Google Scholar] [CrossRef]
  32. Korzhyk, V.; Khaskin, V.; Voitenko, O.; Sydorets, V.; Dolianovskaia, O. Welding Technology in Additive Manufacturing Processes of 3D Objects. Mater. Sci. Forum 2017, 906, 121–130. [Google Scholar] [CrossRef]
  33. Wu, B.; Pan, Z.; Ding, D.; Cuiuri, D.; Li, H.; Xu, J.; Norrish, J. A review of the wire arc additive manufacturing of metals: Properties, defects and quality improvement. J. Manuf. Process. 2018, 35, 127–139. [Google Scholar] [CrossRef]
  34. Jandric, Z.; Labudovic, M.; Kovacevic, R. Effect of heat sink on microstructure of three-dimensional parts built by welding-based deposition. Int. J. Mach. Tools Manuf. 2004, 44, 785–796. [Google Scholar] [CrossRef]
  35. Song, Y.-A.; Park, S.; Choi, D.; Jee, H. 3D welding and milling: Part I–a direct approach for freeform fabrication of metallic prototypes. Int. J. Mach. Tools Manuf. 2005, 45, 1057–1062. [Google Scholar] [CrossRef]
  36. Song, Y.-A.; Park, S.; Chae, S.-W. 3D welding and milling: Part II—Optimization of the 3D welding process using an experimental design approach. Int. J. Mach. Tools Manuf. 2005, 45, 1063–1069. [Google Scholar] [CrossRef]
  37. Kwak, Y.-M.; Doumanidis, C. Geometry Regulation of Material Deposition in Near-Net Shape Manufacturing by Thermally Scanned Welding. J. Manuf. Process. 2002, 4, 28–41. [Google Scholar] [CrossRef]
  38. Katou, M.; Oh, J.; Miyamoto, Y.; Matsuura, K.; Kudoh, M. Freeform fabrication of titanium metal and intermetallic alloys by three-dimensional micro welding. Mater. Des. 2007, 28, 2093–2098. [Google Scholar] [CrossRef]
  39. Baufeld, B.; Biest, O.; Gault, R. Additive manufacturing of Ti–6Al–4V components by shaped metal deposition: Microstructure and mechanical properties. Mater. Des. 2010, 31, S106–S111. [Google Scholar] [CrossRef]
  40. Clark, D.; Bache, M.; Whittaker, M.T. Shaped metal deposition of a nickel alloy for aero engine applications. J. Mater. Process. Technol. 2008, 203, 439–448. [Google Scholar] [CrossRef]
  41. Xiong, J.; Zhang, G.; Gao, H.; Wu, L. Modeling of bead section profile and overlapping beads with experimental validation for robotic GMAW-based rapid manufacturing. Robot. Comput. Manuf. 2013, 29, 417–423. [Google Scholar] [CrossRef]
  42. Xiong, J.; Zhang, G.; Qiu, Z.; Li, Y. Vision-sensing and bead width control of a single-bead multi-layer part: Material and energy savings in GMAW-based rapid manufacturing. J. Clean. Prod. 2013, 41, 82–88. [Google Scholar] [CrossRef]
  43. Yang, D.; He, C.; Zhang, G. Forming characteristics of thin-wall steel parts by double electrode GMAW based additive manufacturing. J. Mater. Process. Technol. 2016, 227, 153–160. [Google Scholar] [CrossRef]
  44. Aiyiti, W.; Zhao, W.; Lu, B.; Tang, Y. Investigation of the overlapping parameters of MPAW-based rapid prototyping. Rapid Prototyp. J. 2006, 12, 165–172. [Google Scholar] [CrossRef]
  45. Suryakumar, S.; Karunakaran, K.; Bernard, A.; Chandrasekhar, U.; Raghavender, N.; Sharma, D. Weld bead modeling and process optimization in Hybrid Layered Manufacturing. Comput. Des. 2011, 43, 331–344. [Google Scholar] [CrossRef]
  46. Ding, D.; Pan, Z.; Cuiuri, D.; Li, H. A tool-path generation strategy for wire and arc additive manufacturing. Int. J. Adv. Manuf. Technol. 2014, 73, 173–183. [Google Scholar] [CrossRef]
  47. Ding, D.; Pan, Z.; Cuiuri, D.; Li, H. A practical path planning methodology for wire and arc additive manufacturing of thin-walled structures. Robot. Comput. Manuf. 2015, 34, 8–19. [Google Scholar] [CrossRef] [Green Version]
  48. Ding, D.; Pan, Z.; Cuiuri, D.; Li, H.; Larkin, N. Adaptive path planning for wire-feed additive manufacturing using medial axis transformation. J. Clean. Prod. 2016, 133, 942–952. [Google Scholar] [CrossRef]
  49. Ma, Y.; Cuiuri, D.; Li, H.; Pan, Z.; Shen, C. The effect of postproduction heat treatment on γ-TiAl alloys produced by the GTAW-based additive manufacturing process. Mater. Sci. Eng. A 2016, 657, 86–95. [Google Scholar] [CrossRef]
  50. Zhang, Y.M.; Li, P.; Chen, Y.; Male, A.T. Automated system for welding-based rapid prototyping. Mechatronics 2002, 12, 37–53. [Google Scholar] [CrossRef]
  51. Wang, H.; Jiang, W.; Valant, M.; Kovacevic, R. Microplasma powder deposition as a new solid freeform fabrication process. In Proceedings of the Institution of Mechanical Engineers, Part B: Journal of Engineering Manufacture; SAGE Publications: Newcastle upon Tyne, UK, 2003; Volume 217, pp. 1641–1650. [Google Scholar]
  52. Zhang, Y.M.; Chen, Y.; Li, P.; Male, A.T. Weld deposition-based rapid prototyping: A preliminary study. J. Mater. Process. Technol. 2003, 135, 347–357. [Google Scholar] [CrossRef]
  53. Xiong, J.; Zhang, G. Adaptive control of deposited height in GMAW-based layer additive manufacturing. J. Mater. Process. Technol. 2014, 214, 962–968. [Google Scholar] [CrossRef]
  54. Ahn, D.-G. Direct metal additive manufacturing processes and their sustainable applications for green technology: A review. Int. J. Precis. Eng. Manuf. Technol. 2016, 3, 381–395. [Google Scholar] [CrossRef]
  55. Posch, G.; Chladil, K.; Chladil, H. Material properties of CMT—Metal additive manufactured duplex stainless steel blade-like geometries. Weld. World 2017, 61, 873–882. [Google Scholar] [CrossRef]
  56. Spencer, J.D.; Dickens, P.M.; Wykes, C.M. Rapid prototyping of metal parts by three-dimensional welding. Proc. Inst. Mech. Eng. Part B J. Eng. Manuf. 1998, 212, 175–182. [Google Scholar] [CrossRef]
  57. Fronius International GmbH. Schweißpraxis Aktuell: CMT-Technologie; WEKA Media GmbH: Kissing, Germany, 2013. [Google Scholar]
  58. Fronius International GmbH. Current Welding Practice CMT Technology; DVS Media GmbH: Düsseldorf, Germany, 2014. [Google Scholar]
  59. Bruckner, J.; Himmelbauer, K. Cold Metal Transfer—Ein neuer Prozess in der Fügetechnik; DVS-Berichte Band 237; DVS Media GmbH: Düsseldorf, Germany, 2005. [Google Scholar]
  60. Zhang, H.; Feng, J.; He, P.; Zhang, B.; Chen, J.; Wang, L. The arc characteristics and metal transfer behaviour of cold metal transfer and its use in joining aluminium to zinc-coated steel. Mater. Sci. Eng. A 2009, 499, 111–113. [Google Scholar] [CrossRef]
  61. Pickin, C.; Williams, S.; Lunt, M. Characterisation of the cold metal transfer (CMT) process and its application for low dilution cladding. J. Mater. Process. Technol. 2011, 211, 496–502. [Google Scholar] [CrossRef] [Green Version]
  62. Ayarkwa, K.; Williams, S.; Ding, J. Assessing the effect of TIG alternating current time cycle on aluminium wire + arc additive manufacture. Addit. Manuf. 2017, 18, 186–193. [Google Scholar] [CrossRef] [Green Version]
  63. Ma, Y.; Cuiuri, D.; Hoye, N.; Li, H.; Pan, Z. The effect of location on the microstructure and mechanical properties of titanium aluminides produced by additive layer manufacturing using in-situ alloying and gas tungsten arc welding. Mater. Sci. Eng. A 2015, 631, 230–240. [Google Scholar] [CrossRef]
  64. Williams, S.W.; Martina, F.; Addison, A.C.; Ding, J.; Pardal, G.R.; Colegrove, P. Wire + Arc Additive Manufacturing. Mater. Sci. Technol. 2016, 32, 641–647. [Google Scholar] [CrossRef] [Green Version]
  65. Leyens, C.; Peters, M. Titanium and Titanium Alloys: Fundamentals and Applications; John Wiley & Sons: Hoboken, NJ, USA, 2003. [Google Scholar]
  66. Kim, T.B.; Yue, S.; Zhang, Z.; Jones, E.; Jones, J.R.; Lee, P. Additive manufactured porous titanium structures: Through-process quantification of pore and strut networks. J. Mater. Process. Technol. 2014, 214, 2706–2715. [Google Scholar] [CrossRef]
  67. Wu, B.; Pan, Z.; Li, S.; Cuiuri, D.; Ding, D.; Li, H. The anisotropic corrosion behaviour of wire arc additive manufactured Ti-6Al-4V alloy in 3.5% NaCl solution. Corros. Sci. 2018, 137, 176–183. [Google Scholar] [CrossRef]
  68. Gu, J.; Ding, J.; Williams, S.; Gu, H.; Bai, J.; Zhai, Y.; Ma, P. The strengthening effect of inter-layer cold working and post-deposition heat treatment on the additively manufactured Al–6.3Cu alloy. Mater. Sci. Eng. A 2016, 651, 18–26. [Google Scholar] [CrossRef] [Green Version]
  69. Brice, C.; Shenoy, R.; Kral, M.; Buchannan, K. Precipitation behavior of aluminum alloy 2139 fabricated using additive manufacturing. Mater. Sci. Eng. A 2015, 648, 9–14. [Google Scholar] [CrossRef]
  70. Guo, N.; Leu, M. Additive manufacturing: Technology, applications and research needs. Front. Mech. Eng. 2013, 8, 215–243. [Google Scholar] [CrossRef]
  71. Yan, L. Wire and Arc Addictive Manufacture (WAAM) Reusable Tooling Investigation. 2013. Available online: https://dspace.lib.cranfield.ac.uk/handle/1826/12308 (accessed on 23 February 2020).
  72. Xu, F.; Lv, Y.; Liu, Y.; Shu, F.; He, P.; Xu, B. Microstructural Evolution and Mechanical Properties of Inconel 625 Alloy during Pulsed Plasma Arc Deposition Process. J. Mater. Sci. Technol. 2013, 29, 480–488. [Google Scholar] [CrossRef]
  73. Bressan, J.; Daros, D.; Sokolowski, A.; Mesquita, R.; Barbosa, C. Influence of hardness on the wear resistance of 17-4 PH stainless steel evaluated by the pin-on-disc testing. J. tianMater. Process. Technol. 2008, 205, 353–359. [Google Scholar] [CrossRef]
  74. Knapp, G.; Mukherjee, T.; Zuback, J.; Wei, H.; Palmer, T.; De, A.; Debroy, T. Building blocks for a digital twin of additive manufacturing. Acta Mater. 2017, 135, 390–399. [Google Scholar] [CrossRef]
  75. Mukherjee, T.; Manvatkar, V.; De, A.; Debroy, T. Dimensionless numbers in additive manufacturing. J. Appl. Phys. 2017, 121, 064904. [Google Scholar] [CrossRef] [Green Version]
  76. Mukherjee, T.; Debroy, T. A digital twin for rapid qualification of 3D printed metallic components. Appl. Mater. Today 2019, 14, 59–65. [Google Scholar] [CrossRef]
  77. Xu, X.; Mi, G.; Luo, Y.; Jiang, P.; Shao, X.; Wang, C. Morphologies, microstructures, and mechanical properties of samples produced using laser metal deposition with 316 L stainless steel wire. Opt. Lasers Eng. 2017, 94, 1–11. [Google Scholar] [CrossRef]
  78. Gray, G.T.; Livescu, V.; Rigg, P.; Trujillo, C.; Cady, C.; Chen, S.; Carpenter, J.; Lienert, T.; Fensin, S.J. Structure/property (constitutive and spallation response) of additively manufactured 316L stainless steel. Acta Mater. 2017, 138, 140–149. [Google Scholar] [CrossRef]
  79. Zhang, K.; Wang, S.; Liu, W.; Shang, X. Characterization of stainless steel parts by Laser Metal Deposition Shaping. Mater. Des. 2014, 55, 104–119. [Google Scholar] [CrossRef]
  80. Ma, M.; Wang, Z.; Zeng, X. A comparison on metallurgical behaviors of 316L stainless steel by selective laser melting and laser cladding deposition. Mater. Sci. Eng. A 2017, 685, 265–273. [Google Scholar] [CrossRef]
  81. Wang, X.; Deng, D.; Yi, H.; Xu, H.; Yang, S.; Zhang, H. Influences of pulse laser parameters on properties of AISI316L stainless steel thin-walled part by laser material deposition. Opt. Laser Technol. 2017, 92, 5–14. [Google Scholar] [CrossRef]
  82. Bertoli, U.S.; Guss, G.; Wu, S.; Matthews, M.; Schoenung, J.M. In-situ characterization of laser-powder interaction and cooling rates through high-speed imaging of powder bed fusion additive manufacturing. Mater. Des. 2017, 135, 385–396. [Google Scholar] [CrossRef]
  83. Khairallah, S.A.; Anderson, A.T.; Rubenchik, A.; King, W.E. Laser powder-bed fusion additive manufacturing: Physics of complex melt flow and formation mechanisms of pores, spatter, and denudation zones. Acta Mater. 2016, 108, 36–45. [Google Scholar] [CrossRef] [Green Version]
  84. Manvatkar, V.; De, A.; Debroy, T. Heat transfer and material flow during laser assisted multi-layer additive manufacturing. J. Appl. Phys. 2014, 116, 124905. [Google Scholar] [CrossRef] [Green Version]
  85. Caiazzo, F.; Alfieri, V. Laser-Aided Directed Energy Deposition of Steel Powder over Flat Surfaces and Edges. Materials 2018, 11, 435. [Google Scholar] [CrossRef] [Green Version]
  86. Chen, X.; Li, J.; Cheng, X.; He, B.; Wang, H.; Huang, Z. Microstructure and mechanical properties of the austenitic stainless steel 316L fabricated by gas metal arc additive manufacturing. Mater. Sci. Eng. A 2017, 703, 567–577. [Google Scholar] [CrossRef]
  87. Yadollahi, A.; Shamsaei, N.; Thompson, S.M.; Seely, D.W. Effects of process time interval and heat treatment on the mechanical and microstructural properties of direct laser deposited 316L stainless steel. Mater. Sci. Eng. A 2015, 644, 171–183. [Google Scholar] [CrossRef]
  88. Rodriguez, N.; Vázquez, L.; Huarte, I.; Arruti, E.; Tabernero, I.; Álvarez, P. Wire and arc additive manufacturing: A comparison between CMT and TopTIG processes applied to stainless steel. Weld. World 2018, 62, 1083–1096. [Google Scholar] [CrossRef]
  89. Stützer, J.; Totzauer, T.; Wittig, B.; Zinke, M.; Jüttner, S. GMAW Cold Wire Technology for Adjusting the Ferrite–Austenite Ratio of Wire and Arc Additive Manufactured Duplex Stainless Steel Components. Metals 2019, 9, 564. [Google Scholar] [CrossRef] [Green Version]
  90. Wang, L.; Xue, J.; Wang, Q. Correlation between arc mode, microstructure, and mechanical properties during wire arc additive manufacturing of 316L stainless steel. Mater. Sci. Eng. A 2019, 751, 183–190. [Google Scholar] [CrossRef]
  91. Caballero, A.; Ding, J.; Ganguly, S.; Williams, S. Wire + Arc Additive Manufacture of 17-4 PH stainless steel: Effect of different processing conditions on microstructure, hardness, and tensile strength. J. Mater. Process. Technol. 2019, 268, 54–62. [Google Scholar] [CrossRef]
  92. Ding, D.; Pan, Z.; Cuiuri, D.; Li, H. Wire-feed additive manufacturing of metal components: Technologies, developments and future interests. Int. J. Adv. Manuf. Technol. 2015, 81, 465–481. [Google Scholar] [CrossRef]
  93. Yang, D.; Wang, G.; Zhang, G. Thermal analysis for single-pass multi-layer GMAW based additive manufacturing using infrared thermography. J. Mater. Process. Technol. 2017, 244, 215–224. [Google Scholar] [CrossRef]
  94. Xiong, J. Forming Characteristics in Multi-Layer Single-Bead GMA Additive Manufacturing and Control for Deposition Dimension. Master’s Thesis, Harbin Institute of Technology, Harbin, China, 2014. [Google Scholar]
  95. Xiong, J.; Li, Y.; Li, R.; Yin, Z. Influences of process parameters on surface roughness of multi-layer single-pass thin-walled parts in GMAW-based additive manufacturing. J. Mater. Process. Technol. 2018, 252, 128–136. [Google Scholar] [CrossRef]
  96. Wu, W.; Xue, J.; Wang, L.; Zhang, Z.; Hu, Y.; Dong, C. Forming Process, Microstructure, and Mechanical Properties of Thin-Walled 316L Stainless Steel Using Speed-Cold-Welding Additive Manufacturing. Metals 2019, 9, 109. [Google Scholar] [CrossRef] [Green Version]
  97. Eriksson, M.; Lervåg, M.; Sørensen, C.; Robertstad, A.; Brønstad, B.M.; Nyhus, B.; Aune, R.; Ren, X.; Akselsen, O. Additive manufacture of superduplex stainless steel using WAAM. MATEC Web Conf. 2018, 188, 03014. [Google Scholar] [CrossRef]
  98. Bermingham, M.J.; StJohn, D.H.; Krynen, J.; Tedman-Jones, S.; Dargusch, M. Promoting the columnar to equiaxed transition and grain refinement of titanium alloys during additive manufacturing. Acta Mater. 2019, 168, 261–274. [Google Scholar] [CrossRef]
  99. Lin, J.; Lv, Y.; Liu, Y.; Sun, Z.; Wang, K.; Li, Z.; Wu, Y.; Xu, B. Microstructural evolution and mechanical property of Ti-6Al-4V wall deposited by continuous plasma arc additive manufacturing without post heat treatment. J. Mech. Behav. Biomed. Mater. 2017, 69, 19–29. [Google Scholar] [CrossRef] [PubMed]
  100. Feng, Y.; Zhan, B.; He, J.; Wang, K. The double-wire feed and plasma arc additive manufacturing process for deposition in Cr-Ni stainless steel. J. Mater. Process. Technol. 2018, 259, 206–215. [Google Scholar] [CrossRef]
  101. Hosseini, V.; Högström, M.; Hurtig, K.; Bermejo, M.A.V.; Stridh, L.-E.; Karlsson, L. Wire-arc additive manufacturing of a duplex stainless steel: Thermal cycle analysis and microstructure characterization. Weld. World 2019, 63, 975–987. [Google Scholar] [CrossRef] [Green Version]
  102. Baufeld, B.; Biest, O.; Gault, R. Microstructure of Ti-6Al-4V specimens produced by shaped metal deposition. Int. J. Mater. Res. 2009, 100, 1536–1542. [Google Scholar] [CrossRef]
  103. Lippold, J.C.; Kotecki, D.J. Welding Metallurgy and Weldability of Stainless Steels; Wiley-VCH: Hoboken, NJ, USA, 2005; p. 376. [Google Scholar]
  104. Herzog, D.; Seyda, V.; Wycisk, E.; Emmelmann, C. Additive manufacturing of metals. Acta Mater. 2016, 117, 371–392. [Google Scholar] [CrossRef]
  105. Hejripour, F.; Binesh, F.; Hebel, M.; Aidun, D.K. Thermal modeling and characterization of wire arc additive manufactured duplex stainless steel. J. Mater. Process. Technol. 2019, 272, 58–71. [Google Scholar] [CrossRef]
  106. Ziewiec, A.; Zielinska-Lipiec, A.; Tasak, E. Microstructure of Welded Joints of X5CrNiCuNb16-4 (17-4 PH) Martensitic Stainlees Steel after Heat Treatment. Arch. Met. Mater. 2014, 59, 965–970. [Google Scholar] [CrossRef] [Green Version]
  107. Zhang, X.; Wang, K.; Zhou, Q.; Ding, J.; Ganguly, S.; Marzio, G.; Yang, D.; Xu, X.; Dirisu, P.; Williams, S.W. Microstructure and mechanical properties of TOP-TIG-wire and arc additive manufactured super duplex stainless steel (ER2594). Mater. Sci. Eng. A 2019, 762, 138097. [Google Scholar] [CrossRef]
  108. Ding, J.; Colegrove, P.; Mehnen, J.; Ganguly, S.; Almeida, P.S.; Wang, F.; Williams, S. Thermo-mechanical analysis of Wire and Arc Additive Layer Manufacturing process on large multi-layer parts. Comput. Mater. Sci. 2011, 50, 3315–3322. [Google Scholar] [CrossRef] [Green Version]
  109. Colegrove, P.; Coules, H.; Fairman, J.; Martina, F.; Kashoob, T.; Mamash, H.; Cozzolino, L.D. Microstructure and residual stress improvement in wire and arc additively manufactured parts through high-pressure rolling. J. Mater. Process. Technol. 2013, 213, 1782–1791. [Google Scholar] [CrossRef]
  110. Sames, W.; List, F.A.; Pannala, S.; Dehoff, R.; Babu, S. The metallurgy and processing science of metal additive manufacturing. Int. Mater. Rev. 2016, 61, 315–360. [Google Scholar] [CrossRef]
  111. Fang, J.; Dong, S.; Wang, Y.; Xu, B.; Zhang, Z.; Xia, D.; He, P. The effects of solid-state phase transformation upon stress evolution in laser metal powder deposition. Mater. Des. 2015, 87, 807–814. [Google Scholar] [CrossRef]
  112. Masubuchi, K. Analysis of Welded Structures: Residual Stresses, Distortion, and Their Consequences; Elsevier: Amsterdam, The Netherlands, 2013; Volume 33. [Google Scholar]
  113. Deng, D.; Murakawa, H. FEM prediction of buckling distortion induced by welding in thin plate panel structures. Comput. Mater. Sci. 2008, 43, 591–607. [Google Scholar] [CrossRef]
  114. Lee, Y.; Bandari, Y.; Nandwana, P.; Gibson, B.; Richardson, B.; Simunovic, S. Effect of Interlayer Cooling Time, Constraint and Tool Path Strategy on Deformation of Large Components Made by Laser Metal Deposition with Wire. Appl. Sci. 2019, 9, 5115. [Google Scholar] [CrossRef] [Green Version]
  115. Martina, F.; Ding, J.; Williams, S.; Caballero, A.; Pardal, G.R.; Quintino, L. Tandem metal inert gas process for high productivity wire arc additive manufacturing in stainless steel. Addit. Manuf. 2019, 25, 545–550. [Google Scholar] [CrossRef] [Green Version]
  116. Gordon, J.V.; Harlow, D.G. Statistical Modeling of Wire and Arc Additive Manufactured Stainless Steel 304: Microstructure and Fatigue. Int. J. Reliab. Qual. Saf. Eng. 2019, 26, 1950016. [Google Scholar] [CrossRef]
  117. Tian, Y.; Ouyang, B.; Gontcharov, A.; Gauvin, R.; Lowden, P.; Brochu, M. Microstructure evolution of Inconel 625 with 0.4 wt% boron modification during gas tungsten arc deposition. J. Alloy. Compd. 2017, 694, 429–438. [Google Scholar] [CrossRef]
  118. Dong, B.; Pan, Z.; Shen, C.; Ma, Y.; Li, H. Fabrication of Copper-Rich Cu-Al Alloy Using the Wire-Arc Additive Manufacturing Process. Met. Mater. Trans. A 2017, 48, 3143–3151. [Google Scholar] [CrossRef]
  119. Geng, H.; Li, J.; Xiong, J.; Lin, X.; Zhang, F. Optimization of wire feed for GTAW based additive manufacturing. J. Mater. Process. Technol. 2017, 243, 40–47. [Google Scholar] [CrossRef]
  120. Scotti, A.; Ponomarev, V.; Lucas, W. Interchangeable metal transfer phenomenon in GMA welding: Features, mechanisms, classification. J. Mater. Process. Technol. 2014, 214, 2488–2496. [Google Scholar] [CrossRef] [Green Version]
  121. Scotti, A.; Ponomarev, V.; Lucas, W. A scientific application oriented classification for metal transfer modes in GMA welding. J. Mater. Process. Technol. 2012, 212, 1406–1413. [Google Scholar] [CrossRef] [Green Version]
  122. Yi, H.; Qi, L.; Luo, J.; Zhang, D.; Li, N. Direct fabrication of metal tubes with high-quality inner surfaces via droplet deposition over soluble cores. J. Mater. Process. Technol. 2019, 264, 145–154. [Google Scholar] [CrossRef]
  123. Thompson, S.M.; Bian, L.; Shamsaei, N.; Yadollahi, A. An overview of Direct Laser Deposition for additive manufacturing; Part I: Transport phenomena, modeling and diagnostics. Addit. Manuf. 2015, 8, 36–62. [Google Scholar] [CrossRef]
  124. Wang, P.; Nai, M.L.S.; Tan, X.; Sin, W.J.; Tor, S.B.; Wei, J. Anisotropic Mechanical Properties in a Big-Sized Ti-6Al-4V Plate Fabricated by Electron Beam Melting. In TMS 2016: 145th Annual Meeting & Exhibition: Supplemental Proceedings; Springer: Berlin/Heidelberg, Germany, 2016; pp. 5–12. [Google Scholar] [CrossRef]
  125. Cain, V.; Thijs, L.; Van Humbeeck, J.; Van Hooreweder, B.; Knutsen, R. Crack propagation and fracture toughness of Ti6Al4V alloy produced by selective laser melting. Addit. Manuf. 2015, 5, 68–76. [Google Scholar] [CrossRef]
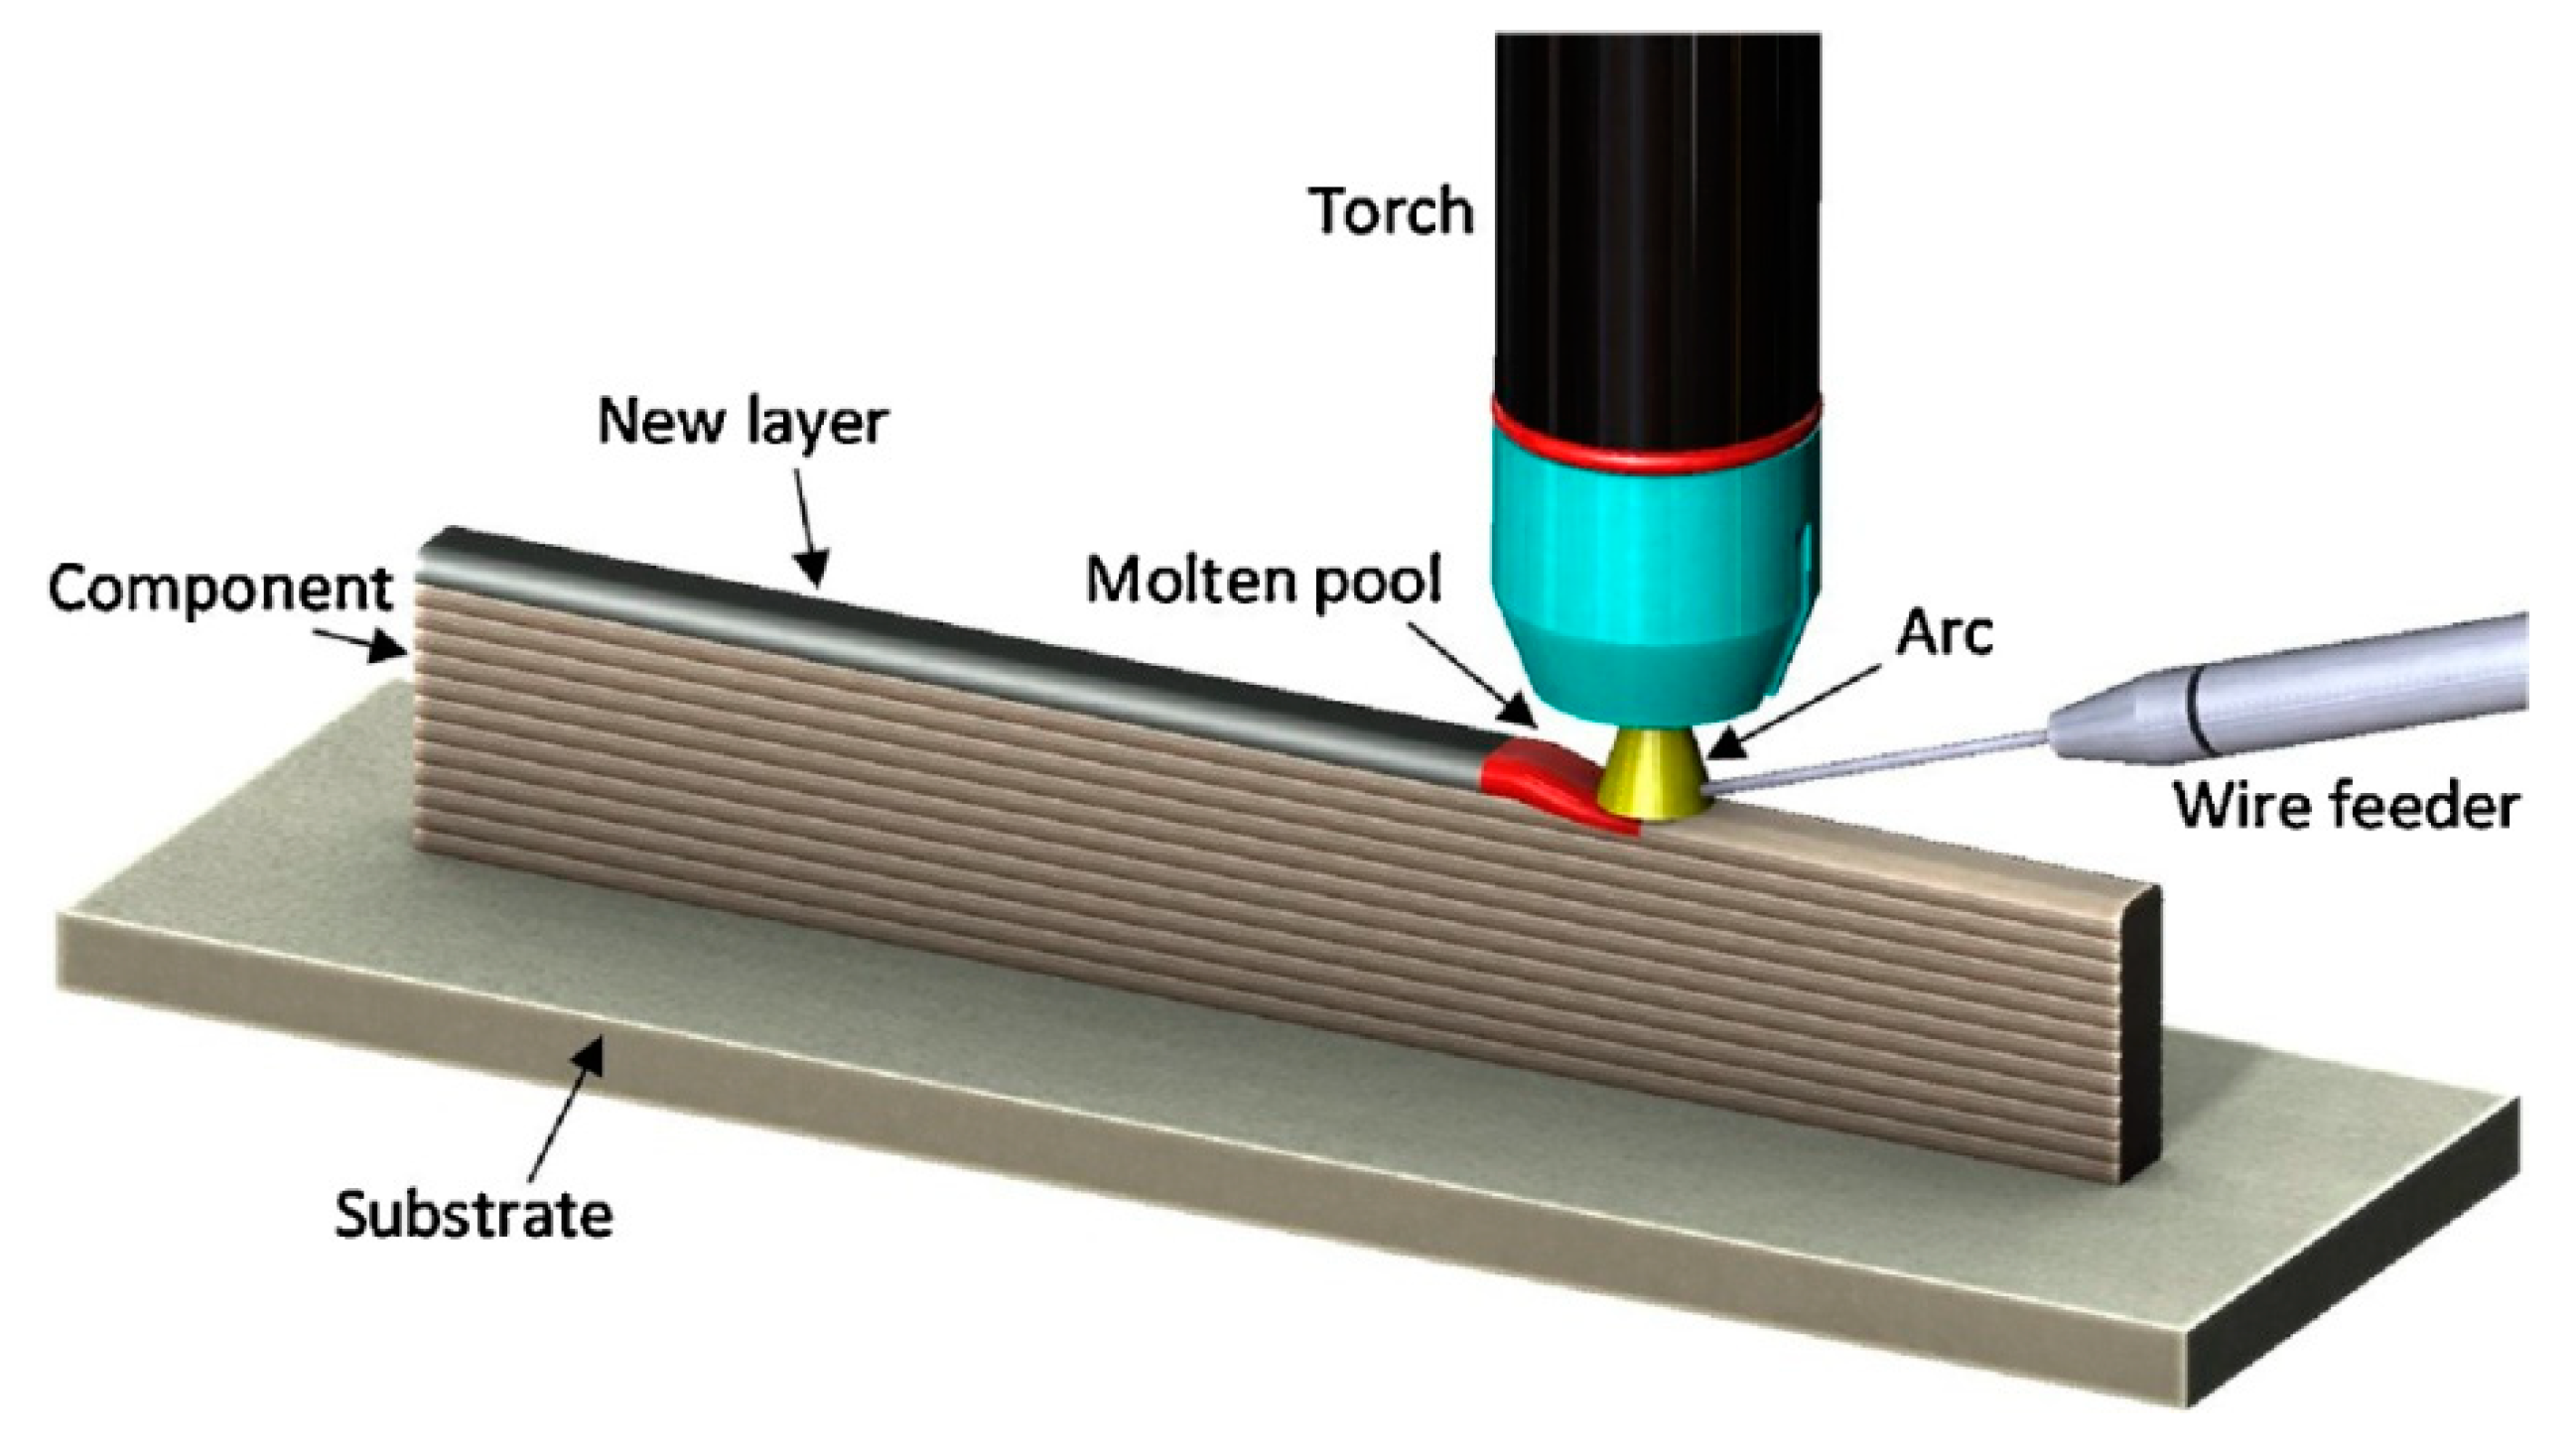
Figure 1. Diagrammatic sketch of WAAM process [31].
Applsci 10 01563 g001
Figure 2. Arc power and scanning speed of WAAM (also called DED-GMA), DED-L, and PBF-L processes for 316 stainless steel [26].
Applsci 10 01563 g002
Figure 3. Morphologies of different parts in samples prepared using different parameters [96]: (a) profile of sample G3010; (b) the bottom parts of different deposited samples; (c) the upper-right parts of different deposited samples (the parts in (b) correspond to the bottom region of (a), and the parts in (c) correspond to the upper-right region of (a)).
Applsci 10 01563 g003
Figure 4. Photographs of different deposited wall samples [100]: (a), (b), and (c) showing the DWF-PAM samples prepared at speeds of 30 cm/min, 50 cm/min, and 60 cm/min, respectively; (d), (e), and (f) demonstrate the SWF-PAM samples prepared at speeds of 30 cm/min, 50 cm/min, and 60 cm/min, respectively.
Applsci 10 01563 g004
Figure 5. (a) Macrostructure of the cross-section of a WAAMed H00Cr21Ni10 stainless steel part and (b) three regions A, B, and C of each deposited layer, i.e., Equiaxed grain region (A), Columnar grain region (B), and Fine grain region (C) [100].
Applsci 10 01563 g005
Figure 6. Microstructures in the adjacent area of the middle section of the deposited walls [100] (H00Cr21Ni10 steel).
Applsci 10 01563 g006
Figure 7. Micrographs of the structures fabricated with different mixing ratios at 500 x magnification, taken in layer 10, etching: Beraha II, white: austenite, blue/brown: ferrite [89]. (WAAMed duplex stainless steel components by mixing two different filler metals)
Applsci 10 01563 g007
Figure 8. Micrographs [91]: (a) Sample fabricated with SG1 (Shielding gas 1: 38% He + 2% CO2 + Ar), As-deposited condition; (b) Sample for tensile testing, AD + H900 condition; (c) Sample for tensile testing, ST+H900 condition (Material: 17-4 steel).
Applsci 10 01563 g008
Figure 9. Diagram of the oscillation pass [115].
Applsci 10 01563 g009
Figure 10. Deformation during oscillation [115].
Applsci 10 01563 g010
Figure 11. Typical cross-section of WAAM type-2205 duplex stainless steel samples. The brighter area contains more austenitic and the darker more ferritic. A pattern may be seen in the deposited sample, where lines 1 and 2 represent the brightest and darkest etched regions, respectively [101].
Applsci 10 01563 g011
Figure 12. Vickers hardness of 316L stainless steel components prepared by SpeedPulse and SpeedArc additive manufacturing. A 500 g load was applied for all indentations with a dwell time of 10 s [90].
Applsci 10 01563 g012
Figure 13. Micro-hardness of bottom, middle, and upper parts of sample G3010 (gradual reduction of bottom current, scanning speed is 30 cm/min, cooling time is 10 s) [96].
Applsci 10 01563 g013
Figure 14. Average micro hardness values of different deposited specimens (316L Stainless Steel) [96].
Applsci 10 01563 g014
Figure 15. Hardness distribution of the oscillated pass samples (17-4 PH stainless) deposited in different shielding gas under different heat treatment conditions (SG1: 38% He + 2% CO2 + Ar; SG2: 2.5% CO2 + Ar; AD represents as-deposited; ST: as-deposited followed by solution treatment only; AD+H900: as-deposited plus H900 ageing treatment; ST+H900: as-deposited followed by solution treatment and H900 ageing) [91].
Applsci 10 01563 g015
Figure 16. Fracture morphology of tensile fracture surfaces of AD+H900 condition: as-deposited plus H900 ageing treatment [91].
Applsci 10 01563 g016
Table 1. List of abbreviations.
AbbreviationsPhrases
3DThree-dimensional
ADAs-deposited
AD+H900As-deposited plus H900 ageing treatment
AMAdditive manufacturing
BJBinder jetting
CGEFComplete grown equiaxed ferrite
CMTCold metal transfer welding
DEDDirected energy deposition
DED-GMADirected energy deposition with gas metal arc
DED-LDirected energy deposition-laser
DSSDuplex stainless steel
DWF-PAMDouble-wire feed and plasma additive manufacturing
ELElongations
GMAWGas metal arc welding
GMAW–CMTGas metal arc welding with the cold metal transfer process
GTAWGas tungsten arc welding
HHorizontal
IGEFIncomplete grown equiaxed ferrite
LMPDLaser metal powder deposition
MEMaterial extrusion
MJMaterial jetting
PAWPlasma arc welding
PBFPowder bed fusion
PBF-LPowder bed fusion-laser
RPRapid prototyping
SGShielding gas
SG1Shielding gas1
SG2Shielding gas 2
SLSheet lamination
SLMSelective laser melting
STAs-deposited followed by solution treatment only
ST+H900As-deposited followed by solution treatment and H900 ageing
SWF-PAMSingle-wire feed and plasma additive manufacturing
UTSUltimate tensile strength
VVertical
VPVat photo-polymerization
WAAMwire arc additive manufacturing
YSYield strength
Table 2. Commercial WAAM machines.
CompanyModelDetailsCountry
Gefertec GmbHGTarc3000-3 WAAM machineA three-axis system for the production of parts up to 3 m3 with a maximum mass of 3000 kg.Germany
MazakVARIAXIS j-600AMApplied to the production and repair of aerospace parts, molds, and dies and oil-drilling components.Japan
AddilanAddilan VO.1A closed loop control system and an inert chamber with a special loading and unloading system.Spain
Nanjing Enigma Automation CO., Ltd.ArcMan-600Building Dimensions: 400 × 400 × 600 mmChina
Layer thickness resolution: 0.5–0.25 mm
Nanjing Zhongke Raycham Laser Technology Co., Ltd.RC-WAAM-3000Building Dimensions: 3000 × 2000 × 1000 mmChina
Max wire feed rate: 1–5 m/min
Table 3. Main research groups working on WAAM.
CountryResearch GroupsSynonyms of Wire Arc Additive Manufacturing (WAAM)Ref.
United StatesSouthern Methodist UniversityRapid prototyping (RP) based on gas tungsten arc welding (GTAW)Jandric et al. [34]
Tufts UniversityNear-Net Shape ManufacturingKwak et al. [37]
South KoreaKorea Institute of Science and Technology3D weldingSong et al. [35,36]
JapanOsaka University3D micro weldingKatou et al. [38]
United KingdomUniversity of SheffieldShaped metal depositionBaufeld et al. [39]
Cranfield UniversityWire Arc Additive ManufacturingWilliams et al.
University of ManchesterWire Arc Additive ManufacturingPrangnell et al.
Coventry UniversityWire Arc Additive ManufacturingBiswal et al.
University of Wales SwanseaShaped metal depositionClark et al. [40]
ChinaHarbin Institute of TechnologyGMAW-based rapid manufacturingXiong et al. [41,42]
Harbin Institute of TechnologyGMAW based additive manufacturingYang et al. [43]
Xi An Jiao Tong UniversityMPAW—based rapid prototypingAiyiti et al. [44]
IndiaIndian Institute of TechnologyHybrid Layered Manufacturing Suryakumar et al. [45]
AustraliaUniversity of WollongongWire and arc additive manufacturing (WAAM)Ding et al. [46,47]
Wire-feed additive manufacturingDing et al. [48]
GTAW based-additive manufacturingMa et al. [49]
Table 4. Process parameters of different samples [96].
SampleScanning Speed/cm.min−1Cooling Time/sBottom Current Mode
G30103010Gradual reduction of bottom current
T30103010Transient reduction of bottom current
G35103510Gradual reduction of bottom current
G3000300
G3005305
G30153015
Table 5. Linear energy density (heat input) of three different WAAM techniques
WAAM TechniquesMaterialLinear Energy Density/Heat InputReported by
GMAW-CMTDuplex stainless steel-G 25 940.4–0.87 KJ/mmEriksson et al. [97]
GTAWTi-6Al-4V0.186–1.492 KJ/mmBermingham et al. [98]
PAWTi-6Al-4V0.655–1.302 KJ/mmLin et al. [99]
Table 6. Process parameters affecting the macro morphology of WAAM stainless steel parts
WAAM TechniquesMaterialProcess ParametersMacroscopic CharacteristicsReported by
MIG316L (austenitic) stainless steelWelding current mode Gradual reduction of bottom currentImproves bottom formationWu et al. [96]
Increasing scanning speedUnevenness of both ends
PAMH00Cr21Ni10 (austenitic) stainless steelSWF-PAM: single-wire feed and plasma additive manufacturingSlightly better surface-quality than that of Double-wire feed and plasma additive manufacturingFeng et al. [100]
DWF-PAM: double-wire feed and plasma additive manufacturing/
PAM: SWF-PAM, DWF-PAMIncreasing scanning speedBetter surface quality
GMAWType-2209 (duplex) stainless steelDeposition pathAlternating direction deposition pathUniform layer heightHosseini et al. [101]
One-direction deposition pathUneven sides: the start side was higher than the end side.
GMAWH08Mn2Si low-carbon steel Decreasing interlay temperature Surface roughness decreasesXiong et al. [95]
Increasing scanning speedSurface roughness increases
Increasing wire feeding speedSurface roughness increases
Table 7. Microstructure and mechanical properties of stainless steels manufactured by WAAM.
ProcessMaterialsProcess FactorsMicrostructureYS (MPa)UTS (MPa)EL (%)Hardness (HV)Reported by
DWF-PAMH00Cr21Ni10 (austenitic) stainless steelScanning speedA lot of complete grown equiaxed ferrite (CGEF) grains/About 550, similar in the vertical and horizontal directions 44.7–58.7~193 Feng et al. [100]
SWF-PAMA number of incomplete grown equiaxed ferrite (IGEF) grains, and a few CGEF grains/Around 510, similar in the vertical and horizontal directions20.5–35.4~187Feng et al. [100]
SpeedPulse WAAM316 (austenitic) stainless steelHeat input, cooling rateCoarser secondary dendrite arm spacingHorizontal 418.0Horizontal 550 ± 6 //Wang et al. [90]
SpeedArc WAAMSmaller secondary dendrite arm spacingHorizontal 417.9Horizontal 553 ± 2/Higher than the hardness of SpeedPulse WAAM partsWang et al. [90]
GMAW–CMTDuplex Stainless SteelChemical composition of feedstockAs the nickel content reduces, the austenite plates become smaller in size and less in content.////Stützer et al. [89]
CMT17-4 PH (martensitic) stainless steelAs-built, Shielding gas 1 (SG1): 38% He + 2% CO2 + ArHigher percentage of retained austenite: 0.85%, area percentage. Mainly a dendritic martensite-δ ferrite microstructure/Average 994Average 11.9~330Caballero et al. [91]
As-built, Shielding gas 2 (SG2) composition: 2.5% CO2+ArLower percentage of retained austenite: 0.12%, area percentage///~340
CMT17-4 PH stainless steelSG1+post-deposition heat treatment: AD+H900Columnar microstructure/Average 1208Average 7.3~450Caballero et al. [91]
CMT17-4 PH stainless steelSG1+post-deposition heat treatment: ST+H900A columnar microstructure/Average 1352Average 13.8~440Caballero et al. [91]
CMT17-4 PH stainless steelSG1+ Solution treatedN/A/Average 1003Average 12.6~330Caballero et al. [91]
* The WAAM process was also referred as DWF-PAM, SWF-PAM, GMAW–CMT, and CMT in different papers.
Table 8. Defects in WAAM components and the formation reasons
WAAM TechniquesMaterialDefects ReasonsReported by
WAAM304 stainless steelPorosityInsufficient energy for complete melting the layers; gas generation.Gordon et al. [116]
WAAMMetals (Steel, Al, Ti, etc.)PorosityRaw material-inducedContaminants of wire and substrateWu et al. [33]
Process-inducedInsufficient fusion or spatter ejection
DelaminationIncomplete melting or insufficient re-melting of the underlying solid between layers
GTAWInconel 625Solidification cracking Existence of liquid film at terminal solidificationTian et al. [117]
GTAWIntermetallic Al/CuGrain boundary crackIntermetallic phase-equilibrium is freely brokenDong et al. [118]
Table 9. Tensile strength of stainless steel parts produced using different WAAM processes
ProcessMaterialsSampleYS (MPa)UTS (MPa)EL (%)Reported by
SpeedPulse WAAM316 (austenitic) stainless steelHorizontalAs-deposited418.0550 ± 6/Wang et al. [90]
SpeedArc WAAM316 (austenitic) stainless steelHorizontalAs-deposited417.9553 ± 2/Wang et al. [90]
Wrought (cold finished)316 (austenitic) stainless steel/Cold finished255–310525–623/Yadollahi et al. [87]
Speed-cold-welding additive manufacturing316 (austenitic) stainless steelT3010-H1As-deposited335.00537.40/Wu et al. [96]
T3010-H2310.00498.77/
T3010-H3336.83563.78/
T3010-V1370.33628.19/
T3010-V2371.11616.07/
T3010-V3342.56585.83/
G3010-H1330.17541.08/
G3010-H2345.67561.38/
G3010-H3327.17570.56/
G3010-V1369.17628.04/
G3010-V2364.17606.68/
G3010-V3339.50574.68/
G3510-H1307.33524.30/
G3510-H2306.17525.75/
G3510-H3336.67593.59/
G3510-V1359.56634.47/
G3510-V2336.67602.56/
G3510-V3336.67621.44/
G3015-H1333.33564.69/
G3015-H2335.83558.86/
G3015-H3353.00619.28/
G3015-V1373.00637.98/
G3015-V2345.83609.24/
G3015-V3365.50595.88/
CMT technology in continuous modes316L (austenitic) stainless steelHorizontalAs-deposited364.3 ± 13.9577.3 ± 4.043.4 ± 4.7Rodriguez et al. [88]
Vertical336.9 ± 1.7574.1 ± 7.942.0 ± 3.7
CMT technology in pulsed modesHorizontal374.0 ± 11.2588.0 ± 5.745.1 ± 3.5
Vertical331.7 ± 5.4536.0 ± 15.345.6 ± 16.7
TopTIG technology in continuous modeHorizontal365.5 ± 8.7590.3 ± 3.642.3 ± 2.7
Vertical322.2 ± 2.7539.9 ± 14.743.1 ± 6.9
CMT17-4 PH (martensitic) stainless steelHorizontalPost-deposition heat treatment: AD+H900/12938.2Caballero et al. [91]
VerticalPost-deposition heat treatment: AD+H90011246.5
HorizontalPost-deposition heat treatment: ST+H900/135313.8
VerticalPost-deposition heat treatment: ST+H900135113.8
HorizontalAs-deposited (AD)/100911.6
VerticalAs-deposited (AD)97912.2
HorizontalPost-deposition heat treatment: ST/100012.8
VerticalPost-deposition heat treatment: ST100612.4
H: horizontal; V: vertical; EL: elongations; YS: yield strength; UTS: ultimate tensile strength; T3010: transient reduction of bottom current, scanning speed 30 cm/min, cooling time 10 s; G3010: gradual reduction of bottom current, scanning speed 30 cm/min, cooling time 10 s; G3510: gradual reduction of bottom current, scanning speed 35 cm/min, cooling time 10 s; G3015: gradual reduction of bottom current, scanning speed 30 cm/min, cooling time 15 s; AD: as-deposited; AD+H900: as-deposited plus H900 ageing treatment; ST: as-deposited plus solution treatment; ST+H900: as-deposited followed by solution treatment and H900 ageing.