Article

An Experimental Study on the Defect Detectability of Time- and Frequency-Domain Analyses for Flash Thermography

1
Mechanics of Materials and Structures (UGent-MMS), Department of Materials, Textiles and Chemical Engineering (MaTCh), Ghent University, Technologiepark-Zwijnaarde 46, 9052 Zwijnaarde, Belgium
2
SIM Program M3 DETECT-IV, Technologiepark-Zwijnaarde 48, B-9052 Zwijnaarde, Belgium
*
Authors to whom correspondence should be addressed.
Appl. Sci. 2020, 10(22), 8051; https://doi.org/10.3390/app10228051
Submission received: 22 October 2020 / Revised: 9 November 2020 / Accepted: 10 November 2020 / Published: 13 November 2020
(This article belongs to the Special Issue Infrared Imaging and NDT)

Abstract

:
A defect’s detectability in flash thermography is highly dependent on the applied post-processing methodology. The majority of the existing analysis techniques operate either on the time-temperature data or on the frequency-phase data. In this paper, we compare the efficiency of time- and frequency-domain analysis techniques in flash thermography for obtaining good defect detectability. Both single-bin and integrated-bin evaluation procedures are considered: dynamic thermal tomography and thermal signal area for the time-domain approach, and frequency domain tomography and adaptive spectral band integration for the frequency-domain approach. The techniques are applied on various carbon fiber reinforced polymer samples having a range of defect sizes and defect types. The advantages and drawbacks of the different post-processing techniques are evaluated and discussed. The best defect detectability is achieved using the integrated procedure in frequency domain.

1. Introduction

In several industrial sectors (e.g., aerospace sector), composite materials are replacing traditional metals and alloys due to their advantageous properties such as a high stiffness-to-weight ratio and a good corrosion resistance. On the other hand, the layered structure of composites makes them susceptible to internal damage features that may arise during production or during their service life. The presence of these defects may have a detrimental effect on the load-bearing capabilities of the component and must therefore be detected.
Flash thermography (FT) is a quick, full-field and non-contact non-destructive testing (NDT) technique that detects defects by exploiting the mismatch in thermal properties between the base material and an internal defect [1,2,3,4]. While there exists alternative inspection schemes for infrared thermography, such as lock-in thermography [1,5,6] and frequency- (and/or phase-) modulated thermography [7,8,9,10,11], the focus of this paper lies on flash thermographic inspection. In FT, a short but intense flash excitation is used to introduce a heat flux on the sample’s surface, which drives the diffusion of thermal waves in the material’s through-thickness direction. Meanwhile, the sample’s surface temperature evolution is recorded using a high-sensitivity infrared (IR) camera. At an internal boundary or defect, the thermal diffusivity mismatch between the defect and the sound material leads to a local abnormal temperature evolution. As such, a defect can be revealed as a localized anomaly in the recorded surface temperature profile. Unfortunately, thermographic inspection is inherently limited due to the strongly damped and highly diffusive nature of the induced thermal waves, making the detection of deep and small defects a challenging task. It is known that there exists a limiting depth beyond which defects cannot be detected, which depends on the thermal diffusivity, the defect depth, the recording duration, and the measurement’s noise level [12,13].
The defect detectability is significantly improved by post-processing of the recorded thermal data sequence using image processing [14,15,16] and data processing [2,3,17,18,19,20] techniques. Some of the data processing algorithms operate directly on the time-domain data (i.e., the recorded thermal sequence), such as dynamic thermal tomography (DTT) [21,22], differential absolute contrast (DAC) [23], and thermal signal area (TSA) [24]. On the other hand, performing the analysis in the frequency domain (i.e., after performing a fast Fourier transform) exhibits the advantageous property that undesirable effects of non-uniform heating and non-uniform surface emissivity are strongly reduced. Some of the analysis techniques operating in frequency domain are pulsed phase thermography (PPT) [18,25,26], modified pulse-phase thermography (PPT1/PPT2) [27], phase-domain thermal tomography (PDTT) [21], and adaptive spectral band integration (ASBI) [19]. PDTT may be considered as a phase-domain equivalent of DTT, where a pixel’s phase angle instead of an indicative time provides information on the defect’s depth [21]. PDTT, however, requires the operator to select both the evaluation frequency and the phase range of interest, and can scarcely be used for quantitative defect evaluation. The thermographic data may also be processed in different ways (e.g., in a statistical manner), as is done in principal component thermography (PCT) [28,29], higher-order statistics (HOS) [30], and thermographic signal reconstruction (TSR) [26,31], for example.
In this paper, we present an experimental study on the efficiency of several time- and frequency-domain analysis techniques to obtain good defect detectability on several carbon fiber reinforced polymer (CFRP) samples with different defect types, sizes, and depths. A distinction is made between techniques that consider a single time (or frequency) bin and techniques that exploit an integration procedure over a specific time (or frequency) range. The structure of the paper is as follows: Section 2 introduces the materials and experimental methods used for this research. Section 3 provides a brief background of the post-processing techniques considered in the study, after which the results on the different inspected samples are presented in Section 4. Lastly, concluding remarks are gathered in Section 5.

2. Materials and Methods

In this research, a carbon fiber reinforced polymer (CFRP) coupon with flat bottom holes (FBHs), a CFRP coupon with barely visible impact damage (BVID), and a CFRP aircraft panel with backside stiffeners and a complex cluster of production defects were investigated. The samples are indicated as CFRPFBH, CFRPBVID, and CFRPPROD, respectively.
The CFRPFBH coupon measured 140 × 90 × 5.5 mm3 and had a quasi-isotropic layup of [(−45/0/45/90)3]s. Five circular FBHs with a diameter of 20 mm were milled from the back side, with remaining thicknesses of 0.85 mm, 1.64 mm, 2.47 mm, 3.68 mm, and 4.51 mm. A schematic illustration of this sample is provided in Figure 1a.
The CFRPBVID sample measured 140 × 90 × 5.5 mm3 and had a quasi-isotropic layup of [(+45/0/−45/90)3]s. The BVID was introduced by dropping a 7.72 kg impactor from a drop height of 0.3 m, which delivered a measured impact energy of 18.5 J. A calibrated drop tower was used for the low-velocity impact [32]. An image of the impacted sample, on which the impact location is marked, is presented in Figure 1b. The amplitude maps obtained through an ultrasonic C-scan inspection (5 MHz focused ultrasound) in the reflection mode using dynamic time gating clearly revealed the complex damage cone through the depth of the sample (see Figure 1b).
The CFRPPROD aircraft panel consists of a skin plate of 500 × 1000 × 2.55 mm3 with several horizontal backside stiffeners (see Figure 1c). The part was originally intended to serve as a lower flap for an Airbus A400M. However, the component was scrapped because of a complex cluster of production defects. Through the use of a vibrometric NDT method, i.e., broadband mode-removed guided wave inspection, which was recently proposed by the current authors [33], a damage map was obtained, which revealed the presence of the backside stiffeners and the complex defect cluster (see Figure 1c).
All samples were inspected through flash thermography in the reflection mode, in which a Hensel linear flash lamp was used to provide an optical flash with a flash duration of 5 ms, in which 6 kJ of energy was consumed. The cooling down regime of the CFRPFBH coupon was recorded for 100 s. The impacted CFRPBVID sample (both the impacted side and the back side) was recorded for 50 s, while a 40 s recording duration was used for the aircraft CFRPPROD panel. A cooled FLIR A6750sc infrared camera with 640 pixels   × 512 pixels, a noise-equivalent differential temperature NEDT of 20 mK and a bit depth of 14 bits was used. The IR camera, with an additional filter, was sensitive within the 3–5 μ m wavelength range. The distance between the flash lamp and each inspected sample was 300 mm, while the distance between the IR camera and the CFRPFBH and CFRPBVID coupons was 500 mm and 1000 mm for the aircraft panel. Hardware and software from Edevis GmbH guaranteed a proper synchronization between the flash excitation and the data acquisition. The recorded thermographic sequences were loaded into an in-house developed MATLAB toolbox to perform the post-processing.

3. Post-Processing Methodologies

The focus of this paper lays on both the time-domain and frequency-domain pixel-wise analysis approaches. Further, a distinction was made between processing techniques that evaluated either a single time (or frequency) bin, or an integration of multiple time (or frequency) bins. In this study, the former was indicated by ‘single-bin evaluation’, while the latter was indicated by ‘integrated-bin evaluation’. Besides the single-bin and integrated-bin evaluation techniques that are discussed hereafter, there is a wide range of processing techniques that perform their evaluation by considering multiple time (or frequency) bins [3,26,28,30,31,34].
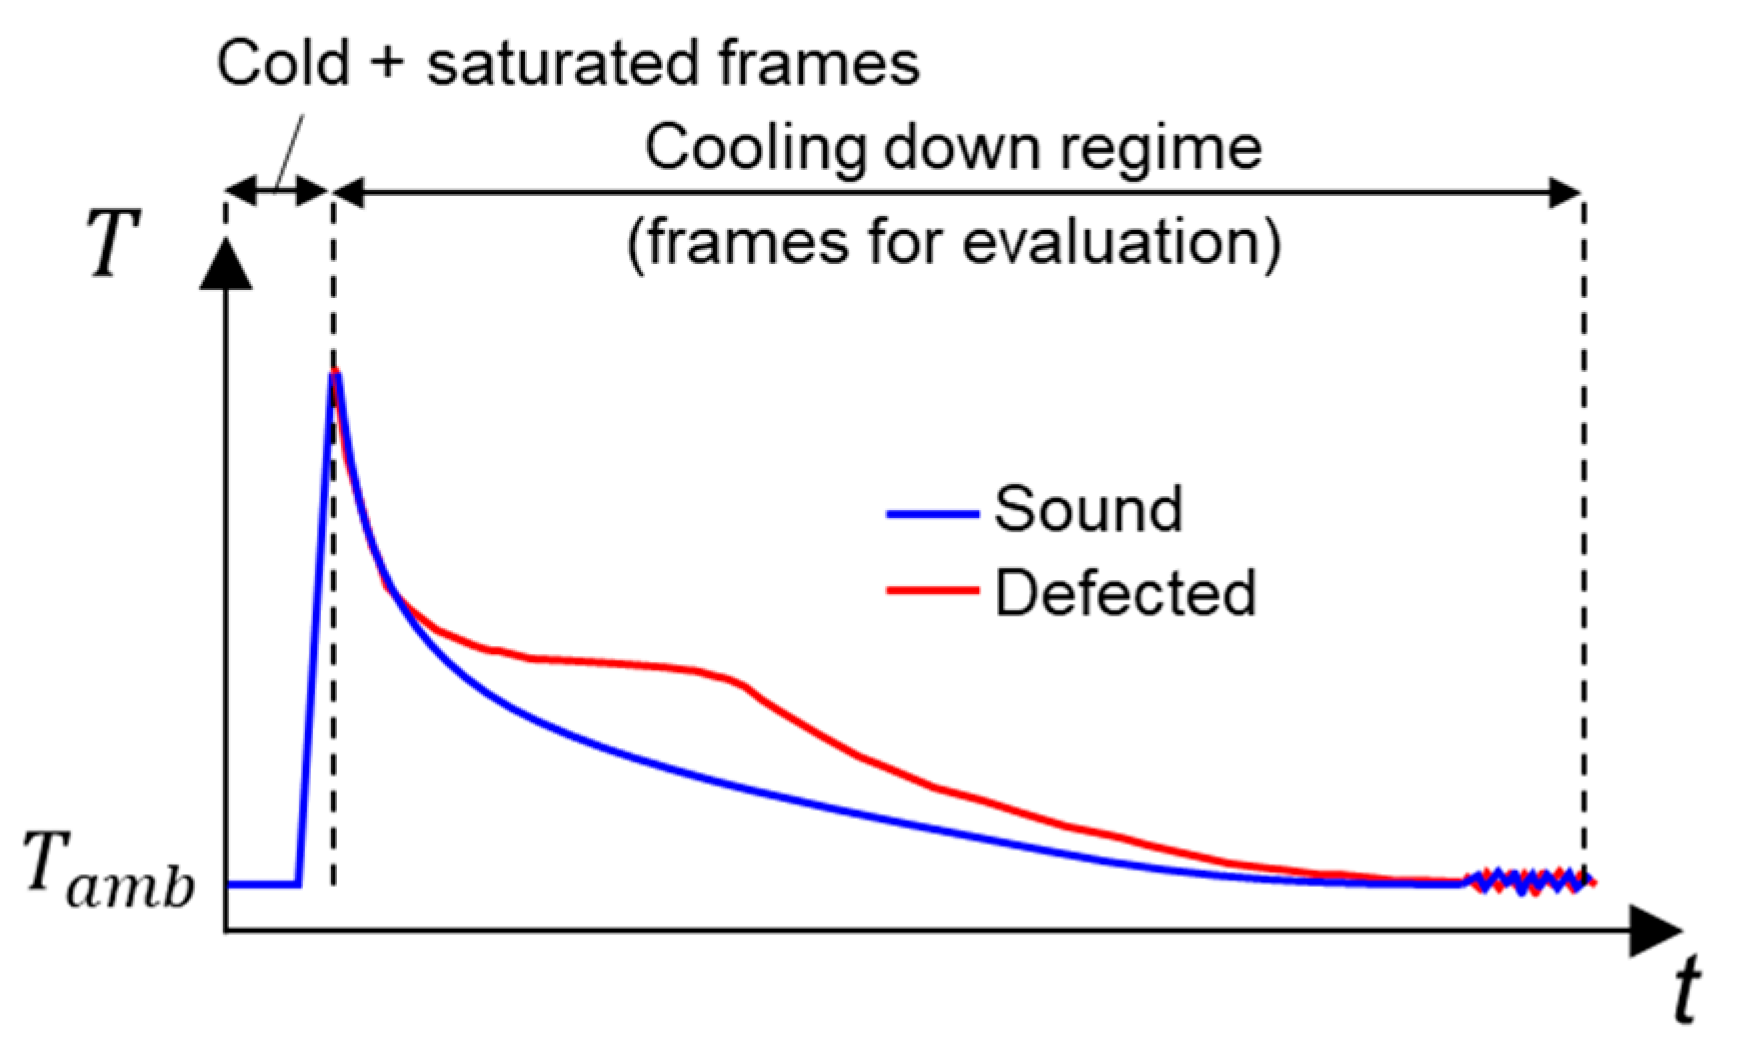
Figure 2 schematically presents the recorded temporal evolution for a pixel located at damage-free material (sound pixel) and for a pixel located at a defect (defected pixel). Only the cooling regime after the flash excitation was considered for further evaluation [18]. In the following sections, a brief overview of the considered analysis techniques was provided.

3.1. Time-Domain Analysis

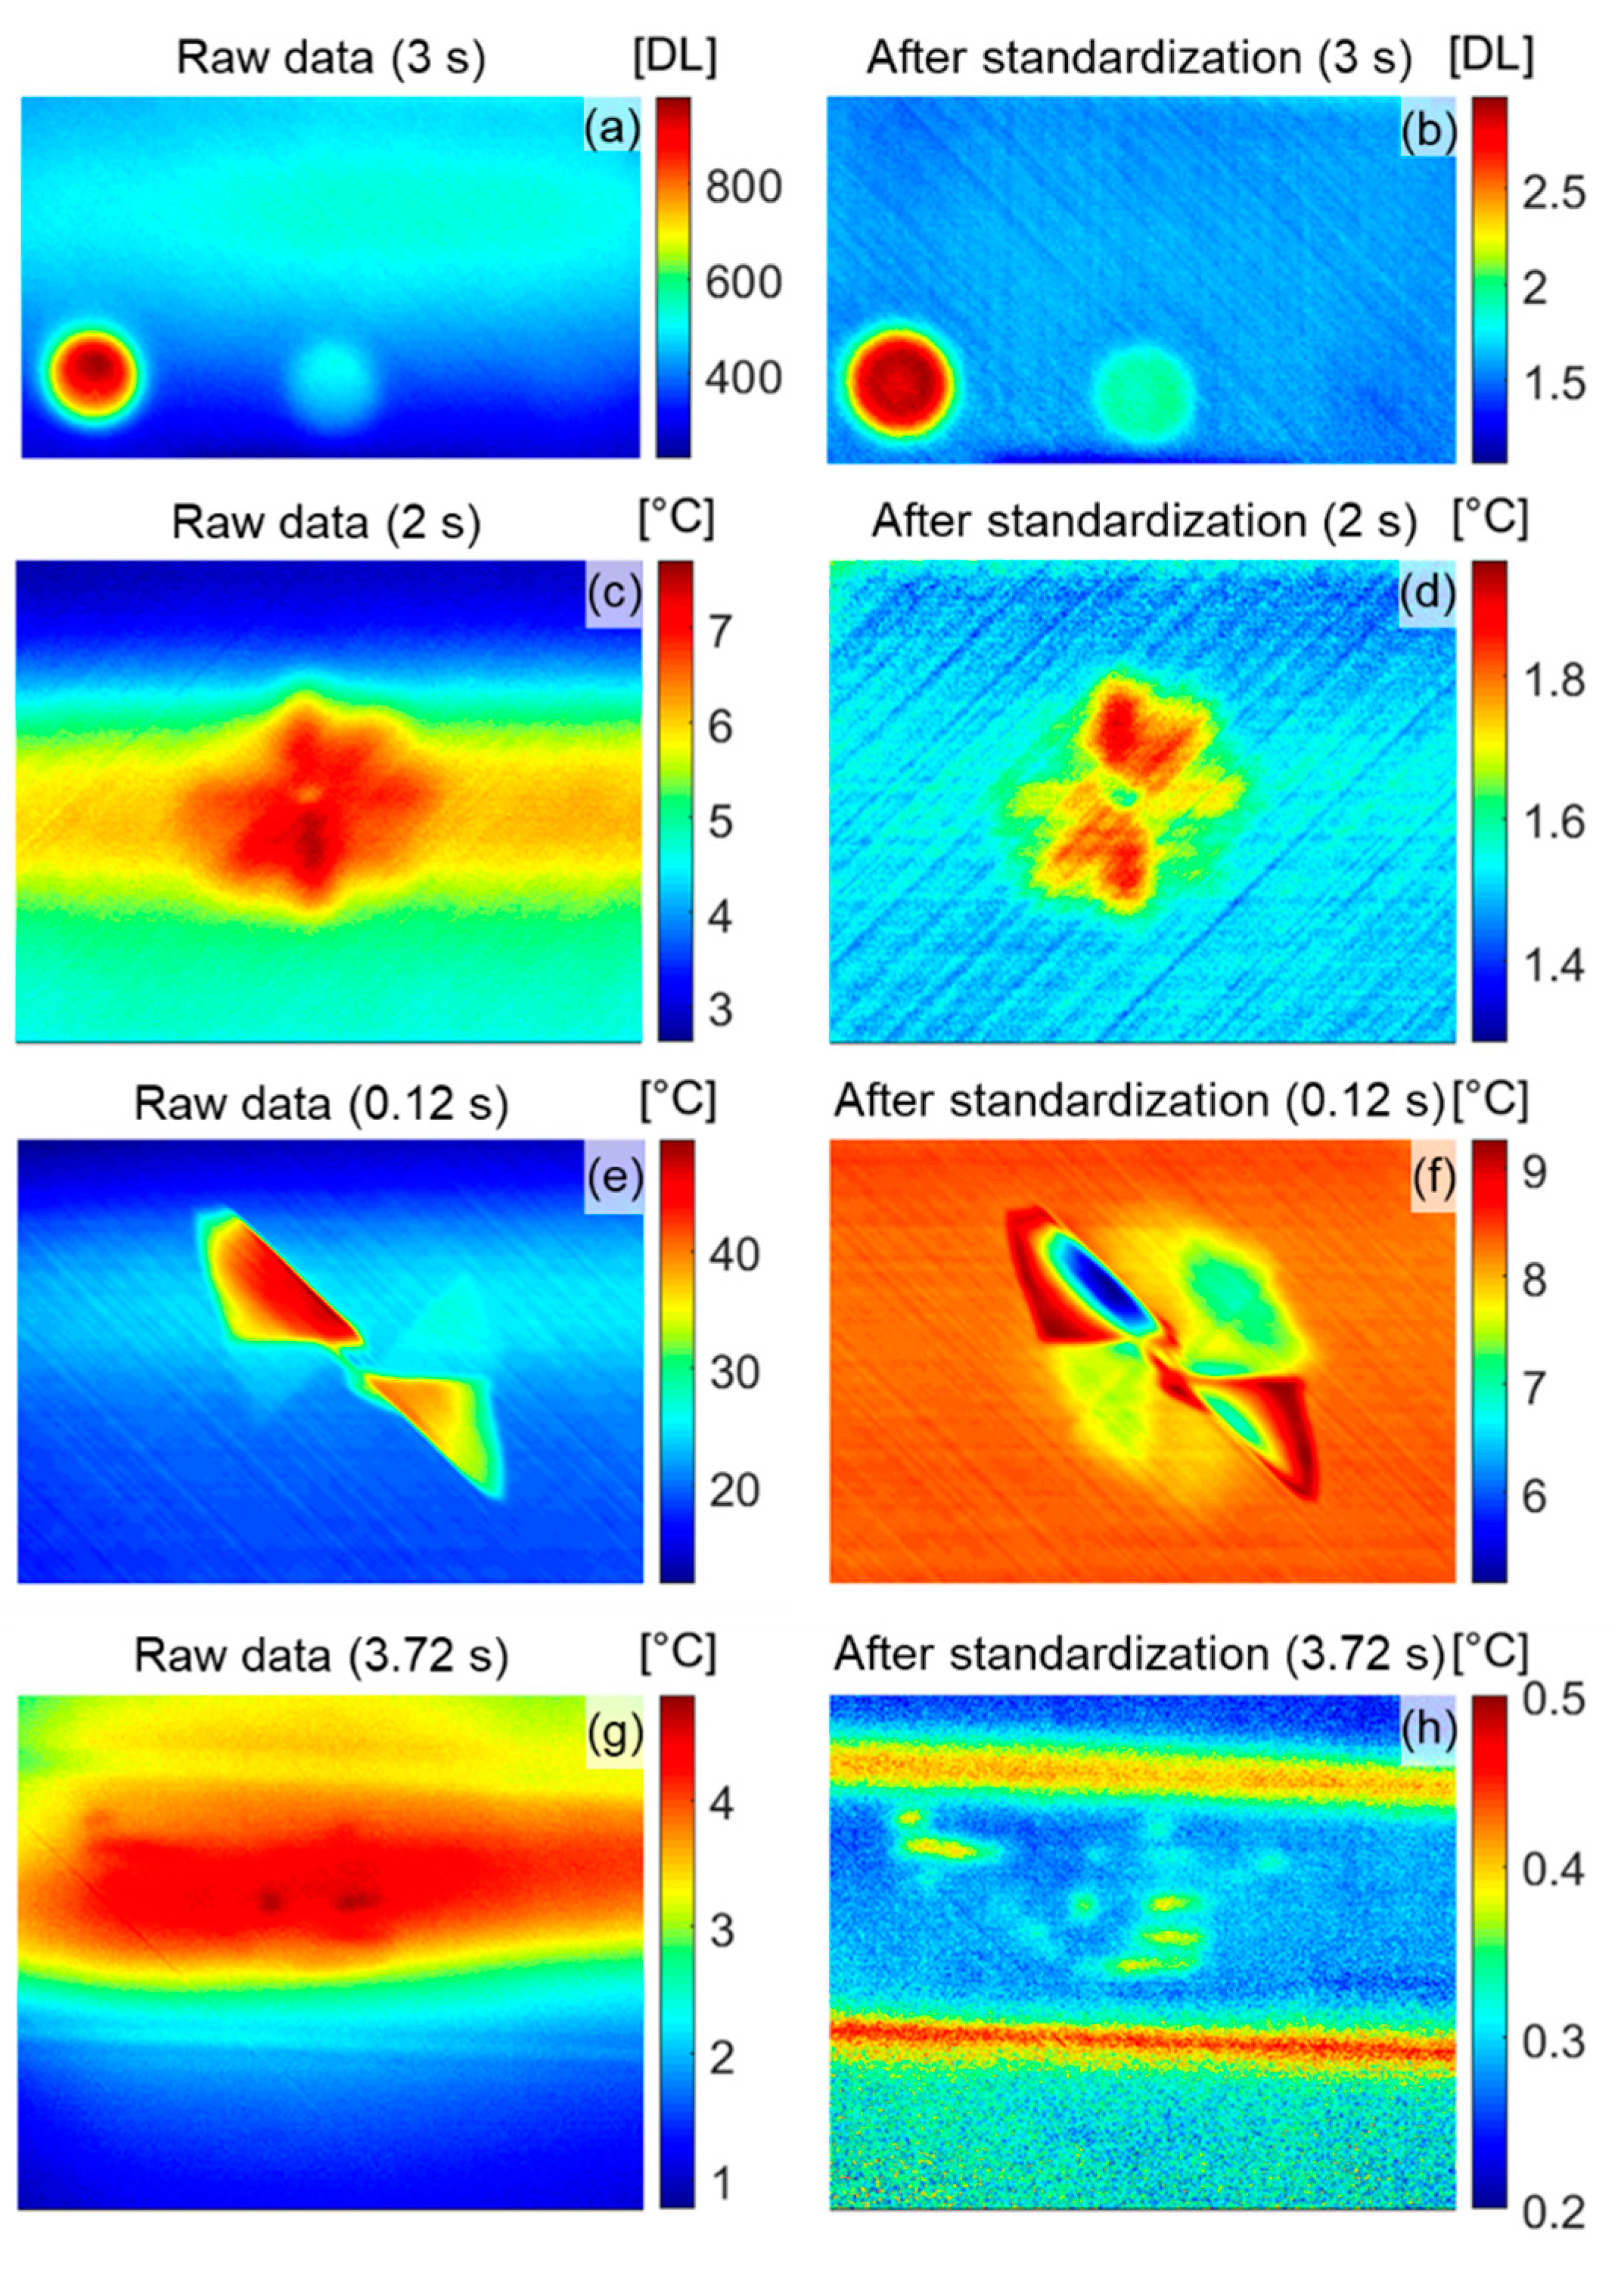
In flash thermography, the excitation conditions typically introduce a strong non-uniform background, which is in many cases detrimental for the defect detectability using post-processing techniques based on the magnitude of temperature. This excitation non-uniformity is clearly seen in the thermal response at an arbitrary time sample (see Figure 3 Left Column). In order to reduce the effect of non-uniform excitation, a standardization step is applied to the raw data. The standardized thermal response T s t a n d ( i , j , t ) was calculated in a pixel-wise manner as follows [28]:
T s t a n d ( i , j , t ) = T ( i , j , t ) T ¯ ( i , j ) σ T ( i , j )
where T ( i , j , t ) is the thermal response of pixel p ( i , j ) , and T ¯ ( i , j ) and σ T ( i , j ) its respective mean value and standard deviation over time. The effectiveness of this prior standardization is demonstrated in Figure 3 Right Column.

3.1.1. Single-Bin Evaluation: Dynamic Thermal Tomography (DTT)

Dynamic thermal tomography (DTT) is an often-used time-domain analysis technique, which operates on the thermal contrast Δ T [21,22,35]. The thermal contrast is calculated by subtracting the thermal response of a manually chosen reference (sound) pixel’s thermal response from all other pixel responses (see Figure 4a). The resulting thermal contrast Δ T is close to zero for a sound pixel and has a typical shape for a defected pixel (see Figure 4b). In this approach, the maximum thermal contrast value Δ T m a x and the time at which this occurs t Δ T , m a x are determined for each pixel individually. This is schematically illustrated in Figure 4b. Next, surface maps of the maximum thermal contrast (called ‘maxigramT) and the time of maximum thermal contrast (called ‘timegram’) could be generated. Typically, the shallower the defect, the higher the maximum thermal contrast and the lower the time of maximum thermal contrast, and vice versa. Thus, DTT’s timegram can be used to perform defect depth inversion, which requires calibration curves [22]. As such, DTT can be classified as a single-bin evaluation technique in the time domain.

3.1.2. Integrated-Bin Evaluation: Thermal Signal Area (TSA)

Thermal signal area (TSA) integrates the thermal response T s t a n d ( i , j , t ) of each pixel p ( i , j ) over a user-defined time range [ t 1 t 2 ] [24]:
A ( i , j ) = t 1 t 2 T s t a n d ( i , j , t )
The integration range is a crucial parameter for the performance of the TSA. While a large integration time assured that deep defects could be detected, a short integration time reduces the effect of lateral heat diffusion and as such provides a better defect sizing. The optimal integration range corresponds to a time range around the moment of maximum thermal contrast [24] (see Figure 4a,b). This selection is complicated by the presence of defects at different depths (i.e., with different times of maximum thermal contrast) and the lack of prior information about any defect. The integration approach of TSA is graphically presented in Figure 4a,b, where the integration is performed over the time range [ t 1 t 2 ] . To the best of the authors’ knowledge, there were no studies on the defect depth inversion possibilities through TSA.

3.2. Frequency-Domain Analysis

The short heat pulse induced by the flash excitation stimulates heat waves over a wide range of frequencies. In this regard, the fast Fourier transform decomposes the thermal dataset into its individual frequency components for enhanced defect detection and quantification. It is well known that the diffusion length of a heat wave, which also relates to the defect detectability, is frequency dependent [18,26]:
μ ( f ) = α Z π · f
where α Z (m2/s) is the through-thickness diffusivity. Hence, a lower evaluation frequency f allows one to detect deeper features in the sample since the thermal diffusion length μ increases. In the frequency domain, the phase has the advantage that it is an emissivity-normalized quantity, meaning that undesirable effects of non-uniform heating and non-uniform surface emissivity are significantly reduced [18]. In other words, the calculation of the phase has a similar effect as the standardization procedure in time domain (see Equation (1)).

3.2.1. Single-Bin Evaluation: Frequency-Domain Tomography (FDT)

In Ref. [21], defect detection is performed by evaluating the phase at arbitrary frequencies. In contrast, the present approach focuses on a systematic search of the maximum phase contrast and its corresponding frequency, analogous to DTT. The phase contrast was calculated by either subtracting the phase profile of a single known sound pixel, the mean phase value of a known sound area, or the mean phase value of the entire inspected sample, from the phase profile of every pixel [36]. In this study, the phase contrast was calculated by the latter approach. Similar to the temperature contrast curve, the phase contrast curve of a defected pixel exhibits a maximum (negative) phase contrast Δ φ m a x at a corresponding frequency of maximum phase contrast f Δ φ , m a x ; their surface maps are termed ‘maxigramF’ and ‘frequencygram’, respectively. This is schematically illustrated in Figure 4c. Evaluation of these two quantities, i.e., Δ φ m a x and f Δ φ , m a x , can be classified as a single-bin evaluation technique in the frequency domain. In analogy with DTT, this procedure is termed frequency-domain tomography (FDT). The deeper a defect, the lower the frequency of maximum phase contrast f Δ φ , m a x (see Equation (3)). Since the frequency of maximum phase contrast is typically found at very low frequencies, deep defects might be attributed the same f Δ φ , m a x due to a limited frequency resolution in the experimental data [19]. Recording for a longer duration would increase the frequency resolution (defined by their inverse relationship, Δ f = 1 / t e n d ), but the defect detectability might become worse since the additionally evaluated part is noisy and strongly affected by lateral heat diffusion effects. Due to this reason, defect depth inversion through FDT becomes challenging for deeper defects.

3.2.2. Integrated-Bin Evaluation: Adaptive Spectral Band Integration (ASBI)

Adaptive spectral band integration (ASBI) is a frequency-domain analysis technique, in which each pixel’s negative phase contrast Δ φ ( i , j , f ) is integrated over its optimal frequency range, i.e., [ 0   Hz f b l i n d , 2 ( i , j ) ] [19]:
D I ( i , j ) = f = 0   H z f b l i n d , 2 ( i , j ) Δ φ ( i , j , f ) | Δ φ ( i , j , f ) < 0
ASBI’s integrated area is schematically illustrated in Figure 4c on which the second blind (i.e., zero-crossing) frequency f b l i n d , 2 is indicated. With this integration procedure, the phase response over a wide range of frequencies is fused in order to get a balance between defect detectability and reduced effects of lateral heat diffusion. This is also related to the typically skewed distribution of the phase contrast curve, in which the higher-frequency range [ f Δ φ , m a x ( i , j ) f b l i n d , 2 ( i , j ) ] (i.e., less effects of lateral heat diffusion) contributes more to the ASBI’s damage index than the lower-frequency range [ 0   Hz f Δ φ , m a x ] [19]. Due to the high dynamic range, the obtained ASBI surface maps are represented in a logarithmic scale (after inverting the sign of the damage index values) for improved defect visibility. The specific choice of the integration limits, i.e., 0 Hz and f b l i n d , 2 , also has the advantage that the procedure can be fully automated without the need of user input or parameter selection, in contrast to TSA where the user must manually select the integration limits t 1 and t 2 . ASBI is an integrated-bin evaluation technique in the frequency domain and yields a unique damage index map. Coupled with simulations, ASBI can also be used for quantitative depth inversion [19].

4. Results

4.1. CFRPFBH Coupon

The results of the different post-processing techniques on the CFRPFBH coupon sample are gathered in Figure 5. The true sizes and locations of the FBHs are marked on the figures. Firstly, Figure 5a,b presents DTT’s maxigramT and timegram. In the maxigramT (Figure 5a), only the three shallowest FBHs (0.85 mm, 1.64 mm, and 2.47 mm depth) were detected. Additionally, there were clear effects of the fiber orientations, which distorted the background uniformity. On the other hand, the timegram (Figure 5b) also hinted at the presence of the two deepest FBHs. The timegram was noisy since its values for sound pixels represent random fluctuations in the thermal contrast. The noisiness of the timegram can be significantly reduced by performing a threshold based on the maximum value of maxigramT [22], however, this also removes the signature of low-contrast defects. This additional thresholding was therefore not considered in this article. Furthermore, the effect of lateral heat diffusion can be observed for the shallower defects, where the values in the timegram increase with the distance away from the FBH’s center. Consequently, the defects did not have a sharp outline in the timegram, which would complicate accurate defect sizing.
The result of TSA is displayed in Figure 5c. Several integration limits were carefully checked, and an integration range of 50 s was found to provide a good detectability of the defects. This is a sensible integration range since it ranges over the timegram values of all FBHs (i.e., it encapsulates the times of maximum thermal contrast, see also Figure 4b). In the TSA output, the three shallowest FBHs (0.85 mm, 1.64 mm, and 2.47 mm depth) were clearly detected, while the presence of the fourth FBH (3.68 mm depth) was hinted. The background was significantly more uniform and less noisy than in DTT’s maxigramT and timegram. Of course, due to the integration procedure over a relatively long temporal range, the effects of lateral heat diffusion blur the edges of the shallow defects with respect to DTT’s maxigramT. In order to obtain better defect sizing, it would be beneficial to make the integration procedure adaptive in a pixel-wise manner. In that way, shallow defects will be associated with a short integration time in order to limit lateral diffusion effects. Deep defects, on the other hand, will have long integration times in order to increase their contrast. However, such an adaptive integration procedure was out of scope in this manuscript.
The resulting images from FDT are presented in Figure 5d,e. The maxigramF (see Figure 5d) provides a good indication of the (note the logarithmic color scale).
While DTT’s maxigramT and FDT’s maxigramF mainly serve for defect detection, DTT’s timegram and FDT’s frequencygram can be used for quantitative depth inversion. The main limitation for the timegram lies in its limited detectability of deep defects (FBHs detected clearly up to 2.47 mm depth, see Figure 5b), however, quite uniform values were obtained over a defect’s signature. On the other hand, the frequencygram could detect significantly deeper defects (detected up to 4.51 mm, see Figure 5e), but the limited frequency resolution makes it practically very difficult to perform depth inversion for deep defects (deep defects had the same frequency values). With ASBI, only one single damage map is obtained, which serves for both defect detection and quantitative defect depth inversion (based on calibration curves from simulation) [19].
Next, in order to provide a quantitative measure of the defect detectability, the contrast-to-noise ratio (CNR) was calculated for each detected FBH through the following formula [30,37]:
C N R = 20 log 10 ( | A ¯ d A ¯ r e f | σ A r e f ) ( dB )
where A ¯ d and A ¯ r e f are the average values of the defective and reference area, respectively. Squares of 16 pixels × 16 pixels were selected at the FBH centers for the defective areas A d , and the reference area A r e f was defined by a rectangle of 176 pixels × 31 pixels in the center of the sample (illustrated as A r e f in Figure 5a). The CNR values of all FBHs are reported in Table 1 for the post-processing results that were magnitude based (i.e., not DTT’s timegram and FDT’s frequencygram). As expected, the CNR values decreased with increasing defect depth. DTT’s maxigramT provided the lowest CNR value of all techniques, and only detected the three shallowest FBHs. The negative CNR for the deepest two FBHs indicates that they were not detected. TSA provides a significant improvement over the maxigramT. While FBHE was not visually detected (at 4.51 mm, see Figure 5c), its CNR value indicates that it can be extracted by TSA. FDT’s maxigramF consistently provided an increased defect detectability in comparison to TSA. ASBI obtained an even better defect detectability for the shallowest four FBHs, after which both frequency-domain approaches provide similar defect detectability for the deepest FBHE. The observation that both frequency-domain techniques’ CNR values came closer together with increasing defect depth was explained by the fact that the second blind frequency f b l i n d , 2 (upper integration limit for ASBI, see Figure 4c) reduced with increasing defect depth (see also Equation (3)). Thus, ASBI’s integration range gradually became smaller and finally, for very deep defects, effectively reduced to FDT’s f Δ φ , m a x due to the limited frequency resolution.
Since CNR is strongly dependent on the noise level of the reference area (see Equation (5)), it does not always give a clear indication of how well a defect is actually detected. Defect-to-background ratio (DBR) is an alternative defect detectability metric that is less affected by measurement noise. First, the data is normalized so that the values range from 0 to 1 (this requires a sign inversion for FDT and ASBI), after which the DBR was calculated as follows [38]:
D B R = A ¯ d A ¯ r e f
The same reference and defect areas are used as for the CNR calculations. As such, DBR compares the ratio of the mean amplitudes of the reference and defected area. In principle, a defect that has a DBR value higher than 1 presents enough signal to be detectable. The DBR values for all FBHs and amplitude-based post-processing techniques are presented in Table 2. The DBR values for DTT’s maxigramT indicate that the three shallowest FBHs (depth up to 2.51 mm) were detectable, while the deepest were more difficult to detect. TSA did not give high DBR values, even though several FBHs were easily detectable in the output image (see Figure 5c). The reason why TSA gave low DBR values lays in the fact that TSA’s background amplitude ( ± 270 DL in the TSA output and ± 0.25 after normalization) was not zero-mean, and was of the same order as a defect’s amplitude ( ± 550 DL for FBHA in the TSA output, and 1 after normalization). FDT’s maxigramF and ASBI, on the other hand, obtained very high DBR values, which indicates that these defects were well detectable and that these techniques obtained an almost zero-reference background (see Figure 5d,f). Additionally, here, their DBR values came closer together with increasing defect depth, as was already discussed for the CNR results.
Figure 6 presents the cross-sections A-A’ and B-B’ (indicated in Figure 5a) with the normalized output of the post-processing techniques, i.e., DTT’s maxigramT, TSA, FDT’s maxigramF and ASBI. Notice that TSA did not obtain a zero-mean background since it is not a contrast quantity, which makes a comparison difficult. The normalization was therefore done by subtracting the minimum value in the cross-section before dividing by the then obtained maximum value. The timegram and frequencygram were not represented here since their values were not directly related to a measure of how well a defect is detected (i.e., not magnitude based). Cross-section A-A’ crosses FBHB (at 1.64 mm depth), and cross-section B-B’ went through the deepest FBHE (at 4.51 mm depth). In order to evaluate the defects’ lateral size and sharpness, the defect locations are indicated on the cross-sectional views. Providing a quantitative comparison of the estimated defect sizes would require establishing appropriate decibel drop levels (e.g., −3 dB drop cuts a defect off at 50% of its maximum amplitude [19,39]) for each post-processing technique. This, however, was out of the scope of the present article.
In cross-section A-A’ (Figure 6a), all post-processing techniques detected FBHB (see also Figure 5, Table 1 and Table 2). DTT’s maxigramT, FDT’s maxigramF, and ASBI all provided a comparable defect contour with a similar sharpness. In contrast, TSA had a significantly wider defect indication due to lateral heat diffusion, and therefore did not obtain a sharp defect contour. The inset of the figure highlights the noise level of a sound area, in which the superior noise suppression of the frequency-domain analysis techniques (i.e., FDT and ASBI) could be observed.
In cross-section B-B’ (see Figure 6b), the normalized amplitude of all processing techniques was significantly more noisy due to the decreased defect detectability (i.e., reduced contrast at FBHE). DTT’s maxigramT did not provide any detectability of the deepest FBHE. TSA provided increased amplitude at the FBH location (the defect was more clearly presented here due to the locally applied normalization), however, with very low defect sharpness. FDT’s maxigramF provided a slightly sharper defect outline than ASBI.

4.2. CFRPBVID Coupon

The typical structure of the delamination cone introduced by a low-velocity impact resembles a winding staircase through the sample’s depth (see C-scan results in Figure 1b) [32]. This complex defect structure (i.e., overlapping, closely spaced delaminations at similar depths) is a challenging inspection case for infrared thermography.
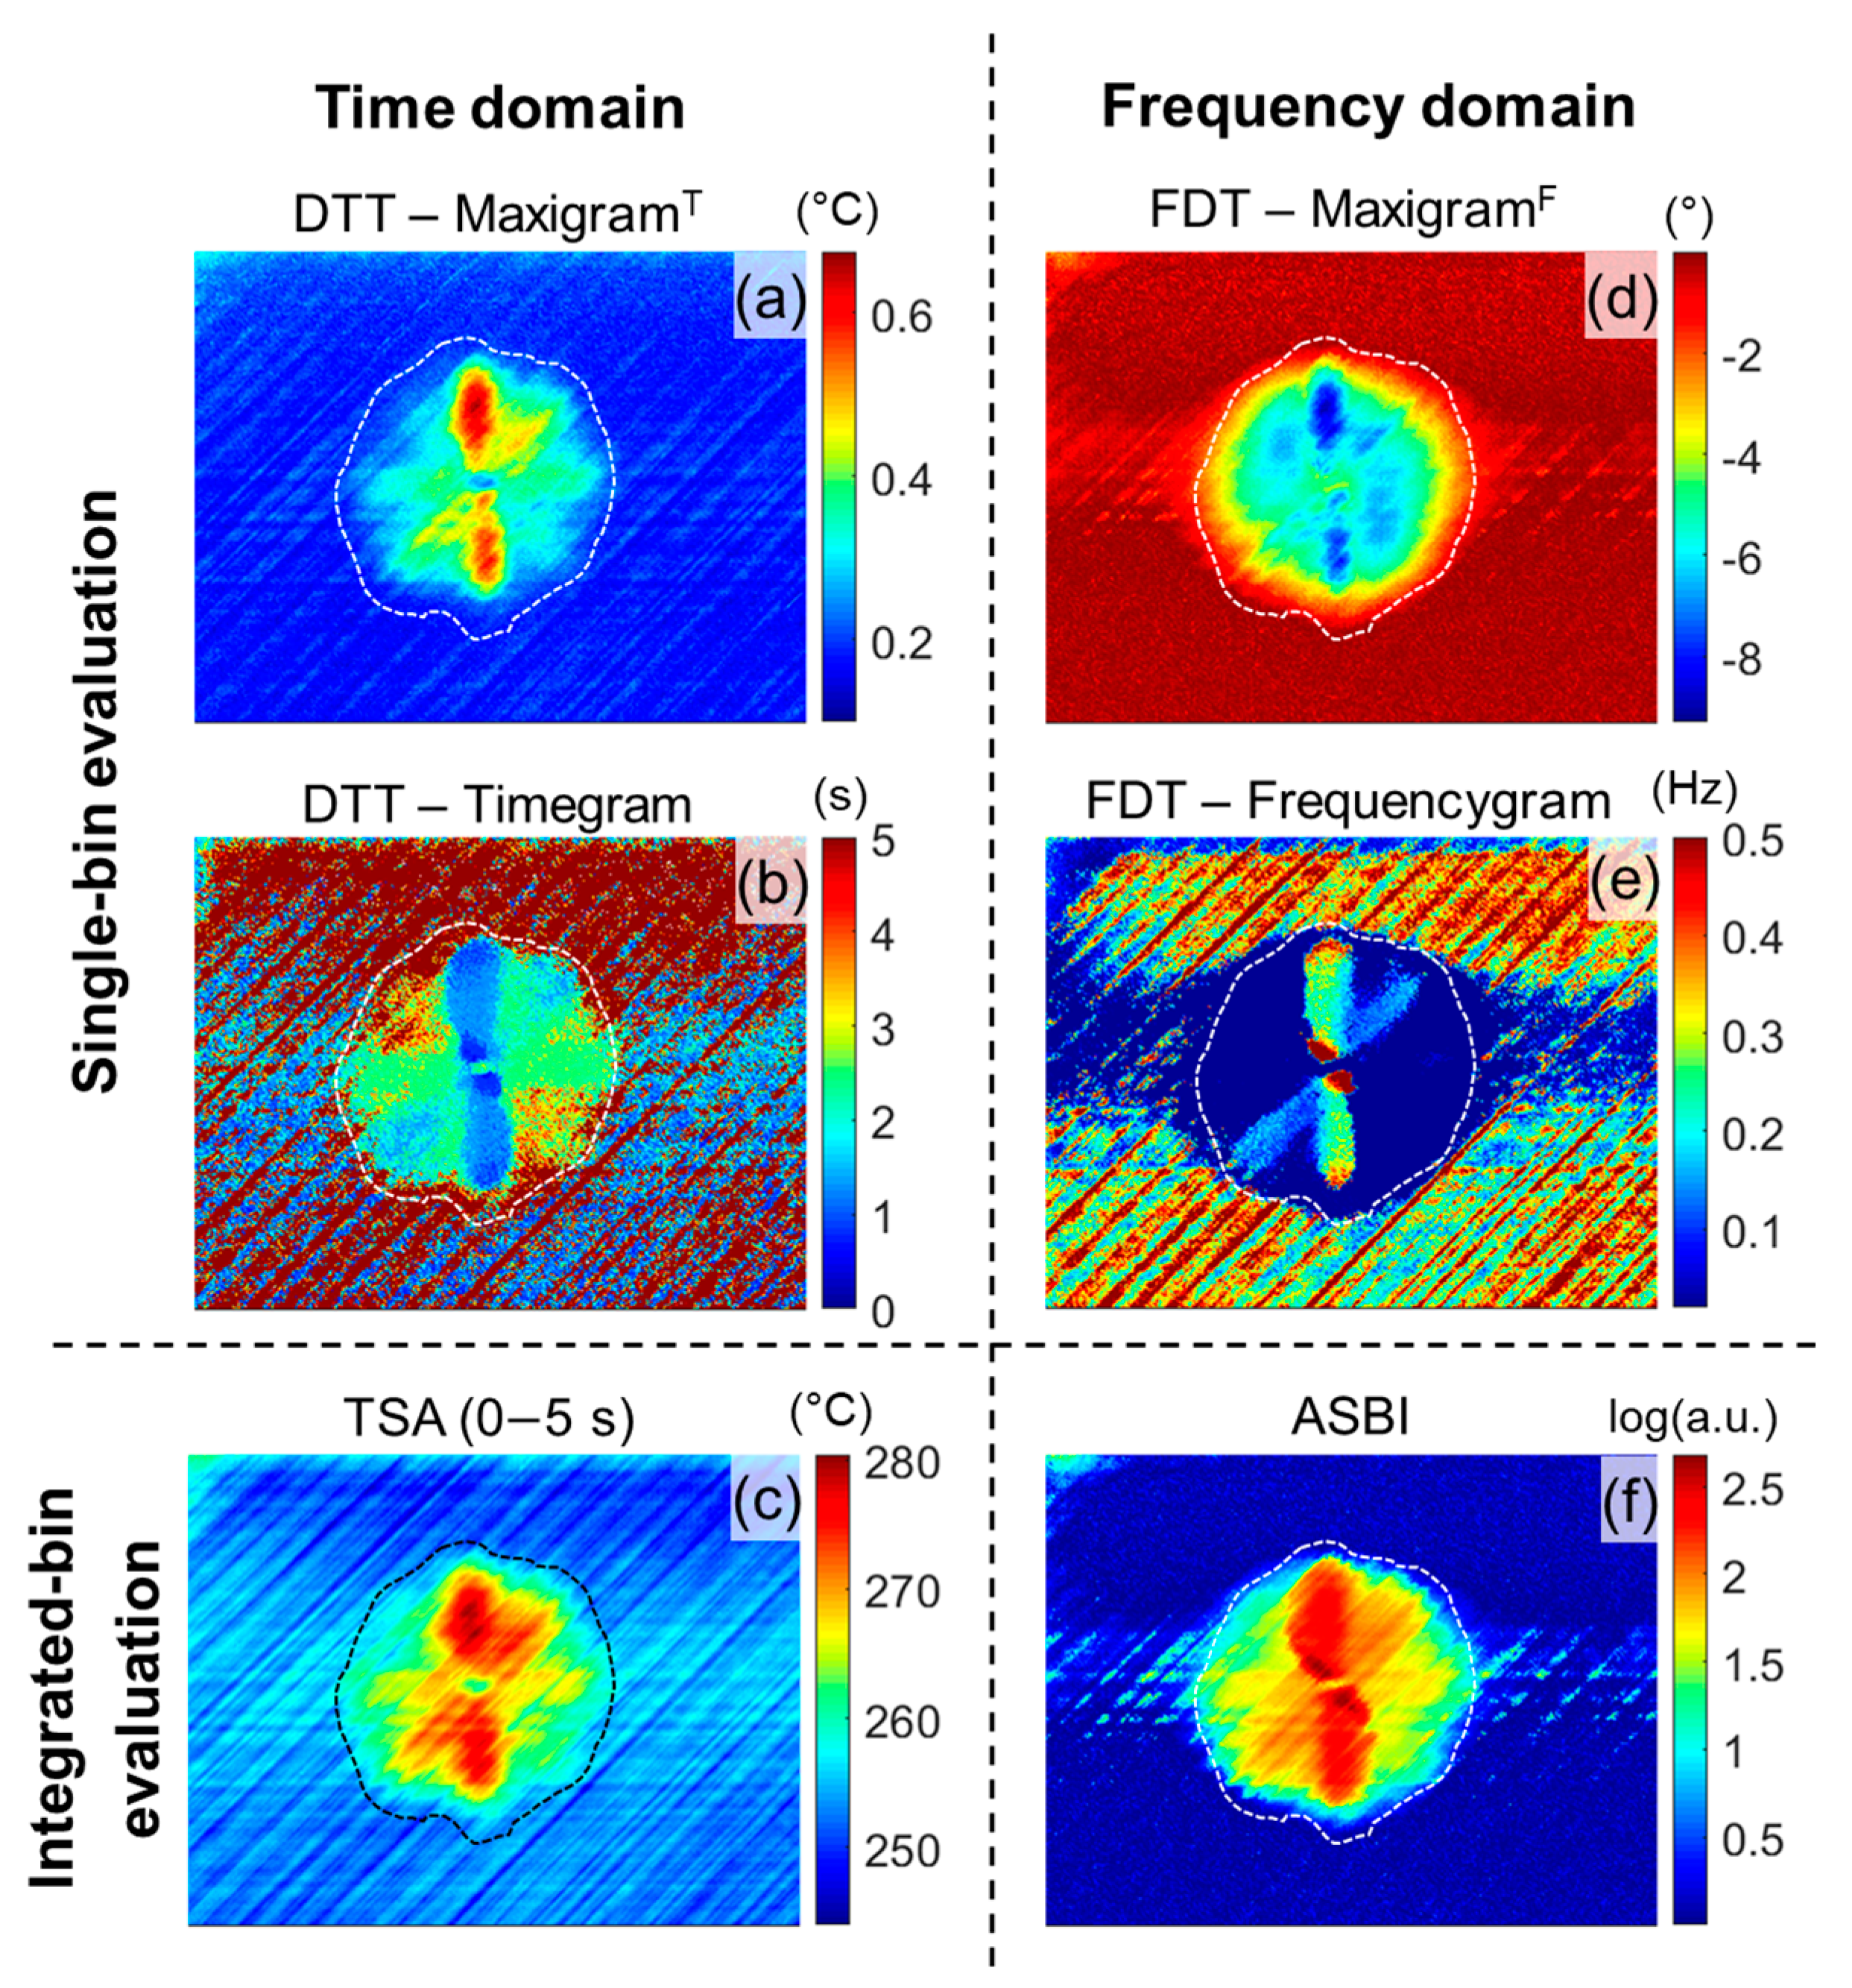
The post-processed results for the impacted side of the CFRPBVID coupon are presented in Figure 7. The contour of the defected zone, detected by the C-scan inspection (see Figure 1b), was overlaid on the thermographic results. In DTT’s maxigramT (Figure 7a), the shallowest parts of the BVID were clearly detected, while the signatures of the deeper steps of the winding staircase were merged together. There were only minor artifacts from the fiber orientation at the surface. The timegram (Figure 7b) was significantly noisier than the maxigramT, and did not provide improved defect detectability. The first 5 s after excitation were found to be a good integration range for TSA, which resulted in the image in Figure 7c. This integration range was selected by considering DTT’s timegram (see Figure 7b), in which no additional defects were detected after 3 s. It is clear that the integration in this defect scenario had caused the shallow defects’ signatures to largely merge into one global defect indication.
FDT’s maxigramF (Figure 7d) provided an overall indication of the defected area, however, the signatures from the individual steps of the winding staircase merged due to lateral heat diffusion. While the standardization removed almost all traces of the non-uniform excitation (see Figure 3c,d), the frequency-domain results were still affected by the extreme non-uniform excitation. The frequencygram (Figure 7e) highlighted the overall defected area, in which only the first three steps of the winding staircase could be distinguished. For all deeper steps, a uniform frequency value was retrieved. In a comparable manner to DTT’s timegram (see Figure 7b), the frequencygram had a noisy background and was influenced by the excitation non-uniformity. Lastly, the damage index calculated by ASBI (Figure 7f) obtained a distinct outline of the defected area, in which several shallow steps of the winding staircase were observed. The central area where the non-uniform excitation was concentrated (see Figure 3c) was also present in ASBI’s damage index map.
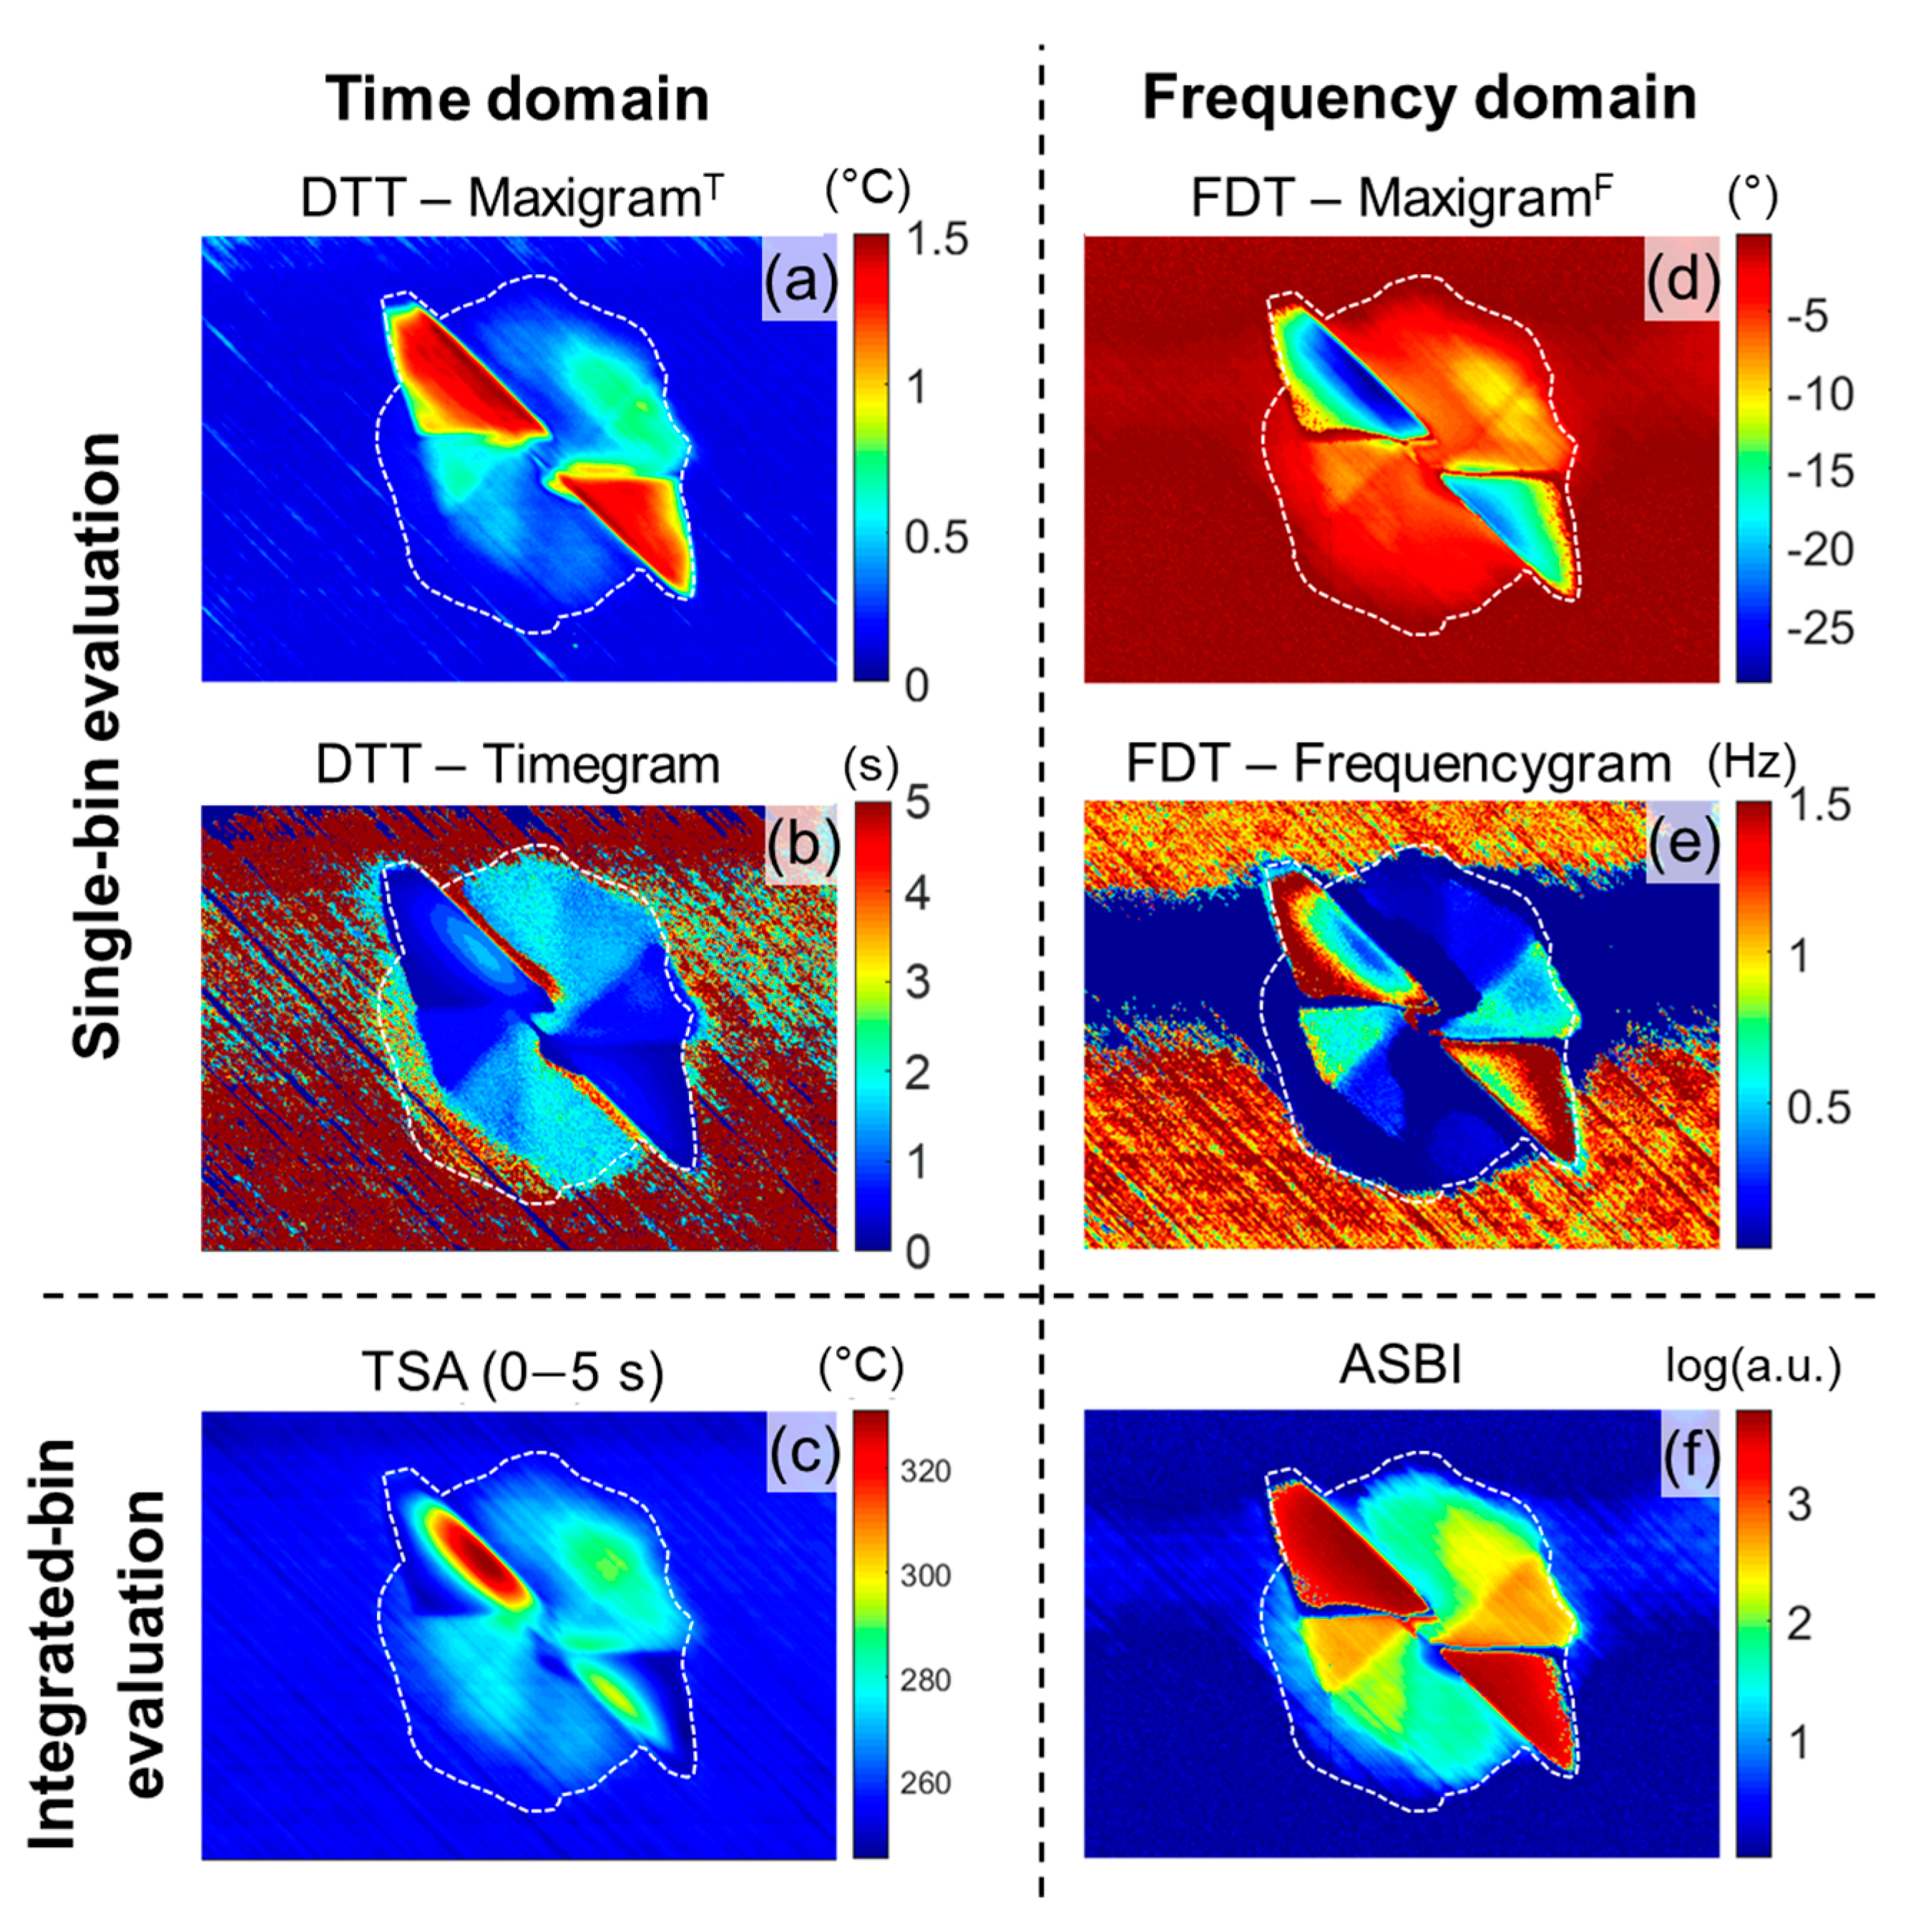
Figure 8 presents the inspection results of the backside of the CFRPBVID coupon. The contour of the defected zone, detected by the C-scan inspection (see Figure 1b), was overlaid on the IRT results. DTT’s maxigramT (Figure 8a) only clearly detected the first steps of the delamination cone, and had minor influences of the sample’s fiber architecture. The timegram (Figure 8b), on the other hand, resolved more steps, and even hinted the existence of a second, deeper level of the delamination cone (at the left bottom). Similar to the previous timegrams (see Figure 5b and Figure 7b), the background was very noisy and affected by the surface’s fiber architecture. Integrating the thermal signal over the first 5 s (see Figure 8c) provided an overall defect indication, however, it was difficult to distinguish between the different steps of the winding staircase. This time range was selected by evaluating DTT’s timegram (see Figure 8b), in which no additional defect locations were highlighted after this duration. The deeper steps of the delamination cone provided a small and similar thermal signature, which in combination with their closely related depth locations caused their signatures to merge due to lateral heat diffusion.
In the frequency domain, the maxigramF (Figure 8d) detected the global structure of the defected area, however, individual steps cannot be distinguished (significant influence of lateral heat diffusion at the relatively low f Δ φ , m a x ). Except for the horizontal band that was introduced by the flash excitation (see Figure 3e), the background was highly uniform and had a low noise level. In contrast, the background in the frequencygram (Figure 8e) was non-uniform and had a pronounced effect of both the excitation non-uniformity and the sample’s fiber orientation at the surface. This was also observed previously for the other inspected samples. ASBI provides an improved measure for defect detection (Figure 8f), clearly highlighting the first winding of the winding staircase. Additionally, also a second winding level was highlighted in ASBI’s damage index map, and sharper defect edges were obtained than in the timegram. DTT’s timegram, FDT’s frequencygram, and ASBI show a good agreement of the overall defected zone with the C-scan result (see the superimposed contour line).

4.3. CFRPPROD Aircraft Panel

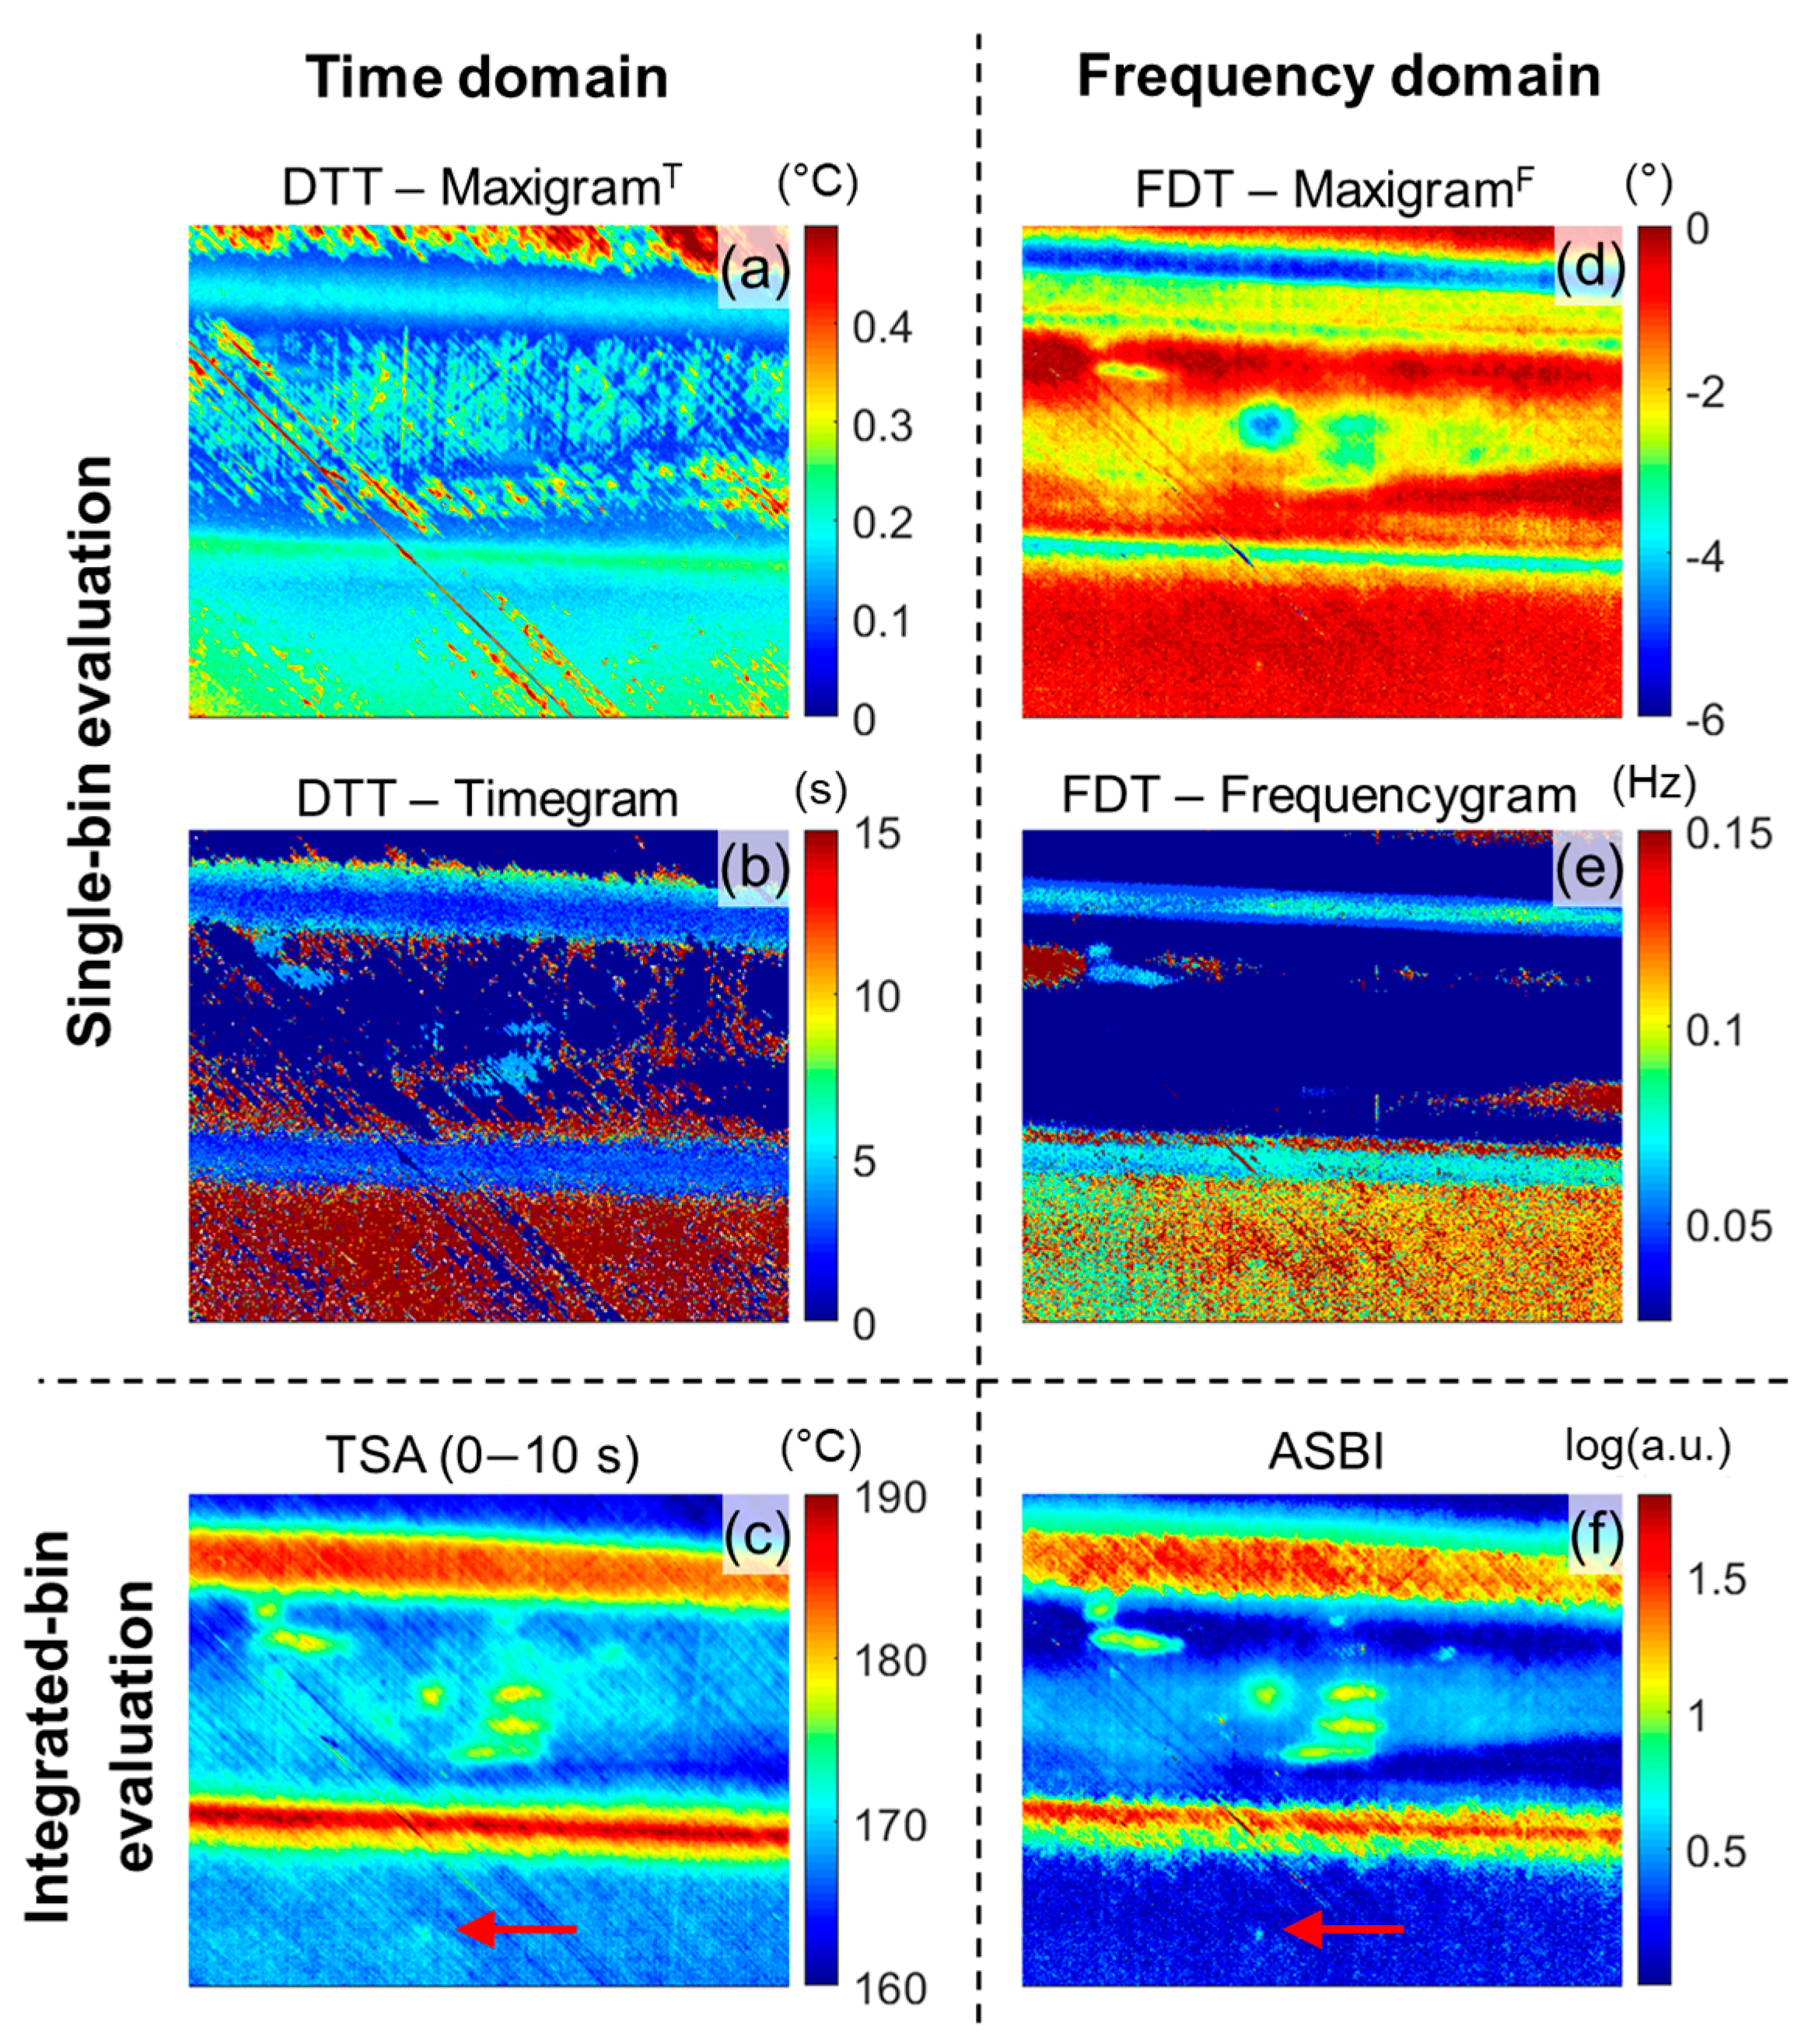
Finally, the CFRPPROD aircraft panel with horizontal backside stiffeners and a complex cluster of production defects was discussed (see Figure 1c). The results of the post-processing techniques are presented in Figure 9. DTT’s maxigramT (Figure 9a) provides no noticeable defect detectability. Only the backside stiffeners can be extracted, while the remainder of the component is governed by noise. In the timegram (Figure 9b), additional features can be observed in between both stiffeners (at the indicated location of the defect cluster in Figure 1c). However, a comparison with the damage map obtained through broadband vibrational NDT (see Figure 1c) shows that not all features of the defect cluster were detected in DTT’s timegram. The features that were detected in DTT’s timegram (around 5 s) indicate that the first 10 s was a good integration range for TSA. This was confirmed in the output of TSA (see Figure 9c), where many more of the defect features were retrieved. This indicates that the defect features that provide only a limited thermal contrast were not always properly detected by DTT. The integrated TSA technique, on the other hand, successfully highlights the presence of multiple defects. However, compared to the vibrational map (see Figure 1c), the defect indications in TSA were blurry (due to lateral heat diffusion) and there was more background noise. The small defect below the bottom stiffener (indicated with the red arrow in Figure 9c) was not detected by TSA.
FDT’s maxigramF (Figure 9d) revealed the locations of many of the small defect features, but their detectability was strongly hindered by the non-uniformity, which was introduced by the flash excitation (see Figure 3g). The frequencygram is presented in Figure 9e, and only highlighted the backside stiffeners and part of the complex defect cluster. ASBI (Figure 9f) shows a good agreement with the broadband vibrational map (Figure 1c). Both backside stiffeners were highlighted by an increased damage index, and the small defects in the complex defect cluster were detected more clearly than in the TSA output. Additionally, the very small isolated defect below the bottom stiffener was well represented in the ASBI damage map (see arrow in Figure 9f). However, note that there was still a remnant of the non-uniform heating profile.

5. Conclusions

In this article, the defect detectability of both time- and frequency-domain analysis techniques for flash thermography was evaluated. Both processing techniques that evaluate a single time (or frequency) bin, i.e., DTT and FDT, and techniques that perform an integration over a range of time (or frequency) bins, i.e., TSA and ASBI, are of interest. Three CFRP samples, with different defect types (FBH, impact damage, and cluster of production defects), sizes, and depths were inspected.
The time-domain results illustrate the advantage of standardizing the dataset before applying amplitude-based processing algorithms in order to suppress effects of non-uniform excitation/emissivity. The results further indicate that the time-domain integration (i.e., TSA) outperformed the time-domain single-bin technique (i.e., DTT) when a defect exhibited only a limited amount of thermal contrast (e.g., deep FBHs and complex cluster). However, when concerned with shallow defects in close proximity (e.g., BVID), the integrated technique tended to merge the individual defect locations into one global defected zone. This merging was a result of the integration procedure, which was affected by lateral heat diffusion, and reduced the defect detectability and sharpness of a defect. While DTT’s timegram delivered a better defect detectability than the maxigramT, it typically suffered from a noisy background and was more affected by lateral heat diffusion. DTT’s maxigramT provides a sharp outline of the detected defects, while the defect contour obtained through TSA was not sharp due to effects of lateral heat diffusion.
The single-bin evaluation approach in the frequency domain (i.e., FDT) provided improved defect detectability (i.e., higher contrast-to-noise and defect-to-background ratios) and a higher inspectable defect depth than its time-domain counterpart. However, since FDT generally refers to low indicative frequencies, its maxigramF and frequencygram were both strongly affected by lateral heat diffusion. Moreover, the frequency-domain results also show a higher sensitivity to the non-uniform heating. The integrated frequency-domain technique (i.e., ASBI) provided good defect detectability and could highlight deeper defects than TSA.

Author Contributions

Conceptualization, G.P., S.H. and M.K.; Funding acquisition, S.H. and M.K.; Methodology, G.P., S.H. and M.K.; Resources, W.V.P. and M.K.; Software, G.P. and S.H.; Supervision, S.H. and M.K.; Validation, G.P., S.H., J.S. and M.K.; Writing—original draft, G.P.; Writing—review and editing, S.H., J.S., W.V.P. and M.K. All authors have read and agreed to the published version of the manuscript.

Funding

The authors acknowledge the SBO project DETECT-IV (Grant no. 160455), which fits in the SIM research program MacroModelMat (M3) coordinated by Siemens (Siemens Digital Industries Software, Belgium) and funded by SIM (Strategic Initiative Materials in Flanders) and VLAIO (Flemish government agency Flanders Innovation and Entrepreneurship). The authors also acknowledge Fonds voor Wetenschappelijk Onderzoek-Vlaanderen (FWO-Vlaanderen) through grants 1S11520N and 1148018N. The authors further thank SABCA Limburg for providing the aircraft panel.

Conflicts of Interest

The authors declare no conflict of interest.

References

  1. Maierhofer, C.; Röllig, M.; Gower, M.; Lodeiro, M.; Baker, G.; Monte, C.; Adibekyan, A.; Gutschwager, B.; Knazowicka, L.; Blahut, A. Evaluation of Different Techniques of Active Thermography for Quantification of Artificial Defects in Fiber-Reinforced Composites Using Thermal and Phase Contrast Data Analysis. Int. J. Thermophys. 2018, 39. [Google Scholar] [CrossRef]
  2. Milne, M.J.; Reynolds, W.N. The non-destructive evaluation of composites and other materials by thermal pulse video thermography. In Proceedings of the Thermosense VII: Thermal Infrared Sensing for Diagnostics and Control, Cambridge, MA, USA, 23–26 October 1984; Volume 0520, pp. 119–1222. [Google Scholar]
  3. Vavilov, V.P.; Burleigh, D.D. Review of pulsed thermal NDT: Physical principles, theory and data processing. NDT Int. 2015, 73, 28–52. [Google Scholar] [CrossRef]
  4. Yang, R.; He, Y. Optically and non-optically excited thermography for composites: A review. Infrared Phys. Technol. 2016, 75, 26–50. [Google Scholar] [CrossRef]
  5. Chatterjee, K.; Tuli, S.; Pickering, S.; Almond, D.P. A comparison of the pulsed, lock-in and frequency modulated thermography nondestructive evaluation techniques. NDT E Int. 2011, 44, 655–667. [Google Scholar] [CrossRef] [Green Version]
  6. Busse, G.; Wu, D.; Karpen, W. Thermal wave imaging with phase sensitive modulated thermography. J. Appl. Phys. 1992, 71, 3962–3965. [Google Scholar] [CrossRef]
  7. Hedayatrasa, S.; Poelman, G.; Segers, J.; Van Paepegem, W.; Kersemans, M. Performance of frequency and/or phase modulated excitation waveforms for optical infrared thermography of CFRPs through thermal wave radar: A simulation study. Compos. Struct. 2019, 225, 111177. [Google Scholar] [CrossRef]
  8. Hedayatrasa, S.; Poelman, G.; Segers, J.; Van Paepegem, W.; Kersemans, M. Novel discrete frequency-phase modulated excitation waveform for enhanced depth resolvability of thermal wave radar. Mech. Syst. Signal Process. 2019, 132, 512–522. [Google Scholar] [CrossRef]
  9. Hedayatrasa, S.; Poelman, G.; Segers, J.; Van Paepegem, W.; Kersemans, M. On the application of an optimized Frequency-Phase Modulated waveform for enhanced infrared thermal wave radar imaging of composites. Optics Lasers Eng. 2021, 138, 106411. [Google Scholar] [CrossRef]
  10. Tabatabaei, N.; Mandelis, A. Thermal-wave radar: A novel subsurface imaging modality with extended depth-resolution dynamic range. Rev. Sci. Instrum. 2009, 80, 034902. [Google Scholar] [CrossRef] [Green Version]
  11. Tabatabaei, N.; Mandelis, A. Thermal coherence tomography using match filter binary phase coded diffusion waves. Phys. Rev. Lett. 2011, 107, 165901. [Google Scholar] [CrossRef]
  12. Burgholzer, P.; Hendorfer, G. Limits of Spatial Resolution for Thermography and Other Non-destructive Imaging Methods Based on Diffusion Waves. Int. J. Thermophys. 2013, 34, 1617–1632. [Google Scholar] [CrossRef] [PubMed] [Green Version]
  13. Groz, M.-M.; Abisset, E.; Meziane, A.; Sommier, A.; Pradère, C. Three-Dimensional Reconstruction of Thermal Volumetric Sources from Surface Temperature Fields Measured by Infrared Thermography. Appl. Sci. 2019, 9, 5464. [Google Scholar] [CrossRef] [Green Version]
  14. Erazo-Aux, J.; Loaiza-Correa, H.; Restrepo-Girón, A. Histograms of oriented gradients for automatic detection of defective regions in thermograms. Appl. Optics 2019, 58, 3620–3629. [Google Scholar] [CrossRef] [PubMed]
  15. Ibarra-Castanedo, C.; Gonzalez, D.; Klein, M.; Pilla, M.; Vallerand, S.; Maldague, X. Infrared image processing and data analysis. Infrared Phys. Technol. 2004, 46, 75–83. [Google Scholar] [CrossRef]
  16. Poelman, G.; Hedayatrasa, S.; Segers, J.; Van Paepegem, W.; Kersemans, M. Multi-scale gapped smoothing algorithm for robust baseline-free damage detection in optical infrared thermography. NDT E Int. 2020, 112, 102247. [Google Scholar] [CrossRef]
  17. Ciampa, F.; Mahmoodi, P.; Pinto, F.; Meo, M. Recent Advances in Active Infrared Thermography for Non-Destructive Testing of Aerospace Components. Sensors 2018, 18, 609. [Google Scholar] [CrossRef] [Green Version]
  18. Ibarra-Castanedo, C.; Maldague, X. Pulsed phase thermography reviewed. Quant. InfraRed Thermograph. J. 2004, 1, 47–70. [Google Scholar] [CrossRef]
  19. Poelman, G.; Hedayatrasa, S.; Segers, J.; Van Paepegem, W.; Kersemans, M. Adaptive spectral band integration in flash thermography: Enhanced defect detectability and quantification in composites. Compos. Part B Eng. 2020, 202, 108305. [Google Scholar] [CrossRef]
  20. Popow, V.; Gurka, M. Full factorial analysis of the accuracy of automated quantification of hidden defects in an anisotropic carbon fibre reinforced composite shell using pulse phase thermography. NDT E Int. 2020, 116, 102359. [Google Scholar] [CrossRef]
  21. Vavilov, V.; Shiryaev, V.; Kuimova, M. Time- and Phase-Domain Thermal Tomography of Composites. Photonics 2018, 5, 31. [Google Scholar] [CrossRef] [Green Version]
  22. Vavilov, V.P.; Kuimova, M.V. Dynamic Thermal Tomography of Composites: A Comparison of Reference and Reference-Free Approaches. J. Nondestruct. Eval. 2018, 38, 2. [Google Scholar] [CrossRef]
  23. Benítez, H.D.; Ibarra-Castanedo, C.; Bendada, A.; Maldague, X.; Loaiza, H.; Caicedo, E. Definition of a new thermal contrast and pulse correction for defect quantification in pulsed thermography. Infrared Phys. Technol. 2008, 51, 160–167. [Google Scholar] [CrossRef]
  24. Moradi, M.; Safizadeh, M.S. Detection of edge debonding in composite patch using novel post processing method of thermography. NDT E Int. 2019, 107, 102153. [Google Scholar] [CrossRef]
  25. Maldague, X.; Marinetti, S. Pulse phase infrared thermography. J. Appl. Phys. 1996, 79, 2694–2698. [Google Scholar] [CrossRef]
  26. Oswald-Tranta, B. Time and frequency behaviour in TSR and PPT evaluation for flash thermography. Quant. InfraRed Thermograph. J. 2017, 14, 164–184. [Google Scholar] [CrossRef]
  27. Netzelmann, U.; Müller, D. Modified pulse-phase thermography algorithms for improved contrast-to-noise ratio from pulse-excited thermographic sequences. NDT E Int. 2020, 116, 102325. [Google Scholar] [CrossRef]
  28. Rajic, N. Principal component thermography for flaw contrast enhancement and flaw depth characterisation in composite structures. Compos. Struct. 2002, 58, 521–528. [Google Scholar] [CrossRef]
  29. Rajic, N. DSTO-TR-1298, Principal Component Thermography; DSTO Aeronautical and Maritime Research Laboratory: Fishermans bend, Victoria, Australia, 2002; p. 38. [Google Scholar]
  30. Madruga, F.J.; Ibarra-Castanedo, C.; Conde, O.M.; López-Higuera, J.M.; Maldague, X. Infrared thermography processing based on higher-order statistics. NDT E Int. 2010, 43, 661–666. [Google Scholar] [CrossRef]
  31. Shepard, S.M. Temporal Noise Reduction, Compression and Analysis of Thermographic Data Sequences; Thermal Wave Imaging, Inc.: Ferndale, MI, USA, 2003. [Google Scholar]
  32. Spronk, S.W.F.; Kersemans, M.; De Baerdemaeker, J.; Gilabert, F.A.; Sevenois, R.; Garoz, D.; Kassapoglou, C.; Van Paepegem, W. Comparing damage from low-velocity impact and quasi-static indentation in automotive carbon/epoxy and glass/polyamide-6 laminates. Polymer Test. 2018, 65, 231–241. [Google Scholar] [CrossRef] [Green Version]
  33. Segers, J.; Hedayatrasa, S.; Poelman, G.; Van Paepegem, W.; Kersemans, M. Robust and baseline-free full-field defect detection in complex composite parts through weighted broadband energy mapping of mode-removed guided waves. Mech. Syst. Signal Process. 2021, 151. [Google Scholar] [CrossRef]
  34. Sun, J.G. Analysis of Pulsed Thermography Methods for Defect Depth Prediction. J. Heat Transfer 2006, 128. [Google Scholar] [CrossRef]
  35. Vavilov, V.P. Dynamic thermal tomography: Recent improvements and applications. NDT E Int. 2015, 71, 23–32. [Google Scholar] [CrossRef]
  36. Theodorakeas, P.; Koui, M. Depth Retrieval Procedures in Pulsed Thermography: Remarks in Time and Frequency Domain Analyses. Appl. Sci. 2018, 8, 409. [Google Scholar] [CrossRef] [Green Version]
  37. Welvaert, M.; Rosseel, Y. On the definition of signal-to-noise ratio and contrast-to-noise ratio for FMRI data. PLoS ONE 2013, 8, e77089. [Google Scholar] [CrossRef] [Green Version]
  38. Segers, J.; Hedayatrasa, S.; Poelman, G.; Van Paepegem, W.; Kersemans, M. Probing the limits of full-field linear local defect resonance identification for deep defect detection. Ultrasonics 2020, 105, 106130. [Google Scholar] [CrossRef]
  39. Saintey, M.B.; Almond, D.P. Defect sizing by transient thermography II: A numerical treatment. J. Phys. D Appl. Phys. 1995, 28, 2539–2546. [Google Scholar] [CrossRef]
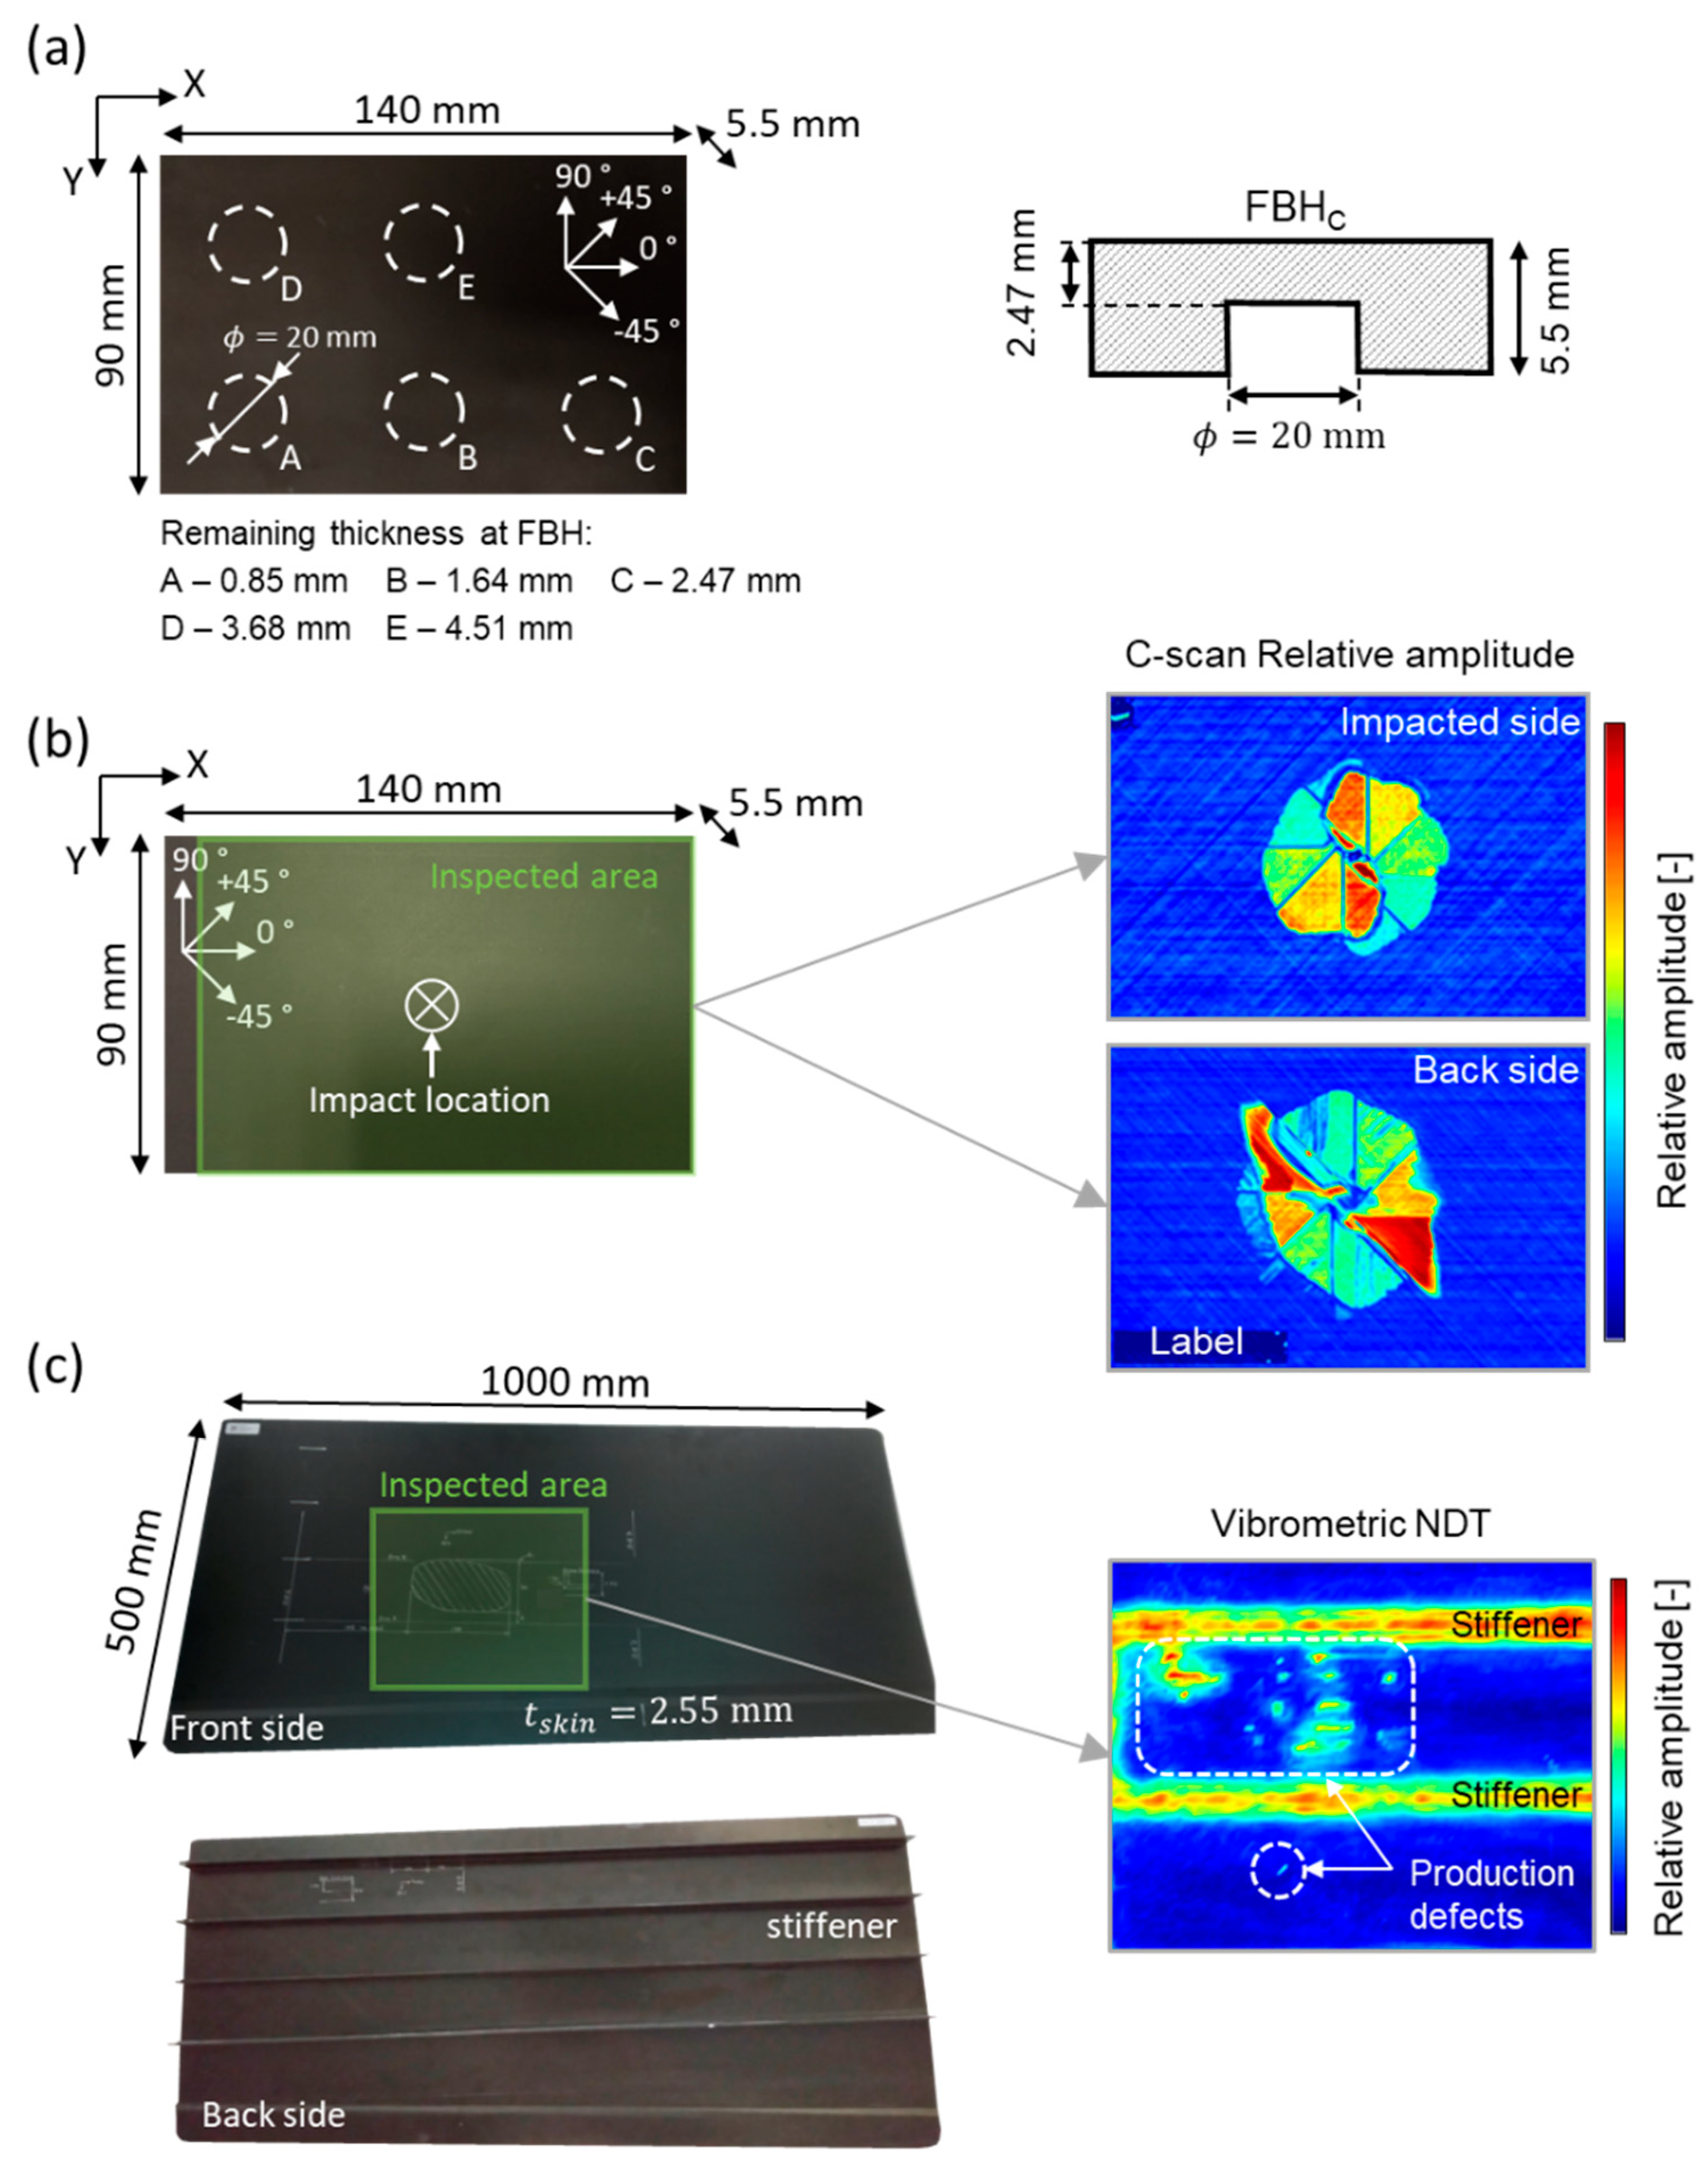
Figure 1. Photographs of (a) carbon fiber reinforced polymer (CFRP)FBH coupon (and schematic illustration of flat bottom hole FBHC); (b) CFRPBVID coupon, and the corresponding ultrasonic C-scan results; and (c) CFRPPROD panel with backside stiffeners, and the damage map obtained by a broadband vibrometric NDT technique [33].
Applsci 10 08051 g001
Figure 2. Graphical representation of the thermal response for a sound and defected pixel.
Applsci 10 08051 g002
Figure 3. Thermogram at an arbitrary time instance before and after standardization for the (a,b) CFRPFBH coupon; (c,d) impacted side of the CFRPBVID coupon; (e,f) back side of the CFRPBVID coupon; and (g,h) CFRPPROD aircraft panel.
Applsci 10 08051 g003
Figure 4. Graphical representation of the considered analysis techniques in the (a,b) time domain (i.e., dynamic thermal tomography (DTT) and thermal signal area (TSA)) and (c) frequency domain (i.e., frequency-domain tomography (FDT) and adaptive spectral band integration (ASBI)).
Applsci 10 08051 g004
Figure 5. Results of processing techniques for the CFRPFBH coupon: (a,b) DTT maxigramT Δ T m a x and timegram t Δ T , m a x ; (c) TSA (0–50 s); (d,e) FDT maxigramF Δ φ m a x and frequencygram f Δ φ , m a x ; and (f) ASBI damage index map.
Applsci 10 08051 g005
Figure 6. Normalized cross-sections (a) A-A’ (FBHB); and (b) B-B’ (FBHE) for the post-processed results by DTT maxigramT, TSA (0–50 s), FDT maxigramF, and ASBI. See Figure 5a for the location of both cross-sections.
Applsci 10 08051 g006
Figure 7. Results of processing techniques for the impacted side of the CFRPBVID coupon: (a,b) DTT maxigramT Δ T m a x and timegram t Δ T , m a x ; (c) TSA (0–5 s); (d,e) FDT maxigramF Δ φ m a x and frequencygram f Δ φ , m a x ; and (f) ASBI damage index map.
Applsci 10 08051 g007
Figure 8. Results of processing techniques for the back side of the CFRPBVID coupon: (a,b) DTT maxigramT Δ T m a x and timegram t Δ T , m a x ; (c) TSA (0–5 s); (d,e) FDT maxigramF Δ φ m a x and frequencygram f Δ φ , m a x ; and (f) ASBI damage index map.
Applsci 10 08051 g008
Figure 9. Results of processing techniques for the CFRPPROD aircraft panel: (a,b) DTT maxigramT Δ T m a x and timegram t Δ T , m a x ; (c) TSA (0–10 s); (d,e) FDT maxigramF Δ φ m a x and frequencygram f Δ φ , m a x ; and (f) ASBI damage index map.
Applsci 10 08051 g009
Table 1. Contrast-to-noise ratio (CNR) for all FBHs of the CFRPFBH coupon sample.
Contrast-to-Noise Ratio (dB)
Time-DomainFrequency-Domain
Depth (mm)DTT
MaxigramT
TSA
(0–50 s)
FDT
MaxigramF
ASBI
FBHA0.8525.837.145.673.8
FBHB1.6421.3435.942.759.0
FBHC2.4714.330.738.047.5
FBHD3.68−0.719.728.830.7
FBHE4.51−8.113.118.618.0
Table 2. Defect-to-background ratio (DBR) for all FBHs of the CFRPFBH coupon sample.
Defect-to-Background Ratio (–)
Time-DomainFrequency-Domain
Depth (mm)DTT
MaxigramT
TSA
(0–50 s)
FDT
MaxigramF
ASBI
FBHA0.8510.33.9174.76341.0
FBHB1.646.53.5126.51159.4
FBHC2.473.52.473.4307.3
FBHD3.681.41.426.245.5
FBHE4.511.21.28.811.3
Publisher’s Note: MDPI stays neutral with regard to jurisdictional claims in published maps and institutional affiliations.