1. Introduction
Aluminum and its alloys are widely used in many industries owing to its excellent thermal conductivity, electrical conductivity, extensibility and low density [
1,
2]. For instance, aluminum is used in producing heat sinks with multislit structure [
3]. Though it has a poorer thermal conductivity than copper, its low density makes aluminum become more popular in aviation and aerospace [
4]. In microelectromechanical systems (MEMS) field, aluminum is processed into various shapes as a core mandrel, which can be utilized to electrochemical forming small and microparts with complex internal cavities, such as corrugated horn antennas and micro waveguides, etc. [
5]. Besides, precision aluminum disks are used extensively for hard-drives in the computer industry and precision aluminum mirrors are used in numerous optical applications as in lasers and rotating mirrors in copying machines [
6,
7].
However, aluminum microstructures are difficult to cut in certain aspects due to its low hardness and deformability, especially for those from aluminum foils [
8]. Traditional wire/blade saw cutting uses wire or blade made by cemented carbide or diamond as tools to cut workpiece by tool traveling or spinning, which cannot fulfill the feature scale as well as machining accuracy, and serious bending deformation will appear because of vibrations from the relative motion and extrusion between tool and foil [
9,
10]. What is more, slits with microscales are difficult to fabricate in aluminum foils due to the limitation of tool size. As a result, straight and smooth slits cannot be stably machined in aluminum foils with a thickness of 100 μm. Wire electrical discharge machining (WEDM) and wire electrochemical machining (WECM) are two typical contactless cutting methods. In WEDM, the material is melted and vaporized by the heat generated in electric spark and the material removal rate is relatively fast compared with WECM. However, the overlapping machined surface is made up of the recast layer and heat-affected zones, leaving poor surface roughness [
11,
12]. Contrary to WEDM, WECM removes material by controlled electrochemical reactions rather than thermal energy. The anode material is dissolved into electrolyte ionic by ionic. Though it avoids the trouble of white layer and heat-affected zones, low efficiency, and stray corrosion are the main drawbacks in cutting aluminum foils [
13,
14]. Besides, either in WEDM or WECM, the wire electrode needs to move along the axial direction to refresh electrolytes and remove processing products. When fabricating microstructures, the especially designed fixture is required to avoid vibration of the micro-wire electrode [
15]. Laser cutting is another contactless machining method that employs a focused laser beam to generate high power and vaporize the material. The advantage of this method is that it has high efficiency and machining accuracy. However, the equipment cost of laser cutting is rather expensive, especially femtosecond laser machining. Besides, as aluminum has a low absorption rate of laser and low melting point, the processing speed is limited, and spherical slags will appear around slit edges [
16].
In this study, a new cutting method is proposed where an ordinary tungsten micro-wire is utilized as the tool to cut aluminum foil without tool traveling or spinning. It is assumed that a tungsten wire with a diameter as small as a cutting tooltip could cut aluminum foil merely by a feeding movement along with the slit profile, as tungsten has much higher strength than aluminum [
17,
18]. This study aims to analyze the brief principle of this proposed method and experiments are carried out to verify its performances on yielding micro-slits in aluminum foils. Further, process parameters are optimized in order to obtain straight and smooth slits.
2. Principle
Figure 1 shows the process of slit cutting with a tungsten micro-wire. Briefly, the process can be divided into four steps. In the first step, the tungsten micro-wire contacts with the aluminum foil and gets bent, generating tension, as shown in
Figure 1a. In second, the tension reacts to the aluminum foil and causes stress concentration at the foil edge, as shown in
Figure 1b. Due to the sensitive plasticity of aluminum, the plastic strain will occur around the tungsten wire, resulting in a small “breach” [
18]. The goal of this step is to generate enough power for cutting aluminum foil as well as to produce the breach for stress concentration [
19]. The wire feeding rate in this step namely initial velocity is relatively slow, usually ranging from 10 μm·s
−1 to 50 μm·s
−1. In third, the cutting process gets easier and faster because the breach maintains along the cutting trajectory. The wire feeding rate of this step namely secondary velocity can reach 500 μm·s
−1, as shown in
Figure 1c. At last, the tungsten wire returns along the cutting path to the initial position, preparing for the next slit, as shown in
Figure 1d.
Essentially, this cutting method is not much different from traditional mechanical cutting. The diameter of the tungsten microwire used in this process is dozens of micrometers. Keeping the feeding motion of tungsten wire, plastic deformation will take place at the foil edge and stress will gradually generate. Once the stress exceeds the tensile strength of aluminum, a breach, and then a slit will generate.
A statics simulation is performed via Abaqus software to analyze the second step of generating the cutting force and producing the breach [
20]. First, the initial contact force
) is calculated by the elongation of the tungsten wire.
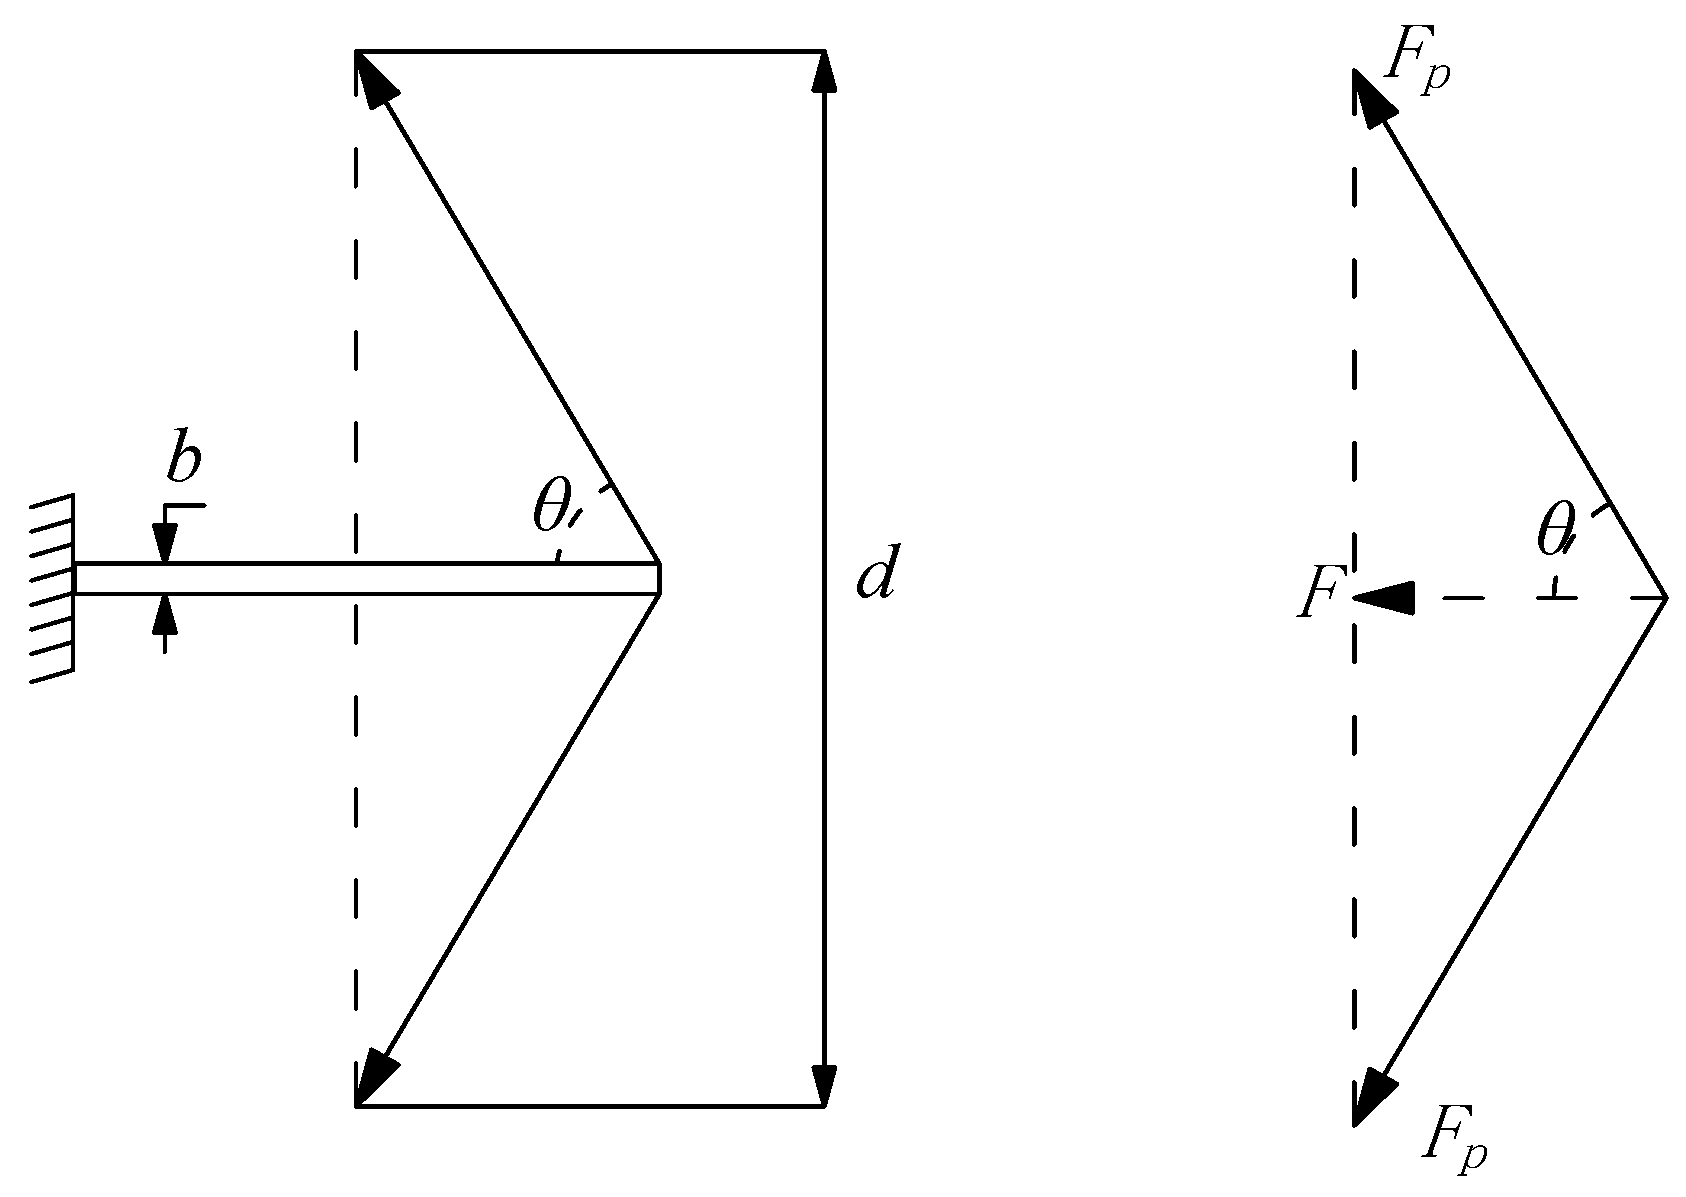
Figure 2 shows the force model and the analysis of the simulation. Let the cross-sectional area of tungsten wire be
, the original length of tungsten wire be
, and its elongation be
. Besides,
is the opening width of the wire fixture and
is the angle between tungsten wire and aluminum foil in the process. According to the definition of elastic modulus and the preload force (
) gained when fixing tungsten wire,
is derived as follows:
The initial contact force (
) can be obtained by employing force synthesis principle and written as
In present work, the tungsten wire used is 50 μm in diameter with original length () of 115 μm. The preload force is set at 5 N when fixing this kind of tungsten wires and the opening width of the wire fixture () is 2 mm. During experiments, the angle between tungsten wire and aluminum foil () is measured to be 75°. As a result, the initial contact force () can be calculated referring to Equation (1) and the value is 2.01 N.
Second, a series of parameters necessary for simulation are set, as summarized in
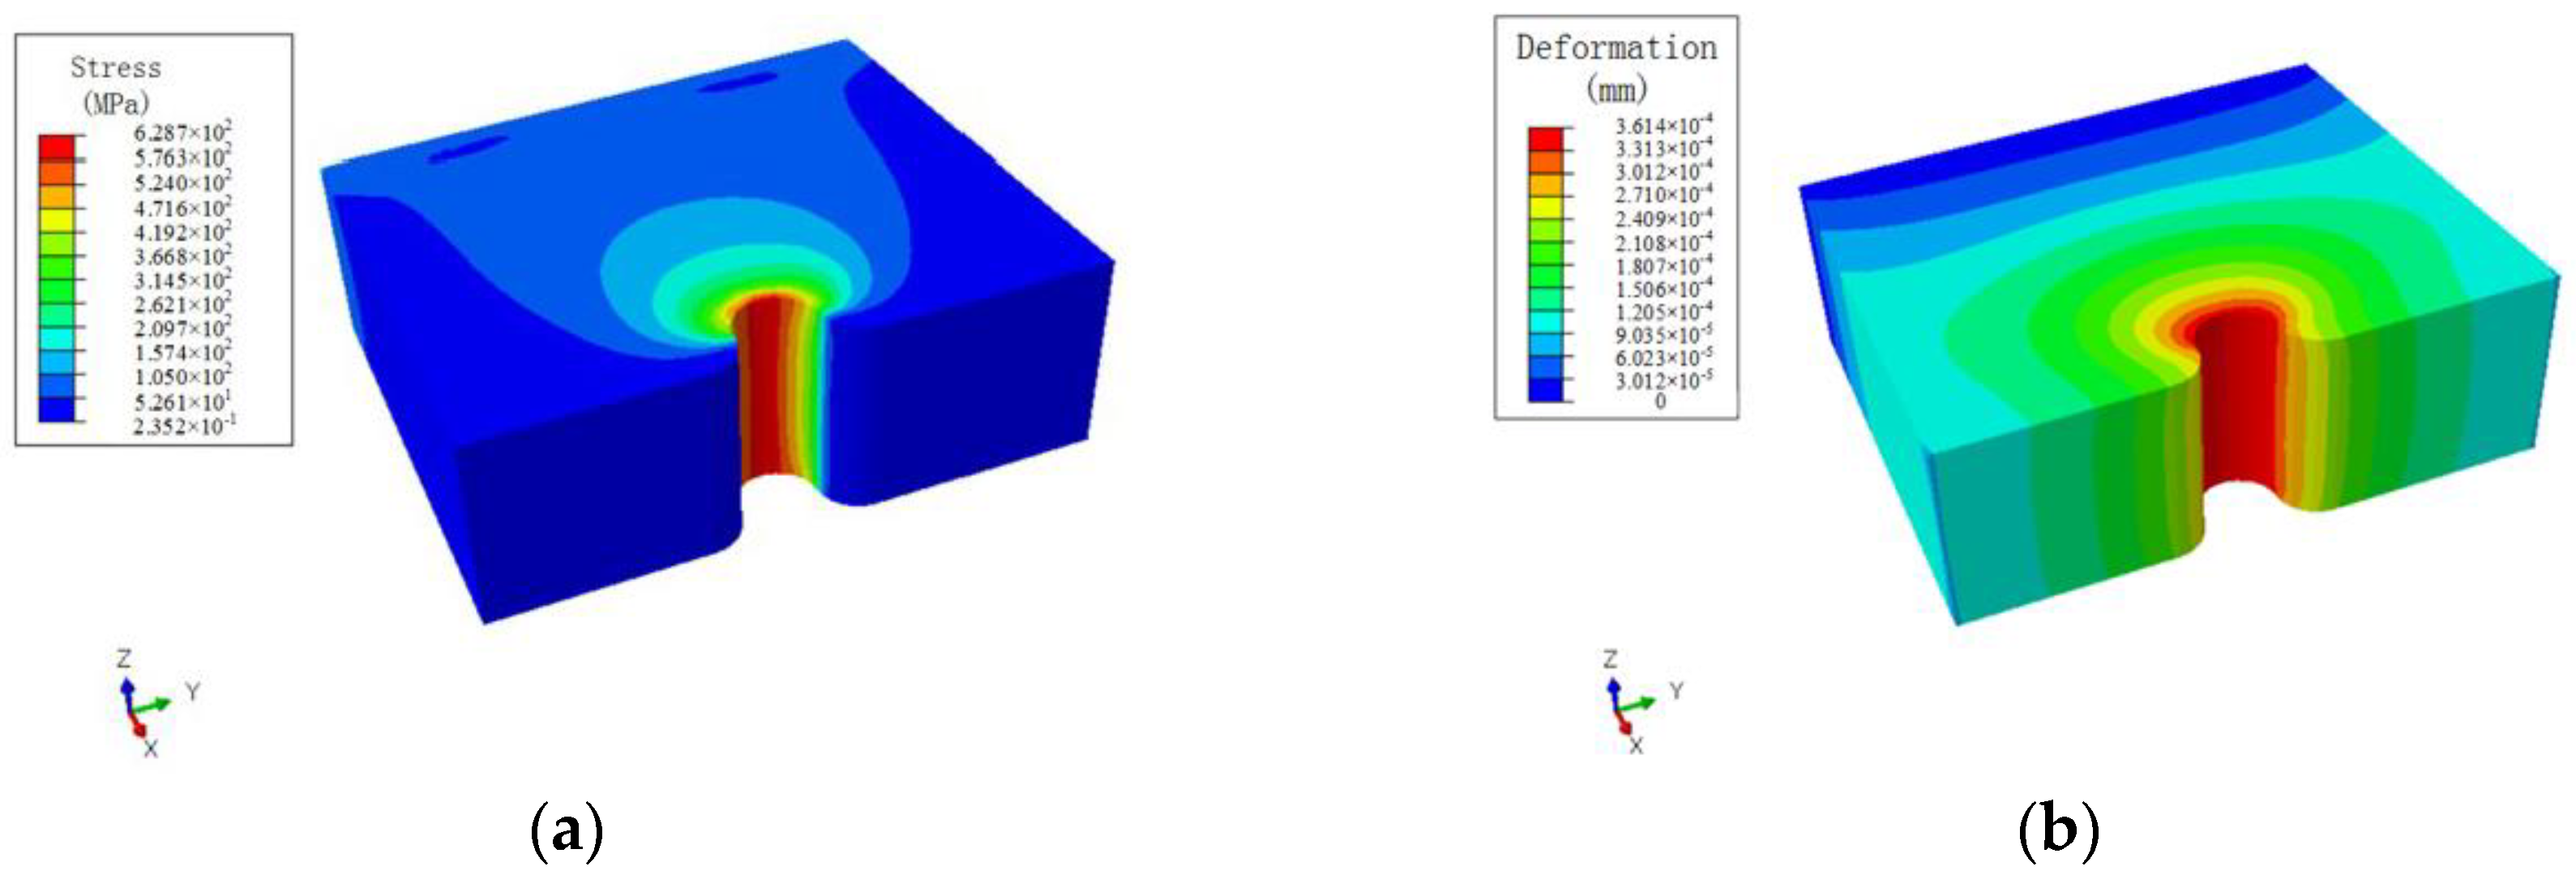
Table 1. In this simulation, the back of aluminum foil is fixed and all its freedom degrees are limited as boundary conditions. Hexahedron mesh is employed for the finite element calculation. The stress and deformation distributions are shown in
Figure 3. Obviously, the von Mises stress near the breach is much higher than in other areas and exceeds the rupture strength of aluminum. As a result, a straight slit with great width consistency can be machined.
3. Experiments
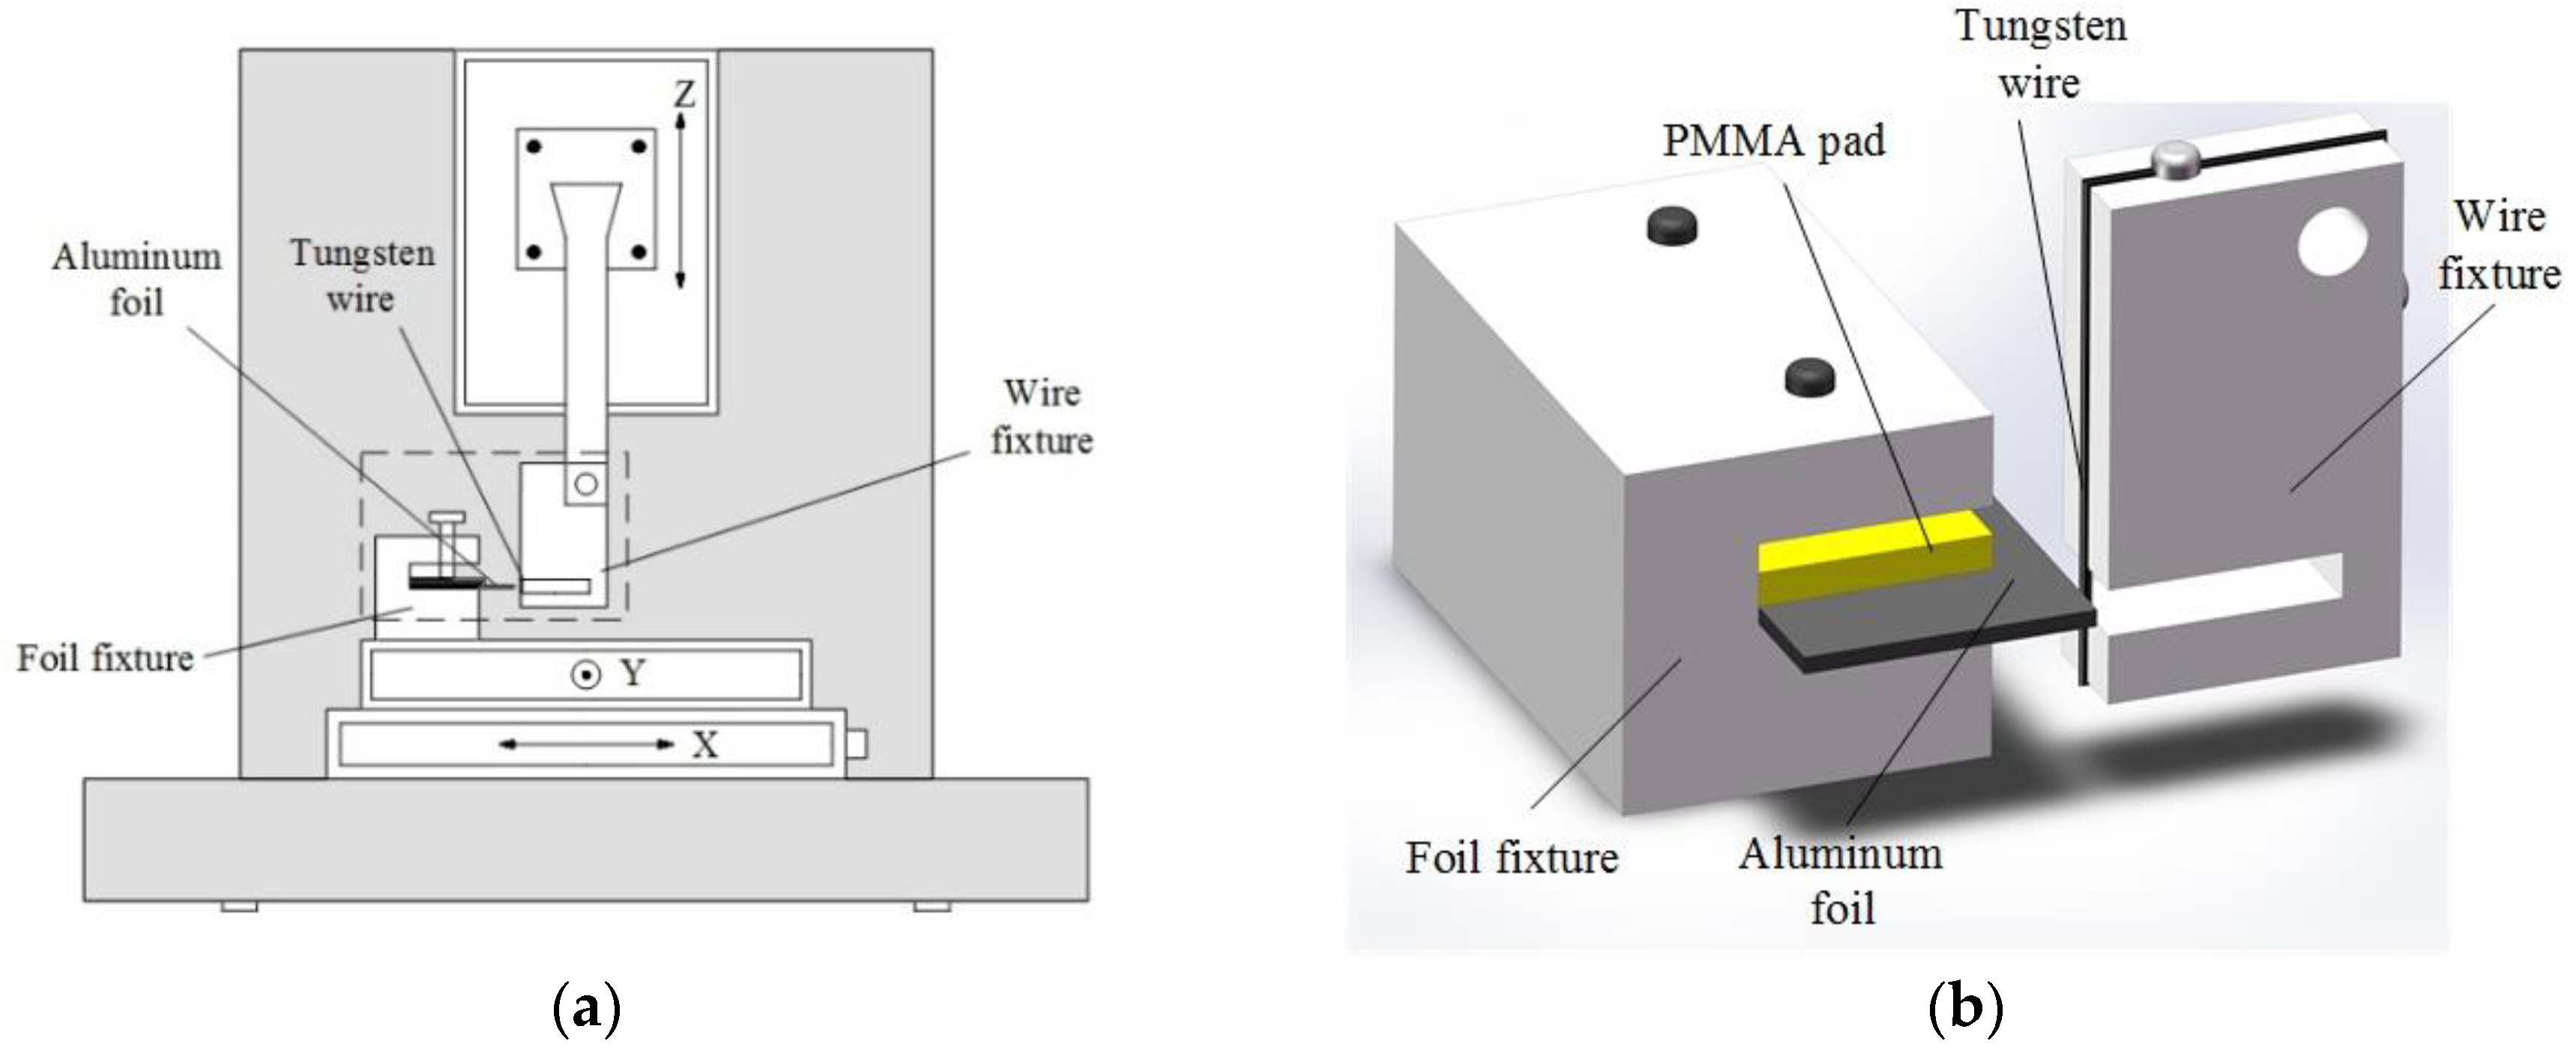
The experiments were carried out on a specially designed machine tool, as shown in
Figure 4. The fundamental component is a three-axis stage fixed on a platform. Its maximum travel length is 50 mm (X-axis) × 25 mm (Y-axis) × 100 mm (Z-axis). The tungsten wire is put in a small cube made by (polymethyl methacrylate) PMMA where a trench is pre-processed. Meanwhile, the aluminum foil is put on a fixture made by epoxy resin and a PMMA pad is employed to avoid surface scratch and deformation.
In this work, the aluminum foil is 100 μm in thickness and the tungsten micro-wire is 50 μm in diameter. In previous trials, a tungsten wire with a diameter of 25 μm is easily broken while a tungsten wire with a diameter of 100 μm is too thick and tends to bend aluminum foil. Further, a set of parameters is selected to investigate their effects on slit cutting performances. The chemical composition of aluminum foil is listed in
Table 2 and primary machining conditions used for experimental tests are shown in
Table 3.
Afterward, the slit dimensions were measured using a 3D profilometer (DVM5000, Leica, Wetzlar, Germany) and a scanning electron microscope (SEM: S-3400N, Hitachi, Tokyo, Japan) was used to observe 3D views. In addition, a 3D measurement laser microscope (OLS4100, OLYMPUS, Tokyo, Japan) was employed to measure surface roughness.
4. Result and Discussion
4.1. Width Consistency of Slits
During the experiment, the slit length was 5 mm. At first, the aluminum foil was machined under the initial velocity for 1 mm as the tungsten wire needs to generate tension and produce a breach. At this position, the stress generally exceeds the tensile strength of aluminum according to
Figure 2, preparing for the second stage. After finishing the first stage, the cutting process is paused for several seconds. Afterward, the aluminum foil was machined under secondary velocity till the preset length.
Considering the slit machined is rather long compared with its width, the width consistency should be a central index to assess machining quality.
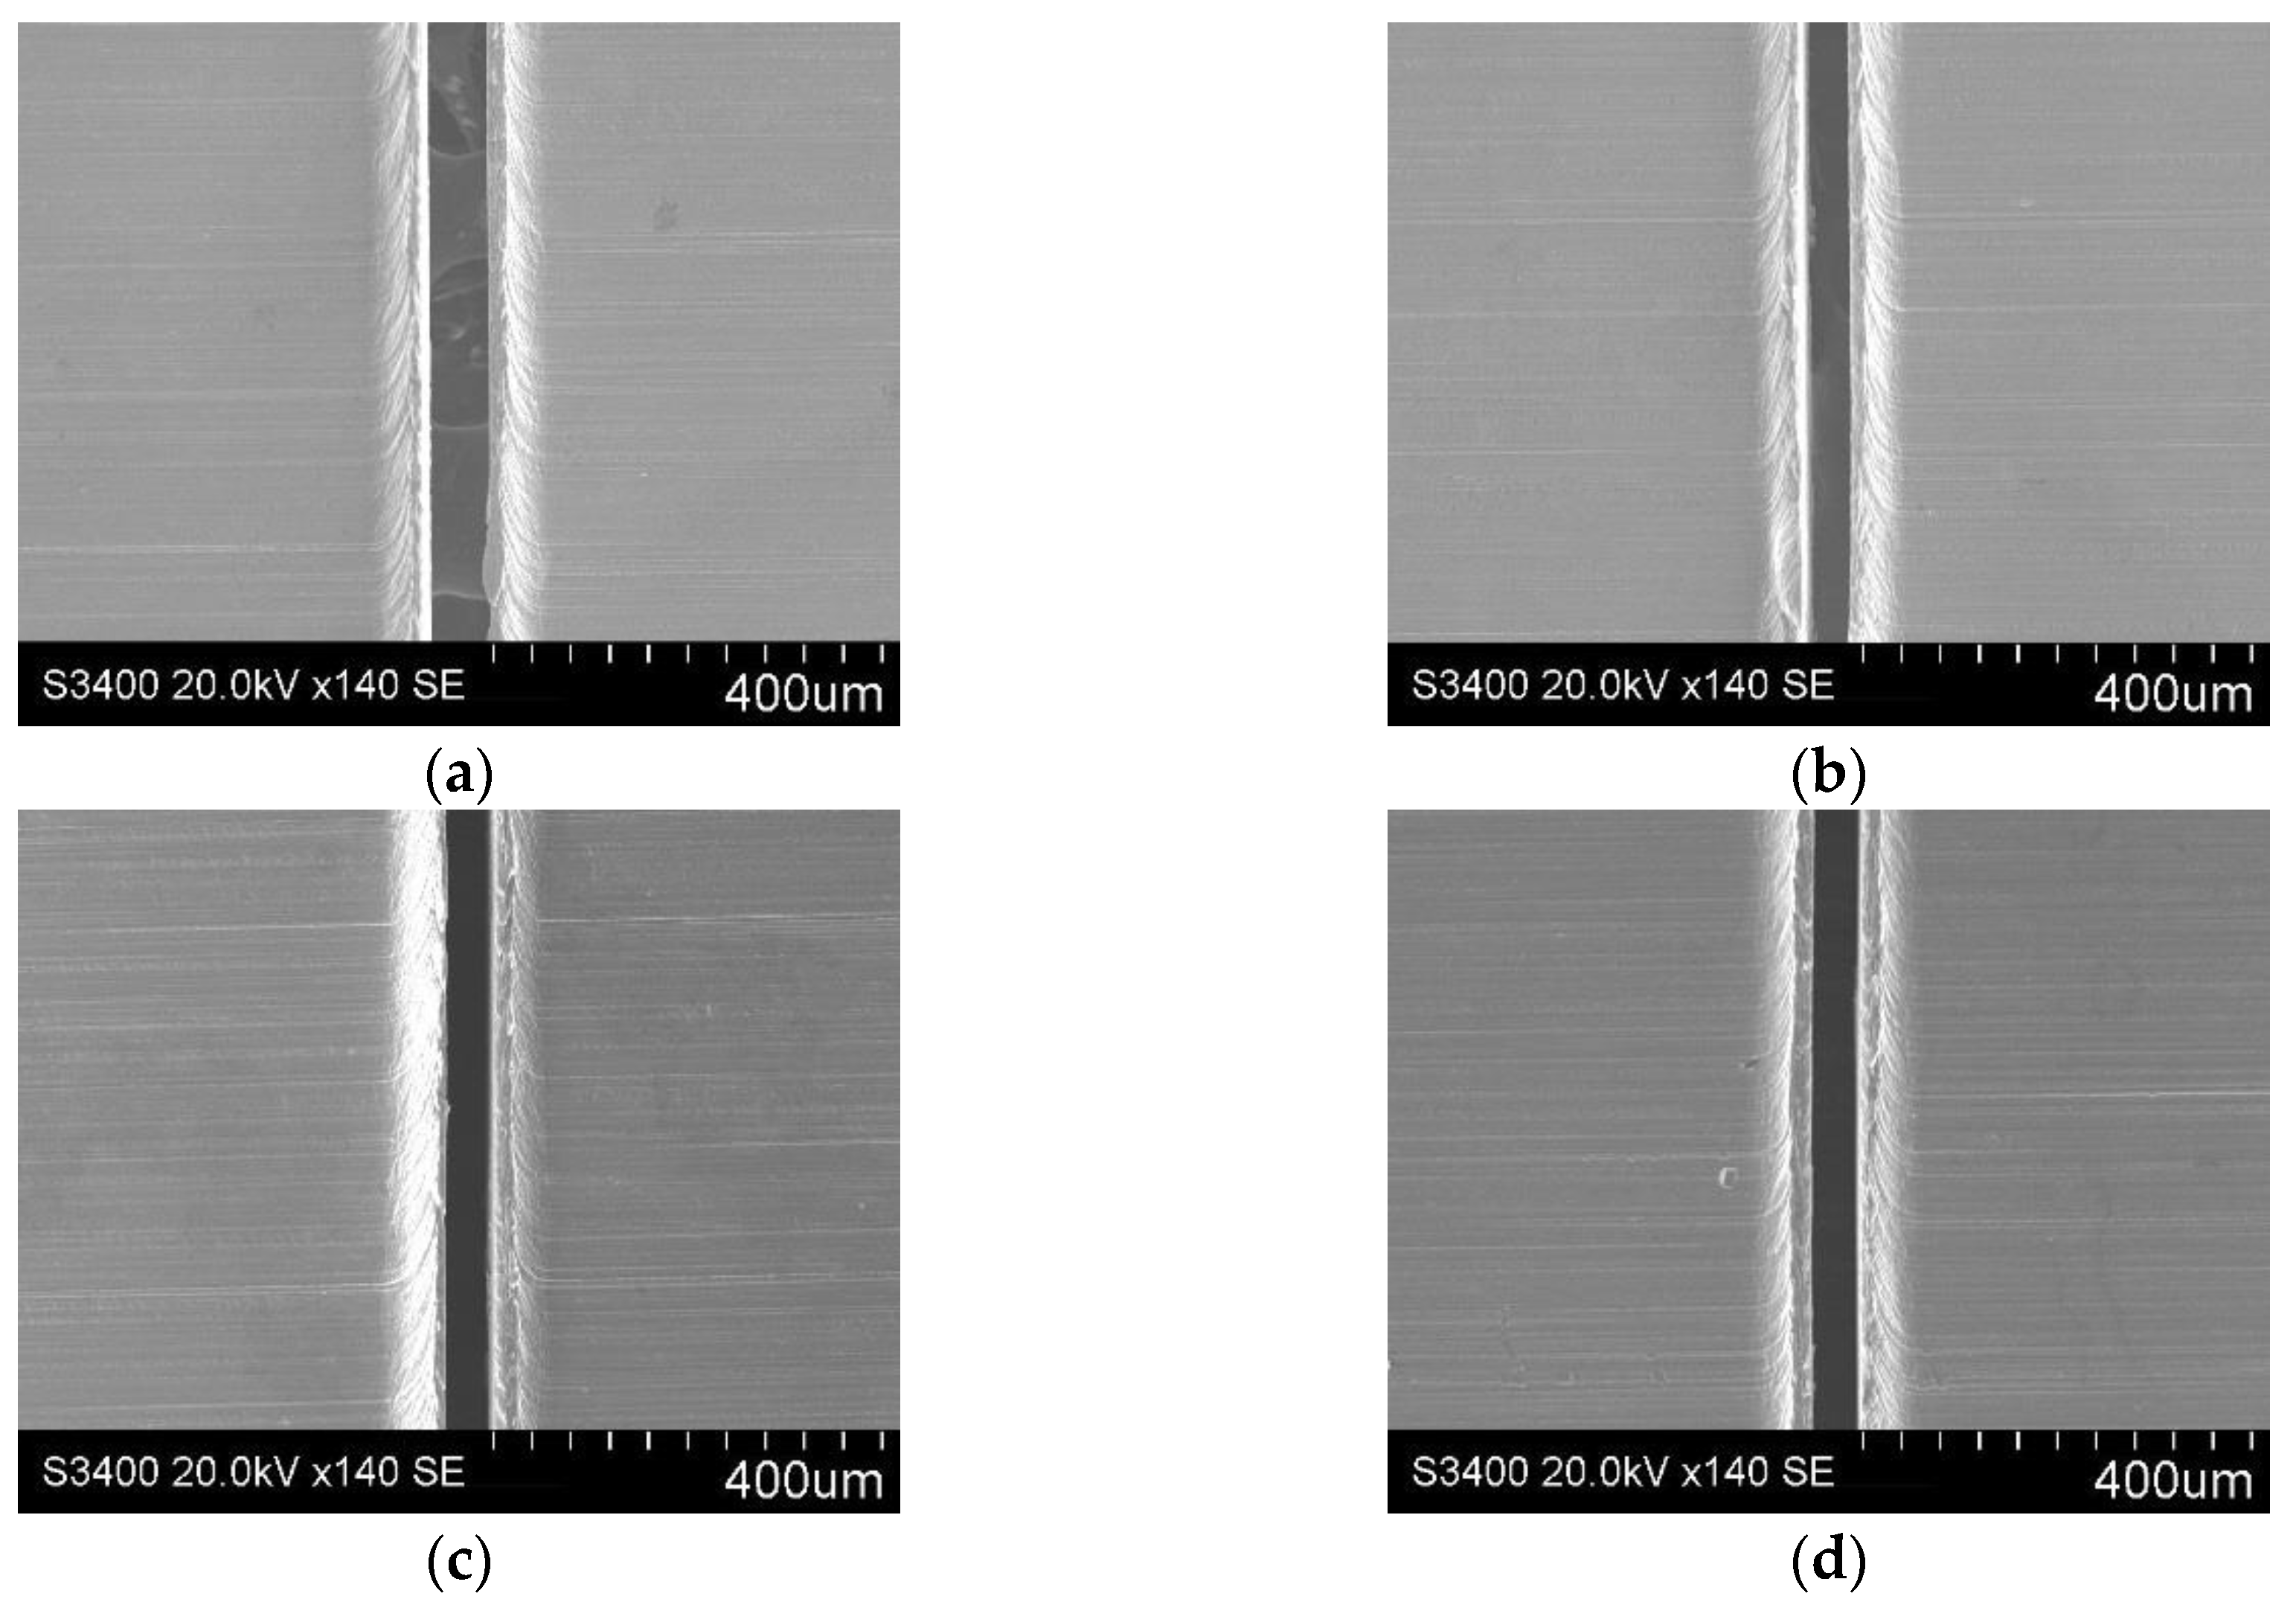
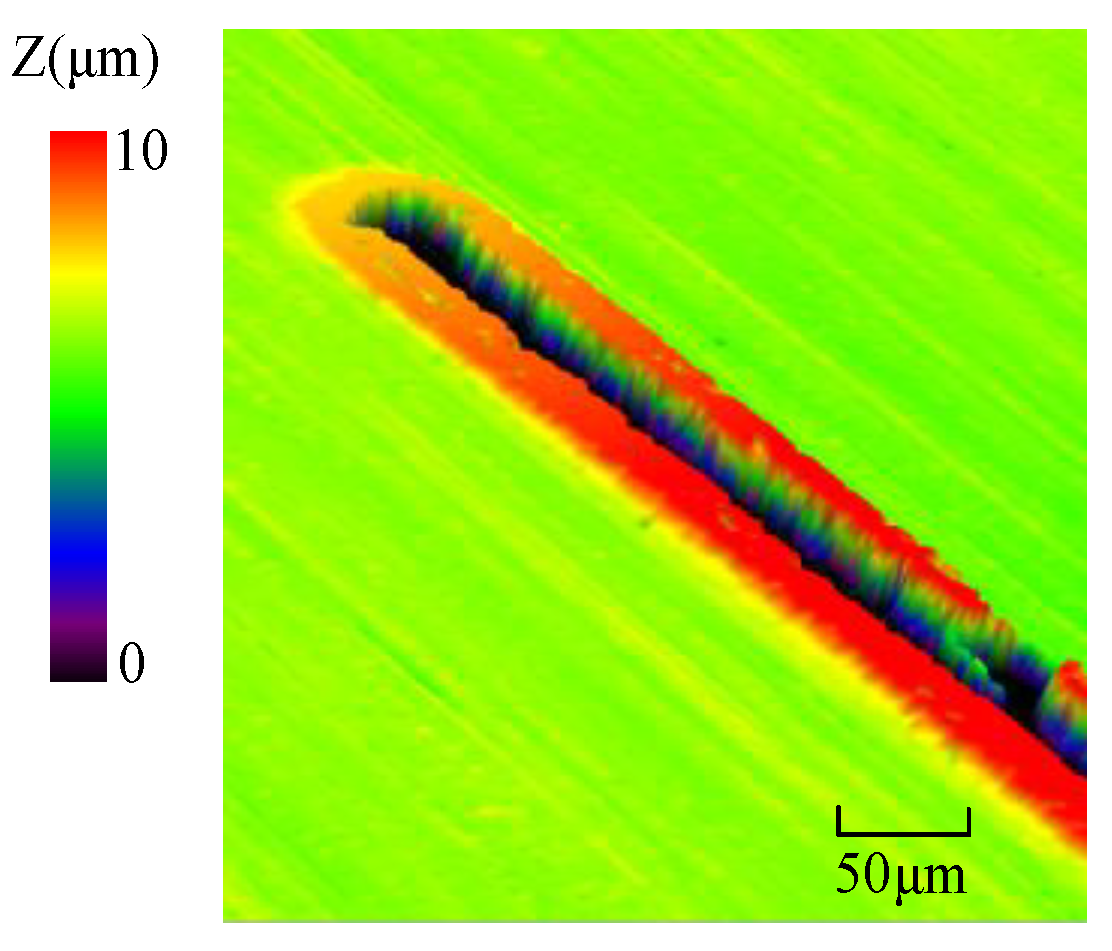
Figure 5 shows the SEM micrographs of slits using different initial and secondary velocities. It is observed that plastic flow exists at both sides of each slit. In the cutting process, material near the slit is extruded and plastic bulge deformation appears. As a result, these regions will be a little bit thicker than other regions for about 2 to 5 μm, as shown in
Figure 6.
In this study, eight measure points were sequentially selected on each slit to obtain average width and standard deviation. The first measure point was 0.5 mm away from the kerf and the interval was 0.5 mm between the two measure points.
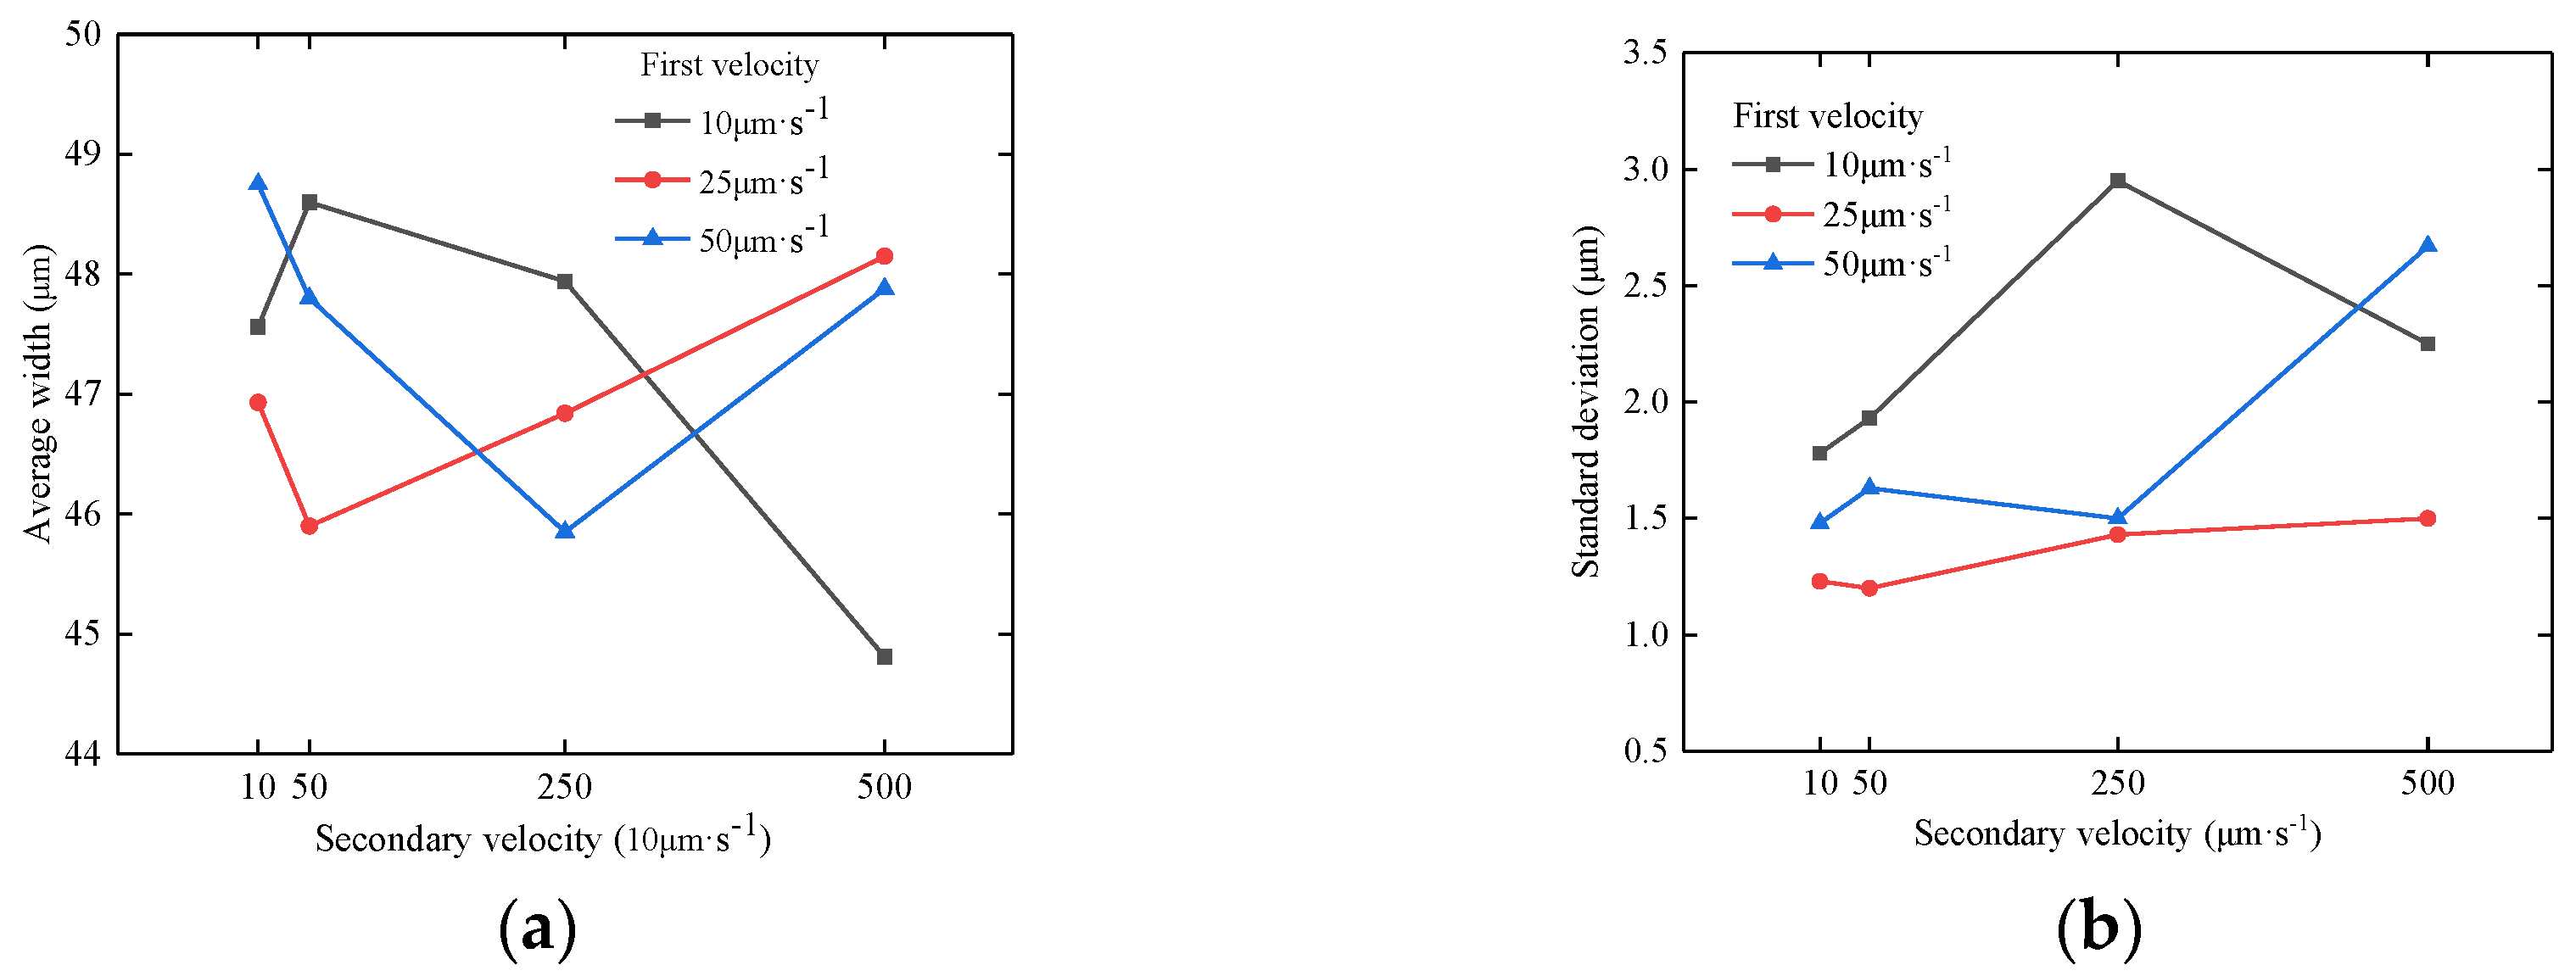
Figure 7 shows the width data of each slit and the average width of each slit as well as standard deviation. It can be observed that the average width of each slit is between 44.82~48.75 μm, which is a little smaller than the diameter of the tungsten wire. It is probably caused by minor elastic deformation between tungsten wire and aluminum foil. After cutting, the slit will spring back slightly. Besides, the machined slits are rather straight and have great width consistency.
For a single slit, the width machined under initial velocity shows no difference from the width machined under secondary velocity. The maximum width standard deviation is 2.95 μm with an average width of 47.94 μm, which proves this method has great stability. In addition, it is worth mentioning that slits machined with an initial velocity of 25 μm·s
−1 show the best consistency compared with others as shown in
Figure 8.
4.2. Surface Roughness
For each slit, 5 areas on its sidewall were randomly selected to measure surface roughness.
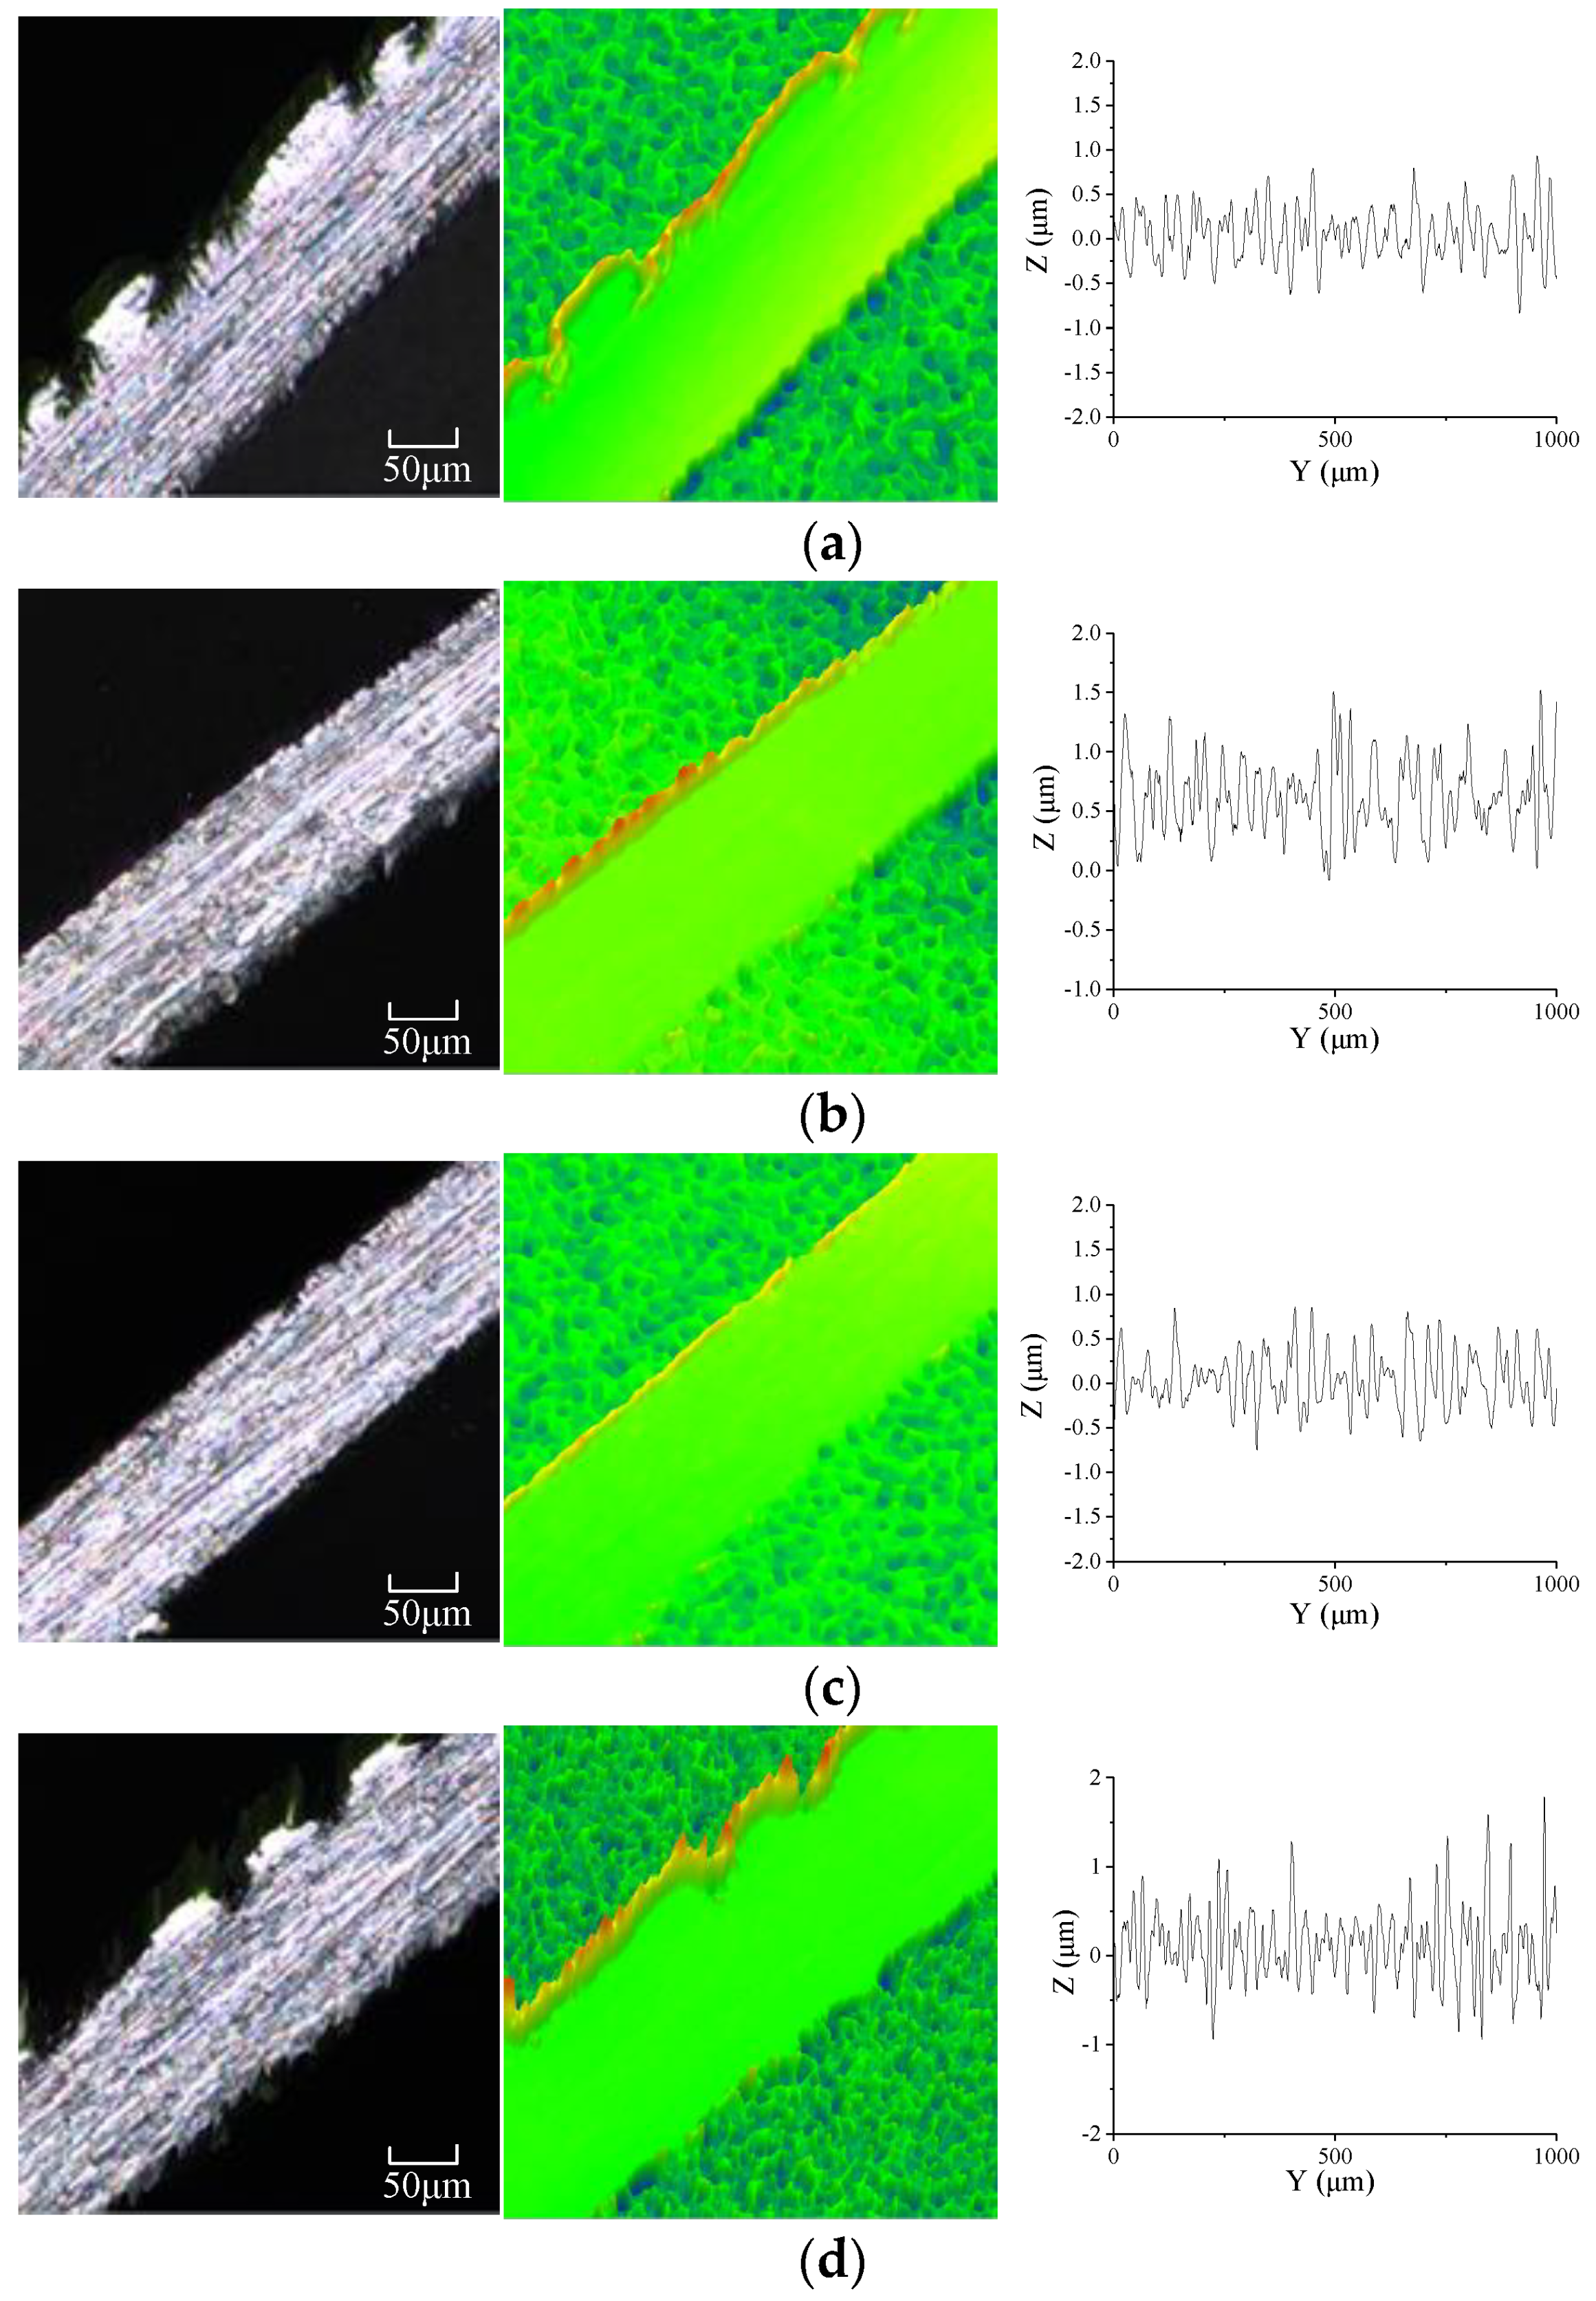
Figure 9 shows the 3D views of some slit side walls machined under different velocities. The average roughness is summarized in
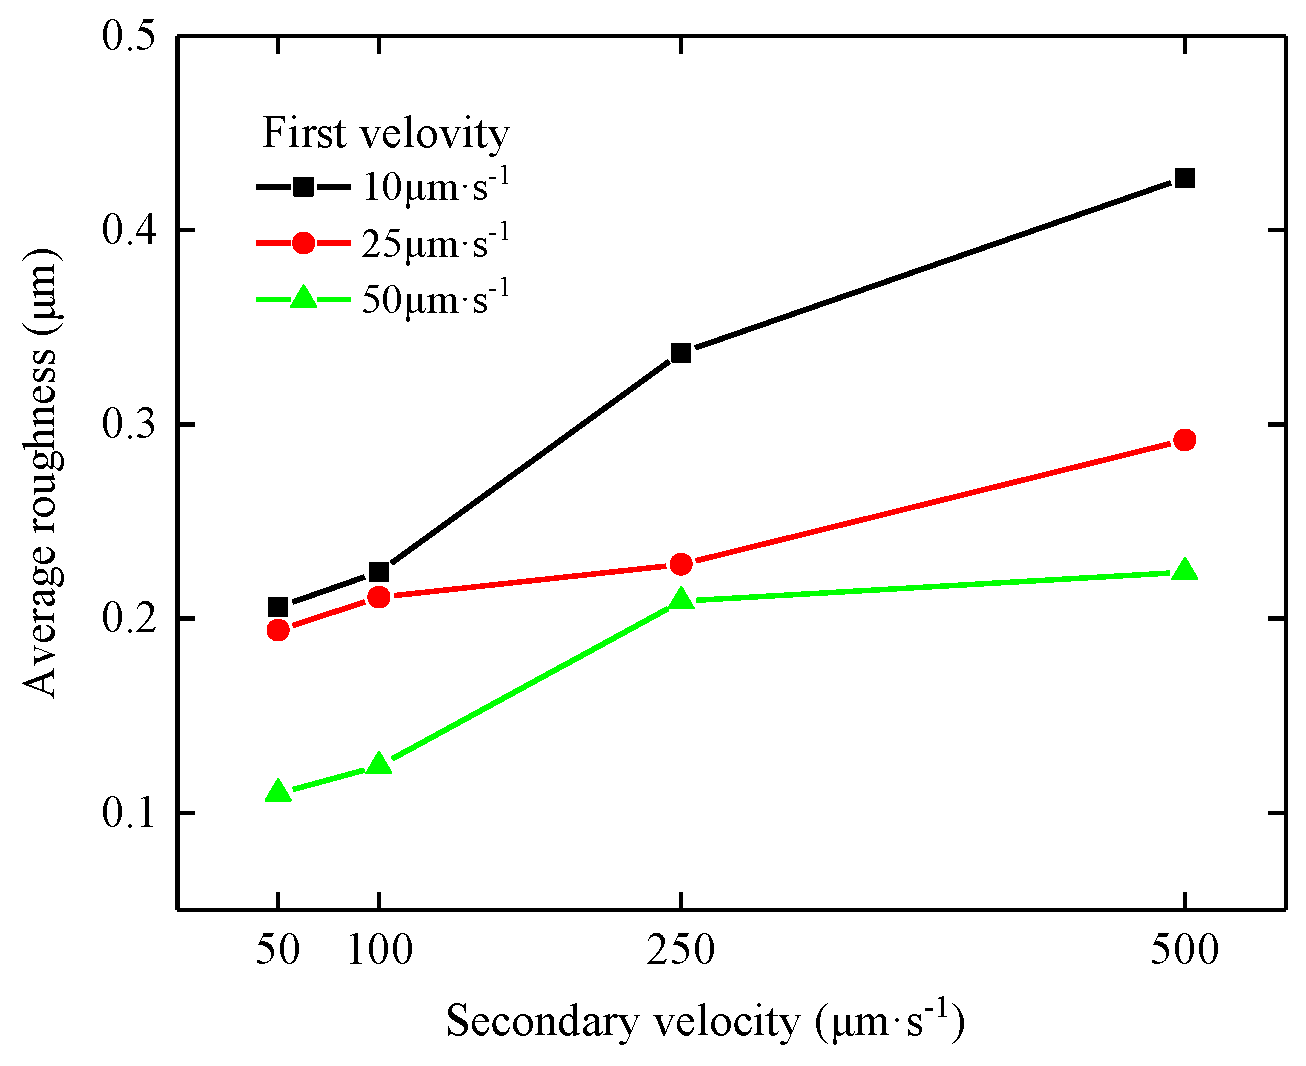
Figure 10.
It is observed that the average roughness Ra that increases with secondary velocity becomes fast. At the initial velocity of 50 μm·s−1, the average roughness Ra is 0.110 μm when the secondary velocity is 50 μm·s−1 and it increases to 0.225 μm when the secondary velocity is 500 μm·s−1. With the increase of the feeding rate, the tungsten micro-wire does not have enough time to cause smooth plastic deformation in aluminum foil, leaving a rough surface.
It is also observed that the average roughness Ra is higher when the initial velocity reduces to 25 or 10 μm·s
−1, where the average rough Ra is 0.194 μm and 0.206 μm with the secondary velocity at 50 μm·s
−1, as shown in
Figure 9. That is because when the secondary velocity is much faster than the initial velocity, the cutting process is not so smooth when changing the feeding rate, which reduces the surface quality of the machined surface.
5. Conclusions
In this study, a novel cutting method for aluminum foil is proposed where an un-traveling tungsten micro-wire is utilized as the tool. It only needs one feeding motion without tool traveling or spinning. According to simulation and experiments, conclusions could be drawn:
For an aluminum foil with a certain thickness, a tungsten wire with a moderate diameter can fulfill the cutting process. The wire first feeds at a low velocity to contact the foil edge and generate enough tension. Due to the sensitive plasticity of aluminum, plastic strain in the form of a breach will occur.
For a single slit, the width machined under initial velocity shows no difference from the width machined under secondary velocity, which is a little smaller than tool diameter. Among all slits, the width standard deviation is less than 3 μm with an average width of around 47 μm, which shows great width consistency.
The roughness of the slit side wall is mainly determined by secondary velocity. The roughness increases fast with secondary velocity and a smoother surface can be obtained when the initial velocity is close to the secondary velocity. The best surface roughness is 0.110 μm.
Author Contributions
Conceptualization, J.Z. and X.F.; methodology, X.F. and N.Q.; software, J.Z.; validation, J.Z. formal analysis, J.Z.; investigation, J.Z.; resources, N.Q.; data curation, J.Z.; writing—original draft preparation, J.Z.; writing—review and editing, X.F. and N.Q.; visualization, J.Z.; supervision, N.Q.; project administration, N.Q.; funding acquisition, N.Q. All authors have read and agreed to the published version of the manuscript.
Funding
This research was funded by National Natural Science Foundation of China grant number 51675274.
Conflicts of Interest
The authors declare no conflict of interest.
References
- Sanders, R.E., Jr. Technology innovation in aluminum products. JOM 2001, 53, 21–25. [Google Scholar] [CrossRef]
- Rahimi, M.H.; Tabaian, S.H.; Marashi, S.P.H.; Saramad, S.; Arab, M.; Hemasian, A. Heat treatment of aluminum in preparing porous anodic alumina templates. Micro. Nano Lett. 2012, 7, 125–129. [Google Scholar] [CrossRef]
- Schöbel, M.; Altendorfer, W.; Degischer, H.P.; Vaucher, S.; Buslaps, T.; Di Michiel, M.; Hofmann, M. Internal stresses and voids in SiC particle reinforced aluminum composites for heat sink applications. Compos. Sci. Technol. 2011, 71, 724–733. [Google Scholar] [CrossRef]
- Ng, C.K.; Melkote, S.N.; Rahman, M.; Kumar, A.S. Experimental study of micro- and nano-scale cutting of aluminum 7075-T6. Int. J. Mach. Tools Manuf. 2006, 46, 929–936. [Google Scholar] [CrossRef]
- Mann, C.M. Fabrication technologies for terahertz waveguide. In Proceedings of the 1998 IEEE Sixth International Conference on Terahertz Electronics Proceedings, Leeds, UK, 3–4 September 1998. [Google Scholar]
- Zoric, I.; Zach, M.; Kasemo, B.; Langhammer, C. Gold, Platinum, and Aluminum Nanodisk Plasmons: Material Independence, Subradiance, and Damping Mechanisms. ACS Nano 2011, 5, 2535–2546. [Google Scholar] [CrossRef] [PubMed]
- Komanduri, R.; Chandrasekaran, N.; Raff, L.M. MD Simulation of nanometric cutting of single crystal aluminum–effect of crystal orientation and direction of cutting. Wear 2000, 242, 60–88. [Google Scholar] [CrossRef]
- Liu, Y.; Wang, C.; Guo, B.; Shan, D.; Zhang, M. Softening effect of ultrasonic vibration on micro-blanking deformation behaviour of titanium foil. Micro. Nano Lett. 2017, 12, 808–812. [Google Scholar] [CrossRef]
- Kao, I.; Bhagavat, M.; Prasad, V.; Talbot, J.; Chandra, M.; Gupta, K. Integrated Modeling of Wiresaw in Wafer Slicing. In Proceedings of the NSF Grantees Conference, Monterrey, Mexico, 5–8 January 1998. [Google Scholar]
- Buyuksagis, I.S. Effect of cutting mode on the sawability of granites using segmented circular diamond sawblade. J. Mater. Process. Technol. 2007, 183, 399–406. [Google Scholar] [CrossRef]
- Williams, R.E.; Rajurkar, K.P. Study of electrical discharge machining(WEDM)process parameters using Taguchi method. J. Mater. Process. Technol. 1991, 28, 127–138. [Google Scholar] [CrossRef]
- Rao, T.B.; Krishna, A.G. Selection of optimal process parameters in WEDM while machining Al7075/SiCp metal matrix composites. Int. J. Adv. Manuf. Technol. 2014, 73, 299–314. [Google Scholar] [CrossRef]
- Béjar, M.A.; Eterovich, F. Wire-electrochemical cutting with a NaNO3 electrolyte. J. Mater. Process. Technol. 1995, 55, 417–420. [Google Scholar] [CrossRef]
- Kalaimathi, M.; Venkatachalam, G.; Sivakumar, M.; Ayyappan, S. Experimental investigation on the suitability of ozonated electrolyte in travelling-wire electrochemical machining. J. Braz. Soc. Mech. Sci. Eng. 2017, 8, 1–11. [Google Scholar] [CrossRef]
- Meng, L.; Zeng, Y.; Fang, X.; Zhu, D. Micro-shaping of metallic glass by wire electrochemical micro-machining with a reciprocating traveling workpiece. J. Alloys Compd. Interdiscip. J. Mater. Sci. Solid-State Chem. Phys. 2018, 739, 235–248. [Google Scholar] [CrossRef]
- Yilbas, B.S.; Khan, S.; Raza, K.; Keles, O.; Ubeyli, M.; Demir, T.; Karakas, M.S. Laser cutting of 7050 Al alloy reinforced with Al2O3 and B4C composites. Int. J. Adv. Manuf. Technol. 2010, 50, 185–193. [Google Scholar] [CrossRef]
- Dieter, G.E. Mechanical Metallurgy, 3rd ed.; McGraw-Hill: New York, NY, USA, 1986. [Google Scholar]
- Hertzberg, R.W. Deformation and Fracture Mechanics of Engineering Materials, 4th ed.; Wiley: New York, NY, USA, 1996. [Google Scholar]
- Kim, A.; Tunvir, K. Study of Al-alloy foam compressive behavior based on instrumented sharp indentation technology. J. Mech. Sci. Technol. 2006, 20, 819–827. [Google Scholar] [CrossRef]
- Jiang, Z.Y.; Tieu, A.K. A simulation of three-dimensional metal rolling processes by rigid–plastic finite element method. J. Mater. Process. Technol. 2001, 112, 144–151. [Google Scholar] [CrossRef]
© 2020 by the authors. Licensee MDPI, Basel, Switzerland. This article is an open access article distributed under the terms and conditions of the Creative Commons Attribution (CC BY) license (http://creativecommons.org/licenses/by/4.0/).

