Article

Austenite Reversion Tempering-Annealing of 4 wt.% Manganese Steels for Automotive Forging Application

Steel Institute of RWTH Aachen University, 52072 Aachen, Germany
*
Author to whom correspondence should be addressed.
Metals 2019, 9(5), 575; https://doi.org/10.3390/met9050575
Submission received: 25 April 2019 / Revised: 10 May 2019 / Accepted: 14 May 2019 / Published: 17 May 2019
(This article belongs to the Special Issue Physical Metallurgy of High Manganese Steels)

Abstract

:
New medium Mn steels for forged components, in combination with a new heat treatment, are presented. This new annealing process implies air-cooling after forging and austenite reversion tempering (AC + ART). This leads to energy saving compared to other heat treatments, like quenching and tempering (Q + T) or quenching and partitioning (Q + P). Furthermore, the temperature control of AC + ART is easy, which increases the applicability to forged products with large diameters. Laboratory melts distinguished by Ti, B, Mo contents have been casted and consecutively forged into semi-finished products. Mechanical properties and microstructure have been characterized for the AC and the AC + ART states. The as forged-state shows YS from 900 MPa to 1000 MPa, UTS from 1350 MPa to 1500 MPa and impact toughness from 15 J to 25 J. Through the formation of nanostructured retained metastable austenite an increase in impact toughness was achieved with values from 80 J to 100 J dependent on the chemical composition.

1. Introduction

In the last decade several material concepts were designed in order to substitute the classic quench and tempering (Q + T) steels. These materials required high yield strength by keeping applicable levels of toughness and ductility to prevent brittle fracture [1]. Besides the Q + T steels, precipitation hardening ferritic pearlitic (PHFP) steels are also widely used in the automotive industry. These steels do not accomplish the balance of mechanical properties of the Q + T steels but achieve their final mechanical properties through air-cooling out of the forging heat. In order to improve the mechanical properties of these steels micro-alloying concepts where applied on the PHFP steels in order to increase the yield strength [2]. Recently, steels with a ductile bainitic microstructure (HDB) have been developed and are now widely used [3,4]. These steels offer comparable toughness to the Q + T steels but still not a sufficient yield strength level. The gap in properties could finally be closed by using steels, which contain a small fraction of retained austenite in their matrix. Through the retained austenite strength and toughness can be further increased as a consequence of the transformation induced plasticity (TRIP) [5]. Alternatively, the quenching and partitioning steels (Q + P) have been designed, with the material quenched into the range between the martensite start temperature ( M s ) and the martensite finish temperature ( M f ) [6]. After the quenching these materials are directly tempered in order to achieve carbon and to some extend manganese partitioning into the retained austenite, in order to increase its stability. These materials achieve good combinations of strength and ductility but require a complex processing that shows a high sensibility of the achieved properties on the process parameters. As the narrow parameter windows during these processes limits the possibilities for industrial application, the current focus is shifted again to materials, which achieve their final properties through air-cooling. Air-hardening medium manganese (LHD) steels can be used for these purposes. Through the high amounts of manganese, these materials develop a martensitic microstructure via air-cooling, by keeping reasonable levels of toughness [7,8]. The increase in toughness in the as-forged state can be reached through the alloying of grain boundary strengthening elements like boron [9,10] or molybdenum [11,12]. Alternatively, through an addition of aluminium, retained austenite can be stabilized to room temperature in order to increase the ductility of these alloys [13]. These air hardening medium Mn steels combine good mechanical properties with a simple process route, which leads to cost and CO2-emission reduction.
Recently, it was shown that this alloy group shows a further increase in toughness by keeping applicable levels of strength when the materials are intercritically annealed [14]. Intercritical annealing of medium manganese steels leads to an stabilization of the newly formed austenite until room temperature through the partition of alloying elements into the austenite. This mechanism is know as austenite reverted transformation (ART) annealing [15,16]. Figure 1 compares the new air-cooling + austenite reversion tempering process (AC + ART) which standard heat treatments. Most papers using the ART effect deal with applications for sheet products, as the necessary heat treatment can be best tailored by continuous strip annealing treatments. Thus, the composition requirement and the process parameters have been studied for a wide range of medium manganese steels [17,18,19,20]. As the time-temperature profiles of sheet products cannot be applied on forging parts because of the complex geometries and great cross sections, only simple and robust heat treatments can be used to modify the microstructure. Therefore, the annealing in the intercritical area and the influence on the mechanical properties need further investigation in order to reach the full potential of these alloys.

2. Materials and Methods

Three laboratory melts were ingot-casted in an ALD vacuum induction furnace (80 kg, 140 m m × 140 m m × 500 m m ). The melts differ in the type and concentration of their grain boundary strengthening elements B and Mo. Alloy L1 and L2 are alloyed with boron in different amounts and titanium for nitrogen control. Alloy L3 is alloyed with molybdenum. Additionally, all melts are alloyed with niobium in order to control the austenite grain size during the forging process. The resulting chemical compositions can be seen in Table 1. After casting the blocks were homogenized at 1200 C for 5 h and consecutively forged into rods (60 × 60 m m 2 base area). The samples for the mechanical tests were manufactured from the transition region between corner and center of the rod. For tensile tests, round tensile samples with a diameter of 6 m m and a test length of 30 m m and for impact tests standard Charpy-V-notch samples were produced. The quasi-static tensile test have been performed with an elongation rate of 0.0005 s −1, for the impact test a 300 J hammer was used.
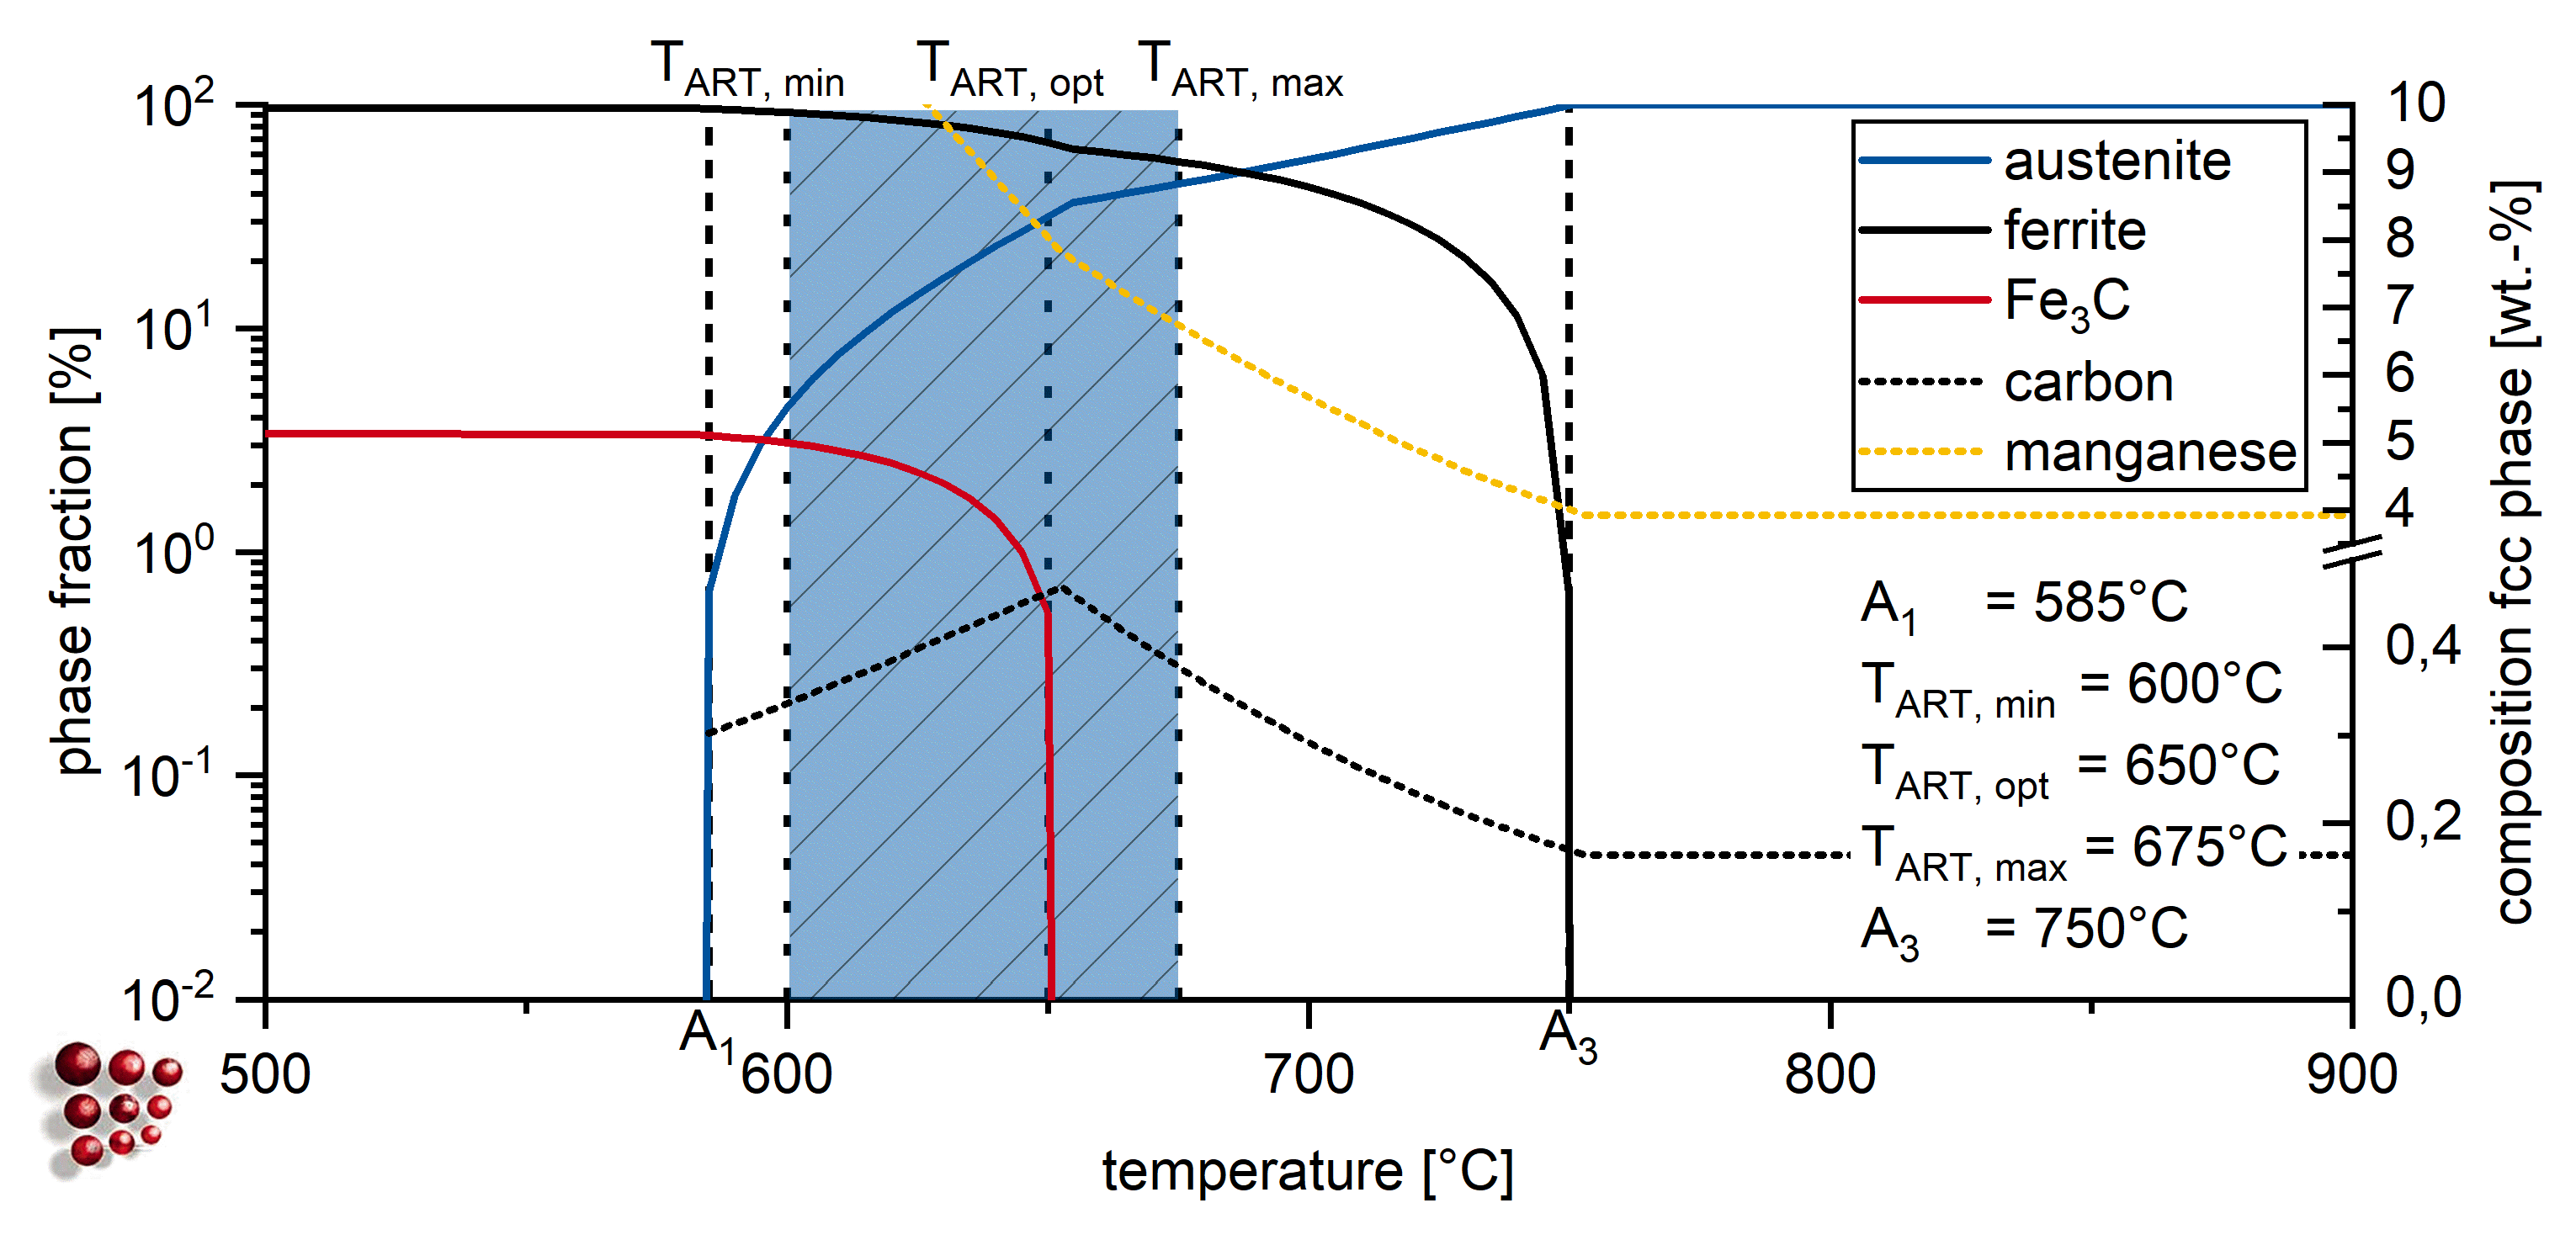
As it can be seen in Figure 2, the intercritical range for the present alloys is between 585 C and 750 C , with a maximum carbon enrichment in the austenite at 650 C . The annealing was carried out between TART, min temperature of 600 C and TART, max temperature of 675 C in order to investigate the influence of different carbon concentrations and therefore different austenite stabilities on the mechanical properties. The thermodynamic simulations have been carried out using MatCalc6 commercial software and the MC-Fe database. The ART-annealing was done in a salt bath (THERMCONCEPT GmbH, Bremen, Germany) for 1 h at 600 C , 625 C , 650 C and 675 C .
Preparation for electron backscatter diffraction (EBSD) measurements was done by mechanical grinding with SiC paper up to 4000 grit followed by mechanical polishing using 3 μ m and 1 μ m diamond slurry. Subsequently, the samples were electropolished at 37 V for 15 s using an electrolyte consisting of 700 m L ethanol (C2H5OH), 100 m L butyl glycol (C6H14O2) and 78 m L perchloric acid (60%)(HClO4). For the scanning electron microscopy (SEM) experiments a Zeiss Sigma SEM (Carl Zeiss Microscopy GmbH, Jena, Germany) was used. The fracture surfaces were analyzed by taking secondary electron (SE) images at an acceleration of 20 k V . Chemical analyses of the fracture surfaces were done using Energy Dispersive X-ray Spectroscopy (EDS). EBSD measurements were done using an acceleration voltage of 20 k V , a step size of 50 n m and a working distance of 18 m m . Post-processing of the dataset was done using the MATLAB-based MTEX toolbox.

3. Results

3.1. Mechanical Properties

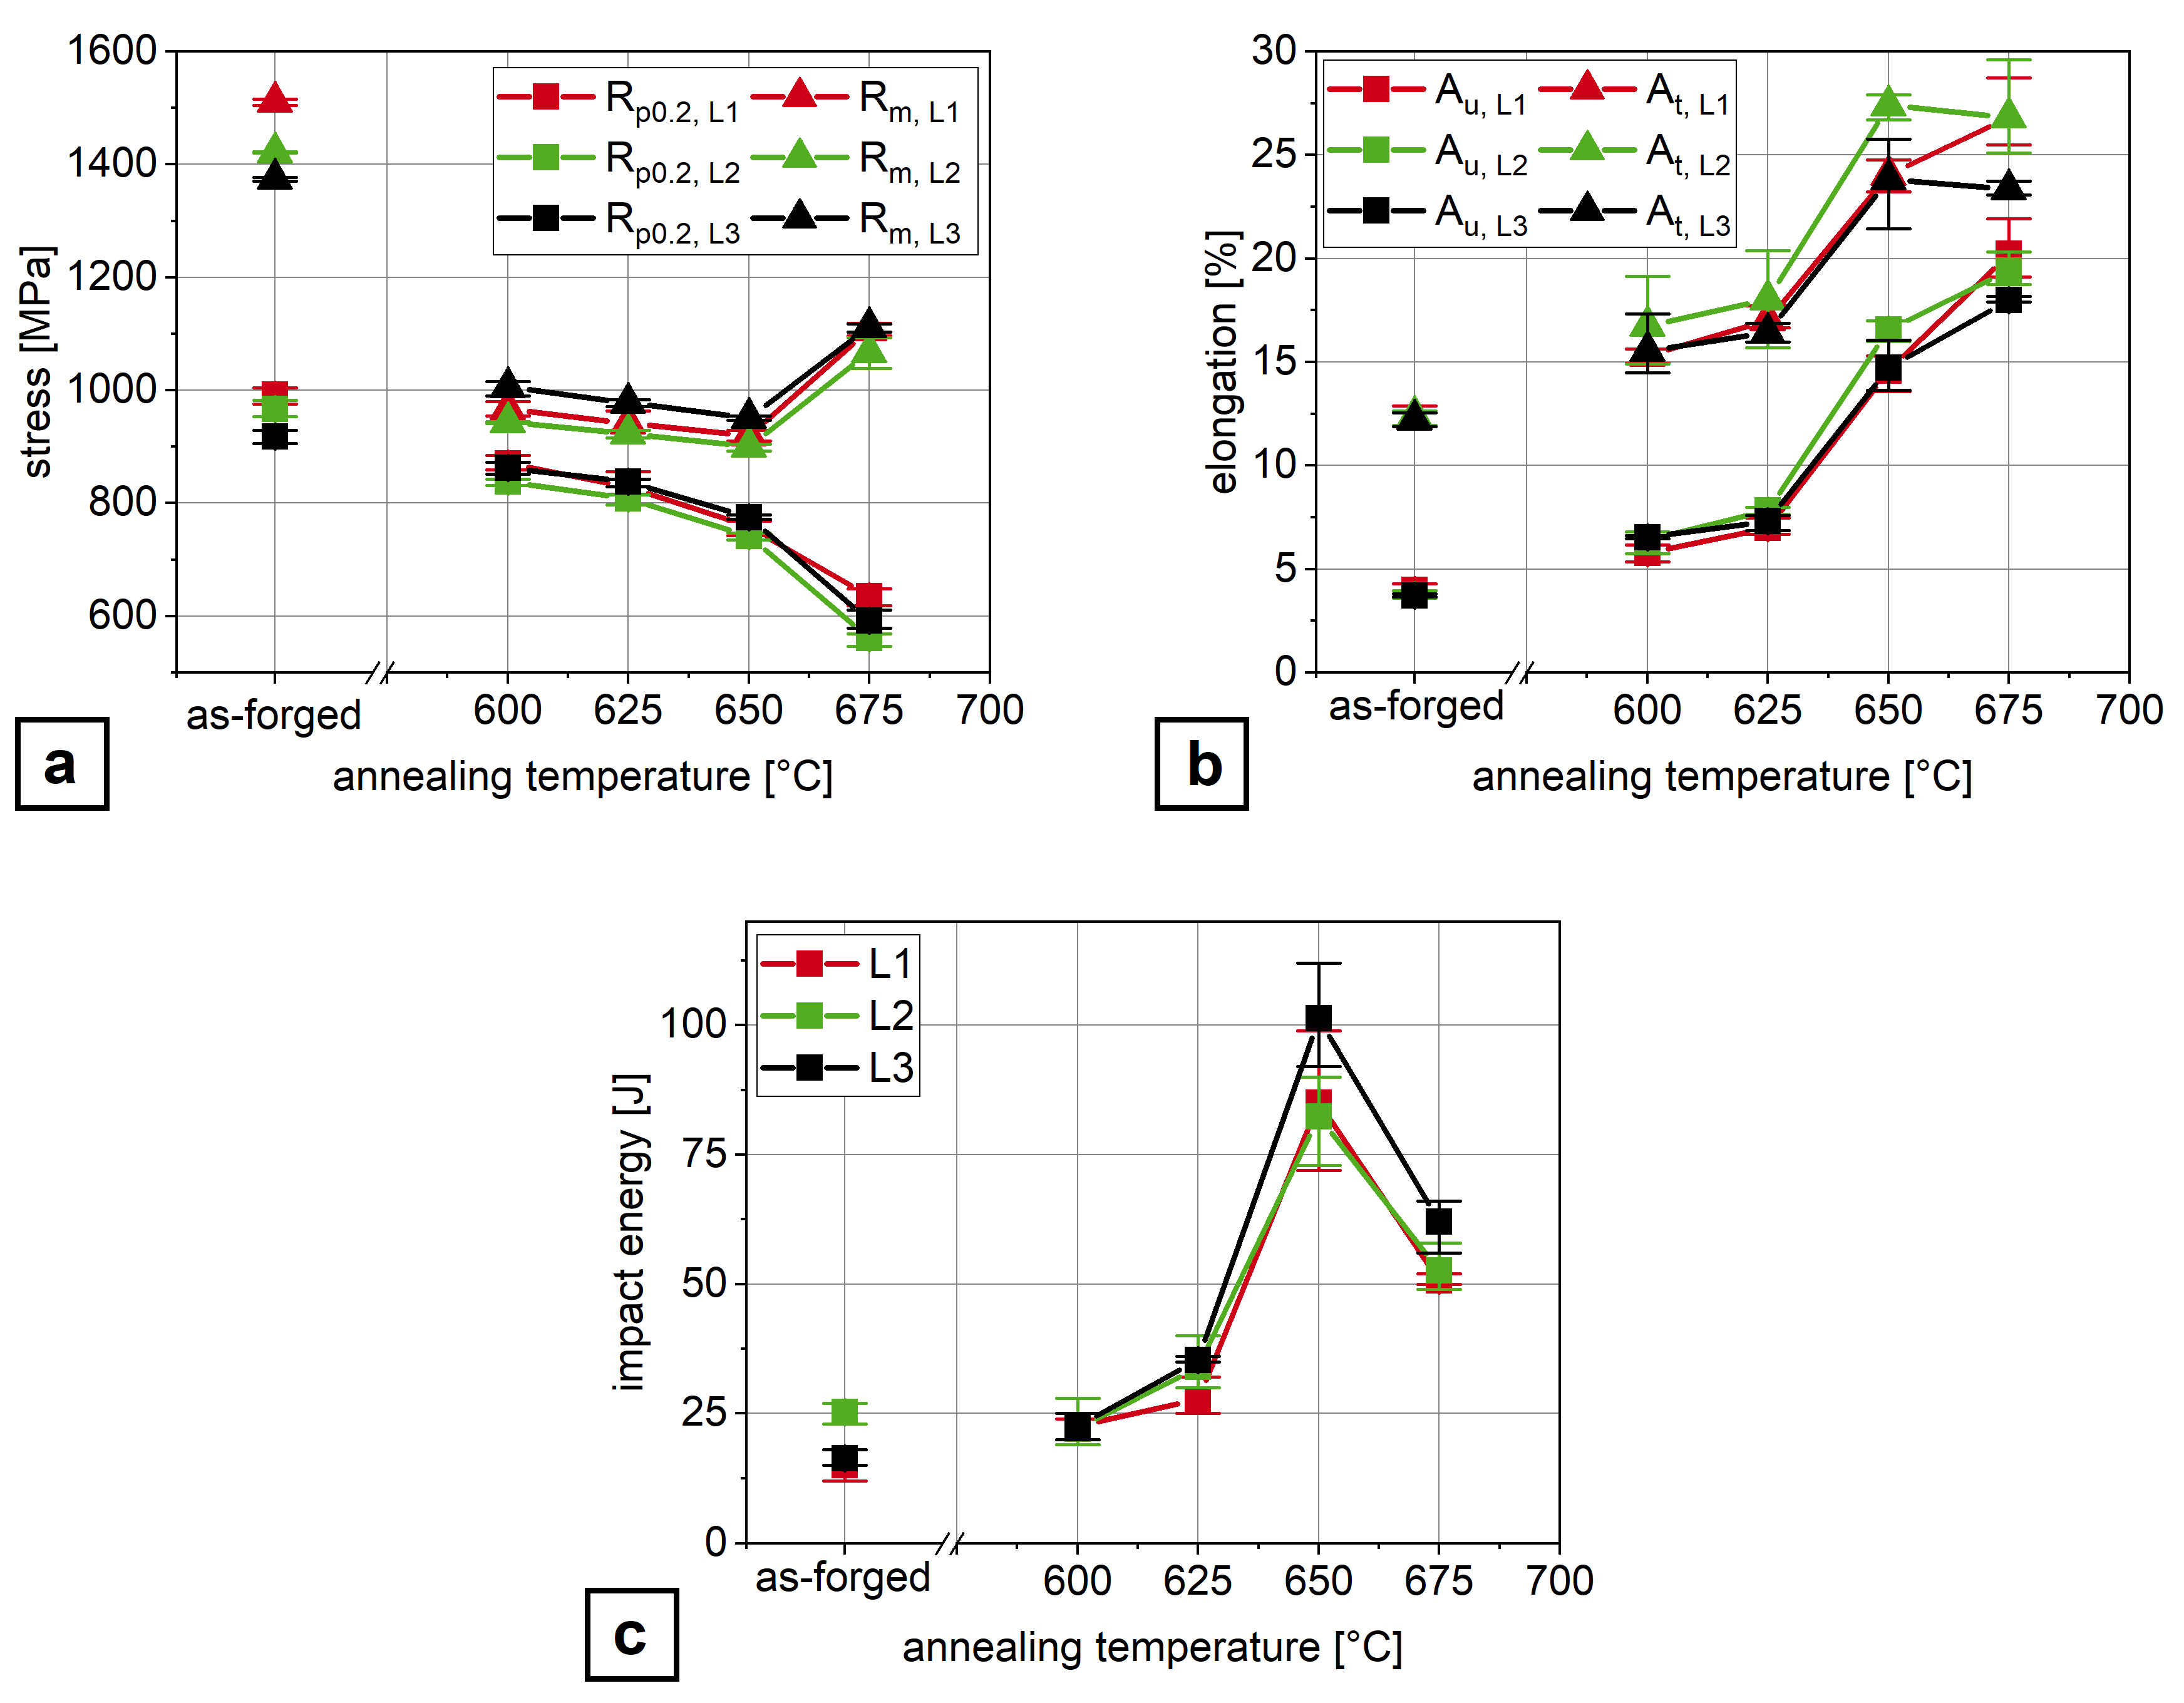
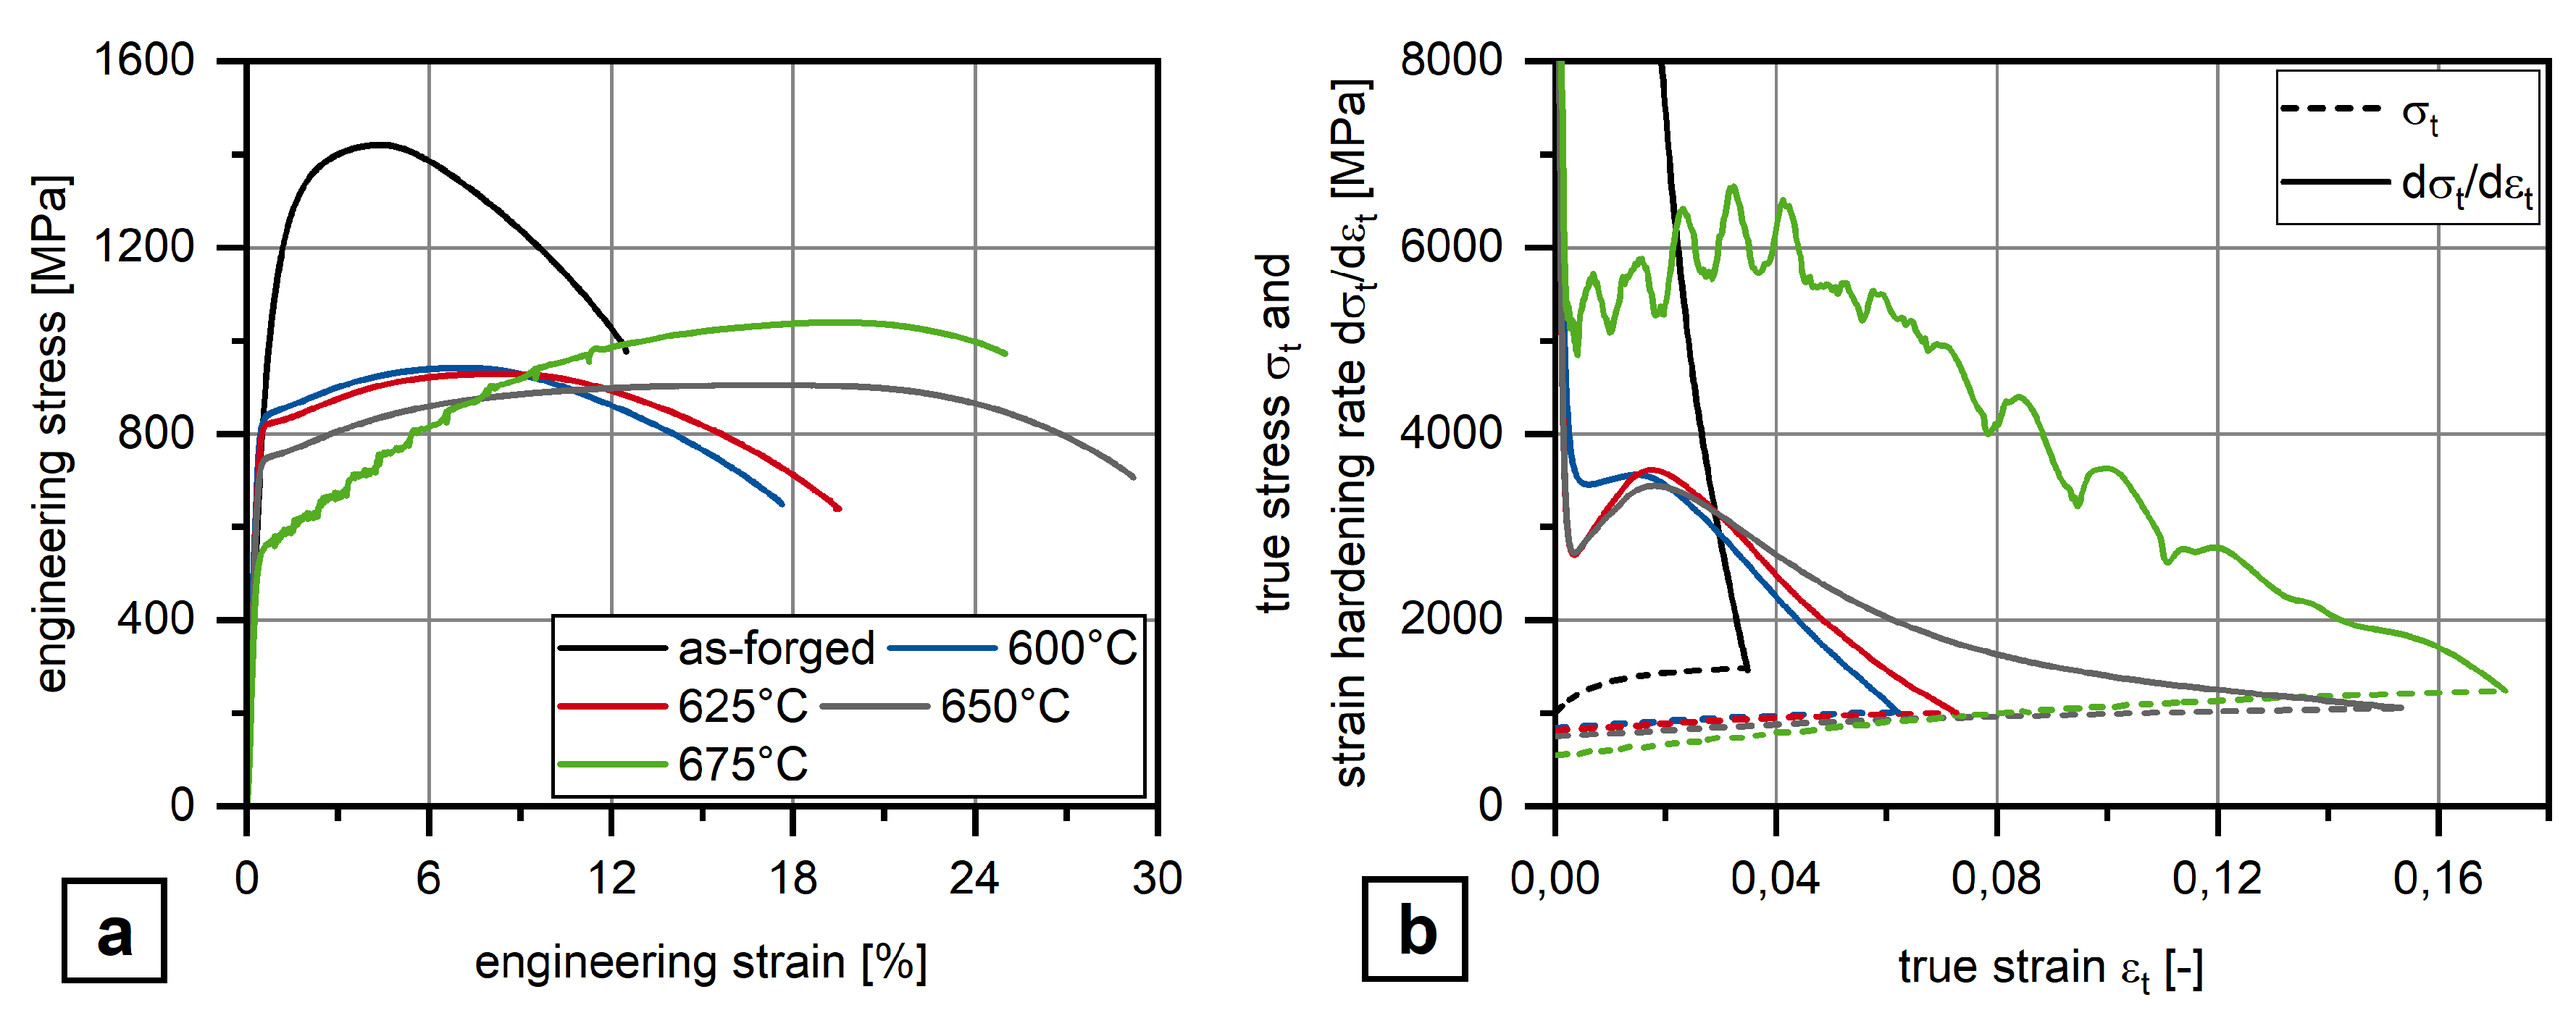
The materials in the as-forged state are characterized by high yield strengths between 930 M Pa and 1000 M Pa , tensile strengths from 1370 M Pa to 1510 M Pa , small uniform elongations from 3.7% to 4.3% and total elongations from 12.2% to 12.4%, respectively. The Charpy impact energy at this state is in the range between 15 and 30 J . After the annealing treatment, these properties change as it can be seen in Figure 3. The yield stress decreases continuously while the ultimate tensile stress has a minimum at 650 C and increases at 675 C . The yield ratio YS/UTS consequently increases from 0.66 in the as-forged state to 0.82 at 650 C and decreases at 675 C to 0.54. The uniform elongation increases continuously up to 18%, while the total elongation shows a maximum of 27% and 24% at 650 C for the alloys L2 and L3 respectively but continuously increases up to 27% for alloy L1. The Charpy impact energy shows a maximum at 650 C and reaches in the case of alloy L3 values around 100 J . An overview of the impact energy of all three alloys after different heat treatments can be seen in Table 2. The stress strain curves and the strain-hardening curves of alloy L2 are shown in Figure 4. The as-forged state shows in comparison to the annealed states a much higher strain hardening. The at 600 C , 625 C and 650 C annealed samples have a very similar strain behavior, which is characterized by a clearly visible maximum at 0.2 true strain. The at 675 C annealed sample shows a different strain hardening behavior with clearly visible serrations in the engineering stress-strain curve. These serrations represent inhomogeneities in the strain hardening behavior, due to pronounced differences in local plastic deformation. As can be concluded from Figure 3 all investigated steels show, in principle, the same temperature dependency in their mechanical properties irrespective of their specific chemical composition.

3.2. Microstructure

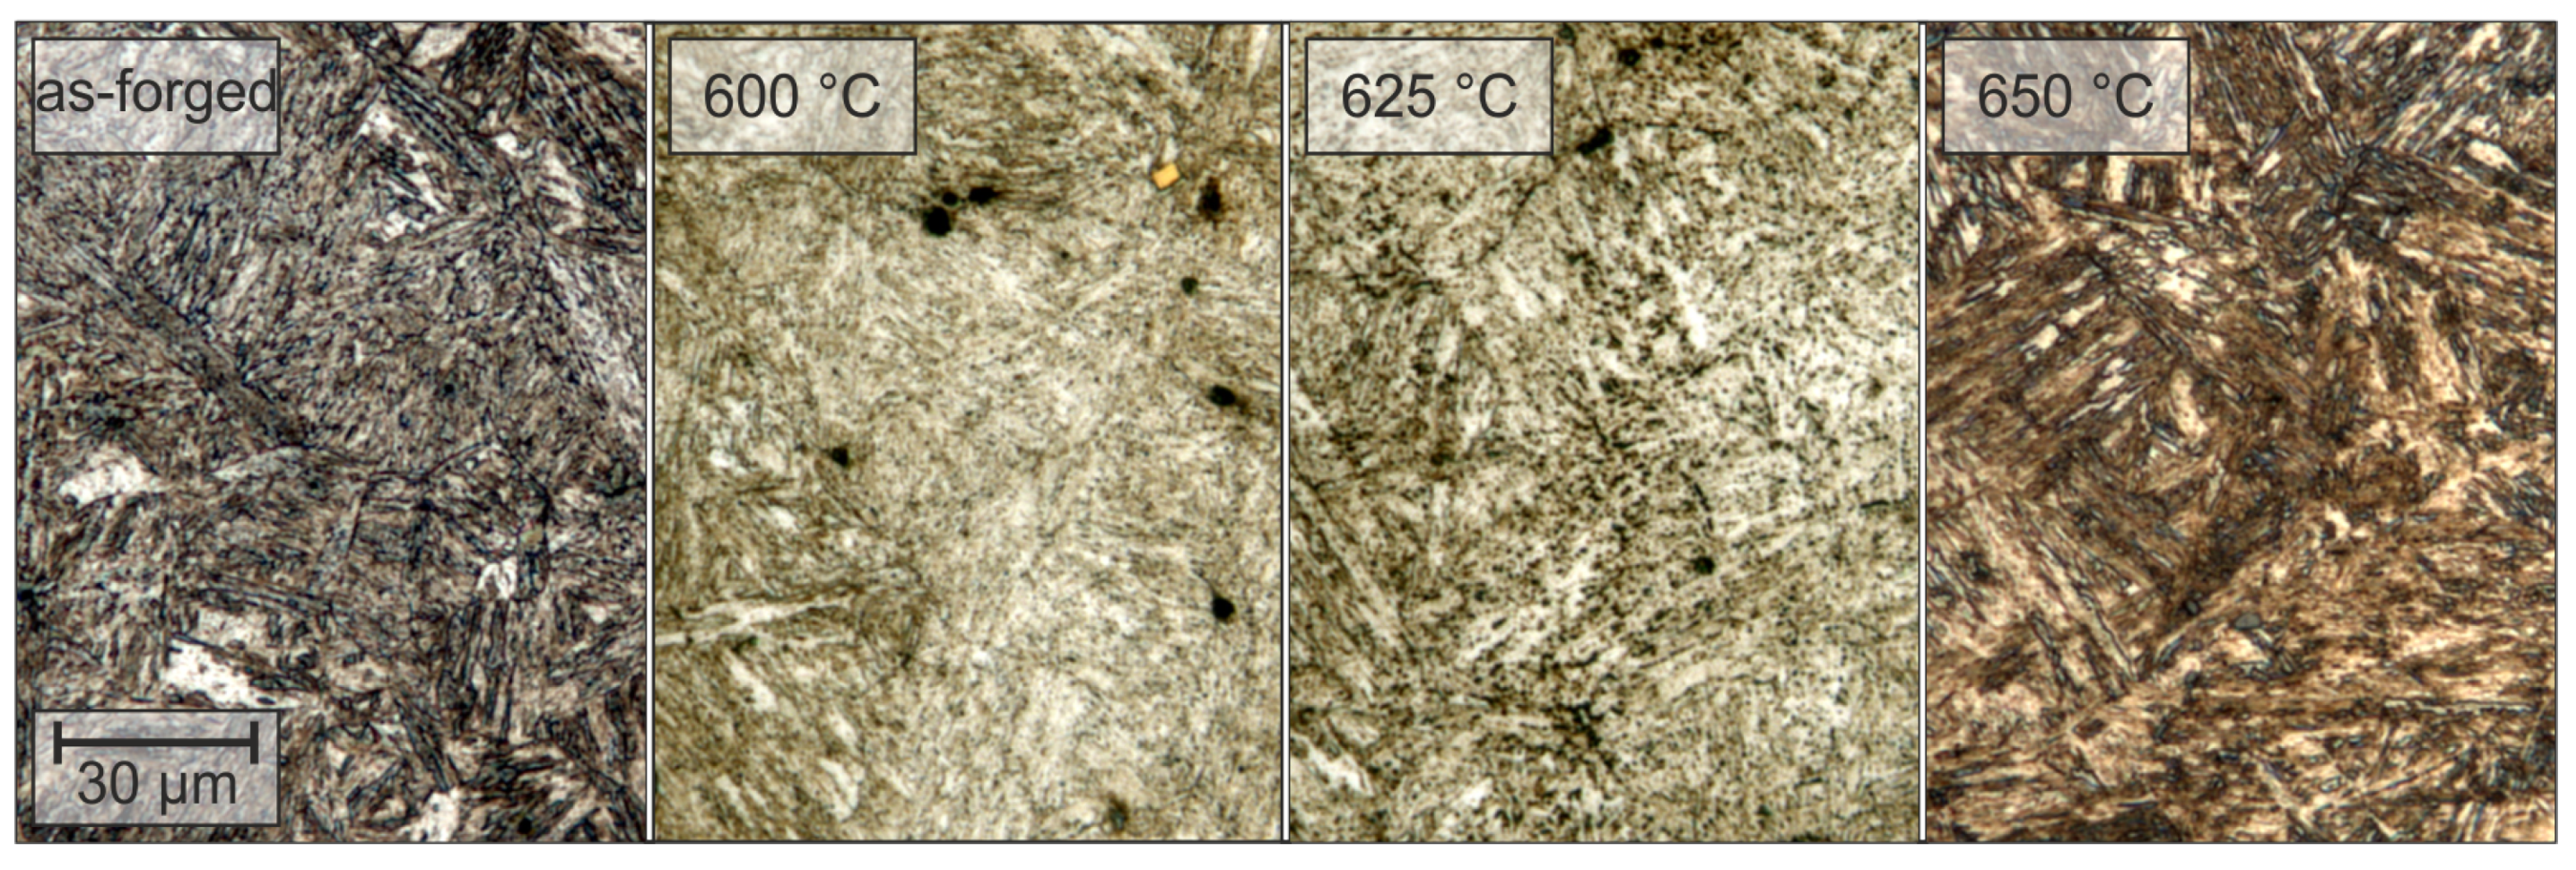
The microstructure observed with light optical microscopy (LOM) shows marginal differences after the heat-treatment (Figure 5). The as-forged sample develops a fully martensitic microstructure after air cooling. After annealing, all samples show weakly rounded and widened martensite laths in comparison to the as-forged state. In the as-forged state small carbides below 1 μ m can be found, which are hardly distinguishable from the matrix. The samples annealed at 600 C and 625 C show carbides, which grow with increasing annealing temperature. As a consequence of the smaller amount of dissolved carbon the etching behavior changes, which can be concluded from the differently colored martensitic matrix. After annealing at 650 C , no carbides were found.
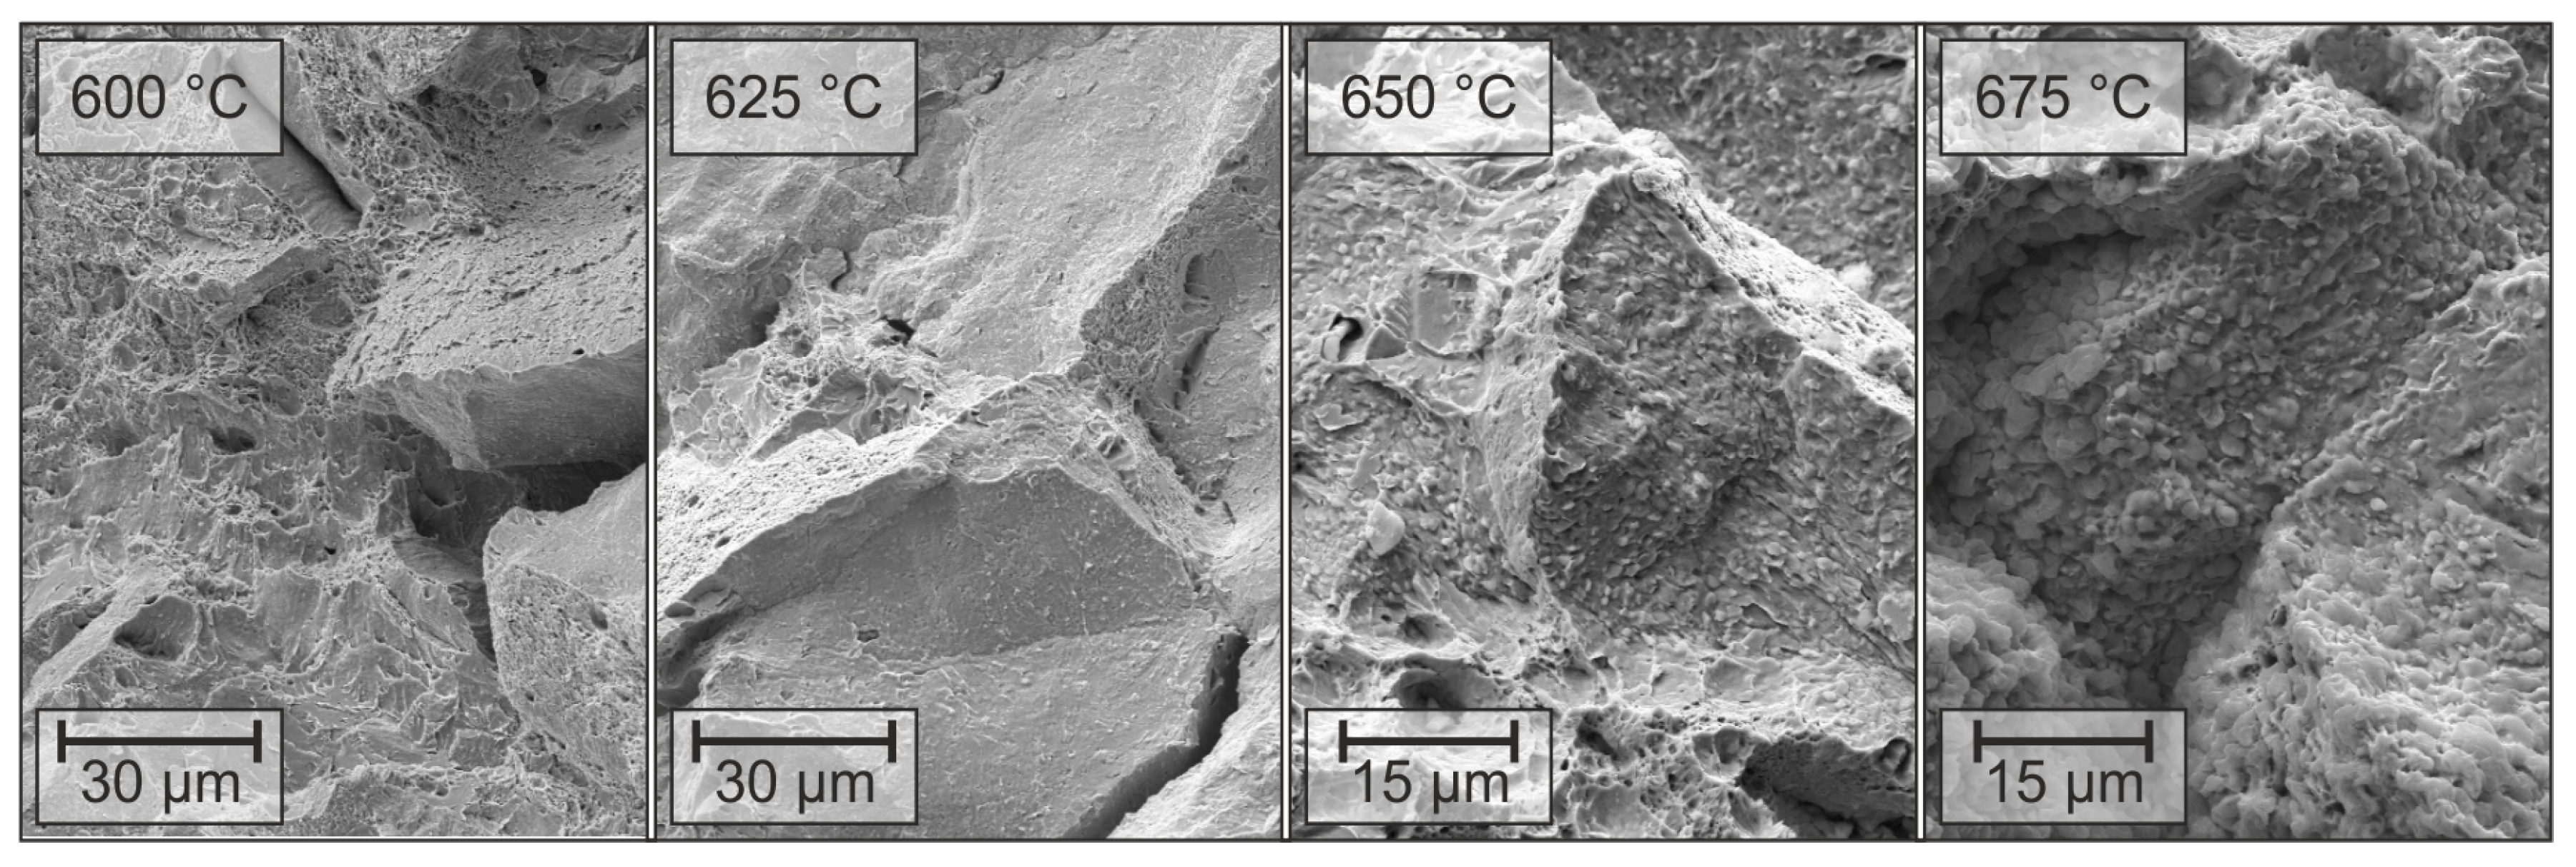
Investigations of the fracture surface of the Charpy-V-notch samples have been performed by scanning electron microscopy (SEM). Figure 6 shows exemplary the evolution of the fracture morphology from 600 C up to 675 C . At 600 C and 625 C most of the fracture surface shows mainly intergranular cleavage fracture and only small regions with ductile pores. At 650 C cleavage fracture still dominates but a second phase is observable on the fracture surface. These particles show a round morphology with a radius of around 2 μ m . The chemical composition of these particles was measured using energy dispersive X-ray spectroscopy. In comparison to the matrix an enrichment of manganese up to 8 wt.% was measured, as well as an enrichment of carbon of from 3 wt.% to 4 wt.%. The Mn content corresponds well with the simulated data in Figure 2. The C-level increase corresponds as well while the absolute values measured are unrealistically high due to the detection restriction of light elements with EDX. If the annealing temperature is increased up to 675 C the particles are coarser up to 5 μ m and in some cases form a film at the grain boundaries. In all samples a mixture between intergranular and intragranular fracture was observed. The intergranular fracture takes place along the prior austenite grain boundaries of the martensite matrix. The exposed planes in the fracture surfaces have a diameter of 10 μ m to 40 μ m .
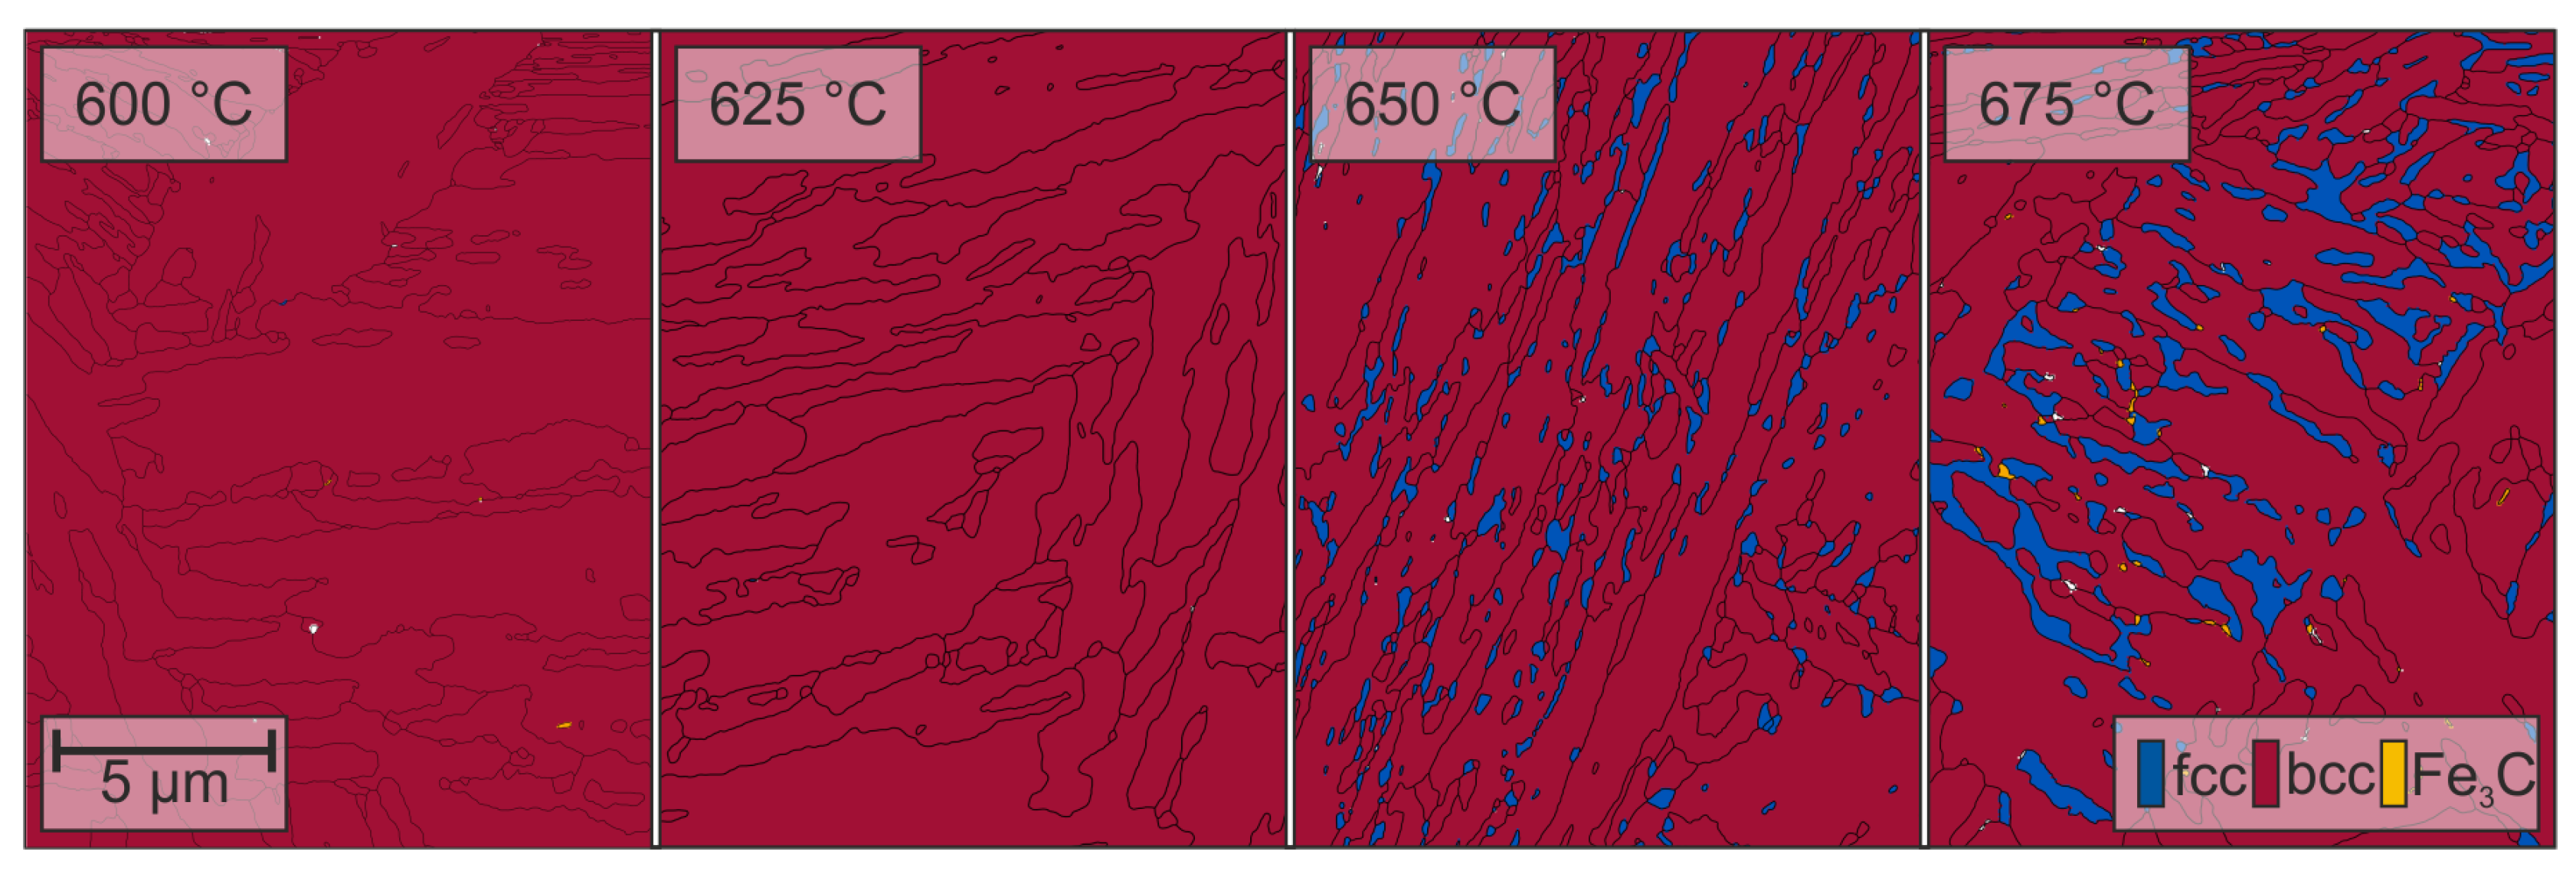
As a result from the previous observations, EBSD-measurements were carried out to analyze the distribution of austenite in the ferritic matrix. Figure 7 shows the resulting phase maps exemplary for the laboratory melt L3, as the results for melt L1 and L3 are similar. The size of the martensitic laths seems to be in the same range for all tested samples, reaching from below 1 μ m up to a maximum thickness of approximately 5 μ m . For lower annealing temperatures (600 C and 625 C ) a pure ferritic matrix has been found. Just some regions on boundaries haven been indexed as cementite or have not been indexed at all. If the temperature is increased to 650 C small austenite particles can be observed on prior austenite grain boundaries or in between martensite laths. At 675 C the austenite is present as a film at these grain boundaries, in some cases decorated with small cementite precipitates. Apart from the differences in morphology, the volume fraction of the austenite regions also increased in comparison to 650 C . For both states it was found, that the austenite is not distributed homogeneously in the matrix but forms all colonies of austenite islands within a prior austenite grain or islands and films along prior austenite grain boundaries or at martensite boundaries. Besides ferrite, austenite and cementite, ε-martensite was also included in the EBSD-measurement but not detected.

4. Discussion

Mechanical properties, microstructure and Charpy impact energy indicate the usual response of hardened steels to tempering for annealing temperatures up to 625 C but a significant change after annealing at 650 C and 675 C . Comparing the annealing temperatures of 650 C and 675 C the ultimate tensile strength shows an increase of 160 M Pa while the yield stress decreases by 180 M Pa with rising temperature. Comparing the annealing temperature of 625 C , 650 C and 675 C , the Charpy impact energy is drastically improved at 650 C but drops again at 675 C . The uniform elongation increases with annealing temperature but the total elongation shows a maximum of 27% at 650 C in comparison to 12% in the as-forged state for the alloy L2. The pronounced increase of Charpy impact energy indicates the presence of a second phase, which is supported by the observed particles on the fracture surfaces of the Charpy samples, as well as by evidence of the austenite phase and the carbides by the EBSD measurement. The observed change of Charpy impact energy can be explained by the TRIP effect on one hand and the impact of grain boundary segregation on the other hand.
The austenite phase is enriched with manganese and carbon, which can result in the TRIP effect during deformation contributing to improved ductility and toughness. But, if the austenite phase exceeds a range of about 10 vol.% the local enrichment gets smaller leading to a different stability of the austenite [21,22,23]. Both the larger volume fraction and the smaller stability result in discontinuous TRIP behavior that is reflected by the serrated stress-strain curve.
The austenite was always found at interfaces, primarily at prior austenite grain boundaries or at martensite lath boundaries. Due to the enrichment of manganese at these boundaries [21,24], austenite will form earlier in these regions during the heat treatment. When the nucleation of austenite starts, the newly formed austenite acts as a diffusion sink for manganese and carbon at the surrounding grain boundary, as the main driving force for manganese is the formation of austenite close to the thermodynamic equilibrium [25]. As the diffusivity at the grain boundary is high, the manganese segregation at grain boundaries will be reduced by austenite islands. This consecutively leads to a strengthening of the grain boundaries. Together with the effect of the grain boundary strengthening elements boron and molybdenum [11,12] the annealing treatment increases the Charpy impact energy drastically at the expense of yield strength and tensile strength. This loss in strength is caused by the absorption of the matrix carbon through the austenite. As the carbon is dissolved in the newly formed fcc-particles, it can no longer be used for strengthening the matrix through small carbides or through solid solution strengthening. This effect is already observable after annealing at 600 C .
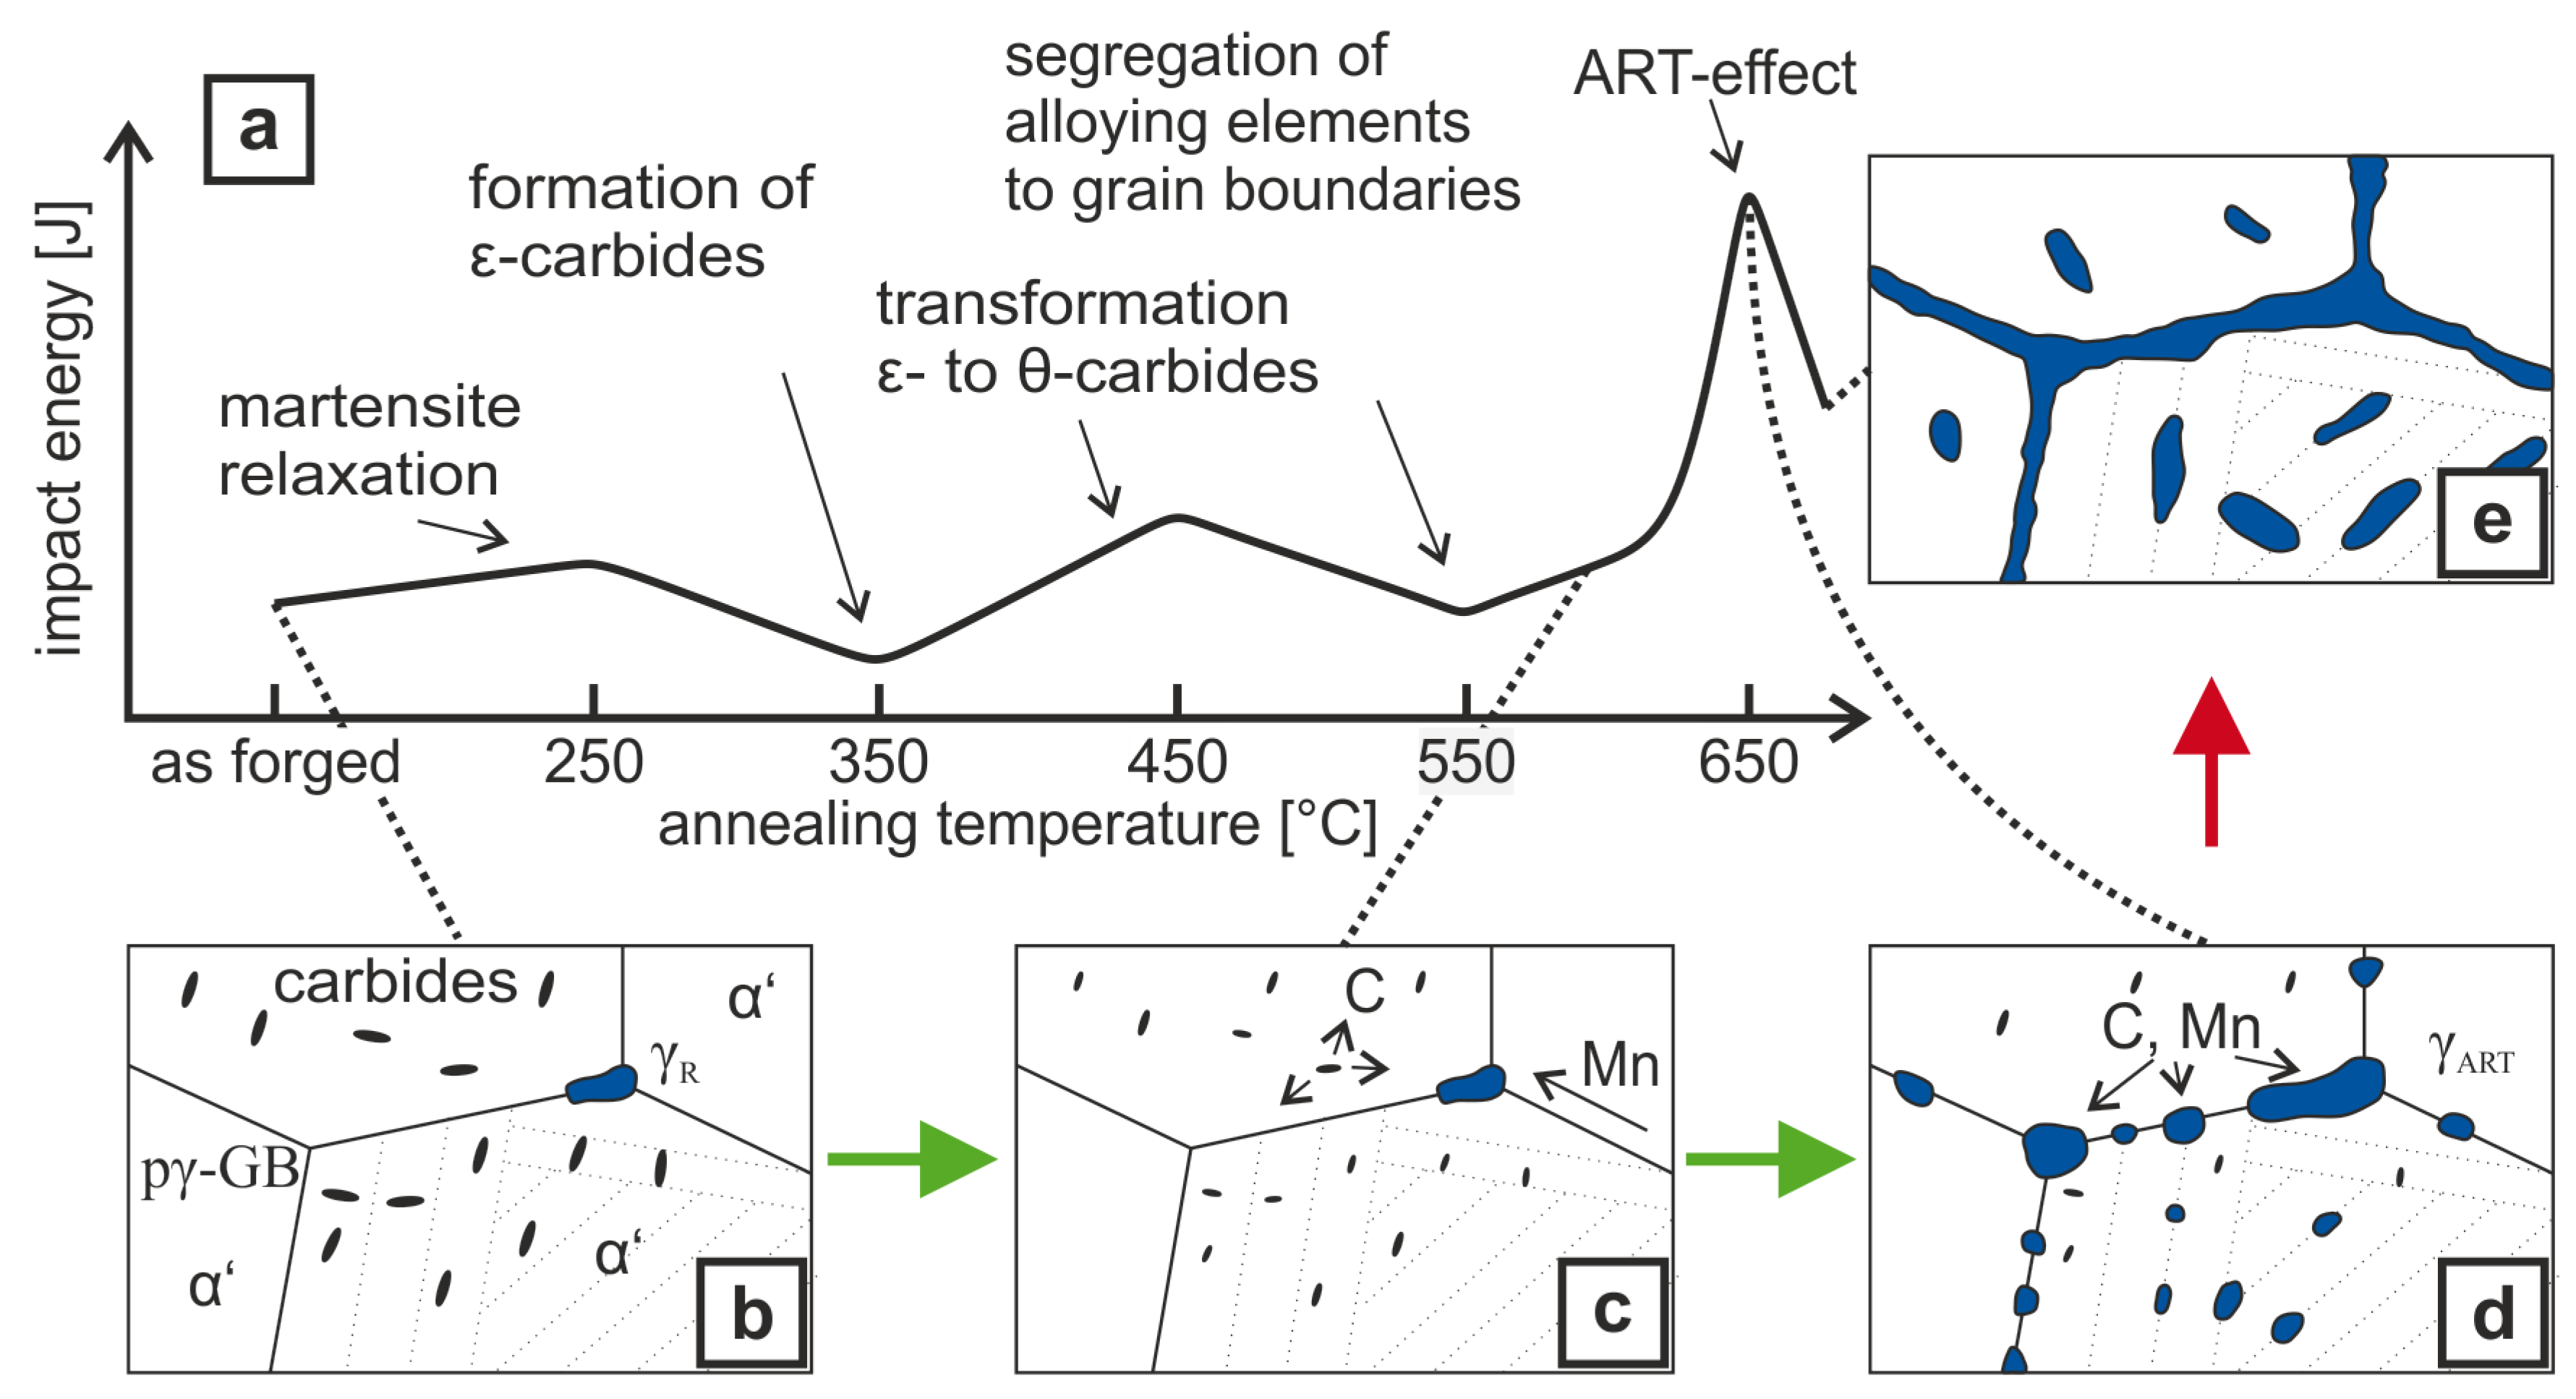
These results can be used to explain the Charpy impact energy alteration after annealing at different temperatures, which have been reported earlier [8]. Figure 8 shows the schematic development of the microstructure in dependence of the annealing temperature. In the as-forged state the material shows a martensitic microstructure with small carbides. Low amounts of retained austenite can also be found. After annealing above the dissolution temperatur of the carbides the matrix gets enriched with carbon while manganese diffuses along prior austenite grain boundaries. Through the enrichment of manganese and carbon in this region nanostructured austenite forms and get stabilized. If the optimum temperature (650 C ) is exceeded, austenite forms thin films on grain-boundaries, which lowers the Charpy impact energy drastically.

5. Conclusions

The proposed air cooling + austenite reversion tempering (AC + ART) treatment is a robust process that can be applied for forgings with various dimensions. From this study, the following conclusions can be drawn:
  • Air-hardening martensitic forging steels develop high ultimate tensile strengths from 1370 M Pa –1510 M Pa but low room temperature Charpy impact energy of below 20 J .
  • Microalloying with boron and molybdenum only slightly increases the Charpy impact energy after air cooling.
  • Through ART-annealing, finely distributed retained austenite islands are obtained that can provide Charpy impact energy values above 80 J .
  • Obviously, there exist an optimum austenite content as by austenite fractions above about 10 vol.% Charpy impact energy decreases again together with the development of serrated plastic flow behavior in the tensile test.
  • The Charpy impact energy improvement is due to the occurrence of a continuous TRIP effect and less Mn segregation at grain boundaries.

Author Contributions

Conceptualization, A.G.; methodology, A.G.; validation, A.G. and R.E.; formal analysis, A.G. and R.E.; investigation, A.G. and R.E.; data curation, A.G.; writing—original draft preparation, A.G.; writing—review and editing, A.G. and W.B.; visualization, A.G.; supervision and discussion, W.B.; project administration, W.B.; funding acquisition, W.B.

Funding

Results presented here are from the research project IGF 27 EWN. Funding was provided by the German Federal Ministry of Economics and Energy via the German Federation of Industrial Cooperative Research Associations ”Otto von Guericke” (AiF) in the program to encourage the industrial Community research by an resolution of the German Bundestag and the Steel Forming Research Society (FSV).

Conflicts of Interest

The authors declare no conflict of interest. The funders had no role in the design of the study; in the collection, analyses, or interpretation of data; in the writing of the manuscript, or in the decision to publish the results.

Abbreviations

The following abbreviations are used in this manuscript:
AC + ARTAir cooling and austenite reversion tempering
Q + TQuenching and tempering
Q + PQuenching and partitioning
ARTAustenite reverted transformation
EDSEnergy dispersive X-ray spectroscopy
PHFPPrecipitation hardening ferritic pearlitic
EBSDElectron backscattering diffraction
SESecondary electron
SEMScanning electron microscopy
LOMLight optical microscopy
HDBHigh ductile bainite
LHDAir hardening ductile (German abbreviation)

References

  1. Bleck, W.; Bambach, M.; Wirths, V.; Stieben, A. Microalloyed Engineering Steels with Improved Performance—An Overview. HTM J. Heat Treatm. Mat. 2017, 72, 346–354. [Google Scholar] [CrossRef]
  2. Bleck, W.; Keul, C.; Zeislmair, B. Entwicklung eines höherfesten mikro legierten ausscheidungshärtenden ferritisch/perlitischen Schmiedestahls AFP-M. [The development of a high-strength, microalloyed, precipitation hardening, ferritic-perlitic formed steel AFP-M]. Schmiede J. 2010, 3, 42–44. [Google Scholar]
  3. Keul, C.; Wirths, V.; Bleck, W. New bainitic steels for forging. Arch. Civ. Mech. Eng. 2012, 12, 119–125. [Google Scholar] [CrossRef]
  4. Keul, C.; Urban, M.; Back, A.; Hirt, G.; Bleck, W. Entwicklung eines hochfesten duktilen bainitischen (HDB) Stahls für hochbeanspruchte Schmiedebauteile. [The Development of a High-Strength, Ductile, Bainitic (HDB) Steel for Heavy Duty Forged Components]. Schmiede J. 2010, 9, 28–31. [Google Scholar]
  5. Wirths, W.; Wagener, R.; Bleck, W.; Melz, T. Bainitic Forging Steels for Cyclic Loading. Adv. Mat. Res. 2014, 922, 813–818. [Google Scholar] [CrossRef] [Green Version]
  6. Edmonds, D.V.; He, K.; Rizzo, F.C.; De Cooman, B.C.; Matlock, D.K.; Speer, J.G. Quenching and partitioning martensite—A novel steel heat treatment. Mater. Sci. Eng. A 2006, 438–440, 25–34. [Google Scholar] [CrossRef]
  7. Stieben, A.; Bleck, W.; Schönborn, S. Lufthärtender duktiler Stahl mit mittlerem Mangangehalt für die Massivumformung. [Air hardening ductile steel with medium manganese content for forging]. massivUmformung 2016, 9, 50–55. [Google Scholar]
  8. Stieben, A. Eigenschaften lufthärtender martensitischer Schmiedestähle mit Mangangehalten von 3–10 Gew.-%. [Properties of Air-hardening Martensitic Forging Steels with Manganese Concentrations of 3–10 wt.-%]. Ph.D. Thesis, RWTH Aachen University, Aachen, Germany, 16 March 2018. [Google Scholar]
  9. Hwang, S.K.; Morris, J.W. The use of a boron addition to prevent intergranular embrittlement in Fe-12Mn. Metall. Trans. A 1980, 11, 1197–1206. [Google Scholar] [CrossRef]
  10. Kuzmina, M.; Ponge, D.; Raabe, D. Grain boundary segregation engineering and austenite reversion turn embrittlement into toughness: Example of a 9 wt.% medium Mn steel. Acta Mater. 2015, 86, 182–192. [Google Scholar] [CrossRef]
  11. Song, S.; Faulkner, R.G.; Flewitt, P.E.J. Quenching and tempering-induced molybdenum segregation to grain boundaries in a 2.25Cr–1Mo steel. Mater. Sci. Eng. A 2000, 281, 23–27. [Google Scholar] [CrossRef]
  12. Bolton, J.D.; Petty, E.R.; Allen, G.B. The mechanical properties of α-phase low carbon Fe-Mn alloys. Metall. Trans. 1971, 2, 2915–2923. [Google Scholar] [CrossRef]
  13. Suh, D.W.; Ryu, J.H.; Joo, M.S.; Yang, H.S.; Lee, K.; Bhadeshia, H.K.D.K. Medium-Alloy Manganese-Rich Transformation-Induced Plasticity Steels. Metall. Mater. Trans. A 2013, 44A, 286–293. [Google Scholar] [CrossRef]
  14. Gramlich, A.; Emmrich, R.; Bleck, W. Annealing of 4 wt.-% Mn forging steels for automotive application. In Proceedings of the 4th International Conference on Medium and High Manganese Steels, Aachen, Germany, 1–3 April 2019; pp. 283–286. [Google Scholar]
  15. Miller, R.L. Ultrafine-grained microstructures and mechanical properties of alloy steels. Metall. Mater. Trans. B 1972, 3, 905–912. [Google Scholar] [CrossRef]
  16. Ma, Y. Medium-manganese steels processed by austenite-reverted-transformation annealing for automotive applications. Mater. Sci. Tech. 2017, 33, 1713–1727. [Google Scholar] [CrossRef]
  17. Kaar, S.; Schneider, R.; Krizan, D.; Béal, D.; Sommitsch, C. Influence of the Quenching and Partitioning Process on the Transformation Kinetics and Hardness in a Lean Medium Manganese TRIP Steel. Metals 2019, 9, 353. [Google Scholar] [CrossRef]
  18. Grajcar, A.; Kilarski, A.; Kozlowska, A. Microstructure–Property Relationships in Thermomechanically Processed Medium-Mn Steels with High Al Content. Metals 2018, 8, 929. [Google Scholar] [CrossRef]
  19. Liu, C.; Peng, Q.; Xue, Z.; Deng, M.; Wang, S.; Yang, Y. Microstructure-Tensile Properties Relationship and Austenite Stability of a Nb-Mo Micro-Alloyed Medium-Mn TRIP Steel. Metals 2018, 8, 615. [Google Scholar] [CrossRef]
  20. Sevsek, S.; Haase, C.; Bleck, W. Strain-Rate-Dependent Deformation Behavior and Mechanical Properties of a Multi-Phase Medium-Manganese Steel. Metals 2019, 9, 344. [Google Scholar] [CrossRef]
  21. Luo, H.; Shi, J.; Wang, C.; Cao, W.; Sun, X.; Dong, H. Experimental and numerical analysis on formation of stable austenite during the intercritical annealing of 5Mn steel. Acta Mater. 2011, 59, 4002–4014. [Google Scholar] [CrossRef]
  22. Chen, J.; Lv, M.; Liu, Z.; Wang, G. Combination of ductility and toughness by the design of fine ferrite/tempered martensite-austenite microstructure in a low carbon medium manganese alloyed steel plate. Mater. Sci. Eng. A 2015, 648, 51–56. [Google Scholar] [CrossRef]
  23. Twardowski, R.; Prahl, U. Microstructure based flow curve modeling of high-Mn steels with TWIP and TRIP effect. Comput. Methods Mater. Sci. 2012, 12, 130–136. [Google Scholar]
  24. Chen, J.; Lv, M.; Liu, Z.; Wang, G. Influence of Heat Treatments on the Microstructural Evolution and Resultant Mechanical Properties in a Low Carbon Medium Mn Heavy Steel Plate. Metall. Mater. Trans. A 2016, 47A, 2300–2312. [Google Scholar] [CrossRef]
  25. Nasim, M.; Edwards, B.C.; Wilson, E.A. A study of grain boundary embrittlement in an Fe-8%Mn alloy. Mater. Sci. Eng. A 2000, 281, 56–67. [Google Scholar] [CrossRef]
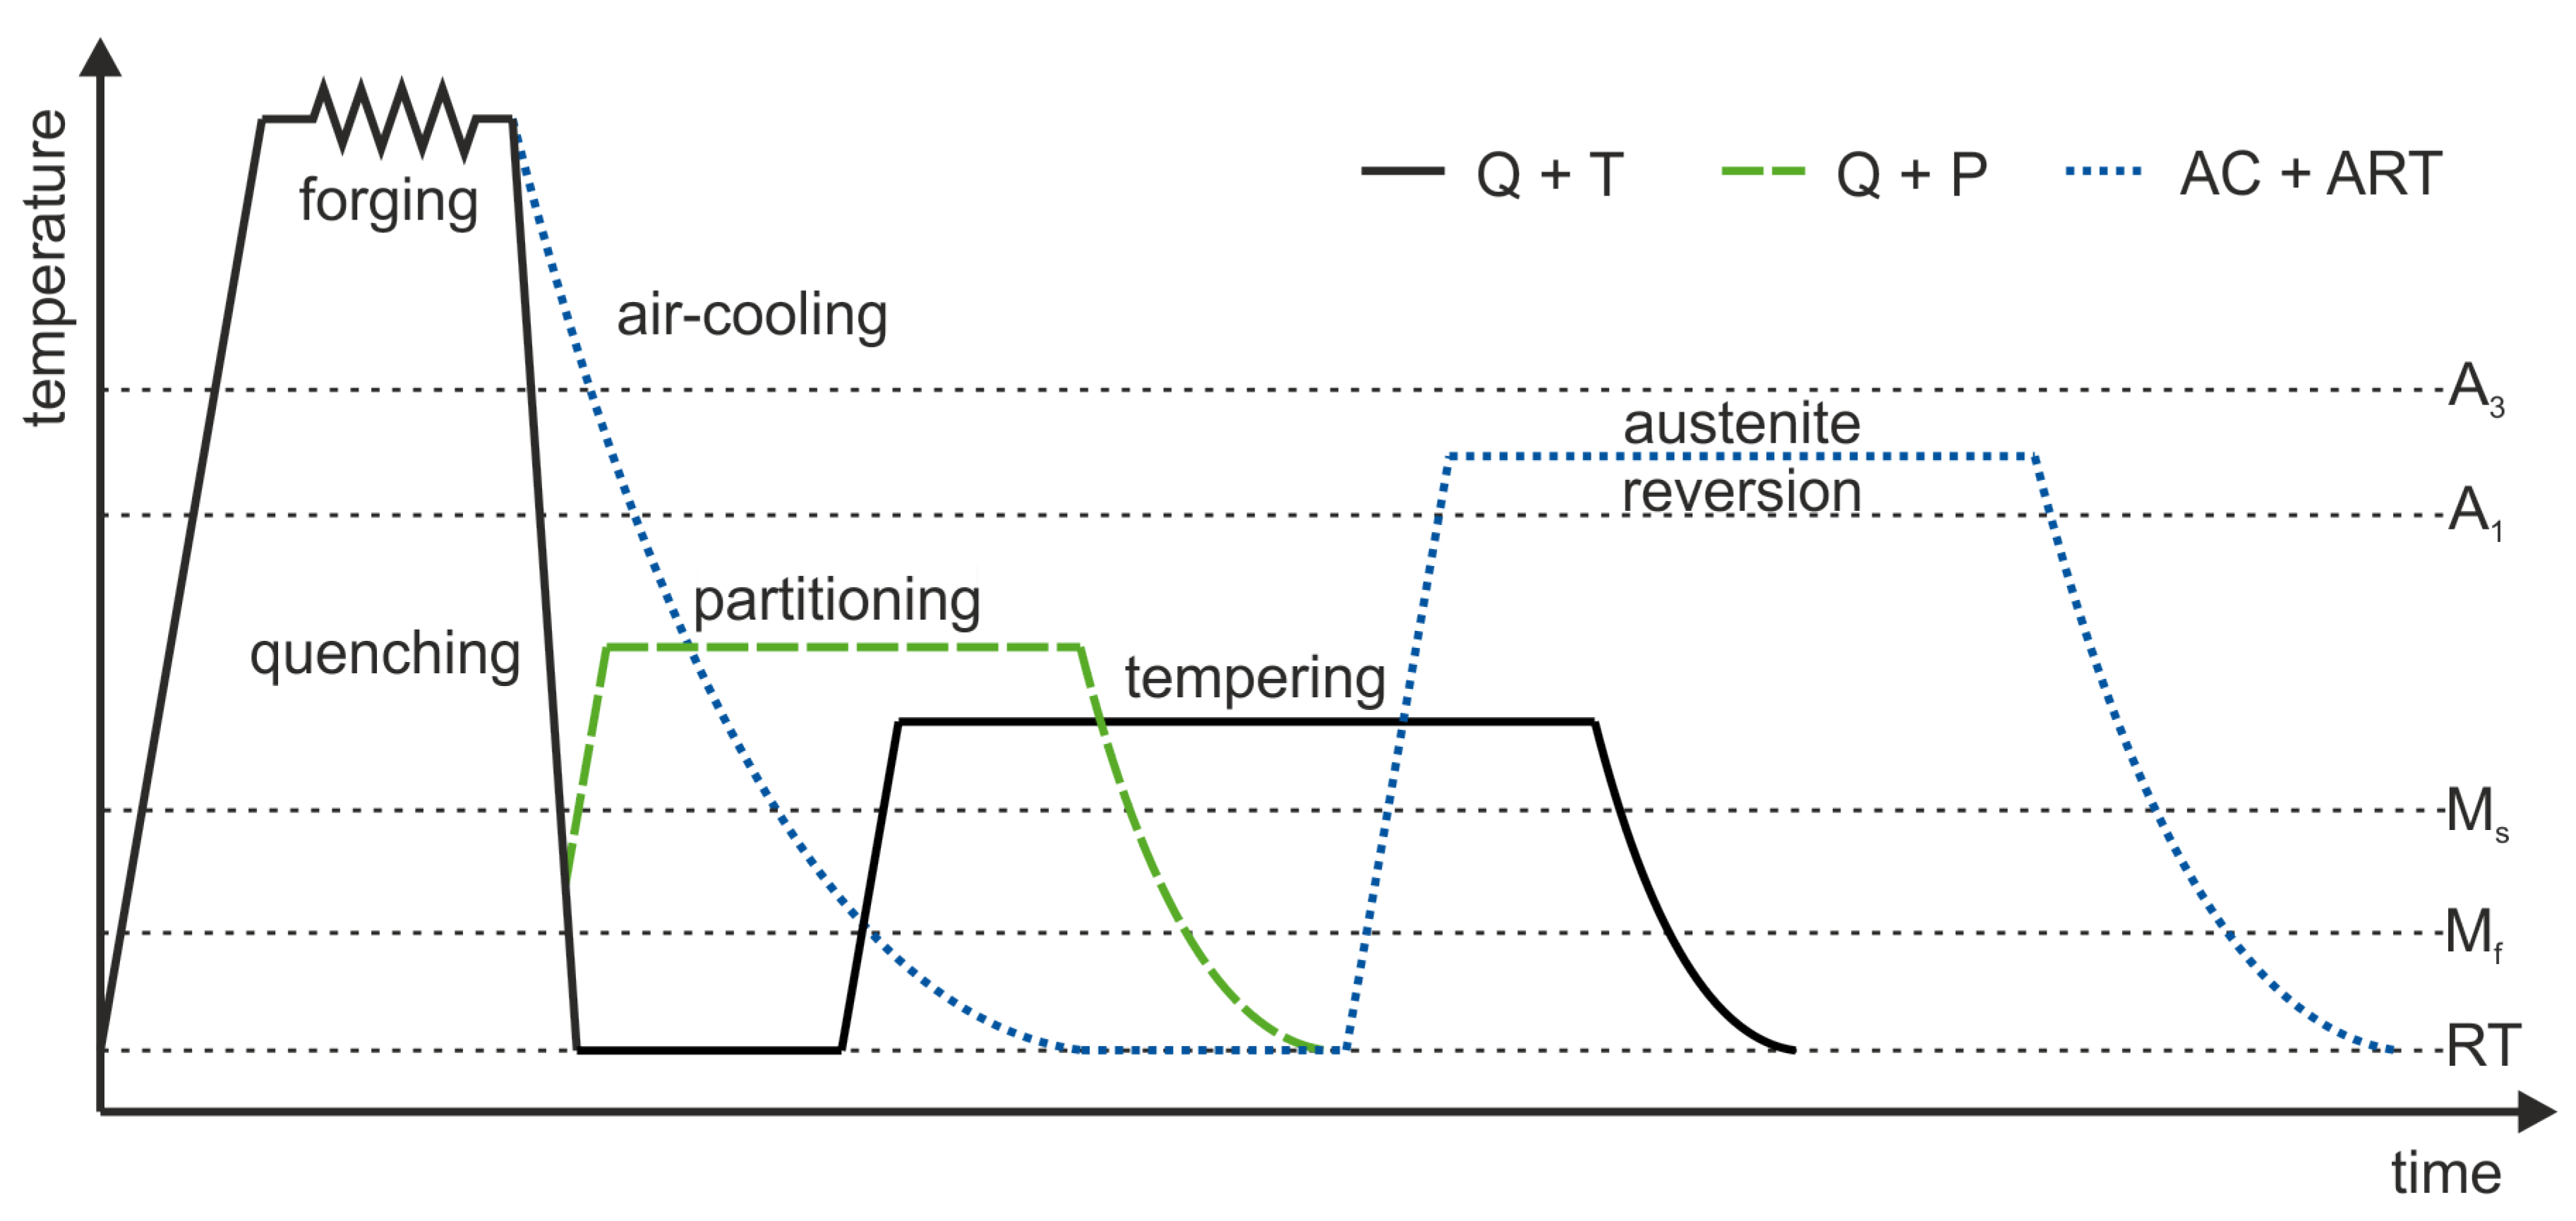
Figure 1. Comparison of the new air-cooling + austenite reversion tempering process (AC + ART) compared to the standard quenching + tempering (Q + T) and quenching + partitioning (Q + P) heat treatments. The time axis of this diagram is schematic and does not reflect the real tempering times.
Metals 09 00575 g001
Figure 2. Thermodynamic equilibrium calculations of the temperature dependency of the different phases and the equilibrium C and Mn contents of the fcc phase. The investigated temperature range for ART annealing is indicated.
Metals 09 00575 g002
Figure 3. Tempering charts for the alloys L1–L3. The yield strength (YS) and ultimate tensile strength (UTS) (a), uniform Au and total elongation At (b) and the impact energy (c) are shown.
Metals 09 00575 g003
Figure 4. Annealing influence on the stress-strain-curve (a) and strain hardening curves (b).
Metals 09 00575 g004
Figure 5. Microstructure observable with light optical microstructure (LOM) for the as-forged state and the at 600 C , 650 C and 675 C annealed samples. Exemplary alloy L2 is shown in this figure.
Metals 09 00575 g005
Figure 6. Scanning electron microscopy (SEM) micrographs of the fracture surfaces of Charpy-V-notch impact samples, annealed at different temperatures. Exemplary alloy L2 is shown in this figure.
Metals 09 00575 g006
Figure 7. Electron backscatter diffraction (EBSD) phasemaps of austenite distribution after annealing for 1 h with different annealing temperatures. As the austenite is not homogenously distributed in the matrix the volume fraction can just be estimated. For 600 C and 625 C less than 1 vol.% was detected. For 650 C the approximated volume fraction is around 10 vol.% and for 675 C 20 vol.% have been detected.
Metals 09 00575 g007
Figure 8. Correlation of the Charpy impact energy alteration [8] with austenite morphology obtained through ART annealing (a). The (be) describe the formation of the microstructure and are explained in detail in the text. α′ is representing the martensitic matrix, γ is representing austenite in the retained (γR) and ART-annelead (γART) condition, while pγ-GB stands for prior austenite grain boundary.
Metals 09 00575 g008
Table 1. Chemical composition of the laboratory melts. All concentrations are given in wt.%.
AlloyC *SiMnPS *AlMoTiNbBN
L10.190 504.020.0080.0110.0310.020.0200.0350.00160.011
L20.170.503.990.0100.0090.0250.020.0200.0330.00570.010
L30.150.494.020.0110.0090.0270.20<0.0030.035<0.00050.010
* C, S determined with Leco-combustion analyses.
Table 2. Impact energy at room temperature after different annealing treatments.
AlloyAs-Forged600 C625 C650 C675 C
L115 J 23 J 28 J 85 J 51 J
L225 J 22 J 34 J 82 J 53 J
L316 J 22 J 35 J 101 J 62 J