Article

Acquisition and Evaluation of Theoretical Forming Limit Diagram of Al 6061-T6 in Electrohydraulic Forming Process

1
Department of Aerospace Engineering, Pusan National University, Busan 46241, Korea
2
Department of Green Transportation System, Graduate School of Convergence Science, Pusan National University, Busan 46241, Korea
*
Author to whom correspondence should be addressed.
Metals 2019, 9(4), 401; https://doi.org/10.3390/met9040401
Submission received: 28 February 2019 / Revised: 27 March 2019 / Accepted: 29 March 2019 / Published: 2 April 2019

Abstract

:
The current study examines the forming limit diagram (FLD) of Al 6061-T6 during the electrohydraulic forming process based on the Marciniak–Kuczynski theory (M-K theory). To describe the work-hardening properties of the material, Hollomon’s equation—that includes strain and strain rate hardening parameters—was used. A quasi-static tensile test was performed to obtain the strain-hardening factor and the split-Hopkinson pressure bar (SHPB) test was carried out to acquire the strain rate hardening parameter. To evaluate the reliability of the stress–strain curves obtained from the SHPB test, a numerical model was performed using the LS–DYNA program. Hosford’s yield function was also employed to predict the theoretical FLD. The obtained FLD showed that the material could have improved formability at a high strain rate index condition compared with the quasi-static condition, which means that the high-speed forming process can enhance the formability of sheet metals. Finally, the FLD was compared with the experimental results from electrohydraulic forming (EHF) free-bulging test, which showed that the theoretical FLD was in good agreement with the actual forming limit in the EHF process.

1. Introduction

Forming thin plate materials is limited by the occurrence of fractures and wrinkles. In the case of uniaxial tensile deformation of the sheet, when the deformation is small, the plastic strain increases as the load increases. However, after the load reaches the peak value, the plastic strain increases, and the deformation becomes unstable immediately even though the load decreased. At this time, diffuse necking occurs at the center of the specimen, because load reduction due to cross-section reduction is larger than load increase due to the work hardening of the sheet in micro deformations.
As the diffused neck grows, a local neck occurs where most deformation is concentrated in a narrow region in the direction having a critical slope with respect to the tensile direction. In addition, with sudden decrease in the plate’s thickness, the load suddenly drops without any increase in load displacement–displacement curve—resulting in ductile fracture.
To avoid defects and generate products desired by the designer, accurately evaluating the sheet metal’s forming limit is necessary. Generally, during the sheet metal forming process, the forming limit diagram (FLD) is employed to predict whether materials fracture or not. The FLD was first introduced by Keeler [1] and Goodwin [2]. It is a curve that characterizes a sheet’s formability, it also reflects major and minor strains prior to localized necking. If the deformed sheet’s strains are located below the curve, the material is evaluated to be safe from breakage, otherwise, it is expected that the sheet is fractured. The FLD is obtained using theoretical or experimental methods. The FLD prediction theory includes Swift’s diffusion neck theory [3], Hill’s local necking theory [4], and Marciniak and Kuczynski’s (M-K) theory [5]. A forming limit diagram development is found in previous research [6,7,8]. Keeler and Brazier [6] found that the level of FLD increased with sheet thickness and the strain-hardening index, they also approximated this phenomenon into forming limit equations. Raghavan et al. [7] reviewed the commonly used empirical method to predict the forming limit curves for various steel sheets, and Green and Black [8] showed the details of a visual method to determine the occurrence of necking using strain measuring systems.
Among these theories, the M-K theory is most widely used because it is in good agreement with experimental results. Many researchers have actively carried out studies to modify this model to predict more accurate forming limits. Ghazanfari and Assempour [9] used a modified M-K model to predict the FLD of carbon steel by combining geometrical and material inhomogeneity. While Safdarian [10] developed the new M-K model to consider the effect of bending strain on FLD.
Generally, FLD is obtained under quasi-static conditions or under a strain rate of 1 s−1 or less. However, forming characteristics of materials change depending on forming speed, which affects formability. Therefore, FLD should be able to consider changes in strain rate to predict the forming limit of various sheet metal forming processes with various strain rate condition.
In recent years, many high-speed forming processes such as electrohydraulic forming (EHF), explosive forming (EF), and electromagnetic forming (EMF), have been developed. According to Golowin [11] and Kamal [12], high-speed forming provides improved formability due to the high-pressure and high-speed impact compared to forming processes under quasi-static conditions. The improved formability has been demonstrated with steels [13], aluminum alloys [14], as well as magnesium and titanium alloys [15]. Therefore, many high-speed forming processes have been studied for improved sheet metal formability.
Among many high-speed forming processes, EHF uses a discharged electric energy as a deformation resource of the blank in fluid. As shown in Figure 1, it consists of capacitor, chamber, die, electrodes, blank, wire, and fluid. When the capacitor discharges the electric energy, two electrodes deliver the energy into the fluid and it creates a high-pressure, high-temperature shock wave, which forms the sheet metal. The EHF process can reduce experimental cost by using only one rigid tool. In addition, when compared to EMF, it is possible to reduce the occurrence of defects or wrinkles because sheet bouncing does not occur even though the process proceeds at high-speed [16].
To evaluate the improved formability during the EHF process, acquiring FLD from the EHF experiment is the simplest way, this is however difficult to obtain. In general, experimental FLD can be obtained at a constant strain rate. However, in EHF experiments, the plate’s strain rate is not constant, and it ranges from 0 to 1000 s−1 or more. Therefore, it is necessary to develop the theoretical FLD, which can consider strain rate variation in EHF.
Therefore, in this study, to acquire theoretical FLD during the EHF process, the M-K theory was used, and Hollomon’s stress–strain equation including strain-hardening and strain rate sensitivity parameters was employed [17]. The strain-hardening index was acquired from the quasi-static tensile test and the strain rate sensitivity parameter was obtained by the split-Hopkinson pressure bar (SHPB) test, which is a high strain rate property acquisition test. In addition, the numerical simulation for EHF was conducted to evaluate the material’s property obtained from the quasi-static tensile test and SHPB test by comparing results of the numerical simulation and EHF experiment. Finally, to evaluate whether the obtained FLD can predict the actual forming limit of the plate, experimental results from the EHF process were compared to theoretical FLD.

2. Material Property for Al 6061-T6

Hollomon’s equation, which includes the strain rate hardening and strain-hardening indices, is used to consider the sheet’s high strain rate on FLD and is presented in Equation (1).
σ ¯ = K ε ¯ n ( ε ¯ ˙ ε ¯ ˙ 0 ) m
where σ ¯ is the effective stress, K is the stress coefficient, ε ¯ is the effective strain, ε ¯ ˙ is the effective strain rate, ε ¯ ˙ 0 is reference strain rate (0.00067 s−1), n is the strain hardening index, and m is the strain rate hardening coefficient.

2.1. Quasi-Static Material Property

In Equation (1), K and n are generally acquired by a quasi-static tensile test. Parameter n measures the ability of a material to become harden, and a larger value indicates larger degrees of strain hardening. For most general materials, the strain-hardening index is in the 0.1–0.5 range. The strain hardening exponent n and the strength coefficient K are both determined from the true stress versus the true strain in the region of uniform elongation.
In this study, the MTS Landmark-370 machine was employed to calculate parameters K and n of the Al 6061-T6 material at a strain rate of 0.00067 s−1, at room temperature. The specimen was designed using ASTM E8 as shown in Figure 2 [18]. L = 200 mm, G = 50 mm, C = 20 mm, W = 12.5 mm, R = 12.5 mm, and thickness = 1 mm. Parameters K and n of Al 6061-T6 are presented in Table 1.

2.2. High Strain Rate Material Property

The strain rate hardening index m in Equation (1) is obtained from the material property acquisition test at various strain rate conditions. In this research, the SHPB test was performed to obtain the parameter m. The SHPB is a specialized apparatus used to investigate material properties at high strain rate conditions. Kolsky [19] presented a method for acquiring the dynamic behavior of materials using the SHPB test. Two cylindrical bars are positioned at each end of a specimen to compress it as shown in Figure 3. Dimensions for the specimen were as follow: diameter = 10 mm and length = 10 mm. When a bar (incident bar) in front of the specimen is struck by an impact bar, a compressive stress wave is generated, and it propagates in the direction of the specimen. When this wave reaches the contact surface between the bar and the specimen, some fraction of the wave is reflected back to the bar, and the remaining portion passes through the specimen up to the next bar (transmitted bar). During the test, elastic stress waves of the two bars are measured by two strain gauges attached to the surface of the bars as shown in Figure 3 and they are used to calculate the stress–strain wave of the specimen using Equations (2) and (3).
σ s p e c i m e n ( t ) = Y S S s p e c i m e n ε T ( t )
ε s p e c i m e n ( t ) = 2 C 0 L s p e c i m e n 0 t ε T ( t ) d t
In Equation (2), Y and S are young’s modulus and area of cross-section for the bar, Sspecimen is the cross-section of the specimen. ε T ( t ) is the strains of the transmitted bar measured by strain gauge. In Equation (3), C0 is a propagation velocity for elastic wave in the bar, Lspecimen is the length of the specimen. The SHPB test is described in detail in [20].
Figure 4 shows the stress–strain curves of Al 6061-T6 according to the strain rate condition calculated using Equations (2) and (3). Three curves were obtained at 2300, 3200, and 3900 s−1, and were used to calculate the strain rate hardening index m using the curve explained in Equation (1). To obtain the material constant m, the stress and the strain should be replaced with logarithmic scale. The parameter m can then be extracted using a linear curve-fitting method, this is shown in Table 1.

3. Numerical Simulation of Electrohydraulic Forming

3.1. Finite Element Modeling for Fluid Parts

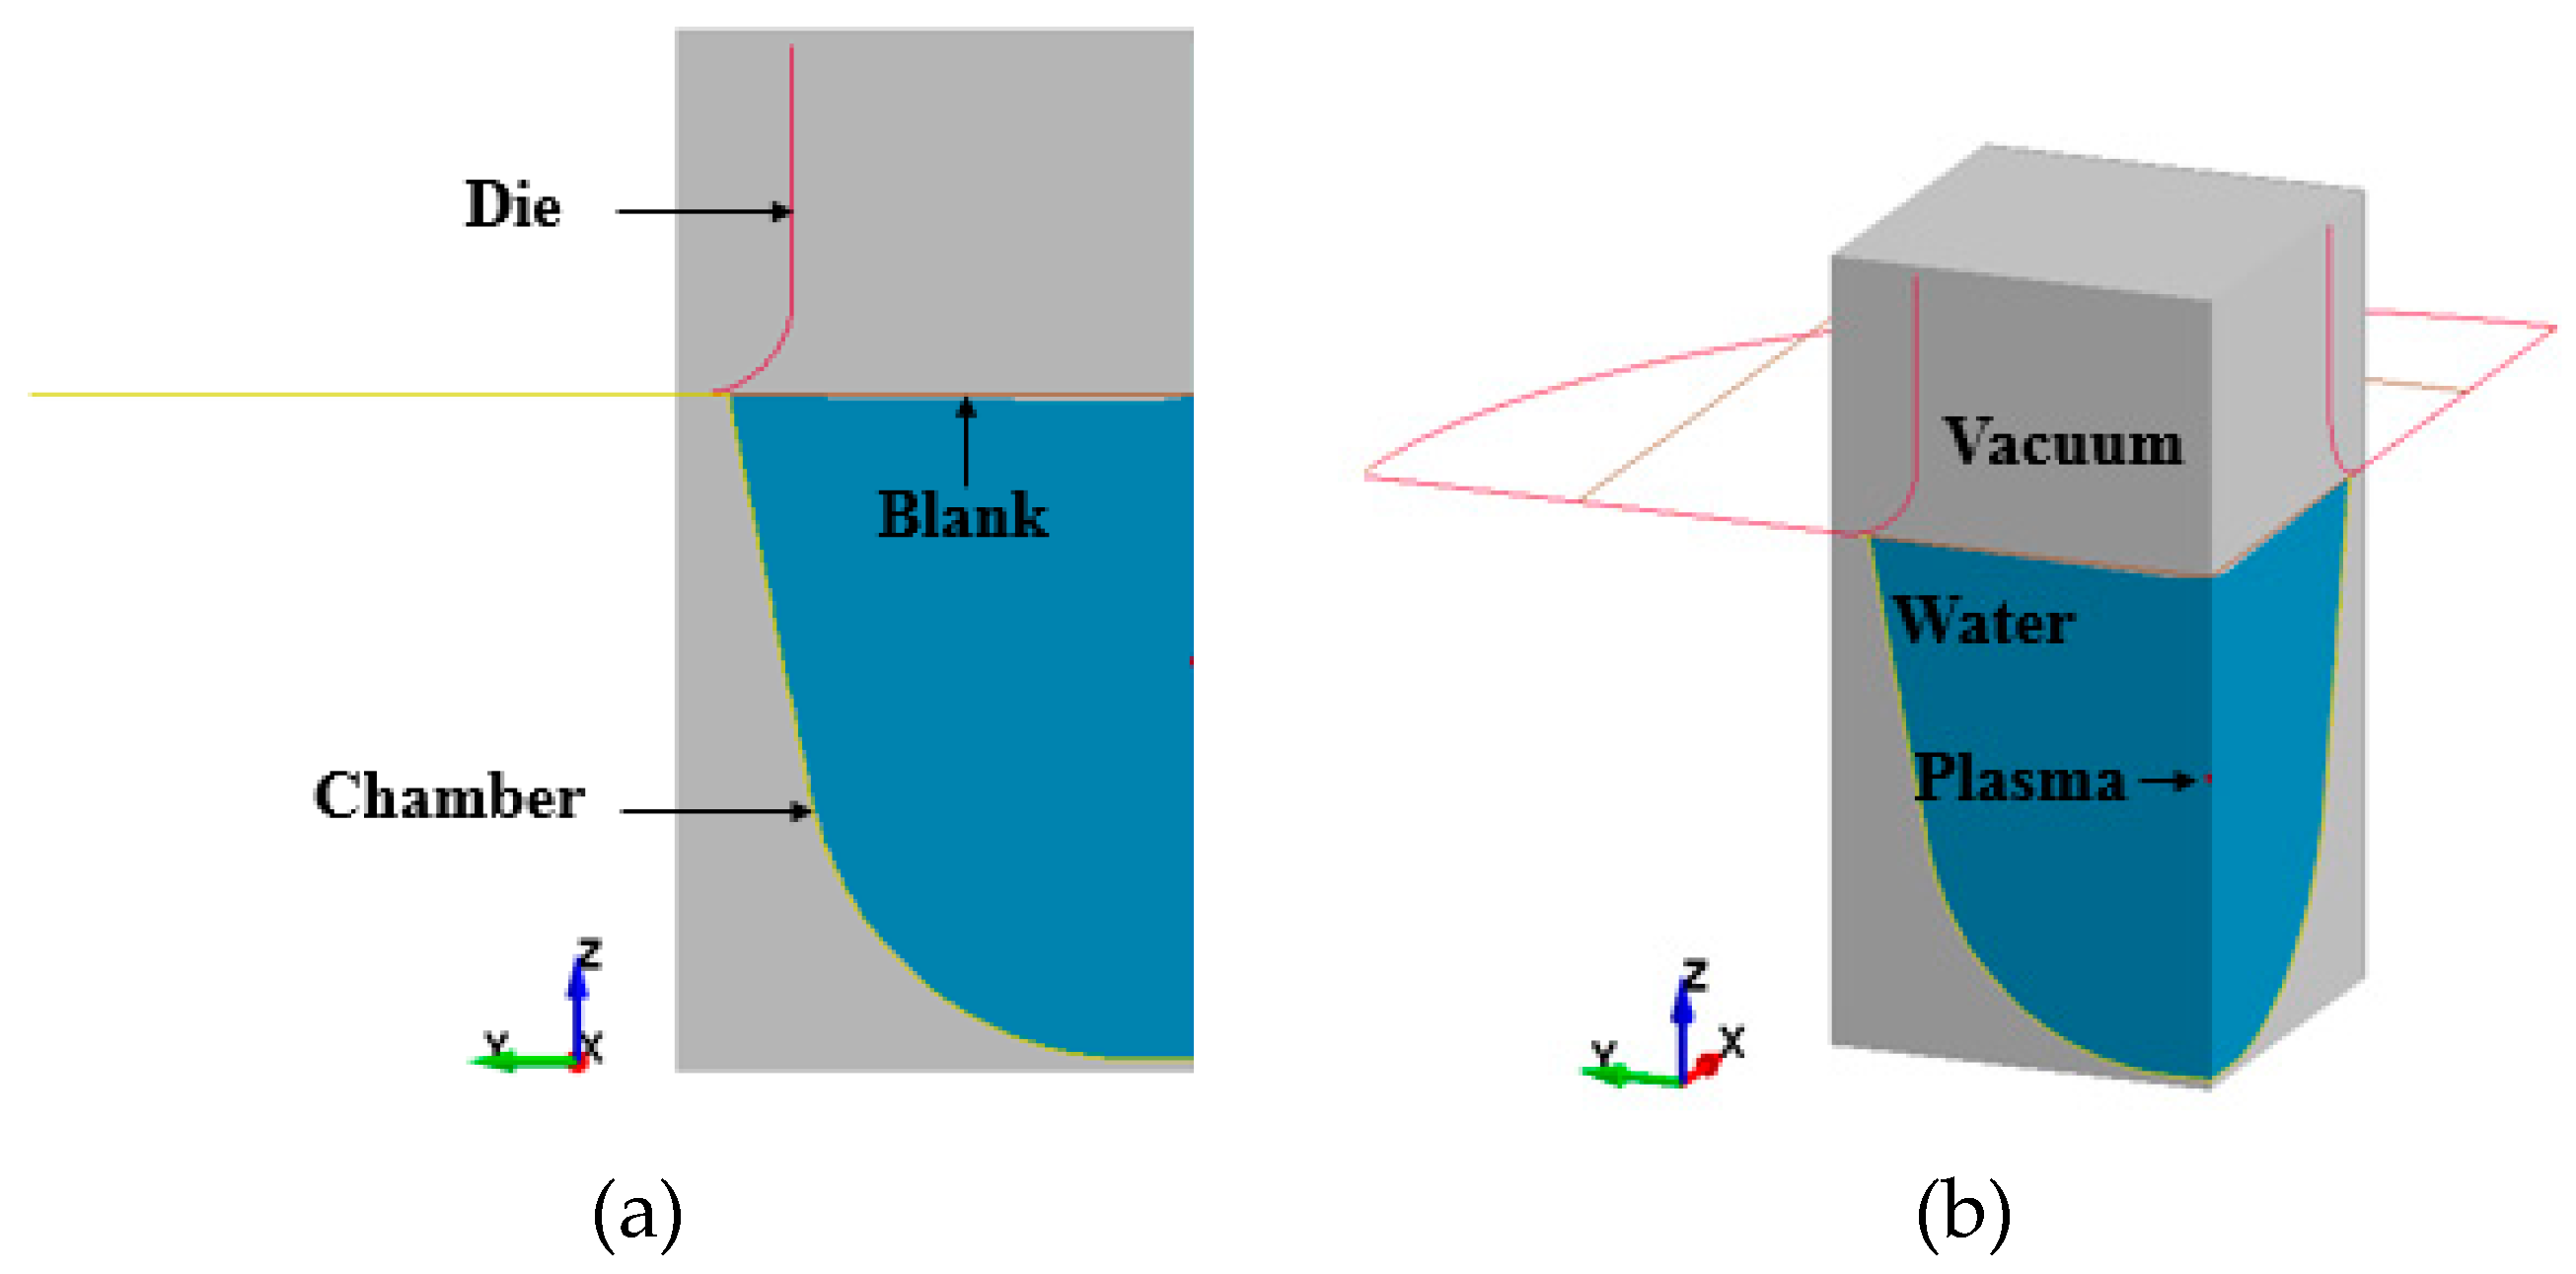
To validate the material property obtained in Section 2, a numerical simulation for EHF was performed. The numerical model was developed in the LS-DYNA program. To reduce numerical cost, only 1/4 of the model was employed because the numerical model is axisymmetric about the Z-axis. In the numerical model, there are fluid parts (water, vacuum, plasma) and structural parts (blank, chamber, die) as shown in Figure 5. In the experiment, electrodes are used to deliver electric energy into the water. However, when using the electrodes in the simulation, the model is so complicated that it is too difficult to create the elements. For the simulation efficiency, plasma part was used instead of the electrodes. This treatment is reasonable because many previous studies [21,22,23] have shown that the numerical model with the plasma part can represents the deformation results well instead of electrodes.
The most important factor in the fluid parts is the plasma part that has the forming resource. Plasma is necessary for the application of electric energy and was modeled as an adiabatically expanding gas with 1-mm radius. The electric energy in the plasma was assumed to be uniform through the entire volume of the plasma and the pressure is presented as shown in Equation (4).
P = ( γ 1 ) ρ ρ 0 E
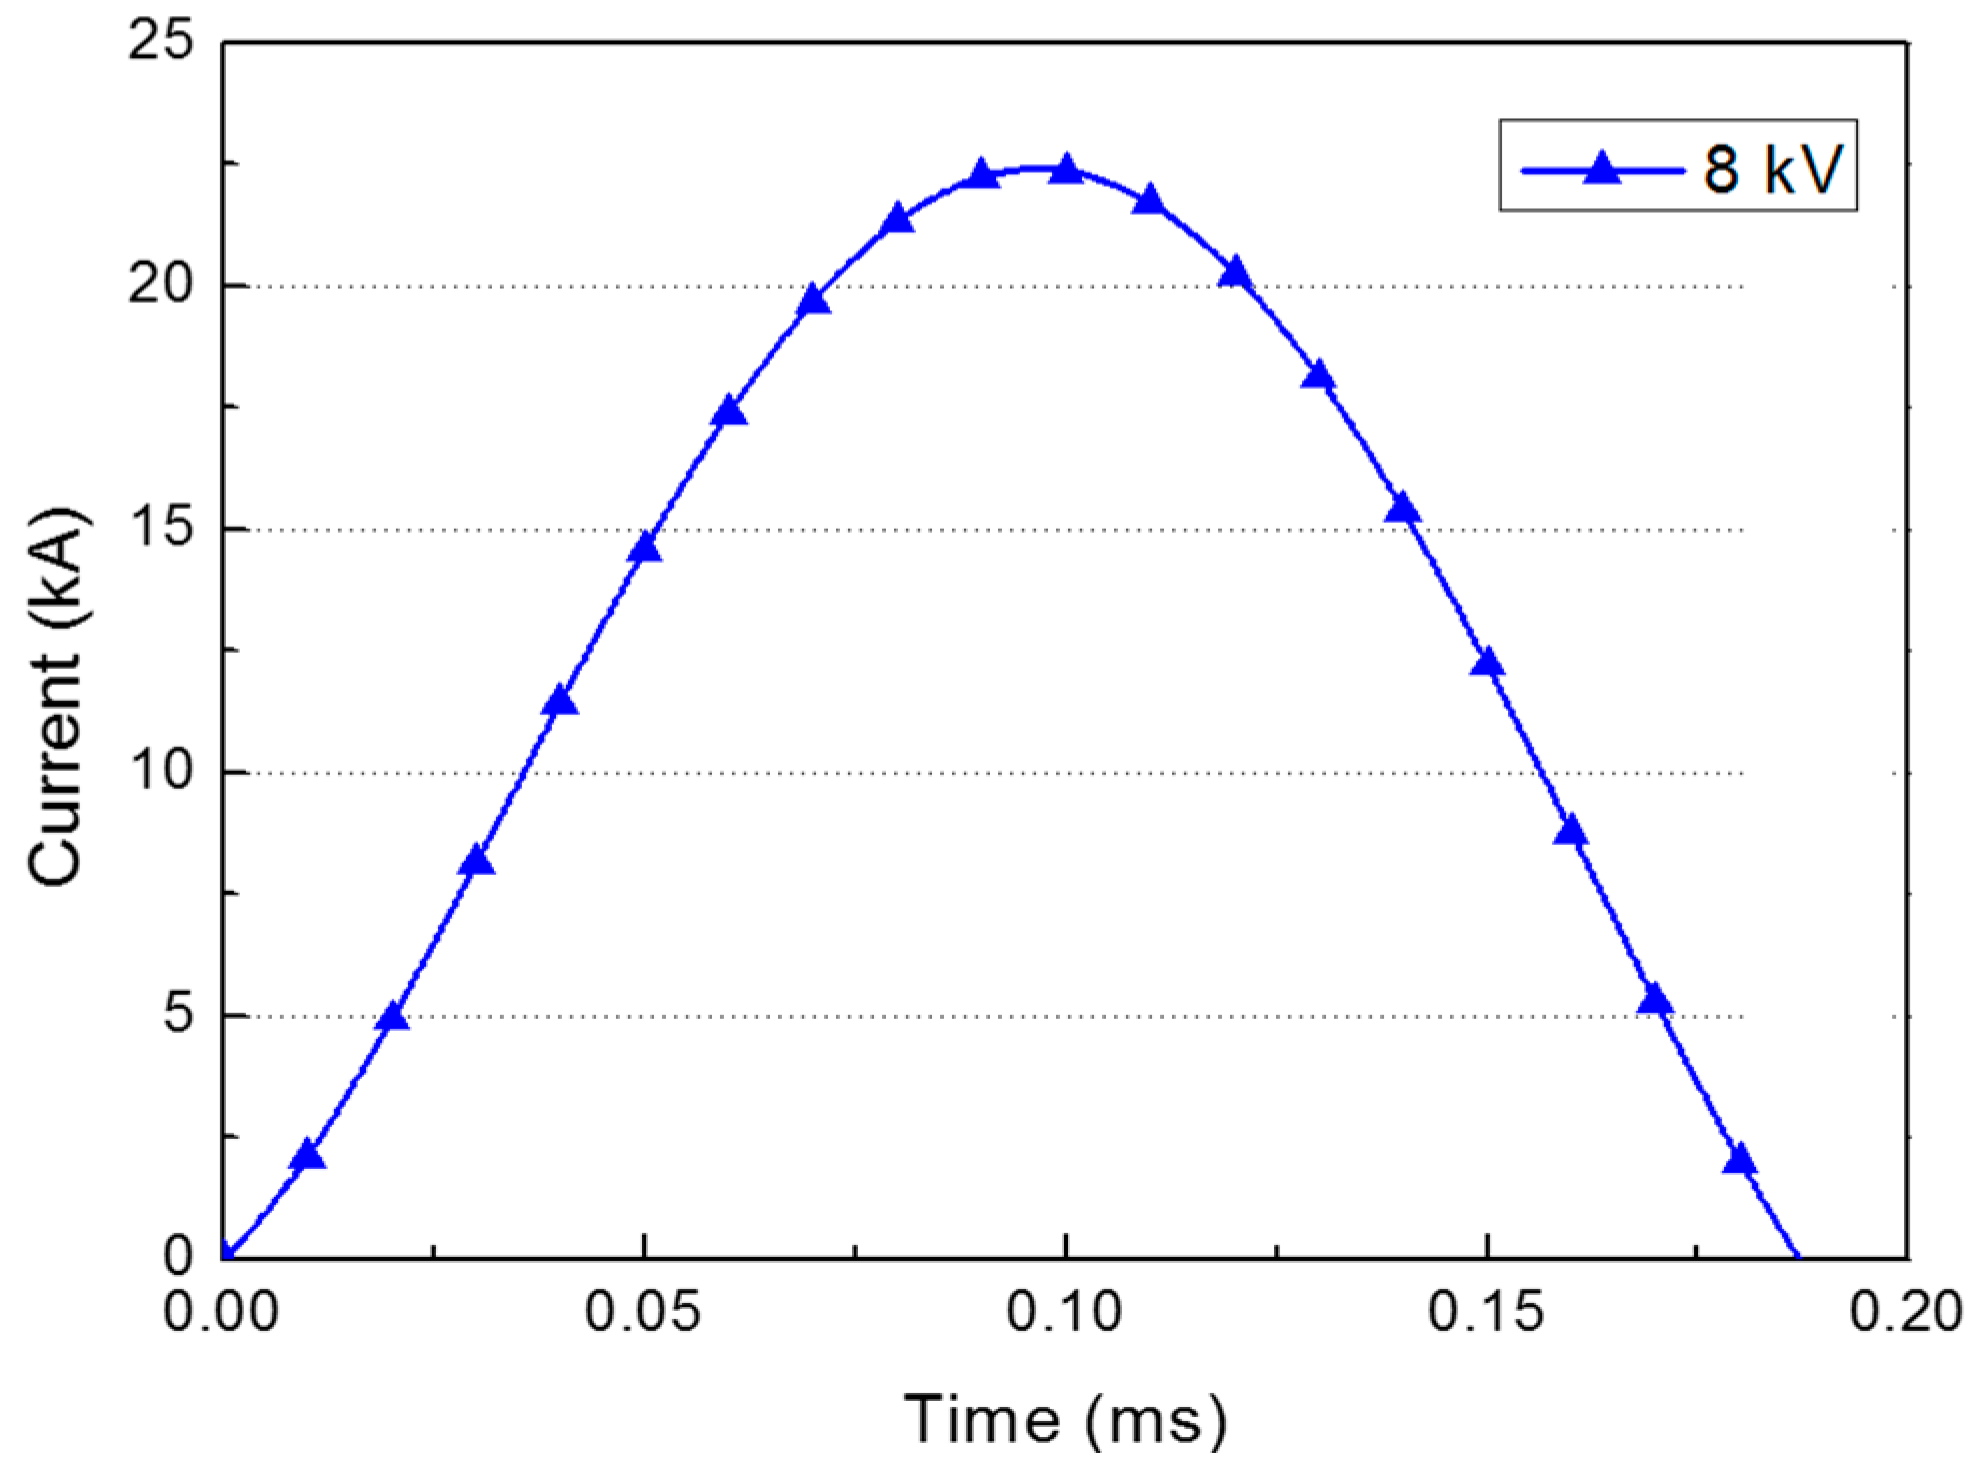
where γ is an adiabatic index, ρ is the density, ρ 0 is the initial density, and E is the initial energy per volume of the plasma. The parameter E is calculated as the product of the current and the voltage. In this paper, γ was 1.26 and ρ 0 was 1000 kg/m3, which is equal value with the density of the water. To calculate E, the current curve was obtained by Rogowski coil as shown in Figure 6, and the voltage was assumed to decrease linearly from the input voltage 8 kV to 0 until the current curve reached the peak value.
Since the numerical model in this research has three fluid parts, the contact conditions between them must be defined, but they cannot be easily defined as the contact conditions used in general structural analysis. In addition, to deform the blank, elements of the water part underwent a large deformation, inducing the mesh distortion problem. The above problems can be resolved by applying the arbitrary Lagrange–Eulerian (ALE) solver in LS-DYNA.

3.2. Numerical Model of Structural Parts

Structural parts consist of blank, chamber, and die, all of which are modeled using shell elements for reducing the simulation time. The chamber and the die are assumed to be rigid bodies and the material of the blank is Al 6061-T6. The element size of the blank is 2 mm and other parts have similar size with the blank to deliver the pressure of the water accurately. The material property for the blank was presented with stress–strain curves obtained in Section 2 using *DEFINE_TABLE and *DEFINE_CURVE in LS-DYNA.
When defining the contact between the fluid and structure parts (i.e., fluid–structure interaction (FSI), the *CONSTRAINED_ LAGRANGE_IN_SOLID keyword of LS-DYNA was used. To apply this keyword, the two parts must overlap in part [24]. Therefore, as shown in Figure 5, the vacuum part is larger than the actual space that must be vacuumed (between the blank and the die). This allows the vacuum to overlap with the structural parts and the keyword to work properly.

3.3. Results of Numerical Simulation

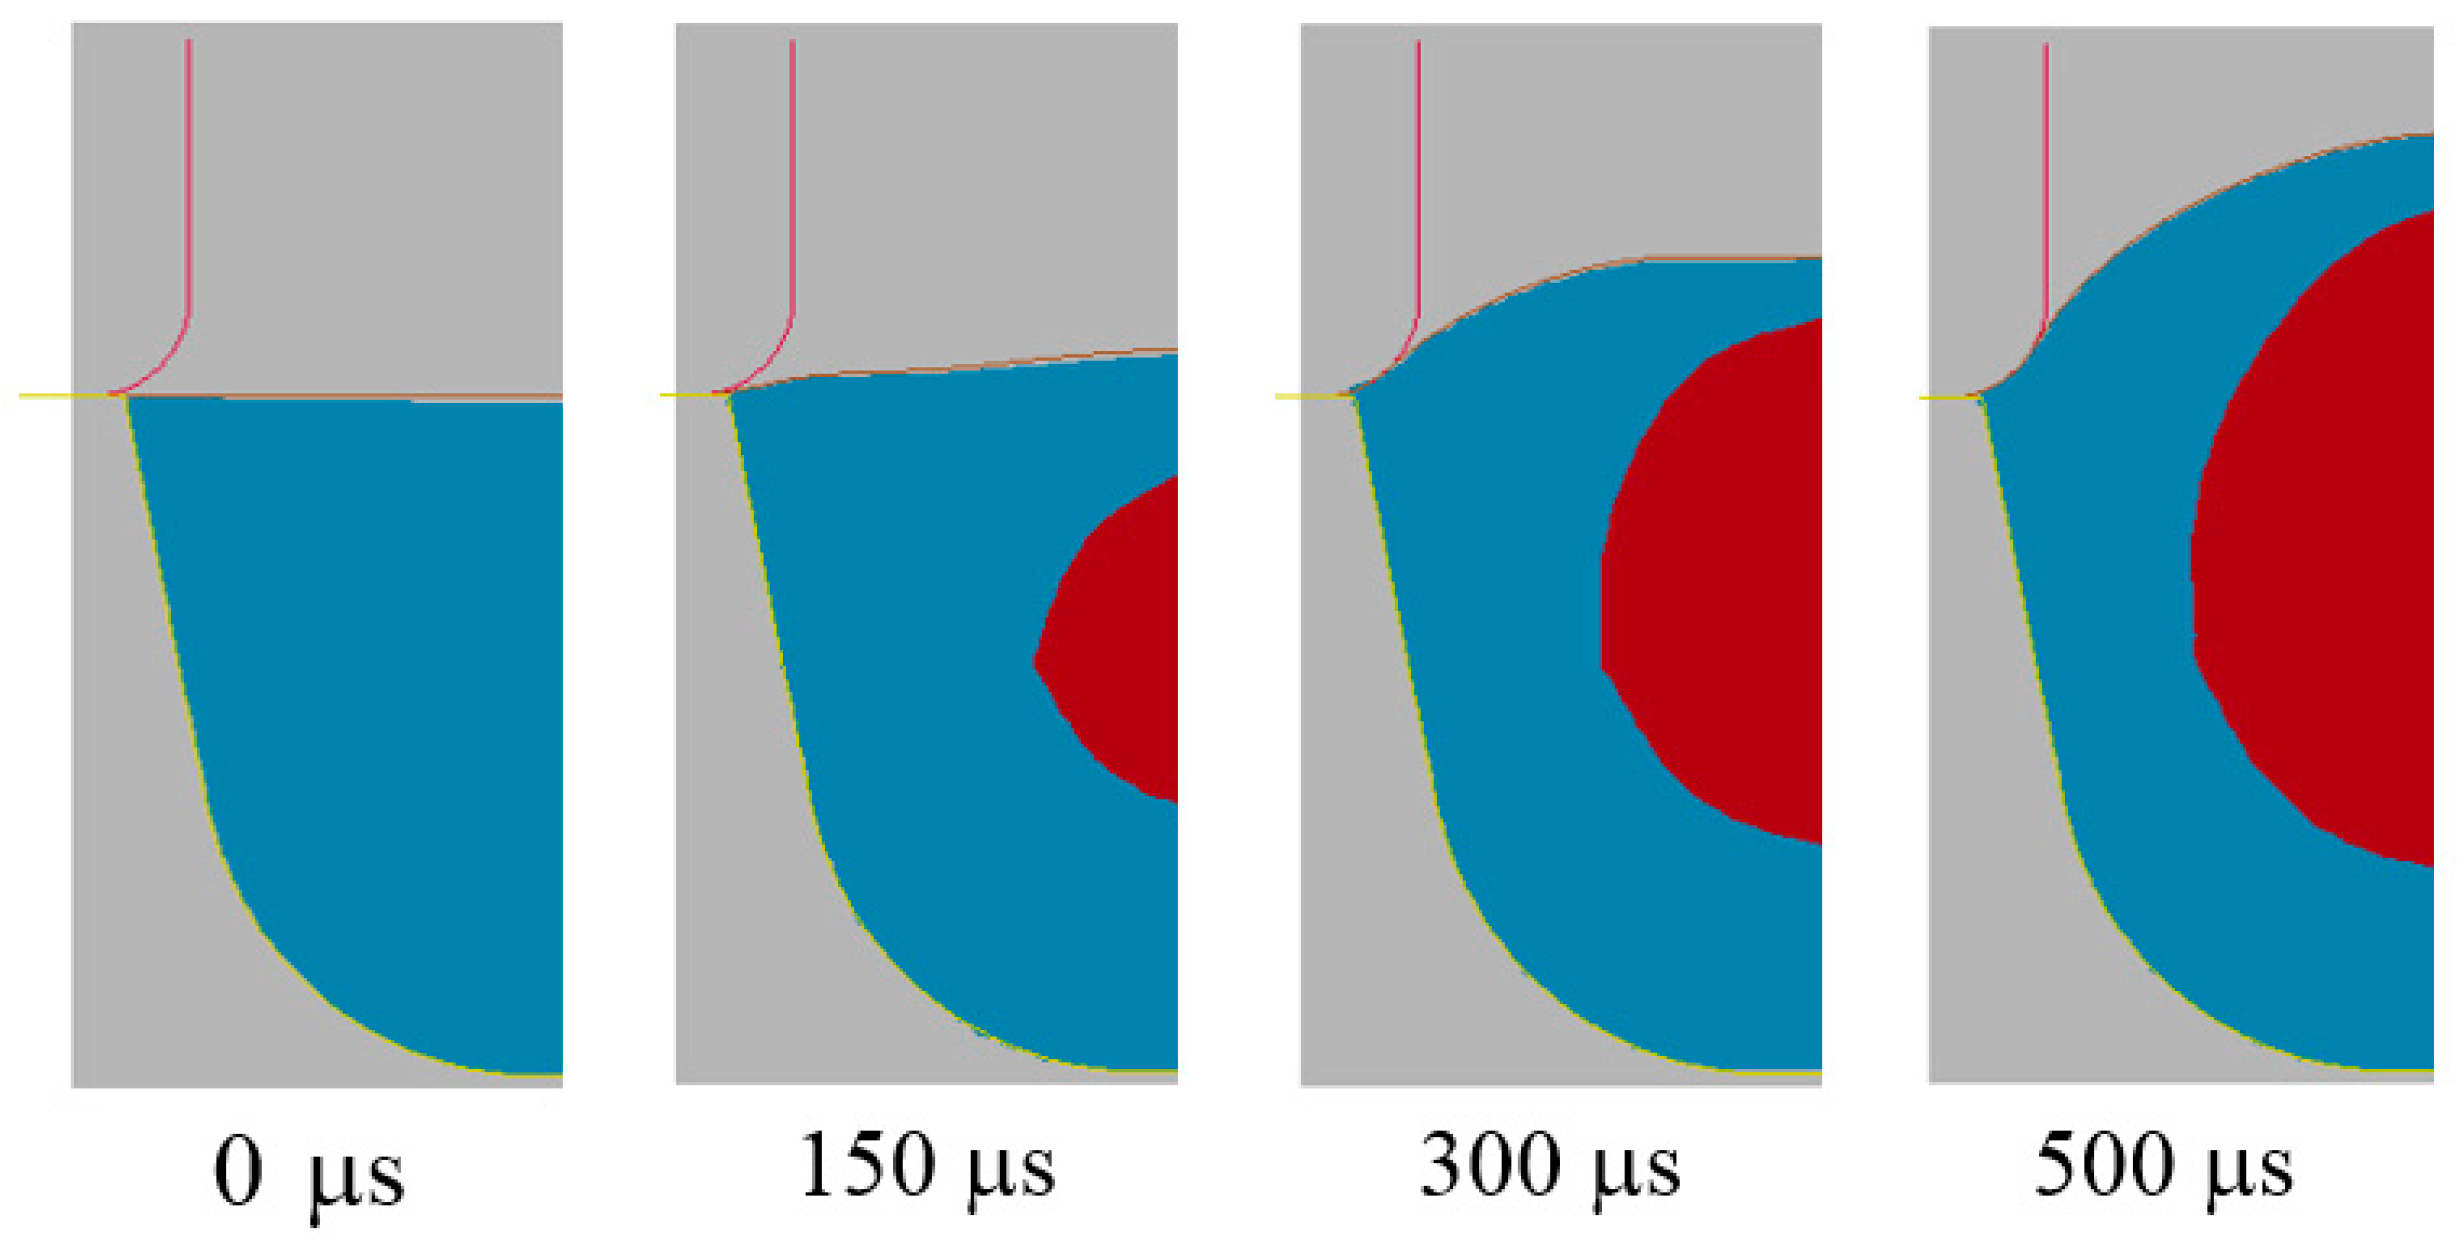
Figure 7 shows the progression of the EHF and the deformation behavior of the blank. The initial plasma part is very small at the beginning step and grows larger with increasing electric energy as time goes on. As the shape of the plasma changes, water moves and causes the free bulging deformation of the blank as shown in Figure 7. This figure also shows that there was no leakage of the fluid due to the FSI, mentioned in Section 3.2, being properly applied to the numerical model.
Figure 8 shows the effective strain rate over time at points A, B, and C on the blank. The maximum strain rate was approximately 2300 s−1, which was created near the entrance where the blank is inserted. The reason for the maximum strain rate at point C due to the fact that it was closed to the area clamped to the chamber and the die. The forming of the blank took place in a very short time, and the section near point C was tensioned rapidly due to clamping, so that the maximum strain rate occurred near point C.
In addition, the maximum strain rate was less than 2500 s−1, the final deformation shapes of the sheet in the simulation and the experiment were similar as shown in Figure 9, although there was a 10% error in maximum bulge height, meaning that the material property obtained from SHPB is valid for the EHF process.

4. Theories for Prediction of Forming Limit Diagram

4.1. M-K Model

To predict the forming limit in the biaxial tensile state, Marciniak and Kuczynski used a model with initial material defects in the groove set perpendicular to the major strain ( ε 1 ) direction. Assuming that the defects cause a local neck as the plate deforms under biaxial tension, they predicted the forming limit due to the occurrence of local necking. This theory largely depends on the size of the initial defects, but generally agrees well with the experimental results and has been widely used until recently in the evaluation of the forming limit of the material. The FLD shape obtained by the M-K model is greatly influenced by the yield function used under the biaxial tensile condition. This phenomenon occurs because a close relationship exists between the ratio of the flow stress in the biaxial tensile state and the stress in the plane strain deformation state depending on the shape of the yield curve.
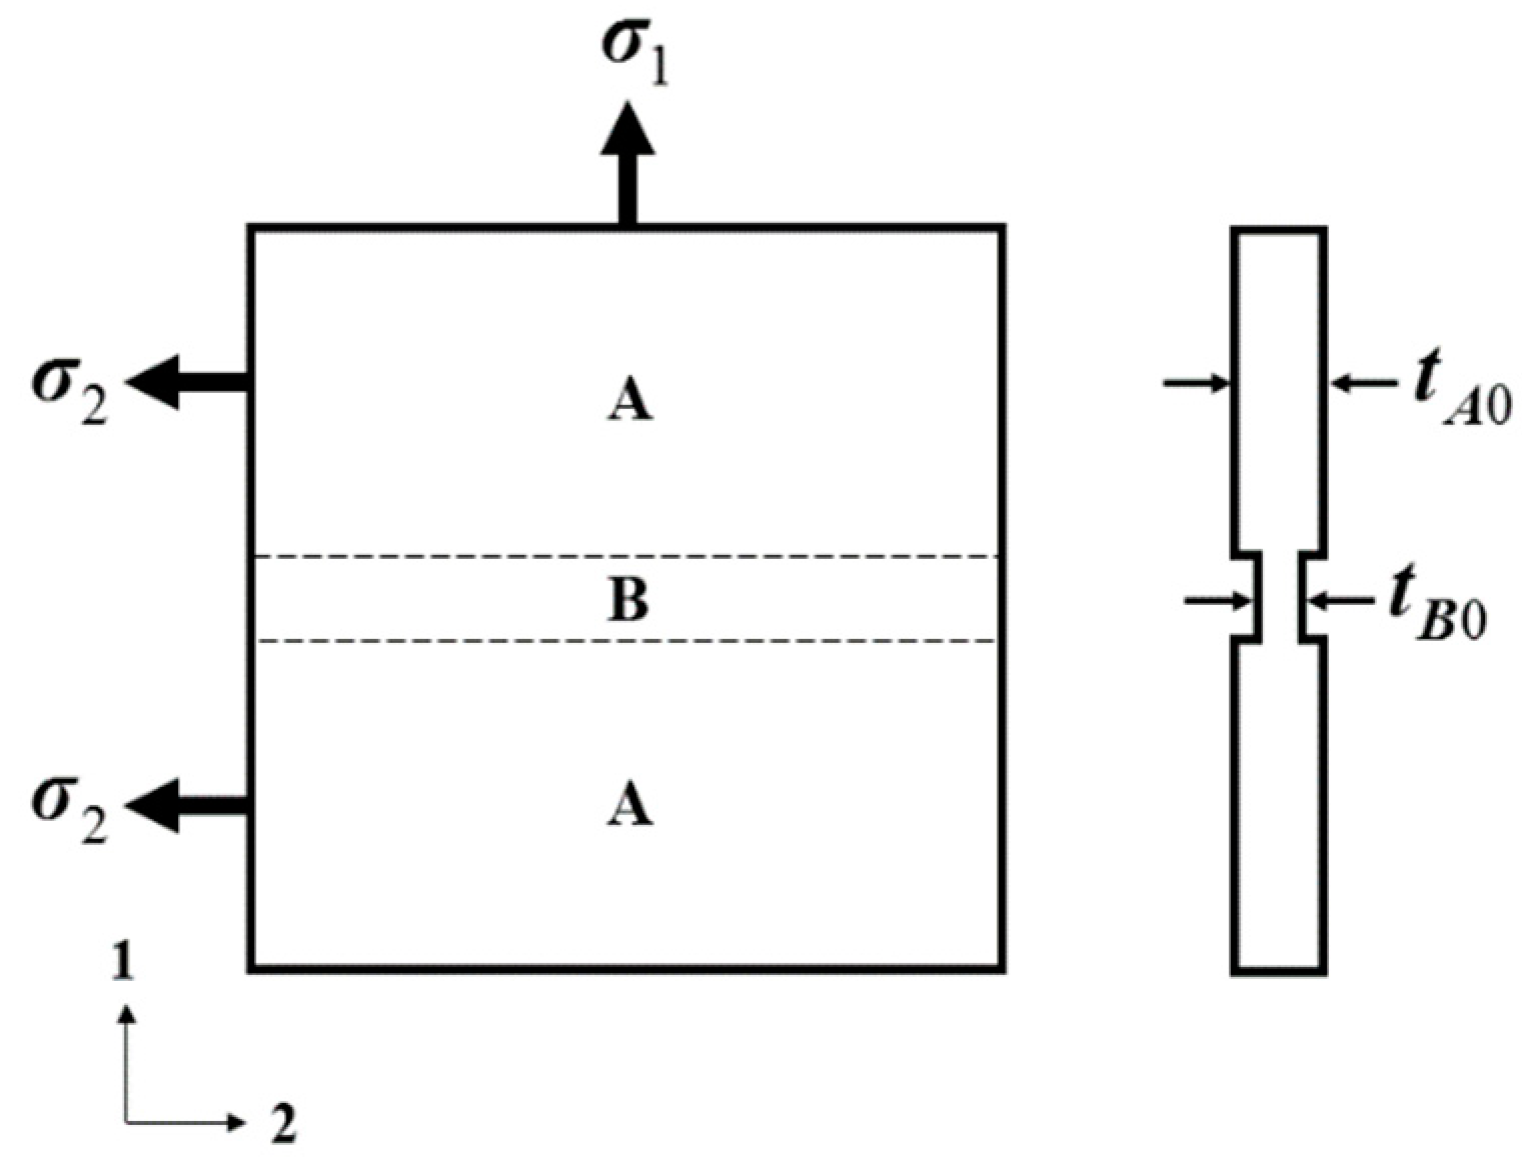
Assuming that the sheet where the biaxial tensile stress is applied has an initial defect at a narrow region across the plate width in a direction perpendicular to the major principal stress direction as shown in Figure 10, the initial imperfection of the plate is expressed as Equation (5).
f 0 = t B 0 / t A 0
where t A 0 is the initial thickness of the uniform region A and t B 0 is the initial thickness of the imperfection region B. f 0 can be assumed or obtained by the surface roughness experiment. Generally, for FLD based on M-K model, f 0 is at least 0.98 [5,25,26,27,28,29]. Therefore, in this paper, f 0 was assumed to be 0.995.
Because forces acting in direction 1 in regions A and B must be in equilibrium with each other when the biaxial tension is applied to the plate, Equation (6) should be satisfied, from the force equilibrium relation.
σ A 1 t A = σ B 1 t B σ A 1 t A 0 exp ( ε A 3 ) = σ B 1 t B 0 exp ( ε B 3 )
where σ A 1 and σ B 1 are stresses in direction 1 of the uniform and the imperfect regions, respectively, and ε A 3 and ε B 3 are the strains in the thickness direction of the uniform and the imperfect regions, respectively. The ratio of the stresses σ A 2 and σ A 1 in region A has a constant value defined as Equation (7).
α = σ A 2 / σ A 1
In addition, the plate to be deformed should satisfy Equation (8).
ε A 2 = ε B 2 ( Δ ε A 2 = Δ ε B 2 )
where ε A 2 and ε B 2 are the strains in direction 2, and Δ ε A 2 and Δ ε B 2 are the strain increments.
When it is assumed that the stress ratio as shown in Equation (7) is constant and isotropic hardening occurs, the strain ratio in the uniform region A is also a constant value and it is specified as a constant as shown in Equation (9).
β A = Δ ε A 2 / Δ ε A 1
The flow stress equation and the yield criterion of the material described in the next section are applied here. Then, assuming the strain increment in the direction of major strain (direction 1 in Figure 10) in the initial uniform region, the values satisfying Equations (5)–(8) are obtained through iterative calculation.
As the deformation of the material progresses, the strain state within the imperfection region approaches the plane strain state, and the necking is set to occur when the strain increment ratio ( Δ ε A 1 / Δ ε B 1 ) becomes smaller than 0.1.

4.2. Yield Function

The yield function of the material used in this study is Hosford 79 (nonquadratic anisotropic yield function) developed by Hosford [30] and is shown in Equation (10).
f ( σ i j ) = F | σ 2 σ 3 | a + G | σ 3 σ 1 | a + H | σ 1 σ 2 | a = 1
where F, G, and H are anisotropic parameters, and a is an index determined according to the crystal structure of the material. When a = 2, Equation (10) can be reduced to the von-Mises yield criterion. When a = 6 and 8, it is known that Equation (10) indicates good experimental results for BCC (body-centered cubic) and FCC (face-centered cubic) materials, respectively. In addition, when the parameter a increases, Equation (10) approximates the shape of the Tresca’s yield function curve and it is the same as in the case of a = ∞. In this research, parameter a = 8 was used because the crystal structure of the Al 6061-T6 is FCC.
Considering only the normal anisotropy of the sheet assuming a plane stress state for the thin sheet, Equation (10) is summarized as Equation (11).
σ ¯ = [ 1 1 + r ( 1 + | α | a + r | 1 α | a ] 1 a | σ 1 |
where r is a normal anisotropy parameter and α is the stress ratio ( σ 2 / σ 1 ). The value of r was obtained by the uniaxial tensile test, which was 0.84 in the case of Al 6061-T6 [31]. The strain ratio and the strain work are shown in Equations (12) and (13).
β = ε 2 ε 1 = α a 1 r ( 1 α ) a 1 1 + r ( 1 α ) a 1
σ ¯ Δ ε ¯ = ( 1 + α β ) σ 1 Δ ε 1

4.3. Procedure for Calculation of Theoretical FLD

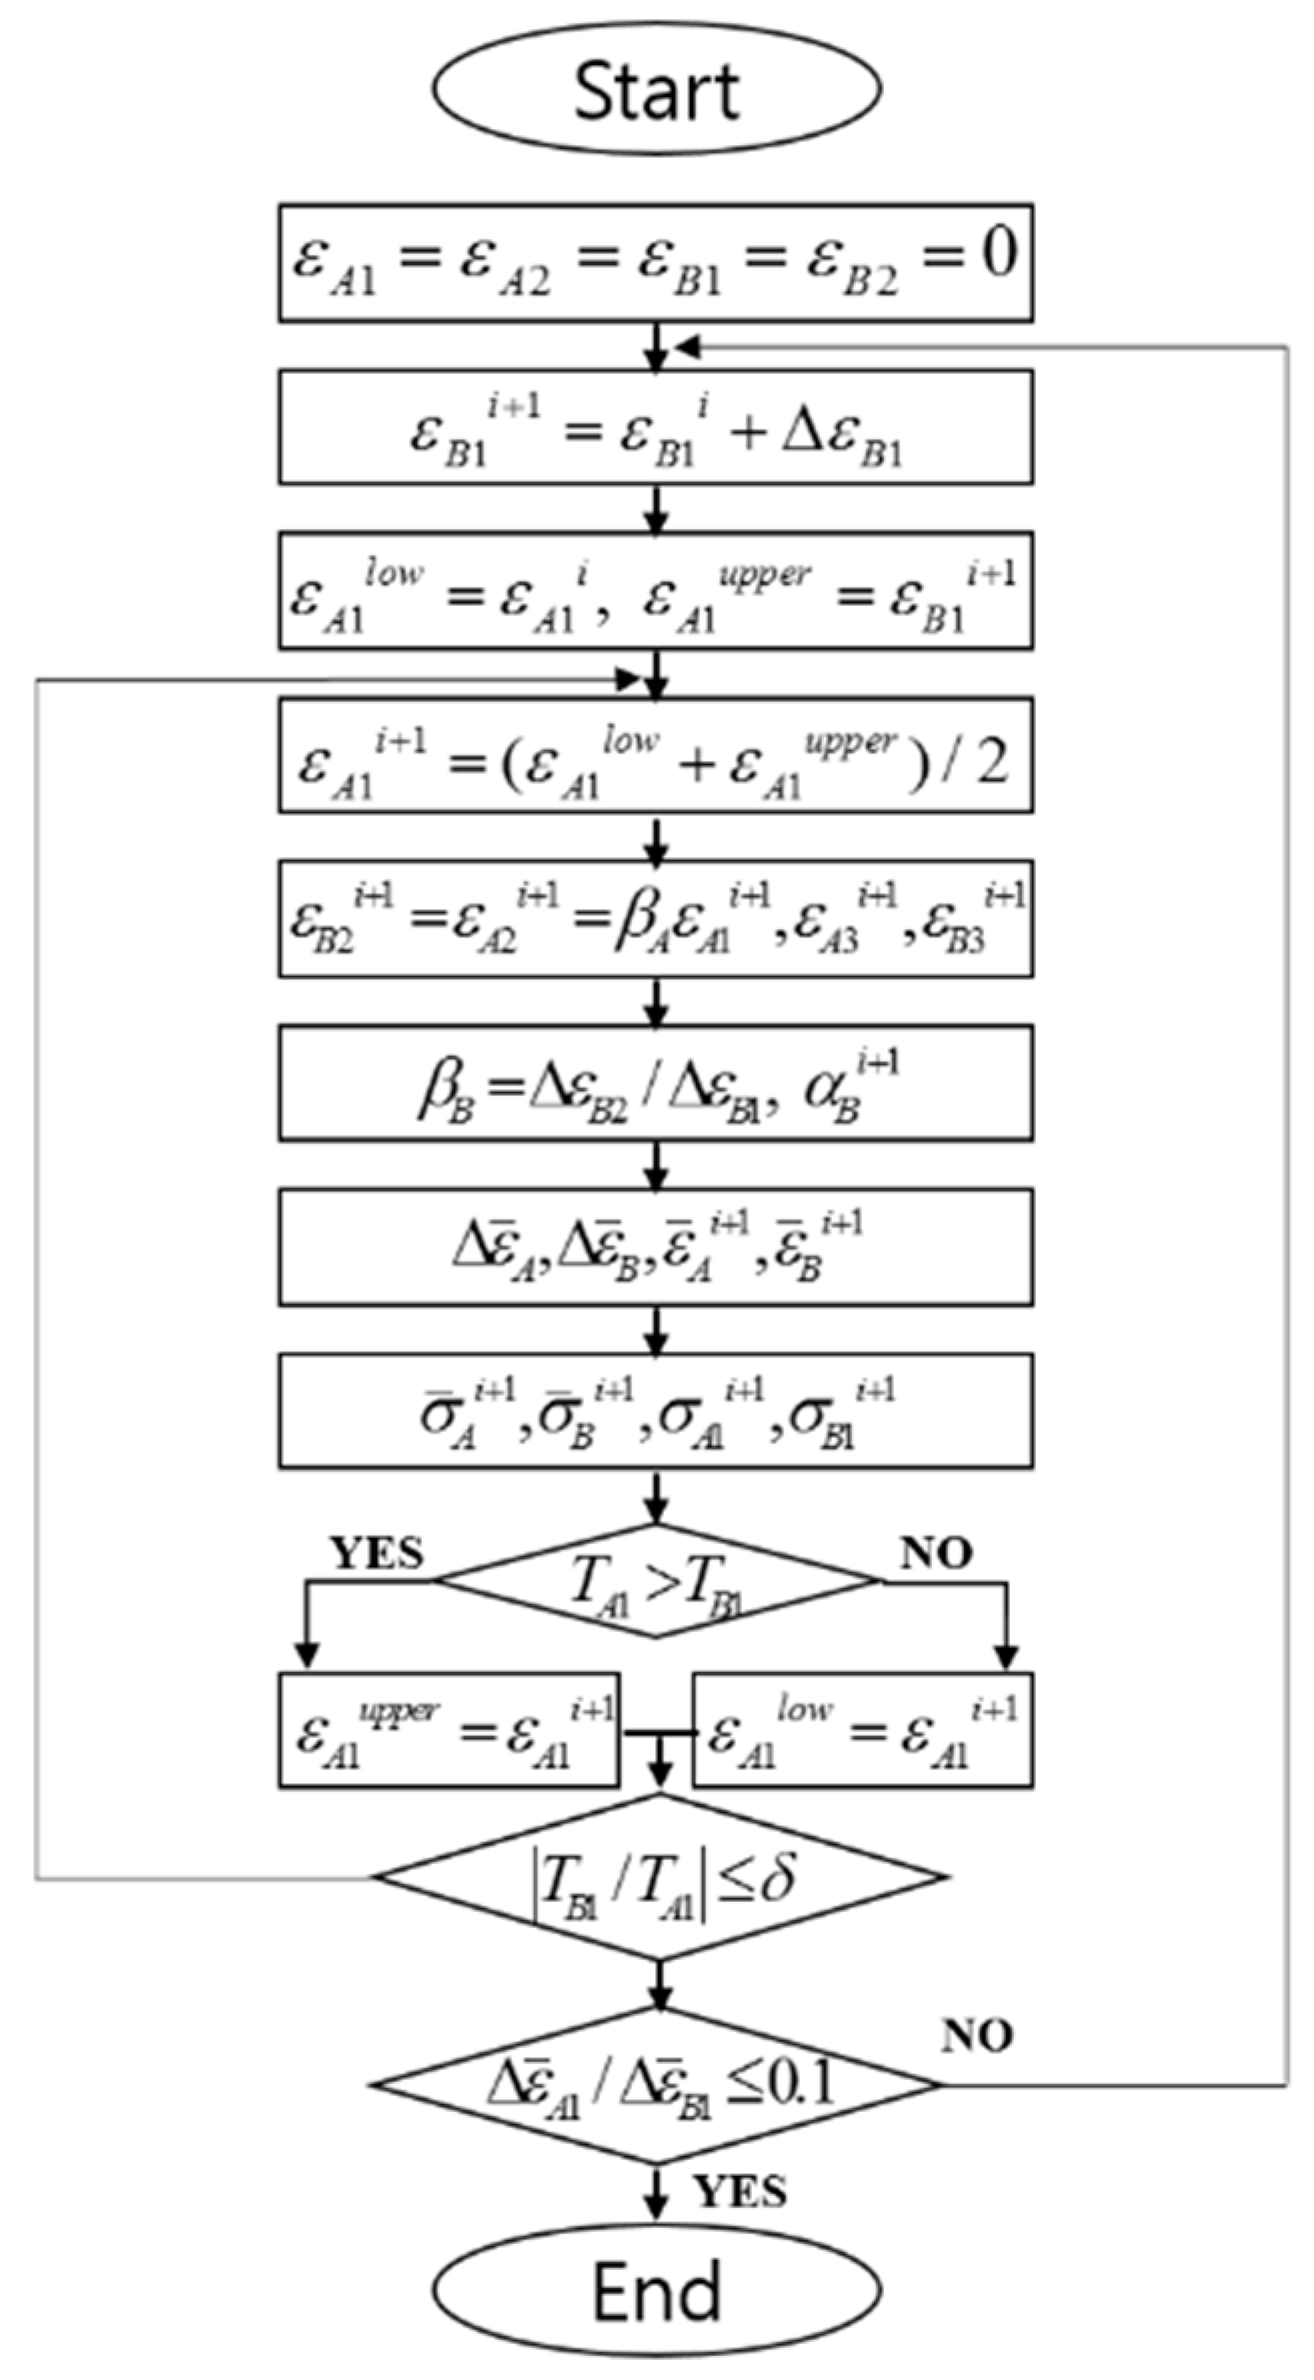
The method for acquiring FLD using the M-K method is shown in Figure 11. (1) Set the initial value of stress ratio in region A, β A . It has a value ranging from 0 to 1 depending on the tensile state and it is used to obtain the stress ratio α A using Equation (12). (2) Assume that the initial value of Δ ε B 1 is 1e−4 and calculate Δ ε B 2 . (3) Calculate β B and α B using Equation (8). (4) Calculate Δ ε ¯ A and Δ ε ¯ B by using an effective strain work equation. (5) Adjust the value of Δ ε A 1 until Equation (6) is satisfied. In Figure 10, TA1 is the force in region A and TB1 is the force in region B as described in Equation (6). In addition, δ is a term representing the force equilibrium criterion of region A and region B, and this value is set to 1 + 1e−10. (6) Apply Δ ε B 1 continuously until Equation (6) is satisfied and Δ ε A 1 / Δ ε B 1 becomes smaller than 0.1. (7) Acquire ε ¯ A and ε ¯ B depending on the values of β A when step (6) is satisfied and present these values on the ε 1 ε 2 plane.

5. Forming Limit Diagram

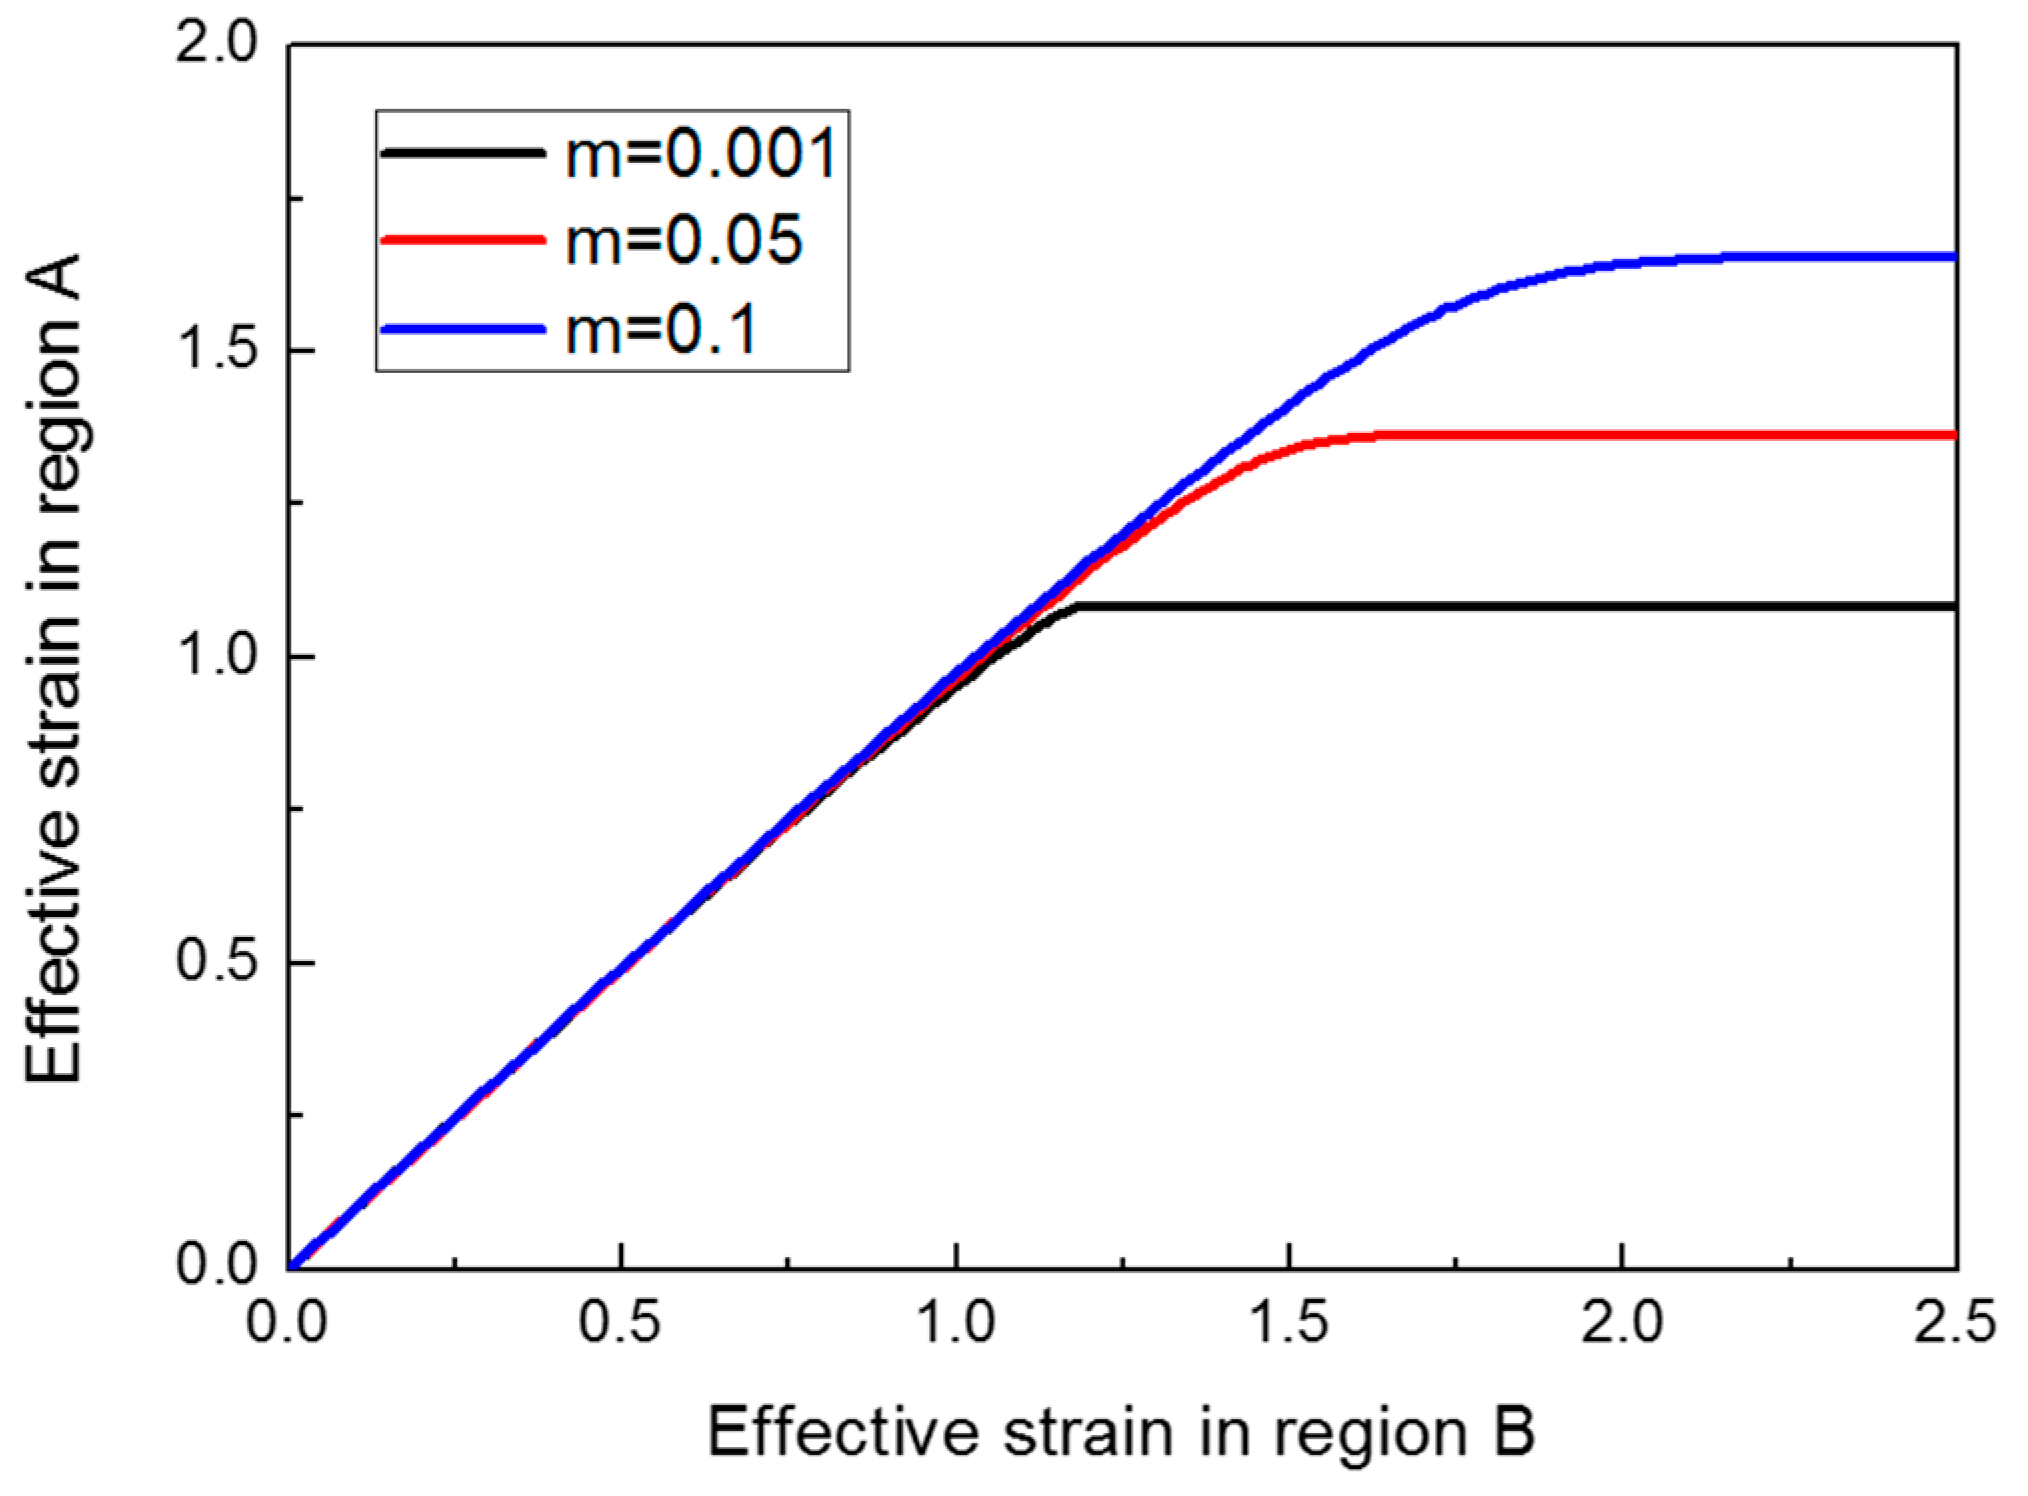
As mentioned in the introduction Section, the material has different deformation characteristics depending on the strain rate. Figure 12 shows the deformation evolution of the material according to the strain rate sensitivity index m at biaxial strain state. At the beginning of the process, the deformation is similar in the uniform and the imperfection regions. However, when it reaches a certain limit, it concentrates on the imperfection region, which means the necking. In addition, as the value of m becomes larger, local instability occurs later in the material, and large plastic deformation is possible, so that the formability of the material is improved.
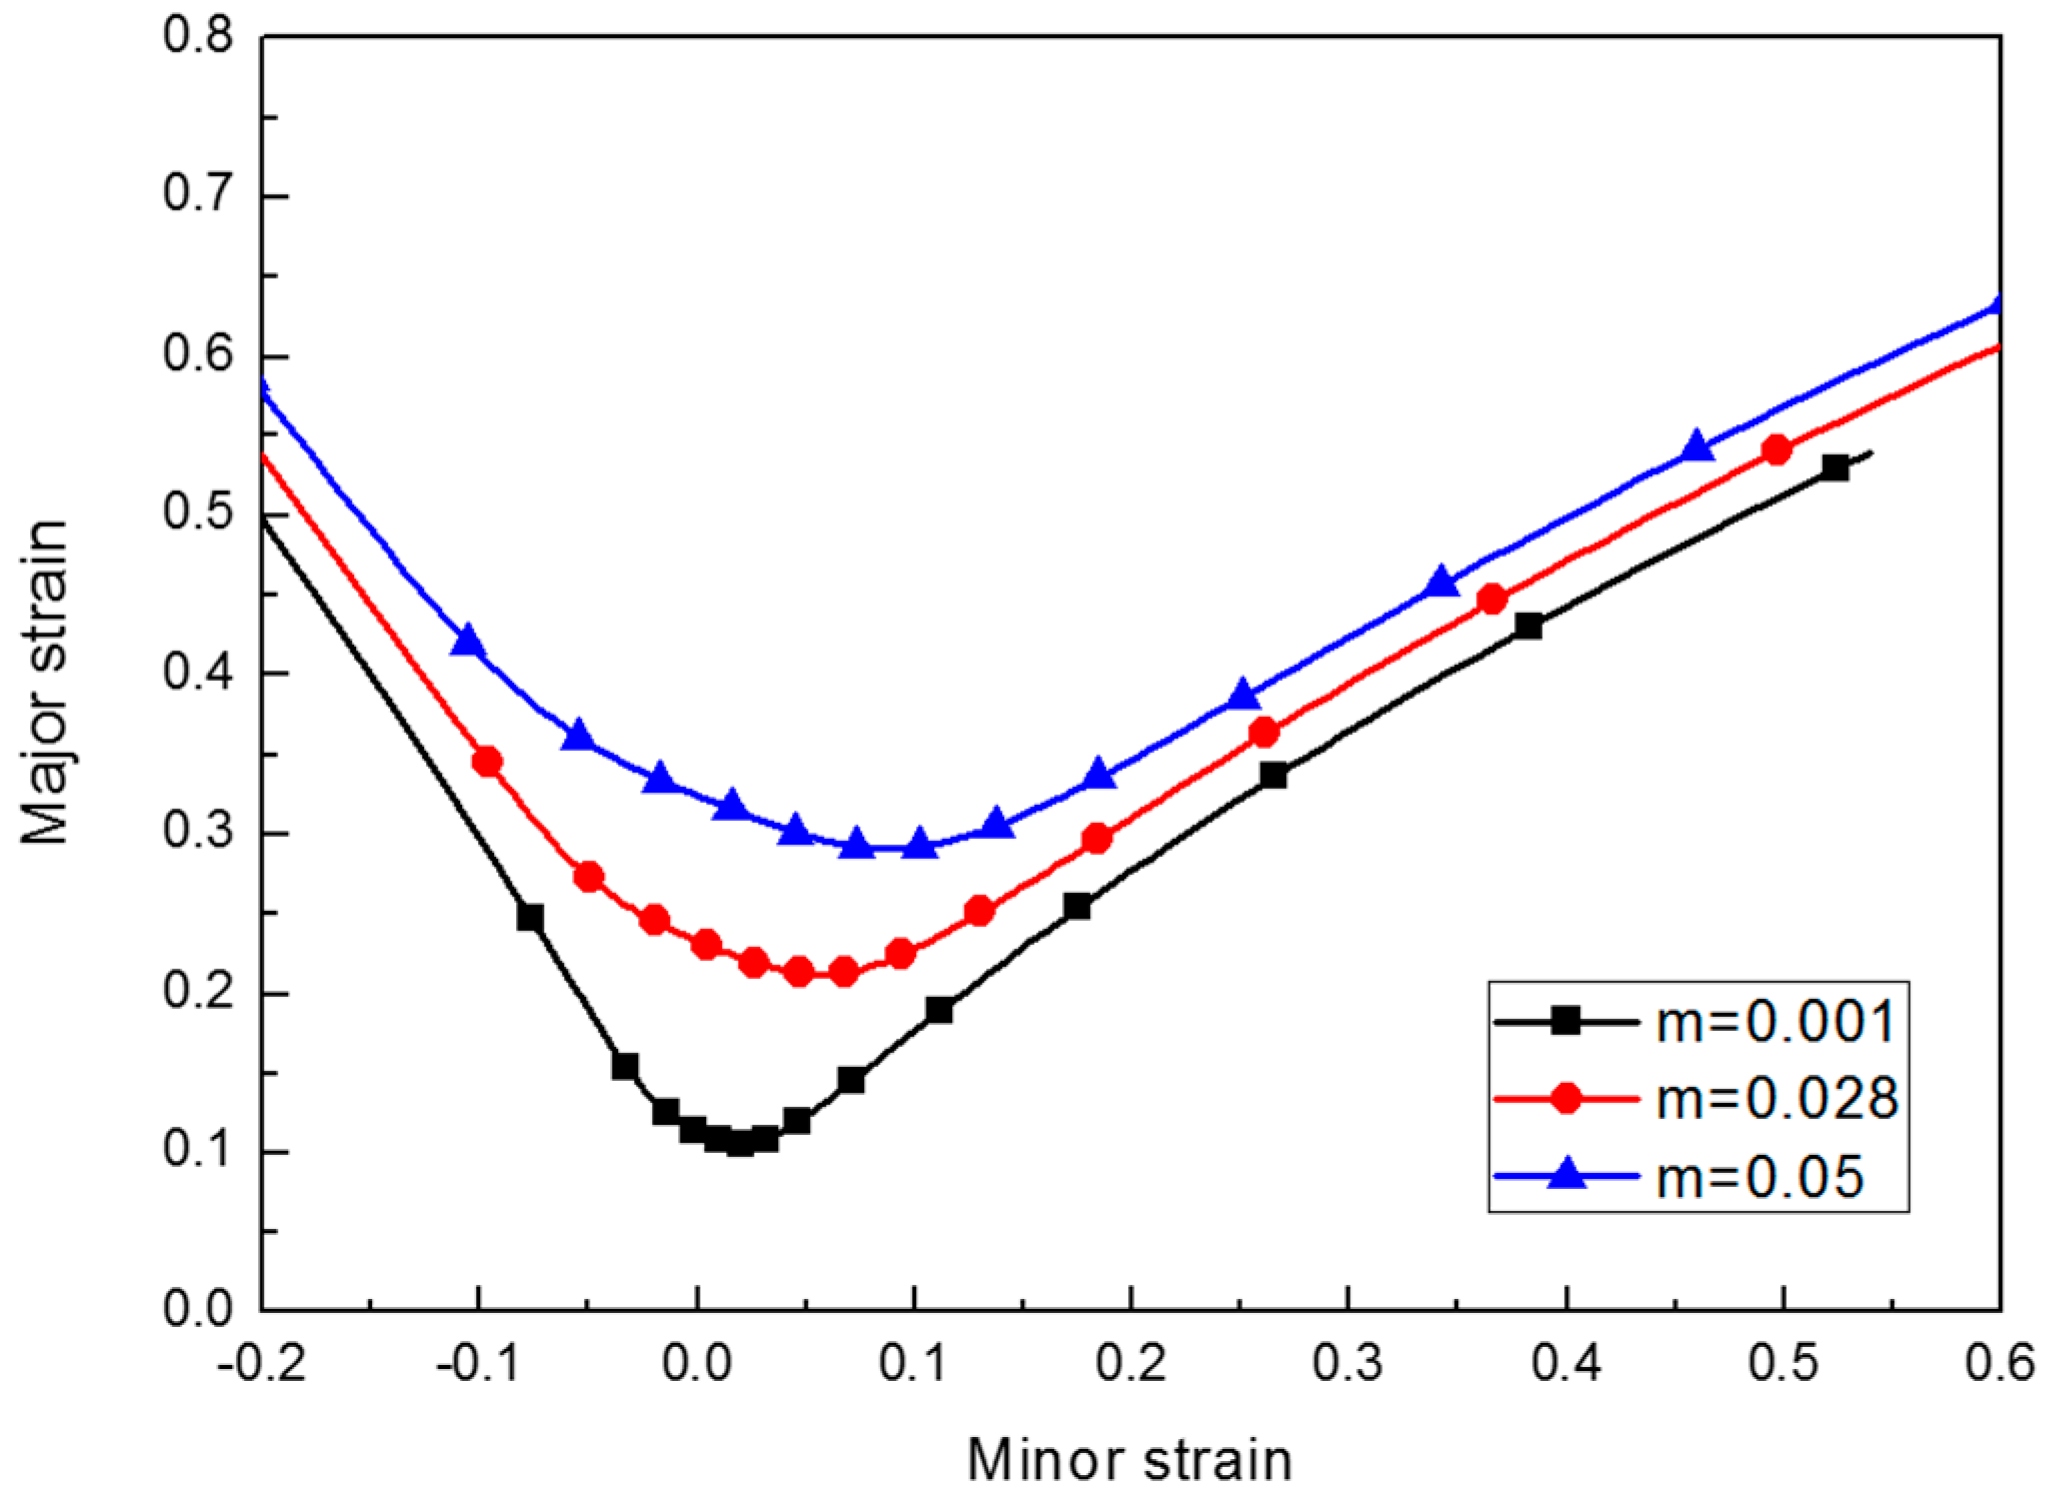
Figure 13 shows the theoretical FLD of Al 6061-T6 according to the different strain rate index. As described in Figure 12, the larger value of m, the higher the forming limit line is, which means that the formability is improved.
The inertia effect is well known as the cause of formability improvement [32]. It delays unstable conditions such as necking due to the inertia that wants to maintain its original stable state when the material is deformed at high-strain rate condition. As the strain rate change increases, the inertia effect lasts the stable state for longer than quasi-static state, and the necking is delayed, resulting in improved formability. Therefore, high-speed forming, which can dramatically increase the strain rate, can improve the formability of the materials that have low formability.

6. Evaluating the Forming Limit Diagram at a High-Strain Rate Condition Using Experimental Results

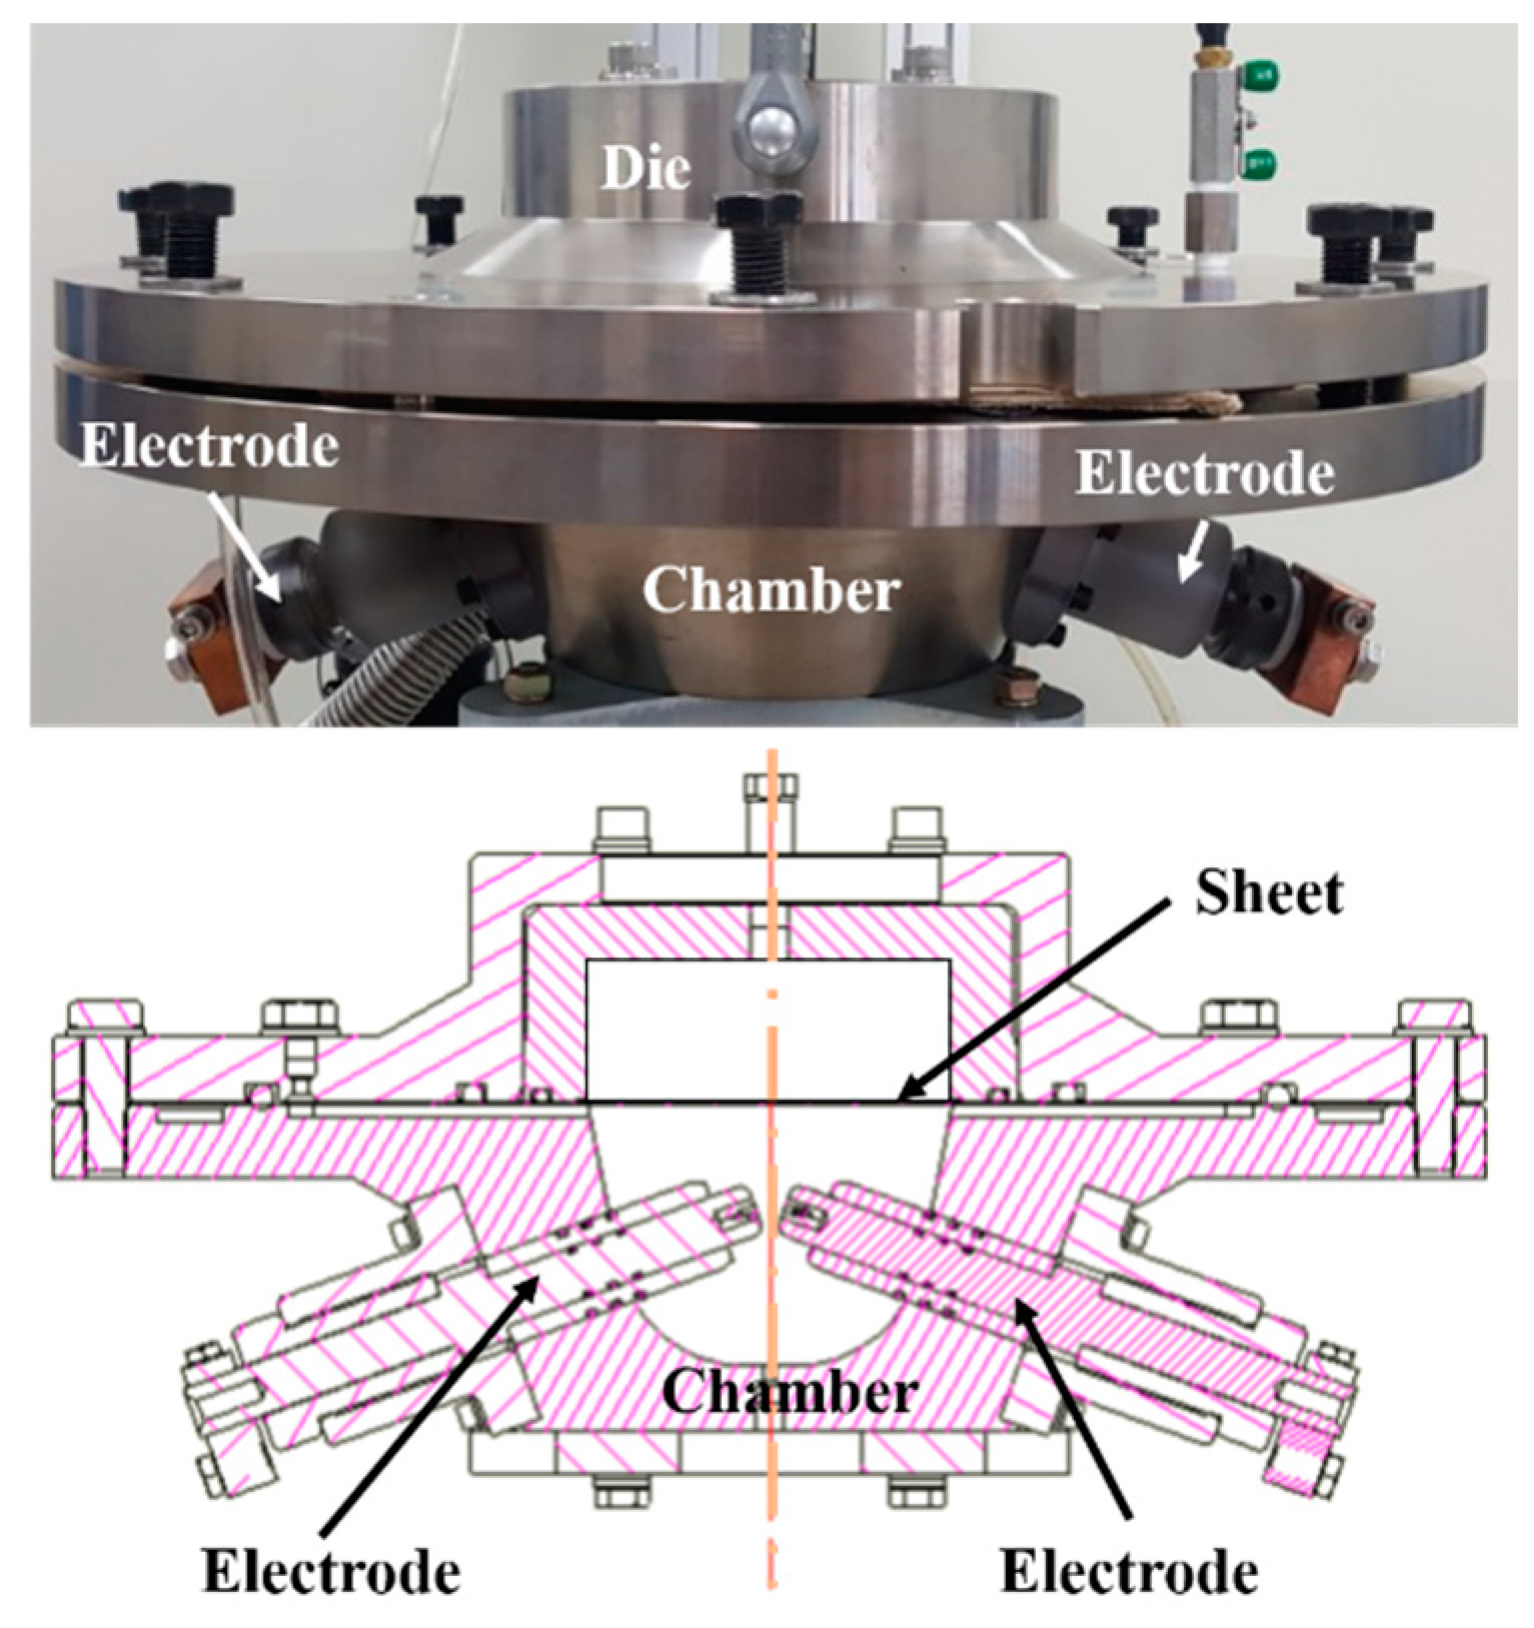
To evaluate the reliability of theoretical FLD at m = 0.024, the diagram was compared with the experimental results obtained from the EHF free-bulging test. The experiment was carried out using the equipment as shown in Figure 14. The input voltage was 12 kV, which is enough to create cracks in the sheet, and the results of the deformed sheet are shown in Figure 15. The strains of the deformed sheet were measured using a strain measurement apparatus, and they were scattered in the FLD as described in Figure 16.
The strains of the sheet in the safe zone are located higher than the theoretical quasi-static FLD (m = 0.001), and the strains of the sheet in the fracture zone are located higher than the theoretical FLD at the high strain rate index (m = 0.024), which means that the formability of the sheet is enhanced in the EHF process as compared with the quasi-static condition as mentioned in the introduction. In addition, because FLD at m = 0.024 is located between the different strain zone, it can be concluded that the theoretical FLD acquired in this study can predict the onset of instability or localization of the sheet metal in EHF process well.

7. Conclusions

In this study, a theoretical FLD was obtained to evaluate the formability of sheet metals in electrohydraulic forming process. Hollomon’s stress–strain equation and Hosford’s yield function were used to obtain the FLD based on the M-K theory. The SHPB test was conducted to obtain the value of m in Hollomon’s equation at the strain rate range of 2300–3900 s−1, and numerical simulation was carried out to evaluate the stress-strain curves acquired from SHPB test.
From the theoretical FLD of Al 6061-T6, it was confirmed that as the value of m becomes larger, local instability occurs later in the sheet, and large plastic deformation is possible so that the formability of the sheet is improved. This phenomenon occurs because of the inertial effect, which wants to maintain its original state and delay going to unstable necking state. Therefore, formability is better when the material is under the rapid changes in the strain rate. In conclusion, when the sheet material is formed in a high-speed forming, which can result in a large strain rate change in the sheet, the formability of the sheet metal can be enhanced.
In addition, experimental results from EHF test were used to confirm the reliability of theoretical FLD. The FLD showed good agreement with experimental results, concluding that theoretical FLD based on the M-K model is reliable.
In the future work, using the acquired theoretical FLD, the forming limit will be predicted when the sheet metal is deformed into a complicated shape, such as a sharp edge, in the EHF process.

Author Contributions

M.-A.W. performed the numerical simulation and experiments for electrohydraulic forming; W.-J.S. and B.-S.K. wrote the algorithm for theoretical forming limit diagram; M.-A.W. and J.K. wrote and edited the paper; All authors were involved in discussion for the paper.

Funding

This work was supported by the National Research Foundation of Korea (NRF) grant funded by the Korea government (MSIT) through the Engineering Research Center (No. 2012R1A5A1048294) and the Basic Science Research Program (No. NRF-2017R1D1A3B03034265).

Conflicts of Interest

The authors declare no conflict of interest.

References

  1. Keeler, S.P.; Backhofen, W.A. Plastic instability and fracture in sheets stretched over rigid punches. ASM Trans. Q. 1963, 56, 25–48. [Google Scholar]
  2. Goodwin, G.M. Application of strain analysis to sheet metal forming problems in the press shop. SAE Tech. Pap. 1968. [Google Scholar] [CrossRef]
  3. Swift, H.W. Plastic instability under plane stress. J. Mech. Phys. Solids 1952, 1, 1–18. [Google Scholar] [CrossRef]
  4. Hill, R.T. On discontinuous plastic states, with special reference to localized necking in thin sheets. J. Mech. Phys. Solids 1952, 1, 19–30. [Google Scholar] [CrossRef]
  5. Marciniak, Z.; Kuczyński, K. Limit strains in the processes of stretch-forming sheet metal. Int. J. Mech. Sci. 1967, 9, 609–620. [Google Scholar] [CrossRef]
  6. Keeler, S.P.; Brazier, W.G. Relationship between laboratory material characterization and press shop formability. Microalloying 1975, 75, 517–530. [Google Scholar]
  7. Raghavan, K.S.; Van Kuren, R.C.; Darlington, H. Recent progress in the development of forming limit curves for automotive sheet steels. SAE Tech. Pap. 1992. [Google Scholar] [CrossRef]
  8. Green, D.E.; Black, K.C. A visual technique to determine the forming limit for sheet materials. SAE Trans. 2002, 624–634. [Google Scholar] [CrossRef]
  9. Ghazanfari, A.; Assempour, A. Calibration of forming limit diagrams using a modified Marciniak–Kuczynski model and an empirical law. Mater. Des. 2012, 34, 185–191. [Google Scholar] [CrossRef]
  10. Safdarian, R. Forming limit diagram prediction of tailor welded blank by modified M-K model. Mech. Res. Commun. 2015, 67, 47–57. [Google Scholar] [CrossRef]
  11. Golowin, S.; Kamal, M.; Shang, J.; Portier, J.; Din, A.; Daehn, G.S.; Bradley, R.; Newman, K.E.; Hatkevich, S. Application of a Uniform Press Actuator for Electromagnetic Processes of Sheet Metal. J. Mater. Eng. Perform. 2007, 16, 455–460. [Google Scholar] [CrossRef]
  12. Kamal, M.; Daehn, G.S. A Uniform Press Electromagnetic Actuator for Forming Flat Sheets. J. Manuf. Sci. Eng. 2007, 129, 369–379. [Google Scholar] [CrossRef]
  13. Melander, A.; Delic, A.; Björkblad, A.; Juntunen, P.; Samek, L.; Vadillo, L. Modelling of electro hydraulic free and die forming of sheet steels. Int. J. Mater. Form. 2013, 6, 223–231. [Google Scholar] [CrossRef]
  14. Smerd, R.; Winkler, S.; Salisbury, C.; Worswick, M.; Lloyd, D.; Finn, M. High strain rate testing of automotive aluminium alloy sheet. Int. J. Impact Eng. 2005, 32, 541–560. [Google Scholar] [CrossRef]
  15. El-Magd, E.; Abouridouane, M. Characterization, modelling and simulation of deformation and fracture behaviour of light-weight wrought alloys under high strain rate loading. Int. J. Impact Eng. 2006, 32, 741–758. [Google Scholar] [CrossRef]
  16. Golovashchenko, S.F.; Bessonov, N.M.; Ilinich, A.M. Two-step method of forming complex shapes form sheet metal. J. Mater. Process. Technol. 2011, 211, 875–885. [Google Scholar] [CrossRef]
  17. Hollomon, J.H. Tensile deformation. Aime Trans. 1945, 12, 1–22. [Google Scholar]
  18. ASTM International. ASTM E8/E8M-09 Standard Test Methods for Tension Testing of Metallic Materials; ASTM: West Conshohocken, PA, USA, 2011. [Google Scholar]
  19. Kolsky, H. Stress wave in Solids. J. Sound Vib. 1949, 1, 41–65. [Google Scholar] [CrossRef]
  20. An, W.J.; Woo, M.A.; Noh, H.G.; Kang, B.S.; Kim, J. Design and Fabrication of Split Hopkinson pressure bar for Acquisition of Dynamic Material property of Al6061-T6. Int. J. Precis. Eng. Manuf. 2016, 33, 587–594. [Google Scholar] [CrossRef]
  21. Golovashchenko, S.F.; Gillard, A.J.; Mamutov, A.V.; Golovashchenko, S.F.; Mamutov, A.V.; Gillard, A.J.; Mamutov, A.V. Formability of dual phase steels in electrohydraulic forming. J. Mater. Process. Technol. 2013, 213, 1191–1212. [Google Scholar] [CrossRef]
  22. Hassannejadasl, A.; Green, D.E.; Golovashchenko, S.F.; Samei, J.; Maris, C. Numerical modelling of electrohydraulic free-forming and die-forming of DP590 steel. J. Manuf. Process. 2014, 16, 391–404. [Google Scholar] [CrossRef]
  23. Mamutov, A.V.; Golovashchenko, S.F.; Mamutov, V.S.; Bonnen, J.J. Modeling of electrohydraulic forming of sheet metal parts. J. Mater. Process. Technol. 2015, 219, 84–100. [Google Scholar] [CrossRef] [Green Version]
  24. Hallquist, J.O. LS-DYNA Keyword User’s Manual; Livermore Software Technology Corporation 970: Livermore, CA, USA, 2007. [Google Scholar]
  25. Banabic, D.; Dannenmann, E. Prediction of the Influence of Yield locus on the Limit strains in Sheet Metals. J. Mater. Process. Technol. 2001, 109, 9–12. [Google Scholar] [CrossRef]
  26. Lou, Y.; Kim, S.B.; Huh, H. Analytical Study of the Effect of Material Properties on the Formability of Sheet Metal Based on the M-K Model. Trans. Mater. Process. 2010, 10, 393–398. [Google Scholar] [CrossRef]
  27. Ahmadi, S.; Eivani, A.R.; Akbarzadeh, A. An Experimental and Theoretical Study on the Prediction of Forming Limit Diagrams using New BBC Yield Criteria and M-K Analysis. Comp. Mater. Sci. 2009, 44, 1272–1280. [Google Scholar] [CrossRef]
  28. Bazzaz, A.R.; Noori, H.; Mahmudi, R. Calculation of Forming Limit Diagrams using Hill’s 1993 Yield Criterion. Int. J. Mech. Sci. 2011, 53, 262–270. [Google Scholar] [CrossRef]
  29. Aretz, H. Numerical Analysis of Diffuse and Localized Necking in Orthotropic Sheet Metal. Int. J. Plast. 2007, 23, 798–840. [Google Scholar] [CrossRef]
  30. Hosford, W.F. On yield loci of anisotropic cubic metals. In Proceedings of the Seventh North American Metalworking Research Conference, SME, Dearborn, MI, USA, May 1979; pp. 191–197. [Google Scholar]
  31. Friedman, P.A.; Pan, J. Effects of plastic anisotropy and yield criteria on prediction of forming limit curves. Int. J. Mech. Sci. 2000, 42, 29–48. [Google Scholar] [CrossRef]
  32. Altan, T.; Tekkaya, A.E. Sheet Metal Forming: Processes and Applications; ASM International: Almere, The Netherlands, 2012. [Google Scholar]
Figure 1. A schematic view of electrohydraulic forming apparatus.
Metals 09 00401 g001
Figure 2. Specimen for quasi-static tensile test.
Metals 09 00401 g002
Figure 3. (a) Conceptual design and (b) specimen of the split Hopkinson Pressure Bar.
Metals 09 00401 g003
Figure 4. Stress–strain relationship of Al 6061-T6 at quasi-static and high-strain rate conditions.
Metals 09 00401 g004
Figure 5. (a) Y-Z plane view and (b) three-dimensional view for numerical simulation model of electrohydraulic forming process.
Metals 09 00401 g005
Figure 6. Current curve used in the numerical simulation.
Metals 09 00401 g006
Figure 7. Blank deformation versus time during discharge.
Metals 09 00401 g007
Figure 8. Effective strain rate at different position of deformed blank.
Metals 09 00401 g008
Figure 9. Comparison of numerical simulation and experiments.
Metals 09 00401 g009
Figure 10. Assumption of initial imperfection in M-K theory.
Metals 09 00401 g010
Figure 11. Flow chart for acquisition of forming limit diagram.
Metals 09 00401 g011
Figure 12. Deformation behavior of regions A and B according to the m value.
Metals 09 00401 g012
Figure 13. Theoretical forming limit diagram of Al 6061-T6 material.
Metals 09 00401 g013
Figure 14. Experimental apparatus for electrohydraulic forming.
Metals 09 00401 g014
Figure 15. Experimental results from EHF experiment at 12 kV.
Metals 09 00401 g015
Figure 16. Evaluation of the theoretical forming limit diagram using experimental results.
Metals 09 00401 g016
Table 1. Material constants of Al 6061-T6.
CoefficientValue
K530
n0.14048
m0.028