1. Introduction
Titanium alloy Ti6Al4V, a highly-preferred material in aerospace and biomedical industries due to its mechanical and biocompatibility properties, suffers from poor machinability. Given the higher cost of titanium, the use of subtractive processes is not an economical approach due to the material wastage [
1]. Additive processes produce near net-shape components and can replicate complex shapes with simple tooling. Among additive processes, metal sintering is an efficient method for producing complex-shaped components of titanium and titanium alloys, wherein the powder is heated below the melting point (~80%
Tm) with or without the application of mechanical pressure [
2,
3]. The pressureless microwave-based sintering of metal is a rapid process and requires a shorter thermal treatment time as compared against the conventional sintering processes [
4]. However, in the pressureless microwave sintering, the mechanical properties of the components are affected by the presence of pores that are inevitable. Various research groups have evaluated the mechanical properties in the additive manufactured components [
5,
6,
7]. Kumar et al. [
6] observed that ductility decreases with the increase of pore size in conventional sintering of the Ti6Al4V alloy. On the contrary, strain localization and early crack initiation were also observed as a result of increased pore size. Further, the stress concentration around the pore tends to induce the non-uniform elongation of the material. Chawla et al. noticed that the tensile strength, Young’s modulus, fatigue strength, and strain at failure improved with the decrease in pore size and pore densities in the sintering of steel [
7]. Fadida et al. observed that the presence of pores and their sizes influence the failure mechanism and mechanical properties of the parts produced by additive manufacturing processes [
5].
In the literature, the pore sizes were estimated via one of the following methods: light microscope, scanning electron microscopy, mercury intrusion porosimetry, water immersion porosimetry, thermoporometry, etc. [
8]. However, these techniques are destructive in nature and/or demand a meticulous sample preparation. Given the fact that the pores are unevenly distributed inside the components, the estimation of the pore size has to be carried out at multiple sites, failing which the conventional techniques may misconstrue the results. On the other hand, X-ray micro-computed tomography (µ-CT) has emerged as a non-destructive and effective method for measuring pore size and distribution. Research groups have evaluated pore size and its distribution using micro-CT in various materials such as polymer sintered parts [
9], metal solder joints [
10,
11], powder metallurgical parts [
12], sintered parts for ceramics [
13], and die castings [
14]. Hence, µ-CT has been quite expedient in imaging and reconstructing the three-dimensional pores and the material integrity. However, the evaluation of pores in a sintered titanium alloy has not been reported to date. Further, multi-objective optimization of the process parameters for both tensile strength and pore size has not been reported yet.
Design of experimental (DOE) techniques, including Taguchi, full factorial, and response surface methodology, have been widely used to study the effect of a wide range of process parameters on the output response [
15]. In this study, pressureless, high-temperature microwave sintering of titanium alloy components was performed. The experiments were formulated using the central composite design methodology (CCD). Response surface methodology is a DOE technique that is useful in estimating non-linear interactions, given its axial and center points [
16]. Three process parameters, namely temperature for sintering (
St), rate of heating (
Hr), and holding time (
Ht), were studied at five different levels. The tensile strength (as per ASTM standard B925-15), average pore size (APS), and the pore size distribution was evaluated by a Universal testing machine and X-ray micro-CT, respectively. The isolated and combined effect of each of the input process parameters on the tensile strength and the APS was investigated using analysis of variance. Furthermore, optimized process parameters were identified to obtain the minimum pore size corresponding to the maximum tensile strength.
2. Materials and Methods
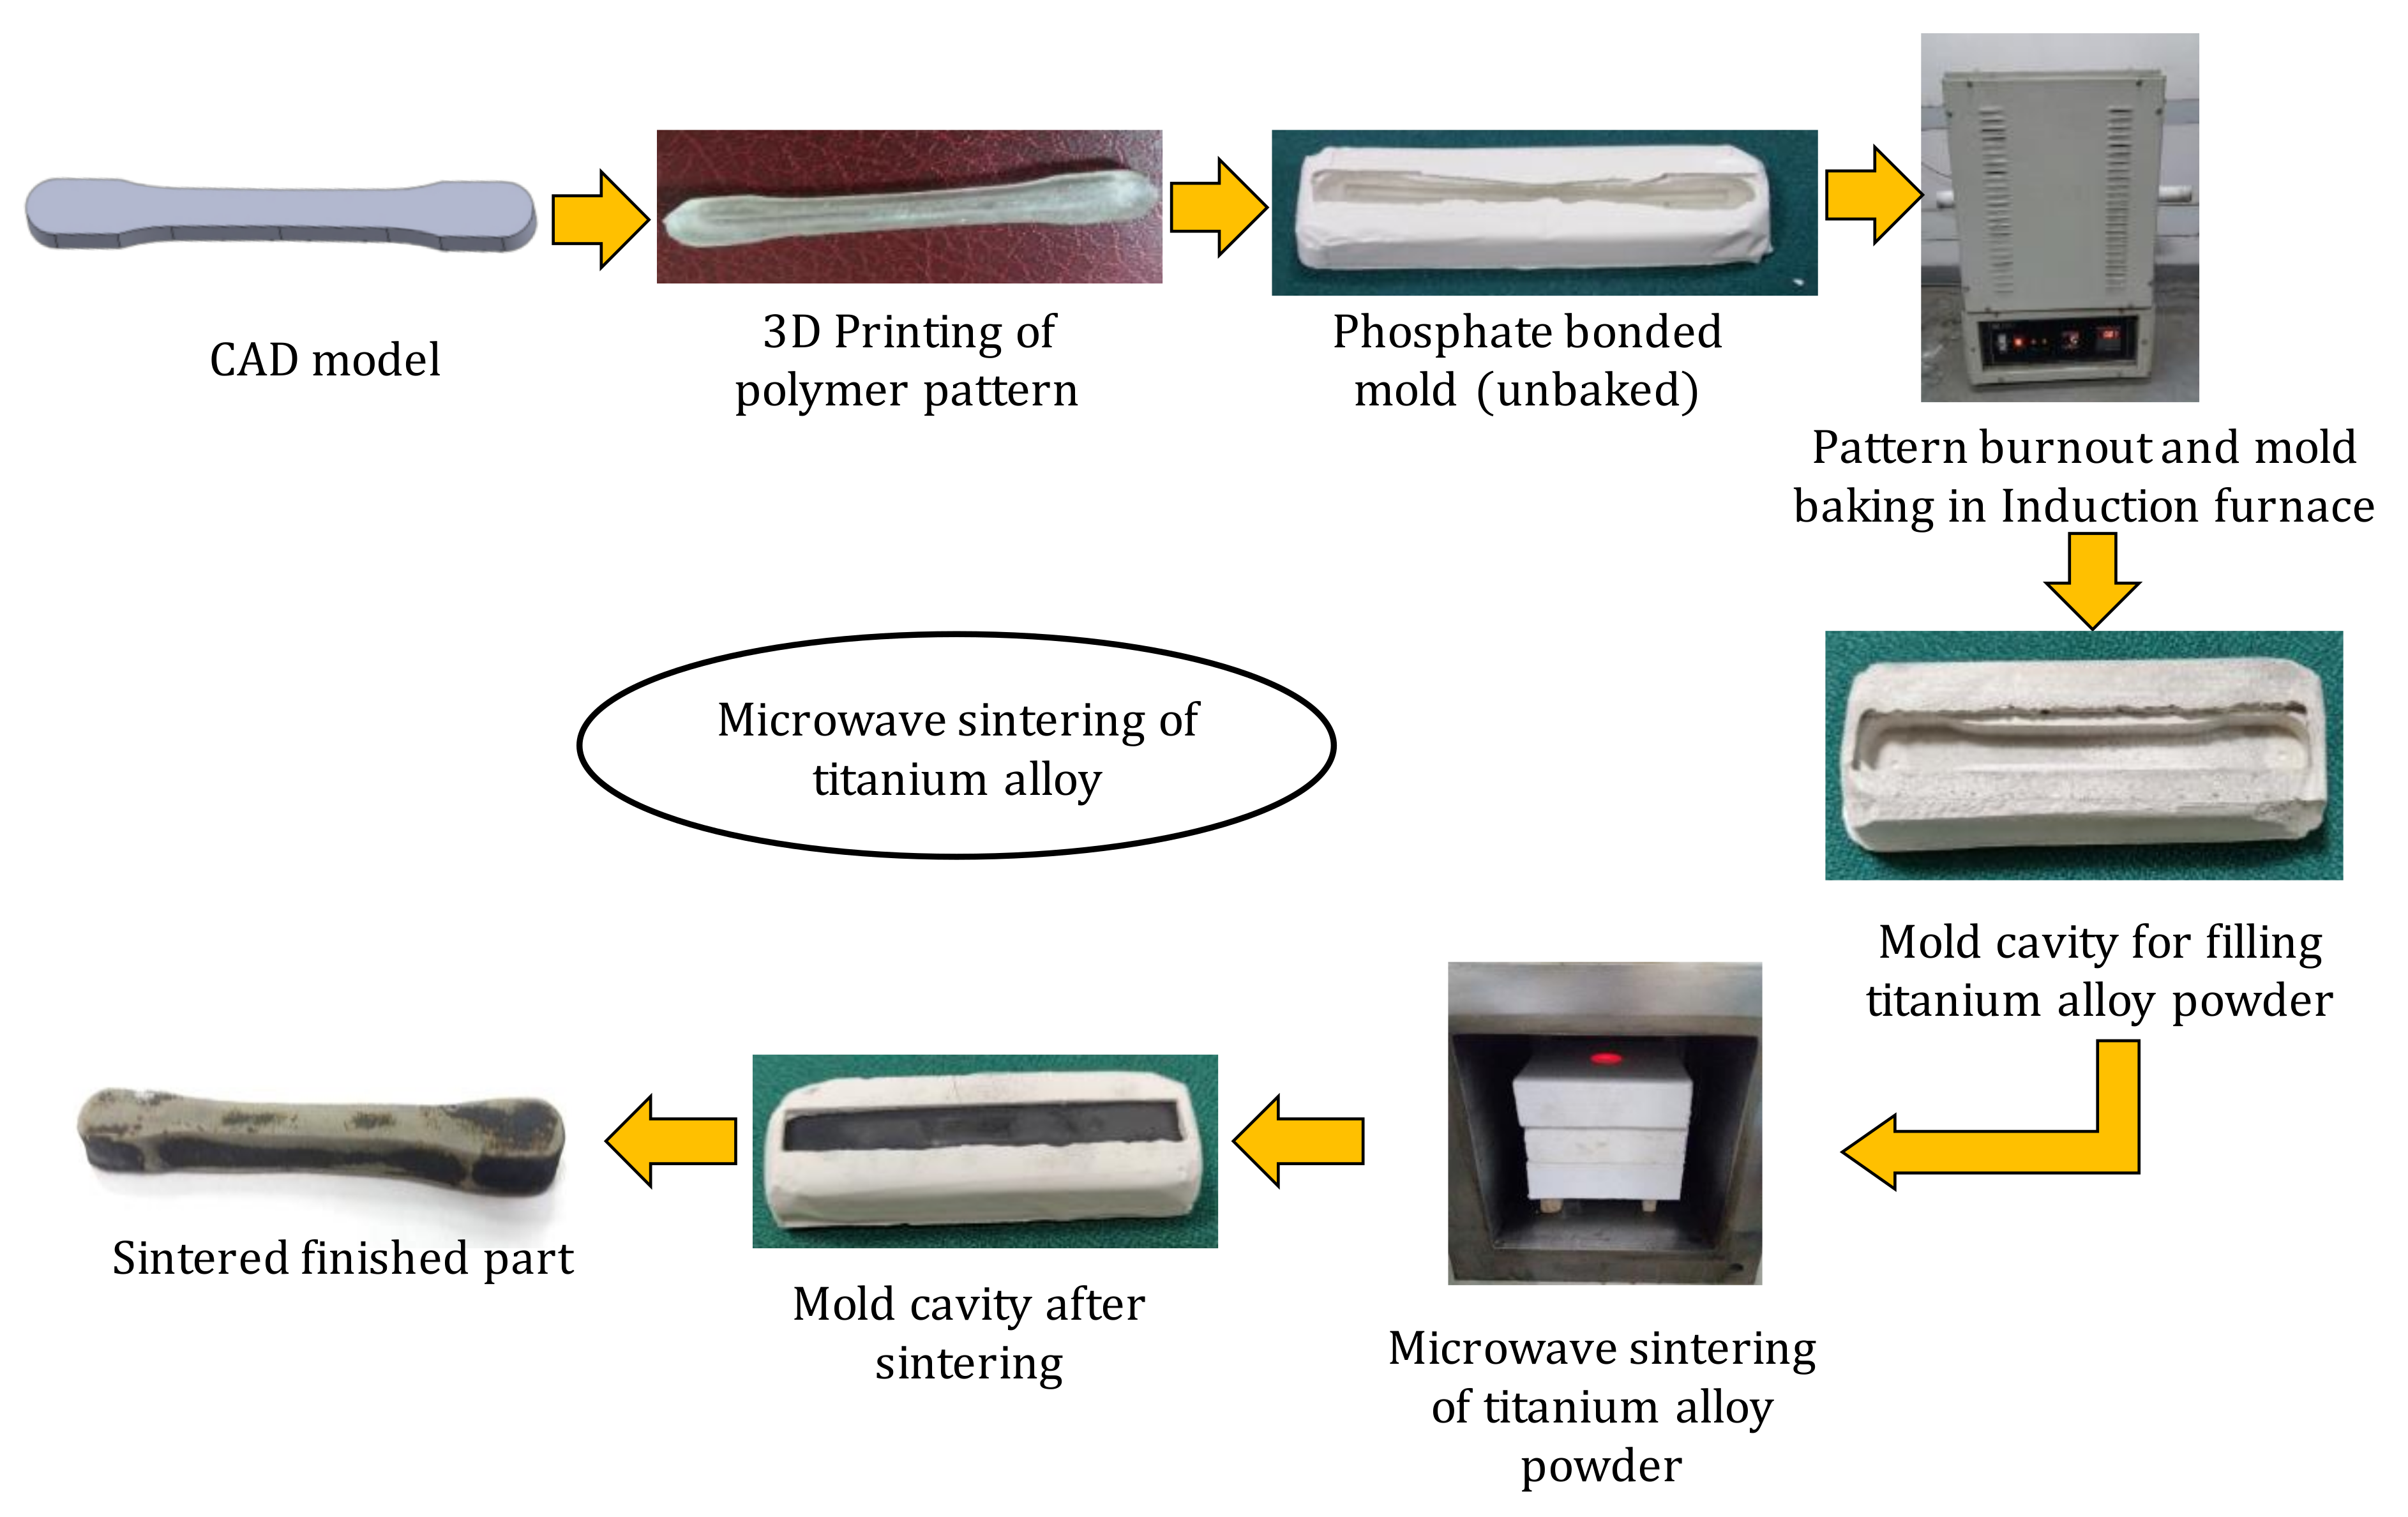
The process flow diagram of pressureless sintering using microwaves for Ti6Al4V is shown in
Figure 1. A cylindrical component was prepared for the µ-CT studies and a dog-bone-shaped component was prepared for the tensile testing experiments. First, a computer aided design (CAD) of the component was modeled according to ASTM B925-15 using Solidworks
®, a commercial software (Dassault Systèmes, Vélizy-Villacoublay, France). The CAD model was 3D printed using the stereolithography technique, using a photopolymer resin (FLGPCL02, Formlabs, Somerville, Massachusetts, USA). The polymeric parts formed the pattern that was required to create a phosphate cavity/mold, which was used for the sintering of the Ti6Al4V powder. The phosphate molds were prepared using a Bellavest powder and BegoSol hardener (Bego, Bremen, Germany), pre-mixed in the ratio of 100:24 by weight percentage. During baking of the phosphate mold, in an induction furnace at 850 °C (Metrex Scientific Instruments Ltd., New Delhi, India), the polymeric part melted and evaporated.
The phosphate molds were subsequently filled under the continuous vibrations with the Ti6Al4V powder (AP&C, Boisbriand, Canada) for microwave sintering. The size of the particles of the alloy powder ranged between 10 to 70 µm, as seen in the
Supplementary Section Figure S1. Pressureless sintering was carried out in a multimode cavity microwave furnace, using a magnetron source (Hitachi, Tokyo, Japan), operating at a rated power of 1.45 kW at 2.45 GHz, with an operating temperature range of 350 °C to 1400 °C. An indirect mode of heating was used with the aid of SiC susceptors. Four SiC susceptors of size 50 mm × 50 mm × 10 mm were used inside the heating zone to absorb and re-radiate the radiations for heating the metal sample. Before the start of the experiment, the heating chamber of the furnace was purged with argon gas, at 8 liters per minute (LPM), for 30 min to remove oxygen from the chamber. A continuous flow of argon gas was maintained at 6 LPM during the sintering process (both heating and cooling cycle) to avoid oxidation of the component. The equipment is capable of heating at a maximum rate of 15 °C/min. This heating rate is achieved due to the use of single magnetron of maximum power equivalent to 1.45 kW at 2.45 GHz. A schematic of the sintering equipment, the mechanism of sintering, the microwave furnace image, and the heating cycles are provided in the
Supplementary Section Figure S2. Titanium is a nonmagnetic material that weakly couples with the magnetic field. Titanium alloy does not absorb microwave radiation below 1000 °C [
17]. Hence, silicon carbide (SiC) susceptors were used to captivate the microwave radiation and re-radiate the energy to the metal sample.
The Ti6Al4V-powder-filled phosphate mold was placed inside the heating zone made of alumina crucible. A non-contact type infrared pyrometer was used for the measurement of temperature. The measurement range for the pyrometer was between 350 to 1400 °C. Four 50 mm × 50 mm × 10 mm SiC susceptors were placed around the phosphate mold. The total cycle time ranged between 5.5 to 8 h for each of the twenty experiments. After the completion of the heating and cooling cycle, the sintered component was removed from the mold, cleaned, and ultra-sonicated for 10 min in deionized water to discard any un-sintered titanium alloy or mold particles.
Central composite design (CCD) was used for designing the experiments. CCD yields good accuracy by minimum number of experiments [
15]. In this work, the effects of the processing input parameters
St,
Hr, and
Ht on the tensile strength and average pore size were studied. In the case of
Hr, the values were varied, equally spaced between 5 and 15 °C/min, whereas in the case of
Ht, the levels were varied from 30 to 90 min with a variation of 15 min between each level. The range of parameters were selected based on trial experiments. The distance of axial point α was assigned as two. CCD yielded twenty experimental combinations for the three input parameters at five different levels. The twenty experiments contained eight cube points, six axial points, and six center points. Five different heating rates resulted in different cycles, as shown in the
supplementary section Figure S2d.
The tensile strength of the microwave sintered components was identified using a tensile testing machine (Model Number: 5582, Norwood, MA, USA) at a crosshead speed of 500 µm/min, as per ASTM B925-15 standard [
18]. X-ray micro-computed tomography (Model: µ-CT-50, Scanco Medical, Bassersdorf, Switzerland) was used for the measurement of pore size. The setup is shown in the
Supplementary Section Figure S4. The resolution and voxel size was 4.4 µm. Scanning was performed using an X-ray source at 90 kV and a current density at 88 µA. From the initial experiments, the threshold value to isolate pores from solid titanium material was identified. The 2D X-ray images were taken by focusing on different sections within the component, as the component was slowly rotated from 0 to 180°. A three-dimensional model was reconstructed using the 2D X-ray plots with the help of the Scanco Medical reconstruction software. The pore sizes were evaluated by fitting the maximum sized virtual spheres. The average pore size was calculated using the method described in detail elsewhere [
19]. The pores were identified according to their attenuation coefficient given by Equation (1):
where
is the intensity of X-ray at the detector,
is the intensity of the X-ray at the source,
is the thickness of the component, and
is the attenuation coefficient [
19].
The tensile test results and the pore size results were analyzed using analysis of variance (ANOVA). The probability (
p) and variance factor values (
F) were calculated using MiniTab
® software (Minitab Limited, Coventry, UK). From the ANOVA results, the significant input parameters along with their linear and non-linear contributions were identified. A regression equation for the response obtained through CCD is known as response surface methodology. The general form of the Equation (2) is given by:
where
is the output response variable,
denotes the number of variables,
and
are the constants, and
and
are the 1st and 2nd order and the combined (interaction) terms of the process, respectively. The term
represents the random error in the statistical model. The effect of input parameters in both individual and combined modes on the tensile strength and pore size distribution were evaluated. Multi-objective optimization was performed to maximize tensile strength and minimize average pore size using the Genetic Algorithm Toolbox in MATLAB
® (Version 2017R, Natick, MA, USA).
3. Results and Discussions
The tensile strength of the dog-bone-shaped components manufactured using microwave sintering of the titanium alloy Ti6Al4V are reported in
Table 1. The effect of the processing parameters on the tensile strength is shown in
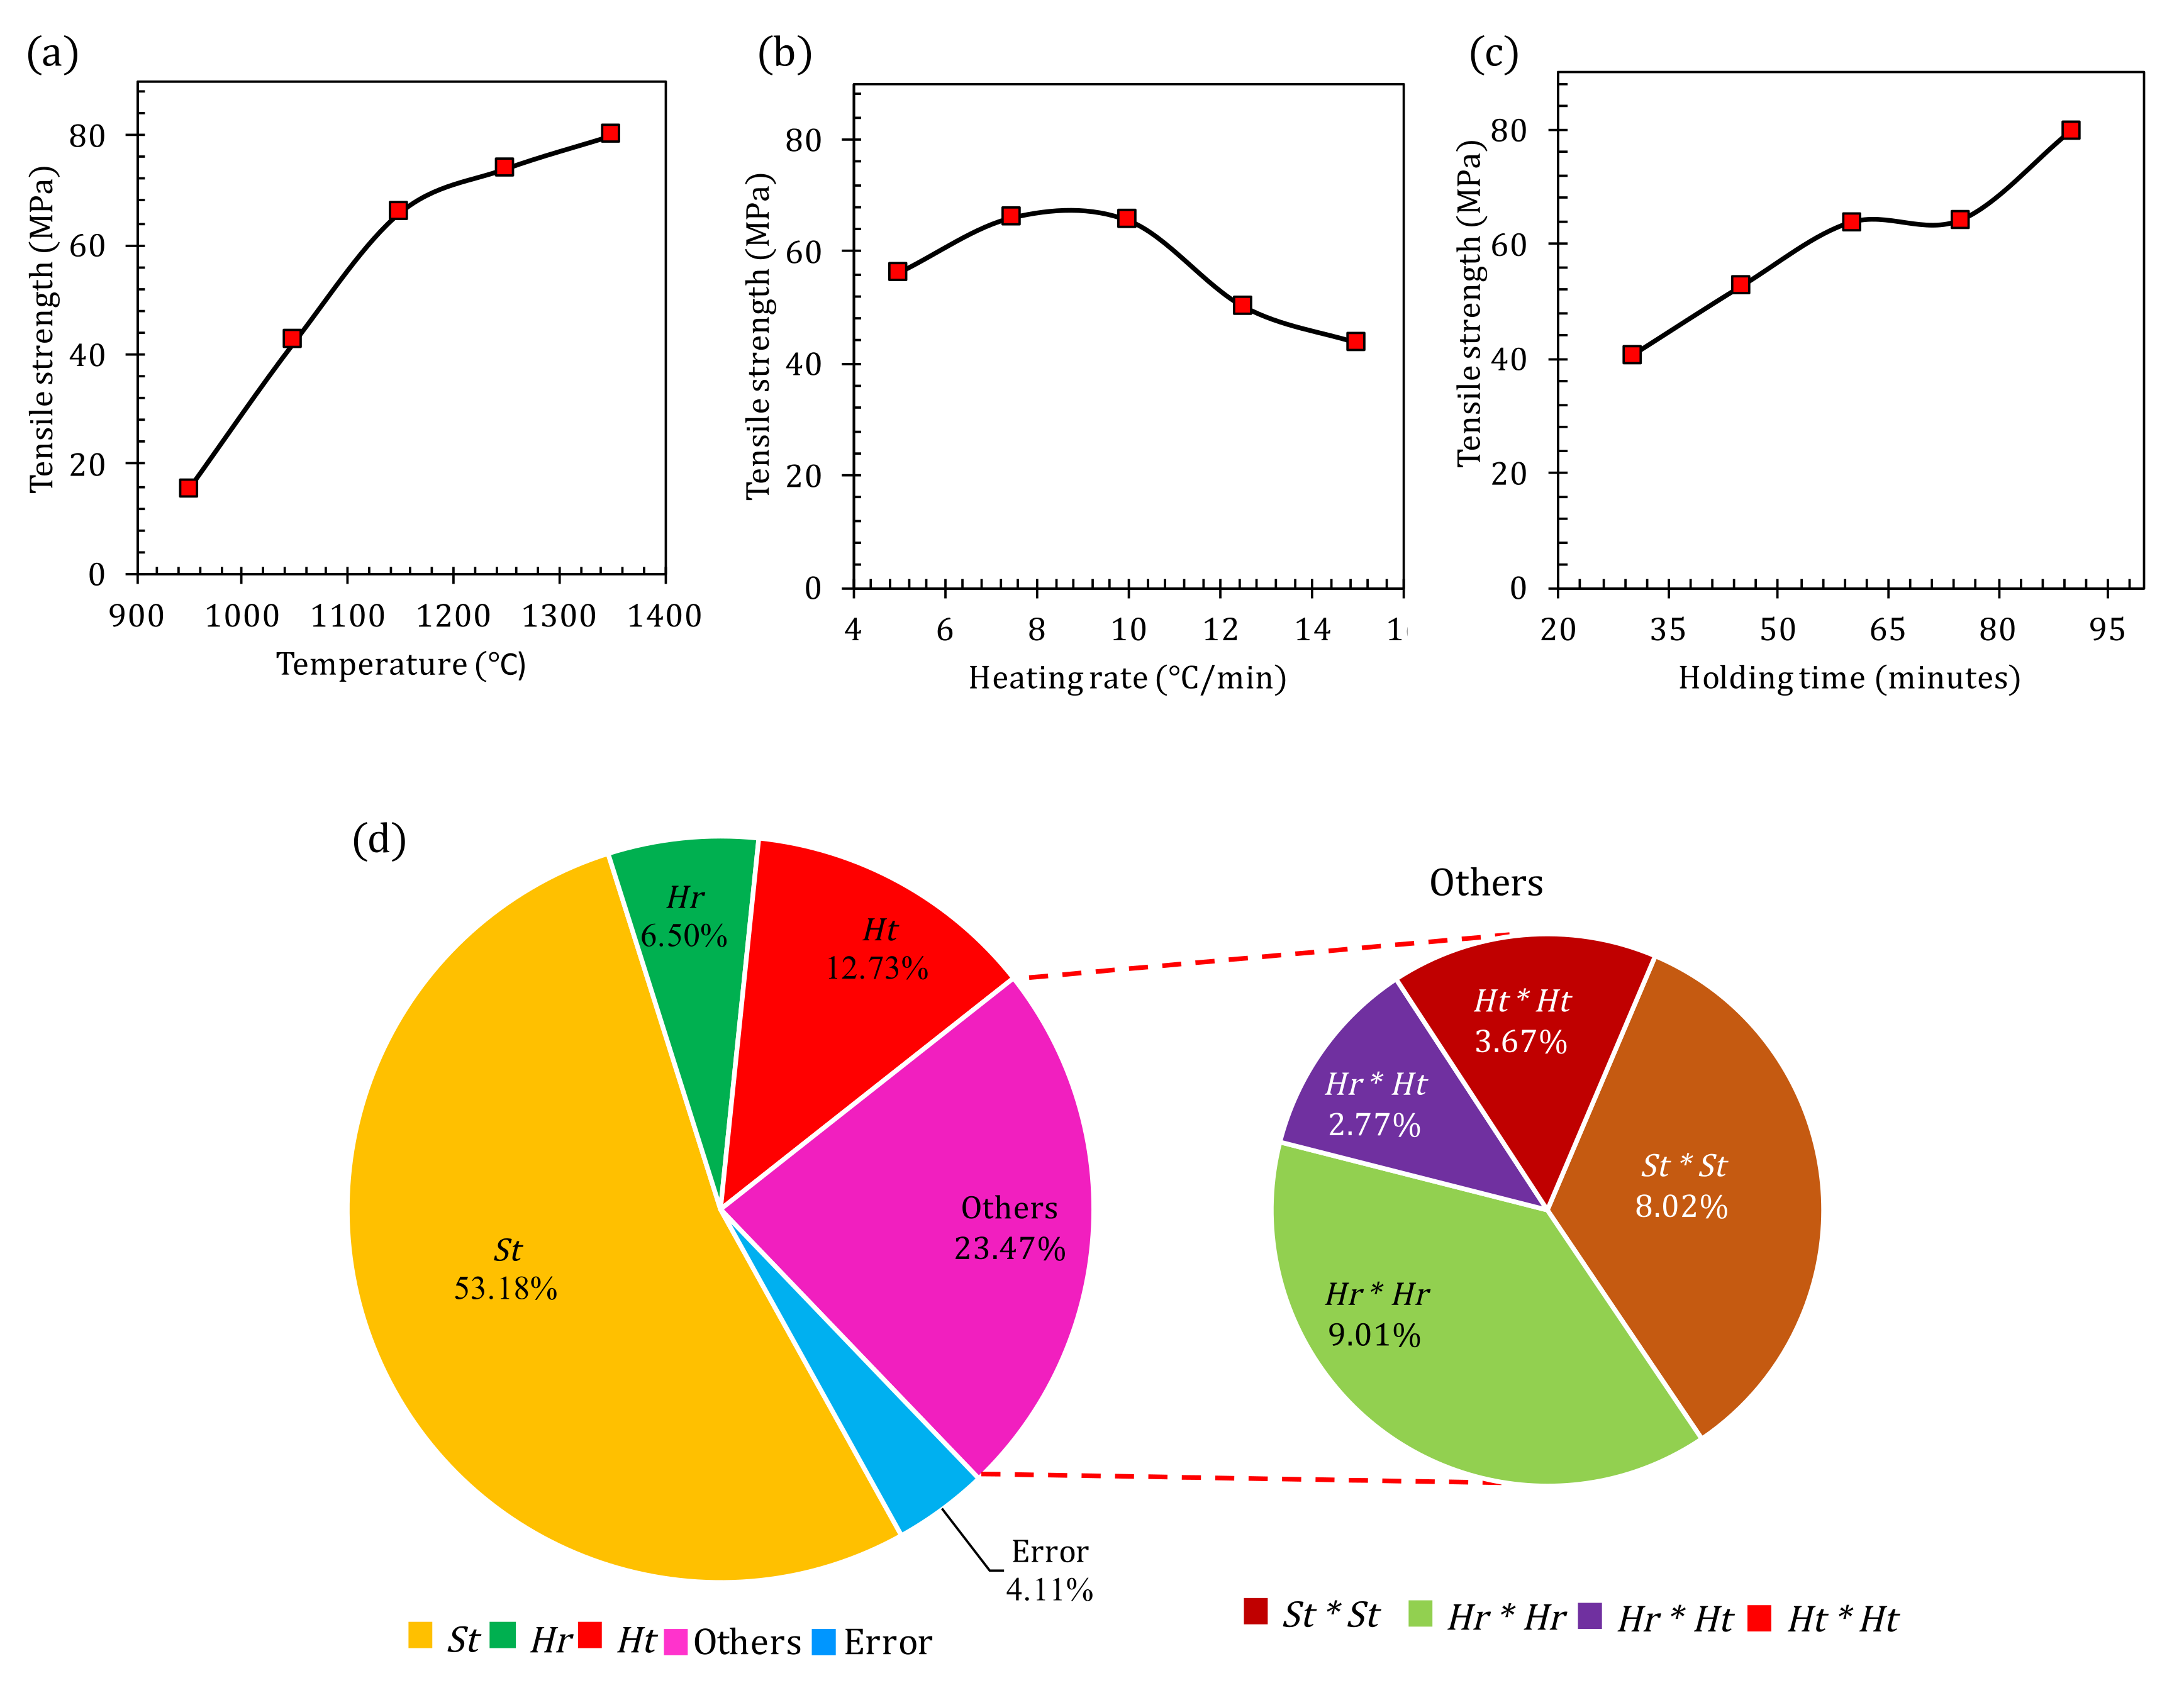
Figure 2. As seen in the
Figure 2, the tensile strength was significantly influenced by sintering temperature. The tensile strength was found to increase significantly with an increase in sintering temperature from 950 to 1150 °C; however, beyond 1150 °C, the increase in tensile strength was marginal. At 1150 °C, the necks between the micro-particles of Ti6Al4V were formed. An increase thereafter, contributed merely to the thickening of the neck regions, with a marginal increase in strength.
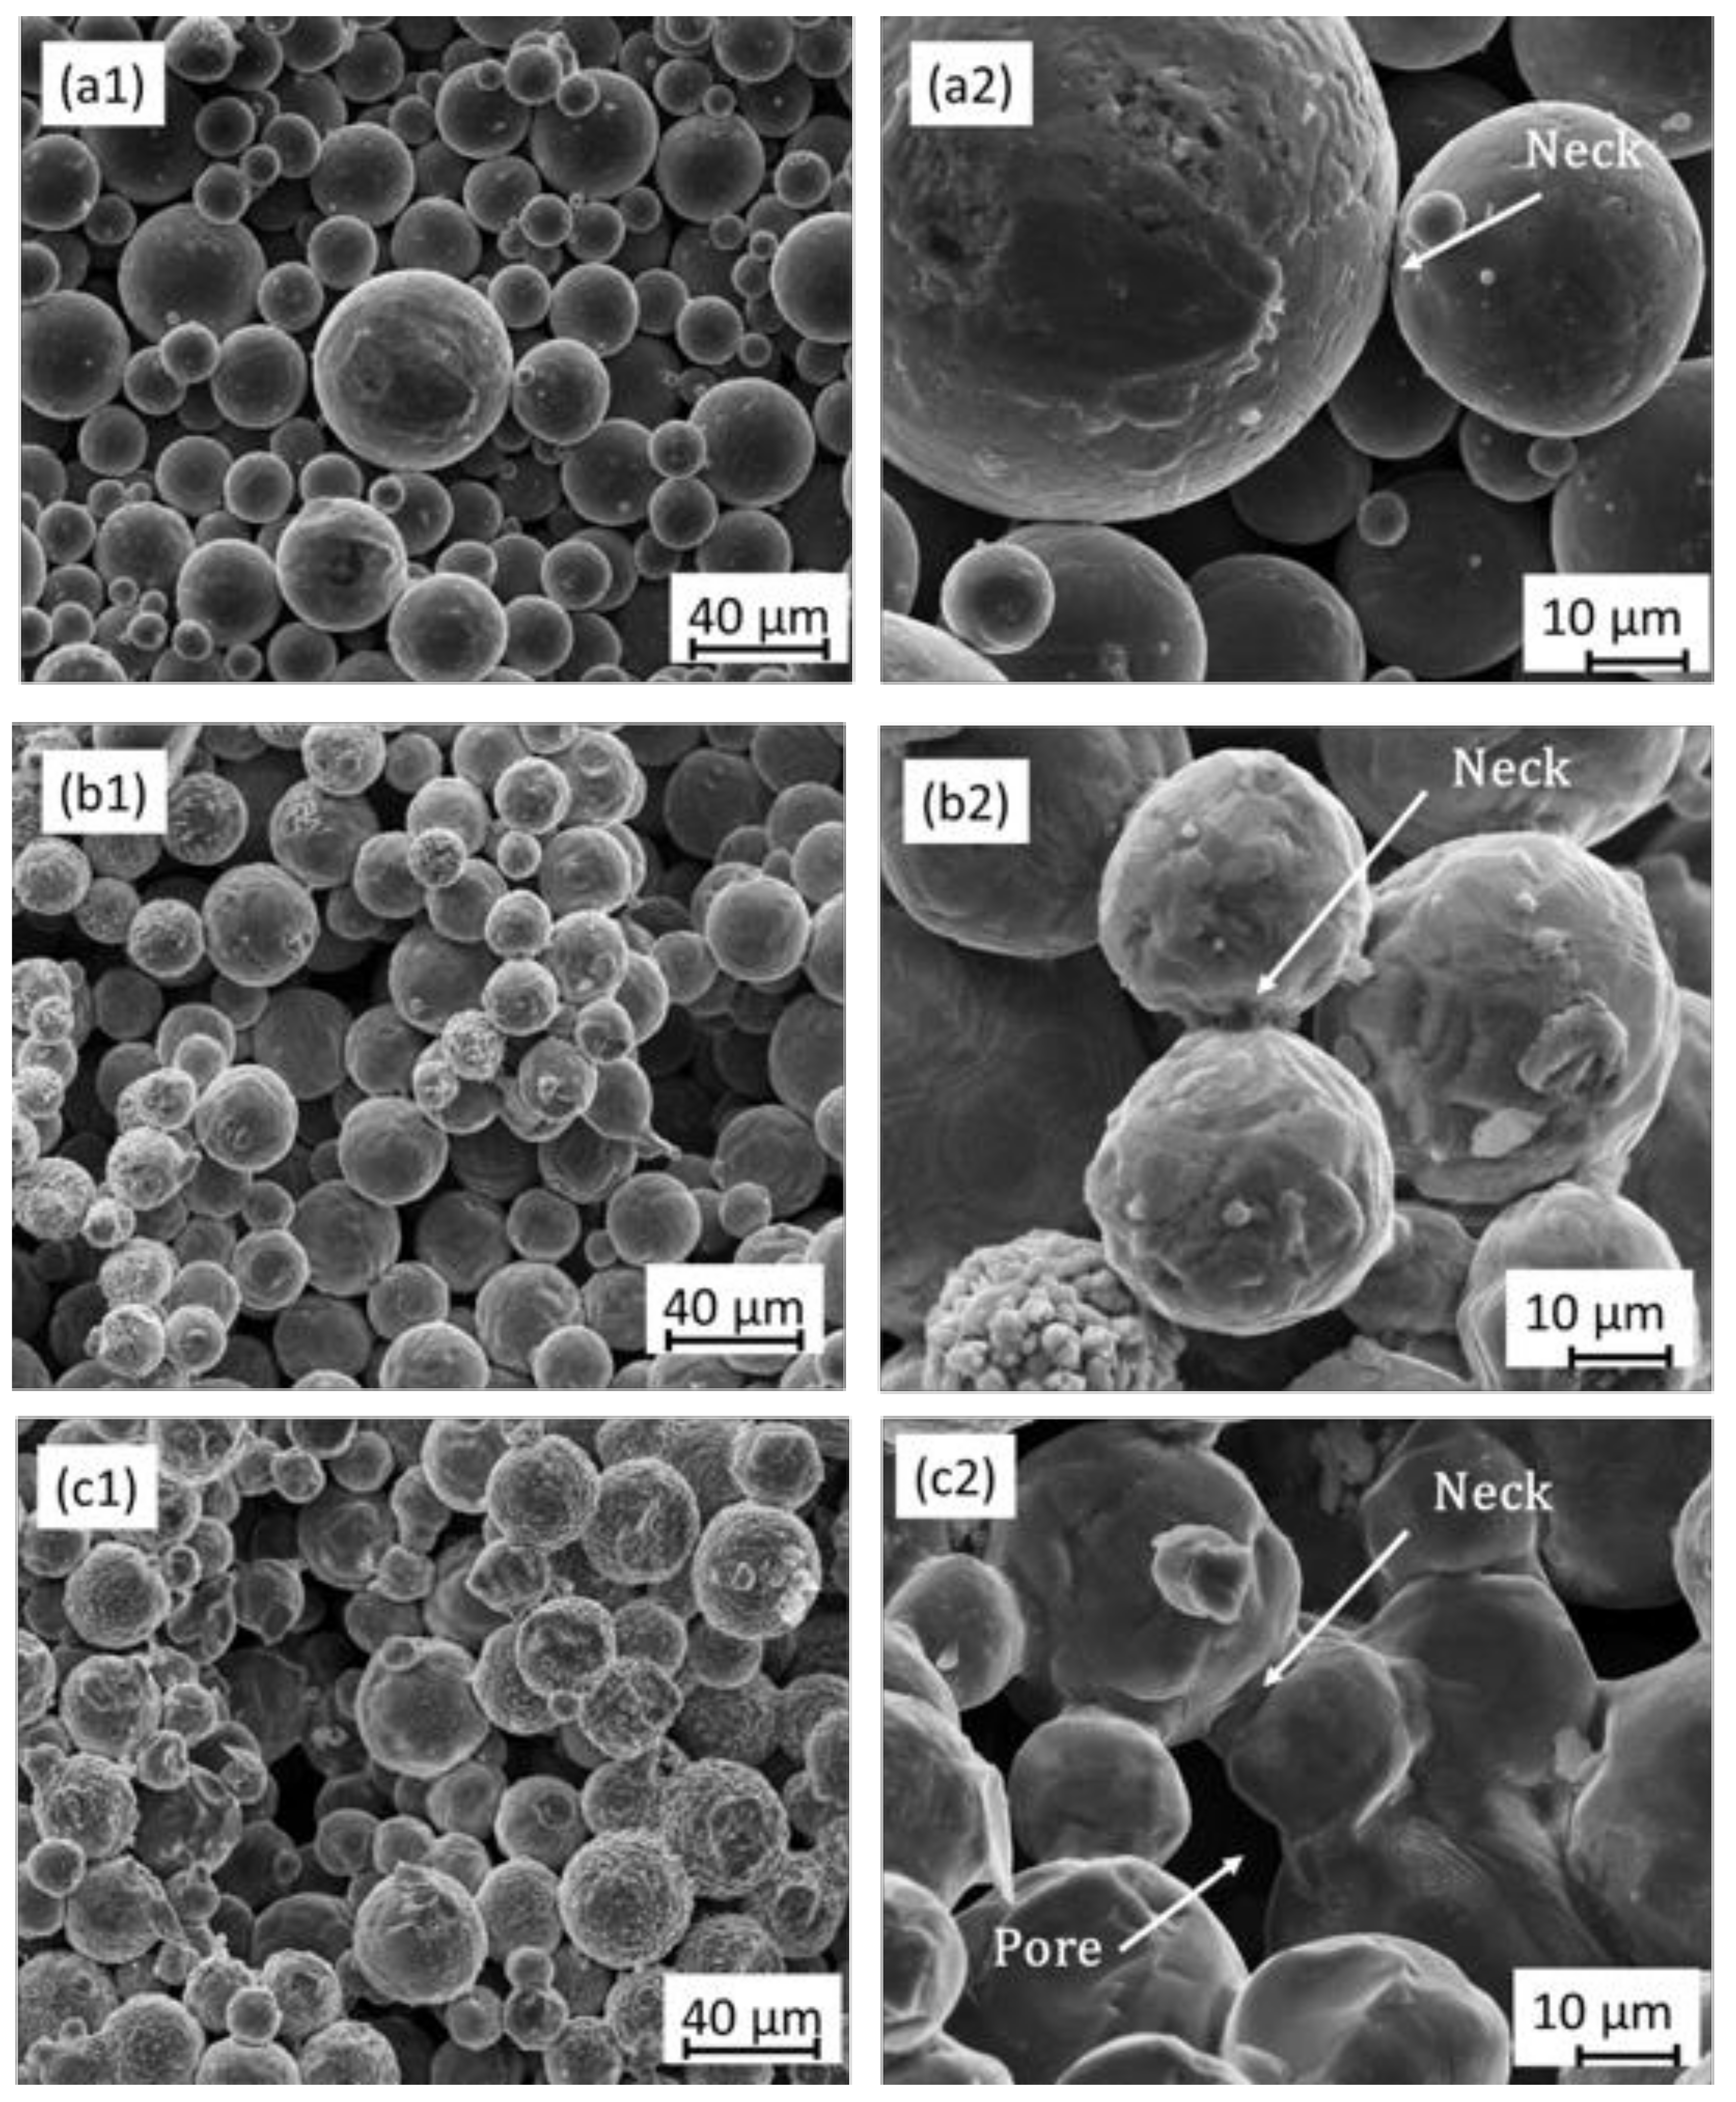
This phenomenon can be visualized in the SEM images shown in
Figure 3. The maximum value of the tensile strength was observed between the temperature range of 1250 to 1350 °C. A linearly increasing contribution of heating rate (
Hr) to tensile strength was observed, merely, between 5 to 10 °C/min. Thereafter, the tensile strength was observed to decrease with an increase in the heating rate. Higher heating rates did not provide sufficient time for the powder particles for the formation and strengthening of necks. Larger neck sizes were observed at
Hr of 5 to 10 °C/min. In the case of holding time (
Ht), the tensile strength was observed to increase proportionally. A longer holding time allowed for the formation of stronger necks, resulting in the increase of tensile strength. The model for the prediction of tensile strength is given by Equation (3):
Due to the experimental variation, the presence of the error was inevitable in the model. The random error in the developed statistical model was estimated as per Equation (4):
where
DF represents the total degree of freedom. The value of
t was obtained from standardized
t-distribution tables [
15]. The calculated error range in the developed statistical model for tensile strength was ±10.20 MPa.
The percentage contribution of the process parameters is shown in
Figure 2d, and the statistical significance is given in
Table 2. Analysis of variance was carried out on the output responses. Test statistic (
TS) or the
Fregression was used to assess the responses.
TS is a ratio of two estimators of variance [
15]. Firstly, the numerator corresponds to the variance between the sub-groups of a distribution. Secondly, the denominator estimates the variance within the sub-groups. A null hypothesis would be true, if the mean values of all sub-groups in a given distribution were equal. The null hypothesis shall be rejected, if
TS was sufficiently larger than
Fstandard, a necessary condition for the response to be considered statistically significant. When null hypothesis is true or the response is insignificant, then
TS ≤
Fstandard. The
Fstandard value was obtained from
F distribution tables given elsewhere [
15].
From
Table 2 and
Figure 2,
St is a significant parameter with a
p value equal to 0.0001, and it contributes to ~53% in linear terms and 8% in square terms in the regression equation.
Hr contributes for 6.5% in linear terms (
p value = 0.001), 9% in square terms (
p value = 0.001), and ~3% in interaction terms (
p value = 0.011). Similarly,
Ht contributes for ~13% in linear terms (
p value = 0.0001), ~4% in square terms (
p value = 0.007), and ~3% in interaction terms (
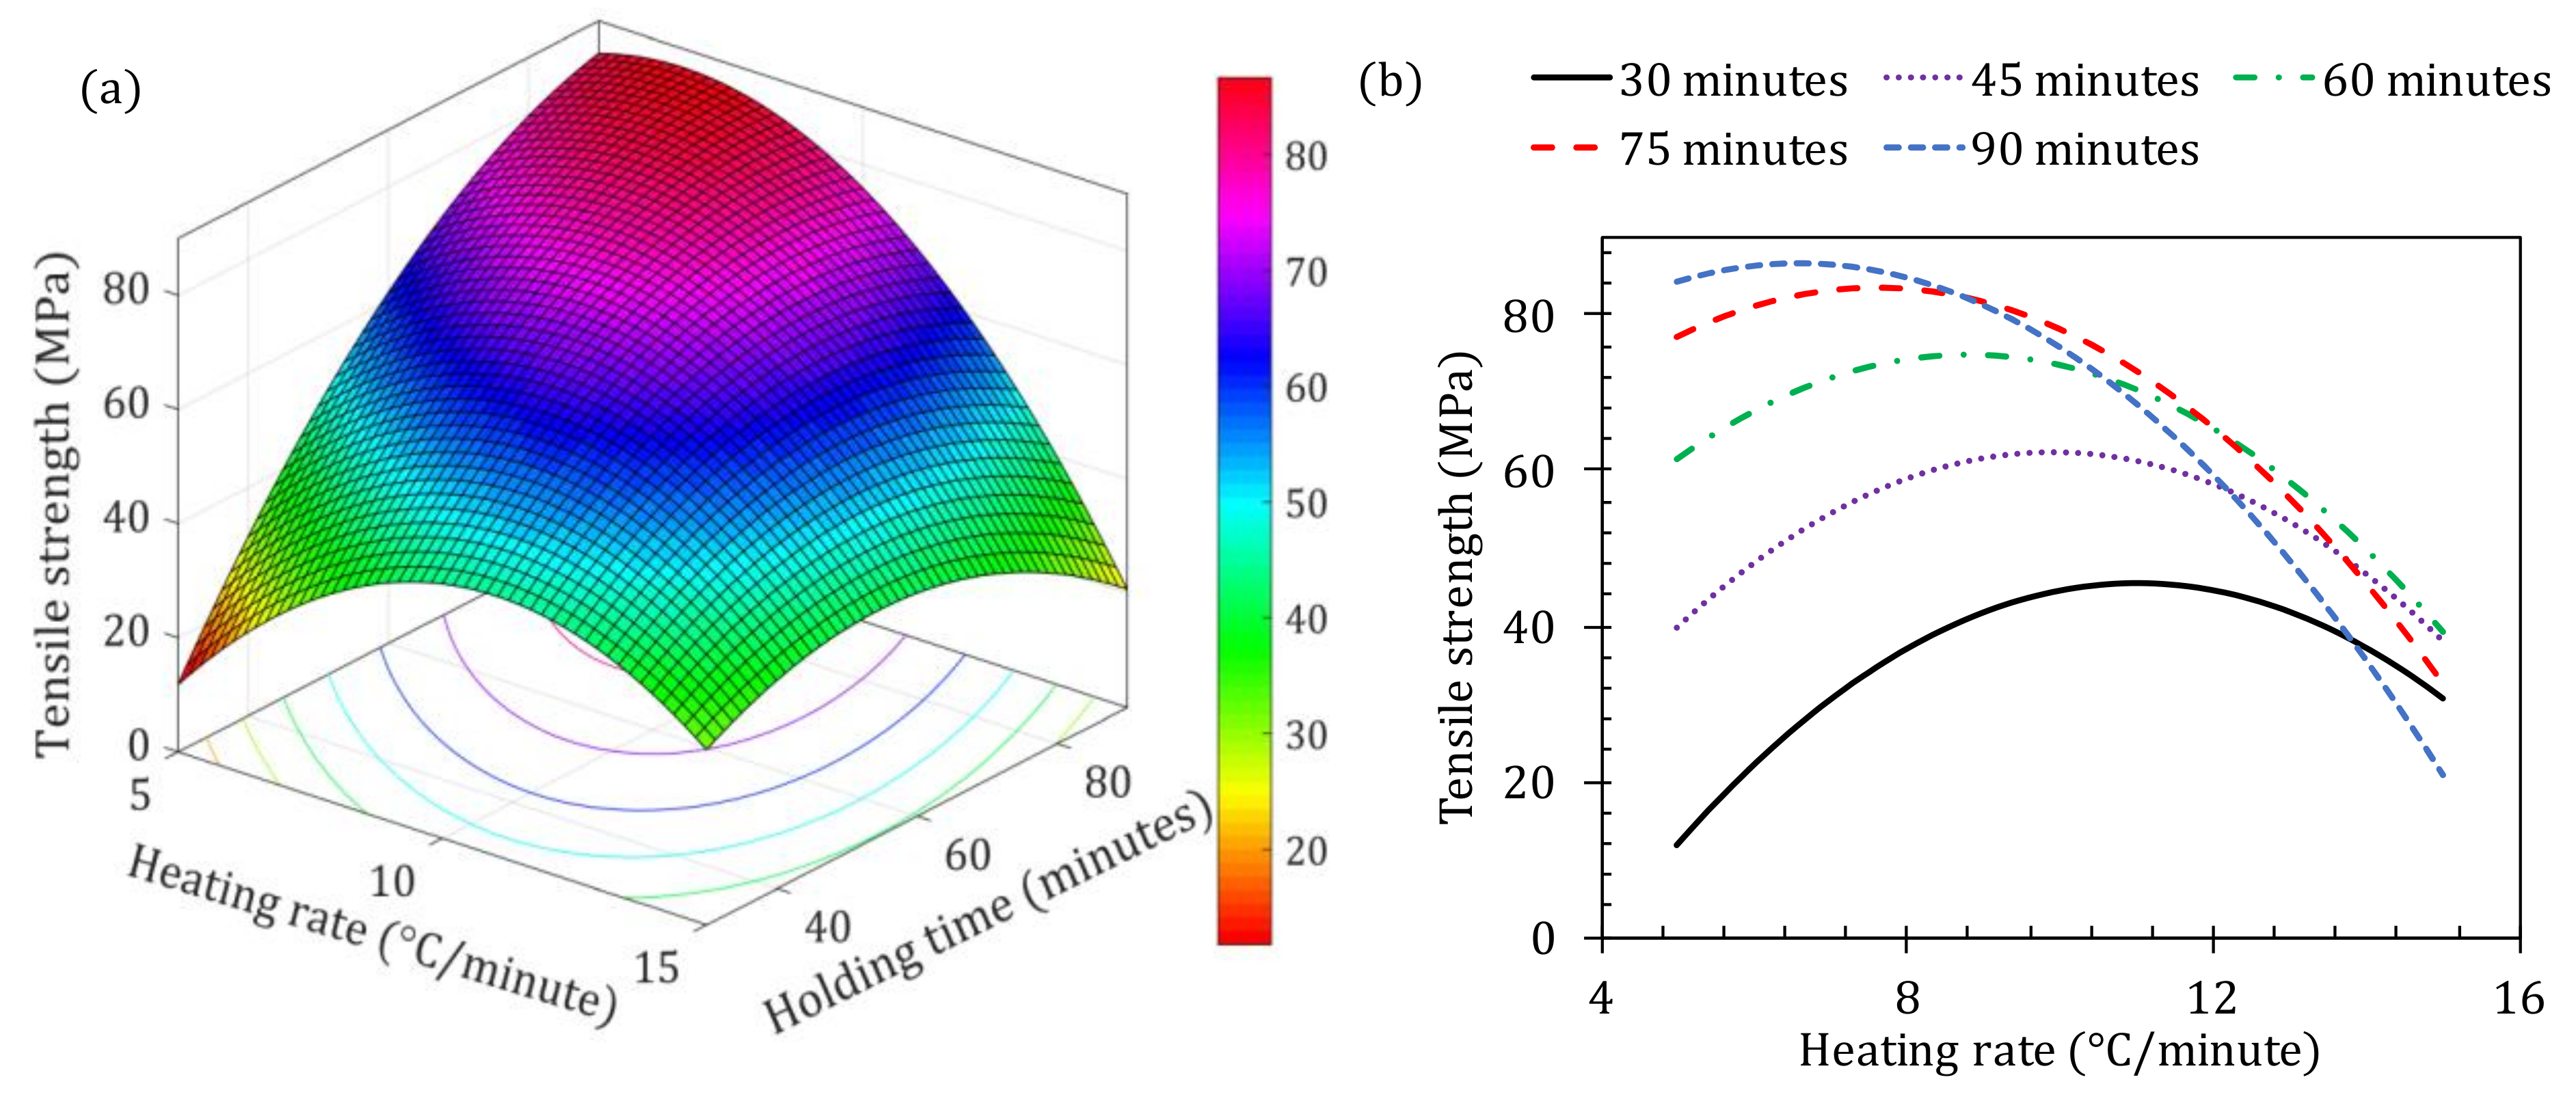
p value = 0.011). And among the three input parameters, the interaction effect was observed only between
Hr and
Ht. The effect is shown via a surface plot and a line plot in the
Figure 4. At the lowest
Hr, the interaction between
Ht and tensile strength was proportional; however, at higher
Hr values, an inverse trend was noticed. The tensile strength increased between the heating rates of 5 to 10 °C/min. Above 10 °C/min, an increase in the
Hr caused a decrease in the tensile strength. This is because of the decreased amount of surface melting of the particles between the powder particles at the higher heating rate. Lower heating rates allow greater time for the surface melting of the powder particles.
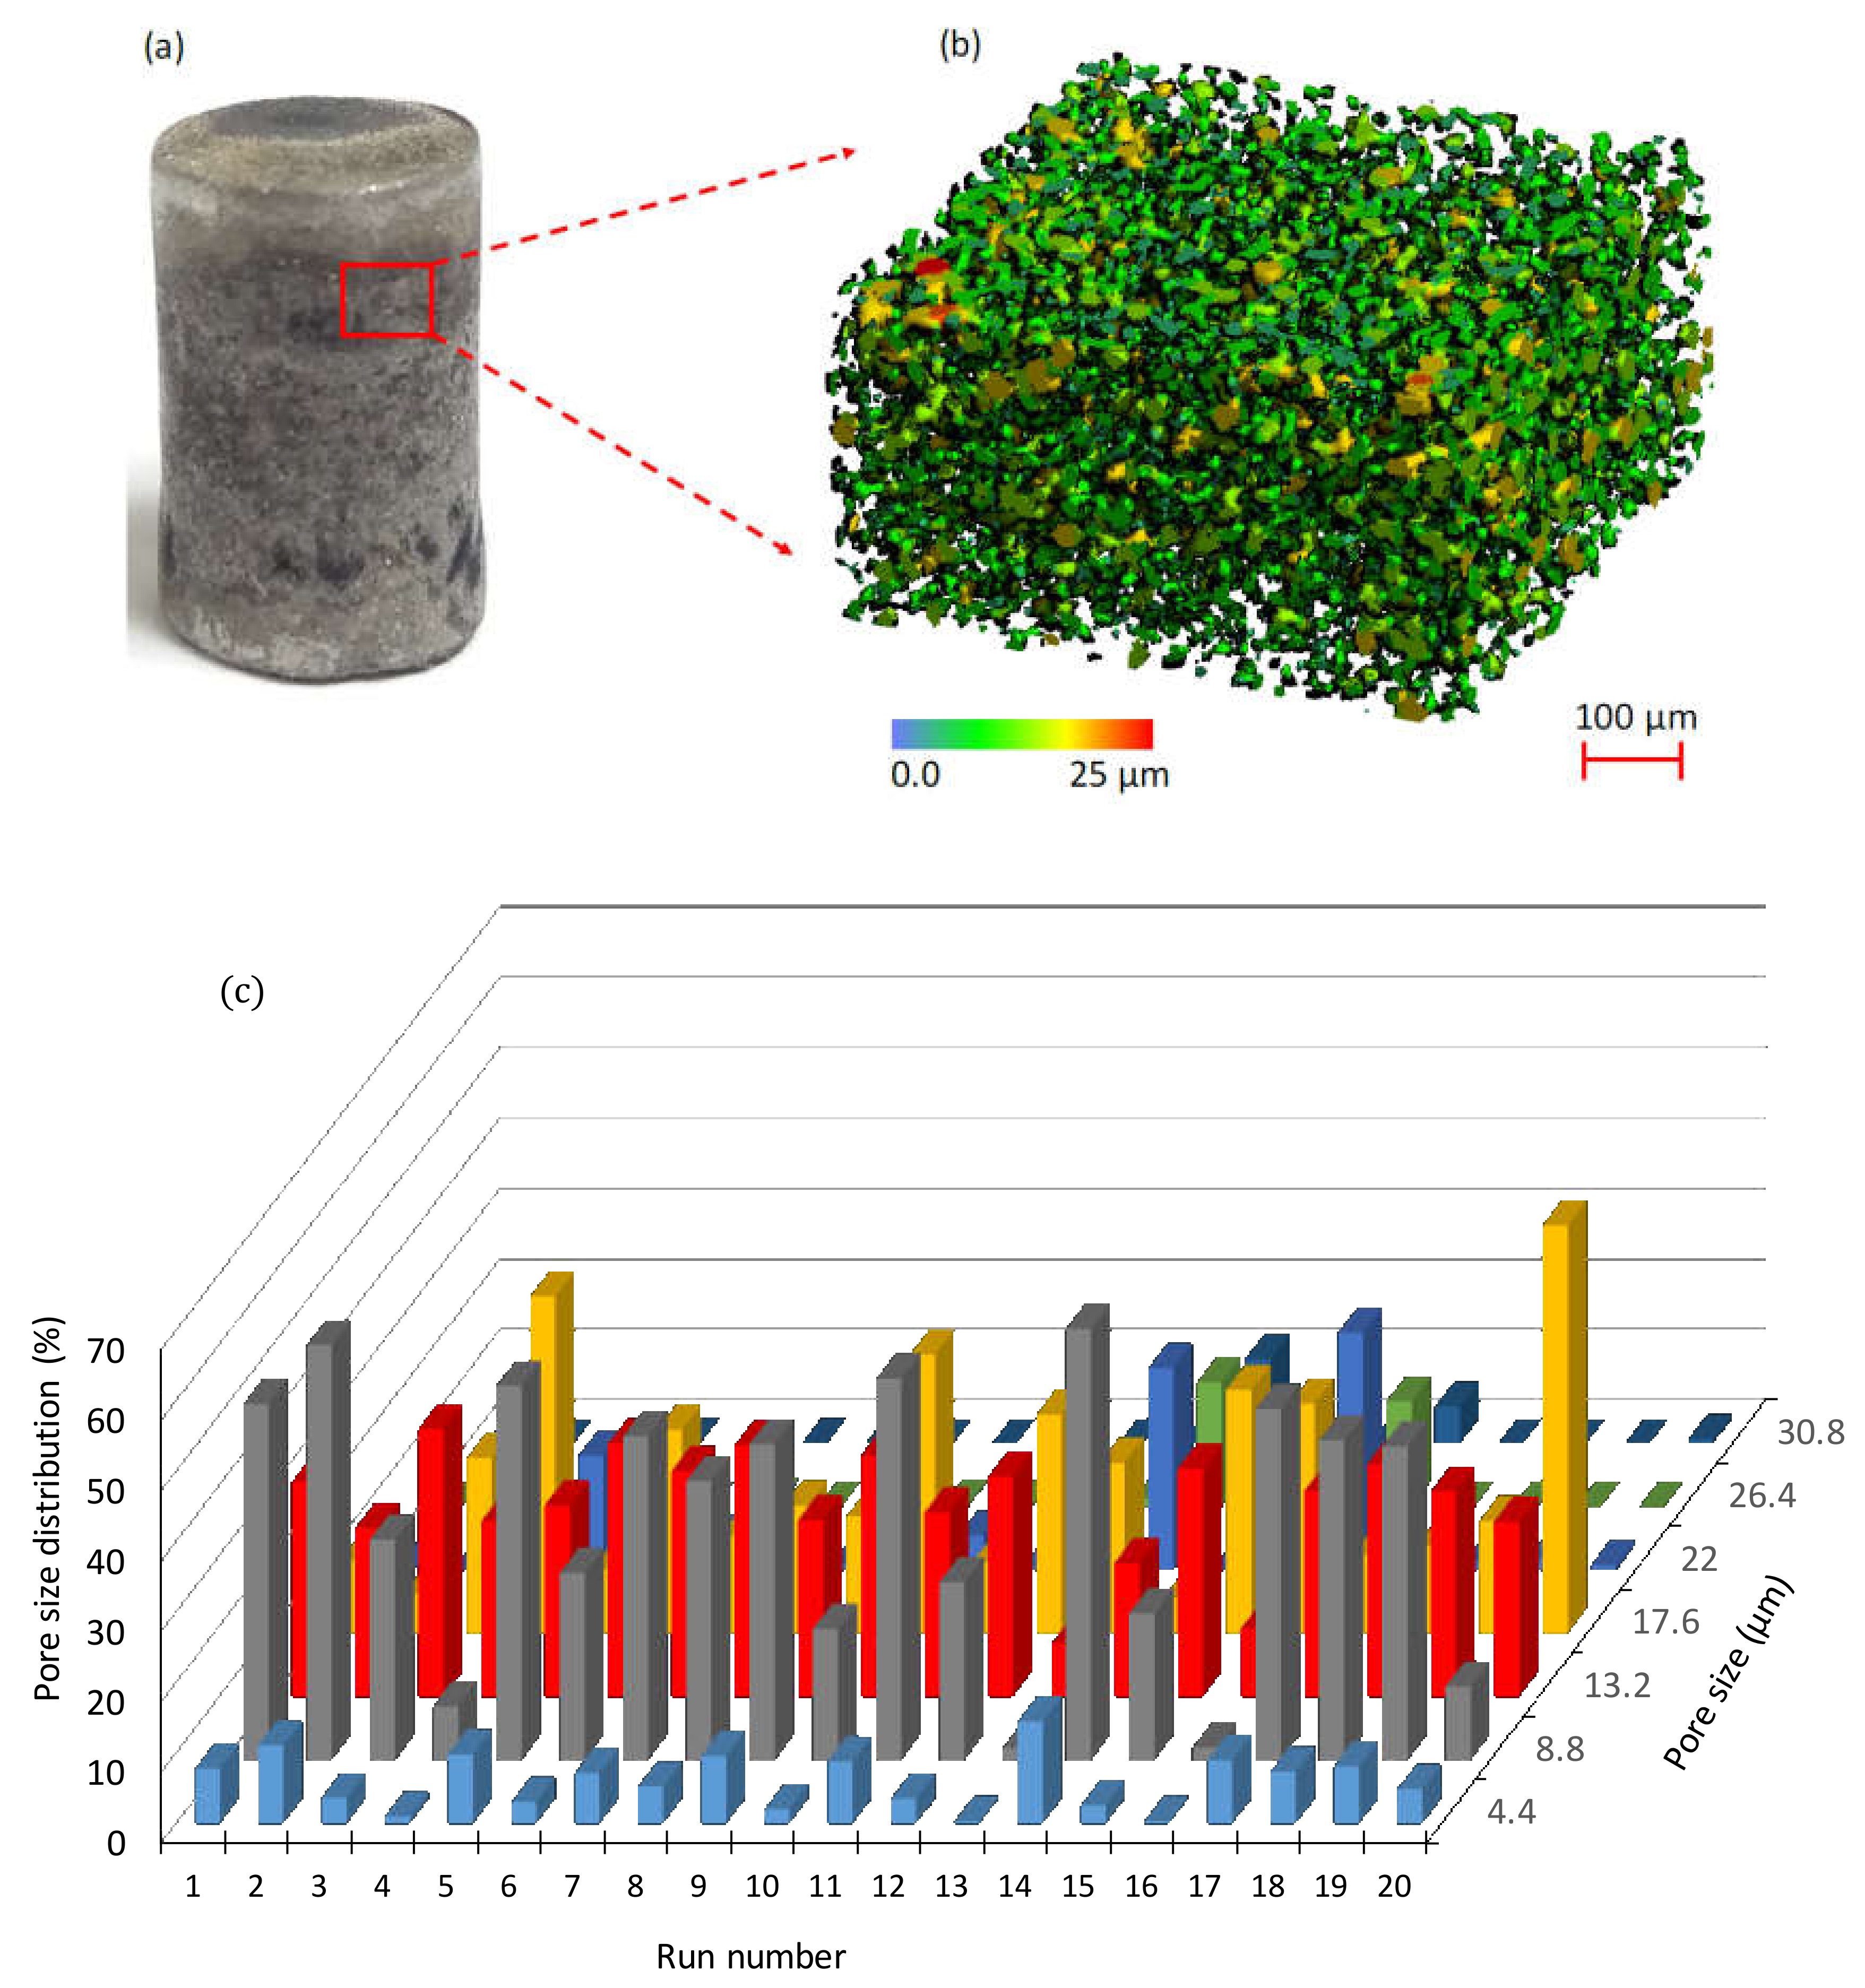
The pore sizes and the distribution were calculated for the cylindrical sintered components for each of the 20 experiments. An actual image of the cylindrical sintered component, a 3D-constructed image of the pores in a volume of 550 µm × 300 µm × 500 µm, and the pore size distribution are provided in
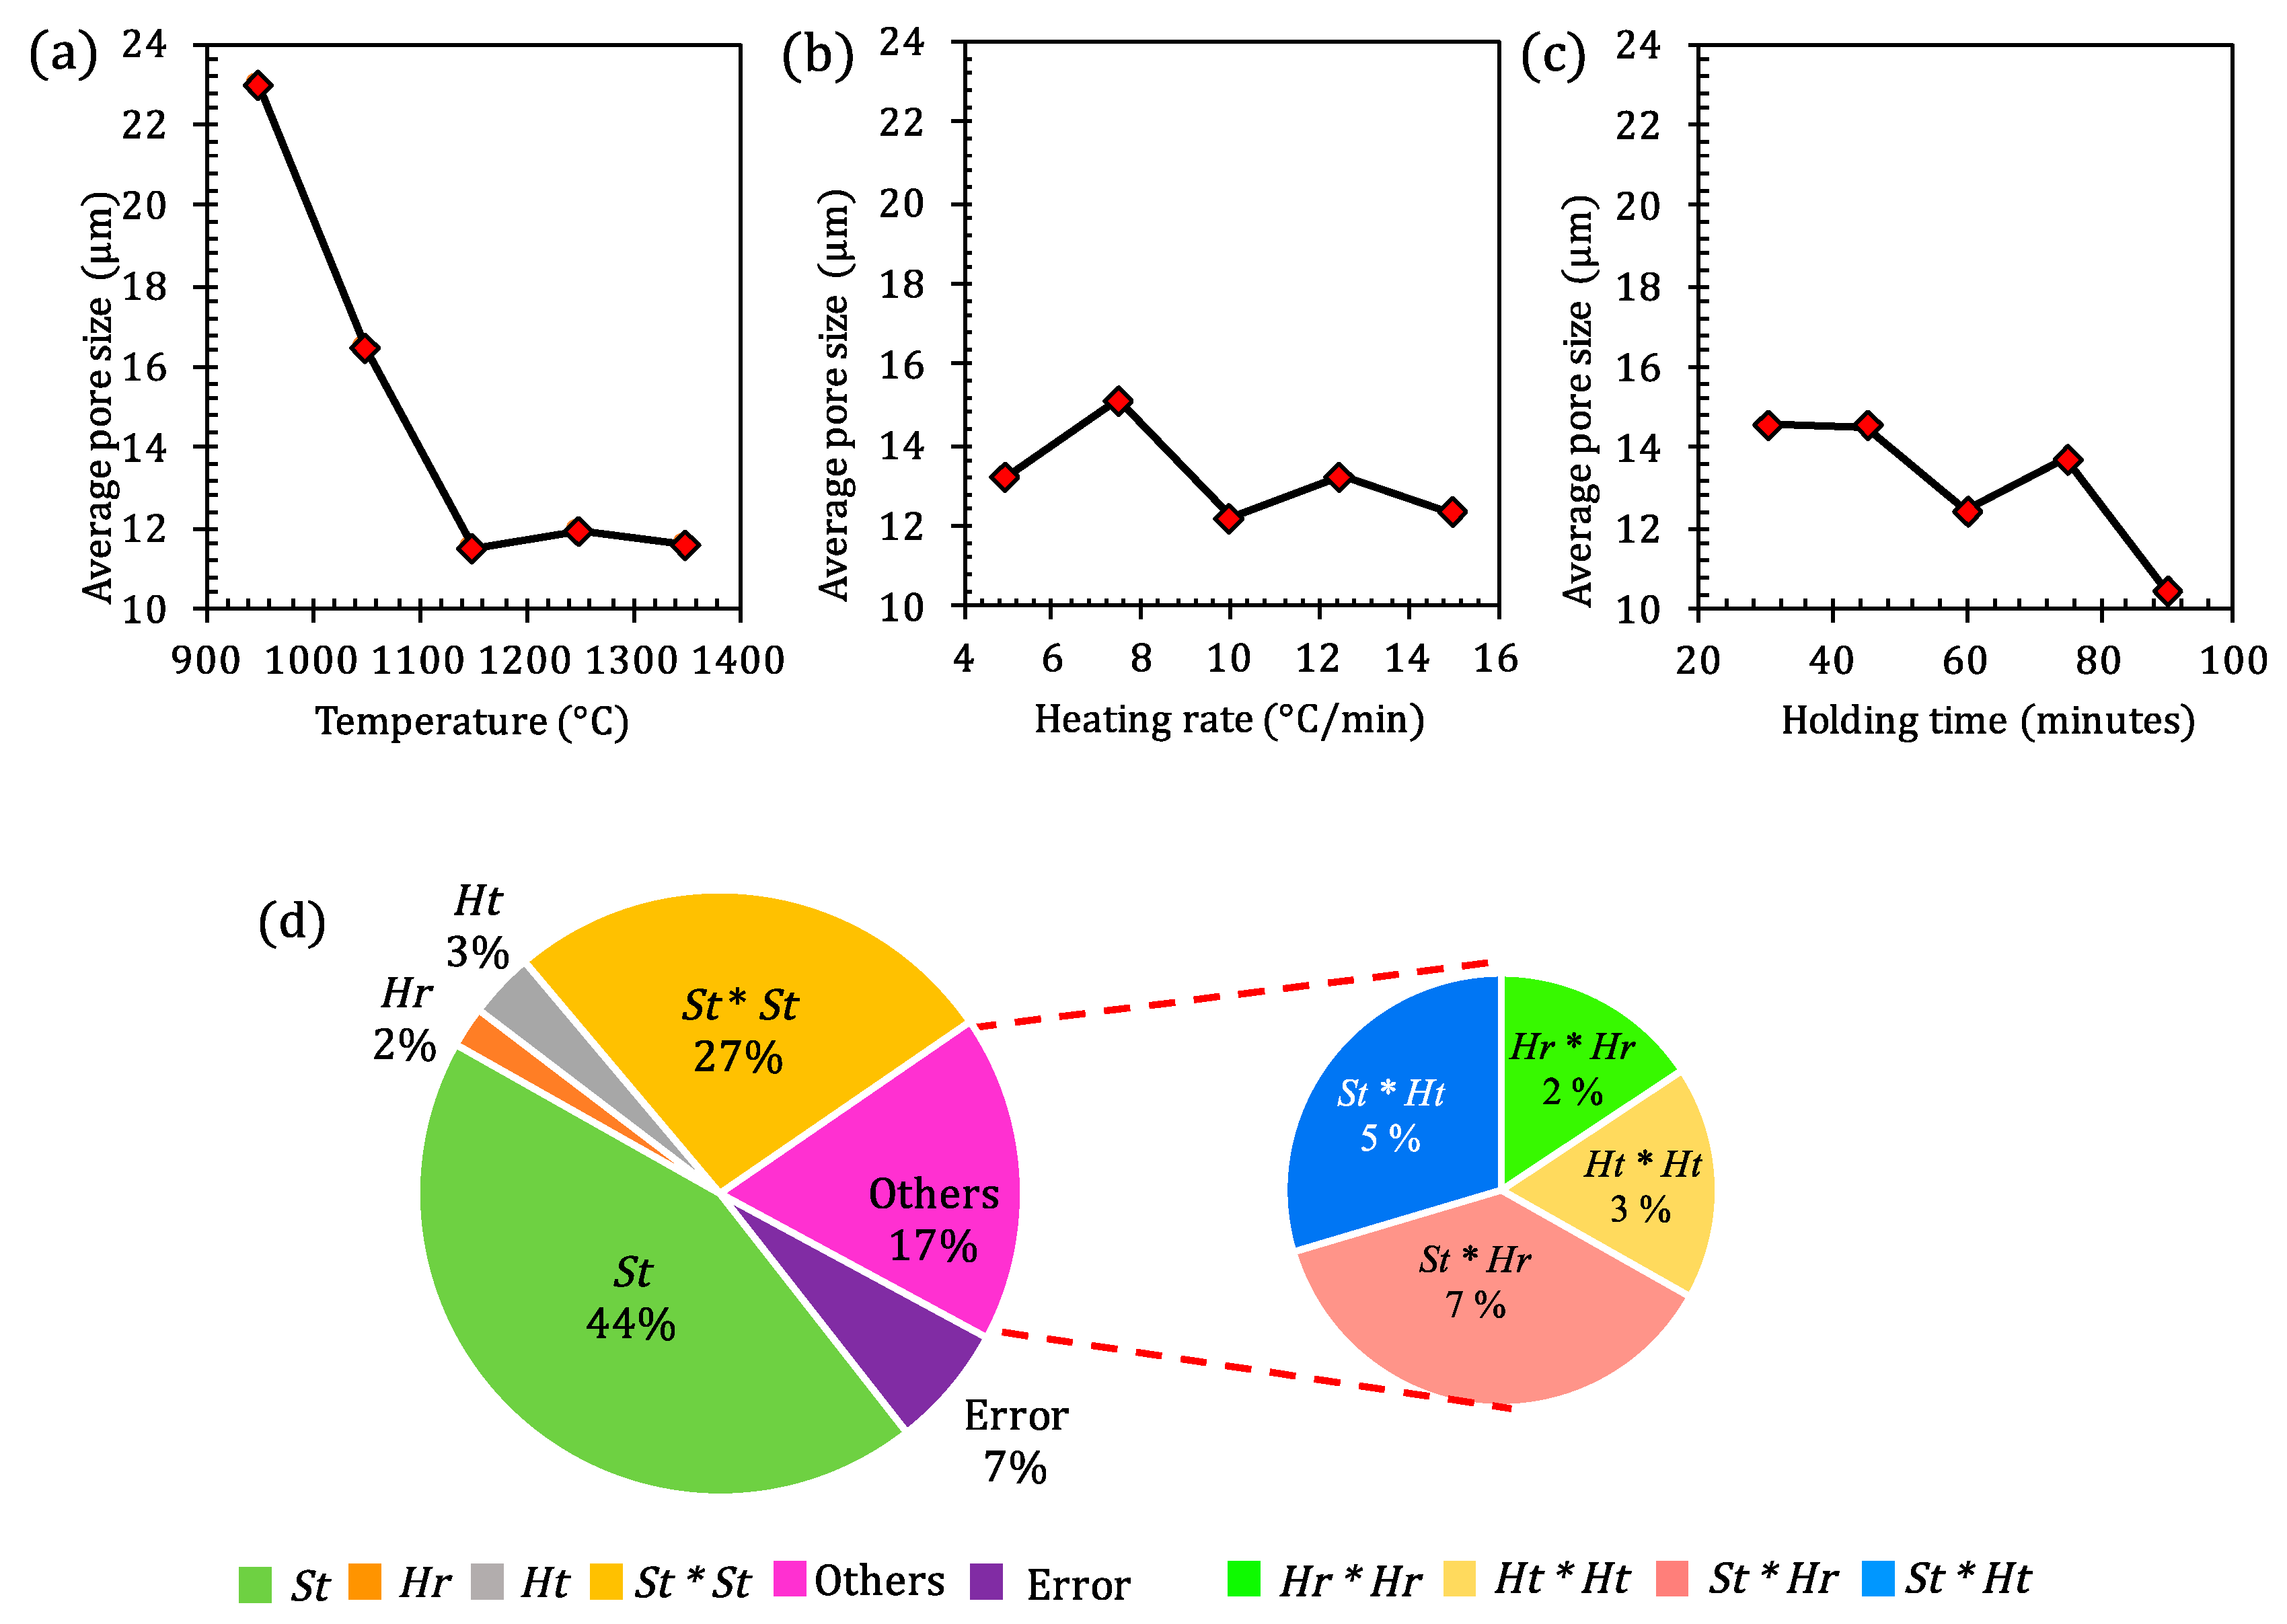
Figure 5. The majority of the pore sizes for the twenty experiments ranged between 4.4 and 30 µm. It was observed that the average pore size (APS) decreased with the increase in
St upto 1150 °C and saturated thereafter, as shown in
Figure 6. On the other hand,
Hr was found to least affect the APS and the values oscillated between 12 to 16 µm.
Ht was promising in reducing the APS, offering the least APS at 90 min. The model for the prediction of average pore size (APS) is given by Equation (5):
The error present in the statistical model is estimated according to Equation (6) as following:
The calculated error for APS was ±2.48 µm in the developed model. The ANOVA results for APS is given in
Table 2 and the percentage contribution is given in
Figure 6d.
TS was observed to be higher than
Fstandard and; therefore, the response APS was statistically significant.
Among the contributing input parameters to APS,
St was a significant parameter with a
p value equal to 0.0001 and it contributed to ~44% in linear terms, 27% in square terms, and 12% in interaction terms (5%—
St and
Ht,
p value = 0.007; 7%—
St and
Hr,
p value = 0.013) in the regression equation.
Hr contribution was merely 2% in linear terms (
p value = 0.083), 2% in square terms (
p value = 0.025), and ~7% in interaction terms (
p value = 0.007). Similarly,
Ht contributed for ~3% in linear terms (
p value = 0.0001), 3% in square terms (
p value = 0.007), and ~5% in interaction terms (
p value = 0.013). Among the three input parameters, the interaction effect was observed between
St and
Hr as well as between
St and
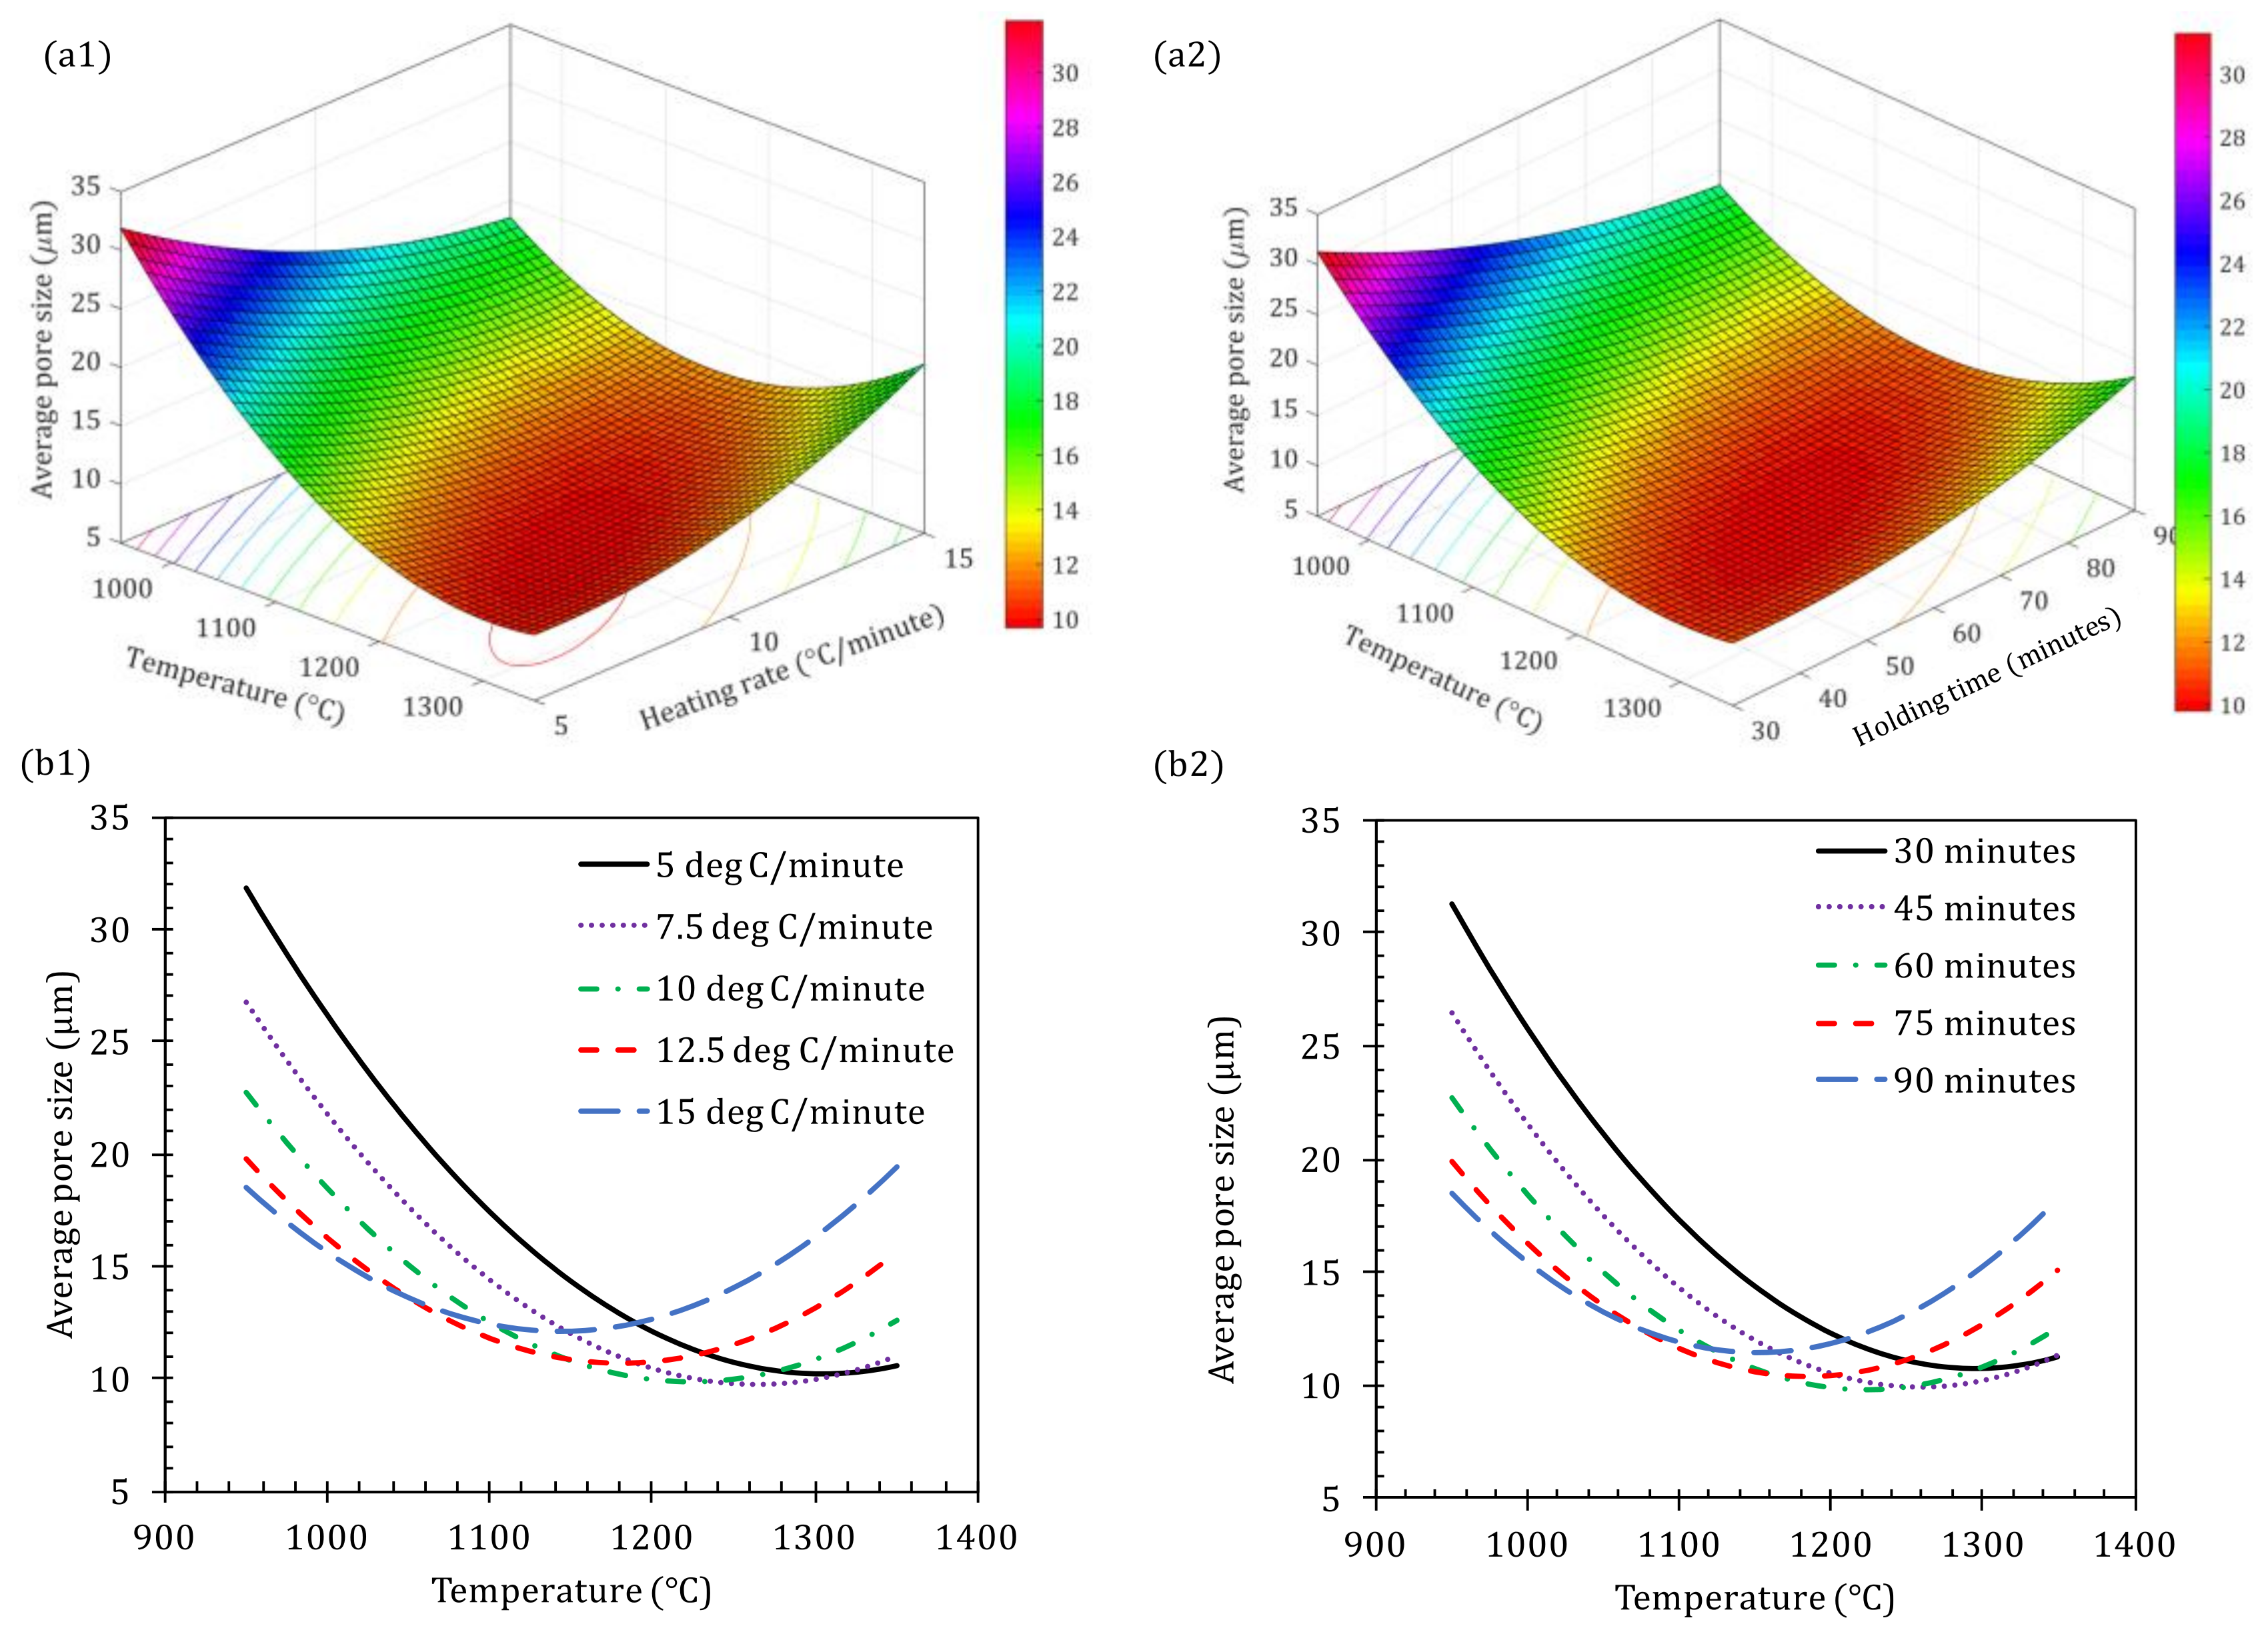
Ht. The effect is shown via surface plots and line plots in
Figure 7. At various
Hr values, the interaction between
St and APS was observed to be inversely proportional and saturated above a threshold temperature. At a lower
St, APS decreased with the increase in
Ht and
Hr. This observation reversed at a higher
St. As seen in
Figure 7, APS increased with the increase in
Ht and
Hr. At higher heating rates, the powder particles weld instantly with each other without allowing the formation of wider necks, thereby locking the air pockets and resulting in a higher APS [
20].
In the SEM micrographs shown in
Figure 3, no recast zones were noticed on the surfaces of the particles corresponding to the temperature at 950 °C (
Figure 3(a1,a2)). However, in the case of 1150 °C, partial melting of the surfaces was observed in
Figure 3(b1,b2). Larger sized pores rearranged to reduce the size of the pores. However, at a higher temperature, such as 1350 °C, distinct melting on the surface of the particles was witnessed. Also, wider necks were observed between the particles, as seen in
Figure 3(c1,c2). Larger sized pores were observed, in comparison to
Figure 3(b1,b2). One possible explanation is that, at higher temperatures, the entrapped vapor pressure increases to offset the densification, thereby creating larger voids [
21,
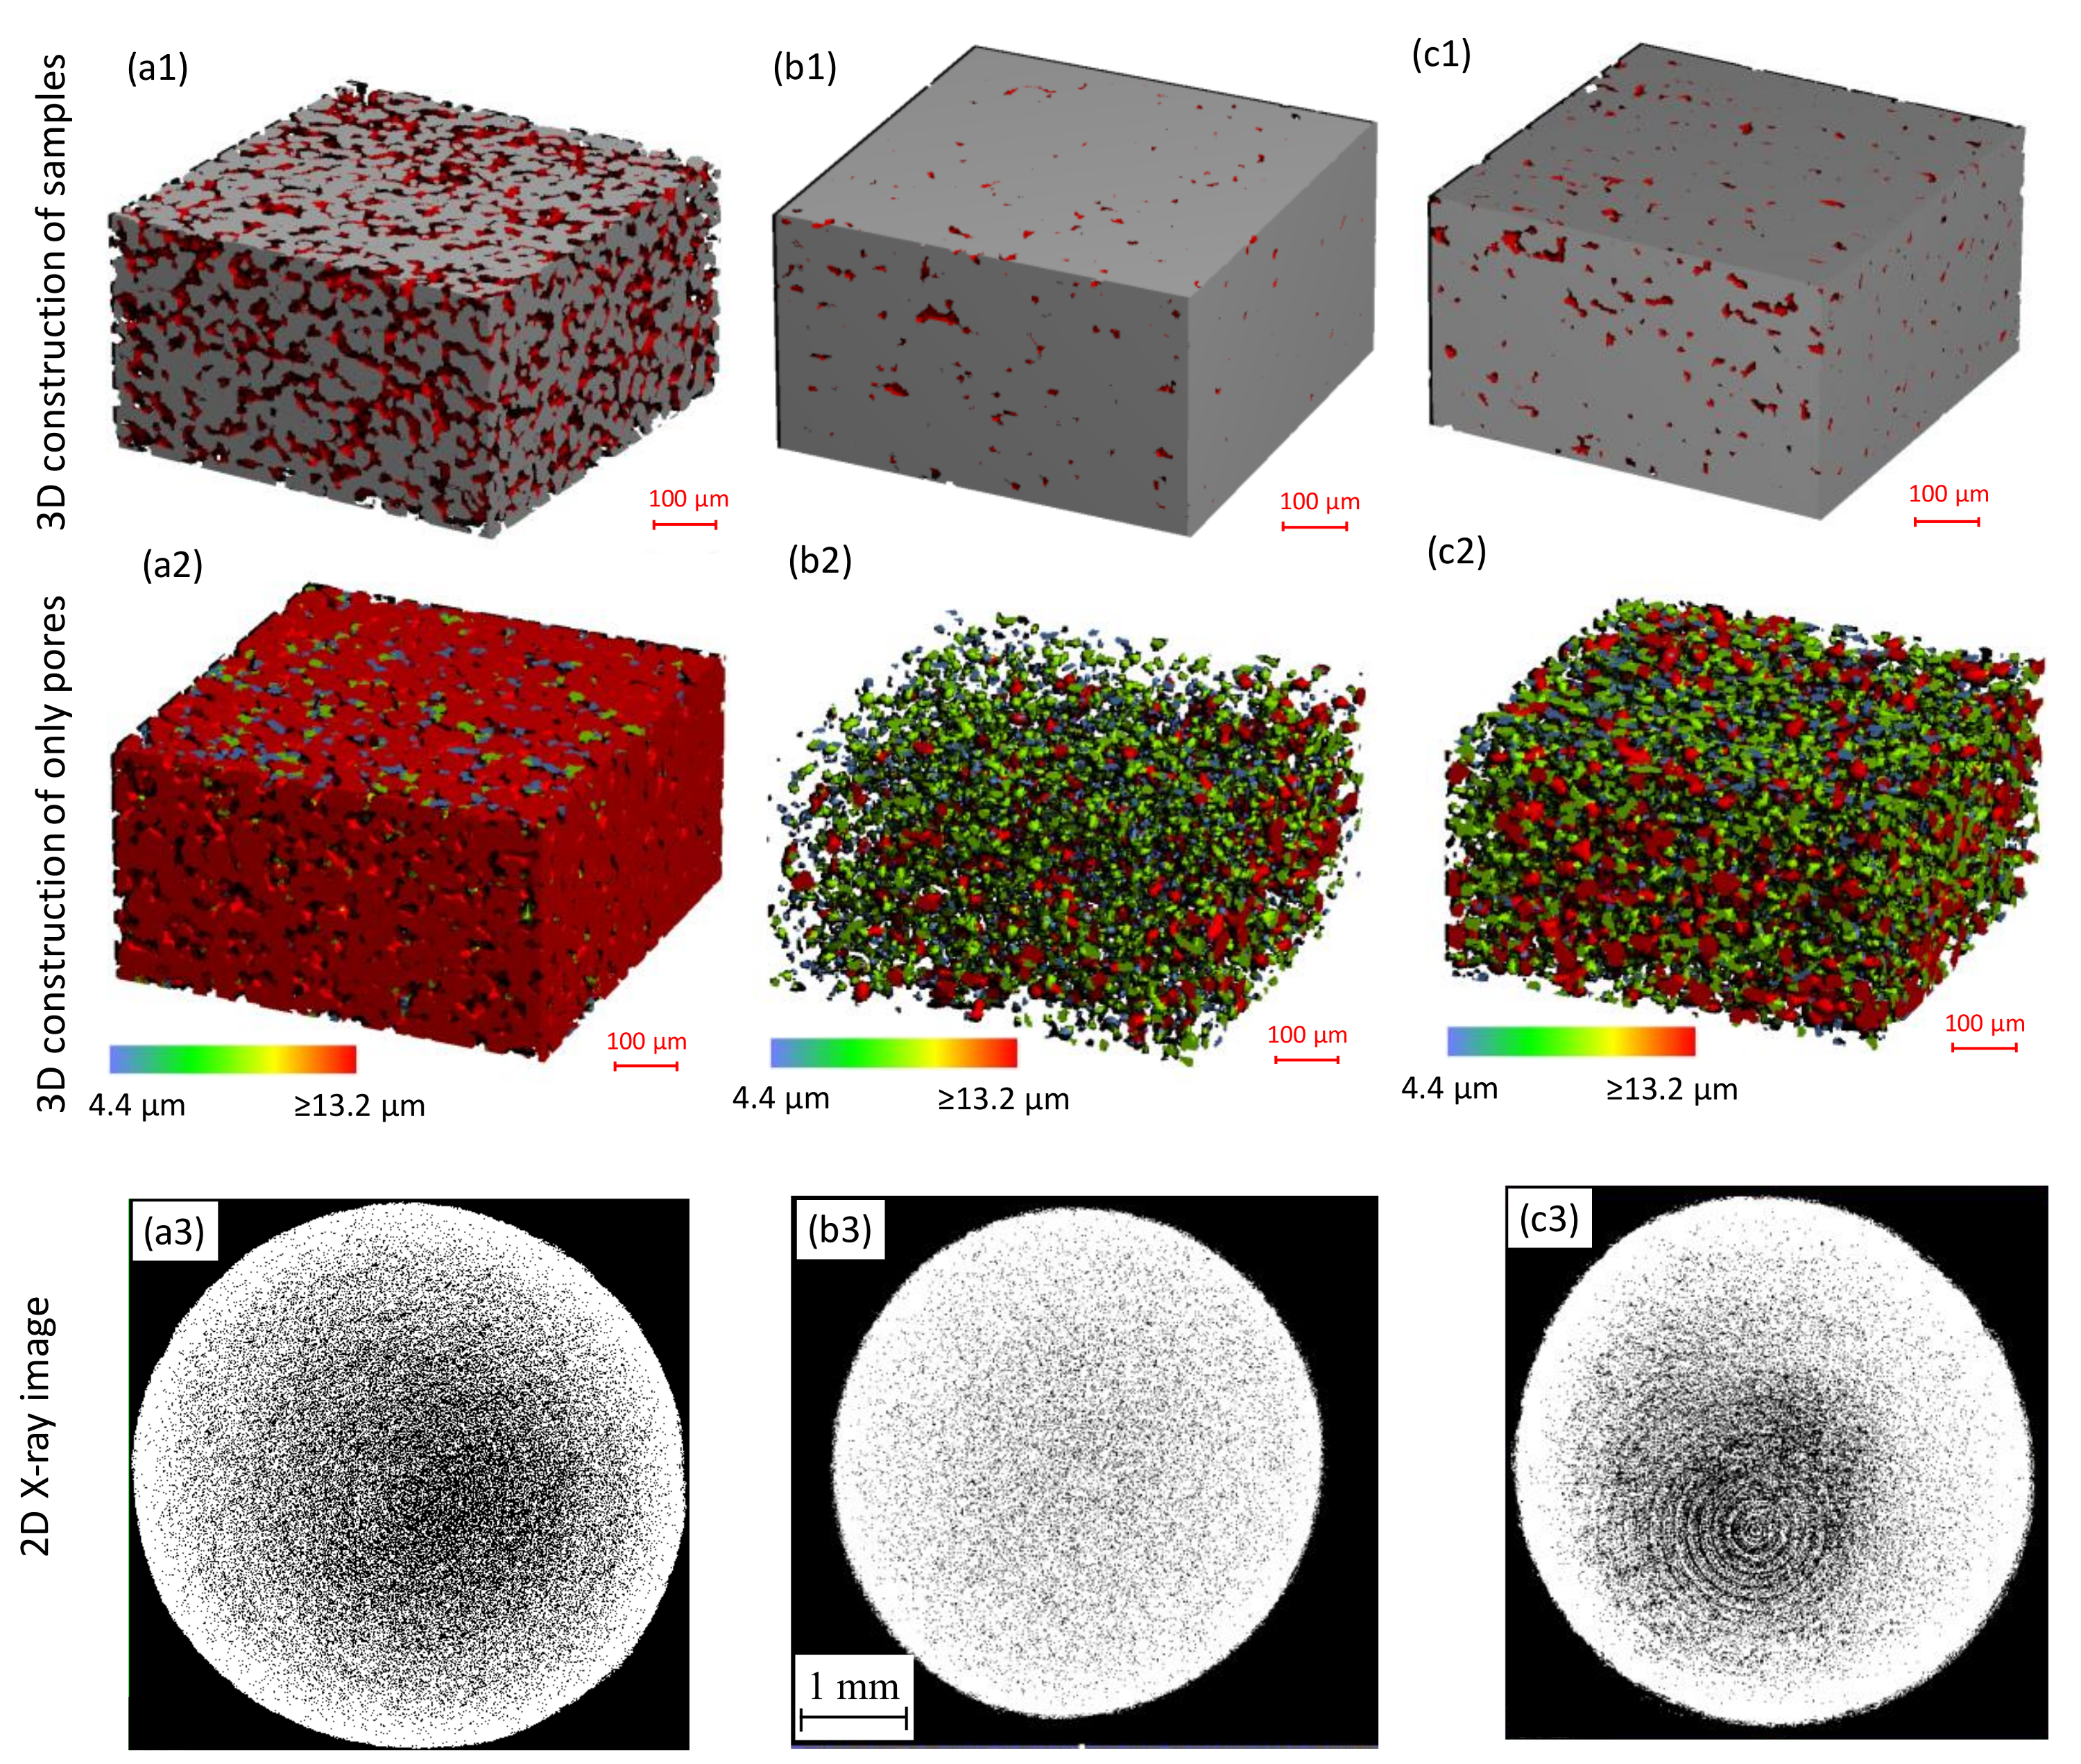
22]. A comparison of the 3D reconstructed µ-CT images as well as the 2D images of the components processed at three sintering temperatures (
St), namely, 950, 1150 and 1350 °C, at a heating rate (
Hr) of 10 °C/min and a holding time (
Ht) of 60 min is shown in
Figure 8.
The 3D reconstructed images are shown in
Figure 8(a1,b1,c1). The grey colored regions depict the Ti6Al4V material and the red colored regions indicate the pores. For better understanding, 3D construction of only the pores are seen in
Figure 8(a2,b2,c2). It is clearly seen from
Figure 8(a2) that the component sintered at a
St of 1150 °C possessed the smallest sized pores, as compared to the components sintered at 950 and 1350 °C sintering temperatures. The uniformity of the distribution of the pores for 1150 °C, in comparison to 950 and 1350 °C, are shown in
Figure 8(a3,b3,c3).
Three confirmation experiments were performed to validate the developed model. The process parameters and their corresponding output responses are tabulated in
Table 3. Multi-objective optimization was carried out using the Genetic Algorithm Toolbox in MATLAB
® 2017R. The parameters that yielded the maximum strength and optimal pore size were found to be:
St—1293 °C,
Hr—6.65 °C/min, and
Ht—72 min. Three dog-bone-shaped components were manufactured by sintering at the above input parameters for tensile testing, and another set of three cylindrical components were manufactured for pore size evaluation. The optimal values for the predicted and experimented tensile strength were 89.88 ± 10.2 MPa and 90.19 ± 7.23 MPa. The optimal values for the predicted and experimented APS were 11.4 ± 2.48 µm and 11.36 ± 0.25 µm. The experimental results matched with the numerical prediction within the limits.
