Article

Development of a Workflow for Topological Optimization of Cutting Tool Milling Bodies

by
Bruno Rafael Cunha
1,
Bruno Miguel Guimarães
2,
Daniel Figueiredo
2,
Manuel Fernando Vieira
1,3 and
José Manuel Costa
1,3,*
1
Department of Mechanical Engineering, Faculty of Engineering, University of Porto, R. Dr. Roberto Frias, 4200-465 Porto, Portugal
2
R&D Department, PALBIT S.A., P.O. Box 4, 3854-908 Branca, Portugal
3
LAETA, Institute of Science and Innovation in Mechanical and Industrial Engineering, R. Dr. Roberto Frias, 4200-465 Porto, Portugal
*
Author to whom correspondence should be addressed.
Metals 2026, 16(1), 116; https://doi.org/10.3390/met16010116
Submission received: 24 December 2025 / Revised: 13 January 2026 / Accepted: 17 January 2026 / Published: 19 January 2026
(This article belongs to the Special Issue Advances in Manufacturing and Machining Processes of Metals)

Abstract

This study establishes a systematic and reproducible workflow for topology optimization (TO) of indexable face milling cutter bodies with integrated internal coolant channels, designed for Additive Manufacturing (AM) of metallic parts. Grounded in Design for Additive Manufacturing (DfAM) principles, the workflow combines displacement-based TO and computational fluid dynamics analysis to generate simulation-driven tool geometries tailored to the constraints of AM. By leveraging iterative design knowledge, the proposed methodology enhances the scalability and repeatability of the design process, reducing development time and supporting rapid adaptation across various tool geometries. AM is explicitly exploited to integrate support-free internal coolant channels directed toward the insert cutting edge, thereby achieving a 20% mass reduction relative to the initial milling tool designs, and improving material usage efficiency at the design stage. The workflow yields numerically optimized geometries that maintain simulated global stiffness under the considered loading conditions and exhibit coolant flow distributions that effectively target the exposed cutting edges. These simulation results demonstrate the feasibility of an AM oriented, workflow-based approach for the numerical design of milling tools with internal cooling, mass reduction and provide a focused basis for subsequent experimental validation and comparison with conventionally manufactured counterparts.

1. Introduction

The continuous evolution of the manufacturing industry places increasing demands on machining processes to achieve higher efficiency, precision, and sustainability [1,2]. In this context, the concept of workflow has evolved from simple manual task coordination to complex, digitally integrated systems that manage the entire lifecycle of a product, from conceptual design to physical realization [3,4,5,6]. Within the specific domain of subtractive manufacturing, this evolution is critically manifested in the development of cutting tools that can withstand extreme operational conditions [7].
Modern machining operations, particularly in the aerospace, automotive, and die/mold sectors, are increasingly characterized by the use of “difficult to cut” materials [8]. Advanced alloys, such as hardened steels, titanium alloys (e.g., Ti6Al4V), and nickel-based superalloys (e.g., Inconel 718), offer superior mechanical and thermal properties but pose significant challenges to machinability [9,10]. These materials typically exhibit high yield strength and low thermal conductivity, a combination that prevents heat from dissipating through the chip [11]. Consequently, during high-speed machining, a significant portion of the mechanical energy consumed is converted into thermal energy, leading to extreme temperature accumulation at the primary and secondary shear zones [12,13,14,15].
The management of this thermal energy is paramount. Excessive heat generation at the tool–chip interface accelerates various wear mechanisms, including adhesion, abrasion, and chemically induced diffusion wear [16,17,18,19]. Furthermore, cyclic thermal loads can lead to thermal fatigue, causing comb cracks and premature catastrophic failure of the cutting edge. Beyond tool life, high temperatures compromise the integrity of the workpiece, inducing tensile residual stress and microstructural alterations that may render the component unusable [20,21,22]. Therefore, the effective removal of heat is not merely an auxiliary function but a critical requirement for process stability.
Traditionally, heat dissipation has been managed through flood cooling, where large volumes of cutting fluid are pumped into the machining zone to dissipate heat. However, this approach has significant drawbacks. From a functional perspective, the “vapor barrier” (the effect created by the evaporation of fluid at high temperatures) often prevents the coolant from effectively reaching the cutting edge, limiting its cooling capacity [23,24]. From an environmental and economic standpoint, flood cooling is increasingly scrutinized due to the health hazards associated with petroleum-based fluids and the high costs of disposal and maintenance [25,26]. These limitations have influenced the shift toward internal cooling strategies, where fluid is delivered through channels within the tool body directly to the heat source [27,28,29].
Despite the proven benefits of internal cooling, its implementation has been historically hindered by the geometric limitations of conventional manufacturing technologies. The production of tool bodies via subtractive methods, such as drilling and milling, typically restricts the design of the cooling channels to straight, cylindrical geometries. The intersection of these drilled holes inevitably creates sharp corners and “dead zones” where fluid velocity drops and turbulence increases. According to fluid dynamics principles, these geometric discontinuities cause flow separation and significant pressure losses, reducing the hydraulic efficiency of the system [30,31]. Moreover, drilled channels cannot conform to the complex external profiles of modern cutting tools, leading to uneven cooling and thermal gradients within the tool body [32].
The emergence of Additive Manufacturing (AM) has provided a solution to these geometric constraints, enabling the fabrication of “conformal cooling” channels. These channels are designed to follow the tool’s topology, maintaining a constant distance from the cutting surface to ensure uniform heat extraction. AM allows for the creation of optimized cross-sections (such as elliptical or teardrop shapes) and complex trajectories like helices, which are impossible to manufacture via drilling [33,34].
While Laser Powder Bed Fusion (LPBF) has been the dominant AM technology for metallic components, it is associated with high capital costs, complex safety requirements for handling reactive powders, and significant post-processing needs [35]. Recently, metal fused filament fabrication (Metal FFF) has gained attention as a cost-effective and accessible alternative [36]. Metal FFF utilizes a filament composed of metal powder bound by a polymer matrix, which is extruded layer by layer to form a “green part”. This part subsequently undergoes a debinding process to remove the polymer and a high-temperature sintering process to fuse the metal particles [37,38,39].
However, the application of Metal FFF for producing high-precision functional components, such as milling heads, presents a unique set of challenges that have not been adequately addressed in the literature. Unlike LPBF, where the powder bed mostly provides passive support, Metal FFF requires physical support structures for overhanging features. In the context of internal cooling channels, removing these supports is often impossible, necessitating a rigorous Design for Additive Manufacturing (DfAM) approach to create self-supporting internal geometries. Furthermore, the sintering process involves significant volumetric shrinkage (often around 20%), which aggravates the achievement of the tight dimensional tolerances required for tool holder interfaces and insert pockets [40,41,42,43].
A comprehensive review of the state of the art reveals a distinct gap: while the benefits of conformal cooling are well theorized, and the Metal FFF process is well-documented for general parts, there is a lack of integrated research combining these fields. There are virtually no studies that propose a validated workflow for designing, optimizing, and manufacturing cutting tool bodies using Metal FFF. Existing literature often treats fluid dynamics and structural integrity as separate problems, failing to address the multi-physical nature of cutting tools, where mass reduction (for lower inertia) must not compromise stiffness, and where channel geometry must be optimized for both fluid flow and printability.
To bridge this gap, this study proposes a novel, reproducible workflow that integrates two parallel optimization methodologies. The first methodology employs topology optimization (TO) and finite element analysis (FEA) to design a lightweight yet rigid tool structure capable of withstanding cutting forces. The second methodology utilizes computational fluid dynamics (CFD) to design conformal cooling channels that maximize flow velocity and cooling uniformity while adhering to the self-supporting constraints of the FFF process. These parallel tracks converge in the fabrication of the tool utilizing 17-4 PH stainless steel, a material selected for its favorable balance of mechanical properties and corrosion resistance.
Therefore, the primary objective of this work is to develop and numerically demonstrate an integrated CAD–TO–CFD workflow tailored to Metal FFF milling heads with conformal coolant channels. Specifically, considering an industrial eight (8) insert milling cutter body. The workflow is then applied to two additional cutter bodies with seven (7) and six (6) inserts, respectively, to assess their robustness and scalability across a family of geometrically related tools.

2. Materials and Methods

2.1. Materials

To ensure the reproducibility of the proposed workflow, three distinct milling tool geometries were selected. The primary case study for workflow development was an 8 teeth milling tool (Ref: 063A20190-08 08-022040). Subsequently, two additional tools with 7 and 6 inserts were utilized to validate the versatility, scalability, and robustness of the workflow. All tools use the same indexable inserts (Ref: XPET 100304 PDSR-MP). Both the milling tool and indexable inserts are commercial products from PALBIT S.A. (Aveiro, Portugal). A summary of each tool’s specifications and their respective roles in this study is presented in Table 1.
A suite of software tools was integrated to support the design and simulation phases. Siemens NX (v. 2406, Siemens Digital Industries Software, Plano, TX, USA) was utilized for CAD modeling, channel design, simulation, and TO via the “Simcenter Nastran” (default) package. Material properties were sourced from Granta EduPack 2024 R2 (ANSYS, Inc., Canonsburg, PA, USA). Computational fluid dynamics (CFD) simulations were conducted using Ansys Fluent (ANSYS, Inc.). For AM, the Eiger slicing software (Version 3.20.110) was used to understand the support needed for the Metal X system (Markforged, Waltham, MA, USA). The primary case study, following workflow development, was then sliced and fabricated using 17-4 PH stainless steel V2 filament (Markforged). This material was chosen considering the necessary mechanical properties for milling tool bodies, which are well aligned with this stainless steel alloy, and among the possibilities of materials for FFF.

2.2. Methods

The developed workflow comprises two parallel methodologies (TO and channel design), which are integrated into a final union step as presented on Figure 1.
Before applying each methodology, specific geometric constraints (Figure 1, Critical Surfaces) were defined to preserve compatibility. Surfaces in contact with the CNC machine arbor fixing were set to “keep in” on the “construction body” feature, and the insert pockets received an even distribution of the applied force to ensure the relative positions and tolerances remained unaltered. To avoid the formation of empty voids inside the geometry, a “shape constraint” feature named “fill the void” was used.
To ensure repeatability and printability without support structures, the conventionally drilled internal coolant channels were redesigned using a rationalized approach. The path was constrained to a 45-degree tilt relative to the build plate. Unlike previous semicircular cross-sections that required internal supports, a new “stretched teardrop” geometry was implemented [44]. This self-supporting shape leverages the tilted path to maximize printability while maintaining flow efficiency.
The CFD simulations were performed by INEGI (Porto, Portugal) to validate the flow within the channel and the direction of the flow toward the cutting edge. The simulation assumed a steady-state laminar flow regime, using water (for easier simulations and quicker results) at 25 °C as the fluid medium. The inlet velocity was set to 1 m/s. To avoid local back-pressure effects, a relative pressure of 0 Pa was applied at the outlet, positioned at a sufficient distance from the exit of the flow path.
The whole optimization was executed within the Siemens NX TO module. The primary objective was defined as maximizing stiffness, subject to a mass constraint that retained 80% of the original design mass. The material properties for 17-4 PH stainless steel used in the simulation had a Young’s Modulus of 202 GPa and a Poisson’s ratio of 0.275. The boundary conditions applied to the surfaces contacting the machine arbor fixing were defined as fixed constraints.
The cutting forces were calculated based on a theoretical model calculator [45]. A safety factor of 1.5 was applied to the calculated values, resulting in total forces applied to each insert of 13.5 kN (8 inserts tool), 10.5 kN (7 inserts tool), and 9 kN (6 inserts tool). This translates to the cutting force being applied perpendicularly to the surfaces that support the back of the insert, thus leading to a certain displacement of this surface.
The workflow concludes with a Boolean integration of each methodology, resulting in the “final union” operation. The TO body intersects with the base tool geometry, followed by the subtraction of the coolant channels. A shelling operation is applied to the exposed sections of the channels to ensure the integrity of the wall thickness. Finally, machining allowances (material addition) are added to insert pocket surfaces to allow for post-production rectification and grinding. The goal of this approach is to keep the workflow methodology-agnostic: the different methodologies are developed in parallel rather than as sequential dependencies. Consequently, new methods (e.g., lattice design) can be incorporated at the final union stage without requiring changes to the existing workflow.

3. Results and Discussion

3.1. Topology Optimization

The mass reduction performed on the TO, 20%, is clearly significant, and it is important to evaluate its impact on the tool body. An approach is to compare the FEA of the TO body with that of one of the original tools, thereby evaluating the displacement that occurs during tool operation under a specific cutting force.
For the TO milling body, an FEA simulation of the optimized result is available in the Siemens NX module for TO. For the original model, the same solver method (Simcenter Nastran) and the same material properties were utilized, with a precision of 0.3 mm on the tetrahedral mesh.
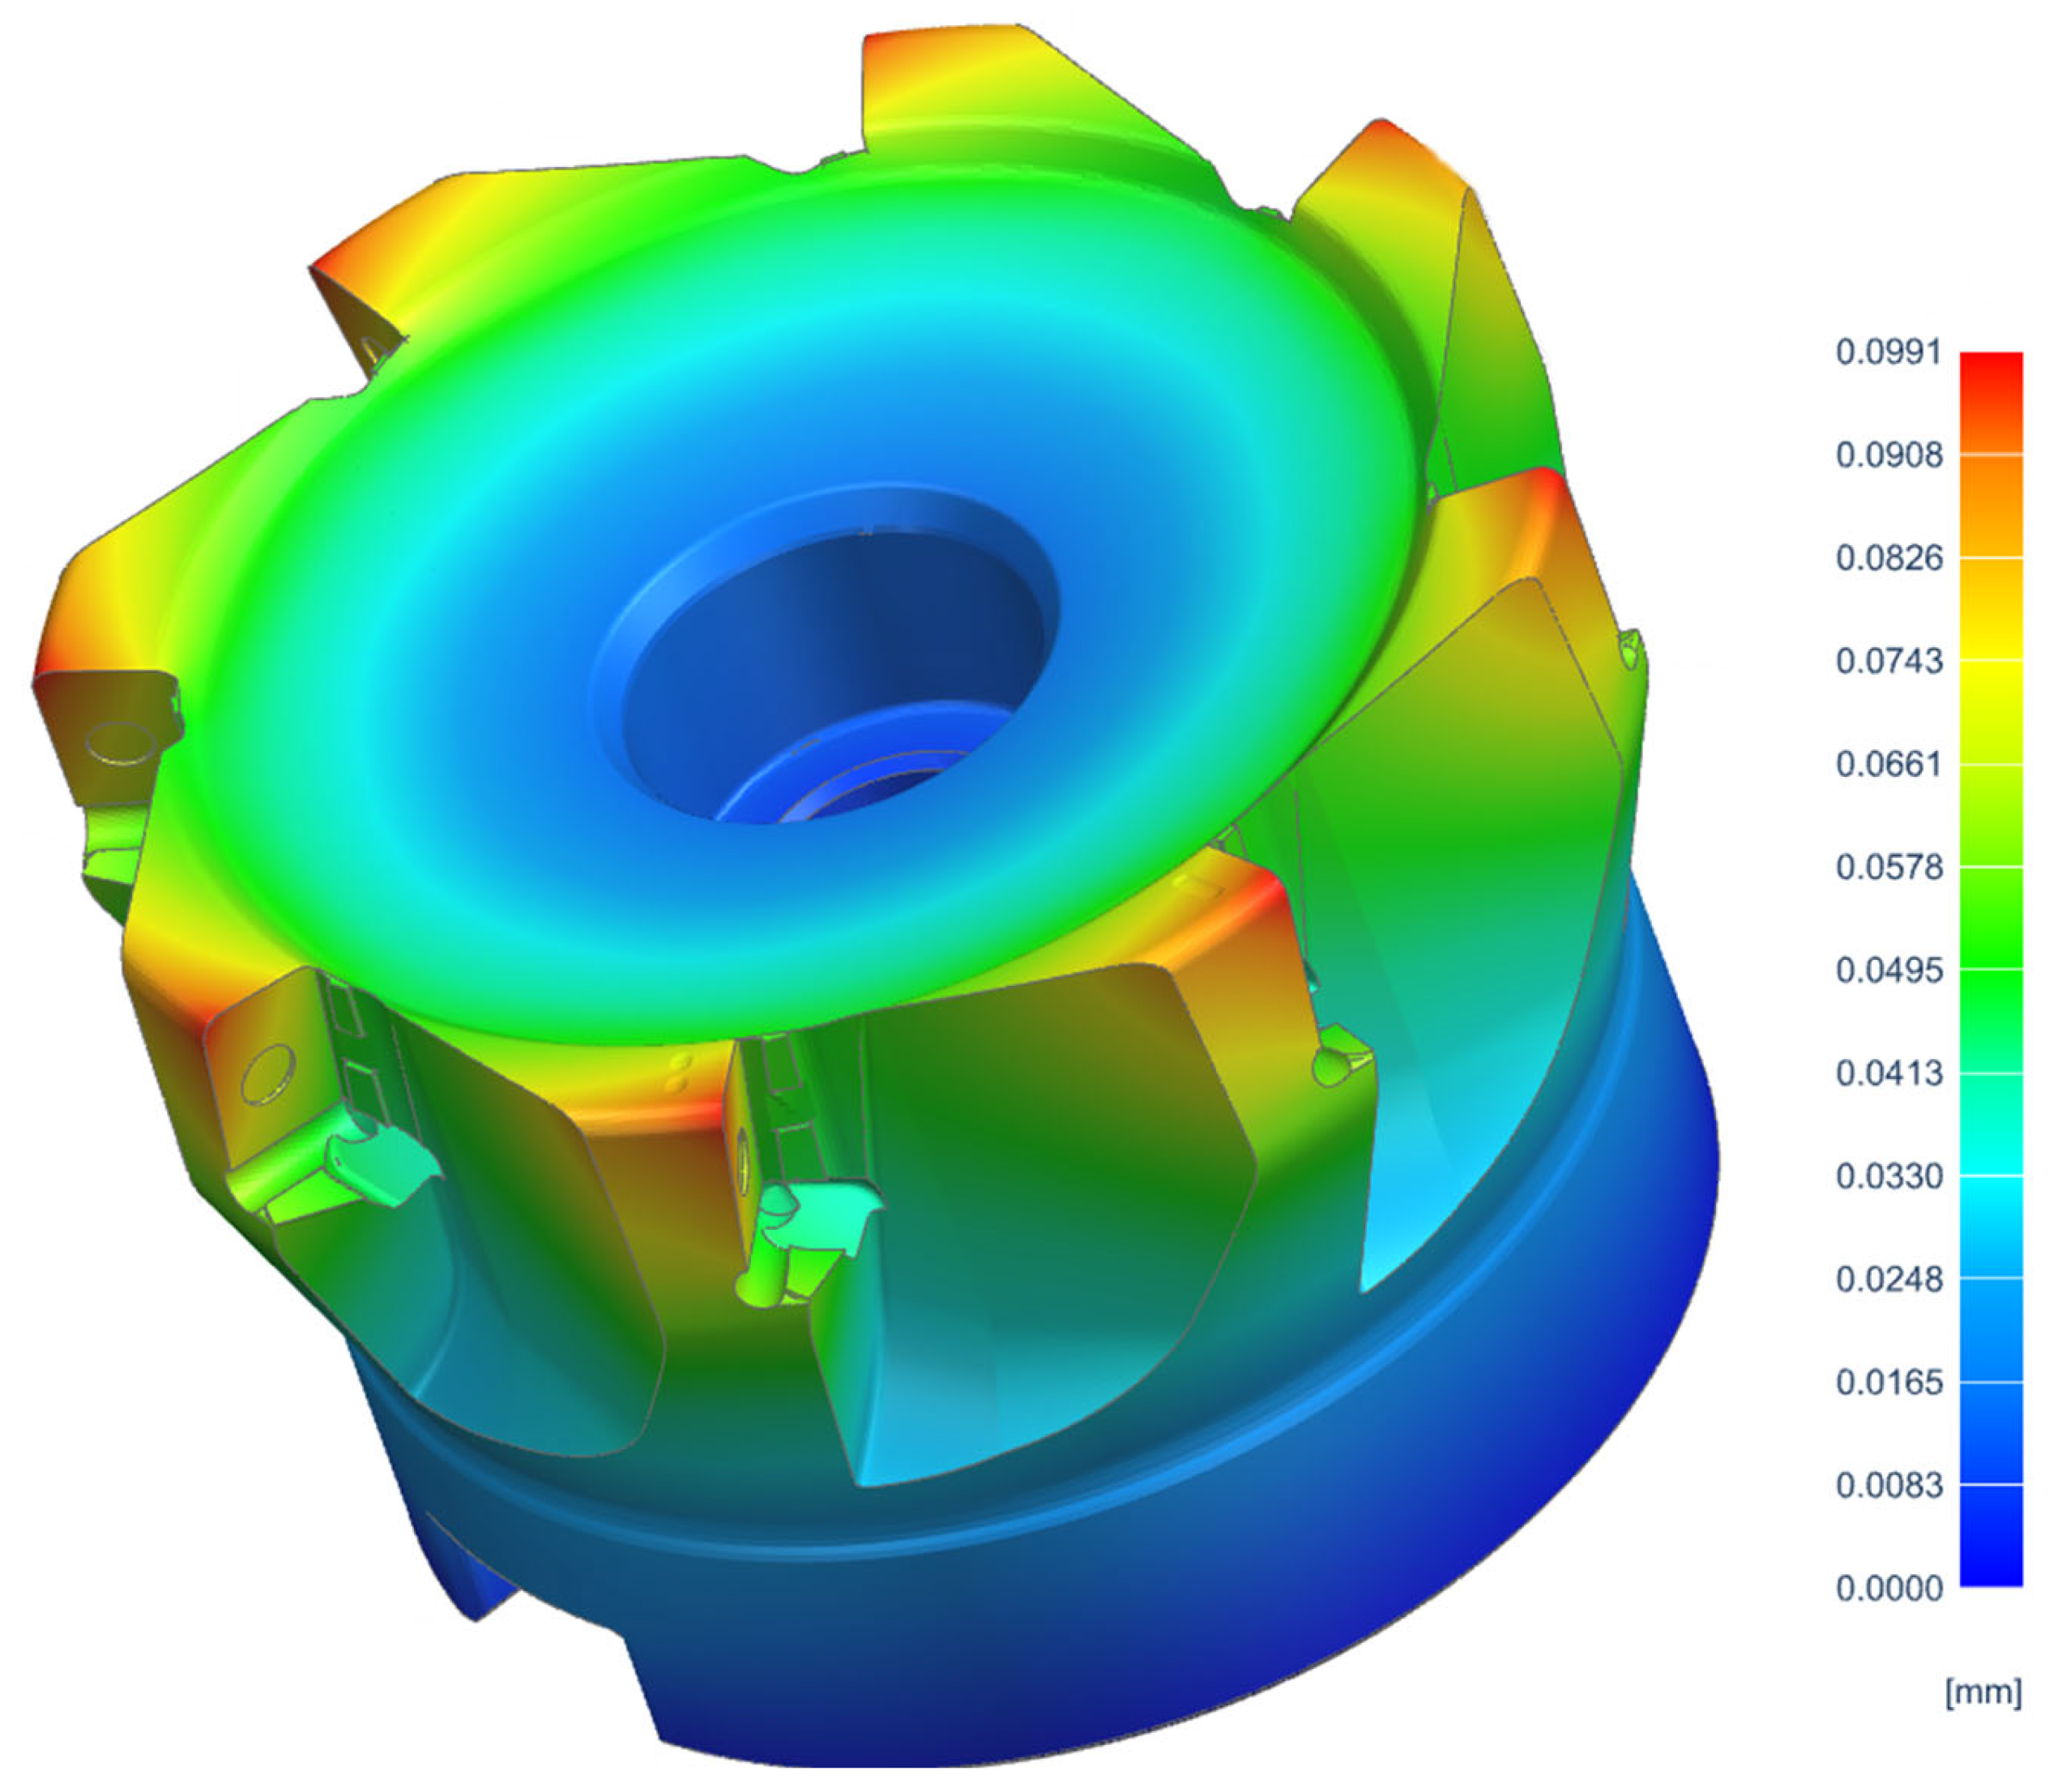
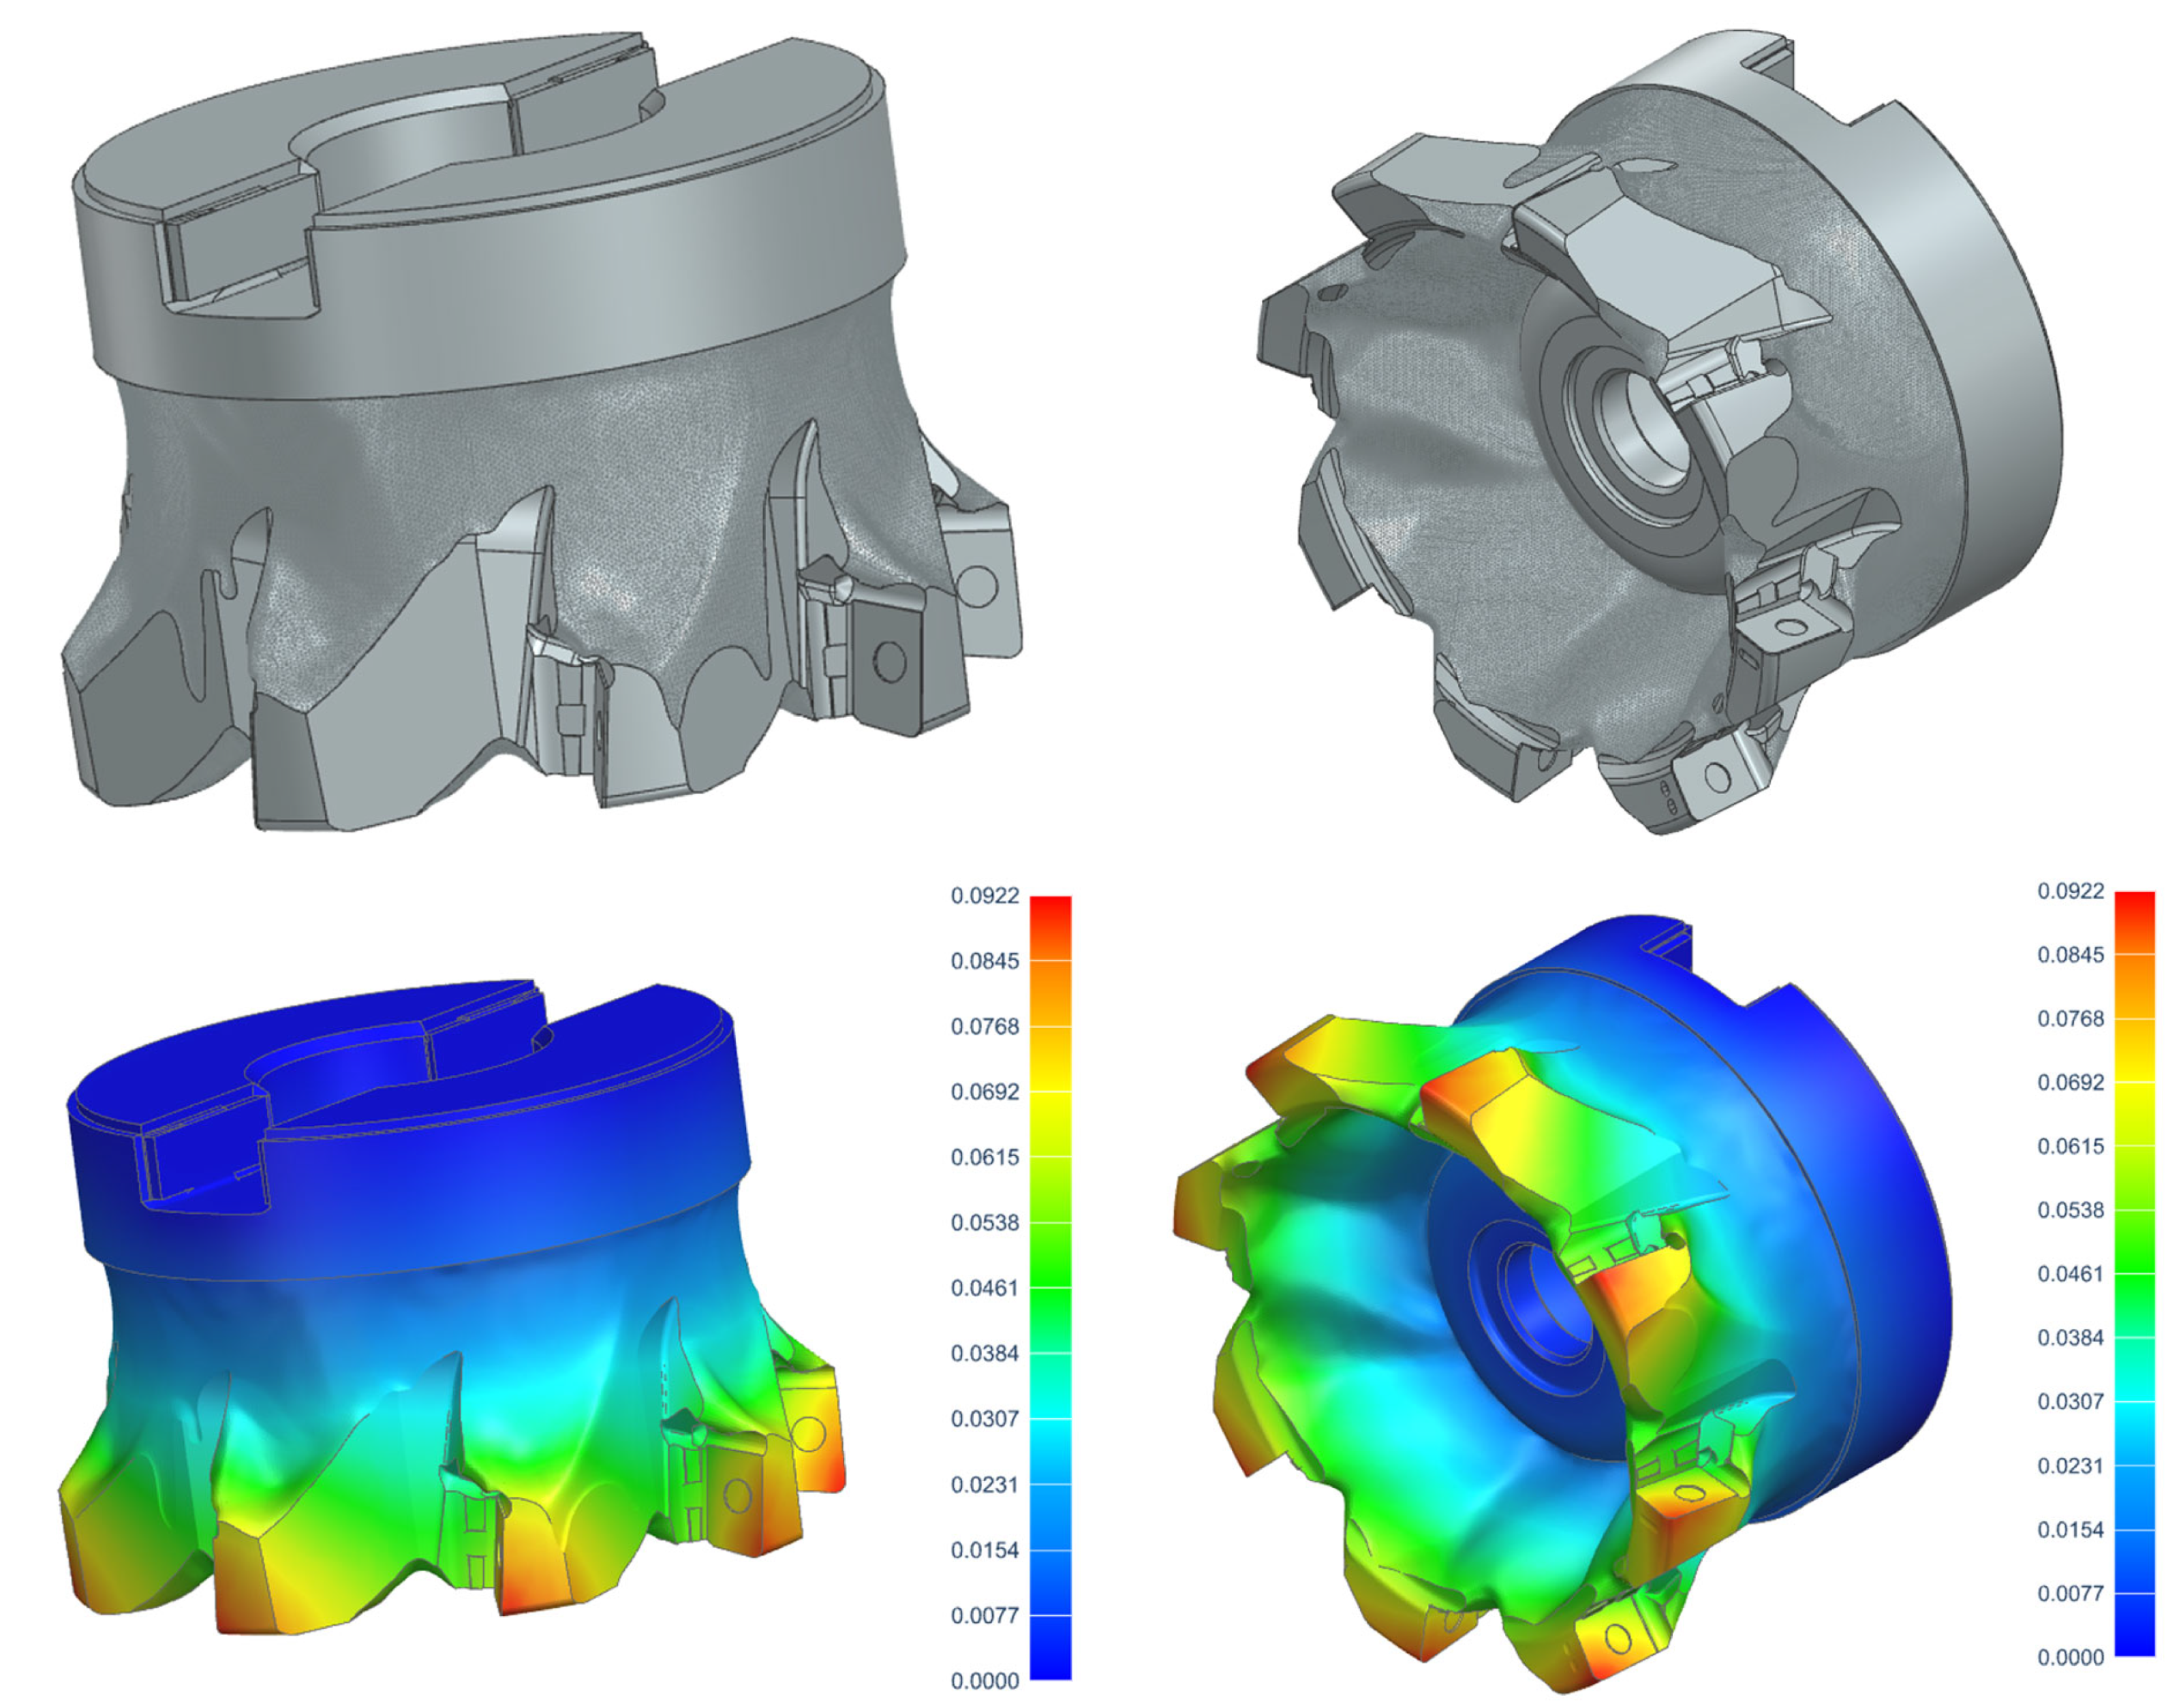
Figure 2 presents the original eight insert milling tool FEA result, where the maximum displacement obtained by the simulation was 0.0991 mm. Compared to the original tool, the topology-optimized version, as shown in Figure 3, exhibits a lower displacement of 0.0922 mm. These differences, despite being of a small order of magnitude (−0.069 mm), highlight the possibility of removing material from the milling tool body without affecting its mechanical behavior during the cutting process. This enhanced performance can be attributed to the shape optimization performed by the TO module on Siemens NX.
Analyzing the milling body shape of the optimized tool (Figure 3) The curves and contours present a slimmer organic shape compared to the original model. The “fill the void” feature contributed to a continuous, smooth surface on the tool body. The TO achieves a good equilibrium between the functional parts and design freedom, thanks to the mass available for optimization.
This simulation cannot predict potential defects created by material anisotropy, a well-known challenge of AM technology, as well as porosity, and several other possible problems in the AM manufacturing process. However, it is still an interesting result, as the tests on the workflow can provide a more comprehensive analysis of its performance, thereby enhancing the understanding of its applicability and robustness to different tool designs.

3.2. Coolant Channel Design

The coolant channel design was developed under the constraints of material extrusion (MEX). In this study, MEX is implemented via metal fused filament fabrication (Metal FFF), which imposes requirements such as minimum wall thickness, avoidance of unsupported overhangs, and fully support-free internal features (since internal supports cannot be removed from enclosed channels). Accordingly, the channel geometry was defined in accordance with DfAM principles, which motivated the use of a tilted channel trajectory and a self-supporting, teardrop-like cross-section to ensure printability while maintaining functional flow delivery to the cutting edge.
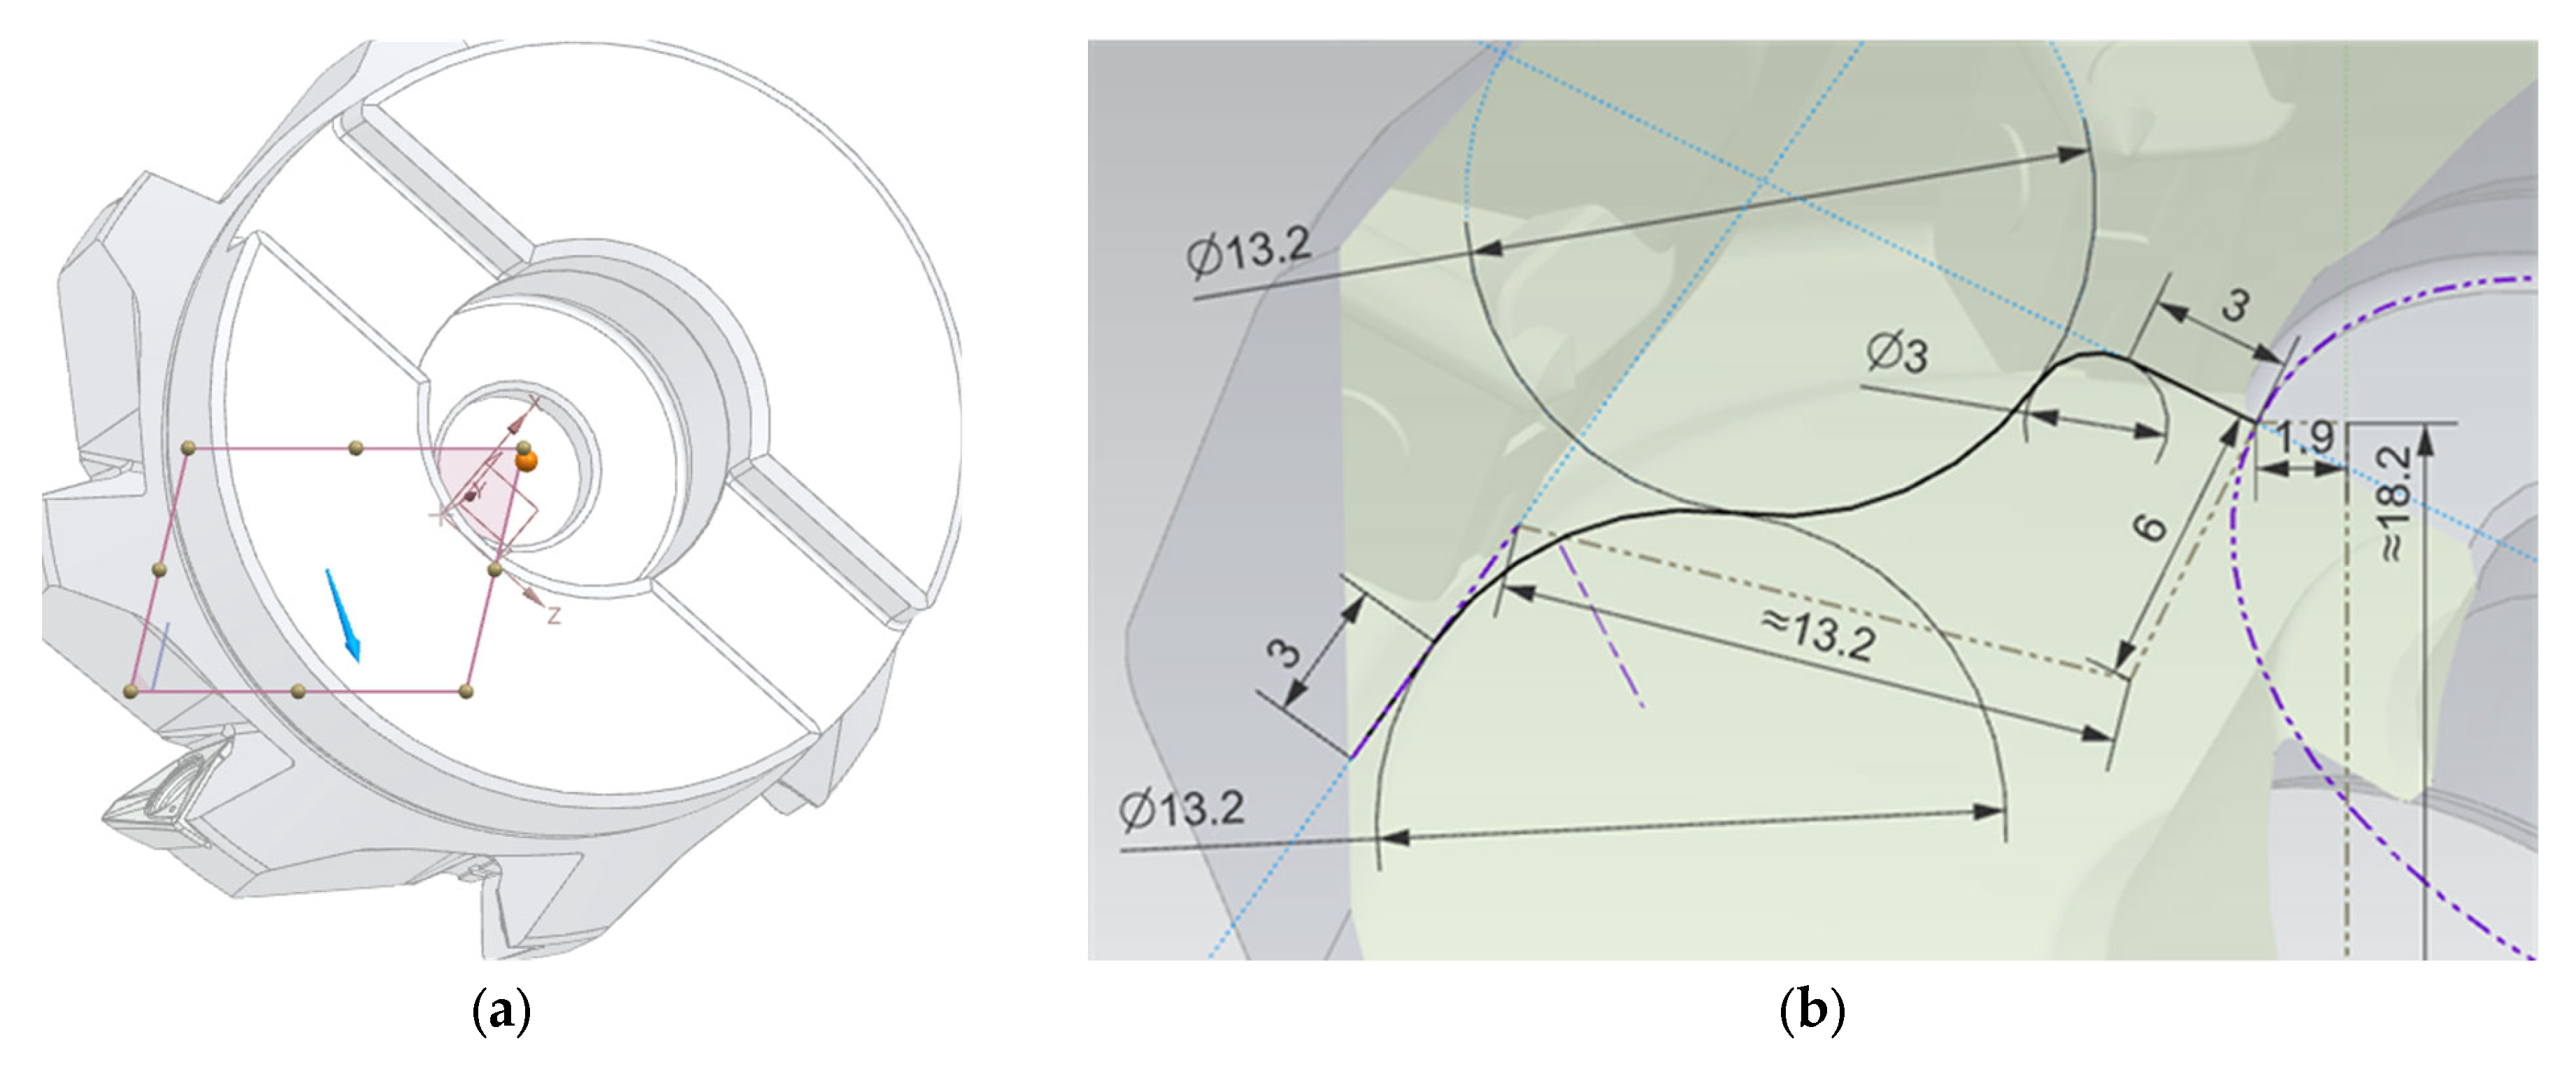
To create the channels path, first, a plane (represented on Figure 4a) that had the center point of the tool and an inclination of 45 degrees in the print direction is aligned (by rotation) to intersect the desired target position on the insert.
The coolant channels began at the intersection between the plane and the surface where the fluid would be located. Smooth curves have been shown on Figure 4b; to keep a laminar flow, the path joins the entry to the desired exit.
The dimensions were defined arbitrarily using the insert size to determine a construction line tangent to the fluid surface edge and another line at the desired exit. The intersection of the two circles then defines the distance between these two lines. The entry and exit lines were described as half the insert size, as well as the smaller circle, whose intent was to smooth the transition between the entry line and the first big circle.
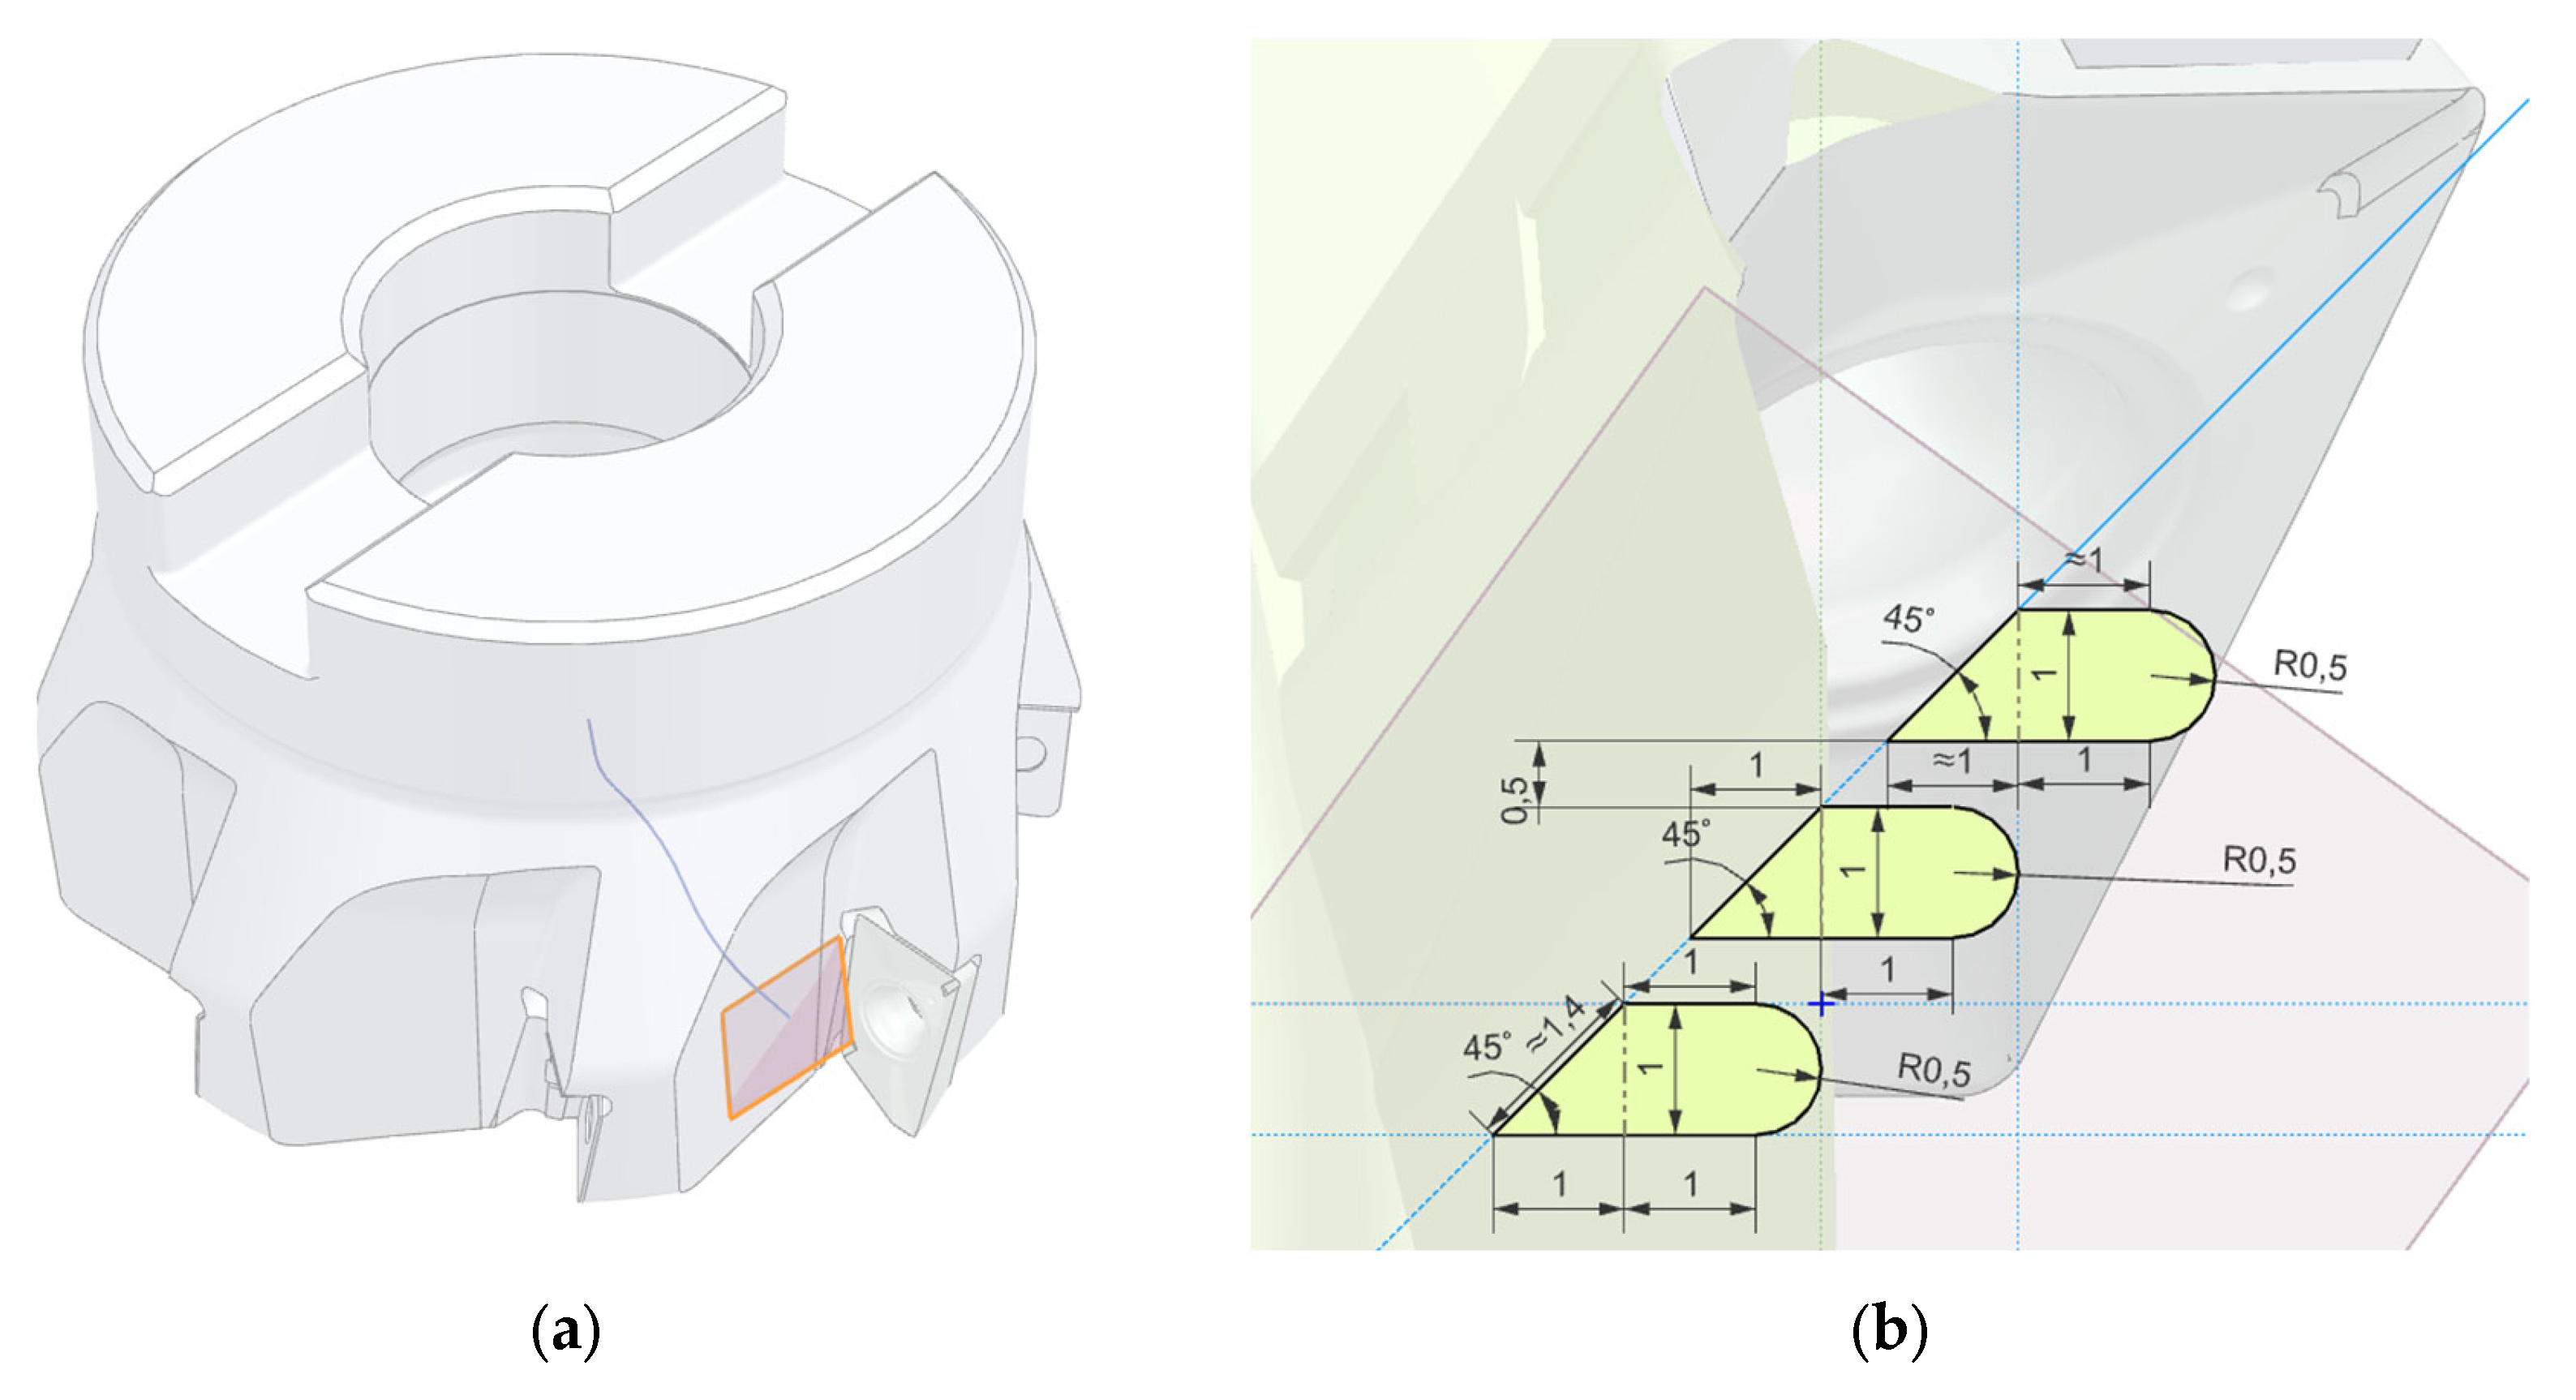
After defining the path, a feature in NX was utilized to create a plane where the normal of the plane is tangent to a line at a user-defined point. In this case, the point chosen was the last point of the path, therefore creating a plane, as seen in Figure 5a, which has the perspective of the channel exit, facilitates the positioning and design of the channels’ geometry.
To further enhance the supportless design, a geometry close to a teardrop shape was utilized, as shown in Figure 5b, also with a 45-degree angle on the top side (in relation to the print direction). These two sketches were then utilized on the function sweep to be subtracted from the original tool model.
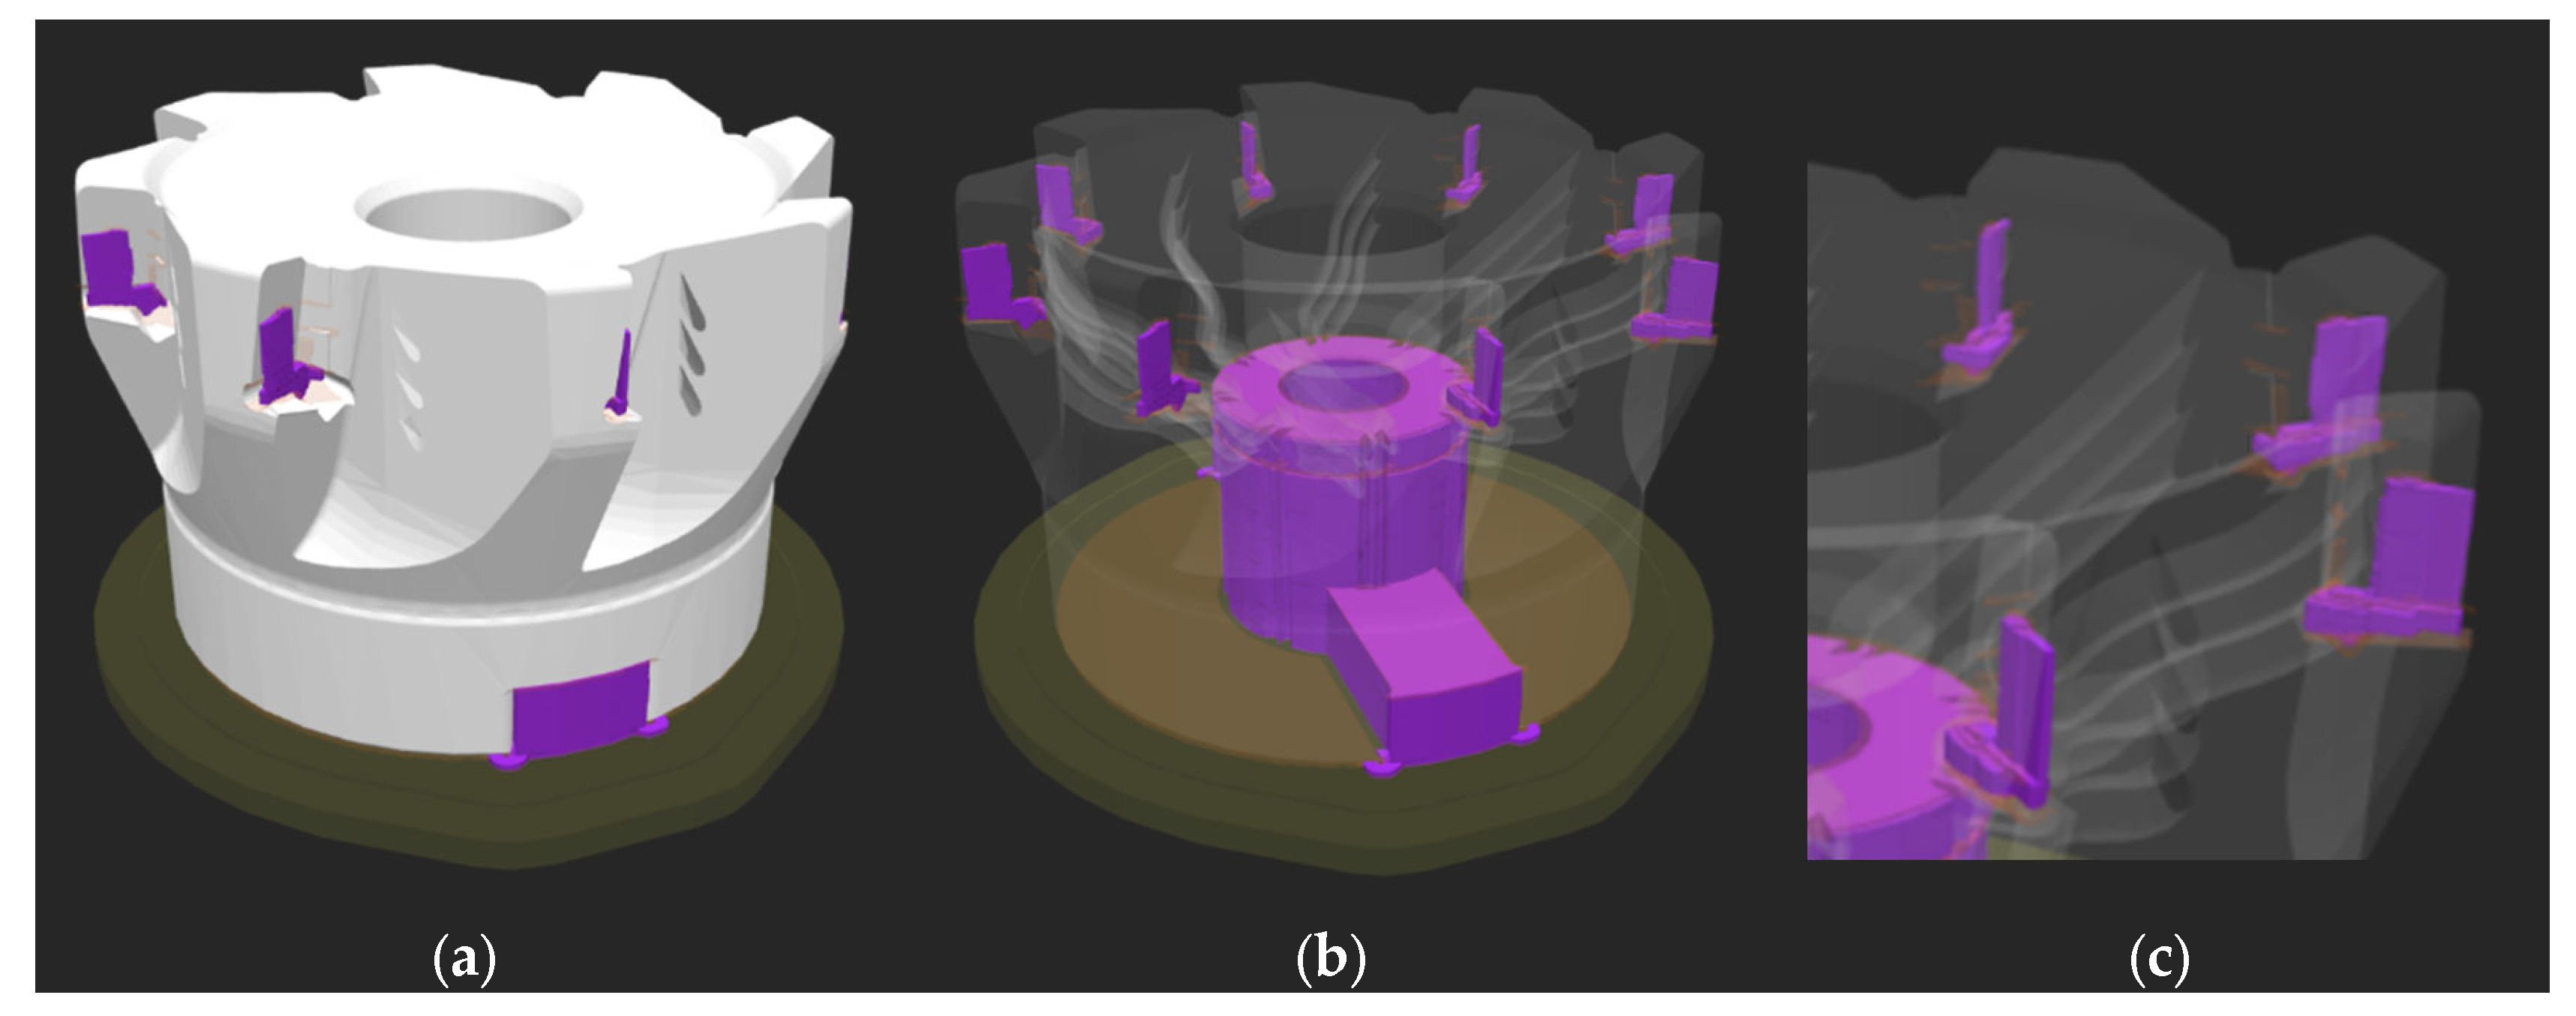
To test the supportless premise, as defined in the workflow diagram (Figure 1), a slice simulation was performed on the Eiger software, as seen in Figure 6, confirming the self-supporting channel design. Figure 6a presents the tool in white, and the support material in purple, with no visible support material on the channels’ exit. It is only possible to view support material in the insert pocket, where it will be added during the machining allowance in the model preparation for printing step. Looking at Figure 6b, the tool material is now transparent, and it is possible to visualize the absence of support material inside the coolant channels, which is confirmed by the closeup on Figure 6c.
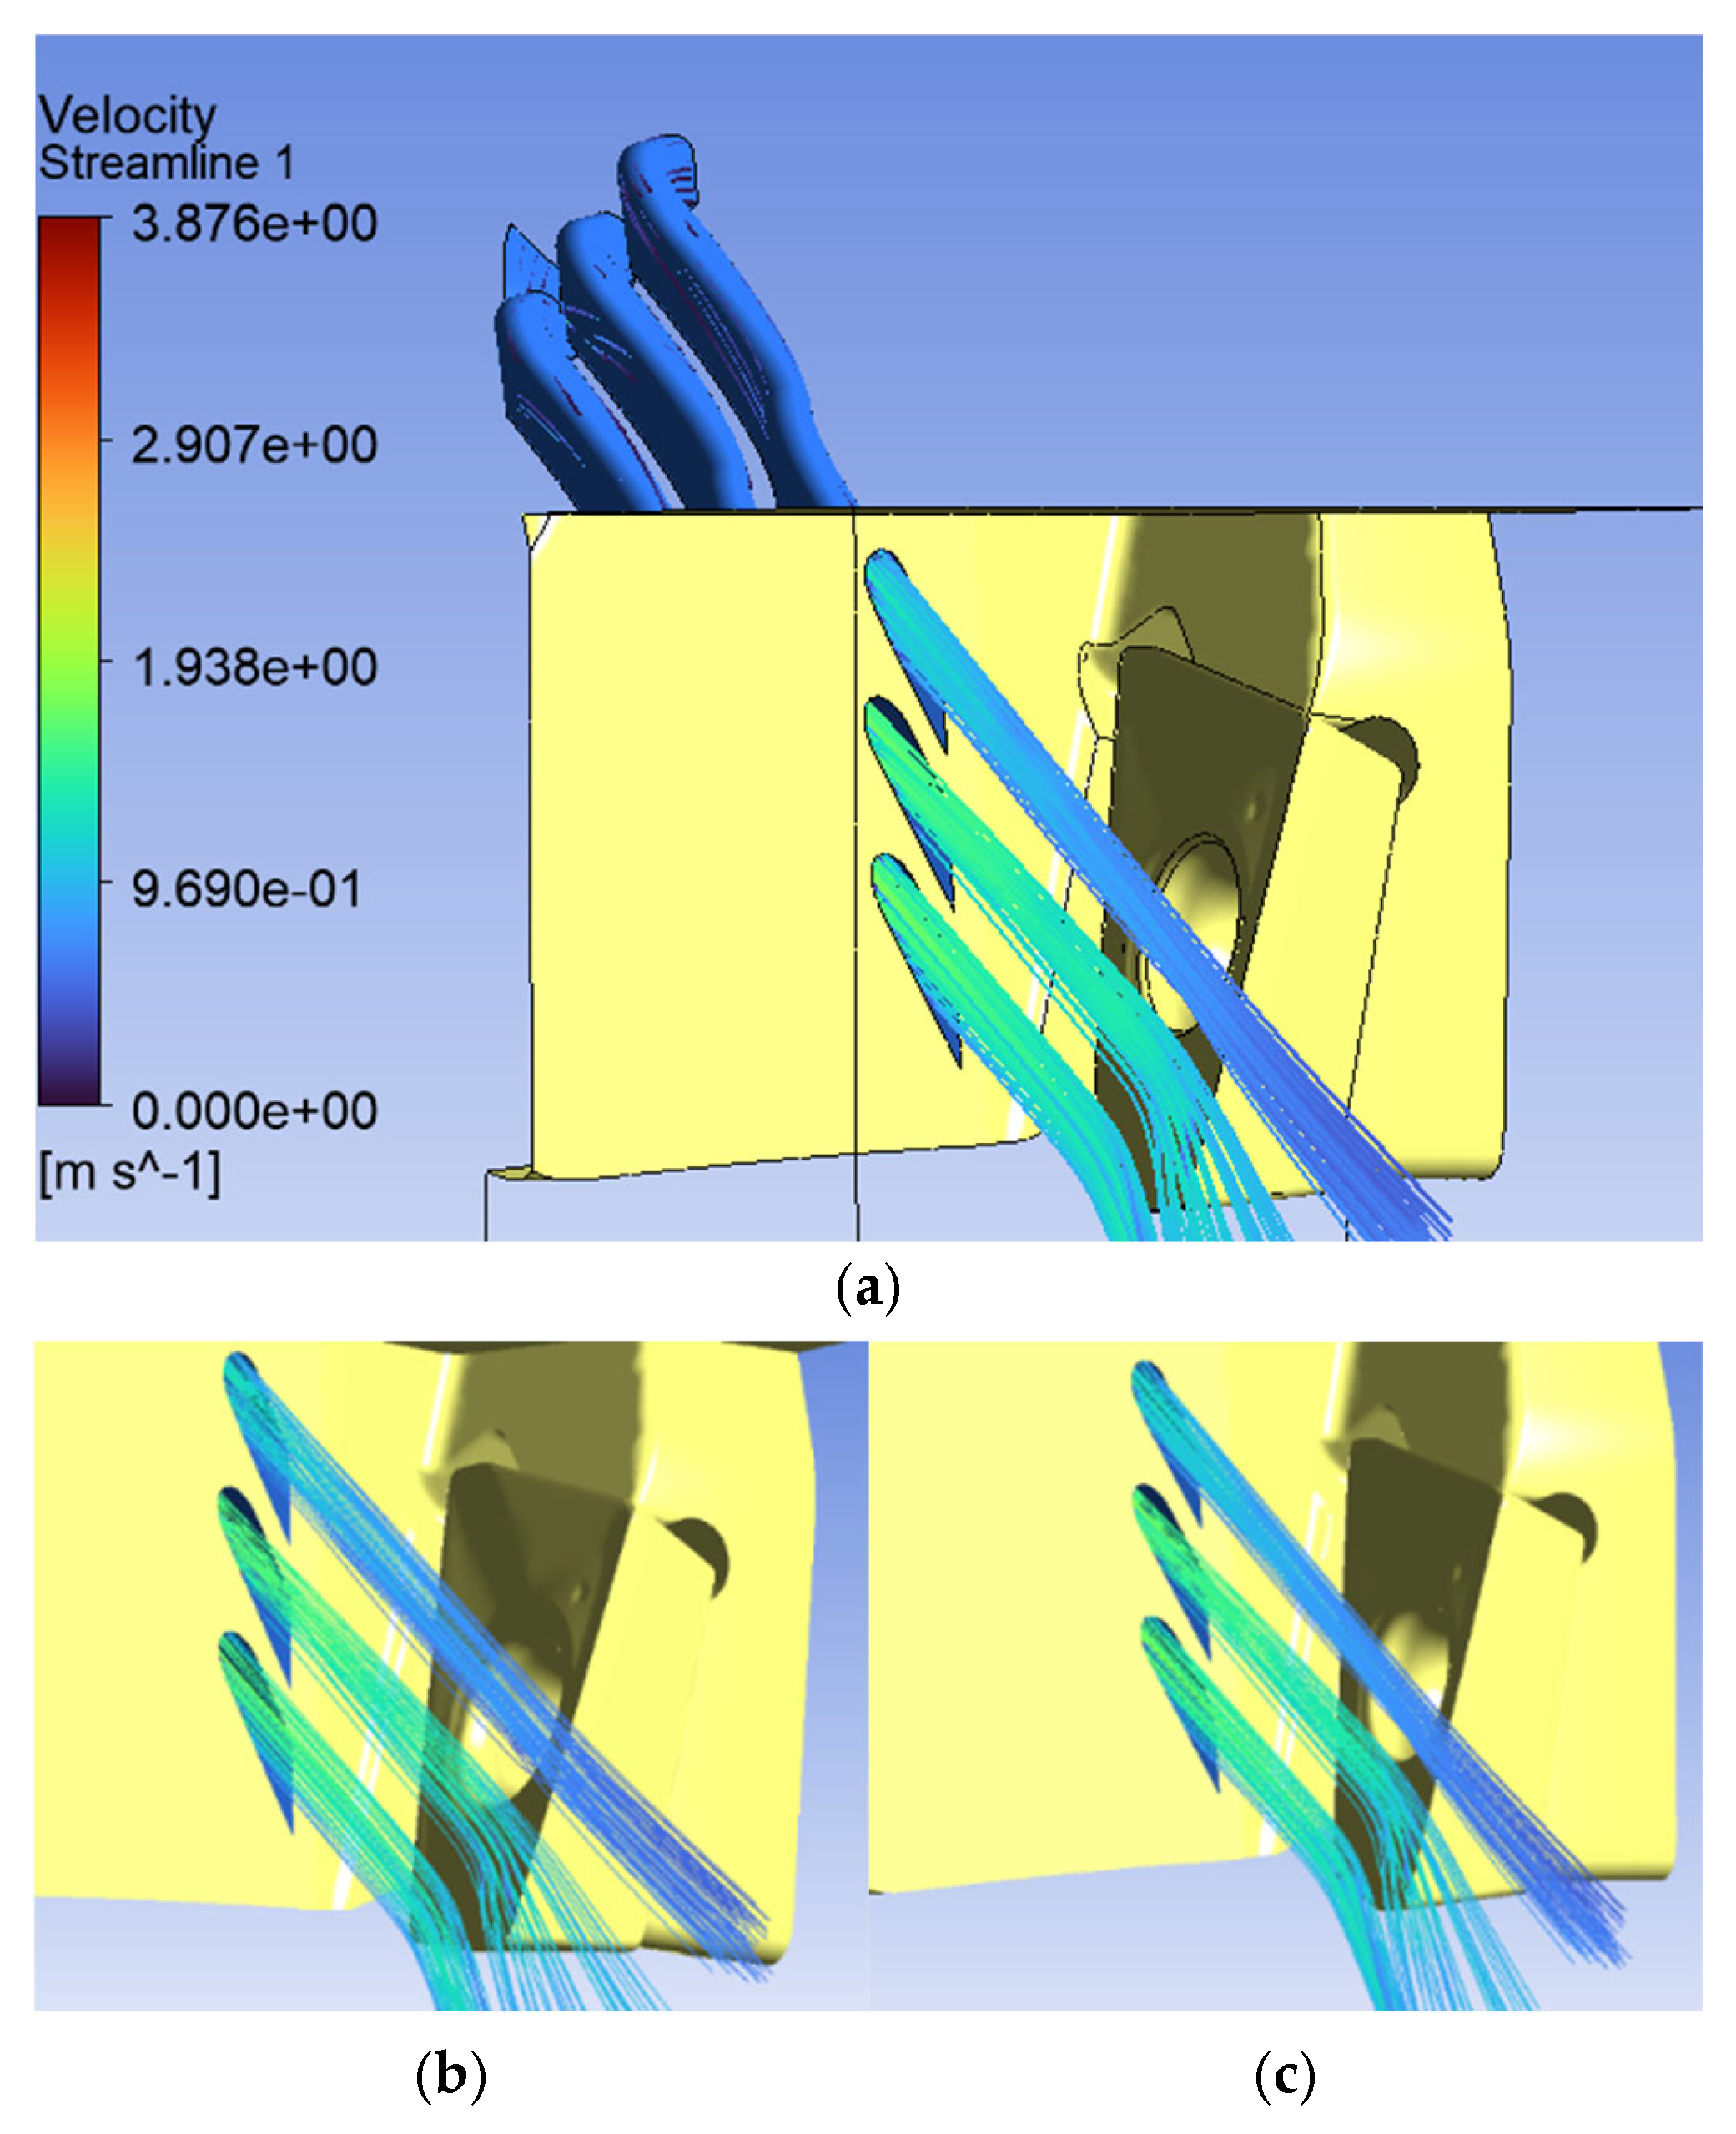
The next step involves testing the channel design using a CFD simulation to evaluate the fluid direction to the cutting edge and the fluid behavior within the channels. As depicted in Figure 7, the fluid successfully targets the cutting edge, and it is also noticeable that the fluid in the upper channel is not as fast as in the other two, which is not detrimental to the performance of the tool because all three channels act together during the cutting process, therefore distributing the fluid. Moreover, inside the channel, the fluid is in laminar flow, which is beneficial for the performance of these coolant channels.

3.3. Print Preparation

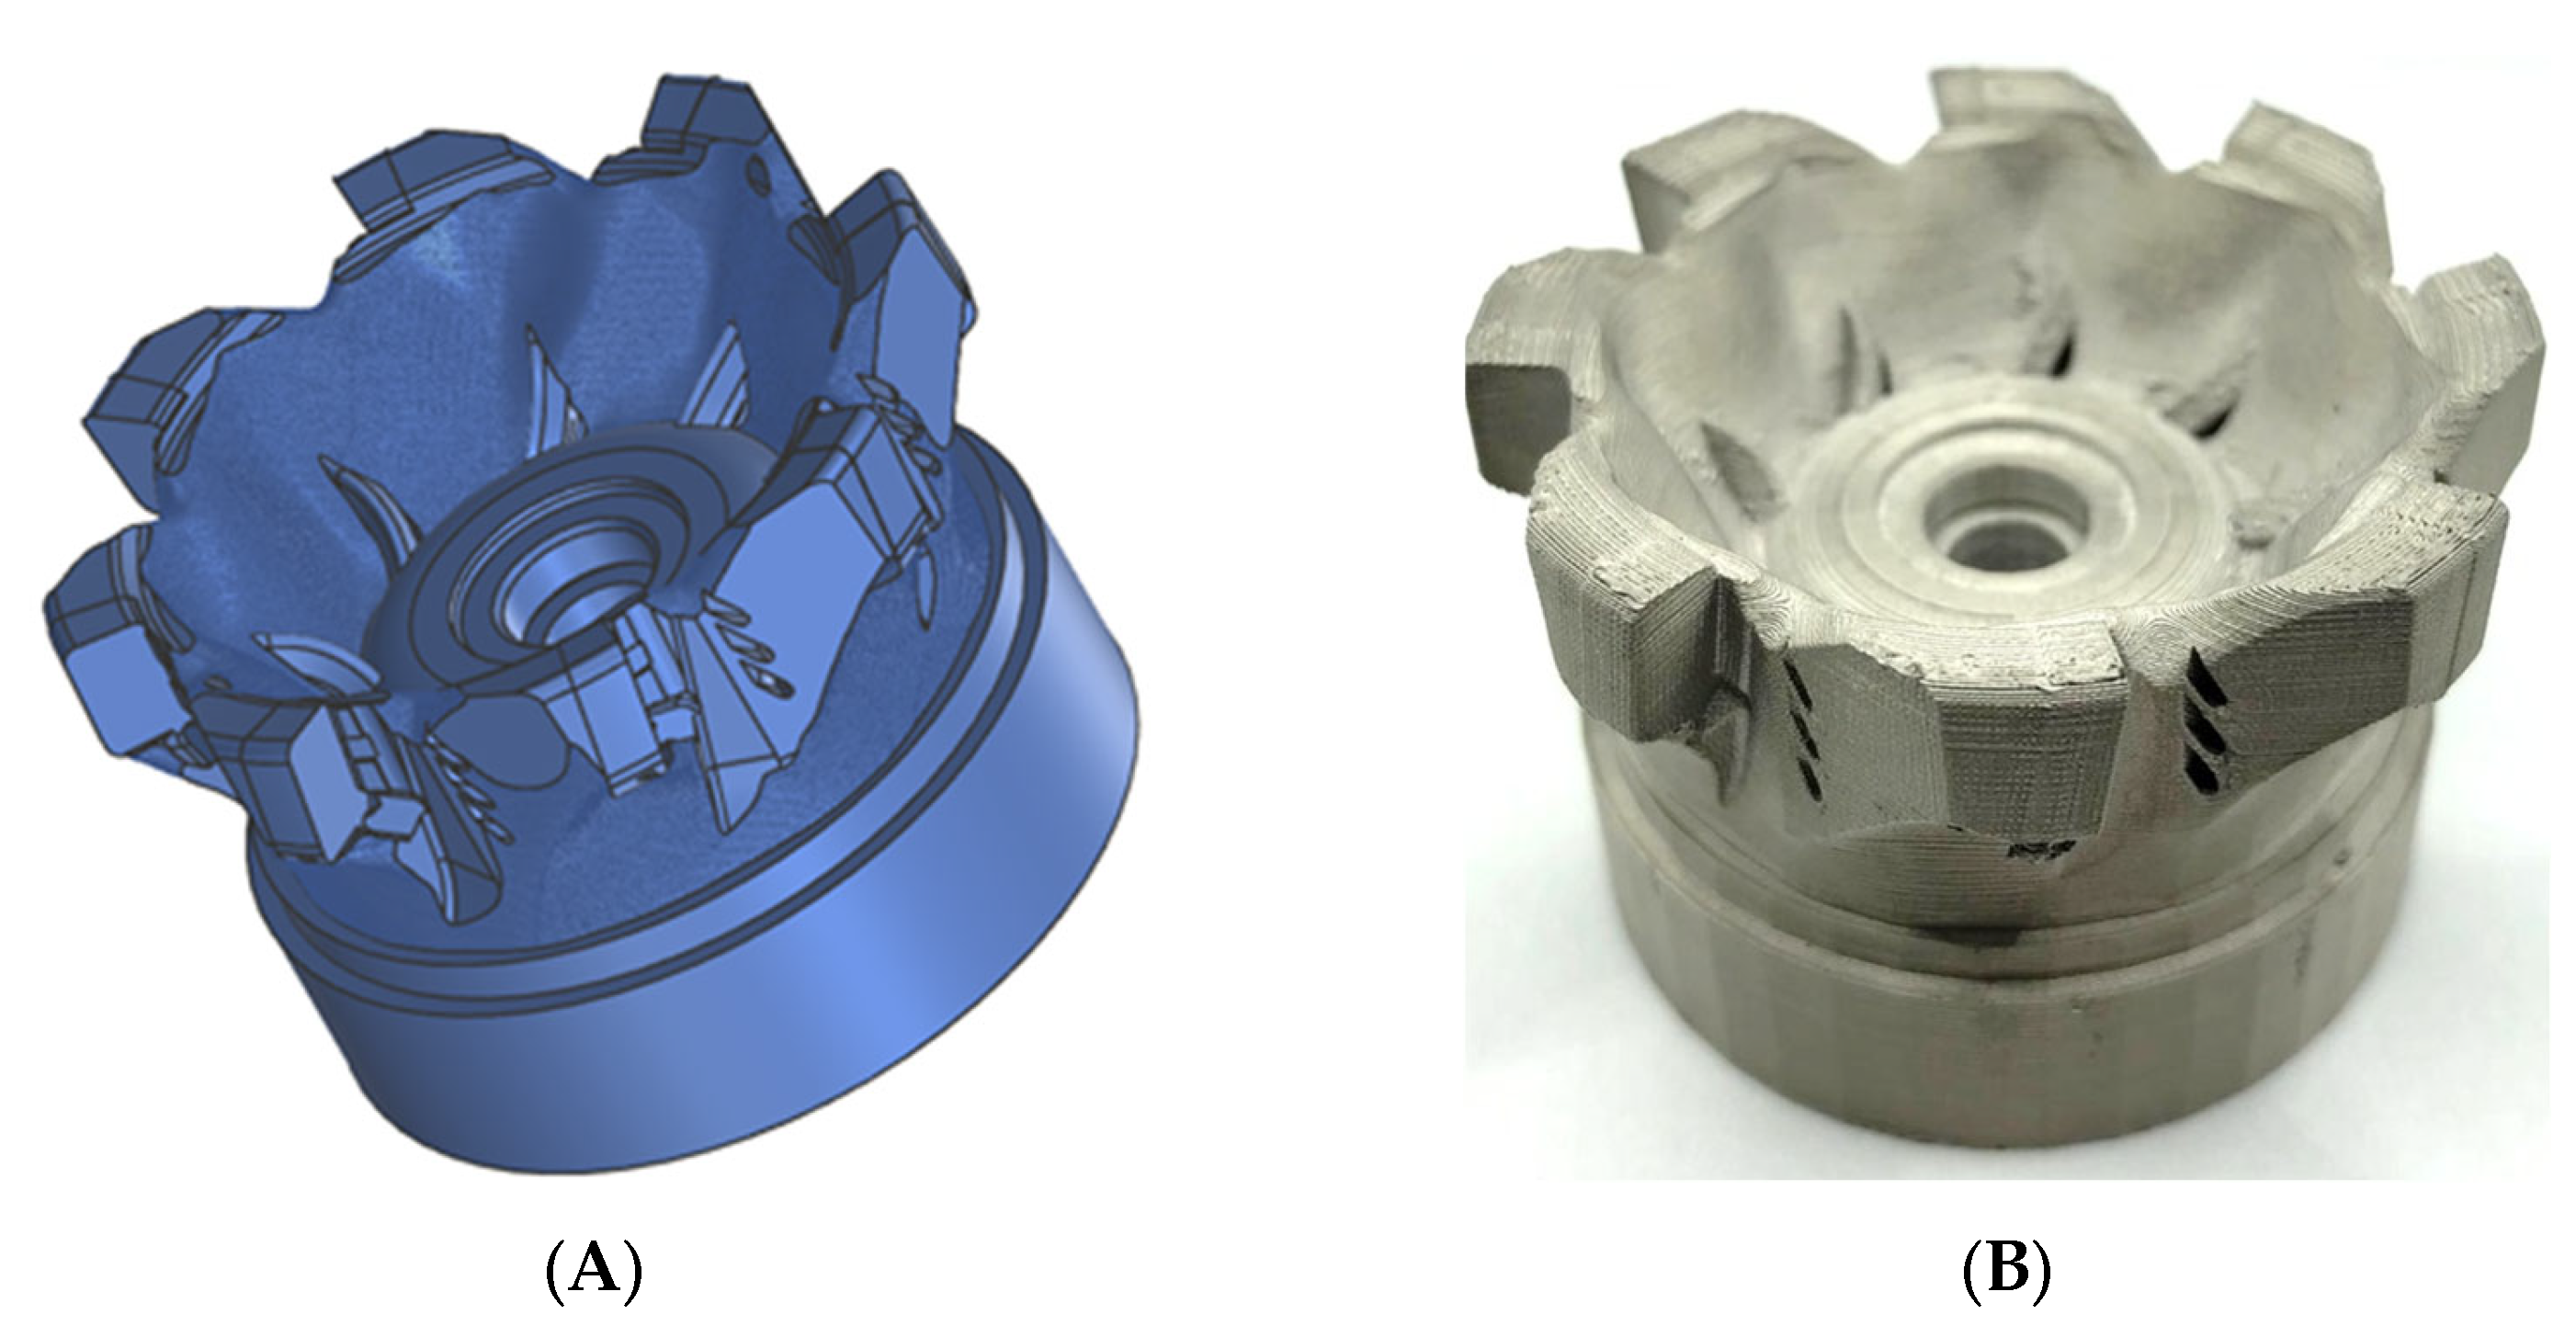
Lastly, on the workflow, the integration of the TO and coolant channel into a single CAD body. Figure 8 presents this integration, as well as the machining allowances added for the AM process and post-processing machining operations.
The final model required channel reconstruction on the inner section of the tool body, with a 0.5 mm shell thickness added around the channels. The addition of material in the pocket inserts was made by rotating the central axis from −1.15 to 6 degrees. A sketch of the insert’s outer pocket shape was created with a 0.1 mm excess, through which a circular pattern was made to apply to all insert pockets.

3.4. Post-Processing

In post-processing, the machining allowance must be removed from the printed part through machining processes. This approach enables achieving the final specific dimensions with precise tolerances, as well as ensuring a smooth surface finish on the critical surfaces (surfaces in contact with the machine arbor and the cutting inserts). Also, post-processing is responsible for creating the threads for the screws that attach to the inserts.

3.5. Workflow Validation

The workflow developed presents two independent methodologies that are processed in parallel and can integrate different features into an enhanced milling tool. Therefore, the possibility of adding more methodologies remains.
Considering the developed workflow, two milling tools with seven and six inserts were used to apply and validate the developed solution.
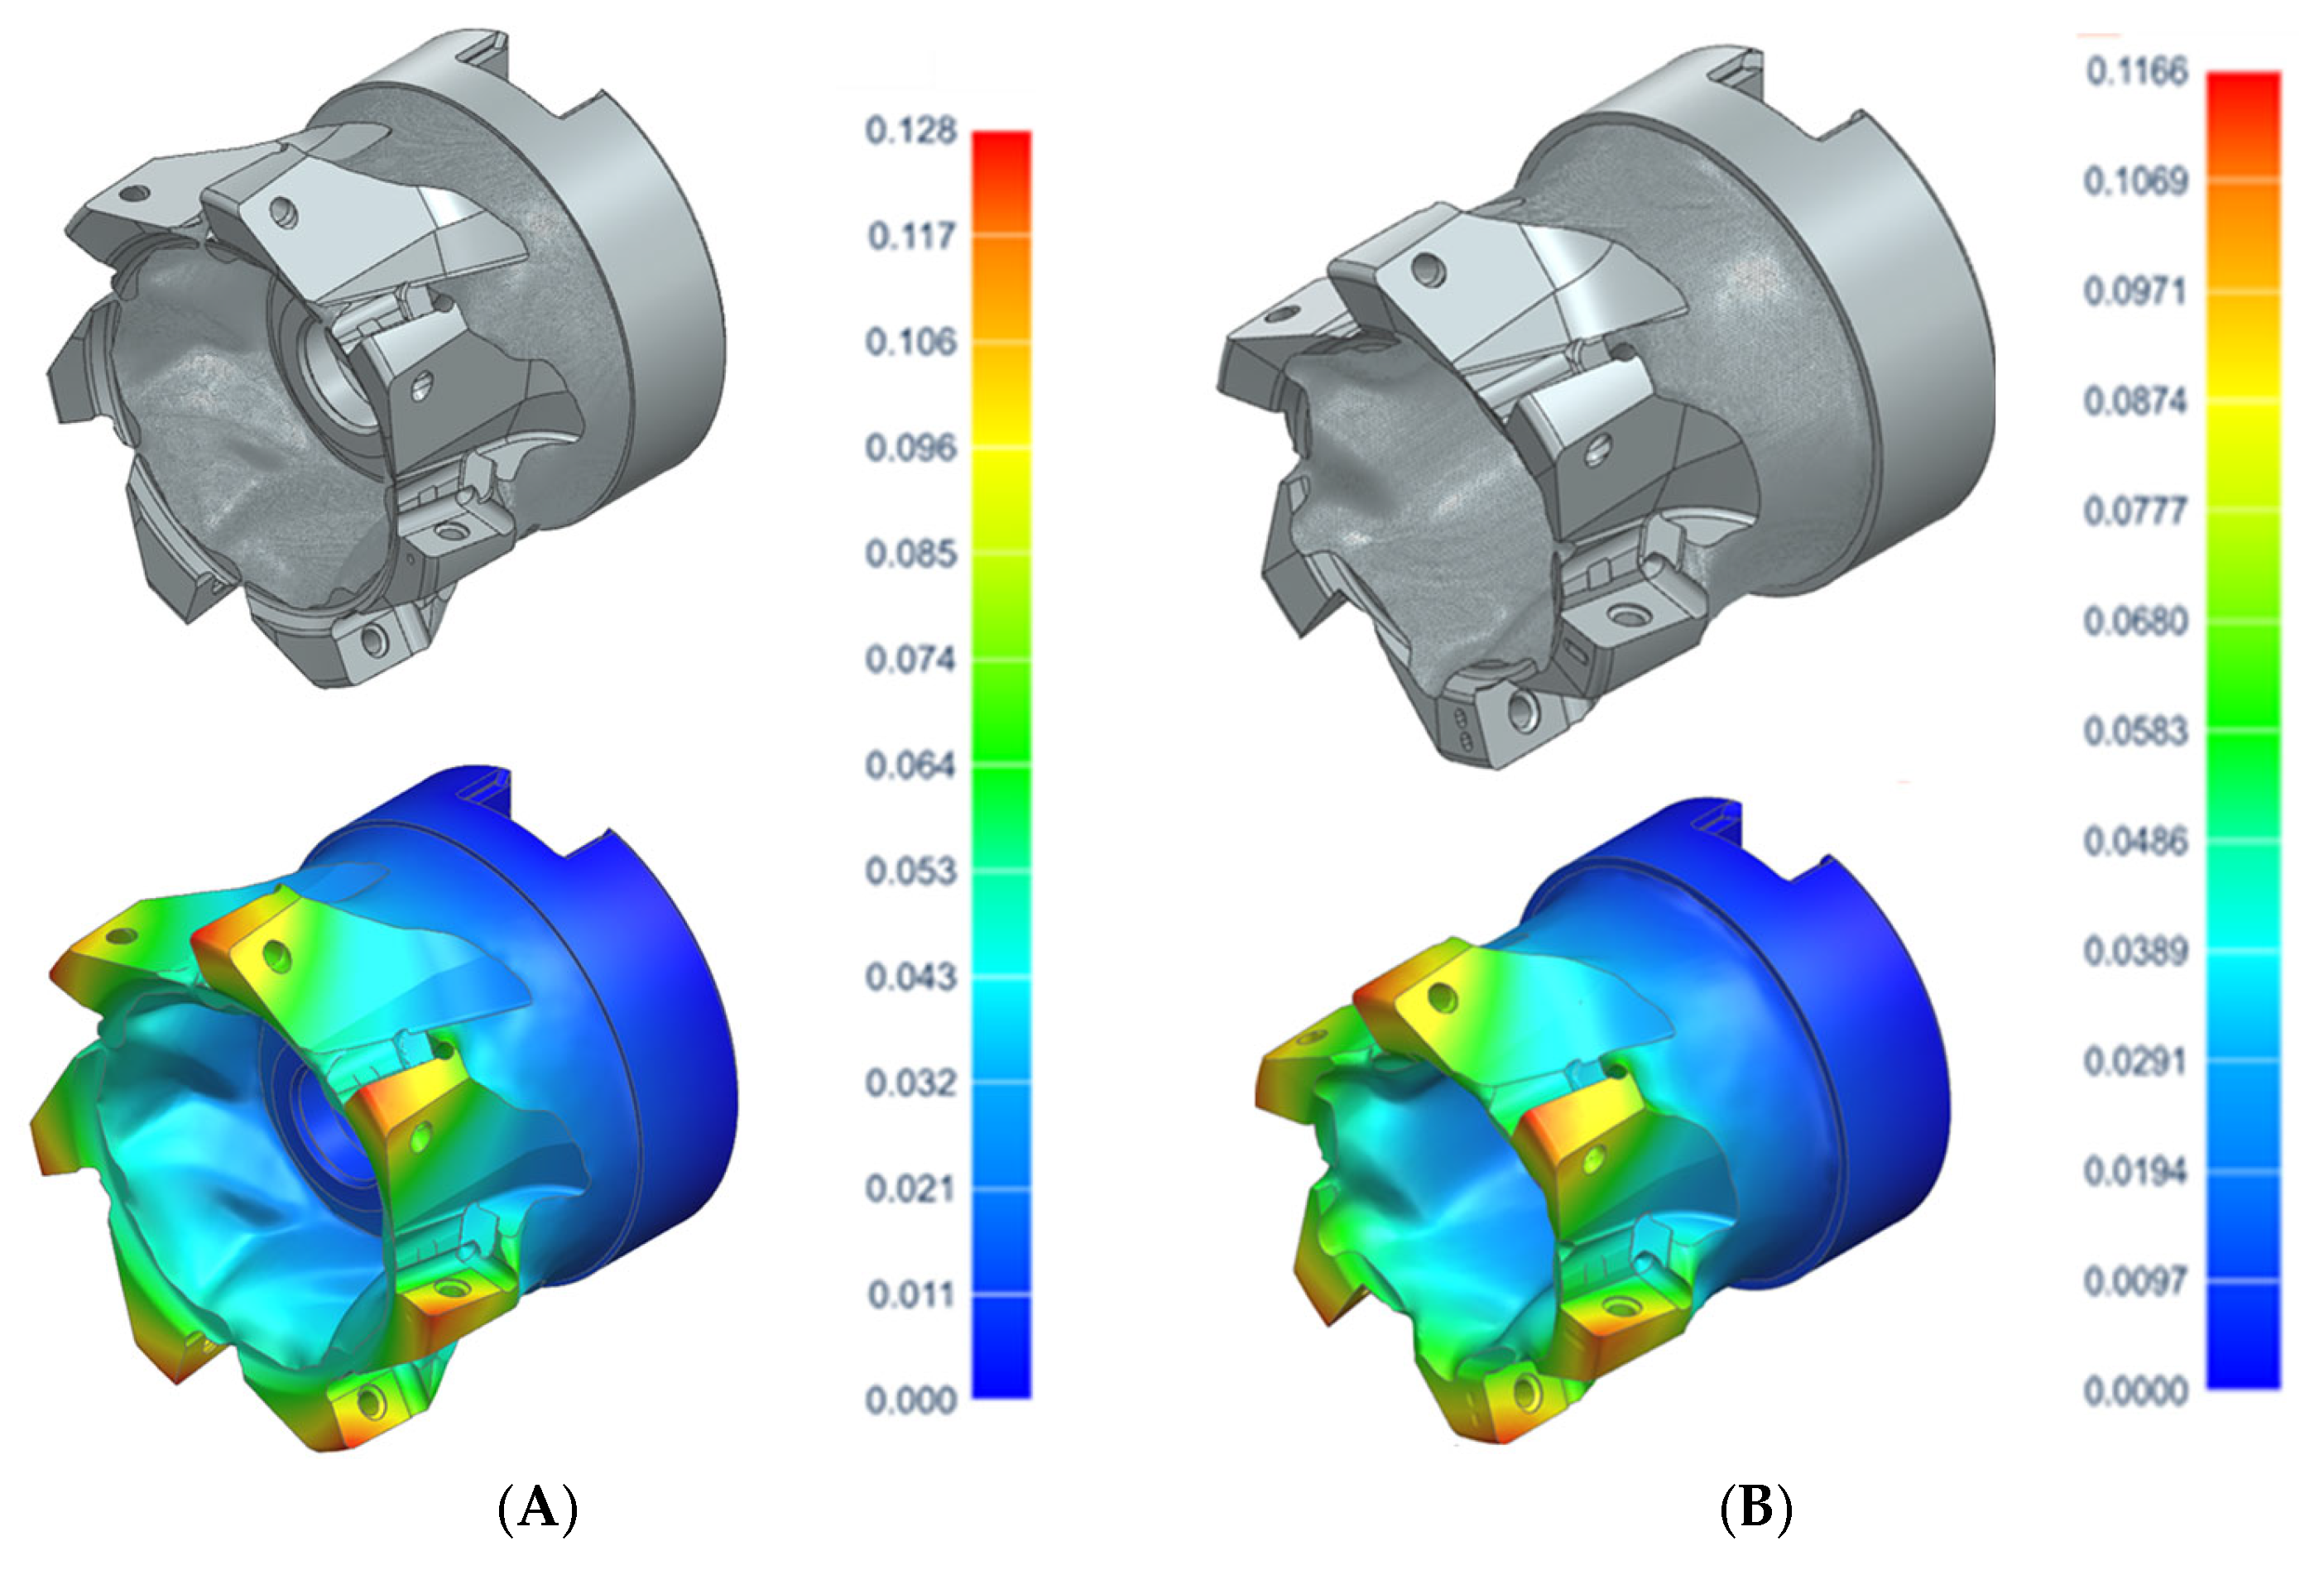
The repeatability of the workflow is evidenced by the milling body shape shown in Figure 9, which is similar to the shape presented by the original tool. Examining the displacements, the seven and six inserts milling tools had displacements of 0.128 mm and 0.116 mm, respectively, which remain close to the displacement of the original tool.
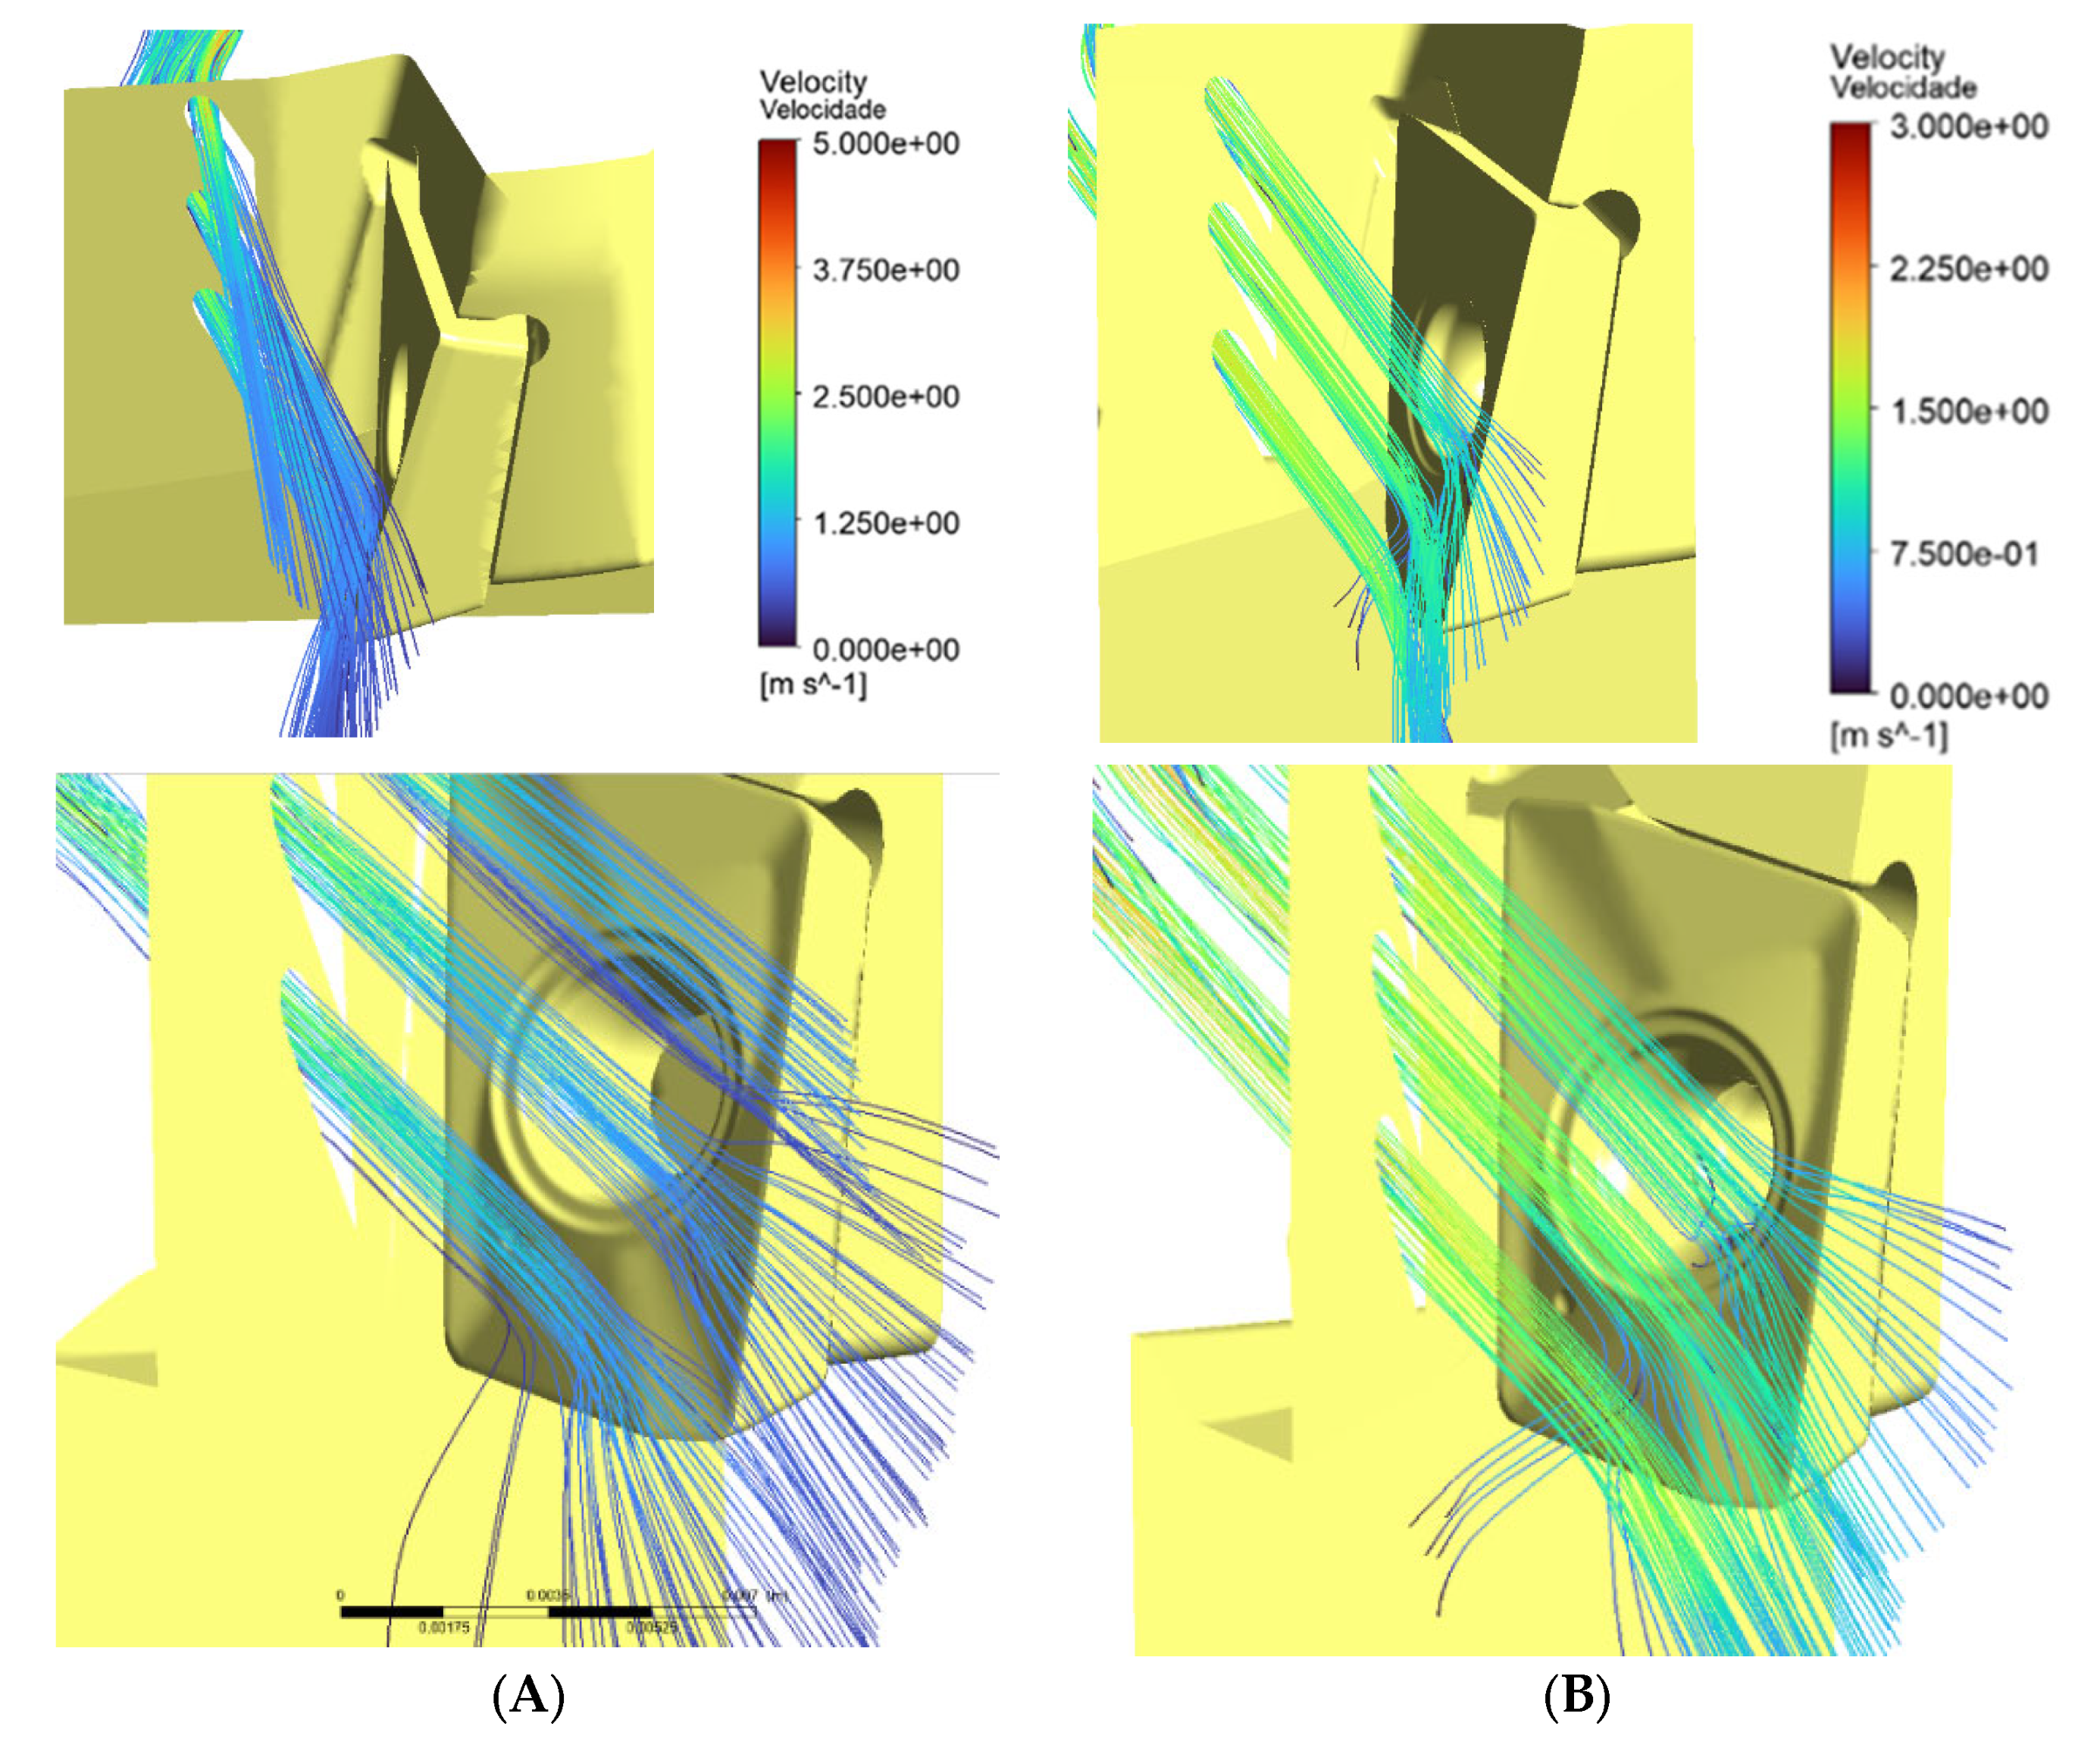
The fluid simulations of the seven and six insert milling tools, as depicted in Figure 10, were performed in the same conditions as the development tool (eight insert milling tool). The results show a less smother exit compared to the eight insert tool. Nevertheless, in all cases, the fluid is well distributed between the different channels targeting the insert’s cutting edges.

4. Conclusions

As further tools are developed, the channel design methodology may require targeted refinements to mature and ensure applicability across different milling tool classes. This adaptability is a deliberate feature of the proposed workflow, which was conceived to accommodate parallel methodologies that can evolve independently and be integrated at a final union stage without introducing sequential dependencies.
The developed workflow resulted in a structured framework composed of two parallel methodologies—TO and internal coolant channel design—both grounded in DfAM principles. This structure enables the exploitation of AM capabilities while maintaining control over geometric quality, mechanical performance, and manufacturability. By avoiding methodological interdependencies, the workflow supports future extensions, such as lattice integration or alternative cooling strategies, without compromising existing design steps.
Achieved a 20% mass reduction relative to the baseline milling tool body, contributing to lower rotational inertia and improved dynamic performance, while promoting material efficiency and sustainability. Finite element analysis confirmed that the optimized geometry maintained displacement levels within the same order of magnitude as those of the reference design, demonstrating that material reduction was achieved without compromising structural integrity.
The coolant channel design methodology focused on directing fluid flow toward the cutting edge from the inside outward, preserving consistent insert contact locations while allowing non-uniform velocity distributions within the channels. This approach promotes effective cooling and improved chip evacuation, both of which are critical for tool performance and longevity. Although the methodology proved effective for the studied case, its modular nature allows future refinement as additional tool geometries and operating conditions are considered.
Overall, the proposed workflow demonstrates strong relevance as a scalable and adaptable design framework for additively manufactured milling tool bodies. By integrating DfAM principles into a modular and parallel structure, the workflow reduces development time, facilitates design reuse, and enables systematic optimization across different tool configurations. Future work will focus on extending the workflow to a broader range of tool classes, refining the coolant channel methodology as new tools are introduced, and incorporating in-process monitoring to validate both structural and thermal performance experimentally.

Author Contributions

Conceptualization, B.R.C., B.M.G., D.F., M.F.V., and J.M.C.; methodology, B.R.C., B.M.G., and J.M.C.; software, B.R.C.; validation, B.R.C., B.M.G., and J.M.C.; formal analysis, B.R.C.; investigation, B.R.C.; resources, B.M.G., D.F., M.F.V., and J.M.C.; writing—original draft preparation, B.R.C.; writing—review and editing, B.M.G. and J.M.C.; visualization, B.R.C.; supervision, B.M.G., M.F.V., and J.M.C.; project administration, B.M.G., D.F., and J.M.C. All authors have read and agreed to the published version of the manuscript.

Funding

This research was funded by PALBIT, through the project Hi-rEV—Recuperação do Setor de Componentes Automóveis (PRR-C644864375-00000002), and by COMPETE 2030 under the project SNexT: Nova geração de ferramentas híbridas (nr 14419, COMPETE2030-FEDER-00582100).

Data Availability Statement

The original contributions presented in this study are included in the article. Further inquiries can be directed to the corresponding author.

Acknowledgments

The authors acknowledge PALBIT S.A. for their collaboration and technical support, and Francisco Matos from INEGI for his support regarding the fluid dynamics simulation evaluations.

Conflicts of Interest

Authors Bruno Miguel Guimarães and Daniel Figueiredo were employed by PALBIT S.A. The remaining authors declare that the research was conducted in the absence of any commercial or financial relationships that could be construed as a potential conflict of interest.

References

  1. Arnold, H.M. The machine tool industry and the effects of technological change. In Technology Shocks; Physica: Heidelberg, Germany, 2003; pp. 59–97. [Google Scholar]
  2. Matos, F.; Coelho, H.; Emadinia, O.; Amaral, R.; Silva, T.; Gonçalves, N.; Marouvo, J.; Figueiredo, D.; de Jesus, A.; Reis, A. Additively manufactured milling tools for enhanced efficiency in cutting applications. In Proceedings of the Third European Conference on the Structural Integrity of Additively Manufactures Materials, (ESIAM23), Porto, Portugal, 4–6 September 2023; Elsevier: Amsterdam, The Netherlands, 2023. [Google Scholar]
  3. Leymann, F.; Roller, D. Production Workflow: Concepts and Techniques; Prentice-Hall: EnglewoodCliffs, NJ, USA, 2000. [Google Scholar]
  4. Caro, J.L.; Guevara, A.; Aguayo, A. Workflow: A solution for cooperative information system development. Bus. Process Manag. J. 2003, 9, 208–220. [Google Scholar] [CrossRef]
  5. Georgakopoulos, D.; Hornick, M.; Sheth, A. An overview of workflow management: From process modeling to workflow automation infrastructure. Distrib. Parallel Databases 1995, 3, 119–153. [Google Scholar] [CrossRef]
  6. Traxel, K.D.; Bandyopadhyay, A. First Demonstration of Additive Manufacturing of Cutting Tools using Directed Energy Deposition System: Stellite™-Based Cutting Tools. Addit. Manuf. 2019, 25, 460–468. [Google Scholar] [CrossRef]
  7. Carlsson, B. The development and use of machine tools in historical perspective. J. Econ. Behav. Organ. 1984, 5, 91–114. [Google Scholar] [CrossRef]
  8. Costa, J.M.; Sequeiros, E.W.; Santos, R.F.; Vieira, M.F. Benchmarking L-PBF Systems for Die Production: Powder, Dimensional, Surface, Microstructural and Mechanical Characterisation. Metals 2024, 14, 520. [Google Scholar] [CrossRef]
  9. Yıldırım, Ç.V.; Kıvak, T.; Sarıkaya, M.; Şirin, Ş. Evaluation of tool wear, surface roughness/topography and chip morphology when machining of Ni-based alloy 625 under MQL, cryogenic cooling and CryoMQL. J. Mater. Res. Technol. 2020, 9, 2079–2092. [Google Scholar] [CrossRef]
  10. Qadria, S.I.A.; Harmain, G.A.; Wani, M.F. Influence of Tool Tip Temperature on Crater Wear of Ceramic Inserts During Turning Process of Inconel-718 at Varying Hardness. Tribol. Ind. 2020, 42, 310–326. [Google Scholar] [CrossRef]
  11. Sartori, S.; Ghiotti, A.; Bruschi, S. Hybrid lubricating/cooling strategies to reduce the tool wear in finishing turning of difficult-to-cut alloys. Wear 2017, 376–377, 107–114. [Google Scholar] [CrossRef]
  12. Anuj Srivathsa, S.S.; Muralidharan, B. Review on 3D printing techniques for cutting tools with cooling channels. Heliyon 2023, 9, e22557. [Google Scholar] [CrossRef]
  13. Gong, P.; Zhang, Y.; Cui, X.; Xu, S.; Yang, M.; Jia, D.; Li, C. Lubricant transportation mechanism and wear resistance of different arrangement textured turning tools. Tribol. Int. 2024, 196, 109704. [Google Scholar] [CrossRef]
  14. De Pasquale, G.; Yudianto, A. Functional design and testing of additively manufactured milling cutting heads with enhanced structural and lubrication properties. Prog. Addit. Manuf. 2025, 10, 4165–4184. [Google Scholar] [CrossRef]
  15. Fischmann, P.; Galland, S.; Zange, F. Improved coolant channel flow efficiency for grooving tools through simulation and additive manufacturing. Procedia CIRP 2025, 133, 346–351. [Google Scholar] [CrossRef]
  16. Fan, G.; Zhang, J.; Chen, H.; Xiao, G.; Chen, Z.; Yi, M.; Xu, C.; Fan, L.; Li, G. Analysis of tool wear of TiAlN coated tool, machined surface morphology and chip during titanium alloy milling. Tribol. Int. 2024, 197, 109751. [Google Scholar] [CrossRef]
  17. Lindvall, R.; Lenrick, F.; M’Saoubi, R.; Ståhl, J.-E.; Bushlya, V. Performance and wear mechanisms of uncoated cemented carbide cutting tools in Ti6Al4V machining. Wear 2021, 477, 203824. [Google Scholar] [CrossRef]
  18. Lin, G.; Shi, H.; Liu, X.; Wang, Z.; Zhang, H.; Zhang, J. Tool wear on machining of difficult-to-machine materials: A review. Int. J. Adv. Manuf. Technol. 2024, 134, 989–1014. [Google Scholar] [CrossRef]
  19. Peng, J.; Xu, Z.; Zhou, R.; Wang, R.; Li, G.; Yao, X.; Zhao, B.; Ding, W.; Xu, J. Wear mechanisms of superhard cutting tools in machining of SiCp/Al composites. Wear 2025, 564–565, 205695. [Google Scholar] [CrossRef]
  20. Ogedengbe, T.S.; Okediji, A.P.; Yussouf, A.A.; Aderoba, O.A.; Alabi, I.O.; Alonge, O.I. The Effects of Heat Generation on Cutting Tool and Machined Workpiece. In Proceedings of the International Conference on Engineering for Sustainable World, Ota, Nigeria, 3–8 July 2019; IOP Publishing Ltd: Bristol, UK, 2019. [Google Scholar]
  21. Komanduri, R.; Hou, Z.B. Thermal modeling of the metal cutting process * Part II: Temperature rise distribution due to frictional heat source at the tool}chip interface. Int. J. Mech. Sci. 2001, 43, 57–88. [Google Scholar] [CrossRef]
  22. Liang, X.; Liu, Z.; Wang, B. Multi-pattern failure modes and wear mechanisms of WC-Co tools in dry turning Ti–6Al–4V. Ceram. Int. 2020, 46, 24512–24525. [Google Scholar] [CrossRef]
  23. Lakner, T.; Bergs, T.; Döbbeler, B. Additively manufactured milling tool with focused cutting fluid supply. Procedia CIRP 2019, 81, 464–469. [Google Scholar] [CrossRef]
  24. Kesriklioglu, S. Ineffectiveness of flood cooling in reducing cutting temperatures during continuous machining. Int. J. Adv. Manuf. Technol. 2022, 122, 3957–3968. [Google Scholar] [CrossRef]
  25. Dixit, U.S.; Sarma, D.K.; Davim, J.P. Environmentally Friendly Machining; Springer: Berlin/Heidelberg, Germany, 2012. [Google Scholar]
  26. Race, A.; Zwierzak, I.; Secker, J.; Walsh, J.; Carrell, J.; Slatter, T.; Maurotto, A. Environmentally sustainable cooling strategies in milling of SA516: Effects on surface integrity of dry, flood and MQL machining. J. Clean. Prod. 2021, 288, 125580. [Google Scholar] [CrossRef]
  27. Duchosal, A.; Serra, R.; Leroy, R.; Hamdi, H. Numerical optimization of the Minimum Quantity Lubrication parameters by inner canalizations and cutting conditions for milling finishing process with Taguchi method. J. Clean. Prod. 2015, 108, 65–71. [Google Scholar] [CrossRef]
  28. Vardhanapu, M.; Chaganti, P.K.; Ghosh, A.; Mahale, A.; Kulkarni, O.P. Whole-body inhalation study of nanoparticle-enhanced vegetable oil metalworking fluids in mice for assessing occupational health risks. Sci. Rep. 2025, 15, 21256. [Google Scholar] [CrossRef] [PubMed]
  29. Pimenov, D.Y.; da Silva, L.R.R.; Machado, A.R.; França, P.H.P.; Pintaude, G.; Unune, D.R.; Kuntoğlu, M.; Krolczyk, G.M. A comprehensive review of machinability of difficult-to-machine alloys with advanced lubricating and cooling techniques. Tribol. Int. 2024, 196, 109677. [Google Scholar] [CrossRef]
  30. Mativenga, P.; Schoop, J.; Jawahir, I.S.; Biermann, D.; Kipp, M.; Kilic, Z.M.; Özel, T.; Wertheim, R.; Arrazola, P.; Boing, D. Engineered design of cutting tool material, geometry, and coating for optimal performance and customized applications: A review. CIRP J. Manuf. Sci. Technol. 2024, 52, 212–228. [Google Scholar] [CrossRef]
  31. Zachert, C.; Liu, H.; Lakner, T.; Schraknepper, D.; Bergs, T. CFD simulation to optimize the internal coolant channels of an additively manufactured milling tool. Procedia CIRP 2021, 102, 234–239. [Google Scholar] [CrossRef]
  32. Peng, R.; Jiang, H.; Tang, X.; Huang, X.; Xu, Y.; Hu, Y. Design and performance of an internal-cooling turning tool with micro-channel structures. J. Manuf. Process. 2019, 45, 690–701. [Google Scholar] [CrossRef]
  33. Tofail, S.A.M.; Koumoulos, E.P.; Bandyopadhyay, A.; Bose, S.; O’Donoghue, L.; Charitidis, C. Additive manufacturing: Scientific and technological challenges, market uptake and opportunities. Mater. Today 2018, 21, 22–37. [Google Scholar] [CrossRef]
  34. Wagner, G.; Nóbrega, J.M. Conformal Cooling Channels in Injection Molding and Heat Transfer Performance Analysis Through CFD—A Review. Energies 2025, 18, 1972. [Google Scholar] [CrossRef]
  35. Zhou, L.; Miller, J.; Vezza, J.; Mayster, M.; Raffay, M.; Justice, Q.; Al Tamimi, Z.; Hansotte, G.; Sunkara, L.D.; Bernat, J. Additive Manufacturing: A Comprehensive Review. Sensors 2024, 24, 2668. [Google Scholar] [CrossRef]
  36. Dey, A.; Roan Eagle, I.N.; Yodo, N. A Review on Filament Materials for Fused Filament Fabrication. J. Manuf. Mater. Process. 2021, 5, 69. [Google Scholar] [CrossRef]
  37. Turner, B.N.; Gold, S.A. A review of melt extrusion additive manufacturing processes: II. Materials, dimensional accuracy, and surface roughness. Rapid Prototyp. J. 2015, 21, 250–261. [Google Scholar] [CrossRef]
  38. Oliveira, C.; Maia, M.; Costa, J. Production of an Office Stapler by Material Extrusion Process, using DfAM as Optimization Strategy. U.Porto J. Eng. 2023, 9, 28–41. [Google Scholar] [CrossRef]
  39. Jacob, J.; Pejak Simunec, D.; Kandjani, A.E.Z.; Trinchi, A.; Sola, A. A Review of Fused Filament Fabrication of Metal Parts (Metal FFF): Current Developments and Future Challenges. Technologies 2024, 12, 267. [Google Scholar] [CrossRef]
  40. Costa, J.; Sequeiros, E.; Vieira, M.T.; Vieira, M. Additive Manufacturing: Material Extrusion of Metallic Parts. U.Porto J. Eng. 2021, 7, 53–69. [Google Scholar] [CrossRef]
  41. Costa, J.M.; Sequeiros, E.W.; Vieira, M.F. Fused Filament Fabrication for Metallic Materials: A Brief Review. Materials 2023, 16, 7505. [Google Scholar] [CrossRef]
  42. Sadaf, M.; Bragaglia, M.; Slemenik Perše, L.; Nanni, F. Advancements in Metal Additive Manufacturing: A Comprehensive Review of Material Extrusion with Highly Filled Polymers. J. Manuf. Mater. Process. 2024, 8, 14. [Google Scholar] [CrossRef]
  43. Costa, J.M.; Sequeiros, E.W.; Figueiredo, D.; Reis, A.R.; Vieira, M.F. Optimizing Metal AM Potential through DfAM: Design, Performance, and Industrial Impact; IntechOpen: Hamilton, NJ, USA, 2024. [Google Scholar]
  44. Costa, I.B.; Cunha, B.R.; Marouvo, J.; Figueiredo, D.; Guimarães, B.M.; Vieira, M.F.; Costa, J.M. Topology Optimization of a Milling Cutter Head for Additive Manufacturing. Metals 2025, 15, 729. [Google Scholar] [CrossRef]
  45. KENNAMETAL. KM Solid End Mill Torque & Horsepower Calculator. Available online: https://www.kennametal.com/be/en/resources/engineering-calculators/end-milling/km-solid-end-mill-torque-and-horsepower.html (accessed on 30 April 2025).
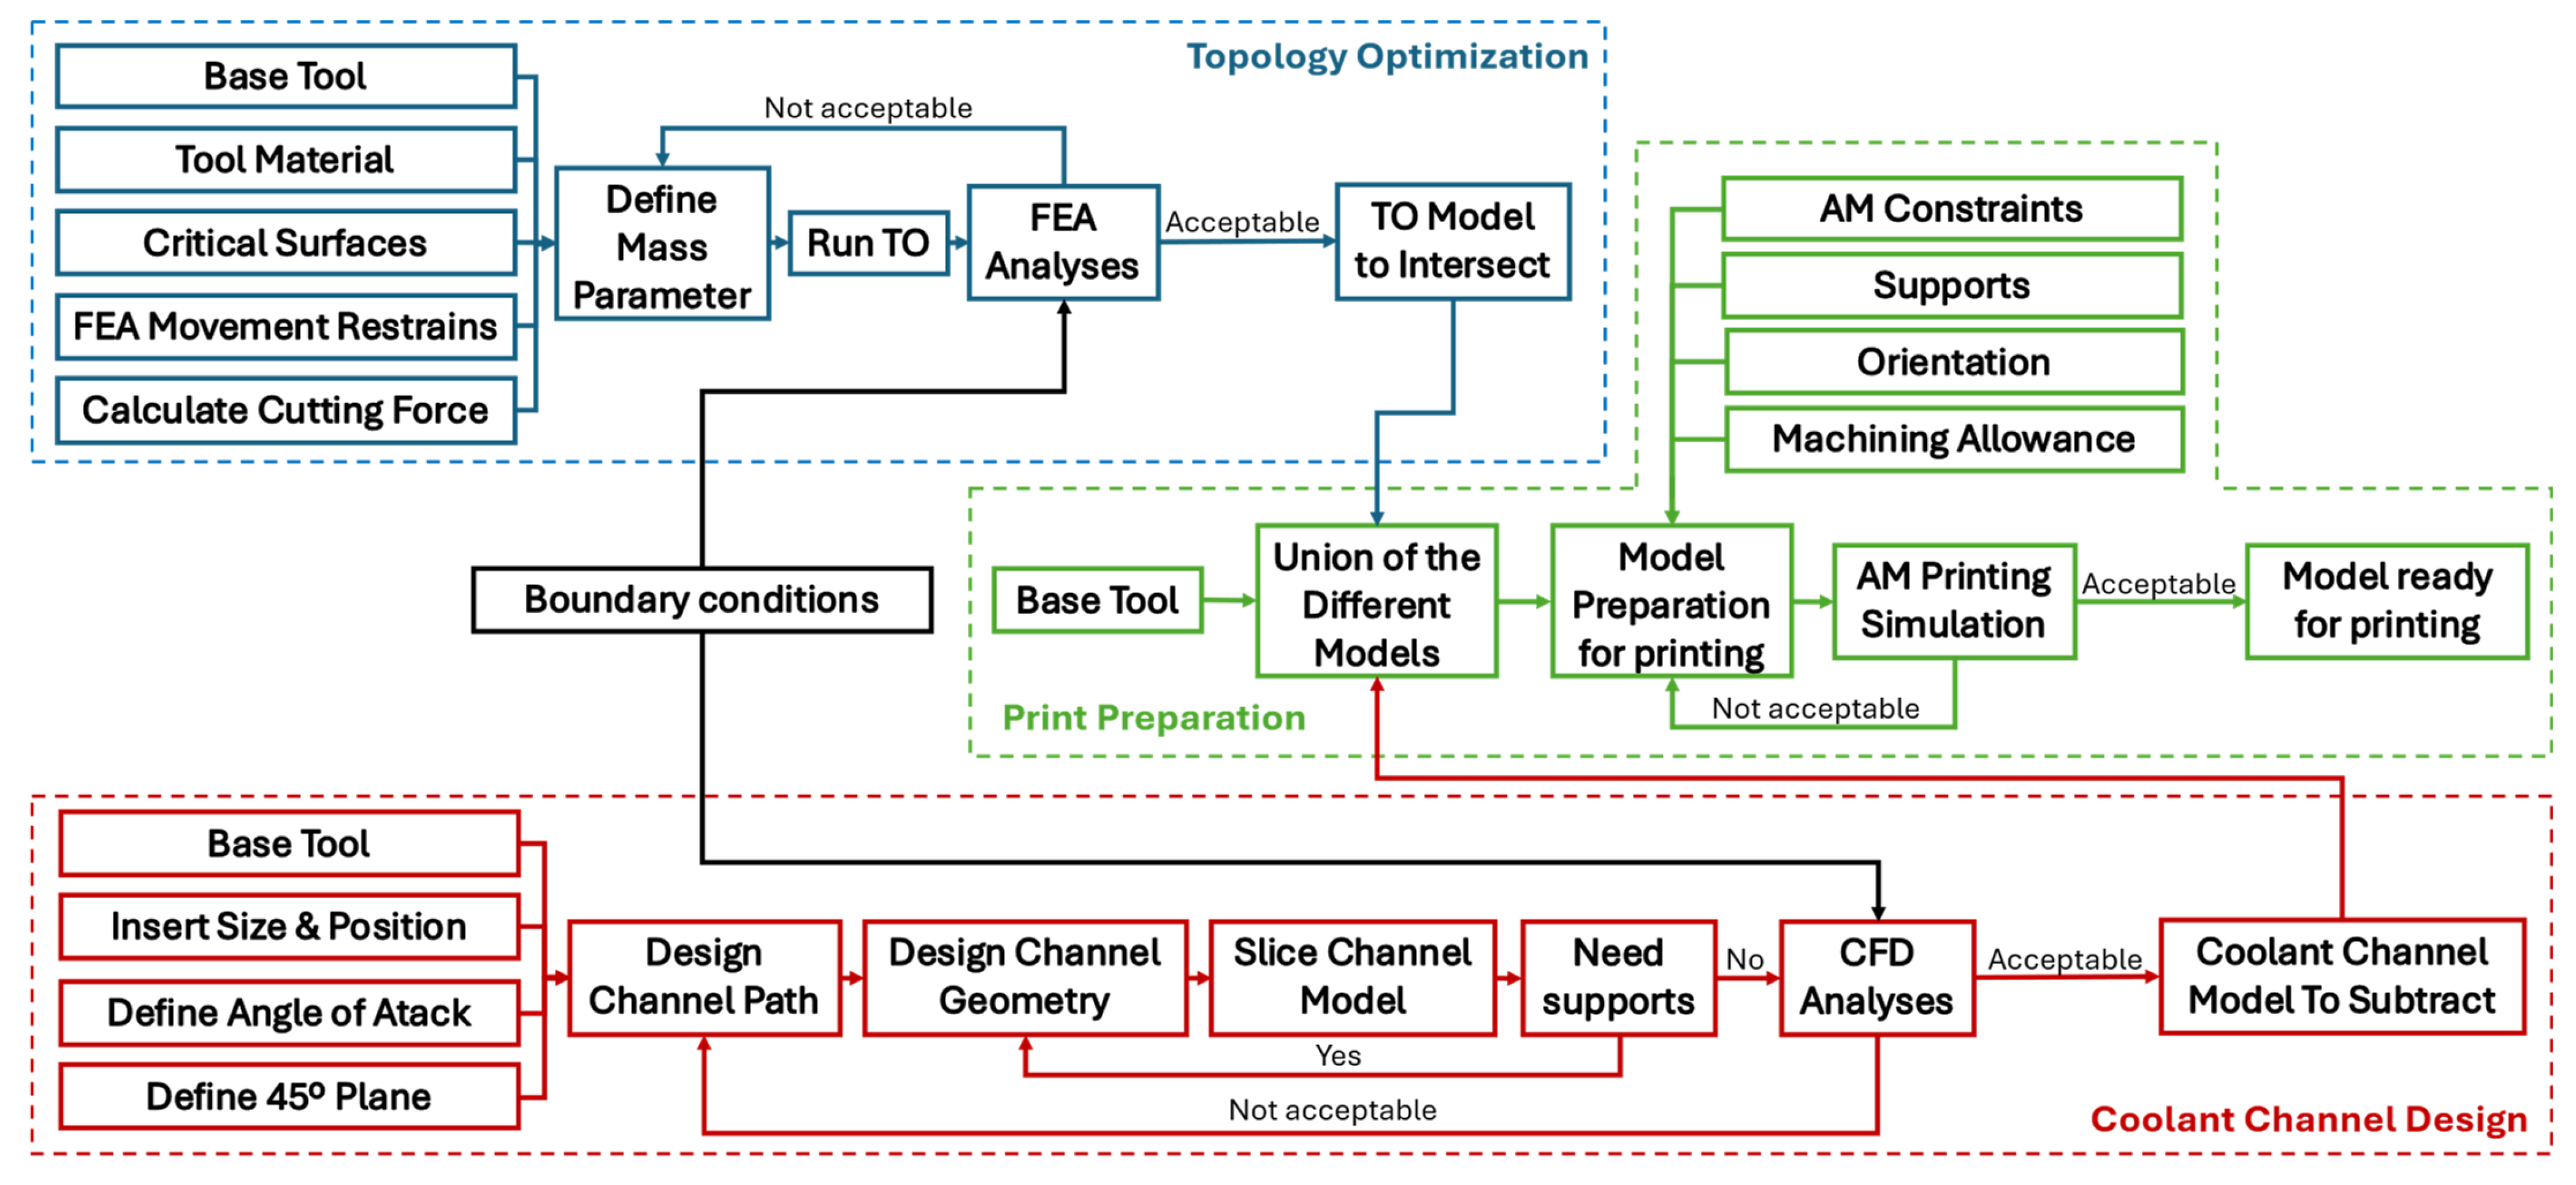
Figure 1. Workflow diagram.
Metals 16 00116 g001
Figure 2. Original eight teeth milling tool displacement analysis.
Metals 16 00116 g002
Figure 3. Topology-optimized eight teeth milling tool, and displacement analyses (mm).
Metals 16 00116 g003
Figure 4. (a) Plane position for sketch. (b) Sketch design of coolant channel trajectory.
Metals 16 00116 g004
Figure 5. Coolant channel: (a) sketch plane; (b) geometry.
Metals 16 00116 g005
Figure 6. Coolant channels slice on Eiger software: (a) solid tool (white) view and support material (purple); (b) transparent tool view and support material; (c) channel geometry closeup.
Metals 16 00116 g006
Figure 7. CFD result of coolant channel on eight teeth milling tool. (ac) utilize the same scale.
Metals 16 00116 g007
Figure 8. Workflow result of eight teeth milling tool: (A) CAD model. (B) 17-4 PH stainless steel produced by Metal FFF X system.
Metals 16 00116 g008
Figure 9. TO CAD and displacement analyses of: (A) seven insert milling tool; (B) six insert milling tool.
Metals 16 00116 g009
Figure 10. CFD result of coolant channel on: (A) seven insert milling tool; (B) six insert milling tool.
Metals 16 00116 g010
Table 1. Summary of milling tools used for workflow development and validation.
Tool ReferenceDiameter (mm)Number of InsertsRole in Study
063 A 201 90-08-08-022040638Development
050 A 201 90-07-08-022040507Validation
040 A 201 90-06-08-022040406Validation
Disclaimer/Publisher’s Note: The statements, opinions and data contained in all publications are solely those of the individual author(s) and contributor(s) and not of MDPI and/or the editor(s). MDPI and/or the editor(s) disclaim responsibility for any injury to people or property resulting from any ideas, methods, instructions or products referred to in the content.