Article

Influence of Overlay Welding Process on the Morphology, Microstructure, and Performance of the Overlay Layer

1
Institute of Process Equipment and Control Engineering, College of Mechanical Engineering, Zhejiang University of Technology, Hangzhou 310023, China
2
Engineering Research Center of Process Equipment and Remanufacturing, Ministry of Education, Zhejiang University of Technology, Hangzhou 310023, China
3
Wenzhou Special Equipment Inspection & Science Research Institute, Wenzhou 325800, China
*
Authors to whom correspondence should be addressed.
Metals 2025, 15(9), 987; https://doi.org/10.3390/met15090987
Submission received: 9 August 2025 / Revised: 28 August 2025 / Accepted: 4 September 2025 / Published: 5 September 2025
(This article belongs to the Special Issue Properties and Residual Stresses of Welded Alloys)

Abstract

This study investigates the effects of welding parameters and the addition of a buffer layer on the morphology, microstructure, mechanical properties, and corrosion resistance of the overlay layer during overlay welding. This paper uses Q235 steel as the base material, ER309L as the buffer layer, and ER347 as the overlay layer to conduct process experiments on overlay welding component, aiming to obtain optimal process parameters. The effects of welding line energy and weld bead overlap rate on the morphology, dimensions, and dilution rate of the overlay layer were analyzed. Furthermore, the influence of the presence or absence of the buffer layer on the microstructure, mechanical properties, and corrosion resistance of the overlay layer was investigated. The microstructure and morphology of the overlay layer were characterized by optical microscopy (OM), scanning electron microscopy (SEM) and energy-dispersive spectroscopy (EDS). Mechanical and electrochemical tests were also performed to evaluate the mechanical and corrosion resistance properties of ER347 stainless steel weld overlays. The results showed that the optimal process parameters were successfully obtained, which ensured sound weld bead formation while minimizing dilution. The addition of the buffer layer (ER309L) improved the bonding quality of the overlay welding component interface, reduced element dilution in the overlay layer, significantly improved hardness distribution, and reduced sudden changes in hardness in the fusion zone, thereby optimizing the mechanical properties of the ER347 stainless steel overlay layer. After adding the buffer layer, the corrosion current density decreased from 6.23 × 10⁻⁵ A·cm−2 to 2.21 × 10⁻⁵ A·cm−2, and the corrosion potential increased from −1.049 V to −0.973 V, effectively reducing the corrosion risk of the overlay component. This study innovatively introduced a buffer layer in the process of overlay welding austenitic stainless steel on low-carbon steel and investigated the impact of the overlay welding process on the overlay layer, thereby contributing to a comprehensive understanding of the overlay welding process from multiple perspectives.

1. Introduction

Overlay welding is a surface treatment process in which a harder metal is deposited onto the surface of a base metal to enhance wear resistance and corrosion resistance. It is also widely applied in the maintenance and repair of worn components in service, effectively extending the operational life of equipment [1,2]. As a key technology, overlay welding plays a crucial role in achieving intelligent manufacturing in the era of Industry 4.0. In recent years, with rapid technological advancements and the continuous strengthening of national strategies on green manufacturing and advanced manufacturing, overlay welding manufacturing and remanufacturing technologies have become increasingly important. As a crucial method for manufacturing and remanufacturing, overlay welding is widely applied in the fabrication or repair of equipment components in fields such as petrochemical, aerospace, and energy power industries. Through remanufacturing, high-quality refurbishment, and life extension and other techniques, it significantly reduces the resource and energy consumption as well as carbon emissions brought by manufacturing new parts [3,4,5].
In these industries, a large number of pressure vessels and pipelines must operate under high temperature, high pressure, corrosive, and hydrogen-rich environments. The manufacture of composite vessels using low-carbon steel with stainless steel overlaid on the surface can overcome the high cost of stainless steel vessels, reduce the overall production cost of equipment, improve economic efficiency, and maximize the performance advantages of different materials [6,7,8,9]. Low-carbon steel is widely used in the pressure vessel industry due to its good plasticity, toughness, and weldability, but it faces issues such as low hardness and insufficient corrosion resistance under complex service conditions [10]. Austenitic stainless steel is a material with excellent overall performance, exhibiting outstanding corrosion resistance in various corrosive media, high toughness and ductility, non-magnetic properties, and excellent processability [11,12].
When overlaying austenitic stainless steel on low-carbon steel surfaces, significant compositional differences between the base material and the ER347 overlay layer may lead to dilution of alloying elements from the overlay layer into the base metal. Additionally, the substantial residual stress can easily cause interfacial defects such as delamination and cracking, thereby affecting the microstructure and properties of the overlay layer [4,13,14]. Bozeman et al. [15] conducted laser deposition of 309L stainless steel wires with different layer numbers on carbon steel substrates, and found that insufficient heat input resulted in cracking, wire breakage, and delamination defects, whereas excessive heat input caused wire dripping. During multilayer overlay welding, the dilution rate of the first layer was relatively high, but dropped significantly in the second layer, suggesting that two or more layers of overlay welding can help reduce defects and dilution. Mohammed et al. [16] investigated the microstructure, microhardness, ductility, and corrosion resistance of corrosion-resistant austenitic stainless steel 308L overlay welded on medium-strength low-alloy steel DMR 249A, along with variations in dilution rate. Shamanian et al. [17] employed austenitic stainless steel (ER309L) as a buffer layer to deposit super duplex stainless steel on high-strength low-alloy steel, and characterized the microstructure, microhardness, and morphology. The results demonstrated that ER309L buffer layer could better withstand high dilution and thermal cycling effects from the low-carbon base metal during overlay welding. Based on previous research on austenitic stainless steel overlaid on low-carbon steel, a buffer layer is commonly introduced to mitigate the compositional and physical property mismatches, reduce dilution effects, and improve the bonding quality at the interface, thereby enhancing the corrosion resistance and mechanical properties of the overlay layer [14,18,19]. Balaguru et al. [20] studied the effect of dilution on microhardness and found that a lower base metal dilution rate led to higher microhardness in the overlay layer. Moreover, microhardness generally increased with distance from the fusion boundary. Suthar et al. [21] introduced a nickel-based buffer layer (Alloy 625) between a nickel-based overlay welding alloy and AISI 316L stainless steel substrate, significantly improving corrosion resistance compared to samples without the buffer layer. Thawari et al. [22] deposited Stellite 6 coatings on SS316 substrates using Inconel 625 as a buffer layer and found that the buffer layer reduced the dilution rate by 25% and increased microhardness by 12%. Wu et al. [23] overlay welded S6 on F91 steel using IN82 and S21 as buffer layers. Their results showed that the S6 layer deposited on S21 exhibited higher hardness, while the one on IN82 had lower hardness due to Fe and Ni dilution, which reduced C content and thus carbide formation. They also proposed that elemental dilution could be mitigated by adjusting current intensity and heat input. These studies collectively demonstrate that lower dilution rates are beneficial to mechanical and corrosion-resistant properties of overlay components, and introducing a buffer layer effectively reduces dilution. Furthermore, buffer layers help minimize defects and improve interfacial bonding. Jeong et al. [13] reduced interfacial defects by introducing a P21 buffer layer between the base material and the deposited high-carbon tool steel. No interfacial defects were observed on the cross-section of the samples with the buffer layer, and tensile strength and elongation increased by 7% and 244%, respectively. Tippayasam et al. [24] conducted a study on the influence of preheating, shielding gas, and the application of a buffer layer on the performance of Fe-Cr-C overlay welding alloys deposited by flux-cored arc welding (FCAW). In this study, austenitic nickel served as a buffer layer and Fe-Cr-C alloy as the overlay material. The results showed that preheating and gas shielding affected bead profile and deposition efficiency, thus altering welding performance. The buffer layer improved bonding between the weld overlay and substrate, reduced cracking caused by elemental dilution in the fusion zone, and balanced toughness and hardness. Li et al. [25] used laser cladding to deposit Stellite 6 on an FB2 substrate and studied the effect of buffer layer on crack formation. The results showed that samples with a buffer layer did not exhibit surface cracking even after 300 thermal cycles and had reduced porosity. In contrast, samples without a buffer layer developed macroscopic residual stress that drove crack propagation, with visible cracks appearing after just 104 cycles.
Previous studies have primarily focused on the effects of adding a buffer layer on the interface bonding quality and mechanical properties of overlay components. Furthermore, few reports have been published on the introduction of a buffer layer on low-carbon steel followed by overlay welding with austenitic stainless steel. Building on this foundation, this study conducted process experiments on overlay components using ER309L as a buffer layer and ER347 as the overlay material on a Q235 substrate. The aim was to obtain optimal process parameters and analyze the influence of welding line energy and weld bead overlap rate on the morphology, dimensions, and dilution rate of the overlay layer. Additionally, using optical microscopy, scanning electron microscopy, energy dispersive spectroscopy, microhardness testing, and electrochemical testing, the study investigated the effects of the presence or absence of an ER309L buffer layer on the microstructure, mechanical properties, and corrosion resistance of the ER347 stainless steel overlay layer. This study provides a reference for researchers to obtain optimal overlay welding process parameters, further improve the mechanical properties and corrosion resistance of overlay welding components, and offers theoretical guidance for the practical application of overlay welding technology in engineering.

2. Experimental Details

2.1. Experimental Materials and Equipment

The Q235 steel used in this experiment is the most widely produced and applied structural steel, offering high economic efficiency. It possesses good strength, plasticity, toughness, weldability, and machinability [26]. The Q235 steel substrate used in the experiment had dimensions of 300 mm × 200 mm × 25 mm, and its chemical composition is shown in Table 1.
The overlay materials selected were austenitic stainless steel welding wires: ER309L for the buffer layer and ER347 for the overlay layer. These two types of welding wires are widely used in industrial applications due to their excellent high-temperature resistance, corrosion resistance, and weldability [27]. Both wires had a diameter of 1.2 mm. Their chemical compositions are listed in Table 2.
To investigate the effect of welding parameters on the morphology of the overlay layer, four sets of welding parameters were designed. By comparing the cross-sectional morphology of the prepared single-pass welds, the optimal welding parameters were determined. Based on the team’s previous research experience, literature review on welding of austenitic stainless steel, and validation through preliminary experiments, the following welding parameters were ultimately selected for the experiment: the welding current are 220 A, 240 A, 260 A and 280 A, with corresponding welding voltages of 22 ± 2 V, 24 ± 2 V, 26 ± 2 V and 28 ± 2 V, the welding speed is 40 cm/min and the shielding gas flow rate is 18 L/min.
The AR1440 six-axis welding robot (Yaskawa Electric (China) Co., Ltd., Shanghai, China) used in this experiment was manufactured by YASKAWA Electric (China) Corporation (Shanghai, China). This equipment is specifically designed for high-precision arc welding and is widely used in welding applications across industries such as automotive manufacturing, steel structures, shipbuilding, and pressure vessels. The robot features compact structure, stable operation, and high repeatability, making it especially suitable for industrial scenarios with stringent requirements for welding quality and efficiency. It fully meets the process and operational requirements of the overlay welding experiments conducted in this study. Figure 1 shows the on-site setup of the arc overlay welding experiment.
Prior to the overlay welding experiment, the Q235 steel substrate required appropriate surface preparation. First, rust and surface oxides were removed using an angle grinder and sandpaper. The polished surface was then cleaned with an acetone solution to eliminate any residual oil or contaminants, ensuring a clean and uncontaminated substrate surface. After cleaning, the substrate was securely fixed in a dedicated fixture to prevent thermal deformation caused by excessive heat accumulation or external disturbance during the overlay welding process, which could affect the stability and quality of weld bead formation. Next, shielding gas was turned on and adjusted to an appropriate flow rate to ensure sufficient coverage of the molten pool during overlay welding and to prevent oxidation. The control cabinet and welding power supply were then turned on sequentially. Based on the substrate’s position, the arc initiation and termination point along the welding path were determined, and the process parameters were set according to the technical requirements. Using a tutorial programmer (YAS4. 00. 00A(EN/CN)-00), the welding torch angle and welding wire stick-out length were precisely adjusted to ensure the distance between the wire tip and the substrate surface was approximately 2 mm. This was carried out to maintain process stability and ensure high-quality formation of the overlay layer.

2.2. Characterization

2.2.1. Microstructure Characterization

  • Optical microscopy (OM)
The preparation process for metallographic specimens used in microstructural observation is as follows: a wire EDM machine (Taizhou Risheng Machinery Factory, Jiangsu, China) was used to cut metallographic specimens measuring 8 × 8 × 5 mm from the Q235 base material and the interface bonding area of overlay components with or without a buffer layer. The sample was then ultrasonically cleaned with acetone followed by ethanol to remove surface oils and impurities. Due to the small size of the specimen, cold mounting method was employed to improve stability and ease of handling during the subsequent grinding and polishing processes. Grinding process in turn using 240#, 400#, 800#, 1200# and 2000# sandpaper. Mirror polishing was then performed using a 0.25 μm silica suspension until a smooth, defect-free surface was obtained. After polishing, the sample was ultrasonically cleaned in ethanol for 5 min and dried with cold air. Subsequently, the Q235 base material samples were corroded using a 4 wt.% nitric acid alcohol solution, and the samples from the weld overlay interface bonding area were treated using selective corrosion method to process the sample surfaces. The sample surface was sequentially etched using 4 wt.% nitric acid alcohol solution and aqua regia (HNO3:HCl = 1:3), with the etching time controlled at approximately 3 s. After corrosion, the specimen was immediately rinsed with ethanol and dried with cold air. The microstructure was then observed under an optical microscope.
2.
Scanning electron microscopy (SEM) and energy dispersive spectroscopy (EDS)
A Zeiss Gemini 500 field emission scanning electron microscope (SEM, Carl Zeiss AG, Oberkochen, Germany) was used to characterize the microstructure of Q235 base material and ER347 austenitic stainless steel weld overlay component with and without an ER309L buffer layer. Elemental analysis was performed using a Bruker D8 Advance energy dispersive spectrometer (EDS) integrated with the SEM system.

2.2.2. Mechanical Property Testing

To evaluate the plasticity and strength of the ER347 stainless steel overlay layer, microhardness testing was conducted. The tests were performed using an MHVS-1000Z digital automatic turret Vickers microhardness tester (Hongce Instrument Technology Co., Ltd., Shanghai, China), following the standard GB/T 4340.1-2009 Metallic Materials—Vickers Hardness Test—Part 1: Test Method [28]. To ensure measurement accuracy, the specimen surface was ground and polished to achieve a smooth, flat, and defect-free testing surface, with both the top and bottom surfaces kept level. The starting point for microhardness testing is at the fusion line between the base material and the overlay weld layer. Along the direction perpendicular to the fusion line, testing is first conducted toward the base material direction at intervals of 0.5 mm, up to a distance of 2.5 mm from the fusion line, recording a total of five indentations. For specimens without a buffer layer, measurements are taken toward the overlay layer at intervals of 0.5 mm, up to a distance of 3.0 mm from the fusion line, recording a total of six indentations. For specimens with a buffer layer, testing is conducted toward the overlay layer at intervals of 0.5 mm until reaching a distance of 5.5 mm from the fusion line, recording a total of 11 indentations. During testing, a load of 0.3 kgf is applied and maintained for 10 s, with hardness values calculated using the diagonal method. To enhance data reliability and reproducibility, each set of specimens was tested three times. After removing extreme values, the average of the test results for each position was calculated. The test results were then compared and analyzed to understand the patterns of hardness changes.

2.2.3. Electrochemical Performance Testing

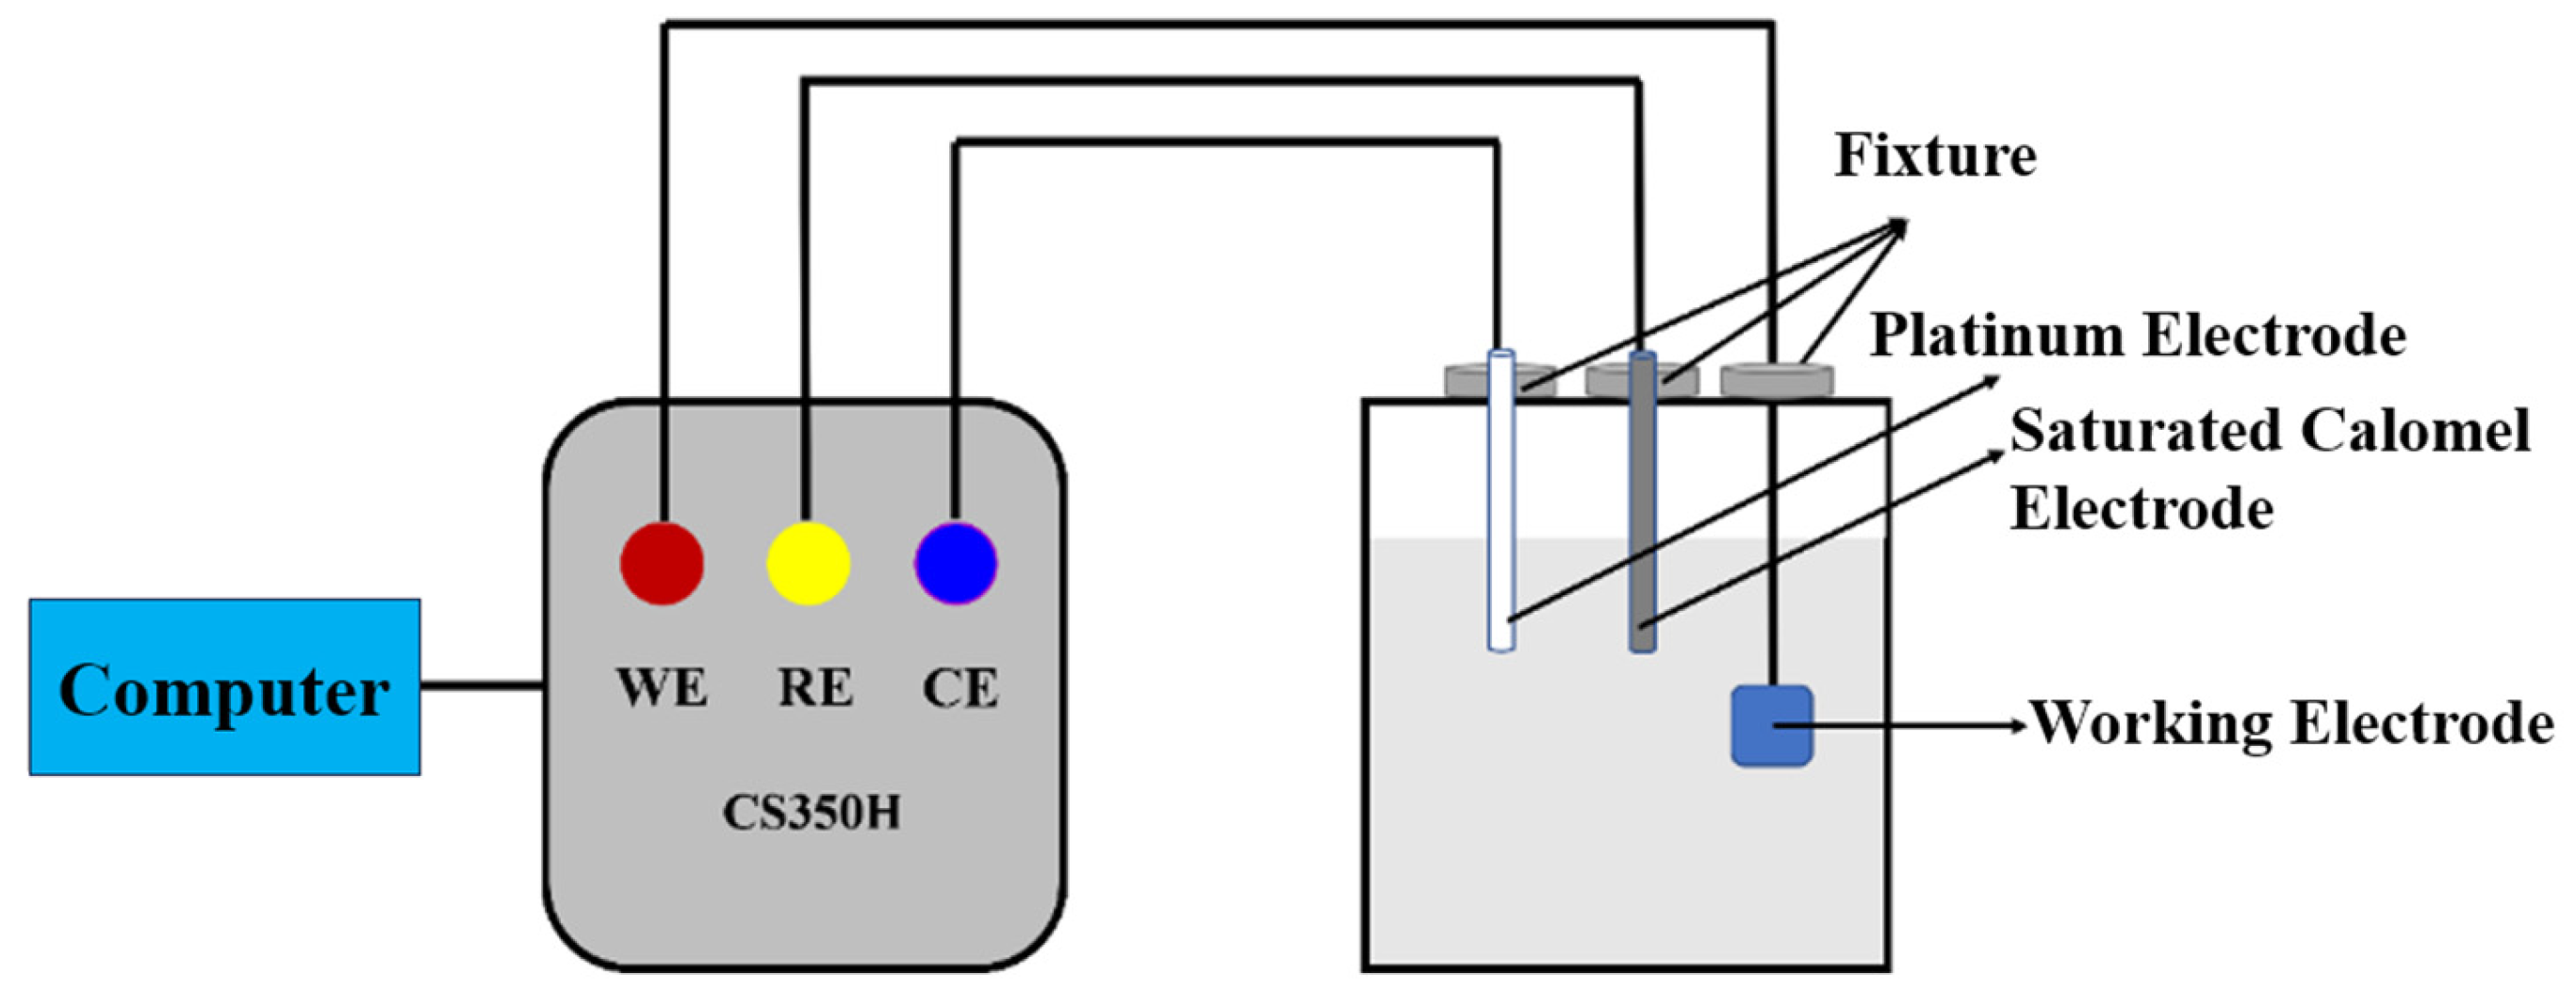
The electrochemical performance tests were conducted using a CorrTest CS350H electrochemical workstation (Wuhan Corrtest Instrument Co., Ltd., Wuhan, China). The experimental setup is illustrated in Figure 2. A conventional three-electrode system was used, consisting of a working electrode (WE), a counter electrode (CE), and a reference electrode (RE). All tests were performed at room temperature in a 3.5 wt.% NaCl solution. During the test, the specimen (with an exposed area of 1 cm2) served as the working electrode, a platinum electrode was used as the counter electrode to complete the electrochemical circuit, and a saturated calomel electrode was employed as the reference electrode to provide a stable potential reference for the working electrode.
The test specimens were pre-prepared samples of the ER347 stainless steel overlay layer. Prior to testing, a copper wire was connected to the back side of each specimen using conductive adhesive, and the specimen was encapsulated by cold mounting method with only a 1 cm2 surface exposed as the effective test area. To ensure a smooth and clean test surface, the exposed area was ground up to 2000# using SiC sandpaper, followed by mirror polishing with a 0.25 μm silica suspension. After polishing, all samples were ultrasonically cleaned in ethanol for 5 min and dried with cold air.
Before the formal tests, the open circuit potential (OCP) was monitored until it stabilized (typically within ±300 mV). Electrochemical impedance spectroscopy (EIS) was conducted by applying a 10 mV sinusoidal AC signal across a frequency range from 105 Hz to 10−1 Hz, scanning from high to low frequency. After the EIS measurement, potentiodynamic polarization test was performed with a scan potential range of −1 V to +2 V (vs. OCP) at a scan rate of 10 mV/s. The obtained EIS and polarization curve data were analyzed and fitted using the CS Studio5 software (CS5.6.1202.2).

3. Results and Discussion

3.1. Effect of Welding Parameters on the Morphology of the Overlay Layer

3.1.1. Effect of Welding Line Energy

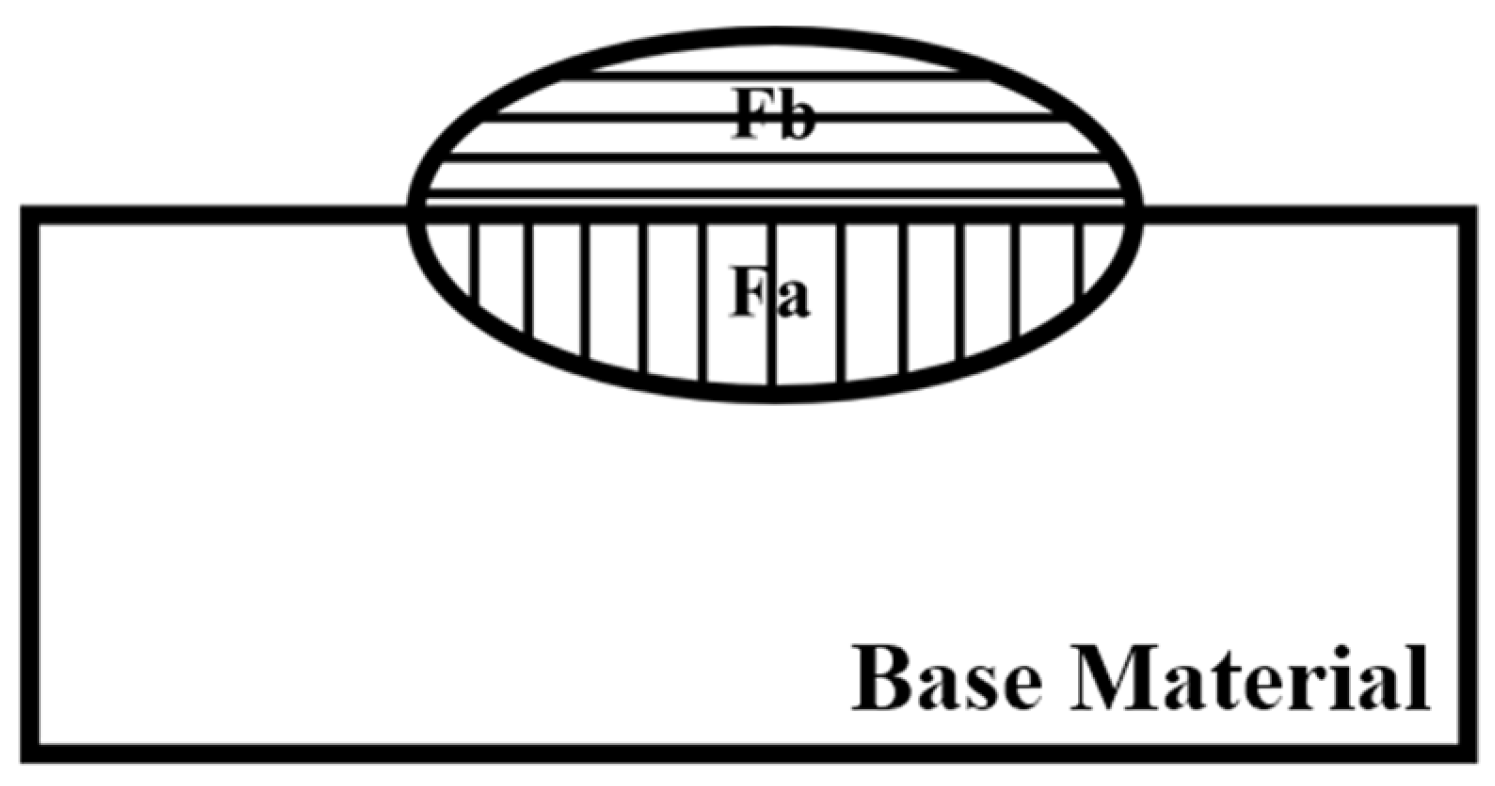
When overlay welding austenitic stainless steel onto the surface of Q235 steel, it is essential not only to ensure that the overlay layer has good geometric form but also to minimize the dilution rate. This helps fully utilize the performance of the overlay material, reduce the risk of failure, and enhance the overall quality and durability of the overlay layer [29]. In this study, Adobe Photoshop software (v23.6) was used to measure the macroscopic morphology of the weld bead, the dilution rate of single-pass weld was calculated using the dilution calculated by Equation (1) and Figure 3 shows a schematic cross-section of a single-pass overlay welding [30]. Dilution rate is defined as the ratio of the cross-sectional area of the fused base metal to the total cross-sectional area of the weld, the smaller the dilution rate, the better the weld performance [31]. Based on these measurements, the effects of welding line energy on the shape, size, and dilution rate of the overlay layer were analyzed.
η = F a F a + F b × 100 % ,
where η is the dilution rate, Fa is the area of metal incorporated into the base material portion of the overlay weld cross-section (mm2), and Fb is the area occupied by the molten metal on the surface of the base material in the cross-section of the overlay weld (mm2).
Based on the welding parameters of each group, the welding line energy q can be calculated using Equation (2):
q = 60 ε U I V J/cm,
where ε is the thermal efficiency coefficient, typically taken as 0.85, U is the welding voltage (V), I is the welding current (A), and V is the welding speed, set at 40 cm/min in this study.
The calculated welding line energy values corresponding to each set of welding parameters are shown in Table 3.
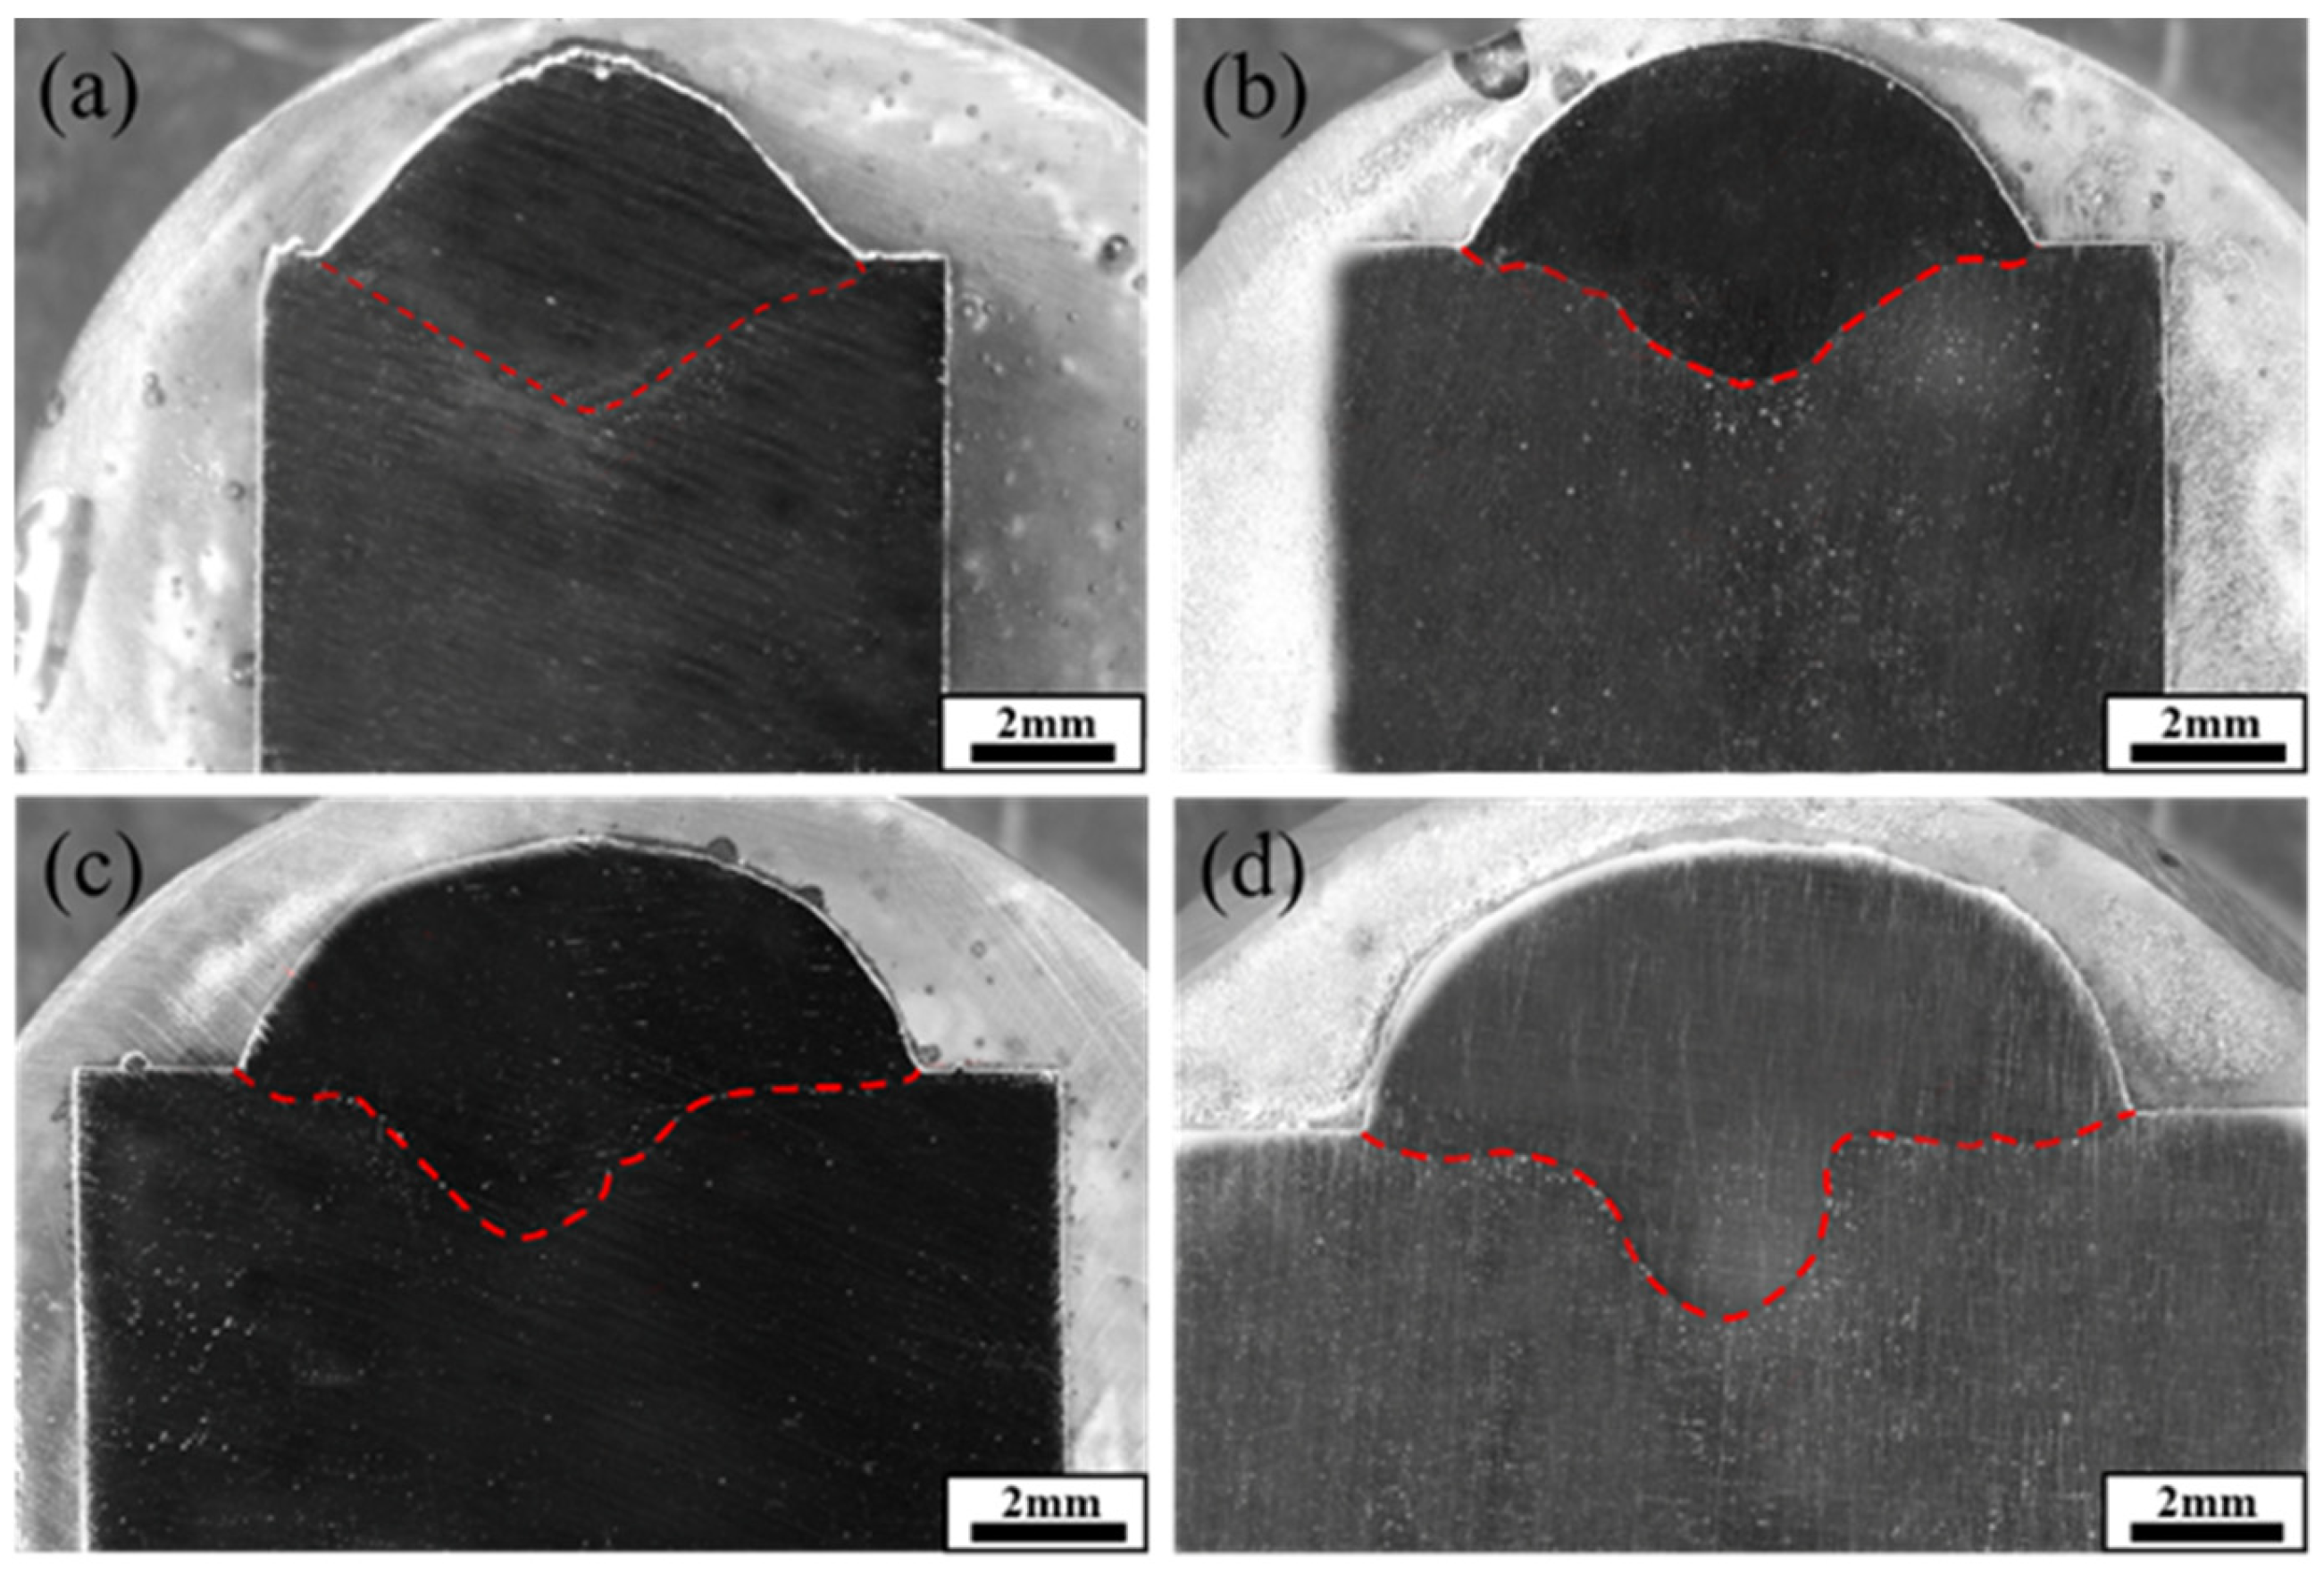
Due to the programming settings of the welding robot and the requirements for arc stability, the welding voltage varied in synchronization with the welding current during the welding process. As shown in Figure 4, with the increase in welding heat input, the shape of the single-pass weld gradually transitioned from an elliptical to a finger-like profile. This phenomenon was particularly pronounced at the welding line energy of 9.9 kJ/cm. The primary reason for this is that as the welding current increases, the arc exerts a stronger impact force on the surface of the base material, promoting deeper penetration of the molten pool into the substrate and eventually forming a finger-shaped weld.
Table 4 presents the cross-sectional morphology and dilution rate of single-pass overlay welding under different welding line energies. As the welding heat input varied, changes were observed in the melt depth, melt width, residual height, and dilution rate of the weld. Under the S-1 welding heat input conditions, the dilution rate of the weld is the highest. As the welding heat input increases, the dilution rates of the other three specimens exhibit a nonlinear decreasing trend. The dilution rate of the S-2 specimen shows a significant reduction compared to S-1, and the weld morphology is well formed. The dilution rates of the S-3 and S-4 specimens also decrease, but the decline rate slows down. As shown in the table, the dilution rate of the S-4 specimen is the lowest, but its weld morphology is finger-shaped compared to S-2. The weld morphology of S-3 is also uneven and exhibits a certain degree of finger-shaped weld morphology.

3.1.2. Effect of Weld Bead Overlap Rate

The weld bead overlap rate is a critical parameter in the overlay welding process, as it directly affects the uniformity, mechanical properties, corrosion resistance, and material utilization of the overlay layer. Proper adjustment of the overlap rate helps optimize the thickness, microstructure distribution, and joint performance of the overlay layer [32]. As shown in Figure 4 and Table 4, the cross-sectional morphology and dilution rate of the single-pass overlay weld at different welding line energies indicate that when using the welding parameters of sample S-2 for overlay welding, under the condition of ensuring good weld bead formation, the dilution rate is relatively low. Therefore, the welding parameters of sample S-2 from Table 3 were selected to study the effect of different weld overlap rates on the overlay weld layer.
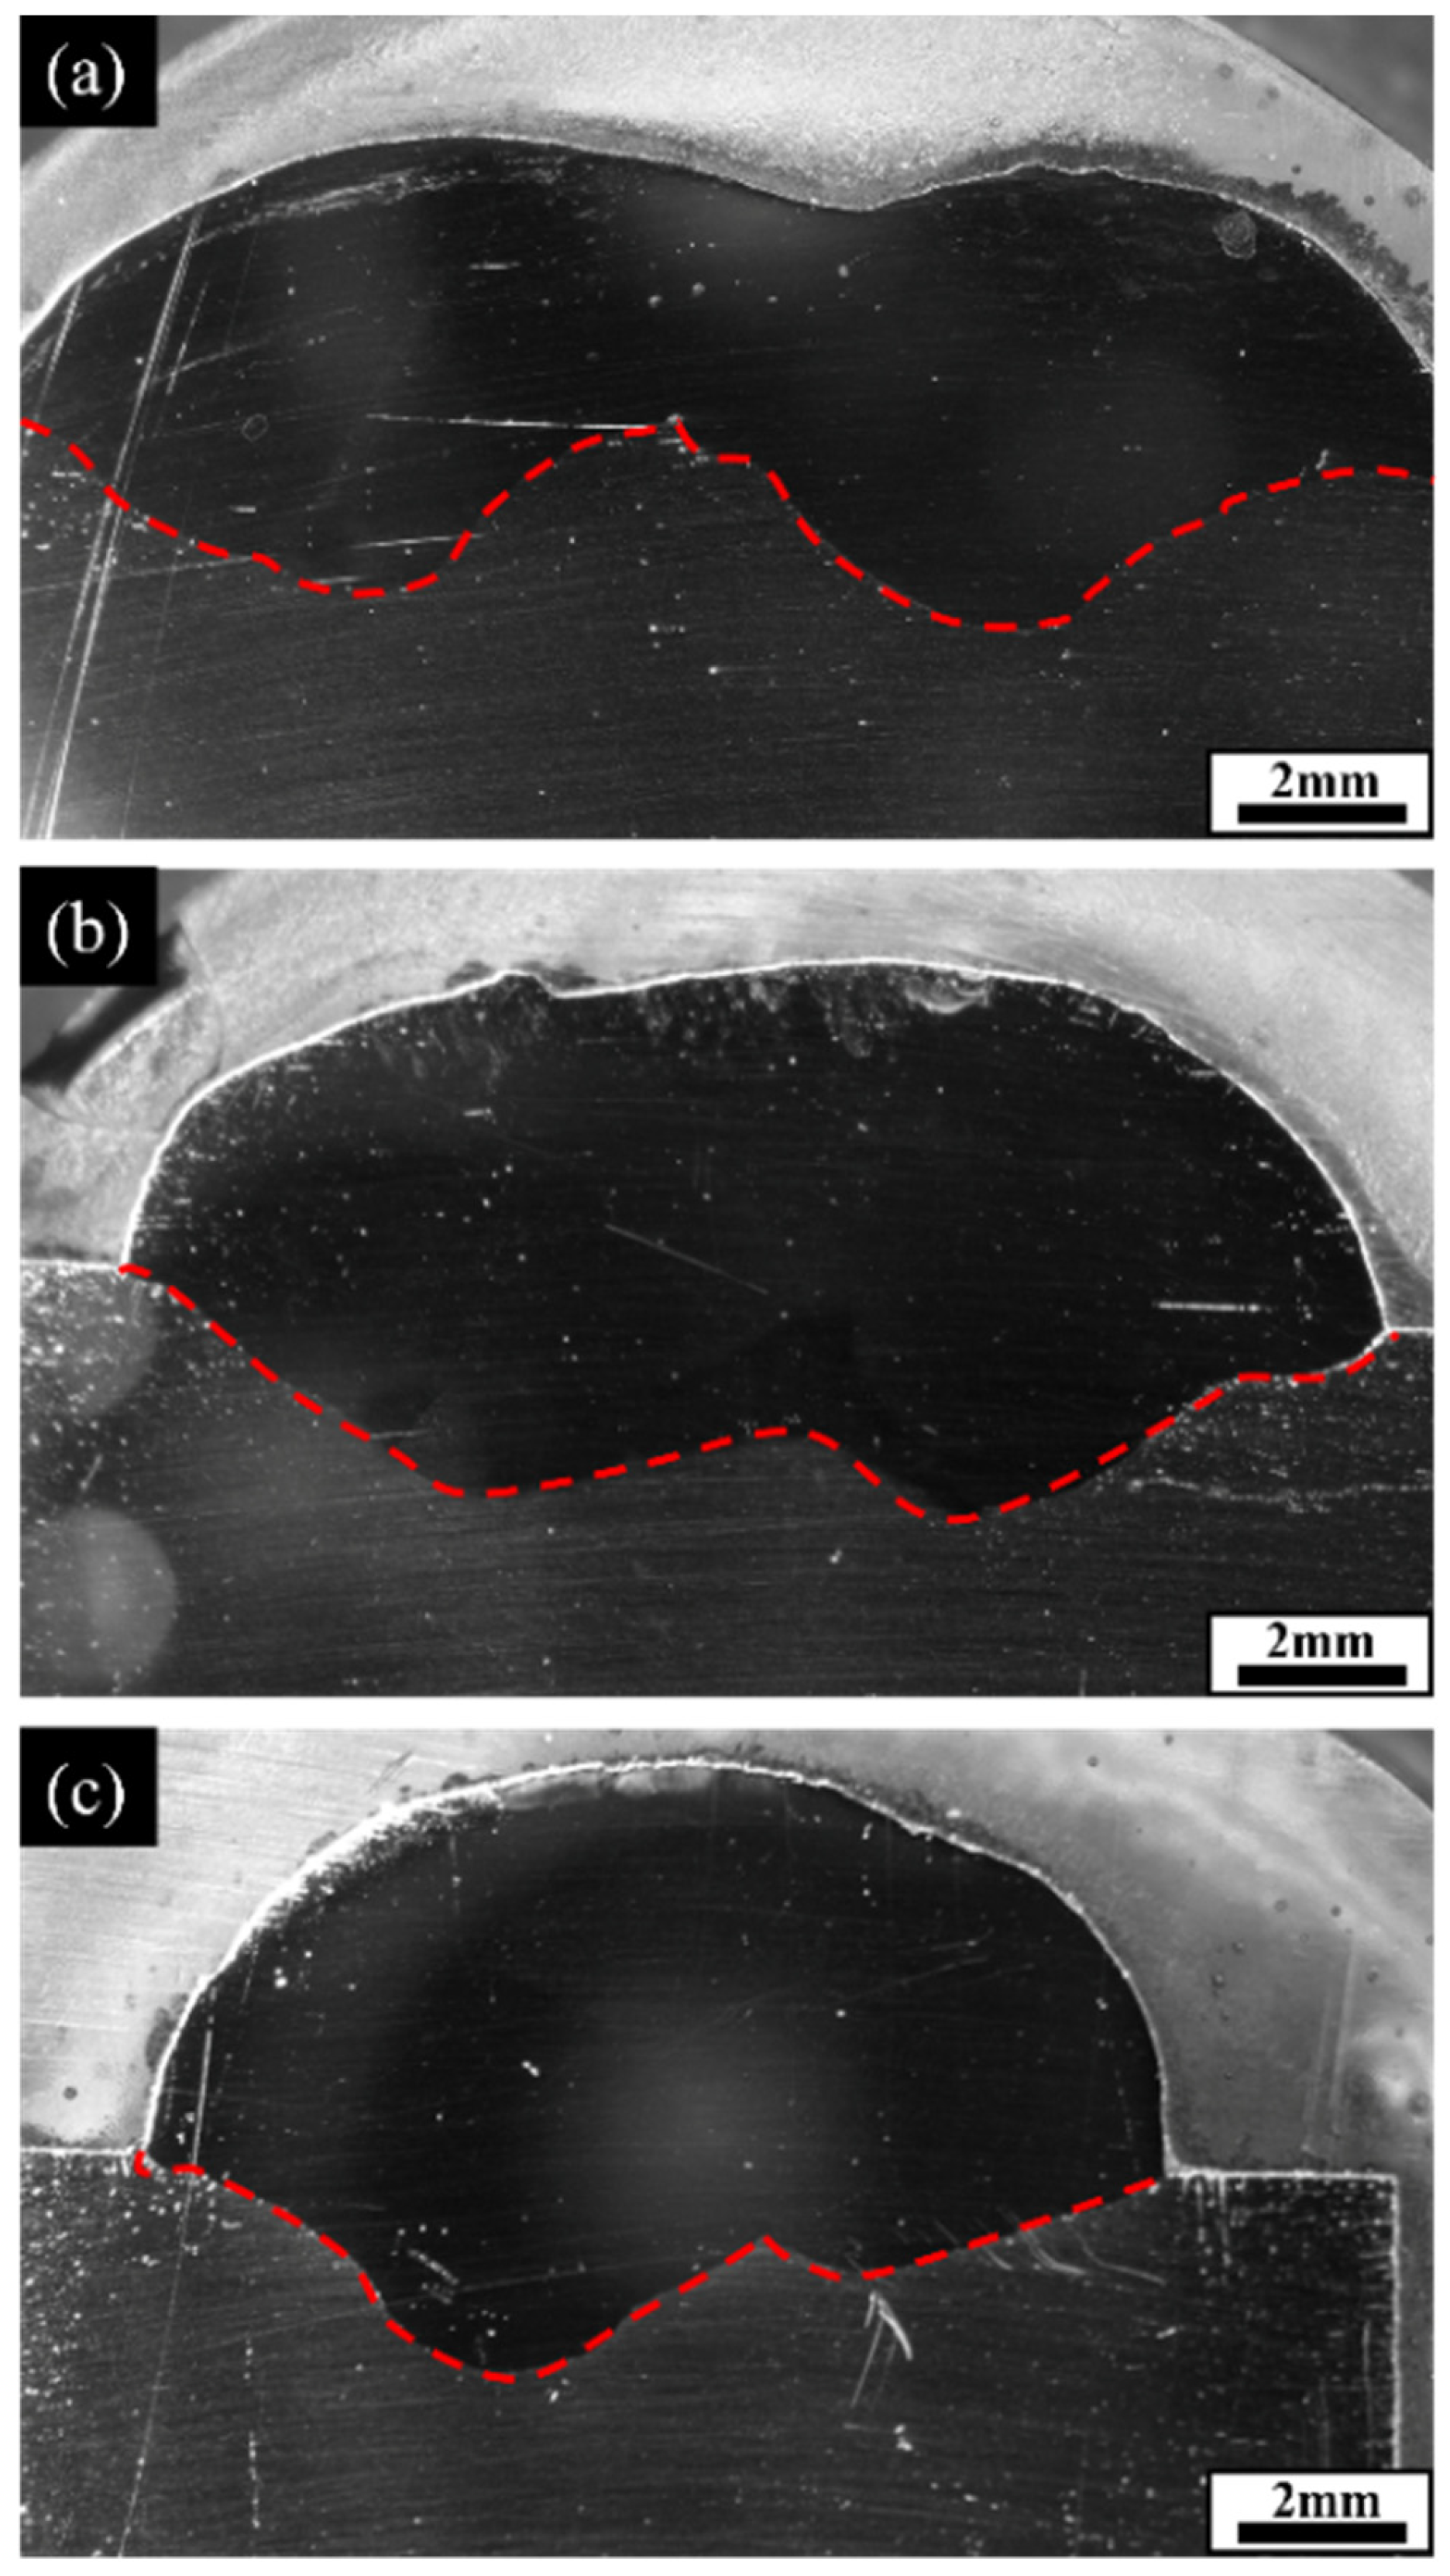
Figure 5 illustrates the cross-sectional morphology of the overlay layer under different weld bead overlap rates. By comparing the cross-sectional profiles at various overlap rates, the influence of overlap rate on the forming quality, microstructure, and performance of the overlay layer can be analyzed, providing a basis for optimizing overlay welding process parameters. As shown in the figure, the weld bead cross-sections vary significantly with different overlap rates. At an overlap rate of 25%, noticeable concavity appears at the overlapping surface of the weld bead, while the root bulges upward. The weld bead thickness is uneven, with the smallest thickness at the overlap zone. The weld exhibits a finger-like shape, and the fusion line is wavy, which tends to cause stress concentration and weaken the strength of the overlay component. When the overlap rate is 50%, the weld bead surface transitions smoothly, the weld is evenly distributed, no obvious finger-like welds are observed, and the fusion line is smooth. Local stress concentration is minimal, and the welding quality is relatively high. When the overlap rate is 75%, the weld bead surface transition is smooth but the residual height is higher. A distinct finger-like weld appears on the left side of the weld, and the weld distribution is uneven on both sides, with clear local stress concentration.
Table 5 presents the variation trends of weld bead cross-sectional dimensions and dilution rates under different overlap rates. As the weld bead overlap rate increases, the weld width gradually decreases. The residual height increases, while the weld depth changes slightly. The dilution rate tends to decrease, reducing the influence of the substrate on the chemical composition of the overlay welding metal.
Compared to S2-1 and S2-3, the S2-2 weld bead exhibits uniform forming, high visual quality, and well-distributed welds, representing the best welding quality. Therefore, the overlay welding process parameters of S2-2 (current 240 A, voltage 24 ± 2 V, welding speed 40 cm/min, weld bead overlap rate 50%, shielding gas flow rate 18 L/min) are selected for subsequent experiments.
In summary, a weld bead overlap rate of 50% provides better welding quality and cross-sectional morphology, meeting the process requirements for overlay layers.

3.2. Effect of Buffer Layer Addition on the Microstructure and Properties of er347 Stainless Steel Overlay Layer

3.2.1. Microstructural Analysis

Overlay welding was performed on the surface of Q235 steel substrate using the welding process parameters labeled S2-2. Specimens were prepared using wire electrical discharge machining, followed by grinding and polishing. Since the overlay component is composed of dissimilar materials with significant differences in corrosion resistance, selective corrosion method was employed to reveal the metallographic structures, which were then observed under a microscope. The results are shown in Figure 6.
From Figure 6a,c it can be seen that the overlay layer contains no welding defects such as pores, microcracks, or inclusions, indicating that it meets the requirements of the overlay welding process. Furthermore, no visible separation is observed in the fusion zone between the substrate and the overlay layer, suggesting good metallurgical bonding and high welding quality. Figure 6a shows the microstructure of the overlay component without a buffer layer. The left side of the fusion line corresponds to the Q235 steel, and the right side is the ER347 stainless steel overlay layer. There is a distinct interface between the two sides, with no visible decarburized layer. The substrate primarily consists of ferrite and pearlite, while the ER347 overlay layer exhibits an austenite and ferrite structure. The austenite phase grows in the form of columnar dendritic crystals, and the precipitation of a secondary phase is clearly observed. In Figure 6b, the region of the substrate near the fusion line shows significantly coarsened grains due to the thermal effects of welding, while the grain size in areas farther from the fusion line is relatively smaller. Figure 6c presents the microstructure of the overlay component with a buffer layer. The structural features of the Q235 substrate and the ER347 overlay layer are similar to those shown in Figure 6a. The Q235 substrate remains composed mainly of ferrite and pearlite, with the pearlite distributed in granular or blocky forms within the ferritic matrix, and the overall microstructure is relatively uniform. In the ER347 overlay layer, the black phase is ferrite, and the gray-white phase is austenite, both distributed uniformly. Additionally, due to the strong corrosion resistance of the ER309L austenitic stainless steel buffer layer, its organization after corrosion is lighter in color. It mainly consists of austenite with a small amount of ferrite, and the distribution is relatively homogeneous.
The microstructure of the stainless steel overlay welding layer is mainly composed of austenite and ferrite, which is determined by the solidification mode and elemental composition. Based on the composition of the austenitic stainless steel filler wire, the calculated Creq/Nieq ratio is 1.67, corresponding to the FA solidification mode. In this mode, the cooling process occurs in two stages. In the first stage (primary solidification), ferrite predominantly precipitates. In the second stage (solid-state phase transformation), austenite gradually forms along ferrite grain boundaries and dendrite boundaries, a process primarily influenced by the contents of Cr and Ni. Chromium contributes to ferrite stabilization, while nickel is a typical austenite stabilizer. The precipitation of ferrite in the first stage induces elemental segregation: ferrite grains are enriched in Cr and depleted in Ni, while the grain boundaries are enriched in Ni and depleted in Cr. Consequently, during solid-state phase transformation, austenite preferentially precipitates at the grain boundaries. In addition, since Cr and Ni atoms have relatively large atomic radii, their diffusion under concentration gradients is relatively difficult, whereas smaller C atoms diffuse more readily. This promotes the consumption of Cr through the formation of chromium carbides, which weakens the stabilizing effect of Cr on ferrite to some extent. However, due to the relatively high cooling rate of the overlay welding process, the transformation of ferrite to austenite is not fully completed. As a result, under the stabilizing effect of Ni on austenite, the final solidified microstructure of the weld overlay consists mainly of austenite with a small amount of ferrite.

3.2.2. Chemical Composition Analysis

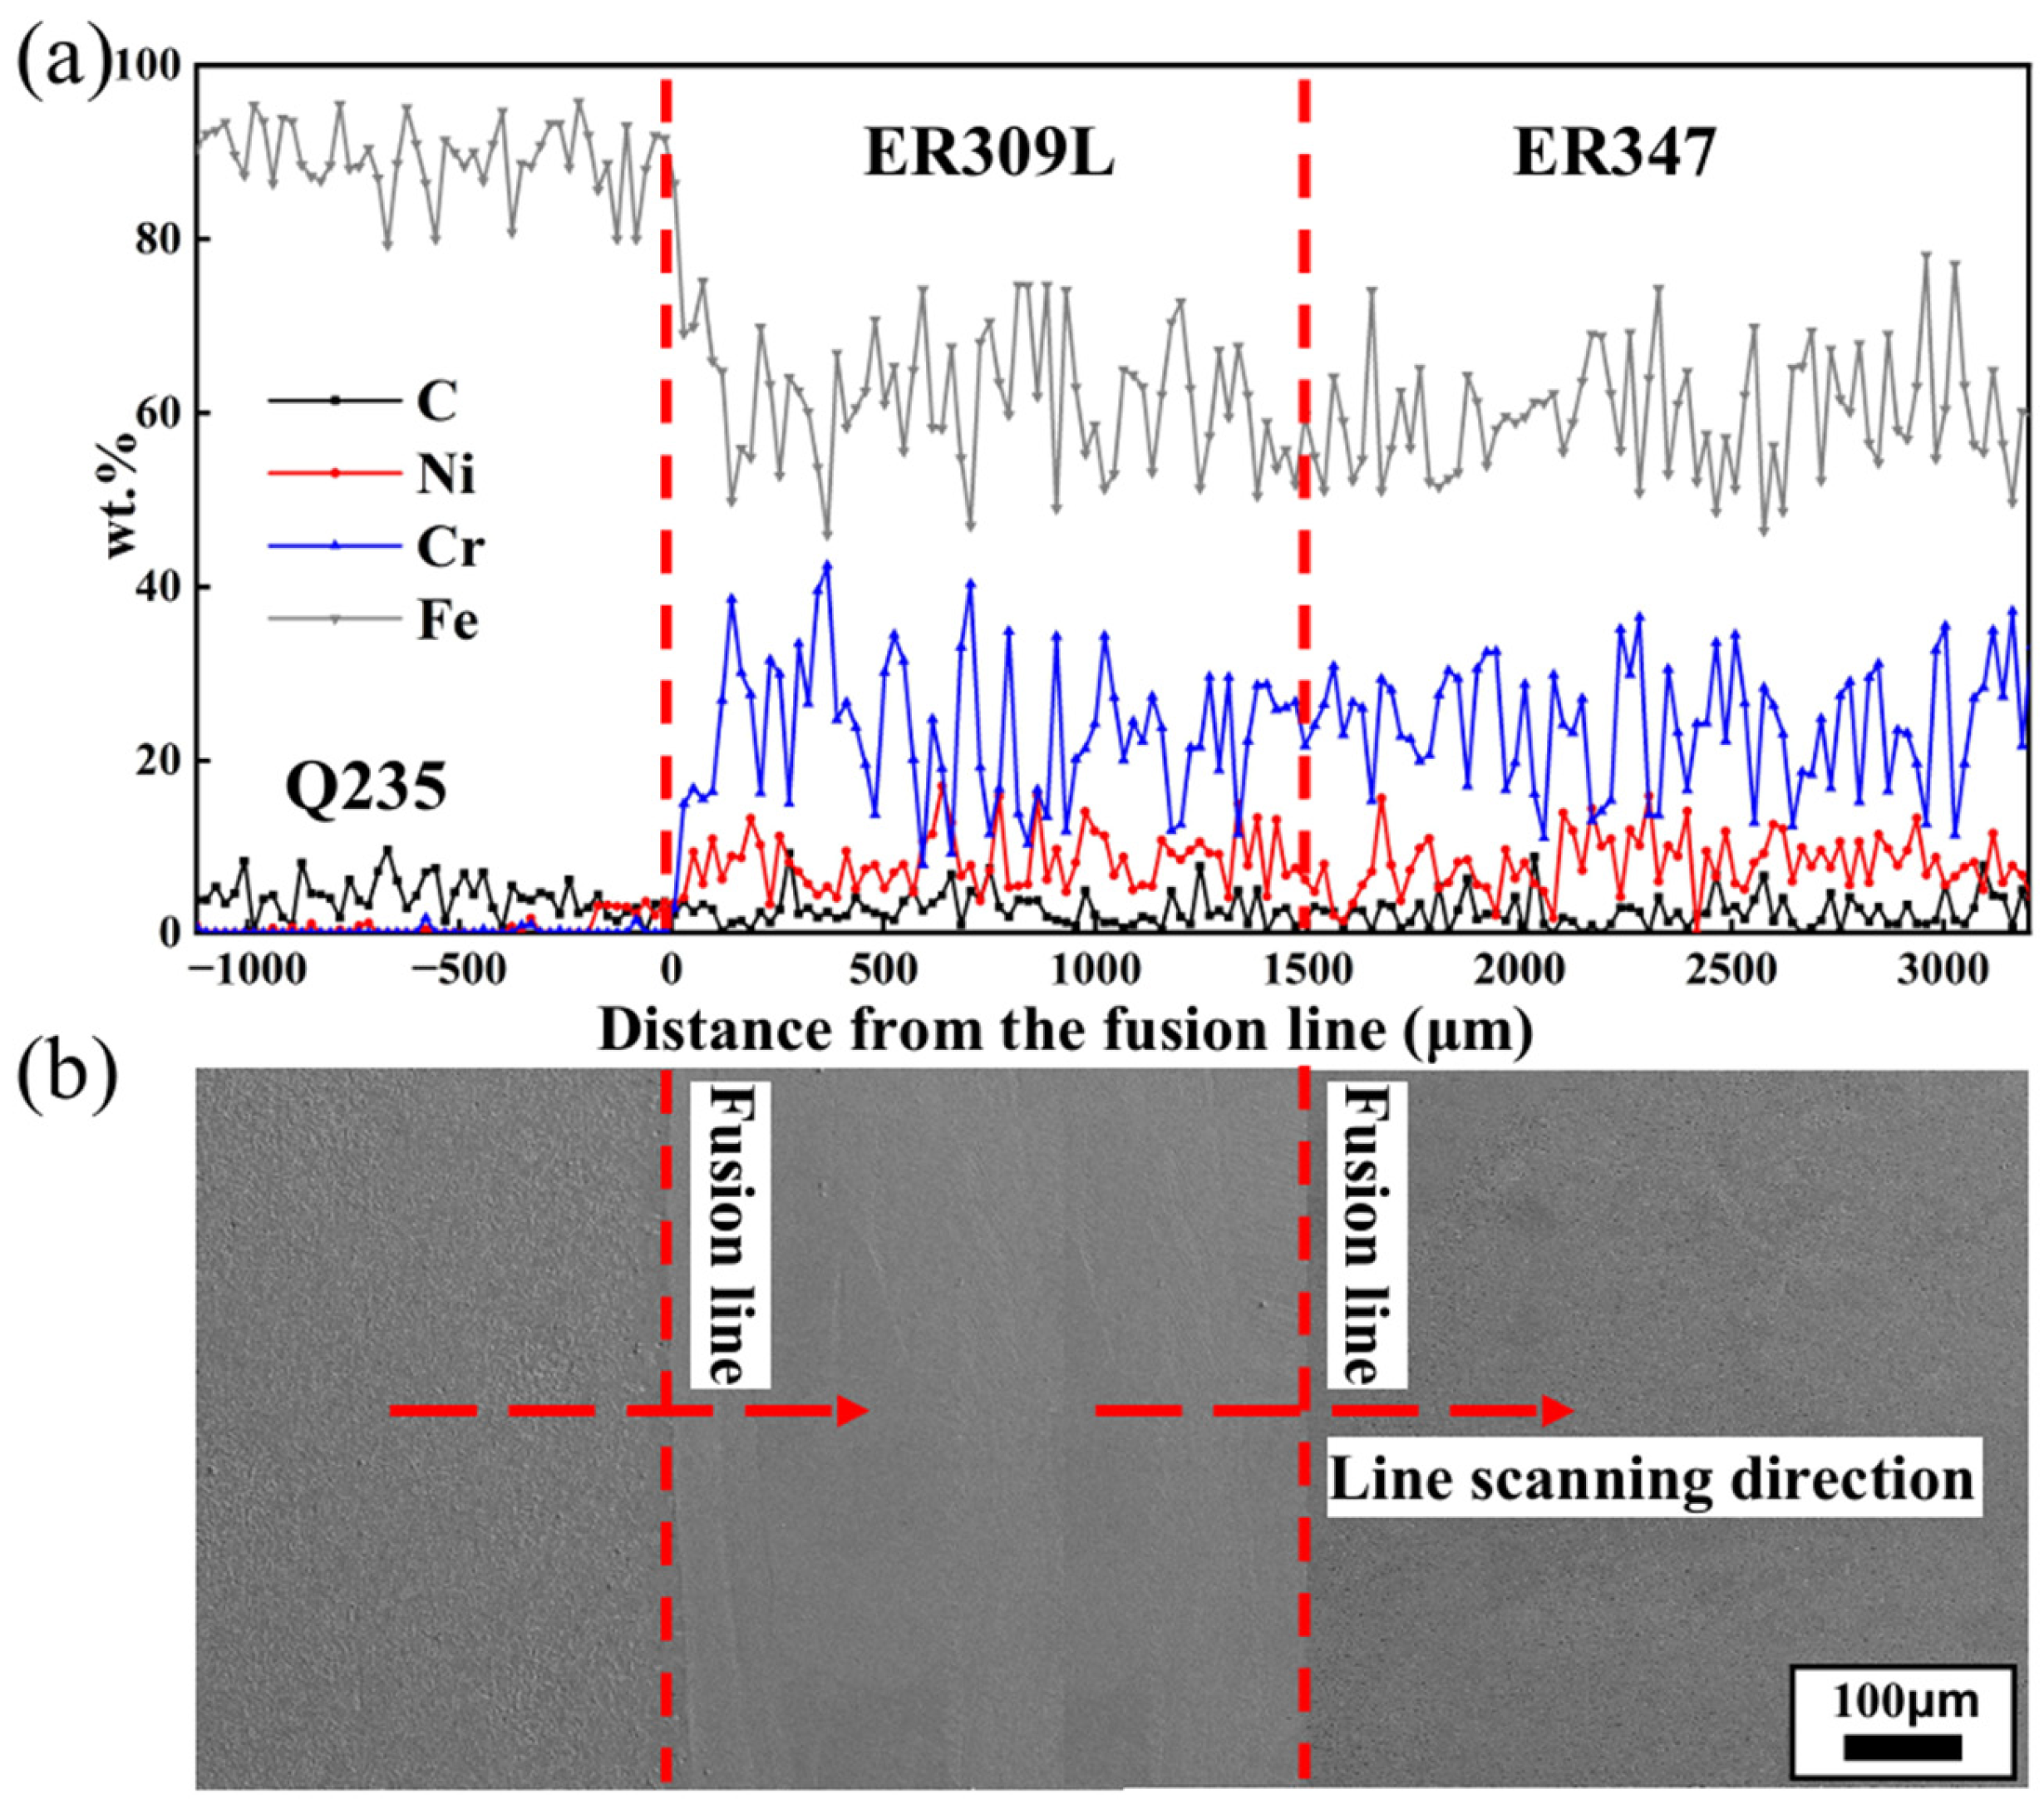
To further understand the distribution characteristics of chemical elements between the substrate and the ER347 stainless steel overlay layer, a line scan was conducted transversely from the substrate to the ER347 overlay layer. The results are shown in Figure 7. The main element in the substrate is Fe, while the primary elements in the ER347 overlay layer are Fe, Cr, and Ni. Near the fusion line, a sharp change in Cr and Ni content is observed, which is attributed to the absence of these elements in the substrate. Although Fe is the main component in both the substrate and the ER347 overlay layer, its concentration in the latter is significantly lower. Therefore, a noticeable drop in Fe content occurs at the fusion boundary. This rise-and-fall pattern in elemental concentration indicates that the amount of substrate melting during the overlay welding process is relatively low, and the dilution rate of the ER347 overlay layer is lower. This, to some extent, helps maintain the corrosion resistance of the overlay material.
Elemental analysis of the overlay component with a buffer layer was conducted using line scanning, and the results are shown in Figure 8. The main elements in the substrate and the ER347 overlay layer are consistent with those previously described. The Cr and Ni element contents in the buffer layer ER309L are about 4% higher than that of ER347. As shown in Figure 8a, the Cr and Ni content in the buffer layer is significantly higher than that in the ER347 overlay layer as well as in the ER347 layer shown in Figure 7a. Moreover, Figure 8a demonstrates that the addition of the buffer layer effectively prevents dilution of Cr and Ni in the ER347 overlay layer by the substrate. In addition, the distribution of Cr and Ni between the buffer layer and the ER347 overlay layer is uniform, with no sharp compositional changes, indicating that the two materials have similar chemical compositions and exhibit good metallurgical bonding.
During the overlay welding process, due to the high Cr and Ni content in ER347 and the fact that the Q235 steel substrate is primarily composed of Fe with a small amount of C, a significant chemical composition inhomogeneity occurs in the fusion zone, resulting in a pronounced concentration gradient. According to Fick’s First Law, the primary driving force for elemental diffusion is the concentration gradient, meaning that elements tend to diffuse from regions of high concentration to regions of low concentration. Under this influence, a dilution zone for Cr and Ni elements and a diffusion layer for C are formed near the fusion line.
Cr and Ni are present in high concentrations in the ER347 overlay layer, but are almost absent in the Q235 substrate, resulting in an obvious concentration gradient that promotes the diffusion of Cr and Ni into the substrate. At the same time, since Q235 steel contains a relatively high amount of C, while the ER347 contains very little, C tends to diffuse toward the fusion region, forming a carbon diffusion layer. Compared with the drastic compositional change between Q235 and ER347, the introduction of an ER309L buffer layer effectively mitigates the impact of the concentration gradient on elemental diffusion. This results in a smoother compositional transition at the interface and significantly enhances the overall performance of the ER347 stainless steel overlay layer.

3.2.3. Mechanical Properties Analysis

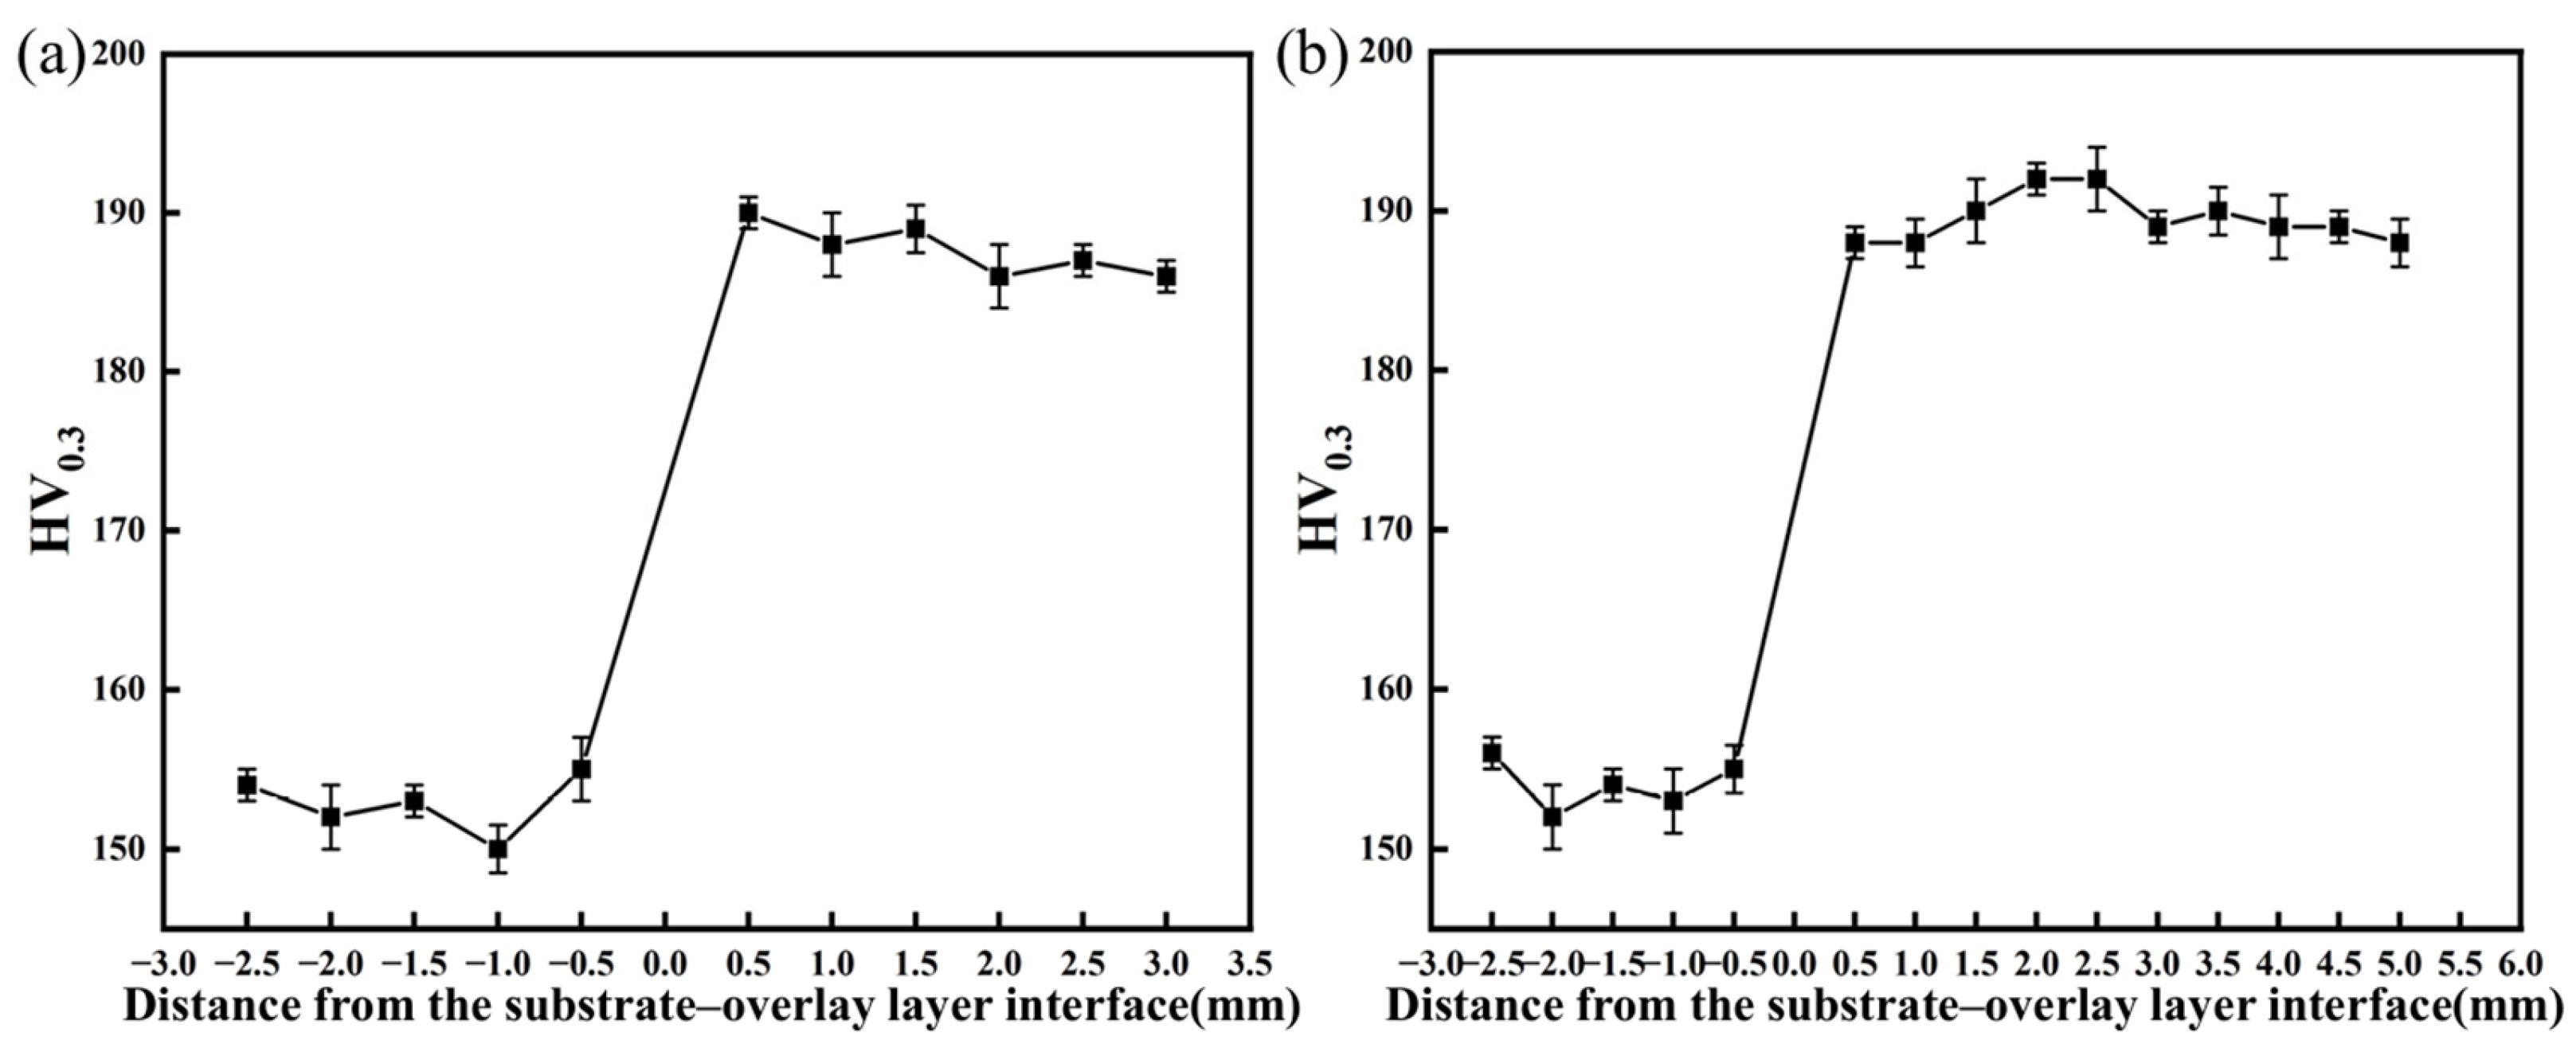
Figure 9 shows the microhardness distribution curves of the overlay component. Figure 9a presents the hardness profile without buffer layer. As shown in the figure, the hardness of the substrate is approximately 150 HV, while the average hardness of the ER347 stainless steel overlay layer is around 190 HV. The region of the overlay layer near the substrate shows lower hardness than the far-end region, with a peak hardness of 192 HV observed at the fusion line. This localized hardness increase is primarily attributed to the diffusion of carbon from the substrate into the ER347 overlay layer under high-temperature conditions. During cooling, this results in the formation of chromium carbides on the austenitic stainless steel side, leading to a hardness peak in the overlay layer near the fusion line.
Figure 9b displays the hardness distribution for the component with buffer layer. The results indicate a noticeable increase in hardness at the fusion line between the substrate and the ER309L buffer layer. However, unlike components without a buffer layer, the area near the fusion line in the buffer layer does not exhibit a hardness peak. This occurs because the chromium carbides formed by C atom diffusion undergo heat treatment effects due to thermal input during the ER347 overlay welding process, causing partial carbide dissolution and consequently reducing hardness near the fusion line. Subsequently, the hardness of the buffer layer exhibits a slight upward trend before the fusion line with the overlay layer. This can be attributed to the refinement of grains in the buffer layer before the fusion line due to thermal effects during the overlay layer deposition, thereby increasing hardness. After the fusion line between the ER309L buffer layer and the ER347 overlay layer, the hardness slightly increases, reaching a maximum of 196 HV. The overall hardness variation between the buffer layer and the overlay layer is relatively stable with minimal fluctuation. This is because both the buffer layer and the ER347 overlay layer are stainless steel materials with extremely low carbon content, exhibiting minimal compositional differences. The diffusion gradients for elements such as carbon and chromium are small, making the influence of elemental diffusion negligible. Furthermore, the existence of the buffer layer reduces the dilution effect of the substrate on the ER347 overlay layer.
Based on the above analysis, the addition of a buffer layer to a large extent alleviates the hardness changes between the substrate and the ER347 stainless steel overlay layer, thereby optimizing the mechanical performance of the ER347 overlay layer.

3.2.4. Corrosion Resistance Analysis

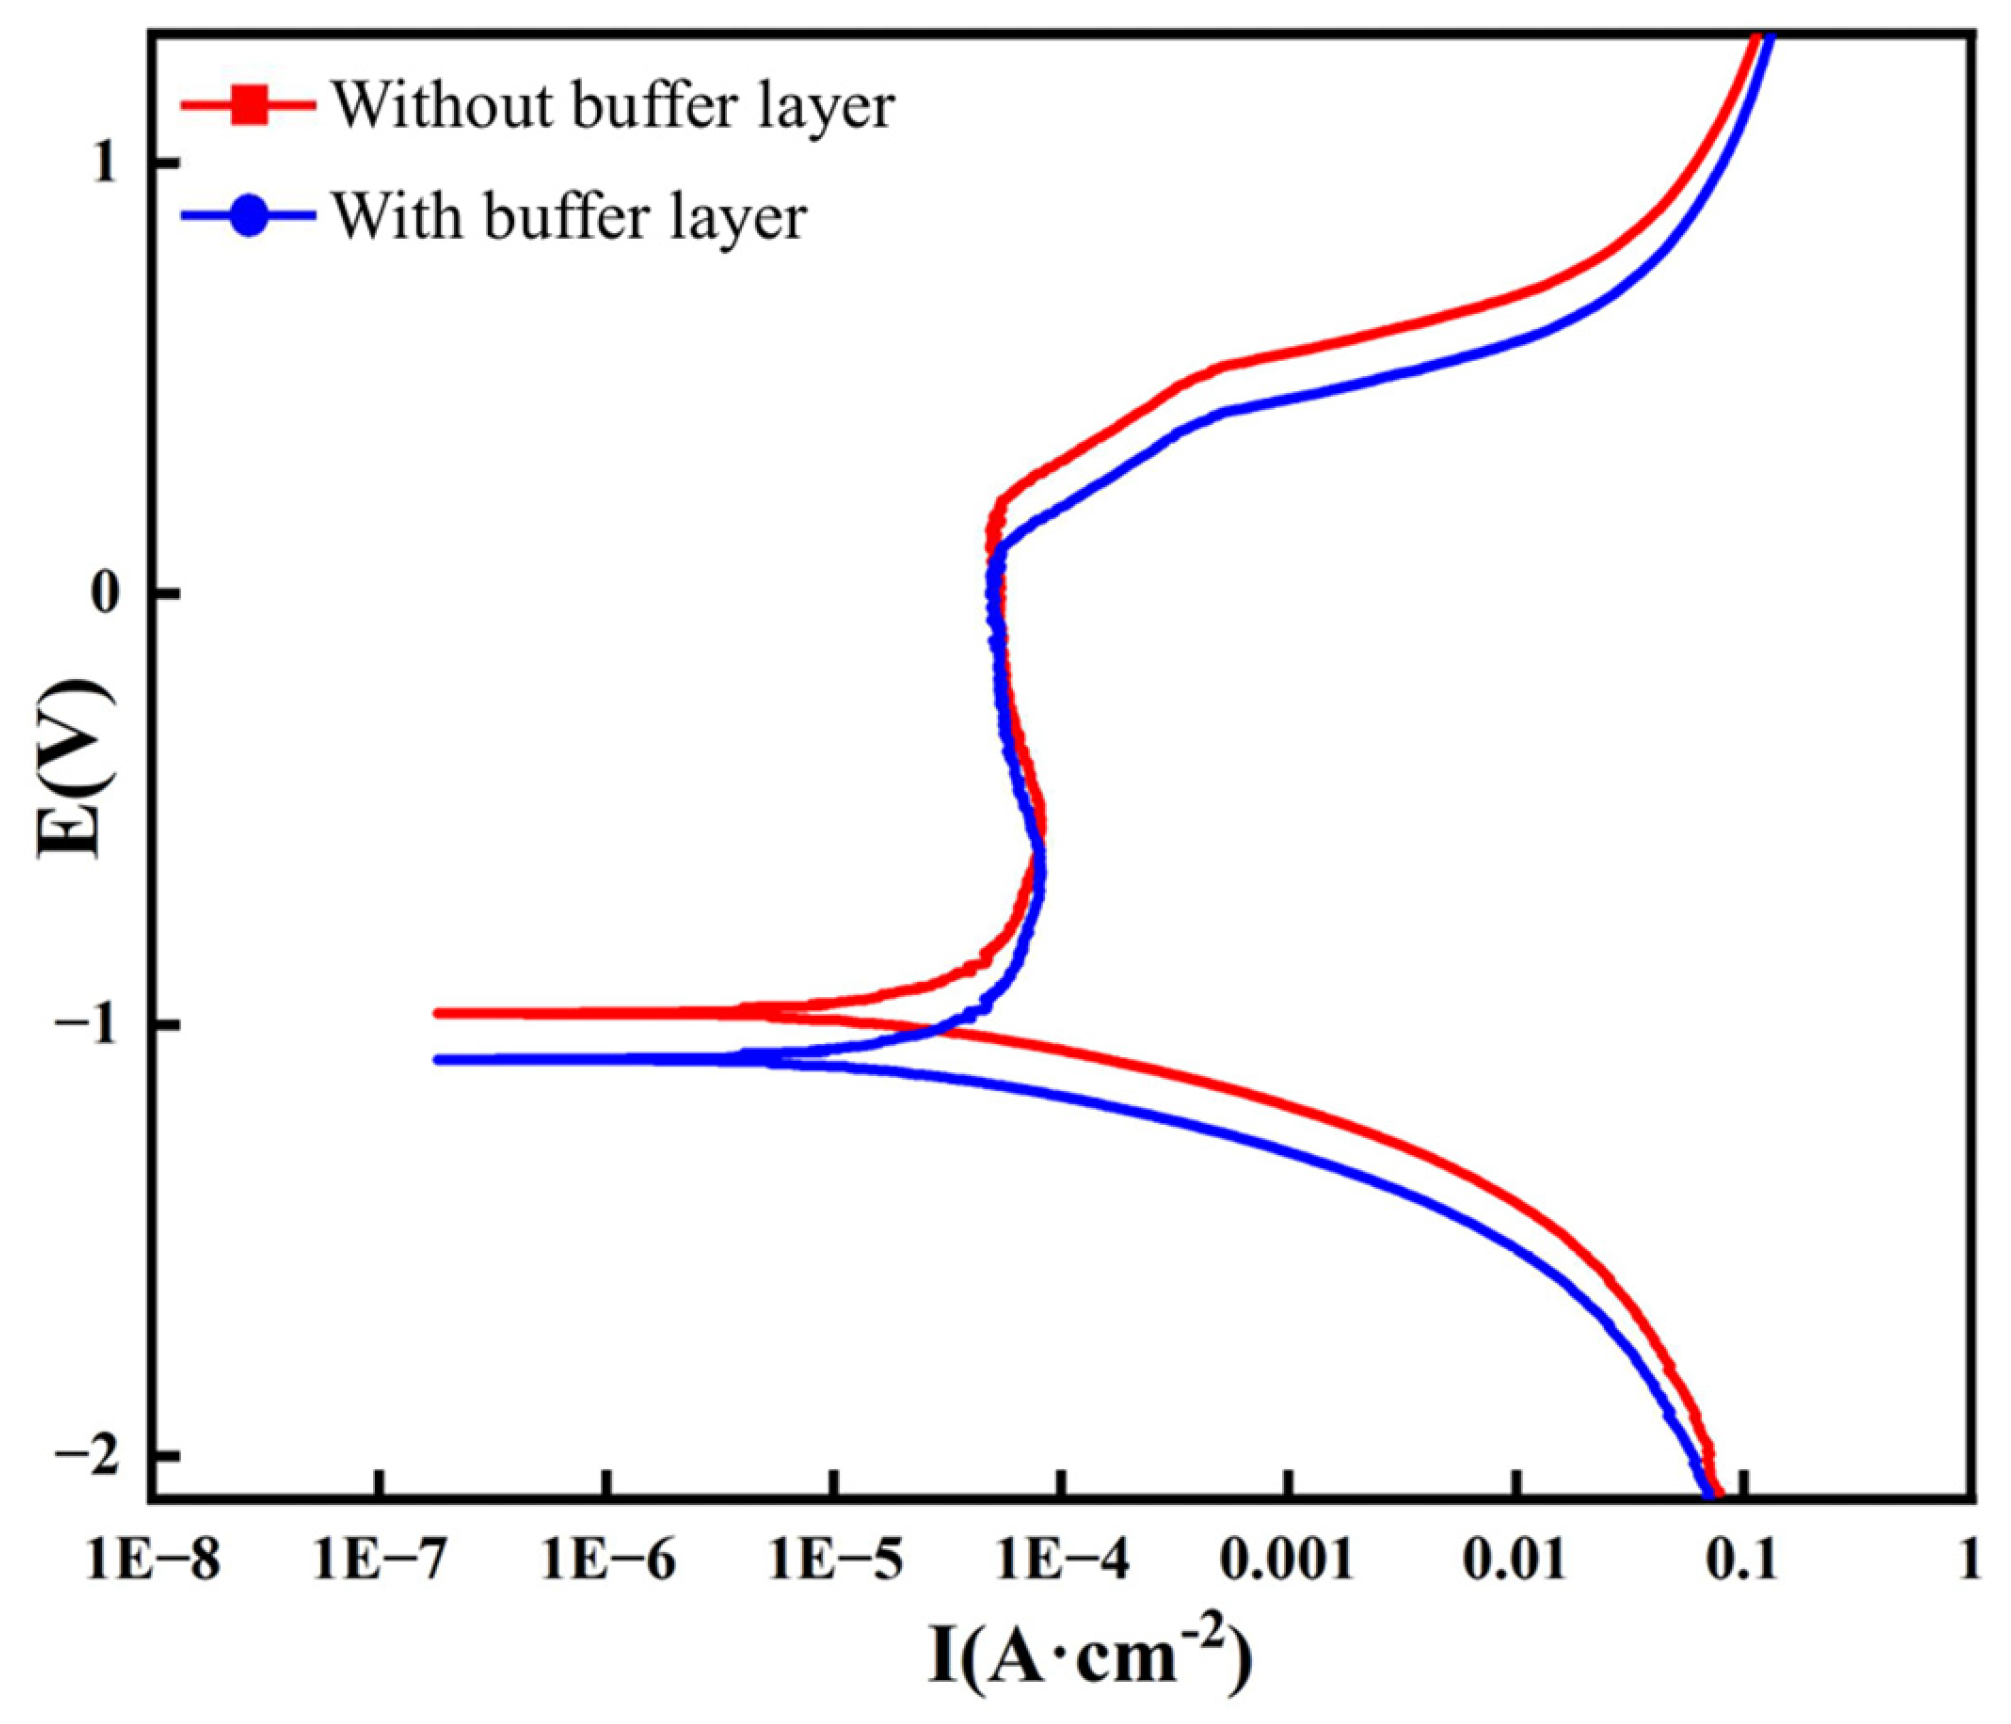
Figure 10 shows the potentiodynamic polarization curves of the ER347 stainless steel overlay layer in a 3.5 wt.% NaCl solution. The analysis indicates that the ER347 overlay layer with a buffer layer exhibits better corrosion resistance in the 3.5 wt.% NaCl environment. In combination with the data in Table 6, it can be observed that the corrosion potential of the ER347 overlay layer with a buffer layer is higher than that without a buffer layer. A higher corrosion potential indicates greater resistance of the material surface to corrosive media. Furthermore, the corrosion current density of the ER347 overlay layer with a buffer layer is significantly lower than that without the buffer layer, further confirming its superior corrosion resistance. From the perspective of microstructure, stainless steel contains a high content of Cr and Ni elements to enhance corrosion resistance. Among them, Ni is an austenite-forming element, which contributes to the stability of the austenitic structure and the improvement of corrosion resistance. With the introduction of a buffer layer, the microstructure of the weld overlay is characterized by austenite with a small amount of ferrite. The ferrite content is relatively low, and the overall microstructure is uniformly distributed, which facilitates the formation of a more effective passive film and thereby improves the corrosion resistance of the overlay layer. Therefore, the addition of a buffer layer can effectively reduce the corrosion risk of the ER347 overlay layer and enhance its overall corrosion resistance.
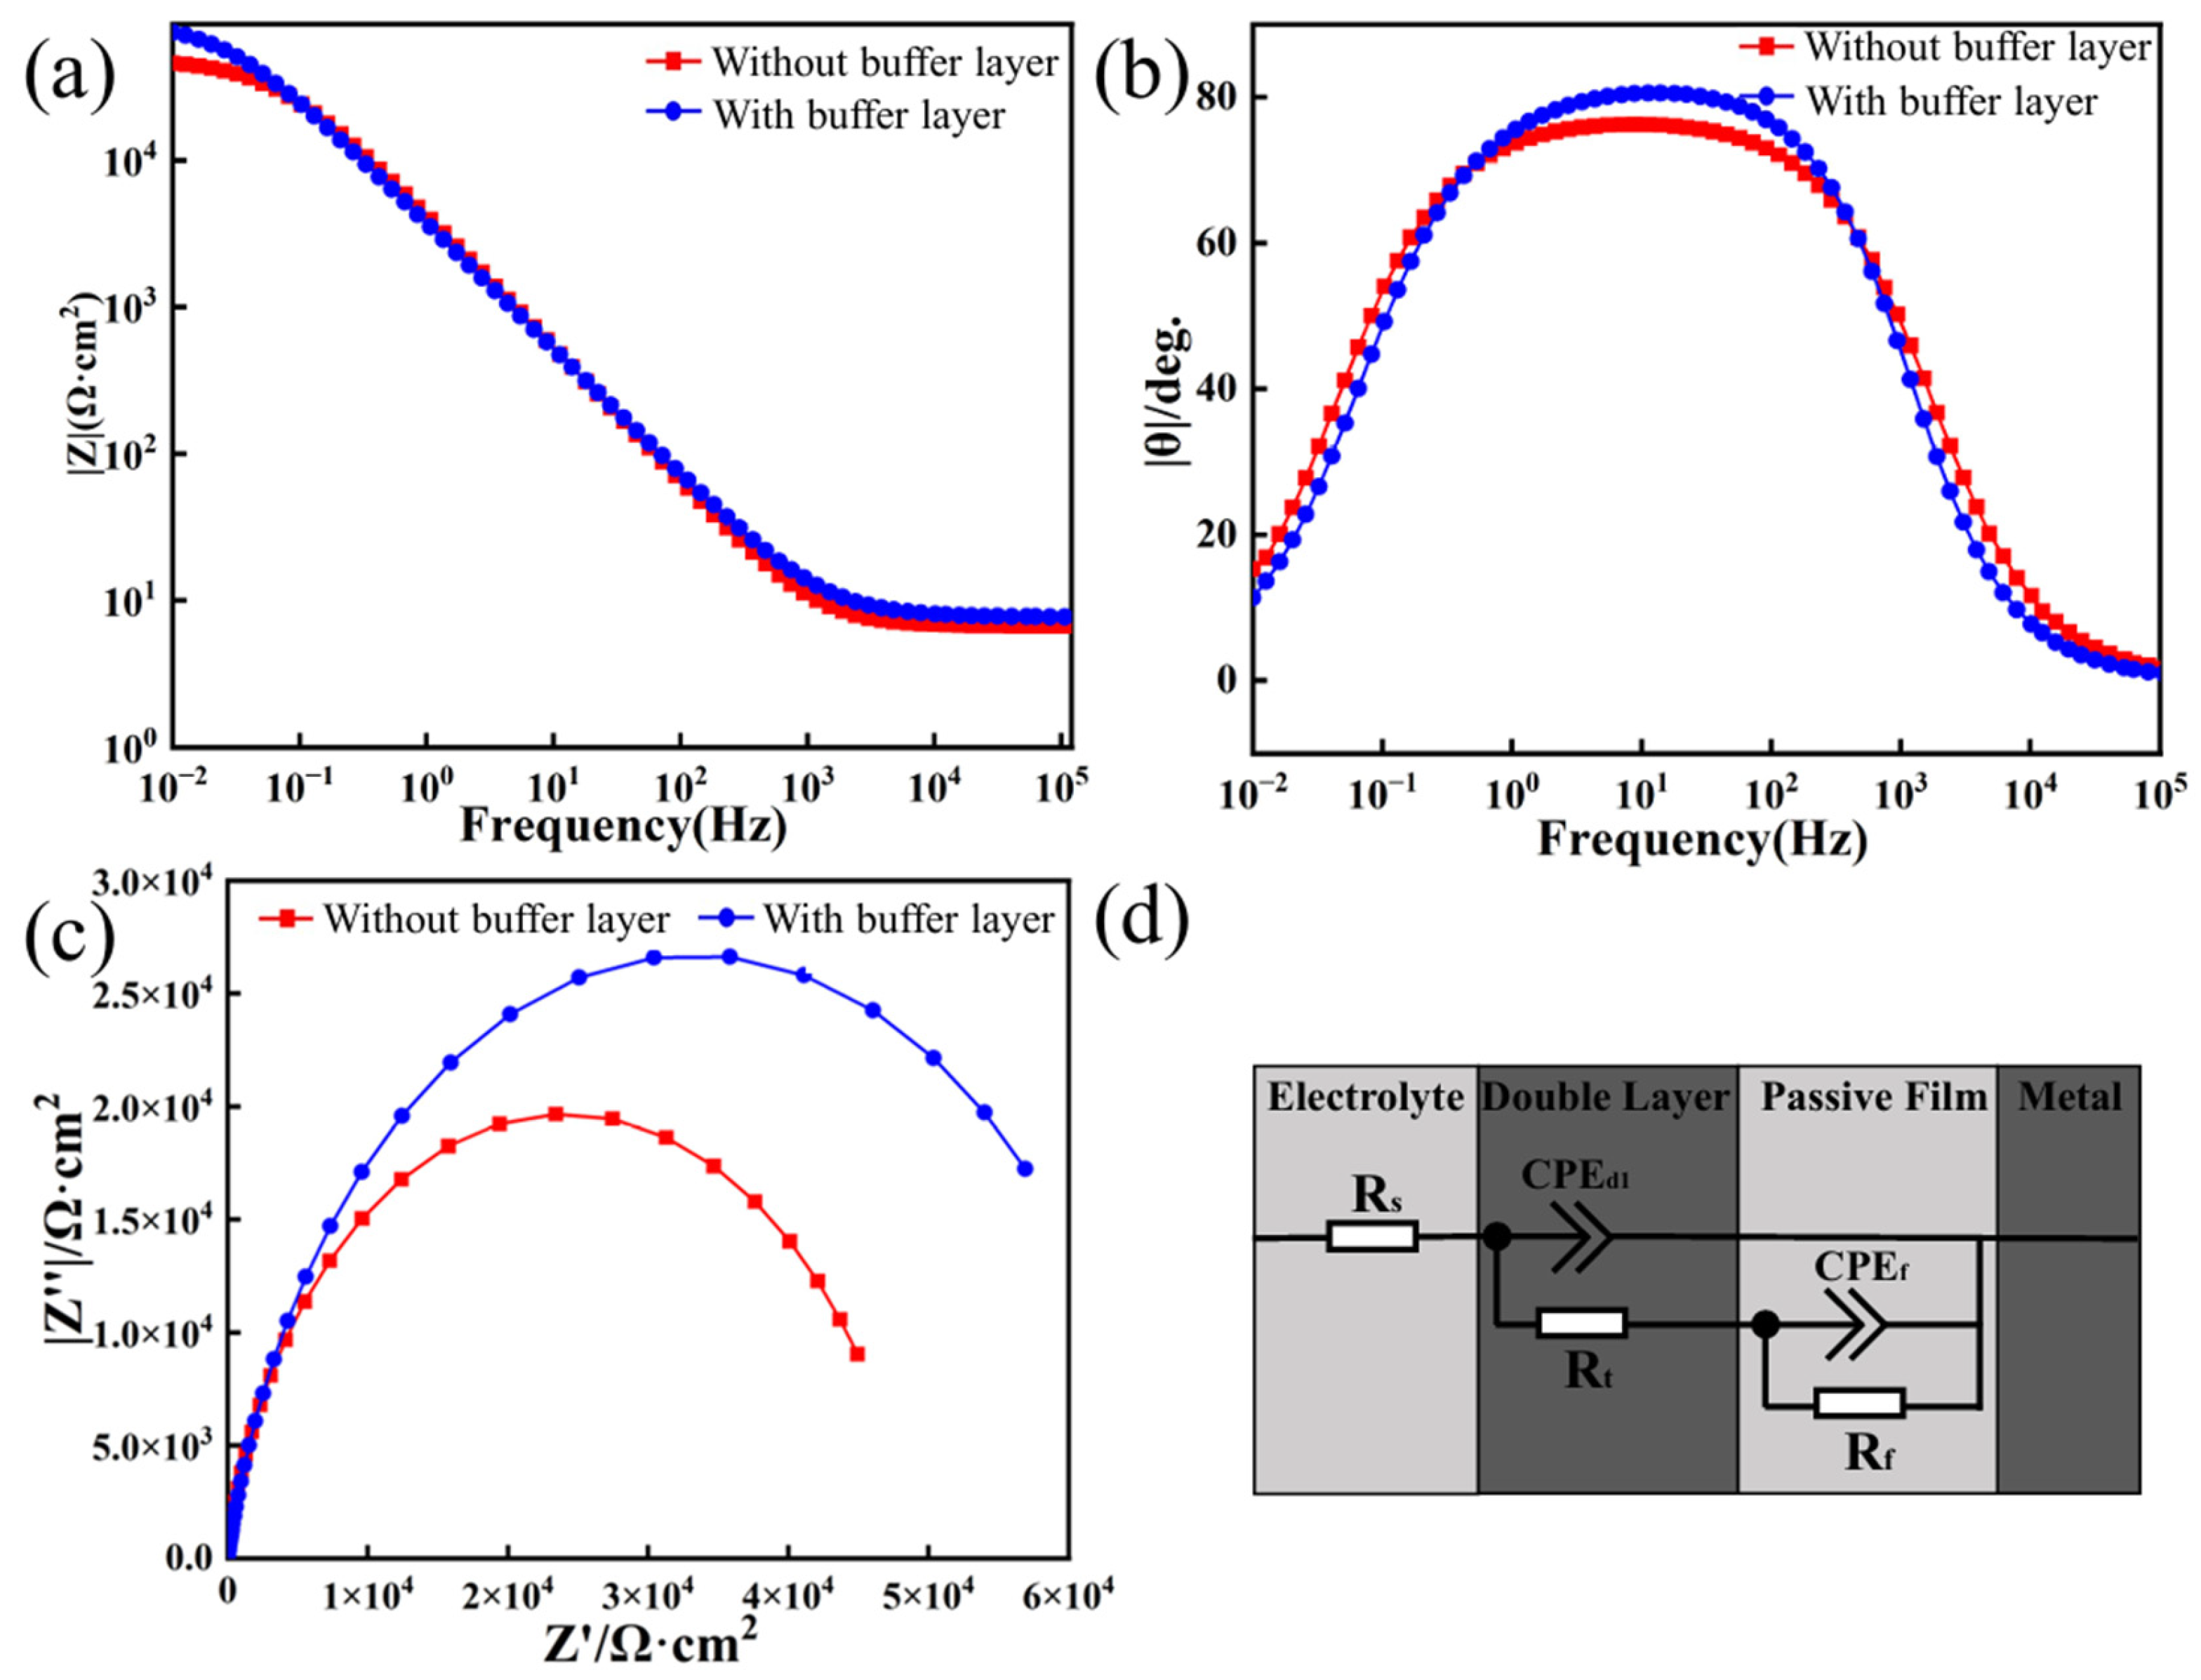
Electrochemical impedance spectroscopy (EIS) is performed by applying a small-amplitude AC signal to measure the impedance response of a material surface over a range of frequencies, enabling the analysis of its electrochemical behavior and interfacial reaction characteristics. In the low-frequency range (0.01–1 Hz), the low-frequency impedance modulus is typically used to evaluate a material’s corrosion resistance and the stability of its protective film. Analysis of the results in Figure 11a shows that the impedance modulus of the ER347 stainless steel overlay layer with a buffer layer is higher than that without a buffer layer, indicating that the passive film on the former is more stable and offers better corrosion resistance. The phase angle diagram in Figure 11b further supports this conclusion. It was found that the ER347 overlay layer with a buffer layer exhibits a maximum phase angle close to 80°, which is higher than that of the layer without a buffer layer. This suggests that the passive film on its surface is more intact and exhibits stronger capacitive behavior.
The Nyquist plots in Figure 11c show that both types of ER347 overlay layers, with and without a buffer layer, exhibit relatively complete semicircular capacitive arcs in 3.5 wt.% NaCl solution, indicating that they have similar corrosion mechanisms. The analysis shows that a larger radius of the capacitive arc corresponds to higher impedance exhibited by the material during corrosion, which in turn indicates greater stability and improved corrosion resistance. By comparison, the capacitive arc radius of the ER347 stainless steel overlay layer with a buffer layer is significantly larger than that of the layer without a buffer layer, confirming that the passive film on the surface of the ER347 overlay layer with a buffer layer is more stable and the corrosion resistance is considerably enhanced.
The equivalent circuit used for fitting the EIS data is shown in Figure 11d, and the corresponding fitting parameters are listed in Table 7. In this equivalent circuit, Rs represents the solution resistance, i.e., the resistance between the working electrode (the ER347 overlay welding sample) and the reference electrode. Rt denotes the charge transfer resistance at the metal/electrolyte interface, which is usually related to the corrosion reaction rate. A larger Rt value indicates a lower corrosion rate and better corrosion resistance of the sample. Rf represents the resistance of the passive film, which corresponds to the resistance of the oxide film formed on the stainless steel surface. A higher Rf suggests a denser passive film and enhanced corrosion resistance. CPEd1 simulates the double-layer capacitance at the electrode/solution interface, while CPEf characterizes the capacitive behavior of the surface oxide film. It reflects the dielectric properties and uniformity of the passive film. A higher CPEf value indicates stronger capacitive behavior, which may be related to the film thickness.
From the EIS fitting results, it is evident that the ER347 stainless steel overlay layer with a buffer layer exhibits superior corrosion resistance compared to that without a buffer layer. This observation is consistent with the results obtained from the potentiodynamic polarization tests. Therefore, the introduction of a buffer layer is an effective method to reduce the corrosion risk of the overlay layer and enhance the corrosion resistance of the ER347 stainless steel overlay layer.

4. Conclusions

This study first explored the overlay welding process. As the welding line energy increased, the weld bead morphology transitioned from well-formed to finger-like, while the dilution rate decreased. A low dilution rate reduces element diffusion, benefiting the interface bonding quality and overall performance of the overlay welding component. Based on this, the optimal welding parameters were determined, ensuring good weld formation with a relatively low dilution rate. These parameters were then used to investigate the effect of overlap rate on weld morphology and dilution rate. When the weld bead overlap rate was 50%, the weld bead exhibited sound formation, uniform distribution, and low dilution. In contrast, when the overlap rate was either higher or lower, finger-shaped welds were more pronounced, weld bead distribution was uneven, and local stress concentration became evident. Subsequently, the obtained welding parameters were used to investigate the effect of the buffer layer on the ER347 overlay layer. The results revealed that the addition a buffer layer would make the microstructure of the overlay layer more uniform, reduced the dilution effect of elements, made the transition of microhardness more uniform, and enhanced the corrosion resistance of the overlay layer. The specific conclusions of this study are as follows:
(1)
Considering the combined effects of welding heat input and weld overlap ratio, the optimal process parameters were determined through experiments as follows: welding current 240 A, welding voltage 24 ± 2 V, welding speed 40 cm/min, weld bead overlap rate 50%, and shielding gas flow rate 18 L/min. These parameters ensured sound weld bead formation while minimizing the dilution rate to the greatest extent.
(2)
Microstructural observation of the overlay layers prepared with the optimized process parameters revealed that the samples with a buffer layer exhibited no obvious welding defects and good interfacial bonding, indicating improved interfacial quality. In contrast, the microstructure of the samples without a buffer layer showed distinct interface delamination. Line scan elemental analysis further confirmed that the addition of the buffer layer effectively mitigated the dilution of Cr and Ni elements from the ER347 overlay layer by the substrate. The elemental distribution between the buffer layer and the overlay layer was uniform, with no abrupt changes, which contributed to improved mechanical properties. In comparison, the samples without a buffer layer exhibited more pronounced elemental gradients.
(3)
The addition of a buffer layer improves the localized hardness increase at the interface caused by C element diffusion, resulting in a more uniform hardness gradient. This optimizes the mechanical properties of the ER347 overlay layer and improves the overall structural stability and durability. In contrast, overlay components without a buffer layer experience more drastic changes in hardness in the fusion zone, which is detrimental to the mechanical properties of the components.
(4)
After adding the buffer layer, the corrosion current density of the ER347 stainless steel overlay layer decreased from 6.23 × 10⁻⁵ A·cm−2 to 2.21 × 10⁻⁵ A·cm−2, and the corrosion potential increased from −1.049 V to −0.973 V, indicating that it was more resistant to corrosive media and that its corrosion resistance had improved. Electrochemical testing and equivalent circuit fitting results also show that the overlay layer with a buffer layer has a higher impedance modulus, a larger capacitive arc radius, a denser passivation film, and a lower corrosion rate, indicating that the addition of a buffer layer can effectively improve the corrosion resistance of overlay welding components and reduce the risk of corrosion.

Author Contributions

Conceptualization, methodology, investigation, writing—original draft, funding acquisition, Y.M.; resources, investigation, data curation, writing—original draft, J.Z. and Z.Y.; resources, writing—review and editing, validation, M.L.; resources, validation, funding acquisition, Z.C.; formal analysis, data curation, visualization, D.F. and S.R.; writing—review and editing, project administration, W.Z.; writing—review and editing, supervision, project administration, J.Y. All authors have read and agreed to the published version of the manuscript.

Funding

This paper was funded by the National Natural Science Foundation of China (No. 52375391) and Wenzhou Basic Scientific Research Project (grant number G2023065).

Data Availability Statement

The original contributions presented in this study are included in the article. Further inquiries can be directed to the corresponding authors.

Conflicts of Interest

Authors Min Li and Zhihui Cai were employed by the company Wenzhou Special Equipment Inspection & Science Research Institute. The remaining authors declare that the research was conducted in the absence of any commercial or financial relationships that could be construed as a potential conflict of interest.

References

  1. Balaguru, S.; Gupta, M. Hardfacing studies of Ni alloys: A critical review. J. Mater. Res. Technol. 2021, 10, 1210–1242. [Google Scholar] [CrossRef]
  2. Suraj, R. Hardfacing and its effect on wear and corrosion performance of various ferrous welded mild steels. Mater. Today Proc. 2021, 42, 842–850. [Google Scholar] [CrossRef]
  3. Liu, Z.; Zhao, D.; Wang, P.; Yan, M.; Yang, C.; Chen, Z.; Lu, J.; Lu, Z. Additive manufacturing of metals: Microstructure evolution and multistage control. J. Mater. Sci. Technol. 2022, 100, 224–236. [Google Scholar] [CrossRef]
  4. Ning, Y.; Qiu, Z.; Wu, B.; Pan, Z.; Li, H. Hardfacing of metals: A review of consumables, properties and strengthening processes. J. Mater. Res. Technol. 2025, 36, 6330–6349. [Google Scholar] [CrossRef]
  5. Singla, Y.K.; Maughan, M.R.; Arora, N.; Dwivedi, D.K. Enhancing the wear resistance of iron-based alloys: A comprehensive review of alloying element effects. J. Manuf. Process. 2024, 120, 135–160. [Google Scholar] [CrossRef]
  6. Luz, F.S.D.; Pinheiro, W.A.; Monteiro, S.N.; Candido, V.S.; Silva, A.C.R.D. Mechanical properties and microstructural characterization of a novel 316L austenitic stainless steel coating on A516 Grade 70 carbon steel weld. J. Mater. Res. Technol. 2020, 9, 636–640. [Google Scholar] [CrossRef]
  7. Khaghani, A.; Pouranvari, M. Wire-arc directed energy deposition of martensitic stainless steel hardfacing alloy: Microstructure and abrasion wear resistance. J. Mater. Res. Technol. 2025, 34, 1721–1731. [Google Scholar] [CrossRef]
  8. Bakhshayesh, M.M.; Farzadi, A.; Kalantarian, R.; Zargarzadeh, A. Evaluation of crane wheels restored by hardfacing two distinct 13Cr-4Ni martensitic stainless steels. J. Mater. Res. Technol. 2023, 26, 6067–6083. [Google Scholar] [CrossRef]
  9. Farzadi, A.; Kalantarian, R. Microstructural development and corrosion behavior of 13Cr–4Ni-1Mo martensitic stainless steel clad. Weld. World 2020, 64, 1811–1823. [Google Scholar] [CrossRef]
  10. Zhang, B.Y.; Liu, B.X.; He, J.N.; Fang, W.; Zhang, F.Y.; Zhang, X.; Chen, C.X.; Yin, F.X. Microstructure and mechanical properties of SUS304/Q235 multilayer steels fabricated by roll bonding and annealing. Mater. Sci. Eng. A 2019, 740-741, 92–107. [Google Scholar] [CrossRef]
  11. Hajiannia, I.; Shamanian, M.; Kasiri, M. Microstructure and mechanical properties of AISI 347 stainless steel/A335 low alloy steel dissimilar joint produced by gas tungsten arc welding. Mater. Des. 2013, 50, 566–573. [Google Scholar] [CrossRef]
  12. Kannan, A.R.; Rajkumar, V.; Prasad, C.D.; Shanmugam, N.S.; Yoon, J. Microstructure and hot corrosion performance of stainless steel 347 produced by wire arc additive manufacturing. Vacuum 2023, 210, 111901. [Google Scholar] [CrossRef]
  13. Jeong, Y.E.; Shin, G.Y.; Shim, D.S. Effect of P21 buffer layer on interfacial bonding characteristics of high-carbon tool steel hardfaced through directed energy deposition. J. Manuf. Process. 2021, 68, 1596–1614. [Google Scholar] [CrossRef]
  14. Cao, J.; Wang, Y.; Liu, X.; Xu, G.; Zeng, X.; Wei, K. Single-pass high-power laser-Arc hybrid welding of thick stainless steel clad plates: Microstructure and mechanical properties. J. Mater. Res. Technol. 2024, 30, 5733–5745. [Google Scholar] [CrossRef]
  15. Bozeman, S.C.; Isgor, O.B.; Tucker, J.D. Effects of processing conditions on the solidification and heat-affected zone of 309L stainless steel claddings on carbon steel using wire-directed energy deposition. Surf. Coat. Technol. 2022, 444, 128698. [Google Scholar] [CrossRef]
  16. Mohammed, R.; Kumar, E.N.; Ram, G.D.J.; Kamaraj, M.; Reddy, G.M.; Rao, K.S. Microstructure, Mechanical and Corrosion Behavior of Weld Overlay Cladding of DMR 249A steel with AISI 308L. Mater. Today Proc. 2019, 15, 2–10. [Google Scholar] [CrossRef]
  17. Shamanian, M.; Eghlimi, A.; Eskandarian, M.; Szpunar, J.A. Interface microstructure across cladding of super duplex stainless steel with austenitic stainless steel buffer layer. Surf. Coat. Technol. 2014, 259, 532–542. [Google Scholar] [CrossRef]
  18. Bhoskar, A.; Naik, H.; Kalyankar, V.; Deshmukh, D. Nickel-based metallurgical coating architectures for superior wear resistance in high-temperature P91 steel applications. J. Alloys Met. Syst. 2025, 9, 100151. [Google Scholar] [CrossRef]
  19. Ding, Y.; Liu, R.; Yao, J.; Zhang, Q.; Wang, L. Stellite alloy mixture hardfacing via laser cladding for control valve seat sealing surfaces. Surf. Coat. Technol. 2017, 329, 97–108. [Google Scholar]
  20. Balaguru, S.; Abid, M.; Gupta, M. Investigations on different hardfacing processes for High temperature applications of Ni-Cr-B-Si alloy hardfaced on austenitic stainless steel components. J. Mater. Res. Technol. 2020, 9, 10062–10072. [Google Scholar]
  21. Suthar, F.V.; Shah, H.N.; Mandal, D.; Chaudhury, S.K. Effect of alloy 625 buffer layer on corrosion resistance of nickel base hardfacing. Surf. Coat. Technol. 2024, 485, 130893. [Google Scholar] [CrossRef]
  22. Thawari, N.; Gullipalli, C.; Katiyar, J.K.; Gupta, T.V.K. Influence of buffer layer on surface and tribomechanical properties of laser cladded Stellite 6. Mater. Sci. Eng. B 2021, 263, 114799. [Google Scholar] [CrossRef]
  23. Wu, Y.; Schmitt, T.; Bousser, E.; Vernhes, L.; Khelfaoui, F.; Perez, G.; Klemberg-Sapieha, J.E.; Brochu, M. Microstructural and mechanical characterization of Stellite-hardfaced coatings with two types of buffer layers. Surf. Coat. Technol. 2020, 390, 125611. [Google Scholar] [CrossRef]
  24. Tippayasam, C.; Taengwa, C.; Palomas, J.; Siripongsakul, T.; Thaweechai, T.; Kaewvilai, A. Effects of flux-cored arc welding technology on microstructure and wear resistance of Fe-Cr-C hardfacing alloy. Mater. Today Commun. 2023, 35, 105569. [Google Scholar] [CrossRef]
  25. Li, X.; Xiong, J.; Ou, W.; Yuan, X.; Zhang, L.; Xu, J.; Yang, J.; Jiao, Y.; Zhang, H.; Chen, Z.; et al. Cracking mechanisms and prevention of Stellite 6# surface layer built by laser cladding during thermal cyclic process. Inter. J. Fatigue 2023, 168, 107439. [Google Scholar]
  26. Chen, Y.; Xu, Y.; Li, T.; Du, J.; Guo, L.; Hu, K. Fabrication and characterization of self-lubricating anti-wear 316L stainless steel/h-BN composite coatings on Q235 substrate via laser cladding. Opt. Laser Technol. 2025, 180, 111564. [Google Scholar] [CrossRef]
  27. Li, C.; Qin, G.; Tang, Y.; Zhang, B.; Lin, S.; Geng, P. Microstructures and mechanical properties of stainless steel clad plate joint with diverse filler metals. J. Mater. Res. Technol. 2020, 9, 2522–2534. [Google Scholar] [CrossRef]
  28. GB/T 4340.1-2009; Metallic Materials—Vickers Hardness Test—Part 1: Test Method. Standards Press of China: Beijing, China, 2009.
  29. Sun, L.; Jiang, F.; Huang, R.; Yuan, D.; Su, Y.; Guo, C.; Wang, J. Investigation on the process window with liner energy density for single-layer parts fabricated by wire and arc additive manufacturing. J. Manuf. Process. 2020, 56, 898–907. [Google Scholar] [CrossRef]
  30. Srikarun, B.; Oo, H.Z.; Petchsang, S.; Muangjunburee, P. The effects of dilution and choice of added powder on hardfacing deposited by submerged arc welding. Wear 2019, 424–425, 246–254. [Google Scholar] [CrossRef]
  31. Tarng, Y.S.; Juang, S.C.; Chang, C.H. The use of grey-based Taguchi methods to determine submerged arc welding process parameters in hardfacing. J. Mater. Process. Tech. 2002, 128, 1–6. [Google Scholar] [CrossRef]
  32. Gejendhiran, S.; Karpagaraj, A.; Manivannan, S.; Shiva, S.; Kannan, T.D.B. Experimental study on mechanical, damping and corrosion properties of Inconel 718 hard-faced stainless steel 304 using cold metal transfer. Eng. Fail. Anal. 2024, 156, 107871. [Google Scholar] [CrossRef]
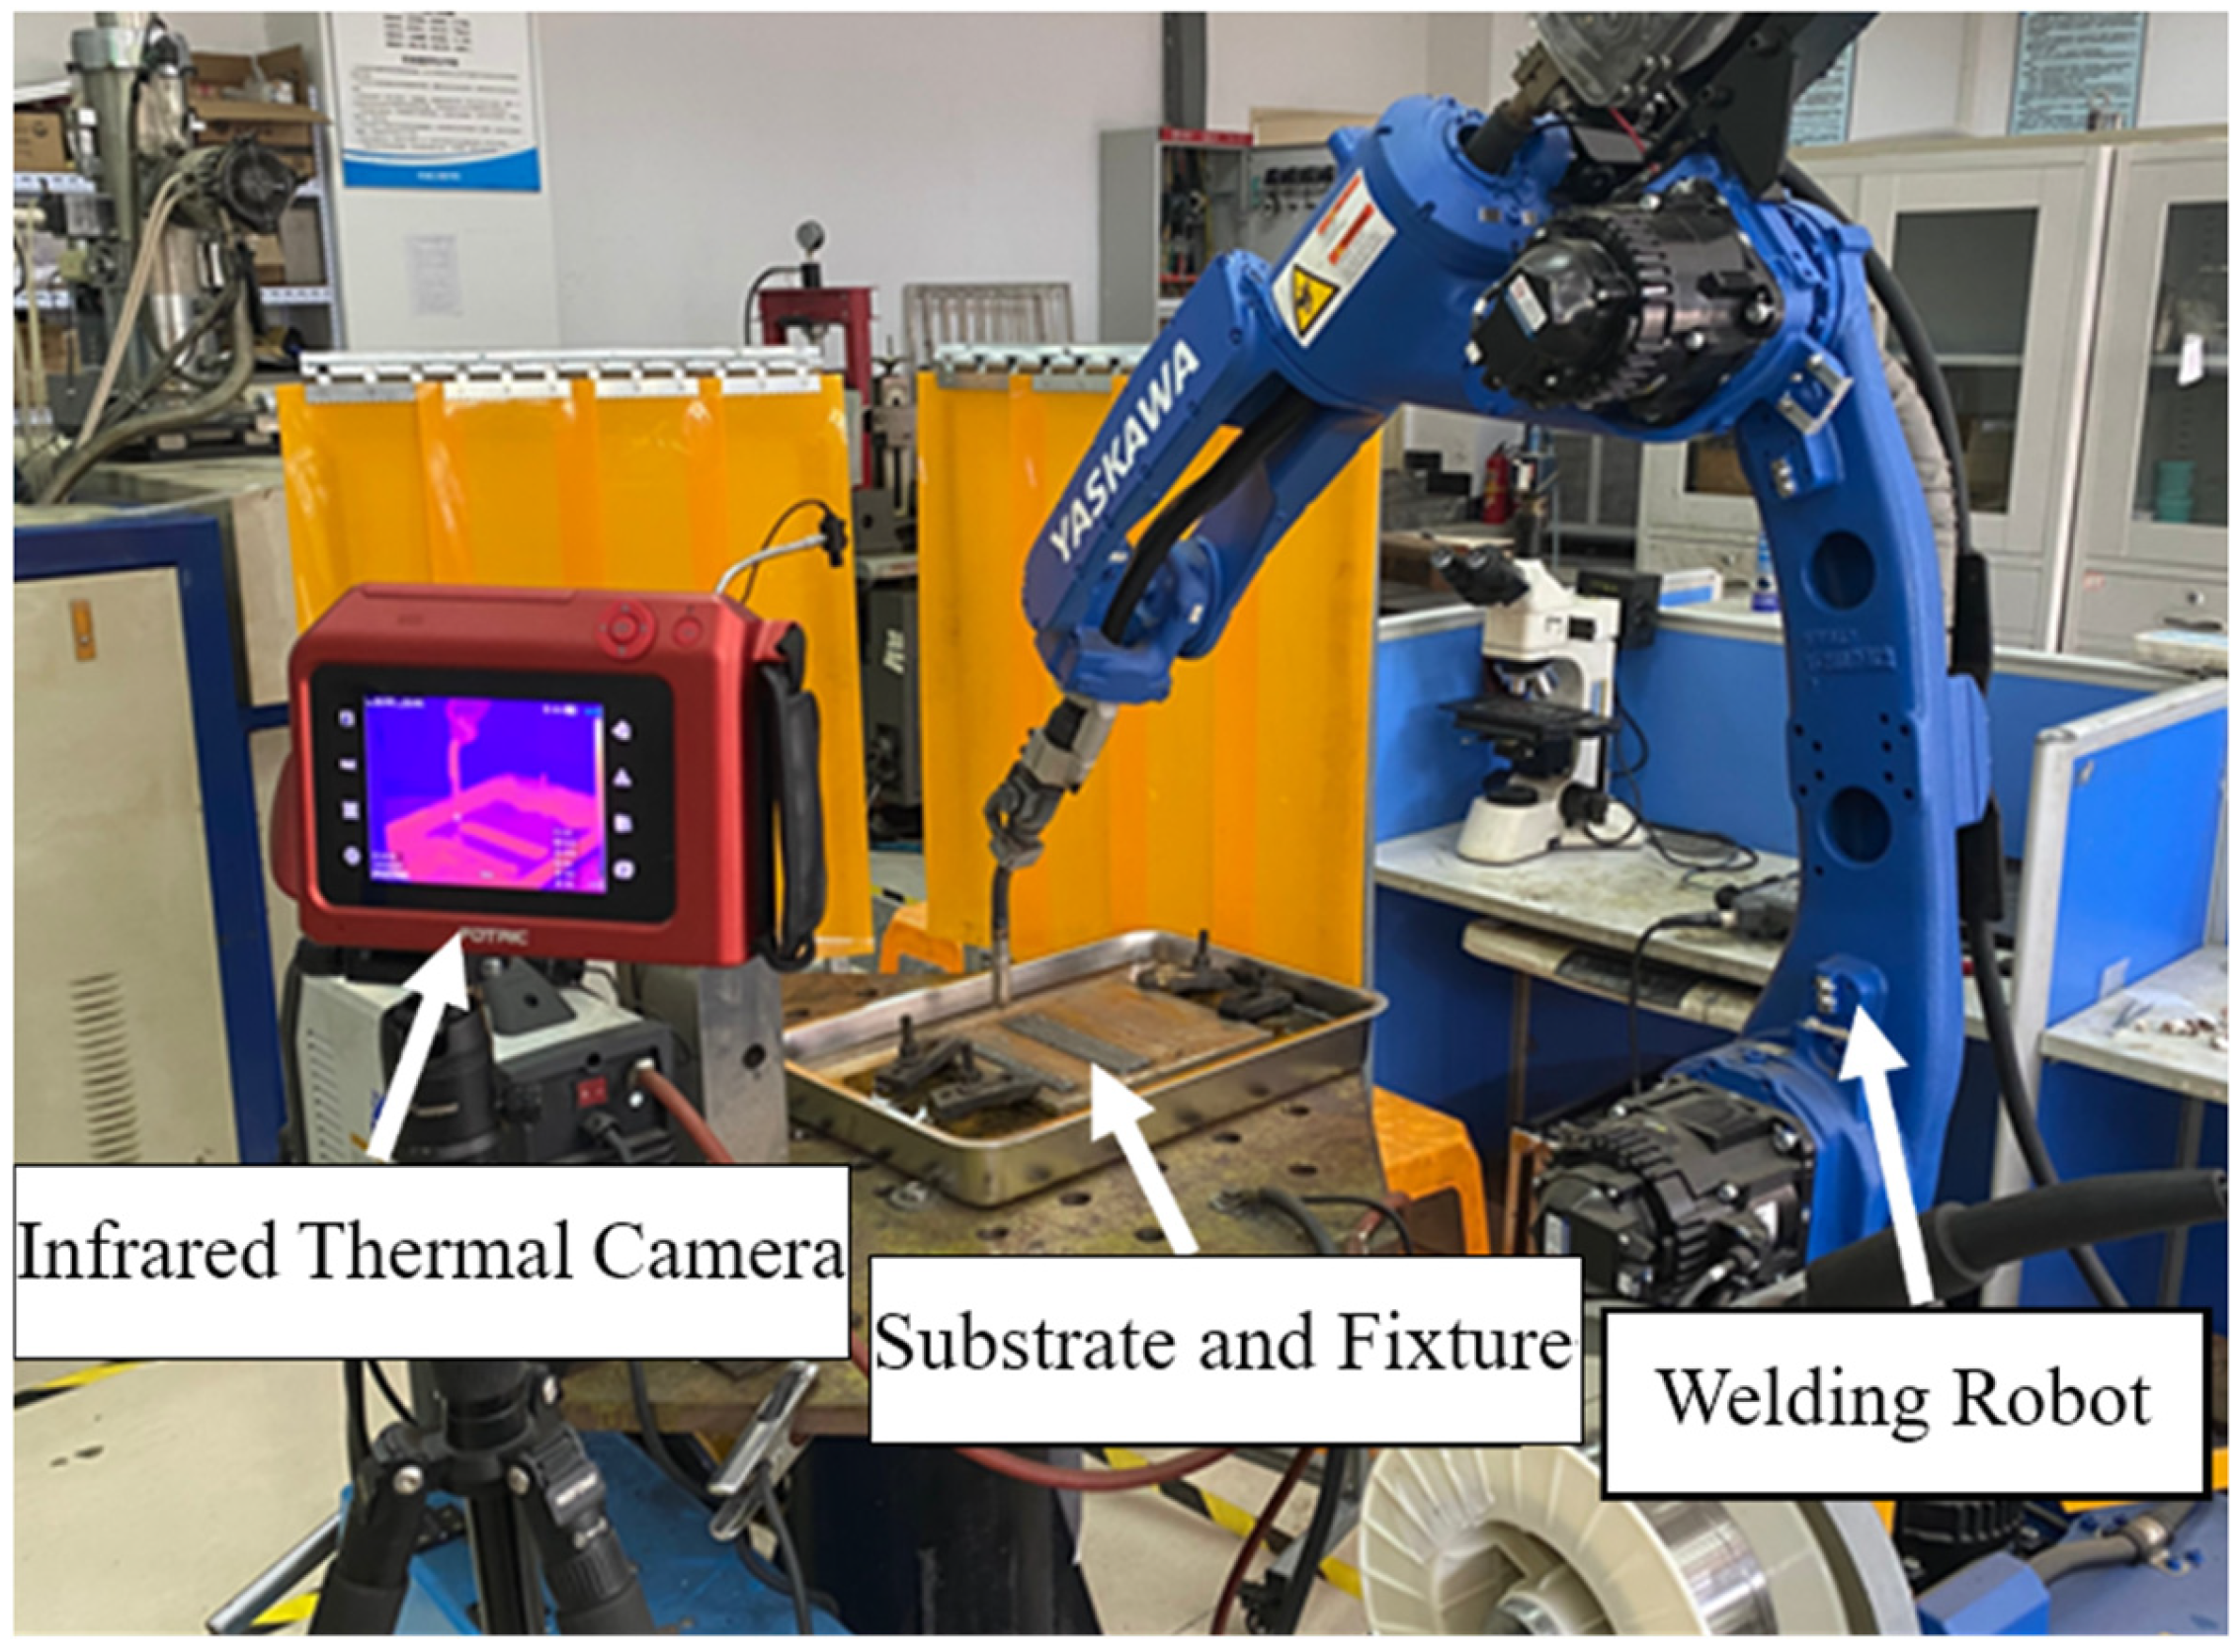
Figure 1. On-site condition of arc overlay welding test.
Metals 15 00987 g001
Figure 2. Electrochemical test system.
Metals 15 00987 g002
Figure 3. Schematic diagram of single-pass overlay welding cross-section.
Metals 15 00987 g003
Figure 4. Cross-sectional morphology of single-pass overlay welding under different welding line energies: (a) S-1; (b) S-2; (c) S-3; (d) S-4.
Metals 15 00987 g004
Figure 5. Cross-sectional morphology of weld beads under different overlap rates, with the first pass on the left: (a) 25%; (b) 50%; (c) 75%.
Metals 15 00987 g005
Figure 6. Microstructure diagram: (a) components without buffer layer; (b) Q235 steel substrate; (c) components with buffer layer.
Metals 15 00987 g006
Figure 7. Chemical composition analysis of overlay welding component without buffer layer: (a) line scanning results; (b) line scanning position.
Metals 15 00987 g007
Figure 8. Chemical composition analysis of overlay welding component with buffer layer: (a) line scanning results; (b) line scanning position.
Metals 15 00987 g008
Figure 9. Microhardness curve: (a) without buffer layer; (b) with buffer layer.
Metals 15 00987 g009
Figure 10. Potentiodynamic polarization curves of ER347 stainless steel overlay layers in 3.5 wt.% NaCl solution.
Metals 15 00987 g010
Figure 11. EIS diagram of overlay layer of ER347 stainless steel in 3.5 wt.% NaCl solution: (a) impedance modulus diagram; (b) phase angle diagram; (c) Nyquist plot; (d) equivalent circuit diagram.
Metals 15 00987 g011
Table 1. Chemical composition of Q235 steel (wt.%).
ElementsCMnPSSiFe
content≤0.2≤1.4≤0.045≤0.045≤0.35Bal.
Table 2. Chemical composition of welding wire (wt.%).
ElementsCMnPSSiCrNiNbFe
ER309L0.0381.340.0200.0070.4023.8313.25---Bal.
ER3470.0261.390.0240.0070.2919.309.790.2Bal.
Table 3. Welding line energy under different welding parameters.
Specimen NumberWelding Current
(A)
Welding Voltage (V)Welding Speed (cm/min)Shielding Gas Flow Rate (L/min)Welding Line Energy (kJ/cm)
S-122022 ± 2 (100%)40186.2
S-224024 ± 2 (100%)40187.3
S-326026 ± 2 (100%)40188.6
S-428028 ± 2 (100%)40189.9
Table 4. Variation in single-pass overlay welding morphology and dilution rate under different welding line energies.
Specimen NumberMelt Depth
(mm)
Melt Width
(mm)
Residual Height
(mm)
Dilution Rate
(%)
S-11.97.62.741.7
S-22.082.930.4
S-32.39.43.329.2
S-42.610.53.926.3
Table 5. Variation in weld bead cross-sectional dimensions under different overlap rates.
Specimen NumberOverlap Rate
(%)
Melt Depth
(mm)
Melt Width
(mm)
Residual Height
(mm)
S2-1252.1817.253.75
S2-2502.4314.494.12
S2-3752.3711.404.53
Table 6. Fitting results of potentiodynamic polarization curves of ER347 stainless steel overlay layers.
SpecimenEcorr/VIcorr/A·cm−2
without buffer layer−1.0496.23 × 10−5
with buffer layer−0.9732.21 × 10−5
Table 7. AC impedance fitting results of ER347 stainless steel overlay layer.
SpecimenRs (Ω·cm2)CPEd1Rt
(Ω·cm2)
CPEfRf
(Ω·cm2)
Q1N1Q2N2
without buffer layer6.674.30 × 10−50.912.10 × 1043.27 × 10−50.602.17 × 104
with buffer layer6.764.31 × 10−50.912.92 × 1042.52 × 10−50.435.22 × 104
Disclaimer/Publisher’s Note: The statements, opinions and data contained in all publications are solely those of the individual author(s) and contributor(s) and not of MDPI and/or the editor(s). MDPI and/or the editor(s) disclaim responsibility for any injury to people or property resulting from any ideas, methods, instructions or products referred to in the content.