Article

Investigation of Single-Pass Laser Remelted Joint of Mo-5Re Alloy: Microstructure, Residual Stress and Angular Distortion

1
College of Materials Science and Engineering, Chongqing University, Shazhengjie, Shapingba, Chongqing 400044, China
2
National Key Laboratory of Nuclear Reactor Technology, Nuclear Power Institute of China, Chengdu 610213, China
3
The 9th Research Institute of China Electronics Technology Group Corporation, Mianyang 621000, China
*
Authors to whom correspondence should be addressed.
Metals 2025, 15(10), 1145; https://doi.org/10.3390/met15101145
Submission received: 1 September 2025 / Revised: 1 October 2025 / Accepted: 9 October 2025 / Published: 15 October 2025
(This article belongs to the Special Issue Properties and Residual Stresses of Welded Alloys)

Abstract

Molybdenum-rhenium (Mo-Re) alloys, especially those with low Re content, have great potential in fabricating nuclear components. However, the extremely high melting point and high brittleness of Mo-Re alloys make them difficult to weld. In this study, laser welding was used to prepare single-pass remelted joint of Mo-5Re alloy with welding parameters of laser power 2800 W, welding speed 2 m·min−1 and argon gas flow rate 20 L·min−1. The microstructure of the remelted joint was investigated by the optical microscopy and the scanning electron microscopy. The microhardness distribution of the joint was analyzed. In addition, the temperature field, residual stress, and angular distortion of the joint were investigated by both numerical and experimental methods. The results show that columnar grains grew from the fusion boundary toward the center of the weld pool, and equiaxed grains formed in the central region of the fusion zone (FZ). In the heat-affected zone (HAZ), the grains transformed from initial elongated into equiaxed grains. The electron backscatter diffraction (EBSD) results revealed that high-angle grain boundaries (HAGBs) dominated in FZ. Oxide/carbide particles at grain boundaries and inside the grains can be inferred from contrast results. The average microhardness of FZ was 170 ± 5 (standard deviation) HV, which was approximately 80 HV lower than that of the base metal (250 ± 2 HV). Softening phenomenon was also observed in HAZ. The calculated weld pool shape showed high consistency with the experimental observation. The peak temperature (296 °C) of the simulated thermal cycling curve was ~8% higher than the measured value (275 °C). The residual stress calculation results indicated that FZ and its vicinity exhibited high levels of longitudinal tensile residual stresses. The simulated peak longitudinal residual stress (509 MPa) was ~30% higher than the measured value (393 MPa). Furthermore, both the simulation and experimental results demonstrated that the single-pass remelted joint of Mo-5Re alloy produced only minor angular distortion. The obtained results are very useful in understanding the basic phenomena and problems in laser welding of Mo alloys with low Re content.

1. Introduction

Molybdenum (Mo) and its alloys possess advantages such as high melting point, excellent high-temperature mechanical strength, low coefficient of thermal expansion, and good thermal conductivity, making them suitable as structural materials for advanced reactor types including fast neutron reactors and nuclear fusion reactors [1,2]. The fabrication of complete Mo alloy structural components inevitably relies on welding processes. However, Mo and its alloys exhibit significant brittleness, resulting in their poor weldability. The brittleness of Mo alloys primarily stems from two factors: first, the inherent brittleness of Mo itself, and second, the segregation of impurities at grain boundaries of Mo alloys [3]. Alloying can partially mitigate the brittleness of Mo, with the element rhenium (Re) demonstrating particularly outstanding effects. The addition of Re to Mo can significantly reduce the ductile-to-brittle transition temperature (DBTT), thereby enhancing its processability and weldability. The Re element can also increase the recrystallization temperature of Mo, improving its high-temperature performance.
Various welding methods have been employed to join Mo alloys, including resistance welding [4,5,6], vacuum brazing [7,8], friction stir welding [9,10], and fusion welding [11,12,13,14,15]. Among these methods, laser welding stands out as a highly efficient and precise technique, due to its short processing time, concentrated energy input, and capability to operate in open environments [16].
Liu et al. [11] conducted lap welding of 50Mo-50Re alloy using Nd:YAG laser. Microstructural observation revealed the presence of numerous large-sized pores in the weld seam. Fractographic analysis indicated that the joints failed through intergranular fracture, with grain boundaries and grain interiors containing substantial amounts of compounds composed of Mo and Re elements. The primary causes of joint failure were attributed to coarse microstructures and detrimental impurity elements. An et al. [13] optimized the fiber laser welding process for La2O3-nanoparticle-strengthened Mo alloy. The joints exhibited a mixed fracture mode of intergranular and cleavage fracture, with porosity defects observed on the fracture surfaces. Zhang et al. [17,18] investigated lap welding of La2O3 dispersedly strengthened Mo alloy cladding with end plugs. Significant porosity defects were observed in the fusion zone (FZ) of the joints. The introduction of Ti or Zr interlayers was found to effectively suppress pore formation in the laser-welded joints of Mo alloys. Xie et al. [19,20] demonstrated that reduced heat input during fiber laser welding resulted in notable grain refinement in FZ of nanostructured Mo alloy joints, along with significant reduction of porosity defects in FZ. Zhang et al. [21] examined the effect of welding pass number on porosity in laser-welded joints between Mo alloy thin-walled tubes and end plugs. When the number of welding pass was increased from 2 to 8, the joint porosity decreased from approximately 1.00% to 0.48%, with maximum and average pore diameters reduced by about 53% and 27%, respectively.
Defects and residual stresses play important roles in limiting the completeness and mechanical properties of Mo alloy welded joints. Kramer et al. [12] performed laser welding on 0.5 mm thick Mo-45Re alloy and observed crack formation in the weld seam. The fracture surface exhibited brittle fracture morphology with a predominantly intergranular fracture mode. Zhang et al. [15] found that laser power had the most significant effect on both penetration depth and bead width in Mo-5Re alloy joints, with both parameters increasing monotonically with power. However, excessive laser power would induce transverse cracks in the joints. Wang et al. [22] demonstrated that residual tensile stresses in Mo alloy laser welded joints were a critical factor contributing to cracking. Because experimental measurements are inherently limited in capturing full-field stress characteristics, numerical simulation techniques offer an alternative approach. Zhang et al. [23] conducted fiber laser circumferential welding of thin-walled nanostructured Mo alloy tubes and employed ANSYS to analyze preheating effects on residual stresses. The combined numerical-experimental results showed that peak residual tensile stresses decreased monotonically with increasing preheating temperature. Zhang et al. [24] performed electron beam welding of La2O3-strengthened Mo alloy and implemented ABAQUS-based finite element analysis of welding residual stresses. The authors reported that the accumulated high residual stresses in the weld region increased cracking susceptibility, which was consistent with experimental observations.
Current researches were mainly focused on welding of Mo alloys with high Re content. Although the increase of Re content can improve the weldability of Mo alloys, excessive Re will adversely affect the nuclear application of this kind of alloy. Therefore, studies on welding Mo alloys with low Re content are very necessary. In addition, the research on residual stresses and welding distortion in welded joints of Mo-Re alloy is still limited.
In this study, the Mo-5Re alloy (5 wt.% Re content) with a thickness of 3 mm was single-pass remelted by the laser welding mothed without filler addition. The microstructural observation and the microhardness investigation of the remelted joint were carried out. Furthermore, by both the experimental and numerical analysis methods, the temperature field, residual stresses, and angular distortion in the remelted joint were investigated. The main objectives of this study are to establish a fundamental understanding of laser welding of Mo alloys with low Re content, and to assess whether the finite element model developed on the MSC.Marc platform (MSC.Marc 2020) can reliably predict the residual stresses and angular distortion in the laser remelted joint. The findings are expected to provide both theoretical insight and methodological reference for welding process optimization and performance prediction of the laser welded joints of Mo alloys with low Re content.

2. Materials and Methods

2.1. Preparation of Molybdenum-Rhenium Alloy Laser Remelted Joint

The Mo alloy (containing 5 wt.% Re) employed in this study was prepared via powder metallurgy-hot rolling processes, and was supplied by Luoyang Aikemai Tungsten & Molybdenum Technology Co., Ltd., Luoyang, China. The chemical composition of the Mo-5Re alloy was presented in Table 1. The alloy plate dimensions were 150 mm × 100 mm × 3 mm. The welding schematic and workpiece dimensions were shown in Figure 1. No fixtures were used during the welding process, namely the plate was directly placed flat on the welding workbench. The laser welding equipment consisted of a TRUMPF TruDisk 3002 solid-state multimode laser (TRUMPF Photonics Components GmbH, Bavaria, Germany), TruLaser Cell 3000 laser beam welding system (TRUMPF Photonics Components GmbH, Bavaria, Germany), and off-axis gas shielding hose. The off-axis gas shielding hose is positioned at a 45-degree angle to the workpiece (or laser beam), with the air outlet maintained at a distance of 10 mm from the workpiece surface. Before welding, the areas to be welded were sanded with sandpaper, cleaned with alcohol, and dried in air. During welding, the laser was focused on the upper surface of the plate, and the beam diameter was 0.666 mm. The welding parameters was specified in Table 2, and the line energy was determined to be 75,600 J·m−1. No preheating treatment was performed prior to welding. Ar (99.999%) shielding gas was continuously supplied 10 s before welding, throughout the entire welding process, and maintained for 30 s after welding.

2.2. Observation of Microstructure and Measurement of Hardness

Specimens with dimensions of 10 mm × 5 mm × 3 mm were obtained by a DK7740 electrical discharge wire-cutting machine (Changzhou Beichen CNC Equipment Co., Ltd., Changzhou, China) for microstructural observation and hardness test. The samples were mechanically ground sequentially with 80 # to 1500 # grit sandpaper and polished with 2.5 μm diamond abrasive paste. For optical microscopy (OM) observation, specimens were etched at room temperature with a mixed acid solution (HNO3:H2SO4:H2O = 5:2:3 by volume) for 2–3 s, and the microstructure was examined using a Zeiss Axio Scope.A1 microscope (Carl Zeiss AG, Jena, Germany). For electron backscatter diffraction (EBSD) analysis, samples were electrolytically polished in a solution of anhydrous ethanol and sulfuric acid (7:1 by volume) at 18 V, 0.6 A for 8 s, followed by EBSD characterization using a JSM-7800F field emission scanning electron microscopy (Japan Electronics Co., Ltd., Tokyo, Japan) to identify the phases and grain boundary types in the joint. The step size, working distance and acceleration voltage of EBSD analysis were 1 μm, 15 mm and 20 kV, respectively. The resolution rate reached 92%. The noise reduction process was not conducted. All chemical reagents used in this study were of analytical grade (AR) and supplied by Chuandong Chemical Co., Ltd., Chongqing, China. Microhardness test was performed on an HV-1000Z microhardness tester (Shanghai Juhui Instrument Manufacturing Co., Ltd., Shanghai, China) with a 0.1 mm spacing between measurement points, using a 200 gf (HV0.2) load and a 10-s dwell time. Each point was tested only once.

2.3. Measurement of Welding Thermal Cycle, Residual Stress and Weld Deformation

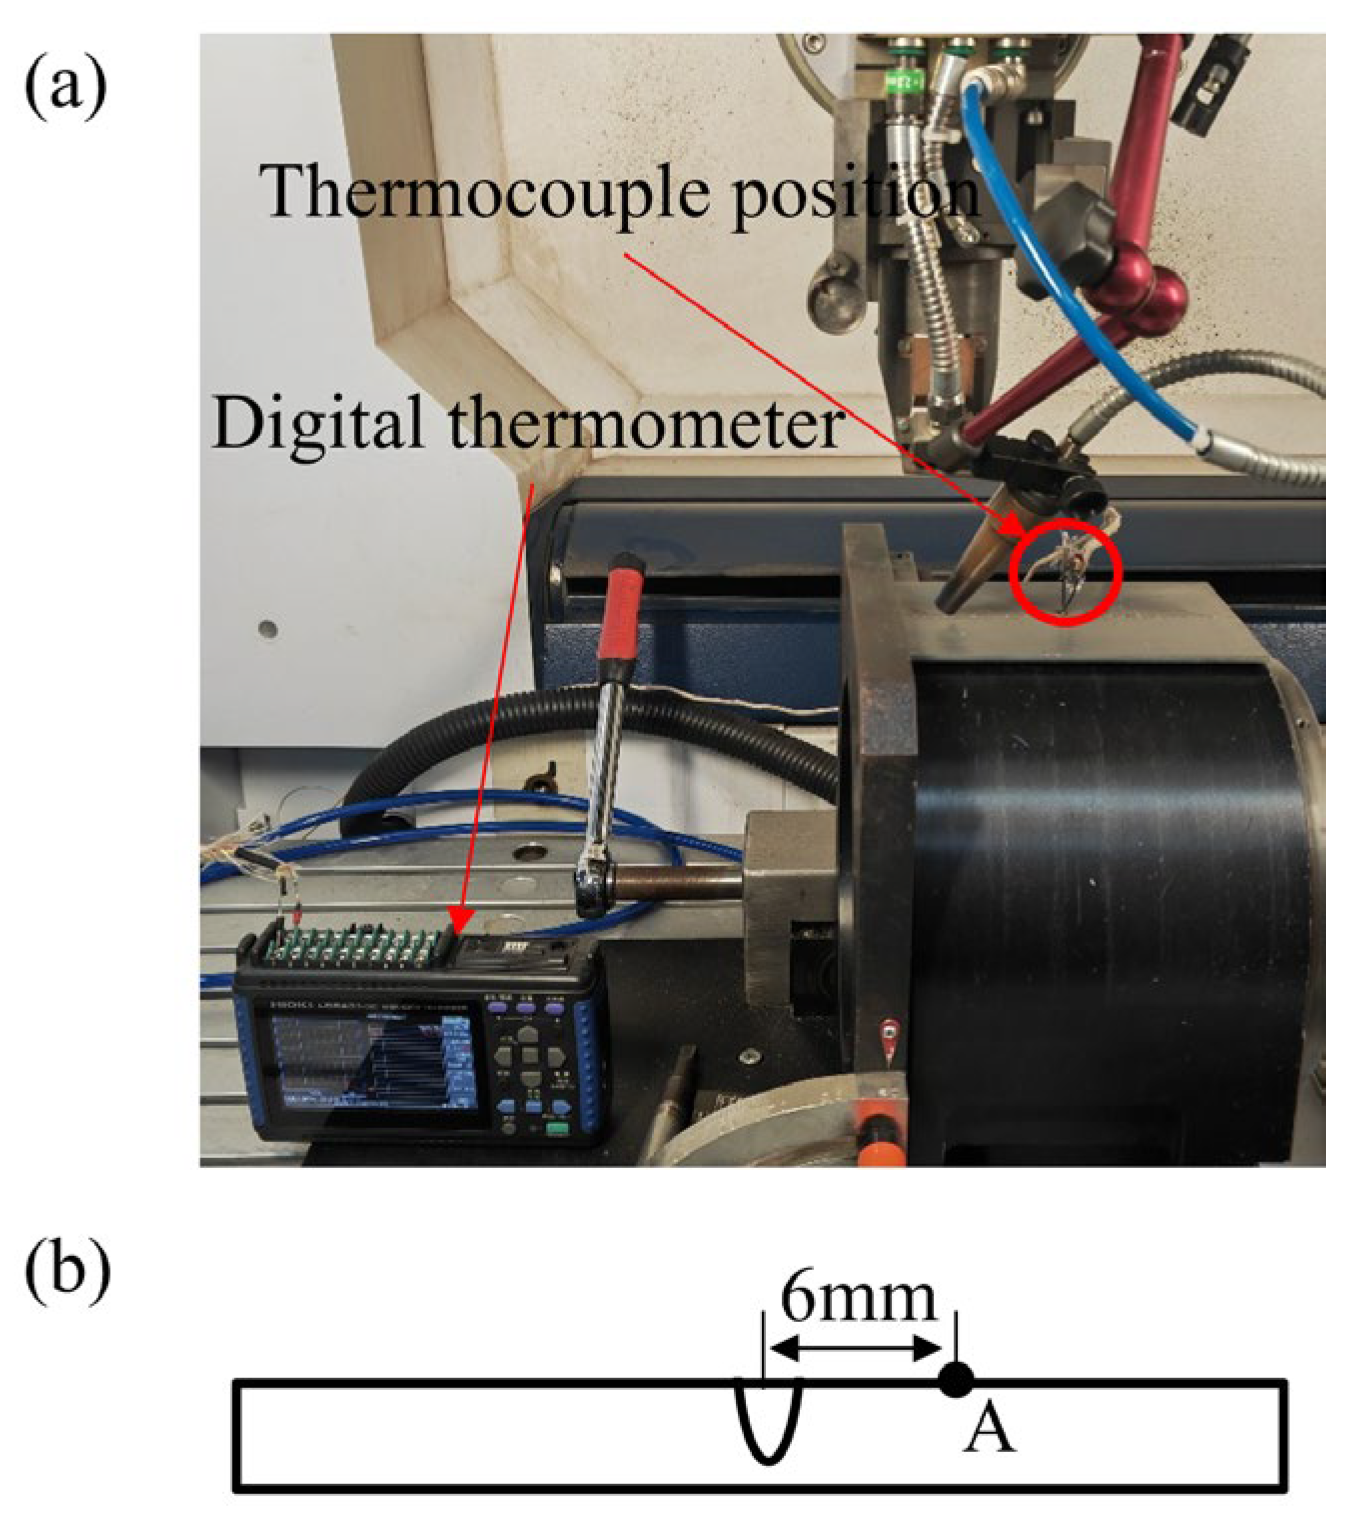
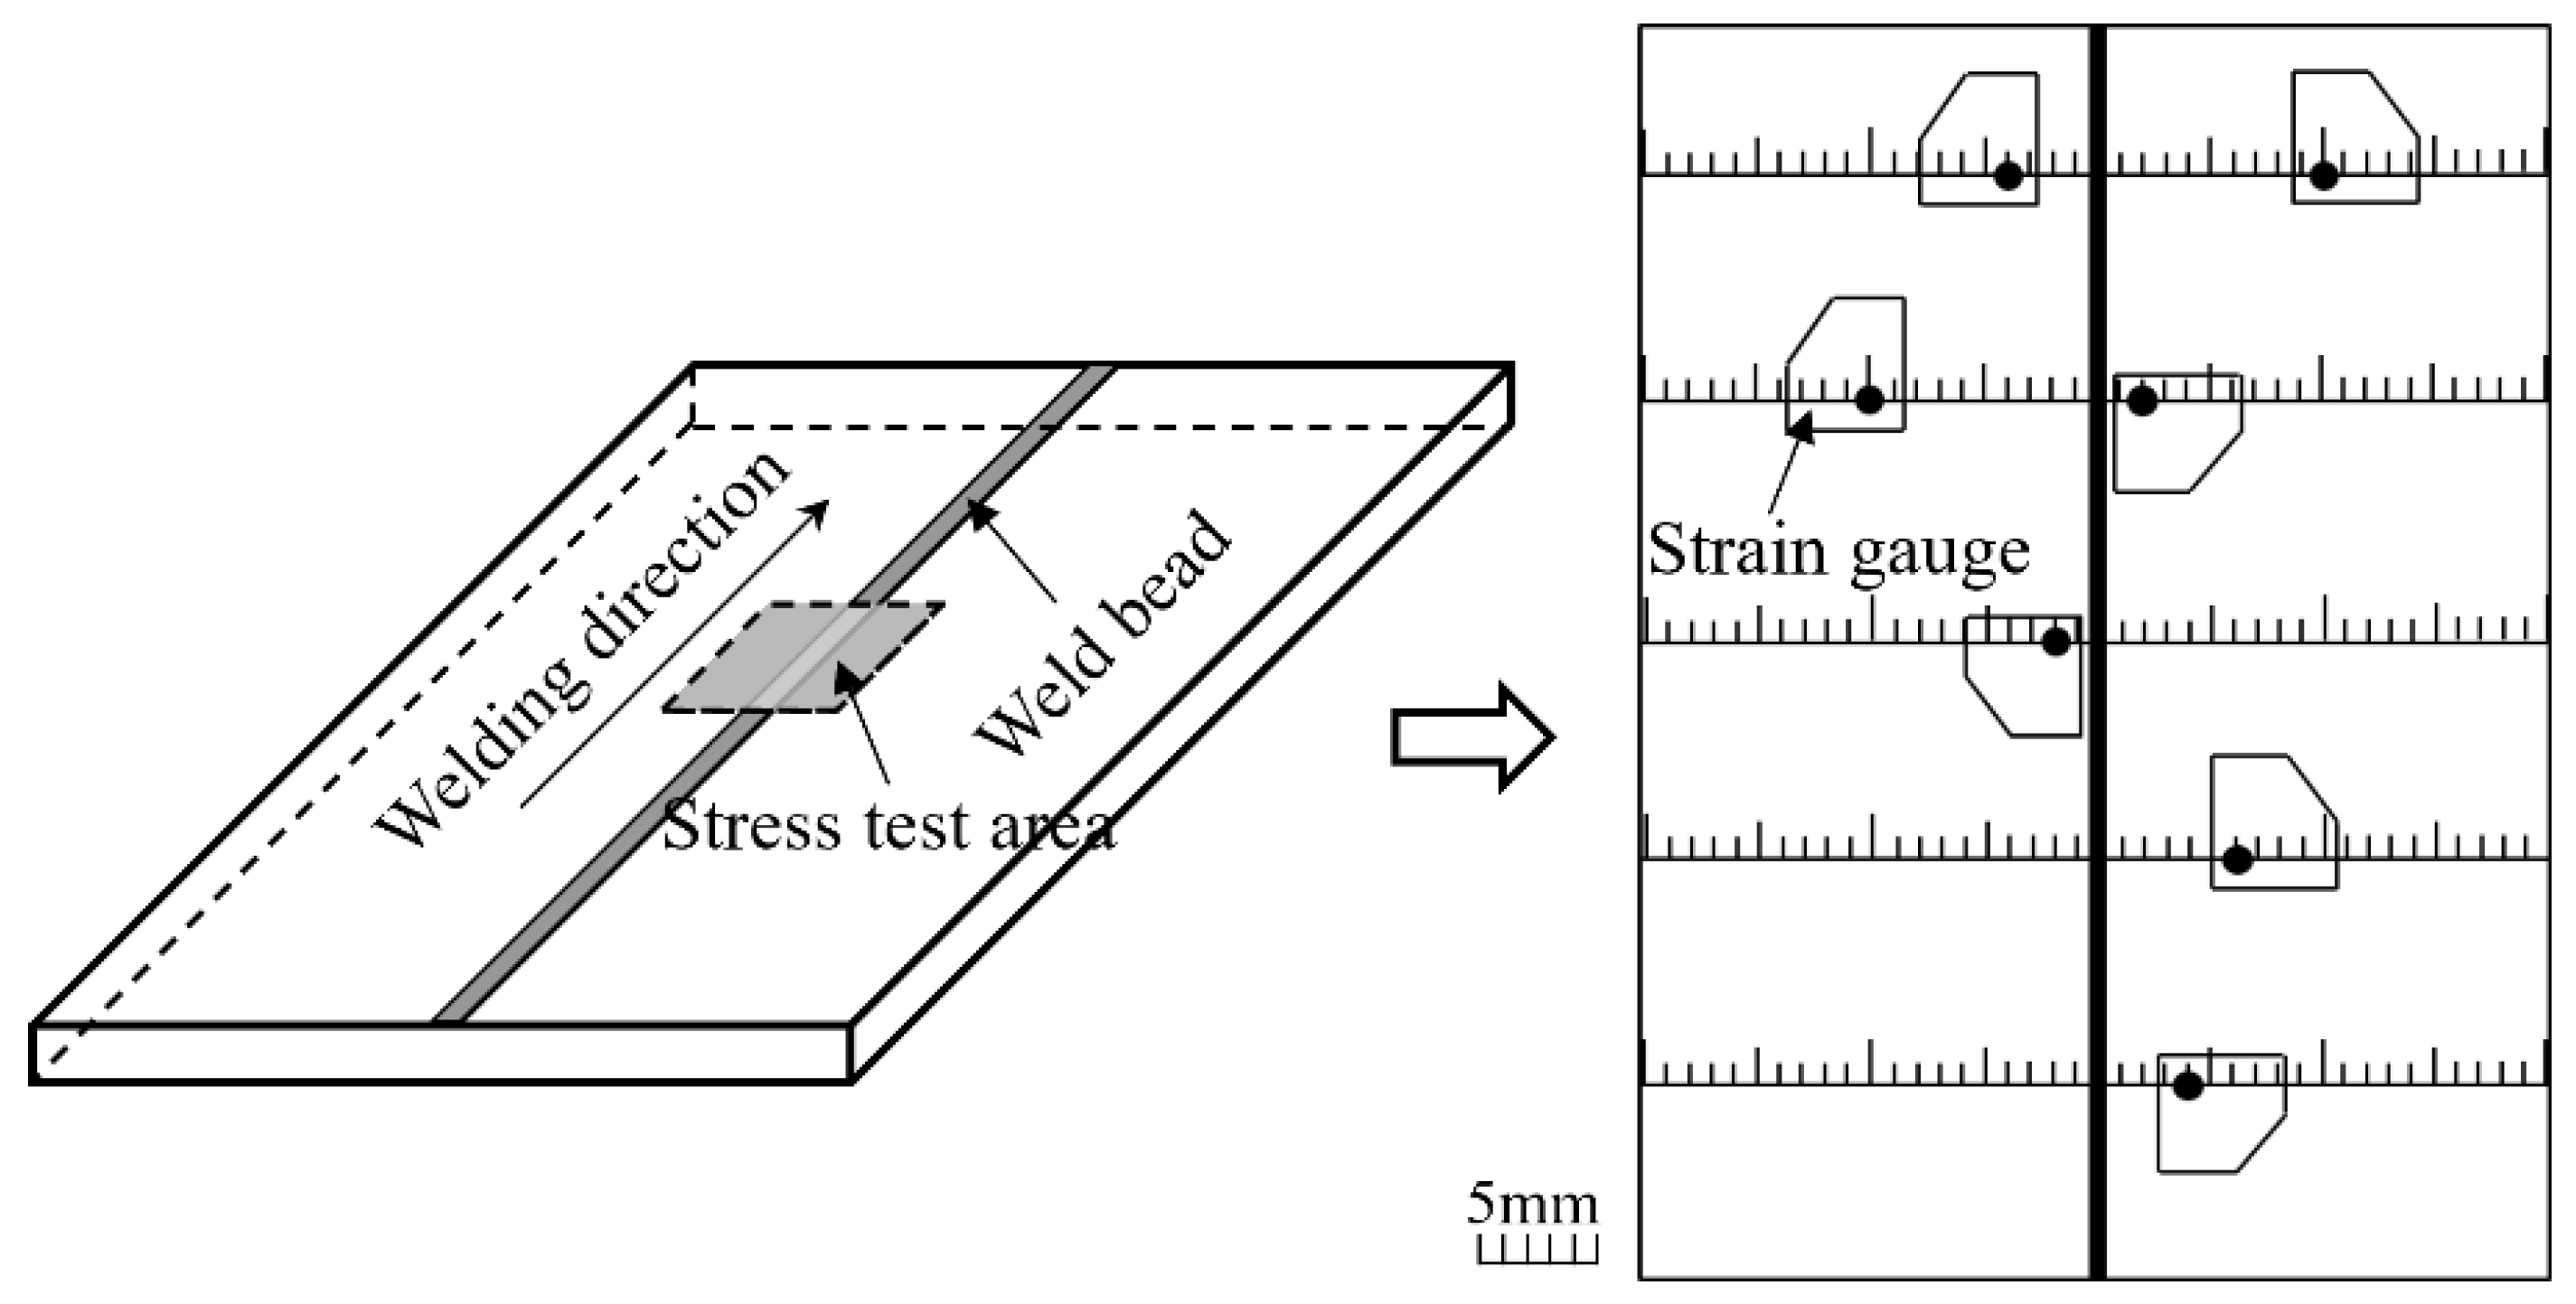
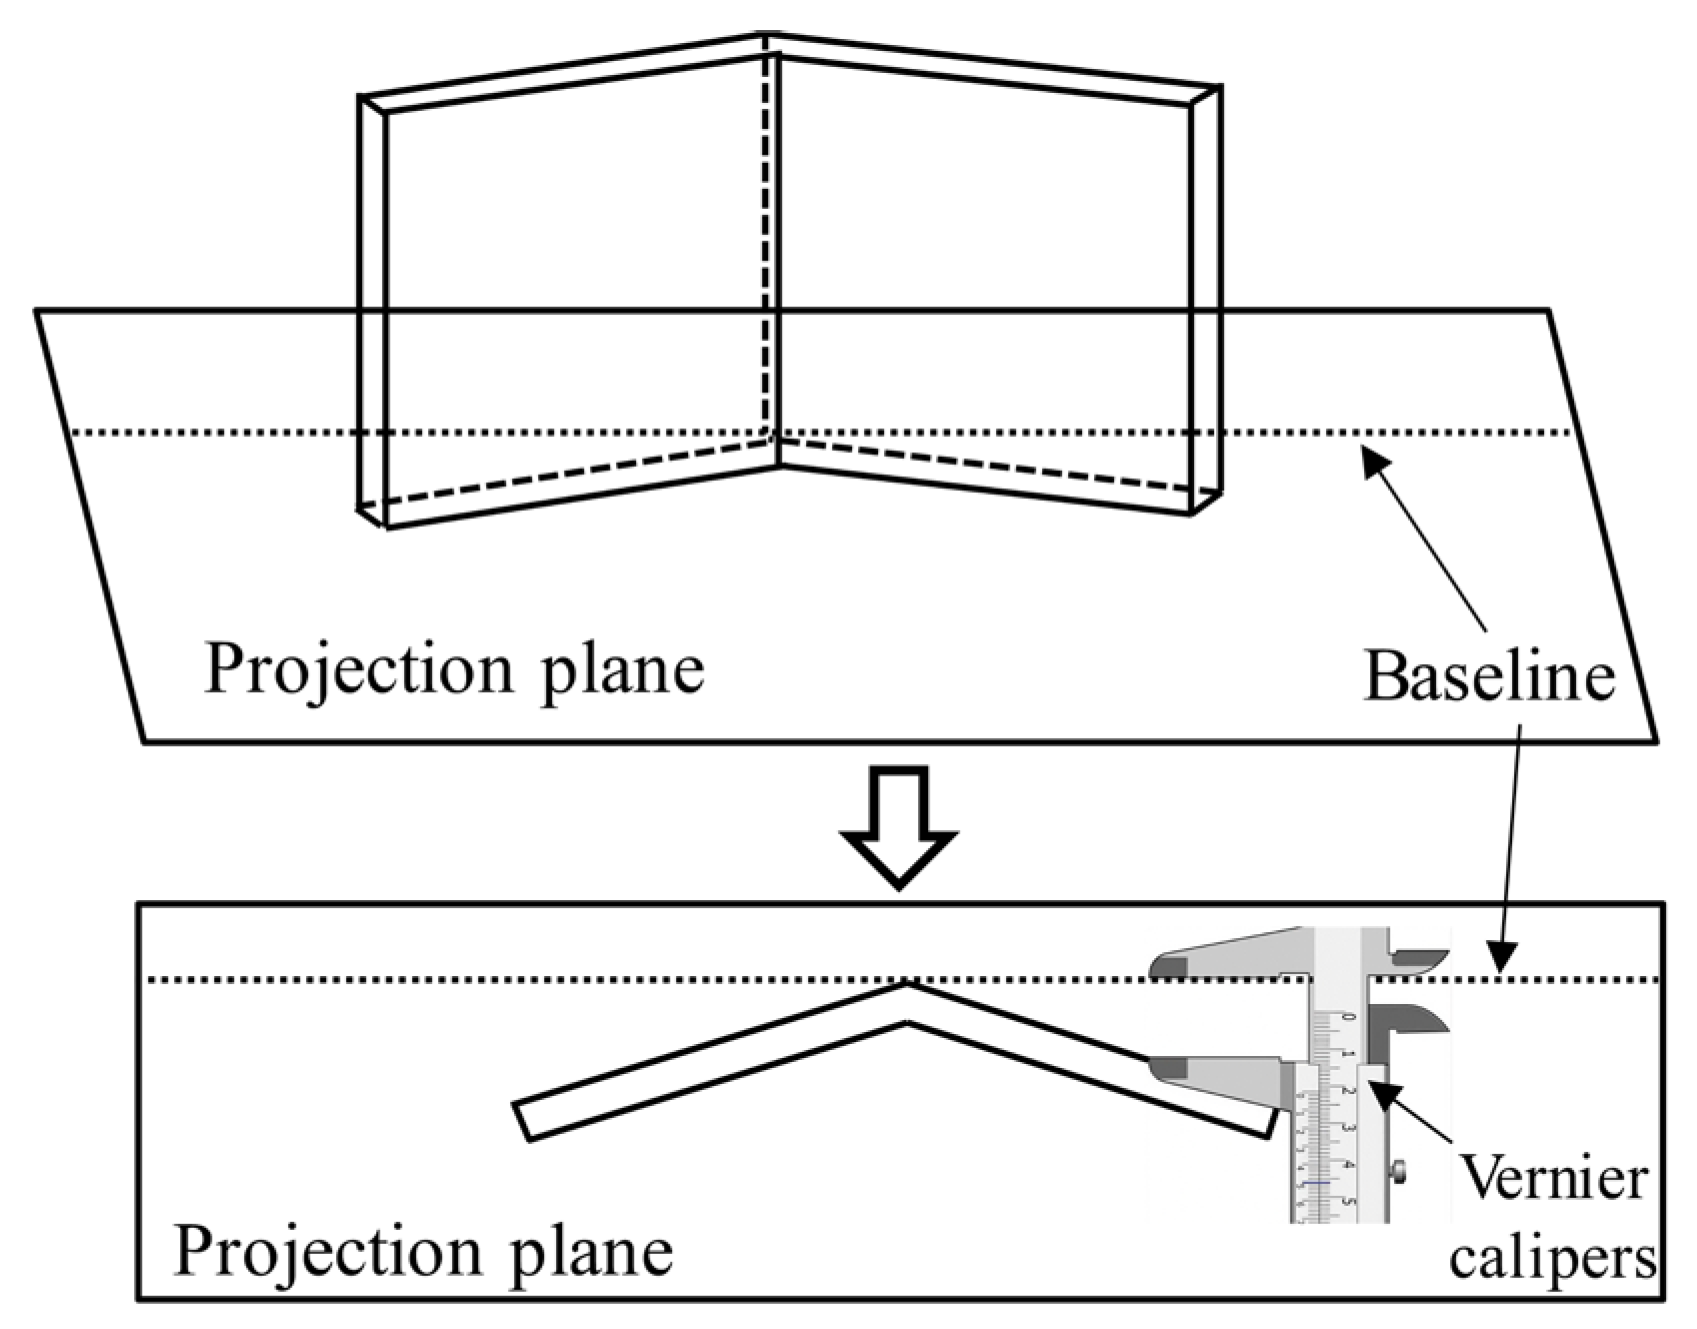
A nickel-chromium alloy/nickel-silicon alloy K-type thermocouple was used to measure the temperature of a location near the weld. Considering the structural particularity of the laser welding equipment (as shown in Figure 2), the thermocouple was spot-welded at a position of 6 mm from the weld centerline by a capacitive energy storage thermocouple welding machine. A digital thermometer was used to record the temperature changes at this location during the welding process. The measurement step size was 0.01 s. After welding, the hole-drilling method was employed to measure the residual stresses on the upper surface of the joint. First, strain gauges were attached to the surface of the test workpiece. Then, mechanical drilling was performed to release the elastic strain at the measurement location. The diameter and depth of the holes were 1.5 mm and 2 mm, respectively. The residual stresses can be calculated by the released strains. Generally, a stable stress zone exists in the middle section of the weld bead in the plate joint after welding. Therefore, the stress measurements in this region can be used to represent the stress distribution on the upper surface of the middle cross-section of the weld seam. The measurement area and strain gauge locations are shown in Figure 3. The testing process was carried out in accordance with the GB T31310-2014 standard [25]. The models of the strain gauge tester and the strain gauge were HK21A (Shandong Hawking Electro-Mechanical Science and Technology Co., Ltd., Shandong, China) and BE120-2CA-K (Zhonghang Electronic Measuring Instruments Co., Ltd., Hanzhong, China), respectively. Due to the relatively thin plates used in this study, the projection method illustrated in Figure 4 was adopted to measure the angular distortion. The contour line of the lower surface of the specimen before welding was projected onto a white paper by the line-drawing method. This line was defined as the baseline. After welding, points were evenly divided on the contour line of the lower surface of the specimen perpendicular to the welding direction, as well as on the baseline. The distance between the points on the contour line and on the baseline was measured by a vernier caliper. The obtained distance values were taken to evaluate the angular distortion of the welded specimen.

3. Finite Element Analysis

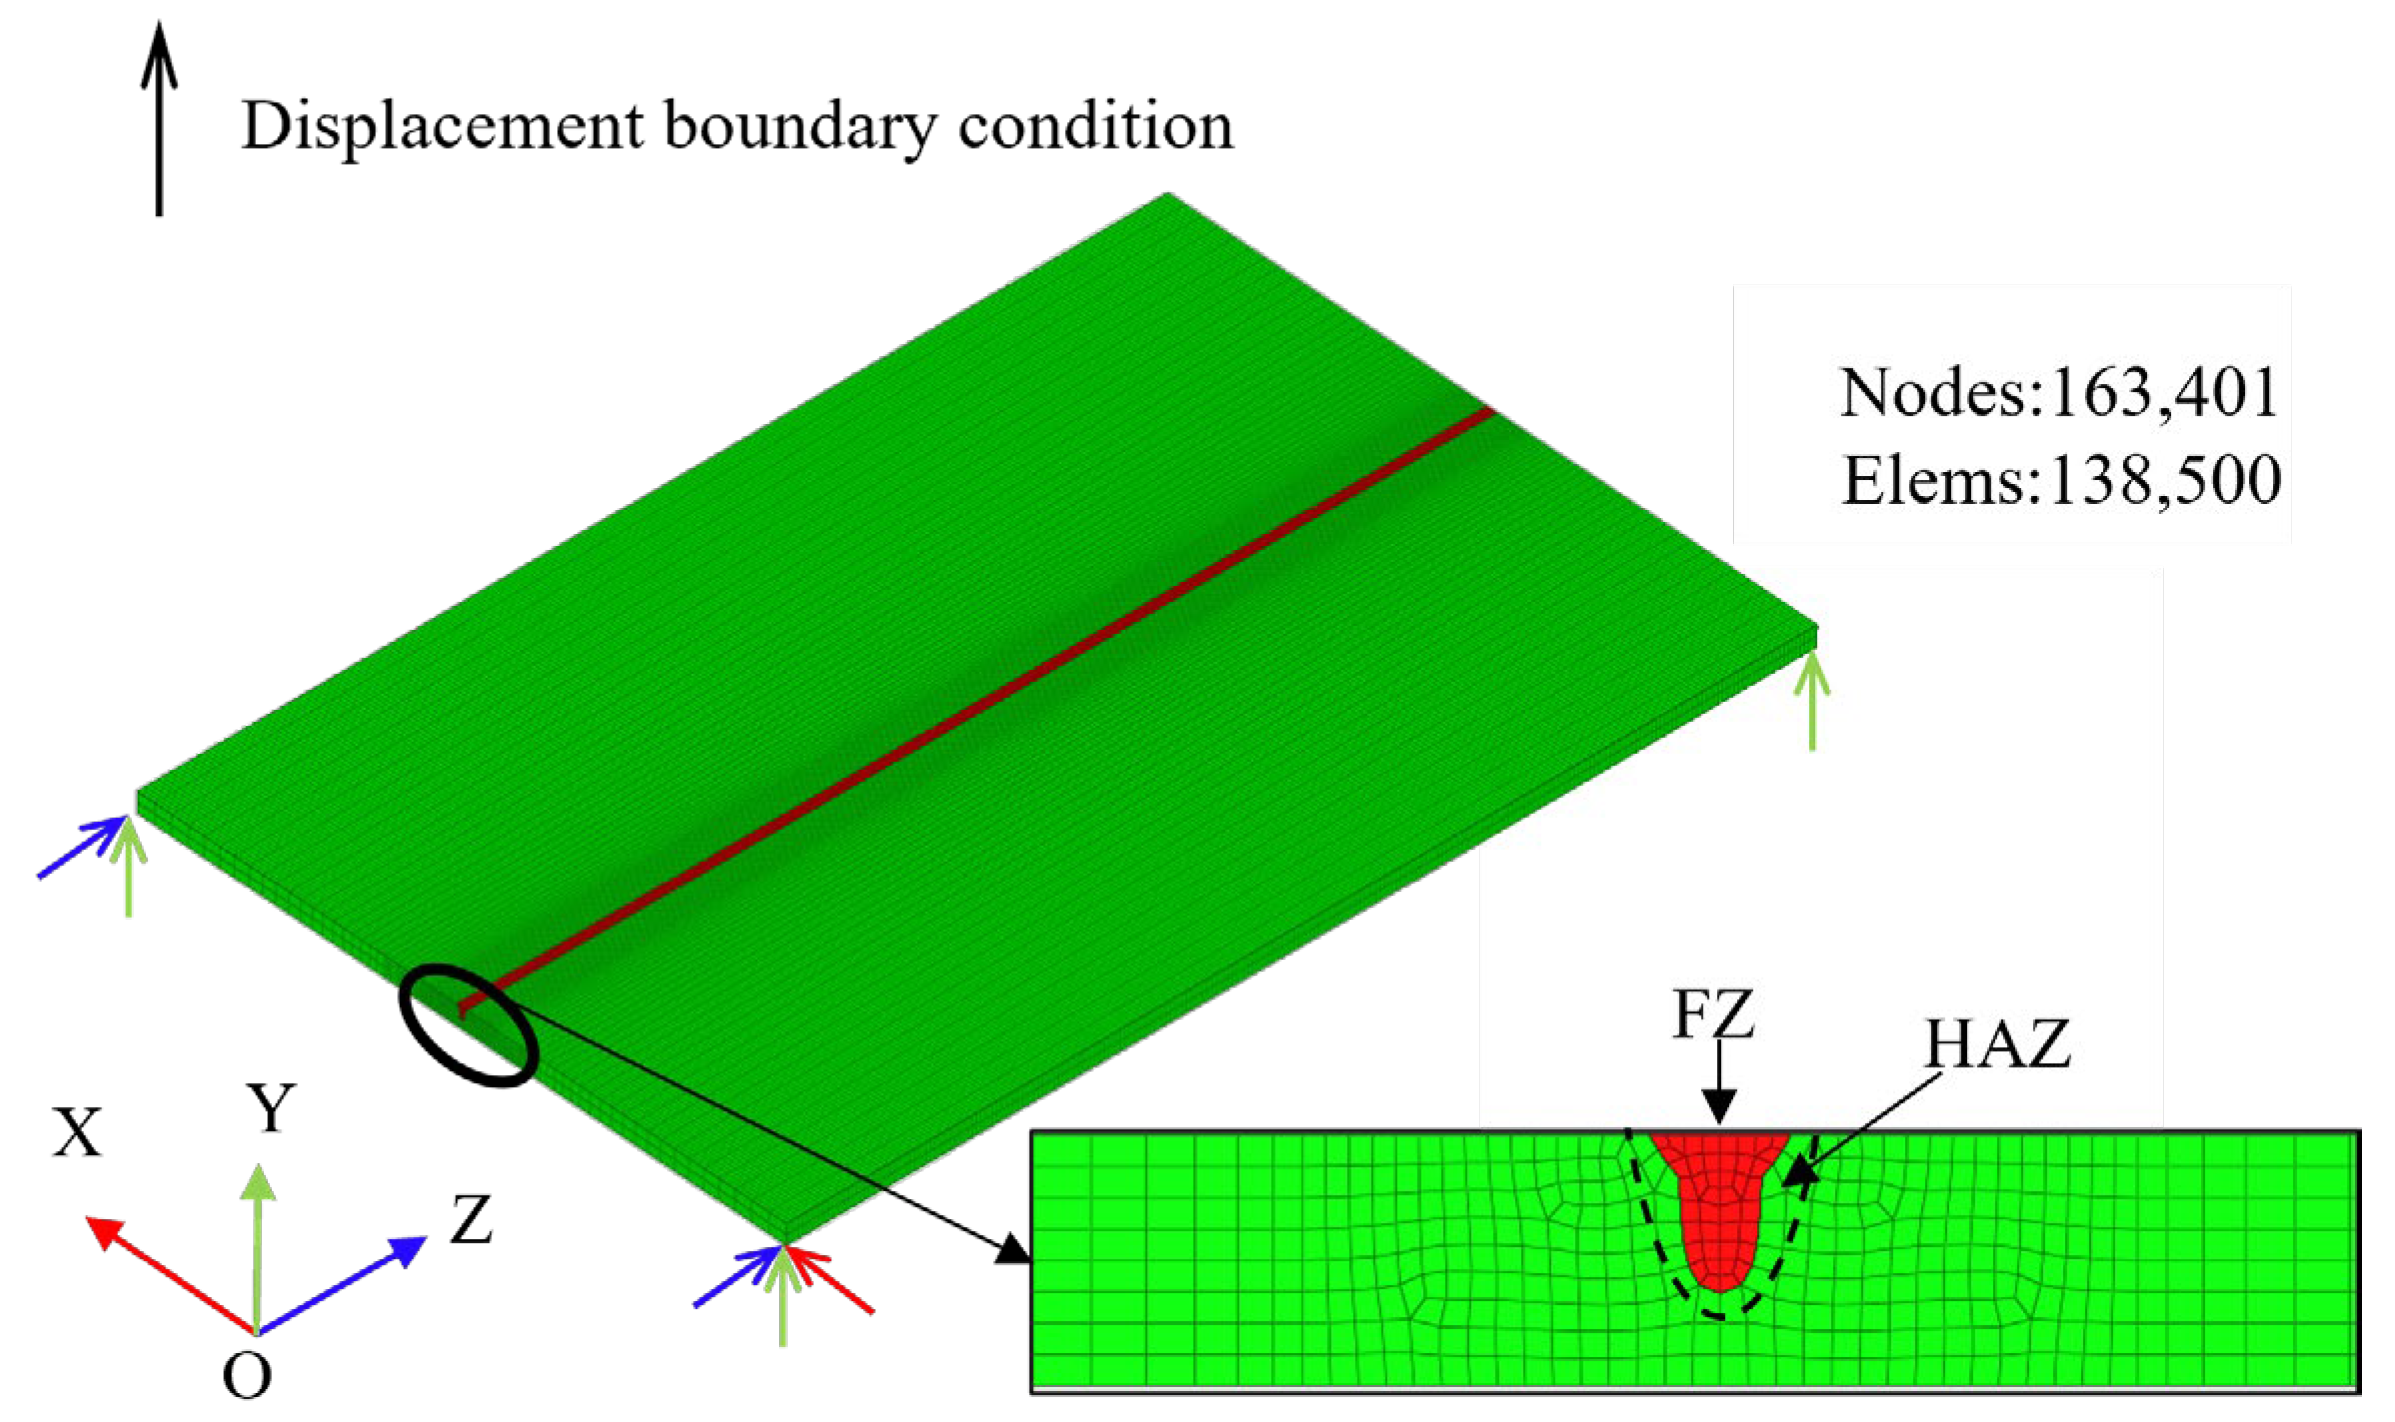
The general-purpose finite element software MSC.Marc 2020 (MSC.Software Co., Los Angeles, CA, USA) was used to simulate the laser remelting process. This software is suitable to solve the highly nonlinear and the multiple coupled problems. Based on MSC.Marc 2020, a three-dimensional finite element mesh model consistent with the actual weld seam dimensions of the remelted joint was established, as shown in Figure 5. During meshing, both computational accuracy and speed were considered. FZ and its adjacent areas were meshed with relatively fine elements, while coarser elements were used for the regions farther from FZ. The average element sizes in FZ and the heat-affected zone (HAZ) were approximately 0.2 mm and 0.3 mm, respectively. The fixed time step of the welding process was set at 0.01 s, while the cooling process was set with an adaptive time step according to the temperature. All mesh elements were 8-node hexahedral elements, with a total of 138,500 elements and 163,401 nodes. During the welding process, no external constraints were used. The workpiece was placed flat on the worktable and did not undergo three-dimensional movement. Therefore, the 3-node 6-degree-of-freedom displacement constraints as shown in Figure 5 were selected.

3.1. Thermal Analysis

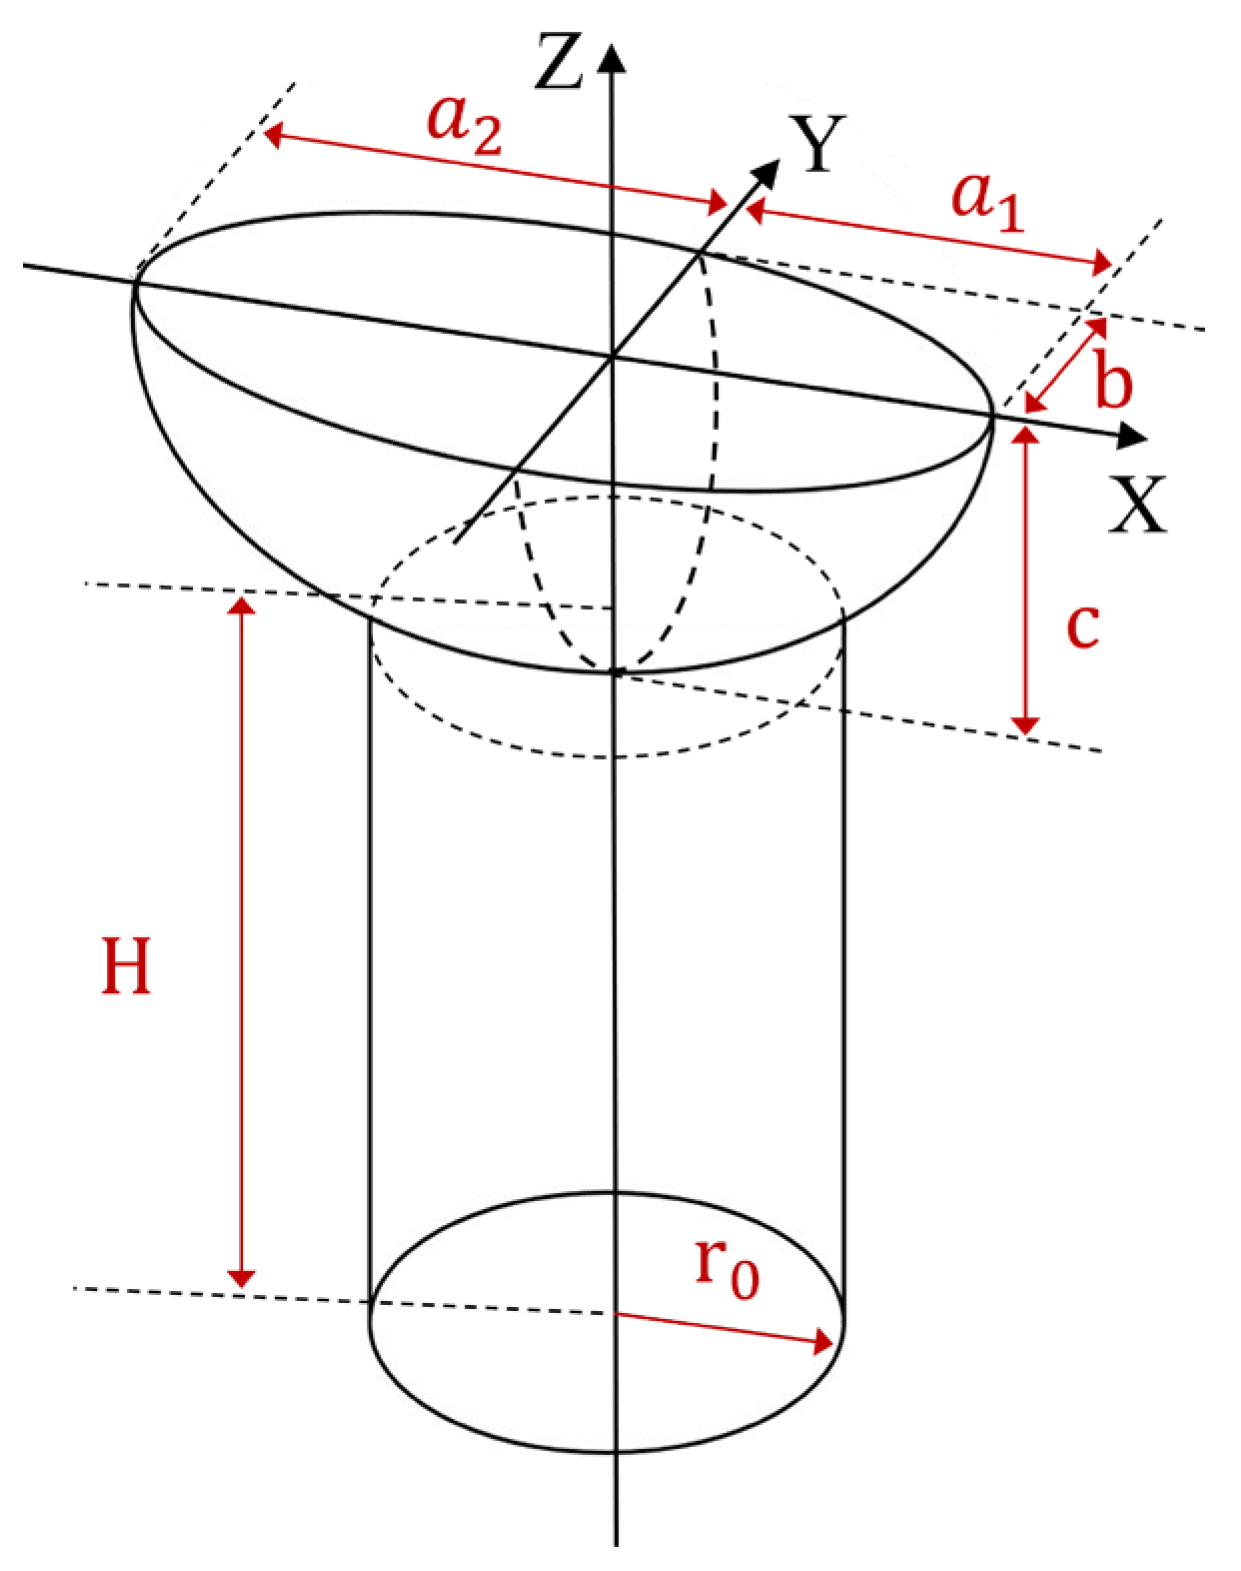
The weld pool of the Mo-5Re alloy single-pass laser remelted joint obtained in this study exhibited a “nail” shape. The heat input during laser remelting process was simulated using a combined heat source model of a double-ellipsoid and a cylinder, as shown in Figure 6, in order to effectively reproduce a thermal state which is similar to the real welding state.
The total heat input Q of the combined heat source is given by:
Q   =   η P   =   n 1 Q   +   n 2 Q
  n 1 + n 2 = 1
where, η represents the welding heat efficiency, set as 0.9; P is the laser power. n 1 and n 2 are the distribution coefficients for the double ellipsoid and cylinder heat sources, respectively, with n 1 set as 0.35 and n 2 set as 0.65.
The heat flux density distributions for the front and rear halves of the upper part of the double ellipsoid heat source, denoted as q 1 and q 2 , are defined as [26]:
  q 1 ( x , y , z )   =   6 3 f 1 Qn 1 π π a 1 bc exp [ 3 ( x 2 a 1 2 + y 2 b 2 + z 2 c 2 ) ]   x     0 ,   z     H 1
  q 2 ( x , y , z ) = 6 3 f 2 Qn 1 π π a 2 bc exp [ 3 ( x 2 a 2 2 + y 2 b 2 + z 2 c 2 ) ]   x   <   0 ,   z     H 1
where, H 1 is the effect height of the double ellipsoid in the thickness direction of the plate; a 1 , a 2 , b and c are the ellipsoid shape parameters; f 1 and f 2 are the heat distribution functions for the front and rear ellipsoids, respectively, with the condition f 1 + f 2 = 2 .
The heat flux density ( q V ) for the lower part of the cylinder heat source is defined as:
q V   =   3 Qn 2 π r 0 2 H exp ( 3 r 2 r 0 2 )   ( H 1   <   z     d )
  H = d   H 1
where, H is the height of the cylinder heat source, d is the plate thickness, r 0 is the effective radius, and r is the distance from a point in the laser beam area to the center of the heat source.
The relevant parameters for the combined heat source model were shown in Table 3. By adjusting the parameters of the heat source model and the respective distribution coefficients for the double ellipsoid and cylindrical heat sources, the simulated thermal cycle curve, as well as the geometry and dimensions of the molten pool, can closely match the experimental results.
During welding, heat transfers from the high-temperature to the low-temperature regions of the workpiece via conduction. This heat transfer can be described by Fourier’s law (Equation (7)):
λ ( 2 T x 2 )   +   λ ( 2 T y 2 )   +   λ ( 2 T z 2 )   +   ( q v )   =   ρ c P ( T t )
where, T represents the temperature field to be determined (K), λ is the thermal conductivity (W·m−1·K−1), qv is the heat power from the internal heat source (J·m−3), ρ is the density (kg·m−3), c P is the specific heat capacity at constant pressure (J·kg−1·K−1), and t is the heat transfer time (s). The values of λ, ρ and c P vary with temperature, and the thermophysical properties of Mo-5Re alloy used in this study were shown in Table 4.
In the welding process, heat transfer is complicated. Convection and radiation heat transfer were considered in this study, and they were described by Newton’s law and the Stefan-Boltzmann law, respectively. The equations for convection and radiation heat transfer are:
  q c   =   α c ( T     T 0 )
q r = ε C 0 ( T 4 T 0 4 )
where, q c and q r represent the convective and radiative heat flux densities between the workpiece and the surrounding environment; α c is the convection heat transfer coefficient, with a value of 0.33 W·m−2·K−1 [27]; T 0 is the ambient temperature (298 K). The emissivity ( ε ) is determined by factors such as the material itself, temperature and surface finish. In this study, ε was taken as a constant value of 0.8. and C 0 is the Stefan-Boltzmann constant.

3.2. Mechanical Analysis

The mechanical analysis used the same finite element model as the thermal analysis, with the only difference being the element type. The results from the thermal analysis were applied as thermal loads in the structural analysis model through direct coupling to solve for stress and deformation. The mechanical analysis conducted in this study simulated the mechanical behavior of the material within the scope of solid mechanics. The effects of strain rate on plasticity were neglected, assuming the viscosity of the material to be zero. Additionally, the solid-liquid phase transition of the material in FZ was ignored, treating the material as a continuous solid without considering the solid-liquid coupling. Therefore, during the welding process, the total strain of the material can be described by Equation (10):
  ε total   =   ε e   +   ε p   +   ε th
where, ε e is the elastic strain, ε p is the plastic strain, and ε th is the thermal strain.
The elastic behavior of the material was described using the isotropic Hooke’s law, and the plastic behavior was modeled by the Von Mises yield criterion [28]. In this study, an ideal elastic-plastic model was used, neglecting the effects of material work hardening. The mechanical properties of Mo-5Re alloy as a function of temperature were shown in Table 5. As an exploratory study, the mechanical properties of the weld seam were considered to be the same as the base metal (BM).
The data below 1500 °C in Table 4 and Table 5 were obtained by experimental measurements. Because of the difficulty in measuring the properties above 1500 °C, the property values at relatively high temperatures were assumed to be the same as those at 1500 °C.

4. Results and Discussion

4.1. Microstructure and Hardness of the Mo-5Re Alloy Laser Remelted Joint

4.1.1. Microstructural Characterization of the Mo-5Re Alloy Remelted Joint

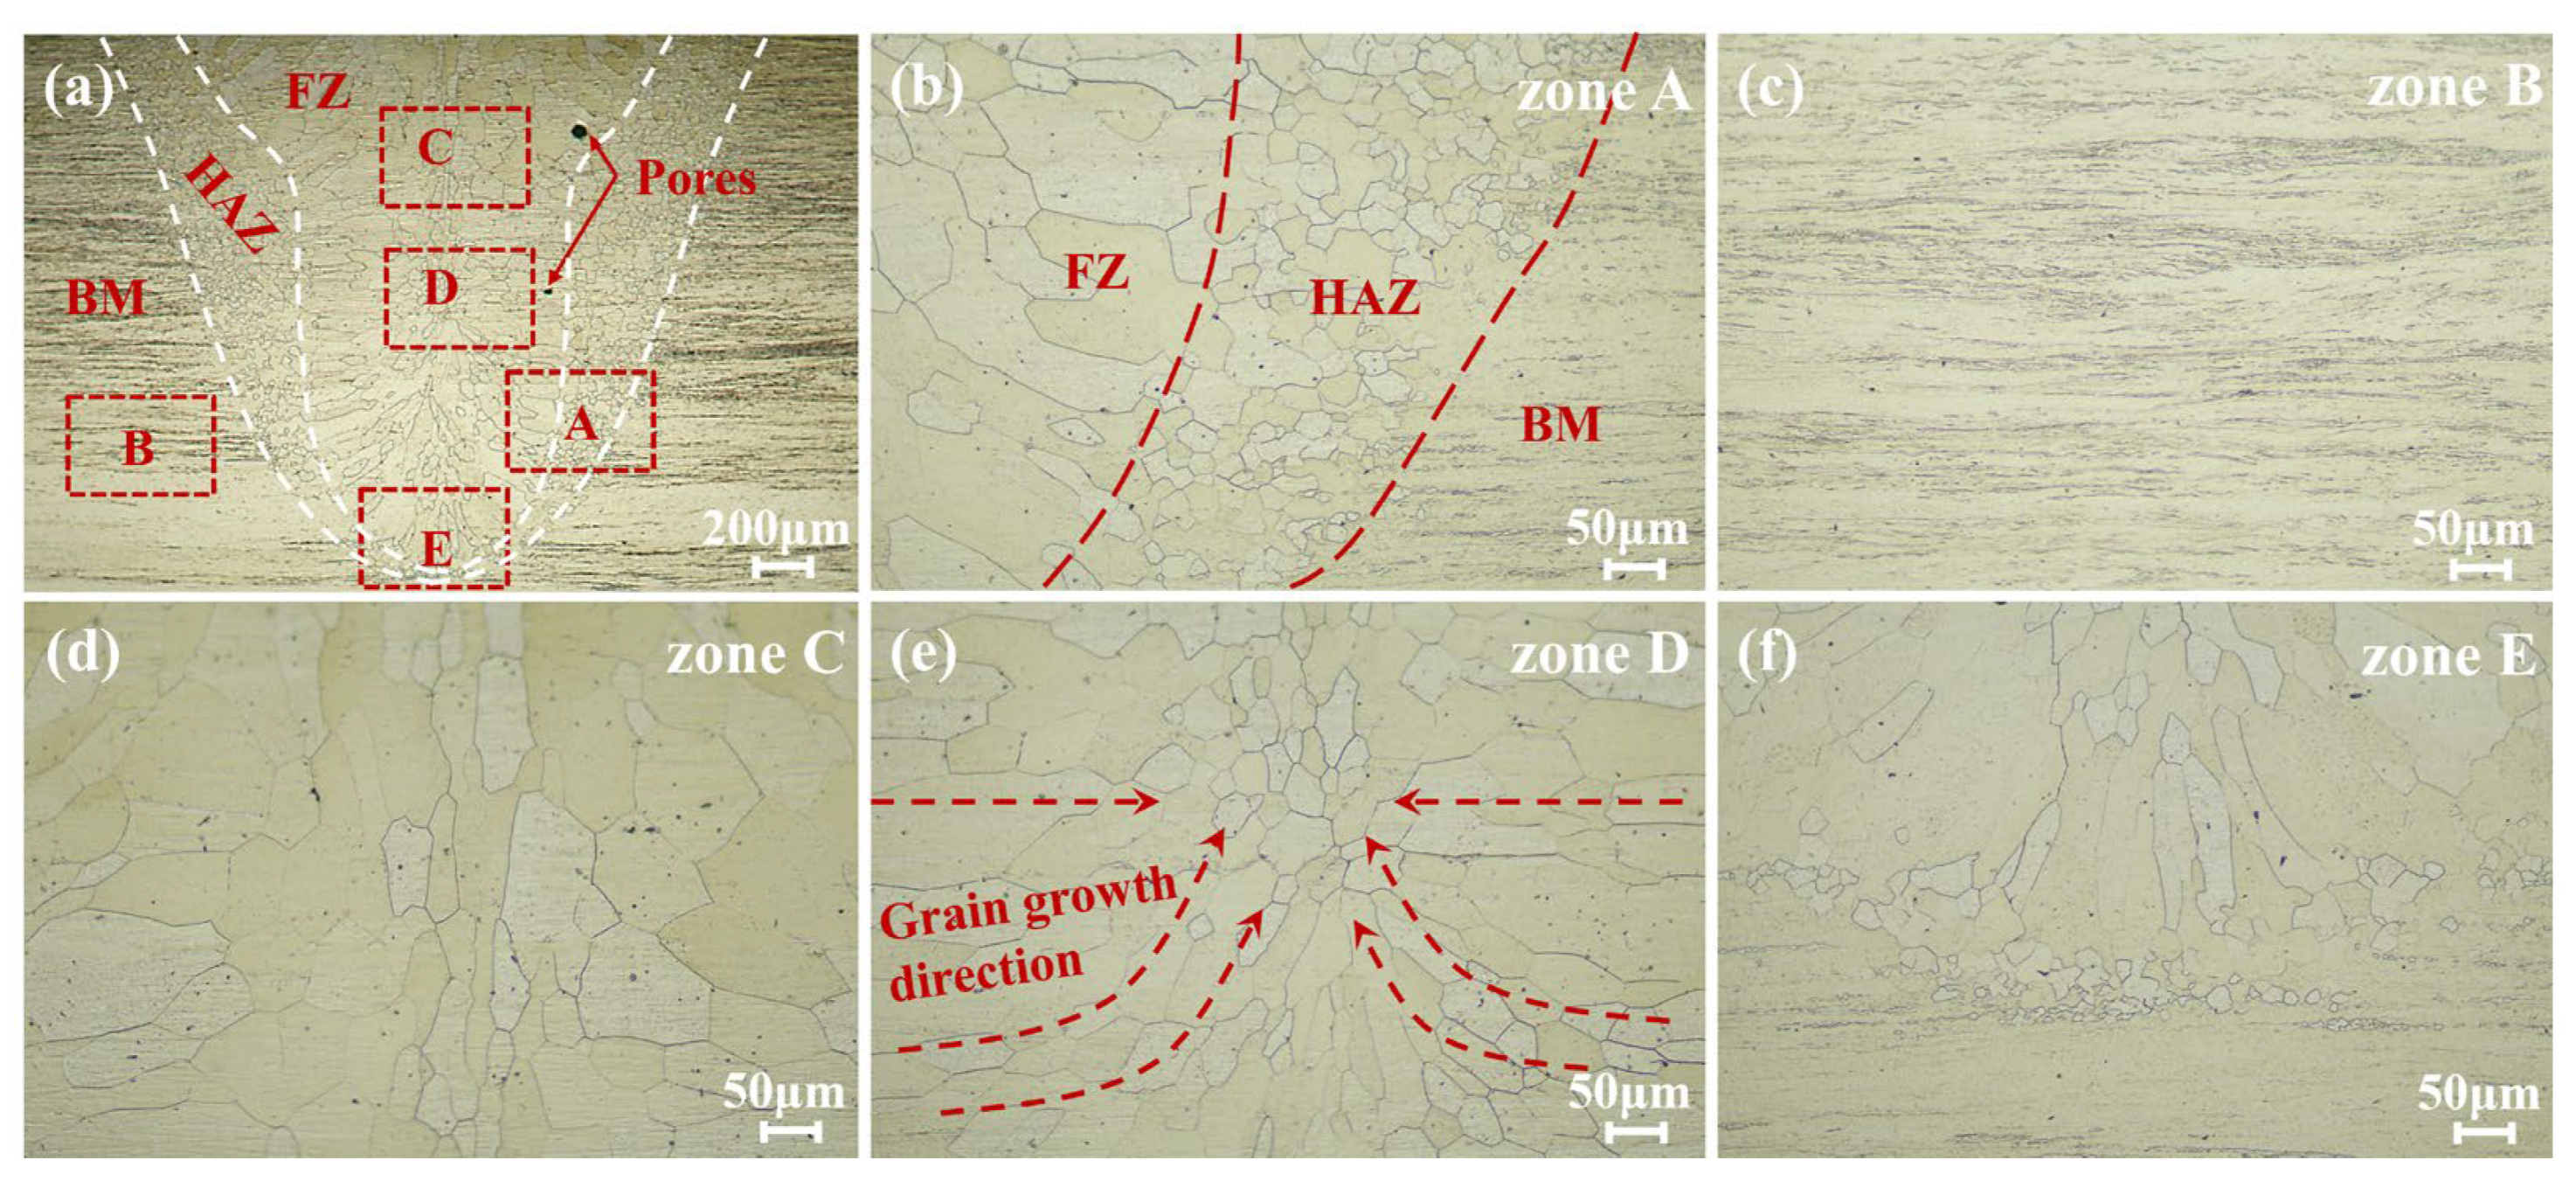
Figure 7 shows the microstructure of the Mo-5Re alloy single-pass laser remelted joint. FZ exhibited a “nail-shape” morphology (Figure 7a), being wide at the top and narrow at the bottom. A limited number of pores were observed near the fusion line, which can be attributed to: (1) the keyhole effect caused by metal vapor pressure during deep penetration laser welding, and (2) the inherent difficulty of powder metallurgy materials in achieving complete densification, leaving potential micro-pores. The joint can be divided into three distinct zones (Figure 7b): the fusion zone (FZ), the heat-affected zone (HAZ) and base metal (BM). Figure 7c shows that BM consisted of elongated grains along the deformation direction. However, because of the high energy density of laser welding, recrystallized equiaxed grains were obtained in HAZ, completely replacing the original fibrous structure of BM. As shown in Figure 7d,e, columnar grains grew from the fusion line toward the weld center, while fine equiaxed grains were formed in the center of FZ due to the low heat input and large cooling rate of laser welding. The width of HAZ varied with location as a function of peak temperature and high-temperature dwell time. And a very narrow HAZ region in adjacent to the weld root can be observed in Figure 7f.
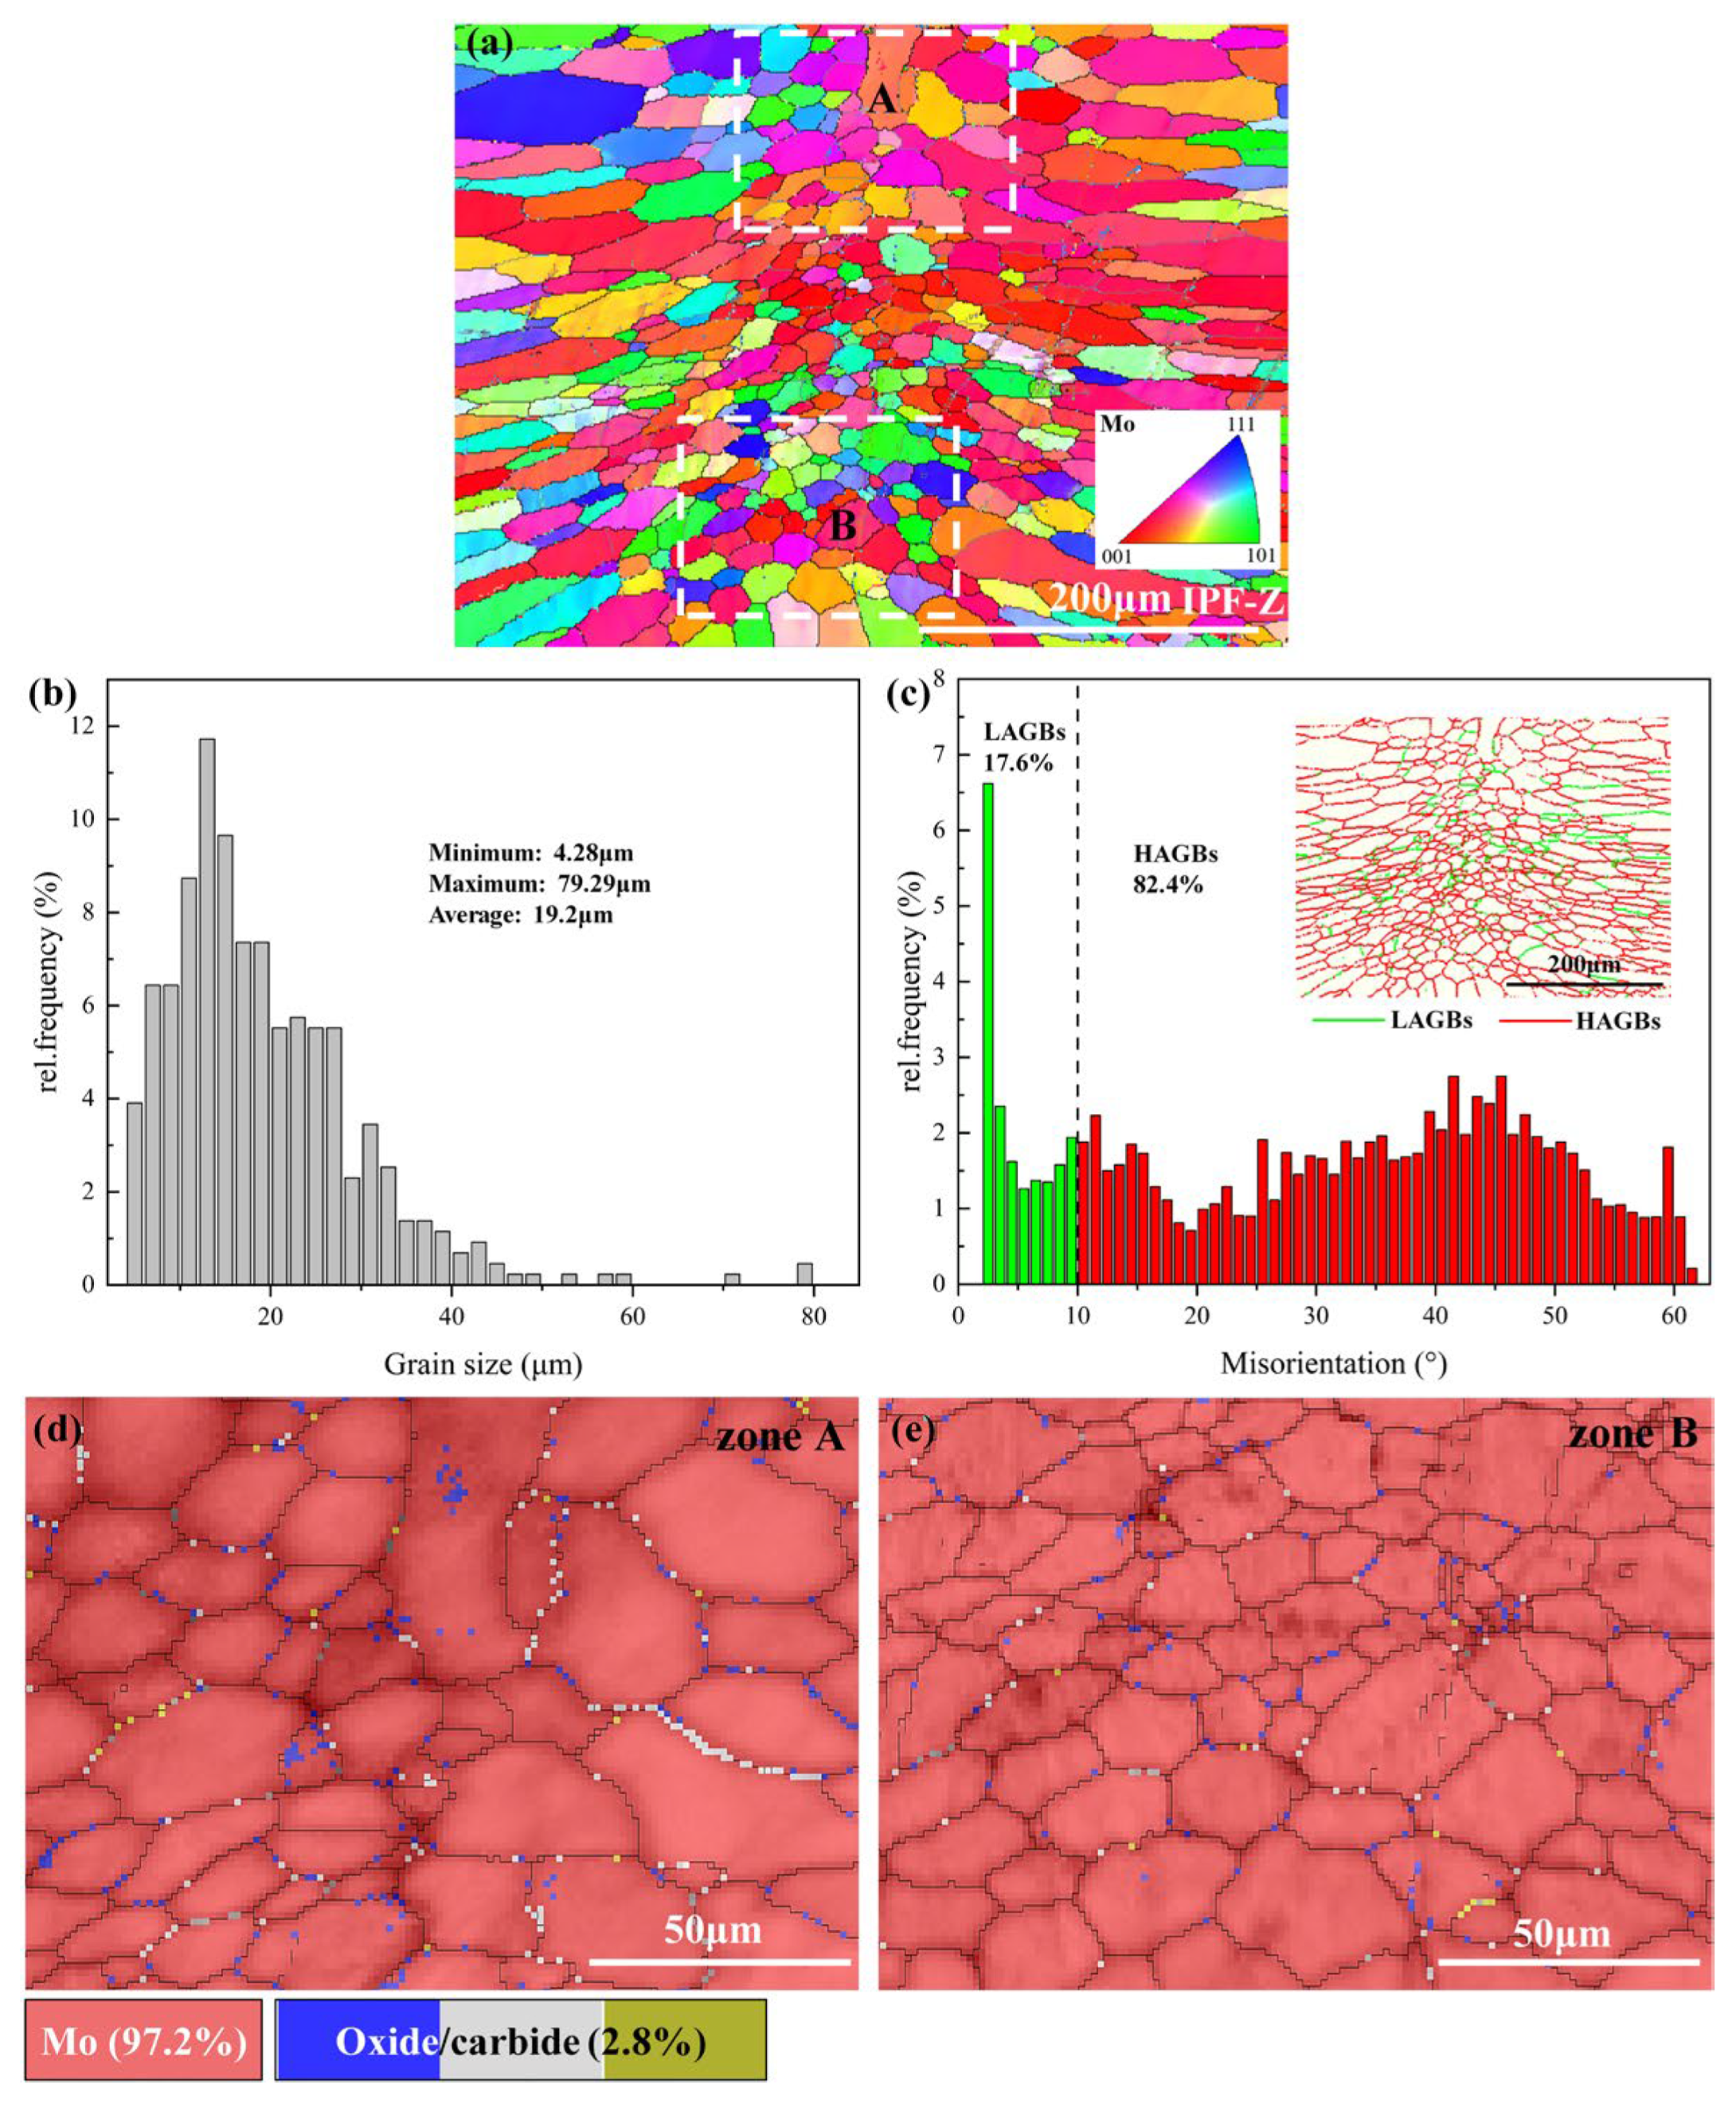
EBSD analysis was performed on the central region of FZ, and the results were shown in Figure 8. Figure 8a presents the inverse pole figure (IPF) map of the FZ center, revealing that the microstructural features were consistent with the OM observations. Grain size statistics (Figure 8b) presented a maximum equivalent circular diameter of 79.29 μm, minimum of 4.28 μm, and average of 19.2 μm in the analyzed area. Figure 8c shows the grain boundary misorientation distribution. The grain boundaries with misorientation angle larger than 10° were classified as high-angle grain boundaries (HAGBs), and the others were classified as low-angle grain boundaries (LAGBs). Based on a sample size of 286 for grain statistics, it can be seen that HAGBs (82.4%) predominated in the region as shown in Figure 8c. The disordered atomic arrangement at HAGBs can result in higher interfacial energy compared to LAGBs, effectively impeding dislocation motion [29]. This may further lead to the tendency of brittle fracture at the joint under tensile stress induced by restricted plastic deformation.
Figure 8d,e present the phase distribution statistics in zone A and zone B, respectively, as marked in Figure 8a by the white boxes. The results demonstrated that the matrix of FZ was the Mo phase (97.2% of the area), with no Re-containing phases detected due to the low Re content. Oxide/carbide-like phases, inferred by the contrast (2.8%), were distributed along grain boundaries and inside the grains. Both O and C exhibit low solubility in Mo and tend to migrate to grain boundaries at elevated temperatures, leading to the formation of oxides and carbides. Although discontinuous distribution of limited oxide/carbide particles at grain boundaries has minimal effect on joint properties, excessive oxide/carbide, particularly when forming continuous networks along grain boundaries, will cause grain boundary embrittlement [29]. The molybdenum oxides possess relatively low melting points (e.g., MoO3 melts at 1068 K [30]), potentially forming intergranular liquid films during solidification. The as-produced liquid films may induce intergranular cracking under tensile stress. Additionally, their low boiling points (e.g., MoO3 boils at 1428 K [30]) promote vaporization during laser welding. The oxide vapors have extremely low solubility in the molten pool, and have strong tendency to form the pore defects along the fusion line when they are trapped.

4.1.2. Microhardness Distribution of the Mo-5Re Alloy Remelted Joint

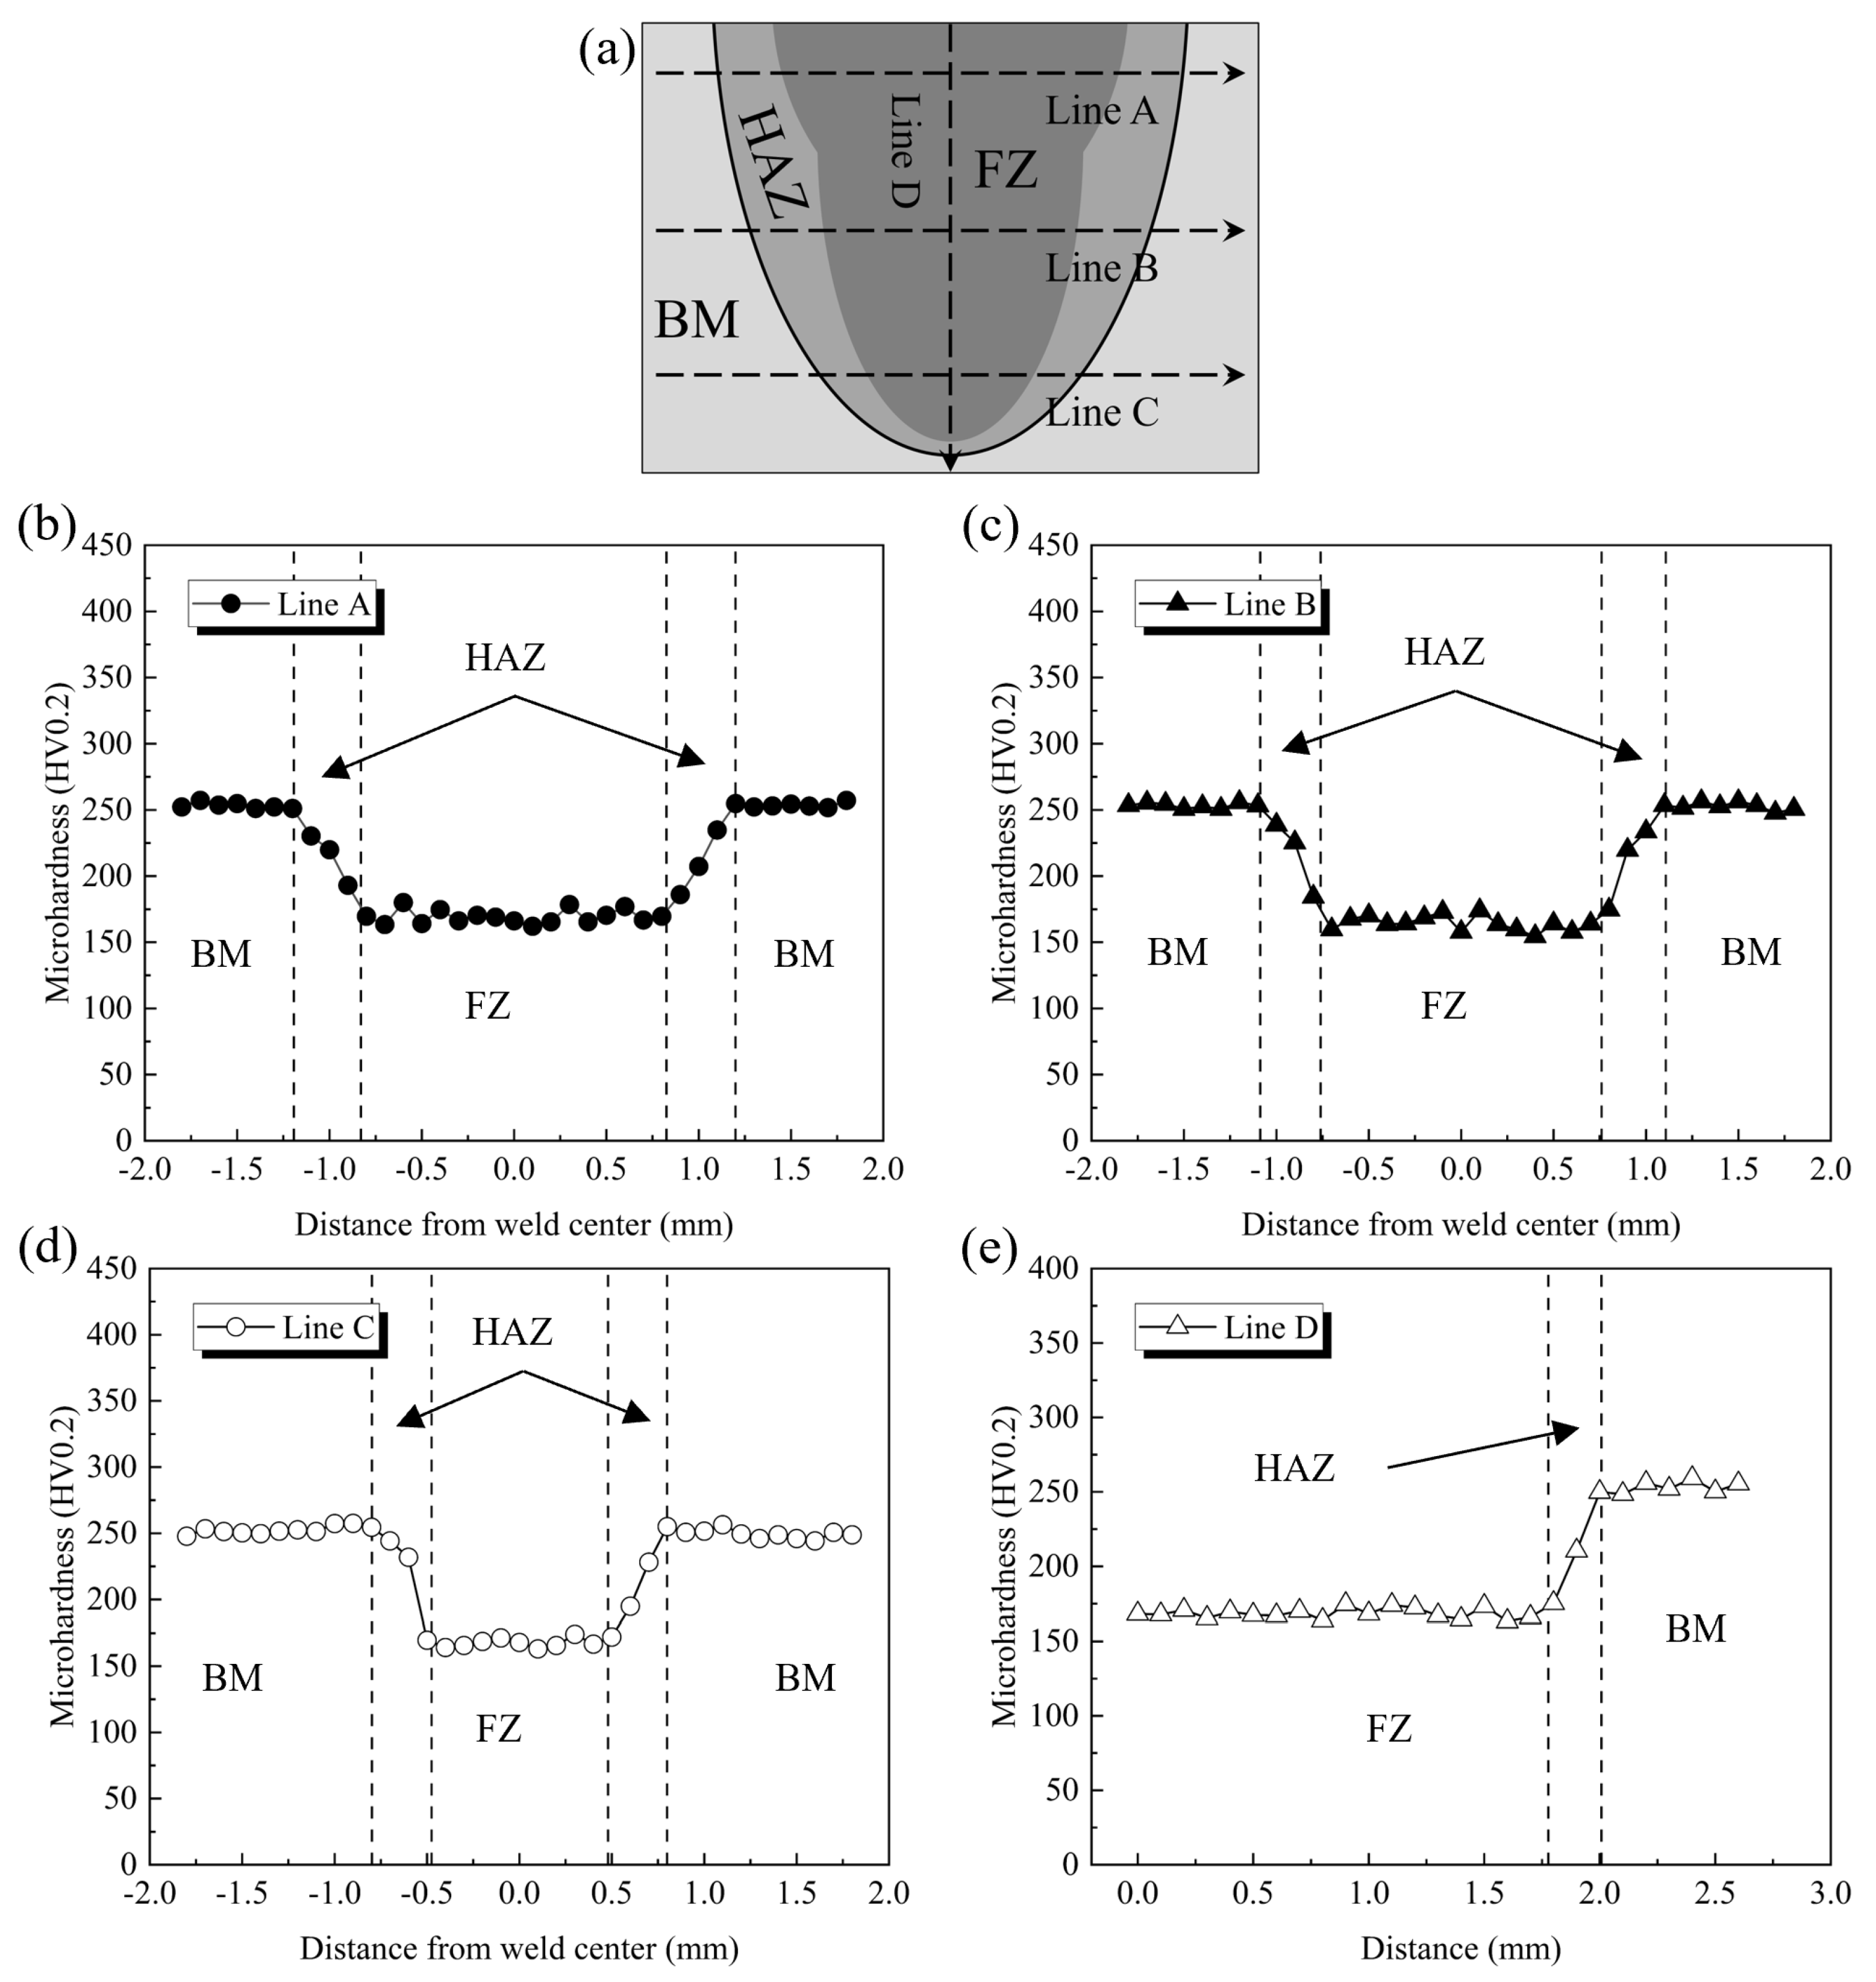
Figure 9 shows the Vickers hardness measurement results of the Mo-5Re alloy single-pass laser remelted joint. Figure 9a illustrates the hardness measurement paths: Line A, B and C parallel to the upper surface of FZ, and Line D perpendicular to the upper surface of FZ. Line A was 0.3 mm away from the upper surface of the remelted joint. The distances between Line A and Line B and between Line B and Line C were both 0.6 mm. Figure 9b–d present the microhardness distributions along transverse paths Line A, B, and C, respectively, demonstrating similar hardness distribution trends at different transverse paths. The microhardness value of the Mo-5Re base material was 250 ± 2 HV. Recrystallization softening can be observed in HAZ. The degree of softening in HAZ increased when the location was closer to FZ due to higher peak temperatures and longer duration above the effective recrystallization temperature. However, due to the insufficient heat-effect, a certain degree of refined microstructure was retained, resulting in higher hardness in HAZ than in FZ. FZ exhibited the lowest microhardness, averaging around 170 ± 5 HV. As revealed by the aforementioned microstructural analysis, FZ was primarily comprised of coarse columnar grains that grew along the direction of heat flow. The grain coarsening diminished the strengthening effect of fine-grained structures and reduced the ability to impede dislocation motion, consequently leading to a decrease in hardness. Figure 9e displays the microhardness distribution along the FZ centerline (Line D). The hardness indentation spacing of 0.1mm is less than half the HAZ width (0.12 mm) at the weld root position, and therefore the interaction of plastic zones can be avoided. Although grain size differences existed between the upper and lower regions of FZ, the hardness remained relatively consistent due to the overall dense microstructure, uniform composition, and absence of solid-state phase transformation in FZ.

4.2. Temperature Field, Residual Stresses, and Welding Deformation in the Mo-5Re Alloy Laser Remelted Joint

Due to the inherently poor plasticity of Mo alloys, residual stresses in the joint significantly affect both integrity and mechanical performance of the joint. Therefore, this study employed numerical simulation methods to analyze the temperature field, residual stresses, and welding deformation in the single-pass remelted joint of Mo-5Re alloy.

4.2.1. Temperature Field of the Remelted Joint

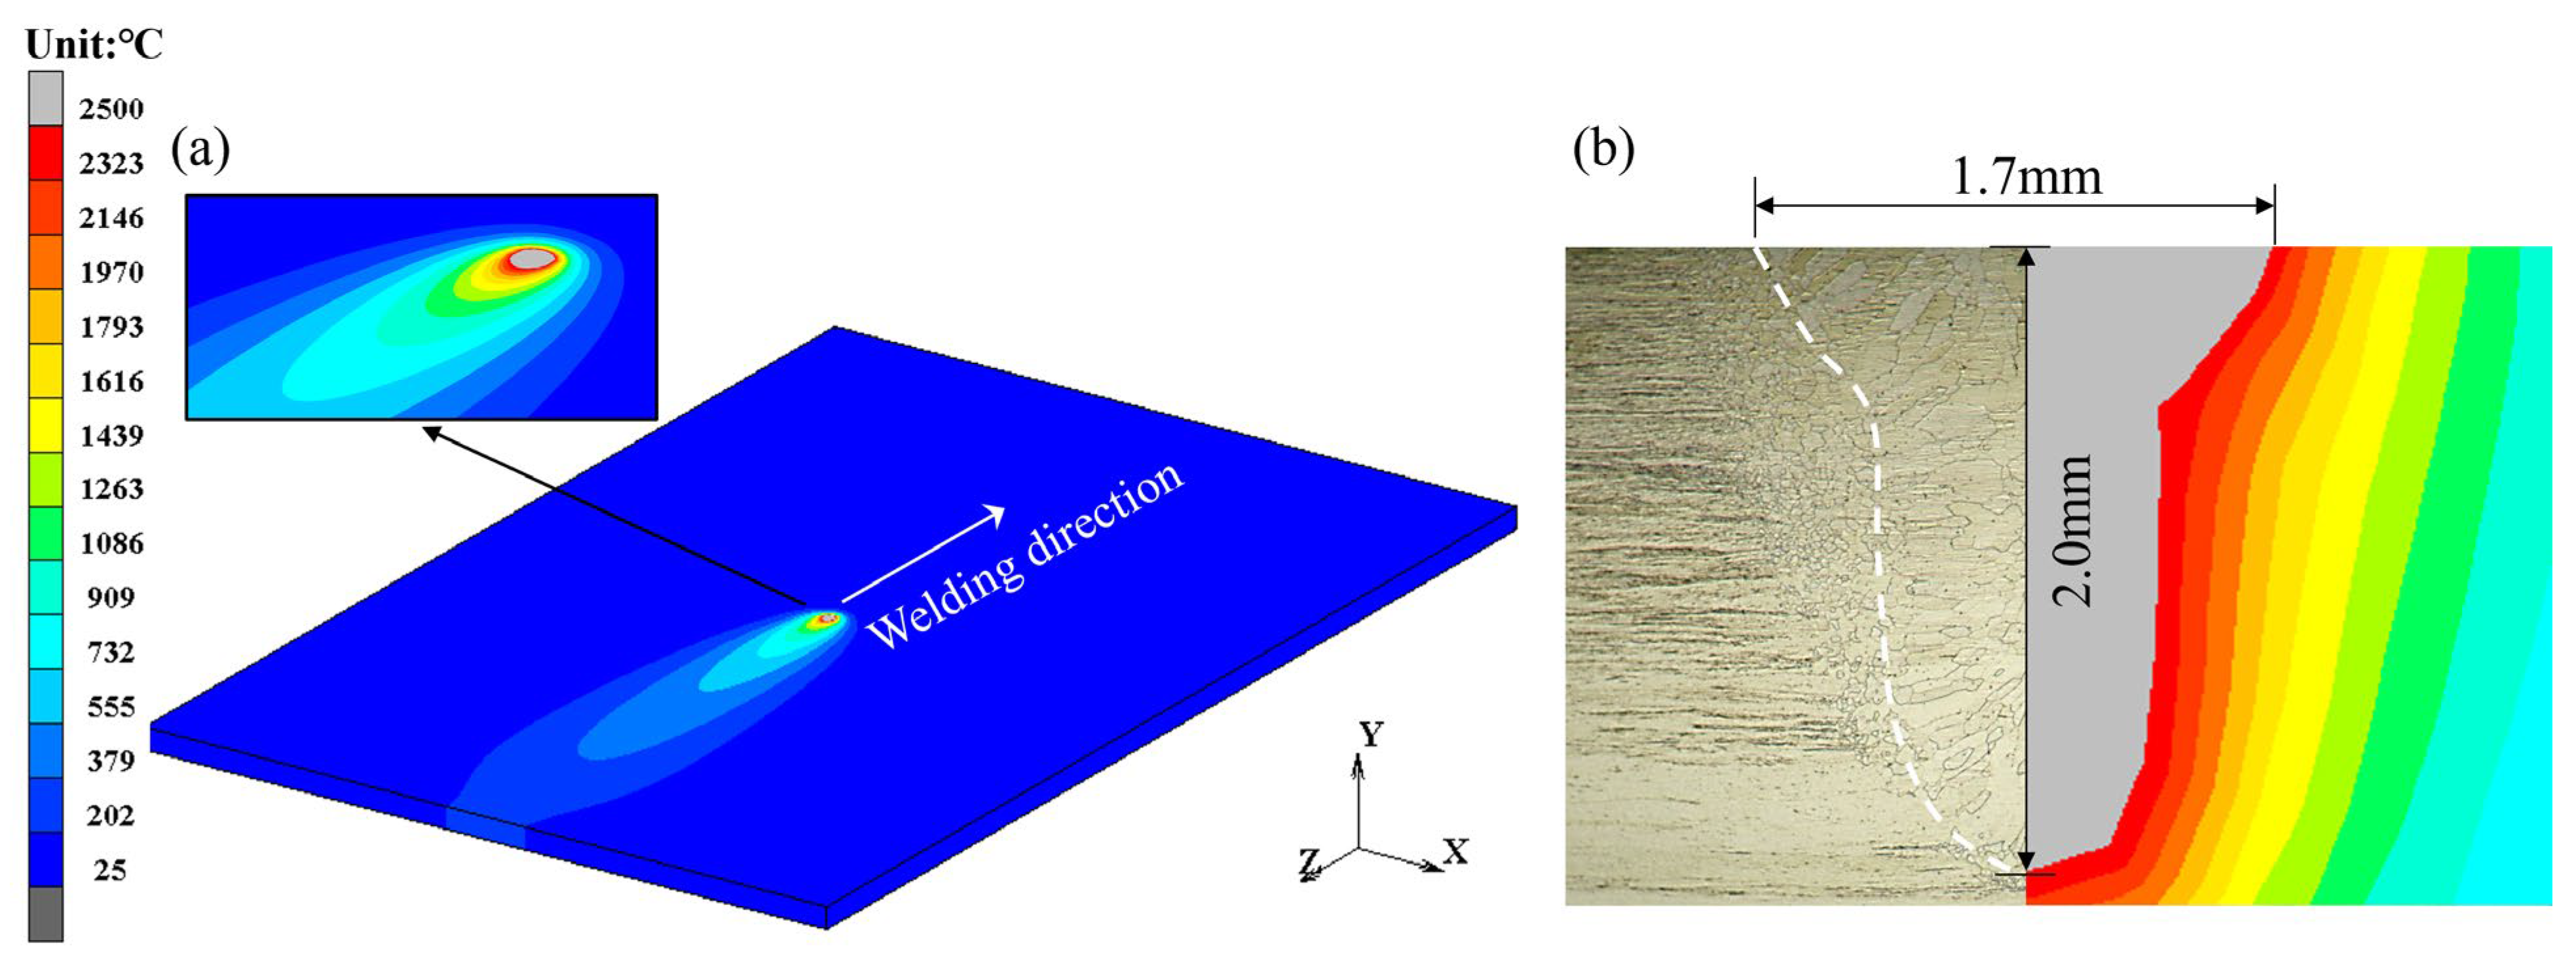
The welding temperature field calculated using a combined double-ellipsoid and cylindrical heat source model was presented in Figure 10. Figure 10a displays the instantaneous temperature distribution contour on the workpiece surface during welding, where the gray region corresponded to the areas with peak temperatures exceeding the metallurgical melting point of Mo-5Re alloy (2500 °C), namely the weld pool zone. The laser weld pool exhibited a relatively circular surface profile with distinct thermal characteristics: the front of the pool showed steeper temperature gradients evidenced by denser isothermal lines, while the trailing edge demonstrated elliptical and sparse isotherms. Furthermore, because of the concentrated energy input characteristic of laser welding, most area of the workpiece maintained ambient temperature. Figure 10b compared the temperature distribution at the middle cross-section of the joint obtained by numerical simulation with that of the actual weld pool. It revealed that the simulation result had excellent agreement with the experimental observation. To quantitatively evaluate the computational reliability of the welding temperature field, the thermal history at nodal position A (marked in Figure 2) was extracted and compared with experimental data (Figure 11). It can be seen that the simulated and measured thermal cycles showed remarkable consistency in both heating and cooling stages, with merely 21 °C deviation in peak temperature.

4.2.2. Residual Stress Distribution in the Remelted Joint

Figure 12 shows the predicted residual stress distribution contours on the surface and in the middle cross-section of the Mo-5Re alloy single-pass laser remelted joint. The contours of the surface presented symmetric distributions of longitudinal and transverse residual stresses on both sides of the weld seam, with a stable residual stress zone existing in the middle section of the joint. Relatively large longitudinal tensile residual stresses can be seen in FZ and its adjacent high-temperature-affected regions (Figure 12a). The longitudinal tensile residual stress values in these regions slightly exceeded the room-temperature yield strength of BM (488 MPa). The areas farther from FZ exhibited longitudinal compressive residual stresses with the values less than 150 MPa. Transverse tensile residual stresses primarily concentrated near the weld toe and root regions (Figure 12b). Notably, the magnitude of transverse residual stresses was substantially lower than that of longitudinal residual stresses, attributing to the relatively weaker transverse constraint.
Figure 13 compared the numerical and experimental residual stresses along Line 1 on the upper surface of the middle cross-section in the remelted joint. Generally good agreement between both results was obtained. As shown in Figure 13a, the experimentally measured maximum longitudinal tensile residual stress was 393 MPa, while the calculated value at the same location was 509 MPa. The value difference probably stemmed from ignoring the effect of softening on residual stresses. The transvers residual stresses along Line 1 were shown in Figure 13b. It revealed that low transverse tensile residual stresses existed near FZ, and transverse compressive residual stresses were generated in FZ. The experimental transverse stress measurements were higher than the calculated values, mainly due to systematic errors inherent in the hole-drilling measurement method. It is clear that the residual stress states in FZ and its vicinity of the remelted joint were complicated. The significant tensile residual stresses in the above regions may make the joint particularly susceptible to cracking.

4.2.3. Welding Deformation Distribution of the Remelted Joint

Figure 14 presents the magnified (10×) contours of the overall displacement distribution and the thickness-direction (Y-direction) displacement distribution of the remelted joint obtained by simulation. As shown in Figure 14a, the post-weld deformation of the entire joint was relatively small, with a maximum value of 0.267 mm. The deformation primarily occurred in and near the weld bead, resulting from the residual plastic deformation of these regions. Figure 14b displays the contour of the displacement distribution in the Y direction. Due to the uneven distribution of transverse shrinkage along the thickness direction, angular distortion was generated in the remelted joint. The maximum value of displacement in the Y direction was 0.264 mm.
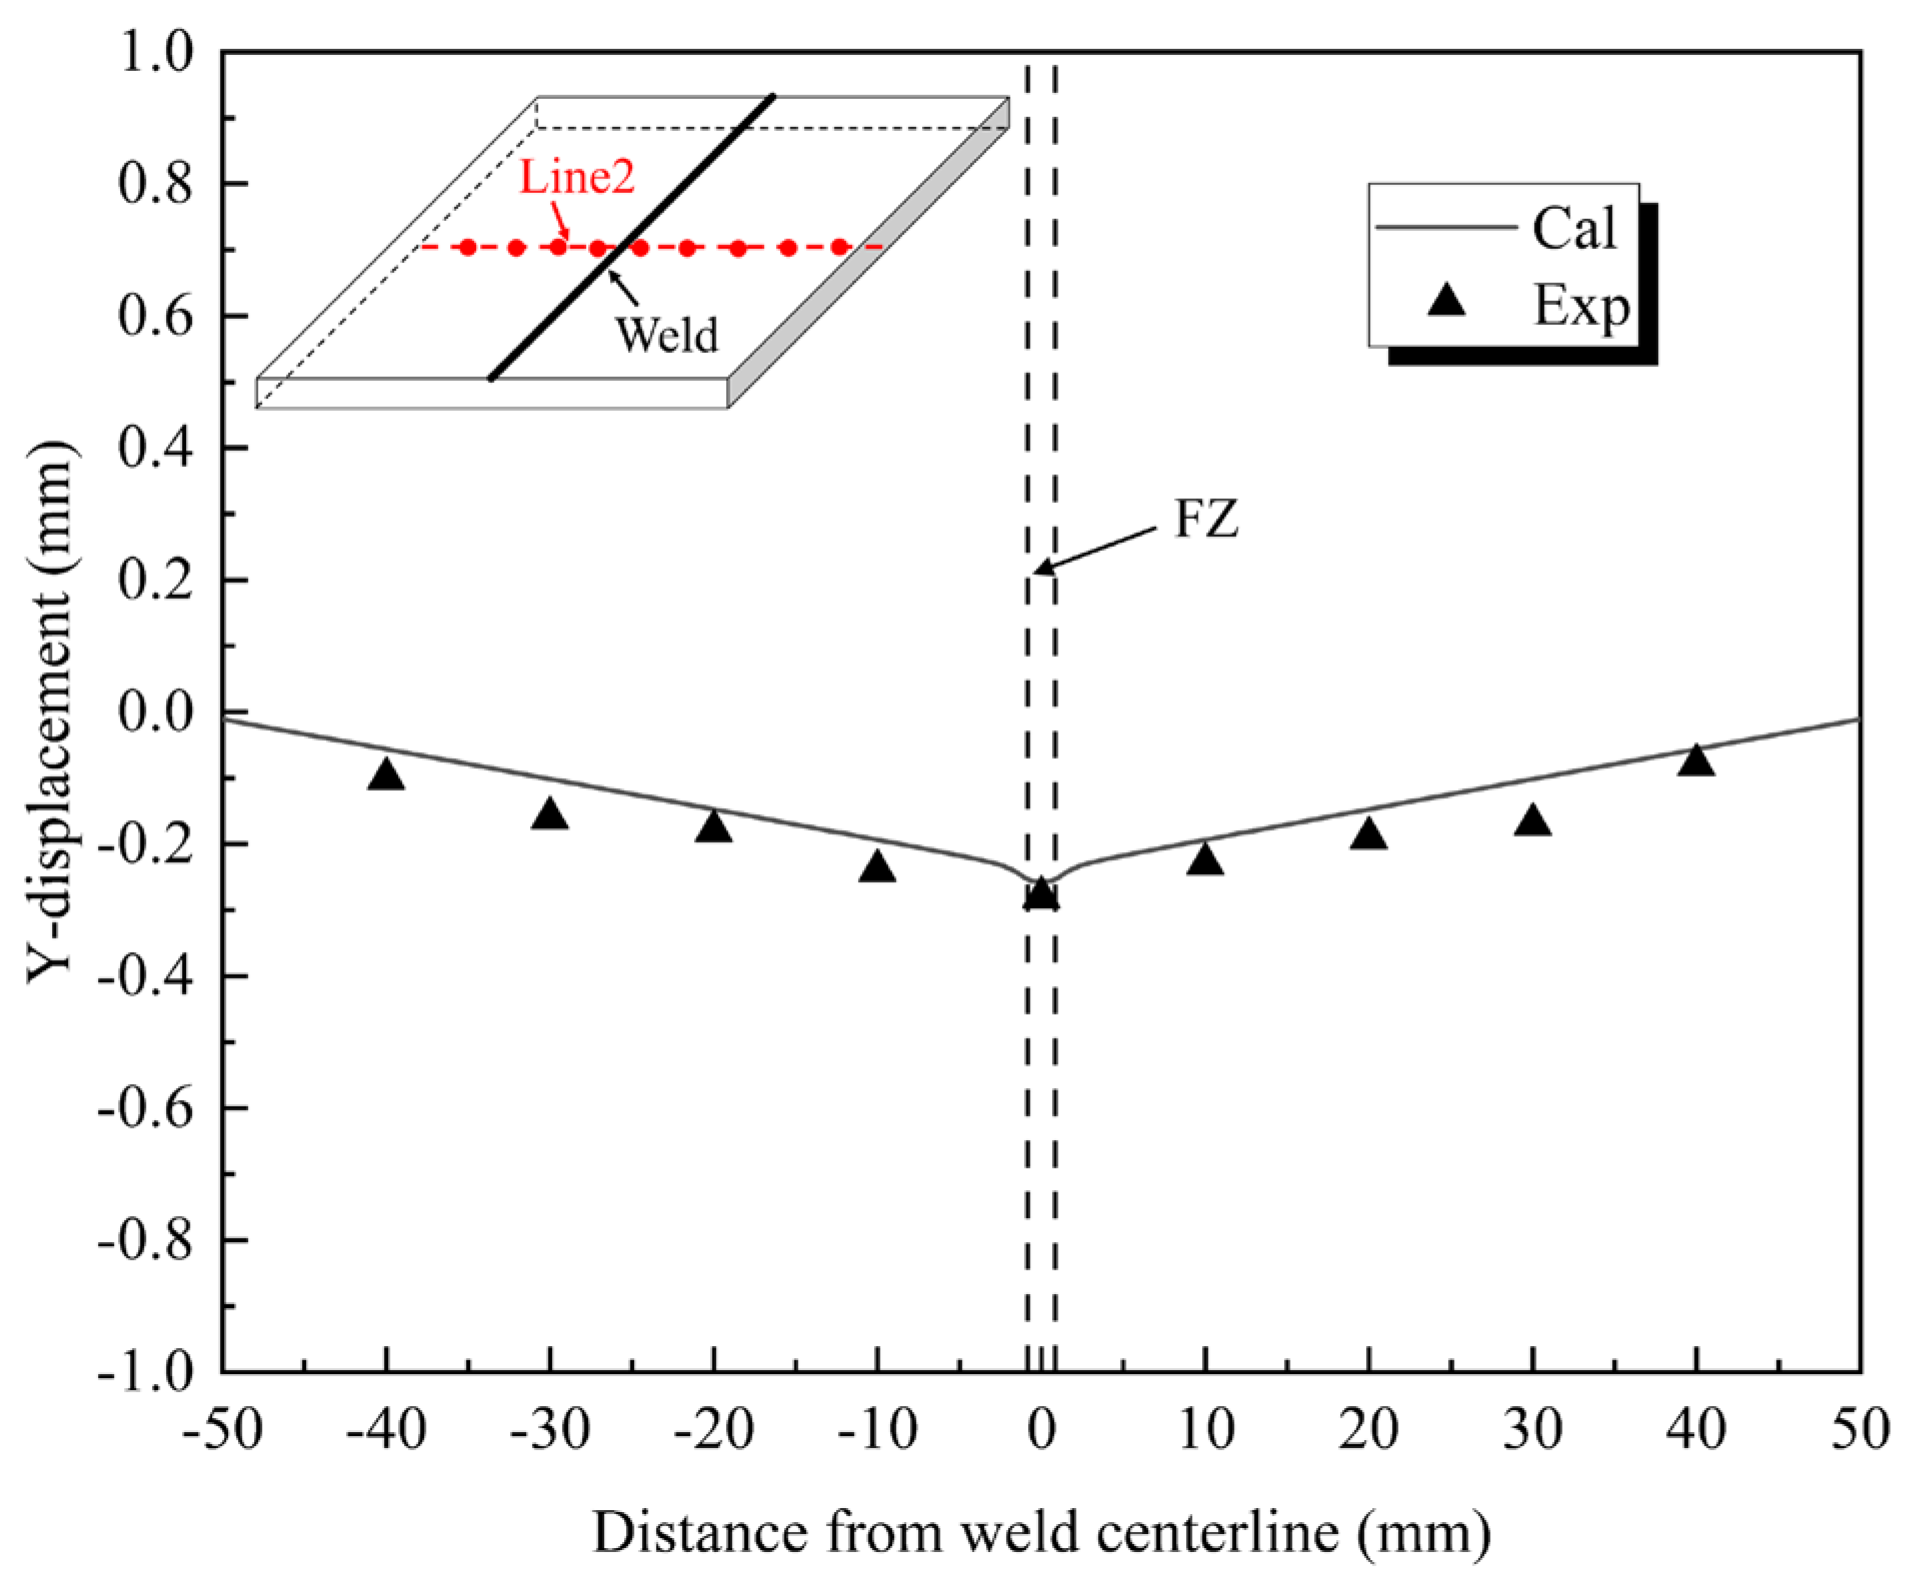
The comparison of simulated and measured Y-direction displacements along Line 2 on the lower surface of the middle cross-section of the remelted joint was presented in Figure 15. Although the experimentally measured displacements were slightly larger than the simulated values, both distributions showed similar trends. The maximum measured displacement along Line 2 was 0.28 mm, while the simulated value was 0.256 mm.
Although the simulation results (residual stresses and angular distortion predictions) matched the experimental measurements well, the established modeling still has some limitations, such as the neglect of viscoplasticity, the same properties adopted for weld and BM, and no attention was paid on mushy-zone kinetics. In the subsequent studies on laser welding of Mo-5Re alloy, the numerical models will be improved.

5. Conclusions

The 3 mm thick Mo-5Re alloy (low Re content) was single-pass remelted (no filler) by the laser welding mothed. The microstructure and microhardness of the remelted joint were investigated. In addition, numerical prediction and experimental validation of the temperature field, residual stresses, and angular distortion in the remelted joint were carried out. The main conclusions are as follows:
(1) The molten pool of Mo-5Re alloy during the single-pass laser remelting process exhibited a “nail-shape” profile (wider at the top and narrower at the bottom). HAZ of the remelted joint consisted of recrystallized equiaxed grains, while FZ contained both columnar and equiaxed grains.
(2) Equiaxed grains with average size of 19.2 μm mainly existed in the central region of FZ. 82.4% of the boundaries in FZ were high-angle grain boundaries. Oxide/carbide particles inferred from contrast results were observed distributing along the grain boundaries and inside the grains.
(3) The trends of microhardness distribution in different transverse paths on the cross-section of the remelted joint were similar. Softening occurred in HAZ, and the closer it was to FZ, the lower the microhardness was. The average value of the hardness in FZ was 170 ± 5 HV, which was ~80 HV lower than that of BM (250 ± 2 HV). However, no significant change in hardness value in the longitudinal direction on the centerline of FZ.
(4) The simulated weld pool shape and thermal cycle curve were in good agreement with the experimental results. Relatively large longitudinal tensile residual stresses were generated in FZ and its vicinity of the remelted joint. The maximum measured longitudinal tensile residual stress was 393 MPa, which was 116 MPa lower than the calculated value (509 MPa). The overall displacement of the remelted joint was very small. The maximum measured displacement along the thickness direction on the lower surface of the middle cross-section of the remelted joint was 0.28 mm, while the predicted value was 0.256 mm.
(5) This study provides a theoretical basis and methodological reference for the process optimization and performance prediction of laser welding of Mo alloys with low Re content. Based on the results obtained in this study, laser welding process parameters can be designed to produce Mo-5Re alloy butt joints with/without fillers. In addition, if simulation studies are carried out on the temperature field and residual stresses in the butt joints, the property differences between the weld and BM will be seriously considered to establish a model with high computational accuracy.

Author Contributions

Conceptualization, Y.W., D.D. and X.Q.; investigation, D.P., X.Q., S.H. and M.S.; data curation, M.S., S.H., W.L. and D.P.; writing—original draft preparation, Y.W., D.D. and M.S.; writing—review and editing, Y.W., X.Q., W.L. and D.D.; project administration, S.H., D.P. and Y.W.; funding acquisition, Y.W., X.Q., W.L. and D.D. All authors have read and agreed to the published version of the manuscript.

Funding

This research was funded by the National Natural Science Foundation of China [grant numbers 12205285, U2341256 and 52471032]. The research is also supported by the Innovation Program of Nuclear Power Institute of China [grant number KJCX-2023-YC2-07].

Data Availability Statement

The data and methods used in the research are presented in sufficient detail in the document for other researchers to replicate the work.

Conflicts of Interest

Danmin Peng, Xi Qiu, Shuwei Hu, and Wenjie Li were employed by the National Key Laboratory of Nuclear Reactor Technology, Nuclear Power Institute of China; Mingwei Su was employed by the 9th Research Institute of China Electronics Technology Group Corporation. The remaining authors declare that the research was conducted in the absence of any commercial or financial relationships that could be construed as a potential conflict of interest.

References

  1. Leclercq, A.; Czech, A.; Mouret, T.; Lis, M.; Wrona, A.; Brailovski, V. Molybdenum 8wt% rhenium alloy processed by laser powder bed fusion: From powder production to mechanical testing at elevated temperatures. Int. J. Refract. Met. Hard Mater. 2025, 132, 107266. [Google Scholar] [CrossRef]
  2. Hu, B.; Quan, C.; Ma, S.; Zhang, Q.; Xing, H.; Wang, L. Strengthening-toughening mechanism of carbon-coated TiC/ZrC secondary phase doping molybdenum alloy. Mater. Sci. Eng. A-Struct. 2025, 929, 148096. [Google Scholar] [CrossRef]
  3. Du, F.; Duan, B.; Wang, D.; Wu, Z.; Liu, X. Preparation, microstructure and mechanical properties of a Ce-PSZ reinforced molybdenum alloy. Int. J. Refract. Met. Hard Mater. 2025, 131, 107204. [Google Scholar] [CrossRef]
  4. Farrell, J.; Umstead, W.; Xu, J.; Zhai, T. Resistance spot welding of 50Mo-50Re refractory alloy foils. In Proceedings of the 2008 IEEE International Vacuum Electronics Conference, Monterey, CA, USA, 22–24 April 2008. [Google Scholar] [CrossRef]
  5. Xu, J.H.; Jiang, X.P.; Zeng, Q.; Zhai, T.G.; Leonhardt, T.; Farrell, J.; Umstead, W.; Effgen, M.P. Optimization of resistance spot welding on the assembly of refractory alloy 50Mo-50Re thin sheet. J. Nucl. Mater. 2007, 366, 417–425. [Google Scholar] [CrossRef]
  6. Xu, J.H.; Zhai, T.G. The small-scale resistance spot welding of refractory alloy 50Mo-50Re thin sheet. JOM 2008, 60, 80–83. [Google Scholar] [CrossRef]
  7. Sun, J.; Song, X.; Li, X.; Zhao, X.; Dai, J.; Li, C. Synergistic back stress and Pd-induced heterogeneous microstructure design for high-performance Mo-5Re/Nb-1Zr brazed joints. Int. J. Refract. Met. Hard Mater. 2025, 133, 107363. [Google Scholar] [CrossRef]
  8. Xia, C.Z.; Wu, L.; Xu, X.P.; Zou, J.S. Phase constitution and fracture analysis of vacuum brazed joint of 50Mo-50Re refractory alloys. Vacuum 2017, 136, 97–100. [Google Scholar] [CrossRef]
  9. Fujii, H.; Sun, Y.F.; Kato, H. Microstructure and mechanical properties of friction stir welded pure Mo joints. Scr. Mater. 2011, 64, 657–660. [Google Scholar] [CrossRef]
  10. Tabernig, B.; Reheis, N. Joining of molybdenum and its application. Int. J. Refract. Met. Hard Mater. 2010, 28, 728–733. [Google Scholar] [CrossRef]
  11. Liu, P.; Feng, K.Y.; Zhang, G.M. A novel study on laser lap welding of refractory alloy 50Mo-50Re of small-scale thin sheet. Vacuum 2017, 136, 10–13. [Google Scholar] [CrossRef]
  12. Kramer, D.P.; Mcdougal, J.R.; Booher, B.A.; Ruhkamp, J.D.; Kwiatkowski, J.J. Electron Beam and Nd-Yag Laser Welding of Niobium-1% Zirconium and Molybdenum-44.5% Rhenium Thin Select Material. In Proceedings of the Energy Conversion Engineering Conference & Exhibit IEEE, Denver, CO, USA, 15–19 September 2013. [Google Scholar] [CrossRef]
  13. An, G.; Sun, J.; Sun, Y.J.; Cao, W.C.; Zhu, Q.; Bai, Q.L.; Zhang, L.J. Fiber laser welding of fuel cladding and end plug made of La2O3 dispersion-strengthened molybdenum alloy. Materials 2018, 11, 1071. [Google Scholar] [CrossRef]
  14. Yu, H.; Zhang, H.D.; Zhang, L.J.; Ning, J.; An, G.; Zhang, L.L. Regulation of performance of laser-welded socket joint of Mo-14Re ultra-high-temperature heat pipe by introducing Ti into both weld and heat affected zone. J. Mater. Res. Technol. 2023, 22, 569–584. [Google Scholar] [CrossRef]
  15. Zhang, L.L.; Zhang, L.J.; Yang, Q.J. Weldability of molybdenum-rhenium alloy based on a single-mode fiber laser. Metals 2022, 12, 841. [Google Scholar] [CrossRef]
  16. Yu, K.; Zhang, Y.; Yuan, X.D.; Zhao, L.B.; Li, Z.J. Effect of long-term thermal exposure on microstructure of laser-welded UNS N10003 alloy. Nucl. Sci. Tech. 2024, 35, 193. [Google Scholar] [CrossRef]
  17. Zhang, L.J.; Pei, J.Y.; Zhang, L.L.; Long, J.; Zhang, J.X.; Na, S.J. Laser seal welding of end plug to thin-walled nanostructured high-strength molybdenum alloy cladding with a zirconium interlayer. J. Mater. Process. Technol. 2019, 267, 338–347. [Google Scholar] [CrossRef]
  18. Zhang, L.L.; Zhang, L.J.; Long, J.; Ning, J.; Zhang, J.X.; Na, S.J. Effects of titanium on grain boundary strength in molybdenum laser weld bead and formation and strengthening mechanisms of brazing layer. Mater. Design 2019, 169, 107681. [Google Scholar] [CrossRef]
  19. Xie, M.X.; Li, Y.X.; Shang, X.T.; Wang, X.W.; Pei, J.Y. Effect of heat input on porosity defects in a fiber Laser welded socket-joint made of powder metallurgy molybdenum alloy. Materials 2019, 12, 1433. [Google Scholar] [CrossRef]
  20. Xie, M.X.; Li, Y.X.; Shang, X.T.; Wang, X.W.; Pei, J.Y. Microstructure and mechanical properties of a fiber welded socket-joint made of powder metallurgy molybdenum alloy. Metals 2019, 9, 640. [Google Scholar] [CrossRef]
  21. Zhang, L.J.; Liu, J.Z.; Pei, J.Y.; Ning, J.; Zhang, L.L.; Long, J.; Zhang, G.F.; Zhang, J.X.; Na, S.J. Effects of power modulation, multipass remelting and Zr addition upon porosity defects in laser seal welding of end plug to thin-walled molybdenum alloy. J. Manuf. Process. 2019, 41, 197–207. [Google Scholar] [CrossRef]
  22. Wang, Z.X.; Yang, J.Z.; Wang, S.C.; Wang, X.J.; Xing, H.R.; Hu, B.L.; Wang, L.; Muzamil, M.; Wang, Q.; Feng, R.; et al. Crack generation and propagation mechanism of Mo-14Re alloy laser welding. Int. J. Refract. Met. Hard Mater. 2024, 121, 106684. [Google Scholar] [CrossRef]
  23. Zhang, L.J.; Liu, J.Z.; Bai, Q.L.; Wang, X.W.; Sun, Y.J.; Li, S.G.; Gong, X. Effect of preheating on the microstructure and properties of fiber laser welded girth joint of thin-walled nanostructured Mo alloy. Int. J. Refract. Met. Hard Mater. 2019, 78, 219–227. [Google Scholar] [CrossRef]
  24. Zhang, G.; Chen, G.Q.; Cao, H.; Liu, R.C.; Zhang, B.G.; Leng, X.S. Uncovering the weakening mechanism of electron beam welded joints of La2O3 dispersion strengthened molybdenum alloy: Experiment and simulation. Mater. Lett. 2023, 333, 133586. [Google Scholar] [CrossRef]
  25. GB/T 31310-2014; Determination of Residual Stress in Metal Materials by the Hole-Drilling Strain Method. China Standards Press: Beijing, China, 2014.
  26. Goldak, J.; Chakravarti, A.; Bibby, M. A new finite element model for welding heat sources. Metall. Trans. B 1984, 15, 299–305. [Google Scholar] [CrossRef]
  27. Luo, W.Z.; Cheng, H.M.; Liu, H.Y.; Wang, Y.F.; Ye, Y.H.; Deng, D.A. Numerical simulation of residual stress and welding deformation for high strength steel Q960E butt-welded joints. China Mech. Eng. 2023, 34, 2095–2105. [Google Scholar] [CrossRef]
  28. Muránsky, O.; Hamelin, C.J.; Smith, M.C.; Bendeich, P.J.; Edwards, L. The effect of plasticity theory on predicted residual stress fields in numerical weld analyses. Comput. Mater. Sci. 2012, 54, 125–134. [Google Scholar] [CrossRef]
  29. Zhang, L.J.; Yu, H.; Zeng, X.L.; Sun, G.; Ding, X.D.; Sun, Y.J. Influences of Si-Ti combined alloying on microstructures and properties of laser welded socket joints of molybdenum. Opt. Laser Technol. 2024, 175, 110749. [Google Scholar] [CrossRef]
  30. Dong, J.; Zhong, W.Y.; Zhang, Z.; Gao, J.; He, X.F. Microstructure transformation and pore formation mechanism of Mo-14Re alloy weld by vacuum electron beam welding. Vacuum 2023, 218, 112594. [Google Scholar] [CrossRef]
Figure 1. Diagrammatic sketch of the laser remelting process.
Metals 15 01145 g001
Figure 2. (a) Test equipment for welding thermal cycle and (b) location of the thermocouple.
Metals 15 01145 g002
Figure 3. Arrangement of strain gauges on the top surface of the remelted joint.
Metals 15 01145 g003
Figure 4. Schematic image of measuring angular distortion.
Metals 15 01145 g004
Figure 5. Finite element mesh model and displacement boundary conditions for Mo-5Re alloy single-pass remelted joint.
Metals 15 01145 g005
Figure 6. Double ellipsoid-cylinder combined heat source model.
Metals 15 01145 g006
Figure 7. Microstructure of the Mo-5Re alloy laser remelted joint. (a) Low-magnification OM image of the cross-section of the joint; (bf) high-magnification images of zone A, zone B, zone C, zone D and zone E, respectively, in (a).
Metals 15 01145 g007
Figure 8. EBSD results of FZ. (a) Inverse pole figures (IPF); (b) grain sizes; (c) grain boundary misorientation distributions; (d,e) phase distributions of zone A and zone B, respectively, marked in (a).
Metals 15 01145 g008
Figure 9. Microhardness distribution of Mo-5Re alloy remelted joint. (a) Diagrammatic sketch of the hardness measurement paths; (be) hardness values on Line A, Line B, Line C and Line D, respectively.
Metals 15 01145 g009
Figure 10. Temperature field of the remelted joint. (a) Transient temperature field distribution; (b) comparison of molten pool shapes.
Metals 15 01145 g010
Figure 11. Comparison of the welding temperature cycles obtained by numerical simulation and experimental measurement at point A (marked in Figure 2).
Metals 15 01145 g011
Figure 12. Contours of residual stress distribution in the remelted joint. (a) Longitudinal residual stress; (b) transverse residual stress.
Metals 15 01145 g012
Figure 13. Comparison of residual stress distributions along Line 1 on the top surface of the middle cross-section in the remelted joint. (a) Longitudinal residual stress; (b) transverse residual stress.
Metals 15 01145 g013
Figure 14. Contours of welding deformation of the remelted joint. (a) Overall deformation (10×); (b) deformation in the Y-direction (10×).
Metals 15 01145 g014
Figure 15. Displacements in the Y direction on the lower surface of the middle cross-section in the remelted joint.
Metals 15 01145 g015
Table 1. Chemical Composition of Mo-5Re (wt.%).
ElementKNaMnSnCaFeCNOReMo
Content≤0.002≤0.002≤0.0015≤0.001≤0.0002≤0.00550.0037<0.00030.00135Bal.
Table 2. Welding parameters.
Welding
Parameters
Power
(W)
Speed
(m·min−1)
Spot Diameter
(mm)
Defocus
(mm)
Gas Flow Rate
(L·min−1)
Efficiency
Value280020.5332.21200.9
Table 3. Heat source parameter values.
Heat Source Parametersa1a2bcH1Hr0n1n2
Value0.350.550.450.30.31.450.50.350.65
Table 4. Temperature-dependent thermal physical properties of Mo-5Re alloy.
Temperature
(K)
Density
(kg·m−3)
Thermal Conductivity
(W·m−1·K−1)
Specific Heat
(J·kg−1·K−1)
29810,50074240
47374240
67375240
87377250
107379260
127385280
147393320
167387320
187387320
Table 5. Temperature-dependent mechanical properties of Mo-5Re alloy.
Temperature
(K)
Linear Expansion
(K−1)
Temperature
(K)
Yield Strength
(MPa)
Young’s
Modulus
(GPa)
Poisson’s Ratio
2980.000004962984853200.3
4730.000004965734193100.31
6730.000005178733492960.31
8730.0000055311732282820.32
10730.0000058913732102700.32
12730.0000064215731852550.31
14730.0000070117731202320.3
16730.0000076418731202320.3
18730.00000764
Disclaimer/Publisher’s Note: The statements, opinions and data contained in all publications are solely those of the individual author(s) and contributor(s) and not of MDPI and/or the editor(s). MDPI and/or the editor(s) disclaim responsibility for any injury to people or property resulting from any ideas, methods, instructions or products referred to in the content.