Article

Determination of Damage Constant and Critical Damage by the Combined Experiment and FEM Using the Reference Processes

1
Graduate School of Mechanical and Aerospace Engineering, Gyeongsang National University, Jinju 52828, Republic of Korea
2
Department of Mechanical and Automotive Engineering, Kongju National University, Cheonan 32588, Republic of Korea
3
ReCAPT, School of Mechanical and Aerospace Engineering, Gyeongsang National University, Jinju 52828, Republic of Korea
*
Author to whom correspondence should be addressed.
Metals 2025, 15(12), 1376; https://doi.org/10.3390/met15121376
Submission received: 11 November 2025 / Revised: 2 December 2025 / Accepted: 9 December 2025 / Published: 15 December 2025

Abstract

The practical characterization algorithm is presented to find the optimized damage constants and critical damages of the traditional damage models formulated by some unknown damage constants. The flow characterization of the material SWCH45F is conducted using the combined finite element method (FEM) and experimental method, assisted by elastoplastic finite element (FE) analysis of a cylindrical tensile test with accuracy. The new concept of a critical edge length of FEs is proposed to overcome the highly negative situations caused by the remeshing during a bulk metal-forming simulation for reliable damage prediction. With accurate flow behavior and optimized numerical conditions, two examples of bulk metal-forming processes, including the tensile test and bolt heading process (all are clear in the fracture perspective), are then simulated to reveal the relationship between the damage constant and maximum damage, which is employed to determine the damage constant and the critical damage. This approach is successfully used to optimally calculate the damage constant of the generalized Huh’s damage model along with the critical damage. The generality and practicality of the new approach are emphasized.

1. Introduction

Ductile fracture is serially composed of pore initiation, coalescence, growth, and material fracture. The damage has been described as a history-dependent state variable or weighted strain. There are numerous damage models [1,2,3,4,5,6,7,8,9,10,11,12,13,14,15,16] with different theoretical backgrounds, ranging from mechanically simple models to experimental studies. These damage models consist of basic elements such as maximum principal stress or normalized maximum principal stress [2,3,5,13], mean stress or stress triaxiality [4,5,7,8,11,12,13,14,15], energy [2,11], three principal stresses [2], and effective stress [1]. Critical damage, which is the damage value at the fracture instant, is essential in evaluating the ductile fracture.
From an empirical point of view, there is a problem that the linkage between the damage models is weak, and the critical damage varies greatly depending on the process. This prevents the traditional damage models from having quantitative meaning, and as a result, it significantly reduces their applicability to precision FE prediction of fracture, shearing, blanking, etc. Mechanical and metallurgical complexities, as well as numerical issues, concerning ductile fracture have hindered researchers from developing a practical and general method for predicting a ductile fracture during cold forging. Damage can be considered to be a strain multiplied by the weight that is directly related to stress. Strain is generally concentrated, but stress can jump locally. Just as a fracture occurs locally, damage tends to be concentrated locally. In the case of bulk metal-forming processes that require remeshing during finite element analysis, sophisticated numerical techniques are also required to obtain reliable FE predictions regarding damage because of damage characteristics.
It is thus challenging to quantify the reason for a ductile fracture during cold forging using conventional damage models. One of the reasons lies in plastic deformation-dependent material behaviors, including critical plastic deformation-induced embrittlement [17]. Nonetheless, due to the industrial significance, very complicated fracture problems associated with the bulk and sheet metal-forming processes, including rod shearing and anisotropic metal sheet forming [18], have recently been addressed using improved damage models. Despite the contributions of many researchers to this field, further efforts are still needed to enhance the practicality and generality of their findings. In the case of sheet metal forming, which does not require remeshing due to relatively small deformation, an attempt was made to solve the aforementioned problem by considering its characteristics. For example, the generalized incremental stress state-dependent damage model (GISSMO) [16] has attracted researchers seeking a general approach to ductile fracture during sheet metal forming [17,19,20], owing to its generality and practicability. It is characterized by calculating fracture strain curves that reflect standardized tests and deformation modes, such as tension, shear, and various notch tensions of sheet specimens, the manifestation of the damage-softening phenomenon, and the demonstration of the FE size effect. It was initially designed for sheet metal forming, allowing for low strain. When dealing with sheet metals, the damage constants required can be obtained relatively systematically from the bulk metal forming, owing to the low strains.
On the contrary, bulk metal forming focuses on much larger strains than sheet metal forming. For example, from the FE predictions of the stress triaxiality and effective strain for the tensile test of SWCH10A [21] (gauge length = 15 mm; diameter of circular specimen = 3 mm) shown in Figure 1, the stress triaxiality remains at 0.33, only for the strain less than an eighth of the fracture strain. However, when the maximum strain reaches 50% at the final stroke (fracture instant), the stress triaxiality reaches about 0.6. Notably, the stress triaxiality reaches 0.87 at the fracture instant, emphasizing that it does not exhibit any uniformity even in the cylindrical tensile test, especially at the fracture point. Therefore, a similar approach with the GISSMO cannot be applied to bulk metal forming, even though it was attempted with a bar material [22] to reveal the fracture properties of a bolt, a component of a mechanical structure.
Since necking is a natural phenomenon during the cylindrical tensile test due to mechanical instability, post-necking strain hardening can be scientifically predicted without imperfections or damage to the coupling. By utilizing the natural phenomena during the cylindrical tensile tests, various methods [23,24] for obtaining flow curves from them using the finite element method (FEM) were presented. Recently, a systematic way of obtaining the flow curve using the elastoplastic FEM was developed by Kim et al. [25], which enhanced the accuracy of the tensile test prediction. Notably, it can give the FE-predicted cylindrical tensile test with acceptable accuracy, which is crucial in solving the damage accumulation and material fracture. The capability of accurately FE-predicting the tensile test of cylinder specimens using the two-dimensional (axisymmetric) FEM is thus very advantageous in approaching the fracture problems from a bulk metal-forming perspective. It should be emphasized that a tensile test has many engineering implications, including the fracture.
On the contrary, the region where a ductile fracture occurs during forging experiences an extreme plastic deformation, resulting in frequent remeshing. Due to the smoothing of history-dependent variables during remeshing, the damage is severely affected by the FE size. The GISSMO considers the numerical effect and is focused on the interpolation error. However, countermeasures to ensure safety from numerical influences owing to the remeshing and FE size are required to improve the applicability of the traditional damage models that are suitable for bulk metal forming. However, GISSMO’s strength lies in its generality. Exploiting this strength in volumetric plastic work can help to solve chronic problems.
To make the damage model satisfy the purpose of bulk metal forming, a practical generalization of traditional methods is indispensable, taking advantage of GISSMO. Additionally, a systematic method for obtaining the damage constants and a technique for ensuring numerical robustness should be developed. It can be easily revealed that the roots of the traditional damage models involve the normalized maximum principal stress, stress triaxiality, and energy, and the like. In the case of Huh’s damage model ( D = σ 1 σ 1 + H   η d ε ¯ ), for example, normalized maximum principal stress and stress triaxiality are used simultaneously. Notably, its generalization is possible through treating the fixed constant (i.e., 3) as an unknown damage constant, depending on the material or process.
This study combines two distinct and clear fracture cases of the cylindrical tensile test and bolt heading to determine the damage constant of the generalized Huh’s damage model, which satisfies them at once. A new concept of critical FE size is presented, which produces reliable damage in the bolt heading process where the remeshing is critical. Through these efforts, we present a method of generalizing the traditional damage models that have been independently developed. This study utilized an implicit elastoplastic FE analysis software, AFDEX V24 [26] (an Altair APA solution for metal forming or manufacturing), based on the MINI-tetrahedral finite elements [27,28].

2. Two Clear Fracture Cases—Reference Processes

2.1. Tensile Test

It was assumed that the material is not rate dependent. The flow curve in the upper panel of Figure 2 is associated with the dashed line in the lower panel, the experimental tensile test curve of SWCH45F. The Young’s modulus and Poisson’s ratio of the material are 210 GPa and 0.3, respectively. The points N′, Q′, and F′ on the flow curve correspond to those of N (necking point), Q, and F (fracture point), respectively. The solid line part of the flow curve, denoted as the EP-flow curve [25], was obtained by the elastic deformation compensation scheme of the RP-flow curve characterized from the cylindrical tensile test (radius and gage length of specimen: 3 and 15 mm, respectively) based on the rigid plasticity. Notably, it can predict the flow curve at large strains. However, the flow information just around the fracture point F′ could not be achieved because of numerical oscillation, which the activated ductile fracture might cause [29]. Therefore, the numerical fracture point means the point at the end of the solid line part of the flow curve. The elastoplastic FE predictions (dashed) of the tensile test are compared with the experimental results (solid) in the lower panel, showing excellent agreement.
First, the FE mesh effect on the FE-predicted damage was checked to find an optimized mesh system. The NCL damage model was employed. Typical structural FE mesh systems are given in Figure 3. For example, Figure 3c comprises 10,000 quadrilaterals (10,000 nodes). Figure 4 shows the variation in the damage with the number of quadrilaterals, revealing that the maximum NCL damage converges with 1.13, starting from the mesh system with 7000 quadrilaterals. Interestingly, the critical FE size in terms of damage exists, as shown in Figure 4. Damage in bulk metal forming, empirically speaking, tends to be fundamentally concentrated at the fracture region, which is relatively small compared to the entire material. A damage-softening phenomenon also tends to accelerate damage concentration, as damage is mathematically a weighted deformation, which may cause damage softening. Even though strain hardening, which generally occurs in the deformed area, tends to propagate the deformation outward, the damage works in the direction opposite to the strain.
Figure 5 exhibits FE predictions for the tensile test, obtained using the optimized FE mesh system. As shown in Figure 5b,c, the maximum principal stress and stress triaxiality differ much from position to position in the necking region. The maximum stress triaxiality of 0.72 occurs at the necking point along the central line at the numerical fracture point. At this point, the fracture occurred because the NCL damage marked the maximum value of 1.13, the critical damage value of the NCL damage model.
Figure 6 shows the trajectories of the stress triaxiality, maximum principal stress, effective strain, and NCL damage, revealing that the maximum stress triaxiality began to increase from the necking instant and reached approximately 0.74 at the numerical fracture point and instant. This phenomenon differs from common sense, which states that the stress triaxiality during the cylindrical tensile test is almost 1/3. The difference becomes more distinct in the effective strain–stress triaxiality curve in Figure 7, where the effective strain–normalized maximum principal stress curve is also shown. Figure 7 shows a very short strain range corresponding to the pre-necking strain hardening region, where the stress triaxiality and normalized maximum principal stress are maintained at a constant. On the contrary, they change almost linearly with strain for most strain ranges (from 0.17 to 0.97) in the post-necking strain hardening region, resulting in maximum values of 0.72 and 1.4 for stress triaxiality and the normalized maximum principal, respectively.

2.2. Bolt Heading Process

Figure 8a shows the automatic five-stage cold forging (AMSCF) process for an SWCH45F bolt. The material of the bolt is the SWCH45F steel heat-treated for AMSCF. It was assumed that the dies were all rigid. The stroke of the upper die from the initial contact point with the material to the early fracture point was 4.2 mm. Only a sixth domain was selected for the analysis, using two symmetry planes. The friction coefficient was assumed to be 0.05 because the material was well-lubricated. However, severe plastic deformation in the bolt heading process is expected to cause a lubrication regime change [30], but this topic was excluded in this study.
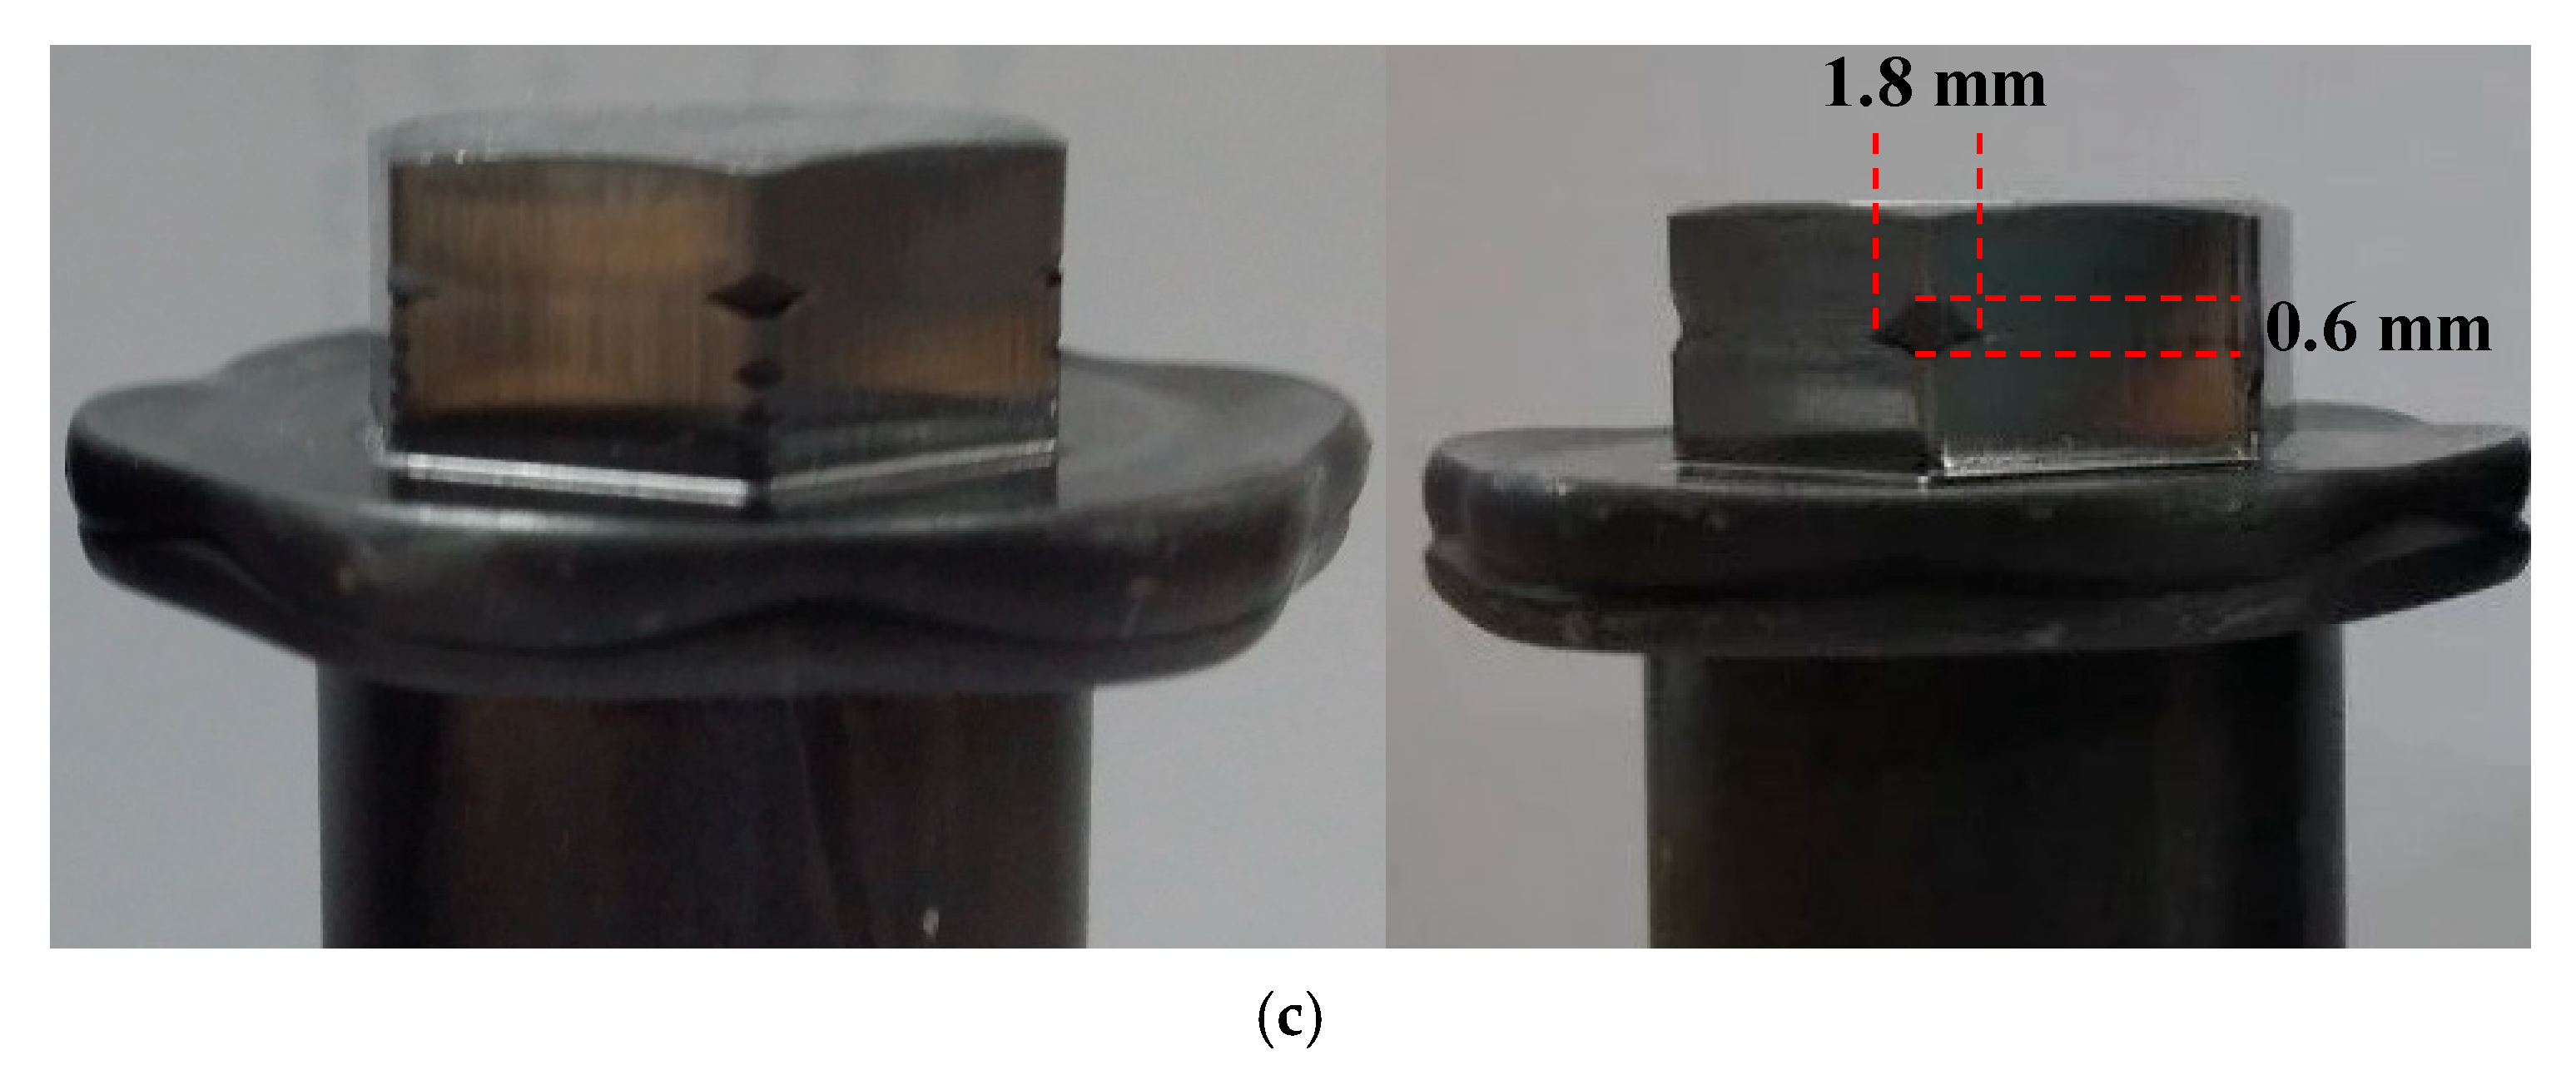
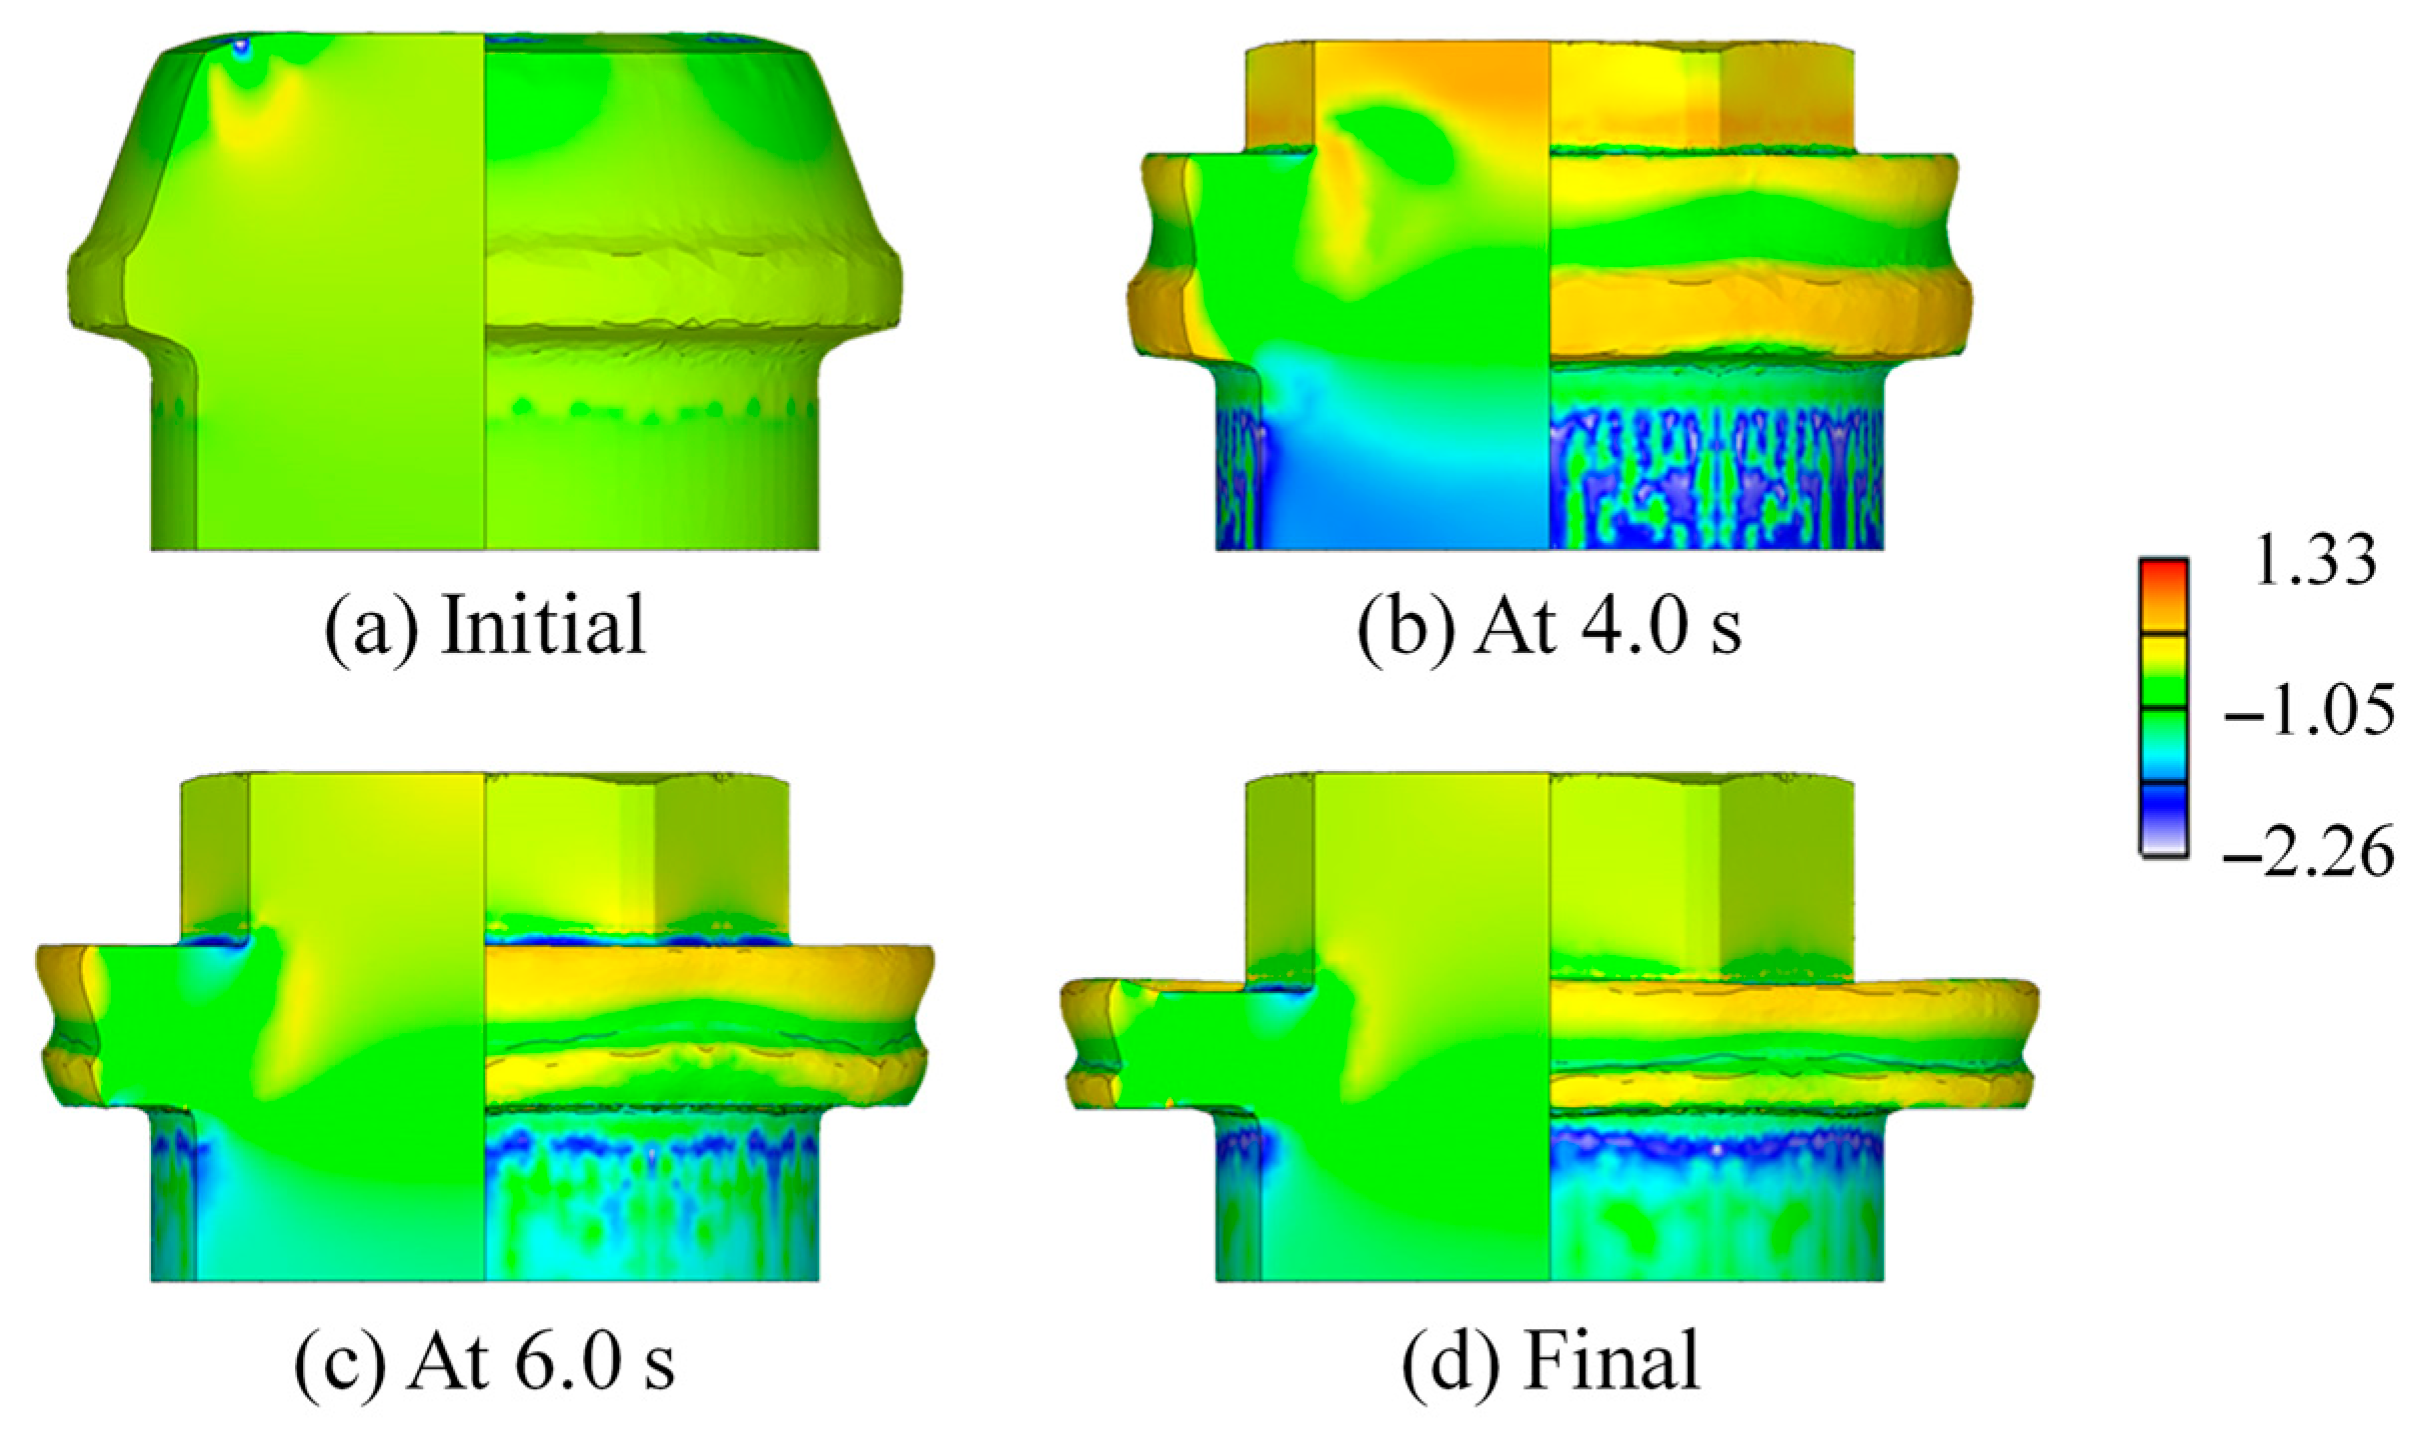
Figure 8b shows the FE-predicted effective strain, exhibiting its maximum value of around 4.5 at the bolt head’s corner. Note that this process design experimentally produced the bolt with ductile fractures in the head, as shown in Figure 8c, which were formed during bolt heading.
A fracture tends to occur locally, usually in regions of severe deformation. Numerical analysis is thus exposed to issues concerned with FE size and remeshing. To make engineering analysis quantitatively meaningful for fracture prediction, it must be free from the numerical reliability problem. If a reference FE size is determined by numerical experience, depending on the process, it can contribute to resolving numerical issues during damage calculation. Here, the possibility of addressing the FE size effect problem is investigated using the bolt heading process.
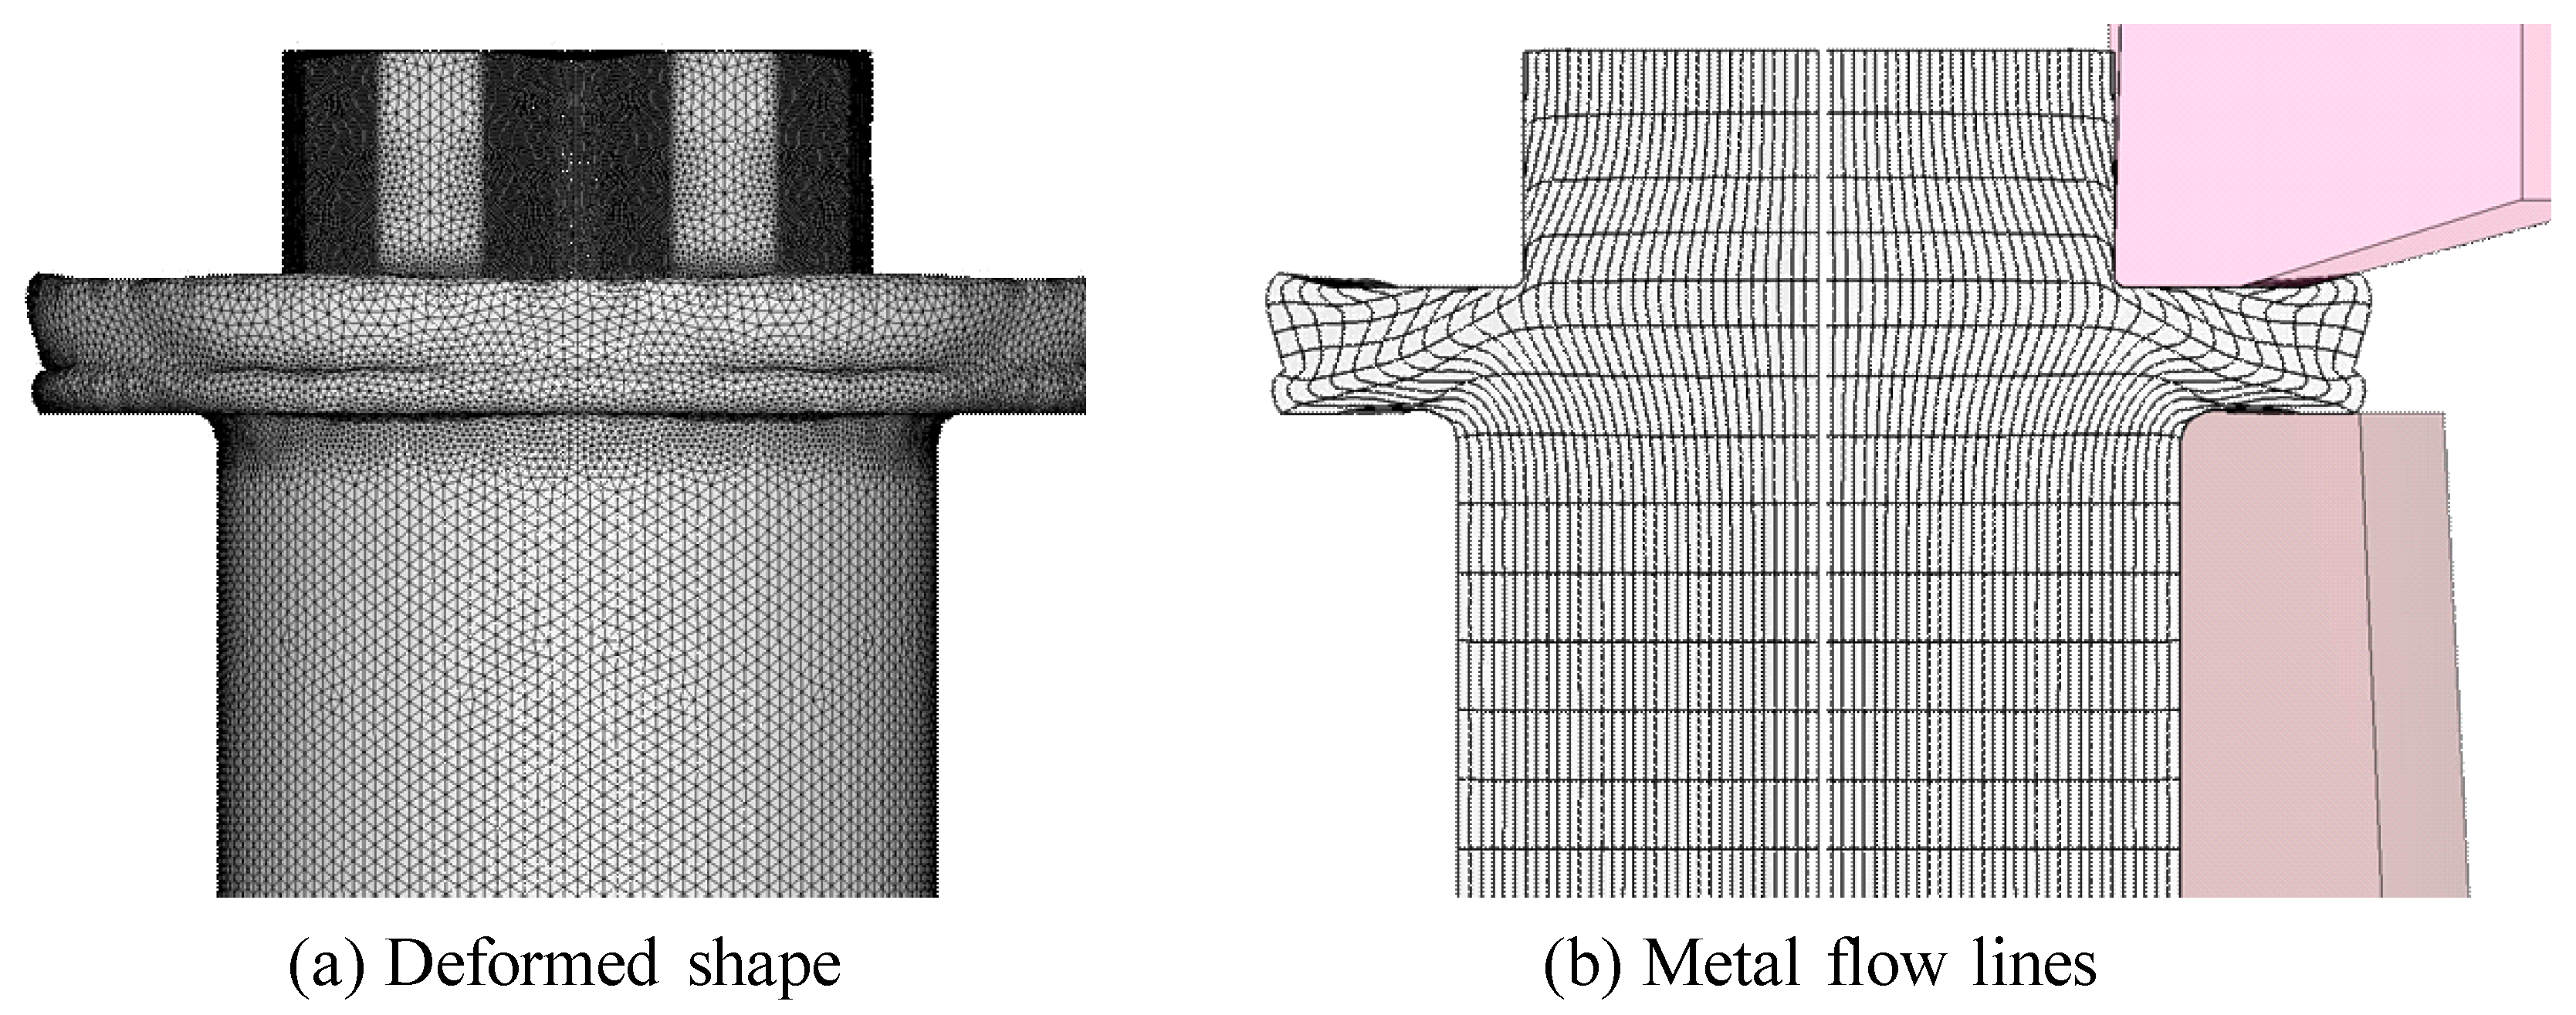
Figure 9 is an example of the FE mesh (88,000 nodes, 450,000 tetrahedral elements) used in this study. The dense elements were placed in the central deformation region. The FE size is defined as the average of the tetrahedral elements’ edge length, shown in Figure 9. The average edge length was calculated by averaging the edge lengths of ten tetrahedra selected near the fracture point. It is noted that this average edge length can represent the FE size because the tetrahedra in the FE mesh are all nearly regular, as is shown in Figure 9.
Figure 10 shows the change in the FE-predicted maximum NCL damage at the fracture point with edge length. The damage varies sensitively to the average edge length, ranging from 0.13 to 0.30 mm, indicating the existence of a critical FE size in terms of its reliability. It is a similar concept to the critical size of quadrilateral finite elements, along with its appropriate step size, in cold extrusion to remove forming load oscillation due to the discontinuous change in the numerical reduction in the area. The reason for this high sensitivity is that the fractures occurred locally at the points where deformation is extreme, as shown in the experiment in Figure 8b. Consequently, the smoothing of history-dependent elemental values, including damage, is inevitable due to frequent remeshing if the mesh density is not optimized. In our experience, this smoothing phenomenon has a particularly significant impact on the most severely damaged regions.
Notably, the maximum NCL damage negligibly changed in the case of an average edge length shorter than 0.12 mm, as the average edge length decreased. This implies that a critical edge length of FEs, called critical FE size, is 0.12 mm in this bolt-heading process regarding the ductile fracture at the corner. It is empirically believed that a certain number of FEs should construct the severely damaged region, the nucleus of a ductile fracture, to reduce the effect of remeshing. Here, the crack size in Figure 8b is defined in the remeshing perspective by a minimum height of 0.6 mm and a width of 1.8 mm. That is, the crack size is 0.6 mm. Therefore, a critical FE size means that at least five triangles on the surface or tetrahedra in the volume should describe the critical crack. Figure 10 illustrates that when the average edge length exceeds the critical FE size, the FE-predicted damage can be misleading, and no regulatory method can be beneficial for this type of ductile fracture problem. From now on, the FE mesh system with an average FE size of 0.11 mm was employed for the bolt-heading simulation.
Figure 11 shows the variation in stress triaxiality during bolt heading, exhibiting a drastic change with stroke. To observe the stress triaxiality at the fracture point in more detail, we traced it, as shown in Figure 12a. Unlike the tensile test, the stress triaxiality changed a lot with the stroke, ranging from −0.32 to 0.51. The material at the fracture point undergoes plastic deformation in a state of compressive stress during the early stroke, and longitudinal stress in tension acts at the fracture point before the ductile fracture occurs. Figure 12b shows the factors (stress triaxiality and normalized maximum principal stress) affecting damage during the bolt heading, which fluctuates significantly with the strain accumulation compared to Figure 8 for the tensile test. In Figure 12b, the patterns of two curves (effective strain–stress triaxiality and normalized maximum principal stress curves) are similar. These features also appear in Figure 8. However, the absolute value of the effective strain–normalized maximum principal stress curve in the tensile test is relatively large compared to that in the bolt heading. This is due to the difference in mean stress at the fracture point during plastic deformation, which causes a fracture at a relatively low strain in the tensile test. The stress triaxiality of the bolt heading, which influences the weighting factor in the damage calculations, is relatively small compared to the tensile test.
Finally, we verified the analysis model, including die geometry and flow behavior. A comparison of Figure 13a with the experiments in Figure 8c validates the analysis model, as the deformation’s experimental vital features are similar to the FE predictions. Figure 13b of the FE-predicted metal flow lines means that the fracture in Figure 8c was not caused by any lousy metal flow lines, owing to a wrong process design.

3. Characterization of Damage Constant of the Generalized Huh’s Damage Model

Ko et al. [13] proposed the following damage model
D = σ 1 σ ¯ 1 + 3 η d ε ¯
where the actual number three was fixed. We generalized Huh’s damage model as follows:
D = σ 1 σ ¯ 1 + H η d ε ¯
where the damage constant H, replacing the fixed actual value of 3.0, is an unknown. The NCL damage model employed in the previous section is the zero-damage constant case of the generalized Huh’s damage model.
The tensile test and bolt-heading processes have precise fracture positions and strokes, which are all visible. With these two reference processes for the same material, an unknown damage constant can be calculated, along with the critical damage. We thus sought to obtain the damage constant H and critical damage of the generalized Huh’s model that can be used simultaneously for the tensile test and bolt heading process with accuracy.
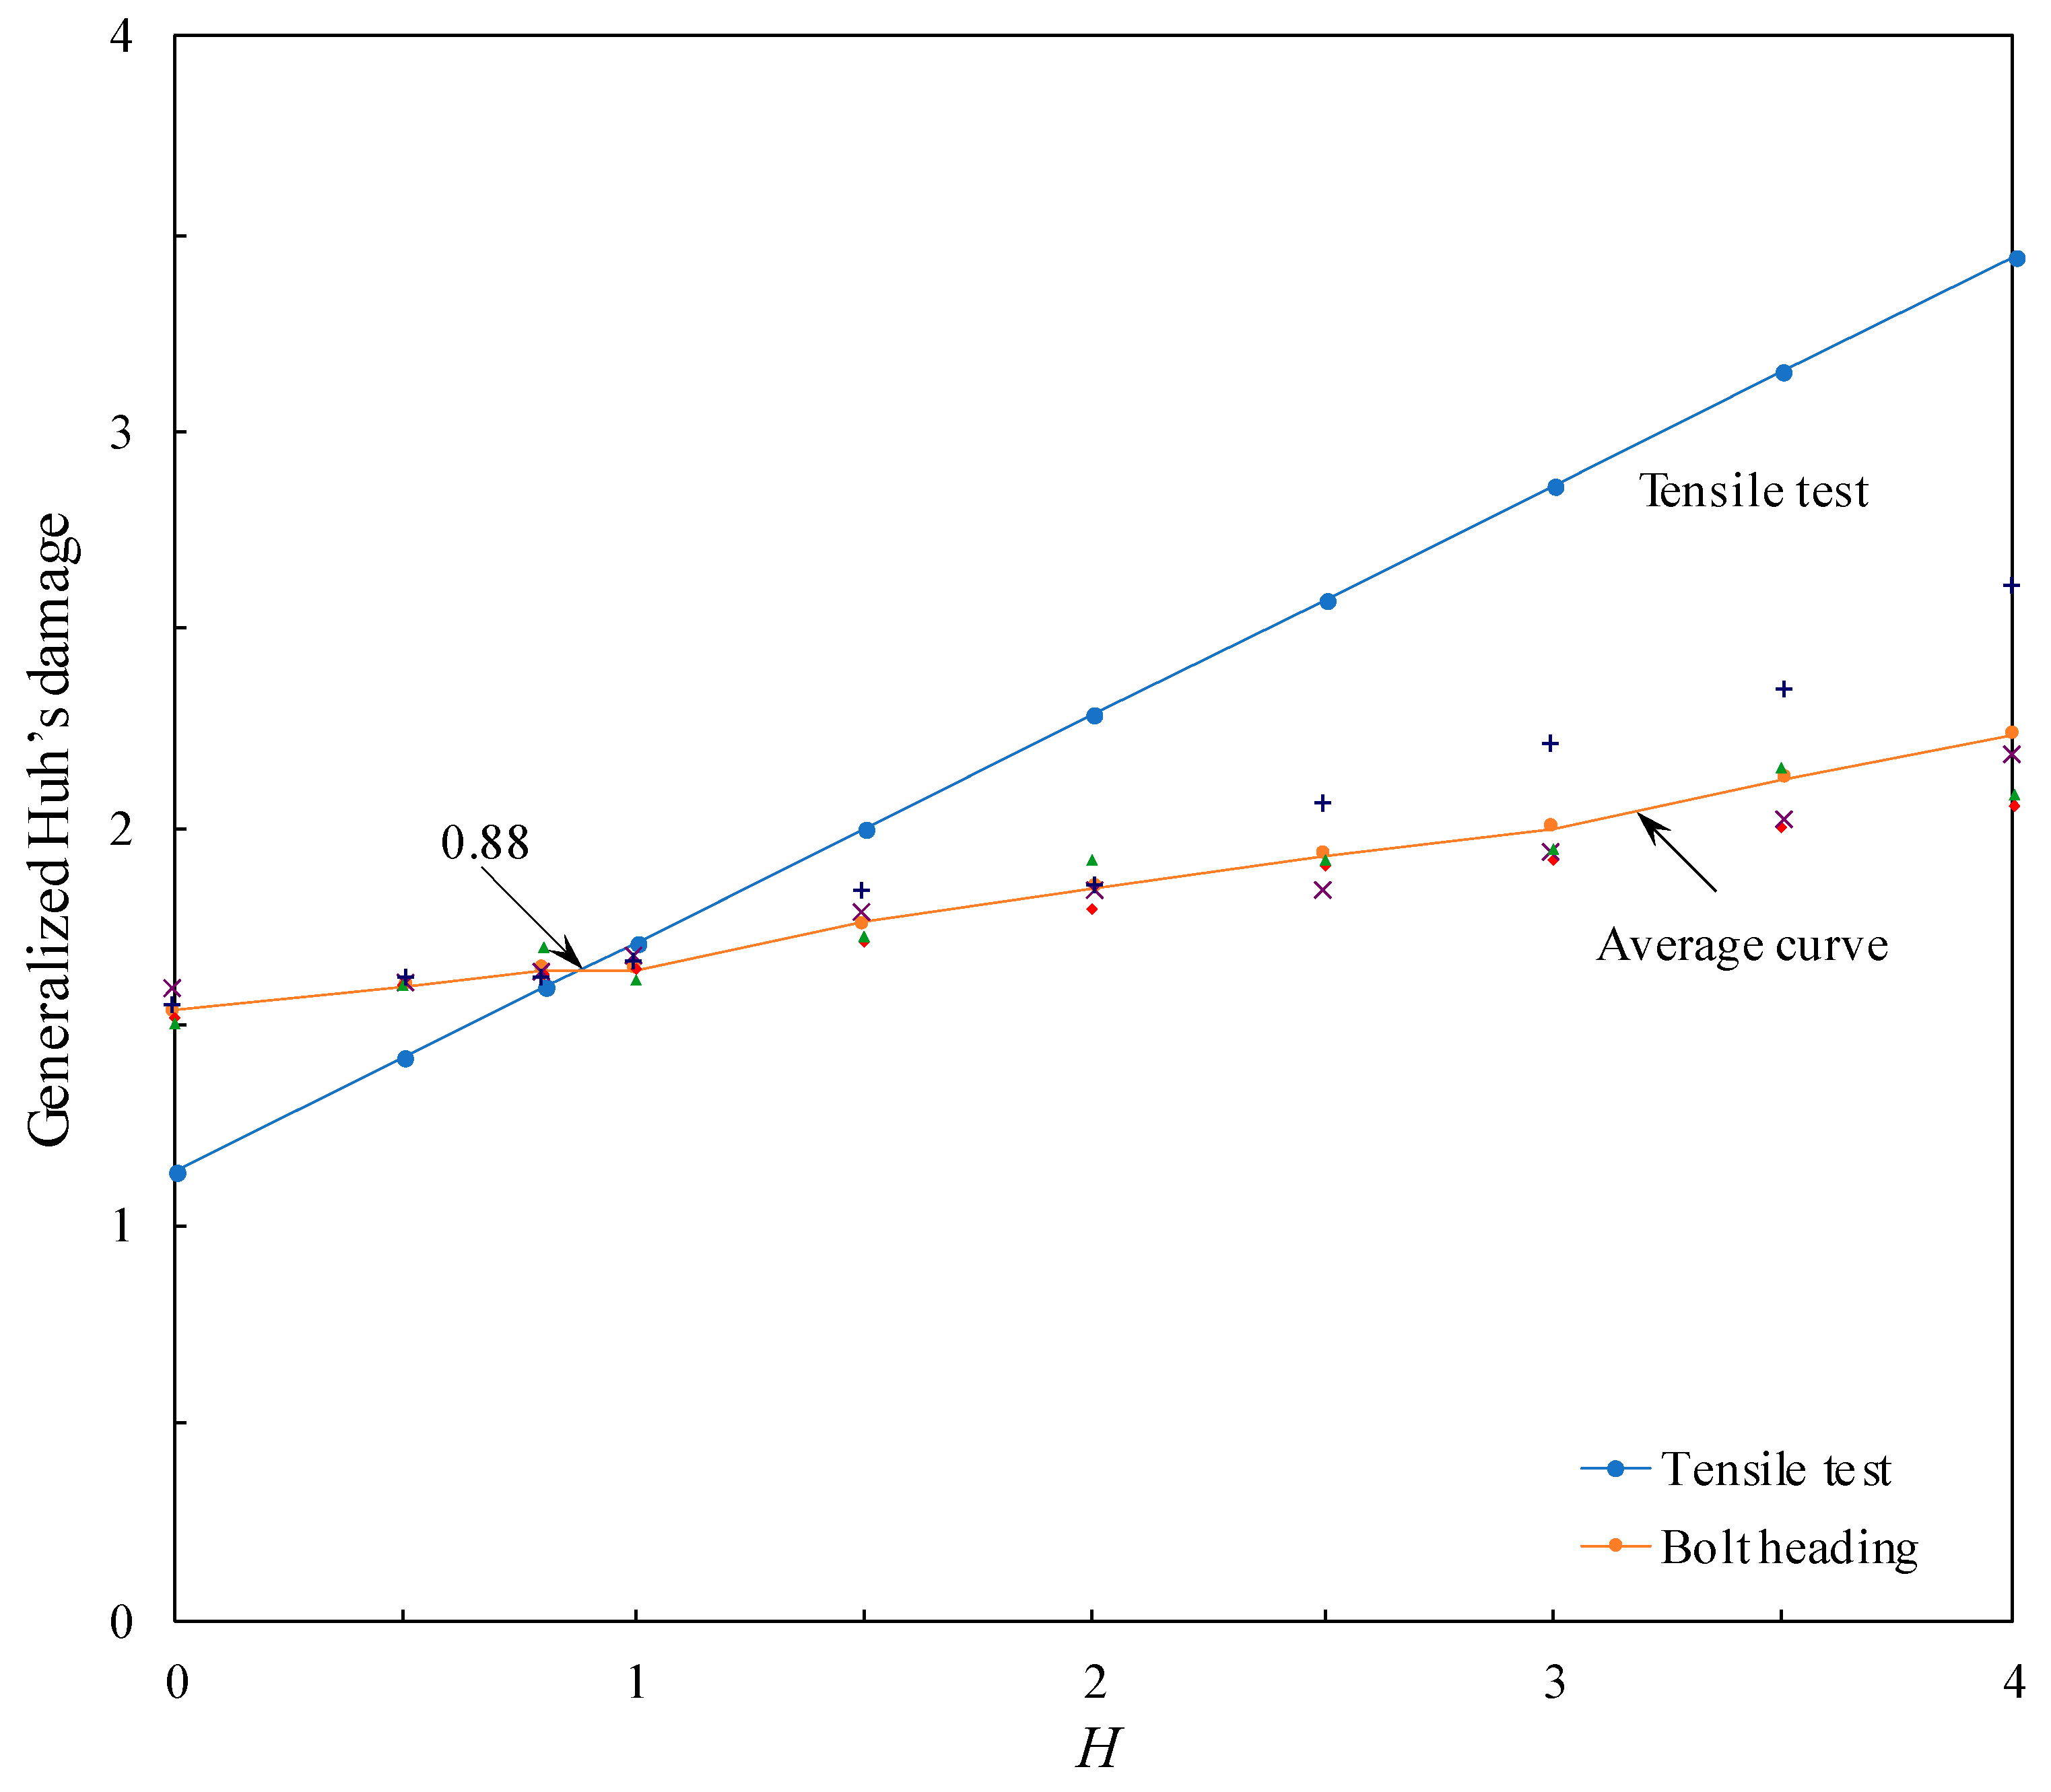
For these two reference processes, the fracture points were known. The changes in damage constant H at the fracture points were tracked for both reference processes, as shown in Figure 14. Since damage softening was not considered, the second term in Equation (2) should be constant. Therefore, the generalized Huh’s damage–H curve should be straight. The damage–H curve obtained by the axisymmetric FEM for the tensile test should be straight because of its numerical clarity. However, in general, the generalized Huh’s damage–H relationship obtained by three-dimensional FEM for the bolt-heading process cannot be a straight line because of the numerical effect during remeshing in simulating a trimming process.
The error is owing to a drastic change in state variables at the critical corners. Because of the goodness of the FE model in Figure 9 with the average edge length of 0.11, the generalized Huh’s damage-H curve is almost straight, as shown in Figure 14, which was obtained as the average of five FE predictions for each of the 10 sample H values. This curve validates the remeshing criterion and scheme [31].
Suppose the damage constant H, determined at the intersection point of two H–damage curves in Figure 14, is used. In that case, fractures of both the tensile test and bolt-forming processes should occur at the same damage value, i.e., the critical damage. Therefore, when using the damage constant and critical damage determined in this way, a ductile fracture can be accurately predicted using the same criteria for both processes. The damage constant, calculated in this way (H = 0.88), broadens the range of applicable problems compared to the theoretical damage constant of 3.0.
Generalization or improvement of a traditional damage model may be possible through this simple and practical approach, along with reference processes. However, the reference processes have some constraints. They should give the researchers information about distinct fracture instants and positions and accurately simulate them. The tensile test is, of course, the essential reference process for all cases because it can be additionally utilized for the flow characterization of the material. The bolt heading process became an excellent example of the reference process because the actual process could be analyzed accurately, and the location of the fracture, owing to damage, could be identified. This kind of example can frequently be found on industrial shop floors.
As shown in Figure 14, when the tensile test is considered to be the reference process, as either the NCL’s critical damage value (i.e., the critical damage value of the generalized Huh’s damage model with H = 0) for the bolt-heading process or the slope of the H–damage curve increases, the H value increases. The reason for the relatively small slope of the bolt-heading process to the tensile test lies in the small stress triaxiality, a weighting factor for the damage. This means that both the material and the process influence the H value. However, the H value is more dependent on the process, whereas the normalized maximum principal stress dominates the material in the damage mechanics.

4. Conclusions

The details of traditional damage models were analyzed from the viewpoint of practicability, and the GISSMO damage model, which has recently been widely used in the sheet metal forming field, was reviewed from the perspective of bulk metal forming, including forging. From them, the systematic method of determining the damage constants of the generalized Huh’s damage model, along with its corresponding critical damage value for the SWCH45F carbon steel, heat-treated for manufacturing fasteners, was presented using the cylindrical tensile test and bolt-forming process. The two bulk metal-forming processes, employed as reference processes, are characterized by their distinct fracture points and instants.
The combined experiment revealed the accurate flow behavior of the material, with distinct strain hardening, using an elastoplastic FEM in conjunction with the cylindrical tensile test. By using this flow curve to reveal the fracture during the cylindrical tensile test, the same tensile test process was accurately analyzed. This engineering procedure and its results emphasize the advantages of a cylindrical tensile test, focusing on the fact that it represents all bulk metal-forming processes and that all the obtained results, including fracture, are evident within the theoretical framework. It was particularly highlighted that the flow curve for an enormous strain can be obtained, and the critical damage is accurately predicted at the numerical fracture point and instant.
The same flow information was used to analyze the bolt-heading process, which has a clear fracture point, and the process shape is relatively elaborate. However, the material used in this process at the early stage of the stroke is subjected to compression deformation, unlike the tensile test. The bolt-heading process employed in this study serves as a good reference for determining the damage model’s damage constant, utilizing a single damage constant and the tensile test. The effect of the element size on the maximum damage was first analyzed, revealing a critical edge length of FEs, which is the maximum allowable edge length for reliable damage calculation. Based on this new finding, a remeshing criterion, the five-element crack refinement rule, was suggested.
The damage constant (H = 0.88) of the generalized Huh’s damage model was obtained at the intersection point of two damage constant–critical damage curves constructed by the tensile test and bolt-heading process, revealing that the calculated damage constant is far away from the theoretical value (3.0) of Huh’s damage model.
Finally, it is emphasized that the method presented in this study is general and can be applied to damage models with multi-damage constants. It can also be applied to blended damage models, which can encompass or integrate the various fundamental concepts of traditional damage models simultaneously.

Author Contributions

B.H. was involved in writing—original draft, data curation, and writing and editing. H.L. was involved in visualization and software. S.H. was involved in methodology and formal analysis. M.J. was involved in supervision and writing—review and editing. All authors have read and agreed to the published version of the manuscript.

Funding

This work was partly supported by the Korea Institute of Energy Technology Evaluation and Planning (KETEP) grant, funded by the Korean government (MOTIE) (20214000000520, Human Resource Development Project in Circular Remanufacturing Industry). This work was supported by the Human Resources Development of the Korea Institute of Energy Technology Evaluation and Planning (KETEP) grant, funded by the Ministry of Trade, Industry and Energy of Korea (No. RS-2024-00398425). This work was supported by the Regional Innovation System and Education (RISE) program through the RISE Center, Gyeongsangnam-do, funded by the Ministry of Education (MOE) and the Gyeongsangnam-do Provincial Government, Republic of Korea (No. 2025-RISE016-001).

Data Availability Statement

The original contributions presented in this study are included in the article. Further inquiries can be directed to the corresponding author.

Conflicts of Interest

The authors declare no conflicts of interest.

References

  1. Freudenthal, M. The Inelastic Behavior of Engineering Materials and Structures; John Wiley Sons Inc.: Hoboken, NJ, USA, 1950; Volume 55, p. 657. [Google Scholar] [CrossRef]
  2. McClintock, F.A. A criterion for ductile fracture by the growth of holes. J. Appl. Mech. 1968, 35, 363–371. [Google Scholar] [CrossRef]
  3. Cockcroft, M.G.; Latham, D.J. Ductility and workability of metals. J. Inst. Met. 1968, 96, 33–39. [Google Scholar]
  4. Rice, J.R.; Tracey, D.M. On the ductile enlargement of voids in triaxial stress fields. J. Mech. Phys. Solids 1969, 17, 201–217. [Google Scholar] [CrossRef]
  5. Brozzo, P.; Deluca, B.; Rendina, R. A new method for the prediction of formability limits in metal sheets. In Proceedings of the 7th Biennial Congress of the IDDRG, Amsterdam, The Netherlands, 9–13 October 1972. [Google Scholar]
  6. Gurson, A.L. Continuum theory of ductile rupture by void nucleation and growth. J. Eng. Mater. Technol. 1977, 99, 2–15. [Google Scholar] [CrossRef]
  7. Norris, D.M.; Reaugh, J.E.; Moran, B.; Quin˜ones, D.F. A plastic strain mean-stress criterion for ductile fracture. J. Eng. Mater. Technol. 1978, 100, 279–286. [Google Scholar] [CrossRef]
  8. Oyane, M.; Sato, T.; Okimoto, K.; Shima, S. Criteria for ductile fracture and their applications. J. Mech. Work. Technol. 1980, 4, 65–81. [Google Scholar] [CrossRef]
  9. Needleman, A.; Tvergaard, V. An analysis of ductile rupture in notched bars. J. Mech. Phys. Solids 1984, 32, 461–490. [Google Scholar] [CrossRef]
  10. Johnson, G.R.; Cook, W.H. Fracture characteristics of three metals subjected to various strains, strain rates, temperatures and pressures. Eng. Fract. Mech. 1985, 21, 31–48. [Google Scholar] [CrossRef]
  11. Chaoudadi, R.; Meester, P.D.E.; Vandermeulen, W. Damage work as ductile fracture criterion. Int. J. Fract. 1994, 66, 155–164. [Google Scholar] [CrossRef]
  12. Törnqvist, R. Design of Crashworthy Ship Structures. Ph.D. Thesis, Technical University of Denmark, Lyngby, Denmark, 2003; p. 243. [Google Scholar]
  13. Ko, Y.K.; Lee, J.S.; Huh, H.; Kim, H.; Park, S. Prediction of fracture in hub-hole expanding process using a new ductile fracture criterion. J. Mater. Process. Technol. 2007, 187–188, 358–362. [Google Scholar] [CrossRef]
  14. Bai, Y.; Wierzbicki, T. A new model of metal plasticity and fracture with pressure and Lode dependence. Int. J. Plast. 2008, 24, 1071–1096. [Google Scholar] [CrossRef]
  15. Lou, Y.; Huh, H. Extension of a shear-controlled ductile fracture model considering the stress triaxiality and the lode parameter. Int. J. Solids Struct. 2013, 50, 447–455. [Google Scholar] [CrossRef]
  16. Neukamm, F.; Feucht, M.; Haufe, A. Consistent damage modelling in the process chain of forming to crashworthiness simulations. LS-Dyna Anwenderforum 2008, 30, 11–20. [Google Scholar]
  17. Watanabe, A.; Fujikawa, S.; Ikeda, A.; Shiga, N. Prediction of ductile fracture in cold forging. Procedia Eng. 2014, 81, 425–430. [Google Scholar] [CrossRef]
  18. Rickhey, F.; Hong, S.M. Stress triaxiality in anisotropic metal sheets—Definition and experimental acquisition for numerical damage prediction. Materials 2022, 15, 3738. [Google Scholar] [CrossRef]
  19. Kim, H.; Yamanaka, M.; Altan, T. Prediction and elimination of ductile fracture in cold forging by FEM simulations. In Proceedings of the 23th NAMRC Conference, Lincoln, Nebraska, 24–26 May 1995; pp. 63–69. [Google Scholar]
  20. Kõrgesaa, M. The effect of low stress triaxialities and deformation paths on ductile fracture simulations of large shell structure. Mar. Struct. 2019, 63, 4564. [Google Scholar] [CrossRef]
  21. Kim, K.M.; Ji, S.M.; Joun, M.S.; Lee, S.W.; Hong, S.M. Flow behavior dependence of rod shearing phenomena of various materials in automatic multi-stage cold forging. J. Mech. Sci. Technol. 2023, 37, 139–148. [Google Scholar] [CrossRef]
  22. Gu, B.J.; Lim, J.M.; Hong, S.M. Determination and verification of GISSMO fracture properties of bolts used in radioactive waste transport containers. Materials 2022, 15, 1893. [Google Scholar] [CrossRef]
  23. Joun, M.S.; Razali, M.K.; Jee, C.W.; Byun, J.B.; Kim, M.C.; Kim, K.M. A review of flow characterization of metallic materials in the cold forming temperature range and its major issues. Materials 2022, 15, 2751. [Google Scholar] [CrossRef]
  24. Shin, H.H.; Kim, S.H.; Choi, M.K.; Ju, Y.W. Extraction of equivalent stress versus equivalent plastic strain curve of necking material in tensile test without assuming constitutive model. J. Eng. Mater. Technol. 2024, 146, 021007. [Google Scholar] [CrossRef]
  25. Kim, N.Y.; Kim, N.H.; Razali, M.K.; Lee, H.M.; Joun, M.S. Analytical and numerical evaluation of the relationship between elongation calibration function and cyber standard tensile tests for ductile materials. Mater. Des. 2025, 253, 113851. [Google Scholar] [CrossRef]
  26. Joun, M.S. Recent advances in metal forming simulation technology for automobile parts by AFDEX. IOP Conf. Ser. Mater. Sci. Eng. 2020, 834, 012016. [Google Scholar] [CrossRef]
  27. Arnold, D.N.; Brezzi, F.; Fortin, M. A stable finite element for the Stokes equations. Calcolo 1984, 21, 337–344. [Google Scholar] [CrossRef]
  28. Lee, M.C.; Chung, S.H.; Jang, S.M.; Joun, M.S. Three-dimensional simulation of forging using tetrahedral and hexahedral elements. Finite. Elem. Anal. Des. 2009, 45, 745–754. [Google Scholar] [CrossRef]
  29. Razali, M.K.; Joun, M.S.; Chung, W.J. A novel flow model of strain hardening and softening for use in tensile testing of a cylindrical specimen at room temperature. Materials 2021, 14, 4876. [Google Scholar] [CrossRef]
  30. Joun, M.S.; Heo, Y.; Kim, N.H.; Kim, N.Y. On lubrication regime changes during forward extrusion, forging, and drawing. Lubricants 2024, 12, 352. [Google Scholar] [CrossRef]
  31. Lee, M.C.; Joun, M.S.; Lee, J.K. Adaptive tetrahedral element generation and refinement to improve the quality of bulk metal forming simulation. Finite Elem. Anal. Des. 2007, 43, 788–802. [Google Scholar] [CrossRef]
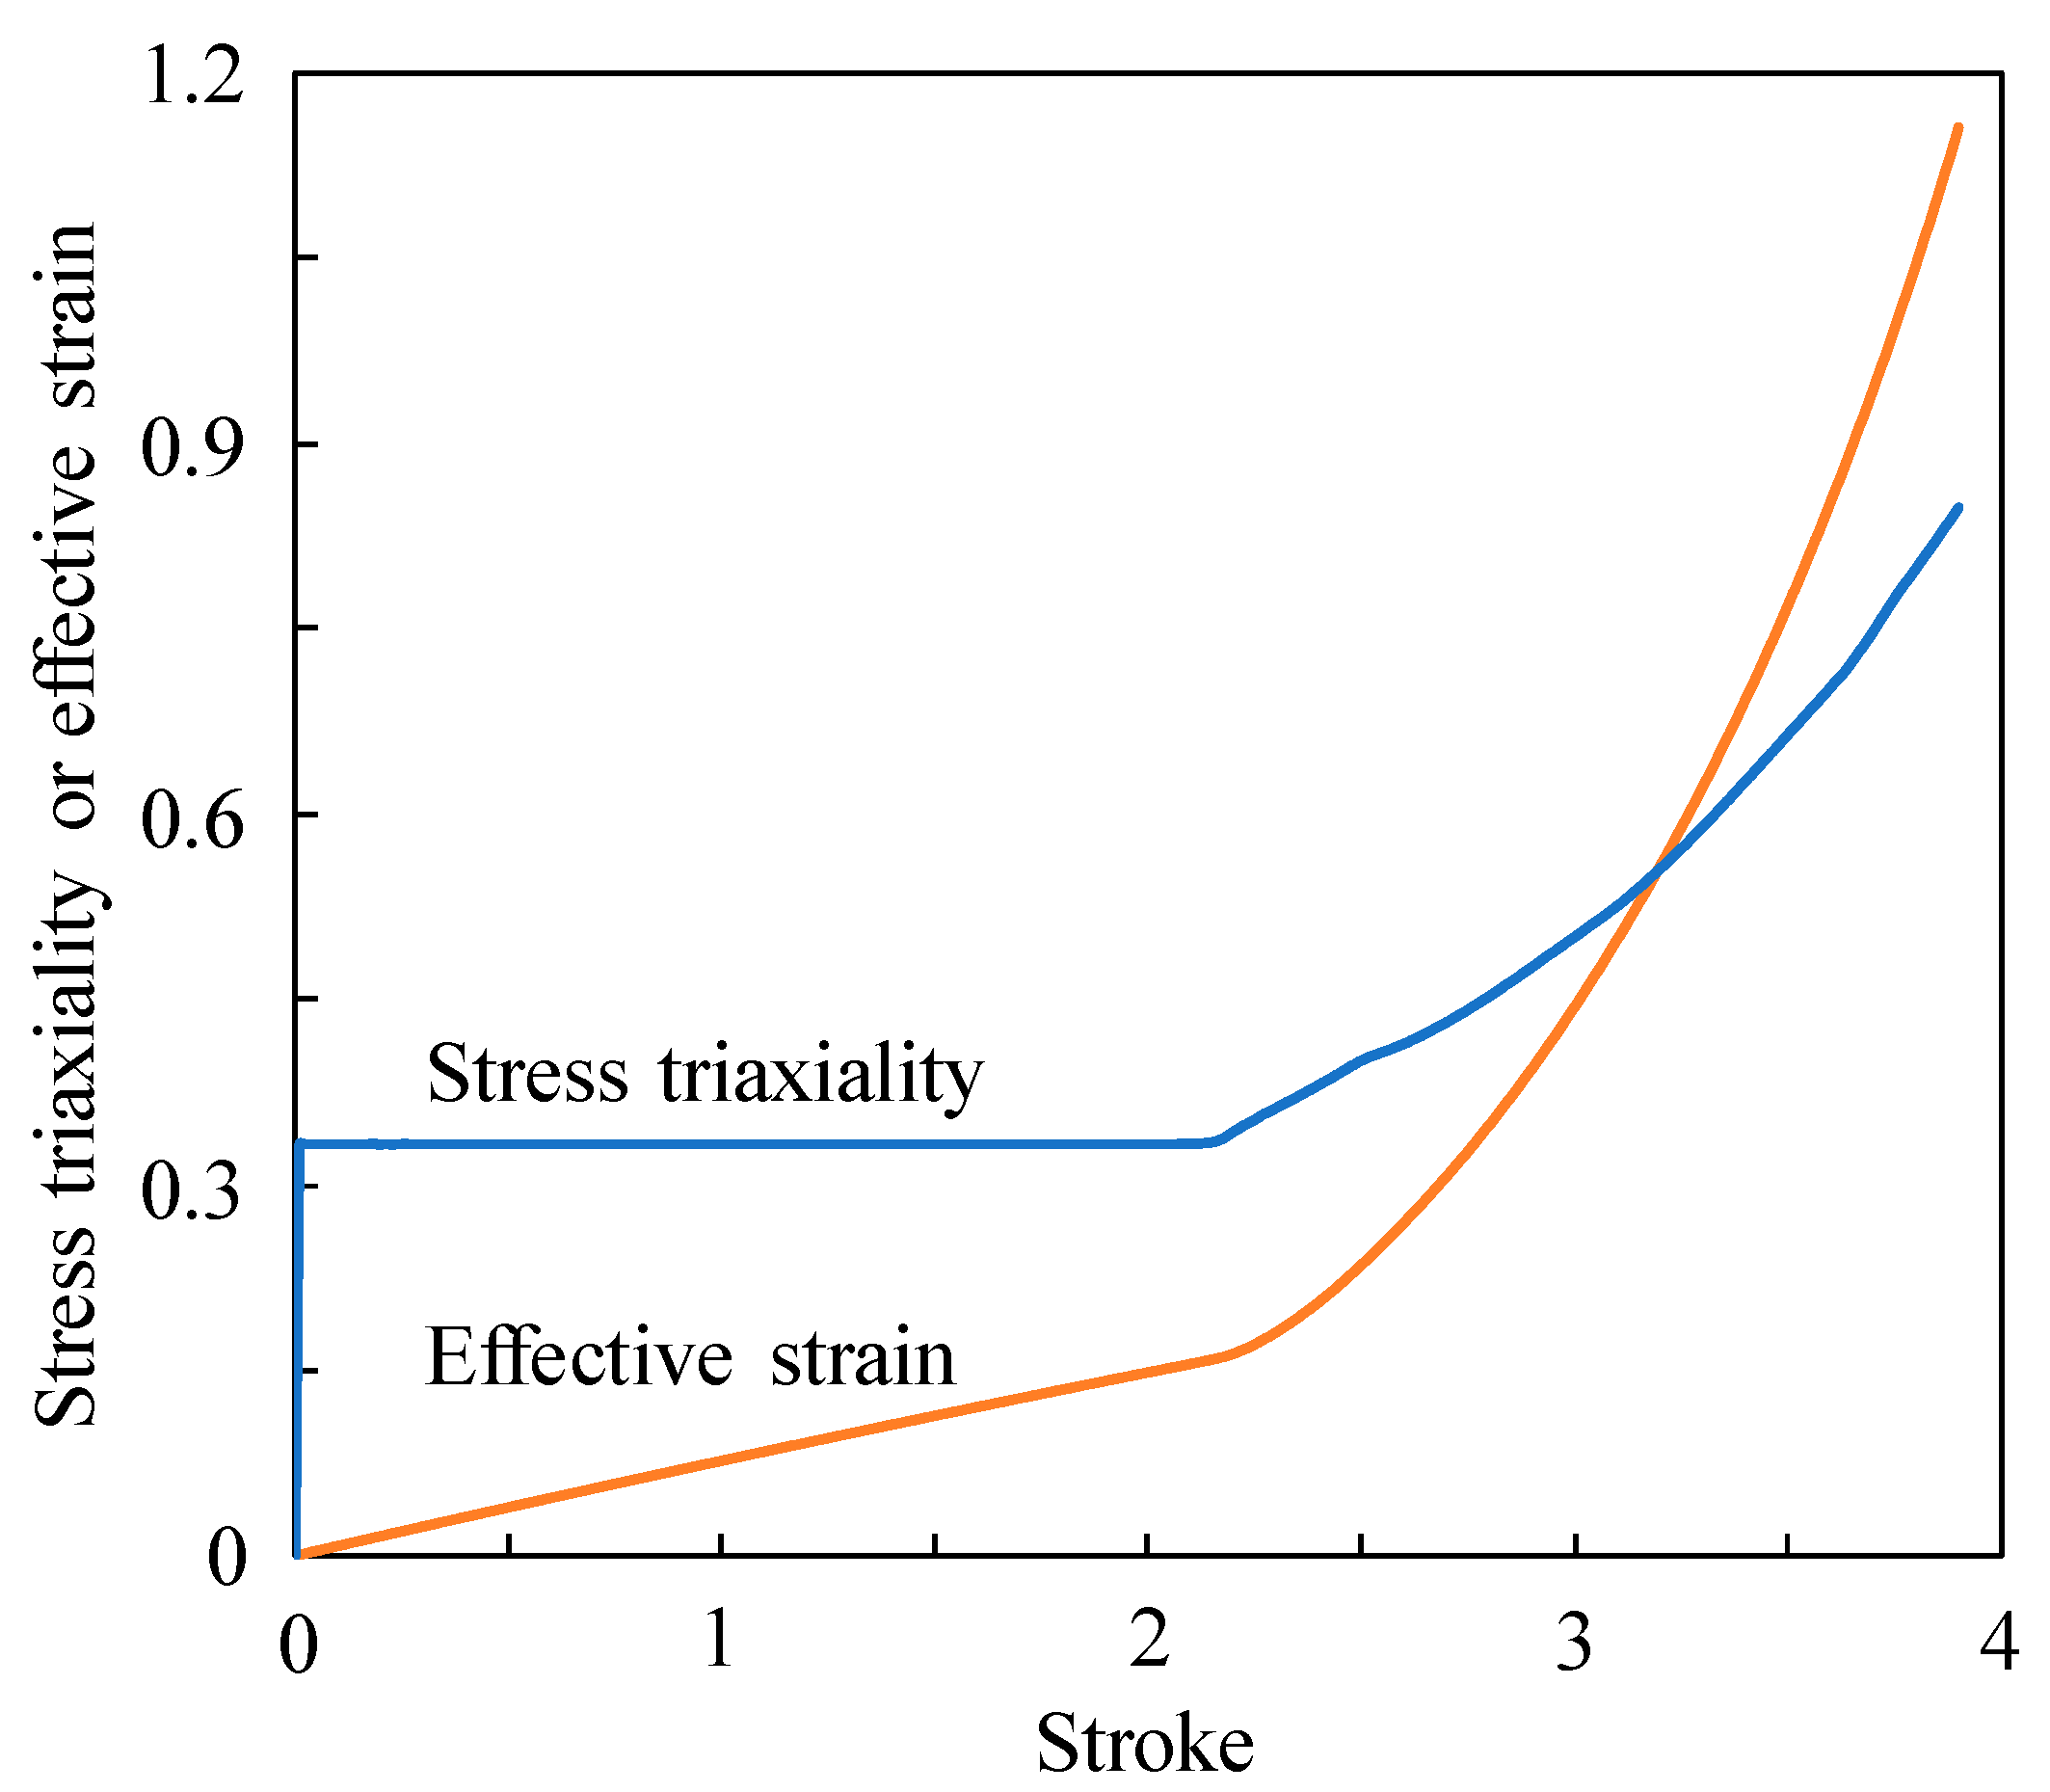
Figure 1. Changes in stress triaxiality and effective strain at the fracture point as stroke increases during the tensile testing of cylindrical specimen of SWCH10A.
Metals 15 01376 g001
Figure 2. SWCH45F’s flow curve (EP-FEM) and comparison of experimental and EP-FEM-predicted tensile tests.
Metals 15 01376 g002
Figure 3. Quadrilateral structural FE mesh system with the number of quadrilaterals.
Metals 15 01376 g003
Figure 4. Variation in damage with the number of quadrilaterals.
Metals 15 01376 g004
Figure 5. Elastoplastic FE predictions of the tensile test.
Metals 15 01376 g005
Figure 6. Trajectory of stress triaxiality, maximum principal stress, effective strain, and NCL damage at the maximum damage point.
Metals 15 01376 g006
Figure 7. Effective strain–normalized maximum principal stress and effective strain–stress triaxiality curves.
Metals 15 01376 g007
Figure 8. Process design for AMSCF of a SWCH45F bolt, FE-predicted effective stress, and the fractured head of the forged bolt at the final stroke. (a) Process of design; (b) FE-predicted effective strain; and (c) experiment, focusing on the fracture on the bolt head.
Metals 15 01376 g008aMetals 15 01376 g008b
Figure 9. Typical FE mesh system, focusing on the mesh density near the fracture point.
Metals 15 01376 g009
Figure 10. Edge length of FE mesh system–NCL’s critical damage curve.
Metals 15 01376 g010
Figure 11. Evolution of stress triaxiality in the bolt head during the bolt heading.
Metals 15 01376 g011
Figure 12. Trace of the change in stress triaxiality at the fracture point with the stroke. (a) Stroke–stress triaxiality curve; (b) effective strain–normalized maximum principal stress and stress triaxiality curves.
Metals 15 01376 g012aMetals 15 01376 g012b
Figure 13. Deformed shape with the FE mesh system and metal flow lines in the cross-section.
Metals 15 01376 g013
Figure 14. Tracing the damage values at the fracture point during the tensile testing and bolt heading and determining the damage constant and its corresponding critical damage.
Metals 15 01376 g014
Disclaimer/Publisher’s Note: The statements, opinions and data contained in all publications are solely those of the individual author(s) and contributor(s) and not of MDPI and/or the editor(s). MDPI and/or the editor(s) disclaim responsibility for any injury to people or property resulting from any ideas, methods, instructions or products referred to in the content.