1. Introduction
The term micromilling refers to mechanical micro-machining (chip-forming material removal) performed with tools of defined geometry, carried out either on conventional ultra-precision machine tools or on dedicated micromachine tools, and used to produce high-precision three-dimensional features from various materials [
1]. Micromilling is performed using micro end mills, generally defined as milling tools with diameters ranging from 0.025 to 2 mm [
2].
When comparing micro-cutting with conventional macro-cutting, several differences can be observed, primarily resulting from the miniaturization of machine tool components, cutting tools, and the machining process itself.
For example, in micromilling, even low-amplitude vibrations can significantly affect tool life and the quality of the machined surface. Moreover, due to the extremely small dimensions of micro-tools, it is very difficult to detect tool damage, wear, or breakage. In addition, conventional cutting force models (e.g., Merchant’s model) cannot be directly applied to predict cutting forces in micro-cutting, since the chip thickness is of the same order of magnitude as the tool’s edge radius. This leads to a negative effective rake angle and to elastoplastic deformation of the workpiece. Furthermore, in micromilling, the specific cutting resistance is higher than in macro-machining when the depth of cut is smaller than the minimum chip thickness [
3,
4,
5]. These effects are collectively referred to as micromachining size-effect phenomena and can influence cutting forces, chip-formation mechanisms, vibrations and process stability, energy consumption during machining, as well as the resulting surface quality.
In conventional cutting, the undeformed chip thickness is typically much larger than the tool edge radius; therefore, its influence can be neglected, and the tool can be considered perfectly sharp. In addition, the effective rake angle is approximately equal to the nominal rake angle, and the dominant chip-formation mechanism is material shearing. However, when the undeformed chip thickness is of the same order of magnitude as the tool’s edge radius, the tool can no longer be considered perfectly sharp, and the effective rake angle becomes negative. In this case, the chip-formation mechanism, in addition to shearing, includes the so-called ploughing of the material, i.e., elastoplastic deformation of the workpiece material [
3].
Due to the intermittent nature of the cutting process in micromilling, the undeformed chip thickness varies in the radial direction during each tooth engagement, ranging from zero up to the value of the feed per tooth. When the feed per tooth exceeds the minimum chip thickness, both material-shearing and material-ploughing mechanisms occur within a single tooth pass. When the width of the cut is smaller than the minimum chip thickness (at the tool-entry and tool-exit regions), the ploughing mechanism becomes dominant. In contrast, when the width of the cut is larger, the shearing mechanism dominates, and chip formation takes place. If the minimum chip thickness is greater than the feed per tooth, no chip will form over several consecutive tooth engagements due to the dominant ploughing mechanism and the elastic recovery of the material.
Weule and co-authors [
5] analyzed the minimum chip thickness in the micromilling of C45 steel using a carbide end mill with a cutting-edge radius of 5 μm. The authors found that, due to the minimum chip thickness effect, the machined surface exhibits a serrated pattern [
5].
In micro-cutting, it is essential to determine the minimum chip thickness in order to select appropriate cutting conditions for the machining process. The value of the minimum chip thickness depends on the tool cutting-edge radius, the workpiece material properties, and other machining parameters and can be determined through simulations [
6,
7], theoretical calculations [
8,
9], or experimentally [
10]. A review of the available literature shows that the minimum chip thickness ranges from 5% to 42% of the tool cutting-edge radius.
Vogler and co-authors [
7] analyzed the minimum chip thickness in the micromilling of pearlite and ferrite using Chuzoy’s microstructure-based FEM model [
11]. Their simulations revealed that the ratio of minimum chip thickness to cutting-edge radius is approximately 20% for pearlite and 35% for ferrite.
Liu et al. [
8] introduced the concept of the normalized minimum chip thickness (
λₙ), defined as the ratio of the minimum chip thickness to the cutting-edge radius. For a range of cutting speeds and different cutting-edge radii, the authors determined the normalized minimum chip thickness during the micromilling of Al6082-T6 aluminum alloy and steels C18 and C40. They concluded that the normalized minimum chip thickness is 35–40% for aluminum, 20–30% for steel C18, and 20–42% for steel C40.
Kim and co-authors [
12] experimentally investigated the minimum chip thickness by analyzing cutting-force variations during the machining of CuZn36Pb3 brass alloy. They concluded that the ratio of minimum chip thickness to cutting-edge radius in micromilling brass is 22–25%.
1.1. Forces in Micromilling
Mathematical models for predicting cutting forces in macro-milling, which assume a perfectly sharp tool and a homogeneous workpiece material, cannot be directly applied to the prediction of cutting forces in micro-milling. Although macro- and micromilling are nearly identical from a kinematic standpoint, several additional influencing factors must be considered when analyzing cutting forces in micromilling.
Lai and co-authors [
13] modeled cutting forces in micromilling while accounting for the effects of minimum chip thickness and tool edge radius. They proposed a mathematical model for predicting micromilling forces based on Waldorf’s slip-line material shear model [
14]. For the micromilling of copper, the minimum chip thickness was determined using an FEM model and found to be 25% of the tool cutting-edge radius. Through experimental validation, the authors concluded that the proposed model provides good accuracy in predicting micromilling forces.
The occurrence of tool runout in micromilling has a significant influence on cutting forces and surface quality, as analyzed by Afazov and co-authors [
15]. They developed a mathematical model that accounts for the nonlinearity of cutting forces in micromilling by incorporating tool radial runout and minimum chip thickness. The proposed model was validated experimentally through micromilling tests on a 30CrNiMo8 steel workpiece.
Bao and Tansel [
16] developed an analytical model for predicting cutting forces in micromilling, based on the conventional cutting-force model proposed by Tlusty and MacNeil [
17]. The developed mathematical model accounts for cutting conditions, tool geometry, and workpiece material properties, while the chip thickness is calculated from the trajectory of the tool tooth in engagement. It was concluded that the results obtained using the proposed model deviate on average by about 10% from experimental measurements. In subsequent studies, the authors improved the model accuracy by incorporating tool radial runout [
18] and tool wear [
19].
Zaman and co-authors [
20] presented the first three-dimensional cutting-force model for micromilling, which also considers the axial cutting force component. Additionally, unlike other models based on the undeformed chip thickness, this model determines the actual chip thickness and incorporates it into the force calculations. The proposed model was experimentally validated through micromilling tests of the stainless, heat-resistant steel X46Cr13.
Li [
21] also developed a three-dimensional mathematical model for predicting cutting forces in micromilling, taking into account the tool trochoidal trajectory, radial runout, and the influence of minimum chip thickness. To verify the proposed model, the authors conducted a series of micromilling experiments on copper and found that the mean prediction error was below 10%.
Jun and co-authors [
22,
23] developed a model for predicting dynamic cutting forces and analyzing vibrations in micromilling, incorporating influential factors such as the minimum chip thickness effect, material elastic recovery, and the elastoplastic behavior of the workpiece. They compared the results of the proposed model with those of a standard cutting-force model that does not include these effects, as well as with experimental data for pearlite and ferrite. The proposed model demonstrated good agreement with experimental measurements.
When analyzing micromilling forces, it is also necessary to consider the specific cutting resistance of the workpiece material. In macro-milling, the specific cutting resistance depends on tool geometry and material, workpiece material, and the cutting conditions. However, in micromilling, the ratio of chip thickness to tool edge radius has a major influence on specific cutting resistance. Specifically, when the undeformed chip thickness is smaller than the edge radius, a nonlinear increase in specific cutting resistance occurs [
24].
Fliz and co-authors [
25] investigated the nonlinear behavior of specific cutting resistance in the micro-machining of pure copper. Among other things, the authors experimentally analyzed specific cutting resistance by varying the cutting speed (40, 80, 120 m/min) and feed per tooth (0.75, 1.5, 3, and 6 μm/tooth) using a ϕ254 μm end mill and a depth of cut of 30 μm. Their study showed that increasing cutting speed results in higher specific cutting resistance, and that smaller feed per tooth values correspond to greater specific cutting resistance [
25]. The authors identified the dominant ploughing mechanism of chip formation and the negative effective rake angle as the primary reasons for the influence of feed per tooth on specific cutting resistance.
Malekian and Park [
26] proposed a cutting-force prediction model for micromilling that incorporates the effects of ploughing and material elastic recovery, tool radial runout, and the dynamic characteristics of the machining system. However, through micromilling experiments on Al6061 aluminum alloy using a ϕ0.5 mm end mill, the authors established that the specific cutting resistance depends on chip thickness, i.e., on the feed per tooth. They also identified a threshold feed-per-tooth value above which the specific cutting resistance—and consequently the cutting forces—becomes linear.
Yoon and Ehmann [
27] developed a linearized model for predicting cutting forces in micromilling. This model computes the cutting force for three characteristic cases (I)
h <
hmin; (II)
hmin <
h <
ra; (III)
h >
ra, where
h is the undeformed chip thickness,
hmin is the minimum chip thickness, and
ra is the tool edge radius. By simulating cutting forces and specific cutting resistance for a material with a tensile strength of 170 MPa, the authors found that the specific cutting resistance and resultant cutting force exhibit strongly nonlinear behavior in cases I and II, while in case III these values change approximately linearly [
27].
To avoid the nonlinearity of specific cutting resistance and other adverse effects associated with the miniaturization phenomena in micromilling, the experimental investigations presented in the following sections were carried out under the condition that both the depth of cut and the feed per tooth were always greater than the tool cutting-edge radius.
1.2. Self-Excited Vibrations in Micromilling
Afazov [
15], similarly Monka [
28], with their co-authors, proposed a model for predicting self-excited vibrations in micromilling, which, among other factors, incorporates the nonlinearity of cutting forces directly influenced by tool radial runout and cutting speed, as well as the dynamic characteristics of the tool–toolholder–spindle assembly. The limiting depths of cut predicted by this model showed that the modal parameters of the system have a significant impact on the resulting stability lobe diagrams, especially at spindle speeds above 35,000 rpm. To validate the developed model, the authors conducted a series of experimental tests in which self-excited chatter vibrations were detected during the micromilling of 30CrNiMo8 steel at various spindle speeds and depths of cut. Based on these experiments, it was concluded that there is a good correlation between the predicted and experimentally obtained results for spindle speeds up to 32,000 rpm.
In a continuation of their research, Afazov and co-authors [
29] used the previously developed model to analyze the influence of tool cutting-edge radius, tool rake angle, feed per tooth, and workpiece preheating temperature on the limiting depth of cut during the micromilling of 30CrNiMo8 steel. Stability lobe diagrams were generated for two cutting-edge radii (3.5 μm and 15 μm), two feed-per-tooth values (4 μm/tooth and 8 μm/tooth), two rake angles (0° and 8°), and two workpiece preheating temperatures (25 °C and 600 °C). The stability diagrams were experimentally validated, and it was concluded that increasing the cutting-edge radius reduces the limiting depth of cut and diminishes the influence of rake angle and workpiece preheating temperature. Moreover, increasing the rake angle and/or the preheating temperature, for a constant cutting-edge radius, leads to an increase in the limiting depth of cut. An increase in feed per tooth has no significant effect on the limiting depth of cut for spindle speeds below 45,000 rpm, whereas for higher spindle speeds, a slight increase in the limiting depth of cut and a change in the shape of the stability diagram were observed.
Shi and co-authors [
30,
31] investigated the influence of system damping, tool clamping torque, and tool overhang on the limiting depth of cut and the frequencies of self-excited vibrations. Through micromilling experiments on a brass workpiece, it was found that, for the specific machining system considered, system damping has a significant influence on the limiting depth of cut at spindle speeds below 21,000 rpm. For the same workpiece material, the effect of tool clamping torque was also analyzed. The tool was clamped with torques of 8 Nm, 9 Nm, and 12 Nm, and for each case the frequencies of self-excited vibrations were experimentally determined. The results showed that decreasing the tool clamping torque reduces the stiffness of the tool–holder interface, which in turn lowers the frequency at which self-excited vibrations occur.
The influence of tool overhang on the frequencies of self-excited vibrations was examined during the micromilling of Ck45 steel. Based on this investigation, it was concluded that chatter occurs at frequencies approximately equal to the natural frequency of the clamped tool, and that this frequency decreases as the tool overhang increases.
The authors also proposed a new method for detecting self-excited vibrations during micromilling using specialized piezoelectric systems. The proposed system detects vibrations in the transitional stage between forced and self-excited vibrations, enabling its application in on-line monitoring of micromachining systems for the purpose of preventing chatter.
Due to the elastoplastic contact between the tool and the workpiece in micromilling, the system exhibits high damping, which has a significant influence on process stability. To analyze this phenomenon, Rahnama and co-authors [
32] extended earlier research conducted for conventional machining by Tobias [
33], Opitz [
34], and Tlusty [
35], and proposed a model for determining the limiting depth of cut in micromilling that incorporates system damping. The damping coefficients were defined based on the assumption that the process damping force
Fpd is proportional to the volume of material “ploughed” beneath the tool tip.
To construct the micromilling stability lobe diagram, the authors also identified the modal parameters of the machining system by combining experimental modal analysis with the finite element method. The stability lobe diagram defined using the proposed model was experimentally validated through micromilling tests on an Al7075 aluminum alloy workpiece [
32]. It was found that, for the specific machining system considered, system damping has a significant effect on the limiting depth of cut at spindle speeds below 30,000 rpm.
Determining the modal parameters of micromachining systems is a challenging task that must be addressed efficiently to define the stability limits of the micromilling process. Considering primarily the diameter of micro-cutting tools, it is clear that experimental modal analysis cannot be applied to determine the system frequency response function (and thus its modal parameters). One approach to solving this problem was proposed by Park and co-authors in [
36], who demonstrated that it is possible to obtain the frequency response function of the more robust components of the system (tool holder, spindle, machine structure) through experimental modal analysis, and then couple it with the frequency response function of the tool obtained using finite element analysis. The method that enables the coupling of frequency response functions obtained by different means is known as the receptance coupling (RC) method. When coupling the frequency response functions, the authors also included the rotational degrees of freedom of the components being coupled, thereby increasing the accuracy of the proposed method.
A review of the literature presented above shows that the major challenges in analyzing self-excited vibrations in micromilling are the accurate modeling of nonlinear cutting forces caused by minimum chip thickness and flank-face friction, as well as the difficulty of determining modal parameters of micromachining systems due to the small tool dimensions and the impossibility of applying standard experimental modal analysis.
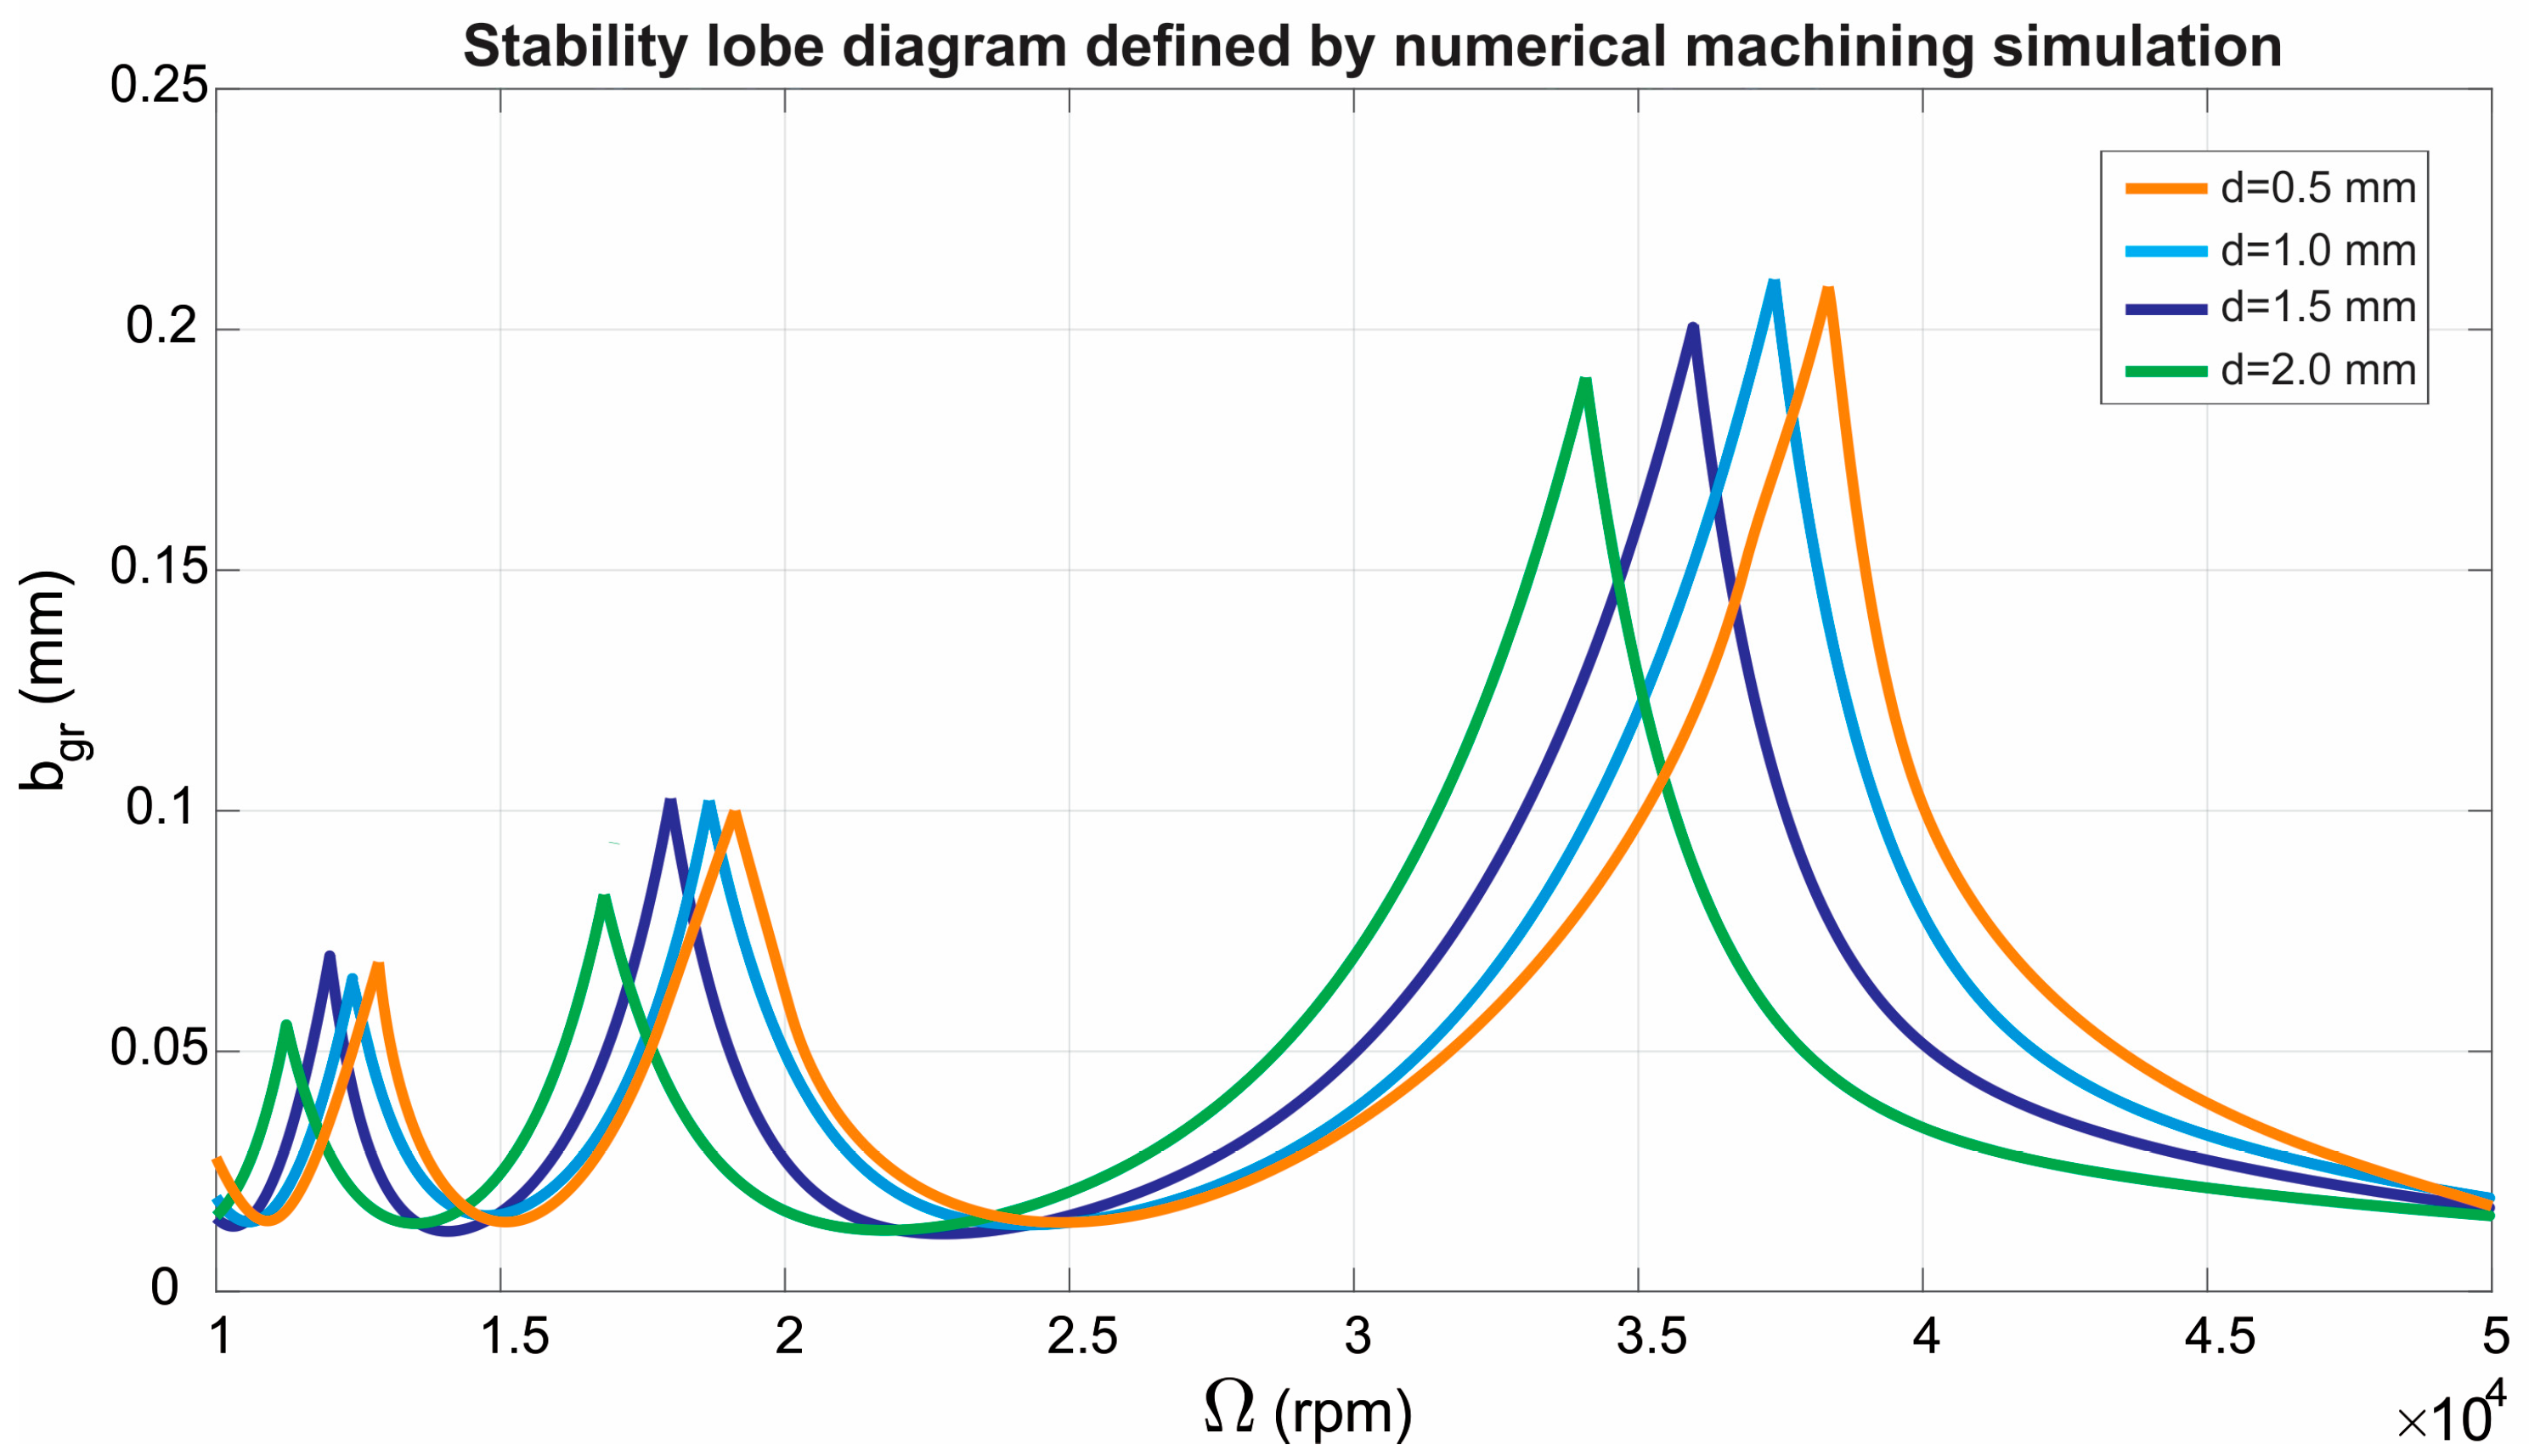
This study presents a new mathematical and numerical model for predicting self-excited vibrations in micromilling, with particular focus on machining Al7075 aluminum alloy. The model introduces an improved approach to cutting-force prediction, which, in addition to conventional force components, incorporates the effects of flank-face friction, elastoplastic material behavior, and the minimum chip thickness phenomenon. Based on the modal parameters of the machining system—determined using the receptance coupling method—a numerical simulation of the micromilling process with continuously increasing depth of cut was conducted, yielding stability lobe diagrams for different tool diameters. The final part of the study presents the experimental validation of the numerical results through micromilling tests on Al7075 alloy, which confirmed a high degree of agreement between simulation and experiment.
2. Numerical Simulation of Self-Excited Vibrations in Micromilling
As previously noted, the micro-cutting and macro-cutting processes are nearly identical from a kinematic standpoint; however, certain differences arise when their dynamic behavior is considered. For example, the mechanisms of chip formation in micro-cutting differ from those in macro-cutting, since, in addition to the material-shearing mechanism, the ploughing mechanism also becomes significant. One of the sources of the ploughing mechanism is the elastoplastic behavior of the material.
In micro-cutting, the elastoplastic behavior of the material manifests through different chip-formation mechanisms that directly depend on the minimum chip thickness. Depending on the relationship between the instantaneous chip thickness and the minimum chip thickness, three cases may occur (
Figure 1).
In the first case, when the chip thickness is smaller than the minimum value (
Figure 1a), only elastic deformation of the workpiece material occurs, meaning that no material is removed. As the chip thickness approaches the minimum chip thickness, the ploughing phenomenon appears (
Figure 1b); in this stage, grooves are formed on the workpiece surface, the material accumulates along the groove edges, but a chip is still not formed. Finally, when the chip thickness exceeds the minimum value, material shearing occurs, and a chip is formed (
Figure 1c).
The minimum chip thickness directly depends on the cutting-edge radius of the tool, on the properties of the workpiece material (ductile materials exhibit higher minimum chip thickness values), and on the friction coefficient between the workpiece and the tool.
Self-excited vibrations in micromilling occur only when chip formation takes place, that is, when the chip thickness exceeds the minimum chip thickness. To ensure that this condition is fulfilled, the cutting-force modeling and the numerical simulation of the micromilling process were carried out only for cases where
h >
ra, with the assumption that the tool cutting-edge radius is slightly larger than the minimum chip thickness [
3].
2.1. Modeling of Cutting Forces in Micromilling
The fundamental difference between conventional milling and micromilling lies in the methods used to define cutting forces, i.e., in the chip-formation mechanisms, which differ significantly at the macro and micro scales. For this purpose, a new cutting-force modeling method for micromilling is proposed, which accounts for the elastic deformation of the material during cutting and its influence on the stability of the cutting process.
The numerical simulation of the micromilling process, presented in the following sections, is performed for cases in which the chip thickness during machining is greater than the tool cutting-edge radius; however, the influence of this radius on the chip-formation mechanism must not be neglected.
In micromilling, when
h >
ra >
hmin, the elastic recovery of the workpiece material after the passage of a tool tooth causes contact between the flank face of the tool and the machined surface. As a result, a friction force arises in the region of this contact (
Figure 2).
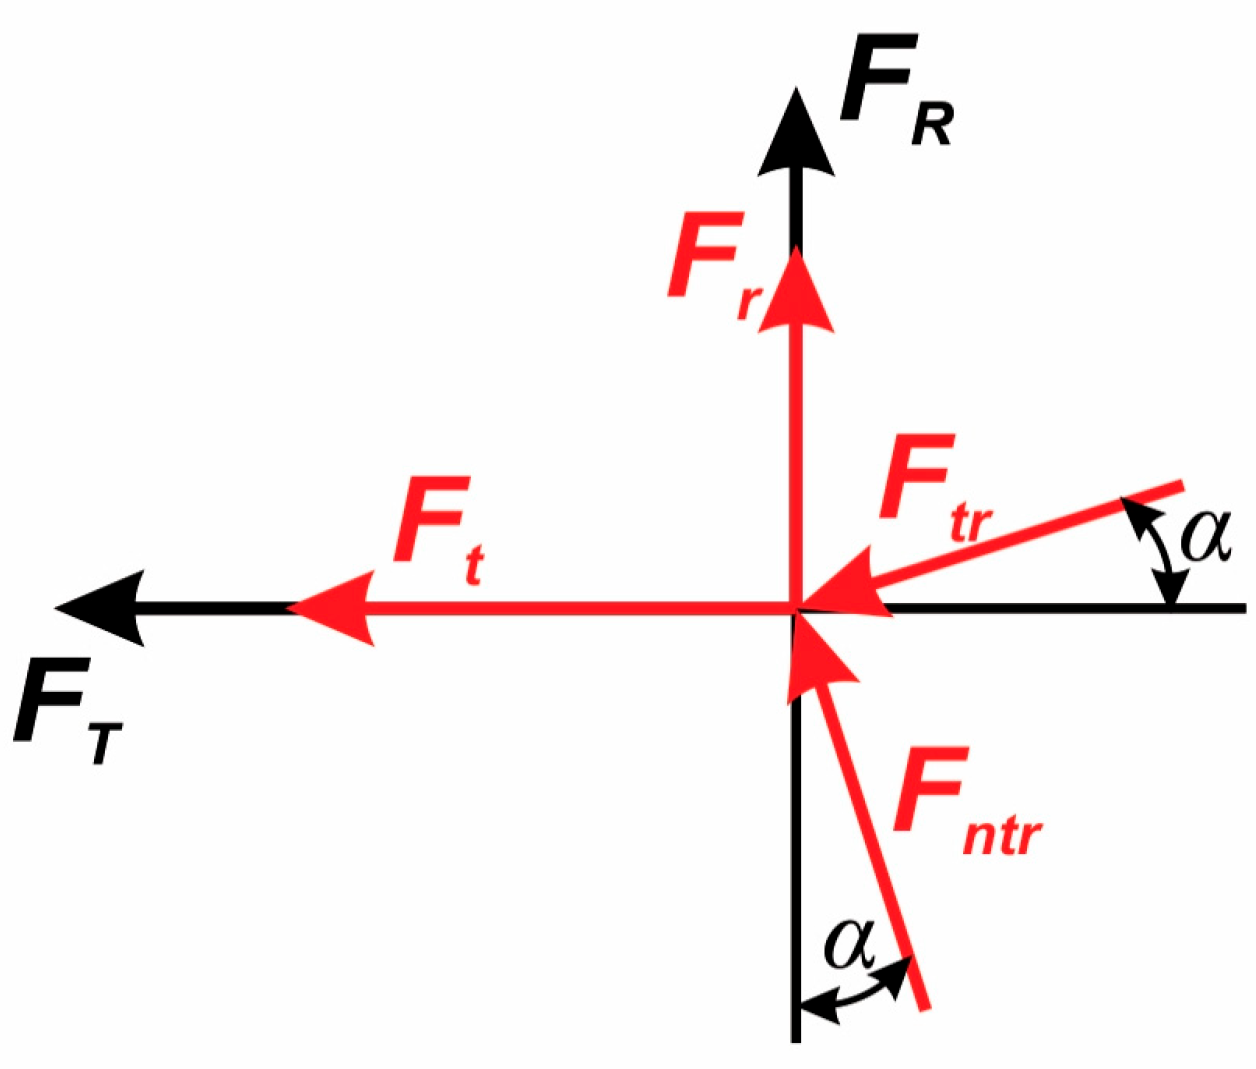
The friction force Ftr and its normal component Fntr influence the tangential (Ft) and radial (Fr) cutting force components and must therefore be considered when modeling these forces.
In conventional machining, the tangential and radial cutting forces depend on the specific cutting resistance of the workpiece material and on the cross-sectional area of the chip. In this case, the friction force between the tool flank face and the machined surface has only a minor influence on the cutting process and can therefore be neglected.
However, in micro-cutting, the influence of the tool cutting-edge radius becomes significant, and the tangential and radial cutting-force components must be supplemented by the corresponding friction-force components acting on the tool’s flank face.
The friction force on the tool’s flank face is determined based on the contact length between the flank face and the machined surface Δ, the depth of cut
b, and the tangential stresses in the contact zone between the flank face and the machined surface (
).
The friction force (
Ftr) generates tangential stress in the contact zone between the tool’s flank face and the machined surface. These stresses are not constant along the entire contact length; therefore, to determine the friction force, it is first necessary to define the tangential stress distribution function within the contact zone. According to Astakhov [
37], the tangential stress distribution in metal cutting is given by the following expression:
where
is the shear stress of the workpiece material, and
x is the position along the contact zone measured from the cutting-edge tip (point B,
Figure 2).
The mean value of the tangential stresses in the contact zone between the tool’s flank face and the machined surface is obtained by integrating the previous expression:
To determine the contact length between the tool’s flank face and the machined surface (Δ), which is required for calculating the friction force (
Ftr), the cutting process can be divided into three zones (
Figure 2). The region bounded by points A and B is the contact zone between the tool rake face and the chip; the region from point B to point C is the zone where the workpiece material fractures and the chip is formed; and the region bounded by points C and D is the contact zone between the tool’s flank face and the machined surface. The highest stresses induced by the tool edge occur at point B, causing material fracture and chip formation in its vicinity [
37]. Point C represents the lowest contact point between the tool edge and the workpiece, while point D represents the final point of contact between the tool’s flank face and the machined surface.
By analyzing the positions of these points, it can be concluded that material compression occurs between points B and C, with the amount of compression denoted as hBC, whereas between points C and D the workpiece material undergoes elastic recovery, denoted as hCD. Based on the values of hBC and hCD, the contact length between the tool’s flank face and the machined surface (Δ) is determined.
From
Figure 2, the expression for determining the contact length between the tool’s flank face and the machined surface can be defined as:
According to Astakhov [
37], the amount of compressed workpiece material (
hBC) and the elastic recovery of the workpiece material (
hCD) can be related to the chip compression ratio using the following expression:
where
ξ is the chip compression ratio,
ra is the tool cutting-edge radius, and
γ is the rake angle of the tool.
Taking the previous expressions into account, the equation for determining the friction force on the tool’s flank face can be written as follows:
The normal component of the friction force (
Fntr) is determined based on the friction force (
Ftr) and the kinematic friction coefficient (
μk).
Considering the friction force (
Ftr) and its normal component (
Fntr), the tangential (
FT) and radial (
FR) cutting forces in micromilling are determined based on the force components shown in
Figure 3.
2.2. Micromilling Numerical Simulation
The numerical simulation of the micromilling process uses numerical integration to solve the equations of motion and accounts for possible system nonlinearities caused by the characteristics of the cutting process itself [
38]. To simplify the solution of these complex differential equations, certain assumptions must be introduced. For example, the helical geometry of the end-mill flutes is neglected, and the process is assumed to be performed using a tool with straight cutting edges (
γ = 0°). This approximation greatly simplifies the solution of the governing differential equations while still allowing a physically meaningful analysis of the cutting process, given that the machining is performed at relatively small depths of cut. Under this assumption, the cutting forces are evaluated on a per-tooth engagement basis rather than through continuous axial discretization of the helical flutes. The cutting force components are then calculated directly from the instantaneous undeformed chip thickness using the mechanistic force formulation implemented in the model.
Additionally, a second assumption is that each tool tooth follows a circular trajectory. It was assumed that each tooth of the tool follows a circular trajectory. Although the real trajectory is cycloidal due to the superposition of rotational and translational motions, the translational component is small compared to the spindle speed and tool diameter. Therefore, the actual tooth path can be accurately approximated by a sequence of circular arcs shifted by the feed per tooth. In addition to the previous, since micro-cutting behavior is strongly governed by the relationship between chip thickness and the tool edge radius, the numerical simulation assumes that the chip thickness is always greater than the edge radius, i.e., h > r.
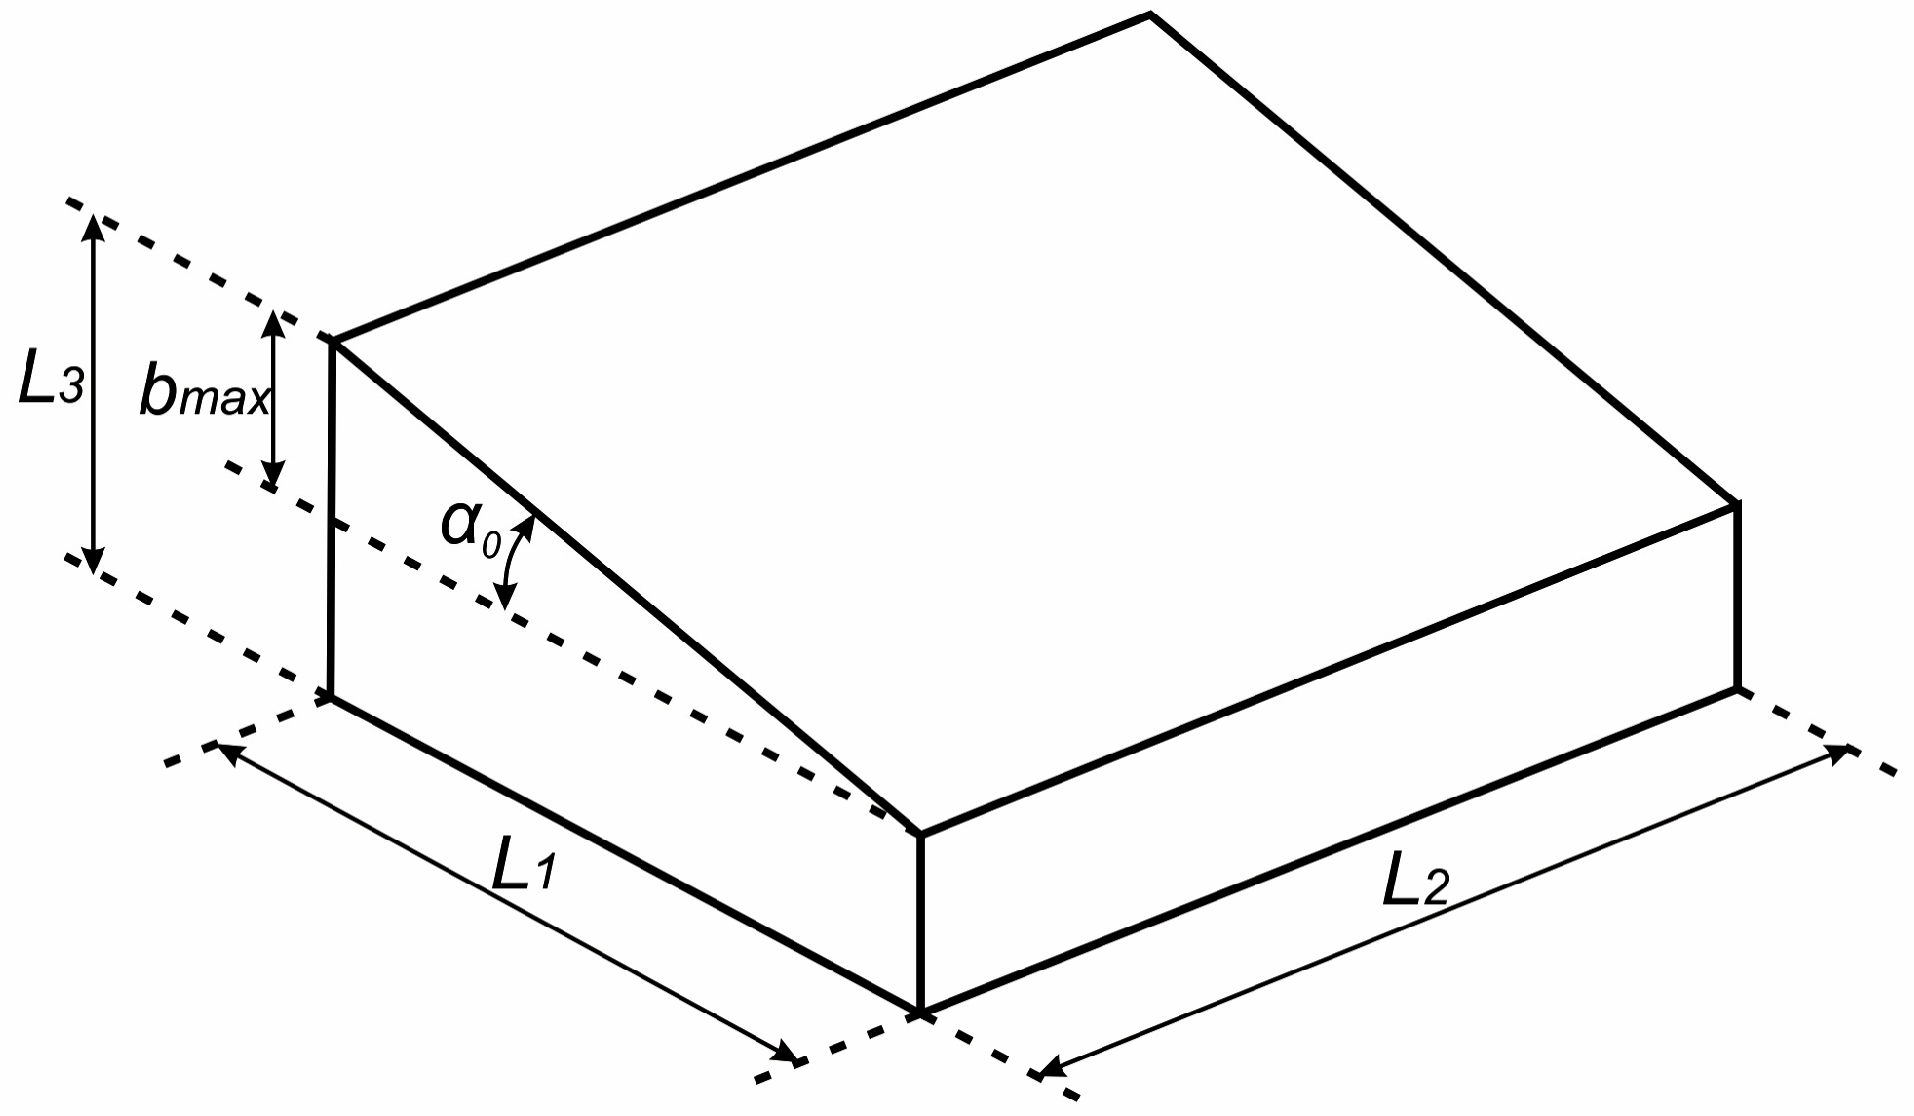
Since the objective of this method is to determine the stability limit of the simulated machining system under given cutting conditions, the micromilling simulation is performed on a workpiece with an inclined upper surface (
Figure 4). This inclination enables the simulation of a continuously increasing depth of cut, which in turn causes a gradual increase in cutting-force magnitude and a corresponding jump in tool-vibration amplitude. Based on this information, the limiting depth of cut is determined [
39].
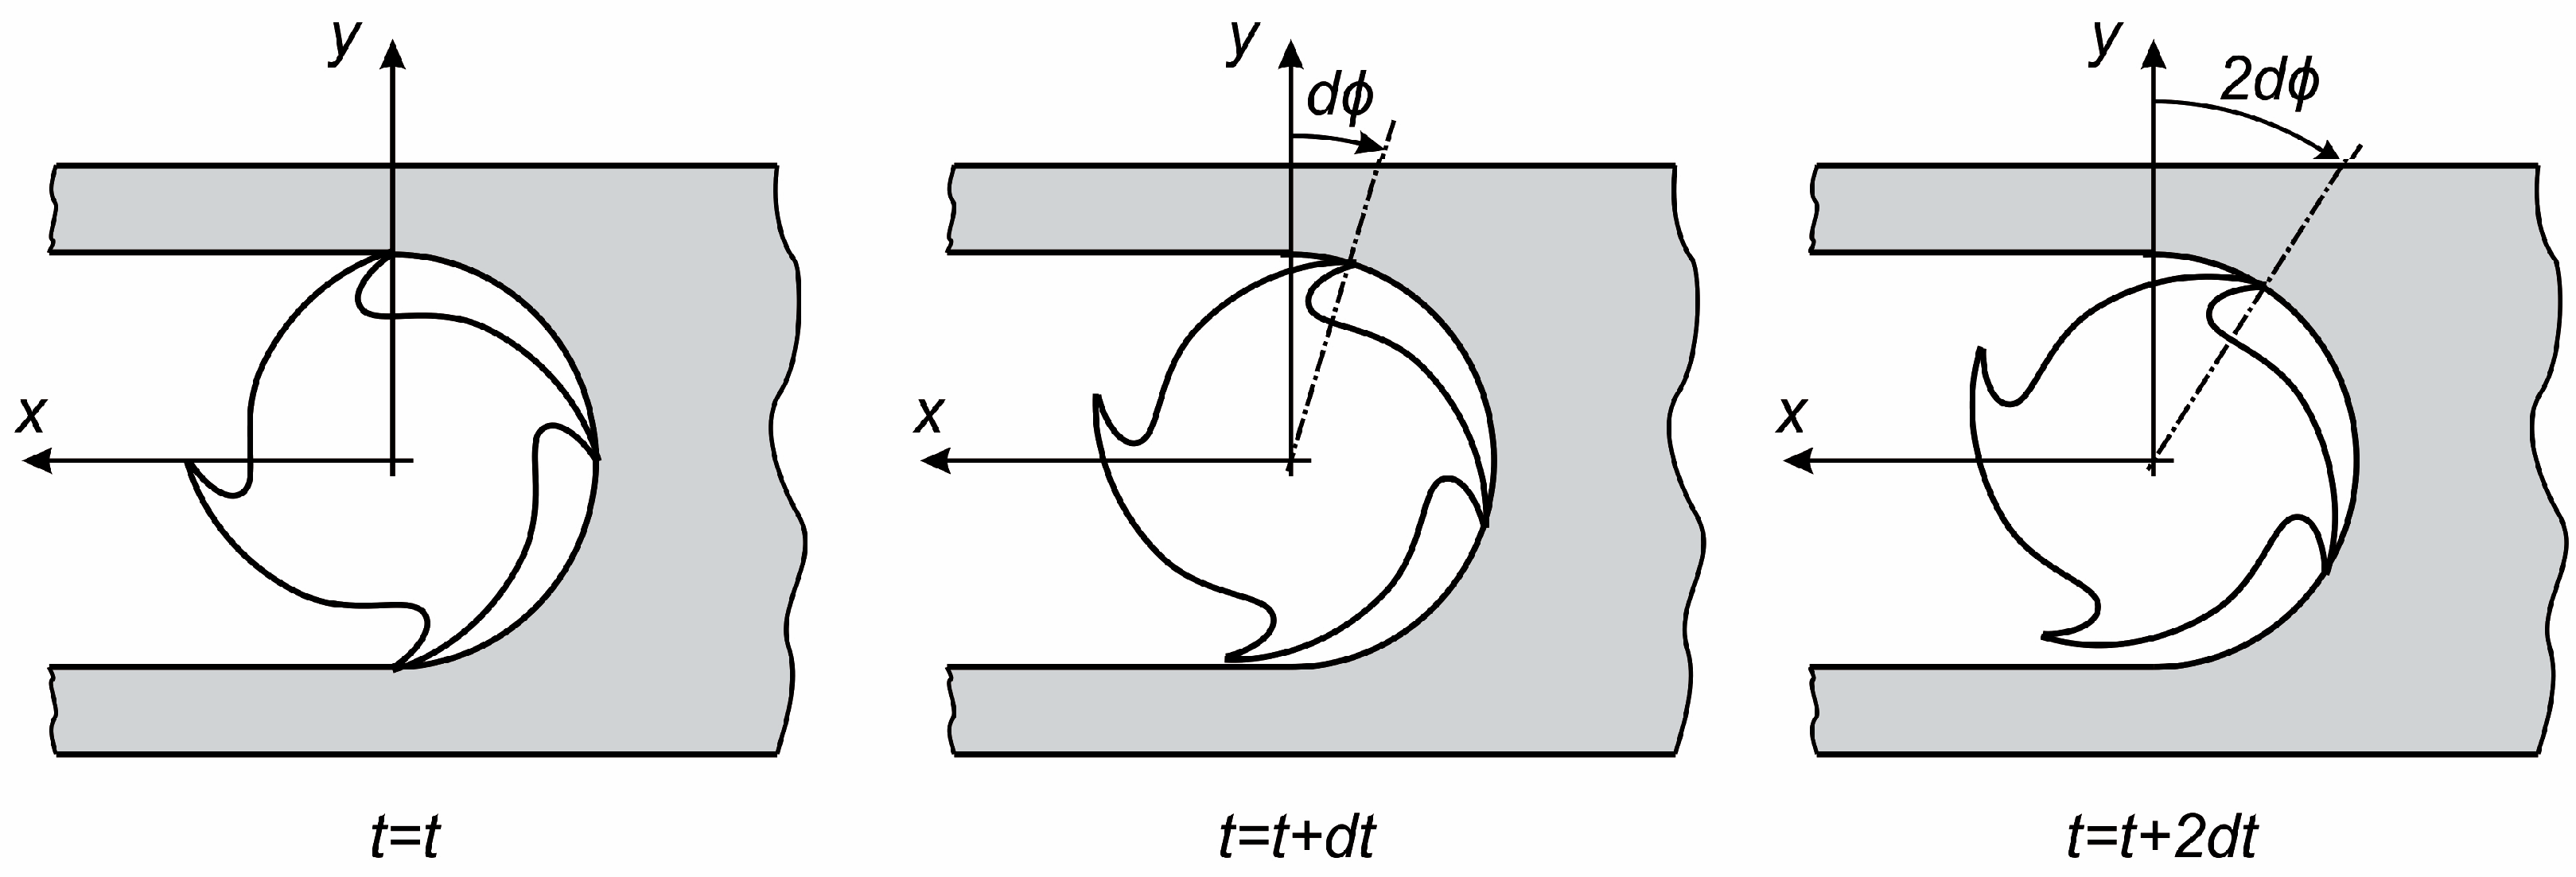
During the numerical simulation of micromilling, the tool rotation is divided into a finite number of equal steps, such that a small-time increment
dt corresponds to an engagement-angle increment
dϕ (
Figure 5). In this way, at every moment of the simulation it is known which tool tooth is engaged in cutting and how that tooth is oriented in space, meaning that the directions of the tangential and radial cutting-force components are known in the global Cartesian coordinate system.
In addition, it should be noted that the inclination angle of the workpiece’s upper surface in the numerical micromilling simulation should not exceed .
The numerical simulation of the micromilling process is carried out in four steps:
The instantaneous chip thickness (
h) is calculated for the current tool engagement angle
ϕ using Equation (12).
where
ϕ is the current tool engagement angle (
Figure 6), and
sz is the feed per tooth.
- 2.
Determination of the cutting resistance in the X and Y directions.
Using the data obtained in the previous step and applying the principles of conventional (macro-scale) cutting theory, the tangential (
Ft) and radial (
Fr) cutting resistances are determined from Equation (13).
Next, using Equations (8) and (9), the friction resistance (
Ftr) and its normal component (
Fntr) acting on the tool’s flank face are determined. Then, based on these previously obtained resistance components, the tangential (
FT) and radial (
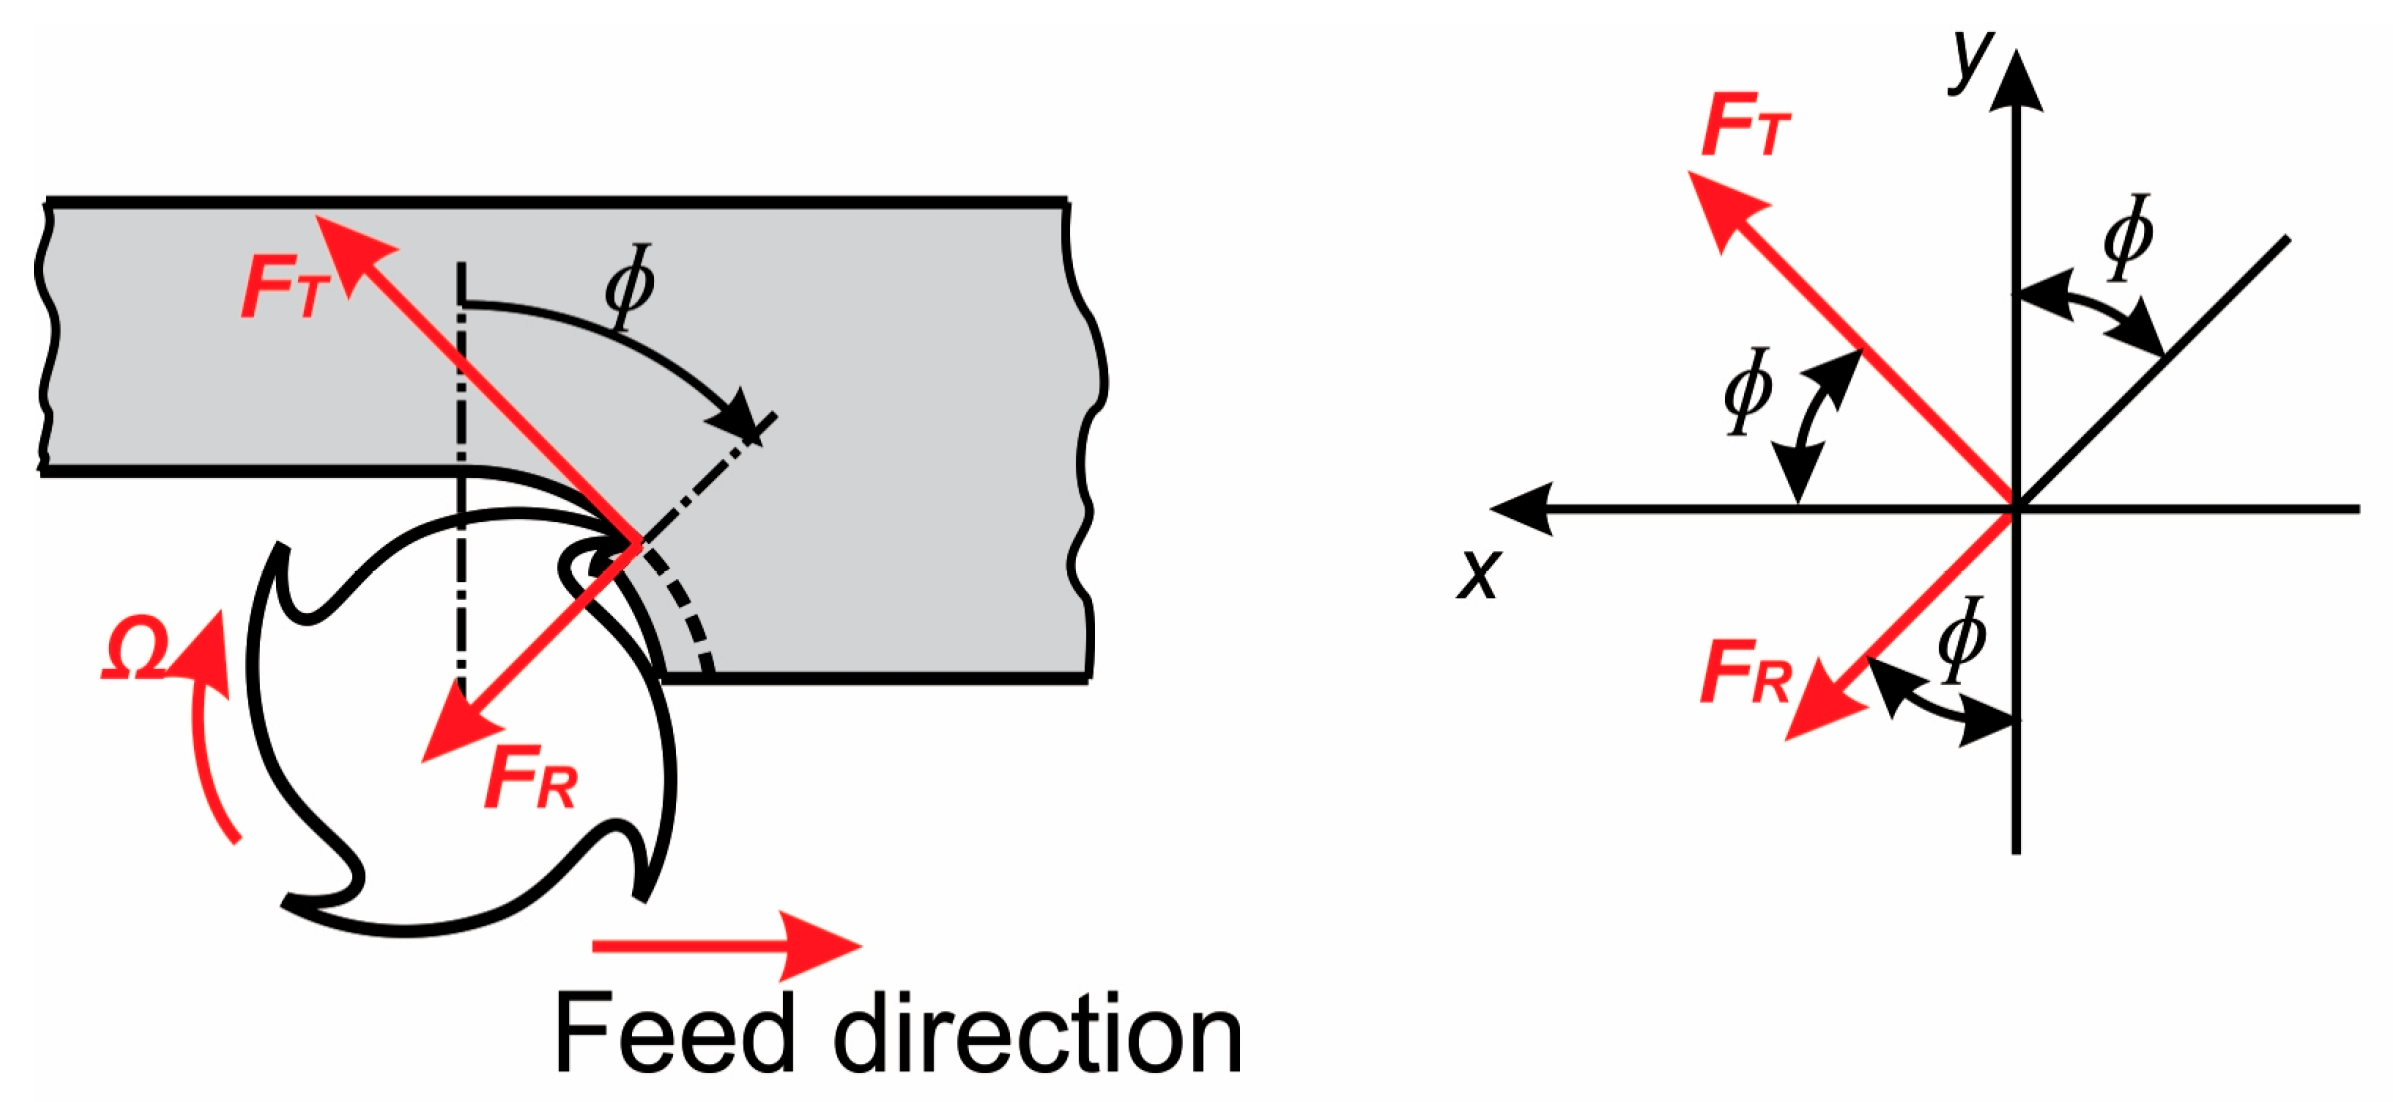
FR) cutting resistances in micromilling are calculated from Equations (10) and (11). Depending on the current tool engagement angle
ϕ, these forces are projected onto the X and Z axes (
Figure 7).
- 3.
Determination of the tool-tip displacement in the X and Y directions
The tool-tip displacements, which define the vibration amplitude of the tool, are calculated by substituting the previously determined cutting-resistance components into Equation (16).
where the velocities
and
, as well as the displacements
and
, are obtained from the previous simulation step (with zero initial conditions) using numerical (Euler) integration:
- 4.
Definition of new input data and repetition of the entire procedure
The tool engagement angle is increased by a predefined increment
dϕ, and the instantaneous depth of cut is updated using Equation (12). The entire procedure is then repeated for the new values of
ϕ and
btr.
Figure 8 shows the complete algorithm of the presented numerical simulation of self-excited vibration in micromilling.
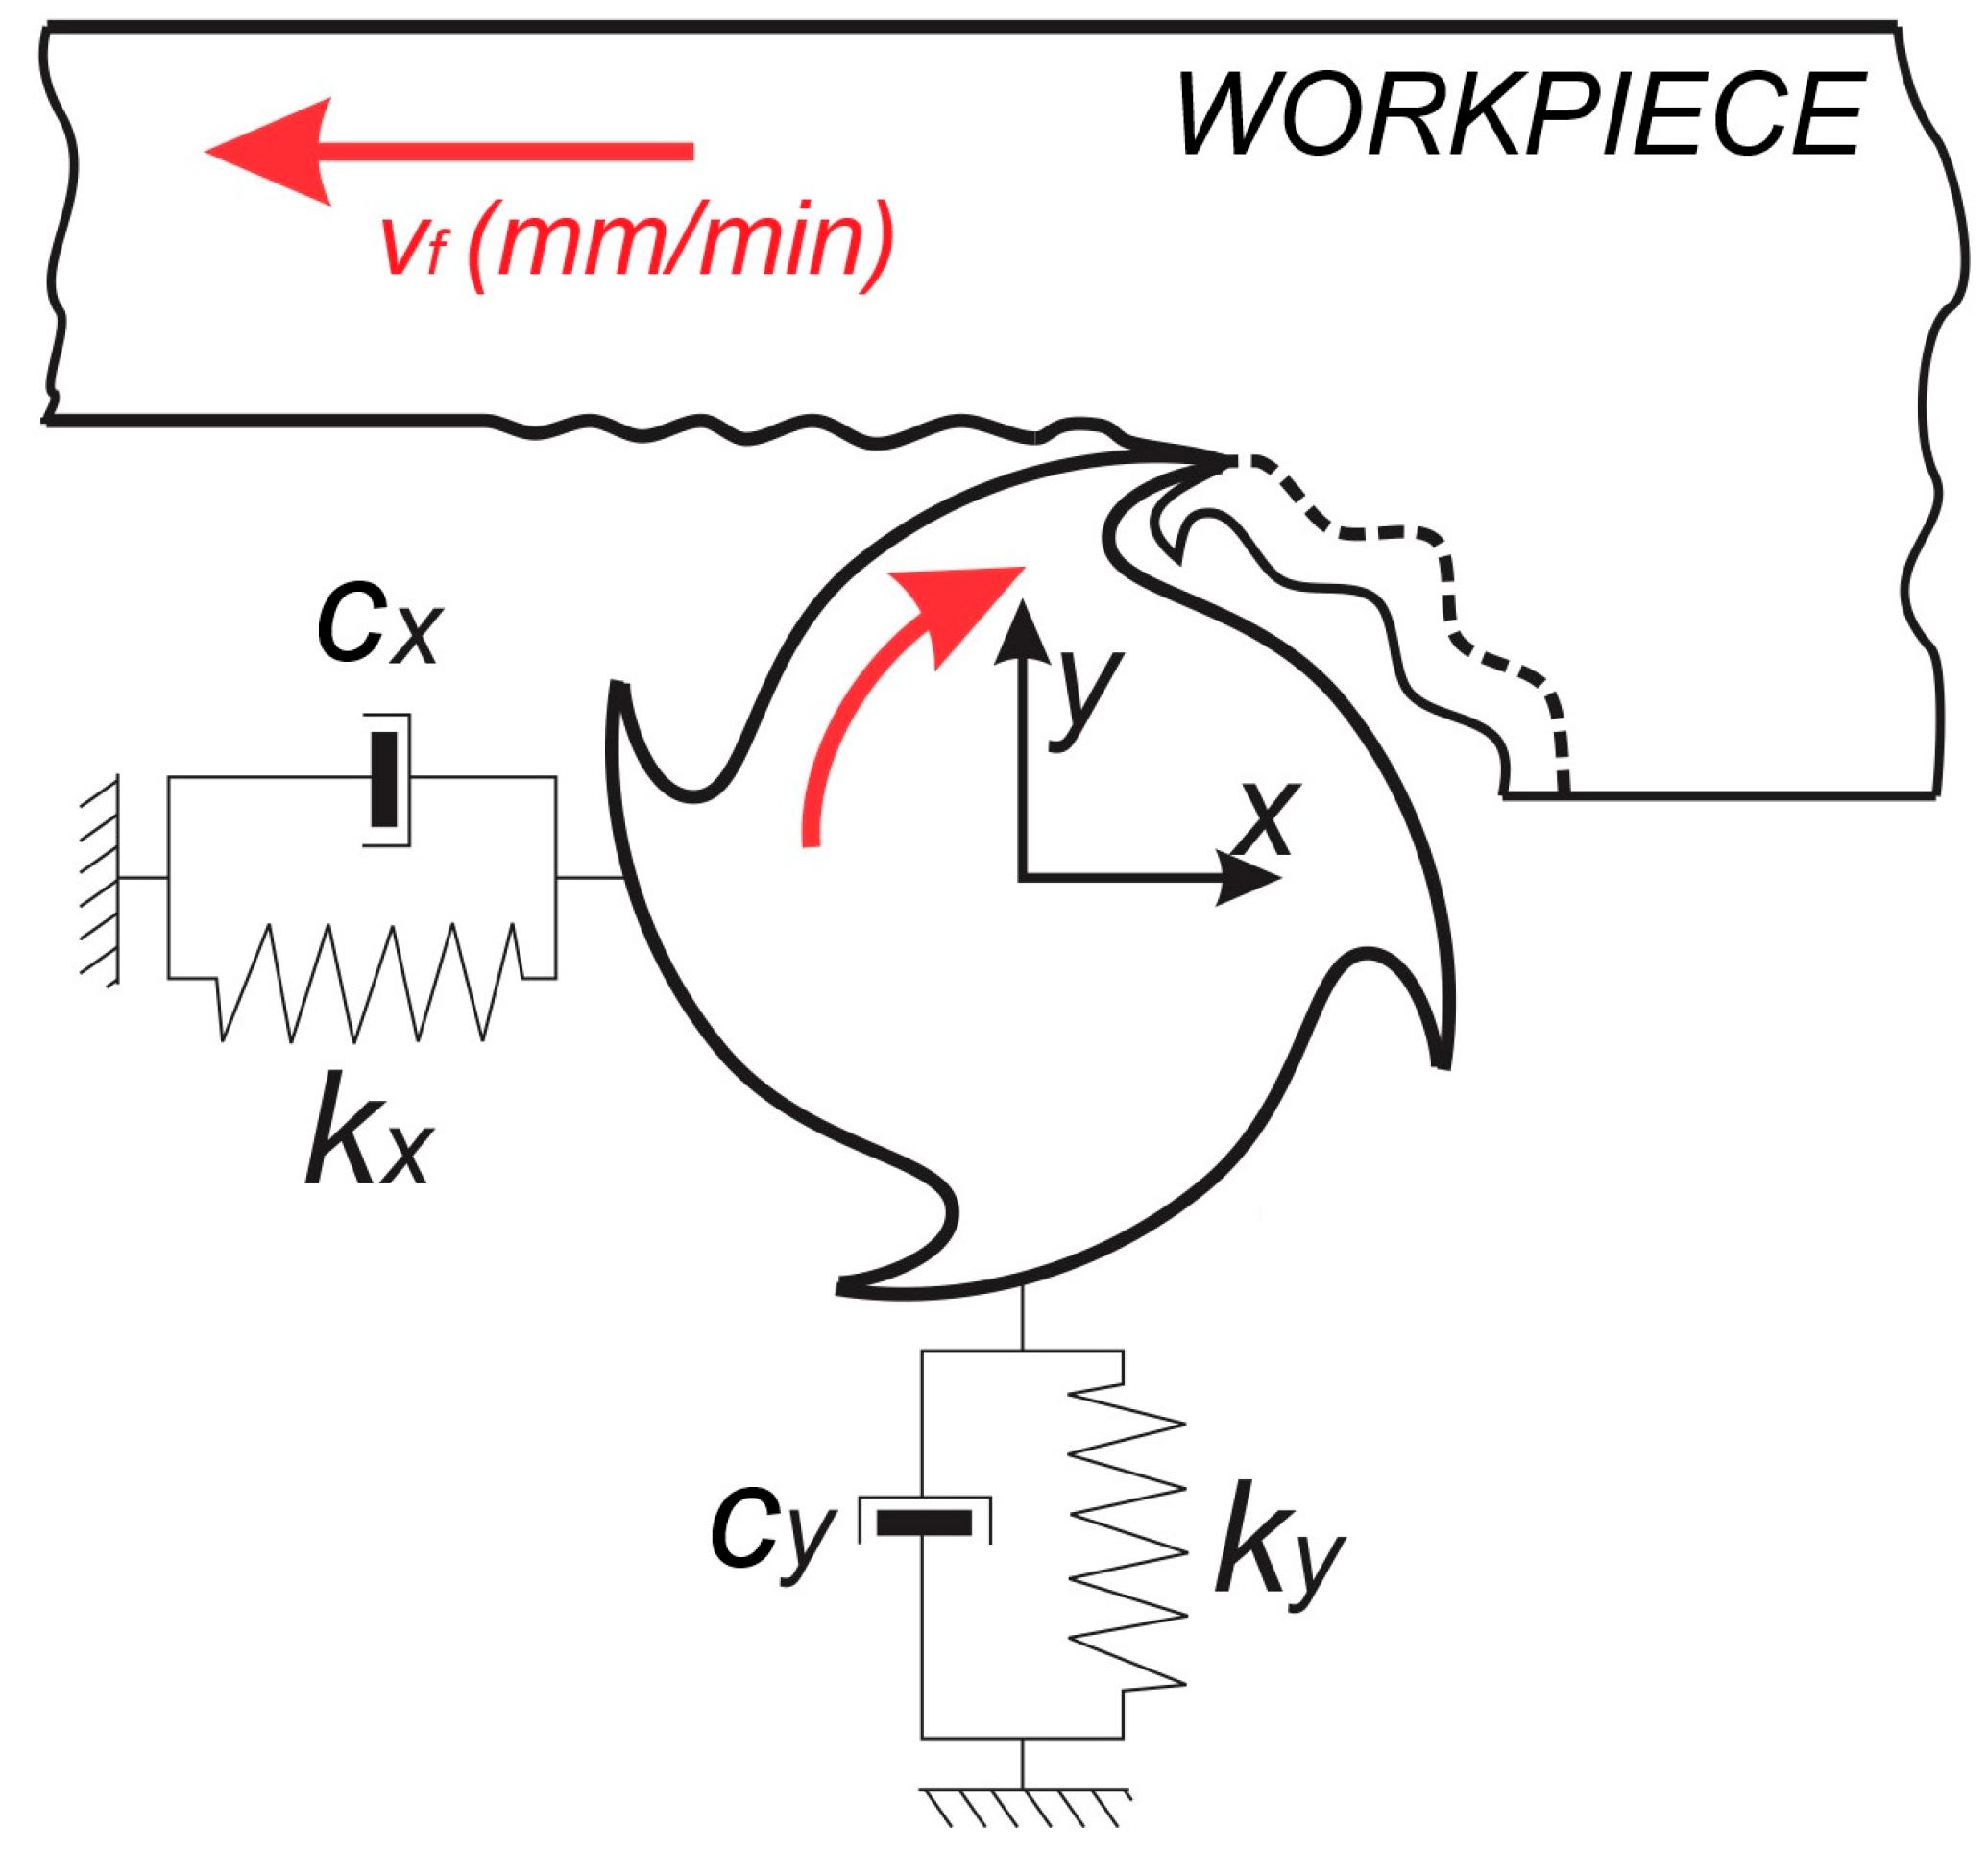
It should be noted that, prior to performing the numerical simulation of the milling process, the appropriate input parameters must be defined. These parameters include: the modal parameters of the machining system (
mx,y,
cx,y and,
kx,y) (
Figure 9), the properties of the workpiece material (
KS,
Kt,
Kr,
τ0), the tool diameter, number of teeth, and cutting-edge radius, the cutting conditions (spindle speed
Ω and feed per tooth
sz), the entry and exit engagement angles, and the inclination angle of the workpiece upper surface α
o. In addition, the initial conditions must be specified—namely, that the depth of cut, tool-tip displacements, and cutting forces are all equal to zero at the start of the simulation. Finally, the simulation is carried out according to the established four-step procedure.
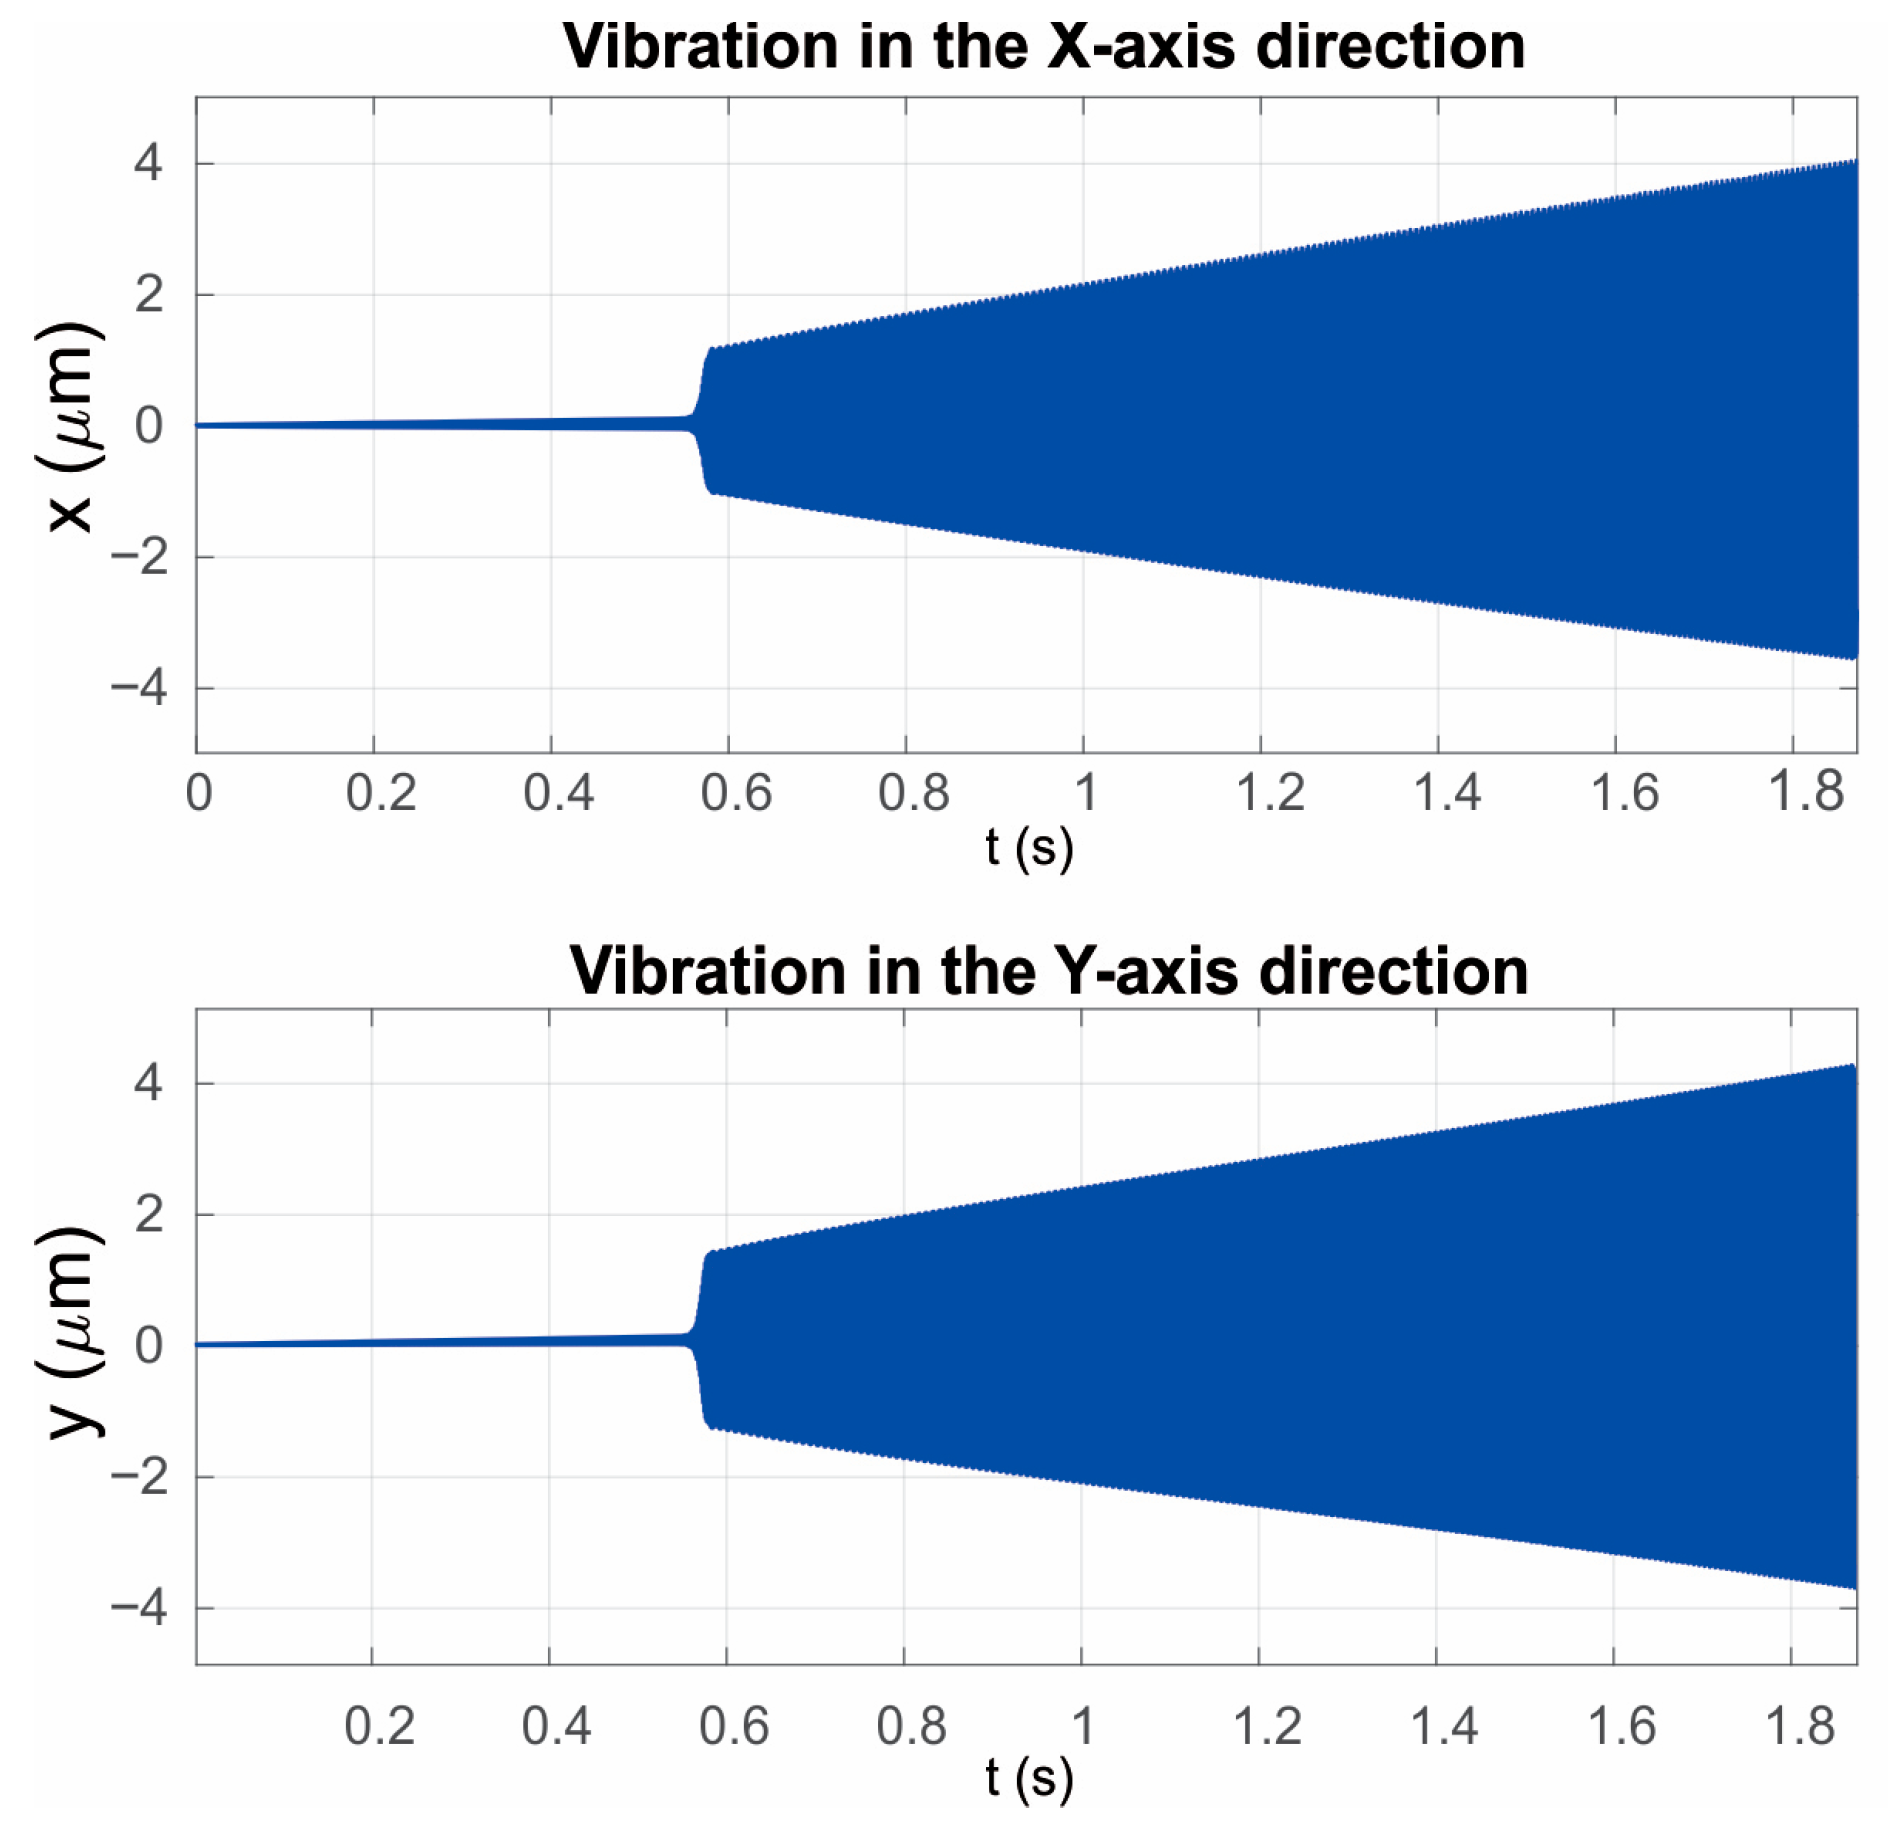
Figure 10 shows an example of the results of the numerical micromilling simulation in the X and Y directions for the case of machining an aluminum workpiece, with a workpiece surface inclination angle of
, a 1 mm diameter end mill, a spindle speed of 30,000 rpm, and a feed per tooth of
.
By examining the tool vibrations in the X and Y directions shown in
Figure 10, a clear jump in vibration amplitude (chatter) can be observed. If the moment of this amplitude jump (
Tgr) is taken as the onset of self-excited vibrations, it is then possible—based on the elapsed time from the beginning of cutting and the workpiece inclination angle—to determine the limiting depth of cut (19).
As the final output of the improved numerical simulation of the micromilling process with continuously varying depth of cut, the tool vibrations in the X and Y directions are presented, with the moment of chatter onset clearly indicated, along with the calculated limiting depth of cut (
Figure 11).
4. Experimental Validation of the Stability Lobe Diagram Defined by the Numerical Simulation of the Micromilling Process
Due to the risk of tool breakage at high spindle speeds, as well as the potential danger of damaging the air-bearing spindle, the experimental verification of the stability lobe diagrams defined in the previous section was performed using a constant depth of cut. For practical reasons, the verification was conducted for only one tool diameter, namely the ϕ1.5 mm tool.
The experimental validation was carried out on an Al7075 workpiece using a 1.5 mm diameter end mill with three cutting edges. The depths of cut, selected from the previously defined stability lobe diagram, were kept constant for each tool pass. The width of cut was the same for all passes and was set to 1.5 mm, while the feed was kept constant for each spindle speed at . Additionally, to minimize the risk of tool damage, the cutting length was limited to 15 mm.
The selection of spindle-speed (
Ω) and depth-of-cut (
b) combinations was carried out to most effectively examine the lobed (wavy) characteristic of the previously defined stability diagram, while strictly accounting for the tool’s sensitivity to breakage. Accordingly, several
Ω-b combinations were chosen within the stable region (below the stability curves), and several others within the unstable region of the stability lobe diagram (above the stability curves). The selected combinations are presented in
Table 5.
Figure 25 shows the setup of the machining center for the experimental investigation of self-excited vibrations during the micromilling of Al7075 aluminum alloy.
During the experimental verification, eight tests were performed, with each
Ω-b combination assigned to a separate machined surface on the workpiece. To detect the onset of self-excited vibrations, the vibrations of the spindle assembly were recorded for each experiment using the previously described diagnostic equipment. However, applying the Fast Fourier Transform (FFT) to each of the recorded signals revealed that this method is not suitable for detecting the onset of chatter due to the dominant influence of the tool’s fundamental rotational frequency, as noted in references [
49,
50,
51,
52].
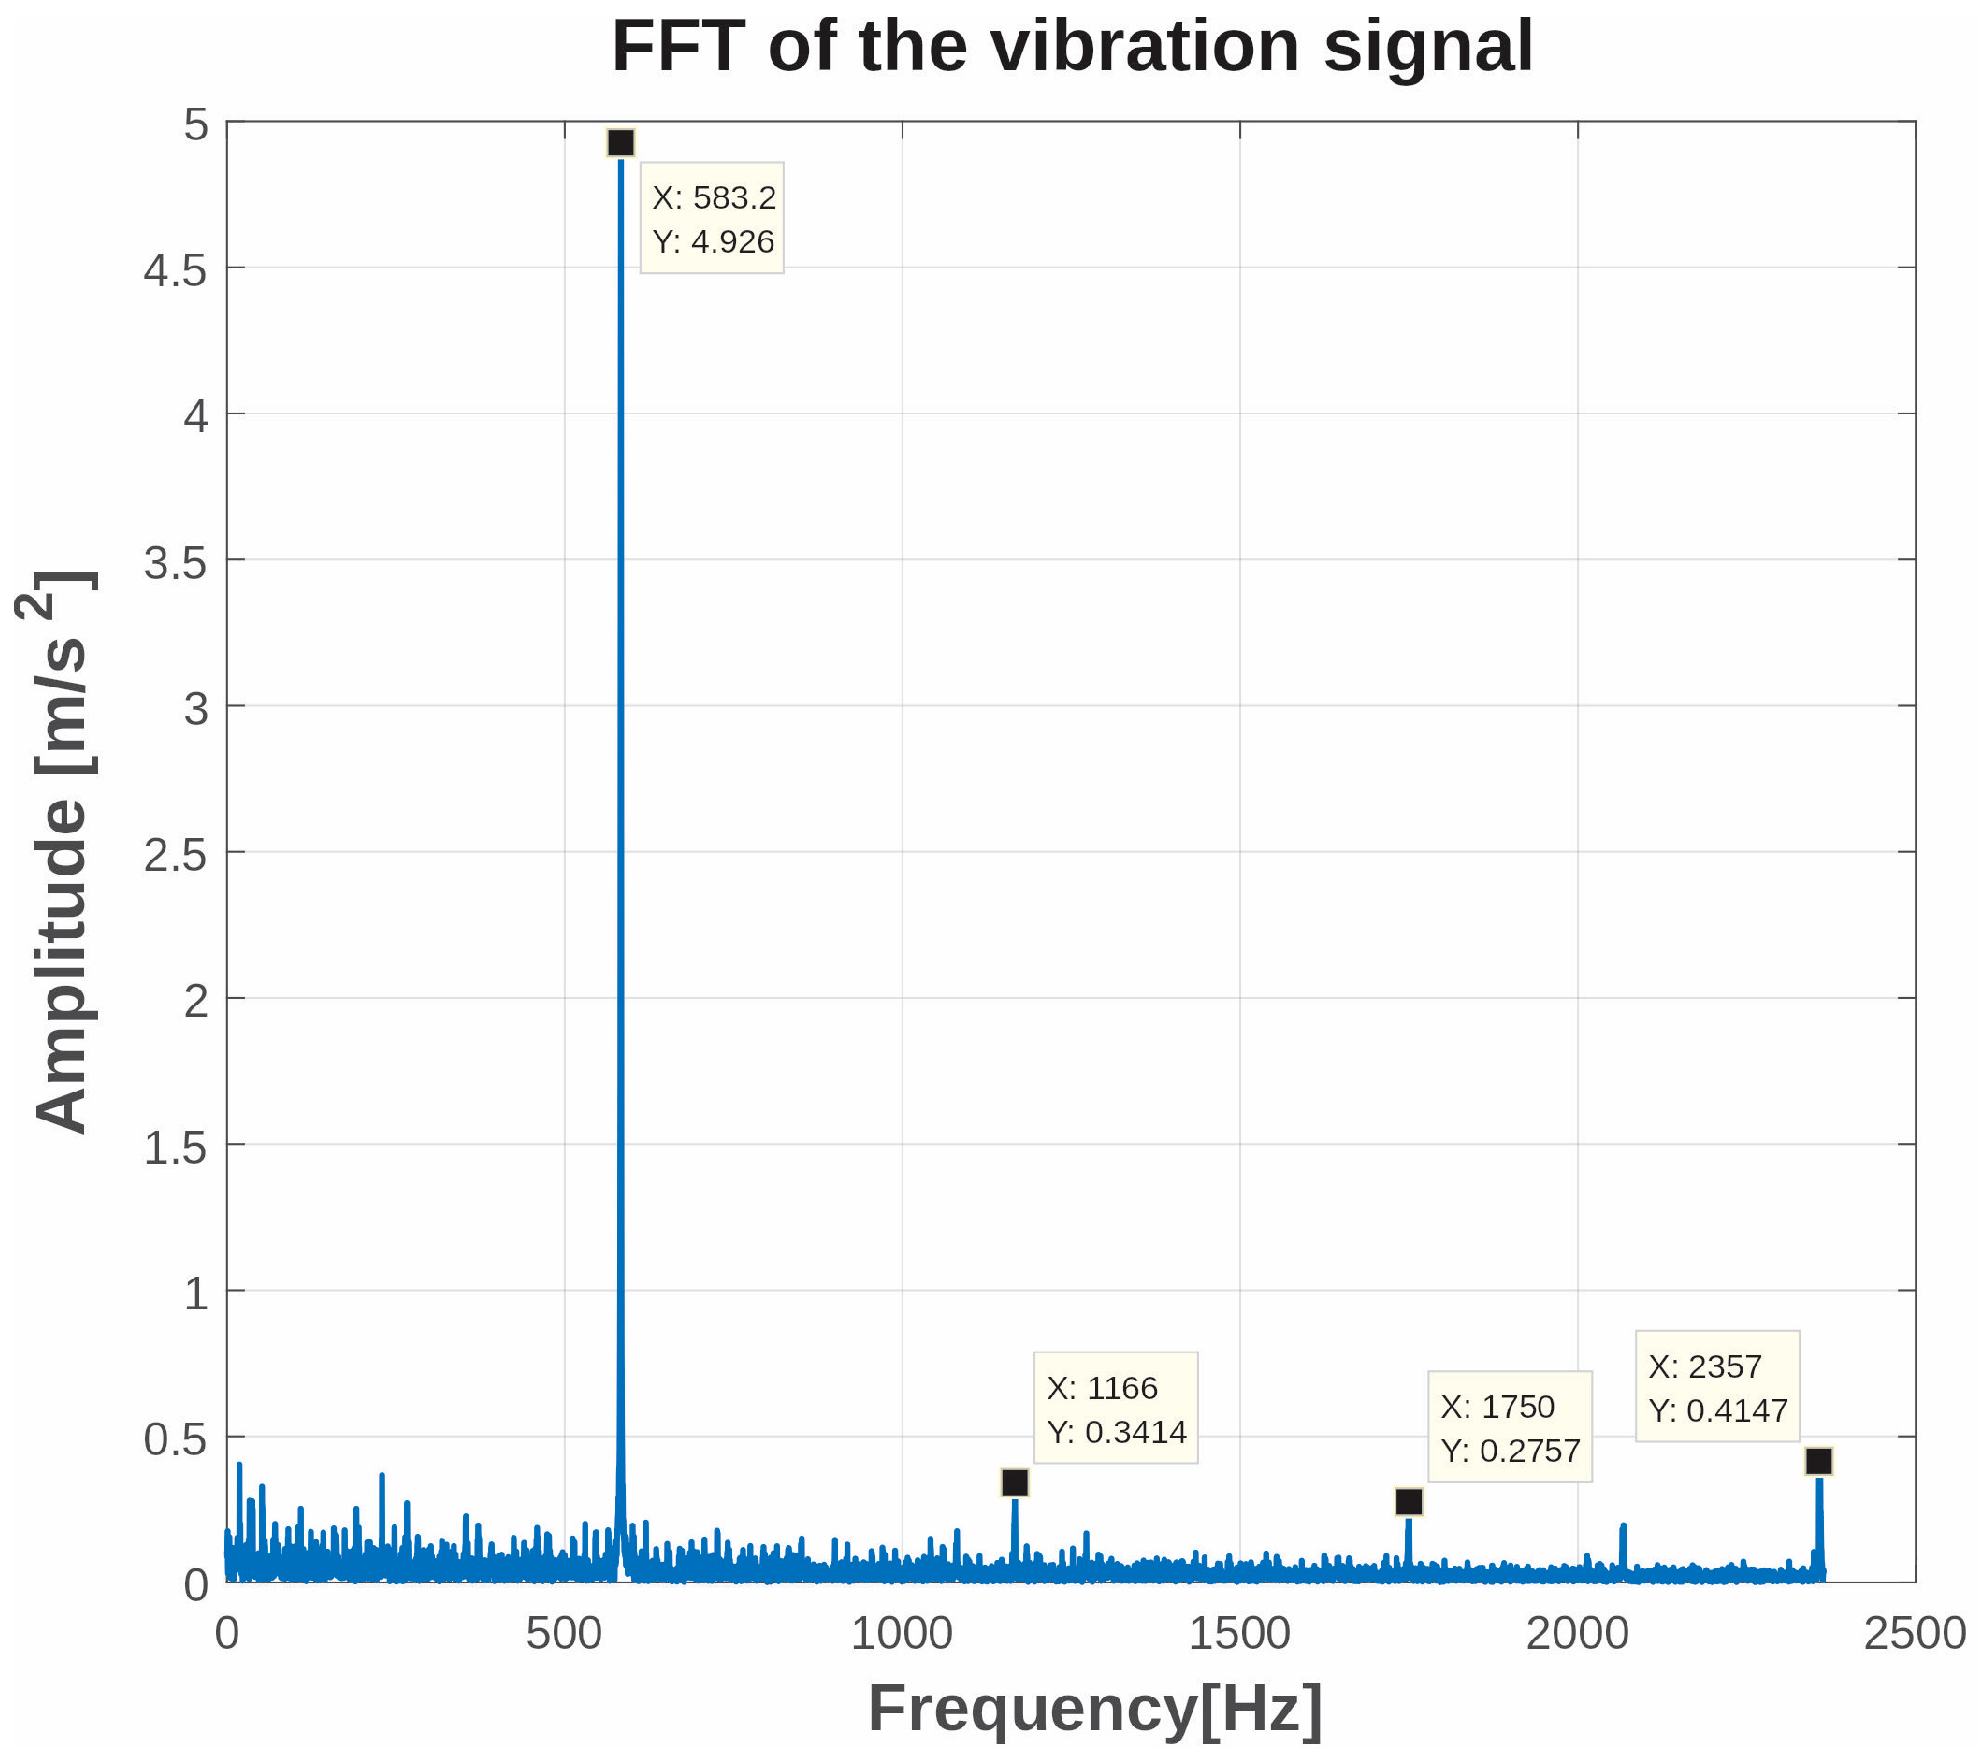
Figure 26 shows the FFT result for the signal from experiment No. 6, corresponding to a spindle speed of 35,000 rpm. The fundamental rotational frequency of the tool, 583.2 Hz, dominates the entire frequency spectrum, making it difficult to detect the amplitude of the chatter frequency in this manner.
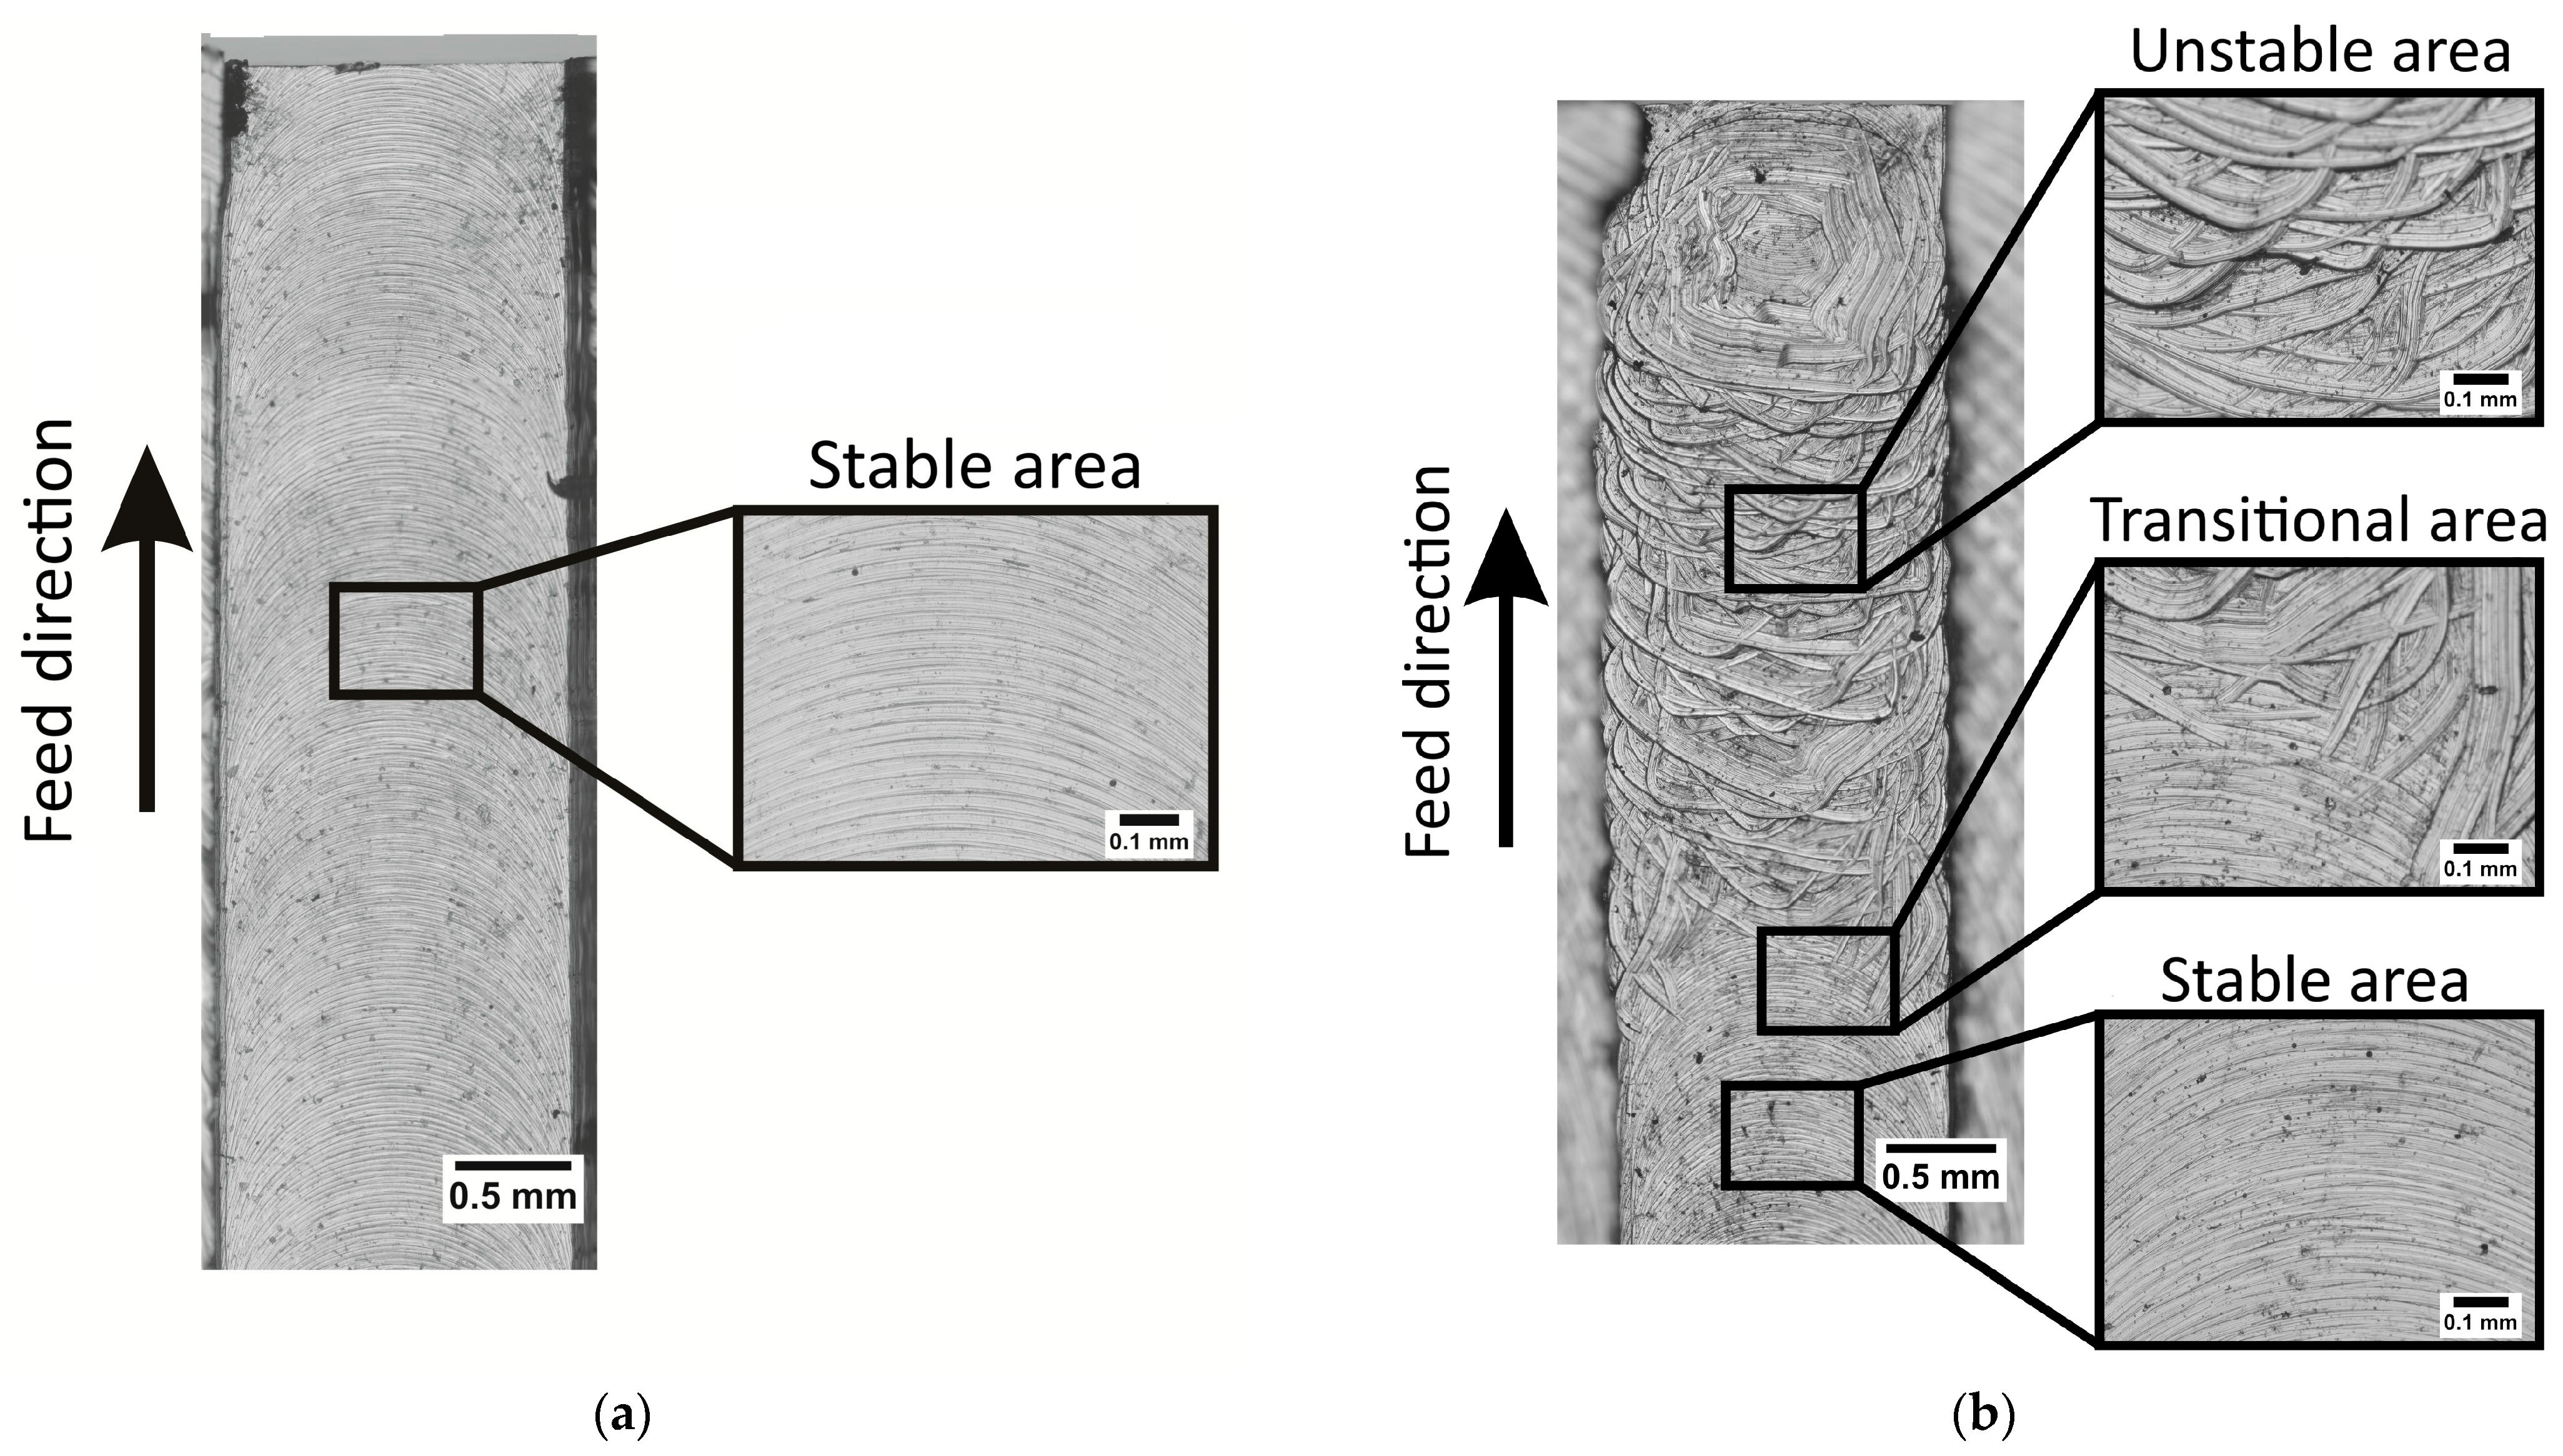
Due to the inability to apply the Fast Fourier Transform, the detection of chatter onset was performed using an analysis of the surface roughness of the machined workpiece. To detect the onset of self-excited vibrations, each tool pass was recorded using a Leitz Orthoplan optical microscope in the direction normal to the machined surface.
Figure 27a shows the appearance of the tool marks in the case of a stable cutting process, while
Figure 27b shows the marks corresponding to an unstable cutting process.
By analyzing the microscopic images of all tool passes, the depths of cut at which self-excited vibrations occurred were identified, and the results are presented in
Table 6.
The experimental results are also plotted on the stability lobe diagram defined by the numerical simulation (
Figure 28). Stable cutting conditions are marked with green circles, while the cutting regimes in which chatter occurred are indicated with red diamonds. During machining at a spindle speed of 35,000 rpm and a depth of cut of 0.1 mm, severe vibrations and tool breakage occurred almost immediately; this case is represented on the stability diagram by a blue square.
Based on the previous figure, it can be considered that the stability lobe diagram obtained through the micromilling simulation has been successfully validated by the experimental investigations for the case of machining Al7075 aluminum alloy.
Author Contributions
Conceptualization, C.M. and D.M.; methodology, C.M. and M.K.; software, M.K. and D.M.; validation, K.M. and A.Ž.; investigation, C.M.; resources, K.M. and A.Ž.; writing—original draft preparation, C.M. and D.M.; writing—review and editing, K.M., C.M. and A.Ž.; visualization, M.K. and D.M.; supervision, K.M. and C.M.; project administration, K.M. and M.K.; funding acquisition, K.M. All authors have read and agreed to the published version of the manuscript.
Funding
The article was prepared thanks to the support of the Ministry of Education of the Slovak Republic through the grants KEGA 042TUKE-4/2025 and VEGA 1/0576/26, as well as thanks to support of CEEPUS agency within the network SK-2026-01-2526.
Data Availability Statement
The original contributions presented in this study are included in the article. Further inquiries can be directed to the corresponding authors.
Acknowledgments
The paper presents a part of the research supported by the Ministry of Science, Technological Development and Innovation (Contract No. 451-03-137/2025-03/200156) and the Faculty of Technical Sciences, University of Novi Sad through project “Scientific and Artistic Research Work of Researchers in Teaching and Associate Positions at the Faculty of Technical Sciences, University of Novi Sad 2025” (No. 01-50/295). The authors would like to thank for the support to the Ministry of Education of the Slovak Republic through the grants KEGA 042TUKE-4/2025 and VEGA 1/0576/26, as well as thanks to support of CEEPUS agency within the network SK-2026-01-2526.
Conflicts of Interest
The authors declare no conflicts of interest.
References
- Cheng, K.; Huo, D. Micro-Cutting: Fundamentals and Applications; Wiley: Hoboken, NJ, USA, 2013; ISBN 978-0-470-97287-8. [Google Scholar]
- Dornfeld, D.; Min, S.; Takeuchi, Y. Recent Advances in Mechanical Micromachining. CIRP Ann. 2006, 55, 745–768. [Google Scholar] [CrossRef]
- Liu, X.; DeVor, R.; Kapoor, S.; Ehmann, K. The Mechanics of Machining at the Microscale: Assessment of the Current State of the Science. J. Manuf. Sci. Eng.-Trans. ASME 2004, 126, 666–678. [Google Scholar] [CrossRef]
- Vogler, M.P.; DeVor, R.E.; Kapoor, S.G. Microstructure-Level Force Prediction Model for Micro-Milling of Multi-Phase Materials. J. Manuf. Sci. Eng. 2003, 125, 202–209. [Google Scholar] [CrossRef]
- Weule, H.; Hüntrup, V.; Tritschler, H. Micro-Cutting of Steel to Meet New Requirements in Miniaturization. CIRP Ann. 2001, 50, 61–64. [Google Scholar] [CrossRef]
- Shimada, S.; Ikawa, N.; Tanaka, H.; Ohmori, G.; Uchikoshi, J.; Yoshinaga, H. Feasibility Study on Ultimate Accuracy in Mi-crocutting Using Molecular Dynamics Simulation. CIRP Ann. 1993, 42, 91–94. [Google Scholar] [CrossRef]
- Vogler, M.P.; DeVor, R.E.; Kapoor, S.G. On the Modeling and Analysis of Machining Performance in Micro-Endmilling, Part I: Surface Generation. J. Manuf. Sci. Eng. 2005, 126, 685–694. [Google Scholar] [CrossRef]
- Liu, X.; DeVor, R.E.; Kapoor, S.G. An Analytical Model for the Prediction of Minimum Chip Thickness in Micromachining. J. Manuf. Sci. Eng. 2005, 128, 474–481. [Google Scholar] [CrossRef]
- Son, S.M.; Lim, H.S.; Ahn, J.H. Effects of the Friction Coefficient on the Minimum Cutting Thickness in Micro Cutting. Int. J. Mach. Tools Manuf. 2005, 45, 529–535. [Google Scholar] [CrossRef]
- Kim, C.-J.; Mayor, J.R.; Ni, J. A Static Model of Chip Formation in Microscale Milling. J. Manuf. Sci. Eng. 2005, 126, 710–718. [Google Scholar] [CrossRef]
- Chuzhoy, L.; DeVor, R.E.; Kapoor, S.G.; Bammann, D.J. Microstructure-Level Modeling of Ductile Iron Machining. J. Manuf. Sci. Eng. 2002, 124, 162–169. [Google Scholar] [CrossRef]
- Kim, C.J.; Bono, M.; Ni, J. Experimental Analysis of Chip Formation in Micro-Milling; Technical Papers Society of Manufacturing Engineers-All Series; NAMRIA: Manila, Philippines, 2002.
- Lai, X.; Li, H.; Li, C.; Lin, Z.; Ni, J. Modelling and Analysis of Micro Scale Milling Considering Size Effect, Micro Cutter Edge Radius and Minimum Chip Thickness. Int. J. Mach. Tools Manuf. 2008, 48, 1–14. [Google Scholar] [CrossRef]
- Waldorf, D.J.; DeVor, R.E.; Kapoor, S.G. A Slip-Line Field for Ploughing During Orthogonal Cutting. J. Manuf. Sci. Eng. 1998, 120, 693–699. [Google Scholar] [CrossRef]
- Afazov, S.M.; Ratchev, S.M.; Segal, J. Modelling and Simulation of Micro-Milling Cutting Forces. J. Mater. Process. Technol. 2010, 210, 2154–2162. [Google Scholar] [CrossRef]
- Bao, W.Y.; Tansel, I.N. Modeling Micro-End-Milling Operations. Part I: Analytical Cutting Force Model. Int. J. Mach. Tools Manuf. 2000, 40, 2155–2173. [Google Scholar] [CrossRef]
- Tlusty, J.; MacNeil, P. Dynamics of Cutting Forces in End Milling. Ann. CIRP 1975, 24, 21–25. [Google Scholar]
- Bao, W.Y.; Tansel, I.N. Modeling Micro-End-Milling Operations. Part II: Tool Run-Out. Int. J. Mach. Tools Manuf. 2000, 40, 2175–2192. [Google Scholar] [CrossRef]
- Bao, W.Y.; Tansel, I.N. Modeling Micro-End-Milling Operations. Part III: Influence of Tool Wear. Int. J. Mach. Tools Manuf. 2000, 40, 2193–2211. [Google Scholar] [CrossRef]
- Zaman, M.T.; Kumar, A.S.; Rahman, M.; Sreeram, S. A Three-Dimensional Analytical Cutting Force Model for Micro End Milling Operation. Int. J. Mach. Tools Manuf. 2006, 46, 353–366. [Google Scholar] [CrossRef]
- Li, C.; Lai, X.; Li, H.; Ni, J. Modeling of Three-Dimensional Cutting Forces in Micro-End-Milling. J. Micromech. Microeng. 2007, 17, 671–678. [Google Scholar] [CrossRef]
- Jun, M.B.G.; Liu, X.; DeVor, R.E.; Kapoor, S.G. Investigation of the Dynamics of Microend Milling—Part I: Model Development. J. Manuf. Sci. Eng. 2006, 128, 893–900. [Google Scholar] [CrossRef]
- Jun, M.B.G.; DeVor, R.E.; Kapoor, S.G. Investigation of the Dynamics of Microend Milling—Part II: Model Validation and Interpretation. J. Manuf. Sci. Eng. 2006, 128, 901–912. [Google Scholar] [CrossRef]
- Mian, A.J. Size Effect in Micromachining. Ph.D. Thesis, The University of Manchester, Manchester, UK, 2011. [Google Scholar]
- Filiz, S.; Conley, C.M.; Wasserman, M.B.; Ozdoganlar, O.B. An Experimental Investigation of Micro-Machinability of Copper 101 Using Tungsten Carbide Micro-Endmills. Int. J. Mach. Tools Manuf. 2007, 47, 1088–1100. [Google Scholar] [CrossRef]
- Malekian, M.; Park, S.S.; Jun, M.B.G. Modeling of Dynamic Micro-Milling Cutting Forces. Int. J. Mach. Tools Manuf. 2009, 49, 586–598. [Google Scholar] [CrossRef]
- Yoon, H.S.; Ehmann, K.F. Dynamics and Stability of Micro-Cutting Operations. Int. J. Mech. Sci. 2016, 115, 81–92. [Google Scholar] [CrossRef]
- Monka, P.P.; Monkova, K.; Pantazopoulos, G.A.; Toulfatzis, A.I. Effect of Wear on Vibration Amplitude and Chip Shape Characteristics During Machining of Eco-Friendly and Leaded Brass Alloys. Metals 2023, 13, 828. [Google Scholar] [CrossRef]
- Afazov, S.M.; Zdebski, D.; Ratchev, S.M.; Segal, J.; Liu, S. Effects of Micro-Milling Conditions on the Cutting Forces and Process Stability. J. Mater. Process. Technol. 2013, 213, 671–684. [Google Scholar] [CrossRef]
- Shi, Y.; Mahr, F.; von Wagner, U.; Uhlmann, E. Chatter Frequencies of Micromilling Processes: Influencing Factors and Online Detection via Piezoactuators. Int. J. Mach. Tools Manuf. 2012, 56, 10–16. [Google Scholar] [CrossRef]
- Shi, Y.; Mahr, F.; von Wagner, U.; Uhlmann, E. Gyroscopic and Mode Interaction Effects on Micro-End Mill Dynamics and Chatter Stability. Int. J. Adv. Manuf. Technol. 2013, 65, 895–907. [Google Scholar] [CrossRef]
- Rahnama, R.; Sajjadi, M.; Park, S.S. Chatter Suppression in Micro End Milling with Process Damping. J. Mater. Process. Technol. 2009, 209, 5766–5776. [Google Scholar] [CrossRef]
- Tobias, S.A. Theory of Regenerative Machine Tool Chatter. Engineer 1958, 207, 199–203. [Google Scholar]
- Opitz, H.; Bernardi, F. Investigation and Calculation of the Chatter Behaviour of Lathes and Milling Machines. Ann. CIRP Int. Inst. Prod. Eng. Res. 1970, 18, 335–343. [Google Scholar]
- Tlustý, J.; Polacek, M. The Stability of the Machine TooI Against Self-Excited Vibration in Machining; ASME: New York, NY, USA, 1963; pp. 465–474. [Google Scholar]
- Park, S.S.; Altintas, Y.; Movahhedy, M. Receptance Coupling for End Mills. Int. J. Mach. Tools Manuf. 2003, 43, 889–896. [Google Scholar] [CrossRef]
- Astakhov, V.; Xiao, X. A Methodology for Practical Cutting Force Evaluation Based on the Energy Spent in the Cutting System. Mach. Sci. Technol. 2008, 12, 325–347. [Google Scholar] [CrossRef]
- Schmitz, T.L.; Smith, K.S. Machining Dynamics: Frequency Response to Improved Productivity; Springer International Publishing: Cham, Switzerland, 2019; ISBN 978-3-319-93706-9. [Google Scholar]
- Mladjenovic, C.; Monkova, K.; Zivkovic, A.; Knezev, M.; Marinkovic, D.; Ilic, V.; Mladjenovic, C.; Monkova, K.; Zivkovic, A.; Knezev, M.; et al. Experimental Identification of Milling Process Damping and Its Application in Stability Lobe Diagrams. Machines 2025, 13, 96. [Google Scholar] [CrossRef]
- Čiča, Đ.; Zeljković, M.; Globočki-Lakić, G.; Sredanović, B. Modelling of Dynamical Behavior of a Spindle-Holder-Tool Assembly. Stroj. Časopis Za Teor. Praksu U Stroj. 2012, 54, 135–144. [Google Scholar]
- Maia, N.M.M.; Montalvão e Silva, J.M. Theoretical and Experimental Modal Analysis; Research Studies Press, Wiley: Somerset, UK, 1997. [Google Scholar]
- Ding, P.; Huang, X.; Zhang, X.; Wang, C.; Gao, T.; Chang, M.; Li, Y. Reliability updating and parameter inversion of micro-milling. Mech. Syst. Signal Process. 2022, 174, 109105. [Google Scholar] [CrossRef]
- Xiao, H.; Hu, X.; Luo, S.; Li, W. Developing and Testing the Prototype Structure for Micro Tool Fabrication. Machines 2022, 10, 938. [Google Scholar] [CrossRef]
- Faraz, M.I.; Petru, J. Evaluation of Machining Variables on Machinability of Nickel Alloy Inconel 718 Using Coated Carbide Tools. Machines 2024, 12, 4. [Google Scholar] [CrossRef]
- Schmitz, T.L.; Davies, M.A.; Kennedy, M.D. Tool Point Frequency Response Prediction for High-Speed Machining by RCSA. J. Manuf. Sci. Eng. 2001, 123, 700–707. [Google Scholar] [CrossRef]
- Tlusty, G. Manufacturing Process and Equipment; Pearson: Upper Saddle River, NJ, USA, 2000; ISBN 978-0-201-49865-3. [Google Scholar]
- Hreha, P.; Hloch, S.; Monka, P.; Monkova, K.; Knapčikova, L.; Hlavaček, P.; Zeleňák, M.; Samardžić, I.; Kozak, D. Investigation of sandwich material surface created by abrasive water jet (awj) via vibration emission. Metalurgia 2013, 53, 29–32. [Google Scholar]
- Mehdi, K.; Monka, P.P.; Monkova, K.; Sahraoui, Z.; Glaa, N.; Kascak, J. Investigation of Dynamic Behavior and Process Stability at Turning of Thin-Walled Tubular Workpieces Made of 42CrMo4 Steel Alloy. Machines 2024, 12, 120. [Google Scholar] [CrossRef]
- Feng, J.; Liu, X.-T. Mechanism and Modeling of Machining Process Damping: A Review. Int. J. Adv. Manuf. Technol. 2023, 127, 1045–1069. [Google Scholar] [CrossRef]
- Karmiris-Obratanski, P.; Thangaraj, M.; Leszczyńska-Madej, B.; Markopoulos, A.P. Advanced Machining Technology for Modern Engineering Materials. Materials 2024, 17, 2064. [Google Scholar] [CrossRef]
- Jia, B. Vibration Propagation Characteristics of Micro-Milling Tools. Machines 2022, 10, 946. [Google Scholar] [CrossRef]
- Filho, J.M.C.; Melotti, S. Evaluation of an experimental modal analysis device for micromilling tools. Int. J. Adv. Manuf. Technol. 2022, 119, 6679–6692. [Google Scholar] [CrossRef]
Figure 1.
Influence of minimum chip thickness on the chip-formation mechanism in micromilling: (a) the chip thickness is smaller than the minimum value–no material is removed; (b) the chip thickness approaches the minimum chip thickness—the ploughing phenomenon appears; (c) the chip thickness exceeds the minimum value—chip is formed.
Figure 2.
Friction force between the tool flank face and the machined workpiece surface.
Figure 3.
Determination of tangential and radial cutting forces in micromilling.
Figure 4.
Geometry of the workpiece used for the analysis of self-excited vibrations.
Figure 5.
Increment of the tool engagement angle dϕ over different time segments dt.
Figure 6.
Instantaneous tool engagement angle and approximation of the cutter tooth trajectory.
Figure 7.
Projection of micromilling forces onto the X and Y axes.
Figure 8.
Algorithm of the presented numerical simulation of self-excited vibration in micromilling.
Figure 9.
The dynamics of the milling process.
Figure 10.
Results of the numerical micromilling simulation.
Figure 11.
Result of the numerical micromilling simulation with continuous variation in the depth of cut.
Figure 12.
Air-bearing spindle for micromachining clamped into the main spindle of the FM-38 machining center.
Figure 13.
Main spindle–tool holder–tool assembly decomposed into four components with the corresponding characteristic coordinates.
Figure 14.
Determination of the (a) direct and (b) cross FRFs of the air-bearing spindle in the horizontal direction.
Figure 15.
Real and imaginary parts of the direct FRF for the air-bearing spindle in the horizontal direction.
Figure 16.
Real and imaginary parts of the cross FRF for the air-bearing spindle in the horizontal direction.
Figure 17.
Real and imaginary parts of the direct FRF for the air-bearing spindle in the vertical direction.
Figure 18.
Real and imaginary parts of the cross FRF for the air-bearing spindle in the vertical direction.
Figure 19.
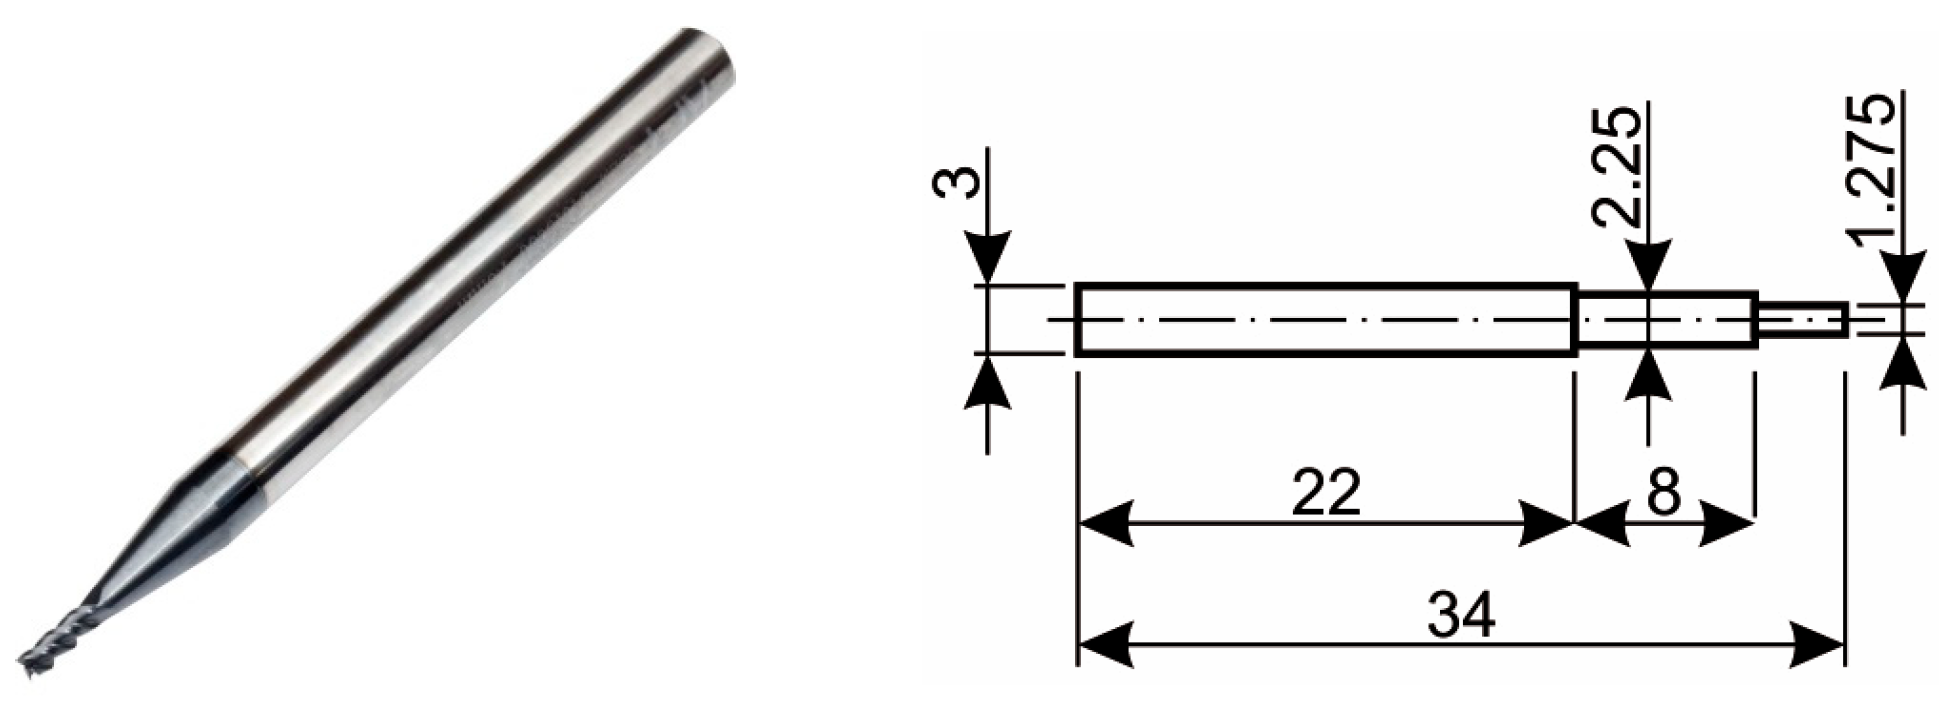
Micromilling tool used for receptance coupling with the air-bearing spindle (unit: mm).
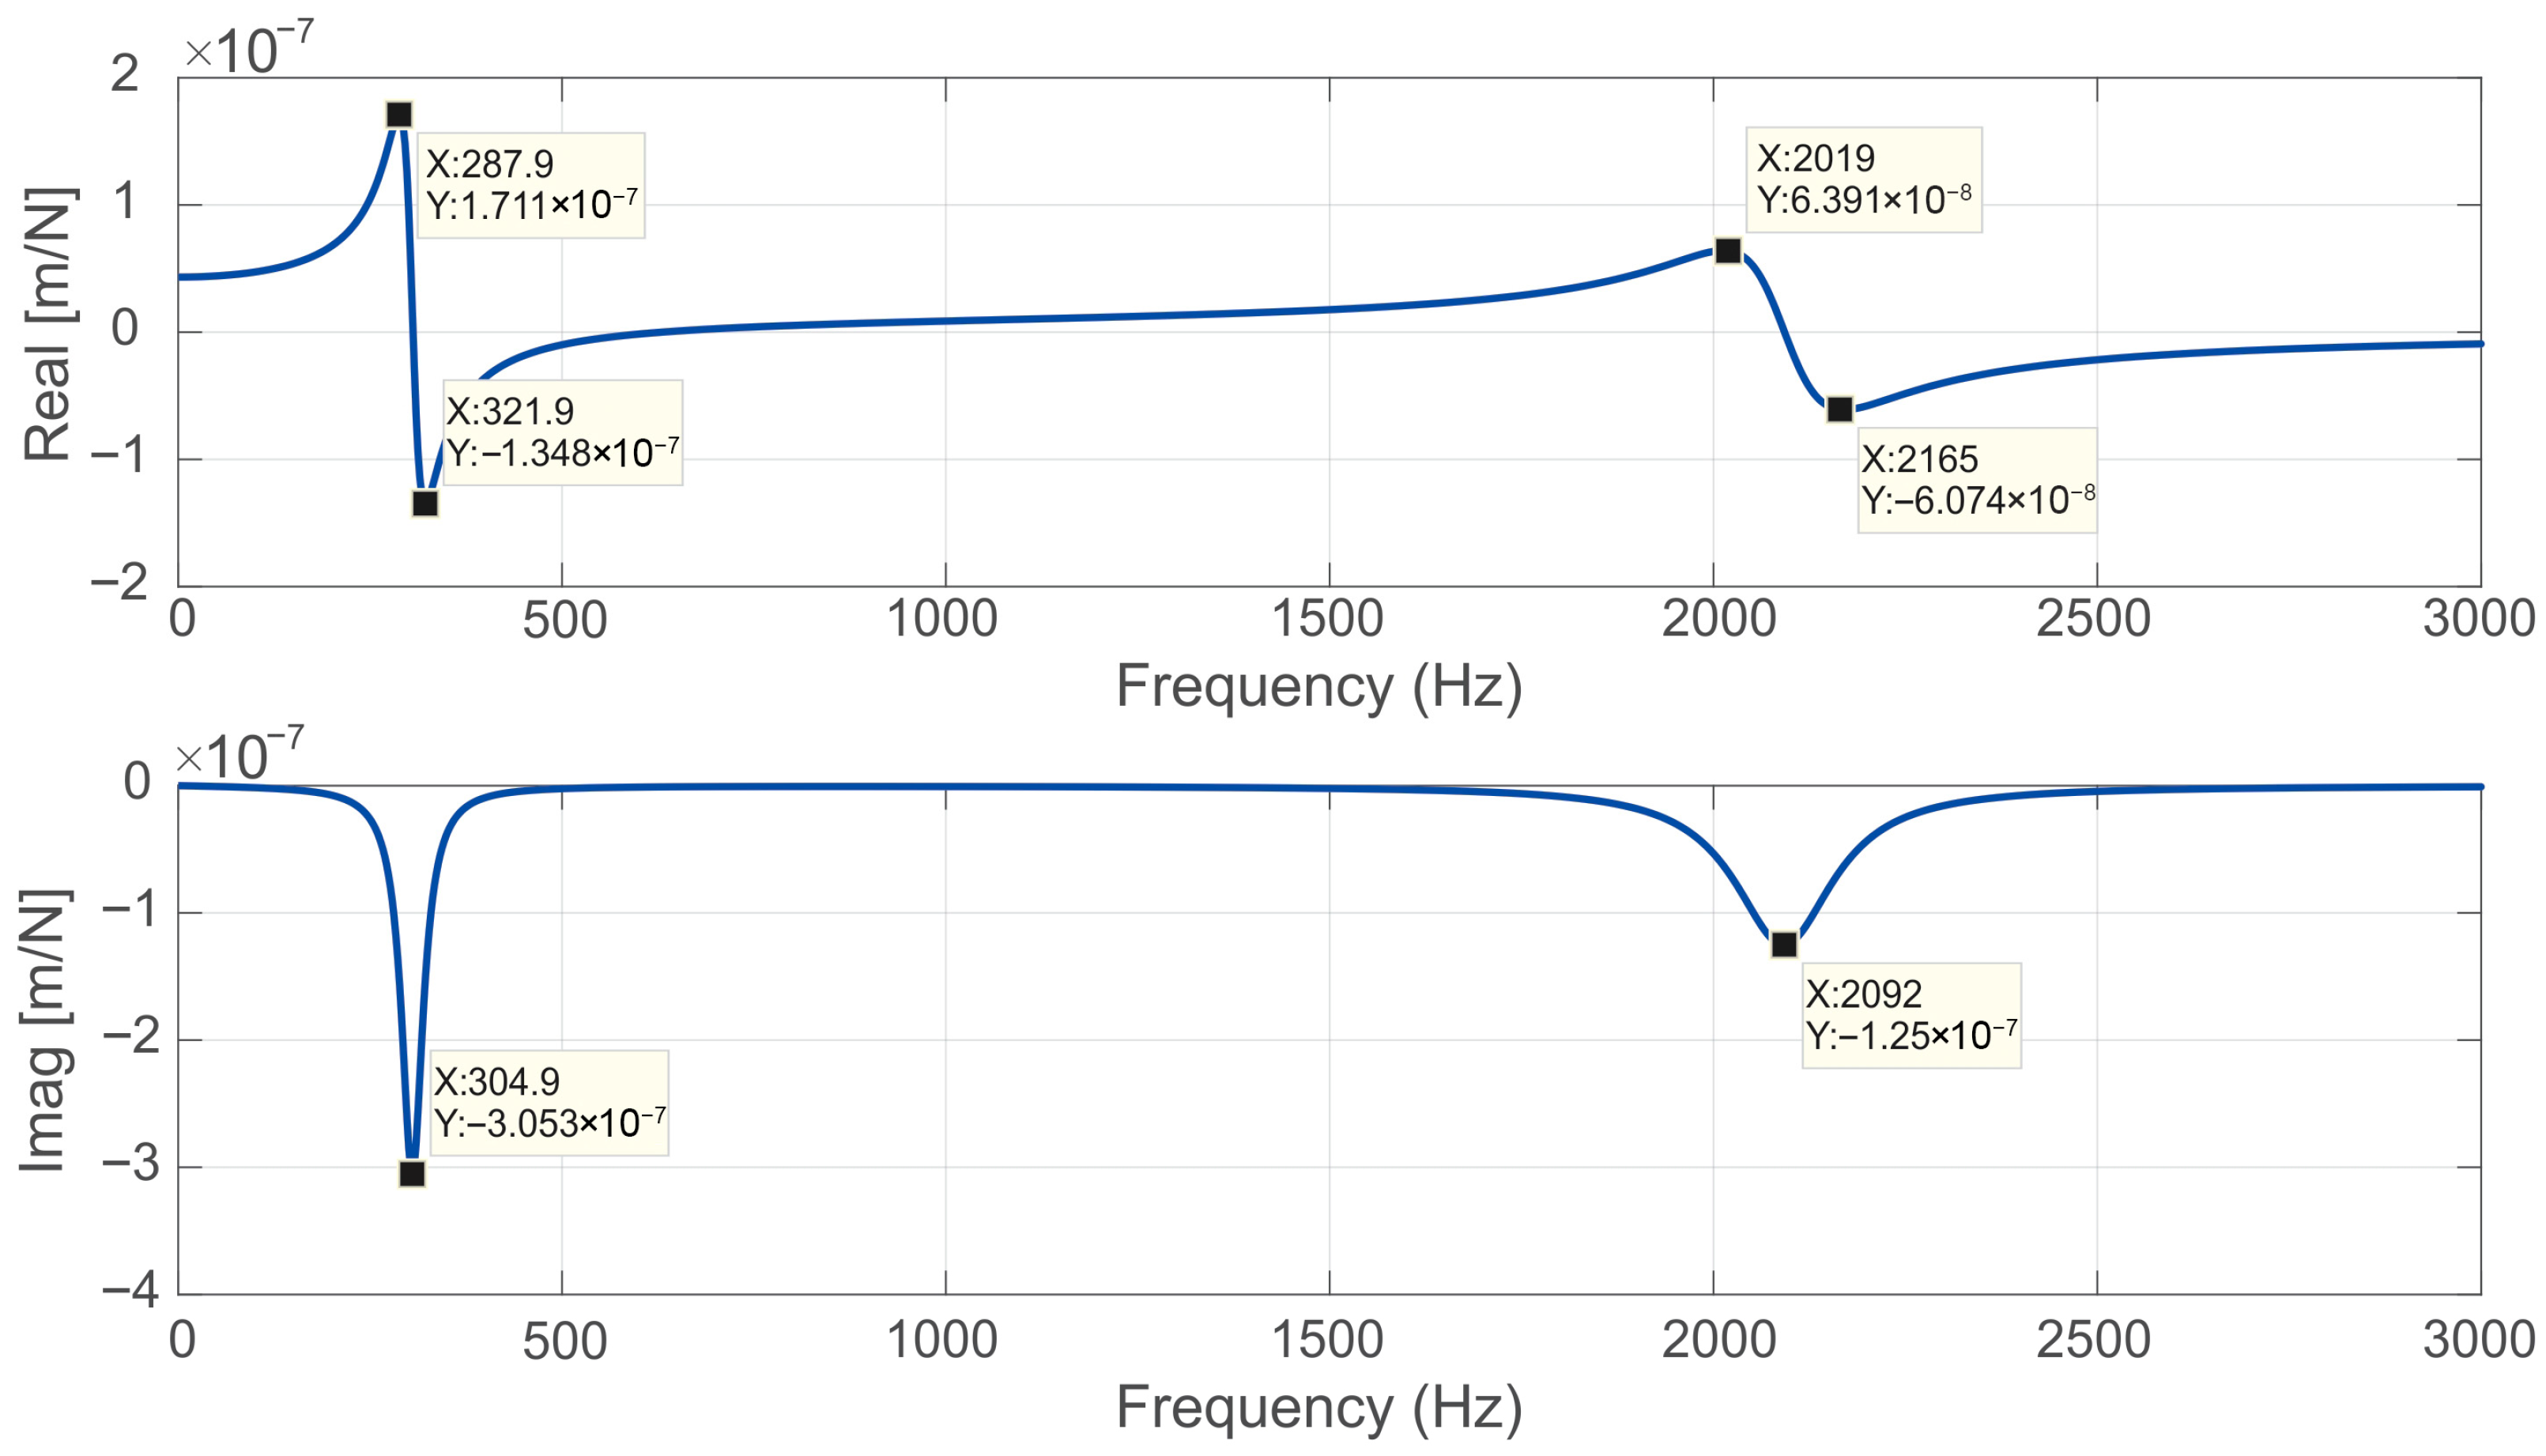
Figure 20.
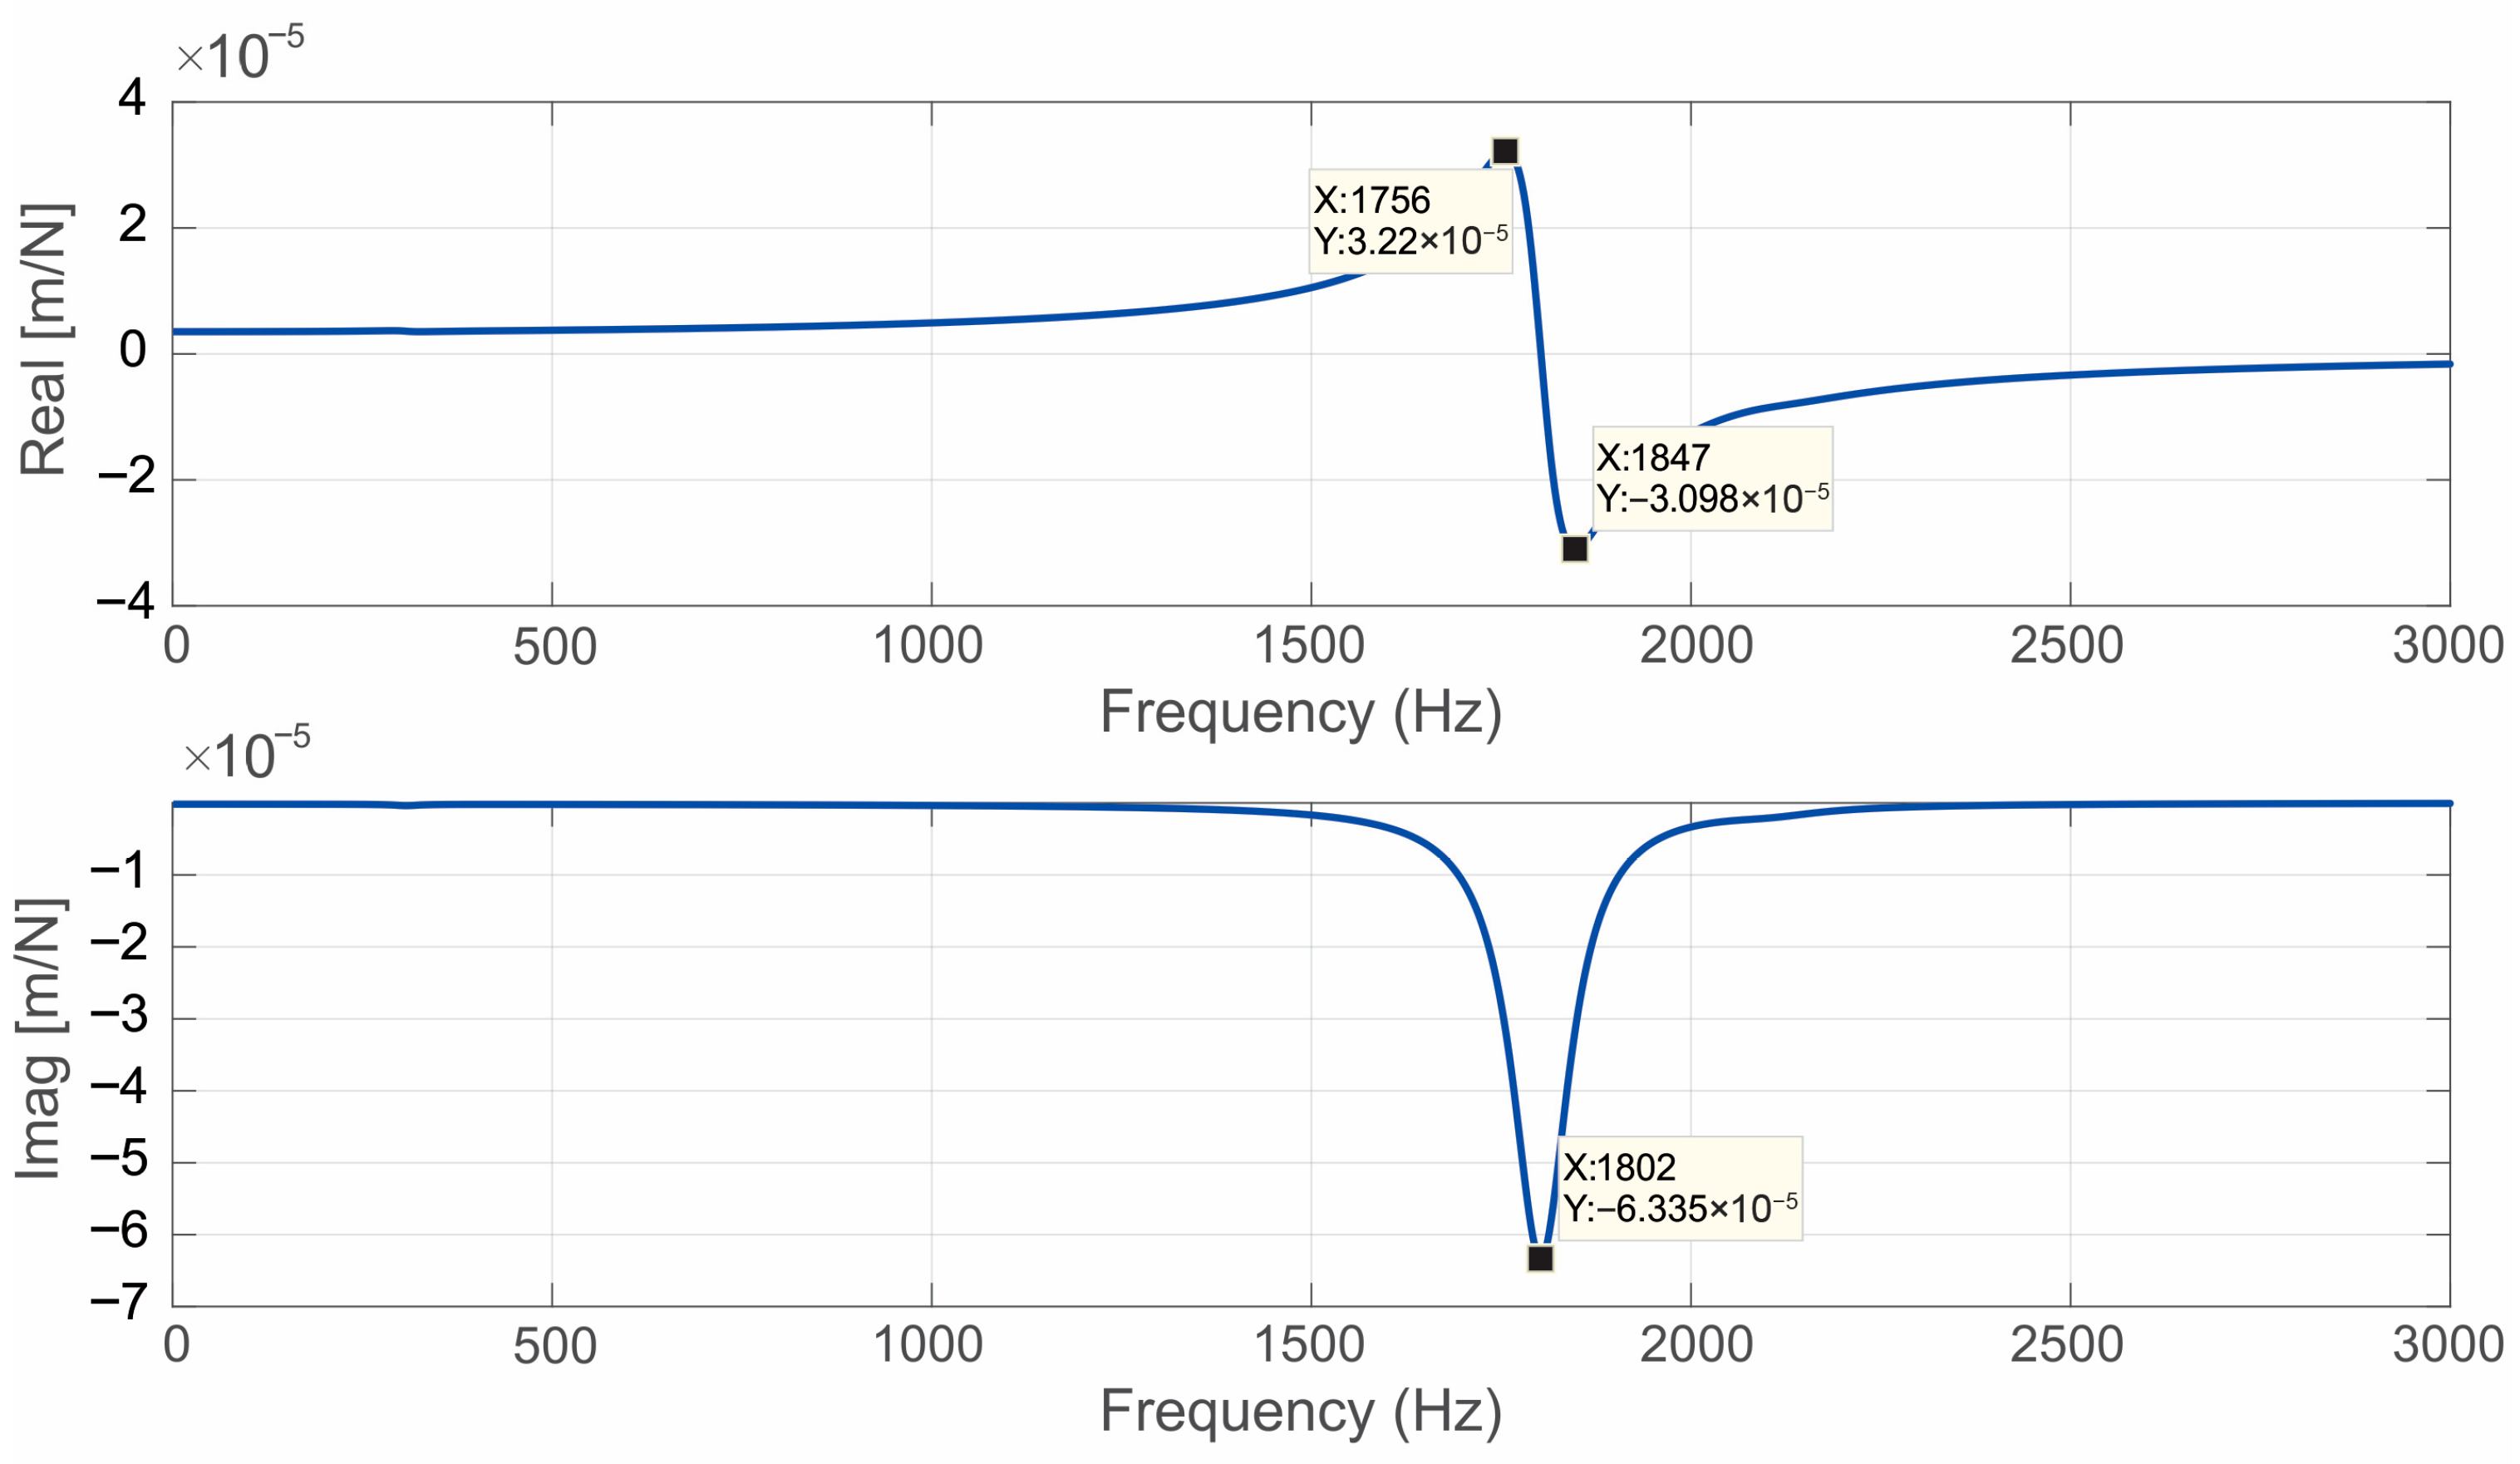
Real and imaginary parts of the FRF for the air-bearing spindle–tool assembly in the horizontal direction.
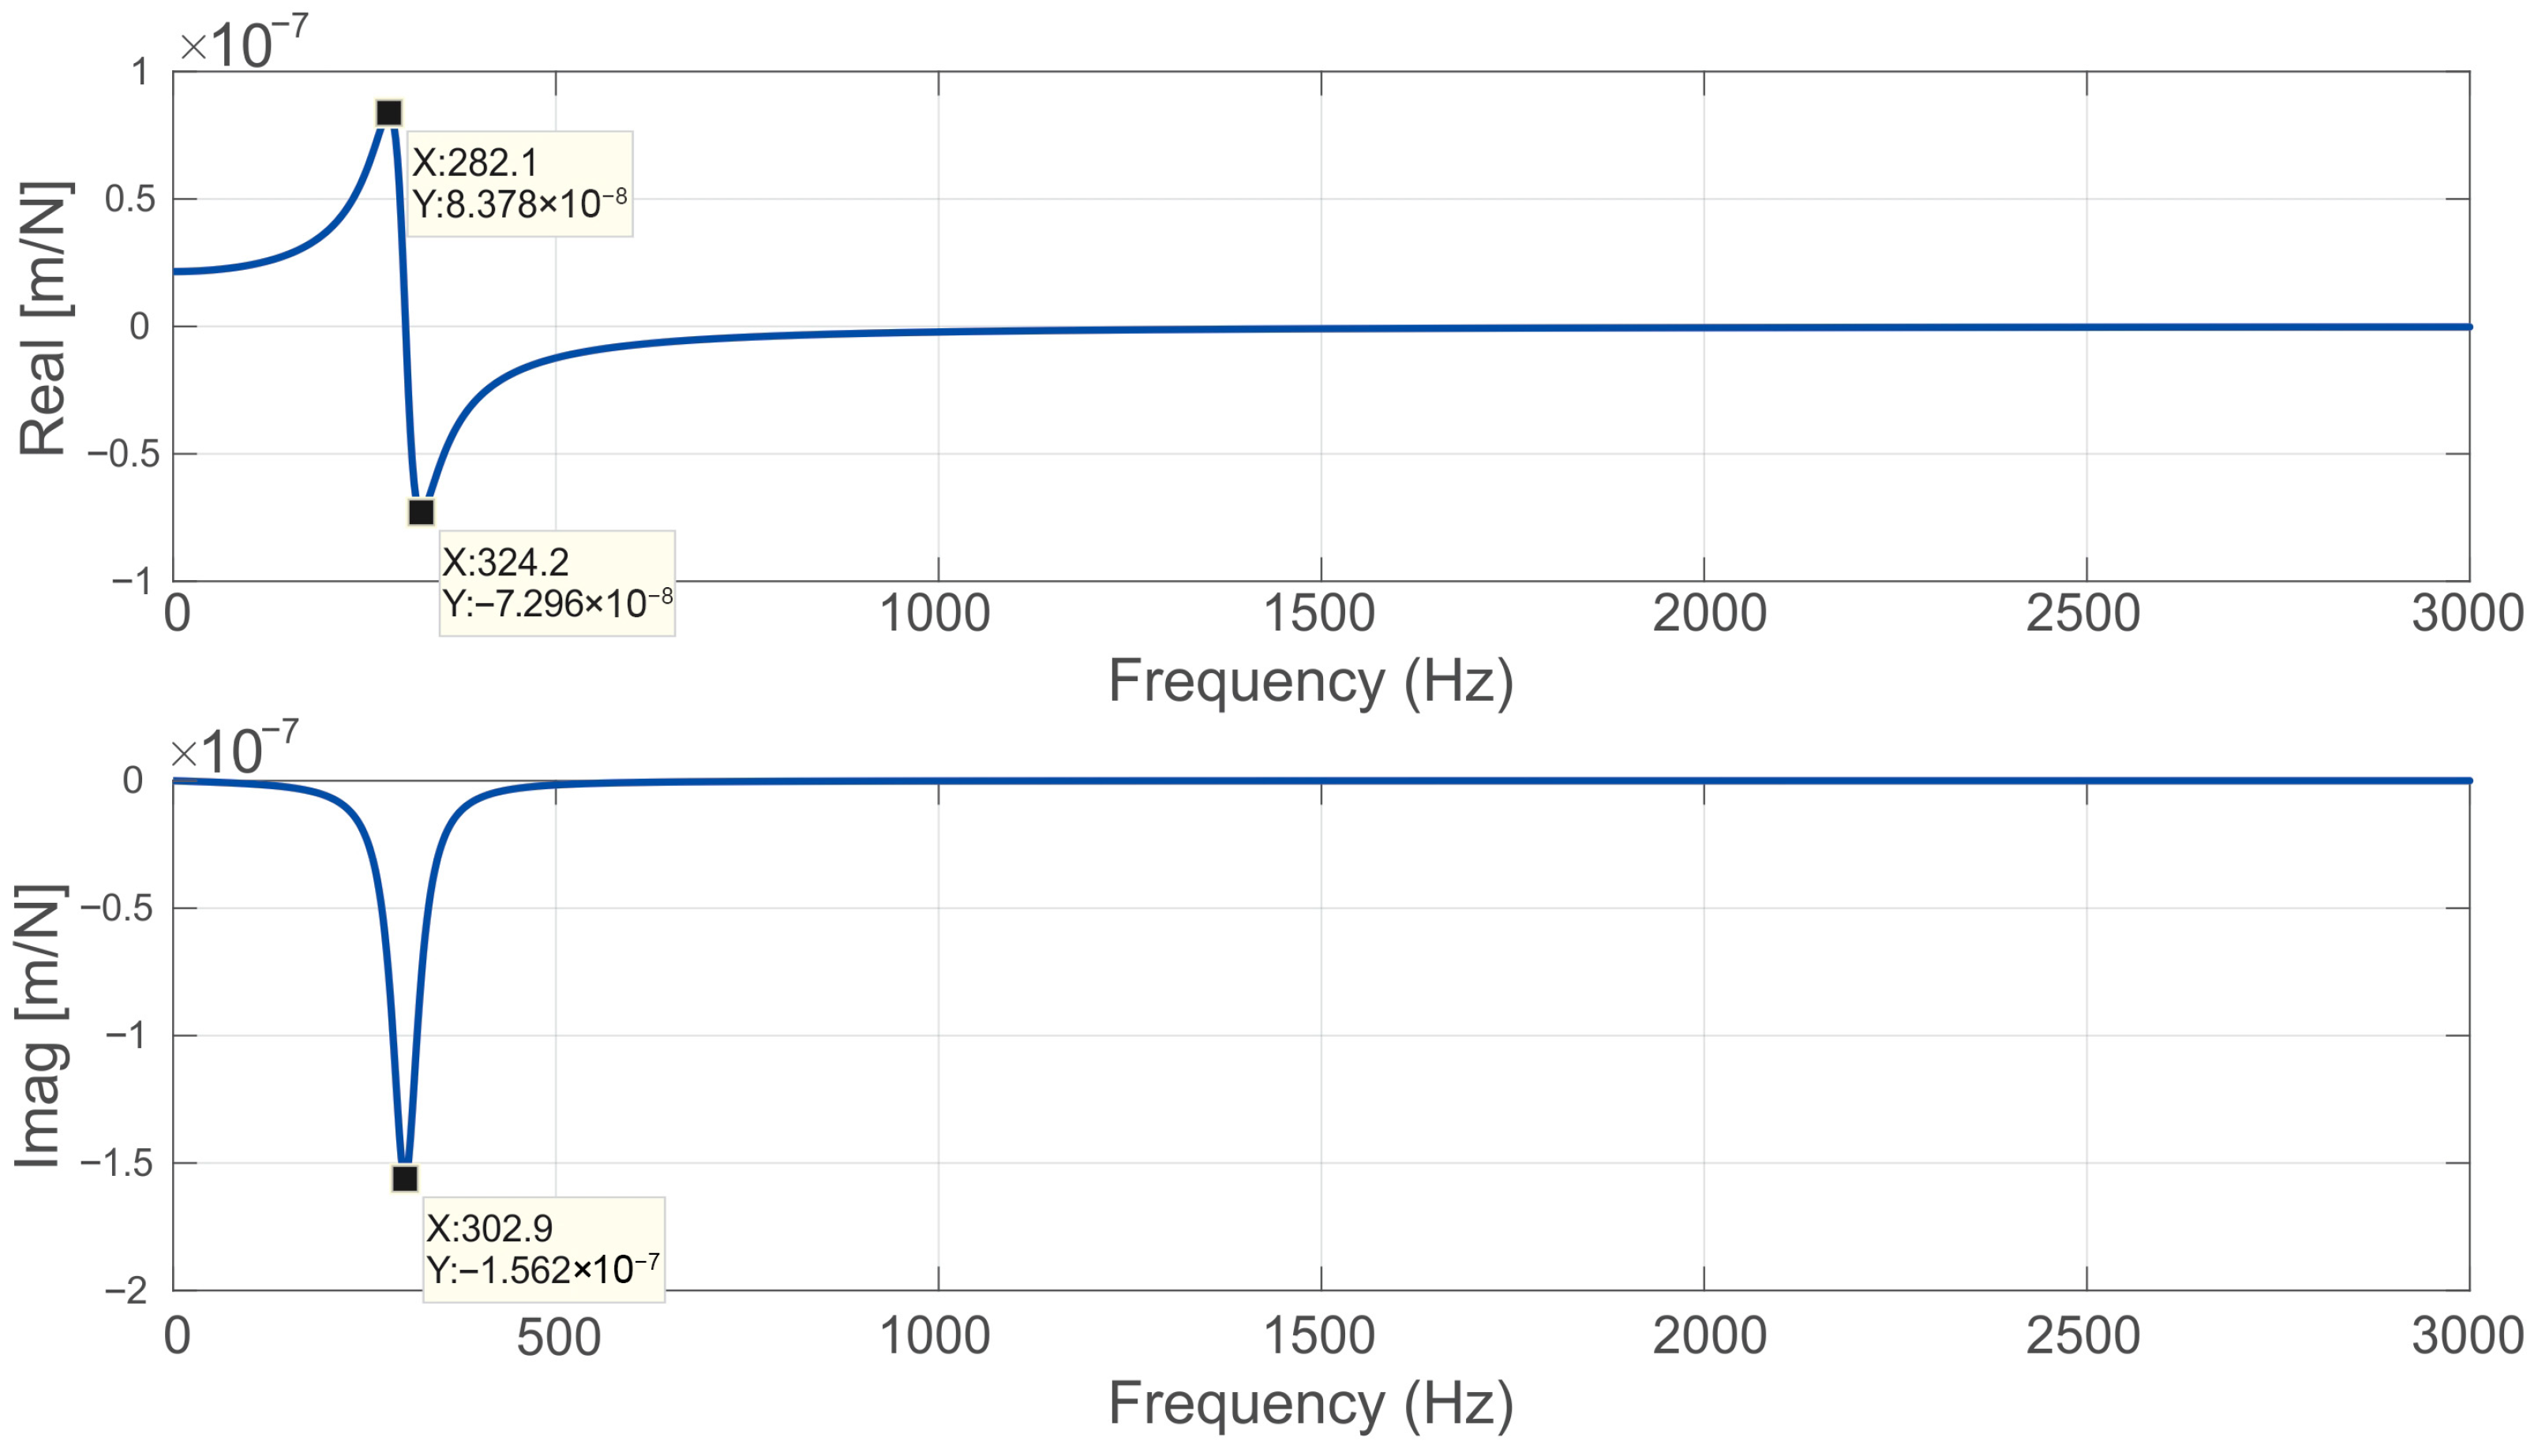
Figure 21.
Real and imaginary parts of the FRF for the air-bearing spindle–tool assembly in the vertical direction.
Figure 22.
Measurement of the tool cutting-edge radius using an optical microscope.
Figure 23.
Numerical simulation of the machining process at a spindle speed of 20,000 rpm.
Figure 24.
Stability lobe diagram defined by numerical machining simulation for end mills with diameters of 0.5, 1, 1.5, and 2 mm.
Figure 25.
Machining center setup for experimental testing.
Figure 26.
Fast Fourier Transform of the signal from experiment No. 6.
Figure 27.
Microscopic image of the machined channel for (a) stable and (b) unstable cutting conditions.
Figure 28.
Stability lobe diagram defined by the improved numerical micromilling simulation with superimposed experimental results.
Table 1.
Mechanical properties, machinability characteristics, and chemical characteristics of Al7075 aluminum alloy.
| Mechanical Properties | Machinability Characteristics |
|---|
Hardness
HV | Tensile Strength
Rm (MPa) | Specific Cutting Resistance
Ks (MPa) | Cutting Force Angle
β (°) |
|---|
| 175 | 590 | 750 | 68 |
| Chemical Composition |
| Cu (%) | Mn (%) | Mg (%) | Si (%) | Fe (%) | Zn (%) | Ti (%) | Cr (%) | Pb (%) |
| 1.63 | 0.03 | 2.25 | 0.09 | 0.115 | 5.65 | 0.05 | 0.185 | 0.005 |
Table 2.
Modal parameters of the air-bearing spindle–tool system.
| Measurement Direction | Modal
Parameters | Tool Diameters d (mm) |
|---|
| 0.5 | 1 | 1.5 | 2 |
|---|
X-axis
direction | (Hz) | 1917 | 1871 | 1799 | 1708 |
| 0.0274 | 0.0243 | 0.026 | 0.0255 |
| (N/m) | 3.12 × 10⁵ | 3.42 × 10⁵ | 3.05 × 10⁵ | 3.05 × 10⁵ |
Y-axis
direction | (Hz) | 1923 | 1874 | 1802 | 1711 |
| 0.0252 | 0.0267 | 0.0252 | 0.0269 |
| (N/m) | 3.26 × 10⁵ | 3.05 × 10⁵ | 3.13 × 10⁵ | 2.87 × 10⁵ |
Table 3.
The cutting parameters required for improved numerical simulation.
Workpiece
Characteristics | Material: | Al7075 |
| Specific cutting resistance | 750 |
| Chip-compression factor | 5 |
| Shear stress | 331 |
| Kinematic friction coefficient | 0.38 |
Tool
Characteristics | Diameter | |
| Cutting-edge radius | 3 |
| Rake angle γ (°) | 30 |
| Clearance angle α (°) | 15 |
| Number of tool teeth | 3 |
Other
Parameters Required for the
Simulation | Tool entry angle (°) | 0 |
| Tool exit angle (°) | 180 |
| Feed per tooth | 5 |
| Workpiece inclination angle (°) | 2 |
Table 4.
Limiting depths of cut determined by the numerical machining simulation for the corresponding tool diameters.
| Simulation No. | Spindle Speed (rpm) | Limiting Depth of Cut (mm) |
|---|
| d = 0.5 (mm) | d = 1 (mm) | d = 1.5 (mm) | d = 2 (mm) |
|---|
| 1 | 10,000 | 0.0265 | 0.0195 | 0.0154 | 0.0158 |
| 2 | 11,000 | 0.0162 | 0.0176 | 0.0231 | 0.0426 |
| 3 | 12,000 | 0.0342 | 0.0448 | 0.0700 | 0.0285 |
| 4 | 13,000 | 0.0565 | 0.0381 | 0.0206 | 0.0152 |
| 5 | 14,000 | 0.0200 | 0.0187 | 0.0143 | 0.0160 |
| 6 | 15,000 | 0.0155 | 0.0155 | 0.0174 | 0.0238 |
| 7 | 16,000 | 0.0205 | 0.0251 | 0.0280 | 0.0475 |
| 8 | 17,000 | 0.0281 | 0.0362 | 0.0547 | 0.0933 |
| 9 | 18,000 | 0.0521 | 0.0693 | 0.1033 | 0.0428 |
| 10 | 19,000 | 0.0950 | 0.0864 | 0.0418 | 0.0218 |
| 11 | 20,000 | 0.0538 | 0.0369 | 0.0225 | 0.0184 |
| 12 | 21,000 | 0.0282 | 0.0240 | 0.0180 | 0.0136 |
| 13 | 22,000 | 0.0215 | 0.0182 | 0.0155 | 0.0142 |
| 14 | 23,000 | 0.0182 | 0.0156 | 0.0137 | 0.0149 |
| 15 | 24,000 | 0.0155 | 0.0141 | 0.0140 | 0.0176 |
| 16 | 25,000 | 0.0150 | 0.015 | 0.0166 | 0.0227 |
| 17 | 26,000 | 0.0154 | 0.0173 | 0.0206 | 0.0232 |
| 18 | 27,000 | 0.0186 | 0.0190 | 0.0245 | 0.0330 |
| 19 | 28,000 | 0.0209 | 0.0191 | 0.0278 | 0.0393 |
| 20 | 29,000 | 0.0215 | 0.0281 | 0.0364 | 0.0527 |
| 21 | 30,000 | 0.0291 | 0.0361 | 0.0479 | 0.0700 |
| 22 | 31,000 | 0.0380 | 0.0471 | 0.0609 | 0.0908 |
| 23 | 32,000 | 0.0486 | 0.0577 | 0.0786 | 0.1162 |
| 24 | 33,000 | 0.0636 | 0.0758 | 0.1008 | 0.1480 |
| 25 | 34,000 | 0.0814 | 0.0977 | 0.1294 | 0.1840 |
| 26 | 35,000 | 0.1044 | 0.1239 | 0.1650 | 0.1278 |
| 27 | 36,000 | 0.1295 | 0.1534 | 0.1980 | 0.0866 |
| 28 | 37,000 | 0.1591 | 0.1898 | 0.1253 | 0.0641 |
| 29 | 38,000 | 0.1937 | 0.1606 | 0.0853 | 0.0492 |
| 30 | 39,000 | 0.1589 | 0.1072 | 0.0651 | 0.0378 |
| 31 | 40,000 | 0.1072 | 0.0778 | 0.0517 | 0.0376 |
| 32 | 41,000 | 0.0780 | 0.0630 | 0.0458 | 0.0305 |
| 33 | 42,000 | 0.0627 | 0.0513 | 0.0368 | 0.0252 |
| 34 | 43,000 | 0.0505 | 0.0410 | 0.0330 | 0.0254 |
| 35 | 44,000 | 0.0402 | 0.0363 | 0.0286 | 0.0226 |
| 36 | 45,000 | 0.0446 | 0.0325 | 0.0259 | 0.0216 |
| 37 | 46,000 | 0.0373 | 0.0270 | 0.0262 | 0.0204 |
| 38 | 47,000 | 0.0322 | 0.0272 | 0.0230 | 0.0185 |
| 39 | 48,000 | 0.0273 | 0.0235 | 0.0203 | 0.0176 |
| 40 | 49,000 | 0.0265 | 0.0204 | 0.0200 | 0.0172 |
| 41 | 50,000 | 0.0232 | 0.0215 | 0.0178 | 0.0163 |
Table 5.
Combinations of spindle speeds and depths of cut for experimental validation of the stability lobe diagram.
| Experiment No. | Spindle Speed [rpm] | Depth of Cut (μm) |
|---|
| 1. | 25,000 | 10 |
| 2. | 30,000 |
| 3. | 35,000 |
| 4. | 40,000 |
| 5. | 30,000 | 30 |
| 6. | 35,000 |
| 7. | 40,000 |
| 8. | 35,000 | 75 |
| 9. | 25,000 | 20 |
| 10. | 45,000 | 30 |
| 11. | 35,000 | 100 |
Table 6.
Results of the experimental investigation of self-excited vibrations in micromilling.
| Experiment No. | Spindle Speed [rpm] | Depth of Cut (μm) | System Stability |
|---|
| 1. | 25,000 | 10 | stable |
| 2. | 30,000 |
| 3. | 35,000 |
| 4. | 40,000 |
| 5. | 30,000 | 30 |
| 6. | 35,000 |
| 7. | 40,000 |
| 8. | 35,000 | 75 |
| 9. | 25,000 | 20 | unstable |
| 10. | 45,000 | 30 |
| 11. | 35,000 | 100 |
| Disclaimer/Publisher’s Note: The statements, opinions and data contained in all publications are solely those of the individual author(s) and contributor(s) and not of MDPI and/or the editor(s). MDPI and/or the editor(s) disclaim responsibility for any injury to people or property resulting from any ideas, methods, instructions or products referred to in the content. |
© 2025 by the authors. Licensee MDPI, Basel, Switzerland. This article is an open access article distributed under the terms and conditions of the Creative Commons Attribution (CC BY) license (https://creativecommons.org/licenses/by/4.0/).


