Article

Experimental Verification of Forming Characteristics Enhancement by Combined Variable Punch Speed/Blank Holder Force Process Path in Warm Deep Drawing of A5182 Aluminum Alloy

by
Shoichiro Yoshihara
1,
Akinori Shibata
2,† and
Ken-ichi Manabe
3,*
1
Department of Mechanical Engineering, Shibaura Institute of Technology, Koto-ku 135-8548, Tokyo, Japan
2
Department of Mechanical Engineering, Tokyo Metropolitan University, 1-1 Minami-Osawa, Hachioji-shi 192-0397, Tokyo, Japan
3
Department of Mechanical Systems Engineering, Tokyo Metropolitan University, 6-6 Asahigaoka, Hino-shi 191-0065, Tokyo, Japan
*
Author to whom correspondence should be addressed.
Current address: Kobe Steel, Ltd., 2-3-18 Wakinohama-Kaigandori, Chuo-ku, Kobe 651-8585, Hyogo, Japan.
Metals 2025, 15(12), 1329; https://doi.org/10.3390/met15121329
Submission received: 29 September 2025 / Revised: 21 November 2025 / Accepted: 28 November 2025 / Published: 2 December 2025
(This article belongs to the Special Issue Advances in the Forming and Processing of Metallic Materials)

Abstract

Warm deep drawing is an effective special deep drawing technique for improving the forming limits of difficult-to-form materials such as aluminum alloys, magnesium alloys, and stainless steels. This paper experimentally investigated the effect of a combined variable process path, which integrates a variable punch speed (VSPD) and a variable blank holder force (VBHF) path, on the warm deep drawing performance of an A5182 aluminum alloy sheet at 300 °C (where the strain rate sensitivity index m equals 0.11). Experiments demonstrated not only a reduction in the forming time and an improved wall thickness uniformity, but also an improvement in the forming limits. The significant improvement in the forming characteristics is discussed in terms of the theoretical three-dimensional process window (SPD-BHF-flange reduction ratio (ΔDR*) space) consisting of the fracture limit and flange wrinkling limit derived from deep drawing theory, and it was shown to be consistent with the experimental results. Finaly, the novel combined VSPD/VBHF process path successfully achieved deep drawing with a challenging drawing ratio (DR) of 3.3.

1. Introduction

In recent years, global efforts toward carbon neutrality have accelerated rapidly. In the automotive, aircraft, and home appliance industries, a further weight reduction is being pursued. Consequently, in materials, the substitution of structural members and components with lightweight metallic materials such as advanced high-strength steel sheets and high-strength aluminum alloys is gaining attention and is expected to increase further. However, high-strength aluminum alloys are difficult to form, presenting challenges in terms of improving their formability, dimensional accuracy, and quality. Among the latest technological developments in sheet metal forming, warm forming has been highlighted as one of the special forming methods that is effective not only for difficult-to-form materials like aluminum and magnesium alloys, but also for improving the formability of high-strength steel and ultra-high-strength steel [1].
Warm forming is defined as processing in the temperature range of 0.357Tm < T < 0.55Tm, where Tm is the melting point of the metal [2]. It has historically been used to improve the deep drawability (formability) and reduce the forming force of difficult-to-form materials, and has been practically applied to stainless steels for large-degree forming [3,4]. Stainless steel products have long been used in kitchenware, home appliances, building materials, and even automobile parts due to their high corrosion resistance, durability, and hygienic properties. In 2015, an experimental study was conducted on the warm deep drawing of laminated sheets made of stainless steel and aluminum [5]. A highly productive warm deep drawing process has been developed for stainless steel by using a high-frequency induction heating method [6].
In recent years, research and development into the application of warm forming to lightweight metals such as aluminum and magnesium alloys has been extremely active, and a large number of research results have already been reported. Regarding the warm forming of aluminum–magnesium alloys (5000 series), Toros et al. reviewed 82 major research papers and publications worldwide on this topic [7]. The deep drawability and limiting drawing ratio (LDR) of aluminum alloy are influenced by the temperature and strain rates in warm forming. For the warm deep drawing of A5083, the effects of the temperature and forming speed were investigated, focusing on different temperature gradients as a fundamental study. It was reported that the LDR became lower with an increasing forming speed at all die temperatures (20–180 °C) [8]. As a reference, the LDR values for the warm deep drawing of aluminum alloys are as follows: For aluminum alloy A5182, the deep drawability in the warm temperature range from 100 to 250 °C has been investigated, and it has been reported that the LDR at 250 °C is approximately 2.8 [9]. For A5754 and A6016, the LDR has been reported to be greater than 2.6 and greater than 2.5, respectively, at 250 °C [10]. In order to further improve the formability in warm deep drawing, a new combined forming method was developed that combines the special forming technique of variable BHF (VBHF) deep drawing. For magnesium alloy AZ31 sheets, a significant improvement in the LDR was achieved by warm deep drawing at 400 °C, using a VBHF process to achieve an LDR of >5 [11].
However, warm forming has traditionally focused on the strength difference between the forming and load-bearing parts due to the difference in temperature. There has been less research to date on improving the deep drawability by focusing on the strain rate dependence of the forming temperature. Even when the strain rate dependency was considered, it was focused on formability under the condition of a constant forming speed.
An investigation that aimed to improve deep drawability by focusing on the strain rate dependency of materials was conducted on the variable SPD (VSPD) and VBHF process method in 1996 [12]. This variable path process involves varying the SPD and BHF during the forming process, focusing on the strain rate dependency of the materials. In the warm deep drawing of aluminum alloy 5082 sheets, the fracture and wrinkling limits were formulated with elementary theory using the constitutive equation σ = K ε ˙ m ε n , which combines the strain rate dependency and strain hardening characteristics. The effects of the material properties and forming conditions on these limits were investigated. The experimental results confirmed a qualitative agreement with the theoretical limit lines [12]. Furthermore, the experiments demonstrated the possibility of a forming time reduction and the further uniformity of the wall thickness distribution by simultaneously varying the SPD and BHF process path [12].
Subsequently, a superplastic material (SPZ2: Zn-22Al-0.5Cu-0.01Mg alloy with m = 0.32 and n = 0.005 at 250 °C) was investigated as a metallic material exhibiting a significant strain rate sensitivity. The effects of the SPD and BHF on flange-wrinkling behavior during cylindrical deep drawing were experimentally investigated. A theoretical analysis also demonstrated the existence of a critical forming path for the VBHF/VSPD. As a result, it was demonstrated that a significant reduction in the forming time was possible [13]. Under appropriate forming conditions, a drawing ratio of DR = 5.0 was possible. Furthermore, the theoretical results suggested that the above-mentioned strain rate effect did not appear for strain-rate-independent materials (m = 0) [13].
In contrast, deep-drawing steel sheets exhibit a small strain rate dependency, even at room temperature. For instance, the actual measurements of an SPCE sheet with a 0.7 mm thickness showed that the strain rate sensitivity index m was approximately 0.02. Therefore, the effectiveness of the combined VBHF/VSPD deep drawing method, which takes advantage of the strain rate effect, was verified using a finite element analysis and experiments, even for materials with a small m value [14]. The experimental and numerical results revealed that the forming limit was improved under VBHF/VSPD conditions, compared to constant BHF/SPD conditions, even at room temperature [14].
Considering industrial applications, a fuzzy control method for the combined VBHF/VSPD deep drawing process was developed [15]. To demonstrate its effectiveness, the experimental results showed that the forming time and formability were improved in the cylindrical deep drawing of SPCE sheets with a 0.7 mm thickness [15].
However, as mentioned above, for materials that exhibit a moderately high strain rate sensitivity (m = approximately 0.1) during warm forming, such as practical aluminum alloy sheets, the fundamental forming characteristics and the effect of the combined VSPD/VBHF deep drawing process path have not yet been fully experimentally elucidated.
On the other hand, based on the aforementioned advances in experimental research and development, theoretical analysis models have been developed for the warm deep drawing of aluminum alloys using the warm forming theory and finite element method simulations [16], thermal–mechanical-coupled finite element simulations for the warm cylindrical deep drawing of aluminum alloys [17], and the experimental verification of the finite element analysis results using temperature- and strain-rate-dependent in-plane anisotropic material models for the warm deep drawing of A5754-O [18] and A5086 alloys [19]. Consequently, the fundamental research and analytical techniques have significantly advanced. However, these studies remain limited to constant-speed conditions. The application to complex advanced forming technologies, such as deformation phenomena under a VBHF or variable speed conditions, remains a future challenge.
This study aimed to experimentally clarify the basic forming characteristics and the effects of VSPD/VBHF paths in warm cylindrical deep drawing at 300 °C using the lightweight aluminum alloy A5182. In this study, the authors newly created a theoretical 3D forming process window consisting of a BHF-SPD flange-reduction ratio (ΔDR*) space and investigated the applicability of a VSPD and combined VSPD/VBHF path design to the deep drawing process design for strain-rate-dependent materials. Based on this, the authors clarified the forming principle of combined variable processing paths, which not only significantly reduced the forming time, but also improved the forming limits through an improved product quality.

2. Materials and Methods

2.1. Materials

The aluminum alloy used in this experiment was Al-Mg A5182-O, 1.0 mm thick. Tensile test specimens were half the size of JIS13-B2, JIS Z 2241: Metallic Materials—Tensile Testing Method. Japanese Standards Association: Tokyo, Japan, 2011.
Figure 1 shows the stress–strain curves obtained at 300 °C with tensile speeds of 10 to 100 mm/min. From Figure 1b, it can be seen that the m and n values were almost constant within this range. Table 1 shows the material properties in the rolling direction, calculated by multiple regression based on these results.

2.2. Methods

2.2.1. Warm Deep Drawing Test

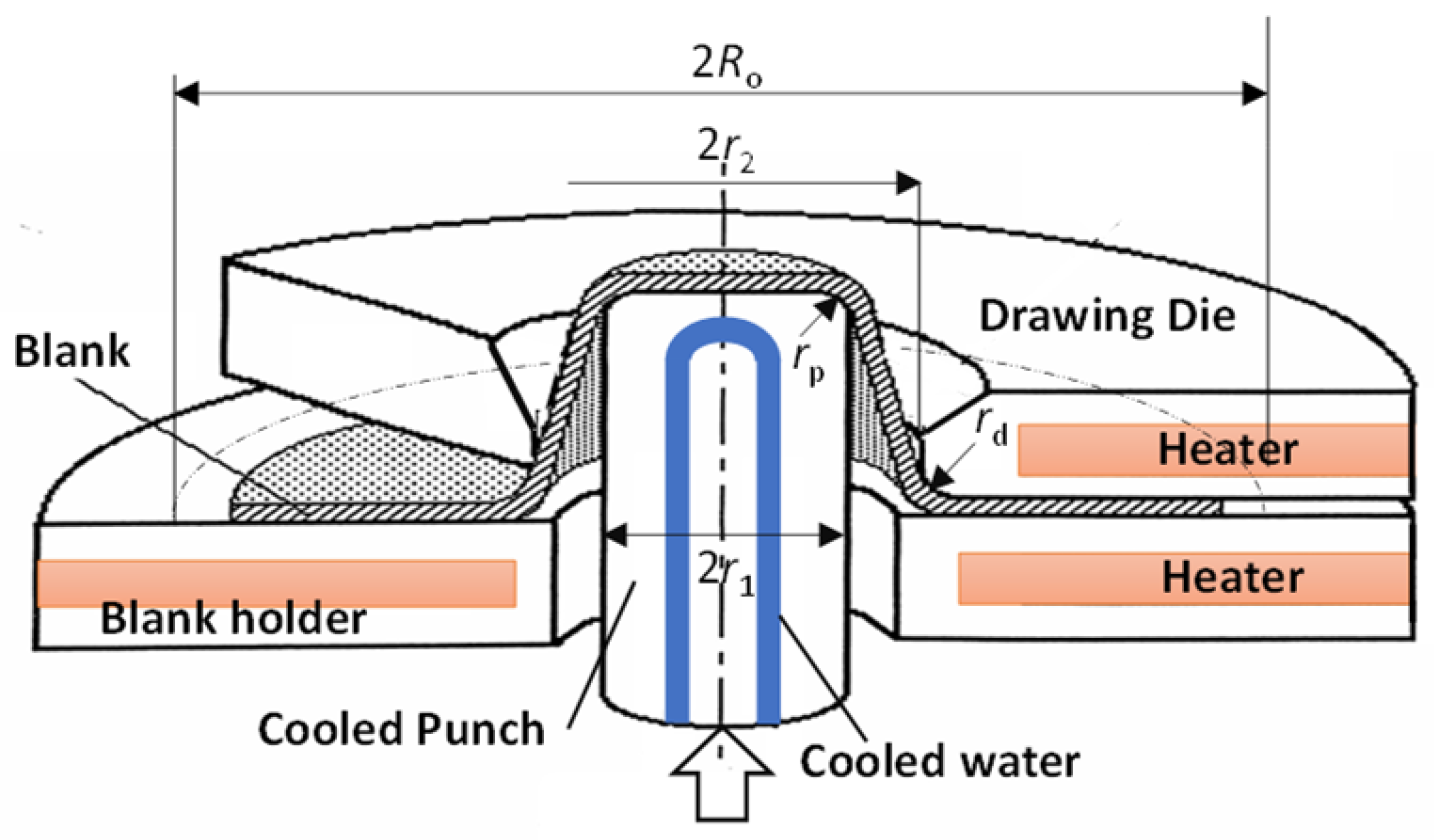
Figure 2 shows a schematic illustration of warm deep drawing. The warm deep drawing apparatus and die tooling, designed and prototyped in our lab, were built into the Instron-type universal testing machine (Instron, 825 University Avenue, Norwood, MA, USA) with a maximum capacity of 100 kN. In this deep drawing device, the BHF and SPD were independently feedback-controlled arbitrarily variables during the process under computer control [13]. The flange part of the die was uniformly heated by six cartridge heaters, and the punch head could be water-cooled from the inside of the punch. Additionally, the blank was cooled with compressed air from the outside at the die outlet immediately after drawing into the die cavity. The tooling and experimental conditions for the cylindrical deep drawing test are shown in Table 2. Warm deep drawing experiments were performed at 300 °C, where strain rate dependence was observed. The temperature distribution on the surface of the die and the blank holder after holding for 10 min was within ±1 °C after setting the blank. In the experiment, the blank holding time was set to 10 min with a margin. The drawing ratios, DRs, were 2.5, 3.1, and 3.3. A dry fluorine lubricant (Unon S, manufactured by Nippon Valqua Industries, Tokyo, Japan) was applied to both sides of the blank. The paths for the VBHF and VSPD methods were the conventional constant condition, a broken line path, and a multipoint linear path. The fracture limit and wrinkle limit were calculated using Excel, and a 3D process window (BHF-SPD-ΔDR* space) was created using Blender ver. 4.4.1. The display range for the ΔDR* axis for the wrinkle limit was up to 1.003 when DR = 2.5, up to 0.7347 when D = 3.1, and 0.0678 when DR = 3.3. The break limit was up to 1.051 when DR = 2.5, up to 1.077 when DR = 3.1, and 0.9829 when DR = 3.3. The punch speed (SPD) was constant from 5 to 100 mm/min, regardless of the DR.
Under constant SPD and BHF conditions, the deep drawing experiments were carried out under the following conditions. (1) SPD: 5, 10, 15, 30, 50, 80, 100, 150, 200, 300, 400, 550, 1000 mm/min; (2) BHF: 0.15, 0.3, 0.5, 1.0, 2.0, 3.0, 5.0, 20, 50 kN. Variable forming conditions (VBHF and VSPD) were carried out within these ranges for the blanks with three different DRs (2.5, 3.1, 3.3).

2.2.2. Determination of Fracture Limit and Wrinkle Limit

The onset point of flange wrinkling was defined as the point where wrinkling began to increase rapidly, determined by measuring the distance between the die and the blank holder (the apparent thickness of the blank). The deep drawing process was stopped midway, and the point of wrinkling was confirmed from the state of flange wrinkling.
The fracture limit point was defined as the point where the punch load begins to decrease sharply in the initial stages of drawing. This method is applicable for determining the fracture limit in the initial and middle stage of forming, but it is not applicable in the late stage of forming.
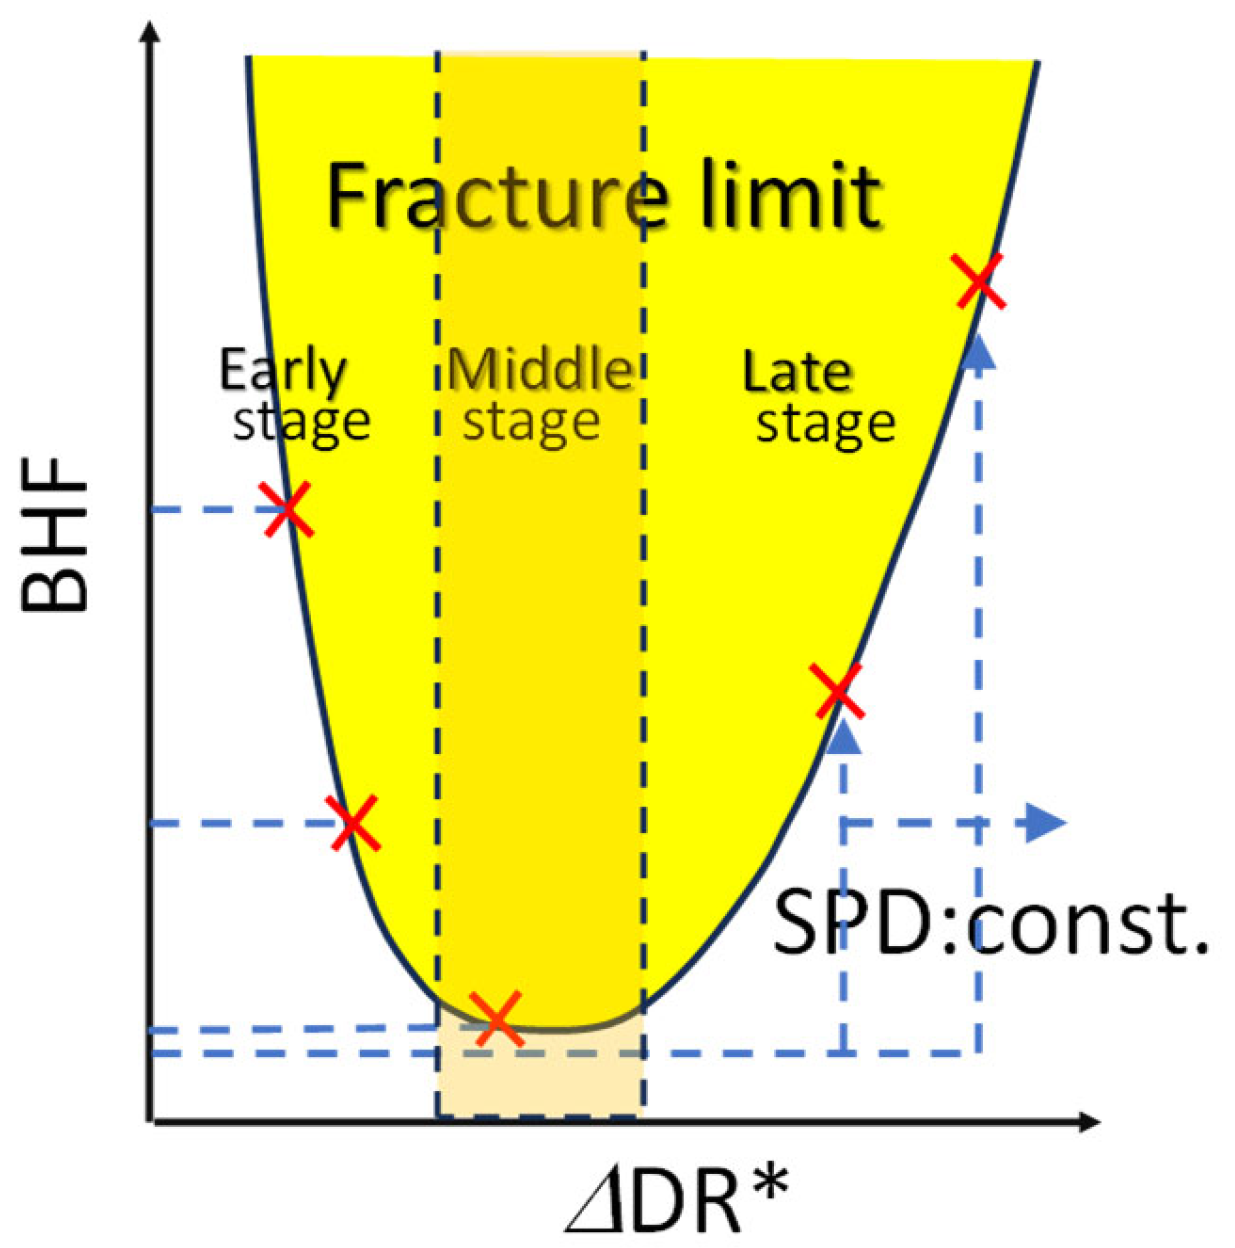
Figure 3 shows a conceptual diagram for determining the fracture limit point in the later stages of forming, as adopted in this study. This method is characterized by performing deep drawing under constant BHF/SPD conditions and determining the drawing limit by assessing whether fracture occurred due to a rapid increase in the BHF during the late stage of the drawing process. Specifically, fractures were avoided until the middle stage of the deep drawing process, and then the BHF was rapidly increased at the specific set ΔDR* in the late stage of the forming process [20]. For example, in this study, for DR = 3.1, the BHF was set to 1 kN and the SPD to 10 mm/min, and the BHF was rapidly increased when a specified ΔDR* stage was reached in the late stage of the forming process; then, deep drawing was continued with the set BHF condition. At this time, the BHF setting was adjusted repeatedly depending on whether deep drawing was possible with the set BHF or whether a fracture occurred, thereby identifying the fracture limit BHF at which a fracture occurs (safe-jump path test).

3. Deep Drawing Theory for Process Window

An extended deep drawing theory of the VBHF and VSPD processes for the strain rate and strain-hardening materials (constitutive equation, σ = K ε ˙ m ε n ) was reported [12]. This theory is based on the deformation mechanics of the flange part in the process. An analysis was performed to theoretically support the experimental results and demonstrate the allowable successful process space in the three-dimensional process window (BHF-SPD-ΔDR* space) for VBHF and VSPD deep drawing.
The key theoretical formulas [13] for the analysis are as follows:
(1)
Critical Wrinkle Limit BHF, Hcrw:
H crw = p cr A f = π r 0 2 ( R d + r d ) 2 E 0 ω c r 3.28 r 2 + r d r 2 2 ( 2 r 2 t 0 ) ( R 0 r 2 ) ( R 0 r 2 ) 2 ( r 2 + r d r 2 ) 2 1 α B α H ( σ i E 0 ) 2 4.77 r 2 + r d r 2 2 ( 2 r 2 t 0 ) α B α D 1 + ω c r μ 3.82 ( r 2 + r d r 2 ) 2 2 r 2 t 0 2 ( R 0 r 2 ) 1 α H σ i E 0
where
E 0 = 4 E F 0 / ( E + F 0 ) 2 ,   F 0 = K n ε ¯ ˙ e q m ( ε ¯ e q + 0.001 ) n 1 ,   α H = β 0 + β i ,   δ = 2 r 2 / t 0
σ i = 1.1 σ ¯ e q l n β 0 β i   ,   α B = β 0 + β i β 0 β i   ,     α D = ( β 0 + β i ) 2 ( β 0 β i ) 3 ,     β 0 = r 0 r 2 ,     β i = r 2 + r d r 2
(2)
Critical Fracture Limit BHF, Hcrf:
H crf = 2 π r 2 2 DR * μ δ 4 ρ d σ a l σ ¯ e q t 0 4 ρ d ( 1 + μ α ) 1.1 σ ¯ e q l n DR * t 0 4 ρ d σ ¯ e q
In order to obtain the theoretical solution for warm deep drawing, the material properties and other input data for different drawing ratios (DRs) were as follows: K = 260 MPa, m = 0.11, n = 0.1, E = 70 GPa, σal = 260 MPa, R0 = 44.4 mm for DR = 2.5, R0 = 55 mm (DR = 3.1), R0 = 58.5 (DR = 3.3), t0 = 1 mm, r1 = 16 mm, r2 = 17.75 mm, rd = 8 mm, rp = 5 mm, ωcr = 0.00017, and μ = 0.0667. The dimensions of the die and tooling were the same as those of the experimental setup.

4. Results and Discussion

4.1. Warm Deep Drawing Properties with Variable Process Path at DR = 2.5

4.1.1. Theoretical Process Window and Process Path

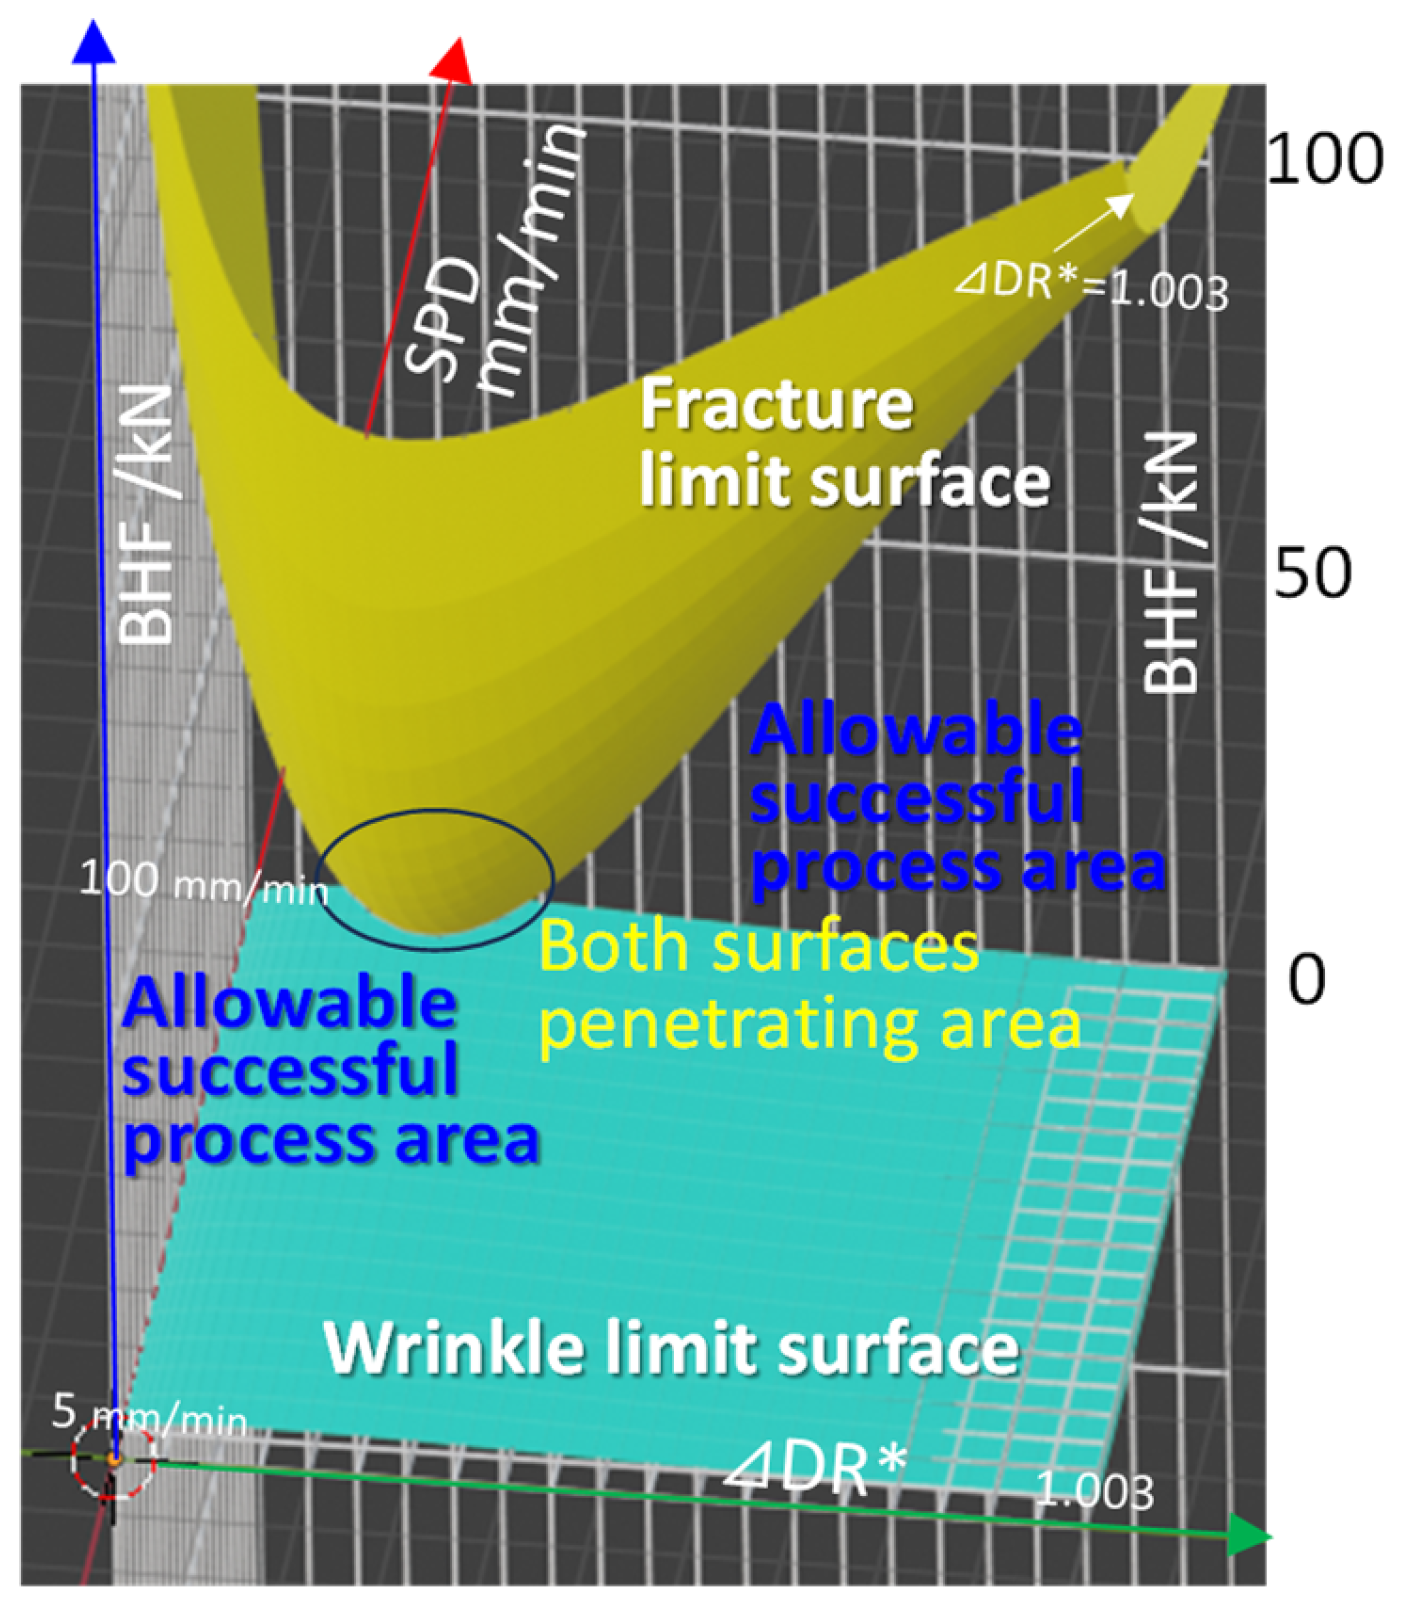
The deep drawing margin at DR = 2.5 was examined from the 3D display space of fracture and wrinkle limit surfaces according to extended deep drawing theory. Figure 4 shows the theoretical process window for the warm cylinder deep drawing of A5182 at DR = 2.5. The vertical axis represents the region of possible drawing, sandwiched between the flange wrinkle limit surface and the fracture limit surface for the BHF. The wider this region, the easier the drawing process. The depth axis represents the punch speed SPD, and the horizontal axis represents the 3D process window based on the flange reduction ratio (ΔDR*), which represents the forming progress. In this figure, for example, if ΔDR* on the horizontal axis increases and intersects with the fracture limit surface under a constant BHF condition, it indicates that the forming limit due to fracture has been reached. At DR = 2.5, the wide punch speed range in the depth does not intersect with the fracture limit surface, indicating a wide drawing margin and the ability to select the optimal path from a variety of forming paths without constraints.

4.1.2. Effect of VBHF Path on Wall Thickness Distribution

First, to verify the effect of variable BHF paths at a constant punch speed of DR = 2.5, the effect on the wall thickness distribution of the drawn cup was investigated.
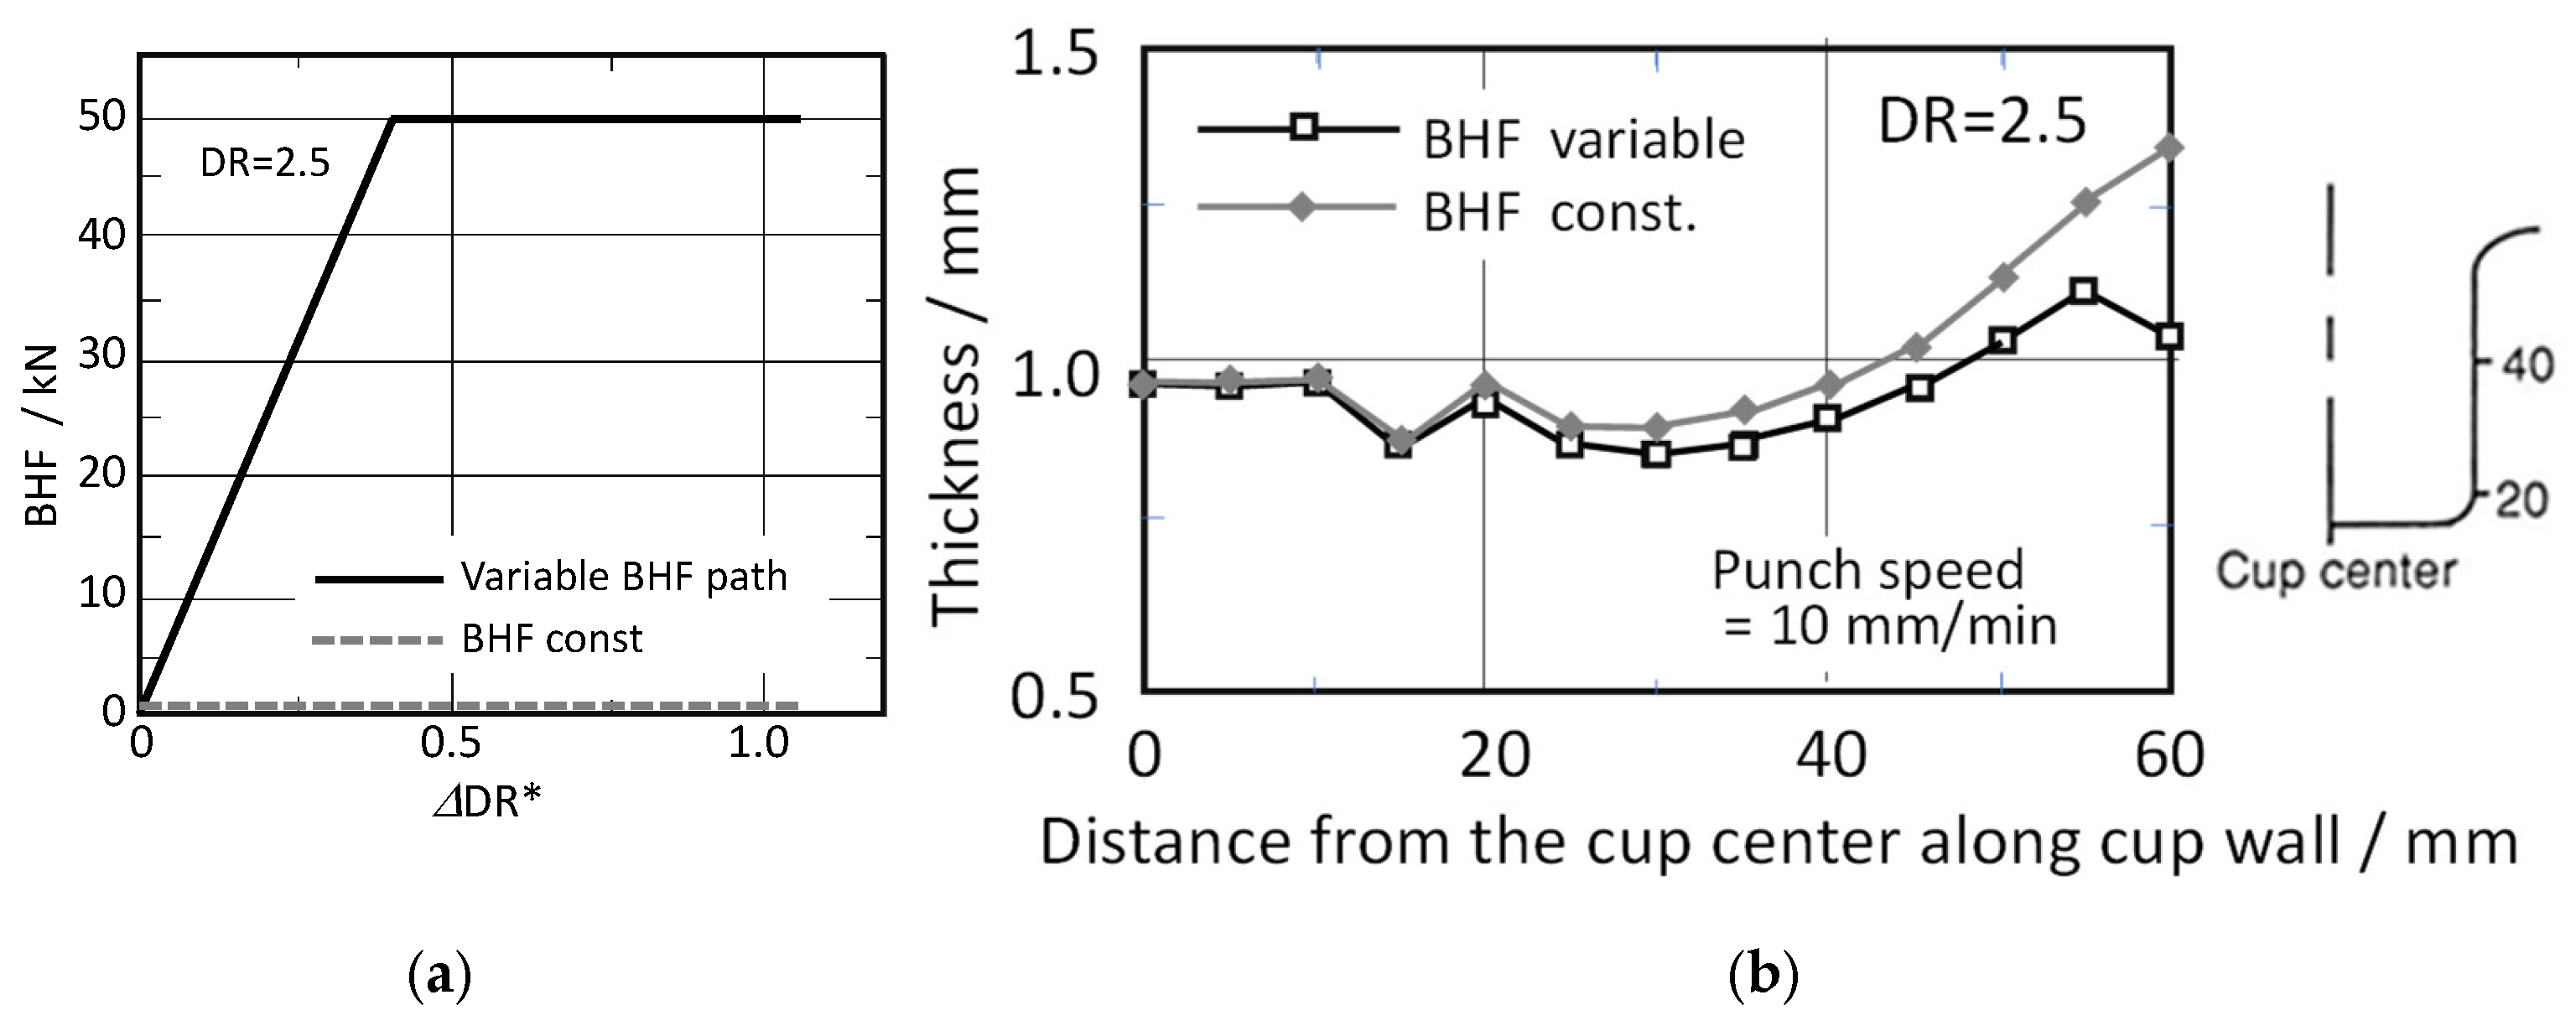
Figure 5a shows the comparison of the constant BHF condition (0.5 kN) and the VBHF path, and Figure 5b shows the comparison results of the wall thickness distribution of the circular cups drawn by using these two BHF paths. The effects of both BHF paths on the thickness distribution began to appear near the punch shoulder, and it can be seen that, in the cylindrical section, the VBHF path, which applies a higher BHF in the late forming stage, achieves a more uniform thickness distribution. This is the same result as previous reports by Manabe et al. (1995) [21], and it can be confirmed that the VBHF path, which increases in the middle and late stages of the process, is also highly effective at improving the wall thickness distribution in the warm deep drawing of A5182.
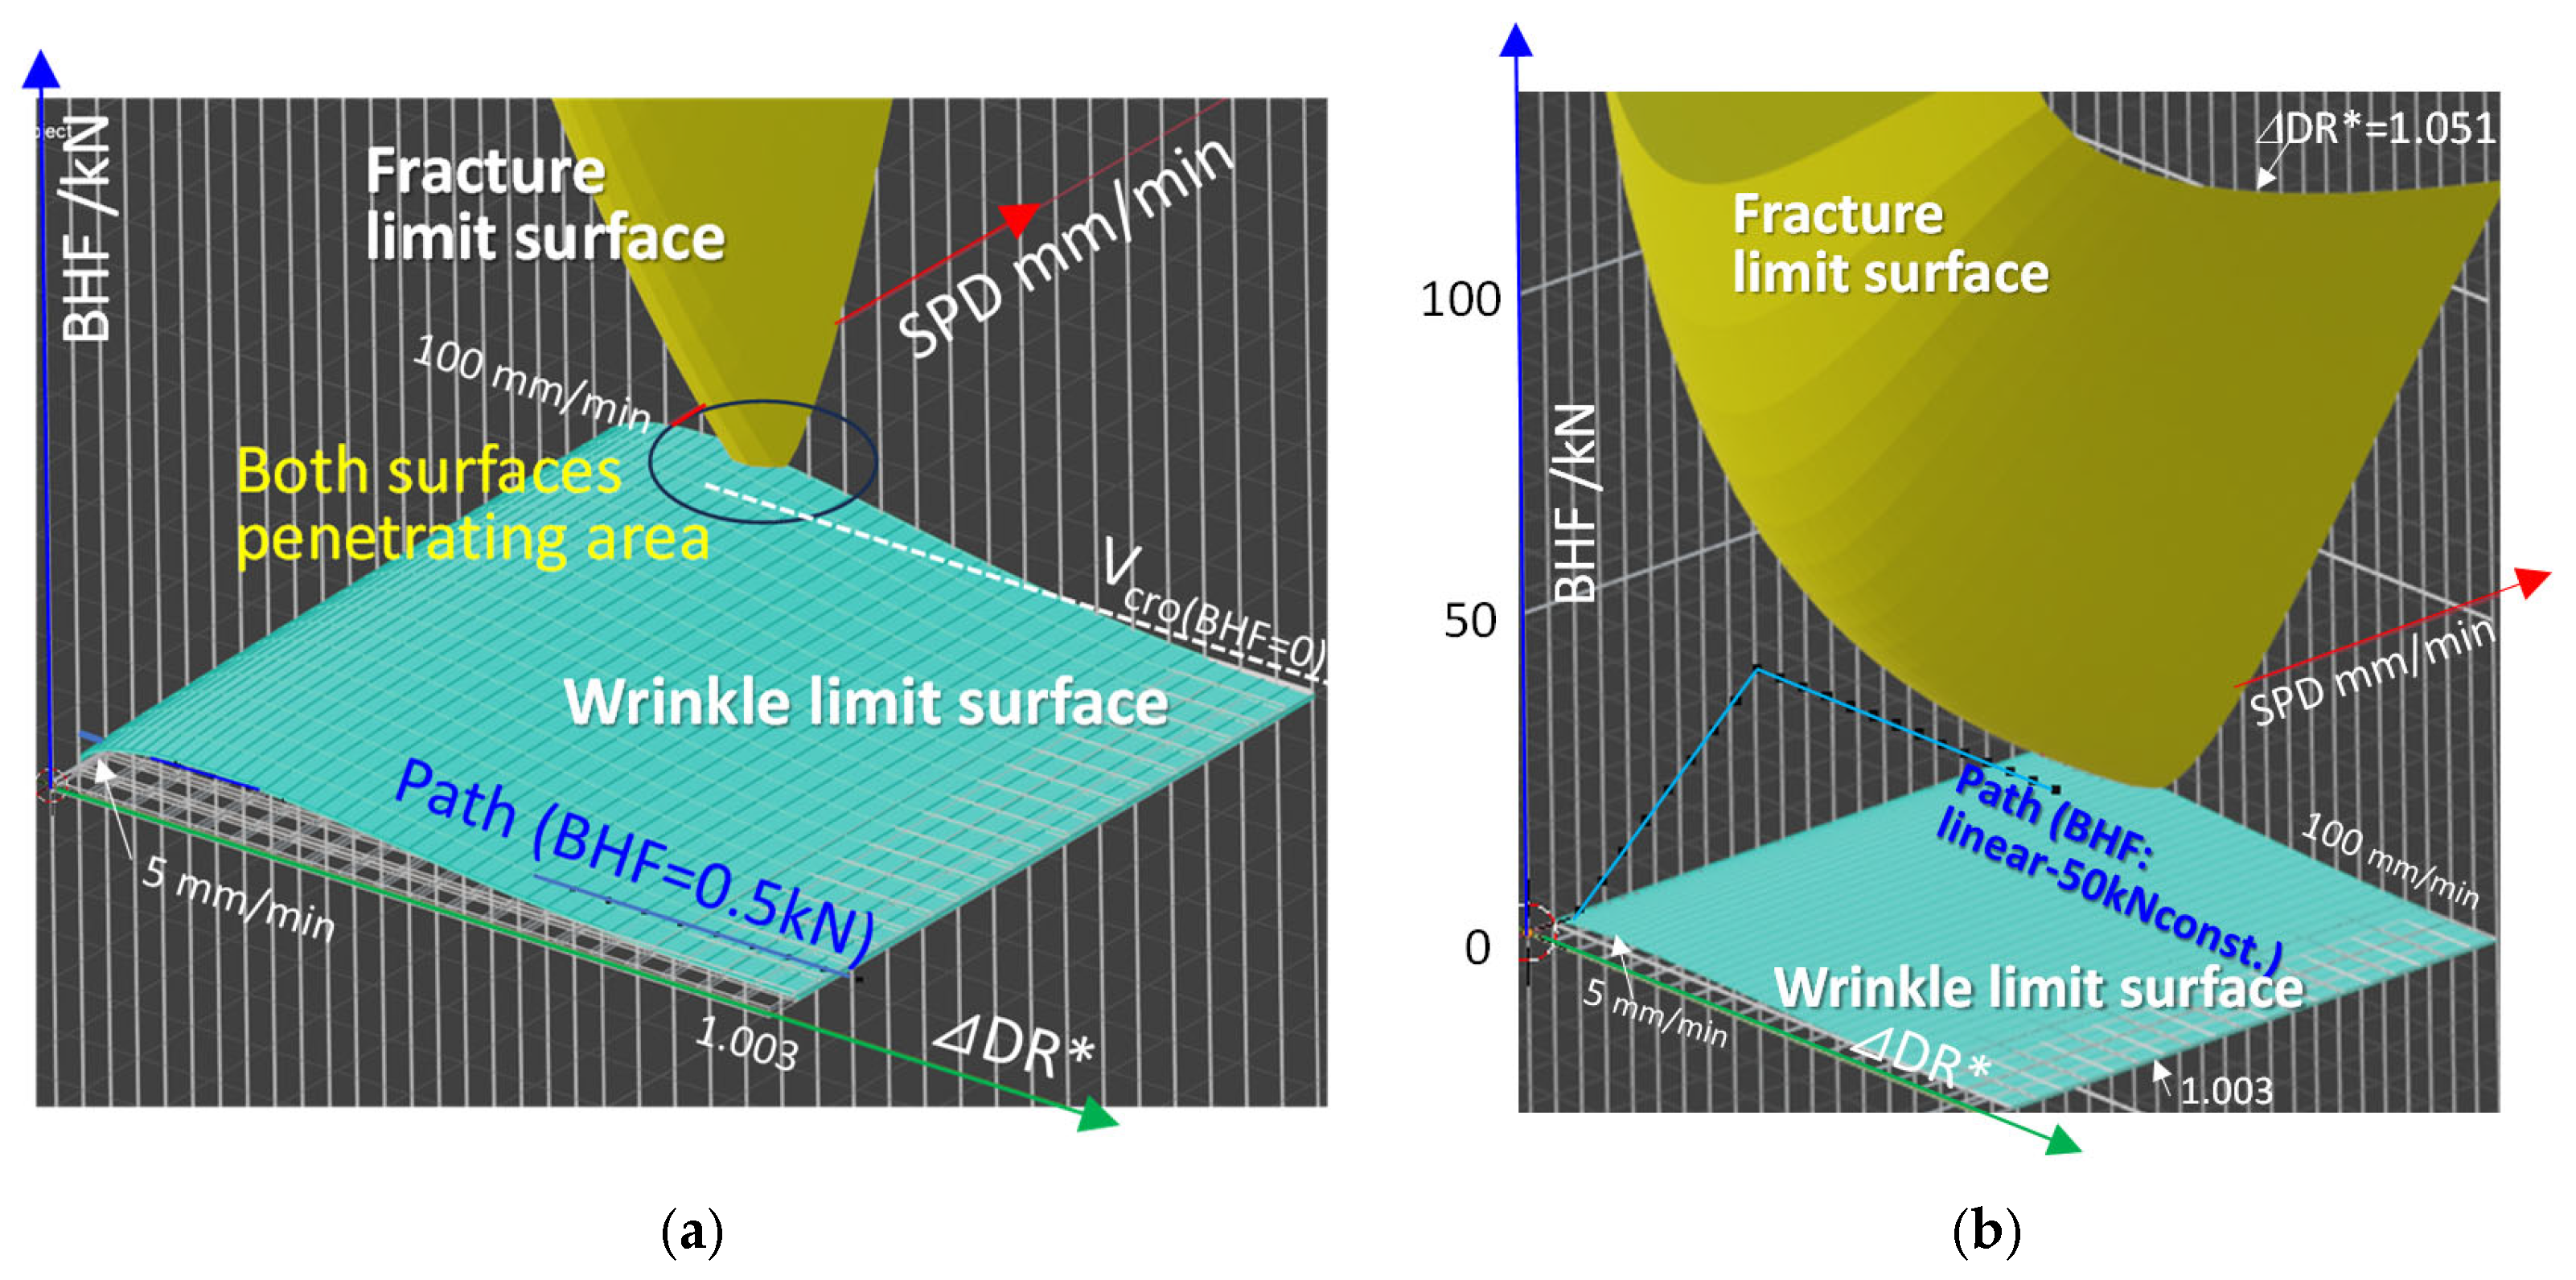
Figure 6 shows the two BHF paths in Figure 5a above, plotted on the theoretical 3D process window. The low-BHF path for a constant BHF = 0.5 kN (Figure 5a) is indicated by the blue line in Figure 6a. The low-BHF line passed through the wrinkling area and reached the successful formable region in the late stage in the 3D process window. It can also be seen that the broken-line BHF path allowed the process to be set within the successful formable region over almost the entire area during the forming process. In the experiments, there were no wrinkles on the drawn cup. In this case, it is possible that the wrinkles can disappear in the late stage.
For this DR = 2.5, the space between the fracture limit surface and the wrinkle limit surface was broad and wide in the 3D process window. This means that the blank can be easily formed and successful. In addition, in the 3D process window, there existed a Vroc, which indicates the critical punch speed of about 100 mm/min for DR = 2.5. Below the SPD, the deep drawing process was successful and easily possible.
The linear VBHF path in Figure 5a is indicated in Figure 6b. Because of the large BHF, it is well known that the process path approaches the fracture limit surface, and the process can successfully avoid fractures. The experimental result coincided with the theoretical 3D process window well.

4.2. Warm Deep Drawing Properties with Variable Process Path at DR = 3.1

4.2.1. Theoretical Process Window at DR = 3.1

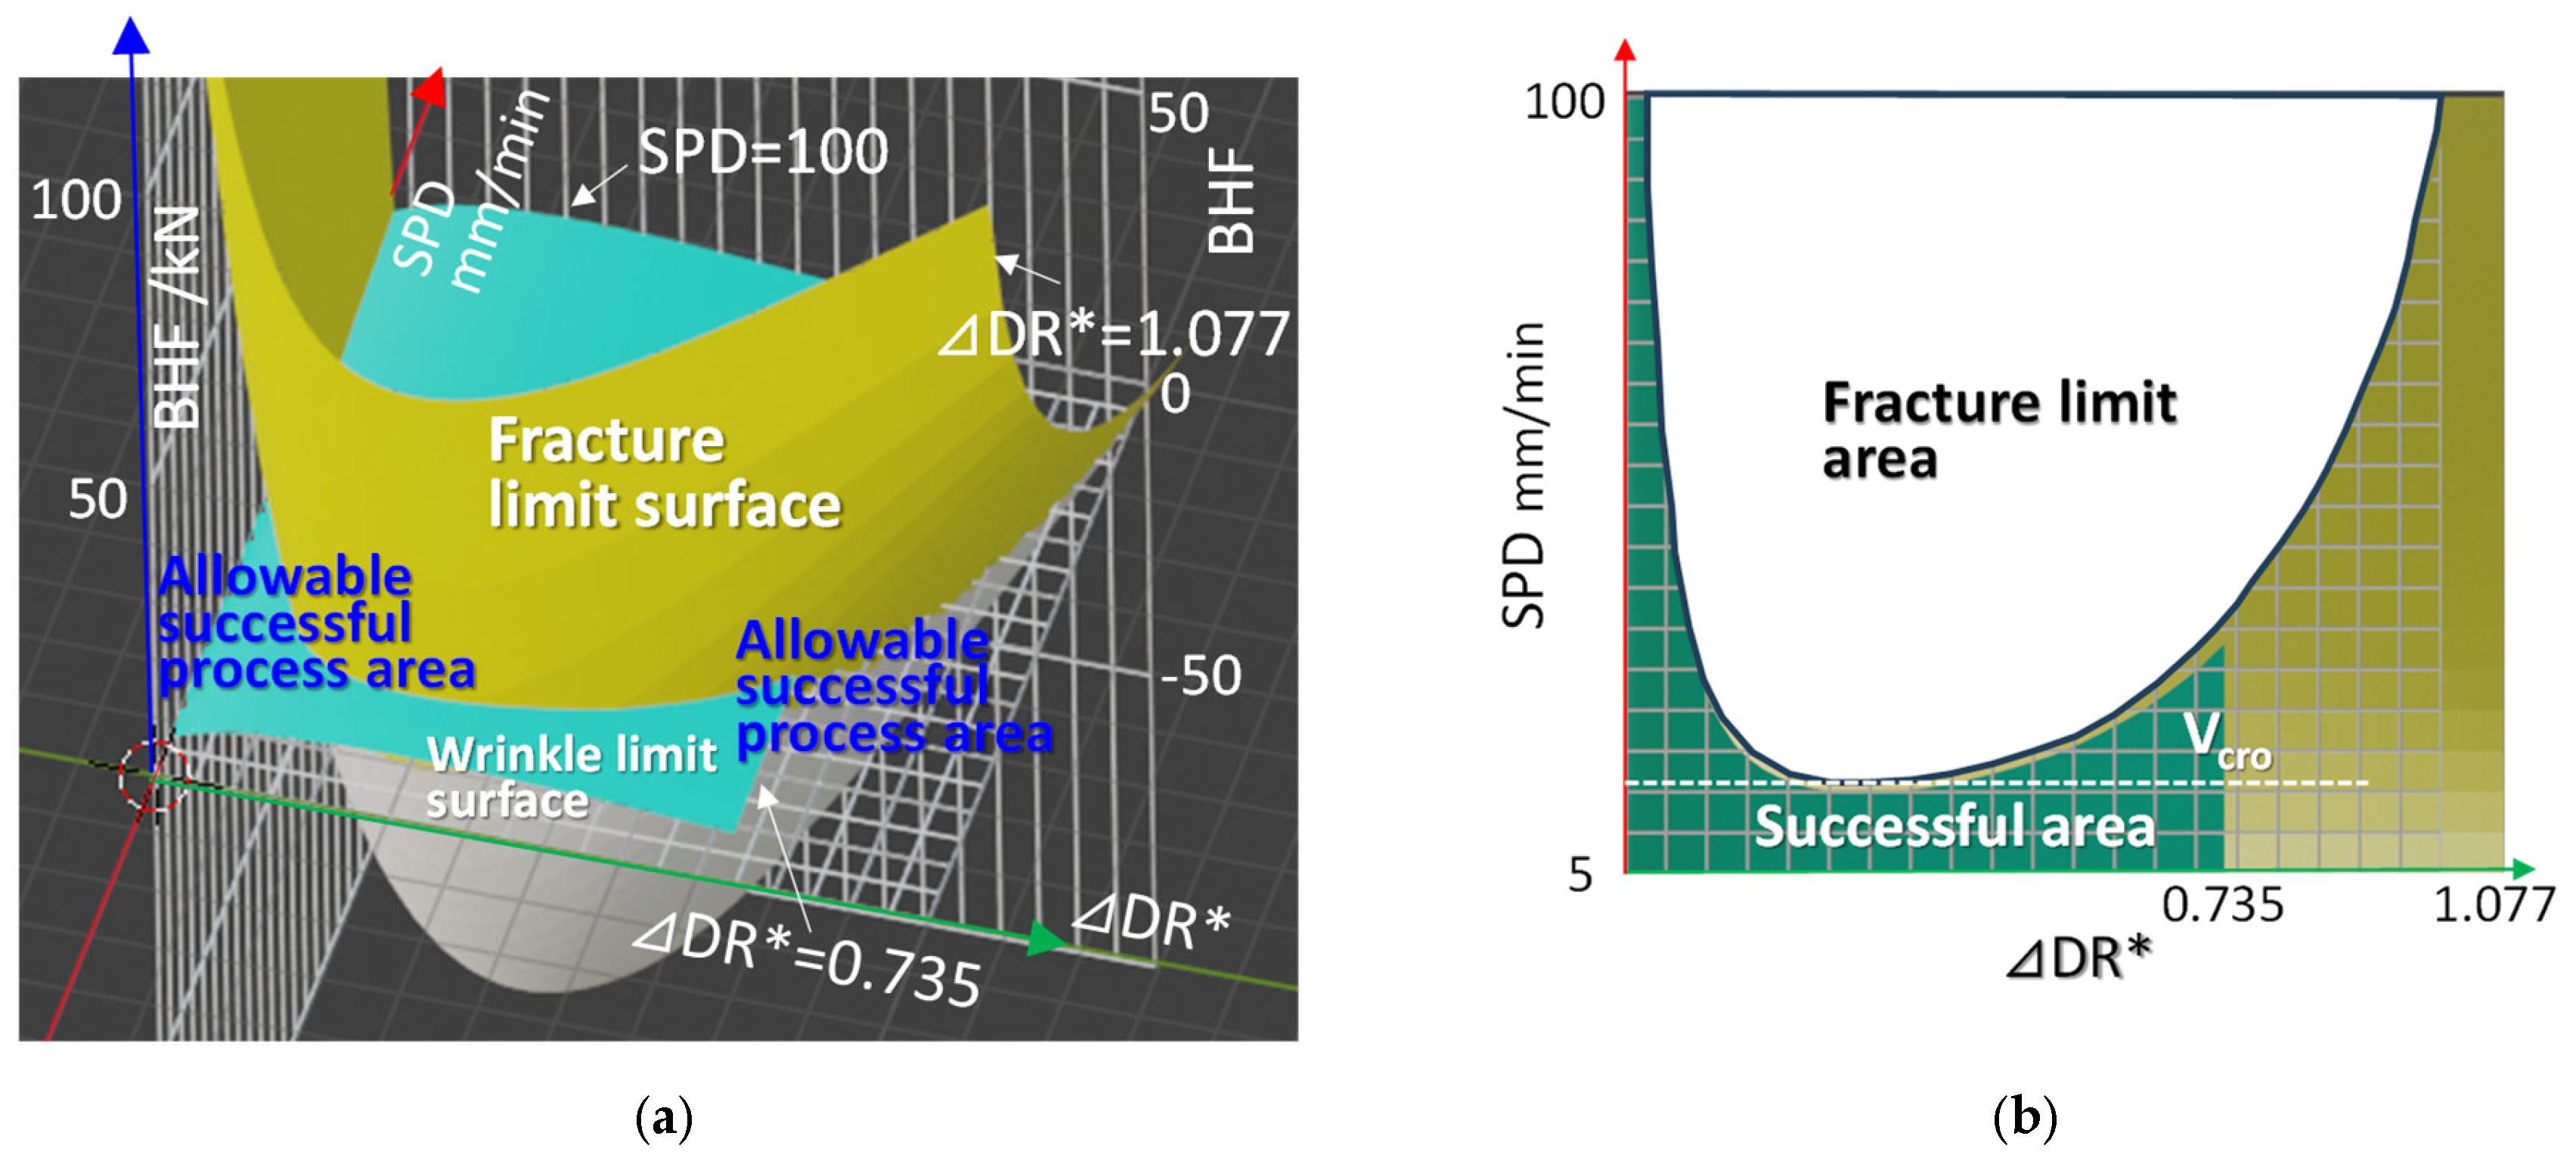
Figure 7 shows the theoretical process window for DR = 3.1. Compared to the case of DR = 2.5 in Figure 4, the flange wrinkle limit surface rose very slightly (invisible on the graph), while the fracture limit surface moved significantly downward, undergoing a significant change as it passed through the flange wrinkle limit surface and penetrated into the negative BHF region. Incidentally, the surface where the fracture limit surface intersects with the plane of BHF = 0 is shown in Figure 7b. Figure 7b shows that, under constant punch speed conditions, as forming progresses with an increase in ΔDR* on the horizontal axis, the surface intersects with the fracture limit curve and reaches the forming limit due to a fracture. It can be inferred that, at low punch speeds within the speed range where forming is possible at DR = 3.1, the forming process becomes much more difficult than at DR = 2.5. However, there still exists a narrow successful area below the Vcro, theoretically. As shown in the experimental results described below, deep drawing can be achieved by the combined VSPD/VBHF process in the presence of Vcro in DR.

4.2.2. Comparison of Experimental and Theoretical Results for Flange Wrinkling and Fracture Limits

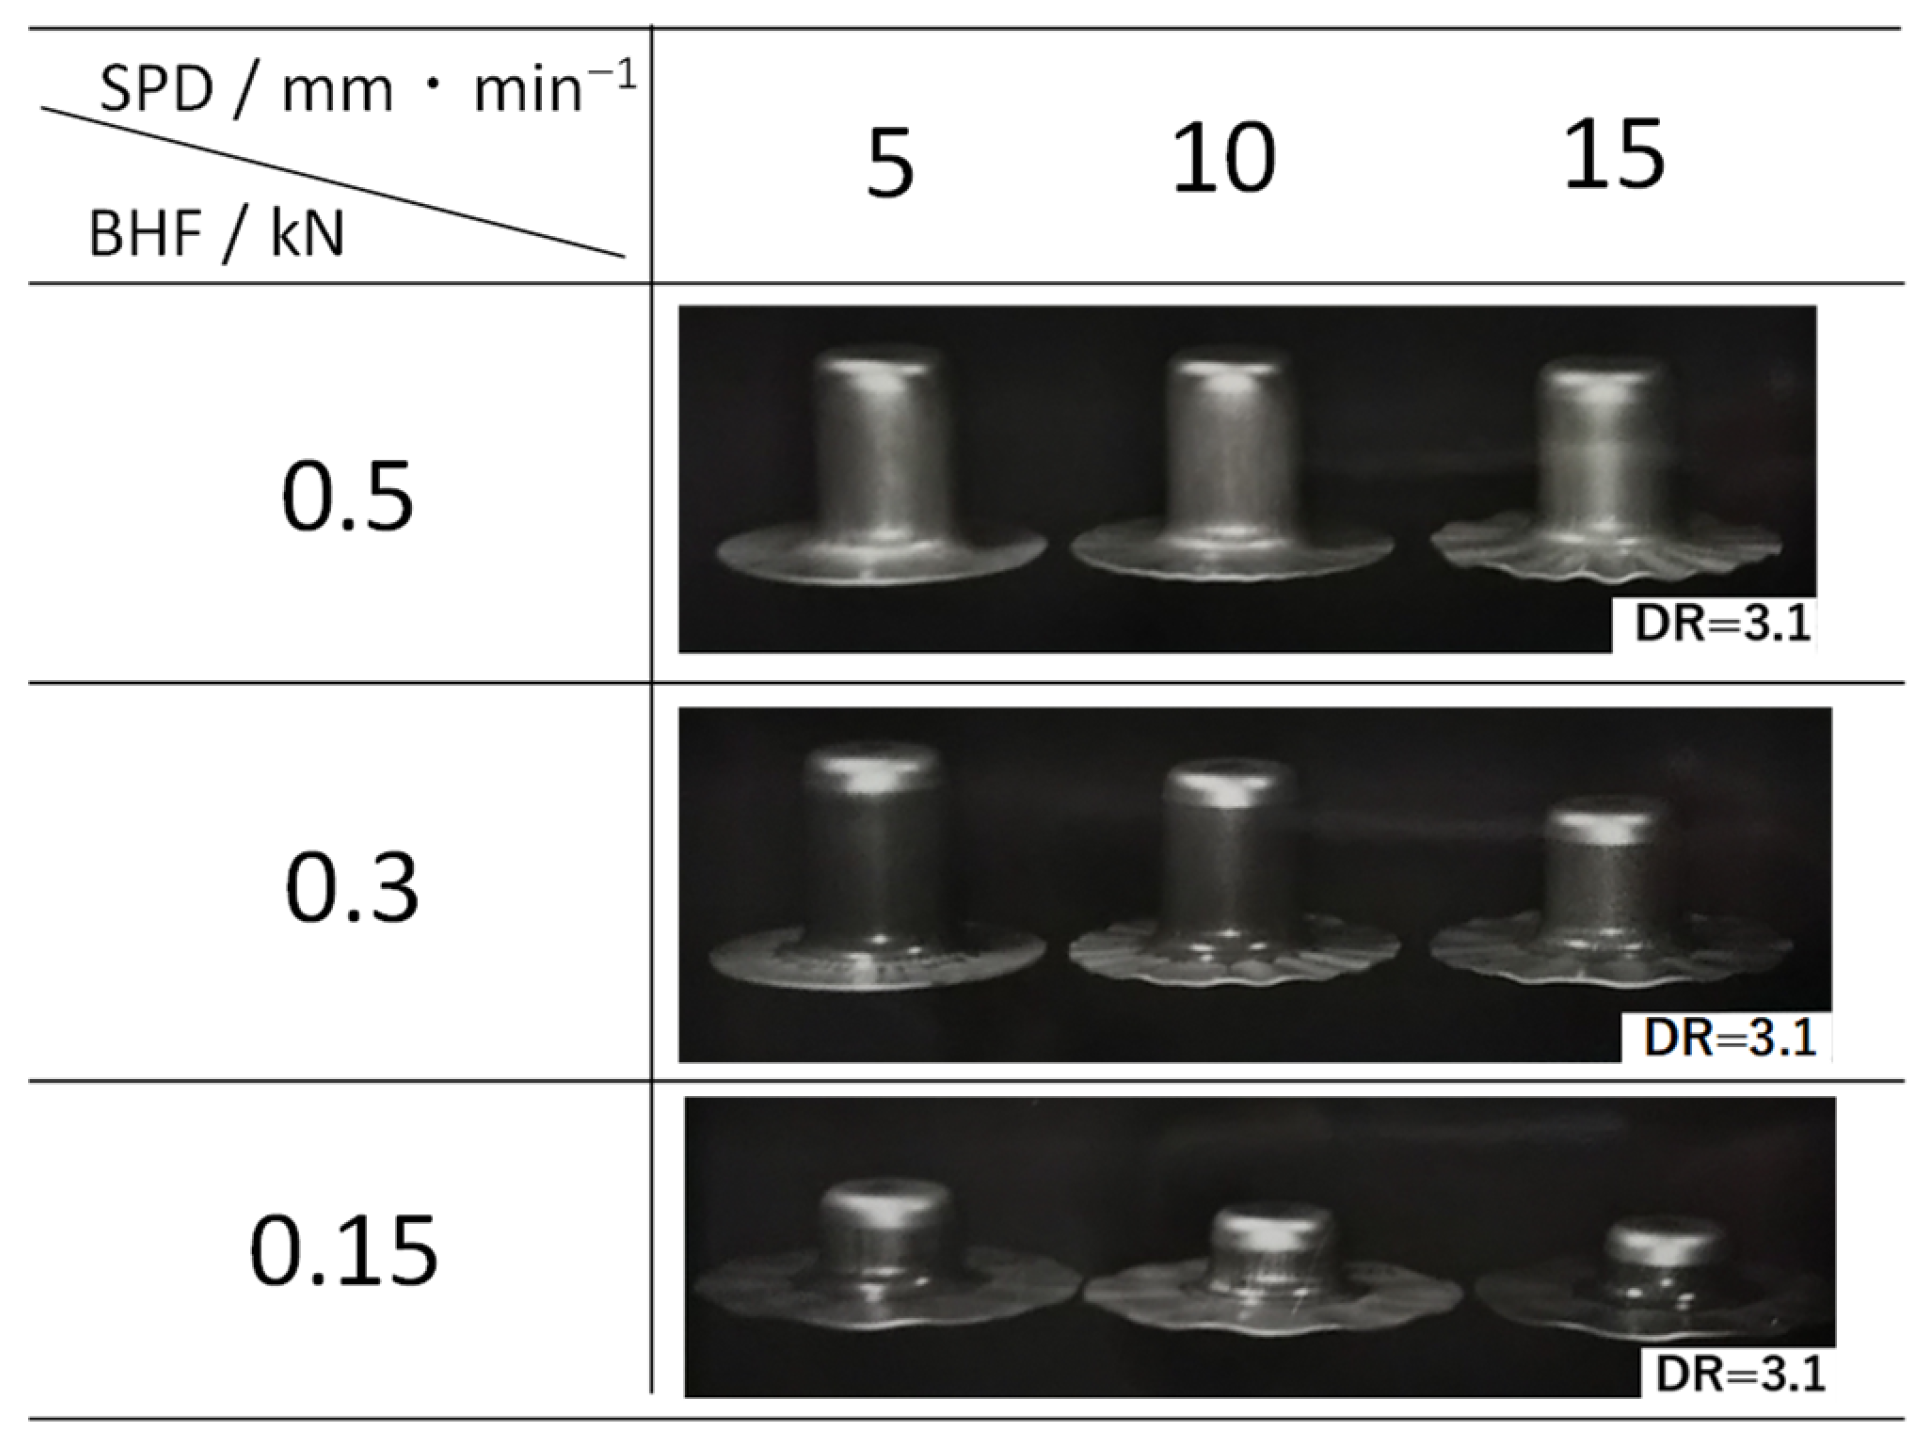
Experiments were conducted under three BHF conditions (0.1 to 0.5 kN) and five SPD conditions (5 mm/min to 50 mm/min). When the SPD exceeded 30 mm/min, the cup wall fractured before flange wrinkle initiation. At a slow punch speed of 5 mm/min, no wrinkles were observed when the BHF was greater than 0.3 kN. In conjunction with wrinkle detection based on a direct measurement of the apparent blank thickness described in Section 2.2.2., the actual occurrence of flange wrinkles was observed and verified using the following method. In this experiment, the punch was stopped once the punch stroke reached 50 mm or the flange wrinkle height reached 2 mm or greater, and the wrinkling condition was evaluated.
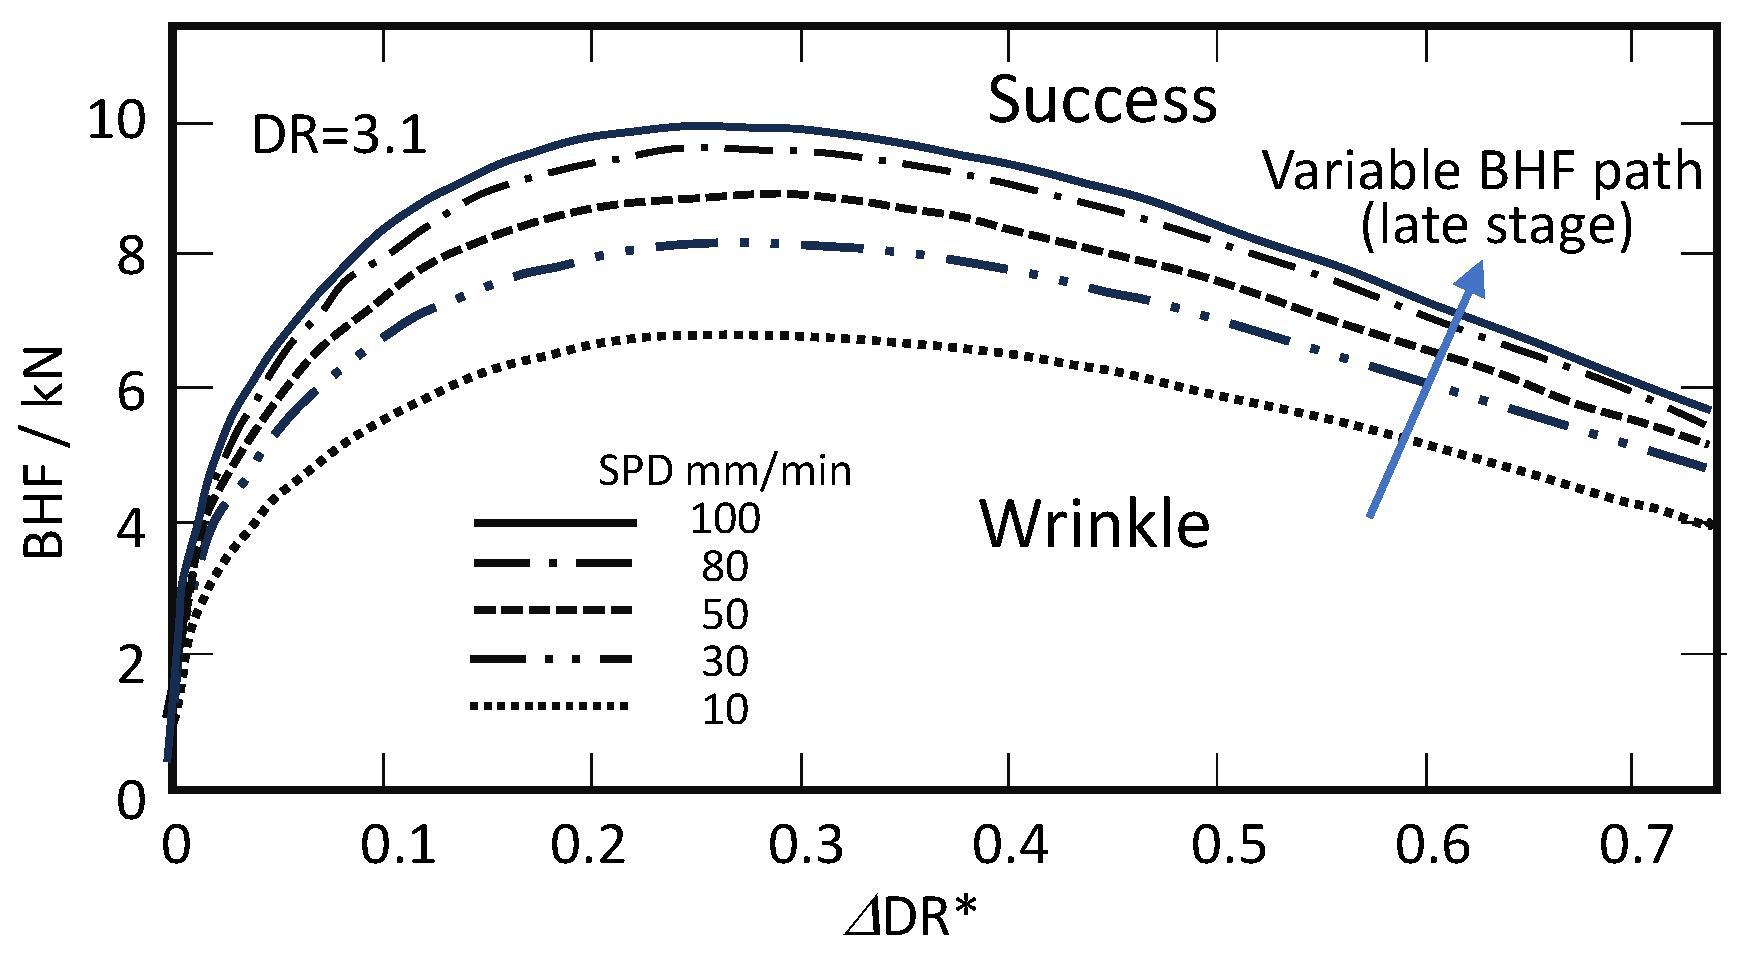
Figure 8 shows the effects of the BHF and SPD on the flange wrinkle formation and the wrinkling mode under constant BHF/SPD conditions. The results confirmed that flange wrinkle formation depends on the punch speed; the faster the punch speed, the earlier the wrinkling occurs and the larger the BHF required to suppress wrinkling. This tendency is even more pronounced for the superplastic material SPZ, which exhibits significant strain rate dependence [13]. As a result of a comprehensive comparison of the above experimental and theoretical results, the parameter ωcr, which indicates the relative wrinkle height, and the friction coefficient μ, an influential factor related to it, were set to ωcr = 0.00017 and μ = 0.0667 in the theoretical analysis. As a result, it was possible to compare and examine the results using calculation conditions with the same values, even for different DRs and different forming conditions. Consequently, the tendency of the theoretical results was as consistent as possible with the experimental results under all experimental conditions.
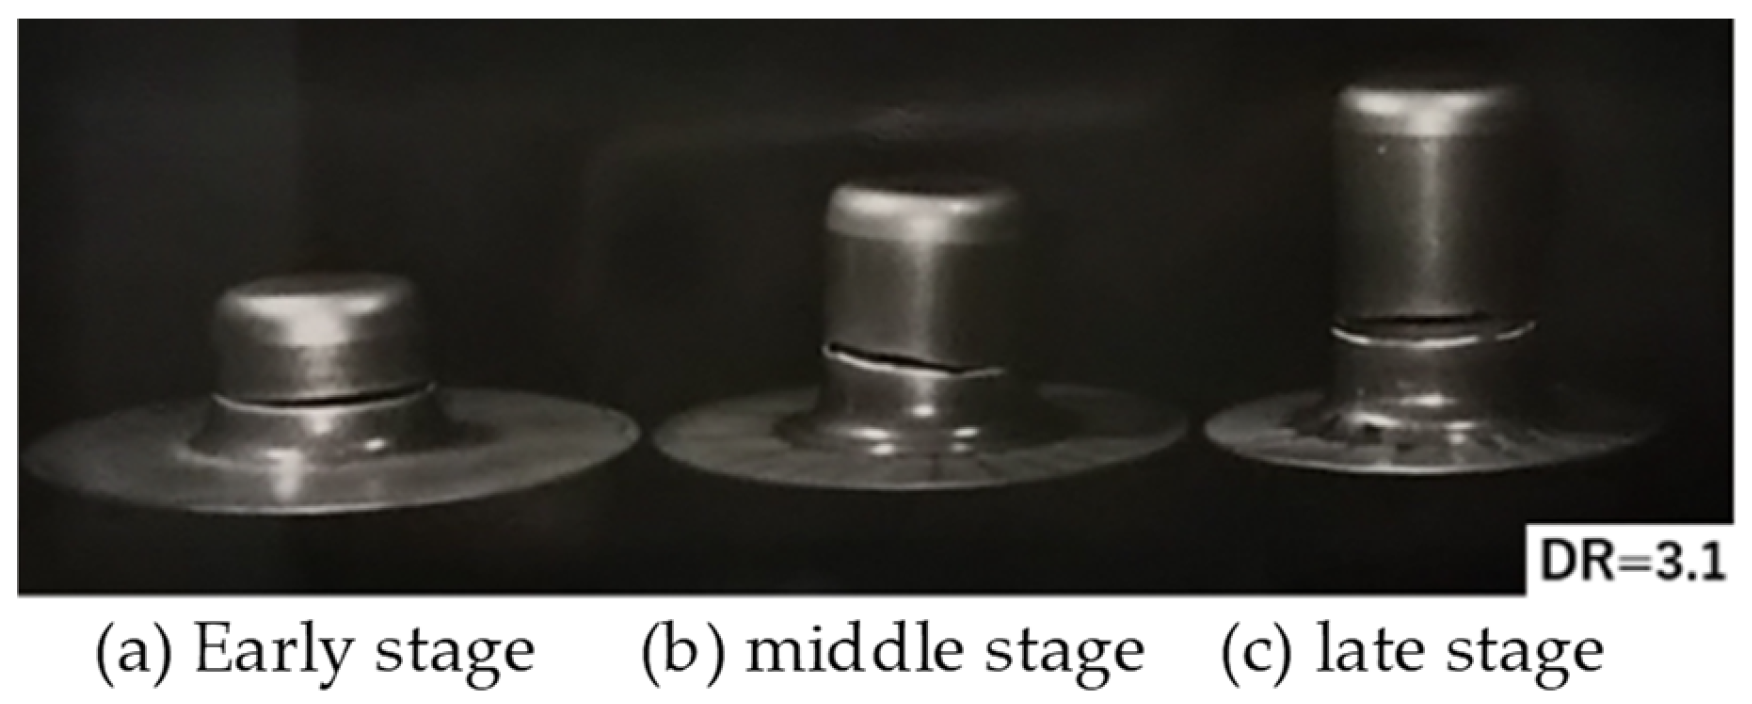
Figure 9 shows the fracture modes and fracture locations at each forming stage when determining the fracture limits during the early, middle, and late stages of deep drawing at DR = 3.1. In warm deep drawing, the punch was water-cooled and the die was heated, which caused a temperature distribution in the blank material, resulting in a lower strength near the die exit shoulder than near the punch shoulder. Thus, the fracture occurred near the die entrance in warm deep drawing, rather than near the punch shoulder as in a uniform temperature field, as shown in Figure 9. All the fracture modes and locations at each forming stage in the experiments were almost identical, with fractures occurring approximately directly below the die exit and exhibiting axisymmetric ductile fractures. These results suggest that the results obtained from the safe-jump path test applied to the A5182 alloy to determine the fracture limit in the later stages of the process, as adopted in this study, are largely valid.
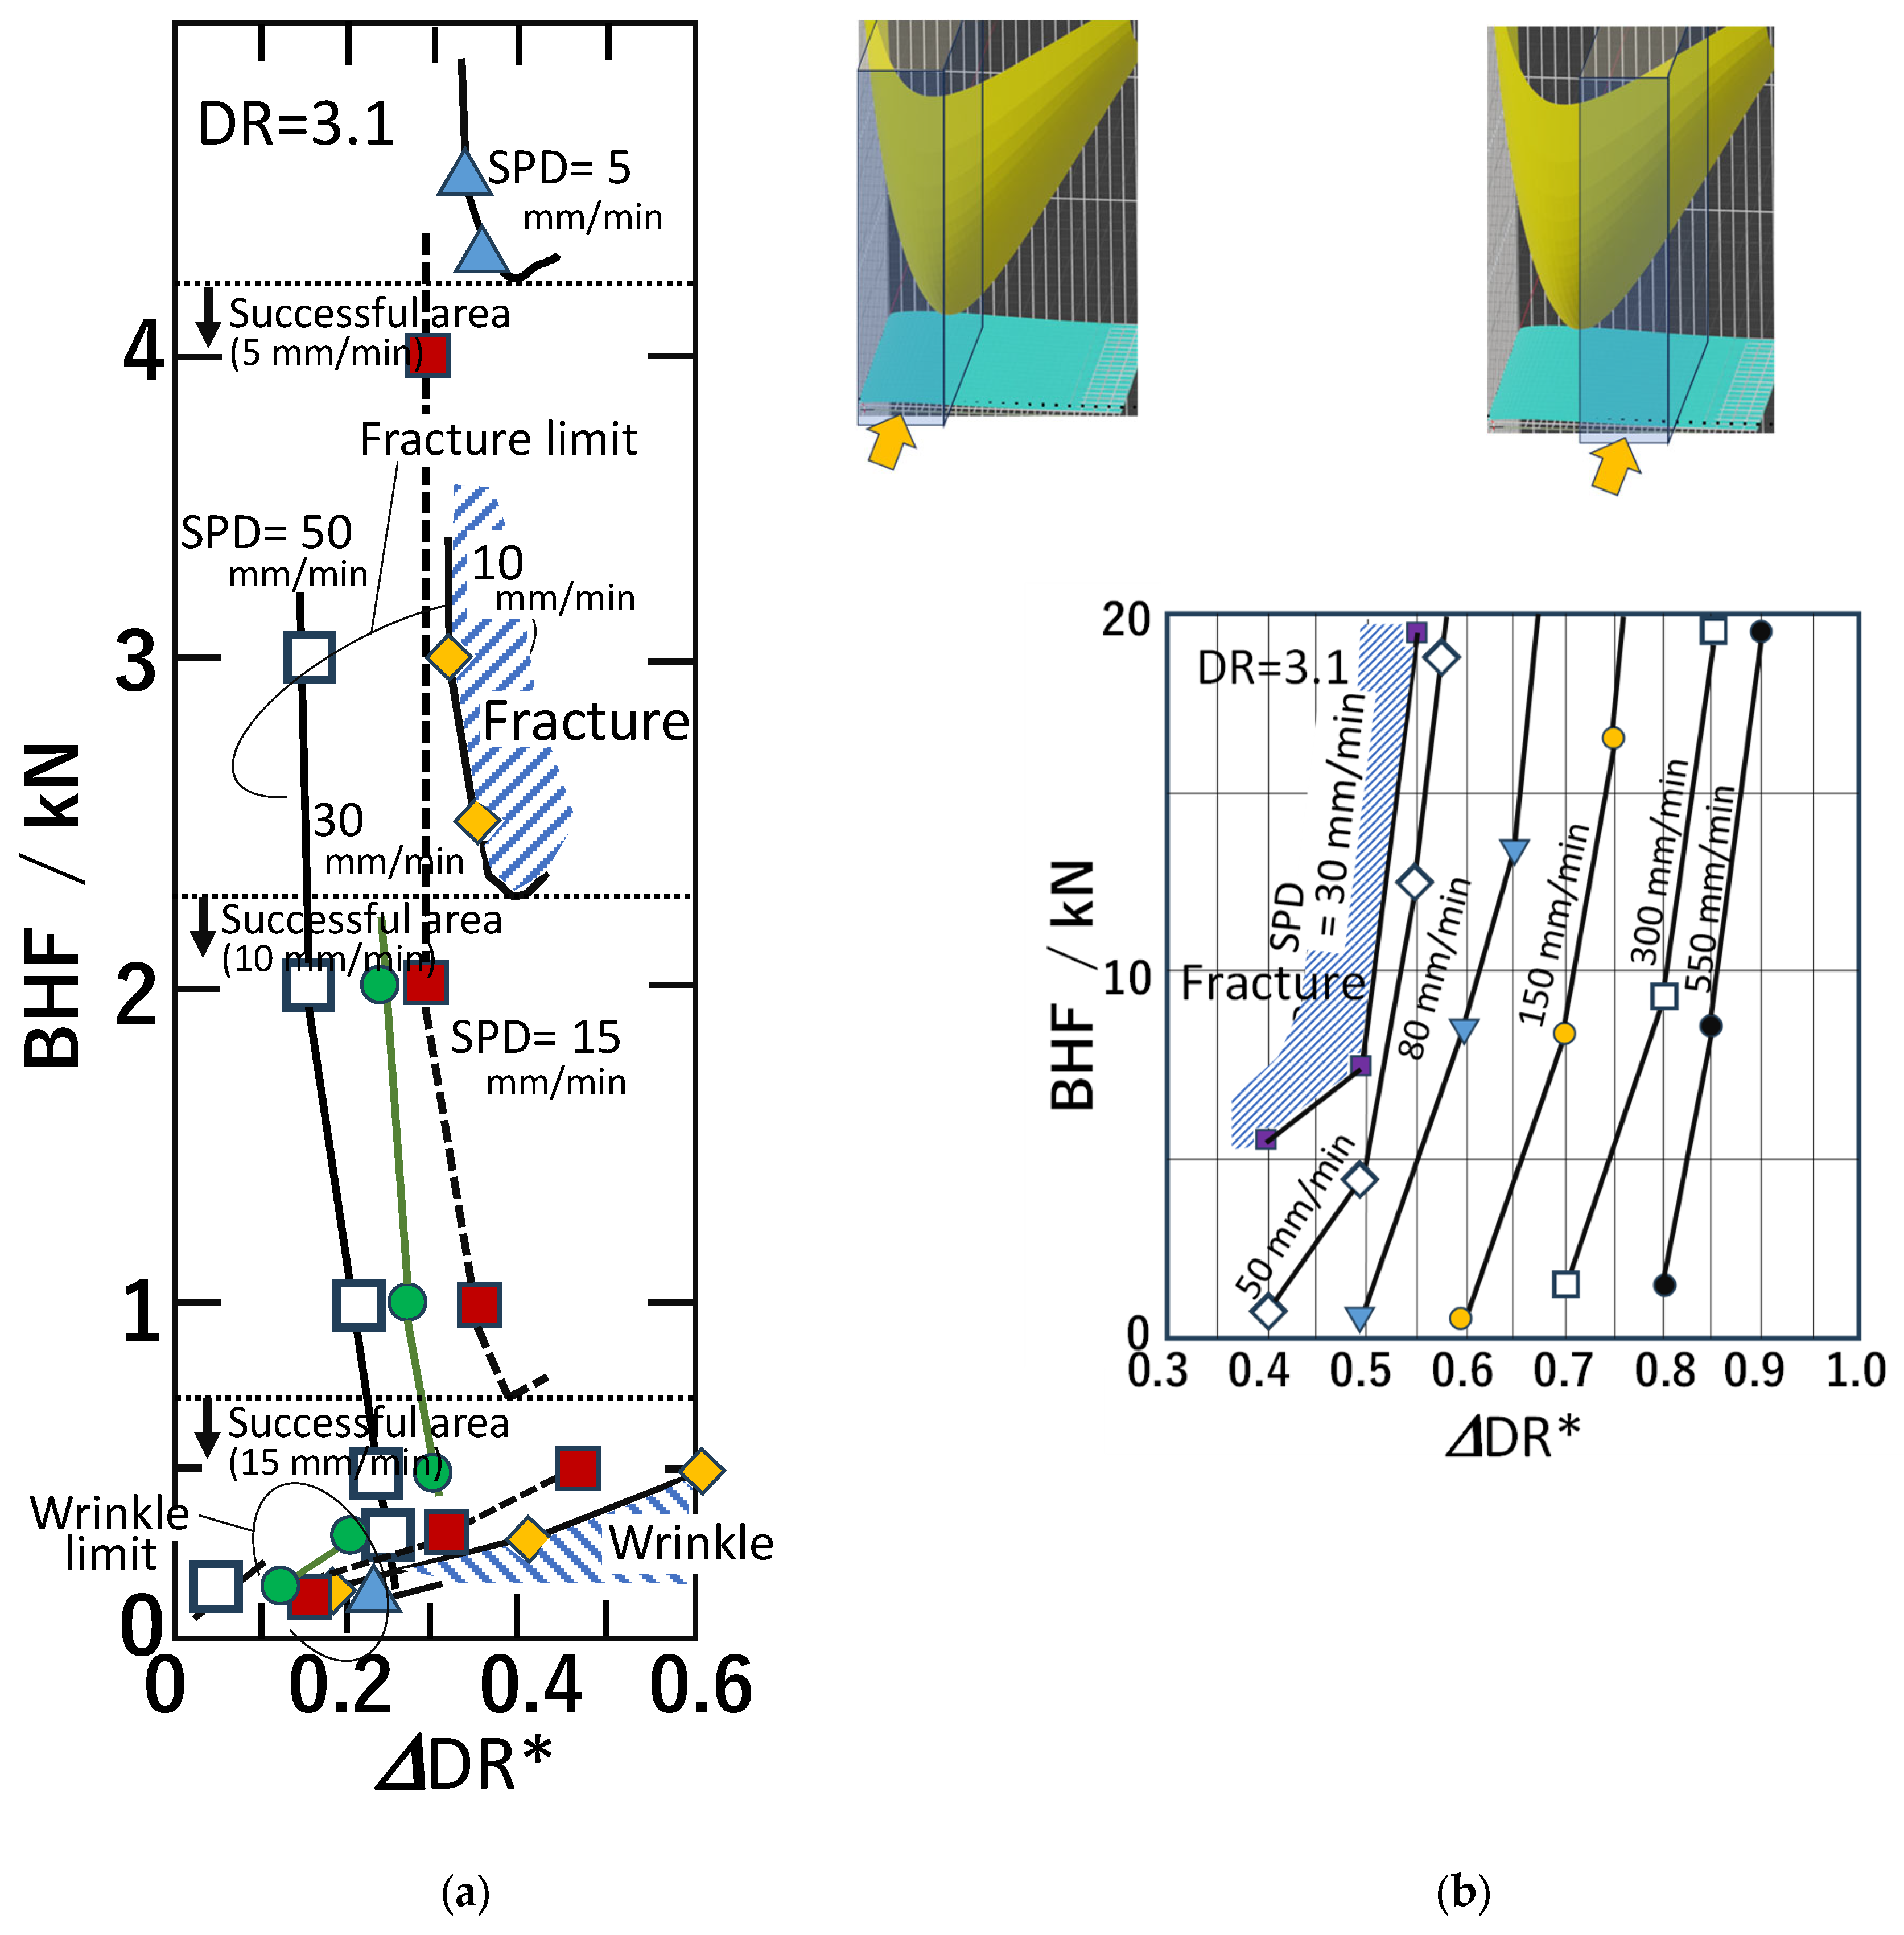
Next, based on the above results, the effects of the BHF and SPD conditions on the fracture limit and flange wrinkle limit at DR = 3.1 were experimentally investigated. Figure 10 shows the fracture limit and flange wrinkle limit curves obtained in the warm deep drawing experiment under different BHF and SPD conditions. This figure corresponds to the experimental results for the theoretical 3D process window in the early stage of forming, shown in Figure 7a. Figure 10a is a front view of Figure 7, with ΔDR* on the horizontal axis and the BHF on the vertical axis, as shown in the 3D schematic diagram. Similar to the theoretical results, the experimental results confirmed that the flange wrinkle limit was low and not significantly affected by the SPD. Meanwhile, the fracture limit varied significantly with the SPD, dropping sharply as the SPD increased, and qualitatively agreeing with the theoretical results. Similar to the theoretical results, the fracture limit appeared to penetrate the wrinkle limit, qualitatively confirming the validity of the theoretical results. Furthermore, Figure 10a indicates that, at a constant SPD of 15 mm/min, the BHF must be approximately 1 kN or less to achieve a high forming efficiency. Furthermore, at 5 mm/min, the BHF must be 4 kN or less to achieve a high forming efficiency. On the other hand, Figure 10b shows that the fracture limit in the later forming stage in the experimental range is difficult to reach unless the SPD is increased rapidly.
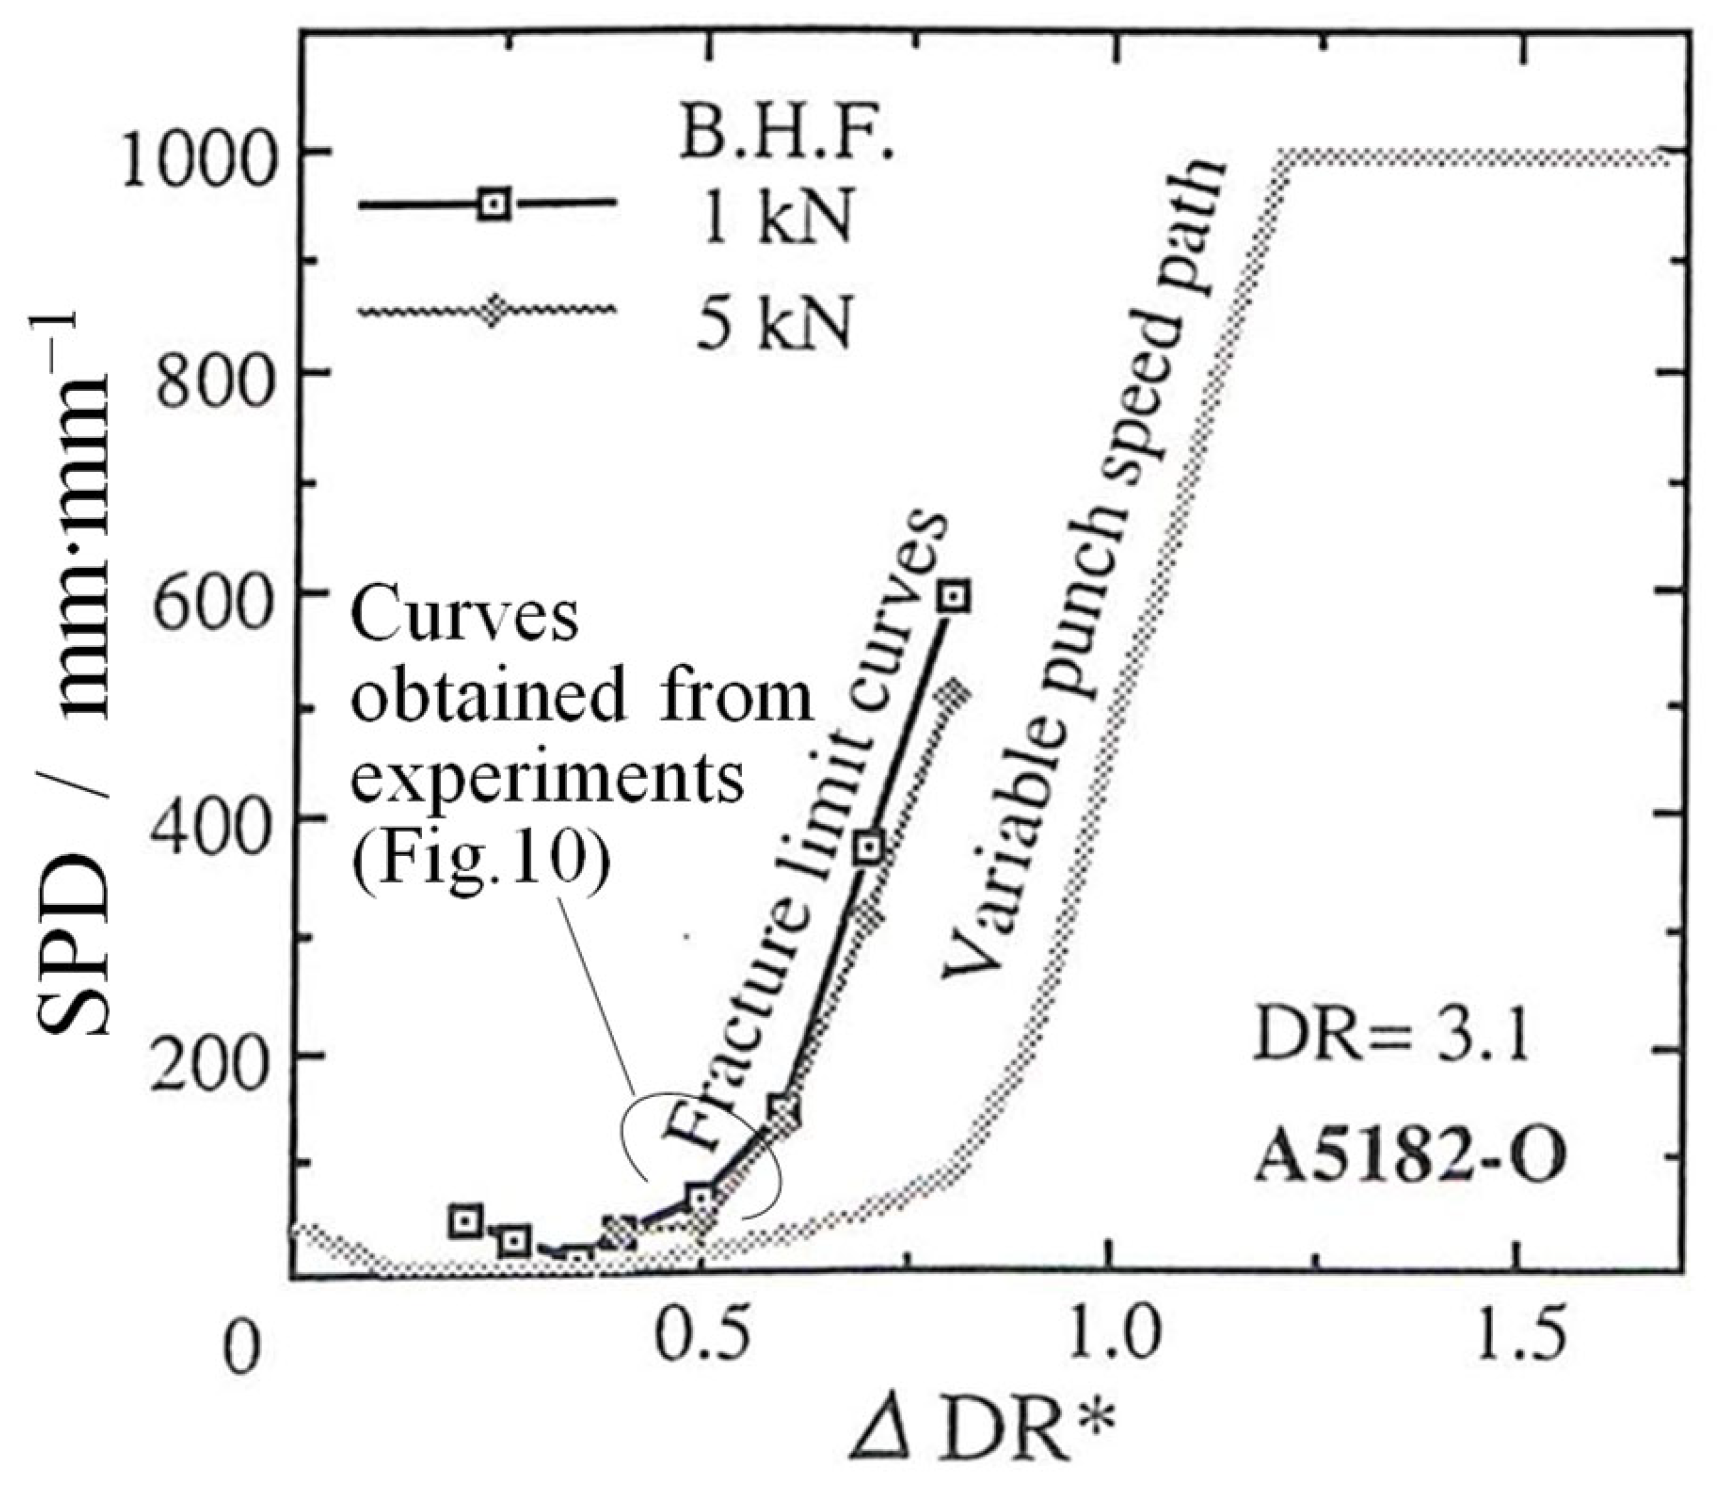
Figure 11 shows the fracture limit curve for the later stage of forming, obtained from the experimental results in Figure 10b and rearranged by SPD. This was obtained for an SPD range of 30 to 550 mm/min. The vertical axis values are significantly larger than those for the early stage of forming. As the SPD increased, the fracture limit curve broke in the later stage of forming (Figure 9c). By comparing this with the 3D process window in Figure 7, it can be seen that, in the early stage of forming (Figure 10a), increasing the SPD leads to an earlier fracture, while in the later stage of forming (b), a faster SPD leads to a delayed fracture. Displaying this in three dimensions reveals that, as the SPD value increases, the shape of the fracture limit curve expands in 3D. Furthermore, in the early stage of forming, the wrinkle limit line and fracture limit intersect, penetrating both limit curves. These experimental and theoretical results show good agreement, supporting the validity of the theory.

4.2.3. Effects and Effectiveness of Combined Variable Process Path

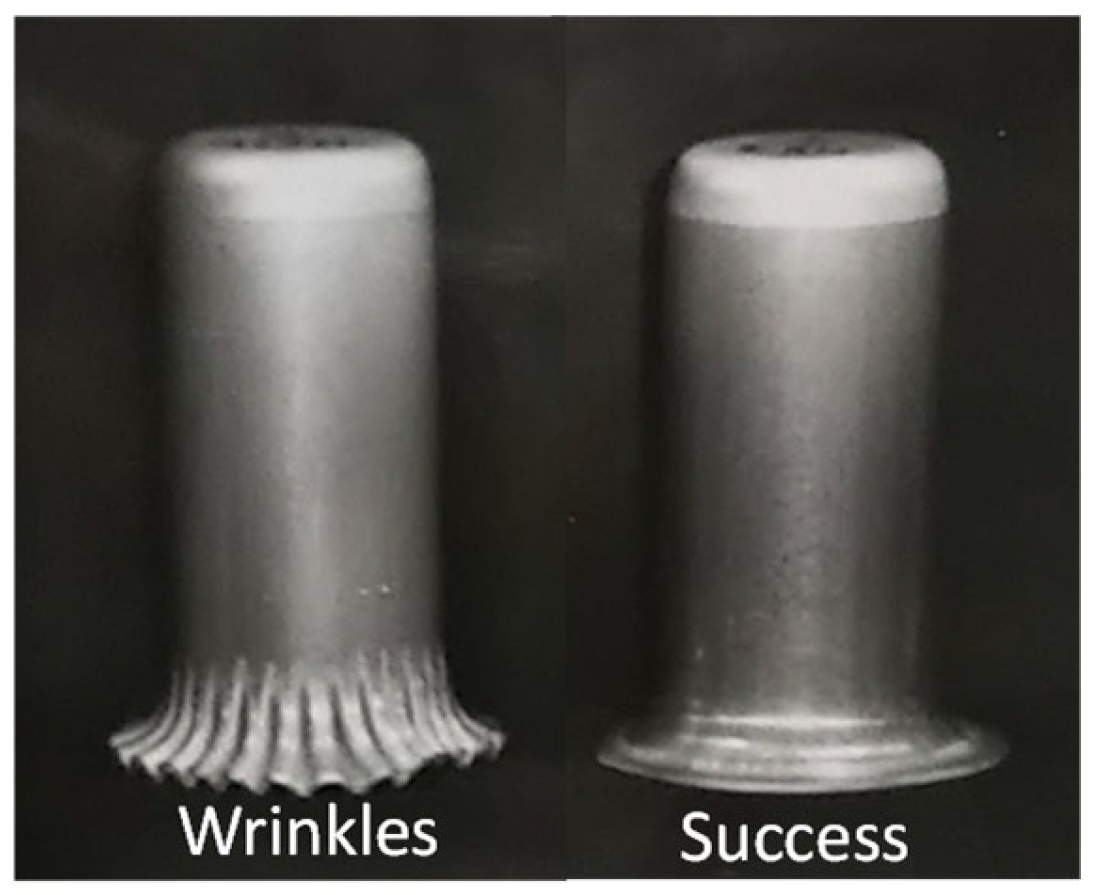
To examine the effect of the VSPD path alone, the experiment involved setting a margin on the horizontal axis of the VSPD path, and first employing the VSPD path and constant BHF (1 kN) conditions shown in Figure 11 above. As a result, it was found that wrinkles occurred on the edges of all the drawn cups, not only at 1 kN, but also under low, constant BHF conditions (Figure 12, left). With this VSPD path, the SPD rapidly increased in the latter half of the forming process. The effect of the SPD on the wrinkle limit, shown in Figure 13, suggests that the wrinkle limit increased with a rapid increase in the SPD, creating conditions that make wrinkles more likely to occur. At the same time, the lack of a BHF at the die shoulder radius likely made wrinkles even more likely to occur.
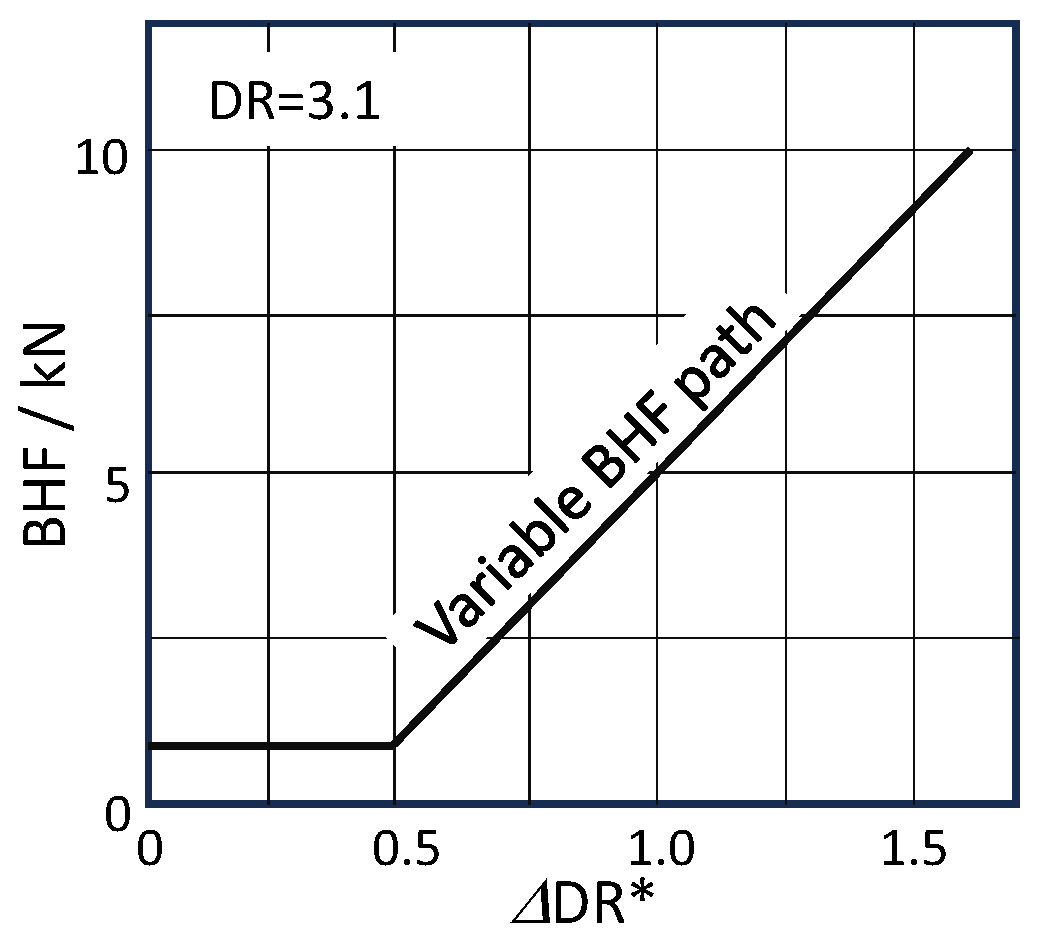
Therefore, in order to suppress these edge wrinkles, the BHF in the latter half of the forming process was increased, with the expectation of an elimination effect as described in Section 4.1.2., while also aiming to achieve a more uniform wall thickness distribution. The authors therefore investigated a combined VBHF path (Figure 14) with a VSPD path.
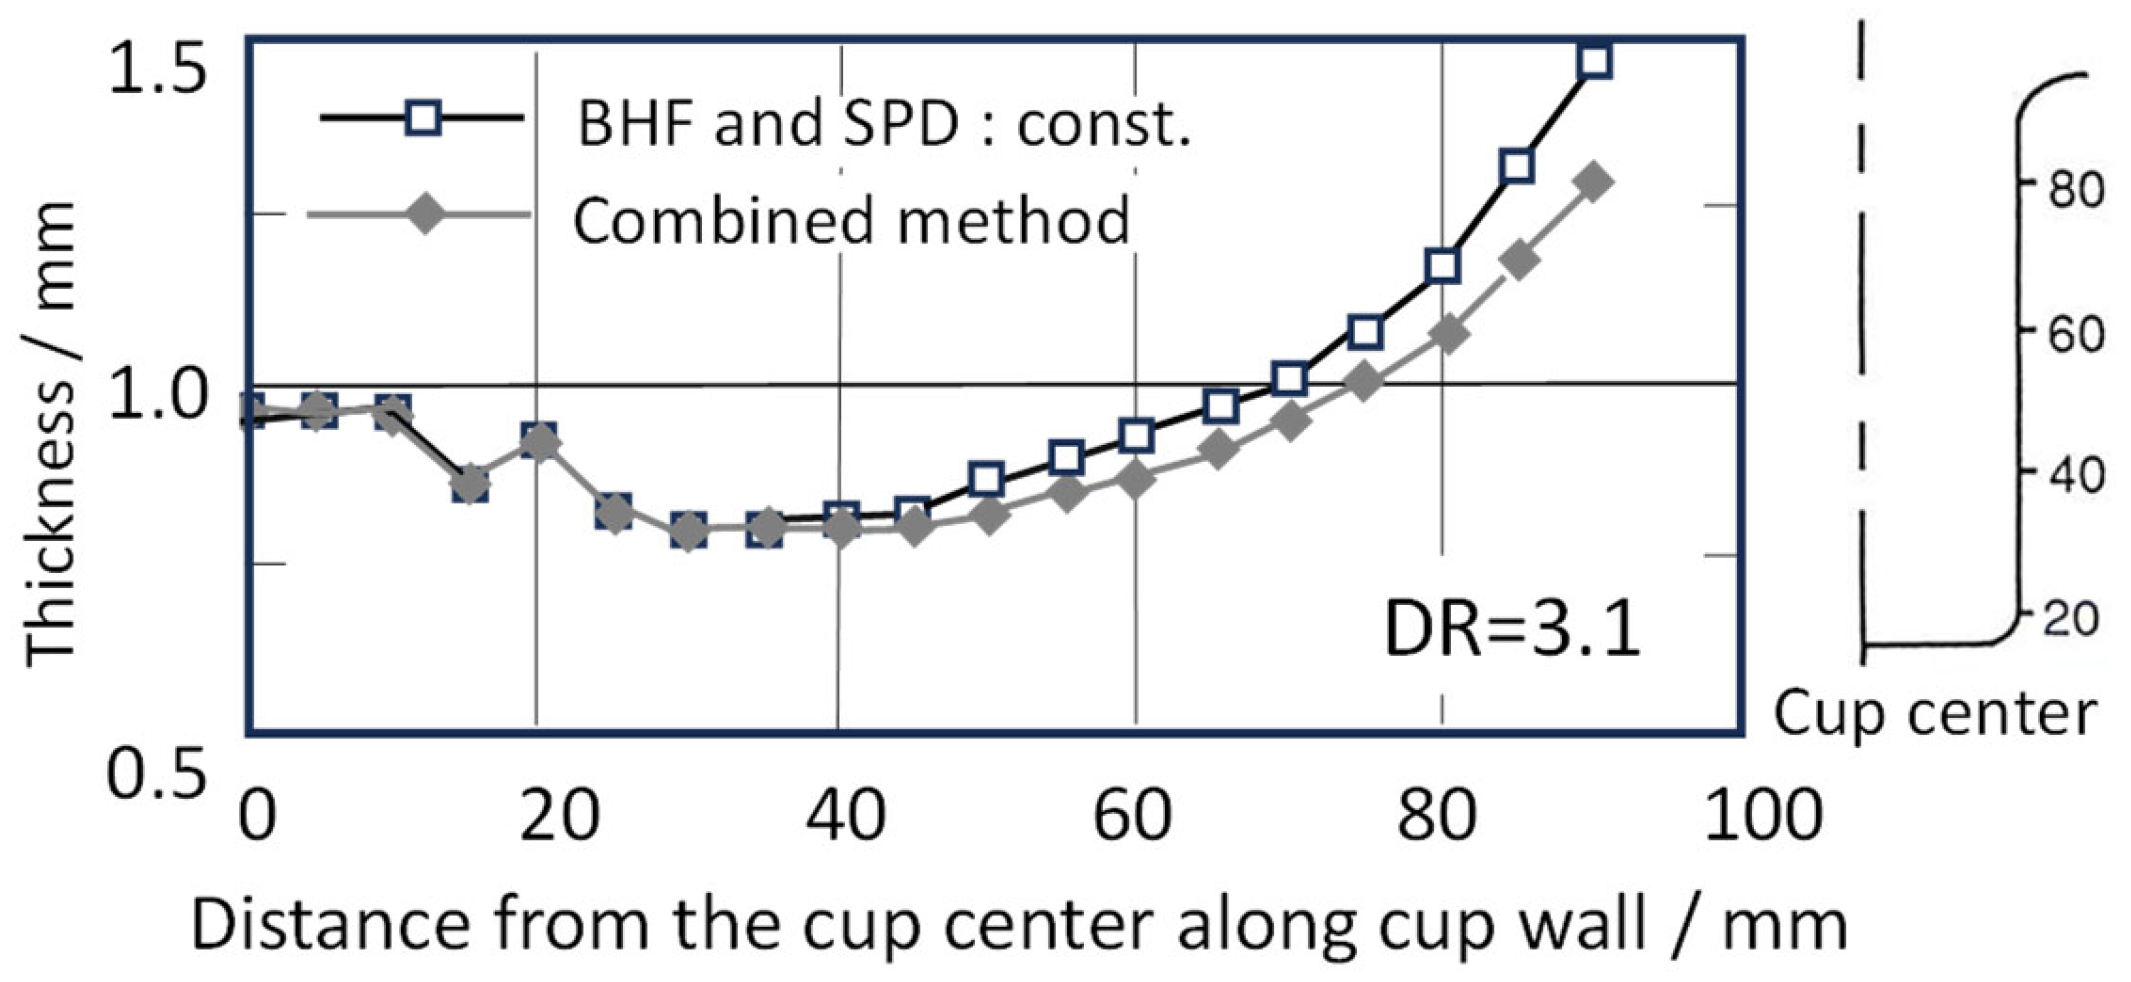
Figure 15 shows the effect of the combined VSPD/VBHF path on the wall thickness distribution of the drawn cup. The combined VSPD/VBHF path, which combines the VSPD path (Figure 11) and the VBHF route (Figure 14), suppresses edge wrinkles in the later stages of forming. As a result, there was no difference in the wall thickness distribution of the drawn cup between the constant SPD (15 mm/min)/BHF (1 kN) path and the VBHF/VSPD path up to approximately 30 mm from the cup’s center. However, after that, the constant path exhibited a greater wall thickness increase toward the cup edge. In contrast, the VBHF/VSPD path achieved a uniform wall thickness by suppressing a wall thickness increase through an excessive BHF in the later stages of the forming process.
Table 3 compares the forming times for different SPD/BHF processing paths. Since the SPD limit required to avoid a fracture under constant SPD conditions is 15 mm/min, it took 320 s to process an 80 mm stroke. In contrast, the shortest processing time with the VSPD path (Figure 11) at BHF = 1 kN was 129 s, a reduction of approximately 2/5. The combined VSPD/VBHF path, which also enables an improved thickness distribution, reduced the time to 134 s. In this way, by adopting the VSPD path, a significant reduction in the processing time can be achieved, further demonstrating the excellent features of the combined VSPD/VBHF path (Table 3).

4.3. Novel Forming Principle Combining VSPD/VBHF Processing Path (DR = 3.3)

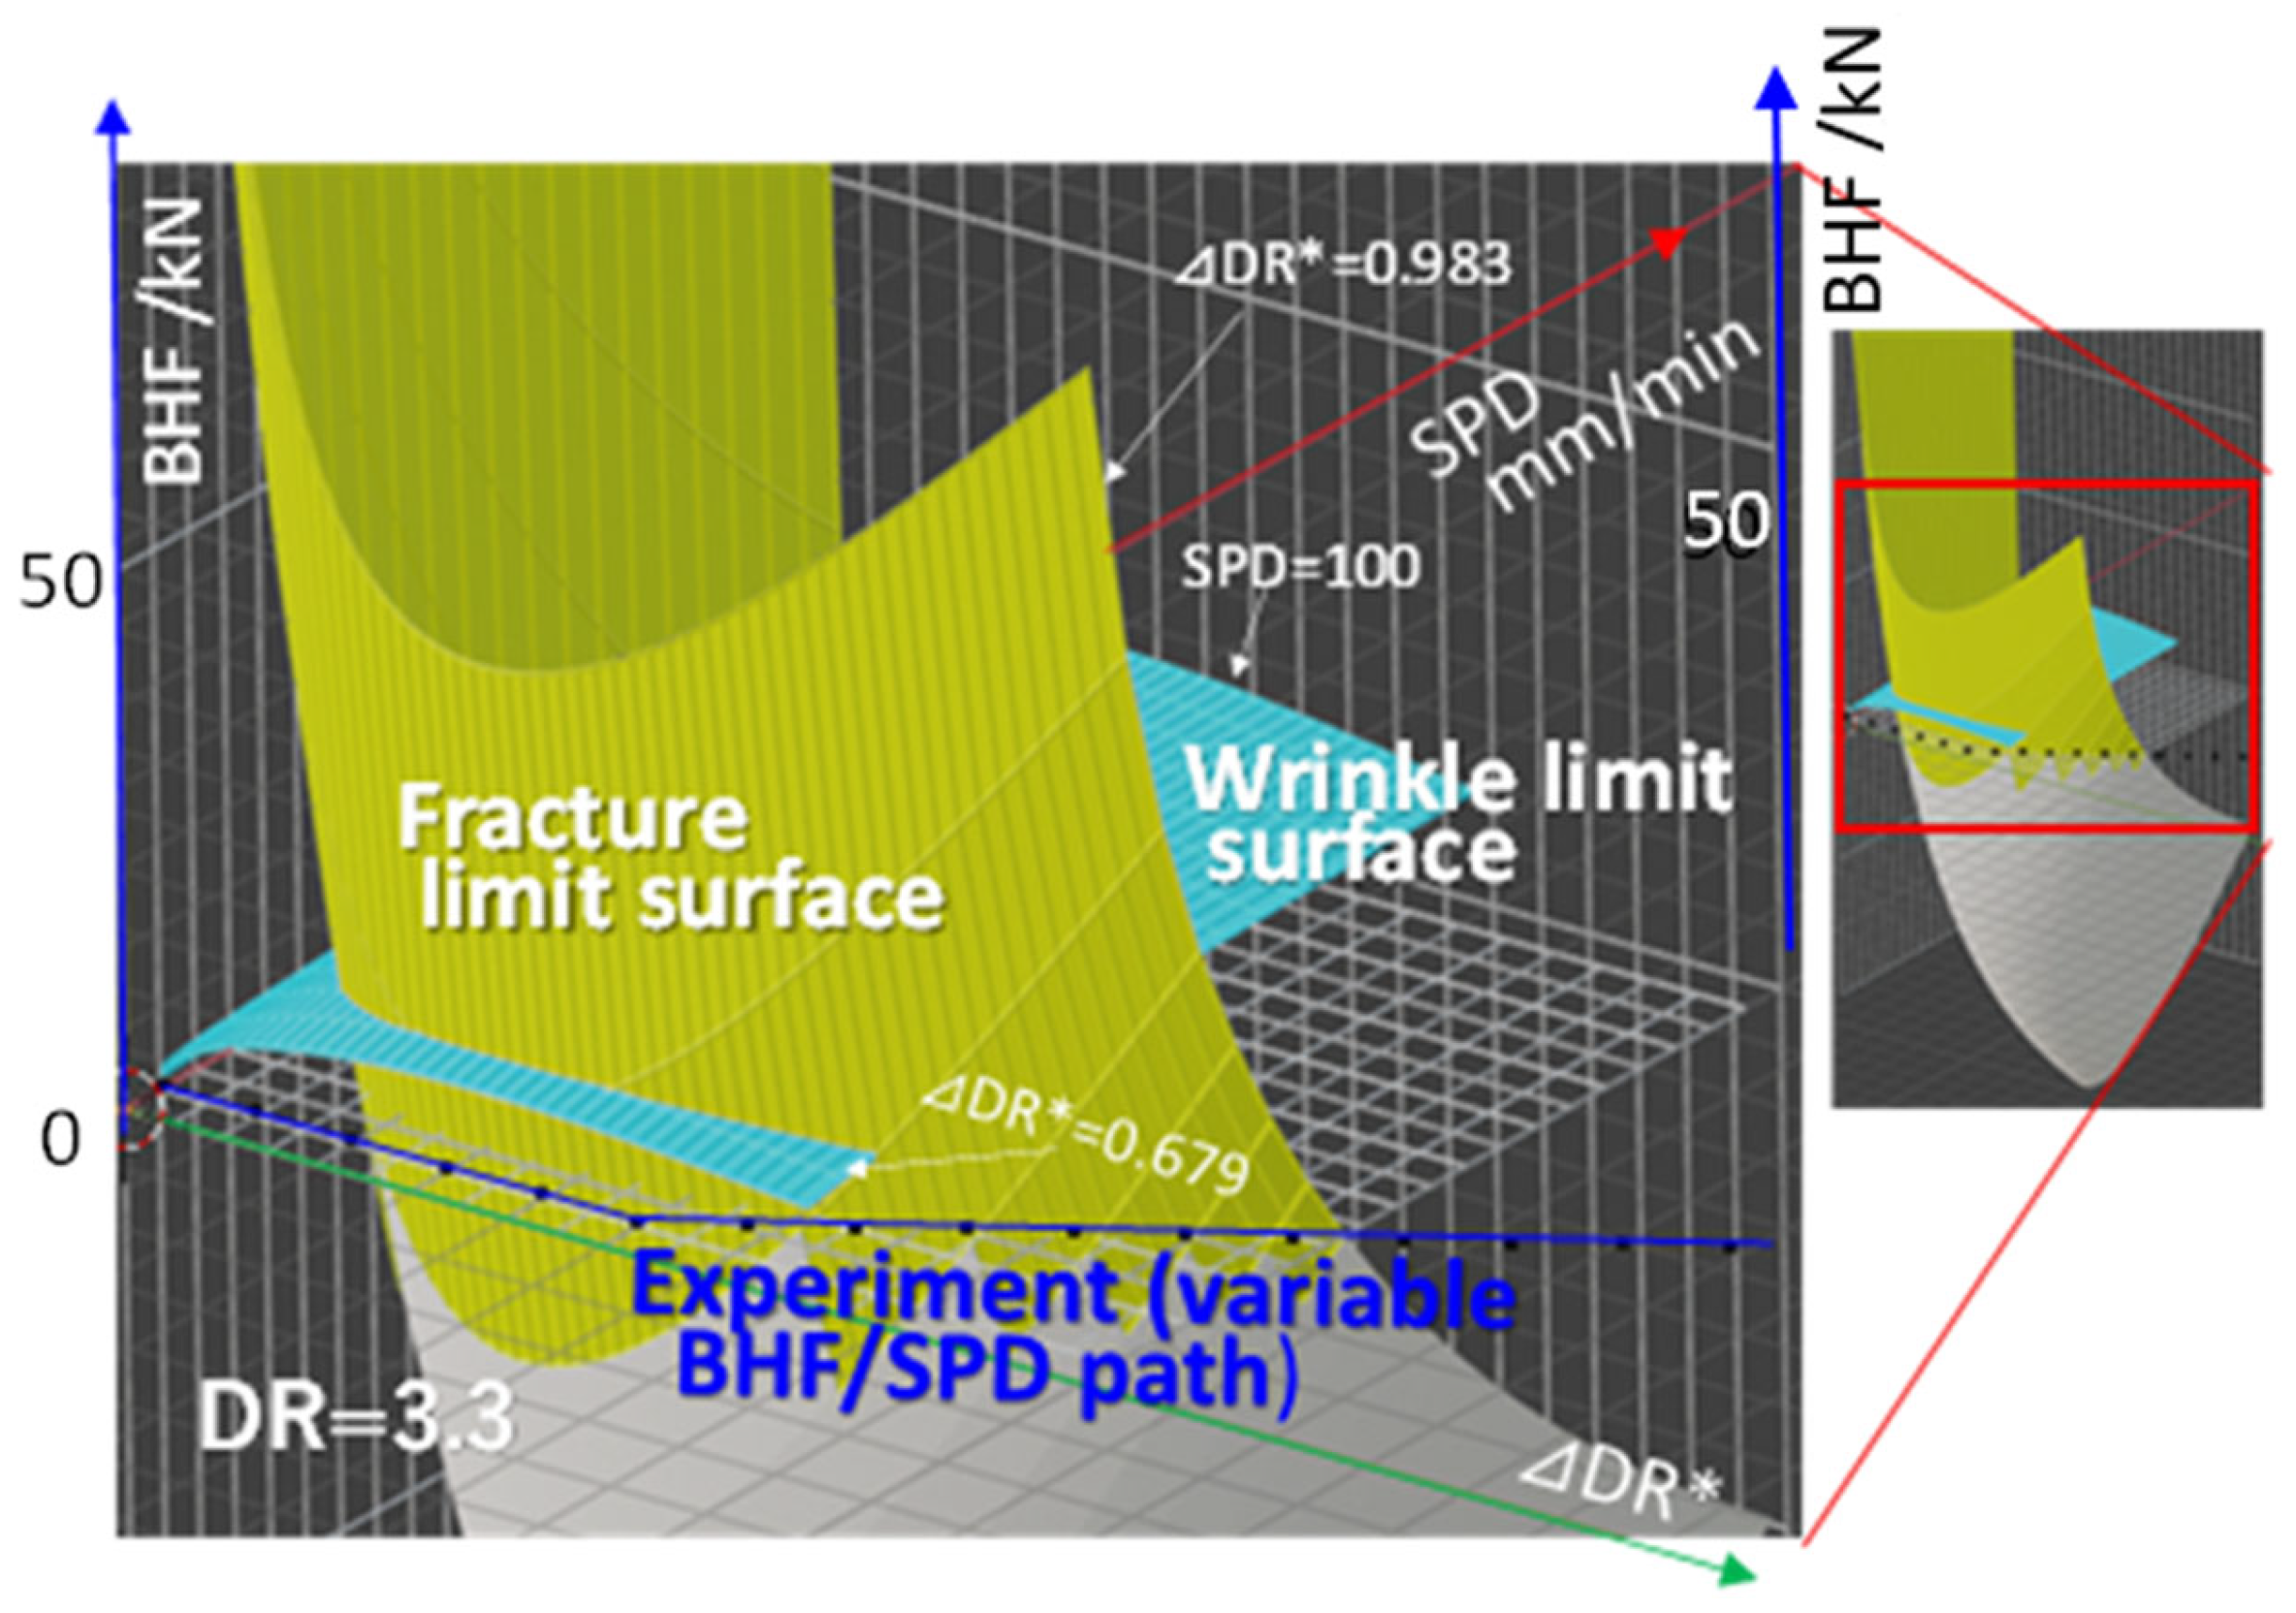
Figure 16 shows the theoretical process window for DR = 3.3. The fracture limit curve moved further downward than in the case of DR = 3.1 in Figure 5, and the successful area outside the fracture limit surface narrowed, making forming extremely difficult.
This forming method focuses on extremely low forming speeds, and the basic forming principle is to first avoid fractures at low speeds and then increase the speed. Warm forming is desirable for achieving significant benefits. This was demonstrated at DR = 3.1. Even with a larger blank, DR = 3.3, the process window in Figure 16 confirms the existence of a successful region where fractures can be avoided at extremely low speeds. In preliminary deep drawing experiments, under constant-SPD and constant-BHF conditions, fractures occurred early in forming and wrinkles occurred late in forming, resulting in no successful parts. It was necessary to conclude that the forming limit had been reached. Preliminary basic experiments at DR = 3.3 demonstrated that the maximum SPD required to avoid fractures early in forming was 5 mm/min. The minimum BHF required to avoid fractures was 0.5 kN at SPD = 5 mm/min. However, under these conditions, edge wrinkles occurred late in forming, and no successful parts were obtained. This suggests the possibility of forming by avoiding wrinkles, making a combined VBHF process path at DR = 3.1 inevitable.
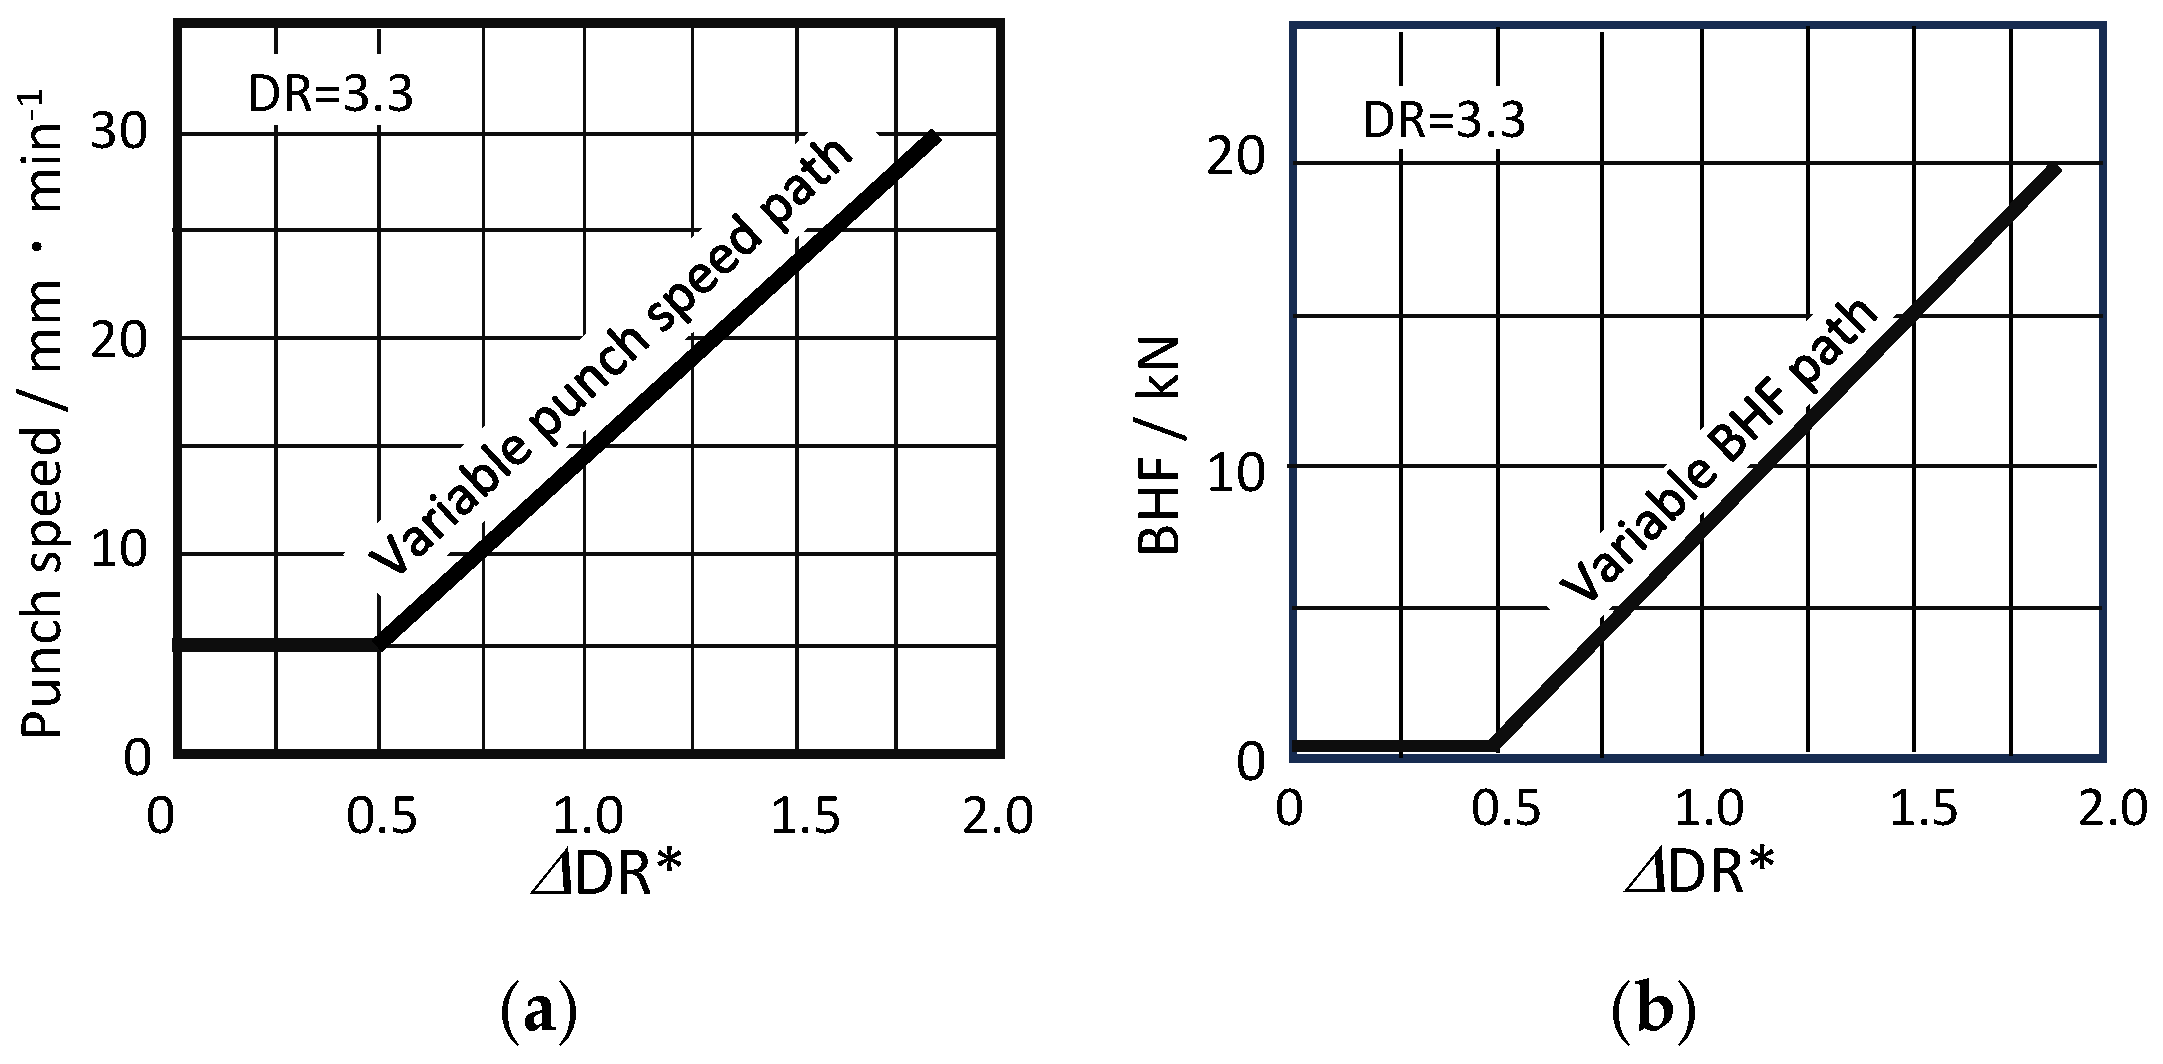
Based on the experimental results for DR = 3.1 in the previous section, the authors experimentally verified a combined variable process path within a very narrow region of the theoretical process window at DR = 3.3: a VSPD path that increases from a low SPD to a high speed, shortening the processing time, and a VBHF path that increases the BHF in the later stages of forming, thereby achieving a more uniform wall thickness distribution and improving the quality.
Figure 17 shows the combined VSPD/VBHF path adopted. It also shows the path plotted on the theoretical process window. This path does not intersect with the fracture limit surface. Because the wrinkle limit surface becomes higher as the DR increases, it can be seen that the combined path plotted penetrated the wrinkle limit line from the early stages of forming, increased in the later stages, and crossed the limit surface, becoming a combined path that increased with the SPD.
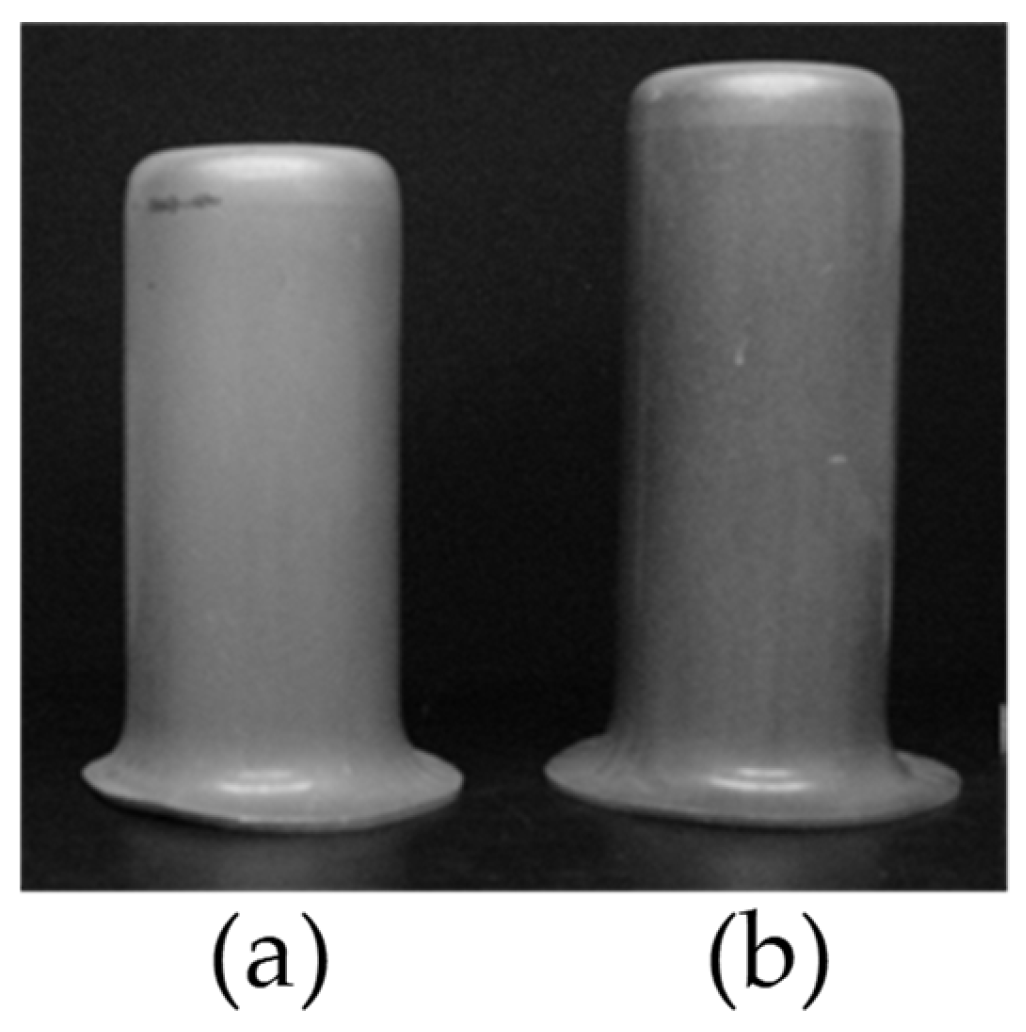
Figure 18 shows a drawn sample formed using the combined VSPD/VBHF route. A DR of 3.3 was achieved, which exceeds the processing limit of conventional methods.

5. Conclusions

  • Experiments using the aluminum alloy A5182 experimentally verified that warm deep drawing using a combined VSPD/VBHF path technique is an innovative forming process that simultaneously achieves a shortened forming time, improved forming limits, and a uniform wall thickness distribution. A large degree of reduction (DR) of 3.3 was achieved in the warm deep drawing of A5182. This was due to the moderate strain rate sensitivity index (m) value (=0.11) at a forming temperature of 300 °C, and the m value played a major role. This method is highly promising and a sustainable approach for application to other lightweight metals, and it is expected that new forming processes will be developed that make full use of the m value.
  • The theoretical 3D process window (BHD-SPD-DDR* space) was consistent with the experimental results, demonstrating its applicability to process design. It became clear that the existence of Vcro holds the key to the suitability of applying the new VSPD/VBHF process to the design and development.
  • The optimization of VSPD/VBHF paths remains a challenge, and advanced numerical approaches using multiphysics models and optimization algorithms are expected to significantly improve their prediction accuracy and fully automate the complex path design process for industrial implementation.

Author Contributions

Conceptualization, K.-i.M.; validation, A.S. and S.Y.; formal analysis, A.S.; investigation, A.S.; writing—original draft preparation, K.-i.M.; writing—review and editing, K.-i.M. and S.Y.; supervision, K.-i.M. All authors have read and agreed to the published version of the manuscript.

Funding

This research received no external funding.

Data Availability Statement

The original contributions presented in this study are included in the article. Further inquiries can be directed to the corresponding author.

Acknowledgments

The authors are grateful to T. Yagami, a former PhD student at Tokyo Metropolitan University, for his cooperation in the calculation for the deep drawing analyses and Hirohisa Fujimoto for his corporation in the 3D visualization and software.

Conflicts of Interest

Author Akinori Shibata was employed by the company Kobe Steel, Ltd. The remaining authors declare that the research was conducted in the absence of any commercial or financial relationships that could be construed as a potential conflict of interest.

Nomenclature

BHFblank holder force
DRdrawing ratio (=Ro/r2)
DR*current drawing ratio (=r0/r2)
ΔDR*flange reduction ratio (=DR − DR* = (R0r0)/r2)
Hcrfcritical blank holder force for fracture
Hcrwcritical blank holder force for flange wrinkle
K strength coefficient ,   σ = K ε ˙ m ε n
LDRlimiting drawing ratio
m strain rate sensitivity index ,   σ =   K ε ˙ m ε n
n strain hardening exponent ,   σ =   K ε ˙ m ε n
SPDpunch speed, v
Vcrocritical punch speed at constant punch speed condition (see Figure 7)
VBHFvariable blank holder force
VSPDvariable punch speed
ε ¯ ˙ eq mean equivalent strain rate
μcoefficient of friction between blank and tool
ρd = rd/torelative die shoulder radius
σalallowable fracture stress of blank material
σ ¯ e q mean equivalent stress
ωcrallowable specific wrinkle height

References

  1. Trzepieci’nski, T. Recent developments and trends in sheet metal forming. Metals 2020, 10, 779. [Google Scholar] [CrossRef]
  2. Trzepieci’nski, T.; Pieja, T.; Malinowski, T.; Smusz, R.; Motyka, M. Investigation of 17-4PH steel microstructure and conditions of elevated temperature forming of turbine engine strut. J. Mater. Process. Technol. 2018, 252, 191–200. [Google Scholar] [CrossRef]
  3. Watanabe, Y. Warm deep drawing method of stainless steel sheet. J. JSTP 1992, 37, 396–403. [Google Scholar]
  4. Kotkunde, N.; Hansoge, N.; Krishnamurthy, S.; Kumar, S.; Gangadhar, J. Experimental and numerical investigations on hot deformation behavior and processing maps for ASS 304 and ASS 316. High Temp. Mater. Process. 2018, 37, 873–888. [Google Scholar] [CrossRef]
  5. Afshin, E.; Kadkhodayan, M. An experimental investigation into the warm deep-drawing process on Laminated sheets under various grains sizes. Mater. Des. 2015, 87, 25–35. [Google Scholar] [CrossRef]
  6. Ishizaki, T.; Shinomiya, T.; Morimoto, M.; Aikawa, T.; Miyazaki, K.; Shirakawa, N. Development of highly productive warm drawing using high frequency induction heating with ring shaped heating coils. Bull. JSTP 2020, 3, 735–739. [Google Scholar]
  7. Toros, S.; Ozturk, F.; Kacar, I. Review of warm forming of aluminum-magnesium alloys. J. Mater. Process. Technol. 2008, 207, 1–12. [Google Scholar] [CrossRef]
  8. Naka, T.; Yoshida, F. Deep drawability of type 5083 aluminum–magnesium alloy sheet under various conditions of temperature and forming speed. J. Mater. Process. Technol. 1999, 89/90, 19–23. [Google Scholar] [CrossRef]
  9. Ohwue, T.; Takata, K.; Saga, M.; Kikuchi, M. Deep drawability of 5000 series aluminum alloy sheets in warm working condition. J. Jpn. Inst. Light Met. 2000, 50, 451–455. [Google Scholar] [CrossRef]
  10. Bolt1, P.J.; Werkhoven, R.J.; van den Boogaard, A.H. Warm deep drawing of aluminium sheet. In Proceedings of the 10th International Conference on Sheet Metal, SheMet 2003, Jordantown, UK, 14–16 April 2003. [Google Scholar]
  11. Yoshihara, S.; Nishimura, H.; Yamamoto, H.; Manabe, K. Formability enhancement in magnesium alloy stamping using a local heating and cooling technique: Circular cup deep drawing process. J. Mater. Process. Technol. 2003, 142, 609–613. [Google Scholar] [CrossRef]
  12. Manabe, K.; Yoshihara, S.; Nishimura, H.; Shibata, A. Theoretical analysis of punch speed and blank holder force control; in deep drawing process of strain-rate-Sensitive materials. In Proceedings of the ASME Dynamics Systems and Control Division ASME, Atlanta, GA, USA, 17–22 November 1996; pp. 175–182. [Google Scholar]
  13. Manabe, K.; Soeda, K.; Shibata, A. Effects of variable punch speed and blank holder force in warm superplastic deep drawing process. Metals 2021, 11, 493. [Google Scholar] [CrossRef]
  14. Yagami, T.; Manabe, K. FE analysis on deformation mechanism of strain-rate-sensitive materials in cylindrical deep-drawing with combination punch speed and blank holder control. J. Solid Mech. Mater. Eng. 2007, 1, 1385–1396. [Google Scholar] [CrossRef]
  15. Manabe, K.; Koyama, H.; Yoshihara, S.; Yagami, T. Development of a combination Punch-Speed and Blank-Holder Control System for the Deep Drawing Process. J. Mater. Process. Technol. 2002, 125/126, 440–445. [Google Scholar] [CrossRef]
  16. Kim, H.S.; Koç, M.; Ni, J. Development of an analytical model for warm deep drawing of aluminum alloys. J. Materi. Process. Technol. 2008, 197, 393–407. [Google Scholar] [CrossRef]
  17. Takuda, H.; Mori, K.; Masuda, I.; Abe, Y.; Matsuo, M. Finite element simulation of warm deep drawing of aluminium alloy sheet when accounting for heat conduction. J. Mater. Process. Technol. 2002, 120, 412–418. [Google Scholar] [CrossRef]
  18. Laurent, H.; Coër, J.; Manach, P.Y.; Oliveira, M.C.; Menezes, L.F. Experimental and numerical studies on the warm deep drawing of an Al–Mg alloy. Int. J. Mech. Sci. 2015, 93, 59–72. [Google Scholar] [CrossRef]
  19. Neto, D.M.; Martins, J.M.P.; Cunha, P.M.; Alves, J.L.; Oliveira, M.C.; Laurent, H.; Menezes, L.F. Thermo-mechanical finite element analysis of the AA5086 alloy under warm forming conditions. Int. J. Solid. Struct. 2018, 151, 99–117. [Google Scholar] [CrossRef]
  20. Manabe, K.; Hamano, H.; Nishimura, H. A new variable blank holding force method in deep drawing of sheet materials. J. JSTP 1988, 29, 740–747. [Google Scholar]
  21. Manabe, K.; Yoshihara, S.; Yang, M.; Nishimura, H. Fuzzy controlled variable blank holding force technique for circular cup deep drawing of aluminum alloy sheet. In Technical Papers of the North American Manufacturing Research Institution of SME 1995; Society of Manufacturing Engineers (SME): Dearborn, MI, USA, 1995; pp. 41–46. [Google Scholar]
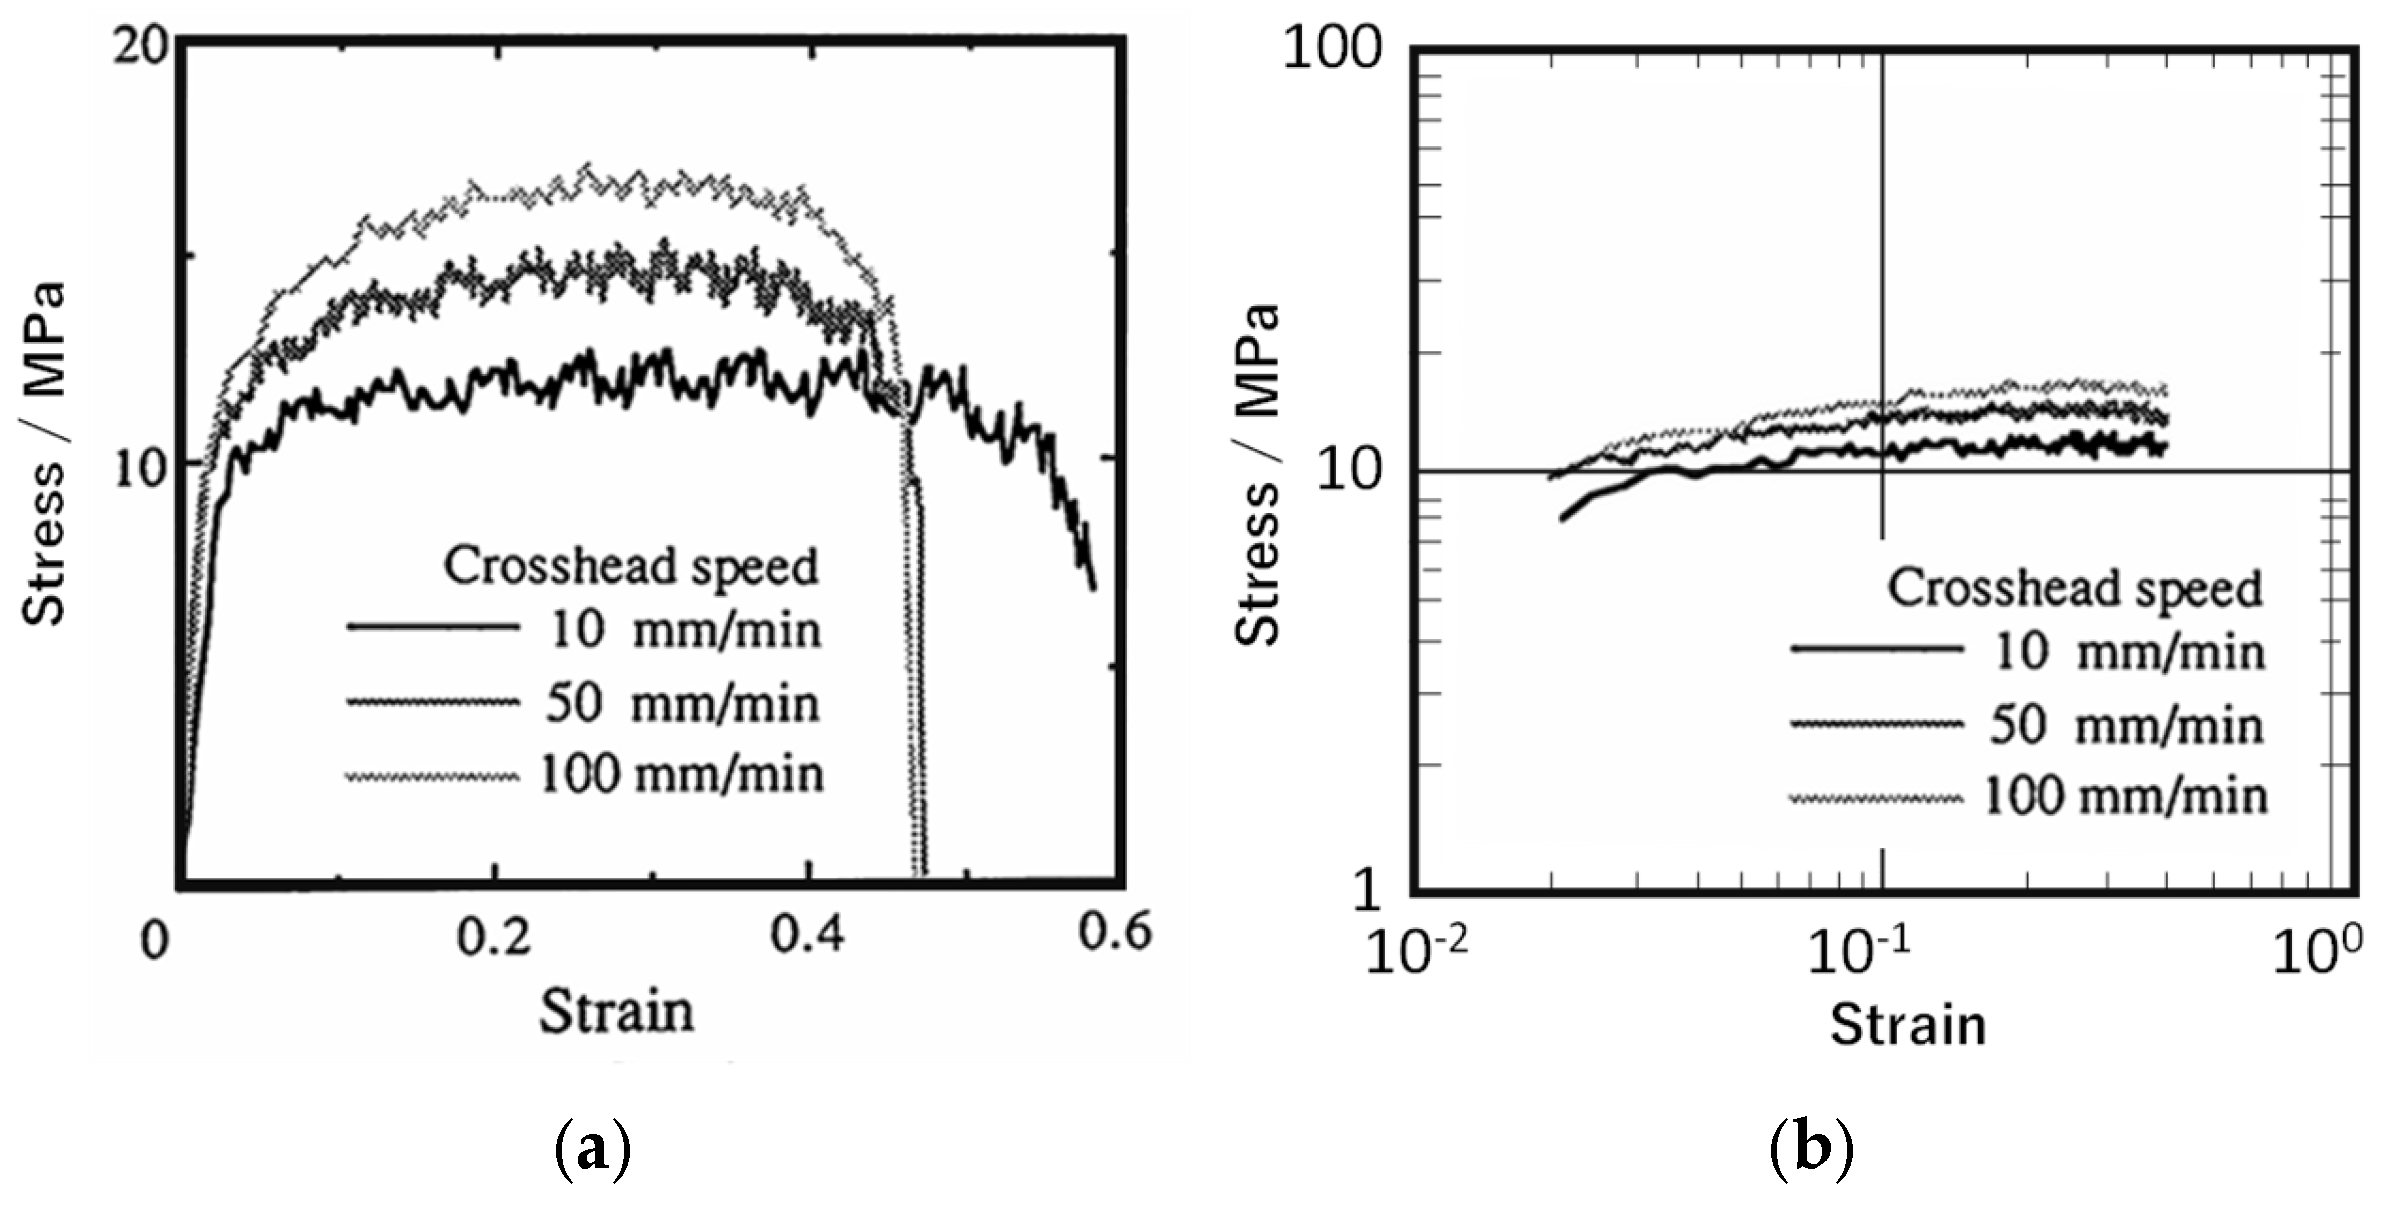
Figure 1. Stress–strain curves and stress–strain-rate curves at different tensile speeds of the A5182 aluminum alloy sheet used under 300 °C. (a) Stress–strain curve and (b) stress–strain curve (log–log plot).
Metals 15 01329 g001
Figure 2. Schematic illustration of warm deep drawing.
Metals 15 01329 g002
Figure 3. A conceptual diagram for determining the fracture limit point in the late stage of the deep drawing process.
Metals 15 01329 g003
Figure 4. Three-dimensional (3D) presentation of theoretical process window for warm circular-cup deep drawing of aluminum alloy A5182 (DR = 2.5, 300 °C). The space between the fracture limit surface and the wrinkle limit surface indicates the allowable successful process region.
Metals 15 01329 g004
Figure 5. Effect of variable BHF path on wall thickness distribution of deep drawn cup in DR = 2.5. (a) Two types of VBHF paths (constant BHF and VBHF path). (b) Cup wall thickness distribution by different VBHF paths (experimental).
Metals 15 01329 g005
Figure 6. Theoretical 3D process window representation of the two BHF paths shown in Figure 5a. (a) Constant BHF condition (0.5 kN); (b) linear VBHF path. Note that Figure 4 and Figure 5a,b have different display angles and vertical BHF scales.
Metals 15 01329 g006
Figure 7. Theoretical 3D process window for DR = 3.1. (a) 3D process window and (b) 2D process window on BHF = 0 plane. Vcro indicates critical minimum SPD at const. SPD condition on BHF = 0 plane.
Metals 15 01329 g007
Figure 8. Effect of SPD on flangewrinkling occurrence and its mode at different BHFs.
Metals 15 01329 g008
Figure 9. Comparisons of fracture modes and locations between conventional early/middle stages and the late stage in the warm deep drawing process (experimental). A safe-jump path test was used to determine the fracture limit in the late stage.
Metals 15 01329 g009
Figure 10. Fracture limit and flange wrinkle limit curves (A5182, DR = 3.1, experimental) for different SPD conditions in warm deep drawing with corresponding schematic 3D process window. (a) Early forming stage; (b) late forming stage. The arrows in the two upper 3D process windows (schematic diagrams) indicate the viewing directions corresponding to (a,b).
Metals 15 01329 g010
Figure 11. Fracture limit curves on the SPD in the late forming stage, obtained under different BHF conditions and a VSPD path employed in the experiment.
Metals 15 01329 g011
Figure 12. Forming defect (edge wrinkling) under the VSPD and constant low-BHF (1 kN) path (Figure 11, DR = 3.1), and successful drawn cup (right) with the combined VBHF/VSPD method (Figure 14).
Metals 15 01329 g012
Figure 13. Effect of punch speed on wrinkle limit curve.
Metals 15 01329 g013
Figure 14. VBHF path combined with VSPD path of Figure 11.
Metals 15 01329 g014
Figure 15. Comparison of wall thickness distribution between different VBHF/VSPD path conditions (experimental).
Metals 15 01329 g015
Figure 16. Theoretical 3D process window in DR = 3.3. Enlarged view of the overall fracture limit surface.
Metals 15 01329 g016
Figure 17. Combined VSPD/VBHF path applied to a deep drawing process with DR = 3.3. (a) VSPD path; (b) VBHF path (experimental).
Metals 15 01329 g017
Figure 18. Successful drawn sample with combined VSPD/VBHF path. (a) DR = 3.1; (b) DR = 3.3.
Metals 15 01329 g018
Table 1. Material properties in rolling direction of material used (A5182).
Temperature/°CK/MPamnStrain RangeStrain Rate Range
3002580.110.110−2 < ε < 110−3 < ε ˙ < 7 × 10⁻²
σ = K ε ˙ m ε n .
Table 2. Cylindrical deep drawing tooling/experimental conditions.
Punch diameter 2r1/mm32Punch shoulder radius rp/mm5
Punch speed (SPD)/mm∙min−15~1000Blank holder force (BHF)/kN0.15~50
Temperature/°C300Blank diameter 2Ro/mm88.8, 110, 117 (DR = 2.5, 3.1, 3.3)
LubricantA spray-type dry fluorine lubricant “Yunon S” (VALQUA, Ltd., Tokyo, Japan)
Table 3. Comparison of forming times under different VSPD/VBHF processing paths in warm deep drawing (DR = 3.1, forming time: at punch stroke 80 mm).
Processing PathForming Time/s
Constant SPD/BHF method (SPD = 15 mm/min, BHF = 1 kN)320
VSPD method under constant BHF = 1 kN129
Combined VSPD/VBHF method (modified VSPD path)134
Disclaimer/Publisher’s Note: The statements, opinions and data contained in all publications are solely those of the individual author(s) and contributor(s) and not of MDPI and/or the editor(s). MDPI and/or the editor(s) disclaim responsibility for any injury to people or property resulting from any ideas, methods, instructions or products referred to in the content.