Article

Novel Wear-Resistant Mechanism Induced by MUPZs via RRA Process in Microalloyed High Manganese Steel

1
School of Material Science and Engineering, Kunming University of Science and Technology, Kunming 650093, China
2
National & Local Joint Engineering Laboratory for Technology of Advanced Metallic Solidification Forming and Equipment, Kunming 650093, China
3
Department of Engineering Mechanics, Faculty of Civil Engineering and Mechanics, Kunming University of Science and Technology, Kunming 650500, China
4
Yunnan Kungang Wear Resistant Material Science Co., Ltd., Kunming 650093, China
*
Authors to whom correspondence should be addressed.
Metals 2023, 13(5), 902; https://doi.org/10.3390/met13050902
Submission received: 4 April 2023 / Revised: 27 April 2023 / Accepted: 4 May 2023 / Published: 6 May 2023
(This article belongs to the Special Issue Wear Resistance of Metallic Materials)

Abstract

:
Microalloying and heat treatment have been regarded as an efficient way to get higher wear resistance in high manganese steel, and multiscale precipitates can be obtained randomly by the aging process; however, most of the previous work on heat treatment was more concerned with peak aging time and not the synergistic mechanism of different sized precipitates. Here, we propose a novel wear-resistant mechanism by multiscale precipitates regulated via a retrogression and re-aging (RRA) process. Micron, submicron, and nano precipitates are obtained by the RRA process and jointly form micro-scale ultrafine precipitation zones (MUPZs), which can protect the matrix surface and reduce the abrasive embedded probability, thus ameliorating the micro-cutting and micro-plowing mechanisms. This novel wear-resistant mechanism induced by MUPZs shows better effect under high impact energy due to sufficient work hardening caused by the interaction between dislocations and multi-scale precipitates in MUPZs. This work was investigated using SEM, EDS, and TEM, combined with mechanical properties and impact abrasive wear tests.

1. Introduction

High manganese steel has been widely used in the milling industry due to its good impact toughness and work hardening ability. Recently, there has been extensive research on alloying and heat treatment processes in order to improve impact wear resistance, enhance the efficiency of beneficiation, and reduce manpower and material costs [1,2,3,4,5]. Microalloying elements such as Ti, V, and Nb were introduced to strengthen high manganese steel by the precipitation of a large number of dispersed carbonitrides [6,7,8,9,10]. Many scholars have done quite a lot of research work, especially in the characterization of precipitated phases, the acquisition of peak aging, and the characterization of microstructures after impact abrasive wear [11,12,13]. Some scholars proposed that manganese steel displays distinct wear mechanisms depending on the level of impact loads. Specifically, slip is the dominant mechanism at low loads, twinning is the primary force at medium loads, and martensitic transformation becomes the main mechanism at high loads [14,15,16]. Wen and Agunsoye, J.O., reported [17,18] that nano-scale precipitates with a large volume fraction obtained in the alloyed high manganese steel will affect the propagation and movement of dislocations during the impact abrasive wear process, form more dislocation entanglement areas, and improve the material’s ability to resist deformation.
In order to obtain more precipitates, it is necessary to increase the addition amount of microalloying elements; however, a higher concentration of alloying elements inevitably leads to the formation of sub-micron or even micron-sized precipitates during solidification or solid-state cooling due to fluctuations in composition and energy. Zhou and Li [19,20] indicated that micron-scale precipitates can resist abrasive wear by preventing abrasive particles from embedding into the matrix due to their high hardness and stiffness, thereby protecting the matrix from cutting actions; however, some research claimed that this micron precipitates, due to poor bonding with the matrix, significantly reducing the comprehensive mechanical properties of the material. Moreover, under actual impact abrasive wear conditions, microscopic precipitates are prone to act as crack nucleation and extension sources, leading to the detachment of the precipitates from the matrix in a short time, which not only decreases the resistance to abrasive action but also deteriorates the surface continuity of the matrix, exacerbating the problem of abrasive particles embedding in subsequent processes.
Here, we propose a novel wear-resistant mechanism by multi-scale precipitates obtained via a retrogression and re-aging (RRA) process [21,22,23,24,25]. Firstly, we promote a pre-aging process to obtain high density of precipitates. Then, sub-micron precipitates agglomerated on micron-scale precipitates in studied steel were dissolved by a regressive process. Next, dispersed sub-micron and nano precipitates boomed and formed micro-scale ultrafine precipitation zones (MUPZs) around the initial micron precipitates during the re-aging process. Lastly, when the specimen underwent impact abrasive wear, due to the synergistic effect of multi-scale precipitates, this micro-region showed excellent performance against abrasive particles, and formed a uniform and smooth abrasive layer on the matrix surface according to the crushing and friction of abrasive particles, which can not only resists the embedding of abrasive particles directly but can also protect the continuity of the matrix, make the matrix deformation uniform, and reduce the nucleation and expansion of fatigue cracks during subsequent processes.

2. Materials and Methods

The studied microalloying high manganese steel prepared by conventional melting and raw materials used for smelting experimental steel in this paper included the following: pig iron, scrap steel, ferrosilicon (Si = 85.6%), ferromanganese (Mn = 82.3%), ferrochrome (Cr = 70.6%), pure copper (Cu > 99%), ferromolybdenum (Mo = 52.8%), nickel plate (Ni = 57.6%), ferroniobium (Nb = 49.8%), ferrovanadium (V = 66.3%), ferrotitanium (Ti = 51.7%), aluminum wire. N was added by melting ferrochrome nitride (N = 4.8%), the chemical composition of raw materials is the mass percentage, and the metals were smelted in a medium frequency induction furnace. The nitrogen content was measured using a ONH-HMC oxygen, nitrogen, and hydrogen analyzer [26]. The carbon content was measured using the Bruker G4 ICARUS infrared carbon sulfur analyzer [27], the remaining elements were measured by Agilent 5110 Inductively Coupled Plasma Emission Spectrometer. (ICP-OES); the results are listed in Table 1. Subsequently, the samples with the dimension of 200 mm × 20 mm × 20 mm were cut from the received ingot and then heated to 1150 °C for 2 h and water-quenched to room temperature, to obtain a full austenite structure. Next, the experimental samples (RRA) were firstly pre-aged at 450 °C for 23 h and air-cooled, followed by a 15 min retrogression processing under 900 °C, then water quenched. Finally, we carried out the re-ageing process at 450 °C for another 1 h and the sample was air-cooled for the second time. The whole heat treatment process was described in Figure 1.
The microstructures of the specimens were analyzed using various techniques. Firstly, the specimens were mechanically polished using 2000 grit size and then etched with 4% nitric acid for 20 s before being observed under a scanning electron microscope (SEM, ZEISS EVO 18) and a field emission scanning electron microscope (FE-SEM, Sigma250). Additionally, the morphology and size distribution of nano-sized precipitates were observed using a high-resolution transmission electron microscope (HRTEM, FEI Tecnai G2 TF30). Thin films used for HRTEM tests were mechanically thinned to about 0.07 mm and then perforated in an electrolytic twin-jet solution of 8 vol% perchloric acid in ethanol at −25 °C. To determine the elements’ composition of the precipitates, energy dispersive spectrometer (EDS, Bruker XFlash 6) was used.
The tensile samples were machined using a wire-cut electric discharge machine. Room temperature tensile tests were performed on a MTS E45.305 universal testing machine with laser extensometer at a grid speed of 1 mm/min. Micro-Vickers hardness tests were implemented for measuring the initial hardness of the matrix by using an automatic micro-Vickers hardness tester (Shimadzu, HMV-G). For initial hardness, a 7 × 12 matrix was imprinted onto the substrate with a spacing of 300 μm between each point. A hardness distribution map of the sample after RRA was plotted.
Impact abrasive wear tests were conducted using an impact abrasive wear tester (MLD-10, China) at different loads (2.5 J, 5 J), followed by SEM characterization of the wear surface and sub-surface cross section. The upper specimens were cut into 30 mm × 10 mm × 10 mm cuboids from ingots that had undergone different stage of heat treatment processes (pre-aging, retrogression, and re-aging). The lower specimens were machined into ring shapes from a 40 Cr ingot. During the experiments, the upper specimen was impacted at a speed of 60 times per minute, while the lower specimen was rotated at a speed of 200 rpm. The abrasive used was quartz sand with a particle size of approximately 50 mesh, and its flow rate was 30 kg/h. To ensure repeatability, tests under each condition were repeated three times. Prior to the tests, the specimens underwent a 15 min pre-wear process to ensure a stable contact surface between the upper and lower specimens. As the experiments continued, both the upper and lower specimens were removed every 30 min, washed with water, and ultrasonically cleaned in ethanol for 5 min. The mass variations were then recorded using a precision electronic balance (with a precision of 0.01 g) before being put back to continue the tests.

3. Results and Discussion

3.1. Microstructure Characterization

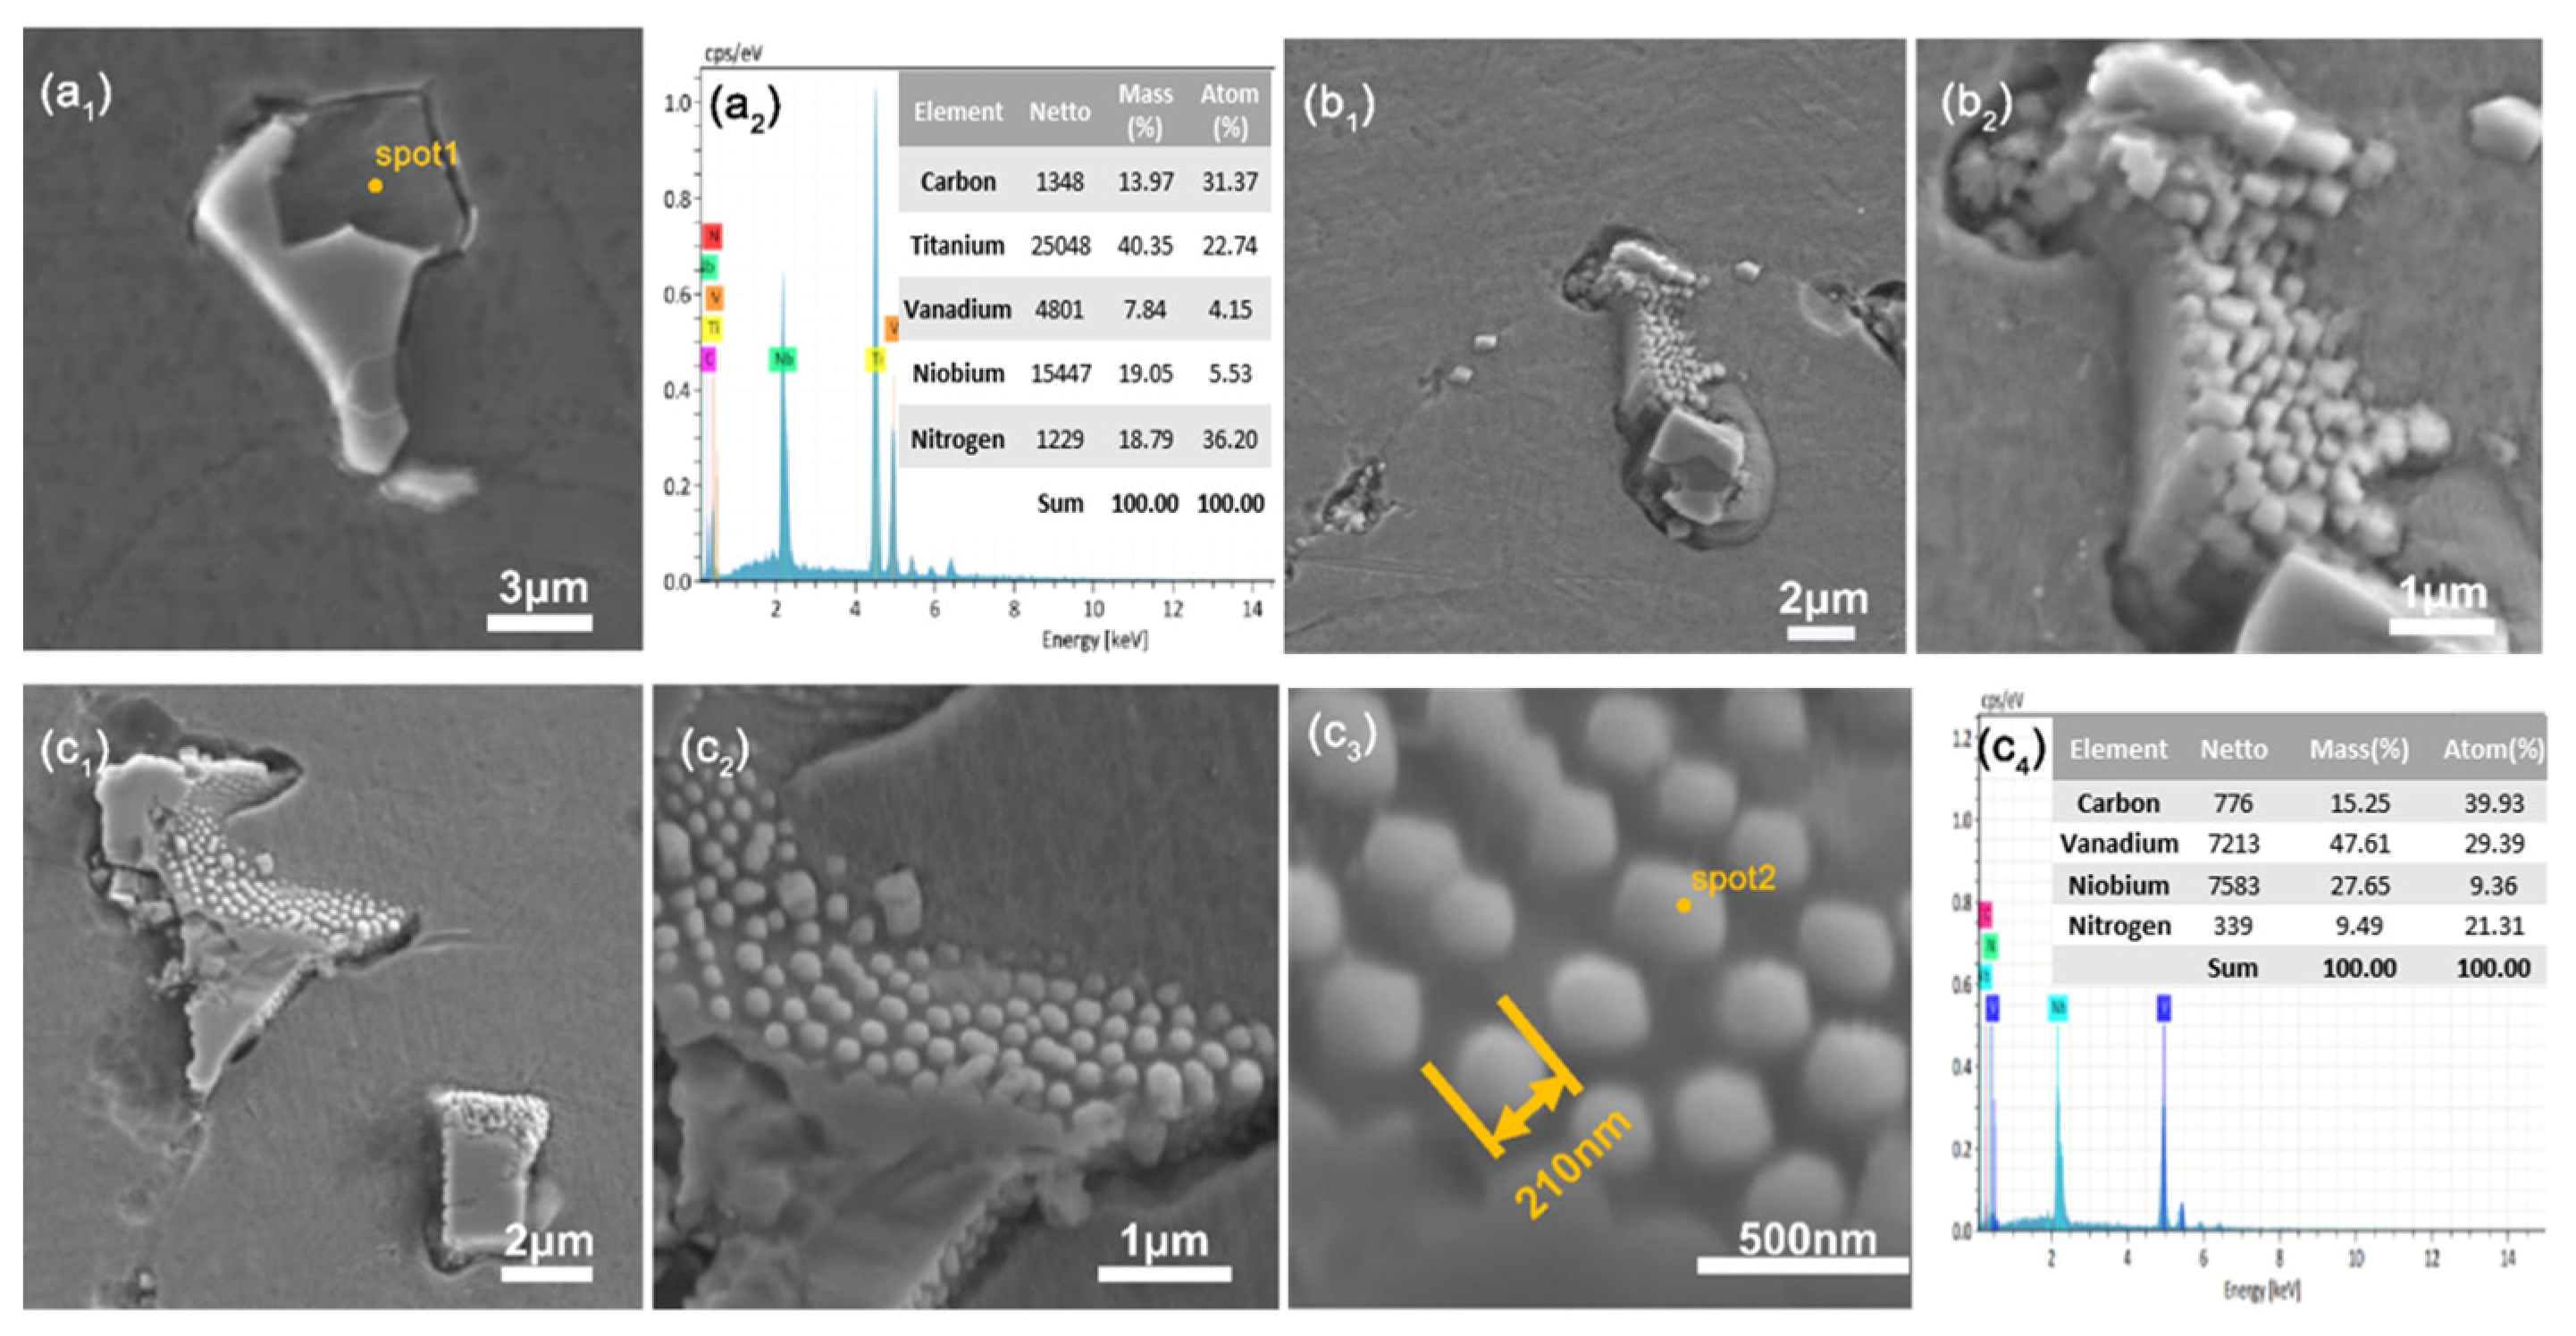
Figure 2 shows the morphology of the heterogeneous nucleation of sub-micron precipitates on initial micron precipitates after pre-aging stage, and it can be seen as a specimen that has undergone a single-stage aging process. It can be observed that a large number of spherical sub-micron precipitates nucleate at the edges of the micron precipitates. As shown in Figure 2(a1), the micro-scale precipitates can be seen as two parts with a cubic core. An energy spectrum point scan analysis was performed on this cubic core, and the results are shown in Figure 2(a2). The main chemical composition of this cubic core precipitate is Ti, C, and N, with small amounts of Nb and V, indicating that it is Ti(C, N) precipitated directly from the liquid phase during the casting solidification process. In the subsequent heat treatment process, other strongly precipitated elements, such as Nb and V, are wrapped and grown in the form of a shell, forming irregular micro-scale precipitates with larger size and more complex composition. Figure 2(b1,b2) show another typical precipitate, where the subsequent shell-like precipitate is actually formed by the agglomeration of sub-micron spherical precipitate clusters. This situation almost exists in every larger-sized micro-scale precipitate, such as shown in Figure 2(c1–c3), where sub-micron precipitate clusters are prone to agglomerate at their shell or edge positions, regardless of whether they have grown into irregular shapes or still maintain their cubic shape. The size of these sub-micron precipitate clusters is mostly around 200nm. Figure 2(c4) is an energy spectrum point scan analysis image of sub-micron precipitates, which mainly contain Nb, V, C, and N, with a particularly high content of V. Therefore, these agglomerated sub-micron precipitates are mainly multi-component carbonitrides rich in V, which nucleate in a spherical form and grow, and then continuously stack in a laminated form, ultimately causing further coarsening of the micro-scale precipitates. This is consistent with the previous research by Kuzucu et al. [28,29], which showed that when the alloying elements are more abundant and the aging time is longer, it is easy to form large-sized multi-component precipitates with core–shell structures.
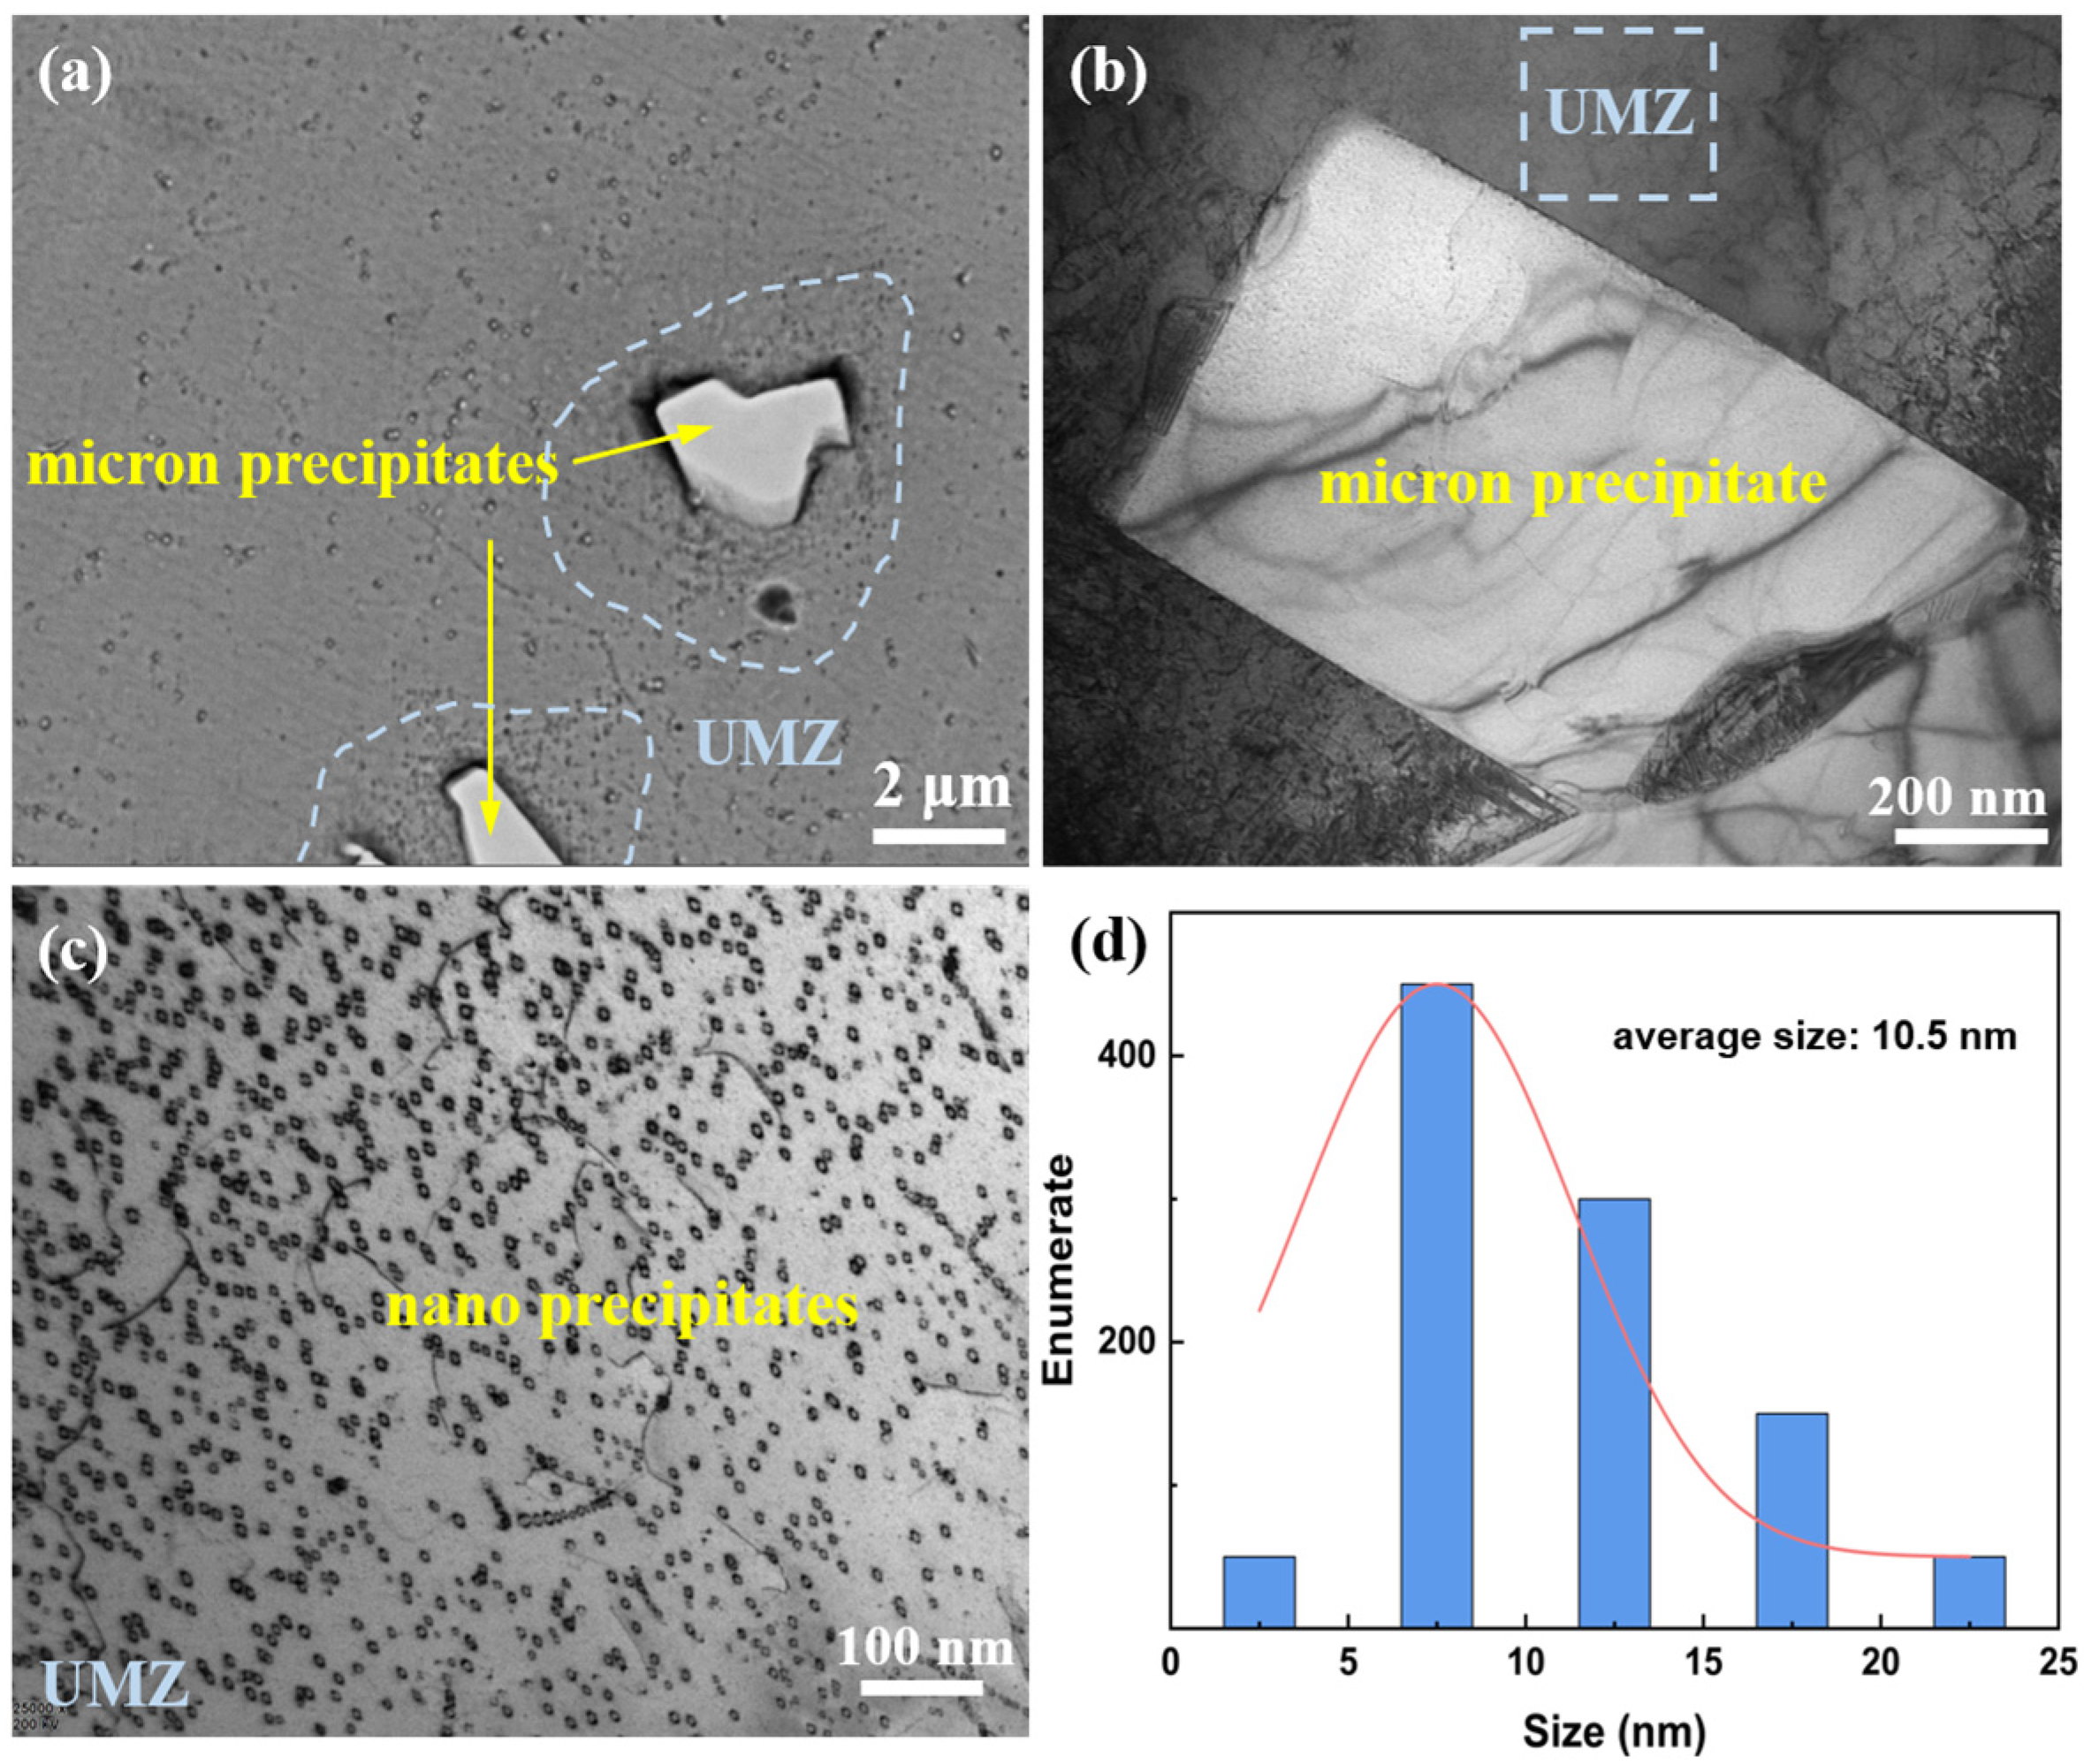
Figure 3 show the microstructure of micro-scale ultrafine precipitation zones (MUPZs) near micron precipitates after the RRA process. Figure 3a demonstrates that after the RRA process, the heterogeneous nucleation of sub-micron precipitates on the initial micron precipitates disappears, and micro-scale ultrafine precipitation zones (MUPZs) with a large number of sub-micron precipitates form around the initial micron precipitates. Figure 3b shows the TEM morphology of specimen after RRA process, the bright rectangular prism has been confirmed to be Ti(C, N), and many dislocations can also be seen around it. The light-blue dashed box shows the MUPZ near the Ti(C, N), and the enlarged morphology can be seen in Figure 3c. As shown in Figure 3c, a significant number of dispersed nano precipitates are present within the MUPZs. These nanoscale precipitates are mostly spherical in shape. Figure 3d is a statistical distribution of the particle size of the nanoscale precipitates shown in Figure 3c, which reveals that their sizes are all within 0–25 nm, with an average size of 10.5 nm. Therefore, the MUPZs are actually regions containing a significant number of sub-micron and nanoscale precipitates, which are first formed by the dissolving of non-uniform nucleation and aggregation sub-micron precipitates onto sub-micron precipitates, and then further developed during the subsequent aging process.
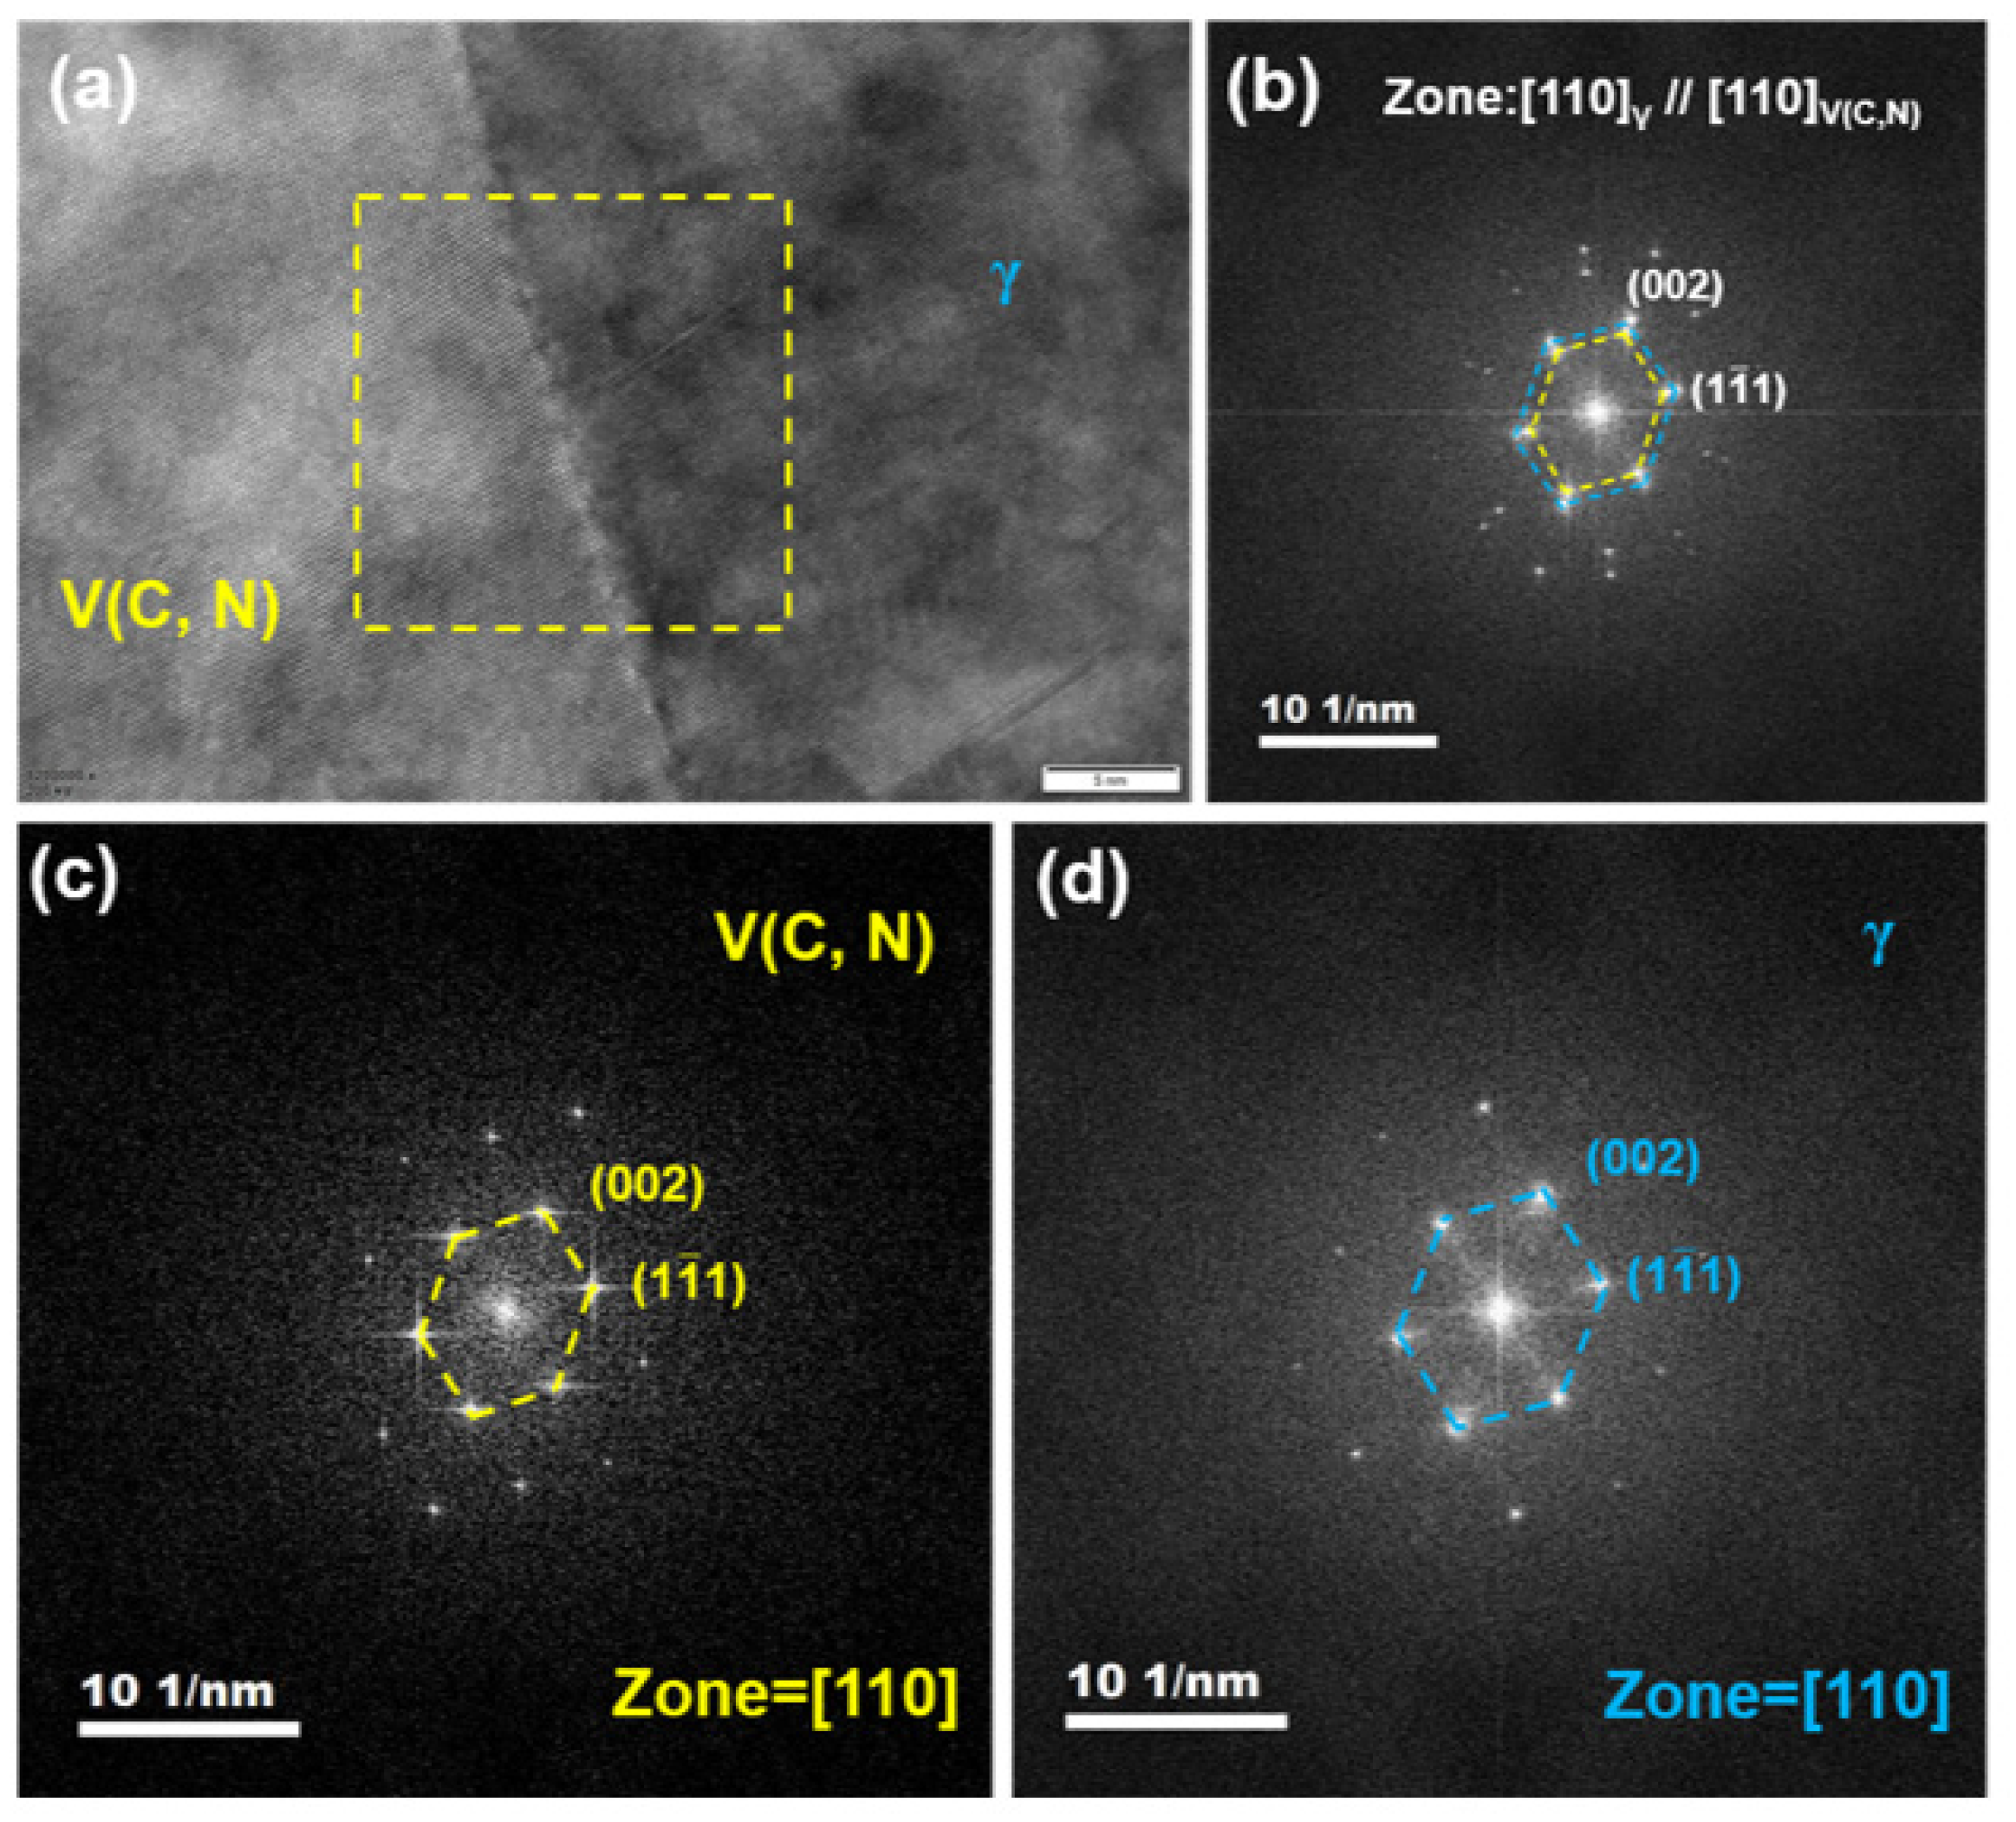
Figure 4 shows the high-resolution transmission electron microscopy analysis of the phase boundary between the sub-micron precipitate and the matrix in MUPZ after RRA process. In Figure 4a, a distinct flat interface can be observed between the two phases. There are some darker regions in both the brighter left area and the darker right area, which are surface defects caused by the sample preparation process. The fast Fourier transform (FFT) of the yellow dashed box area in Figure 4a yields diffraction spots shown in Figure 4b. Two sets of spots appear simultaneously, with similar basic shapes but obvious differences in size. Therefore, the two phases have a semi-coherent relationship, with similar structures but different atomic spacings. To further analyze the specific information of the two phases, the two sets of diffraction spots were separated into Figure 4c,d. Figure 4c is the diffraction spot of the brighter left area in Figure 4a, and the phase analyzed is V(C, N). Figure 4d is the diffraction spot of the darker right area in Figure 4a and the phase analyzed is austenite. Therefore, we can conclude that, in the sample, there is a semi-coherent interface between the nanoscale precipitates and the austenite matrix. A semi-coherent interface refers to the situation where the lattice spacings between the two phases at the interface differ greatly, and it is impossible to achieve complete correspondence at the interface. Therefore, some dislocations will be generated on the interface to reduce the elastic strain energy of the interface. At this point, the atomic arrangement of the two phases on the interface can partially maintain matching, which is called a semi-coherent interface [30,31,32,33].
Figure 5 shows the high-resolution transmission electron microscopy analysis of the nano precipitates in a MUPZ. In Figure 5a, it can be observed that the nano precipitates have a grainy morphology with a diameter of approximately 18 nm. Some Moiré fringes are visible on the surface due to height variations, while the atomic arrangement of the austenite matrix is more regular in the upper left and right regions. Figure 5 displays the FFT pattern of the orange boxed area in Figure 5a, which reveals the presence of two sets of diffraction patterns represented by Figure 5c,d, respectively. By calibrating the diffraction patterns, it is possible to determine that the diffraction spots of the matrix correspond to austenite, whereas those of the precipitates require measuring multiple sets of interplanar spacings after IFFT. To minimize the interference of the Moiré fringes, Figure 5e displays the overlaid inverse fast Fourier transform (IFFT) images of Figure 5c,d obtained using Photoshop. The selected region is the orange boxed area in Figure 5a. The red signal points represent the diffraction pattern of austenite matrix obtained after inverse Fourier transformation, while the green signal points represent the diffraction pattern of the precipitates obtained after IFFT. To further observe the information at the interface between the precipitates and the matrix, the yellow boxed area was selected for enlargement, as shown in Figure 5f,g. Figure 5f shows the presence of phase boundaries with slip steps of two atomic layers. Hussein et al. [34] provided an explanation of the mechanism of cross-slip for the formation of these phase boundaries. Figure 5g shows another phase boundary, with sub-steps between two red dashed lines of two atomic spacings, equal to 0.44 nm. Additionally, there is a wedge dislocation between the red dashed lines. When compared to the standard PDF card, the interplanar spacings of the (002) crystal planes of VN and Nb2C are 0.2416 nm and 0.2016 nm, respectively. NbC, V2C, and V8C7 either do not have diffraction information for the (002) crystal plane or only have diffraction information for higher-index planes, such as (004), due to their crystal structure. The (002) interplanar spacing of V2N is 0.2202 nm, indicating that the precipitates are V2N.

3.2. Mechanical Properties

Figure 6a shows the engineering stress–strain curve obtained from the tensile test of the RRA specimens, indicating a yield strength of 490 MPa, a tensile strength of 965 MPa, and an elongation of 40.0%. Compared to the single-stage aging specimen, the material exhibits higher yield and tensile strengths. Figure 6b displays the morphology of the tensile fracture surface, showing typical ductile fracture features with small dimples of approximately 2 μm distributed uniformly across the entire fracture surface. Additionally, a small amount of sub-micron precipitates is retained within the dimples, demonstrating good toughness of the material. Moreover, the plastic deformation of each micro-region during the tensile process is very uniform and able to coordinate with each other for deformation. Figure 6c shows the micro-Vickers hardness distribution map of the RRA sample, indicating that the hardness range is approximately 320 HV–340 HV with a concentration around 332 HV. There is only one point below 320 HV, which may be due to the detachment of sub-micron precipitates during the polishing process, resulting in a lower hardness value at that point.

3.3. Impact Abrasive Wear Sub-Surface Characterization

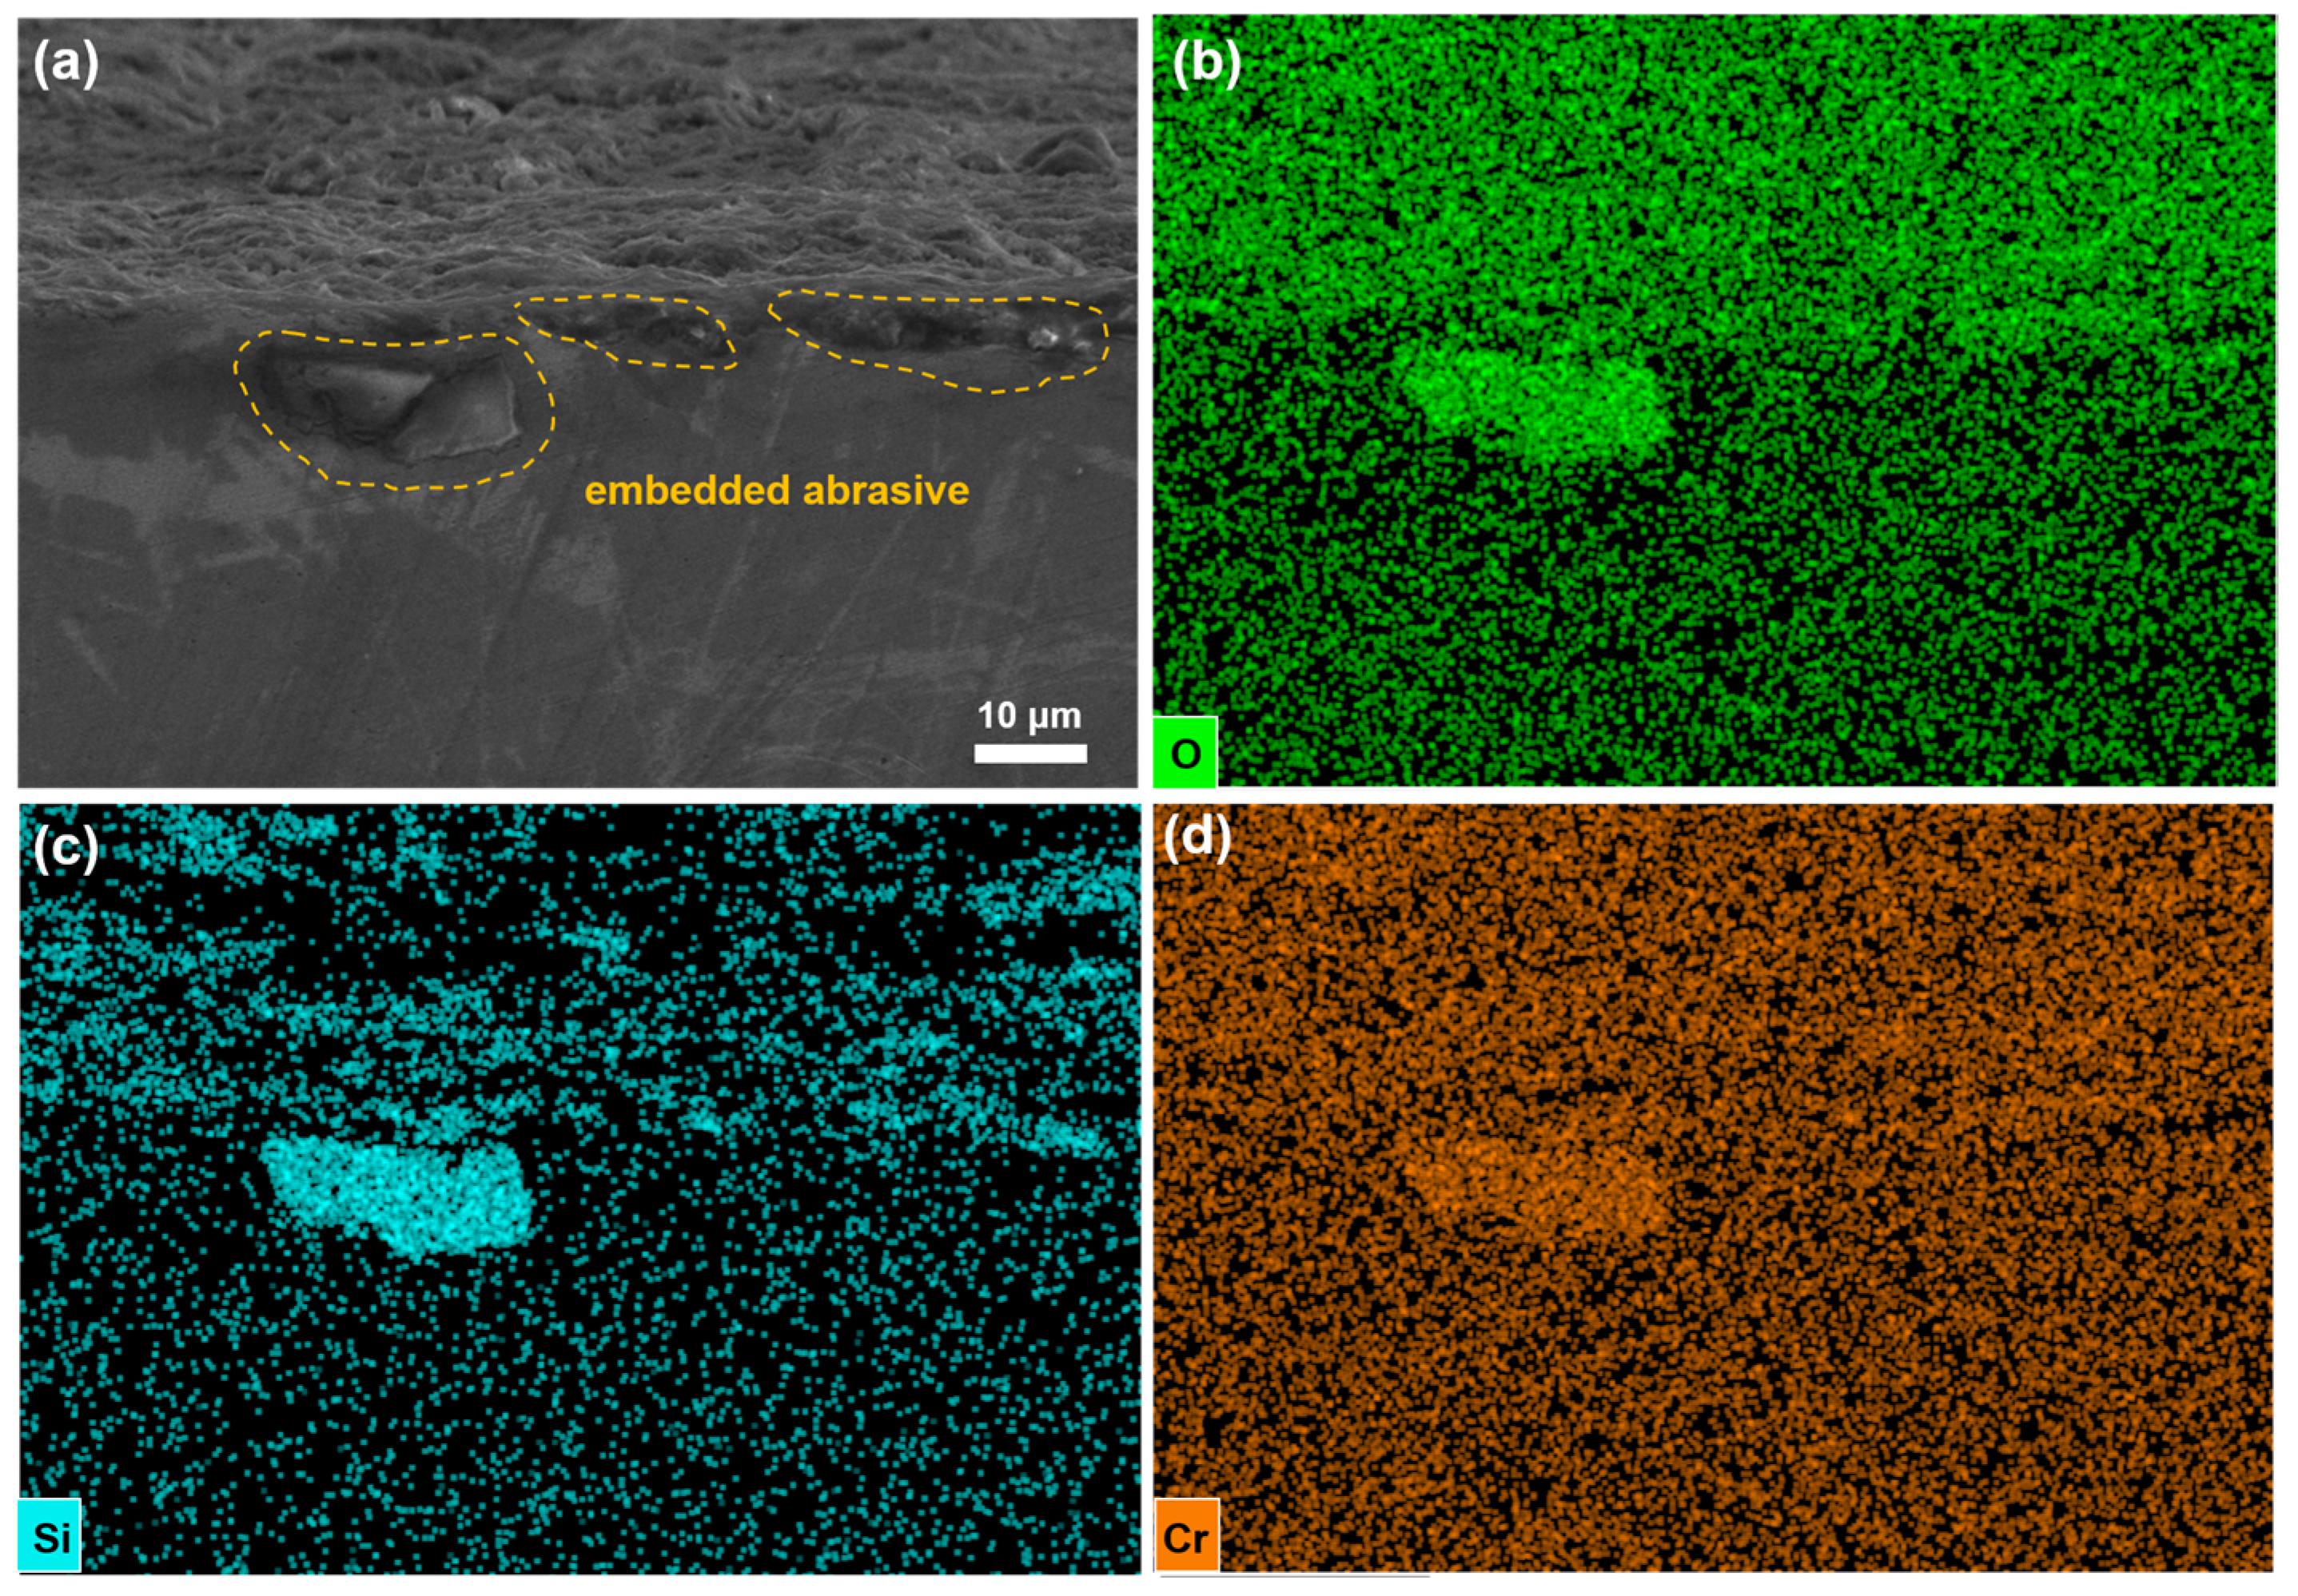
Figure 7 shows the sub-surface morphology of the pre-aging stage sample after a 5 h impact abrasive wear test with an impact energy of 5 J. Numerous cracks appeared in the sub-surface wear layer within a few micrometers with some extending to form detachment pits. Additionally, larger particles, exceeding ten micrometers in size and composed of Si, O, and Cr, were embedded in the sub-surface layer. This composition corresponds to the abrasive material SiO2 and the counterface high-chromium cast iron. The high content of Cr in the abrasive particles indicates that they were not initially embedded in the substrate to such a depth. Rather, it is more likely that they were carried by the abrasive flow between the upper and lower samples, and when they reached the incomplete area of the substrate (where local spalling pits had already appeared) without any significant enrichment zone of micron or sub-micron precipitates, the particles became partially embedded into the substrate. During subsequent impact loading, the particles were further embedded, even breaking into two smaller abrasive particles. Due to continuous material contact with the lower sample made of high-chromium cast iron, material exchange occurred, resulting in a high content of Cr on the entire surface of the abrasive particle. The presence of expanding cracks in the sub-surface layer indicates that the material did not fully resist the abrasive particle’s action under the sustained dynamic loading, possibly due to the hardening effect reaching its limit, with multiple slip directions of dislocations being blocked, preventing the release of stress and leading to the formation of cracks. Alternatively, the cracks may have nucleated due to the presence of micron precipitates and their significant strain instability with respect to the substrate, leading to rapid crack propagation along the phase boundary and subsequent detachment. Overall, under the condition of a relatively high impact energy of 5 J, the material after pre-aging stage did not fully exert its resistance to abrasive particle action, resulting in only moderate wear resistance.
Figure 8 shows the sub-surface morphology and EDS analysis of the sample which has undergone a regression treatment stage after 5 h of impact abrasive wear with 5 J of impact energy. It can be seen that the embedding of abrasive particles has been improved in the area with micron-scale precipitates, but the effect is not significant. After the regression treatment, the aggregation of sub-micron precipitates on the micron precipitates has been improved, but due to the high temperature and water quenching, MUPZs will not be formed during the process. It can be seen that the depth of abrasive particle embedding is about several microns, which is shallower compared to the pre-aging sample. The embedding direction of the left abrasive particles is about 45 degrees to the sample surface, and it is clearly blocked by the triangular micron-scale precipitates, which prevents the abrasive particles from embedding into deeper areas of the substrate. In addition, due to the high hardness of the abrasive particles and micron precipitates relative to the substrate, under continuous impact, the upper substrate undergoes severe plastic deformation and local fracture, resulting in discontinuity on the surface of the entire substrate material, which promotes the subsequent embedding of abrasive particles. Therefore, the wear resistance will be greatly reduced in the subsequent impact abrasive wear process. Overall, the sample after the regression treatment stage can provide some resistance to abrasive particle action through the micron-scale precipitates, but this effect only exists when the abrasive particles are close to the micron-scale precipitates. Moreover, due to the large plastic deformation of the substrate, crack propagation occurs, which leads to surface discontinuity, and is thereby not conducive to sustained resistance to abrasive particles. Under high impact energy, such as 5 J, the wear resistance performance shows good performance in the initial stage, but deteriorates severely in the subsequent stages.
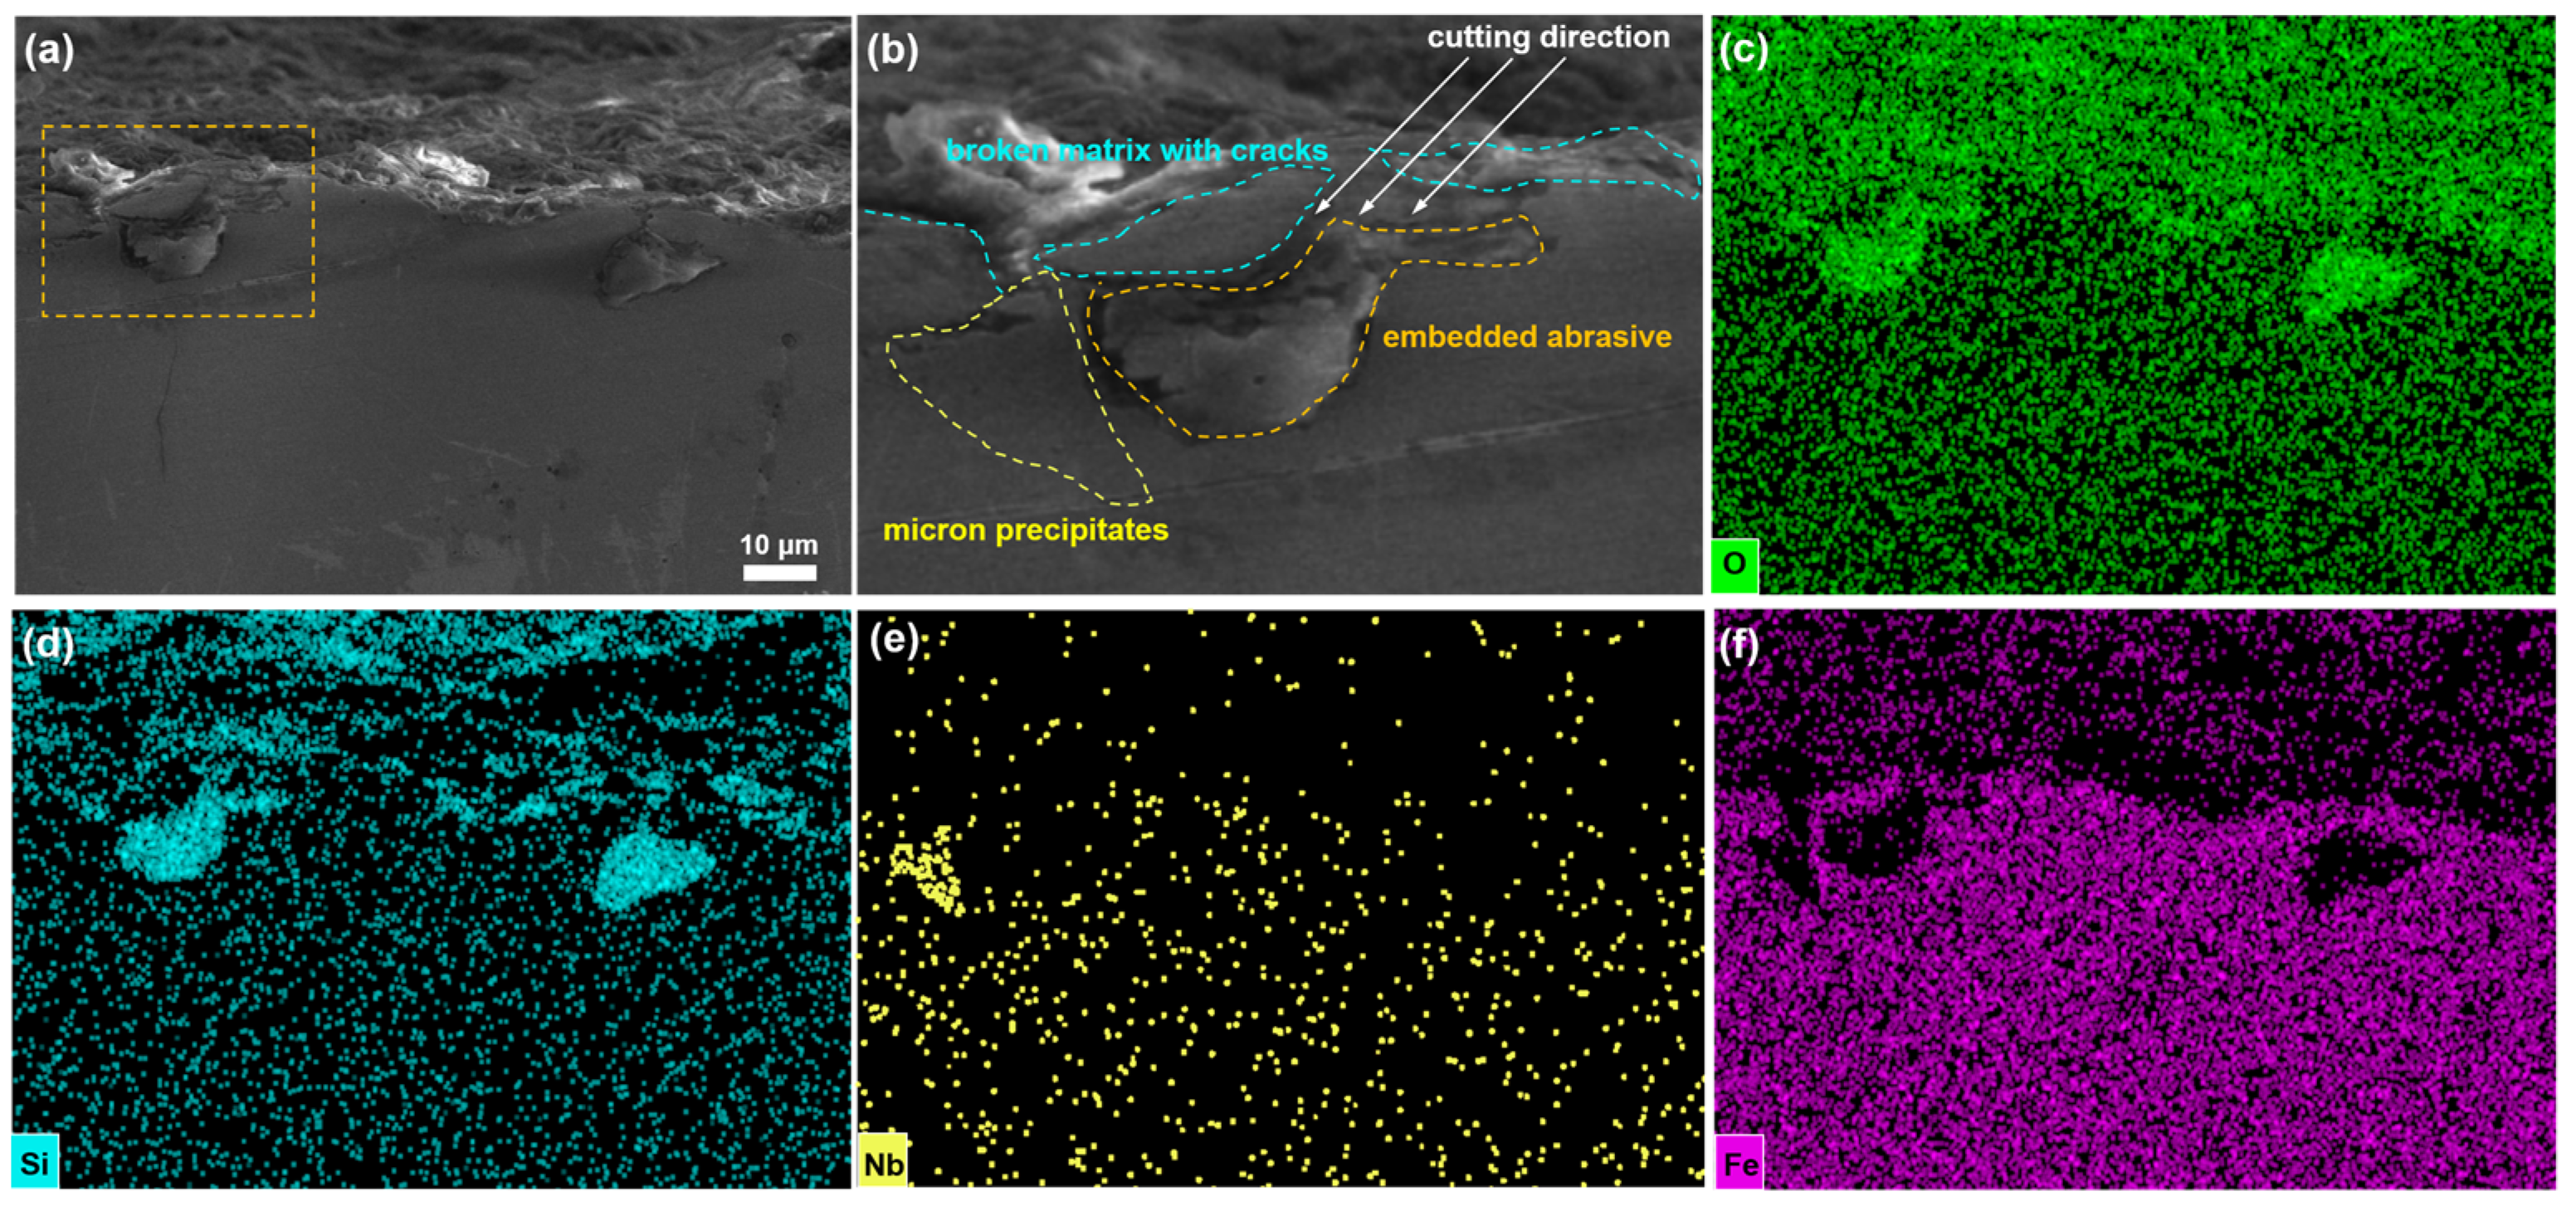
Figure 9 shows the sub-surface morphology and EDS analysis of the sample with re-aging process after 5 h of impact with a 5 J impact abrasive wear test. It is noteworthy that the sample surface is almost continuous, without any obvious pit formation due to crack propagation. Most of the abrasive grains are blocked at the surface, and due to the continuous impact, a cohesive layer is formed after their fragmentation. The cohesive layer formed by the broken abrasive grains adheres well to the underlying matrix surface, forming a smooth arc surface. Therefore, in the subsequent impact abrasive wear process, not only does the matrix surface not break (there is no sharp point causing a significant decrease in pressure), but also the plastic deformation is uniform, as the micro-regions on the matrix surface can match well with each other. Moreover, the cohesive layer has a high hardness, which can resist other abrasive grains from embedding in it during the subsequent wear process, effectively protecting the matrix surface. Interestingly, the formation of this broken abrasive grain cohesive layer is worth further investigation. From Figure 9a,e, it can be observed that there are micron Nb precipitates several micrometers deep from the worn surface, and the cohesive layer appears above these micrometer-scale precipitates. In the several micrometer regions between the cohesive layer and the micrometer-scale precipitates, the matrix remains relatively complete without any microscopic cracks or embedded abrasive grains. Interestingly, this micrometer-scale region around the micron precipitates corresponds to the MUPZs observed in the previous electron microscopy characterization of the RRA sample. When subjected to continuous impact loading, the MUPZs can interact with a large number of nano precipitates and dislocations, resulting in a significant increase in the dislocation multiplication ability. Due to the mechanism of dislocation bypass, a large number of dislocations increase in the form of dislocation rings, cells, and walls. On the other hand, the slip of dislocations is hindered, resulting in a smaller amount of plastic deformation in the region. MUPZs have excellent work hardening ability, so even if there is a distance of several micrometers between the micrometer-scale precipitates and the abrasive grains, the work-hardened MUPZs can resist abrasive grain embedding well. Moreover, with the support of micrometer-scale precipitates below, a smooth arc surface cohesive area has formed above. Under the same impact load, the pressure per unit area is greatly reduced, and the work hardening ability continues to improve, resulting in a uniform and slow increase in plastic deformation. The stress dispersion leads to a decrease in the formation of microscopic cracks. Overall, the use of RRA processing significantly improves the wear resistance of materials by promoting the formation of MUPZs around micron precipitates. The specific changes to the wear mechanisms caused by MUPZs, as well as the effects of MUPZs on wear performance under different impact loads, will be discussed in the next section.

3.4. Impact Abrasive Wear Properties and Wear-Resistant Mechanism

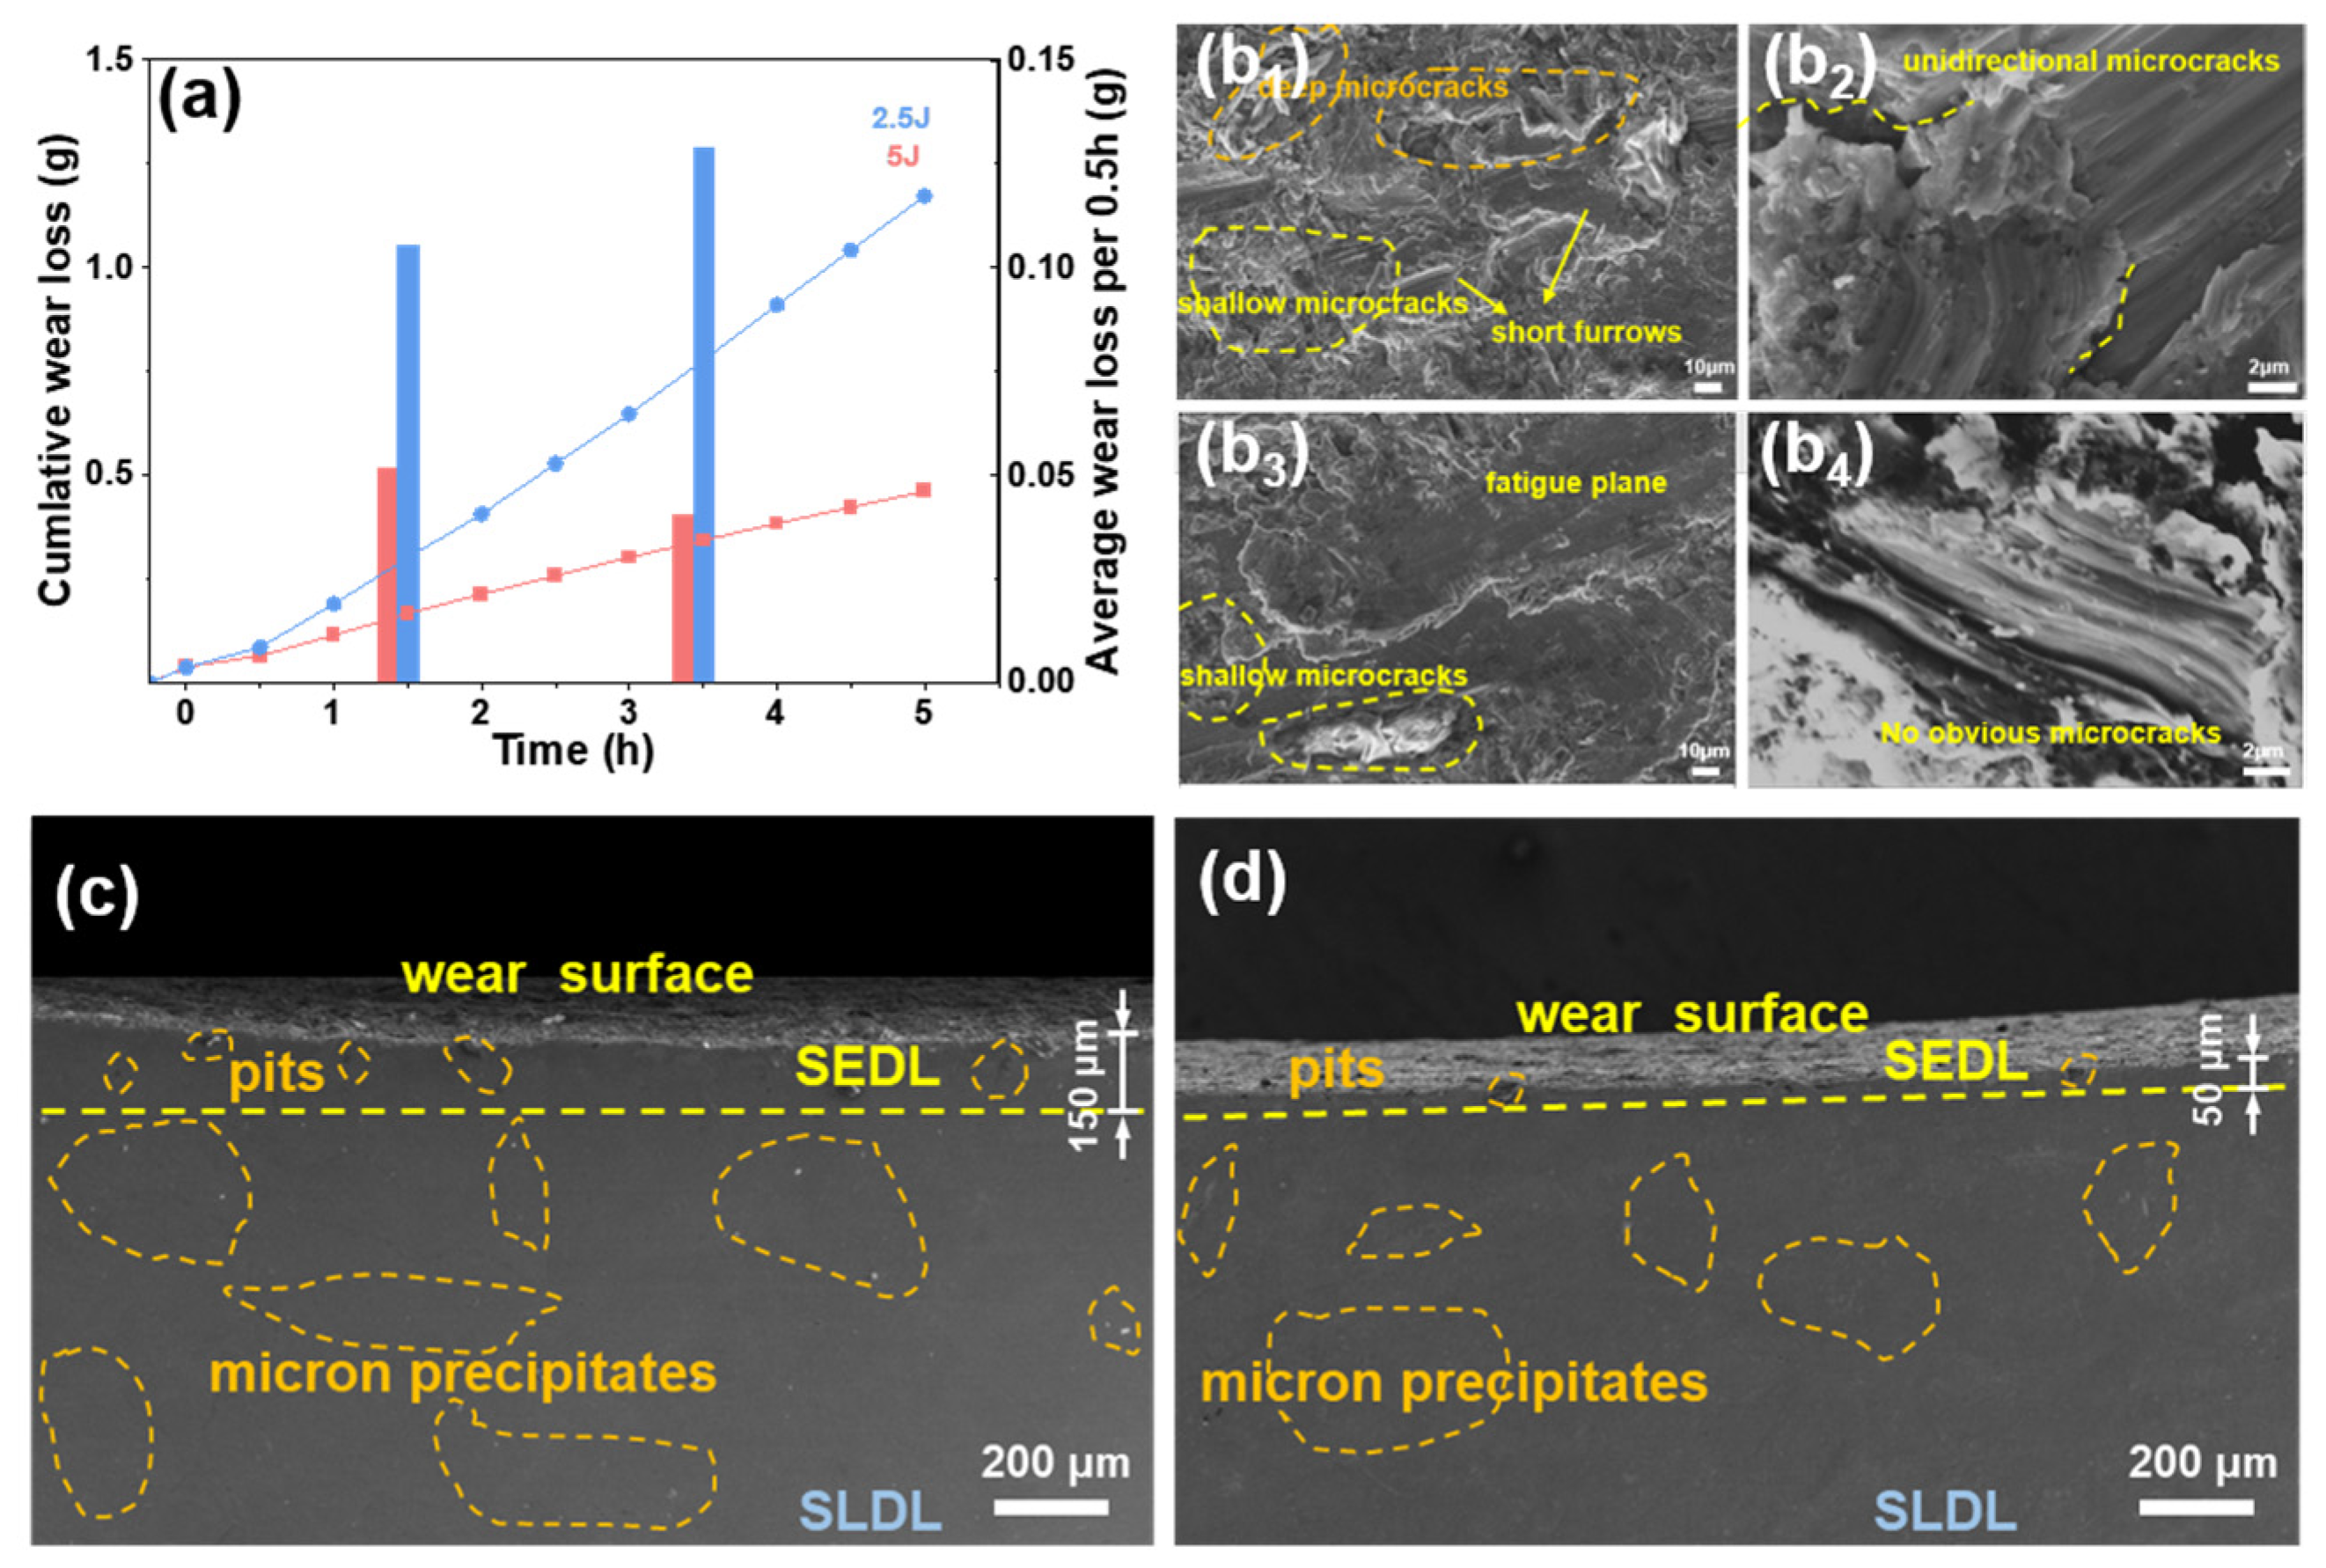
Figure 10a shows the cumulative weight loss and average weight loss per half-hour during the first and second 2.5 h of impact abrasive wear test on the RRA specimens at 2.5 J and 5 J impact energies, respectively, over a 5 h period. The line graph indicates that the material’s cumulative wear at 2.5 J was 1.17 g, which was much higher than the 0.46 g at 5 J. The bar chart reveals that the performance of the RRA specimens varied under different impact energies during the first and second 2.5 h of the experiment. Specifically, the average weight loss per half hour increased at 2.5 J from 0.10 g to 0.13 g, while it decreased from 0.05 g to 0.04 g at the 5 J condition. This suggests that, although the presence of MUPZs improves the material’s wear resistance, its performance is more pronounced under high impact loads (5 J), which is clearly related to the dislocation motion in MUPZs. When the impact energy is high, the material can absorb more energy to provide sufficient dislocation proliferation and motion, and the interaction of MUPZs directly affects dislocation proliferation and motion, thereby improving work hardening ability and wear resistance. However, when the impact energy is low, although MUPZs are present, the interaction with dislocations is limited, thus limiting work hardening ability and relatively moderate wear resistance improvement. Figure 10(b1–b4) shows the surface morphology of an RRA specimen after impact abrasive wear test, where Figure 10(b1,b2) corresponds to an impact energy of 2.5 J. It can be seen that the wear surface exhibits some short and shallow grooves, as well as some deeper and shallower microcracks. These cracks tend to appear at the edges of the grooves and are not fully continuous, often appearing unidirectionally along the direction of the grooves. Figure 10(b3,b4) corresponds to an impact energy of 5 J. It can be observed that there are only a few shallow cracks and fewer grooves with shallower depths that tend to appear individually. Additionally, the wear surface exhibits obvious spalling-induced fatigue plateaus. No significant microcracks were found near the grooves. This indicates not only that MUPZs exhibit an improved resistance to abrasive particle embedding at an impact energy of 5 J but also that, due to sufficient work hardening, deformation becomes more uniform and microregions can coordinate well for deformation, reducing the possibility of crack nucleation and propagation, especially near the micron-sized precipitates, thus decreasing the probability of micron precipitates detaching from the matrix in the early working period.
Figure 10c,d shows the sub-surface morphology of the specimens after 5 h impact abrasive wear tests with impact energies of 2.5 J and 5 J, respectively. The cross-sectional area selected for observation was approximately 800 μm deep beneath the wear surface. Figure 10c indicates that the sub-surface of the specimen subjected to 2.5 J impact energy can be divided into two regions: the severe plastic deformation layer (SEDL) within the top 150 μm and the slight plastic deformation layer (SLDL) within the bottom 650 μm. The difference between these two regions is evident: within the SEDL, most of the micron precipitates have been detached due to the significant plastic deformation of the matrix, which resulted in large strain mismatches with the brittle micro-scale precipitates that underwent almost no deformation. As a result, micro-cracks propagated throughout the precipitates, causing them to fall off easily during polishing, leaving behind pits that are surrounded by micro-cracks. In contrast, in the SLDL, the plastic deformation is relatively small, and the interface between the matrix and the micro-scale precipitates remains intact. Therefore, micro-crack initiation and propagation are less pronounced, and most of the micron precipitates remain embedded in the matrix after polishing. The thickness of the SEDL is reduced to approximately 50 μm at 5 J impact energy, and even within the SEDL, some micron precipitates remain. This indicates that the material has a good work hardening effect, which reduces the plastic deformation of the matrix, resulting in a thinner severe plastic deformation layer and slower detachment of micron precipitates during impact abrasive test.
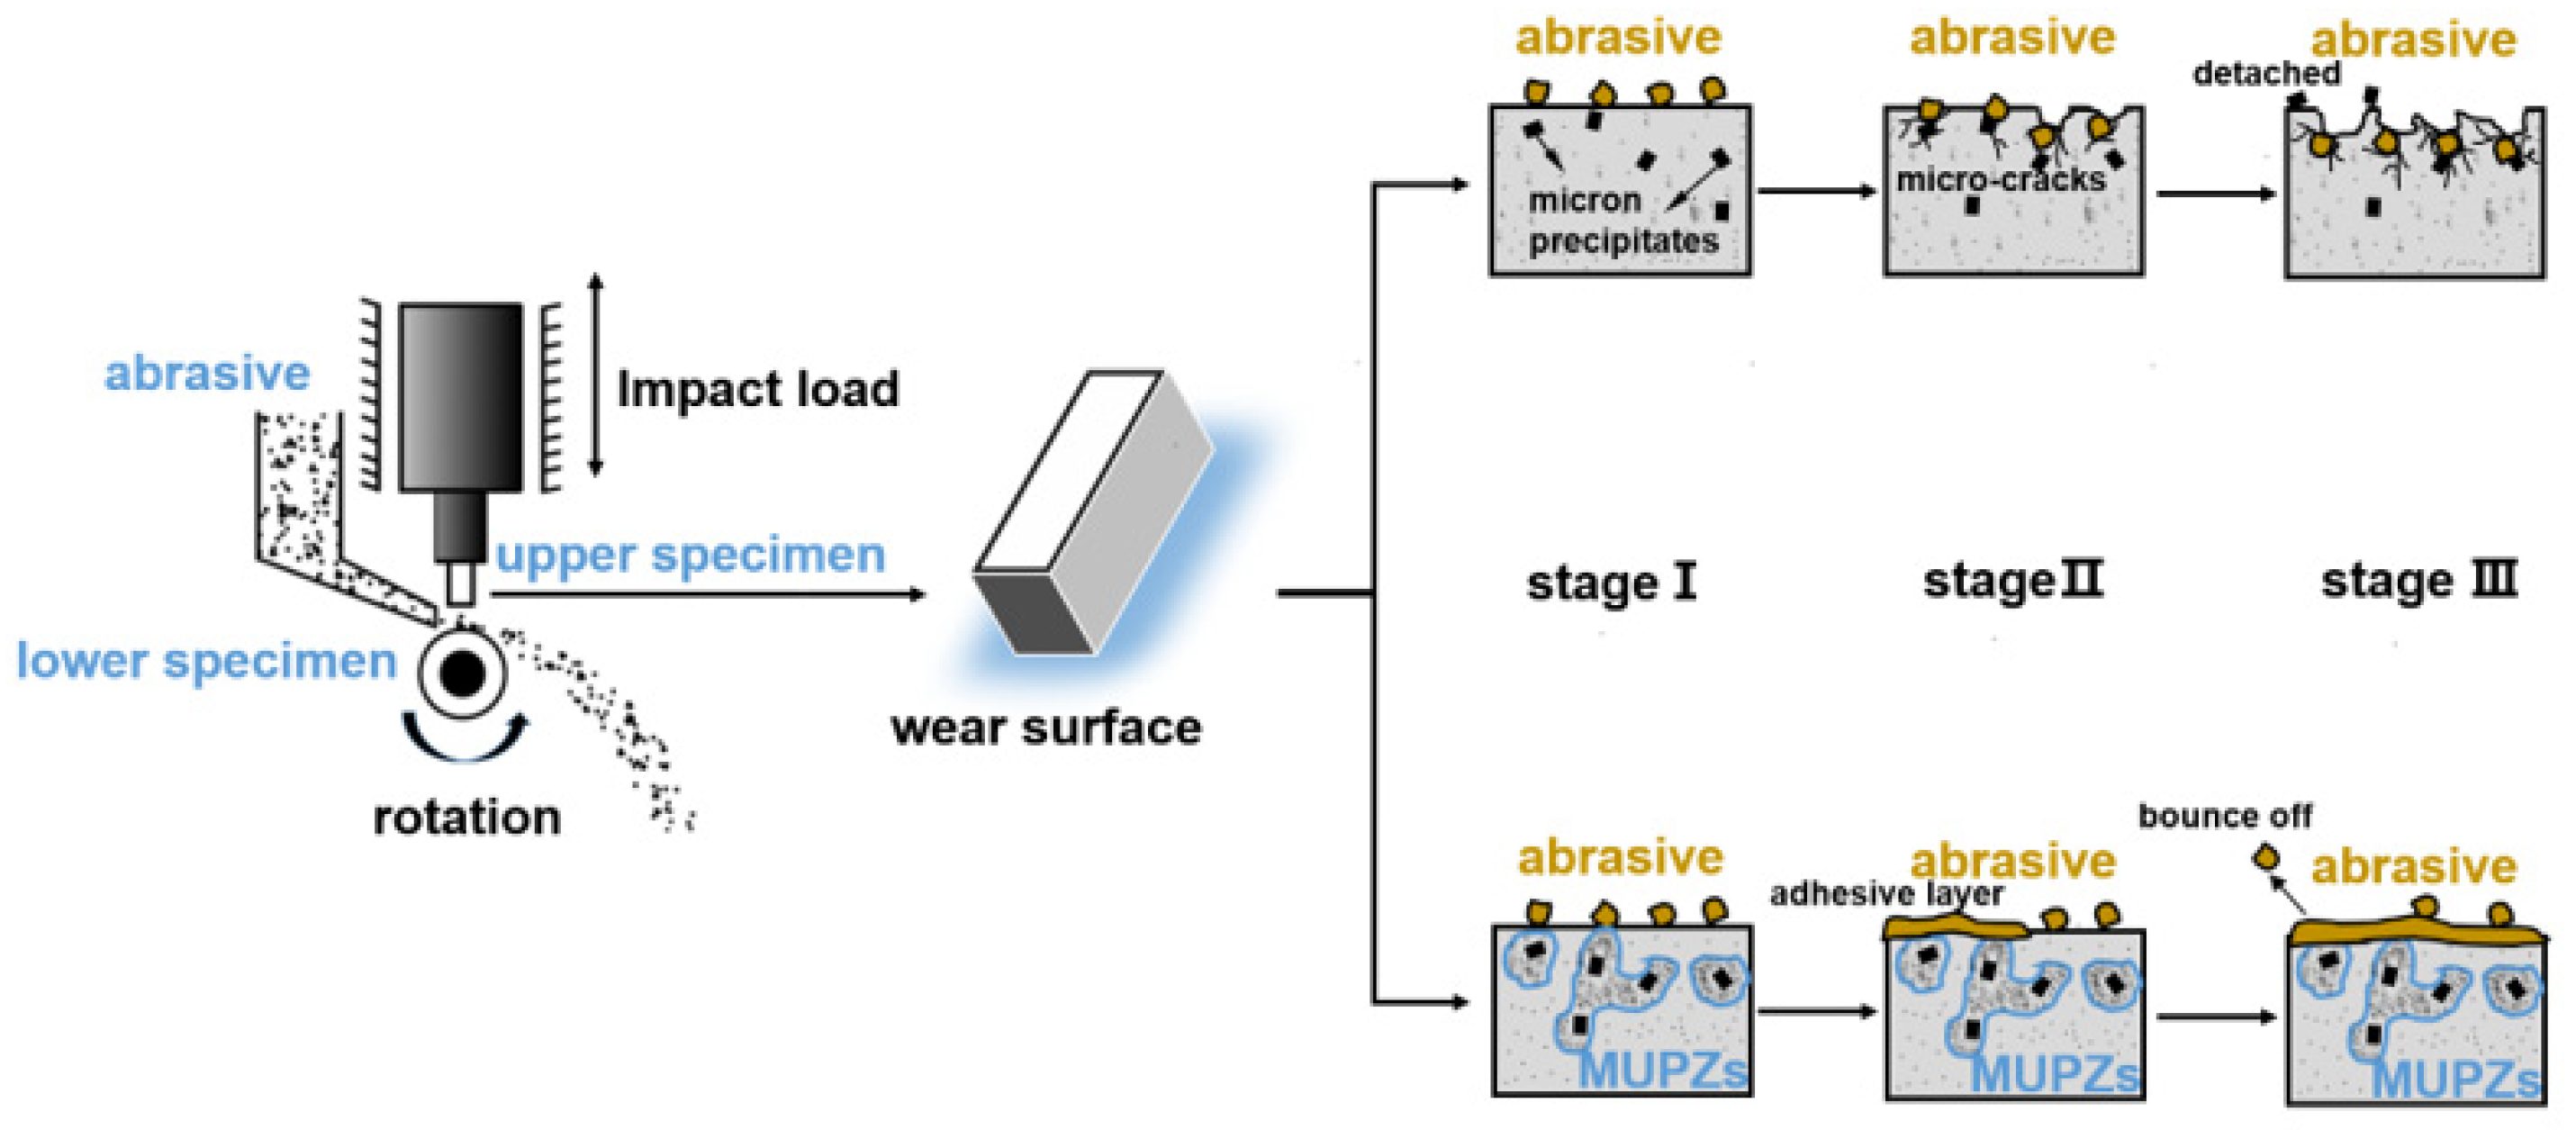
Figure 11 illustrates the wear-resistant mechanism of impact abrasive wear. It can be observed that after the RRA treatment, MUPZs are formed around the micron precipitates, and during the three stages of the experiment, the wear-resistant mechanism undergoes changes. In the absence of MUPZs, as was with the specimen that only underwent a single-stage aging treatment, the abrasive particles on the wear surface can very easily to cut into the substrate due to the normal impact load and tangential friction. In the second stage, due to the insufficient work hardening ability, the abrasive particles can only play a resistance role when they directly contact the micron precipitates, and as the experiment progresses, the lack of coordination in the dislocation movement of the micro-zones leads to a large strain difference, and cracks nucleate and rapidly propagate along the micron precipitates. In the third stage, as the cracks have extended along the entire micron-sized precipitate, the particles detach from the substrate, leaving pits and losing their ability to resist abrasive particles, and the depth of subsequent abrasive cutting increases, resulting in a severely discontinuous material surface and a serious deterioration of wear resistance. In contrast, for specimens with MUPZs, the MUPZs have a very good work hardening ability under high load impact wear conditions, so in the first stage, when abrasive particles cut into the surface, they will cause severe work hardening of the MUPZs located between the hard micron precipitates and the abrasive particles, and the abrasive particles will no longer cut into the interior after being embedded slightly into the surface. In the second stage, due to the continuous work hardening of the MUPZs, the abrasive particles continue to be resisted on the surface. According to the normal impact load and tangential friction, the abrasive particles are partially broken and form an adhesive layer that closely sticks to the substrate surface. As the experiment progresses to the third stage, the adhesive layer formed by the broken abrasive particles connects to each other, and the range becomes larger and more closely fits the matrix surface. Subsequent abrasive particles are resisted by the adhesive layer, and the continuity of the material surface is maintained very well until the fully work-hardened MUPZs and the abrasive-particle adhesive layer peel off due to fatigue effects, forming a fatigue platform.

4. Conclusions

The present work proposed by using RRA treatment to form micro-scale ultrafine precipitation zones (MUPZs) around initial micron precipitates, and the impact-wear resistance can be elevated. The microstructure evolution including the formation of MUPZs, wear surface morphology combined with sub-surface characterization, and novel impact abrasive wear-resistant mechanism induced by MUPZs were studied. The following major conclusions were drawn:
(1)
Through the complete RRA treatment, the retrogression process can be used to dissolve the aggregated sub-micron precipitates formed at the edges of the initial micron precipitates during the pre-aging stage, and alloying elements such as V and Nb can diffuse a certain distance. Then, in the short-term re-aging process, the (Nb, V)x (C, N)y are dispersed again at the sub-micron and nanoscales, and form the micro-scale ultrafine precipitation zones (MUPZs);
(2)
Through the complete RRA treatment, the specimen can be given good mechanical properties with a yield strength of 490 MPa, tensile strength of 965 MPa, elongation of 40.0%, and micro-Vickers hardness of nearly 322 HV;
(3)
The specimens after different stage of the RRA process (pre-aging, retrogression, re-aging) are compared under a 5 h impact abrasive wear test with a 5 J impact load. The subsurface characterization shows that MUPZs can play a significant role in resisting the abrasive and decreasing the wear loss caused by micro-cutting and micro-plowing mechanism;
(4)
The RRA specimens with MUPZs were compared after 5 h of impact abrasive wear tests under 2.5 J and 5 J energies. It was demonstrated that MUPZs exhibit better work-hardening and wear-resistant abilities. Additionally, an adhesive layer composed of broken abrasive particles can be formed near the wear surface with MUPZs. This layer resists abrasive particles and causes them to bounce off, presenting a novel impact abrasive wear-resistant mechanism.

Author Contributions

R.W. and Q.S. conceived the idea and set the research direction. Q.S. and W.Z. provided the experimental material and heat treatment method. R.W., H.F. and X.C. characterized the material properties. R.W. analyzed the data and drafted the manuscript. Z.L., R.W., Q.S., R.W. and X.H. discussed and edited the manuscript, and reconfirmed the microstructure and mechanical properties of the experimental materials. Q.S. and Z.L supervised the work. All authors have read and agreed to the published version of the manuscript.

Funding

National Natural Science Foundation of China (52071167), the Science Foundation for Outstanding Youth of Yunnan Province (202201AW070004), the Science Foundation of the Yunnan Provincial Science and Technology Department (202101AT070074), and the Science and Technology Major Project of Yunnan Province (202202AG050011).

Data Availability Statement

Not applicable.

Acknowledgments

The authors greatly acknowledge the National Natural Science Foundation of China (52071167), the Science Foundation for Outstanding Youth of Yunnan Province (202201AW070004), the Science Foundation of the Yunnan Provincial Science and Technology Department (202101AT070074), and the Science and Technology Major Project of Yunnan Province (202202AG050011) for financial support.

Conflicts of Interest

The authors declare no conflict of interest.

References

  1. Bambach, M.; Conrads, L.; Daamen, M.; Güvenç, O.; Hirt, G. Enhancing the crashworthiness of high-manganese steel by strain-hardening engineering, and tailored folding by local heat-treatment. Mater. Des. 2016, 110, 157–168. [Google Scholar] [CrossRef]
  2. Kuyucak, S.; Zavadil, R.; Gertsman, V. Heat-treatment processing of austenitic manganese steels. Rev. Turnat. (Rom. Foundry J.) 2004, 10, 11–14. [Google Scholar]
  3. Xu, H.; Zhao, J.; Cao, W.; Shi, J.; Wang, C.; Wang, C.; Li, J.; Dong, H. Heat treatment effects on the microstructure and mechanical properties of a medium manganese steel (0.2 C–5Mn). Mater. Sci. Eng. A 2012, 532, 435–442. [Google Scholar] [CrossRef]
  4. Smith, R.; DeMonte, A.; Mackay, W. RETRACTED: Development of high-manganese steels for heavy duty cast-to-shape applications. J. Mater. Process. Technol. 2004, 153–154, 589–595. [Google Scholar] [CrossRef]
  5. Haase, C.; Kühbach, M.; Barrales-Mora, L.A.; Wong, S.L.; Roters, F.; Molodov, D.A.; Gottstein, G. Recrystallization behavior of a high-manganese steel: Experiments and simulations. Acta Mater. 2015, 100, 155–168. [Google Scholar] [CrossRef]
  6. Tęcza, G.; Garbacz-Klempka, A. Microstructure of cast high-manganese steel containing titanium. Arch. Foundry Eng. 2016, 16, 163–168. [Google Scholar] [CrossRef]
  7. Pham, M.K.; Nguyen, D.N.; Hoang, A.T. Influence of vanadium content on the microstructure and mechanical properties of high-manganese steel. Int. J. Mech. Mechatron. Eng. 2018, 18, 141–147. [Google Scholar]
  8. Morrison, W. Microalloy steels–the beginning. Mater. Sci. Technol. 2009, 25, 1066–1073. [Google Scholar] [CrossRef]
  9. Siciliano, F.; Jonas, J.J. Mathematical modeling of the hot strip rolling of microalloyed Nb, multiply-alloyed Cr-Mo, and plain C-Mn steels. Metall. Mater. Trans. A 2000, 31, 511–530. [Google Scholar] [CrossRef]
  10. Moghaddam, E.; Varahram, N.; Davami, P. On the comparison of microstructural characteristics and mechanical properties of high-vanadium austenitic manganese steels with the Hadfield steel. Mater. Sci. Eng. A 2012, 532, 260–266. [Google Scholar] [CrossRef]
  11. Di, X.; Li, M.; Yang, Z.; Wang, B.; Guo, X. Microstructural evolution, coarsening behavior of vanadium carbide and mechanical properties in the simulated heat-affected zone of modified medium manganese steel. Mater. Des. 2016, 96, 232–240. [Google Scholar] [CrossRef]
  12. Ren, J.-k.; Chen, Q.-y.; Chen, J.; Liu, Z.-y. Role of vanadium additions on tensile and cryogenic-temperature charpy impact properties in hot-rolled high-Mn austenitic steels. Mater. Sci. Eng. A 2021, 811, 141063. [Google Scholar] [CrossRef]
  13. Cai, Z.; Wang, S.; Zhou, Y.; Dong, J.; Ma, L.; Liu, S. Influence of aging treatment on mechanical properties and wear resistance of medium manganese steel reinforced with Ti (C, N) particles. Friction 2023, 1–14. [Google Scholar] [CrossRef]
  14. Jacob, R.; Sankaranarayanan, S.R.; Babu, S.K. Recent advancements in manganese steels—A review. Mater. Today Proc. 2020, 27, 2852–2858. [Google Scholar] [CrossRef]
  15. Bouaziz, O.; Allain, S.; Scott, C.; Cugy, P.; Barbier, D. High manganese austenitic twinning induced plasticity steels: A review of the microstructure properties relationships. Curr. Opin. Solid State Mater. Sci. 2011, 15, 141–168. [Google Scholar] [CrossRef]
  16. Kim, J.G.; Enikeev, N.A.; Seol, J.B.; Abramova, M.M.; Karavaeva, M.V.; Valiev, R.Z.; Park, C.G.; Kim, H.S. Superior strength and multiple strengthening mechanisms in nanocrystalline TWIP steel. Sci. Rep. 2018, 8, 11200. [Google Scholar] [CrossRef]
  17. Wen, Y.H.; Peng, H.; Si, H.; Xiong, R.; Raabe, D. A novel high manganese austenitic steel with higher work hardening capacity and much lower impact deformation than Hadfield manganese steel. Mater. Des. 2014, 55, 798–804. [Google Scholar] [CrossRef]
  18. Agunsoye, J.O.; Talabi, S.I.; Bello, O. Wear characteristics of heat-treated Hadfield austenitic manganese steel for engineering application. Adv. Prod. Eng. Manag. 2015, 10, 97–107. [Google Scholar] [CrossRef]
  19. Zhou, Z.; Shan, Q.; Jiang, Y.; Li, Z.; Zhang, Z. Effect of nanoscale V2C precipitates on the three-body abrasive wear behavior of high-Mn austenitic steel. Wear 2019, 436, 203009. [Google Scholar] [CrossRef]
  20. Li, C.; Li, X.; Deng, X.; Wang, Z. Revealing the role of micron-sized in situ TiC particles on tensile properties and fracture mechanism of martensitic wear-resistant steel at elevated temperature. Mater. Sci. Eng. A 2022, 832, 142503. [Google Scholar] [CrossRef]
  21. Zhong, H.; Li, S.; Wu, J.; Deng, H.; Chen, J.; Yan, N.; Chen, Z.; Duan, L. Effects of retrogression and re-aging treatment on precipitation behavior, mechanical and corrosion properties of a Zr + Er modified Al-Zn-Mg-Cu alloy. Mater. Charact. 2022, 183, 111617. [Google Scholar] [CrossRef]
  22. Altuntaş, G.; Altuntaş, O.; Bostan, B. Characterization of Al-7075/T651 Alloy by RRA Heat Treatment and Different Pre-deformation Effects. Trans. Indian Inst. Met. 2021, 74, 3025–3033. [Google Scholar] [CrossRef]
  23. Liu, P.; Hu, L.; Zhang, Q.; Yang, C.; Yu, Z.; Zhang, J.; Hu, J.; Cao, F. Effect of aging treatment on microstructure and corrosion behavior of Al-Zn-Mg aluminum alloy in aqueous solutions with different aggressive ions. J. Mater. Sci. Technol. 2021, 64, 85–98. [Google Scholar] [CrossRef]
  24. Li, B.; Wang, X.; Chen, H.; Hu, J.; Huang, C.; Gou, G. Influence of heat treatment on the strength and fracture toughness of 7N01 aluminum alloy. J. Alloys Compd. 2016, 678, 160–166. [Google Scholar] [CrossRef]
  25. Haider, T.N.; Kahtan, S.M. Microstructural evaluation and mechanical properties of an Al-Zn-Mg-Cu-alloy after addition of nickel under RRA conditions. Mater. Sci. Appl. 2013, 2013, 39744. [Google Scholar]
  26. Sun, T.; Liang, J.; Li, D.; Zhong, L.; Gong, C. A New Detection Method for Oxygen, Nitrogen and Hydrogen on Superalloy Milling Surfaces. Int. J. Mech. Eng. Appl. 2018, 6, 29–34. [Google Scholar] [CrossRef]
  27. Cheng, C.; Dou, Z.-H.; Zhang, T.-A.; Su, J.-M.; Zhang, H.-J.; Liu, Y.; Niu, L.-P. Sulfur distribution in preparation of high titanium ferroalloy by thermite method with different CaO additions. Rare Met. 2019, 38, 793–799. [Google Scholar] [CrossRef]
  28. Kuzucu, V.; Aksoy, M.; Korkut, M.; Yildirim, M. The effect of niobium on the microstructure of ferritic stainless steel. Mater. Sci. Eng. A 1997, 230, 75–80. [Google Scholar] [CrossRef]
  29. Luo, W.; Wang, L.; Wang, Y.; Meng, L.; Yuan, Y.; Zhang, L.; Wu, G. Microstructure and mechanical properties of a 2 wt% Nb bearing low carbon steel. Mater. Sci. Eng. A 2021, 826, 141957. [Google Scholar] [CrossRef]
  30. Chateau, J.; Dumay, A.; Allain, S.; Jacques, A. Precipitation hardening of a FeMnC TWIP steel by vanadium carbides. J. Phys. Conf. Ser. 2010, 240, 012023. [Google Scholar] [CrossRef]
  31. Klinkenberg, C.; Hulka, K.; Bleck, W. Niobium carbide precipitation in microalloyed steel. Steel Res. Int. 2004, 75, 744–752. [Google Scholar] [CrossRef]
  32. Zhang, S.; Chen, W.; Huang, F.; Cheng, Y.F.; Li, K.; Hu, Q.; Liu, J. The significant effect of tantalum on the hydrogen-induced cracking of pipeline steel: Morphology, hydrogen permeation, and theoretical studies. Corros. Sci. 2022, 200, 110213. [Google Scholar] [CrossRef]
  33. Chen, L.; Huang, X.; He, K.; Wang, H. Precipitation behavior and age hardening effect of the precipitates in a Fe-13Cr-4Al-2Mo-1.2 Nb alloy. Mater. Charact. 2021, 173, 110918. [Google Scholar] [CrossRef]
  34. Hussein, A.M.; Rao, S.I.; Uchic, M.D.; Dimiduk, D.M.; El-Awady, J.A. Microstructurally based cross-slip mechanisms and their effects on dislocation microstructure evolution in fcc crystals. Acta Mater. 2015, 85, 180–190. [Google Scholar] [CrossRef]
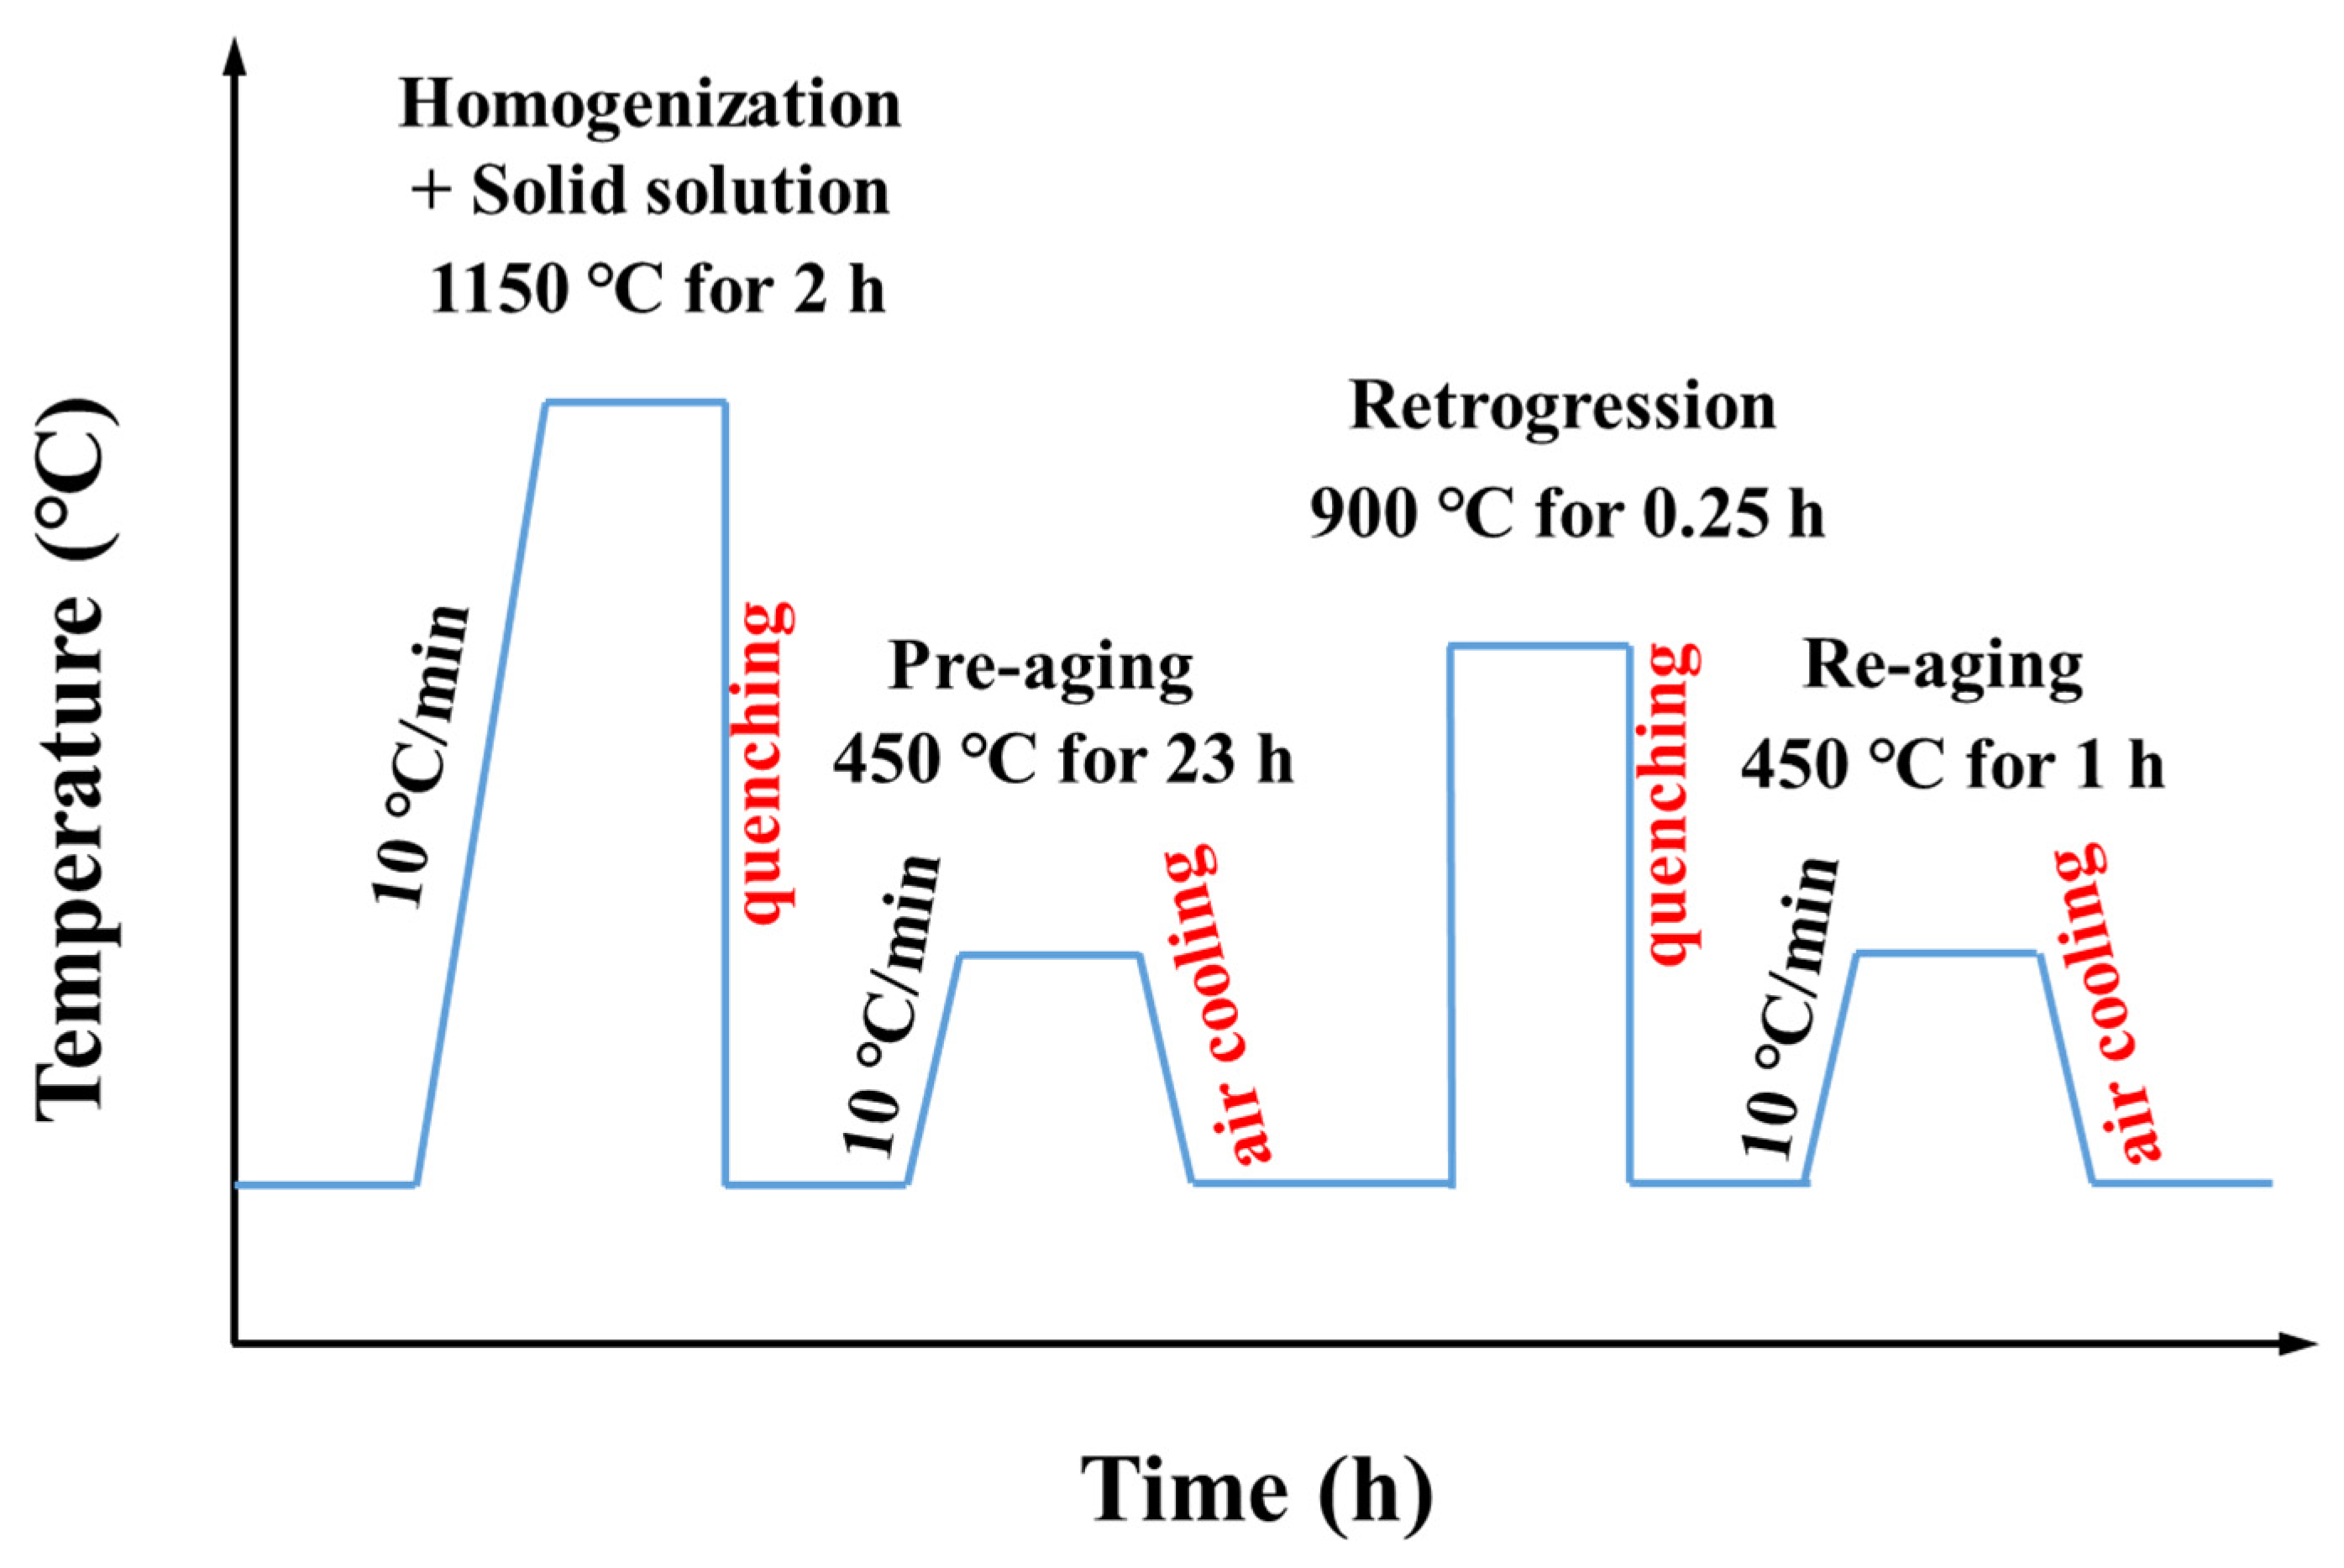
Figure 1. Process diagram of retrogression and re-aging (RRA) treatment.
Metals 13 00902 g001
Figure 2. Microstructure and EDS analysis of heterogeneous nucleation of sub-micron precipitates on micron precipitates after pre-aging process: (a1,a2) morphology and EDS spot analysis of precipitate in area 1, (b1,b2) low and high magnification morphology of precipitates in area 2 (c1c4) different magnification morphology and EDS spot analysis of precipitates in area 3.
Metals 13 00902 g002
Figure 3. Microstructure of MUPZs near micron precipitates after RRA process: (a) SEM morphology, (b) TEM morphology, (c) TEM enlarged view of the blue dotted box in (b), and (d) size distribution statistics of nano precipitates.
Metals 13 00902 g003
Figure 4. Phase boundary between sub-micron precipitate and matrix in MUPZ after RRA process: (a) microstructure, (bd) FFT analysis.
Metals 13 00902 g004
Figure 5. Nano precipitates in MUPZs after RRA process: (a) microstructure, (bd) FFT analysis, (eg) IFFT analysis.
Metals 13 00902 g005
Figure 6. Tensile test and hardness test after RRA process: (a) engineering stress–strain curve, (b) fracture morphology, (c) micro-Vickers hardness analysis.
Metals 13 00902 g006
Figure 7. Morphology and EDS analysis of impact abrasive wear (5 J) on sub-surface with specimen after pre-aging process: (a) morphology of wear sub-surface, (bd) EDS mapping of O, Si, Cr in (a).
Metals 13 00902 g007
Figure 8. Morphology and EDS analysis of impact abrasive wear (5 J) on sub-surface with specimen after retrogression process: (a) morphology of wear sub-surface, (b) enlarged view of orange dashed box in (a), (cf) EDS mapping of O, Si, Nb, V in (a).
Metals 13 00902 g008
Figure 9. Morphology and EDS analysis of impact abrasive wear (5 J) on sub-surface with specimen after re-aging process: (a) morphology of wear sub-surface, (b) enlarged view of orange dashed box in (a), (cf) EDS mapping of O, Si, Nb, V in (a).
Metals 13 00902 g009
Figure 10. Impact abrasive wear test of specimen after RRA process: (a) wear loss diagram, (b1,b2) wear surface morphology (2.5 J), (b3,b4) wear surface morphology(5 J), (c) sub-surface morphology (2.5 J), (d) sub-surface morphology(5 J).
Metals 13 00902 g010
Figure 11. A novel impact abrasive wear-resistant mechanism induced by MUPZs in specimen via RRA process.
Metals 13 00902 g011
Table 1. Compositions of studied steel (wt%).
CMnCrSiTiVNbCuNiMoPSN
0.9218.801.870.880.100.360.110.460.220.410.0050.010.090
Disclaimer/Publisher’s Note: The statements, opinions and data contained in all publications are solely those of the individual author(s) and contributor(s) and not of MDPI and/or the editor(s). MDPI and/or the editor(s) disclaim responsibility for any injury to people or property resulting from any ideas, methods, instructions or products referred to in the content.