Article

Analysis on Bonding Interface during Solid State Additive Manufacturing between 18Cr-8Ni and 42CrMo4 High Performance Alloys

by
Syed Quadir Moinuddin
1,
Venkata Varalakshmi Machireddy
2,
Vadla Raghavender
3,
Tejonadha Babu Kaniganti
4,
Venukumar Sarila
5,
Shankar Madhuraveli Ponnappan
6,
Ragavanantham Shanmugam
7,* and
Muralimohan Cheepu
8,9,*
1
Department of Mechatronics Engineering, ICFAI Foundation for Higher Education, Hyderabad 501203, Telangana, India
2
Department of Mechanical Engineering, Malla Reddy Engineering College (A), Hyderabad 500100, Telangana, India
3
Department of Aeronautical Engineering, Institute of Aeronautical Engineering, Hyderabad 500043, Telangana, India
4
Department of Mechanical Engineering, Kallam Haranadha Reddy Institute of Technology, Guntur 522019, Andhra Pradesh, India
5
Department of Mechanical Engineering, Vardhaman College of Engineering, Hyderabad 501218, Telangana, India
6
Division of Safety and Fire Engineering, School of Engineering, Cochin University of Science and Technology, Kochi 682022, Kerala, India
7
School of Engineering, Math and Technology, Navajo Technical University, Crownpoint, NM 87313, USA
8
Department of Materials System Engineering, Pukyong National University, Busan 48513, Republic of Korea
9
STARWELDS Inc., Busan 46722, Republic of Korea
*
Authors to whom correspondence should be addressed.
Metals 2023, 13(3), 488; https://doi.org/10.3390/met13030488
Submission received: 17 January 2023 / Revised: 20 February 2023 / Accepted: 24 February 2023 / Published: 27 February 2023
(This article belongs to the Special Issue High-Performance Alloys and Alloys Manufacturing)

Abstract

:
The need for additive manufacturing (3D printing) to create near net shape components from a wide variety of materials has grown in recent years. There are several additive manufacturing methods to build various parts by different materials. However, it is challenging to construct, the components with incompatible materials combination for high temperature and creep resistance using conventional methods. Consequently, the purpose of this research is to investigate the use of solid state welding (friction welding) in additive manufacturing (SSAM) of incompatible materials, namely alloy Cr18-Ni8 and 42CrMo4 low alloy alternative layers. The interface bonding strength must be strengthened to achieve the desired isotropic characteristics and high strength for the components. Due to the low temperature at the bonding interface, secondary phases cannot develop when solid state welding is used. In order to obtain the highest bonding strength, optimal process parameters were examined using design of experiments (DOE) with Box–Behnken design model and analysis of variance (ANOVA). The major process parameters of upset pressure, friction pressure and burn-off length were varied to obtain the optimal conditions. In addition, the bonded interfaces were examined by the microstructural characteristics as well as mechanical properties such as micro-hardness and bonding strength. The interface is made up of alloys intermixed with different zones such as a dynamically recrystallized zone and a thermomechanical affected zone. The intermixed layers revealed the migration of C and Mo to Cr18-Ni8 alloy and separated the Fe and Ni bands. The fractography analysis revealed ductile and slightly brittle fracture surfaces with a mixed mode. The relationship between bond strength and interface thickness was determined by studying the impact of interface thickness on bond strength.

1. Introduction

The continuous progress of technology has driven the demand for new and advanced materials, and this trend is likely to continue as more and more cutting-edge technologies are developed in the future. Creating novel materials to meet the requirements of emerging applications immediately is a challenging task. Therefore, as a result, efforts were made to create hybrid materials for use in manufacturing. As a result of their superior mechanical qualities, austenitic stainless steels found widespread use in a variety of contexts [1,2,3]. In addition, austenitic stainless steels have excellent corrosion resistance, tensile strength, and elongation even at high temperatures. However, these steels are expensive and restricted for some applications due to the thermal conductivity variations compared with other materials [4,5,6]. In order to accomplish the required properties of the parts, along with stainless steel, there are high tensile steels, and special steels are developed. Several industries, including the nuclear, power plant, chemical, and transportation sectors, have found success using alloys of stainless steel and high tensile steel [7,8,9,10,11]. The water reactor nozzle connection welded joints are the most complicated arrangement in that boiler system due to their dissimilarity. The joining of these dissimilar materials such as stainless steels and carbon steels or high alloying steels is difficult due to the using of improper filler metals, which cannot fulfill the required metallurgical bonding [12,13]. These filler metals typically function as under-matched fillers or may cause the formation of secondary phases. In addition, the carbon content of the high-strength low alloy steels is higher than the stainless steel and tends to form the carbides along the fusion boundaries and weld zone.
In order to avoid the difficulties of dissimilar welding materials, several new ways were considered, such as low-temperature welding techniques including brazing, solid-state welding, interlayers, and low-temperature welding. Among them, solid-state welding methods were widely used for welding dissimilar materials. In particular, friction welding and friction-based welding methods were achieved with excellent metallurgical bonding without defects and inter-metallics in the welds [14,15,16]. Due to the lower temperatures at the weld interface, the occurrence of phase transitions in friction welding are minimal. Except for certain essential metals, friction welding procedures can solve all of the issues that plague fusion welding techniques [17,18,19]. For example, the dissimilar materials of stainless steel to titanium alloys were friction welded using interlayers to avoid direct contact between two materials. The use of interlayers has resulted in the avoidance of the formation of inter-metallics in the weld interface [20,21,22,23,24]. However, the same materials without interlayer welded joints have several brittle intermetallic compounds of Fe-Ti, Cr-Ti and Ti-Ni-based phases, which are not plastically deformed and reduce the ductility of the joints [25]. Yet, joining steel to aluminum, stainless steel to copper, copper to aluminum, and titanium to copper all worked without the use of interlayers [26,27,28]. In friction welding, the variable welding parameters are very few compared to arc welding methods. The friction welding parameters of friction time, friction pressure, upsetting time, and spindle speed or rotational speed are the significant variables that can be used to control the process. However, joining dissimilar materials is always challenging to identify the suitable welding parameters due to their different physical properties [29,30,31]. It is necessary to derive the optimal welding settings using state-of-the-art design of experiments for each innovative combination in order to save processing time and offer the best possible welding results. Setting up a welding process with suitable input parameters is imperative to obtaining high-quality joints. For this reason, it takes long time- and money-consuming trials to determine the optimal set of friction welding parameters that will yield an acceptable result. To avoid this problem, mathematical models are developed to provide precise predictions for the selection of a combination of parameters and the relationship between input and output reactions. Several methods of mathematical models are developed based on the applications and the model of response surface methodology (RSM), which became one of the most valuable models for manufacturing units [32,33,34]. The response surface methodology refers to a set of mathematical and statistical modeling techniques that can be used to model and evaluate problems where the response is the result of a combination of several variables. Recent research has focused on optimizing the parameters of the friction welding process by employing state-of-the-art computer methods [35]. The optimization techniques were applied for the dissimilar welding of carbon steel to stainless steel by developing an empirical relation to estimating mechanical properties as an output [36]. Yousefiech et al. have investigated the optimization method using the Taguchi method and design experiments for the TIG welding with pulsed mode for the duplex stainless steel [37]. Response surface methodology also was used to develop the mathematical models to obtain the response graphs of the effect of input parameters on the output results. For this model, the input parameters of voltage, feed rate, travel speed, and arc length were considered to analyze the penetration, dilution, and bead width of the pipe welds welded by submerged arc welding [38]. Bakkiyaraj et al. [39] identified the optimization of friction welding parameters for the dissimilar welds of mild steel to stainless steel to predict the tensile strength. Based on the output results, it was identified that rotational speed was a most significant parameter to govern the process. Some of the studies by Palanivel et al. [40] investigated the variation in grain size due to variation of parameters in friction welding of titanium tubes using response surface methodology (RSM) and other optimization methods. The influencing parameter of rotational speed governed the grain size interpretation as increasing heat at the interface. Kimura et al. [41] reported that the tensile strength depends on the friction time and is determined by the RSM technique.
Ates et al. [42] investigated a novel artificial neural network (ANN) method for optimizing welding parameters of TIG welding to predict higher tensile strength and elongation. In this method, the experimental data was simulated using a numerical program to obtain the output. The validation results revealed have good agreement with the experimental results. Luo et al. [43] advanced the prediction method by mixing the integrated approach to control the friction welding flashed material at the interface of small tube welding. Moreover, it was achieved to prevent inner flash formation. Some of the studies on additive manufacturing resulted in the solving of various difficulties for the deposition of incompatible materials using various methods [44,45]. Thus, research into the optimization, numerical aspect, and modeling of the friction welding method has occurred. The majority of the researchers focused on the effect of welding parameters on the metal loss of tensile strength with an improper combination of input parameters. Even though the optimization and modeling methods were adopted to predict the strength of the joints, the responses were a mandatorily good fit for the prediction of the output responses. Hence, it is crucial to investigate the suitable welding parameters which significantly influence the required output responses. The selection of proper friction welding conditions can lead to good mechanical properties. However, this approach is applied by very few studies along with optimization.
In the present investigation, an attempt has been made to understand the fundamentals of the bonding interface during solid state additive manufacturing using friction welding between dissimilar materials of Cr18-Ni8 (304SS) with 42CrMo4 (SCM440). A Box–Behnken design was employed to determine the influence of parameters interface and bonding strength.

2. Design of Experiments

In friction welding, the input parameters are relatively less than the other welding methods. However, the selection of a suitable combination of parameters is highly required to obtain high-quality joint strength. The independently controllable process parameters were determined based on the results of prior experiments Previous test findings were used to determine that the most influential conditions for the chosen dissimilar materials combination were a combination of friction pressure (FP), upset pressure (UP), and burn-off length (BOL). The range of these welding conditions was obtained from the trail test results and are used for further experiments by using design of experiments. The minimum and maximum limits of the welding conditions are given in Table 1. The Box–Behnken experimental design is used for the DOE, and the range of welding conditions is used as the independent variable. In this model, 17 combinations of coded conditions are determined as per the mathematical model based on the given range of conditions. The output of the DOE was utilized to mathematically determine optimization strategies and evaluate the responses to the outcome. The DOE can decide the combinations appropriately to obtain the excellent strength of the welds. The DOE data was capable of estimating the parameters using either quadratic or linear models.

3. Materials and Methods

The experimental conditions were designed based on Box–Behnken DOE using 3 levels of factorial design. Based on the DOE suggested combination of conditions, experiments were performed on continuous drive friction welding. The friction welding machine was made by KUKA with a load capacity of 150 kN. The dissimilar materials of Cr18-Ni8 with 42CrMo4 of 12 mm diameter and length of 120 mm were used for the analysis. The chemical composition and mechanical properties of the substrates are given in Table 2 and Table 3, respectively. In this study, friction time 5 s, upset time 5 s and rotational speed 1500 rpm were kept constant after several optimal test trail runs. The other major three parameters of friction pressure, upset pressure and burn-of length were used as variables to obtain the optimal conditions. Strong welds could be achieved due to the machining of the rods’ faying surfaces to achieve a smooth, flat surface. The surfaces were also cleaned with alcohol to remove the dirt and grease tints before welding. The substrates of stainless steel were positioned as a fixed member and 42CrMo4 steel kept as a rotating member for welding as shown in Figure 1. The following procedure was used for the deposition of additive layers. To produce the bonding between two materials, the initial procedure is the same as with regular friction welding. After the initial welded joint was obtained, the substrate was cut about 10 mm from the bonding interface, which is fixed on the rotating chuck side (42CrMo4 steel). To obtain the second layer, another Cr18-Ni8 substrate was replaced on the rotating chuck side and welded to the 42CrMo4 deposited layer. Again, about 10mm of Cr18-Ni8 was cut, which became the second layer. This process was repeated until the required height was reached. The thickness of the first layer was reduced and extruded as a weld flash during the deposition of the second layer. The size and diameter of the weld flash is not same for both the materials due to the difference in their physical properties (see Figure 1) The samples were cross-sectioned to analyze the microstructural analysis after polishing the surfaces as per the standard metallographic procedures. For tensile strength analysis, the samples were prepared as per the ASTM-E8 standard in cylindrical form after removing the weld flash. The samples for fatigue strength, the samples were prepared as per the ASTM E466 and tested with high cycle fatigue conditions. The microstructures and fractography analysis were analyzed using a scanning electron microscope and optical microscopes. After obtaining the tensile strength, the data was used for optimization analysis using the ANOVA technique with a quadratic model.

4. Mathematical Model

The variable factors of FP, UP, and BOP are considered input factors and the tensile strength is the output response. The response functions are expressed as
TS = f(FP, UP, BOL)
where TS is the tensile strength, FP is the friction pressure, UP is the upset pressure and BOL is the burn-off length. The mathematical models to use to determine the relationships between input factors and output responses at a confidence level of 95%. The relationships of tensile strength were formed a non-linear function of input factors. The relationship can be formed as follows.
TS = a0 + a1FP+ a2UP + a3BOL + a12FP × UP + a13FP × BOL + a23UP × BOL + a11FP2 + a22UP2 + a33BOL2
where a0 is the average of output responses and a1, a2 a3…a33 are the response coefficients which are dependent on the effect of input parameters. Based on the DOE, the significance of the model and the combination of welding parameters with output responses are confirmed by using p values. The values of p less than 5% (0.05) indicate significant models. Whereas, the p values greater than 0.05 are insignificant models. A two-factor interaction model, 2FI, is utilised for the sequential sum of squares for the two-factor interaction such as FP, UP or UP and BL, etc. While using a linear model, the F-value tests the significance of adding interaction terms. The p value of the linear model is 0.76 and of the 2FI model is 0.61; both are suggested as near matching models. However, for the quadratic vs. 2FI model, the p value is 0.0028, which is suggested and significant for the present model. Among three welding parameters, the friction force is an essential factor to relate the combination with other factors and also significant with the second order form. Parameters for optimal strength have been predicted with the help of the ANOVA optimization method, with tensile strength and friction welding parameters serving as inputs. The 2D and 3D response surface graphs were created to display the results with the link between input parameters and tensile strength. Moreover, the data of the prediction by mathematical model and the actual data comparison showed good fitting with the model to form a linear relation with the regression of 1.

5. Results and Discussion

Optimization

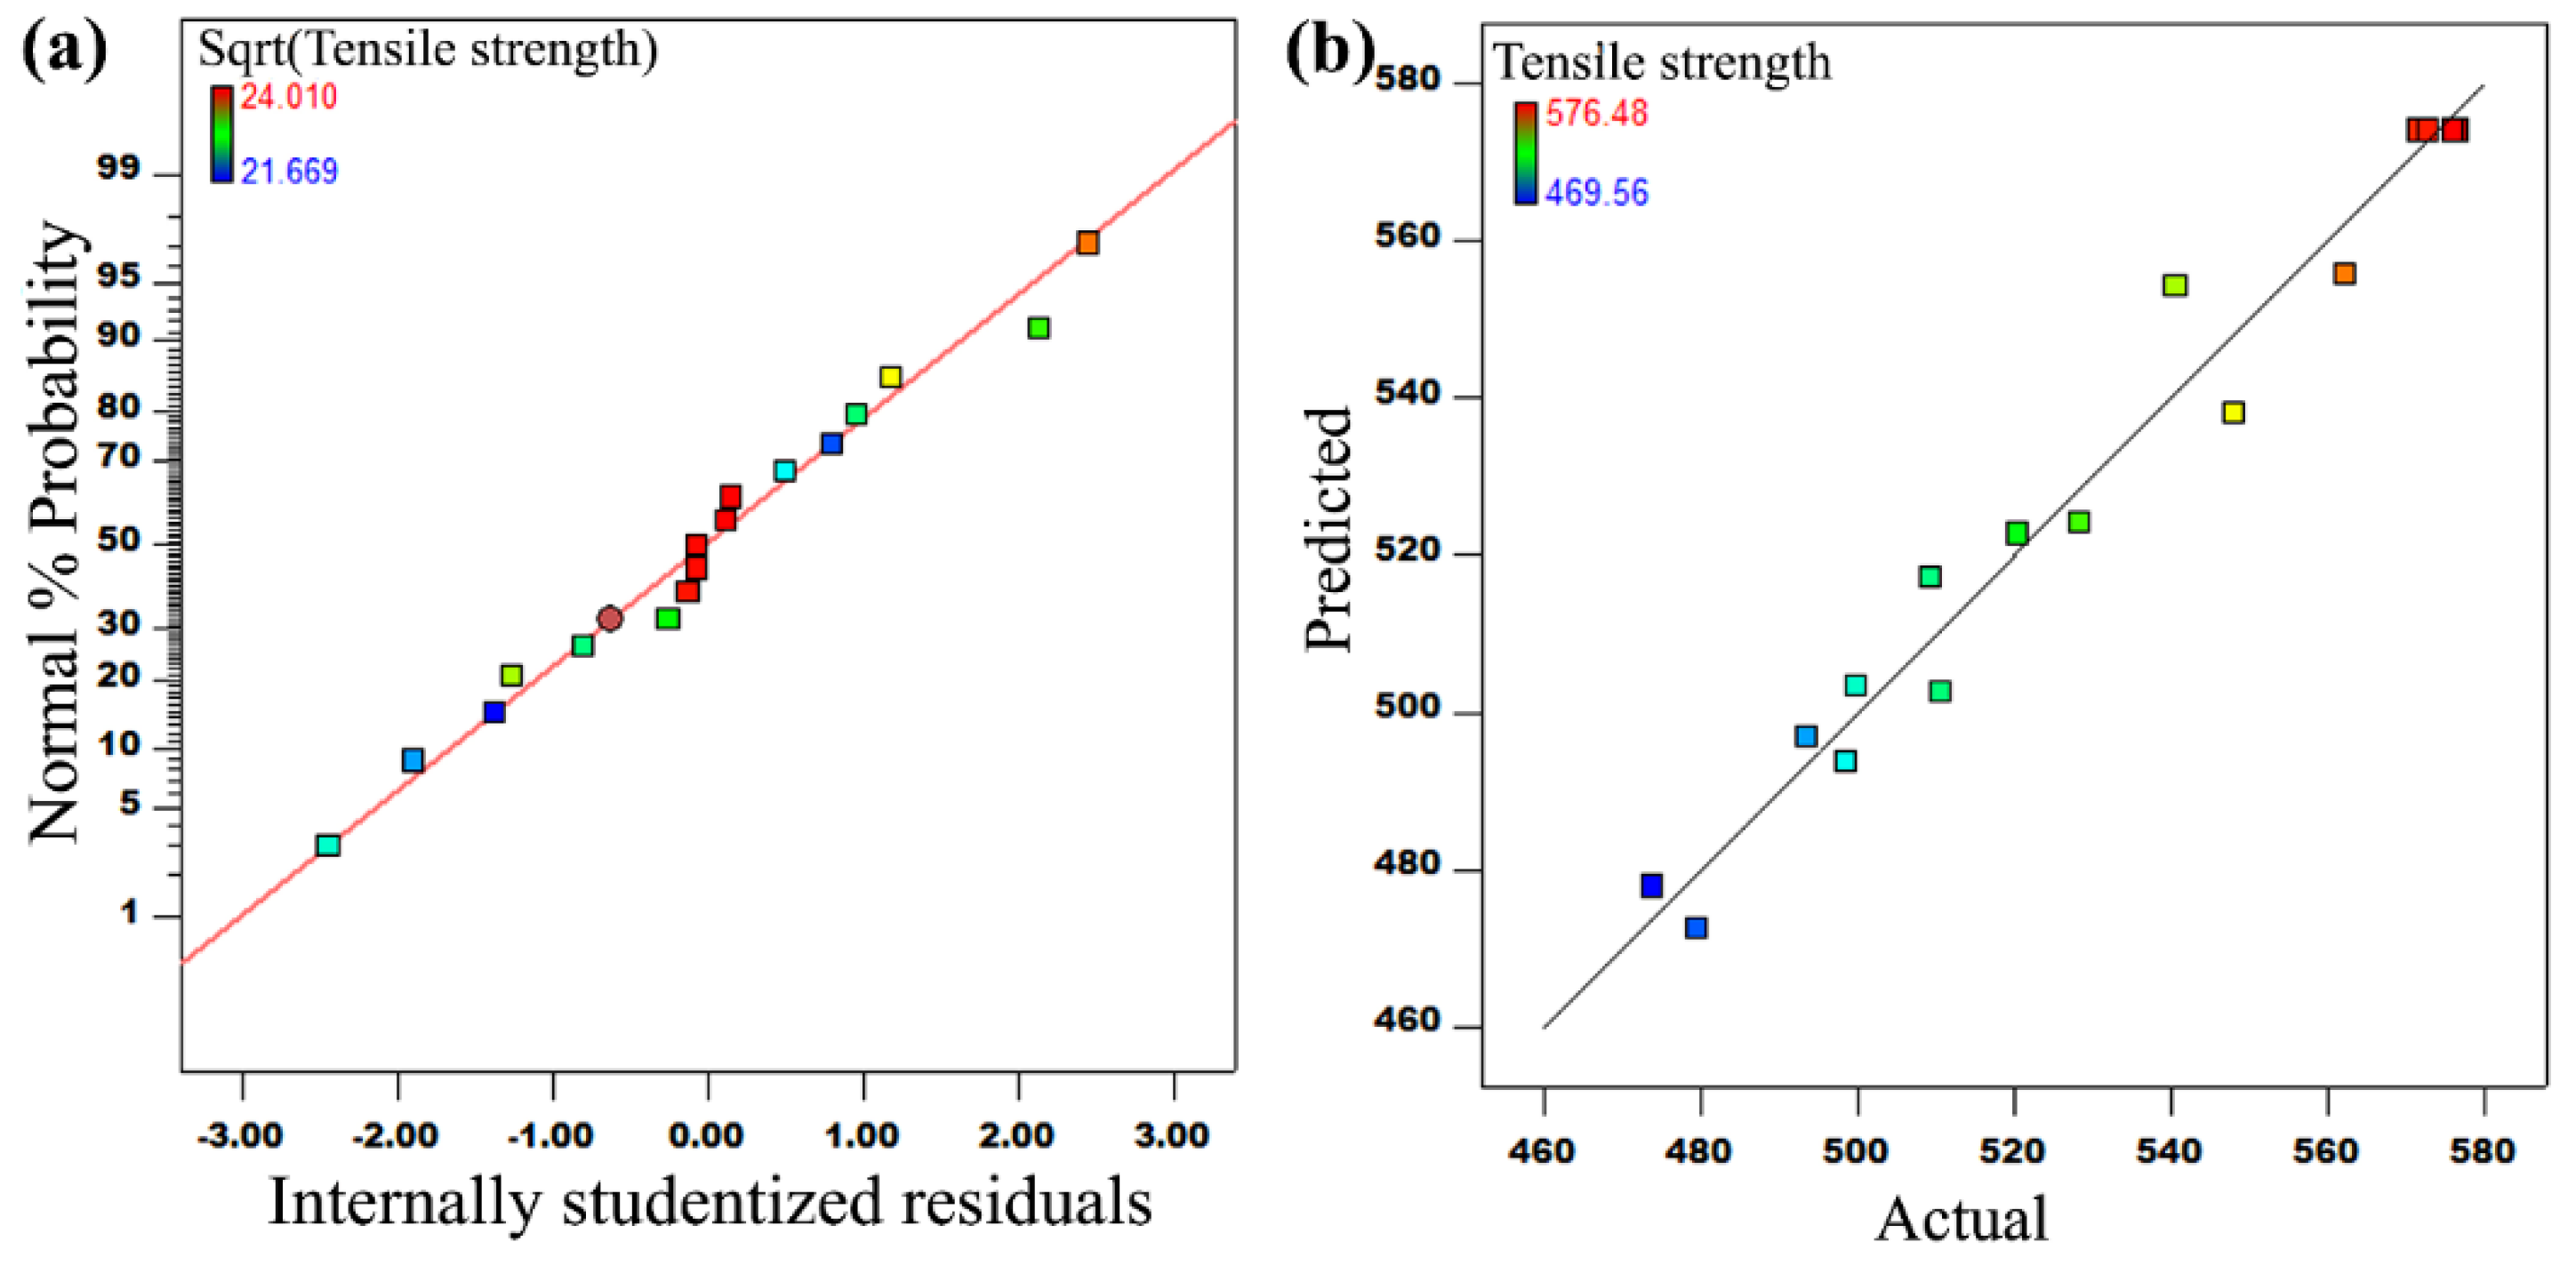
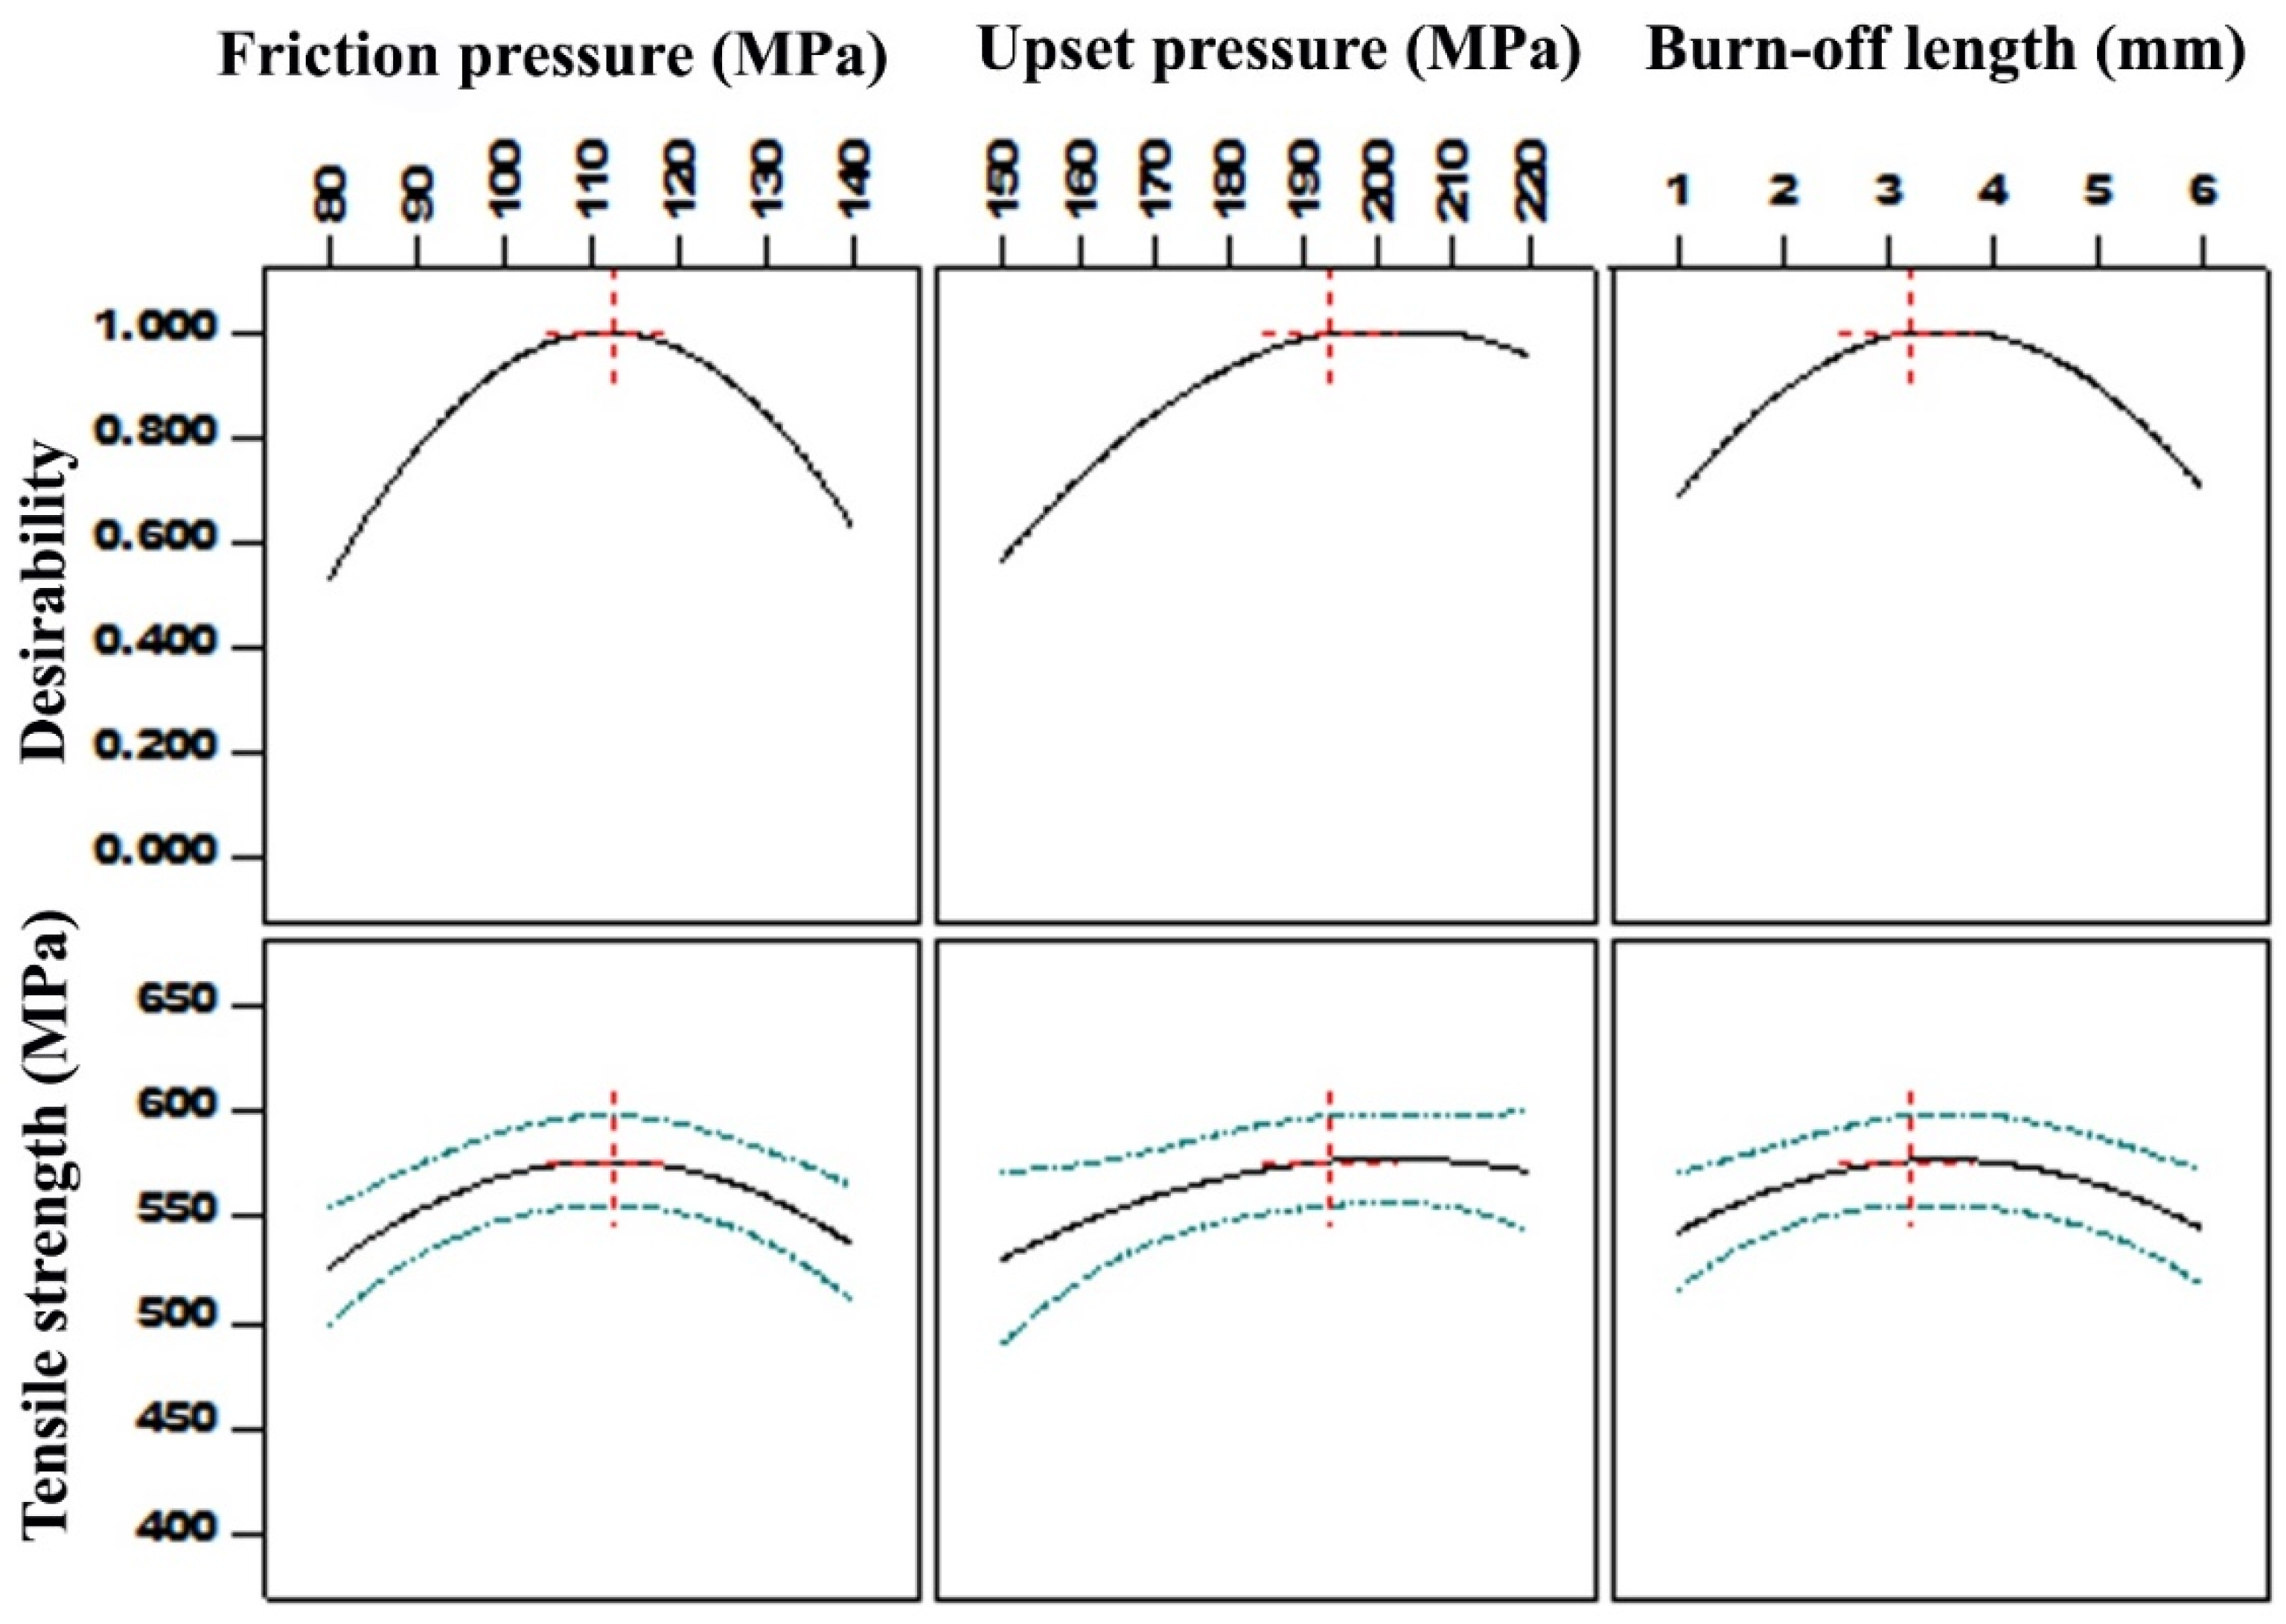
The DOE model by Box–Behnken design matrix according to the minimum and maximum limits (see Table 1) is given in Table 4. There are 17 combinations, with the experimental data results in Table 4. The experimental data of tensile strength was used to develop the mathematical models to predict the parameters for the desired output. Equation (3) establishes the mathematical connection between the input variables and the estimated tensile strength. Using Equation (3), the tensile strength can be predicted for any welding condition from the selected combinations. Figure 2 shows the linear graphs of residual of the design and output values with the normal % probability and the relation between actual and predicted. In this case, the actual and projected data points form a linear relationship with small residuals. Both the largest and smallest possible residuals must fall within a range of 2.5, and the likelihood of having no residuals at all is substantially higher than having any of the other values. It means that the selected design is accurate and can fit the data with the input factors to predict the tensile strength. Figure 3 illustrates the individual factors effects on output responses of tensile strength.
Sqrt(TS) = −20.37 + 0.33 × FP + 0.22 × UP + 2.07 × BOL − 4.69 × 10⁻⁴ × FP × UP − 1.86 × FP × BOL − 5.51 × UP × BOL − 1.06 × FP2 − 3.81 × UP2 − 0.11 × BOL2
A parabolic approach influences the effect of friction pressure on tensile strength that as the increase of friction pressure from 80 MPa to 112 MPa, tensile strength is gradually increased. However, the further increase of friction pressure resulted in a decrease in tensile strength due to the excessive heat generation at the weld interface. The graph’s desirability expressed its influence on tensile strength, with the maximum desirable value being around 112 MPa and below or above, which has a negative impact on tensile strength. In the case of upset pressure, however, the tensile strength gradually increases from 150 MPa to 194 MPa. Further increasing this value resulted in constant strength with no significant changes up to a point where it began to decrease. The effect of burn-off length also seems to be similar to friction pressure in that it affects increasing tensile strength as increasing BOL from 1 mm to 3.2 mm, and further increasing resulted in decreasing.
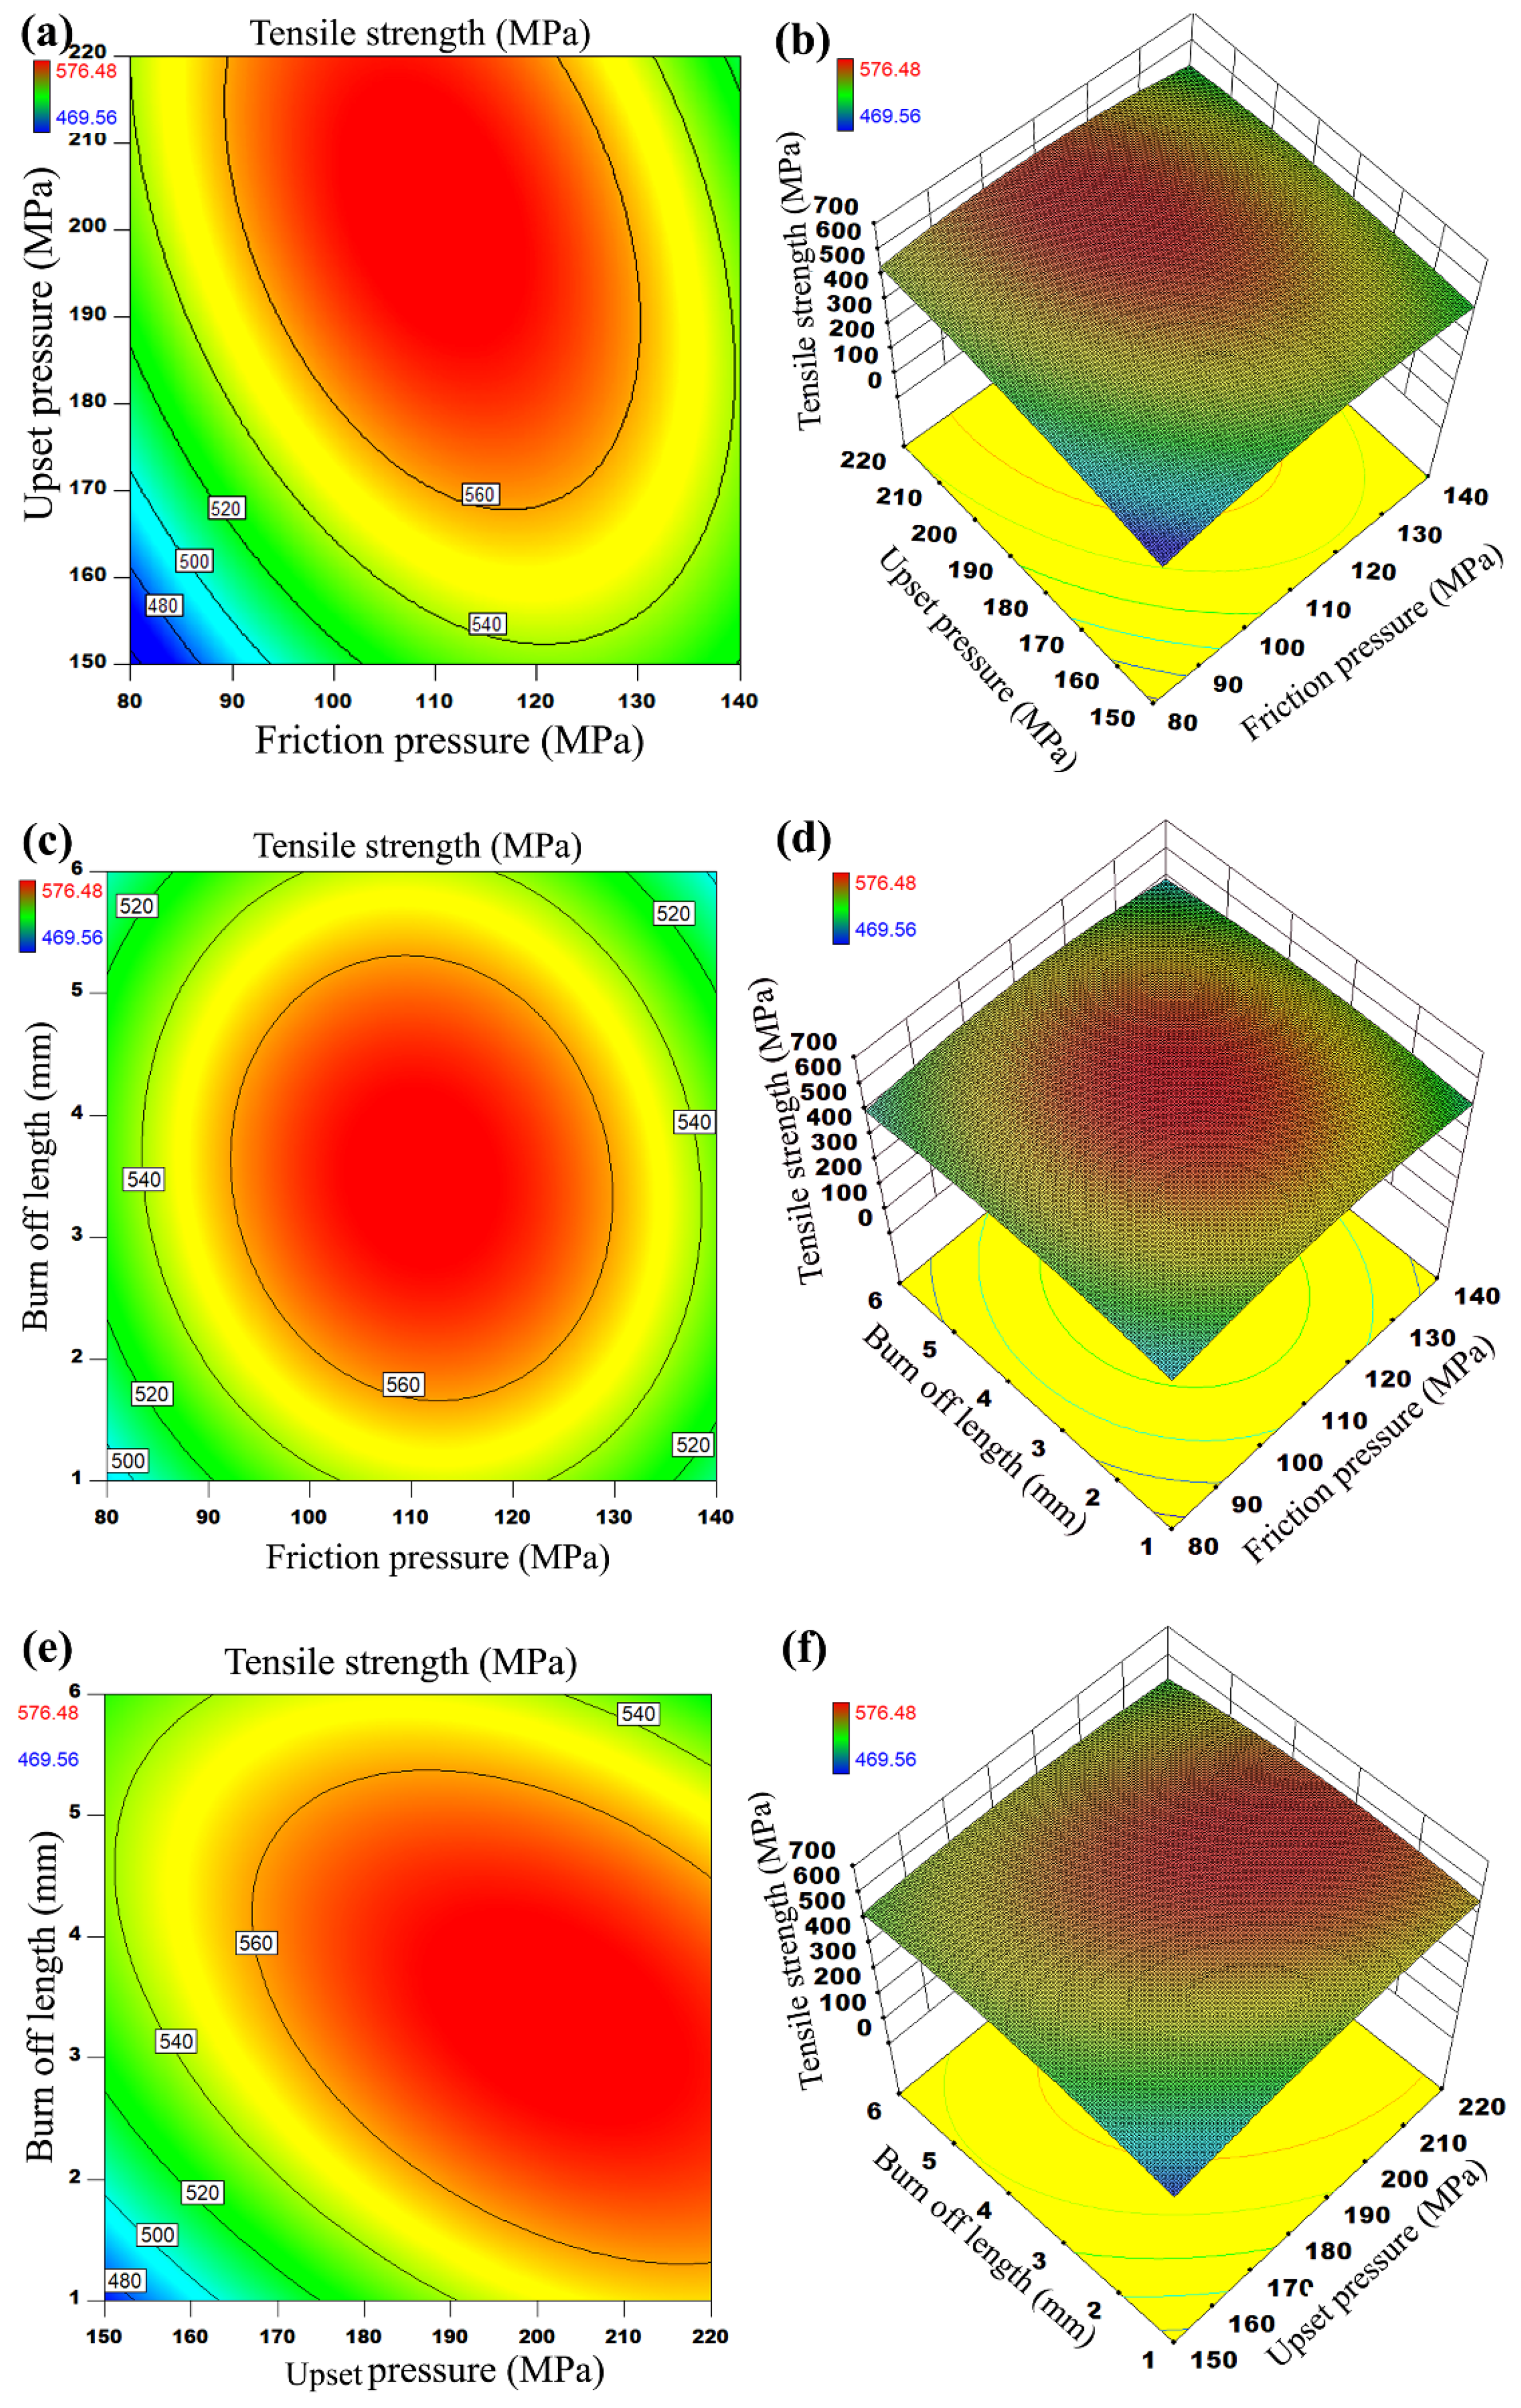
Figure 4 exhibits the contour plots of the responses and input factors in 2D and 3D views to reveal the relationship between input factors and tensile strength. The combined factors’ effect on tensile strength is clearly indicated using contour graphs. The combination of FP and UP revealed that the higher tensile strength was obtained at a higher UP and medium FP. The lower values of FP and UP showed lower tensile strength, whereas an increase of FP resulted in an increase in tensile strength.
On the other hand, the combination of FP and BOL indicated that the tensile strength is higher at the medium values of FP and BOL. The maximum FP of 112 MPa and BOL of 3.4 MPa achieved the highest tensile strength. The vast region of the zone is available to obtain the higher tensile strength using FP and BOL combinations. This set of contour maps indicates that increasing the FP and BOL are not necessary to reach the maximum tensile strength. The combination of UP and BOL revealed that the highest tensile strength is achieved at higher UP and BOL values. At a BOL range of 2 to 5 mm, the maximum upset pressure of 200 to 220 MPa has the highest tensile strength. The contour maps indicate the effect of multi factors on the tensile strength, which is more precise than individual factors. In particular, in welding processes, the impact of multi factors is more reasonable and practical than the effect of single elements. Moreover, the 3D view of the response contours revealed the wide scope of the parameters on the output responses to select the welding conditions much more precisely.
The optimization of the results by the analysis of variance (ANOVA) technique is given in Table 5. The degree of freedom for the different models is 3, and the p value is recorded as 0.75 to 0.002. However, the quadratic model is the only one that showed a significant model with a p of 0.0028, which is below 0.5 as per the DOE model and optimization techniques. The quadratic model satisfied the F value, mean square and sum of squares in the appropriate range to meet the model boundaries. The residuals are formed at a minimum and are below the standard reference of 5.
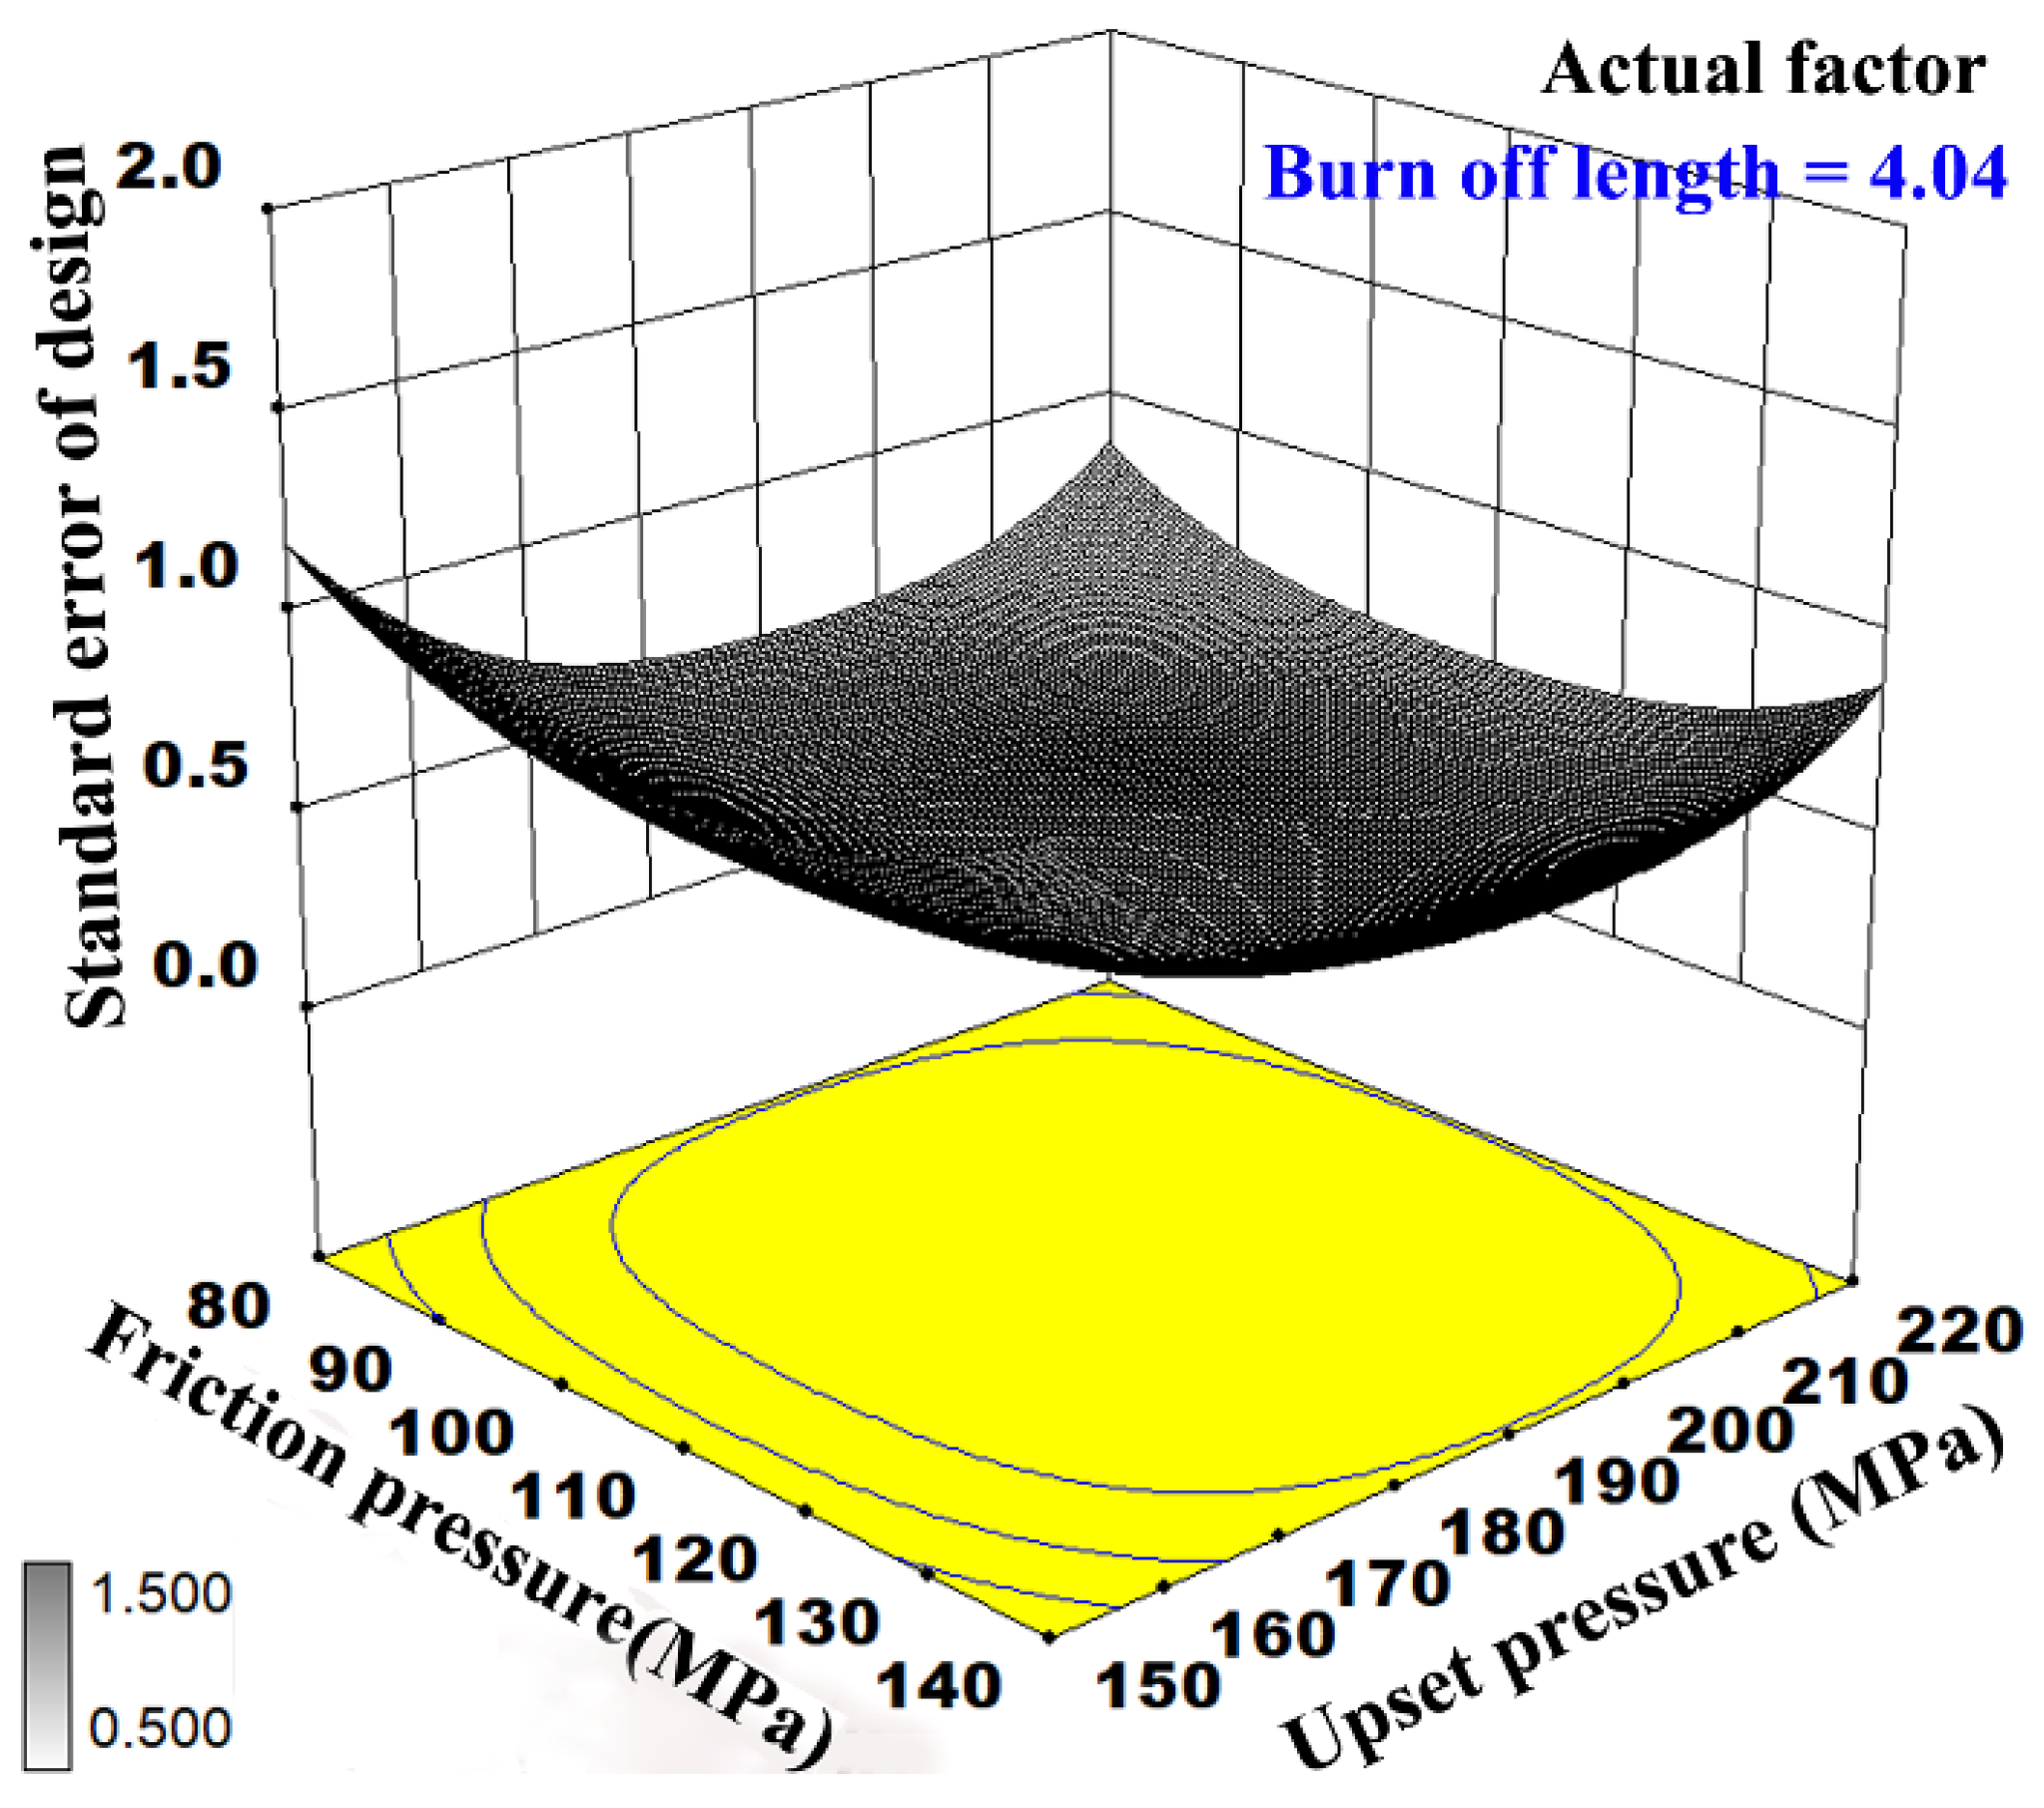
The ANOVA table with optimization of the model data is given in Table 6. The design matrix was evaluated based on the quadratic model, taking into account the available data of the results. As per the table values, it is recommended that the standard errors should be smaller and fall within the type of coefficient. Coming to the VIF value, 1 is the idle value, and if it is above 10, then it is a signal of cause for concern. Whereas, if it is more than 10, and nearly 100, it is a sign of alarm and means that the coefficients are misestimated due to multi-collinearity. Table 7 shows the degree of optimization and its accuracy for the model. There are three different models reported to compare the present DOE model. Among them, the quadratic model is suggested based on the highest R-squared value with the minimum deviation. The developed model for the dissimilar materials of 304 stainless steel and 42CrMo4 steel is accurate and achieved 88% model accuracy. Using this DOE technique and ANOVA optimization technique, the predicted results are in good agreement with the experimental results. Figure 5 illustrates the Box–Cox plot for power transmission considering lambda and Ln residuals. Power is evaluated over the −1 to 1 coded factor. However, the current value of 2.71 is extremely close to the optimal value of 3. The actual welding conditions’ standard error design is depicted in Figure 6. As previously stated, the model’s accuracy is 88%, with the major influencing parameters of friction pressure and upset pressure detailed. The standard error of design is recorded as 1.2 for both the parameters of FP and UP. Figure 7 represents the ramp function of the graphical desirability optimization model with individual factors range. The model’s desirability is 1, and the error in the output response is 0.18.
Figure 8 shows the design model and the response factors in a mathematical form with the cube of different elements. The validation test results show the desirability of 1 and the predicted value of 576.71 MPa. The entire model design includes the ranges of each input factor and optimal values, and also the predicted data values. The mathematical equation to predict the optimal welding conditions (input data) for the highest tensile strength (output results) is efficiently developed using the selected design model and optimization technique. The validation test results revealed the value of tensile strength is 572.14 MPa and the predicted value is 576.71 MPa. The standard deviation is 19.88 and the model is accurate with 95% desired confidence.
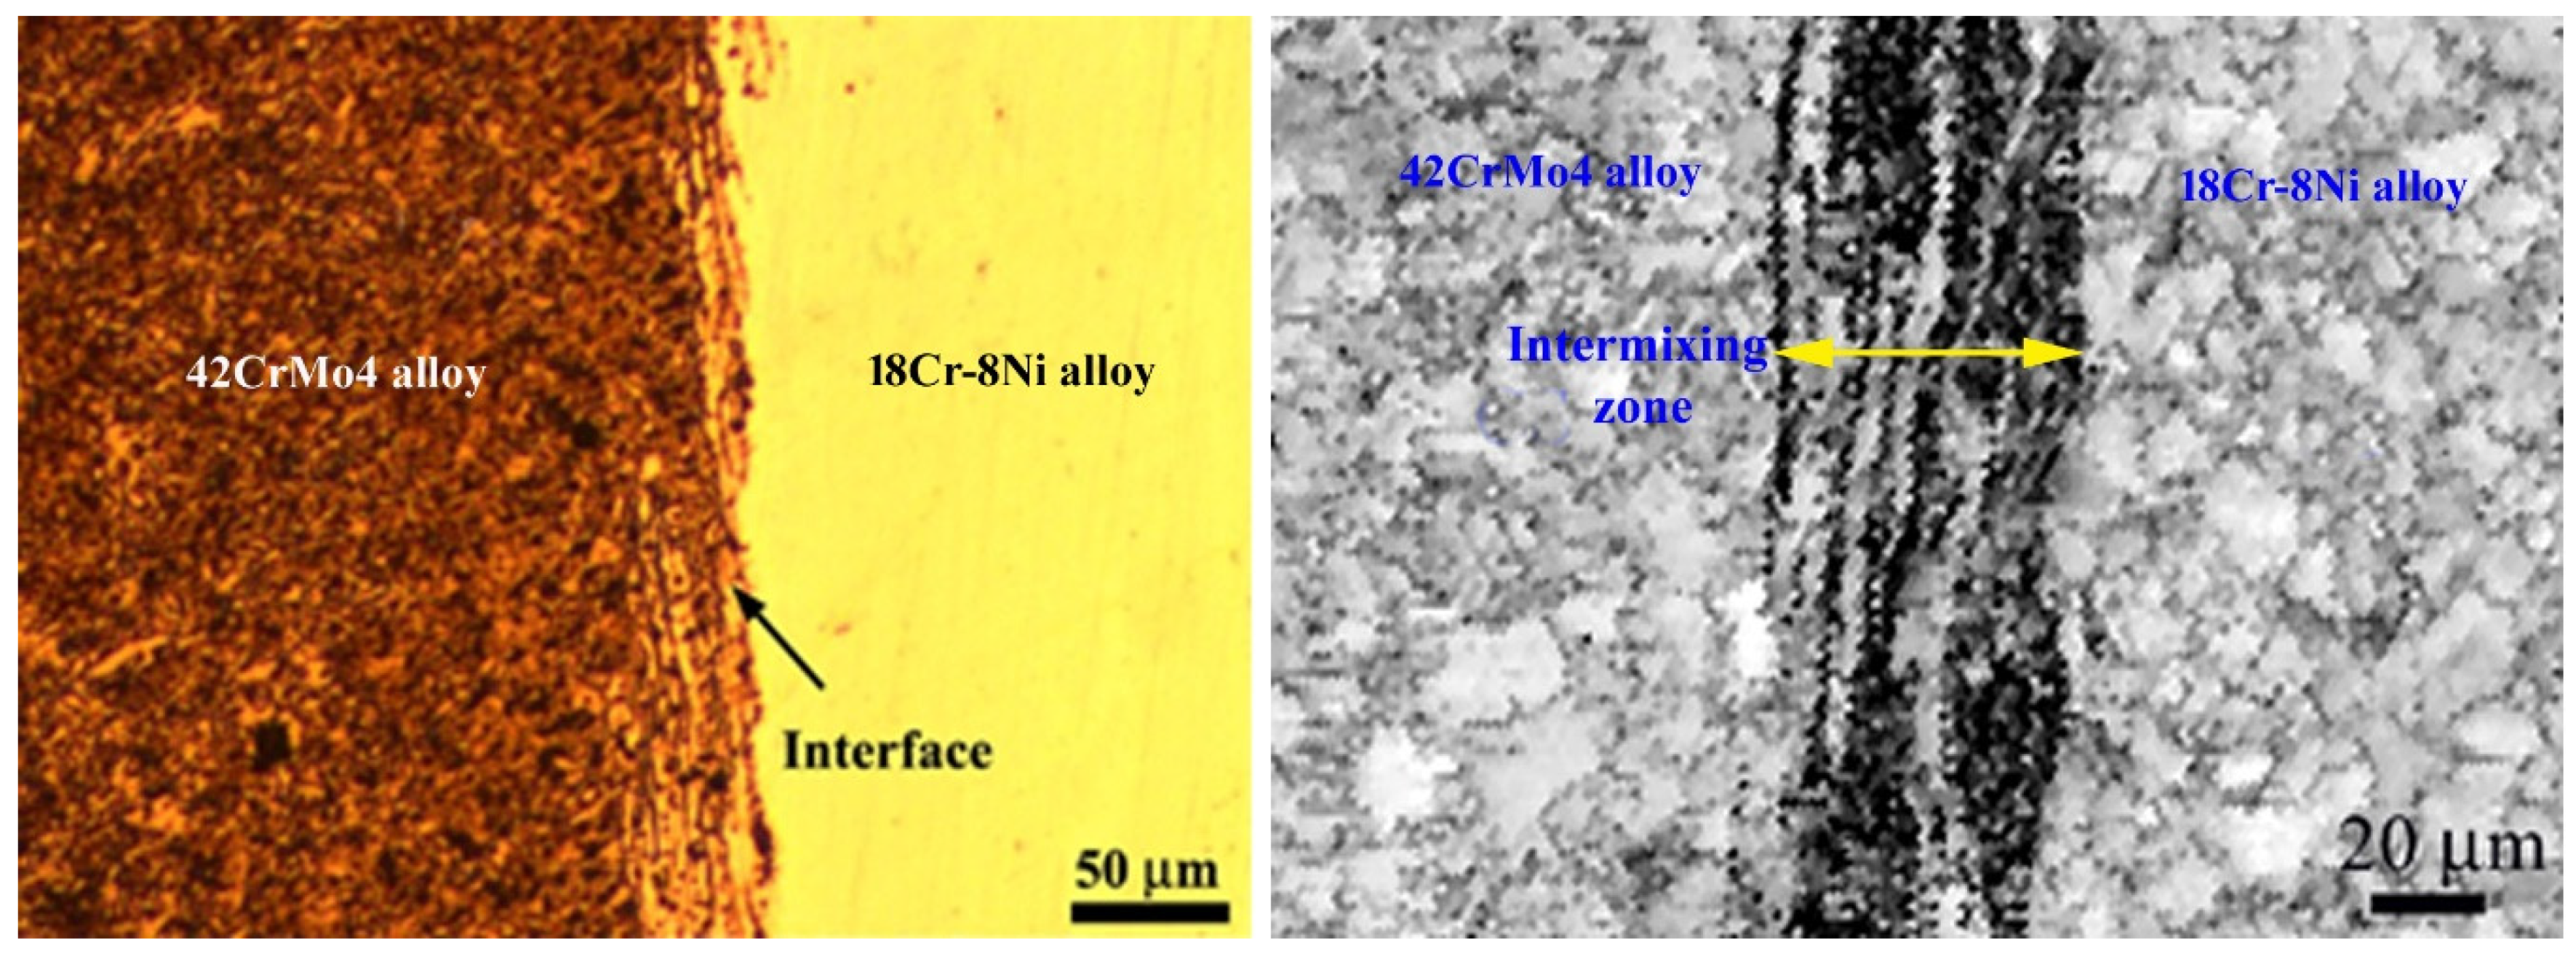
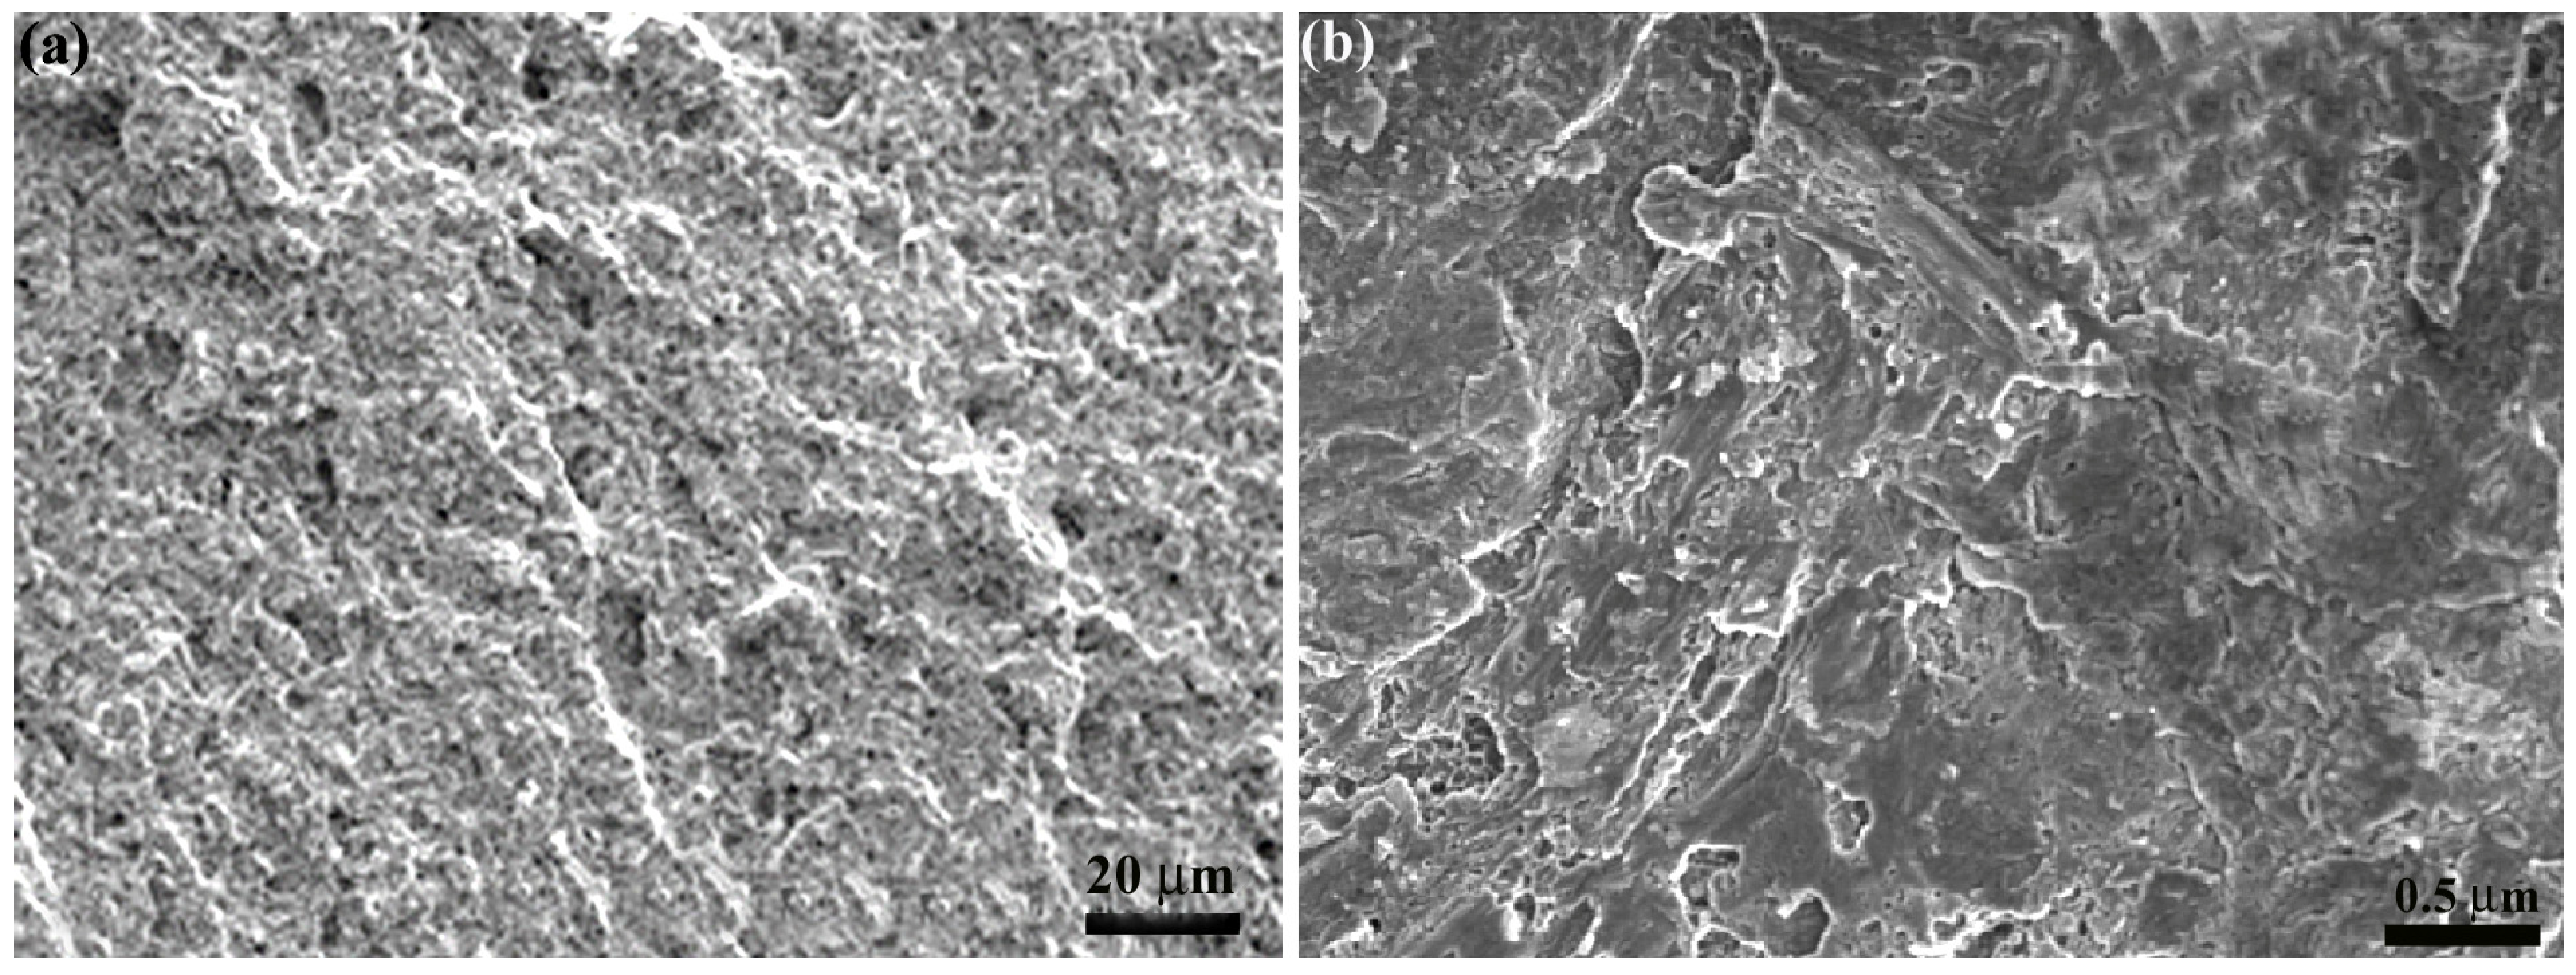
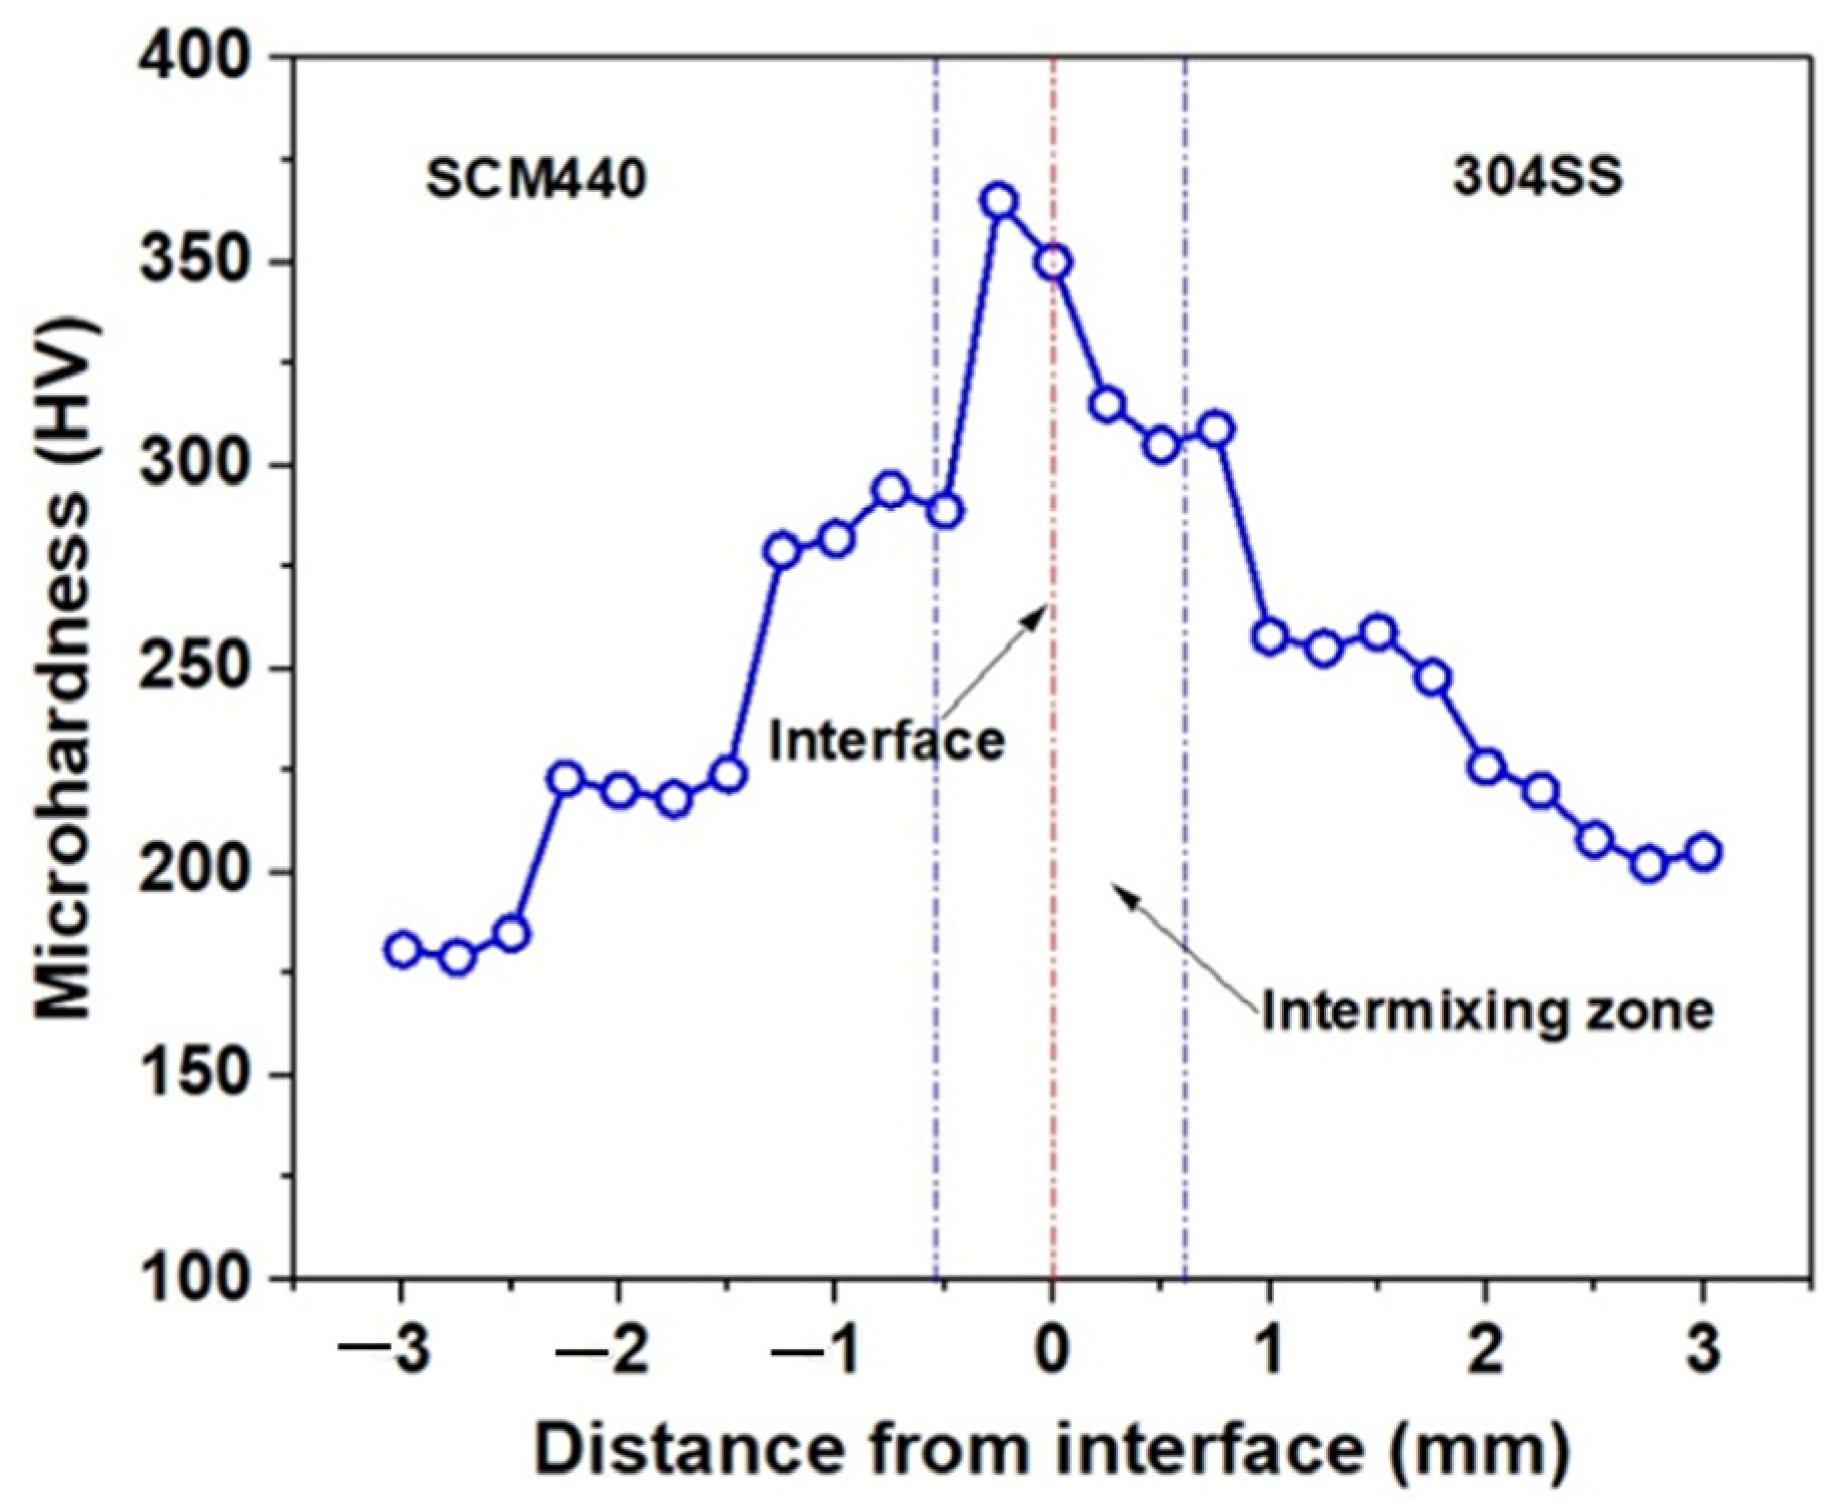
Figure 9 illustrates the microstructure of the dissimilar welded joint. In dissimilar friction welding, the metallurgical bonding between two surfaces (interface) forms with the intermixing of both the materials under friction force. Intermixing and diffusion occur at the interface during friction welding, resulting in strong metallurgical bonding. The intermixing zone is about 80 µm observed, which is intermixed with 18Cr-8Ni into 42CrMo4. The zone adjacent to the interface experienced severe plastic deformation under friction force and upset force. The deformed region is called a dynamic recrystallization zone (DRX) where the microstructure is deformed and changes grain structure with fine grains. Whereas, the formation of martensite microstructure is observed on the 42CrMo4 side due to the thermal cycle of heating and cooling at the interface. The microstructure on the 18Cr-8Ni side is slightly deformed; its microstructure is adjacent to the interface. The width of the intermixing zone is dependent on the material type and welding conditions. The dissimilar combinations of friction welding carbon steel to stainless steel welds revealed that the intermixing zone varies with BOL [46,47,48,49,50]. The width of the intermixing zone is optimal for this combination of materials and can be varied by combination of welding conditions. Figure 10 illustrates the fractography of the tensile fractured surfaces of the dissimilar friction welded joints. The fracture surfaces revealed the presence of dimples with a ductile mode of fracture. According to the optimal welding conditions and the higher tensile strength, the mode of fracture also evidenced that the joint, if formed firmly without any defects and strong interface, formed between 42CrMo4 and 18Cr-8Ni. The microhardness of the welded joints was measured and represented in Figure 11. The highest hardness is achieved at the interface, where the intermixing zone is formed. The presence of highest hardness is due to the formation of deformed bands along the interface [51,52,53]. Some of the bands resembled martensite flakes with plastic deformation under rotational speed. Therefore, its hardness is relatively higher for the intermixed bands in the intermixing zone. The hardness is slightly higher on both sides of the interface where the DRX region is presented. With the formation of fine grains and deformed microstructure, the DRX zone of hardness is higher than the matrix [54,55,56,57]. Even though the hardness of the interface is higher, the strength and elongation of the joints are not lower and are degraded by high hardness intermixing bands. The predicted friction welding conditions are accurate and effectively used to produce the dissimilar combination of friction welded joints.
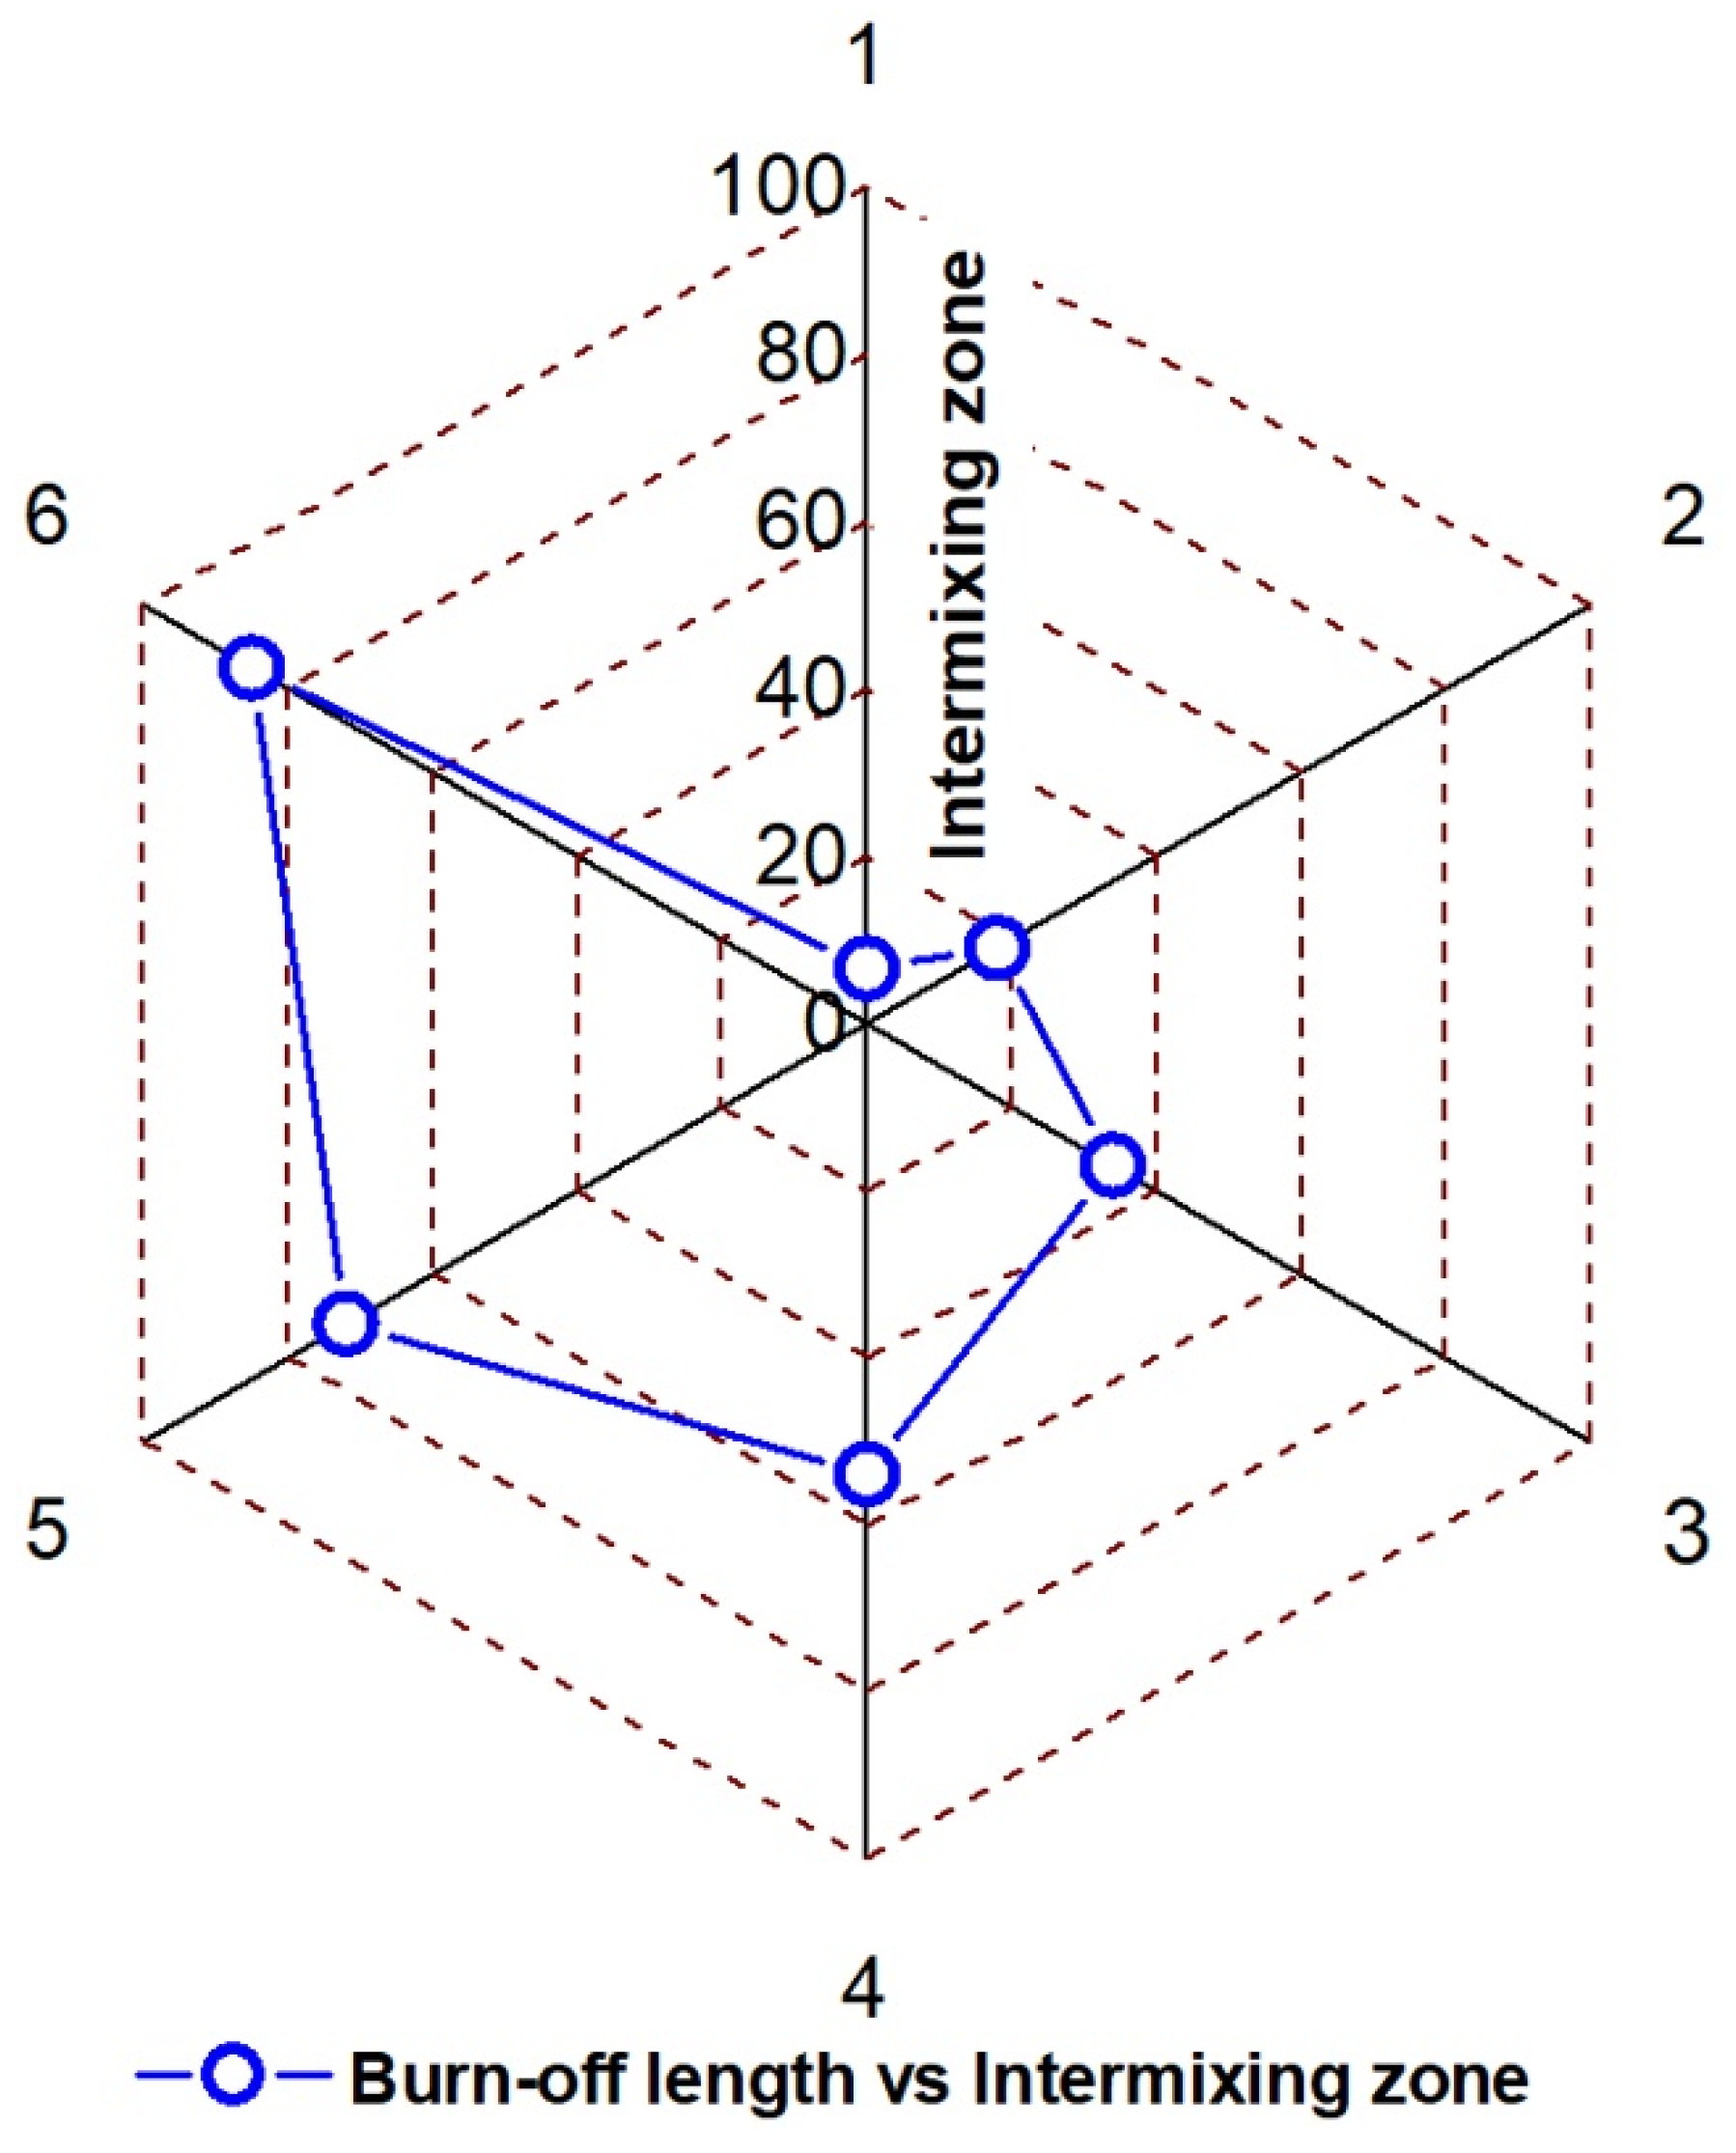
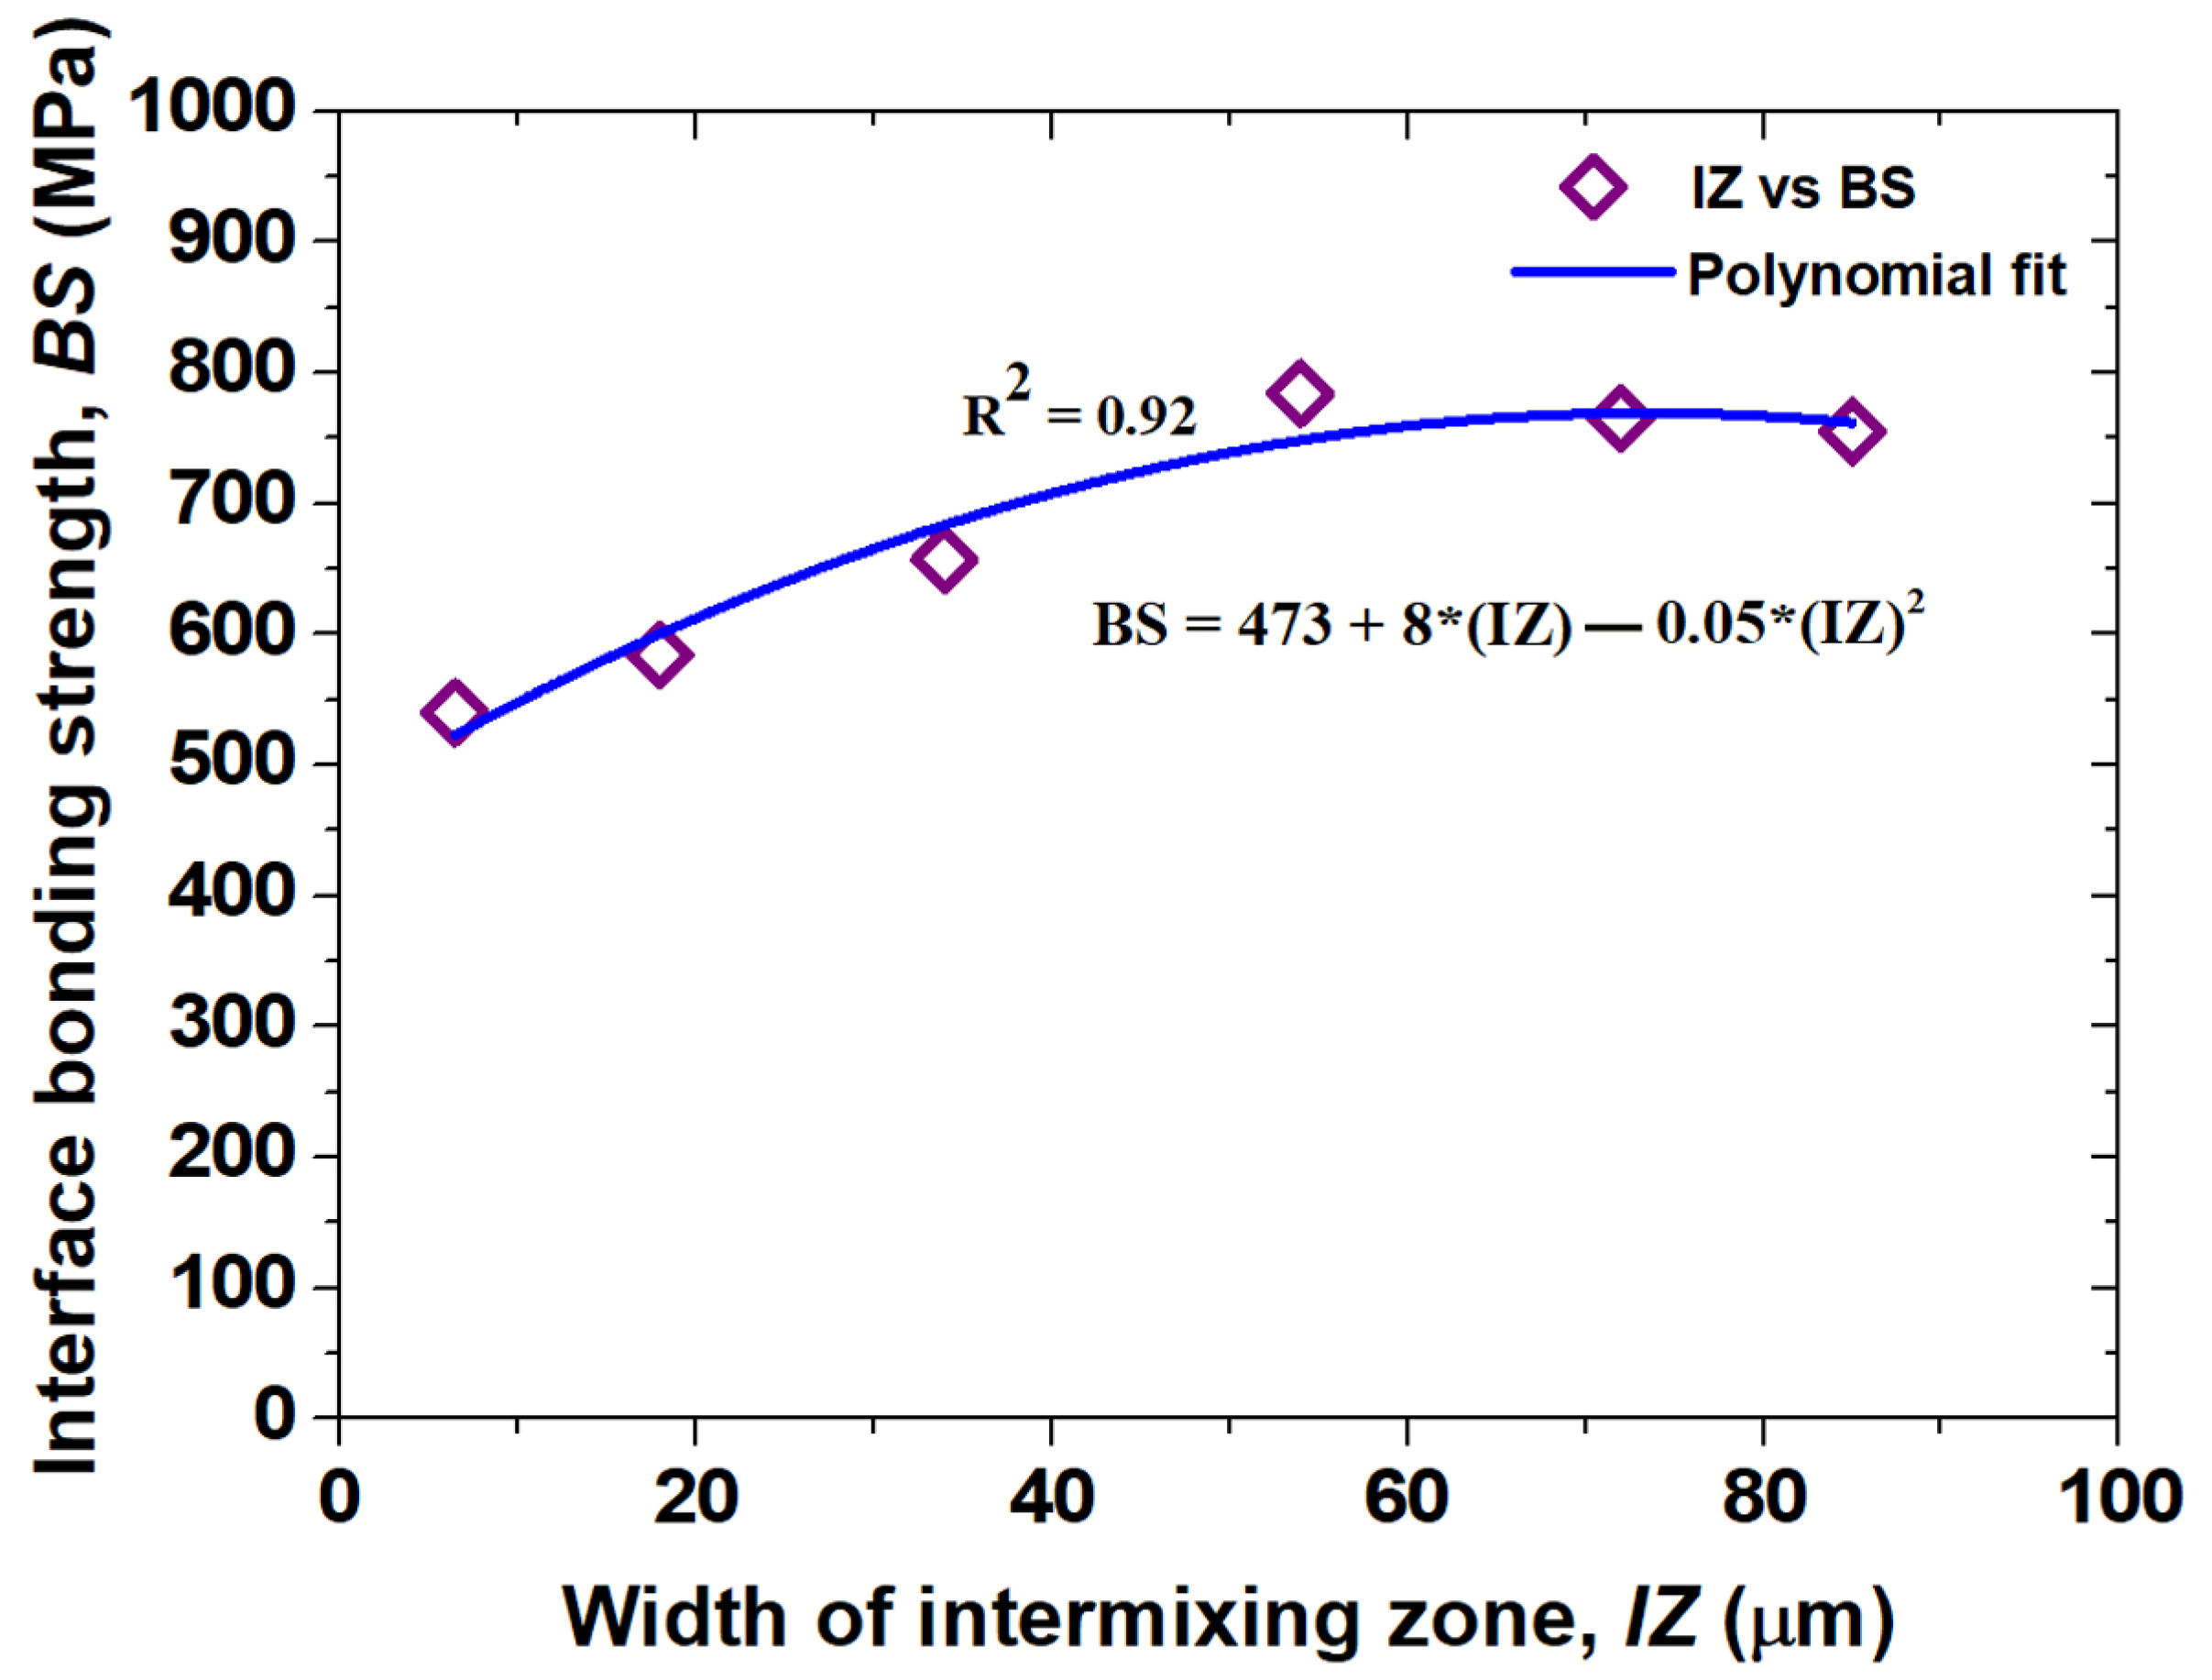
Figure 12 illustrates the variation in intermixing zone width as increasing of burn-off length. During welding at friction stage, the interaction of friction time between two materials is determined by of the selection of frictional time and pressure. The formation of the intermixing zone most likely depends on the selection of burn-off length values. The results revealed that the width of intermixing zone increased gradually along with increasing burn-off length. Consequently, the influence of intermixing zone width on bonding strength is clearly indicated in Figure 13. Initially, as increasing the width of intermixing zone, bonding strength also increased. Whereas, the bonding strength starts to reduce after reaching the critical value. The further increase of intermixing zone width revealed negative effect on the bonding strength. The microstructures of the interfaces revealed the formation of interface with the presence of intermixing layers from two dissimilar materials. Figure 14 illustrates the deposition of dissimilar materials part using SSAM with the wall resolution. The resolution of the wall is rough due to the difference in size of the weld flash of dissimilar materials. As mentioned above, a wide width of intermixed zone can be seen at burn-off length 6 mm in Figure 15c. An optimal burn-off length and intermixing zone is necessary to obtain the highest bond strength.

6. Conclusions

In this study, the dissimilar materials of Cr18-Ni8 and 42CrMo4 are used for solid state additive manufacturing using friction welding. The dissimilar materials were successfully deposited and analyzed their bonding interface characteristics and mechanical properties. The welding parameters were optimized to obtain the optimal parameters for higher bonding strength. The major conclusions of the results are as follows.
  • The mathematical models obtained to correlate the effect of friction process parameters in the bond strength using response contour graphs.
  • The bond strength is significantly affected by the friction force and burn-off length. Tensile strength is identified as increasing with the increasing of friction pressure and burn-off length up to optimal values, after which it started to decrease.
  • Above the critical point, the intermixing zone widened as the burn-off length increased, indicating a weakening of the bonds.
  • Due to the interplay of the bands, the maximum hardness was achieved near the interface. The fractography results showed that there were no brittle phases present, indicating that the fracture happened in a ductile manner.
  • The additive manufacturing process in the solid state results in deposits with a low wall resolution. Mixing zones where elemental bands migrate in opposite directions to generate microstructures at interfaces.
  • The structure property correlations, linearity of the deposition and defects analysis are considered as a future interests.

Author Contributions

Conceptualization, S.Q.M., M.C. and V.V.M.; methodology, M.C., V.R., T.B.K., R.S. and S.M.P.; investigation, M.C. and V.S.; writing—original draft preparation, S.Q.M., M.C. and T.B.K.; Writing—review and editing, R.S., S.Q.M., V.V.M., V.R., T.B.K. and M.C.; validation, V.V.M., S.M.P., V.S., R.S. and M.C. All authors have read and agreed to the published version of the manuscript.

Funding

This research received no external funding.

Data Availability Statement

Not applicable.

Conflicts of Interest

The authors declare no conflict of interest.

References

  1. Paventhan, R.; Lakshminarayanan, P.R.; Balasubramanian, V. Optimization of friction welding process parameters for joining carbon steel and stainless steel. J. Iron Steel Res. Int. 2012, 19, 66–71. [Google Scholar] [CrossRef]
  2. Muralimohan, C.H.; Ashfaq, M.; Ashiri, R.; Muthupandi, V.; Sivaprasad, K. Analysis and characterization of the role of Ni interlayer in the friction welding of titanium and 304 austenitic stainless steel. Metall. Mater. Trans. A 2016, 47, 347–359. [Google Scholar] [CrossRef]
  3. Yi, M.-S. Comparison of welding deformation characteristics by circumferential welding for austenitic and duplex stainless steel pipe: Experimental Study. J. Weld. Join. 2022, 40, 141–148. [Google Scholar] [CrossRef]
  4. Muthupandi, V.; Srinivasan, P.B.; Seshadri, S.K.; Sundaresan, S. Effect of weld metal chemistry and heat input on the structure and properties of duplex stainless steel welds. Mater. Sci. Eng. A 2003, 358, 9–16. [Google Scholar] [CrossRef]
  5. Cheepu, M.; Susila, P. Interface microstructure characteristics of friction-welded joint of titanium to stainless steel with interlayer. Trans. Indian Inst. Met. 2020, 73, 1497–1501. [Google Scholar] [CrossRef]
  6. Kong, Y.S.; Cheepu, M.; Park, Y.W. Effect of heating time on thermomechanical behavior of friction-welded A105 bar to A312 pipe joints. Trans. Indian Inst. Met. 2020, 73, 1433–1438. [Google Scholar] [CrossRef]
  7. Cheepu, M.; Che, W.S. Friction welding of titanium to stainless steel using Al interlayer. Trans. Indian Inst. Met. 2019, 72, 1563–1568. [Google Scholar] [CrossRef]
  8. Sathiya, P.; Panneerselvam, K.; Abdul Jaleel, M.Y. Optimization of laser welding process parameters for super austenitic stainless steel using artificial neural networks and genetic algorithm. Mater. Des. 2011, 32, 1253–1261. [Google Scholar] [CrossRef]
  9. Cheepu, M.; Che, W.S. Influence of friction pressure on microstructure and joining phenomena of dissimilar joints. Trans. Indian Inst. Met. 2020, 73, 1455–1460. [Google Scholar] [CrossRef]
  10. Sahin, M. Evaluation of the joint interface properties of Austenitic stainless steel joined by friction welding. Mater. Des. 2007, 28, 2244–2250. [Google Scholar] [CrossRef]
  11. Cheepu, M.; Muthupandi, V.; Che, W.S. Interface microstructural characterization of titanium to stainless steel dissimilar friction welds. In Proceeding of the TMS 2019 148th Annual Meeting & Exhibition, San Antonio, TX, USA, 10–14 March 2019; Springer Publisher: Cham, Switzerland, 2019; pp. 259–268. [Google Scholar]
  12. Faes, K.; Dhooge, A.; De Baets, P.; Van Der Donckt, E.; De Waele, W. Parameter optimisation for automatic pipeline girth welding using a new friction welding method. Mater. Des. 2009, 30, 581–589. [Google Scholar] [CrossRef]
  13. Cheepu, M.; Venkateswarlu, D.; Rao, P.N.; Muthupandi, V.; Sivaprasad, K.; Che, W.S. Microstructure characterization of superalloy 718 during dissimilar rotary friction welding. Mater. Sci. Forum 2019, 969, 211–217. [Google Scholar] [CrossRef]
  14. Jung, J.-H.; Park, D.-W.; Baek, E.-R. Study on the Microstructure and Mechanical Properties of Butt GMAW Al/Fe Dissimilar Joints using Pure Copper Filler Metal. J. Weld. Join. 2021, 39, 641–648. [Google Scholar] [CrossRef]
  15. Cheepu, M.; Muthupandi, V.; Che, W.S. Improving mechanical properties of dissimilar material friction welds. Appl. Mech. Mater. 2018, 877, 157–162. [Google Scholar] [CrossRef]
  16. Kong, Y.S.; Cheepu, M.; Lee, J.K. Evaluation of the mechanical properties of Inconel 718 to SCM 440 dissimilar friction welding through real-time monitoring of the acoustic emission system. Proc. Inst. Mech. Eng. Pt. L J. Mater. Des. Appl. 2021, 235, 1181–1190. [Google Scholar] [CrossRef]
  17. Cheepu, M.; Venkateswarlu, D.; Rao, P.N.; Kumaran, S.S.; Srinivasan, N. Effect of process parameters and heat input on weld bead geometry of laser welded titanium Ti-6Al-4V alloy. Mater. Sci. Forum 2019, 969, 613–618. [Google Scholar] [CrossRef]
  18. Chandra, G.R.; Venukumar, S.; Cheepu, M. Influence of rotational speed on the dissimilar friction welding of heat-treated aluminum alloys. IOP Conf. Ser. Mater. Sci. Eng. 2020, 998, 012070. [Google Scholar] [CrossRef]
  19. Gopi, S.; Mohan, D.G. Evaluating the Welding Pulses of Various Tool Profiles in Single-Pass Friction Stir Welding of 6082-T6 Aluminium Alloy. J. Weld. Join. 2021, 39, 284–294. [Google Scholar] [CrossRef]
  20. Muralimohan, C.H.; Muthupandi, V.; Sivaprasad, K. The influence of aluminum intermediate layer in dissimilar friction welds. Int. J. Mater. Res. 2014, 105, 350–357. [Google Scholar] [CrossRef]
  21. Aali, M. Investigation of Spindle Rotation Rate Effects on the Mechanical Behavior of Friction Stir Welded Ti 4Al 2V Alloy. J. Weld. Join. 2020, 38, 81–91. [Google Scholar] [CrossRef] [Green Version]
  22. Paventhan, R.; Thirumalaikumarasamy, D.; Kantumuchu, V.C.; Ahmed, O.S.; Abbas, M.; Alahmadi, A.A.; Alwetaishi, M.; Alzaed, A.N.; Ramachandran, C.S. Optimizing Friction Welding Parameters in AISI 304 Austenitic Stainless Steel and Commercial Copper Dissimilar Joints. Coatings 2023, 13, 261. [Google Scholar] [CrossRef]
  23. Anuradha, M.; Das, V.C.; Venkateswarlu, D.; Cheepu, M. Parameter optimization for laser welding of high strength dissimilar materials. Mater. Sci. Forum 2019, 969, 558–564. [Google Scholar] [CrossRef]
  24. Lee, J.M.; Cheepu, M.; Chung, H. Experiment-Based Distortion Prediction Model for Wire-Based Additive Manufactured Parts. J. Mech. Sci. Technol. 2022, 36, 6227–6237. [Google Scholar] [CrossRef]
  25. James, J.A.; Sudhish, R. Study on effect of interlayer in friction welding for dissimilar steels: SS 304 and AISI 1040. Procedia Technol. 2016, 25, 1191–1198. [Google Scholar] [CrossRef]
  26. Cheepu, M.; Susila, P. Growth rate of intermetallics in aluminum to copper dissimilar welding. Trans. Indian Inst. Met. 2020, 73, 1509–1514. [Google Scholar] [CrossRef]
  27. Kong, Y.S.; Cheepu, M.; Kim, D.G. Microstructure and Mechanical Properties of Friction-Welded and Post-Heat-Treated Inconel 718. Trans. Indian Inst. Met. 2020, 73, 1449–1453. [Google Scholar] [CrossRef]
  28. You, H.; Lee, T.; Kang, M.; Kim, C. Process Review on Dissimilar Metal Joining of Steel and Ti Alloys. J. Weld. Join. 2021, 39, 666–676. [Google Scholar] [CrossRef]
  29. Kang, S.; Cha, J.; Kang, M. A Review on the Design Rule for the Friction Stir Welding using Bobbin Tool for Aluminum. J. Weld. Join. 2021, 39, 520–526. [Google Scholar] [CrossRef]
  30. Haribabu, S.; Cheepu, M.; Devuri, V.; Kantumuchu, V.C. Optimization of welding parameters for friction welding of 304 stainless steel to D3Tool steel using response surface methodology. In Techno-Societal 2018: Proceedings of the 2nd International Conference on Advanced Technologies for Societal Applications, Maharashtra, India, 14–15 December 2018; Springer International Publishing: Cham, Switzerland, 2020; Volume 1, pp. 427–437. [Google Scholar]
  31. Anuradha, M.; Das, V.C.; Susila, P.; Cheepu, M.; Venkateswarlu, D. Effect of welding parameters on TIG welding of Inconel 718 to AISI 4140 steel. Trans. Indian Inst. Met. 2020, 73, 1515–1520. [Google Scholar] [CrossRef]
  32. Lee, J.-H.; Park, H.-K. Evaluation of WC-Co-Cr3C2 Hard Materials for Friction Stir Welding Tool Application via Spark Plasma Sintering Process. J. Weld. Join. 2021, 39, 513–519. [Google Scholar] [CrossRef]
  33. Haribabu, S.; Cheepu, M.; Tammineni, L.; Gurasala, N.K.; Devuri, V.; Kantumuchu, V.C. Dissimilar Friction Welding of AISI 304 Austenitic Stainless Steel and AISI D3 Tool Steel: Mechanical Properties and Microstructural Characterization. In Advances in Materials and Metallurgy; Lecture Notes in Mechanical Engineering; Lakshminarayanan, A., Idapalapati, S., Vasudevan, M., Eds.; Springer: Singapore, 2019. [Google Scholar]
  34. Venkateswarlu, D.; Cheepu, M.; Rao, P.N.; Kumaran, S.S.; Srinivasan, N. Characterization of microstructure and mechanical properties of AA2219-O and T6 friction stir welds. Mater. Sci. Forum 2019, 969, 205–210. [Google Scholar] [CrossRef]
  35. Cheepu, M.; Cheepu, H.; Che, W.S. Influence of Joint Interface on Mechanical Properties in Dissimilar Friction Welds. Adv. Mater. Process. Technol. 2022, 8, 732–744. [Google Scholar] [CrossRef]
  36. Anuradha, M.; Das, V.C.; Susila, P.; Cheepu, M.; Venkateswarlu, D. Microstructure and mechanical properties for the dissimilar joining of Inconel 718 alloy to high strength steel by TIG welding. Trans. Indian Inst. Met. 2020, 73, 1521–1525. [Google Scholar] [CrossRef]
  37. Bang, H.-S.; Bang, H.-S.; Kim, K.-H. Effects of Process Parameters on Friction Stir Weldability in Dissimilar Joints of AA5052 and Advanced High Strength Steel. J. Weld. Join. 2021, 39, 189–197. [Google Scholar] [CrossRef]
  38. Lakshiminarayanan, A.K.; Balasubramanian, V. Comparison of RSM with ANN in predicting tensile strength of friction stir welded AA7039 aluminum alloy joints. Trans. Nonferrous Met. Soc. China. 2009, 19, 9–18. [Google Scholar] [CrossRef]
  39. Bakkiyaraj, M.; Saikrishnan, G.; Balasubramanian, V. Estimating the mechanical properties of friction welded AISI 410 MSS joints using empirical relationship. Metallur. Res. Technol. 2020, 117, 618. [Google Scholar] [CrossRef]
  40. Palanivel, R.; Laubscher, R.F.; Dinaharan, I. An investigation into the effect of friction welding parameters on tensile strength of titanium tubes by utilizing an empirical relationship. Measurement 2017, 98, 77–91. [Google Scholar] [CrossRef]
  41. Kimura, M.; Suzuki, K.; Kusaka, M.; Kaizu, K. Effect of friction welding condition on joining phenomena and mechanical properties of friction welded joint between 6063 aluminium alloy and AISI 304 stainless steel. J. Manuf. Process. 2017, 26, 178–187. [Google Scholar] [CrossRef]
  42. Hakan, A. Prediction of gas metal arc welding parameters based on artificial neural networks. Mater. Des. 2007, 28, 2015–2023. [Google Scholar]
  43. Luo, J.; Ye, Y.H.; Xu, J.J.; Luo, J.Y.; Chen, S.M.; Wang, X.C.; Liu, K.W. A new mixed-integrated approach to control welded flashes forming process of damping-tube–gland in continuous drive friction welding. Mater. Des. 2009, 30, 353–358. [Google Scholar] [CrossRef]
  44. Oh, D.; Kang, Y.; Kim, K. Effect of Additive Machines and Powders on Mechanical Properties of Stainless Steel 316L Manufactured by L-PBF. J. Weld. Join. 2022, 40, 322–328. [Google Scholar] [CrossRef]
  45. Xian, G.; Cheepu, M.; Yu, J.; Cho, S.M.; Yeom, J.T.; Choi, Y.S.; Kang, N. Enhancing Tensile Properties of Wire-Arc Additively Manufactured Ti-6Al-4 V Deposits Via Cryogenic Vaporised Ar Shielding/Cooling. Met. Mater. Int. 2023, 29, 501–514. [Google Scholar] [CrossRef]
  46. Kantumuchu, V.C.; Cheepu, M. The Influence of Friction Time on the Joint Interface and Mechanical Properties in Dissimilar Friction Welds. J. Met. Mater. Res. 2022, 5, 1–7. [Google Scholar] [CrossRef]
  47. Cheepu, M.; Che, W.S. Effect of Burn-off Length on the Properties of Friction Welded Dissimilar Steel Bars. J. Weld. Join. 2019, 37, 46–55. [Google Scholar] [CrossRef]
  48. Park, J.; An, G.; Kim, D. Residual Stress and Deformation Characteristics by FSW and SAW of Wear Resistant Steel. J Weld Join. 2022, 40, 133–140. [Google Scholar] [CrossRef]
  49. Kantumuchu, V.C. Additive Manufacturing for Industrial Applications and Potential Quality Challenges. In Advances in Additive Manufacturing Processes; Bentham Science Publishers: Bussum, The Netherlands, 2021; pp. 216–239. [Google Scholar]
  50. Shiva, A.; Cheepu, M.; Kantumuchu, V.C.; Kumar, K.R.; Venkateswarlu, D.; Srinivas, B.; Jerome, S. Microstructure characterization of Al-TiC surface composite fabricated by friction stir processing. In IOP Conference Series: Materials Science and Engineering; IOP Publishing: Bristol, UK, 2018; Volume 330, p. 012060. [Google Scholar]
  51. Kavitha, C.; Malini, P.G.; Kantumuchu, V.C.; Kumar, N.M.; Verma, A.; Boopathi, S. An experimental study on the hardness and wear rate of carbonitride coated stainless steel. In Materials Today: Proceedings; Elsevier: Amsterdam, The Netherlands, 2022. [Google Scholar]
  52. Sarila, V.K.; Koneru, H.P.; Pathapalli, V.R.; Cheepu, M.; Kantumuchu, V.C. Wear and Microstructural Characteristics of Colmonoy-4 and Stellite-6 Additive Layer Deposits on En19 Steel by Laser Cladding. Trans. Indian Inst. Met. 2022, 1–8. [Google Scholar] [CrossRef]
  53. Cheepu, M.; Kantumuchu, V.C. Numerical Simulations of the Effect of Heat Input on Microstructural Growth for MIG-Based Wire Arc Additive Manufacturing of Inconel 718. Trans. Indian Inst. Met. 2022, 1–9. [Google Scholar] [CrossRef]
  54. Sarila, V.K.; Moinuddin, S.Q.; Cheepu, M.; Rajendran, H.; Kantumuchu, V.C. Characterization of Microstructural Anisotropy in 17–4 PH Stainless Steel Fabricated by DMLS Additive Manufacturing and Laser Shot Peening. Trans. Indian Inst. Met. 2022, 1–8. [Google Scholar] [CrossRef]
  55. Sarila, V.; Koneru, H.P.; Cheepu, M.; Chigilipalli, B.K.; Kantumuchu, V.C.; Shanmugam, M. Microstructural and Mechanical Properties of AZ31B to AA6061 Dissimilar Joints Fabricated by Refill Friction Stir Spot Welding. J. Manuf. Mater. Process. 2022, 6, 95. [Google Scholar] [CrossRef]
  56. Cheepu, M.; Venukumar, S.; Phanindra, K.H.; Likhith, N.; Sameer, M.; Johith, M.S.; Devuri, V.; Kantumunchu, C. Optimization of welding parameters for the joint interface of rotary friction welds. In AIP Conference Proceedings; AIP Publishing LLC: Melville, NY, USA, 2022; Volume 2648, p. 030035. [Google Scholar]
  57. Cheepu, M.; Baek, H.J.; Kim, Y.S.; Cho, S.M. Penetration Estimation of GTAW with C-Type Filler by Net Heat Input Ratio. Weld. J. 2022, 101, 240s–248s. [Google Scholar] [CrossRef]
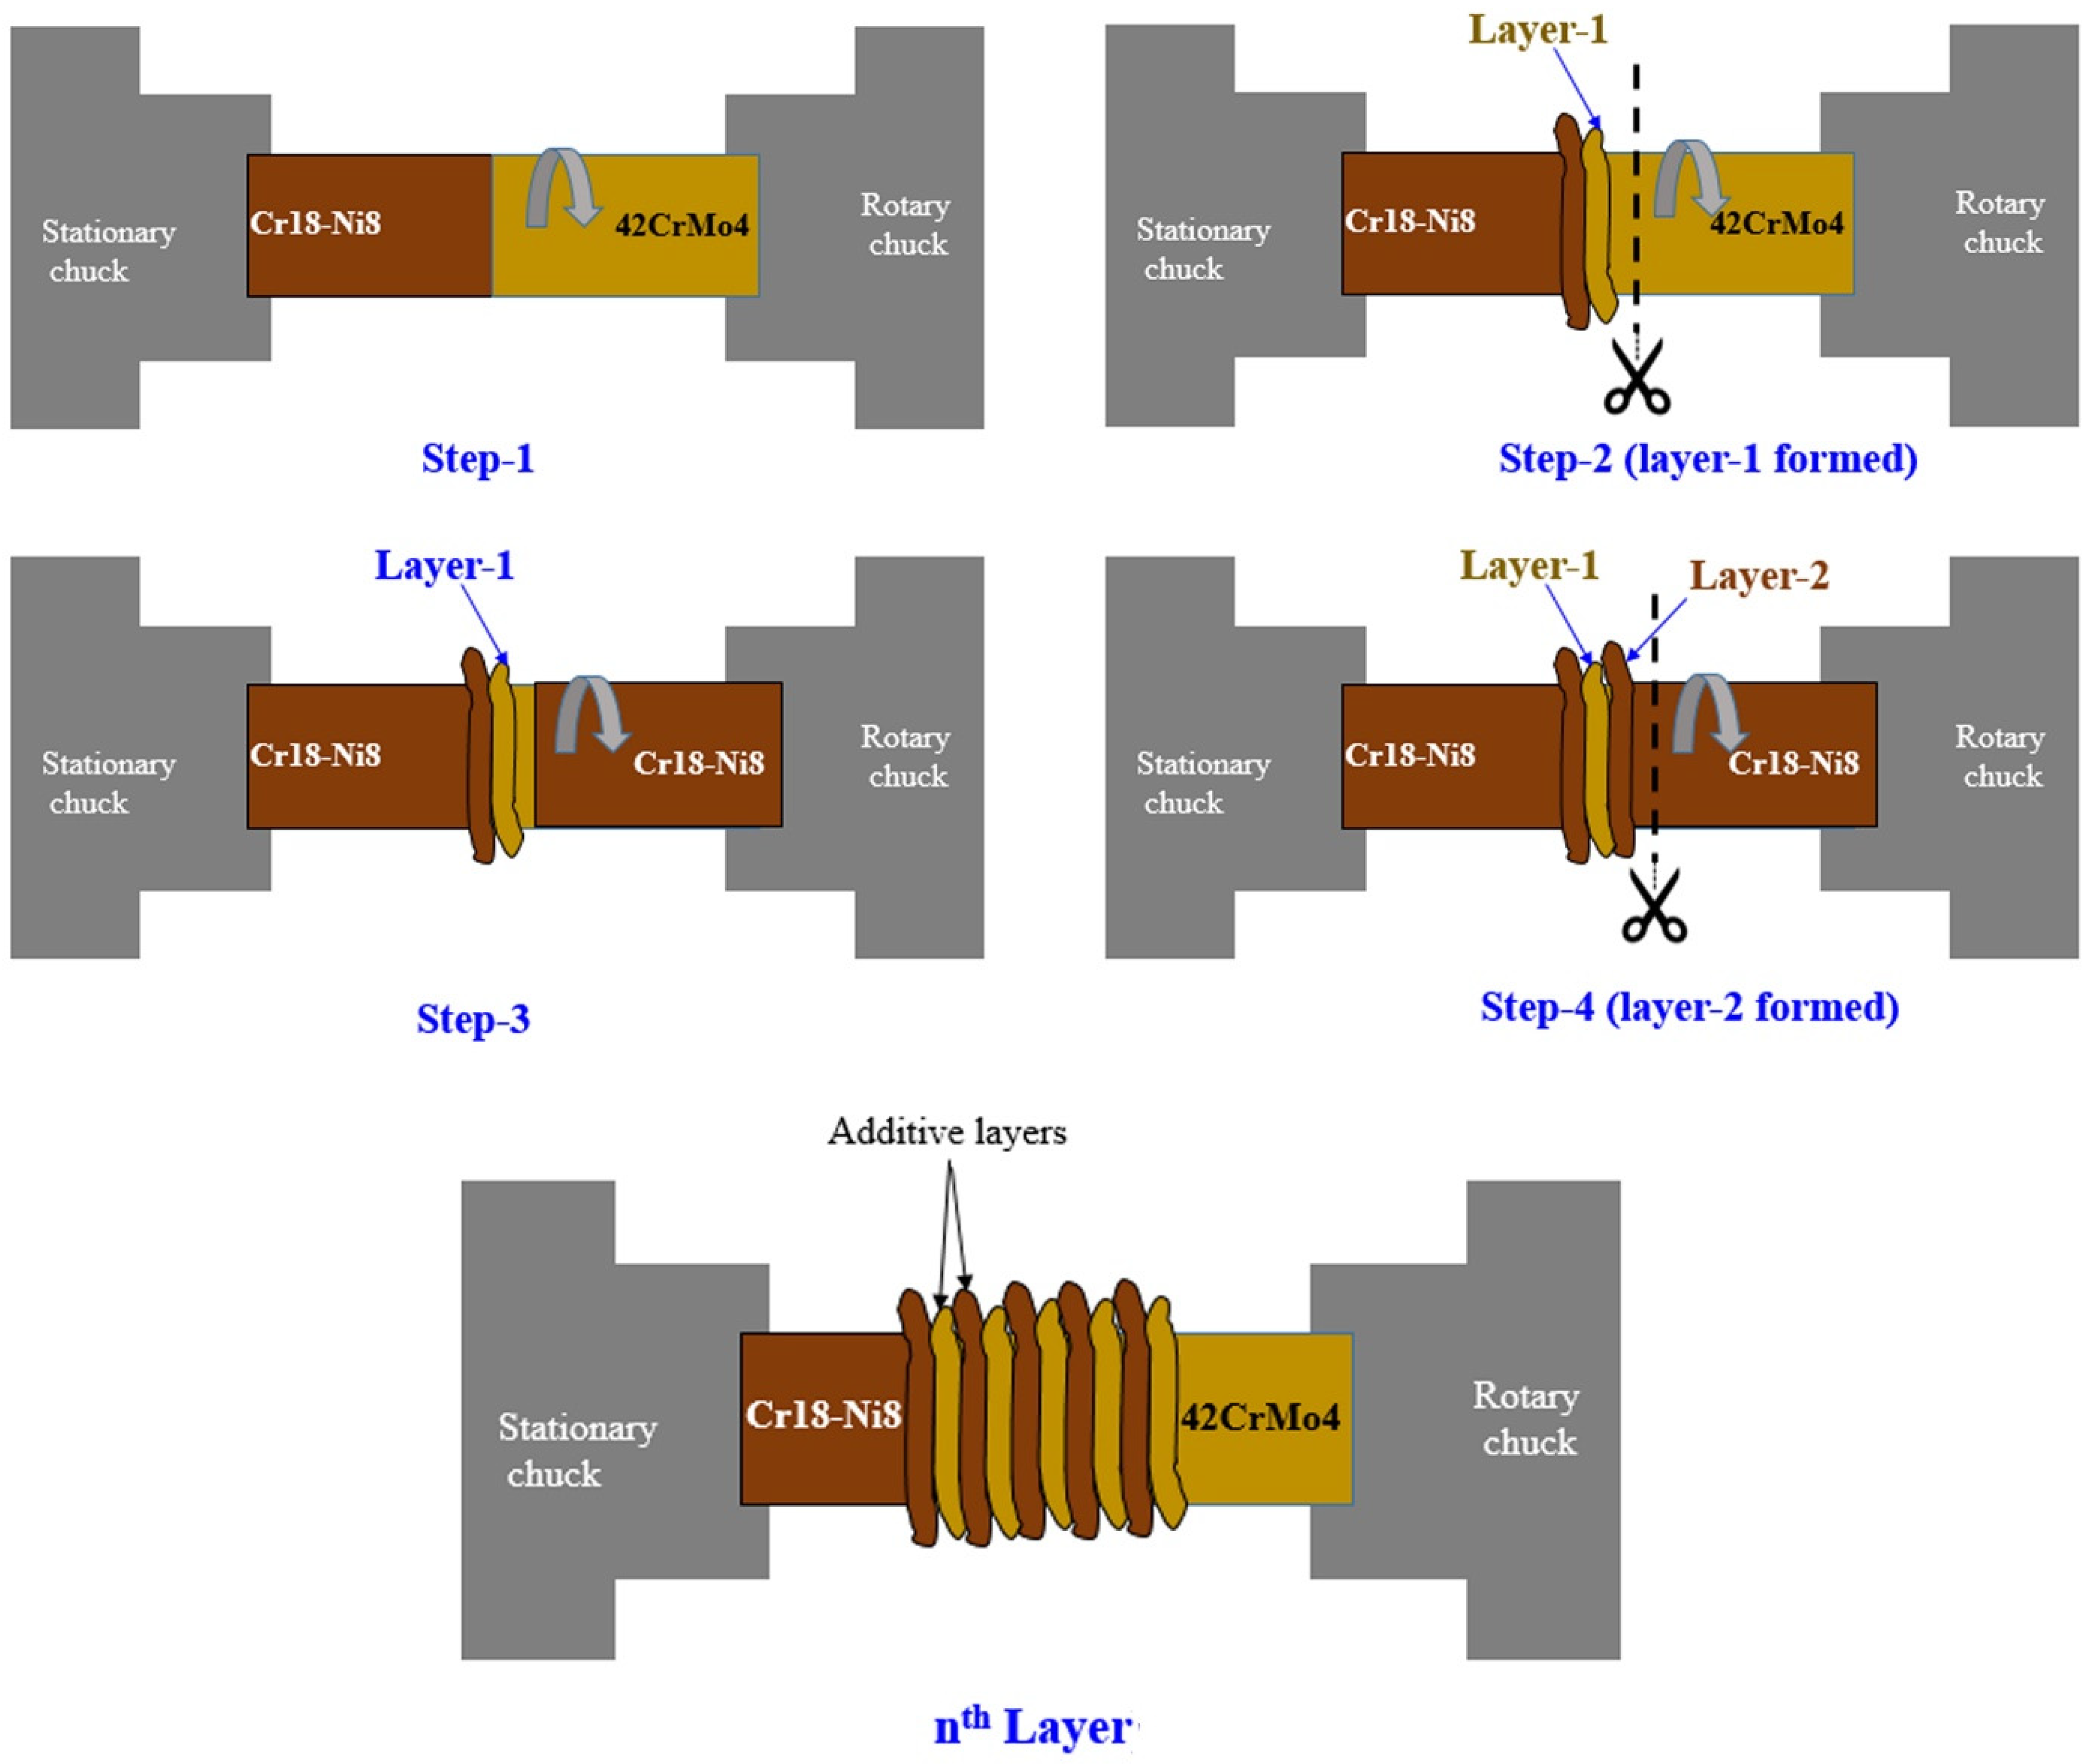
Figure 1. Schematic view of solid state additive manufacturing process for parts deposition.
Metals 13 00488 g001
Figure 2. The linear graphs shows the developed response model accuracy conditions (a) Normal plot of residuals, (b) predicted and experimental values comparison.
Metals 13 00488 g002
Figure 3. The individual effects of input factors on the tensile strength and desirability.
Metals 13 00488 g003
Figure 4. The effect of welding conditions on tensile strength graphs (a,c,e) Contour plots (2D), and (b,d,f) are response surface graphs (3D).
Metals 13 00488 g004
Figure 5. Box–Cox plot for power transformation.
Metals 13 00488 g005
Figure 6. Standard error design of the actual parameters (experimental conditions).
Metals 13 00488 g006
Figure 7. Ramp function graph of desirability optimization.
Metals 13 00488 g007
Figure 8. Mathematical distribution of the factors with cube (a) desirability (b) tensile strength.
Metals 13 00488 g008
Figure 9. Microstructure of the dissimilar joint interface.
Metals 13 00488 g009
Figure 10. Fractography analysis of the tensile tested joints of the failure location (a) 42CrMo4 and (b) 18Cr-8Ni.
Metals 13 00488 g010
Figure 11. Microhardness of the dissimilar friction welded joints.
Metals 13 00488 g011
Figure 12. Intermixing zone variation according to burn-off length.
Metals 13 00488 g012
Figure 13. The relationship between width of intermixing zone and interface bonding strength.
Metals 13 00488 g013
Figure 14. Solid state additive manufacturing of dissimilar layers (a) as deposited, (b) wall resolution processed condition.
Metals 13 00488 g014
Figure 15. Interface microstructure of the solid state additive manufacturing of dissimilar layers at different intermixing zones (burn-off length) (a) 2 mm, (b) 4 mm and (c) 6 mm.
Metals 13 00488 g015
Table 1. The maximum and minimum level of evaluated factors (input parameters).
Welding ConditionsMinimum LevelMaximum Level
Friction pressure (MPa)80140
Upset Pressure (MPa)160220
Burn-off length (mm)16
Table 2. Chemical composition (wt.%) of the substrates used for additive manufacturing.
Substrate TypeCSiMnPSNiCrMoNFe
42CrMo40.410.170.820.0360.038-1.050.23-balance
Cr18-Ni80.030.851.60.0450.038.217.683.40.1balance
Table 3. Mechanical properties of the substrates used for additive manufacturing.
Substrate TypeTensile Strength (MPa)Yield Strength (MPa)Elongation (%)Hardness (Hv)Melting Temperature (°C)
42CrMo4687415282101416
Cr18-Ni8716593392201440
Table 4. Box–Behnken design matrix and experimental results of the tensile strength.
RunCode of FactorsWelding ConditionsTensile Strength (MPa)
LowMiddleHighFP (MPa)UP (MPa)BOL (mm)-
11−101401603502.74
2−110802203563.52
30−111101606548.05
40001101903571.58
50001101903572.65
6−10−1801901469.56
710−11401901530.56
8−1−10801603479.5
9−101801906486.5
100001101903572.56
111011401906510.58
120111102206520.34
130−1−11101601498.65
141101402203509.47
1501−11102201540.58
160001101903575.89
170001101903576.48
Table 5. Analysis results of the significance of each order and determination of the order of response model.
SourceSum of SquaresDOFMean SquareF Valuep-Value Prob > FSignificance
Mean vs. Total8343.7719018.84--Suggested
Linear vs. Mean4.8930.290.400.7586-
2FI vs. Linear2.6530.500.620.6172-
Quadratic vs. 2FI11.8932.2713.260.0028Suggested & Significant
Cubic vs. Quadratic4.2730.40188.41<0.0001-
Residual3.5642.105 × 10−3---
Total8371.0317531.13---
Table 6. Analysis of variance (ANOVA) table for optimization of the models.
SourceSum of SquaresDOFMean SquareF Valuep-Value
Prob > F
Significance
Model9.1791.025.950.0141Significant
A-FP0.3410.341.990.2009-
B-UP0.8510.854.970.0610-
C-BOL0.1510.150.900.3738-
AB0.7210.724.180.0802-
AC0.08010.0800.470.5166-
BC0.7010.704.070.0834-
A23.8413.8422.410.0021-
B20.5010.502.890.1328-
C21.8811.8811.010.0128-
Residual1.2070.17---
Lack of fit1.1930.40188.41<0.0001Significant
Pure error8.419 × 10−342.105 × 10⁻³---
Cor Total10.3716----
Table 7. Optimal response model analysis based on the value of accuracy and R-squared value of fitting curves.
Std.AdjustedR-SquaredPredictedStd. Dev.PressSignificance
SourceR-SquaredR-Squared
Linear0.850.08−0.12−0.5215.82-
2FI0.890.22−0.23−1.3824.72-
Quadratic0.410.880.73−0.8218.95Suggested
Disclaimer/Publisher’s Note: The statements, opinions and data contained in all publications are solely those of the individual author(s) and contributor(s) and not of MDPI and/or the editor(s). MDPI and/or the editor(s) disclaim responsibility for any injury to people or property resulting from any ideas, methods, instructions or products referred to in the content.