Abstract
The hot forging process brings significant advantages in terms of improved mechanical properties of the part compared with other processes, such as casting or machining. The metal flow in the forging process leads to texture modifications and can be macroscopically visualized by the so-called grain-flow orientation (GFO). This study showed the effect of GFO on fatigue life by using a rotational flexing fatigue test. The tests that were performed using SAE 1045H steel material, at rolling and transverse directions, showed the influence of GFO on the specimens’ mechanical properties compared with the reference samples taken from the machined rolled bar. The experimental results showed that the forged samples with the GFO in the main deformation direction presented a higher fatigue life than the other tested configurations.
1. Introduction
Forged mechanical components have greater strength than those produced by other manufacturing processes, such as casting or machining [1,2], justified by the particular grains’ orientations, clearly visible macroscopically as fibers. Several manufacturing processes produce mechanical components, but forged products exhibit excellent mechanical properties at a lower cost. Therefore, the hot forging process is widely used in manufacturing components for automobile and truck parts, in addition to other industrial components. However, appropriate parameters for the forging process and preform are needed to obtain defect-free forging components [3,4].
A preform is an initial geometry similar to the final geometry that is transformed into the part’s final configuration without causing material failure or degrading material properties. It is necessary to optimize the preform to reduce the underfill defect with minimum forging load and effective stress [5,6]. One problem that may occur is the wear caused by a local bonding between the hot workpiece and the dies and a thermal softening phenomenon of the dies [7]. The factors influencing die life are mechanical loading, thermal fatigue, plastic deformation, and wear, among others. In the forging process, hot working refines the grains, increasing strength and ductility, as forged components have a low probability of having internal defects, unlike castings. Parameters such as internal defects can influence fatigue design [7,8].
Fatigue life prediction is a complicated process. Cyclic loads (mechanical or thermal) usually lead to cyclic residual stress reversals, which cause the accumulation of inelastic strain. Inelastic strain energy is a factor that facilitates fatigue crack initiation and growth. Micro-cracks may already be present depending on the surface finish, significantly reducing fatigue life. Although many forgings are machined in critical areas to remove the forged surface, some are not machined in all crucial regions after forging [9,10]. Surface roughness or decarburization has a more negligible effect on low-cycle fatigue due to plastic deformation. The reduction in fatigue life due to decarburization is closely related to its depth. It has been suggested that controlled forging conditions produce surface finish quality similar to hot-rolled surfaces [11,12].
The anisotropy induced by the forging process of the material is the leading cause of the improvement in mechanical properties. The defects’ and inclusions’ orientations on the material, in the deformation direction, are called fibering or the grain-flow orientation of the component. To make the best use of the advantages of the grain-flow orientation imposed by forging to the component, it is necessary to account for the correct orientation of the fibers by the flow of the material in the tooling and the adequate planning of the forging stages [13,14]. Likewise, if the fiber orientation is not adequate, it may compromise the mechanical properties of the component. As a result of the mechanical work, second-phase particles, such as inclusions and segregations, as well as voids, tend to distribute and assume a shape roughly analogous to the deformation of the part. If the particles and inclusions are ductile and softer than the matrix, they acquire an elongated, ellipsoidal shape (e.g., MnS in steel). If they are brittle, they break into fragments that develop in parallel to the main working direction (e.g., Al2O3 in steel). If they are harder and more resistant than the matrix, they do not deform (e.g., SiO2 in steel) [13,15]. To classify inclusions in steels, the ASTM E-45 and ASTM E-1122 standards are usually used as a reference. A classification of inclusions is sought according to the following criteria: inclusion type, stringer formation, inclusion diameter, and severity. Inclusions are significant contributors to fatigue and mechanical anisotropy in steel. It is practically impossible or commercially unfeasible to avoid such defects. The number of inclusions appears to be a determining factor in fatigue crack growth. Its effect is manifested through anisotropy of crack growth rates with an increasing number of inclusions, but, in this case, sulfides are more detrimental than oxides [16,17].
One of the effects of hot working is the change in shape and distribution of segregations in the steel. The reduction in the dimension normal to the direction of deformation of the products (thickness in flat products and diameter in cylindrical products) causes the reduction in the spaces between the arms of the dendrites originated in the solidification process. This reduction is also favorable to homogenization by diffusion. For this reason, the degree of reduction or deformation is essential in forming operations. The deformation effect is most easily observed in the longitudinal section containing the most significant deformation. The strong orientation of the micro-segregation regions originating from solidification in the direction of the greatest elongation of the material has a fibrous appearance that gives the material its fibrousness [9,13,18].
On the computational mechanics side, finite element models (FEMs) to simulate technological processes are crucial to preventing projected parts problems, predicting grain flow lines, and enhancing in-service performances. The evaluation of results through the comparison between the FEM and experiments (particularly macrography for the current topic) significantly aided predicting the magnitude of the grain flow density, providing guidelines to enhance the quality of the forged material with directional fatigue resistance and strength. With the improvement in accuracy to minimize the volume of material required, it is necessary to control the precise volume of the preform, the direction of the flux of material, and the filling of the flash area to compare with the main techniques and the results with better mechanical and metallurgical properties.
This study aimed to quantitatively evaluate the influence of the hot-forged component’s fiber/grain-flow orientation on the fatigue life property. The factor that motivated this study was the lack of standards and appropriate literature that clearly address the issue, while demonstrating practical values obtained in tests and not only qualitatively as it is usually found. The study’s relevance is of most importance for the forging industry because the safety of a manufactured mechanical component can be affected by an incorrect grain-flow orientation.
2. Materials and Methods
2.1. Determination of Fatigue Life
The material in the study was SAE 1045 steel, the chemical composition of which included carbon (0.420–0.50%), iron (98.51–98.98%), manganese (0.60–0.90%), phosphorous (≤0.040%), and sulfur (≤0.050%). The percentage of sulfur in the chemical composition of steels plays a key role due to its presence in manganese sulfate (MnS) inclusions. Previous studies evaluating tension–compression, torsion, and rotational fatigue tests with specimens varying the fiber orientation at 0°, 22.5°, 45°, 67.5°, and 90° relative to the rolling direction showed a fatigue life reduction of 10.5% between 0° and 90° [14,19]. So, anisotropy, measured through the Lankford coefficient (r), is a crucial factor [20,21]. Values of in effervescent steels vary between 0.8 and 1.2 [22]. In some interstitial free (IF) steels, it can be as high as 2.2 [22]. Copper in austenitic stainless steel can originate values as low as 0.1. [22]. Determining fatigue strength limits by fatigue testing has become routine, although they are lengthy tests. However, sometimes, a quick method of estimating the fatigue strength limit for a given component is required at the preliminary design and prototype stage. In experiments with many specimens, it was concluded that the fatigue strength limit ( could be related to the tensile strength ( in steels according to [13,22]:
when ≤ 1460 MPa; MPa, when > 1460 MPa. However, when the material’s microstructure is known, it is possible to obtain a more approximate result from the tabulated ratios [22]. The stress amplitude is denoted as , which is the cyclic stress amplitude that causes fatigue failure. The maximum and minimum stresses are symbolized by and , respectively. Knowing , allows calculation of the number of cycles to failure according to [22]:
where and are constants determined by:
To calculate the constants, it is necessary to determine the fraction and the corrected stress () according to:
2.1.1. Modifying Factors
The specimens used in the rotating beam tests to determine the strength limit were carefully constructed and tested under controlled conditions. However, it is unrealistic to expect that the values obtained in mechanical or structural components are identical to those obtained in the laboratory due to the variables found in the materials, such as composition, manufacturing, environment, and design [22].
With such reasoning, Martin [23], based on reference [22], identified factors that qualify the effects of these variables that adjust the values of the strength limits through a correction according to Equation (7):
where is the surface condition modification factor, is the size modification factor, is the load change factor, is the temperature change factor, is the reliability factor, and is the change factor for varying effects, is the strength limit of the rotating-beam-type test specimen, and is the strength limit at the critical location of a part in geometry and condition of use.
The specimen of the rotating beam test was polished in the axial direction. The surface condition modification factor () depends on the surface condition of the component and should be calculated according to [22]:
where exponents a and b are found in Table 1.

Table 1.
Parameters of the surface condition modification factor (adapted from [22]).
The currently proposed model for the size change factor () in the case of bending and torsion loading can be expressed by [22]:
where is the diameter of the specimen. For axial loading, this effect is negligible; thus, = 1. The average values of the loading type modification factor () were set to = 1 (bending), = 0385 (axial load), and = 0.59 (torsion), per [22].
Temperature has a significant influence on the mechanical behavior of steel. Most structural steels become brittle at low temperatures (below the transition temperature), which can present a severe problem. At high temperatures (above the ambient temperature), there are decreases in mechanical strength and resistance to corrosion, and the higher the temperature, the more significant the reduction. In addition, metallurgical phenomena can occur at high temperatures, such as temper embrittlement, which can compromise the use of the part. In addition to what was previously discussed, when the structural component is used above room temperature, one should also consider the temperature influence on the fatigue limit [23]. The temperature modification factor () is obtained from the following:
Here, temperatures may range from 21 ≤ ≤ 538 °C. The reliability factor () is of paramount importance due to the dispersion of the results. Data presented [22] showed that the standard deviation associated with the fatigue limit of steels is around 8%. Thus, the reliability factor () can be directly obtained from Table 2.

Table 2.
The reliability factor () [22].
The miscellaneous effects modification factor () should consider all other factors that may influence fatigue, such as metallurgical aspects associated with fatigue, which were not considered in the previous correction factors. Thus, the presence of residual stresses (arising, for example, from steel shot blasting, etc.), the presence of an electrodeposited layer on the surface of the structural component, the possibility of corrosion, the frequency (when this influences fatigue, as in the case of corrosion), among others, are herein considered [22].
2.1.2. Stress Concentrator and Notch Sensitivity
As already described, any metallic material may present several irregularities or discontinuities, such as holes, indentations, or notches. They cause an increase in the theoretical stresses in the vicinity of the discontinuity. A stress concentration factor was then defined: , used with the nominal stress to obtain the resulting maximum stress. This stress is described by the following equation [11,22]:
where is the reduced value of and is the nominal or engineering stress. To calculate , Neuber’s equation is used:
Finally, is the Heywood parameter for steels, given in Table 3, and is the radius of the round specimen.

Table 3.
Heywood parameter for steels [22].
To determine , one should the use the classical graph, “Factor determination for a round shaft under bending”, from the classical work of Budynas et al. [22], not here depicted due to copyright constraints.
3. Experimental Campaign
The experiments in this study were developed to verify the influence of the grain-flow orientation on fatigue life and its impact on the anisotropic properties of a mechanical component. To this end, steel specimens were made, and their fiber was oriented by machining and hot forging. Subsequently, they were subjected to flexo-rotational fatigue tests in a piece of specific equipment to determine their fatigue life.
Specimens were developed in three different fiber configurations. These three fiber configurations were differentiated into:
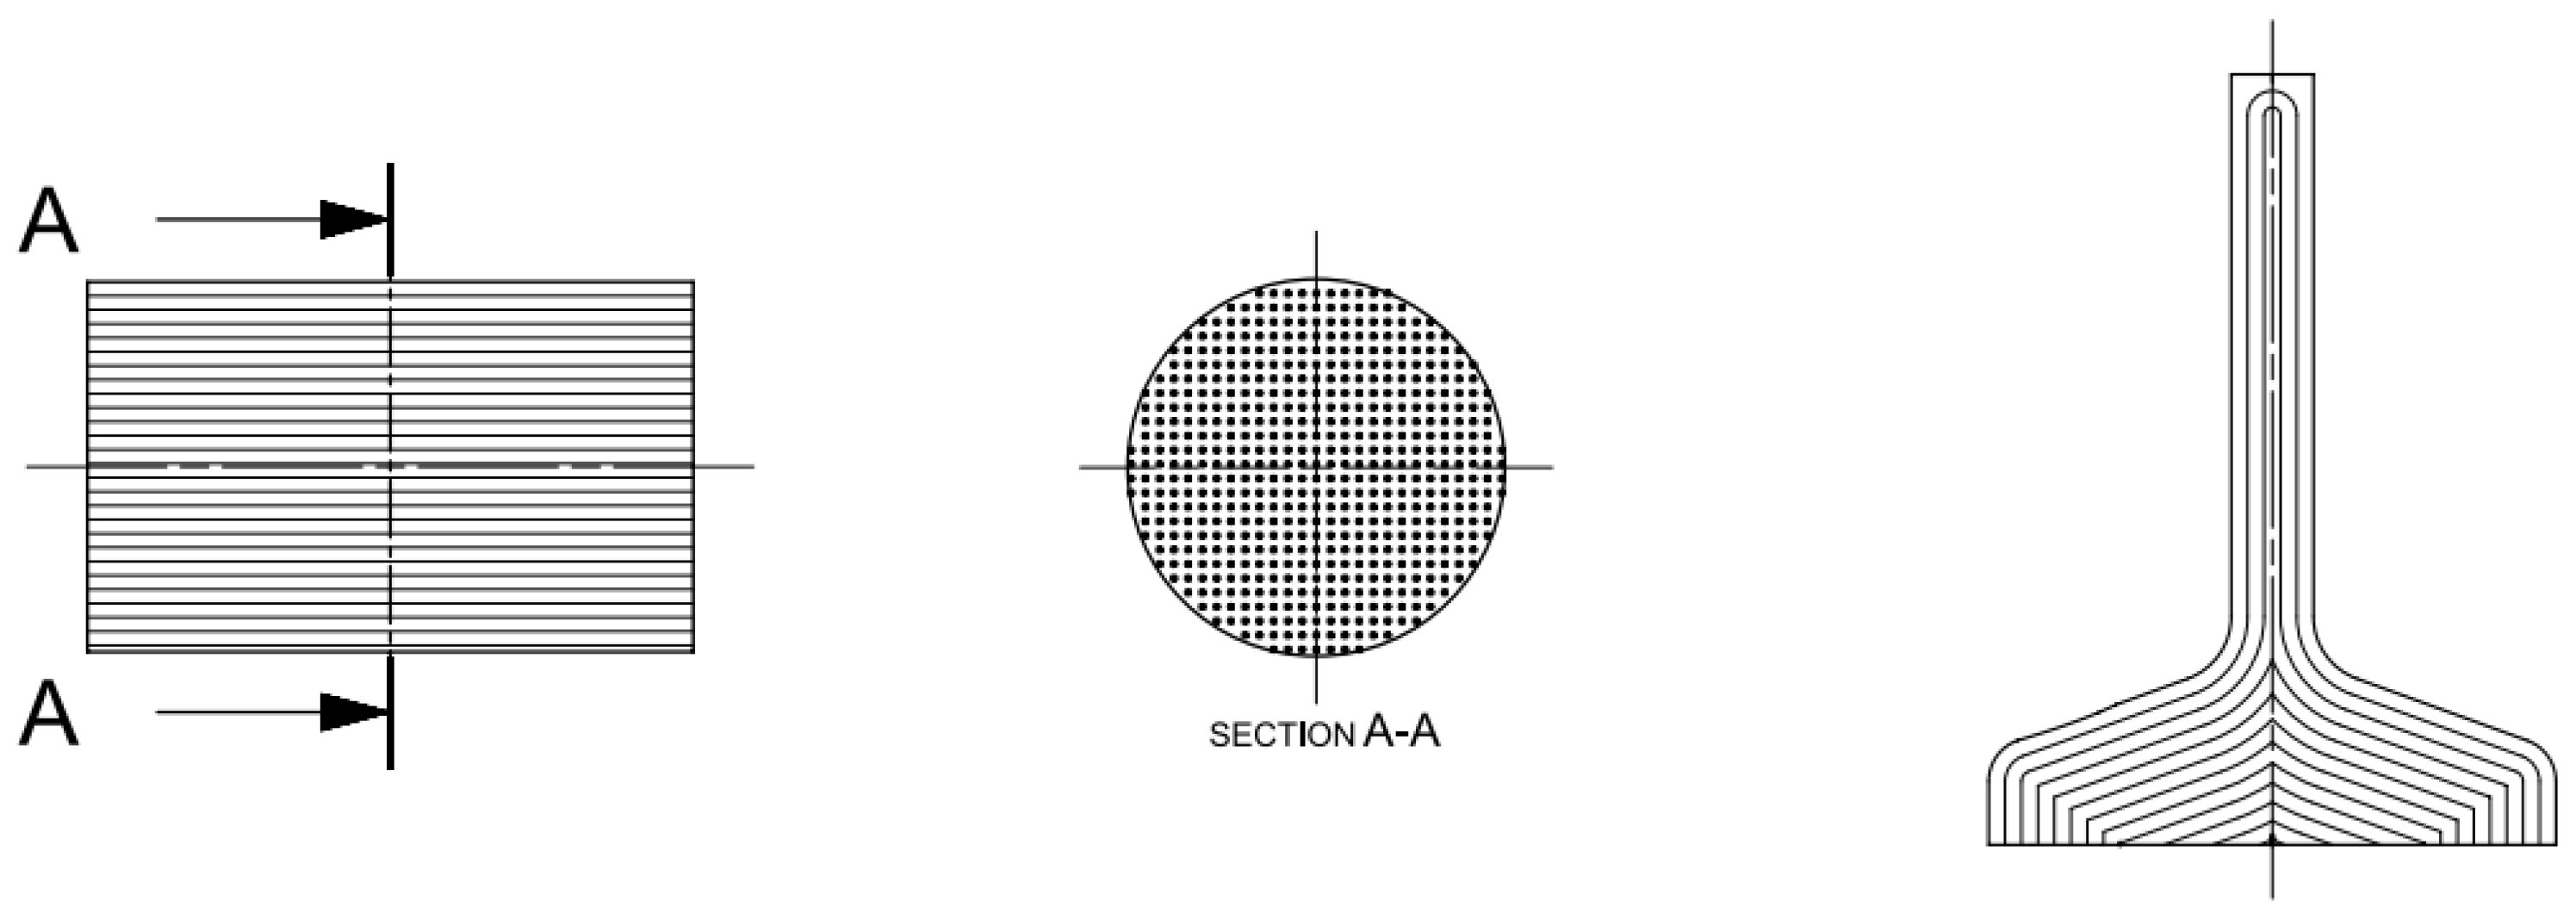
- Configuration A (Figure 1): simulated a forged component with its proper orientation because its fibers were arranged along the longitudinal direction of the specimen, that is, at 0° from the rolling direction;
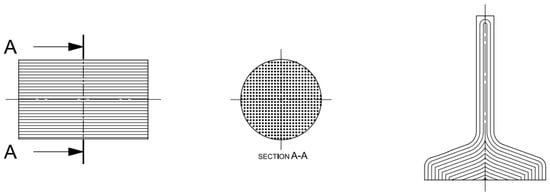 Figure 1. Configuration A (left: blank with longitudinal fiber direction, and right: specimen with resulting fiber).
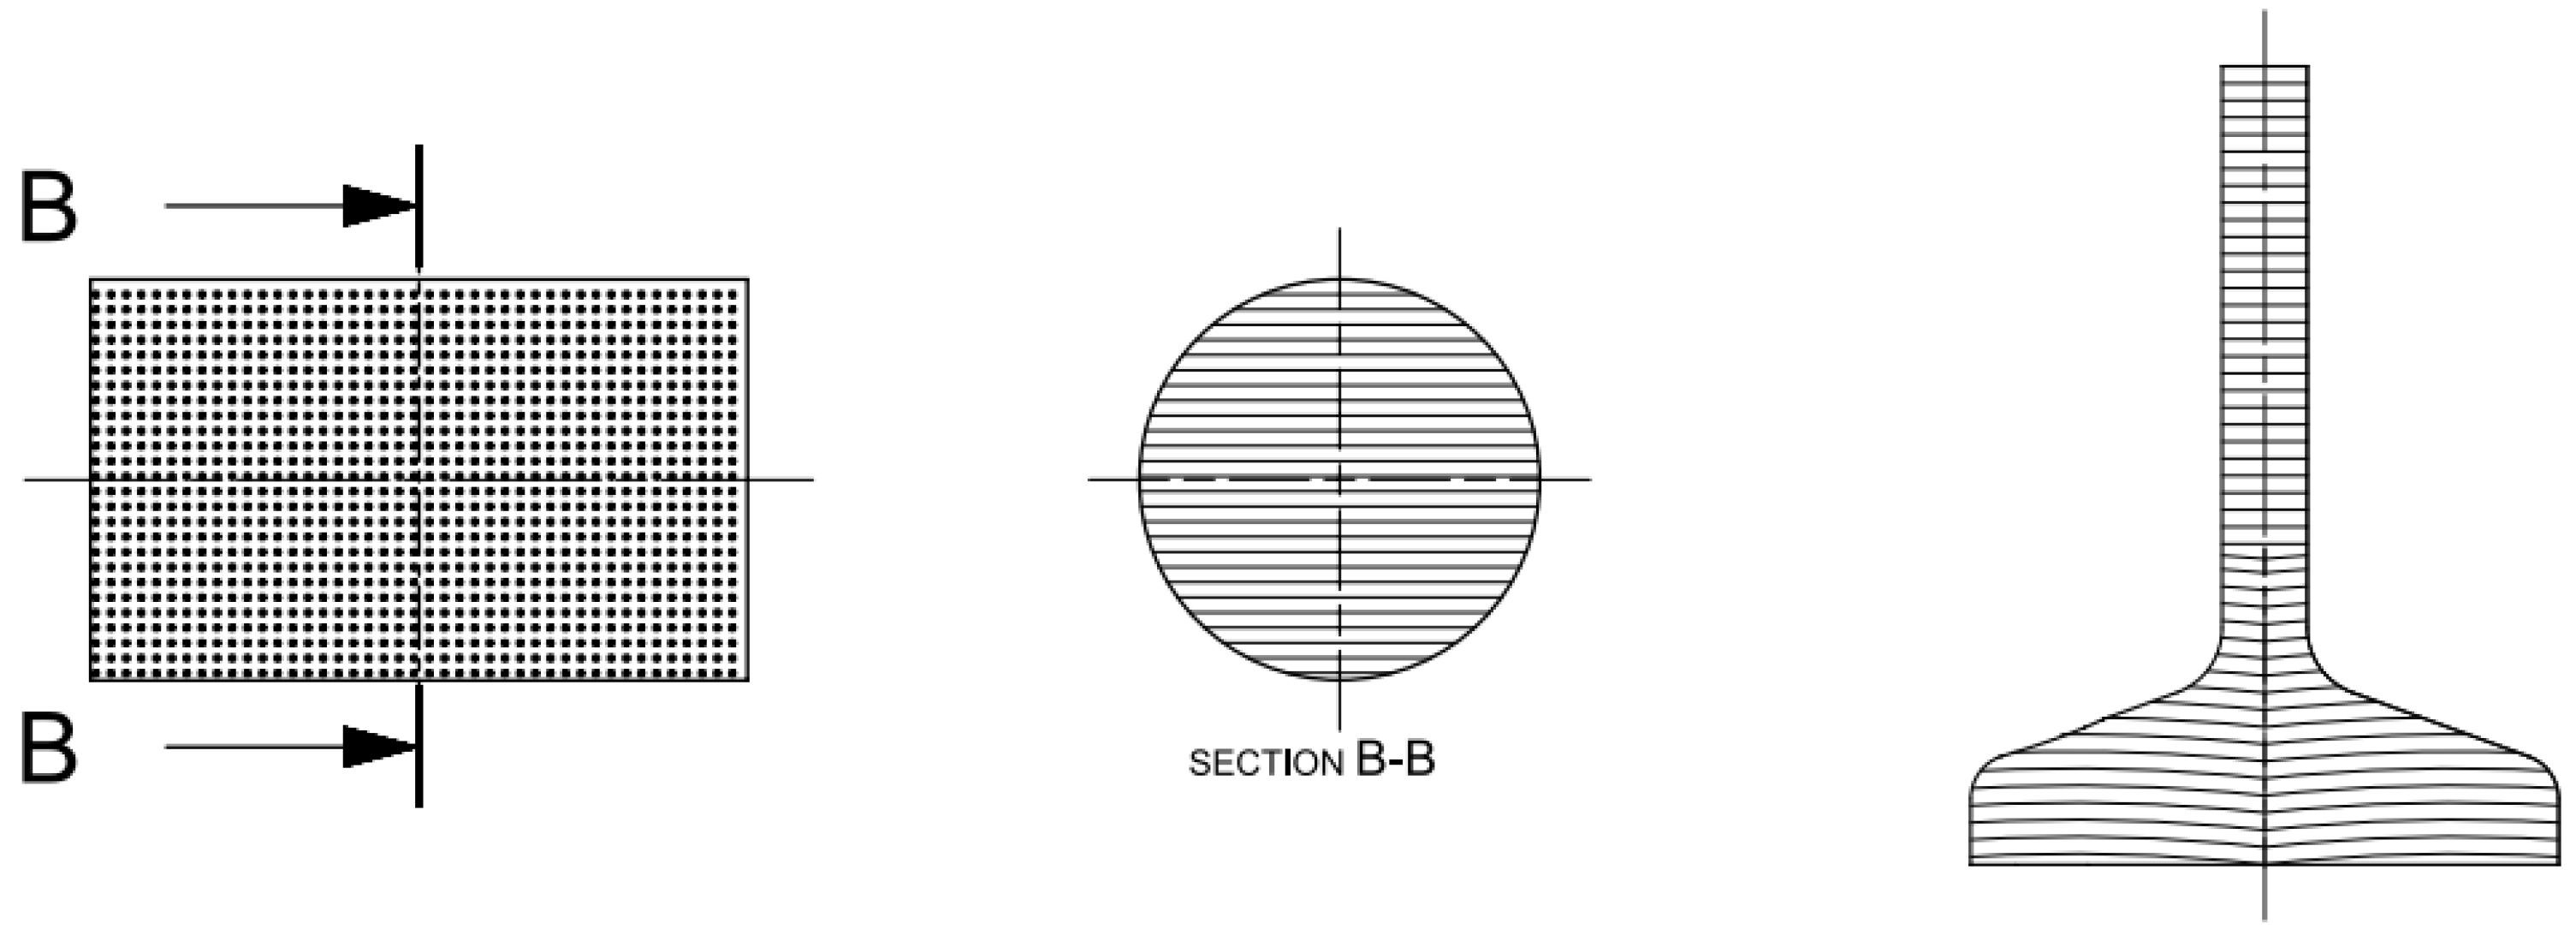
 - Configuration B (Figure 2): simulated a forged component with its orientation nonadequate because its fibers were arranged along the cross direction of the specimen, that is, at 90° from the rolling direction;
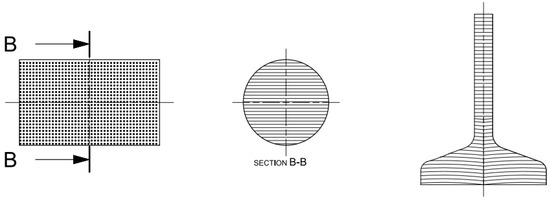 Figure 2. Configuration B (left: machined blank with transverse fiber direction, and right: specimen with resulting fiber).
 - Configuration C (Figure 3): simulated an unwrought component machined straight from the bar, so its rolling fibers were in the longitudinal direction, that is, 0° from the rolling direction but cut.
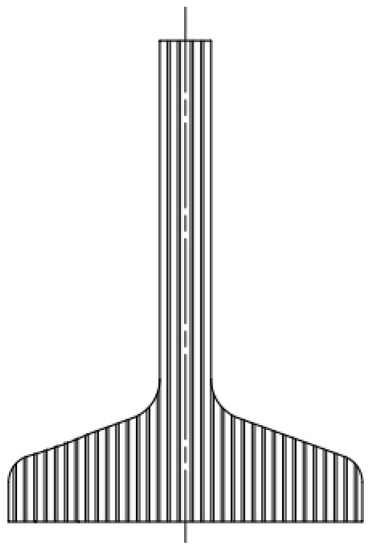 Figure 3. Configuration C (left: blank with longitudinal fiber direction, and right: specimen with resulting fiber).
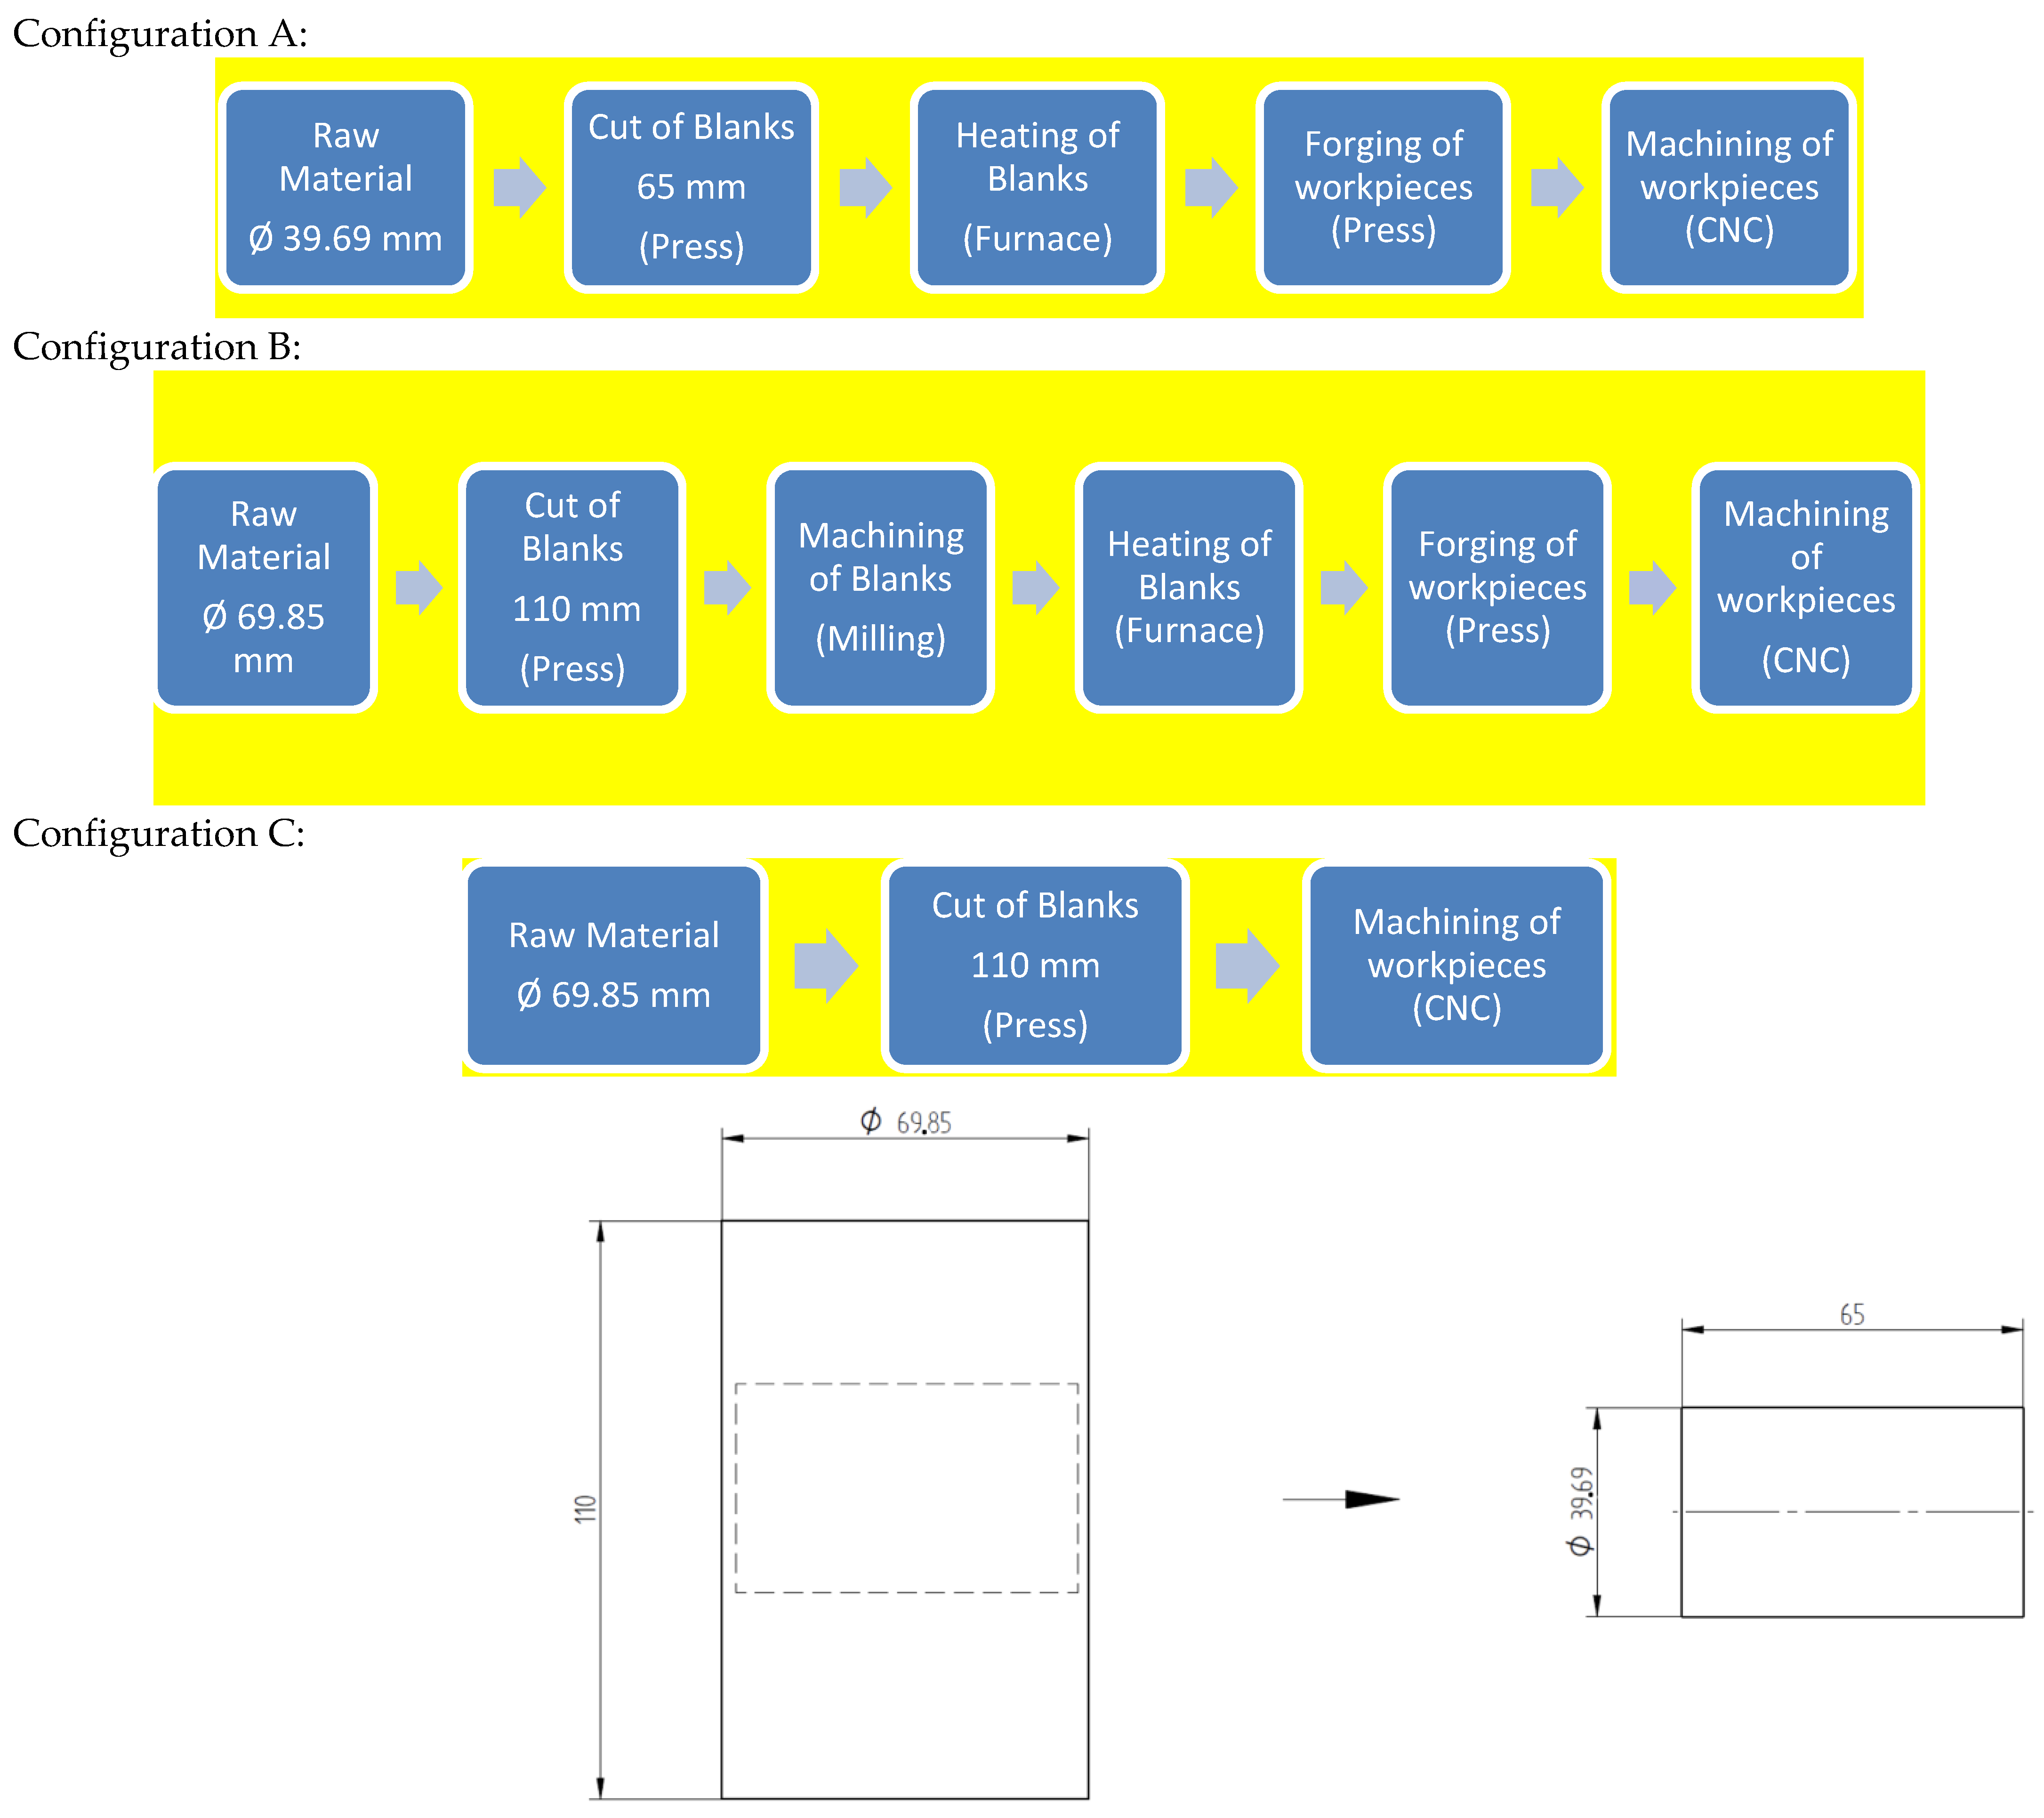
As noted, the specimens were produced from SAE 1045H material with diameters ∅39.69 and ∅69.85 according to the manufacturing flow indicated in Table 4.

Table 4.
Flow of operations for manufacturing specimens.
3.1. Sample Fabrication Process
To achieve the desired fiber orientation in the specimens, the manufacturing process followed the flowcharts shown and Figure 4 and Figure 5.
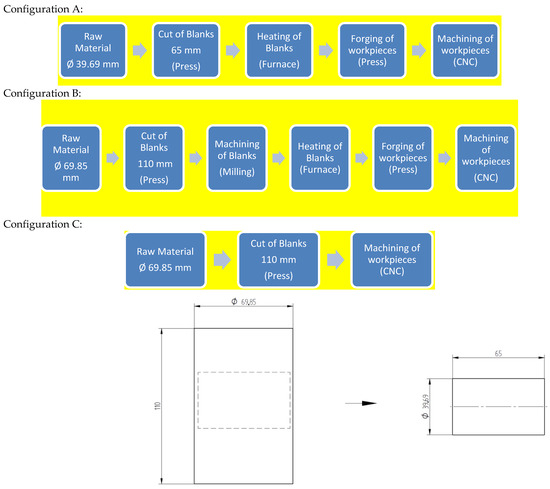
Figure 4.
Schematic drawing of blank removal for forging. Measurements in millmeters.
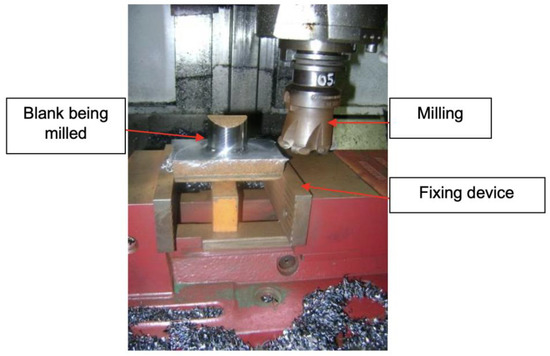
Figure 5.
Blank machining process.
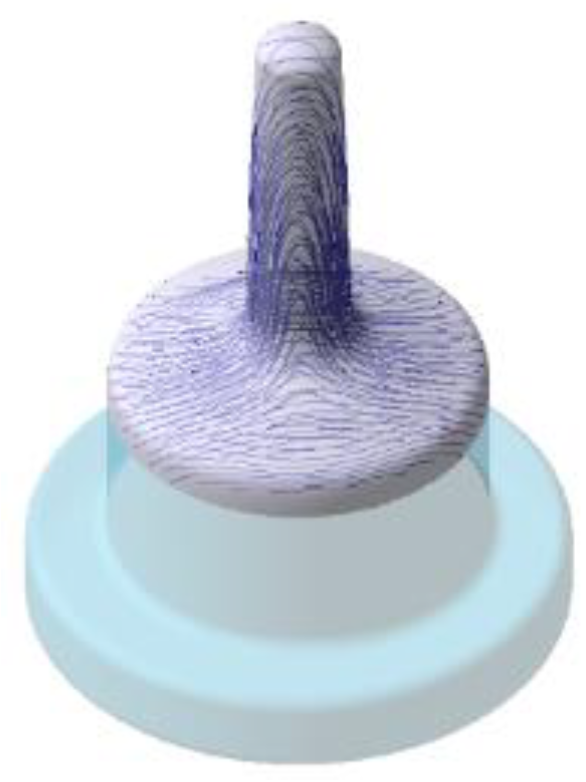
Figure 6 and Figure 7 demonstrate the positioning of the blank within the tooling, the flow of the material filling the tool, and the intended fiber orientation. These images were obtained through a simulation of the forging process in Qform software (QuantorForm Ltd., Fujairah, United Arab Emirates) using the data from Table 5. This simulation was used only to check if the amount of material was adequate for the actual forging process and the expected fiber development for the specimen. Temperature boundary conditions at the tools were set to mimic the real manufacturing conditions, i.e., 250 °C.

Figure 6.
The sequence of the forging process simulated in QForm.
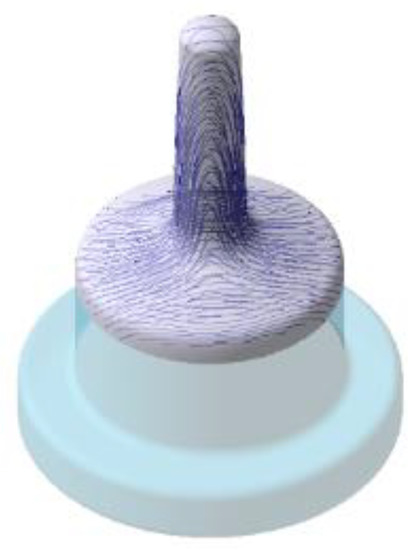
Figure 7.
Grain-flow orientation simulated in QForm.

Table 5.
Input data for forging simulation. â (â—Qform).
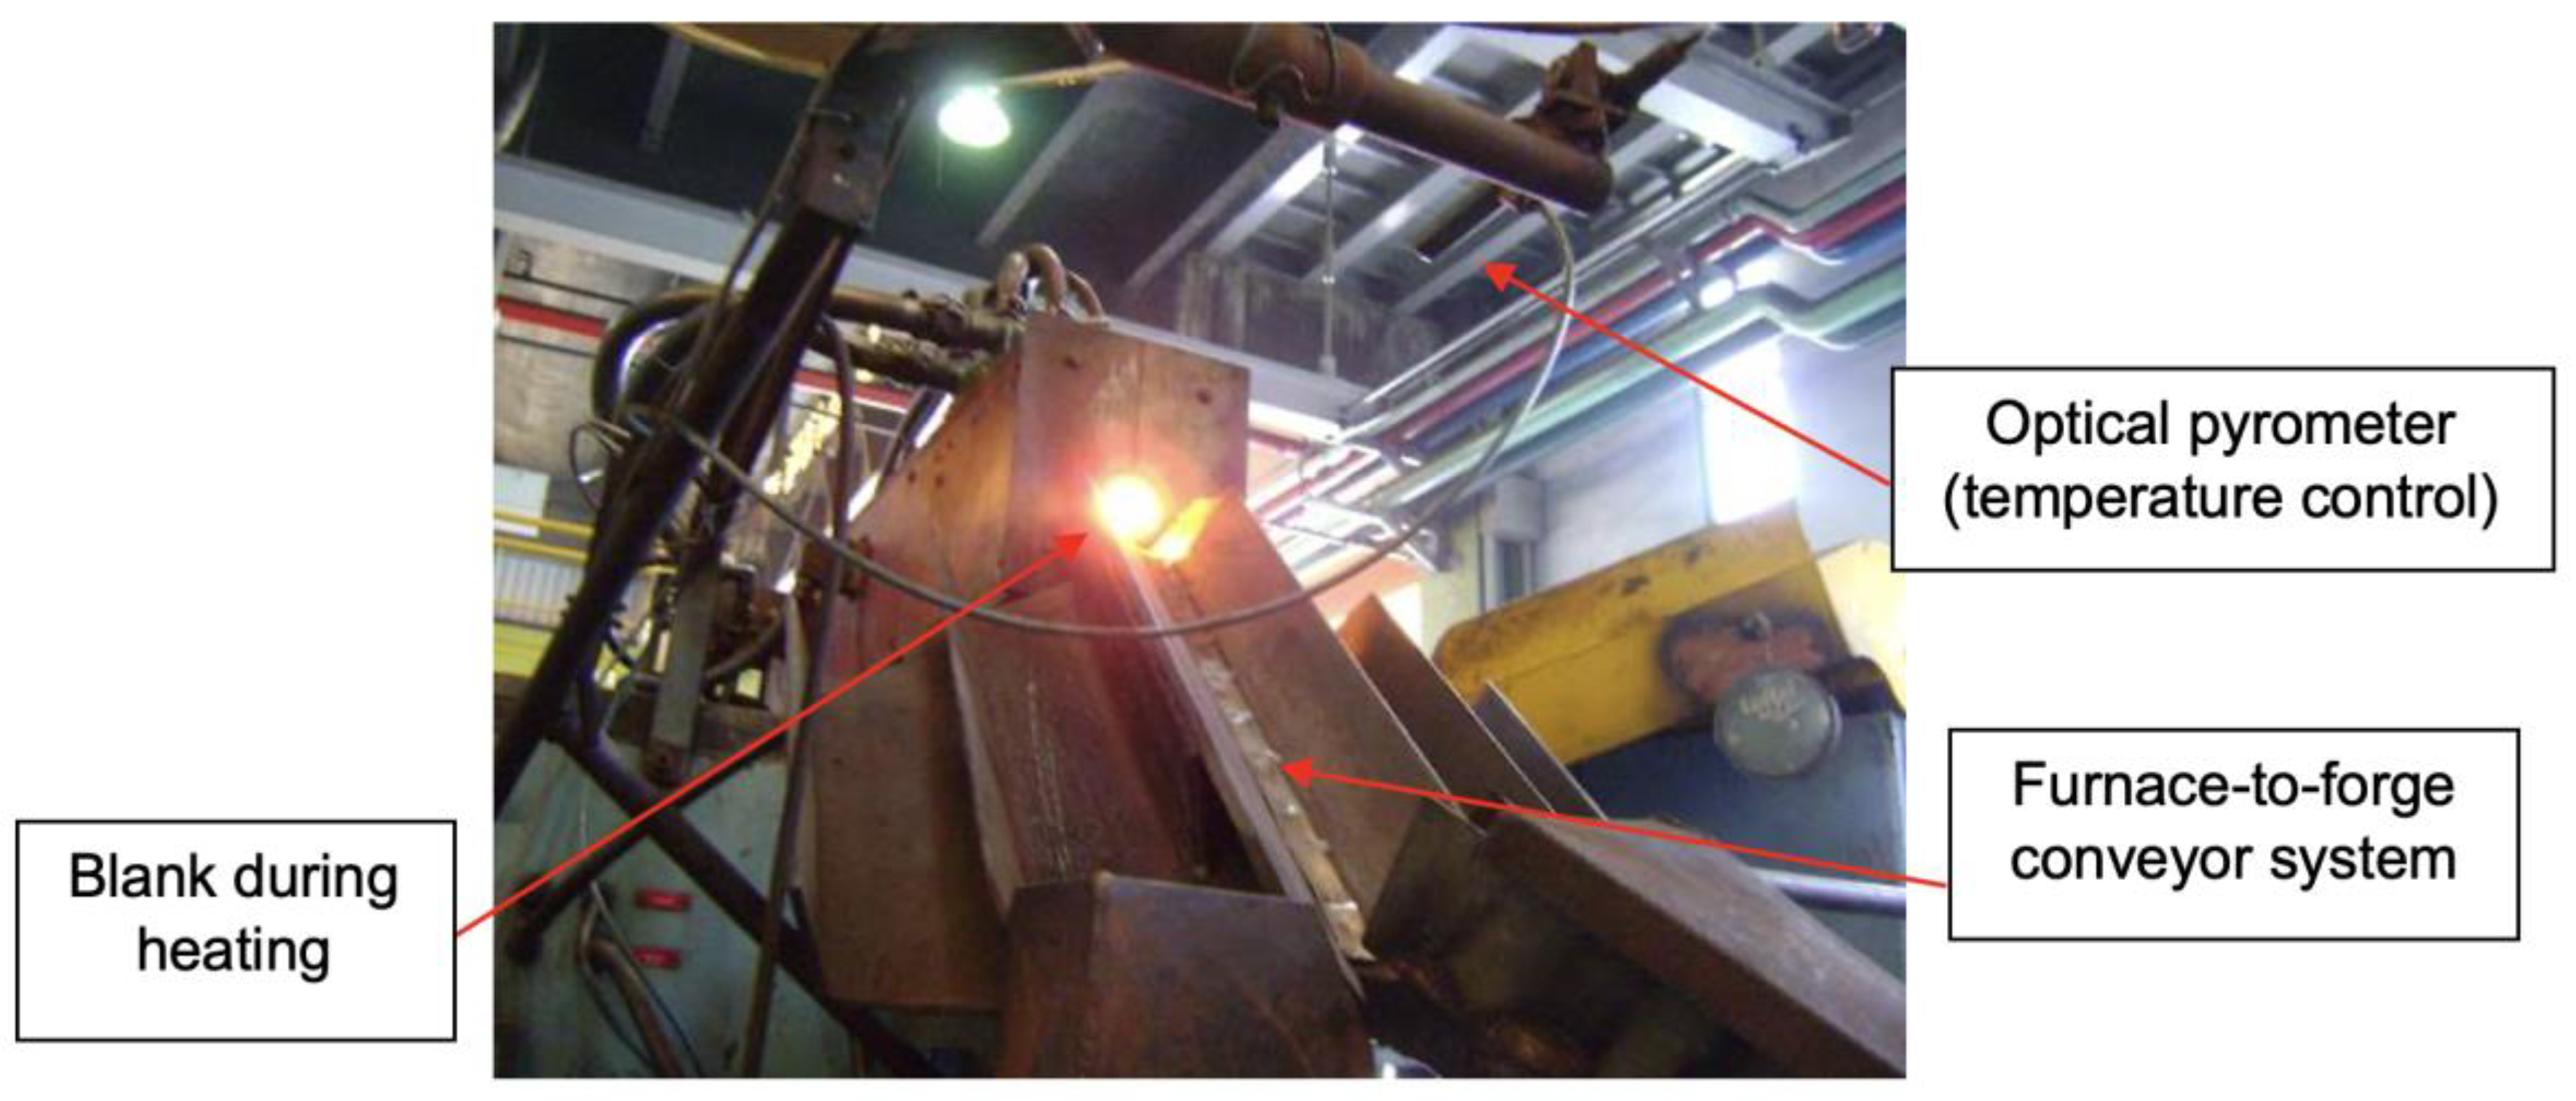
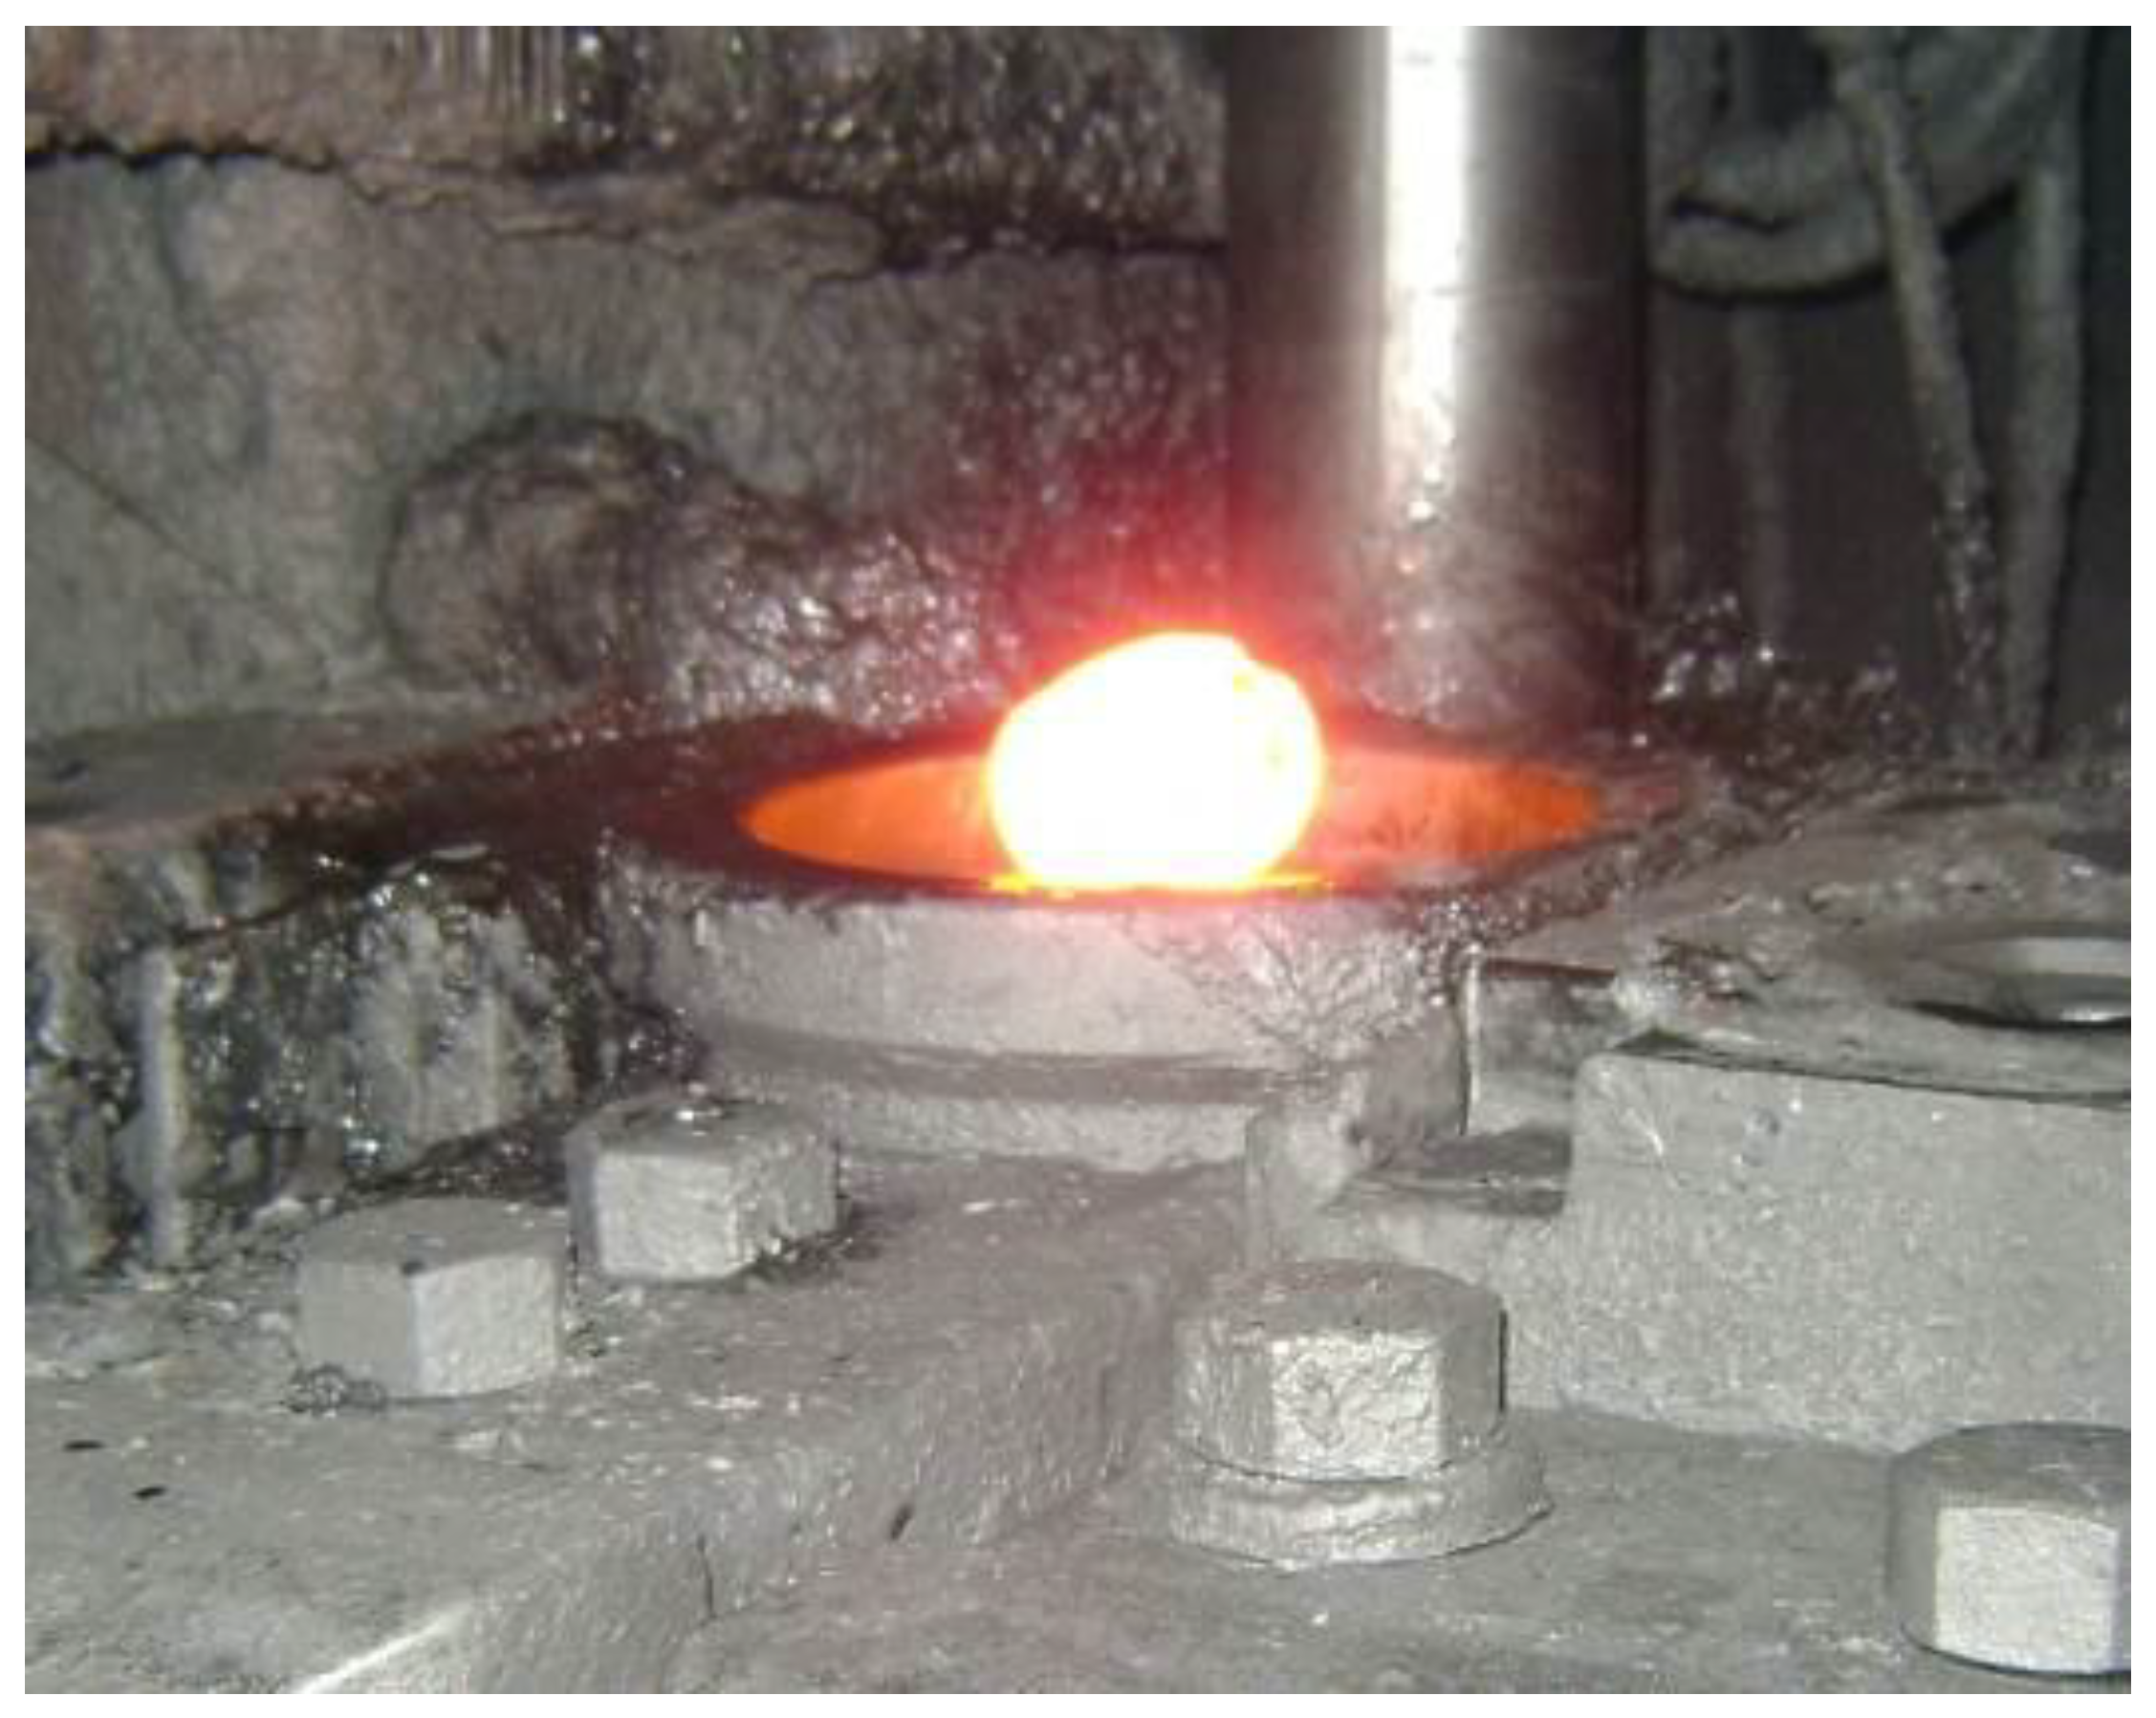
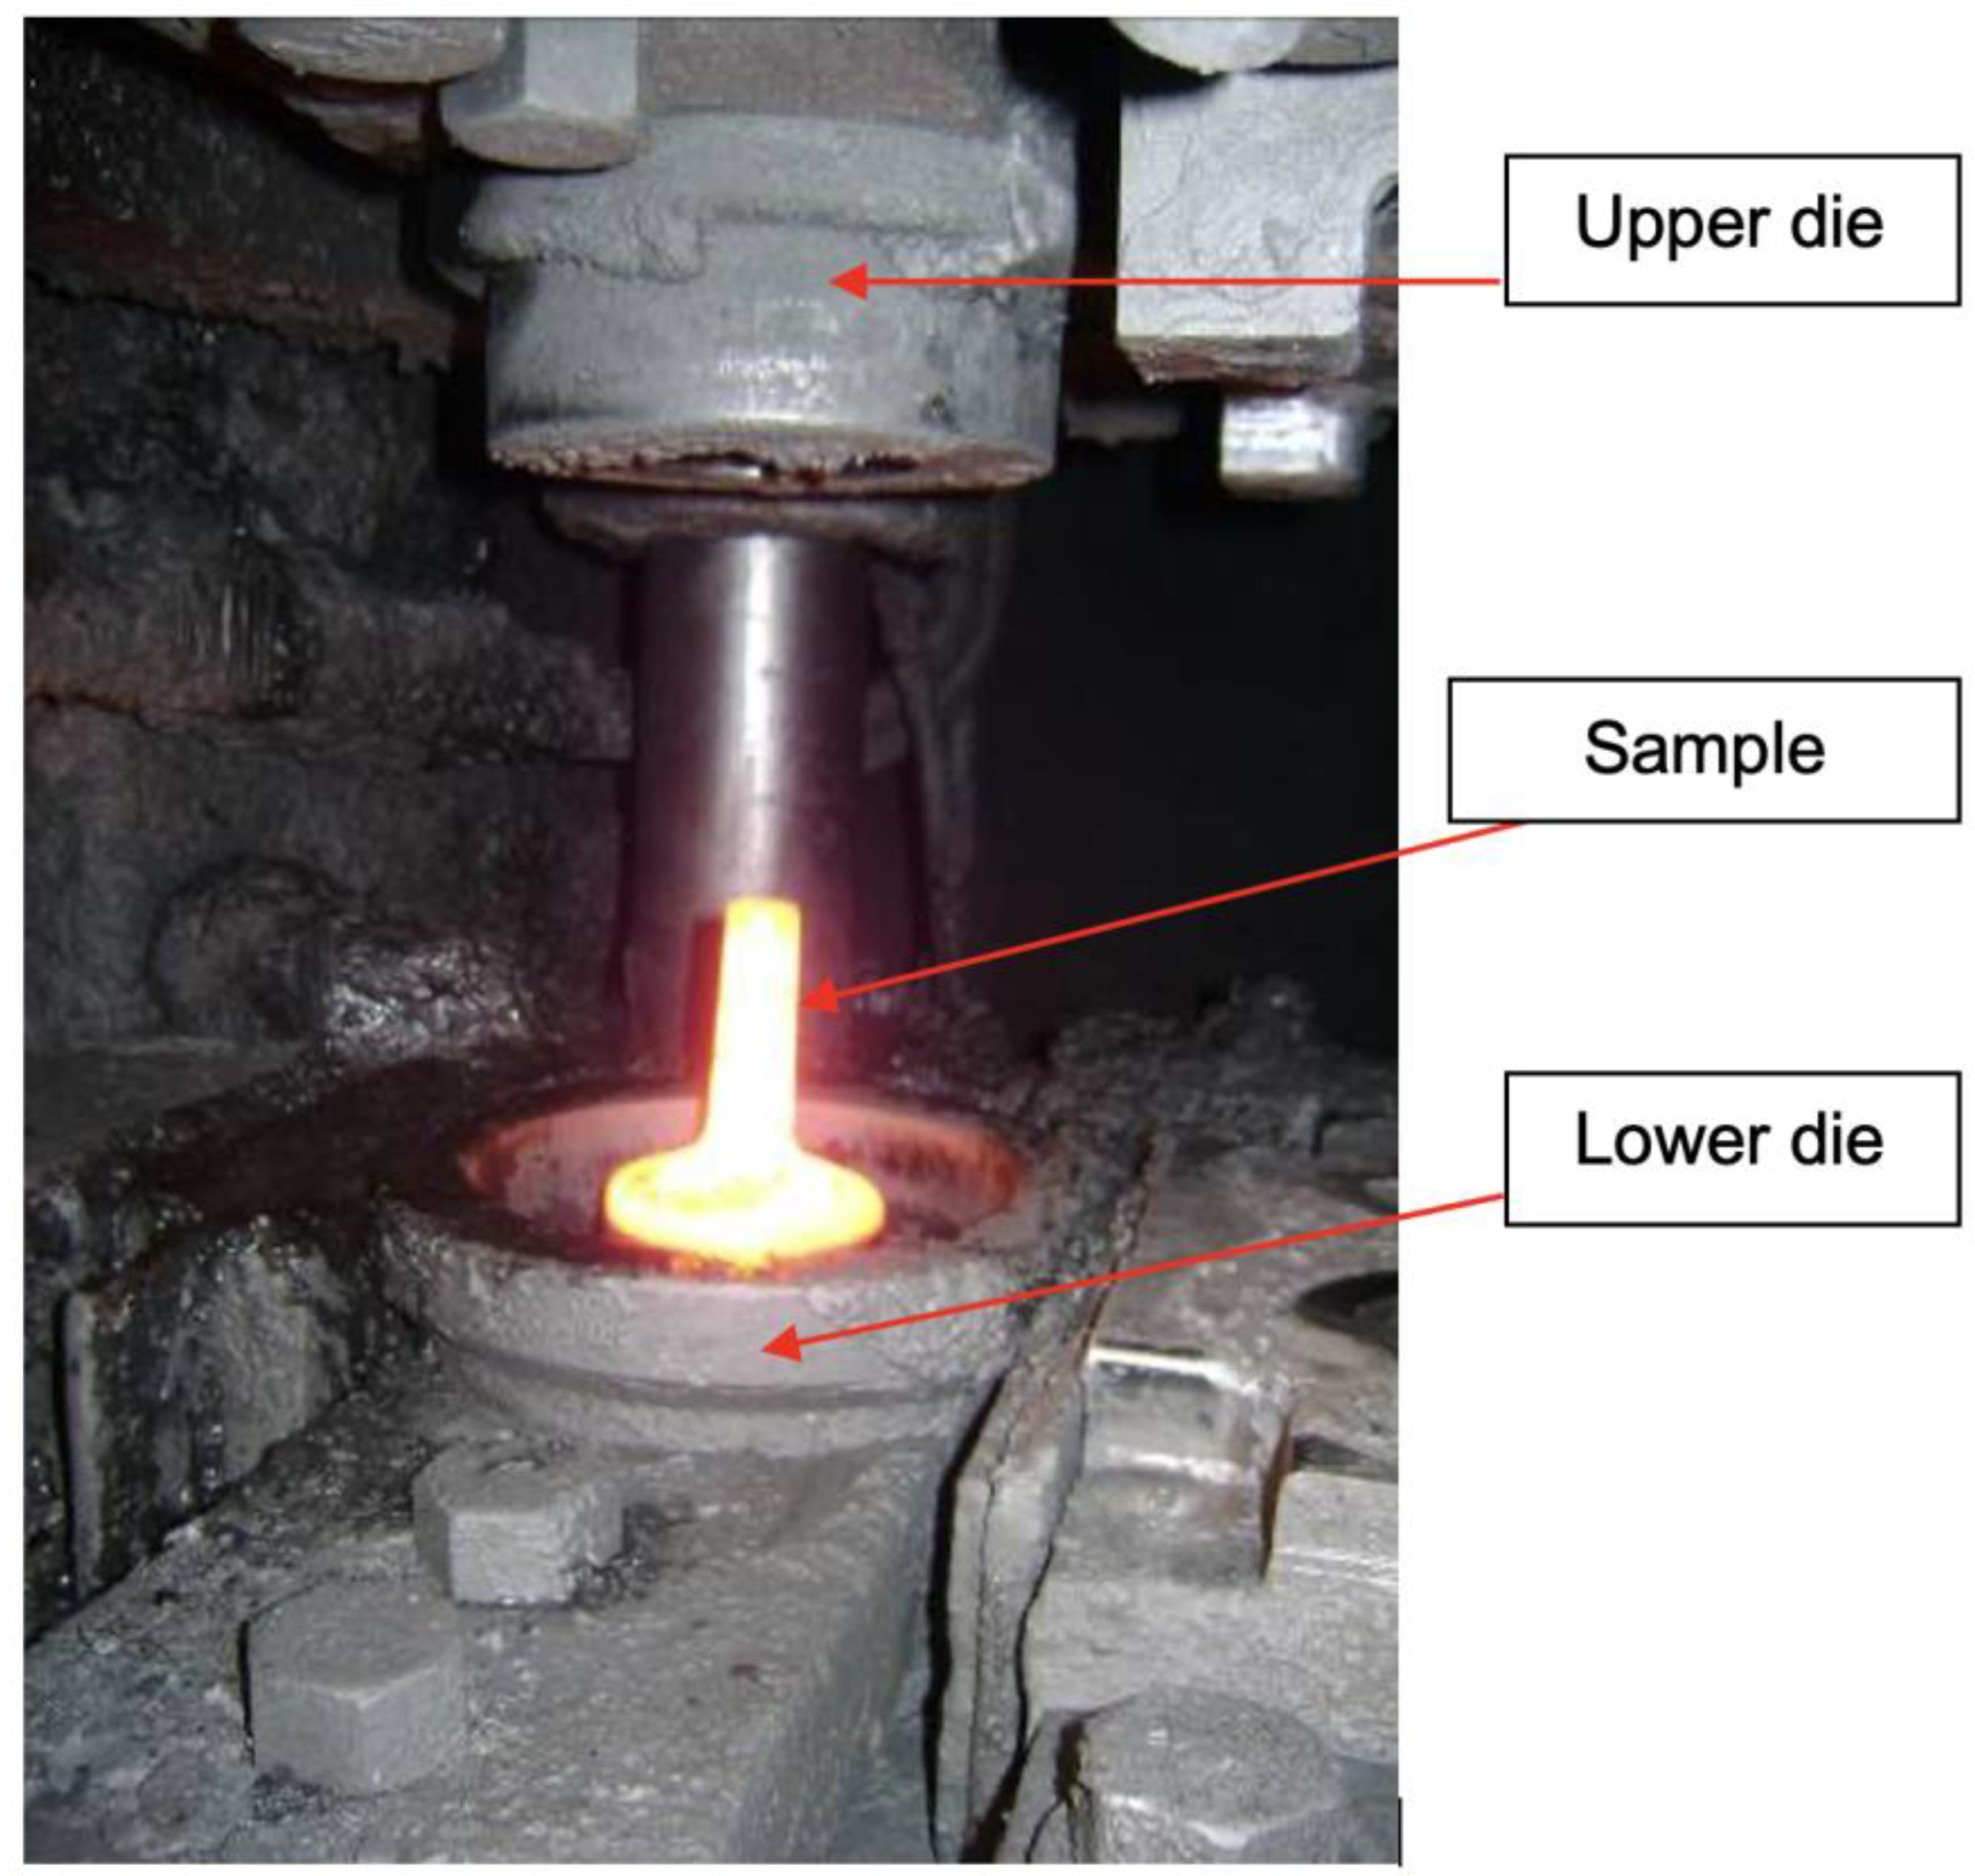
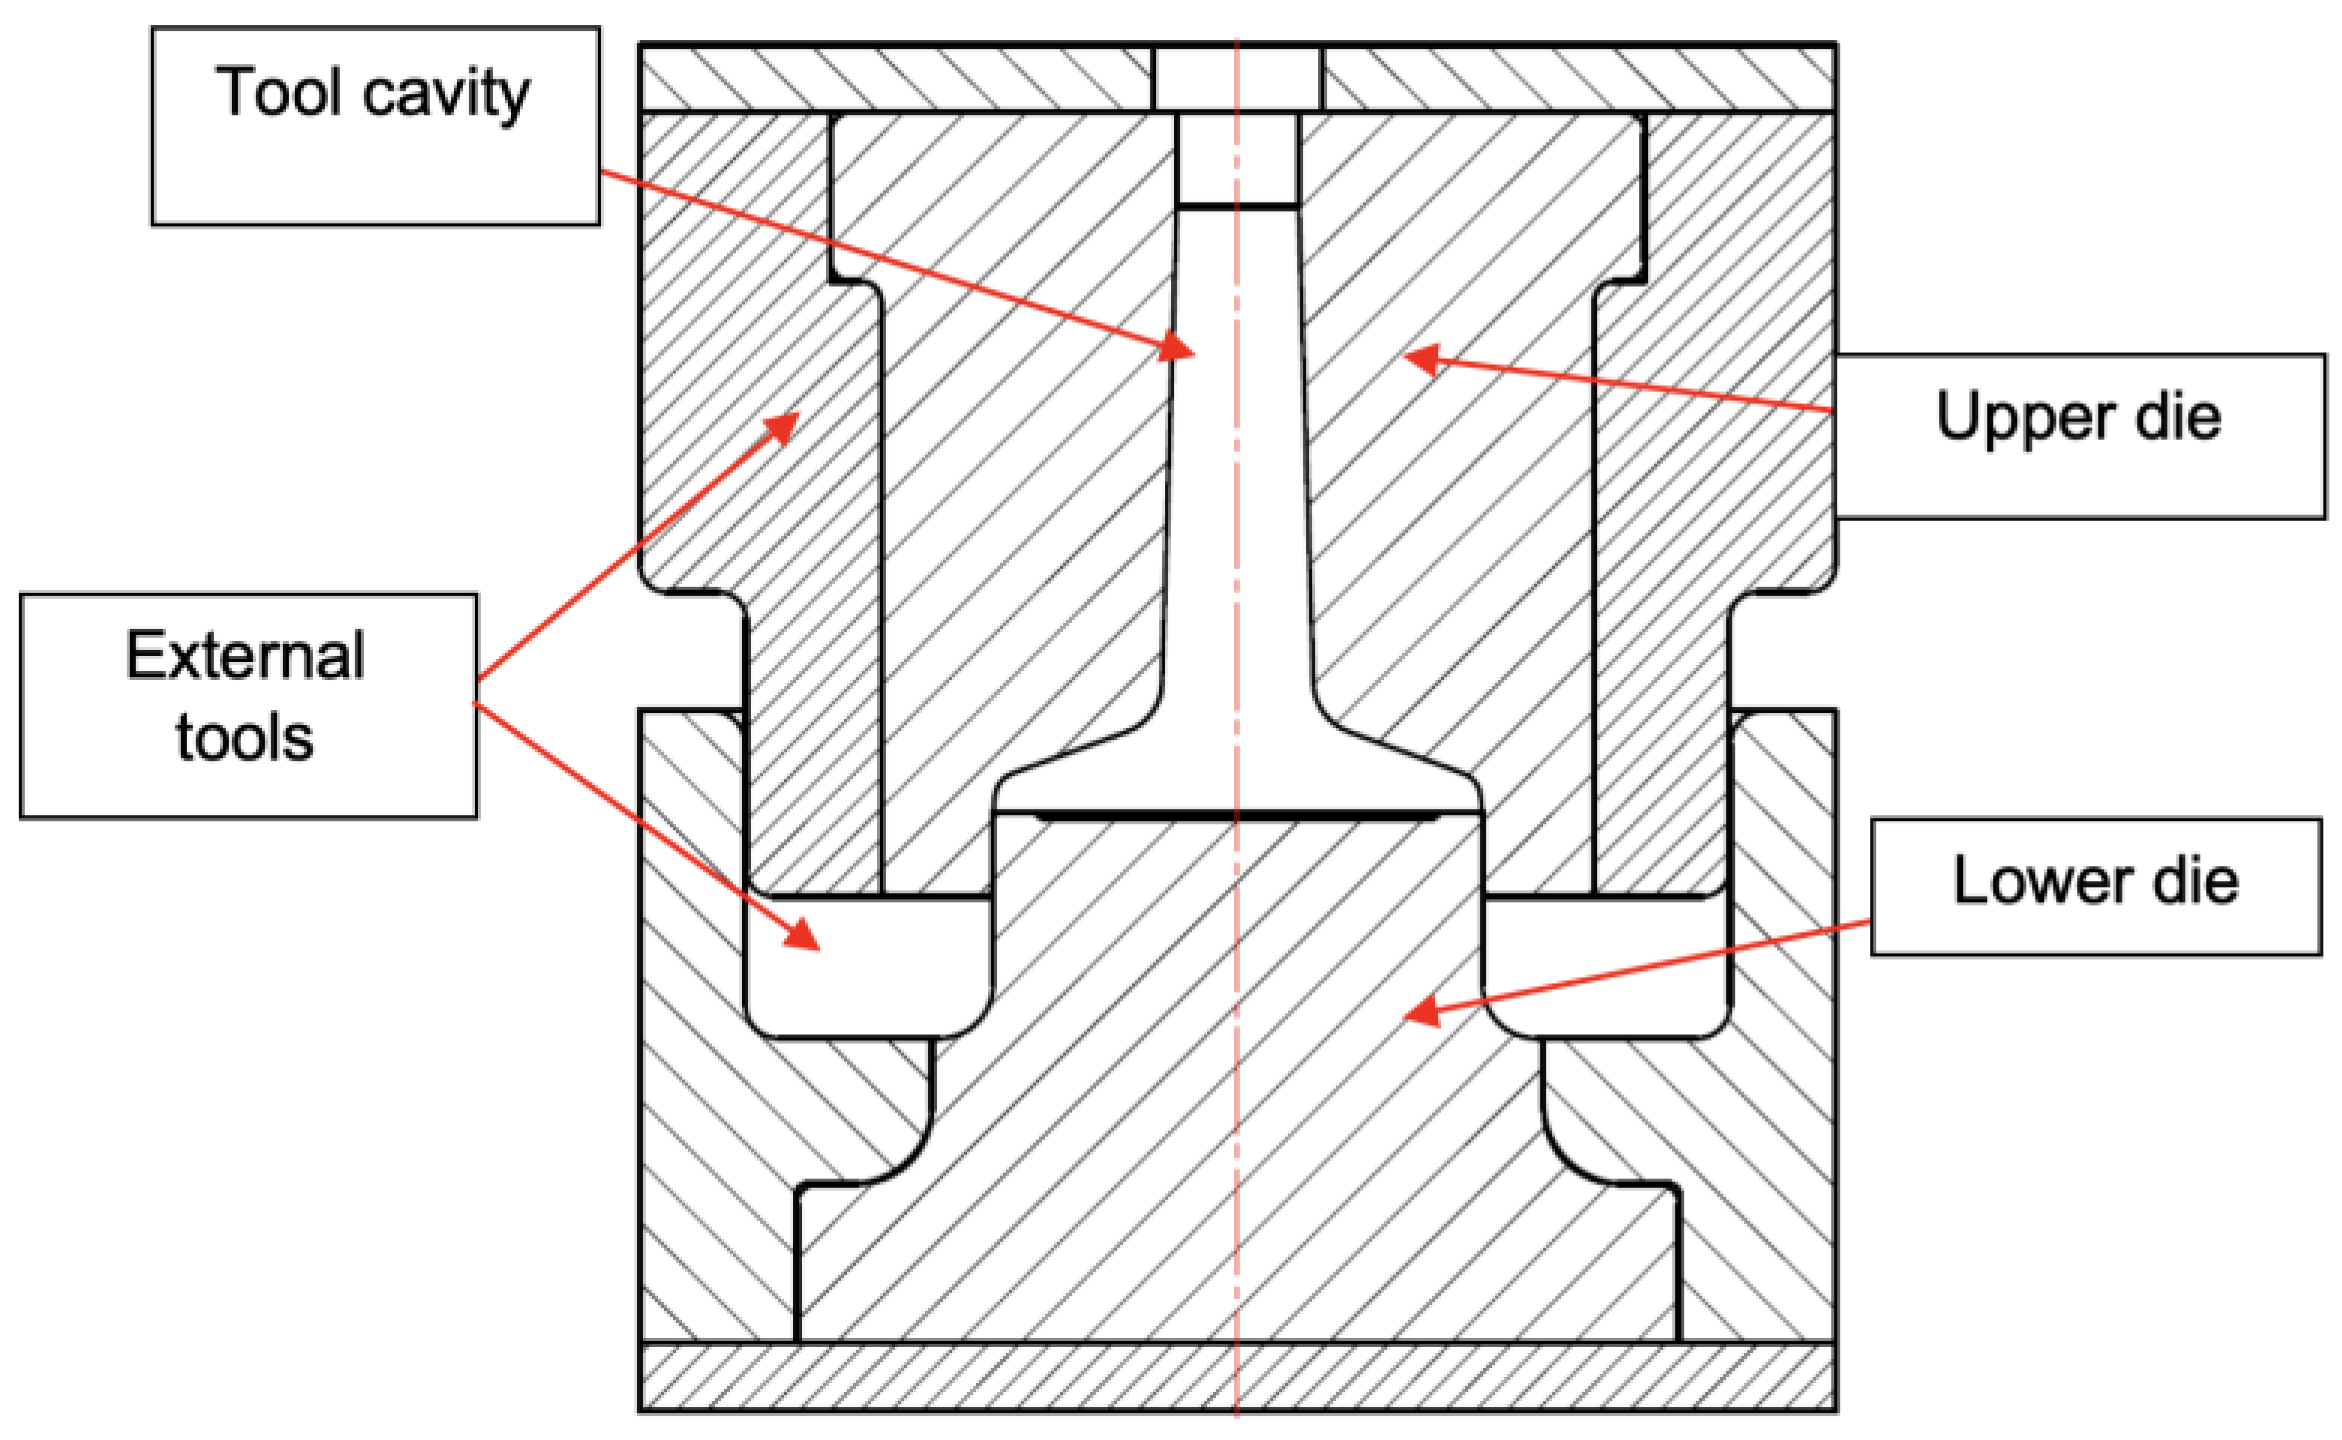
The typical extrusion forging process was performed in a mechanical press, where first the blanks were heated in an induction furnace between 1150/1200 °C, as shown in Figure 8, and then forged in a 9800 kN mechanical press, as shown in Figure 9 and Figure 10, in a tool made of AISI H13 material previously heated between 200 and 250 °C. Figure 11 shows the layout of the forging tool.
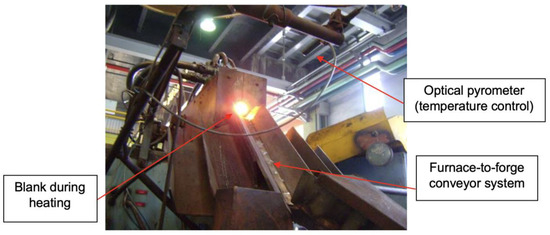
Figure 8.
Blank heating furnace.

Figure 9.
Billet positioned to be forged.

Figure 10.
Sample after forging.
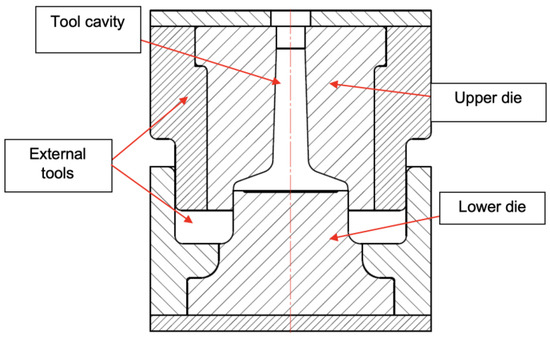
Figure 11.
Forging tool sketch.
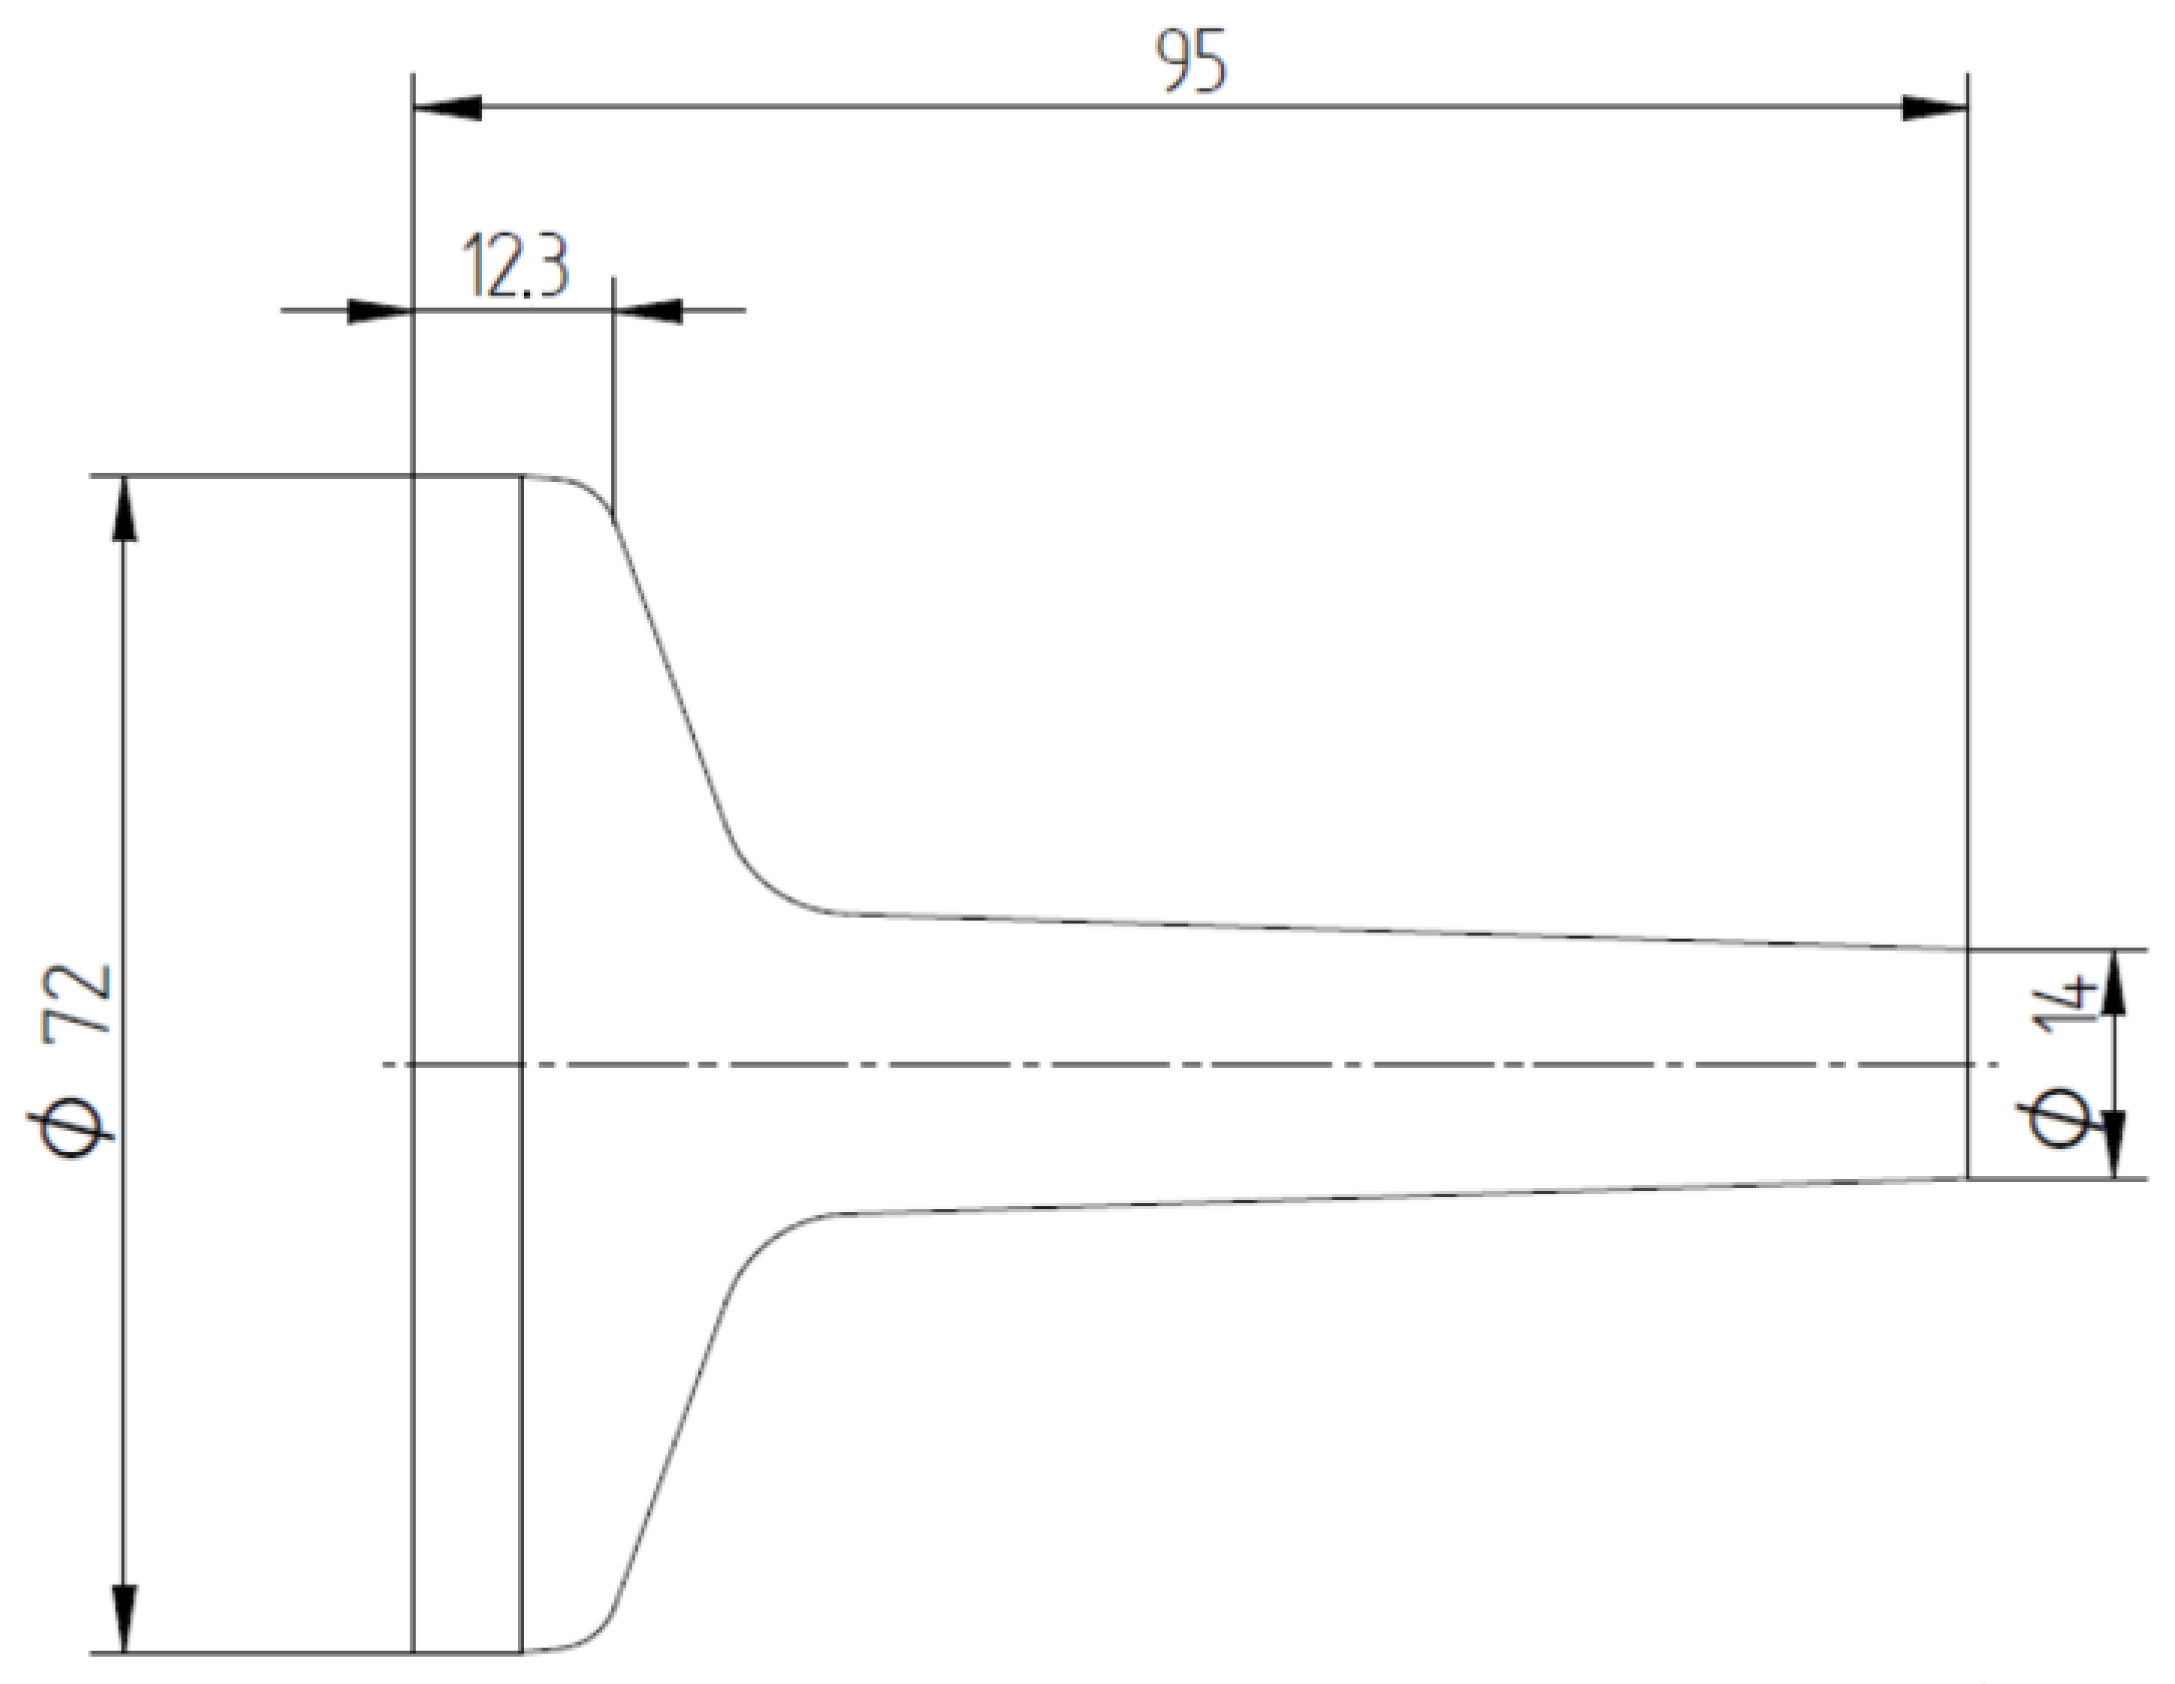
Figure 12 demonstrates the specimen design with the geometry after the forging operation. The tolerances applied were determined according to DIN EN 10243 [24].
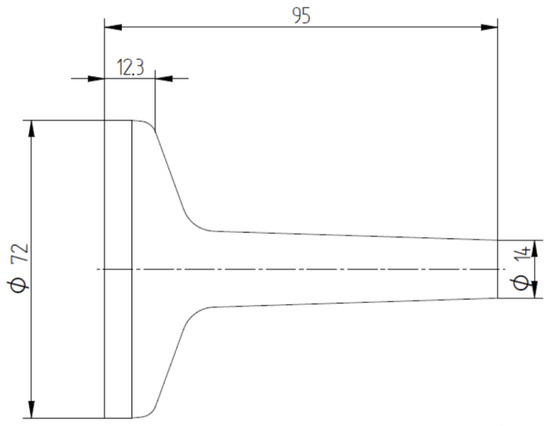
Figure 12.
Drawing of the forged part. Measurements in millimeters.
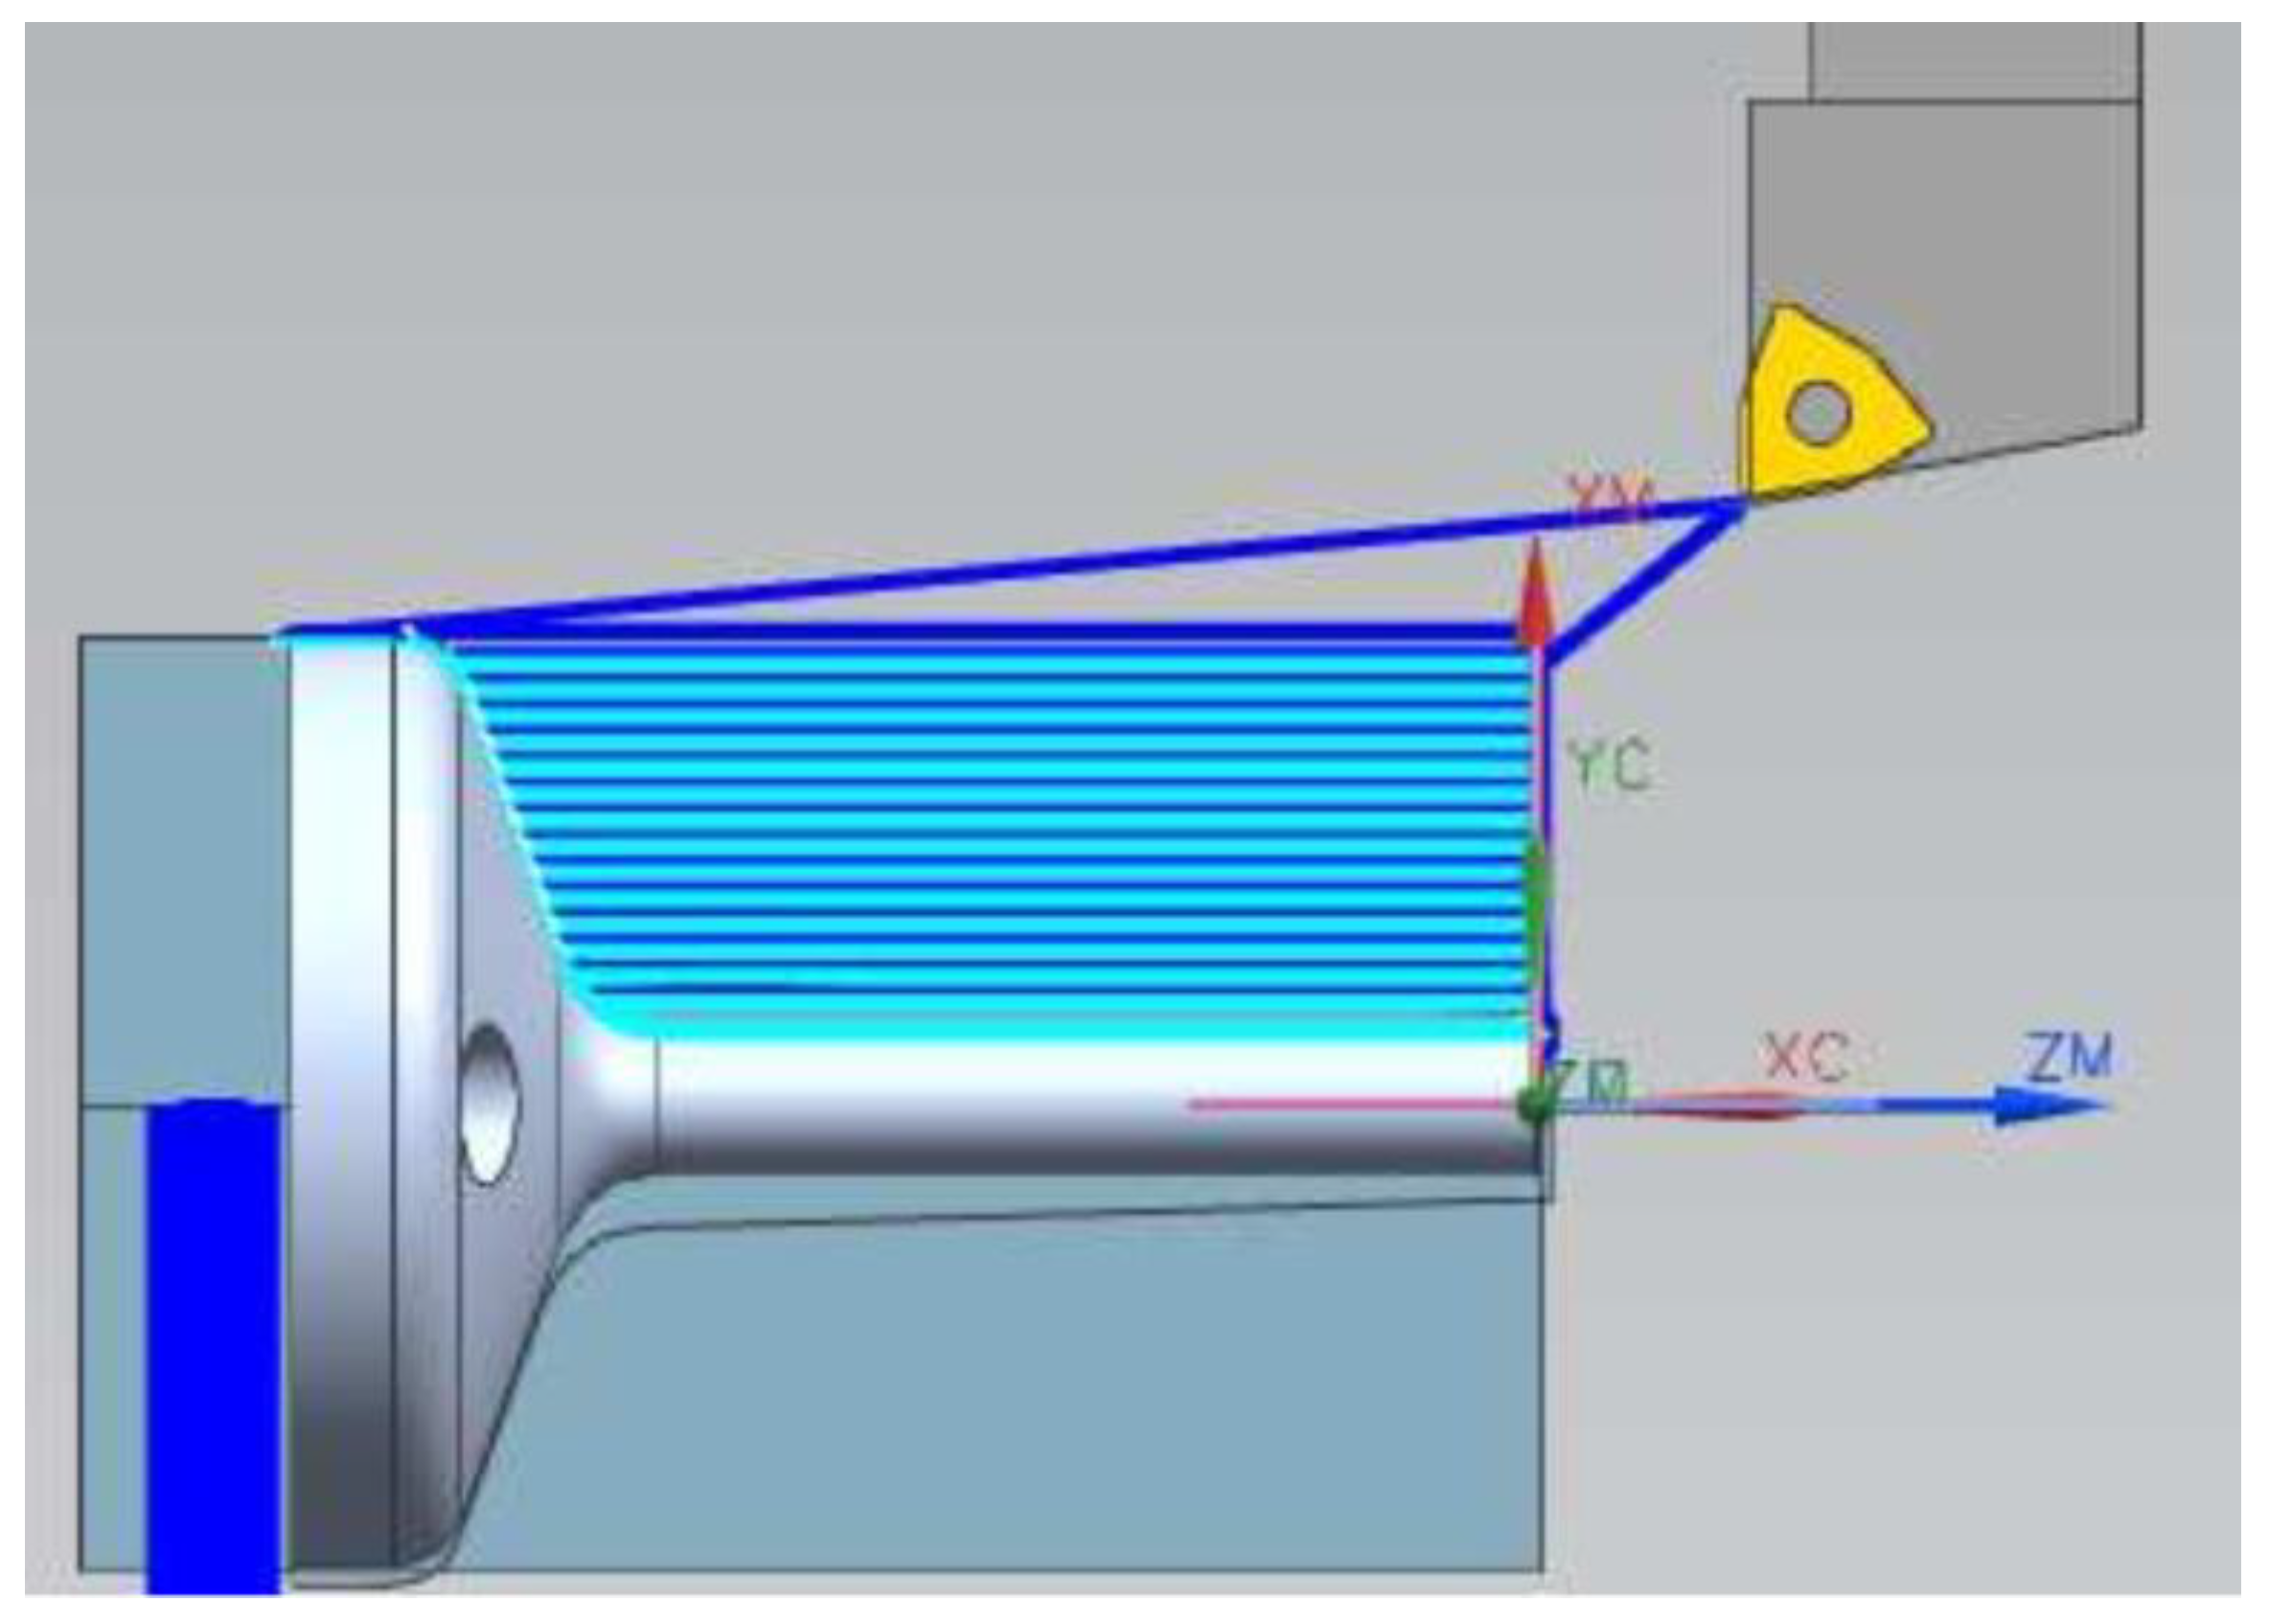
To finish the manufacturing process, samples were machined in a CNC lathe to ensure dimensional repeatability between the specimens, as illustrated in Figure 13. The machined specimens were then polished at the transition radius region of the flange with the stem so that the roughness did not interfere with the fatigue test results. Then, the specimens were drilled in the flange region for subsequent attachment to the fatigue test equipment, as illustrated in Figure 14. The tolerances applied for machined specimens were determined according to ISO 2768.
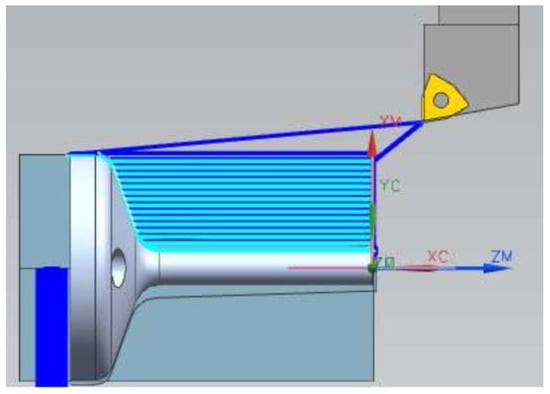
Figure 13.
CAM program for turning the specimens.
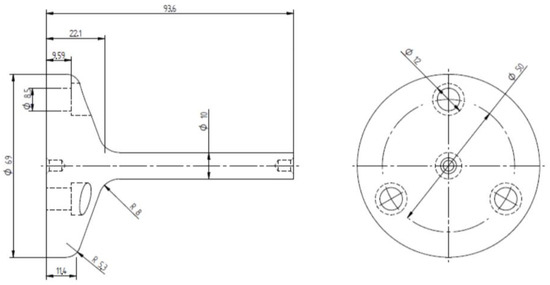
Figure 14.
Drawing of machined specimens. Measurements in millimeters.
3.2. Metallographic Testing
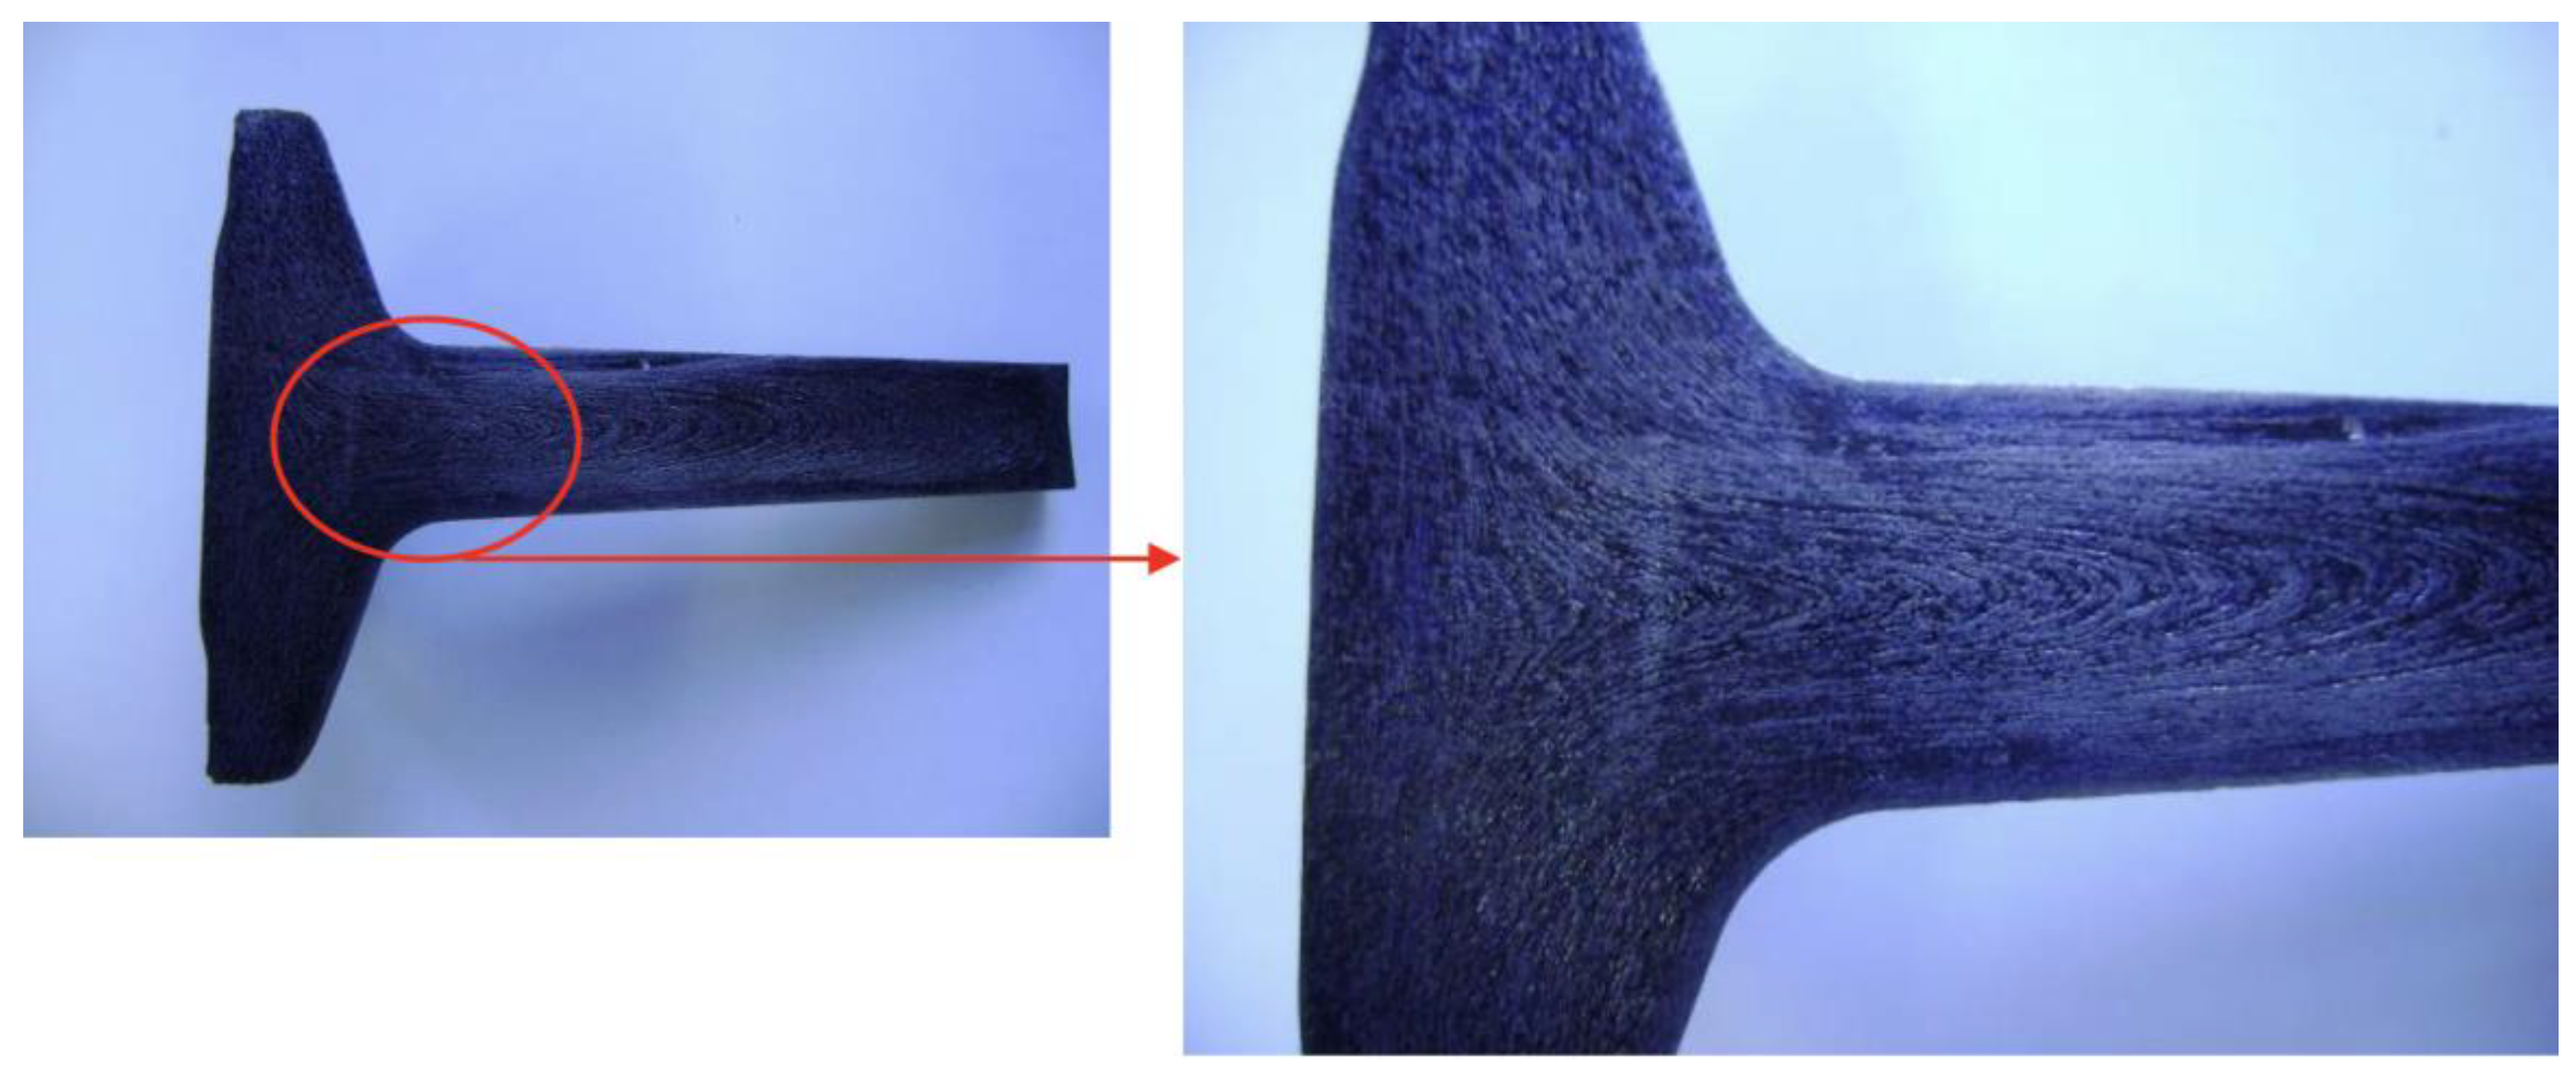
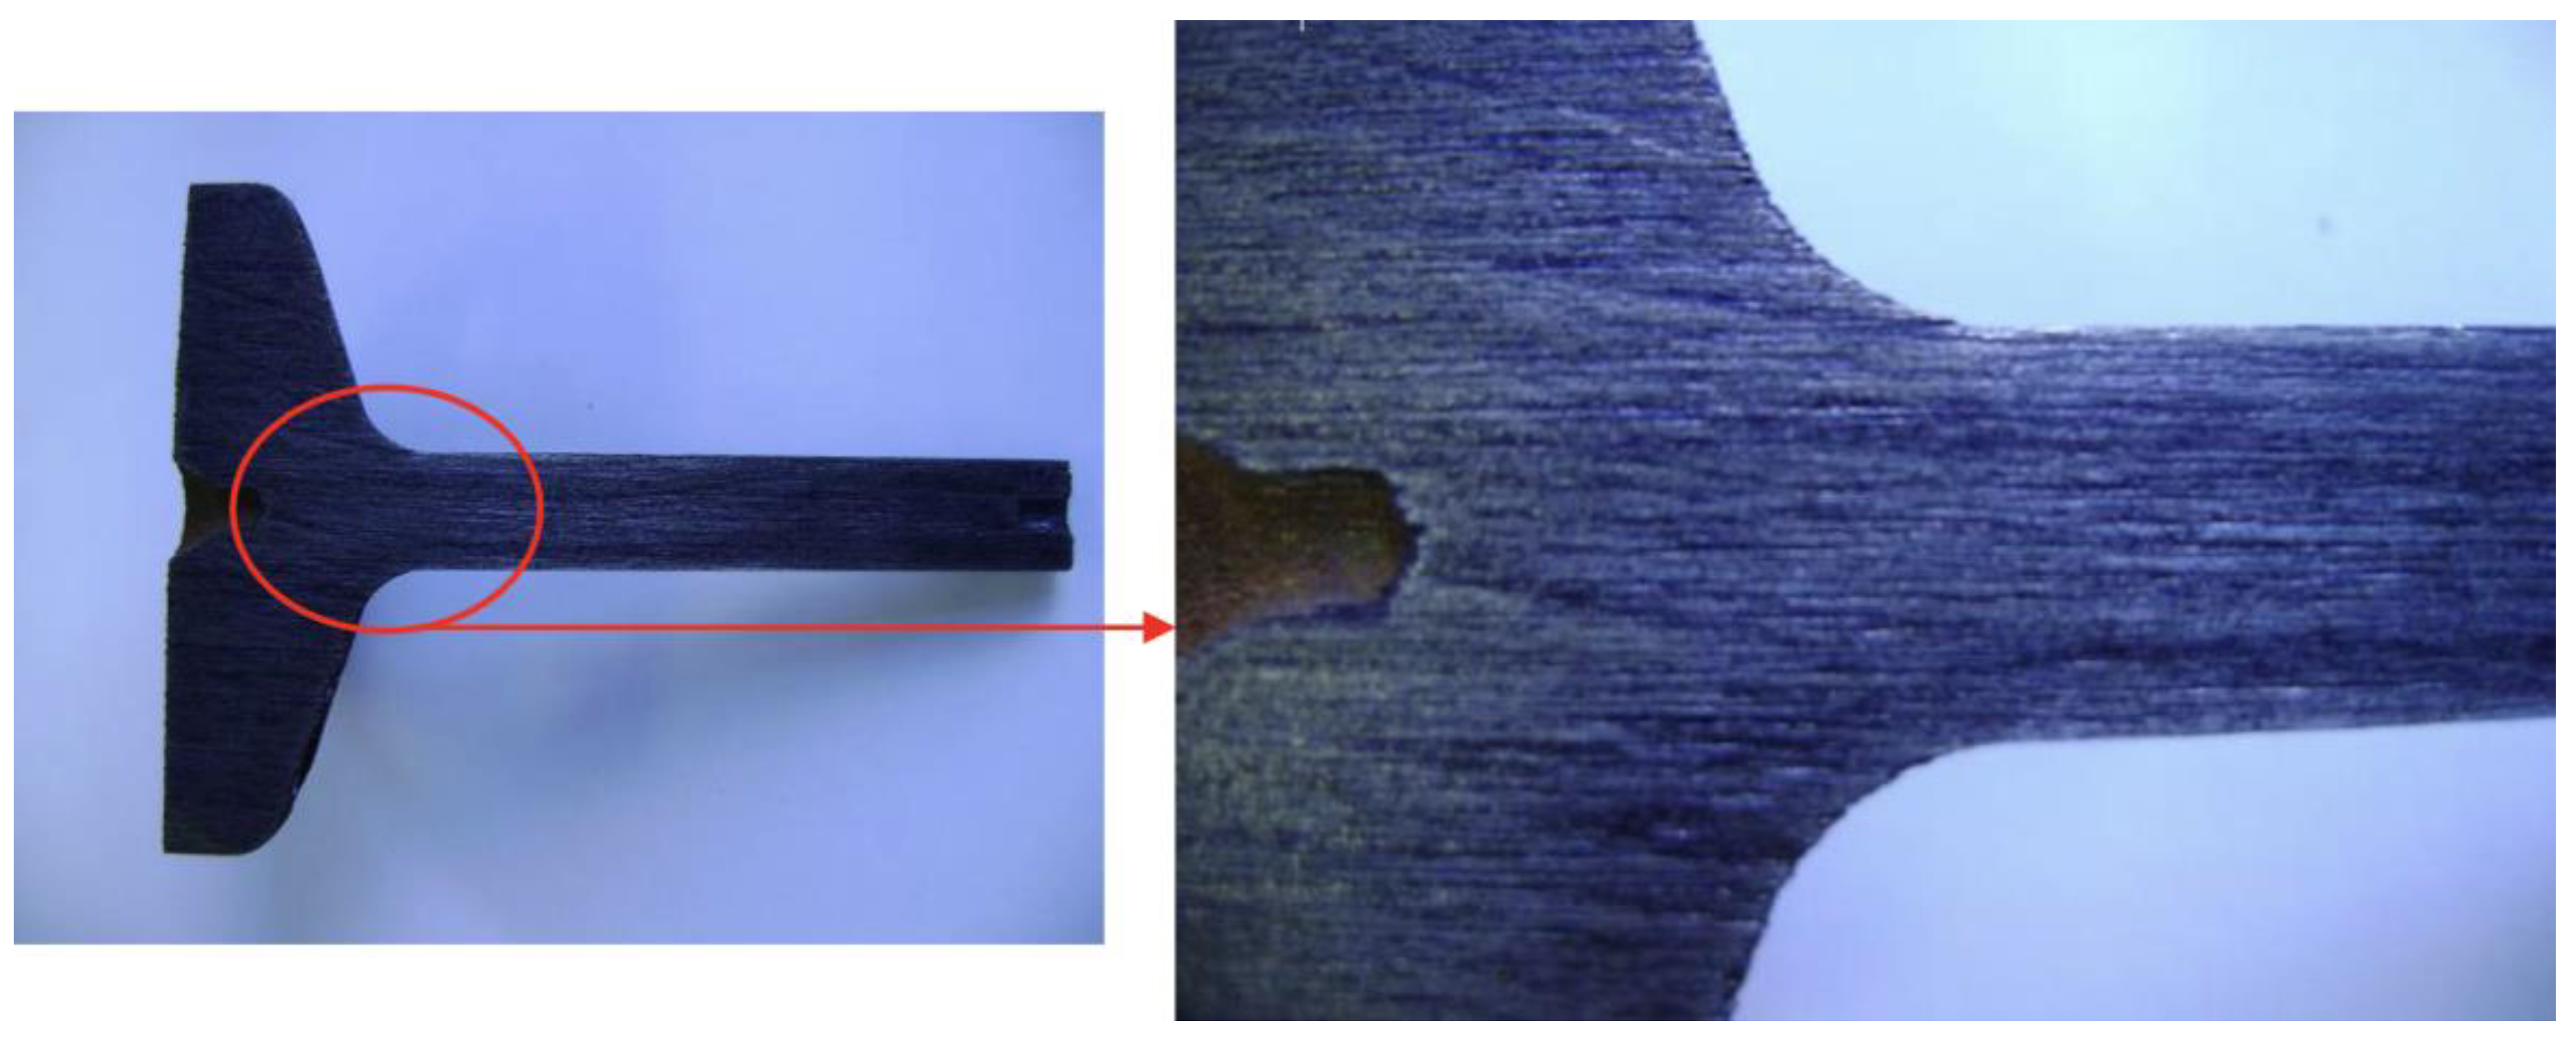
A sample of each configuration was metallographically analyzed to confirm the orientation of the fibers generated in the specimens. To this end, the specimens were cut lengthwise, sanded, and attacked in a 30% sulfuric acid (H2SO4) solution heated between 80 °C and 90 °C as recommended by ABNT NBR 8108. Blue tracing paint was applied over the attacked surface to make the fiber lines visible. Figure 15, Figure 16 and Figure 17 show the fibers revealed on the specimens of the three proposed configurations.
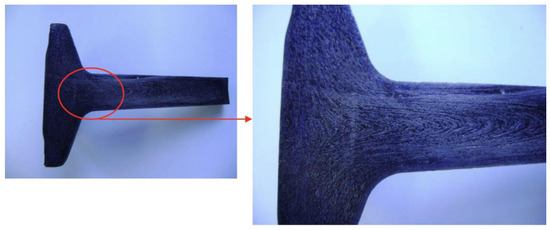
Figure 15.
Fibers from configuration A.
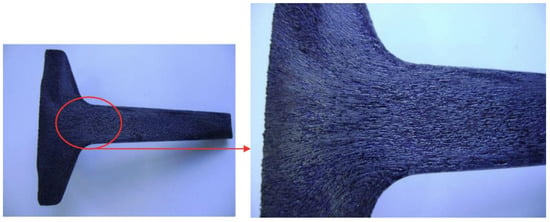
Figure 16.
Fibers from configuration B.
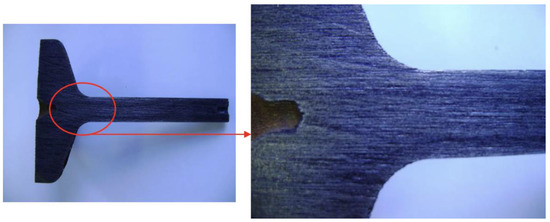
Figure 17.
Fibers from configuration C.
3.3. Fatigue Test
To evaluate the components’ fatigue life, a rotational flexural fatigue tester or rotating beam was used, which caused the maximum stress in the region of the beam due to the moment caused by the load coupled to the end of the specimens (Figure 18 and Figure 19). A load of 500 ± 50 N was applied to the specimens coupled at 80 mm from the clamping system with a constant frequency of 8.33 Hz. The equipment recorded the number of cycles applied to the specimen until it ruptured.
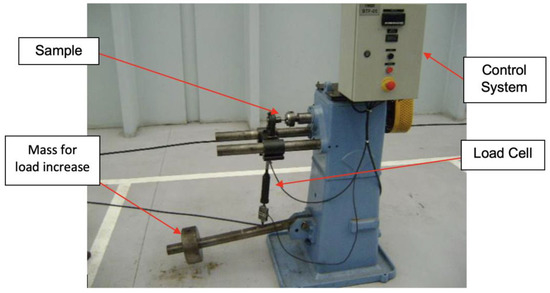
Figure 18.
Fatigue test equipment.
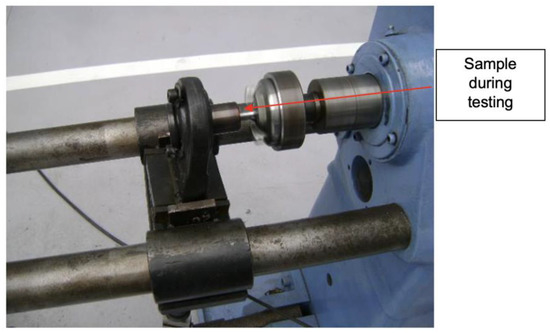
Figure 19.
Sample in a fatigue test.
3.4. Theoretical Fatigue Life Calculation
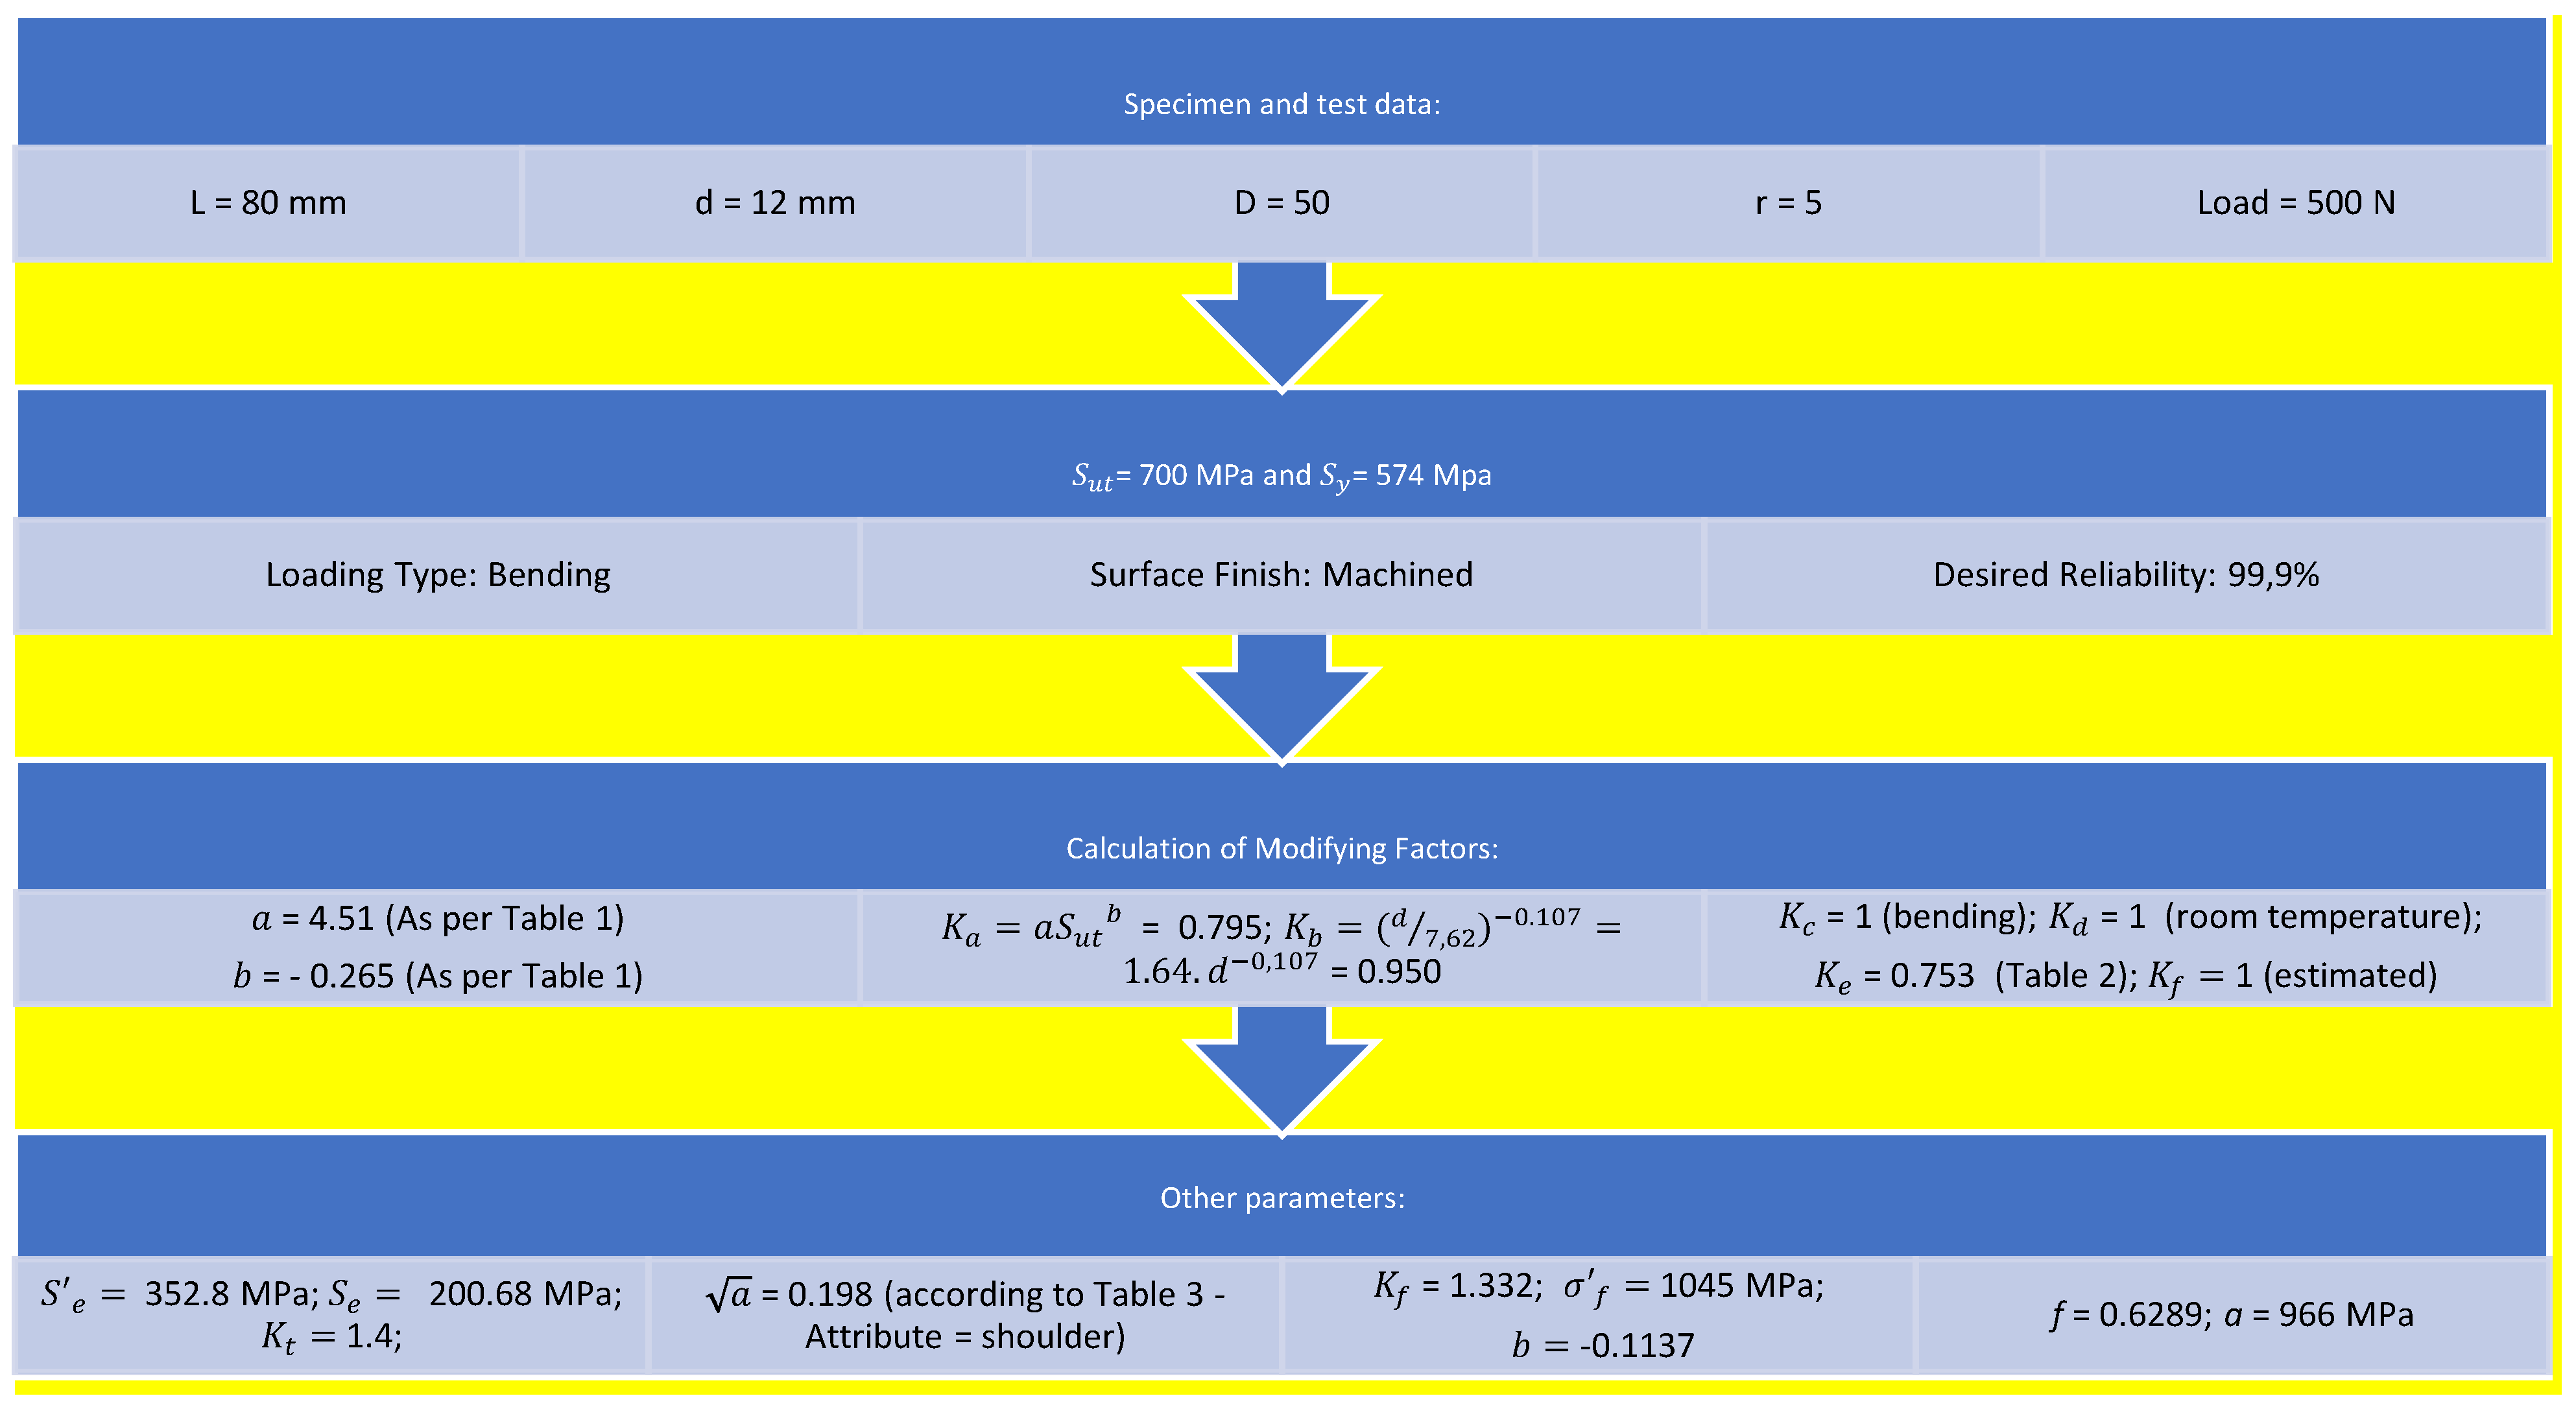
To verify the suitability of the samples’ dimensions and testing time, the number of theoretical cycles to failure was calculated according to the following sequence in Chart 1.
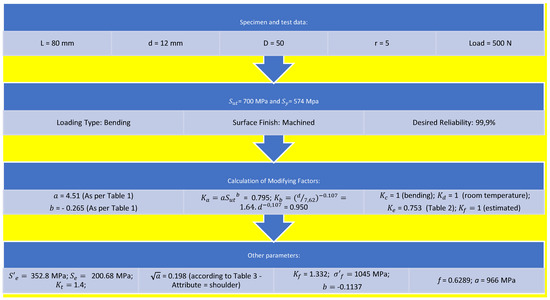
Chart 1.
Theoretical fatigue life calculation.
Additionally, to determine stress values, a simple linear elastic, isotropic simulation resorting to eight-node first-order solid elements (incompatible modes) was performed using Abaqus Software 2021 (Dassault systems, Vélizy-Villacoublay, France), Figure 20. Applying the loads and boundary conditions of the fatigue test yielded stress values of MPa and MPa. Finally, from Equation (2), and based on the numerical predictions for stress amplitude, the foreseeable number of cycles was determined as 13,576.

Figure 20.
Simulation of stresses applied to the specimen.
4. Results
4.1. Fatigue Test Results
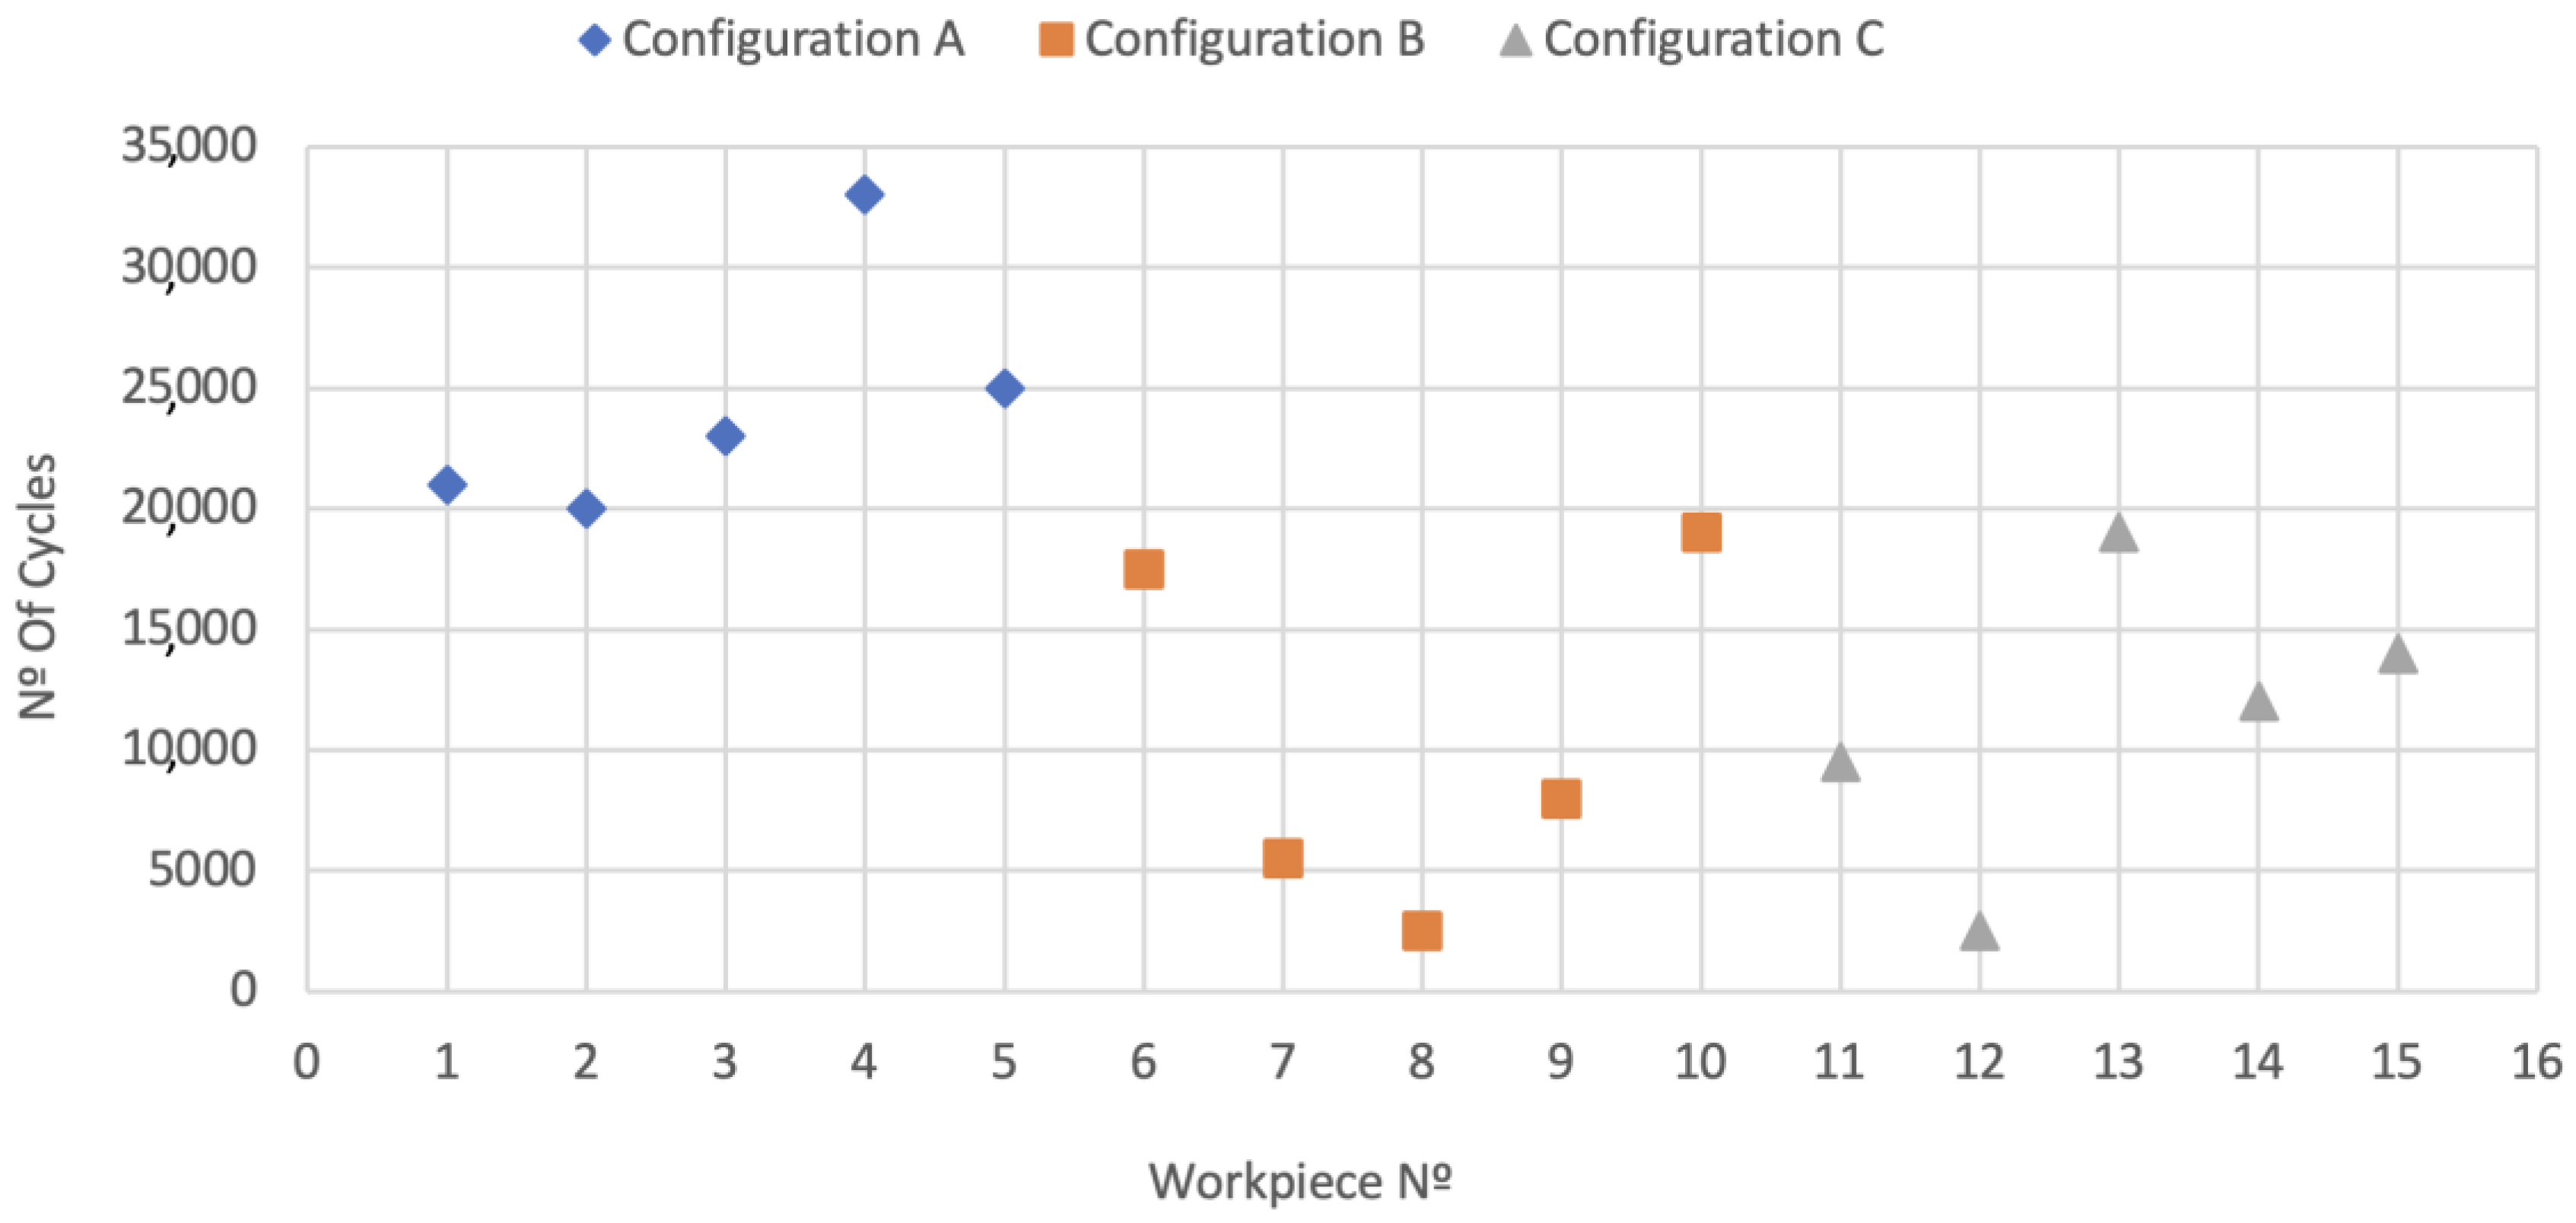
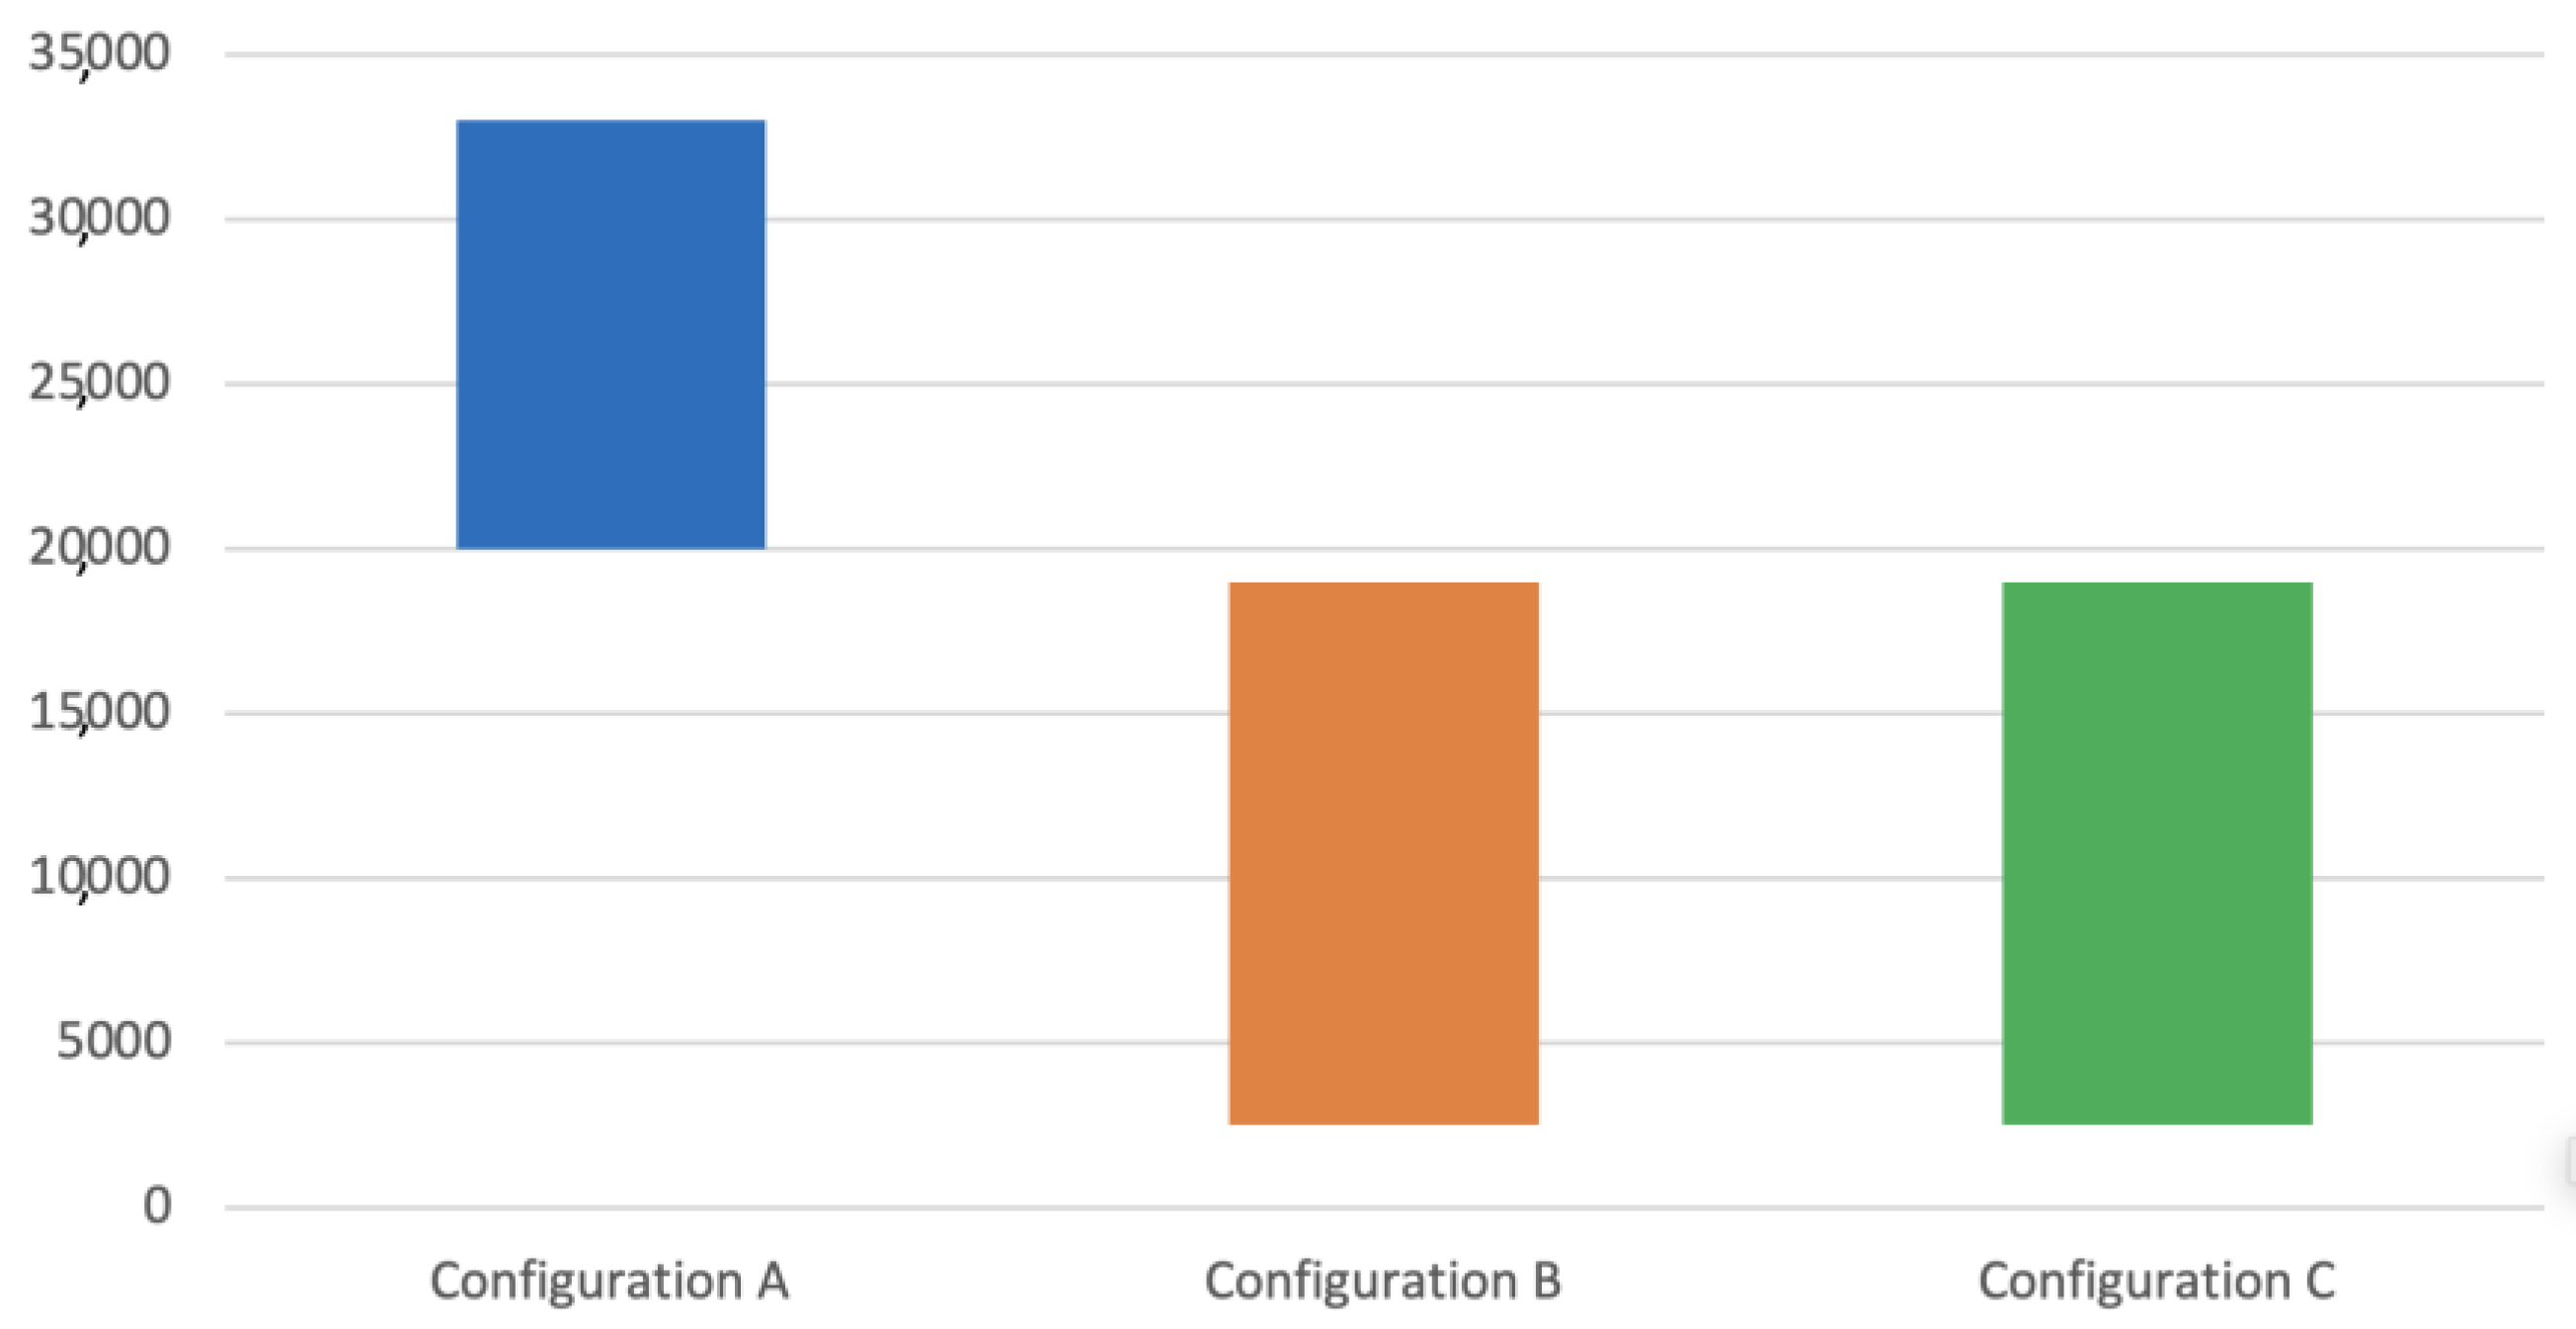
Table 6 and Figure 21 and Figure 22 show the results obtained after the rupture of the specimens submitted to fatigue tests.

Table 6.
Fatigue test results.
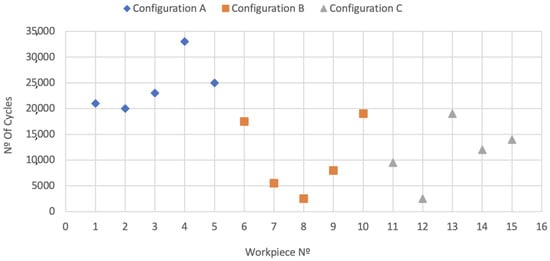
Figure 21.
Fatigue test results by workpiece.

Figure 22.
Fatigue test results by configuration.
4.2. Discussion
The fatigue strength of a component has many associated variables (see Equation (7)), making the determination of exact values a challenging task, which explains the high standard deviation values shown in Table 6 and Figure 21 and Figure 22. Even so, the tests allowed us to demonstrate how the changes in the manufacturing process variables predicted changes in mechanical and metallurgical characteristics, influencing the component’s fatigue life.
The results showed that specimens of configuration A achieved a much longer fatigue life than configurations B and C, actually doubling it. The results indicated a similar fatigue life behavior between configurations B and C. It is important to emphasize that this similar behavior between these two configurations is valid for this case analyzed and may not represent expected behavior for other specimen geometries.
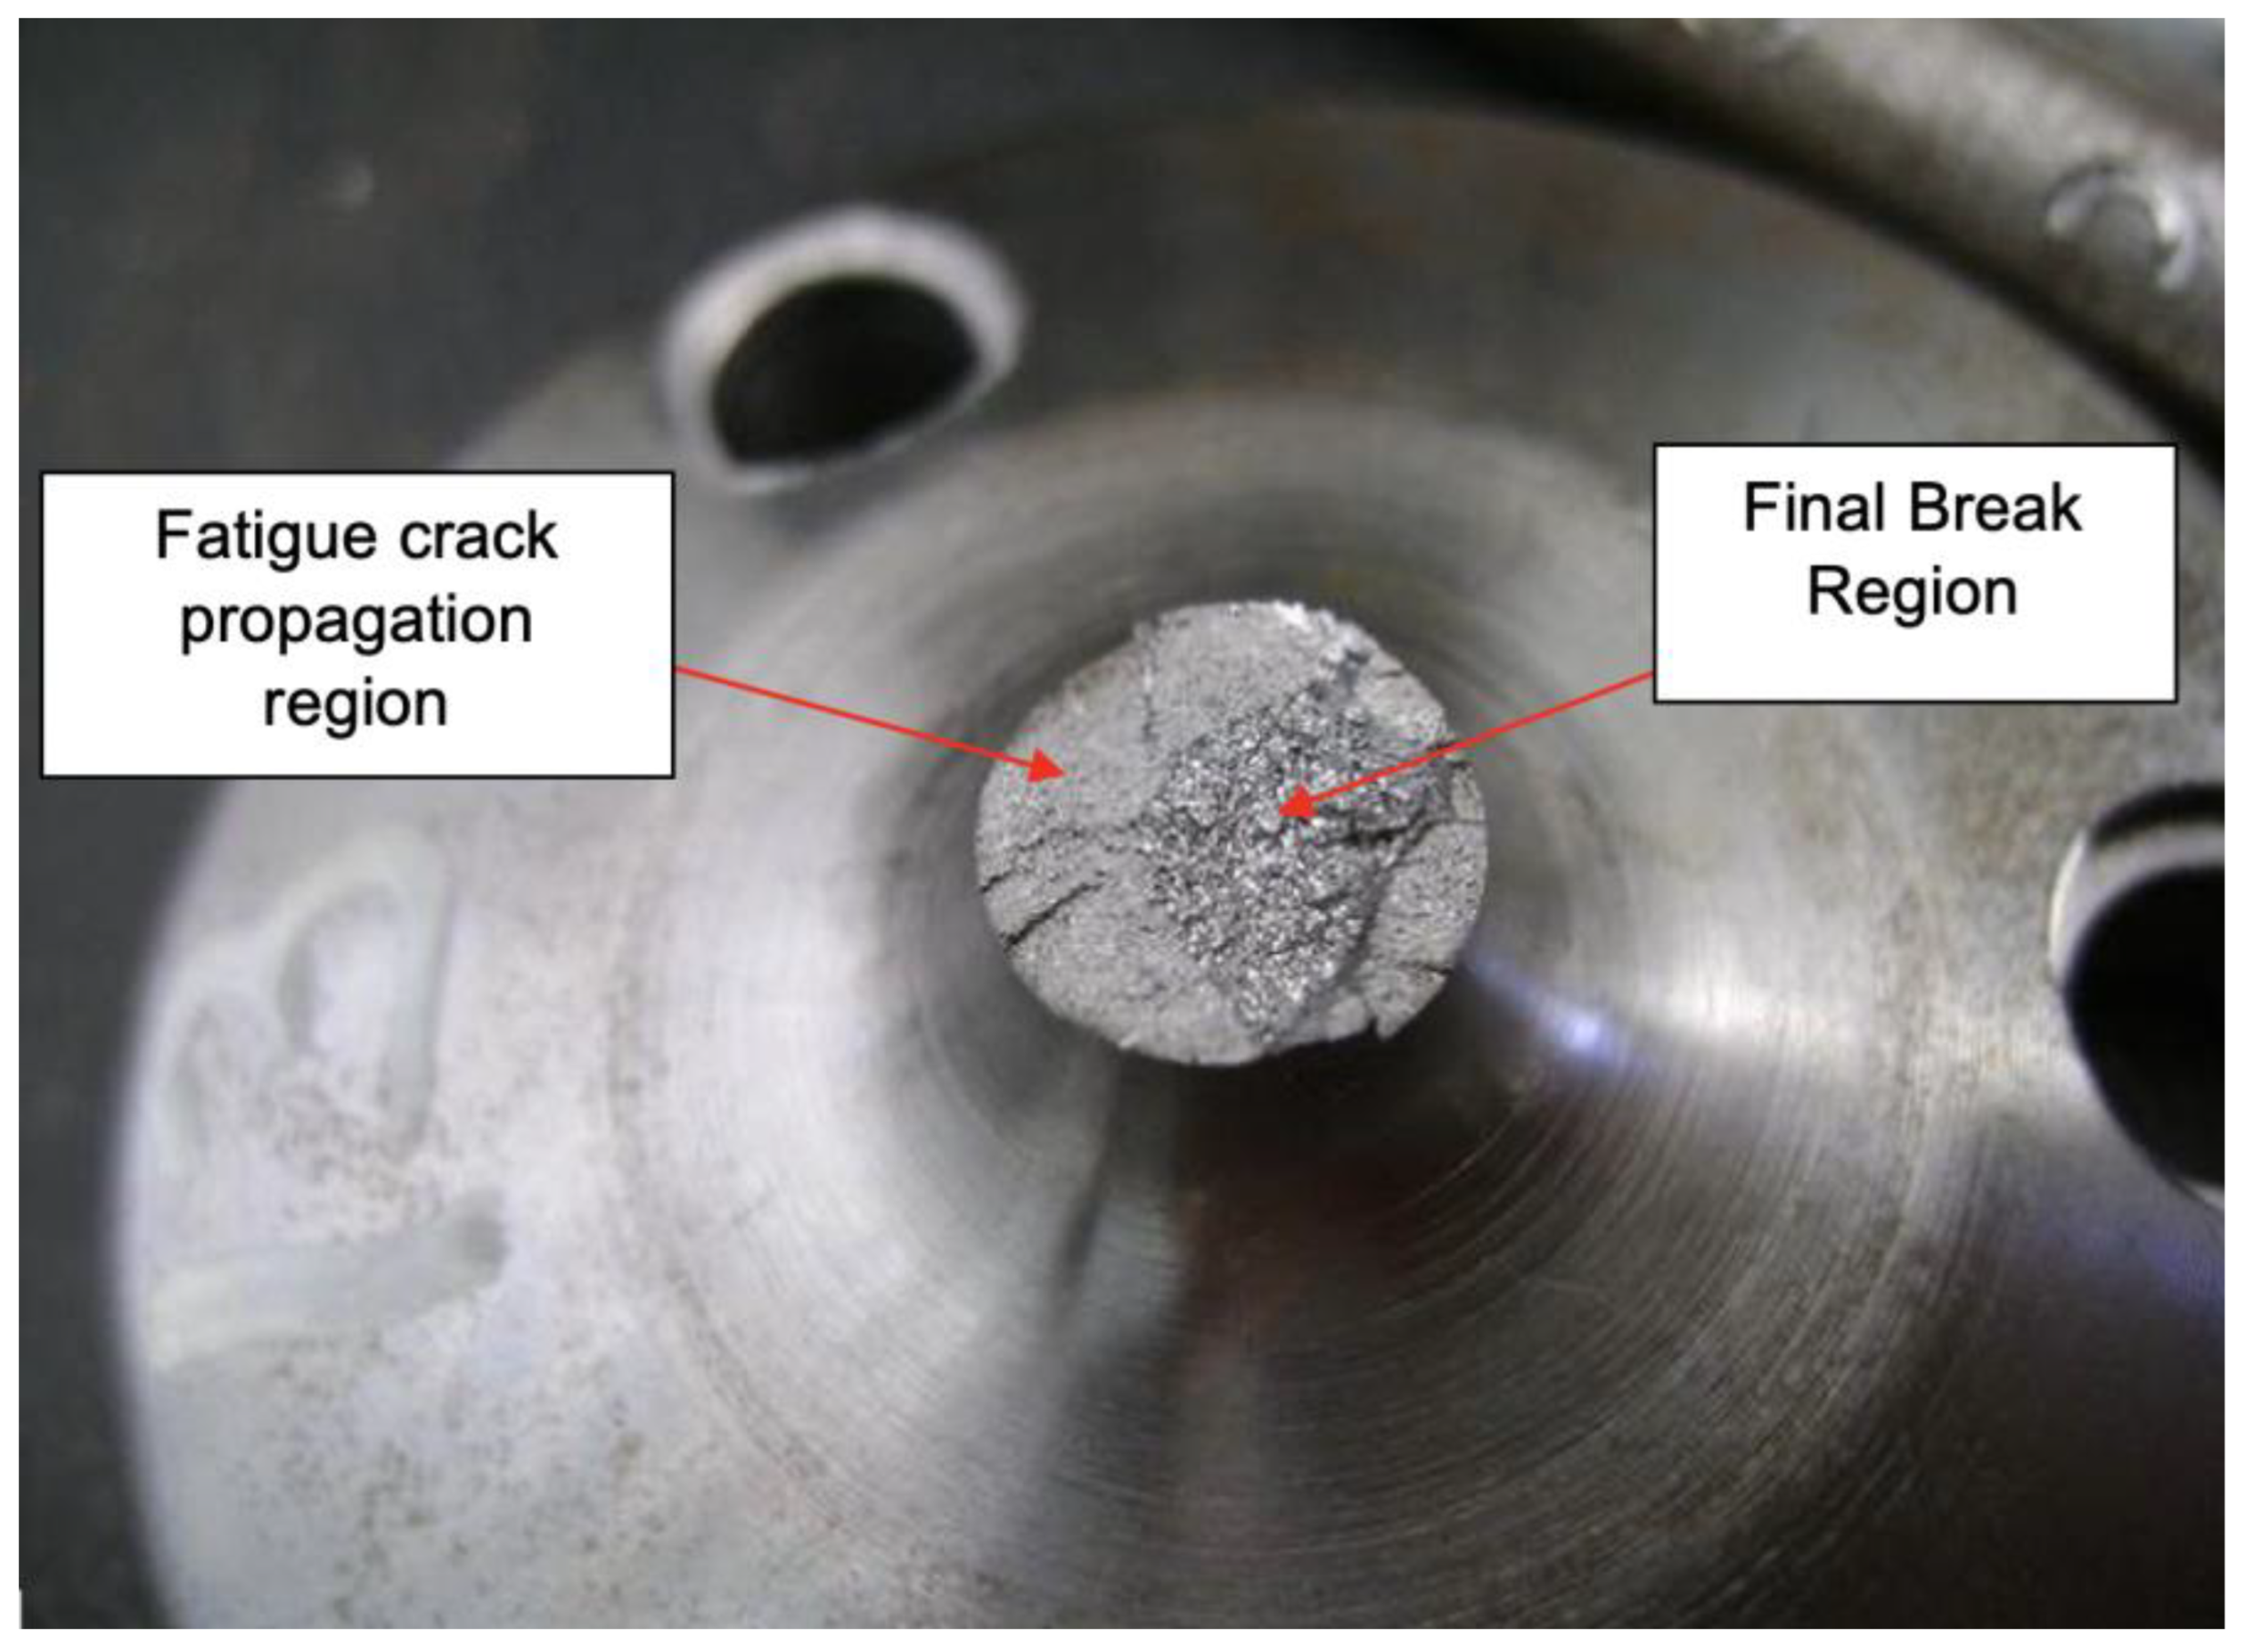
As expected, the specimens submitted to the tests fractured in the same position for both configurations while showing similarities in their morphology—typical of an alternating loading—as illustrated in Figure 23.
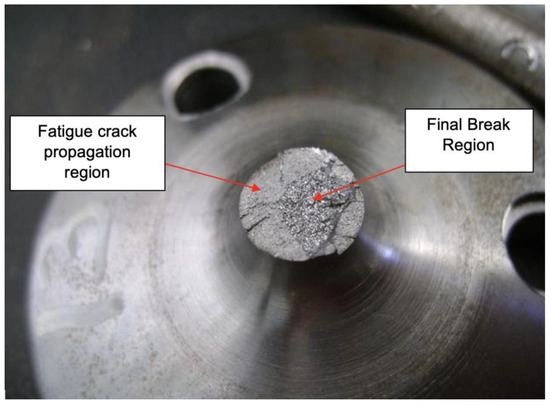
Figure 23.
Fracture region of the specimen.
5. Conclusions
The tests performed on the specimens proved that the fiber orientation in the longitudinal direction of loading has a fatigue life 2.3 times higher than that obtained in the tests in the transverse direction.
In addition to experiments, theoretical fatigue life calculations made from finite element stress analyses are essential to verify adequacy of some parameters: specimen geometry, loads, and test times. The initial estimate based on calculations helps reduce the possibility of errors and unnecessary costs and allows for comparison with the physical tests.
It is known that high safety coefficients are applied in structural calculations of components that guarantee, in theory, the desired life for a component. It is also known that this implies increased costs, such as an increase in the amount of material used in manufacturing or an addition of subsequent processes, such as heat treatments.
In the hot forging process, a higher strength is observed due to the heterogeneity of its structure resulting from the grain-flow orientation coinciding with the anisotropy of the material (macrograph of configuration A). Considering the fatigue life of this forged part and the theoretical calculation of the life cycle until failure, configuration A of the part herein studied (longitudinal direction of the fibers) outperformed configurations B and C by approximately 2.3 times regarding the number of cycles. The optimization of technologies such as computer simulation (Figure 7) and parameter evaluation using finite elements can help compare distinct fiber directions, as shown in Figure 15, where a higher density of directed fibers can be observed, with longer fatigue life and less macro-segregation effect.
Optimizing the geometry of forged components, considering their fiber orientation, can reduce the amount of material used in their manufacture and thus promote considerable cost reduction and guide the design of the component.
Author Contributions
Conceptualization, J.A.S. and C.C.Y.; methodology, C.C.Y.; software, J.A.S.; validation, R.A.d.S.; formal analysis, R.A.d.S.; investigation, J.A.S.; resources, J.A.S.; data curation, C.C.Y.; writing—original draft preparation, C.C.Y.; writing—review and editing, R.A.d.S.; supervision, R.A.d.S.; project administration, C.C.Y.; funding acquisition, J.A.S. All authors have read and agreed to the published version of the manuscript.
Funding
Ricardo Alves de Sousa acknowledges the support from the Portuguese Science Foundation under grants UIDB/00481/2020 and UIDP/00481/2020; and CENTRO-01-0145-FEDER-022083—Portugal Regional Operational Programme (Centro2020) under the PORTUGAL 2020 Partnership Agreement, through the European Regional Development Fund.
Institutional Review Board Statement
Not applicable.
Informed Consent Statement
Not applicable.
Data Availability Statement
Not applicable.
Conflicts of Interest
The authors declare that they have no conflicts of interest regarding the topic of this submission.
References
- Davoudi, M.; Nejad, A.F.; Koloor, S.S.R.; Petru, M. Investigation of effective geometrical parameters on wear of hot forging die. J. Mater. Res. Technol. 2021, 15, 5221–5231. [Google Scholar] [CrossRef]
- Pandya, V.A.; George, P.M. Effect of preform design on forging load and effective stress during closed die hot forging process of pin. Mater. Today Proc. 2020, 44, 106–112. [Google Scholar] [CrossRef]
- Razali, M.K.; Kim, S.W.; Irani, M.; Kim, M.C.; Joun, M.S. Practical quantification of the effects of flow stress, friction, microstructural properties, and the tribological environment on macro- and micro-structure formation during hot forging. Tribol. Int. 2021, 164, 107226. [Google Scholar] [CrossRef]
- D’Addona, D.M.; Antonelli, D. Application of numerical simulation for the estimation of die life after repeated hot forging work cycles. Procedia CIRP 2019, 79, 632–637. [Google Scholar] [CrossRef]
- Emamverdian, A.A.; Sun, Y.; Chunping, C. Deformation and wear in a H21 (3Cr2W8V) steel die during hot forging: Simulation, mechanical properties, and microstructural evolution. J. Mater. Res. Technol. 2021, 15, 268–277. [Google Scholar] [CrossRef]
- Zhuang, W.; Han, X.; Hua, L.; Xu, M.; Chen, M. FE prediction method for tooth variation in hot forging of spur bevel gears. J. Manuf. Process. 2019, 38, 244–255. [Google Scholar] [CrossRef]
- Ghalehbandi, S.; Biglari, F. Predicting damage and failure under thermomechanical fatigue in hot forging tools. Eng. Fail. Anal. 2020, 113, 104545. [Google Scholar] [CrossRef]
- Rajiev, R.; Sadagopan, P. Simulation and Analysis of hot forging dies for Pan Head bolt and insert component. Mater. Today Proc. 2018, 5, 7320–7328. [Google Scholar] [CrossRef]
- Dai, W.; Yao, Z.; Zhang, H.; Li, C.; Liu, Y.; Zhang, Y. Effect of forging ratio on tensile properties and fatigue performance of EA4T steel. J. Manuf. Process. 2022, 76, 291–303. [Google Scholar] [CrossRef]
- Da Costa, P.R.; Soares, H.; Reis, L.; De Freitas, M. Tension/torsion ultrasonic fatigue testing on a railway wheel. Procedia Struct. Integr. 2020, 25, 445–453. [Google Scholar] [CrossRef]
- Almaraz, G.D.; Vilchez, J.R.; Dominguez, A. Ultrasonic fatigue on the automotive steels: AISI/SAE 4140T and 1045. Procedia Struct. Integr. 2019, 18, 594–599. [Google Scholar] [CrossRef]
- Wu, H.; Bill, T.; Teng, Z.; Pramanik, S.; Hoyer, K.-P.; Schaper, M.; Starke, P. Characterization of the fatigue behaviour for SAE 1045 steel without and with load-free sequences based on non-destructive, X-ray diffraction and transmission electron microscopic investigations. Mater. Sci. Eng. A 2020, 794, 139597. [Google Scholar] [CrossRef]
- Chastel, Y.; Caillet, N.; Bouchard, P.-O. Quantitative analysis of the impact of forging operations on fatigue properties of steel components. J. Mater. Process. Technol. 2006, 177, 202–205. [Google Scholar] [CrossRef]
- Navas, V.G.; Gonzalo, O.; Quintana, I.; Pirling, T. Residual stresses and structural changes generated at different steps of the manufacturing of gears: Effect of banded structures. Mater. Sci. Eng. A 2011, 528, 5146–5157. [Google Scholar] [CrossRef]
- Pessard, E.; Morel, F.; Bellett, D.; Morel, A. A new approach to model the fatigue anisotropy due to non-metallic inclusions in forged steels. Int. J. Fatigue 2012, 41, 168–178. [Google Scholar] [CrossRef]
- Jin, M.; Yu, L.-L.; Liu, X.-G.; Guo, B.-F. High temperature stress–strain curves of MnS and their applications in finite element simulation. Trans. Nonferrous Met. Soc. China 2018, 28, 2082–2093. [Google Scholar] [CrossRef]
- Pessard, E.; Morel, F.; Verdu, C.; Flacelière, L.; Baudry, G. Microstructural heterogeneities and fatigue anisotropy of forged steels. Mater. Sci. Eng. A 2011, 529, 289–299. [Google Scholar] [CrossRef]
- Rao, V.D. Metallurgical integrity for economic production of quality steel forgings for advanced applications. Mater. Today Proc. 2020, 39, 1434–1439. [Google Scholar] [CrossRef]
- Cyril, N.S.; Fatemi, A. Experimental evaluation and modeling of sulfur content and anisotropy of sulfide inclusions on fatigue behavior of steels. Int. J. Fatigue 2009, 31, 526–537. [Google Scholar] [CrossRef]
- Bresciani, E.; Silva, I.B.; Batalha, G.F.; Button, S.T. Conformação Plástica de Metais–Edição Digital; EPUSP: São Paulo, Brazil, 2011; ISBN 978-85-86686-64-1. [Google Scholar]
- Schaefer, L. Conformação Mecânica; Imprensa Livre: Porto Alegre, RS, Brazil, 1999; ISBN 85-86647-13-6. [Google Scholar]
- Budynas, R.G.; Nisbett, J.K.; Shigley, J.E. Shigley’s Mechanical Engineering Design, 9th ed.; McGraw-Hill: New York, NY, USA, 2011. [Google Scholar]
- Saalfeld, S.; Scholtes, B.; Niendorf, T. On the influence of overloads on the fatigue performance of deep rolled steel SAE 1045. Int. J. Fatigue 2019, 126, 221–230. [Google Scholar] [CrossRef]
- DIN EN 10243-1; Steel die Forging—Tolerances on Dimensions. Deutscheus Institut Für Normung (DIN): Berlin, Germany, 2000.
Disclaimer/Publisher’s Note: The statements, opinions and data contained in all publications are solely those of the individual author(s) and contributor(s) and not of MDPI and/or the editor(s). MDPI and/or the editor(s) disclaim responsibility for any injury to people or property resulting from any ideas, methods, instructions or products referred to in the content. |
© 2023 by the authors. Licensee MDPI, Basel, Switzerland. This article is an open access article distributed under the terms and conditions of the Creative Commons Attribution (CC BY) license (https://creativecommons.org/licenses/by/4.0/).

