Article

Experimental Research on the Behaviour of Metal Active Gas Tailor Welded Blanks during Single Point Incremental Forming Process

Faculty of Engineering, “Lucian Blaga” University, 550024 Sibiu, Romania
*
Author to whom correspondence should be addressed.
Metals 2021, 11(2), 198; https://doi.org/10.3390/met11020198
Submission received: 14 December 2020 / Revised: 18 January 2021 / Accepted: 19 January 2021 / Published: 22 January 2021
(This article belongs to the Special Issue Design of Welded Steel Structures)

Abstract

:
The present paper aims to study the behaviour of Metal Active Gas (MAG) tailor welded blanks during the single point incremental forming process (SPIF) from an experimental point of view. The single point incremental forming process was chosen for manufacturing truncated cone and truncated pyramid shaped parts. The same material (S355) and the same thickness (0.9 mm) were selected for the joining of blank sheets because the main goal of the paper was to study the influence of the MAG welding process throughout the SPIF process. A Kuka robot, equipped with a force transducer and an optical measurement system were used for manufacturing and evaluating the parts by SPIF. The selected output data were major and minor strain, thickness reduction, forces and springback at the SPIF process. Another line test was performed to evaluate the formability in SPIF. The main conclusion of the paper is that during the SPIF process, fractures occur in one side welded blanks even at moderate wall angles, while in the case of double side welded blanks there is a decrease of formability but parts can still be produced at moderate angles (55 degrees) without any problems.

1. Introduction

The use of welded blanks started as a result of the possibility of joining sheets having different densities, different mechanical characteristics and even different thicknesses, for the purpose of reducing their weight, while maintaining the strength. Their first applications appeared in the automotive industry, especially in the production of the reinforcement parts of cars which ensure increased stiffness [1].
Even if welding decreases the formability of the material, the application of a local heat treatment can lead to its improvement. Aluminium sheets or carbon-steel sheets can be used and there are currently several technological types of welding sheets: tailor welded blanks (TWB), patchwork blanks, tailor rolled blanks and tailor heat treated blanks [2]. This paper will further refer to tailor welded blanks only. Most studies have focused on determining the flow limit diagram (FLD) for TWB sheets because they evaluate the formability of the materials [3].
Comparative studies have been performed on the mechanical characteristics of TWB, as well as on the formability of different types of welding: tungsten inert gas welding, friction stir welding, friction stir vibration welding or laser welding [4,5]. The mechanics of TWB and the influence of welding on the mechanical properties have also been studied, with an emphasis on the tensile test, formability tests and identifying the fracture modes [6]. Identifying the welding zone-only properties for laser TWB subjected to deep-drawing was another challenge. The flow stress and strain were measured using the digital image correlation (DIC) technique [7]. A finite element analysis, as well as an experimental analysis were conducted to determine the behaviour of dual-phase steel and high-strength steel TWBs during the deep-drawing process [8,9].
The formability of TWB was also studied using the finite element method, considering a ductile fracture Gurson—Tvergaard—Needleman (GTN) model [10].
In the last 25 years, the incremental forming process has gained an important place among sheet metal forming processes due to the advantages it offers: the absence of complex tools results in reduced lead-time and cost in the case of small batch production -, the plastic strain localization leads to an improved formability of materials [11] and they allow a high degree of flexibility, even when limiting to simple, standard tools [12]. A number of technological versions of this process have emerged over time, starting with single point incremental forming (SPIF), in which the punch operates on the blank having the edges fixed [13], two-point incremental forming (TPIF), in which the punch simultaneously operates with a counter punch [14], electric hot incremental forming, in which the punch is heated by means of high-current density [15] and laser forming, in which a laser beam is located underneath the die, heating the blank locally, thus improving the formability of materials with low plasticity [16].
The present paper refers to SPIF only, because it is the most frequently used among the mentioned processes and also because of its universality. The main applications of SPIF are found in the automotive, the aeronautical, aerospace and the medical implants industries, that is, wherever small-batch and unit productions are necessary. Regarding the medical implants industry, recent studies have been conducted on the manufacturing of cranioplasty plates [17], a facial implant [18] or a thin shell clavicle implant [19] by SPIF. Chen et al. presented a review paper that actually shows the critical state of the art of biomedical implants manufactured by SPIF [20]. The SPIF of biocompatible materials, which are necessary for implants, was also performed [21].
The sheets processed by SPIF are generally metallic materials: carbon steel, aluminium alloys [22], magnesium alloys [16], titanium alloys [17], steel-Cu composite sheets [23] but polymers have also been recently processed [24,25,26]. The SPIF process can be performed on either a CNC milling machine [27], with the aid of a robot that follows a certain trajectory- or on a specially designed machine tool, such as the machine produced by the Japanese company, Amino. Numerical and experimental research conducted regarding SPIF has focused, for the most part, on the evaluation of the forming mechanism [28], the fracture mechanism and formability in SPIF, formally named spifability [29], on the determination of the principal strain and thickness reduction [30], residual stresses [31], as well as on the determination of the forces in the forming process [32,33]
The applications of SPIF of TWB sheets combine the advantages of both processes. The most important applications of using the SPIF of TWB sheets are found in the automotive industry, for obtaining lighter parts which help reduce the weight of the entire automobile. Thus, if TWB sheets are employed in the automotive industry, with the purpose of locally increasing the mechanical strength by using sheets made of materials with higher strength, higher thickness or local corrosion protection, the SPIF process is also applied in the automotive industry, at the making of custom cars in small-batch or even unit productions. Therefore, combining the two processes results in the small-batch and unit productions of door panels, pillars and rear long members for luxury cars or race cars. Other industrial applications of using SPIF of TWB sheets include the production of high speed train parts or the customization of luxury aircrafts in the aeronautics industry. Applications of SPIF of TWB sheets have recently been found in architecture, where custom design elements can be obtained, using materials of different colours and textures [34].
Among the first studies regarding the forming behaviour of FSTWBs in SPIF, Ambrogio et. al. [35], concluded that it is necessary to reduce the wall angle by 8 degrees compared to unwelded blanks made of the same material and the same thickness so that the forming process takes place in good conditions.
A study on the behaviour of aluminium FSTWBs during a uniaxial tensile test and SPIF was presented by Thuillier et al. [36]. The FSTW process with variable parameters for rotational speed and feed rate was used in the manufacturing of the specimens. They maintained a constant tilt angle value. Following the uniaxial tensile test, a reduction of the tensile strain at break is observed, ranging from 12% for the unwelded specimens to 3% for the FSTW specimen. The fracture occurred in the area around the welded bead, with a strong strain localization near the welding. FSTWBs were subjected to the SPIF process with a conical trajectory until the fracture occurred.
A material model calibration for SPIF of FSTWBs was developed by Campos et al. [37]. Using the finite element method and an elasto-plastic model, the authors identified three distinct areas of behaviour, namely, the weld bead (or the nugget zone), the thermo mechanically affected zone and the heat affected zone. A multi linear piecewise function was used to simulate the material behaviour of the weld bead. By using this algorithm, they determined, on the basis of the uniaxial tensile test, the yield stress, the strain hardening exponent and the strain coefficient for the three identified areas.
Silva et al. evaluated the spifability of TWBs produced by friction stir welding (FSW), based on the use of DC04 steel dummy sheets, so as to protect the welding bead from the rotational movement of the punch and thus to avoid damaging the contact surface between the punch and the blank [34]. They produced TWBs with the welding bead parallel to the rolling direction, transverse to the rolling direction and inclined at an angle of 45 degrees to the rolling direction. To not introduce the influence of different material characteristics in the study on the behaviour of TWBs during SPIF, the same type of material was chosen, aluminium AA1050-H111 sheets but with two different thicknesses. The only problems occurred at the truncated pyramidal shapes, where the welding bead is inclined at 45 degrees to the rolling direction, where cracks appeared approximately simultaneously in all the corners of the part. The conclusion drawn by the authors was that for TWBs produced by SPIF a maximum wall angle of 60 degrees can be obtained for truncated pyramid-shaped parts and a maximum angle of 65 degrees can be obtained for truncated cone-shaped parts.
Sisodia and Kumar conducted experimental research to study the influence of the process parameters on the surface roughness in SPIF using dummy sheet for aluminium TWBs. They investigated the influence of the wall angle, step size, punch diameter, feed rate and dummy sheet thickness [38].
The response surface methodology (RSM) was used to investigate the effects of the process parameters that is, rotational speed of the punch, vertical step and travel speed on the formability of aluminium 6061 TWBs produced by FSW [39]. They evaluated the influence of the punch rotational velocity and vertical step on the microstructure, fracture surface and macrostructure of the welded joints. They noticed a fine uniform microstructure of the welding bead, with an elongated grain distribution. They also assessed the formability of welded blanks based on the strain hardening exponent values.
The formability of aluminium 5083 FSTWBs in two-point incremental forming process [40] was evaluated by Ebrahimzadeh et al. They first carried out a series of experiments meant to compare the formability of FSTWBs in TPIF and SPIF processes, under different wall angles, concluding that formability improvement occurs in the case of the TPIF process. They noticed that fractures occurred in both SPIF and TPIF cases, in a direction perpendicular to the weld bead. They also applied RSM to study the influence of the punch rotational velocity, feed rate and vertical step on the thickness variation and springback angle in TPIF. They additionally performed a fractography analysis, concluding that while spherical shaped dimples appear in SPIF, elongated shaped dimples appear in TPIF.
A numerical investigation, using the finite element method (FEM), on the behaviour of FSTWBs during SPIF process is presented by Marathe and Raval [41]. They used three types of materials: a “strong” material, a “weak” material and another material for the welding bead. They determined the movement of the welding bead and the thickness reduction by the numerical simulation of a truncated cone geometry. They also studied the initial effect of the position of the punch on the movement of the welding bead.
Rubino et al. presented a comparative numerical study using FEM for the SPIF simulation of TWBs produced by two welding processes—FSTW (FSW) and tungsten inert gas welding (TIGW), from the perspective of the welding process parameters [42]. The conclusion is that TIGW leads to a lower formability compared to FSTW (FSW).
As far as the formability of TWBs produced by laser welding is concerned, it was studied by Rattanachan et al. from the perspective of determining the strains and forming limit for two different steels using the same hemispherical dome as the desired geometry [43]. The major strain, minor strain and thickness reduction results obtained for unwelded blanks were compared for each material, as well as for the two materials of the laser welded blank.
Another study on the formability of FSTWBs in SPIF was published by Maji et al. [44]. FSTWBs from aluminium AA5083 were subjected to dome, bending and line tests. The results obtained for unwelded blanks and TWBs were compared and flow limit curves (FLCs) were plotted, a reduction of formability having been observed in the case of welded blanks.
Another study analysed the formability of friction stir welded AA 6061 and AA 5083 blanks during SPIF both in terms of strain distribution and in terms of microstructure. The microstructure of FSTWBs was compared both before and after the SPIF process [45]. They observed the presence of dynamic recrystallization and implicitly of fine and equiaxed grains and high temperatures in the stir zone, as well as the absence of dynamic recrystallization and implicitly of elongated grains in the thermo-mechanical affected zone and the heat affected zone. They found a grain size reduction after the SPIF process ranging between 21% and 27%.
Reviewing all the studies on TWBs manufactured by SPIF, two essential characteristics are observed: firstly, all studies referred to the manufacturing of parts using universal milling machines or machining centres that involved the rotational movement of the punch, which can degrade the contact surface and secondly, the joining process was either friction stir welding or laser welding. Thus, it is noticed that there are no theoretical or experimental studies on the forming behaviour during SPIF of TWBs obtained by metal active gas (MAG) welding. The present study therefore focused on the elimination of the rotational speed and thus the possibility of degradation of the welded bead, by using a robot for the manufacturing of the parts, as well as on the evaluation of the major strain, minor strain and thickness reduction for the entire duration of the manufacturing process, by using the digital image correlation technique. The forming behaviour during SPIF of TWBs obtained by (MAG) welding was studied for truncated cone-shaped parts and truncated pyramid-shaped parts with a 60-degree wall angle but fractures occurred in both one-sided welded blanks and double side welded blanks. In view of the fact that the punch rotation, which leads to the worsening of formability in SPIF, was eliminated, it has been agreed upon compensating by reducing the wall angle to 55 degrees in the analysed parts. We chose to use the same base material, with the same thickness, so as not to influence the process with different material characteristics. To highlight the influence of the MAG welding joint on SPIF, the same base material, with the same thickness was chosen, so as not to influence the process with different material characteristics. The manufacturing of the welding blanks using MAG was also performed in such a way that the welding joint is perpendicular to the rolling direction. The influence of the welding type (one side or double side) on the formability of TWBs in SPIF was additionally studied. None of the mentioned studies compared the variation and values of the forces obtained in SPIF for unwelded blanks and TWB. A comparative study of the springback between unwelded blanks and TWBs was not performed in other studies either.

2. Materials and Methods

As the main goal of the present study was the influence of welding throughout the SPIF process, on the research focusses on welded sheets having the same material and thickness. When using different materials or different thicknesses, the formability is likely to be influenced by the variation of the mechanical properties of the sheets or by the variation of their thickness. By using the same materials, with the same thickness, identically positioned relative to the rolling direction of the sheet and by using the same punch and the same trajectory, it is certain that the only influencing parameters were the welding parameters.

2.1. Welding the Specimens

The specimens were made of a S355 hot rolled steel, which is a non-alloy steel (EN 10025-2) and is very frequently used in the manufacturing of welded structures where higher strength is required (Figure 1). This steel is also characterized by good weldability and formability. As far as the chemical composition is concerned, according to SREN 10025-2, it is presented in Table 1.
Ce = C + Mn/6 + (Cr + Mo + V)/5 + (Ni + Cu)/15.
The process by which the blank sheets were joined is the Metal Active Gas (MAG) welding, which is a welding process where an electric arc is created between a wire electrode and the base material. In the manufacturing of the specimens, having taken into account the base material, a 0.8 mm diameter G3Si l (SG2) welding wire was used for welding, having the chemical composition presented in Table 2.
The welding operations were performed using a Model DR series ARK ROBO 1100 DAIHEN welding robot (Targu Jiu, Romania) with a work capacity ranging from 0–500 A to 0–50 V. The thickness of the base metal was 0.9 mm and the shielding gas used was a mixture of 82% argon and 18% CO2, respectively. As far as the welding regime is concerned, the parameters were the following: welding current (I) of 80 A, arc voltage (V) of 18 V, welding speed (S) of 40 cm/min.
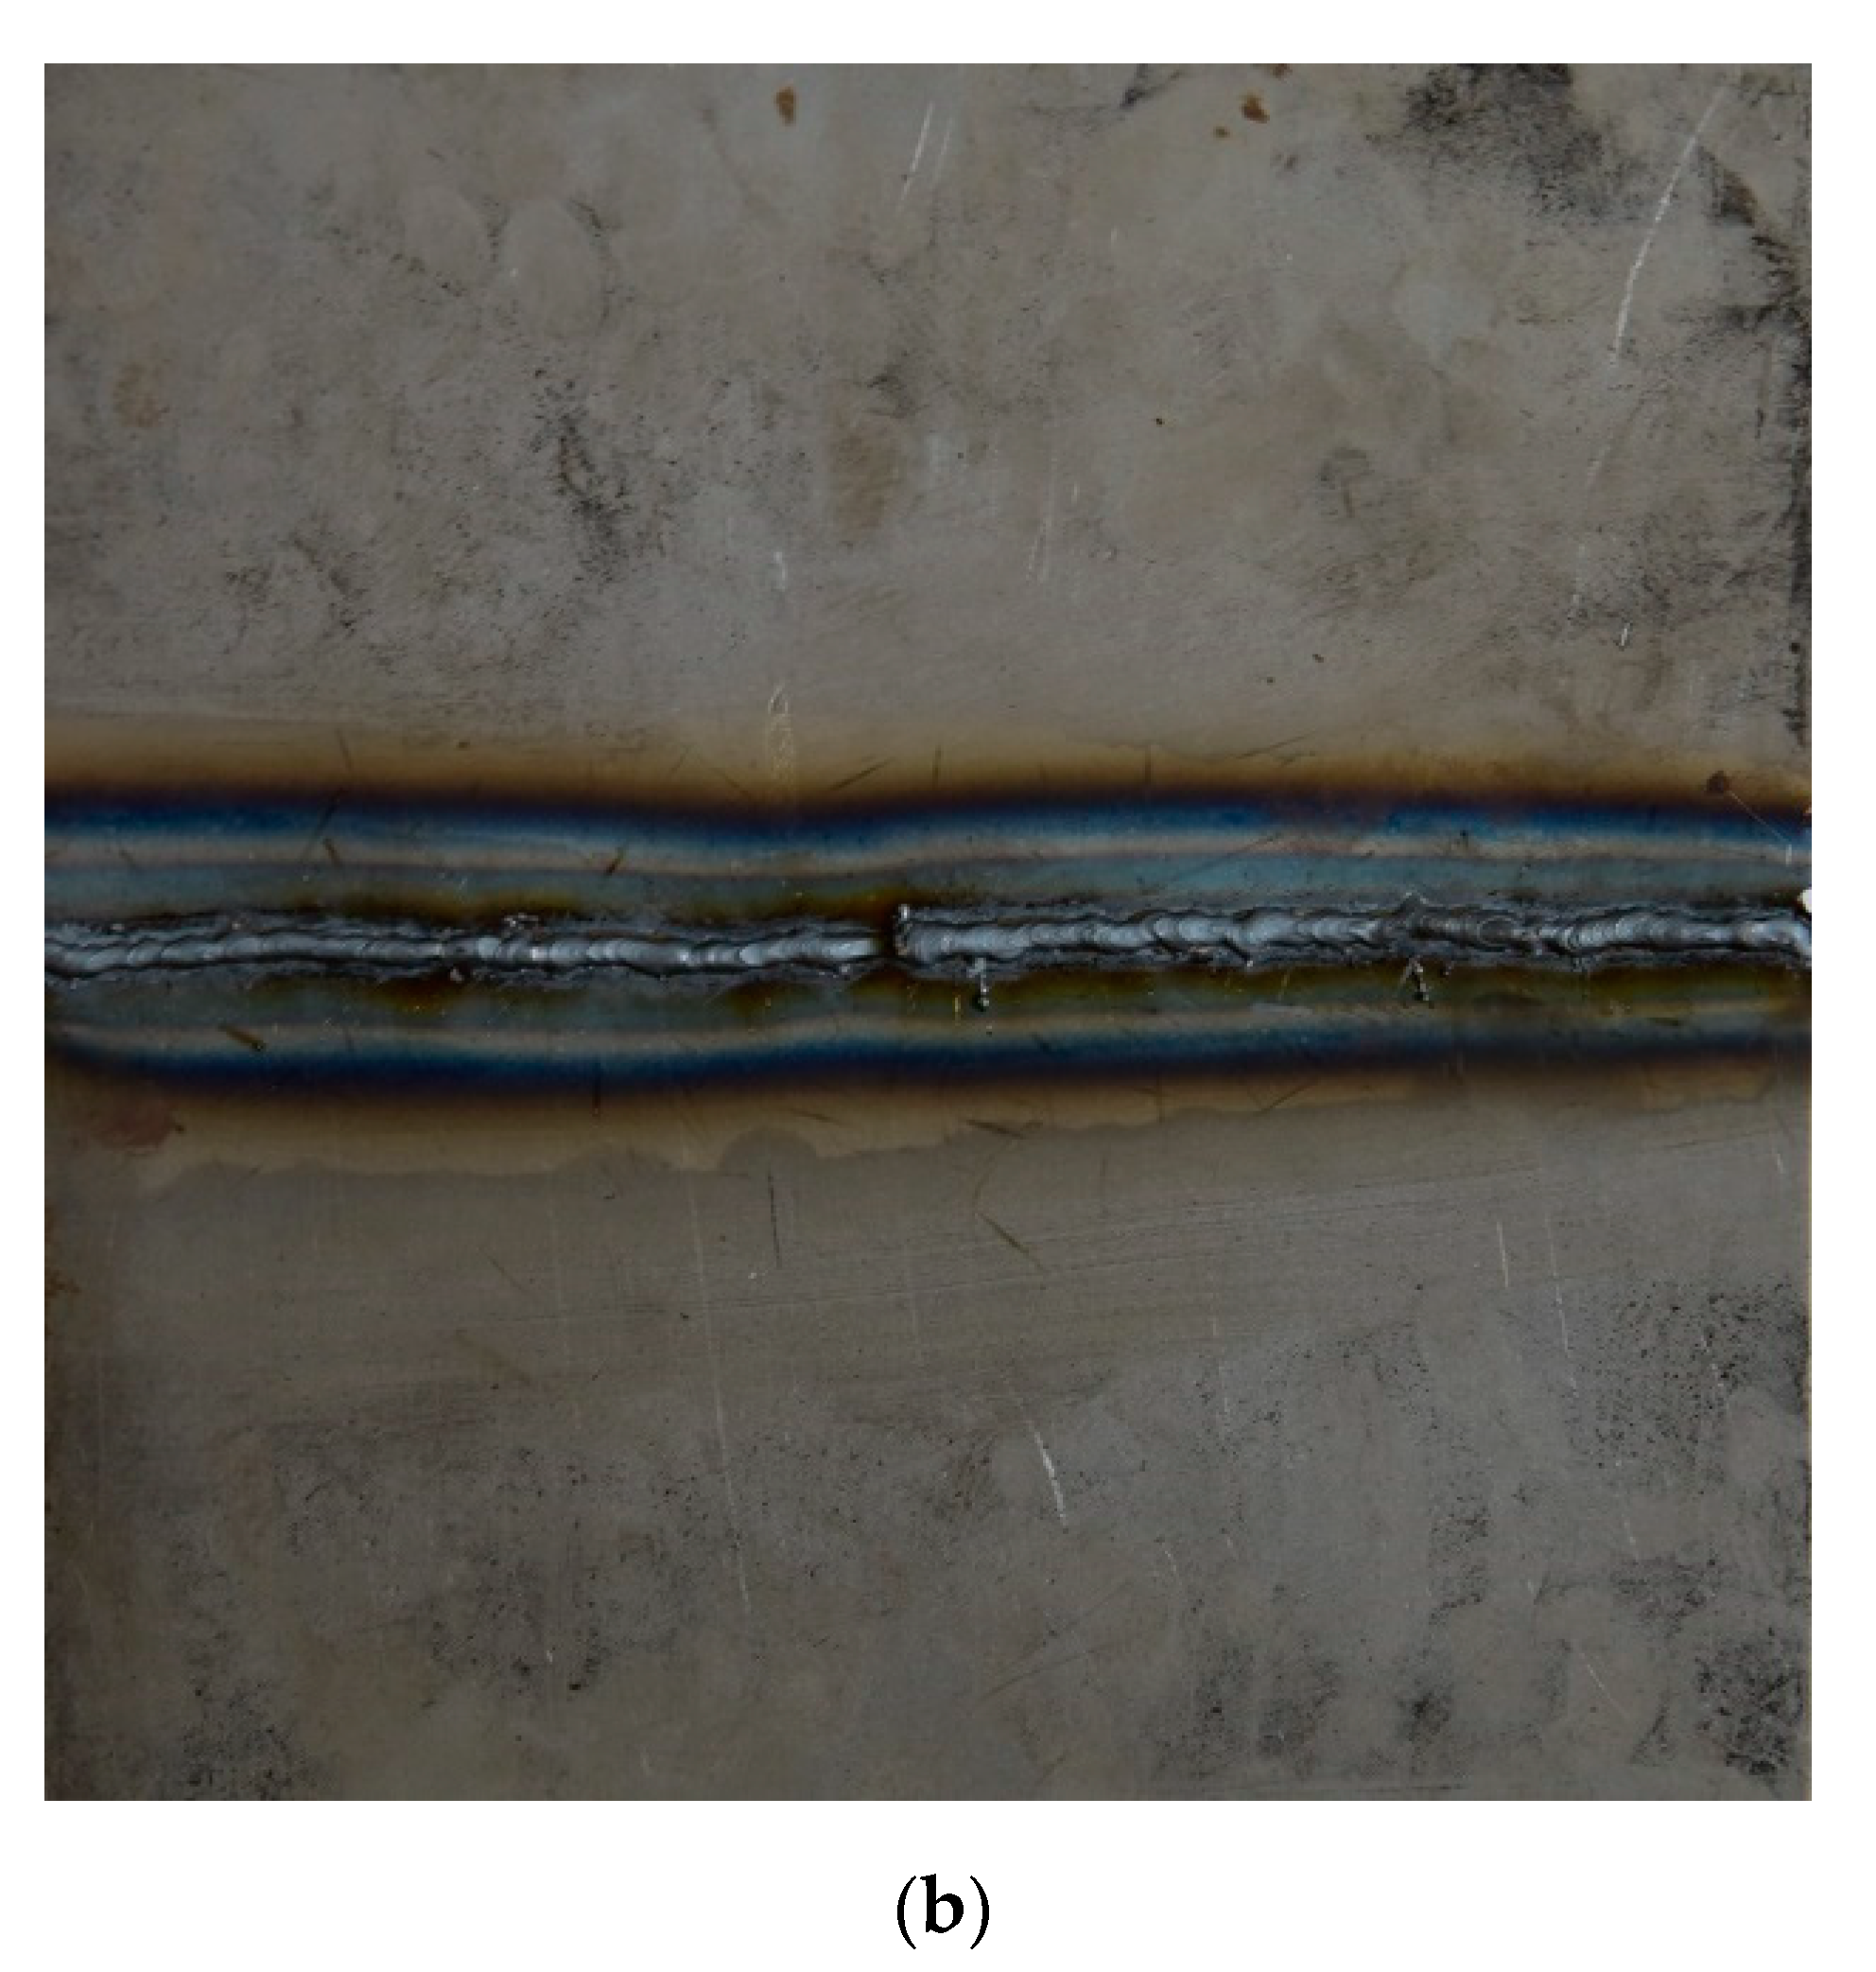
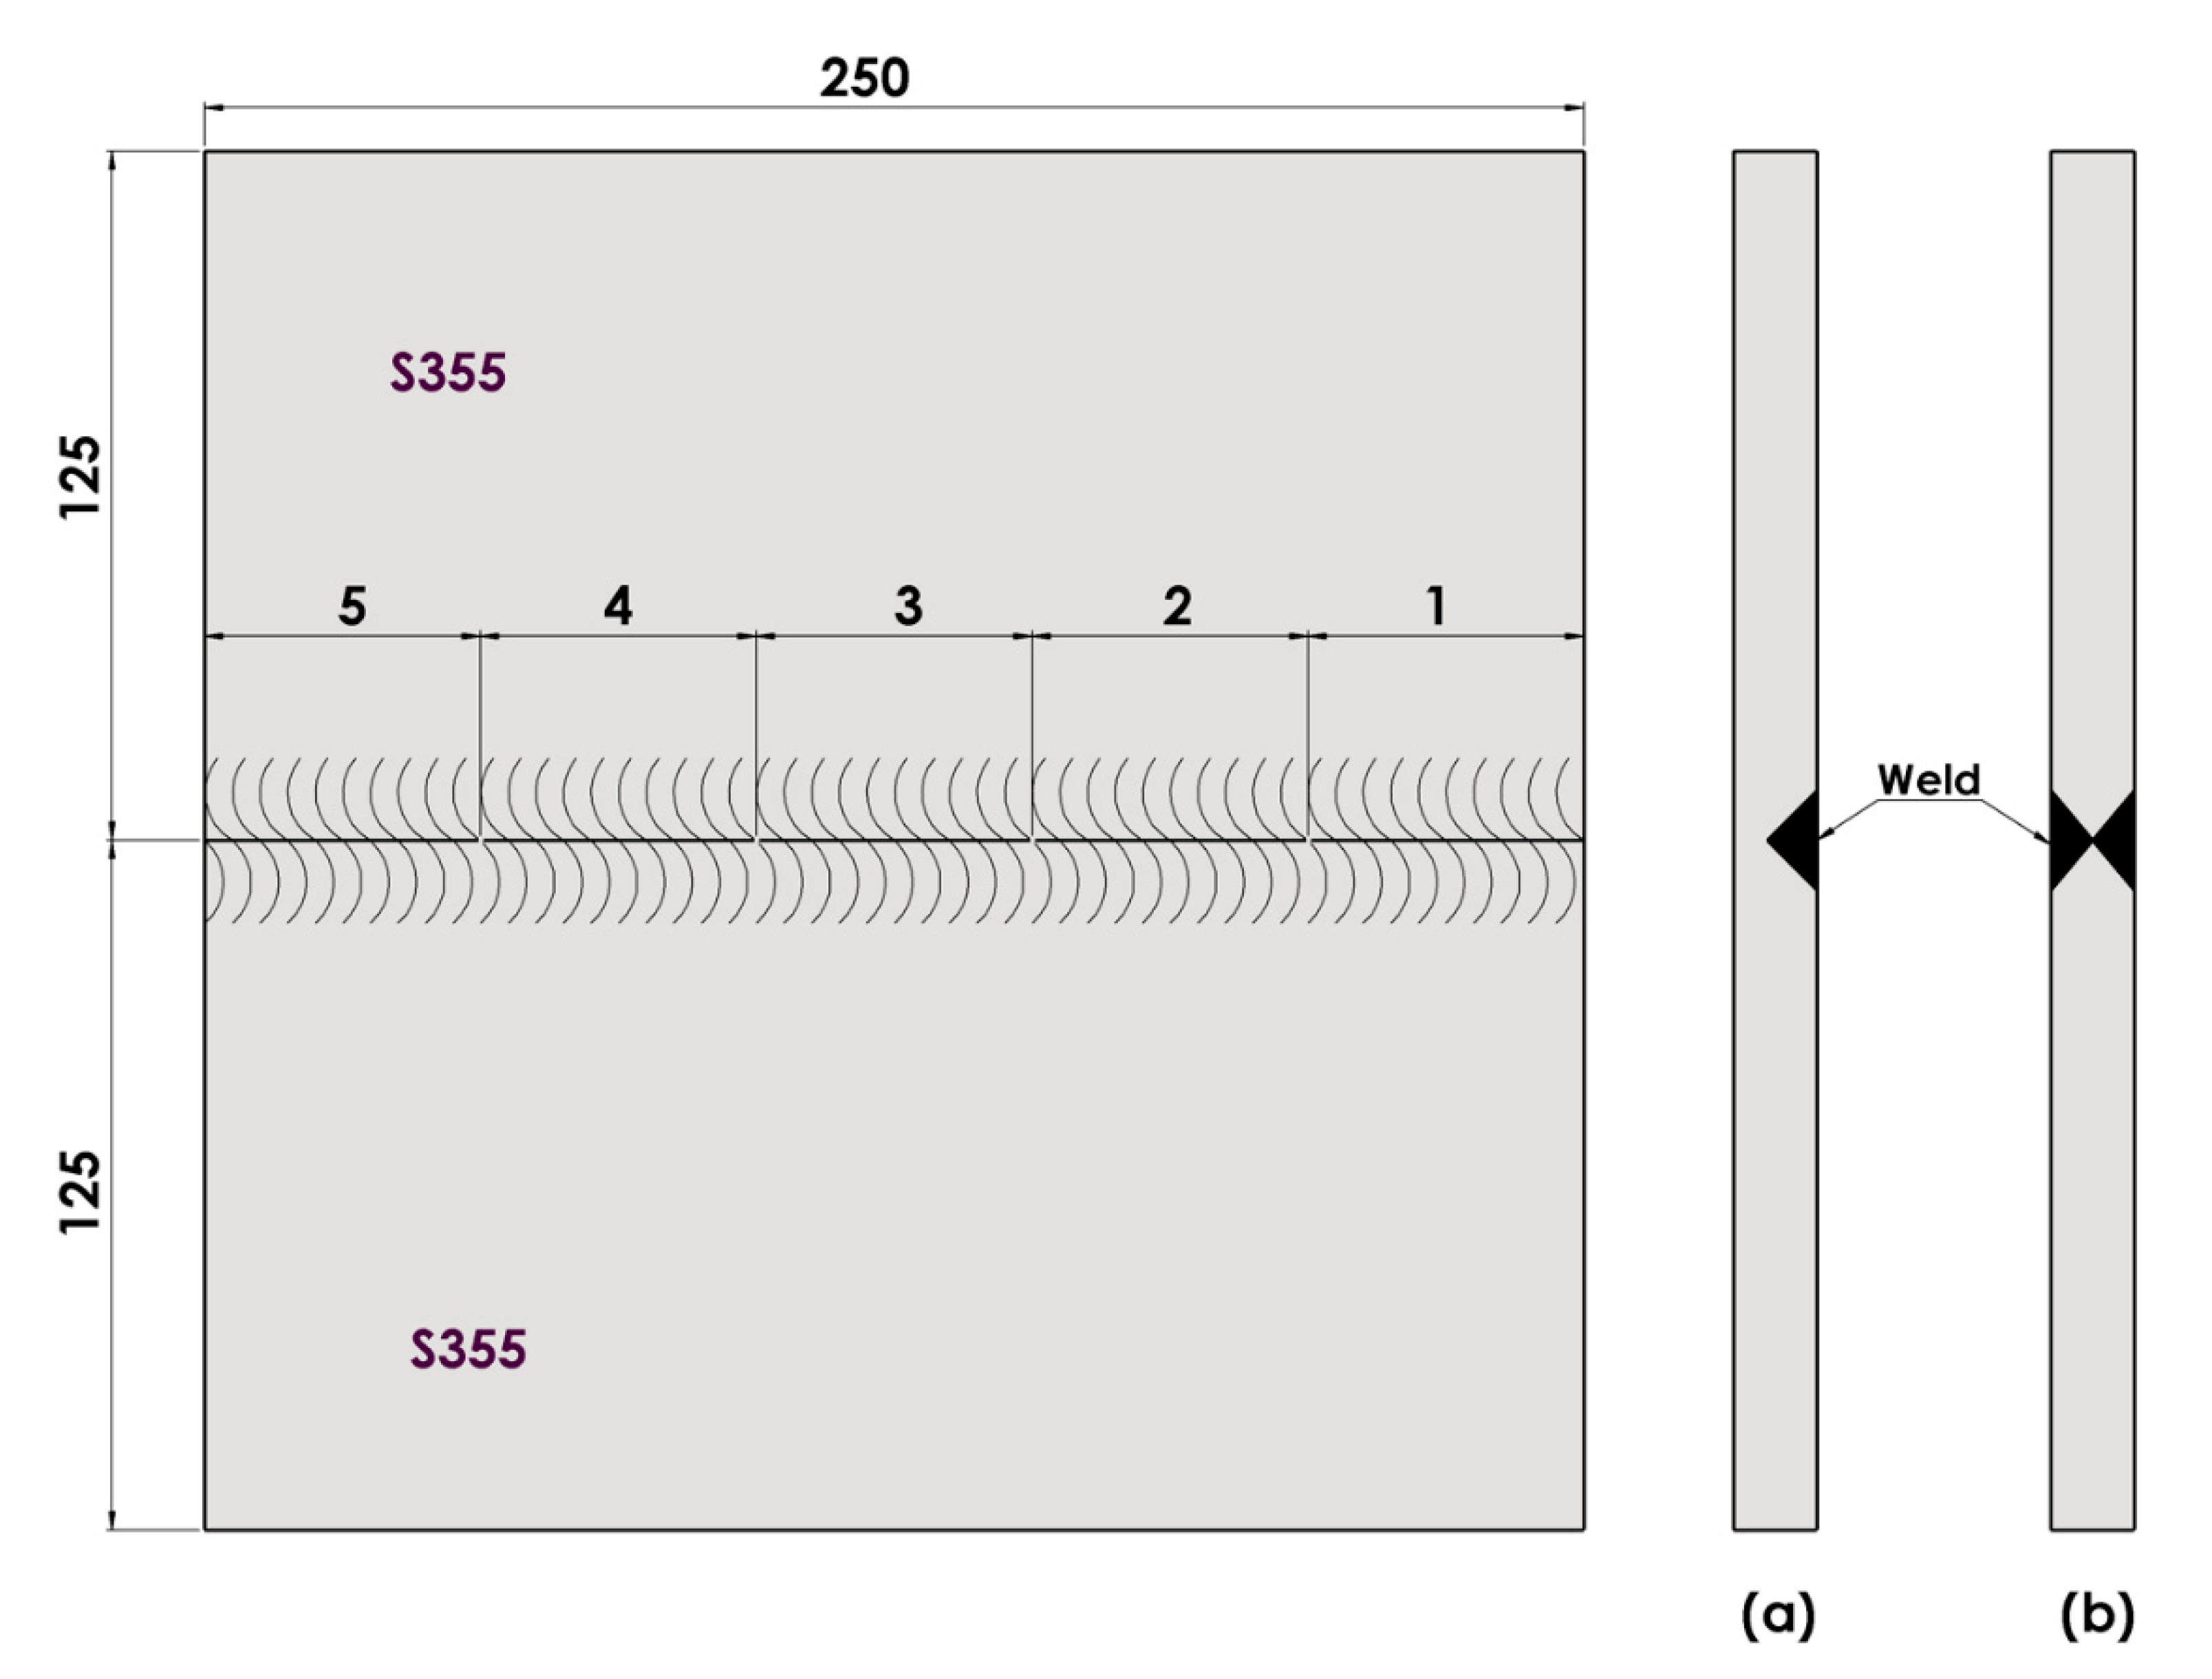
The specimens were obtained by joining 125 mm × 250 mm S355 steel sheets. In the welding of the specimens, two variants of welding deposition were also chosen (Figure 1). Thus, for half of the specimens, the welding bead was deposited only on one side (one side welding) (Figure 2a) and for the second half, welding beads were deposited on both sides (double side welding) (Figure 2b).
The welding of the sheets was obtained by applying the back-step welding technique and each bead segment had a length of 50 mm. This was done to avoid the deformation or perforation of the joined sheets. Because the sheets suffer bending due to the high temperature during the welding process, the blank sheets were subjected to polishing and cold unbending following the MAG welding process.

2.2. Uniaxial Tensile Tests

Prior to determining the formability of welded specimens in SPIF, it was necessary to determine their uniaxial tensile behaviour. The Instron 5587 test machine (Sibiu, Romania) was used for the uniaxial tensile test. The test machine has a maximum loading force in steady state of 300 kN and an adjustable test speed in the range of 0.001–500 mm/min. The machine operates by means of the Bluehill software, which allows automatic sensor calibration, system monitoring, real-time result visualization and the possibility of determining conventional stress-strain curves and true stress-strain curves. To be able to compare the influence of welding on the forming behaviour of these specimens, all specimens taken from unwelded sheets, one side welded sheets and double side welded sheets were tested.
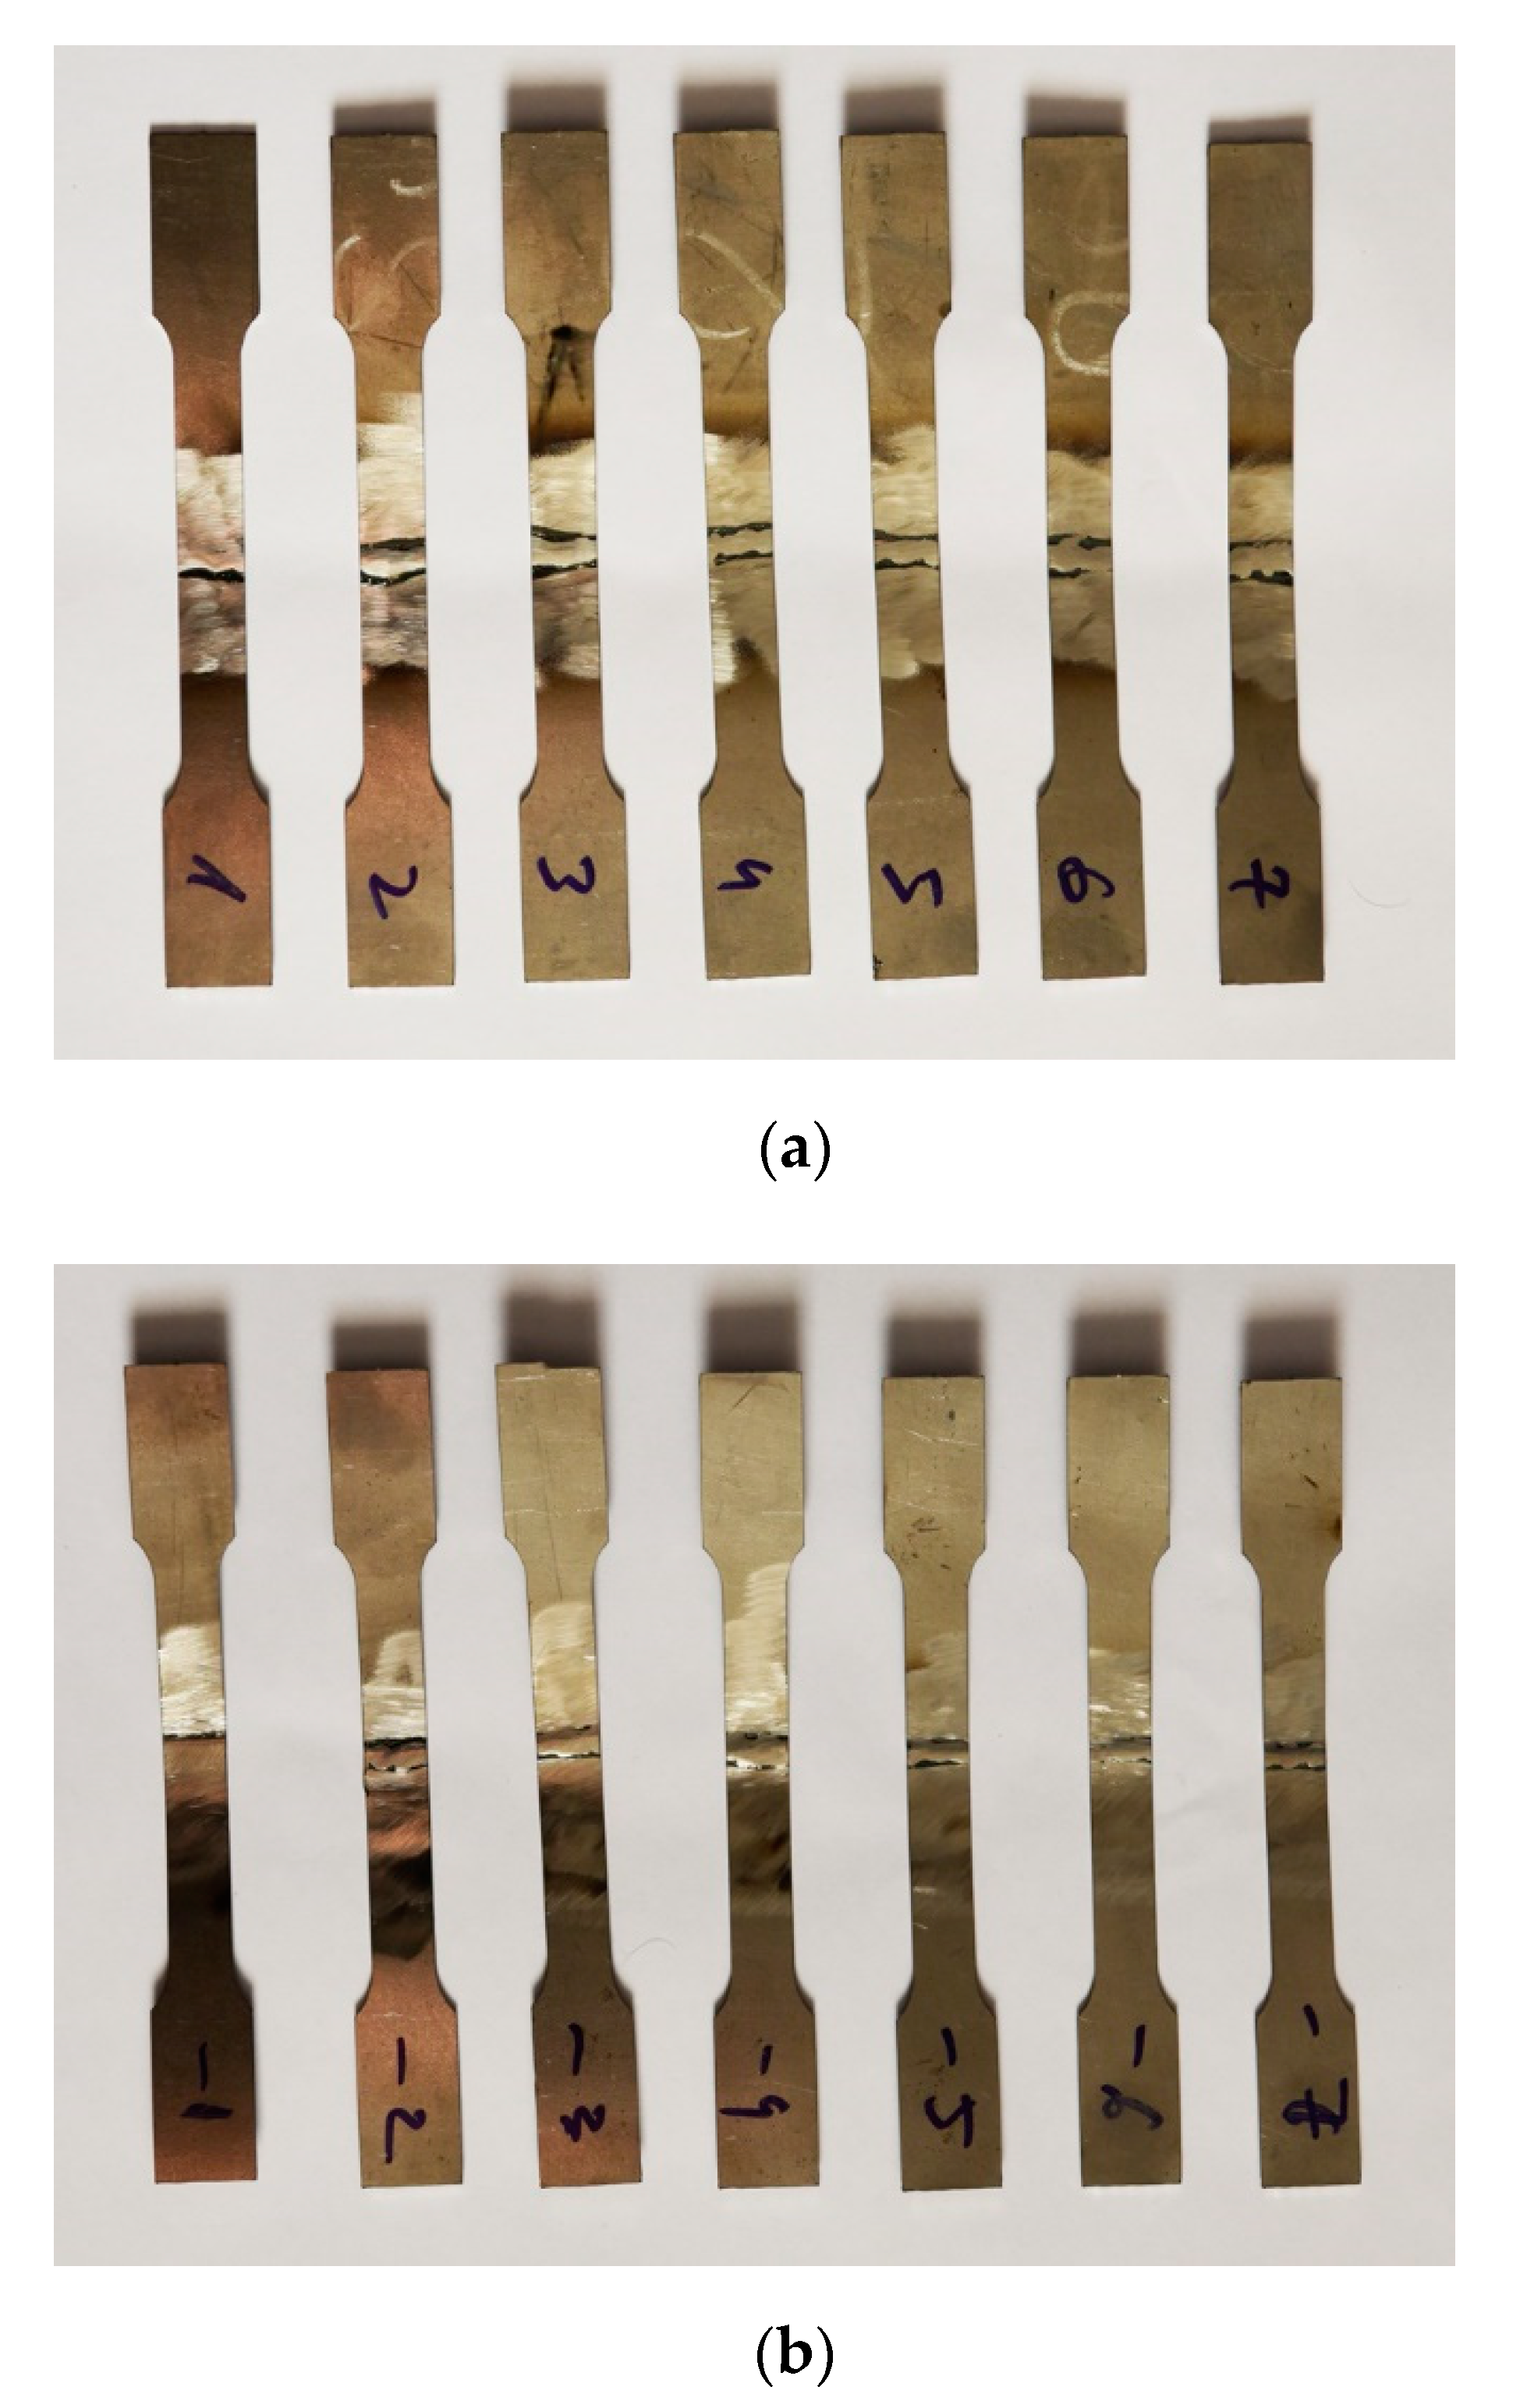
The experimental program for the uniaxial tensile testing of all these specimens foresaw: sampling sets of seven specimens for each type of specimen, that is, for unwelded sheets, one side welded sheets and double side welded sheets (the shape of the specimens was the standard for this type of test), choosing the specimen width b0 = 16 mm and the calibrated distance l0 = 100 mm; setting the testing speed to 10 mm/min; setting the acquisition rate of the machine to 20 pairs of points/second and developing the test method. The one side welded specimens and double side welded specimens for the uniaxial tensile test are presented in Figure 3.
The specimens are only taken across the welding beads because, in the case of the SPIF process with spiral trajectory presented in the current paper, the punch trajectory is always perpendicular to the welding beads. Therefore, the most important stretching appears on the directions across the welding.
The selected output data were the elasticity modulus—E [MPa], tensile stress at Yield [MPa], strain hardening exponent, maximum tensile stress [MPa], tensile strain at maximum tensile stress [mm/mm] and tensile strain at break [mm/mm].

2.3. Single Point Incremental Forming of Tailored Welded Blanks

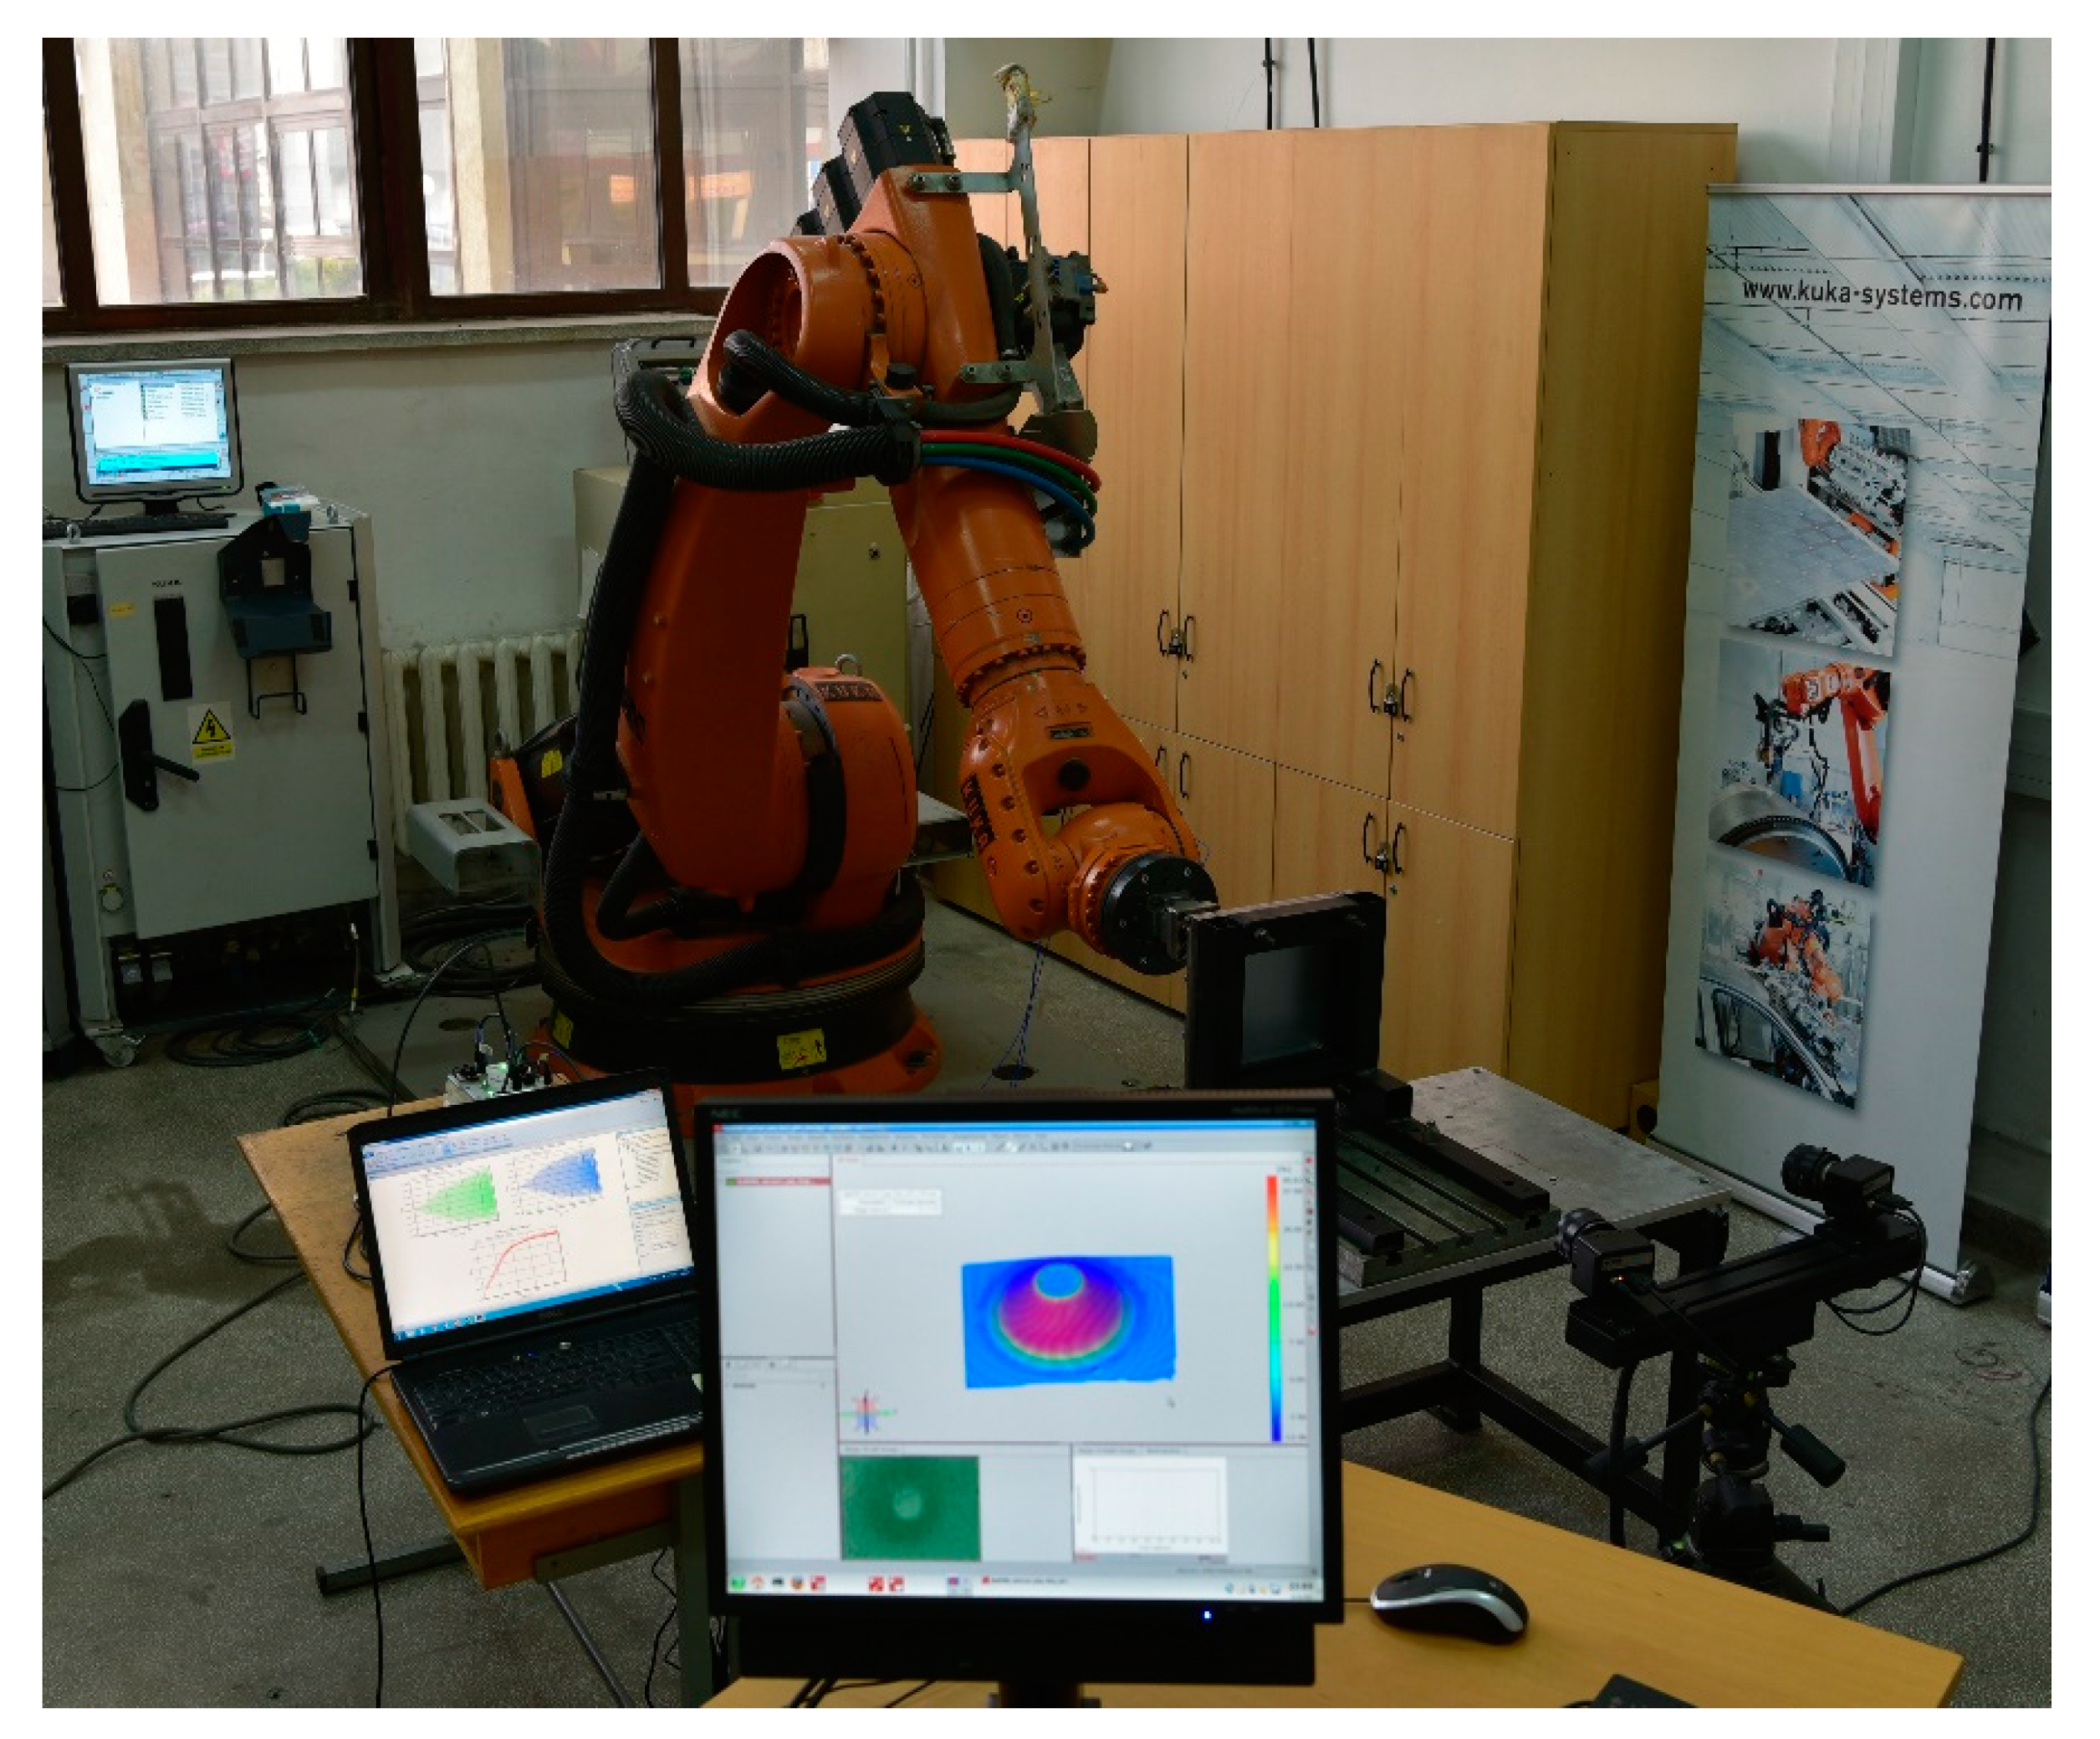
Due to the fact that the purpose of this research is to study the behaviour of one side tailored welded blanks and double side tailored welded blanks in single point incremental process both in terms of process forces and in terms of major and minor strain and thickness reduction, a Kuka Kr210 robot (Sibiu, Romania) was chosen as an alternative to using a universal milling machine. Its use in the present study is a great advantage, namely that the possibility to vertically position the part processed by SPIF allows the mounting of cameras behind the part. Thus, displacements, strains and thickness reduction can be determined at any time of the forming process, as opposed to the case of using a universal milling machine, when all this data can only be determined at the end of the forming process. The experimental layout consisting of the support for the forming die, the Kuka Kr210 robot and the Aramis system required for digital image correlation is shown in Figure 4.
The Kuka Kr210 robot is characterized by high-speed movement and high force and power. In addition, the robot ensures these high performances at a repeatability of ±0.06 mm. The maximum work volume of this robot is 97 m3. The high speed is required in the SPIF process, as it is known to be a process that requires long processing times. Furthermore, although SPIF is generally recognized as a process that leads to lower deformation forces compared to other processes (deep-drawing for example), in this case, due to the type of material used and the presence of the welding, forces higher than in other situations were required.
The experimental layout is composed of a vertically positioned fixing frame only. The blank is rigidly stiffened between the frame and the blankholder by means of 12 fixing screws. The frame used to perform all the tests was designed with a rectangular active area with the active side of Lp = 200 mm. The frame radius was R = 4 mm. The size of the blanks was 250 mm × 250 mm. The geometries selected for the analysis of the formability of TWBs in SPIF were the truncated cone and the truncated pyramid. For both types of geometries, a spiral trajectory was chosen, where no local maxima appear for major and minor strain and thickness reduction when advancing the punch in the z direction (direction perpendicular to the initial plane of the blank). For both types of trajectories, the punch was initially positioned in the centre of the part, followed by its movement in order not to come into contact with the material in the corner of the trajectory at the truncated pyramid and on the diameter of the large base at the truncated cone, respectively. A first contact of the punch with the weld bead has thus been prevented. In the case of the truncated pyramid, the side length of the large base was L = 85 mm and in the case of the truncated cone, the diameter of the large base was D = 85 mm. The diameter of the hemispherical punch was dp = 10 mm. The value of the step used to achieve the geometry of the part was s = 0.5 mm for the truncated pyramid-shaped parts and s = 1 mm for the truncated cone-shaped parts. The speed of the robot arm was v = 400 mm/min. To reduce friction, a thin layer of lubricant was sprayed on the contact surface between the blank and the punch.
The punch was fixed in a collet, which in turn was fixed on the robotic arm. The force transducer was mounted between the robotic arm clamp and the collet.
The force transducer used was a PCB 261A13 piezoresistive sensor (Sibiu, Romania) from PCB, with a capacity of 70 pF which allows the force measurement on the three directions of the coordinate axes. It allows the measurement of a maximum force of 44.48 kN on the z direction (which coincides with the axis of the robotic arm) and a maximum force of 19.57 kN on the x and y directions, respectively. It transmits the measured electrical signals to the Quantum X MX840B digital acquisition system from HBM, an 8-channel acquisition board which allows the reception of signals from either full-bridge or half-bridge strain gauges or piezoresistive full bridge. The signal from the piezoresistive sensor is amplified by the CMD 600 digital charge amplifier (Sibiu, Romania) for piezoelectric sensors, also from HBM. The software used for the data acquisition was Catman. Before starting the measurements, the entire force acquisition system was calibrated in the force range 0.5 kN for the z direction and 0.3 kN for the x and y directions.
To measure the major strain, minor strain and thickness reduction, the digital image correlation method was applied. In this regard, the Aramis system from Gom was used, which allows the acquisition of images, as well as their processing. Two high resolution lenses with a focal length of 50 mm were used. Before starting the forming process, the measuring area, a volume measuring 96 mm × 96 mm × 40 mm, was calibrated. The measurement technique consisted of obtaining an image every 5 s.
The blank preparation consisted of spray painting the outer surface of the part (the one that does not come into contact with the punch) with a white matte rubber coating, to allow a high degree of deformation and to avoid its exfoliation during SPIF. A diffuse network of graphite dots was applied following the drying of this layer of paint.
It should be noted that the Aramis calculation system allows the determination of the major and minor strain and thickness reduction in three ways: engineering strain, logarithmic strain and green strain. Of these three, the logarithmic strain was chosen to be presented in the current paper, so as to compare the results with the ones obtained analytically.

3. Results and Discussion

3.1. Uniaxial Tensile Test

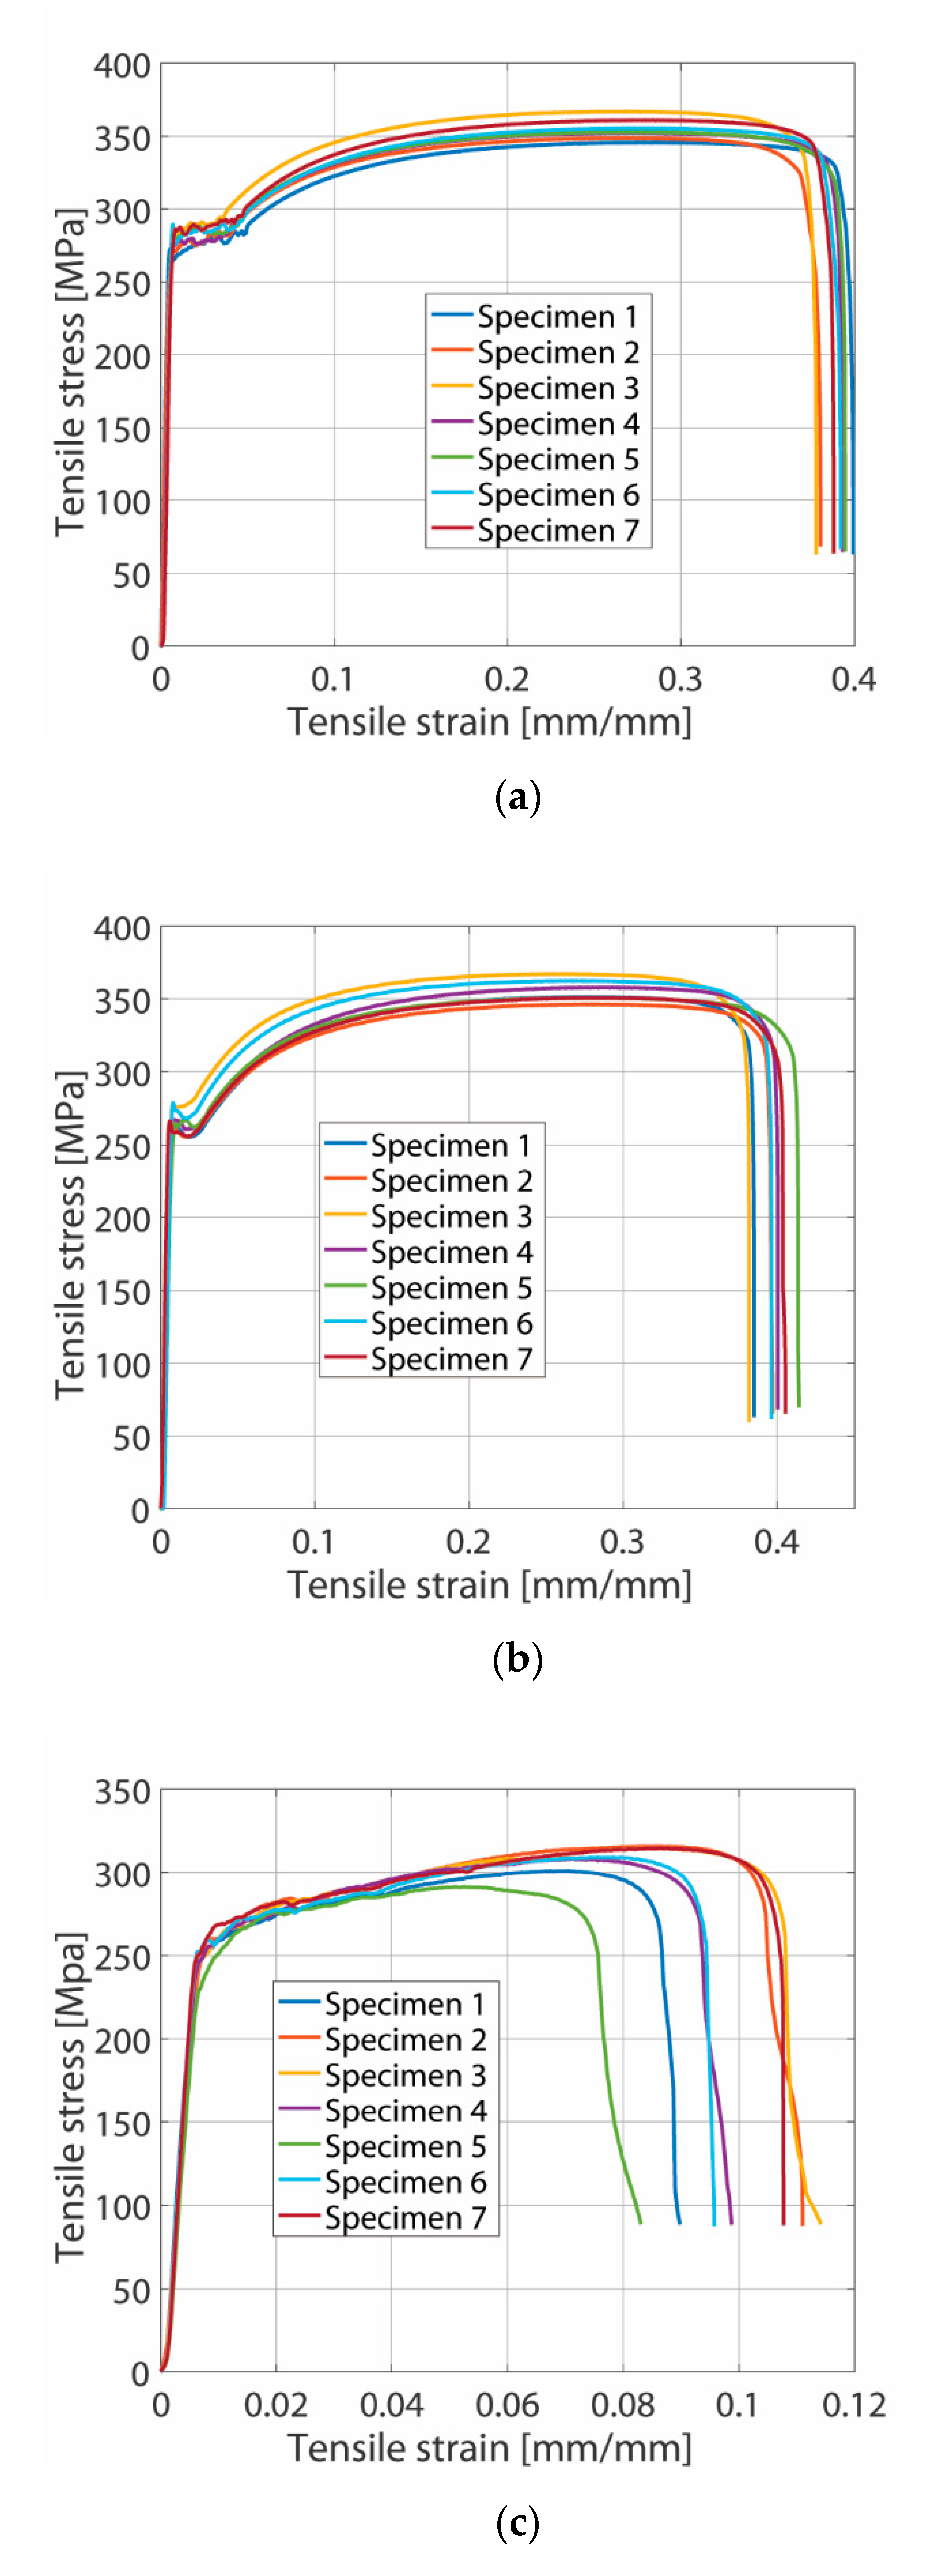
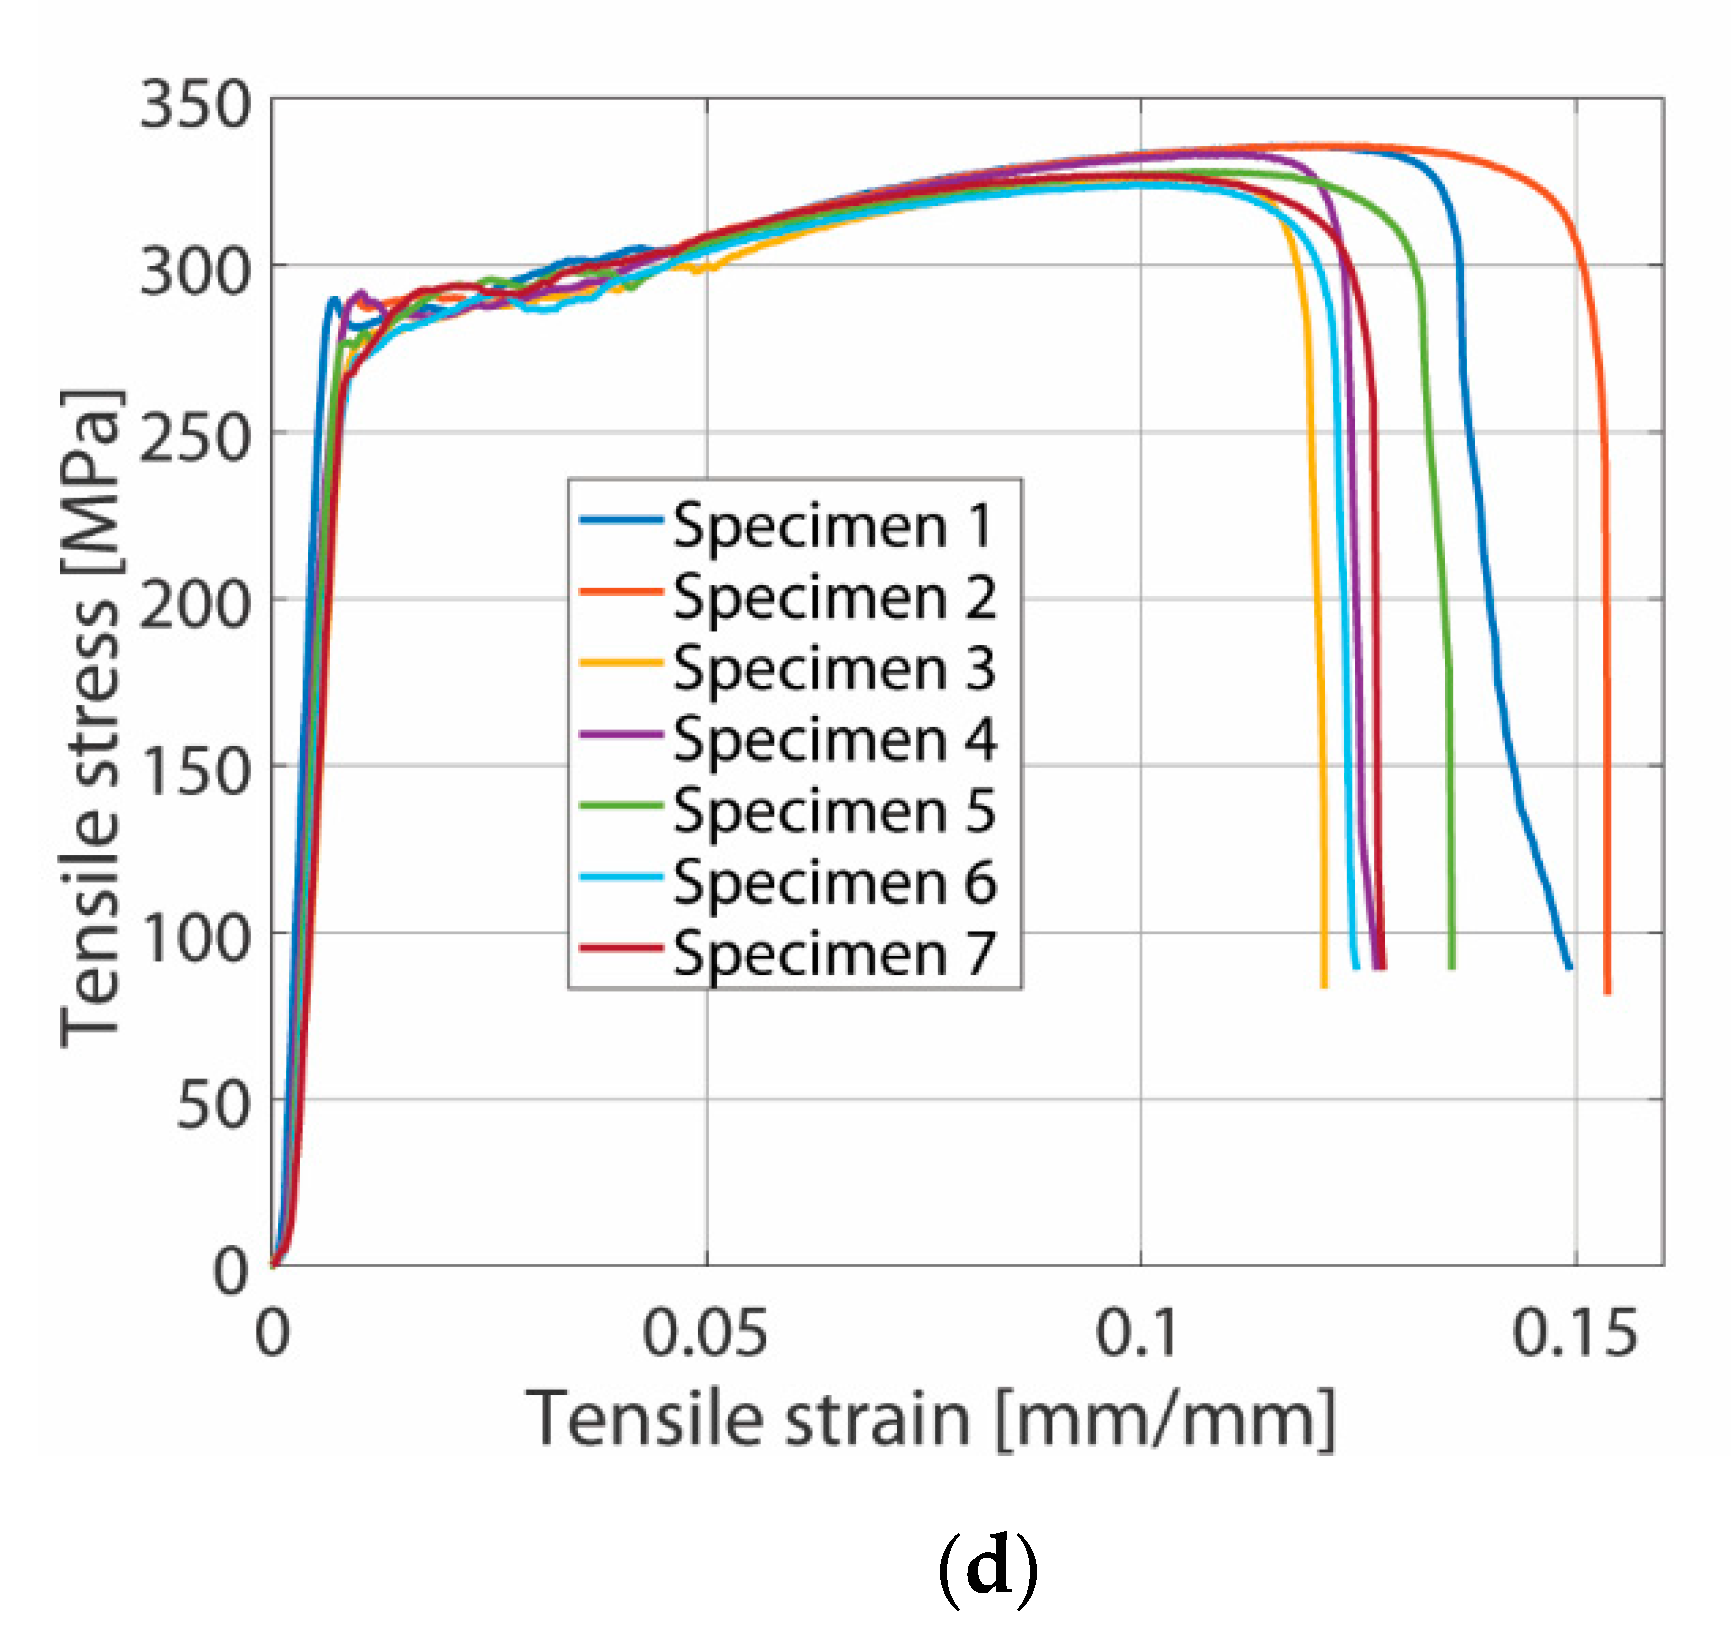
Sets of seven specimens were made for the unwelded specimens collected for parallel and transverse directions to the rolling direction, for both one side welded specimens and double side welded specimens (both obtained so that the tensile direction coincides with the rolling direction). The results of the experiments are presented in Table 3, Table 4, Table 5 and Table 6 and in Figure 5. To highlight the results, the statistical processing is also presented in each table, that is, the mean, standard deviation and p-value. The Anderson-Darling test, a test derived from the Kolmogorov-Smirnov test, was employed for the purpose of assessing the normality of the data distribution for each type of result. This test is considered to be the most sensitive of all normality tests. If p ≥ 0.05, the data distribution is considered to respect the null hypothesis, that is, the sample distribution is normal. When analysing the uniaxial tensile test results, it is observed that they all comply with the null hypothesis, most tests producing high (solid) p-values (greater than 0.4). There is only one exception, that of the tensile strain at break at the double side welded specimens, where the p-value is 0.175, which is also higher than 0.05.
At the analysis of the one side welded specimens and the double side welded specimens, it is noticed that the break mostly occurs in the thermo mechanical affected zone, in the proximity of the welding bead.
Close values of the measured data are observed from the very start between the unwelded specimens collected for rolling direction and the unwelded specimens collected for transversal direction. It was found that in the case of the unwelded specimens, the mean value of E-modulus is 64,928 MPa for specimens collected for rolling direction and 60,275 MPa for specimens collected for transversal direction, higher than 49,586 MPa for one side welded specimens and 48,555 MPa for double side welded specimens, respectively. These results lead to an increase of the elasticity of the material, the maximum elasticity occurring in the case of the double side welded specimen.
The maximum value of the tensile stress at Yield is obtained in the case of the double side welded specimens, 278 MPa, almost equal to the 276 MPa value, obtained for the unwelded specimens collected for rolling direction. In the case of the maximum tensile stress and tensile strain at maximum tensile stress, close data is observed between the unwelded specimens collected for rolling direction and the unwelded specimens collected for transversal direction (353–355 MPa and 0.2757 mm/mm). As far as the one side welded specimens are concerned, the mean value of the maximum tensile stress is 309 MPa and the tensile strain at maximum tensile stress, which is actually the value of interest, is only 0.0782 mm/mm, that is, only 28.3% of the value obtained for the unwelded specimens. Regarding the double side welded specimens, the mean value of the maximum tensile stress is 330 MPa and the tensile strain at maximum tensile stress is 0.1055 mm/mm, which is 38.3% of the value obtained for the unwelded specimens. The same observations can be drawn regarding the tensile strain at break as well, where the average values for the unwelded specimens ranged between 0.3907 and 0.3970 mm/mm, while in the case of the welded specimens, the values obtained for one side welded specimens and double side welded specimens were 0.1000 mm/mm and 0.1340 mm/mm, respectively. These represent 25.6% of the value of the unwelded specimens collected for rolling direction for one side welded specimens and 34.3% for double side welded specimens, respectively.
When analysing the strain hardening exponent (n) values, it can be observed that it has a higher value in the case of the unwelded specimens, n = 0.22, value which decreases in the case of double side welded specimens and one side welded specimens at n = 0.17 and n = 0.12, respectively. The uniaxial tensile test aimed to set the mechanical properties for unwelded specimens collected on rolling and transversal directions, as well as for one side and double side welded specimens. In fact, the purpose of the uniaxial tensile test was to correlate the mechanical properties with the formability of these materials. When analysing the uniaxial tensile test results, it is observed that both the tensile strain at maximum tensile stress and the tensile strain at break decrease in the case of one side welded and double side welded specimens when compared to unwelded specimens, which leads to a decrease of the formability of these types of sheets. The decrease in the case of one side welded specimens is, of course, more pronounced than that in the case of double side welded specimens. Regarding the Yield stress value, it can be stated that a material with a higher value reaches the plasticity state later, accumulating a higher stress up to the occurrence of the plastic strain. However, the Yield stress value in the double side welded specimens is observed to be approximately equal to that of the unwelded specimens collected in rolling direction. A lower value of the Yield stress, corroborated by a low value of the tensile strain at break, which contributes to the reduction of formability, is found in the one side welded specimen. The analysis of the strain hardening exponent (n) values leads to the observation that both the tensile strain at maximum tensile stress and the tensile strain at break decrease in the case of both one side and double side welded specimens when compared to unwelded specimens. A higher value of the strain hardening exponent (n) leads to a uniform strain distribution and implicitly to a better formability. All these results indicate a significant decrease of the formability of the welded specimens compared to the unwelded specimens. However, in light of the fact that the single point incremental forming is a sheet metal forming process that leads to a significant increase in formability, the experiments were carried on by obtaining the truncated pyramid and truncated cone shaped parts.

3.2. Single Point Incremental Forming of Tailored Welded Blanks

The forming of the truncated pyramid-shaped and truncated cone-shaped parts for the one side welded blanks was firstly attempted. Regardless of the chosen geometry or the pitch of the spiral trajectory, which was used for both trajectories in the case of the first four parts, fractures occurred. They appeared in the immediate proximity of the welded bead, in the heated-affected zone (HAZ) and propagated as it can be observed in Figure 6. Fractures appeared at different heights of the parts (i.e., at different degrees of deformation), without following a pattern. This fact was also confirmed by the low values of the tensile strain at maximum tensile stress and tensile strain at break obtained for these blanks at the uniaxial tensile test.
It was next proceeded with the obtaining of the parts for the double side welded blanks. Sets of three specimens were made for both the truncated pyramid-shaped and truncated cone-shaped parts. All 12 specimens were conformant, no fractures having occurred. The maximum values of the major strain, minor strain, thickness reduction, as well as of the maximum forces on the three directions of the cartesian coordinate system were first analysed. The obtained results are found in Figure 7, Figure 8, Figure 9 and Figure 10 and in Table 7, Table 8, Table 9 and Table 10. In the tables, the first experiment is the one shown in the figure. Also, in the Supplementary Materials section, we present the movies of the major strain, minor strain and thickness reduction variation over the course of the SPIF process. To assess the normality of the data distribution, the mean value and standard deviation were also calculated and the Anderson-Darling test was applied. The tables indicate that the p-value is significantly higher than 0.05 for all four types of experiments. The lowest values were obtained for the minor strain in the case of the welded parts, for both the truncated pyramid-shaped and the truncated cone-shaped parts.
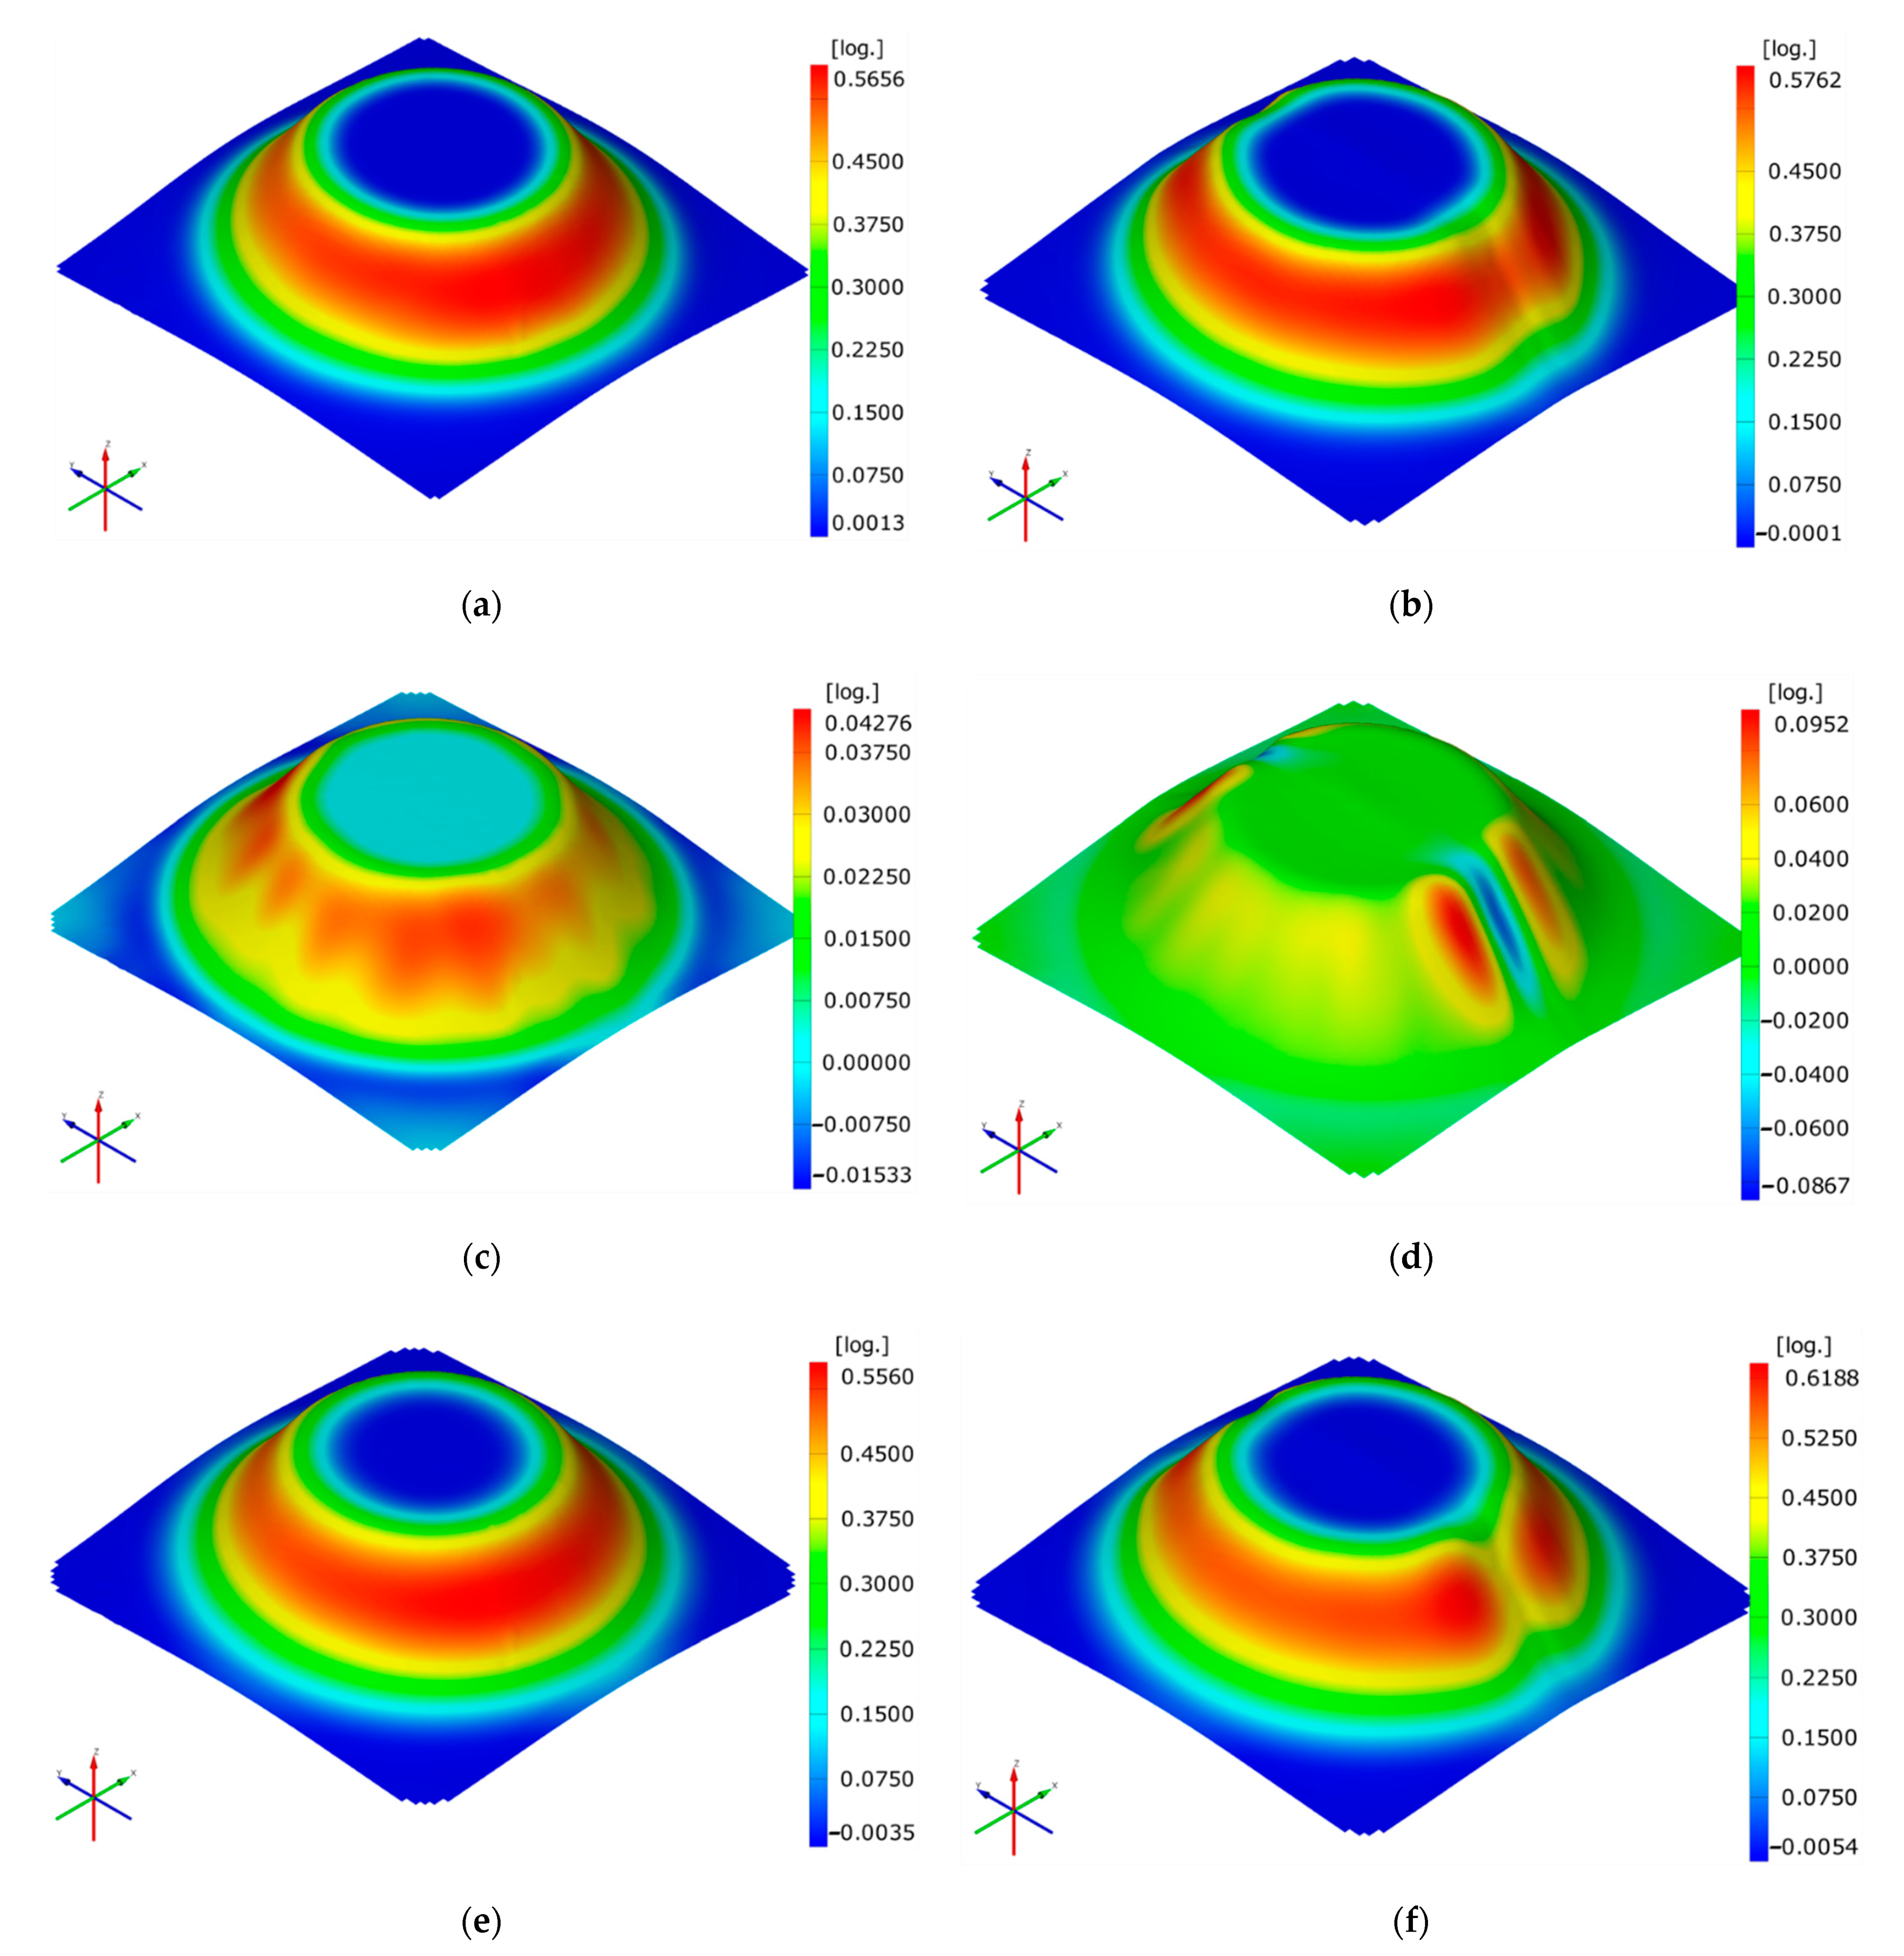
As mentioned, the formability of the material in the case of single point incremental forming is improved. This is due to the fact that the plastic deformation takes place locally, incrementally. When studying the principal strain distribution for the unwelded parts, while the plastic strain is observed to have significant values on the part walls, values are almost zero in the flange area and the bottom of the truncated pyramid or truncated cone. In the case of the unwelded truncated cone-shaped parts, it can be observed that in the forming area (on the wall of the truncated cone), the major strain values are much higher compared to those of the minor strain, an aspect which was also observed by Neto et al. [46]. In fact, an almost uniform distribution of the major strain can be observed on the part wall. Moreover, there is a small negative minor strain in the connection area between the wall and the flanges. This leads to an almost identical distribution of the thickness reduction to that of the major strain. These are highlighted in Figure 7a,c,e.
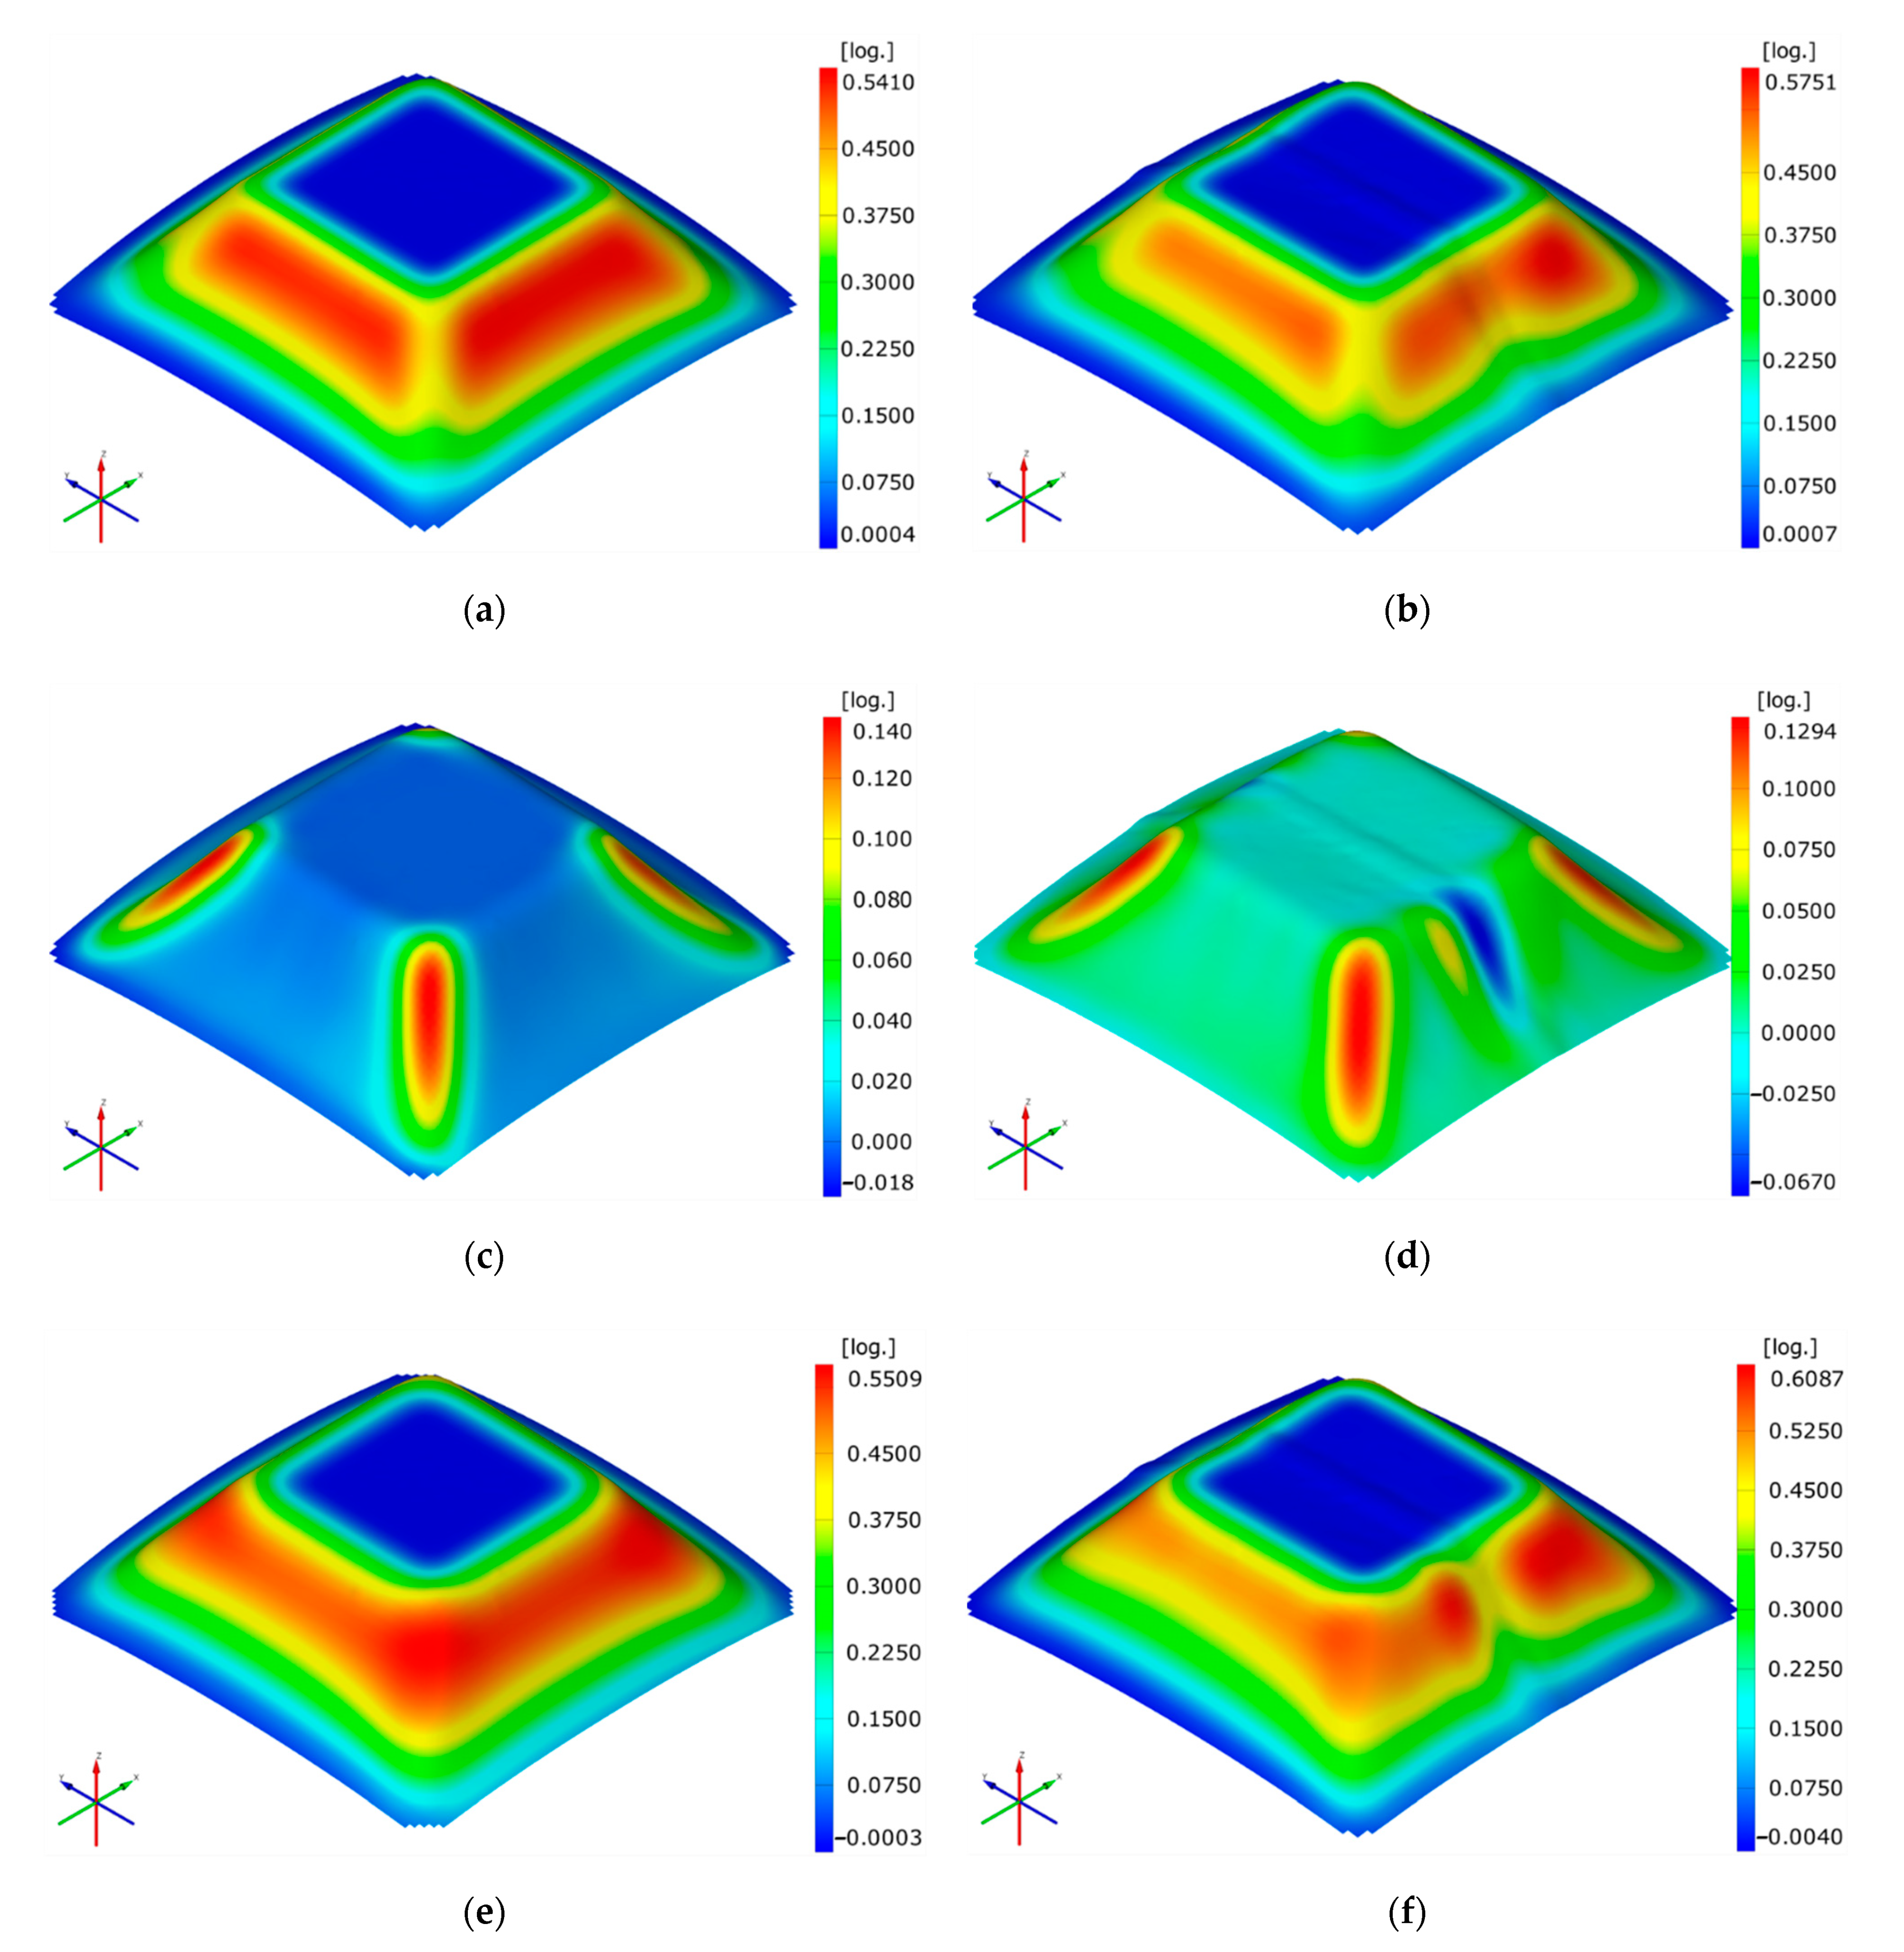
In the case of the unwelded truncated pyramid-shaped parts, significant values of the major strain are observed to appear on the wall of the truncated pyramid with maximum values at the end of each linear trajectory, while higher values of the minor strain also appear in the corner areas of the part. The major strain has lower values in the corner areas of the part. Negative values of the minor strain appear at the connection between the wall of the part and the flange, similar to the truncated cone-shaped part. In the case of truncated pyramid-shaped parts, the thickness reduction distribution slightly differs from the major strain distribution, which had lower values in the corner areas. The thickness reduction distribution is almost uniform in this case as well. All these remarks are highlighted in Figure 8a,c,e.
Regarding the thickness reduction distribution on the part wall, it is known that it respects the sine law.
For the parts produced by single point incremental forming a 55 degree wall angle was used, which corresponds to a logarithmic strain in thickness reduction of 0.556. Testing this angle was chosen for the purpose of evaluating the possibility of increasing the formability compared to the limit condition for a 50 degree wall angle set by Ambrogio et al. [34]. Analysing the values from Table 7 and Table 9, as well as Figure 7e and Figure 8e the values obtained for the unwelded blanks are observed to be very close to the analytical value of the logarithmic strain in thickness direction.
It is a well-known fact that there are three main categories of areas in an unwelded part processed by SPIF, namely, flat surfaces, characterized by plane strain stretching conditions, surfaces of revolution, also characterized by plane stretching conditions and intersection areas of the flat surfaces (corners), characterized by biaxial stretching conditions. The analysis of the strain state presented in Figure 7 and Figure 8 shows that it changes in welded parts processed by SPIF. On the flat surfaces of the truncated pyramid-shaped parts and on the surfaces of revolution of the truncated cone-shaped parts, the plane strain stretching condition is replaced by a biaxial strain condition in the part wall area. Moreover, if compression strains occur in the welding bead, stretching strains occur on both sides of the welding bead, causing a rapid transition from compression strain conditions to stretching strain conditions. This is explained by the presence in this area of a joint between the base material with a higher plasticity and the weld bead with a low plasticity but higher elasticity. Any discontinuity in a material, along with the welding bead which can be considered a discontinuity, is known to lead to the occurrence of stress concentrators. This contributes to an increased risk of shear and even fractures occurring in this area. No changes were recorded in the corner area of the truncated pyramid-shaped parts, because the welding bead is not found in these areas and does not influence the strain conditions. Regarding the thickness reduction, the maximum value appears, as previously mentioned, in the base material also, in the immediate proximity of the welding bead, as a result of the major strain and minor strain distribution.
The average maximum values of the major strain in the case of the double side welded blanks are ε1 = 0.58 mm/mm (Figure 7b and Figure 8b) for truncated cone-shaped parts and the truncated pyramid, slightly higher than the values obtained for unwelded blanks, ε1 = 0.55 mm/mm and ε1 = 0.57 mm/mm, respectively.
The minor strain variation at the double side welded parts differs significantly from that of the unwelded blanks. Thus, in the wall area, positive values of the minor strain appear on both sides of the welding bead, while negative values appear on the welding bead area. These values, when considered as absolute values, are approximately equal, ε2 = 0.09 mm/mm for the truncated cone-shaped parts and ε2 = 0.07 mm/mm for the truncated pyramid-shaped parts (Figure 7d and Figure 8d). This change in the minor strain values in the heat affected zone leads to the danger of fractures occurring in this area. Practically, when comparing the maximum values of the minor strain, the values observed in the case of double side welded truncated pyramid-shaped parts (ε2 = 0.13 mm/mm) are lower than those of the unwelded parts (ε2 = 0.14 mm/mm), both maximum values appearing in the corner areas of the part. On the other hand, in the case of the truncated cone-shaped parts, due to the presence of the welding bead, the maximum values of the minor strain are ε2 = 0.1 mm/mm for the double side welded blanks and ε2 = 0.04 mm/mm for the unwelded blanks.
As far as the thickness reduction is concerned, the distribution for both types of trajectories is similar to the major strain distribution. It is observed that the maximum values of the thickness reduction appear at both types of trajectories in the part wall area, in the heat affected zone, on the left and right sides of the welding bead, symmetrically arranged. The average maximum values of the thickness reduction in the case of double side welded blanks are εt = 0.61 mm/mm for the truncated pyramid-shaped parts and εt = 0.62 mm/mm for the truncated cone-shaped parts, higher than εt = 0.55 mm/mm for both categories of unwelded blanks.
The decrease of the major strain and thickness reduction values in the welding bead and implicitly the obtaining of maximum values in the thermo mechanical affected areas was also observed by Rattanachan et al. [43] for parts obtained by FSTW.
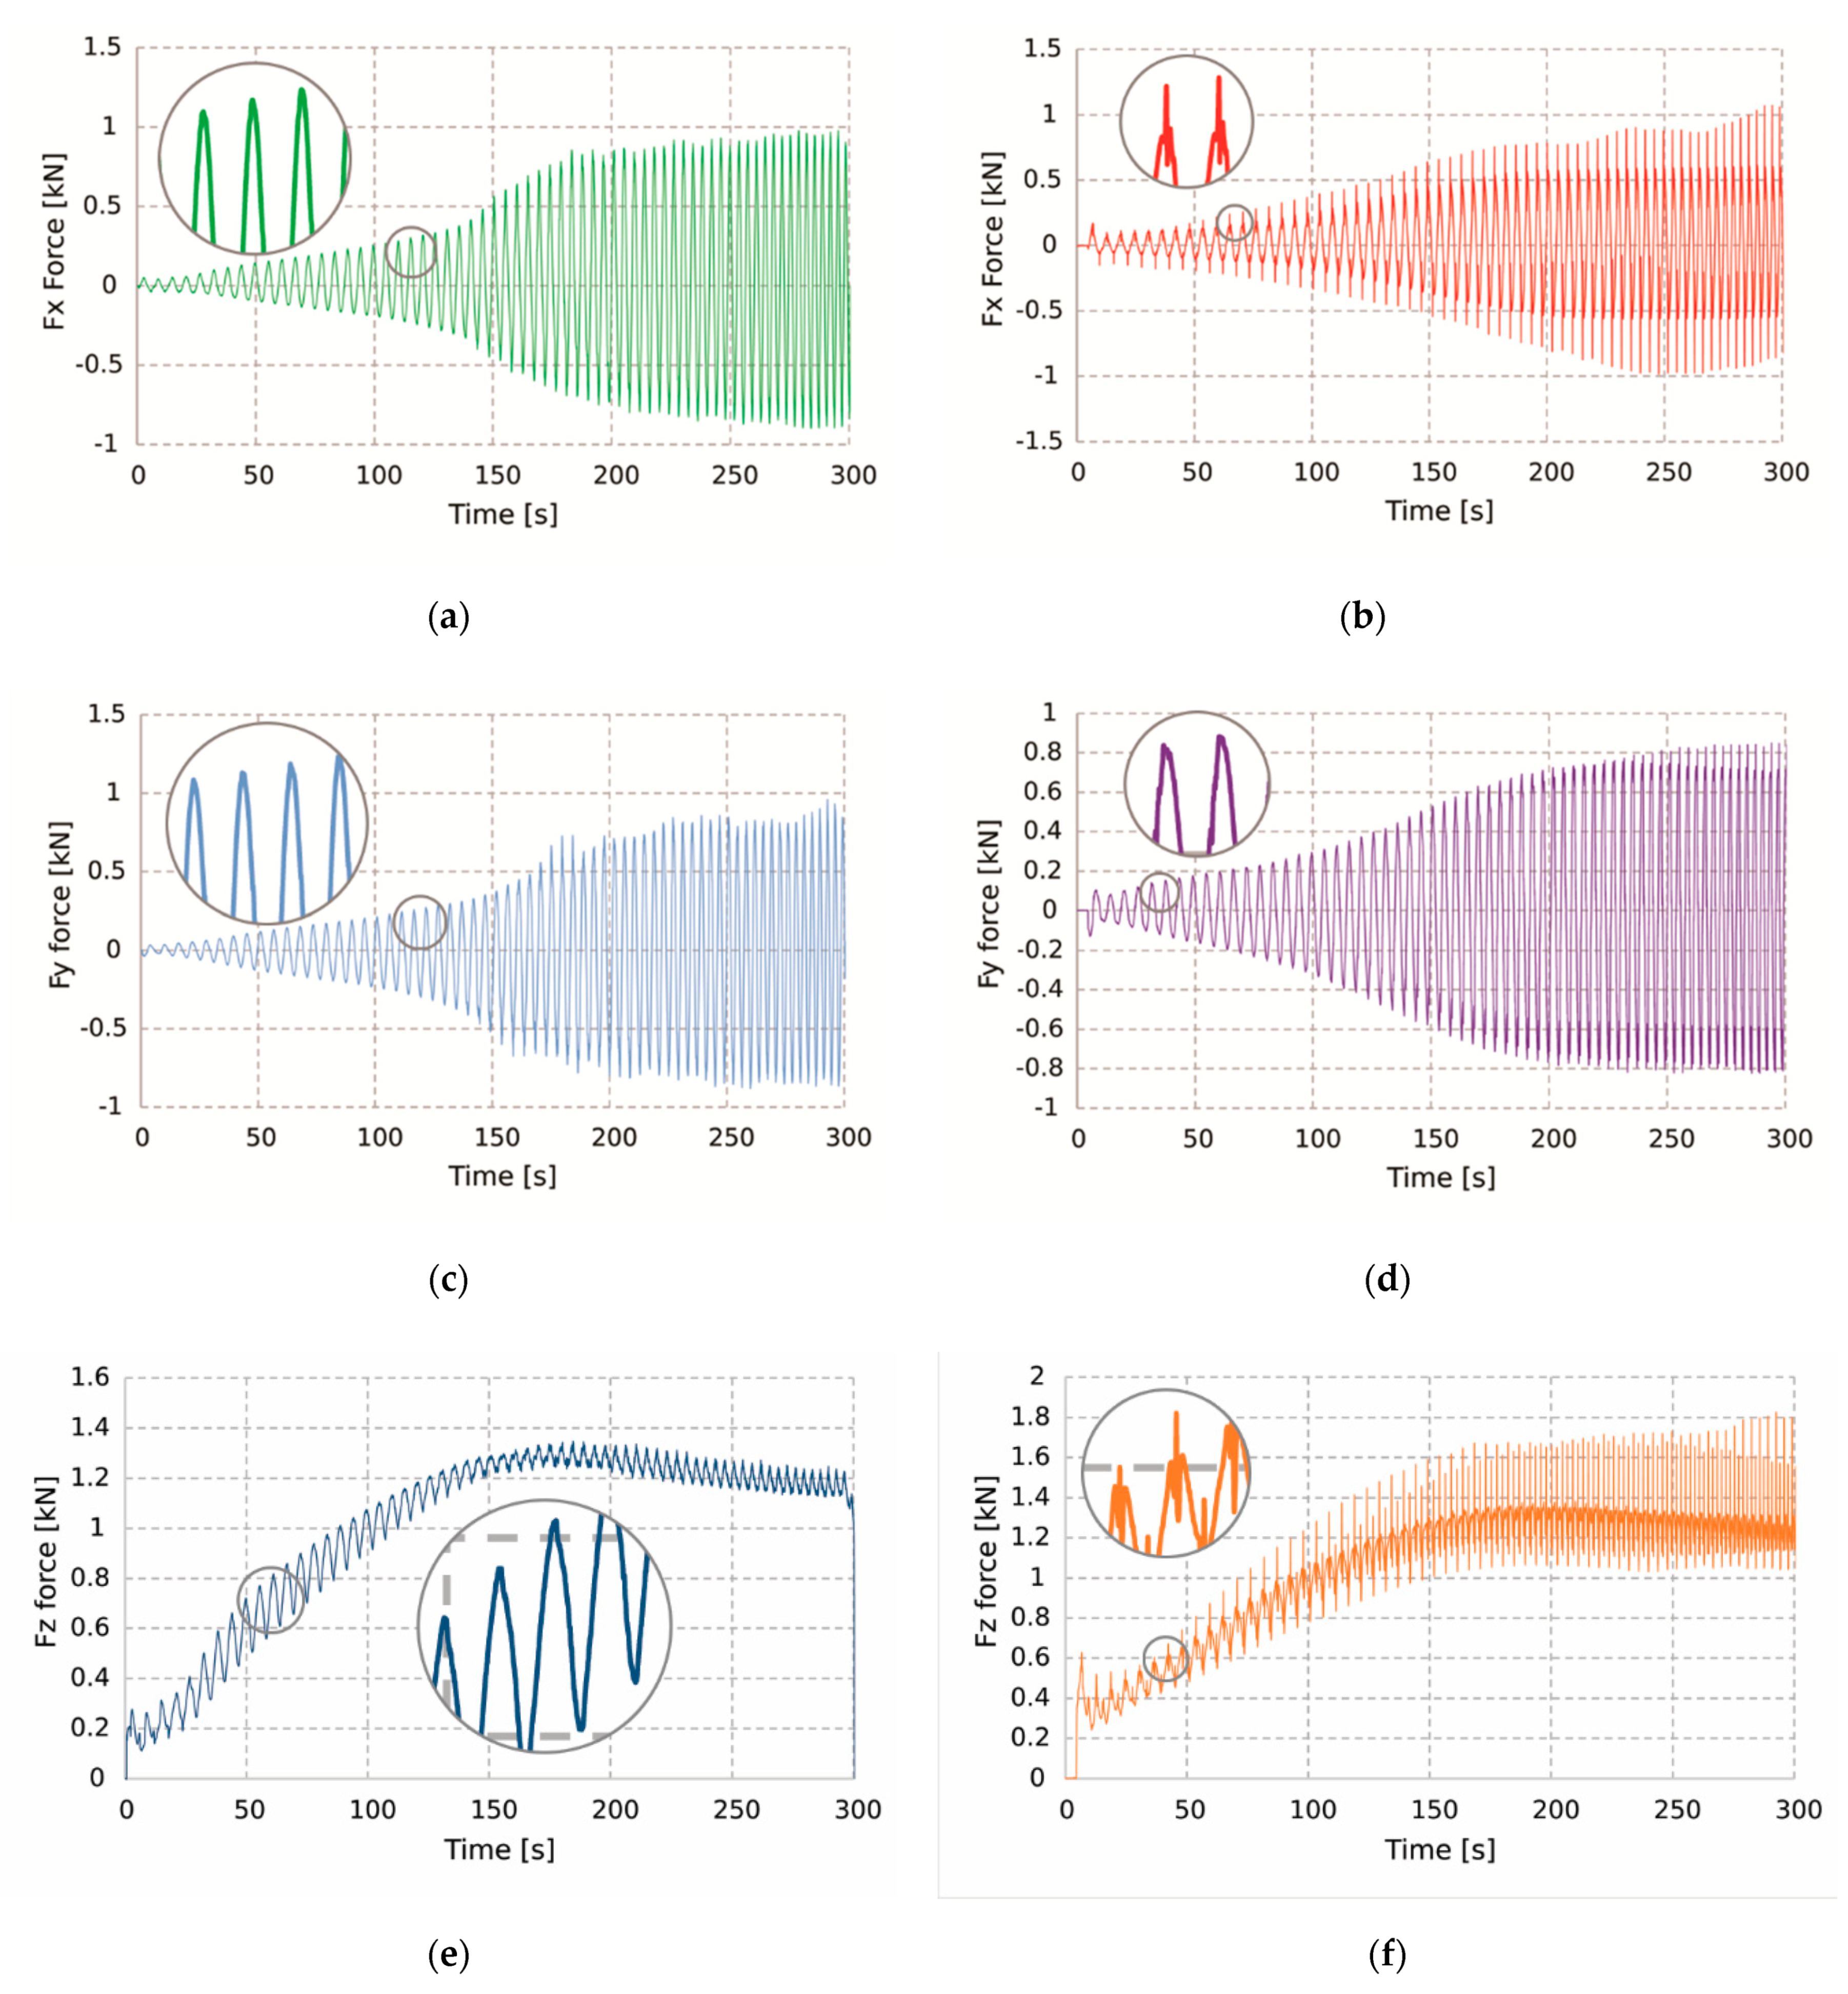
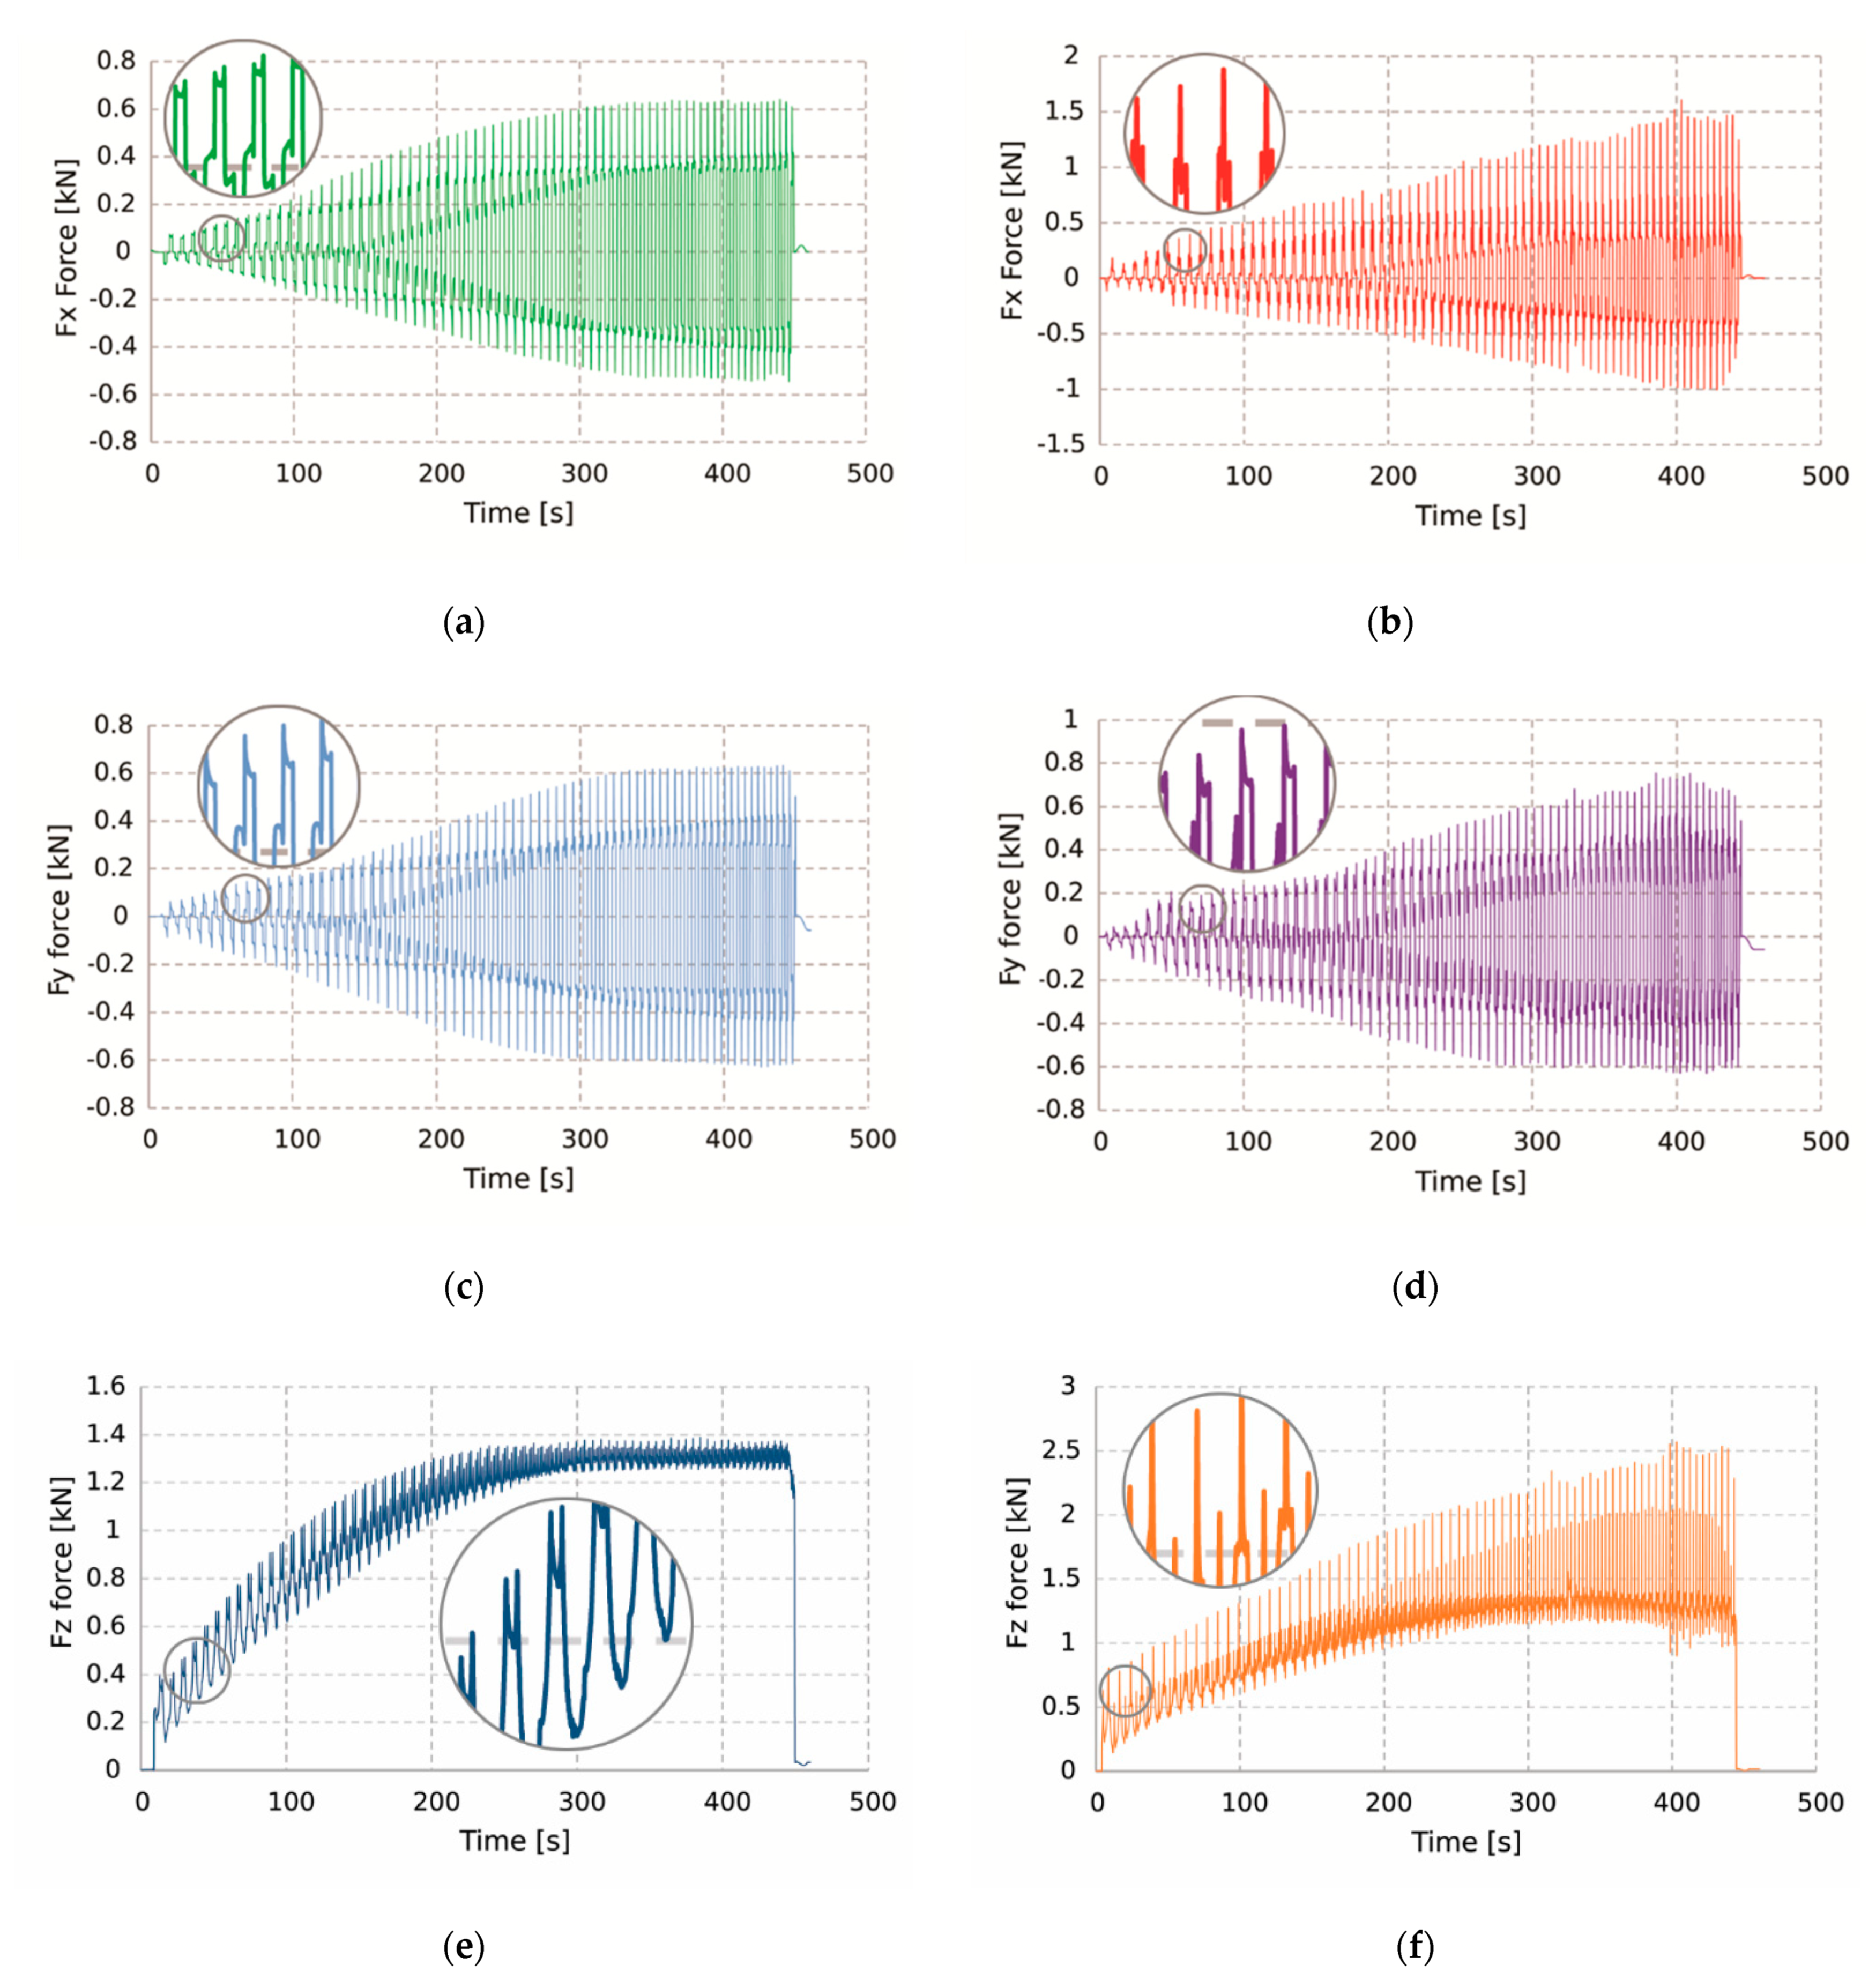
The graphs showing the force variation during SPIF of the double side welded blanks maintain, as can be seen in Figure 9 and Figure 10, the force variation tendency of the unwelded blanks. At both types of trajectories, the forces increase from zero at the beginning of the process, to the maximum value towards the end of the process, with variations in between, depending on the punch position at a given moment. If the force on the z direction has positive values only, the forces on the x and y directions oscillate around zero. The values and variation behaviour of the forces in the unwelded blanks processed by SPIF are in complete agreement with other studies [33]. It should be noted from the very beginning that the forces in the processing of the truncated pyramid-shaped parts were higher due to a lower value in the z direction of the spiral trajectory pitch. The paper presents (Figure 9 and Figure 10) the unfiltered force variation on the x, y and z directions. This approach was chosen with the purpose of highlighting the changes that occur in the force variations of the unwelded specimens and welded specimens. Thus, the mentioned differences can be observed in the detailed image of each figure. Local maxima (peaks), which appear at the passing of the punch over the welding beads, can be observed at both the truncated pyramid trajectory and the truncated cone trajectory. These local maxima are present at the forces on the z direction, as well as at the forces on the x direction (in the case of force measurement), perpendicular to the welding bead. The presence of these peaks is due to the fact that the welding bead has a higher strength than that of the base material. The local maxima are not present on the y direction, as this direction is parallel to the welding bead. This is more pronounced in the case of the truncated pyramid-shaped parts, as a consequence of the trajectory that alternately coincides with the two directions of the axes. This difference is faded at the truncated cone-shaped parts.
At both types of trajectories, the maximum value appears in the z direction, the direction of the punch penetration. In the case of the truncated pyramid-shaped parts, the maximum average value of the Fz force was Fz = 1.39 kN for unwelded blanks and Fz = 2.39 kN for double side welded blanks, while in the case of the truncated cone-shaped parts, the values obtained were Fz = 1.26 kN for unwelded blanks and Fz = 1.85 kN for double side welded blanks, respectively.
The parts obtained from unwelded blanks had approximately equal maximum values of the forces in the x and y directions: Fx = Fy = 0.63 kN for the truncated pyramid-shaped parts and Fx = Fy = 0.90 kN for the truncated cone-shaped parts. In the case of the parts obtained from double side welded blanks, the values were Fx = 1.39 kN and Fy = 0.70 kN for the truncated pyramid-shaped parts and Fx = 1.11 kN and Fx = 0.91 kN for the truncated cone-shaped parts. In both situations an increase of the value of the Fx and Fy components is observed in the parts obtained from double side welded blanks.
The forces at the parts formed by SPIF obtained in the case of double side welded blanks are higher than those obtained in the case of unwelded blanks, due to the punch passing over the welding bead. The Fz force in SPIF for welded blanks is 72% higher than for unwelded blanks in the case of truncated pyramid-shaped parts and 49% higher in the case of truncated cone-shaped parts. The Fx force in SPIF for welded blanks is 120% higher than for unwelded blanks in the case of truncated pyramid-shaped parts and 22% higher in the case of truncated cone-shaped parts.
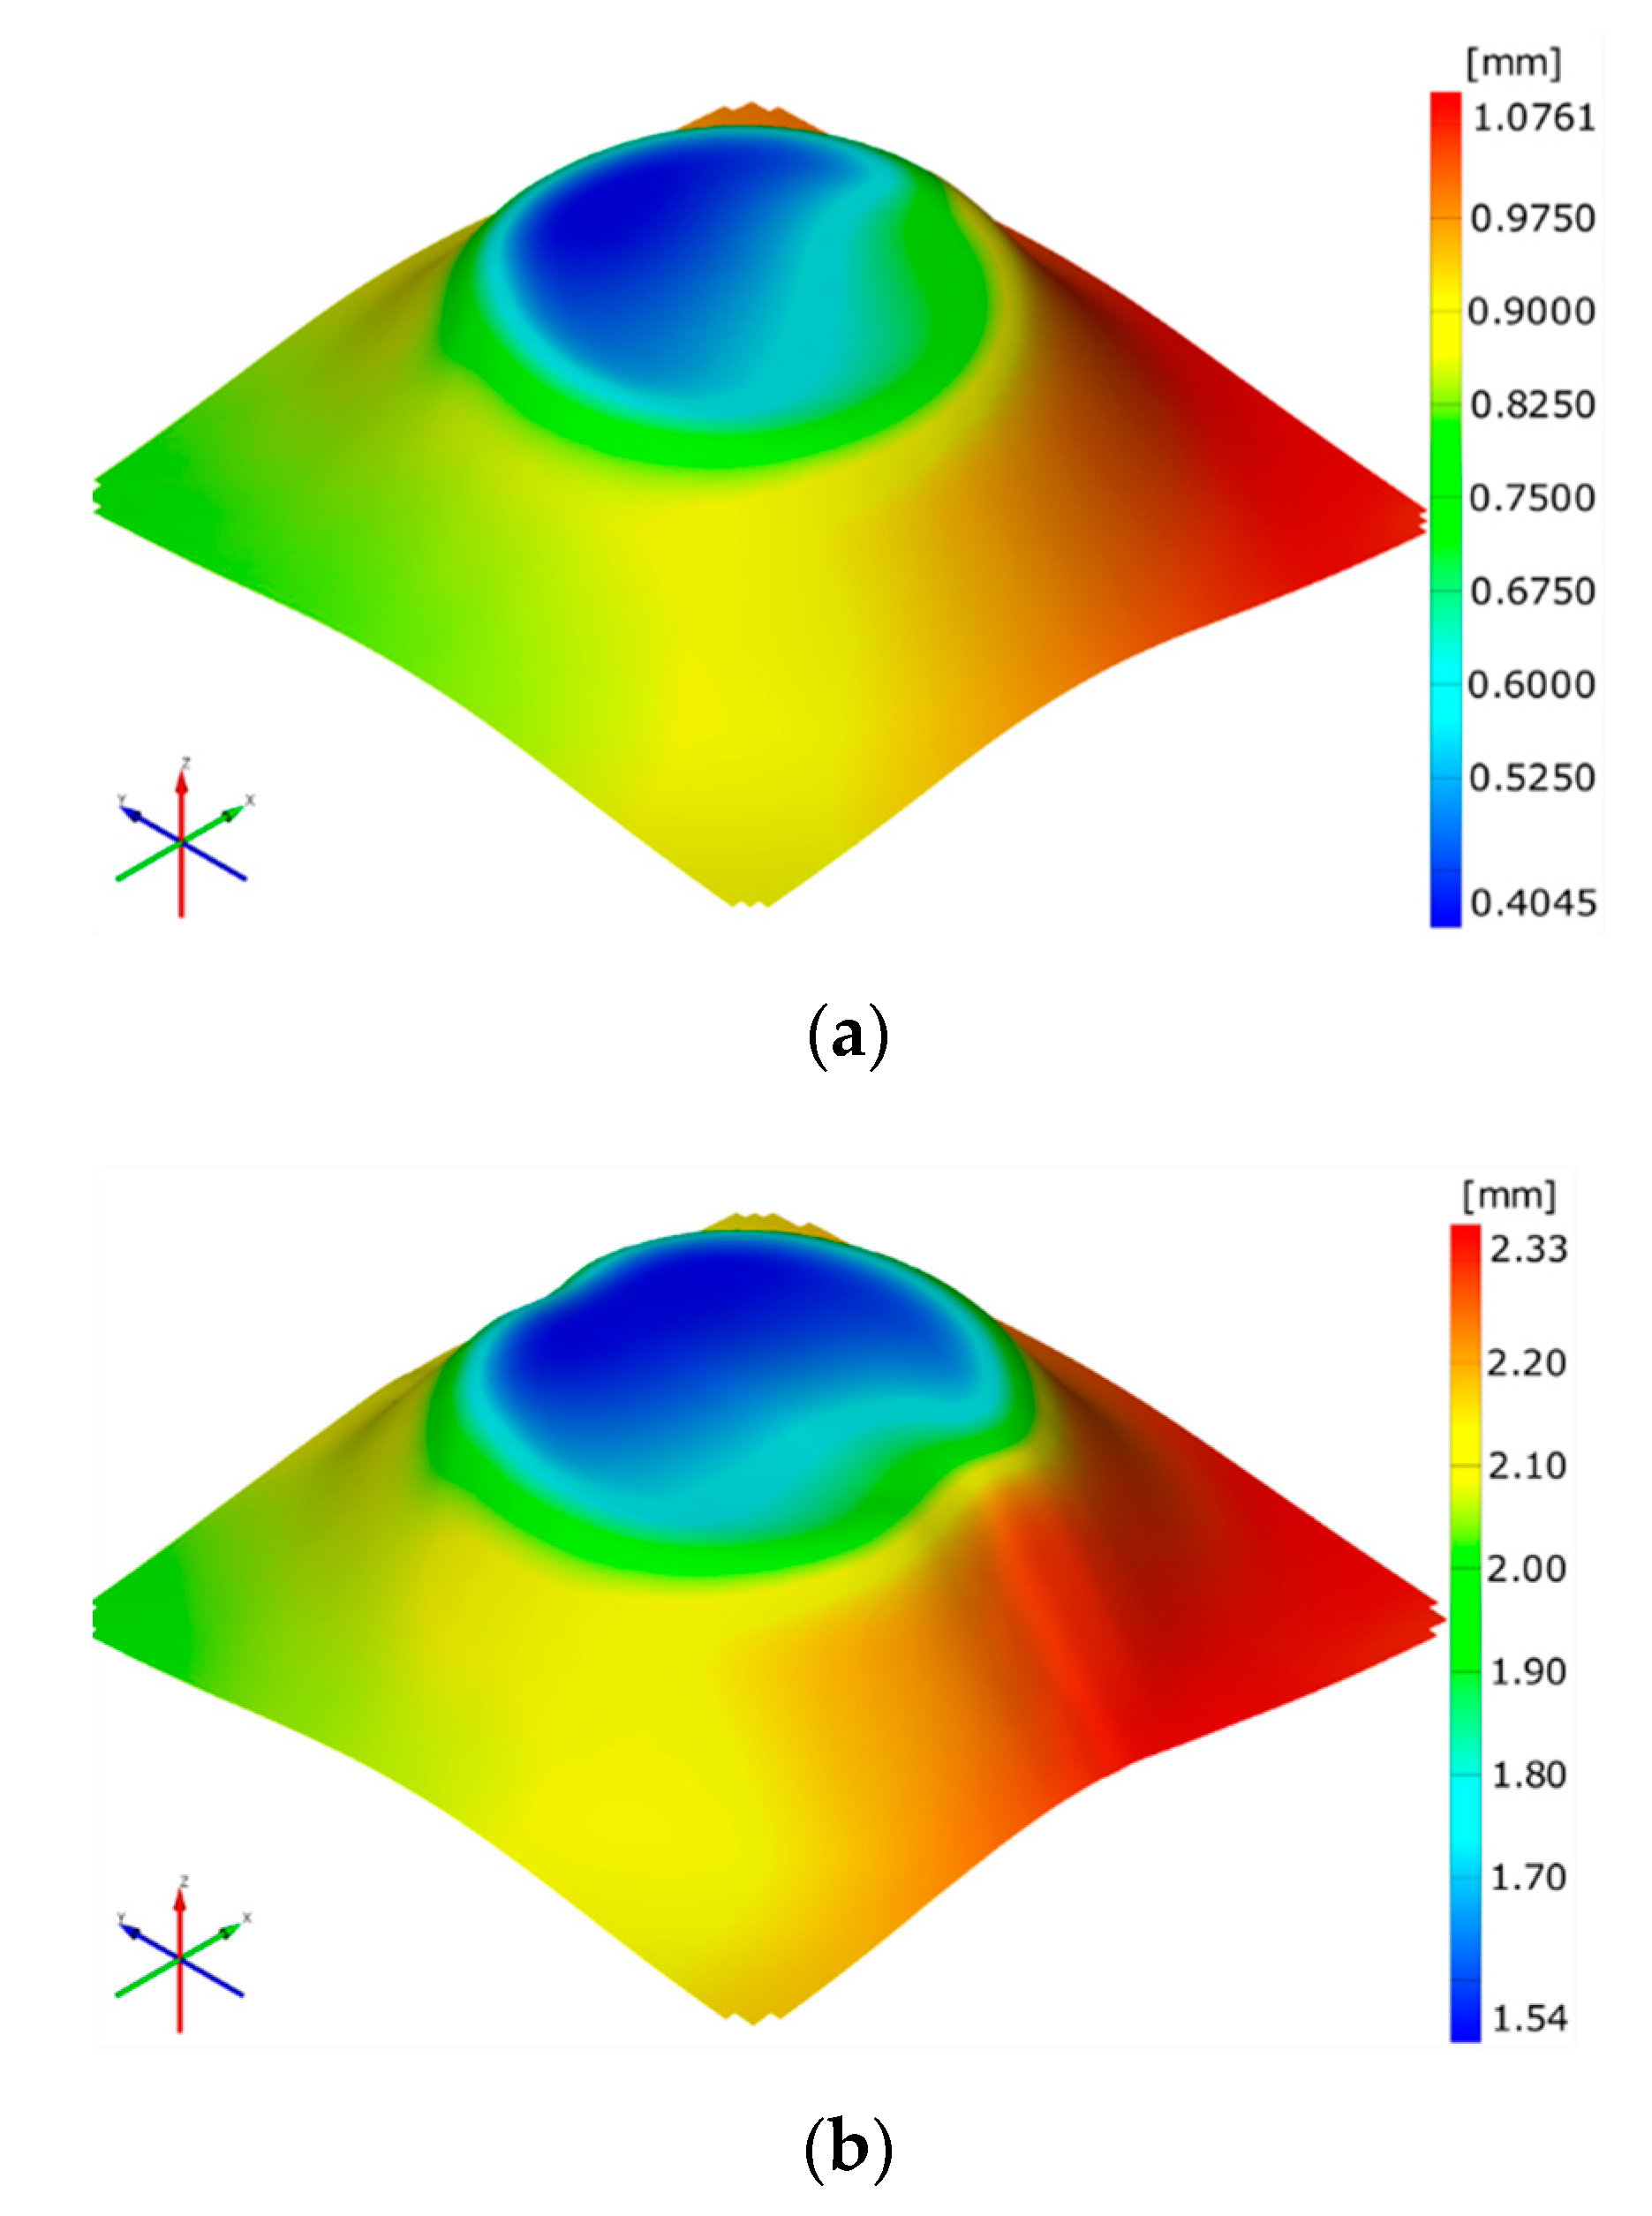
In the case of metal forming processes in general and of the incremental forming process (SPIF) in particular, knowing the springback value is especially important, because it influences the accuracy of the part. Knowing the springback value allows the correction of the punch trajectories, so as to eliminate dimensional and shape errors. Following the completion of the forming process, the punch was retreated from the part, 8 of the total 12 screws were removed, the part only being supported by the 4 remaining screws, situated in the bottom part of the experimental layout. After these steps, the springback values were measured. Figure 11 shows the total displacement variation for the truncated cone-shaped parts. The springback values for the four categories of parts are presented in Table 7, Table 8, Table 9 and Table 10. The springback has a higher value in the case of welded sheets. This is due to the fact that the unwelded sheets in the SPIF process have a relatively uniform stress distribution, which leads to a lower springback value in the welded sheets, whereas the presence of the welded bead produces a non-uniform stress distribution and implicitly higher springback values. This is also correlated with the uniaxial tensile test results, where it can be observed that the welded sheet has lower values of the E modulus, that is, a higher elasticity and consequently, higher springback values.
When analysing the images that show the springback value, it can be observed that in both the cases of welded and unwelded parts, it is not uniform on the entire surface of the part. The maximum value of the springback appears in the area of the last contact between the punch and the blank, for both the truncated pyramid and truncated cone-shaped parts. However, as can be seen in Figure 11, the maximum springback values appear in the flange area. The maximum values obtained in the bottom area were therefore analysed for comparison, since this is the area of interest following the forming process. In both cases, the springback is higher for the welded parts than for the unwelded parts. This is due to the presence of the welding bead, which has a higher elasticity than that of the base material. The maximum values in the case of the truncated pyramid-shaped parts are s = 0.969 mm for the parts obtained from unwelded blanks and s = 2.24 mm for the ones obtained from double side welded blanks. As for the truncated cone-shaped parts, the maximum average values are s = 0.443 mm and s = 1.563 mm for the parts obtained from unwelded blanks and double side welded blanks, respectively.
Marathe also concluded, on the basis of a finite element simulation, that the maximum springback value occurs in the case of TWBs compared to unwelded blanks, especially in the case of strong materials [41].
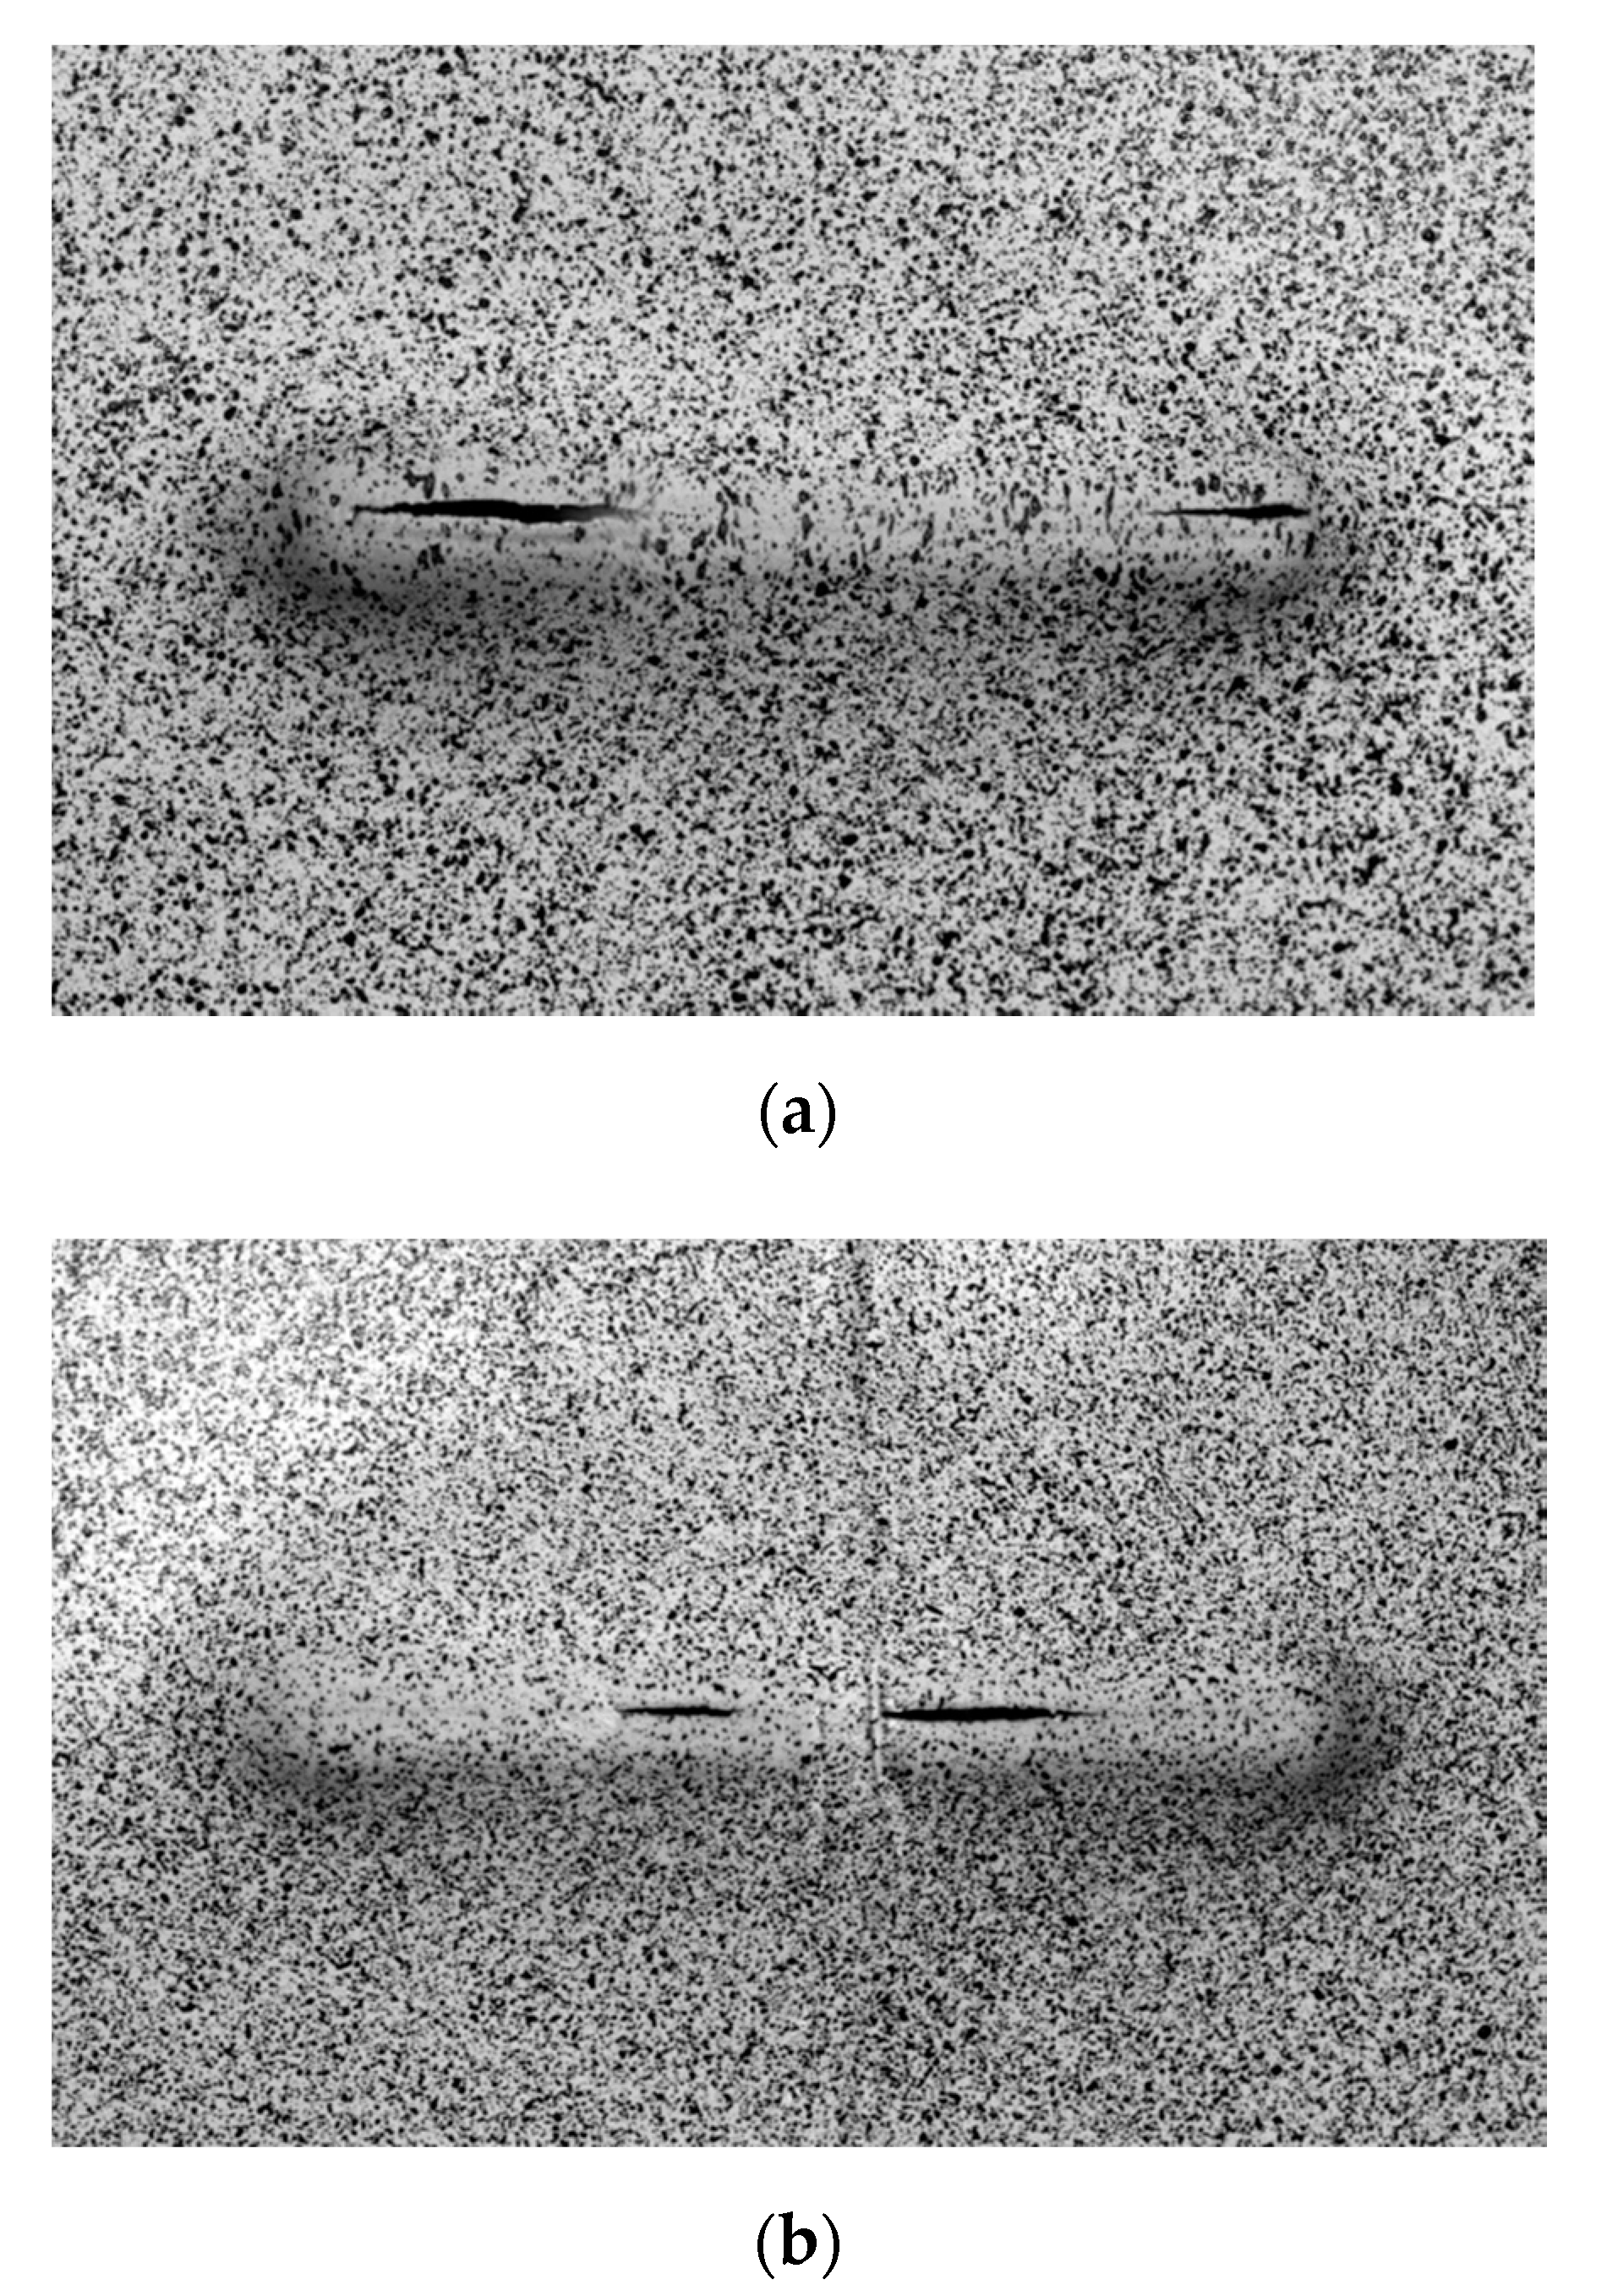
With the focus on determining the formability in SPIF, the uniaxial tool path test (uniaxial stretching test) is used, that is, a test in which the punch executes a linear trajectory, with penetrations in the material only at the ends of this trajectory, until the first fracture occurs. Only double side welded blanks were tested, without testing one side welded blanks also, because these blanks could not be formed by SPIF without cracks. Figure 12 presents the specimens immediately after the crack occurred.
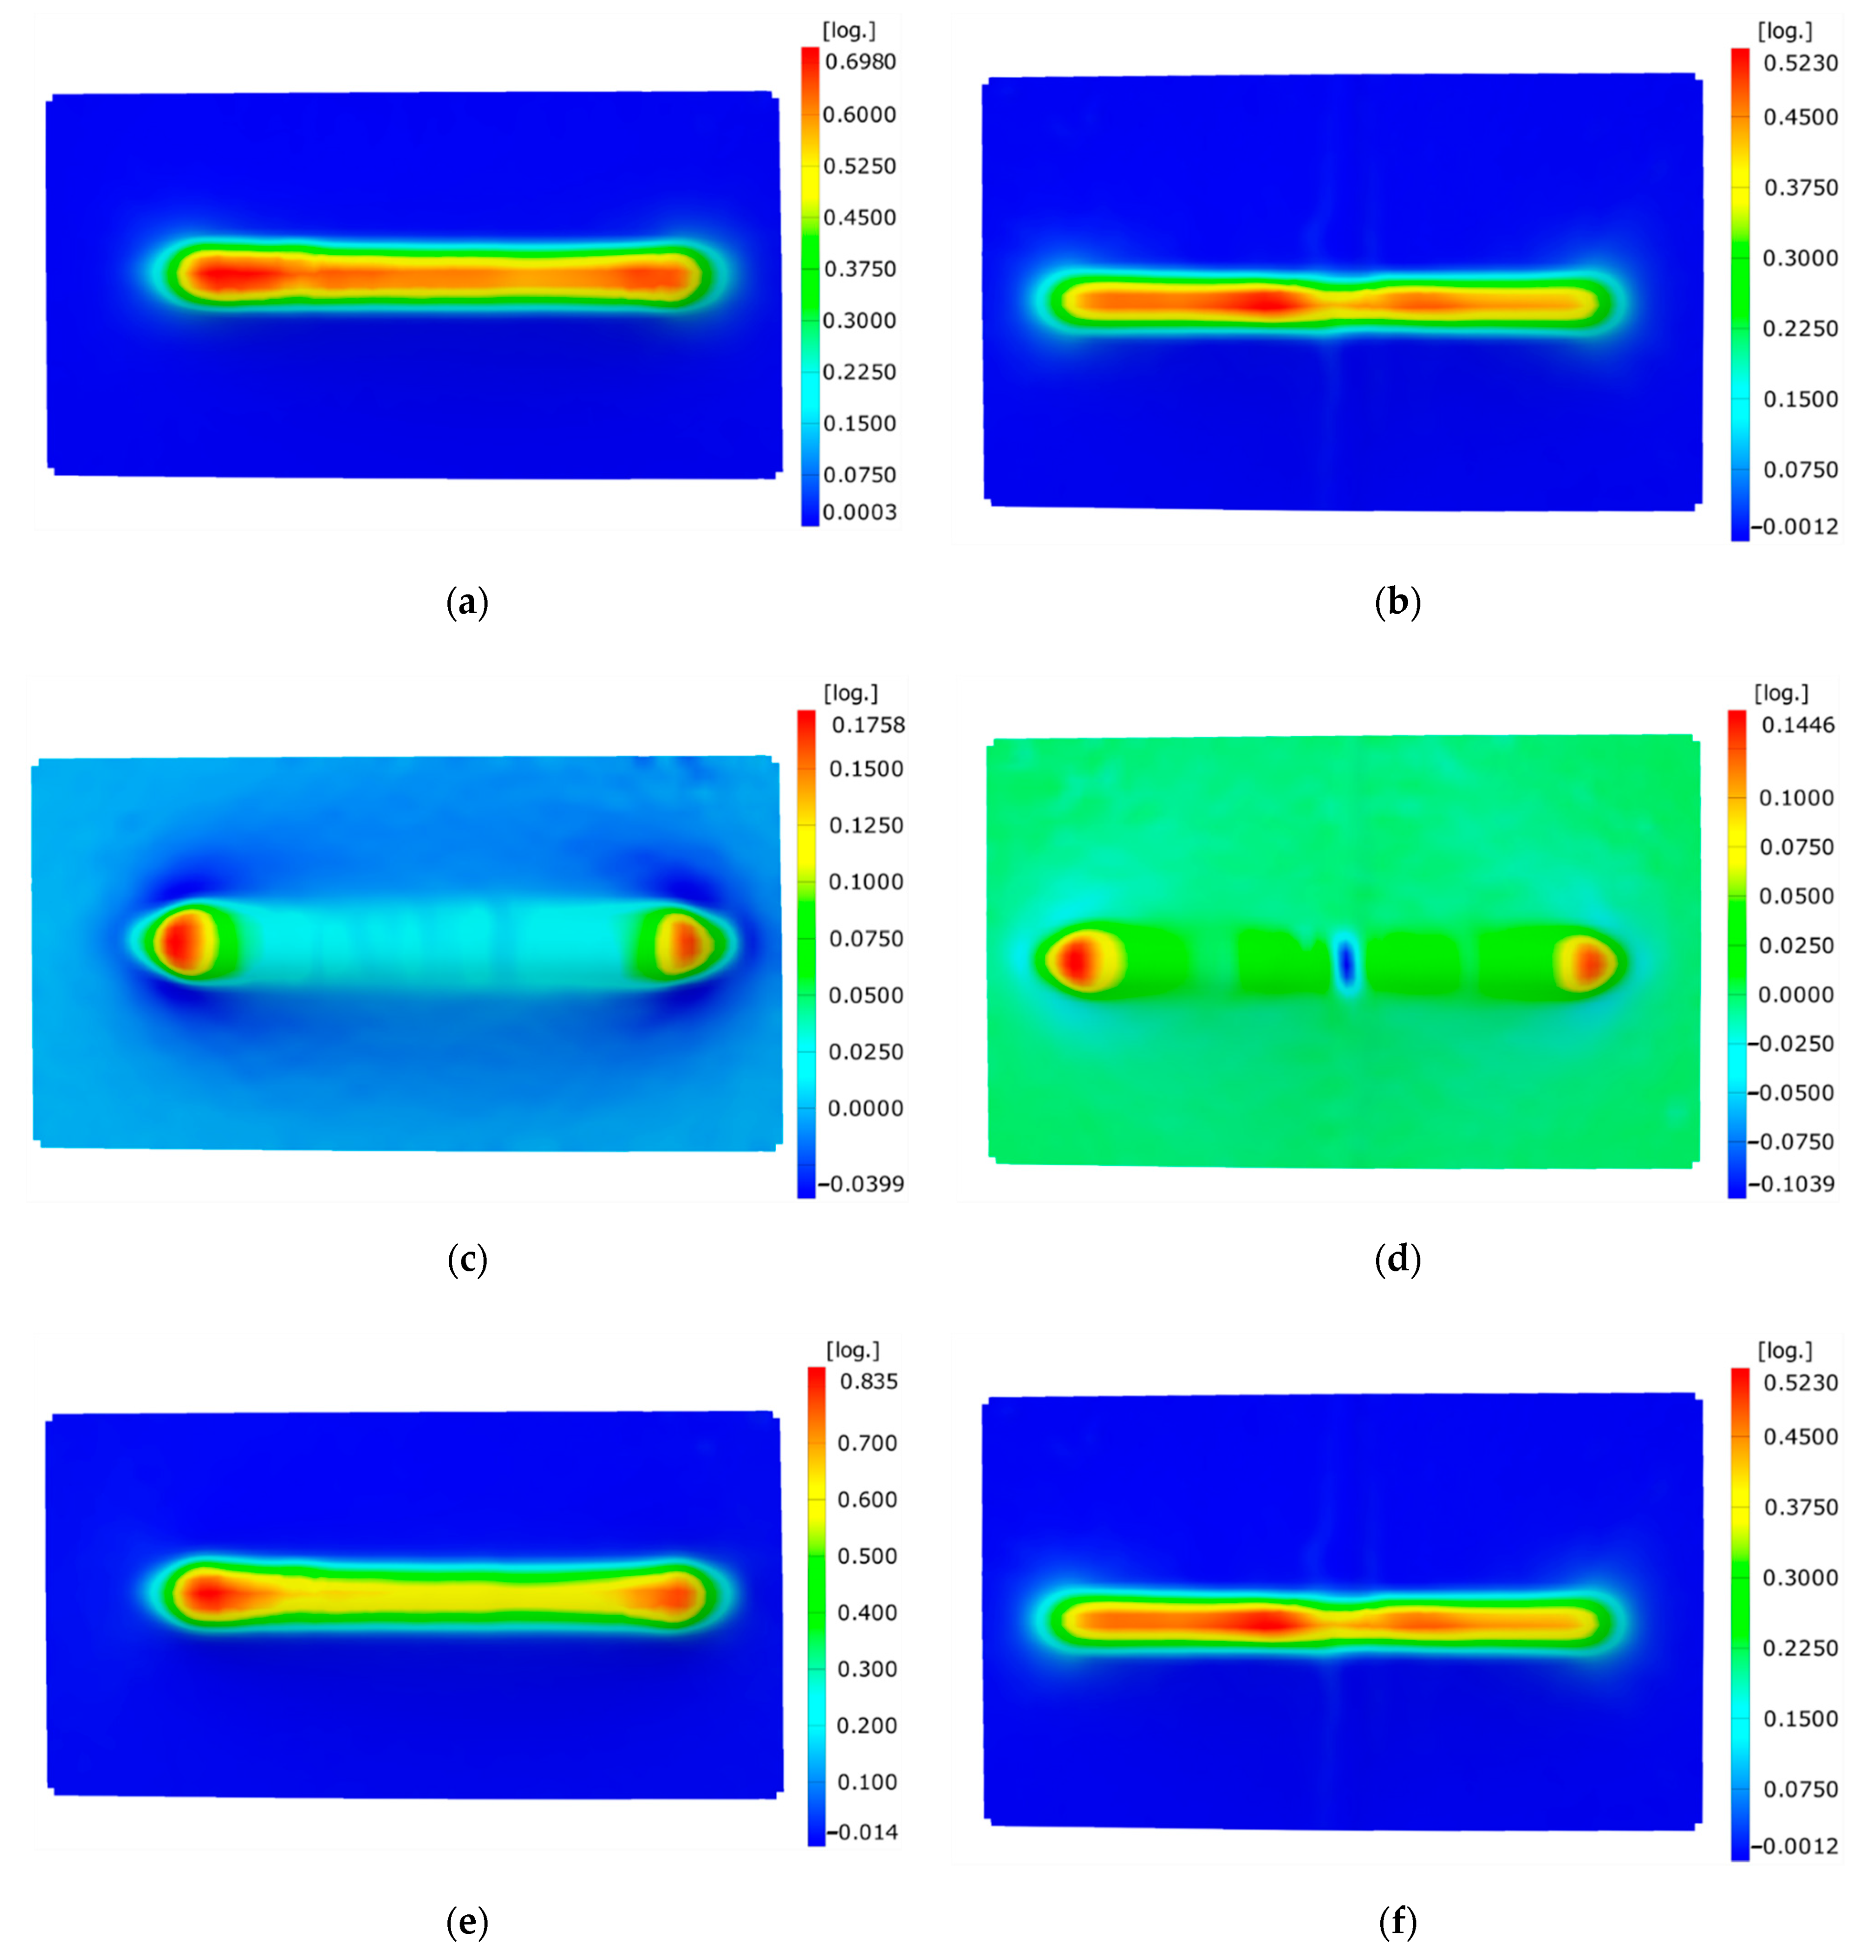
The performing of a bi-axial stretching test (cross test) was also intended but this was not possible due to the presence of the welding bead on the exact direction of the punch movement, which would have significantly influenced the results. In this type of test, it is known that in the case of unwelded blanks, a pure uniaxial stretching is generated on the linear trajectory and a bi-axial stretching is generated at the ends of the trajectory (that is, the major strain has significant values along the linear trajectory and the minor strain increases at the ends of the trajectory). This is also visible in Figure 13.
The analysis of the images in Figure 13 shows that, while in the case of unwelded blanks the fracture appears and develops from the ends of the trajectory towards its middle, as it is normal, in the case of double side welded blanks the fracture appears and develops in the heat-affected zone and is heading towards the ends of the trajectory. All values in Table 11 and Table 12 were extracted from the images acquisitioned immediately before the fracture occurred.
The material is observed to not suffer a major thickness reduction in the welding bead but in its immediate proximity, in the heat-affected zone. The maximum thickness reduction value for the welded blanks is εt = 0.55 mm/mm, compared to εt = 0.84 mm/mm in the case of unwelded blanks. The maximum value of the major strain for the welded blanks is ε1 = 0.52 mm/mm, compared to ε1 = 0.70 mm/mm in the case of unwelded blanks, while the maximum value of the minor strain for the welded blanks is ε1 = 0.15 mm/mm, compared to ε1 = 0.18 mm/mm in the case of unwelded blanks. However, a conclusion similar to that of the analysis of the minor strain variation at the welded blanks formed by SPIF can also be drawn in the analysis of the minor strain distribution at the uniaxial stretching test. In exact terms, a ε2 = −0.10 mm/mm negative value of the minor strain is observed, which leads to the occurrence of the fracture in the heat-affected zone. A maximum height reduction is also observed, from h = 14.37 mm in the case of unwelded blanks to h = 12.3 mm in the case of welded blanks.
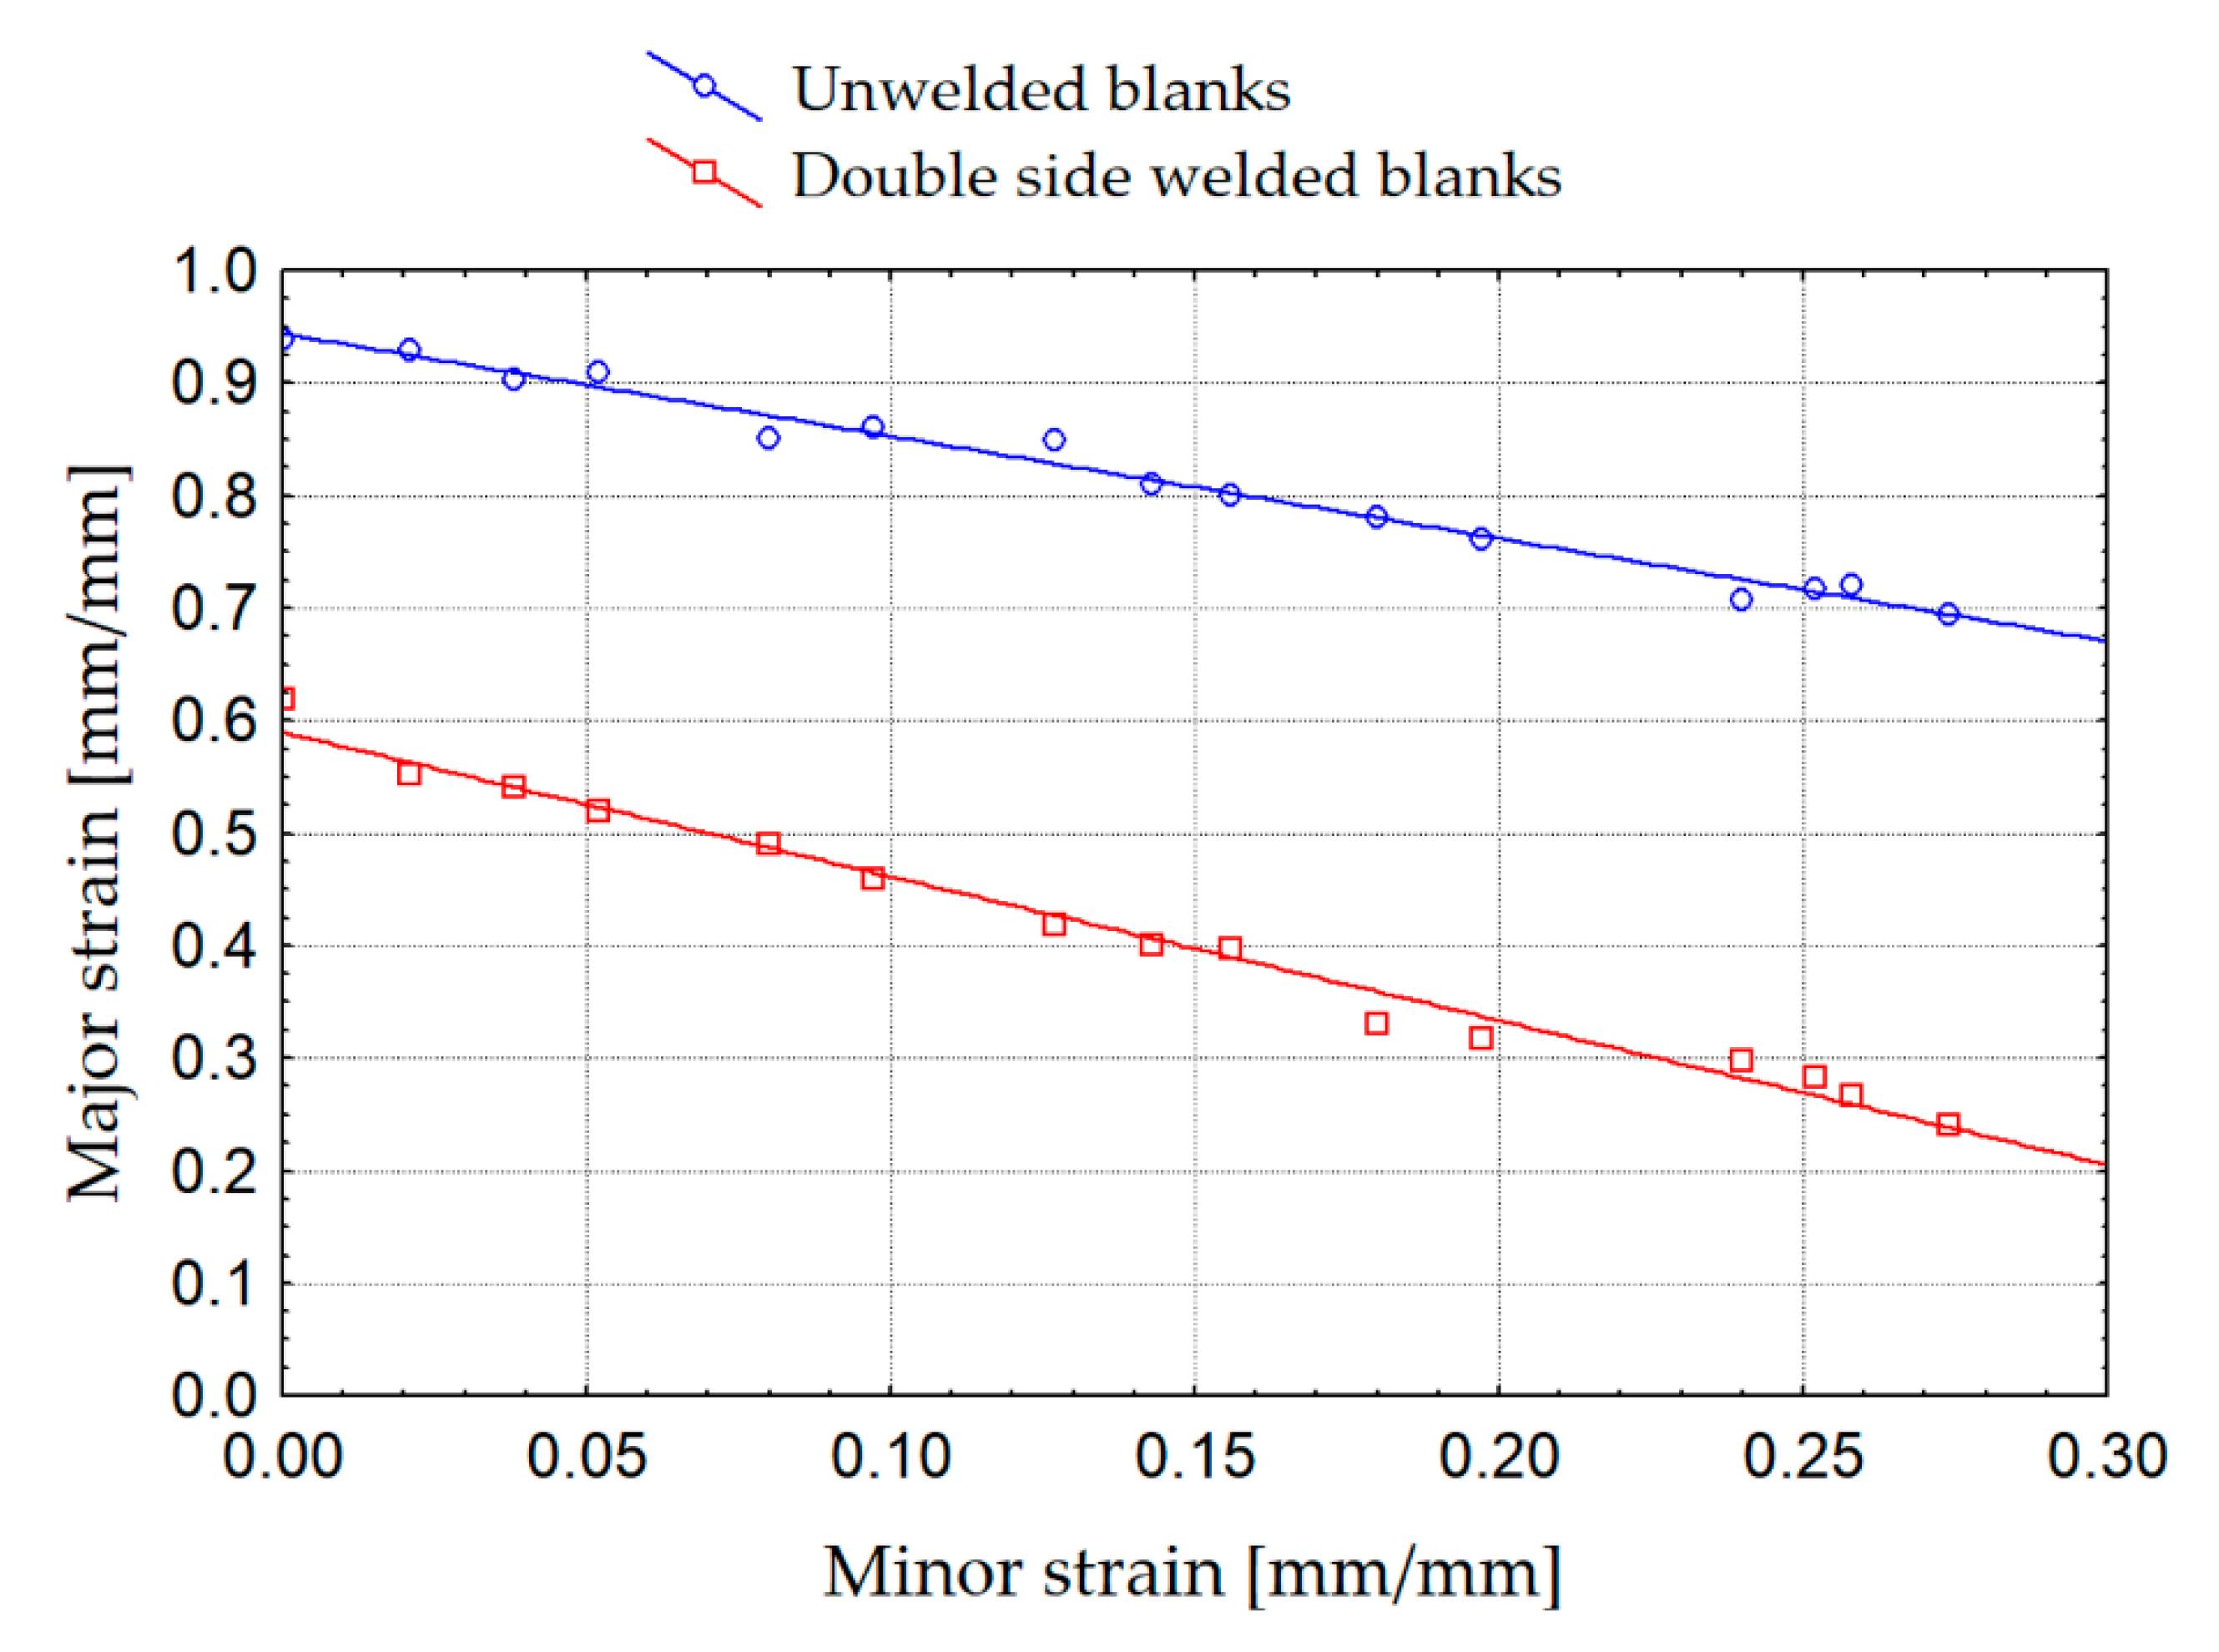
Taking into account the results obtained for the truncated cone-shaped parts and the truncated pyramid-shaped parts produced at 60 degrees for double side TWBs (where fractures appeared in the thermo-mechanical affected zone), parts at 65 degrees were also produced for unwelded blanks until the break occurred. Corroborated by the results obtained in the previously presented uniaxial stretching test, the flow limit curves (FLC) for these materials were plotted. It is known that due to the localization (local action) of the plastic strain and the nature of the SPIF process, the formability of materials processed by SPIF is higher than that in the case of other sheet metal forming processes, such as deep-drawing. The FLC curve, plotted in major strain—minor strain coordinates, is graphically represented by a line with negative slope. The vast majority of the pairs of points (major strain—minor strain) on the FLC are located near the major strain, validating the idea of there being a plane strain state. However, a decrease of formability is observed in the TWB sheet, due to the appearance of the maximum values of the major strain and thickness reduction in the immediate proximity of the welding bead.
When analysing the graph in Figure 14, it can be seen that the FLC for the double side TWBs produced by MAG is positioned lower on the ε12 diagram, which indicates an approximate 30% reduction of the formability compared to the unwelded blanks.
In addition, the line that defines the FLC for TWBs has a higher slope (in module) than that of the unwelded blanks. The decrease of formability in SPIF of TWBs compared to unwelded blanks was also observed by Rubino et al. for TIG welded sheets processed by SPIF [42]. They observed a remarkably lower formability of TWBs produced by TIG than that of unwelded blanks or FSTW blanks.
4. Conclusions

Following the experimental research carried out for the SPIF of one side, double side MAG welded and unwelded blanks, the following conclusions can be drawn:
  • in the case of parts produced by SPIF, obtained from one side welded blanks, fractures occur even at low heights of parts and moderate wall angle (55 degrees). This behaviour of one side welded blanks is also confirmed by the uniaxial tensile test, with the reduction of the maximum value of the tensile strain at break εbreak = 0.1 mm/mm;
  • the parts formed by SPIF, obtained from double side welded blanks, did not show fractures at the same wall angle (55 degrees), even if the maximum value of the tensile strain at break was also reduced (εbreak = 0.13 mm/mm), compared to εbreak = 0.39 mm/mm for the base material. This confirms that the SPIF process increases the formability of the material even in the case of welded blanks using MAG;
  • in the heat-affected zone there are increased positive values of the minor strain on the left and on the right side of the welding bead and negative values in the welding bead, which leads to the possibility of fractures occurring in that area;
  • the springback value is always higher for welded blanks produced by SPIF, the springback being 3.5 times higher in the case of the truncated cone-shaped parts but knowing its value can compensate the trajectory in such a way as to obtain parts as accurate as possible;
  • the values obtained for major strain, minor strain, thickness reduction and maximum height following the uniaxial tool path test show that there is an average of 20% decrease in formability in the case of MAG welded blanks produced by SPIF, compared to unwelded blanks, even if the tensile strain at break decreases by about 3 times.
As direction for future research, a comparative study on the behaviour of other welding technologies, such as friction stir welding or laser welding in the manufacturing of parts by SPIF is proposed. Testing these technologies for different materials and different thicknesses is also suggested.

Supplementary Materials

The following are available online at https://www.mdpi.com/2075-4701/11/2/198/s1, Video S1: Major strain variation unwelded truncated cone shaped parts, Video S2: Major strain variation MAG welded truncated cone shaped parts, Video S3: Minor strain variation unwelded truncated cone shaped parts, Video S4: Minor strain variation MAG welded truncated cone shaped parts, Video S5: Thickness reduction variation unwelded truncated cone shaped parts, Video S6: Thickness reduction variation MAG welded truncated cone shaped parts, Video S7: Major strain variation unwelded truncated pyramid shaped parts, Video S8: Major strain variation MAG welded truncated pyramid shaped parts, Video S9: Minor strain variation unwelded truncated pyramid shaped parts, Video S10: Minor strain variation MAG welded truncated pyramid shaped parts, Video S11: Thickness reduction variation unwelded truncated pyramid shaped parts, Video S12: Thickness reduction variation MAG welded truncated pyramid shaped parts.

Author Contributions

Conceptualization, V.O., D.D. and G.P.R.; data curation, V.O., G.P.R., M.O.P. and E.A.; formal analysis, V.O., D.D. and E.A.; investigation, V.O., S.-G.R., G.P.R., M.O.P. and E.A.; methodology, V.O., D.D. and M.O.P.; project administration, V.O., D.D. and S.-G.R.; resources, V.O., D.D., S.-G.R., G.P.R., M.O.P. and E.A.; software, V.O., S.-G.R., G.P.R. and M.O.P.; supervision, V.O., D.D. and S.-G.R.; validation, V.O., S.-G.R., G.P.R., M.O.P. and E.A.; visualization, V.O., G.P.R., M.O.P. and E.A.; writing—original draft, V.O., D.D. and S.-G.R.; writing—review & editing, V.O., D.D. and S.-G.R. All authors have read and agreed to the published version of the manuscript.

Funding

This research was funded by Lucian Blaga University of Sibiu & Hasso Plattner Foundation grant number LBUS-IRG-2020-06.

Institutional Review Board Statement

Not applicable.

Informed Consent Statement

Not applicable.

Data Availability Statement

The data presented in this study are openly available in [repository name e.g., FigShare] at [doi], reference number [reference number].

Acknowledgments

Project financed by Lucian Blaga University of Sibiu & Hasso Plattner Foundation research grants LBUS-IRG-2020-06.

Conflicts of Interest

The authors declare no conflict of interest.

References

  1. Haghshenas, M.; Gerlich, A.P. Joining of automotive sheet materials by friction-based welding methods: A review. Eng. Sci. Technol. Int. J. Jestech 2018, 21, 130–148. [Google Scholar] [CrossRef]
  2. Merklein, M.; Johannes, M.; Lechner, M.; Kuppert, A. A review on tailored blanks-Production, applications and evaluation. J. Mater. Process. Technol. 2014, 214, 151–164. [Google Scholar] [CrossRef]
  3. Karpagaraj, A.; Kumar, N.R.; Thiyaneshwaran, N.; Shanmugam, N.S.; Habibi, M.; Hashemi, R.; Tafti, M.F.; Assempour, A. Experimental investigation of mechanical properties, formability and forming limit diagrams for tailor-welded blanks produced by friction stir welding. J. Manuf. Process. 2018, 31, 310–323. [Google Scholar]
  4. Cheepu, M.; Sarala, R. Experimental and numerical studies on gas tungsten arc welding of Ti-6Al-4V tailor-welded blank. J. Braz. Soc. Mech. Sci. Eng. 2020, 42, 1–11. [Google Scholar]
  5. Bagheri, B.; Abbasi, M.; Hamzeloo, R. Comparison of different welding methods on mechanical properties and formability behaviors of tailor welded blanks (TWB) made from AA6061 alloys. Proc. Inst. Mech. Eng. Part C J. Mech. Eng. Sci. 2020. [Google Scholar] [CrossRef]
  6. Evin, E.; Tomas, M. The Influence of Laser Welding on the Mechanical Properties of Dual Phase and Trip Steels. Metals 2017, 7, 239. [Google Scholar] [CrossRef] [Green Version]
  7. Hur, Y.C.; Kim, D.; Kim, B.M.; Kang, C.Y.; Lee, M.G.; Kim, J.H. Measurement of Weld Zone Properties of Laser-Welded Tailor-Welded Blanks and Its Application to Deep Drawing. Int. J. Automot. Technol. 2020, 21, 615–622. [Google Scholar] [CrossRef]
  8. Bandyopadhyay, K.; Panda, S.K.; Saha, P.; Padrnanabham, G. Limiting drawing ratio and deep drawing behavior of dual phase steel tailor welded blanks: FE simulation and experimental validation. J. Mater. Process. Technol. 2015, 217, 48–64. [Google Scholar] [CrossRef]
  9. Mennecart, T.; ul Hassan, H.; Guner, A.; Ben Khalifa, N.; Hosseini, M. Deep Drawing of High-Strength Tailored Blanks by Using Tailored Tools. Materials 2016, 9, 77. [Google Scholar] [CrossRef] [Green Version]
  10. Safdarian, R. Forming Limit Diagram Prediction of AISI 304-St 12 Tailor Welded Blanks Using GTN Damage Model. J. Test. Eval. 2020, 48, 4473–4487. [Google Scholar] [CrossRef]
  11. Behera, A.K.; de Sousa, R.A.; Ingarao, G.; Oleksik, V. Single point incremental forming: An assessment of the progress and technology trends from 2005 to 2015. J. Manuf. Process. 2017, 27, 37–62. [Google Scholar] [CrossRef] [Green Version]
  12. Duflou, J.R.; Habraken, A.M.; Cao, J.; Malhotra, R.; Bambach, M.; Adams, D.; Vanhove, H.; Mohammadi, A.; Jeswiet, J. Single point incremental forming: State-of-the-art and prospects. Int. J. Mater. Form. 2018, 11, 743–773. [Google Scholar] [CrossRef]
  13. Gatea, S.; Ou, H.G.; McCartney, G. Review on the influence of process parameters in incremental sheet forming. Int. J. Adv. Manuf. Technol. 2016, 87, 479–499. [Google Scholar] [CrossRef] [Green Version]
  14. Ou, L.; An, Z.G.; Gao, Z.Y.; Zhou, S.Q.; Men, Z.X. Effects of Process Parameters on the Thickness Uniformity in Two-Point Incremental Forming (TPIF) with a Positive Die for an Irregular Stepped Part. Materials 2020, 13, 2634. [Google Scholar] [CrossRef] [PubMed]
  15. Shi, X.F.; Gao, L.; Khalatbari, H.; Xu, Y.; Wang, H.; Jin, L.L. Electric hot incremental forming of low carbon steel sheet: Accuracy improvement. Int. J. Adv. Manuf. Technol. 2013, 68, 241–247. [Google Scholar] [CrossRef]
  16. Hino, R.; Kawabata, K.; Yoshida, F. Incremental forming with local heating by laser irradiation for magnesium alloy sheet. Procedia Eng. 2014, 81, 2330–2335. [Google Scholar] [CrossRef] [Green Version]
  17. Racz, S.G.; Breaz, R.E.; Tera, M.; Girjob, C.; Biris, C.; Chicea, A.L.; Bologa, O. Incremental Forming of Titanium Ti6Al4V Alloy for Cranioplasty Plates-Decision-Making Process and Technological Approaches. Metals 2018, 8, 626. [Google Scholar] [CrossRef] [Green Version]
  18. Araujo, R.; Teixeira, P.; Montanari, L.; Reis, A.; Silva, M.B.; Martins, P.A.F. Single point incremental forming of a facial implant. Prosthet. Orthot. Int. 2014, 38, 369–378. [Google Scholar] [CrossRef]
  19. Vanhove, H.; Carette, Y.; Vancleef, S.; Duflou, J.R. Production of thin shell clavicle implants through Single Point Incremental Forming. Procedia Eng. 2017, 183, 174–179. [Google Scholar] [CrossRef]
  20. Cheng, Z.N.; Li, Y.L.; Xu, C.X.; Liu, Y.Y.; Ghafoor, S.; Li, F.Y. Incremental sheet forming towards biomedical implants: A review. J. Mater. Res. Technol. 2020, 9, 7225–7251. [Google Scholar] [CrossRef]
  21. Sabater, M.; Garcia-Romeu, M.L.; Vives-Mestres, M.; Ferrer, I.; Bagudanch, I. Process Parameter Effects on Biocompatible Thermoplastic Sheets Produced by Incremental Forming. Materials 2018, 11, 1377. [Google Scholar] [CrossRef] [PubMed] [Green Version]
  22. Baharudin, B.; Azpen, Q.M.; Sulaima, S.; Mustapha, F. Experimental Investigation of Forming Forces in Frictional Stir Incremental Forming of Aluminum Alloy AA6061-T6. Metals 2017, 7, 484. [Google Scholar] [CrossRef] [Green Version]
  23. Al-Ghamdi, K.A.; Hussain, G. On the comparison of formability of roll-bonded steel-Cu composite sheet metal in incremental forming and stamping processes. Int. J. Adv. Manuf. Technol. 2016, 87, 267–278. [Google Scholar] [CrossRef]
  24. Bagudanch, I.; Vives-Mestres, M.; Sabater, M.; Garcia-Romeu, M.L. Polymer incremental sheet forming process: Temperature analysis using response surface methodology. Mater. Manuf. Process. 2017, 32, 44–53. [Google Scholar] [CrossRef] [Green Version]
  25. Medina-Sanchez, G.; Garcia-Collado, A.; Carou, D.; Dorado-Vicente, R. Force Prediction for Incremental Forming of Polymer Sheets. Materials 2018, 11, 1597. [Google Scholar] [CrossRef] [Green Version]
  26. Lozano-Sanchez, L.M.; Sustaita, A.O.; Soto, M.; Biradar, S.; Ge, L.; Segura-Cardenas, E.; Diabb, J.; Elizalde, L.E.; Barrera, E.V.; Elias-Zuniga, A. Mechanical and structural studies on single point incremental forming of polypropylene-MWCNTs composite sheets. J. Mater. Process. Technol. 2017, 242, 218–227. [Google Scholar] [CrossRef]
  27. Tera, M.; Breaz, R.E.; Racz, S.G.; Girjob, C.E. Processing strategies for single point incremental forming—A CAM approach. Int. J. Adv. Manuf. Technol. 2019, 102, 1761–1777. [Google Scholar] [CrossRef]
  28. Maass, F.; Hahn, M.; Tekkaya, A.E. Interaction of Process Parameters, Forming Mechanisms, and Residual Stresses in Single Point Incremental Forming. Metals 2020, 10, 656. [Google Scholar] [CrossRef]
  29. Ai, S.; Long, H. A review on material fracture mechanism in incremental sheet forming. Int. J. Adv. Manuf. Technol. 2019, 104, 33–61. [Google Scholar] [CrossRef] [Green Version]
  30. Mirnia, M.J.; Dariani, B.M.; Vanhove, H.; Duflou, J.R. Thickness improvement in single point incremental forming deduced by sequential limit analysis. Int. J. Adv. Manuf. Technol. 2014, 70, 2029–2041. [Google Scholar] [CrossRef]
  31. Slota, J.; Krasowski, B.; Kubit, A.; Trzepiecinski, T.; Bochnowski, W.; Dudek, K.; Neslusan, M. Residual Stresses and Surface Roughness Analysis of Truncated Cones of Steel Sheet Made by Single Point Incremental Forming. Metals 2020, 10, 237. [Google Scholar] [CrossRef] [Green Version]
  32. Kumar, A.; Gulati, V.; Kumar, P.; Singh, H. Forming force in incremental sheet forming: A comparative analysis of the state of the art. J. Braz. Soc. Mech. Sci. Eng. 2019, 41, 251. [Google Scholar] [CrossRef]
  33. Bai, L.; Li, Y.; Yang, M.S.; Lin, Y.B.; Yuan, Q.L.; Zhao, R.F. Modeling and Analysis of Single Point Incremental Forming Force with Static Pressure Support and Ultrasonic Vibration. Materials 2019, 12, 1899. [Google Scholar] [CrossRef] [PubMed] [Green Version]
  34. Silva, M.B.; Skjoedt, M.; Vilaça, P.; Bay, N.; Martins, P.A.F. Single point incremental forming of tailored blanks produced by friction stir welding. J. Mater. Process. Technol. 2009, 209, 811–820. [Google Scholar] [CrossRef]
  35. Ambrogio, G.; Fratini, L.; Micari, F. Incremental forming of friction stir welded taylored sheets. In Proceedings of ESDA2006 8th Biennial ASME Conference on Engineering Systems Design and Analysis, Volume 4: Fatigue and Fracture, Heat Transfer, Internal Combustion Engines, Manufacturing, and Technology and Society; American Society of Mechanical Engineers: New York, NY, USA, 2006; pp. 757–762. [Google Scholar]
  36. Thuillier, S.; Andrade-Campos, A.; Carlone, P.; Valente, R.; De Sousa, R.J.A. Integrated design in welding and incremental forming: Mechanical behavior of friction stir welded blanks. AIP Conf. Proceedings 2019, 2113, 060010. [Google Scholar]
  37. Andrade-Campos, A.; Thuillier, S.; Martins, J.; Carlone, P.; Tucci, F.; Valente, R.; Paulo, R.M.F.; Alves de Sousa, R.J. Integrated design in welding and incremental forming: Material model calibration for friction stir welded blanks. Procedia Manuf. 2020, 47, 429–434. [Google Scholar] [CrossRef]
  38. Sisodia, V.; Kumar, S. Influence of process parameters on surface roughness in single point incremental forming using dummy sheet. IOP Conf. Ser. Mater. Sci. Eng. 2018, 361, 012003. [Google Scholar] [CrossRef]
  39. Alinaghian, I.; Ranjbar, H.; Beheshtizad, M.A. Forming Limit Investigation of AA6061 Friction Stir Welded Blank in a Single Point Incremental Forming Process: RSM Approach. Trans. Indian Inst. Met. 2017, 70, 2303–2318. [Google Scholar] [CrossRef]
  40. Ebrahimzadeh, P.; Baseri, H.; Mirnia, M.J. Formability of aluminum 5083 friction stir welded blank in two-point incremental forming process. Proc. Inst. Mech. Eng. Part E J. Process Mech. Eng. 2018, 232, 267–280. [Google Scholar] [CrossRef]
  41. Marathe, S.P.; Raval, H.K. Numerical investigation on forming behavior of friction stir tailor welded blanks (FSTWBs) during single-point incremental forming (SPIF) process. J. Braz. Soc. Mech. Sci. Eng. 2019, 41, 424. [Google Scholar] [CrossRef]
  42. Rubino, F.; Esperto, V.; Paulo, R.M.F.; Tucci, F.; Carlone, P. Integrated manufacturing of AA6082 by friction stir welding and incremental forming: Strain analysis of deformed samples. Procedia Manuf. 2020, 47, 440–444. [Google Scholar] [CrossRef]
  43. Rattanachan, K.; Sirivedin, K.; Chungchoo, C. Formability of tailored welded blanks in single point incremental forming process. Adv. Mater. Res. 2014, 979, 339–342. [Google Scholar] [CrossRef]
  44. Maji, K.; Kumar, S.; Kumar, G. Experimental study on the effects of incremental forming and friction stir welding on formability of AA5083 sheet. IOP Conf. Ser. J. Phys. Conf. Ser. 2019, 1240, 012090. [Google Scholar] [CrossRef]
  45. Tayebi, P.; Fazli, A.; Asadi, P.; Soltanpour, M. Formability analysis of dissimilar friction stir welded AA 6061 and AA 5083 blanks by SPIF process. Cirp J. Manuf. Sci. Technol. 2019, 25, 50–68. [Google Scholar] [CrossRef]
  46. Neto, D.M.; Martins, J.M.P.; Oliveira, M.C.; Menezes, L.F.; Alves, J.L. Evaluation of strain and stress states in the single point incremental forming process. Int. J. Adv. Manuf. Technol. 2016, 85, 521–534. [Google Scholar] [CrossRef] [Green Version]
Figure 1. The welding of the specimens: (a)—welding bead on one side; (b)—welding bead on both sides. (1, 2, 3, 4, 5—the sequence of the deposition of welding beads).
Metals 11 00198 g001
Figure 2. The TWBs after the MAG welding process (a) one side welded blank (b) double side welded blank.
Metals 11 00198 g002aMetals 11 00198 g002b
Figure 3. The specimens for the uniaxial tensile test. (a)—one side welded specimens; (b)—double side welded specimens.
Metals 11 00198 g003
Figure 4. Experimental layout used for single point incremental forming of tailored welded blanks.
Metals 11 00198 g004
Figure 5. The engineering stress-strain curves for: unwelded specimens collected on rolling direction (a), unwelded specimens collected on transversal direction (b), one side welded specimens (c) and double side welded specimens (d).
Metals 11 00198 g005aMetals 11 00198 g005b
Figure 6. The cracks that appears for one side welded blanks for truncated cone-shaped parts (a) and for truncated pyramid-shaped parts (b).
Metals 11 00198 g006
Figure 7. The major strain variation for unwelded blanks (a) and double side welded blanks (b), the minor strain variation for unwelded blanks (c) and double side welded blanks (d) and the thickness reduction variation for unwelded blanks (e) and double side welded blanks (f) for truncated cone-shaped parts.
Metals 11 00198 g007
Figure 8. The major strain variation for unwelded blanks (a) and double side welded blanks (b), the minor strain variation for unwelded blanks (c) and double side welded blanks (d) and the thickness reduction variation for unwelded blanks (e) and double side welded blanks (f) for truncated pyramid-shaped parts.
Metals 11 00198 g008
Figure 9. The Fx force variation for unwelded blanks (a) and double side welded blanks (b), the Fy force variation for unwelded blanks (c) and double side welded blanks (d) and Fz force variation for unwelded blanks (e) and double side welded blanks (f) for truncated cone-shaped parts.
Metals 11 00198 g009
Figure 10. The Fx force variation for unwelded blanks (a) and double side welded blanks (b), the Fy force variation for unwelded blanks (c) and double side welded blanks (d) and Fz force variation for unwelded blanks (e) and double side welded blanks (f) for truncated pyramid-shaped parts.
Metals 11 00198 g010
Figure 11. The springback variation for unwelded blanks (a) and double side welded blanks (b) for truncated cone-shaped parts.
Metals 11 00198 g011
Figure 12. The specimens immediately after the crack occurred for unwelded blanks (a) and double side welded blanks (b) for uniaxial tool path test.
Metals 11 00198 g012
Figure 13. The major strain variation for unwelded blanks (a) and double side welded blanks (b), the minor strain variation for unwelded blanks (c) and double side welded blanks (d) and the thickness reduction variation for unwelded blanks (e) and double side welded blanks (f) for uniaxial tool path test.
Metals 11 00198 g013
Figure 14. Flow limit curves for unwelded blanks and double side welded blanks processed by SPIF.
Metals 11 00198 g014
Table 1. Nominal chemical composition for S355 steel.
CSiMnAlNiCrCuTiOCe
0.130.181.50.020.020.030.050.39
Table 2. Chemical composition for the wire electrode.
Wire Electrode (G3Si 1-DIN EN 440)CMnSiSP
0.0771.410.860.0120.014
Table 3. Results of uniaxial tensile test for unwelded specimens collected on rolling direction.
Specimen NumberE modulus (MPa)Tensile Stress at Yield (MPa)Strain Hardening ExponentMaximum Tensile Stress (MPa)Tensile Strain at max. Tensile Stress (mm/mm)Tensile Strain at Break (mm/mm)
1.65,609.5269.990.2100345.880.28650.3992
2.62,806.6267.370.2172348.860.26730.3805
3.66,950.9278.680.2134367.110.27580.3878
4.63,522.5275.820.2203352.310.26400.3930
5.65,002.6280.350.2197352.900.27500.3945
6.66,375.5277.160.2282355.510.28180.3920
7.64,231.4286.150.2292361.090.27980.3880
Mean64,928.4276.50.2197354.810.27570.3907
St. dev1506.66.320.00717.260.00790.0060
p-value0.9440.8210.6440.7200.8080.760
Table 4. Results of uniaxial tensile test for unwelded specimens collected on transversal direction.
Specimen NumberE Modulus (MPa)Tensile Stress at Yield (MPa)Strain Hardening ExponentMaximum Tensile Stress (MPa)Tensile Strain at Max. Tensile Stress (mm/mm)Tensile Strain at Break (mm/mm)
1.56,549.8262.980.2337351.460.27020.3850
2.58,516.5262.000.2229346.380.27300.3970
3.63,761.4263.920.2173355.200.26750.3815
4.59,076.9266.370.2348357.880.28030.4003
5.60,018.5263.090.2203350.910.27980.4141
6.62,793.0264.690.2131356.530.27430.3962
7.61,205.8263.760.2267350.790.28450.4052
Mean60,274.6263.830.2241352.740.27570.3970
St. dev2511.11.400.00814.000.00610.0112
p-value0.9420.6310.7870.5220.7880.806
Table 5. Results of uniaxial tensile test for one side welded specimens.
Specimen NumberE Modulus (MPa)Tensile Stress at Yield (MPa)Strain Hardening ExponentMaximum Tensile Stress (MPa)Tensile Strain at Max. Tensile Stress (mm/mm)Tensile Strain at Break (mm/mm)
1.50,534.2250.580.1114300.970.06730.0897
2.46,151.1256.970.1238308.900.08270.1110
3.49,051.6250.600.1250314.650.08470.1140
4.50,768.6253.770.1214308.160.07130.0987
5.44,016.4247.450.1075305.270.07400.0830
6.52,051.8252.380.1196309.260.07970.0957
7.54,526.5251.970.1165314.640.08770.1077
Mean49,585.7251.960.1179308.840.07820.1000
St. dev3556.52.960.00654.880.00750.0115
p-value0.8060.7170.6030.5130.7930.799
Table 6. Results of uniaxial tensile test for double side welded specimens.
Specimen NumberE Modulus (MPa)Tensile Stress at Yield (MPa)Strain Hardening ExponentMaximum Tensile Stress (MPa)Tensile Strain at max. Tensile Stress (mm/mm)Tensile Strain at Break (mm/mm)
1.49,083.8286.450.1638335.580.11770.1490
2.49,117.4280.750.1731330.680.10970.1533
3.44,808.2276.680.1677326.130.10300.1210
4.50,966.1280.690.1751333.340.10630.1270
5.52,654.8276.640.1672327.980.10600.1357
6.46,190.6272.360.1714324.080.09930.1247
7.47,060.5279.160.1703331.890.09670.1276
Mean48,554.5278.960.1698329.950.10550.1340
St. dev27414.410.00394.090.00690.0126
p-value0.8920.6300.9310.9300.8030.175
Table 7. Results for unwelded blanks processed by SPIF in truncated cone shape.
Test NumberMajor Strain (mm/mm)Minor Strain (mm/mm)Thickness Reduction (mm/mm)Fz Force (kN)Fx Force (kN)Fy Force (kN)Maximum Springback (mm/mm)
1.0.5670.0430.5541.3470.9770.9570.404
2.0.5560.0390.5521.2540.9110.8980.328
3.0.5740.0450.5571.1710.8040.8340.598
Mean0.5660.0420.5541.2570.8970.8960.443
St. dev0.0090.0040.0020.0880.0870.0610.139
p value0.5520.3990.5650.6250.5430.6280.391
Table 8. Results for double side welded blanks processed by SPIF truncated cone shape.
Test NumberMajor Strain (mm/mm)Minor Strain (mm/mm)Thickness Reduction (mm/mm)Fz Force (kN)Fx Force (kN)Fy Force (kN)Maximum Springback (mm/mm)
1.0.5750.0950.6161.8241.0760.8481.54
2.0.5610.0910.5991.8470.9870.8931.74
3.0.6130.1130.6451.8701.2770.9981.41
Mean0.5830.0990.6201.8471.1130.9131.563
St. dev0.0270.0110.0230.0230.1490.0770.166
p value0.3690.2220.5300.6310.4380.4260.558
Table 9. Results for unwelded blanks processed by SPIF in truncated pyramid shape
Test NumberMajor Strain (mm/mm)Minor Strain (mm/mm)Thickness Reduction (mm/mm)Fz Force (kN)Fx Force (kN)Fy Force (kN)Maximum Springback (mm/mm)
1.0.5410.1410.5511.3890.6410.6320.958
2.0.5520.1390.5421.4110.6540.6420.926
3.0.5580.1430.5581.3700.6120.6181.023
Mean0.5500.1410.5501.3900.6360.6310.969
St. dev0.0090.0020.0080.0210.0210.0120.049
p value0.5120.6310.6040.6210.4430.5840.481
Table 10. Results for double side welded blanks processed by SPIF in truncated pyramid shape
Test NumberMajor Strain (mm/mm)Minor Strain (mm/mm)Thickness Reduction (mm/mm)Fz Force (kN)Fx Force (kN)Fy Force (kN)Maximum Springback (mm/mm)
1.0.5750.1290.6082.5661.6050.7541.978
2.0.5770.1230.5972.4121.3820.7122.421
3.0.5790.1300.6152.2011.1710.6812.321
Mean0.5770.1270.6072.3931.3860.7162.240
St. dev0.0020.0040.0090.1830.2170.0370.232
p value0.6310.1690.5520.5890.6290.5920.291
Table 11. Results of the uniaxial tool path test for unwelded sheets.
Test NumberMajor Strain (mm/mm)Minor Strain (mm/mm)Thickness Reduction (mm/mm)Maximum Height (mm)
1.0.6980.1760.83514.29
2.0.7120.1790.85114.88
3.0.6960.1720.83013.94
Mean0.7020.1760.83914.37
St. dev0.0090.0030.0110.475
p value0.1420.6300.3230.533
Table 12. Results of the uniaxial tool path test for double side welded sheets.
Test NumberMajor Strain (mm/mm)Minor Strain (mm/mm)Thickness Reduction (mm/mm)Maximum Height (mm)
1.0.52300.14460.554412.36
2.0.51760.14130.549811.99
3.0.52980.15470.572112.54
Mean0.52350.14690.558812.30
St. dev0.00610.00700.00120.280
p value0.6080.3270.2590.476
Publisher’s Note: MDPI stays neutral with regard to jurisdictional claims in published maps and institutional affiliations.