Article

Bionic Repair of Thermal Fatigue Cracks in Ductile Iron by Laser Melting with Different Laser Parameters

1
Key Laboratory of Automobile Materials, Jilin University, Ministry of Education, Changchun 130025, China
2
College of Material Science and Engineering, Jilin University, Changchun 130025, China
3
School of Mechanical Science and Aerospace Engineering, Jilin University, Changchun 130025, China
*
Author to whom correspondence should be addressed.
Metals 2020, 10(1), 101; https://doi.org/10.3390/met10010101
Submission received: 12 December 2019 / Revised: 2 January 2020 / Accepted: 3 January 2020 / Published: 9 January 2020
(This article belongs to the Special Issue Advances in Laser Materials Processing)

Abstract

:
Nodular iron brake discs typically fail due to serious thermal fatigue cracking, and the presence of graphite complicates the repair of crack defects in ductile iron. This study presents a novel method for remanufacturing ductile iron brake discs based on coupled bionics to repair thermal fatigue cracks discontinuously using bio-inspired crack blocking units fabricated by laser remelting at various laser energy inputs. Then, the ultimate tensile force and thermal fatigue crack resistance of the obtained units were tested. The microhardness, microstructure, and phases of the units were characterized using a digital microhardness meter, optical microscopy, scanning electron microscopy, and X-ray diffraction. It was found that the units without defects positively impacted both the thermal fatigue resistance and tensile strength. The unit fabricated at a laser energy of 165.6 15 + 19 J/ mm 2 had sufficient depth to fully close the crack, and exhibited superior anti-cracking and tensile properties. When the unit distance is 3 mm, the sample has excellent thermal fatigue resistance. In addition, the anti-crack mechanism of the units was analysed.

1. Introduction

Ductile iron with good wear resistance, heat conductivity, and castability has become a popular cast metal material that is widely used to manufacture train brake discs [1]. Brake discs are important components of trains, and they mainly fail due to thermal fatigue cracks [2,3,4]. Analyzing the condition of railway train brake discs suggests that their surfaces experienced significant pressures and friction, and they often operate in hot/cold alternating environments due to frequent braking which generates large thermal stresses [5]. When the stress exceeds the limit of the material strength, thermal fatigue cracks appear and expand on the disc surface, leading to the failure and discarding of brake discs and huge wastes of resources [6]. Therefore, it is of great significance to take effective technical measures to repair the discarded brake discs.
Many efforts have been made to identify the causes of thermal fatigue damage to nodular iron brake discs and repair thermal fatigue cracks on brake disc surfaces. Goo et al. [7] found that the graphite in ductile iron was the source of thermal fatigue cracks and improved the thermal fatigue resistance by regulating its composition and metallurgical structures. Traditionally, during brake disc repair, cracks are first melted with metals using welding equipment and then refilled with liquid metals through spontaneous flow, which completely welds the cracks together. For example, according to the research of Yang et al. [8], after a brake disc was preheated to 300 °C, thermal cracks could be repaired by surfacing welding. Li et al. [9] repaired thermal fatigue cracks with CO2 gas shielded welding, and immediately after welding, the workpiece was heated to about 630 °C and held for 4–6 h to eliminate welding stresses.
Such traditional repair processes are tedious, require complex procedures, long repair cycles, and thermal stresses are generated after repair, which decreased the weld strength. In addition, the use of laser cladding technology was shown to repair thermal fatigue cracks by adding powder with the same chemical composition and content as the substrate in a layer-by-layer manner [10]. Gao et al. [11] exploited the electromagnetic heating effect to repair hot fatigue cracks inside a hot extrusion die of 3Cr2W8V steel using pulse discharge. However, using this method to repair thermal fatigue cracks on ductile iron brake discs is expensive, which limits its application.
Bionics is a new interdisciplinary field that uses biological mechanisms and laws to solve human needs that has rapidly developed since the 20th century [12,13]. Bionics has had a profound impact on materials science over the past two decades, as the unique structure, composition, and corresponding superior properties of biology provide inspiration for researchers to improve the properties of materials or the reliability of structural components [14,15]. For example, the leaves of plants can resist fatigue cracking caused by storms, which is closely related to the phenomenon of biological coupling. The veins of leaves are composed of vascular bundles and mechanical tissues with strong textures, while the mesophyll is composed of parenchyma cells with soft textures [16]. The force required to sustain the propagation of cracks on the mesophyll is not sufficient to tear the veins, and when a crack encounters a hard vein, the cracking behavior is terminated or the propagation is deflected at an angle (Figure 1a). Coincidentally, the same phenomenon is observed dragonfly wings, whose membranes are covered with crisscross veins that are composed of multi-layer compound mechanisms and are the main force bearing units (Figure 1b) [17]. It has been found that cracks do not propagate along a straight line, but frequently deflect. It shows that the crack growth on the dragonfly wings is greatly hindered.
The design of coupled bionic functional materials based on leaves and wings of dragonfly can be used to improve the crack growth resistance of nodular cast iron, which provides a novel idea to repair thermal fatigue cracks. Material surfaces can be laser-treated to produce a region with a different microstructure than the substrate at a predetermined position to form a non-smooth surface in which the softer and harder points are alternately distributed. The surface also has special functions similar to biological surfaces [18]. Laser bionics has been recommended for processing points, strips, and nets on material surfaces to prepare non-smooth surfaces with improved thermal fatigue resistance and tensile properties [19]. According to Zhou et al. [20,21], lasers with different parameters have different effects on improving the thermal fatigue properties of materials.
All the aforementioned studies were aimed at improving the thermal fatigue resistance of materials, however, how to repair the thermal fatigue cracks of nodular iron brake discs is not mentioned. In this study, inspired by bionics, a new method was proposed to repair thermal fatigue cracks in brake discs using discontinuous laser melting treatment on cracks, which the service life of brake disc is prolonged and the efficiency of brake disc repair is improved.

2. Method and Materials

2.1. Experiment Materials

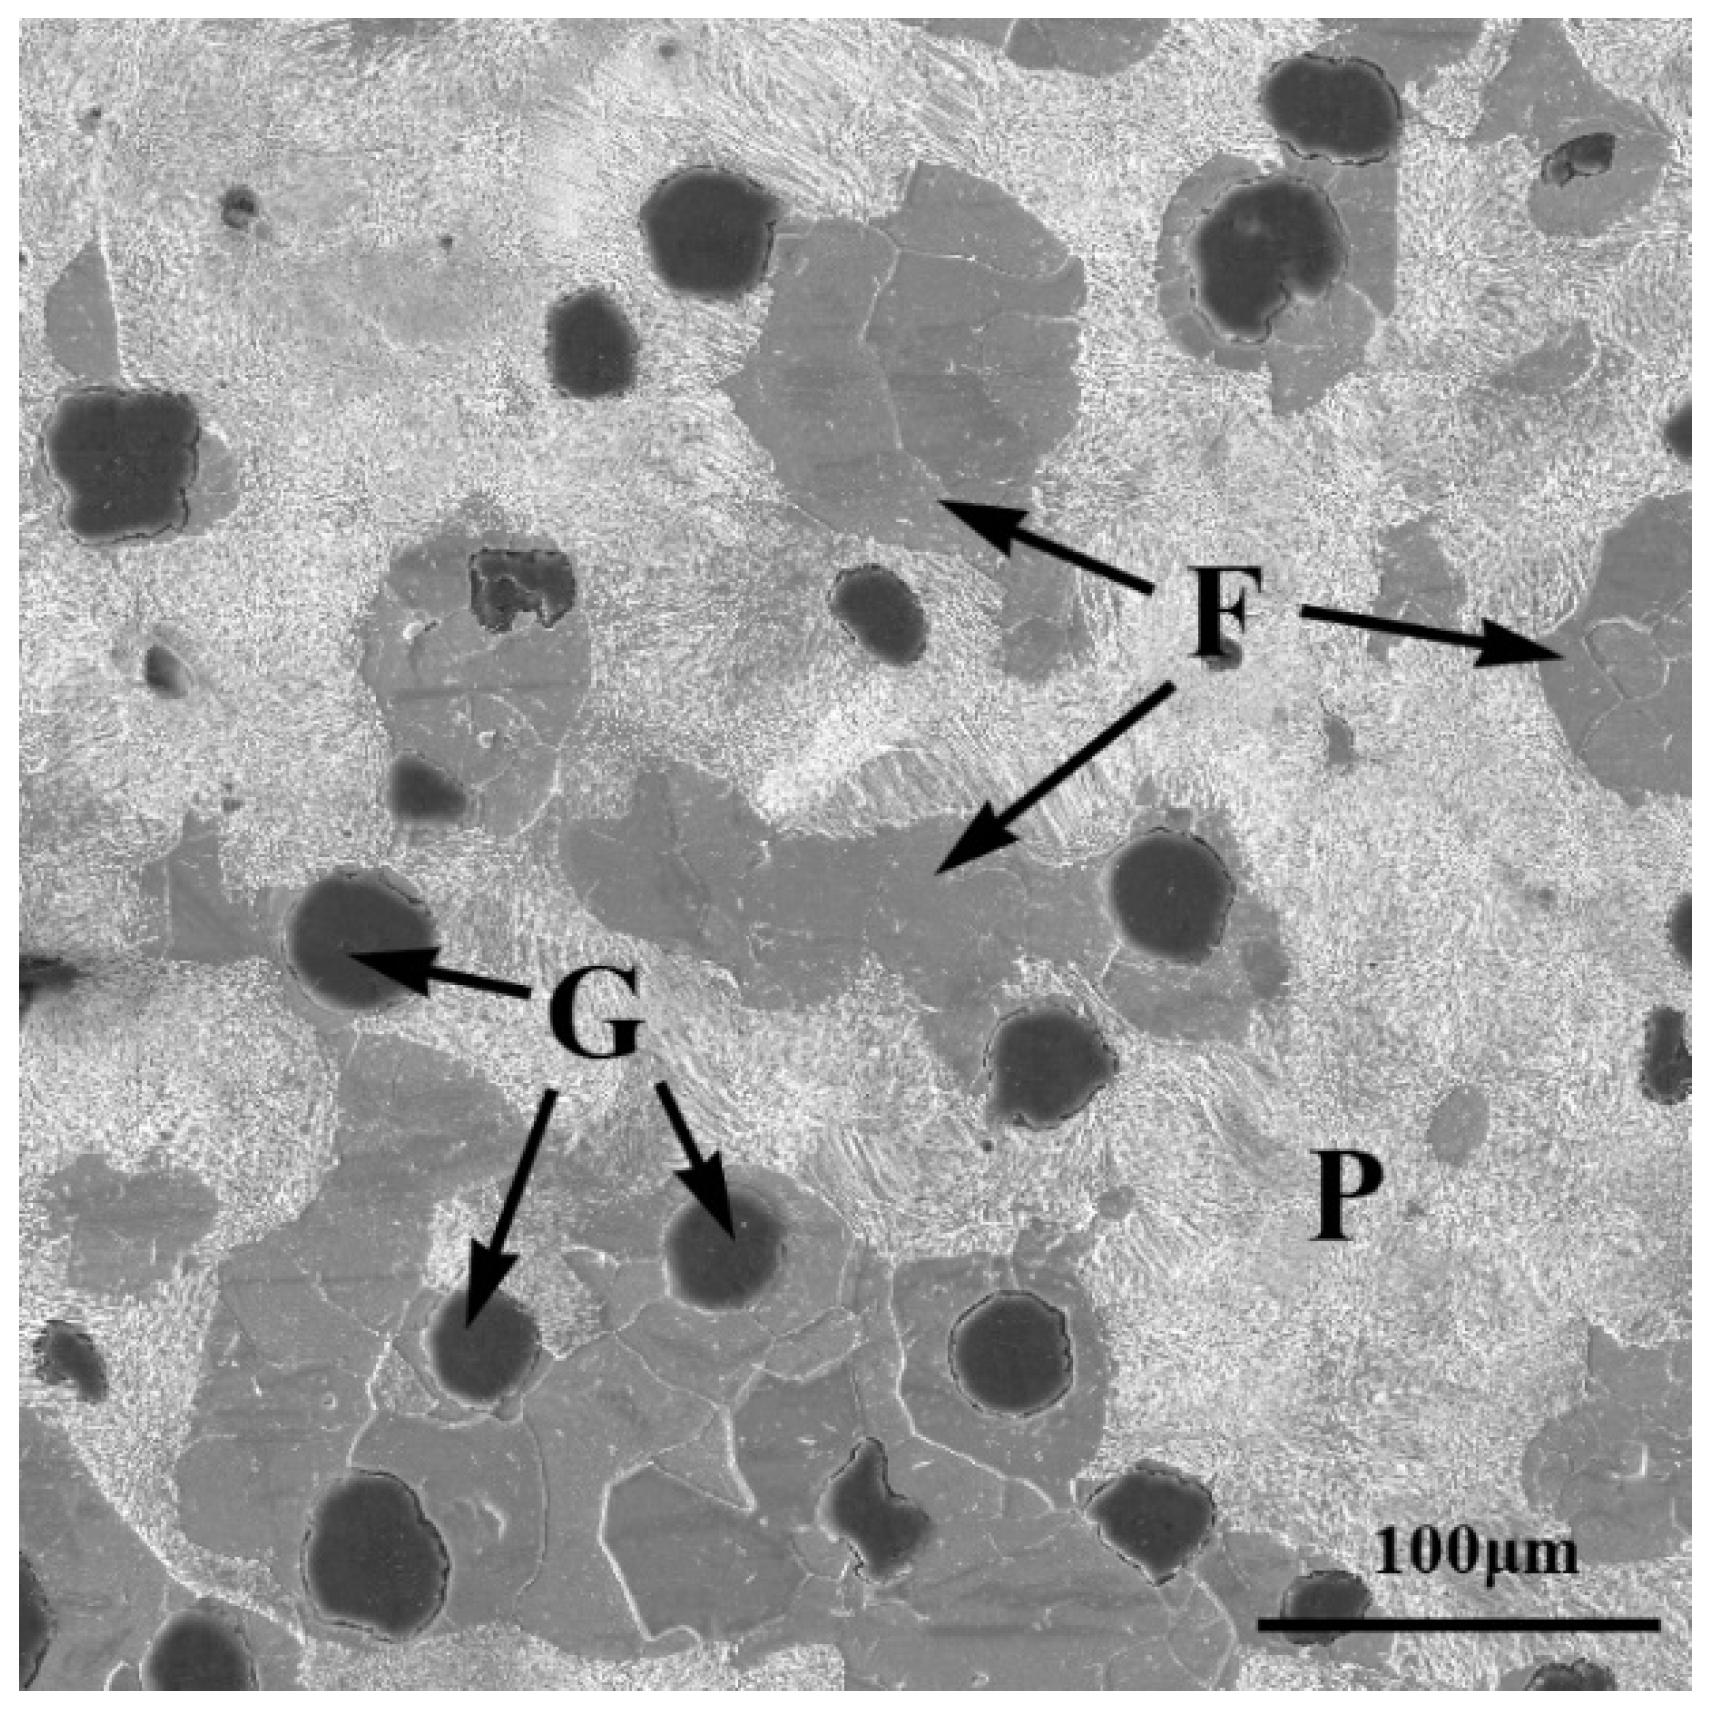
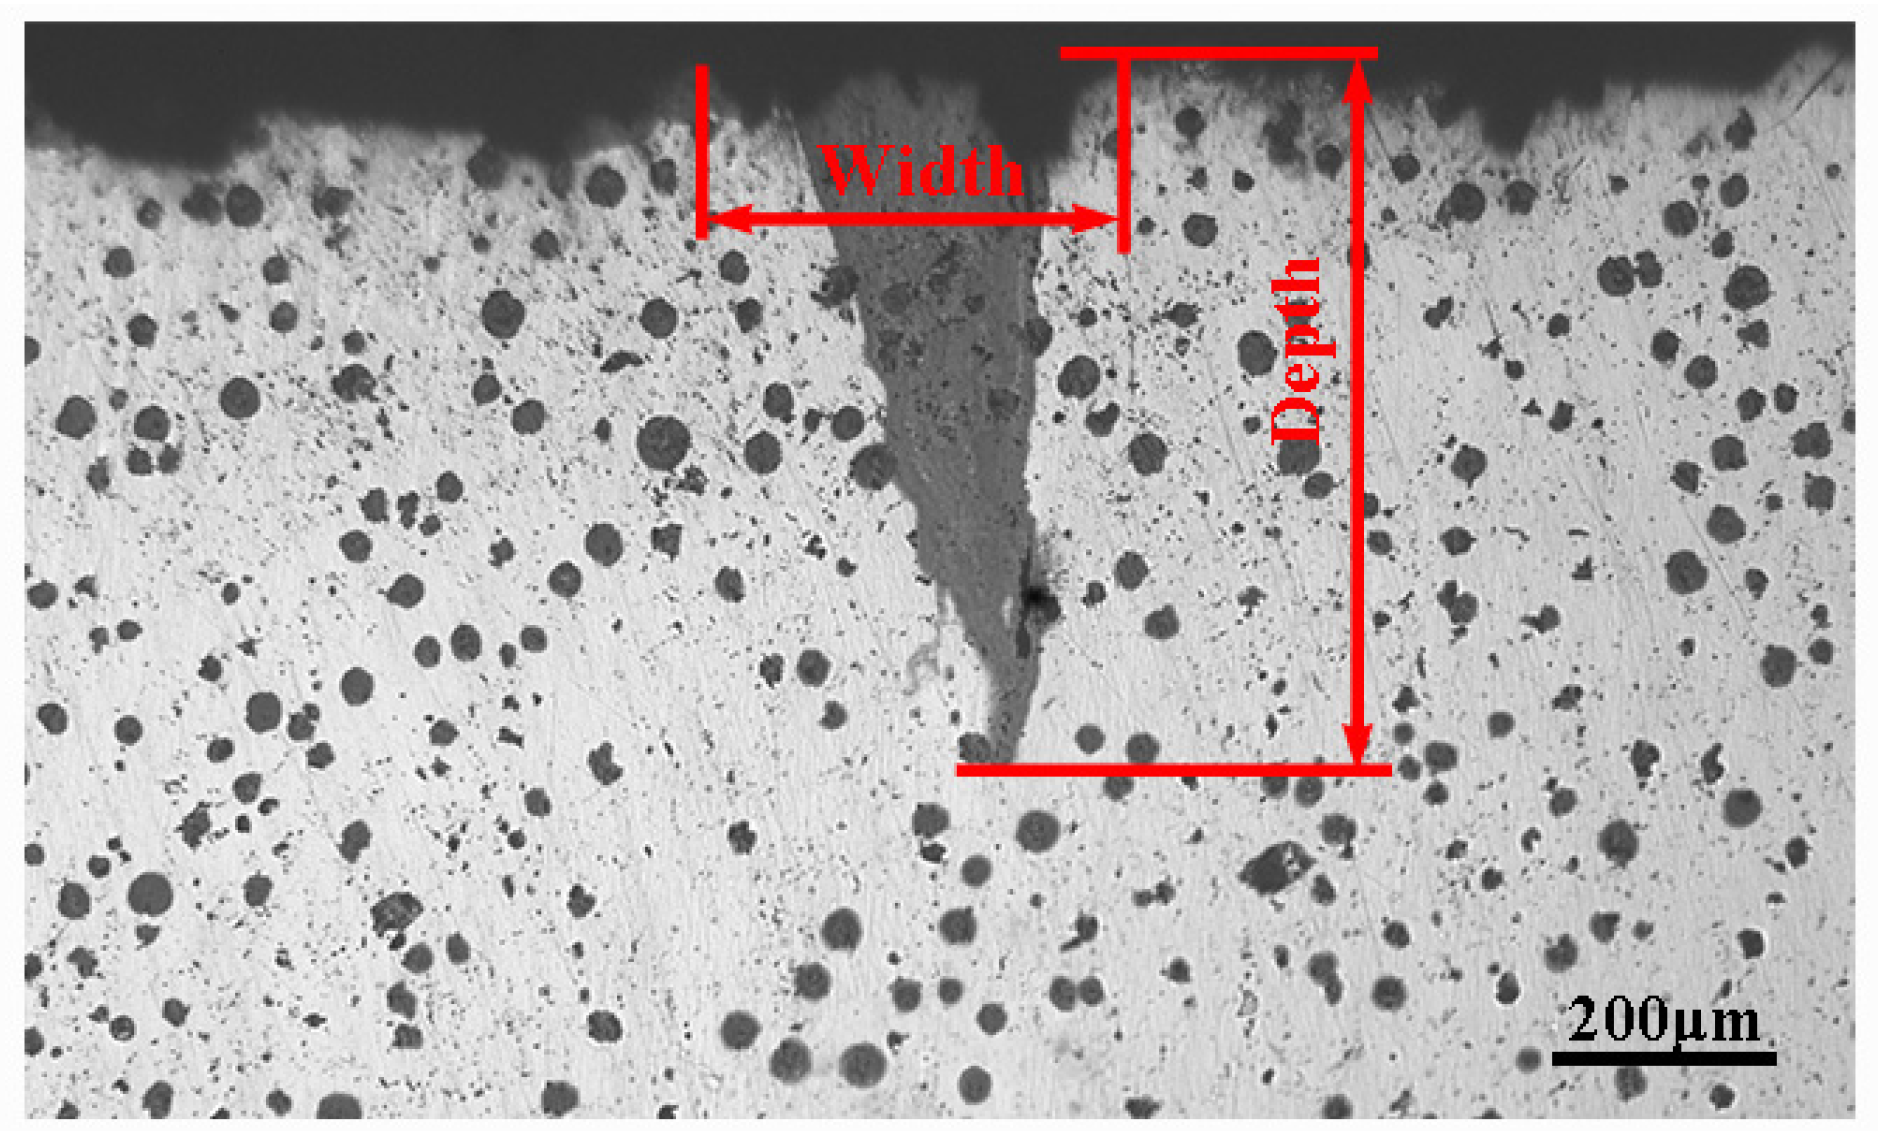
Material was taken from a train brake disc cracked due to thermal fatigue, which was made of nodular iron. Additionally, the chemical composition is shown in Table 1, and the microstructure is shown in Figure 2. The microstructure was composed of spheroidal graphite (G), pearlite (P), and ferrite (F). Figure 3 shows that the surface crack of the damaged brake disc was about 0.33 mm wide and about 0.54 mm deep.

2.2. Sample Preparations

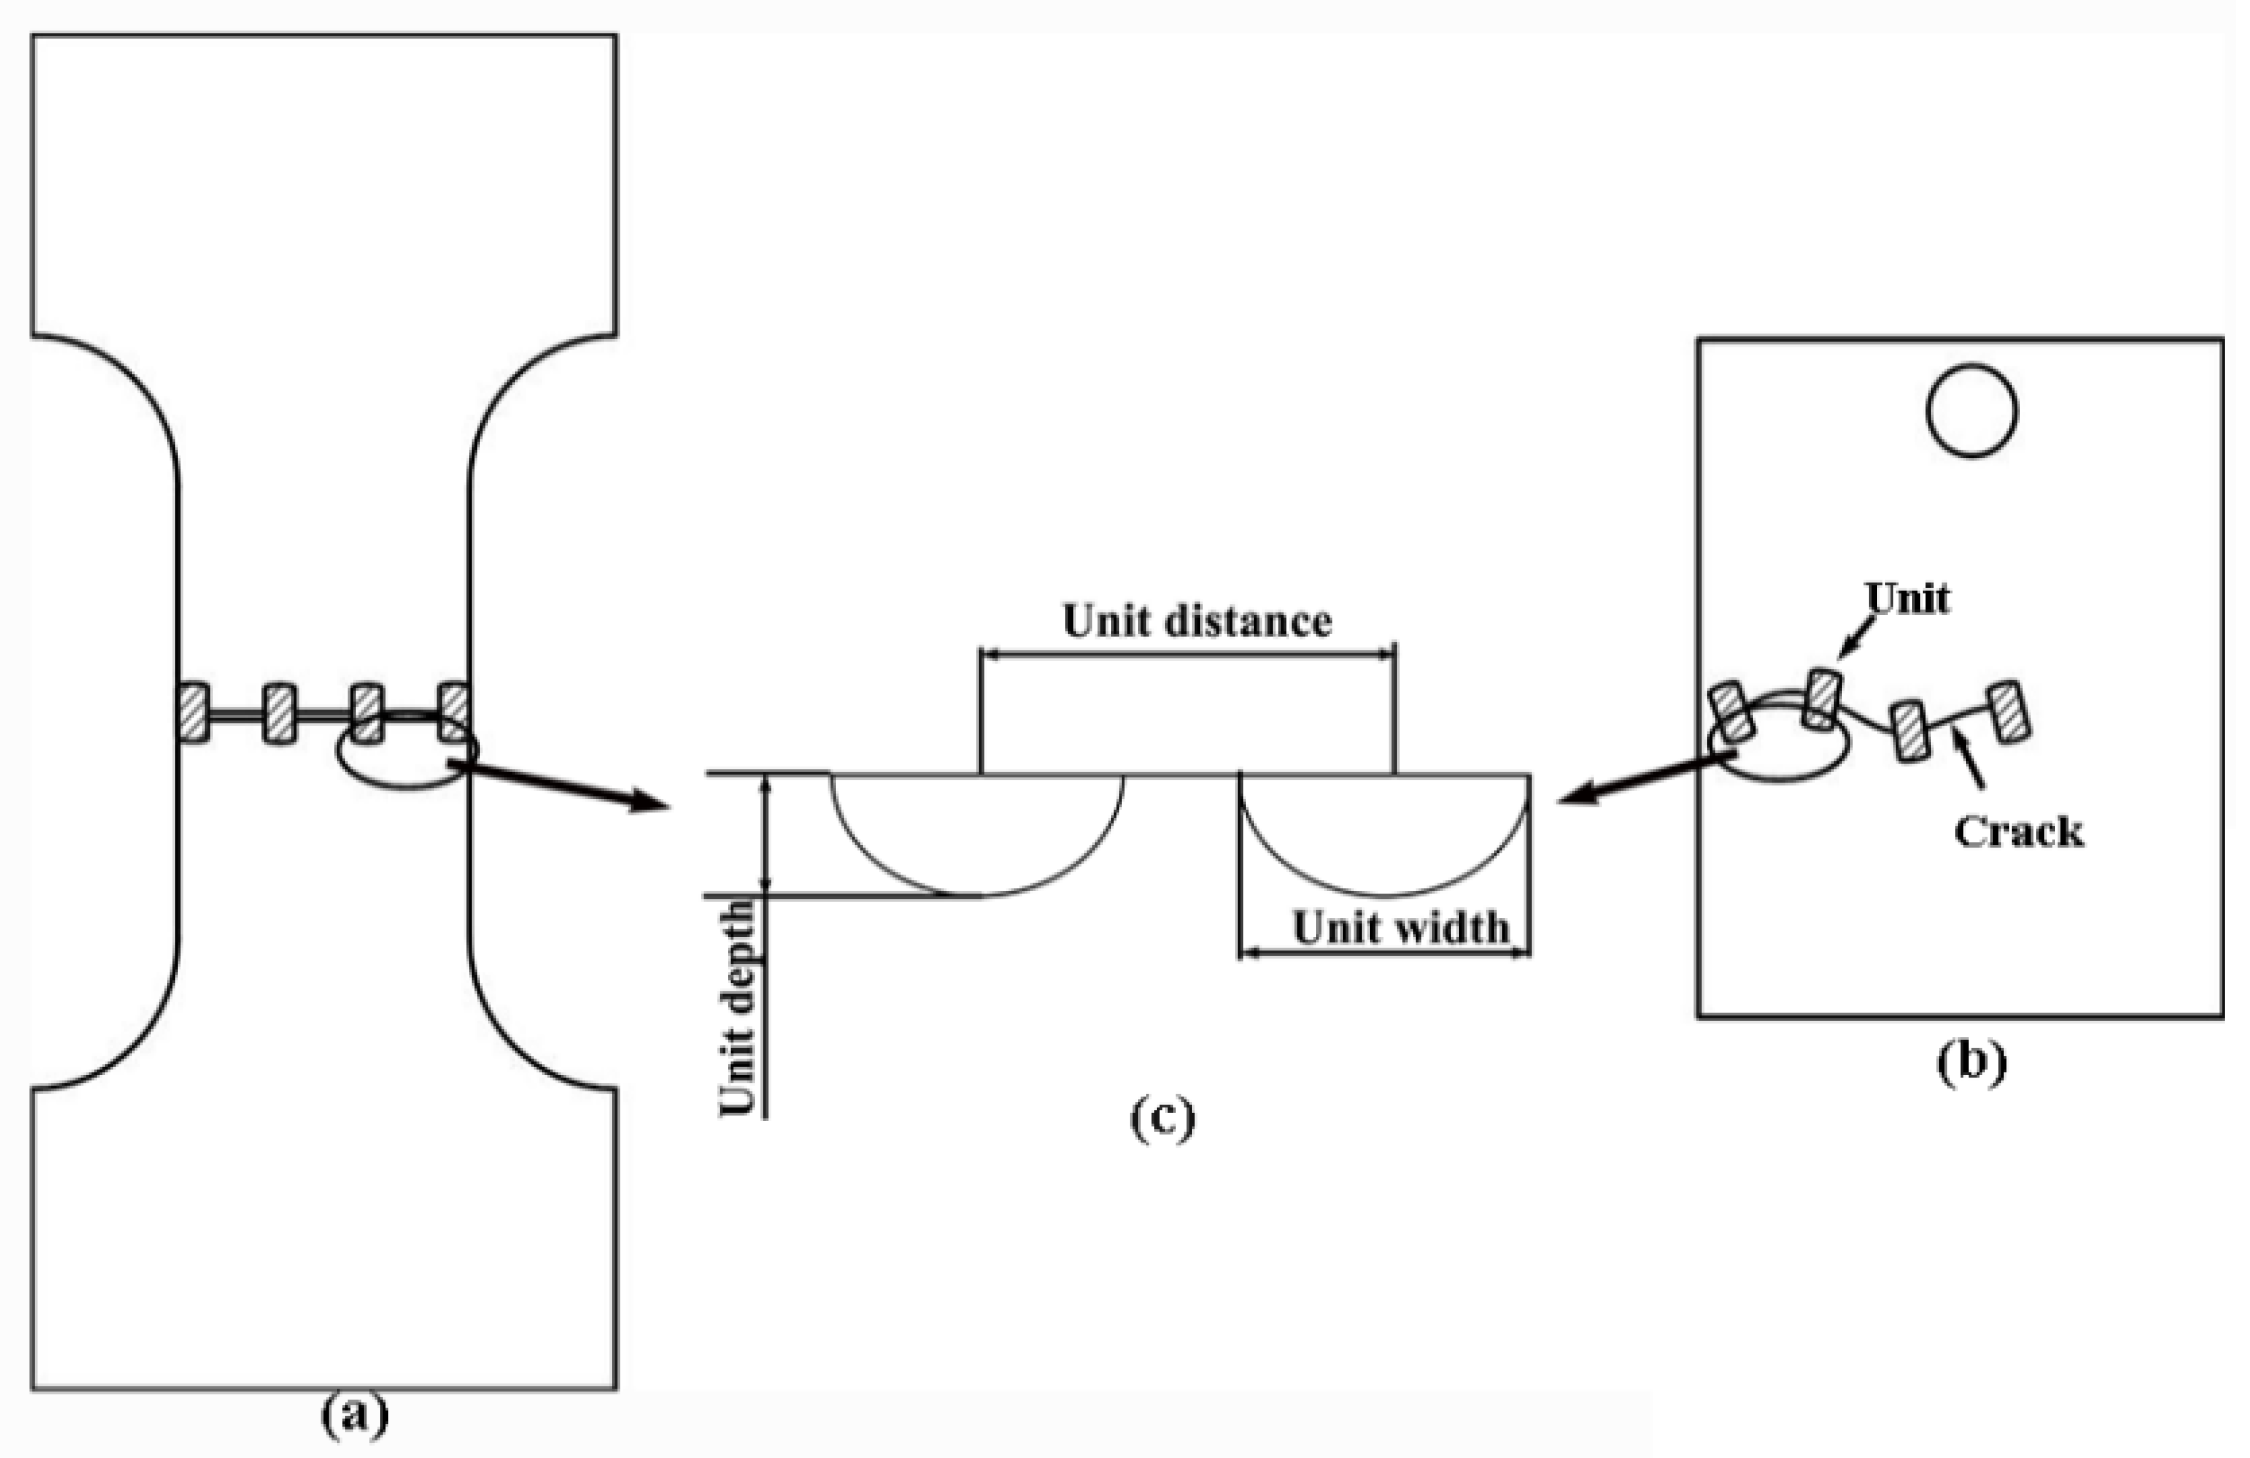
Figure 4 is a schematic diagram of the experimental sample, where Figure 4a is the tensile sample with a gauge length of 30 mm, a width of 20 mm, and a thickness of 5 mm. Considering the operability of the experiment, a notch with a width of about 0.3 mm and a depth of about 0.5 mm was preset in the middle of the tensile sample specimens to replace the crack equivalent. Figure 4b shows a sample for thermal fatigue test, with a size of 30 mm × 20 mm × 5 mm. A circular hole with a radius of 1.5 mm was formed 1 mm away from the upper edge to suspend the samples during thermal fatigue tests. In order to study the effect of unit spacing on the thermal fatigue performance, samples with unit spacings of 3, 5, 7 mm were prepared and labeled as T1, T2, and T3. The aforementioned samples were cut using an electric spark machine (DK7732, Huadong Group, Hangzhou, China). To prevent thermal fatigue and tensile property reduction, due to the surface and side-face roughness, the specimens were mechanically polished progressively by various grits of silicon-carbide-impregnated emery papers prior to laser biomimetic treatment. Oil stains were cleaned with an ultrasonic cleaner containing an acetone solution to form smooth and clean surfaces.
All test samples imitating the anti-crack structure of leaves were fabricated using a solid-state Nd-YAG pulsed laser (XL-500WF, Rofin, Munich, Germany) with a wavelength of 1064 nm and a maximum rated output power of 500 W (Figure 5) [22]. Then, long cracks were segmented into several smaller cracks. In contrast, the structure of the laser remelting zone was obviously different from that of the substrate; thus, the laser remelting zone was defined as a bionic crack blocked unit (unit) for a more convenient discussion. The units were fabricated by a pulse laser with different laser parameters, which are shown in Table 2. Through the work-bench movement, a unit with a length of 3 mm processed by a laser beam was perpendicular to the direction of crack propagation. The unit distance was 2.5 mm. In addition, the untreated specimens were also compared to the laser-treated specimens.

2.3. Experimental Methods

After laser processing, the cross-sections of each unit were cut parallel to the laser direction, and their width and depth were observed under an optical microscope (OLYMPUS, PMG3, Tokyo, Japan). The microstructure was characterized on a scanning electron microscope (SEM, Zeiss, Evo18, Oberkochen, Germany), when the unit cross-sections were smoothed with sandpaper, polished with woolen polished cloth and then corroded for 40 s with a 4% nitric acid alcohol solution. The microhardness of the units was measured using a digital micro hardness meter (Hua Yin, HVS-1000A, Beijing, China) with a 200 g applied load. In addition, phase structures were determined by X-ray diffraction (D/Max, 2500PC, Tokyo, Japan) equipped with Cu Ka radiation at an operating voltage of 40 kV, and a current of 40 mA and a scanning speed of 4°/min.

2.4. Tensile Tests

Tensile tests were conducted using a mechanical testing machine (MTS 810, MTS Systems Corporation, Minnesota, MN, USA), controlled by a servo-controlled hydraulic testing system at a strain rate of 2 mm min−1 at room temperature.

2.5. Thermal Fatigue Test

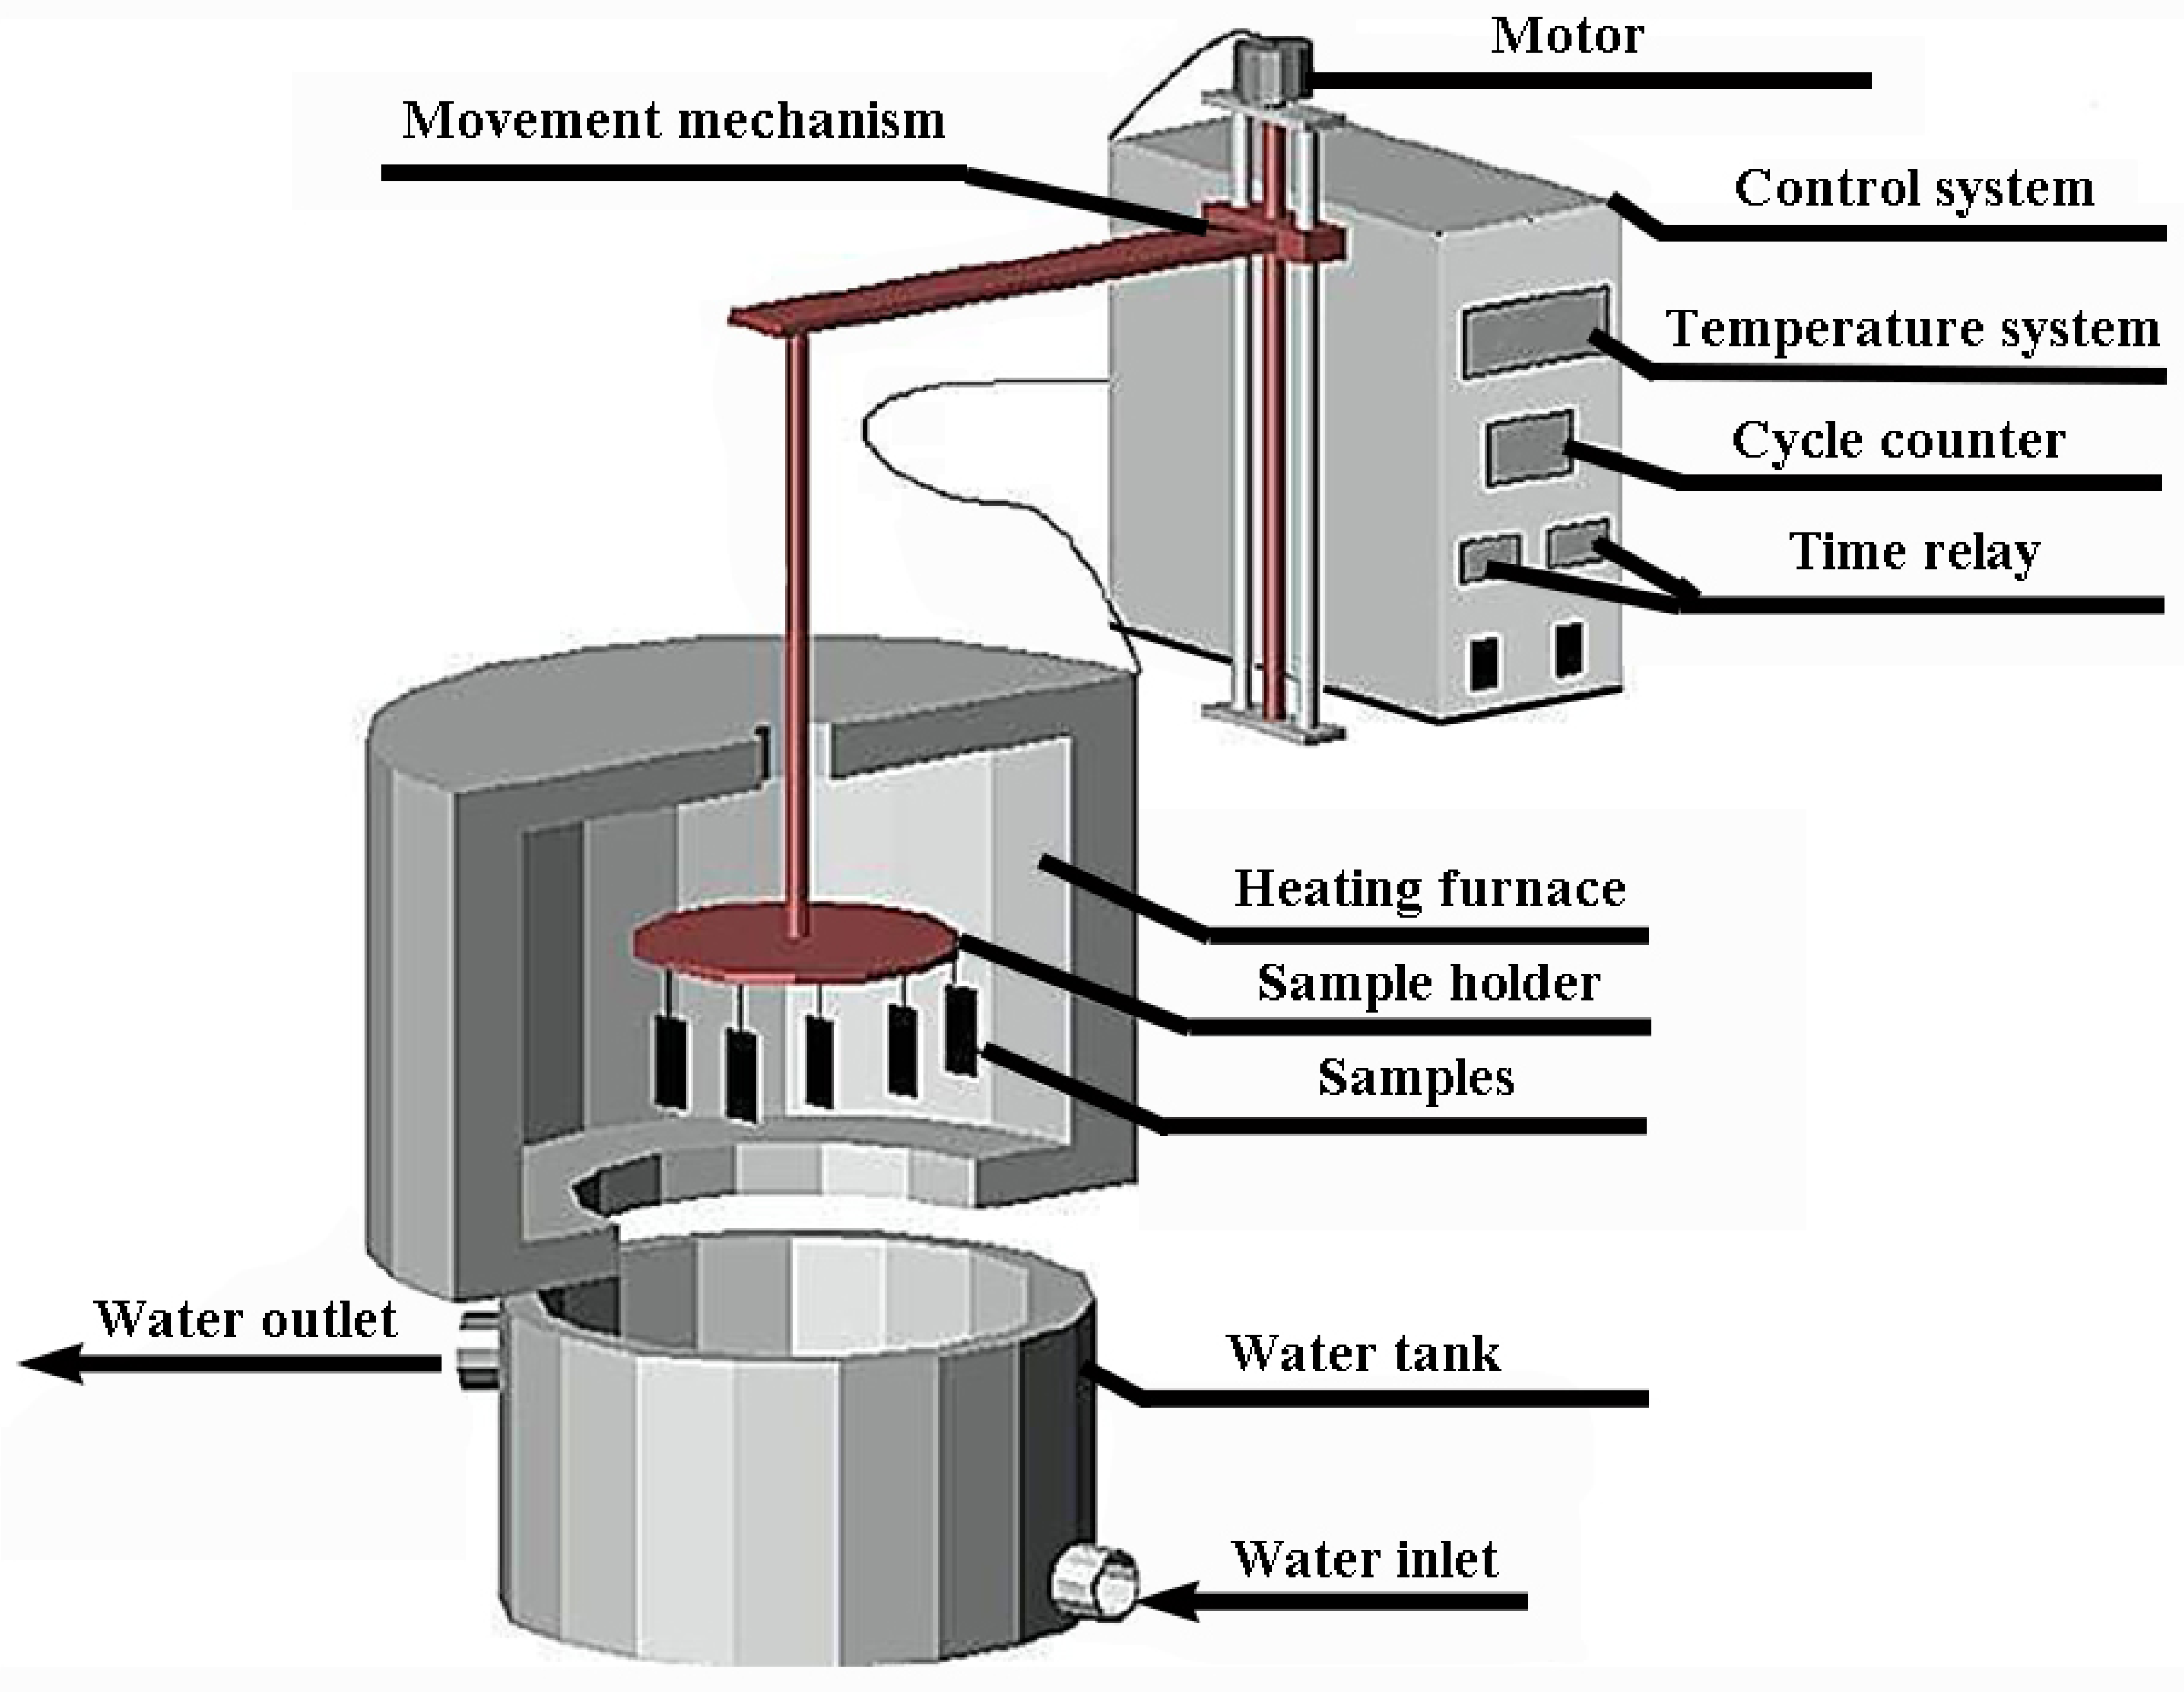
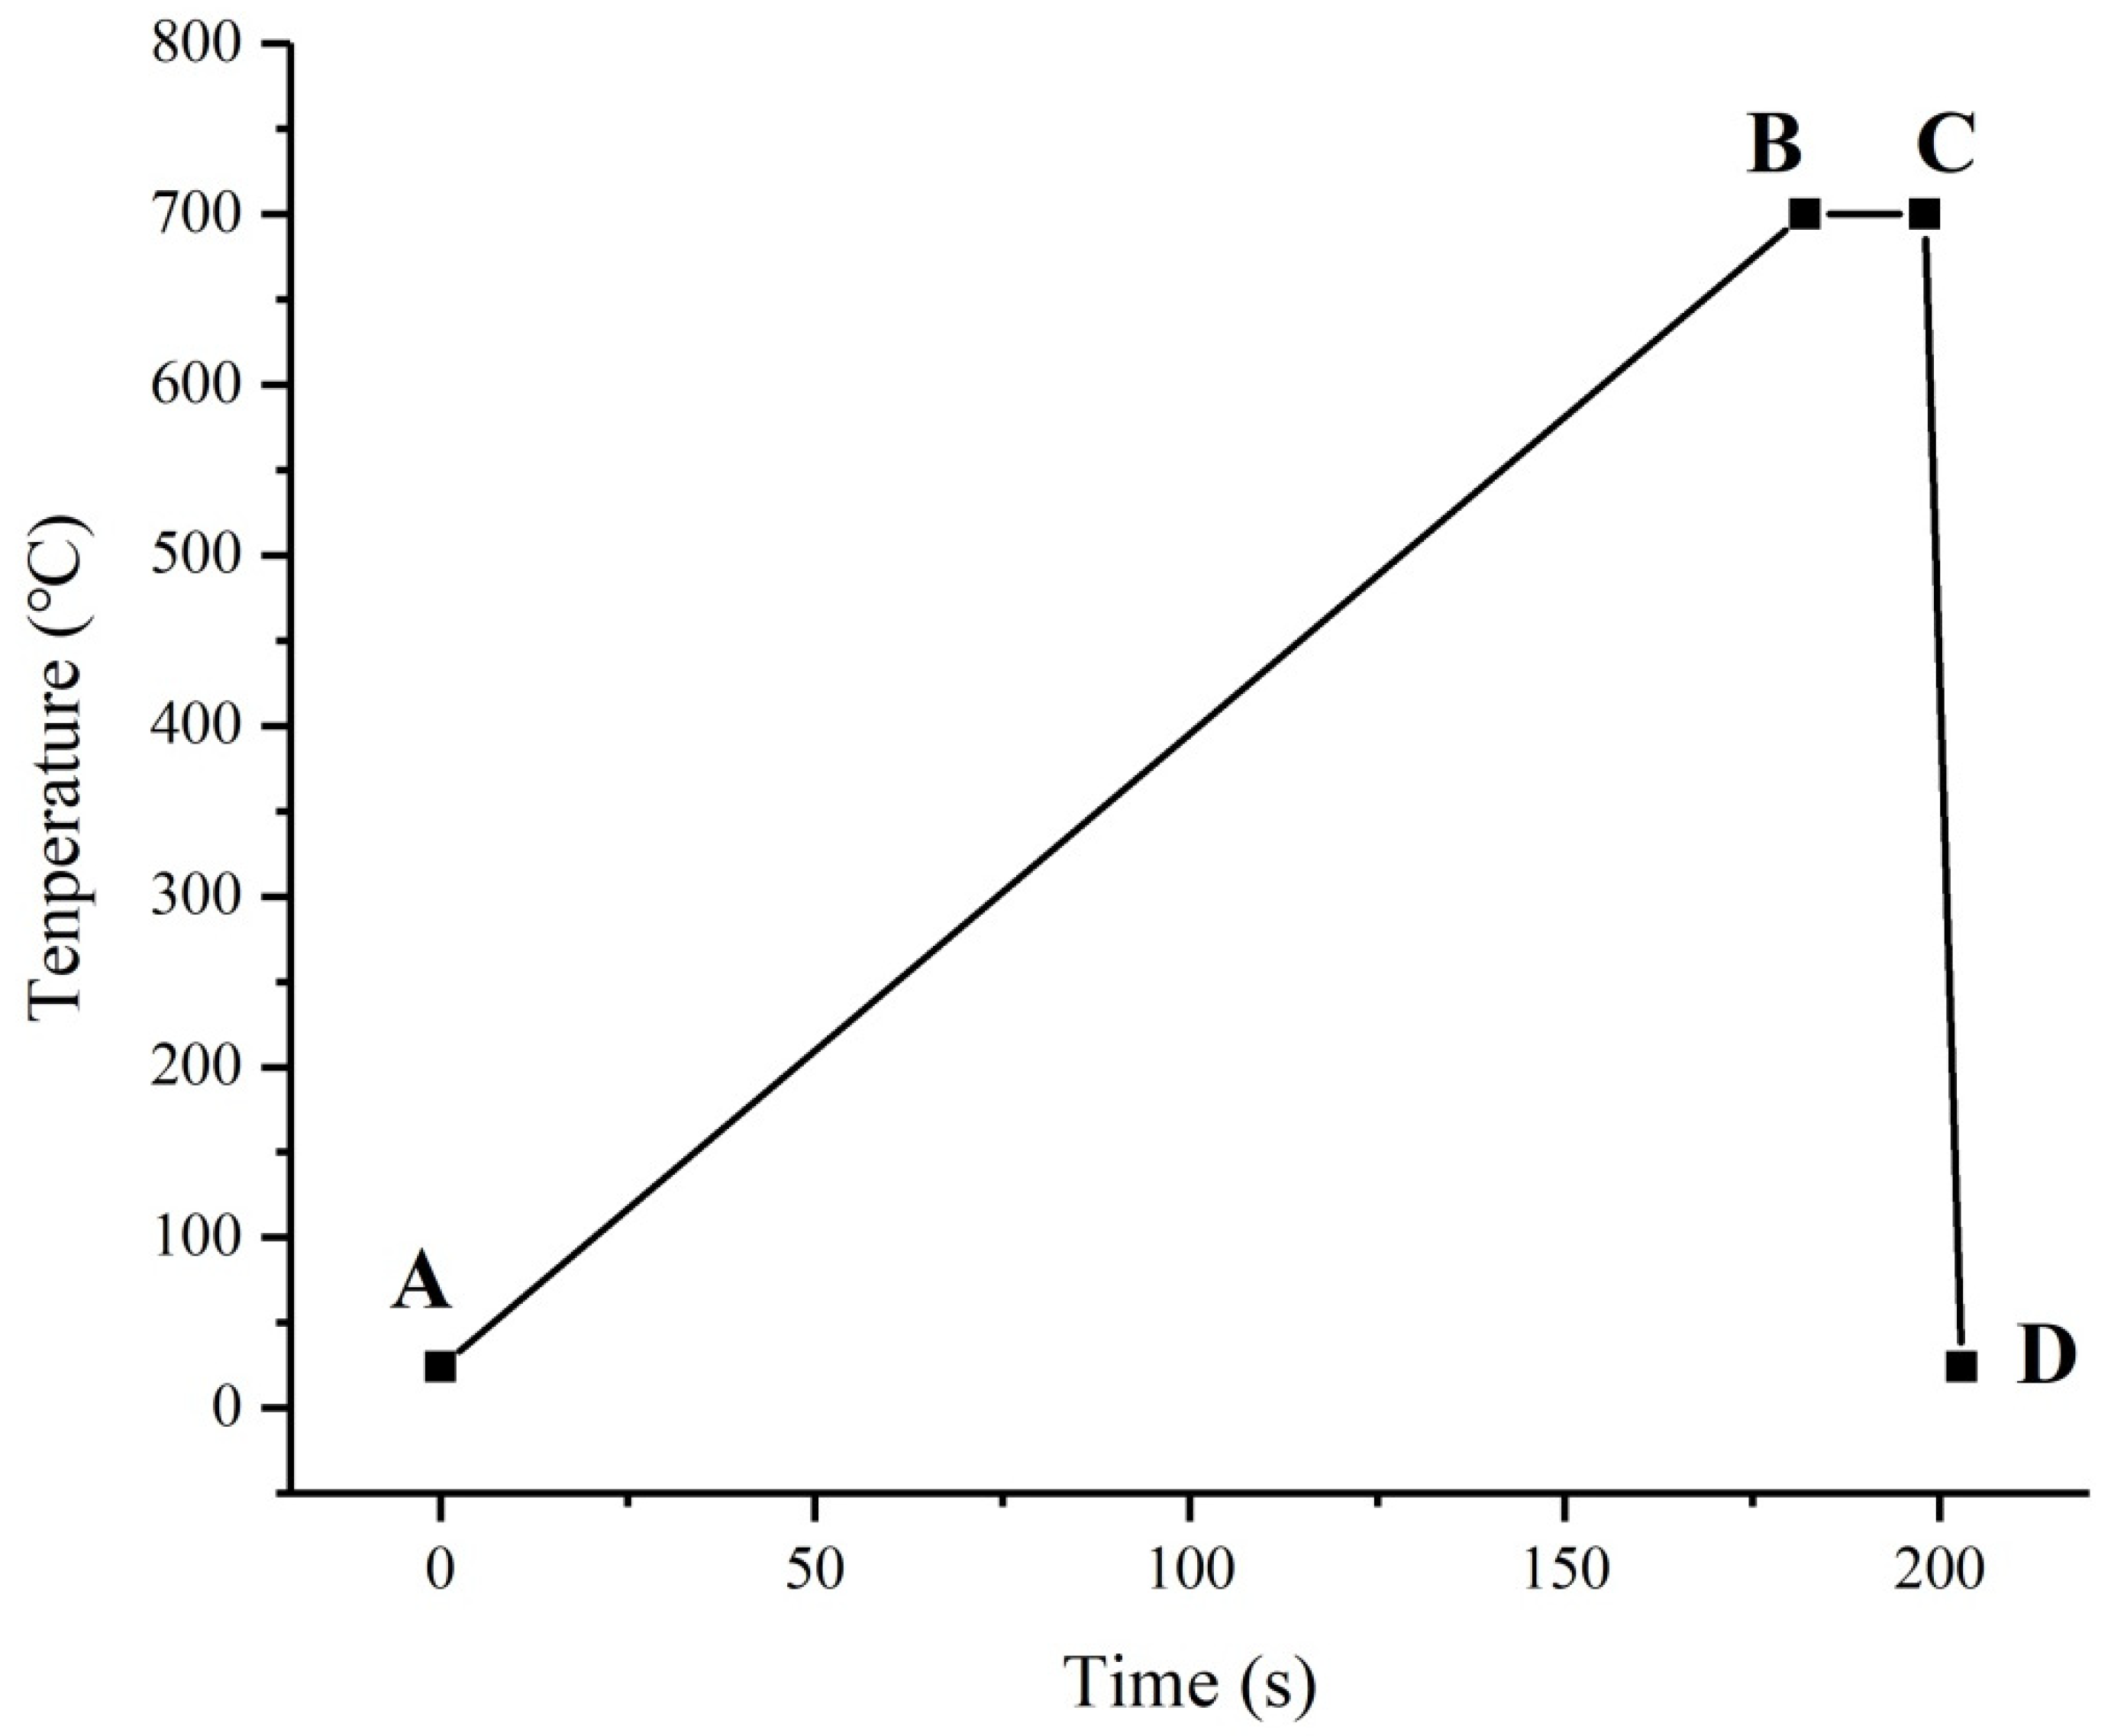
Thermal fatigue tests were carried out by using a self-made thermal fatigue testing machine. Samples were heated in a high-temperature induction resistance furnace and cooled with tap water at room temperature. The heat cycle testing machine scheme is shown in Figure 6. Figure 7 illustrates the average surface-temperature variety of the test sample during one thermal cycle. Test samples were heated from room temperature to 700 °C in 160 s and then cooled to 24 °C in 5 s in one cycle. During thermal test, no samples had any externally applied loads. After tests, samples were taken out, and changes in the crack widths were measured, and the number of cold and hot cycles experienced by each sample was recorded. In this part, the thermal fatigue test was performed five times, and the average values are reported.

3. Results and Discussion

3.1. Microstructure and Sizes of Units

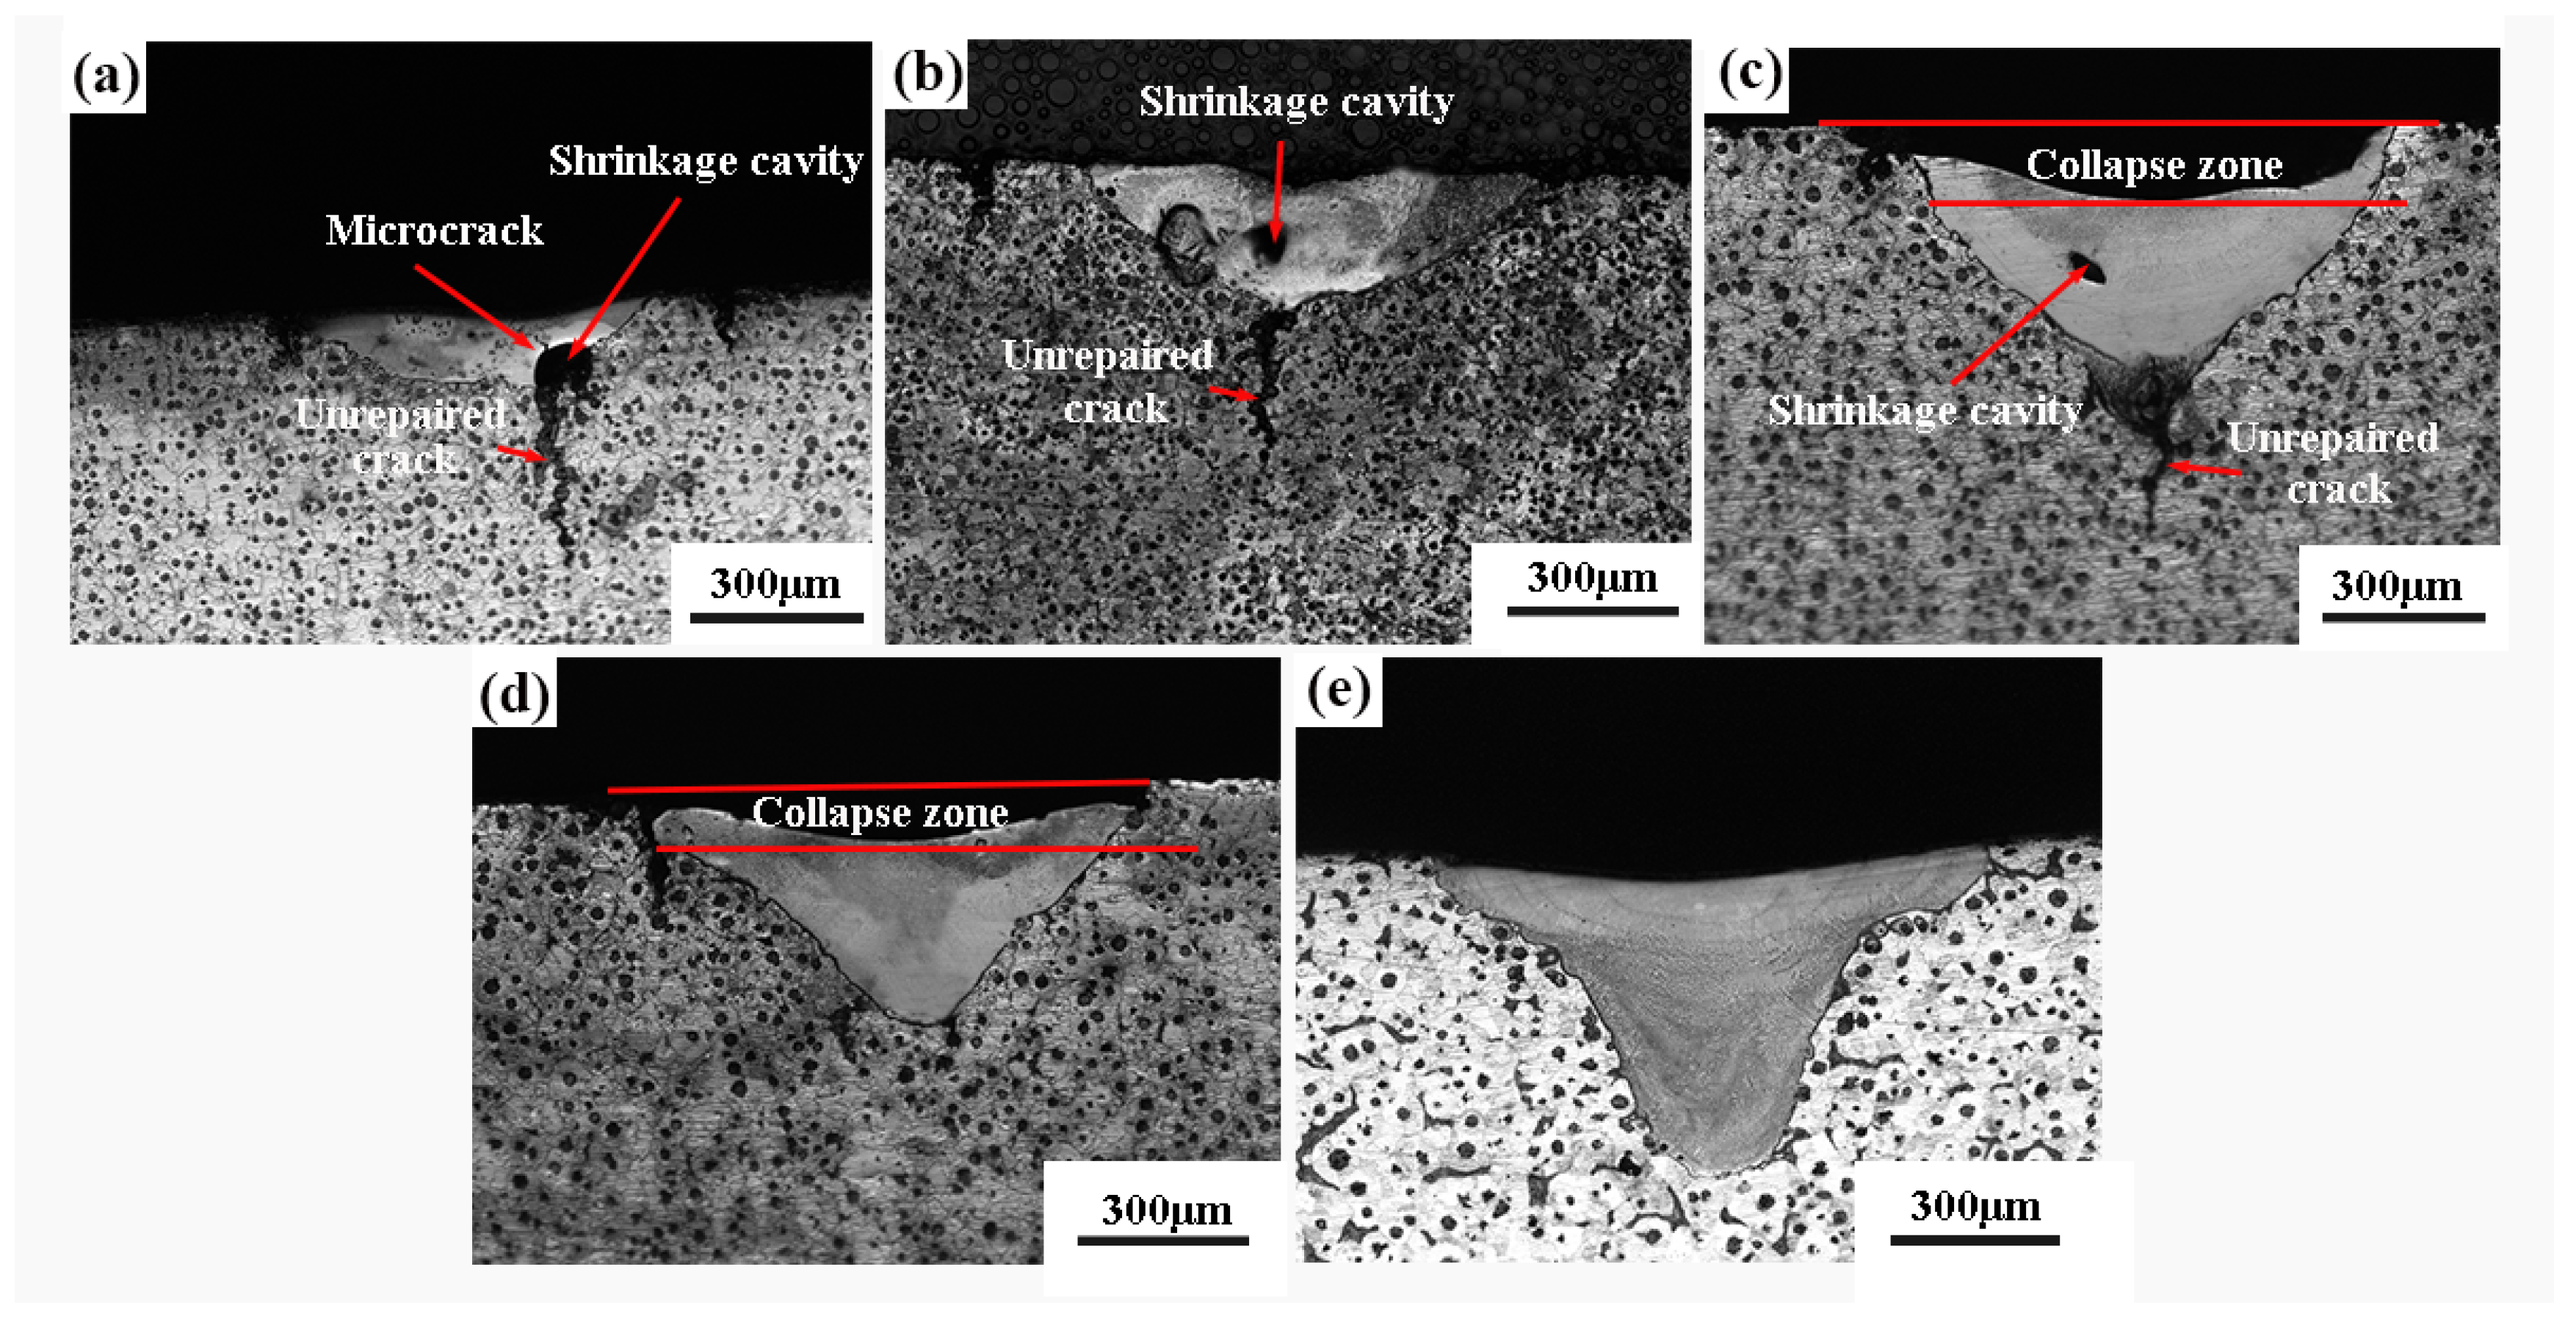
Figure 8 shows optical microscopy images of the cross-sectional morphology of units after cracks were repaired using different laser parameters. It can be clearly seen that there were obvious differences between the unit and the matrix after laser melting. The unit was parabolic, and there was no spheroidal graphite in the matrix. Due to the different laser parameters, the units had different shapes and sizes. The laser energy density used during laser treatment and the size of the prepared units are shown in Table 3.
The sizes of units were measured from each sample using an optical microscope. Consequently, along with an increase in the laser energy input, the width of the units were in the order of No. 1 < No. 2 < No. 3 < No. 4 < No. 5, while the unit depths were in the order No. 1 < No. 2 < No. 3 < No. 4 < No. 5. The laser beam energy obeys a Gaussian function, and the energy is mainly concentrated in the central part of the laser spot [23]. The higher the laser energy density, the deeper the heat transferred to the sample, and the depth gradually increased. The width of units was mainly related to the spot diameter, and since it was the same, no significant changes in width were observed. The units gradually changed from a flat crescent shape to a U-shape. Due to the low laser energy densities, samples No. 1–4 had remelting areas that were too small to completely bridge the cracks. Since less metal was melted by heat, the flowing liquid metal could not completely fill the cracks. After solidification, cracks and holes appeared in the remelting zone, which may form new cracks and reduce the thermal fatigue resistance of the material. There were no microcracks or holes in the remelting zone of sample No. 5, and the thermal fatigue cracks were completely repaired.
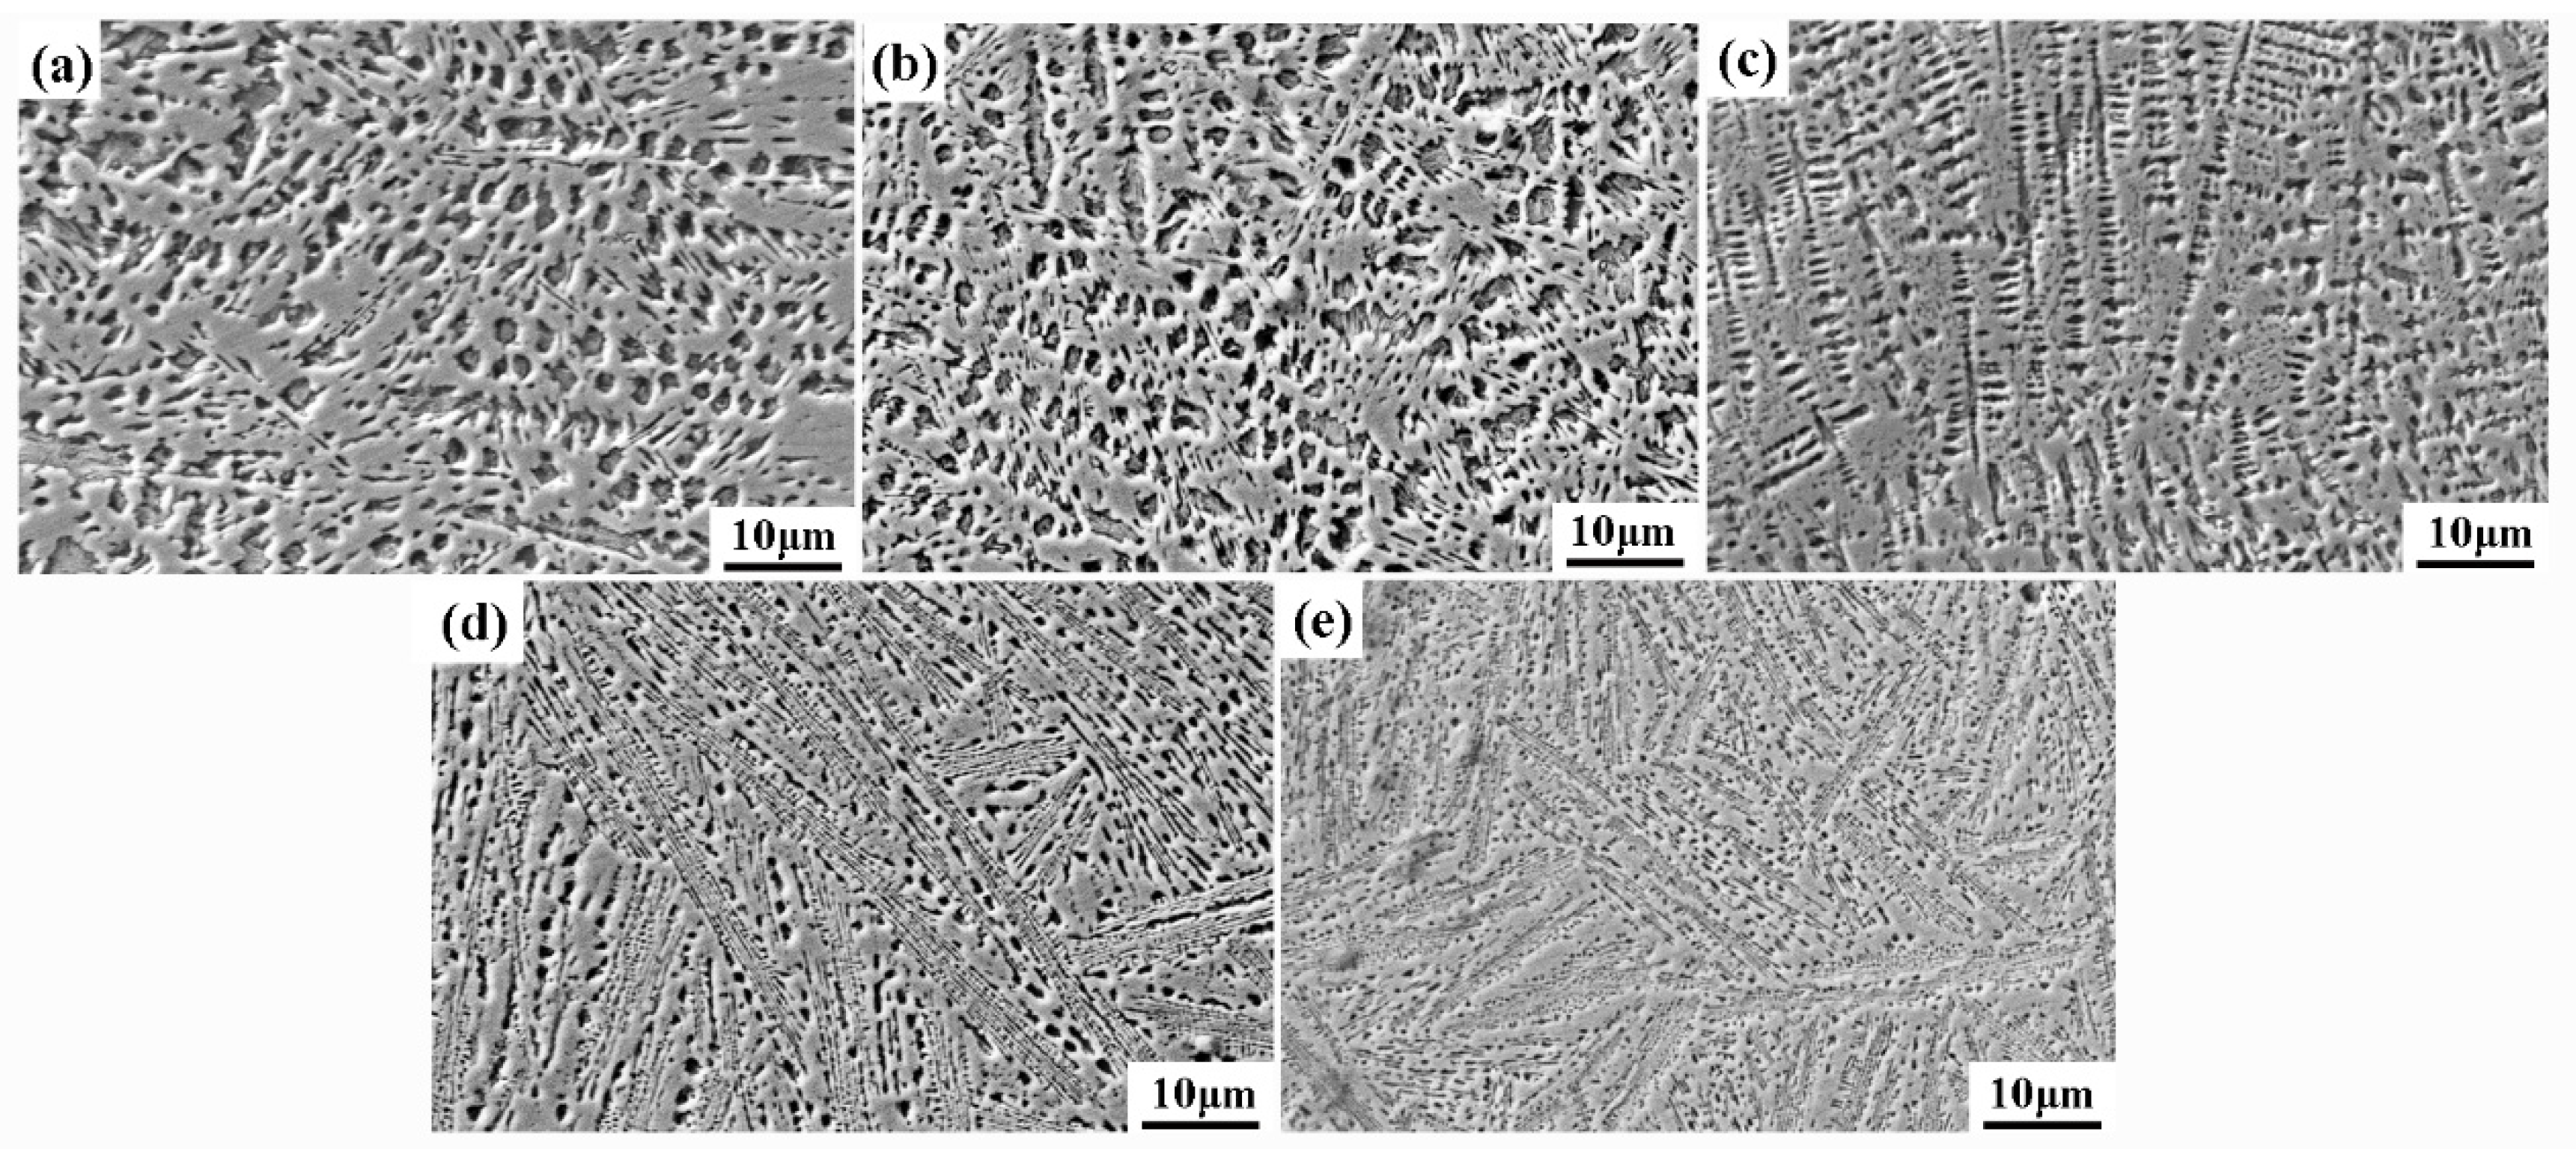
Figure 9 shows the microstructure of the units under SEM. Due to the rapid increase in the sample surface temperature during laser treatment and then a rapid decline after laser treatment, the microstructure of the melting zone was a dense dendritic structure. Thus, the nucleation of the molten metal during rapid cooling occurred much faster than grain growth, which resulted in a small micron-sized microstructure. Obviously, the microstructure of samples No. 1–5 showed similar dendritic crystals but with different dendrite densities. As the laser energy density increased, the dendrite densification of No. 1–5 cells gradually increased, and the grains were gradually refined. The smaller interdendritic spacing resulted in the higher micro-hardness and the better mechanical properties theoretically [24].
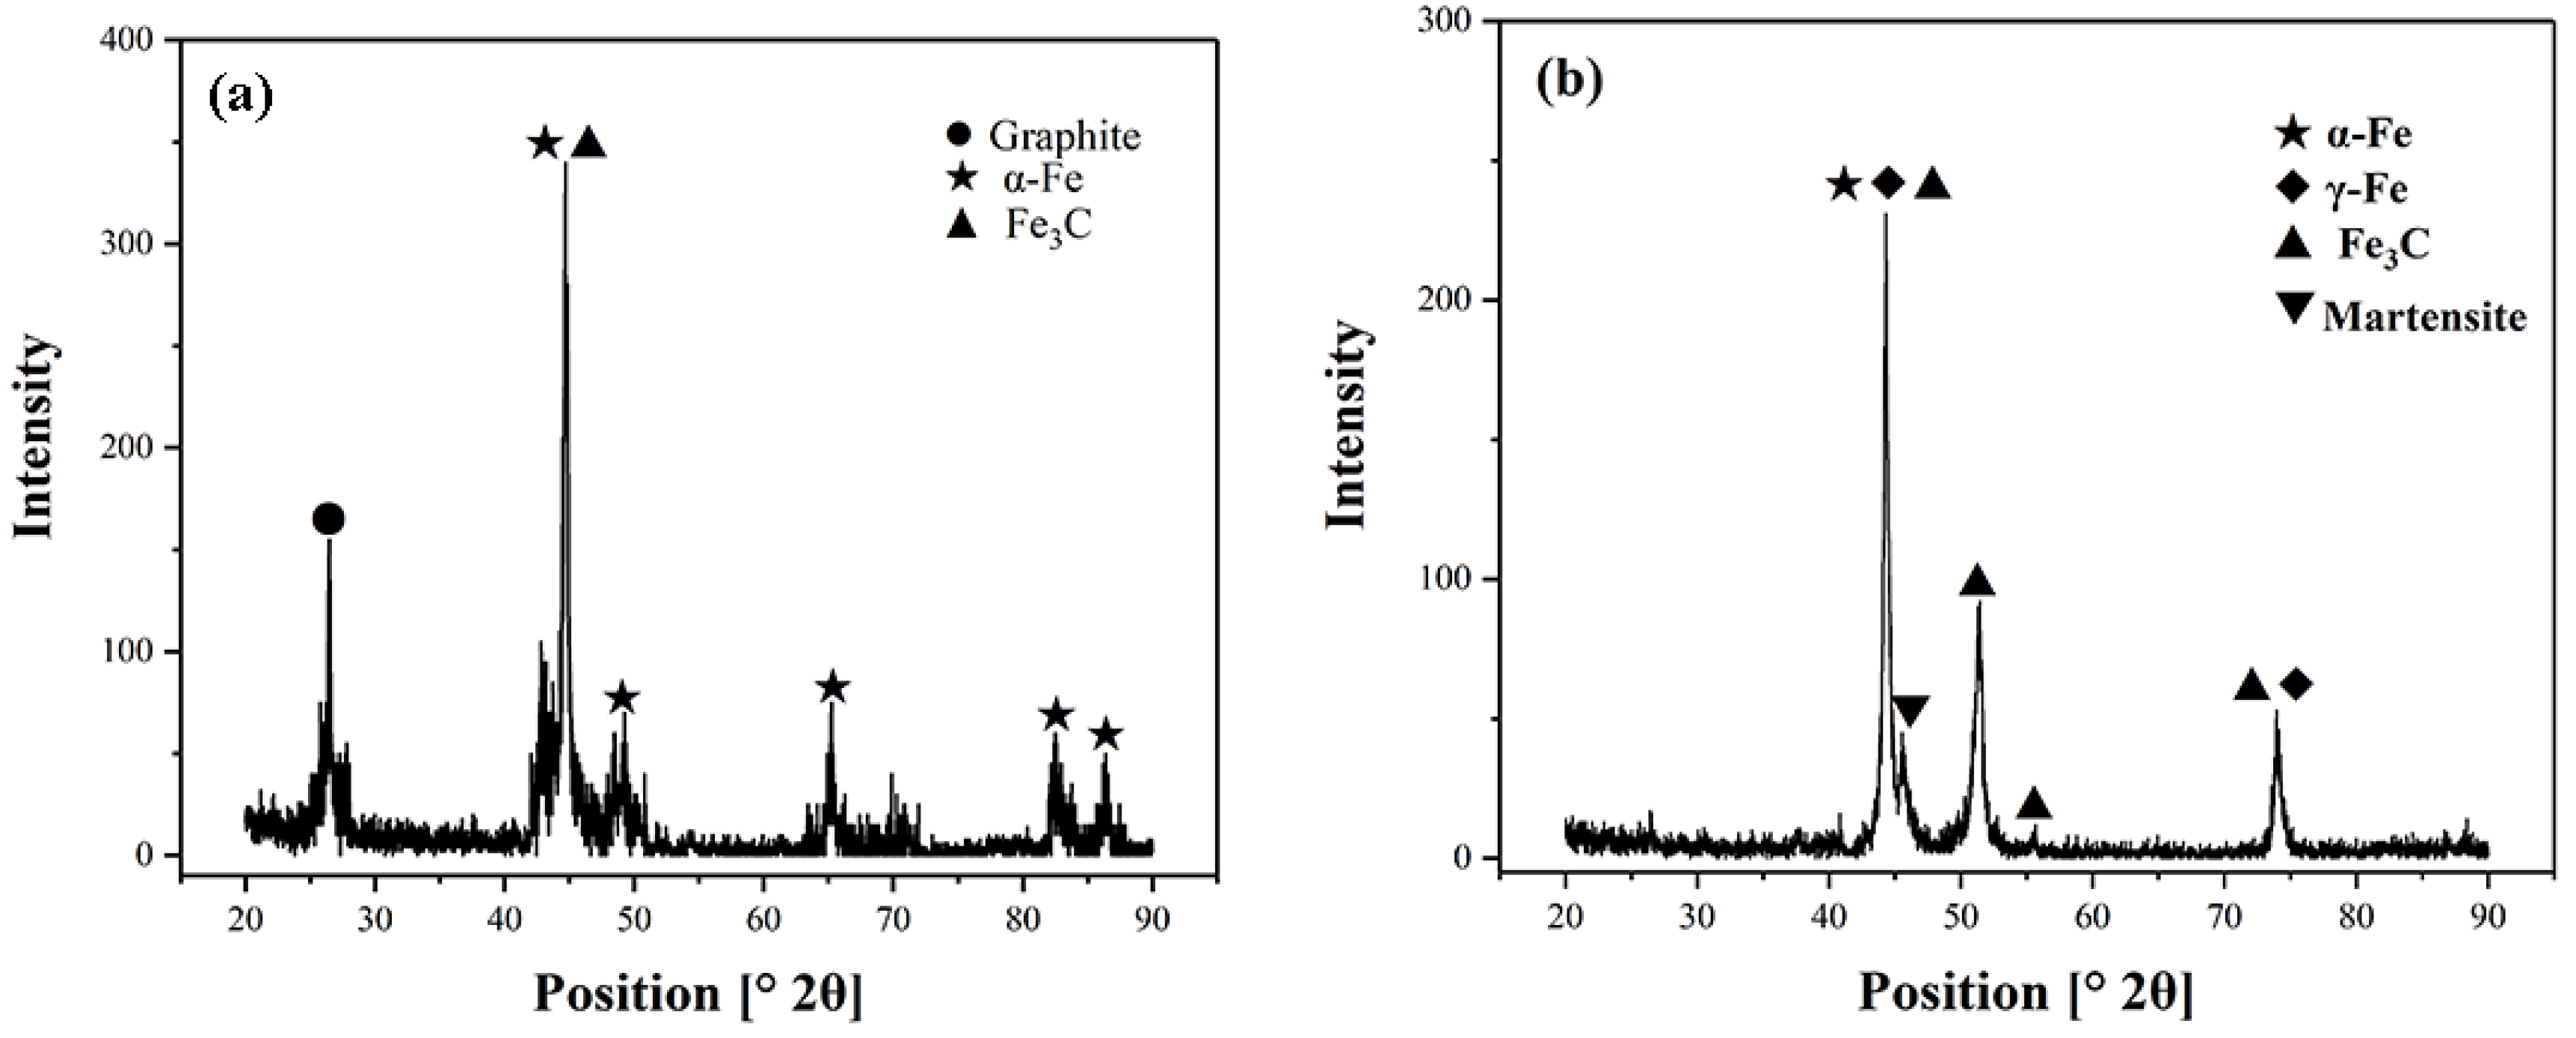
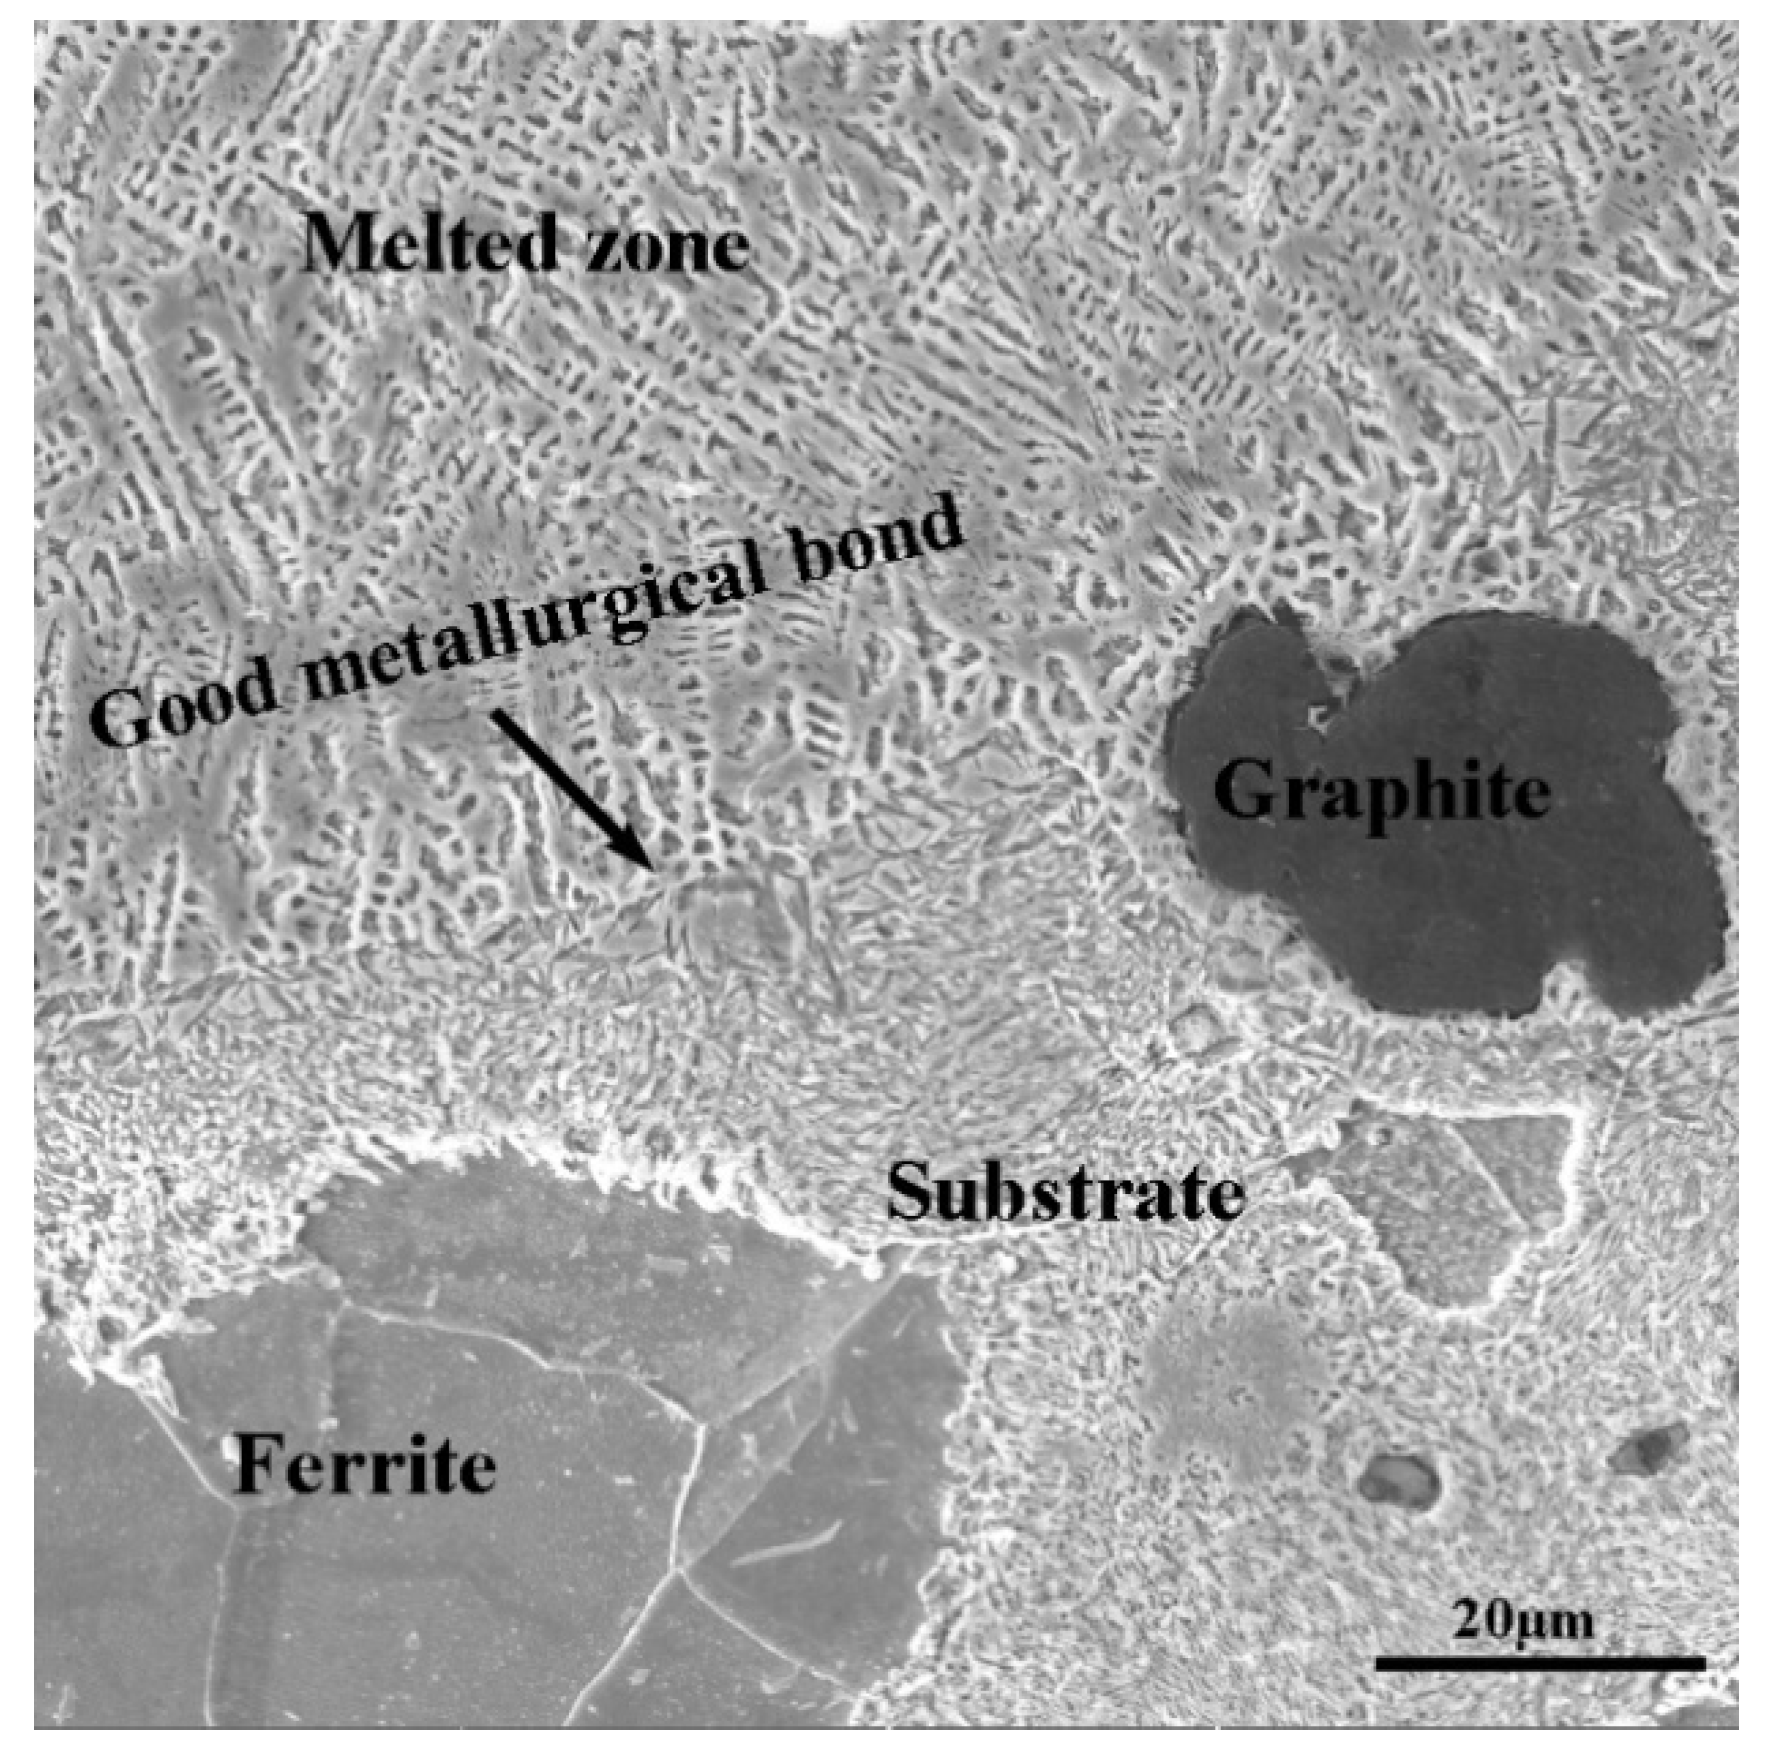
X-ray diffraction was used to analyze the phase of the matrix and units on the surface of untreated and laser melted samples. The results are shown in Figure 10. Due to the large temperature gradient between the molten pool and the surrounding substrate, liquid metal was supercooled and thus recrystallization occurred at a higher cooling speed to form martensite (M). Graphite and iron formed cementite (Fe3C), and tough residual austenite (γ-Fe) was also found in the unit. In the heat-affected zone (HAZ) between the substrate and the melted zone, a slightly lower temperature below the melting point of the cast iron led to a faster austenitization and partial dissolution of graphite. Due to rapid cooling, carbon could not evenly spread, and the carbon concentration of austenite near graphite increased, causing high-carbon needle martensite (M) and residual austenite to form after rapid cooling. Additionally, a good metallurgical bond was formed between the HAZ and the melting zone, as shown in Figure 11.
The reported microhardness values in Table 3 are the average of ten measurements taken at different locations in the cross-section of each unit. As the laser energy input increased, the micro-hardness of units followed the order No. 5 > No. 4 > No. 3 > No. 2 > No. 1, and the microhardness of all units were significantly higher than that of the untreated sample. Sample No. 5 displayed the maximum microhardness of 680 HV 0.2 , which was 128.2% higher than the untreated sample. Fine-grain strengthening was the main reason for this order. Smaller grain sizes resulted in a larger grain boundary area, which increased the resistance of grain plastic deformation, while smaller plastic deformation leads to a higher microhardness [25]. Phase transition strengthening was also involved, as evidenced by the increased dislocation density due to the formation of martensite after laser treatment. High-density dislocations are prone to winding and plugging, which results in deformation hardening. As the crystal defects and microstructural fragmentation increased, the distribution of high pressure on the surface increased the microhardness.

3.2. Tensile Tests with Various Laser Parameters

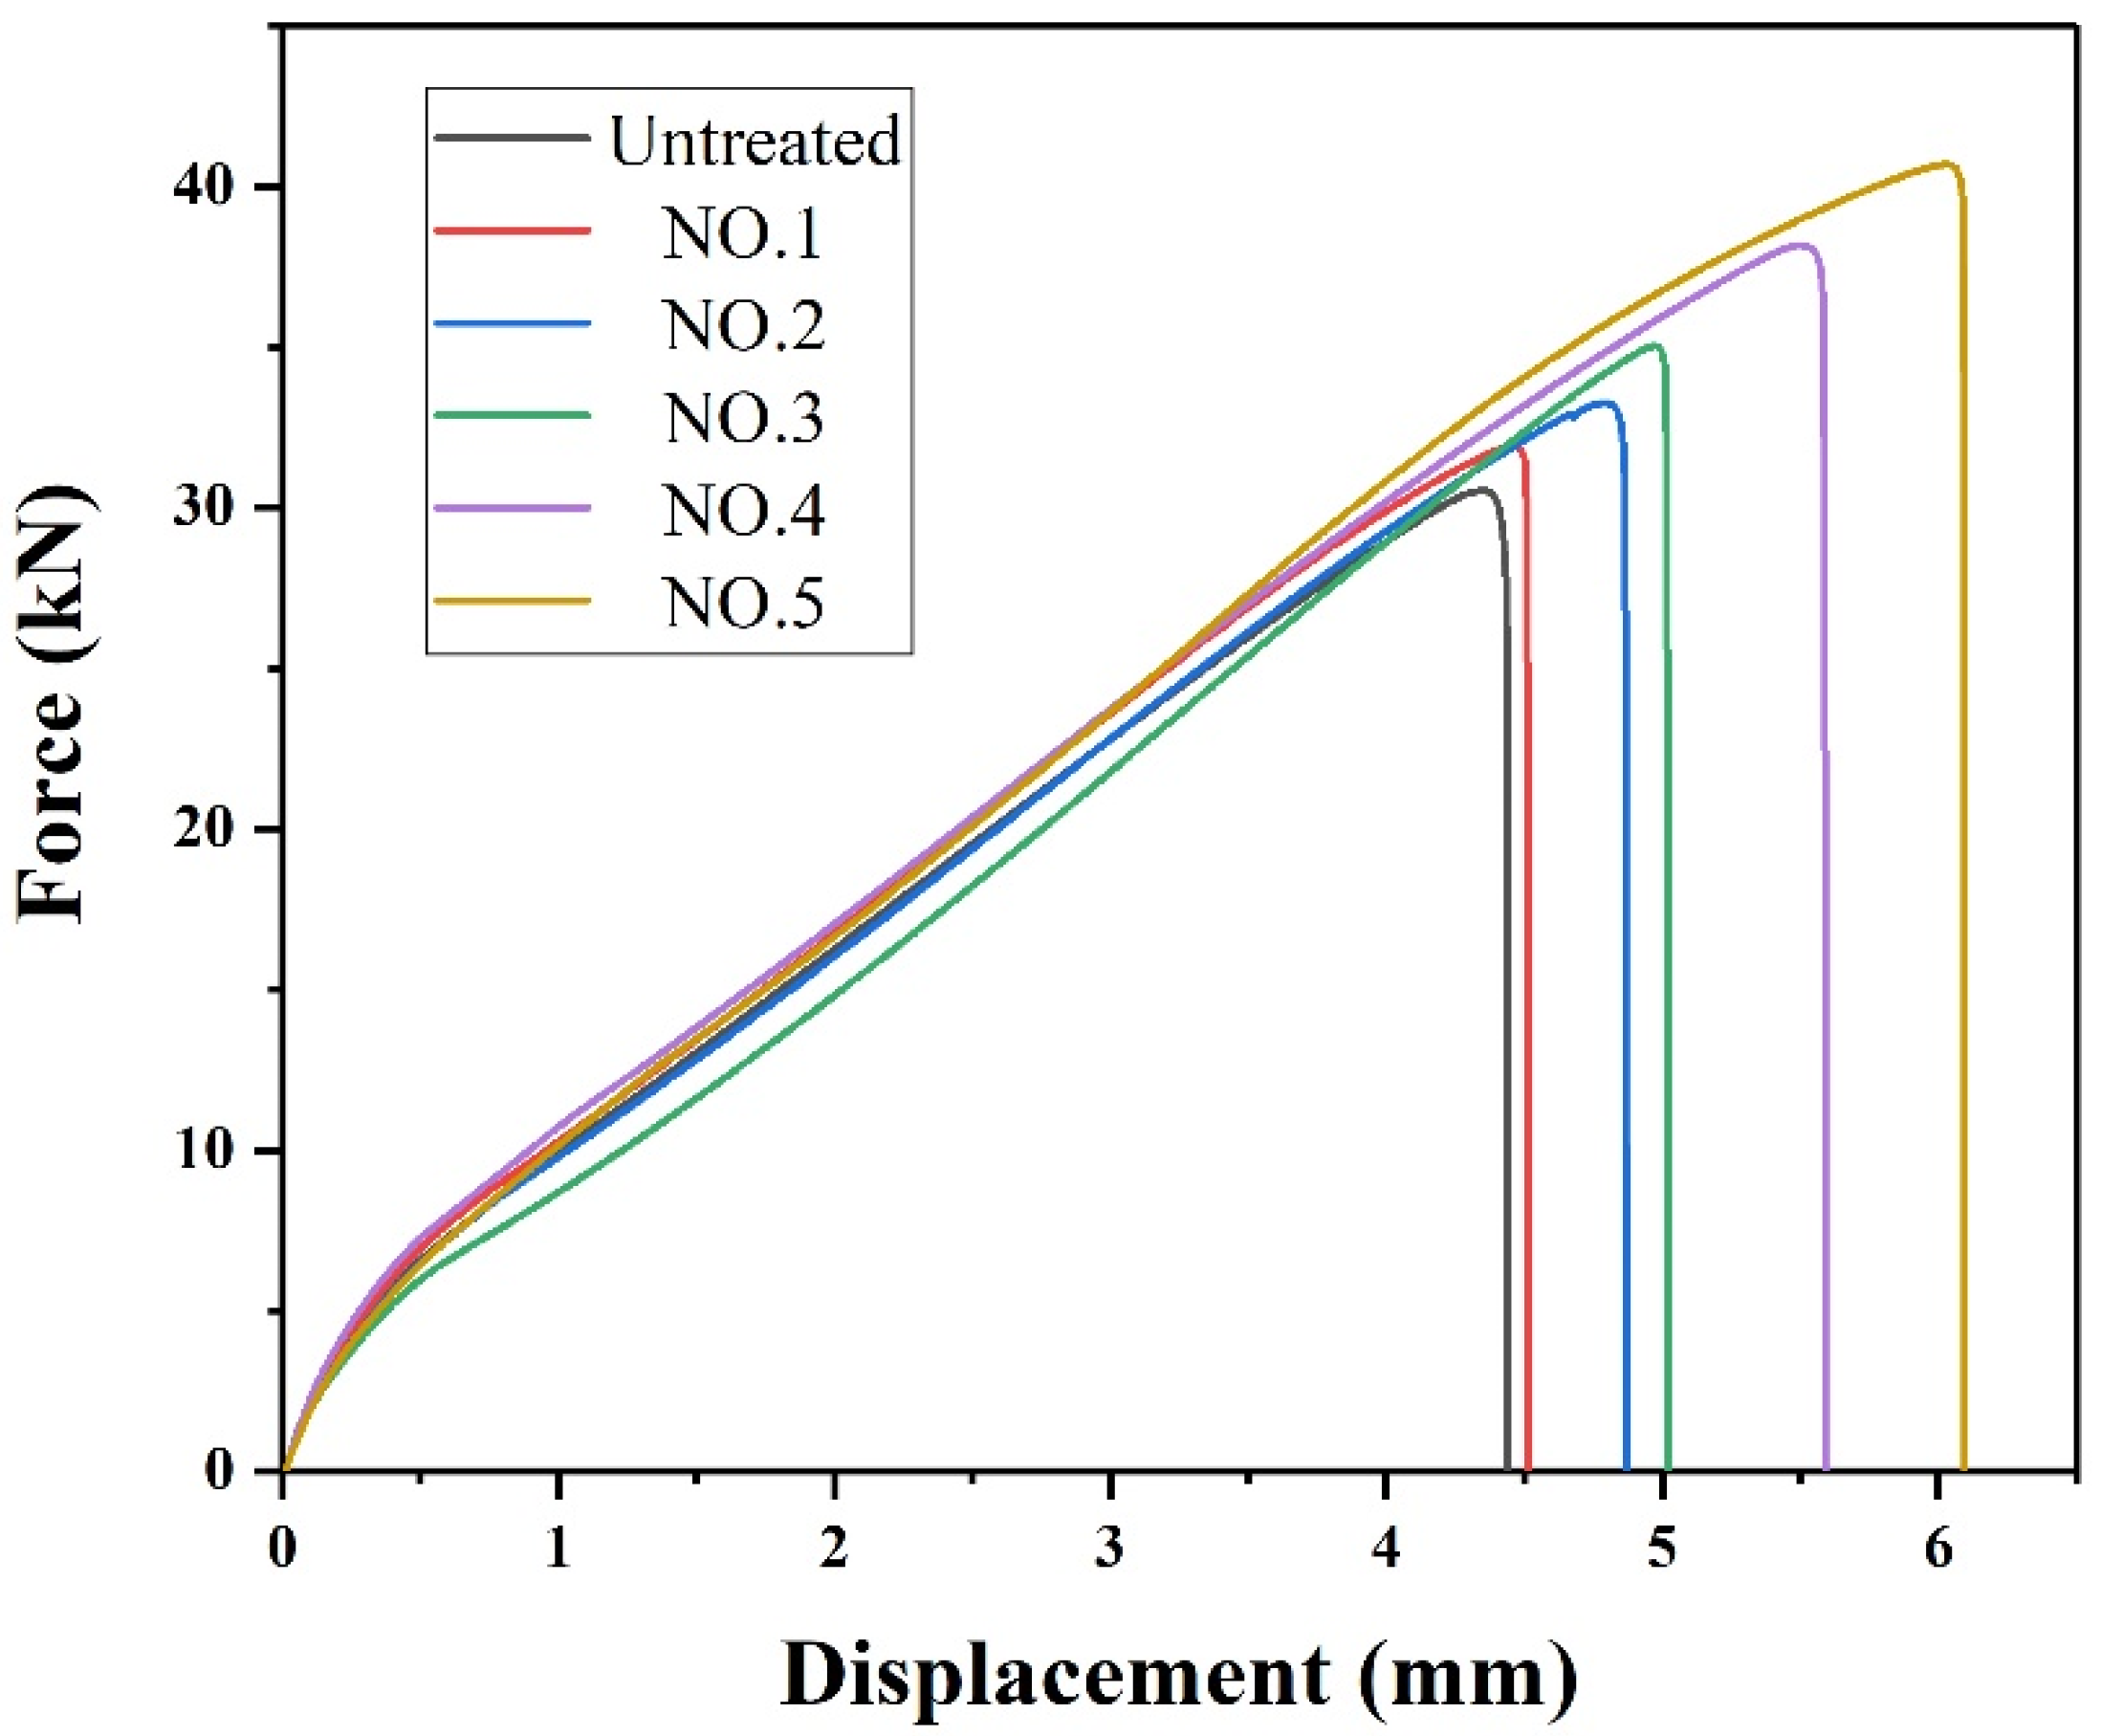
The stress-strain curves of the tested samples are shown in Figure 12. Samples No. 1–5 showed notably better tensile properties than the unrepaired sample. As the laser energy increased, the ultimate tensile force (UTF) of specimens No. 1 (31.90 kN) < No. 2 (33.24 kN) < No. 3 (35.02 kN) < No. 4 (38.15 kN) < No. 5 (40.68 kN), while the ultimate tension of the unrepaired sample is 29.67 kN. Specifically, when the laser energy density was 165.6 15 + 19 J/ mm 2 , the specimen reached the highest UTF of 40.68 kN, which was 37.11% higher than the untreated sample, demonstrating the best tensile property.

3.3. Tensile Mechanism

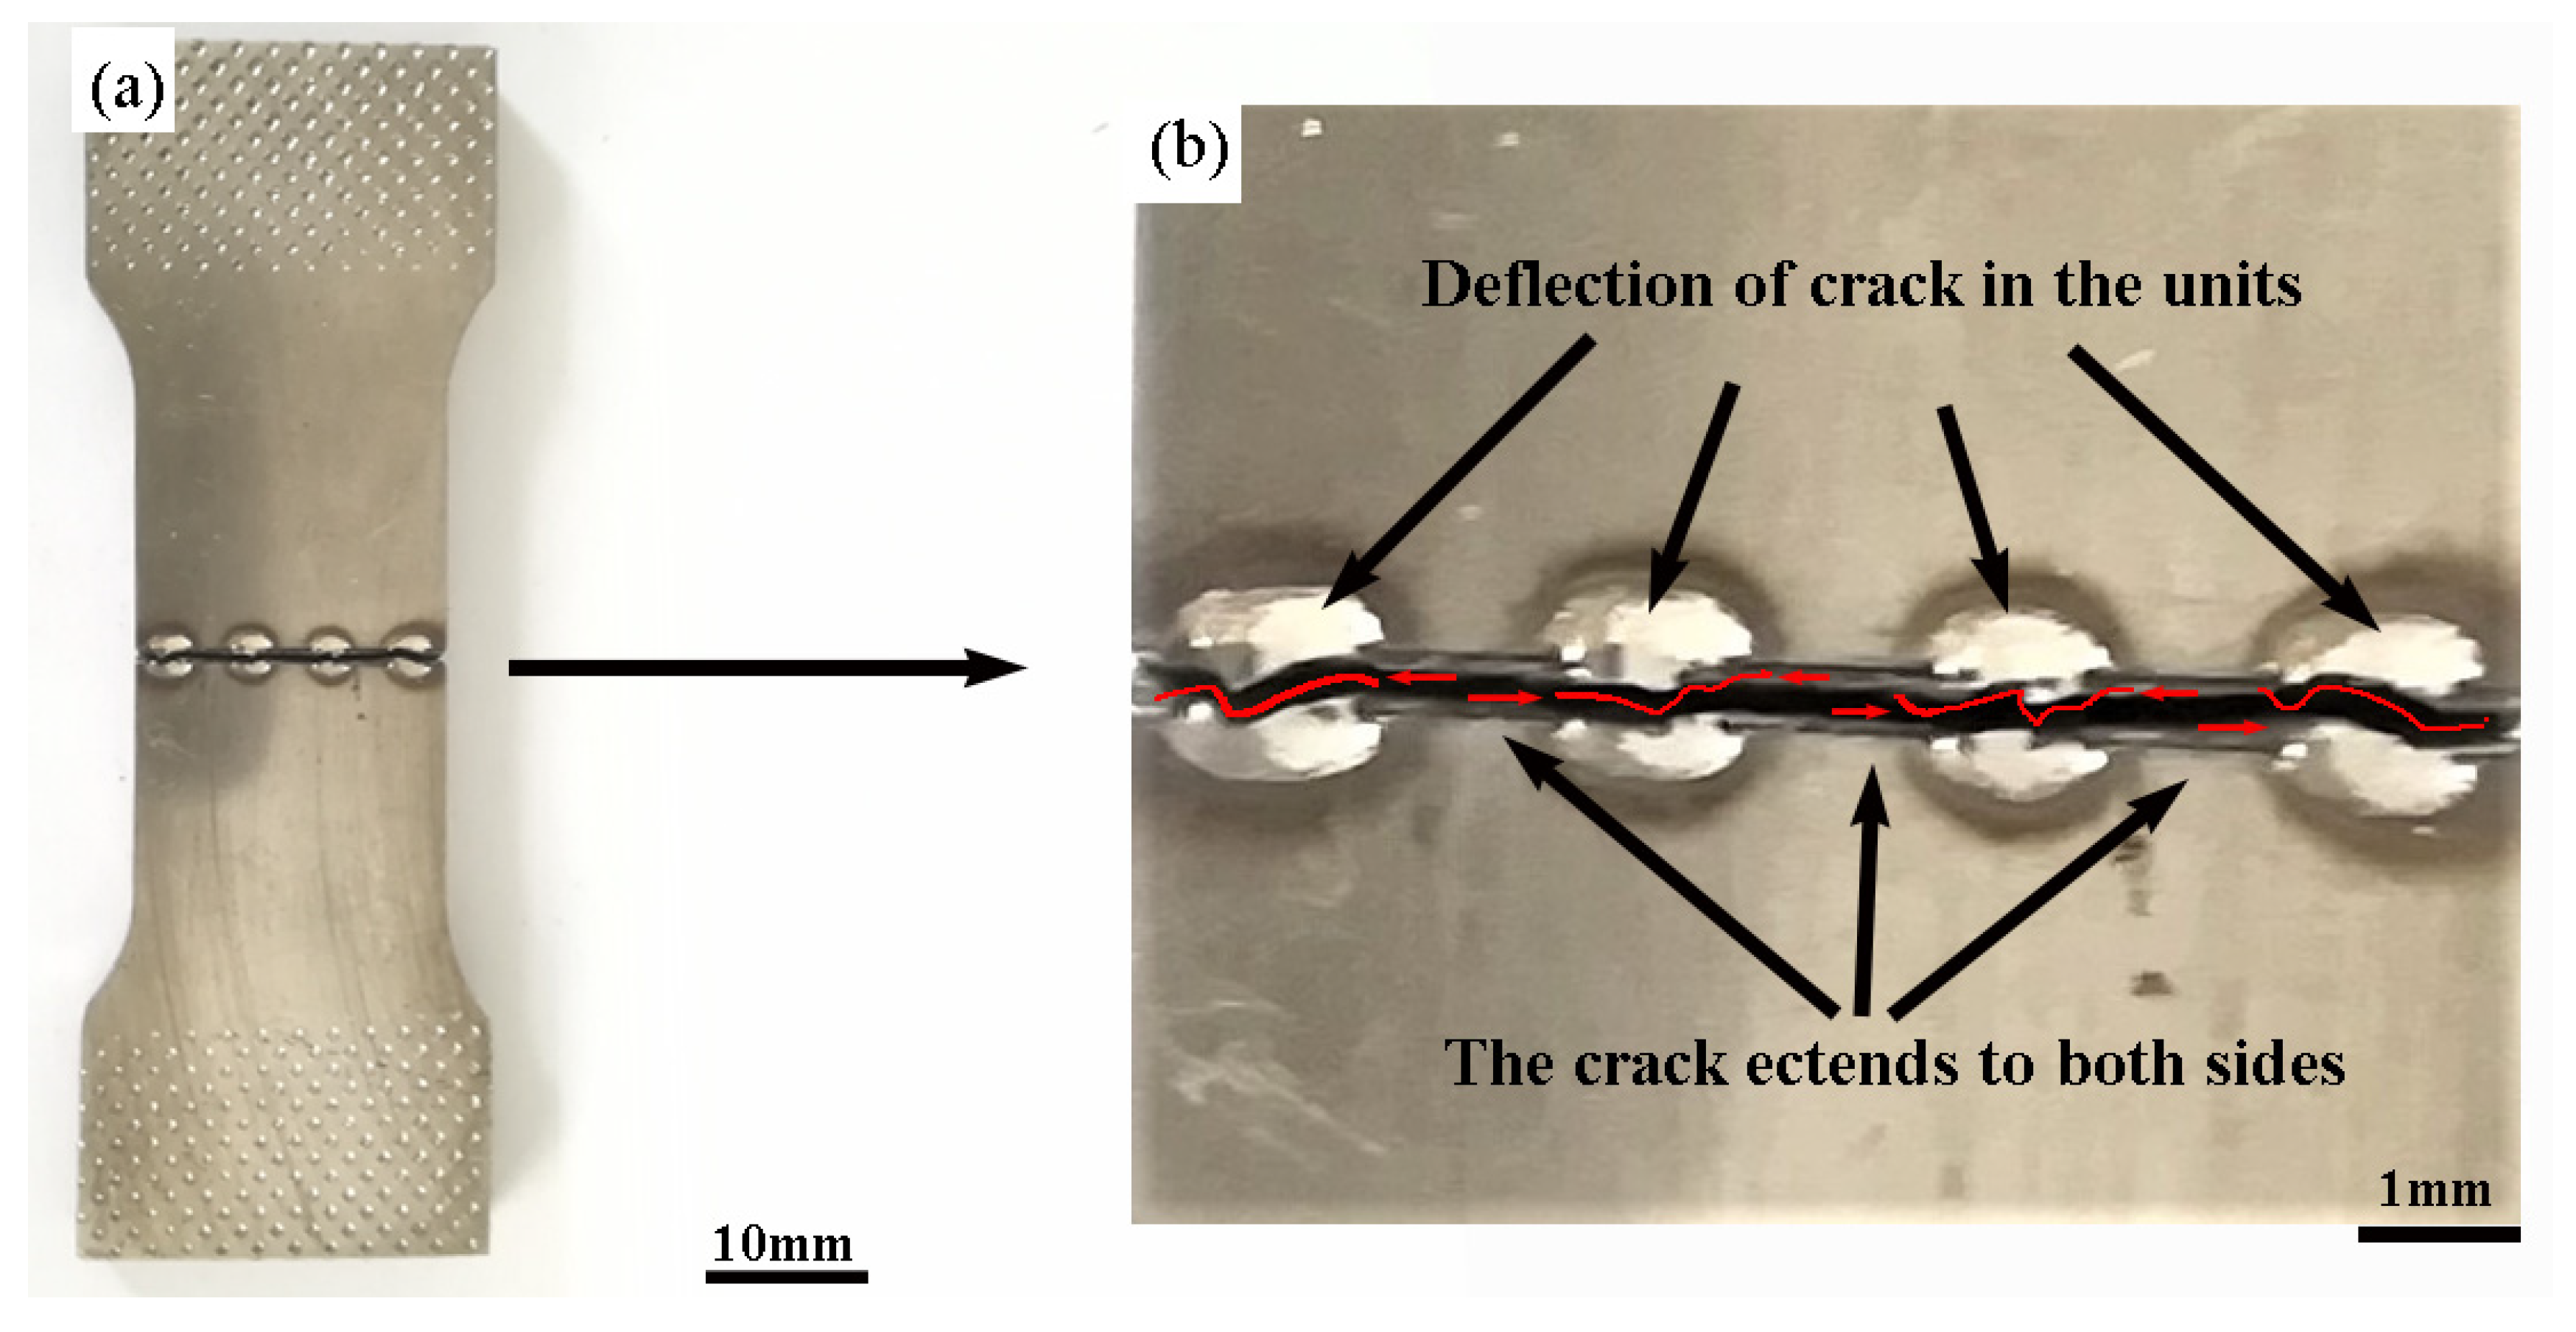
In the laser melted zone, the metal melted and solidified at an extremely rapid rate and formed a smaller and denser microstructure. According to the research of Aqida et al. [26], microstructure improvements enhanced the mechanical properties. As can be seen from Figure 13, during the initial stage of tension application, the units resisted external force, and the stress acting on the crack was reduced. After fracture, the propagation path of the crack inside the unit presented a folded line, which indicated that during tensile tests, units with good toughness concentrated most of the tensile stresses, which hindered crack propagation; therefore, units with greater strengths led to specimens with greater tensile strengths. The relationship between grain size and yield strength can be expressed by the Hall–Petch formula [27]:
δ y = δ i + k y d 1 / 2
where δ y is the yield strength of the material, δ i represents the resistance to dislocation movement; k y is a constant related to the grain size, and d is the average diameter of grains. The formula indicates that the finer the grain size, the higher the strength. In addition, the larger effective cross-section size of the units led to the more significant enhancement effect on the tensile strength of specimens. For samples No. 1 to No. 5, as the laser energy input increased, the unit size was increasingly enlarged, but the grain size gradually decreased, so the strength exhibited a trend of increasing.
As shown in Figure 5, the units of samples No. 1–4 did not completely lock the cracks, and microcracks and shrinkage cavities were observed in the sample. On the one hand, these defects reduced the effective cross-sectional area of the unit; on the other hand, when samples were subjected to loads, these residual defects will serve to create new cracks, thus reducing the tensile strength of the sample. However, No. 5 displayed the highest tensile strength because there were no defects in the unit, and the cracks were completely locked.

3.4. Thermal Fatigue Tests

Since samples were heated in a heating furnace, the surface temperature of the samples slowly increased, so there was almost no temperature gradient between the sample surface and interior during heating; however, the samples expanded during heating. When samples were subsequently rapidly cooled, the surface immediately shrank, while the internal temperature was still high. Therefore, the shrinkage of the surface was limited by the internal material, and the sample surface generated tensile thermal stresses, which caused the cracks to expand.
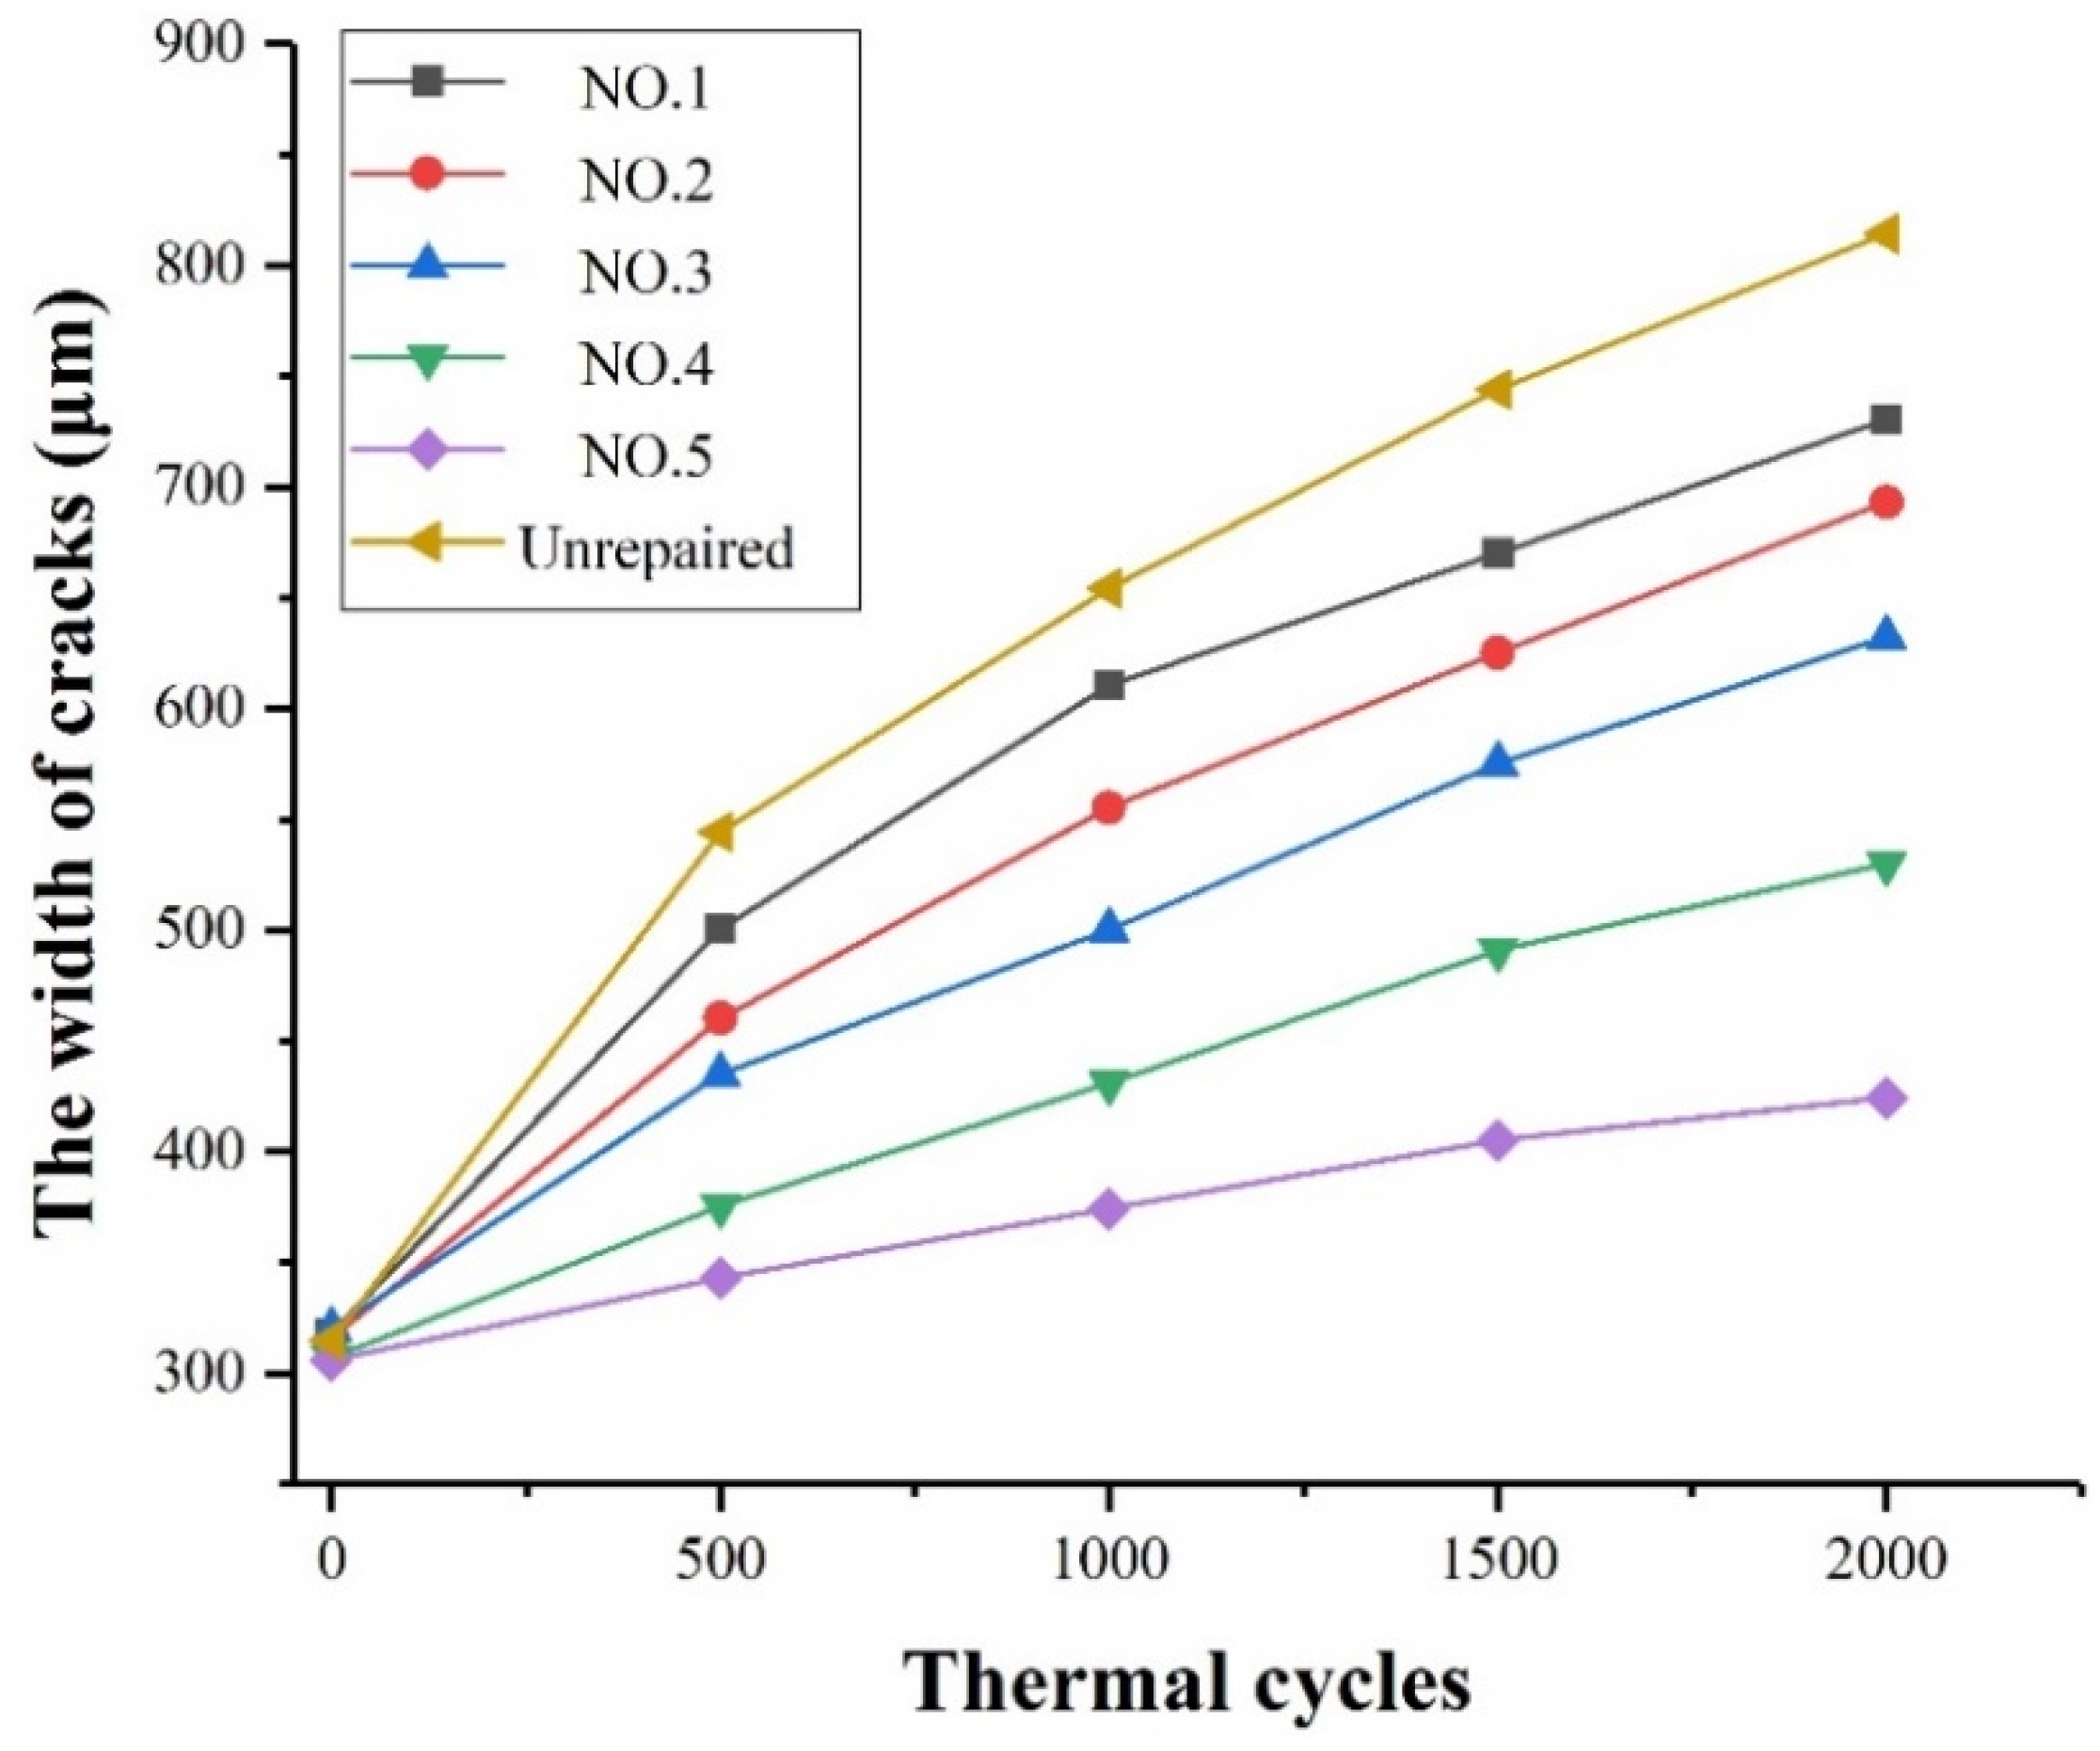
Figure 14 shows the W-N curve which is drawn with the number of cycles (N) taken as the horizontal coordinate and the width of the thermal crack on each sample surface (W) taken as the vertical coordinate.
It is obvious that the crack width in the untreated specimen after 2000 thermal cycles was 499.21 μm, which was larger than the main crack of the repaired specimens. This shows that the locking unit can effectively prevent crack propagation. An increase in the rate of crack expansion in repaired samples was indicated by the different slopes of their curves in Figure 14, which shows that the crack width increase rates followed the order: No. 5 < No. 4 < No. 3 < No. 2 < No. 1. Figure 14 also shows that the increase in the crack width of sample No. 5 was the smallest, with a value of 118.31 μm. The specimen No. 1 with the largest crack width increment of 412.34 μm is 248.53% larger than sample No. 5.
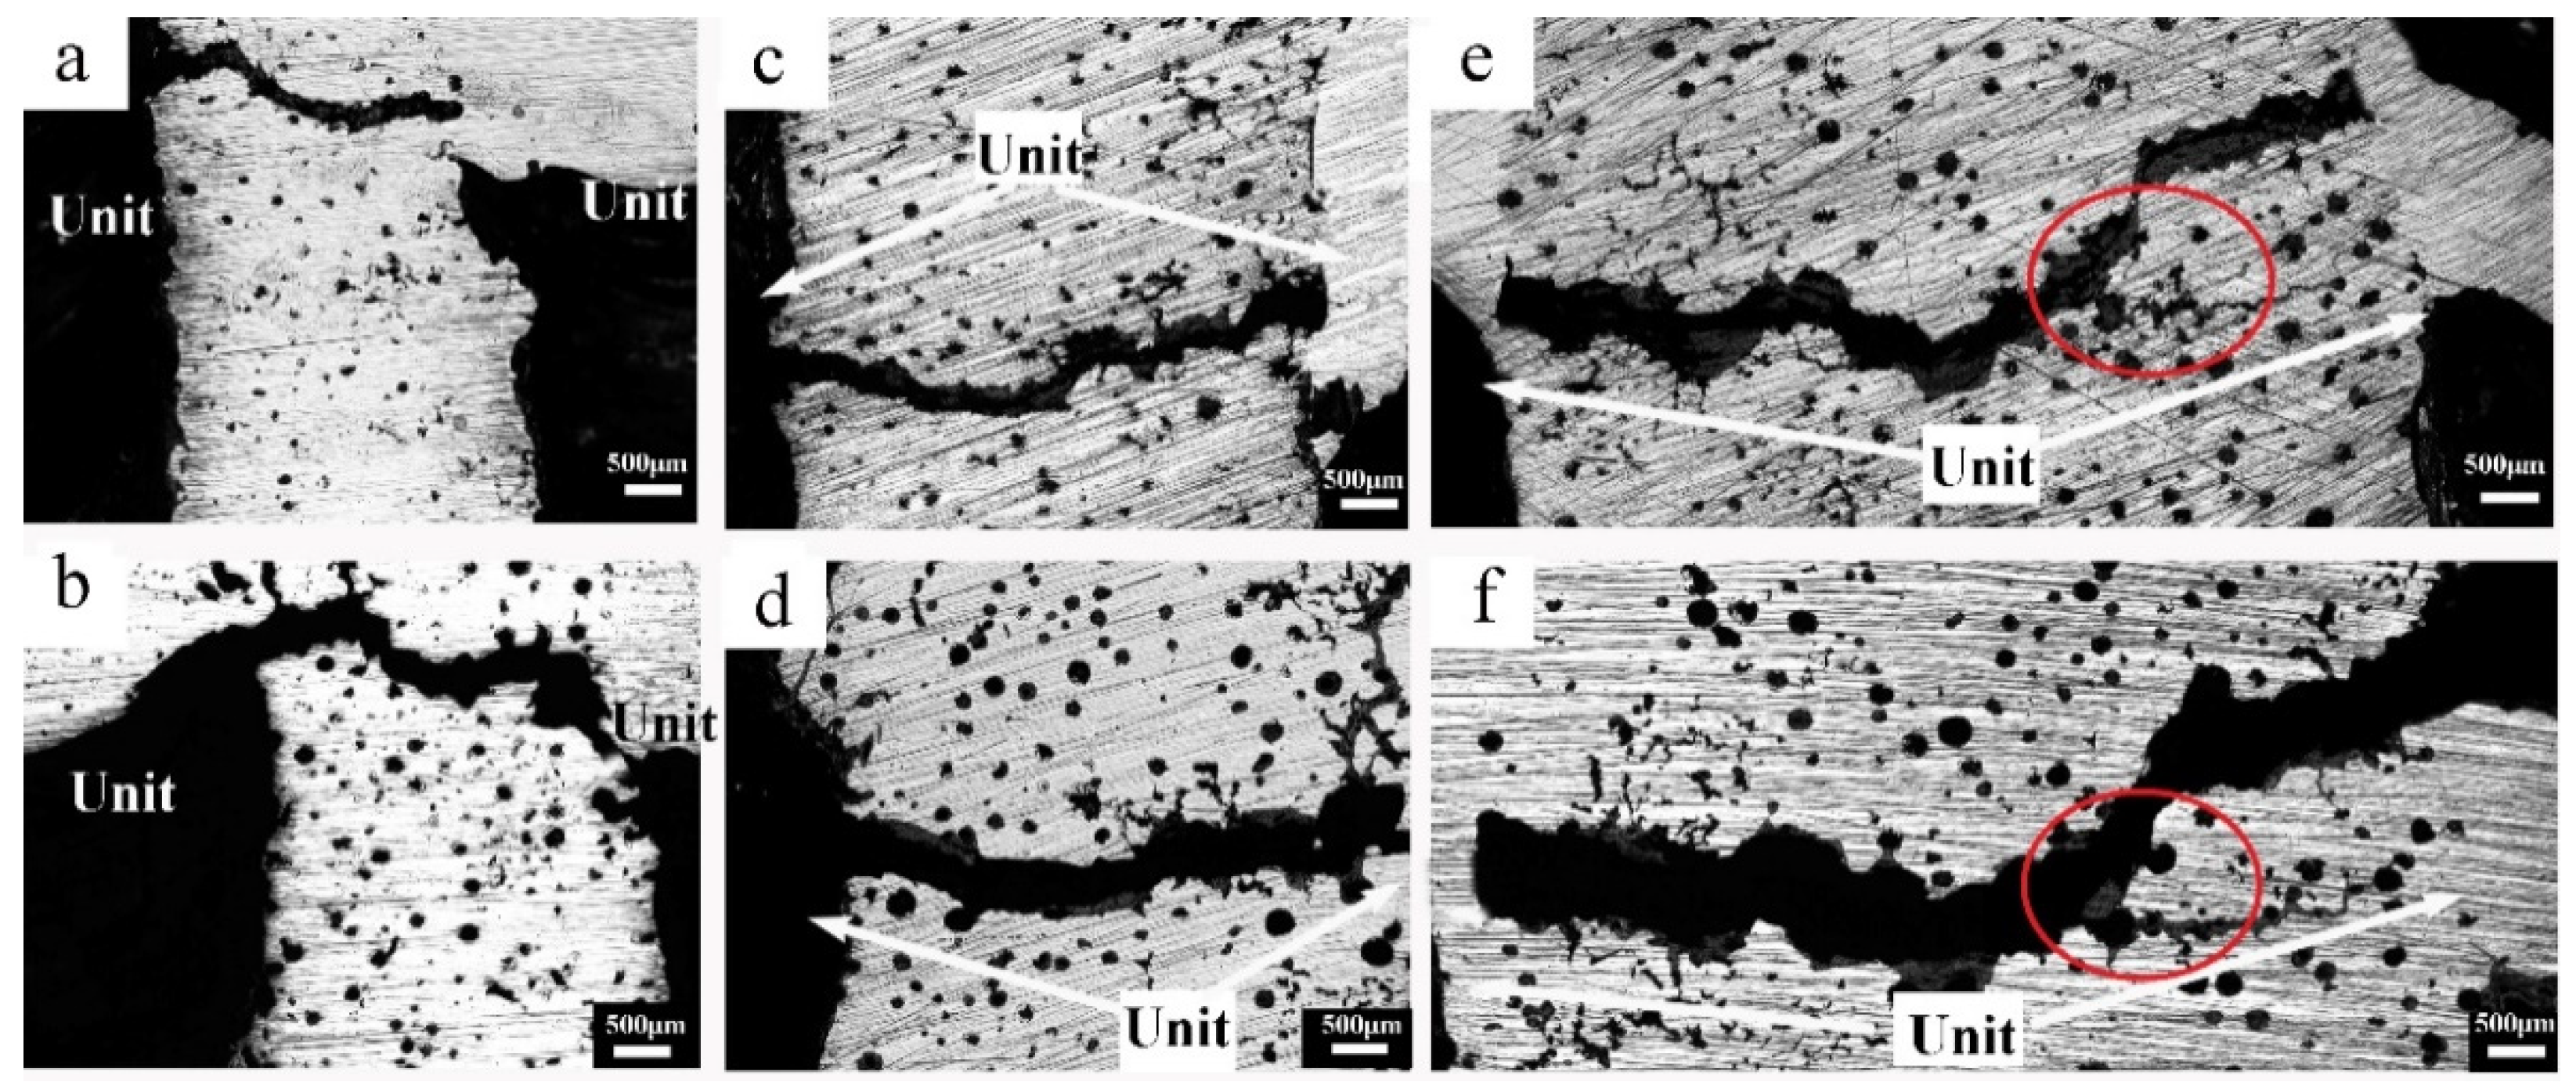
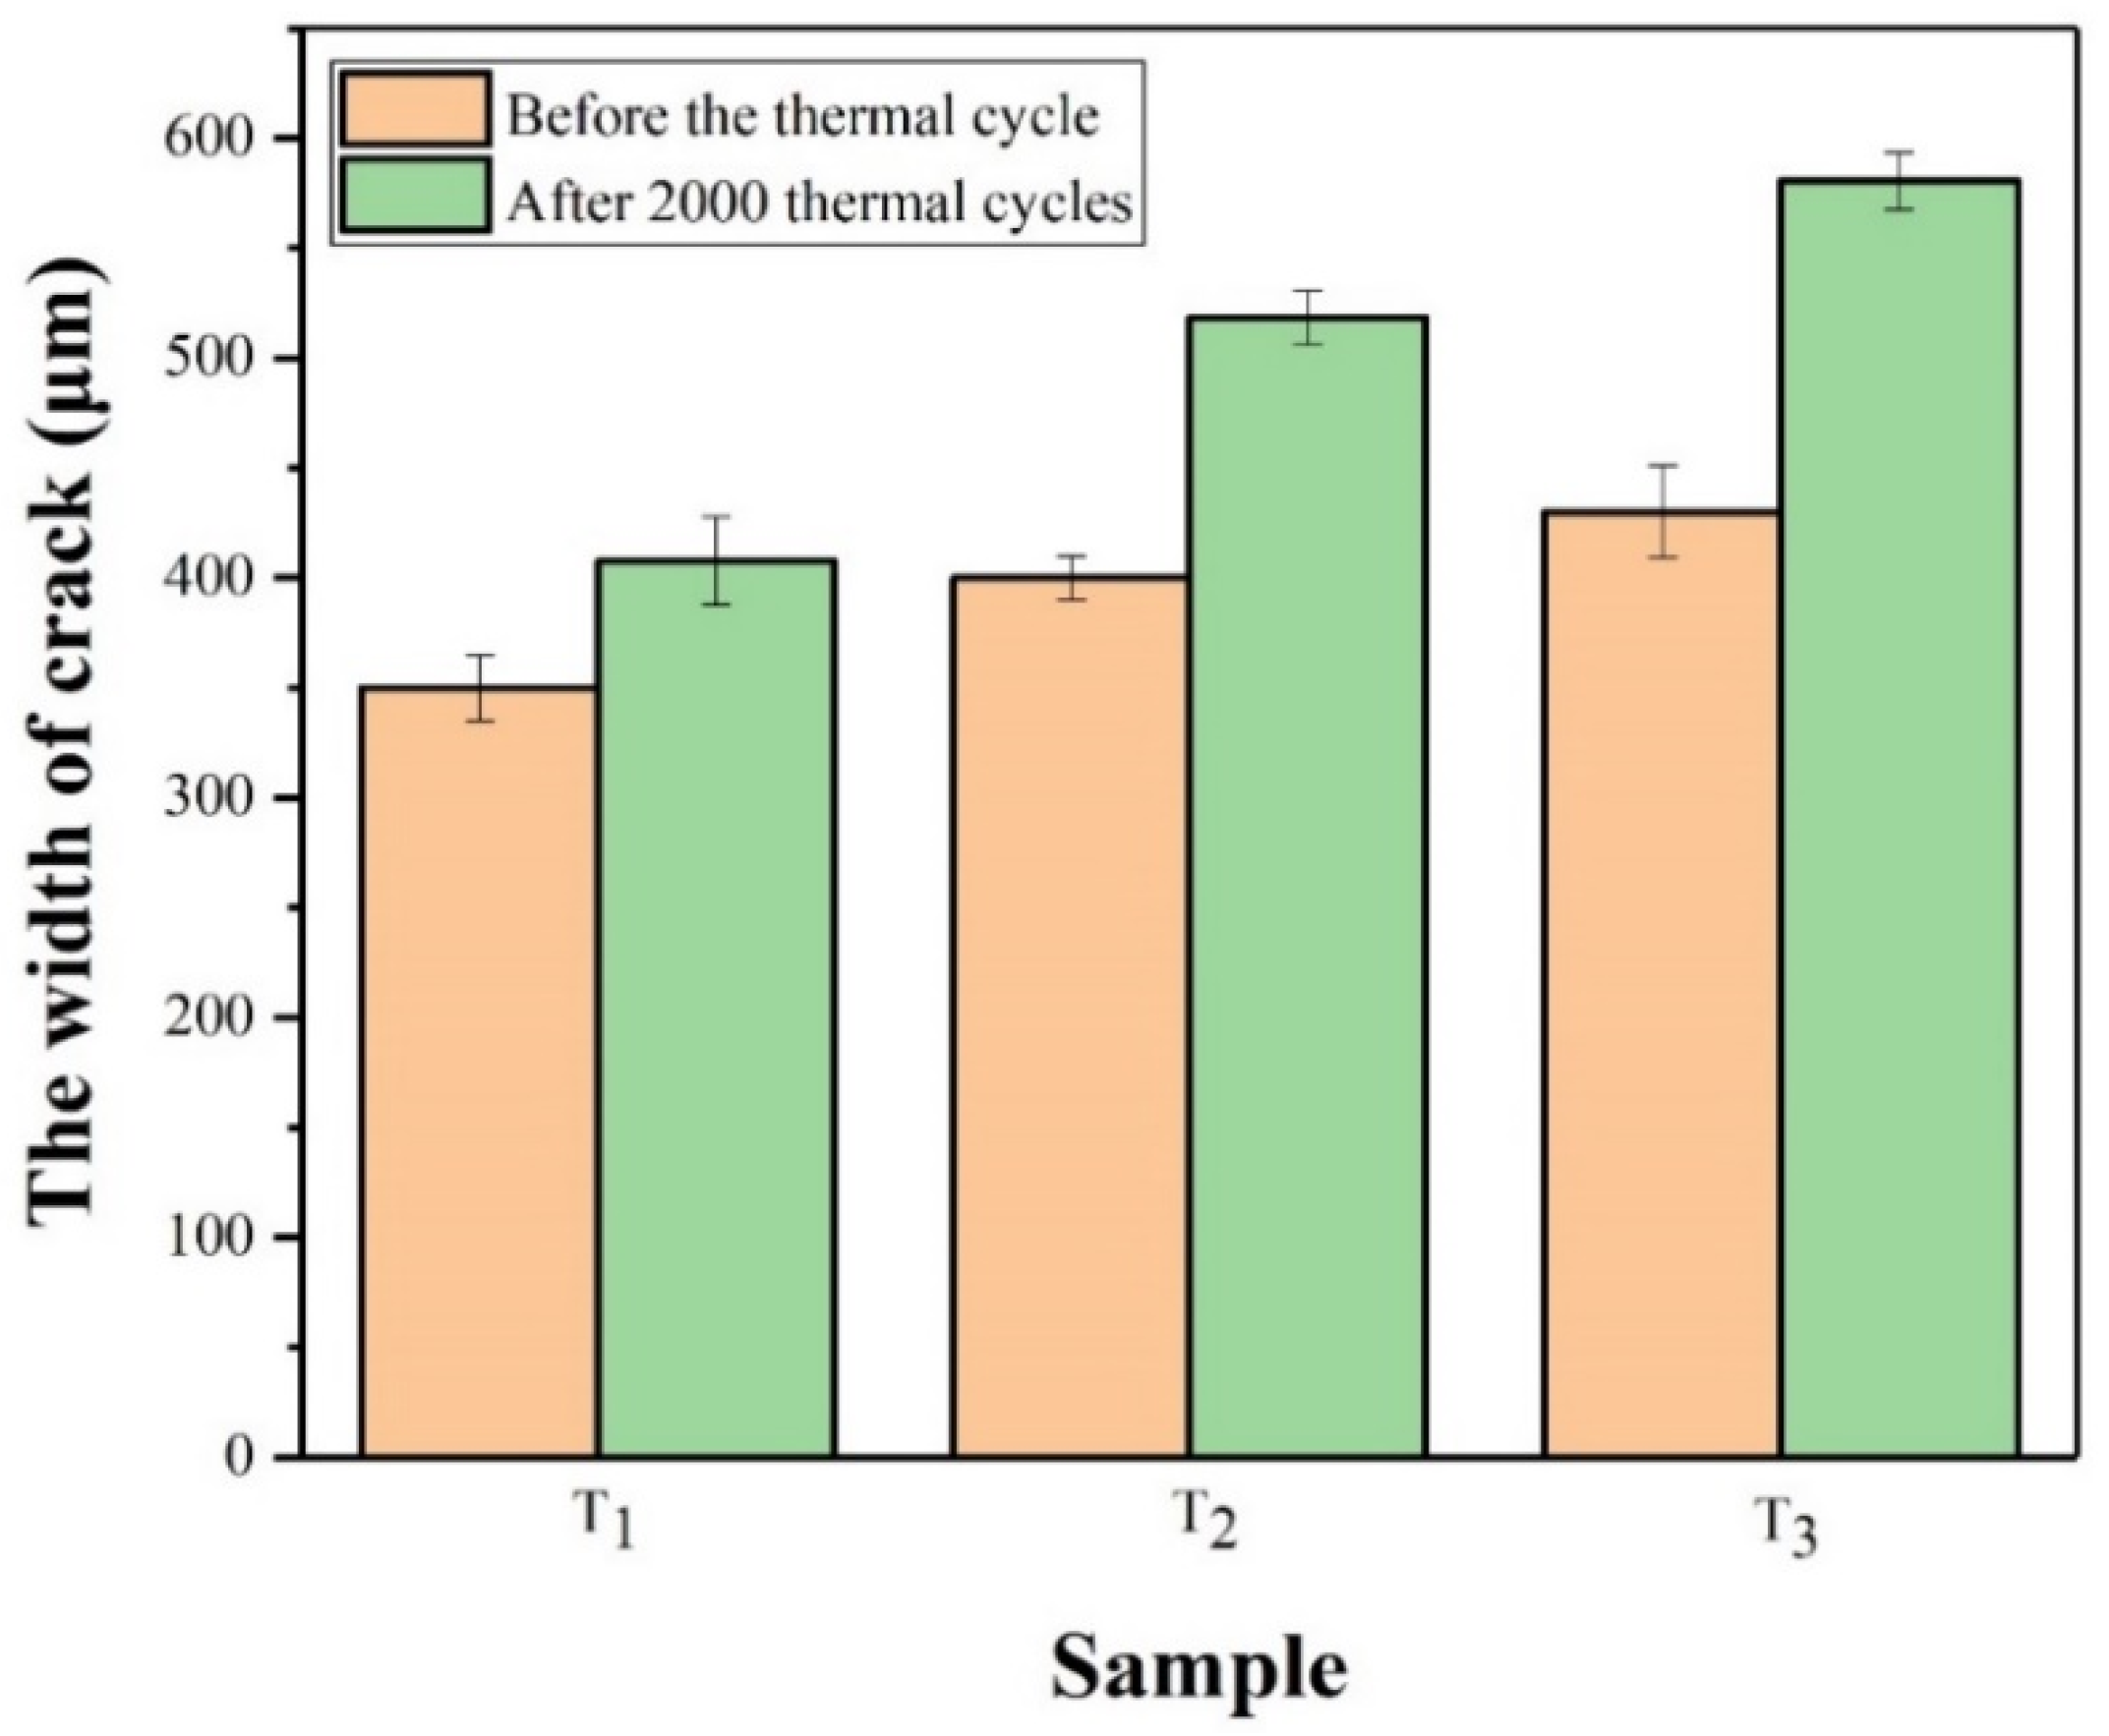
Specimens T1, T2, and T3 were subjected to go through 0 thermal cycles and 2000 thermal cycles respectively, as shown in Figure 15, which shows that the increase in the crack width increment was obviously different after 2000 thermal cycles and followed the order T1 (57.68 μm) < T2 (118.31 μm) < T3 (150.62 μm) as can be seen from Figure 16. Therefore, it can be concluded that as the distance between units increased, the crack width increased gradually, and the locking effect of units on cracks gradually decreased.

3.5. Blocking Mechanisms of Units

3.5.1. Effects of Unit Microstructure

Fatigue cracks generally occur at heterogeneous nucleation sites, such as inclusions, pores, or soft spots in microstructures [28]. It can be seen from Figure 15 above that there was more spheroidal graphite in the matrix of nodular cast iron. Similar to a hole, the graphite among the metallic matrix has no intensity. During thermal cycling, cracks are always initiated at the graphite phase, and the main crack often propagates along the graphite and matrix between the nearest graphite. Therefore, the presence of graphite reduces the thermal fatigue resistance of the material matrix to a certain extent. However, no graphite phase was found in the units, hence no bridge connection was produced between the main crack and the microcracks, whose growth depends on graphite, i.e., the crack propagation route was cut off by the unit. Therefore, the units had better thermal fatigue resistance and prevented cracks from propagating. In addition, laser remelting can refine the grains of the structure and improve the unit strength, which prevents crack propagation.

3.5.2. Effects of the Effective Size and Distance of Units

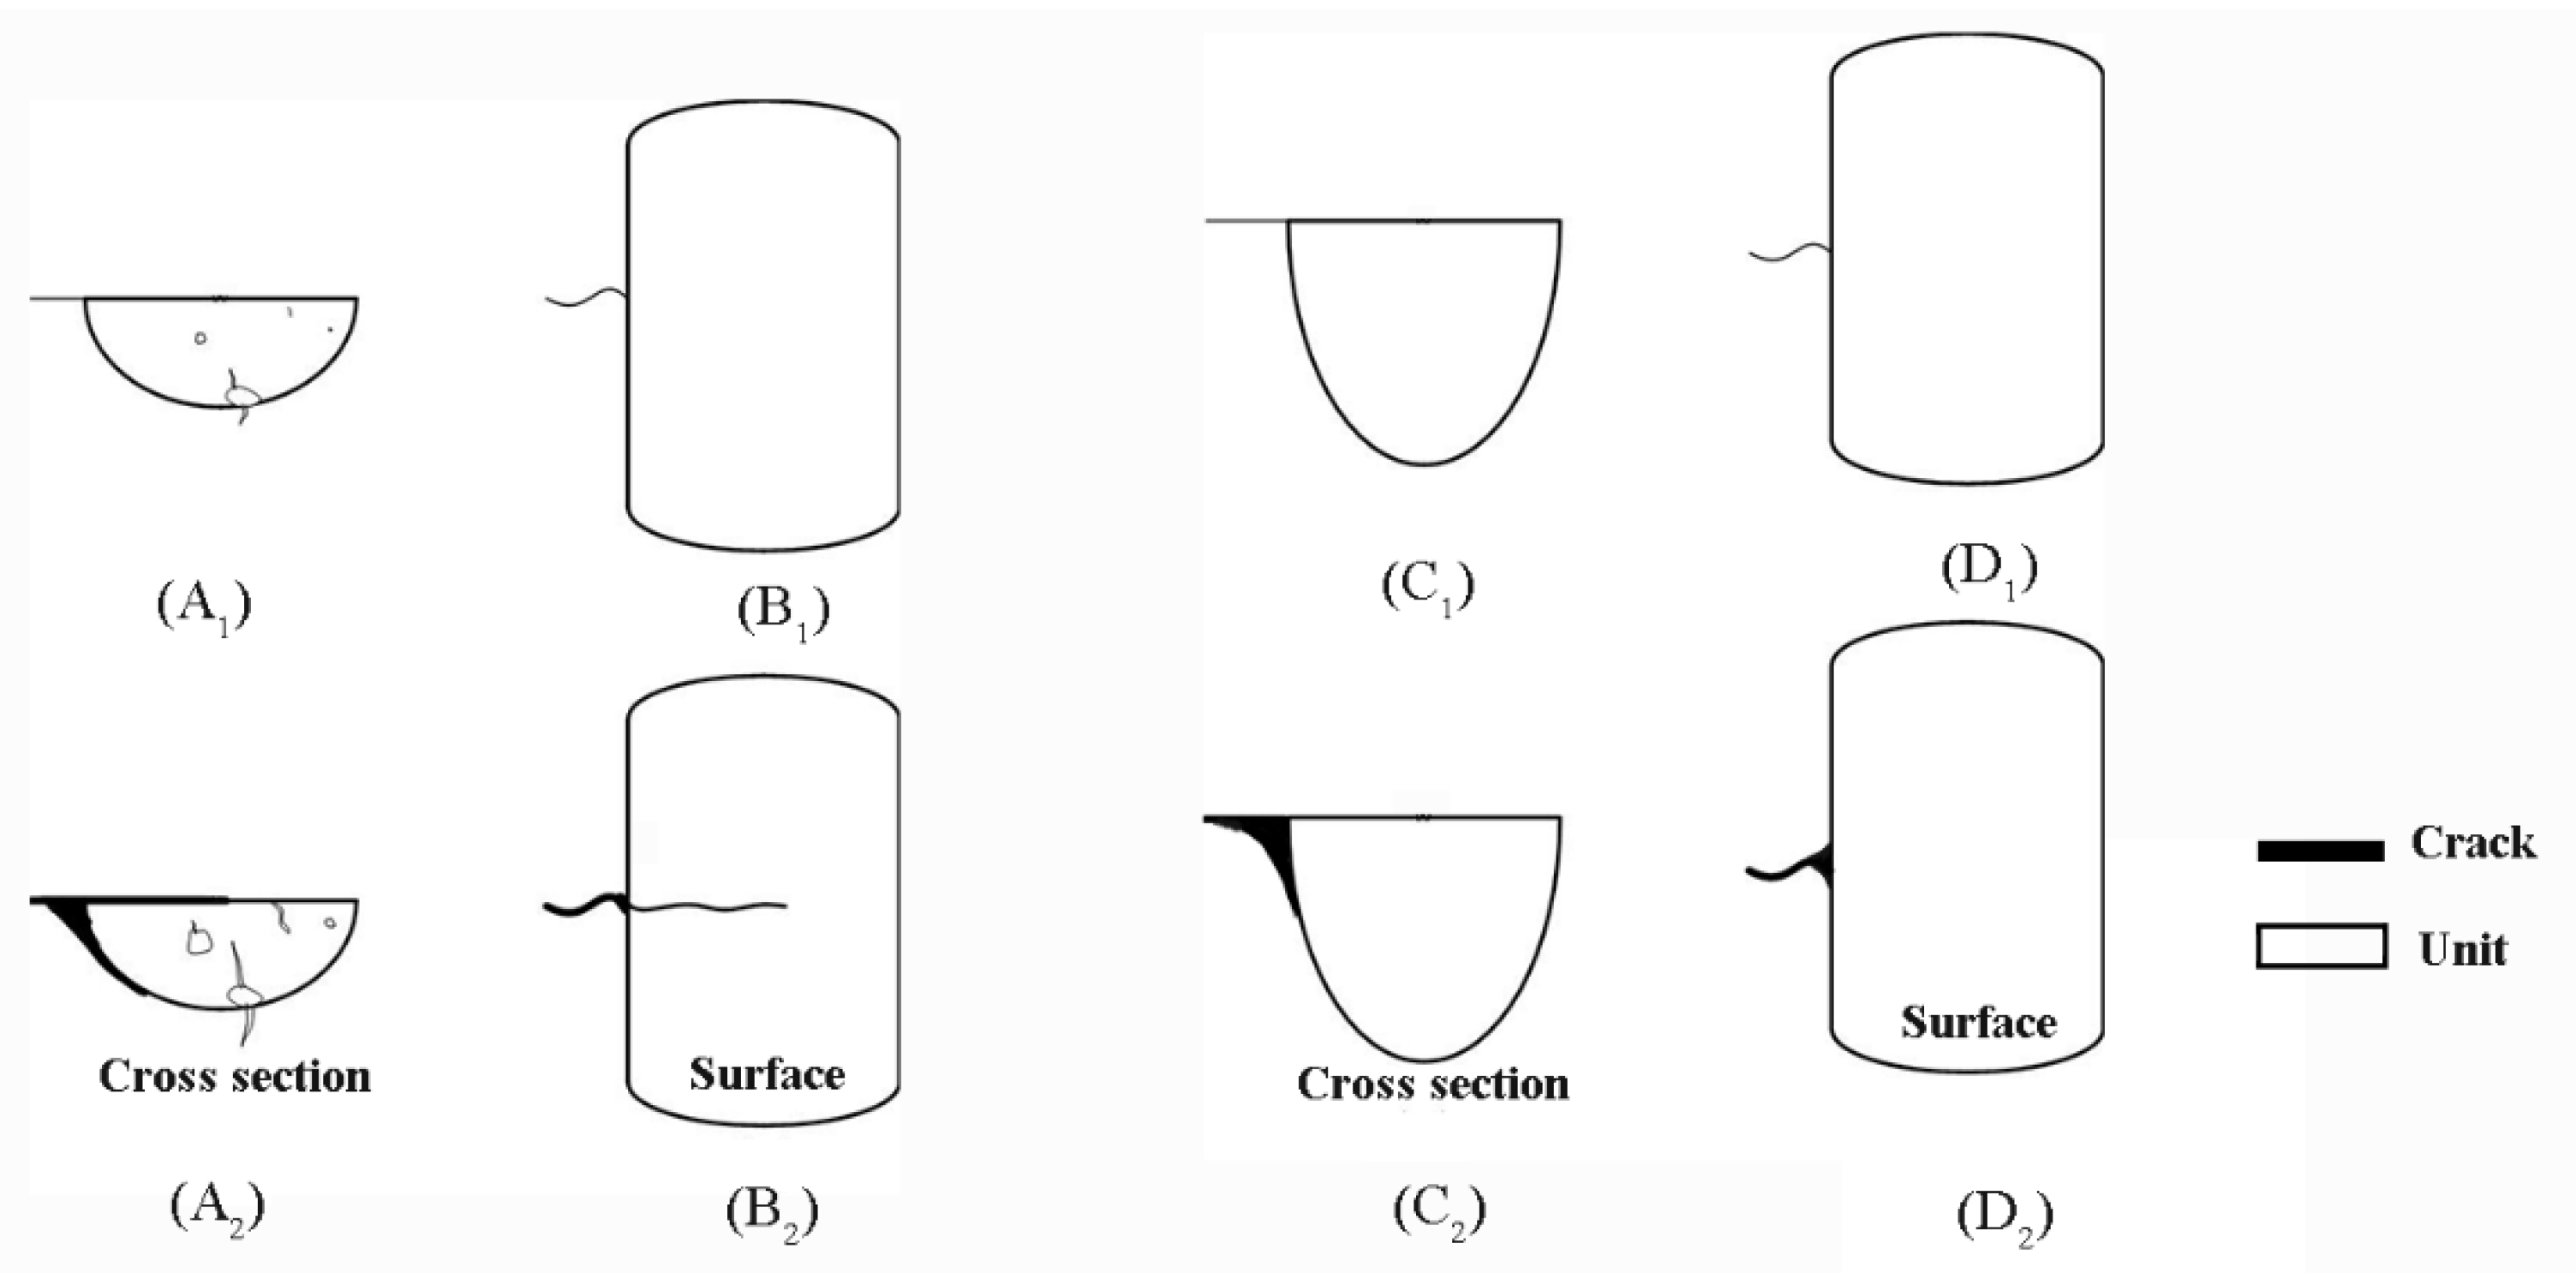
Schematic diagrams of different-sized units which prevented crack propagation are shown in Figure 17 (Figure 17A1–D1 is the sample without thermal cycling, and Figure 17A2–D2 is the sample after 2000 thermal cycles). Since the units had similar surface areas, the depth determined the size of its cross-sectional area. A greater depth of a unit indicates a greater bridging degree of a crack and also a larger cross-sectional area of the strengthened unit; however, the existence of microcracks or holes in the unit reduces the effective depth and cross-sectional area. In addition, the existence of such defects greatly reduces the strength of the unit. Under the action of thermal stress, thermal fatigue cracks will continue to expand into the unit, preventing the unit from effectively locking cracks. Therefore, when the laser energy density was increased, the unit with a larger effective size completely bridged the cracks, and since there were no cracks or holes in the interior, it had a larger tensile strength and could withstand larger thermal tension caused by thermal cycling. This allowed it to greatly reduce the thermal tension on the cracks, thus effectively preventing cracks from propagating.
Since thermal stress was uniformly distributed on the crack, the total force of the thermal stress on the crack depends mainly on the crack length. The smaller the distance between adjacent units, the shorter the length of the crack that is blocked by the unit, and therefore the smaller the resultant thermal stress on the crack. In addition, a smaller unit spacing increases the number of units that can share thermal stresses. When subjected to the same magnitude of thermal stress, the crack in specimens with a smaller unit spacing was subject to less thermal stress, and the cracking speed was slower. In summary, a smaller unit spacing resulted in a better crack blocking effect.

4. Conclusions

This study provides an effective and convenient method to repair brake disc cracks and to extend the service life of brake discs and save resources. Thermal fatigue cracks of ductile iron were repaired discontinuously using biomimetic locking units. The effects of size, microstructure, and spacing of the units on thermal fatigue crack repair were studied. The following conclusions were obtained:
(1)
The units without defects improved both the thermal fatigue resistance and tensile strength. As the laser energy increased, the depth and microhardness of the units gradually increased, while the grain size gradually decreased. The microhardness and depths of the units reached a maximum at a laser input energy of 165.6 15 + 19 J/ mm 2 . In addition, the sample treated at this laser energy exhibited the highest tensile force of 40.68 kN, which was 37.11% higher than the unrepaired specimen.
(2)
Compared with the substrate, the units without graphite effectively prevented crack propagation. In this experiment, after 2000 thermal fatigue cycles, the crack width of the unrepaired specimen increased by 499.21 μm, while the crack width of the repaired specimen increased between 118.31 and 412.34 μm. The crack width of the sample with a laser energy density of 165.6 15 + 19 J/ mm 2 increased by 118.31 μm, which was 23.70% of the unrepaired sample, showing the best crack blocking effect.
(3)
A larger effective depth resulted in a better blocking effect of thermal fatigue cracks. The presence of cracks and holes reduced the strength of the unit and weakened its crack arresting effect, which was also affected by the distance between adjacent units. In this experiment, after 2000 thermal fatigue cycles, the increase in the crack width of the unit sample with a spacing of 7 mm was 150.62 μm, while the crack width in the unit sample with a spacing of 3 mm increased by 57.68 μm, which was 61.70% smaller than that of the unrepaired sample. This demonstrates the beneficial effects of reducing the spacing of units on inhibiting thermal fatigue crack propagation.

Author Contributions

Conceptualization, T.Z. and B.Z.; data curation, S.M. and G.C.; funding acquisition, H.Z.; methodology, S.M.; project administration, H.Z.; validation, S.W.; writing—original draft, S.M.; writing—review and editing, S.M. All authors have read and agreed to the published version of the manuscript.

Funding

This work was supported by Project 985-High Performance Materials of Jilin University, Project 985-Bionic Engineering Science and Technology Innovation, National Natural Science Foundation of China (U1601203), and double first-class project by Jilin Province and Jilin University (SXGJXX2017-14).

Acknowledgments

Acknowledgments are made to the Key Laboratory of Automobile Materials of Jilin University for the use of scanning electron microscopy and X-ray diffraction.

Conflicts of Interest

The authors declare no conflicts of interest regarding the publication of this paper. I would like to declare on behalf of my co-authors that the work described was original research that has not been published previously, and not under consideration for publication elsewhere, in whole or in part. All the authors listed have approved the manuscript that is enclosed.

References

  1. Fragassa, C.; Radovic, N.; Pavlovic, A.; Minak, G. Comparison of mechanical properties in compacted and spheroidal graphite irons. Tribol. Ind. 2016, 38, 49–59. [Google Scholar]
  2. Šamec, B.; Potrč, I.; Šraml, M. Low cycle fatigue of nodular cast iron used for railway brake discs. Eng. Fail. Anal. 2011, 18, 1424–1434. [Google Scholar] [CrossRef]
  3. Chen, H. Dynamic failure mechanism and reverse design and preparation of new high-speed brake disc composite materials for high-speed trains above 350 km/h. Acad. Trends 2011, 4, 20–24. [Google Scholar]
  4. Bagnoli, F.; Dolce, F.; Bernabei, M. Thermal fatigue cracks of fire fighting vehicles gray iron brake discs. Eng. Fail. Anal. 2009, 16, 152–163. [Google Scholar] [CrossRef]
  5. Li, Z.; Han, J.; Yang, Z.; Pan, L. The effect of braking energy on the fatigue crack propagation in railway brake discs. Eng. Fail. Anal. 2014, 44, 272–284. [Google Scholar] [CrossRef]
  6. Mazánová, V.; Polák, J. Initiation and growth of short fatigue cracks in austenitic Sanicro 25 steel. Fatigue Fract. Eng. Mater. Struct. 2018, 41, 321–330. [Google Scholar] [CrossRef]
  7. Goo, B.-C.; Lim, C.-H. Thermal fatigue of cast iron brake disk materials. J. Mech. Sci. Technol. 2012, 26, 1719–1724. [Google Scholar] [CrossRef]
  8. Yang, F.T. Repair of brake disc of new series winch. Coal Mine Mach. 1989, 8, 14–17. [Google Scholar]
  9. Li, Y.H.; Li, X.F.; Niu, M.L. Repair of front wheel brake plate of electric wheel dumper. Eng. Mach. Maint. 2012, 2, 146. [Google Scholar]
  10. Ge, M.Z.; Xiang, J.; Zhen, F. Effect of laser cladding repair on fatigue crack propagation rate of TC4 titanium alloy. Mater. Bull. 2108, 32, 98–103. [Google Scholar]
  11. Gao, D.K.; Fu, Y.M.; Wang, P. Crack prevention and repair of 3Cr2W8V thermal fatigue crack. China Surf. Eng. 2001, 14, 42–44. [Google Scholar]
  12. Liu, Y.; Zhou, H.; Yang, C.Y.; Chen, J.Y. Thermal Fatigue Resistance of Bionic Compacted Graphite Cast Iron Treated with the Twice Laser Process in Water. Strength Mater. 2015, 47, 170–176. [Google Scholar] [CrossRef]
  13. Xin, T.; Hong, Z.; Li, C.; Zhang, Z.-H.; Ren, L. Effects of c content on the thermal fatigue resistance of cast iron with biomimetic non-smooth surface. Int. J. Fatigue 2008, 30, 1125–1133. [Google Scholar] [CrossRef]
  14. Liang, Y.; Huang, H.; Li, X.; Ren, L. Fabrication and Analysis of the Multi-Coupling Bionic Wear-Resistant Material. J. Bionic Eng. 2010, 7, S24–S29. [Google Scholar] [CrossRef]
  15. Ren, L.Q.; Liang, Y.H. Biological couplings: Classification and characteristic rules. Sci. China Ser. E Technol. Sci. 2009, 52, 2791–2800. [Google Scholar] [CrossRef]
  16. Kamat, S.; Su, X.; Ballarini, R.; Heuer, A.H. Structural Basis for the Fracture Toughness of the Shell of the Conch Strombus Gigas. Nature 2000, 405, 1036–1040. [Google Scholar] [CrossRef]
  17. Ren, L.Q.; Li, X. Functional characteristics of dragonfly wings and progress in bionic research. Sci. China Sci. Technol. 2013, 56, 11–25. [Google Scholar] [CrossRef]
  18. Chen, Z.; Zhu, Q.; Wang, J.; Yun, X.; He, B.; Luo, J. Behaviors of 40Cr steel treated by laser quenching on impact abrasive wear. Opt. Laser Technol. 2018, 103, 118–125. [Google Scholar] [CrossRef]
  19. Faisal, T.R.; Abad, E.M.K.; Hristozov, N.; Pasini, D. The Impact of Tissue Morphology, Cross-Section and Turgor Pressure on the Mechanical Properties of the Leaf Petiole in Plants. J. Bionic Eng. 2010, 7, S11–S23. [Google Scholar] [CrossRef]
  20. Zhou, H.; Tong, X.; Zhang, Z.; Li, X.; Ren, L. The thermal fatigue resistance of cast iron with biomimetic non-smooth surface processed by laser with different parameters. Mater. Sci. Eng. A 2006, 428, 141–147. [Google Scholar] [CrossRef]
  21. Chang, G.; Zhou, T.; Zhou, H.; Zhang, P.; Ma, S.; Zhi, B.; Wang, S. Effect of Composition on the Mechanical Properties and Wear Resistance of Low and Medium Carbon Steels with a Biomimetic Non-Smooth Surface Processed by Laser Remelting. Metals 2020, 10, 37. [Google Scholar] [CrossRef] [Green Version]
  22. Wang, Y.; Huang, G.; Su, Y.; Zhang, M.; Tong, Z.; Cui, C. Numerical Analysis of the Effects of Pulsed Laser Spot Heating Parameters on Brazing of Diamond Tools. Metals 2019, 9, 612. [Google Scholar] [CrossRef] [Green Version]
  23. Lu, H.; Liu, M.; Yu, D.; Zhou, T.; Zhou, H.; Zhang, P.; Bo, H.; Su, W.; Zhang, Z.; Bao, H. Effects of Different Graphite Types on the Thermal Fatigue Behavior of Bionic Laser-Processed Gray Cast Iron. Metall. Mater. Trans. A 2018, 49, 5848–5857. [Google Scholar] [CrossRef]
  24. Babenko, A.A.; Zhuchkov, V.I.; Selmenskih, N.I. Effect of Boron on the Microstructure and Mechanical Properties of Low-Carbon Tube Steel. Mater. Sci. Forum 2019, 946, 374–379. [Google Scholar] [CrossRef]
  25. Yuan, Y.; Zhang, P.; Zhao, G.; Gao, Y.; Tao, L.; Chen, H.; Zhang, J.; Zhou, H. Effects of Laser Energies on Wear and Tensile Properties of Biomimetic 7075 Aluminum Alloy. J. Mater. Eng. Perform. 2018, 27, 1361–1368. [Google Scholar] [CrossRef]
  26. Aqida, S.N.; Brabazon, D.; Naher, S. An investigation of phase transformation and crystallinity in laser surface modified H13 steel. Appl. Phys. A Mater. Sci. Process. 2013, 110, 673–678. [Google Scholar] [CrossRef] [Green Version]
  27. Busisiwe, J.M.; Ntombizodwa, R.M.; Tshabalala, L.C.; Popoola, P.A.I. The Effect of Stress Relief on the Mechanical and Fatigue Properties of Additively Manufactured AlSi10Mg Parts. Metals 2019, 9, 1216. [Google Scholar]
  28. Pan, S.; Gang, Y.; Li, S. Experimental and numerical study of crack damage under variable amplitude thermal fatigue for compacted graphite iron EN-GJV-450. Int. J. Fatigue 2018, 113, 184–192. [Google Scholar] [CrossRef] [Green Version]
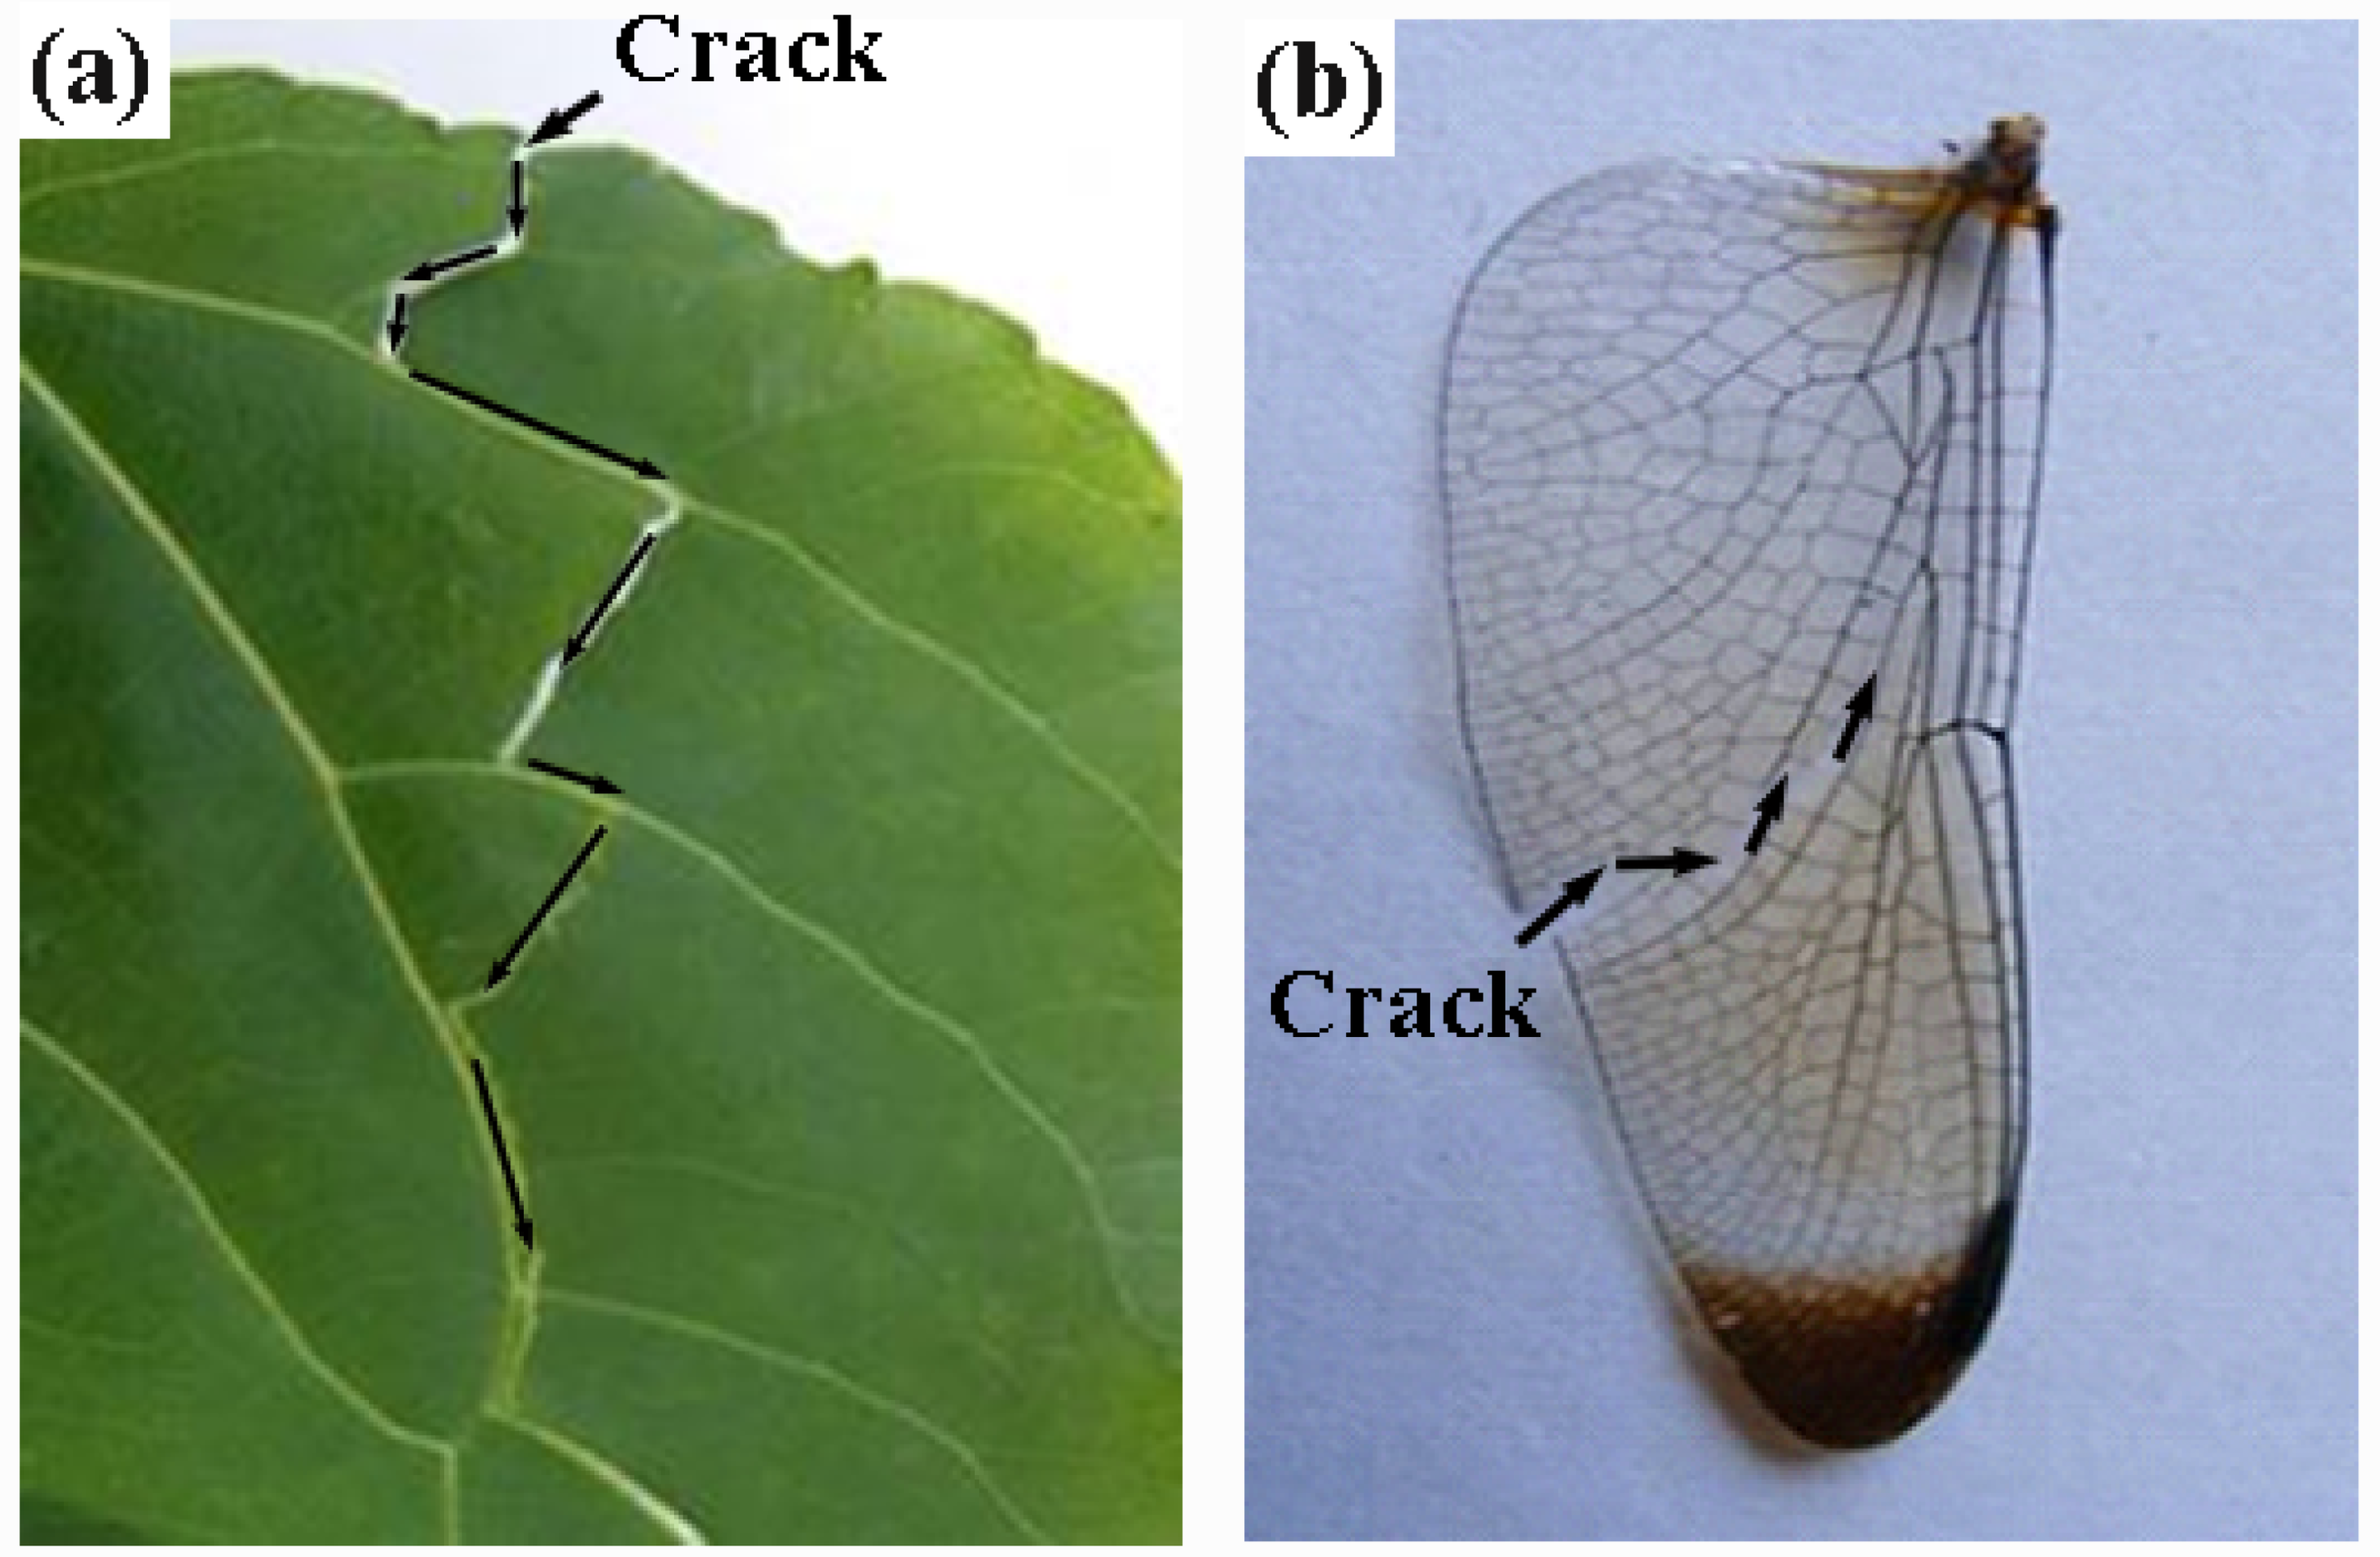
Figure 1. Deflection of crack in the leaf (a) and butterfly wing (b).
Metals 10 00101 g001
Figure 2. Microstructure of ductile iron.
Metals 10 00101 g002
Figure 3. Crack of unrepaired thermal fatigue sample.
Metals 10 00101 g003
Figure 4. Sketch of crack repair. (a) Tensile test sample, (b) thermal fatigue test sample, and (c) the cross section of the sample.
Metals 10 00101 g004
Figure 5. The schematic diagram of laser processing.
Metals 10 00101 g005
Figure 6. Sketch of the thermal-cycle testing rig.
Metals 10 00101 g006
Figure 7. The actual temperature profile of one thermal cycle (Point A and D—25 °C; B and C—700 °C).
Metals 10 00101 g007
Figure 8. Optical microscopy images of the cross-sectional morphology of units: (a) No. 1, (b) No. 2, (c) No. 3, (d) No. 4, and (e) No. 5.
Metals 10 00101 g008
Figure 9. SEM images of the microstructure of units: (a) No. 1, (b) No. 2, (c) No. 3, (d) No. 4, and (e) No. 5.
Metals 10 00101 g009
Figure 10. X-ray diffraction pattern taken from the surface of (a) untreated sample and (b) bionic blocked unit.
Metals 10 00101 g010
Figure 11. The interface between the melting zone and the substrate.
Metals 10 00101 g011
Figure 12. The stress-strain curves of the tested samples.
Metals 10 00101 g012
Figure 13. The fracture morphology of units. (a) Tensile specimen after fracture; (b) partial magnification of the tensile fracture.
Metals 10 00101 g013
Figure 14. The W-N curve (W is the width of the thermal crack; N is the number of thermal cycles).
Metals 10 00101 g014
Figure 15. The change of cracks width of sample T1, T2, and T3. (a,b) Sample T1; (c,d) sample T2; (e,f) sample T3. (a,c,e) 0 thermal cycles; (b,d,f) 2000 thermal cycles.
Metals 10 00101 g015
Figure 16. The crack width of sample T1, T2, and T3 under different thermal cycles.
Metals 10 00101 g016
Figure 17. Schematic description for cracks blocked by units with different sizes. (A1D1) before thermal cycles; (A2D2) after thermal cycles.
Metals 10 00101 g017
Table 1. Chemical compositions of nodular cast iron.
ElementCSiMnPSMgFe
Composition (wt%)3.652.420.600.050.020.05Bal.
Table 2. Details of the biomimetic specimens and laser processing parameters.
SampleElectric Current (A)Pulse Duration (ms)Frequency (Hz)Laser Spot Diameter (mm)Laser Energy Density (J/mm2)Laser Power (W)
NO. 195810180.4212.8
NO. 2110810196.3246.4
NO. 31258101116.4280.0
NO. 41408101144.8313.6
NO. 51558101165.5347.2
Table 3. The dimensions and microhardness of the units.
SampleNo. 1No. 2No. 3No. 4No. 5Untreated Sample
Depth (mm)0.110.250.370.440.59-
Width (mm)0.690.750.890.951.03-
Microhardness (HV0.2)501545581637680298