Article

A Time-Frequency Based Approach for Acoustic Emission Assessment of Sliding Wear

1
Institute of Advanced Technologies, Togliatti State University, Belorusskaya str. 14, 445667 Togliatti, Russia
2
Department of Mechanical and Industrial Engineering, Norwegian University of Science and Technology—NTNU, N-7491 Trondheim, Norway
*
Author to whom correspondence should be addressed.
Lubricants 2020, 8(5), 52; https://doi.org/10.3390/lubricants8050052
Submission received: 20 March 2020 / Revised: 6 May 2020 / Accepted: 7 May 2020 / Published: 9 May 2020
(This article belongs to the Special Issue Acoustic Emission Techniques in Wear Monitoring)

Abstract

:
The acoustic emission method is one of few contemporary non-destructive testing techniques enabling continuous on-line health monitoring and control of tribological systems. However, the existence of multiple “pseudo”-acoustic emission (AE) and noise sources during friction, and their random occurrence poses serious challenges for researchers and practitioners when extracting “useful” information from the upcoming AE signal. These challenges and numerous uncertainties in signal classification prevent the unequivocal interpretation of results and hinder wider uptake of the AE technique despite its apparent advantages. Currently, the signal recording and processing technologies are booming, and new applications are born on this support. Specific tribology applications, therefore, call for developing new and tuning existing approaches to the online AE monitoring and analysis. In the present work, we critically analyze, compare and summarize the results of the application of several filtering techniques and AE signal classifiers in model tribological sliding friction systems allowing for the simulation of predominant wear mechanisms. Several effective schemes of AE data processing were identified through extensive comparative studies. Guidelines were provided for practical application, including the online monitoring and control of the systems with friction, characterizing the severity and timing of damage, on-line evaluation of wear as sliding contact tests and instrumented acceleration of tribological testing and cost reduction.

Graphical Abstract

1. Introduction

Wear resistance is among the most critical service properties of structural materials. Up to date, the reliable estimate of this property can only be obtained from the specially designed tribological tests. The number of variants of tribological tests is vast. Nevertheless, the on-line identification of occurring wear mechanisms is still a challenge. The primary methods, which are currently used, are either indirect (e.g., by measuring the friction coefficient or temperature change) or time-consuming (e.g., by the analysis of wear particles in the oil, the radiation-induced surface activation method, interrupted tribological test and periodic damage assessment, etc.). Meanwhile, it has been widely shown that the acoustic emission (AE) method has great potential for on-line friction unit monitoring and controlling. The method is based on the recording and analyzing the elastic waves emitted by the material or unit when the elastic energy is rapidly released under load or other factors (such as temperature, environment, etc.) [1,2,3].
The primary AE sources in friction and wear include (though not limited to) the dynamic interaction of micro-asperities of contact surfaces, plastic deformation, crack initiation and propagation, separation of wear particles, micro-cutting process, oxidation (corrosion) of surfaces, high-frequency vibrations during the movement of friction bodies, phase transformations, welding, rupture and tearing of micro-asperities [3,4]. Although the same phenomena and AE pseudo-sources may occur in other than friction types of material failures, there is an important difference: in friction, many if not all these mechanisms operate simultaneously and are concentrated in a small contact area. The combination of active tribology mechanisms is determined by the contact conditions. Researchers and practitioners commonly face serious challenges in attempts to identify and classify the operating damage mechanisms. These challenges are posed by the superposing effects of multiple existing AE sources, their random occurrence, wave transformations during propagation and the small size of the tribological contact (which is usually hard to access and characterize in real-time) in combination with the complexity of the friction and contact fatigue process itself. Addressing these issues relies heavily on the robustness of AE signal acquisition and processing that has to be designed in harmony with the process studied. New approaches to the processing of acoustic signals generated during tribological tests are, thus, persistently sought for reliable identification of AE sources and corresponding degradation processes. In the present paper, we overview and compare the performance of various statistical procedures devised for the processing of AE data acquired during routine tribological testing.
The AE technique has been established as a favored in situ method for investigating the friction and wear processes in sliding and rolling contacts in real-time, see, for example, [3,4,5,6,7,8,9]. A plethora of experimental data suggests strongly that the AE method is more sensitive to the processes of friction surface damage than the measurements of the friction force/coefficient [10,11] or vibration [12,13]. Since the inception of the AE method, a large number of descriptive parameters has been proposed and used with a different degree of success in practical situations. In tribology, the most frequently used variables include, but not limited to, the average amplitude or energy, power, count rate, signal root mean square (rms) value, and the amplitude distribution [3,6,10,14,15,16,17,18,19,20,21,22]. Despite the simplicity of their definitions, the empirical relations were established between these AE features and friction conditions, wear rate, and volumetric material loss. However, being integral quantities, these parameters are hardly suitable for a comprehensible distinction between different damage mechanisms with satisfactory temporal resolution and for early warning on the progress of wear or imminent failure. The recent rapid advent of information technologies has paved a new avenue for enabling numerical methods of the AE analysis, including artificial intelligence and machine learning, which create new trends in the contemporary tribological research, c.f. [5,20,23,24,25]. The use of spectral (Fourier [26,27,28] or wavelet [29,30,31,32,33]) transformations demonstrated that the frequency or frequency-temporal distribution of the AE power (energy) can be related to the mechanism of the elastic energy dissipation at the AE source, and this distribution varies depending specifically on the conditions of friction and wear. Therefore, the spectral approaches have been found efficient in finding the end of the run-in process and in predicting the onset of lubrication failure or sudden changes in the lubrication system followed by scoring [3,34,35].
The present overview is aimed at materials scientists and practitioners working closely with tribology testing and intending to improve the efficiency of the routine testing procedures by minimizing human effort necessary to supervise the vast number of tests, shortening the tests themselves without compromising their quality, and reducing the cost of materials and lubricants. To achieve this goal, the strategy is to develop a robust AE approach integrated with tribology testing, which would allow for full automation. Practical guidelines are provided based on the literature survey as well as the authors’ many years of laboratory and industrial experience. The objective of the present overview is to equip the academics and engineers with ideas and verified practices for the AE acquisition and data analysis exploiting the statistical signal processing and classification, which permits consistent discrimination between different damage mechanisms during tribological tests.

2. Methodology Overview

A generally plausible assumption based on fundamental theoretical considerations is that different sources produce AE signals with different waveforms and, therefore, power spectrum densities (PSDs). The distinction between different AE sources corresponding to different underlying damage mechanics can, therefore, become possible through the statistical procedures grouping signals of a similar kind. Various mathematical procedures for unsupervised clustering with or without a priori assumptions concerning the features of AE events caused by sources of different nature can be implemented.
The proposed time-spectral approach to the AE data analysis is based on the following assumptions:
similar mechanisms of contact damage or failure (collectively referred to as ‘AE sources’) operate under similar friction and wear conditions [36,37];
specific sources and processes generate specific AE waveforms and corresponding power spectral densities [28,38,39,40];
the number of simultaneously operating fracture/damage mechanisms is limited; they evolve forming characteristic stages and/or cycles of progressive damage [36,37];
the resultant AE at every instant is governed by one or few predominant damage mechanisms, whose scale prevails over others.
Thus, the similitude of AE spectral characteristics can be used for the quantitative statistical comparison of AE sources active at different instants during tribology tests.
The traditional and most-widely used threshold-based method of amplitude signal discrimination causes irrecoverable errors in AE acquisition during tribology tests due to (i) the loss of AE signals with the amplitudes below the threshold if the threshold is set too high, (ii) multiple false alarms if the threshold is set too low, (iii) the risky judgement regarding the underlying friction and wear mechanisms since the majority of AE parameters depend on the threshold level. Besides, usually, the threshold is set arbitrarily using “a good practice” rather than physically justified approaches. All these shortcomings of the conventional amplitude discrimination substantially limit the applicability of the threshold-based features for recognition of different AE sources or associated wear mechanisms simply because the patterns of descriptive variable become threshold-dependent too. Therefore, we trust that the effectiveness of the recognition of meaningful signals can be improved substantially by thresholdless data acquisition followed by numerical signal detection (see, for example, [41], or a recent survey of existing methods provided in [42]). The triggerless approach assumes continuous data recording (streaming) with a high (up to several Msamples/s) sampling rate and assures that the information is preserved without loss on a storage device for further processing. Considering the usually long duration of tribological tests, the huge volume of transmitting data sets high demands on the computational facilities and methods used for AE signal processing. Therefore, the robust, yet efficient algorithms are incessantly sought by practitioners for handling large data sets.
The results overviewed below have been obtained while probing different broadband AE transducers, amplifiers and analogue-to-digital conversion (ADC) boards. Therefore, we do believe that the results are general enough to be applied for a variety of sliding wear situations and can be reproduced on virtually any AE equipment that supports the streaming recording mode with the ADC dynamic range over 66 dB in the frequency band of 50–1000 kHz or wider, and the gain of 20 dB or higher. Data processing was carried out using the original algorithms for broadband filtering and clustering of AE data, which are overviewed in the next sections.

3. AE Data Acquisition and Processing

In the present work, AE recording was performed continuously, without a threshold, with 12-16 bits amplitude resolution and sampling frequencies f s of 3, 5 and 6.25 Msamples/s for different analogue-to-digital converters used. The f s value obeyed the Nyquist–Shannon–Kotelnikov sampling theorem: f s 2 f max with f max —the maximum frequency in the waveform detectable by the AE transducer. The streamed data were sectioned into consecutive individual realizations (frames) without overlapping. The frame duration, which is commonly termed “length”, when measured in samples was chosen to be of 1.3 ms, which is sufficient to capture the most significant features of both continuous and burst acoustic emissions.
Two primary filtering algorithms and three AE data classification algorithms were comparatively analyzed in the present work in various combinations represented in Figure 1.
The main objective of all processing schemes tested was to identify the predominant AE sources associated with the damage processes occurring during friction contact while reducing or eliminating undesired contributions from multiple background “noise” processes such as vibrations, triboelectric phenomena, electrical or mechanical noise of the friction machine, regular friction noise typical of the normal wear mode, etc.
To increase the signal-to-noise ratio and recognize meaningful signals against backgrounds of noise or random interference, two broadband filtering algorithms were implemented (Figure 1): F1—the spectral noise reduction [43] and F2—the fast Fourier transform (FFT) filter [44]. Both filters utilize the following steps: (i) dividing the whole AE record a(t) into a set of successive realizations (frames) ai(t) with the subscript index i counting the frames, (ii) obtaining the amplitude S(f) and the phase ω(f) spectrum for each AE frame by the forward Fourier transform, (iii) filtering the amplitude spectrum by either the noise subtraction (F1) or frequency correction (F2) procedures followed by recovering the AE waveform â(t) through the inverse Fourier transform using the filtered amplitude Sx(f) and the original phase ω(f) spectra. Details of both procedures are given in Appendix A. The results of filtering depend on either the a priori known noise spectrum Sn(f) in the first algorithm F1 or the correction functions C(f) for the spectral components of interest in the second procedure F2.
Several filter sub-variants were implemented with different assumptions regarding the reasons of noise and signal distortion [45,46,47,48]. These assumptions were used to choose the Sn(f) and C(f) functions for F1 and F2 filters, respectively F1. Specifically, the procedure F1.1 utilises the pre-recorded noise of the free-running friction machine, F1.2 subtracts the noise arising from regular friction due to the interacting micro asperities, F1.3 subtracts the noise associated with the periodic interference, which is frequently encountered in rotating machines. In the last filter, the periodic component in the background noise is effectively detected and suppressed by using the higher-order autocorrelation function method [49,50]. The procedure F2.1 uses the amplitude-frequency response of the AE transducer provided by the manufacturer (ideally, the transducer can be calibrated at the place of operation to generate a more accurate estimate of the C(f) function). For the procedure F2.2, the spontaneous high-energy AE signals from background processes irrelevant to wear are used.
After filtering, a vector of AE features based on the energy/power distribution in time and frequency domains is calculated for each frame as described in Appendix B. The feature extraction procedure was the same regardless of the filter used. The time-dependent set of these vectors (âq rms; Eq; σ … σqG; γqG; sqG—defined in Appendix B, (A9)–(A20)) constitutes the matrix of AE features accounting for the evolution of AE sources during the entire experiment.
Having a set of descriptive variables and PSD functions corresponding to each AE frame, the frames can be classified according to statistically significant differences in these features underlying the differences in the source origin, i.e., in friction and wear mechanisms. Classification or clustering is an important statistical procedure, which is widely used in revealing the inherent structure present in a given data set. The primary task of any clustering procedure is to split a collection of unlabeled data into labelled sub-sets or clusters with respect to a suitable similarity measure such as Euclidean distance, correlation coefficient, or others so that the similar data are grouped together to form a node which is called ‘cluster’, and dissimilar data are disjoined and placed as far apart as possible in the feature space [51,52,53]. In application to acoustic emission, the clustering methods evolved significantly from a simple partition k-means clustering [54] to advanced automatic techniques [55] and pattern recognition by artificial intelligence [56,57]. Apparently, there is no optimal universal clustering method for all situations. Each method has its specific area of rational use, often quite narrow. Up to date, the practice remains to be the primary criterion for judging the quality of the data classification algorithm.
The following three procedures, which are denoted as K1, K2, and K3 in Figure 1 and described in Appendixe C, Appendixe D and Appendixe E, respectively, differed by the input data and similarity measures, have been extensively used by the authors in application to tribological systems testing, and are compared in the present work. K1 is the correlation technique exploiting the statistical coefficient of determination R2 as a measure of pair-wise similarity between PSD functions obtained for each AE frame [58]. The K2 method represents the variant of the familiar k–means hierarchical clustering algorithm modified through the use of the Mahalanobis’ metrics [59] applied to a multivariate set of extracted AE features as described in [60]. The classification procedure K3 is based on the two-parametric criterion comparing the rates of changes in the rolling average rms rate r m s · q and the rms variance σ r m s q 2 with the Euclidean direction and distance between the clusters of signals, c.f. [61]. The procedure K1 uses the shapes of PSDs as input functions to be pairwise compared. K2 employs a parametric set of AE features obtained in both time and frequency domains. K3 relies on the AE power changes quantified in terms of the rolling statistics applied to the AE rms, its rate and variance. Regardless of the method used, the result of classification is represented by the AE frames labelled according to their membership to specific clusters having centroids Cli(t) in the chosen feature space. The groups of signals (clusters) are then associated with underlying active friction/wear mechanisms and/or noise sources of different kinds.
Besides the differences in the input datasets, all classification algorithms differ in the similarity measures employed. The results of clustering depend on the chosen metrics, and the separation criteria maximizing intra-cluster similarities and minimizing inter-cluster similarities. It should be noted that currently, no robust methods exist for setting these criteria, although the recommended guidelines and measures of caution have been formulated in [62]. The method proposed in Ref. [62] is based on regularly scheduled test interruptions followed by microscopic observations and characterization of wear-induced damage on the contact surfaces at each step. Besides regular interrupts by timer, the tests were stopped when the anomalies in the behavior of AE features or wear intensity had been noticed. In this way, the relations between the AE features and the prevailing damage mechanisms were successfully established. After processing of an extensive experimental AE database accumulated through this kind of interrupted testing (c.f. Appendix F for details of the largest of experiments) with different similarity measures, the criteria values matching with the verification conditions listed below for K1, K2 and K3 schemes were obtained [62]. For the best results, the similarity criteria must be determined individually for each friction machine, tribology system or lubricant. This calibration procedure is not time-consuming. However, once it is done, and the similarity measure and the criteria values for group separation are determined, it serves for a long while in the laboratory or industrial testing with no need for additional tuning. The whole procedure can be substantially simplified if the friction or wear maps are known for a given tribological system [63,64]. The AE data can be straightforwardly interpreted in this case. If such detailed information is lacking, the data verification technique proposed in [62] can be applied efficiently. In this method, friction conditions necessary for the occurrence of a particular wear mechanism are simulated, and the relationship between AE features and wear mechanisms is established by comparing the wear scar morphology observed in the interrupted test. Henceforth, the critical friction point is seen on the wear curve (the rate of wear plotted as a function of time or wear path) as an inflexion point indicating the transition from one type of contact interaction to another.

4. Materials and Testing Conditions

The effectiveness of signal processing algorithms is often verified by using artificially generated test signals with known properties. However, for acoustic emission, it is practically impossible to generate artificial signals that resemble a whole variety of real AE signals. Therefore, to observe representative AE signals and their features, we performed comparative investigations using a large volume of experimental AE data obtained in the course of different laboratory experiments where dominant wear mechanisms were independently observed. The tribological tests were complemented by detailed microscopic studies of the morphology of the friction-induced damage. The AE datasets were obtained during standard wear testing procedures using four-ball [65,66], pin-on-disk [67] and cylinder-on-ring [68] testing configurations.
The results of AE processing were verified to be consistent with the results from the analysis of the damaged surface performed at different stages of the test. Verification was performed according to:
(i)
the number of AE sources identified, which should be logically connected with the active processes established based on tribological data and metallographic observations;
(ii)
the number of signals in specific clusters related to the severity of damage processes identified, indicating the “sensitivity” of AE signal recognition;
(iii)
the time of the start and the end of the activity of individual AE sources in relation to the actual damage processes revealed by the behavior of the tribological parameters and metallographic observations.
The laboratory tests have been performed with the account of the following general considerations used for the choice of loading conditions. Ideally, there should be no damage to the sliding contact surfaces as long as lubrication is properly maintained under normal operating conditions. However, in practice, the tribological systems fail in critical situations due to boundary lubrication conditions and/or even lubricant starvation, overheating, misalignment of friction partners during operation, water ingress into the lubricant and other adverse effects. That is why it is common practice when lubricants or materials for actual tribological systems are selected during laboratory tests simulating various possible loading conditions using universal friction testers prior to full-scale testing, c.f. standard test methods for measurement of extreme-pressure properties of lubricants [65,66] and [3,69,70]. These laboratory procedures have been devised specifically to simulate the occurrence of critical conditions which need to be considered for the systems in service.
The following contact materials were tested in the investigations: 100Cr6 steel balls of 12.7 mm diameter (four-ball tests according to [65,66]); Ø6.0 mm 100Cr6 steel balls and 30 × 40 × 5 mm plates of St35, C45 and W6Mo5Cr4V2 steels (pin-on-disk test [67]); Ø8 mm cylinders of 45Cr22Ni4Mo3 steel and AlMg3 aluminum alloy, Ø50 × 5 mm roller made of wear-resistant cast iron Gh190 (cylinder-on-ring test [68]). The lubrication conditions stipulated in corresponding standards included dry friction, mineral motor oil and different lithium-complex greases covering a wide range of friction conditions from dry friction and boundary friction to friction with full immersion in a lubricant. Types of commercial lubricants used in the present work are detailed in Appendix F, along with the arguments on their selection. The broad variability of tested contact conditions enabled simulation and facilitation of various predominant wear mechanisms including (i) abrasive wear causing the material loss in the surface layer due to the micro-cutting, scratching (or grooving), (ii) adhesive wear resulting from welding of surface asperities and shear of adhesion bonds generated in friction, (iii) scoring (or scuffing) representing the severe mode of adhesive wear, which does not occur if the lubricant film is sufficiently thick to prevent sliding partners from coming into contact and (iv) galling and seizing (or welding) which are known as terminal types of adhesive wear.
Specifically, the following conditions were used in compliance with the relevant standards cited, if not stated otherwise: load P ranged from low to high between 59 and 7840 N with the increment prescribed in [65,66], the rotating speed n = 1460 rpm, the loading time t = 10 s [65,66]; P = 25 and 35 N, n = 236 rpm, the radius of the friction track r = 6.4 mm, t = 10 min [67]; P = 20, 40, and 60 N, n = 100 rpm, t = 10 min [68]. Table A2 presented in Appendix F summarizes the loading conditions used in the main series of tests performed with the concurrent AE measurements. Besides this large series of experiments, several tests have been performed to simulate various wear mechanisms at critical conditions, as described in [62]. The load P decreased slightly below the values obtained in the case of setting, scoring or welding of contact surfaces in the main series of tests for the minimum weight as much as the load allowed. Thus, the time until seizure or welding increased. While P and t were varied, n and r were maintained constant with the values stated above. The tests were stopped when the characteristic AE type was observed in conformity with the results obtained during the main series of the tests. While P and t were varied in these tests, n and r were maintained constant. All tests were started at room temperature. When the tests were performed according to the ASTM standards, they were repeated three times and showed good reproducibility in the AE patterns observed. The experiments, where deviations from the standards procedures were suggested (see the text below), were repeated up to ten times. Illustrations shown below are, therefore, typical and representative.
Although the outlined above methodology for the AE acquisition and data processing has been found efficient in all lubrication conditions and tribological systems tested, in what follows we shall exemplify it mostly using the data obtained on the standard four-ball testing machine, where the largest number of tests has been carried out.

5. Results and Discussion

Figure 2 and Figure 3 presents the summary of results of the main series of standard tests [65,66] performed on the four-ball tribometer using mineral motor oil (left column) and lithium-complex grease (right column) as lubricants. Different loads were applied under otherwise the same conditions as shown in the corresponding sub-figures in Figure 2 (the new assembly and fresh lubricant were used for every run). Each run, the load increased stepwise as prescribed in the ASTM codes [65,66]. Combined with substantially different lubrication conditions created by mineral oil and grease, this stimulated the occurrence of different modes of wear reflected by the different morphology and size of the wear scar, which has been examined microscopically and the scare diameter was measured after each test to justify the relationship between the AE clusters and the dominant wear mechanisms. According to the ASTM standards [65,66], the critical size of the scar exists so that no seizure occurs as long as D < [D], whereas seizing takes place when D > [D].
All recorded AE data streams shown in Figure 2 were processed in the same way using the F1.1 + K1 scheme. Speaking in advance, this scheme has been proven most efficient of all others tested, as will be discussed in what follows (specifically, in Appendix G presenting the detailed results of comparative AE studies).
As can be seen in Figure 2, the different patterns of the friction and wear behavior give rise to remarkably different patterns in the AE response. Figure 3 presents the summary of results observed at different loads for both lubricants in terms of the total AE energy, ΣEC, of the classified signals in the corresponding clusters normalized to the testing time T, ΣEC/T (this can be called ‘the cumulative average power’).
At low load, during the steady sliding wear regime when the abrasive friction mode prevails, the traces of damage appear as regular fine scratches (or groves), and the AE signals of Lubricants 08 00052 i001-type dominate at this stage (c.f. Figure 2a, and the white region I in Figure 3). With the increasing contact load, the signatures of adhesion and incipient seizure are observed in addition to scratches here and there at the contact surface, and the signals of Lubricants 08 00052 i002-type appear in response to the momentary film breaking and local adhesion (Figure 2b,f,g, and the region II in Figure 3). The number of these signals increases with the increasing load and eventually begins to dominate in the whole AE time series, Figure 2g. With the further increase of load, the adhesive wear mechanism changes from mild to severe, leading to the local seizure events and extensive plastic material transfer, which are observed progressively on the contact surface. With regard to this process, the Lubricants 08 00052 i003-type signals appear in addition to the Lubricants 08 00052 i004-type signals, while the number of Lubricants 08 00052 i005 signals reduced. The Lubricants 08 00052 i006 signals are always seen if D > [D] that corresponds to seizure according to the ASTM Standards [65,66] (Figure 2c,d,h–j; the region III marks the loads at which seizure is confirmed while surface welding is not, and the region IV corresponds to the observed friction welding). Under the most severe loading conditions with intensive adhesive wear followed by welding of contacted surfaces, the Lubricants 08 00052 i007-type signals prevail, c.f. Figure 2d,e,j. The result is also logical that, if compared to oil, grease results in the earlier onset of seizure. Therefore, it was not possible to observe a wear scar formed by dense scratches without signatures of incipient seizure, scoring or spalling, which is indicated by the distribution of corresponding AE clusters, c.f. Figure 2f–h, and Figure 3b. Based on the similar data obtained for other tribological test schedules described above, it can be argued that the proposed approach is very efficient and sensitive to the dominant wear mechanisms.
Of all these patterns, Figure 2c appears to be most satisfactory to discuss the damage mechanisms in the sequence of their occurrence. It begins with the pre-scoring stage extending up to 2 s approximately, scoring stage (2 to 5 s), and the post-scoring run-in stage (from 5 s to the end of the record). Therefore, this dataset was chosen to probe all different AE signals processing schemes, as summarized in Appendix G.
The signal classification by the K3 method yields substantially similar results. Therefore, in Figure 4 and in what follows, the AE clusters corresponding to the prevailing damage mechanisms at the friction contact under given load can be marked symbolically in a uniform manner: Lubricants 08 00052 i008 corresponds to the scratches on the contact surface as a result of a normal abrasive wear process, Lubricants 08 00052 i009 denotes severe adhesive damage and incipient seizure that can be occasionally seen at some local areas of the contact surface due to a momentary breakdown of the lubricating film, and Lubricants 08 00052 i010 stands collectively for the most severe wear processes heralding the imminent catastrophic wear failure dominated by scoring, seizure, significant plastic material transfer and welding. It is apparent that the proposed classification scheme is substantially simplified. While capturing the principal features and the severity of the wear damage progress, it does not account for the minute details of the wear mechanisms. This simplification is made intentionally, considering the objective of the on-line AE monitoring, which is set as to identify the wear stage and timely diagnose the symptoms of impending catastrophic failure. For this reason, many features of evolving abrasive wear resulting from ploughing by hard asperities and abrasive particles forced against contacting surfaces or adhesive wear associated with the shear of adhesion bonds generated in friction are not discriminated by the proposed method and can be even compiled into the same group of signals in order to highlight the dominated wear mode and classify the severity of damage associate with it.
Thus, Figure 2 and Figure 3 demonstrate that the clustering of the AE events according to the scheme F1.1 + K1 is microscopically justified and aligned well with the dominating wear mechanisms.

6. Applications

6.1. Real-Time Monitoring and Control of Friction Conditions

Once the features of AE signals attributable to various sliding wear mechanisms are known (Section 4), it is not a bid deal to design an automated monitoring and control system for the tribological assembly. As soon as the signals of the critical type (for instance, those indicating the lubricating film break condition accompanying by the increasing activity of insipient seizing or even the appearance of signs of scoring with the Lubricants 08 00052 i017-type signals,) come into the scene, Figure 4, the monitoring system flags the issue, which can be resolved, for example, by extra lubrication of the contact area or by reducing the load on the friction contact. Appropriate, timely measures against scoring and seizing may help to prolong the lifetime of the tribological system significantly. Importantly is that those measures can be implemented in an automated workflow if required.

6.2. Recovery of the Friction Unit Fracture Process Chronology

When the statistically defined AE clusters are attributed to various wear mechanisms (Section 4) and the critical friction and wear conditions are determined along with the corresponding AE features, a time-chart reflecting their appearance can be created for an evocative presentation of degradation mechanisms convenient for on-line monitoring and diagnostics. The proposed in [71] presentation of the damage history using the chronological charts with the color-coded prevailing damage mechanisms according to the classified AE features (shown, for example, as the bottom lines in Figure 4) can replace the cumbersome AE graphs, which often contain multiple AE parameters and which are hard to read. While this way of data representation does not compromise the significance of information for practitioners, it offers an appealing opportunity to observe and analyze the chronology of degradation of lubricant and/or contacting materials with a high degree of confidence [71], and, therefore, to undertake appropriate countermeasures for failure prevention and management.

6.3. Comparative Lubricant Performance Testing

The frequently faced dilemma is that when testing the same friction assembly with different lubricants, the similar diameter of the wear scar (or any other standard parameter characterizing wear damage) is produced while the lubricants may perform drastically differently. The decision based solely on the analysis of the damage morphology is, therefore, not straightforward. Using the distribution of AE signals belonging to different classes during the test (Section 4) or observing the corresponding chronological charts of their appearance (Section 6.2), the judgement on lubricant’s performance quality can be made with confidence. Figure 5 represents an example where two popular commercial greases (Fiol-1—a mix of petroleum oils solidified with lithium soap (a) and Unirex-3—the lithium complex thickened bearing grease (b)) were tested on the standard four-ball machine under the same conditions. The equal final wear scar diameter at the contact surface was measured post mortem, while failure occurred by remarkably different scenarios for two lubricants. According to Figure 5a, the lubricating film broke down, and asperity contact occurred, causing immediate scoring and seizure at 588 N load (and above). The failure occurred shortly after scoring at 981 N. According to the scenario revealed in Figure 5b, clear signatures of two scores were observed under the same conditions, but with the other lubricant. The first score appeared shortly after at the beginning of the test at the load as small as 392 N, while the second one is seen at 981 N – the same as that the maximum seizing load in (a). Besides, AE witnesses that (Figure 5b) throughout the test with Unirex-3 grease, incipient seizure occurred at contacting surfaces, which was just occasionally seen in while testing Fiol-1 (a). Thus, the critical failure load for the lubricant Unirex-3 in Figure 5b is 392 N, which is hard to determine without aid from the AE method. The results illustrated here were obtained on the four-ball friction machine using step-wise loading with a holding time at each load shown in Figure 5; the rotation speed was 1460 rpm. Without limitations, the suggested methodology for AE data processing can be applied to other tribology situations where sliding wear is observed and is to be monitored.

6.4. Accelerated Tribological Tests

Using the classified AE distribution as a marker of the characteristic tribological damage processes, the test time can be reduced significantly. This can be achieved by different procedures such as (i) stopping the test immediately as the signatures of scoring, or other severe modes of wear are detected by AE (Figure 5 and Figure 6), (ii) eliminating visual inspection and verification of wear processes and their severity, and (iii) reducing the number of tests. The latter can be demonstrated on the example of four-ball friction testing [72]. Conventionally, running several similar but independent tests is required with a step-wise load increase for each consecutive test according to the ASTM standards [65,66], Figure 3. For each load, the friction assembly and lubricant must be changed to a new one. Using the continuous AE monitoring with the temporal-frequency signal classification, the series of standard tests can be replaced by a single test with a scheduled step-wise change of the load, Figure 6.
The critical loads, PKAE and PCAE corresponding to the onset of scoring and welding, respectively, can be reliably obtained in this way with only a small (up to 10%) deviation from the values obtained by standard procedures described in [65,66]. This deviation, if it exists, is related to the growth of the contact scar, i.e., the decrease in the contact pressure, yet at the last nonseizure load, Figure 6. Besides, by the presence and characteristics of the Lubricants 08 00052 i019-type signals, a judgment can be reliably made whether the seizure has set in or not, and assess the scale of seizure severity. The reduction of the number of tests and the decrease of the test time results in lower consumption of the lubricant and contact elements. Considering the respective energy and labor savings, the using of an AE-based damage assessment program is apparently beneficial for cost-cutting in tribological testing. The results exemplified in Figure 6 were obtained out on the four-ball friction machine under conditions stipulated in the standards [65,66], with the difference that the loading of the same assembly was carried in a step-wise manner with the holding time shown in the figure.

7. Conclusions

During operation of a sliding friction assembly, predominantly a continuous type AE is recorded. Hence, the early detection of damage/fracture is only possible at the relatively low signal level comparable to that of the background noise. At such a low signal-to-noise ratio, the capability of conventional amplitude-based threshold algorithms for AE detection is strongly limited. Aiming at finding efficient alternative methods for AE acquisition and processing during tribological testing, the present investigation compares several thresholdless temporal-spectral methods devised for identification of primary friction and wear mechanisms. Effective processing schemes combining signal filtering and clustering are highlighted. It is demonstrated that the proposed temporal-spectral approach to the analysis and classification of AE data can significantly increase the informative value of the AE method in application to a wide range of tribological problems. In particular, the modern AE technique allows for finding the start time, duration and sequence of operation of different damage modes, even when several wear mechanisms coexist at critical wear conditions prior to failure. Further development of the proposed approach is seen in the optimization and simplification of the applied algorithms to reduce the computation cost and hardware resources.
Using a large dataset comprising of several hundred AE records obtained for different sliding contact conditions and lubricants (c.f. Appendix F), it is found that the critical wear conditions heralding the imminent failure can be consistently identified by the AE signal. Therefore, it can be concluded that the proposed signal classification methodology is robust. In principle, it can also be adapted to different tribology situations and other areas of practical AE applications, particularly where the signal-to-noise ratio is low.

Author Contributions

Conceptualization, I.R. (Igor Rastegaev) and D.M.; methodology, I.R. (Igor Rastegaev); investigation, I.R. (Igor Rastegaev) and I.R. (Inna Rastegaeva); resources, D.M.; writing—original draft preparation, I.R. (Igor Rastegaev); writing—review and editing, A.V.; supervision, A.V. All authors have read and agreed to the published version of the manuscript.

Funding

This research received no external funding.

Conflicts of Interest

The authors declare no conflict of interest.

Appendix A. Filtering Procedures

The procedure for data filtering by spectral noise subtraction—F1. For each sampled AE frame a ( t ) containing n readings, the Discrete Fourier Transform is applied, and the amplitude S ( f ) and phase ω ( f ) spectra are obtained, respectively, by definition as [73]:
A f = i = 0 n 1 a i exp ( j 2 π n f i )
S ( f ) = { | A f | / n } ,   ω ( f ) = { a r g ( A f ) }
where a i is the signal reading at a discrete-time point i (i = 0…n − 1,), A f is the complex amplitude of the original signal with the corresponding discrete frequency f (f = 0…n − 1), and j is the imaginary unit.
Assuming that the noise is additive and quasi-stationary, a spectral subtraction is performed according to the following procedure [43,44]:
S x ( f ) = [ | S y ( f ) | β α | S n ( f ) | β ] 1 β
where S y ( f ) and S x ( f ) are the original and filtered amplitude signal spectra, respectively, S n ( f ) is the amplitude spectrum of the noise, and α and β are the tuning parameters of which β was set at unity in our tests (although it obviously adds a new degree of freedom for fine-tuning of the noise compensation procedure, in general). The additional condition is used to avoid the negative S x ( f ) values in Equation (A3):
S x ( f ) = max { S y ( f ) α S n ( f ) , 0 }
Given that the coefficients S y ( f ) and S n ( f ) are fluctuating variables applying this algorithm leads to weighted frequency-dependent noise suppression. As a result, the final filtered spectrum Sx(f) often contains the short frequency-limited amplitude spikes. Therefore, to suppress those redundant fluctuations, the nearest-neighbor smoothing procedure is applied as [43]:
S ¯ x ( f ) = S ¯ x ( f 1 ) + ξ ( S x ( f ) S ¯ x ( f 1 ) )
where S ¯ x stands for the smoothed spectral component and ξ is the smoothing factor. The phase component ω y ( f ) of the original signal is not changed, and the complex amplitude of the filtered signal components S ¯ x ( f ) is obtained as:
A ^ f = S ¯ x ( f ) exp ( j ω y ( f ) )
The noise-filtered AE waveform is, thus, obtained through the inverse Fourier transform as:
a ^ i = 1 n f = 0 n 1 A ^ f exp ( j 2 π n f i )
The procedure for data filtering by FFT filter – F2. The FFT filter is applied similarly to the spectral subtraction following the (A1)–(A7) steps with the difference that a correction function C ( f ) representing a set of filtering coefficients is introduced for each frequency component f is used instead of the noise spectrum subtraction, and the noise reduction procedure (A3) is replaced by the following product:
S x ( f ) = S y ( f ) C ( f )
If C ( f ) = 1 the spectrum S y ( f ) remains unchanged at the frequency f, if C ( f ) < 1 , the spectral component S y ( f ) decreases, and if C ( f ) > 1 , S y ( f ) increases. In this process, the correcting coefficients C ( f ) must be chosen so that to avoid exceeding the dynamic range of the signal.

Appendix B. AE Features

For each filtered frame âq(t) (Appendixe A), the power spectrum density, PSD G q ( f ) , was calculated by the method of modified periodograms (Welch’s method) with the Hamming smoothing window to reduce the bias in the power estimates [74].
AE features which are computed for each frame âq(t) with the length (duration) l are shown in Table A1.
Table A1. AE parameters calculated in time and frequency domains.
Time domain
signal root-mean-square valueâq rms = [Σ âq(t)2 / l ]0.5(A9)
signal energyEq = Σ âq(t)2(A10)
signal varianceσ = [Σ(âq(t) - âq mean)2/(l-1)]0.5(A11)
signal kurtosisγ = {Σ[(âq(t) - âq mean)/ σ]4} – 3(A12)
signal skewnesss = Σ[(âq(t) - âq mean)/ σ]3(A13)
Spectral domain
median frequencyfq med at Gqm = 1/2·ΣGq(f)(A14)
signal powerWq =Σ Gq(f)(A15)
spectrum root-mean- square valueGq rms = [ΣGq(f)2 / fmax]0.5(A16)
PSD entropyHq = –Σ[ f∙Gq(f)∙log2(f∙Gq(f))](A17)
PSD varianceσqG = [Σ(Gq(f) - Gq mean)2/(f-1)]0.5(A18)
PSD kurtosisγqG = {Σ[(Gq(f) - Gq mean)/ σqG]4} – 3(A19)
PSD skewnesssqG = Σ[Gq(f) - Gq mean)/ σqG]3(A20)
Thus, for each frame âqp(t), the output dataset includes the signal power spectral density (PSD) curve G q ( f ) and a vector of descriptive variables estimated in both time and frequency domains q rms; Eq …γqG; sqG} (A9)–(A20).

Appendix C. R2 Clustering Algorithm—K1

The method is based on comparing the similarity between the normalized power spectral density functions G ˜ q ( f ) defined as:
G ˜ q ( f ) = G q ( f ) / W q
which obeys the condition
k = 1 n G ˜ q ( f k ) = 1 , ( f 1 = f min , f n = f max )
The normalisation is performed to compare the shapes of the PSD functions and to eliminate the influence of the signal amplitude or power on the result of the comparison. The comparison of functions G ˜ q ( f ) is carried out by using the coefficient of approximation R 2 defined in statistics as [58]:
R 2 = 1 S ¯ r 2 S ¯ t 2
S ¯ r 2 = 1 f   max ( G ˜ i ( f ) G ˜ q ( f ) ) 2 f max 2
S ¯ t 2 = 1 f   max G ˜ ( f ) 2 1 f max ( 1 f   max G ˜ ( f ) ) 2 f max 1
where S ¯ r 2 and S ¯ t 2 refer to the residual and total variance of the function, respectively, G ˜ i ( f ) denotes the reference function to be compared with G ˜ q ( f ) , and f max is the upper frequency in the analyzed frequency band.
The total variance S ¯ t 2 is calculated for both comparing functions G ˜ ( f ) = G ˜ q ( f ) and G ˜ ( f ) = G ˜ i ( f ) . Therefore, for each pair of G ˜ q ( f ) and G ˜ i ( f ) functions, two values of R2 coefficients are obtained characterizing the validity of the forward and reverse approximation. It is clear from Equation (C3) that G ˜ q ( f ) and G ˜ i ( f ) ideally coincide when R2 = 1 ( S ¯ r 2 / S ¯ t 2 = 0 ) and there is no correlation relationship between them if R2 = 0 ( S ¯ r 2 / S ¯ t 2 = 1 ). If R2 < [R2], where [R2] is a pre-set criterion of similarity, two PSDs are recognized as similar, whereas if R2 > [R2], the PSD functions are considered dissimilar, and a new cluster is formed. This procedure is repeated several times for different [R2] until the number of identified clusters saturates.

Appendix D. Modified k-Means Clustering—K2

The method represents the modified k-means clustering method based on minimization of the cost function defined conventionally as [59]:
V = l = 1 k x m C l x m c l 2
where k is the number of a priori defined clusters, C l denotes the obtained clusters with l = 1,2, …k and c l denoting the corresponding arithmetic mean—centroid—of all points in cluster C l , x m is the data point in the chosen feature space, m is the counter of the class members, and x m c l 2 refers to the chosen measure of the distance in the feature space between the data point x m and the centroid c l . The Mahalanobis’ distance is widely known in data science as an effective multivariate metrics that evaluates the distance between a point and a distribution; in Refs. [60,75] it was used as the k-means cost function:
x m c l 2 = i = 1 t ( a i b i σ i ) 2
where (a1, a2, … at) and (b1, b2, … bt) are the sets of descriptive variables corresponding to events A and B, respectively, and (σ1, σ2, … σt) are the standard deviations of the ai and bi values calculated over the entire dataset.
AE is a complex phenomenon, which appears as a superposition of contributions from all active sources, generating a multivariate random process at the sensor output. Therefore, the comparison of a few arbitrarily chosen AE features limits information on the related process. This can be misleading unless robust methods such as the principal component analysis [76] or the factor analysis [54] are used for dimension reduction and the informed choice of the subset of descriptive variables achieving the best predictive performance. In the present work, the k-means classification was performed in the multidimensional space of general AE features obtained in both time and frequency domains as specified in Table A1.

Appendix E. Classification by the RMS change rate—K3

There have been many publications, see, for example, [6,18,77], demonstrating that the root-mean-square value (rms) of the AE signal, being a measure of the average power of a random process, is the parameter which is sensitive to the underlying friction and wear mechanisms. It is therefore plausible to use the rolling rms value as a marker of the degradation process. However, the mean rms value alone is insufficient for that purpose, as it does not indicate the variability of the process. It was noticed in Ref. [77] that the average rate of change in the rms value can serve as a sign of local seizing of the rubbing metal surfaces. Hence, in the present classification algorithm, the descriptive pair of variables ( r m s · q , σ r m s q 2 ) accounting for the fluctuations of the AE signal included the average rate of the rms change r m s · q and the rms variance σ r m s q 2 , which are defined as:
r m s · q = 1 T j = 1 Z ( a ^ ( q + j ) r m s a ^ ( q + j 1 ) r m s )
σ r m s q 2 = 1 Z 1 ( j = 1 Z Δ a ^ ( q + j ) r m s r m s q ) 2
where T is the averaging time and Z is the number of successive frames used for averaging. The Euclidian directions and distance were used to discriminate between different groups of signals in this method.

Appendix F. Details of Loading Conditions for the Mains Series of Tribological Tests

Table A2. Loading conditions used in the main series of experiments.
Contact Materials 1Load, NLubricants 2PV Factor,
N/mm2·m/s
Hertzian Contact Stress Max, P0, MPa3
Four-ball Tester «ChMT-1» (Russia), Testing Standards [65,66]
100Cr6/100Cr610D, L1–L6309944
59D, L1–L65621716
196D, L1–L68392563
392D, L1–L610573229
491D, L1–L611393478
530D, L311683569
618D, L1–L612303757
657L2, L3, L412553835
696L2, L3, L4, L512803910
736L2, L3, L4, L513033982
785D, L1–L613324068
824L2, L513534135
883D, L2, L513854231
981D, L1–L614344383
1059D, L114724496
1099L114904551
1148L1, L615124618
1167L1, L615204644
1177L1, L615244657
1236L1–L615494734
1305L1, L3, L615784820
1383L1, L316094914
1570L1–L616785126
1746L1, L2, L317385311
1844L1, L217705409
1962L1, L2, L4, L5, L618075522
2070L1, L4, L518405621
2158L4, L518665700
2197L1, L4, L518775734
2325L4, L519135843
2453L1, L5, L619475948
3090L621036424
3924L622776957
4905L624537494
6082L626358051
6180L626498094
7848L628698765
Pin-on-disk, Tribometer Nanovea TRB-50N (USA), Testing Standard [67]
100Cr6/St3525D, L31991776
35D, L32231987
100Cr6/C4525D, L32031809
35D, L32272024
100Cr6/W6Mo5Cr4V225D, L32061840
35D, L32312058
Cylinder-on-ring, Testing Machine UMITI (Russia), Testing Standard [68]
45Cr22Ni4Mo3/Gh19020D, L1, L3107610
40D, L1, L3134769
60D, L1, L3154880
AlMg3/Gh19020D, L1, L374423
40D, L1, L393533
60D, L1, L3107610
1 – indenter / sample; 2 – lubrication conditions: D – dry friction; L1 – liquid mineral motor oil Lukoil-Standard 10W40; L2, L3 and L4 – universal lithium mineral greases Fiol-1, Litol-24 and Unirex-3, respectively; L5 – universal lithium synthetic grease Renolit JP1619; L6 – heavy-duty lithium mineral grease Shrus-4M (MoS2 10%). 3 – Maximum Hertzian contact stress for the four-ball tribological assembly and for the cylinder-on-ring test are computed according to [78], and for the pin-on-disk test the ref. [67] was used.
The effectiveness of a lubricating film is highly dependent on the composition (base oil, thickener, stabilizers and additives) of the lubricant used. The composition of the lubricant controls governs the capacity to form the adsorption or chemisorption protective films in the contact area, which can reduce the intensity of adhesive interaction between contact surfaces. In the present work, the popular commercial lubricants, Table A2, with well-documented tribological properties (c.f. [71]) were employed. Here we should note that the lubricants were chosen not only to cover a wide range of lubrication conditions to promote different prevailing modes of fracture but to check the performance and verify the stability of AE data processing algorithms against the type of the lubricant and loading conditions. Two main types of lubricants were employed for this purpose: liquid (mineral motor oil) and lithium complex grease. Four different grease grades were chosen. According to the type of base oil, the greases containing mineral (Litol-24, Unirex-3, Fiol-1, Shrus-4M) or synthetic (Renolit IP 1619) oil were used. With regard to additives, mineral greases Litol-24, Unirex-3, Fiol-1 represent three additive-free popular universal lithium greases with similar properties, while Shrus-4M is a kind of heavy-duty grease using molybdenum disulfide (MoS2) as an additive providing the lubricant with excellent anti-seize properties even under coarse contact between moving surfaces. Although it has been well understood that, the role of additives for surface protection becomes vital when contact conditions become severe and moving components operate in a boundary lubrication regime, the specific effect of solid tribofilms formed from additives is beyond the scope of the present work.

Appendix G. Results of Testing Various Combinations of Filtering and Clustering Algorithms

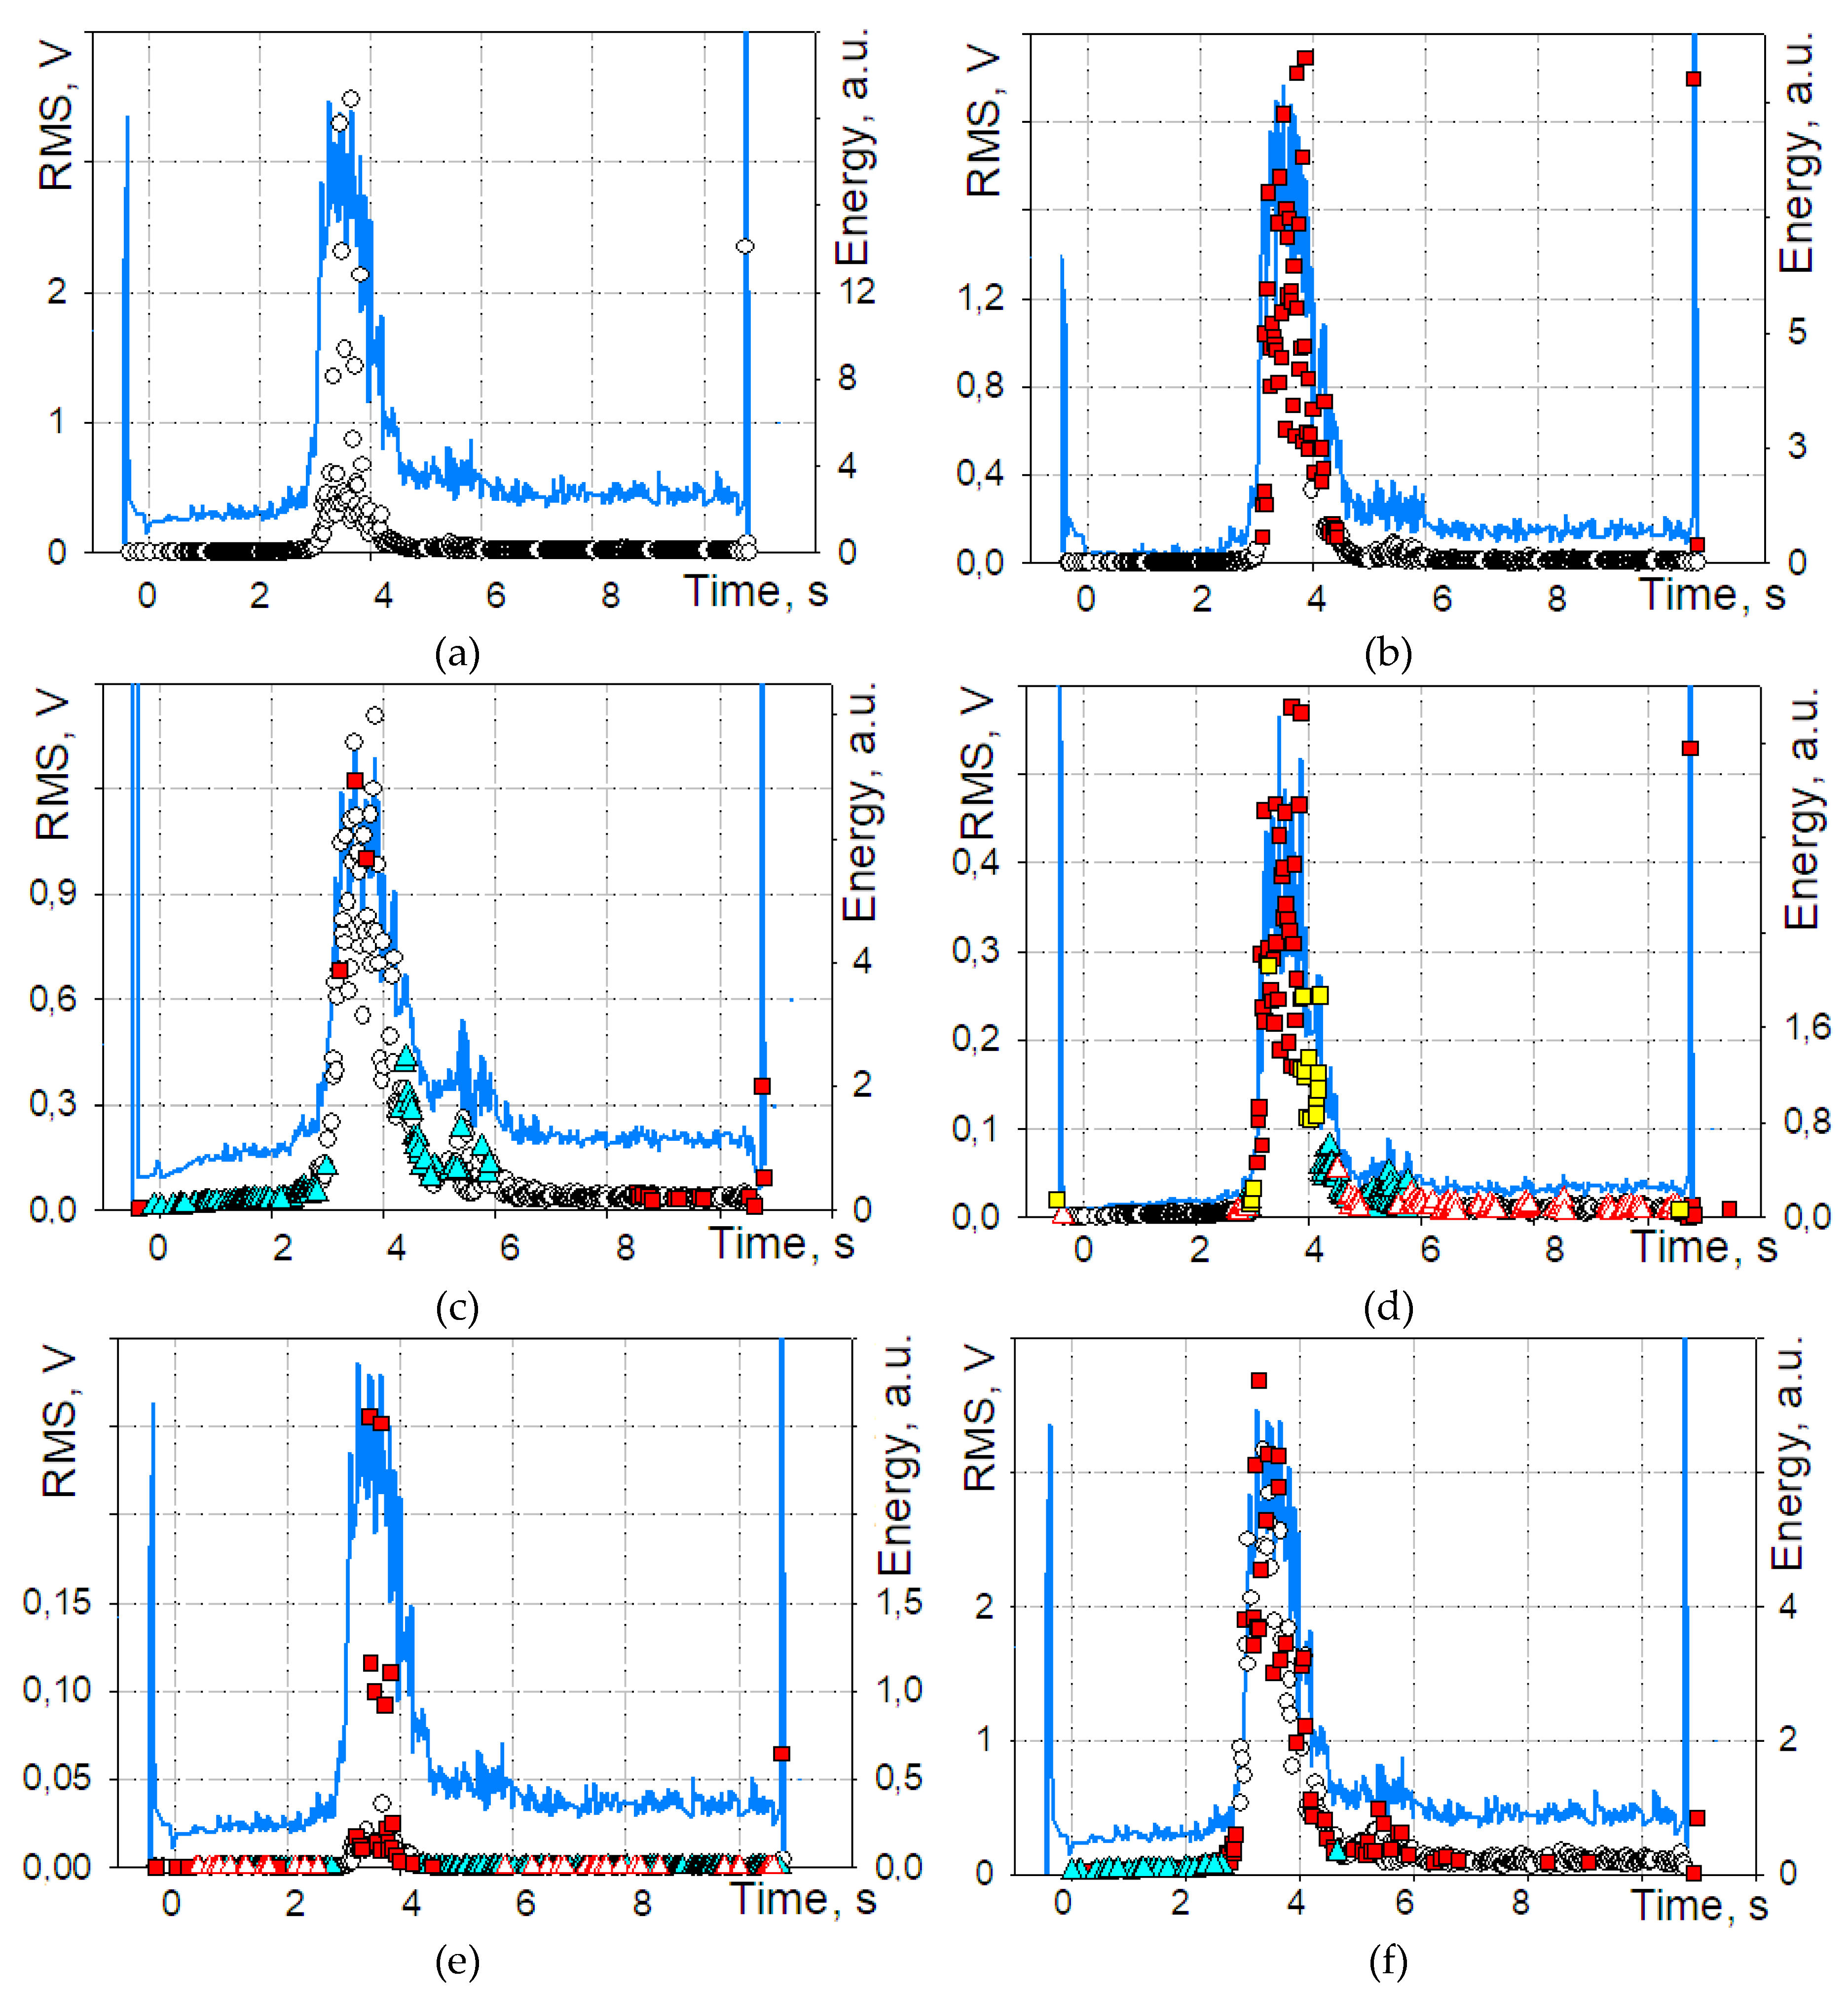
Typical results obtained using different AE data filtration and classification schemes applied to the same AE stream obtained during the test of mineral motor oil 10W-40 on a four-ball friction machine at 1167 N load under close to extreme conditions determined in a series of tests described in Section 5, c.f. Figure 2, are illustrated in Figure A1a-f corresponding to different processing schemes given in Figure 1. A good thing about this example is that the pre-scoring stage (up to 2 s), scoring (2 to 5 s), and the post-scoring run-in stage (from 5 s to the end of the record) are observed in a sequence within a reasonably short stream (c.f. other tribology situations shown in Figure 2). The occurrence of scoring (or some time scuffing) has been confirmed by the standard procedure described in [65] according to the size of the wear scar.
In Figure A1a–f, the integral RMS curve (shown in blue) is plotted to demonstrate the decrease in the AE energy characteristic value due to filtering during signal processing. Indeed, one can notice that filtering results in the inevitable decrease in the integral AE energy parameters by 1.1–10 times, depending on the filter, as compared with the original signal, as illustrated by the RMS curve in Figure A1. However, particular care must be exercised while using the filters F1.3, F2.1 and F2.2 when the signal-to-noise ratio is low because the energy of the filtering functions Sn(f) and C(f) obtained in the on-site tests can often be close to the AE energy recorded during tribological testing.
Most of the AE processing schemes tested, c.f. Figure A1, reveal the AE patterns corresponding to the primary damage mechanisms associated with either abrasive or adhesive types of wear, albeit with notably different sensitivity reflected in the number of signals belonging to distinct classes attributable to specific degradation processes, c.f. Figure 2. The temporal resolution of underlying processes by AE procedures is also different as can be seen by the concurrence the AE-determined period of activity of a specific source and the time interval the corresponding damage mechanism is actually seen in metallographic examinations. We should note that the combinations F1.1 + K2, F1.3 + K2, F2.1 + K2 and F2.2 + K2 (Figure A1a) fail to disclose the damage mechanisms and is, therefore, not practical. The schemes F1.2 + K1 and F2 + K2 demonstrate only partial success in AE signal discrimination, Figure 2b, which is far from being satisfactory. Let us note that, the schemes F2.1 + K3, F2.2 + K1 and F2.2 + K3 yield reasonable results, albeit the unnecessarily and unjustified splitting of some clusters (Figure A1d,e) into two or more. This effect is known as “over-clustering”, which occurs when clusters are too close together resulting in poor discrimination and interpretation problems: here signals marked with Lubricants 08 00052 i020 appear as over-clustering of Lubricants 08 00052 i021-class, and Lubricants 08 00052 i022 is over-clustering of Lubricants 08 00052 i023-group of signals. Thus, the application of these schemes requires the additional procedure for merging clusters, which is laborious for manual post-processing. Otherwise, it needs additional assumptions for the unsupervised automatic implementation. For the reasons mentioned above, these procedures are also not recommended for immediate application. Favorable results of AE signal discrimination are, however, systematically obtained with the F1.3 + K1, F1.3 + K3 and F2.1 + K1 schemes, Figure A1c, revealing a wealth of occurring processes through the statistically well-separated patterns of signals.
The schemes F1.1 + K3, F1.2 + K3 and F1.1 + K1 (specifically, Figure A1f represents the most successful result of signal classification) do not have the shortcomings highlighted above for other processing schemes. The outcomes of these procedures fulfil successfully the verification criteria formulated in Section 3. Therefore, they are chosen as the first option when the AE data processing is used for evaluation of the friction-induced damage in various testing situations described in the main part of the present work.
Considering the above results shown in Figure A1a,b, it might be plausible to conclude that the k-means based K2 algorithm is not practical. Indeed, in its present form, it fails to distinguish properly between active friction mechanisms even if when it is used with the most efficient noise filtering algorithms. This conclusion, however, is not entirely correct as the flexibility of this “classical” clustering method has not been explored in full, and further research is encouraged to reduce the redundancy and increase the efficiency in the set of descriptive variables by using, for example, the principal component analysis or the factor analysis (PCA) as outlined in [54]. The additional strength to this algorithm can be added if the PSD function is included in the feature space. In general, the power of the k-means based approach has been demonstrated in [79] through the proposed innovative adaptive sequential k-means ASK algorithm with the Kullback-Leibler or correlation distance, which has been then proven efficient on many occasions. Nevertheless, it has yet to be tested and adapted to tribology systems.
Figure A1. Typical results illustrating different behaviors of the AE rms ( Lubricants 08 00052 i024 - line) value depending on different signal processing schemes shown in Figure 1 and applied to one and the same dataset obtained in the four-ball testing with mineral oil used as a lubricant: (a) scheme F1.1 + K2, (b) scheme F1.2 + K2, (c) scheme F1.3 + K1, (d) scheme F2.1 + K3, (e) scheme F2.2 + K1, and (f) scheme F1.1 + K1. The categorized AE signals are designated as follows: Lubricants 08 00052 i025-type signals correspond to the sliding wear dominated by abrasive friction; Lubricants 08 00052 i026 symbols denote adhesive damage and incipient seizure; Lubricants 08 00052 i027represents the severe wear mode due to progressing seizure, significant plastic material transfer and welding (see the text below for details). The results shown in (d) and (e) illustrate the over-clustering effect: Lubricants 08 00052 i028 appears as over-clustering of Lubricants 08 00052 i029, and Lubricants 08 00052 i030 is over-clustering of Lubricants 08 00052 i031.
Lubricants 08 00052 g0a1
One should notice, that the use of detection algorithms without data filtering demonstrates a result close to the filter F1 variants, which is understandable since the F1 filtering procedures induce minimal distortions to the AE waveforms and reduce a relatively small part of the signal energy. Nonetheless, without filtering, the number of unrecognized AE signals (attributable to the general noise cluster) is the largest. The conclusion, therefore, is that the efficient noise reduction is a pivotal pre-processing step for the successive signal recognition and discrimination by virtually any clustering algorithms. As a typical example, the results of the application of the AE data processing schemes F1.1 + K3 and F1.1 + K1, which have been considered practical, are shown in Figure 4 and Figure 2, Figure 3, Figure 5 and Figure 6.

References

  1. Pollock, A. Chapter. Acoustic emission inspection. In ASM Metals Handbook. Nondestructive Evaluation and Quality Control; ASM International: Materials Park, OH, USA, 2002; Volume 17, pp. 593–628. [Google Scholar]
  2. Acoustic Emission—Research and Applications; Sikorski, W. (Ed.) InTech: Rijeka, Croatia, 2013; p. 222. [Google Scholar]
  3. Baranov, V.; Kudryavtsev, E.; Sarychev, G.; Schavelin, V. Acoustic Emission at Friction; Tribology and Interface Engineering Series 53; Briscoe, B.J., Ed.; Elsevier: London, UK, 2007; p. 220. [Google Scholar]
  4. Baranov, V.; Kudryavtsev, E.; Sarychev, G.; Schavelin, V. Chapter 1. In Friction of Solids and Nature of Acoustic Emission; Tribology and Interface Engineering Series; Briscoe, B.J., Ed.; Elsevier: London, UK, 2007; pp. 1–36. [Google Scholar]
  5. Boness, R.J.; Mcbride, S.L. Adhesive and abrasive wear studies using acoustic emission techniques. Wear 1991, 149, 41–53. [Google Scholar] [CrossRef]
  6. Boness, R.J.; Mcbride, S.L.; Sobczyk, M. Wear studies using acoustic-emission techniques. Tribol. Int. 1990, 23, 291–295. [Google Scholar] [CrossRef]
  7. Bhushan, B.; Wu, Y.J.; Tambe, N.S. Sliding contact energy measurement using a calibrated acoustic emission transducer. IEEE Trans. Magn. 2003, 39, 881–887. [Google Scholar] [CrossRef]
  8. Hanchi, J.; Klamecki, B.E. Acoustic emission monitoring of the wear process. Wear 1991, 145, 1–27. [Google Scholar] [CrossRef]
  9. Klamecki, B.E.; Hanchi, J. Wear process description based on acoustic-emission. J. Tribol. Trans. ASME 1990, 112, 469–476. [Google Scholar] [CrossRef]
  10. Lingard, S.; Yu, C.W.; Yau, C.F. Sliding wear studies using acoustic-emission. Wear 1993, 162, 597–604. [Google Scholar] [CrossRef]
  11. Bulatov, V.P.; Polevaya, O.V.; Sedakova, E.B.; Fadin, Y.A. Time dependence of the friction coefficient. Tech. Phys. Lett. 1996, 22, 777–778. [Google Scholar]
  12. Tandon, N.; Choudhury, A. A review of vibration and acoustic measurement methods for the detection of defects in rolling element bearings. Tribol. Int. 1999, 32, 469–480. [Google Scholar] [CrossRef]
  13. Eftekharnejad, B.; Carrasco, M.R.; Charnley, B.; Mba, D. The application of spectral kurtosis on Acoustic Emission and vibrations from a defective bearing. Mech. Syst. Signal Process. 2011, 25, 266–284. [Google Scholar] [CrossRef] [Green Version]
  14. Mechefske, C.K.; Sun, G.; Sheasby, J. Using acoustic emission to monitor sliding wear. Insight Non-Destr. Test. Cond. Monit. 2002, 44, 490–497. [Google Scholar]
  15. Hisakado, T.; Warashina, T. Relationship between friction and wear properties and acoustic emission characteristics: Iron pin on hardened bearing steel disk. Wear 1998, 216, 1–7. [Google Scholar] [CrossRef]
  16. Lingard, S.; Ng, K.K. An investigation of acoustic-emission in sliding friction and wear of metals. Wear 1989, 130, 367–379. [Google Scholar] [CrossRef]
  17. Morhain, A.; Mba, D. Bearing defect diagnosis and acoustic emission. Proc. Inst. Mech. Eng. Part J J. Eng. Tribol. 2003, 217, 257–272. [Google Scholar] [CrossRef] [Green Version]
  18. Matsuoka, K.; Forrest, D.; Tse, M.K. On-line wear monitoring using acoustic-emission. Wear 1993, 162, 605–610. [Google Scholar] [CrossRef]
  19. Matsuoka, K.; Taniguchi, K.; Nakakita, M. In-situ wear monitoring of slider and disk using acoustic emission. J. Tribol. 2001, 123, 175–180. [Google Scholar] [CrossRef]
  20. Benabdallah, H.S.; Aguilar, D.A. Acoustic emission and its relationship with friction and wear for sliding contact. Tribol. Trans. 2008, 51, 738–747. [Google Scholar] [CrossRef]
  21. Benabdallah, H.S.; Boness, R.J. Tribological behaviour and acoustic emissions of alumina, silicon nitride and SAE52100 under dry sliding. J. Mater. Sci. 1999, 34, 4995–5004. [Google Scholar] [CrossRef]
  22. Sun, J.; Wood, R.J.K.; Wang, L.; Care, I.; Powrie, H.E.G. Wear monitoring of bearing steel using electrostatic and acoustic emission techniques. Wear 2005, 259, 1482–1489. [Google Scholar] [CrossRef]
  23. Yao, Y.X.; Li, X.L.; Yuan, Z.J. Tool wear detection with fuzzy classification and wavelet fuzzy neural network. Int. J. Mach. Tools Manuf. 1999, 39, 1525–1538. [Google Scholar] [CrossRef] [Green Version]
  24. Kuo, R.J.; Cohen, P.H. Intelligent tool wear estimation system through artificial neural networks and fuzzy modeling. Artif. Intell. Eng. 1998, 12, 229–242. [Google Scholar] [CrossRef]
  25. Dutta, R.K.; Paul, S.; Chattopadhyay, A.B. The efficacy of backpropagation neural network with delta bar delta learning in predicting the wear of carbide inserts in face milling. Int. J. Adv. Manuf. Technol. 2006, 31, 434–442. [Google Scholar] [CrossRef]
  26. Price, E.D.; Lees, A.W.; Friswell, M.I. Detection of severe sliding and pitting fatigue wear regimes through the use of broadband acoustic emission. Proc. Inst. Mech. Eng. Part J J. Eng. Tribol. 2005, 219, 85–98. [Google Scholar] [CrossRef]
  27. Hase, A.; Mishina, H.; Wada, M. Correlation between features of acoustic emission signals and mechanical wear mechanisms. Wear 2012, 292–293, 144–150. [Google Scholar] [CrossRef]
  28. Smolin, A.Y.; Dobrynin, S.A.; Psakhie, S.G. On the possibility of using acoustic spectra to study deformation processes in surface layers during friction. Tech. Phys. Lett. 2009, 35, 1124–1128. [Google Scholar] [CrossRef]
  29. Kishi, T.; Ohtsu, M.; Yuyama, S. Acoustic Emission-Beyond the Millennium; Elsevier Science Ltd.: Kidlington, UK, 2000; p. 234. [Google Scholar]
  30. Gokhale, M.Y.; Khanduja, D.K. Time-domain signal analysis using wavelet packet decomposition approach. Int. J. Commun. Netw. Syst. Sci. 2010, 3, 321–329. [Google Scholar] [CrossRef] [Green Version]
  31. Ferrando Chacon, J.L.; Kappatos, V.; Balachandran, W.; Gan, T.-H. A novel approach for incipient defect detection in rolling bearings using acoustic emission technique. Appl. Acoust. 2015, 89, 88–100. [Google Scholar] [CrossRef]
  32. Saeidi, F.; Shevchik, S.A.; Wasmer, K. Automatic detection of scuffing using acoustic emission. Tribol. Int. 2016, 94, 112–117. [Google Scholar] [CrossRef]
  33. Baccar, D.; Söffker, D. Wear detection by means of wavelet-based acoustic emission analysis. Mech. Syst. Signal Process. 2015, 60–61, 198–207. [Google Scholar] [CrossRef]
  34. Wang, L.; Wood, R.J.K. Acoustic emissions from lubricated hybrid contacts. Tribol. Int. 2009, 42, 1629–1637. [Google Scholar] [CrossRef]
  35. Shevchik, S.A.; Saeidi, F.; Meylan, B.; Wasmer, K. Prediction of failure in lubricated surfaces using acoustic time-frequency features and random forest algorithm. IEEE Trans. Ind. Inf. 2017, 13, 1541–1553. [Google Scholar] [CrossRef]
  36. Bayer, R.G. Mechanical Wear Fundamentals and Testing, 2nd ed.; Marcel Dekker Ink: New York, NY, USA, 2004; p. 400. [Google Scholar]
  37. Botvina, L.R.; Levin, V.P.; Tyutin, M.R.; Zharkova, N.A.; Morozov, A.V.; Ozerskii, O.N.; Dobatkin, S.V. Wear Mechanisms of Structural Steels and Effect of Wear on Their Mechanical and Acoustic Properties during Tension. J. Frict. Wear 2013, 34, 6–13. [Google Scholar] [CrossRef]
  38. Kline, R.A.; Hartman, W.F. Frequency analysis of acoustic emission signals. In Proceedings of the 2nd International Conference on Mechanical Behavior of Materials, Boston, MA, USA, 16–20 August 1976; pp. 1631–1635. [Google Scholar]
  39. Williams, J.H.; Egan, D.M. Acoustic-emission spectral analysis of fiber composite failure mechanisms. Mater. Eval. 1979, 37, 43–47. [Google Scholar]
  40. Muravin, G.B.; Simkin, Y.V.; Merman, A.I. Identification of fracture mechanisms of materials using spectral analysis of acoustic emission signals. Russ. J. Nondestr. Test. 1989, 1, 8–15. [Google Scholar]
  41. Pomponi, E.; Vinogradov, A.; Danyuk, A. Wavelet-based approach to signal activity detection and phase picking: Application to acoustic emission. Signal Process. 2015, 115, 110–119. [Google Scholar] [CrossRef]
  42. Agletdinov, E.; Merson, D.; Vinogradov, A. A new method of low amplitude signal detection and its application in acoustic emission. Appl. Sci. 2020, 10, 73. [Google Scholar] [CrossRef] [Green Version]
  43. Vaseghi, S.V. Advanced Digital Signal Processing and Noise Reduction, 2nd ed.; John Wiley & Sons Ltd.: London, UK, 2000; p. 480. [Google Scholar]
  44. Allen, J.B. Short Time Spectral Analysis, Synthesis, and Modification by Discrete Fourier Transform. IEEE Trans. Acoust. Speech Signal Process. 1977, 25, 235–238. [Google Scholar] [CrossRef]
  45. Rastegaev, I.A.; Merson, D.L.; Rastegaeva, I.I.; Vinogradov, A.Y.; Chugunov, A.V. Comparative spectral analysis of noise-like acoustic signals during monitoring and diagnostics of industrial facilities. Test. Diagn. 2012, 10, 80–87. (In Russian) [Google Scholar]
  46. Rastegaeva, I.I.; Rastegaev, I.A.; Vikarchuk, A.A.; Merson, D.L.; Seleznev, M.N.; Vinogradov, A.Y. Acoustic emission-based feedback system for optimization of liquid processing in rotor devices. Instrum. Syst. Monit. Control Diagn. 2012, 5, 25–31. (In Russian) [Google Scholar]
  47. Rastegaev, I.A.; Danyuk, A.V.; Vinogradov, A.Y.; Merson, D.L.; Chugunov, A.V. Location of noise-like sources of acoustic emissions using the spectral similarity method. Russ. J. Nondestr. Test. 2013, 49, 553–561. [Google Scholar] [CrossRef]
  48. Rastegaev, I.A.; Danyuk, A.V.; Vinogradov, A.Y.; Merson, D.L.; Rastegaeva, I.I. Analysis of noise-like signals of acoustic emission methods broadband filtering. Test. Diagn. 2014, 8, 49–56. (In Russian) [Google Scholar]
  49. Van Trees, H.L. Detection, Estimation, and Modulation Theory: Detection, Estimation, and Linear Modulation Theory; Part 1; John Wiley & Sons Ltd.: London, UK, 2001; p. 440. [Google Scholar]
  50. Ostanin, S.A. Increase of the signal-noise ratio by the method of sequential calculation of autocorrelation function. J. Radio Electron. 2011, 12, 1–9. (In Russian) [Google Scholar]
  51. Mac Queen, J.B. Some methods for classification and analysis of multivariate observations. In Proceedings of the 5th Berkeley Symposium on Mathematical Statistics and Probability; University of California: Berkeley, CA, USA, 1967; pp. 281–297. [Google Scholar]
  52. Hartigan, J.A. Clustering algorithms; John Wiley & Sons Ltd.: New York, NY, USA, 1975; p. 369. [Google Scholar]
  53. Wong, C.-C.; Chen, C.-C.; Su, M.-C. A novel algorithm for data clustering. Pattern Recognit. 2001, 34, 425–442. [Google Scholar] [CrossRef]
  54. Vinogradov, A. Principles of statistical and spectral analysis of acoustic emission and their application to plastic deformation of metallic glasses. J. Acoust. Emiss. 1998, 16, 158–169. [Google Scholar]
  55. Rippengill, S.; Worden, K.; Holford, K.M.; Pullin, R. Automatic classification of acoustic emission patterns. Strain 2003, 39, 31–41. [Google Scholar] [CrossRef]
  56. Sause, M.G.R.; Gribov, A.; Unwin, A.R.; Horn, S. Pattern recognition approach to identify natural clusters of acoustic emission signals. Pattern Recognit. Lett. 2012, 33, 17–23. [Google Scholar] [CrossRef]
  57. Sadegh, H.; Mehdi, A.N.; Mehdi, A. Classification of acoustic emission signals generated from journal bearing at different lubrication conditions based on wavelet analysis in combination with artificial neural network and genetic algorithm. Tribol. Int. 2016, 95, 426–434. [Google Scholar] [CrossRef]
  58. Merson, D.L.; Razuvaev, A.A.; Vinogradov, A.Y. Application of the Spectral Analysis of Acoustic Emission Signals to Studies of Vulnerability of TiN Coatings on Steel Substrates. Russ. J. Nondestr. Test. 2002, 38, 508–516. [Google Scholar] [CrossRef]
  59. Everitt, B.; Landau, S.; Leese, M.; Stahl, D. Cluster Analysis, 5th ed.; John Wiley & Sons: London, UK, 2011; p. 360. [Google Scholar]
  60. Vinogradov, A.; Merson, D.L.; Patlan, V.; Hashimoto, S. Effect of Solid Solution Hardening and Stacking Fault Energy on Plastic Flow and Acoustic Emission in Cu-Ge Alloys. Mater. Sci. Eng. A 2003, 341, 57–73. [Google Scholar] [CrossRef]
  61. Rastegaev, I.A.; Merson, D.L. New Approaches to the Assessment of Wear Mechanisms in Real-Time According to Acoustic Emission Data; Chapter 19; Rubanik, V.V., Ed.; VGTU-Press: Vitebsk, Belarus, 2018; pp. 402–427. (In Belarusian) [Google Scholar]
  62. Rastegaev, I.A.; Merson, D.L.; Vinogradov, A.Y.; Danyuk, A.V. Technique for the Determination of the Critical Points under Acoustic Emission Tribological Tests. Inorg. Mater. 2017, 53, 1506–1512. [Google Scholar] [CrossRef]
  63. Lim, S.; Ashby, M. Overview no. 55 Wear-Mechanism maps. Acta Metall. 1987, 35, 1–24. [Google Scholar] [CrossRef]
  64. Wang, Q.J.; Chung, Y.-W. Encyclopedia of Tribology; Springer: Boston, MA, USA, 2013; p. 4139. [Google Scholar]
  65. ASTM D2596, Standard Test Method for Measurement of Extreme-Pressure Properties of Lubricating Grease (Four-Ball Method); ASTM International: West Conshohocken, PA, USA, 2015.
  66. ASTM D2783, Standard Test Method for Measurement of Extreme-Pressure Properties of Lubricating Fluids (Four-Ball Method); ASTM International: West Conshohocken, PA, USA, 2019.
  67. ASTM G99, Standard Test Method for Wear Testing with a Pin-on-Disk Apparatus; ASTM International: West Conshohocken, PA, USA, 2005.
  68. ASTM G77, Standard Test Method for Ranking Resistance of Materials to Sliding Wear Using Block-on-Ring Wear Test; ASTM International: West Conshohocken, PA, USA, 2017.
  69. Baran, I.; Nowak, M.; Darski, W. Application of acoustic emission in monitoring of failure in slide bearings. J. Acoust. Emiss. 2007, 25, 341–347. [Google Scholar]
  70. Fadin, Y.A. Application of Acoustic Emissions for Mass Wear Analysis. J. Frict. Wear 2008, 29, 21–23. [Google Scholar] [CrossRef]
  71. Rastegaev, I.A.; Merson, D.L.; Danyuk, A.V.; Afanasyev, M.A.; Vinogradov, A. Using acoustic emission signal categorization for reconstruction of wear development timeline in tribosystems: Case studies and application examples. Wear 2018, 410–411, 83–92. [Google Scholar] [CrossRef]
  72. Rastegaev, I.A.; Merson, D.L. Express method for testing lubricants on a four-ball friction machine using the acoustic emission method. Bull. Samara Sci. Cent. Russ. Acad. Sci. 2008, 8, 101–105. (In Russian) [Google Scholar]
  73. Bailey, D.H.; Swarztrauber, P.N. A Fast Method for the Numerical Evaluation of Continuous Fourier and Laplace Transforms. SIAM J. Sci. Comput. 1994, 15, 1105–1110. [Google Scholar] [CrossRef] [Green Version]
  74. Welch, P.D. The use of fast Fourier transform for the estimation of power spectra: A method based on time averaging over short, modified periodograms. IEEE Trans. Audio Electroacoust. 1967, 15, 70–73. [Google Scholar] [CrossRef] [Green Version]
  75. De Maesschalck, R.; Jouan-Rimbaud, D.; Massart, D. The Mahalanobis distance. Chemom. Intell. Lab. Syst. 2000, 50, 1–18. [Google Scholar] [CrossRef]
  76. Manson, G.; Worden, K.; Holford, K.; Pullin, R. Visualisation and dimension reduction of acoustic emission data for damage detection. J. Intell. Mater. Syst. Struct. 2001, 12, 529–536. [Google Scholar] [CrossRef]
  77. Rastegaev, I.A.; Merson, D.L.; Vinogradov, A.Y. Real time acoustic emission methodology in effective tribology testing. Int. J. Microstruct. Mater. Prop. 2014, 9, 360–370. [Google Scholar] [CrossRef]
  78. Popov, V.L. Contact Mechanics and Friction. Physical Principles and Applications; Springer: Berlin/Heidelberg, Germany, 2017; p. 391. [Google Scholar]
  79. Pomponi, E.; Vinogradov, A. A real-time approach to acoustic emission clustering. Mech. Syst. Signal Process. 2013, 40, 791–804. [Google Scholar] [CrossRef]
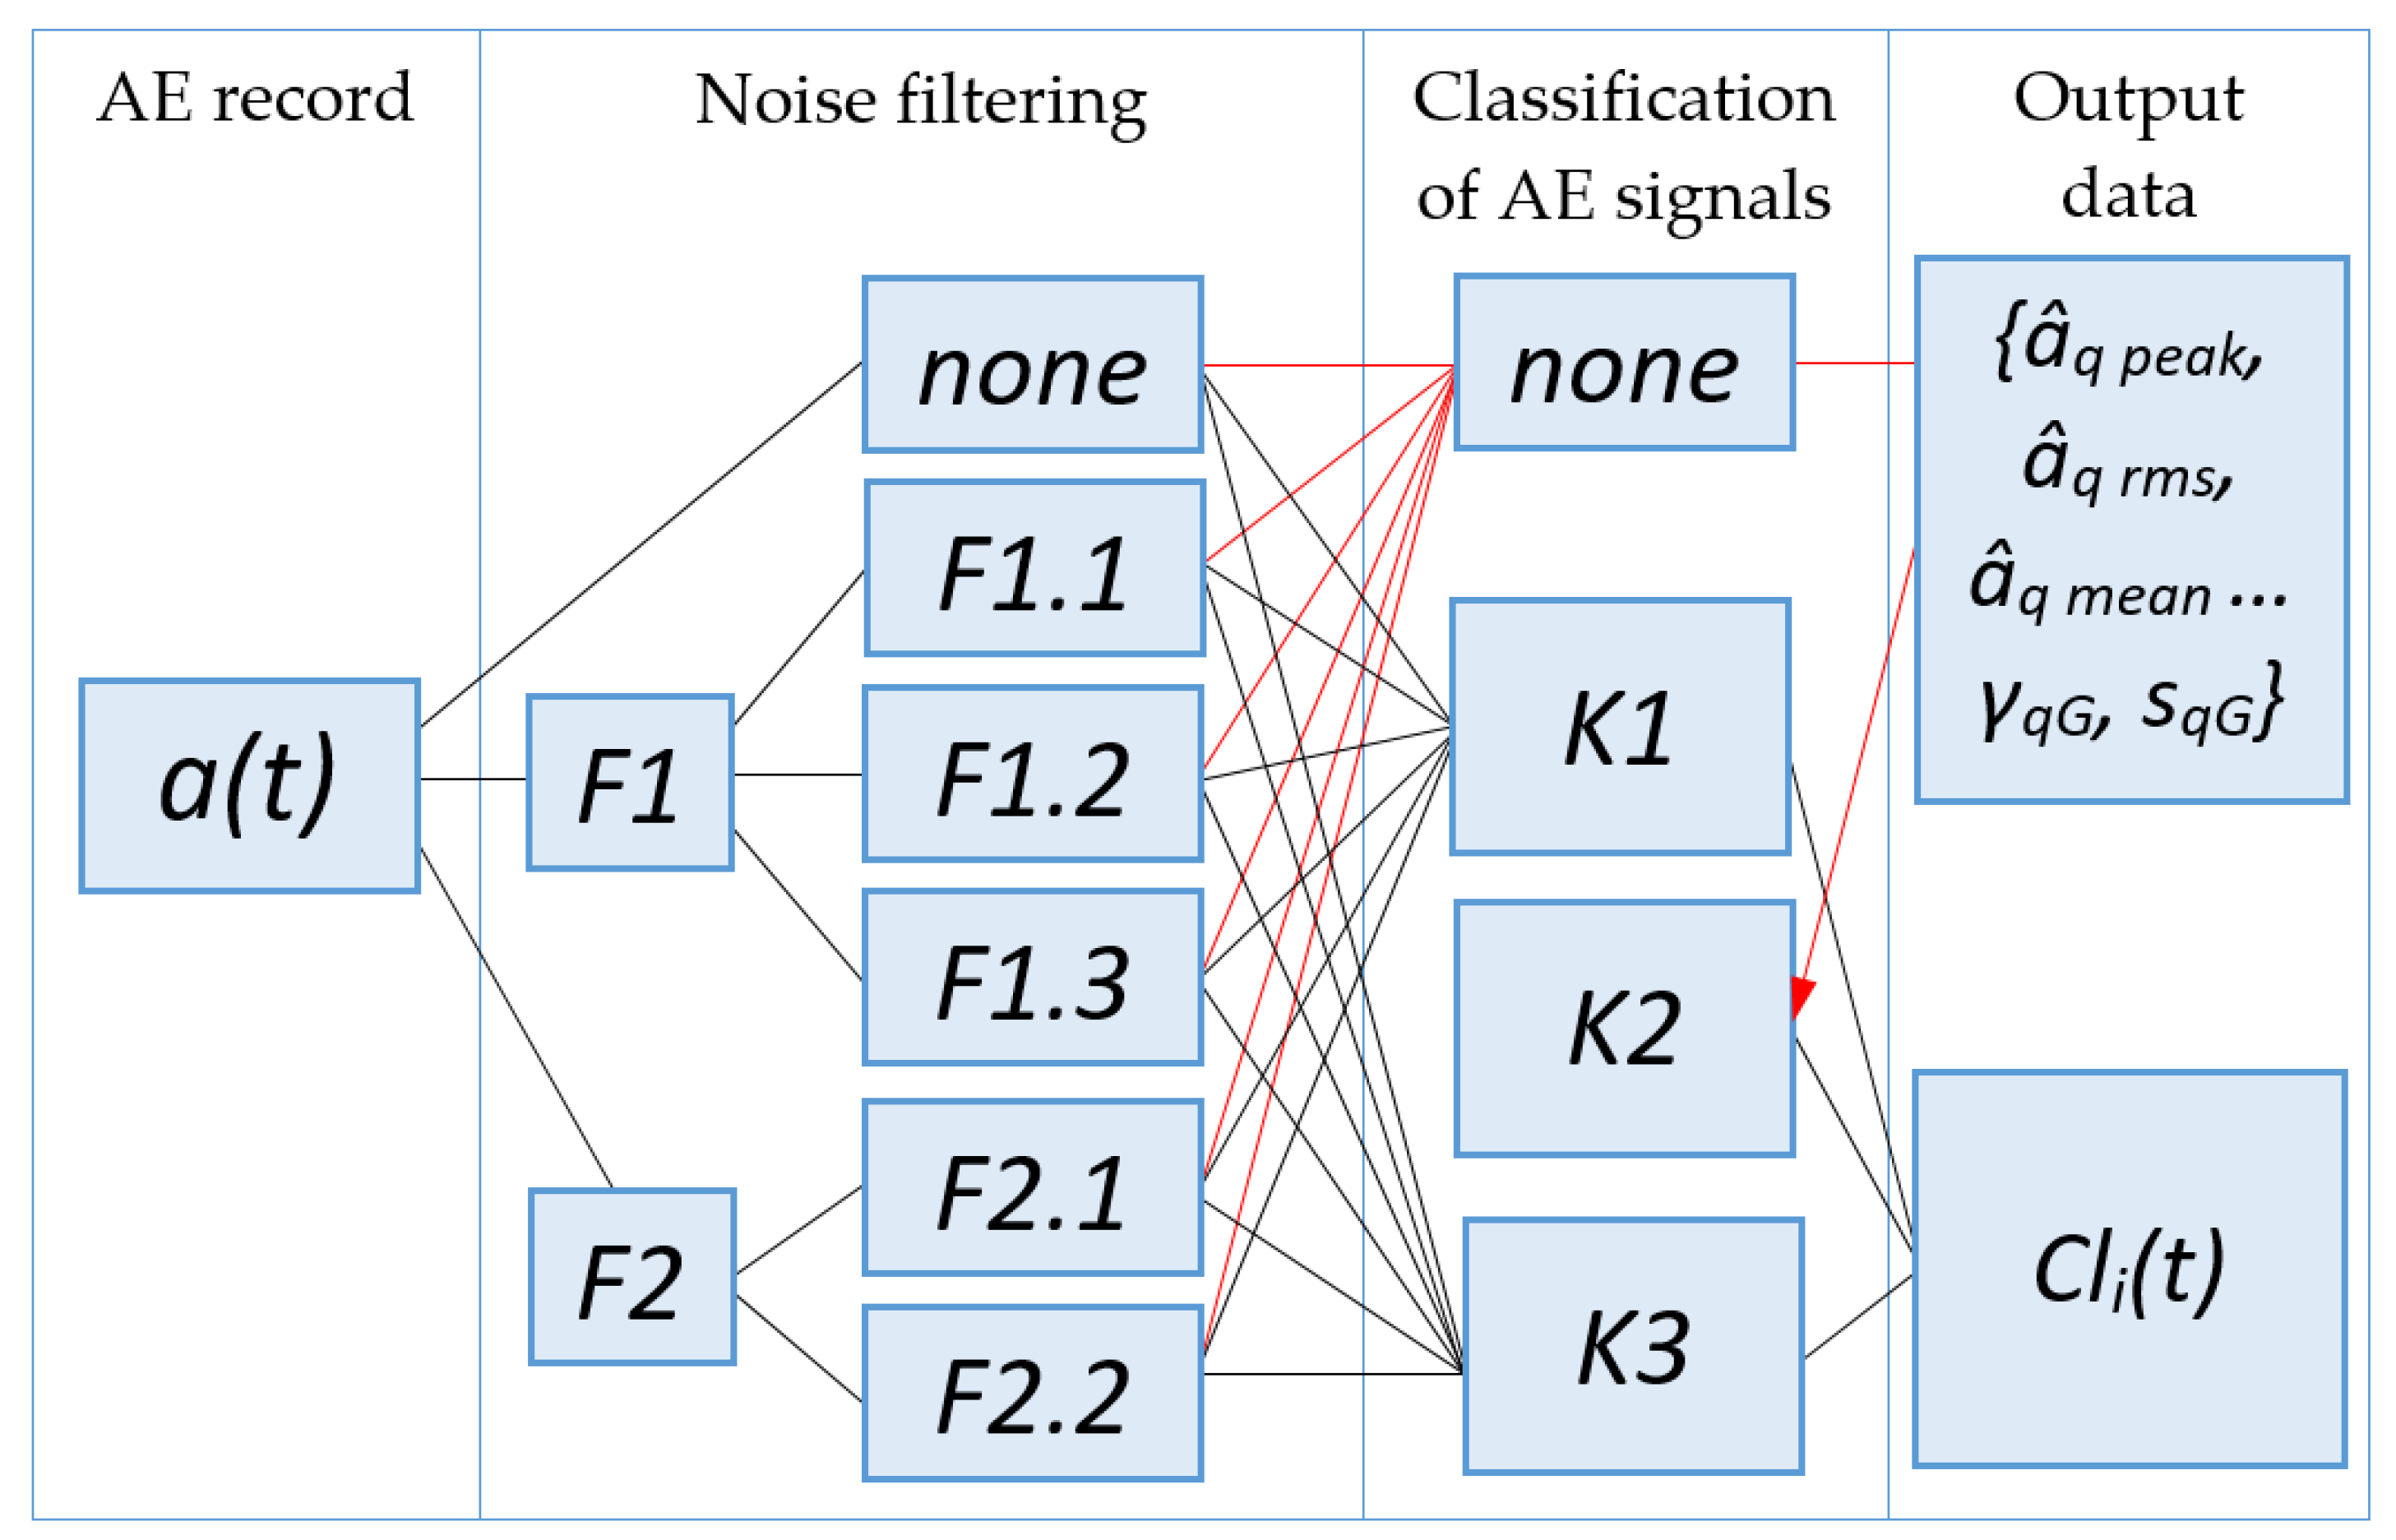
Figure 1. The schematic diagram showing the acoustic emission (AE) data processing flow involving different filtering F and clustering K algorithms tested in various combinations. Symbolic notations are described in the text and Appendix A, Appendix B, Appendix C, Appendix D and Appendix E.
Lubricants 08 00052 g001
Figure 2. The results of the clustering of AE obtained during four-ball testing using the data processing scheme F1.1 + K1. (ae) motor oil test according to [66], (fj) grease test according to [65]. AE signals are grouped as follows: Lubricants 08 00052 i011-type signals correspond to the abrasive-dominated wear; Lubricants 08 00052 i012 denote prevailing adhesive damage and incipient seizure; Lubricants 08 00052 i013 represents the severe wear mode due to progressing seizure, significant plastic material transfer and welding; Lubricants 08 00052 i014 represents AE root-mean-square (RMS) voltage.
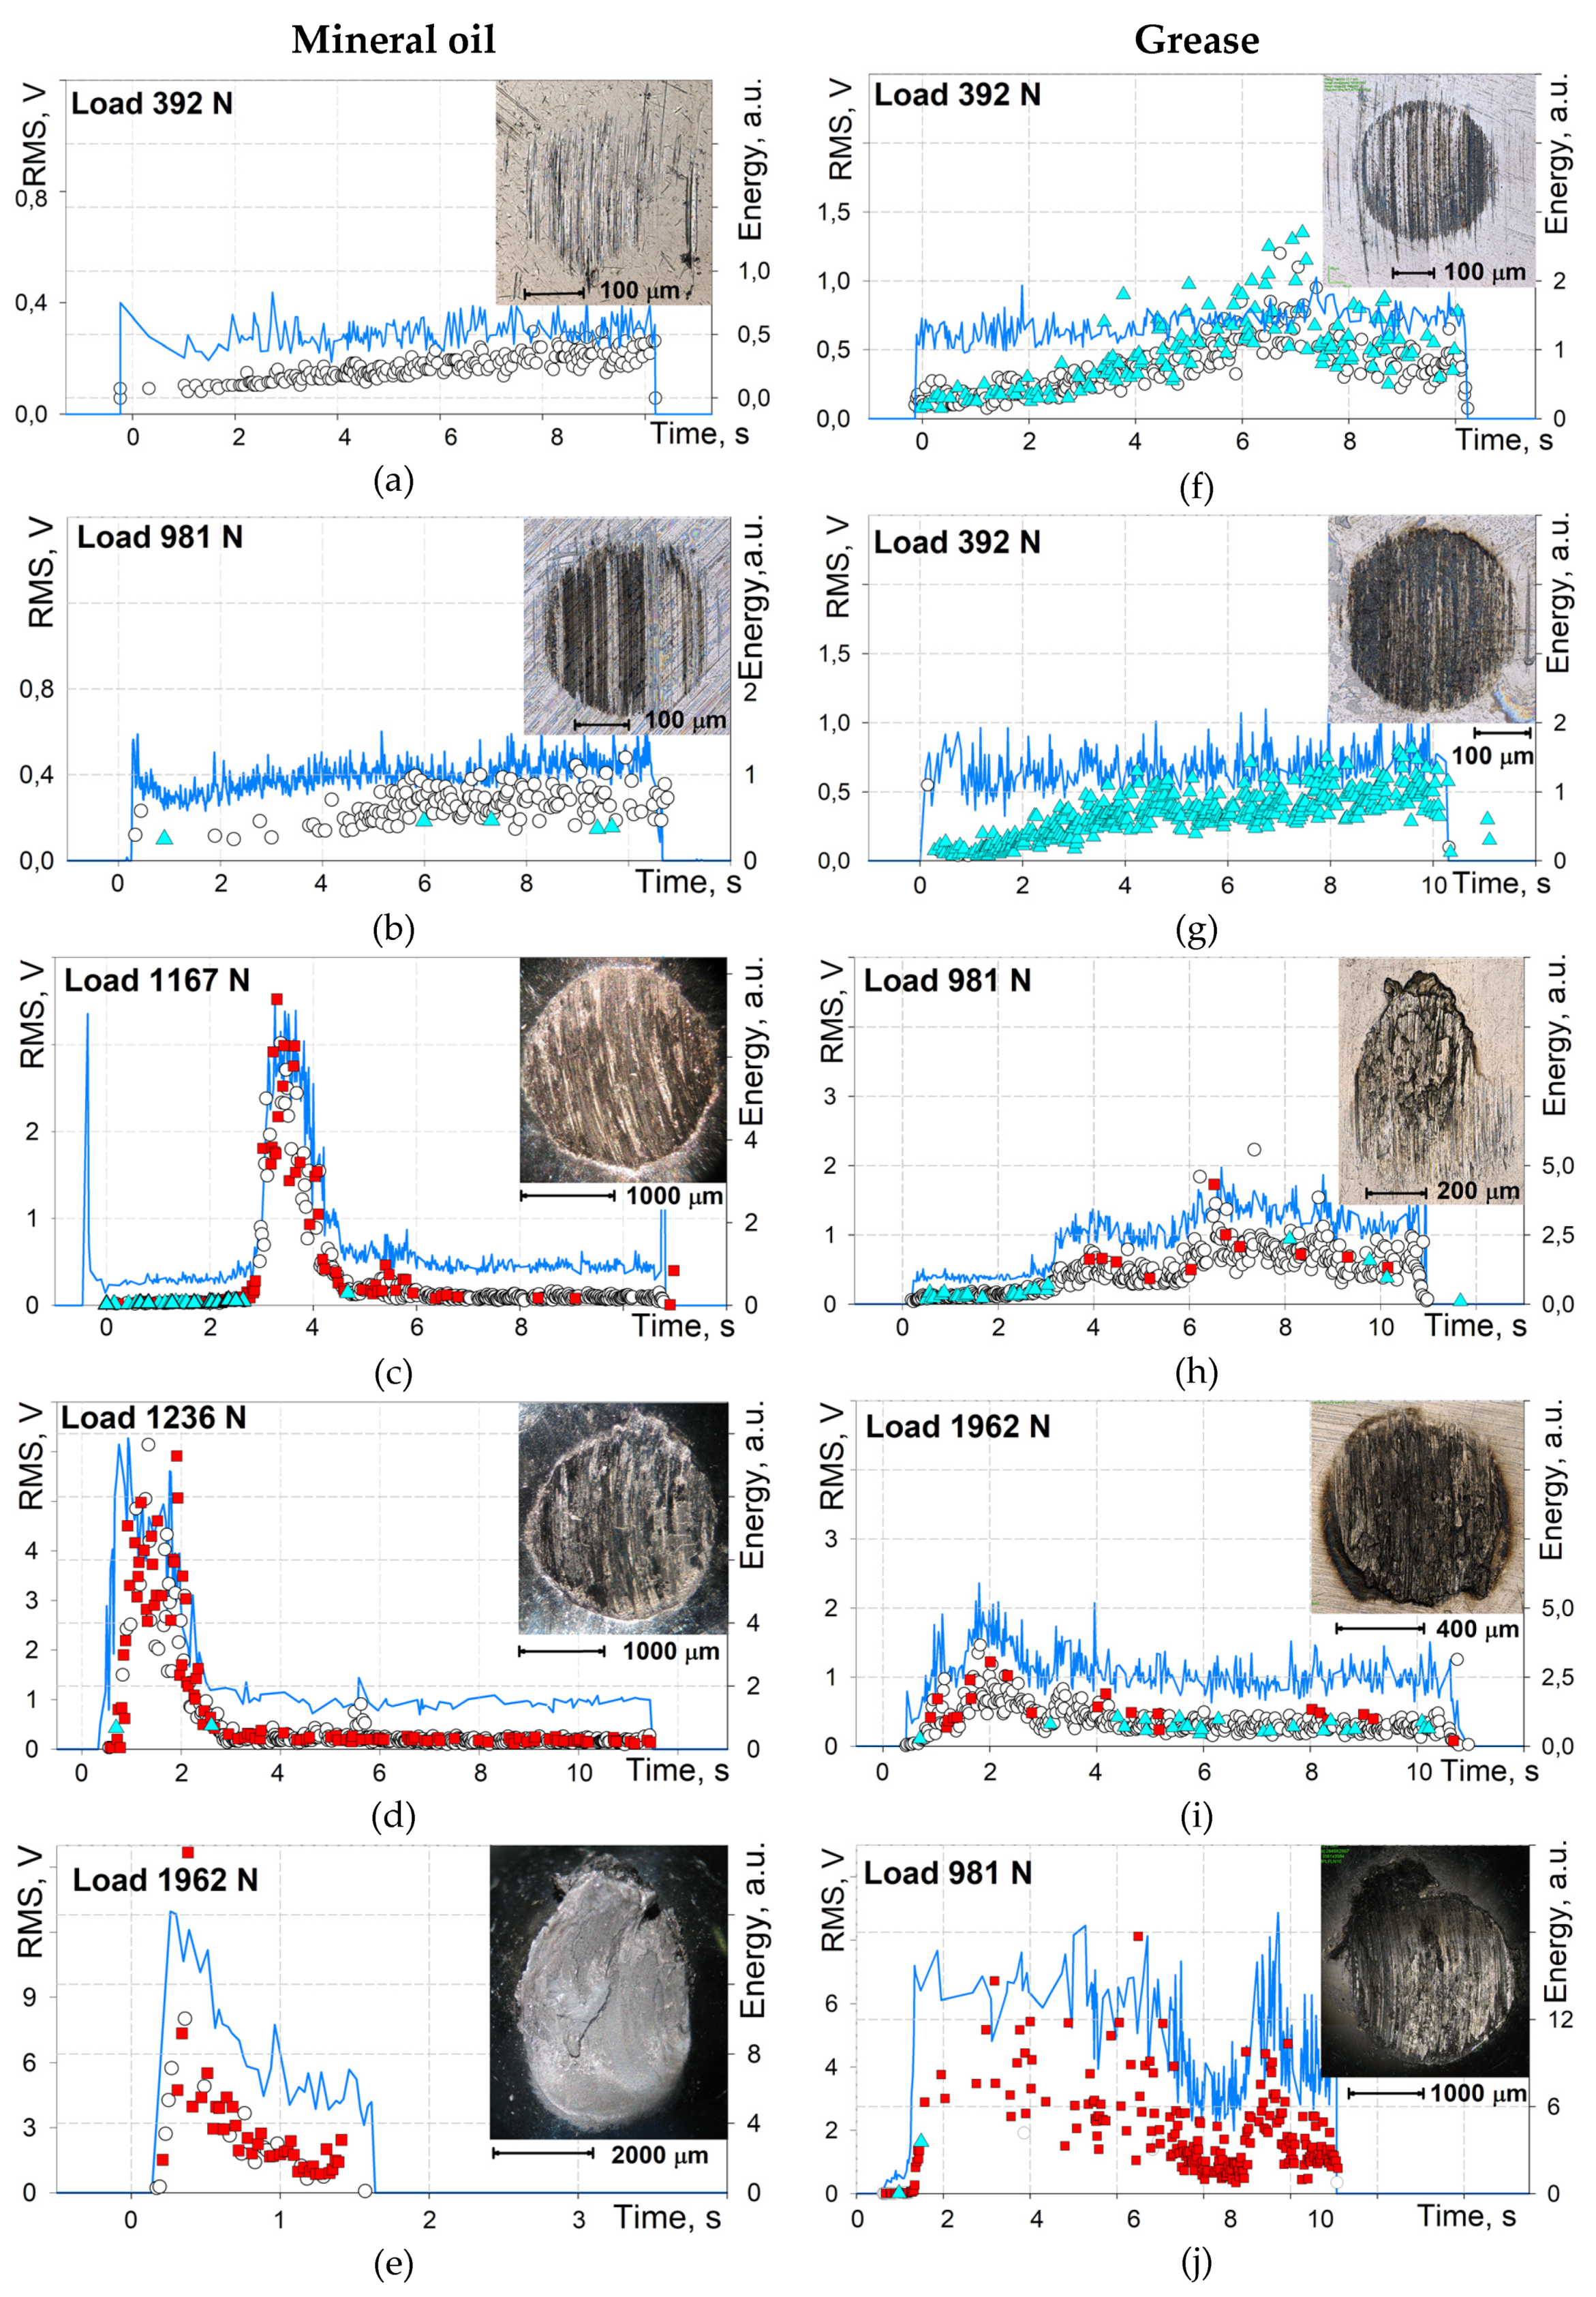
Lubricants 08 00052 g002
Figure 3. The diagram showing the change in the energy of AE signals in each group of events recorded under different loads in the standard four-ball tests [65,66] with motor oil (a) and grease (b) used as lubricants. Classified AE signals are color coded in the same way as in Figure 2. The filled circles Lubricants 08 00052 i015 correspond to the average wear scar diameter D as a function of the applied load P, while the dashed red line Lubricants 08 00052 i016 represents the critical size [D] tabulated in the standards [65,66].
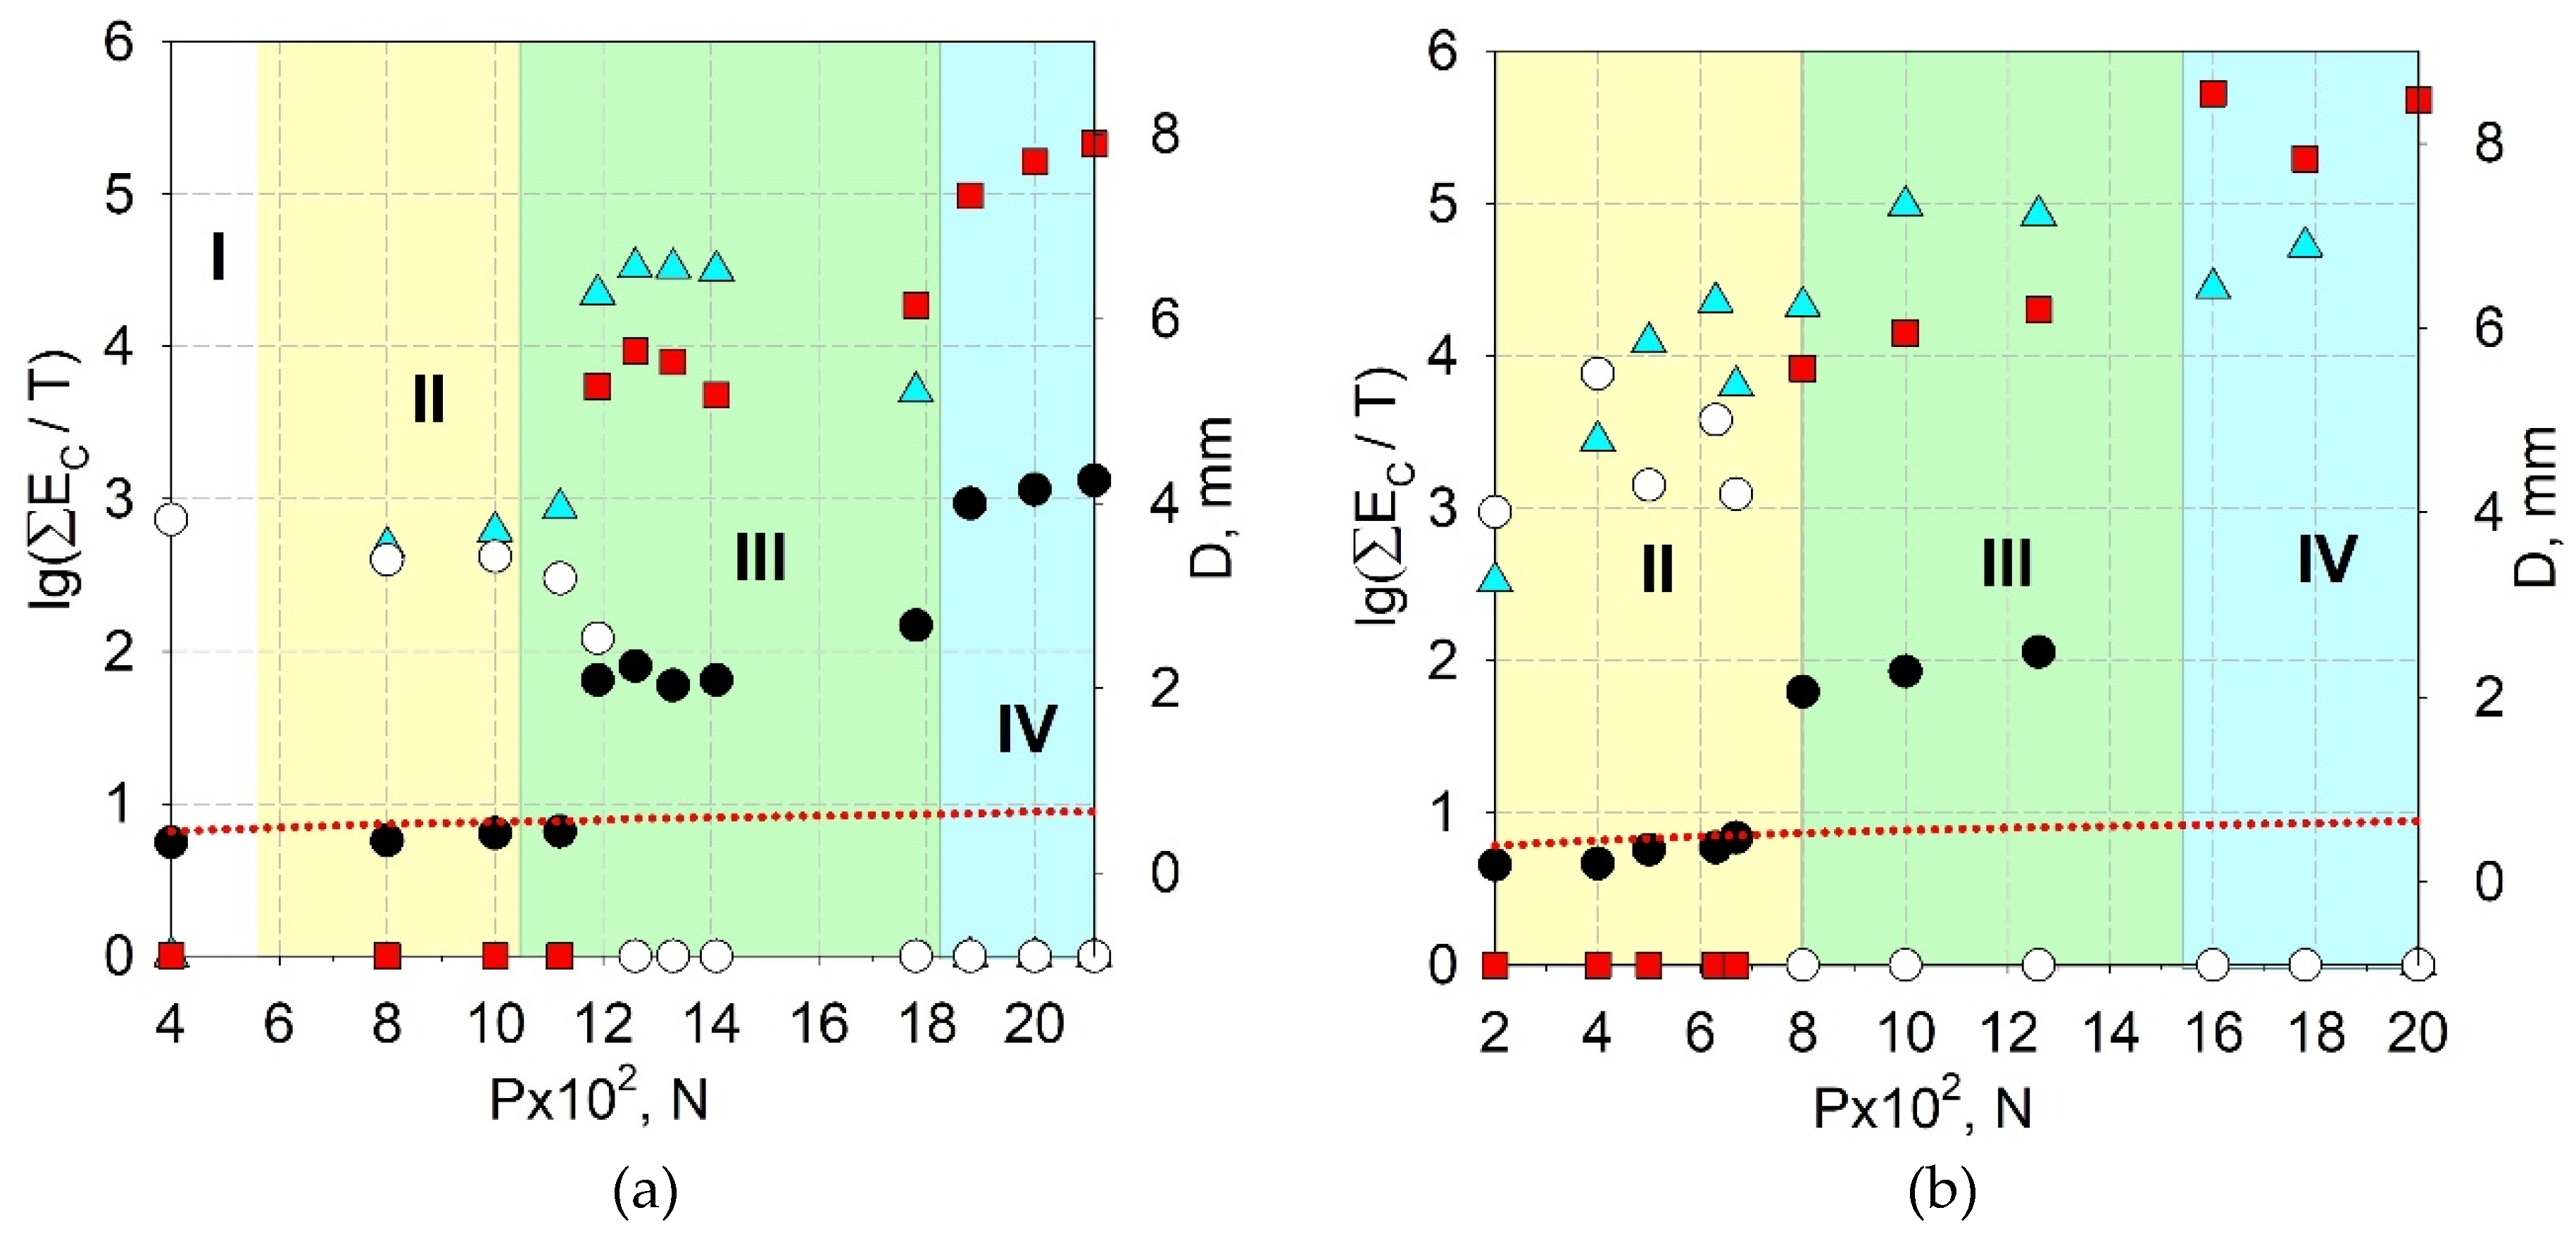
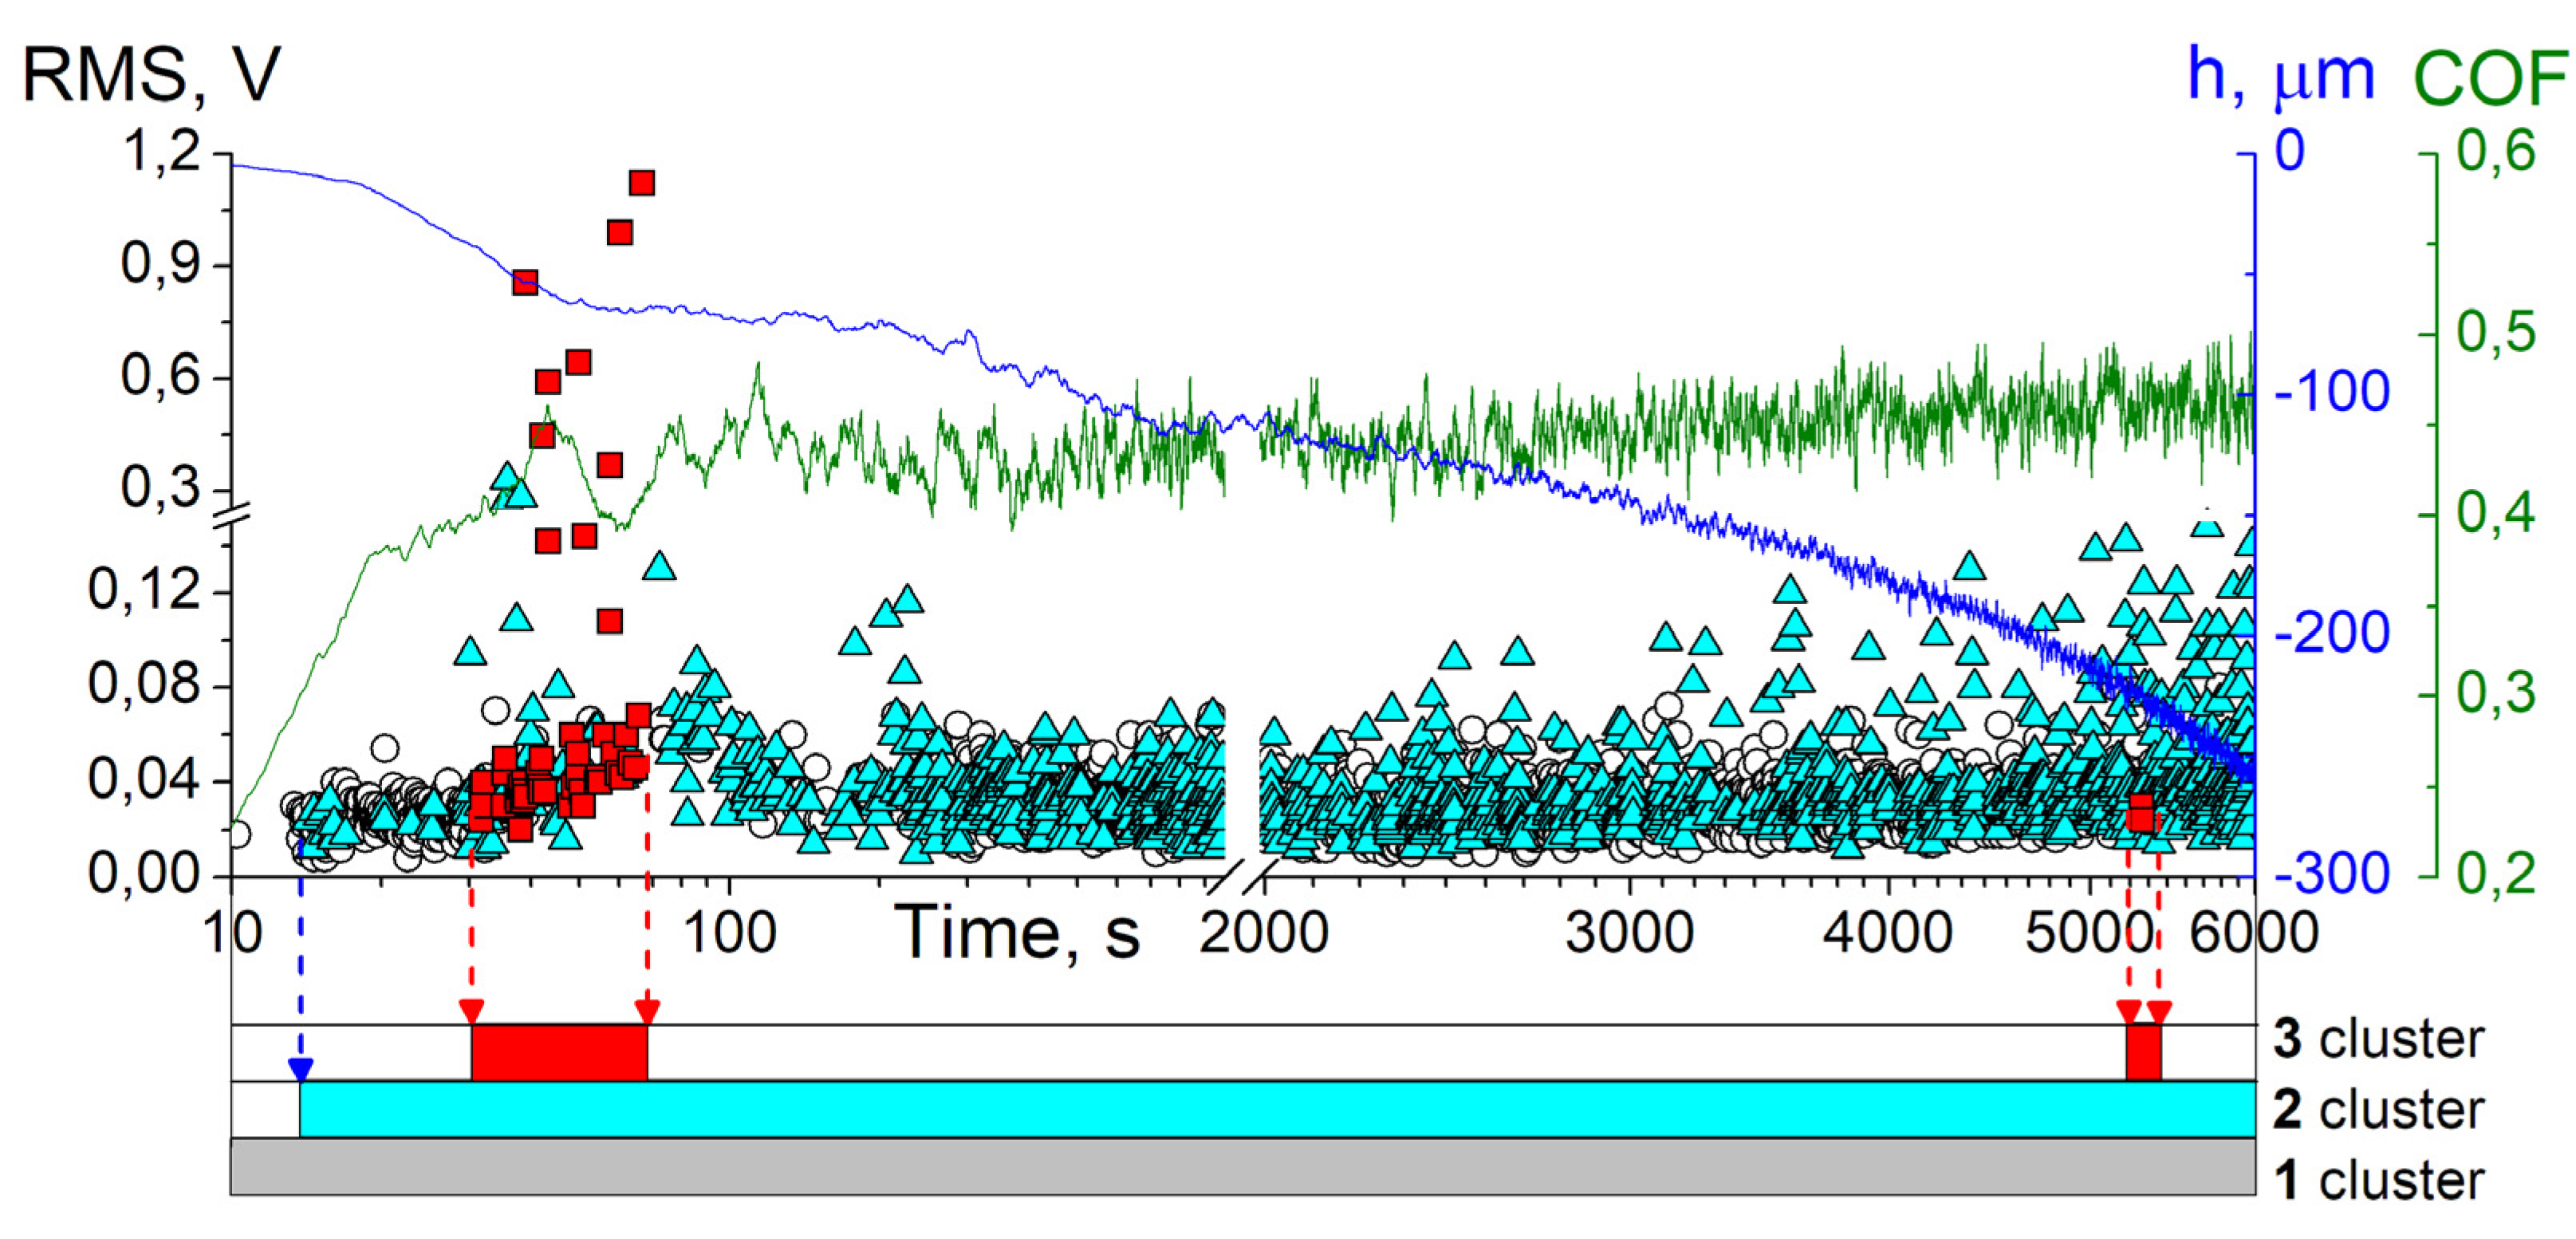
Lubricants 08 00052 g003
Figure 4. An example showing the evolution of clusters and the cluster time-chart showing changes in the wear mechanism during the standard ASTM pin-on-disk testing [67] of the 100Cr6—W6Mo5Cr4V2 steel pair under dry friction; signals are represented in terms of a single parameter—the root-mean-square (RMS), the wear curve is shown as the wear depth h, and the coefficient of friction (COF) is plotted for comparison; the colored symbols denoting different AE clusters are explained in Section 4 and in the caption to Figure 2. The processing scheme F1.1 + K3 is used for this example.
Lubricants 08 00052 g004
Figure 5. AE cluster time-spectral distribution diagrams during testing of two different mineral greases (Fiol-1 (a) and Unirex-3 (b), see [71] for details) under identical conditions on a four-ball friction machine; the same final wear scar diameter was observed for both greases. Classified AE signals are color coded in the same way as in Figure 2 (see the caption for details).
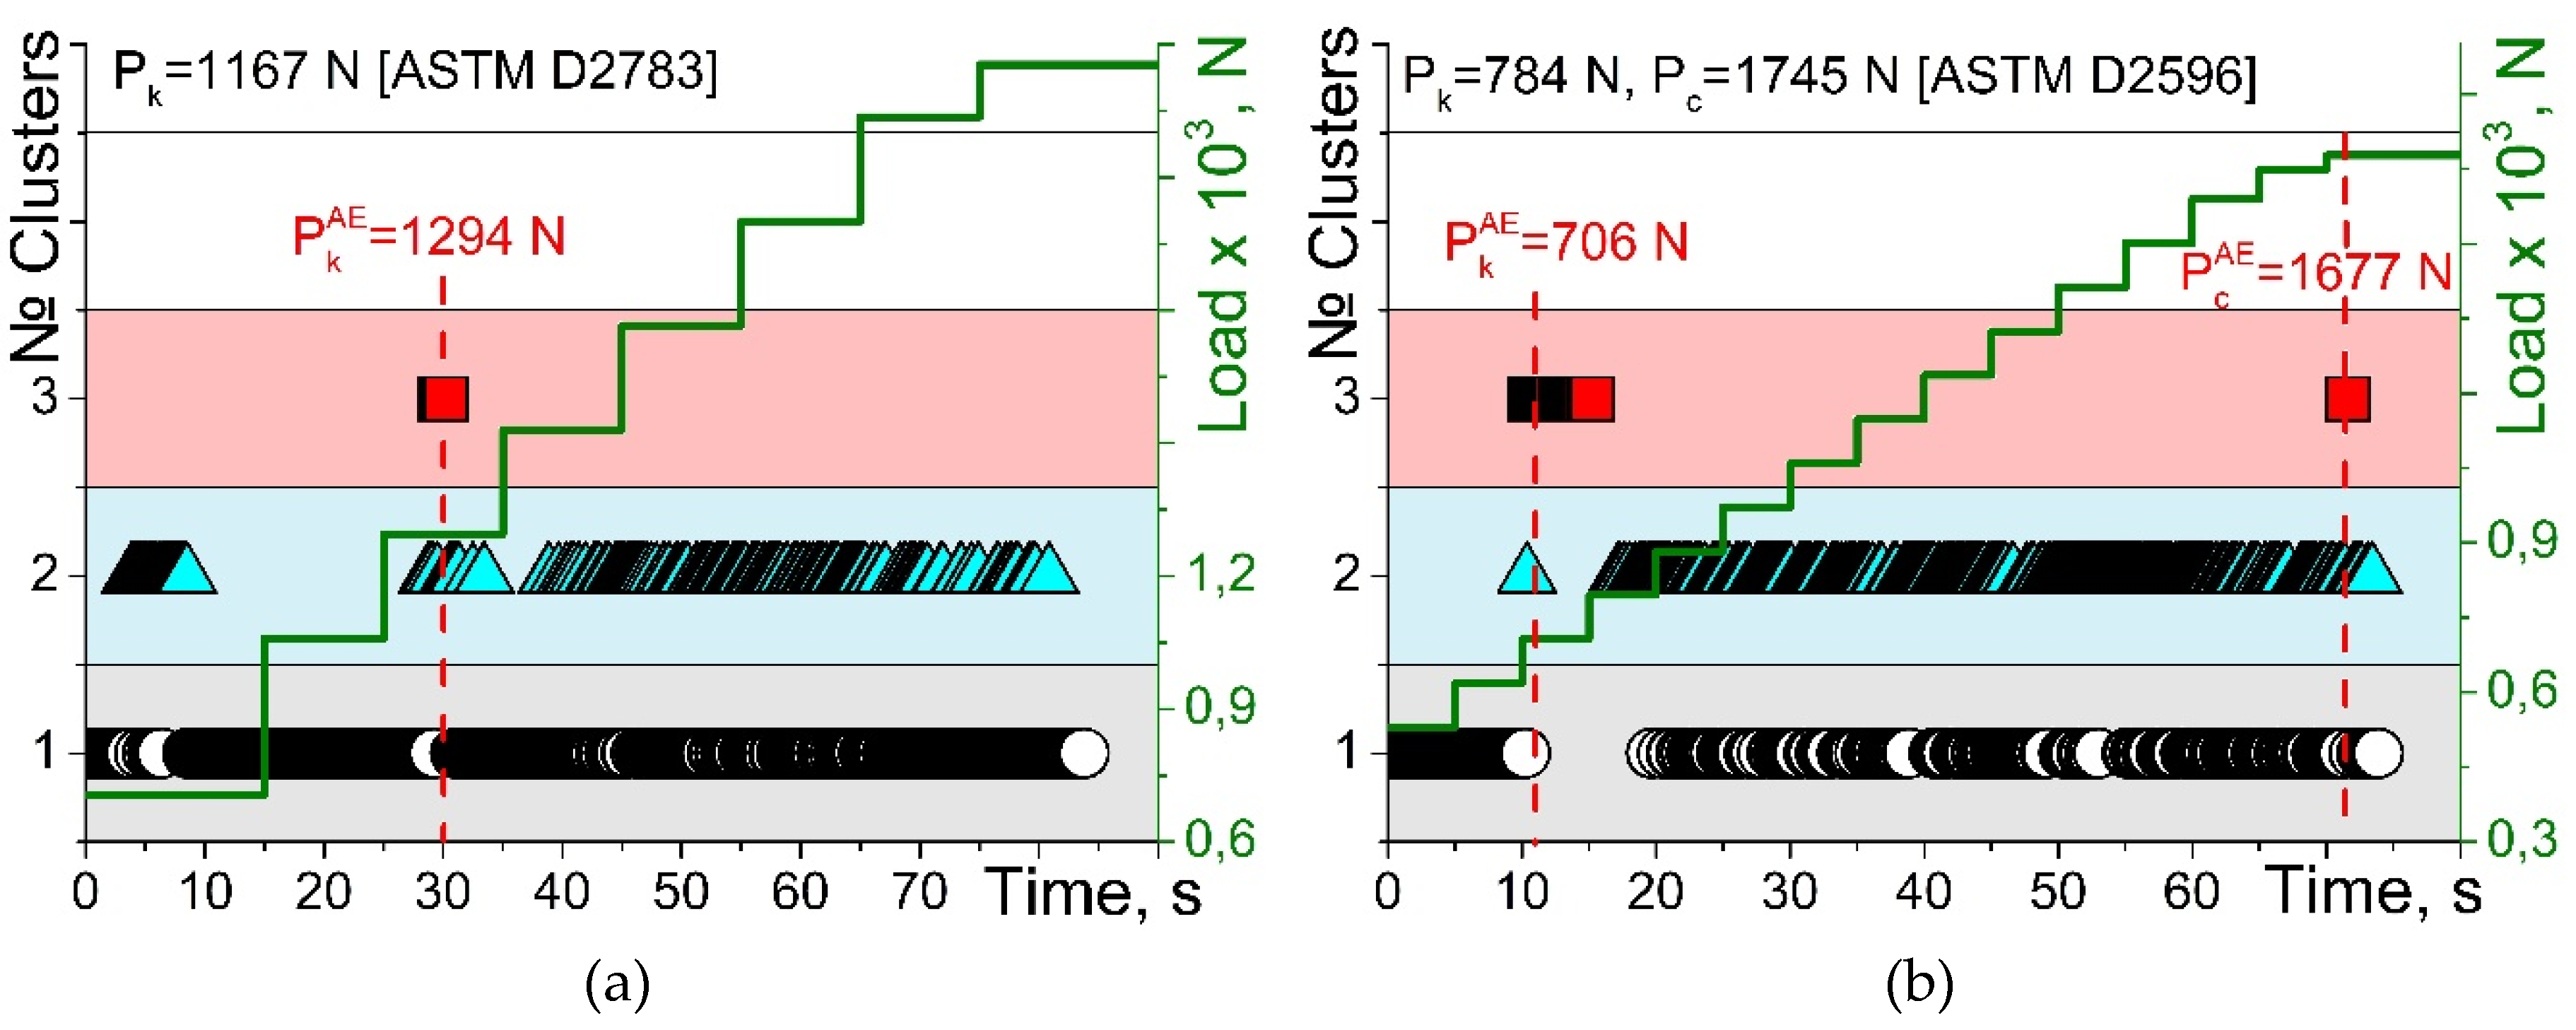
Lubricants 08 00052 g005
Figure 6. The example of an accelerated tribological test using AE data: the critical last nonseizure load, Pk, is determined by the standard procedures [65,66] assuming the use of new assemblies and lubricants at each successive run with the increasing load, while the AE monitoring permits determining the same critical values with the stepwise progressive loading; (a) is engine oil, (b) is grease; here Pk is the critical load obtained by [65,66], and PkAE is the critical load based on the appearance of the specific AE signals belonging to the Lubricants 08 00052 i018-group classified according to the F1.1 + K1 scheme; PcAE denotes the load at which welding is observed. Classified AE signals are color coded in the same way as in Figure 2 (see the caption for details).
Lubricants 08 00052 g006