Article

Friction and Wear in Hot Stamping: The Role of Tool and Workpiece Temperature and Tool Steel Composition

by
Leonardo Pelcastre
Division of Machine Elements, Department of Engineering Sciences and Mathematics, Luleå University of Technology, SE-971 87 Luleå, Sweden
Lubricants 2024, 12(9), 297; https://doi.org/10.3390/lubricants12090297
Submission received: 16 July 2024 / Revised: 19 August 2024 / Accepted: 22 August 2024 / Published: 23 August 2024

Abstract

:
Hot stamping is a forming process widely used in the manufacturing of structural components in automobiles. It is a versatile process that enables the fabrication of complex-shaped components with high strength. It also facilitates the manufacturing of components that incorporate high-strength sections and high-ductility sections, by controlling the cooling rate. The process is versatile in terms of the microstructures and mechanical properties that can be obtained. This versatility, however, puts high demands on the materials pertaining their stability, wear resistance, costs, etc. This study has focused on understanding the effect of temperature on the tribological response of different tool materials when these are exposed to high temperatures. The results show that friction significantly stabilises with increased temperature for most tool steels. One tool steel behaves more unstably at high temperature, and this is attributed to the presence of Cr7C3, MoO3, and VO and severe wear on the workpiece material. The most severe wear on the workpiece is caused by a partially melted interdiffusion layer, which facilitates the detachment of the Al-Si coating and subsequent transfer onto the tool; this effect is maximised at the highest temperatures of the workpiece. An important finding is that friction and material transfer severity decrease as the workpiece temperature decreases, and friction is stabilised as tool temperature increases without minimising wear or the average friction coefficient.

1. Introduction

The forming of high-strength steels by means of press hardening, or hot stamping, has increased in recent decades due to the continued demand for high-strength and low-weight components, especially in the automotive industry. The body-in-white of a car constitutes about 25% of the total weight of the vehicle and it also presents the largest potential for weight reduction. Examples of parts formed using hot stamping for the automotive industry are chassis components such as the A-pillar, B-pillar, bumper, roof rail, rocker rail, and tunnel. Up to approximately 107 million parts/year were reported in 2007 [1], and a report from 2015 stating that up to 205 million hot-stamped parts were reached in 2014 has also been highlighted in the literature [2]. The process itself is versatile in terms of the complexity of shapes, thicknesses, and microsturctures that can be obtained. An example of the versatility of the hot stamping process is the use of different cooling rates in different regions of the pressed components to control the mechanical properties. This is done by controlling the cooling of the workpiece, which can be achieved by either heating the forming dies or by using tool materials with different heat conductivity in specific regions. This technology enables the production of single components with softer and harder regions without the use of joining technologies. For example, a single component can have one region with increased ductility or toughness and other regions with increased strength [3].
In recent years, the tribological behaviour during the hot stamping of Al-Si-coated ultra-high-strength steel has been the topic of investigation of many different research groups. There have been significant advances related to forming simulations, process optimisation, and material and surface modification selection.
The studies in the open literature clearly highlight many of the tribological problems associated with the forming process, with galling and material transfer being a highly discussed topic, as it affects the friction stability, wear and tool life, and component quality. Significant work has been carried out on understanding the mechanisms for its initiation. These studies highlight the occurrence of severe adhesive wear as one of the most critical types of wear [4,5,6,7,8], and others also showcase the importance of abrasive wear [9,10,11], although this type of wear is often seen as less of a problem compared to adhesive wear, and its severity varies significantly depending on the temperature. Other studies have also explored alternative materials and surface engineering technologies to minimise it [12,13], with different levels of success. In general, it is widely accepted that galling cannot be avoided, as it tends to happen regardless of what surface treatment or material is used as counter surface.
In general, it can be acknowledged that a good understanding exists concerning the tribological behaviour of relevant materials, and at relevant conditions. However, one of the aspects which are underrepresented in the open literature is the tribological behaviour of hot tool steels and their friction and wear response when interacting against Al-Si-coated steels. This is critical, as there is a lack of knowledge concerning the tribological behaviour related to the forming of components with tailored microstructures. This is evident, for instance, in a review from 2016 by Merklein et al. [3], where a significant amount of knowledge and information is highlighted concerning the process window, tool thermal properties, mechanical properties, etc., but when discussing the tribological properties of the system, the information is often drawn from studies where the tools are not actively heated or where the conditions do not necessarily correlate to the manufacturing of components with tailored properties.
In a study by Ghiotti et al. [6], they suggest a dependence of the wear mechanisms on the die temperature, with higher temperatures increasing the adhesive wear tendencies. But not enough studies are present to understand what the interplay between different tool material compositions is, as well as the influence of microstructures, and the process operating conditions.
Some studies do exist that highlight the effect of the workpiece, but the information can be at times conflicting. For instance, earlier studies highlight that increasing the temperature of the workpiece could result in a reduction in galling, as at higher temperatures, a more stable and harder phase is developed in the Al-Si coating [5]. Other studies highlight that abrasive wear dominates at low temperatures and adhesive wear does so at high temperatures [11]. Some studies have highlighted a more unstable behaviour of the Al-Si coating at higher temperatures, where temperatures above 700 °C result in the early failure of the Al-Si coating, leading to severe wear and unstable friction [10,14]. Other studies show that a stable friction can still be observed even at 700 °C, but severe adhesive and abrasive wear do take place [15].
Due to the increased demand of components with a tailored microstructure, as well as the continuous push for reducing the process window, it is critical to increase the knowledge associated with the tribological behaviour of heated tool steels, as well as the influence of the temperature on the Al-Si-coated boron steel. Thus, this study aims to bridge the knowledge gaps associated with the effect of temperature on tool steels with different chemical compositions and mechanical properties, as well as the properties of the oxides generated on the surface after exposure to high temperature. Furthermore, the Al-Si coating microstructure and its effect on the wear are also studied with the aim of clearly identifying and differentiating the dominant wear mechanisms under different temperatures.

2. Experimental Procedure

2.1. Materials

Four different tool steels were selected for the tribological tests. The chemical composition and the Micro-Vickers hardness of the steels are given in Table 1. Their respective microstructures are shown in Figure 1. Tool steel 1 (TS1) and tool steel 2 (TS2) are alloyed hot-work tool steels, and TS1 can also be considered as a reference tool steel commonly used in hot stamping; tool steel 3 (TS3) is a tungsten-molybdenum high-speed steel; and tool steel 4 (TS4) is a tool steel commonly used in cold work applications. TS3 and TS4 were selected in view of their good wear resistance and other mechanical properties such as toughness. They were explored from the perspective of being able to be utilised for the forming process with and without active heating. All steels are tempered above 550 °C, and as such, they are expected not to undergo significant changes from a microstructural and mechanical property perspective when exposed to the test temperature. It is important to note that the steels were quenched and tempered, and no other surface treatment or coatings were applied.
The counter specimen used for the tribological tests was a commercially available Al-Si-coated boron steel. The steel was aluminised by means of hot dipping into a molten Al alloy bath with a composition of approximately 88%Al, 9% Si, and 3% Fe in weight percentage. The Al-Si coating was characterised by a layered structure of different intermetallic Al-Fe-Si phases that develop at elevated temperatures due to inter-diffusion between the Al and Si in the coating and the Fe in the substrate [16]. The surface roughness (Sa) of the Al-Si-coated UHSS after alloying at high temperature was measured to be 3.3 µm using 3D optical interferometry.

2.2. Test Procedure

The tribological experiments were carried out using a hot strip tribometer that simulates the tribological conditions prevalent in the hot stamping process. The tests were performed using a flat-on-flat test specimen configuration and linear unidirectional sliding. The geometry used for the tool specimens and a schematic representation of the test setup are shown in Figure 2. The Al-Si-coated boron steel specimens were in the form of strips of 1.5 mm × 15 mm × 1000 mm.
For the sliding tests, a load of 500 N was used, which corresponds to a nominal contact pressure of 4.8 MPa and a sliding velocity of 100 mm/s. Sliding was carried out for a total distance of 1500 mm and this was divided in three strokes of 500 mm each. After each stroke was completed, the workpiece strip was replaced with a new one. This means that the surface of the tool steel specimen did not change whereas that of the workpiece material was always new.
Tribological tests were performed without and with heating (500 °C) of the tool steel specimens. The tool steel temperature was independent of the heating of the counter strip sample. When no heating was used on the tool steel specimens, temperatures between 80 and 120 °C were reached before the onset of the tribological tests due to radiating heating from the hot strip sample.
The heating time for the tests using heated tool steel specimens was approximately one hour from room temperature to 500 °C. Upon reaching the desired temperature on the tool steels, the counter strip specimen was mounted and its heating cycle was initiated. The workpiece strips were austenitised within the tribometer by passing a current through the steel strip in the tribometer. To avoid undesired development of the Al-Si coating microstructure, a stepwise increase in the temperature was utilised to generate an adequate alloying of the Al-Si coating.
For the heating cycle, the temperature was initially increased to 600 °C with a holding time of 4 min. This facilitated the melting of the coating and the initial diffusion of Fe from the substrate into the coating. The temperature was then increased to 700 °C and a holding time of 2 min was used to enable the stable alloying of the coating. Another step to 930 °C and a holding time of 30 s was used to austenitise the steel and finalise the alloying of the coating. Finally, the temperature of the workpiece was adjusted to the desired testing temperature before the onset of sliding.
The parameters used for the tribological tests are summarised in Table 2. Two tests per condition were performed. The selected conditions, albeit relatively mild, are typically encountered in the forming process. This is with the exception of the tests where the workpiece was heated up to 900 °C. The purpose of these tests was simply to understand the behaviour of the system in a theoretical scenario where a process window is short (or negligible), which would leave the workpiece in this range of temperature.

2.3. Nano-Scratch Tests

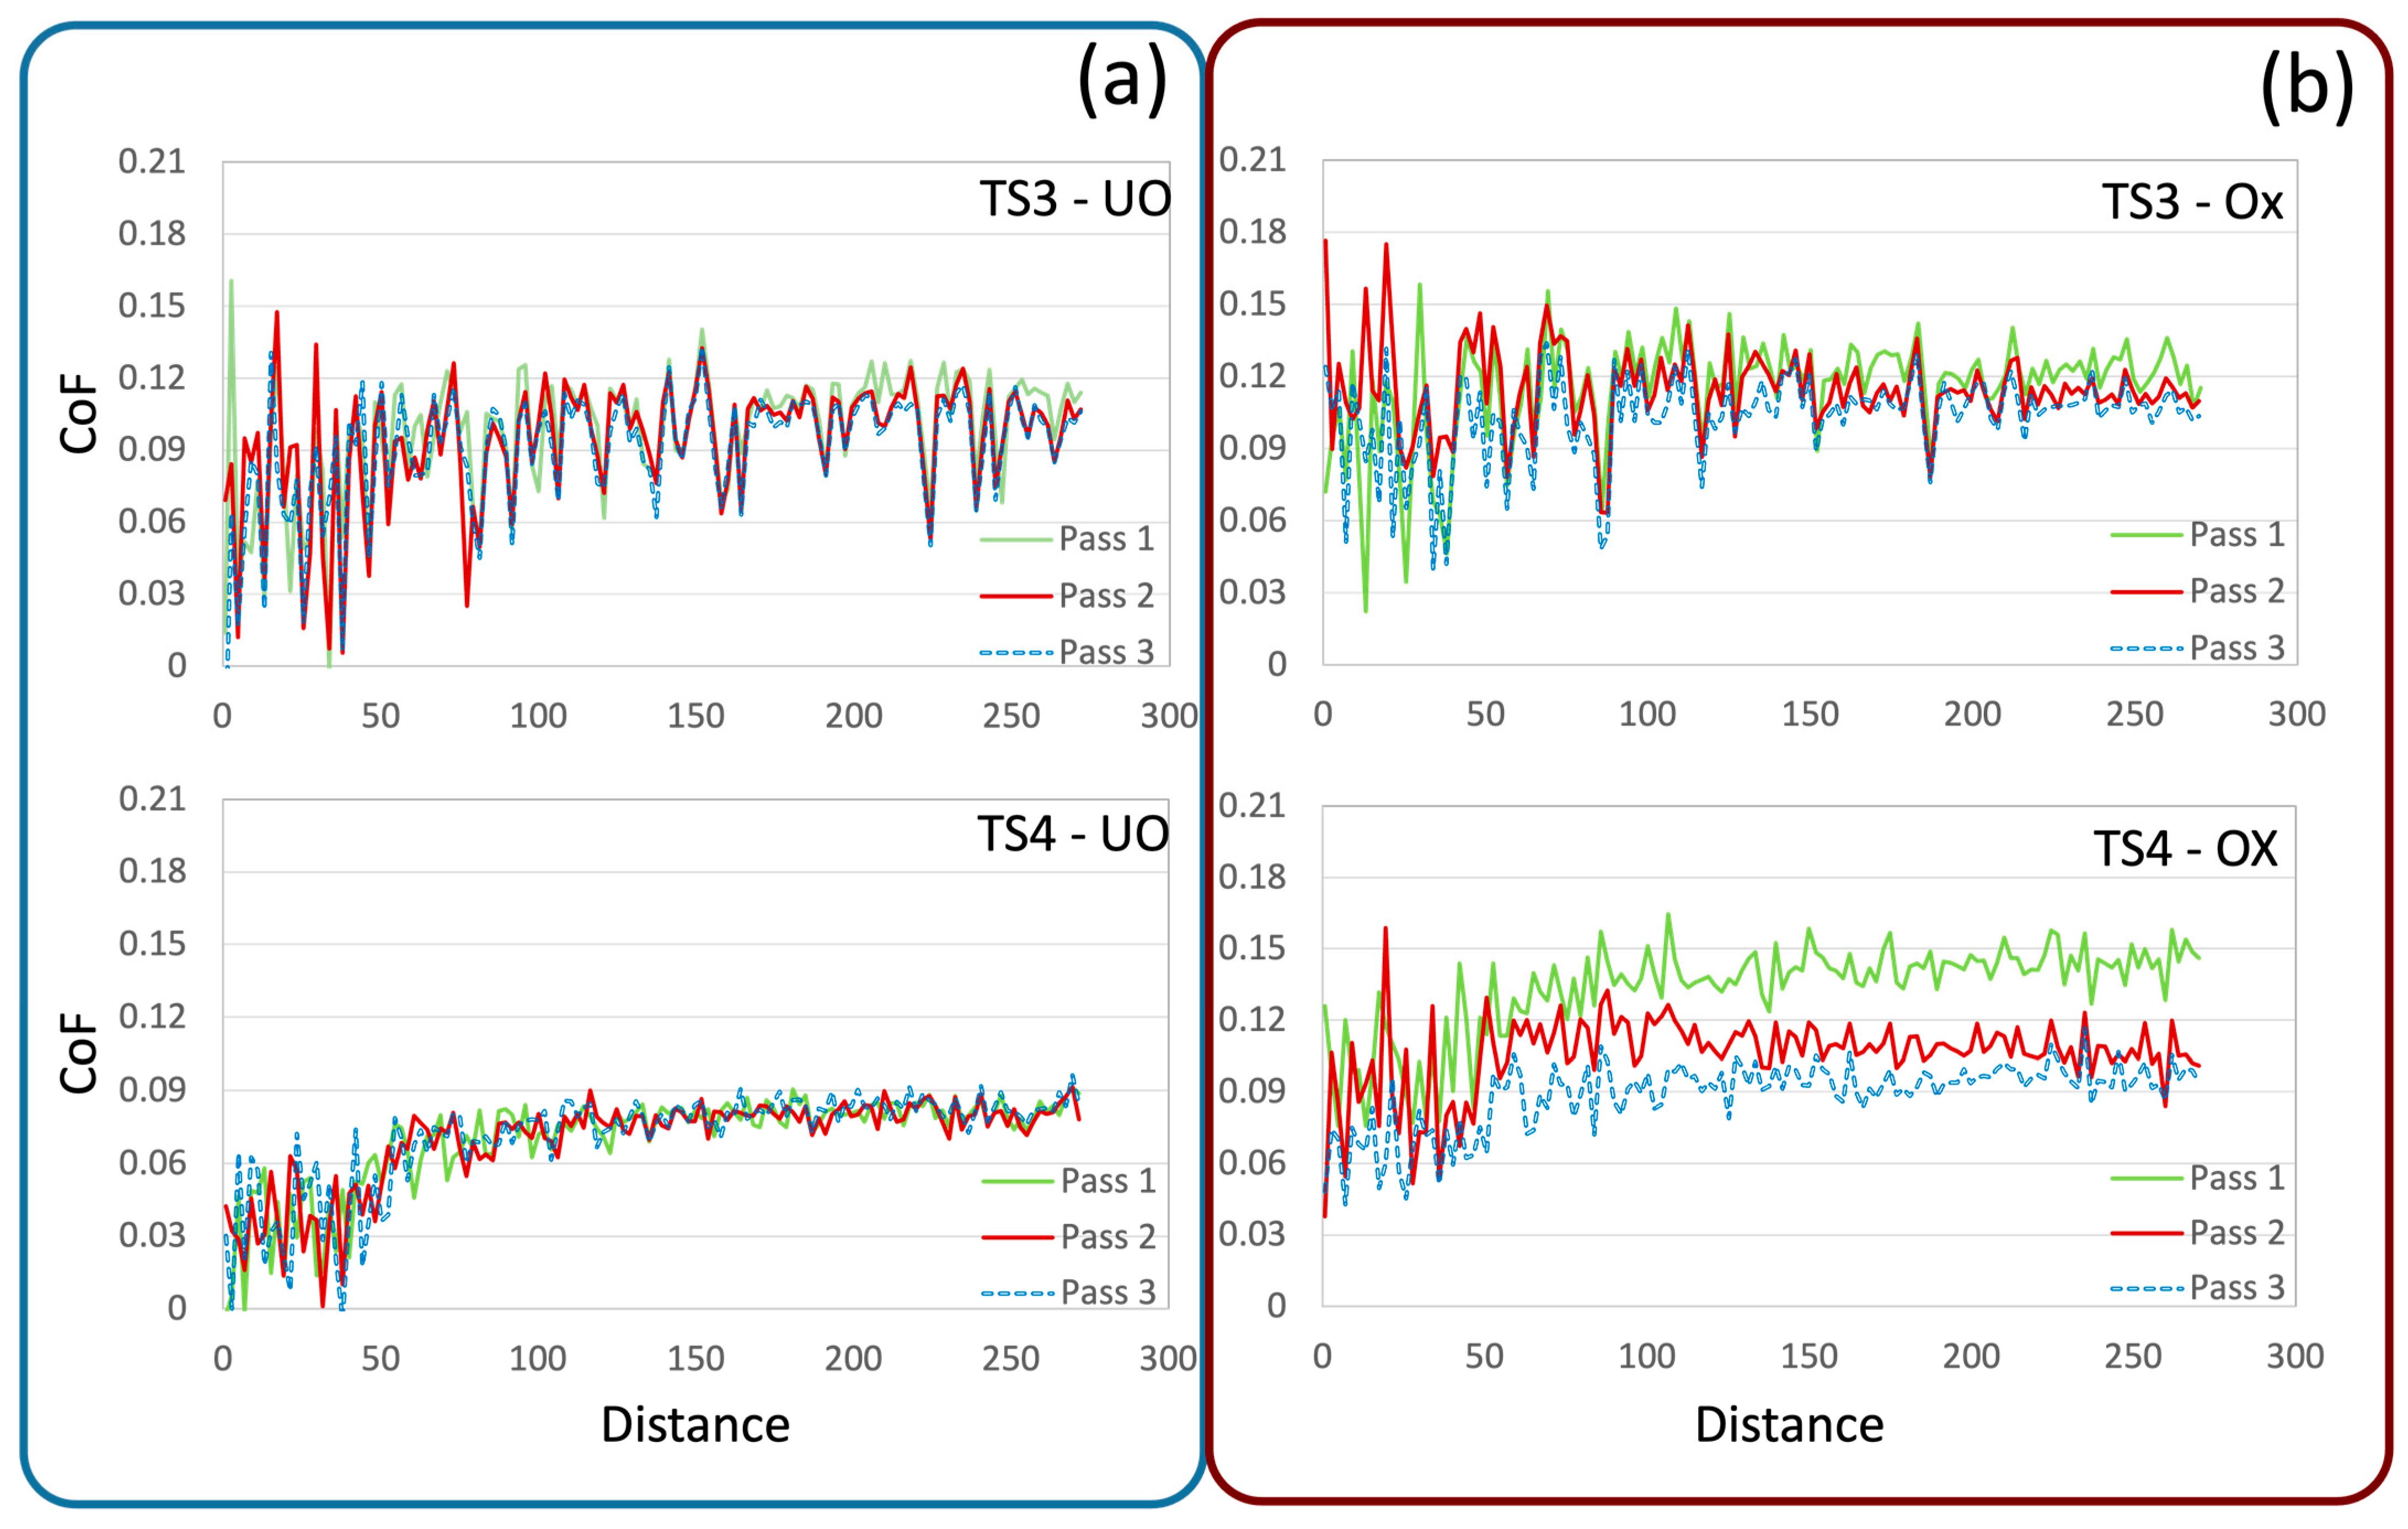
To study the differences in the tribological properties of the tool steel oxides, multi-pass nano-scratch tests were conducted using a Nano-test Vantage system. The tests were conducted using a conical diamond indenter with a 5 µm radius coupled with a friction probe to measure the tangential frictional load. An initial load of 1 mN was applied for the first 35 µm of the scan; a ramping load was then applied with a maximum load of 10 mN using a 0.5 mN/s loading rate. The scan velocity used was 10 µm/s and the total scan length was 270 µm. Three passes were carried out over the same scratch and three repetitions were performed.

2.4. Sample Preparation

The tool steel specimens were manually ground using SiC abrasive paper to homogenise their topography, generating a defined surface lay (perpendicular to the sliding direction), to reduce randomness in the occurrence of galling and to produce a similar average arithmetic surface roughness (Sa) on all the specimens. After grinding, a Sa value of 0.35 ± 0.07 µm was obtained.
For the nano-scratch tests and for the metallographic analysis of the tool steels, the specimens were manually ground and polished to a mirror-like surface. This was achieved using SiC abrasive paper and suspensions of diamond particles of gradually reduced grit size. The final step was performed using a colloidal silica suspension with a grit size of 0.05 µm.
For the metallographic analysis, the samples were also etched using a Nital solution of 0.3% concentration.

3. Results and Discussion

In this section, the results of the tribological tests and the discussion of the microstructural evolution of both interacting specimens are presented.

3.1. Effect of Workpiece Temperature on the Tribological Response

A set of tribological tests was performed using 900 °C as the set temperature for the workpiece strip sample with unheated and heated tool specimens. For these tests, only TS1 and TS2 were used, and the friction response is given in Figure 3. A high coefficient of friction was recorded regardless of the tool steel temperature. When the tool steel specimens were heated up, the coefficient of friction was more stable compared to the experiments where the tool specimens were not heated, but the average value was relatively similar in both cases, varying between 1 and 1.1 in the stable region of sliding. Interestingly, the fluctuations of the coefficient of friction occurred with both tool steels when they were not heated and even though the coefficient of friction was high in all cases, it was also clear that heating the tool steel specimens resulted in the stabilisation of friction response, which resulted in smoother, albeit high, friction coefficient curves. From a global perspective, what this means is that the average level of the coefficient of friction is dictated by the workpiece material and its properties, whereas the stability of friction is dominated by the surface properties of the tool material.
Another interesting finding was that the same thing applies regardless of the tool steel composition. In the open literature, temperatures ranging from 500 °C up to 800 °C are normally reported. The friction coefficient tends to be within the range of 0.5 to 0.6 depending on tool steel hardness, temperature, the contact pressure used, or even the tribometer used [3,7,10,14,15]; however studies such as [10,14] show that increasing temperature tends to increase friction, which is related to the occurrence of severe galling.
It is important to highlight that the periodic sudden drop and increase observed every 500 mm are caused by the introduction of a new strip and the re-initiation of motion. This increase is caused by the acceleration and transition from a static position for the swiping motion of the tool assembly.
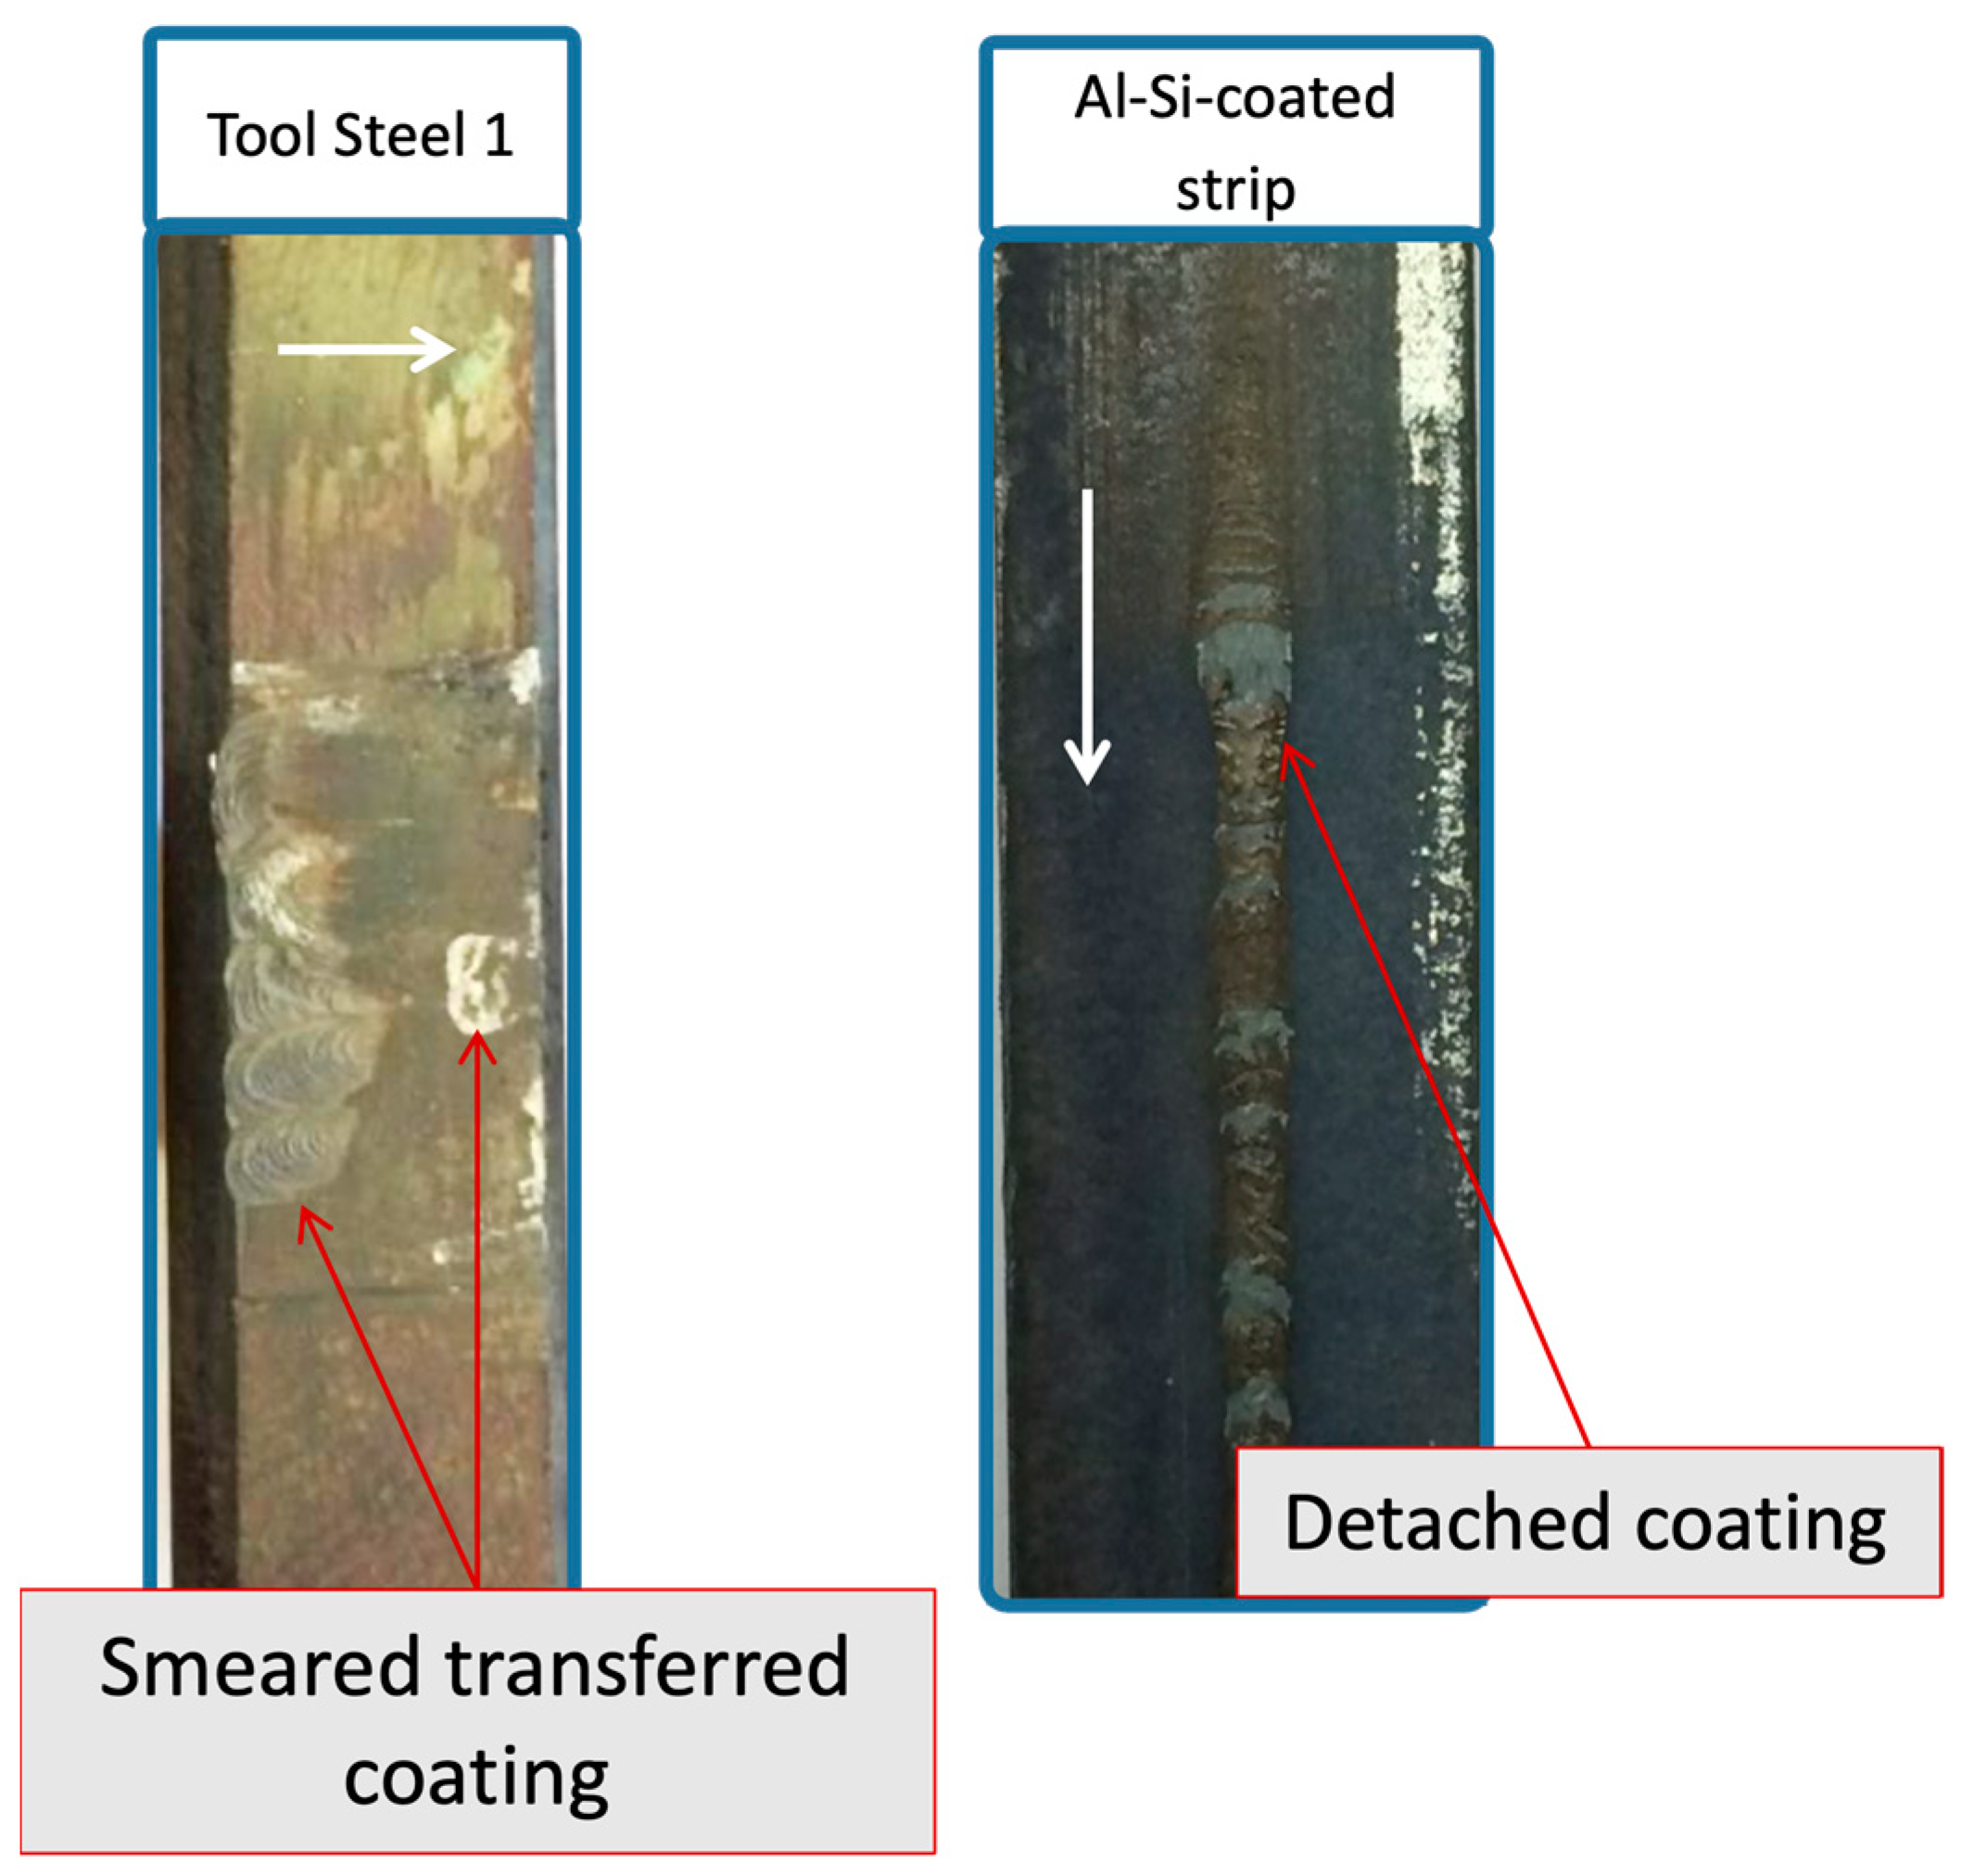
In terms of wear, the surfaces of the tool steels and strips after the tribological tests showed signs of severe damage (Figure 4). Severe adhesive wear and smeared transferred material were observed on the tool specimens, and severe damage and material removal were present on the strip specimens. It is important to note that the type of damage on both specimens was unexpectedly severe. The type of damage seen on the strip surface (localised tearing and/or rupture of the coating) suggests that the conditions used for the tests are too aggressive for the coating and cause its failure.
Scanning Electron Microscopy (SEM) was used for the analysis of the worn surfaces. Evidence of unalloyed material transferred onto the surface of the tool steel specimens was observed, and this was in the form of thin layers as well as lumps of compacted wear debris (Figure 5a). Analysis on the cross-section of the adhered material showed large fragments of the Al-Si coating, which had almost the entire profile of the coating. The typical interlayer of the coating can be seen in this region, indicating that these fragments were detached at the interface between the coating and the steel substrate (Figure 5b). This indicates that due to high adhesion during the tribological test and the presence of increased tangential stresses, the coating detached at the molten diffusion layer (the interface between coating and steel substrate). This is the phase with the lowest hardness and lowest melting point in the coating. In the work carried out by Suheiro et al. [17], it was stated that the diffusion layer contains a mixture of unalloyed aluminium and other ternary phases, which is the reason for its low melting point and hardness (Figure 5c). The presence of unalloyed aluminium on the tool steel surface further suggests that the Al-Si coating was torn at the diffusion layer and exposed areas with unalloyed aluminium, which adhered onto the surface. As reported in the open literature [18], the melting point of the phases in the diffusion layer can range from 600 °C to 850 °C. This indicates that during the tests, it is possible that the layer was partially molten, thus facilitating the detachment of the coating. This is important from a process perspective, as it highlights that having too short a process window, i.e., fast transfer from furnace to press, and thus high temperature on the workpiece, can result in more molten material at the interdiffusion layer and thus risk more material transfer.

3.2. Effect of Tool Steel Chemistry and Temperature on the Tribological Response

A summary of the friction results for all the different tool steels at low and high temperature can be seen in Figure 6. In these experiments, the workpiece temperature during sliding was 700 °C in all cases. A sliding distance of 1500 mm was used for all specimens tested at 500 °C. However, for some of the tests at low temperature, the tests were interrupted after the second stroke (1000 mm) due to the high and unstable friction coefficient observed.
In the tests using unheated tool steel, the coefficient of friction started at 0.5 for TS1 and it increased as sliding progressed; after a sliding distance of 1200 mm, the coefficient of friction suddenly increased to values between 0.9 and 1 and remained at this value for the rest of the test. TS2 had a higher coefficient of friction (0.7) from the beginning of the test, which further increased with sliding, resulting in a maximum of 1 at 800 mm of sliding where the test was interrupted. TS3 had a lower coefficient of friction of 0.5 for the first 500 mm of sliding, which thereafter increased to 0.7 and remained stable at this level. A similar behaviour was observed for TS4; however, in this case, the coefficient of friction increased to 1 after 500 mm.
The tests conducted with the heated tool steels resulted in a more stable coefficient of friction (around 0.5). Only TS4 had a fluctuating coefficient of friction when its temperature was 500 °C. TS1 showed a relatively stable coefficient of friction until ≈1400 mm; at this point, a sudden increase in the coefficient of friction was seen. TS2 and TS3 showed the most stable coefficient of friction; slight instabilities were observed for these two tool steels during the first 500 mm of sliding, but they stabilised, and friction was reduced slightly towards the end of the tests.
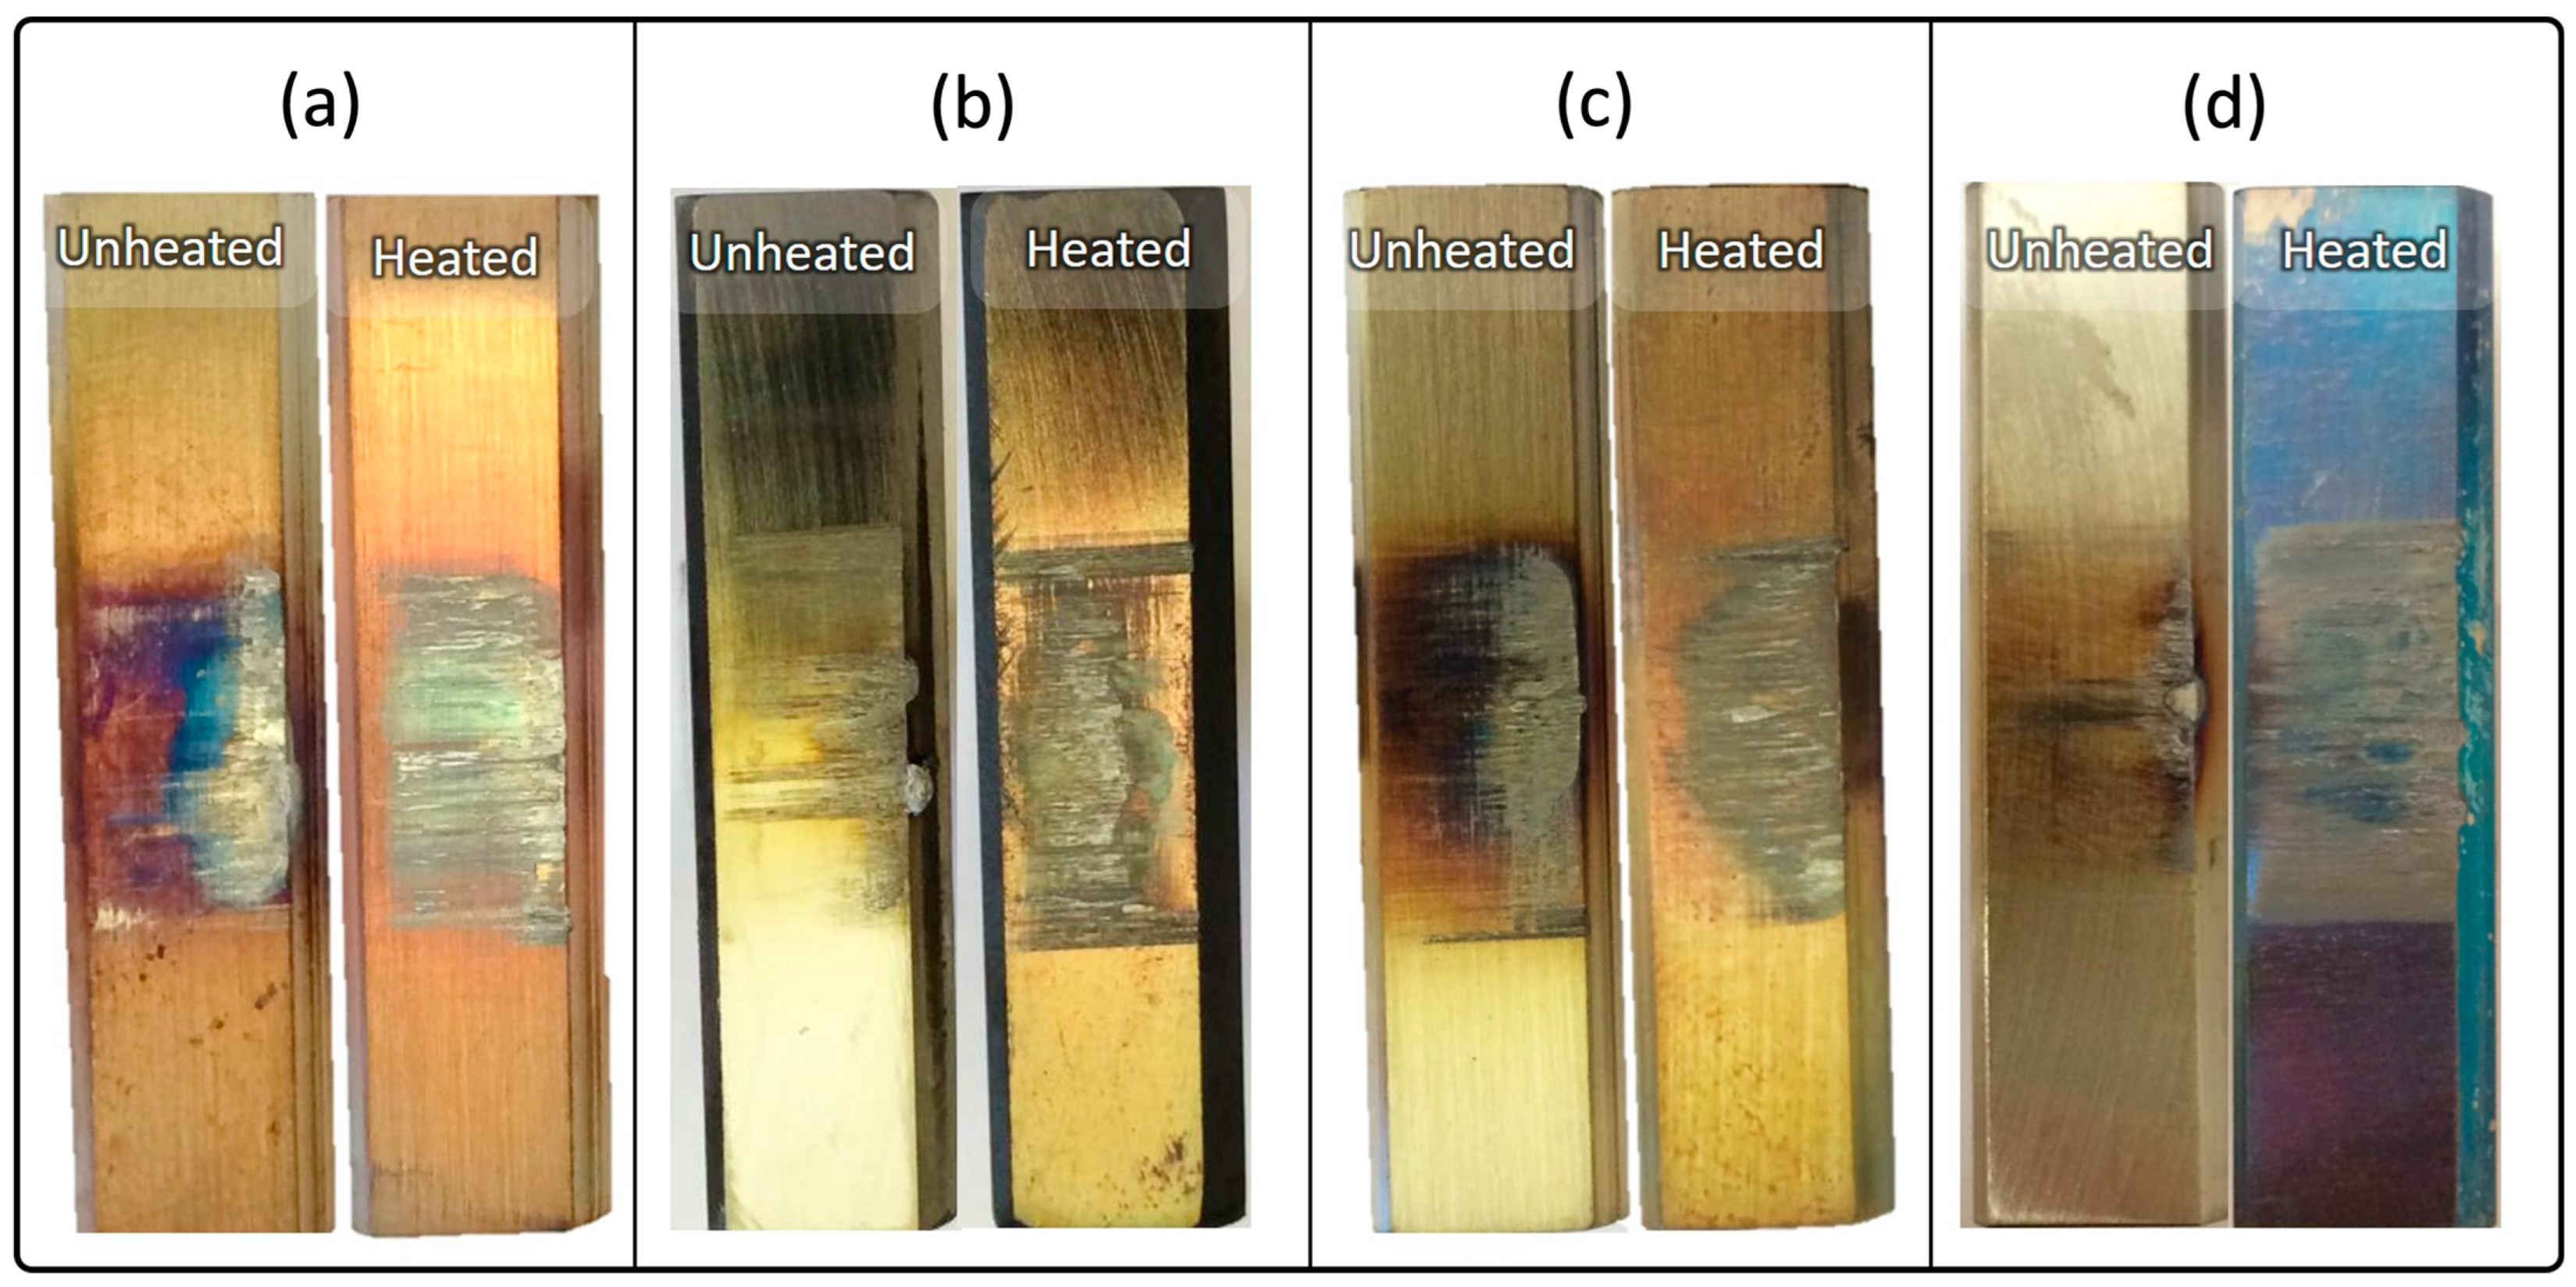
Figure 7 shows photographs of the worn tool steel surfaces. This figure displays the surface obtained after the tribological tests using the unheated and heated tool steel specimens.
Adhesive wear took place on all tool steel surfaces. However, it is important to highlight that a more localised adhesive wear was identified on the unheated specimens. This was particularly noticeable on TS2 and TS4. A more homogenous and distributed contact (noted by the coverage of the adhered material) was seen in all tests using heated tool steels. The localisation of material transfer on the unheated samples occurred primarily at the leading edge of the contact, whereas at higher temperature, the transferred layers were distributed over the whole contact. It was observed that for the tests with unheated tool steels, severe damage to the counter workpiece material took place after a shorter sliding distance (damage similar to that shown in Figure 4) compared to the tests with heated tool steels. Furthermore, the severe damage seen on the workpiece material could be correlated to the sliding distance at which the friction coefficient suddenly increased.
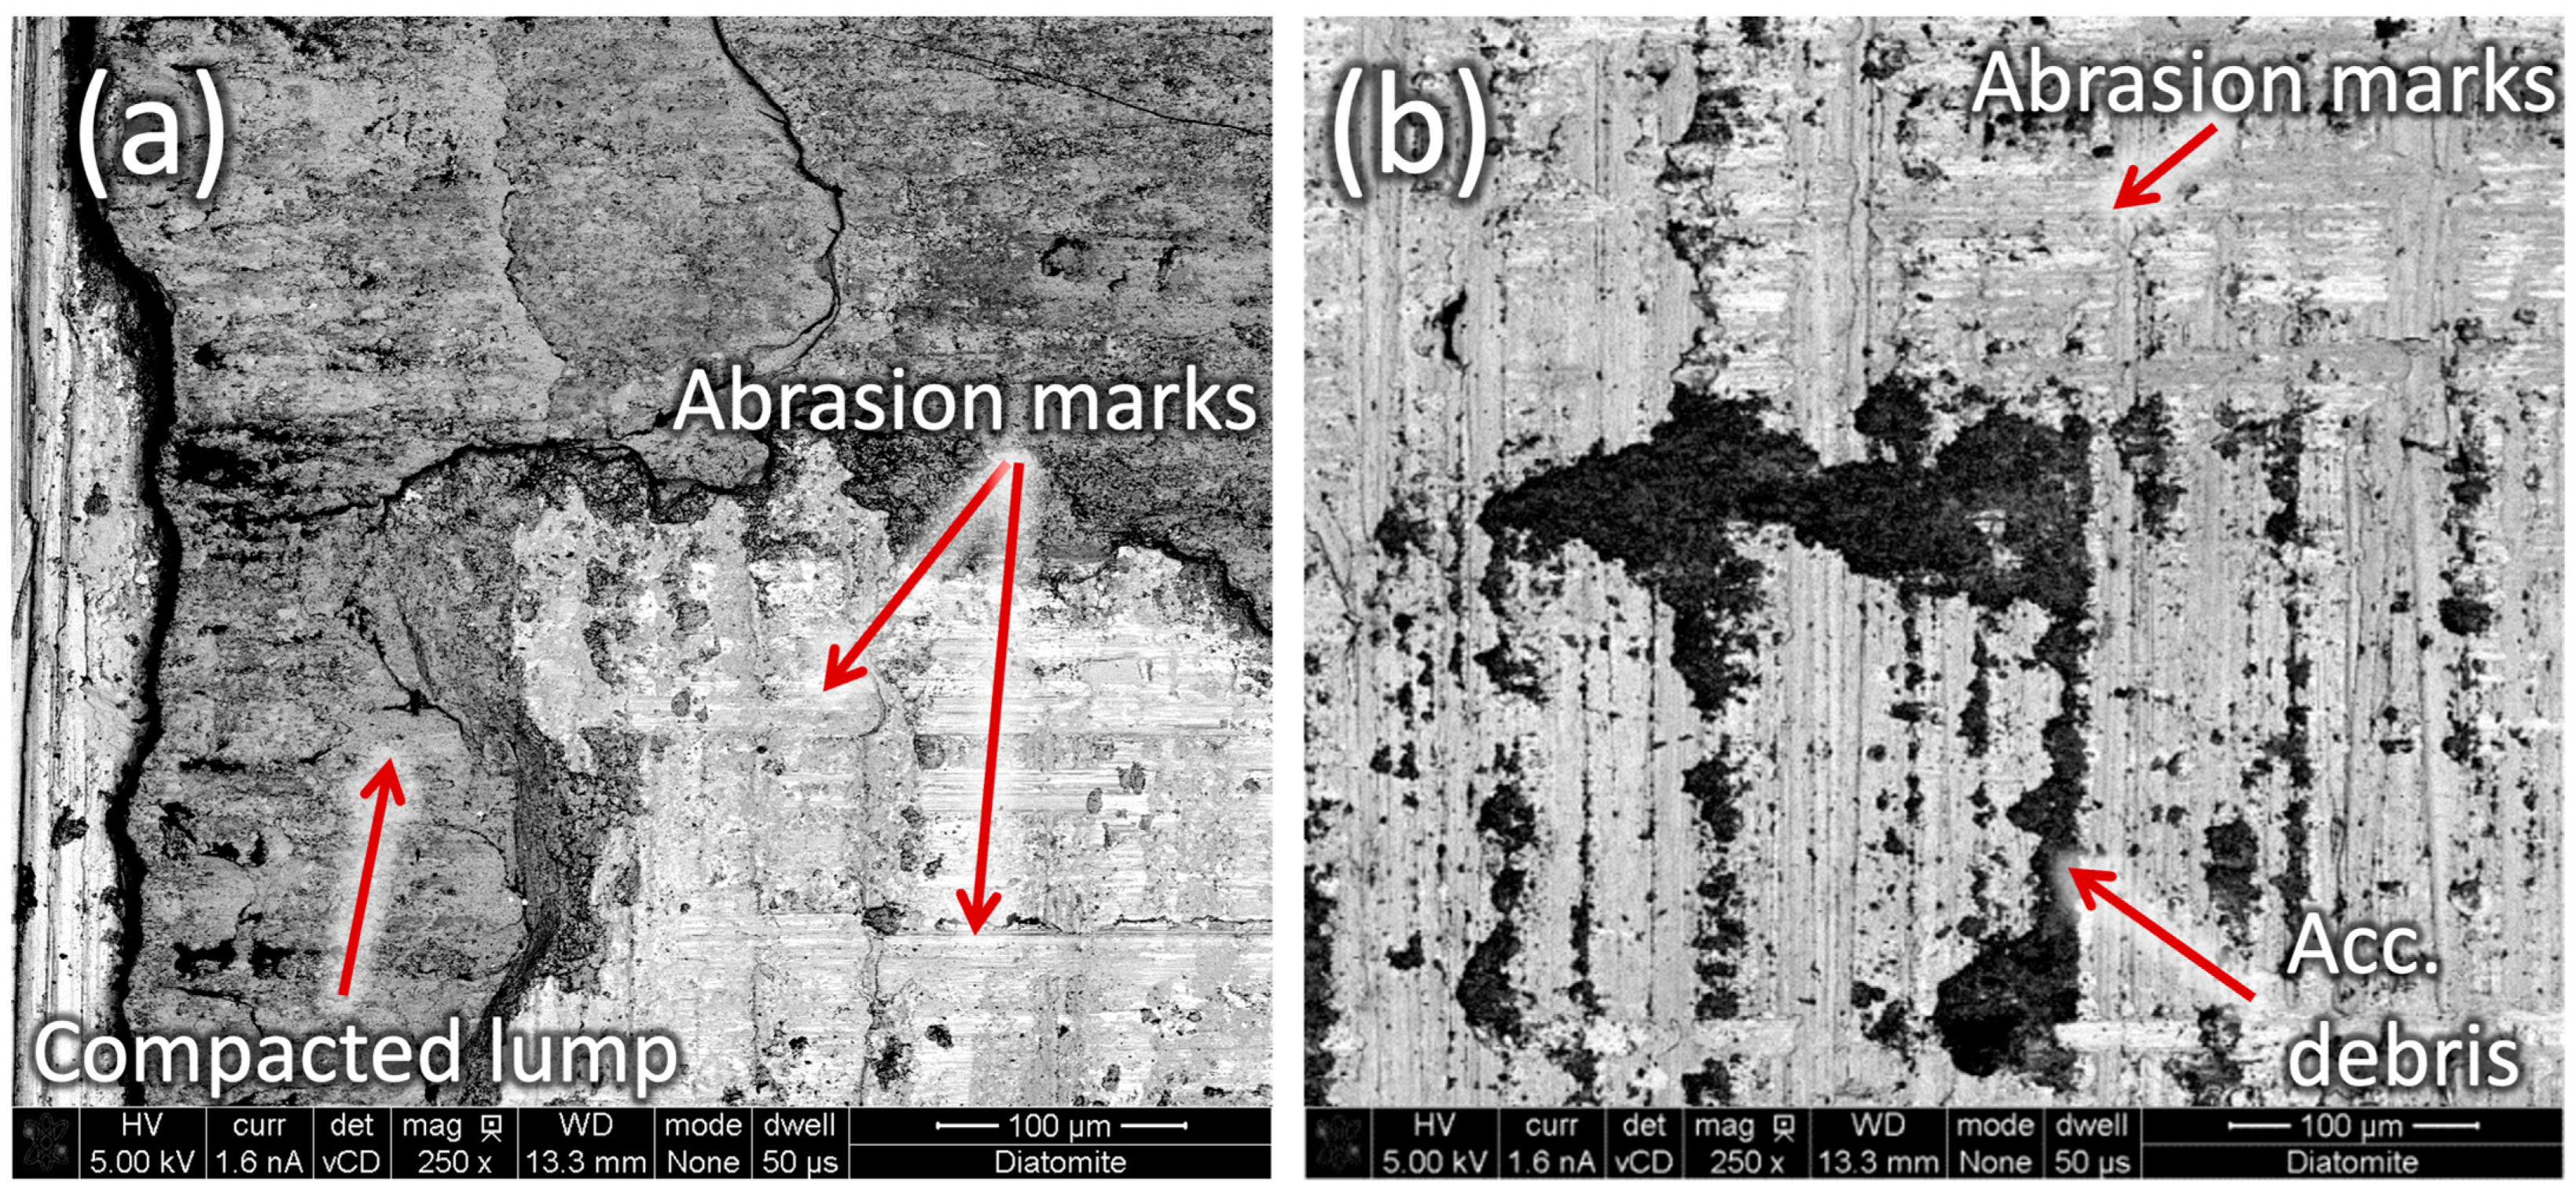
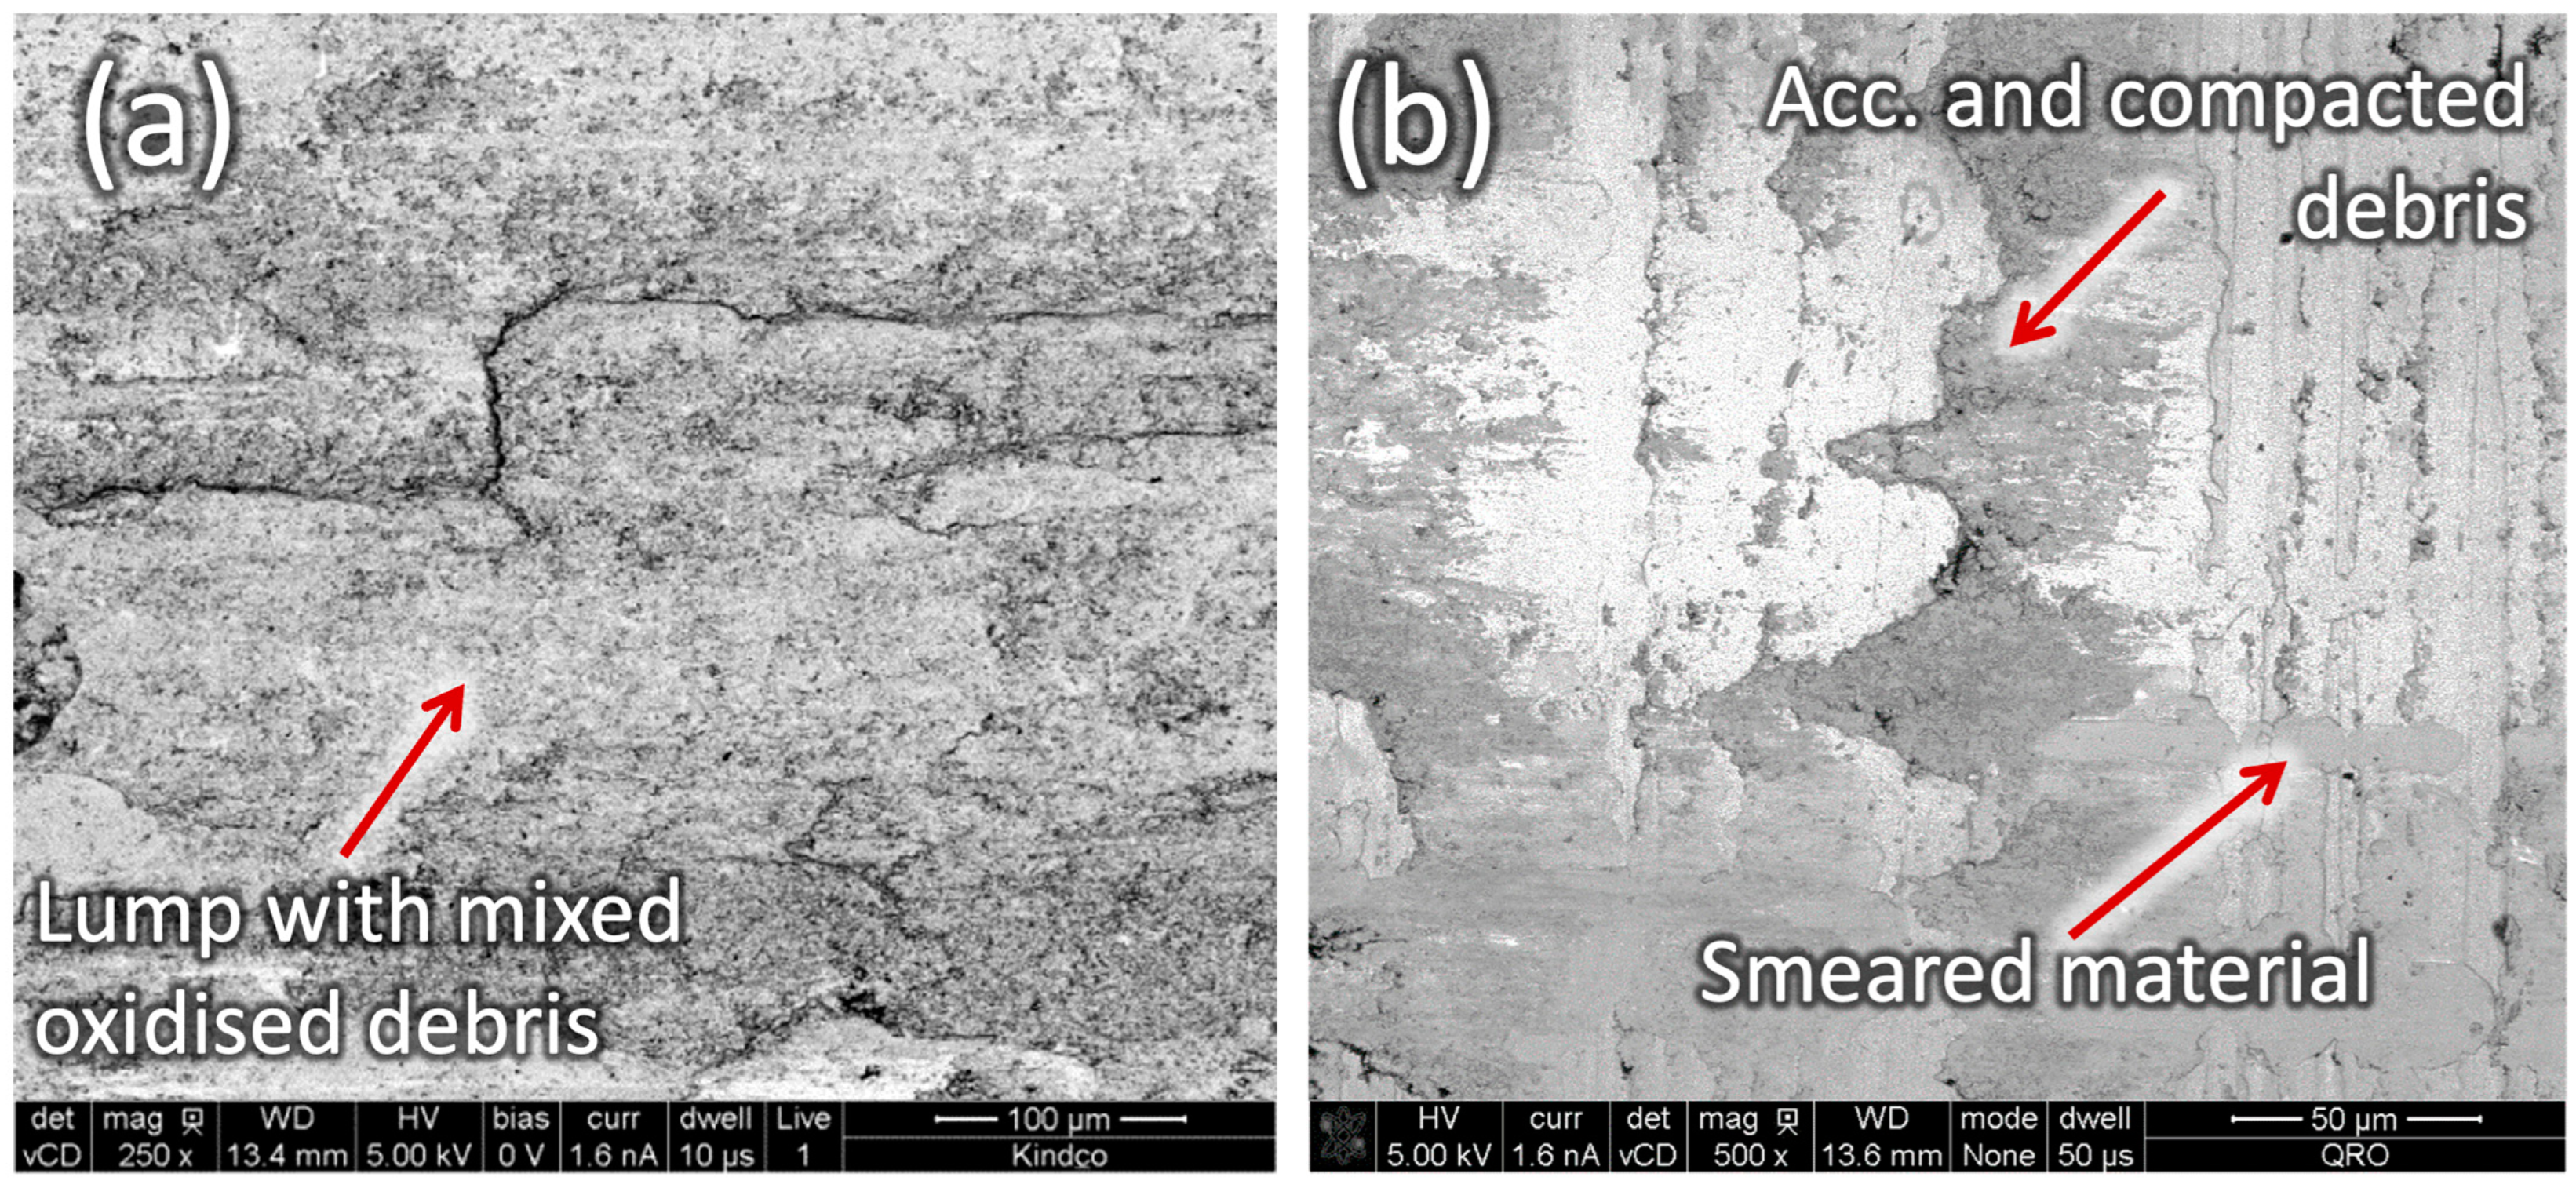
An analysis of selected worn surfaces using SEM was carried out in order to identify the initiation wear mechanisms (Figure 8, Figure 9 and Figure 10). The backscattered electron detector was used to obtain increased contrast between the transferred material and the tool steel surface. In the micrographs, dark grey corresponds to the transferred material (containing primarily Al-Si coating fragments), medium grey corresponds to oxidised tool steel, and light grey corresponds to the exposed/unoxidized tool steel surface.
When using unheated tool steels, two regions could be distinguished in the contact. The first one was at the entrance of the sliding contact and the second one was towards the trailing edge of the contact. At the leading edge, thick lumps of material transfer were developed (Figure 8a); the lumps were randomly formed and not homogeneous. In the second region, an accumulation of wear debris was observed within the valleys of the original surface lay (Figure 8b). In previous work carried out by the author of [19], it was found that the big lumps of material transfer are formed by a combined effect of adhesive wear and the progressive compaction of wear debris; a similar behaviour was also found and reported by Venema et al. [15]. This effect is further enhanced under high contact pressures. The surface damage suggests that the higher contact pressures at the leading edge during sliding promote the formation of larger lumps of transferred material on the tool steel surface.
Similar regions were also found on the surfaces of the heated tool steels (Figure 9). The largest amount of material transfer was seen at the entrance of the contact and accumulated wear debris at the trailing edge of the contact within the grooves of the surface lay. One of the differences was the development of larger and more uniform transfer layers compared to tests with unheated tool steel specimens at both regions. It is important to note that oxidised wear debris (from the tool steel) was consistently observed at the transfer layers and lumps. This indicates that the transferred material consists of a combination of wear debris from the tool steel and the Al-Si coating. The presence of oxides on the surface and oxidised wear debris appears to have a stabilising effect on the formation of a uniform transfer layers. As highlighted in other works, when tribolayers of oxidised wear debris are formed, these can easily shear and accommodate uniformly within the contact, resulting in a stable coefficient of friction [20]. The larger area of coverage seen in the heated tool tests (Figure 7) can be explained by the softer steel at the test temperature and the propensity to undergo abrasive wear, as well as the rapid formation of tribolayers between the oxidised tool steel debris and the debris from the Al-Si coating.
The general wear mechanisms encountered in the unheated and heated tool steels are summarised in Figure 10. This image highlights some important features; when the tool steels are not heated up (Figure 10a), material transfer and abrasive wear take place. This suggests that under these conditions, adhesive and abrasive mechanisms are important and they affect wear and friction, which has also been reported by Venema et al. [15]. As described earlier (Figure 6), frictional instabilities took place when the tool steel specimens were not heated. Heating up the tool steels (Figure 10b) resulted in the oxidation of the tool steel surface. In this case, material transfer also takes place; however, transfer layers are formed by mixed wear debris from the Al-Si coating and debris from the oxidised tool steel. Furthermore, it is also clear that the oxidation of the tool steels has an influence on the friction behaviour by reducing and/or stabilising the coefficient of friction; this is a behaviour also observed in other studies and known to occur in systems at high temperature [20,21]. It has to be noted that the oxidation of the tool steel also takes place for the tests with unheated tool steels, and oxidised debris also impacts friction and wear; however, the impact is significantly maximised when the tools are heated up.
However, as seen in Section 3.2, friction instabilities also occurred in the case of heated TS4. In this case, these instabilities were associated with an influence from the microstructure of the steel on the wear mechanisms. As shown in Figure 10c, severe adhesion, ploughing, and embedment of fragments from the Al-Si coating occurred. It is likely that at this temperature, the oxides formed are not as stable or lubricious and the high discrepancy in hardness between the carbides in the microstructure and its matrix leads to the friction instabilities.
In order to determine if the softening of the steel had an influence on the friction behaviour, hardness measurements were conducted on the specimens after the tribological tests. As seen in Table 3, no significant changes occurred for any of the tool steels. A slight reduction took place for TS3 and TS4, but these changes were not considered sufficient to significantly influence the observed friction and wear behaviour. It is still possible that hardness is different at the tested temperatures for the different tool steels, but in general, it is expected that the relative difference in hardness will be maintained for all the different steels even at high temperatures.
In order to further study the tool steels, the influences of their composition, and the oxides developed during heating, multi-pass nano-scratch tests were conducted on statically oxidised tool steels. These tests were performed with the aim of analysing the differences between the oxides in isolation, without added influence from material transfer or tribolayer formation. This gives an indication of the lubricating properties of the oxides; even if within the nano-scratch tests the temperature and counter surface exist, differences can still be analysed. The static oxidation of the tool steel was conducted on dummy samples using the tribometer under the same conditions used for the tests. For these tests, only TS3 and TS4 were selected as these showed the most stable and unstable friction response, respectively, when heated up. The tool steels were mirror-polished prior to the oxidation process to reduce effects on friction by the surface roughness.
Figure 11a shows the friction response obtained using unheated tool steels. In this case, a lower friction coefficient for TS4 sliding against the diamond tip was obtained than for TS3. For both tool steels, the friction coefficient remained at a similar level during each pass. When performing the tests on the oxidised surfaces (Figure 11b), the coefficient of friction remained at the same level for TS3 and there was no significant changes with each pass. For TS4, the friction coefficient increased from 0.08 to 0.14 for the first pass, it reduced on the second pass to approximately 0.11, and it was down to 0.95 on the last pass.
The behaviour obtained with the nano-scratch tests highlights the poor friction stability of the outermost oxide layer developed on TS4 under the used conditions. The results suggest that this oxide breaks easily, which results in a constant change in the friction behaviour. Furthermore, even though the scratch tests were performed against a diamond tip, these tests also showed that the oxide layer formed on the tool steel when exposed at the testing temperatures is not lubricious in nature.
An XRD analysis of the oxidised tool steels after the tribological tests was performed to identify the phases responsible for the observed friction behaviour, the obtained spectra are given in Figure 12. The analysis was performed outside the wear track. TS1, TS2, and TS3 were characterised by the presence of iron oxides. Fe2O3 was prevalent in TS1 and TS2, whereas Fe3O4 was also present in TS3. Tool steel 3, which showed the lowest and most stable coefficient of friction, also had CrO2. The reduction and stabilisation of friction caused by the presence of Fe3O4 have also been reported in other studies [22,23] and they are associated with its cubic crystalline structure [23]. In the case of TS4, Fe3O4 was also detected along with Cr7C3, MoO3, and VO. Molybdenum and vanadium are elements which can form lubricious oxides (Magnelí phases) at high temperatures [24]. These oxides have a specific structure and stoichiometry that facilitate the shearing of the oxides at high temperature. However, in these experiments, the vanadium oxide formed was not the lubricious oxide (typically V2O5 [24,25]), but the molybdenum and iron oxides that were identified are usually known to be lubricious [22,26,27,28]. It is clear that for this steel, the combination of lubricious and non-lubricious oxides and the large carbides in the steel result in an unstable system from a tribological point of view. Figure 6b shows indications of low friction but it is never stable; this suggests that the oxides do not form a compact and wear protective layer.

4. Conclusions

The effect of tool steel and workpiece temperature on friction and wear during the sliding of Al-Si-coated boron steel against tool steels with different compositions has been studied. The main findings from this investigation are as follows:
  • The high temperature of the workpiece material causes the softening and partial melting of some phases in the Al-Si coating. The high adhesive forces that exist during sliding against tool steel result in the tearing of large fragments of the Al-Si coating and the severe damage of both workpiece material and tool steel.
  • The tribological behaviour of uncoated tool steels sliding against Al-Si-coated UHSS is affected by the temperature of the tool dies:
    A more stable coefficient of friction is obtained when heated tool steels are used, and the stable coefficient of friction is directly related to the formation of transfer layers of oxidised wear debris from the coating and the tool steel.
    Adhesive wear occurs both with unheated and heated tool steel. However, the adhesion is more pronounced in the case of unheated tool steel and promotes frictional instabilities.
    Abrasive wear, micro-ploughing, and the embedding of Al-Si coating fragments occur predominantly when unheated tool steels are used and they affect the frictional stability.
    The development of transferred material with mixed oxidised wear debris is facilitated at high temperature and it has a friction-stabilising effect.
  • High temperature oxidation can result in unstable friction if the formed oxides do not develop stable layers with good adherence to the substrate.

Funding

This research received no external funding.

Data Availability Statement

The data supporting the provided results can be available upon request by contacting the corresponding author.

Acknowledgments

The author would like to acknowledge Gestamp for providing test materials for this study and for their inputs and interest during the realisation of this work.

Conflicts of Interest

The author declares no conflict of interest.

References

  1. Karbasian, H.; Tekkaya, A.E. A review on hot stamping. J. Mater. Process. Technol. 2010, 210, 2103–2118. [Google Scholar] [CrossRef]
  2. Mori, K.; Bariani, P.F.; Behrens, B.-A.; Brosius, A.; Bruschi, S.; Maeno, T.; Merklein, M.; Yanagimoto, J. Hot stamping of ultra-high strength steel parts. CIRP Ann. 2017, 66, 755–777. [Google Scholar] [CrossRef]
  3. Merklein, M.; Wieland, M.; Lechner, M.; Bruschi, S.; Ghiotti, A. Hot stamping of boron steel sheets with tailored properties: A review. J. Mater. Process. Technol. 2016, 228, 11–24. [Google Scholar] [CrossRef]
  4. Boher, C.; Le Roux, S.; Penazzi, L.; Dessain, C. Experimental investigation of the tribological behavior and wear mechanisms of tool steel grades in hot stamping of a high-strength boron steel. Wear 2012, 294–295, 286–295. [Google Scholar] [CrossRef]
  5. Kondratiuk, J.; Kuhn, P. Tribological investigation on friction and wear behaviour of coatings for hot sheet metal forming. Wear 2011, 270, 839–849. [Google Scholar] [CrossRef]
  6. Ghiotti, A.; Bruschi, S.; Sgarabotto, F.; Bariani, P.F. Tribological performances of Zn-based coating in direct hot stamping. Tribol. Int. 2014, 78, 142–151. [Google Scholar] [CrossRef]
  7. Ghiotti, A.; Bruschi, S.; Medea, F.; Hamasaiid, A. Tribological behavior of high thermal conduc-tivity steels for hot stamping tools. Tribol. Int. 2016, 97, 412–422. [Google Scholar] [CrossRef]
  8. Pelcastre, L.; Hardell, J.; Herrera, N.; Prakash, B. Investigations into the damage mechanisms of form fixture hardening tools. Eng. Fail. Anal. 2012, 25, 219–226. [Google Scholar] [CrossRef]
  9. Yuan, S.; Karamchedu, S.; Fan, Y.; Liu, L.; Nyborg, L.; Cao, Y. A case study for a worn tool steel in the hot stamping process. J. Mater. Res. Technol. 2023, 22, 1065–1075. [Google Scholar] [CrossRef]
  10. Macêdo, G.; Pelcastre, L.; Hardell, J. High temperature friction and wear of post-machined additively manufactured tool steel during sliding against AlSi-coated boron steel. Wear 2023, 523, 204753. [Google Scholar] [CrossRef]
  11. Mu, Y.; Simonetto, E.; Scagnolari, M.; Ghiotti, A. Wear in Hot Stamping by Partition Heating. J. Manuf. Mater. Process. 2020, 4, 18. [Google Scholar] [CrossRef]
  12. Schirdewahn, S.; Spranger, F.; Hilgenberg, K.; Merklein, M. Localized Laser Dispersing of Titanium-Based Particles for Improving the Tribological Performance of Hot Stamping Tools. J. Manuf. Mater. Process. 2020, 4, 68. [Google Scholar] [CrossRef]
  13. Mozgovoy, S.; Alik, L.; Hardell, J.; Prakash, B. Material transfer during high temperature sliding of Al-Si coated 22MnB5 steel against PVD coatings with and without aluminium. Wear 2019, 426–427, 401–411. [Google Scholar] [CrossRef]
  14. Deng, L.; Pelcastre, L.; Hardell, J.; Prakash, B.; Oldenburg, M. Experimental Evaluation of Galling under Press Hardening Conditions. Tribol. Lett. 2018, 66, 93. [Google Scholar] [CrossRef]
  15. Venema, J.; Matthews, D.T.A.; Hazrati, J.; Wörmann, J.; van den Boogaard, A.H. Friction and wear mechanisms during hot stamping of AlSi coated press hardening steel. J. Mater. Process. Technol. 2017, 380–381, 137–145. [Google Scholar] [CrossRef]
  16. Grigorieva, R.; Drillet, P.; Mataigne, J.-M.; Redjaïmia, A. Phase transformations in the Al-Si coating during the austenitization step. Solid. State Phenom. 2011, 172–174, 784–790. [Google Scholar] [CrossRef]
  17. Suehiro, M.; Kusumi, K.; Miyakoshi, T.; Maki, J.; Ohgami, M. Properties of aluminum-coated steels for hot-forming. Nippon. Steel Tech. Rep. 2003, 88, 16–21. [Google Scholar]
  18. Veit, R.; Hofmann, H.; Kolleck, R.; Sikora, S. Investigation of the Phase Formation of AlSi-Coatings for Hot Stamping of Boron Alloyed Steel. AIP Conf. Proc. 2011, 1315, 769–774. [Google Scholar]
  19. Pelcastre, L.; Hardell, J.; Prakash, B. Investigations into the occurrence of galling during hot forming of Al–Si-coated high-strength steel. Proc. Inst. Mech. Eng. Part. J. 2011, 225, 487–498. [Google Scholar] [CrossRef]
  20. Pauschitz, A.; Roy, M.; Franek, F. Mechanisms of sliding wear of metals and alloys at ele-vated temperatures. Tribol. Int. 2008, 41, 584–602. [Google Scholar] [CrossRef]
  21. Pelcastre, L.; Hardell, J.; Prakash, B. Galling mechanisms during interaction of tool steel and Al–Si coated ultra-high strength steel at elevated temperature. Tribol. Int. 2013, 67, 263–271. [Google Scholar] [CrossRef]
  22. Hernandez, S.; Hardell, J.; Prakash, B. High-Temperature Friction and Wear of Boron Steel and Tool Steel in Open and Closed Tribosystems. Tribol. Trans. 2017, 61, 448–458. [Google Scholar] [CrossRef]
  23. Vergne, C.; Boher, C.; Gras, R.; Levaillant, C. Influence of oxides on friction in hot rolling: Experimental investigations and tribological modelling. Wear 2006, 260, 957–975. [Google Scholar] [CrossRef]
  24. Aouadi, S.M.; Gao, H.; Martini, A.; Scharf, T.W.; Muratore, C. Lubricious oxide coatings for extreme temperature applications: A review. Surf. Coat. Technol. 2014, 257, 266–277. [Google Scholar] [CrossRef]
  25. Fateh, N.; Fontalvo, G.A.; Gassner, G.; Mitterer, C. The Beneficial Effect of High-Temperature Oxidation on the Tribological Behaviour of V and VN Coatings. Tribol. Lett. 2007, 28, 1–7. [Google Scholar] [CrossRef]
  26. Gulbiński, W.; Suszko, T. Thin films of Mo2N/Ag nanocomposite—The structure, mechani-cal and tribological properties. Surf. Coat. Technol. 2006, 201, 1469–1476. [Google Scholar] [CrossRef]
  27. Suszko, T.; Gulbiński, W.; Jagielski, J. The role of surface oxidation in friction processes on molybdenum nitride thin films. Surf. Coat. Technol. 2005, 194, 319–324. [Google Scholar] [CrossRef]
  28. Gassner, G.; Mayrhofer, P.H.; Kutschej, K.; Mitterer, C.; Kathrein, M. Magnéli phase formation of PVD Mo–N and W–N coatings. Surf. Coat. Technol. 2006, 201, 3335–3341. [Google Scholar] [CrossRef]
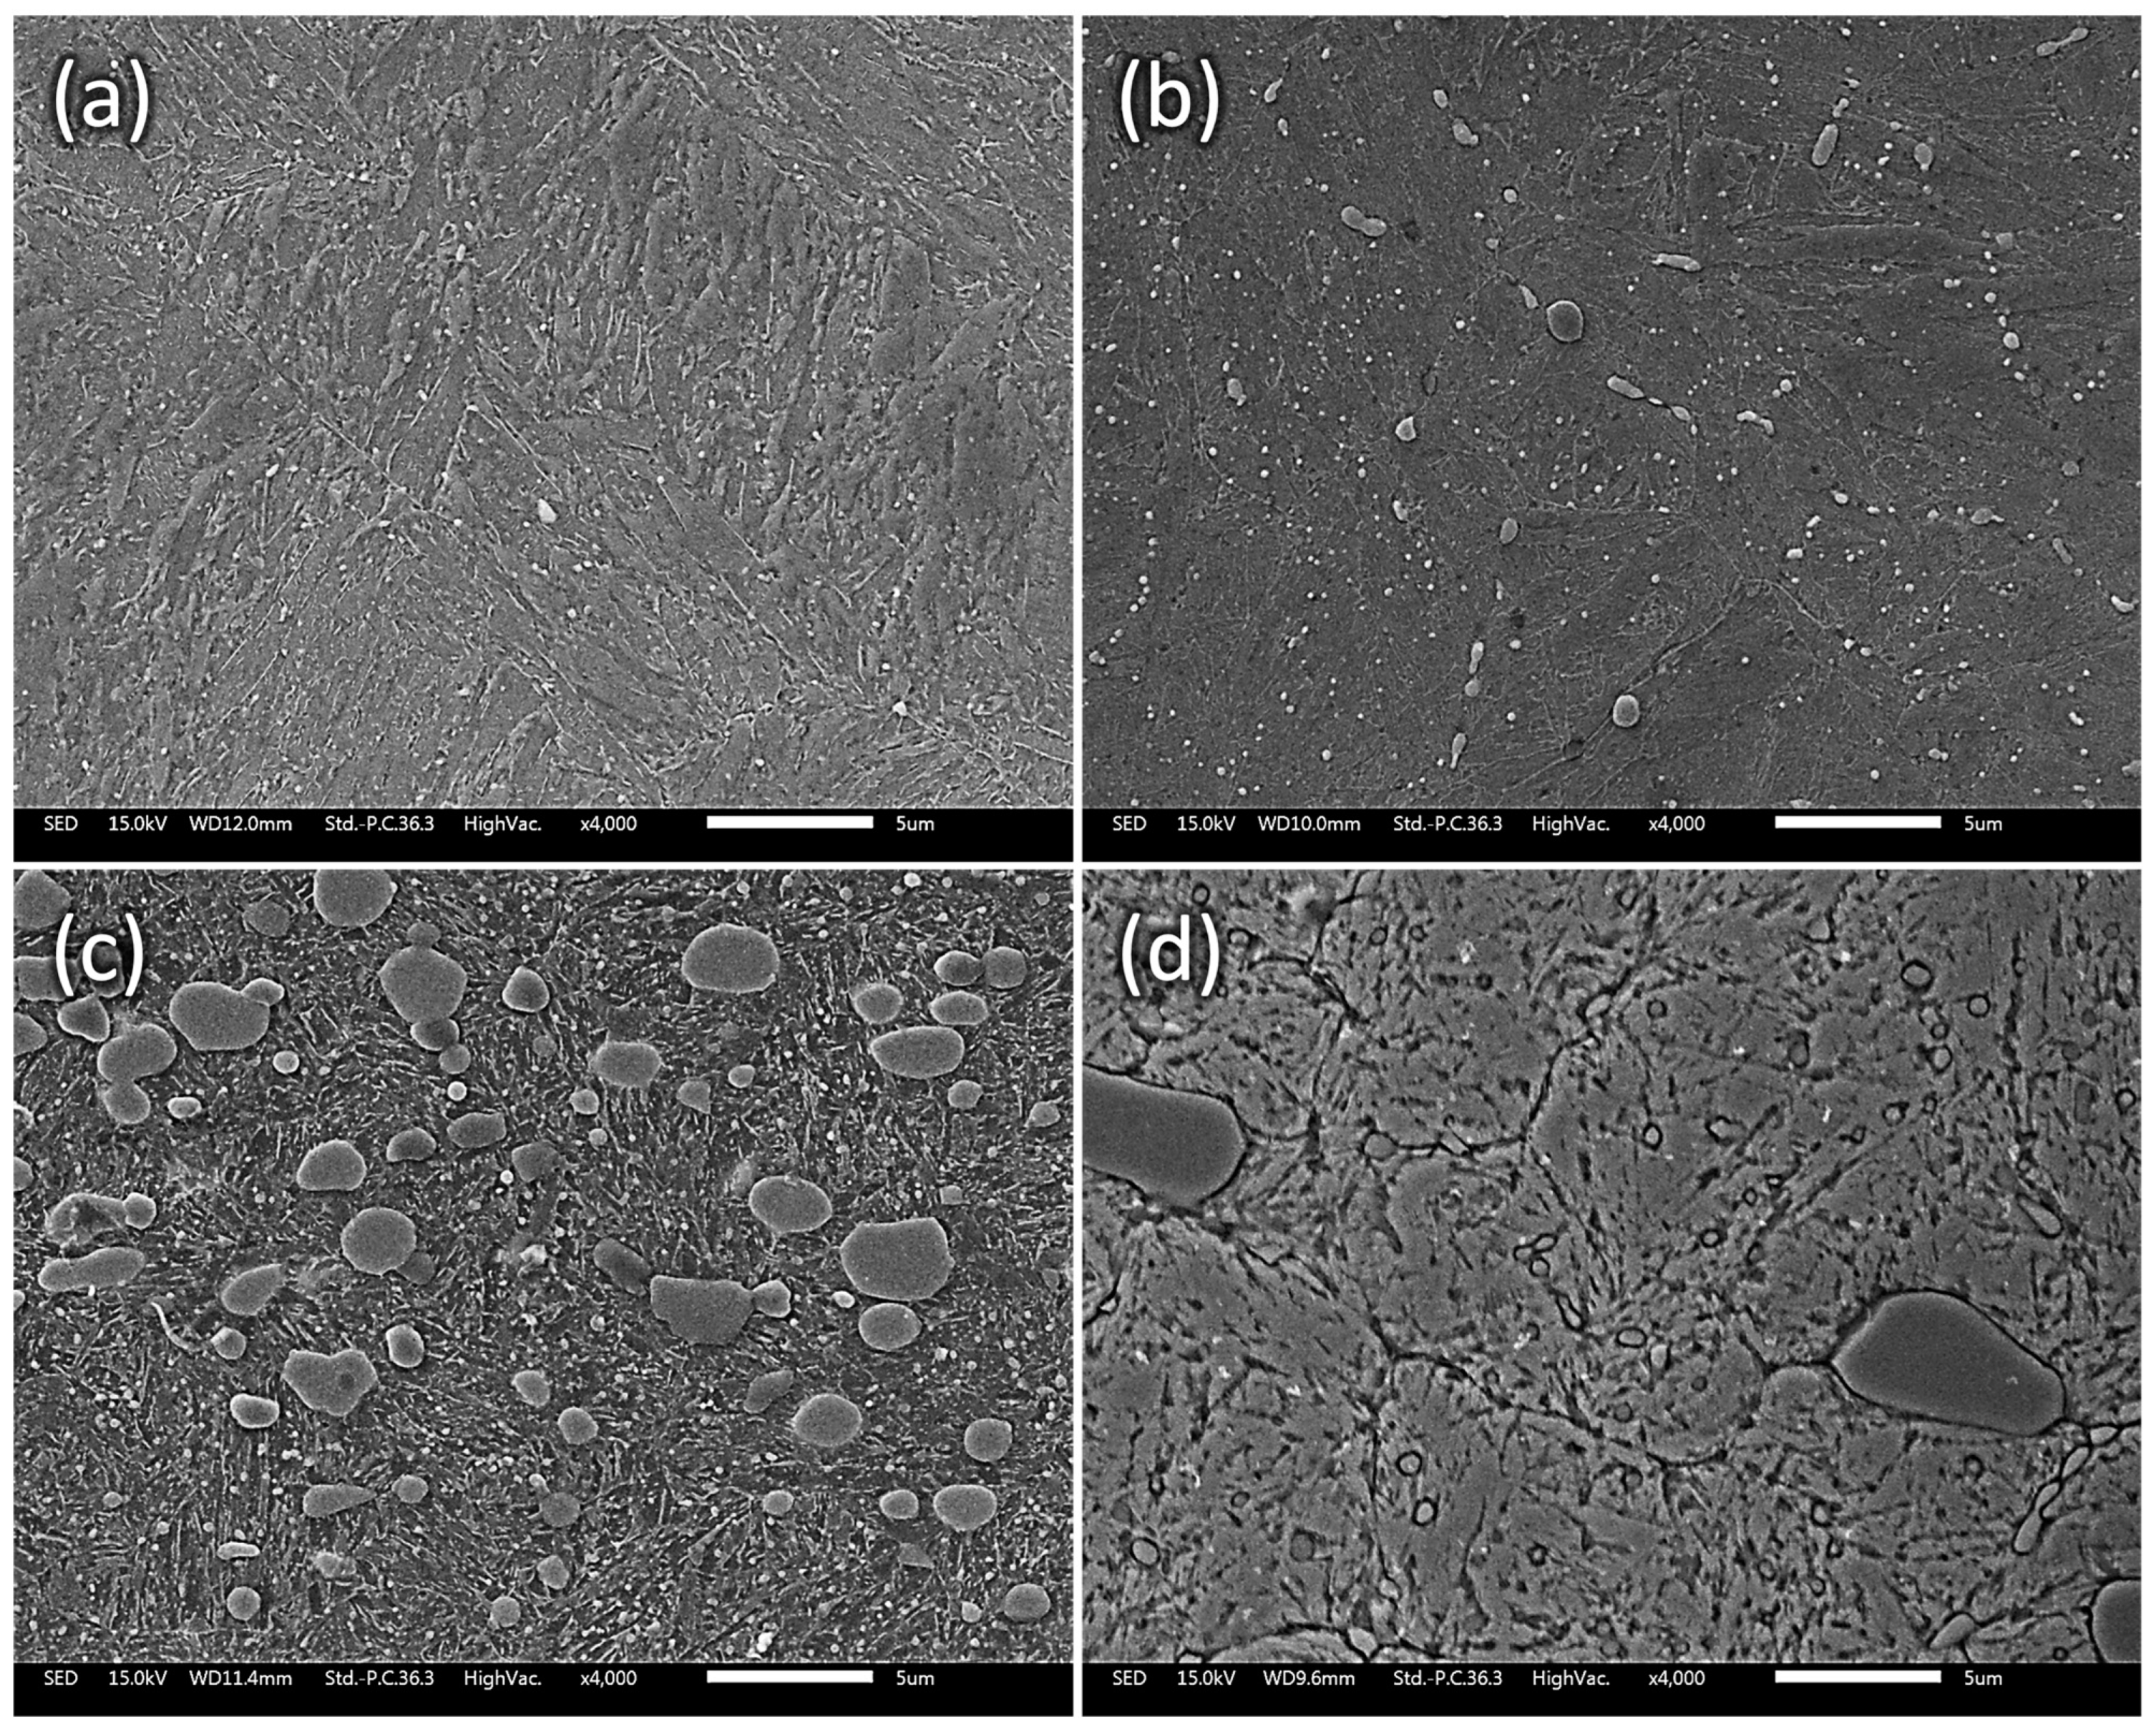
Figure 1. SEM micrographs of the microstructures of the tool steels: (a) TS1, (b) TS2, (c) TS3, and (d) TS4.
Lubricants 12 00297 g001
Figure 2. Schematic representation of (a) the tool steel specimen geometry and (b) the test setup configuration.
Lubricants 12 00297 g002
Figure 3. Friction behaviour using 900 °C as the strip temperature sliding against (a) unheated tool steels and (b) heated tool steels. UHSS strip temperature during test: 900 °C.
Lubricants 12 00297 g003
Figure 4. Top view photographs of the typical wear observed after the tribological tests. The figure shows the heated TS1 (left) and the UHSS strip (right). The sliding direction is marked by the white arrows.
Lubricants 12 00297 g004
Figure 5. SEM micrographs of the test specimens after the tribological tests. (a) Top view of the worn surface of TS1, (b) cross-section under a thick lump of transferred material, and (c) microstructure of the coating, highlighting the properties of the diffusion layer (melting points taken from the literature [18]).
Lubricants 12 00297 g005
Figure 6. Friction behaviour of the tribological tests. (a) Unheated tool steels and (b) heated tool steels. UHSS strip temperature during test: 700 °C.
Lubricants 12 00297 g006
Figure 7. Surface damage observed on the different tool steels after the tribological tests: (a) TS1, (b) TS2, (c) TS3, and (d) TS4. Unheated and heated specimens. Sliding direction: right to left in all samples.
Lubricants 12 00297 g007
Figure 8. Representative worn surfaces of the unheated tool steels (TS1 in figure). (a) Leading edge and (b) end of the contact. Sliding direction: left to right.
Lubricants 12 00297 g008
Figure 9. Representative worn surfaces of the tests using heated tool steels (TS1). (a) Leading edge and (b) end of the contact. Sliding direction: left to right.
Lubricants 12 00297 g009
Figure 10. Summary of the wear mechanisms encountered when using (a) non-heated tool steel (TS1), (b) heated tool steel (TS3), and (c) heated tool steel with severe adhesion (TS4).
Lubricants 12 00297 g010
Figure 11. Friction coefficient from a three-pass repetition nano-scratch test on (a) unheated tool steel specimens and (b) heated tool steel specimens.
Lubricants 12 00297 g011
Figure 12. XRD results from tool steels oxidised in the tribometer (static oxidation). Oxidation temperature: 500 °C.
Lubricants 12 00297 g012
Table 1. Chemical composition of the tool steels used for the tribological tests in wt%.
Tool SteelCSiMnCrMoVCoWHardness (HV0.1)
TS10.380.300.752.602.250.90--567
TS20.450.300.404.503.02.04.50-543
TS30.90--4.105.01.80-6.20654
TS40.820.700.408.01.600.60--798
Table 2. Parameters used for the tribological tests.
ParameterValue
Load/contact pressure500 N/4.8 MPa
Sliding speed100 mm/s
Tool steel temperatureRT* and 500 °C
Strip temperature700 °C and 900 °C
Table 3. Micro-hardness values of the different tool steels before and after the tribological tests.
MaterialHardness before TestHardness after Test
TS1567 ± 13.7568 ± 7.7
TS2543 ± 10.2534 ± 23.8
TS3654 ± 22.3602 ± 13.6
TS4798 ± 8.9748 ± 22.6
Disclaimer/Publisher’s Note: The statements, opinions and data contained in all publications are solely those of the individual author(s) and contributor(s) and not of MDPI and/or the editor(s). MDPI and/or the editor(s) disclaim responsibility for any injury to people or property resulting from any ideas, methods, instructions or products referred to in the content.