Article

High-Temperature Wear and Frictional Performance of Plasma-Nitrided AISI H13 Die Steel

1
Mechanical Engineering Department, Chandigarh Group of Colleges, Landran, Sahibzada Ajit Singh Nagar 140307, India
2
Mechanical Engineering Department, Baba Banda Singh Bahadur Engineering College, Fatehgarh Sahib 140407, India
3
Plasma Surface Engineering Division, Facilitation Center for Industrial Plasma Technologies, Institute for Plasma Research, Gandhinagar 382016, India
4
Mechanical Engineering Department, Thapar Institute of Technology, Patiala 147004, India
5
Surface Engineering for Advanced Materials-SEAM, Swinburne University of Technology, Melbourne 3122, Australia
*
Authors to whom correspondence should be addressed.
Lubricants 2023, 11(10), 448; https://doi.org/10.3390/lubricants11100448
Submission received: 27 July 2023 / Revised: 7 September 2023 / Accepted: 8 September 2023 / Published: 17 October 2023
(This article belongs to the Special Issue Plasma Surface Treatments for Wear and Corrosion Protection)

Abstract

:
Plasma nitriding, a surface treatment technique, is gaining popularity, as it is environment-friendly and offers superior mechanical properties. This research studied the wear and friction performance of AISI H13 die steel after plasma nitriding in a gas mixture of N2:H2 at 20:80, 50:50, and 80:20 (volume ratio) at a fixed time and temperature. This work aimed to analyze the sliding wear performance of the plasma-nitrided tool die steel in hot-forming operations at higher loads. Scanning electron microscopy/electron-dispersive spectroscopy (SEM/EDS) and X-ray diffraction (XRD) techniques were used to study the microstructures of the H13 die steel pins after plasma nitriding. Wear tests were performed on a high-temperature tribometer under uni-directional sliding and dry conditions using a high-temperature tribometer under a 50 N load at various operating temperatures ranging from 25 °C to 600 °C. The results show that the plasma-nitriding process with N2:H2 at 20:80 improved the wear behavior of H13 steel. The friction coefficients and wear volume losses for all the plasma-nitrided specimens were less than those of the untreated die steel.

1. Introduction

High-strength steel sheets are exposed to elevated temperatures in the hot-forming industry. The thin sheets are heated in a furnace, and during heating, the surfaces of the steel sheets show the formation of thick oxide layers consisting of different oxides. This, in turn, reduces friction during the forming operation, as Vergne, 2006 [1] mentioned in his studies. The hot steel sheet is then transferred between the forming dies, and, with the graduate load, the forming of the steel sheet occurs as the tool closes. In many cases, the forming dies are preheated and, during the forming operation, the die surface temperature may exceed 550 °C. The surfaces of the dies are exposed to high tempering due to mechanical and thermal loads. After a few operations, the dies wear out and lose their dimensions. The hardness of the dies is reduced due to the relative sliding between the steel sheet (workpiece) and the die (tool) materials. The tribo-chemical layers develop on the surface of the dies [2,3,4]. Increasing the wear strength of these materials increases the cost of the material [5]. Apart from wear, thermally and mechanically induced strain, thermal fatigue, cracks, micro-cracks, and tempering are other failure mechanisms recognized in hot-forming dies. Thermal fatigue leads to cracking in the dies [6,7,8].
The literature has revealed that approximately 70% of failures in the hot-forming/forging mechanical industries are due to the tribological characteristics of the moving machine components [9,10]. One-third of the world’s energy resources result in waste due to wear and friction [11,12]. The waste of materials and energy, as well as overall pollution, must be reduced. Several approaches have been followed to improve the performance of the tool materials used in the hot-forming industry [13].
Among the various surface treatments, one of the most highly recommended processes is plasma nitriding [8,14]. Plasma nitriding, also known as ion nitriding or glow-discharge nitriding, is a surface engineering process used to improve the mechanical and physical properties of metal components. It is a thermochemical treatment that introduces nitrogen into the surface layers of a metal part to create a hard and wear-resistant nitride layer. The process involves placing the workpiece inside a vacuum chamber or furnace. The chamber is then filled with a nitrogen-rich gas, usually ammonia (NH3), at low pressure. An electric field is applied to the gas, creating a plasma discharge. The plasma consists of highly energized nitrogen ions and electrons. This surface treatment technique is considered a practical alternative for the controlled hard facing of different components that experience fatigue and wear. The surface properties of dies can be improved by plasma nitriding [8,14,15]. In this process, the hardness of the surface of machine components can be increased by diffusing nitrogen into them. This process is environment-friendly, and minimum distortion of the components is ensured as the process is carried out at lower workpiece temperatures. Plasma nitriding imparts wear resistance to stainless steels and hot/cold-worked steels [14,15,16,17,18,19]. AISI H13 hot-forming tool steels are well-known candidates for fabricating dies in the hot-press-forming/forging industry. Although these materials have adequate mechanical strength at elevated temperatures, they often lack resistance to wear [20]. The demand for protective surface treatments has increased recently for almost all types of tool steels. Though enough work has been carried out to increase the wear resistance of the H13 material at different temperatures, it has been observed that limited data are available on wear tests at higher loads and at higher temperatures.
The present investigation aimed to develop plasma nitriding on selected die steel: AISI H13 (H13). The plasma nitriding was developed in a gas mixture of N2:H2 at 20:80, 50:50, and 80:20 (volume ratio) at a fixed time and temperature. After plasma nitriding, the in-depth characterization of the untreated and surface-treated specimens was carried out. Subsequently, wear tests were carried out on a high-temperature tribometer in the laboratory at temperatures ranging from room temperature to 600 °C. The current research work aimed to observe the effect of a higher load (50 N) on the high-temperature wear behaviour of plasma-nitrided tool steels. The outcomes have been stated in the paper and compared to the present literature.

2. Materials and Methods

2.1. Die Steel Selection and Pin Preparation

The substrate material AISI H13 was selected. The chemical composition of the selected steel is shown in Table 1. The pin samples were prepared with a size of 50 mm in length and 8 mm in diameter (according to ASTM G99-04 standard; Section 2.4). The samples were rubbed against emery papers of various grit sizes to lower the surface roughness (Ra) to below 0.03 µm. Roughness measurements were calculated using a surface roughness tester (Make: Mitutoyo; Model: SJ 40, Accuracy: 0.001 µm). For the tribo-test, DIN 20Mn5Cr was chosen for the disc of 100 mm diameter and 8 mm thickness. Heat treatment of the disc samples was carried out to improve the hardness. Steel discs were given a surface-hardening treatment of pack carburizing by heating them to a temperature of 920 °C in the presence of coal, and then allowing them to cool slowly in the furnace. Further, the discs were again heated to 820 °C (just above recrystallization temperature), and then quenched in oil. Finally, the discs were heated for grain refining and internal stress removal. The final hardness, attained by pack carburizing, is about 60 HRC. After this, plasma nitriding was performed to raise hardness to within the range of 60–80 HRC.

2.2. Plasma Nitriding

Before plasma nitriding, the steel pins underwent a three-stage heat treatment process. In the first stage, the pins were heated to 550 °C for 30 min, followed by heating to 850 °C for 10 min and then beyond the austenization temperature for another 10 min. The second stage involved quenching the pins in oil, resulting in the formation of hard martensite in the microstructure. After quenching, the pins were allowed to cool down to room temperature. The third stage was tempering, aimed at releasing the stresses induced during hardening. In this stage, the hardened pins were heated at 550 °C for 30 min and then cooled in the air to room temperature. To completely remove all internal stresses, the high-temperature tempering process was repeated three times. Additionally, the disc material underwent heat treatment and plasma nitriding. Figure 1 shows the schematic diagram of the plasma nitriding process. In the present work, plasma nitriding was performed in a gas mixture of N2:H2 at 20:80, 50:50 and 80:20 (volume ratio) and a pressure of 500 Pa. The temperature and the time for this process were set at 500 °C for 24 h.

2.3. Characterization of Plasma-Nitrided Specimens

The detailed characterization of plasma-nitrided samples was carried out using optical microscopy, SEM/EDS, and XRD techniques. Surface roughness (Ra) and microhardness values were also measured. The process of examining the cross-sectional microstructures of plasma-nitrided specimens using an optical microscope (OM) involves a standard metallographic procedure. The nitrided specimens were cut into cross-sections using a low-speed cutting machine. The cut sections were then hot-mounted in a mounting material, with phenolic powder. To prepare the mounted specimens for microscopic examination, a series of polishing steps were performed to achieve a smooth and reflective surface. The polishing was performed sequentially using SiC emery papers of increasingly finer grit (240, 320, 400, and 600). After using the SiC emery papers, the specimens underwent fine polishing. The fine polishing process further refines the specimen’s surface, making it more suitable for detailed microscopic examination. Once the polishing was completed, the specimens were washed and dried to remove any residual polishing agents or debris. The prepared specimens were examined under an optical microscope manufactured by Leco. To determine the thickness of the nitrided layer, the cross-sectioned specimens were chemically etched with 2% nital. By carefully observing and measuring the etched regions under the microscope, the thickness of the nitrided layer was determined.
The microhardness of the plasma-nitrided specimens was measured using a Vickers microhardness tester, specifically the Mitutoyo HM 200 model. The microhardness measurements were taken at specific locations on the plasma-nitrided specimens. These locations included the surface of the nitrided layer as well as specific depths within the material. For each testing location, three measurements of the microhardness were made to ensure the accuracy and reliability of the hardness values obtained, and the mean value reported. To understand how the microhardness varies from the outer edge of the plasma-nitrided layer to the core of the specimen, microhardness depth profiles were created. These profiles plot the microhardness values as a function of the distance from the surface (outer edge) of the plasma-nitrided layer to the interior (core) of the specimen. By measuring and plotting the microhardness values at different depths, the effectiveness of the plasma-nitriding process and the resulting material properties have been investigated.
The XRD analysis was performed using an Expert Pro X-ray diffractometer manufactured by Malvern PANalytical, a company based in the Netherlands. The specific model used for the analysis is the Expert Pro Model MPD with Cu Kα radiation and a nickel filter at 20 mA under a voltage of 35 kV. A scanning speed of 1 Kcps in the 2θ range of 30–90° was used to perform the XRD at a chart speed of 1 cm min−1 with 2° min−1 as the Goniometer speed. The diffractometer was interfaced with software capable of analyzing the diffraction pattern obtained from the scanning. The software allowed the identification of phases present in the nitride layer based on the characteristic peaks observed in the diffraction pattern. A Field-Emission Scanning Electron Microscope (FE-SEM, FEI Quanta 200F, Czech Republic) was used to investigate the surface and cross-sectional morphology, along with the elemental composition of the plasma-nitrided specimens. The FE-SEM was equipped with an EDS system that allows for the analysis of the elemental composition of the sample. The EDS analysis was performed using an electron beam energy of 20 keV. This energy level was chosen to excite X-rays from the sample, which are characteristic of the elements present in the nitride layer. The EDS analysis provides information on the distribution of elements across the sample’s surface or within specific regions of interest. This information is essential for understanding the effectiveness of the nitriding process, the formation of the nitride layer, and the resulting material properties.

2.4. Tribological Tests

Tribological (wear and friction) tests were carried out under unidirectional sliding and dry conditions using a pin-on-disc tribometer, as shown in Figure 2 (Ducom Bangalore, Bangalore, India, Model-TR20 LE-DHM 800PHM 800). The ASTM G99-04 standard was followed for the tests. Initially, the Ra value was reduced below 0.03 µm by polishing the pin surfaces with emery papers. The fixation of the polished pin and disc samples was carried out on a tribometer. To simulate the higher loads experienced by the die material during forming operations, wear and friction tests were conducted at 50 N. The experiments were performed with a sliding speed of 0.5 m/s and sliding distance of 1500 m at room temperature, 200 °C, 400 °C, and 600 °C for 50 min each. When the required temperature of the disc was achieved, a 50 N load was put on the handle and the experiment was started. After 50 min, the die steel sample was detached from the holder and cleaned with acetone. The weight of the sample was measured with an analytical balance having an accuracy of 0.1 mg. From the weight change data, the wear volume loss (mm3) was calculated.

3. Results and Discussion

3.1. Characterization of Plasma-Nitrided Specimens

3.1.1. Visual Examination, Ra Values, and Microstructure Analysis

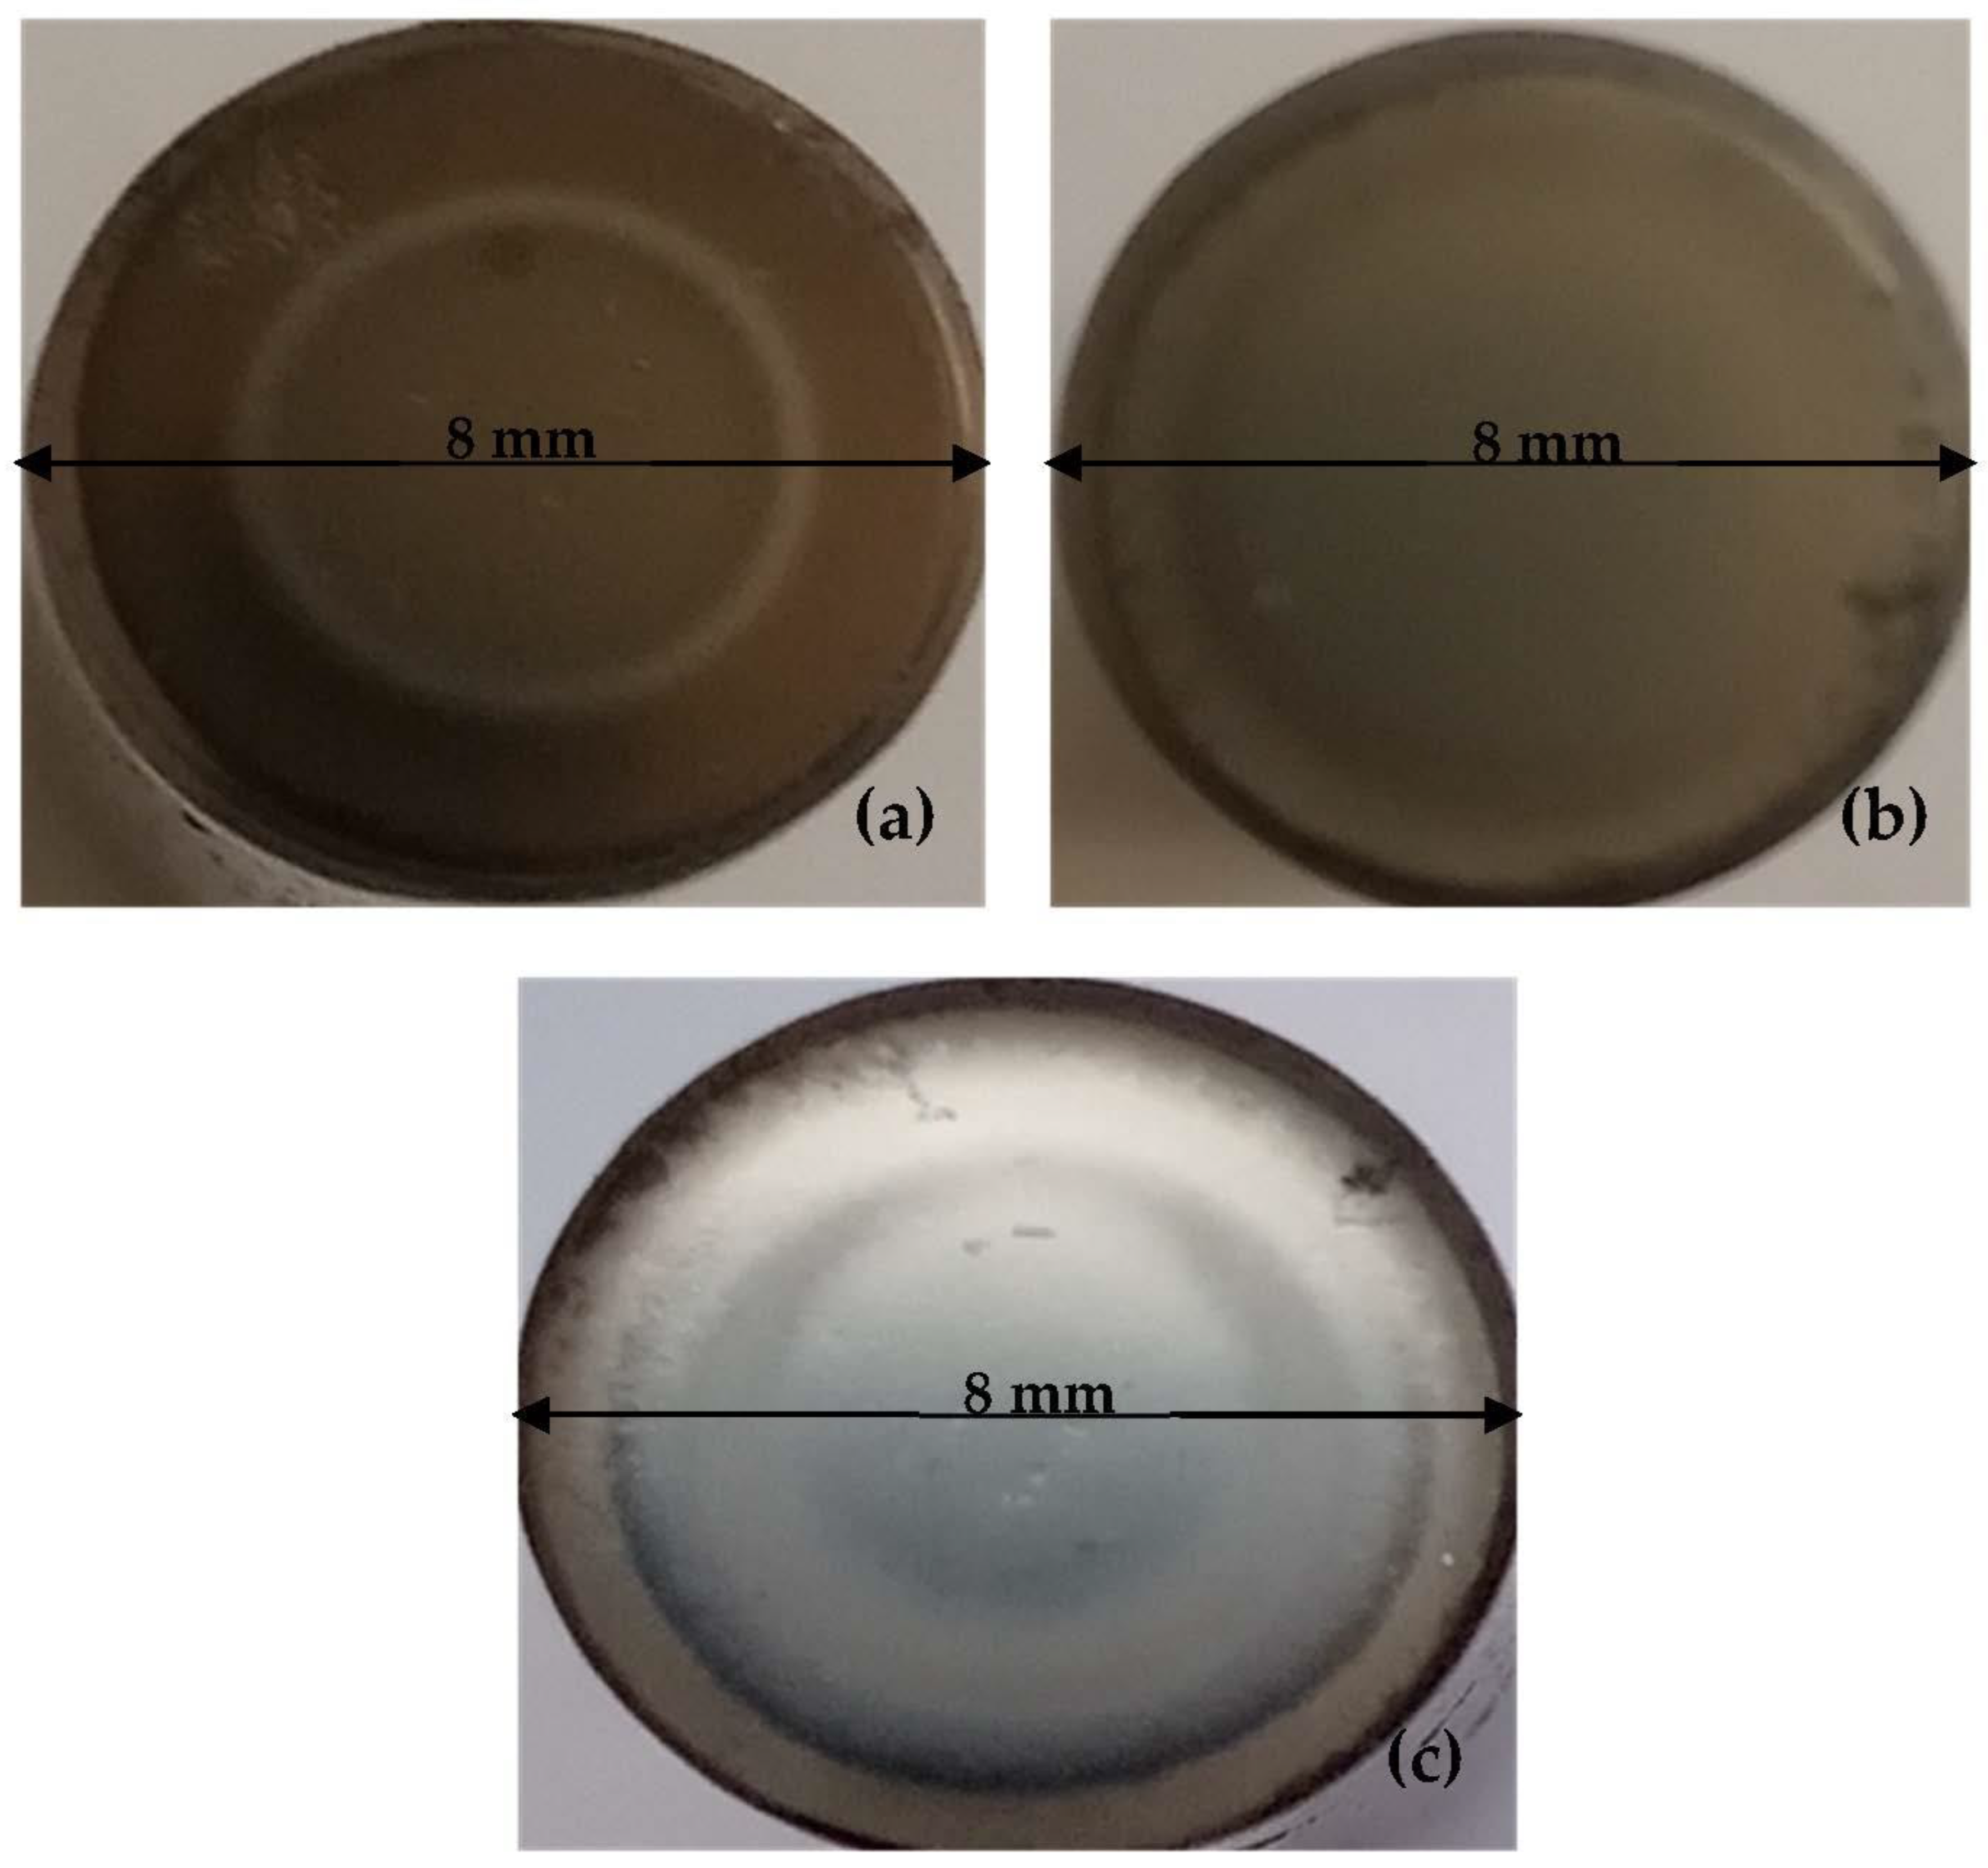
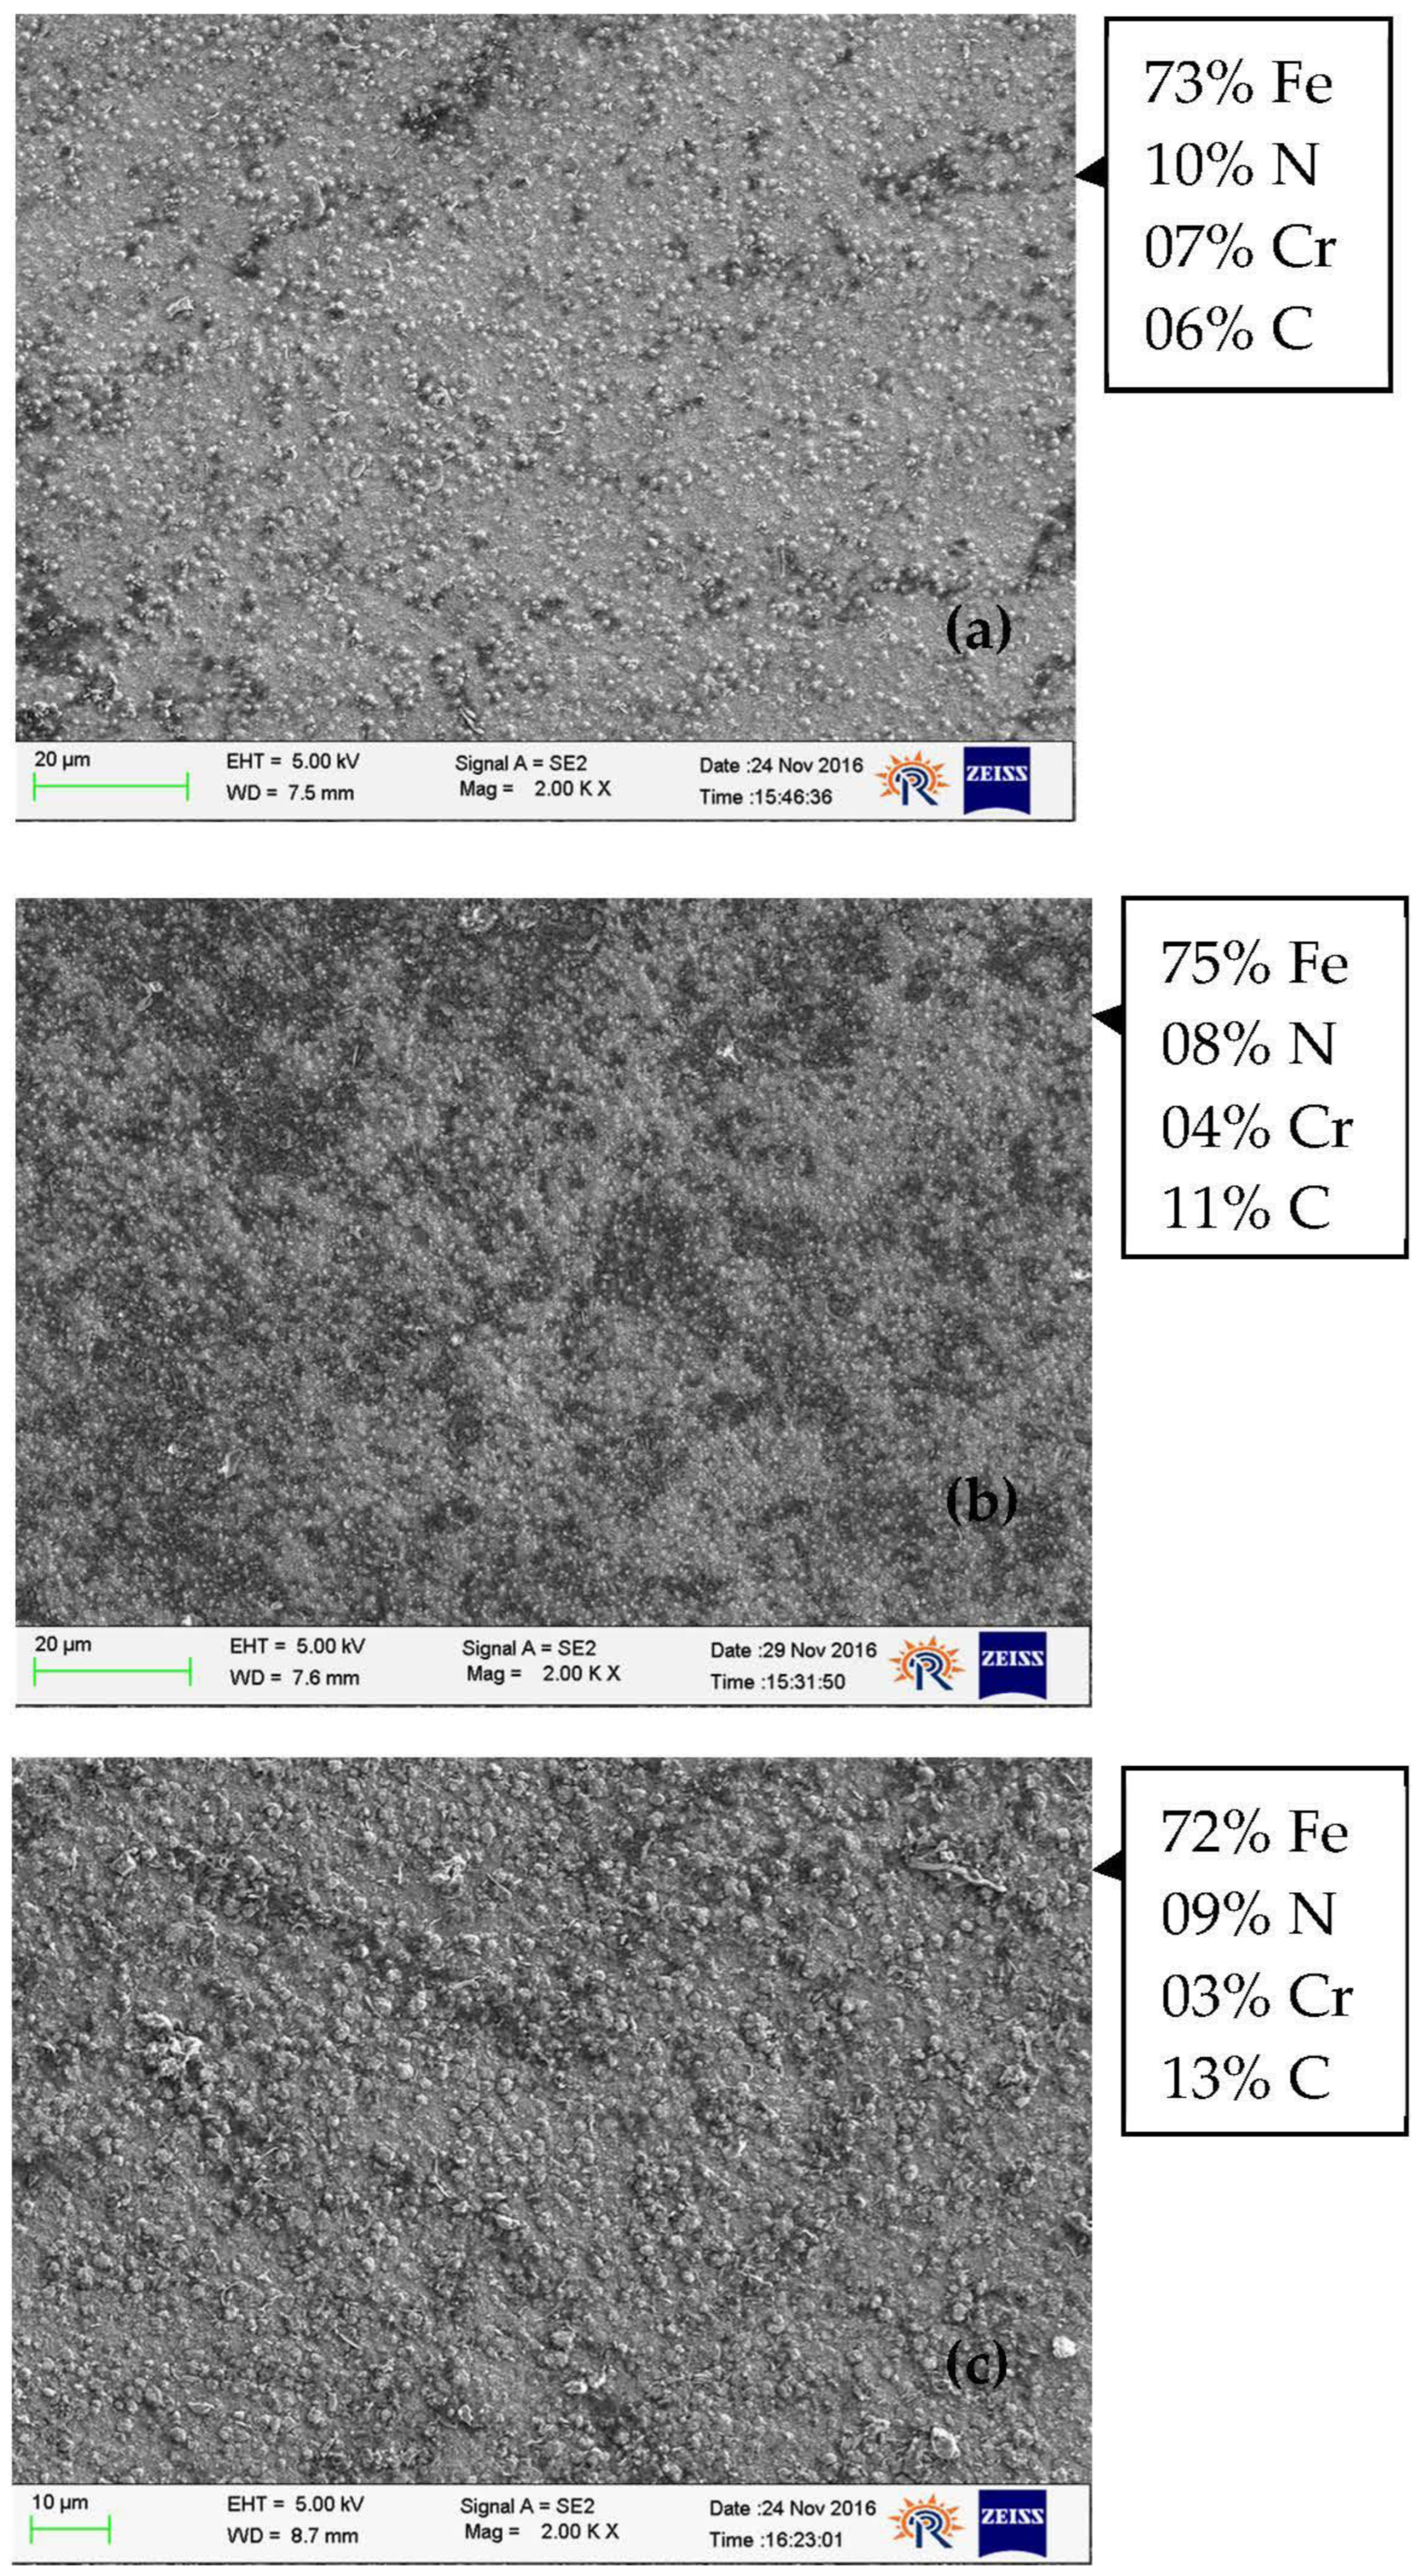
The pin and disc specimens were grey in colour. The macrographs of plasma-nitrided specimens are shown in Figure 3. The surface appeared smooth with no surface cracks. Similar macrographs were observed by Visuttipilukul et al. [21] and Capa et al. [22] in their studies on the development of plasma nitriding on AISI H13 steels. The initial Ra value of the pins was 0.03 µm. The surface roughness value of plasma-nitrided pins treated with 20:80, 50:50, and 80:20 (N2:H2) gas ratios was measured as 0.44, 0.35 and 0.33 μm, respectively. Ra values were higher after treatment due to the sputtering caused by the presence of hydrogen gas, which led to the formation of iron nitrides observed in the EDS analysis in Figure 4. The EDS analysis confirmed the existence of iron nitrides based on the presence of iron and nitrogen on the surface. The samples were plasma-nitrided with different ratios of hydrogen and nitrogen. The nitrogen content was found to be high in the samples created with increased amounts of hydrogen. This may be attributed to the enhanced surface activation by the hydrogen that resulted in the increased incorporation of nitrogen on the surface. Visuttipilukul et al. [21] also identified the formation of nitrides of Fe and Cr in their studies.

3.1.2. Microhardness Analysis

Figure 5 summarizes the microhardness values of the plasma-nitrided pins from the outer surface to the core. The values were recorded at a distance of 100 μm from the outer surface to the core. The surface microhardness values of AISI H13 specimens treated with 20:80, 50:50 and 80:20 (N2:H2) gas ratio were 1045 ± 52, 1214 ± 60 and 1219 ± 61 HV0.1, respectively. The hardness values approximately doubled in comparison to the heat-treated die steel. The microhardness value increased due to the formation of nitrides of chromium and iron, as published in the author’s previous works with different wear loads [18,19]. Visuttipitukul et al. [21], Pellizzari et al. [23], and Birol [24] mentioned that the supersaturation of the BCC matrix with nitrogen resulted in precipitation in the diffusion zone, which hardened the surface. The occurrence of nitrogen in the nitride layer was confirmed by the EDS analysis of specimens. The formation of nitrides led to an increase in hardness in the sub-surface of plasma-nitrided H13 tool steels. From the top surface to the inner region, the hardness values decreased consistently. Therefore, the nitriding layer existed till the point whereat the hardness value became equal to the hardness of the base material plus 50 HV [25]. Considering this fact, the thickness of the nitriding layer for AISI H13 was found to be ~290, ~407 and ~698 μm for 20:80, 50:50 and 80:20 (N2:H2) gas ratios, respectively.

3.1.3. Cross-Sectional SEM Analysis

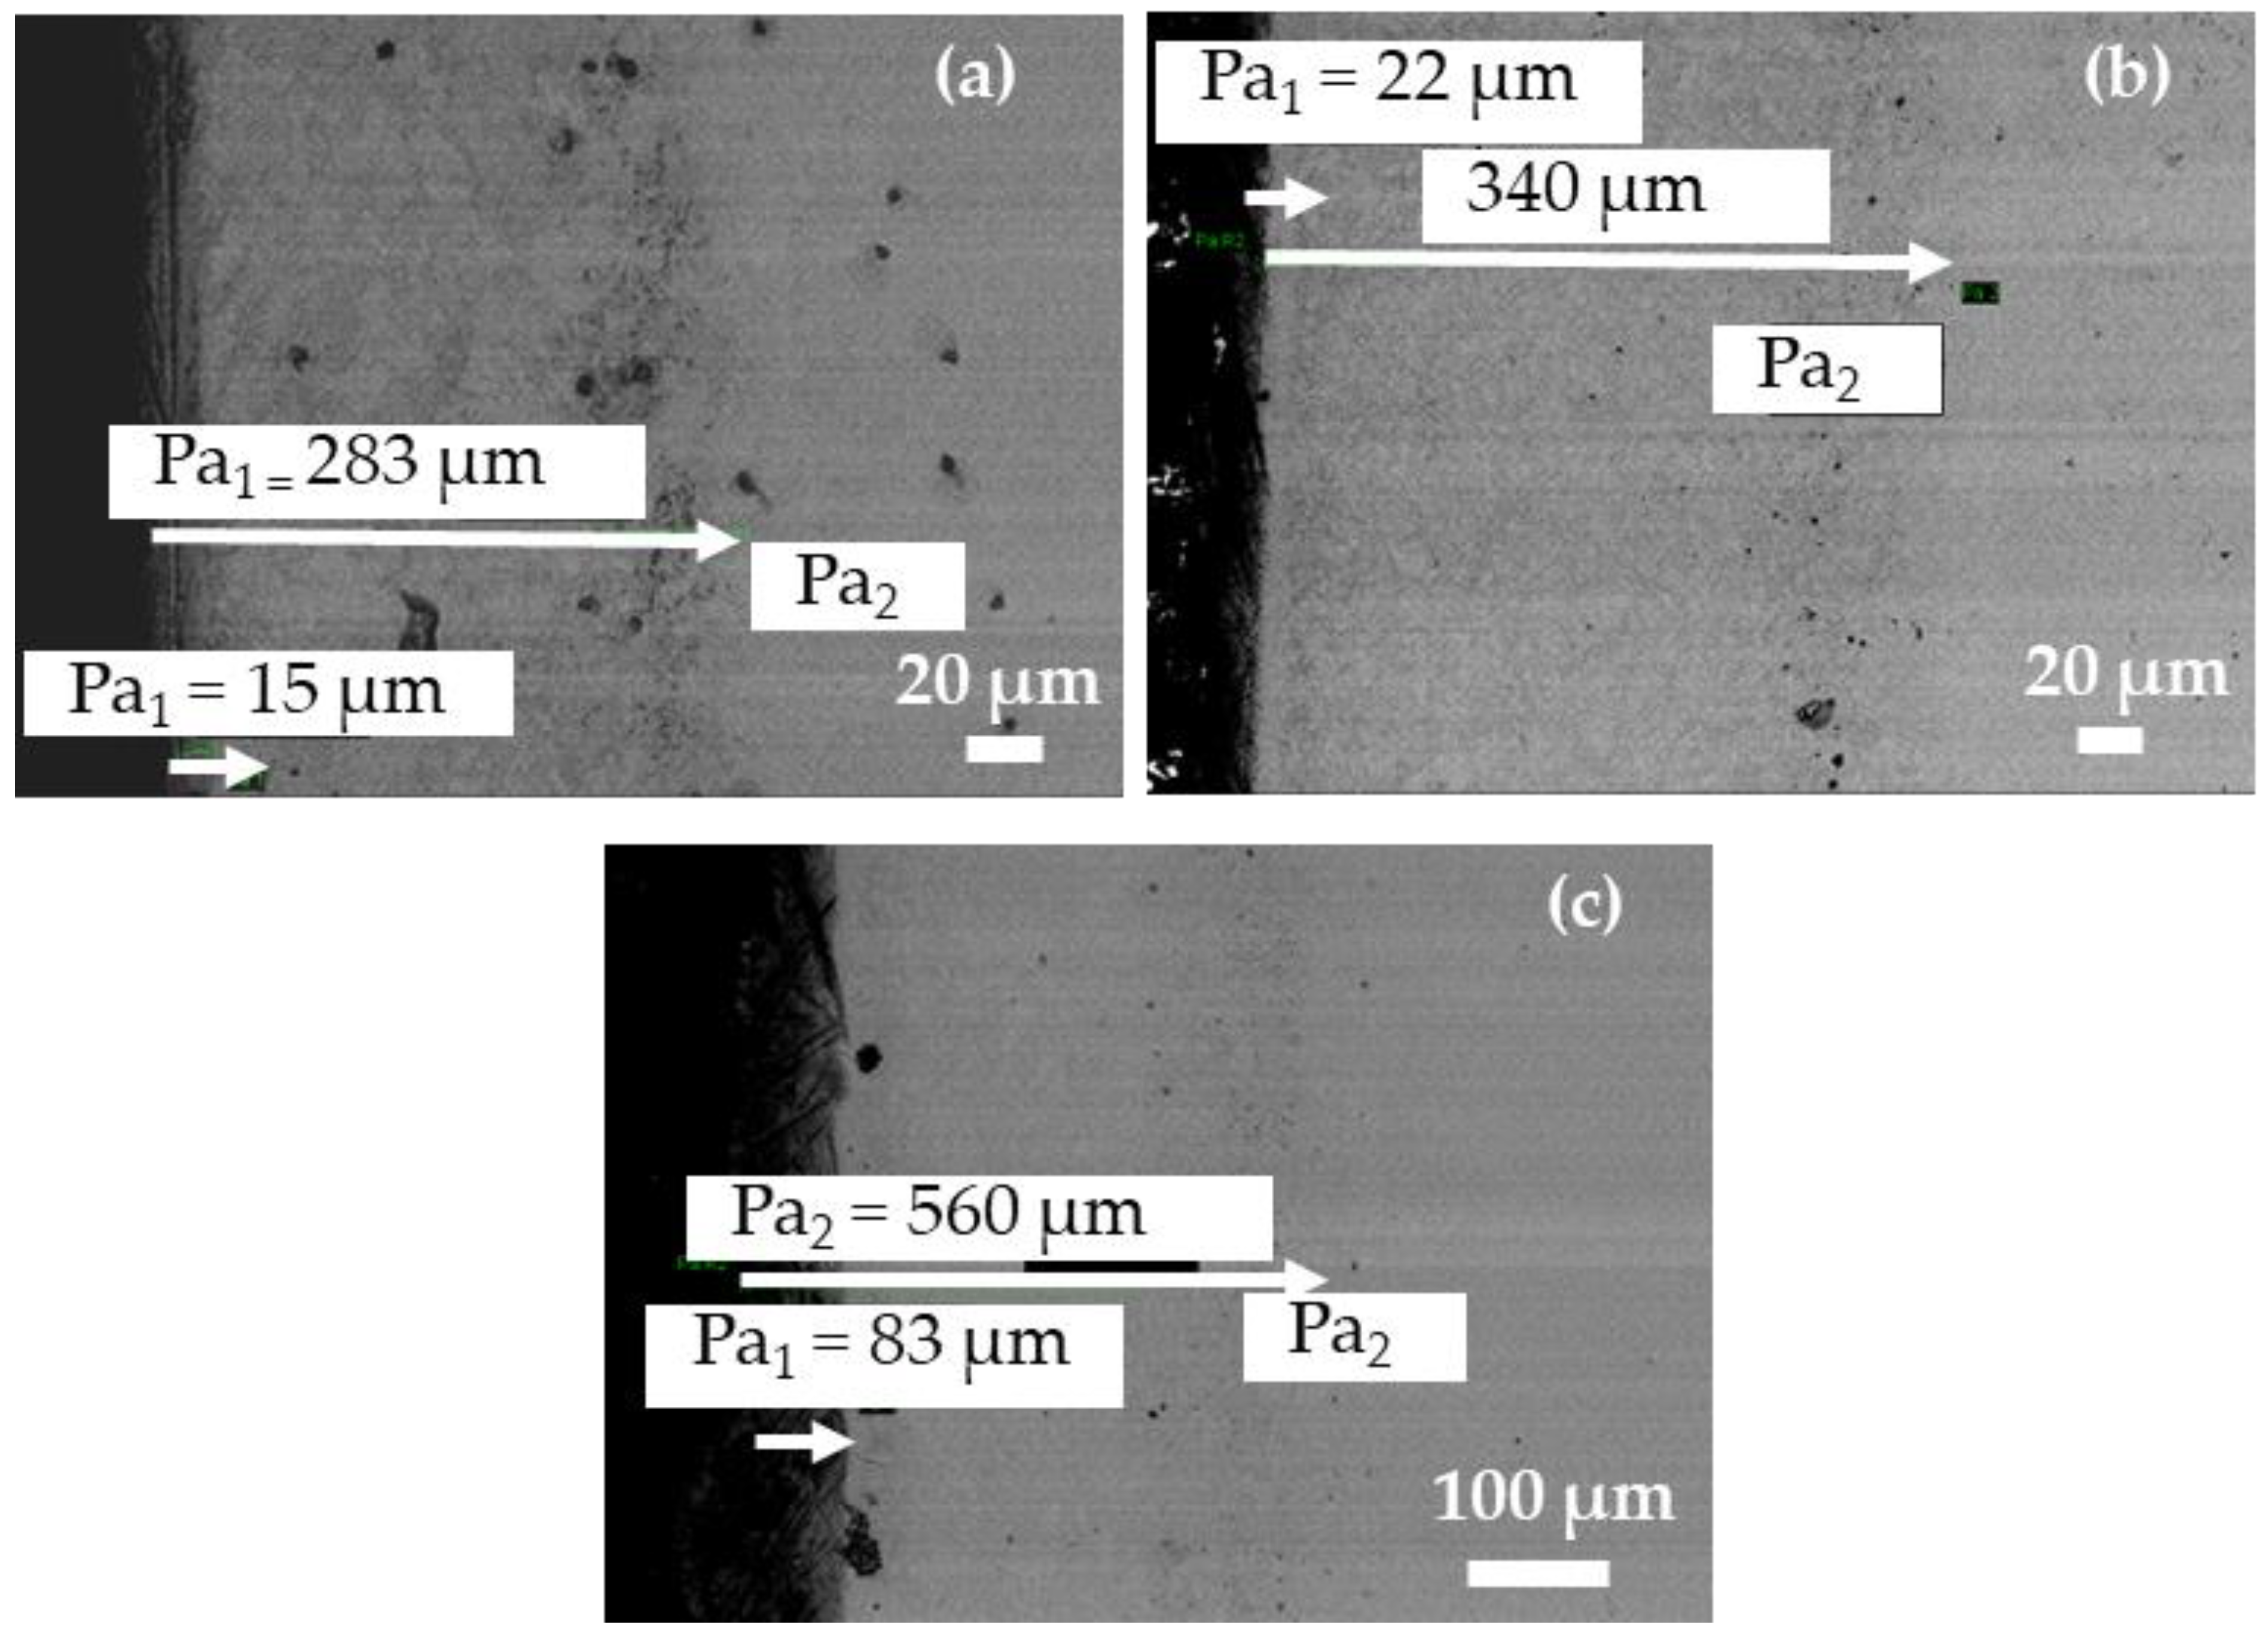
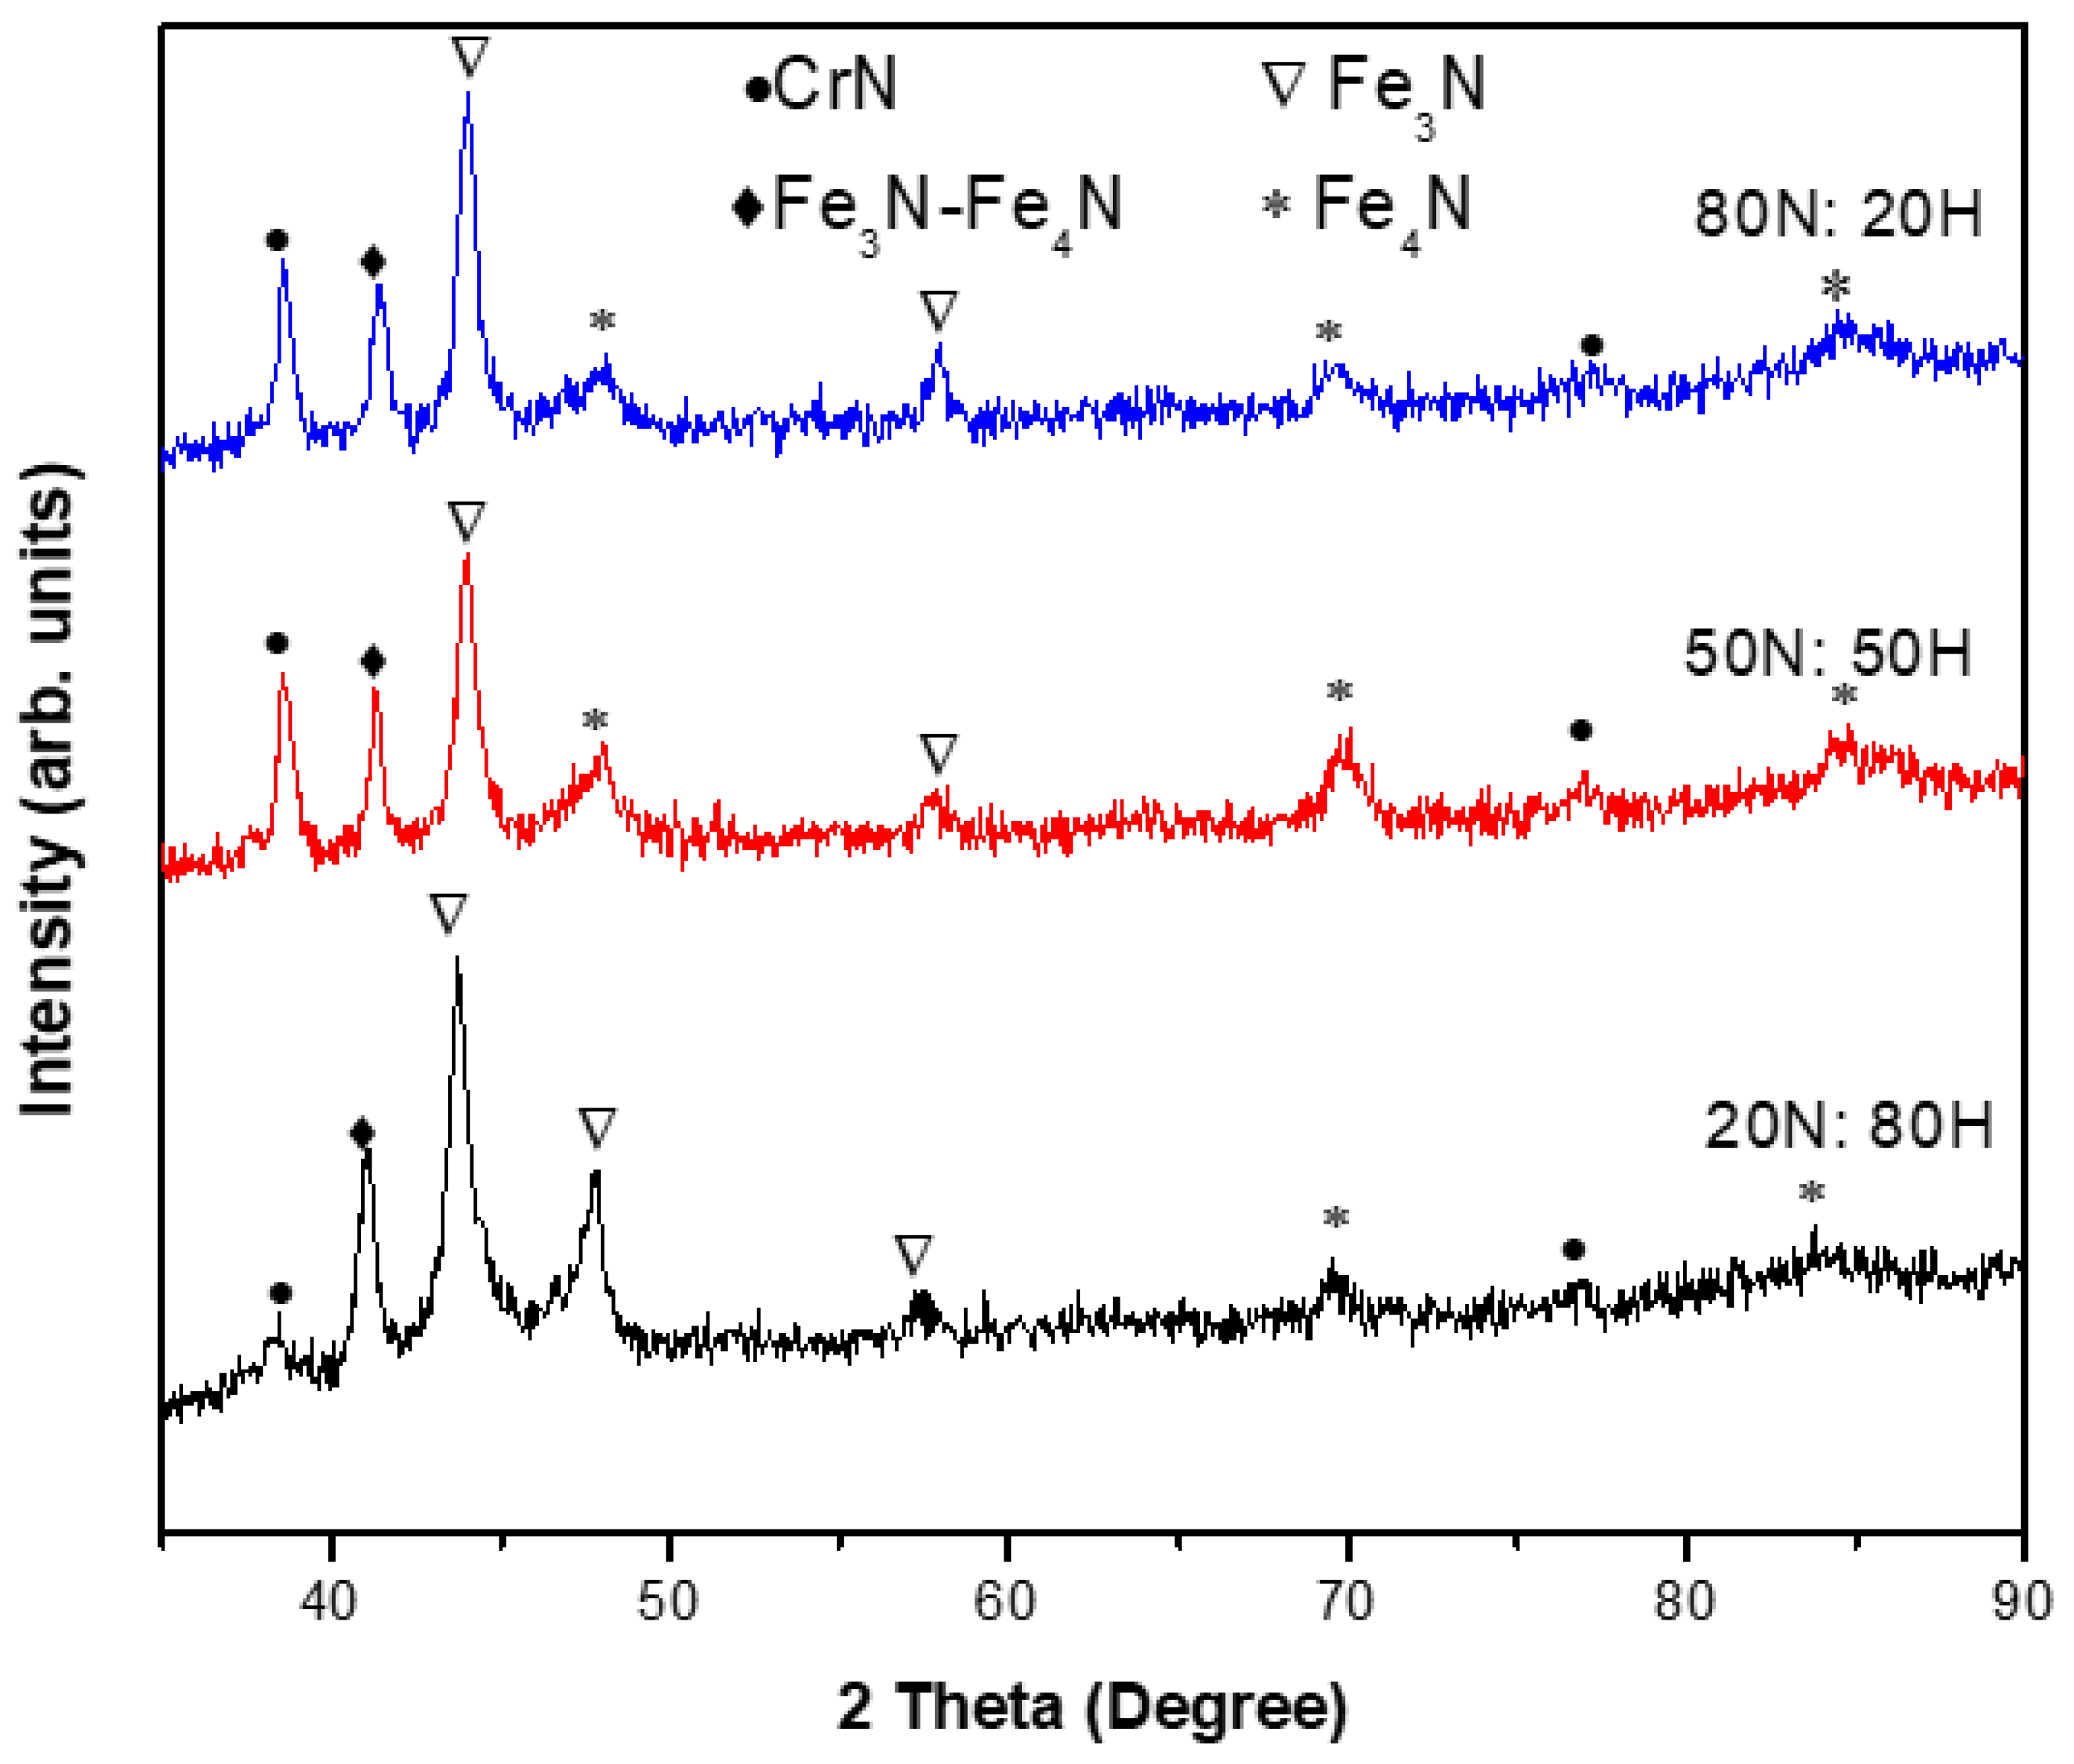
Figure 6 characterizes the cross-sectional morphology of the plasma-nitrided pins. The plasma-nitrided samples were cut along the cross-section. The samples were prepared for metallographic analysis. Afterwards, the samples were etched with 2% nital solution. For the cross-sectional image and the thickness measurements, the samples were observed using SEM. The thickness of the nitride layer was evaluated using the software available with the SEM instrument (Figure 6). The SEM images show the presence of a nitride layer that is constant throughout. The thickness of the nitride layer (including the white layer) was observed to be 283 μm, 340 μm and 560 μm on H13 steel plasma-nitrided with 20:80, 50:50 and 80:20 (N2:H2) gas ratios, respectively. From the figures, it is interesting to note that the white layer thickness in the microstructure varied with varying gas mixtures. On H13 tool steel, the thickness was highest (~87.33 µm) with the 80:20 gas ratio and lowest for the 20:80 (N2:H2) gas ratio. This is consistent with the outcome of the XRD results presented in Figure 7. The high-intensity peaks of Fe3N and Fe4N in specimens treated with 80N2:20H2 indicate higher amounts of iron nitrides, which in turn were responsible for the formation of a thick white layer. The results show that the thickness of the nitride layer is higher with a gas mixture of 80N2:20H2. The EDS analysis confirmed the presence of Fe, N, C and Cr in the nitriding layer. The presence of N at significant quantities confirms the formation of nitrides in the nitriding layer. The content of iron is higher in the matrix. Paschke et al. [26] implemented a plasma nitriding process on DIN-X38CrMoV5-1 die steel by adjusting various process parameters to find the best parameters. The gas ratios used were 10N2:90H2 and 80N2:20H2. The temperatures of 520 °C and 560 °C were selected for plasma nitriding for a duration of 16 h. The author concluded that, after plasma nitriding, the compound layer was formed on the top layer. The maximum hardness was obtained near the surface and decreased towards the core. The nitriding depth increased with nitriding temperature. The hardness of the samples was increased with an increase in nitrogen gas percentage. Visuttipitukul et al. [21] and Leite et al. [27] also showed a similar performance resulting from plasma nitriding on H13 steel at various temperatures.

3.2. Tribological Behaviour

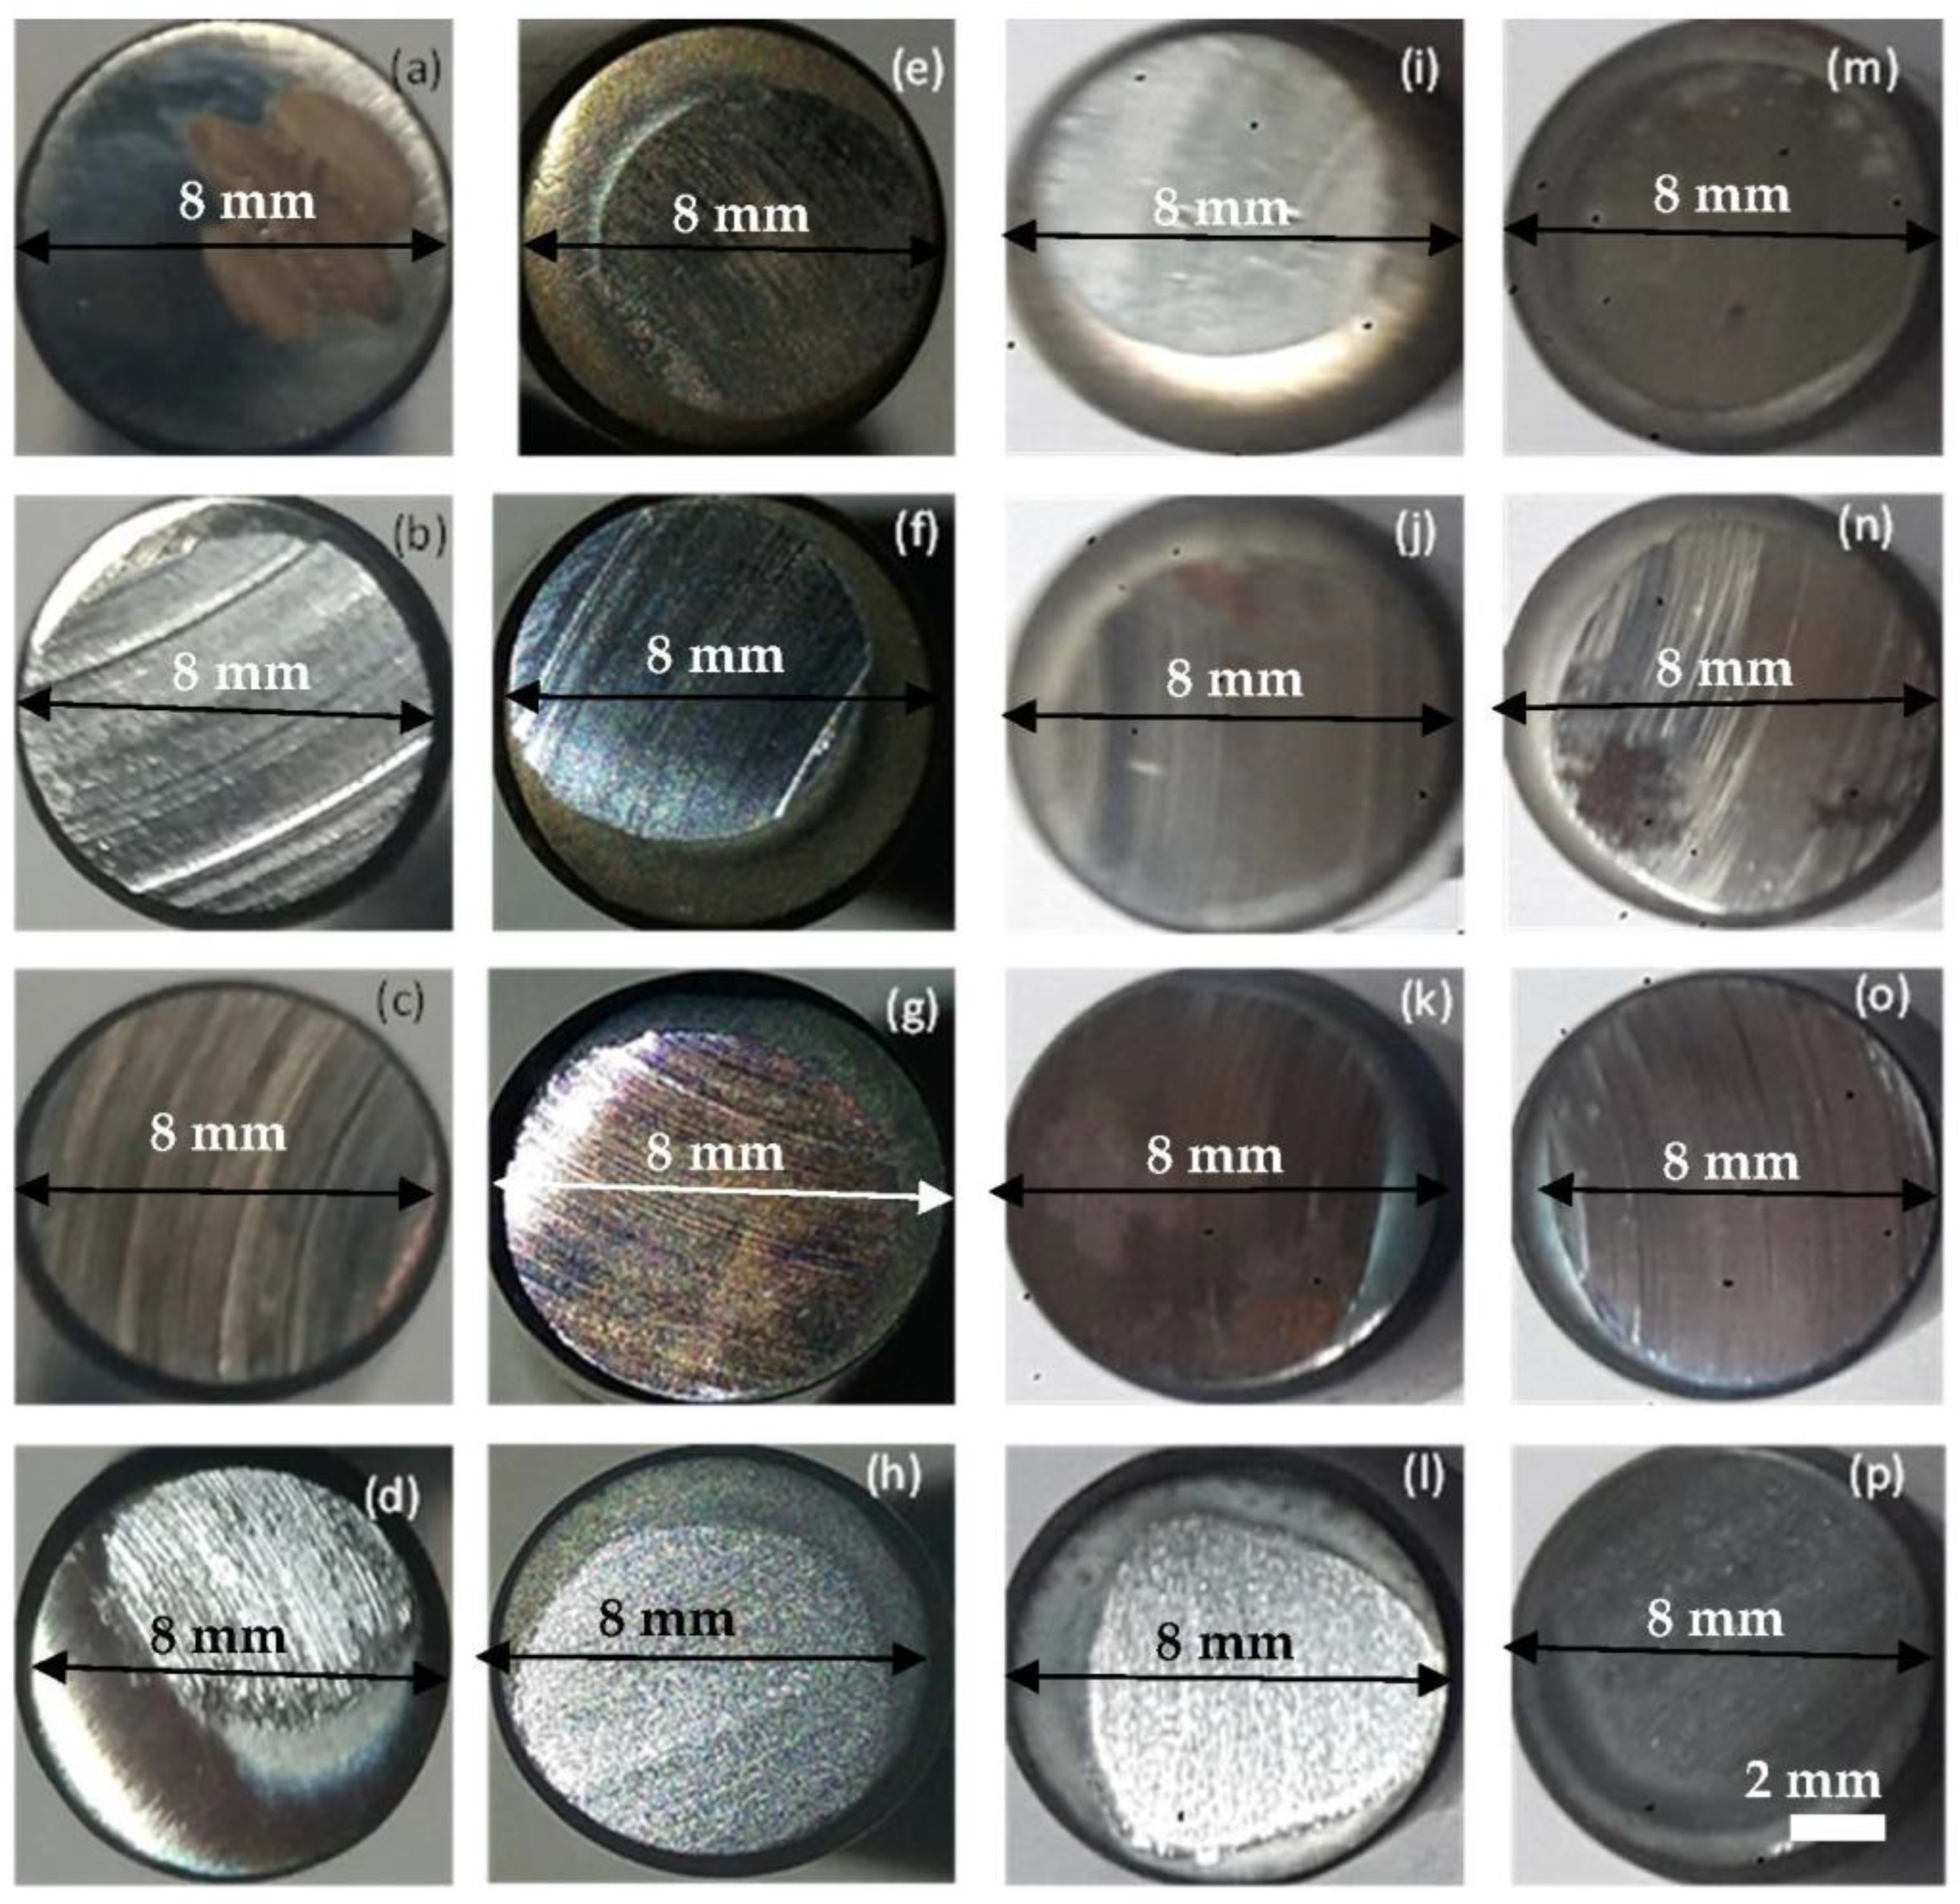
Figure 8 shows camera macrographs of the worn surfaces of untreated and plasma-nitrided specimens after sliding wear tests. The presence of wear marks was visible to the naked eye on the surfaces of all specimens. Figure 9 shows the average coefficient of friction (COF) values of the untreated and plasma-nitrided specimens obtained during experimentation at various temperatures. The value recorded for the untreated H13 specimens at room temperature was ~0.58 at 50 N load. After plasma nitriding at three different gas ratios, the friction coefficient decreased. This was attributed to the nitride layer present in the nitrided specimens. Castro et al. [28] mentioned that thicker nitride layers led to increased die durability due to better wear resistance. The lowest friction coefficient, (0.31), was achieved in the specimen nitrided with N2:H2 at 20:80.
At 200 °C and a load of 50 N, the COF for the untreated steel decreased. The decrease was marginal. The plasma-nitrided specimens showed similar behaviors to room temperature. Ebrahimzadeh et al. [29] reported a similar behaviour for plasma-nitrided specimens at RT and at 250 °C. At 400 °C, the average COF values decreased in comparison to the values obtained at RT and 200 °C. The value recorded for the untreated H13 specimens was ~0.48 at a 50 N load. The average COF values with N2:H2 ratios of 20:80, 50:50, and 80:20 were determined to be ~0.31, ~0.40, and ~0.41 at a 50 N load, respectively. The values for the plasma-nitrided specimens were observed to be lower than the untreated steel. Among all the plasma-nitrided specimens subjected to wear and friction experimentation, the specimen that was plasma-nitrided with 20N2:80H2 showed the lowest values of average COF across all test loads and temperatures. Overall, the values were found to be lower at 400 °C. The lowest average COF value, ~0.314, was recorded for the specimen plasma-nitrided with 20N2:80H2 at 400 °C and a 50 N load. The authors observed oxidation on the surface of the tool steels as experimentation was performed in an open atmosphere. The results were confirmed by the XRD analysis. With the formation of the oxide layer, the COF and wear volume loss were reduced. The formation of an oxide layer acted as a solid lubricant and protected the surface of nitrided steel. A similar behaviour has been observed by other researchers at this test temperature [30,31]. When the temperature was increased from 400 °C to 600 °C, an increase in the average COF values was observed (Figure 9). The increase was significant. COF values increased because the material became softer and the area of contact increased. At higher temperatures, severe oxidation and softening of the material occurred. Consequently, the contact area of the pin increases. At elevated temperatures, the thickness of the oxide layer increased, which resulted in extra locations for adhesive wear. The increase in COF and wear volume loss at elevated temperatures has been reported by several other researchers [32,33].
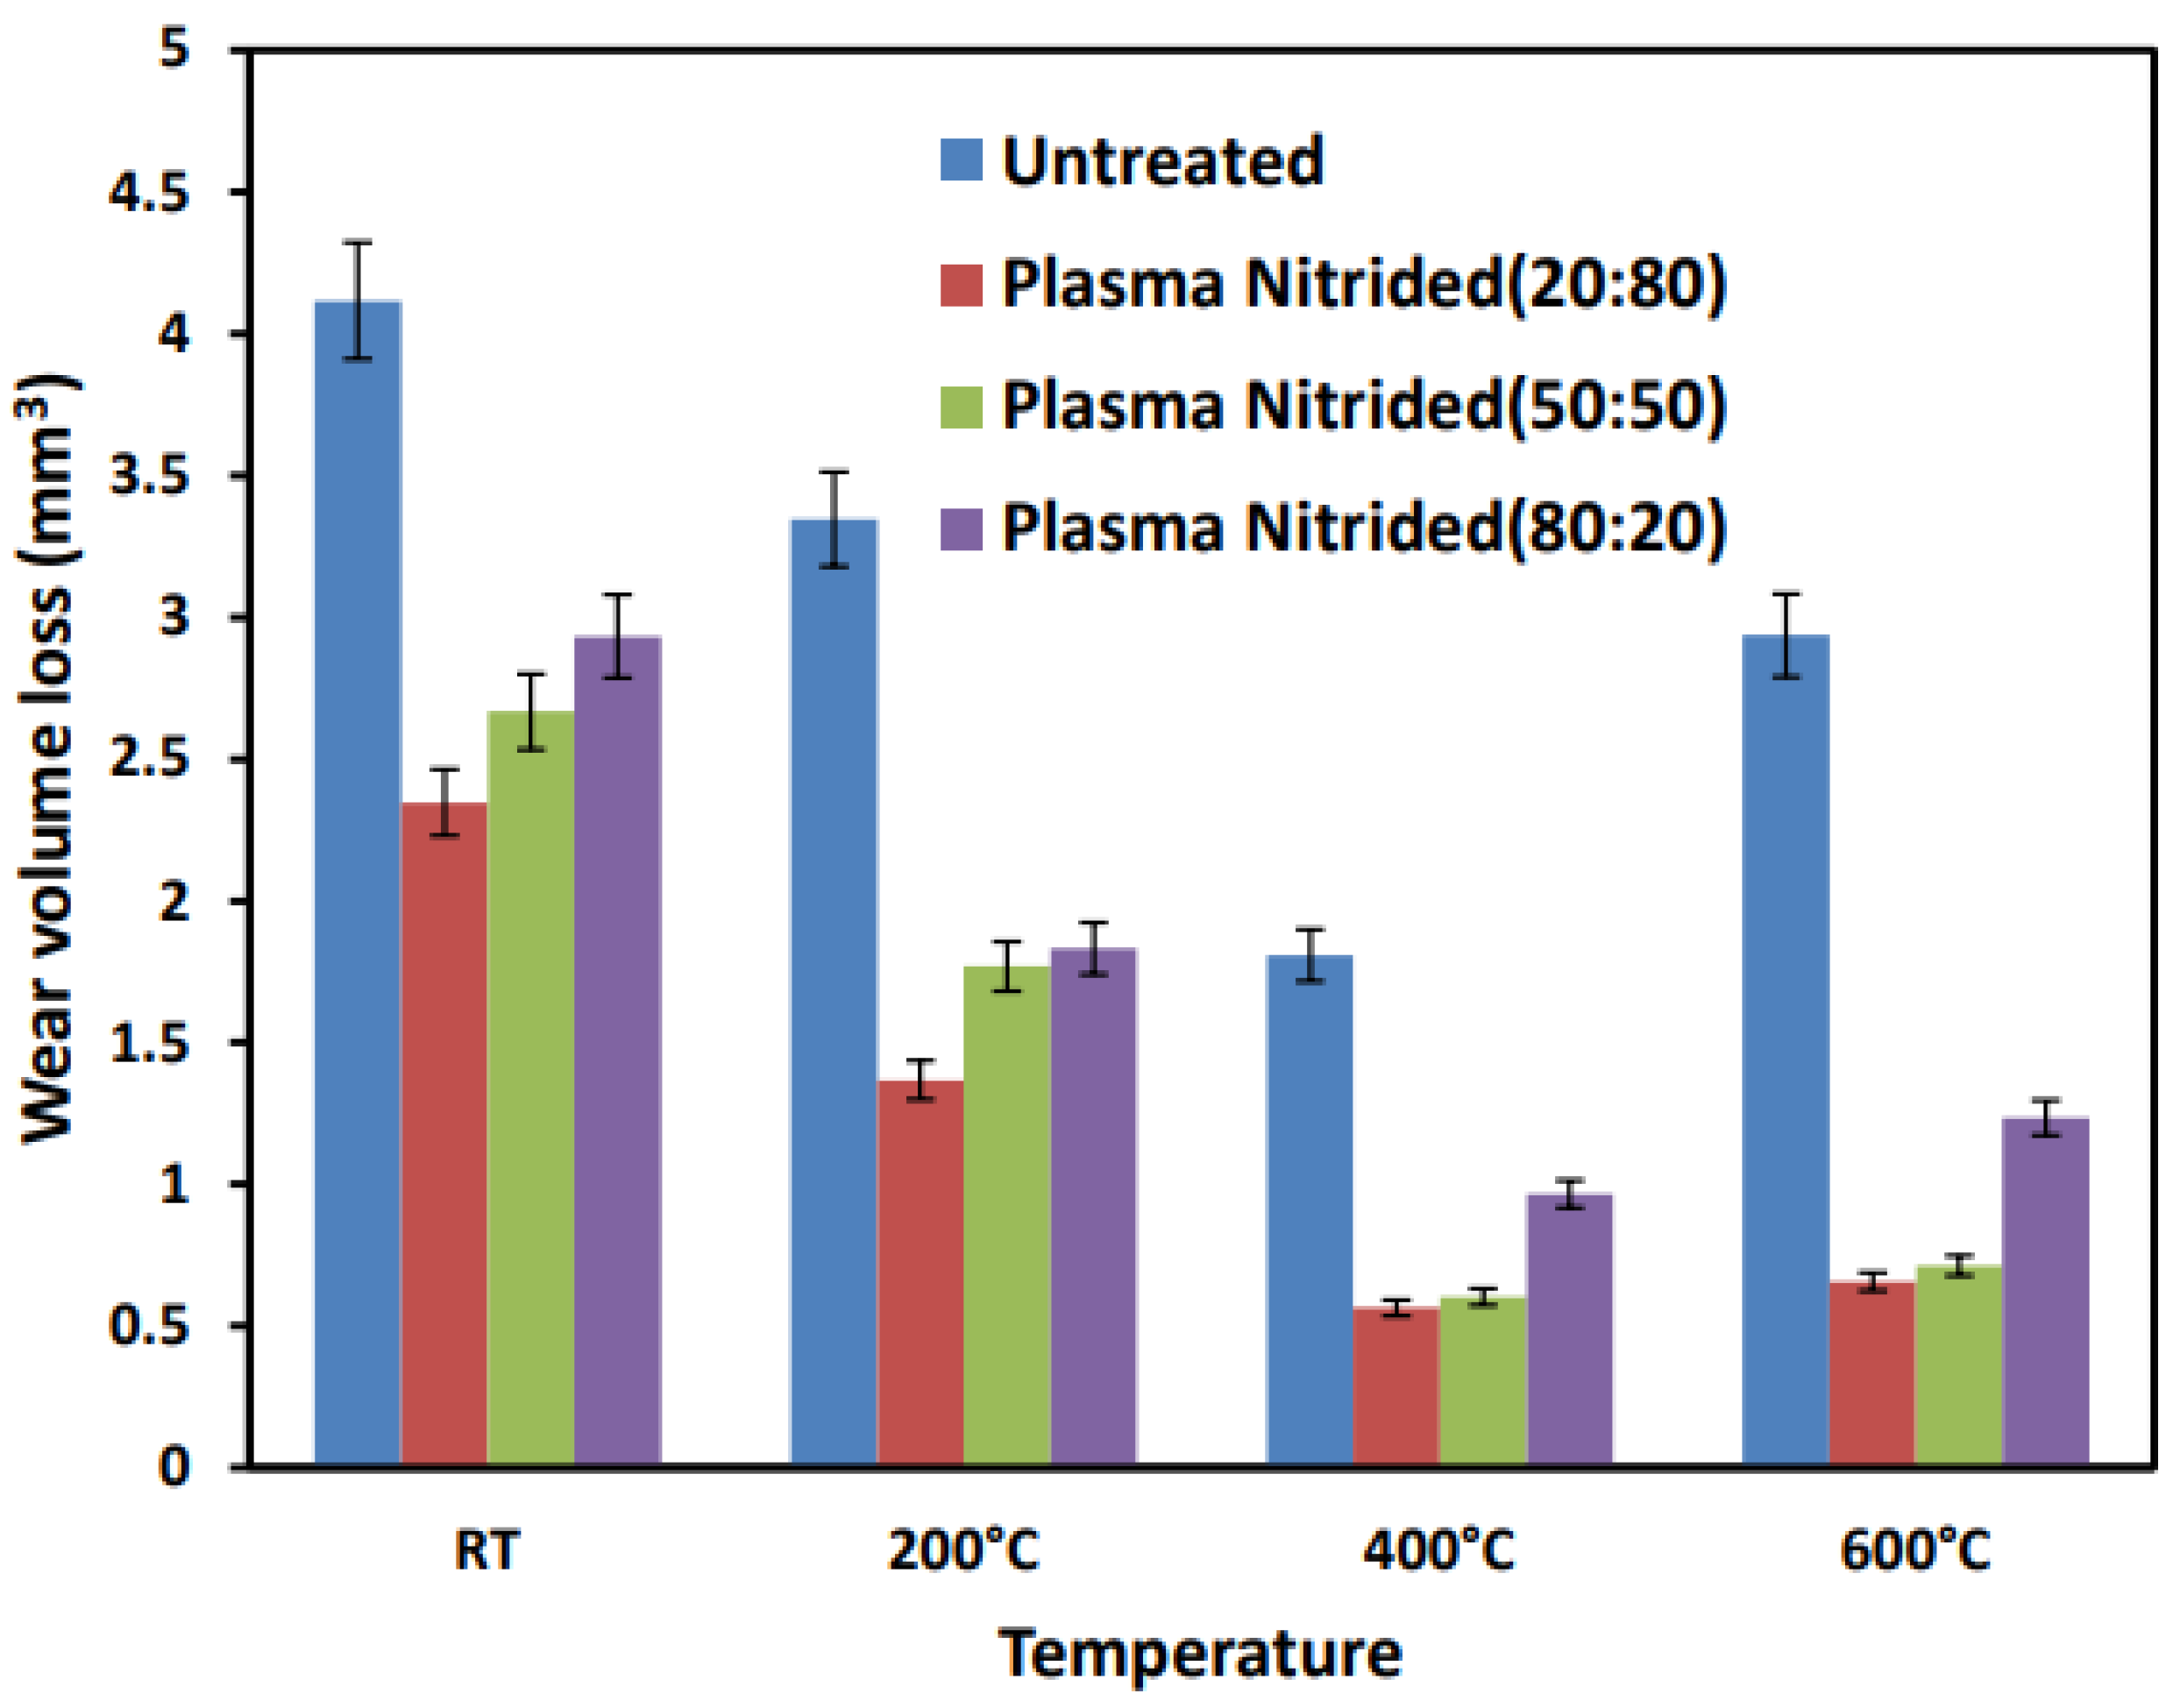
Figure 10 shows the wear volume loss values obtained at different test temperatures and a 50 N load. The values were observed to be higher for untreated specimens at all temperatures. At room temperature, the values were recorded as ~4.12 mm3 for the untreated steel at 50 N load. The maximum wear volume loss was observed for all the specimens at this temperature. The values decreased continuously as the temperature increased to 600 °C.
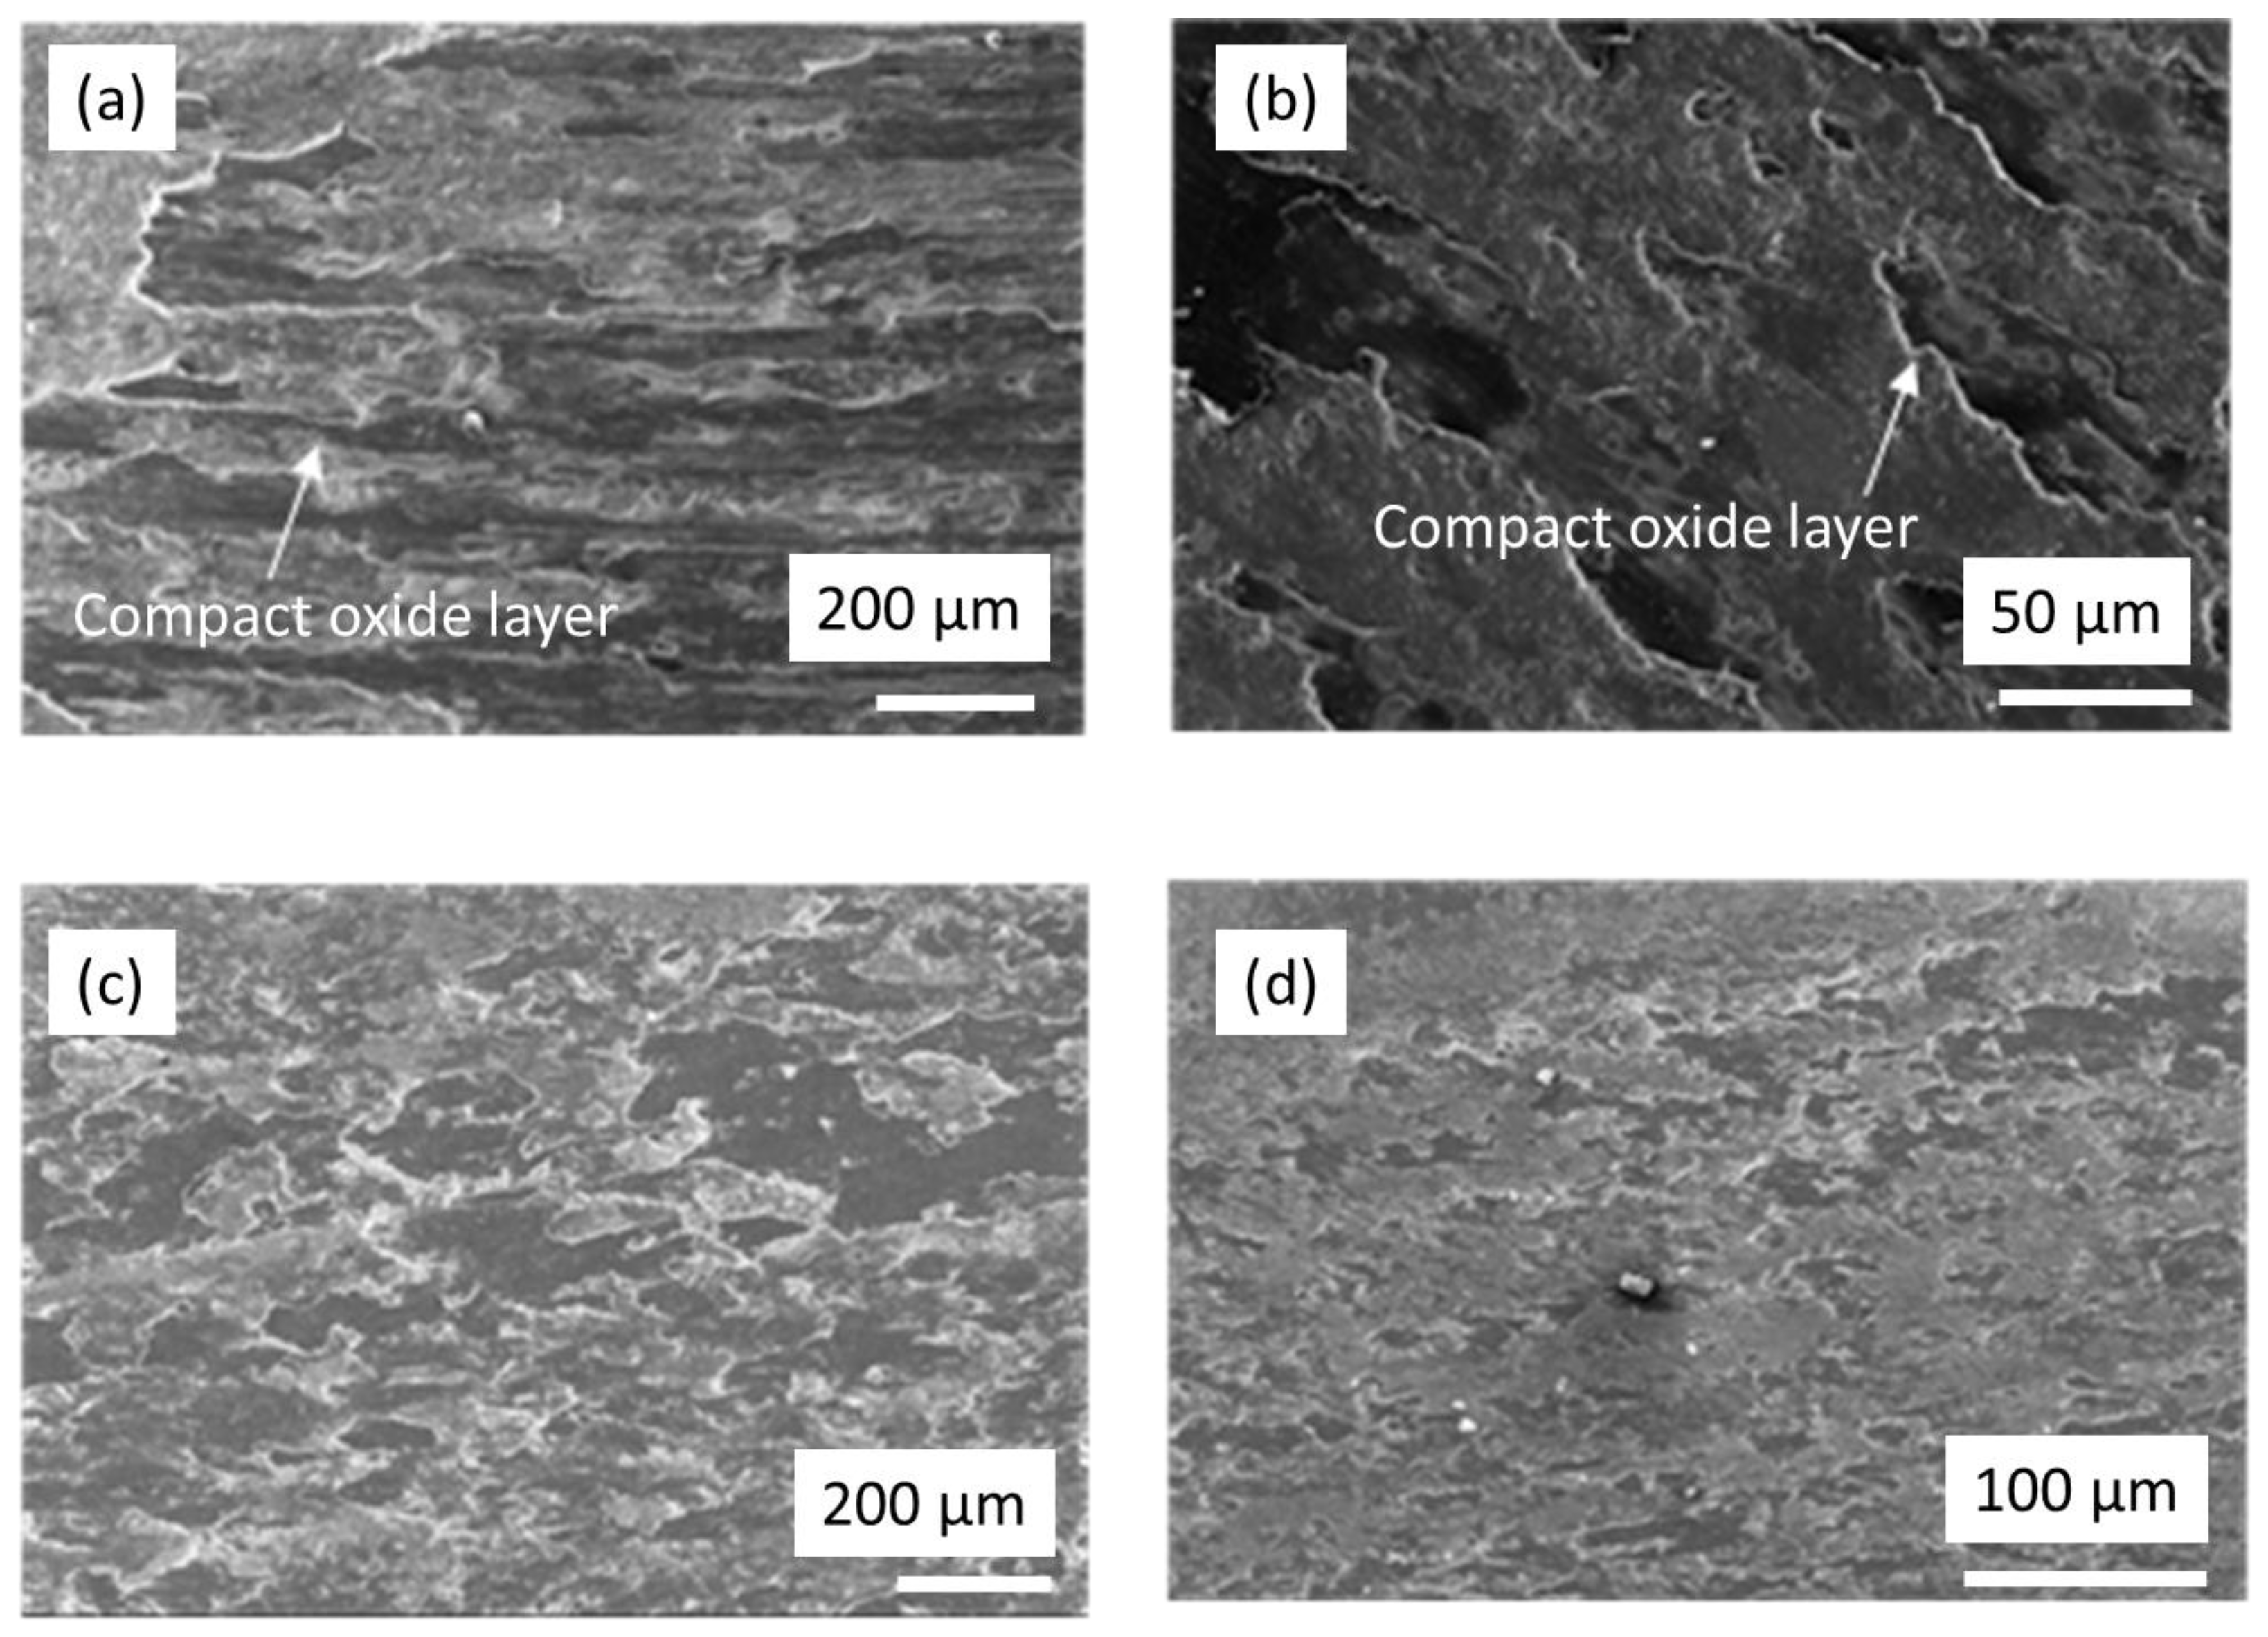
Figure 11, Figure 12, Figure 13 and Figure 14 show the surface morphology of the tested specimens at various temperatures. SEM images mainly exhibited three wear mechanisms; (i) the adhesive wear mechanism, (ii) the abrasive wear mechanism, and (iii) the oxidative wear mechanism. At room temperature and 200 °C, the wear mechanism was more adhesive, indicated by the ploughing of the material and adhesive wear marks. Since experimentation was carried out in the absence of a lubricant, an adhesive bond developed between the pin and the disc.
The morphology of the worn surface at 400 °C showed that the mode of wear was oxidative in nature (Figure 13). Patches of oxide layer were observed and the wear mechanism was found to be mostly oxidative with mild traces of adhesive and abrasive wear. Therefore, the COF values decreased at this temperature. Kashani et al. [34] explained in their work that oxide layers shared a part of the total load, resulting in less adhesion, and thus, the COF and volume loss decreased. Additionally, the oxide layer that formed at 400 °C acted as a lubricant, which decreased the wear volume loss. The SEM morphology supports the wear volume loss results. Amongst all the tested specimens, the volume loss was the lowest at 400 °C. Further to this, at 600 °C, the wear mechanism was a combination of oxidative, adhesive, and abrasive wear (Figure 14). The figures generated are complemented by solid compact oxide layers along with abrasive wear marks.
The results show that the average COF values and the wear volume loss values of untreated steels were higher when compared to those of plasma-nitrided specimens. The wear resistance of the specimens increased from 35% (untreated specimen) to 76% (plasma-nitrided specimens) for all selected temperatures at 50 N owing to the collective influence of the enhanced microstructure, increased hardness, and the thick nitride layer. The experimentation results show that the tribological properties of the plasma-nitrided die steel improved due to the collective influence of the enhanced microstructure, the increased hardness, and the thick nitride layer.
It is important to mention that, upon comparison of the three plasma-nitrided specimens with different ratios of N2:H2, the specimen with a 20:80 gas ratio performed better than the other two. This may be attributed to the formation of a thin white layer on the surface of the specimen. The studies from the literature reveal that the white layer should be thin and uniform for better wear resistance [8,14,21].

4. Conclusions

  • Plasma nitriding with N2:H2 ratios of 20:80, 50:50 and 80:20 was successfully applied to the AISI H13 steel. The nitride layer was thick and evenly distributed. There were no visible cracks.
  • The hardness of steel improved considerably after plasma nitriding. The plasma-nitrided steels showed higher hardness, with an increase of about a factor of two, compared to the untreated die steels. This indicates that the steels perform better in hot-forming applications.
  • The SEM image of the plasma-nitrided surface show evenly distributed micro-particles (nitrides). The XRD analysis of the plasma-nitrided specimens showed the presence of Fe3N, Fe3N-Fe4N, Fe4N and CrN phases in the nitriding layer.
  • Amongst the plasma-nitrided specimens, the specimens nitrided with an N2:H2 ratio of 20:80 showed the highest wear resistance at all temperatures and under a 50 N load.
  • The wear mechanism for the untreated plasma-nitrided specimens at room temperature and 200 °C was predominantly adhesive in nature. At 400 °C, the mode of wear was a combination of oxidative, adhesive and abrasive wear. At 600 °C the mode of wear was observed as oxidative and adhesive.
Hence, it can be concluded that the plasma nitriding technique using 20% N2 and 80% H2 can be adopted as an alternate solution for the surface hardening of dies made up of AISI H13 material. Moreover, enhanced wear resistance can be obtained when subjected to higher loads during forming operations.

Author Contributions

Conceptualization, A.K. and M.K.; methodology, A.K. and M.K.; investigation, A.K., M.K. and S.S.; resources, M.K., A.J. and G.J.; data curation, A.K. and M.K.; writing—original draft preparation, A.K., M.K. and S.S.; writing—review and editing, A.K., M.K., S.S. and T.N.; visualization, A.K., M.K., S.S. and T.N.; supervision, M.K. and S.S.; project administration, M.K.; funding acquisition, M.K. All authors have read and agreed to the published version of the manuscript.

Funding

This research was funded by the Department of Science and Technology, New Delhi (India) under SERB, Science and Engineering-Engineering Scheme, File No. SR/S3/MERC/0072/2012 and EMR/2015/000234 for the research project titled “Development of Thermal Spray Coatings to Control Wear during High-Temperature Applications-Phase I and Phase II”.

Data Availability Statement

Not available.

Acknowledgments

The authors would like to thank the Central Tool Room, Ludhiana (India) for providing heat treatment services for the die materials. The authors are extremely thankful to the Indian Institute of Technology Ropar, Rupnagar, Punjab for offering the essential facilities for conducting the detailed analysis.

Conflicts of Interest

The authors declare no conflict of interest.

Correction Statement

This article has been republished with a minor correction to the existing affiliation information. This change does not affect the scientific content of the article.

References

  1. Vergne, C.; Boher, C.; Gras, R. Influence of oxides on friction in hot rolling: Experimental investigations and tribological modelling. Wear 2006, 260, 957–975. [Google Scholar] [CrossRef]
  2. Winkelmann, H.; Badisch, E.; Kirchgassner, M.; Danninger, H. Wear mechanisms at high temperatures-part 1 Wear mechanisms of different Fe-based alloys at elevated temperatures. Tribol. Lett. 2009, 34, 155–166. [Google Scholar] [CrossRef]
  3. Tomala, A.; Hernandez, S.; Rodriguez Ripoll, M.; Badisch, E.; Prakash, B. Tribological performance of some solid lubricants for hot forming through laboratory simulative tests. Tribol. Int. 2014, 74, 164–173. [Google Scholar] [CrossRef]
  4. Kumar, S. Influence of processing conditions on the mechanical, tribological and fatigue performance of cold spray coating: A Review. Surf. Eng. 2022, 38, 324–365. [Google Scholar] [CrossRef]
  5. Prchlik, L.; Sampath, S. Effect of the microstructure of thermally sprayed coatings on friction and wear response under lubricated and dry sliding conditions. Wear 2007, 262, 11–23. [Google Scholar] [CrossRef]
  6. Singh, S.; Singh, H.; Buddu, R.K. Microstructural investigations on bonding mechanisms of cold-sprayed copper with SS316L steel. Surf. Eng. 2020, 36, 1067–1080. [Google Scholar] [CrossRef]
  7. Lenhard, A.; Damasio, S.; Milke, A.; Schaeffer, L. Method to Estimate Workpiece-Die Heat Transfer Coefficient on Precision Warm Forging Process. In Proceedings of the 4th JSTP International Seminar on Precision Forging March, Nara, Japan, 21–24 March 2006. [Google Scholar]
  8. Deshpande, M.; Altan, T. Selection of Die Materials and Surface Treatments for Increasing Die Life in Hot and Warm Forging; FIA Tech Conference Paper No 644; Forging Industry Association: Independence, OH, USA, 2011. [Google Scholar]
  9. Phakatkar, H.H.; Ghorpade, R.R. Tribology, 2nd ed.; Nirali Prakashan (Maharashtra): Pune, India, 2009. [Google Scholar]
  10. Castaños, B.; Peña-Parás, L.; Maldonado-Cortés, D.; Kitala, M.; Sliwa, S.; Węglarz, M.; Mierzwiński, D. Increasing the tool life of forging die inserts. Int. J. Mod. Manuf. Technol. 2020, XII, 16–21. [Google Scholar]
  11. Holmberg, K.; Erdemir, A. Influence of tribology on global energy consumption, costs and emissions. Friction 2017, 5, 263–284. [Google Scholar] [CrossRef]
  12. Singh, S.; Ghai, V.; Agrawal, A.; Singh, H. Effect of machining parameters on cutting force during micro-turning of a brass rod. Mater. Manuf. Process. 2019, 34, 1816–1823. [Google Scholar] [CrossRef]
  13. Gronostajski, Z.; Hawryluk, M.; Widomski, P.; Kaszuba, M.; Nowak, B.; Polak, S.; Rychlik, M.; Ziemba, J.; Zwierzchowski, M. Selected effective methods of increasing the durability of forging tools in hot forging processes. Procedia Manuf. 2019, 27, 124–129. [Google Scholar] [CrossRef]
  14. Peng, T.; Zhao, X.; Chen, Y.; Tang, L.; Wei, K.; Hu, J. Improvement of stamping performance of H13 steel by compound-layer free plasma nitriding. Surf. Eng. 2019, 36, 492–497. [Google Scholar] [CrossRef]
  15. Kaba, M.; Altay, M.; Akyildiz, E.; Muhaffel, F.; Ozkurt, S.; Atar, E.; Baydogan, M.; Cimenoglu, H. Surface degradation of nitrided hot work tool steels under repeated impact-sliding contacts: Effect of compound layer. Wear 2022, 498–499, 204300. [Google Scholar] [CrossRef]
  16. Karami, M. An investigation of the properties and wear behaviour of plasma nitrided hot-working steel (H13). Wear 1991, 150, 331–342. [Google Scholar] [CrossRef]
  17. Sun, Y.; Bell, T.; Wood, G. Wear behaviour of plasma nitrided martensitic stainless steel. Wear 1994, 178, 131–138. [Google Scholar] [CrossRef]
  18. Kumar, A.; Kaur, M.; Joseph, A.; Jhala, G. Surface engineering analysis of plasma-nitrided die steels. Proc. Inst. Mech. Eng. Part J J. Eng. Tribol. 2020, 234, 917–931. [Google Scholar] [CrossRef]
  19. Kumar, A.; Kaur, M.; Singh, S.; Joseph, A.; Jhala, G.; Bhandari, S. High-temperature tribological studies of plasma-nitrided tool steels. Surf. Eng. 2018, 34, 620–633. [Google Scholar] [CrossRef]
  20. Singh, G.; Kaur, M. Sliding wear behaviour of plasma sprayed 65% (NiCrSiFeBC)-35% (WC-Co) coating at elevated temperatures. Proc. Inst. Mech. Eng. Part J J. Eng. Tribol. 2020, 234, 1396–1415. [Google Scholar] [CrossRef]
  21. Visuttipitukul, P.C.; Kuwahara, H. Charactrization of plasma nitrided AISI H13 tool steel. Acta Metall. Slovaca 2006, 12, 264–274. [Google Scholar]
  22. Capa, M.; Tamer, M.; Gulmez, T.; Bodur, C.T. Life enhancement of Hot-Forging Dies by Plasma-Nitriding. Turk. J. Eng. Environ. Sci. 2000, 24, 111–117. [Google Scholar]
  23. Pellizzari, M.; Molinar, A.; Straffelini, G. Thermal Fatigue Resistance of GAS and Plasma Nitrided 41CrAlMo7 Steel. Mater. Sci. Eng. A 2003, 352, 186–194. [Google Scholar] [CrossRef]
  24. Birol, Y. Analysis of wear of a gas nitrided H13 tool steel die in aluminium extrusion. Eng. Fail. Anal. 2012, 26, 203–210. [Google Scholar] [CrossRef]
  25. Stott, F.H. High-temperature sliding wear of metals. Tribol. Int. 2002, 35, 489–495. [Google Scholar] [CrossRef]
  26. Paschke, H.; Weber, M.; Braeuer, G.; Yilkiran, T.; Behrens, B.A.; Brand, H. Optimized plasma nitriding processes for efficient wear reduction of forging dies. Arch. Civil. Mech. Eng. 2012, 12, 407–412. [Google Scholar] [CrossRef]
  27. Leite, M.V.; Figueroa, C.A.; Gallo, S.C.; Rovani, A.C.; Basso, R.L.O.; Meid, P.R.; Baumvol, I.J.R.; Sinatora, A. Wear mechanisms and microstructure of pulsed plasma nitrided AISI H13 tool Steel. Wear 2010, 269, 466–472. [Google Scholar] [CrossRef]
  28. Castro, G.; Fernández, A.V.; Cid, J. Influence of the nitriding time in the wear behaviour of an AISI H13 steel during the crankshaft forging process. Wear 2007, 263, 1375–1385. [Google Scholar] [CrossRef]
  29. Ebrahimzadeh, I.; Ashrafizadeh, F. High-temperature wear and frictional properties of duplex-treated tool steel sliding against a two-phase brass. Ceram. Int. 2014, 40, 16429–16439. [Google Scholar] [CrossRef]
  30. Barrau, O.; Boher, C.; Gras, R.; Aria, F.R. Analysis of the friction and wear behaviour of hot work tool steel for forging. Wear 2003, 255, 1444–1454. [Google Scholar] [CrossRef]
  31. Podgornik, B.; Zuzek, B.; Kafexhiu, F.; Leskovsek, V. Effect of Si content on wear performance of hot work tool steel. Tribol. Lett. 2016, 63, 5. [Google Scholar] [CrossRef]
  32. Chowdhurya, M.A.; Nuruzzamanb, D.M. Experimental Investigation on Friction and Wear Properties of Different Steel Materials. Tribol. Ind. 2013, 35, 42–50. [Google Scholar]
  33. Kchaou, M.; Alimi, A.; Elleuch, R.; Desplanques, Y. Characterisation of oxidation and wear oxidised surfaces of H13 steel/brass in dry sliding conditions. Int. J. Microstruct. Mater. Prop. 2013, 8, 373–384. [Google Scholar] [CrossRef]
  34. Kashani, H.; Amadeh, A.; Ghasemi, H.M. Room and high-temperature wear behaviours of nickel and cobalt base weld overlay coatings on a hot forging die. Wear 2007, 262, 800–806. [Google Scholar] [CrossRef]
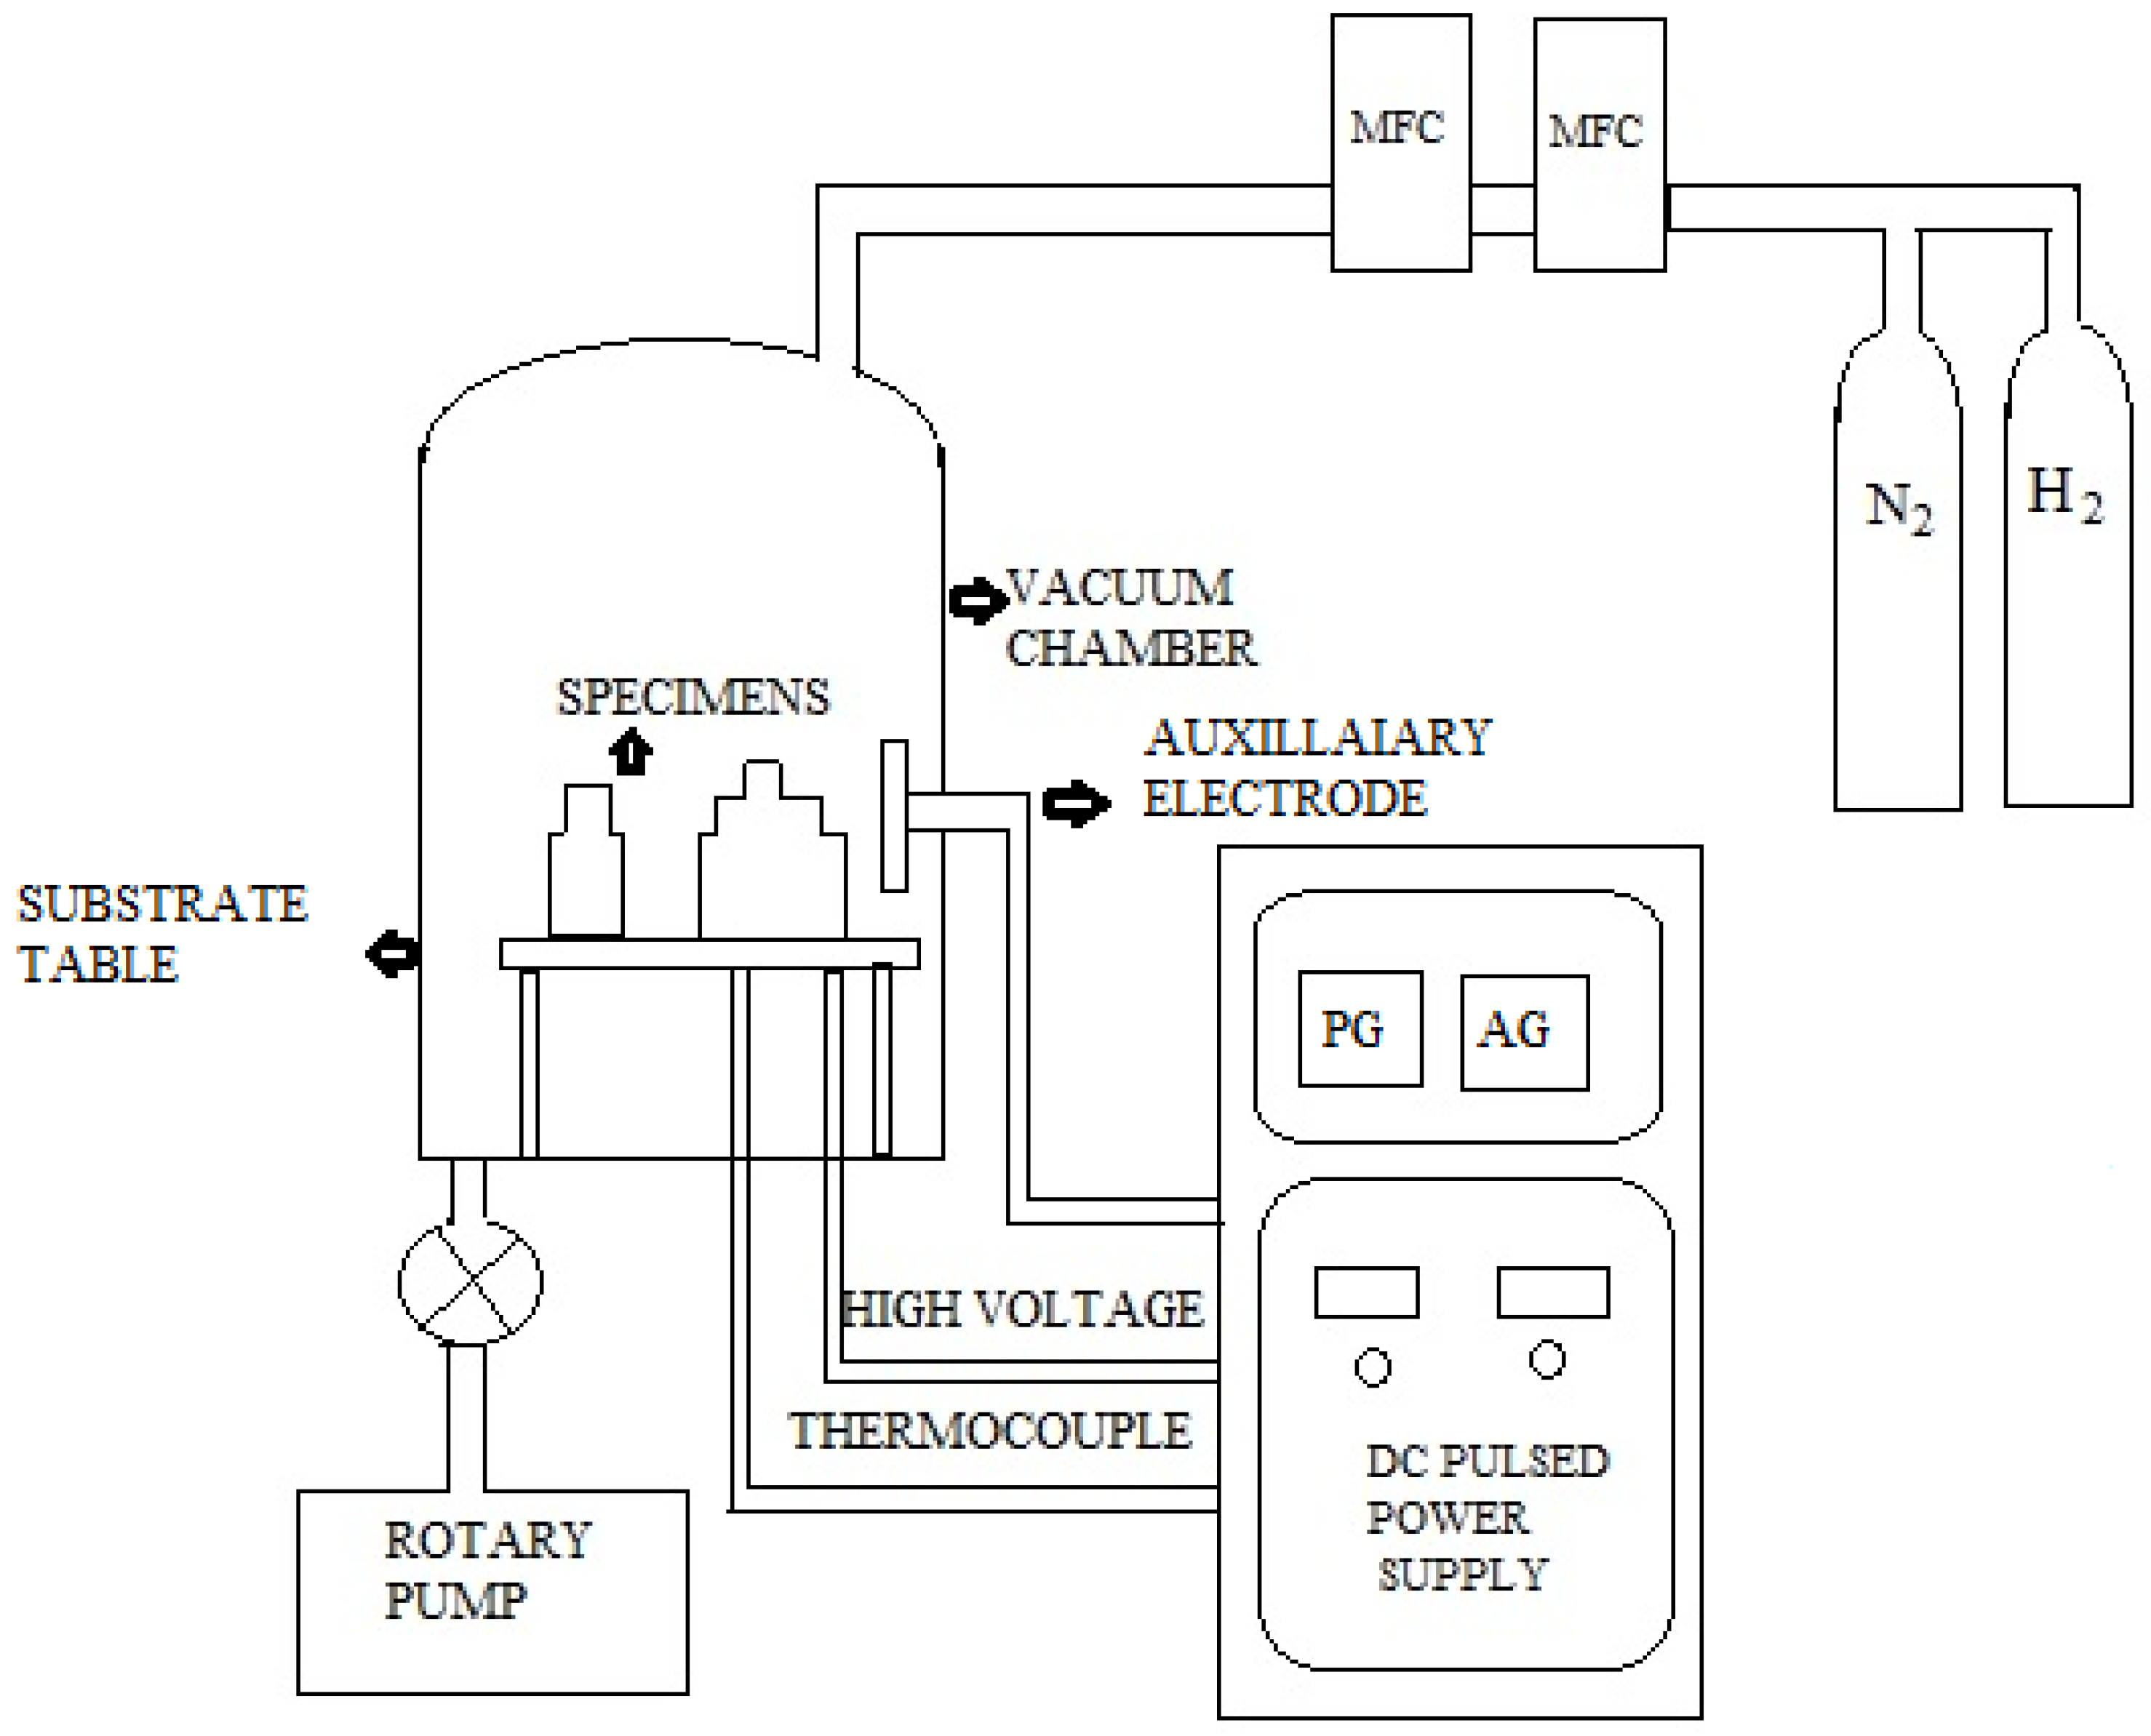
Figure 1. Schematic diagram of plasma nitriding set-up. MFC = mass flow controller.
Lubricants 11 00448 g001
Figure 2. High-temperature pin-on-disc wear and friction tester.
Lubricants 11 00448 g002
Figure 3. Macrographs of AISI H13 plasma-nitrided at 500 °C with N2:H2 ratios of (a) 20:80, (b) 50:50, and (c) 80:20 and a 24 h nitriding time.
Lubricants 11 00448 g003
Figure 4. Surface-scale morphology and EDS analysis of AISI H13 plasma-nitrided with N2:H2 ratios of (a) 20:80, (b) 50:50 and (c) 80:20.
Lubricants 11 00448 g004
Figure 5. Microhardness depth profile of AISI H13 plasma-nitrided samples.
Lubricants 11 00448 g005
Figure 6. Cross-sectional SEM morphology of plasma-nitrided AISI H13 treated at 500 °C for 24 h using (a) 20% nitrogen and 80% hydrogen, (b) 50% nitrogen and 50% hydrogen and (c) 80% nitrogen and 20% hydrogen, showing the case depth thickness.
Lubricants 11 00448 g006
Figure 7. X-ray diffraction pattern for the plasma-nitrided AISI H13 steel at 500 °C for 24 h using different gas ratios: blue for 80N2:20H2; red for 50N2:50H2 and black for 20N2:80H2.
Lubricants 11 00448 g007
Figure 8. Macrographs of worn surfaces of untreated H13 specimens at (a) RT, (b) 200 °C, (c) 400 °C and (d) 600 °C; surfaces plasma-nitrided with 20N2:80H2 at (e) RT, (f) 200 °C, (g) 400 °C and (h) 600 °C; surfaces plasma-nitrided with 50N2:50H2 at (i) RT, (j) 200 °C, (k) 400 °C and (l) 600 °C; and surfaces plasma-nitrided with 80N2:20H2 at (m) RT, (n) 200 °C, (o) 400 °C and (p) 600 °C after sliding wear tests on a high-temperature tribometer under a constant load of 50 N for 50 min.
Lubricants 11 00448 g008
Figure 9. The average coefficient of friction of the untreated and plasma-nitrided AISI H13 steel specimens after the wear test.
Lubricants 11 00448 g009
Figure 10. The wear volume loss of untreated and plasma-nitrided AISI H13 steel specimens after the wear test.
Lubricants 11 00448 g010
Figure 11. The SEM micrographs of worn surfaces of AISI H13 steel specimens after the wear test at RT and under a 50 N load. (a) Heat-treated specimen. (b) PN with 20N2:80H2. (c) PN with 50N2:50H2. (d) PN with 80N2:20H2.
Lubricants 11 00448 g011
Figure 12. The SEM micrographs of worn surfaces of AISI H13 steel specimens after the wear test at 200 °C and under 50 N loads. (a) Heat-treated specimen. (b) PN with 20N2:80H2. (c) PN with 50N2:50H2. (d) PN with 80N2:20H2.
Lubricants 11 00448 g012
Figure 13. The SEM micrographs of worn surfaces of the AISI H13 steel specimens after the wear test at 400 °C and under 50 N loads. (a) Heat-treated specimen. (b) PN with 20N2:80H2. (c) PN with 50N2:50H2. (d) PN with 80N2:20H2.
Lubricants 11 00448 g013
Figure 14. The SEM micrographs of worn surfaces of AISI H13 steel specimens after the wear test at 600 °C and under 50 N loads. (a) Heat-treated specimen. (b) PN with 20N2:80H2. (c) PN with 50N2:50H2. (d) PN with 80N2:20H2.
Lubricants 11 00448 g014
Table 1. Chemical composition of AISI H13 tool steel.
ElementCMnPSSiCrMoNiCuVFe
Weight percent
(wt. %)
0.32–0.450.20–0.500.030.030.80–1.204.75–5.501.10–1.750.030.250.8–1.2Bal
Disclaimer/Publisher’s Note: The statements, opinions and data contained in all publications are solely those of the individual author(s) and contributor(s) and not of MDPI and/or the editor(s). MDPI and/or the editor(s) disclaim responsibility for any injury to people or property resulting from any ideas, methods, instructions or products referred to in the content.