Article

Surface Damage Analysis on the Application of Abrasion and Slurry Erosion in Targeted Steels Using an Erosion Test Rig

by
Ádám Kalácska
1,2,
Rajini Nagarajan
3,*,
Levente Ferenc Tóth
1,2,
Patrick De Baets
1,2,
Karthikeyan Subramanian
4,
Suchart Siengchin
5 and
Gábor Kalácska
6
1
Soete Laboratory, Department of Electromechanical, Systems and Metal Engineering, Ghent University, Technologiepark 46, B-9052 Zwijnaarde, 9000 Ghent, Belgium
2
Flanders Make—The Strategic Research Centre for the Manufacturing Industry, 3001 Leuven, Belgium
3
International Research Center, Department of Mechanical Engineering, Kalasalingam Academy of Research and Education, Krishnankoil, Srivilliputhur 626126, India
4
Department of Automotive Engineering, Birmingham City University, Ras Al Khaimah, United Arab Emirates
5
Department of Materials and Production Engineering, The Sirindhorn International Thai—German Graduate School of Engineering (TGGS), King Mongkut’s University of Technology North Bangkok, 1518 Wongsawang Road, Bangsue, Bangkok 10800, Thailand
6
Institute of Technology, Szent István Campus, MATE, Páter Károly u. 1, 2100 Godollo, Hungary
*
Author to whom correspondence should be addressed.
Lubricants 2022, 10(11), 316; https://doi.org/10.3390/lubricants10110316
Submission received: 27 October 2022 / Revised: 15 November 2022 / Accepted: 15 November 2022 / Published: 18 November 2022
(This article belongs to the Special Issue Assessment of Abrasive Wear)

Abstract

:
The research focuses on slurry abrasion and erosion of martensitic steels used in the mining and agricultural industries. A traditionally constructed slurry pot tester with corundum abrasives in slurry form was used for wear characterisation. Wear testing was performed on each specimen for 180 h. Every 20 h, pauses were taken to characterise the specimen size, weight, hardness, and surface roughness. The worn zone’s damage progression was studied using optical microscopy. As the test period rose, the mass loss due to the wear, which was governed by the impact angle of the slurry flow, followed a linear pattern. The impact of specimen orientation on the wear rate was more pronounced than that of abrasive flow velocity. High-speed video recordings highlighted the varied contact conditions that caused the wear mechanism to shift from abrasion to slurry erosion. Slurry abrasion was seen at the bottom of the specimen as a result of pure sliding conditions, while pitting was observed at the top of the specimen as a result of fatigue from particle impact. Studies of 3D surfaces demonstrated a decrease in wear rate while transitioning from the abraded zone, which witnessed polishing and minor hardness, to the pitting zone. The wear performance of the materials was rated, with tempered martensitic steel coming out on top.

1. Introduction

Slurry erosion is a significant factor in both short and long-distance piping, notably in industries where slurry pumps are utilised for agriculture, mineral processing, hydraulic turbines, and pipelines transporting solid particles. It also has an impact in areas where slurry materials are delivered via tubes and processing is done using mechanical components. It causes significant financial difficulties for the sector since pipeline damage is one of the most important challenges in all industries, notably oil and gas. Because pipeline failures are difficult to forecast, an alternate approach for reducing the erosion that occurs in steel pipes is critical. Pipeline erosion is affected by several elements, including the particles utilised, the particle size, the flow rate, and the pipeline material. Corrosion, erosion, and abrasion are the most common causes of failure in slurry equipment. The investigation of all of these characteristics is critical in slurry handling equipment. Understanding the tribological properties of all the factors is critical for obtaining a workable solution to this issue [1].
Slurries are classified into two types: settling and non–settling slurries. The density of particulate materials will be high in settling slurries, while the particle dimension will be high in non-settling slurries. Erosion is the most important of the material’s three wear characteristics. The repetitive impact of particles on a solid surface causes material erosion. The minute slurry particle contacts the metal surface at a very high flow velocity and gradually removes the metal [2]. The examination of abrasion is also an essential parameter to investigate where material removal occurs as a result of third-party material passage. Slurry erosion is a difficult phenomenon to comprehend since it includes several aspects to consider, such as particle size, time, the speed of the impact particle, angle of attack, material qualities, and so on. All of these factors must be well understood in order to comprehend this process. Some articles were published to better understand the slurry erosion process and the various influencing parameters [3]. The majority of the research focused on particle size and surface velocity. Many additional parameters are also involved in this wear process. Figure 1 depicts all of the many parameters involved in slurry erosion.
In the research of Lindgren et al. [4], slurry pot tests were used to evaluate the erosion of duplex stainless steel and austenitic grade steel. This comprehensive investigation indicates that duplex steel outperforms austenitic grades in aqueous slurries. Also, in austenitic grades, hardness material performed better than ductile material because the hardened surface resists erodent penetration better than the other model, where the duplex stainless steel could not be predicted using the mechanical property of the material due to its complex two-phase microstructure. The erosion rate is greater for angular chromite particles than for other bigger particles, while the erosion rate is lower for larger flake particles. However, the collision efficiency of the slurry was comparable for both materials [4]. A Coriolis erosion tester was used by Clark et al. [5] to evaluate 11 widely available particle steels with hardness values up to 750 HV. For this work, an aqueous slurry containing 10% wt% silica sand particles sized 200–300 µm was used. It was discovered that AISI 1045 steel performed better in terms of erosion resistance and that this steel performed five times better than AISI 1020 standard, non-hardened, carbon steel line pipe material. It was explained by the material’s hard interior surface. Under erosion and abrasion testing, steel with a homogenous structure and hardness similar to silica sand media performed best [5]. Another publication [3] reported on the erosion and abrasion studies of selected martensitic steels used in agricultural and mineral processing applications. This study’s experimental set-up is the most often utilised slurry pot tester; this kind of laboratory test equipment is used for pilot-scale studies to simulate the actual industrial environment. This slurry pot testing technique was developed by Gupta et al. in the early 1990s and is now one of the most widely used test rigs for erosion and abrasion research [3]. Desale et al. [6] used the slurry pot tester to investigate erosion wear for seven different ductile materials (steel, aluminium, copper, and brass, among other materials). The studies are carried out at a low velocity and with a slurry concentration of 10%, with a particle size of 550 µm. All of the operational settings were likewise modified, and all of the materials were evaluated in a variety of scenarios. The erosion wear of all materials was concluded to be proportional to the ratio of erodent to the target material. There is also a substantial association between velocity and particle size of the erodent material, although concentration has only a minimal impact on wear behaviour [6]. Arabnejad et al. [7] used a slurry mix tester to investigate the erosion behaviour of stainless steel under low-impacting velocity conditions. Iron powder, silica, magnetite, alumina, and other testing particles with sizes of 40 µm were utilised. The hardness of the impact particles affected the wear rate of the material; the increased hardness of impacting particles resulted in an elevated erosion ratio. The authors proposed a relationship between mass loss and particle hardness, considering the impact velocity and the angularity of the particles. Abuel-Kasem [8] used a slurry whirling arm ring to examine the erosion of 5117 sheets of steel. As an erodent substance, silica sand particles were employed. The wear test was carried out at low velocity with impact angles of 30 degrees and 90 degrees. It was discovered that the erosion rate is affected by the aspect ratio and the circularity factor. As the particle’s kinetic energy increases (>200 µm particles), the material removal begins as a plough [8].
The erosion rate depends on many factors related to fluid-flow conditions, properties of eroded material and solid particles [9]. Only a few studies evaluate prospective materials in custom-made test configurations, where the wear resistance and the underlying wear processes are thoroughly studied. A slurry-pot tester was designed in the present study to experimentally simulate abrasion and slurry erosive wear of the targeted martensitic steels to agricultural and mineral processing applications, considering the limited availability of customised test rigs. The developed test set-up provides an effective and straightforward way for comparing wear rates and investigating the major wear mechanism of candidate materials under abrasion and slurry erosion. In the developed configuration, both slurry abrasion and erosion are studied in the same test run, highlighting the boundary conditions for the aforementioned processes. The research focuses on a short-term mechanical wear mechanism analysis induced by relatively large particles (2–2.5 mm) moving at a low speed of 1 m/s through slurry abrasion and erosion. In this test system, the different wear mechanisms and their influencing factors were investigated with an emphasis on highlighting the emergence of various wear processes and exploring the operational aspects that impact these wear mechanisms in the existing tribosystem. Different types of steel were tested under diverse wear conditions, and their behaviours are described in this article.

2. Materials and Experimental Methods

2.1. Materials Used

The wear performance of four steel materials was studied in this investigation. The chemical composition of the materials is given in Table 1. The details of these materials with other mechanical properties are tabulated in Table 2. Two sets of materials (Material A and B) had the same chemical composition and were hot-rolled sheets of 5 mm thickness and quenched at a high cooling rate. Material A is treated at room temperature and quenched using water, resulting in a martensitic structure. Material B is heated below the martensitic temperature and cooled by air. A Transformation Induced Plasticity (TRIP) steel was also used for testing, and it was taken as Material C. The combination of martensitic and retained austenite is prevalent in this material structure. The TRIP steel is expected to perform better against impact conditions and material fatigue because of its ductile nature. The 27MnB5 becomes a high-strength wear-resistant material after proper heat treatment, such as quenching and tempering, after which it was used as a reference material (Material R) for this study. The above-mentioned material is most commonly used for agricultural machinery ploughs, disc harrows, wear-resistant pads, linings, and screen grinding plates. This alloyed martensitic steel 27MnB5 (1.5529) has a density of 7.86 kg/dm3, a tensile strength of 1575 [MPa] (0.5 mm/s with 100 kN on Zwick/Roell Xforce P), and a Young modulus of 181 [GPa] (determination 10 kN–20 kN). More details of these selected materials for testing can be found in our previously published work [10]. The basic characteristics and properties of each of the three materials are to be compared with the “reference” material in Table 2.
A heterogeneous mixture of water and solid particles formed the settling slurry. The abrasive medium used in this paper is corundum (Korund EKF-10, MOTIM), which is crystalline in nature and formed of Al2O3, a rock-forming mineral. The particle size chosen for this study was in the range of 2000–2360 µm with a 3.87 kg/m3 density and a hardness value of 2050 Knopp KN/mm2. According to the preceding literature assessment, the hardness of the abrasive particles plays a major role in determining the wear rate of the testing material. It also depends on the angular shape of the abrasive material [11].

2.2. Erosion Testing and Procedure

The testing machine shown in Figure 2a is used to study the abrasion and erosion wear behaviour of the testing materials and to rank them. The slurry pot tester consists of the shaft supported by the ball bearing. The disc is eccentrically connected in the testing container. All the slurry can be accommodated inside the container, as shown in Figure 2b. The ratio of water and slurry is maintained between 4:1, and this ratio will not make the test bed dry and create a proper environment for abrasion. An addition of water is needed at the time of high friction rate and also to lubricate the test sample. At the same time, the ratio should not exceed the 4:1 ratio, and it may decrease the entire wear rate of the material. The central configuration is maintained to ensure the sufficient mixture effect of the samples. The eccentricity of the container helps to produce a pressure zone, and after the impact, particles are settled at the end of the container. Additionally, a high-speed camera (Olympus i-speed 3) is also used to capture the turbulent behaviour of the slurry and track the individual abrasive particles and their contact with the specimen. The size of the particle, surface contact condition and the location-specific wear mechanism was studied using this camera. The container has two sets of specimens on different radius (75 and-, 115 mm). Each set consists of five specimens inside the test rig. Figure 2c shows the top view of the disc with holder and specimen at various configurations. Two specimens are attached inside the container, each one facing the centre of rotation and the other part the pot wall. Holders can be rotated around their axis concerning slurry direction. The specimen pairs were mounted at 30–120° and 45–135° space for 60–150° orientation. These were placed at four different radii 65, 85, 105, and 125 mm. The samples on the radius 65 mm and 105 mm face the centre shaft, and the 85 mm and 125 mm samples face the outside wall. In their static position, all the specimens were immersed inside the slurry for 60 mm. When the rotation begins, the slurry starts impacting the specimen. The tests were performed at the speed of 140 rounds/mins at 21 °C temperature. The continuous supply of water around the container provided the cooling of the pot walls.
In the developed configuration, both abrasion and slurry erosion are studied in the same test run. In Phase 1, the tests focus on investigating material loss over the sliding distance and the corresponding appearance of different wear mechanisms (wear patterns with specimen shape and volume change, as well as a change in surface topography and hardness). Slurry pot testing of 20 specimens mounted on ten holders was carried out for 9 × 20 h of operation. During this step, all four candidate materials were tested under identical circumstances, and the test runs were repeated three times for each material. Table 3 shows the testing parameters and circumstances. At every 20-h intermediate pause, the slurry was replaced with fresh abrasives, and the samples were investigated for their dimensions, weight, hardness and surface roughness. It was important to examine the differentiated zones of the specimen separately for the post-mortem characterization due to the influence of different dominant wear mechanisms. After cleaning the specimens, the surface roughness was monitored with Mitutoyo stylus 2D profilometry. The hardness was measured with Zwick Roell Indentec (Brierley Hill, England) 81875 A/B tester using a diamond tip indenter and 30 kg (~300 N) indentation force. On all specimens, 4 × 5 indents were made covering the three wear zones on the samples (top—pitting, middle—transition, bottom—abraded) and on the unworn reference zone. Macroscopic images of the specimen surface were acquired with Veho VMS 004 Discovery USB digital microscope with 10× zoom. Six macroscopic pictures/specimens were taken, focusing on the differentiated worn surface zones and the unworn reference zone. The blunting process of the edges, the shape change and rounding in the contact zone were documented at every 20-h intermediate pause. Microscopic images were also taken at 400× magnification from the differentiated zones to investigate the deformation and damage of the surface. After 180 h of testing, the specimen were investigated with Keyence VR-5200 wide-area 3D microscopy to analyse the worn specimen surface and the volume change caused by wear.
After the investigation of Phase 1 testing results, Phase 2 was planned to enable studying the effect of specimen orientation, as it was found to be the dominant factor deciding the appearance of different wear mechanisms. The Phase 2 cycle also served as a repetition to exclude possible outliner results. The effect of specimen orientation was tested for the best and worst-performing materials from the first cycle. An Olympus i-speed 3 high-speed camera was used to track the movement of the abrasive particles after contact at the surface of the slurry. This method enhanced the investigation into the appearance of different wear mechanisms. In this regard, slurry pot testing of 20 specimens mounted on ten holders was carried out for 5 × 20 h of operation, including variation in setting the specimen angles of 30–45–60° to the slurry flow. Before the wear tests and after 100 h of testing, the same specimen investigation procedure was carried out as mentioned above.

2.3. Microscopy Analysis

High-speed camera videos made with 2000 fps at 1280 × 1024 resolution aid in understanding the media flow and the backflow effect at the pot walls. This means media equalization, hence the equilibrium state during the operation with the media mixing and flow back. The videos enabled us to track individual corundum particle movements (velocity vector and quantity) and calculate and validate impact and impact energy. It was possible through painted corundum particles with the i-SPEED pro program. The measurement set-up is shown in Figure 3. The summarised actions from the videos are the following: The specimens are circulating at their given radius in the slurry, and the particles are considered static. Due to the water flow, media backflow and abrasive media equalising are observed in the track of the specimen. The initial contact between an individual particle and the specimen happens in the low media density region in the form of a reverse impact. The top specimen area runs in the lower-density media part, where it hits different individual abrasive particles. In parallel, the rest of the specimens below the water are continuously sliding and rolling/slipping in the packed and dense slurry. After the collision, the specimen continues to run on its forced track at the given radius. The particle gets a speed vector (direction, movement) from the contact and is bounced off the specimen towards the pot wall. After the specimen passes, the media is re-equalised, and the cycle goes on.

3. Results and Discussion

3.1. Average Relative Mass Loss

Material loss due to wearing activities was detected for all of the investigated materials (A, B, C, and R) with the effect of different sliding distances and sample radii. The absolute mass change in the function of the sliding distance of the tested slurry pot specimen in testing Phase 1 is shown in Figure 4. In this experiment, the different sliding distances are a consequence of the radial placement of samples. In Figure 4, all results are shown for all materials (A, B, C and R) for all radii (65, 85, 105, 125 mm), indicating the orientation of the specimen. As previously described in the test methodology, orientation “O” refers to specimens oriented towards the outside (pot wall) while their surfaces are aligned 45° with the particle flow. Orientation “I” refers to specimens oriented towards the inside (centre shaft or centre of rotation) while their surfaces are aligned 45° with the particle flow.
The mass decreased linearly in the function of sliding distance and specimen placement in the case of all specimens. Samples mounted on a radius of 105 mm resulted in a severe mass loss in the case of all tested materials, as can be seen in Figure 4. This high mass loss on a radius of 105 mm was unexpected as the wear severity is supposed to increase with higher speed operation [13]. The second most severe wear was observed on the specimen mounted on a radius of 65 mm. Even though all of the specimens were aligned 45° to the abrasive particle flow, their orientation had a more significant effect on the wear of these materials. The slurry pot samples mounted to face the centre shaft (centre of rotation), namely on radii 65 and 105 mm, suffered more severe wear. Hence, the effect of specimen orientation (angle of attack) had a more significant role in the wear severity than the difference in the radius (higher testing speed). The severe wear on the specimen oriented towards the centre shaft could be explained by the effect of the centrifugal force on the slurry. The centrifugal force pushes the abrasive particles in a radial direction to the inside-oriented specimen surfaces, resulting in more severe material removal [14].
Table 4 shows the average relative mass loss [%/100 km] of the examined slurry pot specimen (material A, B, C, R) on all radii (measured throughout each 20-h cycle) and orientation. The relative mass loss was calculated using the contact area and was normalised with the sliding distance.
From Table 4, it is confirmed that material B performs best among the tested materials. It overperforms the rest of the materials by having ~0.5–1% reduced mass loss on 100 km on average. It is clear from the data that the standard deviation values are higher in the case of the radius 85- and 65-mm tests. In these cases, the small amount of overall material loss (1–1.8%) is the explanation for the higher standard deviation. The uncertainties involved in the wear test evaluation on radii 65 and 85 mm prevent a precise comparison. In these cases, it is challenging to measure the small amount of wear after each cycle due to the noise of the removed rust layer. Therefore, conclusions from the wear data will be drawn only from radiuses of 125 and 105 mm, where the standard deviation is below 10%. Also, in the case of radius 105 mm samples, the wear severity is an order of magnitude higher. Table 5 shows the material ranking based on these conclusions.
It is important to note that the average mass loss of specimens mounted on radius 65 was around three times higher compared to the mass loss of samples mounted on radius 85 mm, although the former was running at a lower speed. As previously stated, specimen orientation has the greatest influence on wear in this test configuration. Specimens facing the centre of rotation (centre shaft) were observed to wear more as the centrifugal force pushed the abrasive media particles closer to their surfaces. The two most promising materials (materials A and B) were further investigated in phase two. Here, the focus of the tests was on specimen orientation and its effect on the wear mechanism and wear severity. In test phase two, the severe material loss at a radius of 105 mm was confirmed (Figure 5). This phenomenon could be explained by the media circulation and the effect of the centrifugal force in this unique set-up. The specimen orientation (inwards centre shaft/outwards pot wall) influenced the wear rate in all of the specimens studied in phase two in the same manner as that performed in the first phase. Furthermore, the severity of wear was related to the specimen’s orientation to the media flow. The wear severity of specimens with radii of 65, 85, and 125 mm was ranked as follows: 30° < 60° < 45°. In this case, the lowest wear corresponded to a specimen oriented 30° to the medium flow, whereas the greatest corresponded to 45°. However, in the instance of a radius of 105 mm, the alignment sequence was 60° < 45° < 30° as wear severity increased. Similarly to the previous phase, samples placed on a radius of 105 mm wear away an order of magnitude faster. On the top zone of these samples, a small degree of pitting was also seen (radius 105 mm). When the wear processes of these samples (radius 105 mm) were analysed, it was shown that abrasion was prevalent. This abrasive process was linked to a polishing action of the contact surface with occasional scratches near the rounded specimen edges. During turbulent flow, the media is pressured on the specimen surface due to centrifugal force. Because of the structure of the specimen holding system, specimens orientated towards the centre of rotation (radius of 65 and 105 mm) are more vulnerable to this abrasive impact. However, on samples with a radius of 65 mm, the force and velocity are insufficient to generate the same result.

3.2. Damage Analysis via Surface Topography

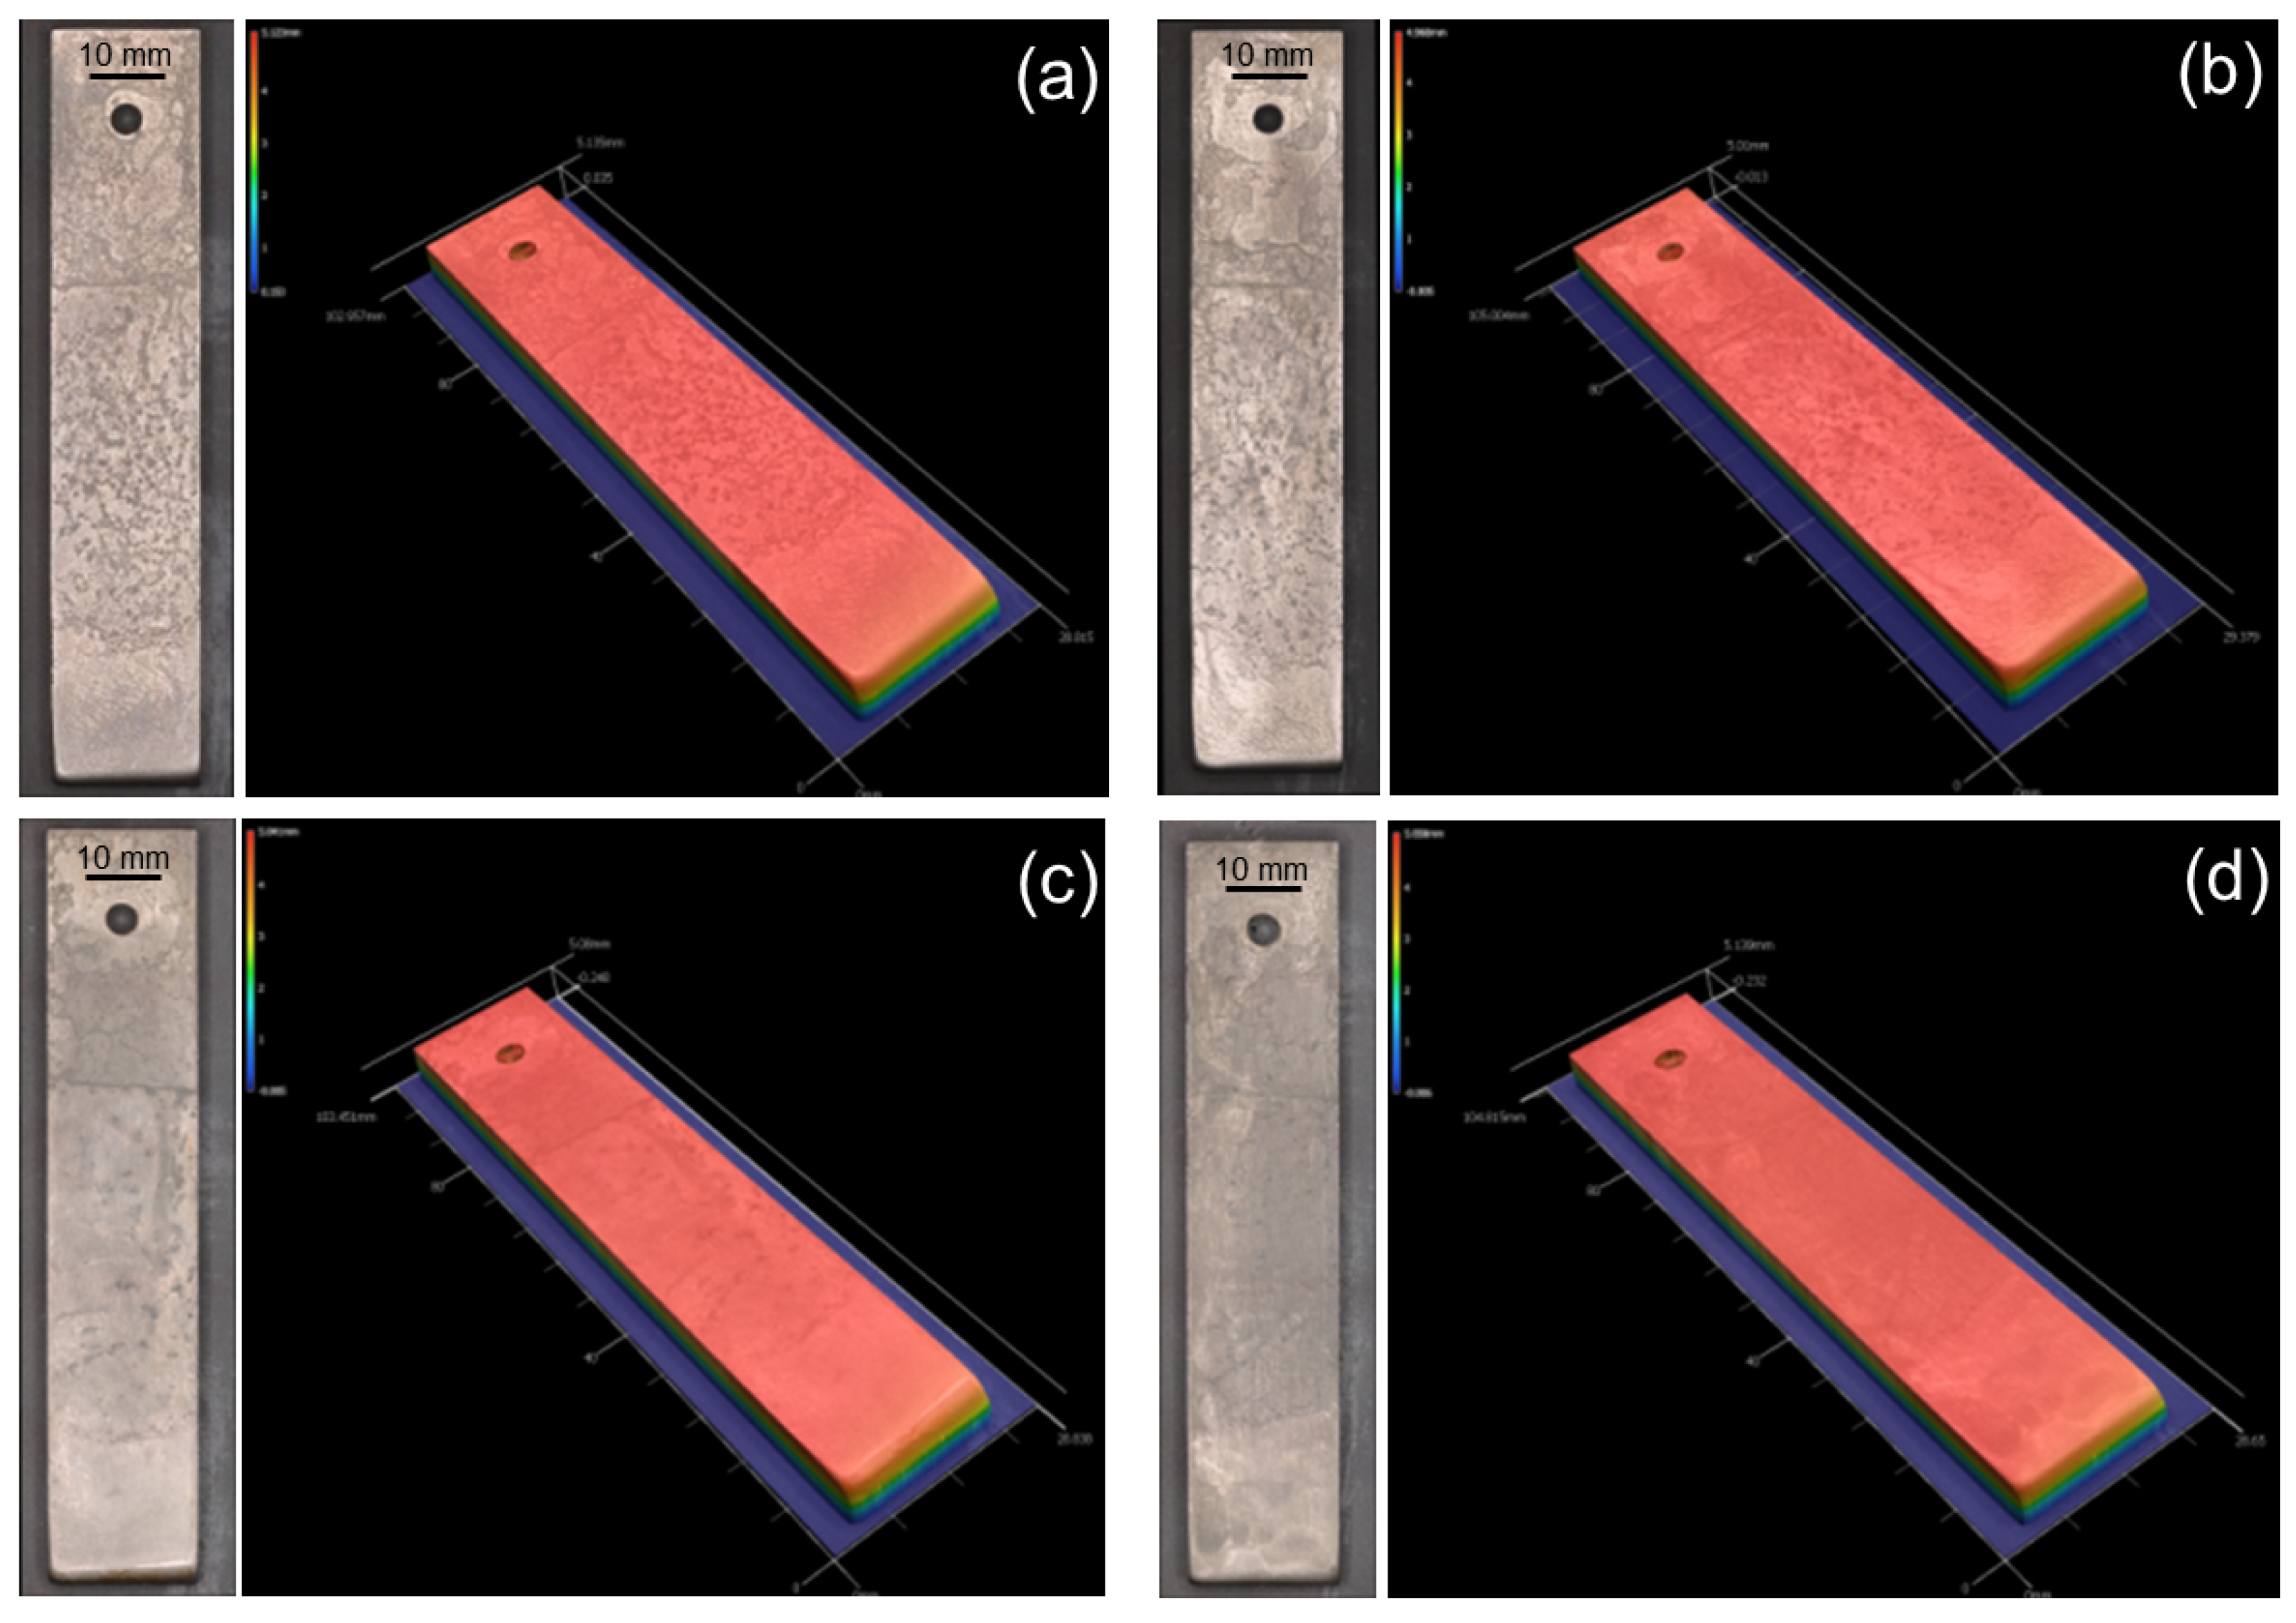
The identified wear mechanisms from the post-mortem analysis (Figure 6) validate the explanation of wear severity. Figure 6 shows the images of the tested specimens from material A after the first cycle (a, b, c, d) and their corresponding height map. Abrasion was observed mostly on samples mounted on a radius of 105 mm, and pitting was observed to be the most severe on samples mounted on a radius of 125 mm. The significant pitting present on samples mounted on a radius of 125 mm could be explained by the particle movement in the media. These particles were found to bounce back from the pot wall after the impact. Severe pits appeared on the specimen surface area close to or above the media level, where the contact was an impact rather than sliding. Here, the damping effect of the water was less significant. After the impact, the backflow effect of the abrasive particles (media equilibrium) within the water was prevalent. In order to validate this explanation, high-speed camera video recordings gave an insight into this phenomenon.
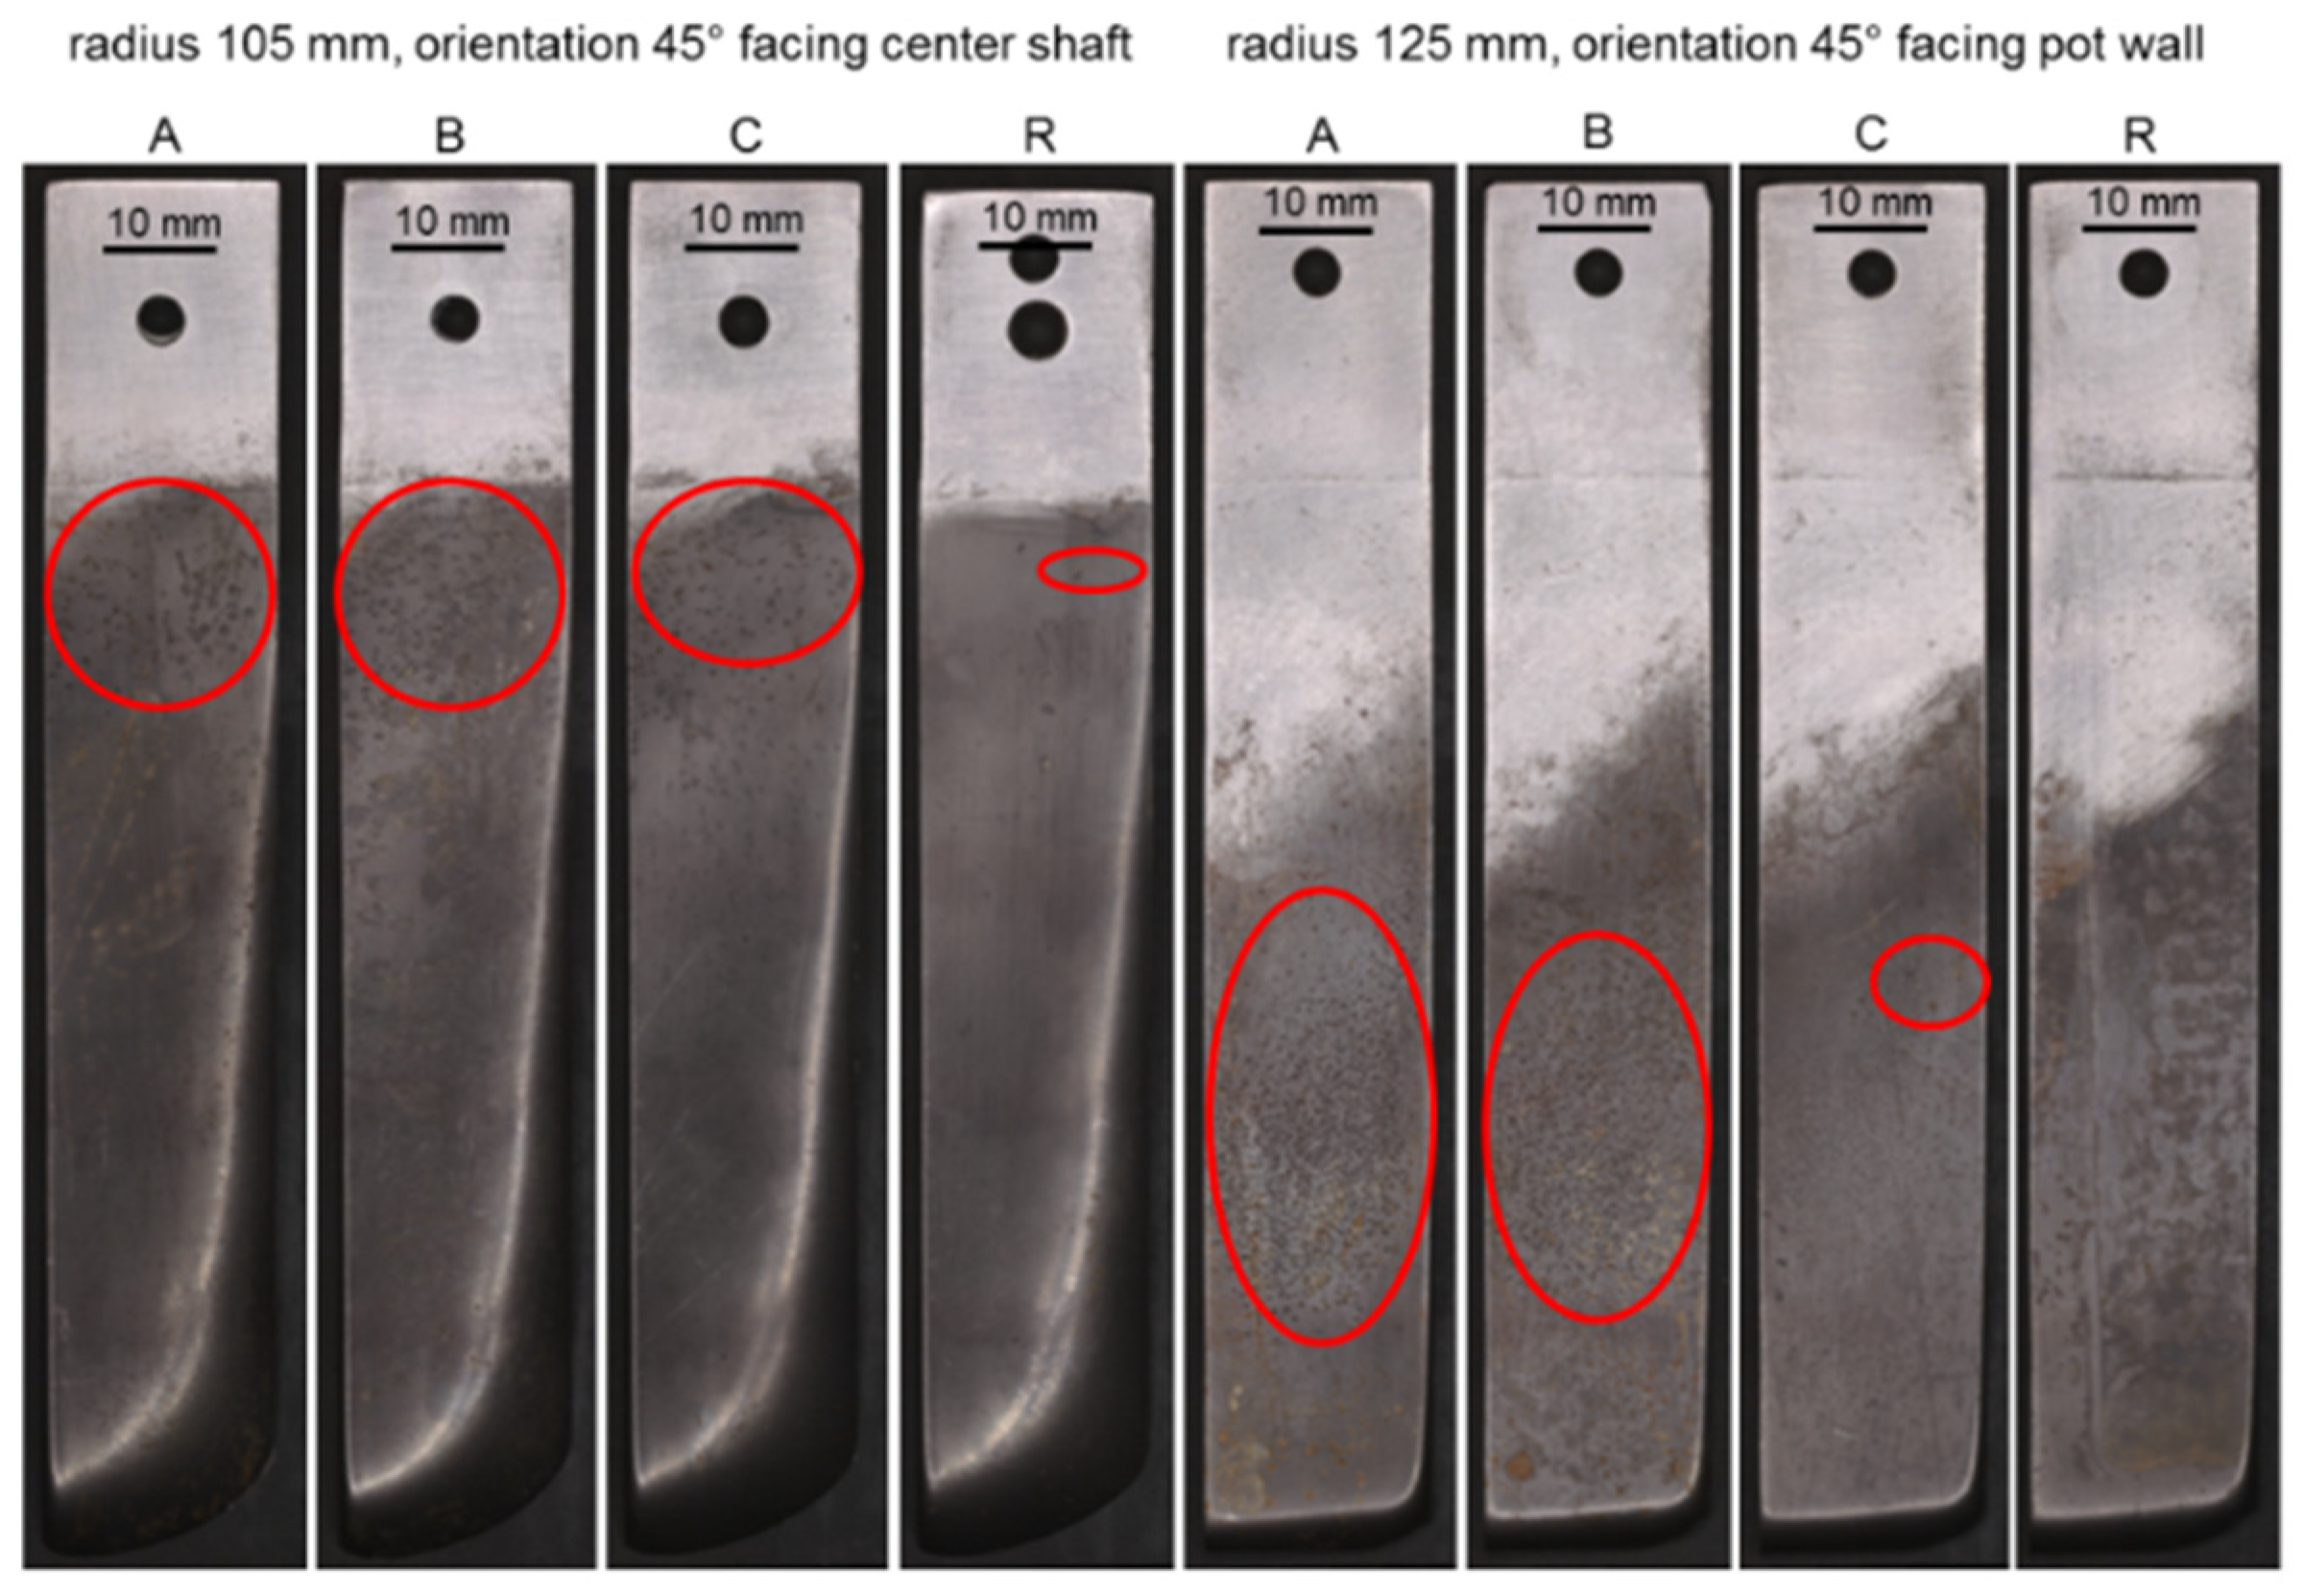
In Figure 6, the red circles indicate the areas observed to be exposed to severe pitting. As concluded, the specimen oriented towards the pot wall suffered severe pitting but less overall wear. This was observed in the case of all of the tested materials. Figure 7 shows an image comparison of worn slurry pot specimens after 180 h of operation for all materials with a radius of 105 and 125 mm, as these samples had the largest worn areas. By comparing the images, it is clear that material C did not experience as much pitting. This could be explained by its more ductile behaviour, which originates from its microstructure.
Its lower hardness helps to minimise the pitting formation that results from the subsurface cracks caused by the impacting particles. The geometry changed according to the position of the specimen, with edge rounding and a shortening of the total length. Due to the custom design configuration of the slurry pot tester, both pitting and abrasion co-existed. The observed characteristic features were dependent on the zone of the specimen. The contact area between the specimen surface and the abrasive media increases with the specimen radius. This increase comes from the effect of the centrifugal force on the slurry, excluding samples mounted on a radius of 125 mm, where the abrasive particle movement has a different characteristic close to the pot wall. The observed characteristic wear mechanism features were dependent on the specimen zones. Two zones could be separated for each wear sample. On the bottom part of the specimen, at the underwater level, where it is inside the abrasive media during operation, a polishing effect and severe material loss were observed. Furthermore, close to the rounded edges, small abrasion scars were noticed. Whereas in the upper zone of the specimen, where the contact is close to the surface level of the abrasive media, pitting was present. Pitting was found to be dominant in the upper part of the worn zone, which is in the lower pressure zone of the media. Pitting was present in the upper part of the worn zone in the case of all specimens and materials. However, the material composition, the radius of the pitting zone, and the orientation of the specimen all played a role in the severity of the pitting zones.
In Phase 2, the best (Material B) and worst-performing materials (Material C) from the first cycle (1 × 20 h) were compared (Figure 8). The 3D geometry images are extracted from the specimens placed on a radius of 65 mm, oriented towards the centre shaft. Materials are characterised as ductile or brittle in erosion literature based on the dependency of their erosion rate on the angle of impingement [15]. The highest erosion rate of ductile materials is at low angles (15–30°), while the maximum erosion rate of brittle materials is close to 90° [16]. Except for material C, which has a microstructure and a lower hardness, the tested materials are deemed more brittle than ductile. It was observed from the first phase results that the pitting on the surface of the material C specimen was not significant. As the specimen angle with the media flow was increased to 60°, this effect of polishing and abrasion was found to be less dominant. Hence, the observed pitting zone increased with the increased attack angle resulting in a less abraded worn area. The wear rate data shown in Figure 5 validates this explanation. The pitting phenomenon was further investigated. The depth of the pits is connected to the impact speed of the particles. Figure 9 shows the comparison of the pits from radii 85 and 125 mm with their 3D and height maps.
The samples mounted on radii 85 and 125 mm are oriented towards the pot wall and experienced the most significant pitting. The two most brittle materials from this investigation were compared (materials A and B). From Figure 9, it is clear that pits were found to be deeper on the specimen surfaces, which were mounted on a radius of 125 mm. The more severe pitting on the samples mounted on a radius of 125 mm could be explained by the theoretical 0.6 m/s difference in sliding speed and the more severe effect of the abrasive media due to the centrifugal force. This observation is in line with the study of Shitole [17] regarding the effect of impacting particle kinetic energy on slurry erosive wear. The pitting was found to be more significant with the sliding distance (Figure 10).
Pitting was observed to be a result of not a single but repeated cyclic deformation. The number and size of the pits grew as a function of the operation time. The investigation of the pit crater bottom surface showed the presence of micro-cracks and an uneven material surface. Examples of these pit surfaces are shown in Figure 11. According to the Hertz contact theory [18], the highest stress in the material is below the contact surface by a few hundred m. Due to the dynamic loading, plastic deformation of the material occurs with dislocation formation, leading to the spread of micro-cracks beneath the surface. These could merge and reach the surface, resulting in a crater. The uneven, not polished surface with signs of micro-cracks in this crater/pit verifies the described formation process. These features (highlighted with red circles) could be identified on high-magnification images taken from the bottom surface of the pits. The higher impact (kinetic) energy on a radius of 125 mm resulted in larger pits than on a radius of 85 mm. The growth and spread of this phenomenon increase at the top part of the worn zone as the sliding distance increases. Hence, the pits are not a result of a single-cycle deformation, and the material is not removed through a single impact.

3.3. Damage Analysis via High-Speed Camera Recordings

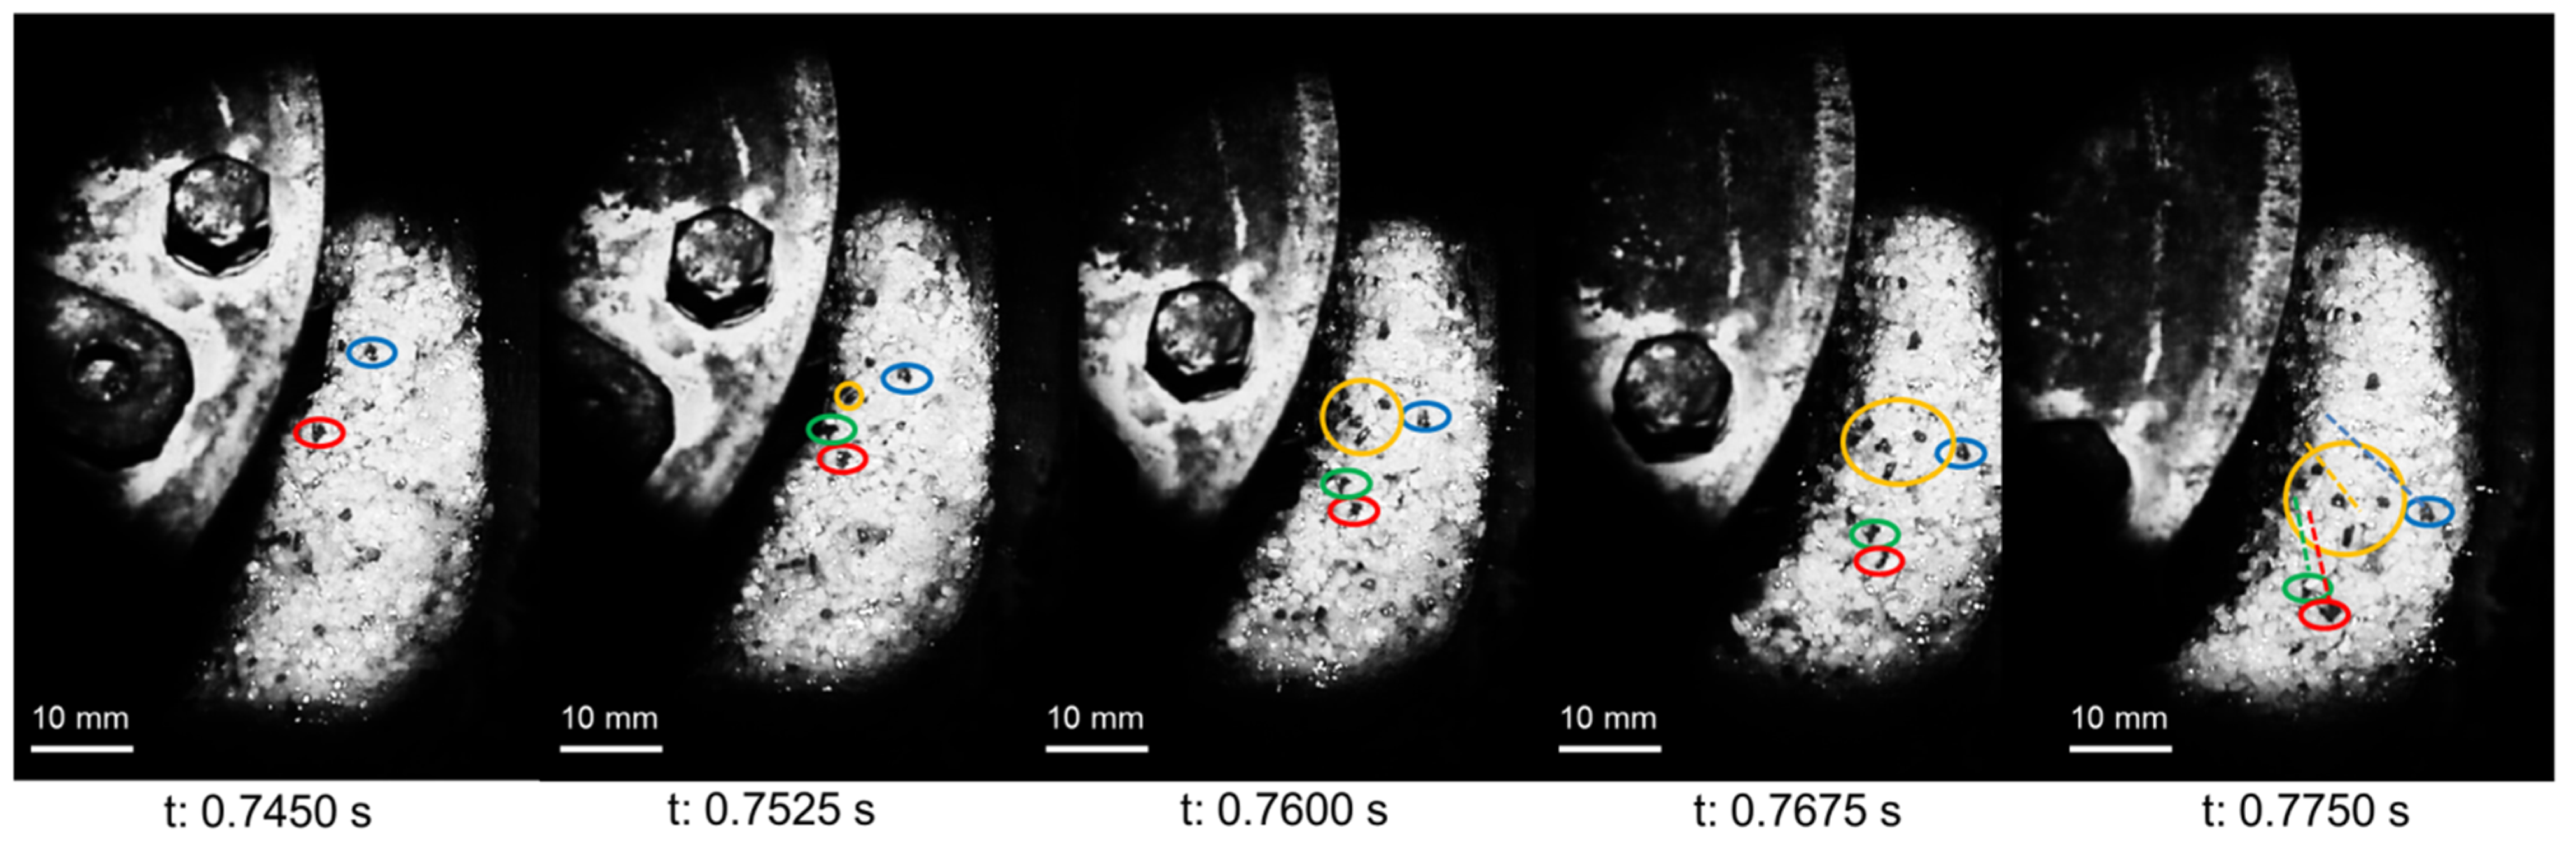
Images from the high-speed camera recordings highlighting the movement of the tracked abrasive particles are shown in Figure 12. To be able to track individual particle movements, some corundum particles were painted for high-speed camera recording. This contrast enables the software to keep track of the individual particle movement. After the given reference input, the software calculates the velocity vector for the given points or particles. This verified the surface speed and highlighted that the movement trajectory at the top part of the specimen often resulted in impacts with the abrasives. The recordings confirmed the post-mortem identified wear mechanisms observed on the slurry pot specimen. These contact conditions and impacts observed at the surface level of the media flow verified the findings of the pitting phenomenon. Figure 12 shows the particle trajectory after the impact for different periods. The calculated average speed vector from coordinate points in the i-Speed software ranged between 1.123–1.637 [m/s]. This range is explained by the not uniform initial conditions of the impact (e.g., change in the presence of water, initial position/orientation difference of the corundum particle). The estimated mass range of a corundum particle is between 0.0116–0.0194 [g]. This resembles to an impulse (I = m × v) range of 0.0131 × 10³–0.0317 × 10³ [kg m/s], meaning an individual corundum particle kinetic energy range of 0.0073 × 10⁻³–0.0259 × 10⁻³ [J]. This is not sufficient for a single impact to cause such severe material damage and form pits as the water further damps the impact. According to Palmgren and Miner, failure occurs when the cumulative damage caused by each loading cycle equals one. The general form of the Palmgren-Miner rule [19] is given by:
i = i k n i N i = 1
where k is the number of stress levels in the block loading spectrum, ni is the number of cycles at each stress level in the block loading spectrum, and Ni is the number of cycles to failure at each stress level. The fatigue calculations are only an estimate, and the calculated lifetimes are very sensitive to small changes in geometry that affect stress levels. Also, the damping effect of the water, which is hard to estimate, plays a significant role. In practice, the stress change over time is, in general, stochastic and not harmonious. The summed low energy impacts are capable of fatigue crack initiation, leading to pitting formation, even before 20 h of operation, as shown in Figure 11. From the initial material properties, material C and reference material R were expected to perform better against impact as their less brittle characteristics originate from the microstructure and lower hardness [20]. This was verified in the observations about the pitting.

3.4. Hardness and Surface Roughness

The change in the surface topography and hardness of the tested specimens were also investigated. All materials were found to have a polished abraded zone at the bottom of the samples with traces of abrasion scars. Material loss in this area was found to be more severe, with visible changes in the geometry in the form of reduced length and blunted or rounded edges. On the top of the worn zone for each material, pitting was observed. Its severity depended on the specimen orientation and the material microstructure. Before testing, the surface roughness parameters of all specimens were similar due to the same manufacturing process: Ra~0.3 µm (arithmetic mean height), Rz~2.2 µm (maximum height), Rq~0.4 µm (root-mean-square roughness). After testing, surface roughness values are shown in Table 6 for both identified worn regions (abraded and fatigued areas). In the case of all materials, the surface of the contact area smoothened and experienced a polishing effect. Moreover, specimen orientation did not affect the resulting surface roughness of the distinguished wear zone.
On average, the surface roughness of the polished zone was reduced to Ra~0.1 µm and Rz to ~0.8 µm within 20 h of testing. The standard deviation of the roughness measurements was below 30%. The top worn zone of the specimen, where pitting was identified, experienced roughening of the surface to Ra~0.8 µm, Rz~7.5 µm. The polishing was present in parallel with the hardening of the contact surface.
Figure 13 shows the hardness change of all tested materials as a function of the operating time. The hardness distribution in the worn zone was constant. This means the sample depth in the slurry did not have a significant effect on the hardening. The hardness gain was already present after the first 20 h of testing. The two hardest and best-performing materials (materials A and B) experienced an average +15 HV hardness gain. The observed pitting was also the most severe in the case of these materials. Material C and material R experienced only minor hardening. The pitting observed on these materials was less significant as well. Material C did not have such a pronounced hardening effect.

4. Conclusions

This study investigated the wear resistance of newly developed martensitic steels and enabled their ranking under slurry abrasion and slurry erosion conditions. The developed slurry pot test rig enabled a quick comparison in wear rate and provided a quick ranking with adequate repetition for each test due to its configuration. The test methodology enabled the investigation of the thin differentiation border between the experienced wear mechanisms in the same set-up. The analysis was carried out with test variables of velocity and impact angle to highlight the appearance of different wear mechanisms and investigate the operational parameters that influence them. The wear process was found to develop on a linear trend. A polished zone with abrasion scars was experienced at the bottom of the samples, where sliding and rolling were the dominant contact mechanisms below the surface level of the abrasive media. Pitting appeared as a characteristic feature on the specimen zone, which was in contact with the top level of the abrasive media, where the dominant contact mechanism was repeated cyclic impact as slurry erosion, resulting in surface fatigue.
Due to the particle flow characteristics and the effect of the centrifugal force, specimens oriented towards the centre shaft experienced severe wear compared to those oriented to face the pot wall. This was also the case for the specimens placed at a smaller radius. The angle at which the particles hit the surface affected how the fatigue looked on the surface in the form of pitting. The pitting was dominant on the specimen oriented towards the pot wall and was found to be more severe with increasing impact velocity and operation time as a result of the repeated cyclic impacts. More significant pitting phenomena were found on the more brittle martensitic materials. 3D investigation of the sample geometry showed the specimen shape changing due to wear over time, confirming that abrasion resulted in more severe material loss than pitting. High-speed camera recordings highlighted the different specimen-particle contact mechanisms depending on the depth of the slurry media. The videos verified the different observed wear mechanisms. Repeated particle impingement was traced in the top specimen zone, resulting in pitting. The specimen experienced hardening of the abraded contact surface, which remained constant afterwards. Tempered martensitic material was the one that wore the least in the comparison, but it also had a lot of pitting because it was more brittle than the TRIP steel. Although the wear results are briefly connected to the tested material properties, the experienced wear differences originate from the material microstructure and will need further material characterization in the future. A follow-up study is considered as future work, focusing on expanding the testing variable range to match further specific slurry erosion applications.

Author Contributions

Investigation, data curation, evaluation, and writing: Á.K. data curation, evaluation: L.F.T. review: P.D.B. writing and review: R.N., K.S. and S.S. test rig development and conceptualization: G.K. All authors have read and agreed to the published version of the manuscript.

Funding

This work was supported by Research Fund for Coal and Steel (RFCS) project RFSR-CT-2015-00010.

Data Availability Statement

The data presented in this study are available on request from the corresponding author. The data are not publicly available due to the present work was carried out within the framework of a project that is bound by Intellectual Property constraints.

Acknowledgments

The authors would like to acknowledge Köckerling for providing the reference material and Haithem Ben Hamouda from ArcelorMittal Global R&D Gent (OCAS NV) for the material supply. The authors are grateful to Róbert Keresztes and Wouter Ost for their support with the experimental activities.

Conflicts of Interest

The authors declare no conflict of interest.

References

  1. Javaheri, V.; Porter, D.; Kuokkala, V.-T. Slurry erosion of steel—Review of tests, mechanisms and materials. Wear 2018, 408–409, 248–273. [Google Scholar] [CrossRef]
  2. Sinha, S.L.; Dewangan, S.K.; Sharma, A. A review on particulate slurry erosive wear of industrial materials: In context with pipeline transportation of mineral−slurry. Part. Sci. Technol. 2015, 35, 103–118. [Google Scholar] [CrossRef]
  3. More, S.R.; Bhatt, D.V.; Menghani, J.V. Recent Research Status on Erosion Wear—An Overview. Mater. Today Proc. 2017, 4, 257–266. [Google Scholar] [CrossRef]
  4. Lindgren, M.; Perolainen, J. Slurry pot investigation of the influence of erodent characteristics on the erosion resistance of austenitic and duplex stainless steel grades. Wear 2014, 319, 38–48. [Google Scholar] [CrossRef]
  5. Clark, H.; Llewellyn, R. Assessment of the erosion resistance of steels used for slurry handling and transport in mineral processing applications. Wear 2001, 250, 32–44. [Google Scholar] [CrossRef]
  6. Desale, G.R.; Gandhi, B.K.; Jain, S. Slurry erosion of ductile materials under normal impact condition. Wear 2008, 264, 322–330. [Google Scholar] [CrossRef]
  7. Arabnejad, H.; Shirazi, S.; McLaury, B.; Subramani, H.; Rhyne, L. The effect of erodent particle hardness on the erosion of stainless steel. Wear 2015, 332–333, 1098–1103. [Google Scholar] [CrossRef]
  8. Abouel-Kasem, A. Particle Size Effects on Slurry Erosion of 5117 steels. J. Tribol. 2010, 133, 014502. [Google Scholar] [CrossRef]
  9. Buszko, M.; Krella, A.; Marchewicz, A.; Gajowiec, G. Effect of annealing temperature on slurry erosion resistance of ferritic X10CrAlSi18 steel. Tribol. Int. 2020, 153, 106648. [Google Scholar] [CrossRef]
  10. Kalácska, Á.; De Baets, P.; Ben Hamouda, H.; Theuwissen, K.; Sukumaran, J. Tribological investigation of abrasion resistant steels with martensitic and retained austenitic microstructure in single- and multi-asperity contact. Wear 2021, 482–483, 203980. [Google Scholar] [CrossRef]
  11. Macchini, R.; Bradley, M.; Deng, T. Influence of particle size, density, particle concentration on bend erosive wear in pneumatic conveyors. Wear 2013, 303, 21–29. [Google Scholar] [CrossRef]
  12. Kalácska, Á.; Székely, L.; Keresztes, R.; Gábora, A.; Mankovits, T.; De Baets, P. Abrasive Sensitivity of Martensitic and a Multi-Phase Steels under Different Abrasive Conditions. Materials 2021, 14, 1343. [Google Scholar] [CrossRef] [PubMed]
  13. Chung, R.; Jiang, J.; Pang, C.; Yu, B.; Eadie, R.; Li, D. Erosion-corrosion behaviour of steels used in slurry pipelines. Wear 2021, 477, 203771. [Google Scholar] [CrossRef]
  14. Nguyen, Q.B.; Nguyen, D.N.; Murray, R.; Ca, N.X.; Lim, C.Y.H.; Gupta, M.; Nguyen, X.C. The role of abrasive particle size on erosion characteristics of stainless steel. Eng. Fail. Anal. 2019, 97, 844–853. [Google Scholar] [CrossRef]
  15. Maher, M.; Iraola-Arregui, I.; Ben Youcef, H.; Rhouta, B.; Trabadelo, V. The synergistic effect of wear-corrosion in stainless steels: A review. Mater. Today Proc. 2021, 51, 1975–1990. [Google Scholar] [CrossRef]
  16. Camacho, J.; Lewis, R.; Dwyer-Joyce, R. Solid particle erosion caused by rice grains. Wear 2009, 267, 223–232. [Google Scholar] [CrossRef]
  17. Shitole, P.P.; Gawande, S.H.; Desale, G.R.; Nandre, B.D. Effect of Impacting Particle Kinetic Energy on Slurry Erosion Wear. J. Bio-Tribo-Corrosion 2015, 1, 29. [Google Scholar] [CrossRef] [Green Version]
  18. Hills, D.; Nowell, D.; Barber, J.R. KL Johnson and contact mechanics. Proc. Inst. Mech. Eng. Part C J. Mech. Eng. Sci. 2016, 231, 2451–2458. [Google Scholar] [CrossRef]
  19. Vernon, P.; Mackin, T. Fatigue failure analysis of a leg press exercise machine. In Failure Analysis Case Studies II; Elsevier: Amsterdam, The Netherlands, 2001; pp. 255–266. [Google Scholar] [CrossRef]
  20. Song, C.; Wang, H.; Sun, Z.; Wei, Z.; Yu, H.; Chen, H.; Wang, Y.; Lu, J. Effect of multiphase microstructure on fatigue crack propagation behavior in TRIP-assisted steels. Int. J. Fatigue 2019, 133, 105425. [Google Scholar] [CrossRef]
Figure 1. Different parameters involved in slurry erosion.
Lubricants 10 00316 g001
Figure 2. (a) Erosion testing set-up [12], (b) eccentric placement of disc in the pot, (c) bottom view of the disc and specimen configuration.
Lubricants 10 00316 g002
Figure 3. Slurry pot test set-up with a high-speed camera.
Lubricants 10 00316 g003
Figure 4. Mass loss of tested slurry pot specimen (Material A, B, C, R on radii 125, 105, 85, 65 mm) in the function of sliding distance [km].
Lubricants 10 00316 g004
Figure 5. Mass loss [%/100 km] normalised with sliding distance in the function of the angle to the abrasive flow of (a) Material A on radius 125 and 105 mm and (b) Material B on radius 85 and 65 mm.
Lubricants 10 00316 g005
Figure 6. Slurry pot testing specimen images of Material A after the first cycle (1 × 20 h) on (a) radius 65 mm, (b) radius 85 mm, (c) radius 105 mm, (d) radius 125 mm, and their corresponding 3D model height maps analysed with white light interferometer.
Lubricants 10 00316 g006
Figure 7. Image comparison of worn slurry pot specimen (Material A, B, C, R) on radius 105 and 125 mm, after 180 h of operation.
Lubricants 10 00316 g007
Figure 8. Second cycle slurry pot test results: Specimens mounted on radius 65 mm facing centre shaft (a) Material B aligned 45° (b) Material B aligned 60° (c) Material C aligned 45° (d) Material C aligned 60° to the slurry.
Lubricants 10 00316 g008
Figure 9. Dimension and depth comparison of the observed pits on the slurry pot specimen during the first cycle. (a) microscopy and height map (b,c) of Material A samples mounted on a radius of 85 mm, (d) microscopy and height map (e,f) of Material A samples mounted on a radius of 125 mm, (g) microscopy and height map (h,i) of Material B samples mounted on a radius of 85 mm, (j) microscopy and height map (k,l) of Material B samples mounted on a radius of 125 mm with all their corresponding height map and 3D image.
Lubricants 10 00316 g009
Figure 10. Progression of pitting on slurry pot specimen Material A and C in the first cycle.
Lubricants 10 00316 g010
Figure 11. Pit surface microscopy images (520× magnification).
Lubricants 10 00316 g011
Figure 12. Images from high-speed camera recordings highlight the movement of the tracked painted abrasive particles.
Lubricants 10 00316 g012
Figure 13. The hardness of the tested slurry pot specimen in the function of wear testing time, (a) Material A (b) Material B (c) Material C (d) Material R.
Lubricants 10 00316 g013
Table 1. Chemical composition of the tested materials [wt%].
Material%C%Mn%Si%P%S%Ti%Cr%Ni%B%Mo%Cu%V%Al%Nb
(max)(max)(max)(max)(max)(max)(max)(max)(max)(max)(max)(max)(max)(max)
A0.21.90.50.020.0050.050.5 0.004
B0.21.90.50.020.0050.050.5 0.004
C0.21.6 0.0180.005 1.9~0.20 0.4
R0.2851.1250.2530.0130.0010.0350.1650.0110.0030.0280.0150.0040.0410.013
Table 2. Highlighted properties of the investigated steels.
MaterialMicrostructureHardnessUltimate Tensile StrengthYield StrengthElongation at Max. ForceCharpy
[HV][MPa][MPa][%]ISO 148-1 (20 °C/−40 °C) [J]
AMartensite478152312902.728/17
BTempered martensite465147414132.138/21
CTRIP multi-phase steel with retained austenite36711607912.4179/32
Table 3. Test parameters and conditions of the first phase.
Radius[mm]1251058565
Angle[°]45454545
Orientation-“O”—pot wall“I”—centre shaft“O”—pot wall“I”—centre shaft
Surface velocity[m/s]1.8851.5831.2820.98
Sliding distance[m/20 h]135721140092297057
Sliding distance[km/180 h]122.15102.6083.0663.51
Table 4. Normalised average relative mass loss [%/100 km] (measured at each cycle) of the tested slurry pot specimen.
MaterialRadiusSpecimen
Orientation
Specimen
Angle
Average
Relative Mass Loss
Standard
Deviation
Average
Mass Loss Per
Material
[mm][-][°][%/100 km][%][%/100 km]
A125O452.6314.088.15
105I16.402.97
85O2.6941.26
65I10.8816.44
B125O452.748.747.53
105I15.256.21
85O2.6740.54
65I9.4613.98
C125O452.9110.038.81
105I16.643.15
85O3.8419.19
65I11.8412.16
R125O452.798.328.72
105I16.223.41
85O3.2041.59
65I12.6512.42
Table 5. Relative mass loss [%/100 km] of the materials considering the contact area, normalised with the sliding distance.
MaterialABCR
Average relative mass loss from r105 mm and r125 mm [%/100 km]9.528.999.789.50
Table 6. Surface roughness parameters of worn specimen distinguishing two wear zones: bottom abraded area and top fatigued area.
Surface Roughness [µm]After Test (Bottom Zone)After Test (Top Zone)
RaRzRqRaRzRq
Material A0.090.910.110.798.231.36
Material B0.100.830.100.976.531.21
Material C0.110.840.120.725.871.08
Material R0.100.720.130.867.421.41
Publisher’s Note: MDPI stays neutral with regard to jurisdictional claims in published maps and institutional affiliations.