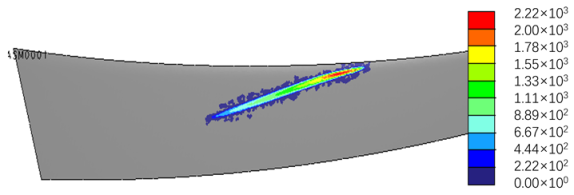
Abstract
This paper presents an innovative and comprehensive methodology for loaded tooth contact analysis (LTCA) of spiral bevel gears, integrating ease-off surface computation with high-precision virtual generating tooth surfaces. The methodology integrates an error-sensitivity analysis model with a semi-analytical LTCA model for spiral bevel gears based on ease-off surfaces, developed using a Universal Generation Model. By leveraging sophisticated corrections in the machining process, the desired ease-off surfaces are obtained, ensuring the accuracy of the generated tooth surfaces. This simulation ensures minimal errors between theoretical and virtual generating tooth surfaces, providing a reliable basis for LTCA. The LTCA model is formulated using CNC-generated tooth surfaces, focusing on misalignments such as pinion offset, adjustment errors, and angular position errors along the pinion and gear axis. The feasibility and effectiveness of the proposed method are verified through comparisons with LTCA software analysis results, demonstrating its high accuracy in predicting the impact of misalignments on contact patterns and load distribution. This integrated approach offers significant advancements in the design and analysis of spiral bevel gears, providing a robust tool for predicting and analyzing gear performance under various misalignment conditions. The combined methodology enhances the reliability and accuracy of LTCA, ensuring optimal performance and durability of spiral bevel gears in practical applications.
1. Introduction
Spiral bevel gears are essential components in many mechanical systems, including automotive, aerospace, and industrial machinery, due to their ability to transmit power efficiently and smoothly between intersecting axes. The design and analysis of these gears are critical to ensure optimal performance, durability, and reliability. Traditional methods for analyzing spiral bevel gears have often relied on empirical data and trial-and-error approaches, which can be time-consuming and less accurate [1,2]. The concept of ease-off surfaces is fundamental in the design of spiral bevel gears. These surfaces represent the deviation of the actual tooth surface from the ideal conjugate surface, allowing for localized bearing contact and reducing edge-loading conditions to prevent early failure.
The research background for spiral bevel gears revolves around improving their load capacity and reducing the issues caused by misalignment and assembly errors. Over the years, substantial research has been conducted to enhance the performance and durability of these gears. Li [3] conducted an in-depth analysis of bending stress in orthogonal curve-face gears, proposing a method for calculating and testing the bending stress at the gear tooth root, which is crucial for understanding the gear’s load-bearing capacity. Similarly, He [4] introduced a multi-step analytical approach for identifying the initial contact point in spiral bevel and hypoid gears, accounting for misalignments and using geometric kinematic transformations and a conic self-adaptive trust region algorithm, to improve tooth contact analysis accuracy and performance. Chen [5] introduced a semi-analytical Q-SLTCA method that efficiently calculates single tooth load contact characteristics and meshing stiffness, validated against finite element methods. Temirkhan [6] presented a computationally efficient quasi-static model for the three-dimensional non-conjugate contact problem between two surfaces, simplifying the conventional five-equation system to two nonlinear equations, and demonstrates improved accuracy and stability, particularly when applied to spur gears with crowned tooth surfaces. Marciniec [7] compared numerical methods for Gleason-type bevel gear contact patterns using mathematical models and finite element analysis, the results suggest mathematical analysis alone can suffice, avoiding the need for experimental verification. A real gear tooth surface modeling method was proposed in [8] to demonstrate actual tooth contact performances with manufacturing errors.
Complementing this, Simon [9] introduced a multi-objective optimization technique specifically tailored for hypoid gears, emphasizing the minimization of tooth contact pressure and transmission error, while simultaneously maximizing their mechanical efficiency. The optimization process heavily depends on LTCA for accurately predicting the distribution of tooth contact pressure and transmission errors, underscoring the critical role of precise computational methodologies in the analysis of gears. Moslem [10] used Transmission3D-Calyx software to perform loaded and unloaded tooth contact analyses of spiral bevel gears, evaluating the impact of axial and radial misalignments on mesh stiffness and gear lifespan. This real gear tooth surface modeling method was used to predict the wear tendency of gear tooth surfaces [11]. Building on these methods, Jiang [12] reviewed the development of logarithmic spiral bevel gears, emphasizing advancements in mathematical modeling, simulation analysis, and CNC machining centers. Adrian [13] outlined a method for generating gear tooth flanks using diagonal milling, introducing a virtual machine tool for precise and rapid calculation of change gears. Moreover, Li [2] investigated the design and power loss assessment of noncircular gear pairs for infinitely variable transmissions. This study presented an innovative approach using modified high-order elliptical pitch curves and introduced a method for evaluating power loss, crucial for enhancing the smoothness and efficiency of gear transmission systems. Similarly, Simon [14] explored advancements in mixed elastohydrodynamic lubrication and the performance enhancements of hypoid gears. Using a unified numerical approach, this research offers a comprehensive analysis of lubrication conditions. The findings demonstrate significant improvements in gear performance by optimizing lubrication conditions and reducing frictional losses. Liu [15] introduced a semi-analytical LTCA method for spiral bevel gears, combining analytical formulas, FEA corrections, and optimization for precise tooth deformation and contact analysis. Li [16] presented a multi-objective optimization approach for spiral bevel gears, focusing on enhancing both contact performance and meshing efficiency. This study utilized sensitivity analysis to select machine tool parameters significantly impacting the tooth surface, optimizing the gear design for higher performance and efficiency. Ding [17] presented a new method that uses optimization algorithms and operational strategies to accurately identify the initial contact point for ETCA, with its accuracy and efficiency validated through numerical examples. Fu [18] developed a mathematical model and finite element analysis for spiral bevel gears, comparing results with empirical formulas and experimental tests, showing good agreement.
Expanding on these methodologies, Ding [19] presented a novel prediction and control methodology specifically tailored for the collaborative grinding process of non-orthogonal aerospace spiral bevel gears, emphasizing improvements in geometric accuracy and load distribution through sophisticated simulation and optimization techniques. Kolivand [20] introduces a computationally efficient load distribution model for hypoid gears that uses ease-off topography and Rayleigh-Ritz shell models for accurate contact analysis, requiring less computational effort than finite element methods. Building on this, Simon [21] devised a multi-objective optimization technique aimed at optimizing the production of face-milled hypoid gears, leveraging numerically controlled machine tools for precise and efficient manufacturing. Stanasel [22] developed a mathematical model for manufacturing high-performance cylindrical gears with curved cycloidal teeth, validated through MATLAB simulation and Solid Edge modeling for future stress analysis. Vivet [23] proposed a new penetration-based contact model that enables more efficient and accurate computation of three-dimensional contact loads, thereby supporting system-level and dynamic analysis, addressing the challenges of contact simulation posed by the complex geometry of spiral bevel gears. Mathur [24] presents a numerical model for loaded tooth contact analysis of straight bevel gears in pericyclic transmissions, using finite strip methods to calculate tooth deflection and a variational framework for load distribution, highlighting the high-power density and noise reduction potential. Moreover, Li [25] focused on the impact of lubrication on gear performance, underscoring the importance of proper lubrication in reducing friction and wear in spiral bevel gears. The integration of these diverse research efforts provides a comprehensive understanding of the current state of the field, showcasing the multifaceted approach required to address the challenges and enhance the performance of spiral bevel gears. Despite these advancements, several bottlenecks persist in the field. One significant challenge is achieving precise tooth surface corrections during the machining process. This difficulty is compounded by the need for accurate simulation tools that can predict gear behavior under various load and misalignment scenarios.
Building on these insights into material performance and failure mechanisms, this paper tackles the challenge of accurately predicting loaded contact patterns in spiral bevel gears by introducing a novel semi-analytical model. This model integrates ease-off surfaces derived from universal gear machining settings, and Hertzian contact theory, ensuring high accuracy in generated tooth surfaces and improving gear performance and durability. The approach ensures high accuracy in generated tooth surfaces, leading to improved performance and durability of spiral bevel gears. The main bottleneck addressed by this paper is the difficulty in achieving precise tooth surface corrections during the machining process.
Consequently, this paper also focuses on the simulation and analysis of misalignments in spiral bevel gears. Using high-precision virtual generating tooth surfaces obtained using a Universal Generation Model, the study minimizes the errors between theoretical and virtual surfaces. By formulating an LTCA model using CNC-generated tooth surfaces, the finite element analysis (FEA) based LTCA model developed in this paper considers various misalignment errors, such as pinion offset and adjustment errors along the pinion and gear axis. In such a way, the research accounts for misalignments and load distribution, providing a comprehensive approach to analyzing gear performance under realistic operational conditions.
2. Generation of Gear Tooth Profiles
2.1. The Dimensional Configuration of Spiral Bevel Gears
The intricate geometry of spiral bevel gears is solely determinable through the resolution of implicit equations, which meticulously capture the intricacies of the manufacturing process, including the geometry of the cutting tool and the specific settings of the machine tool.
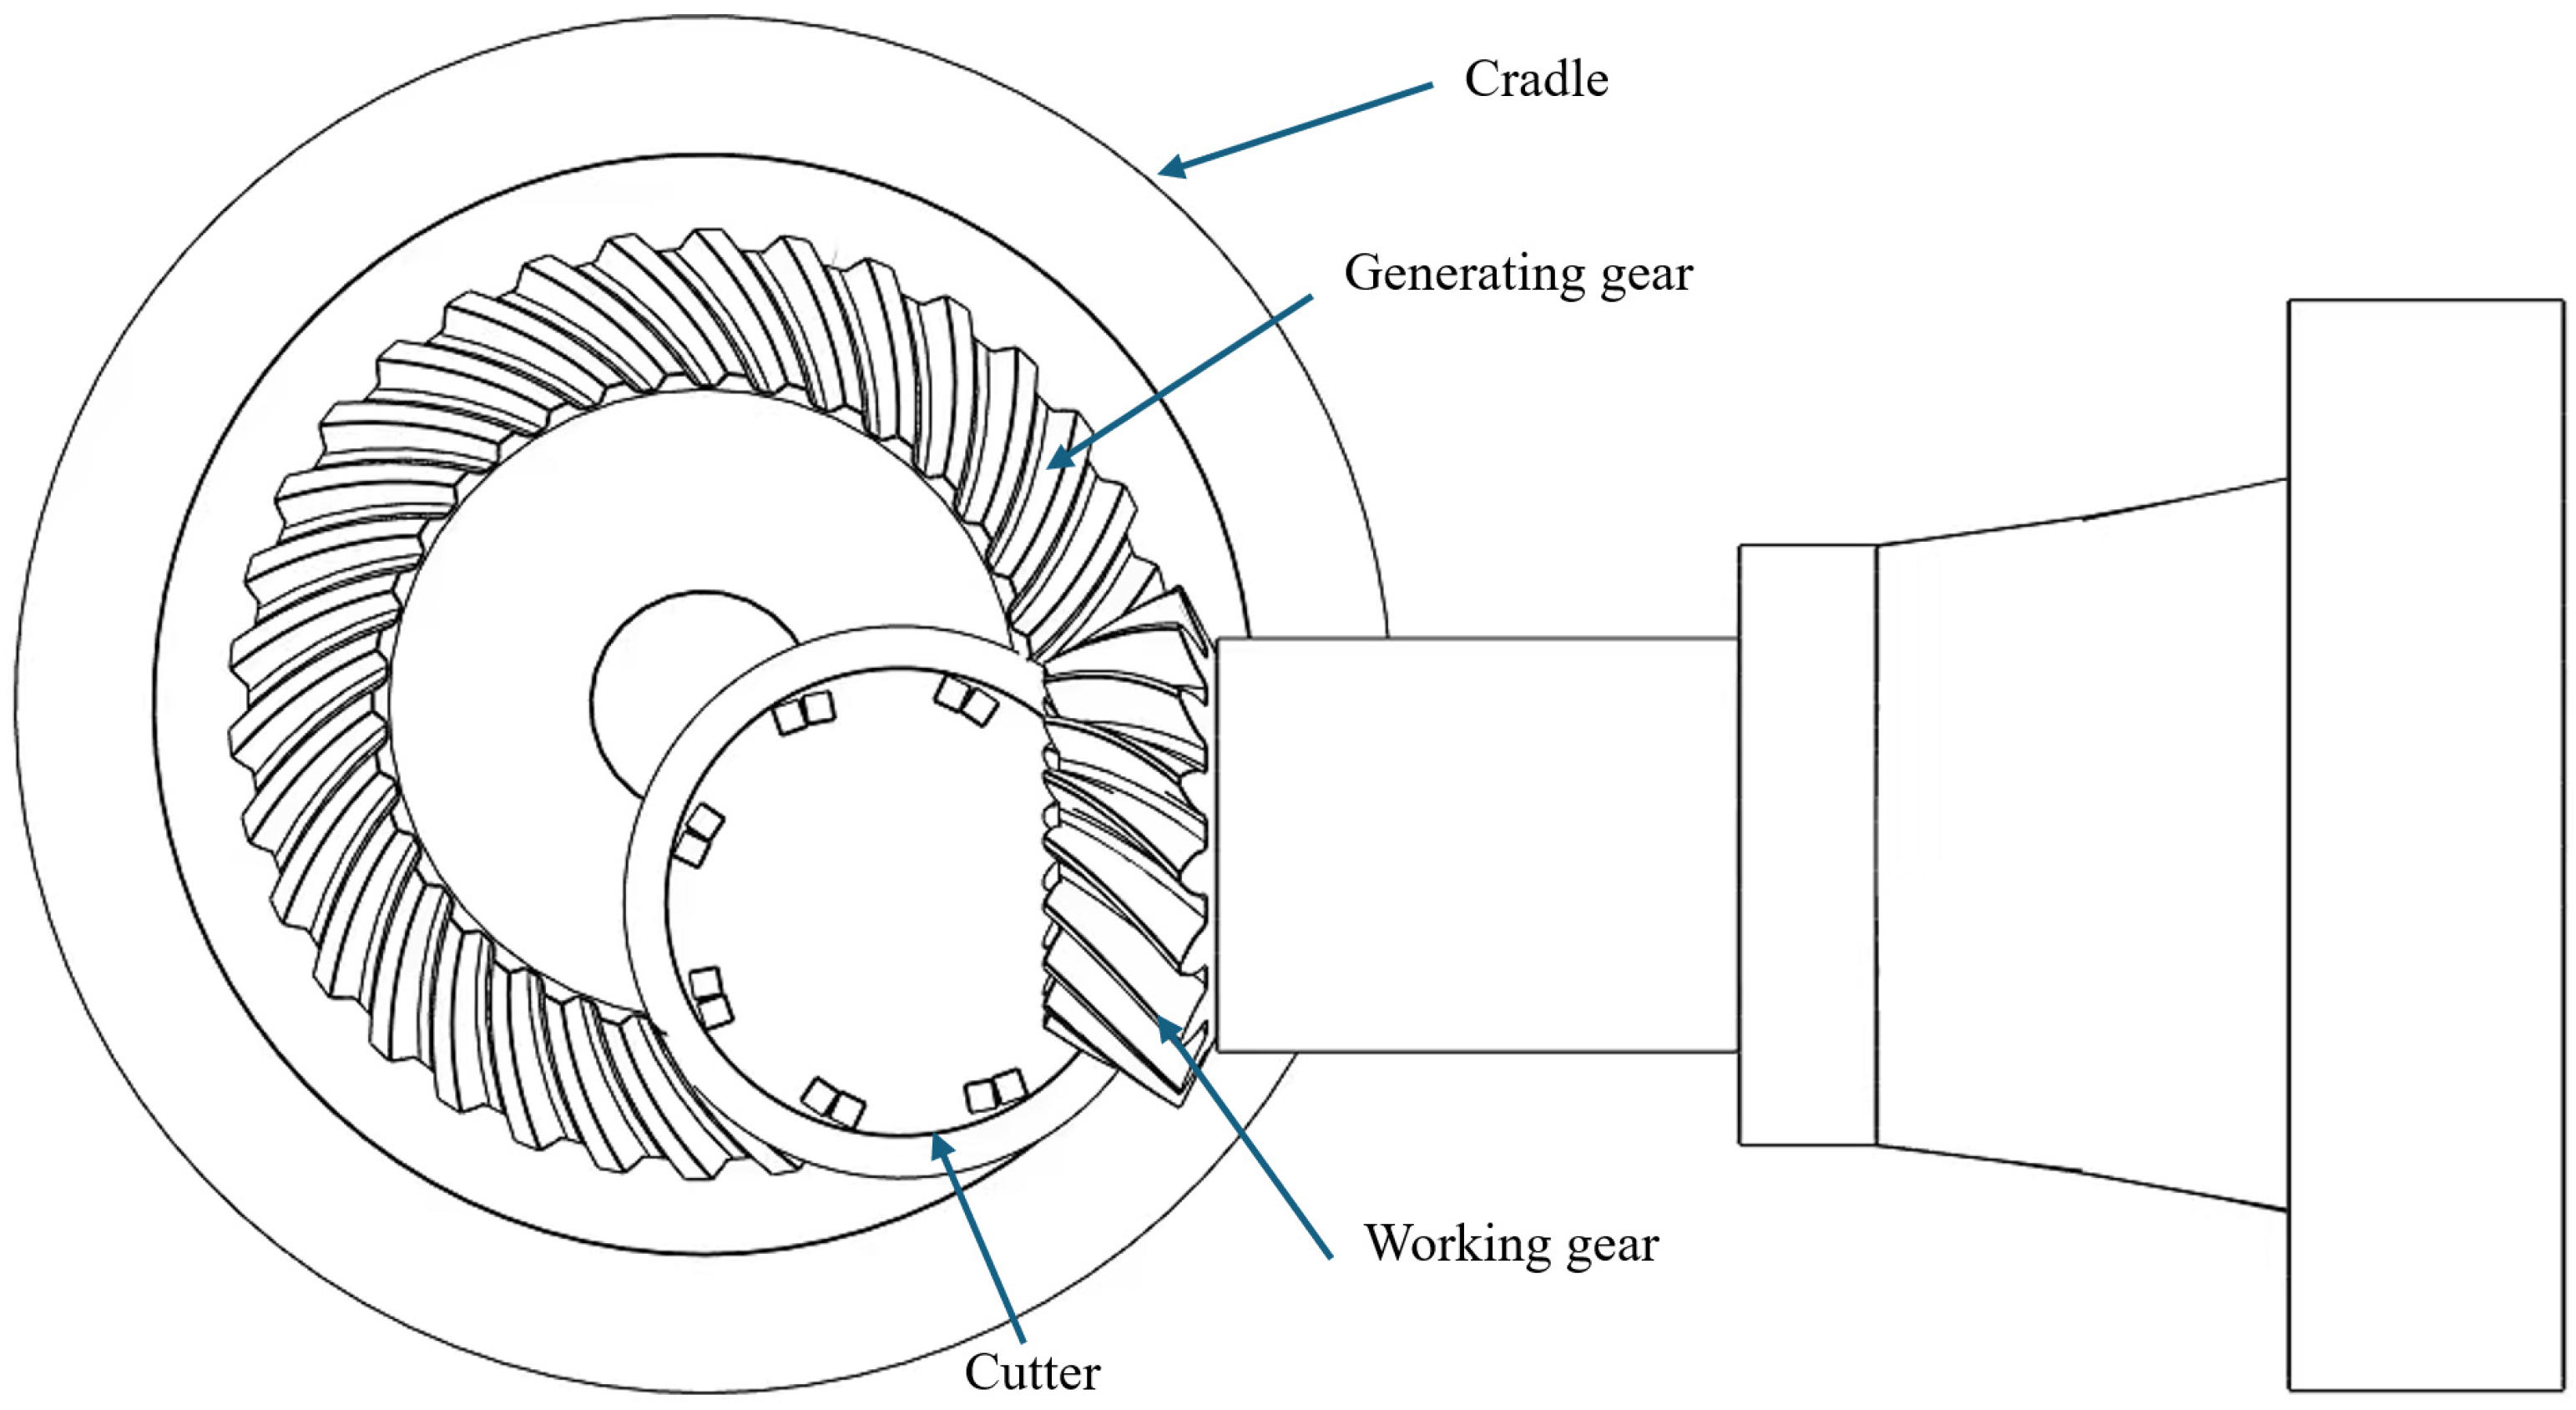
In addition to meeting the basic geometric and gear blank dimensions, it is essential to fulfill performance or functionality requirements concerning contact performance. Key aspects frequently evaluated in the design of spiral bevel gears include the location, size, and shape of the contact pattern on the gear tooth surfaces, as well as the motion transmission error amplitude of the gear pair. Figure 1 illustrates the pinion generation setup, which includes a head-cutter with blades, a virtual generating gear, and the pinion.
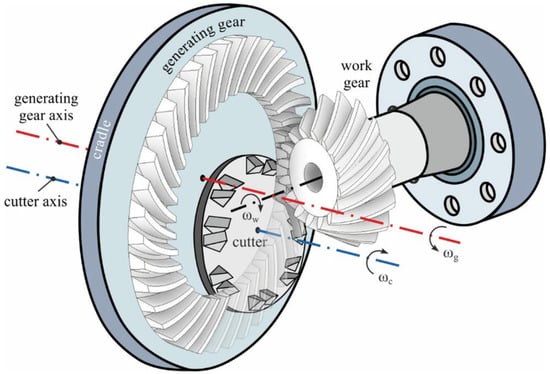
Figure 1.
Cutter, work gear, and cradle rotation in face hobbing (inspired by [26]).
2.2. The Geometry of Cutting Tools and Their Relative Movement
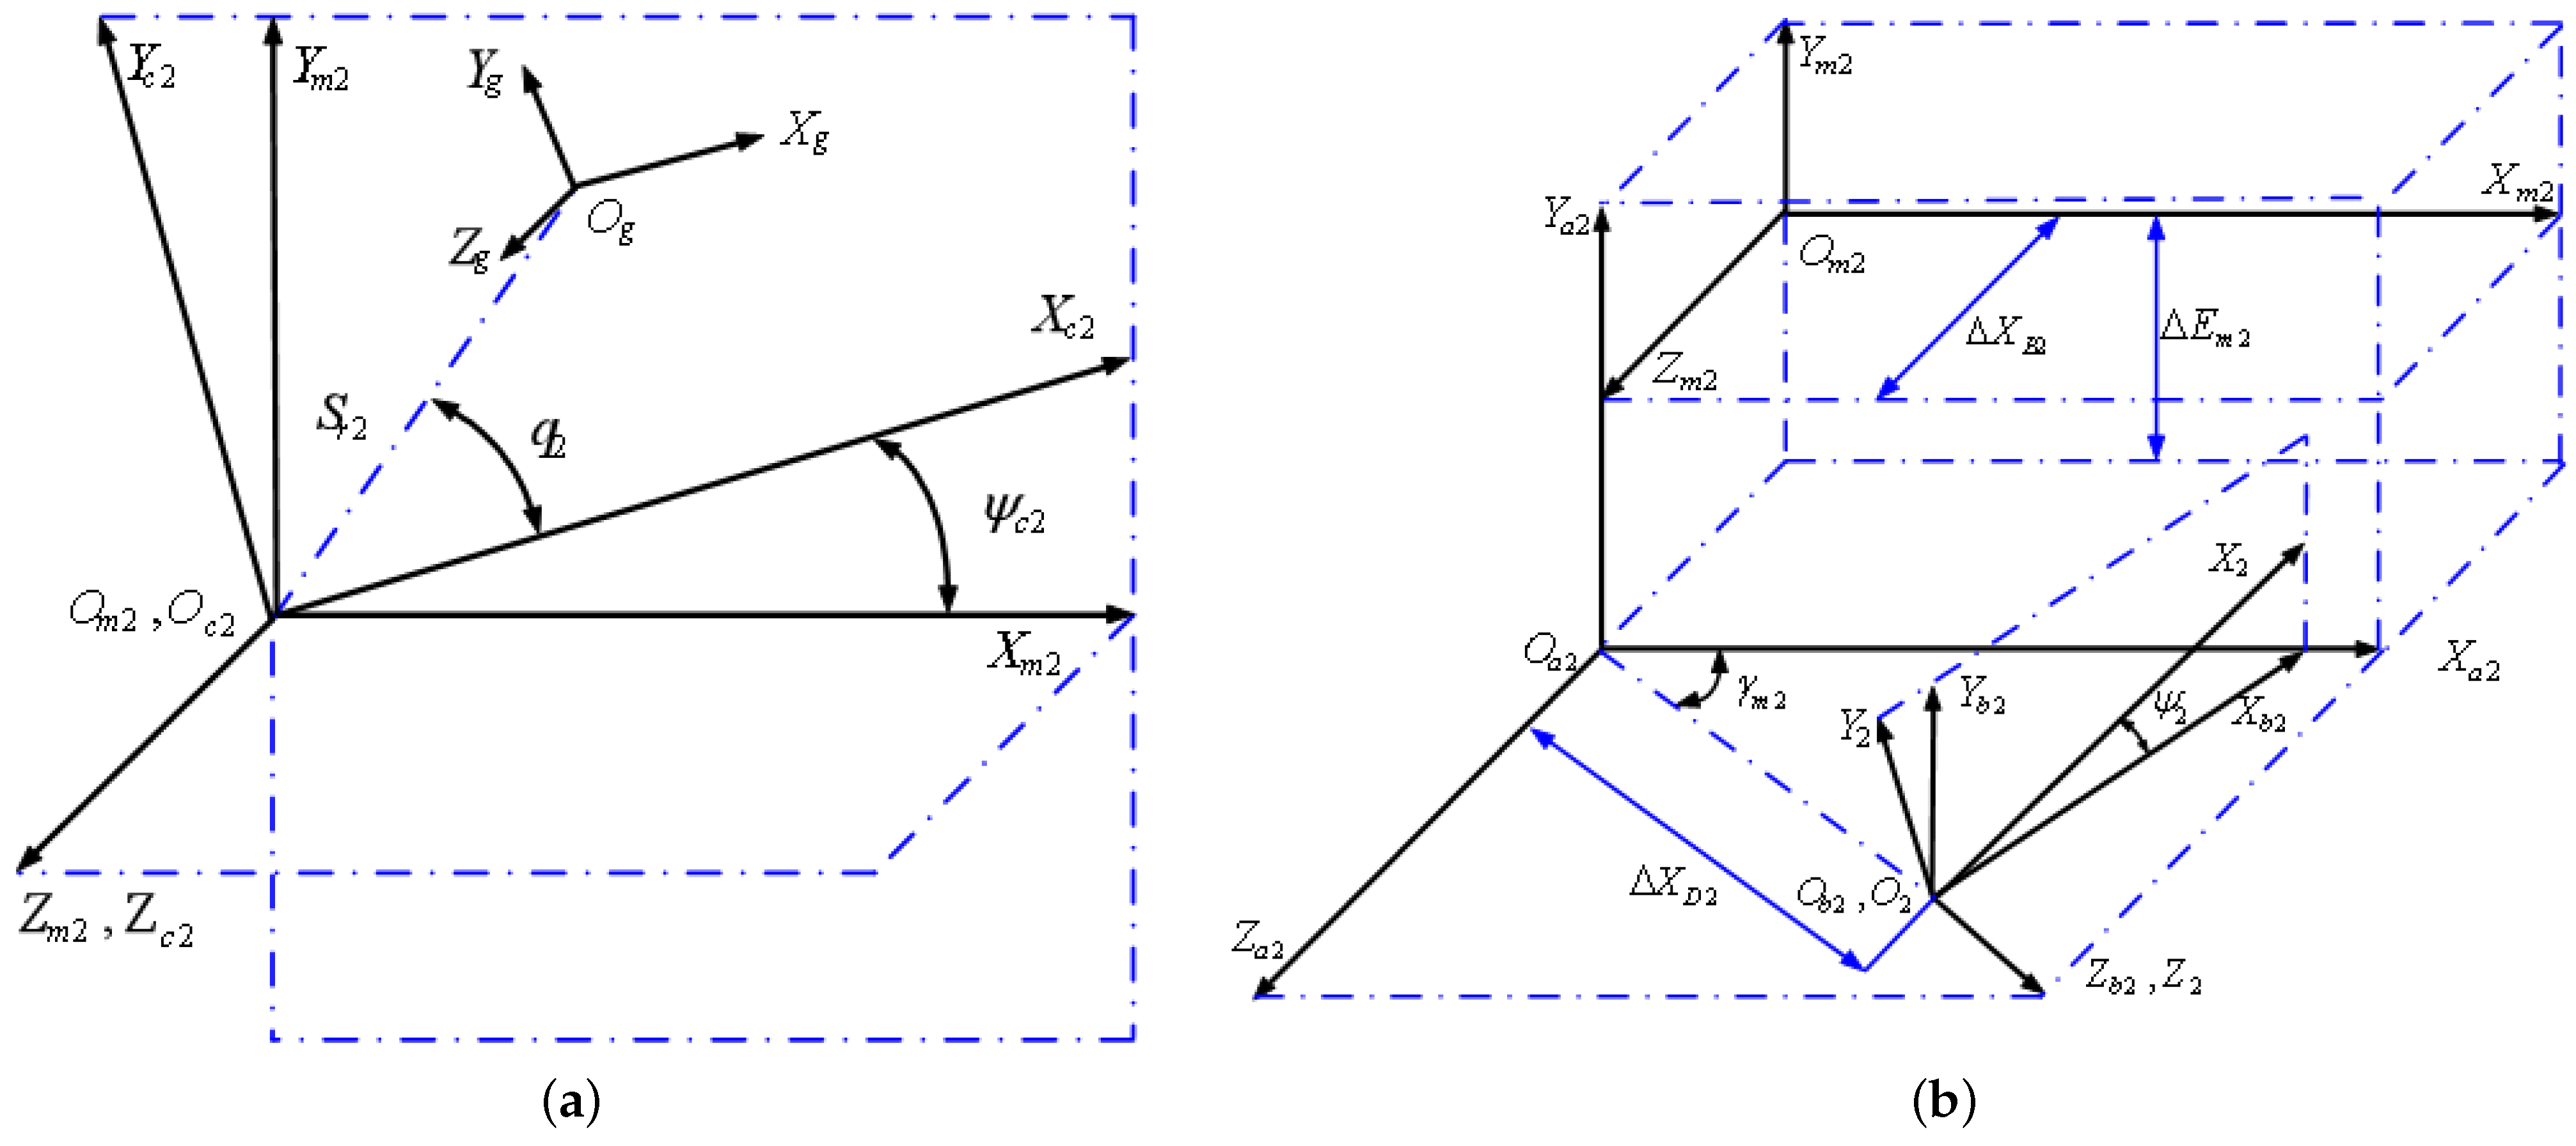
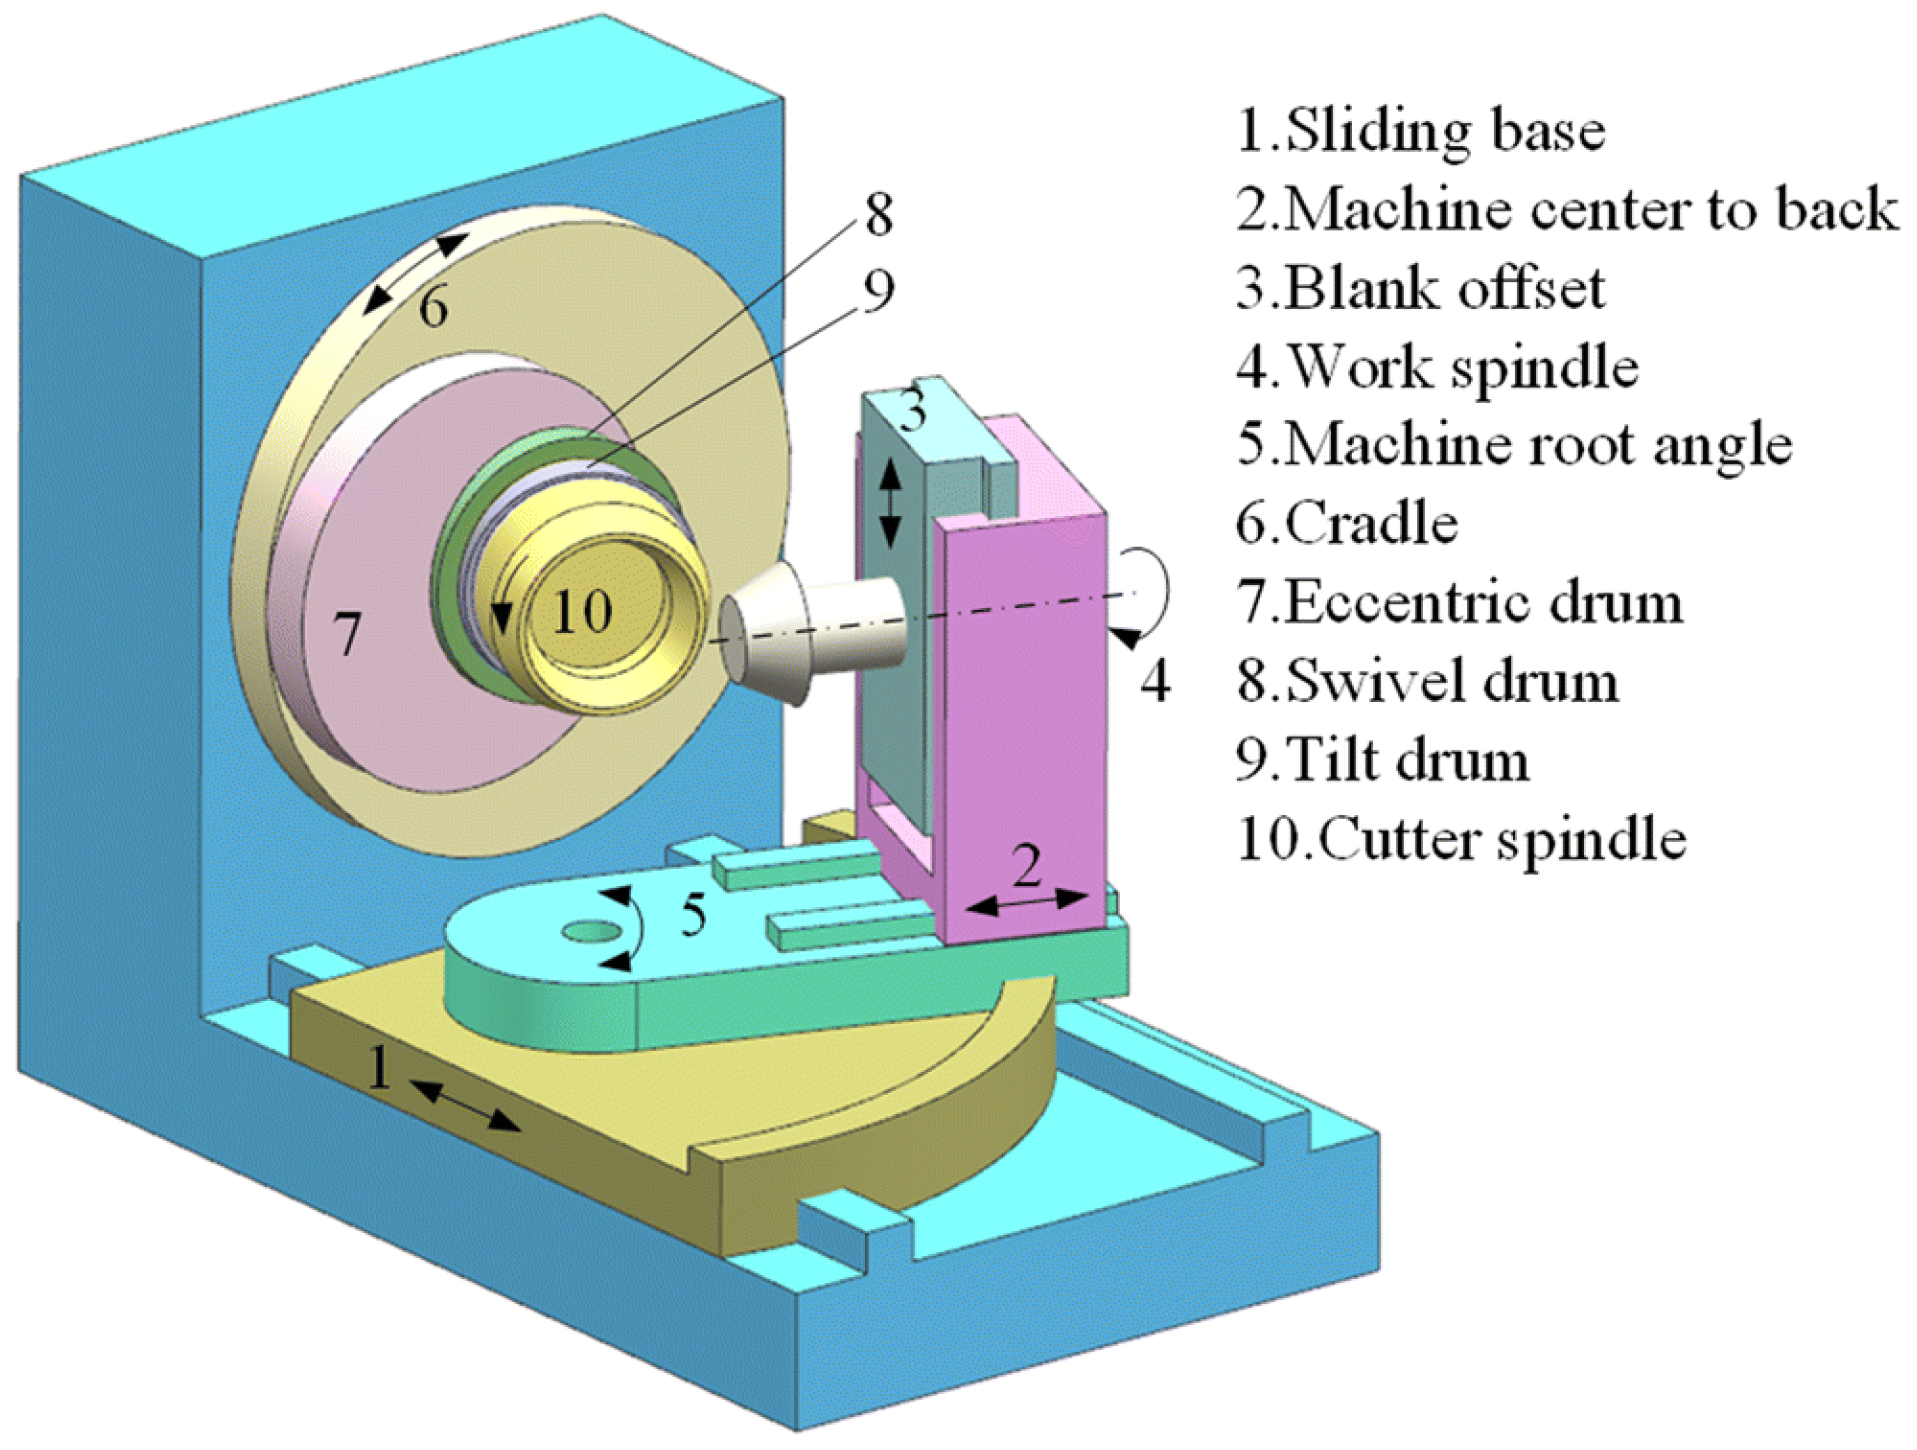
A universal mathematical framework is employed for the generation of tooth surfaces for both pinion and gear, as shown in Figure 2. The coordinate system is firmly attached and remains stationary relative to the workpiece. The coordinate system , firmly attached to the generating machine cradle, describes its angular position. The coordinate system is attached to the cutting machine framework. and assist in work piece installment. The coordinate system is firmly attached to the gear head-cutter. The angles and are associated with instantaneous rotational positions of the gear and the cradle, respectively. There exist six potential auxiliary kinematic variables that can be utilized to alter the tooth surface of a manufactured spiral bevel gear: represents the machine center to back, denotes the blank offset, is the machine root angle, signifies the radial distance, indicates the sliding base, and is the cradle rotation angle. The gear roll ratio is determined by
where and represent angular speeds of the gear and the cradle, respectively.

Figure 2.
Coordinate systems for the generation of gear tooth profiles. (a) Depiction of the installation of the machine tool for the process of generation; and (b) Illustration of machine tool settings.
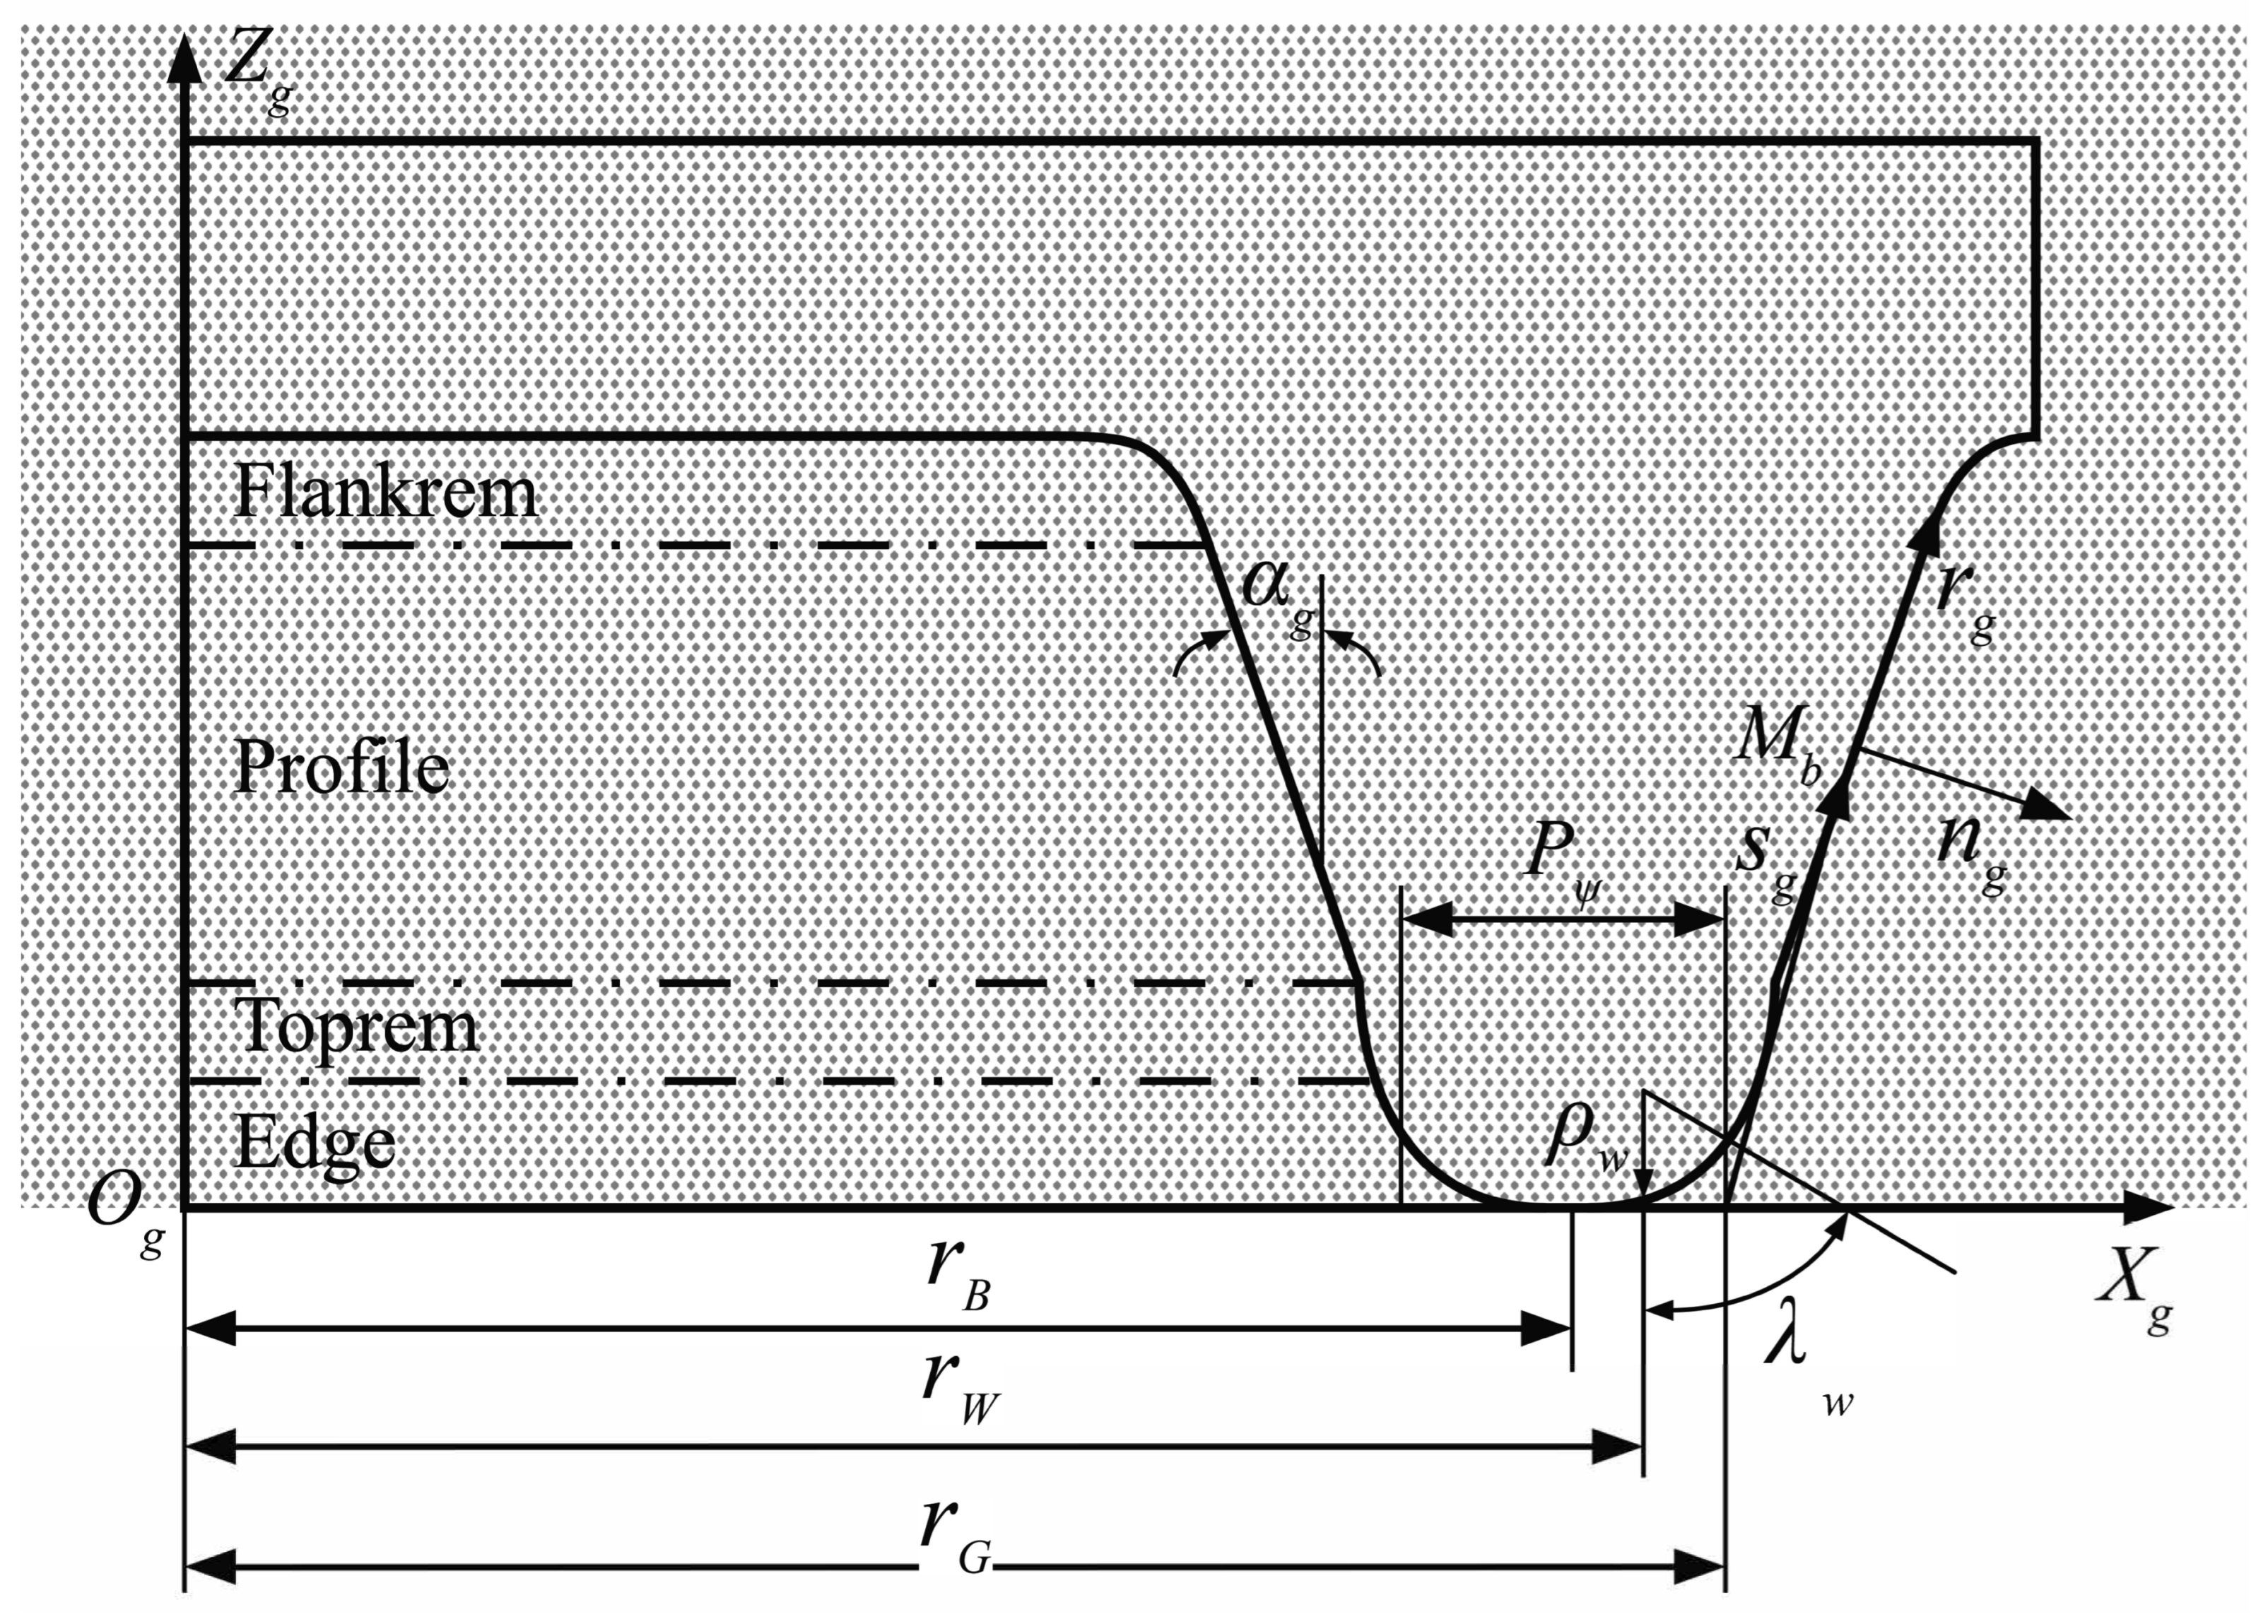
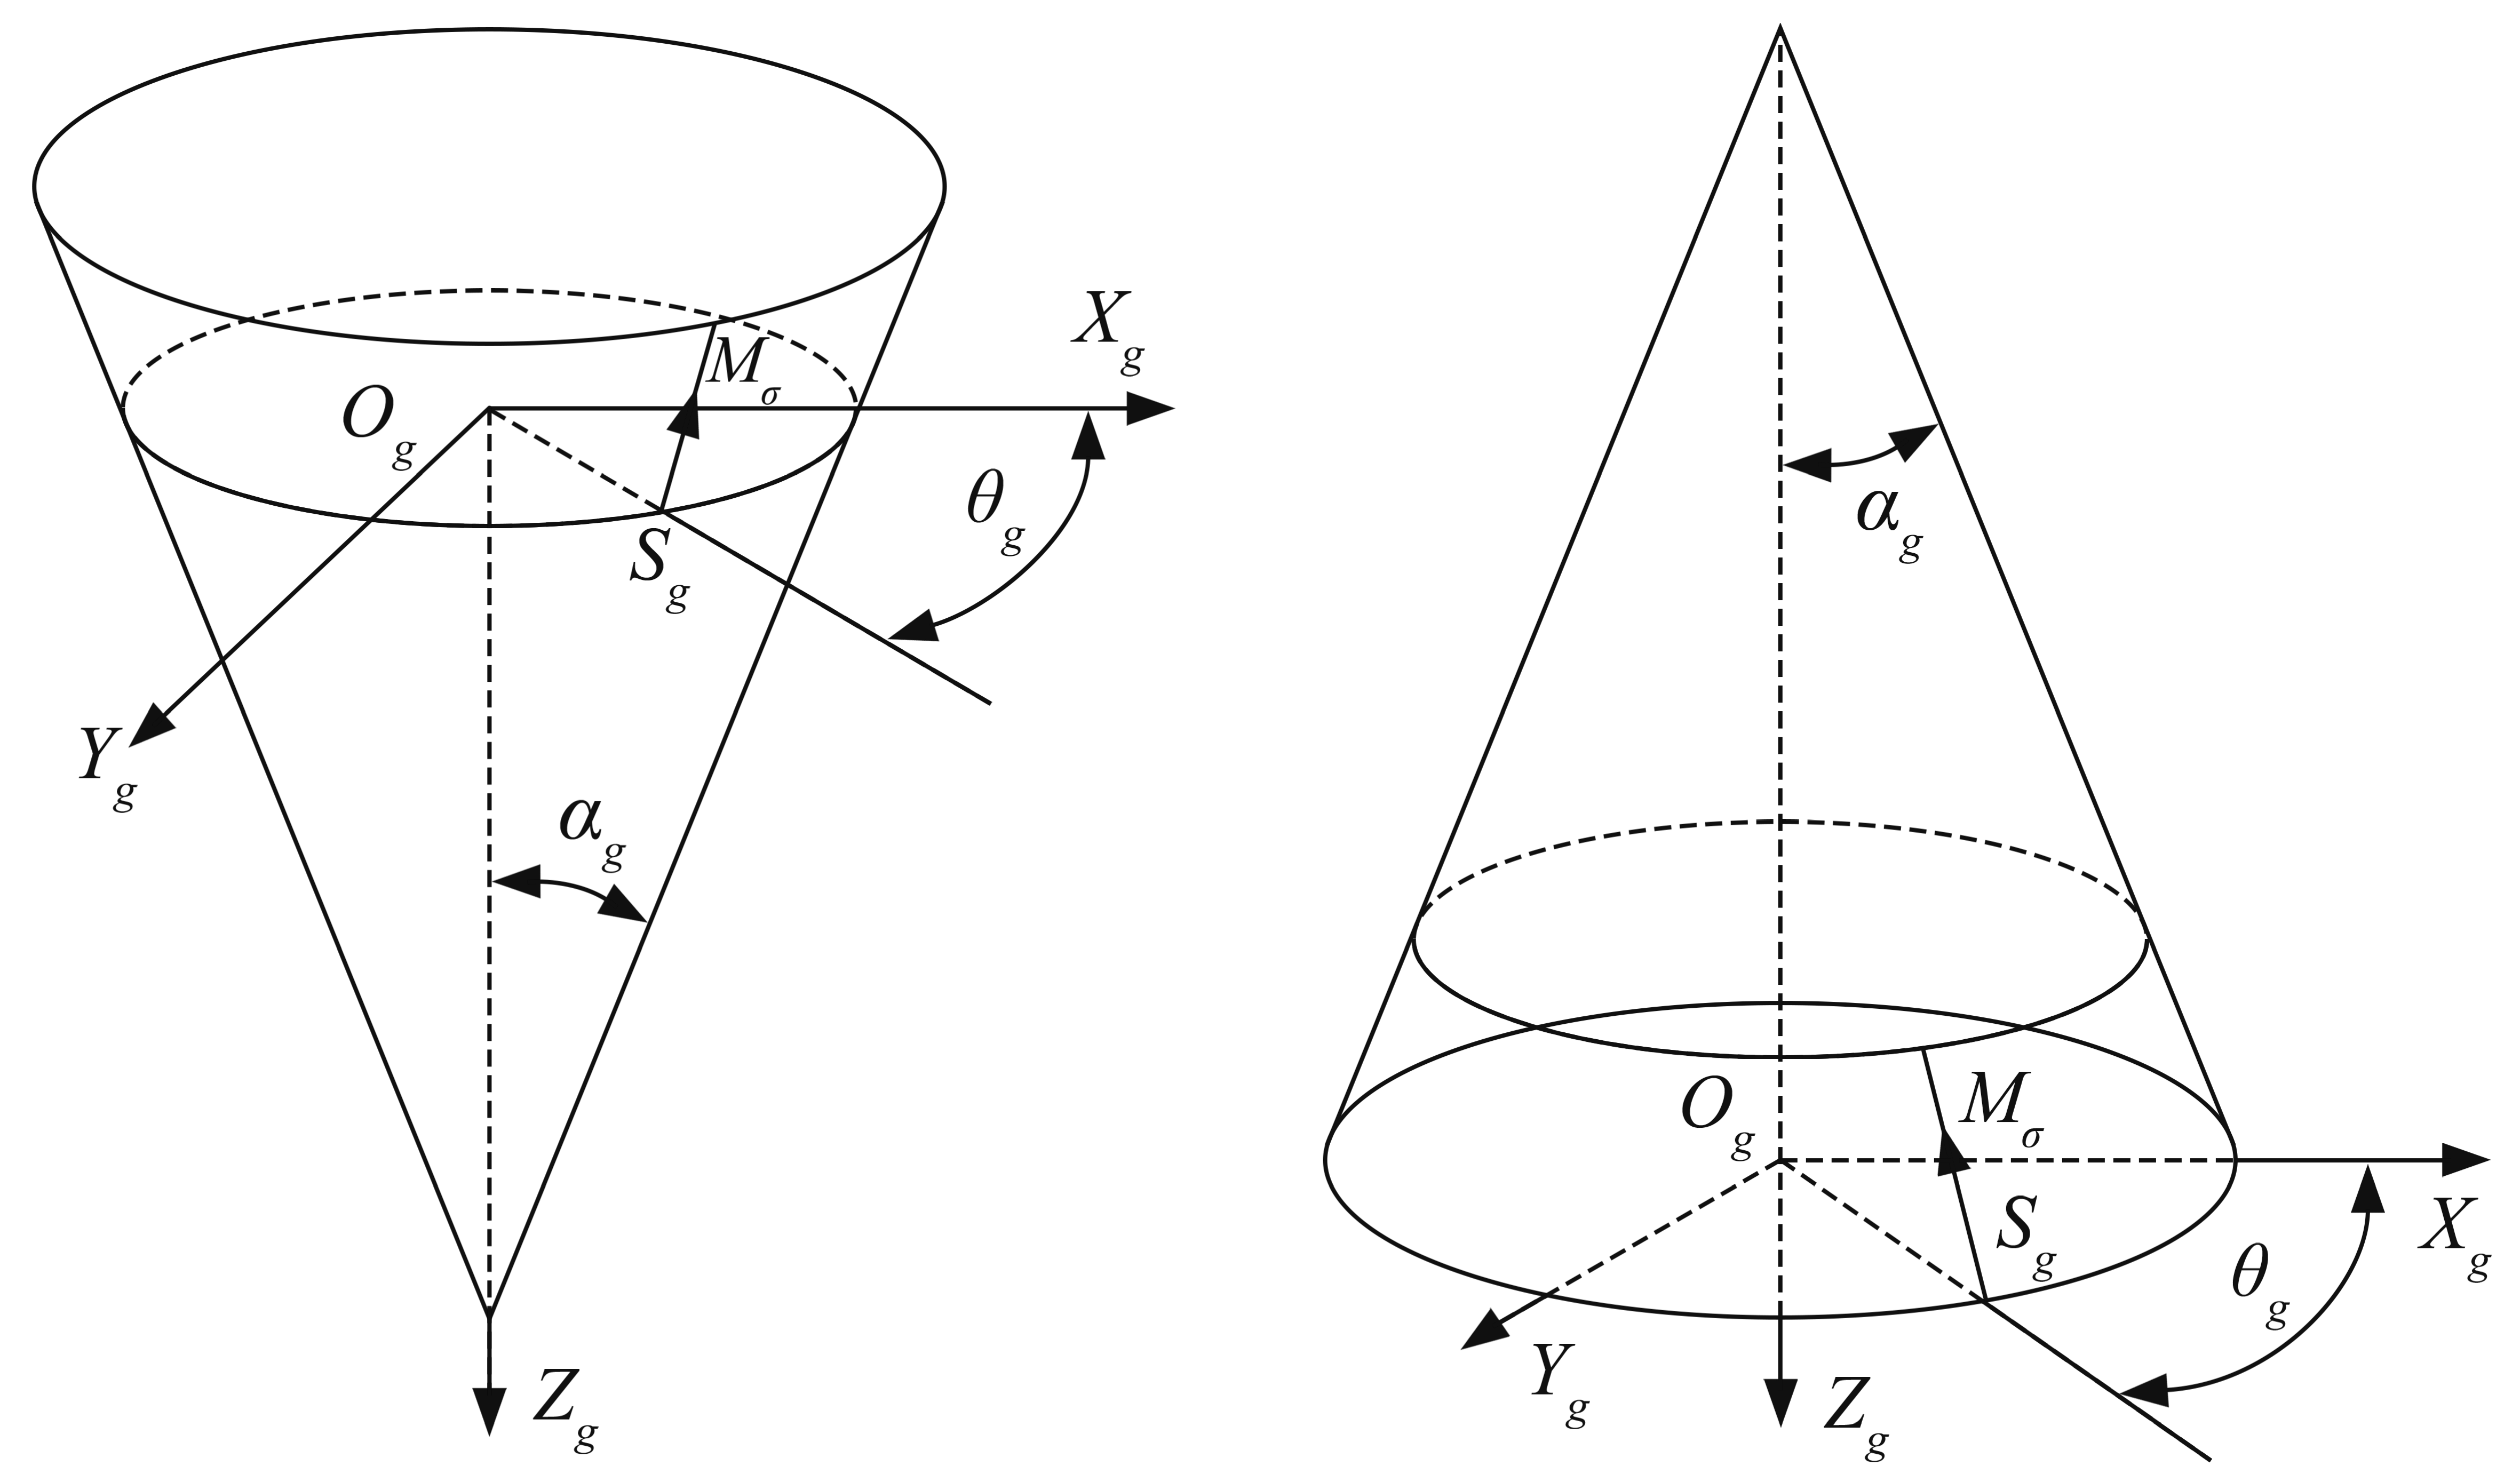
As shown in Figure 3, The cutting edge of the head-cutter blade is divided into four distinct sections: the edge, toprem, profile, and flankrem portions. The cutting surfaces are created by rotating the blade around the -axis with an angle of . The primary shaping of the gear tooth surface occurs through the profile section, which is characterized by a straight line with a profile angle of . The fillet on the gear tooth surface is generated by the edge section, which incorporates a corner radius of . Referring to Figure 3, an arbitrary point located on the cutting surface of the blade is determined by parameters and , as shown in Figure 4. The generating surface of the profile section of the head-cutter blade is expressed through the vector function as
where is the blade angle, denotes tooth surface parameters, and represents the head-cutter point radius. The upper signs in Equation (2) signify generation of the concave side of the gear tooth surface, whereas the lower signs correspond to the convex side.
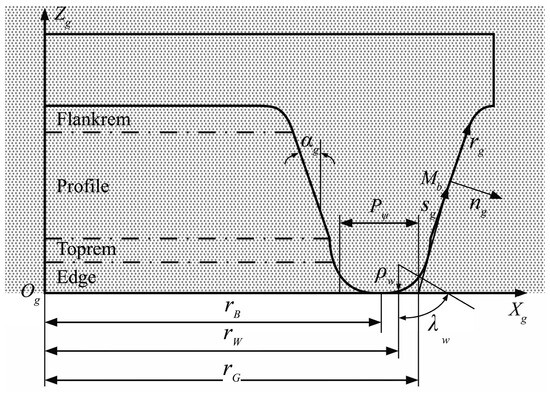
Figure 3.
The four distinct segments of blades.

Figure 4.
Blades and generating cones utilized in the gear generating tool: Specific generating tool cones designed for the concave and convex sides.
The unit normal vector to the generating surface of the profile is denoted by and is represented as
The generating surface relates to the edge section of the head-cutter blade, while is described by the vector function as
where . is the corner radius in the edge section of head-cutter blade for the fillet of the gear.
The unit normal to the generating surface of the edge section is denoted by and is represented as
The surface of the generated gear tooth, denoted as , is represented as
where is the rotation angle of the gear, and represents the transformation matrix from coordinate to .
here,
where is the relative speed vector of the head-cutter to the gear, and , are unit normal vectors of the head-cutter.
2.3. Kinematics of Universal Motion Concept (UMC)
The advent of modern CNC spiral bevel gear generating machines has significantly advanced the generation concept [27,28]. The UMC, which has been developed and seamlessly integrated with machine control software [29], greatly enhances the capabilities of free-form CNC spiral bevel generators. Figure 5 depicts the kinematic representation of the machine tool configurations for a UMC spiral bevel generator model. Each configuration is visualized as a moving element, and its motion is mathematically described through a polynomial function that is dependent on the cradle’s rotation angle. Despite the kinematic model’s foundation in mechanical machinery, we can incorporate the advanced capabilities of modern CNC machines by expressing the machine tool configurations as functions that vary with the cradle’s rotational increments, thereby eschewing the assumption of static, fundamental settings. namely,
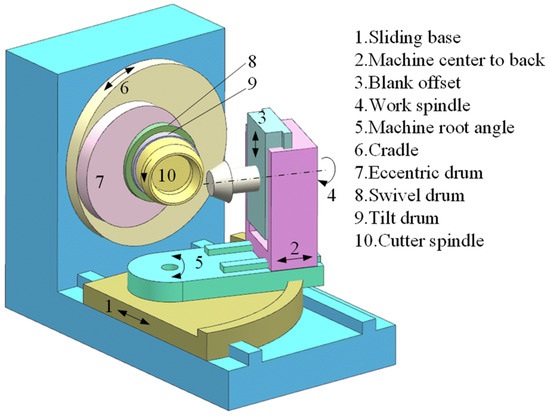
Figure 5.
A machine tool model of spiral bevel gears.
2.4. The Simulation of Generation Process
As described, both face hobbing and face milling procedures can be virtually simulated utilizing the mechanical UMC spiral bevel generator shown in Figure 5. In contrast to cradle-style machines, which are predicated on the spiral bevel gear generation principle involving a generating gear, CNC spiral bevel generators boast a more adaptable design. Nonetheless, the design of spiral bevel gears can be correlated to UMC spiral bevel generators by determining the appropriate machine tool configurations. Furthermore, the generating motions specified for UMC generators can be translated into the motions executed by CNC hypoid generators via computer programming. The six axes of CNC hypoid generators are actuated directly by servo motors, empowering them to execute precise motion functions. As a result, the machine tool configurations can be dynamically characterized as functions that vary with the cradle’s incremental angle q. To accurately portray the generation process, we dissect the relative motion components within the kinematic model depicted in Figure 5 and assign a unique coordinate system to each element. Given the generating roll increment angle q and using Equation (16), we may determine the generation process, as shown in Figure 6. The envelope of with three independent variables , and q is expressed as

Figure 6.
The generation process of the spiral bevel gear.
The generating roll is used in UMC processes and is associated with the rotations of the machine cradle and the work. It can be represented as
where and denote the angular speeds of the workpiece (the gear) and the cradle, respectively. is the ratio of roll.
3. Semi-Analytical Loaded Contact Model Based on Ease-Off Topography
3.1. Theoretical Ease-Off Topography
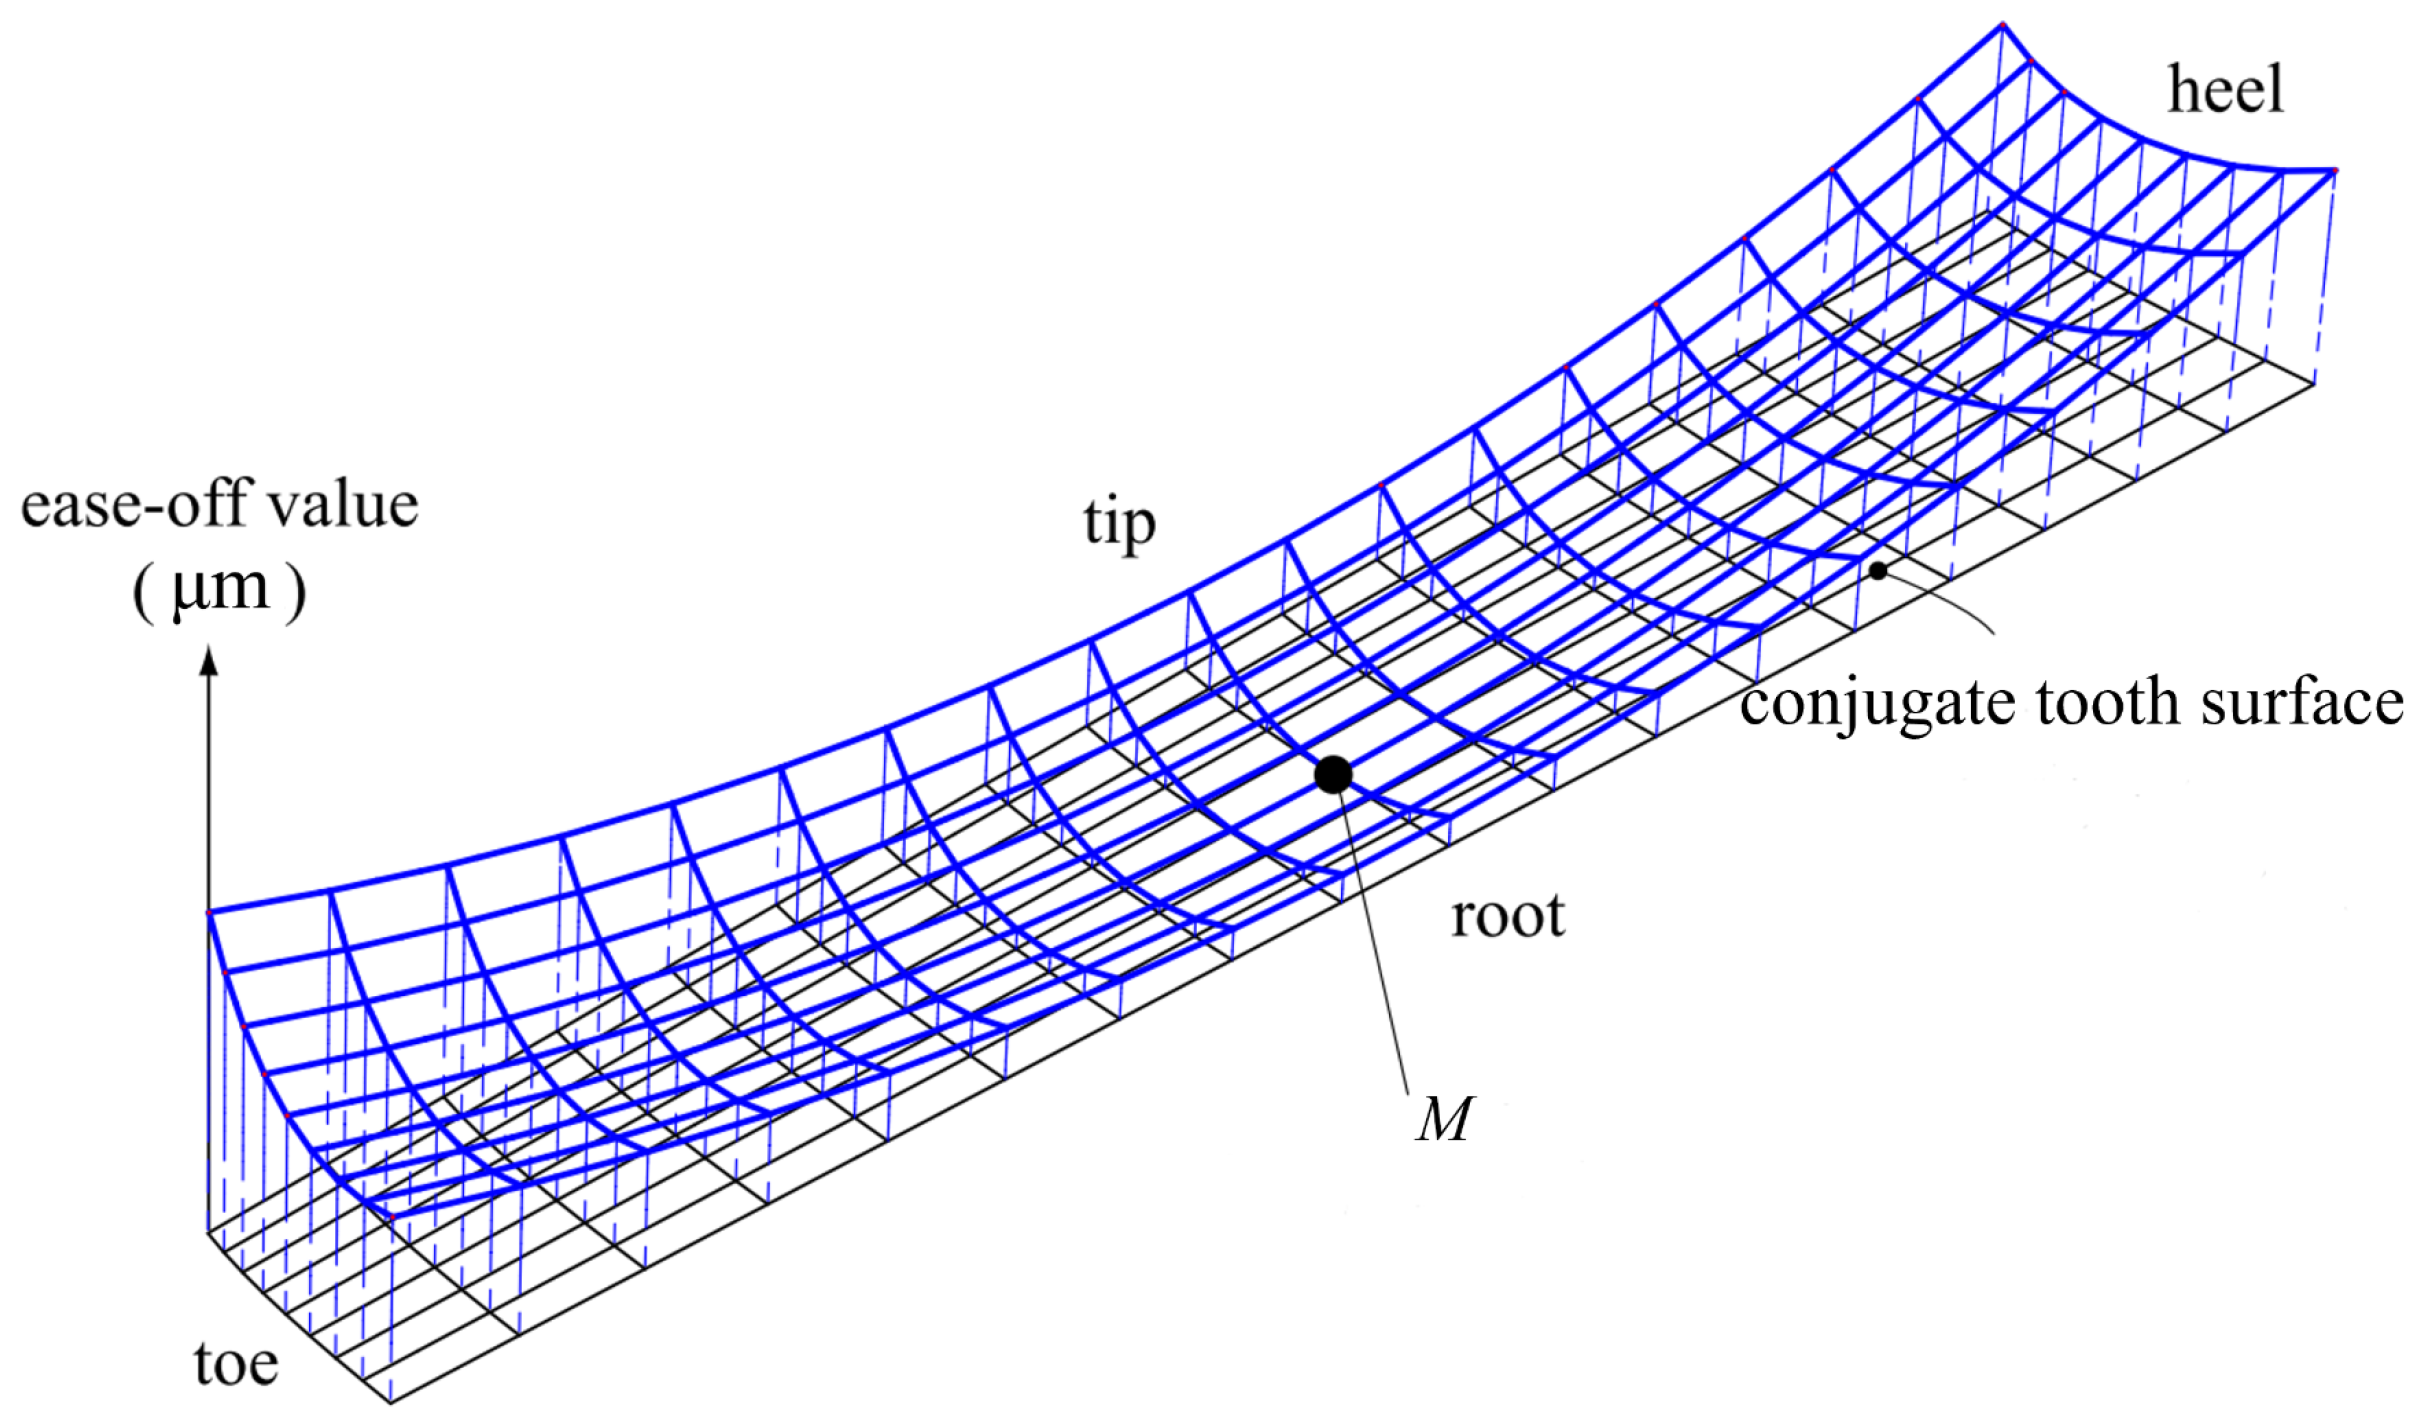
The ease-off value represents the perpendicular difference between the ease-off surface and the conjugate tooth surface. Figure 7 illustrates examples of gear ease-off topographies for the gear’s convex side, where the ease-off grids are based on areas of the gear tooth surfaces produced by higher-order motions described in Equations (19)–(22). If the gear tooth surface is produced by the pinion tooth surface under a constant rolling condition, as determined by the tooth numbers of both the pinion and the gear, the pinion ease-off can be defined as
where is the generating motion parameter of the pinion; represents the conjugate pinion surface generated by the gear tooth, which is determined by
where is the equation of meshing, and and are the coordinate transformation matrices from to . Similarly, the gear ease-off tooth surface can be defined by
where is the conjugate gear surface that is generated by the pinion tooth and is determined by
where and are coordinate transformation matrices from to .

Figure 7.
The ease-off topographies of the gear convex side.
3.2. Calculation of the Contact Line Direction
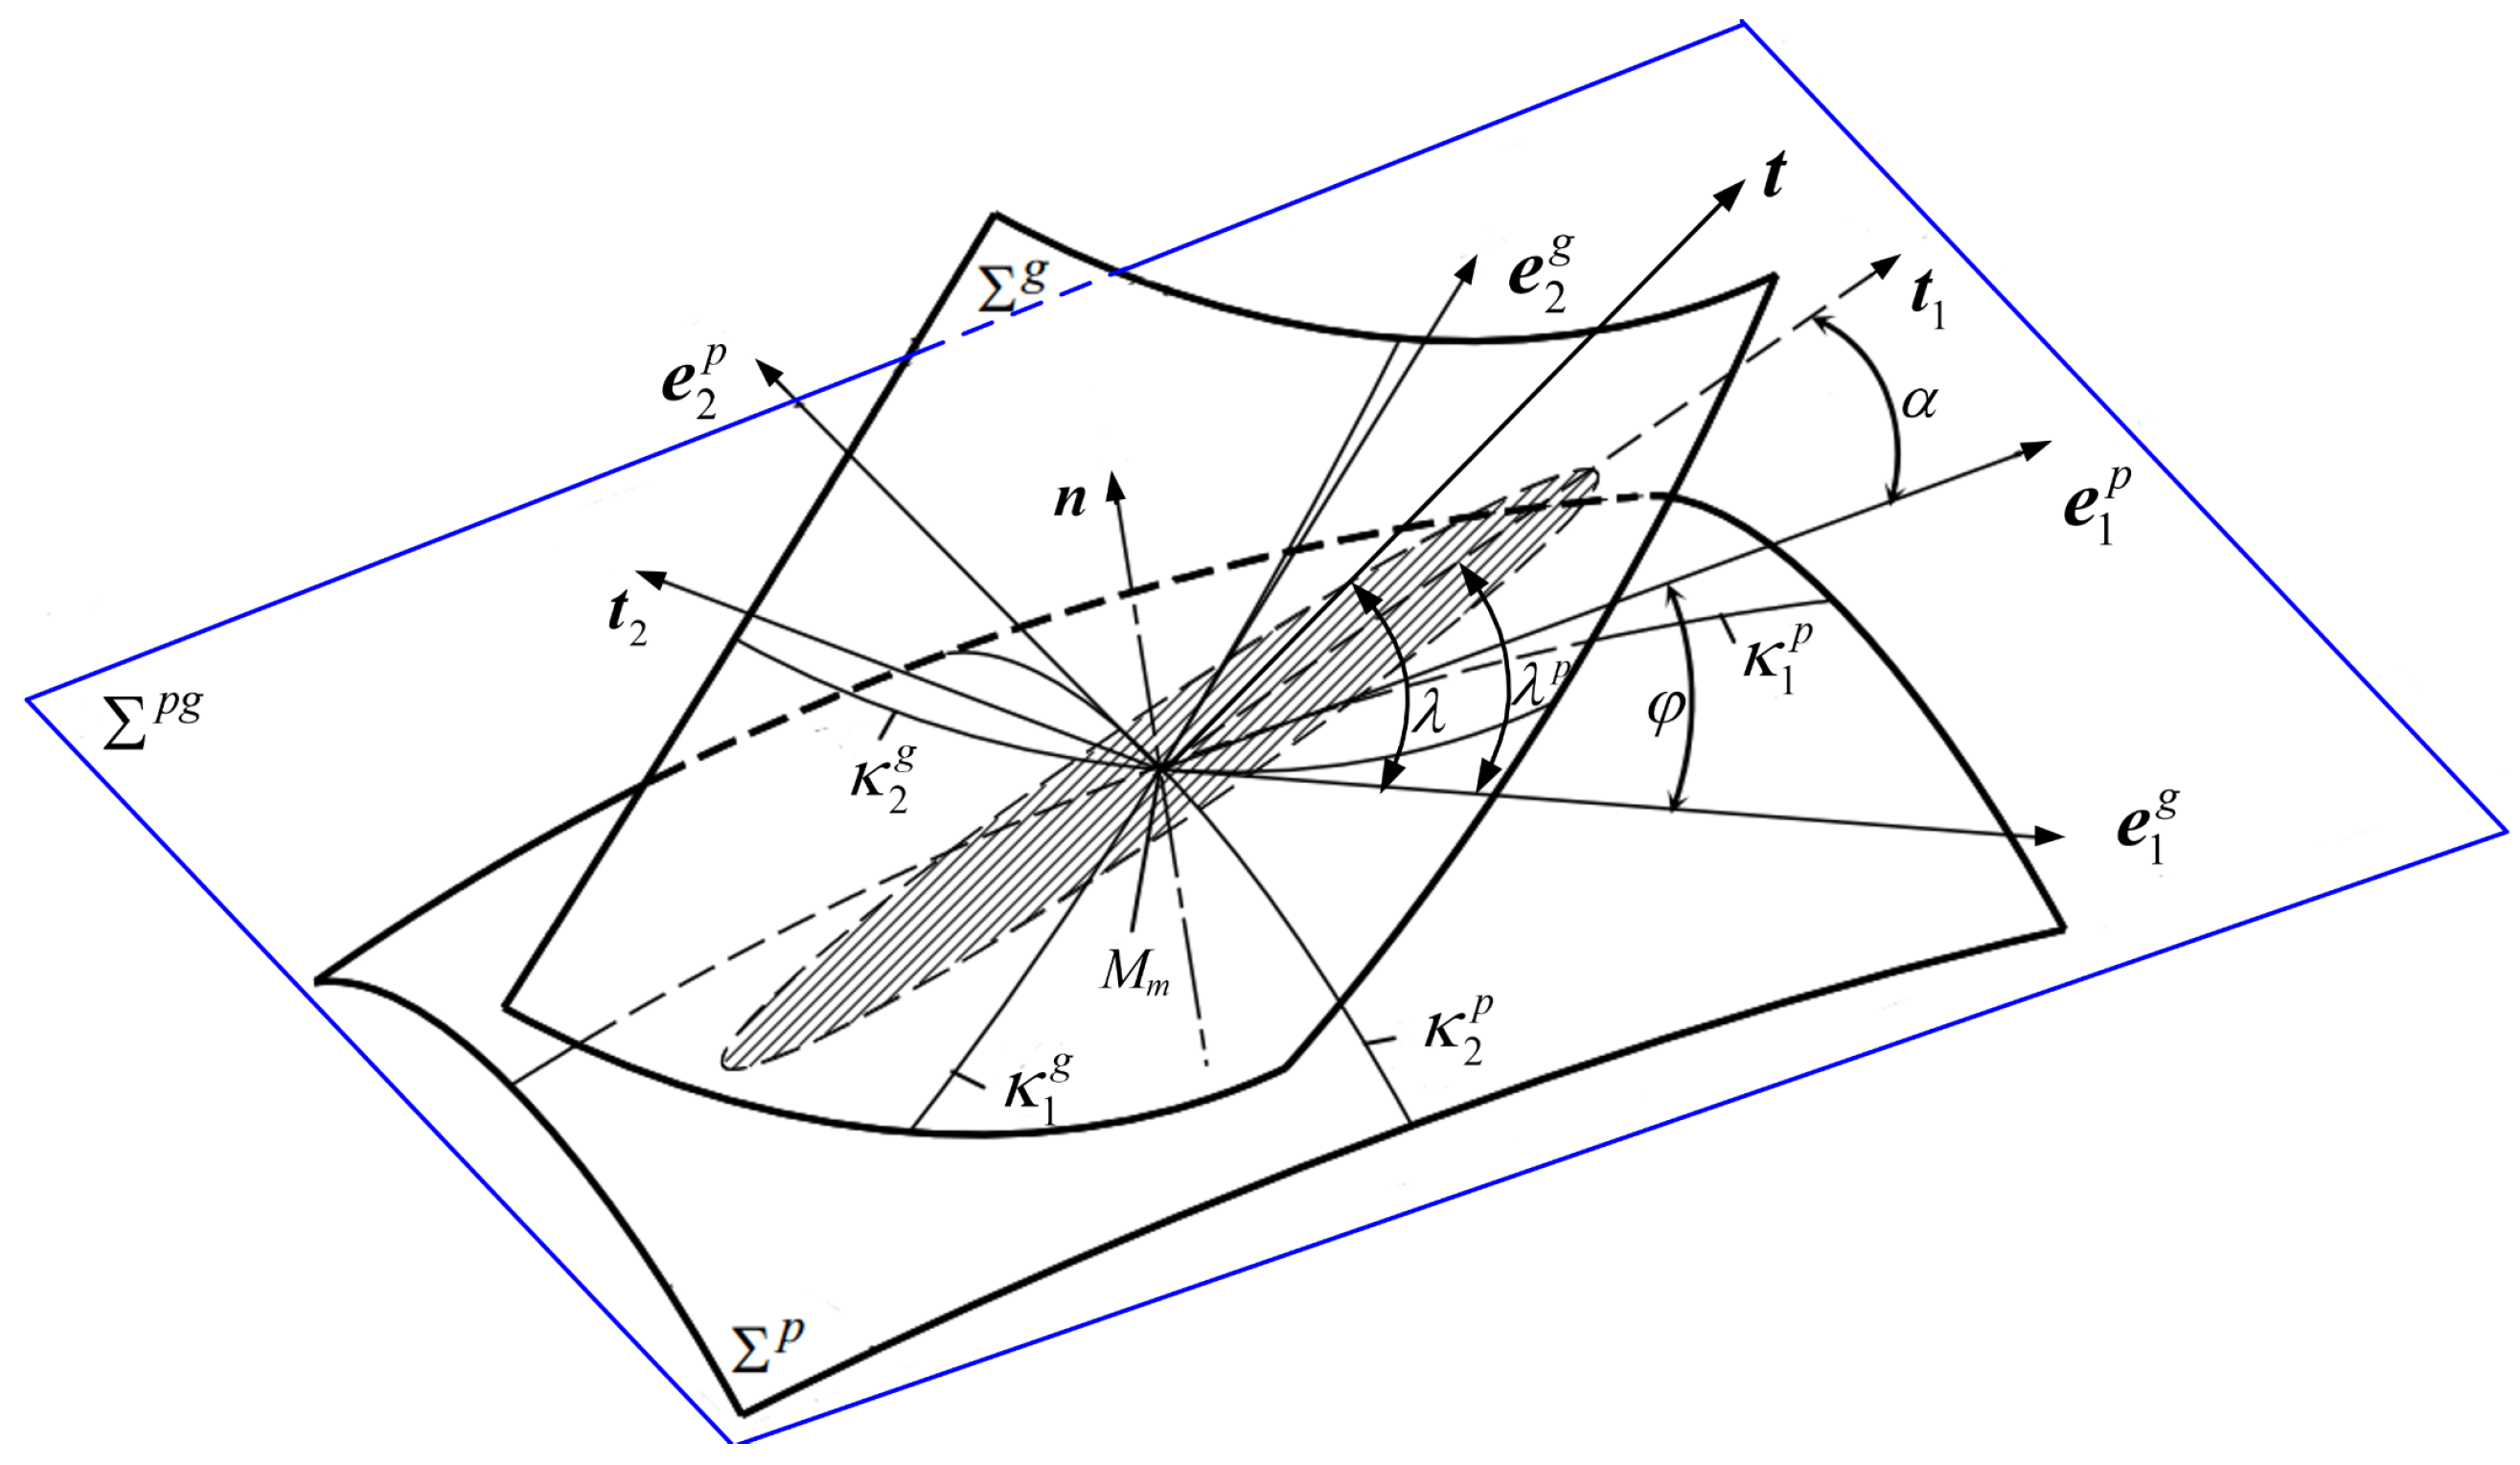
The principal axis of the contact ellipse, which arises during tooth contact under load, aligns itself with the direction of the contact line precisely at the point of contact. To ascertain the orientation of the principal axis of the contact ellipse, a surface is defined. The tangent plane contacts both gear tooth and pinion surface at . The normal curvature, which quantifies the rate of change of the surface’s direction to a given vector traversing the surface on is defined by
where and are normal curvatures along vector . The orientations of the major and minor axes of the contact ellipse can be delineated on the surface by identifying the principal directions, and . The principal directions, specifically and , can be identified on the surface to determine the major and minor axis orientations of the contact ellipse. As depicted in Figure 8, the principal orientations on the surface signify the extreme curvature values that occur as the direction of an arbitrary vector is varied. Using Euler’s equation in Equation (17), the normal curvature along any vector on a given surface can be expressed in terms of its principal curvatures, and .
where is the angle between and , and is the angle between and arbitrary vector , with both angles measured positively in the counter-clockwise direction. Consequently, the relative curvature along the vector can be expressed as
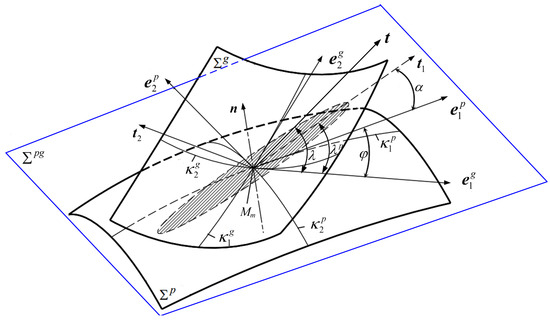
Figure 8.
A depiction of the local coordinate systems on the surface at a given instant of contact.
In Figure 8, to identify one of the principal directions that signify the direction of the contact line at the contact point on the surface , we search for the angles that correspond to the limiting curvature values can be obtained by setting . The angle corresponding to is denoted by ,
where .
3.3. Deformation Coordination Equation of a Contact Ellipse
During the meshing cycle of spiral bevel gears, the loaded tooth contact analysis is reiterated for each meshing position, enabling the determination of the distribution of instantaneous contact load across every contact ellipse. The elastic deformation is divided into two categories contact deformation and bending deformation. To ensure the meshing continuity between the pinion and the gear, the total deformation is constant at various contact locations. The deformation coordination equation of an arbitrary contact ellipse is defined by
where , ℓ is the index of meshing members, , is the quantity of meshing members at the present contact location, is the deformation measurement point coordinate, is the contact point coordinate, is the contact pressure at the contact point , is the bending flexibility of point correspond to contact point , is the contact flexibility of point on the meshing surface, is the deformation at point , is the passive gear rotation angle relative to the drive gear, and is the coefficient that transformation angle deformation to tooth coordinate, which can be represented as
Due to the total deformation of meshing teeth cannot be determined; the deformation coordination Equation (28) is statically indeterminate. It cannot be strictly solved. The total normal load of all contact points is the tangential load of gear transmission.
where is tangential pressure of the contact point , and is the radius of contact point around the drive gear axis. Substituting Equations (28) and (29) into Equation (30), one has
where
Based on the gear engagement at various contact locations, a composite flexibility matrix is constituted at the contact points on the tooth surface [30].
3.4. Semi-Analytical Contact Model for Loaded Tooth Contact Analysis
To accurately simulate the position and attributes of the contact pattern on the ease-off surface utilizing the semi-analytical loaded contact model, it is imperative to initially distribute the applied load along the major axis of the contact ellipse, spanning the entire actual contact width. On any contact ellipse , the half contact width, denoted as , of this contact ellipse is determined using Hertzian theory.
where and are the gear and Poisson’s ratios of the pinion, respectively. is the pressure at the contact point . b is tooth width. and are the elasticity moduli for materials of the pinion and gear, respectively. represents the equivalent radius of curvature that corresponds to the direction aligned with the major axis of the contact ellipse, which is defined as
where and represent the radii of curvature of the pinion and the gear at the location along the direction of the contact line, respectively, and is the pressure at the contact point that is determined by Hertzian theory.
where is the length of this contact ellipse, , in which is the unload separation distance, and is the normal load carried by this contact ellipse, .
4. Validation of the LTCA Model by Using CNC-Generated Tooth Surfaces
Typically, the installation state of gears does not perfectly align with the design specifications, leading to misalignments. These misalignments result in a “mismatched” spiral bevel gear pair, introducing uncertainty regarding the path of contact between the meshing tooth surfaces and the actual load distribution. This methodology is utilized to investigate the consequences of tooth inaccuracies and misalignments on various aspects, including the location of the contact path, the potential extent of the contact area, any separations within this potential contact area, and the angular deviations exhibited by the driven gear member from its theoretically precise position, as dictated by the gear tooth ratio.
4.1. Misalignments and Load Distribution of Spiral Bevel Gears
As is shown in Figure 9, the meshing of tooth surface is considered in the fixed coordinate system . In Figure 9a,b, movable coordinate system and are rigidly connected to pinion and gear, respectively. And both of the pinion and gear are around the Z-axis with a rotation angle. Auxiliary coordinate system and are on behalf of the rotation of pinion and gear, respectively. The misalignments of this system are calculated through coordinate system and relative to a fixed coordinate system , which is shown in Figure 9c. In Figure 9, and are axial displacement of pinion and gear, respectively, is a change of shaft angle, is the shortest distance between the two axis of pinion and gear when they are crossed but not intersected.

Figure 9.
Mesh coordinate system with misalignments. (a) Corner of pinion; and (b) Coner of gear; and (c) , , and with misalignments.
4.2. Validation of the LTCA Model by Simulating Various Misalignment Scenarios and Comparing Results with LTCA Software Analysis
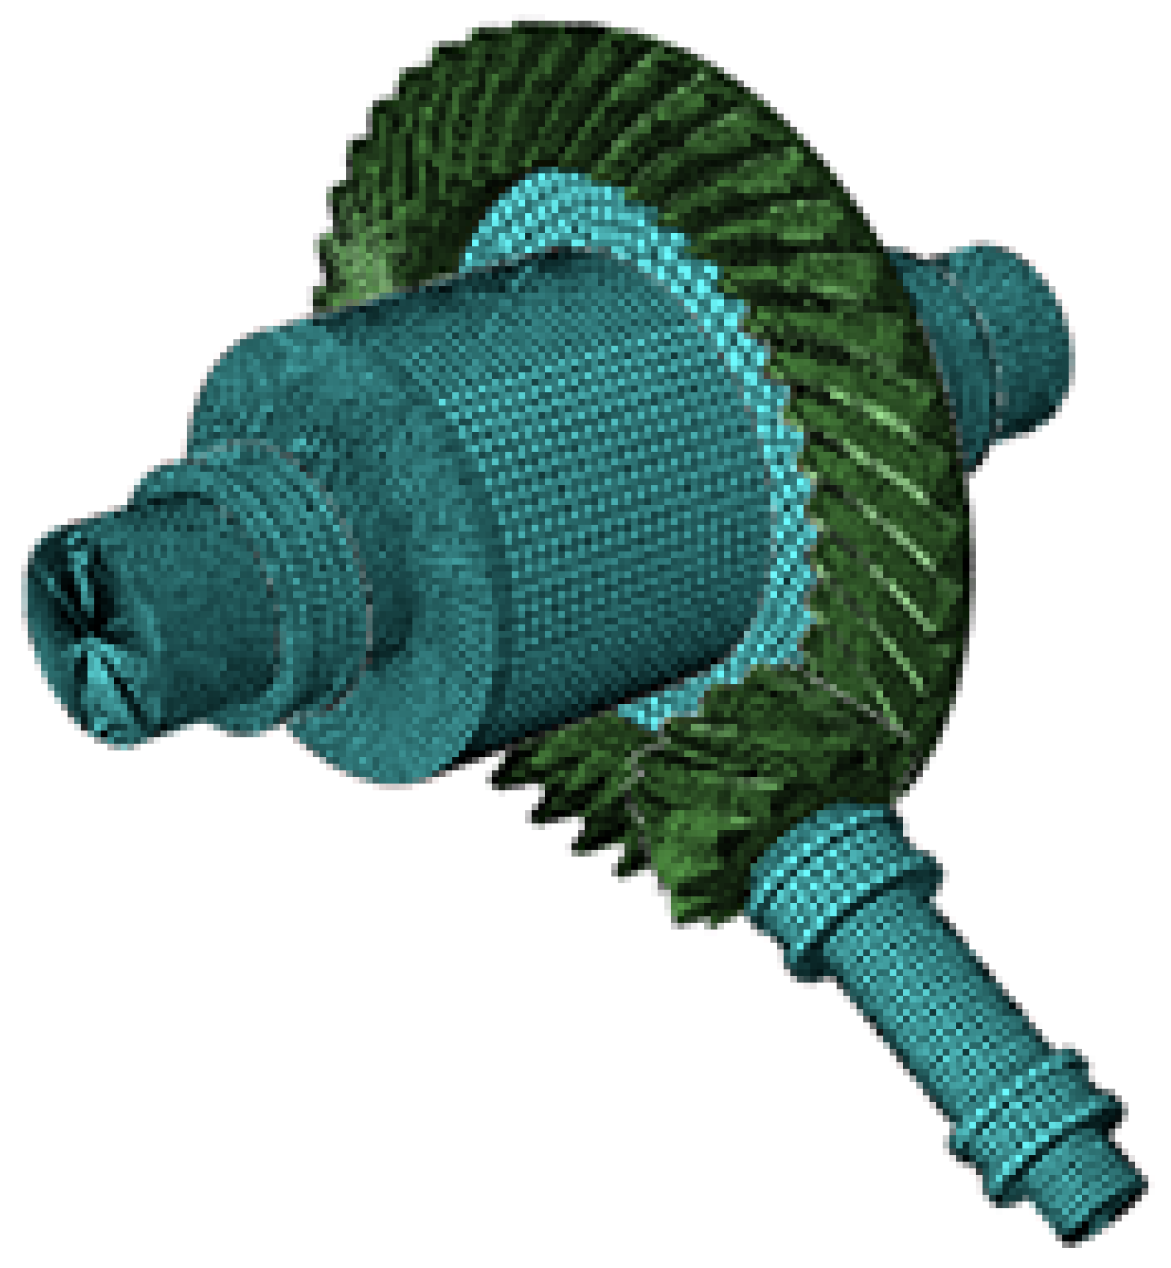
Based on the core parameters in Table 1, a 3D solid model is constructed in CAD and then imported into the finite element pre-processing software to obtain the finite element mesh model. The finite element meshes of the gear system are shown in Figure 10.

Table 1.
The geometric parameters of spiral bevel gear system.

Figure 10.
Finite element meshes of a spiral bevel gear system.
The gear finite element analysis model preprocessing and boundary conditions are set as follows, the same material properties are assigned to both the pinion and the gear, with an elastic modulus of 209,000 MPa and a Poisson’s ratio of 0.3. The elastic modulus of the gear’s support structure is 197,000 MPa, with a Poisson’s ratio of 0.3. The element property uses hexahedral first-order reduced integration elements (C3D8R). An implicit, static analysis algorithm is adopted with a step size of 0.02 during the analysis process, requiring 50 steps to complete the analysis. This setup helps to obtain the analysis structure at different contact positions during meshing. The tooth surfaces of the gear and pinion are defined as a contact pair, with the friction coefficient in the tangential contact properties set to 0.1. Reference points are established at the center of the bearing installation positions on both the pinion shaft and the gear support structure. Coupling constraints are created between the reference points and the bearing contact surfaces. Two perpendicular spring elements are added between the reference points and fixed spatial points, with a spring stiffness of 120,000 N/mm. Contact force, contact pressure, stress, and displacement are set as the output variables. The boundary conditions are defined by constraining all degrees of freedom of both the gear and pinion except for rotation along the axis, and setting the rotation angle of the pinion to 240°.
To ensure convergence during the gear contact analysis process, the analysis is divided into three steps: In the first analysis step, a small rotation is applied to the degree of freedom along the gear’s axis while fixing the pinion. This eliminates the backlash and brings the tooth surfaces into contact, ensuring that no rigid body displacement occurs, and that the initial contact iteration converges. In the second analysis step, the small rotation of the gear is removed, and a torque is applied to the degree of freedom along its axis to analyze the contact state under the initial load. In the third analysis step, the fixed constraint on the pinion’s axis is removed, and a rotational boundary condition is applied to simulate the load analysis during the pinion’s rotation.
According to the regulation of national standard GB11365-89 [31], three misalignments should be controlled when installing spiral bevel gears, such as gear ring axial displacement , gear shaft spacing deviation , and gear shaft angle deviation . According to the gear basic parameters in Table 1 (precision grade level 7), the limit deviation of is ; the limit deviation of is . The limit deviation of is , and the equivalent angular deviation is .
4.3. Influence of Gear Ring Axial Displacement
Set , and take two limit values in the finite element analysis. Adjust the model considering the misalignments and make it no interference between gears. The obtained FEA results are presented in Table 2. It is observable that the inclination angle of the contact path remains relatively constant, while the contact pattern shifts from the toe towards the heel of the mating teeth as the value of increases, as shown in Table 2.

Table 2.
FEA results with gear ring axial displacement.
4.4. Influence of Gear Shaft Spacing Deviation
Set , and take two limit values in the finite element analysis. Adjust the model considering the misalignments and make it no interference between gears. The obtained FEA results are presented in Table 3. It can be noted that the contact pattern is much smaller and the edge contact occurs on the tip of pinion and gear teeth. The contact pattern moves the heel towards the toe of the mating teeth with the increase of , as shown in Table 3.

Table 3.
FEA results with gear shaft spacing deviation.
4.5. Influence of Gear Angular Deviation
Set , and take two limit values in the finite element analysis. Adjust the model considering the misalignments and make it no interference between gears. The obtained FEA results are presented in Table 4. It can be seen that the angular misalignment has a significant influence on contact pattern and by this on the corresponding meshing performance, too. The contact pattern moves the heel towards the toe of the mating teeth with the increase of , as shown in Table 4.

Table 4.
FEA results with gear shaft angle deviation .
4.6. Comparison with LTCA Software
We also make twelve instantaneous contact patterns under different meshing angles within one tooth surface graph. So that we can get the approximate contact pattern figure of the gear tooth surface, as is shown in Figure 11. Compared with the results of LTCA software and measurement, as shown in Figure 12, this method and LTCA software results are very similar in contact pattern. The LTCA results of spiral bevel gears, based on high-precision virtual machining for misalignments, show high accuracy.

Figure 11.
Illustration of contact pattern and path of contact of misalignments are = −0.30 mm, = 0.20 mm (convex) (torque = 100 N·m).

Figure 12.
Results of LTCA software simulation and measurement (torque = 100 N·m). (a) Results of path of contact simulation. (b) Results of contact pattern simulation. (c) Results of contact pattern measurement.
In this section, the geometric models of the spiral bevel gears are precisely generated using the face milling method, resulting in a maximal error of only 0.08094 μm between the theoretical tooth surfaces and the virtual generating tooth surfaces. This high level of precision provides a reliable research platform for the dynamic performance analysis of spiral bevel gears. Building on this, an advanced LTCA method has been developed that incorporates the virtual generating gear with various misalignments. As illustrated in Figure 11, the FEA results demonstrate the apparent influence of these misalignments on the path of contact and the contact pattern, providing deeper insights into the meshing behavior and performance of the gears.
5. Conclusions
In this study, we have explored a comprehensive methodology for LTCA of spiral bevel gears by integrating ease-off surface computation with high-precision virtual generating tooth surfaces. The main objectives were to enhance the accuracy and reliability of LTCA by combining advanced computational methods and validating the approach through practical simulations and theoretical analysis. The results demonstrate significant improvements in predicting and analyzing the performance of spiral bevel gears under various misalignment conditions. We have found that the semi-analytical models significantly improve the prediction of loaded contact patterns by utilizing ease-off surfaces derived from the UGM. This approach effectively combines error-sensitivity analysis with Hertzian contact theory to provide a robust framework for analyzing the contact properties of spiral bevel gears. The ease-off surfaces, optimized through sophisticated corrections in the machining process, ensure high accuracy in the generated tooth surfaces, leading to better performance and durability of the gears. The mathematical kinematical model is directly linked to the machine tool settings of a spiral bevel generator, serving as the foundation for microgeometry optimization and evaluation of spiral bevel gear contact characteristics. This model can be applied to ease-off processes using the generated method. Error-sensitivity analysis delves into the effects of misalignments on the positioning, dimensions, and configuration of the contact pattern. Based on the findings of this analysis, the subsequent conclusions can be drawn:
- The UGM describes the microgeometry and contact properties of ease-off surfaces, and the error-variation equation is developed to reflect the inherent relationships between errors and variations in machine tool settings.
- Advanced semi-analytical LTCA method is developed based on the ease-off spiral bevel gears with misalignments. The results of semi-analytical LTCA illustrate an investigation of the influence of misalignments on the path of contact and contact pattern.
- Through the application of the semi-analytical LTCA method, it is feasible to introduce misalignments during the ease-off process, to relocate the center of the contact pattern to a specific, pre-determined location on the tooth surface.Using the semi-analytical LTCA method, misalignments could be introduced during the ease-off process to move the contact pattern center to a certain predetermined position on the tooth surface.
Complementing this, the finite element analysis (FEA) based LTCA model we have also developed considers various misalignment errors, such as pinion offset and adjustment errors along the pinion and gear axis. The validation of this approach through comparisons with LTCA software analysis results confirms its feasibility and effectiveness in predicting the impact of misalignments on contact patterns and load distribution. The integration of findings reveals that the proposed methodologies not only improve the accuracy of LTCA but also offer a comprehensive and reliable tool for analyzing the performance of spiral bevel gears. By incorporating error-sensitivity analysis and virtual generating tooth surfaces, the integrated approach provides a detailed understanding of the contact properties and the impact of misalignments on gear performance. This synthesis highlights the importance of precise error modeling and the role of advanced computational methods in optimizing the design and analysis of spiral bevel gears.
The proposed methodologies also demonstrate the significant impact of ease-off surfaces and high-precision virtual generating surfaces on the contact properties of gears. The semi-analytical models and the FEA-based LTCA models together ensure that the generated tooth surfaces are highly accurate, leading to better noise reduction, improved contact pressure distribution, and enhanced mechanical efficiency. The validation through practical simulations and comparisons with LTCA software analysis results further confirm the robustness of the proposed approach.
Author Contributions
Conceptualization, Y.L. and D.S.; methodology, Y.L.; software, Y.L.; validation, Y.L. and D.S.; formal analysis, Y.L.; investigation, L.C.; resources, L.C.; data curation, Y.L.; writing—original draft preparation, Y.L.; writing—review and editing, X.M.; visualization, L.C.; supervision, L.C.; project administration, L.C. All authors have read and agreed to the published version of the manuscript.
Funding
This research was funded by the project: High-Performance Geometric Constraint Solving Engine, the Project Number is 2023YFB3309003.
Institutional Review Board Statement
Not applicable.
Informed Consent Statement
Not applicable.
Data Availability Statement
Data are contained within the article.
Acknowledgments
The authors gratefully acknowledge the financial support from Huazhong University of Science and Technology for the research and development of intelligent design and basic key technologies of CNC under Grant No. 2021AAB001.
Conflicts of Interest
The authors declare no conflicts of interest.
References
- Li, G.; Zhu, W. A Review on Up-to-Date Gearbox Technologies and Maintenance of Tidal Current Energy Converters. Energies 2022, 15, 9236. [Google Scholar] [CrossRef]
- Li, G.; Zhu, W. Design and power loss evaluation of a noncircular gear pair for an infinitely variable transmission. Mech. Mach. Theory 2021, 156, 104137. [Google Scholar] [CrossRef]
- Li, G.; Wang, Z.; Zhu, W.; Kubo, A. A function-oriented active form-grinding method for cylindrical gears based on error sensitivity. Int. J. Adv. Manuf. Technol. 2017, 92, 3019–3031. [Google Scholar] [CrossRef]
- He, D.; Ding, H.; Tang, J. A new analytical identification approach to the tooth contact points considering misalignments for spiral bevel or hypoid gears. Mech. Mach. Theory 2018, 121, 785–803. [Google Scholar] [CrossRef]
- Chen, P.; Wang, S.; Zou, H. Efficient semi-analytic method for single tooth contact analysis of loaded spiral bevel gears. Appl. Math. Model. 2024, 129, 754–779. [Google Scholar] [CrossRef]
- Temirkhan, M.; Amrin, A.; Spitas, V.; Spitas, C. Convergence and accuracy problems of the conventional TCA model–Critical analysis and novel solution for crowned spur gears. Proc. Inst. Mech. Eng. Part C J. Mech. Eng. Sci. 2024, 238, 724–736. [Google Scholar] [CrossRef]
- Marciniec, A.; Pacana, J.; Pisula, J.M.; Fudali, P. Comparative analysis of numerical methods for the determination of contact pattern of spiral bevel gears. Aircr. Eng. Aerosp. Technol. 2018, 90, 359–367. [Google Scholar] [CrossRef]
- Li, G.; Wang, Z.; Kubo, A. The modeling approach of digital real tooth surfaces of hypoid gears based on non-geometric-feature segmentation and interpolation algorithm. Int. J. Precis. Eng. Manuf. 2016, 17, 281–292. [Google Scholar] [CrossRef]
- Simon, V.V. Multi-objective optimization of hypoid gears to improve operating characteristics. Mech. Mach. Theory 2020, 146, 103727. [Google Scholar] [CrossRef]
- Moslem, M.; Zippo, A.; Iarriccio, G.; Bergamini, L.; Pellicano, F. Loaded and unloaded tooth contact analysis of spiral bevel gears in consideration of misalignments. Insight-Non-Test. Cond. Monit. 2022, 64, 442–446. [Google Scholar] [CrossRef]
- Li, G.; Wang, Z.; Zhu, W. Prediction of surface wear of involute gears based on a modified fractal method. ASME J. Tribol. 2019, 141, 031603. [Google Scholar] [CrossRef]
- Jiang, J.; Luo, Q.; Wang, L.; Qiao, L.; Li, M. Review on logarithmic spiral bevel gear. J. Braz. Soc. Mech. Sci. Eng. 2020, 42, 400. [Google Scholar] [CrossRef]
- Ghionea, A.; Constantin, G.; Predincea, N.; Sandu, C. Adjustemnt Aspects of Gear Hobbing Machines in Diagonal Milling. In Proceedings of the 16th International Conference on Manufacturing Systems—ICMaS, Bucharest, Romania, 7–8 October 2007; pp. 73–76. [Google Scholar]
- Simon, V.V. Improvements in the mixed elastohydrodynamic lubrication and in the efficiency of hypoid gears. Proc. Inst. Mech. Eng. Part J J. Eng. Tribol. 2020, 234, 795–810. [Google Scholar] [CrossRef]
- Liu, Z.; Li, F.; Xu, Z.; He, Q. Semi-analytical loaded tooth contact analysis method for spiral bevel gears. Int. J. Mech. Sci. 2023, 253, 108329. [Google Scholar] [CrossRef]
- Li, F.; Wang, S.; Chen, P.; Li, Z.; Li, L.; Peng, Q. Multi-objective variable parameter optimization algorithm for spiral bevel gear tooth surface considering meshing efficiency and contact performance. J. Mech. Sci. Technol. 2022, 36, 3547–3559. [Google Scholar] [CrossRef]
- Ding, H.; Zhou, Y.; Tang, J.; Zhong, J.; Zhou, Z.; Wan, G. A novel operation approach to determine initial contact point for tooth contact analysis with errors of spiral bevel and hypoid gears. Mech. Mach. Theory 2017, 109, 155–170. [Google Scholar] [CrossRef]
- Fu, Y.; Zhuo, Y.; Zhou, X.; Wan, B.; Lv, H.; Wang, Z. Theoretical and experimental study on contact characteristics of spiral bevel gears under quasi-static and large loading conditions. Appl. Sci. 2020, 10, 5109. [Google Scholar] [CrossRef]
- Ding, H.; Li, H.; Shao, W.; Tang, J. Prediction and control for local bearing contact-based collaborative grinding of non-orthogonal aerospace spiral bevel gears. Mech. Syst. Signal Process. 2021, 160, 107841. [Google Scholar] [CrossRef]
- Kolivand, M.; Kahraman, A. A load distribution model for hypoid gears using ease-off topography and shell theory. Mech. Mach. Theory 2009, 44, 1848–1865. [Google Scholar] [CrossRef]
- Simon, V.V. Multi-objective optimization of the manufacture of face-milled hypoid gears on numerical controlled machine tool. Proc. Inst. Mech. Eng. Part B J. Eng. Manuf. 2021, 235, 1120–1130. [Google Scholar] [CrossRef]
- Stanasel, I.; Ghionea, A.; Ghionea, I.; Ungur, P.; Stanasel, O. The Mathematical Model for the Generation of the Cylindrical Gear With Curved Cycloidal Teeth. In Proceedings of the International Design Engineering Technical Conferences and Computers and Information in Engineering Conference, Las Vegas, NV, USA, 4–7 September 2007; Volume 48086, pp. 279–287. [Google Scholar]
- Vivet, M. Advanced Techniques for Numerical Contact Analysis in Spiral Bevel Gears. Ph.D. Thesis, Università della Calabria, Heverlee, Italy, 2019. [Google Scholar]
- Mathur, T.D.; Smith, E.C.; Bill, R.C. A novel loaded tooth contact analysis procedure with application to internal–external straight bevel gear mesh in a pericyclic drive. J. Tribol. 2021, 143, 101201. [Google Scholar] [CrossRef]
- Li, G.; Zhu, W. An Active Ease-Off Topography Modification Approach for Hypoid Pinions Based on a Modified Error Sensitivity Analysis Method. ASME J. Mech. Des. 2019, 141, 093302. [Google Scholar] [CrossRef]
- Efstathiou, C.; Tapoglou, N. Simulation of spiral bevel gear manufacturing by face hobbing and prediction of the cutting forces using a novel CAD-based model. Int. J. Adv. Manuf. Technol. 2022, 122, 3789–3813. [Google Scholar] [CrossRef]
- Gabiccini, M. A twist exponential approach to gear generation with general spatial motions. Mech. Mach. Theory 2009, 44, 382–400. [Google Scholar] [CrossRef]
- Simon, V.V. Influence of tooth modifications on tooth contact in face-hobbed spiral bevel gears. Mech. Mach. Theory 2011, 46, 1980–1998. [Google Scholar] [CrossRef]
- Simon, V.V. Manufacture of optimized face-hobbed spiral bevel gears on computer numerical control hypoid generator. J. Manuf. Sci. Eng. 2014, 136, 031008. [Google Scholar] [CrossRef]
- Doe, J. Simulation of hypoid gears dynamic performance. J. Mech. Eng. 2020, 45, 123–135. [Google Scholar]
- GB 11365-89; Terms for Resistance Strain Gauges. China Standards Press: Beijing, China, 1989.
Disclaimer/Publisher’s Note: The statements, opinions and data contained in all publications are solely those of the individual author(s) and contributor(s) and not of MDPI and/or the editor(s). MDPI and/or the editor(s) disclaim responsibility for any injury to people or property resulting from any ideas, methods, instructions or products referred to in the content. |
© 2024 by the authors. Licensee MDPI, Basel, Switzerland. This article is an open access article distributed under the terms and conditions of the Creative Commons Attribution (CC BY) license (https://creativecommons.org/licenses/by/4.0/).

