1. Introduction
It is considered that the processing by cold plastic deformation of metallic materials includes several ways of changing the shape and dimensions of the workpiece, sometimes without the generation of chips, at ambient temperature. Such processes allow the production of parts with small thicknesses and machining allowances, as there are situations where no machining allowances are foreseen. The main advantages of most cold plastic deformation processes are their high productivity and fairly high accuracy, which lead to good interchangeability of manufactured parts and relatively low processing costs when it comes to manufacturing a large number of parts [
1,
2,
3,
4,
5,
6,
7,
8,
9]. A certain improvement of the mechanical properties of the workpiece materials is also possible at the level of the surface layer resulting from the processing due to the manifestation of some hardening effects.
The punching is considered a cold plastic deformation process in which a part of the workpiece in the form of a strip or sheet is separated by cutting. The part detached from the workpiece constitutes the waste. Sometimes, the part made by punching may still require post-processing to reach the finished part.
Punching continues to be a concern for manufacturing engineering researchers, although it has been known for a relatively long time.
Thus, Neugebauer et al. researched the influence exerted by the pre-strain of the workpiece on the stress state of the material in the case of an accuracy punching process [
10]. They found that the width of the material flow in the area resulting from punching is different in the case of steel and aluminum alloy parts, respectively.
Shiratori and Komatsu researched micro-punching with a slant angle [
11]. One of the researched aspects concerned the possibilities of controlling some work parameters by means of a high-accuracy punch and die.
The modification of the punching die in order to increase the tool life and productivity were problems addressed by Arvind et al. [
12]. They considered some factors capable of influencing the mentioned output parameters of the punching process.
Senn and Liewald considered punching high-strength steels by using dies with slant angles [
13]. They found that it is possible to have a lateral deviation of the punch and that the slant angle influences this deviation.
Dheringe and Shelke designed the punch and the die for a punching operation applicable to a workpiece strip type [
14]. They used the Ansys software to characterize some aspects of the behavior of the die during the punching process.
A self-punching riveting process was optimized by Bagherpour et al. by using the analytic hierarchy process method [
15]. They considered that by using optimal values of the input parameters in the optimized process, superior quality of the joints is ensured. The influence of the die parameters on the deformation behavior of the rivet and sheets in the case of a self-punching riveting process was still studied by Liu et al. [
16].
Wojtkowiak and Talaśka published the results of research that highlighted how the clearance between the punch and the die exerts influence on the deviation from the prescribed value of the diameter of a punching hole. The research was carried out for two distinct values of the connection radius of the active area of the punch in the case of a workpiece made of composite material with a polymer matrix [
1].
Shaheen et al. have developed a research that aimed at the optimization of the compound die-punching process using, for this purpose, the finite element method, the Taguchi method, regression analysis, and analysis of variance [
8]. They appreciated that by using the obtained results, it becomes possible to improve the quality of the products, including from the point of view of reducing the burr height.
A method of punching with a slant angle aimed at improving the quality of the surfaces resulting from cutting was investigated by Schenek and Liewald [
17]. They observed that it is possible to generate asymmetric characteristics of the generated surface along the hole circumference.
A progressive die capable of ensuring high productivity and high precision of the processed parts was designed by Skampardonis et al. [
18]. The design problem of a die for simultaneously punching 18 holes in a sheet metal workpiece was addressed by Nivrutti et al. [
19]. It was found that the proposed die ensures a diminishing of the machining time and improves the accuracy of the manufacturing process.
The extent to which the modification of some material properties of the sheet workpieces led to the generation of inclined surfaces was investigated by Katoh et al. [
20]. To this end, they resorted to highlighting the variation of Vickers hardness of austenitic stainless steel in a cross-section through the plate subjected to the punching process.
In this article, the problem of evaluating the processing accuracy of some surfaces made by the application of the punching in the case of workpieces in the form of sheets of three distinct metallic materials was addressed. The punching of square-shaped holes was preferred. An initial analysis of the conditions in which the punching process is carried out allowed the revelation of the parameters of interest pursued in this case and, respectively, the factors capable of exerting influence on the parameters of interest. The use of the finite element method has revealed some interesting aspects regarding the processes that develop in the processing area. Afterward, the paper presents the results of experimental research designed to highlight the influence of the clearance between the punch and the die, the workpiece thickness, the punching speed, and the intended size of the square hole side on the actual size of the square hole side and, respectively, on the height of the burr generated by the punching process. The experimental results were used to determine some power-type function mathematical models corresponding to the two output parameters of the punching process. Some statistical analyses of the obtained experimental results were also performed.
According to the opinions of the authors of this article, the main new aspects proposed by the content of the article refer to (a) addressing the problem of highlighting the influence exerted by some input factors in the punching process in the case of making square-shaped holes; (b) revealing some aspects of the process through simulation using the finite element method; (c) researching some detailed aspects of the process with the help of a device designed and manufactured for this purpose; (d) the identification of empirical mathematical models able to highlight the direction of manifestation and the intensity of the influence exerted by some input factors in the punching process of square-shaped holes on the accuracy corresponding to the side of the obtained square hole.
2. Materials and Methods
2.1. Initial Considerations Regarding the Punching Process and the Accuracy of the Surfaces Achieved by This Process
As previously mentioned, the sheet punching process involves the rectilinear movement of a punch during the working stroke, which gradually penetrates the material of the workpiece and subsequently into the hole in the die, causing the separation of a part of the workpiece in the form of a sheet or strip (
Figure 1). The workpiece is initially placed between the puncher and the die, and, in some cases, before the puncher acts on it, it is subjected to a pressing on the die plate. In this way, creases are avoided on the supposedly flat surface of the obtained part. As a result of the process, a burr of a certain thickness and height may appear on the surface of the workpiece resulting from the exit of the puncher after punching or on the entrance surface of the part separated from the workpiece.
If the characteristics of a system are attributed to the punching process, the output parameters of the process can be considered:
the productivity of the punching process, evaluated, for example, by the number of holes made in a certain unit of time;
the accuracy of the dimensions that characterize the hole obtained by punching; the more complex the cross-section this hole has, the more dimensions there will be specific to the obtained hole;
characteristics of the surface condition generated by punching; usually, the values of some parameters of the roughness of these surfaces are taken into consideration, respectively, the change in micro-hardness of the surface layer resulting from punching;
the size of the forces generated by the punching process, the values of which determine the dimensions of the puncher and, respectively, the power of the pressing equipment on which the punching process takes place;
the size (height and thickness) of the burr generated by the punching process;
the extent to which the process or equipment is sufficiently versatile to be able to be applied when parts of distinct materials, with different shapes and dimensions, etc., are needed.
The values of these output parameters of the punching process are influenced to a greater or lesser extent by the values of the process input factors. Such input factors are [
9,
21,
22,
23,
24,
25,
26,
27,
28,
29,
30]:
the chemical composition of the workpiece material;
some physical-mechanical properties of the workpiece material;
the metallographic structure of the workpiece material; the punching process can take place along a direction perpendicular to the direction of the fibers generated by the sheet or strip lamination process or along a direction that forms a certain angle with the direction of the fibers;
the dimensions of the hole to be made by punching and the thickness of the workpiece;
the structure and mode of operation of the punch used for the materialization of the punching process;
some characteristics of the equipment on which the punching process is performed, such as the rigidity of the different subassemblies of the pressing equipment and the press equipment itself, the geometric precision of some of the components of the pressing equipment, the precision of the movement of the mobile subassemblies of the pressing equipment;
some aspects that characterize the conditions for carrying out the punching process, such as the values of the average speed or the speed at a given moment of the subassembly acting on the puncher or the size of the clearance between the puncher and the hole in the die. The speed is determined by taking into account the length of the working stroke of the movable subassembly of the puncher and the number of double strokes per minute;
the nature and some properties of the materials of the components in the active areas of the puncher and the die and the level of wear of these tool areas;
some dimensions that characterize the active areas of the puncher and the die, etc.
It should be noted that the values of the output parameters from the punching process can also be influenced by some disturbing factors, whose values are more difficult to control. Such factors can be the inhomogeneity of the workpiece material, exemplified, for example, by the variation of some physical-mechanical properties of the workpiece along some of its surfaces, dimensional, shape, and mutual position deviations of the workpiece surfaces, the degree of wear of the puncher and the die, the variation in the speed of the puncher in the working stroke, the variation in the size of the clamping pressure of the workpiece material, etc.
The diametral size of the surface of the part separated from the workpiece differs from the outer diameter of the puncher and the inner diameter of the hole in the die. This leads to the definition of a so-called clearance between the two active elements of the die.
2.2. Modeling Using the Finite Element Method of Some Aspects Regarding the Dimensional Accuracy of the Surfaces Obtained by Punching
Using the finite element method (FEM), it was aimed to simulate the development of the punching process under the same conditions in which the experimental investigations will take place. The software used was Ansys 2023 R2 researcher license with the explicit dynamics module. Siemens Solid Edge 2023 Teacher’s Edition and, later, Ansys Space Claim were used to design the 3D assembly. Since the process requires a lot of computing power, it was decided to use half geometry, but the results were extended for the entire assembly by means of the symmetry option contained in the explicit dynamics module of Ansys.
The 3D geometry thus defined was later imported into Space Claim for the design of edges along the fracture lines produced by the action of the puncher on the workpiece. The same procedure was also applied to the bottom of the processing area, where the workpiece meets the die edges. Such a situation allows the use of a contact match option for matching purposes.
The material considered for the workpiece was Ansys’s NL aluminum alloy, which exhibits a non-linear (NL) behavior and was assigned mechanical properties similar to those of the aluminum alloy used for the experimental tests.
Half of the geometry was imported into explicit dynamics, and the region of symmetry option was used to obtain relevant results applicable to the entire assembly.
The connections branch includes contacts and body interactions. A bonded contact type was used between the lower face of the workpiece and the die, and the other contact was set as a frictionless type between the puncher and the upper face of the workpiece. The so-called frictionless solution was chosen because the purpose of the analysis was to cut the workpiece material in a short time. Under these conditions, a frictional contact type is less relevant to the intended objective of the analysis.
Interactions were allowed between all bodies. Meshing included a patch-conforming method that uses tetrahedrons that have been assigned to all bodies.
The designed edges along the fracture lines on the faces of the workpiece were dimensioned with an element size of 0.25 mm relative to the rest of the assembly (
Figure 2). A contact match option was used to align the nodes for all three bodies based on the type of contact mentioned above. A patch-conforming method with tetrahedrons was applied to mesh the entire assembly. A global element size of 0.5 mm was also used. 33,453 nodes and 144,172 elements were thus generated for the entire assembly. Mesh metric only indicated tetrahedral elements with 4 nodes (Tet4).
Boundary conditions include a fixed support, which was set to the lower face of the die, and a downward pushing force, which was established on the upper face of the puncher. The force is defined by components in relation to the Global Coordinate System. It limits its action only to the Z axis with the same value as the one from experimental tests, with the other two components from axes X and Y receiving 0 [N] in value. The analysis settings include one step with 0.009 end time.
Erosion controls allow a 100% geometric deformation limit. The results show the stress distribution evaluated according to the von Mises criteria and the total strain for the entire process. Initially, it can be seen how the stress is distributed along the fracture lines before entering the plastic domain of the material (
Figure 3). It is followed by a slight bending in the center of the workpiece. It peaks at 2146.5 MPa in the estimated time frame.
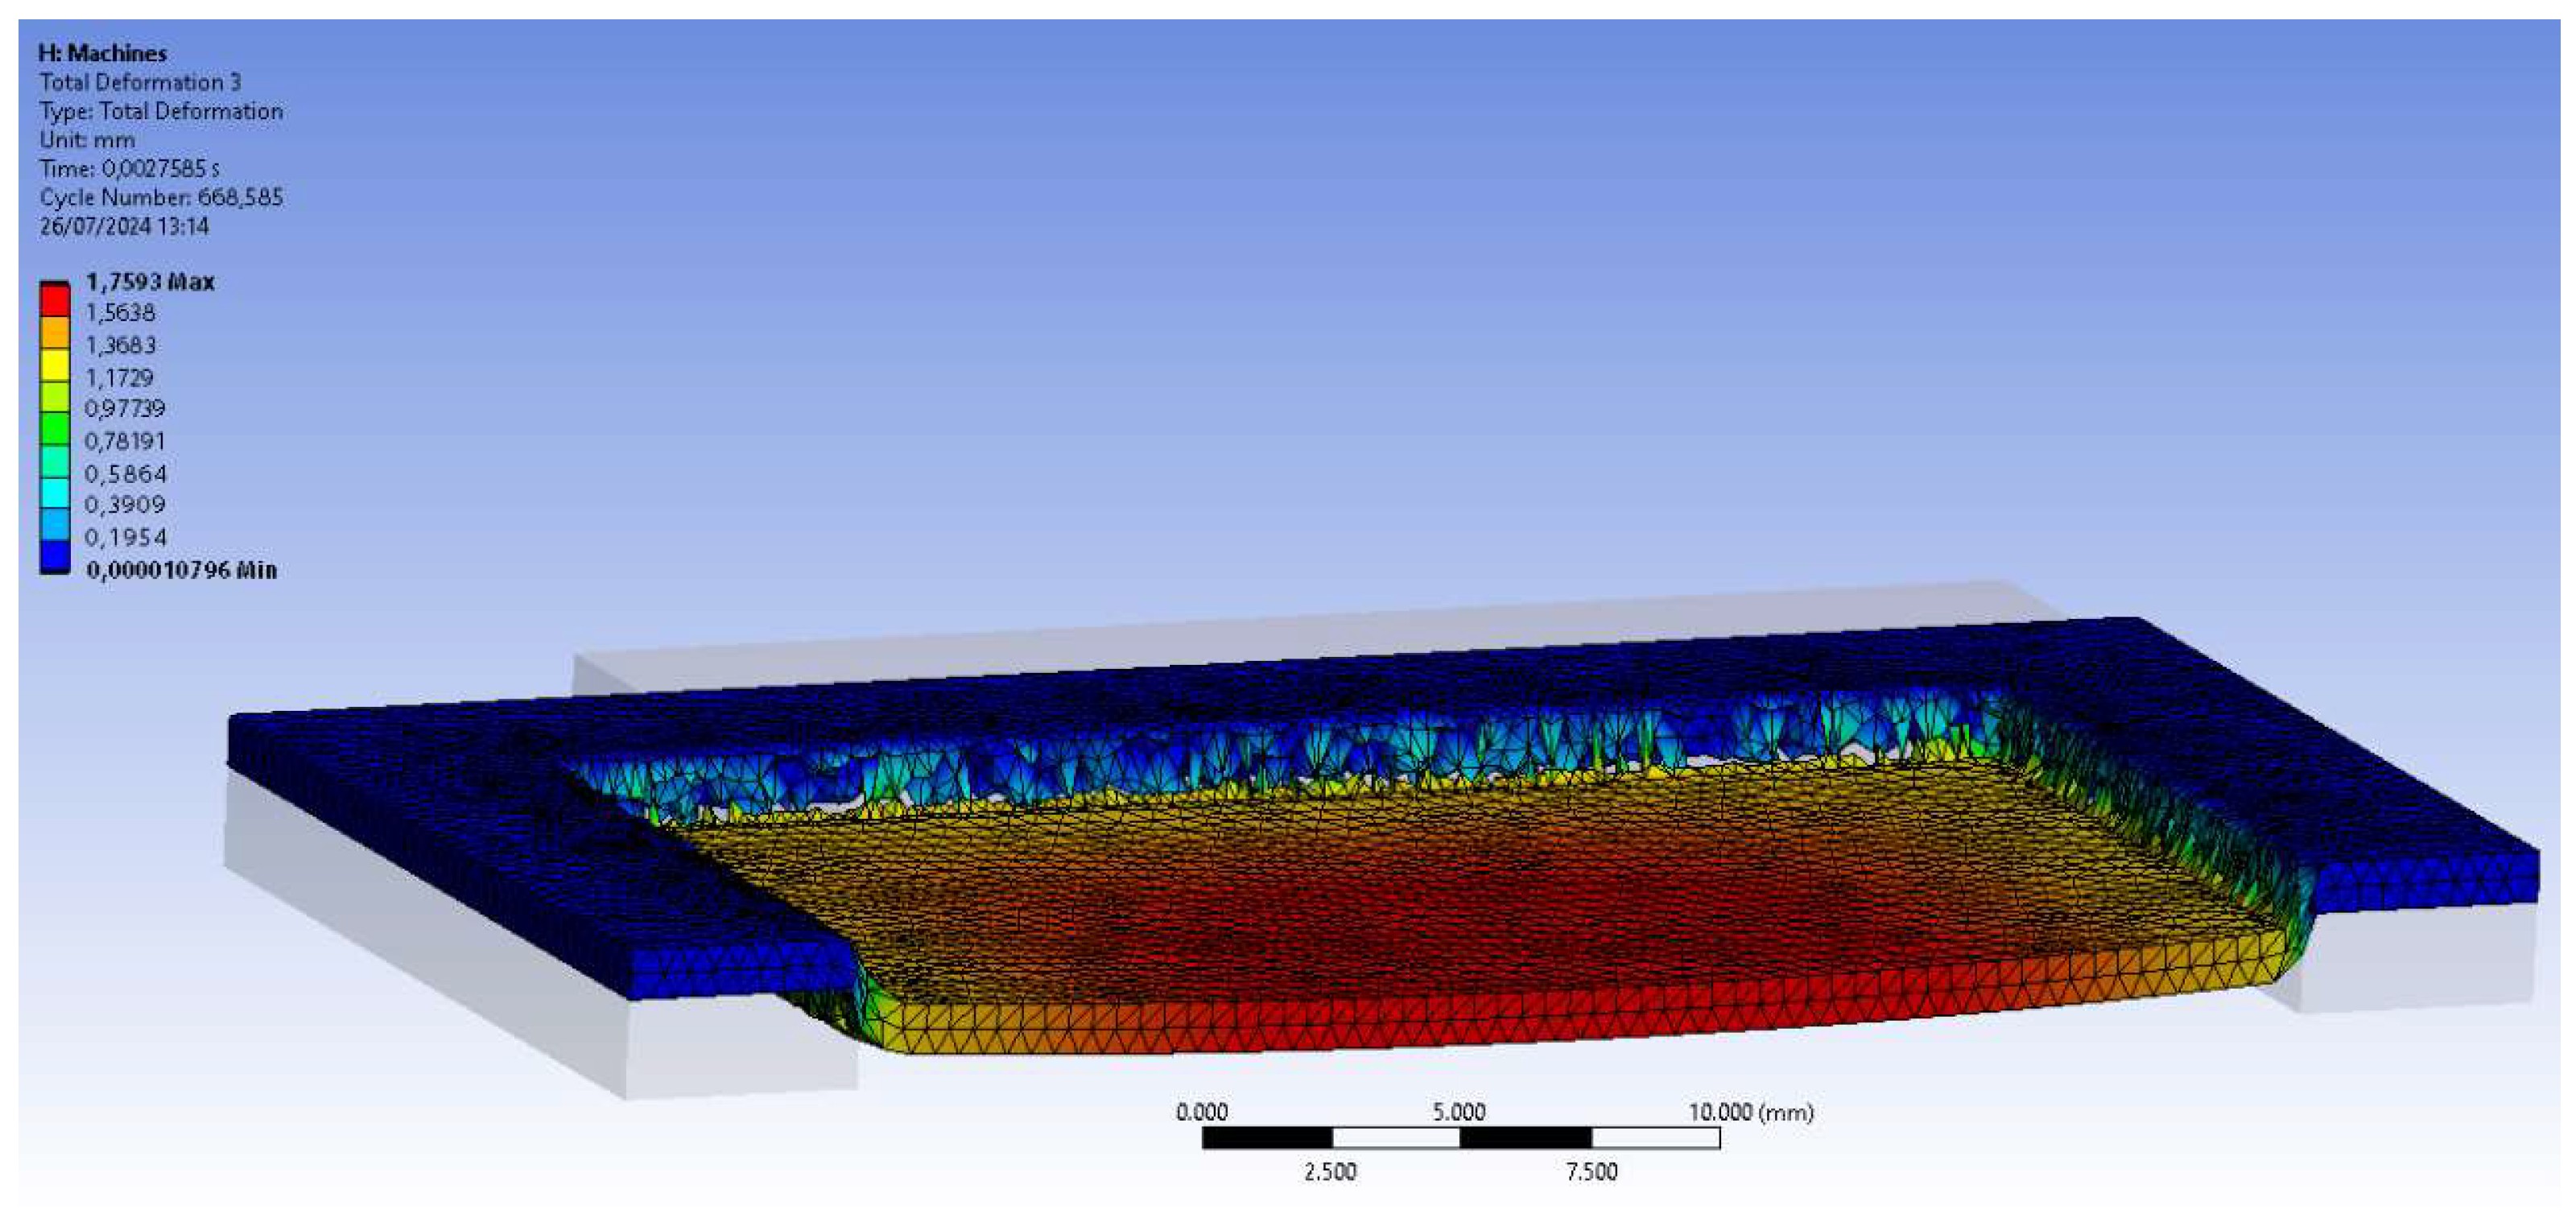
The total deformation is evaluated in three directions corresponding to the three axes of the global coordinate system. Before the process is complete, analysis reveals an intermediate result with burrs remaining and others just forming as the puncher cuts the workpiece (
Figure 4). It peaks at 2.2803 mm in the estimated timeframe.
FEM results are consistent with experimental ones regarding burr formation, providing valuable data from the initiation of the punching process in terms of stress distribution and how the workpiece’s material reacts gradually to the solicitation. Data may be used to optimize the cutting edge of the puncher or to modify certain process parameters.
The authors acknowledge that further refinement may be necessary and recommend that the results be treated with caution.
2.3. Experimental Conditions
The experimental research aimed, first of all, at identifying some empirical mathematical models that would allow the highlighting of the influence exerted by some input factors in the punching process on several parameters of interest for such a processing technique. As such, parameters of interest (output parameters), the accuracy of the size of the square-shaped hole side made in test samples in the form of sheets with three different thicknesses and made of three distinct metallic materials and, respectively, the size maximum
b of the burr measured on the sheet in which the square-shaped holes were made. The three materials from which the test samples were made were carbon steel 1.033, aluminum alloy AlMg3, and stainless steel X5CrNi18-10. The choice of materials was carried out taking into account their quite different physical-mechanical properties. These properties could lead to a clearer separation of the results from the point of view of the values of the output parameters proposed to be studied. Some properties of the three materials from which the test samples were made are mentioned in
Table 1.
The input factors considered were the punching die clearance
c (in mm), the plate thickness
t (in mm), the average cutting speed
v (expressed in %, according to the indications of the press equipment manufacturer), and the intended size of the side
Ld. Three values were used for each of the 4 input factors considered. In this way, the conditions of a full factorial experiment were ensured, with 4 input factors at three levels of variation. As such, a number of 3
4 = 81 experimental tests were required. The values of the input factors were entered in columns 2–5 of
Table 2.
The experimental tests were carried out on an AE 2510NT type press (manufactured by the Amada company in Canada). This equipment allows the processing of mild steel plates with a thickness of up to 3.2 mm, with the application of forces of up to 200 kN.
The actual size of the side La of the square-shaped holes was determined using a digital caliper. To measure the height b of the burrs remaining after the punching process, a device with a dial gauge was used.
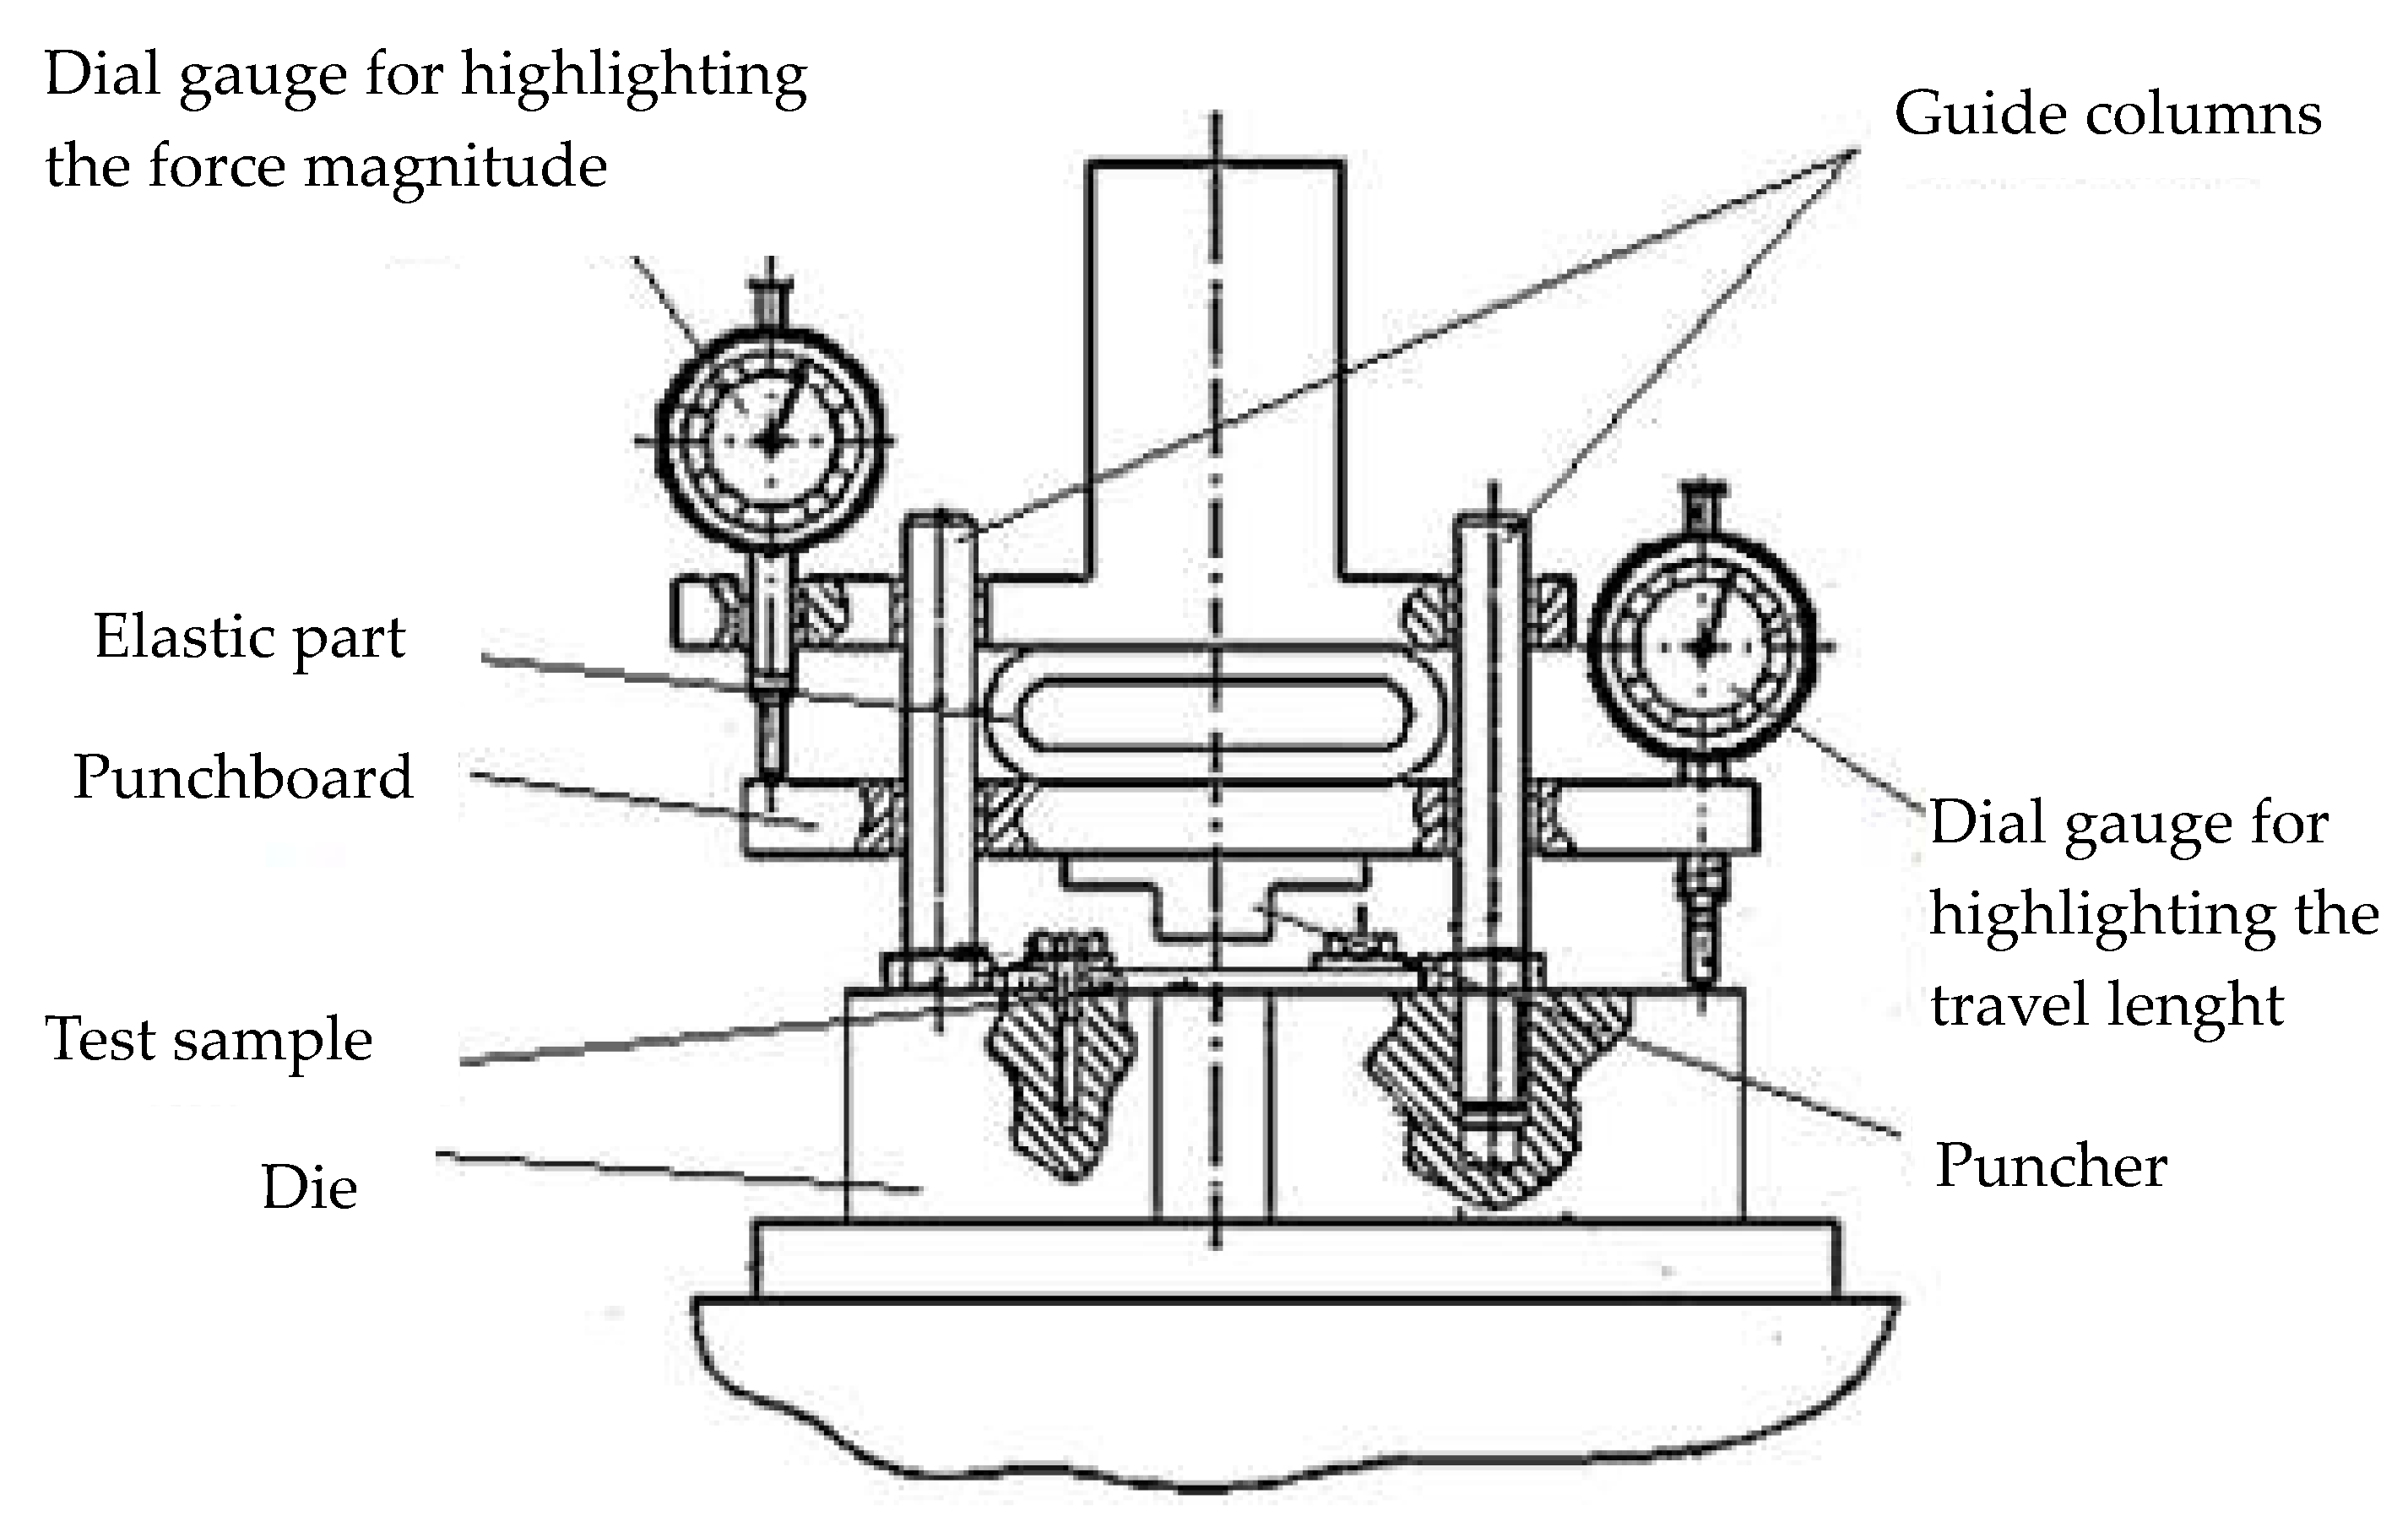
Intending a more detailed analysis of the way in which the punching process is carried out, the device represented schematically in
Figure 2 was designed. It was thus based on the hypothesis that a simulation of the process would be possible by developing a punching process in which it would be possible to observe what happens in the shearing zone of the sheet material as a result of the active stroke made by the puncher towards the die. It was assumed that this would be achieved by considering sheet shear not in the case of the need to obtain a hole but the separation from a narrow strip of a strip segment of a certain length. In this case, there would be the possibility of direct observation and possibly recording using a video camera how the material of the test sample behaves during the active stroke of the puncher. It was assumed that using the device in
Figure 2, processes could be observed that take place, for example, along an axis of symmetry of the square-shaped hole generated by the experimental tests whose results were included in
Table 2.
The device in
Figure 5 includes a punch materialized by a plate in the shape of the letter T, attached to a punch holder plate and having the same thickness as the punch. The punch can move in a direction perpendicular to the upper surface of a strip-shaped test sample. This workpiece has a width less than or at most equal to the thickness of the punch and die. Two holes were made in the test sample through which the test sample was clamped to the die using two screws and two clamps designed to ensure the dissipation of the clamping force on a larger surface.
The movement of the punch towards the die takes place by means of an actuation plate and a punch holder plate. Two columns are used to guide the movement of the two plates. A spring steel deformable elastic part placed between the drive plate and the punch holder plate was supposed to provide information on the magnitude of the force that produces a certain deformation of the test sample material as a result of the movement of the punch in the working stroke.
It was considered that the device could be used to simulate, to a certain extent, the processes that develop in shear zones by placing it on the table of a drilling machine. In such a situation, ensuring the conditions for moving the punch plate together with the punch would have been performed either by slowly raising the table of the column drilling machine or by slowly manually lowering the main shaft of the drilling machine. Two dial gauges were supposed to provide information on the size of the force acting on the punch (the gauge whose feeler contacts the punch holder plate) and, respectively, the size of the gradual penetration of the punch into the test sample material (the gauge whose feeler contacts the die).
The previously described device deviates a little from the case of using a real punching technique. Thus, if in the case of the actual punching process, there is a separation of part of the material of the test sample along a closed contour (corresponding, for example, to a square-shaped hole made by punching), in the case of the device there is, as mentioned, a separation of a rectangular segment by shearing from a strip workpiece along only two sides of the rectangle.
The previously presented device was tested on a column drill, and it showed good operation. However, it was considered that more extensive information would be possible to obtain by placing the device on a universal tensile testing machine. In such a situation, it would have been possible to obtain a force-deformation diagram directly, which would bring additional information regarding the evolution of the mechanical stress and deformation up to the shearing of the test sample material.
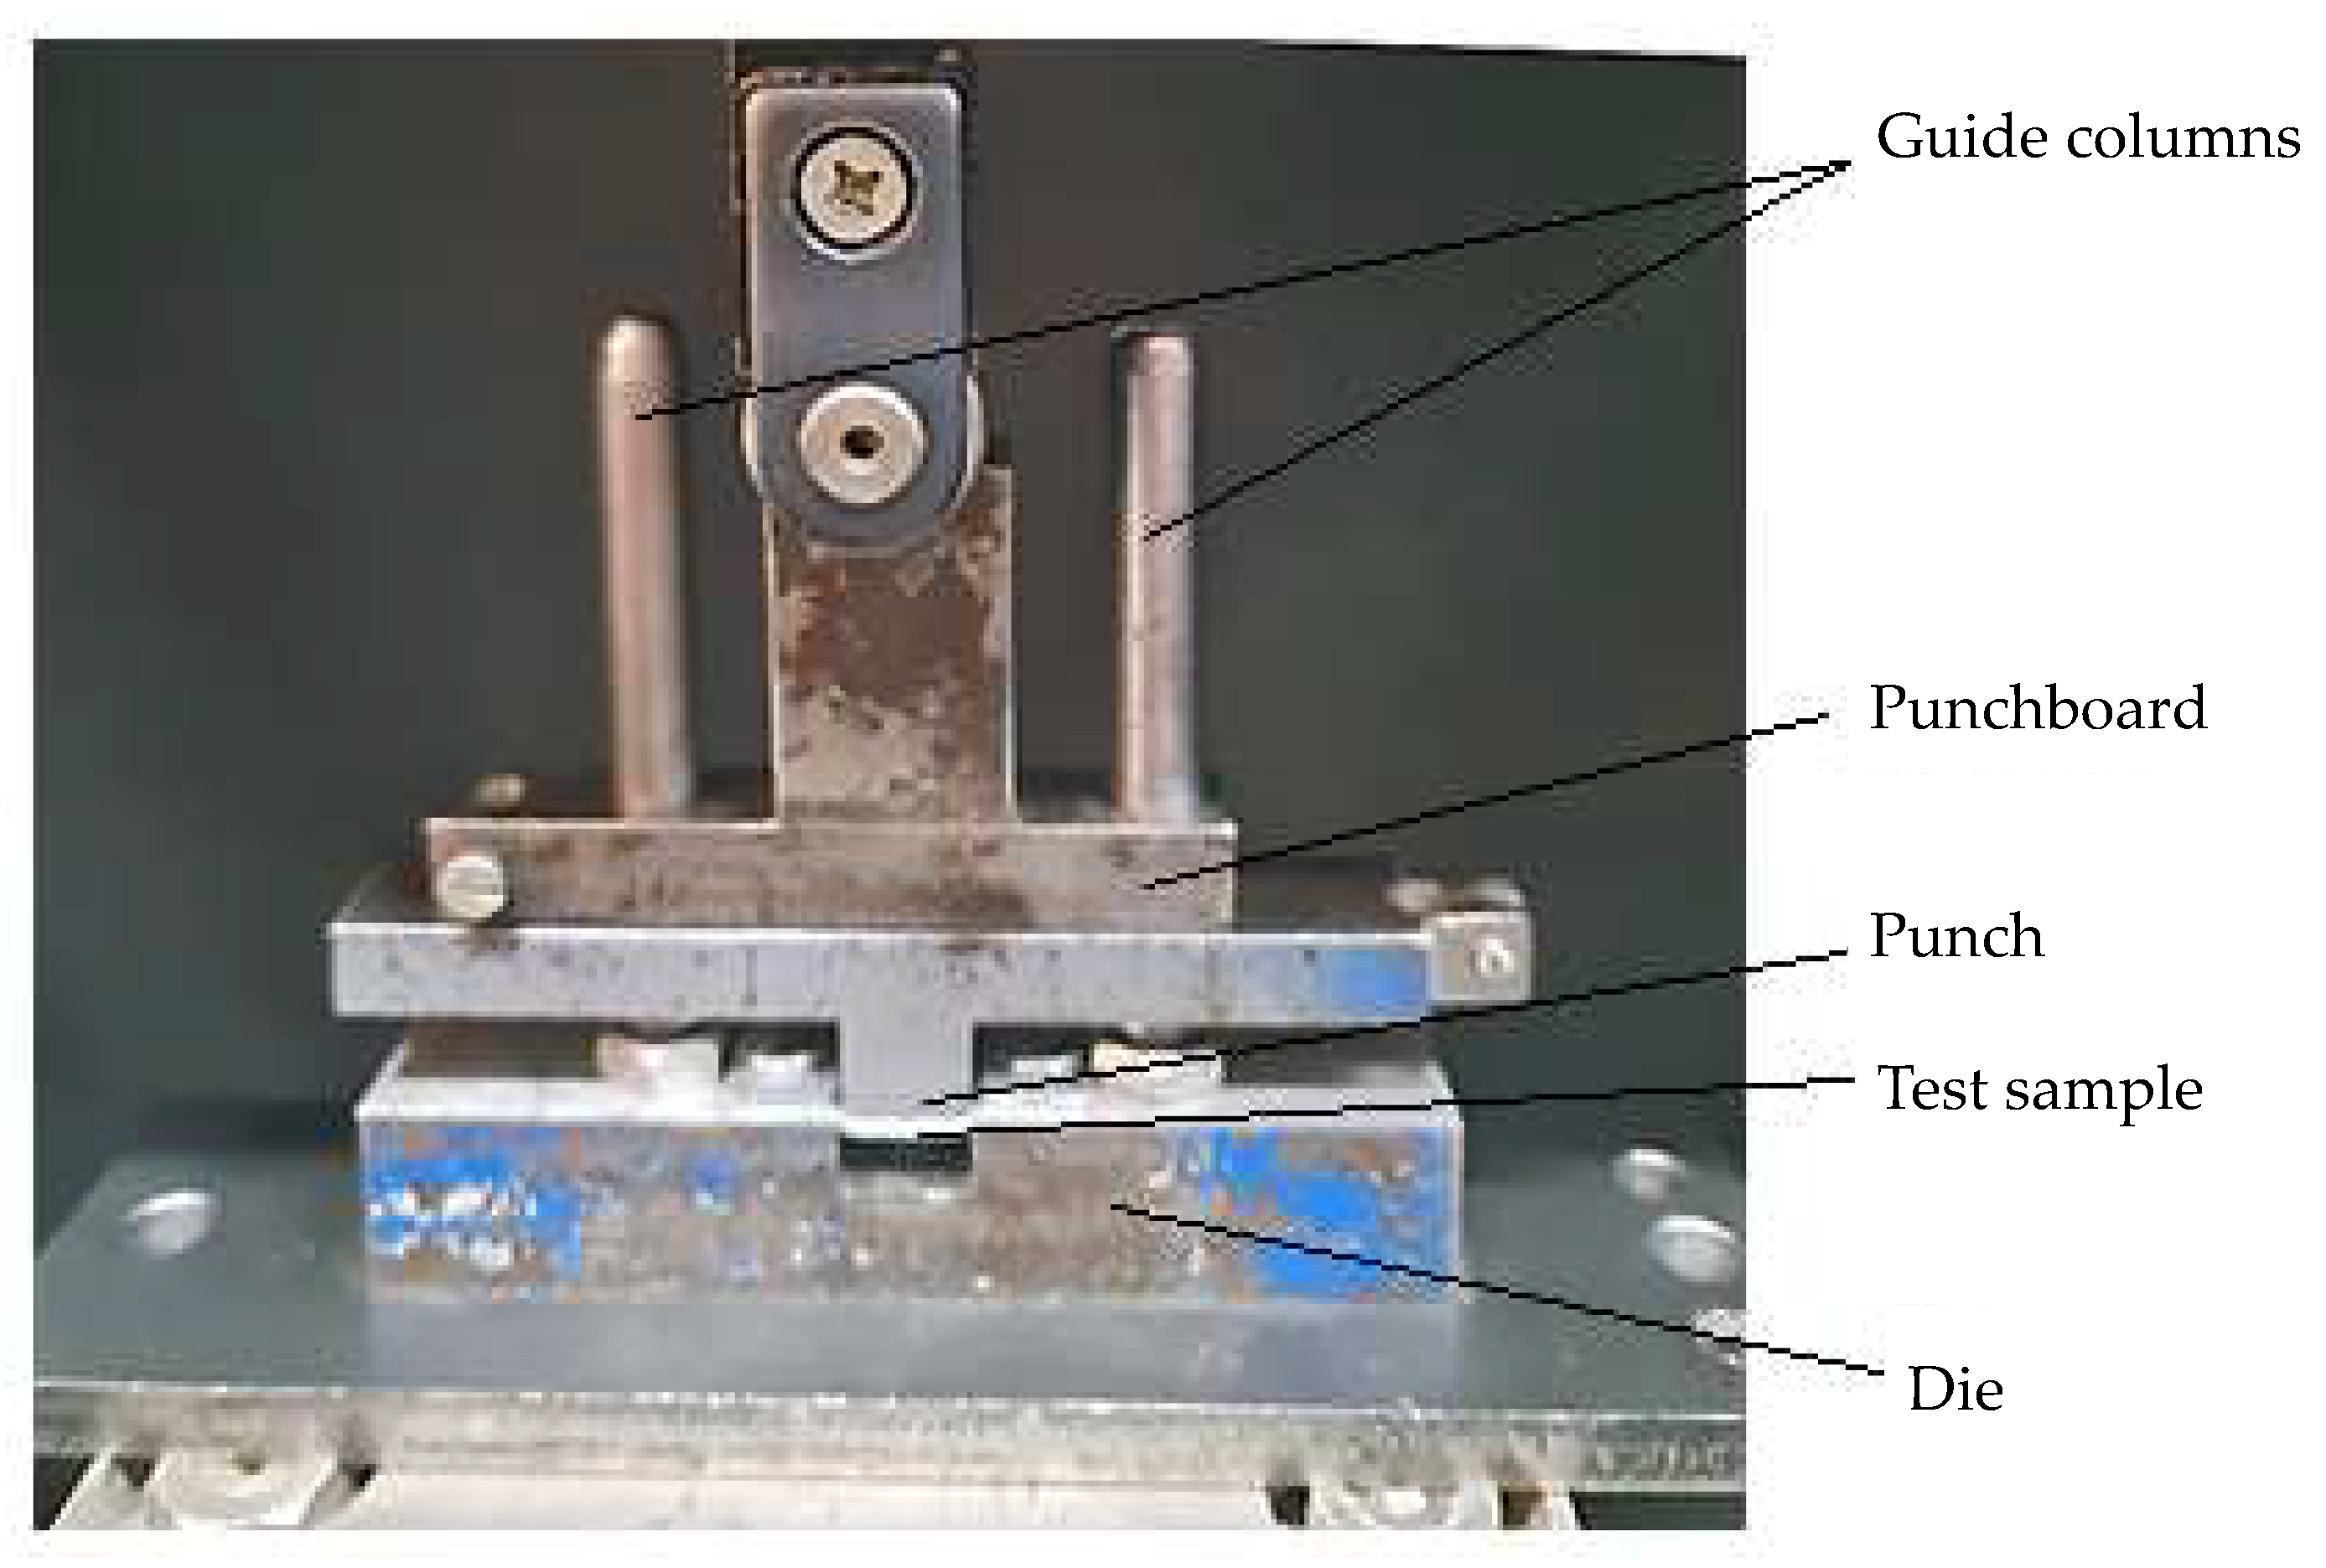
As such, the device was placed on a universal tensile testing machine (WDW type, made in China). In
Figure 6, an image obtained during the shearing process can be observed in the area corresponding to the action of the active edge of the punch in the case of an aluminum alloy test sample.
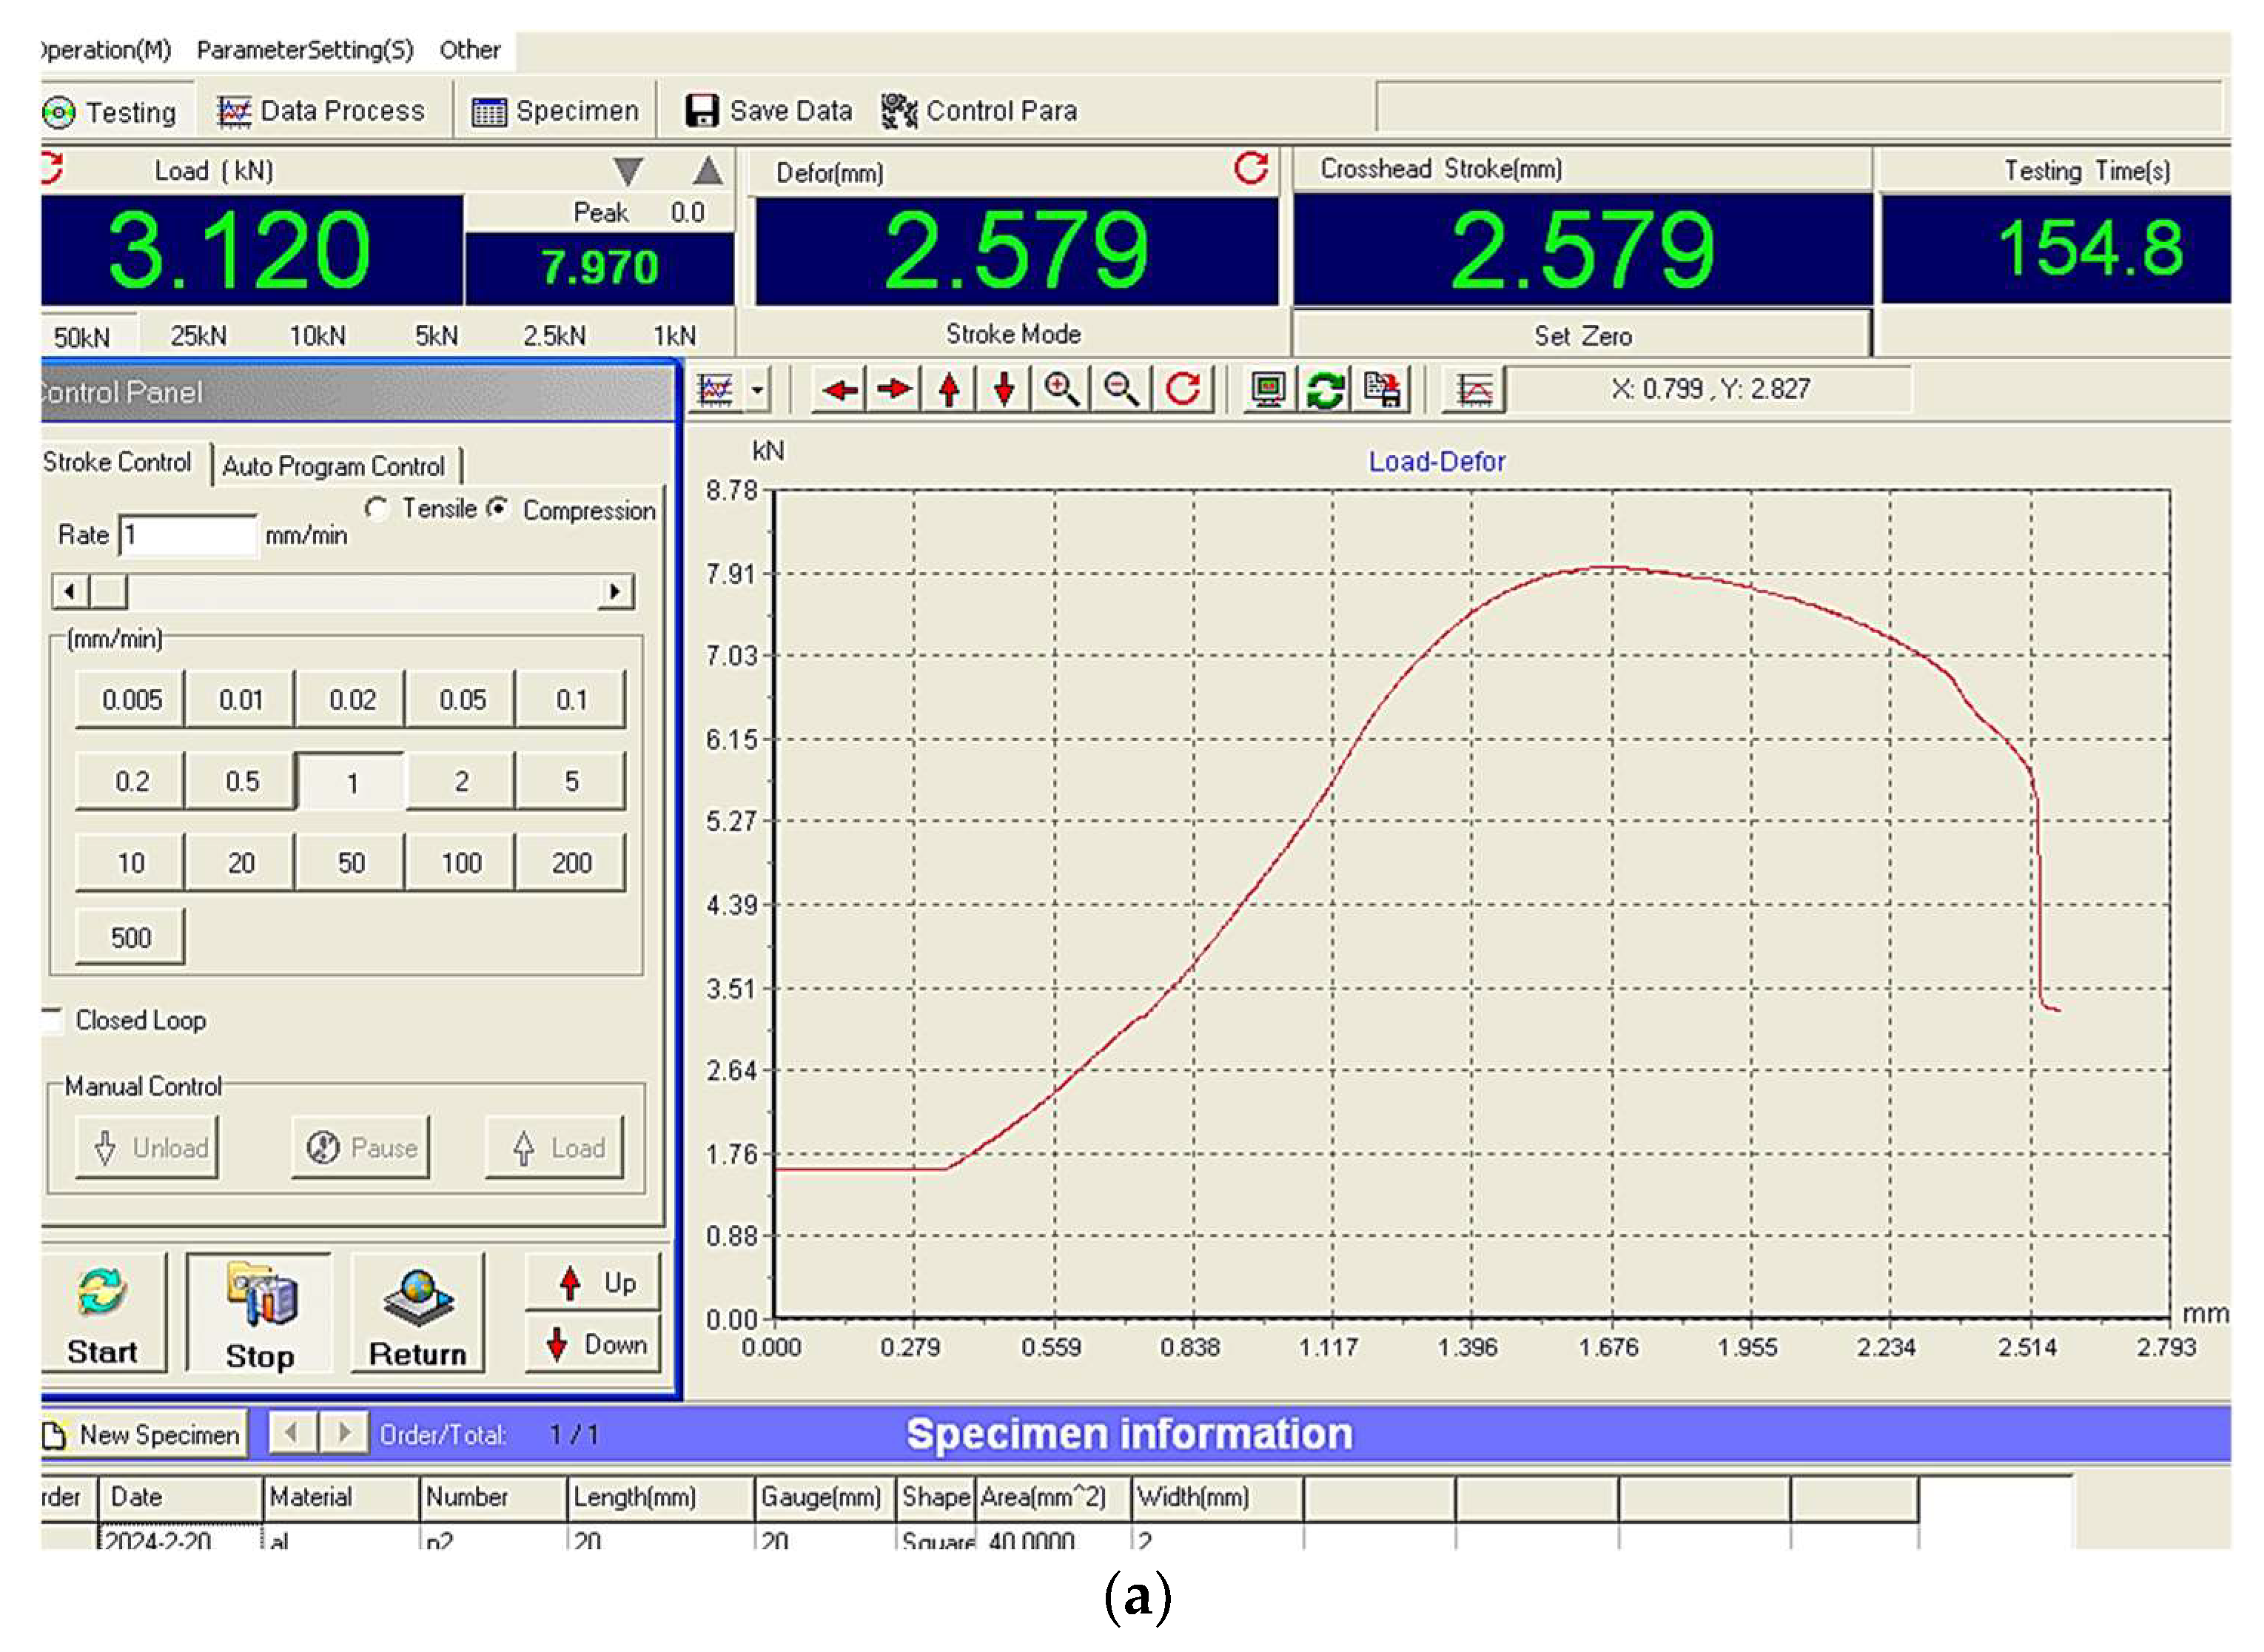
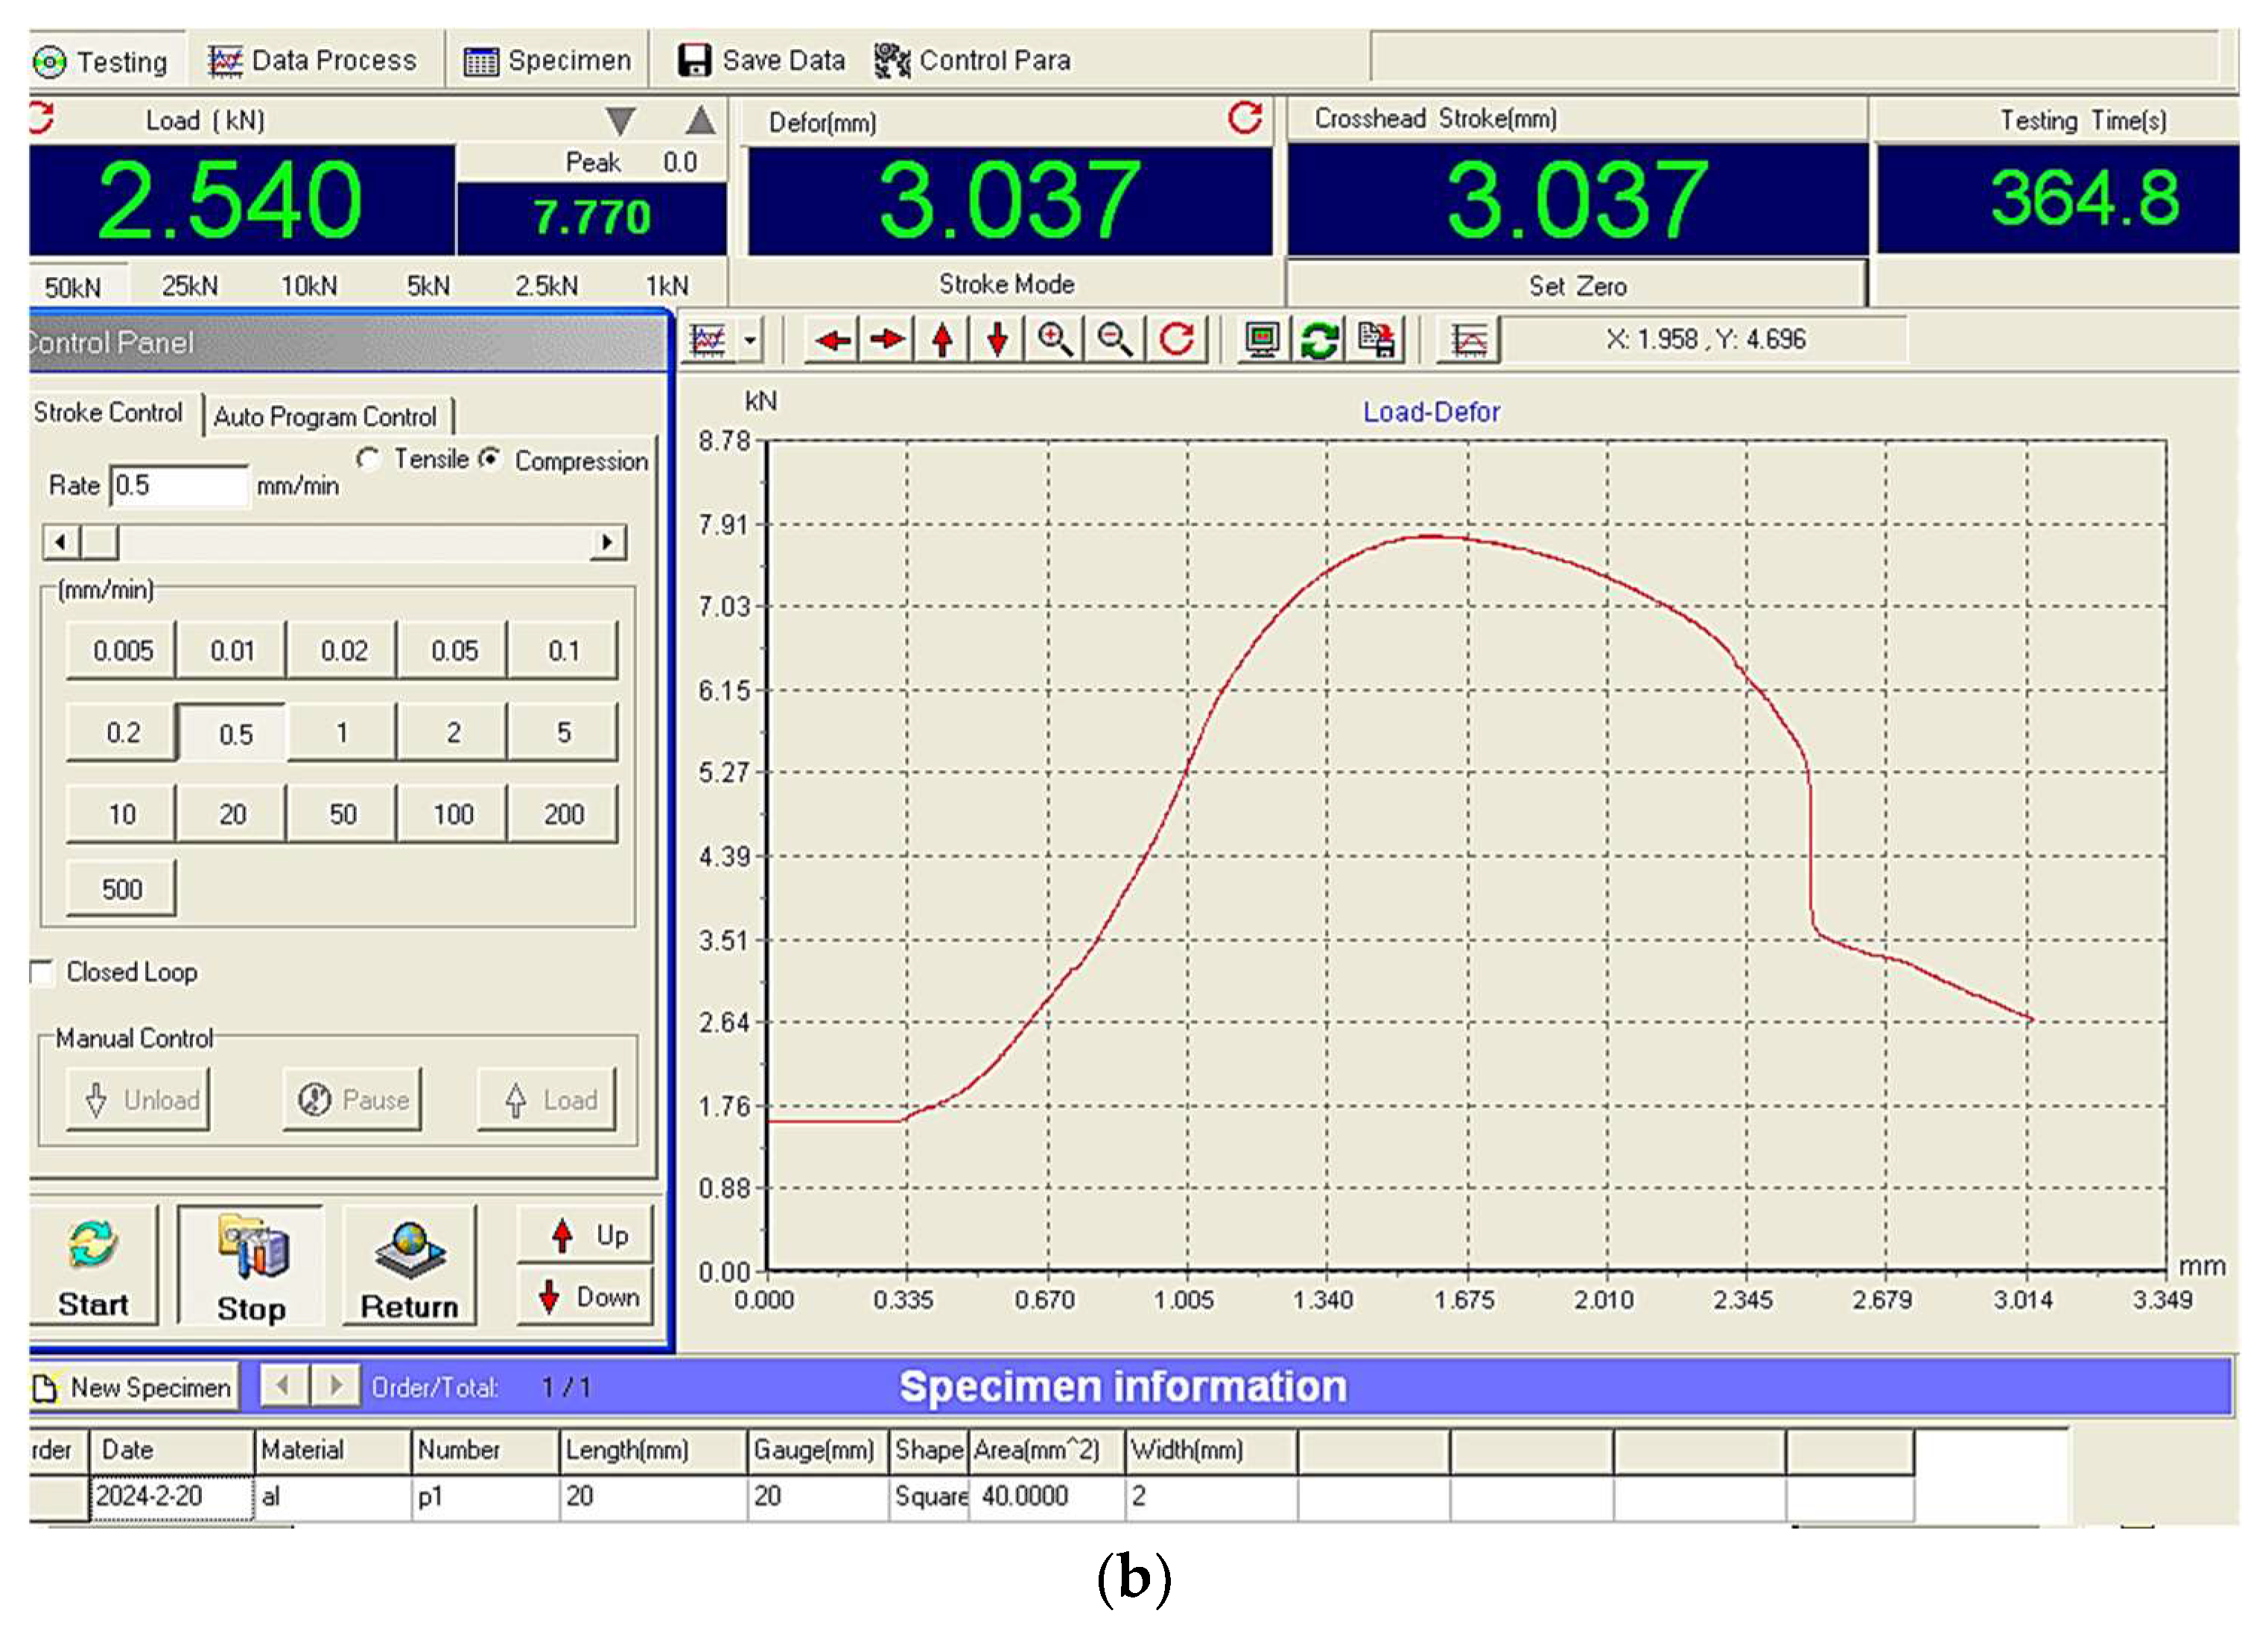
Two diagrams corresponding to the variation of the deformation force in relation to the displacement of the punch in the case of aluminum alloy test samples with two different thicknesses can be seen in
Figure 7. The two diagrams allow us to ascertain the similar profile of the deformation curves for the two test samples with distinct thicknesses. It is found that the force begins to decrease, probably at the moment when the propagation of the cracks generated in the test sample has occurred sufficiently intensively to determine the initiation and development of the process of separation of a part of the workpiece material.
Similar diagrams have been proposed and highlighted by different researchers. Thus, Hambli et al. assessed that four stages can be taken into account by analyzing a curve similar to the one shown in
Figure 7b, namely an elastic stage, an elastoplastic stage, an elastoplastic stage when damage occurs, and the final stage, corresponding to the initiation and propagation of the blanking process [
21,
22].
3. Results
The results of the experimental tests intended to highlight the influence of the four input factors in the punching process (punching die clearance c, workpiece thickness t, punching speed v, and intended size of the square hole side Li) were entered in columns 6–11 from
Table 2, for each of the 3 workpiece materials. As a result of the experimental tests (output parameters from the investigated process), the actual size La of the square hole side and burr height b were taken into account.
Both the values of the input factors and those of the experimental results were used to determine some empirical mathematical models. For this purpose, a specialized Minitab-type software was used. The assessment of the adequacy of the empirical mathematical model determined in relation to the experimental data was carried out using the value of the multiple determination coefficient R2.
In the case of machining processes in the field of machine manufacturing, mathematical models of the power-type function are often used. For example, such empirical mathematical models are used to illustrate the influence of the values of the cutting parameters on the size of the tool life, on the sizes of the components of the cutting force, on the size of some roughness parameters, etc. Although a mathematical power-type function does not ensure the highlighting of the existence of maxima or minima of the output parameter (power-type functions being monotone functions) for the investigated interval of variation of the values of the independent variables, it still provides direct information regarding the intensity and the direction of variation of the output parameter in relation to the variation of the values of the input factors. This information is obtained by examining the values and the mathematical sign preceding the values of the exponents attached to each input factor in the empirical mathematical model of the power-type function.
In accordance with those mentioned earlier, empirical mathematical models corresponding to the actual size of the square hole side were first determined using specialized software for the three materials on which the experimental tests were carried out. These models were the following:
for which the coefficient of multiple determination has the value
R2 = 0.9999420796;
where the coefficient of multiple determination has the value
R2 = 0.9999326538;
the coefficient of multiple determination having, in this case, the value
R2 = 0.5649288565.
Examining the values of the coefficients of multiple determination R2 for the three corresponding empirical mathematical models of the power-type function shows that in the case of steel 1.033 and aluminum alloy AlMg3, there is a good correspondence between the model and the experimental results, since the values of the coefficients of multiple determination R2 are very close to the unitary value. A lower value of the coefficient of multiple determination (R2 = 0.564), so a lower degree of confidence in correlating the experimental results with the empirical mathematical model, was determined in the case of stainless steel X5CrNi18-10. This fact is due to a greater dispersion of experimental results.
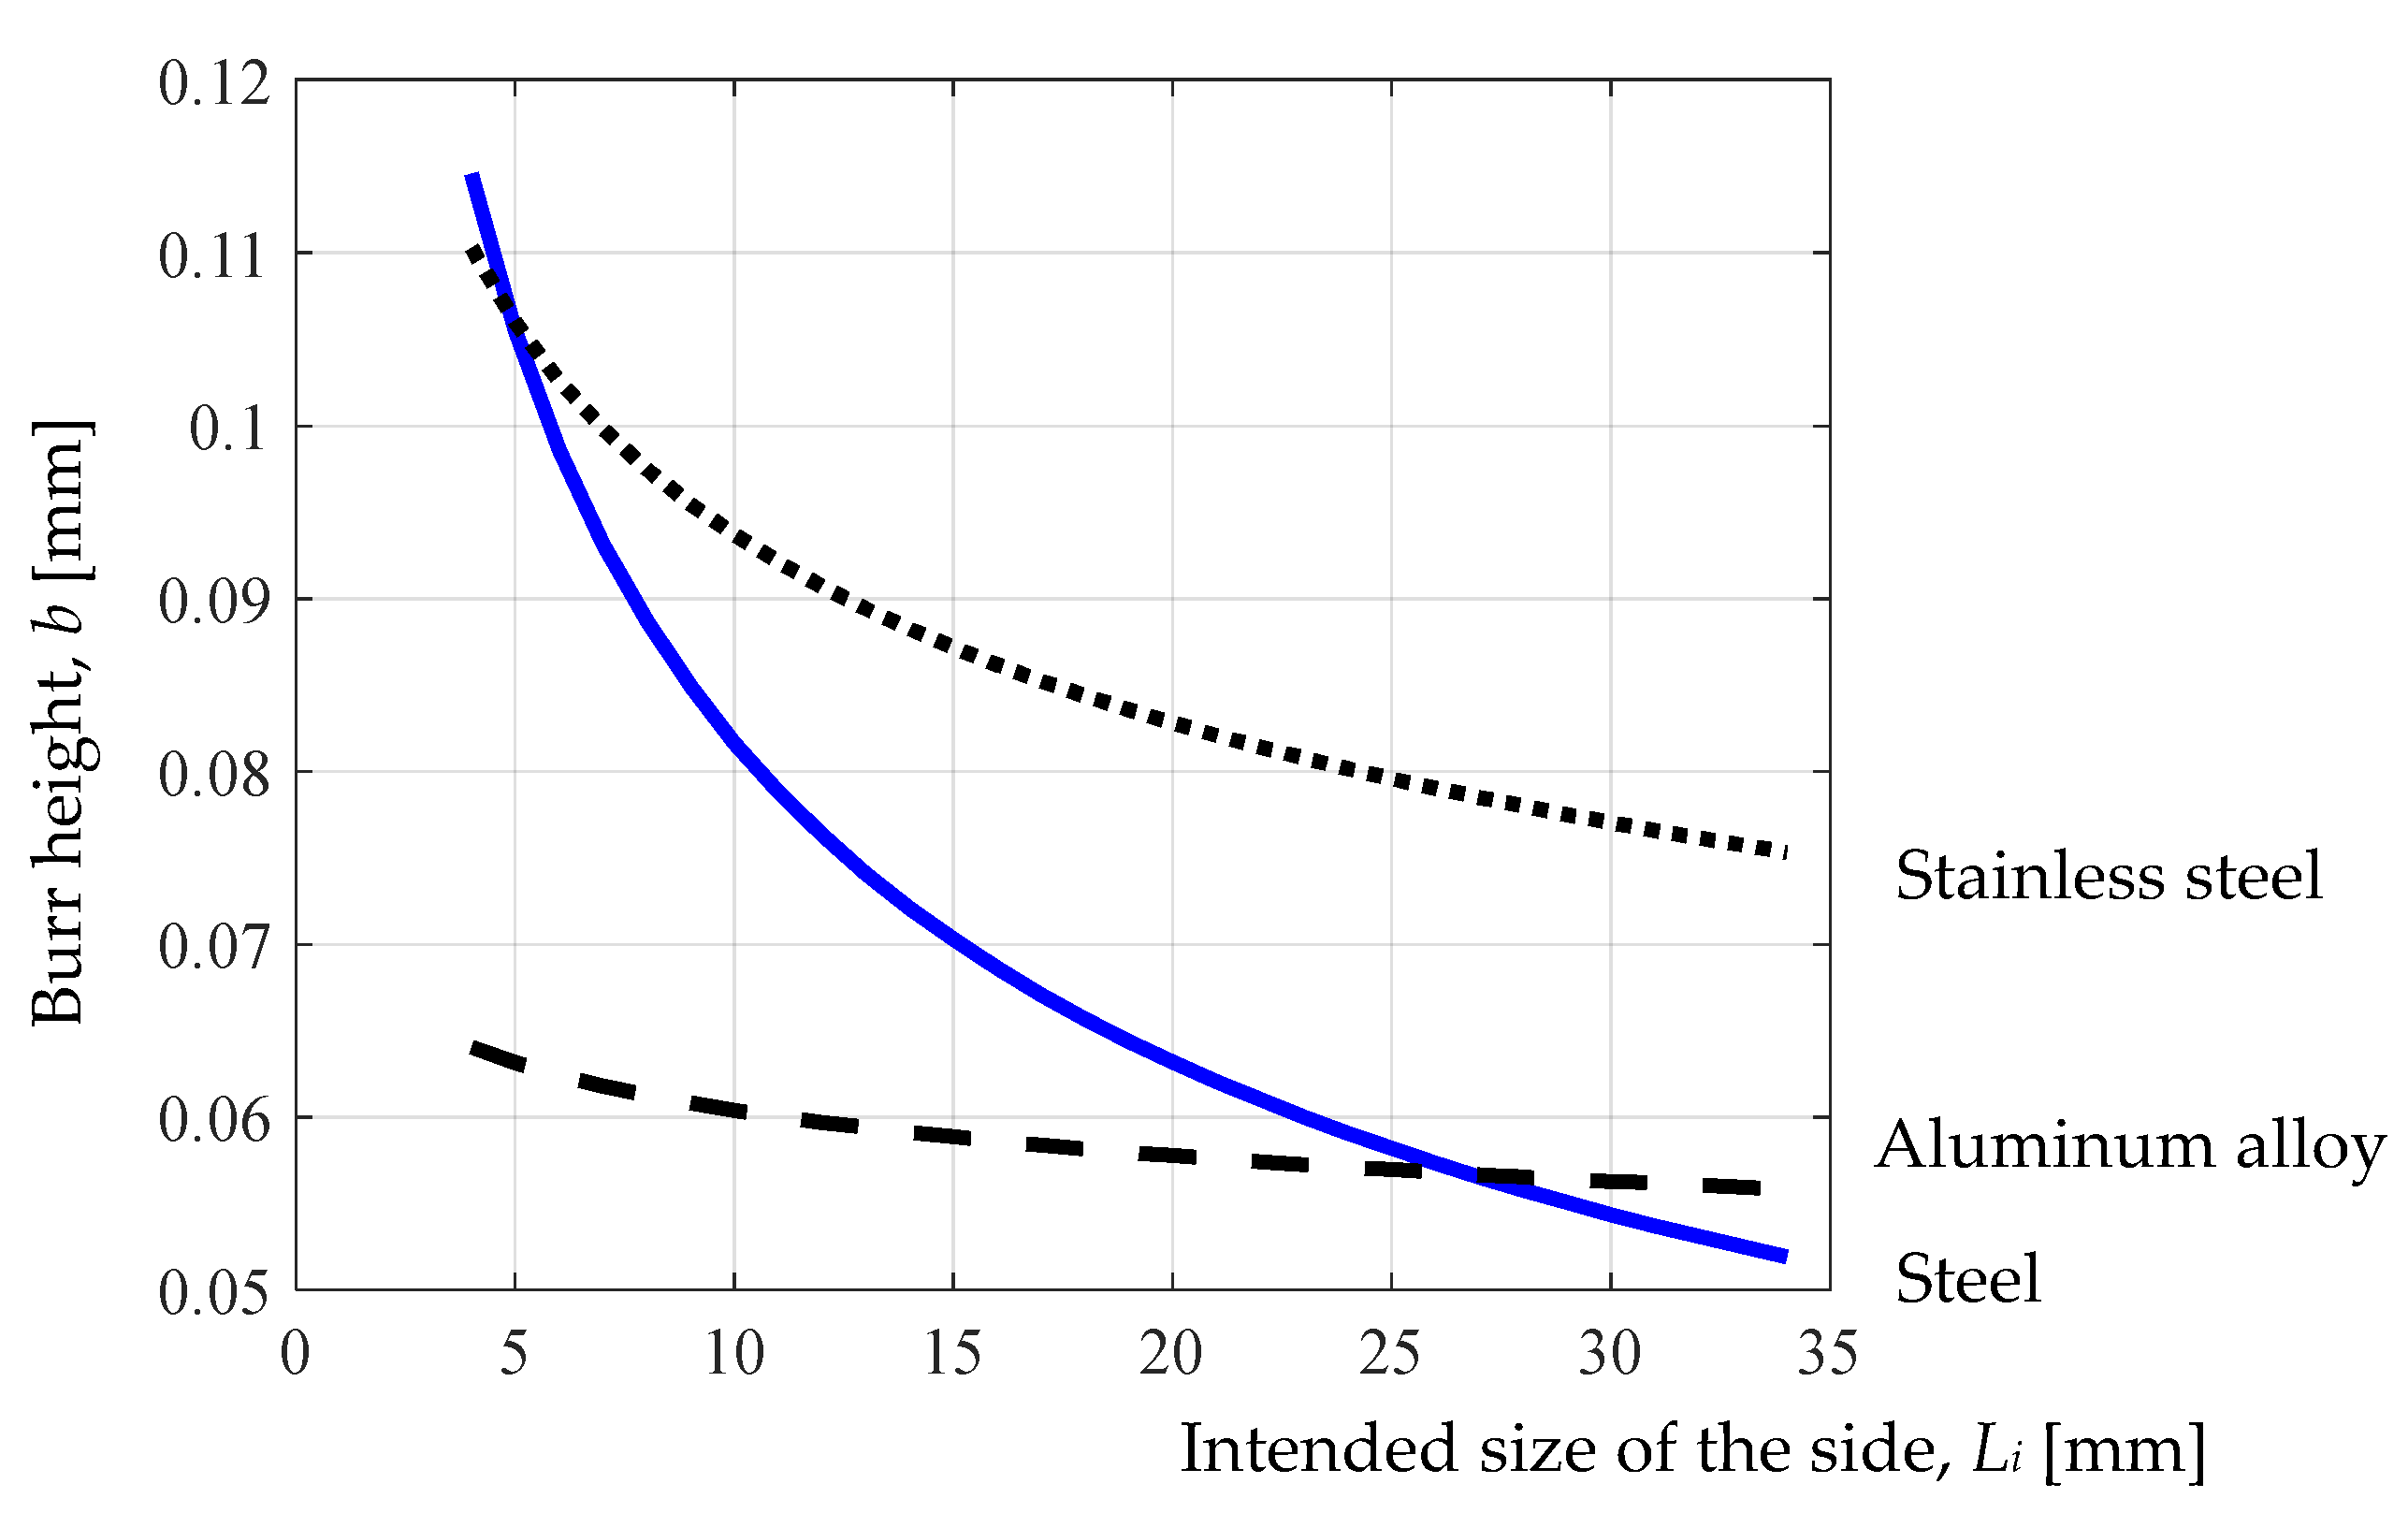
In the second stage, empirical mathematical models of the power-type function corresponding to the variation of burr height b were determined. These models were the following:
for which the coefficient of multiple determination has a value of
R2 = 0.2803842094;
in this case, the coefficient of multiple determination having the value
R2 = 0.4399021056;
the coefficient of multiple determination having the value
R2 = 0.1007470.
Using the empirical mathematical models of the power-type function established for burr height
b in the case of the three materials, graphical representations in
Figure 11,
Figure 12 and
Figure 13 were developed.
4. Discussion
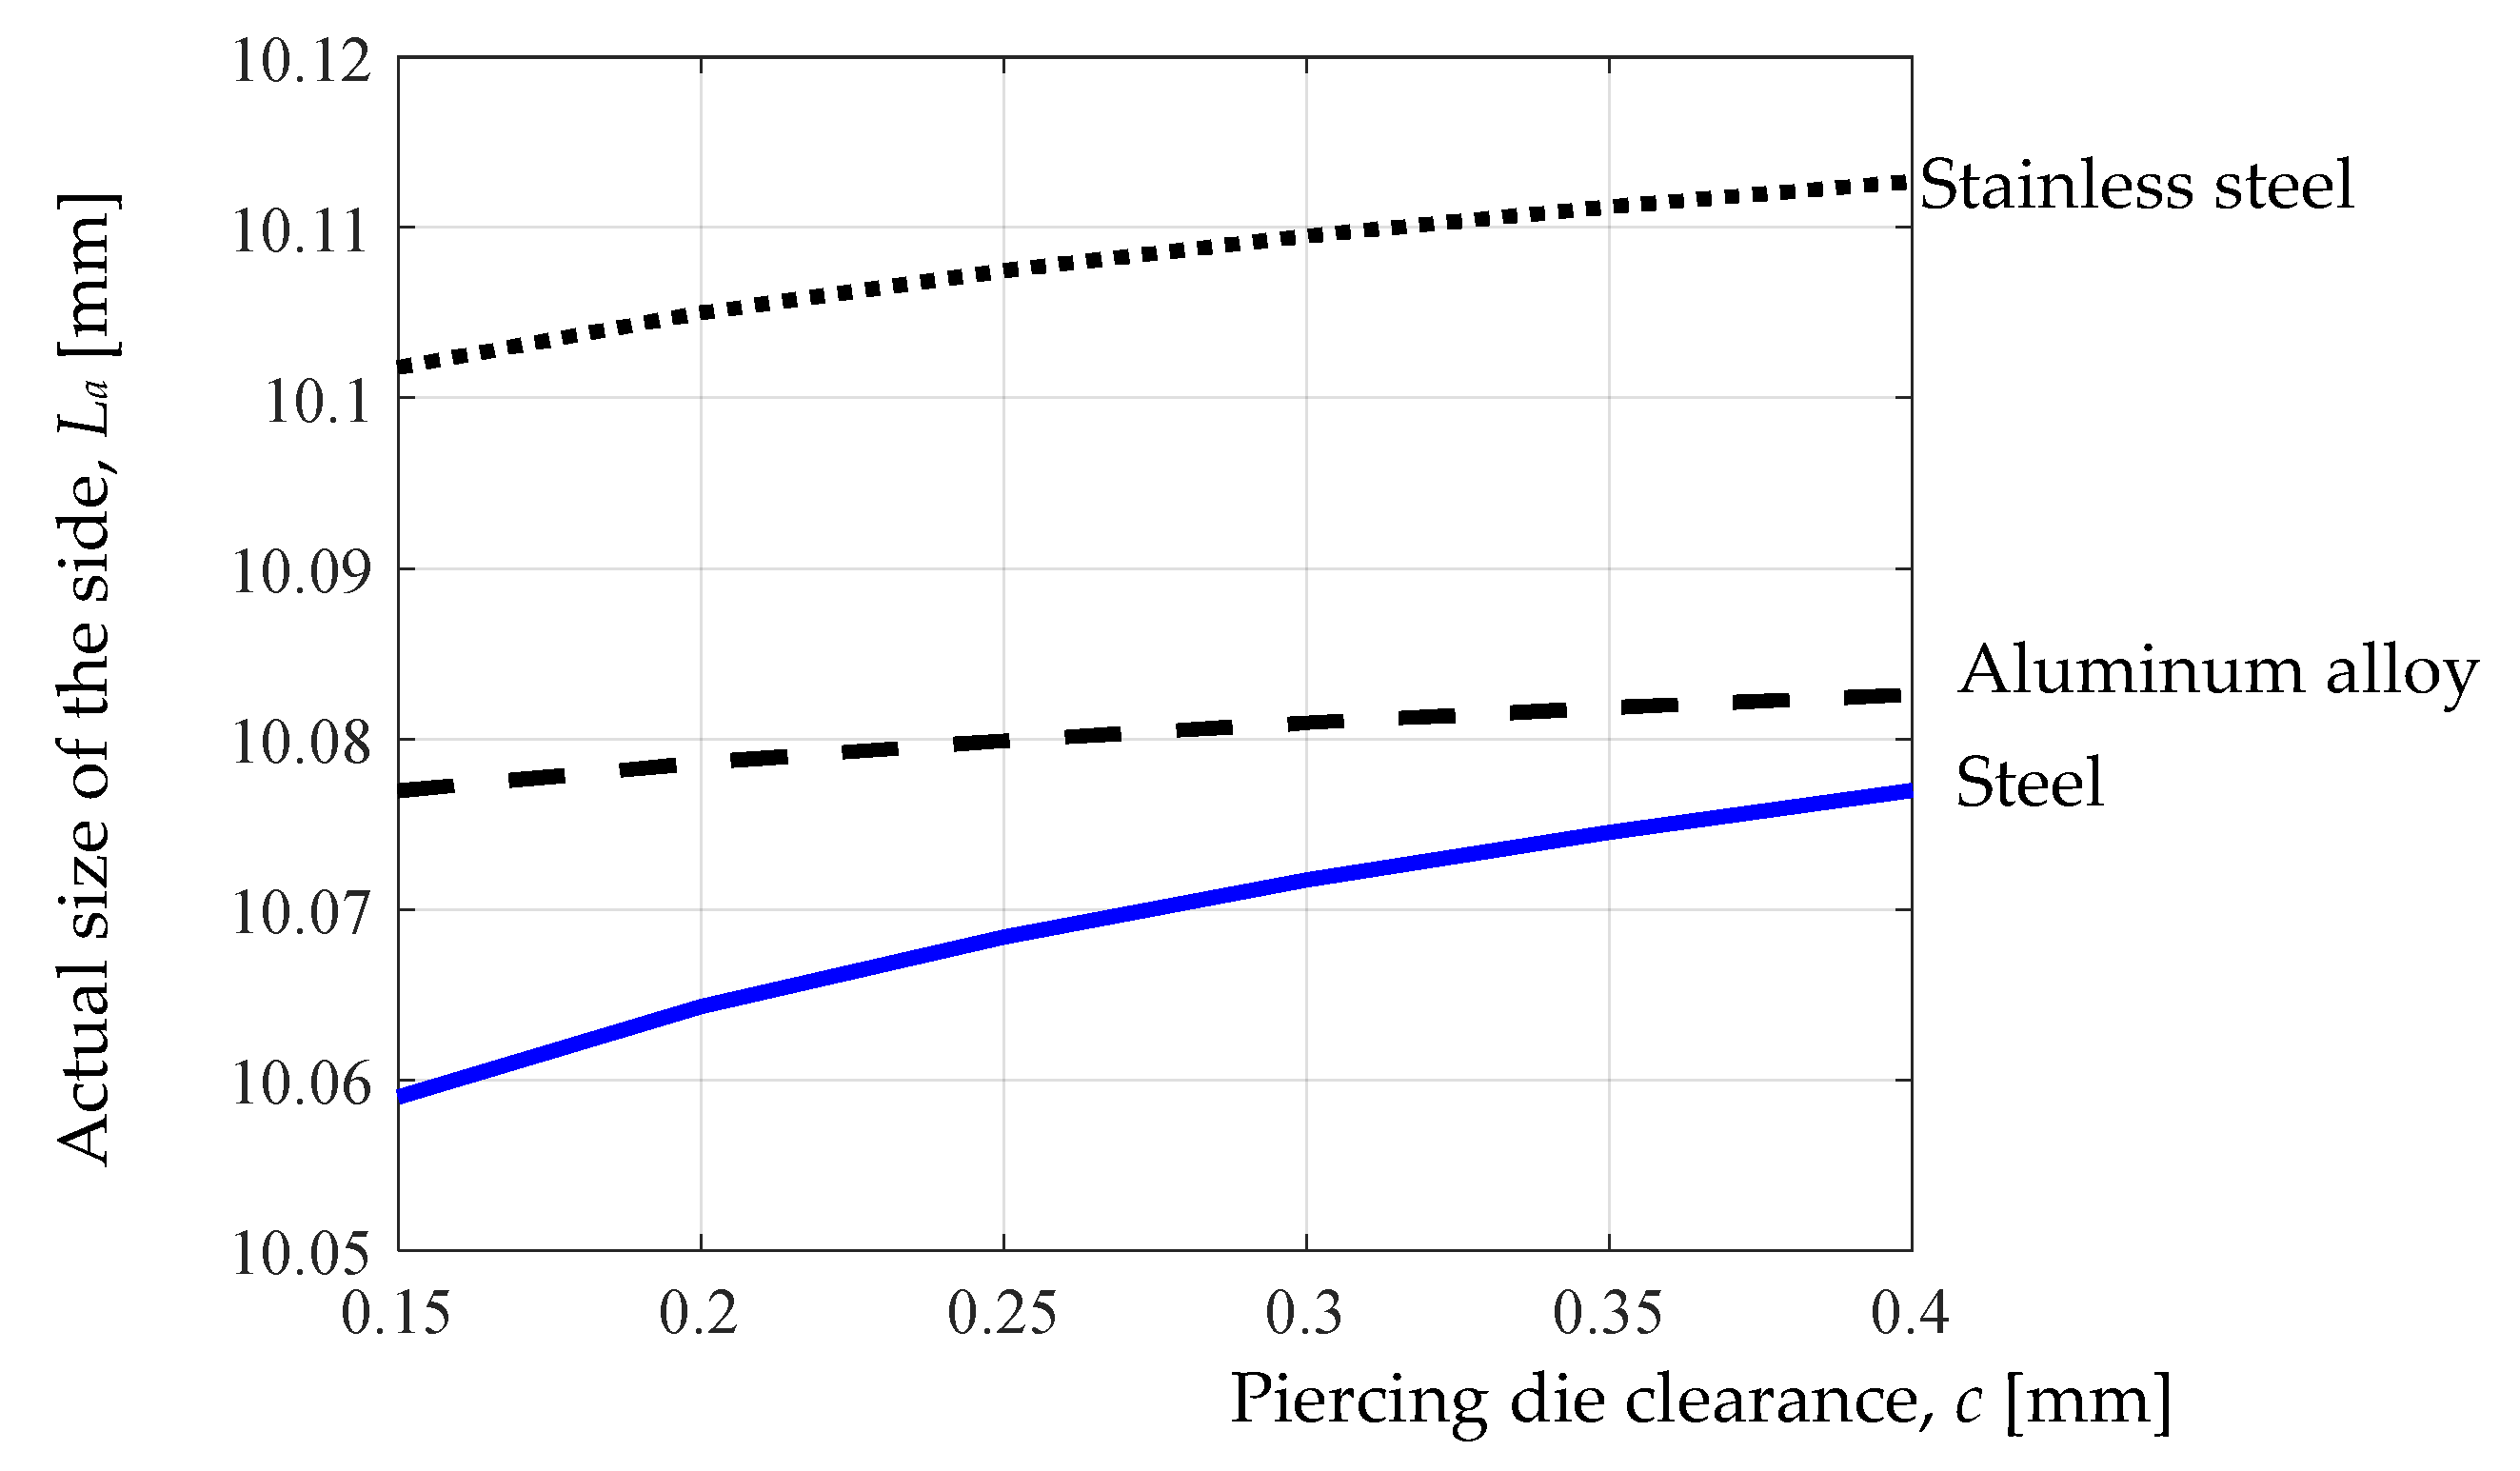
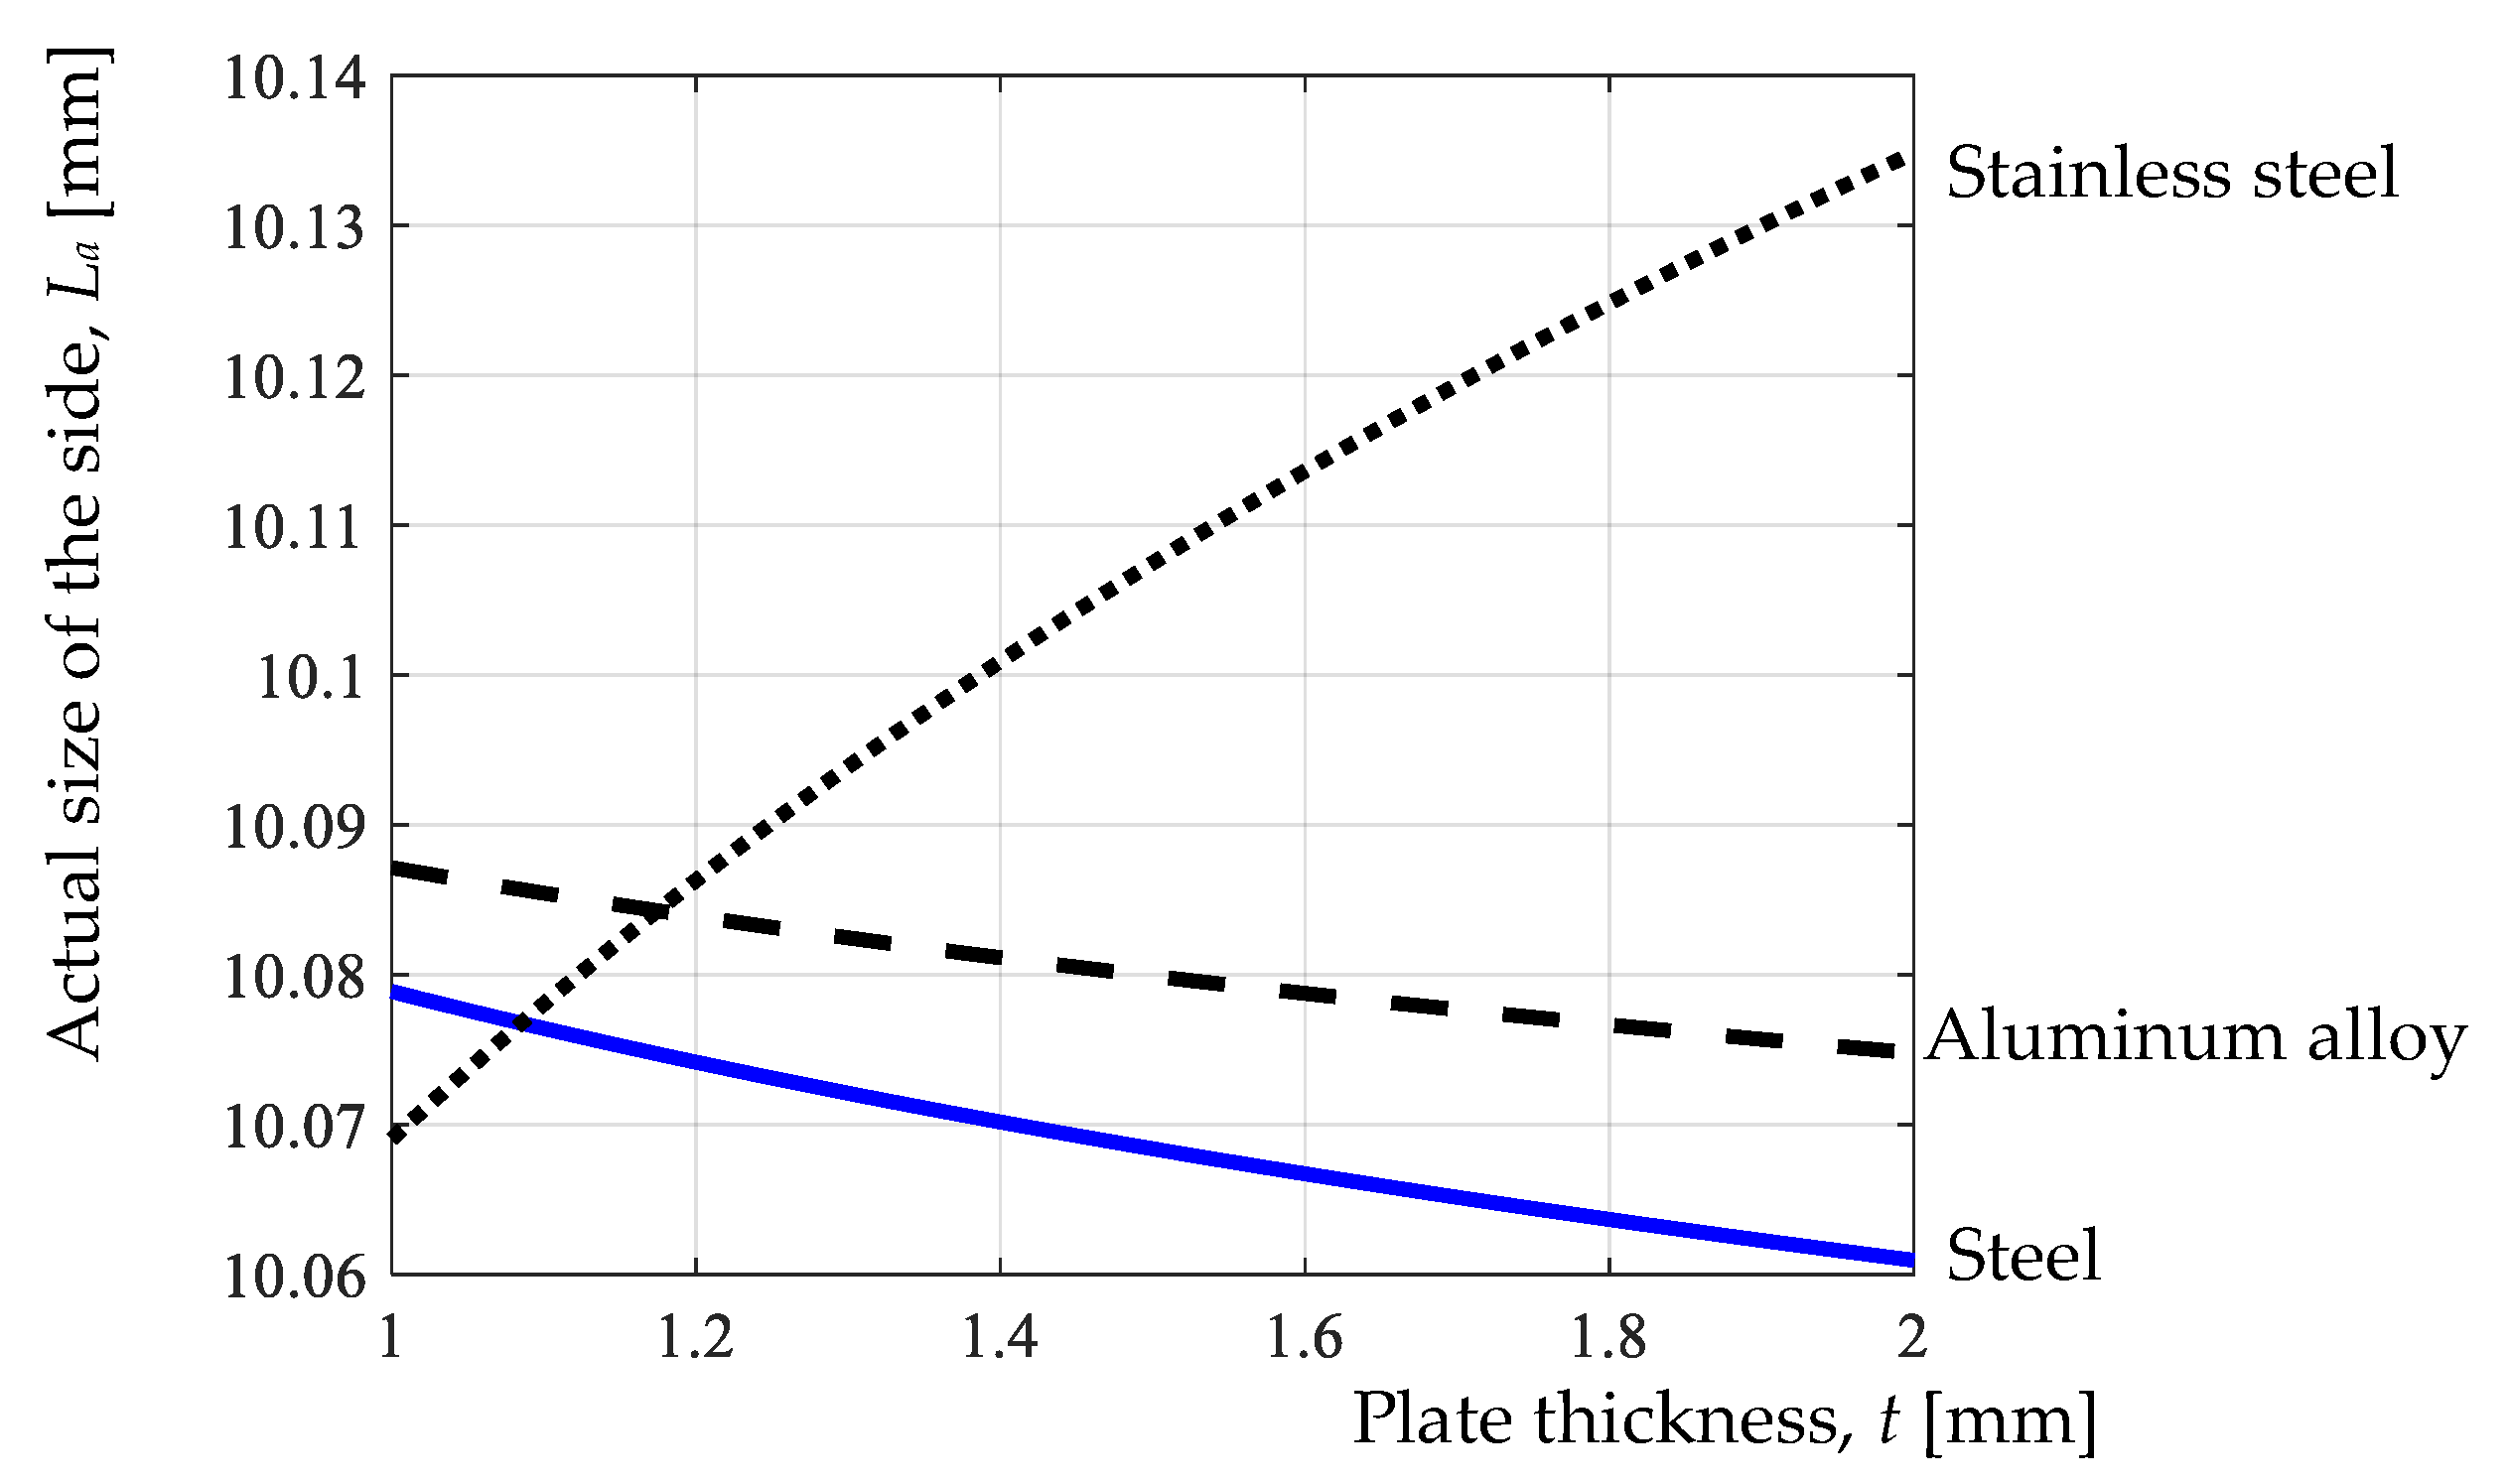
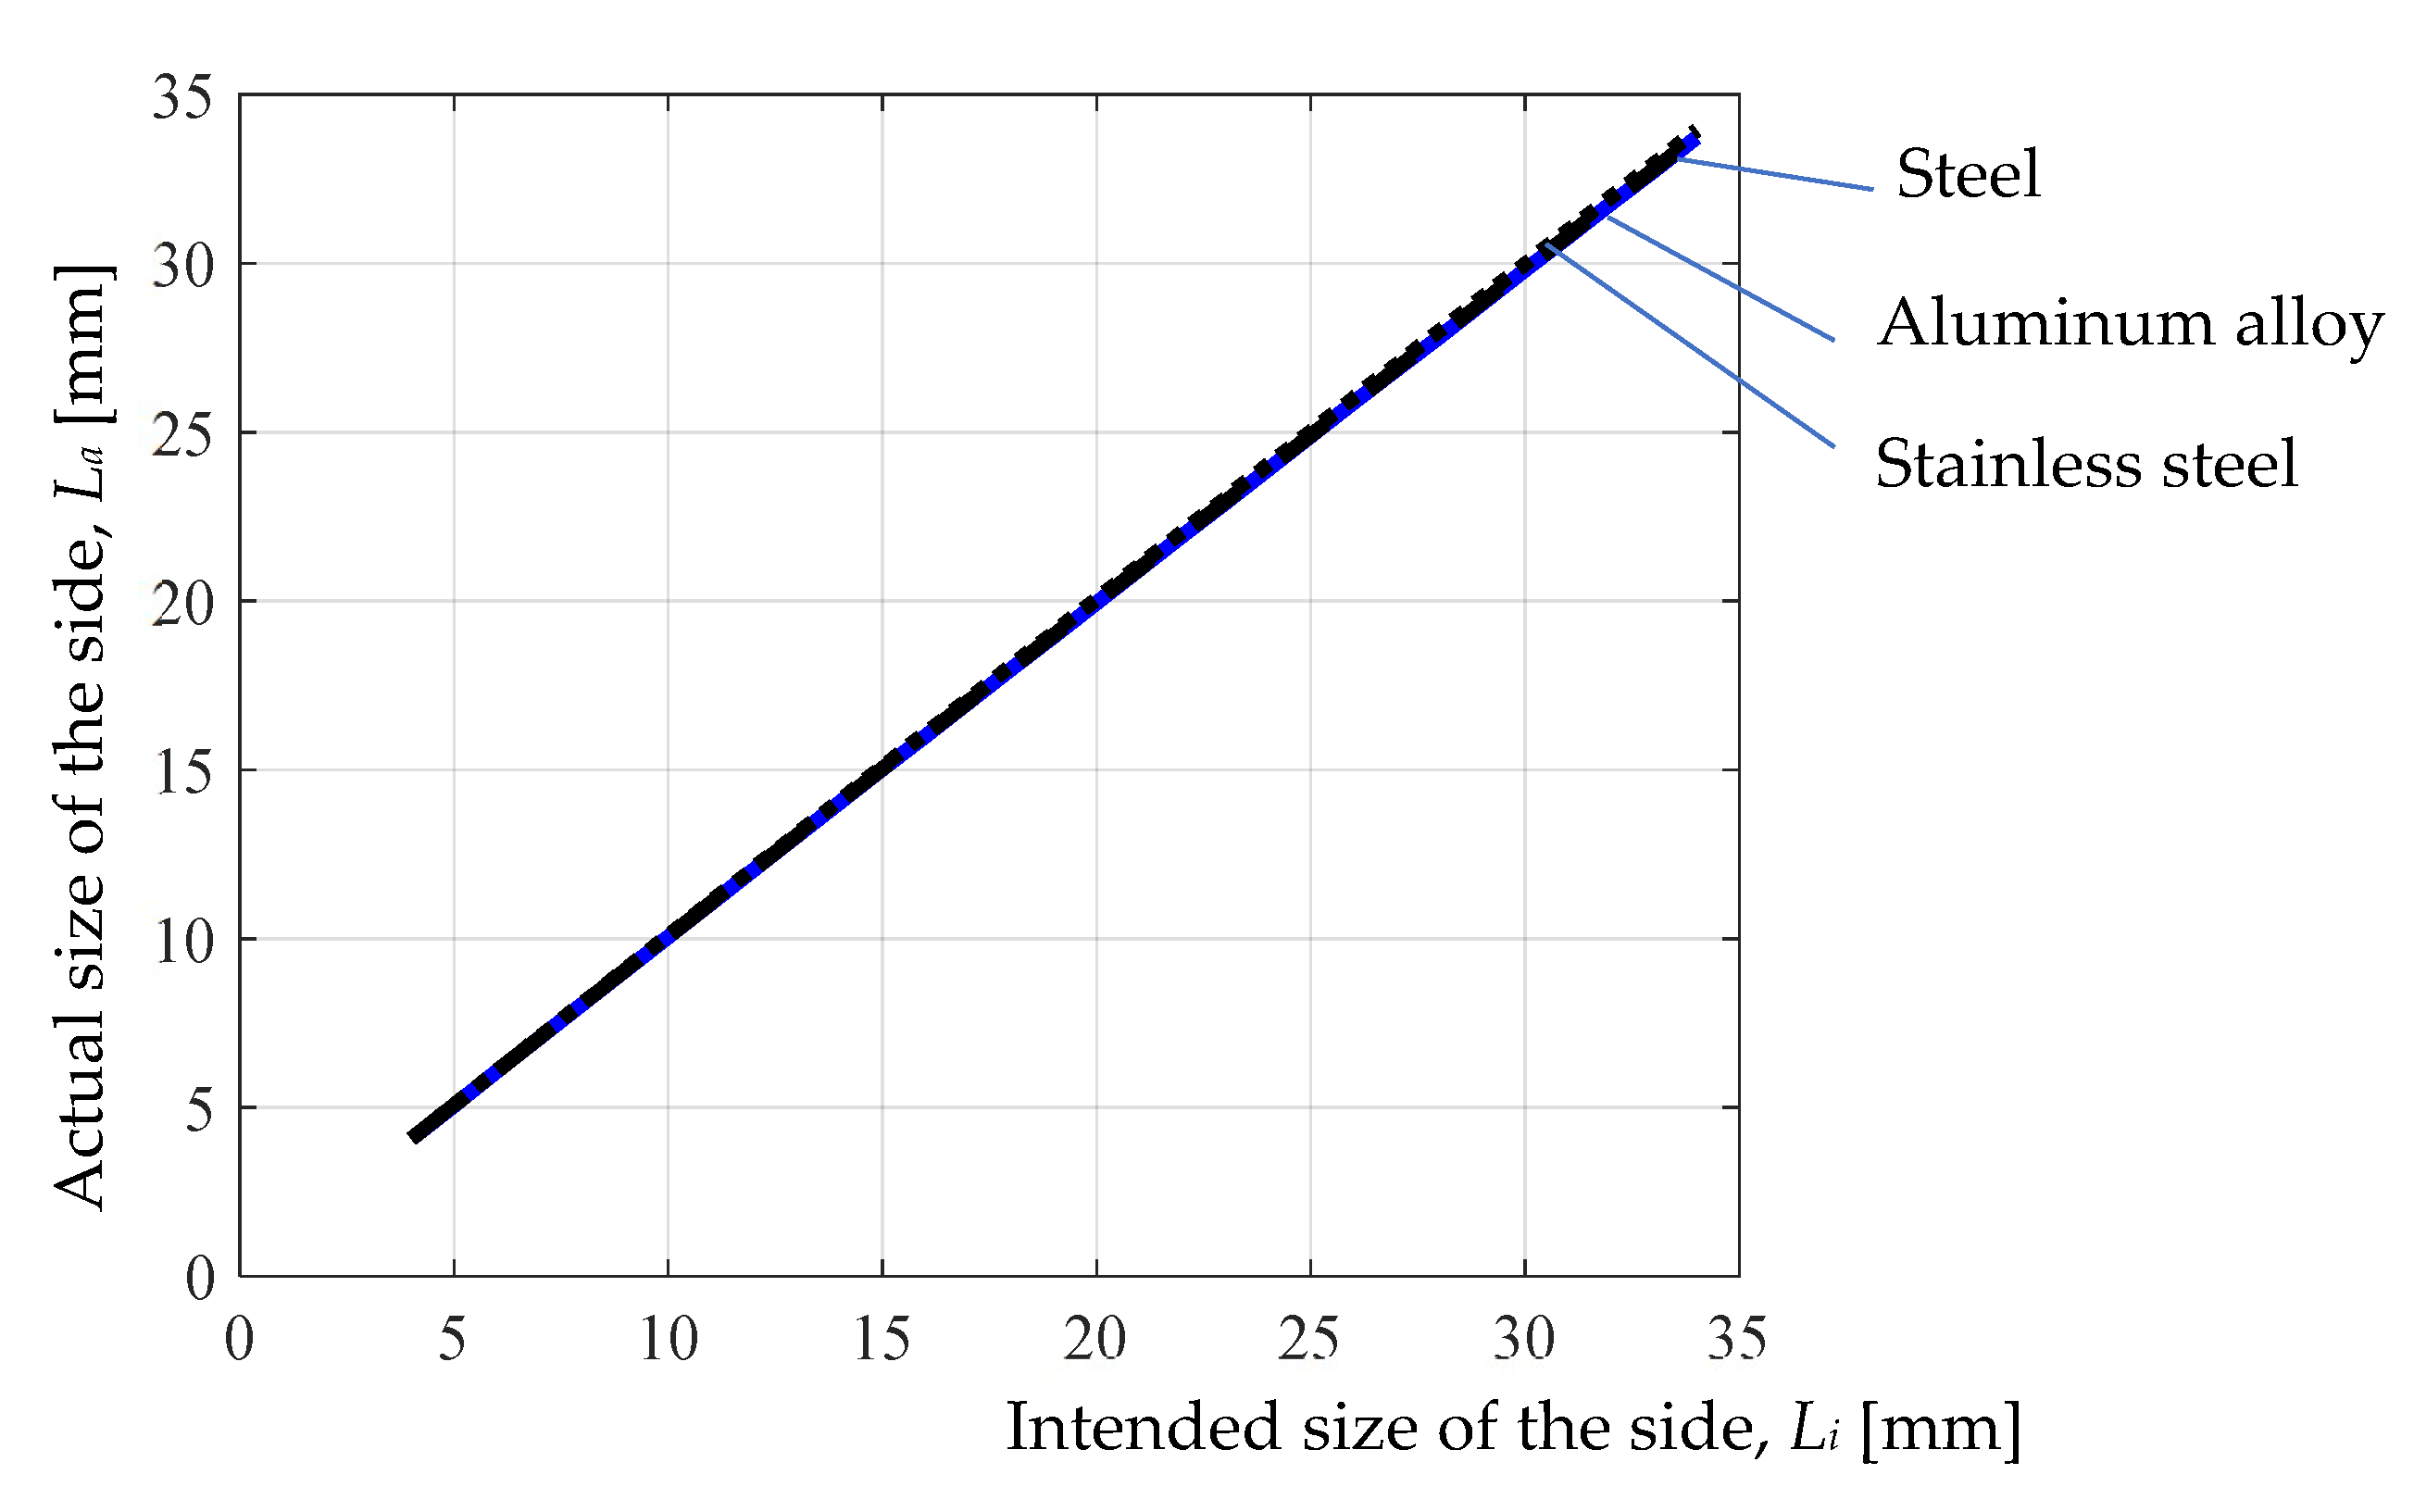
Analysis of the empirical mathematical models and graphical representations in
Figure 8,
Figure 9 and
Figure 10, corresponding to mathematical models (1), (2), and (3), established for the actual size
La of the square-shaped hole side led to the observations mentioned below.
It is thus found that the strongest influence on the actual size La of the square hole side made by punching is exerted, in the case of all three materials, by the intended size of the square hole side Li, since, in the three empirical mathematical models, the magnitude of the exponent attached to the Li factor has the maximum value (close to unity) in relation to the values of the exponents attached to the other input factors (values of the last three input factors being lower). At the same time, as expected, an increase in the intended size of the square hole side Li leads to an increase in the actual size La of the square hole side, since the value of the exponent attached to the Li factor is positive.
The influences of the other factors entering the process, namely punching die clearance c, workpiece thickness t, punching speed v, and intended size of the square hole side Ld, are relatively low since, in the empirical mathematical models (1), (2) and (3), the values of the exponents attached to these factors are very small compared to the value of the exponent attached to the Li factor. It can also be noted that an increase in the clearance size c has the effect of increasing the actual size of the square hole side La, since, in all three equations, the exponent attached to the c factor has a positive value. It is possible that an increase in clearance size c leads to an area of elastic deformation of the sample material before the appearance of cracks, and this is reflected in an increase in the actual size La of the square hole side. Less clear variations are found in the case of the factors thickness t and speed v, in which the values of the exponents are also very low. The directions of variation are different (there are both positive and negative values of the exponents attached to these factors in Equations (1)–(3)).
Examining the empirical mathematical models corresponding to Equations (4)–(6) and graphical representations in
Figure 11,
Figure 12 and
Figure 13 led to the following observations.
The input factor with the greatest influence on burr height b is workpiece thickness t, since, in all three empirical mathematical models, the exponent attached to this factor has the largest absolute value. It is also found that the exponent attached to the t factor has a negative value, which means that an increase in thickness t results in a decrease in burr height b. This variation could be explained by the increasing stiffness of the test sample with increasing thickness t and generating, as such, a burr of lower height. The most pronounced decrease in burr height b is found in the case of aluminum alloy Al Mg3. It could be explained by the higher plasticity of this material, which deforms without generating a burr of higher height.
It is also observed that an increase in the intended size Li of the square hole side leads, in all three cases, to a decrease in burr height b, since the values of the exponent attached to the Li factor are negative. Such a result could be explained by the fact that an increase in the square hole side could prevent the generation of a higher burr over a longer length. The strongest influence is found in the case of steel 1.033, since the absolute value attached to the Li factor in Equation (4) is the largest.
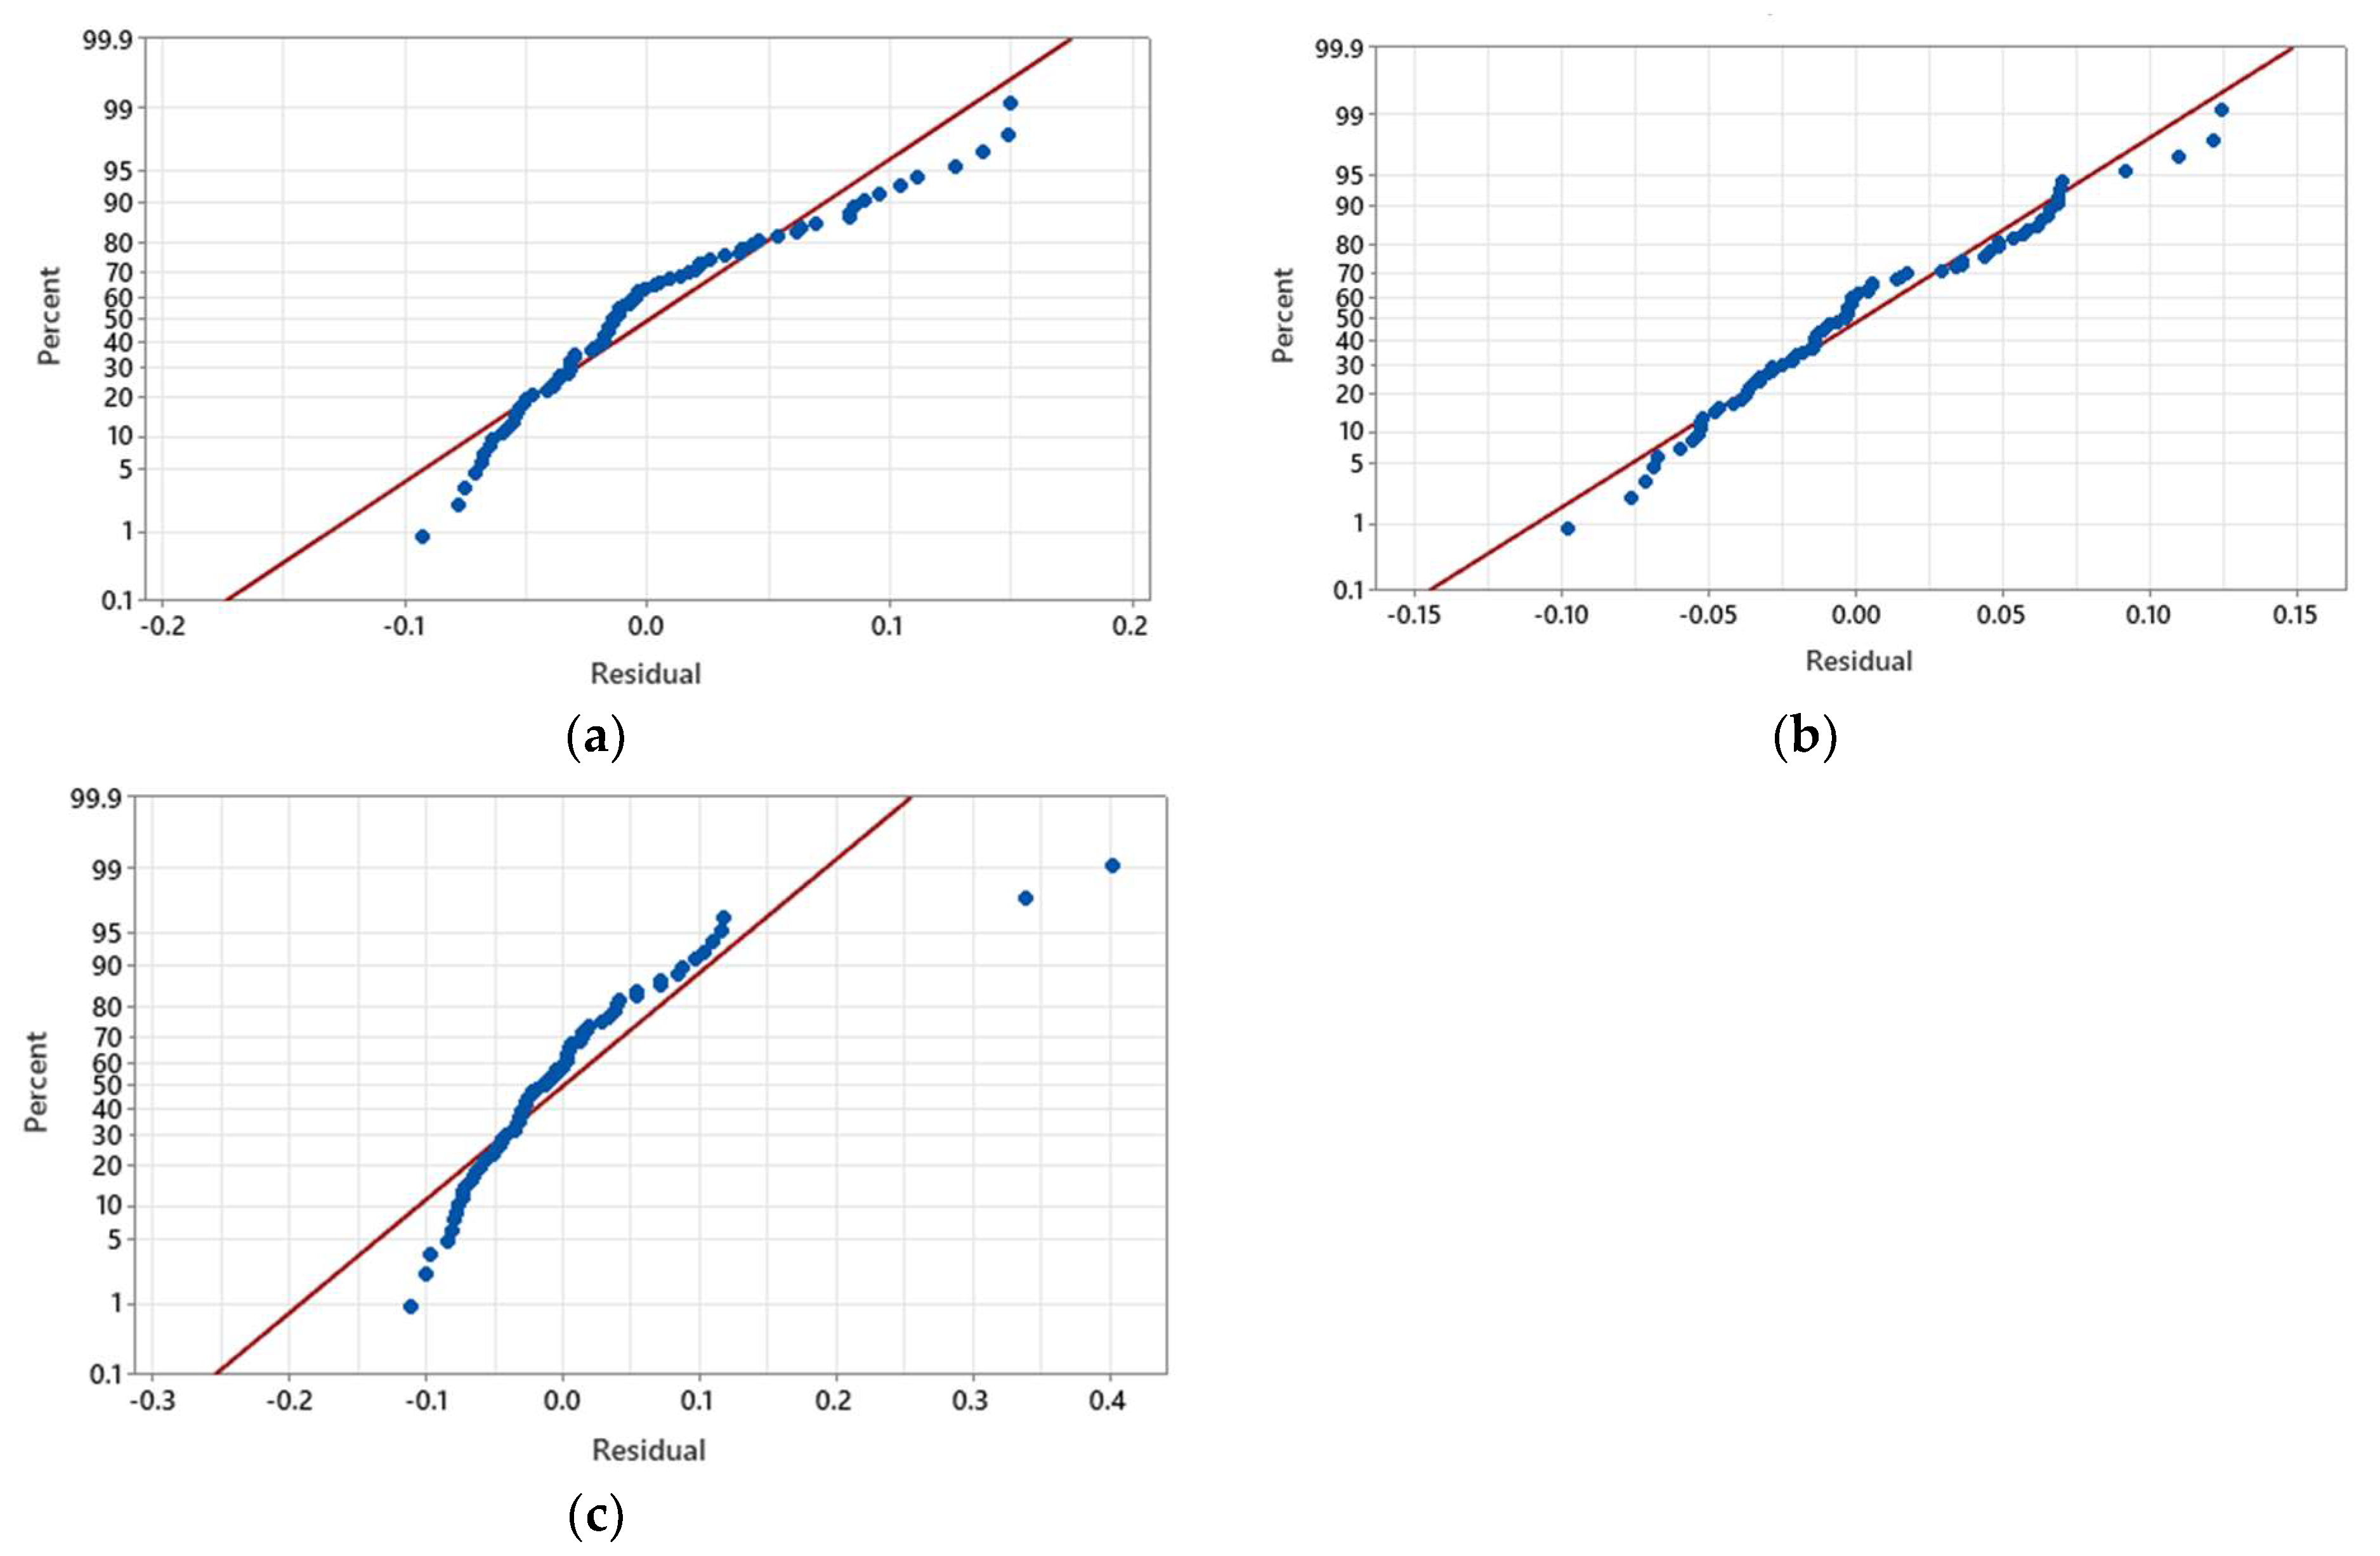
A check of the distribution normality of the experimental results was made possible by analyzing some graphical representations, such as the normal probability graph. Using such a graphical representation, it can be checked whether the residuals corresponding to the proposed empirical mathematical model correspond to a normal distribution or not.
Figure 14 shows the normality verification graphs developed for the actual size
La of the square hole side in the cases of all three test sample materials. An approximately linear distribution of the points is found, which confirms that the distribution of the experimental results was approximately normal.
To highlight the extent to which the empirical mathematical models verify the variations of the dependent variable, the analysis of variance (ANOVA) method was used. The results obtained by using the method were entered in
Table 3. Examining the results of the application of the ANOVA method by considering a significance level
α = 0.05 led to the observation that the
p-values obtained for the actual size
La of the square hole side are lower than the values corresponding to the adopted significance level, which means that there is an acceptable adequacy of the experimental results in relation to the determined empirical mathematical models.
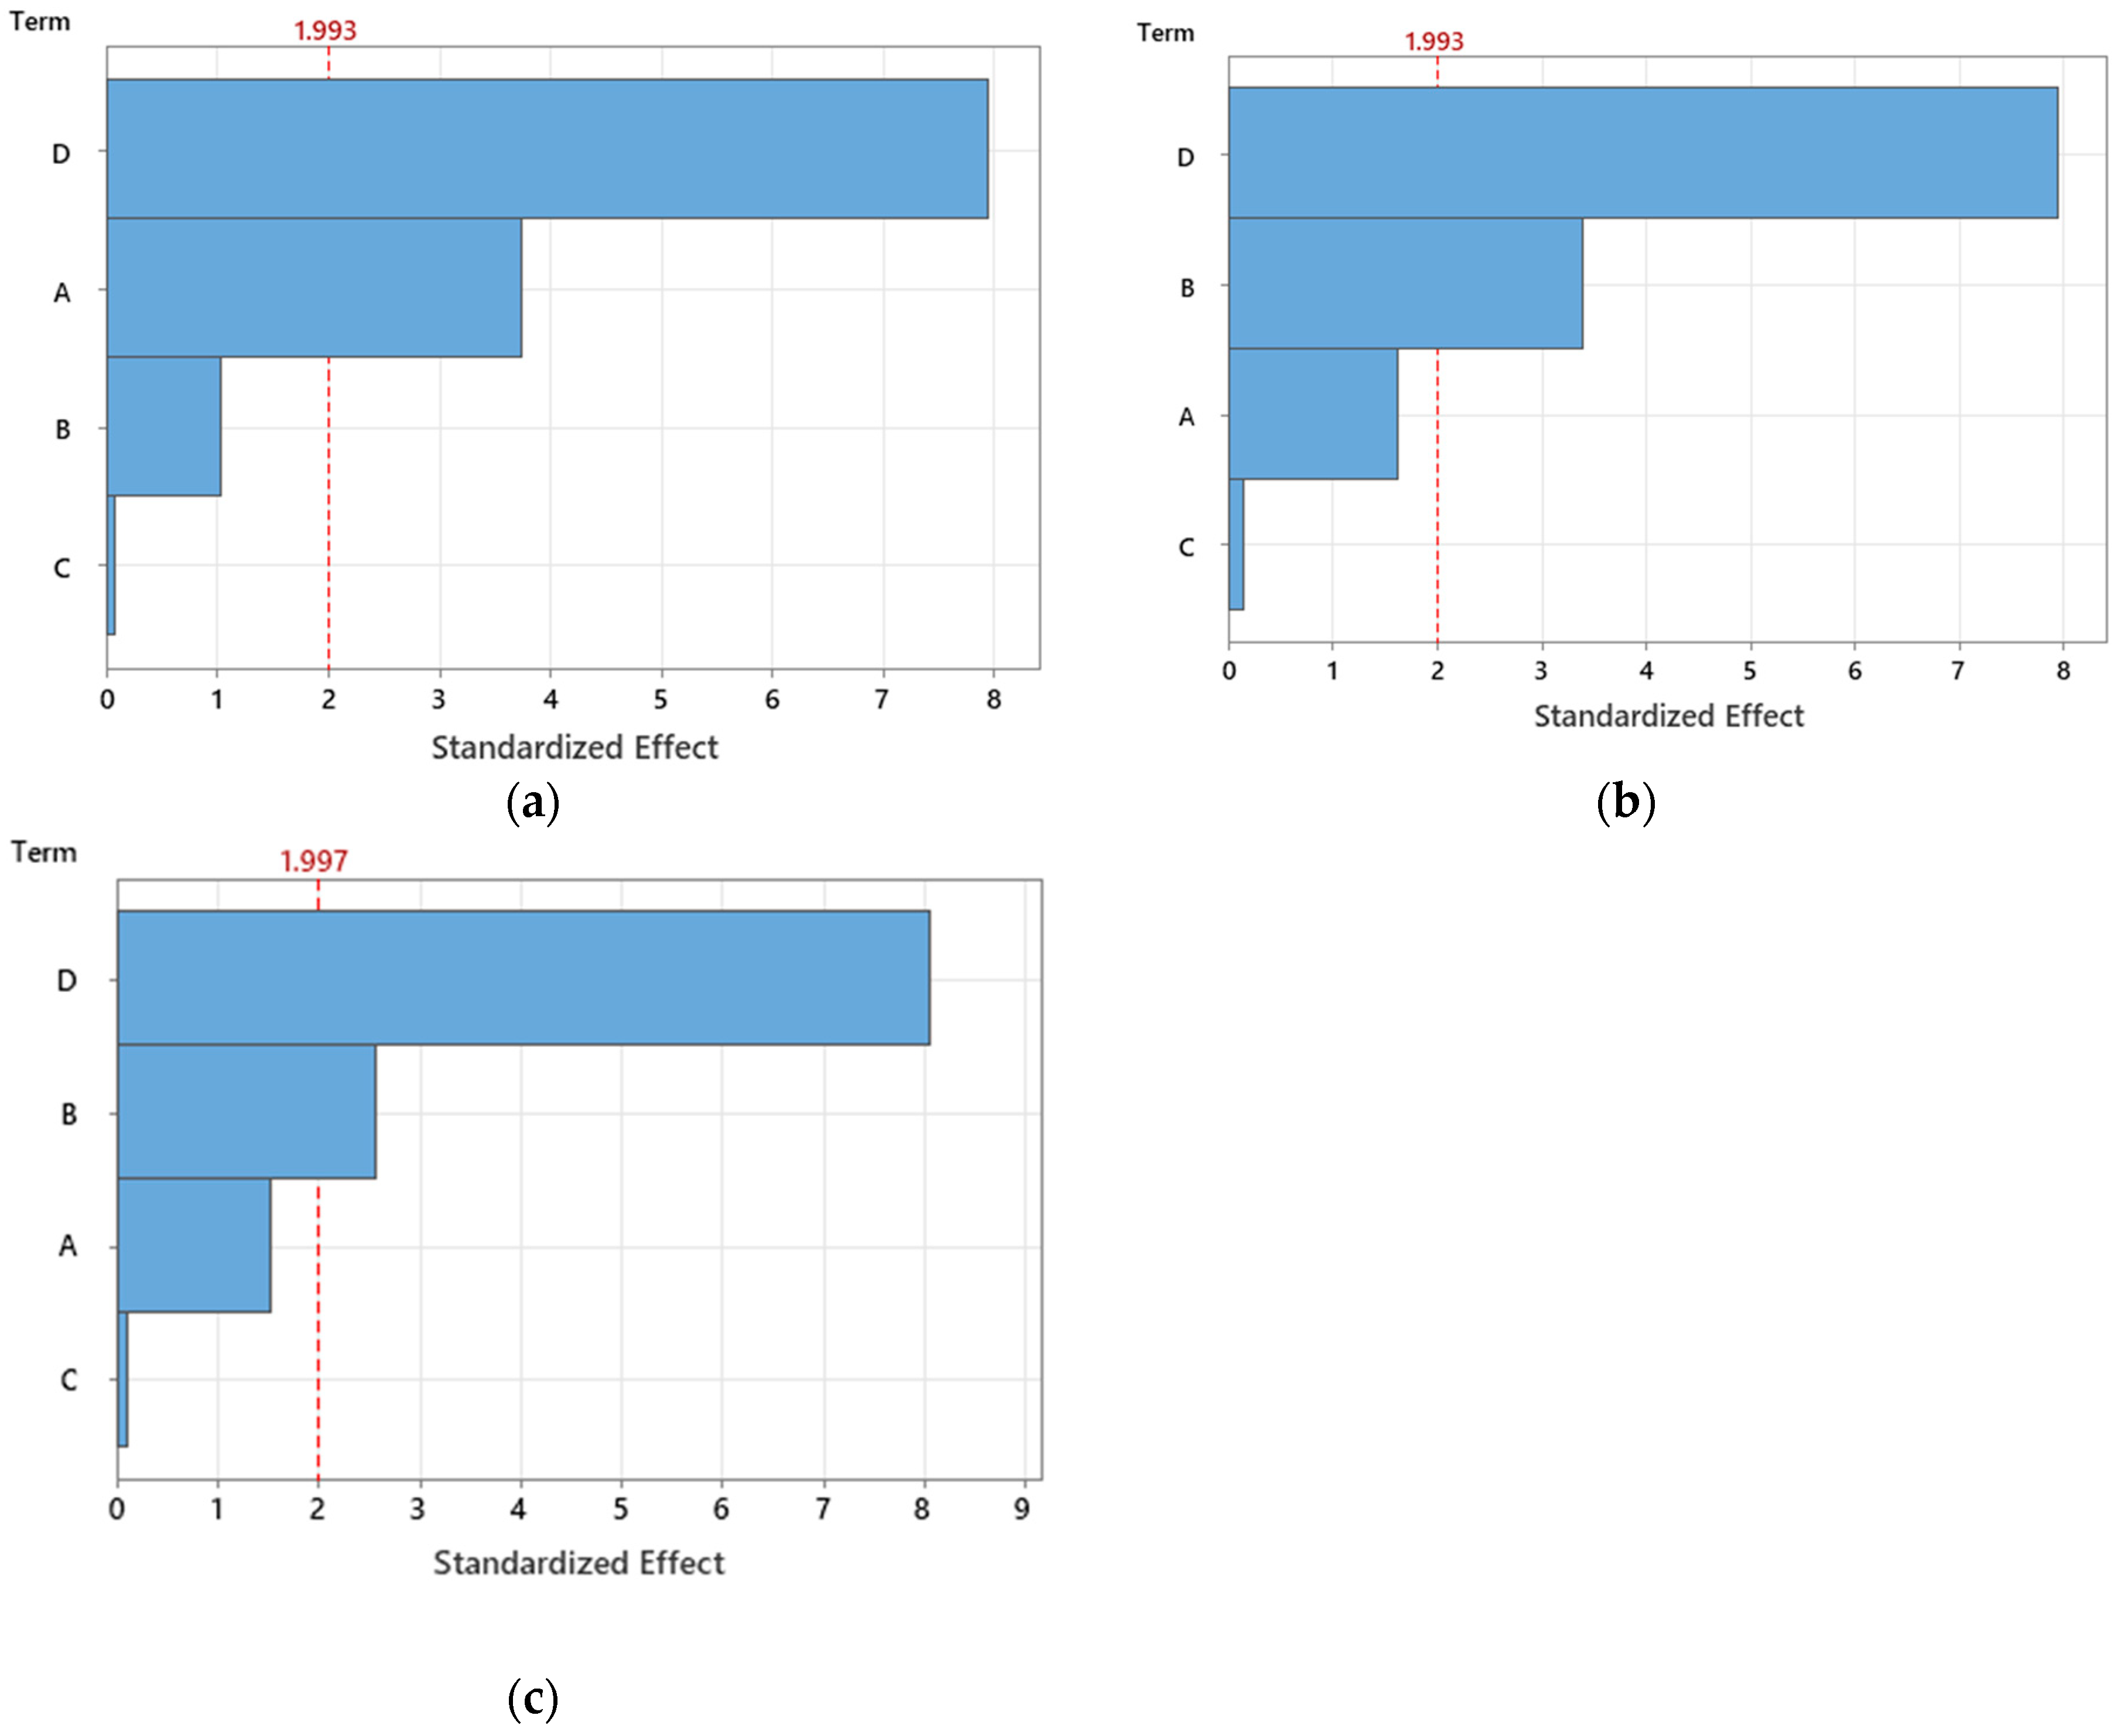
Pareto charts can be used to evaluate the level of influence of some variables on the size of a parameter of interest. The development of such diagrams in the case of the experimental tests led to the graphic representations in
Figure 15. A red line was used to reveal the factors with significant influence, the crossing of which by the bars corresponding to certain factors means that the respective factors have a significant influence. For the investigated situation, clearance
c and sheet thickness
t can thus be considered significant factors. It can be stated that clearance
c is the factor with the greatest influence on the actual size
La of the square hole side.
Suppose the height
b of the burr resulting from the punching process is taken into account in the case of the test samples of the three materials. In that case, the results of the verification of the normality of the distribution are those in
Figure 16. The arrangement of the points around the line corresponding to the normal distribution confirms a distribution close to normal of the experimental results in the case of all three sample materials.
The results of using the ANOVA method for burr heights c in the cases of the three sample materials can be seen in
Table 4. It can be observed that, in this case, the experimental results are also adequate in relation to the empirical mathematical models used.
5. Conclusions
The paper analyzed the case of the need to make square-shaped holes in sheets of different thicknesses from three different materials, namely from a carbon steel type 1.033, an aluminum alloy type AlMg3, and a stainless steel type X5CrNi18-10. As output parameters from the punching process and which are also of interest from the point of view of punching accuracy, the side size of the square-shaped hole and the height of the burr to be removed after applying the cold punching process, respectively, were taken into consideration. The process input factors whose influence on punching accuracy is of interest were puncher-to-die clearance size, sheet thickness, punching speed, and side size of the square-shaped hole to be obtained. Modeling by the finite element method of the processes developed in the contact area between the puncher, sheet, and die highlighted some theoretical aspects of the development of the cold punching and burr formation process. Accepting the hypothesis that some of these aspects could be highlighted practically, a device was designed and manufactured to simulate, to a certain extent, the processes that develop during the use of the cold punching technique. Using the device on a universal tensile testing machine allowed the observation of how mechanical stress varies during the active stroke of the puncher as the cold punching process develops. Next, the experimental research was designed based on a full factorial experiment with four independent variables at three levels of variation. The experimental results were processed using specialized software. In this way, empirical mathematical models of the power-type function were determined. The analysis of the identified empirical mathematical models highlighted the fact, that among the four input factors considered, the strongest influence on the actual size of the side of the square-shaped hole is exerted by the size of the side of the square hole generated in the workpiece. Much lower and subunit values of exponents were determined for the other input factors considered, demonstrating a reduced influence of these factors on punching accuracy. It has been observed that an increase in the desired square hole side size leads to an increase in the actual square hole side size generated in the workpiece. The analysis of the values of the exponents attached to the input factors from the power-type empirical mathematical models showed that an increase in the sheet thickness and, respectively, in the dimension to be obtained of the square hole side results in a decrease in burr height in all three materials on which the experimental investigations were carried out. In the future, it is intended to continue the research taking into account other input factors in the cold punching process, such as some parameters characterizing the geometry of the active surfaces of the puncher and the die and the mechanical properties of the test sample material, respectively.


