Article

Tolerance Specifications Management Integrated into the Product Development Cycle

by
Mattia Maltauro
1,2,*,
Roberto Meneghello
1 and
Gianmaria Concheri
2
1
Department of Management and Engineering, University of Padova, Stradella San Nicola 3, 36100 Vicenza, Italy
2
Laboratory of Design Methods and Tools in Industrial Engineering, Department of Civil, Environmental and Architectural Engineering, University of Padova, Via Venezia 1, 35131 Padova, Italy
*
Author to whom correspondence should be addressed.
Machines 2024, 12(2), 147; https://doi.org/10.3390/machines12020147
Submission received: 15 January 2024 / Revised: 13 February 2024 / Accepted: 18 February 2024 / Published: 19 February 2024

Abstract

:
In tolerancing activities focusing on the allocation of geometrical tolerances, many critical issues originate from the non-optimal assignment of responsibilities among the organization units involved. This paper aims to depict relations between different tolerancing activities and relevant specifications, assigning them to the proper actor and, therefore, expanding the ISO 8015:2011 “responsibility principle”. A classification among tolerancing activities, specifications, and media is proposed; a horizontal hierarchical framework among functional, manufacturing, and verification specifications and a vertical hierarchical framework along the supply chain are discussed. Examples of both hierarchical structures are presented.

1. Introduction

A product’s geometrical specification [1,2] is the result of so-called tolerancing activity [3]. A product specification represents the information contained in the technical product documentation (TPD) stating the product requirements [4]. The geometrical specification is created during the product development phase, and it allows to transpose definite functional requirements into geometrical requirements assigned to actual product features [5,6,7]. The information incorporated in the geometrical specification is shared between departments involved in product development via technical engineering documentation (2D drawings). Alternatively, model-based definition (MBD) is a tool that allows one to represent technical product documentation contents, including geometrical specification, directly into a 3D annotated CAD model [8,9]. Both are possible forms for TPD [10].
In the ISO standard system on geometrical product specifications (ISO-GPS, managed by ISO/TC213), the concepts recalled above are presented in ISO/TS 21619:2018, which lists the basic types of documents relating to geometrical product specifications: functional specification, manufacturing specification, and verification specification [11]. This document, a technical specification, inherits an ambiguous use for “specification” already existing in ISO publications: it is defined both as a “document stating requirement” [11], using the definition from ISO 9000:2015 [4], and as “expressing the field of permissible deviation of a characteristic of a workpiece as permissible limits” in ISO 17450-1:2011 [12]. Within ISO-TPD (technical product documentation, as managed by ISO/TC10), different types of specifications (e.g., general specification, performance specification, process specification, requirement specification, etc.) are considered as documents [10].

1.1. State of the Art

In the literature, a possible classification of the different types of geometrical specification-related activities is proposed, as shown in the following.

1.1.1. Functional Geometric Specification

Functional tolerancing activity is performed in the design phase and focuses on the functional needs of a product: the result is a functional specification in which functional requirements are stated [11]. Many authors agree that interactions among parts and assemblability are important in functional tolerancing [13,14,15,16]. However, a clear and explicit definition for functional tolerancing was not found in the literature.
Nevertheless, many methodologies aiming at creating a functional specification have been described.
Mejbri et al. [13] proposed a recursive method to create a functional specification for complex mechanisms. For each geometrical functional requirement, a functional subassembly is defined and studied separately. The concept of blocks to indicate subassemblies needed for manufacturing and integration is presented. A further development [16] presented an approach for the identification and specification of key parts based on the study of the parts geometry and the interfaces between them. The methodology consists of a top-down decomposition of a geometric functional requirement for the whole mechanism into subassemblies and parts.
Ballu et al. [17] proposed a new design approach called GASAP (geometric as soon as possible) that suggests starting with the CAD modelling of the product as soon as possible in the design phase to identify functional features and design parameters. It guarantees the link between the CAD model and the functional analysis.
Anselmetti [18] developed a semi-automatic system (CLIC, “Cotation en Localisation Avec Influence des Contacts”) that create a functional specification based on the interface between components. It automatically creates the datum reference frame on parts and provides specifications on contacting features. The designer still needs to express the other functional requirement. A clear distinction between the generation of the specification scheme and the tolerance synthesis is stated.
Hu J. and Peng Y. [19] developed a computer-aided tolerancing (CAT) system to create a functional specification based on axiomatic design [20]. Two main phases were identified: the creation of the specification scheme based on rules and the allocation of values to every tolerance. In the second phase, manufacturing and cost-related influences were also considered.
Cao Y. et al. [21] defined a method to create a functional specification that starts by analyzing the assembly to identify the key part and key features. Then, an iterative procedure to create the specification on single parts was proposed.
Göhler et al. [22] proposed a methodological framework to decompose the functional requirement into sources of variation that will become the design parameters. This framework focuses on geometry plus other different parameters, e.g., materials, external factors, etc. The result is a clear link between the stated tolerance and the functional requirement.
Rouetbi et al. [23] developed a methodology for the functional tolerancing of a hyperstatic mechanical system. The methodology first considered the assembly as rigid and, in a second step, defined the capability of the system to deform in a manner that guaranteed assemblability.
Calì et al. [24] proposed an integrated approach to define and control the functionality of flexible components used for damping and storing/dissipating energy by means of ASME or ISO tolerancing standards; it allows to limit experimental tests. Application to a mechanical tensioner was provided.
Berglund et al. [25] reviewed existing methods for the functional characterization of surface texture in functional tolerancing. Therefore, attention was shifted from macrogeometry to microgeometry.

1.1.2. Manufacturing Geometric Specification

Manufacturing tolerancing activity deals with the definition of the manufacturing process, containing all the relevant requirements [11]. If the actual manufacturing process involves more phases, every step requires a dedicated manufacturing specification.
Two original approaches in the manufacturing tolerancing field were proposed: one focused on a virtual “non-ideal surface model” [12] describing the part as built; the other aimed to determine the contribution of manufacturing deviations, step by step, in a bottom-up approach, to define specifications for each manufacturing process step.
Bourdet et al. [26] proposed the small displacement torsor (SDT) that can be used to describe geometric deviations due to manufacturing processes.
Vignat and Villeneuve [27] proposed a simulation process that aimed to create a representation of the manufactured part using the SDT concept, which allows the description of the relative position of a workpiece and tool and its machining capabilities. The result describes a population of produced parts that can be compared to the functional specification. To perform this simulation, it is necessary to estimate both the parameters for the positioning (fixturing) and the machining issues. A generic solution for the positioning (fixturing) problem was also provided [28]; however, the SDT value determination for a given machining operation still needs to be assessed by experimental data.
Different methodologies that use the SDT to evaluate the machining process with respect to the functional specification using inequalities were also developed [29,30].
Anselmetti and Louati [31] proposed an iterative method that allow one to generate manufacturing specifications for every tooling step according to the ISO-GPS language. The procedure is based on tolerance transfer that uses tolerance zones’ vectorial description. Further development of this methodology produced a formal computing solution [32].
Ayadi et al. [33] developed a methodology to generate manufacturing specifications using the SDT concept and, at the same time, adopted the datum system definition provided by ISO-GPS standards.
Anselmetti [34] proposed the “analysis line method” to identify the relations between manufacturing steps in order to generate a tolerance stack-up analysis. This analysis led to the tolerance synthesis, which is a consequence of the specification generation described in [31].
Royer and Anselmetti [35] provided a methodology that allows both analysis and synthesis for the manufacturing specification using the ISO-GPS language. The SDT is used to describe the deviations for the tolerance analysis. It was also proven that this methodology can even be used to evaluate complex joining operations [36].
Integration between the tolerance transfer concept and a computer-aided tolerancing (CAT) software, ANATOLE 3D (more detail on the software in [37]), was proposed to automate the specification synthesis [37].
Xiao et al. [38] discussed the necessity of an information exchange standard that could cover the design and tolerancing aspect for additive manufacturing specifically.
In the field of evaluation of the accumulation of geometrical errors during manufacturing, Hofmann at al. proposed a methodology, based on skin model shapes, that takes into consideration each single manufacturing step [39,40].
In the field of manufacturing, recent trends cover the aspect of “geometrical variation management” linked to the concept of “industry 4.0”.
Schleich et al. [41] showed an overview of potentials and challenges using a digital twin in geometrical variation management, where a fully digitally connected manufacturing environment feeds data to the digital twin itself.
The implementation challenges related to the digital twin for variation management were analyzed by Wärmefjord et al. [42]; a survey among industry and academia enabled them to define the barriers to the full implementation and benefit of the digital twin for variation management in industry.
In a digitally connected manufacturing environment, the possibility of compensating tolerances becomes a reality, as shown by Aschenbrenner et al. [43]. Often, compensation methods are seen as an intervention to limit the scraps, but they can also be used early in the geometric variation management to select appropriate compensation strategies.
Wang et al. [44] developed a variation management model that takes into account the “key control characteristics” for multistage machining processes, including their cost–quality balance.
One of the biggest challenges in variation management is the simulation of actual geometries that are representative of the actual manufacturing process. To overcome this limitation, Qie et al. [45] developed a methodology to simulate skin model shapes based on generative adversarial networks and Hessian locally linear embedding. This approach does not require an explicitly defined parameter.
Recently, a formal procedure to correlate the “manufacturing specification” to the “functional specification” for deformable components was proposed. In this framework, the “manufacturing specification” refers to the “as manufactured” state, therefore, the “free state” while the “functional specification” refers to the “as assembled” state, in which the part can be consider rigid [46,47].

1.1.3. Verification Geometric Specification

The verification tolerancing activity translates into metrological requirements/procedures for functional/manufacturing specifications [11].
Only a few contributions concerning “verification tolerancing” and/or “verification specification” can be found in the literature; these are mainly focused on software testing. No contribution was found that was dedicated to geometric verification and inspection.
Woo [48] states that the verification specification can prevent the verification activity from diverging from the intended procedure and aim, over time, when carefully created. Then, if the requirement is not met, it can be assessed whether the inspection was not appropriate or whether the functional or manufacturing requirements need to be updated.
In the aerospace sector, NASA defined a list of 18 items to be included in the verification procedure. It also listed 11 fields to be included in the verification report. The list included information about measuring equipment, calibrations intervals, single operations sequence, data recording procedures, etc. [49].
Morse [50] introduced the idea of “design for metrology” as a possible new idea that could be further divided into the concepts of “design for metrology”, “design using metrology”, and “metrology for manufacturing” concepts. The possibility of sharing responsibility among different departments was also postulated. In further developments on the topic of “design for metrology”, a definition of “verification specification” within the ISO GPS system was proposed [51].
Qie and Anwer [52] proposed the idea of non-default partitioning for compound features. The partitioning of complex compound features is essential to fully benefit metrological checks. At the same time, the design activities can benefit from their formalization assisting in the definition of functional features.

1.1.4. Interrelation of Different Geometric Specifications

Functional, manufacturing, and verification tolerancing/specification were mainly found to be studied separately. Only a few works showed a clear link between functional and manufacturing specifications: Anselmetti and Louati [31] and Anselmetti [34] clearly state that the manufacturing process must be chosen by the manufacturing engineers to comply with the functional specification defined by the designer. In this framework, the manufacturing specification is used to describe the intermediate state between subsequent manufacturing phases.

1.2. Aim of the Work

Based on these findings, there is a lack of description of the relations among different tolerancing activities/specifications.
This work aims to highlight the relations that occur among the different specification types and the relevant tolerancing activities. Moreover, it will analyze where and when such activities take place during the product design cycle, assigning the relevant responsibilities to the proper actors. Therefore, this paper will answer the question: “how can a proper tolerance specification management be integrated in a product development cycle?”
It is noteworthy to mention that, in the following, the analysis is focused on mechanical assemblies of industrial products for which interchangeable parts [53] are required. The assembly and parts geometries are described in the TPD and considered as the medium [10] (2D drawings or MBD). Specification (or specification scheme) will refer to either a single call-out or all the call-outs regarding allowable deviations, specified according to the GPS language [12], and tolerancing will refer to the activity that generates a specification.

2. Responsibilities in Tolerancing Management

In the current product development cycle, three different key actors can be identified: design, manufacturing, and quality control departments.

2.1. Design Department

In the context of this work, the design department (Figure 1) has the responsibility to develop a geometric model for parts and assemblies that fulfils the functional requirements stated in the product requirements document (PRD) [54].
However, the product geometry description is not limited to the nominal shape and architecture. In the design department, functional tolerancing activity studies the assembly relationships among the parts and, therefore, defines the deviations from nominal geometry that can be allowed while desired functionality remains assured. If needed, experimental tests or simulations may also be performed to assess the allowable deviations (i.e., dimensional and geometric tolerances).

2.2. Manufacturing Department

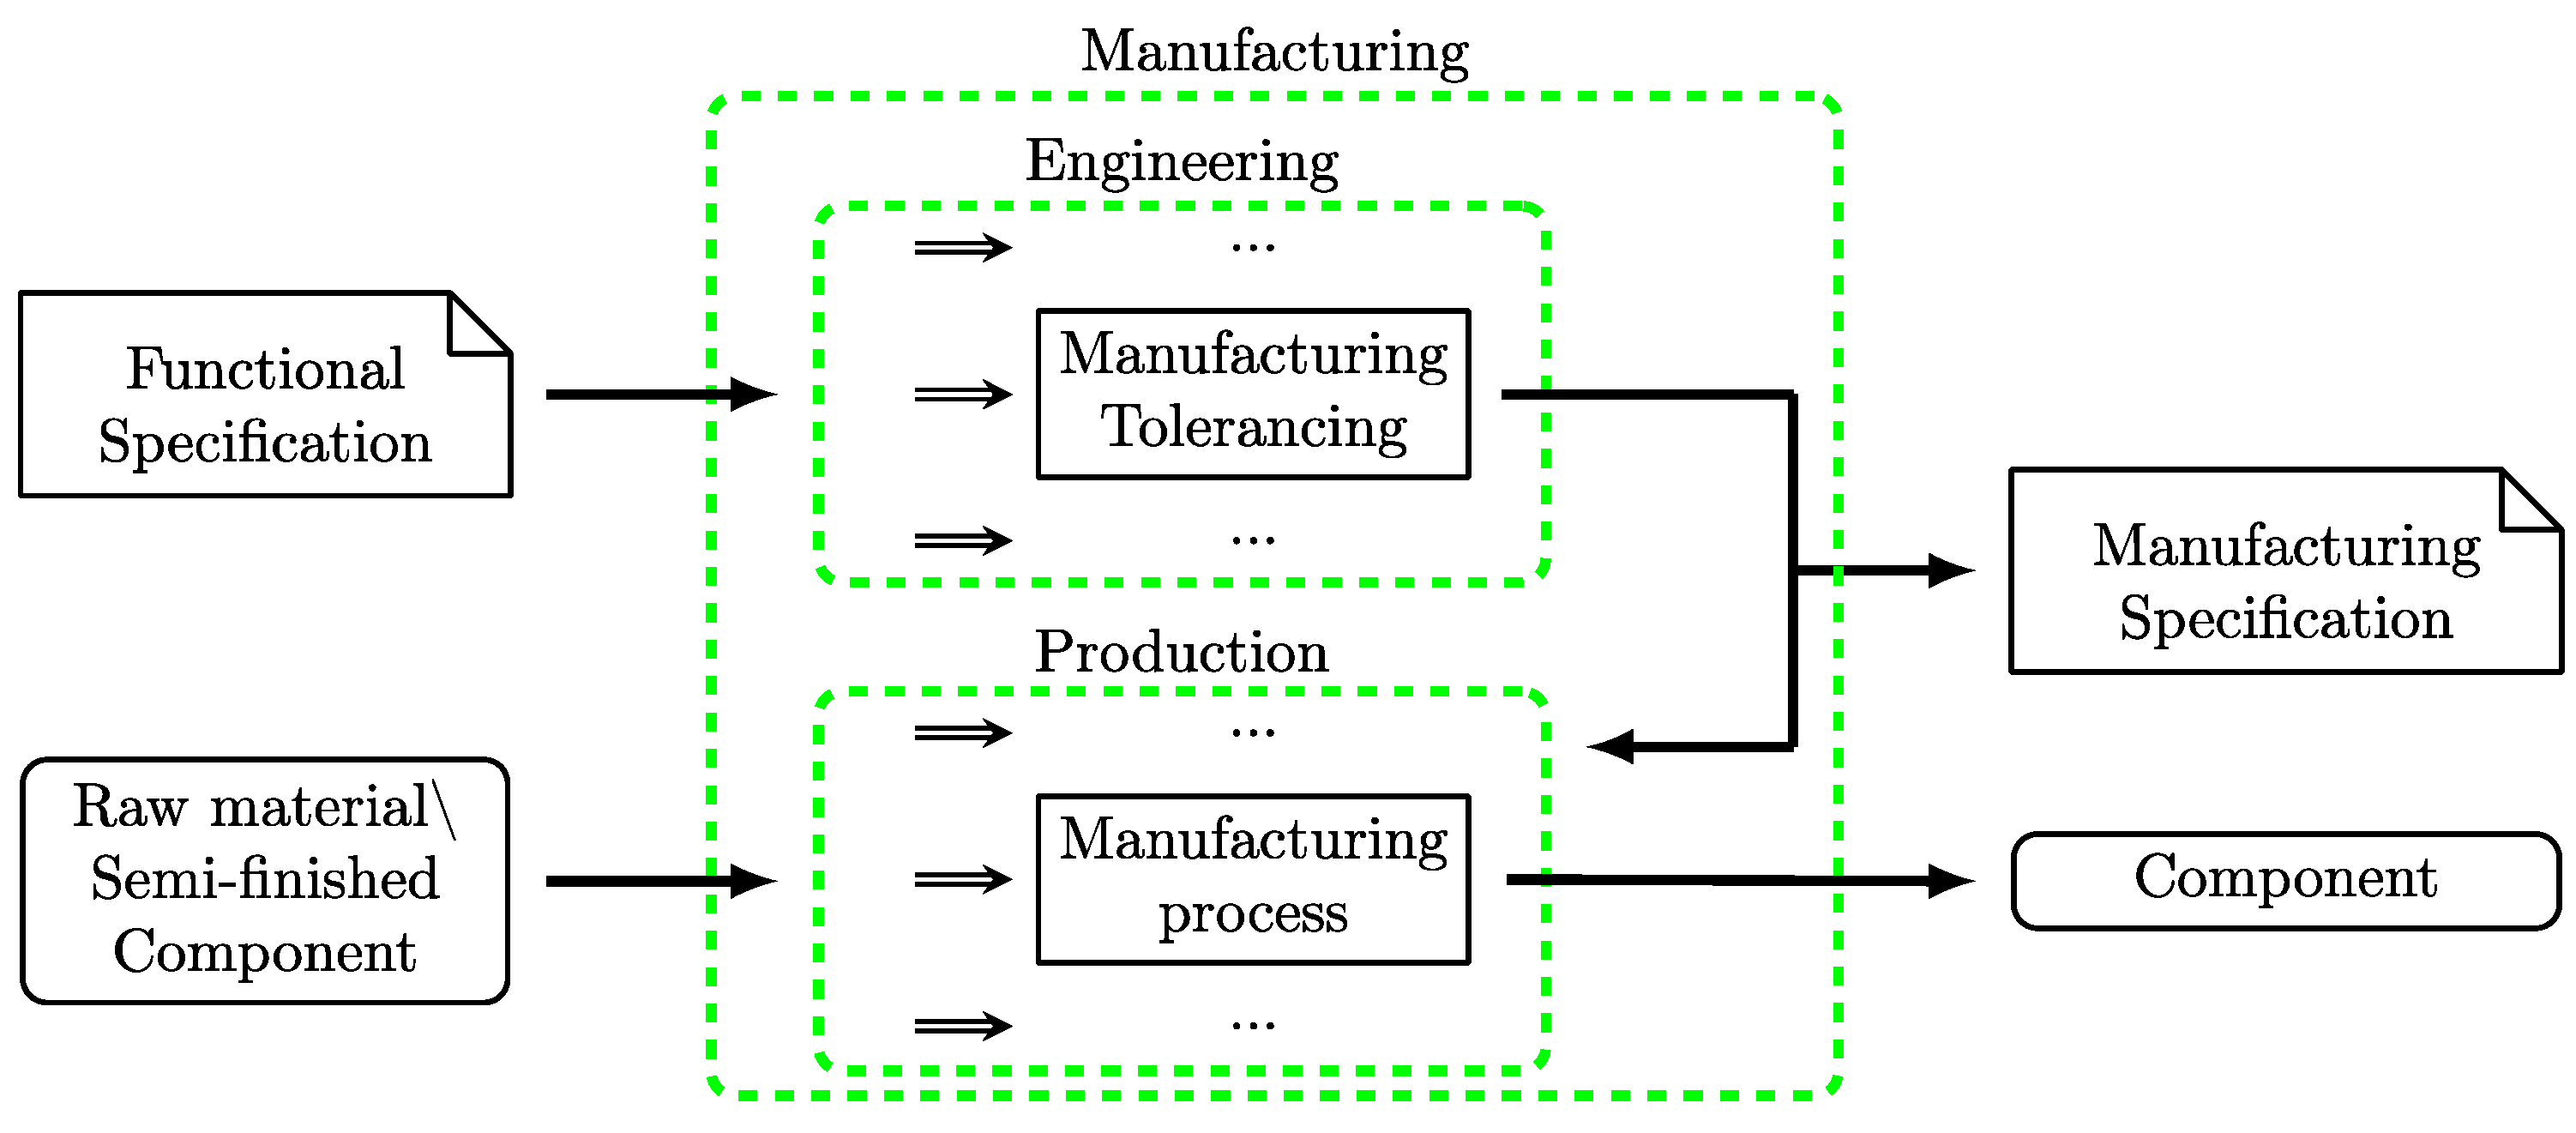
The manufacturing department (Figure 2) is responsible for producing parts and assemblies as defined in the TPD.
The input for this activity is the functional specification. The goal is to design and implement a manufacturing process able to produce any part in conformity with the functional specifications.
Therefore, two sequential phases are needed: the engineering phase and the production phase.
Engineering aims to design and tune the process. This activity involves the use of dedicated software packages, such as CAM (computer-aided manufacturing)/CAPP (computer-aided process planning), and it is referred to as process planning. All the TPD created in this phase convey manufacturing specifications that are based on the considered process’ characteristics and needs. Usually, manufacturing specifications describe a fixturing and/or tooling setup, depending on the process planning. As an example, in a specific manufacturing step, a datum system change may be required because the functional datum features have not been produced yet, and the process considers different manufacturing datum features, as discussed, e.g., in ISO/TS 8062-2:2013 [55]. The manufacturing specifications need to be defined according to the specific manufacturing process requirements, so that if a part complies with the manufacturing specification, it automatically complies with the functional specification. Tolerance stack-ups can be used to establish a connection between functional and manufacturing specifications. As stated in ISO/TS 21619:2018, the ambiguity resulting from the transformation between the functional and manufacturing specifications needs to be taken into consideration. Consequently, manufacturing specifications are often tighter than functional specifications because a combination of more tolerances and/or transformation ambiguity needs to be considered.
Production deals with the actual fabrication of parts/assemblies according to manufacturing specifications: the input is the manufacturing specification.

2.3. Quality Control Department

The quality control department (Figure 3) is mainly responsible for the acceptance or rejection of the production batches and may also support the manufacturing department in statistical process control.
The inputs for this department are the produced parts and the functional and/or manufacturing specifications. The goal is to define and perform a metrological inspection procedure to assess conformance.
Two phases can be identified: the inspection planning and the inspection itself.
Geometrical inspection can be used for many different purposes such as manufacturing process tuning, product certification or first batch approval, production process control, etc. All these different aims could have very different time and cost requirements. The number of items to be inspected can also vary drastically, from tens in total to thousands per day. Moreover, the type of information (i.e., quantity) to be assessed could be different. Therefore, the quality control department is responsible for selecting the appropriate measurement method and implementation. This phase is referred to as inspection planning. A verification specification, which is represented inside the TPD, may be generated if functional/manufacturing specifications are to be integrated to drive the verification procedure, reducing verification uncertainty and/or achieving agreement on measuring uncertainty statements.
Once the verification specification is defined, any qualified operator can perform the inspection by strictly following the specification itself, assuring the estimated (budgeted) measurement uncertainty.
Since two distinct inputs are possible—the functional and manufacturing specifications—a clear distinction shall be made between functional inspection and manufacturing inspection, as shown in [51].

2.3.1. Functional Inspection

Functional inspection is based solely on functional specifications and is the only inspection that should be used to verify conformity, particularly in a supplier–customer relationship. Emphasis should be devoted to ISO 14253-1:2017 to define conformity [56]. The focus of the metrological check is ensuring the parts can perform the intended function and ensuring their interchangeability. Geometric functional inspection may be used to qualify a new supplier, to approve an incoming batch of parts, for selective assembly, etc. The definition of critical-to-quality (CTQ) tolerances and/or the use of functional gauges to speed up inspection may be beneficial, particularly for inbound batch approval [51]. The study of the correlation among different characteristics can be used to define CTQ tolerances and to estimate the value of unmeasured quantities [57]. Selective assembly allows the creation of functional assemblies when the manufacturing process is not capable of guaranteeing interchangeability [58]. Parts can be clustered into different groups, and, once paired together, these groups guarantee assemblability.

2.3.2. Manufacturing Inspection

Inspection based on manufacturing specifications plays a significant but different role. In this case, the scope goes beyond checking for conformity to the specification. Here, the emphasis is on process monitoring, e.g., statistical process control (SPC), process tuning, in-line checks, etc. When performing SPC, the aim is to check whether the manufacturing process remains stable. At the beginning of the manufacturing process, fine-tuning of the process allows one to determine appropriate process parameters. Geometric inspections are crucial to assess actual deviations of the manufacturing process in order to perform corrective actions. The directionality of deviations is crucial to determine possible corrective actions; however, directional information is lost when reporting geometrical error according to the ISO GPS standard [12,59]. In a verification specification dedicated to process tuning and/or SPC, directional information should be defined [51]. At the same time, conformity of intermediate stages of the workpiece to the corresponding manufacturing specification might be considered. The economic benefit of such metrological checks can be evaluated according to the procedure presented by Savio et al. [60].

3. Hierarchy in Tolerancing

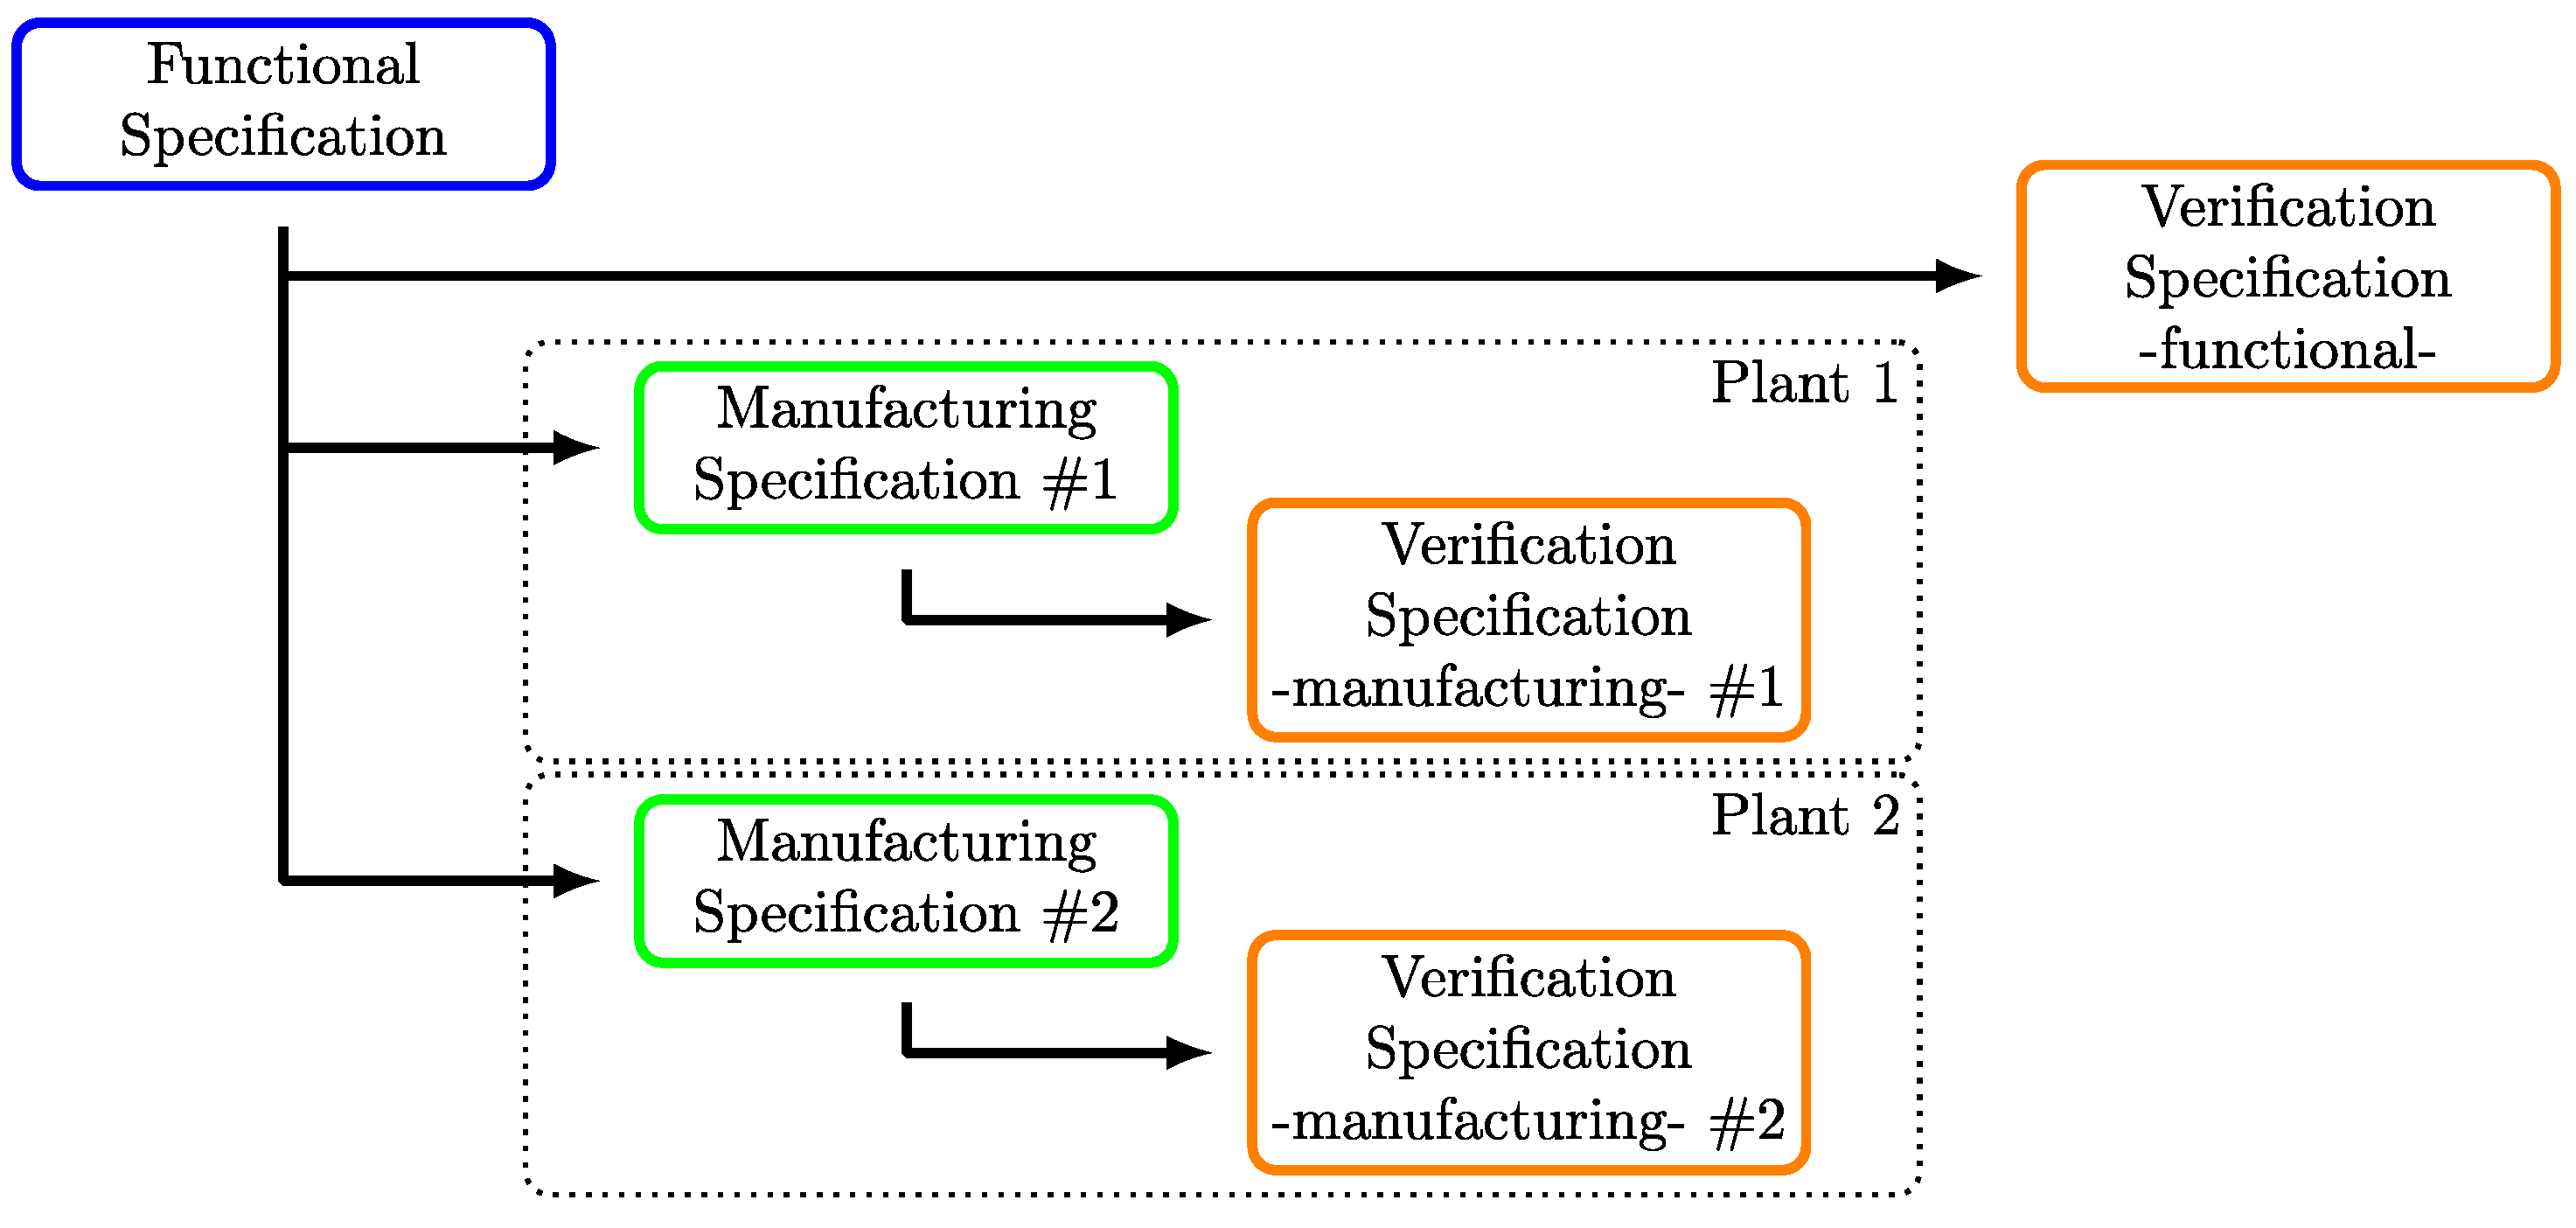
ISO/TS 21619 describes the types of documents/information in tolerancing and makes explicit the constitutive hierarchical relationships among the different specifications and, therefore, in the activities described above. This approach has been further developed in Figure 4, where it was integrated into a multi-production plan organization.
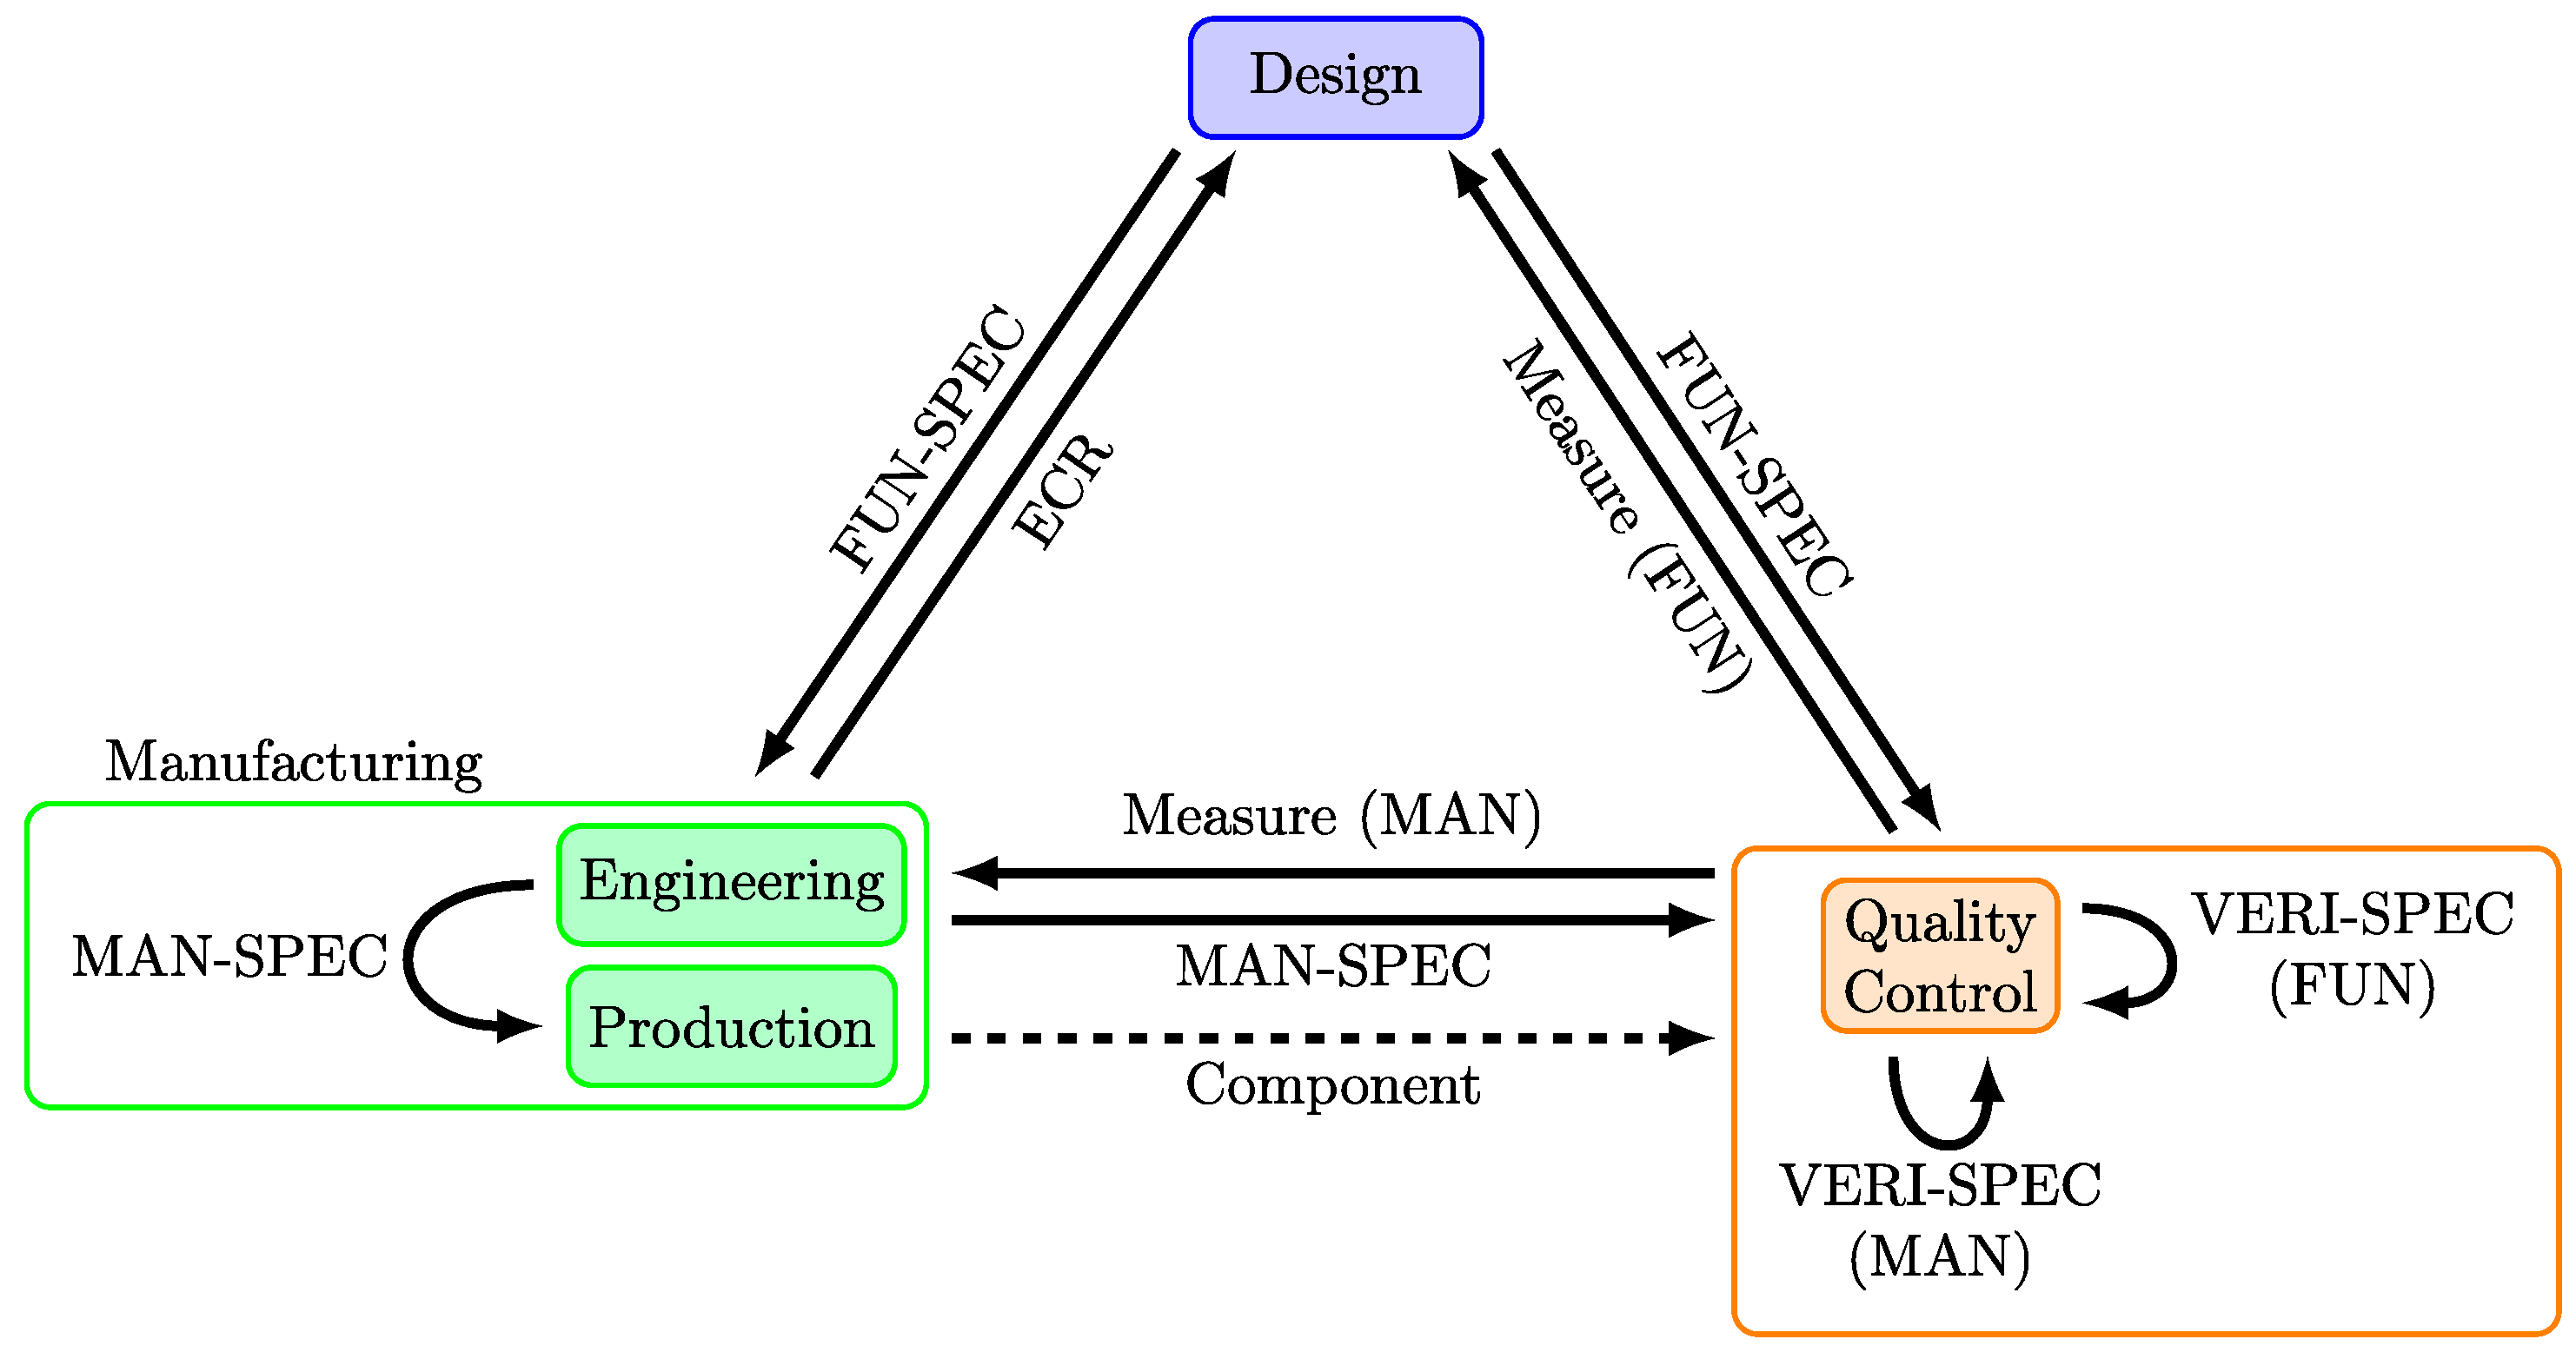
To integrate this hierarchical structure with the assignment of responsibilities previously described, the relations among the tolerancing activities of the three departments are pointed out (Figure 5).
The functional specification is sent by the design department to the manufacturing and the quality control departments. The measurement reports from quality control should be sent as feedback to the design department to validate the design assumptions and assess overall design quality.
The manufacturing department sends the components, together with the manufacturing specification, to quality control, which returns the measure as feedback to tune the process.
When no tuning is possible, the manufacturing process must be changed (manufacturing change), or the involvement of the design department must be invoked by an engineering change request (ECR) [61]. An ECR may be motivated by the assessment of the quality control.
The quality control department receives the functional specification from the design department and the manufacturing specification and produced parts from the manufacturing department. For both specifications, a verification specification, implicit or explicit, is detailed. This TPD details how the metrological check is performed. The functionality-derived verification specification plays an important role when the same inspection needs to be performed in different plants or in a customer–supplier relationship.
The relations between the tolerancing activities (functional, manufacturing, and verification), when fully implemented, are shown in Figure 5; however, during the product development cycle, the fine-tuning of these activities is achieved through loop iterations that may require a trial-and-error approach.

The Supply Chain

When the supply chain is considered, the framework that was described thus far introduces further degrees of complexity. Therefore, it must be described by a more structured scheme (Figure 6).
In Figure 6, the relationships that occur between the different tolerancing activities along the supply chain are depicted. The figure shows the subdepartments involved in the product development and the relevant information flow.
The scheme in Figure 6 expands the one-layer framework described in Figure 5 to accommodate a company-wide view of the interrelated tolerancing activities.
It is possible to identify different layers representing, from top to bottom, the degree of product decomposition. For each layer, it is always possible to identify the design, the manufacturing, and the quality control functions previously described. Each layer, or unit block within a layer, could be assigned to different business units inside the company (internal supply chain) or different companies (external supply chain).
The relations that have been analyzed in the one-layer framework (Figure 5) exist in each layer in Figure 6. The relations between layers shall also be considered.
The upper layer is the product level, where the product, in its “working” configuration, is considered. This coincides with the “full” assembly (the product when it is purchased by the final customer). For example, in terms of the automotive industry, this product level is the finished car. At the second level, the product is subdivided into different functional systems. Each system is a subassembly of the product. Continuing with our example from the automotive industry, the engine can be considered as a system-level subassembly. Each system is then subdivided into subsystems that are taken into consideration at the third level. A subsystem is still a subassembly pertaining to the system: in terms of the automotive example, a subsystem can be represented by the fuel injection system. Finally, the bottom level represents the processing of any single component. The proposed four-layer scheme will be adapted to each specific product based on its intrinsic complexity. Therefore, the number of levels is not fixed: a simple product may be represented by a scheme with fewer levels; a complex product may be represented by more levels. Also, each level may have different names according to the product’s architecture.
The information flow among the levels is bidirectional. The functional specification at the upper level is handed over to the lower level. The functional geometrical requirements are detailed into the lower-level functional requirements. Consequently, the functional specification at any level will comply with the “parent” specification at the upper level, assuring consistency among all the specifications. At the end of the manufacturing process, the artefacts are transferred to the upper level, where they will be integrated/assembled. Possibly, the measurements reports assessed at any level could be transferred to the upper level to implement quality traceability of the production batch.

4. Discussion

In our experience, most of the issues that can be traced back to tolerancing activities derive from a non-optimal allocation of tolerancing tasks. The proposed scheme depicts how the different tolerancing activities should be related, providing every actor involved in the design cycle the possibility to implement their own expertise and assume the relevant responsibilities in the overall tolerancing process.
By taking into consideration the cause–effect relationship between specifications and providing every actor their own role, an improved TPD management is possible. Every modification made at any point will be communicated back effectively and quickly, allowing everyone to be informed about all the relevant decisions that are taken downstream of the development process. If, at some point, the system does not comply with the supposed functionality, a direct link from the functional prescription to its verification, through the manufacturing, can be traced and, possibly, a solution can be worked out.

4.1. Tolerance Hierarchy

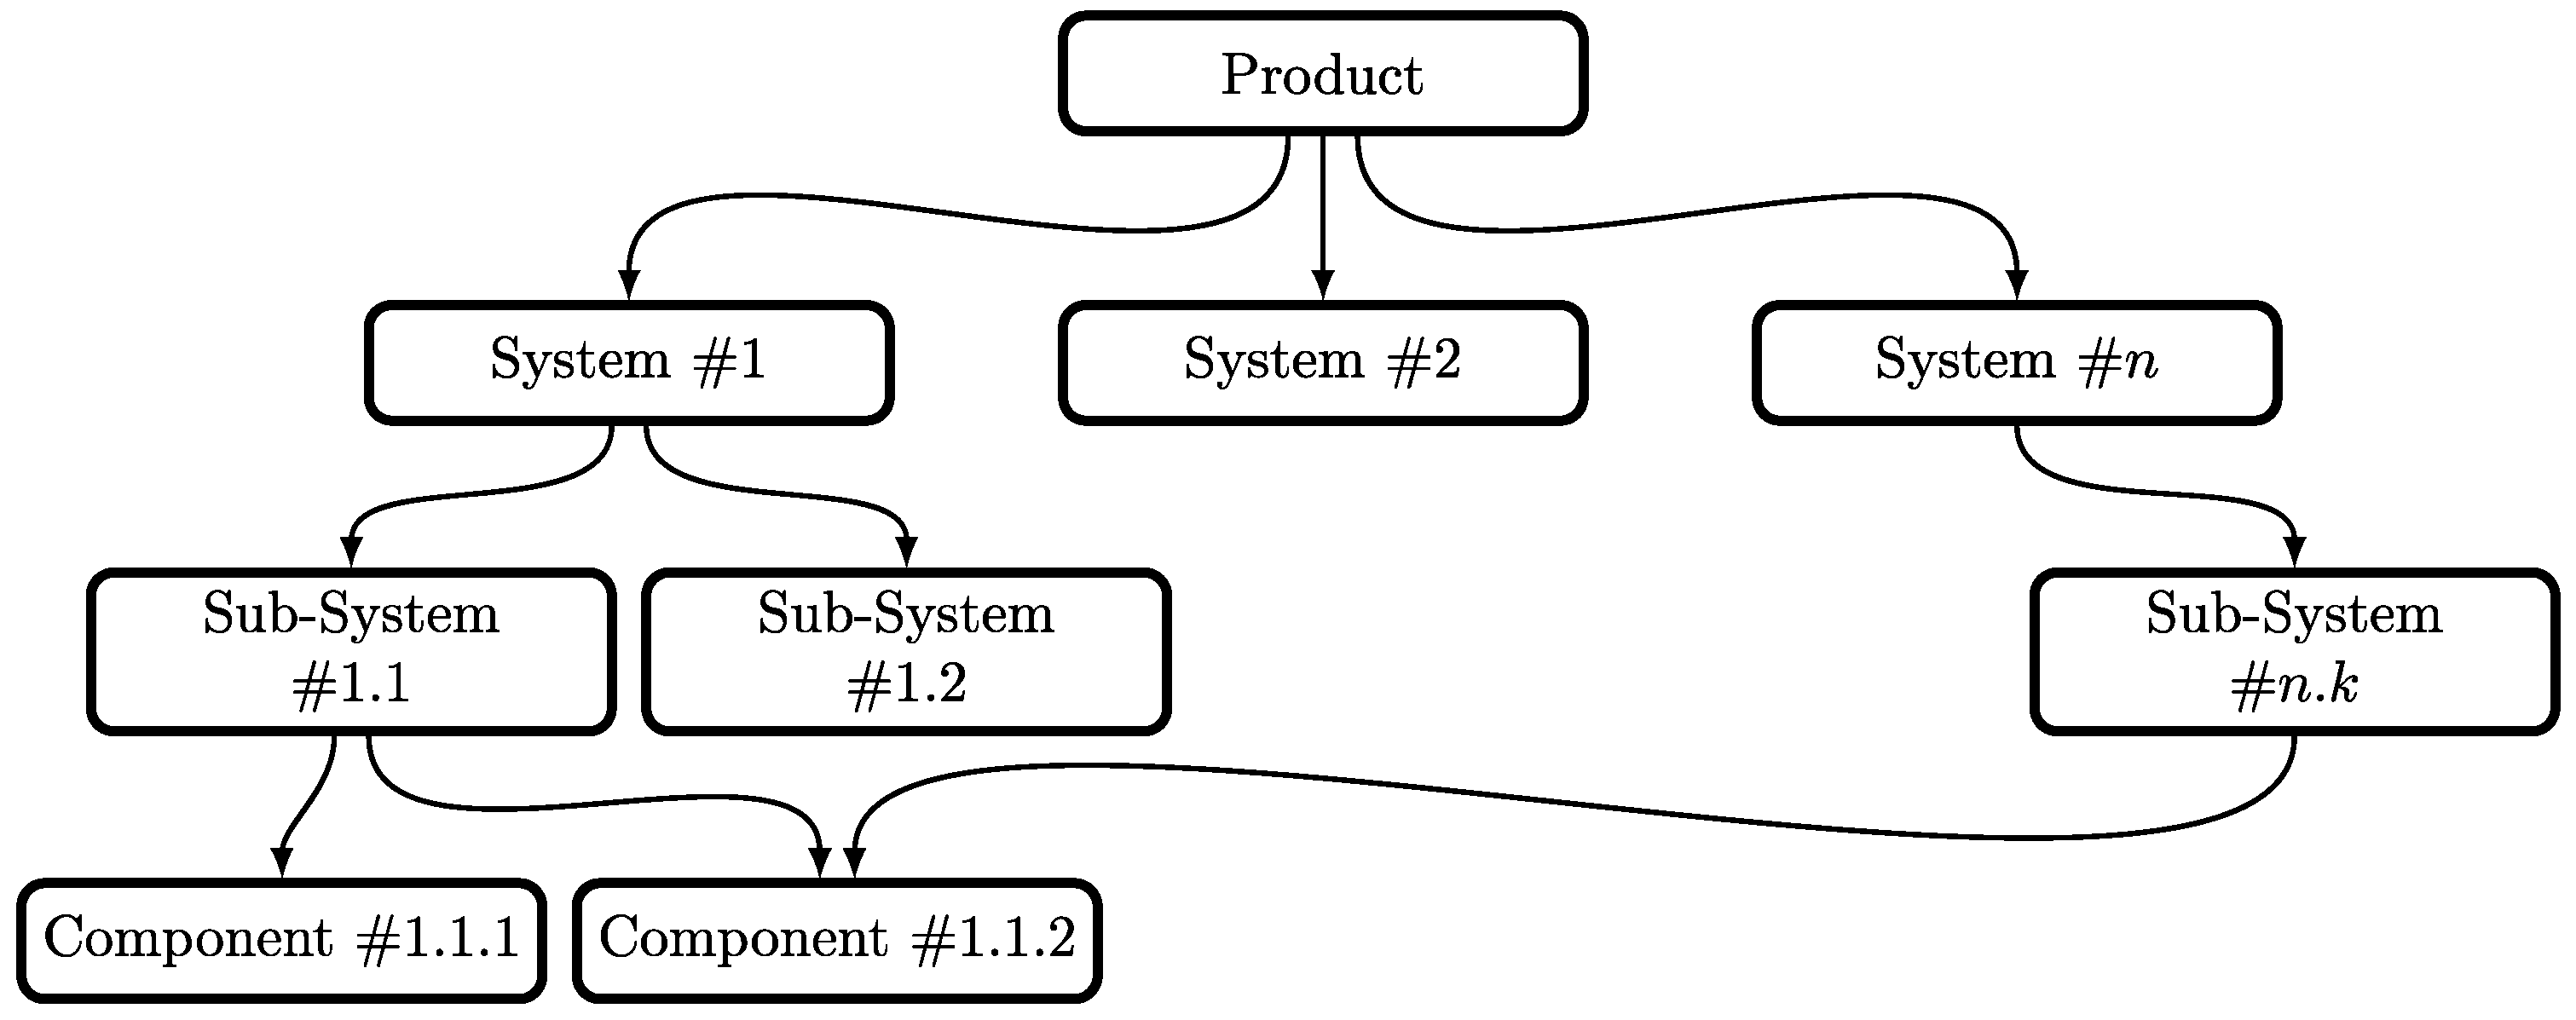
It is important to point out that the scheme in Figure 6 describes the relations between specifications, resulting in the production of a single component. A complete description of the product design should consist of a structured arrangement of many components. Furthermore, one component may be part of different functional subsystems at the same time. As such, it inherits the functionalities from all the subsystems it is part of.
It can be observed that both an intra-level tolerance hierarchy, as proposed in the ISO standard [11], and an inter-level hierarchy exist, as highlighted in Figure 7. A link between any specification and the relevant product-level functional specification can always be traced.

4.2. The Relevance of Functional Specification

Product functions pertain to assembly. Functional tolerancing first addresses the product and then transfers functionality through systems and subsystems down to each single part.
Functional specifications, at the part level, describe the geometric requirements applied to the part and the working (assembly) relations (fitting, position, orientation, etc.) among them. This definition is already established, at the standardization level, in the fields of system and software engineering [61] and information technology [62].
The proposed scheme (Figure 6) places every tolerancing activity in the relevant department. As such, designers oversee the functional aspects, technologists deal with process-related activities, and metrologists define inspection procedures. Often, in industrial practice, neither the intra-level nor the inter-level hierarchy is assured; e.g., responsibility for all the tolerancing activities is granted to one actor only. Therefore, all the different specifications (functional, manufacturing, and verification) are “blended” into a hybrid specification. The result is a poor, partial, mixed up, or jumbled specification with incoherent information and significantly narrower tolerances than actually needed.
Manufacturing and verification specifications are not intended to be transferred from one level to the other. Only the functional specifications should be handed over, since they represent the basic, non-negotiable, geometric requirements that guarantee the product functionality/performance.
The creation of a manufacturing or verification specification does not supersede the functional specification. The use of a manufacturing or verification specification is an intra-company/business unit and allows each user (i.e., manufacturing engineer, metrology operator, etc.) to access specific and customized information that allows for a straightforward understanding and implementation in its environment. As represented effectively in Figure 6, the vertical hierarchy involves only functional specification.

4.3. The V-Model as a Key to Understanding

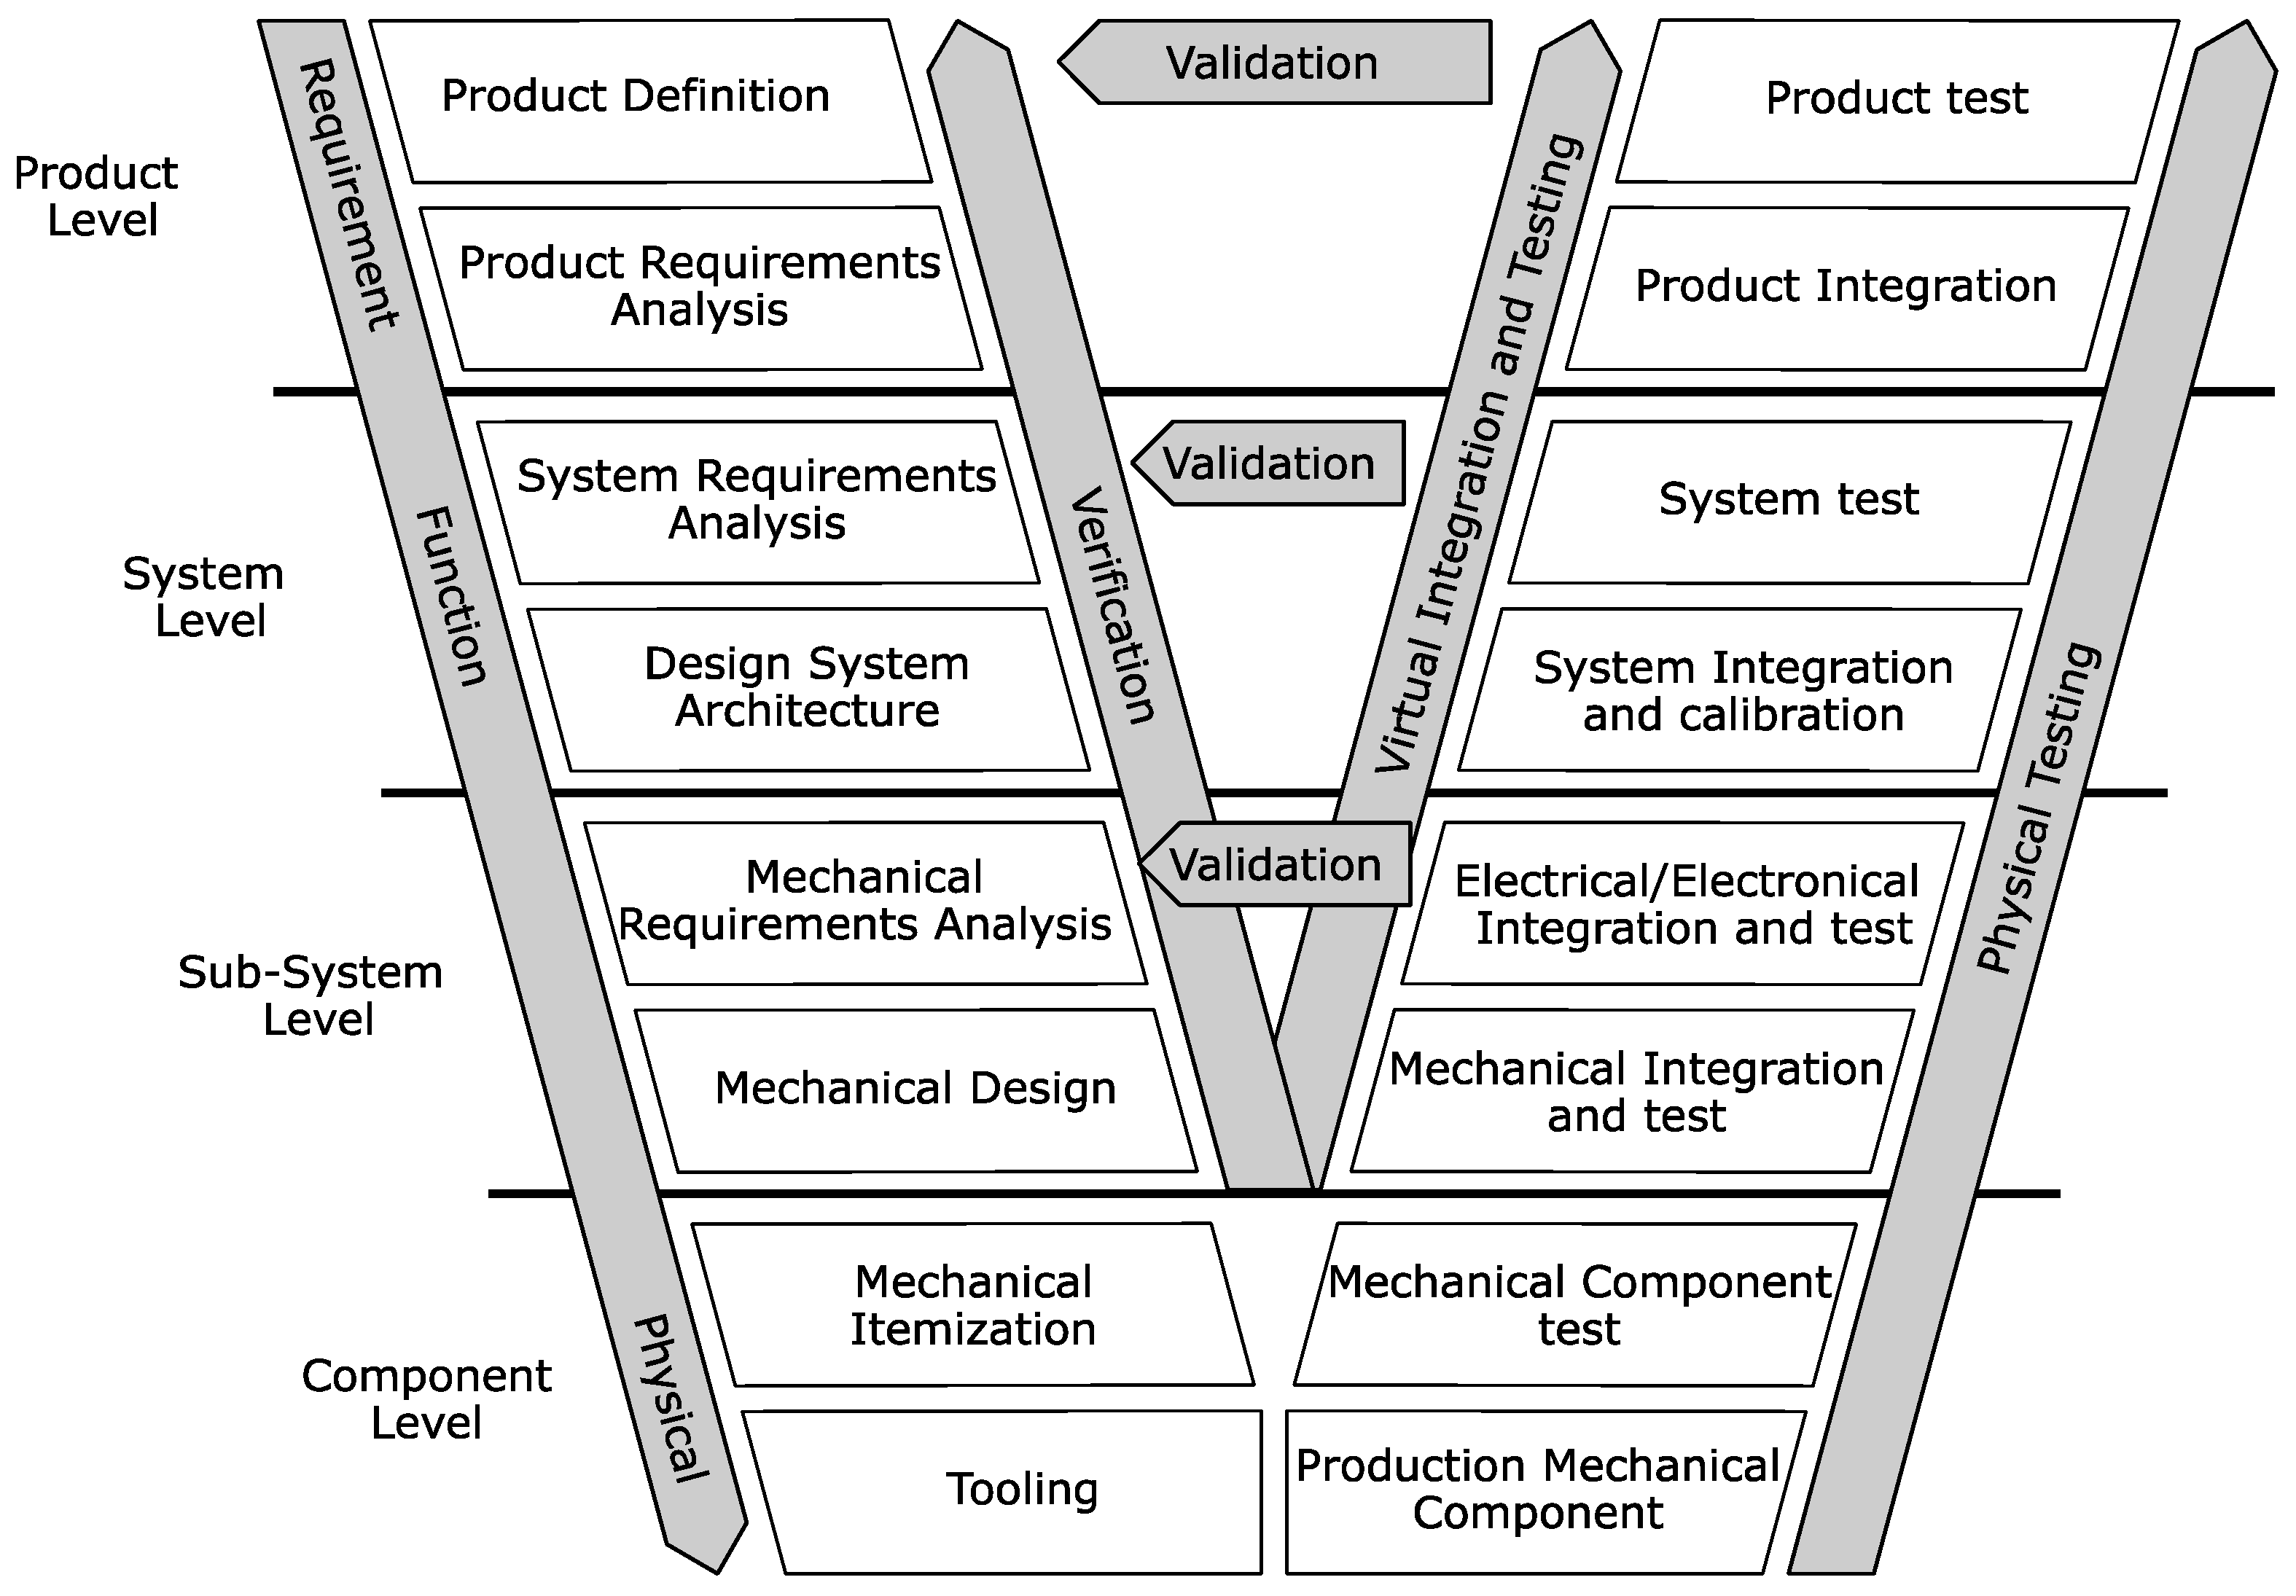
The V-model approach can be applied to the proposed scheme to highlight the product development phases and timing inside complex industrial bodies (Figure 8).
It is possible to recognize top-down problem decomposition taking place in the design department and to recognize bottom-up integration and testing.
Functional tolerancing can be considered a top-down activity that is placed on the descending side of the V-model.
A bottom-up approach for functional tolerancing activity can be frequently observed in industry. The upper-level specifications are constrained by lower-level requirements. Consequently, there is a lack of coherence and requirement control at the product level. More design steps than the minimum are required to guarantee the propagation of functional specifications. Each step adds uncertainties, mainly ambiguity of specification and ambiguity of the description of the function, according to ISO 17450-2:2012 [6], and absorbs a valuable piece of the variability budget defined by the functional specifications at the product level, resulting in a non-optimal specification scheme.

4.4. Examples

In the following section, two examples are introduced to clarify the “vertical” hierarchy for functional specifications and the differences among specification types (“horizontal” hierarchy). The examples are not meant to show or suggest a methodological approach for establishing such hierarchy. Methodologies to convert the information from one specification type to another will be discussed in future works.

4.4.1. Vertical Hierarchy-Submersible Pump

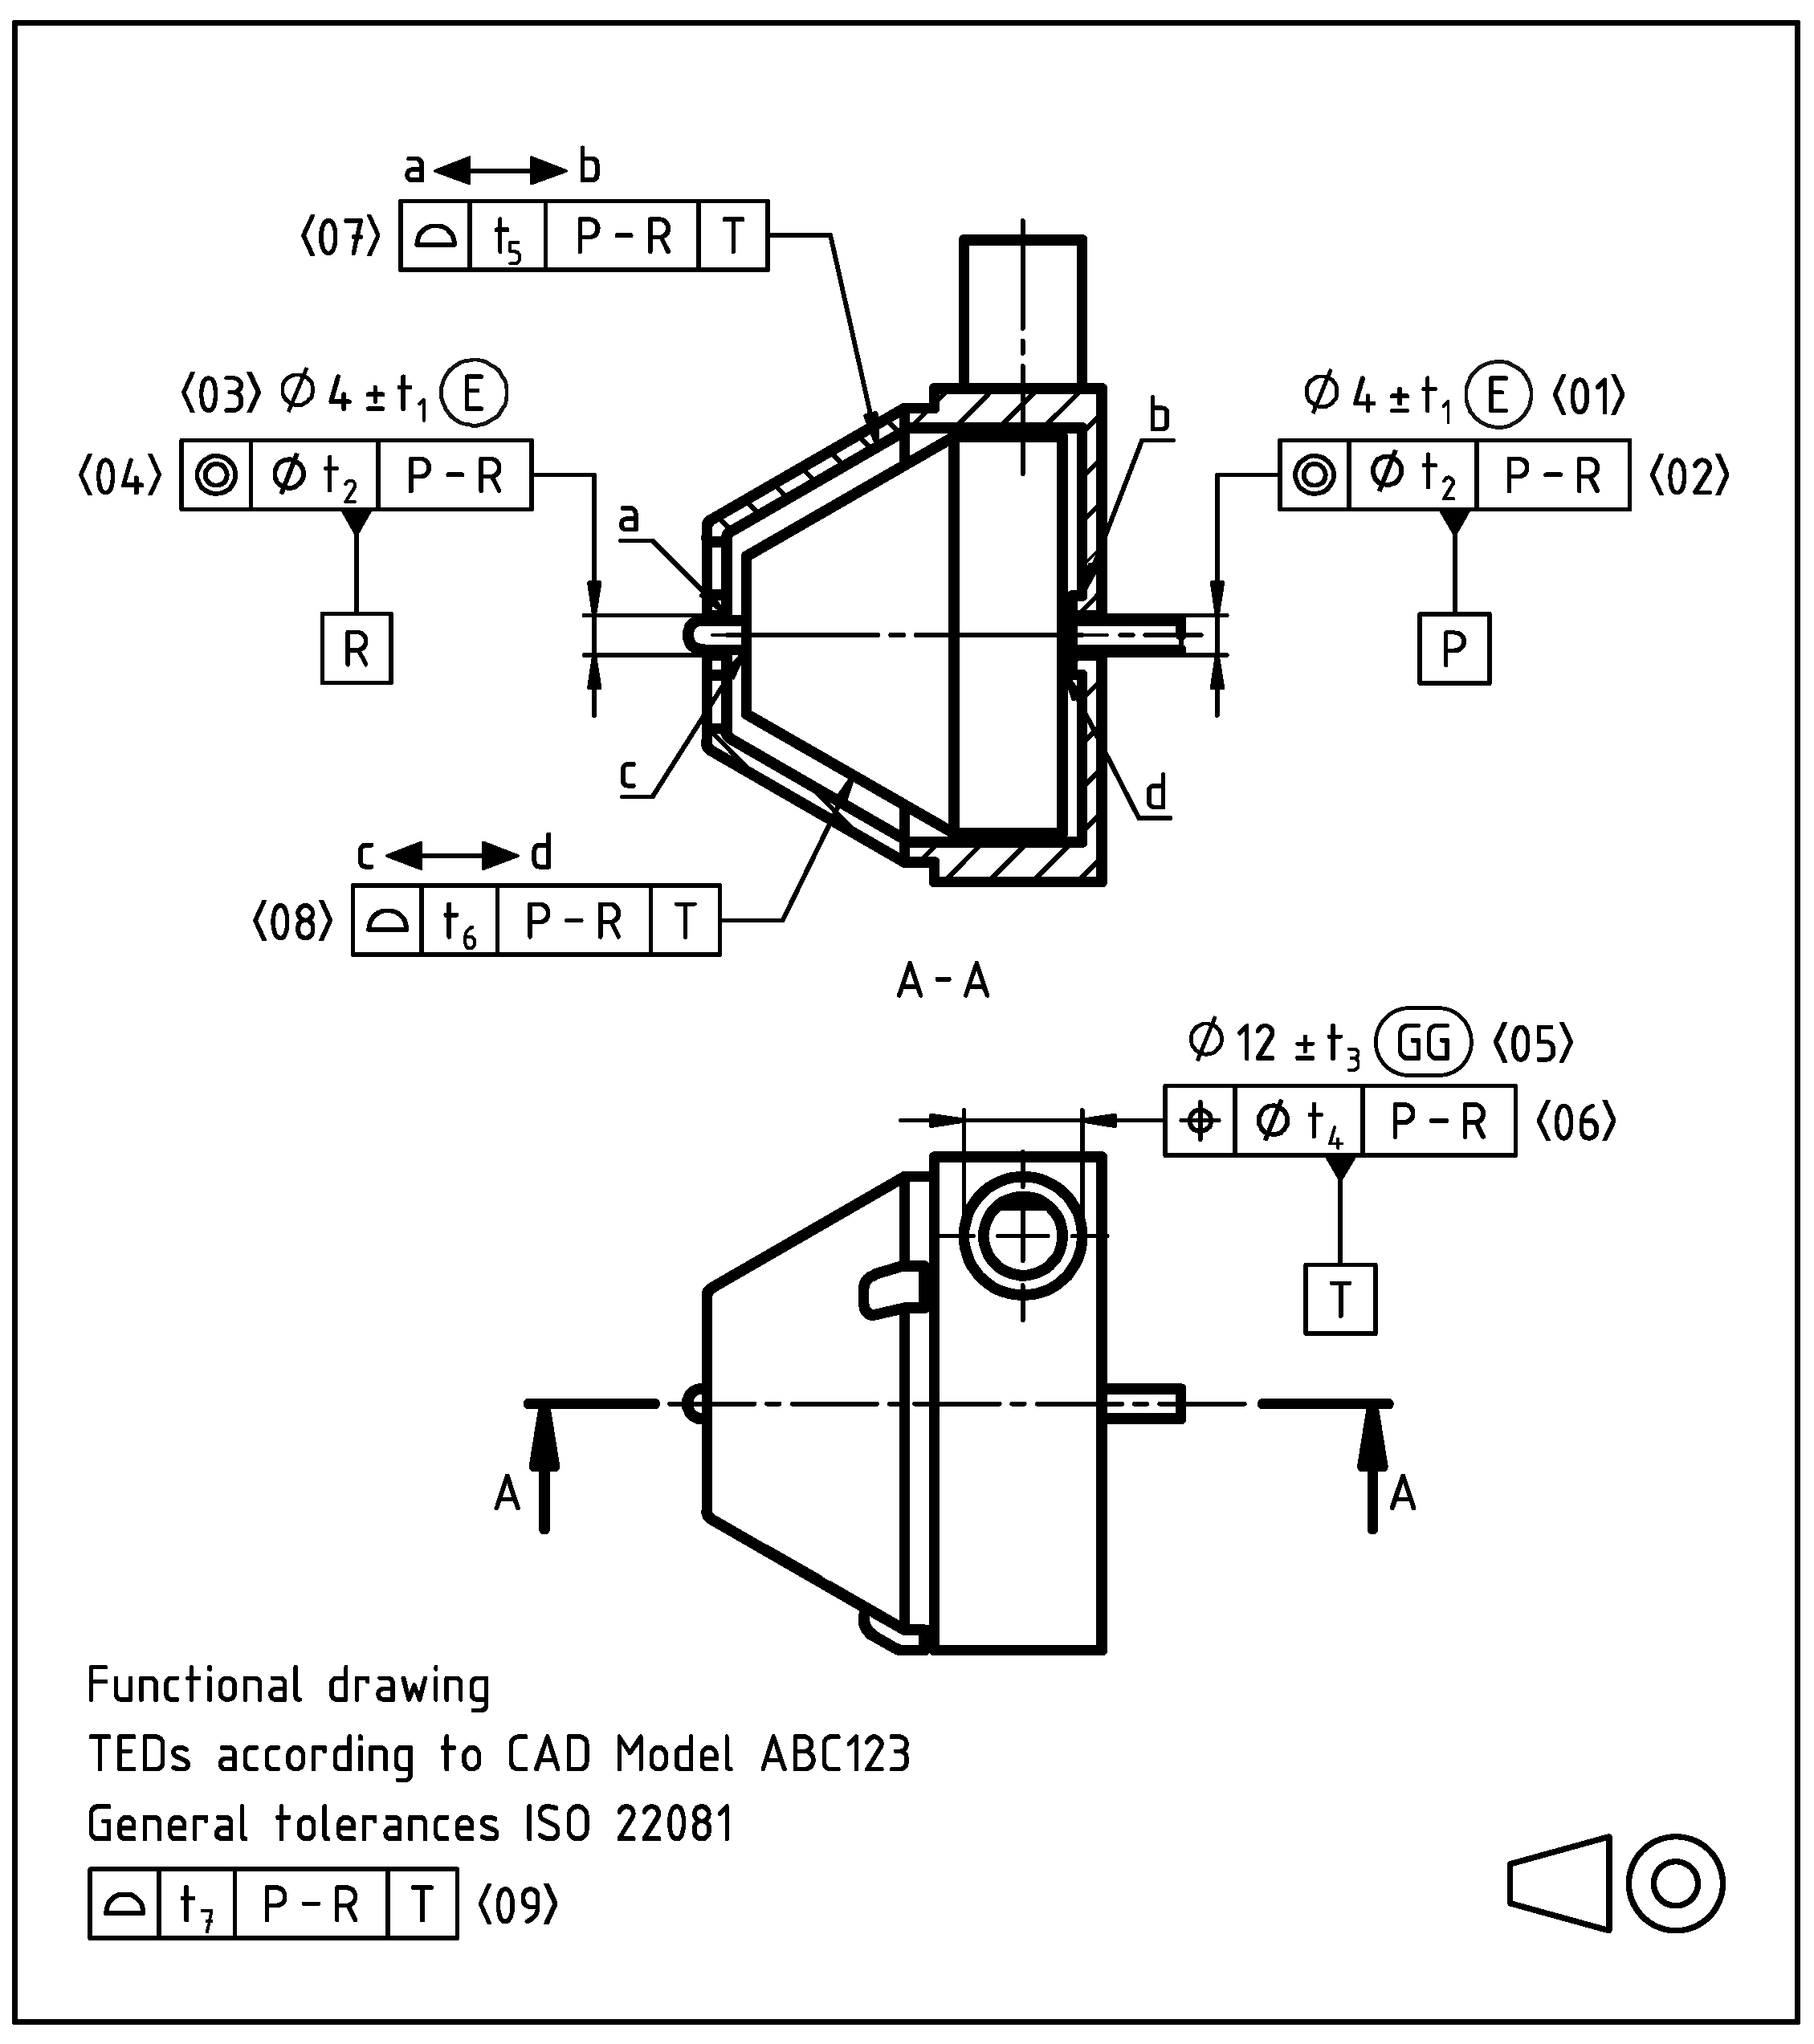
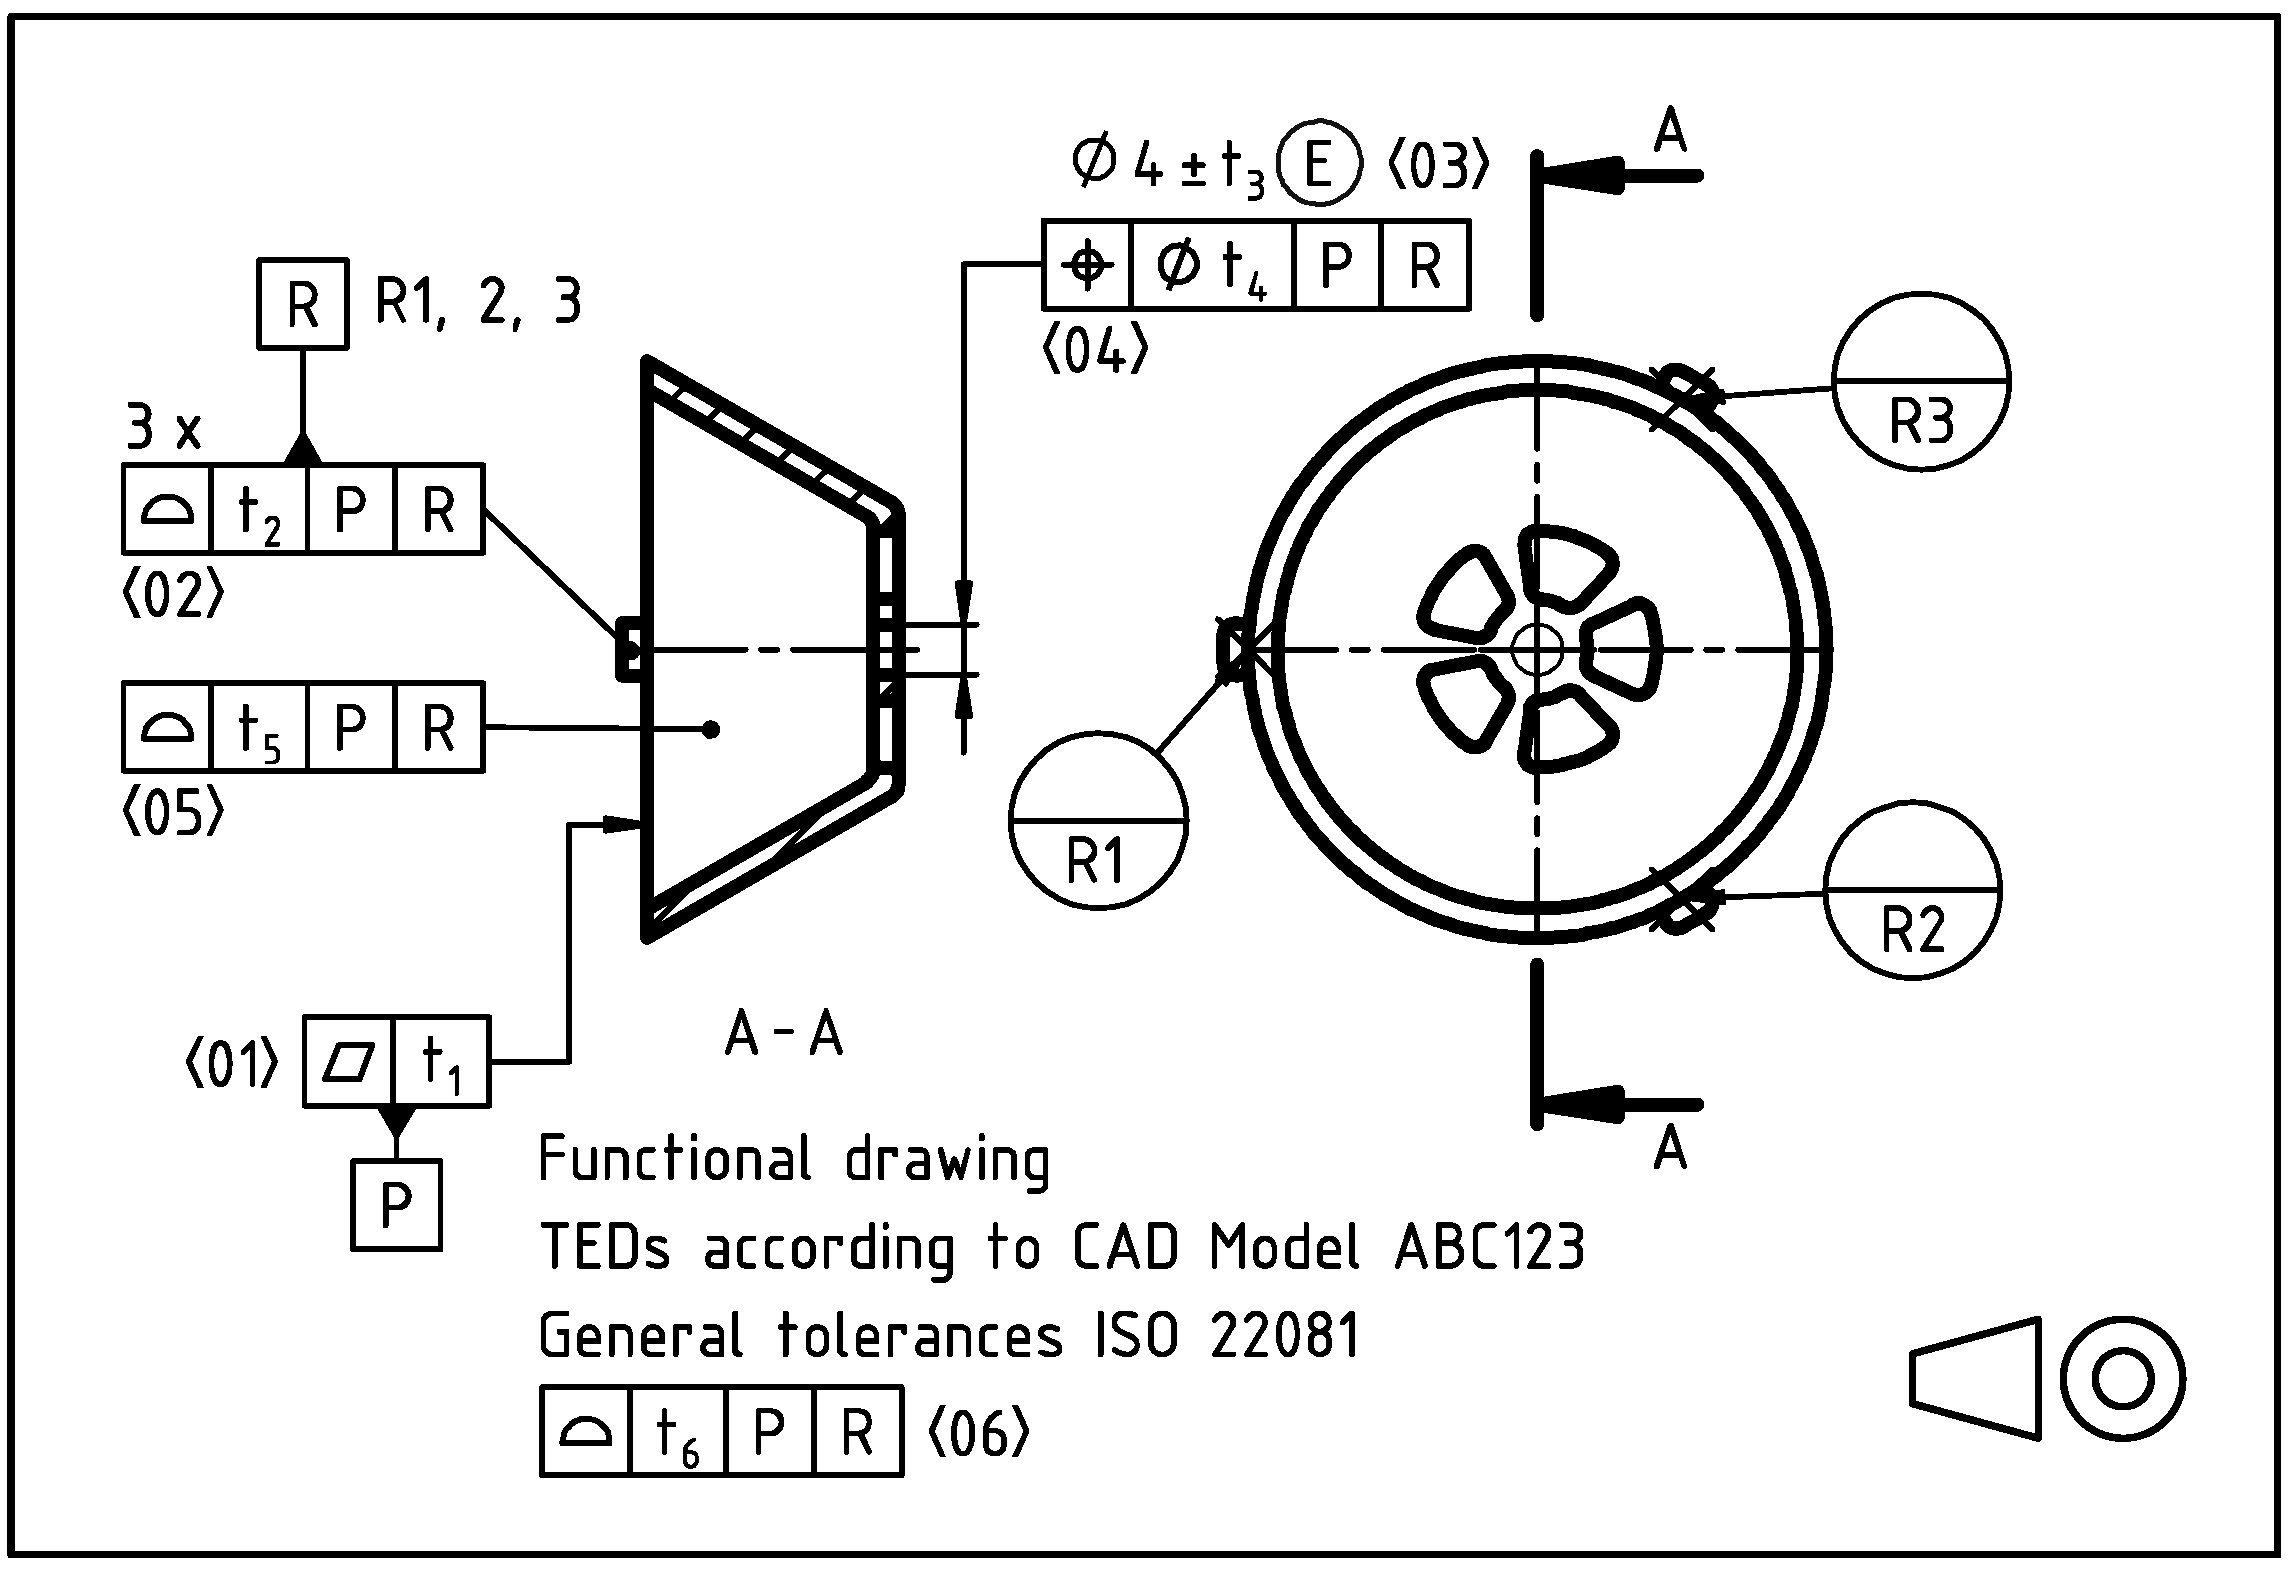
The first example shows a simplified assembly for a submersible pump considering the case and the impeller only. This example shows a possible implementation for the vertical hierarchy. Figure 9 shows a possible functional specification for the assembly. This functional specification concerns both the case subsystem and the impeller envelope. The primary datum [P-R], a common datum, represents the spinning axis that guides the pump mechanical dynamics; the secondary datum [T] is defined by the pump outlet. This datum system exists in the pump assembly since the datum features [64] belong to different parts. Other functional surfaces, controlled by surface profile tolerances, describe both the inner pump case surface and the impeller envelope to assure an adequate functional gap.
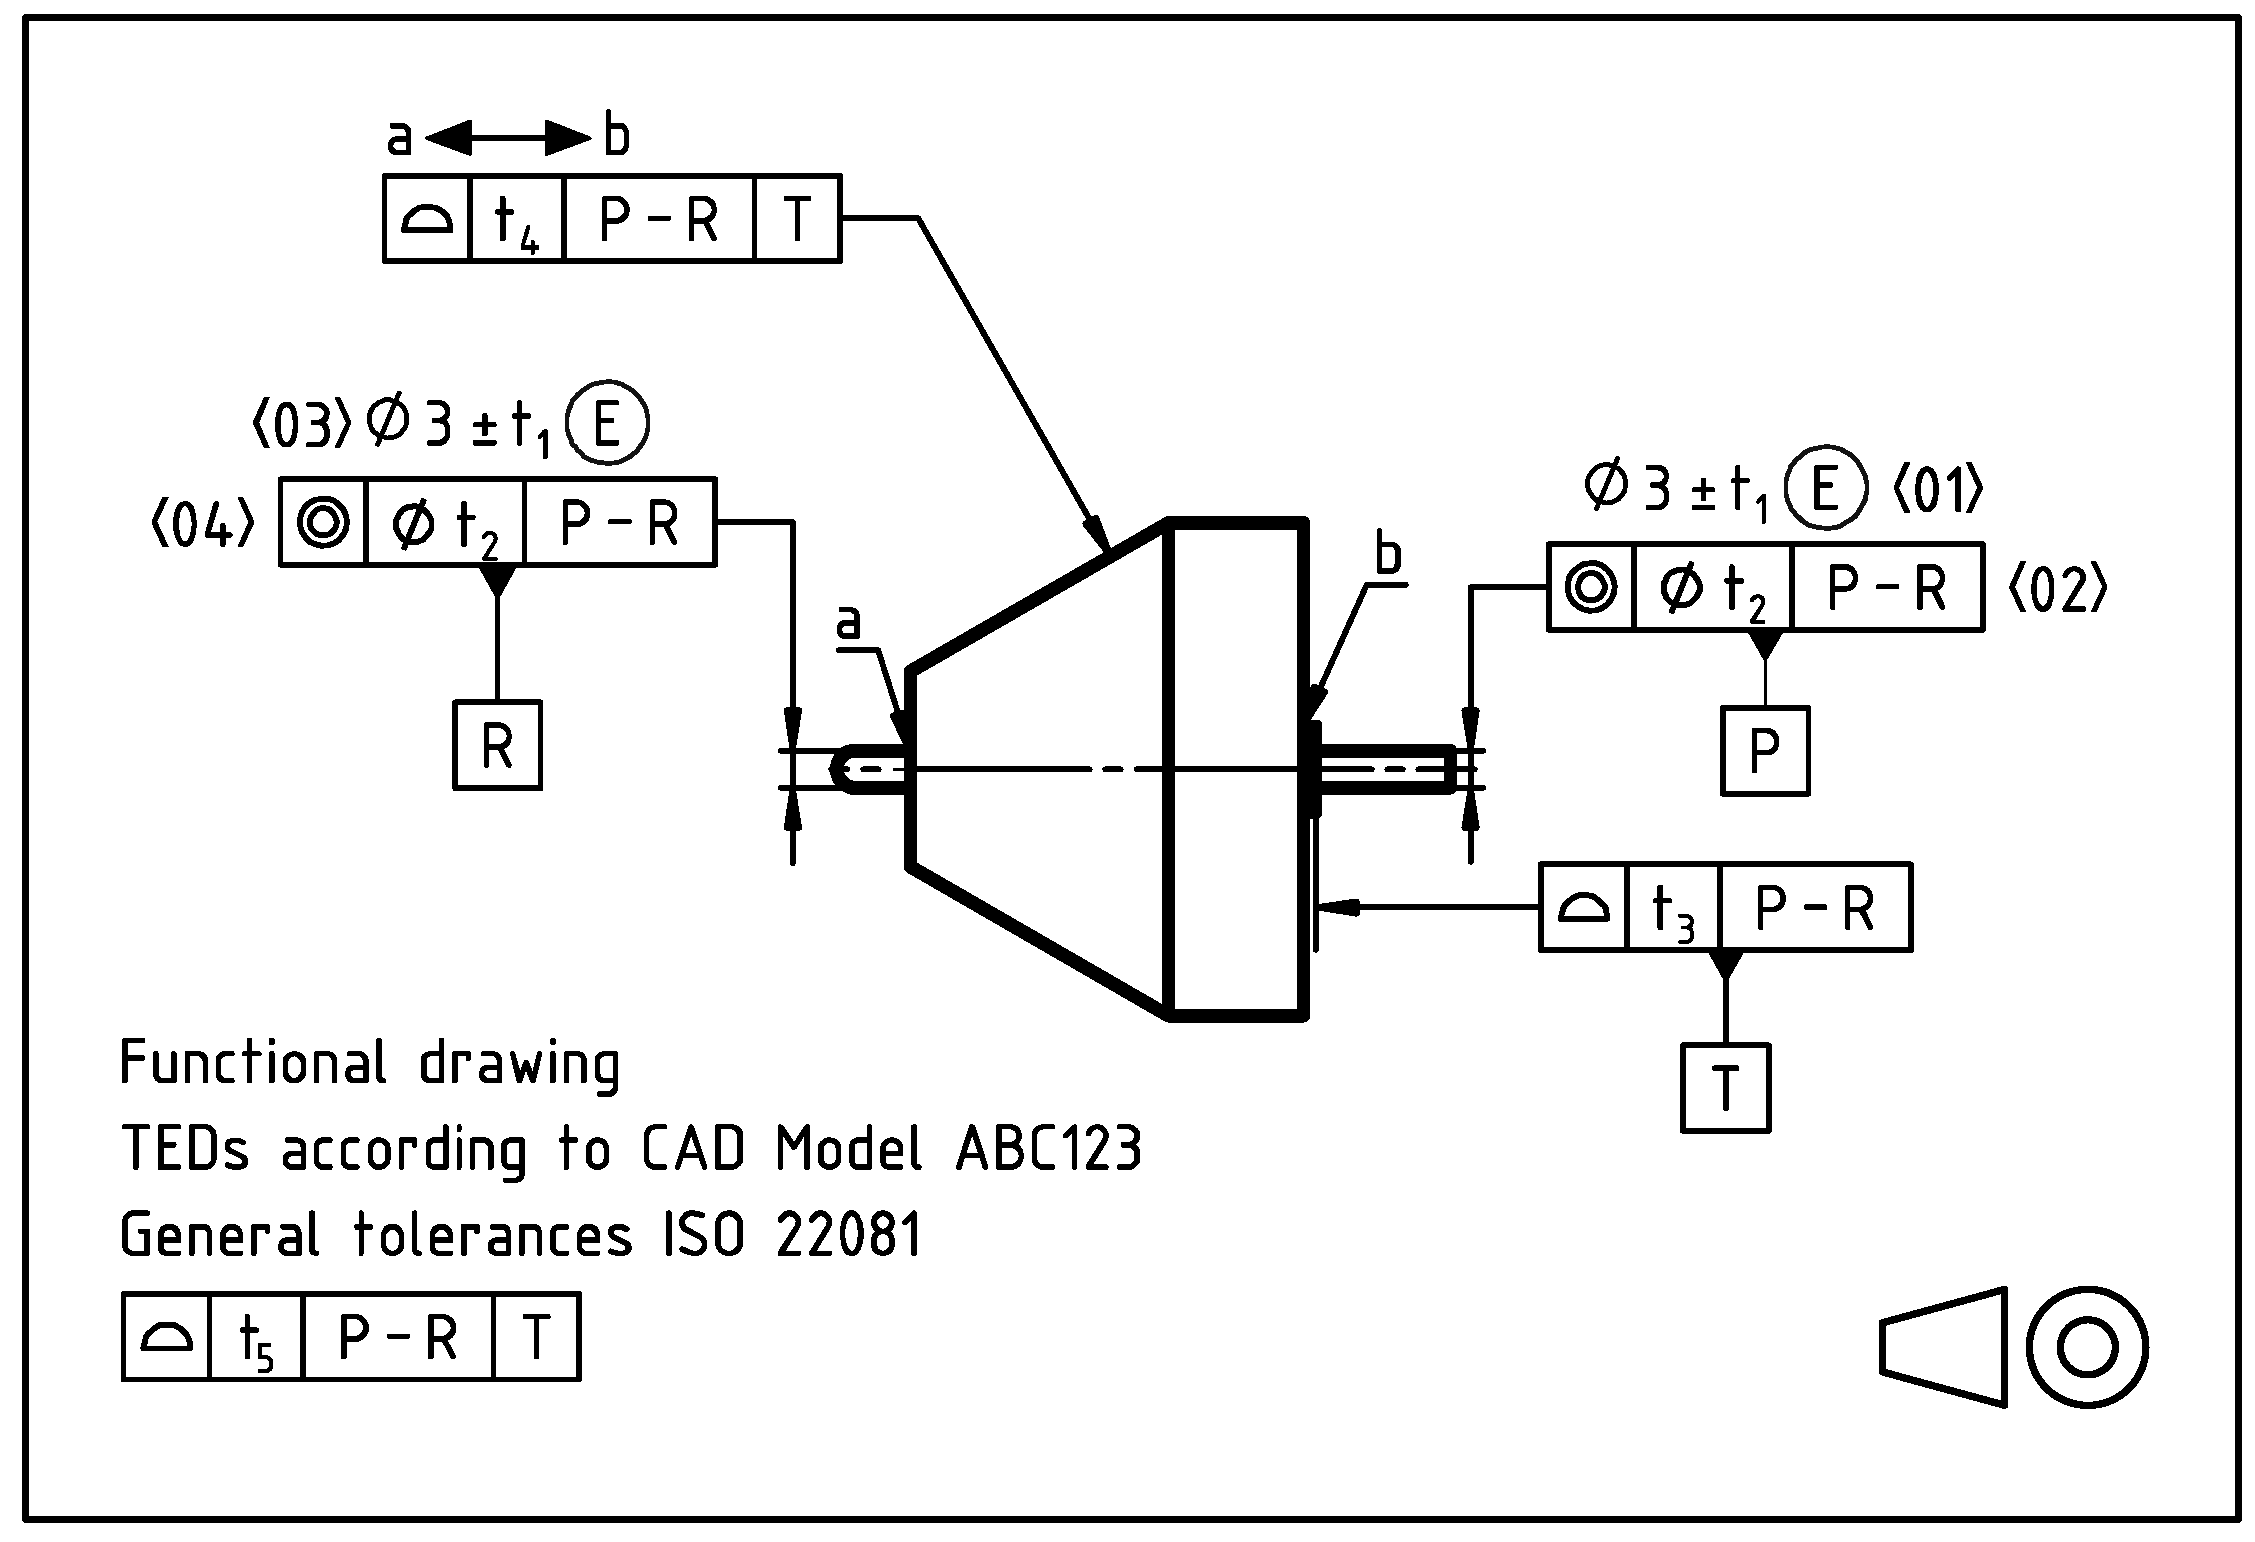
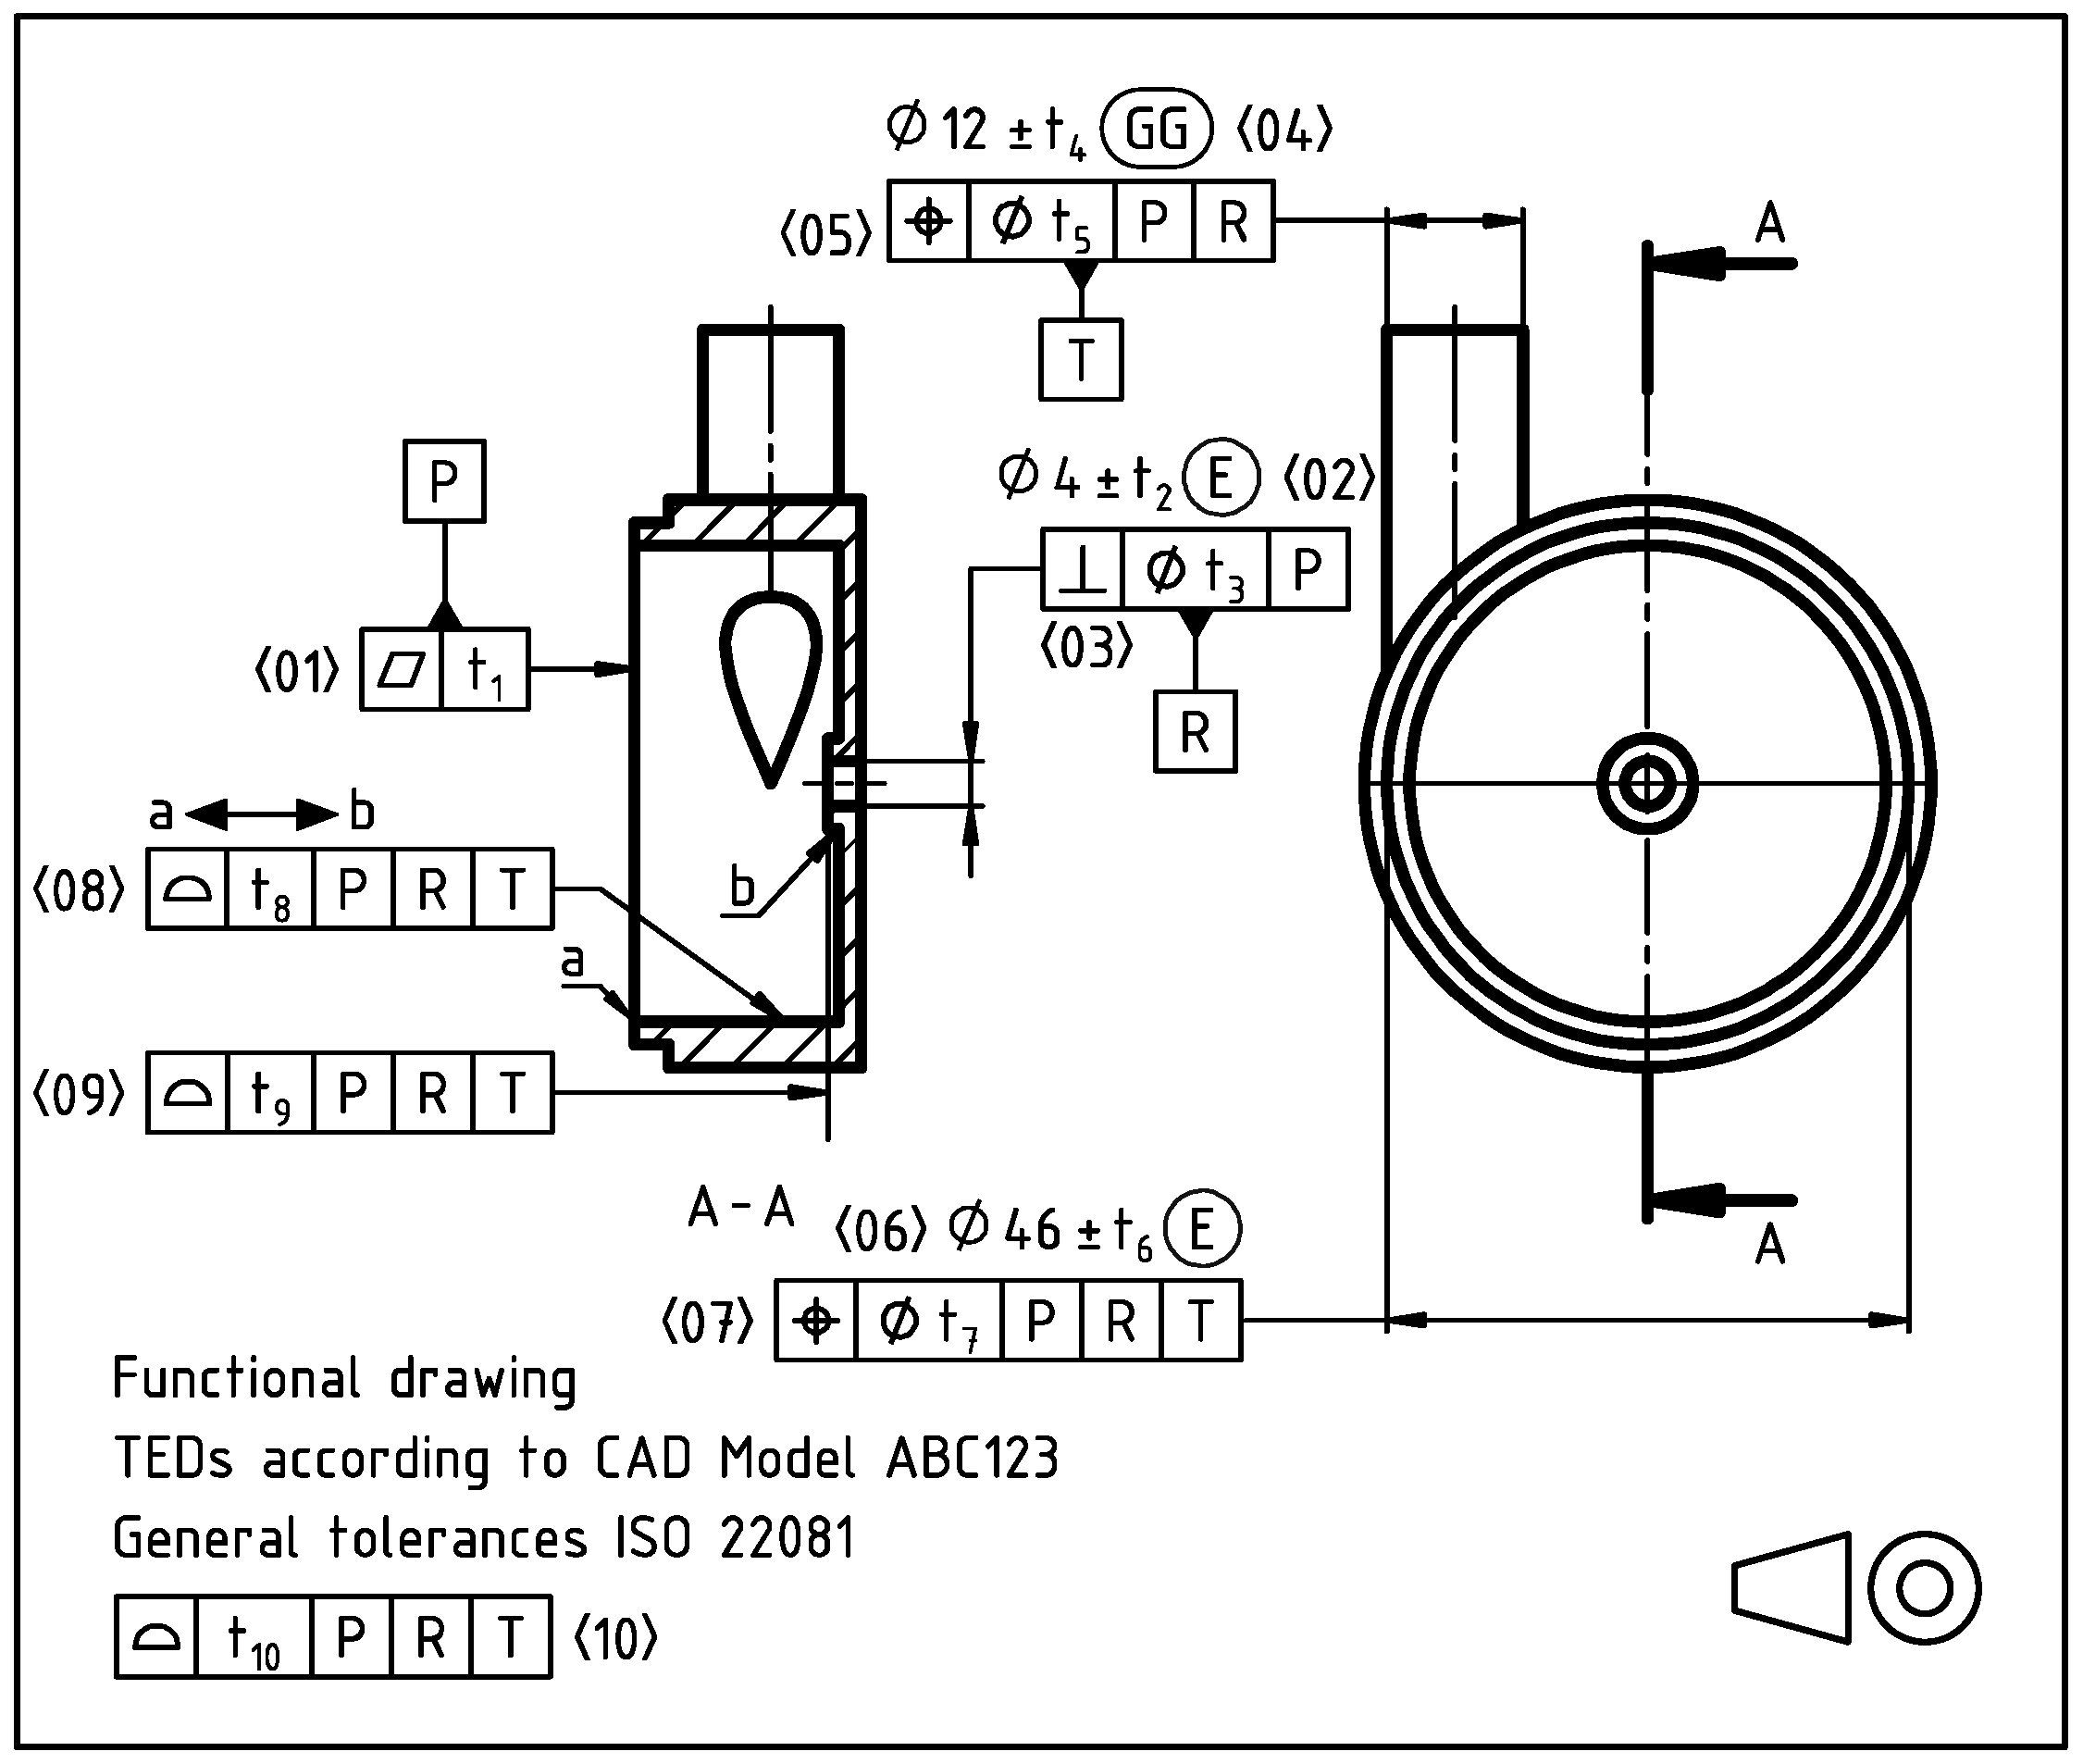
Figure 10, Figure 11 and Figure 12 show consistent functional specifications for the impeller and both the front and rear parts of the case subassembly. At the level of part specification, the datum system describes the assembly mating features: this approach allows one to setup tolerance stack-ups, therefore linking parts specifications to the relevant functional specifications at the assembly level. These tolerance stack-ups allow the implementation of the “vertical” tolerance hierarchy: the tolerances in the parts’ functional specifications represent the input tolerances while the tolerances in the assembly’s functional specifications represent the “critical dimensions” or “key characteristics” than need to be fulfilled. The tolerance values at the assembly level are defined considering the functional requirements of the assembly.

4.4.2. Horizontal Hierarchy-Spacer Plate

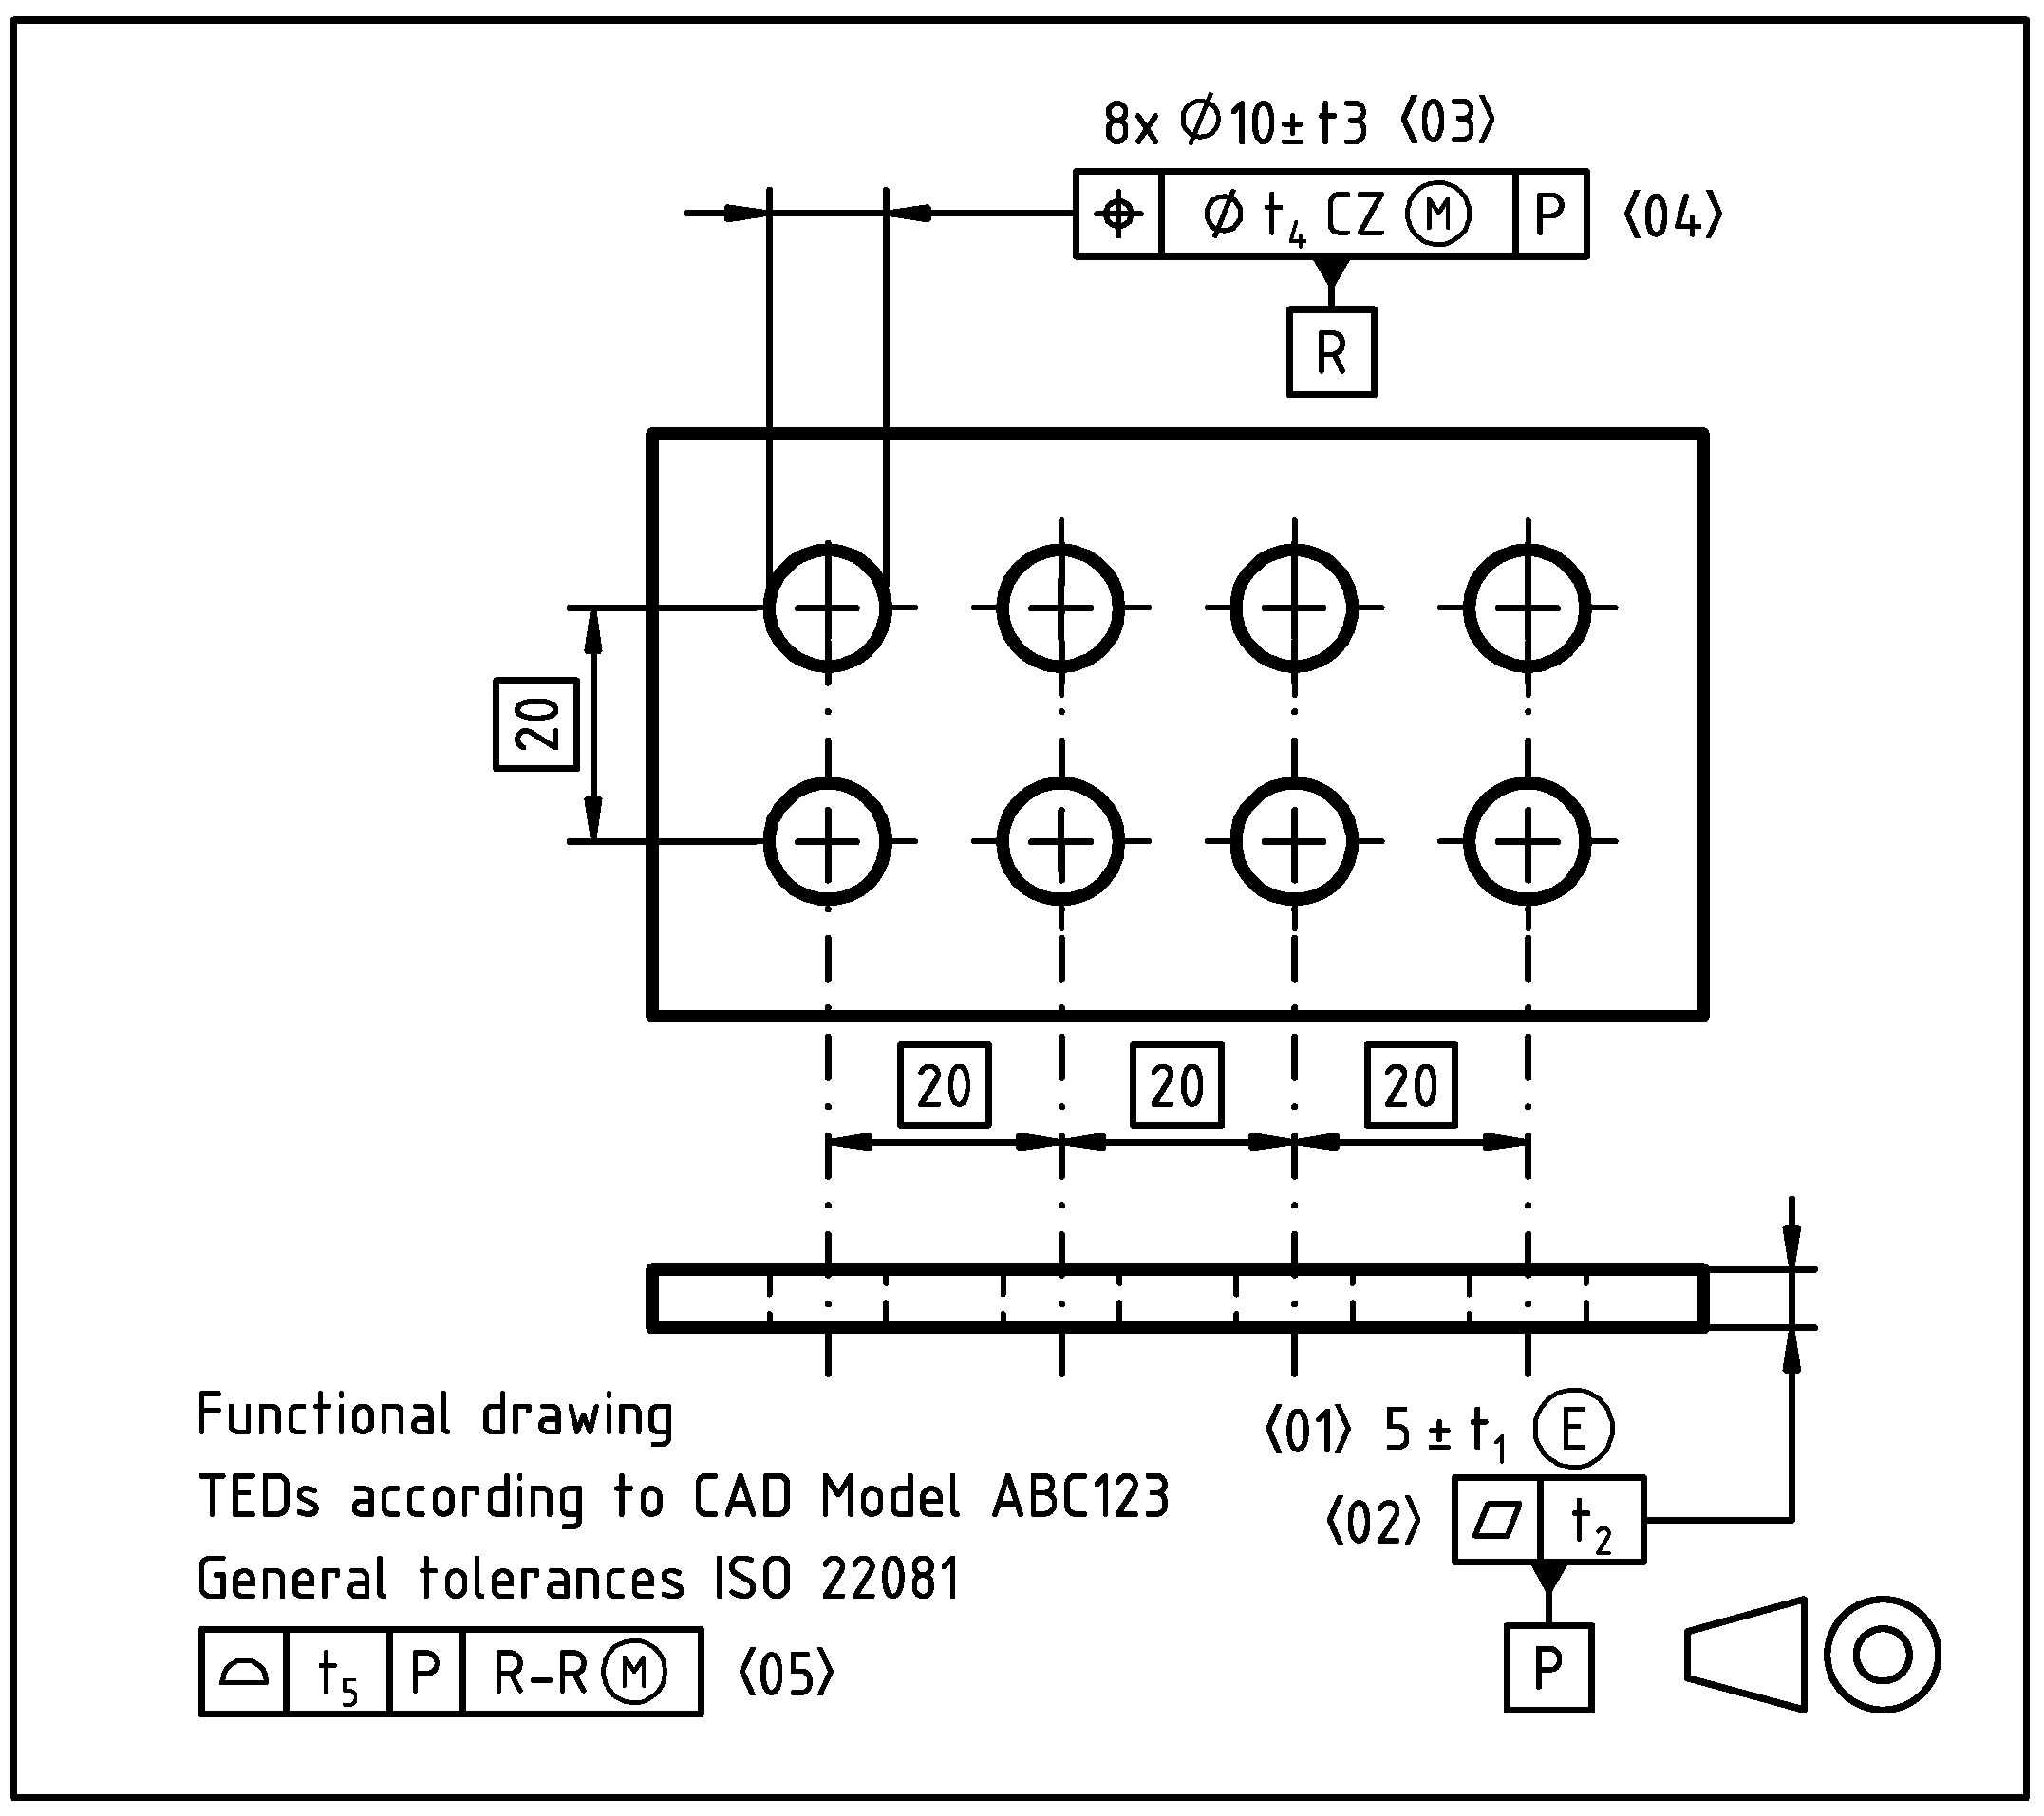
The second example discusses a simple spacer, required to adjust the relative distance between two parts, and aims to depict the horizontal hierarchy. The six-holes pattern aims to accommodate a pattern of throughshafts. Figure 13 shows the functional specification for this component: the flange has three symmetry planes; therefore, it can be assembled in four different layouts. Consequently, the primary datum is assigned to the median plane of the plate thickness. The holes are invoked as a pattern (ISO 5458:2018 [65]) and define the secondary datum, establishing a complete datum system. The issue related to the creation of tolerance stack-up when a pattern defines the datum system is discussed in [66]. All the remaining surfaces do not interact with other parts in the assembly and, therefore, are controlled by general tolerances (ISO 22081:2021 [67]). It is noteworthy that in a multi-stage manufacturing process in which different geometric specification are needed to control each step [39,40], the functional specification does not coincide with the manufacturing specification of the last manufacturing step: it is derived from the assembly conditions independently of the manufacturing process.
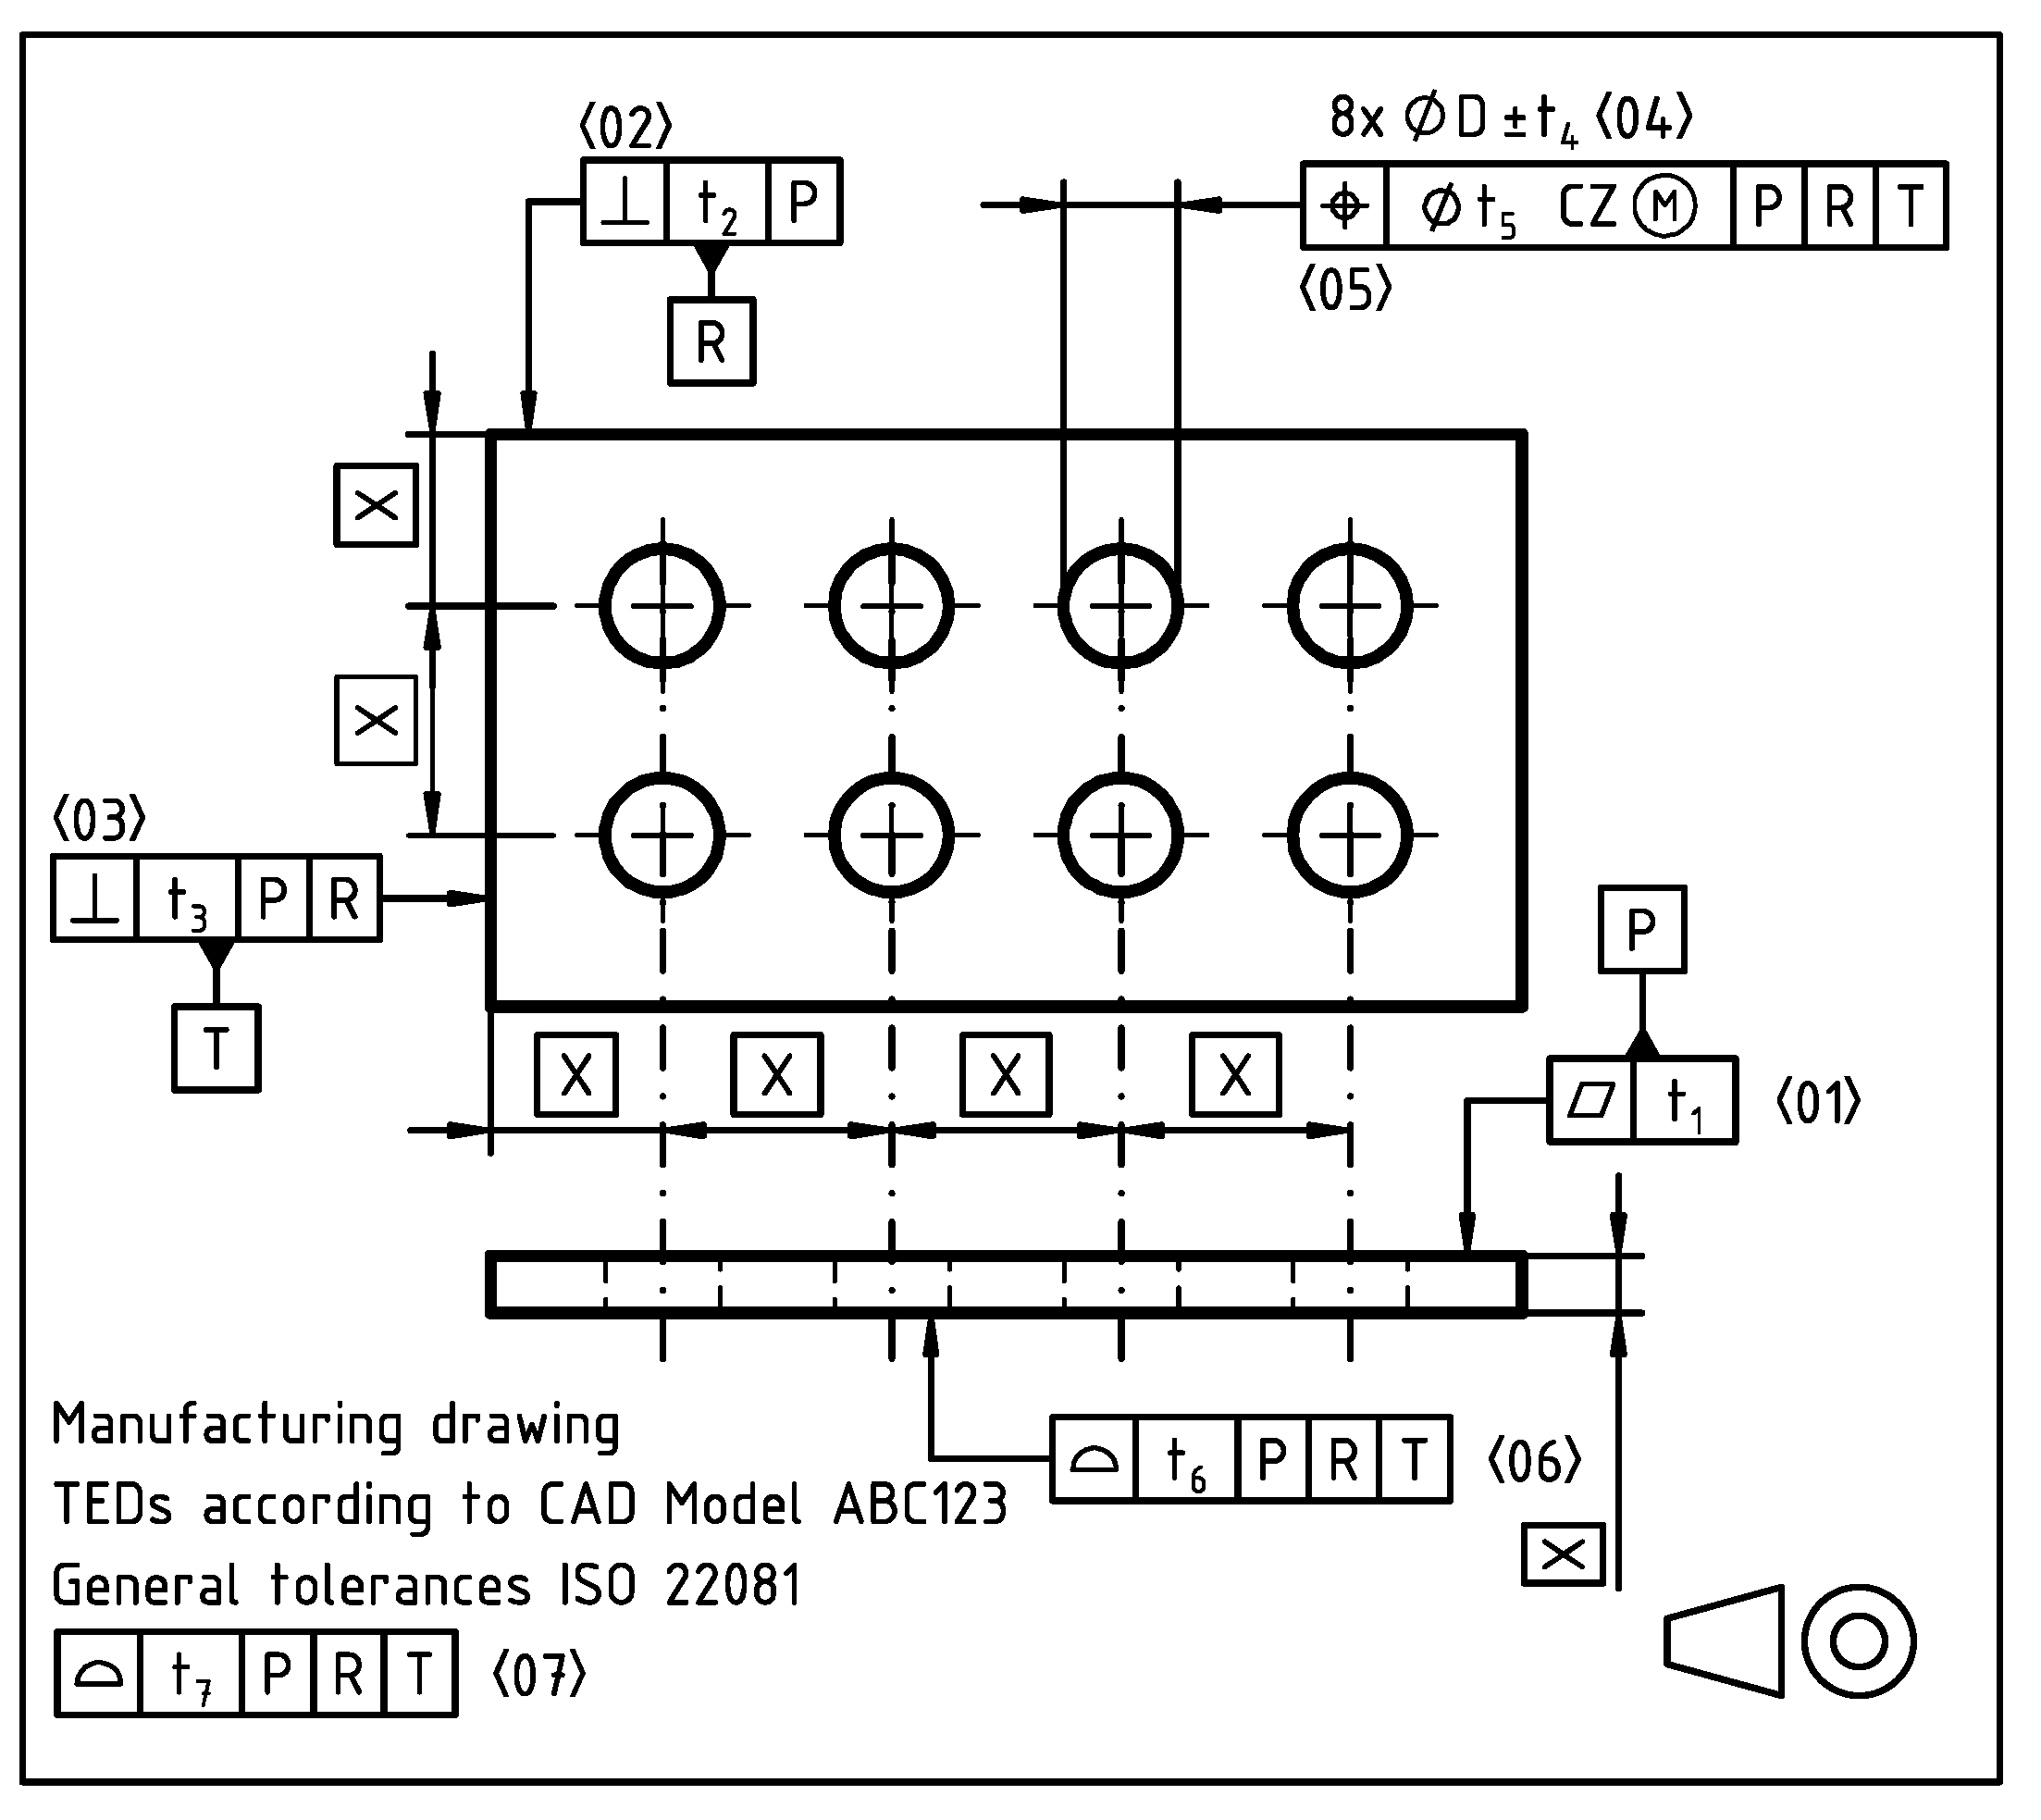
One possible manufacturing specification is proposed in Figure 14. It is assumed that the part will be produced by machining. The datum system is derived by fixturing.
The functional and manufacturing specifications should then be related by tolerance stack-ups, where the functional tolerances are the critical dimension limits, and the manufacturing tolerances are process-dependent variables. If parts are non-rigid, meaning that they will reach a stable configuration only once assembled, the correlation shall take into consideration deformability [46,47]. If more manufacturing steps are required, this transfer will be created between the functional specification and the manufacturing specification relevant to the last manufacturing step. Each previous manufacturing step requiring a dedicated manufacturing specification requires a tolerance transfer between the two subsequent manufacturing specifications [34,35]. The chain of transfer, at the end, will link the first step of the manufacturing process to the functional specification, passing through each manufacturing step.

5. Conclusions

In this paper, a systematic description of the relations between the different tolerancing activities involved in the development cycle of industrial products has been proposed.
It is important to distinguish between the action of tolerancing, the resulting information (specification or specification scheme), and the medium (as defined in ISO 10209:2012 [10]) that enables the information to be transmitted (TPD). In the opinion of the authors, ISO/TS 21619:2018, as part of the ISO-GPS, addresses the information (specification types) rather than the medium (TPD) and should evolve accordingly. Given the relevance of hierarchically organizing specification types as depicted in Figure 4, the identification of the key actors and their responsibility is straightforward, therefore expanding the “responsibility principle” as defined in ISO 8015:2011 [68].
At the industrial level, the implications of the hierarchical framework let every department take the responsibility of managing the functional/manufacturing/verification specifications relevant to its own expertise, in accordance with the hierarchically upper-level constraints, superseding current critical modus operandi in the GPS field.
It is noteworthy that this paper relates to responsibility over the data conveyed by geometric specifications and does not provide insight into how to actually implement this responsibility separation in an actual industrial case. The implementation can differ from case to case based on the particular industrial organization. Concurrent/collaborative engineering frameworks are plausible and beneficial; however, the concurrent development of different geometric specifications does not influence the expanded responsibility principle as presented in this work.

Author Contributions

Conceptualization, M.M., R.M. and G.C.; methodology, M.M.; formal analysis, M.M.; investigation, M.M.; resources, R.M. and G.C.; writing—original draft preparation, M.M.; writing—review and editing, M.M., R.M. and G.C.; visualization, M.M.; supervision, R.M. and G.C.; project administration, R.M. and G.C.; funding acquisition, R.M. and G.C. All authors have read and agreed to the published version of the manuscript.

Funding

This research received no external funding.

Data Availability Statement

No new data were created or analyzed in this study. All data contained within this article.

Conflicts of Interest

The authors declare no conflicts of interest.

References

  1. ISO 14638:2015; Geometrical Product Specifications (GPS)—Matrix Model 2015. ISO International Organization for Standardization: Geneva, Switzerland, 2015.
  2. ISO/TR 14638:1995; Geometrical Product Specification (GPS)—Masterplan 1995. ISO International Organization for Standardization: Geneva, Switzerland, 1995.
  3. Morse, E.; Dantan, J.Y.; Anwer, N.; Söderberg, R.; Moroni, G.; Qureshi, A.; Jiang, X.; Mathieu, L. Tolerancing: Managing Uncertainty from Conceptual Design to Final Product. CIRP Ann. 2018, 67, 695–717. [Google Scholar] [CrossRef]
  4. ISO 9000:2015; Quality Management Systems—Fundamentals and Vocabulary 2015. ISO International Organization for Standardization: Geneva, Switzerland, 2015.
  5. ASME. ASME Y14.5—2018—Dimensioning and Tolerancing 2019; ASME: New York City, NY, USA, 2019; p. 344. [Google Scholar]
  6. ISO 17450-2:2012; Geometrical Product Specifications (GPS)—General Concepts—Basic Tenets, Specifications, Operators, Uncertainties and Ambiguities 2012. ISO International Organization for Standardization: Geneva, Switzerland, 2012.
  7. Pierre, L.; Anselmetti, B.; Anwer, N. On the Usage of Least Material Requirement for Functional Tolerancing. In Proceedings of the Procedia CIRP, Nantes, France, 23–25 May 2018; Volume 75, pp. 179–184. [Google Scholar]
  8. Pinquié, R.; Rivest, L.; Segonds, F.; Véron, P. An Illustrated Glossary of Ambiguous PLM Terms Used in Discrete Manufacturing. Int. J. Prod. Lifecycle Manag. 2015, 8, 142–171. [Google Scholar] [CrossRef]
  9. ISO 16792:2021; Technical Product Documentation—Digital Product Definition Data Practices 2021. ISO International Organization for Standardization: Geneva, Switzerland, 2021.
  10. ISO 10209:2012; Technical Product Documentation—Vocabulary—Terms Relating to Technical Drawings, Product Definition and Related Documentation 2012. ISO International Organization for Standardization: Geneva, Switzerland, 2012.
  11. ISO/TS 21619:2018; Geometrical Product Specifications (GPS)—Types of Documents with GPS 2018. ISO International Organization for Standardization: Geneva, Switzerland, 2018.
  12. ISO 17450-1:2011; Geometrical Product Specifications (GPS)—General Concepts—Model for Geometrical Specification and Verification 2011. ISO International Organization for Standardization: Geneva, Switzerland, 2011.
  13. Mejbri, H.; Anselmetti, B.; Mawussi, B. A Recursive Tolerancing Method with Sub-Assembly Generation. In Proceedings of the Proceedings of the IEEE International Symposium on Assembly and Task Planning, Besancon, France, 10–11 July 2003; IEEE: Piscataway, NJ, USA, 2003; pp. 235–240. [Google Scholar]
  14. Anselmetti, B.; Pierre, L. Complementary Writing of Maximum and Least Material Requirements, with an Extension to Complex Surfaces. In Proceedings of the Procedia CIRP, Stuttgart, Germany, 25–27 May 2016; Volume 43, pp. 220–225. [Google Scholar]
  15. Anselmetti, B.; Mawussi, K. Computer Aided Tolerancing Using Positioning Features. J. Comput. Inf. Sci. Eng. 2003, 3, 15–21. [Google Scholar] [CrossRef]
  16. Mejbri, H.; Anselmetti, B.; Mawussi, K. Functional Tolerancing of Complex Mechanisms: Identification and Specification of Key Parts. Comput. Ind. Eng. 2005, 49, 241–265. [Google Scholar] [CrossRef]
  17. Ballu, A.; Falgarone, H.; Chevassus, N.; Mathieu, L. A New Design Method Based on Functions and Tolerance Specifications for Product Modelling. CIRP Ann. 2006, 55, 139–142. [Google Scholar] [CrossRef]
  18. Anselmetti, B. Generation of Functional Tolerancing Based on Positioning Features. Comput. Des. 2006, 38, 902–919. [Google Scholar] [CrossRef]
  19. Hu, J.; Peng, Y. Development of a Function Oriented Computer Aided Tolerancing (FOCAT) System. Proc. Inst. Mech. Eng. Part B J. Eng. Manuf. 2011, 225, 1189–1203. [Google Scholar] [CrossRef]
  20. Suh, N.P. The Principles of Design; Oxford University Press: Oxford, UK, 1990. [Google Scholar]
  21. Cao, Y.; Zhang, H.; Li, B.; Wu, Z.; Yang, J. Study on Functional Specification Scheme on Interface Based on Positioning Features. Proc. Inst. Mech. Eng. Part B J. Eng. Manuf. 2013, 227, 745–753. [Google Scholar] [CrossRef]
  22. Göhler, S.M.; Husung, S.; Howard, T.J. The Translation between Functional Requirements and Design Parameters for Robust Design. Procedia CIRP 2016, 43, 106–111. [Google Scholar] [CrossRef]
  23. Rouetbi, O.; Pierre, L.; Anselmetti, B.; Denoix, H. ISO Tolerancing of Hyperstatic Mechanical Systems with Deformation Control; Springer: Berlin, Germeny, 2017; pp. 991–1000. [Google Scholar]
  24. Calì, M.; Oliveri, S.M.; Ambu, R.; Fichera, G. An Integrated Approach to Characterize the Dynamic Behaviour of a Mechanical Chain Tensioner by Functional Tolerancing. Strojniški Vestn.—J. Mech. Eng. 2018, 64, 245. [Google Scholar] [CrossRef]
  25. Berglund, J.; Söderberg, R.; Wärmefjord, K.; Leach, R.; Morse, E. Functional Tolerancing of Surface Texture—A Review of Existing Methods. Procedia CIRP 2020, 92, 230–235. [Google Scholar] [CrossRef]
  26. Bourdet, P.; Mathieu, L.; Lartigue, C.; Ballu, A. The Concept of the Small Displacement Torsor in Metrology. In Proceedings of the Series on Advances in Mathematics for Applied Sciences: Volume 40, Advanced Mathematical Tools in Metrology II; World Scientific: Singapore, 1996; pp. 110–122. [Google Scholar]
  27. Vignat, F.; Villeneuve, F. Simulation of the Manufacturing Process, Generation of a Model of the Manufactured Parts. In Digital Enterprise Technology; Springer: Boston, MA, USA, 2007. [Google Scholar]
  28. Villeneuve, F.; Vignat, F. Simulation of the Manufacturing Process in a Tolerancing Point of View: Generic Resolution of the Positioning Problem. In Models for Computer Aided Tolerancing in Design and Manufacturing; Springer: Dordrecht, The Netherlands, 2007. [Google Scholar]
  29. Peng, H.; Peng, Z. Using Small Displacement Torsor to Simulate the Machining Processes for 3D Tolerance Transfer. IOP Conf. Ser. Mater. Sci. Eng. 2020, 831, 012017. [Google Scholar] [CrossRef]
  30. Laifa, M.; Sai, W.B.; Hbaieb, M. Evaluation of Machining Process by Integrating 3D Manufacturing Dispersions, Functional Constraints, and the Concept of Small Displacement Torsors. Int. J. Adv. Manuf. Technol. 2014, 71, 1327–1336. [Google Scholar] [CrossRef]
  31. Anselmetti, B.; Louati, H. Generation of Manufacturing Tolerancing with ISO Standards. Int. J. Mach. Tools Manuf. 2005, 45, 1124–1131. [Google Scholar] [CrossRef]
  32. Mickaël, C.; Bernard, A. 3D ISO Manufacturing Specifications with Vectorial Representation of Tolerance Zones. Int. J. Adv. Manuf. Technol. 2012, 60, 577–588. [Google Scholar] [CrossRef]
  33. Ayadi, B.; Anselmetti, B.; Bouaziz, Z.; Zghal, A. Three-Dimensional Modelling of Manufacturing Tolerancing Using the Ascendant Approach. Int. J. Adv. Manuf. Technol. 2008, 39, 279–290. [Google Scholar] [CrossRef]
  34. Anselmetti, B. ISO Manufacturing Tolerancing: Three-Dimensional Transfer with Analysis Line Method. Int. J. Adv. Manuf. Technol. 2012, 61, 1085–1099. [Google Scholar] [CrossRef]
  35. Royer, M.; Anselmetti, B. 3D Manufacturing Tolerancing with Probing of a Local Work Coordinate System. Int. J. Adv. Manuf. Technol. 2016, 84, 2151–2165. [Google Scholar] [CrossRef]
  36. Royer, M.; Anselmetti, B. 3D Manufacturing Tolerancing with Analysis Line Method Taking into Account Joining Operations During Manufacturing Process. Procedia CIRP 2016, 43, 88–93. [Google Scholar] [CrossRef]
  37. Frère, L.-M.; Royer, M.; Fourcade, J. Tolerance Analysis Using a Computer Aided Tolerancing Software: ANATOLE 3D. Procedia CIRP 2018, 75, 267–272. [Google Scholar] [CrossRef]
  38. Xiao, J.; Anwer, N.; Durupt, A.; Le Duigou, J.; Eynard, B. Information Exchange Standards for Design, Tolerancing and Additive Manufacturing: A Research Review. Int. J. Interact. Des. Manuf. 2018, 12, 495–504. [Google Scholar] [CrossRef]
  39. Hofmann, R.; Gröger, S.; Anwer, N. Skin Model Shapes for Multi-Stage Manufacturing in Single-Part Production. Procedia CIRP 2020, 92, 200–205. [Google Scholar] [CrossRef]
  40. Hofmann, R.; Gröger, S.; Anwer, N. Evaluation of Relations and Accumulations of Geometrical Deviations in Multi-Stage Manufacturing Based on Skin Model Shapes. Procedia CIRP 2022, 114, 147–152. [Google Scholar] [CrossRef]
  41. Schleich, B.; Wärmefjord, K.; Söderberg, R.; Wartzack, S. Geometrical Variations Management 4.0: Towards next Generation Geometry Assurance. Procedia CIRP 2018, 75, 3–10. [Google Scholar] [CrossRef]
  42. Wärmefjord, K.; Söderberg, R.; Schleich, B.; Wang, H. Digital Twin for Variation Management: A General Framework and Identification of Industrial Challenges Related to the Implementation. Appl. Sci. 2020, 10, 3342. [Google Scholar] [CrossRef]
  43. Aschenbrenner, A.; Schleich, B.; Wartzack, S. An Overview and Classification of Tolerance Compensation Methods. Proc. Des. Soc. Int. Conf. Eng. Des. 2019, 1, 3471–3480. [Google Scholar] [CrossRef]
  44. Wang, K.; Yin, Y.; Du, S.; Xi, L. Variation Management of Key Control Characteristics in Multistage Machining Processes Considering Quality-Cost Equilibrium. J. Manuf. Syst. 2021, 59, 441–452. [Google Scholar] [CrossRef]
  45. Qie, Y.; Schleich, B.; Anwer, N. Generative Adversarial Networks and Hessian Locally Linear Embedding for Geometric Variations Management in Manufacturing. J. Intell. Manuf. 2023, 1–30. [Google Scholar] [CrossRef]
  46. Maltauro, M.; Passarotto, G.; Concheri, G.; Meneghello, R. Bridging the Gap between Design and Manufacturing Specifications for Non-Rigid Parts Using the Influence Coefficient Method. Int. J. Adv. Manuf. Technol. 2023, 127, 579–597. [Google Scholar] [CrossRef]
  47. Maltauro, M.; Meneghello, R.; Concheri, G.; Pellegrini, D.; Viero, M.; Bisognin, G. A Case Study on the Correlation Between Functional and Manufacturing Specifications for a Large Injection Moulded Part. In Proceedings of the Advances on Mechanics, Design Engineering and Manufacturing IV—Proceedings of the International Joint Conference on Mechanics, Design Engineering & Advanced Manufacturing, JCM 2022, Ischia, Italy, 1–3 June 2022; Gerbino, S., Lanzotti, A., Martorelli, M., Mirálbes Buil, R., Rizzi, C., Roucoules, L., Eds.; Springer International Publishing: Cham, Switzerland, 2023; pp. 1268–1278. [Google Scholar] [CrossRef]
  48. Woo, S. The Reliability Design of Mechanical System and Its Parametric Accelerated Life Testing. In Handbook of Materials Failure Analysis with Case Studies from the Chemicals, Concrete and Power Industries; Elsevier: Amsterdam, The Netherlands, 2016. [Google Scholar]
  49. NASA. NASA Systems Engineering Handbook; NASA SP-20; NASA: Washington, DC, USA, 2016. [Google Scholar]
  50. Morse, E. Design for Metrology—A New Idea? Procedia CIRP 2019, 84, 165–168. [Google Scholar] [CrossRef]
  51. Maltauro, M.; Morse, E. Towards a Definition of “Geometric Verification Specifications” within the ISO GPS System. Procedia CIRP 2023, 119, 339–344. [Google Scholar] [CrossRef]
  52. Qie, Y.; Anwer, N. Toward Non-Default Partitioning for Compound Feature Identification in Engineering Design. Procedia CIRP 2021, 100, 852–857. [Google Scholar] [CrossRef]
  53. Coulson, T. The Origin of Interchangeable Parts. J. Franklin Inst. 1944, 238, 335–344. [Google Scholar] [CrossRef]
  54. Ishrat, N.Z. Product Management: The Art and Science of Managing Network and Communications Industry Products; Xlibris Corporation: Bloomington, IN, USA, 2013. [Google Scholar]
  55. ISO/TS 8062-2:2013; Geometrical Product Specifications (GPS)—Dimensional and Geometrical Tolerances for Moulded Parts—Rules 2013. ISO International Organization for Standardization: Geneva, Switzerland, 2013.
  56. ISO 14253-1:2017; Geometrical Product Specifications (GPS). Inspection by Measurement of Workpieces and Measuring Equipment. Decision Rules for Verifying Conformity or Nonconformity with Specifications 2017. ISO International Organization for Standardization: Geneva, Switzerland, 2017.
  57. Popa, M.S.; Kortekamp, M.; Aclan, M. Correlation of Geometrical Specifications for Flexible Quality Control in the Manufacturing of Plastic Products. Teh. Vjesn.—Tech. Gaz. 2021, 28, 1456–1461. [Google Scholar] [CrossRef]
  58. Lanza, G.; Haefner, B.; Kraemer, A. Optimization of Selective Assembly and Adaptive Manufacturing by Means of Cyber-Physical System Based Matching. CIRP Ann. 2015, 64, 399–402. [Google Scholar] [CrossRef]
  59. ISO 1101:2017; Geometrical Product Specifications (GPS). Geometrical Tolerancing. Tolerances of Form, Orientation, Location and Run-Out 2017. ISO International Organization for Standardization: Geneva, Switzerland, 2017.
  60. Savio, E.; De Chiffre, L.; Carmignato, S.; Meinertz, J. Economic Benefits of Metrology in Manufacturing. CIRP Ann. 2016, 65, 495–498. [Google Scholar] [CrossRef]
  61. ISO/IEC/IEEE 24765:2017; Systems and Software Engineering—Vocabulary 2017. ISO International Organization for Standardization: Geneva, Switzerland, 2017.
  62. ISO/IEC 2382:2015; Information Technology—Vocabulary 2015. ISO International Organization for Standardization: Geneva, Switzerland, 2015.
  63. Groll, M.W.; Heber, D. E/E-Product Data Management in Consideration of Model-Based Systems Engineering. Adv. Transdiscipl. Eng. 2016, 4, 289–298. [Google Scholar]
  64. ISO 5459:2011; Geometrical Product Specifications (GPS)—Geometrical Tolerancing—Datums and Datum Systems 2011. ISO International Organization for Standardization: Geneva, Switzerland, 2011.
  65. ISO 5458:2018; Geometrical Product Specifications (GPS)—Geometrical Tolerancing—Pattern and Combined Geometrical Specification 2018. ISO International Organization for Standardization: Geneva, Switzerland, 2018.
  66. Maltauro, M.; Meneghello, R.; Concheri, G. Conformity Rate Estimation for Shaft-Hole Pattern Fit Not Compliant with the Boundary Condition Design Criterion. In Proceedings of the Advances on Mechanics, Design Engineering and Manufacturing IV—Proceedings of the International Joint Conference on Mechanics, Design Engineering & Advanced Manufacturing, JCM 2022, Ischia, Italy, 1–3 June 2022; Gerbino, S., Lanzotti, A., Martorelli, M., Mirálbes Buil, R., Rizzi, C., Roucoules, L., Eds.; Springer International Publishing: Cham, Switzerland, 2023; pp. 1256–1267. [Google Scholar] [CrossRef]
  67. ISO 22081:2021; Geometrical Product Specifications (GPS)—Geometrical Tolerancing—General Geometrical Specifications and General Size Specifications 2021. ISO International Organization for Standardization: Geneva, Switzerland, 2021.
  68. ISO 8015:2011; Geometrical Product Specifications (GPS)—Fundamentals—Concepts, Principles and Rules 2011. ISO International Organization for Standardization: Geneva, Switzerland, 2011.
Figure 1. Input/output diagram that describes the functional tolerancing activity that takes place inside the design department. Other tasks performed by the design department are omitted.
Machines 12 00147 g001
Figure 2. Input/output diagram that describes the manufacturing tolerancing activity taking place inside the manufacturing department. Other tasks performed by the manufacturing department are omitted.
Machines 12 00147 g002
Figure 3. Input/output diagram that describes the verification tolerancing activity taking place inside the quality control department. Other tasks performed by the quality control department are omitted.
Machines 12 00147 g003
Figure 4. Hierarchical relations (as described by ISO/TS 21619) among different specifications: functional, manufacturing, and verification, inspired by [11].
Machines 12 00147 g004
Figure 5. The scheme represents the relations among the different departments involved in product development concerning tolerancing activities. Each department block is a “zoom out” from the diagrams represented in Figure 1, Figure 2 and Figure 3; the solid arrows represent an information flow, while the dashed arrow represents the transfer of a physical entity. FUN-SPEC stands for functional specification, MAN-SPEC stands for manufacturing specification, VERI-SPEC stands for verification specification, and ECR stands for engineering change request.
Machines 12 00147 g005
Figure 6. The scheme represents the relations among different departments and different business units (or different companies) along the supply chain that are involved in product development regarding tolerancing activities; each horizontal layer follows the scheme represented in Figure 5.
Machines 12 00147 g006
Figure 7. The scheme represents the functional hierarchy among product, system, subsystem, and component levels, depicting a case in which one component inherits functionality from two distinct subsystems. It could represent a case of a standardized component used in different subsystems or a complex component that is required for different functions (e.g., structural and aerodynamic).
Machines 12 00147 g007
Figure 8. A simplified V-model framework used to describe product development (adapted from [63]).
Machines 12 00147 g008
Figure 9. Functional specification of submersible pump assembly.
Machines 12 00147 g009
Figure 10. Impeller functional specification.
Machines 12 00147 g010
Figure 11. Pump case base functional specification.
Machines 12 00147 g011
Figure 12. Pump case functional specification.
Machines 12 00147 g012
Figure 13. Functional specification for a spacer plate.
Machines 12 00147 g013
Figure 14. Manufacturing specification for a spacer plate.
Machines 12 00147 g014
Disclaimer/Publisher’s Note: The statements, opinions and data contained in all publications are solely those of the individual author(s) and contributor(s) and not of MDPI and/or the editor(s). MDPI and/or the editor(s) disclaim responsibility for any injury to people or property resulting from any ideas, methods, instructions or products referred to in the content.