3.1. Trends of Milling Forces Under Single-Factor Variation
To highlight the evolution of load magnitude with each cutting parameter,
Figure 4,
Figure 5,
Figure 6 and
Figure 7 plot the absolute values of the measured force components, |
Fx|, |
Fy|, and |
Fz|, derived from the signed force data reported in
Table 8. The sign convention for the raw measurements follows the machine-tool axes, as described in the experimental setup, whereas the trend plots focus on the force magnitudes.
Unless otherwise stated, all experimental results reported in this section correspond to mean values obtained from repeated passes under each cutting condition. The associated sample standard deviations were used as uncertainty measures; they remained consistently much smaller than the differences between parameter levels, so that the qualitative trends and rankings discussed in the following subsections are robust.
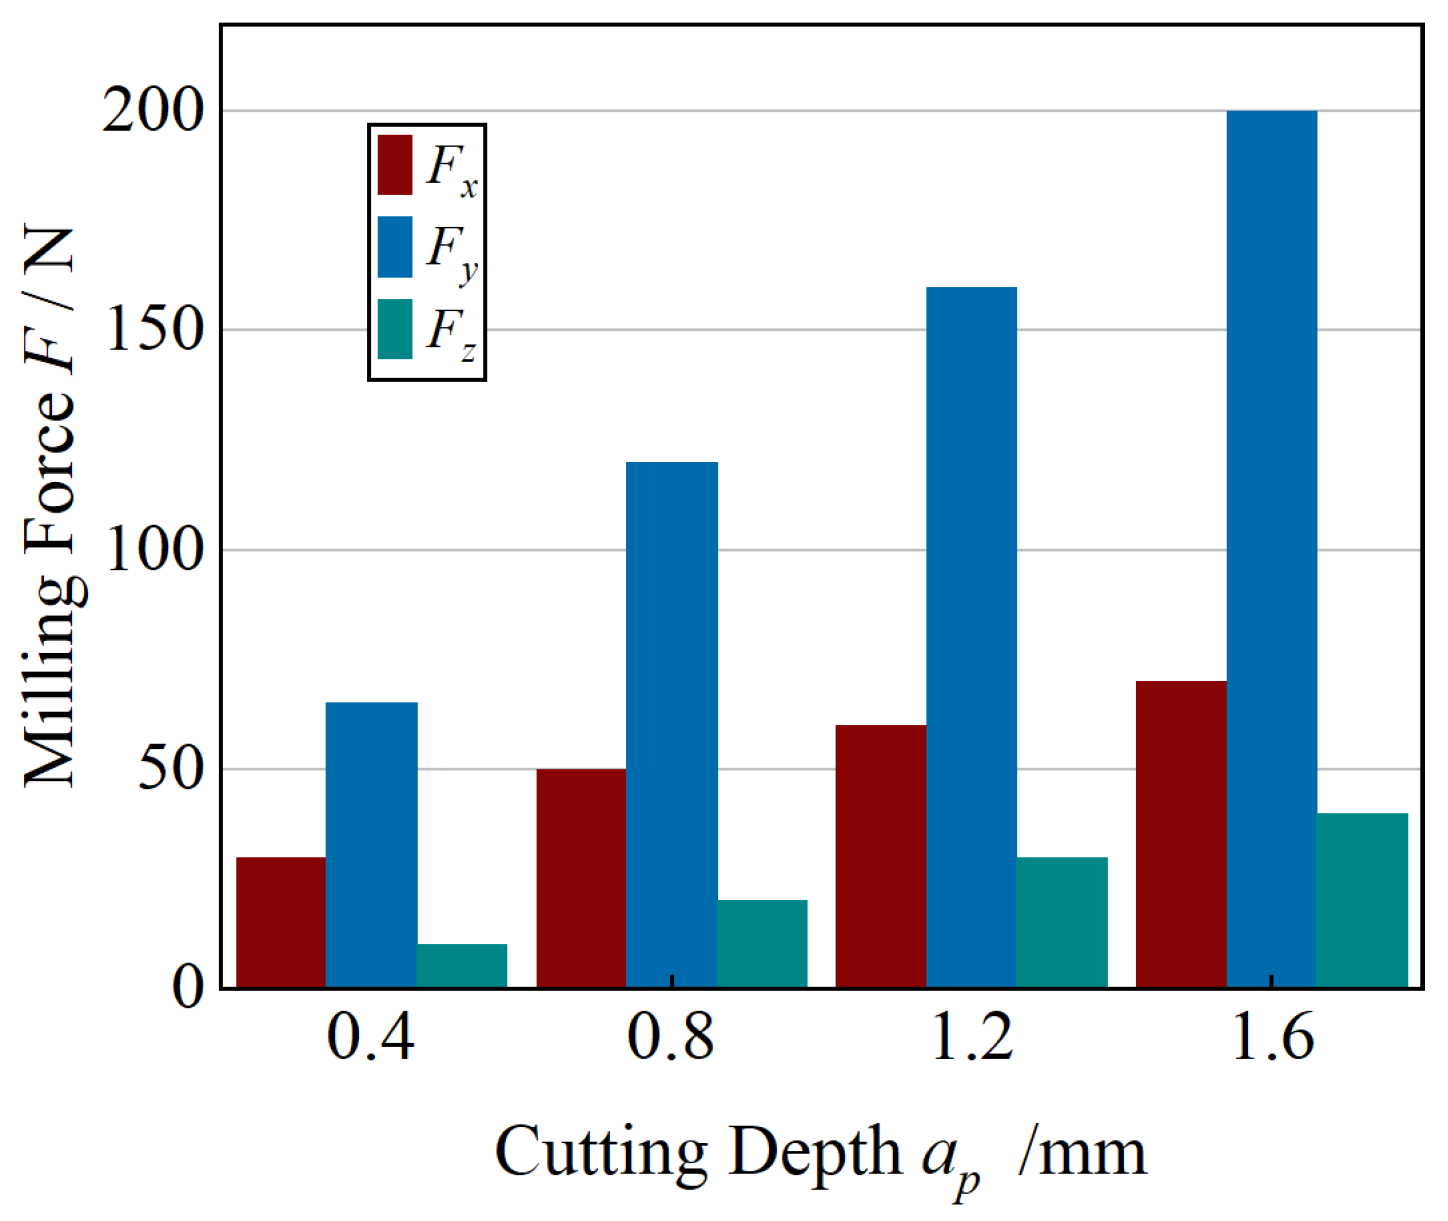
As shown in
Figure 4, the influence of axial cutting depth (
ap) on the milling forces was evaluated under constant conditions of
ae = 5 mm,
n = 1500 r·min
−1, and
fz = 0.05 mm·z
−1. The results reveal a consistent increase in all three force components (
Fx,
Fy, and
Fz) as
ap rises from 0.4 mm to 1.6 mm. This trend arises because a deeper axial engagement enlarges both the chip cross-sectional area and the tool–workpiece contact region, thereby intensifying material deformation and frictional resistance at the interface. Consequently, the overall cutting load grows proportionally with
ap, reflecting the higher mechanical resistance encountered during deeper penetration. Across all axial depth levels in
Figure 4, the standard deviations of the repeated force measurements were small compared with the corresponding mean forces, and they did not alter the monotonic increase trend described above.
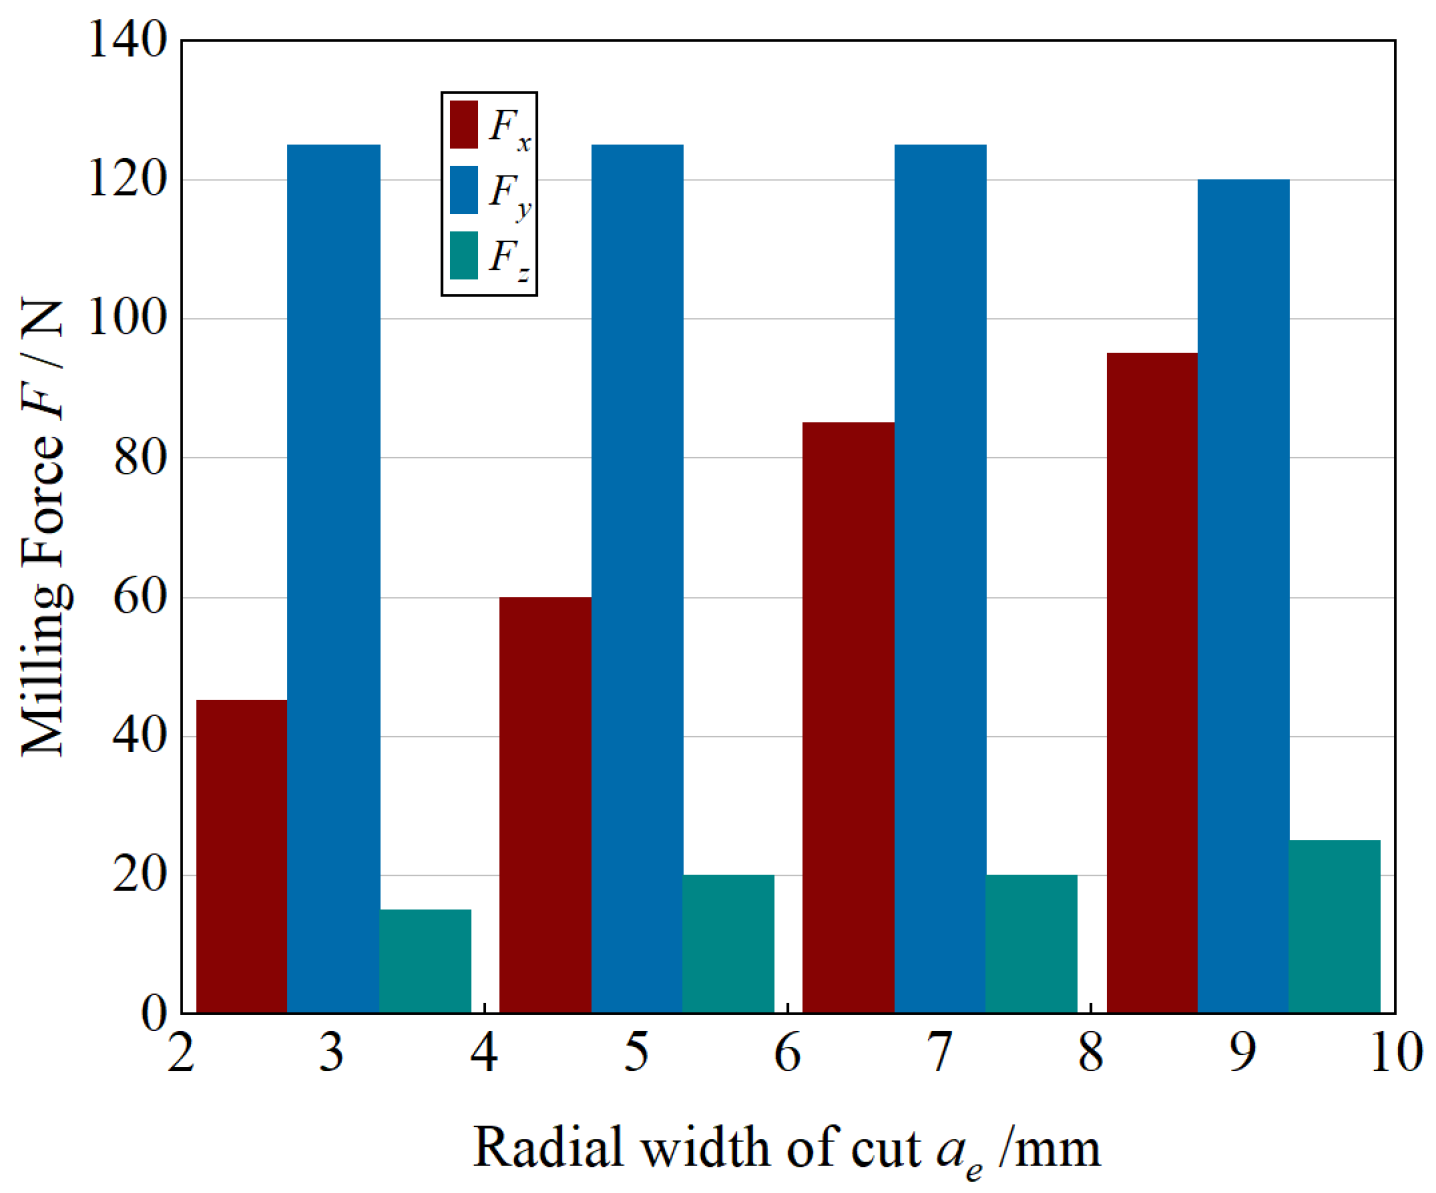
As illustrated in
Figure 5, the influence of radial cutting width (
ae) on milling forces was investigated under constant conditions of
ap = 0.8 mm,
n = 1500 r·min
−1, and
fz = 0.05 mm·z
−1. When
ae increased from 3 mm to 9 mm, the feed-direction force (
Fx) exhibited a pronounced increase, whereas
Fy and
Fz remained nearly constant. This behavior results from the larger radial engagement, which increases the number of teeth simultaneously participating in the cut, thereby amplifying the total tangential load projected onto the feed direction. Meanwhile, as the effective deformation coefficient decreases slightly with greater engagement width, the frictional resistance on the tool flank is reduced. The combined influence of these two opposing mechanisms produces a significant rise in
Fx, while leaving
Fy and
Fz essentially unchanged.
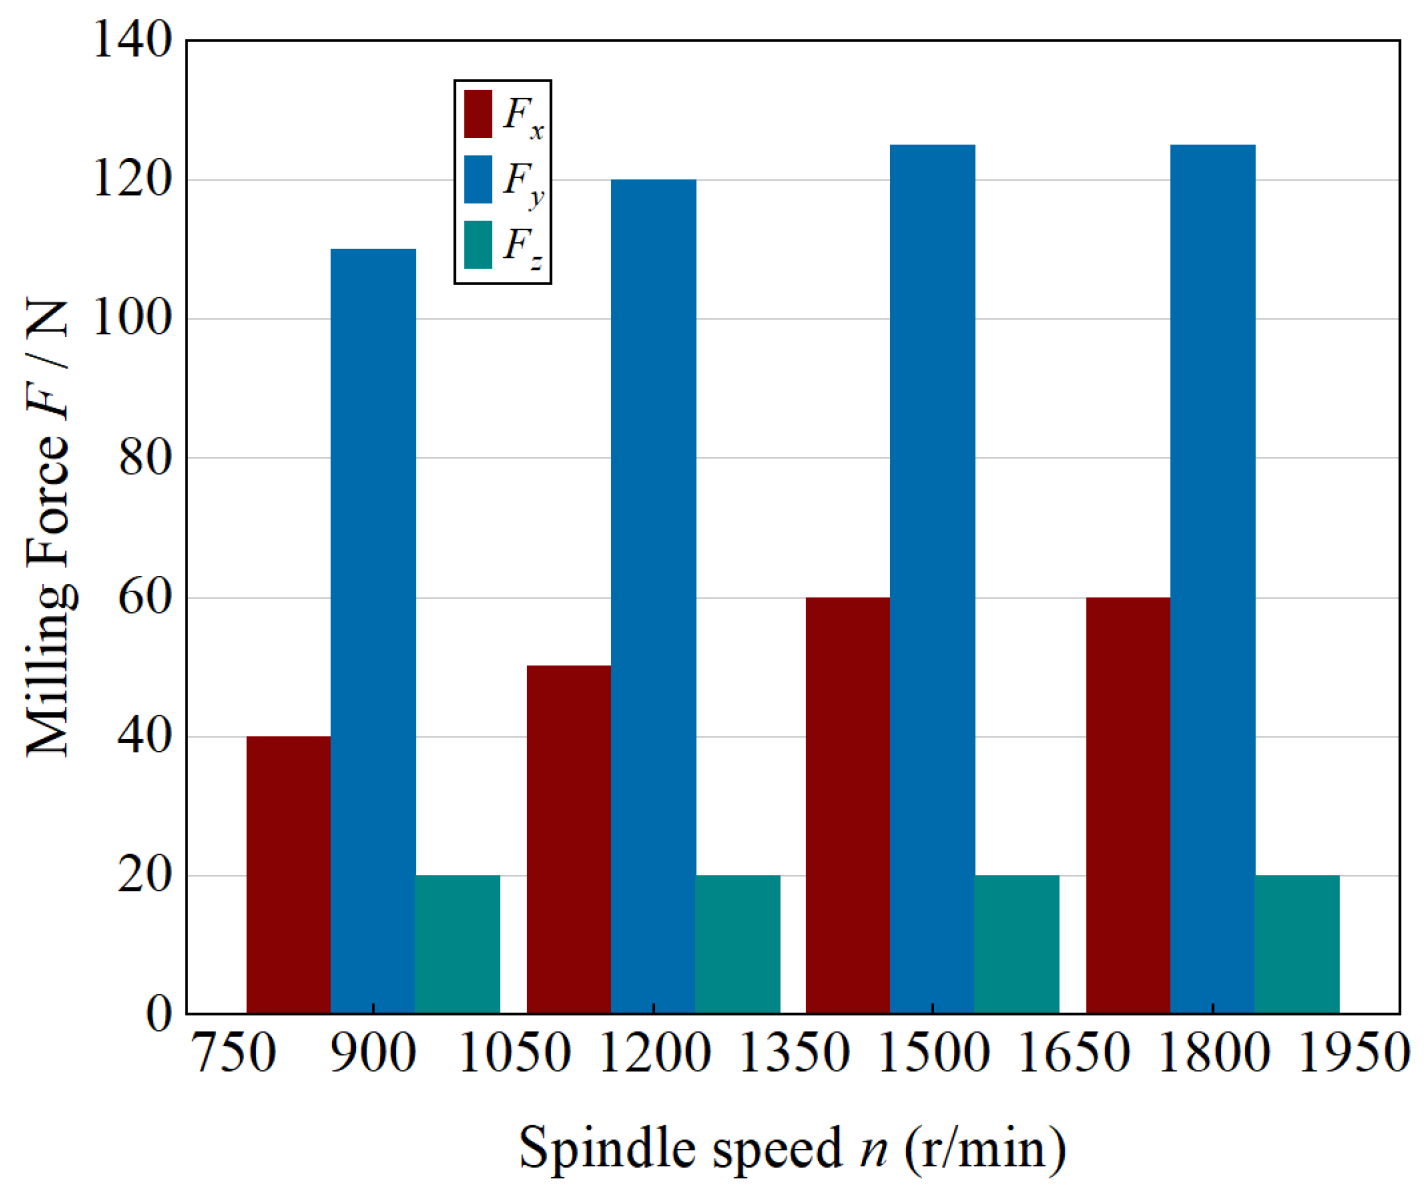
As depicted in
Figure 6, the influence of spindle speed (
n) on the milling forces was examined under constant parameters of
ap = 0.8 mm,
ae = 5 mm, and
fz = 0.05 mm·z
−1. With increasing spindle speed from 900 to 1800 r·min
−1, all three force components (
Fx,
Fy, and
Fz) initially increased and subsequently decreased, exhibiting a distinct non-monotonic trend.
At moderate speeds, the absence of coolant leads to a temperature rise at the tool–chip interface, which enhances material softening yet simultaneously increases deformation resistance due to elevated friction, resulting in larger cutting forces. When the spindle speed exceeds approximately 50 m·min−1, the material removal per tooth diminishes and the tool–workpiece contact time per engagement shortens, thereby reducing the overall load. The interplay between these competing thermal and kinematic mechanisms accounts for the observed pattern of an initial rise followed by a decline in cutting forces at higher spindle speeds.
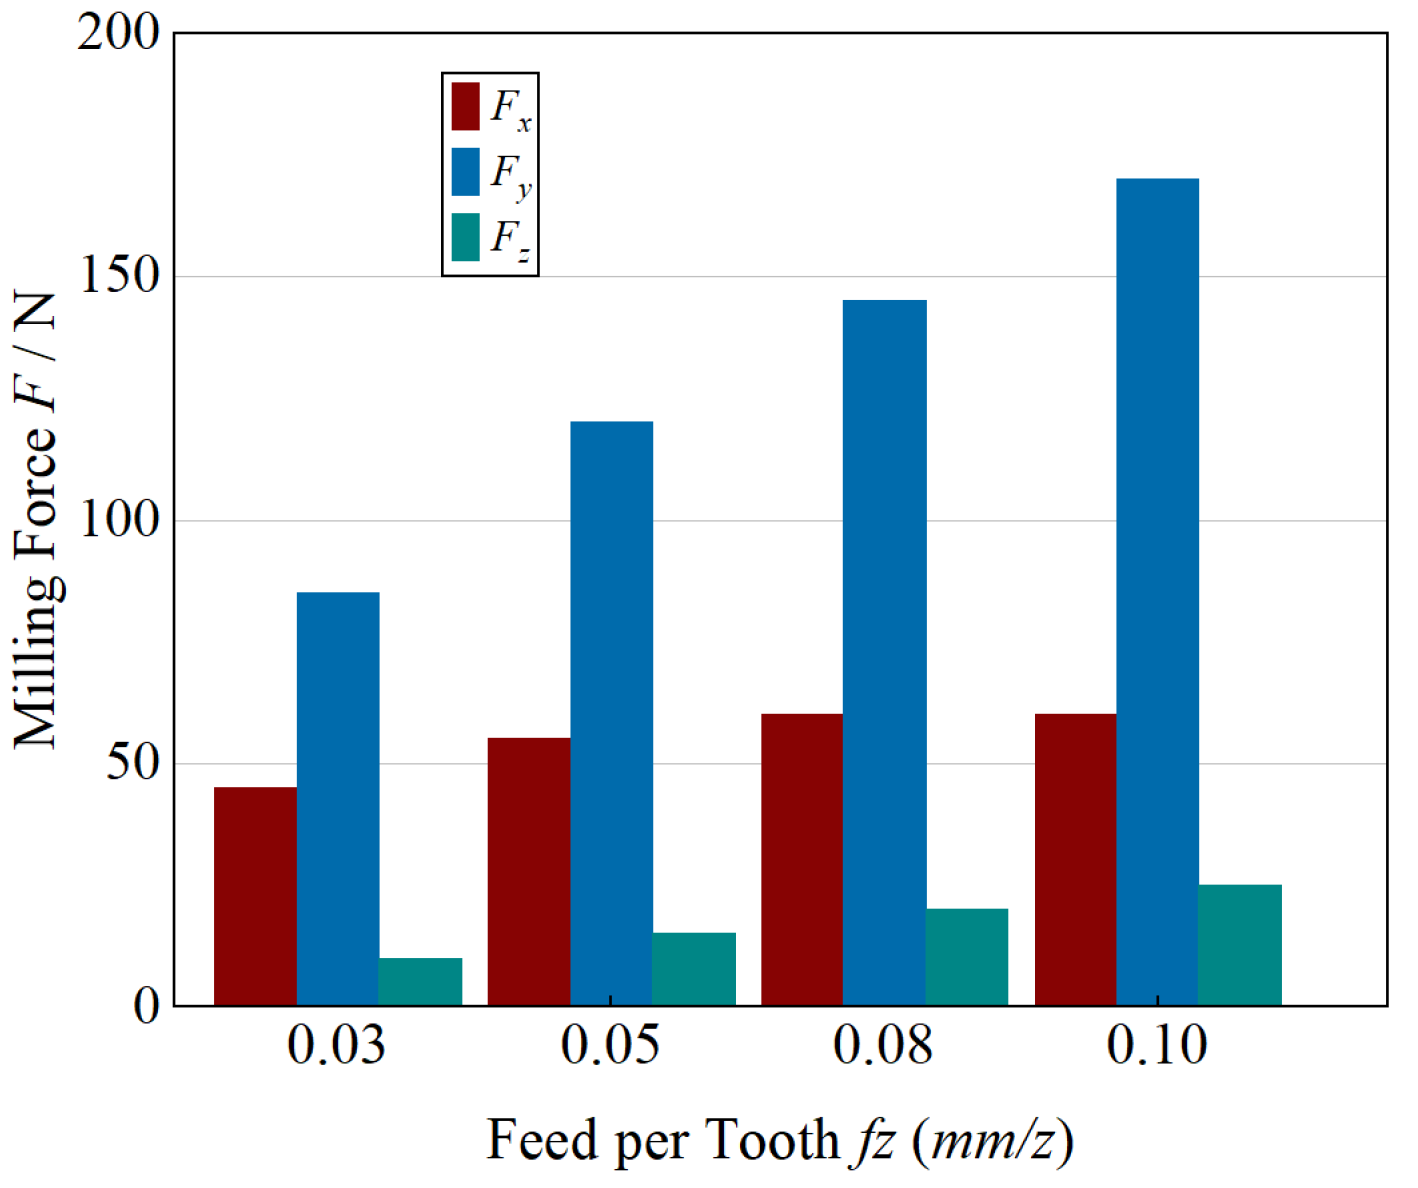
As shown in
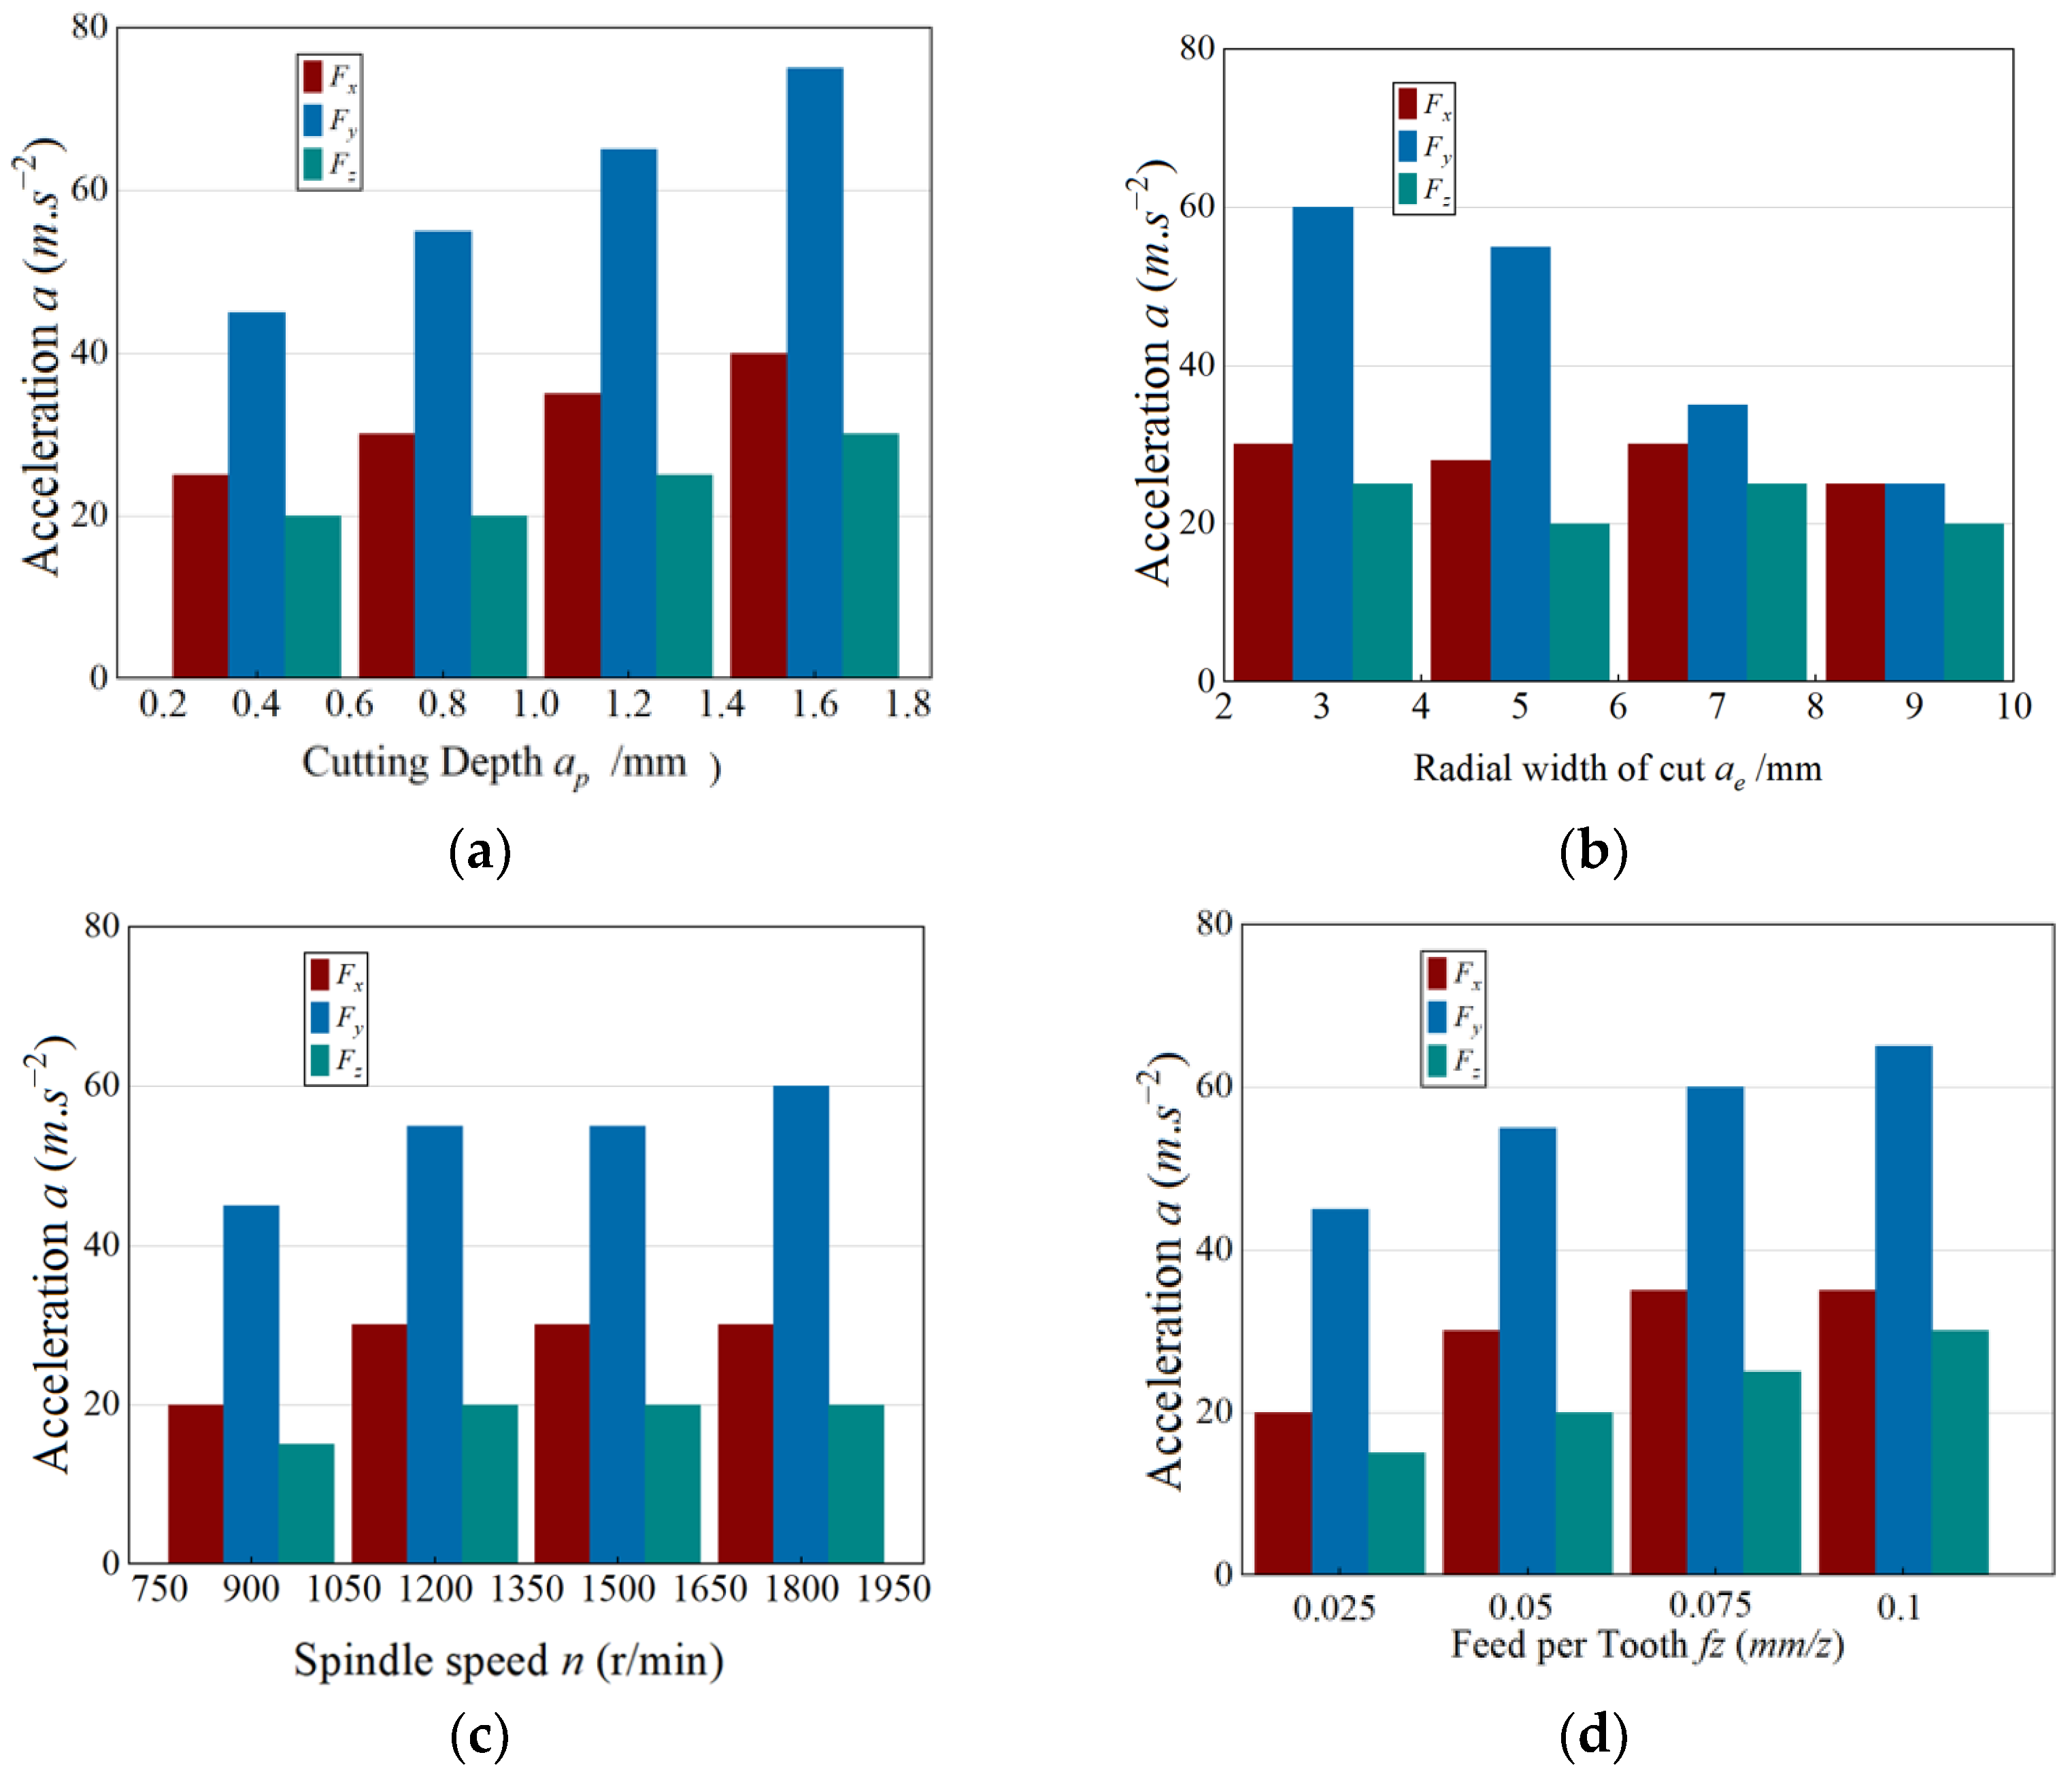
Figure 7, the influence of feed per tooth (
fz) on the cutting forces was examined under constant parameters of
ap = 0.8 mm,
ae = 5 mm, and
n = 1500 r·min
−1. When
fz increased from 0.025 mm·z
−1 to 0.10 mm·z
−1, all three force components (
Fx,
Fy, and
Fz) rose sharply, displaying an almost linear correlation with
fz.
This behavior is attributed to the proportional increase in undeformed chip thickness, which enlarges both the tool–chip contact area and the frictional load along the interface. Among the three directions, Fy exhibited the most pronounced growth, highlighting the dominance of the tangential cutting component, while Fz remained the smallest due to the limited axial immersion typical of end milling. Overall, the results confirm that higher feed per tooth intensifies chip load and interfacial friction, thereby amplifying the resultant cutting forces in all directions.
3.2. Orthogonal and Variance Analyses of Milling Forces
In the orthogonal design, let Kij represent the cumulative response corresponding to the j-th factor at the i-th level, and kij its mean value. The range is defined as Ri = kimax − kimin, where a larger R indicates a stronger influence of that factor on the evaluated response. This analytical approach enables a quantitative ranking of the relative contributions of individual cutting parameters.
The results of the range analysis for the milling forces are summarized in
Table 14.
Table 14 lists the factor-level averages
k1j–
k4j and the corresponding ranges
Rj for each factor, which are used to rank the influence of the milling parameters on the response. For each factor
j, the level average
kij is computed as the arithmetic mean of the response over the four orthogonal runs in which factor
j is set to level
i in the L16(4
4) design. The calculated level means and corresponding
R-values reveal that the axial depth of cut (
ap) exerts the most significant effect across all three force components, confirming its dominant role in determining the overall cutting load. Conversely, spindle speed (
n) exhibits the weakest influence on
Fx and
Fz, whereas the radial width of cut (
ae) contributes least to variations in
Fy. Collectively, these findings establish the following order of sensitivity for the milling forces:
ap >
fz >
ae >
n.
Based on the computed range values for each factor, the relative influence of the cutting parameters on the three directional force components (
Fx,
Fy, and
Fz) was evaluated, as summarized in
Table 15.
The resulting factor hierarchies confirm that the axial depth of cut (ap) exerts the most significant influence on the overall cutting-force response. Secondary contributions arise from the feed per tooth (fz) and radial width (ae), whereas the spindle speed (n) consistently exhibits the weakest effect. Specifically, the sensitivity orders are identified as ap > ae > fz > n for Fx, ap > fz > n > ae for Fy, and ap > fz > ae > n for Fz. These results collectively reinforce that cutting depth is the dominant parameter governing force magnitude across all directions.
A pooled-error analysis of variance (ANOVA) was conducted to assess the statistical significance of each cutting parameter. For each response variable, the factors were assigned three degrees of freedom (df1 = 3), while the remaining non-significant effects were successively combined into the residual term to yield a stable estimate of the error variance. This resulted in a final pooled error degree of freedom of dfe = 9.
Significance was evaluated at nominal confidence levels α = 0.05 and α = 0.01, with corresponding critical F-values of F0.05(3,9) = 3.94 and F0.01(3,9) = 7.02, respectively. Because the L16(44) orthogonal design provides only one observation per condition and the error term is obtained by pooling the smallest sums of squares, these F-tests should be regarded as approximate: effects with F ≥ F0.01(3,9) are described as statistically significant at the 1% level within the pooled-error ANOVA model, effects with F0.05(3,9) ≤ F < F0.01(3,9) as significant at the 5% level, and effects with F < F0.05(3,9) as not statistically significant. The same evaluation protocol was applied consistently to Fx, Fy, and Fz to ensure uniformity across the directional responses.
As summarized in
Table 16, within the pooled-error ANOVA model the axial depth of cut
ap exerts the strongest influence on both
Fx and
Fy, while the radial width of cut
ae affects
Fx and the feed per tooth
fz affects
Fy. For
Fz,
ap again dominates and
fz has a moderate effect, whereas
n and
ae have comparatively small effects that are not statistically distinguishable from the pooled experimental error at the 5% level. These outcomes indicate that, for the tested thin-wall configuration, axial depth of cut is the primary factor governing cutting-force magnitude, but the exact significance levels should be interpreted with caution because they rely on the single-replicate L16(4
4) design and the pooled-error assumption.
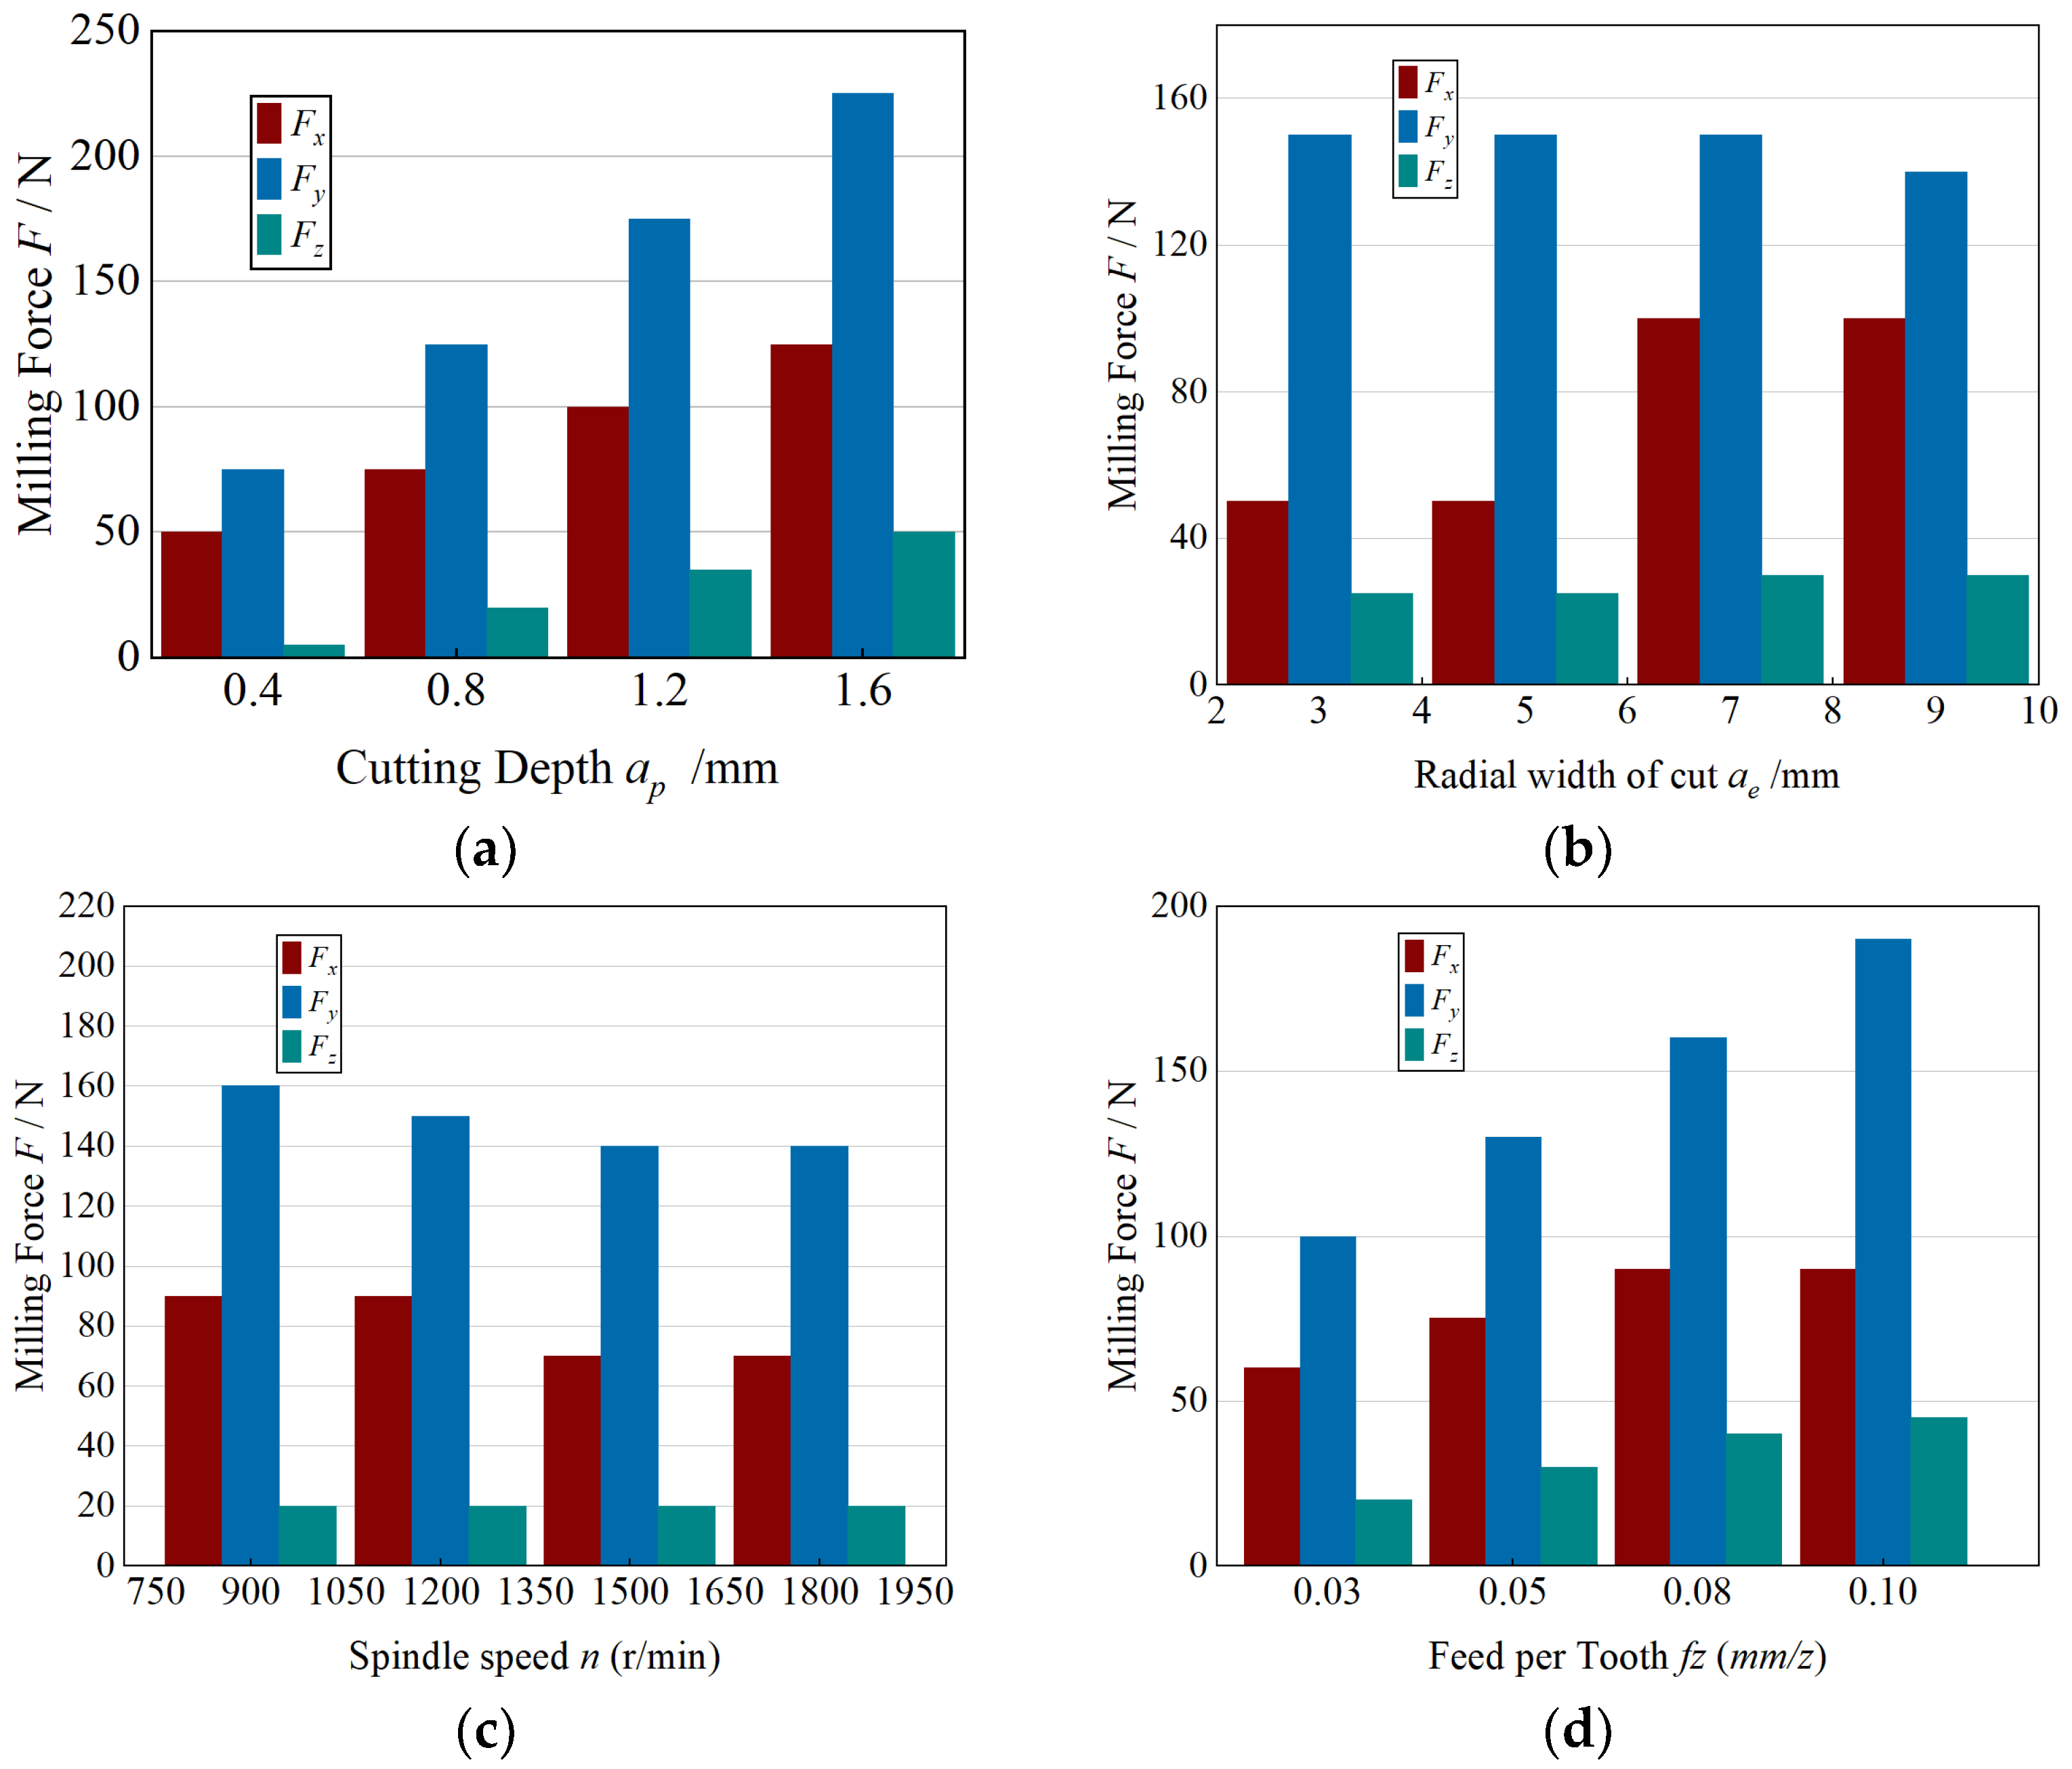
As depicted in
Figure 8, the milling forces exhibit distinct and physically consistent main-effect patterns. Increasing the axial depth of cut (
ap) leads to a pronounced growth in the overall cutting load due to the enlargement of the material removal cross-section. When the radial width of cut (
ae) increases, the feed-direction force (
Fx) rises noticeably, while
Fy and
Fz remain nearly unchanged, indicating that the additional engagement primarily intensifies the tangential loading.
With rising spindle speed (n), all three force components show a slight decrease, attributed to thermal softening of the material and the corresponding reduction in chip thickness per tooth. In contrast, a larger feed per tooth (fz) causes a marked increase in all force components due to the formation of thicker undeformed chips and enhanced ploughing interaction at the tool–workpiece interface. These collective trends align closely with both the single-factor tests and the orthogonal experimental analysis, demonstrating the robustness and internal consistency of the experimental findings.
3.3. Milling Vibration: Single-Factor Trends and Orthogonal Confirmation
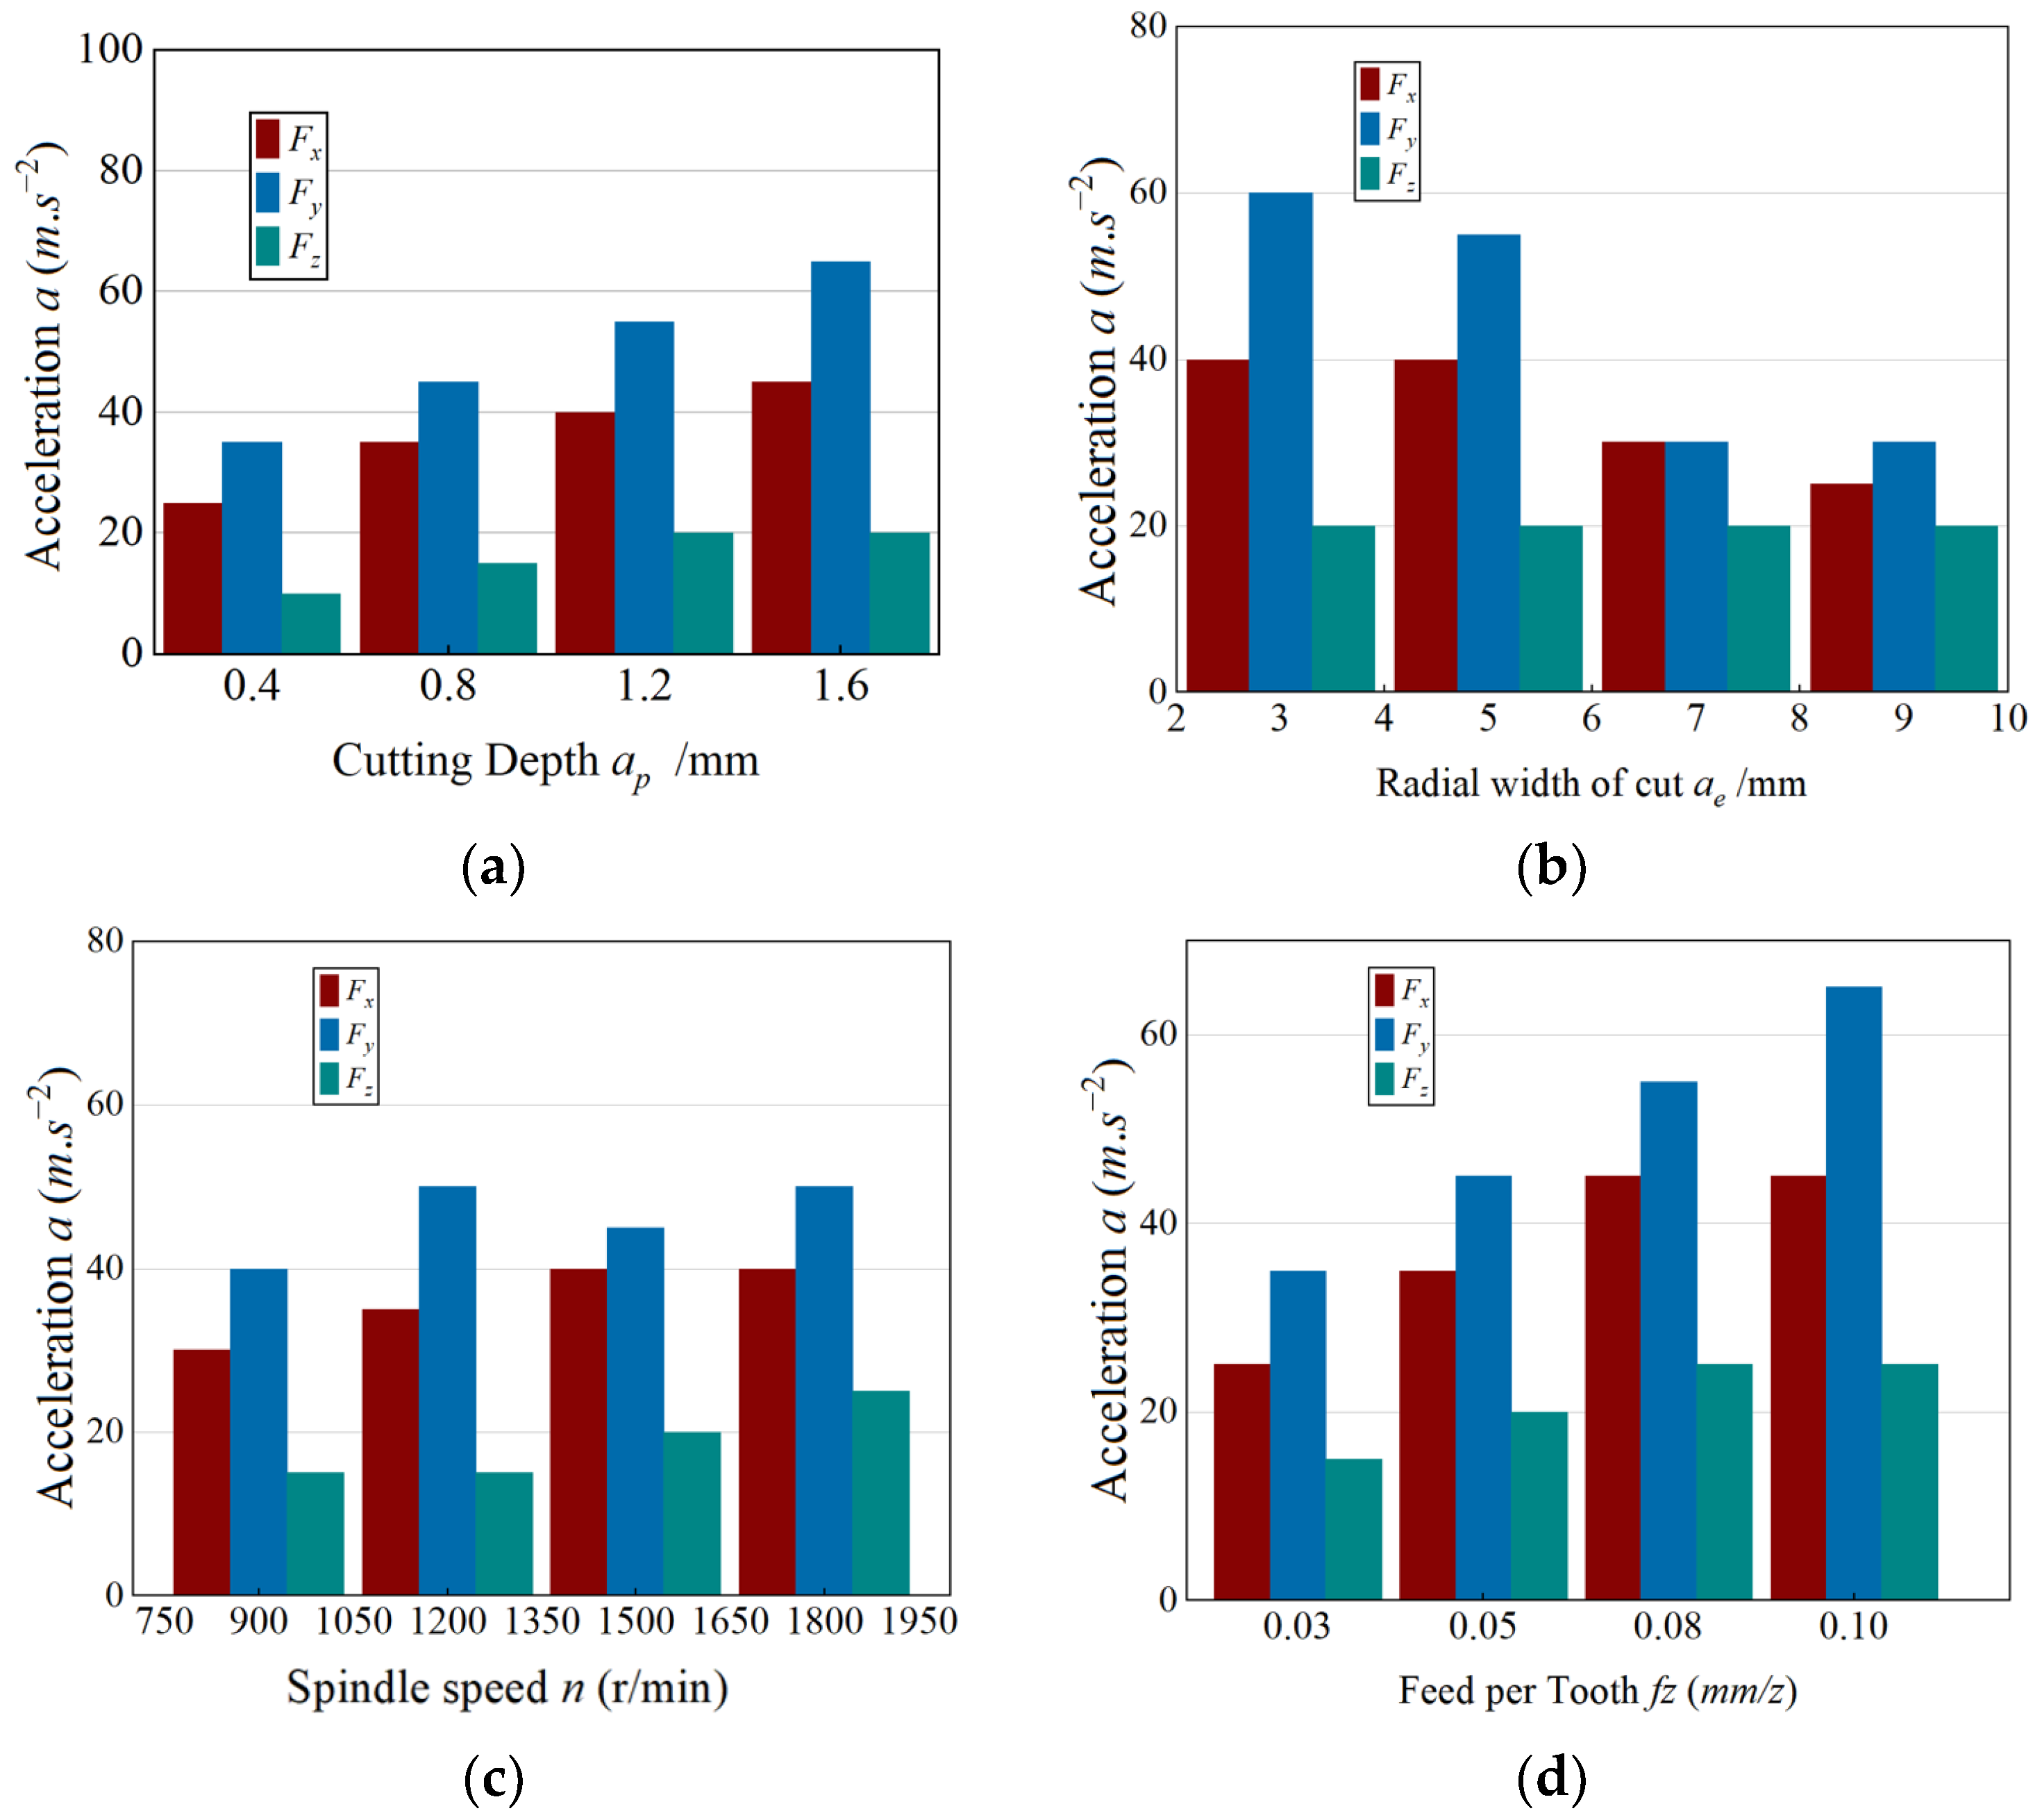
As shown in
Figure 9a, the influence of axial depth of cut (
ap) on vibration behavior was examined under constant parameters of
ae = 5 mm,
n = 1500 r·min
−1, and
fz = 0.05 mm·z
−1. The acceleration amplitudes in all three directions (
ax,
aγ, and
az) increased consistently as
ap rose from 0.4 mm to 1.6 mm. This response stems from the larger cutting engagement, which enhances plastic deformation, frictional contact, and the dynamic excitation of the thin-walled structure.
Across the other single-factor experiments, similar parameter-dependent patterns were observed. Increasing the radial width of cut (ae) slightly amplified ax while exerting negligible influence on aγ and az. Higher spindle speeds (n) led to reduced vibration amplitudes because of shorter tool–workpiece contact durations and intensified thermal softening. Conversely, increasing the feed per tooth (fz) produced a substantial rise in vibration across all directions, caused by thicker undeformed chips and stronger intermittent impact loading.
Overall, the vibration responses follow trends that closely mirror those of the cutting forces, underscoring the strong dynamic coupling between process parameters and structural behavior in thin-wall milling.
According to the proportional contributions obtained from the range analysis, the relative influence of each milling parameter on the vibration accelerations (
ax,
aγ, and
az) was quantified, as summarized in
Table 17. The ranking results reveal that both the feed per tooth (
fz) and the axial depth of cut (
ap) exert the most pronounced effects on vibration amplitude across all measurement directions, with
fz consistently emerging as the dominant factor.
This observation underscores the high dynamic sensitivity of the thin-wall structure to variations in chip thickness and engagement depth, demonstrating that these parameters strongly govern the magnitude and stability of the vibration response. The outcome further confirms the direct linkage between cutting parameters and dynamic behavior in thin-wall milling, providing a quantitative basis for optimizing process conditions to suppress vibration and enhance surface integrity.
An analysis of variance (ANOVA) was conducted to evaluate the statistical significance of the machining parameters on the vibration accelerations (
ax,
aγ, and
az). The analytical procedure followed the same methodology as the cutting-force analysis, ensuring consistency in variance decomposition and confidence-level testing. The results are summarized in
Table 18.
For ax, only the feed per tooth (fz) exhibited a statistically significant effect, while axial depth (ap), radial width (ae), and spindle speed (n) showed negligible influence. This indicates that variations in fz primarily control vibration along the feed direction. In the case of aγ, the axial depth, radial width, and feed per tooth were all significant, confirming that both engagement geometry and chip load contribute to vibration in the width direction, whereas spindle speed again proved insignificant. For az, only feed per tooth exerted a strong effect, with other parameters showing minimal impact.
Overall, the results for the thin-walled beam configuration reveal that feed per tooth (fz) and radial width (ae) are the dominant factors influencing vibration across all directions, whereas spindle speed (n) has the weakest contribution. To effectively suppress vibration while maintaining machining efficiency, a smaller feed per tooth and reduced axial depth are recommended, while higher spindle speeds can be employed to compensate for productivity losses.
Considering both vibration suppression and machining efficiency, the optimal parameter combination was determined as A1B3C4D1, corresponding to ap = 0.4 mm, ae = 7 mm, n = 1800 r·min−1, and fz = 0.025 mm·z−1. This configuration minimizes the overall vibration amplitude while ensuring adequate cutting performance for thin-wall AA7075 milling operations.
As shown in
Figure 10, the main-effects plots obtained from the orthogonal experiments clearly demonstrate that the feed per tooth (
fz) and axial depth of cut (
ap) exert a substantially greater influence on vibration behavior than either the spindle speed (
n) or the radial width of cut (
ae). This pronounced disparity confirms the dominant role of chip load and engagement depth in governing the dynamic response of thin-walled structures, emphasizing that effective vibration control in thin-wall milling primarily depends on the proper selection of these two parameters.
3.4. Surface Topography and Roughness (Thin-Walled vs. Non-Thin-Walled)
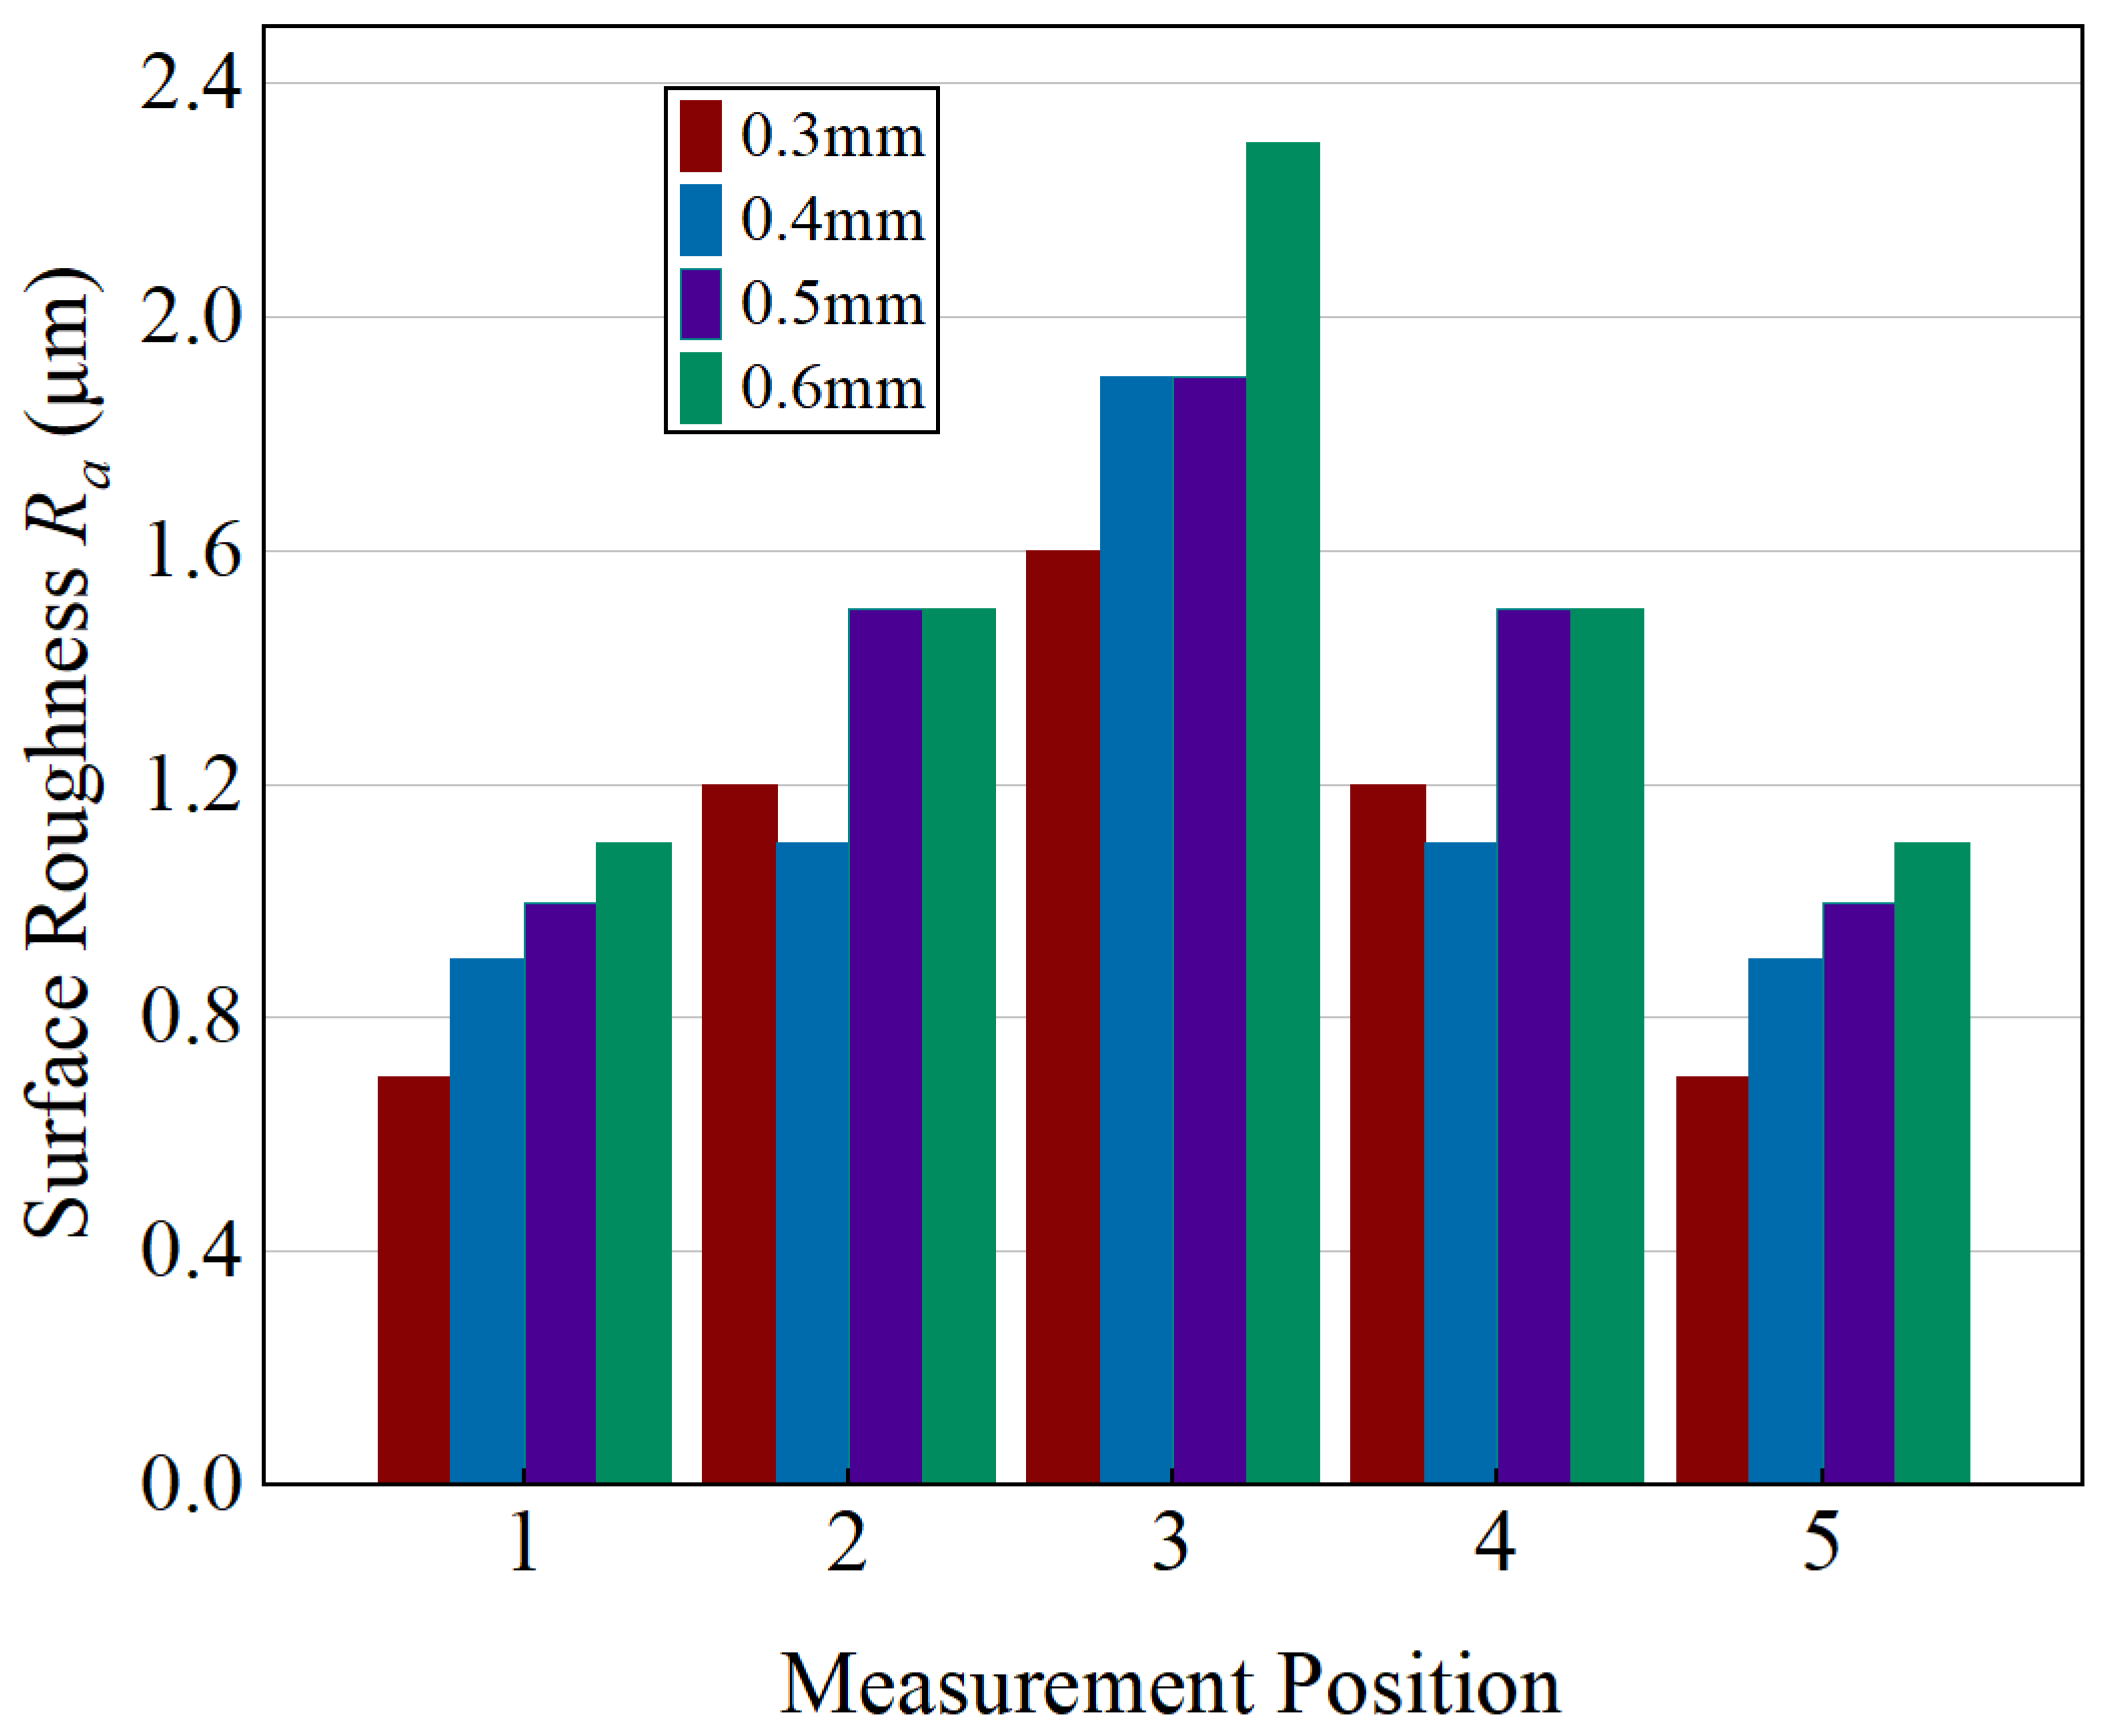
The surface roughness (R
a) was measured at predefined locations on both the thin-walled and reference (non-thin-walled) specimens to ensure consistency in sampling. The selected measurement zones are shown in
Figure 11, where identical surface regions were used for all tests to maintain uniform evaluation conditions and enable reliable comparison between the two structural configurations.
Under constant cutting conditions of
ae = 5 mm,
n = 1500 r·min
−1, and
fz = 0.05 mm·z
−1, an increase in the axial depth of cut (
ap) resulted in a clear rise in the surface roughness (R
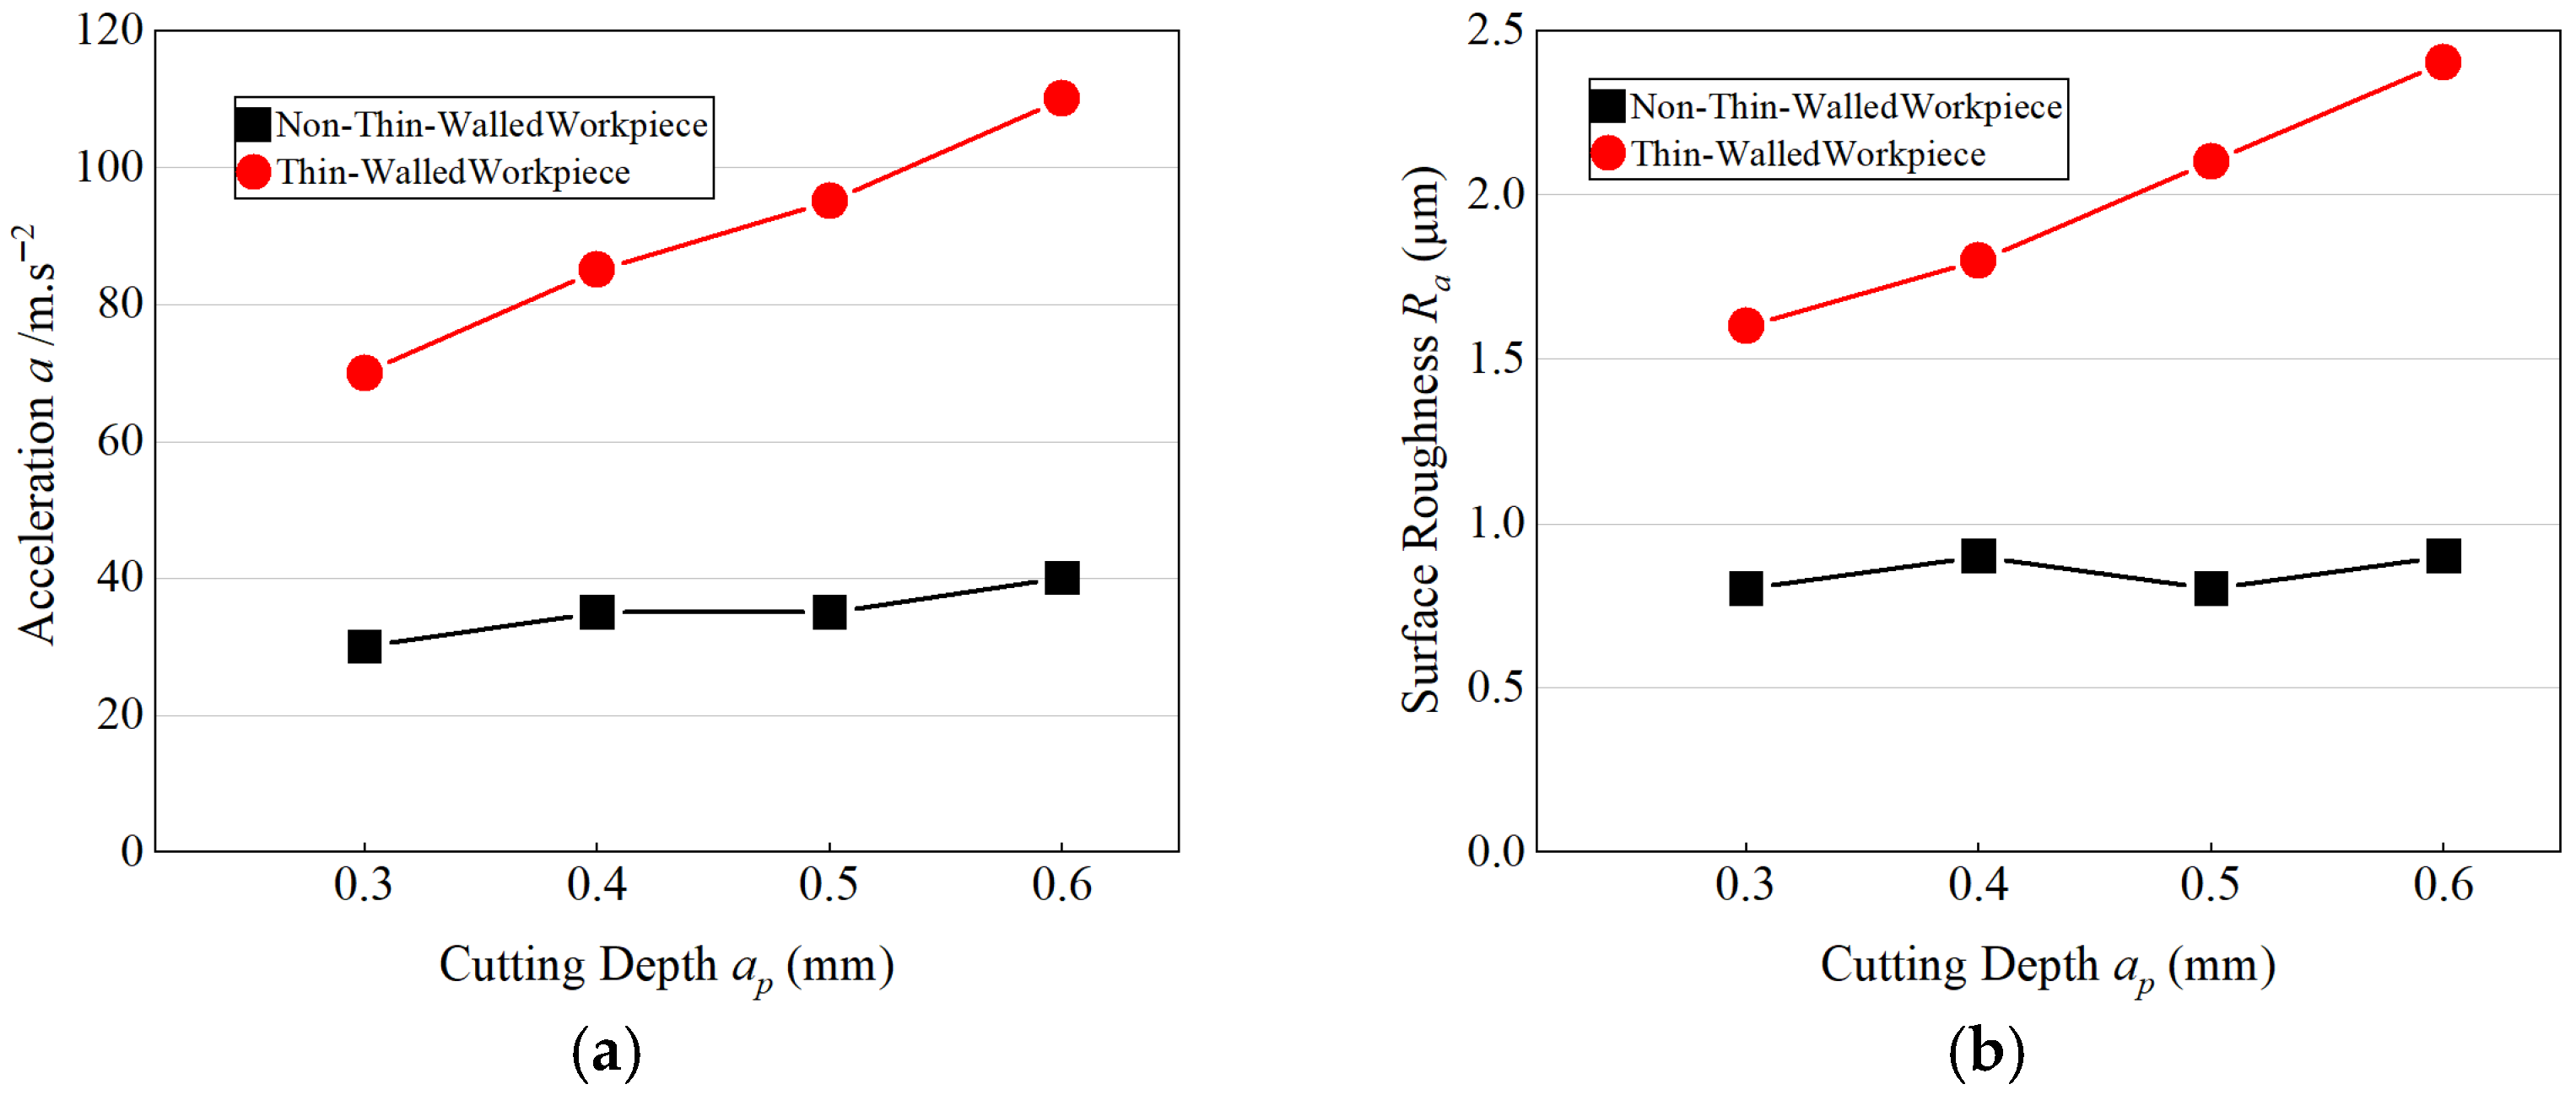
a) for both the thin-walled and reference specimens. As shown in
Figure 12, the thin-walled workpiece consistently exhibited higher roughness values than the non-thin-walled counterpart, primarily due to its lower structural stiffness and greater susceptibility to vibration-induced deflection during milling. The amplified dynamic compliance of the thin wall magnifies surface waviness and tool-mark irregularity, leading to a more pronounced deterioration in surface finish as
ap increases. For all cutting depths examined in
Figure 12, the standard deviations of the measured surface roughness were much smaller than the differences between the parameter levels, so that the relative ranking of the roughness values remained unchanged when considering the experimental uncertainty.
Figure 13 illustrates the influence of axial depth of cut on the milling vibration amplitude and the corresponding surface roughness (Ra) of the thin-wall specimen. For the tested configuration, conditions that generate larger vibration amplitudes consistently exhibit higher
Ra values, whereas conditions with lower vibration amplitudes lead to smoother surfaces. This trend suggests a monotonic relationship between the dynamic excitation of the wall and the resulting finish. In the present work,
Figure 13 is therefore used as a qualitative consistency check linking vibration and surface roughness, rather than as a stand-alone predictive correlation model, because the number of discrete test points is limited and other cutting parameters co-vary across the conditions.
3.5. Residual-Stress Simulation Results
The thermo-mechanically coupled finite-element simulation indicates that the residual stress within the machined layer follows a characteristic depth-dependent pattern. A tensile peak is formed at the immediate surface, which gradually transforms into a compressive stress state with increasing depth and finally attenuates toward a near-zero level in the substrate, in line with residual-stress profiles reported for milled aluminum and nickel-base alloys in the literature [
29,
30,
36]. A tensile peak is formed at the immediate surface, which gradually transforms into a compressive stress state with increasing depth and finally attenuates toward a near-zero level in the substrate. From a through-thickness symmetry standpoint, this profile corresponds to a self-equilibrated tensile–compressive distribution that is nearly symmetric about the depth where the stress crosses zero, while slight deviations from perfect symmetry arise from the one-sided mechanical and thermal loading of the milling process and the asymmetric clamping of the thin wall.
This stress gradient originates from the incompatibility between the intense thermal–plastic deformation induced in the near-surface material during cutting and the elastic constraint imposed by the relatively cooler underlying bulk.
The evolution of this residual-stress field is mainly governed by the competition between thermal loading and mechanical restraining effects. During cutting, severe localized heating and plastic flow generate high tensile stresses at the surface. Upon cooling, the constrained shrinkage of the surface layer leads to the formation of a subsurface compressive zone, resulting in a self-equilibrated stress distribution across the depth.
Parametric analysis further shows that the axial depth of cut (ap) exerts only a limited influence on the residual-stress profile along the depth direction. In contrast, both the spindle speed (n) and the feed per tooth (fn) exhibit pronounced effects. An increase in spindle speed generally suppresses the magnitude of the surface tensile stress, whereas a larger feed per tooth significantly intensifies both the surface tensile peak and the underlying compressive stress.
The weak sensitivity to axial depth of cut can be explained by the enhanced heat dissipation associated with deeper engagement conditions. The enlarged tool–workpiece contact area and more efficient chip removal promote thermal diffusion and reduce local thermal gradients. As a result, the residual-stress field becomes relatively stable with respect to ap, while being predominantly controlled by the coupled thermal–mechanical effects induced by spindle speed and feed per tooth.
These FE-based residual-stress profiles are also consistent with published analytical and experimental studies. Feng et al. [
37] developed a dynamic-recrystallization-enhanced analytical and numerical framework for milling of Inconel 718 and reported a tensile surface peak followed by a subsurface compressive valley, with only moderate sensitivity of the depth profile to radial immersion and axial engagement, which closely resembles the depthwise evolution obtained here for thin-wall AA7075. Furthermore, X-ray diffraction measurements and thermo-mechanically coupled FE predictions for milled aluminum and nickel-base alloys [
29,
30] show comparable surface–subsurface transition depths and compressive peak magnitudes. This agreement in profile shape and qualitative parameter sensitivities indicates that the present FE model captures the dominant thermo-mechanical mechanisms governing residual-stress formation in thin-wall AA7075 slot milling, even though microstructure evolution is represented here by a conventional Johnson–Cook law rather than an explicit recrystallization model.
Although direct residual-stress measurements were not carried out in the present study due to equipment constraints, the depthwise residual-stress profiles predicted by the FE model are consistent with machining-induced residual-stress distributions reported in the literature for aluminium alloys and AA7075 thin sections, which also exhibit a tensile surface peak followed by a subsurface compressive zone that gradually decays toward zero. Moreover, the simulated trends with spindle speed and feed per tooth—namely that higher spindle speed mitigates the surface tensile stress, whereas higher feed per tooth amplifies both the tensile peak and the underlying compressive valley—are in line with the experimentally observed variations in thin-wall deflection and surface roughness under the same cutting conditions. These qualitative agreements provide partial experimental support for the residual-stress predictions and their use in interpreting symmetry-breaking effects.
Because the FE simulations were performed for a single, relatively small radial width of cut ae = 2 mm, the residual-stress distributions reported in this section should be interpreted as representative of a light finishing engagement rather than of the entire experimental range of ae. Larger radial immersions are expected mainly to scale the magnitude of the thermo-mechanical loading, while preserving the tensile–compressive pattern identified here, but a quantitative assessment over the full ae range would require additional simulations.
