Article

Surface Fatigue Behavior of Duplex Ceramic Composites Under High-Frequency Impact Loading with In Situ Accelerometric Monitoring

1
Department of Mechanical and Industrial Engineering, Tallinn University of Technology, Ehitajate Tee 5, 19086 Tallinn, Estonia
2
Łukasiewicz Research Network—Krakow Institute of Technology, Zakopianska 73, 30-418 Krakow, Poland
*
Author to whom correspondence should be addressed.
Crystals 2025, 15(12), 1036; https://doi.org/10.3390/cryst15121036
Submission received: 11 November 2025 / Revised: 29 November 2025 / Accepted: 2 December 2025 / Published: 4 December 2025

Abstract

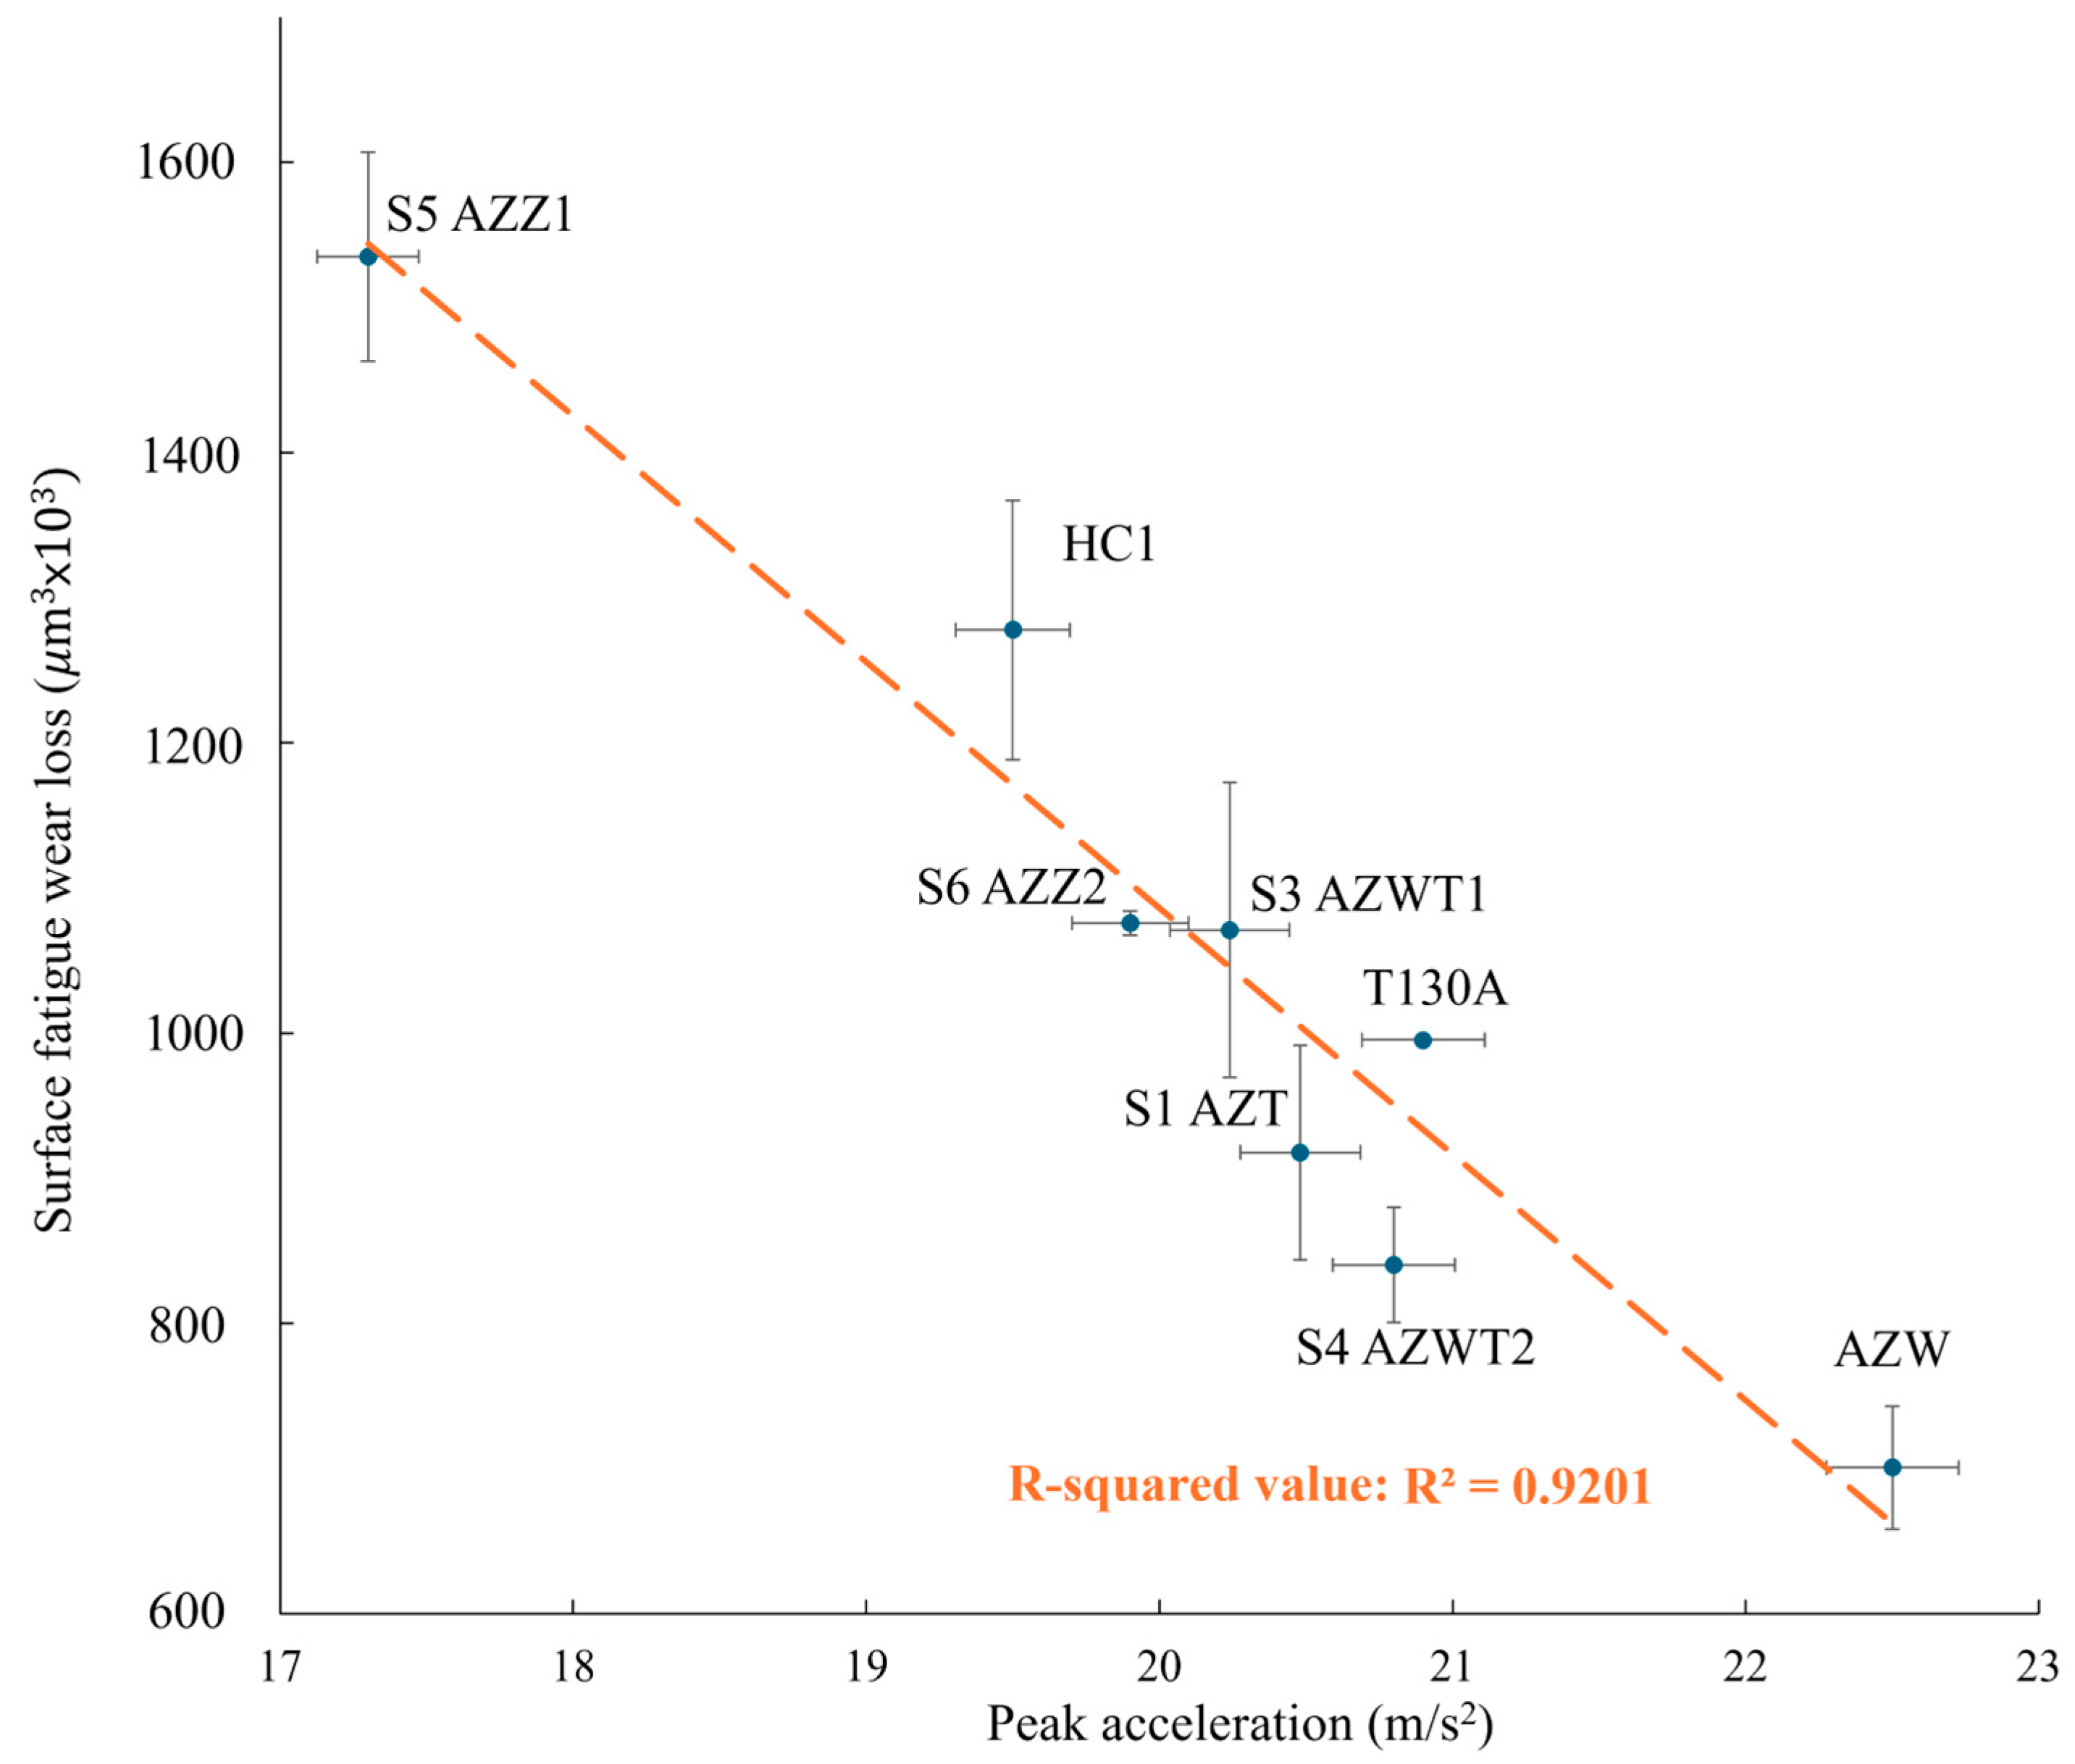
In applications involving repeated high-frequency mechanical impacts, such as cutting, machining, or percussive operations, understanding the surface fatigue performance of advanced ceramics is critical. This study investigated the surface fatigue resistance of duplex oxide–carbide ceramic composites fabricated via spark plasma sintering, complementing prior work on their sliding wear performance. The composites, featuring a hybrid oxide–carbide structure, were tested using a cyclic impact setup with a 10 mm ZrO2 ball activated with 12 hammers fixed to a rotary disc delivering 500,000 impacts per test. Surface degradation was quantified through three-dimensional profilometry to determine the net material loss and scar depth, while fatigue mechanisms were analyzed using scanning electron microscopy coupled with energy-dispersive spectroscopy. In situ monitoring was implemented using accelerometers to capture vibrational signatures during cycling loading, enabling real-time assessment of material response and damage evolution. The WC-containing composite (S2 AZW) exhibited the lowest surface fatigue wear loss (700 × 103 µm3), whereas the ZrC-based composite (AZZ1) showed the highest (1535 × 103 µm3). A distinct inverse correlation was observed between the average peak acceleration and fatigue wear loss. Frequency-domain analysis of accelerometric signals revealed progressive degradation patterns consistent with post-test surface damage, indicating that such signal features may serve as effective in situ indicators for tracking material fatigue in future applications.

1. Introduction

The continuous advancement of engineering systems in aerospace, biomedical, energy, and manufacturing sectors demands materials that exhibit not only high strength and wear resistance but also excellent endurance against repeated mechanical loading, for example, high-frequency tool workpiece impacts in dry machining [1,2]. In such environments, components are often exposed to dynamic contact conditions such as cyclic impacts, vibrations, and surface stresses that ultimately lead to fatigue-driven degradation. While traditional tribological studies have extensively investigated sliding and abrasive wear behavior, surface fatigue, which is a progressive failure mechanism under repeated impact or cyclic contact, is less commonly studied, particularly for brittle materials such as ceramics [3,4,5,6].
Ceramic materials are renowned for their hardness, thermal stability, wear, and corrosion resistance [7,8,9]. However, their intrinsic brittleness poses a significant challenge under cyclic loading conditions, where microcracks can nucleate and propagate even under relatively low-impact forces. To overcome these limitations, recent innovations have introduced duplex oxide–carbide ceramic composites, which in AZW composites (alumina (A), zirconia (Z), and tungsten carbide (W)) can be turned into duplex interpenetrating ceramic composites (DIPCCs) [10]. By manufacturing an interpenetrating structure while using a reduced amount of critical raw materials such as tungsten (W), identified as a critical element in the EU regulation (2024) [11] and difficult to recycle, it is possible to achieve improved fracture toughness and high hardness simultaneously [12]. It is thought that, in addition to significantly improving wear resistance, it also improves resistance to impact and cyclic forces.
For manufacturing ceramic–ceramic composites, the spark plasma sintering (SPS) method can be utilized [13,14]. Although SPS is constrained by sample size and die design, it uses a pulsed DC current, enabling very rapid heating rates and short duration time. This facilitates near full densification of oxide–carbide systems while limiting grain growth and preserving a fine microstructure [15,16]. This is particularly advantageous for refractory materials, where conventional pressureless sintering often requires higher temperatures and longer holding times [17,18].
In the context of cyclic load conditions such as high-cycle surface fatigue, understanding how oxide–carbide ceramic composites respond to repeated impact is crucial. Unlike monotonic loading, cyclic loads and stresses introduce complex degradation mechanisms involving sub-surface crack propagation, interface delamination, formation of new layers, pile up of debris, and contact-induced microstructural evolution [19,20]. In industries and real applications, surface fatigue failure is instantaneous. Therefore, real-time monitoring of a material’s mechanical response is essential for detecting the onset and evolution of surface fatigue damage, particularly because conventional post-test analyses often miss early-stage degradation, and for identifying the patterns that characterize the type and extent of the ongoing damage [21,22].
By coupling high-frequency accelerometers with impact testing platforms, it becomes possible to capture and interpret dynamic responses such as vibration amplitude, frequency shifts, and energy dissipation during the entire surface fatigue behavior of the material. The previous investigations have shown that real-time and in situ monitoring methods can effectively capture the vibrational footprint associated with mechanical degradation [23,24,25,26], especially those involving Fast Fourier Transform (FFT) analysis during sliding wear [10]. However, the application of this approach to surface fatigue scenarios remains underexplored.
The materials used in this study were oxide–carbide composites previously developed via spark plasma sintering (SPS), comprising a fixed crystalline oxide matrix of Al2O3 and ZrO2, with varying crystalline non-oxide carbides (WC, TiC, and ZrC) forming the second phase. These compositions were selected for their diverse mechanical behavior [27,28,29] and potential to form continuous or semi-continuous interpenetrating networks, which may influence crack propagation and energy dissipation mechanisms during surface fatigue loading. The prior evaluation of these composites under sliding wear conditions revealed significant differences in wear rates, Young’s modulus, and surface morphology [10], all of which are expected to play critical roles under cyclic impact loads.
In this study, surface fatigue tests were conducted on the composites, provided that impact energy and frequency were calibrated to simulate high-frequency mechanical impacts, as encountered in real-world applications such as cutting tools, machining tools, or nozzle heads. The core novelty of the present study lies in the integration of in situ accelerometric monitoring during cyclic impact surface fatigue tests. Accelerometers attached to the test setup captured time-resolved vibrational responses, which were subsequently processed using FFT diagrams. By focusing specifically on surface fatigue (distinct from previous studies of sliding wear), this study expands the scope of tribological evaluation for oxide–carbide composites. Moreover, the non-destructive, real-time nature of the monitoring approach offers potential for broader adoption in quality control, material certification, and predictive maintenance frameworks for ceramic components.

2. Materials and Methods

2.1. Material Preparation and Sample Description

The ceramic composite specimens used in this study were fabricated via spark plasma sintering (SPS), following identical powder compositions and densification parameters as those employed in the prior investigation of sliding wear resistance. Briefly, the composites consisted of oxide (Al2O3 (Al2O3-α, TM-DAR grade, 100 nm, TAIMEI, Tokyo, Japan) + ZrO2 (ZrO2 + 3YSZ, 30–60 nm, Inframat, USA)) and one or two carbide (WC (WC, DS 60 grade, 0.6–0.7 μm, H.C. Starck, Germany), TiC (TiC, STD 120 grade, 1.0–1.5 μm, Höganäs, Sweden), or ZrC (ZrC, B grade, 3–5 μm, Höganäs, Sweden)) phases. In summary, powder mixtures were prepared by planetary ball milling at 200 rpm for 2 h using WC balls. All composites were sintered by the SPS method for 4 min under a pressure of 64 MPa. Table 1 demonstrates the composition of samples, sintering conditions, and average phase size after sintering obtained by the line intersection method [10]. The sintered samples were mirror-polished to eliminate surface defects prior to the surface fatigue test.

2.2. Surface Fatigue Test

Since no specific standard exists that defines a surface fatigue test for ceramic composites, the surface fatigue test was conducted using a non-standard custom-designed high-frequency impact rig featuring a rotating disc equipped with 12 equally spaced hammers. Each hammer cyclically delivered normal impacts to the specimen surface via a 10 mm zirconia (ZrO2) ball (RGP balls, Italy, grade G10, 94.8% zirconia + 5.2% Yttria, 87–91 HRA). The disc operated at a fixed rotational speed, producing an impact frequency of 35 Hz and a single-impact energy of 0.075 J, resulting in a total of 500,000 impacts per test (corresponding to 41,667 revolutions per test). Each material variant was tested in triplicate for statistical reliability and reproducibility. Rig reliability was improved by incorporating dry plastic hammer bearings, increasing the hammer thickness to reduce the bearing load, and optimizing the hammer geometry to ensure consistent impact positioning despite potential plastic deformation.
A visual depiction of the test setup, including the arrangement of the disc, hammers, sample holder, and sensor placements, is shown in Figure 1. Both a real photo and schematic design are depicted in this figure; the schematic design is adapted from our previous work [32], with some new changes and modifications. Video S1 as a Supplementary Material demonstrates the operational cycle and dynamic behavior of the setup during testing.

2.3. In Situ Vibration Monitoring and Sensor Configuration

The dynamic response of the specimens during surface fatigue testing was monitored using two AC131-1A accelerometers (CTC, 7939 Rae Boulevard, Victor, NY 14564 USA) mounted on the test platform. One recorded acceleration, while the other provided velocity via integration of the acceleration signal. Both sensors captured high-frequency data continuously, interfaced with a four-channel vibration acquisition system (0–24,000 Hz; 10 mV/g) to ensure precise, real-time measurement of transient impact events.
Two distinct datasets were extracted and analyzed:
  • Acceleration–time signals: Full-range time-domain acceleration data were recorded for the entire surface fatigue test duration (500,000 impacts). These signals allowed the tracking of vibrational changes over time and identification of transient events such as microcrack initiation or progressive surface damage.
  • Frequency-domain (FFT) analysis: Fast Fourier Transform (FFT) was applied to 10-s segments of the velocity data collected during the stabilized surface fatigue phase (approximately after 30,000 revolutions). This analysis enabled detection of characteristic frequency shifts, peak intensity variations, and damping behavior indicative of surface fatigue damage accumulation.

2.4. Surface Fatigue Wear Loss (Net Missing Volume)

After each surface fatigue test, the surface damage was quantitatively evaluated using a non-contact 3D optical profilometer (Bruker Contour GT-K0+). The wear volume was determined by calculating the net missing volume in the surface fatigue zone relative to the unworn reference area. Additionally, the maximum surface indentation depth was measured across multiple regions of each surface fatigue wear scar to account for possible heterogeneity in the impact distribution.
The calculated surface fatigue wear loss was averaged per composite (of three tests) and reported in cubic micrometers (μm3), while surface profiles and 3D wear maps were documented to identify depth variation and damage uniformity.

2.5. Post-Surface Fatigue Characterization and Destruction Mechanisms

Following profilometric analysis, the fatigued surfaces were examined via scanning electron microscopy (SEM, Phenom XL G2, Thermofisher scientific, Waltham, MA, USA, quipped with energy-dispersive spectroscopy (EDS)) to investigate morphological features associated with surface fatigue-induced damage, such as crack initiation sites, delamination zones, and material spalling. The elemental composition across selected regions was assessed using EDS to detect possible phase separation or counterface transfer.

3. Results

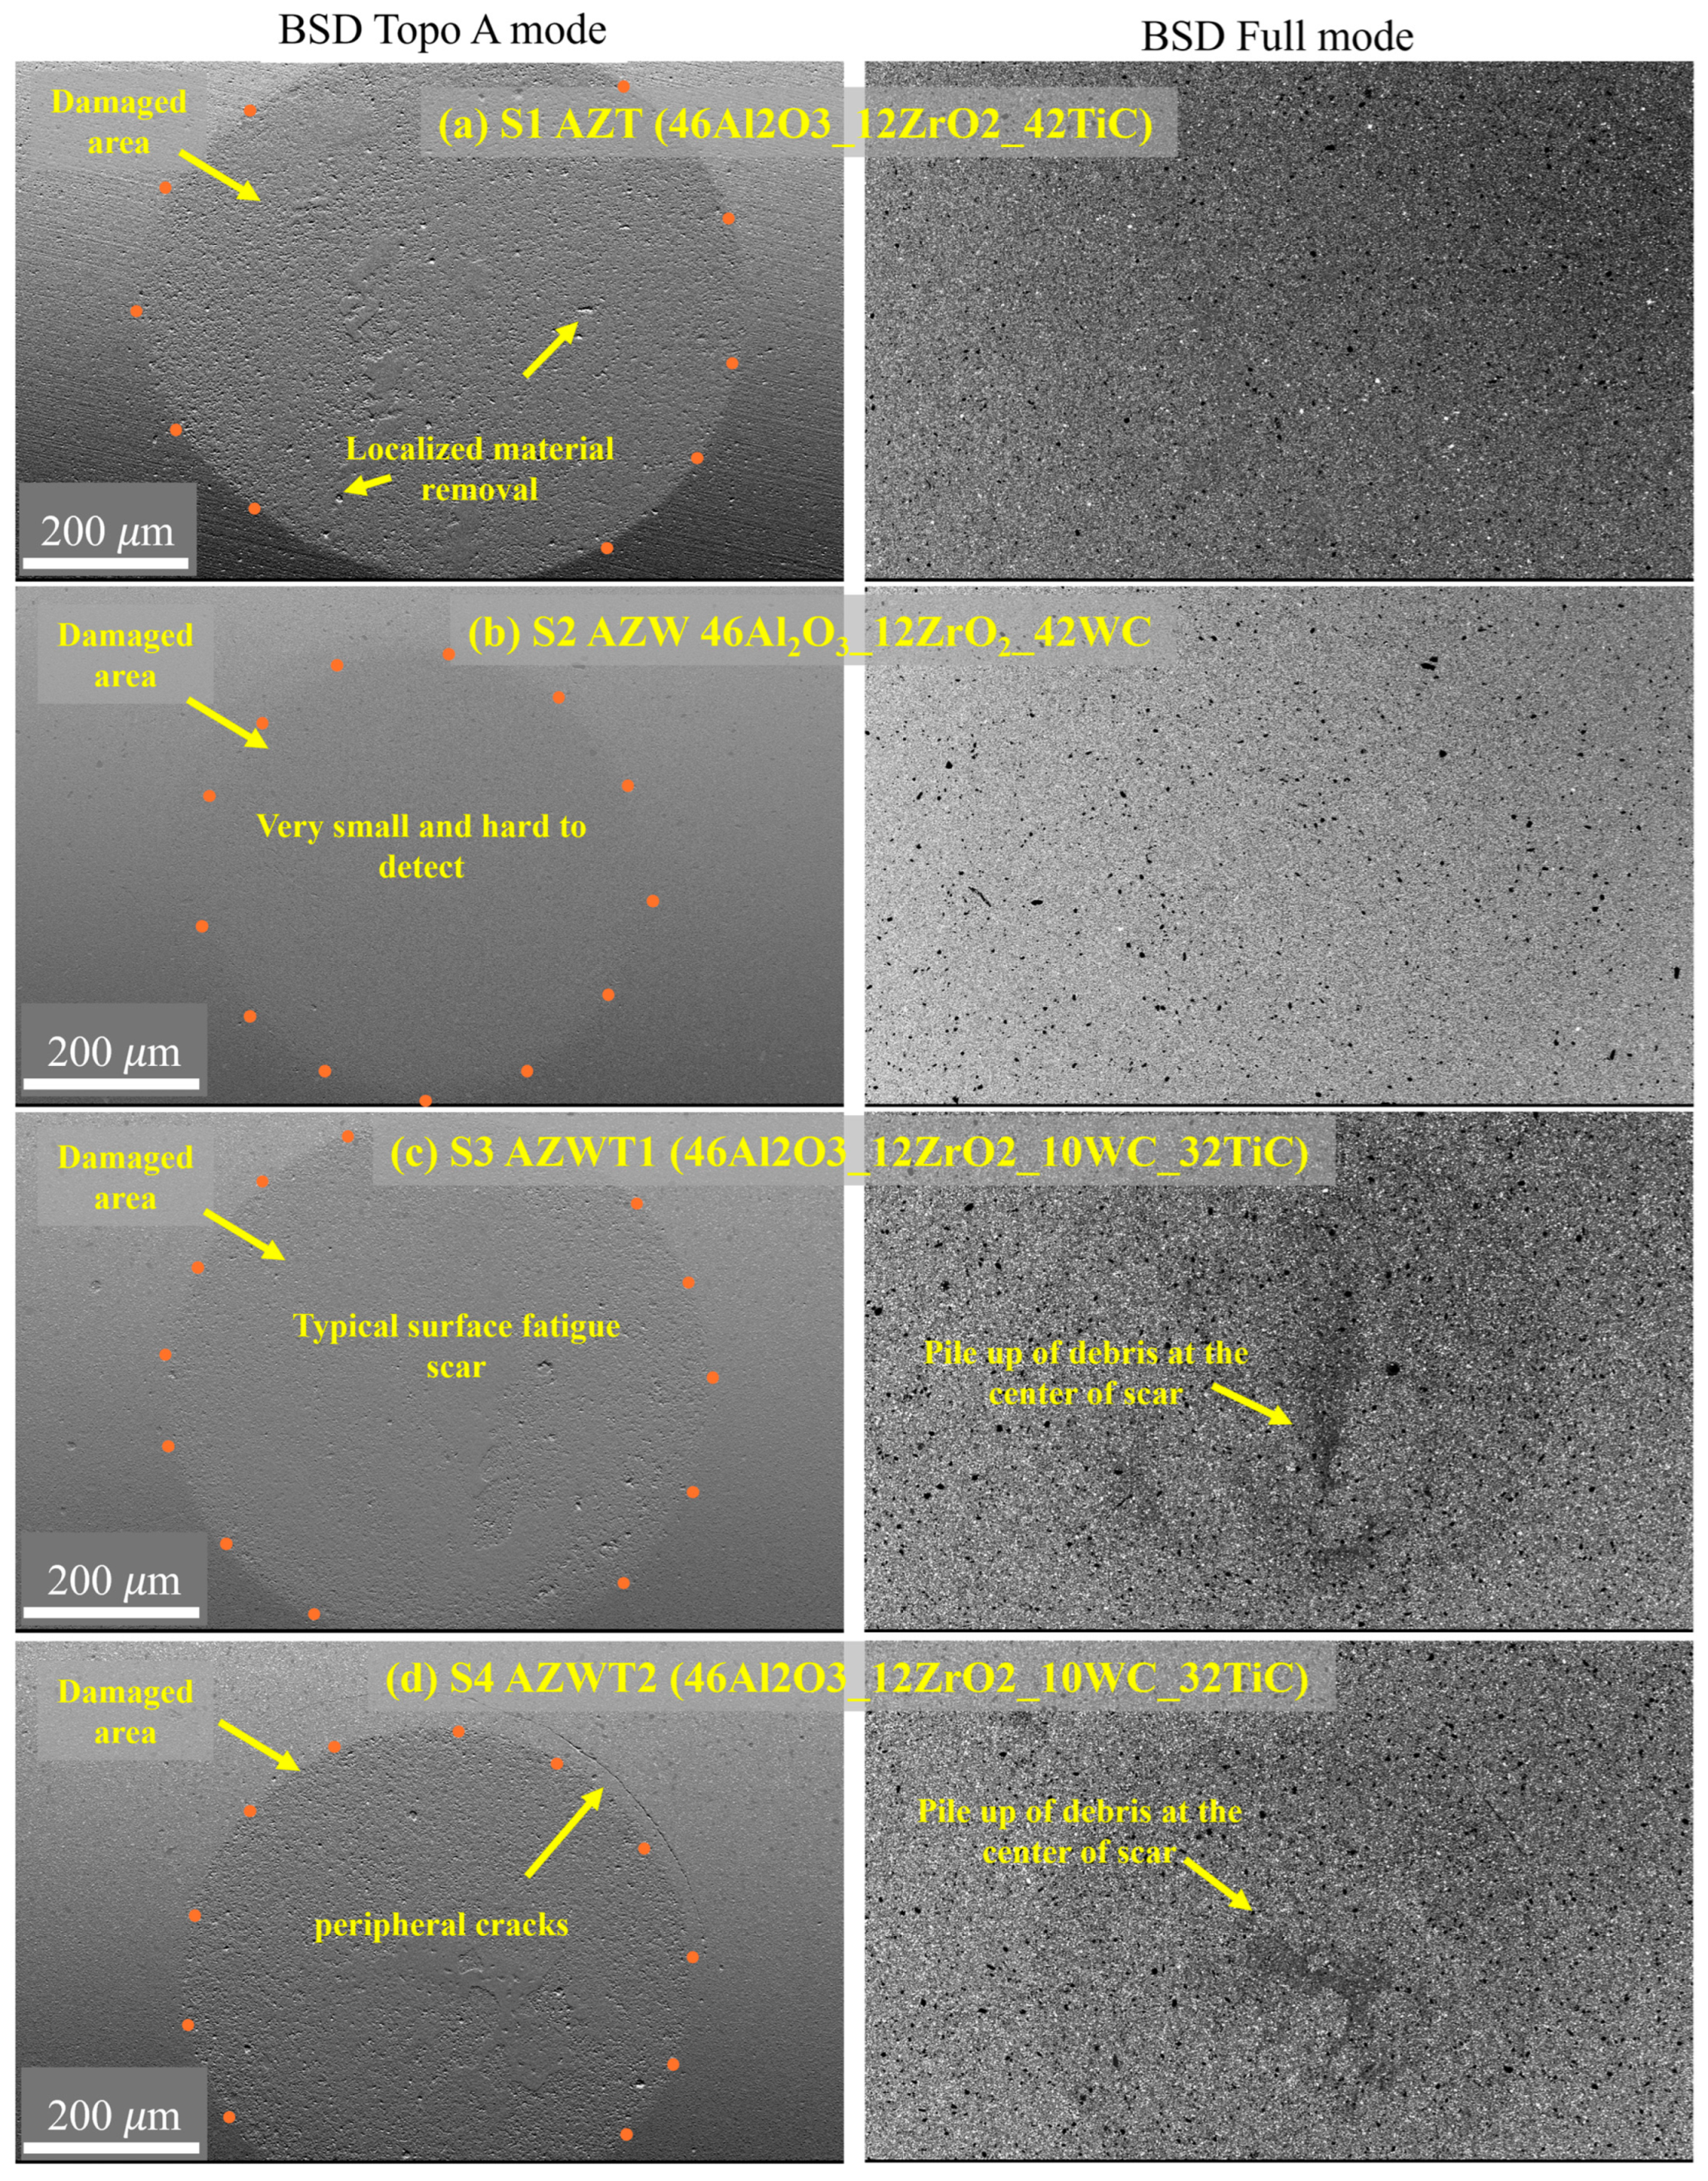
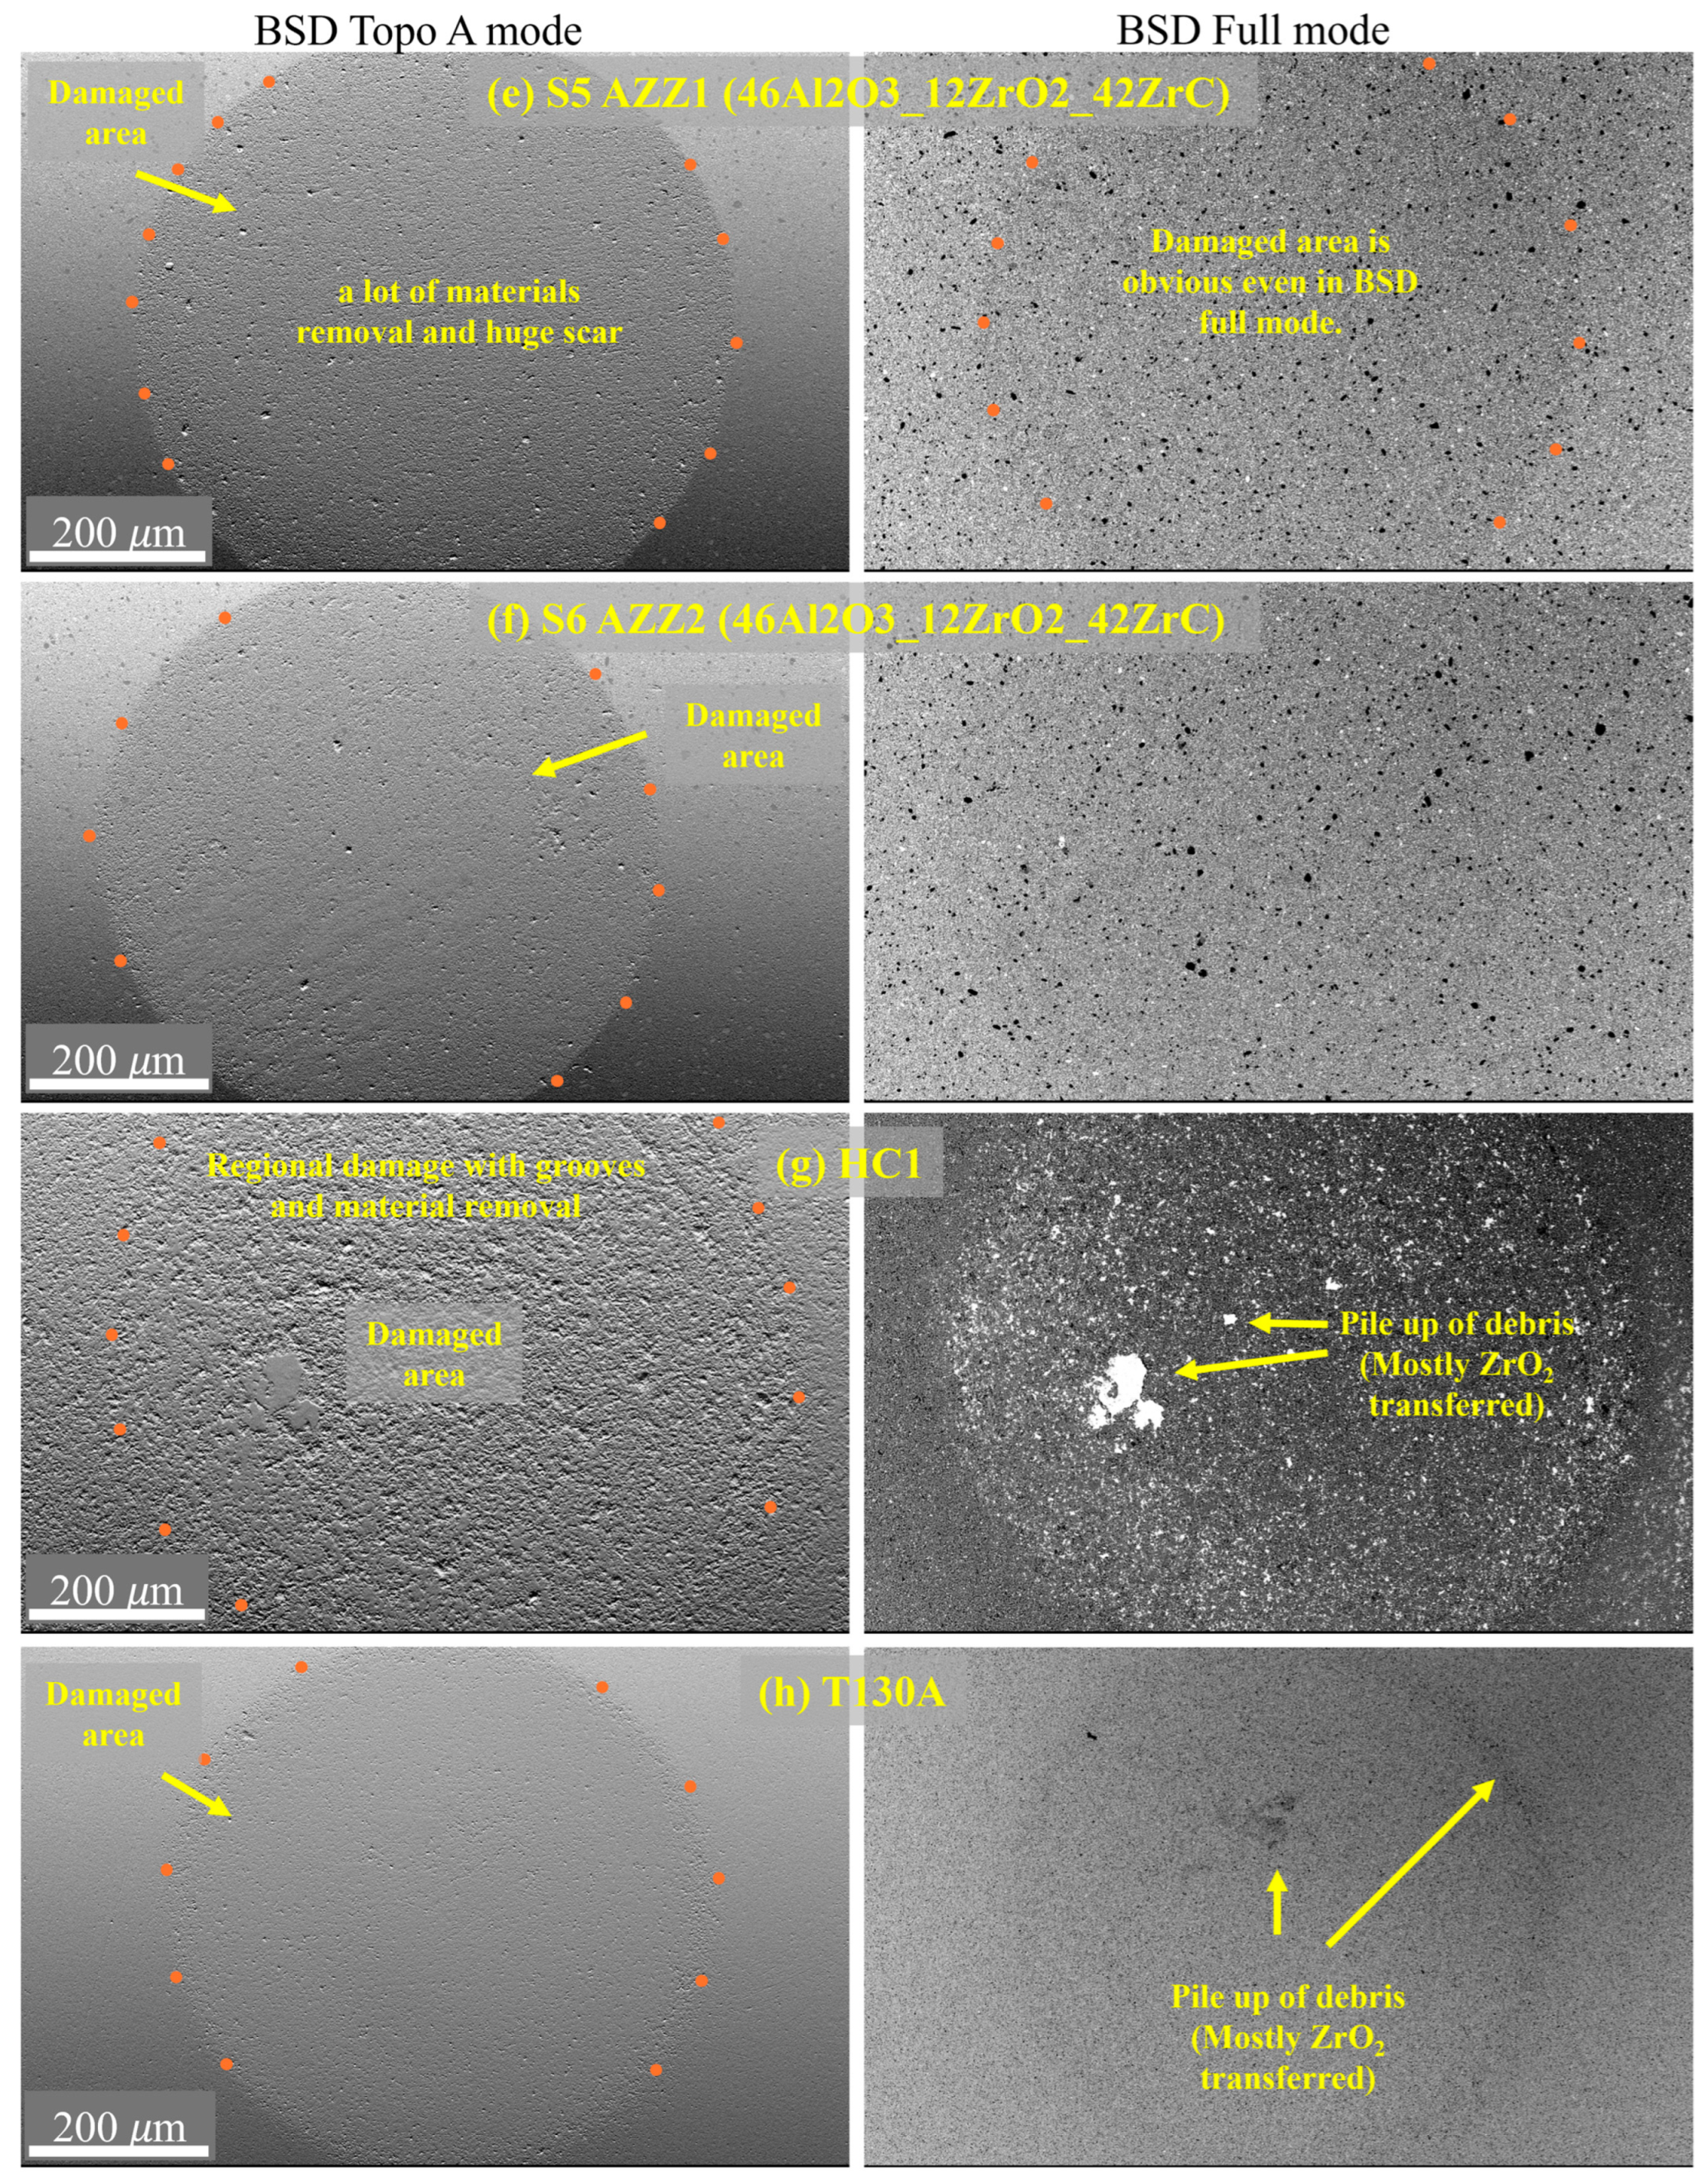
Figure 2 illustrates the SEM images of surface damage resulting from cyclic impact loads in both the Backscattered Electron Detector (BSD) topo A mode (the topographic imaging mode to show the morphology of the surface) and the BSD full mode (the compositional contrast between light and heavy elements) at low magnification. For the S2 AZW composite (Figure 2b), only a very small scar was formed, which was difficult to discern at low magnification and indicated limited material removal. In contrast, the S5 AZZ1 composite exhibited a much larger and clearly visible scar (Figure 2e), which could already be detected even in the BSD full mode. In some of the other composites, pile-up of material and accumulation of debris at the center of the scar could be observed in the BSD full mode, indicating localized material displacement and fragmentation during cyclic impact.
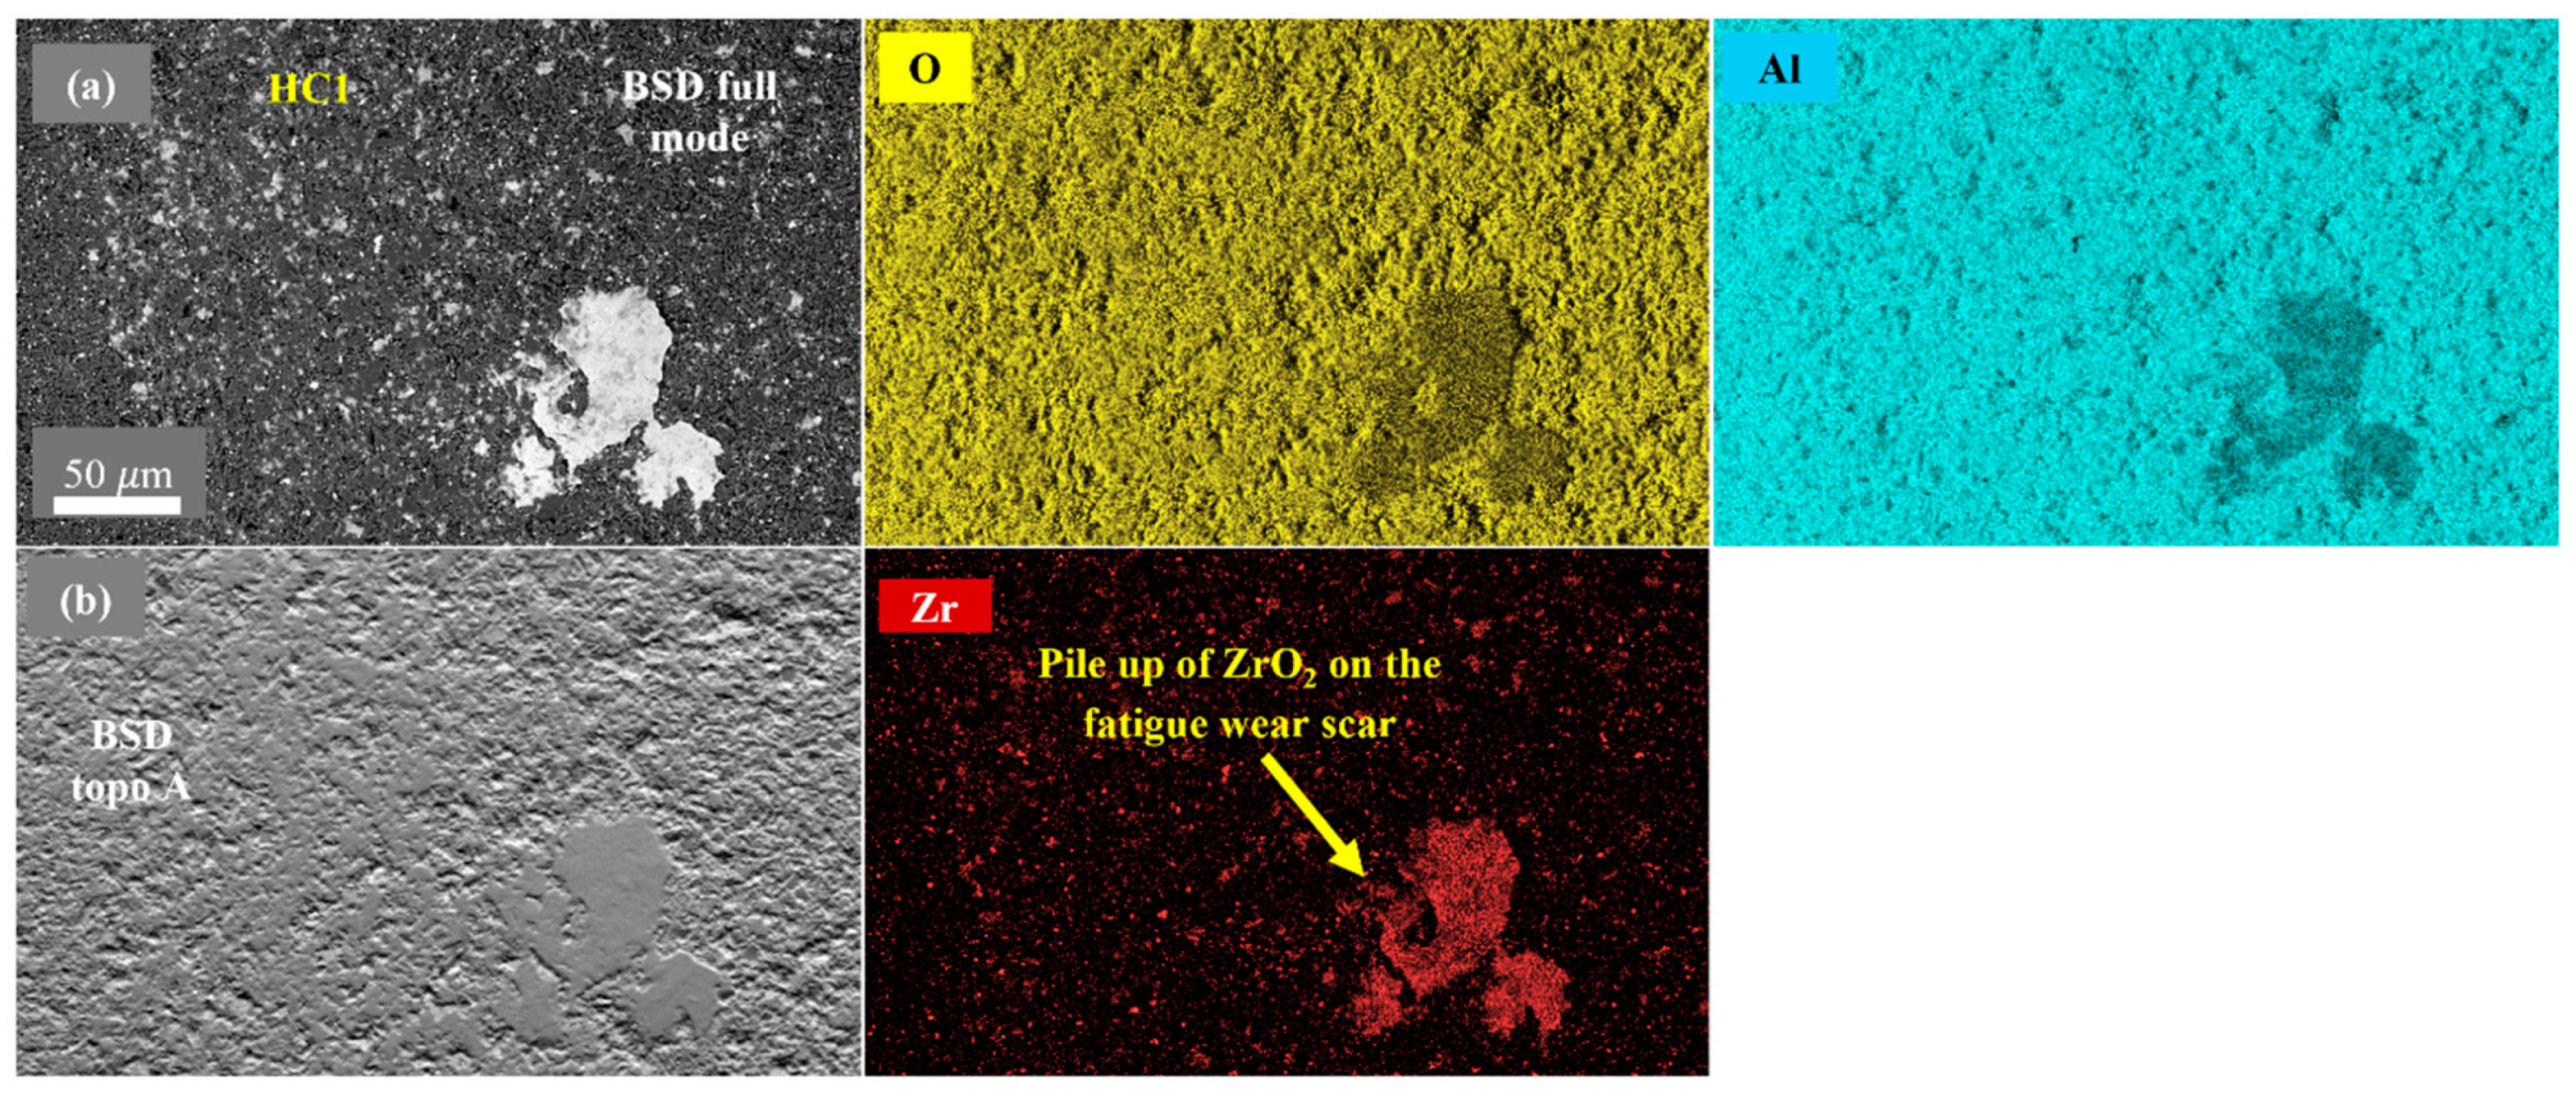
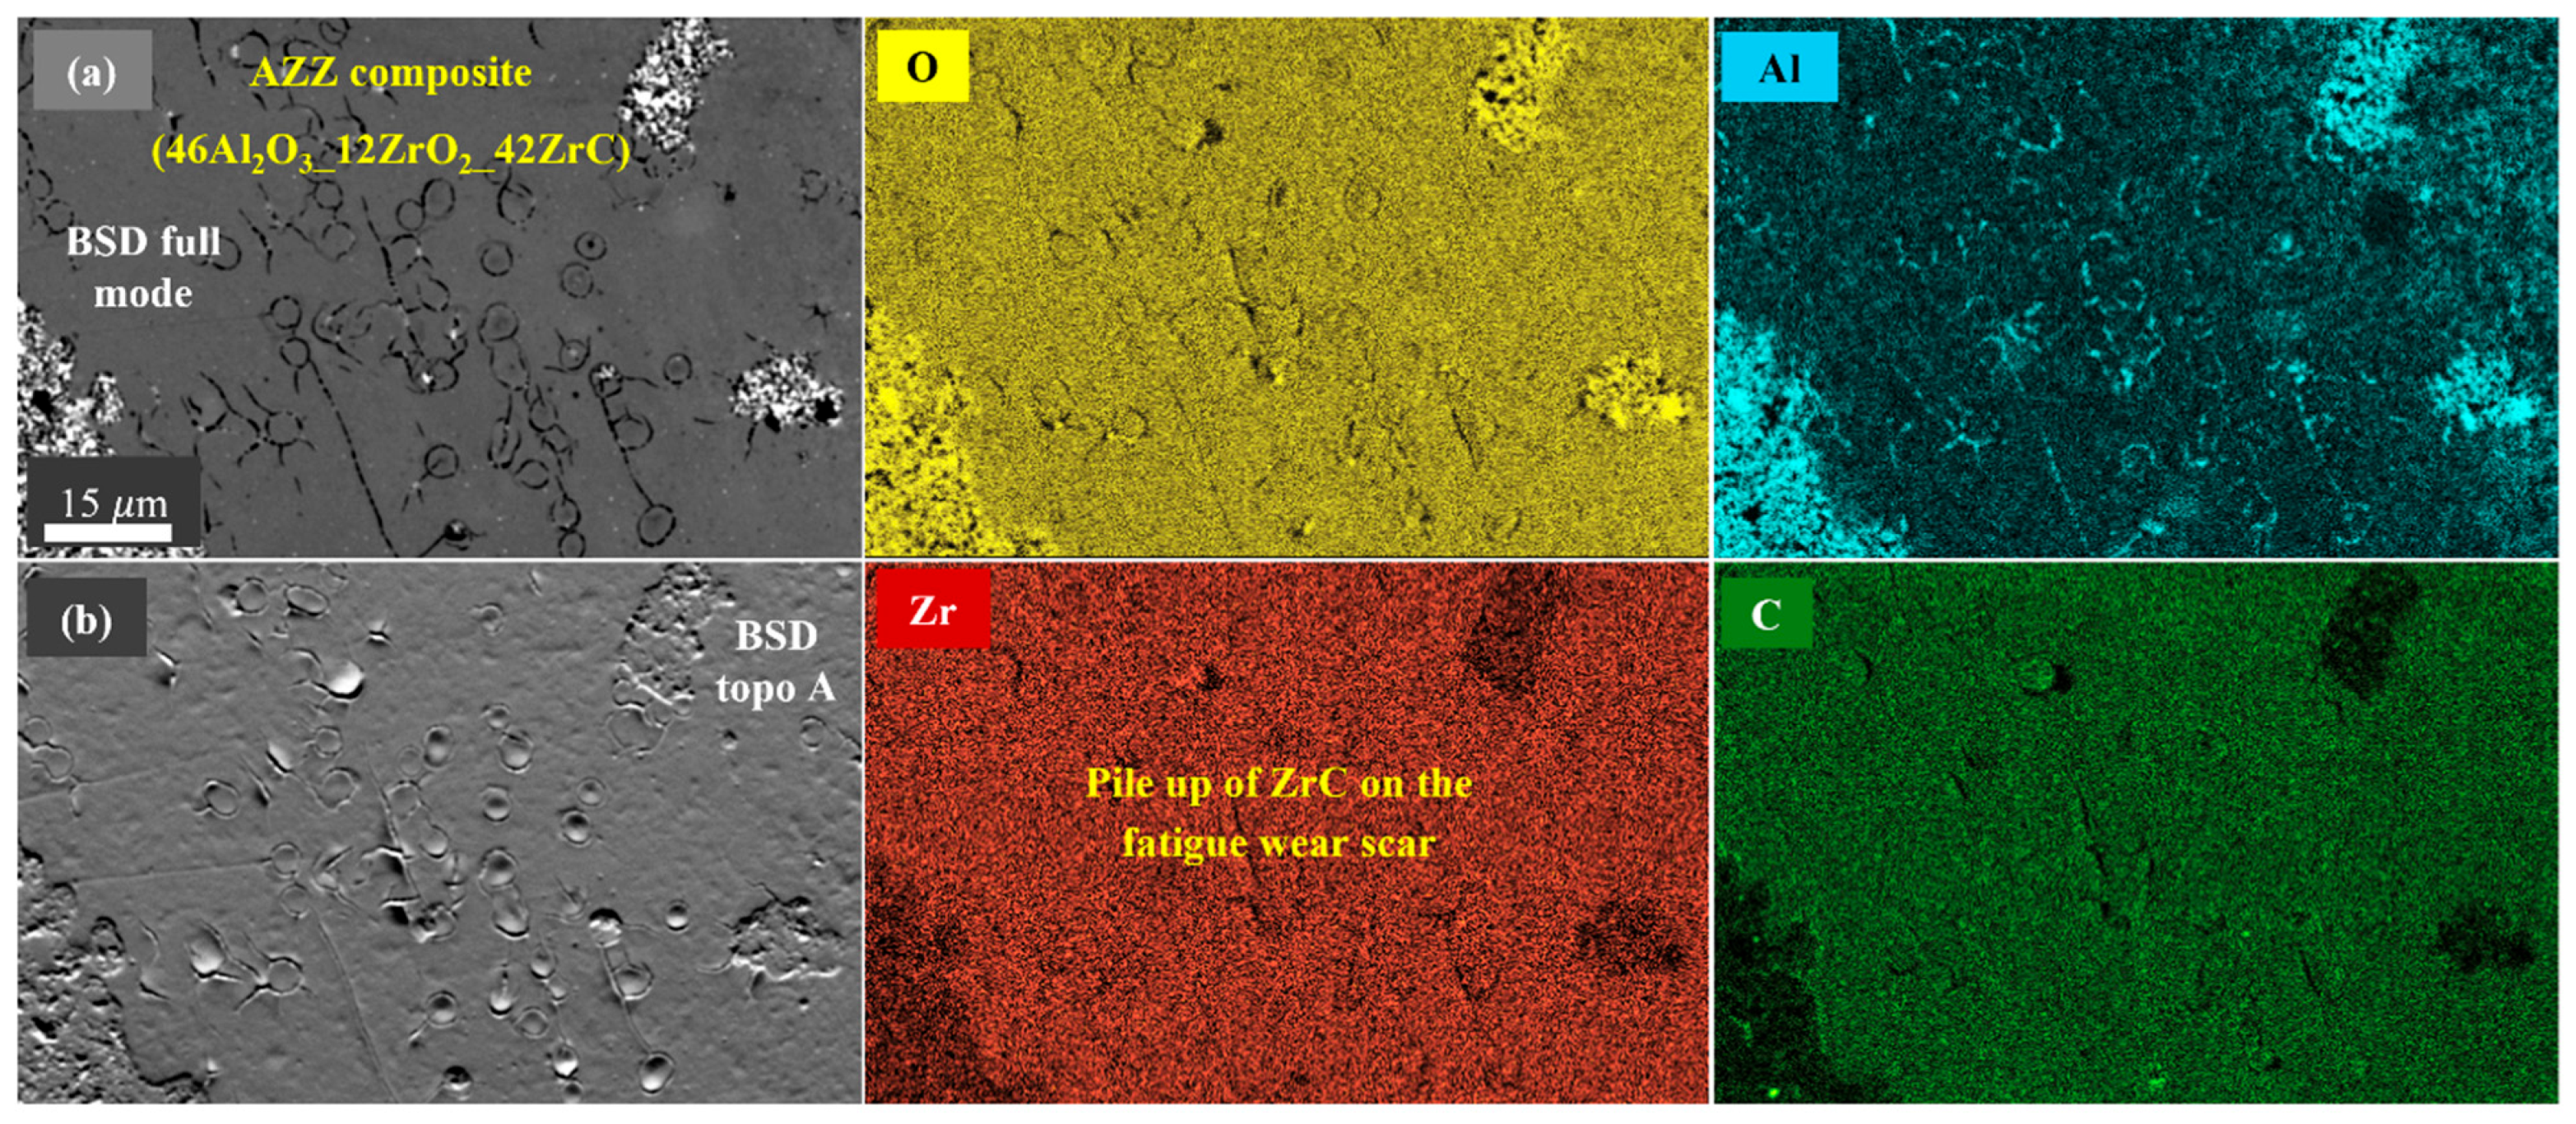
The EDS maps of the HC1 sample and AZZ1 composite from the middle of surface fatigue scars are illustrated in Figure 3 and Figure 4, respectively.
The mechanical properties and relative density of the sintered composites are depicted in Figure 5, which has been adapted from [10].
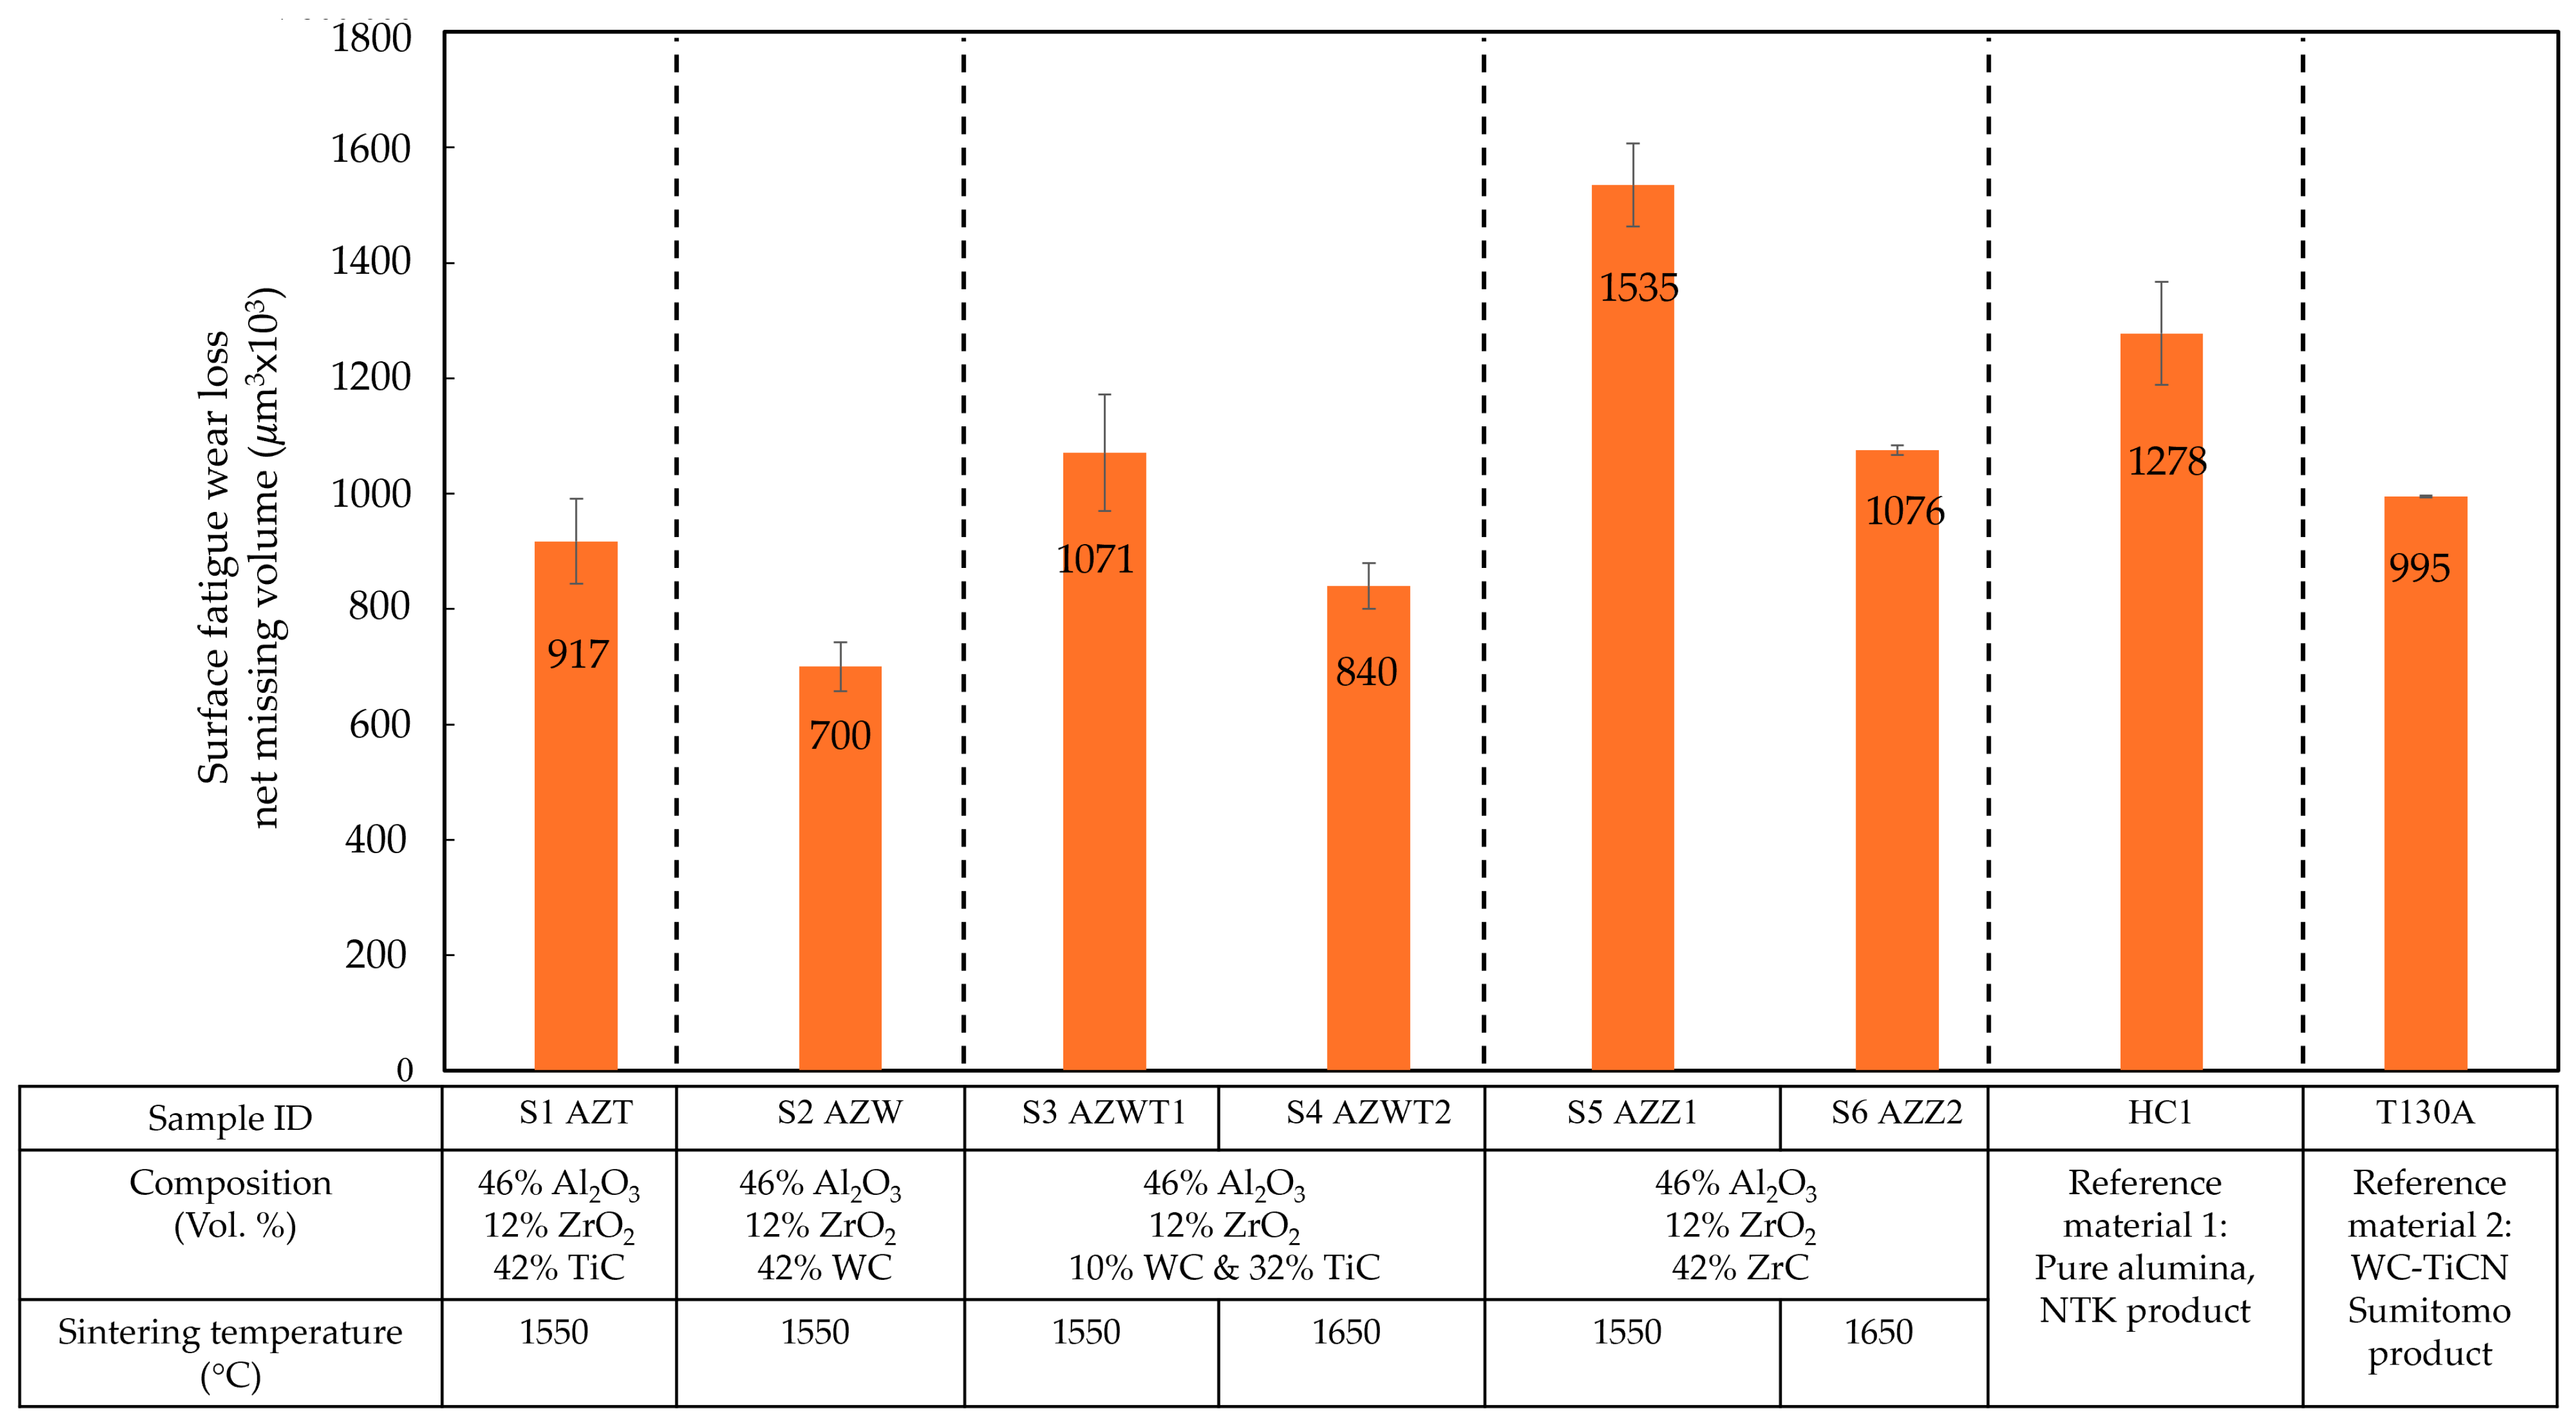
Based on the net missing volume (µm3), the surface fatigue wear loss resulting from the surface fatigue tests was calculated by a 3D optical profilometer and is reported in Figure 6. S2 AZW had the lowest surface fatigue wear loss of 700 × 103 µm3, while S5 AZZ1 had the highest surface fatigue wear loss of 1535 × 103 µm3.
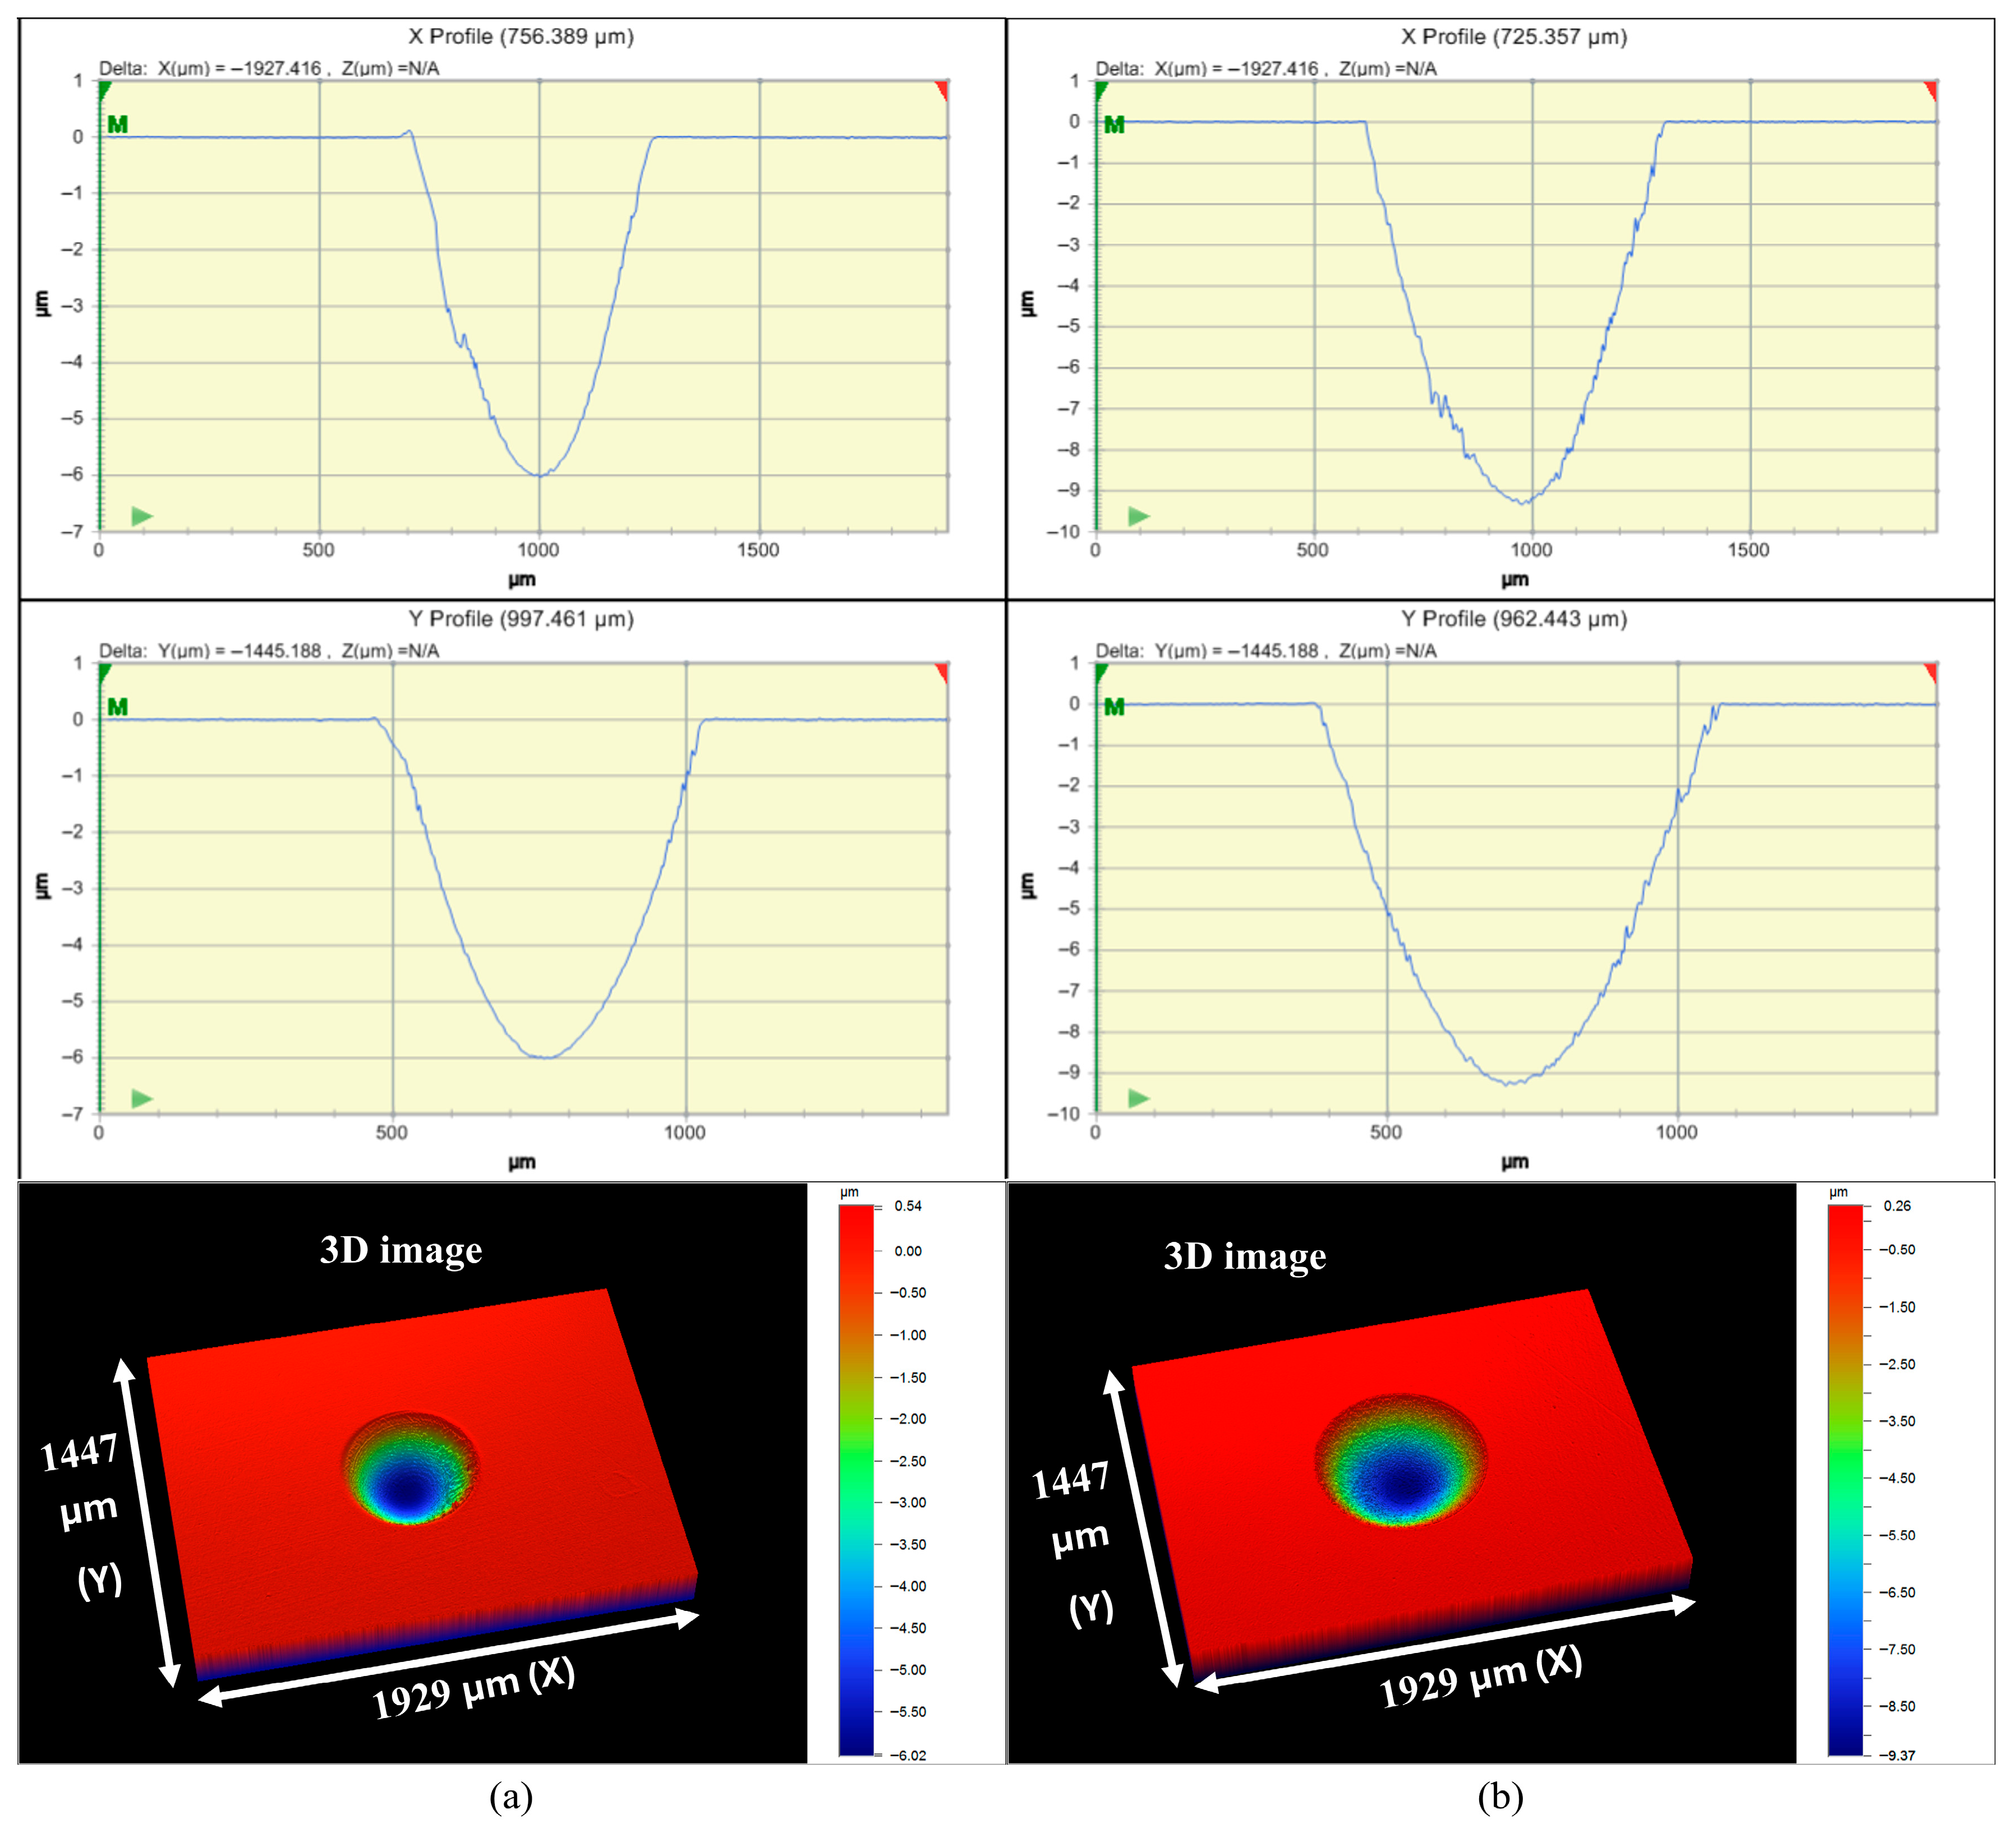
Figure 7 presents the 3D profilometric reconstruction of the surface fatigue scars for two representative composites: S2 AZW (with the lowest wear volume) and S5 AZZ1 (with the highest wear volume). The S2 AZW sample (Figure 7a) exhibited a relatively shallow wear scar, with a maximum depth close to 6 µm and minimal peripheral material removal. In contrast, the S5 AZZ1 sample (Figure 7b) showed a significantly deeper and more irregular wear scar, exceeding 9 µm in depth, along with evident signs of material detachment. The cross-sectional profiles confirm that the surface fatigue damage in S5 AZZ1 was more severe than in S2 AZW, indicating material degradation under cyclic loading.
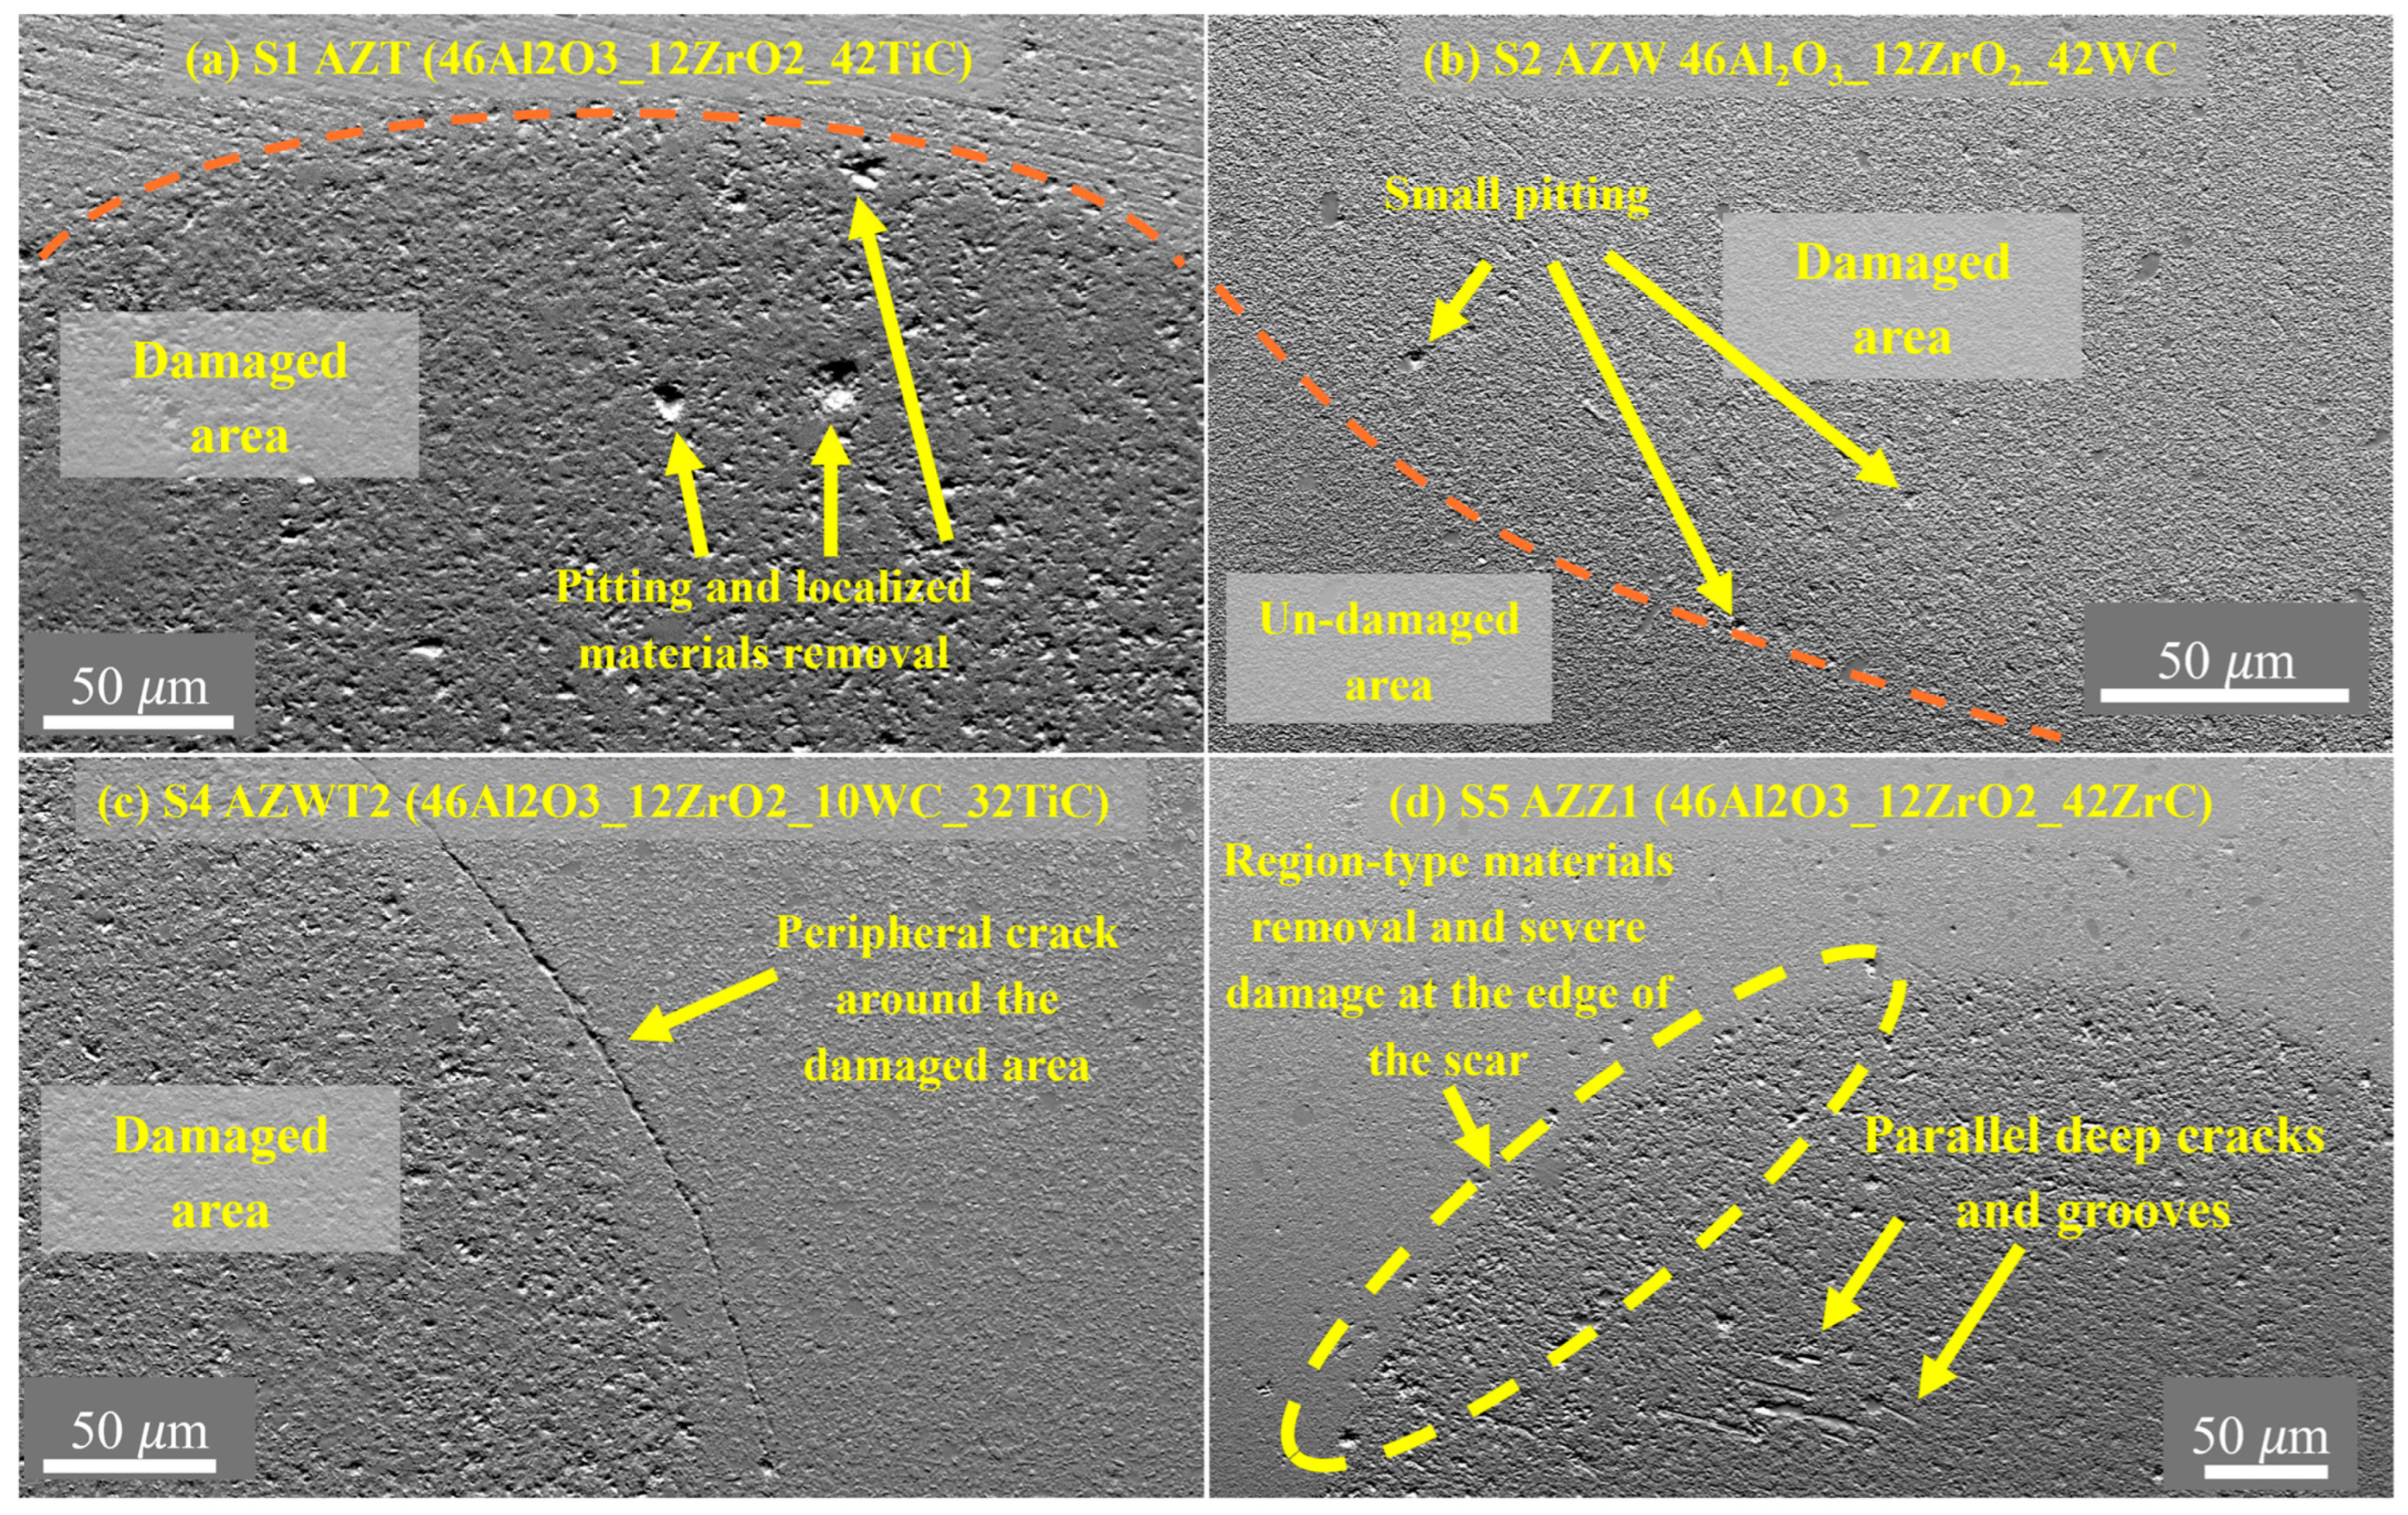
In Figure 8, higher-magnification SEM images (higher magnification than in Figure 2 and Figure 3) of the damaged area caused by surface fatigue tests across different types of composites are illustrated.
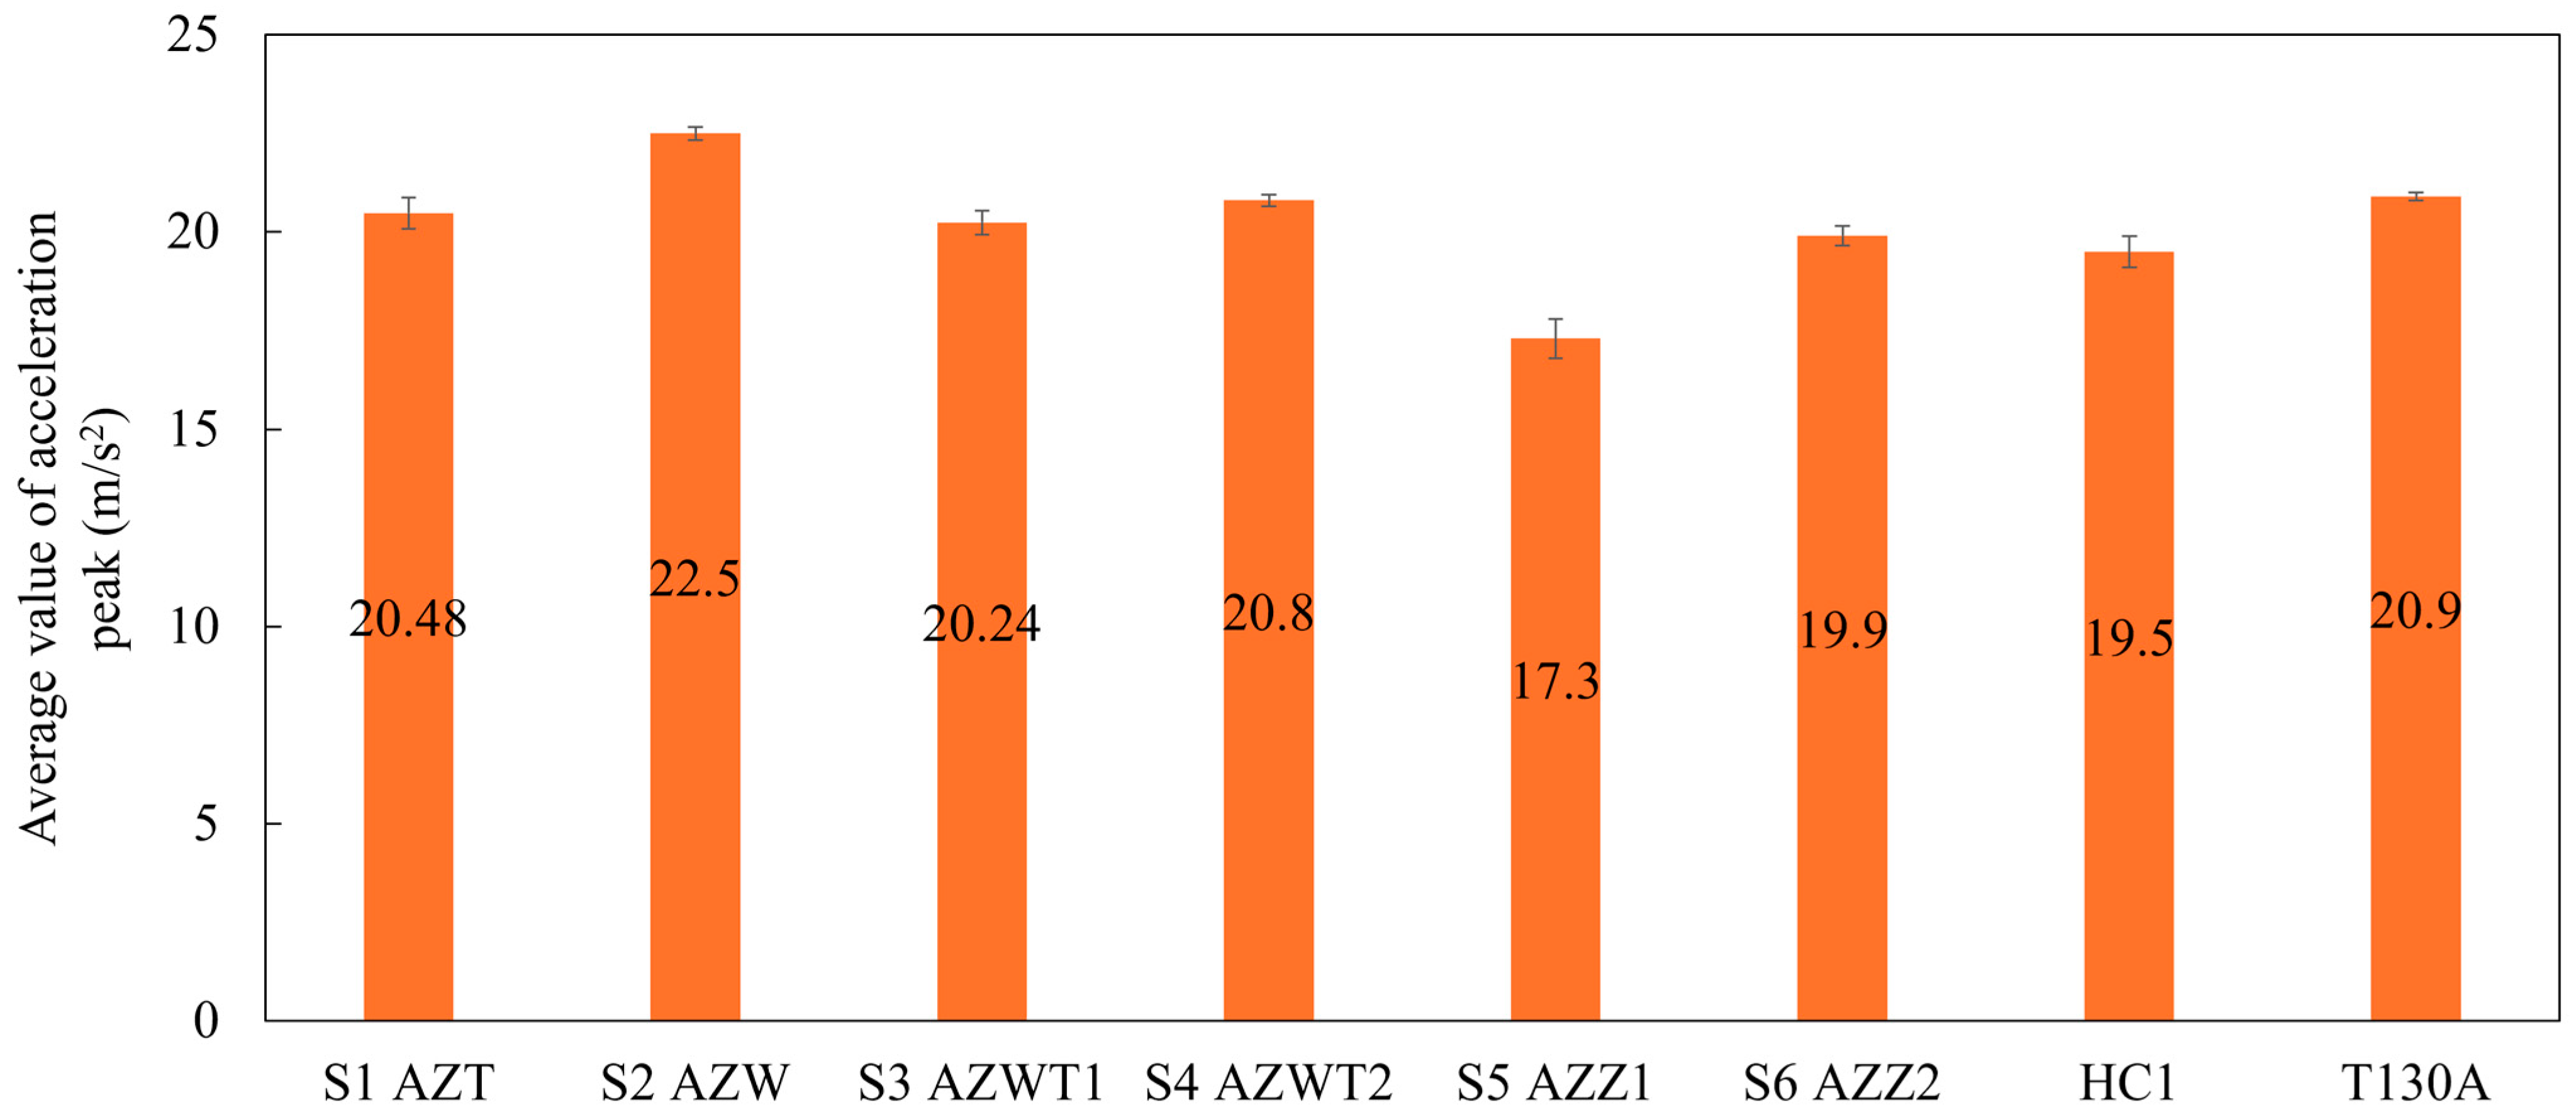
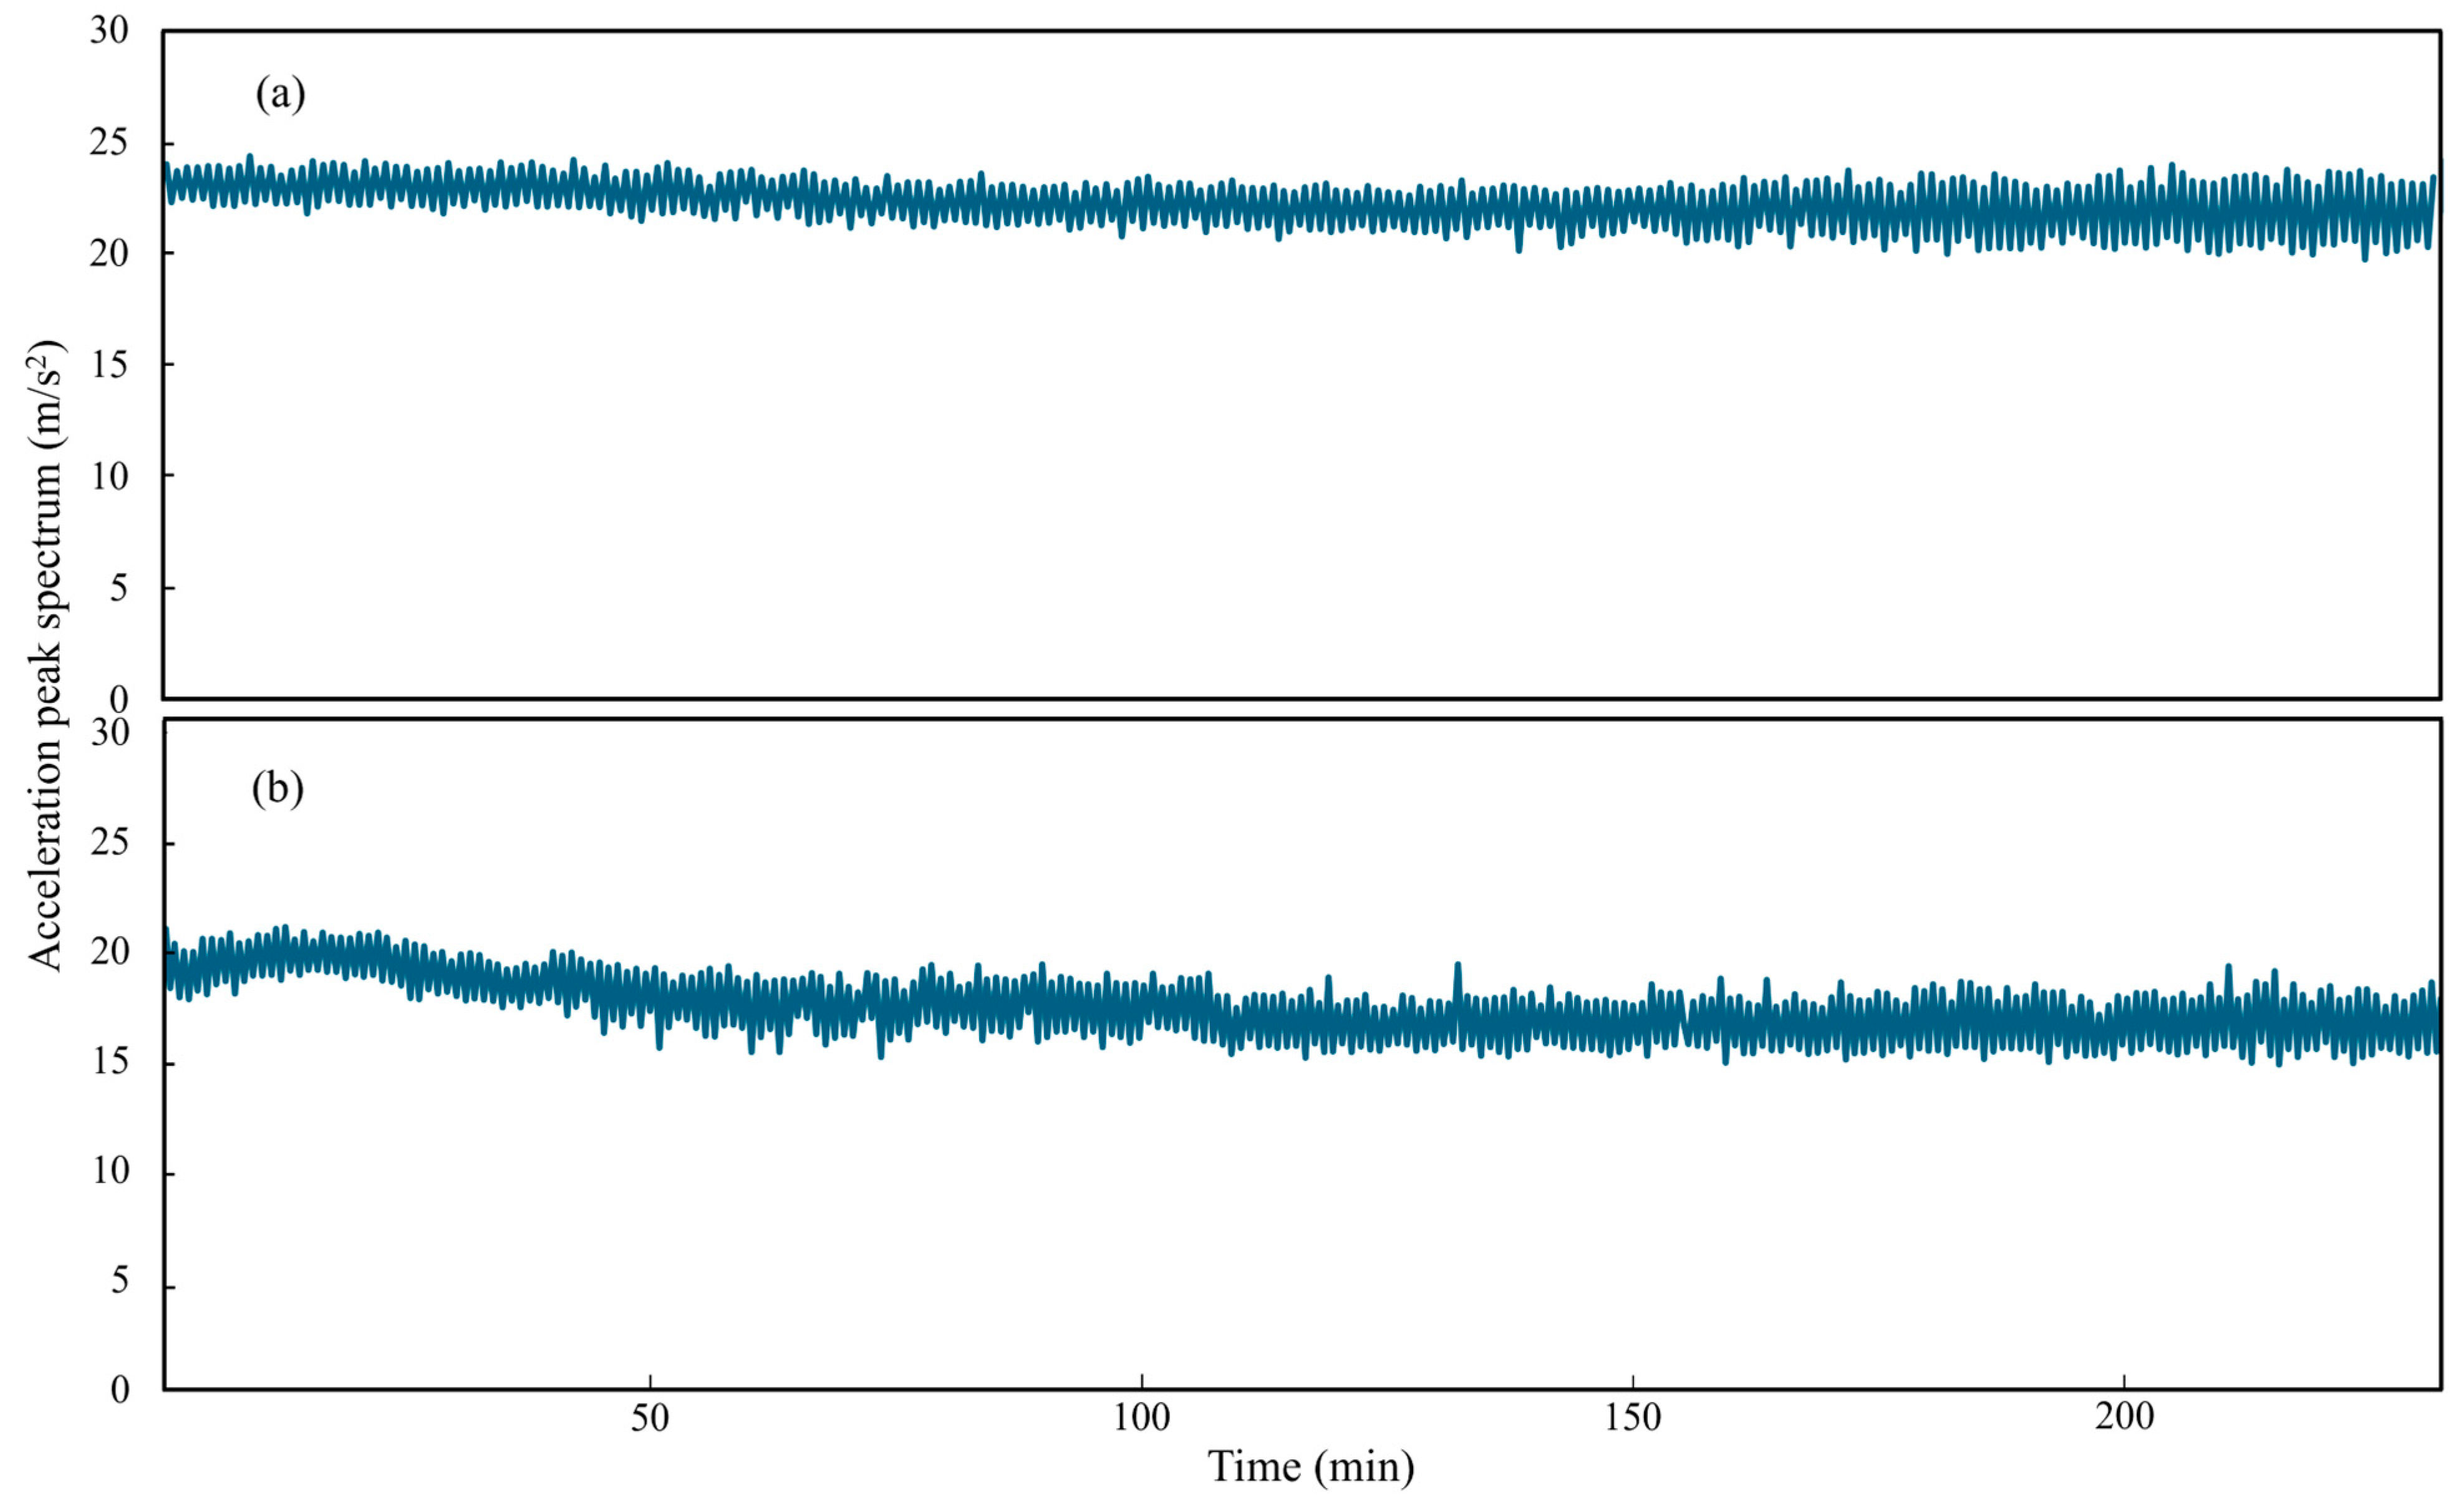
Figure 9 depicts the average values of the acceleration peaks recorded throughout the entire duration of surface fatigue testing. Each data point represents the mean peak acceleration from over 500,000 impacts, providing a quantitative measure of the vibrational energy transmitted during surface fatigue. Among all samples, S2 AZW displayed the highest average acceleration peak (22.5 m/s2).
Additionally, Figure 10 presents the Fast Fourier Transform (FFT) spectrum for each composite during the surface fatigue test. All composites exhibited a dominant frequency peak in the low-frequency region, which was the impacting frequency (~35 Hz).

4. Discussion

The comparative analysis of surface fatigue behavior among the tested duplex ceramic composites and reference materials revealed a correlation between microstructure, phase composition, and dynamic mechanical response under high-frequency impact loading. The results show that not only the type of carbide phase but also the integrity of the oxide–carbide network substantially influences surface fatigue resistance. As demonstrated in both sliding wear [10] and surface fatigue tests (present study), the microstructure of the composite had the highest effect on the material’s ability to distribute stress, resist crack propagation, and retain surface integrity under prolonged cyclic conditions, and the vibration characteristics of the composites.
The surface fatigue wear loss values (Figure 6) further highlight these differences. Among all the tested compositions, the S2 AZW composite (Al2O3-ZrO2-WC) exhibited the lowest surface fatigue wear loss (700 × 103 μm3), confirming its superior resistance to cyclic impact-induced degradation. Meanwhile, S5 AZZ1 (Al2O3-ZrO2-ZrC) displayed the highest material loss (1535 × 103 μm3), indicating poor surface fatigue tolerance. Based on the 3D profilometry images (Figure 7) S2 AZW showed a ~6 µm maximum depth and a ~600 µm scar diameter with smooth edges, while S5 AZZ1 reached a >9 µm depth and a ~700 µm diameter with irregular profiles and peripheral grooves, clear evidence of faster damage accumulation in AZZ1 due to its less ductile carbide network (ZrC), lower relative density (~97%), and higher mismatch in thermal and elastic properties between the oxide and carbide phases.
High-magnification SEM analysis (Figure 8) provided details of damage on the wear zones of the composites. The S2 AZW composite displayed limited surface cracking and small localized material removal, implying a more homogeneous load distribution and higher crack deflection capability (features were discernible at higher SEM magnifications). Conversely, the AZZ1 composite exhibited severe spalling, deep parallel grooves, and extended cracks near the surface fatigue scar edges, signs of brittle fracture, and weak interface adhesion between the oxide and ZrC phases. Meanwhile, HC1 contained ZrO2 pile-up within the surface fatigue scar (Figure 3), while the AZZ composites showed ZrC pile-up and debris accumulation (Figure 4), both reflecting preferential phase exposure and transfer under cyclic impact loads.
The accelerometric data (Figure 9) show a clear correlation with the observed wear behavior, indicating efficient elastic vibration transmission in the AZW composite. In contrast, AZZ1 showed lower peaks, reflecting energy dissipation through microcrack formation, material detachment, and frictional interactions [32]. In brittle materials like AZZ1, the onset of cracking and material detachment led to a reduction in the vibration amplitude. This relationship is reflected in the FFT results (Figure 10), where AZW maintained a stronger 35 Hz peak intensity (2.70 m/s2), consistent with a stiffer and more intact structure, while AZZ1 showed a markedly lower intensity (1.3 m/s2), characteristic of structural damping due to early microcrack formation and damage accumulation. Therefore, lower acceleration and damped FFT signals serve as a signature of higher wear (e.g., AZZ1), while higher acceleration and stronger FFT peaks accompany lower wear (e.g., AZW). Physically, this indicates that lower acceleration is a signature of higher energy dissipation in the wear zone via microcrack nucleation or propagation, interfacial friction, and debris compaction; conversely, higher acceleration reflects more elastic rebound and lower structural damping because the surface and subsurface remain more intact.
A clearer picture of the surface fatigue evolution was obtained from the acceleration–time spectra (Figure 11). For the AZW composite (Figure 11a), the acceleration trend remained nearly constant for most of the test duration. In contrast, the AZZ1 composite (Figure 11b) displayed a much lower acceleration level throughout the test than AZW, with more fluctuating, especially at the beginning of the test, suggesting that significant damage took place almost immediately, resulting in an increased area of contact and a reduced surface load intensity [33,34].
The observed behavior can be rationalized by considering the disparity in Young’s modulus between the two materials in combination with their microstructural characteristics and relative density. The markedly higher modulus of AZW (E ≈ 469 GPa) facilitates superior elastic energy storage upon impact, thereby sustaining the acceleration amplitude and postponing the onset of damage. In contrast, AZZ1, with its substantially lower modulus (E ≈ 323 GPa), undergoes greater elastic compliance, which broadens the contact area and dissipates a larger fraction of impact energy into plastic deformation and damage rather than rebound. This interpretation is consistent with the measured hardness and fracture toughness values (AZW: HV1 ≈ 21.5 GPa and KIC ≈ 5.8 MPa·m1/2; AZZ1: HV1 ≈ 16.6 GPa and KIC ≈ 4.3 MPa·m1/2), although the acceleration response is predominantly governed by the elastic modulus. The limited capacity of the AZZ1 structure to sustain elastic rebound reflects early-stage cracking and progressive loss of structural integrity under repeated impact loading. These time-domain observations are corroborated by the post-test metrics: the shallow scar for AZW (~6 µm depth; ~600 µm diameter) vs. the deeper/irregular scar for AZZ1 (>9 µm; ~700 µm), and with the frequency-domain response (a stronger ~35 Hz peak for AZW, and a weaker peak for AZZ1).
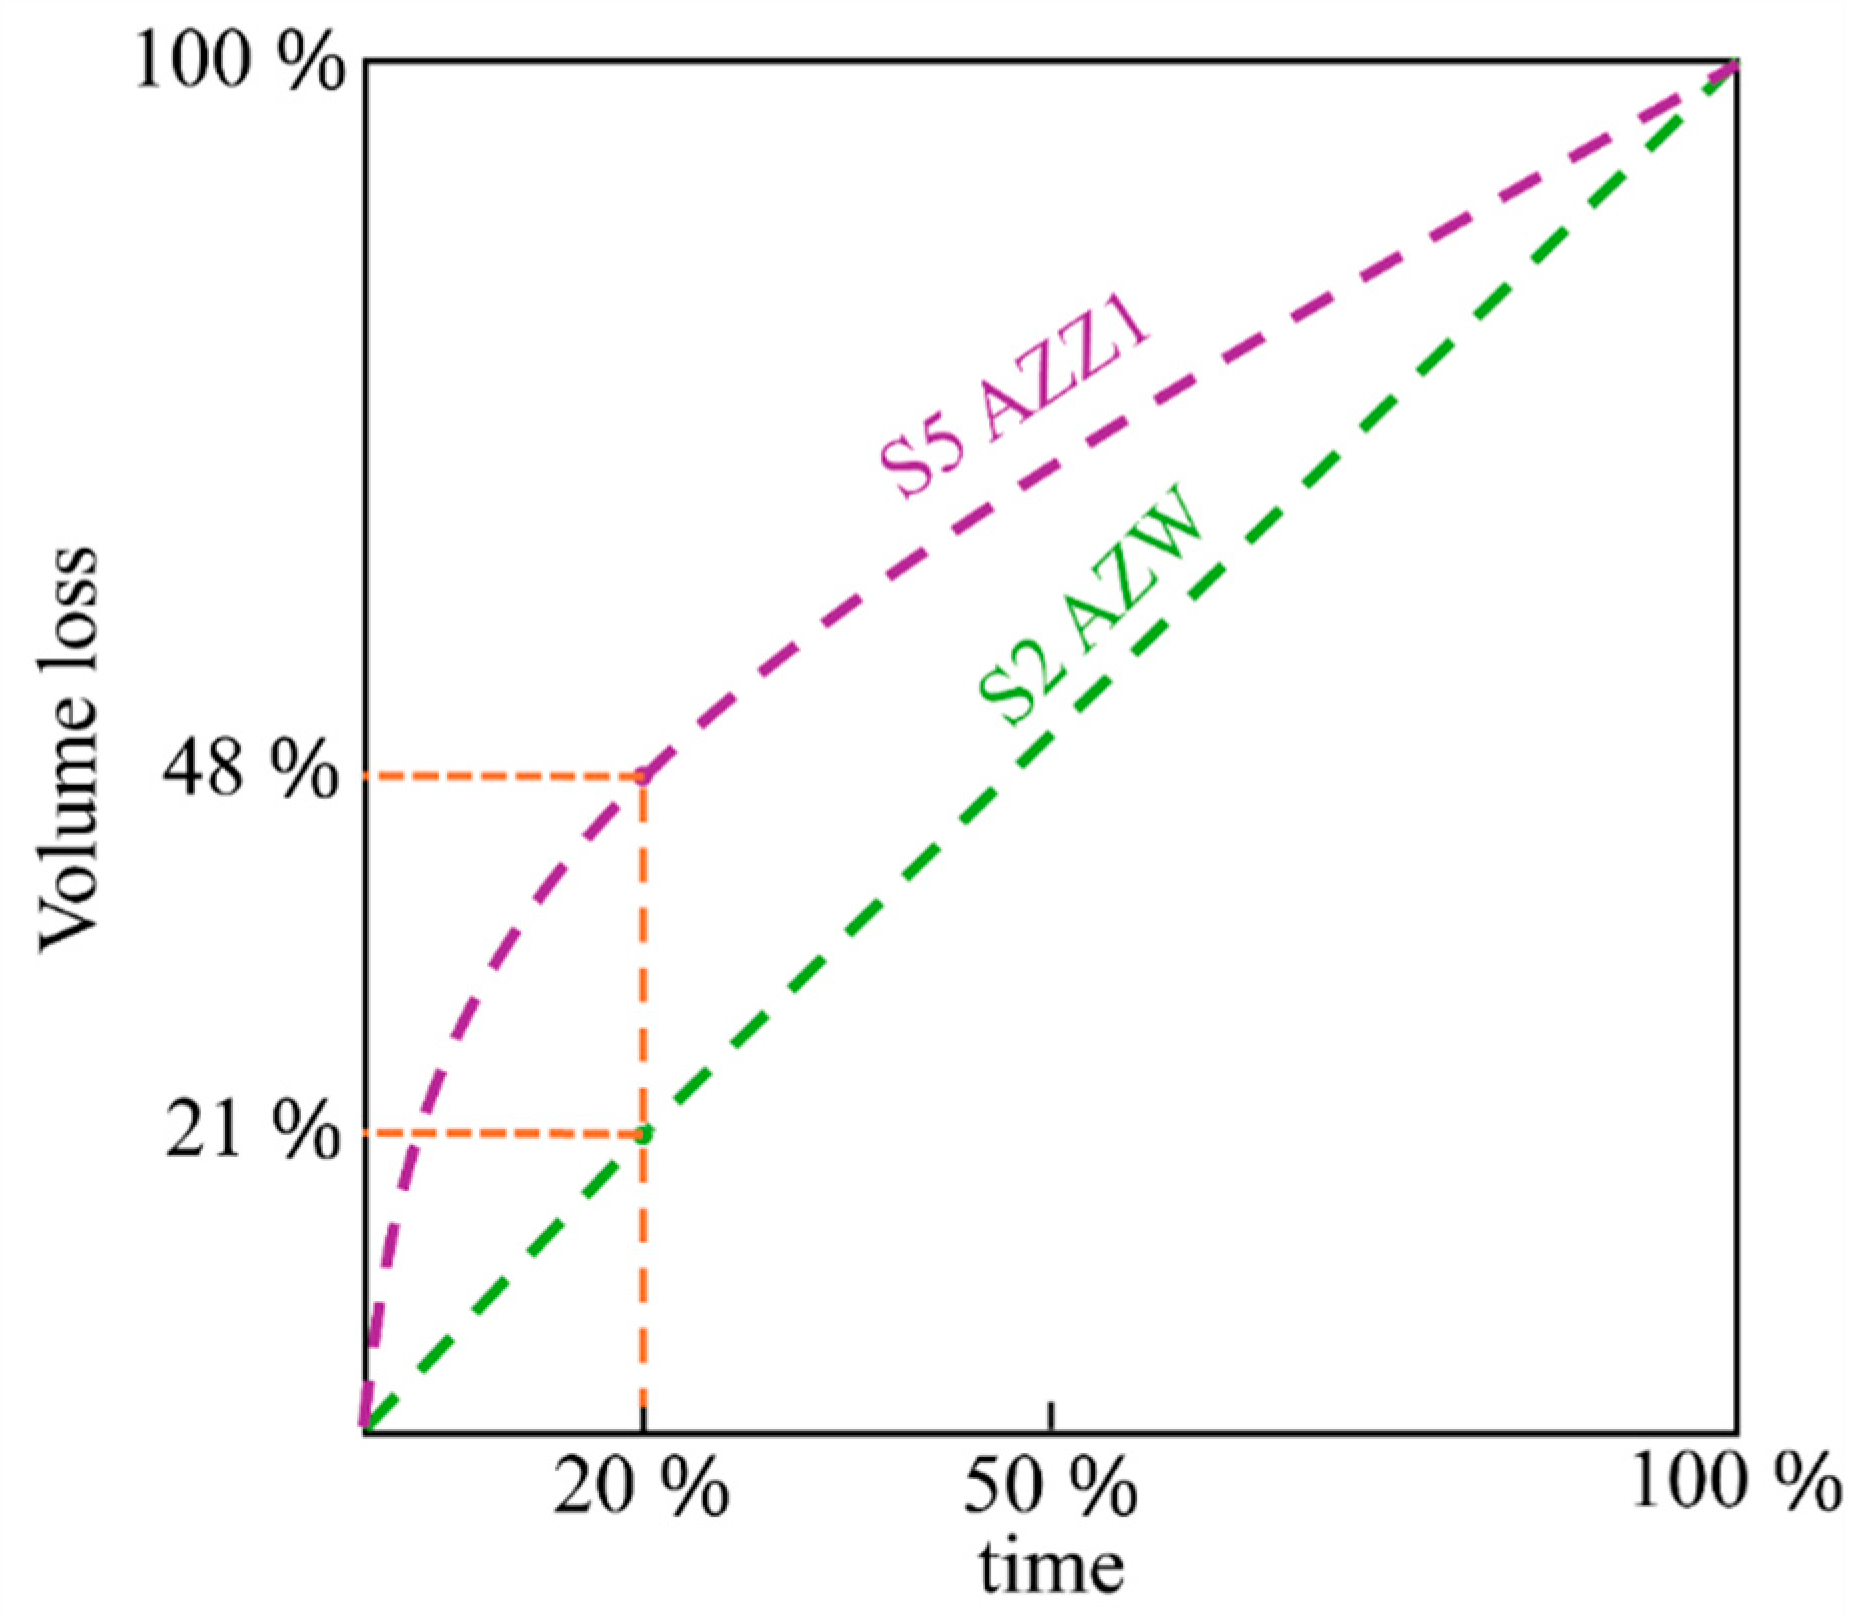
To corroborate the trends observed in the acceleration peak spectra of S2 (AZW) and S5 (AZZ1), tests of 20% of total impacts were conducted, and the interim volume loss was compared with the full-duration results. This partial test revealed two distinct surface fatigue evolution regimes. For AZW, the partial test produced ~21% of the full-test volume loss, indicating a linear, steady-rate damage accumulation. In contrast, AZZ1 had already accumulated ~48% of its final volume loss within the first fifth of the test, indicating intense initial damage and strong energy dissipation during the early loading cycles. The surface fatigue wear loss trends of S2 AZW and S5 AZZ1 are depicted in Figure 12.
To elucidate the relationship between vibrational response and material degradation, the average peak acceleration values were plotted against the corresponding surface fatigue wear volumes for all composites (Figure 13). The data reveal a clear inverse correlation (R2 = 0.92), underscoring the high sensitivity of accelerometric parameters to progressive damage accumulation under cyclic impact loading. Analysis of the surface fatigue data across all composite types revealed the following trends:
  • WC-TiC systems (AZWT1 vs. AZWT2): Increasing the sintering temperature from 1550 °C (S3) to 1650 °C (S4) enhances relative density (99.0% → 99.6%) and Young’s modulus (378 GPa → 387 GPa), leading to improved cyclic impact resistance. Surface fatigue wear loss decreases (1071 µm3 × 103 → 840 µm3 × 103), while acceleration (20.24 m/s2 → 20.80 m/s2) and FFT (2.18 m/s2 → 2.60 m/s2) increase. Besides this densification effect, SEM observations indicate that at the lower sintering temperature (AZWT1), there is more pile-up of debris due to higher porosity than AZWT2. In contrast, the higher temperature condition (AZWT2) produces a more cohesive oxide–carbide network, allowing the mixed WC-TiC structure to redistribute impact stresses more effectively and to shield the Al2O3-ZrO2 oxide structure from catastrophic damage. Even at fixed carbide composition (10 vol.% WC + 32 vol.% TiC), increasing the integrity and continuity of the duplex network via higher sintering temperatures significantly improves surface fatigue behavior by enhancing elastic stiffness and reducing the number of weak interfaces that can act as crack initiation sites. Although the higher sintering temperature causes phase size coarsening (Table 1), this effect does not significantly influence the surface fatigue performance of the AZWT composites.
  • ZrC systems (AZZ1 vs. AZZ2): Moving from 1550 °C (S5) to 1650 °C (S6) modestly improves density (97.00% → 97.60%) and, likewise, improves surface fatigue resistance: wear 1535 µm3 × 103 → 1076 µm3 × 103, acceleration 17.30 m/s2 → 19.9 m/s2, FFT 1.30 m/s2 → 2.50 m/s2. An increase in relative density improves the structural continuity and reduces the porosity between particles, thereby enhancing the material’s ability to store and release impact energy elastically and to maintain the intensity of the FFT peak. Meanwhile, the larger ZrC phase size in AZZ2 reduces the overall ZrC/oxide interfacial area and the density of sharp triple junctions, thereby mitigating local stress concentrations and delaying interface decohesion. However, ZrC-based composites (AZZ1 and AZZ2) have inferior surface fatigue performance as a result of their composition and relative densities. The ZrC phase has a higher melting point [35] and sintering temperature than WC and TiC, and forms a more brittle, less continuous structure in ceramic–ceramic composites. As a result, ZrC-rich composites show earlier interface decohesion, extensive materials removal, and deep groove formation due to surface fatigue tests, especially in AZZ1. Even when densification is improved by increasing the sintering temperature (AZZ2), which reduces surface fatigue wear loss to 1076 × 103 μm3, the surface fatigue resistance of ZrC-based systems remains clearly lower than that of WC- or TiC-containing composites.
  • Across compositions at a ~99.90% density (AZT vs. AZW): Despite similar densification (99.90%), AZW clearly outperforms AZT (with lower surface fatigue wear loss at 700 µm3 × 103 vs. 917 µm3 × 103 and higher acceleration at 22.50 m/s2 vs. 20.48 m/s2). The good behavior of AZW can be attributed to the different mechanical and interfacial characteristics of WC compared with TiC [36]. WC has a higher elastic modulus and hardness and forms a stiffer [37], more effective load-bearing structure within the Al2O3-ZrO2 matrix, which promotes efficient stress transfer and limits local plasticity or microcracking under high-frequency impact loadings. The higher acceleration and FFT amplitude measured for AZW, therefore, reflect a more elastic, rebound-dominated response, whereas the lower dynamic response and higher surface fatigue wear loss of AZT indicate greater conversion of impact energy into microstructural damage and surface degradation.
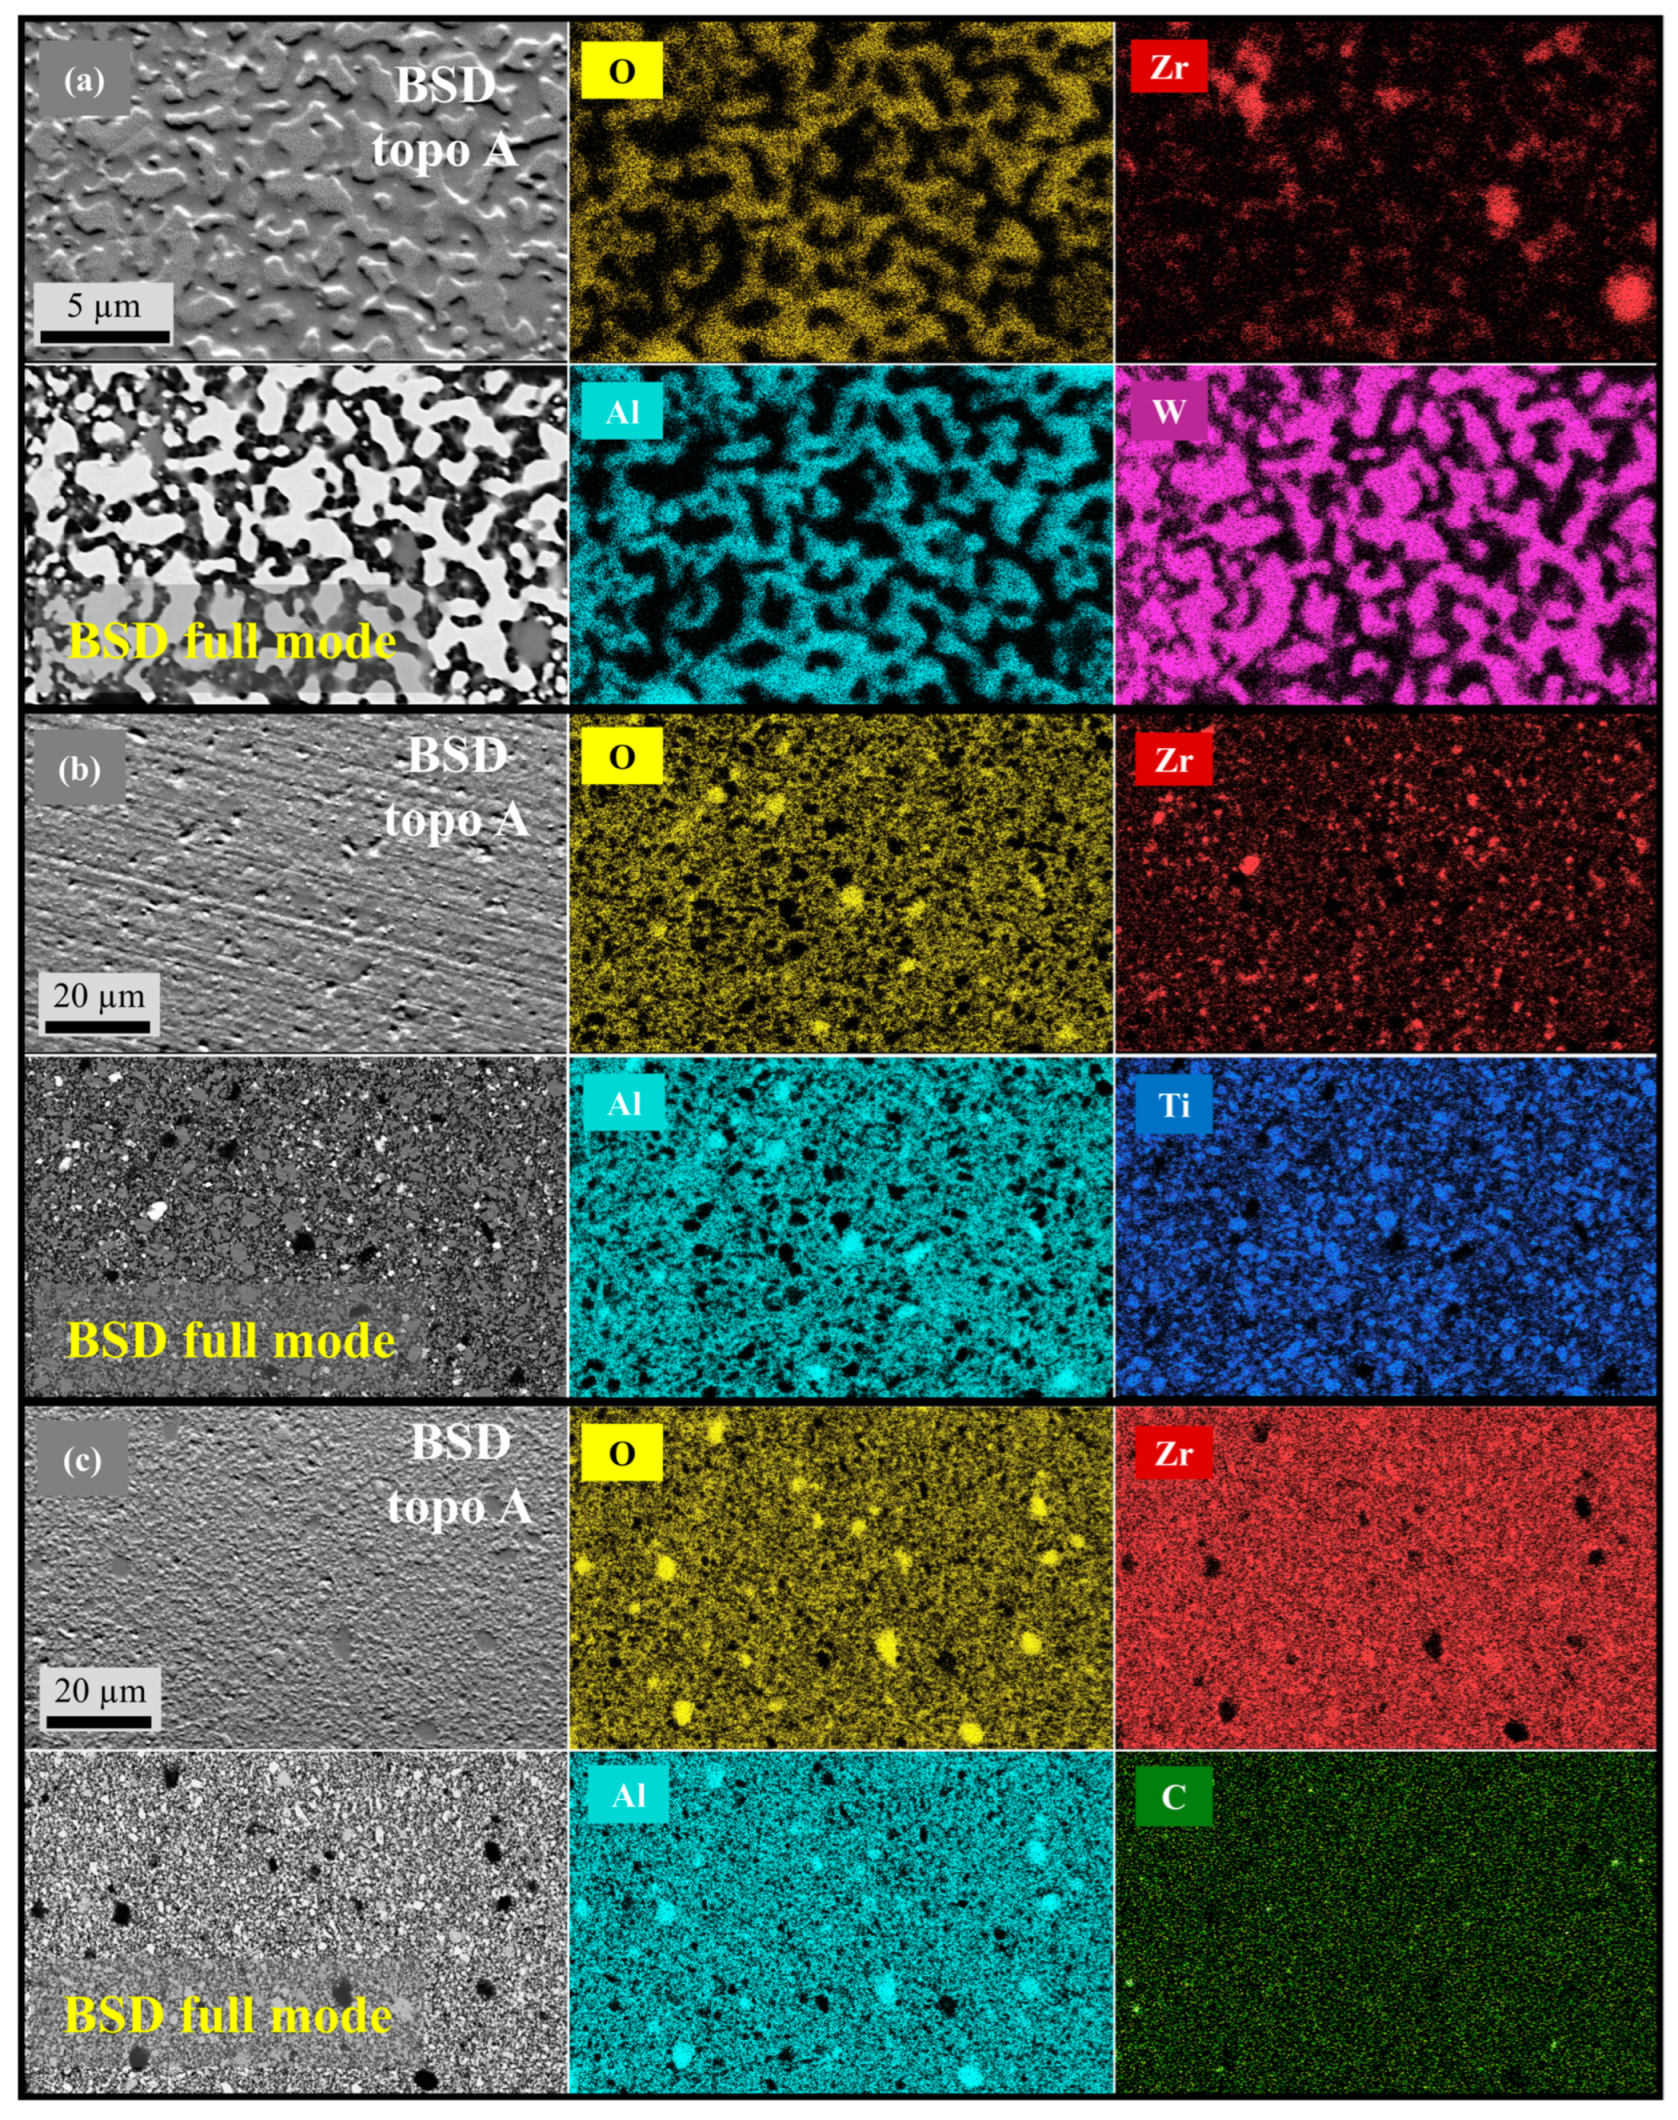
Microstructural analysis of S2 AZW (Figure 14) provided information on its good surface fatigue resistance. The AZW composite exhibited a well-developed duplex interpenetrating structure, where both the Al2O3 main oxide network and the WC carbide skeleton formed continuous, interconnected frameworks. EDS confirmed uniform W and Al distributions, and SEM revealed coherent interfaces. This morphology enabled efficient stress redistribution and impeded crack propagation by promoting crack deflection, bridging, and energy dissipation across interfaces. Additionally, the high interfacial compatibility between WC and the oxide matrix reduced the likelihood of interfacial debonding, leading to enhanced structural coherence during cyclic loading. The uniform dispersion of the WC and Al2O3 phases supports the conclusion that the AZW composite benefits from both mechanical and chemical stability under cyclic impacts. Additionally, for better comparison, the EDS maps of AZT and AZZ composites are provided in Figure 14.
The surface fatigue behavior observed in the present duplex oxide–carbide composites is consistent with trends reported for other hard ceramic systems under impact or cyclic loading. Impact and cyclic fatigue studies on monolithic alumina and zirconia-toughened alumina have reported pronounced brittle damage, with cone cracking and material removal even at relatively modest and low impact energies, reflecting the limited ability of oxide ceramics to redistribute highly concentrated stresses [38]. In contrast, WC- and/or TiC-based hard metals and cermets generally exhibit lower surface fatigue wear rates and a more rebound-dominated response, although they often rely on metallic binders and show different damage mechanisms [39]. In this context, the AZW composite in the present work combines features of both classes of materials: compared with monolithic alumina or alumina–zirconia, the incorporation of a continuous WC structure reduces the surface fatigue wear rate and promotes an elastic response under high-frequency impact loads, whereas the absence of a metallic binder avoids the severe plastic deformation.
Table 2 summarizes the surface fatigue mechanisms and vibration responses of all composites and reference materials.

5. Conclusions

This study investigated the surface fatigue behavior of duplex oxide–carbide ceramic composites under high-frequency impact, using in situ accelerometric monitoring to link dynamic response with material degradation. The results highlight the critical role of phase composition and microstructural morphology in resisting cyclic impact. Based on the comparative results, the following conclusions can be drawn:
  • The Al2O3-ZrO2-WC composite exhibited the lowest surface fatigue wear volume with a shallow, smooth scar and the highest vibration response. Stable acceleration indicated steady material loss during cyclic loading.
  • SEM and EDS analyses confirmed that a continuous duplex interpenetrating structure ensures efficient redistribution of impact stresses, promotion of crack deflection, and delaying damage initiation.
  • Peak acceleration emerged as a reliable, real-time indicator of surface fatigue evolution. A strong inverse correlation was observed between mean peak acceleration and surface fatigue wear volume, with higher acceleration amplitudes consistently associated with reduced material loss. In contrast, other dynamic metrics such as velocity amplitude, kurtosis, and crest factor offered limited discriminatory power under the present testing conditions, highlighting the strong sensitivity of acceleration-based monitoring for tracking cyclic impact damage.
  • FFT analysis revealed that intact materials maintained strong frequency peaks, whereas degraded surfaces exhibited a dampened frequency intensity, reflecting structural damage.

Supplementary Materials

The following supporting information can be downloaded at https://www.mdpi.com/article/10.3390/cryst15121036/s1. Video S1: Operational cycle and dynamic response of the experimental setup during testing.

Author Contributions

Conceptualization, A.K., M.A., I.H. and P.K.; methodology, A.K., M.A. and P.K.; software, A.K. and M.A.; validation, A.K., M.A., P.K. and I.H.; formal analysis, A.K. and M.A.; investigation, A.K., M.A. and P.K.; writing—original draft preparation, A.K.; writing—review and editing, A.K., M.A., P.K. and I.H.; visualization, A.K., M.A. and P.K.; data curation, A K.; supervision, M.A. and I.H.; project administration, M.A. and I.H. All authors have read and agreed to the published version of the manuscript.

Funding

This research was financially supported by the “BEST” grant (PRG643), by the “DuplexCER” project funded under the M-ERA.NET3 program (MNHA22040) and by the Polish National Centre for Research and Development under agreement no. MERA.NET3/2021/82/DuplexCER/2022.

Data Availability Statement

The original contributions presented in this study are included in the article/Supplementary Material. Further inquiries can be directed to the corresponding author.

Acknowledgments

The authors would like to thank the Estonian Research Council and the Polish National Centre for Research and Development.

Conflicts of Interest

The authors declare no conflicts of interest.

Abbreviations

The following abbreviations were used in this manuscript:
SEMScanning Electron Microscopy
EDSEnergy-Dispersive Spectroscopy
DIPCCsDuplex Interpenetrating Ceramic Composites
BSDBackscattered Electron Detector
FFTFast Fourier Transform
SPSSpark Plasma Sintering
AccAcceleration
AZT46% Al2O3-12% ZrO2-42% TiC composites
AZW46% Al2O3-12% ZrO2-42% WC composites
AZWT46% Al2O3-12% ZrO2-10% WC-32% TiC composites
AZZ46% Al2O3-12% ZrO2-42% ZrC composites

References

  1. Su, B.; Lu, C.; Li, C. Current Status of Research on Hybrid Ceramic Ball Bearings. Machines 2024, 12, 510. [Google Scholar] [CrossRef]
  2. Ian Hutchings, P.S. Tribology: Friction and Wear of Engineering Materials; Butterworth-Heinemann: Oxford, UK, 2017. [Google Scholar]
  3. Lee, C.-H.; Lee, C.-H. Chemical–Mechanical Super-Polishing of Al2O3 (0001) Wafer for Epitaxial Purposes. Crystals 2025, 15, 694. [Google Scholar] [CrossRef]
  4. Imariouane, M.; Saâdaoui, M.; Labrador, N.; Reveron, H.; Chevalier, J. Impact Resistance of Yttria- and Ceria-Doped Zirconia Ceramics in Relation to Their Tetragonal-to-Monoclinic Transformation Ability. Ceramics 2025, 8, 26. [Google Scholar] [CrossRef]
  5. Dassios, K.G.; Matikas, T.E. Assessment of Fatigue Damage and Crack Propagation in Ceramic Matrix Composites by Infrared Thermography. Ceramics 2019, 2, 393–406. [Google Scholar] [CrossRef]
  6. Wang, C.; Stiller, T.; Hausberger, A.; Pinter, G.; Grün, F.; Schwarz, T. Correlation of Tribological Behavior and Fatigue Properties of Filled and Unfilled TPUs. Lubricants 2019, 7, 60. [Google Scholar] [CrossRef]
  7. Žmak, I.; Jozić, S.; Ćurković, L.; Filetin, T. Alumina-Based Cutting Tools—A Review of Recent Progress. Materials 2025, 18, 2813. [Google Scholar] [CrossRef]
  8. Chawla, K.K. Ceramic Matrix Composites. In Composite Materials; Springer: New York, NY, USA, 2012; pp. 249–292. [Google Scholar]
  9. Elgazzar, A.; Zhou, S.-J.; Ouyang, J.-H.; Liu, Z.-G.; Wang, Y.-J.; Wang, Y.-M. A Critical Review of High-Temperature Tribology and Cutting Performance of Cermet and Ceramic Tool Materials. Lubricants 2023, 11, 122. [Google Scholar] [CrossRef]
  10. Kariminejad, A.; Auriemma, F.; Antonov, M.; Klimczyk, P.; Hussainova, I. Wear Resistance Analysis of Duplex Interpenetrating Ceramic Composites via In-Situ Vibration Monitoring. Int. J. Refract. Met. Hard Mater. 2026, 134, 107454. [Google Scholar] [CrossRef]
  11. Regulation (EU) 2024/1252 of the European Parliament and of the Council of 11 April 2024 Establishing a Framework for Ensuring a Secure and Sustainable Supply of Critical Raw Materials and Amending Regulations (EU) No 168/2013, (EU) 2018/858, (EU) 2018/1724 and (EU) 2019/1020 (Text with EEA Relevance). Available online: https://eur-lex.europa.eu/eli/reg/2024/1252/oj/eng (accessed on 26 November 2025).
  12. Kariminejad, A.; Klimczyk, P.; Antonov, M.; Hussainova, I. From Scrap to Product: The Effect of Recycled Tungsten Carbide and Alumina Content on the Mechanical Properties of Oxide-Carbide Duplex Ceramic Composite. Proc. Est. Acad. Sci. 2025, 74, 192–197. [Google Scholar] [CrossRef]
  13. Demuynck, M.; Erauw, J.-P.; Van der Biest, O.; Delannay, F.; Cambier, F. Densification of Alumina by SPS and HP: A Comparative Study. J. Eur. Ceram. Soc. 2012, 32, 1957–1964. [Google Scholar] [CrossRef]
  14. Grasso, S.; Yoshida, H.; Porwal, H.; Sakka, Y.; Reece, M. Highly Transparent α-Alumina Obtained by Low Cost High Pressure SPS. Ceram. Int. 2013, 39, 3243–3248. [Google Scholar] [CrossRef]
  15. Vivekanandhan, P.; Raphel, A.; Murugasami, R.; Kumaran, S. Spark Plasma Sintering—An Overviews. In Powder Metallurgy; Elsevier: Amsterdam, The Netherlands, 2026; pp. 253–268. [Google Scholar]
  16. Chuvildeev, V.N.; Panov, D.V.; Boldin, M.S.; Nokhrin, A.V.; Blagoveshchensky, Y.V.; Sakharov, N.V.; Shotin, S.V.; Kotkov, D.N. Structure and Properties of Advanced Materials Obtained by Spark Plasma Sintering. Acta Astronaut. 2015, 109, 172–176. [Google Scholar] [CrossRef]
  17. Tokita, M. Progress of Spark Plasma Sintering (SPS) Method, Systems, Ceramics Applications and Industrialization. Ceramics 2021, 4, 160–198. [Google Scholar] [CrossRef]
  18. Nygren, M. SPS Processing of Nano-Structured Ceramics. J. Iron Steel Res. Int. 2007, 14, 99–103. [Google Scholar] [CrossRef]
  19. Shi, T.; Liu, J.; Yang, G.; Liu, A.; Liu, F. Effect of Cyclic Loading on the Surface Microstructure Evolution in the Pearlitic Rail. Coatings 2023, 13, 1850. [Google Scholar] [CrossRef]
  20. Deng, J.; Zhou, J.; Wu, T.; Liu, Z.; Wu, Z. Review and Assessment of Fatigue Delamination Damage of Laminated Composite Structures. Materials 2023, 16, 7677. [Google Scholar] [CrossRef]
  21. Staffa, A.; Palmieri, M.; Morettini, G.; Zucca, G.; Crocetti, F.; Cianetti, F. Development and Validation of a Low-Cost Device for Real-Time Detection of Fatigue Damage of Structures Subjected to Vibrations. Sensors 2023, 23, 5143. [Google Scholar] [CrossRef]
  22. Saponaro, A.; Nobile, R. In Situ Fatigue Damage Monitoring by Means of Nonlinear Ultrasonic Measurements. Metals 2023, 14, 11. [Google Scholar] [CrossRef]
  23. Romanssini, M.; de Aguirre, P.C.C.; Compassi-Severo, L.; Girardi, A.G. A Review on Vibration Monitoring Techniques for Predictive Maintenance of Rotating Machinery. Eng 2023, 4, 1797–1817. [Google Scholar] [CrossRef]
  24. Wojnar, G.; Burdzik, R.; Wieczorek, A.N.; Konieczny, Ł. Multidimensional Data Interpretation of Vibration Signals Registered in Different Locations for System Condition Monitoring of a Three-Stage Gear Transmission Operating under Difficult Conditions. Sensors 2021, 21, 7808. [Google Scholar] [CrossRef]
  25. Wu, S.-D.; Shang, D.-G.; Zuo, L.-X.; Qu, L.-F.; Hou, G.; Hao, G.-C.; Shi, F.-T. Vibration Fatigue Life Prediction Method for Needled C/SiC Composite Based on Frequency Response Curve with Low Signal Strength. Int. J. Fatigue 2023, 168, 107407. [Google Scholar] [CrossRef]
  26. Rossi, A.; Bocchetta, G.; Botta, F.; Scorza, A. Accuracy Characterization of a MEMS Accelerometer for Vibration Monitoring in a Rotating Framework. Appl. Sci. 2023, 13, 5070. [Google Scholar] [CrossRef]
  27. Grigoriev, M.V.; Kotelnikov, N.L.; Buyakova, S.P.; Kulkov, S.N. The Structure and Properties of Composites Al2O3-ZrO2-TiC for Use in Extreme Conditions. AIP Conf. Proc. 2015, 1683, 020061. [Google Scholar]
  28. Zhu, Y.; Chai, J.; Shen, T.; Wang, Z. Mechanical and Friction Properties of Al2O3-ZrO2-TiC Composite with Varying TiC Contents Fabricated by Spark Plasma Sintering. Metall. Mater. Trans. A 2021, 52, 767–775. [Google Scholar] [CrossRef]
  29. Bai, P.; Li, Y. Study on High Temperature Sintering Processes of Selective Laser Sintered Al2O3/ZrO2/TiC Ceramics. Sci. Sinter. 2009, 41, 35–41. [Google Scholar] [CrossRef]
  30. NTK Cutting Tools, HC1 Grade. Available online: https://ntkcuttingtools.com/products/cast-iron-grade/hc1hw2/ (accessed on 26 November 2025).
  31. Sumitomo, T130A (Replaced by T1500A). Available online: https://www.sumitool.com/en/products/cutting-tools/inserts/grades/t1000a-t1500a.html (accessed on 26 November 2025).
  32. Kumar, R.; Antonov, M.; Klimczyk, P.; Mikli, V.; Gomon, D. Effect of CBN Content and Additives on Sliding and Surface Fatigue Wear of Spark Plasma Sintered Al2O3-CBN Composites. Wear 2022, 494–495, 204250. [Google Scholar] [CrossRef]
  33. Blau, P.J. On the Nature of Running-In. Tribol. Int. 2005, 38, 1007–1012. [Google Scholar] [CrossRef]
  34. Blau, P.J. Running-in: Art or Engineering? J. Mater. Eng. 1991, 13, 47–53. [Google Scholar] [CrossRef]
  35. Chen, X.; Wu, H.; Liu, H.; Yang, Y.; Pei, B.; Han, J.; Liu, Z.; Wu, X.; Huang, Z. Microstructure and Properties of Pressureless-Sintered Zirconium Carbide Ceramics with MoSi2 Addition. Materials 2024, 17, 2155. [Google Scholar] [CrossRef] [PubMed]
  36. Wang, C.; Pi, Z.; Zheng, Z.; Chen, X.; Du, K. Evaluation Method of Interface Bonding Strength of Cemented Carbide with Additives. Sci. Rep. 2025, 15, 7514. [Google Scholar] [CrossRef] [PubMed]
  37. Zhou, X.; Zhang, Z.; Li, X.; Zhang, X.; Chen, M. Microstructural Evolution and Mechanical Properties of TiC-Containing WC-Based Cemented Carbides Prepared by Pressureless Melt Infiltration. Ceram. Int. 2022, 48, 35115–35126. [Google Scholar] [CrossRef]
  38. Kiilakoski, J.; Langlade, C.; Koivuluoto, H.; Vuoristo, P. Characterizing the Micro-Impact Fatigue Behavior of APS and HVOF-Sprayed Ceramic Coatings. Surf. Coat. Technol. 2019, 371, 245–254. [Google Scholar] [CrossRef]
  39. Küpferle, J.; Röttger, A.; Theisen, W. Fatigue and Surface Spalling of Cemented Carbides under Cyclic Impact Loading–Evaluation of the Mechanical Properties with Respect to Microstructural Processes. Wear 2017, 390–391, 33–40. [Google Scholar] [CrossRef]
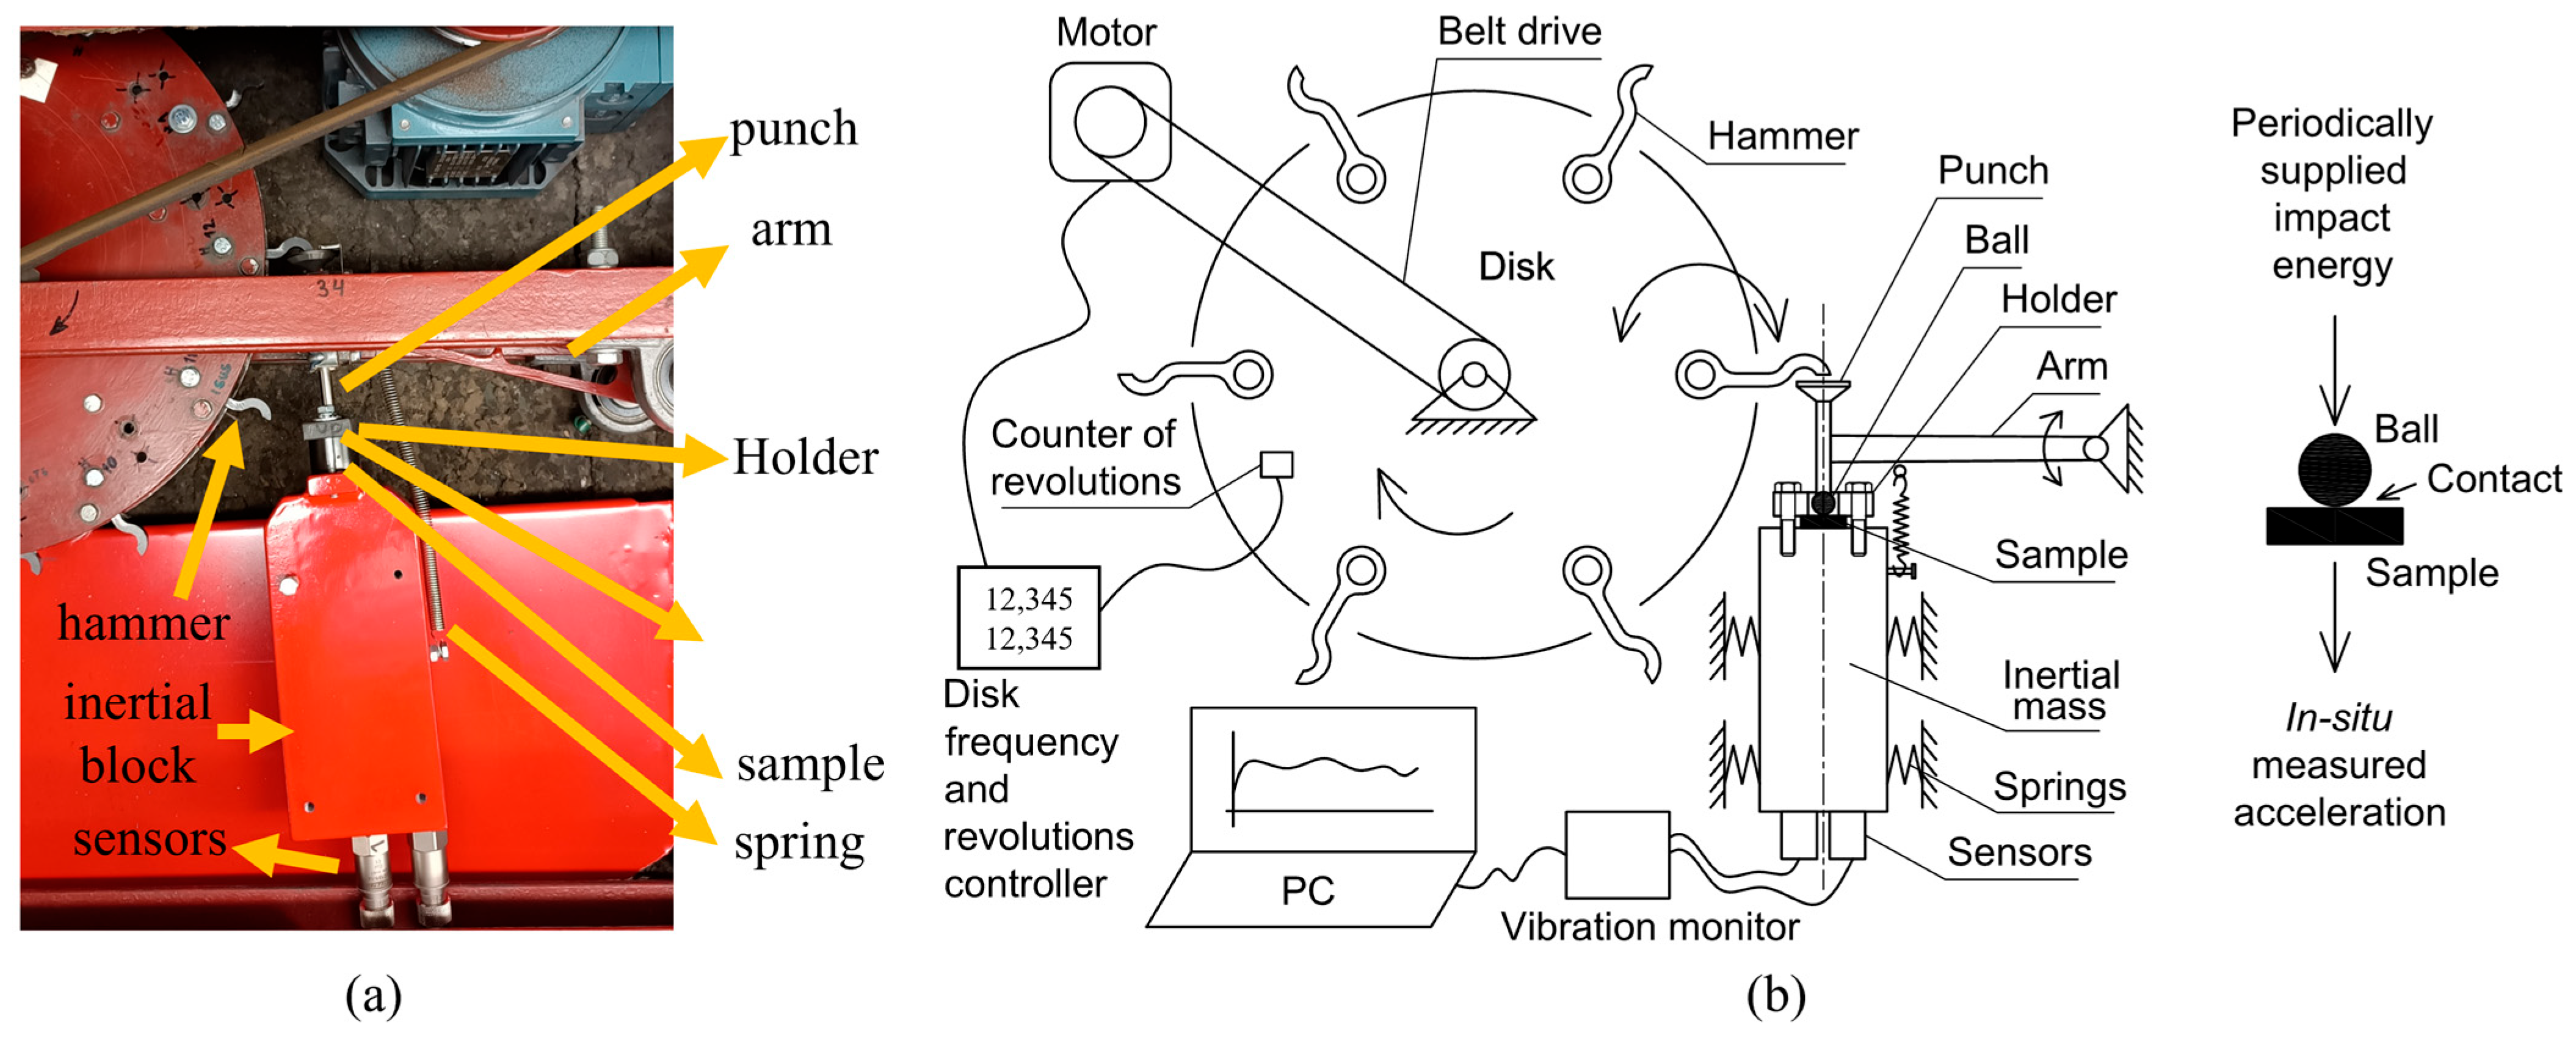
Figure 1. The details of the surface fatigue test machine with vibration monitoring sensors: (a) real photo; (b) schematic design adapted from [32], with modifications.
Crystals 15 01036 g001
Figure 2. SEM images of the surface fatigue (fatigue wear) scars: (a) S1 AZT, (b) S2 AZW, (c) AZWT1, and (d) AZWT2. SEM images of the surface fatigue (fatigue wear) scars: (e) S5 AZZ1, (f) S6 AZZ2, (g) HC1, and (h) T130A. Orange dots in the images indicate the damaged zones.
Crystals 15 01036 g002aCrystals 15 01036 g002b
Figure 3. EDS maps of the surface fatigue (fatigue wear) scar of HC1, (a) BSD full mode, (b) BSD topo A mode.
Crystals 15 01036 g003
Figure 4. EDS maps of the surface fatigue (fatigue wear) scar of AZZ1, (a) BSD full mode, (b) BSD topo A mode.
Crystals 15 01036 g004
Figure 5. Relative density (light blue columns), and mechanical properties (Young’s modulus: orange columns, hardness: dark blue columns, and fracture toughness: green columns) of sintered composites [10].
Crystals 15 01036 g005
Figure 6. Surface fatigue wear loss (net missing volume) of samples measured after surface fatigue tests (µm3).
Crystals 15 01036 g006
Figure 7. Three-dimensional images, depths, and profiles of the surface fatigue scars: (a) S2 AZW composite; (b) S5 AZZ composite.
Crystals 15 01036 g007
Figure 8. SEM images of surface fatigue damage with higher magnification: (a) S1 AZT, (b) S2 AZW, (c) S4 AZWT1, and (d) S5 AZZ1 (In the images, orange dotted line mark the boundary between damaged and undamaged areas).
Crystals 15 01036 g008
Figure 9. Average values of acceleration peaks for the whole duration of surface fatigue tests.
Crystals 15 01036 g009
Figure 10. The 10-s FFT spectra of data collected during the stabilized surface fatigue phase.
Crystals 15 01036 g010
Figure 11. Acceleration peak spectra: (a) S2 AZW; (b) S5 AZZ1.
Crystals 15 01036 g011
Figure 12. Graph of volume loss trends for S2 AZW and S5 AZZ1 (The orange dotted lines show the values of volume loss and time for both S5 AZZ1 and S2 AZW).
Crystals 15 01036 g012
Figure 13. Correlation between peak acceleration and surface fatigue wear loss.
Crystals 15 01036 g013
Figure 14. EDS maps and SEM images of (a) S2 AZW, (b) S1 AZT, and (c) S5 AZZ1.
Crystals 15 01036 g014
Table 1. Sintering conditions and composition of composites (adapted from Kariminejad et al. [10]).
Sample *Composition (Vol.%)Sintering Temperature (°C)Average Phase Size (μm)
Al2O3ZrO2WCTiCZrC
S1 AZT46% Al2O3-12% ZrO2-42% TiC15502.61.7-2.1-
S2 AZW46% Al2O3-12% ZrO2-42% WC15500.80.70.9--
S3 AZWT146% Al2O3-12% ZrO2-10% WC-32% TiC15503.62.92.32.6-
S4 AZWT216504.13.12.63.2-
S5 AZZ146% Al2O3-12% ZrO2-42% ZrC15502.41.8--2.6
S6 AZZ216503.92.8--3.5
HC1Reference material: pure alumina, ceramic turning insert, and NTK product [30]
T130AReference material: WC-TiCN cermet and Sumitomo product [31]
* For oxide phase: A is Al2O3 and Z is ZrO2; for carbide phase: T is TiC, W is WC, and Z is ZrC.
Table 2. Surface fatigue mechanisms and vibration responses.
SampleSurface Fatigue Mechanisms and Damage (Post-Test)Vibration Response
(Acceleration Peak; FFT ~35 Hz)
Surface Fatigue Wear Loss vs. Acceleration (Figure 13)
S1 AZTLocalized material removal; limited cracking (Figure 8a).20.48 m/s2; 2.45 m/s2 → moderately stiff/low damping.Mid–high Acc; mid–low surface fatigue wear loss (917 µm3 × 103).
S2 AZWSmall, localized removal only at high SEM mag.; shallow scar (~6 µm; ~600 µm diameter). Duplex interpenetrating, coherent interfaces (Figure 14).22.5 m/s2; 2.70 m/s2 → highest stiffness/elastic rebound; stable and steady material loss.Highest Acc; lowest surface fatigue wear loss (700 µm3 × 103) → best performance.
S3 AZWT1 Typical surface fatigue scar; pile-up of debris; damage lower than AZZ but higher than AZW; density-limited continuity.20.24 m/s2; 2.18 m/s2 → more damping and energy dissipation than AZWT2.Lower Acc; higher surface fatigue wear loss (1701 µm3 × 103) vs. S4.
S4 AZWT2Improved Young’s modulus and hardness vs. S3; pile-up of debris; peripheral cracks.20.80 m/s2; 2.60 m/s2 → stiffer than S3 after higher-T sintering.Higher Acc; lower surface fatigue wear loss (840 µm3 × 103) than S3.
S5 AZZ1Severe edge damage, region-type materials removal, parallel deep grooves and cracks; (>9 µm depth; ~700 µm dia) ZrC pile up/debris (Figure 5 and Figure 8d).17.30 m/s2; 1.30 m/s2 → strong damping from early microcracking; low Acc value from start with fluctuating until the end of the test.Lowest Acc; highest surface fatigue wear loss (1535 µm3 × 103).
S6 AZZ2Less severe than S5; densification mitigates cracking; ZrC pile-up/debris.19.90 m/s2; 2.50 m/s2 → stiffer than S5.Higher Acc; lower surface fatigue wear loss (1076 µm3 × 103) than S5.
HC1ZrO2 pile-up in the scar (EDS) indicating preferential transfer/exposure.19.50 m/s2; 1.75 m/s2 → moderate damping.Mid–low Acc; mid–high surface fatigue wear loss (1278 µm3 × 103).
T130AGeneral surface fatigue scar; ZrO2 pile-up at the center and at the edge of the scar; moderate fatigue wear loss relative to others.20.90 m/s2; 2.60 m/s2 → relatively stiff/elastic response.Mid–high Acc; mid surface fatigue wear loss (995 µm3 × 103).
Disclaimer/Publisher’s Note: The statements, opinions and data contained in all publications are solely those of the individual author(s) and contributor(s) and not of MDPI and/or the editor(s). MDPI and/or the editor(s) disclaim responsibility for any injury to people or property resulting from any ideas, methods, instructions or products referred to in the content.