Article

UAV Photogrammetry for Concrete Bridge Inspection Using Object-Based Image Analysis (OBIA)

by
Sara Zollini
,
Maria Alicandro
,
Donatella Dominici
*,†,
Raimondo Quaresima
and
Marco Giallonardo
DICEAA, Department of Civil, Environmental Engineering and Architecture, Via Gronchi 18, 67100 L’Aquila, Italy
*
Author to whom correspondence should be addressed.
These authors contributed equally to this work.
Remote Sens. 2020, 12(19), 3180; https://doi.org/10.3390/rs12193180
Submission received: 29 July 2020 / Revised: 21 September 2020 / Accepted: 23 September 2020 / Published: 28 September 2020
(This article belongs to the Section Remote Sensing Communications)

Abstract

:
Monitoring infrastructures is becoming an important and challenging issue. In Italy, the heritage consists of more than 60,000 bridges, which need to be inspected and detected in order to guarantee their strength and durability function during nominal lifespan. In this paper, a non-destructive survey methodology for study concrete bridges surface deterioration and viaducts is presented. Terrestrial and unmanned aerial vehicle (UAV) photogrammetry has been used for visual inspection of a standard concrete overpass in L’Aquila (Italy). The obtained orthomosaic has been processed by means of Object-Based Image Analysis (OBIA) to identify and classify deteriorated areas and decay forms. The results show a satisfactory identification and survey of deteriorated areas. It has also been possible to quantify metric information, such as width and length of cracks and extension of weathered areas. This allows to perform easy and fast periodic inspections over time in order to evaluate the evolution of deterioration and plan urgency of preservation or maintenance measures.

1. Introduction

In Europe, one of the most challenging problems is ageing infrastructure. A lot of countries are working to study technical ways to survey and monitor bridges, viaducts and highways. Italy, also due to its orographic conformation, has a great infrastructure heritage in terms of bridges, viaducts and overpasses, consisting in about 63,575 structures. Among them, approximately 19,000 belong to the railway network managed by RFI (Rete Ferroviaria Italiana); 14,575 are located on the road and motorway network managed by ANAS (Azienda Nazionale Autonoma delle Strade) and approximately 30,000 are managed by Concessionaires, Regions, Provinces and Municipalities. Infrastructures average age is over fifty years and, although they regularly provide their function, they show a constant ageing correlated to environment, service and time [1]. Since 2013, 15 bridges have collapsed in Italy, causing deaths and injuries in half of the cases [2]; among these, the most known collapse is represented by the Polcevera viaduct in Genoa (Italy) on 14 August 2018, in which 43 people died [3].
Starting from the awareness of the numerous problems related to ordinary ageing of the structures, there is the need to ensure safety and adequate performance over time. This is possible through a constant cognitive process and the application of methods and techniques that periodically monitor and control the structures. From these considerations, the need to experiment with techniques and methods for periodic inspections and controls of bridges and viaducts over time arises.
In this paper, a non-destructive methodology for the study of the surface deterioration of reinforced and prestressed concrete bridges and viaducts has been developed. Traditionally, the methodology involves concrete expertise with visual inspection and NDT (Non-Destructive Tests). Then, the survey through both terrestrial and UAV (Unmanned Aerial Vehicle) digital photogrammetry is performed. Photogrammetry consists of set of procedures which allows to acquire frames of physical objects and transform them to its metric representation [4]. Digital photogrammetry (image-based systems) is a widely relevant technique used for 3D reconstruction of architectural objects, for survey of areas and cities or for inspections and control of infrastructures. It can acquire large quantities of data ensuring accurate measurements; moreover, thanks to the development of computer vision, processing times are faster. It has been known that in the last decades, photogrammetry has undergone interesting innovations (i.e., Structure from Motion) to obtain a detailed 3D model useful for complete survey and important support for the management of structures and infrastructures [5,6,7,8,9]. Due to the development and costs reduction of UAV technologies, this technique is increasingly used for the detection of large and difficult-to-access areas. Therefore, digital photogrammetry is widely used in various fields, including bridge engineering; specifically it is an excellent solution for inspections, study and accurate assessment of the state of conservation of bridges and viaducts. Many examples about application of this technique for bridge inspection can be found in literature: the results of a pilot project which goal is monitoring the structural deformations of bridge over the Bosphorus in Istanbul in real time using ground photogrammetric technique is presented by Avsar et al. [10]. The aim of the study is to improve the efficiency of inspection and facilitate the early identification of deformations, in order to prevent the long-term deterioration of the structure. Moreover, an accurate 3D geometric model of Basento bridge (Potenza, Italy) was carried out by UAV digital photogrammetry [11]. Due to the bridge complexity in terms of the shape, the purpose of the work was to generate an accurate global bridge model and to assess the state of conservation.
In other studies, a digital photogrammetry technique is used to measure deformations during load tests [12,13,14,15]. Beyond bridges and viaducts, digital photogrammetry is also used to determine the possible presence of deteriorations on infrastructures such as dams [16,17].
An interesting investigative campaign was conducted using digital terrestrial and UAV photogrammetry on the Chia-nan concrete bridge (Tainan, Taiwan) [18]. The study aimed to identify deteriorations (such as spalling concrete) and cracking frameworks present on reinforced concrete bridge surfaces. The study started from the realization of photogrammetric model, followed by Object-Based Image Analysis (OBIA). The main purpose was to automatically identify spalling and crack patterns, achieving an accuracy of 92%–93%. On the same research line, several studies have been carried out [19,20,21,22,23,24,25]. Besides the UAV photogrammetry [26], several geomatics techniques are used in the literature for the same purpose, like total station [27,28,29], GNSS (Global Navigation Satellite System) [30,31,32] and laser scanner [33,34,35,36].
The survey by means of a total station allows to reach millimetre and sub-millimetre accuracy, with ranges of the order of hundreds of meters. However, it allows to acquire the position of isolated points and, therefore, the execution times of a large size survey are high; in addition, for high distances, reflectors (prism) have to be used. Moreover, the cost of the equipment is in the medium-high range. GNSS positioning techniques detect the points position with accuracies ranging from millimetre to centimetre, depending on the type of receiver. This technique allows to detect, as well as total station, the position of isolated points, that is where the receiver is positioned. They are generally used as GCPs (Ground Control Points). Laser Scanner allows to detect a large number of points (point cloud) with high detail, reaching millimetre/centimetre accuracies. The latest generation laser scanners are able to extrapolate, in addition to the coordinates (x, y, z) of each single point, other very important information, such as the reflectance, colour and normal direction of each single point. However, in the case of 3D survey of large and articulated objects, multiple scans are required at different points of view to avoid shadow areas. In this case, reference targets to align the clouds during the data processing are necessary. Despite the short times for data acquisition, this survey technique requires more time for data processing operations (noise cleaning, cloud alignment, meshing). This technique is adopted not only for the rapid and accurate survey of the geometry of bridges and viaducts, but also for the study of deterioration on the bridges and viaducts surfaces. This application is particularly interesting from the point of view of the conservation, as it allows to carry out non-destructive checks with speed, accuracy and objectivity, repeated over time. However, traditional laser scanner survey is often not enough and it is therefore integrated with RGB image analysis in order to have more information. In this case, the cost of the equipment is higher.
Therefore, the choice of the suitable technique is made considering the type of problem to be detected, the accuracy to be achieved, times, costs and other characteristics such as flexibility and accessibility. Currently, there are no relevant techniques that can individually satisfy all the requirements. It is advantageous, indeed, using different techniques in synergy. However, in literature, the most used and satisfactory techniques are photogrammetry and laser scanning. Of course, it is necessary to validate the results with in situ visual inspection carried out by expertise.
In the present study, terrestrial and UAV digital photogrammetry has been used for a visual inspection of a bridge in L’Aquila (Italy). The technique guarantees levels of precision suitable for the purpose. In addition, acquisition times are shorter and do not require the use of targets. Finally, although the data processing times are greater than the laser scanner survey, this technique has lower overall costs. Moreover, the technique provides more information thanks to the correspondence between chromatic characteristics and position of the detected points. These features make photogrammetry more flexible than the laser scanner. Then, in this paper, in situ decay and terrestrial and UAV photogrammetry are performed for the survey. Secondly, the high quality images obtained by photogrammetry are subsequently processed through Agisoft PhotoScan Pro software. The processing provides point clouds (sparse and dense), 3D photogrammetric model and orthomosaic of the study area. About orthomosaic, after contrast improvement and edge detection operations, the image analysis is performed using OBIA, by means of the open source software Orfeo ToolBox (OTB). OBIA, in alternative to pixel based method, is an object-based image analysis method, which means that the units are image objects instead of pixels [37]. Objects are vector polygons generated from the raster image through the clustering of pixels having similar characteristics [38]. The final result will be a vector map consisting of all the objects. In addition to the spatial coordinates and spectral characteristics, semantic information are associated to the object. OBIA technique consist in two main steps: segmentation and classification [24]. Segmentation subdivides an image into separate portions (objects or segments). Classification is defined as the process that provides thematic maps within the image. The term “thematic map” indicates an image consisting of a set of points (pixels) to which, in addition to the spatial coordinates, a class (or category or label) is associated; the class can be representative of several characteristics. The OBIA technique allows to analyze and classify the images by exploiting not only the radiometric information of the individual pixels, as happens for the pixel-based approach, but also considers the spatial (dimensions, mutual distances, number of pixels per object, etc.) and topological information [37].
The presented methodology allows us to detect and classify the presence of deteriorated areas (spalling areas, crack patterns, etc.) on the object surface [24,39,40]. The results show the potential of the method for inspections and periodic control of the structures.

2. Materials and Methods

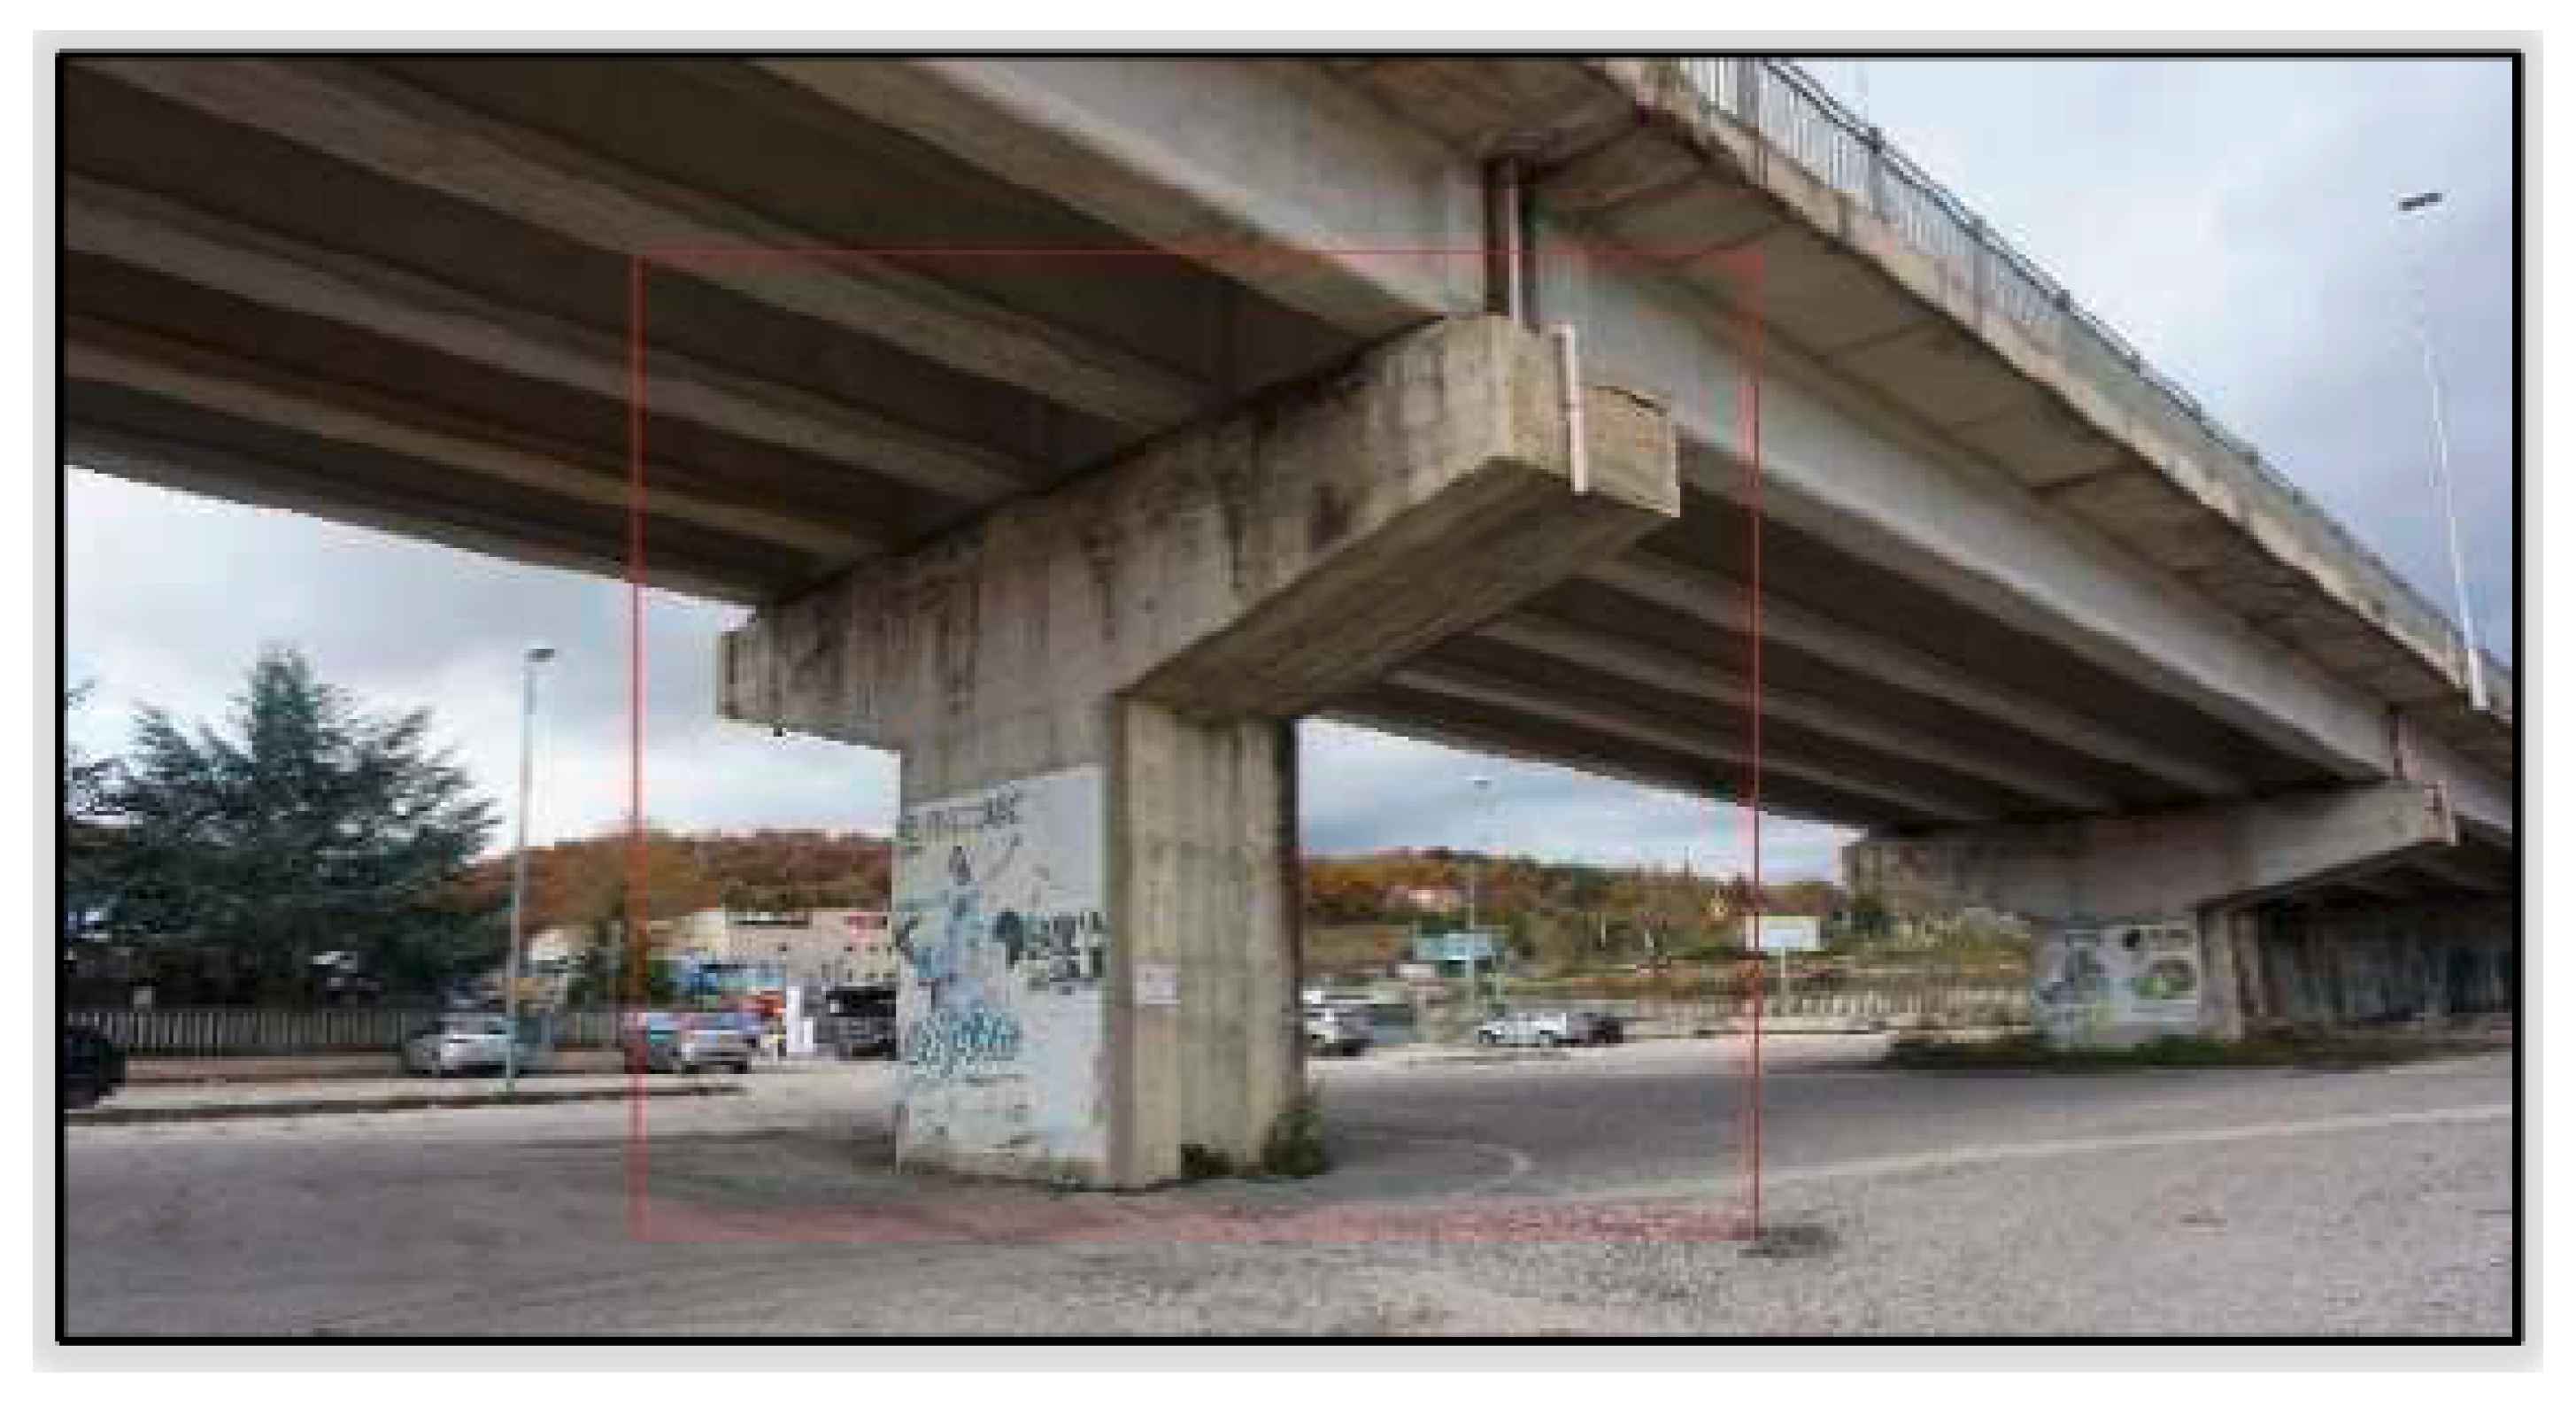
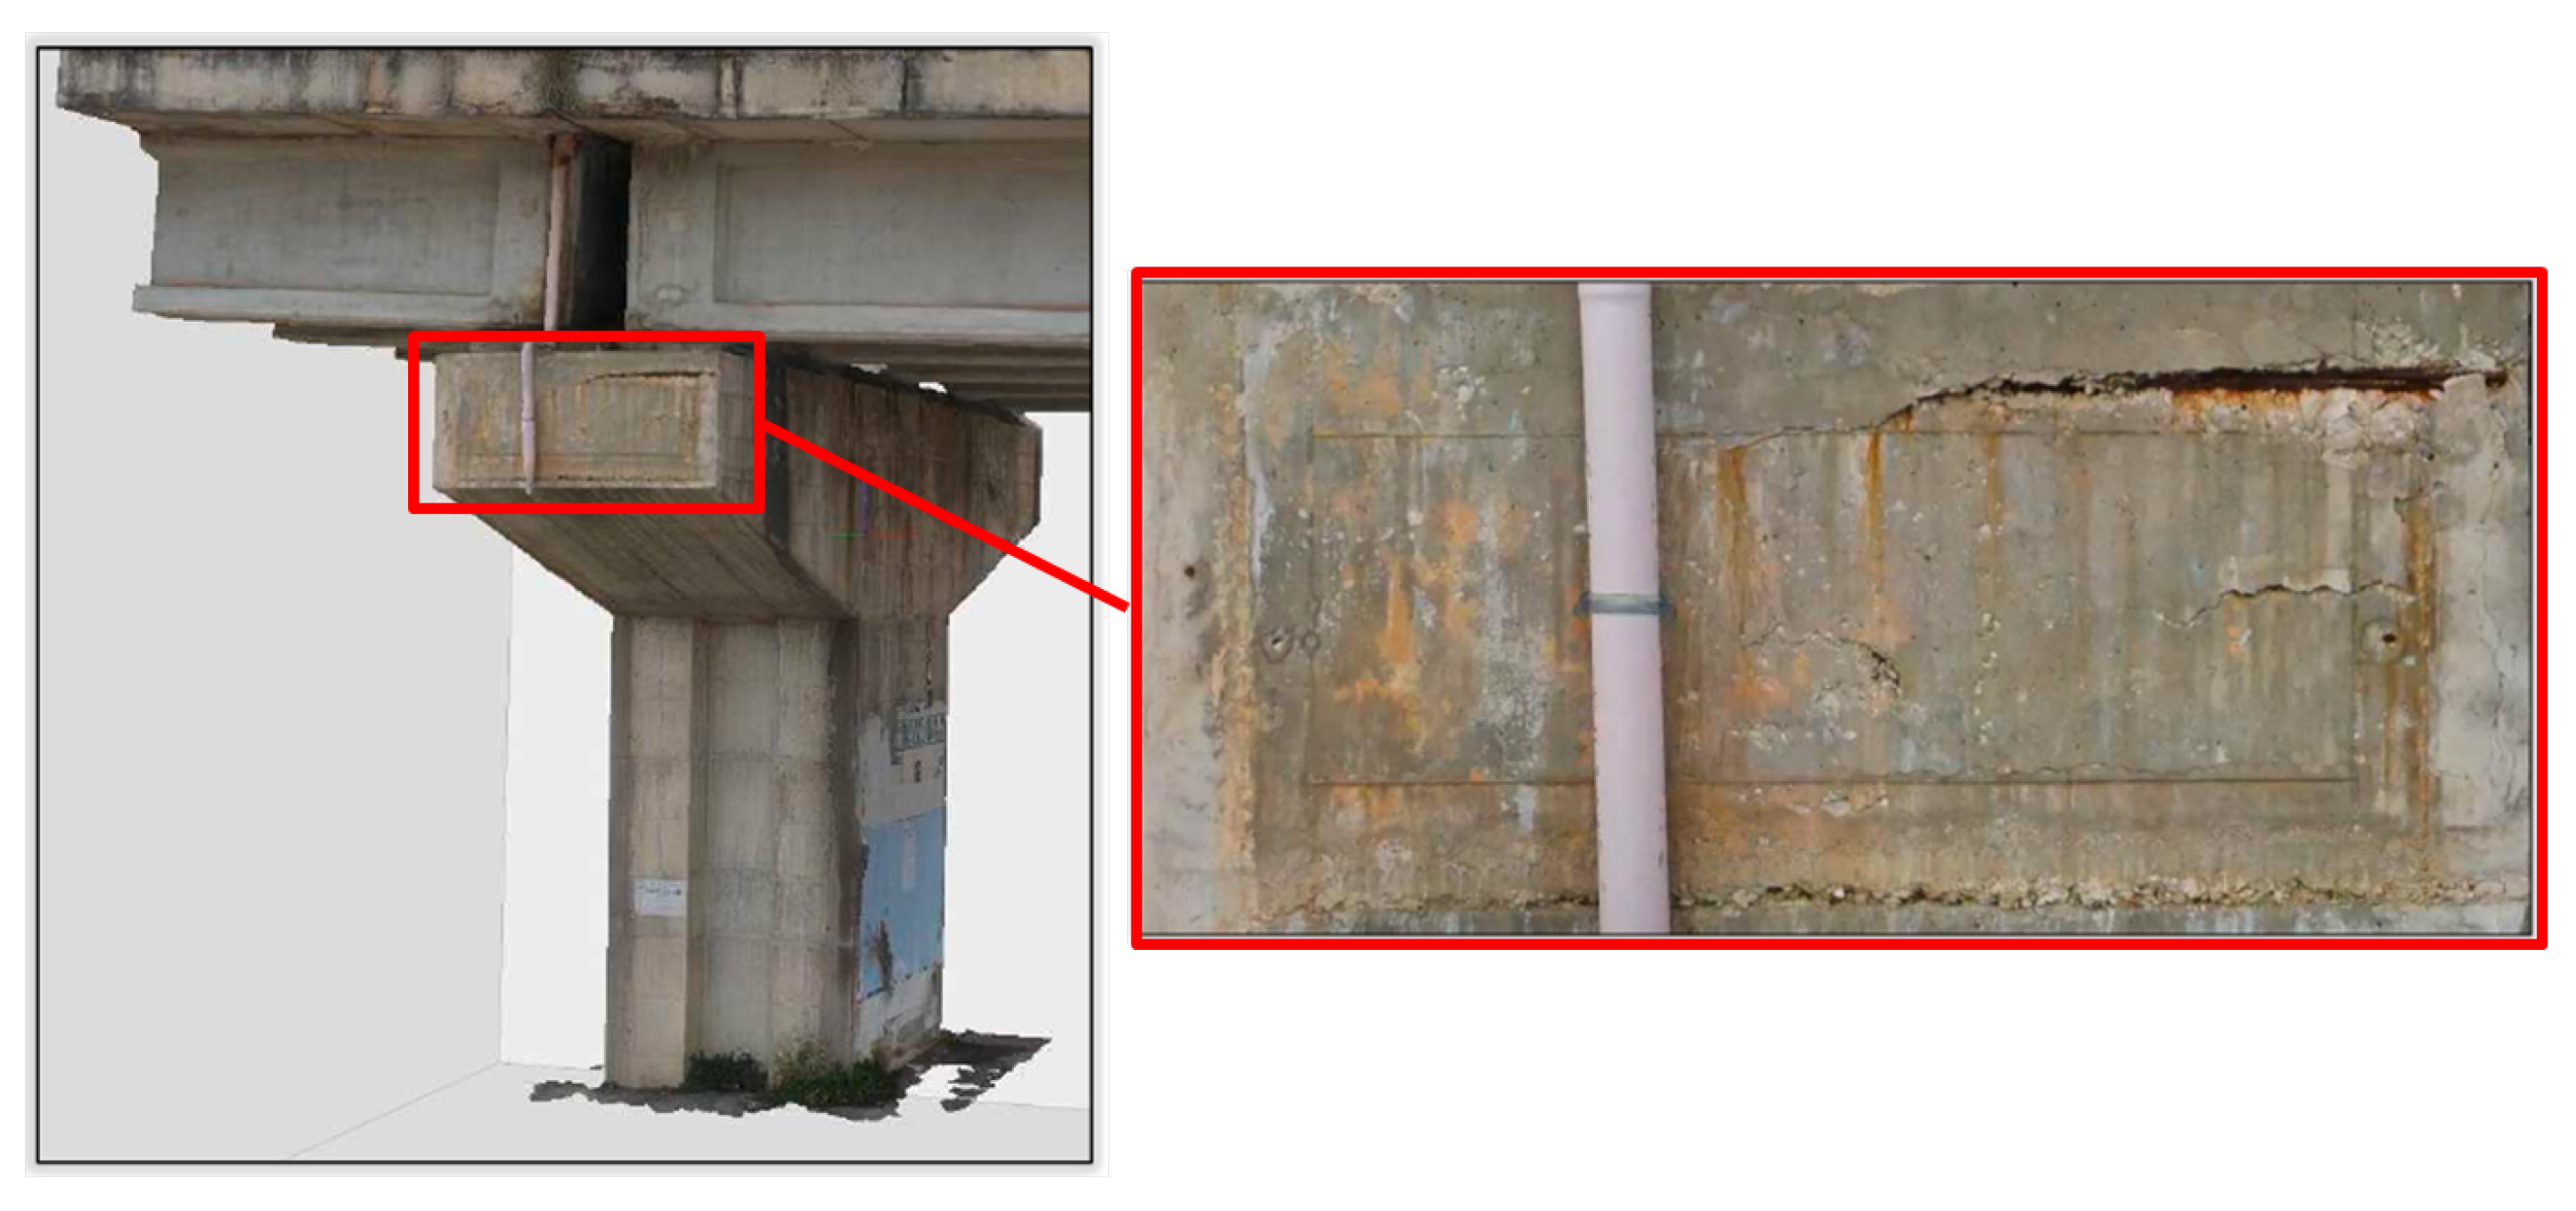
In this work, the overpass located in Via Campo di Pile, industrial center of L’Aquila (Italy) (Figure 1), was studied. It is developed in the N-S direction, between SS.17 and Via Salaria Antica Ovest (L’Aquila, Italy) and it was built between the late 80 s and early 90 s. Overall length of the straight structure is 225 m, consisting in 9 spans, with supported beams and 50 years nominal lifespan. Pillars are monolithic elements made of reinforced concrete composed of vertical and horizontal parts, which have rectangular shape section 2 × 3 m and variable height according to the orography. The overpass is surmounted by 5 symmetrical beams for each span, of rectangular section with variable height from 1 m to 2 m and base of 2 m; the length from the interlocking section is 3.8 m.
After a preliminary inspection of the whole overpass structure, the second pillar in the N-S direction was chosen as representative (Figure 2).
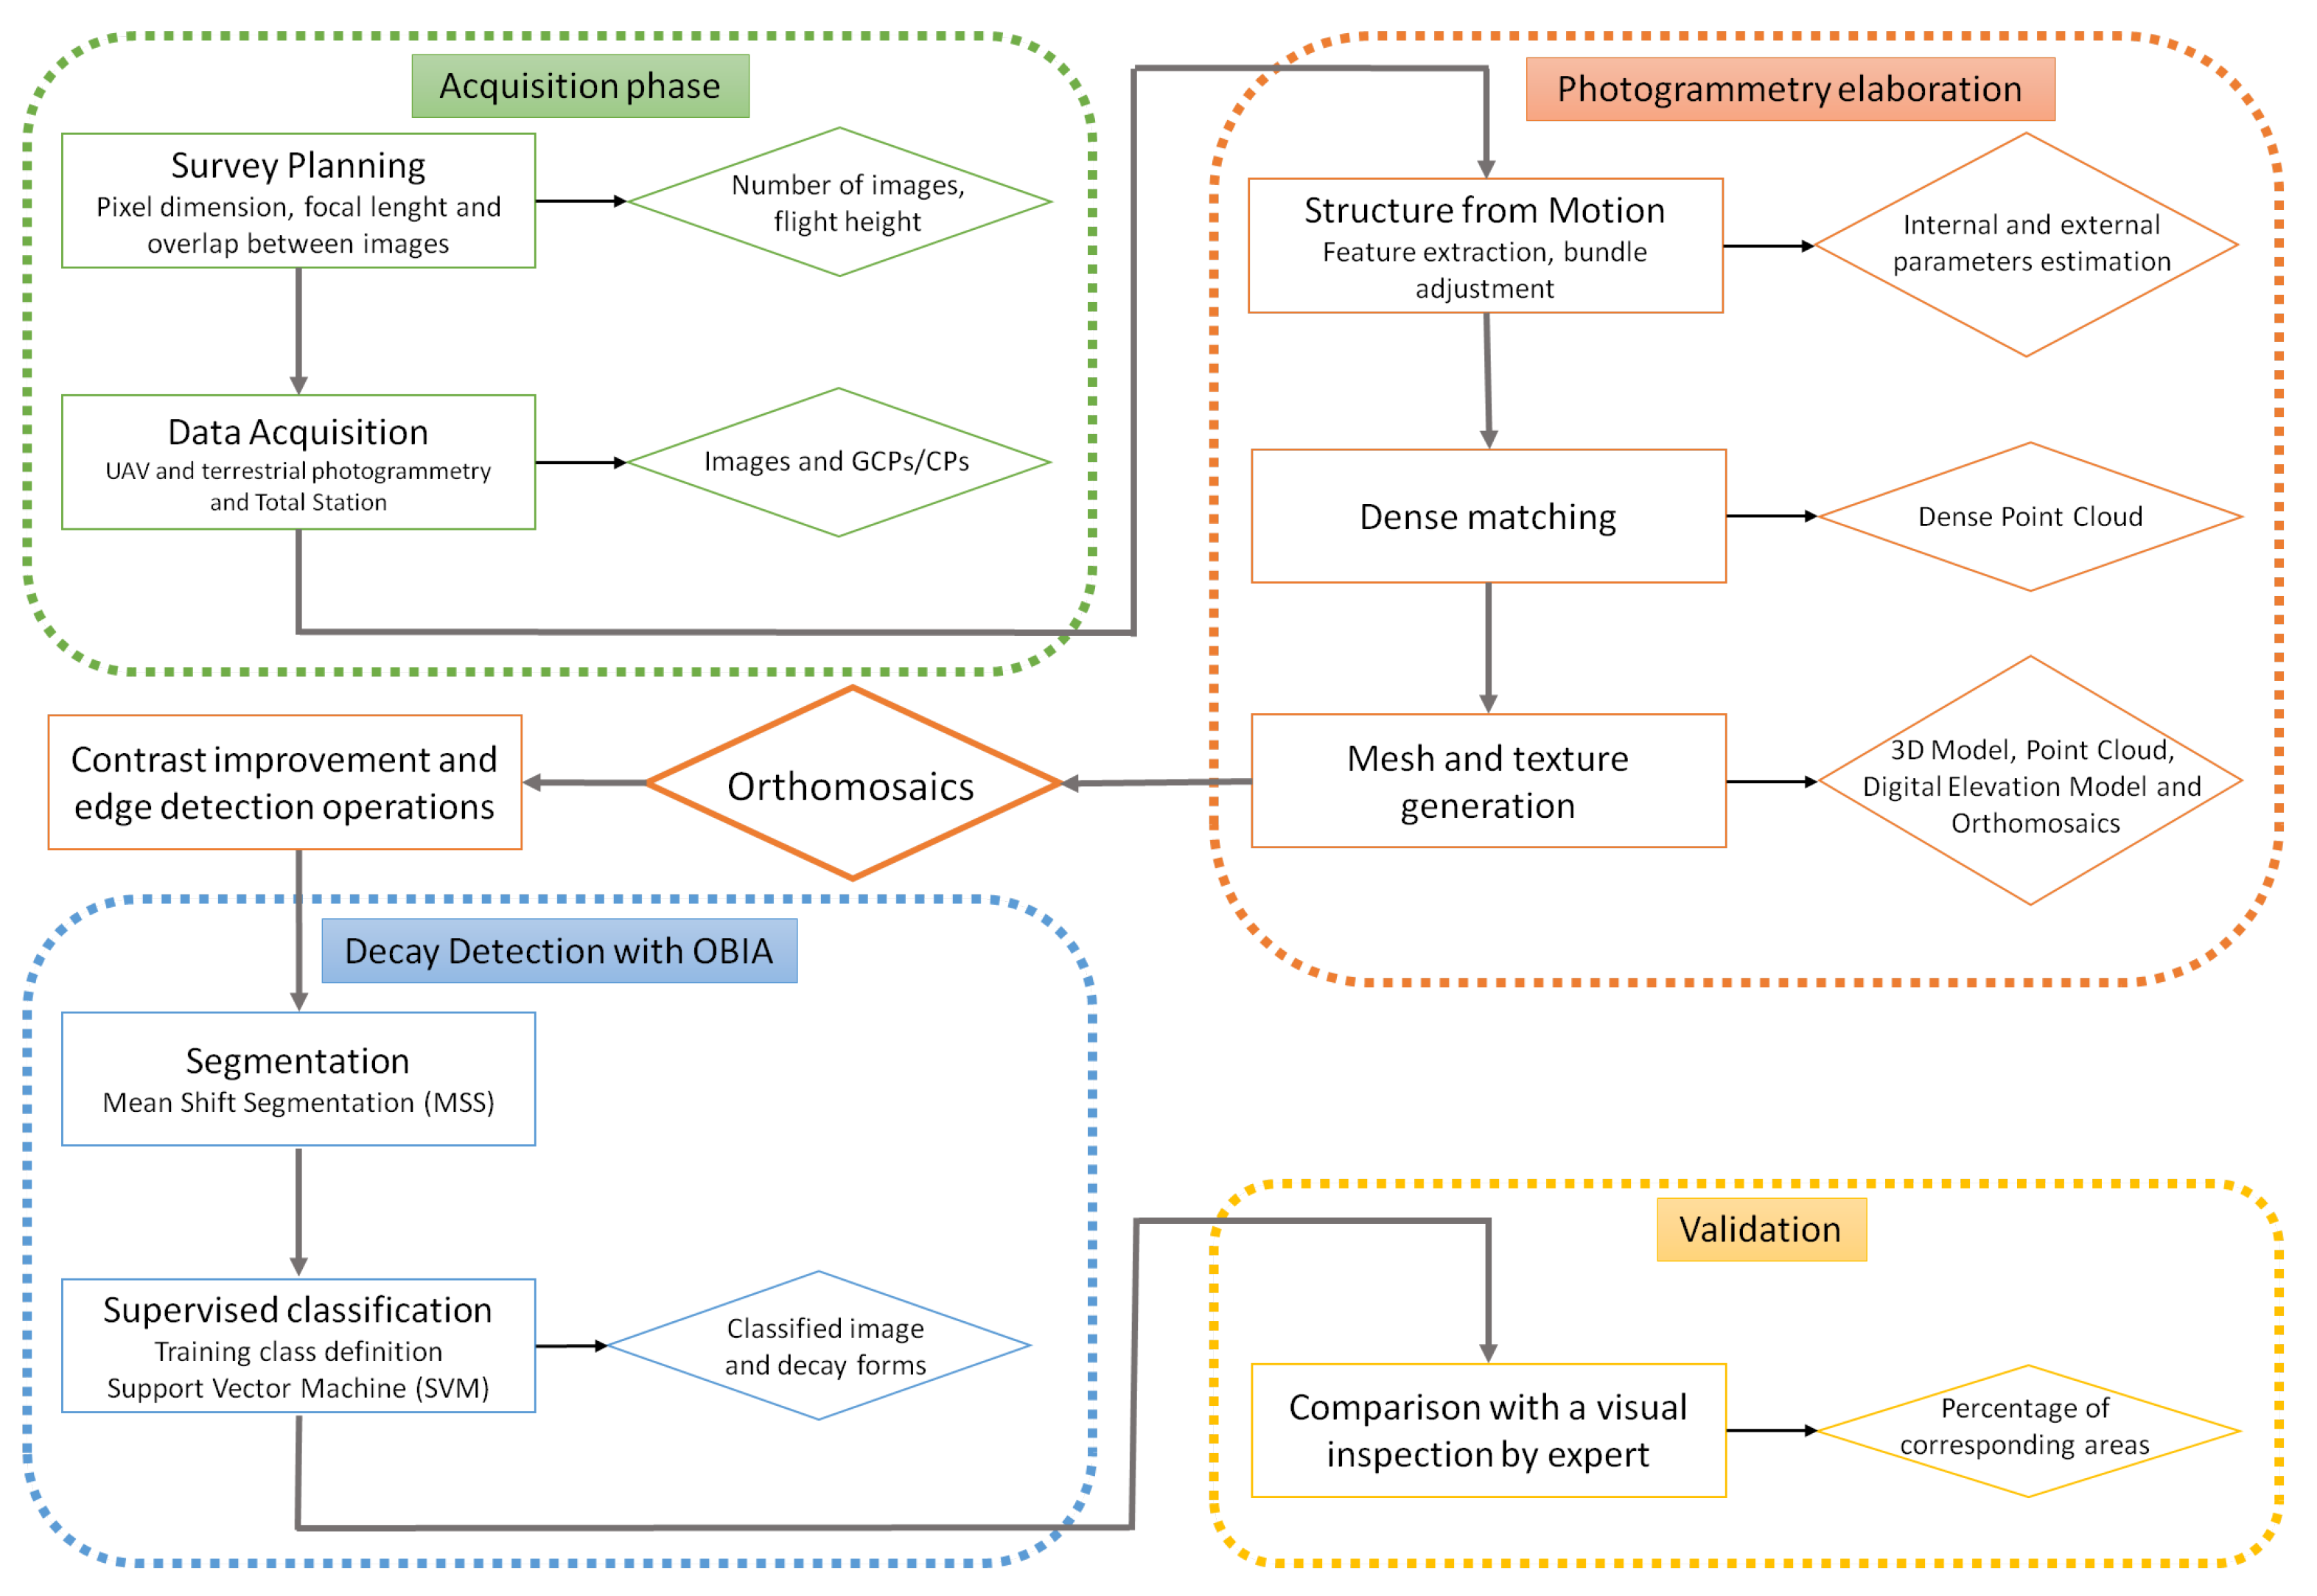
An accurate visual inspection on all overall structure allowed to classify and quantify the decay forms. On a Region Of Interest (ROI), chosen because it shows few but difficult pathologies (cracks) to be detected, an accurate mapping of the surface was carried out; on the base of the reliefs, the rate of each identified altered form was estimated according to practice procedures. Later, the presence of superficial pathologies in the investigated element was identified and detected using digital photogrammetry technique and OBIA. The methodology flowchart is presented in Figure 3.
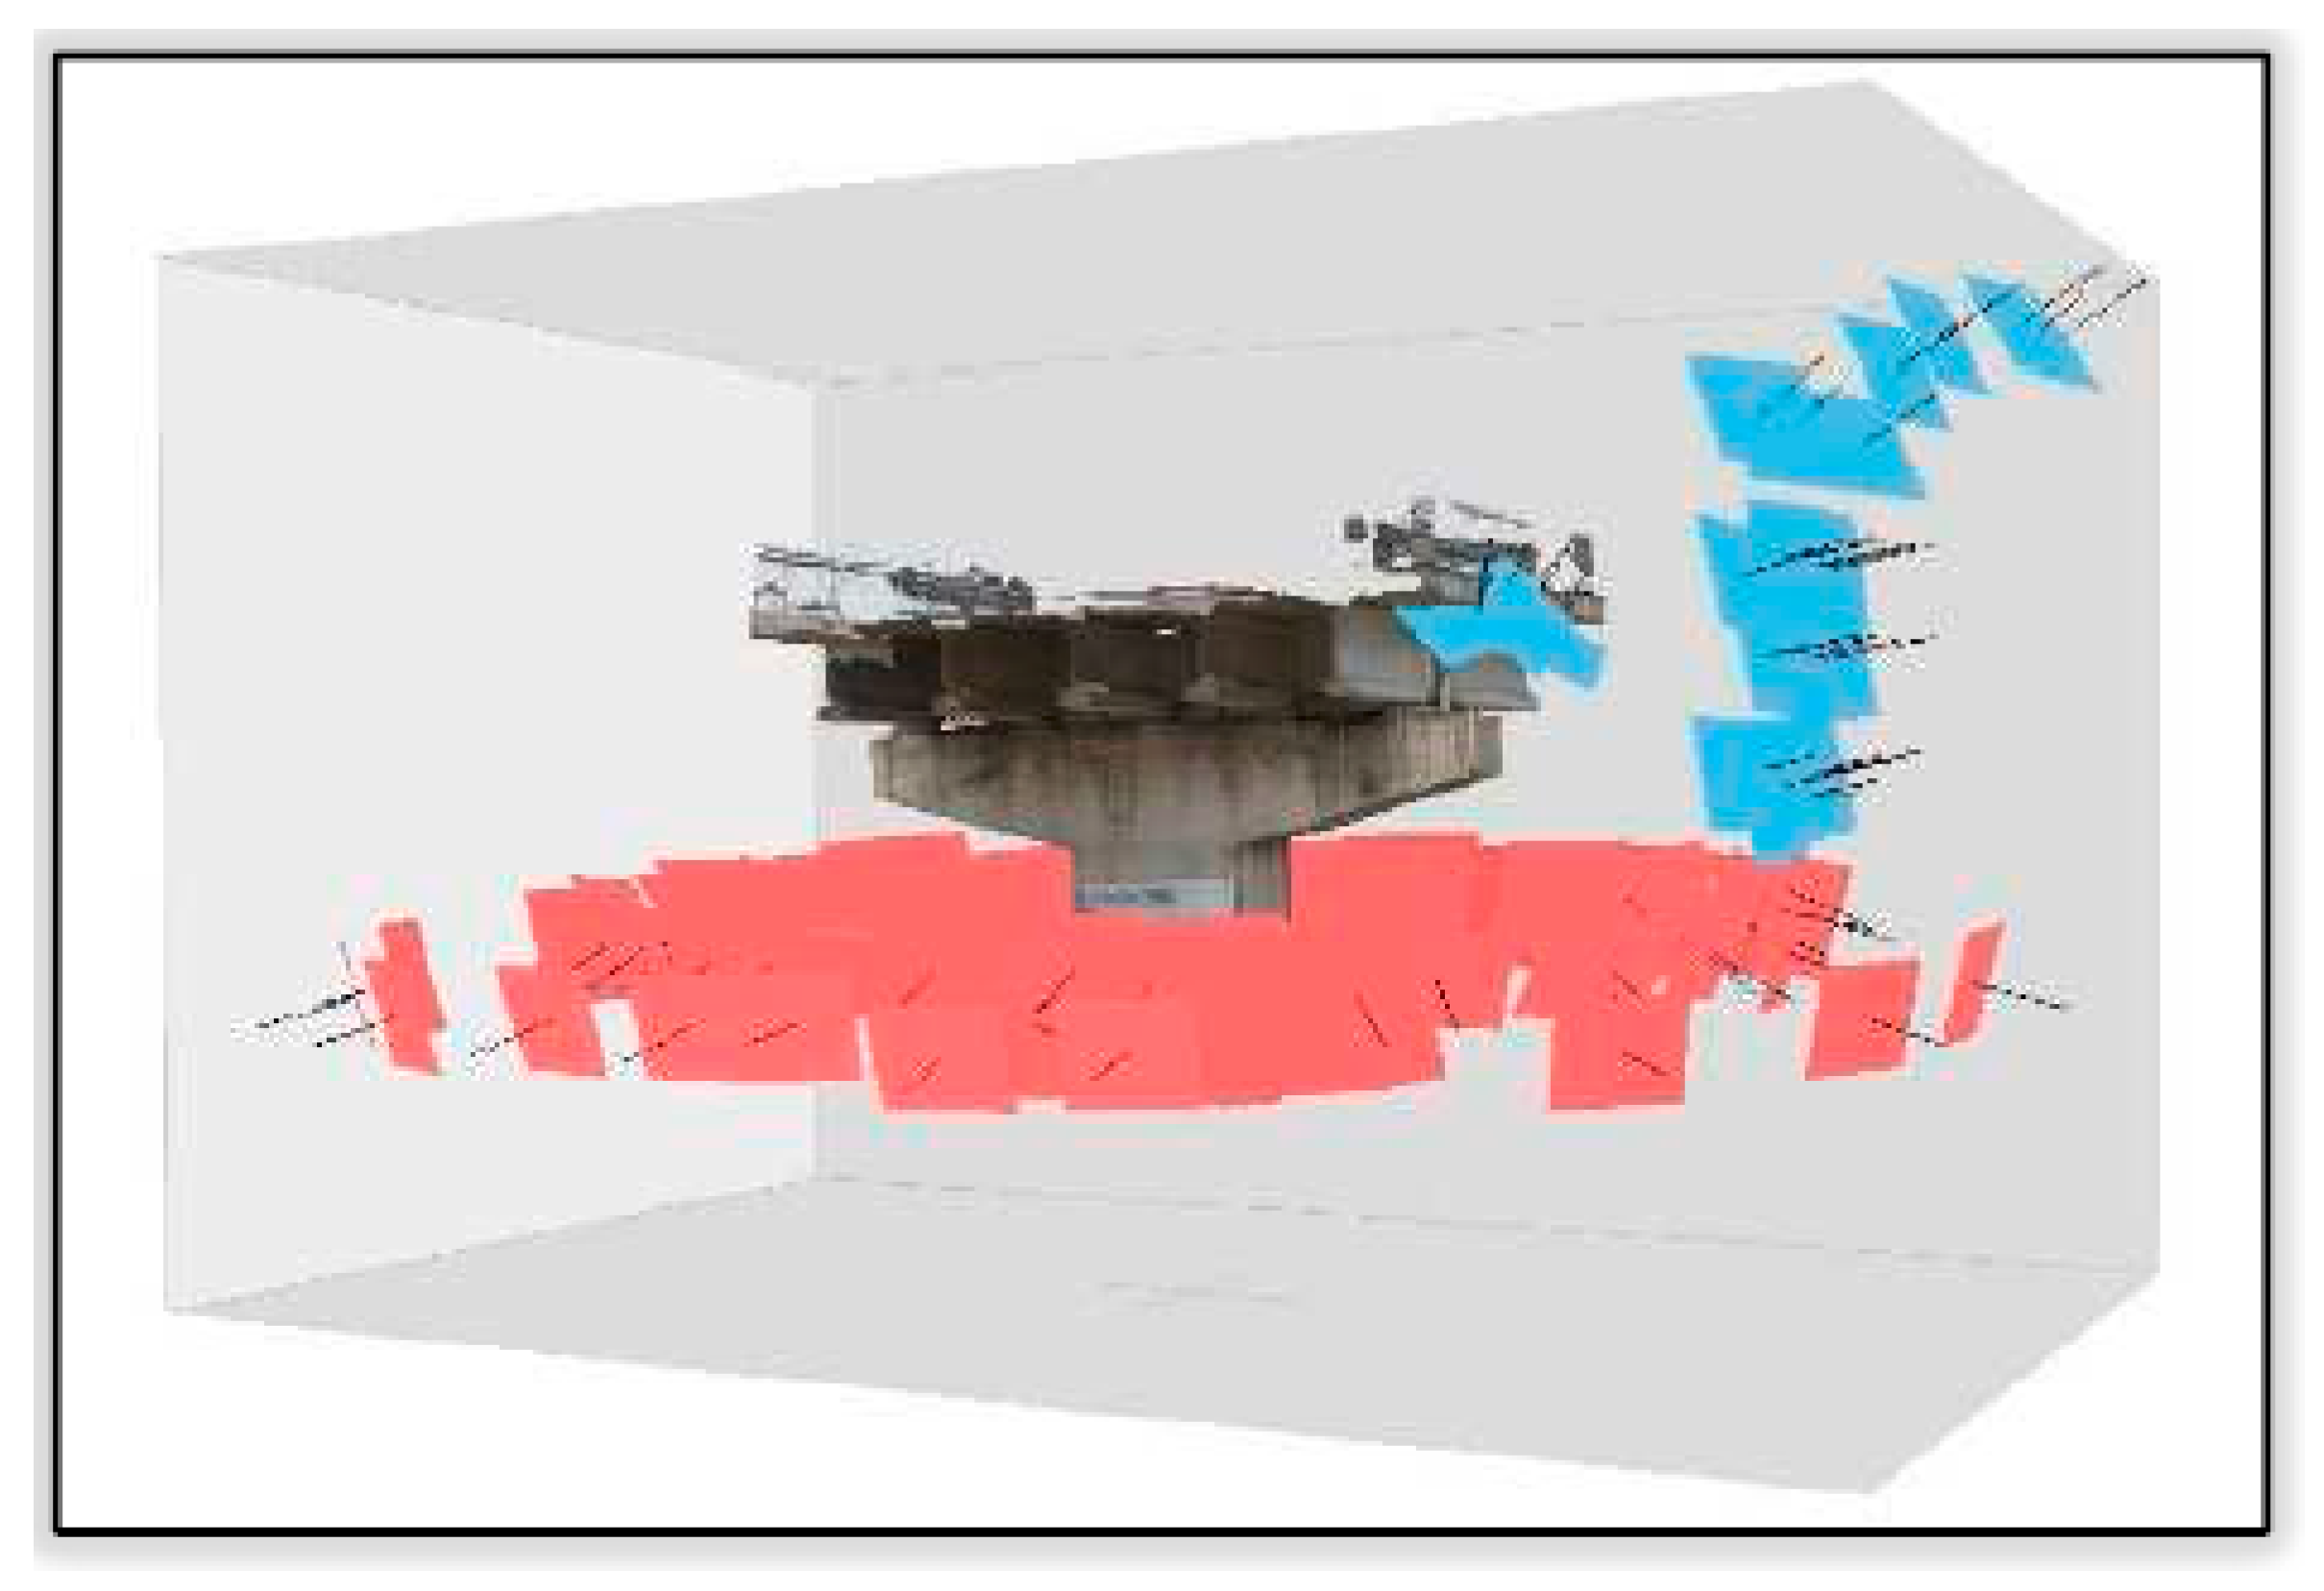
The first step of acquisition phase consists of survey planning. Starting from the knowledge of camera parameters (focal length and sensor dimension, see Table 1) and imposing a GSD (Ground Sample Distance) equal to 1 mm, survey distance of about 5 m is calculated, with an adequate longitudinal and transverse overlap. 125 images, 98 from the ground (red ones in Figure 4) and 27 oblique aerial from UAV (blue ones in Figure 4), were acquired by terrestrial and UAV survey. UAV characteristics are reported in Table 1. In order to scale the model to real world and to evaluate the quality of the survey, several Ground Control Points (GCPs) and Check Points (CPs) were acquired with Total Station TS30 Leica. Acquisition step required around 4 h of work.
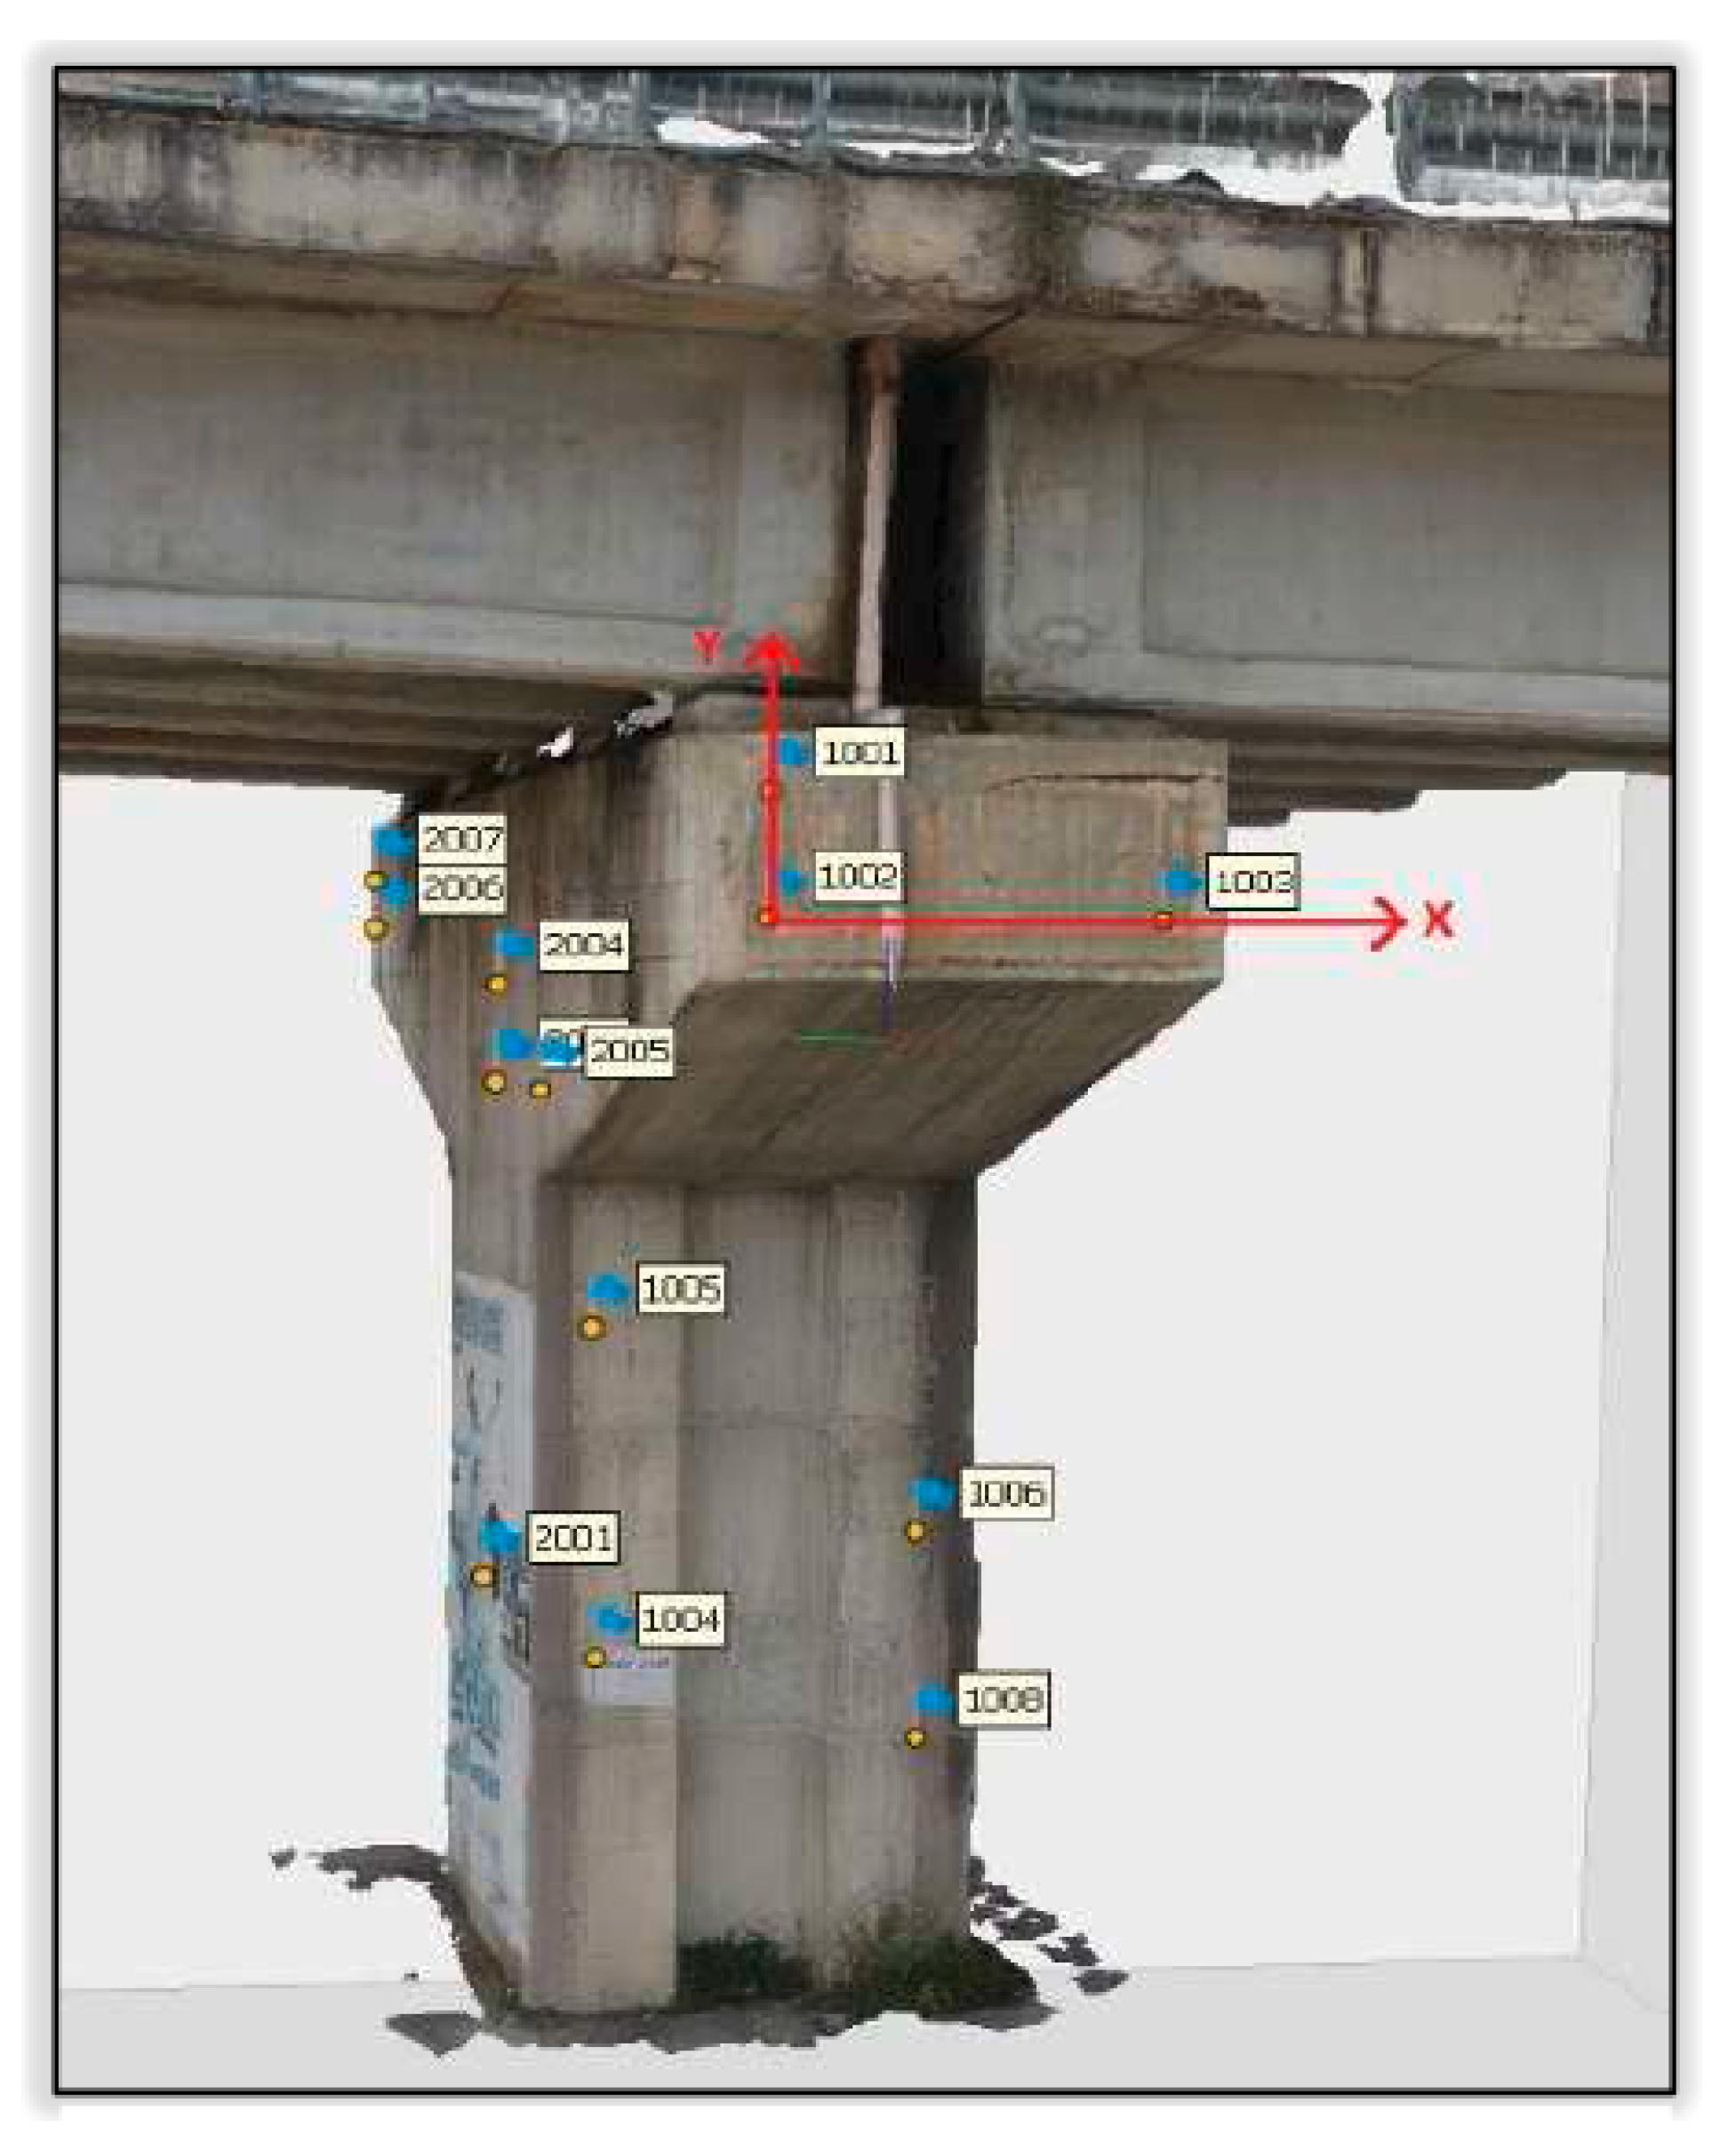
Data were elaborated by means of Agisoft Photoscan Pro [41]. An initial check on the photos quality is carried out by the software, according to parameters such as sharpness, lighting conditions, stability. A value ranging from 0 (poor quality) to 1 (optimal quality) is given and images with values greater than 0.6/0.7 are selected. In this case study, only 5 images were removed. Then, the 3D model of the pillar was obtained following the processing chain of the elaboration phase (Figure 3). It consists of bundle adjustment, dense point cloud generation and mesh and texture creation. In this step, 9 GCPs were included in the elaboration to scale the 3D model and 4 CPs were used to evaluate the quality of the obtained photogrammetric model (Figure 5), with RMS (Root Mean Square) error of about 1.5 cm.
The OBIA was tested on a representative portion of the pillar. For this purpose, a high definition orthomosaic is generated starting from the 3D model, identifying a projection plane through three known points (Figure 5). Image processing operations for contrast enhancement and edge detection were carried out by Orfeo ToolBox (OTB) 7.1.0 open source software.
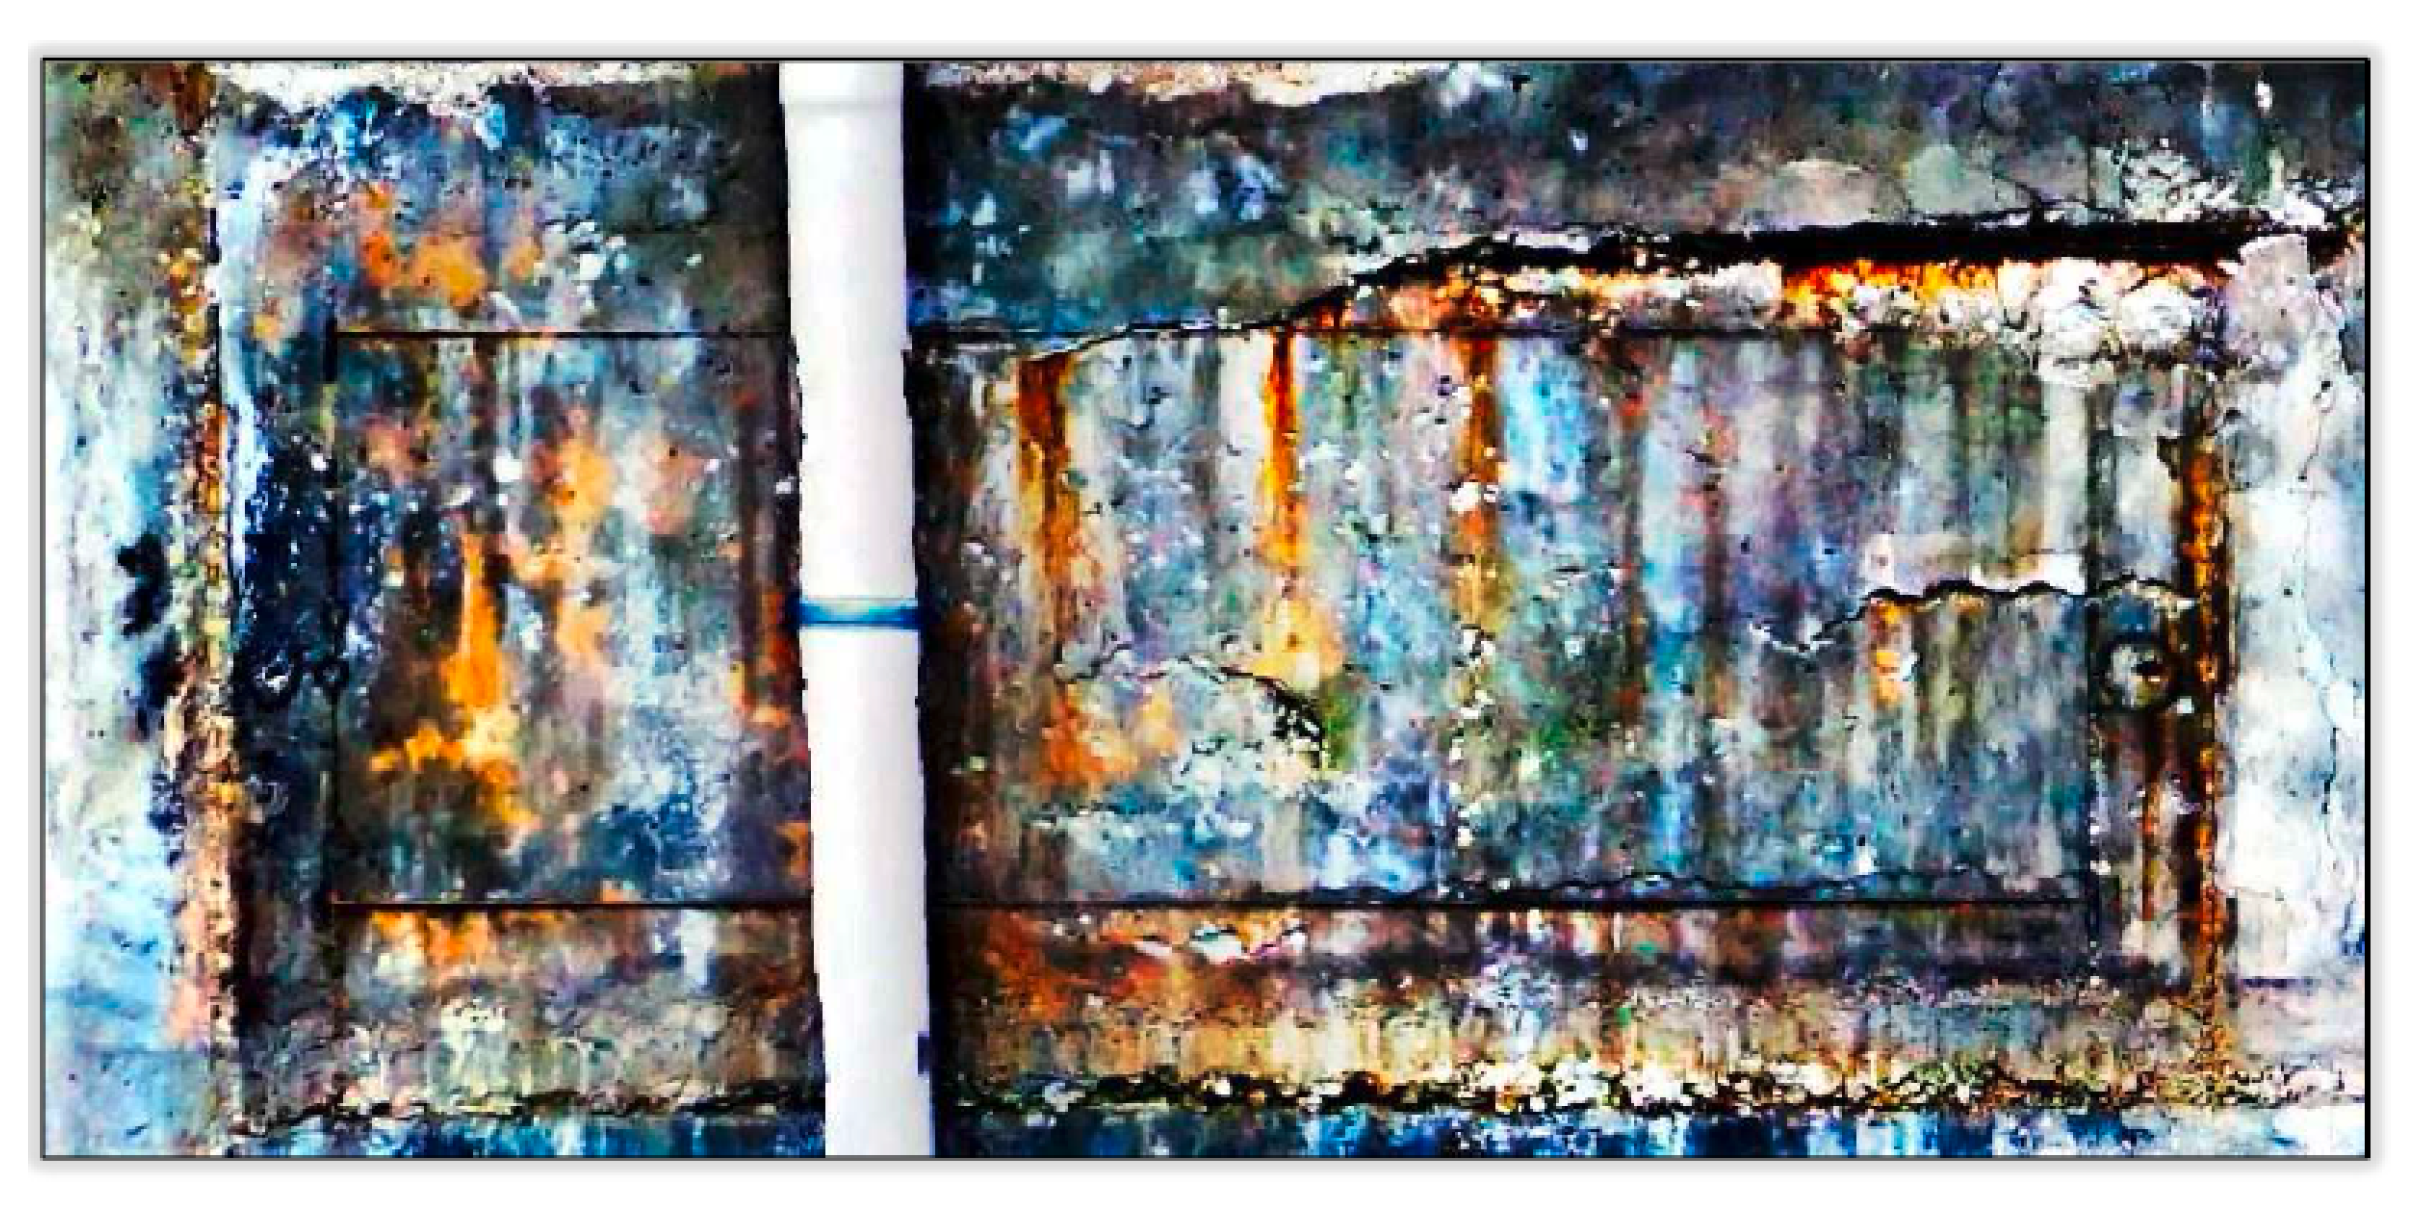
In order to discriminate altered and unaltered areas, contrast is improved through the OTB “ContrastEnhancement” function [42]. The purpose of this algorithm is to emphasize or improve the contrast to facilitate the extraction of information which is not evident in the original images, in order to support the image analysis operations [4]. In this case study, for contrast enhancement, linear stretch algorithm was used instead of non-linear improvement methods [43], according to Rau et al. [18].
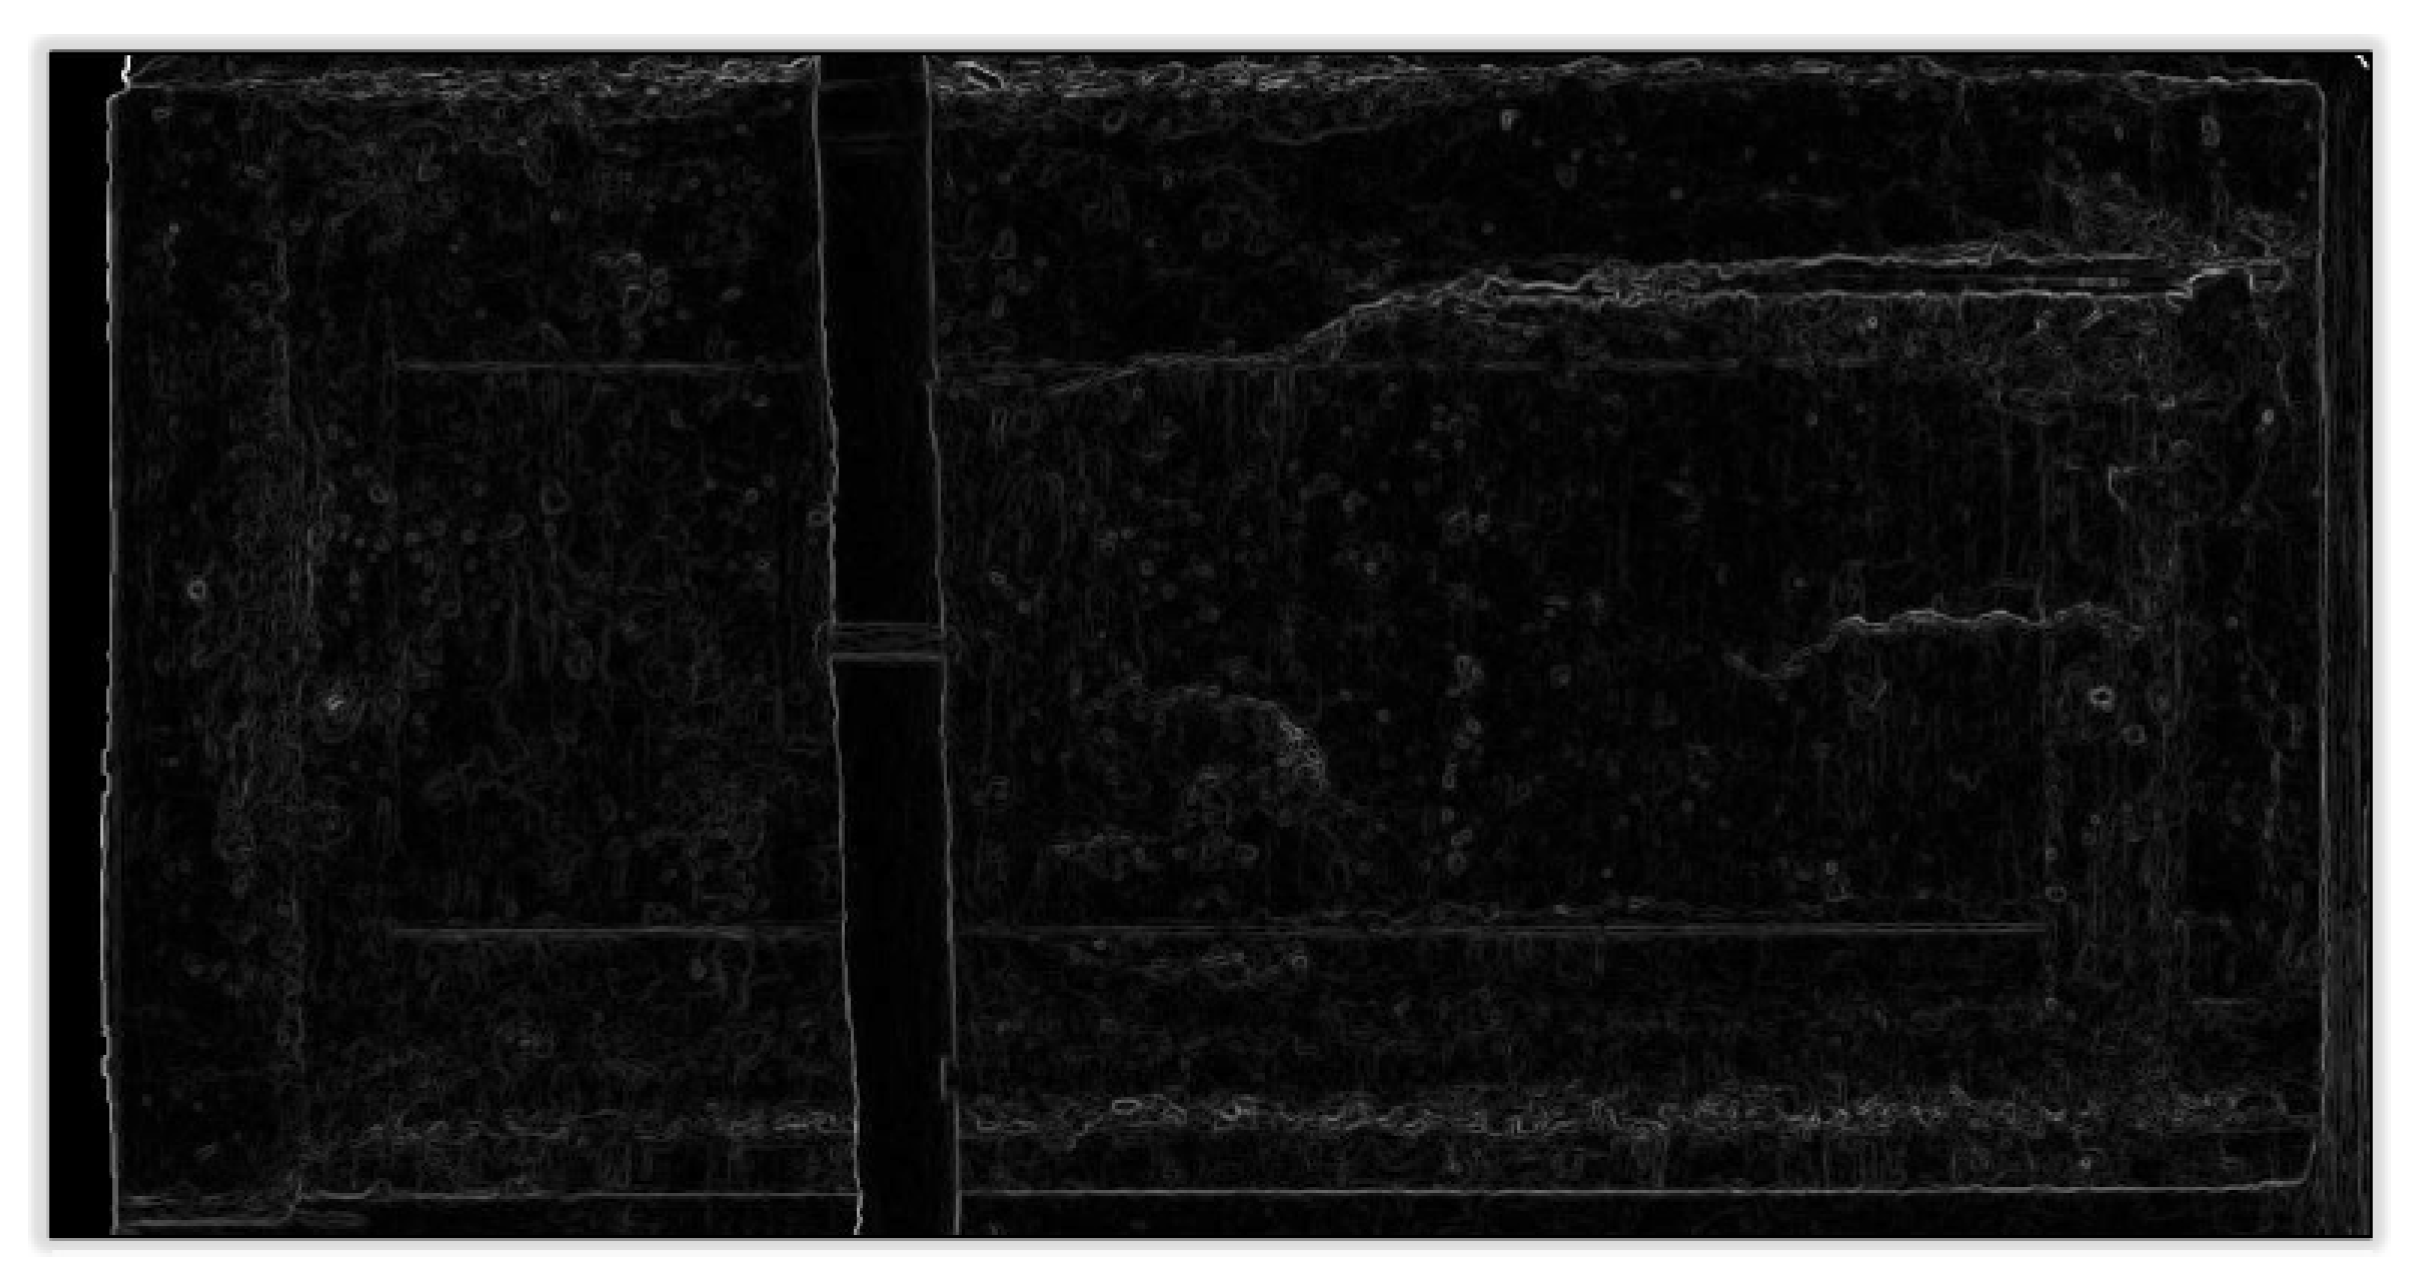
Then, in order to emphasize the edges where there are sudden changes in light intensity of a digital image, like the edge between a crack (low intensity area) and the surrounding unaltered concrete surface (high intensity area), edge detection is performed [44,45]. It was therefore used to help OBIA segmentation phase, through the OTB “EdgeExtraction” function [46].
Finally, OBIA is performed. The main goal is to obtain a vector map consisting of differentiated set of objects (cracks, spalling areas, stains). For every object, in addition to spatial coordinates and spectral characteristics, semantic information is associated. OBIA consists of two steps, segmentation and classification [47]. In segmentation, vector objects consisting in groups of neighbour pixels that have similar characteristics (such as brightness, color, texture) are created. Segments are vector polygons [48]. This process is bottom-up: it starts from a pixel to join other similar pixels to become an object until predefined homogeneity criteria are reached [18]. It is important to underline that the segments, composed by many pixels, have additional spectral information compared to the individual pixels (like average, minimum and maximum values, variance and so on). They also contain spatial information, like mutual distances between objects, number of pixels which compose the object, topology, and so forth [37]. Image segmentation is generally divided into four categories [49] (point-based, edge-based, region-based and hybrid approaches) and there are several segmentation algorithms, like the “watershed”, the “Mean-Shift Segmentation” (MSS), the “fractal net evolution” approach, and the “hierarchical segmentation/recursive hierarchical segmentation” [24]. In the case study, the MSS algorithm present in the Orfeo ToolBox (OTB) open source library was used. The MSS algorithm generates groups of adjacent pixels (segments) having similar radiometric values. The set of segments will constitute a vector map, where the radiometric (spectral mode, mean, variance, etc.) and spatial characteristics deriving from the pixels are associated for each segment. It is composed by three main steps [50,51,52]. In order to carry out the segmentation using the MSS algorithm there are three main parameters to be set:
  • spatial radius h s (expressed in pixel unit), affects the connectivity of the elements and the smoothness of the generated segments. It controls distance (number of pixels) that is considered when grouping pixels into image segments [53]. The choice depends on the size of the objects in the image;
  • range radius h r (expressed in radiometry unit), affects the number of segments. It refers to the degree of spectral variability (distance in the n-dimensions of spectral space) allowed in an image segment. The choice depends on the contrast (the lower the contrast, the lower h r should be);
  • minimum region size M (expressed in pixel unit), is the minimum size of the region and it affects noise; the smaller it is, the larger the small objects will be. It is chosen according to the size of the smallest objects in the image to be segmented.
The OBIA second step is classification. The image has been segmented into appropriate image objects, then it is classified by assigning each object to a class (label) based on characteristics and criteria related to each object or their relationship [48] set by the expert. Since the classes actually present on the scene (cracks, spalling areas, un-deteriorated concrete, etc.) are known, in the case study, supervised classification technique was performed [37,54]. The concrete expert provides a series of practical examples (training data) on which the algorithm builds a decision model to classify the segments of the entire scene. In the OBIA, the classification will concern objects (segments) which, as explained above, are areas (vector polygons) consisting of grouped pixels with similar characteristics; therefore, the training examples will be training areas.
Numerous advantages of this technique have led to prefer OBIA over other techniques. Segmentation divides an image into objects: human eyes conceptually organize what they see in the same way. Moreover, by creating objects, the computational burden is less than other techniques, like pixel-based ones. In addition, image objects take into account many features (like shape, texture, relationship with other objects) which are not present in single pixels. As last, segmentation reduces the spectral variability between the classes [37]. On the contrary, segmenting a large dataset could be a challenge and it is an ill-posed problem, which means that it has not unique solution [54]. Despite of these, for the presented case study, where the dataset is not large, OBIA presents the advantage to discriminate different deteriorated areas on the infrastructure surface.

3. Results

The overall structure presents a good state of conservation; its deterioration is mainly due to decay and weathering related to ageing phenomena; in particular concrete surfaces are affect by: cracks, map cracking, spalling, washout, exposed rebars, rock pockets, scaling, dusting, corrosion of rebars, honeycombs, efflorescences, leaching, detachments and biological colonization. In the considered ROI (Figure 6), washout, cracks, spalling, detachment, rock pockets, exposed rebar, map cracking were detected.

3.1. Digital Terrestrial and UAV Photogrammetry Results

The results of the data processing are the high resolution 3D photogrammetric model and the ROI high resolution orthomosaic ( 1.95 mm/pixel ) (Figure 6).

3.2. Image Processing Techniques

3.2.1. Image Contrast Enhancement

The result of contrast enhancement on orthomosaic ROI, using linear stretch algorithm, is reported in Figure 7.
Edge detection result, reported in Figure 8, is obtained by means of Sobel filter, because it allowed to obtain a better outcome from the point of view of noise, compared to the other filters. The other filters in OTB, gradient and Touzi, were also tested. The first one computes the gradient magnitude of the image at each pixel; the second one, instead, is more suitable to reduce speckle in radar images [55]; Sobel operator calculates the image gradient and then finds the magnitude of the gradient vector, reducing outlier noises.

3.2.2. OBIA: Segmentation and Classification

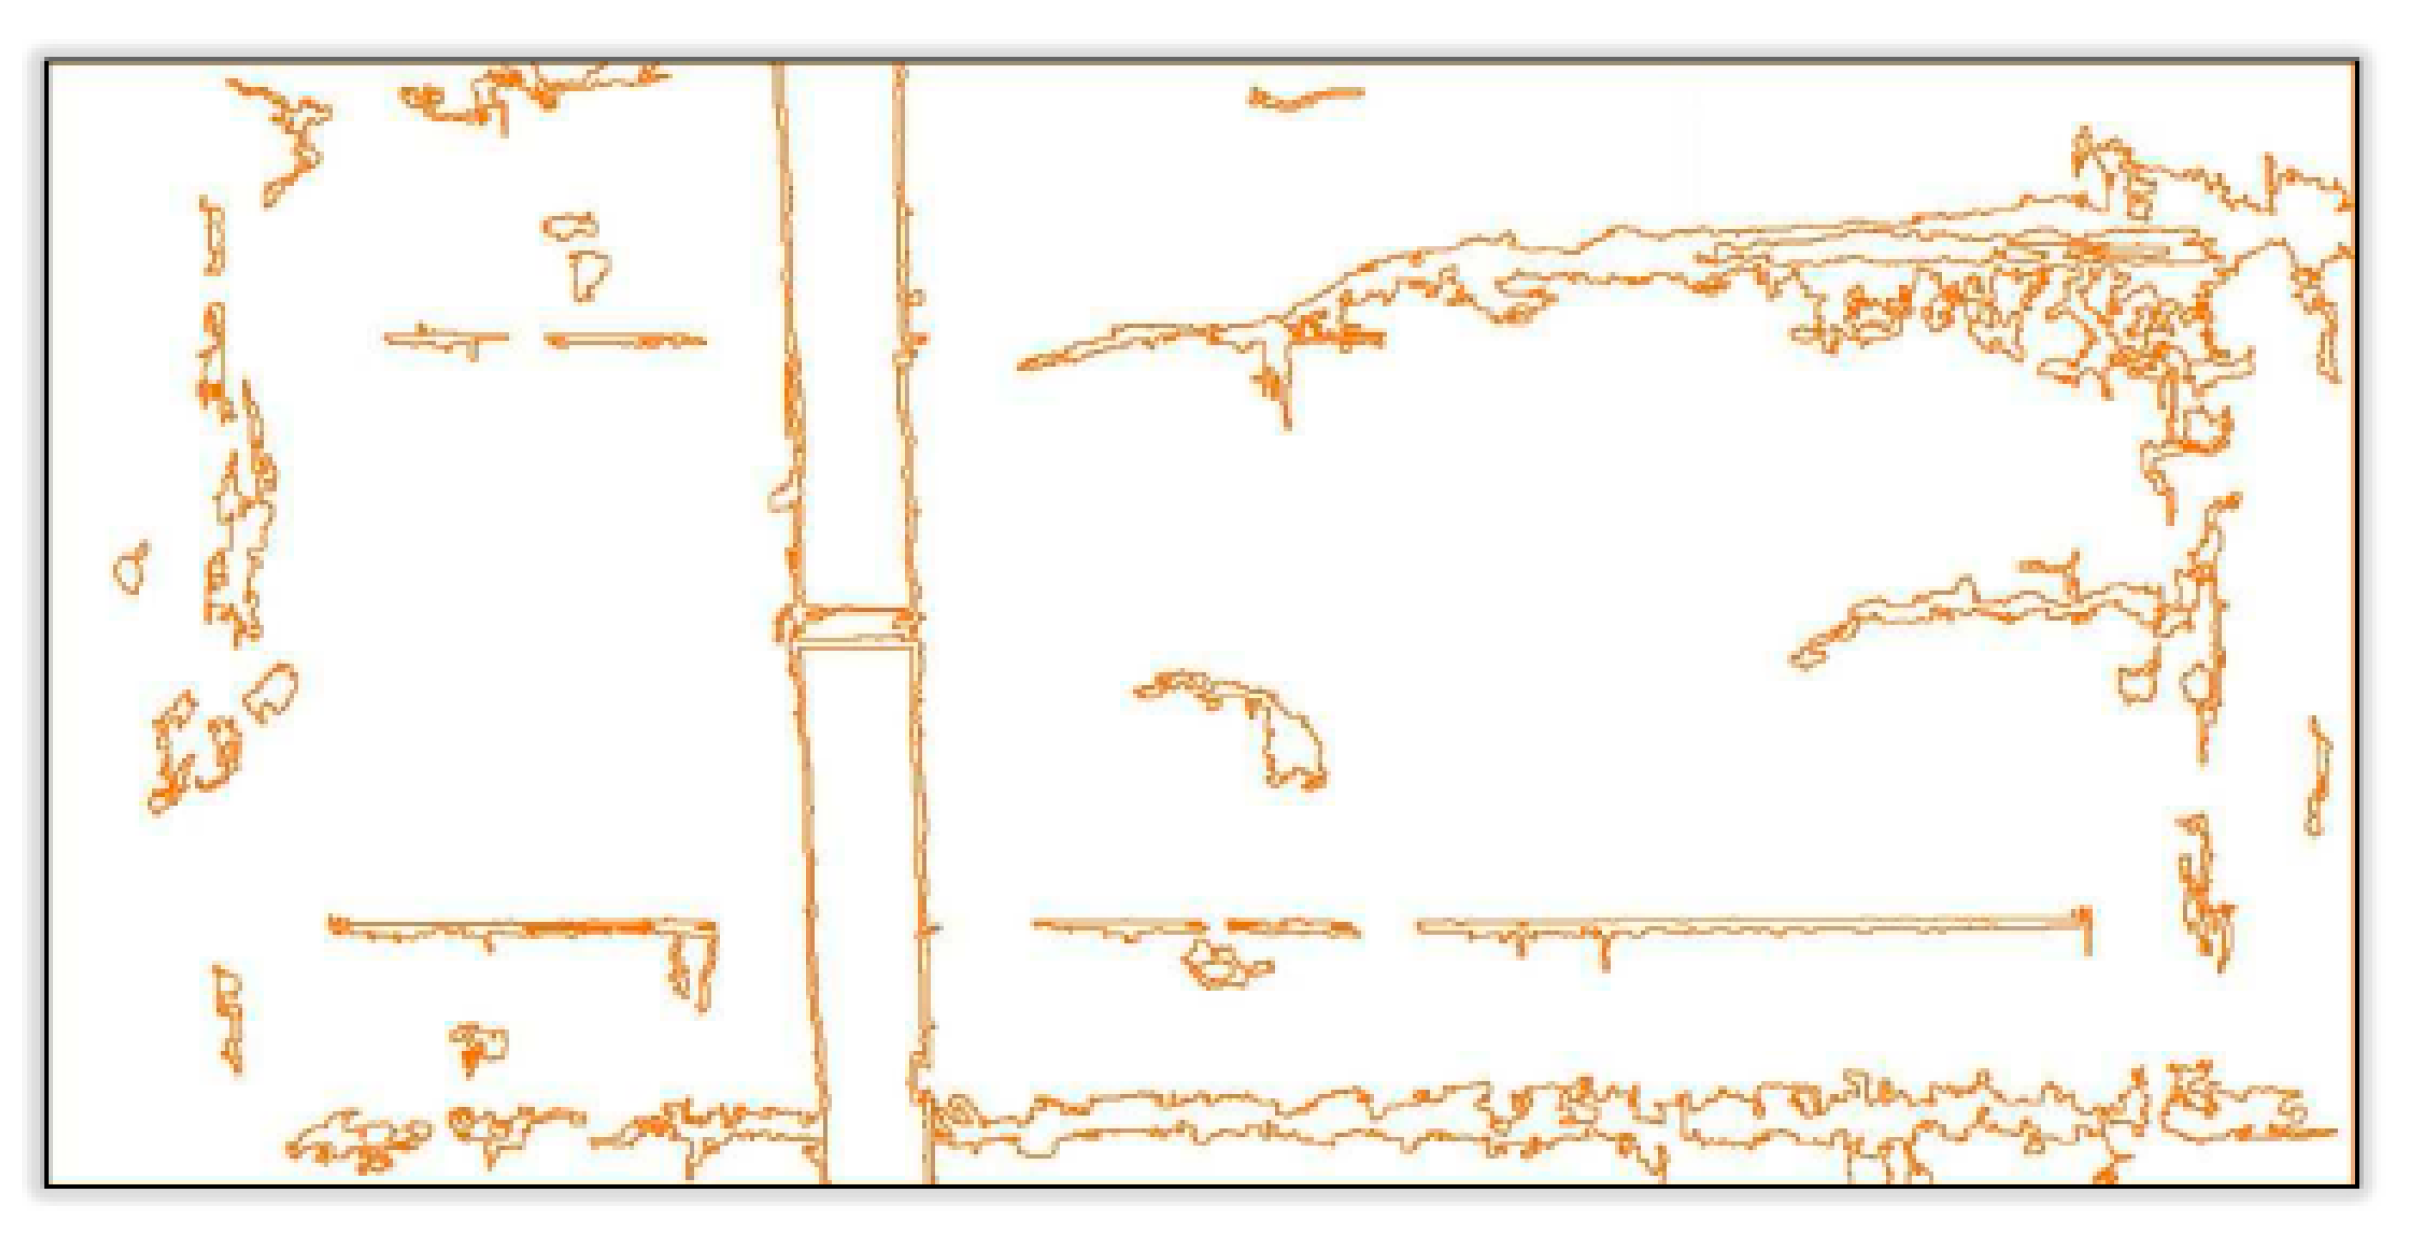
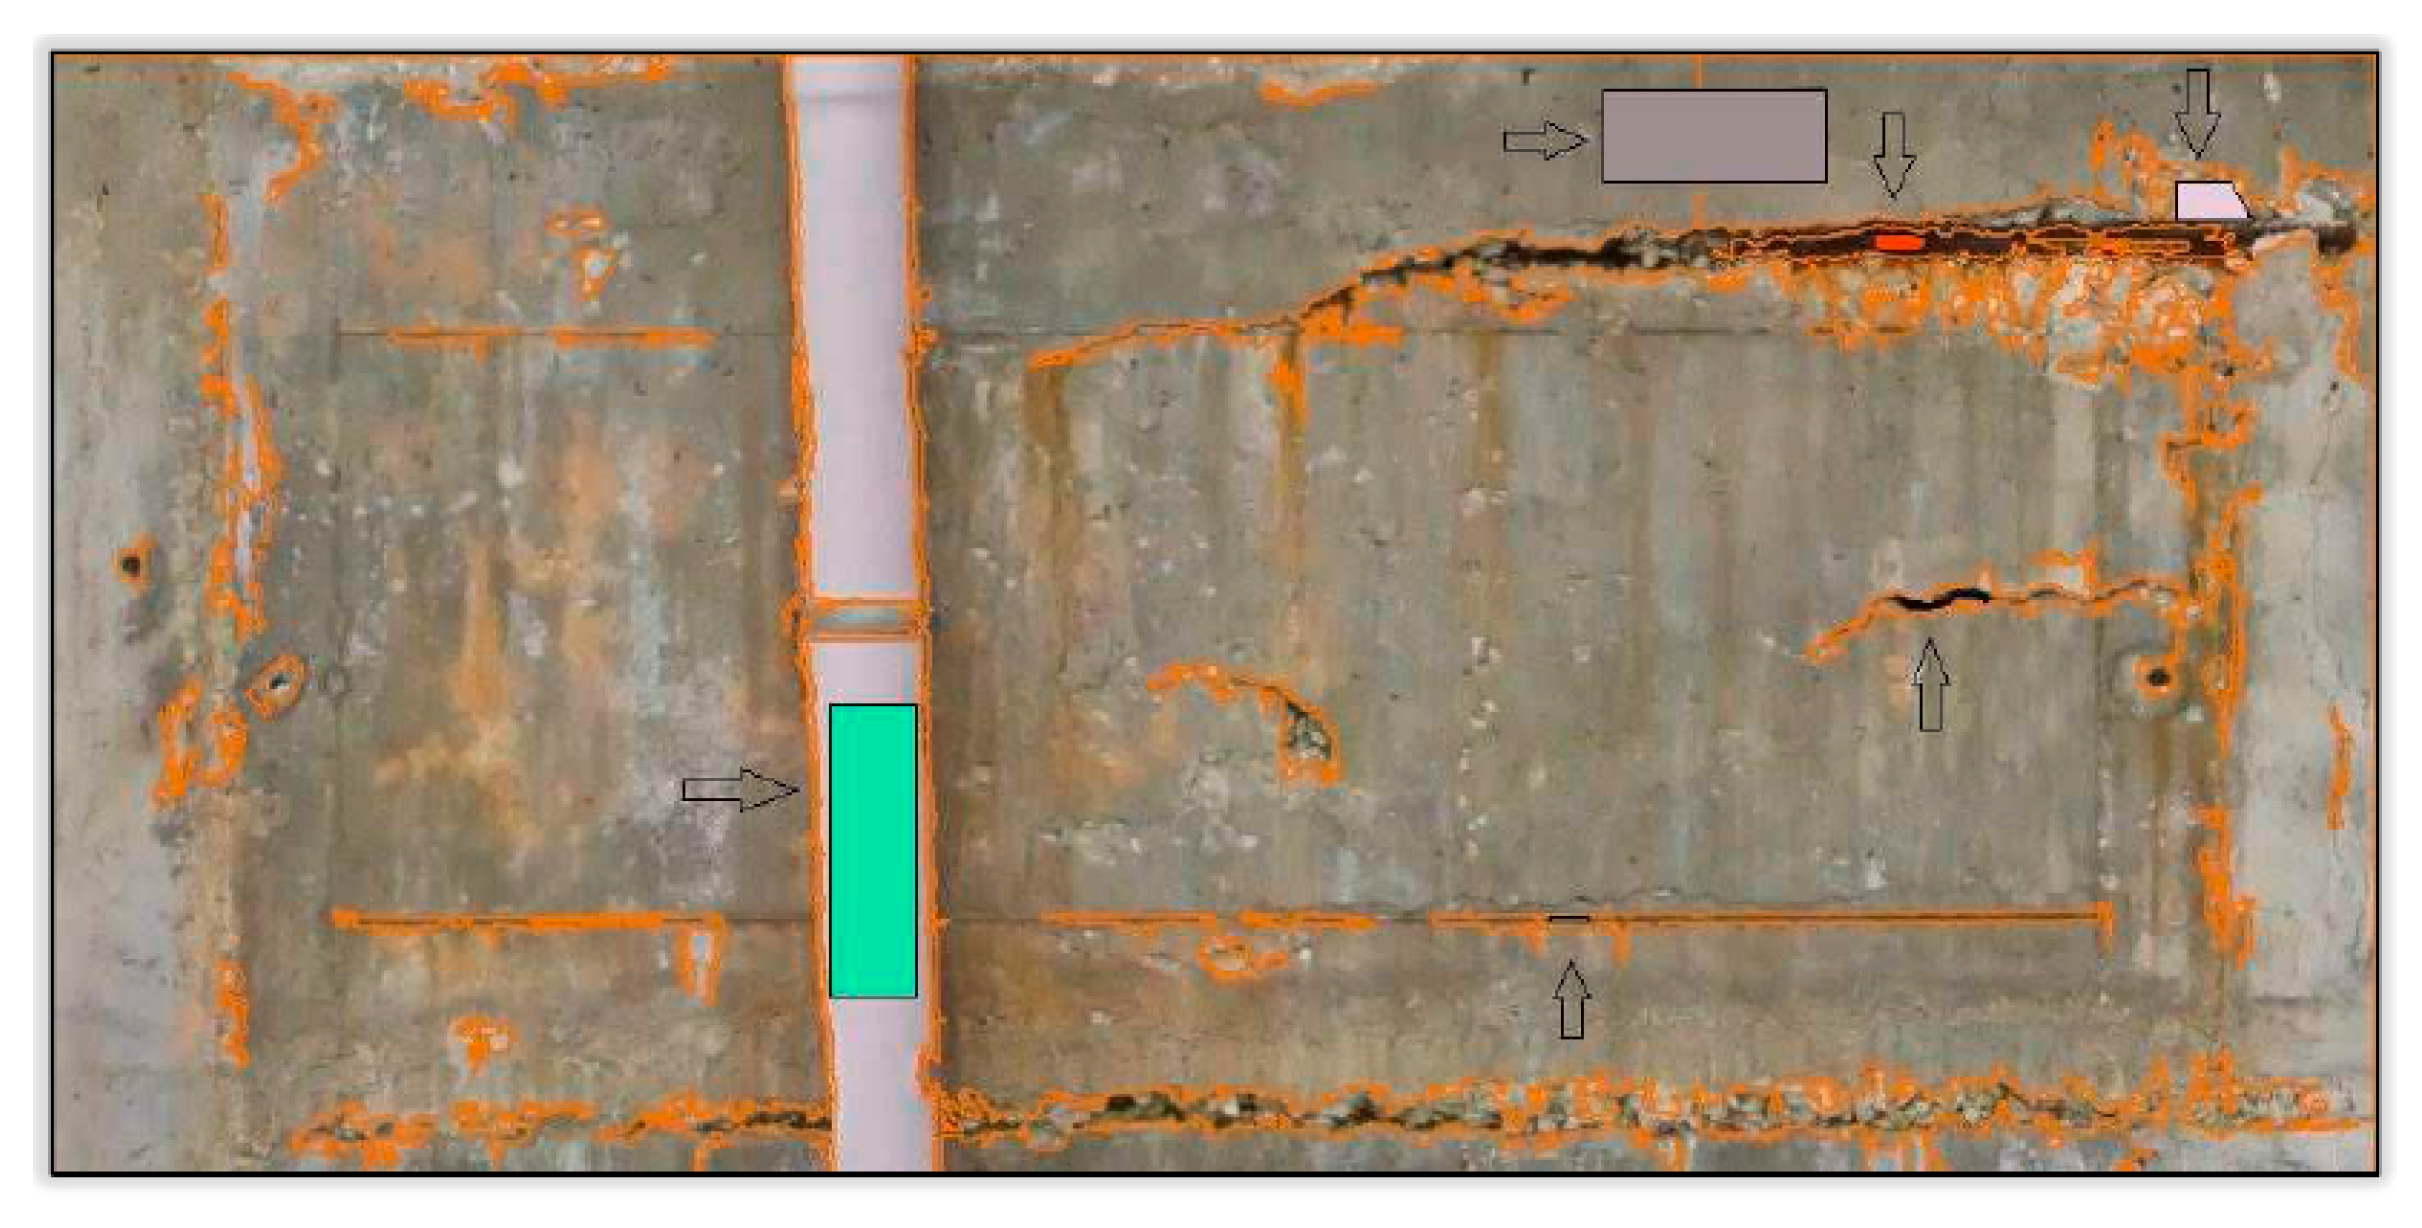
Concerning segmentation, based on image characteristics, after several tests, the most suitable values were h s = 5 , h r = 255 , M = 125 . The vector file made up of different objects (cracks, spalling areas, outcropping reinforcements, drainpipe, rock pockets, lines generated by the formworks), whose edges are represented by the orange lines in Figure 9, is reported.
Then, supervised classification is performed. Main steps are:
  • Classes creation: a label for each type of segment present on the scene to be classified is created; 6 classes reported in Table 2 were defined;
  • Training areas definition for each class: training areas for each class were selected on the orthomosaic. Spectral information (average value and standard deviation) of the orthomosaics was assigned to the corresponded class of segmented image. Since training data will be used in the decision model, known and well-located areas that best represent the class are chosen on the part of the image where each class previously defined is clearly visible and differentiated (Figure 10). These areas are representative of each class. To ensure an accurate classification, the areas need to be located where they cover the full range of variability of each class, excluding boundaries between two or more different classes [56];
  • Classifier training: classifier is trained by giving the training areas as example. In the end, the algorithm create a decision model, that is the set of rules used to classify the other segments in the image. Support Vector Machine (SVM) algorithm was used; the SVM was not born for automatic image classification; however, in the last decade, it has demonstrated great effectiveness in various applications of high-resolution image analysis [24,57,58,59,60]. The SVM algorithm is a supervised non-parametric classifier based on Vapnik’s statistical learning theory [24,61];
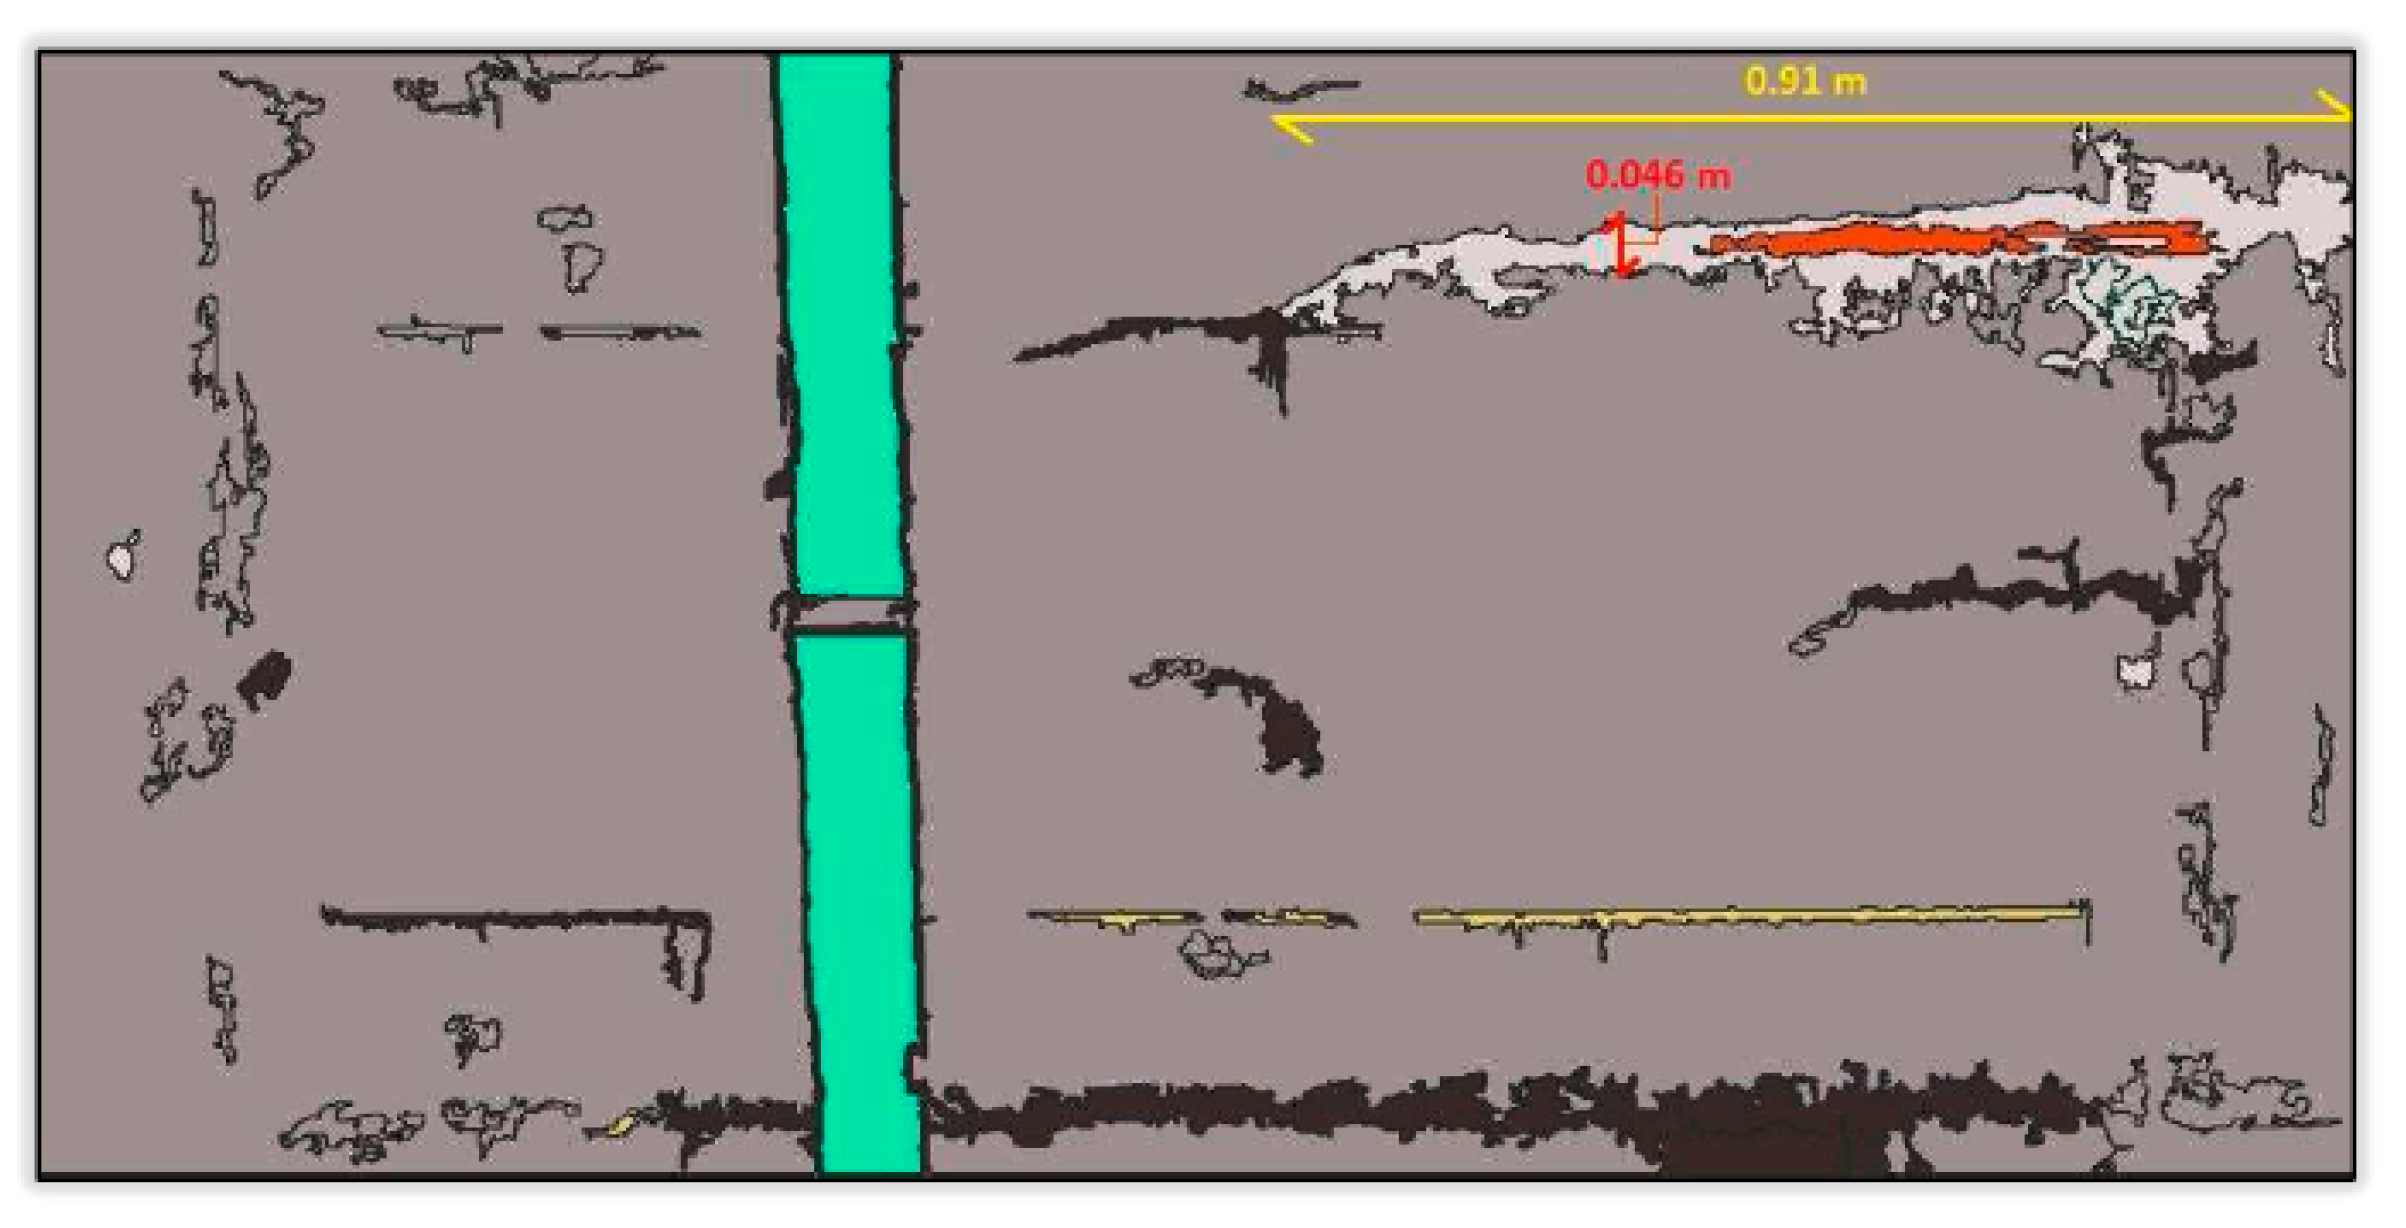
  • Classification: the decision model was applied to the entire segmented image, in order to generate a vector thematic map. Every pixel of the image is associated with a class. The result is showed in Figure 11.

4. Discussion

From the results analysis, it can be observed that the image has been segmented into 64 objects—43 segments were classified with the code 1 label, that is non-deteriorated concrete; 9 objects were instead associated with the class that characterizes the cracks (code 4); 3 classes have been associated to code 3 and other 4 classes to code 5 (spalling and formwork lines, respectively). Finally, segments associated with the drainpipe and exposed rebars (codes 6 and 2) were 4 for the first class and 1 for the second (Table 3).
The greatest number of segments concerns non-deteriorated areas, with about 67% of the objects, followed by the cracked areas with about 14%, then 5% of segments of spalling areas, drainpipe and formwork lines around 6%. Finally, the number of segments associated with the exposed rebars (1.56% in total) occupies a small rate.
Furthermore, 88.08% of the detected surface total area is composed by non-deteriorated concrete; the associated spalling area is approximately 3.06% (considering 2.65% of spalling plus 0.41% of exposed rebars); the formwork footprint constitutes a very small portion, which amounts to 0.42%; finally, the area of the cracks occupies about 3.86% of the surface. However, this value must be further investigated, since part of it has been associated with lower rock pockets (lower part of Figure 11). Map cracking, washout and detachment classes were at first identified as decay forms and so a specific class in the training step was defined, but they were not distinguished by OBIA from the background, so they were not taken into account in the training areas. When there are large images in terms of extensions, training areas should have good distribution through the image and they should be selected taking into account all the different chromatic shades for the same class [40]. As in this case the dataset consists of a small portion of a pillar, it was sufficient a small number of training areas for each class. Most of the image, indeed, were correctly classified.
To validate the obtained results, visual inspection was carried out by the concrete expert.
The expert found 7 decay forms (Figure 12): cracks, rock pockets, detachment, map cracking, exposed rebars, spalling and washout. Drainpipe and formwork lines are not contemplated as decay forms, but they were included for completeness. Comparing OBIA and visual inspections percentage areas, quite differences and similarities must be noted. Background class, in Table 3, has a value of about 88%, instead in Table 4 it is around 72%. The difference is because visual inspection has appreciated other decay forms (washout, map cracking and detachment) while OBIA has not reached statistically significant results. This is probably because strong radiometric differences are not detected. Similarities concern exposed rebars and spalling, which percentage values are close to each other (Table 4). It can be underlined, indeed, that the reference percentage area for spalling is 2.68%, while the OBIA one is 2.65%. About the exposed rebars, reference value is 0.58%, while OBIA one is 0.41%.
About the cracks and rock pockets, reference value is 3.42% compared to 3.86% of OBIA one. The original value of 3.86% was overestimated because OBIA identifies rock pockets as cracks. Looking at both the images, it can be noticed that the spatial position of the cracks is equal for the biggest, but different from the thinner ones. However, because of the inherent nature of the cracks, it is still a challenge to correctly classify them, especially the last mentioned. Despite of this, it must be underlined that OBIA can detect and distinguish cracks of 2 mm width, which is useful for diagnosis and/or structural monitoring and survey. The causes of the presence of the cracks are manifold, as well as their dimensions. Plastic, drying and thermal cracks are caused by concrete mix design and curing and they occur in the early construction phases. Following cracks are produced by typical reinforcement corrosion phenomena (carbon or chloride attack) or spalling of the cover concrete. Map cracking could be attributed to specific mechanisms as alkali aggregate reactions or freeze-thawing. At last, other cracks could be correlated with structural problems as settlements or overloads [62,63]. As maintenance implications, also restored or repaired cracks could be monitored over time.
The ability to save data obtained with the OBIA and to perform metric assessments is very useful because it allows to make repeatable comparisons (monitoring) over time in order to evaluate the evolution of deterioration.
The use of an open source software is one of the main advantage of the presented method. OTB open source software proved to be a powerful tool for OBIA using photogrammetry derived images, even if developed for other applications [39,64,65].
The current practice of visual inspection for concrete infrastructures, as initial diagnostic phase, is time-consuming, expansive, difficult to perform in wide, complex and arduous structures and traffic troublemaking. Moreover, inspections results are mainly qualitative and subjective, leading to possible inconsistent reports if done by no experts or specialists. At last, inadequate or partial visual inspections can lead to a wrong destructive and/or NDT diagnostic planning. With quantifiable and reliable imagery, the UAV Photogrammetry and OBIA developed methodology can potentially supplement and even substitute visual inspection, at least as first analysis of a large dataset.

5. Conclusions

This paper presents a non-destructive survey methodology for the inspection of concrete infrastructures and, in particular, of a concrete overpass in L’Aquila. By analysing the results, the proposed methodology, UAV photogrammetry and Object-Based Image Analysis (OBIA), has proved to be satisfactory for the identification, survey and classification of deteriorated concrete areas. It is also possible to detect geometric characteristics (position, area and dimensions) and spectral signature for the three bands (RGB) of the aforementioned areas. This method has several advantages that make it suitable for periodic inspections and checks of bridges and viaducts: the non-destructiveness of the method, the adaptation to different relief scenarios and, thanks to the use of UAVs, the possibility of taking aerial images in difficult-to-access areas. In addition, the determined geometric and spectral characteristics have the possibility of being saved in digital format and used for comparisons over time, in order to track the evolution of deterioration.
To conclude, as future studies, the authors would like to test the results with more sophisticated stocastical analysis and then, other machine learning algorithms, using also multispectral sensors, in order to better determine possible changes in a wider radiations range. In addition, a 3D analysis could be developed to investigate deterioration all-around.
Design and future developments in this preliminary experimented methodology could be used to characterize concrete weathering and deterioration, but, above all, to perform efficient inspection and monitoring. Future develop/train trends through machine learning, properly validate by imaging classification models and case histories, could allow a decision-making tool for the assessment of concrete conservation, its deterioration and in situ properties. Of course, it is necessary to emphasize that imaging classification models must be built in collaboration with concrete specialists and based on training data verified by validation sets. Inspecting and monitoring the degree of concrete deterioration with new and fast methodology is essential for its conservation, maintenance and safety guarantee.

Author Contributions

Conceptualization, S.Z., M.A., D.D., R.Q. and M.G.; methodology, S.Z., M.A., D.D., R.Q. and M.G.; validation, S.Z., M.A., D.D., R.Q. and M.G.; formal analysis, S.Z., M.A., D.D., R.Q. and M.G.; investigation, S.Z., M.A., D.D., R.Q. and M.G.; resources, S.Z., M.A., D.D., R.Q. and M.G.; data curation, S.Z., M.A., D.D., R.Q. and M.G.; writing–original draft preparation, S.Z., M.A., D.D., R.Q. and M.G.; writing–review and editing, S.Z., M.A., D.D., R.Q. and M.G.; visualization, S.Z., M.A., D.D., R.Q. and M.G.; supervision, S.Z., M.A., D.D., R.Q. and M.G. All authors have read and agreed to the published version of the manuscript.

Funding

This research received no external funding.

Acknowledgments

The authors would like to thank Giuseppe Colagrande, the drone pilot.

Conflicts of Interest

The authors declare no conflict of interest.

Abbreviations

The following abbreviations are used in this manuscript:
2DTwo Dimensional
3DThree Dimensional
ANASAzienda Nazionale Autonoma delle Strade
CPCheck Point
ENACItalian Civil Aviation Authority
GCPGround Control Point
GNSSGlobal Navigation Satellite System
GSDGround Sample Distance
MSSMean-Shift Segmentation
NDTNon-Destructive Tests
OBIAObject Based Image Analysis
OTBOrfeo ToolBox
RFIRete Ferroviaria Italiana
RGBRed Green Blue
RMSRoot Mean Square
ROIRegion Of Interest
SVMSupport Vector Machine
UAVUnmanned Aerial Vehicle

References

  1. Bellino, F. Un intervento poco risolutivo. Il G. Dell’Ingegnere 2019, 6, 25. [Google Scholar]
  2. D’Amato, A. Quali Sono i Ponti e i Viadotti a Rischio Nell’italia Che Crolla. Nextquotidiano 2019. Available online: https://www.nextquotidiano.it/quali-sono-i-ponti-e-i-viadotti-a-rischio-nellitalia-che-crolla/ (accessed on 18 June 2020).
  3. Alessandrini, S. Il crollo del ponte Morandi a Genova. Ingenio 2020. Available online: https://www.ingenio-web.it/20966-il-crollo-del-ponte-morandi-a-genova#:~:text=Alle%2011.36%20del%2014%20agosto,del%20viadotto%20sul%20Polcevera%2C%20un (accessed on 19 June 2020).
  4. Gomarasca, M.A. Basics of Geomatics; Springer Science Business Media: Dordrecht, The Netherlands, 2009. [Google Scholar]
  5. Dominici, D.; Alicandro, M.; Massimi, V. UAV photogrammetry in the post-earthquake scenario: Case studies in L’Aquila. Geomat. Nat. Hazards Risk 2017, 8, 87–103. [Google Scholar] [CrossRef] [Green Version]
  6. Barazzetti, L.; Forlani, G.; Remondino, F.; Roncella, R.; Scaioni, M. Experiences and achievements in automated image sequence orientation for close-range photogrammetric projects. Videometrics Range Imaging Appl. XI 2011, 8085, 80850F. [Google Scholar]
  7. Triggs, B.; McLauchlan, P.F.; Hartley, R.I.; Fitzgibbon, A.W. Bundle adjustment—A modern synthesis. In International wOrkshop on Vision Algorithms; Springer: Berlin/Heidelberg, Germany, 1999; pp. 298–372. [Google Scholar]
  8. Westoby, M.J.; Brasington, J.; Glasser, N.F.; Hambrey, M.J.; Reynolds, J.M. ‘Structure-from-Motion’ photogrammetry: A low-cost, effective tool for geoscience applications. Geomorphology 2012, 179, 300–314. [Google Scholar] [CrossRef] [Green Version]
  9. Chen, S.; Laefer, D.F.; Mangina, E.; Zolanvari, S.I.; Byrne, J. UAV bridge inspection through evaluated 3D reconstructions. J. Bridge Eng. 2019, 24, 05019001. [Google Scholar] [CrossRef] [Green Version]
  10. Avsar, Ö.; Akca, D.; Altan, O. Photogrammetric deformation monitoring of the second Bosphorus Bridge in Istanbul. Int. Arch. Photogramm. Remote Sens. Spat. Inf. Sci. 2014, 40, 71–76. [Google Scholar] [CrossRef] [Green Version]
  11. Marmo, F.; Demartino, C.; Candela, G.; Sulpizio, C.; Briseghella, B.; Spagnuolo, R.; Xiao, Y.; Vanzi, I.; Rosati, L. On the form of the Musmeci’s bridge over the Basento river. Eng. Struct. 2019, 191, 658–673. [Google Scholar] [CrossRef]
  12. Jiang, R.; Jáuregui, D.V.; White, K.R. Close-range photogrammetry applications in bridge measurement: Literature review. Measurement 2008, 41, 823–834. [Google Scholar] [CrossRef]
  13. Maas, H.G.; Hampel, U. Photogrammetric techniques in civil engineering material testing and structure monitoring. Photogramm. Eng. Remote Sens. 2006, 72, 39–45. [Google Scholar] [CrossRef]
  14. Valença, J.; Júlio, E.N.B.S.; Araújo, H.J. Applications of photogrammetry to structural assessment. Exp. Tech. 2012, 36, 71–81. [Google Scholar] [CrossRef]
  15. Whiteman, T.; Lichti, D.D.; Chandler, I. Measurement of deflections in concrete beams by close-range digital photogrammetry. Proc. Symp. Geospat. Theory Process. Appl. 2002, 9, 12. [Google Scholar]
  16. Khaloo, A.; Lattanzi, D.; Jachimowicz, A.; Devaney, C. Utilizing UAV and 3D computer vision for visual inspection of a large gravity dam. Front. Built Environ. 2018, 4, 31. [Google Scholar] [CrossRef] [Green Version]
  17. Buffi, G.; Manciola, P.; Grassi, S.; Barberini, M.; Gambi, A. Survey of the Ridracoli Dam: UAV–based photogrammetry and traditional topographic techniques in the inspection of vertical structures. Geomat. Nat. Hazards Risk 2017, 8, 1562–1579. [Google Scholar] [CrossRef] [Green Version]
  18. Rau, J.Y.; Hsiao, K.W.; Jhan, J.P.; Wang, S.H.; Fang, W.C.; Wang, J.L. Bridge crack detection using multi-rotary UAV and object-base image analysis. Int. Arch. Photogramm. Remote Sens. Spat. Inf. Sci. 2017, 42, 311. [Google Scholar] [CrossRef] [Green Version]
  19. Fernandez Galarreta, J.; Kerle, N.; Gerke, M. UAV-based urban structural damage assessment using object-based image analysis and semantic reasoning. Nat. Hazards Earth Syst. Sci. 2015, 15. [Google Scholar] [CrossRef] [Green Version]
  20. Karantanellis, E. Photogrammetry techniques for object-based building crack detection and characterization. In Proceedings of the 16th European Conference in Earthquake Engineering, Thessaloniki, Greece, 18–21 June 2018. [Google Scholar]
  21. Marsella, M.; Scaioni, M. Sensors for deformation monitoring of large civil infrastructures. Sensors 2018, 18, 3941. [Google Scholar] [CrossRef] [Green Version]
  22. Mistretta, F.; Sanna, G.; Stochino, F.; Vacca, G. Structure from motion point clouds for structural monitoring. Remote Sens. 2019, 11, 1940. [Google Scholar] [CrossRef] [Green Version]
  23. Schweizer, E.A.; Stow, D.A.; Coulter, L.L. Automating near real-time, post-hazard detection of crack damage to critical infrastructure. Photogramm. Eng. Remote Sens. 2018, 84, 75–86. [Google Scholar] [CrossRef]
  24. Teodoro, A.C.; Araujo, R. Comparison of performance of object-based image analysis techniques available in open source software (Spring and Orfeo Toolbox/Monteverdi) considering very high spatial resolution data. J. Appl. Remote Sens. 2016, 10, 016011. [Google Scholar] [CrossRef]
  25. Valença, J.; Puente, I.; Júlio, E.; González-Jorge, H.; Arias-Sánchez, P. Assessment of cracks on concrete bridges using image processing supported by laser scanning survey. Constr. Build. Mater. 2017, 146, 668–678. [Google Scholar] [CrossRef]
  26. Duque, L.; Seo, J.; Wacker, J. Synthesis of unmanned aerial vehicle applications for infrastructures. J. Perform. Constr. Facil. 2018, 32, 04018046. [Google Scholar] [CrossRef]
  27. Beshr, A.A.E.-W.; Kaloop, M.R. Monitoring bridge deformation using auto-correlation adjustment technique for total station observations. Sci. Res. 2013, 4. [Google Scholar] [CrossRef] [Green Version]
  28. Beltempo, A.; Cappello, C.; Zonta, D.; Bonelli, A.; Bursi, O.S.; Costa, C.; Pardatscher, W. Structural health monitoring of the Colle Isarco viaduct. In Proceedings of the IEEE Workshop on Environmental, Energy, and Structural Monitoring Systems (EESMS), Trento, Italy, 9–10 July 2015; pp. 7–11. [Google Scholar]
  29. Lachat, E.; Landes, T.; Grussenmeyer, P. Investigation of a combined surveying and scanning device: The Trimble SX10 Scanning total station. Sensors 2017, 17, 730. [Google Scholar] [CrossRef] [PubMed] [Green Version]
  30. Elnabwy, M.T.; Kaloop, M.R.; Elbeltagi, E. Talkha steel highway bridge monitoring and movement identification using RTK-GPS technique. Measurement 2013, 46, 4282–4292. [Google Scholar] [CrossRef]
  31. Kaloop, M.; Elbeltagi, E.; Hu, J.; Elrefai, A. Recent advances of structures monitoring and evaluation using GPS-time series monitoring systems: A review. ISPRS Int. J. Geo-Inf. 2017, 6, 382. [Google Scholar] [CrossRef] [Green Version]
  32. Chen, Q.; Jiang, W.; Meng, X.; Jiang, P.; Wang, K.; Xie, Y.; Ye, J. Vertical deformation monitoring of the suspension bridge tower using GNSS: A case study of the forth road bridge in the UK. Remote Sens. 2018, 10, 364. [Google Scholar] [CrossRef] [Green Version]
  33. Tang, P.; Akinci, B.; Garrett, J.H. Laser scanning for bridge inspection and management. IABSE Symp. Rep. 2007, 93, 17–24. [Google Scholar] [CrossRef]
  34. Teza, G.; Galgaro, A.; Moro, F. Contactless recognition of concrete surface damage from laser scanning and curvature computation. NDT E Int. 2009, 42, 240–249. [Google Scholar] [CrossRef]
  35. Liu, W.; Chen, S.; Hauser, E. Lidar-based bridge structure defect detection. Exp. Tech. 2011, 35, 27–34. [Google Scholar] [CrossRef]
  36. Guldur, E.; Hajjar, J. Laser-based surface damage detection and quantification using predicted surface properties. Autom. Constr. 2017, 83, 285–302. [Google Scholar] [CrossRef]
  37. Blaschke, T. Object based image analysis for remote sensing. ISPRS J. Photogramm. Remote Sens. 2010, 65, 2–16. [Google Scholar] [CrossRef] [Green Version]
  38. Fiorillo, S.; Villa, G.; Marchesi, A. Tecniche di telerilevamento per il riconoscimento dei soggetti arborei appartenenti al genere Platanus spp. In Proceedings of the ASITA Conference, Lecco, Italy, 29 September–1 October 2015. [Google Scholar]
  39. Grizonnet, M.; Michel, J.; Poughon, V.; Inglada, J.; Savinaud, M.; Cresson, R. Orfeo ToolBox: Open source processing of remote sensing images. Open Geospat. Data Softw. Stand. 2017, 2, 1–8. [Google Scholar] [CrossRef] [Green Version]
  40. De Luca, G.; N Silva, J.M.; Cerasoli, S.; Araújo, J.; Campos, J.; Di Fazio, S.; Modica, G. Object-based land cover classification of cork oak woodlands using UAV imagery and orfeo toolbox. Remote Sens. 2019, 11, 1238. [Google Scholar] [CrossRef] [Green Version]
  41. Agisoft Metashape. 2019. Available online: https://www.agisoft.com/ (accessed on 22 April 2020).
  42. Orfeo ToolBox. 2020. Available online: https://www.orfeo-toolbox.org/CookBook/recipes/contrast_enhancement.html (accessed on 8 July 2020).
  43. Dermanis, A.; Biagi, L.G.A. Il Telerilevamento, Informazione Territoriale Mediante Immagini da Satellite; CEA: Casa Editrice Ambrosiana, Milano, 2002. [Google Scholar]
  44. Davis, L.S. A survey of edge detection techniques. Comput. Graph. Image Process. 1975, 4, 248–270. [Google Scholar] [CrossRef]
  45. Nadernejad, E.; Sharifzadeh, S.; Hassanpour, H. Edge detection techniques: Evaluations and comparisons. Appl. Math. Sci. 2008, 2, 1507–1520. [Google Scholar]
  46. OTB CookBook, 6.6.1. 2018. Available online: https://www.orfeo-toolbox.org/CookBook-6.6.1/Applications/app_EdgeExtraction.html?highlight=edge%20extraction (accessed on 7 July 2020).
  47. Reddy, G.O.; Singh, S.K. (Eds.) Geospatial Technologies in Land Resources Mapping, Monitoring and Management; Springer International Publishing: Berlin/Heidelberg, Germany, 2018. [Google Scholar]
  48. Hsu Geospatial Sites, Object Based Classification. 2020. Available online: http://gsp.humboldt.edu/OLM/Courses/GSP_216_Online/lesson6-1/object.html (accessed on 11 March 2020).
  49. Schiewe, J. Segmentation of high-resolution remotely sensed data-concepts, applications and problems. Int. Arch. Photogramm. Remote Sens. Spat. Inf. Sci. 2002, 34, 380–385. [Google Scholar]
  50. Michel, J.; Youssefi, D.; Grizonnet, M. Stable mean-shift algorithm and its application to the segmentation of arbitrarily large remote sensing images. IEEE Trans. Geosci. Remote Sens. 2014, 53, 952–964. [Google Scholar] [CrossRef]
  51. Fukunaga, K.; Hostetler, L. The estimation of the gradient of a density function, with applications in pattern recognition. IEEE Trans. Inf. Theory 1975, 21, 32–40. [Google Scholar] [CrossRef] [Green Version]
  52. Comaniciu, D.; Meer, P. Mean shift: A robust approach toward feature space analysis. IEEE Trans. Pattern Anal. Mach. Intell. 2002, 24, 603–619. [Google Scholar] [CrossRef] [Green Version]
  53. Image Segmentation of UAS Imagery. Available online: http://myweb.facstaff.wwu.edu/wallin/esci497_uas/labs/Image_seg_otb.htm (accessed on 4 September 2020).
  54. Hay, G.J.; Castilla, G. Object-based image analysis: Strengths, weaknesses, opportunities and threats (SWOT). In Proceedings of the 1st International Conference on Object-based Image Analysis, Salzburg, Austria, 4–5 July 2006. [Google Scholar]
  55. Orfeo Toolbox, Docs, All Applications, Feature Extraction, EdgeExtraction. Available online: https://www.orfeo-toolbox.org/CookBook/Applications/app_EdgeExtraction.html (accessed on 5 September 2020).
  56. Hsu Geospatial Sites, Supervised Classification. 2020. Available online: http://gsp.humboldt.edu/OLM/Courses/GSP_216_Online/lesson6-1/supervised.html#:~:text=Training%20sites%20are%20areas%20that,of%20each%20of%20the%20classes (accessed on 7 September 2020).
  57. Bruzzone, L.; Carlin, L. A multilevel context-based system for classification of very high spatial resolution images. IEEE Trans. Geosci. Remote Sens. 2006, 44, 2587–2600. [Google Scholar] [CrossRef] [Green Version]
  58. Camps-Valls, G.; Bruzzone, L. (Eds.) Kernel Methods for Remote Sensing Data Analysis; John Wiley Sons: Chichester, UK, 2009. [Google Scholar]
  59. Inglada, J. Automatic recognition of man-made objects in high resolution optical remote sensing images by SVM classification of geometric image features. ISPRS J. Photogramm. Remote Sens. 2007, 62, 236–248. [Google Scholar] [CrossRef]
  60. Tuia, D.; Pacifici, F.; Kanevski, M.; Emery, W.J. Classification of very high spatial resolution imagery using mathematical morphology and support vector machines. IEEE Trans. Geosci. Remote Sens. 2009, 47, 3866–3879. [Google Scholar] [CrossRef]
  61. Vapnik, V.N. An overview of statistical learning theory. IEEE Trans. Neural Netw. 1999, 10, 988–999. [Google Scholar] [CrossRef] [PubMed] [Green Version]
  62. Croft, C.; Macdonald, S. (Eds.) Concrete: Case Studies in Conservation Practice; Getty Publications: Los Angeles, CA, USA, 2019; Volume 1. [Google Scholar]
  63. Macdonald, S. (Ed.) Concrete: Building Pathology; John Wiley Sons: Hoboken, NJ, USA, 2008. [Google Scholar]
  64. Christophe, E.; Inglada, J.; Giros, A. Orfeo toolbox: A complete solution for mapping from high resolution satellite images. Int. Arch. Photogramm. Remote Sens. Spat. Inf. Sci. 2008, 37, 1263–1268. [Google Scholar]
  65. Lee, K.; Kim, K.; Lee, S.G.; Kim, Y. Determination of the Normalized Difference Vegetation Index (NDVI) with Top-of-Canopy (TOC) reflectance from a KOMPSAT-3A image using Orfeo ToolBox (OTB) extension. ISPRS Int. J. Geo-Inf. 2020, 9, 257. [Google Scholar] [CrossRef] [Green Version]
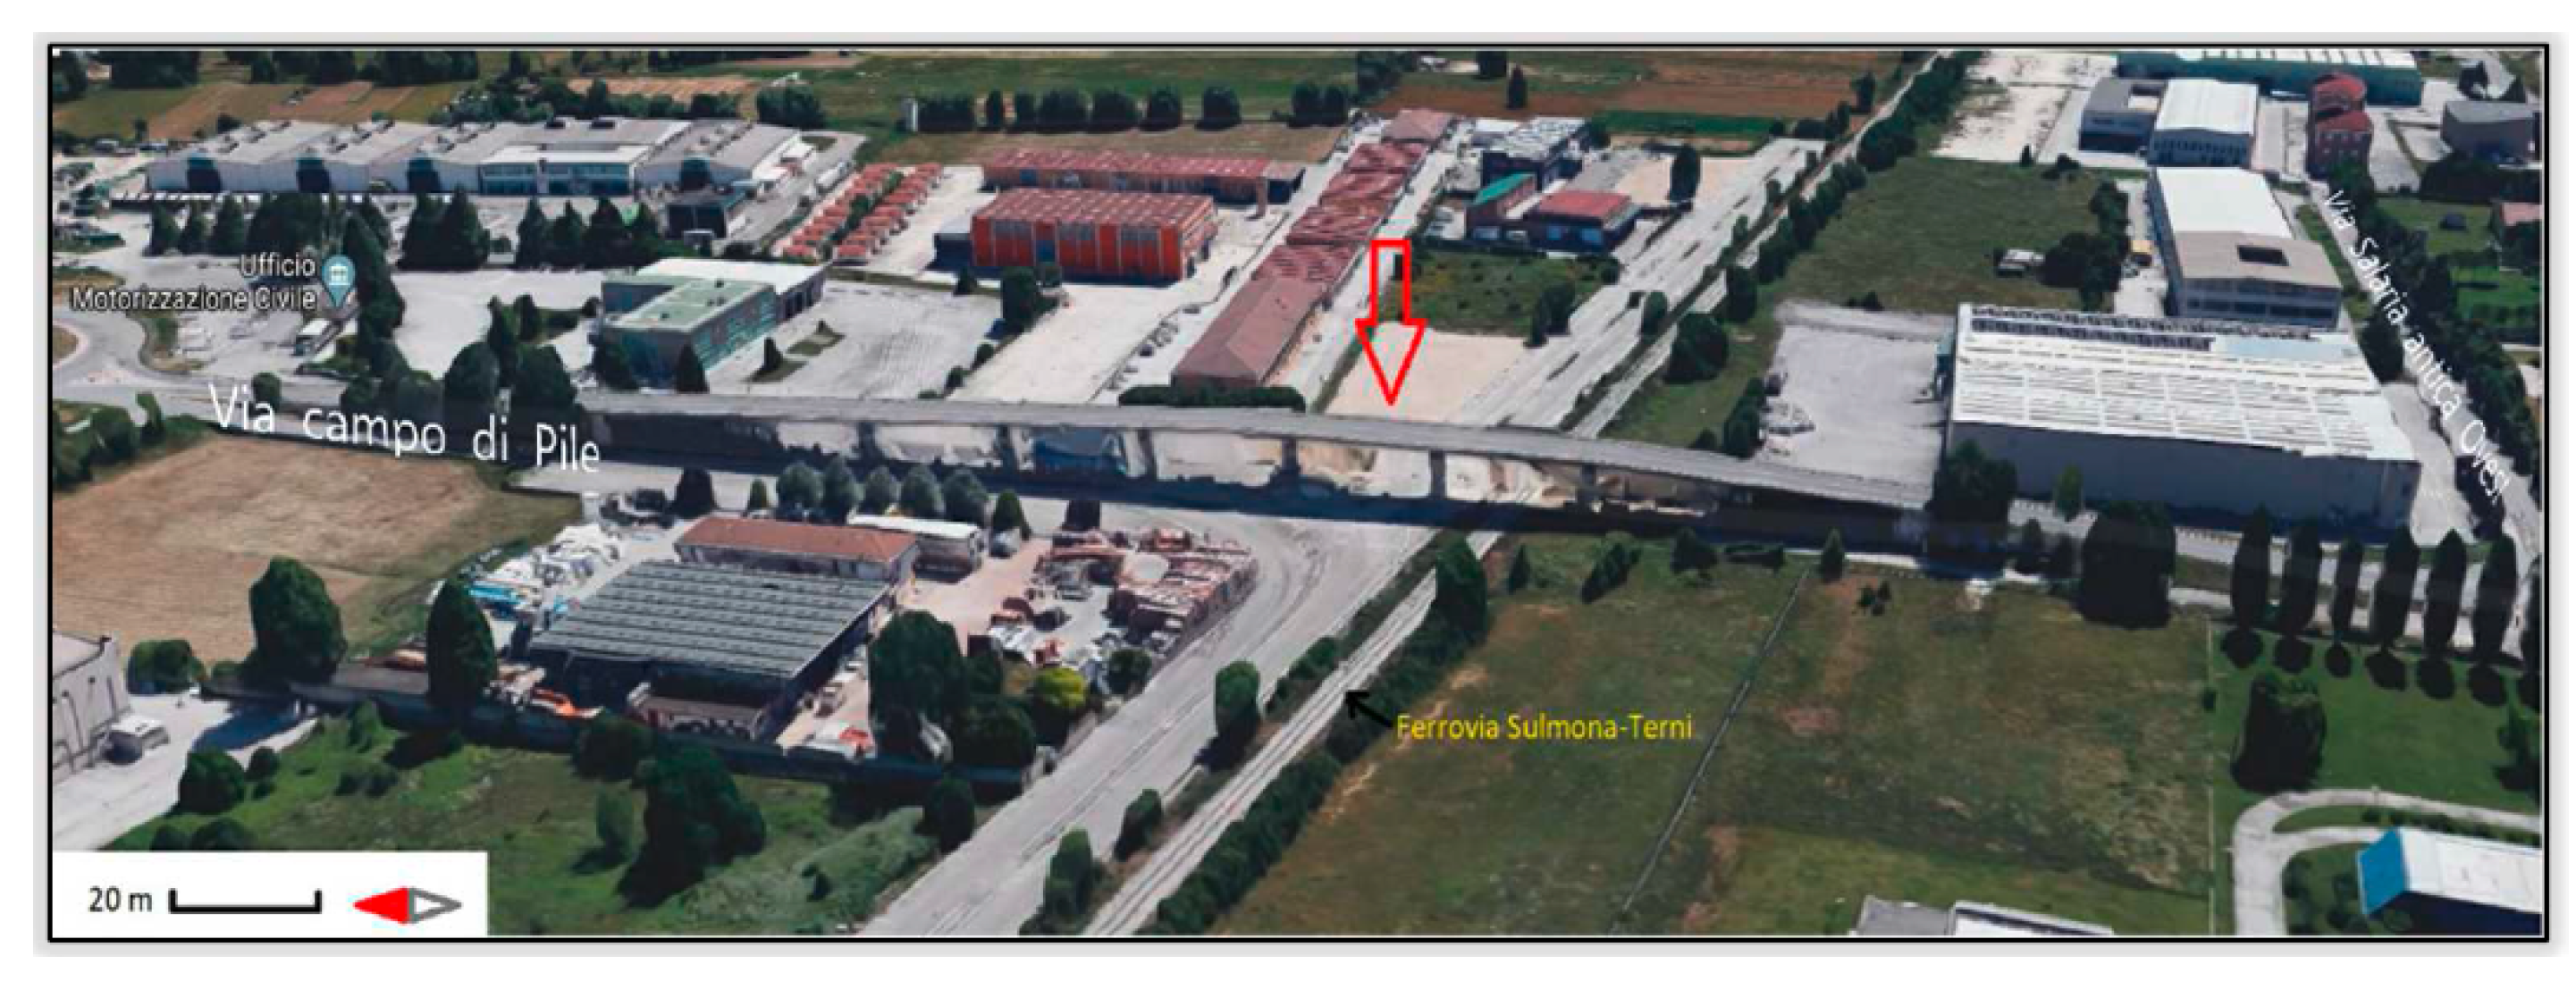
Figure 1. Aerial view of the studied overpass in Via Campo di Pile, L’Aquila, Italy (Image from Google Maps).
Remotesensing 12 03180 g001
Figure 2. Case study pillar.
Remotesensing 12 03180 g002
Figure 3. Methodology flowchart.
Remotesensing 12 03180 g003
Figure 4. Scheme of terrestrial (in red) and unmanned aerial vehicle (UAV) (in blue) photogrammetry images acquired for the analysis.
Remotesensing 12 03180 g004
Figure 5. Location and distribution of Ground Control Points (GCPs) and Check Points (CPs) used in the model and axes of the orthomosaic.
Remotesensing 12 03180 g005
Figure 6. Results of photogrammetric process: high resolution 3D model and ROI orthomosaic.
Remotesensing 12 03180 g006
Figure 7. ROI image after contrast enhancement.
Remotesensing 12 03180 g007
Figure 8. Edge detection result using Sobel filter.
Remotesensing 12 03180 g008
Figure 9. Result of segmented image using the Mean-Shift Segmentation’ (MSS) algorithm, obtained for h s = 5 , h r = 255 , M = 125 .
Remotesensing 12 03180 g009
Figure 10. Training areas defined for the supervised classification.
Remotesensing 12 03180 g010
Figure 11. Classified image results. In the upper right side, an example of spalling area size.
Remotesensing 12 03180 g011
Figure 12. In situ mapping of the decay forms identified by the concrete expert.
Remotesensing 12 03180 g012
Table 1. Technical specifications of the instruments used for terrestrial and UAV photogrammetry.
SensorCamera Sony Alpha 6000
Resolution 24 MP
Focal length 16 mm
Sensor dimensionWidth23.5 mm
Height15.6 mm
Weight 345 g
UAVTypology Micro UAV- Hexacopter
Brand Flytop
Model FlyNovex
Weight at teakeoff 6.00 kg
Maximum wind velocity for safe operation Gusts up to 30 km/h (8 m/s)
Autonomy 20 min in hovering at 25 C
Operating altitude 1–150 m
ENAC Certification Yes
Table 2. Classes created to perform supervised classification.
Class IDColourObject Typology
1GreyBackground (not deteriorated concrete)
2OrangeExposed rebars
3Light greySpalling
4BlackCracks
5YellowFormwork lines
6Light blueDrainpipe
Table 3. Attribute table summary, obtained using Object-Based Image Analysis (OBIA) classification.
Class ID
and Colour
Object TypologyAssociated
Objects Number
% Associated
Object
Area
(cm2)
%
Area
1Background4367.1916,734.8588.08
2Exposed rebars11.5678.510.41
3Spalling34.69504.272.65
4Cracks/Rock pockets914.06733.943.86
5Formwork lines46.2579.540.42
6Drainpipe46.25868.724.57
TOTAL6410019,000100
Table 4. Decay forms areas identified by concrete specialist on the ROI.
Area (cm 2 )% Area
Background13,597.0071.56
Exposed rebars110.000.58
Spalling510.002.68
Cracks/Rock pockets650.003.42
Formwork line143.000.75
Drainpipe960.005.05
Detachment260.001.37
Map cracking430.002.26
Washout2340.0012.32
Total image area19,000.00100