Project Report

Calibration Periodicity of Fuel Tanks Assigned to Legal–Industrial Metrology: A Case Study

by
Asta Meškuotienė
,
Paulius Kaškonas
,
Edita Raudienė
*,
Justina Dobilienė
and
Benas Gabrielis Urbonavičius
Metrology Institute, Kaunas University of Technology, Studentų st. 50, LT-51368 Kaunas, Lithuania
*
Author to whom correspondence should be addressed.
Sustainability 2022, 14(16), 9817; https://doi.org/10.3390/su14169817
Submission received: 7 July 2022 / Revised: 4 August 2022 / Accepted: 6 August 2022 / Published: 9 August 2022
(This article belongs to the Section Sustainable Engineering and Science)

Abstract

:
Reliable quantity measurements are essential to meet the needs of the public interest, health, environmental protection, and the global fair trade of petroleum products. This can only be ensured by accurate and regular calibration of the measuring instruments. The frequency of metrological supervision is differently legally regulated in different countries since there are no clear criteria for determining periodicity. This report presents an analysis of the metrological supervision of vertical and aboveground tanks (intended for oil products) in different countries and long-term data usage for supervision periodicity identification. The periodicity of metrological supervision procedures must be synchronised with technical repairs and must depend on the type and volume of the tank. Choosing the optimal periodicity frequency of different tanks can adjust the economic burden of metrological supervision considering the economic and environmental aspects that is presented in the report with suitable adaptations.

1. Introduction

Social and environmental benefits are directly or indirectly related to the metrology infrastructure. Specialised metrology networks provide specific solutions for all stakeholders along the metrology value chain, including industries, end-users, and citizens [1]. Today, it is important to develop a sustainable coordinated world-class metrology system to increase the impact of metrology on societal challenges to the implementation of policies, standards, and regulations to make them fit for specific purposes [2]. Metrology plays a key role in cost reduction in market transactions, securing property rights, and reaping large profits [3,4]. Metrology is associated with the management and development of ecosystems for learning in science, technology, engineering, art, and mathematics (STEAM) [5]. Instrument calibrations, their periodicity, data and result analyses, and reporting require attention to ensure that everyone is talking about the same thing in the same terms [6]. Trust and confidence are based on metrological surveillance procedures, requirements specified in consensus, and sustainability standards [7]. Metrological principles and practices can facilitate both “local improvisations and general navigable continuity in measurement and management” [3]. This aids in understanding the concept of sustainability [8].
Companies are perceived as engines of economic growth and well-being in society as well as key actors that facilitate quality of life [9]. Sustainability delivers value and financial gains [10]. Business sustainability enables the integration of non-financial environmental and social sustainability performance dimensions into companies and supply chain management [11]. For this reason, organisations must align their actions with the principles of sustainability, focusing on the importance of the economic, social, and environmental value that they provide [12,13]. The need to save becomes an added benefit not only for every business but also for society [14].
There have been growing efforts to integrate sustainability into oil and gas research and the industry [5]. Stock monitoring and management systems are constantly being improved. It allows for adequate planning, performance analysis, and business productivity [15]. The reliability of an inventory depends largely on the tank calibration accuracy [16]. Therefore, the field of metrological supervision is constantly expanding, and methods for investigating tank calibration do not lose relevance [17]. Methods are considered effective when their realisation reduces the cost and duration of calibration compared to the tank calibration method, as stated by the API MPMS 2.2 standard [18]. Various measuring instruments and metrological supervision procedures are employed to ensure traceability and guarantee the reliability of results obtained during the measurement process in legal or industrial metrology. Metrological supervision procedures for fuel tanks include calibration (industrial metrology) and initial and subsequent verification (legal metrology) [19]. It is important to note that the initial verification of fuel tanks involves a calibration procedure, which is a set of operations carried out to establish, under specified conditions, the relationship between the liquid level in the tank and the volume of the liquid [20]. Consequently, during the initial verification, a tank’s graduation table was built to determine the minimum and maximum measurement limits based on the evaluated expanded uncertainties that did not exceed the maximum permissible errors. During subsequent periodic verifications, it was verified that the evaluated volume measurement uncertainties did not exceed the maximum permissible error [21]. In addition to metrological supervision procedures, the technical maintenance of tanks is also very important. It is a set of measures aimed at ensuring that the tank and its accessories meet the intended purpose and conditions during the period of use to ensure the safe use of the tanks [22]. Tanks’ technical maintenance and metrological supervision are different, but at the same time, these procedures are related to the same actions, such as internal and external inspection of the tank, and measurements that include assessments of verticality, roundness, and shape of walls, roof, and floor profiles.
Proper tank operation and continuous maintenance are important for several reasons. These aspects refer to economic and environmental concepts of sustainability. Storing chemicals and products such as oil, fuel, and gasoline in tanks raises concerns and risks related to leaks, spills, and overfills. Owners are responsible for the tanks. They make every effort to meet the requirements of these tanks to protect both the people that use the tanks and the environment. Well-considered technical and metrological supervision can prevent small releases of polluting groundwater over time [23]. Reliable and timely calibration that meets all environmental, safety, and health requirements help prevent costly errors associated with stock resources, as well as inventory tracking and management. The accuracy and control of stock inventory depend largely on the accuracy of the calibration data of various storage tanks and structures deployed along the value chain [24]. The correct maintenance of renewed tank calibration data is important for maintaining customer confidence and identifying potential stock losses [25]. The accurate control of fuel tanks is important for minimising losses related to leak detection and safe fuel storage according to regulations [26]. A typical refinery fuel tank terminal must meet the highest standards of risk control for both the integrity of the plant and equipment and process safety management [27]. Such standards provide technical and operational guidance to minimise the negative impact of tank storage facilities on the environment, helping facilities meet regulatory requirements and best practices [28]. They provide a continuous tank verification with a set periodicity. The set periods and tolerances should be determined according to risk criteria such as “fill and offtake rates, capacity, degree of automated control of movement, potential speed of response, staffing cover arrangements/if a problem” [26].
Both technical maintenance and metrological supervision of tanks are expensive procedures due to the dimensions of the tanks, as they can contain from 100 m3 to 60,000 m3 of fuel, and due to the specifics of the measurement procedures [29]. Therefore, for tank calibration, it is necessary to answer the question about calibration periodicity choice. OIML D10 (ILAC G24) is one of the key guidance documents for the selection of verification and calibration intervals, stating: “Engineering intuition that determines the initial calibration intervals and a system that keeps those intervals constant without review capabilities is not considered reliable enough and is not recommended”. No international standard clearly and unambiguously regulates the periodicity of calibration and verification. Standards [20,29,30] recommend a maximum calibration and verification frequency of 15 years for legal metrology. It is left to national regulations to decide on the type of approval procedures and frequency of tank inspections. Several methods reviewed in the above-mentioned OIML D10 document [31] and in scientific publications [17,29,32] on the subject can be applied to determine and review the calibration intervals. Many aspects must be considered when determining the periodicity, such as the required measurement uncertainty or error, the risk of exceeding the instrument’s tolerances, trends in instrument wear and drift, frequency and duration of use, data of previous calibrations, and maintenance logs. However, the application of these periodic-determining methods is limited because of the specificity of tank calibration procedures, lack of statistical data, and slow reaction to faults.
The main task of this study was to show that the periodicity of tank calibration, taking into account the relevant economic and environmental aspects of sustainability, must be determined based on an analysis of many years of statistics. They must be continuously reviewed, and the interval must be flexible for tanks of different types, materials, and nominal volumes. Comparing the results of the research with existing practice, the aim was to provide reasonable recommendations for the calibration periodicity of the respective tanks. To organise the process more efficiently, it is important to find out what solutions exist in this field in different countries and to use long-term company experience in this field to analyse the results of metrological supervision and control. The following key moments should be considered when analysing the regulations of the tank calibration periodicity:
  • The organisations developing standards and documents related to tank calibration and their periodicity;
  • The standards that are most commonly applied in this area;
  • The periodicity of supervision determined and used in other countries.

2. Fuel Tanks Calibration Periodicity Regulation

National legislation (in Lithuania) implements the OIML and WELMEC requirements and guidelines, which are usually prepared under the ISO and CEN standards. ISO standards are based on the recommendations and manuals of the world’s leading institutions working in a specific field. The European standards comply with the ISO standards. The ISO and American Petroleum Institute (API) have played a key role in shaping legal metrology regulations. These organisations collaborate and adapt to each other’s standards and guidelines [30,33] to achieve universal application. ISO standards defining the periodicity of tank calibration are based on API tests and research [29].
The metrological characteristics of vertical and horizontal tanks and their metrological supervision are governed by OIML R71, which in principle implements ISO 7507 (parts 1 to 5) and ISO 12917 (parts 1 to 2) standards. These standards are in accordance with the API MPMS Manual of Petroleum Measurement Standards (annexes: 2.2A, 2.2B, 2.2C, 2.2D, 2.2E, 2.2F). All of these standards are applied to the European Union in the field of legal metrology.
To identify the practice of other countries on tank calibration and verification periodicity, requests were sent to legal metrology bodies for some countries. European Union countries that provided information on the website of the European Cooperation in Legal Metrology WELMEC were interviewed. The data of the countries that submitted replies were analysed and formed into a chart. Legislation and other documents (guidelines, manuals, regulations, acts, laws, etc.) that were available online and regulations for the verification and calibration of oil product tanks in other countries were also reviewed. This enabled the identification of standards applicable to this area.
To determine the practices of countries on the above issues, the countries were divided into two main groups:
  • European countries (Germany, Norway, Austria, Slovenia, Sweden, Latvia, Estonia, Poland, France, Iceland, the Netherlands, and Croatia) and Great Britain.
  • Other world countries (USA, Australia, Canada, and Russia).
Information on the countries in the first group was collected based on data published by the legal metrology organisations of these countries and/or by direct contact with relevant regulatory bodies. The USA, Australia, Canada, and Norway provide the most available information on these issues. In Australia, individual institutions adapt ISO, API, and American Society for Testing and Materials (ASTM) standards to meet their needs without changing their content. Different countries have established oil industry associations and corporations according to their needs, which also declare the use of internationally recognised standards. The use of ISO, API, the Engineering Equipment and Materials Users Association (EEMUA), OIML standards, and manuals are reflected in the activities of all analysed countries [20,22,29,30,31]. Figure 1 provides a summary of the information provided by countries operating in accordance with standards applicable to fuel tanks.
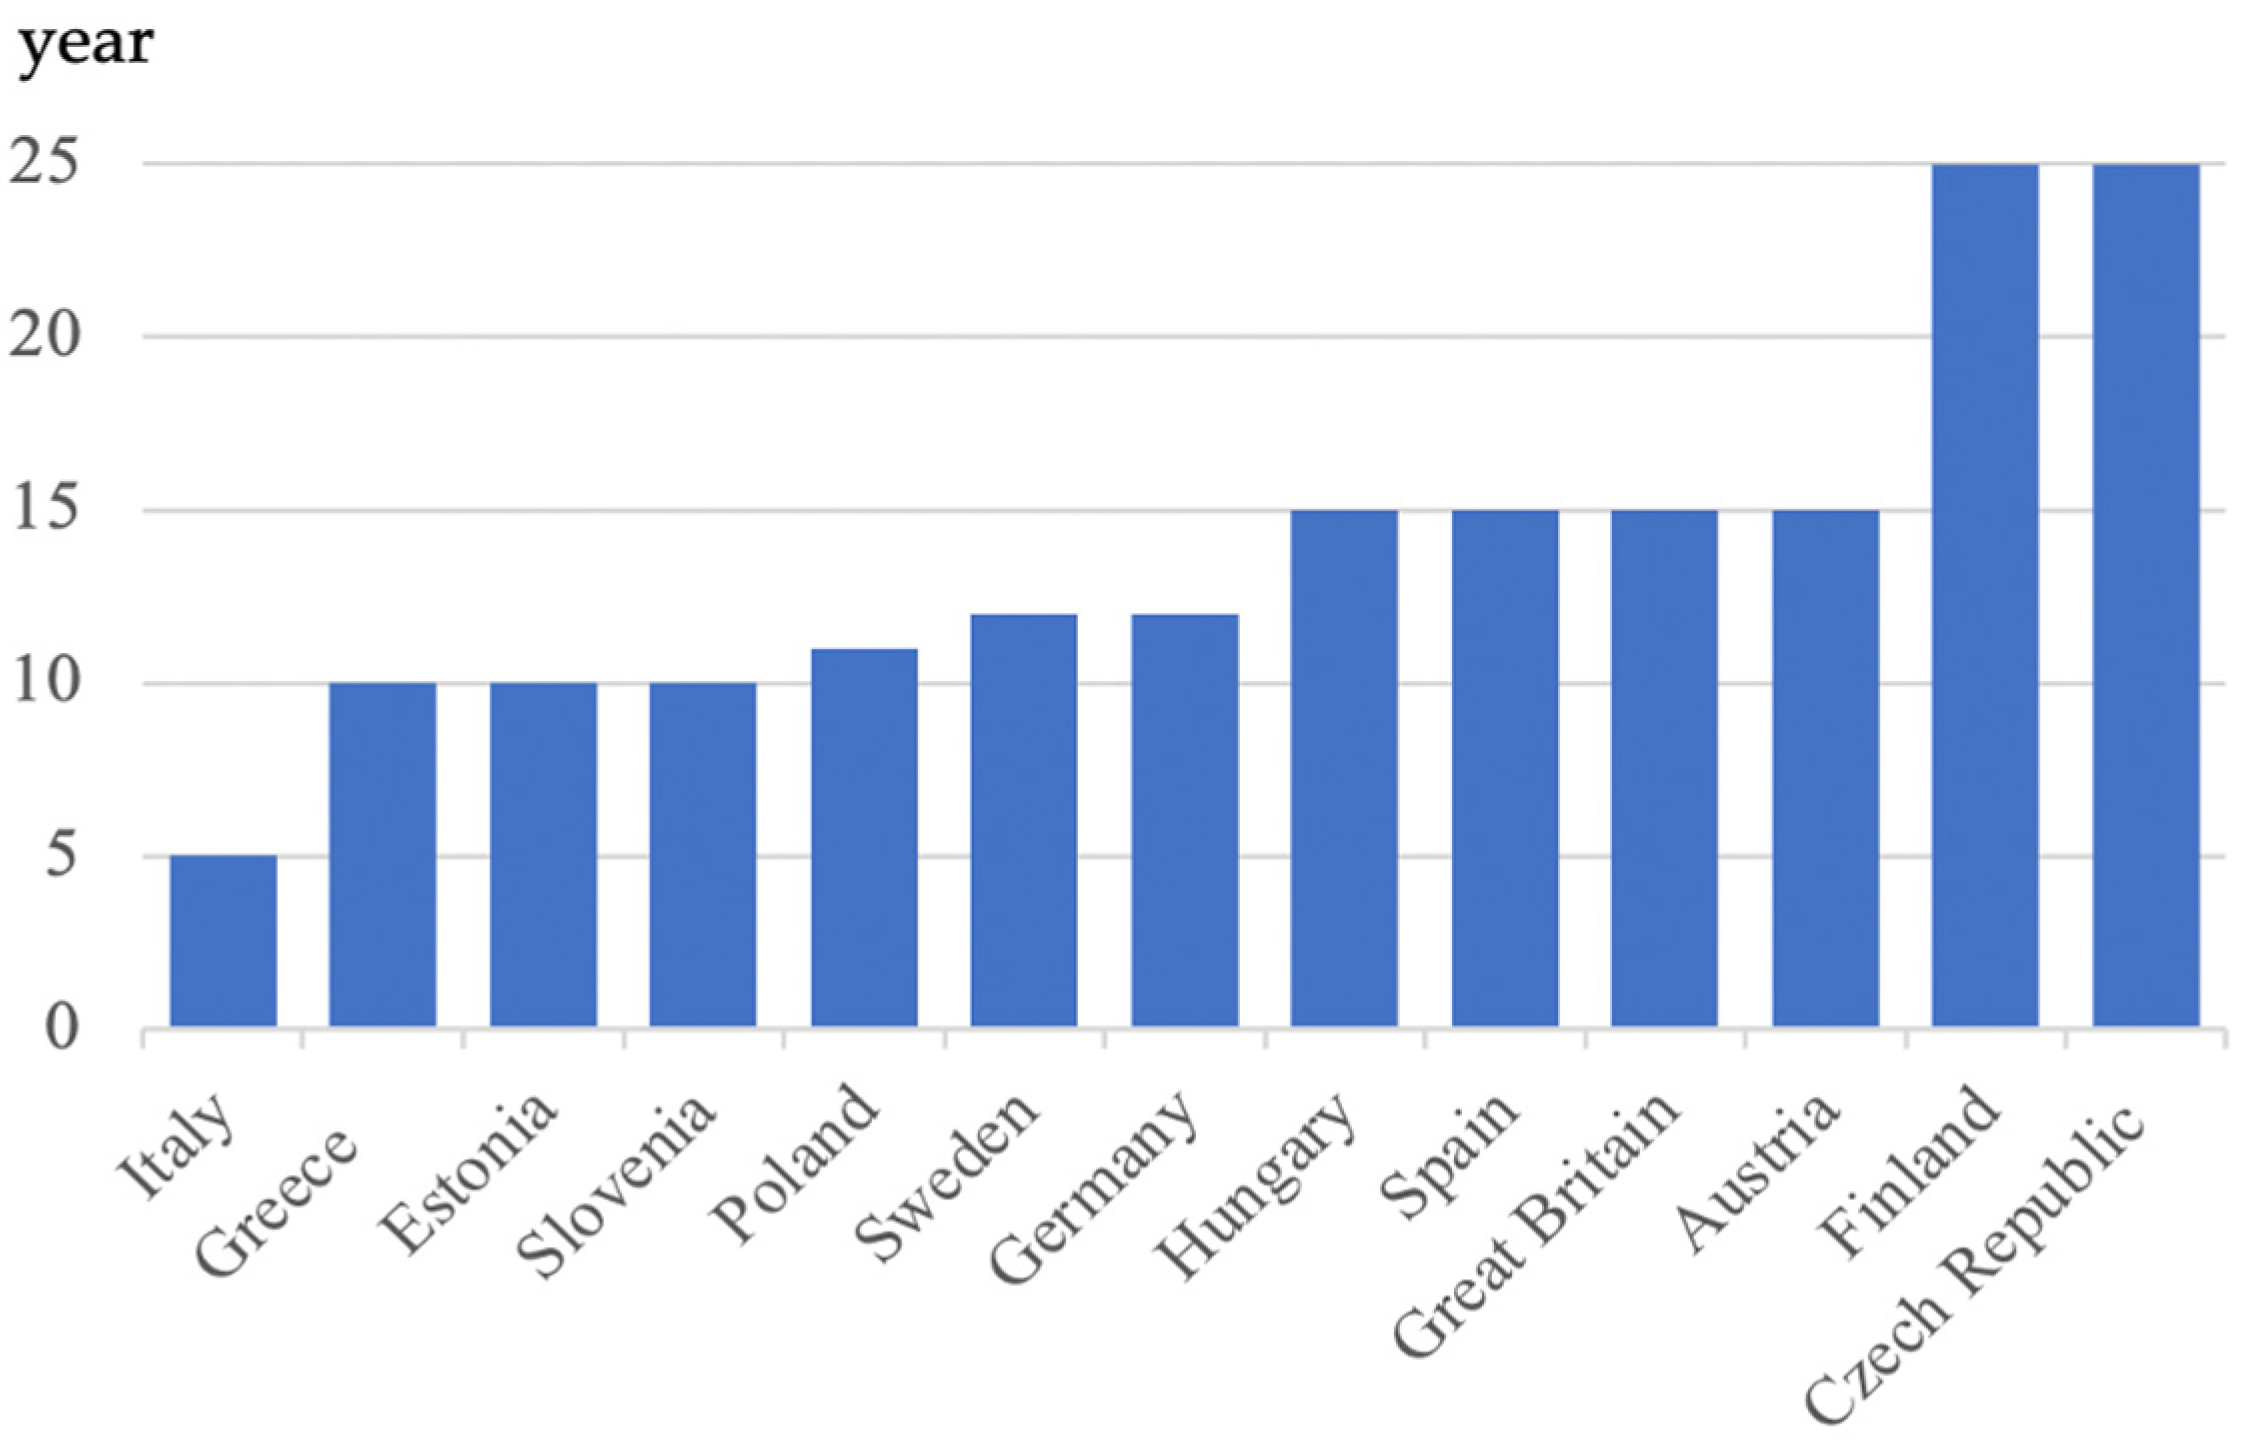
Figure 2 summarises the information related to the metrological supervision of tanks, that is, the calibration periodicity, provided by legal metrology authorities from 17 European countries. The scatter of the periodicity among these 17 European countries is as follows: in 60% of the countries, a 10–15-year period is used; in 12%, 5 years; in 12%, the period is unlimited; and in 16%, tanks do not fall within the scope of legal metrology. Denmark, Switzerland, and Malta applied verification to estimate the volume of fuel tanks. In Slovenia, the verification period for the concrete tanks was unlimited. In Spain, tanks are calibrated at least once every 15 years if the tank design or fluid operating conditions remain unchanged. In Sweden, verification is carried out every 12 years for tanks that are more resistant to corrosion, such as plastic or steel tanks with special coatings. Six years of periodicity was applied for less corrosion-resistant tanks. In Lithuania, periodicity depends on the operational time of the tanks. As the operating time increases, periodicity decreases. In Hungary, for tanks intended for the storage of liquid products (e.g., gasoline or alcohol), the first subsequent verification is carried out after five operational years, and then every 12 years. Estonia, Great Britain, and Finland apply risk assessment tools (including standards) and synchronise metrological supervision procedures with a repair or design changes. The periodicity may change if the tank geometry, material properties, or liquid operating conditions change and the tank is modified or repaired. The essential recommendation of tanks must be inspected for deformations that may affect metrological characteristics.
The maximum recommended periodicity of technical maintenance tests in Europe is 20 years and is regulated by applying EEMUA 159 (equivalent to API 653), keeping the possibility of relying on the manufacturer’s recommendations [22]. Standards governing the periodicity of the metrological supervision of tanks provide a range of 5–15 years [20,29,30].
An analysis of the calibration periodicity regulation showed that OIML R71, ISO 7507 (1/5), and ISO 12917 (1/2) (corresponding to the appendices of the API MPMS Manual of Petroleum Measurement Standards (2.2A, 2.2B, 2.2C, 2.2D, 2.2E, 2.2F) are appropriate for the calibration of tanks, regulating periodicity, and other provisions related to the supervision of tanks in legal and industrial metrology.
The identified standards are used for the metrological and technical maintenance of tanks. An analysis of the experience of various countries showed that, for different types of tanks, regardless of their volume and material, with the exceptions discussed earlier, calibration periodicity in legal metrology from 5 to 15 years is applicable. Such a range of choices does not provide clarity. Therefore, we believe that the only reliable option to classify the selection according to the resistance properties and volume of the containers is the application of statistical results, which is recommended by the API MPMS 2.2A standard.

3. Evaluation of Calibration Periodicity

3.1. Methodology for Determining Calibration Intervals

The methods for calibration interval determination are based on the analysis of error stability over time and are provided in the ILAC-G24/OIML D10 [32] and the scientific literature [33,34]. One of the main parameters for determining the next calibration date is the value of the error, that is, the difference between the real error and the required (desired) limit. When the real error is close to the desired limit, there is a risk that the error may exceed this limit, and in such cases, the calibration interval is not prolonged or shortened. It was noticed that for the tanks, the uncertainty was always the greatest for small volumes. The tanks of the smallest volumes are always “on the limited value”, i.e. the uncertainty is 0.2% (in other words, there is no reserve for fluctuations). This is due to the situation where the volume measurement limits are set during the initial verification, i.e. the volume is properly selected according to the calibration results where the uncertainty limit of 0.2% is not exceeded (for vertical tanks). The general ILAC-G24/OIML D 10 [32] calibration periodicity estimation methods are not applicable to the calibration periodicity determination of tanks because of the specificity of the initial verification procedure of the tanks and the lack of statistical data for periodic verifications.
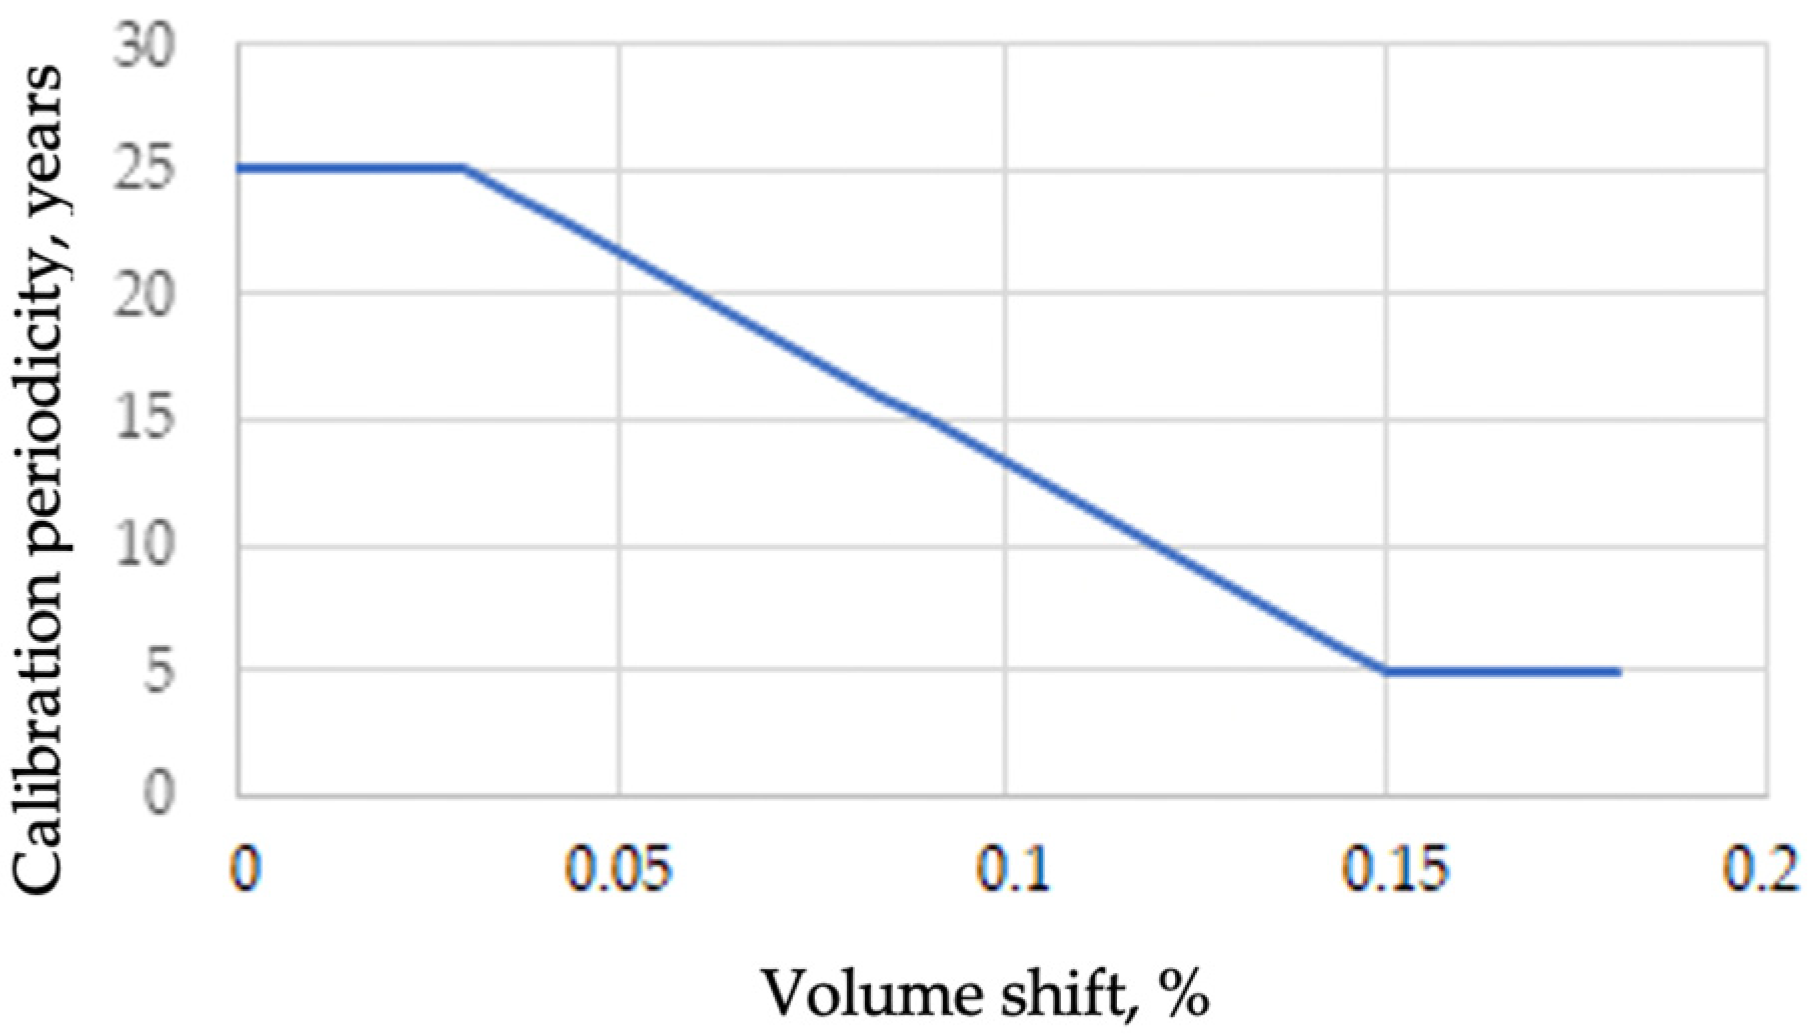
API MPMS 2.2A Standard “Manual of Petroleum Measurement Standards. Chapter 2.2A Measurement and Calibration of Upright Cylindrical Tanks by the Manual Tank Strapping Method” was used for the periodicity evaluation of fuel tanks. These recommendations are for vertical fuel tanks with a capacity of more than 159 cm3 with or without thermal insulation. According to this standard, the maximum calibration period can be up to 25 years. The minimum recommended calibration period was 5 years. The calibration periodicity was estimated from the volume shift, which was calculated from the data in the graduation tables generated during the last two consecutive calibrations. The data-processing methodology [31] for estimating the periodicity of tanks is presented in this section.
Volume shift calculations were performed based on current (new) calibration and previous calibration. Calculations were performed at individual points on the graduation table. The points were selected according to the uniform zones. The uniform zones of the tank were determined from incremental factor sheets for both the previous and new tank capacity tables. The upper and lower gauged level points in the uniform zone of the tank for which the volume shift calculation is performed should be selected according to the following criteria:
  • The upper point corresponds to a point on the graduation table that is 305 mm (12”) above the bottom of the uniform zone.
  • The lower point corresponds to a point on the graduation table that is 305 mm (12”) below the top of the uniform zone.
The mathematical expression for calculating the volume shift is as follows [31]:
Δ V   = | ( V H 2 V L 2 ) ( V H 1 V L 1 ) ( V H 1 V L 1 ) | × 100 ,
where ΔV is the volume shift, %; VH2 and VH1 are the volume values corresponding to the upper point taken from the new and previous calibration graduation tables, respectively; VL2 and VL1 are the volume values corresponding to the lower point taken from the new and previous calibration graduation tables, respectively.
The dependence of the calibration periodicity on the calculated volume shift is illustrated in Figure 3.

3.2. Calibration Periodicity Study

The tests performed in this study cover a variety of tanks intended for the storage of petroleum, petroleum products, and other liquid products: vertical, cylindrical, aboveground, closed- and open-top, and welded storage tanks of various sizes and capacities that exceed 100 m3 [35,36]. All tanks were used outdoors and were stationary (tightly fixed), made of stainless steel, with or without thermal insulation (the coefficient of thermal expansion of the metal in each tank wall is known). The analysed tanks were pressured, non-pressured, refrigerated, and non-refrigerated. Each tank has an assigned code that enables identification with the other tanks. Their technical and metrological supervision was performed according to the API and EEMUA requirements, depending on the tank manufacturer and type specifications. The tanks differ little in in-service conditions and the associated inspection requirements [37,38]. In addition, the tanks satisfied the regulations and legislation applied by the national ministries of the economy, environment, and other services. The owners are responsible for quality control and inspection, which is necessary to ensure compliance with the technical characteristics, design, and construction of the tank.
Data from the metrological supervision of vertical tanks that oil refineries started in 1996 were used for this research. The tanks were calibrated by qualified personnel from accredited laboratories with the right to work in the field of legal metrology. Valid and previous metrological procedure certificates, graduation tables, blueprints, and metrological passports for these tanks were used as reference documents. The calibration table was determined during the calibration process because it is a key component in the measurement of the quantity of liquid in the tank [20]. The structure, shape of the bottom, insulation of the walls, and other tank parameters were evaluated during the calibration table formation procedure (no further evaluation of the aforementioned parameters was required during the calculation of the calibration periodicity). The data obtained show that all tanks underwent an initial verification in accordance with the calibration procedure. The periodicity of the verification procedure regulated by the national law is five years. The tanks must be emptied for the verification procedure. This strongly affects (increases) supervision costs. It became clear that every verification was performed immediately after the full technical inspection, repair, modification, or structural changes to avoid the need to empty the tank.
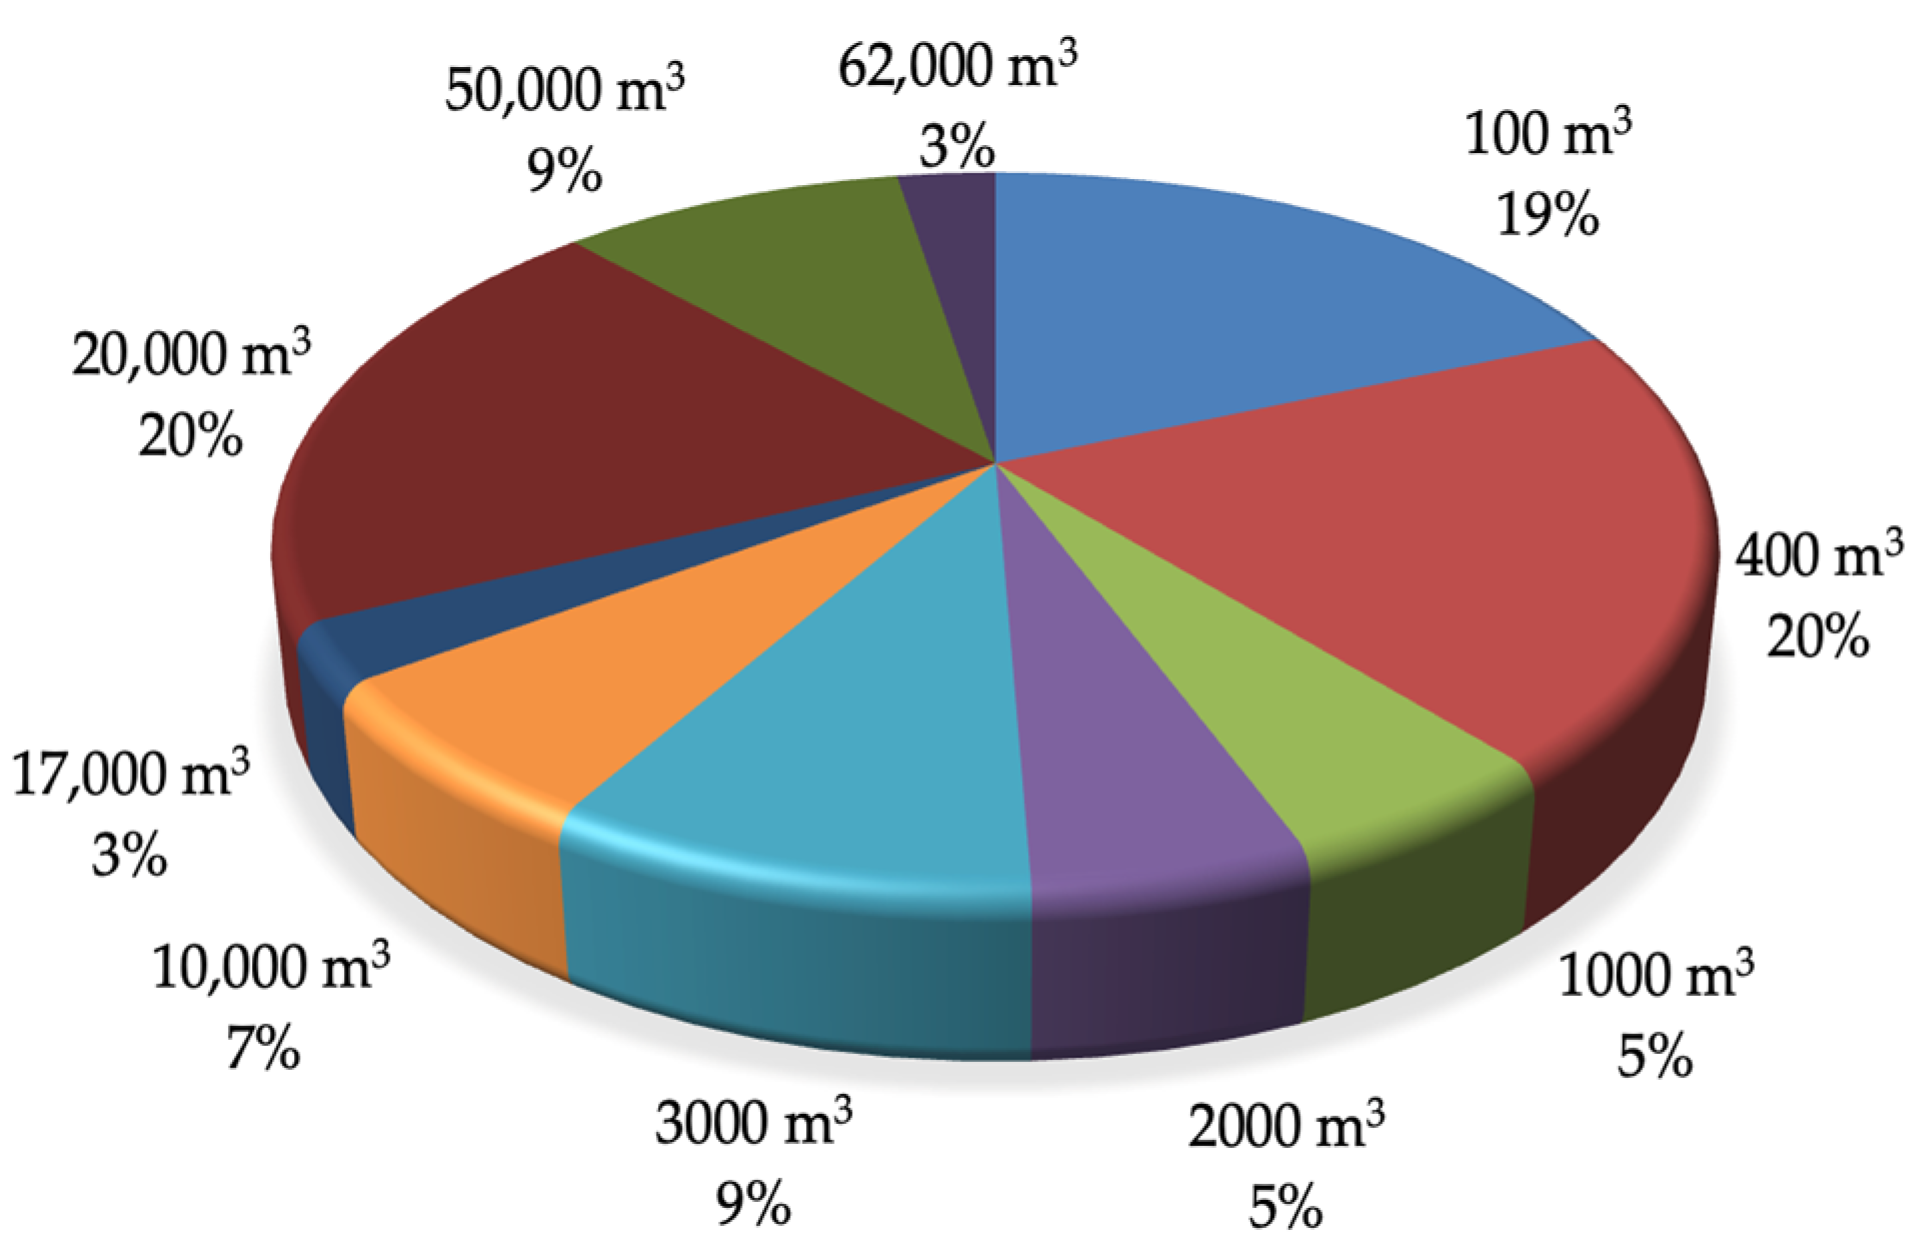
Figure 4 shows the volume distribution of the vertical tanks in the company examined. Graduation tables (of the two previous metrological procedures) were compiled at the same reference temperature and liquid density; therefore, no corrections for temperature or liquid property conversion were necessary.
The calibration period calculations were performed using the methodology described in the previous section. Although the model seems relatively simple, it is intended for technological process optimisation, considering the requirements of legal–industrial metrology. Its practical application enables the industry to improve tank supervision processes and to apply reliable metrology solutions using available resources and instruments. Periodicity was assessed in two ways:
  • Fully considering the recommendations of the standard API MPMS 2.2A (standard method);
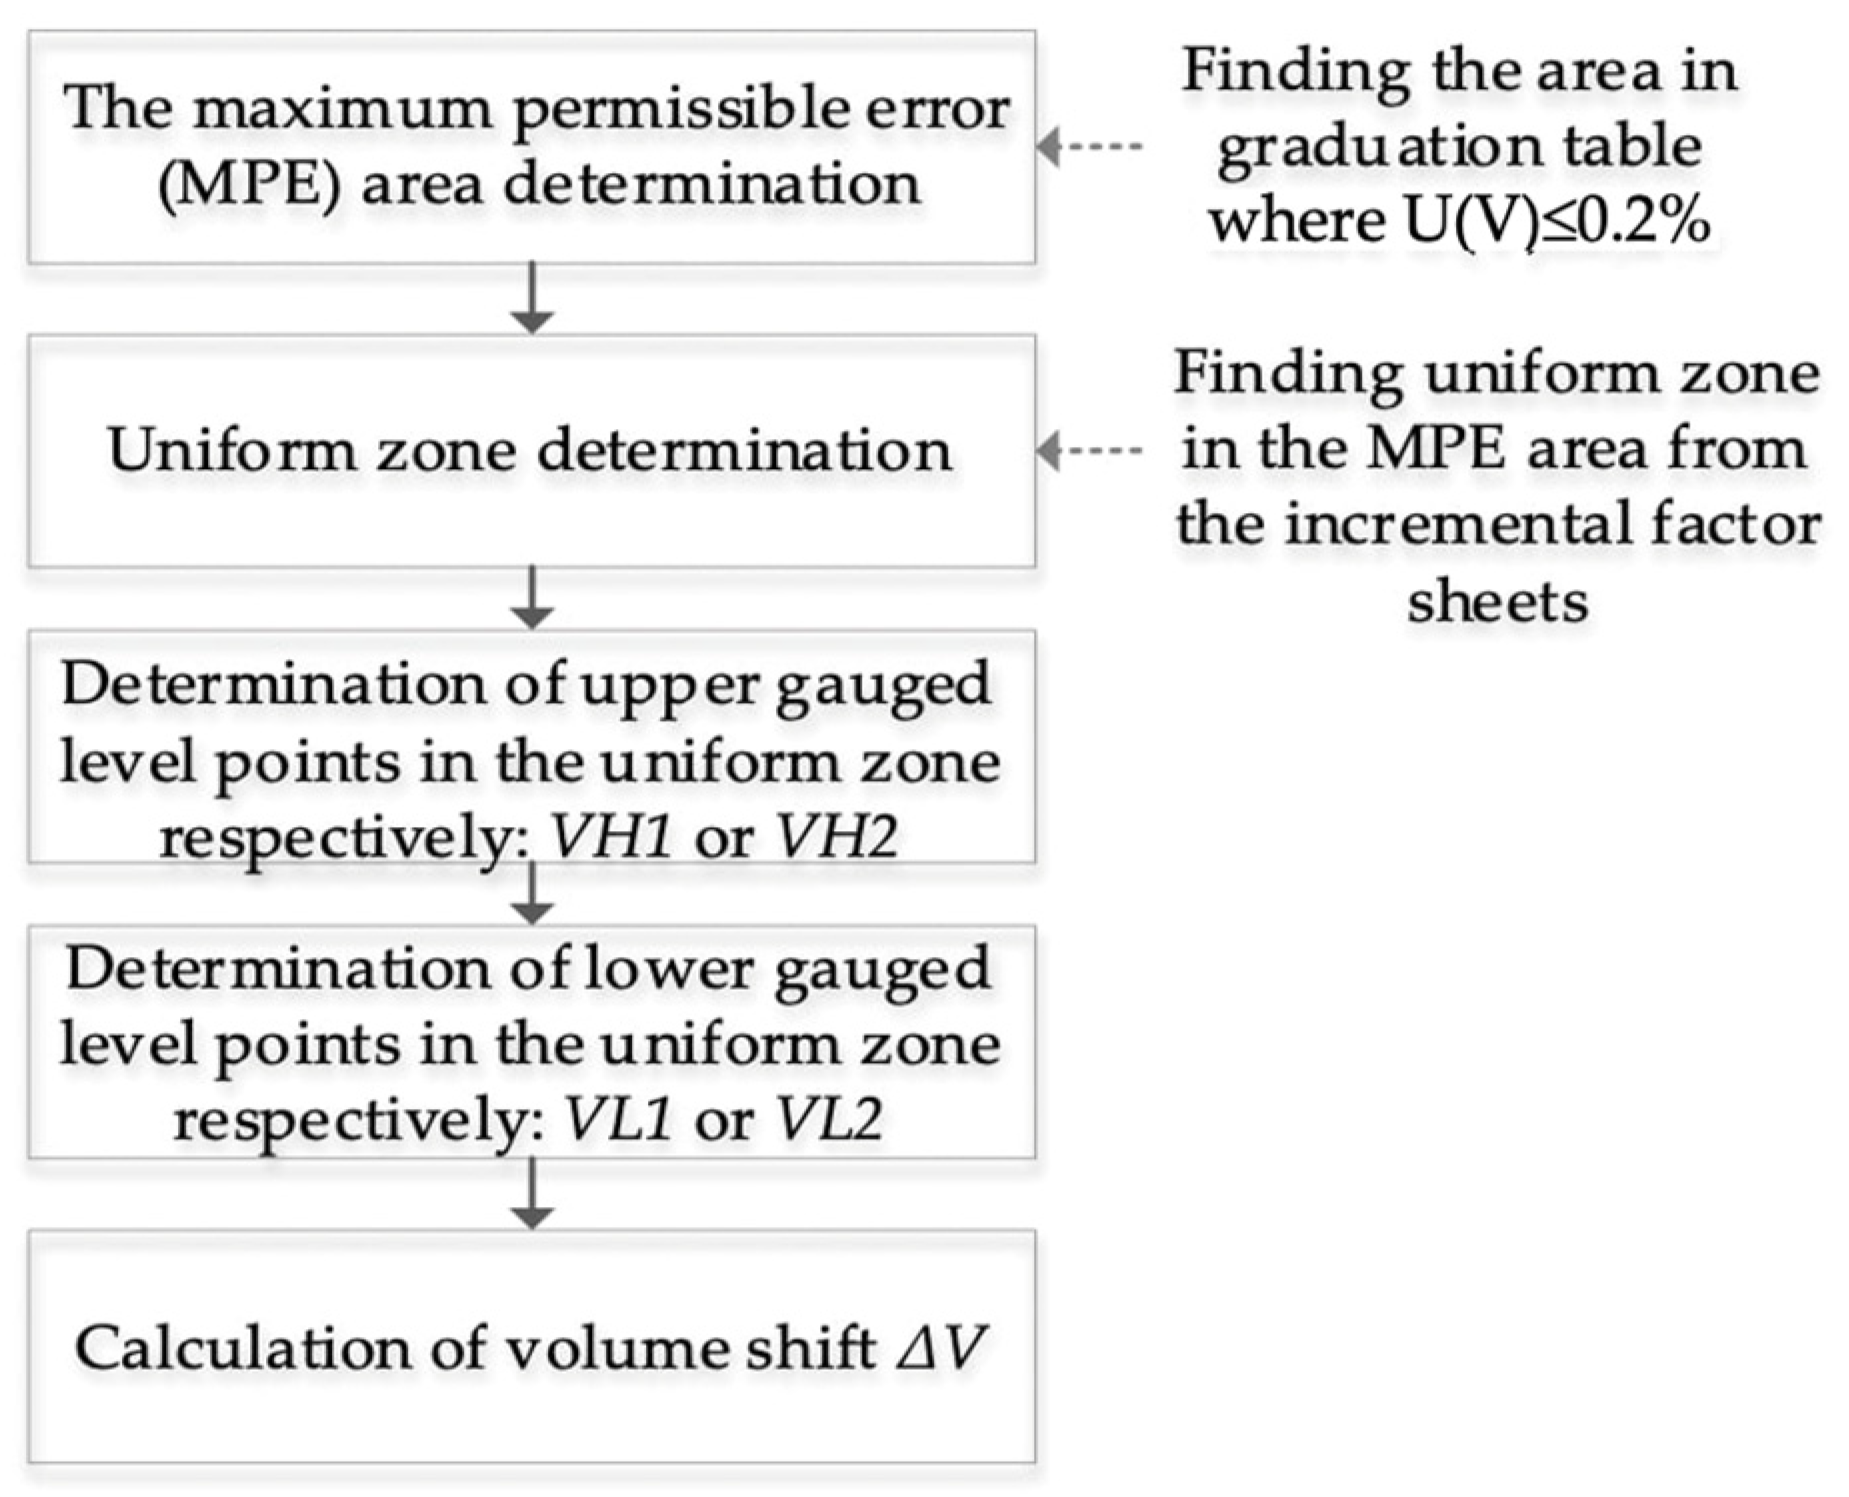
  • Considering the recommendations of the standard API MPMS 2.2A, and evaluating the legal metrology requirements for tanks (modified method). Based on these requirements, the volume estimation error must not exceed a maximum permissible error of ±0.2%. Calculations were performed only for the section of the tank graduation table where the resulting uncertainty was less than 0.2%.
A diagram of the calculation of volume shift using the modified method is shown in Figure 5.
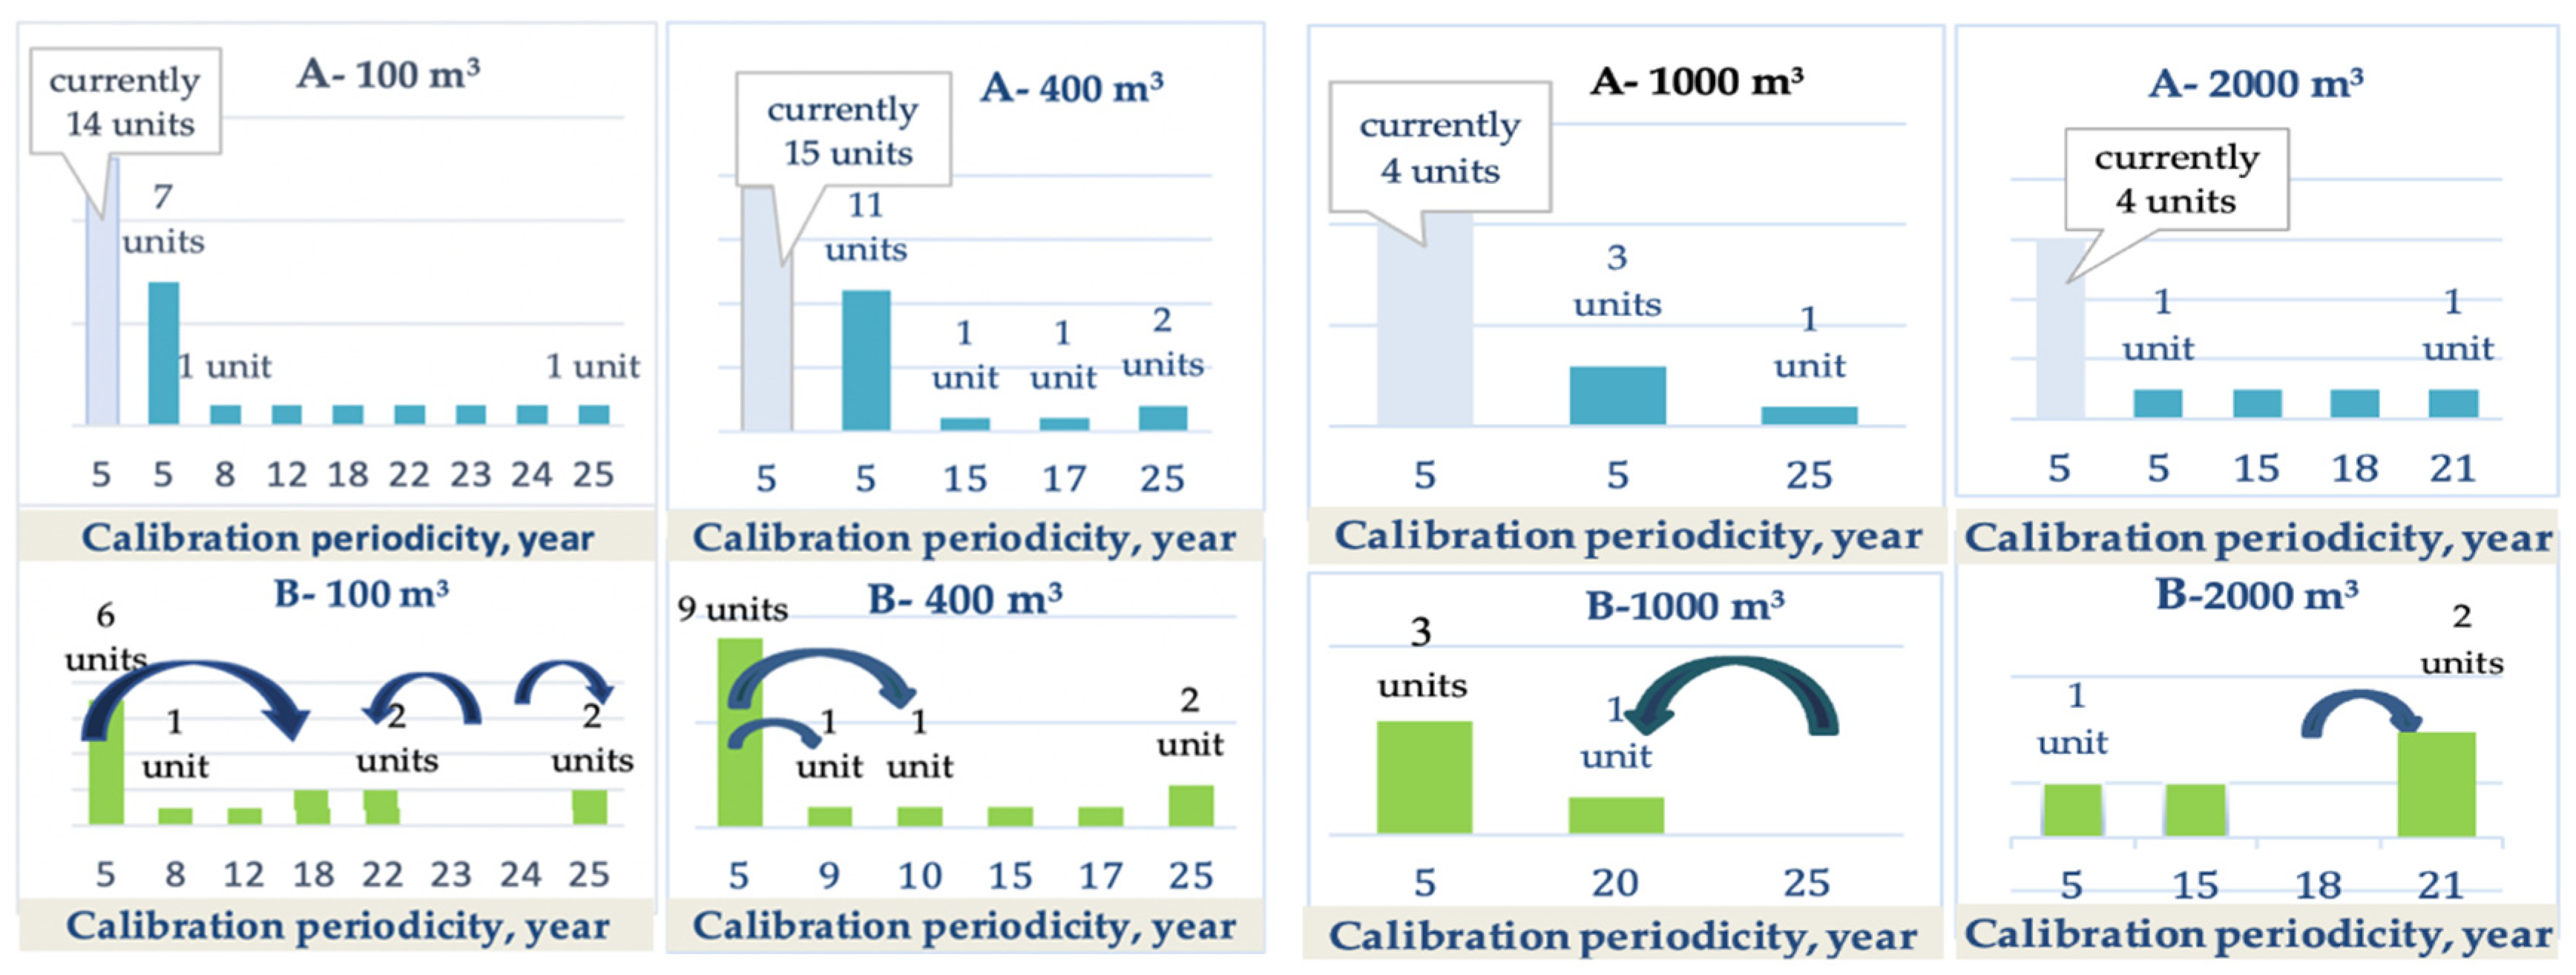
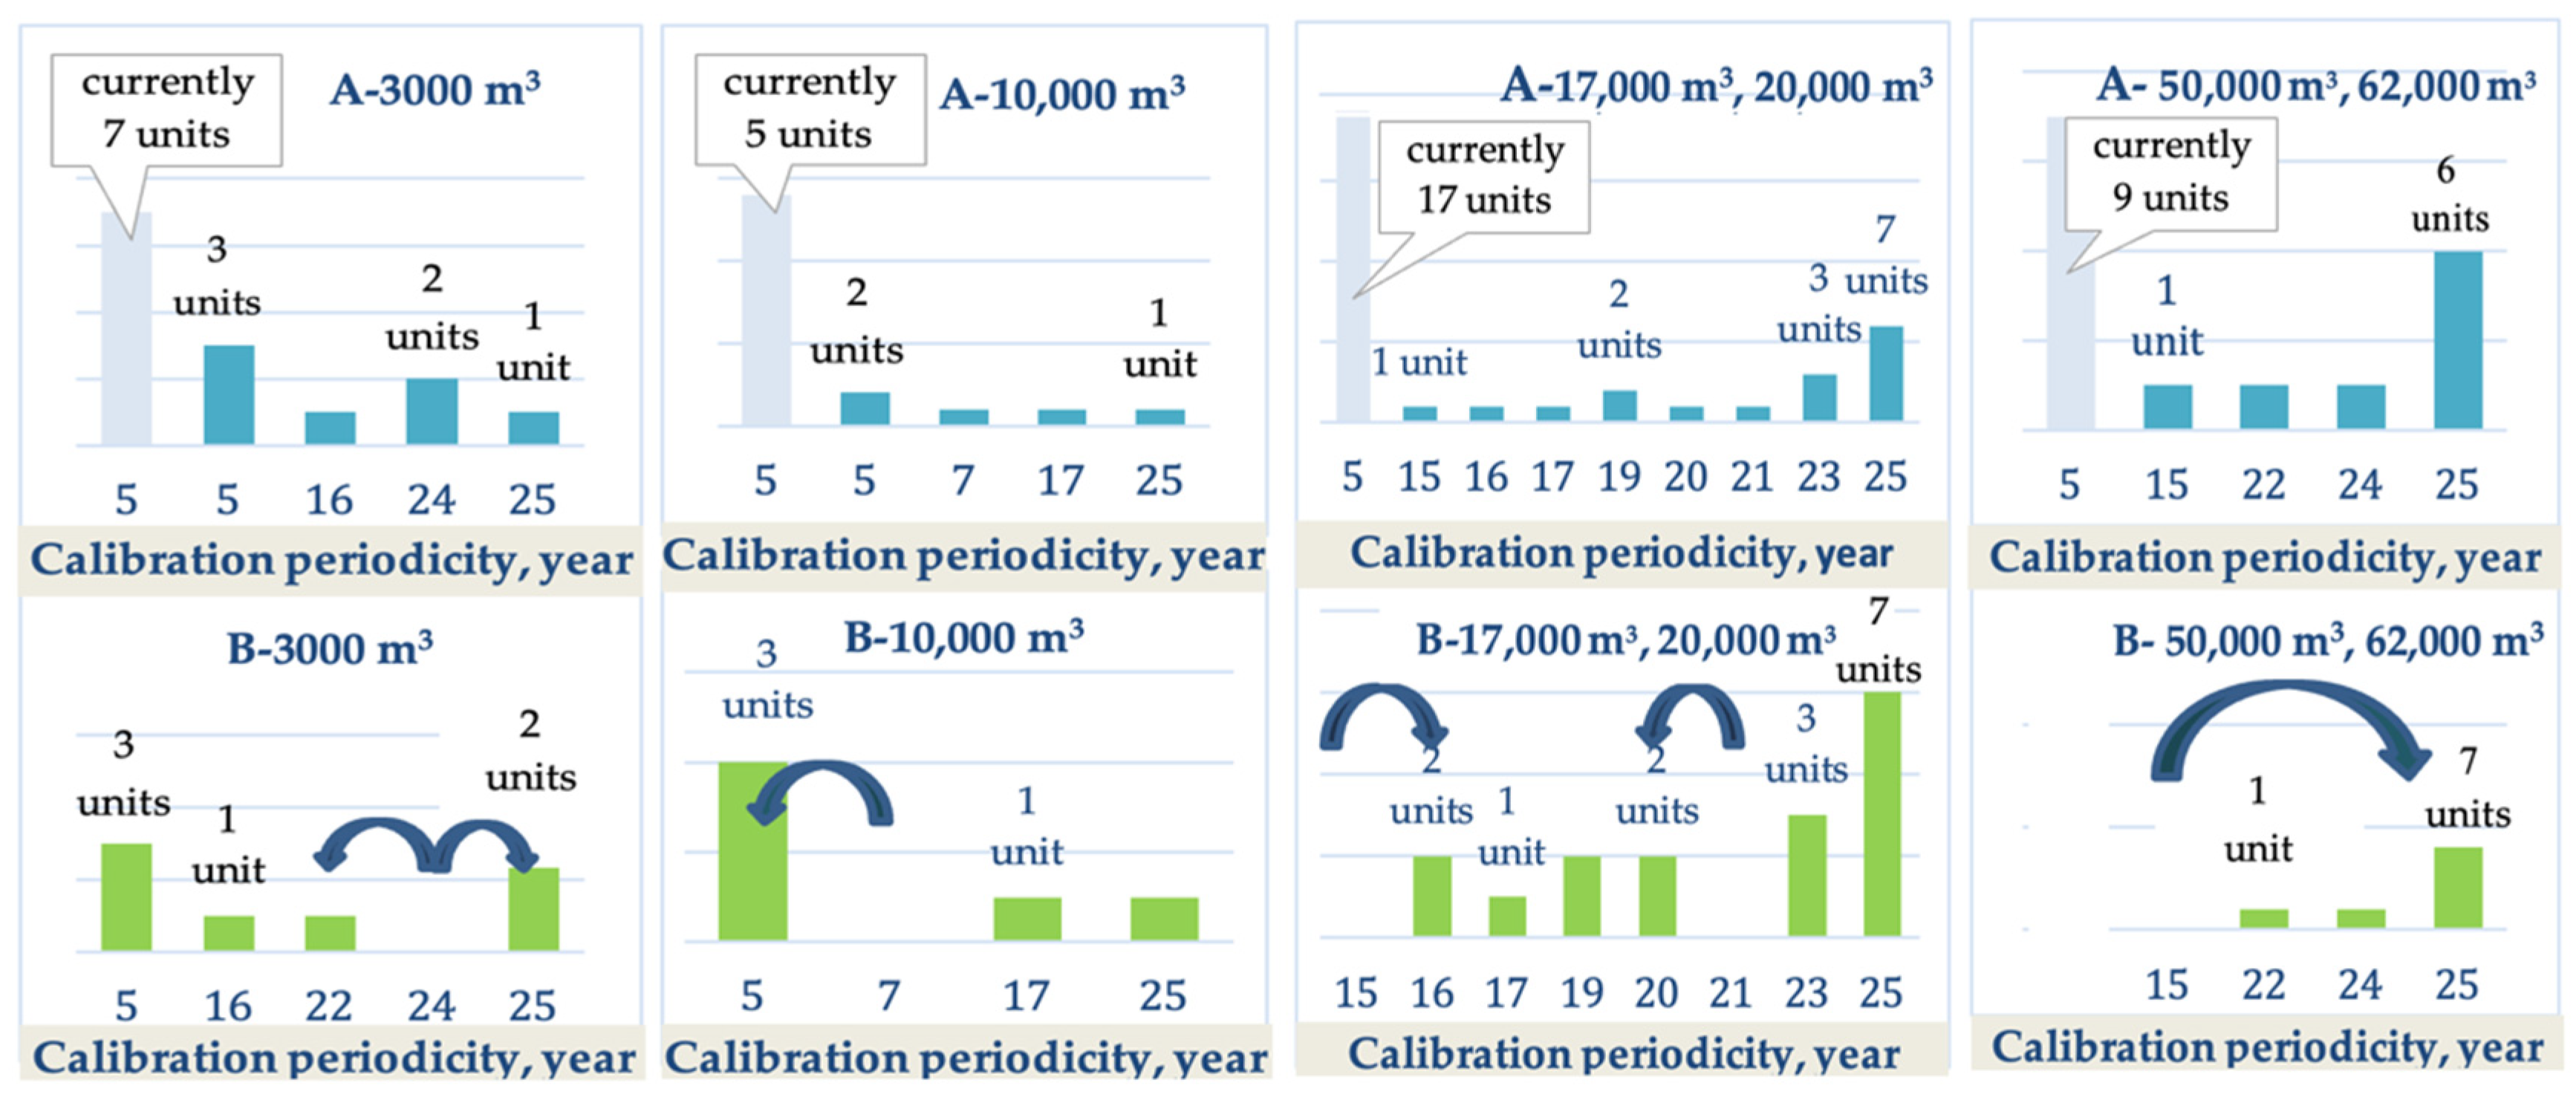
The standard method calculation results are shown in Figure 6, where the bar plots are labelled A. Diagram A shows the number of tanks with the corresponding volume in the company, which are subject to a calibration period of five years (light bars). The dark bars in diagram A show the distribution of the recommended calibration periodicity according to the calculations. Diagram B shows the change in the recommended test frequency calculated using the modified method. Arrows show the changed “direction” in the results obtained by the modified calculation method when compared to the standard calculation method.
The results of the analysed case reveal that the tanks can be divided into two groups according to nominal volume, i.e., 100 m3 ÷ 10,000 m3 and 17,000 m3 ÷ 62,000 m3. The first group is characterised by a variety of results. Metrological supervision intervals were distributed in the range of 5–25 years, according to the results of the modified method. According to the obtained results, the interval between large-volume tanks tends to be larger. The calibration intervals of the large tanks in the second group varied from 15 to 25 years. The predominant periodicity interval of the first group of tanks was five years. An average periodicity of 20 years can be applied to 49% of all the remaining tanks. The average was calculated based on the results of Diagram B. The periodicity interval of the second group of tanks in individual cases may be up to 25 years. For 80% of all studied tanks, a periodicity of 20 years can be applied.

4. Conclusions

This report presents an analysis of the frequency of metrological supervision, criteria, and recommendations for determining the periodicity of vertical, stainless steel, and aboveground fuel tanks. First, the practices in other countries were presented and the periodicity of supervision in other countries was determined. Then, the standards and organisations developing documents related to tank calibration and their periodicity were outlined. Then, the calibration period by retrospective analysis of the calibration data was calculated. These data were presented using the results of several consecutive calibrations. The API MPMS 2.2A 2019 provisions and the methods adopted for legal metrology (presented in this paper) for the recalculation of periodicity were used.
An analysis of data obtained from legal metrology bodies revealed that 71% of European countries apply an average calibration period of 12 years to fuel tanks. It should be noted that this concerns only the tanks assigned to legal metrology. In individual cases, countries define conditions (as an indefinite calibration periodicity for concrete containers), apply risk assessment tools (including standards), and synchronise metrological supervision procedures with repairs or design changes. The reviewed ISO, API, ISO 7507, OIML R 71, and API MPMS 2.2A standards governing the periodicity of tank metrological supervision guide the minimum and maximum periodicity, which is recommended to be between 5 and 15 years.
Comparing the results of the research with existing practices and considering the economic and environmental aspects, it is established that the periodicity of metrological supervision procedures must be synchronised with technical repair and mandatory tank emptying, and must depend on the type and volume of tanks. Based on the countries’ practices and the study results, calibration periods in legal metrology for vertical steel tanks are recommended: up to 12 years for the range of 100 m3–10,000 m3 tanks and up to 20 years for the range of 17,000 m3–62,000 m3. Ensuring systematic and regular technical maintenance and, if necessary, extraordinary metrological calibration should also be emphasised. Tank farm operators, such as refineries and chemical plants with many years of statistics, can reliably predict the calibration periodicity of each tank if they are classified as industrial metrology.
To comply with an adequate ratio of supervision price and tank reliability, it is important to evaluate and determine the periodicity of different tank calibrations. Research on tanks of different types and volumes will be useful in the future. Tank maintenance criteria can complement safety and environmental standards [26,39]. These provisions will enable the industry to make technological processes more efficient and to apply reliable metrology solutions using available resources and instruments. Thus, this study contributes to the development of a more efficient and society-friendly metrology system. This is necessary to meet the needs of the public interest, public health, safety and order, and protection of the environment, consumers, and fair trade [6].

Author Contributions

Conceptualisation, A.M., E.R. and J.D.; supervision, A.M.; methodology, E.R.; investigation, E.R., P.K., J.D. and B.G.U.; formal analysis, A.M.; resources, A.M., P.K., J.D. and B.G.U.; writing—original draft preparation, A.M.; writing—review and editing, P.K., J.D., E.R. and B.G.U.; visualisation, A.M. and E.R. All authors contributed equally. All authors have read and agreed to the published version of the manuscript.

Funding

This research was funded by the economic entity under Contract No. SV9-2823, preparation of recommendations for changing the intervals between periodic inspections of tanks assigned to legal metrology.

Institutional Review Board Statement

Not applicable.

Informed Consent Statement

Not applicable.

Conflicts of Interest

The authors declare no conflict of interest.

References

  1. COM(2021) 89 Final. Proposal for a Decision of the European Parliament and of the Council on the Participation of the Union in the European Partnership on Metrology Jointly Undertaken by Several Member States. Brussels, 2021. Available online: https://eur-lex.europa.eu/legal-content/EN/TXT/?uri=CELEX%3A52021PC0089 (accessed on 3 May 2022).
  2. A/RES/70/1—Transforming Our World: The 2030 Agenda for Sustainable Development; UN Sustainable Development Summit: New York, NY, USA, 2015; p. 35. Available online: https://www.un.org/ga/search/view_doc.asp?symbol=A/RES/70/1&Lang=E (accessed on 3 May 2022).
  3. Fisher, W.P., Jr.; Pendrill, L.; da Cruz, A.L.; Felin, A. Why metrology? Fair dealing and efficient markets for the United Nations’ Sustainable Development Goals. J. Phys. Conf. Ser. 2019, 1379, 12023. [Google Scholar] [CrossRef]
  4. Okeke, A. Towards sustainability in the global oil and gas industry: Identifying where the emphasis lies. Environ. Sustain. Indic. 2021, 12, 15. [Google Scholar] [CrossRef]
  5. Morrison, J.; Fisher, W.P., Jr. Measuring for management in science, technology, engineering, and mathematics learning ecosystems. J. Phys. Conf. Ser. 2019, 1379, 12042. [Google Scholar] [CrossRef]
  6. Global Sustainable Development Report 2019: The Future is Now–Science for Achieving Sustainable Development; Independent Group of Scientists Appointed by the Secretary-General: New York, NY, USA, 2019; p. 216. Available online: https://sustainabledevelopment.un.org/content/documents/24797GSDR_report_2019.pdf (accessed on 3 May 2022).
  7. Fisher, W.P., Jr.; Stenner, A.J. Theory-based metrological traceability in education: A reading measurement network. Measurement 2016, 92, 489–496. [Google Scholar] [CrossRef]
  8. Ameta, G.; Rachuri, S.; Fiorentini, X.; Mani, M.; Fenves, S.J.; Lyons, K.W.; Sriram, R.D. Extending the notion of quality from physical metrology to information and sustainability. J. Intell. Manuf. 2009, 22, 737–750. [Google Scholar] [CrossRef]
  9. Fisher, W.P., Jr. Contextualizing Sustainable Development Metric Standards: Imagining New Entrepreneurial Possibilities. Sustainability 2020, 12, 9661. [Google Scholar] [CrossRef]
  10. Basta, M.; Lapalme, J.; Paquet, M.; Saint-Louis, P.; Zwaida, T.A. How are supply chains addressing their social responsibility dilemmas? Review of the last decade and a half. Corp. Soc. Responsib. Environ. Manag. 2018, 25, 833–843. [Google Scholar] [CrossRef]
  11. Rezaee, Z. Supply chain management and business sustainability synergy: A theoretical and integrated perspective. Sustainability 2018, 10, 275. [Google Scholar] [CrossRef] [Green Version]
  12. Atz, U.; van Holt, T.; Douglas, E.; Whelan, T. The Return on Sustainability Investment (ROSI): Monetizing Financial Benefits of Sustainability Actions in Companies. Sustain. Consum. Prod. 2020, 2, 303–354. [Google Scholar]
  13. Panigrahi, S.S.; Bahinipati, B.; Jain, V. Sustainable supply chain management: A review of literature and implications for future research. Manag. Environ. Qual. Int. J. 2019, 30, 1001–1049. [Google Scholar] [CrossRef]
  14. Alhaddi, H. Triple Bottom Line and Sustainability: A Literature Review. Bus. Manag. Stud. 2015, 1, 11. [Google Scholar] [CrossRef]
  15. Bateh, J.; Heaton, C.; Arbogast, G.W.; Broadbent, A. Defining Sustainability In The Business Setting. J. Sustain. Manag. 2014, 1, 1–4. [Google Scholar] [CrossRef]
  16. Adekitan, A.I.; Omoruyi, O. Stock keeping accuracy: A data based investigation of storage tank calibration challenges. Data Brief 2018, 19, 2155–2162. [Google Scholar] [CrossRef]
  17. Chen, G.; Wan, Y.; Lin, H.; Hu, H.; Liu, G.; Peng, Y. Vertical tank capacity measurement based on Monte Carlo method. PLoS ONE 2021, 16, e0250207. [Google Scholar] [CrossRef]
  18. Agboola, O.O.; Akinnuli, B.O.; Akintunde, M.A.; Ikubanni, P.P.; Adeleke, A.A. Comparative Analysis of Manual Strapping Method (MSM) and Electro-Optical Distance Ranging (EODR) Method of Tank Calibration. J. Phys. Conf. Ser. 2019, 1378, 022062. [Google Scholar] [CrossRef] [Green Version]
  19. Samoilenko, O.; Zaets, V. Calibration of Tanks and Ships’ Tanks for Storage and Transportation of Liquids by Laser Scanning. In Applied Aspects of Modern Metrology; IntechOpen: London, UK, 2021. [Google Scholar] [CrossRef]
  20. Agboola, O.O.; Ikubanni, P.P.; Ibikunle, R.A.; Adediran, A.A.; Ogunsemi, B.T. Generation of Calibration Charts for Horizontal Petroleum Storage Tanks Using Microsoft Excel. MAPAN 2017, 32, 321–327. [Google Scholar] [CrossRef]
  21. OIML R 71: 2008 (E). Fixed Storage Tanks. General Requirements. OIML Technical Subcommittee TC 8/SC 1 Static Volume and Mass Measurement. 2014. Available online: https://www.oiml.org/en/files/pdf_r/r071-e08.pdf (accessed on 20 July 2020).
  22. OIML D20: 2002 (E). Initial and Subsequent Verification of Measuring Instruments and Processes. OIML Technical Subcommittee TC 3/SC 1: Pattern Approval and Verification. 2002. Available online: https://www.oiml.org/en/files/pdf_d/d020-e88.pdf (accessed on 20 July 2020).
  23. Tadros, A.F.F. Environmental aspects of petroleum storage in above ground tank. In E3S Web of Conferences; EDP Sciences: Les Ulis, France, 2020; Volume 166. [Google Scholar] [CrossRef] [Green Version]
  24. Hua, P.; de Oliveira, K.R.F.; Cheung, P.; Gonçalves, F.V.; Zhang, J. Influences of model structure and calibration data size on predicting chlorine residuals in water storage tanks. Sci. Total Environ. 2018, 634, 705–714. [Google Scholar] [CrossRef]
  25. The Importance of Accurate Tank Calibration. Environmental Monitoring Solutions. 2021. Available online: https://drivingfueliq.com/the-importance-of-accurate-tank-calibration/ (accessed on 20 April 2022).
  26. Safety and Environmental Standards for Fuel Storage Sites; Process Safety Leadership Group, Final Report; HSE Books: Norwich, UK, 2009. Available online: https://www.hse.gov.uk/comah/buncefield/fuel-storage-sites.pdf (accessed on 20 April 2022).
  27. Guidelines on Environmental Management for Facilities Storing Bulk Quantities of Petroleum, Petroleum Products and Other Fuels; Energy Institute: London, UK, 2015; Available online: https://publishing.energyinst.org/topics/environment/guidelines-on-environmental-management-for-facilities-storing-bulk-quantities-of-petroleum,-petroleum-products-and-other-fuels2 (accessed on 20 April 2022).
  28. Fanelli, P. Safety and Environmental Standards for Fuel Storage Sites: How to enhance the Safety Integrity of an Overfill Protection System for Flammable Fuel Storage Tanks. In Proceedings of the 5th International Conference on Safety and Environment in the Process, Milan, Italy, 3–6 June 2012; Volume 26. [Google Scholar] [CrossRef]
  29. EEMUA. Publication 159 Above ground flat bottomed storage tanks—A guide to inspection, maintenance and repair. In The Engineering Equipment and Materials Users Association, 5th ed.; EEMUA: London, UK, 2017. [Google Scholar]
  30. ISO 7507-4:2000; Petroleum and Liquid Petroleum Products-Calibration of Vertical Cylindrical Tanks-Part 4: Internal Electro-Optical Distance-Ranging Method. ISO/TC 28/SC 2Measurement of Petroleum and Related Products; ISO: Geneva, Switzerland, 2010.
  31. API MPMS 2.2A Manual of Petroleum Measurement Standards Chapter 2.2A Measurement and Calibration of Upright Cylindrical Tanks by the Manual Tank Strapping Method, 2nd ed.; American Petroleum Institute (API): Washington, DC, USA, 2019.
  32. ILAC-G24: 2007/OIML D 10: 2007 (E). Guidelines for the Determination of Calibration Intervals of Measuring Instruments. ILAC Accreditation Committee and by OIML TC 4 Measurement Standards and Calibration and Verification Devices. 2007. Available online: http://www.ff.bg.ac.rs/Kalibracija/dokumenta/OIML%20Guidelines.pdf (accessed on 22 July 2020).
  33. Howell, J. Towards the re-verification of process tank calibrations. Trans. Inst. Meas. Control 2010, 31, 117–128. [Google Scholar] [CrossRef] [Green Version]
  34. Binner, R.; Howell, J.; Janssens-Maenhout, G.; Sellinschegg, D.; Zhao, K. Practical Issues Relating to Tank Volume Determination. Ind. Eng. Chem. Res. 2008, 47, 1533–1545. [Google Scholar] [CrossRef]
  35. Guide for the National Adoption of ISO Standards as API/American National Standards, 5th ed.; American Petroleum Institute (API): Washington, DC, USA, 2007; Available online: https://mycommittees.api.org/standards/ecs/shared%20documents/policies%20and%20procedures/api%20guide%20for%20adoption%20of%20iso%20standards-5th%20ed.pdf (accessed on 22 July 2020).
  36. 7 Types of Industrial Storage Tanks Explained. Available online: https://www.gsctanks.com/industrial-storage-tanks/ (accessed on 4 May 2022).
  37. Baker, M.A. Comparison of EEMUA 159 to API Standards. Available online: https://slideplayer.com/slide/1427841/ (accessed on 4 May 2022).
  38. Kala, Z.; Gottvald, J.; Stoniš, J.; Omishore, A. Sensitivity analysis of the stress state in shell courses of welded tanks for oil storage. Eng. Struct. Technol. 2014, 6, 7–12. [Google Scholar] [CrossRef]
  39. Safety Guidelines and Good Industry Practices For Oil Terminals. UNECE, 2015. Available online: https://unece.org/sites/default/files/2021-01/TEIA_ENG_OilTerminals.pdf (accessed on 4 July 2022).
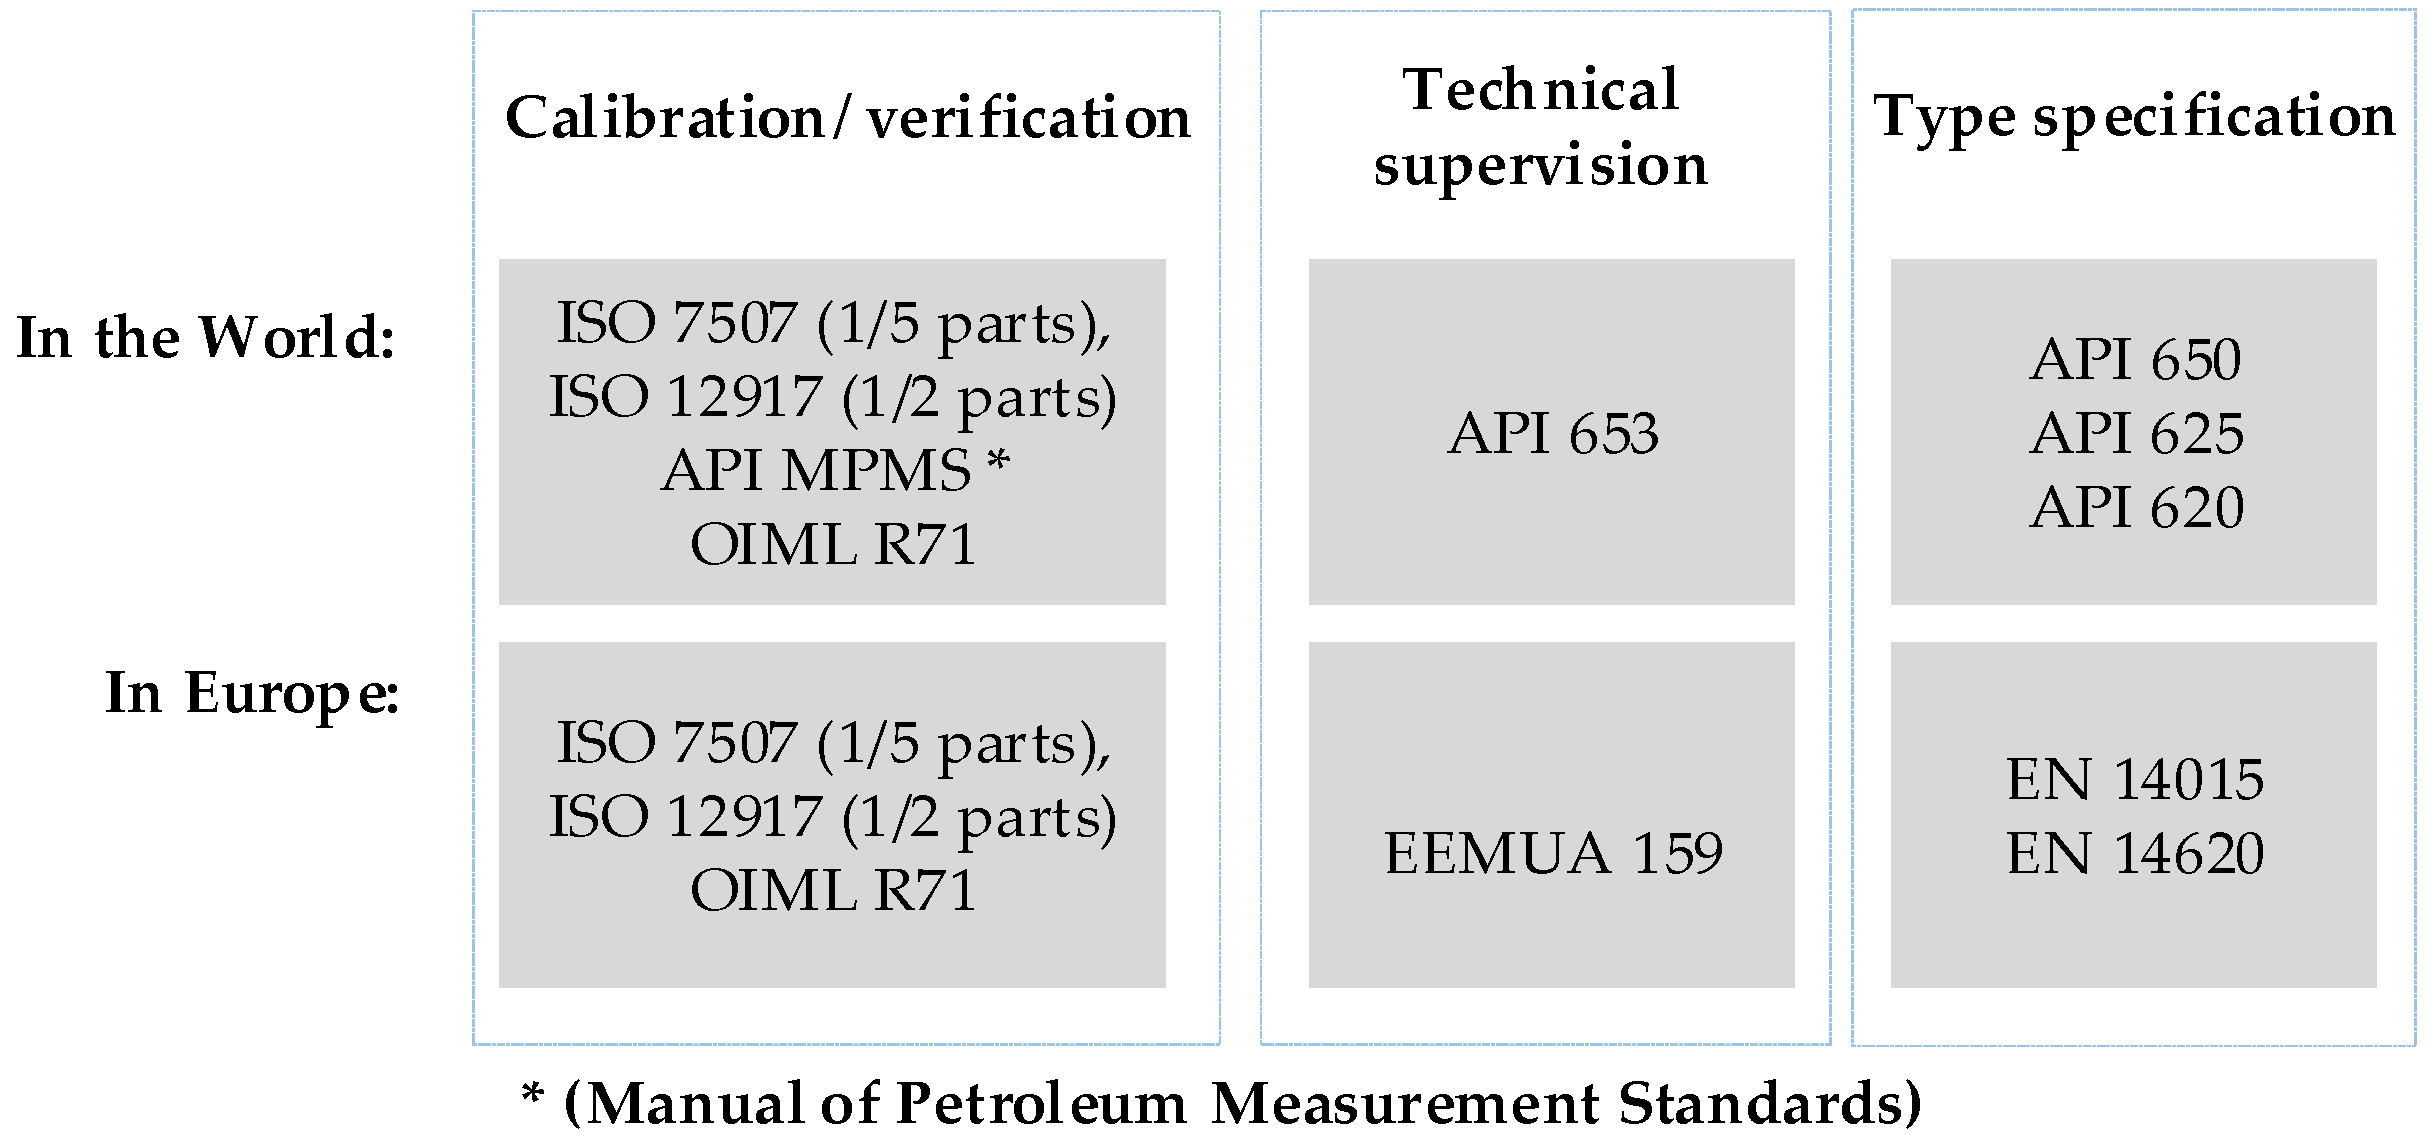
Figure 1. Summary of the information on the standards related to fuel tanks.
Sustainability 14 09817 g001
Figure 2. Summary of calibration periodicity of tanks in 17 countries.
Sustainability 14 09817 g002
Figure 3. Tank calibration periodicity as a function of the calculated volume shift.
Sustainability 14 09817 g003
Figure 4. Distribution of analysed tanks with different volumes.
Sustainability 14 09817 g004
Figure 5. Volume shift calculation diagram, using a modified method.
Sustainability 14 09817 g005
Figure 6. Calculated calibration intervals, using standard method (diagram A) and modified method (diagram B). Arrows show the changes in the results obtained by the modified calculation method compared to the standard calculation method.
Sustainability 14 09817 g006aSustainability 14 09817 g006b
Publisher’s Note: MDPI stays neutral with regard to jurisdictional claims in published maps and institutional affiliations.