Article

Effect of Porosity on Tribological Properties of Medical-Grade 316L Stainless Steel Manufactured by Laser-Based Powder Bed Fusion

by
Germán Omar Barrionuevo
1,2,*,
Magdalena Walczak
3,
Patricio Mendez
4,
Iván La Fé-Perdomo
5,
Erika Chiluisa-Palomo
6,
Wilson Navas-Pinto
1 and
Duncan E. Cree
7,*
1
Departamento de Ciencias de la Energía y Mecánica, Universidad de las Fuerzas Armadas ESPE, Sangolquí 171103, Ecuador
2
Department of Engineering, Universidad Católica del Uruguay, Av. 8 de octubre 2738, Montevideo 11600, Uruguay
3
Department of Mechanical and Metallurgical Engineering, School of Engineering, Pontificia Universidad Católica de Chile, Av. Vicuña Mackenna 4860, Santiago 7820436, Chile
4
Chemical and Materials Engineering Department, University of Alberta, Edmonton, AB T6G 2R3, Canada
5
Escuela de Ingeniería Mecánica, Pontificia Universidad Católica de Valparaíso, Valparaíso 2340025, Chile
6
Facultad de Ciencias de la Ingeniería y Aplicadas, Universidad Técnica de Cotopaxi, Latacunga 050101, Ecuador
7
Department of Mechanical Engineering, McMaster University, Hamilton, ON L8S 4L7, Canada
*
Authors to whom correspondence should be addressed.
Materials 2025, 18(3), 568; https://doi.org/10.3390/ma18030568
Submission received: 11 December 2024 / Revised: 13 January 2025 / Accepted: 23 January 2025 / Published: 26 January 2025
(This article belongs to the Special Issue State of the Art in Materials for Additive Manufacturing)

Highlights

  1. By varying the laser power and scanning speed in laser powder bed fusion, the porosity level can be controlled.
  2. Higher porosity allows for a diminishing wear rate.
  3. The primary wear mechanism in dry sliding of 316L stainless steel against a Si3N4 is three-body abrasion.

Abstract

The potential of laser-based powder bed fusion (L-PBF) technology for producing functional components relies on its capability of maintaining or even improving the mechanical properties of the processed material. This improvement is associated with the microstructure resulting from the high thermal gradient and fast cooling rate. However, this microstructural advantage may be counterbalanced by the lack of full density, which could be tolerated to a certain degree for applications such as biomedical implants and medical equipment. In this study, medical-grade 316L stainless steel specimens with porosities ranging from 1.7 to 9.1% were additively manufactured by L-PBF using different combinations of laser power and scanning speeds. Tribological properties were evaluated by pin-on-disc testing in dry conditions against a silicon nitride test body and analyzed in the context of microstructural characterization by optical and electron microscopy. The results reveal that higher porosity allows for a diminishing wear rate, which is explained by the capacity of the pores to retain wear debris related with the three-body abrasion. This research provides practical insights into the design of medical wear-resistant components, thereby enhancing our understanding of the potential of L-PBF in the fields of materials science and biomedical engineering.

1. Introduction

The laser-based powder bed fusion (L-PBF) technology relies on building 3D objects one layer at a time, employing a high-power laser (>100 W) to fuse a powder bed. Each consecutive layer bonds to the previous one via localized melting, which, with proper geometric control, results in the “growth” of a functional component [1,2,3]. However, additive manufacturing (AM) technologies are associated with inherent challenges, such as heterogeneity due to the anisotropy of the resulting mechanical properties, primarily hardness and elongation [4,5,6], and internal defects such as pores and non-metallic inclusions originating from the quality of the raw powder [7,8,9]. In addition, the processing parameters and the metal powder dispersion system influences the relative densities of additively manufactured parts [10,11].
As a rule of thumb, it has been proposed that components obtained by L-PBF must have a very high relative density (>99%) for them to be useful for conventional engineering applications such as aerospace components, automotive parts, implants, or prosthetics [12,13]. Nonetheless, materials of higher porosity have not been discarded due to their biomimetic potential [14], enabling the reduction in the elastic modulus, which is particularly relevant for medical implants [15]. In this context, porosity can be used for further functionalization of the material, taking advantage of the high surface area and the capacity for permeability, self-lubrication, and biocompatibility [15,16] for which controlling the size, distribution, and connectivity of the pores is essential [6,16,17]. In that sense, L-PBF technology is applicable for tuning porosity parameters by adjusting the processing protocol [16,17].
The specific advantages of porous materials can be tailored by controlling the size, distribution, and connectivity of the pores, allowing for new functions in engineering and biomedical applications [7,17,18]. Porosity levels are essential, but mechanical properties are dependent on porosity in terms of the number of pores (i.e., the fractional porosity), their interconnection, size, morphology, distribution, chemical composition, and lubricant availability. The interdependence of morphological characteristics and functional properties is of particular importance for tribological applications. On the one hand, the presence of pores generally reduces the overall material hardness, which allows for mitigating the stress shielding of medical implants [19,20,21] but can lead to increased wear rates [22] and decreased load-bearing capacity of the material, making it more susceptible to deformation and further material removal under load. On the other hand, porous materials can retain wear debris, preventing them from acting as an abrasive and thus reducing wear [23,24]. However, too high of a porosity can also compromise fracture toughness by providing sites for crack initiation and propagation.
Porous surfaces can also retain lubricants within their structure, potentially reducing friction by providing a consistent lubricant supply at the contact interface [25,26]. Moreover, these craters, or pores, can act as liquid reservoirs [27]. The size of surface craters can change the lubrication response. For example, larger crater sizes affect the deterioration of the properties of the liquid spreading over the mating surfaces. In that regard, research evaluating the tribological performance and wear mechanisms of additively manufactured steel parts remains open to discussion. While several researchers have studied the wear properties of L-PBF samples, their research has primarily focused on the process parameters of these properties [28,29,30].
Austenitic 316L stainless steel (SS) is suitable for L-PBF processing since it has a wide range of potential applications due to its excellent corrosion resistance, biocompatibility, recyclability, and has gained experience in engineering and biomedical applications [31,32]. Kumar [33] examined the effects of chemical composition and microstructure on wear properties of an iron-based selective laser sintering (SLS) material and determined that an increase in iron content led to a rise in the body centered cubic (BCC) phase and a decline in wear properties. For the specific case of 316L SS, Barrionuevo et al. [34] compared the wear resistance of additively manufactured (L-PBF) 316L SS against a conventionally processed material. The results showed there was a 30% higher wear resistance in the case of the L-PBF samples. This suggests additively manufactured materials could offer potential for applications requiring increased wear resistance.
Several authors have evaluated the performance of 316L SS in dry [35,36] and lubricated [37,38] conditions. Mandev et al. [36] reported that 316L SS alloy was suitable for thermal applications due to its extended surface application and transpiration cooling, while Chen et al. [39] explained that the wear mechanisms of SS depends not only on the applied loads, but, to a greater extent, on the microstructure. In this sense, applying heat treatments is not recommended to improve its wear resistance [40].
Therefore, investigating the effect of porosity on the tribological response of additively manufactured biomaterials is necessary to further the process-controlled porosity in an effort to customize wear resistance. The present study undertakes a systematic approach for relating the laser power and scanning speed during the additive manufacturing of L-PBF 316L SS. The wear resistance is evaluated by taking into account the porosity of the materials. In particular, it is hypothesized that tuning of tribological properties is possible without compromising mechanical strength.

2. Materials and Methods

2.1. Sample Preparation by L-PBF

Austenitic stainless steel of medical grade AISI 316L was used to fabricate prismatic samples with dimensions of 16 × 11 × 6 mm3 (Figure 1). The prime material was a metallic powder with an average particle size of around 33 µm (ranging from 18 to 49 µm) with a nominal chemical composition in wt% as follows: 16.5–18.5% Cr, 10–13% Ni, 2–2.5% Mo, ≤2% Mn, ≤1% Si, ≤0.45% P, ≤0.3% C, ≤0.3% S, and Fe (balance).
A Concept Laser (MLAB 200R) L-PBF system (Lichtenfels, Germany) was employed to manufacture the samples additively. The setup featured a 200 W (Nb: YAG) fiber laser, wavelength 1064 nm. A scanning strategy featuring 67° inter-layer rotation was adopted, and a full-factorial design of experiments of two factors (laser power and scanning speed) at three levels was utilized (Table 1). These parameters were chosen to assure reasonable results based on preliminary runs. Hatch spacing of 60 µm and a layer thickness of 30 µm were kept constant to reduce the number of experimental runs. Nitrogen was used as a shielding agent to prevent the molten metal from reacting with oxygen.

2.2. Microstructural Characterization

The porosity of the samples was determined using Archimedes’ principle as the complement of the relative density (RD), shown in Equations (1) and (2). Three replicas of each experimental run were evaluated to certify the reliability of the results.
R D = m a m a m w ρ w ρ T
P o r o s i t y % = 1 R D
where m a is the mass of the sample in the air, m w is the mass of the distilled water, ρ w is the density of the distilled water, and ρ T is the theoretical density of the 316L SS (7.9 g/cm3). The morphology of the external surface was inspected by optical microscopy (OM) (Nikon Eclipse MA200, Tokyo, Japan) and by scanning electron microscopy (SEM) equipped with an energy-dispersive spectroscopy (EDS) analyzer (TESCAN—MIRA 3, Brno, Czech Republic). The OM and SEM micrographs were processed and analyzed using Fiji software (2.16.0) to calculate the porosity level through the threshold tool [41].
The shape factor (SP) calculated by Equation (3) was employed to gain information on the pore morphology. Per represents the perimeter of the pores, and A is the pore area.
S P = P e r 2 4 π A
The experimental results were analyzed using Minitab 19® to determine the statistical effect of the processing parameters.

2.3. Tribological Characterization

A pin-on-disc tribometer (CSM Instruments, Delémont, Switzerland) evaluated the sliding wear resistance in dry conditions. The tests were conducted with a normal force of 5 N at a sliding speed of 0.0167 m s−1, covering a sliding distance of 30 m with a track diameter of 2 mm. The head of the pin was a silicon nitride (Si3N4) sphere with a pin-end diameter of 5 mm and an average hardness of 1550 HV, which was used as the counterbody.
Volume loss and the wear track were determined using a 3D optical profiler (Zygo, ZeGage, Middlefield, CT, USA). Each of the reported results was an average of over three measurements. In addition, the coefficient of friction (µ) was obtained during the sliding wear test, and the specific wear rate ( ω ) was calculated by Equation (4):
ω = V l F × d
where ω is measured in [mm3 N−1m−1], V l is the volume loss in [mm3], F is the normal force [N], and d is the sliding distance [mm].

2.4. Characterization of Nanomechanical Properties

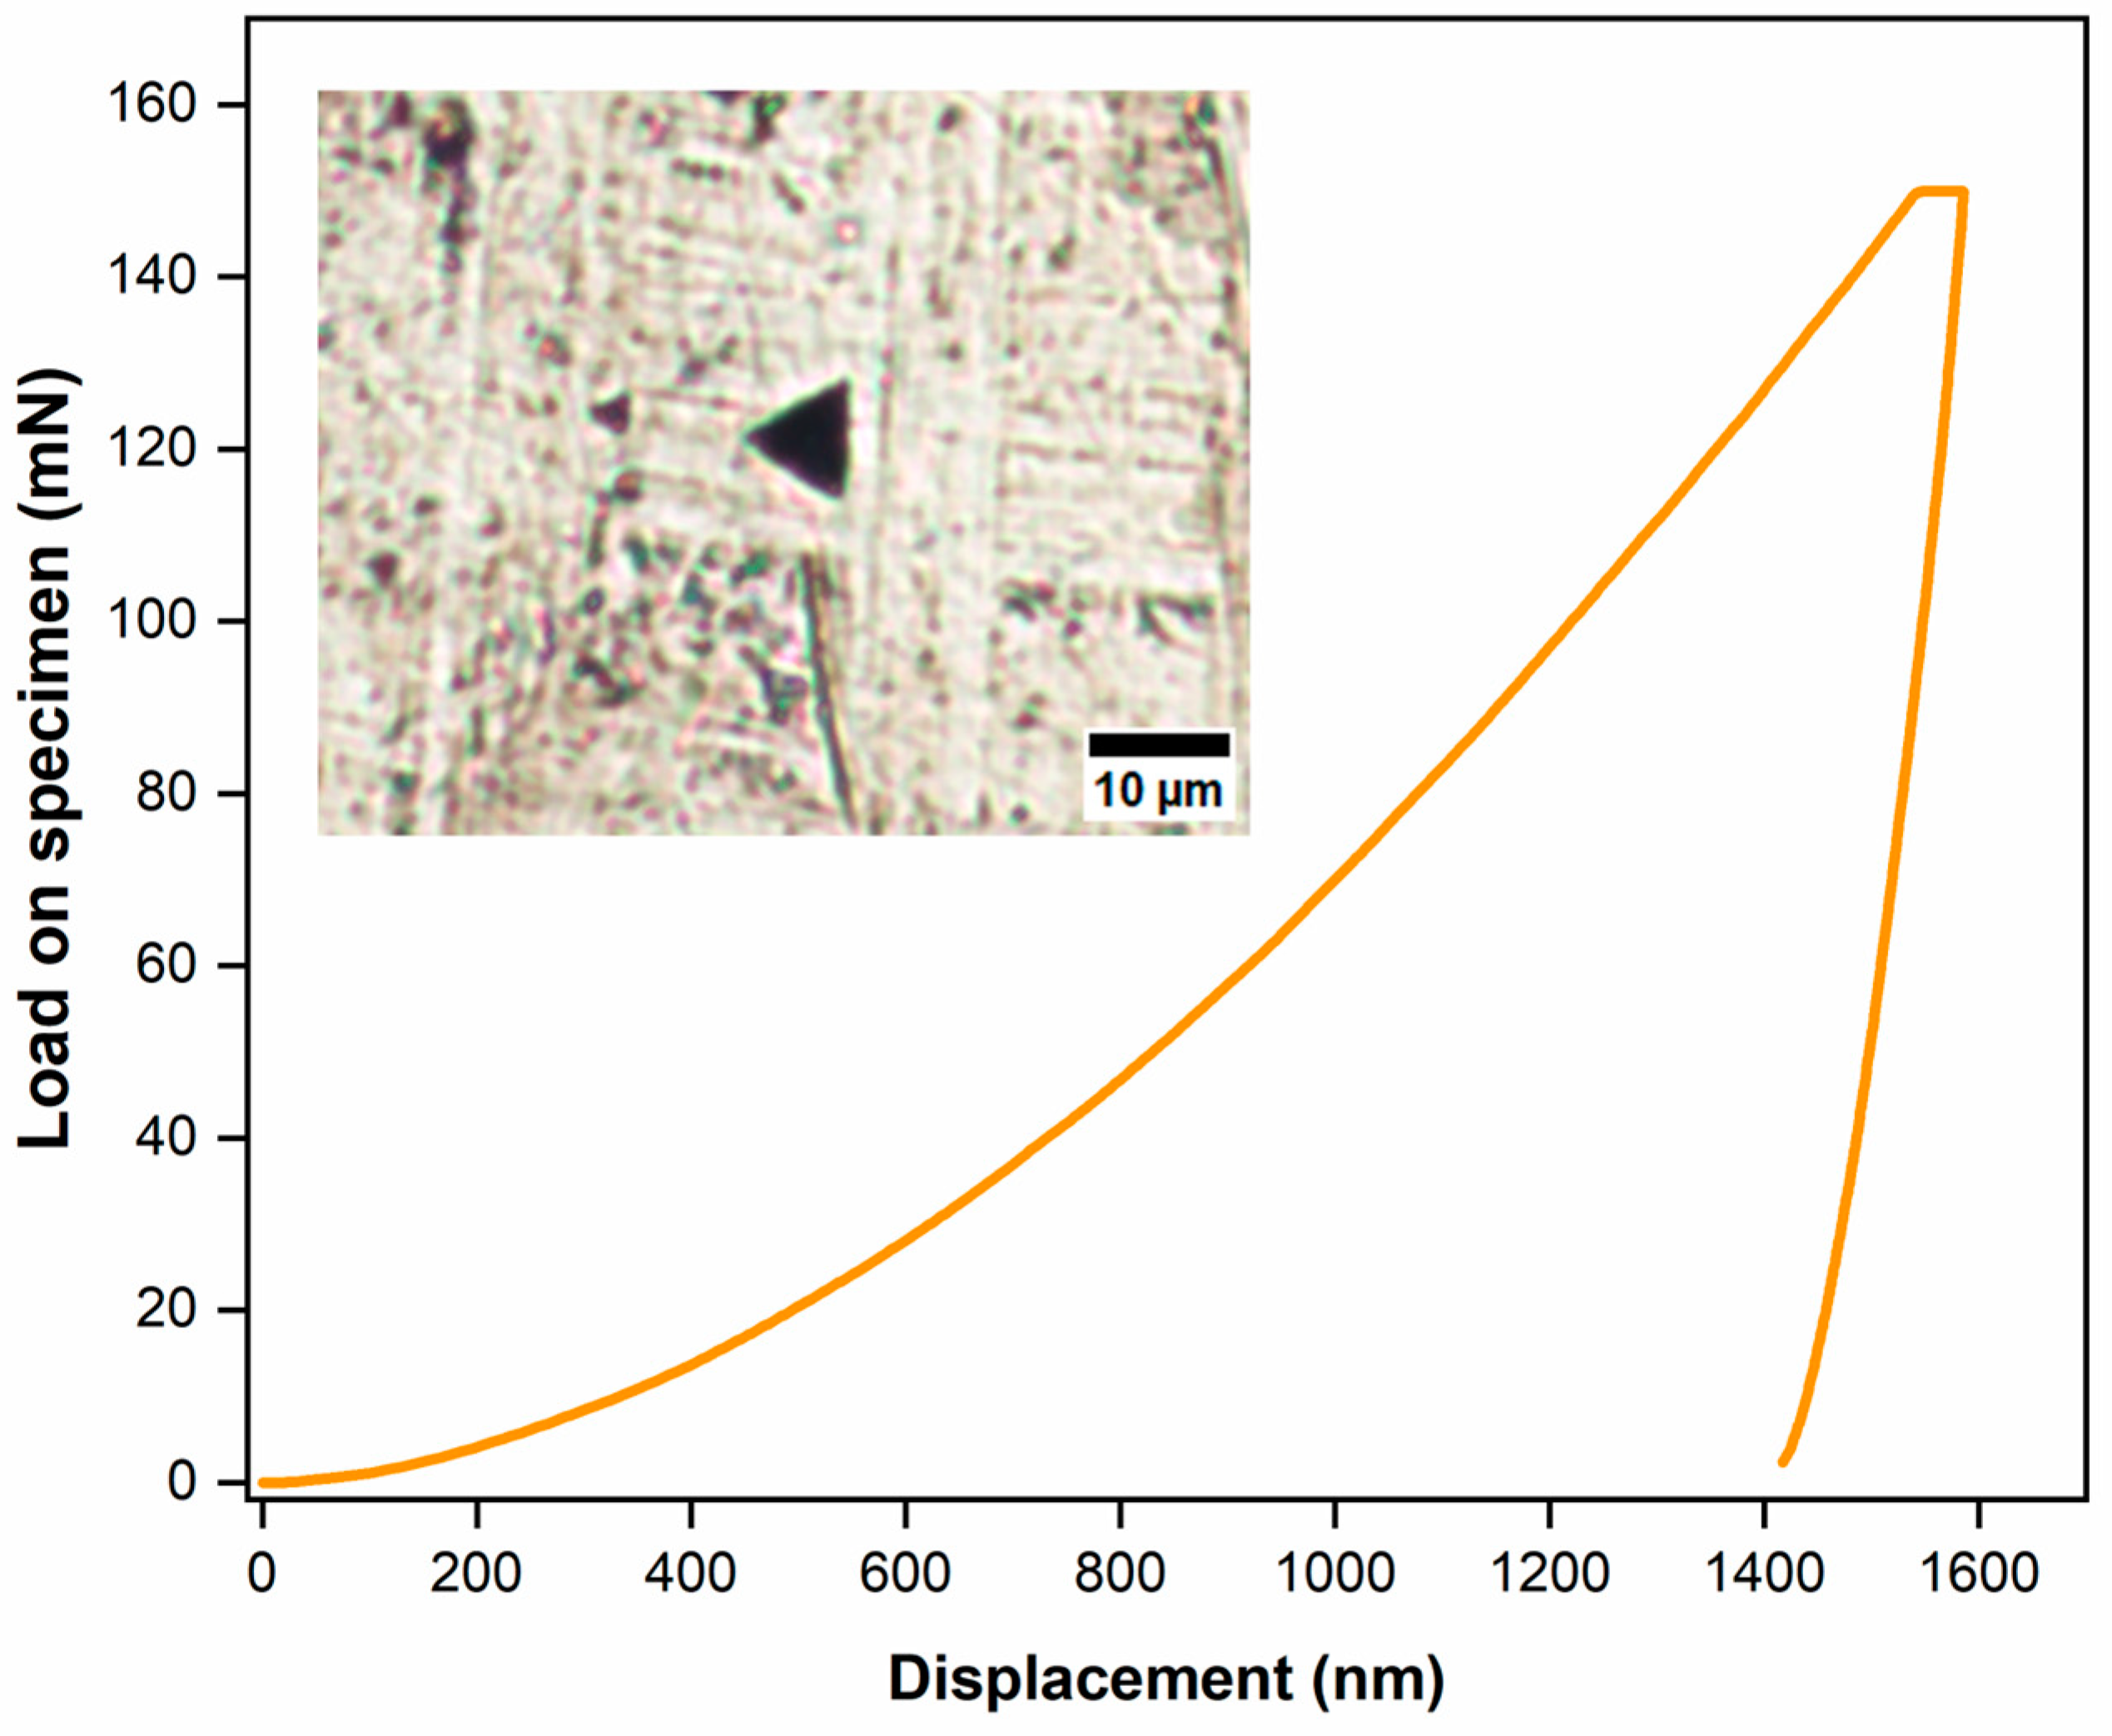
Nanoindentation tests were performed on a porosity-free site with a normal force of 150 mN and a holding time of 10 s using a nanoindentation tester (NHT3) equipped with a standard Berkovich indenter. The Oliver and Pharr method [42] was employed to determine the nanohardness (H) and the reduced elastic modulus (Er) from the loading-unloading curve. The value of H was determined by applying Equation (5):
H = F m a x A c = F m a x 26.43   h c 2  
where F m a x is the maximum indentation force [mN], and hc is the contact depth under the maximum force [nm]. The reduced elastic modulus was evaluated by Equation (6):
1 E r = 1 v s 2 E s + 1 v i 2 E i
where, v s and v i are the Poisson ratio of the sample and the indenter, respectively, and E s and E i are the Young moduli [GPa] of the samples and the indenter, respectively.

3. Results

3.1. Porosity

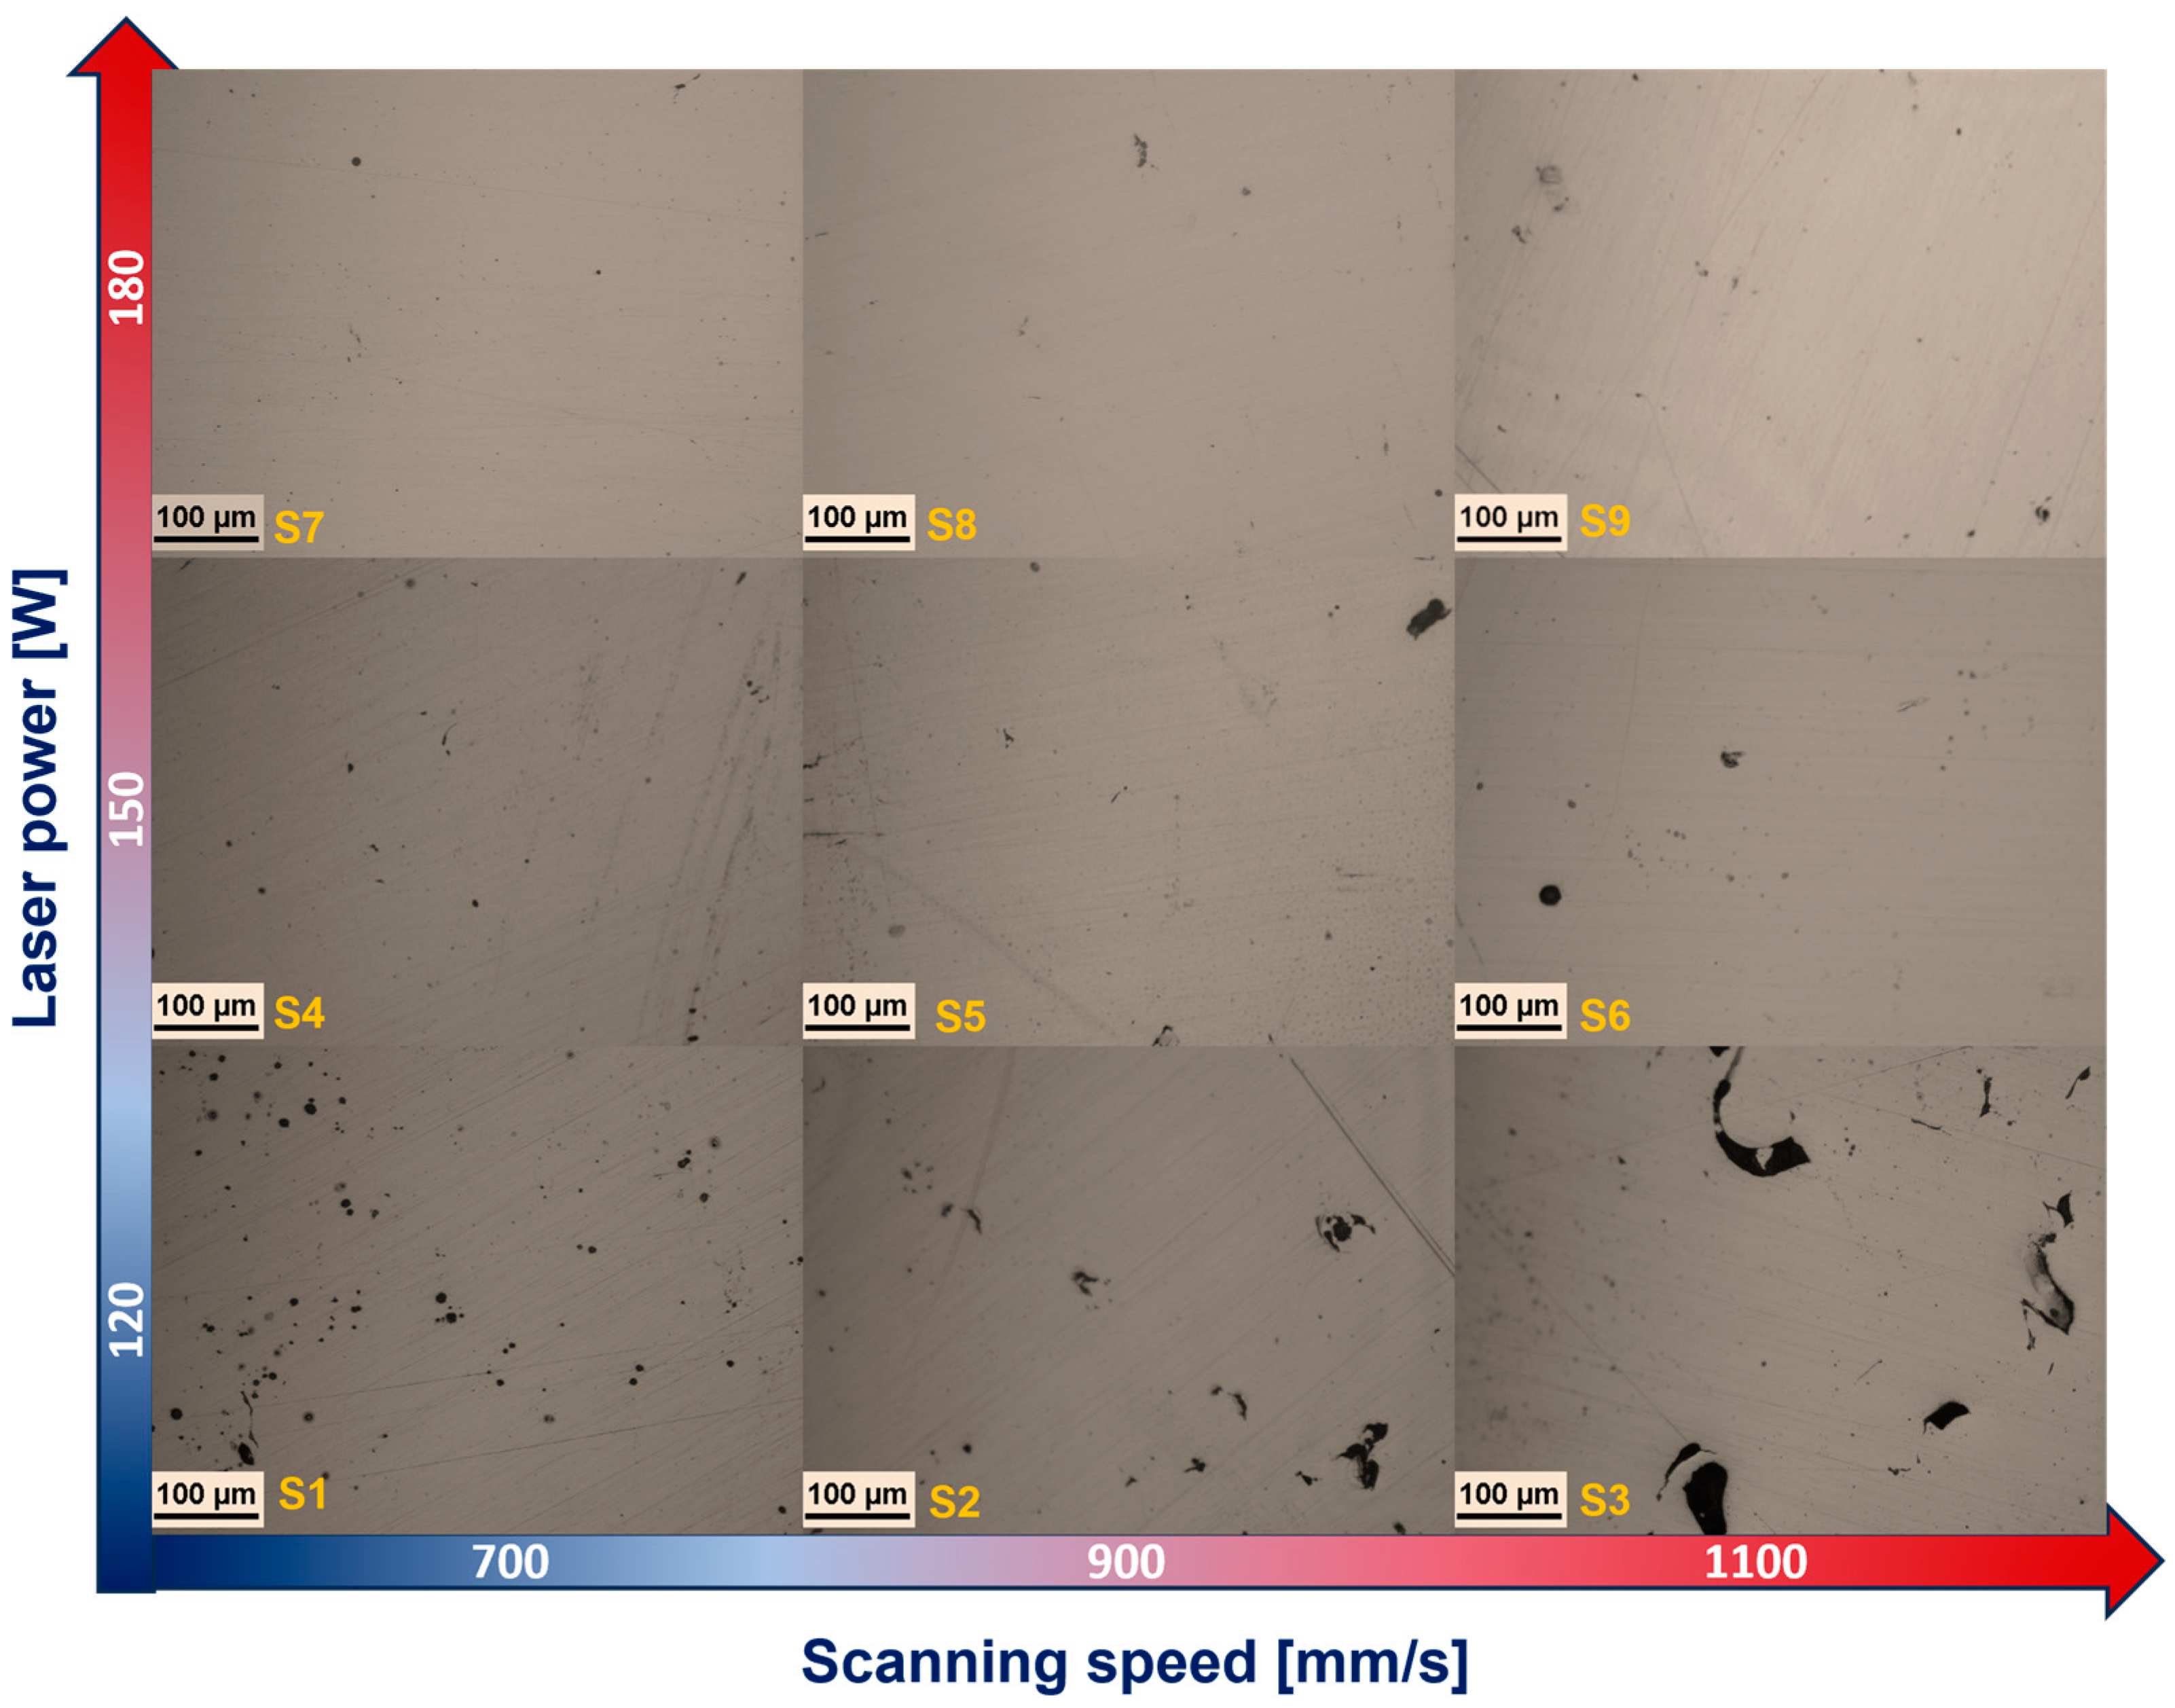
Figure 2 shows the effect of varying the laser power and the scanning speed on the resulting porosity. At a high laser power (180 W), the material presented low porosity, while the speed had an inverse effect. For example, at a scanning speed of 700 mm/s, there was a lower level of porosity compared to a speed of 1100 mm/s where the porosity increased. As reported by several authors [10,26,43,44], insufficient laser energy density tends to produce non-melted and voided regions in the powder layer. This can be statistically verified in the main effect plot graph for porosity (Figure 3).
An average porosity of 5% was obtained when the samples were manufactured with an average laser power (P) and scanning speed (V). To reduce the porosity level, it is recommended to reduce the V and increase the P, while to increase the porosity, it is suggested to increase the V and reduce the P. Table 2 reports the average porosity results with their standard deviations. Using Archimedes’ principle, the sample with the highest porosity (9.1%) was obtained using a low power and high scanning speed. In comparison, the sample with the lowest porosity (1.7%) was obtained with a higher power and lower speed. The porosity calculated by image correlation was lower (<3%). This difference is because the surface porosity did not consider the existing pores inside the samples.
Figure 4 shows the distribution and morphology of a sample with high porosity. The calculated porosity level was 3%, which implies the porosity is closed. A shape factor of about 1 is for spherical pores, while an SP of up to 3.36 was obtained for irregular pores. The reasoning behind shape factors implies that the internal stress concentration around the pores is related to the shape factor. However, the average SP is not directly related to the porosity level. It is worth noting that small pores are generally very close to being perfectly round (SP ~ 1), while large pores are irregular and have a significant internal notch effect on mechanical properties.
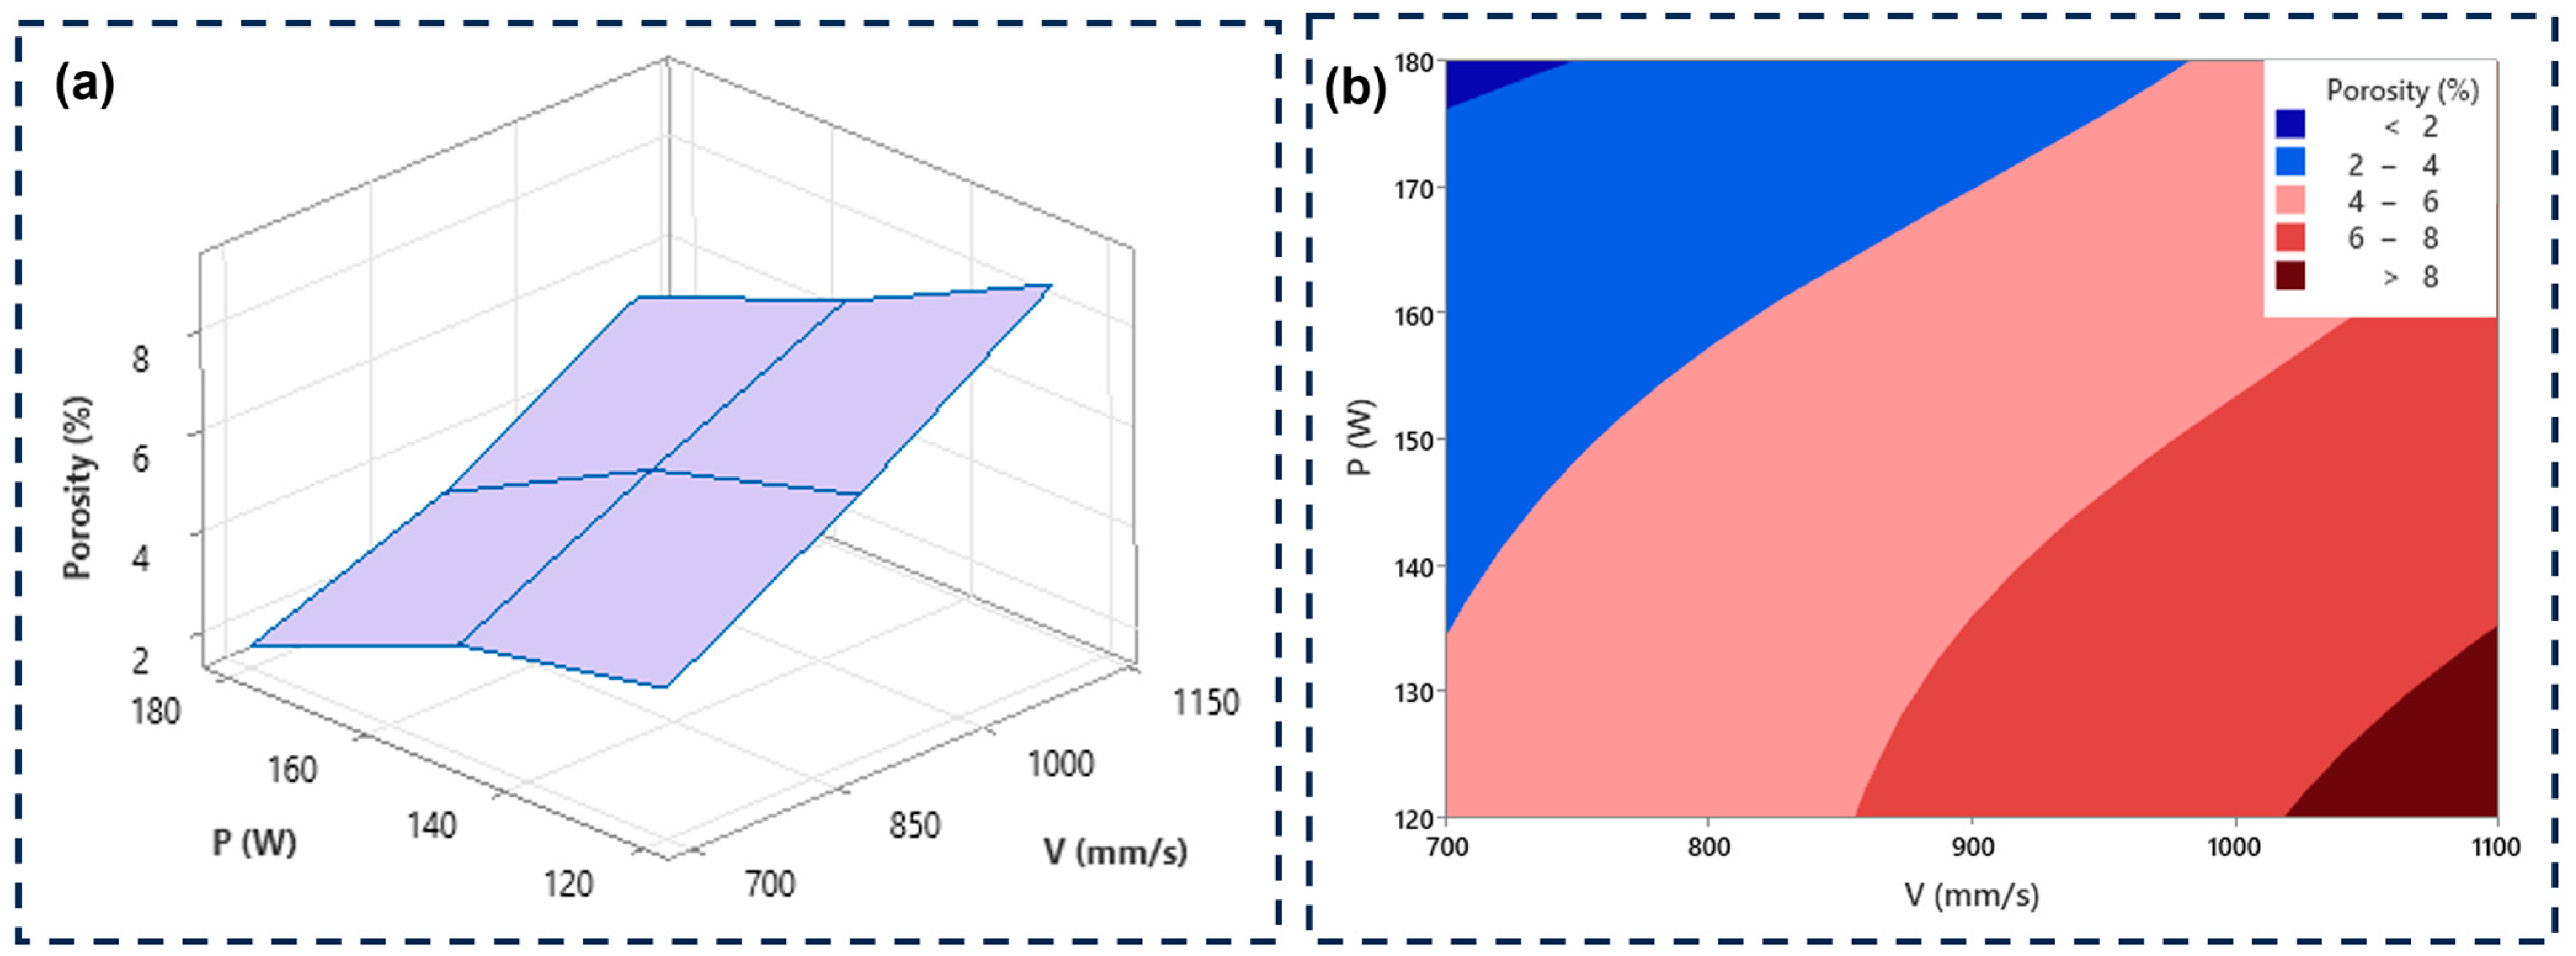
Combining the contour graph and surface plot (Figure 5), a suitable working window can be chosen to control the percentage of porosity by varying laser power and scanning speed. Figure 5a shows a linear behavior, where a higher laser power and a lower scanning speed produces a material with a lower percentage of porosity. Figure 5b shows porosity bands: in the upper left zone is the minimum porosity (<2%); in the central zone, porosity percentages between 2 to 8% can be achieved; and a high porosity is in the lower right zone (>8%).
The analysis of variance of the porosity response is reported in Table 3. As the p-Value determines the statistical significance (<0.05), both laser power (P) and scanning speed (V) impacted the porosity percentage, which is in agreement with the findings of the literature [7,8,45].

3.2. Tribology Performance

3.2.1. Coefficient of Friction

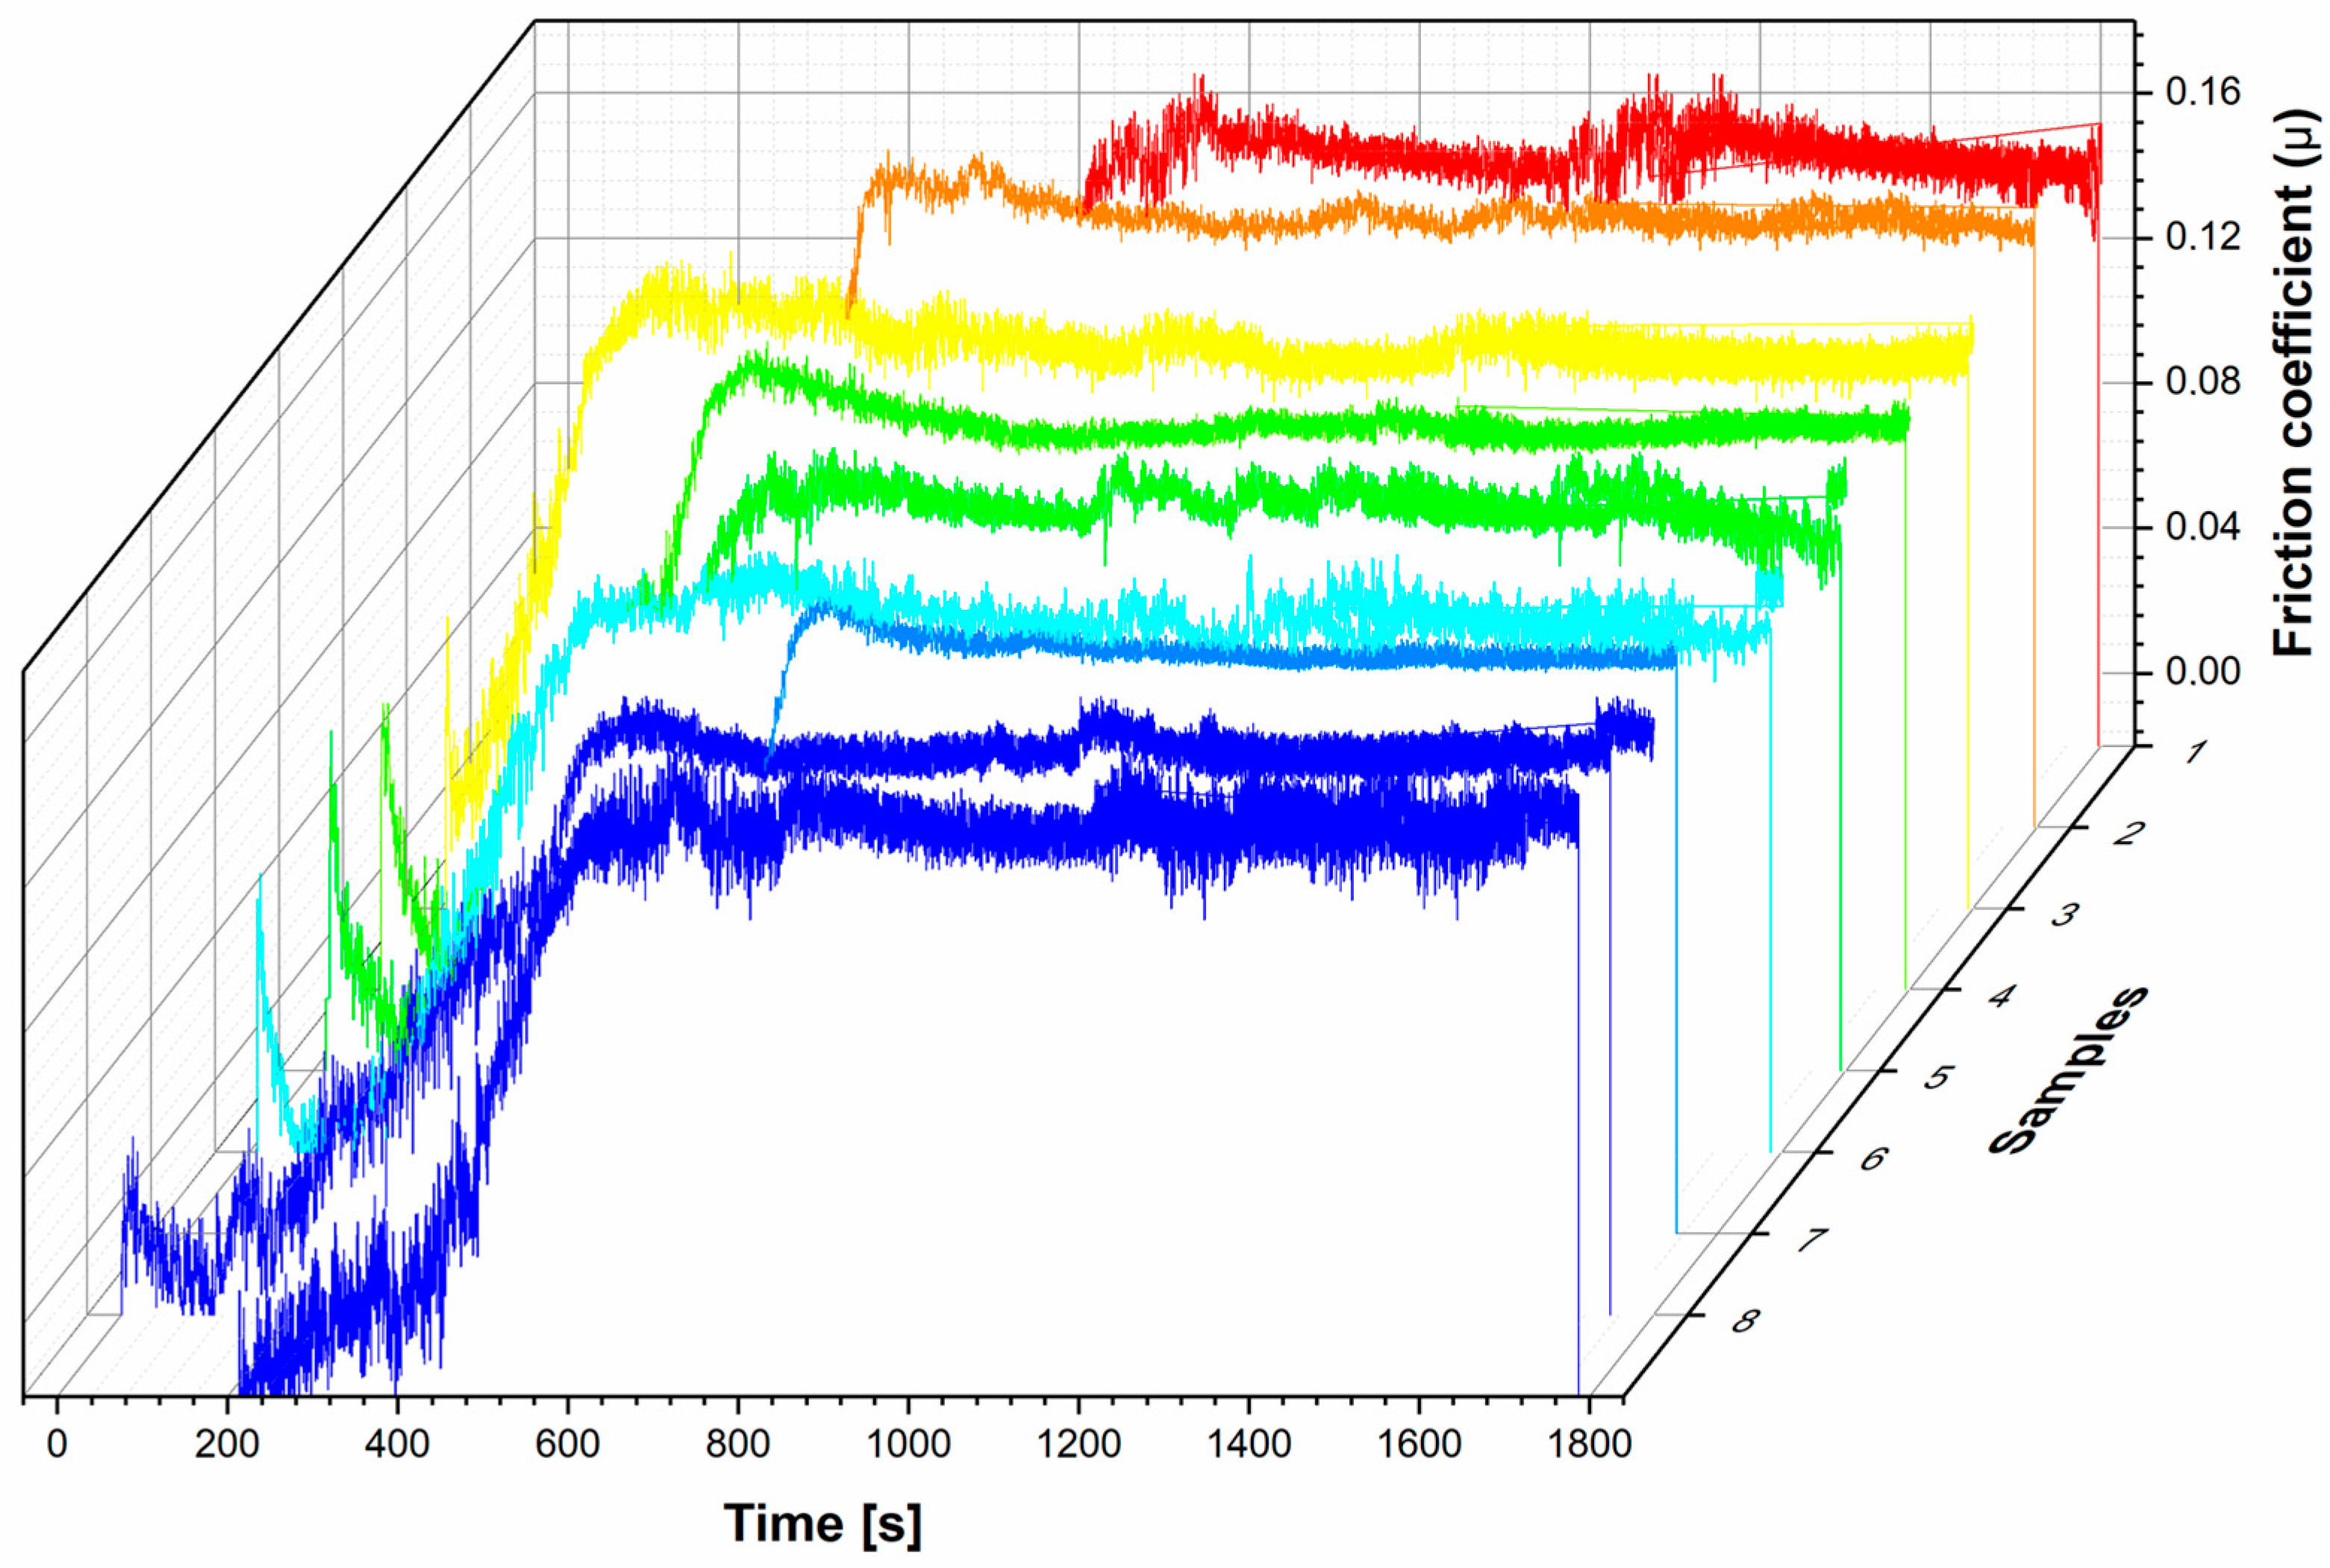
No single model universally describes the synergy between the friction coefficient and wear rate. Several factors, such as surface conditions, hardness, and environmental factors influence this relationship. Figure 6 shows the variation in friction coefficient (µ) during the pin-on-disc test as a function of time. The main difference between the experimental samples is the time to reach the steady-state period. Most samples exceeded the running period of around 400 s (ca. 4 m). In the steady-state period, the µ value varied between 0.122 and 0.151, with an average of 0.137 ± 0.011 (Table 4). However, no relationship between the porosity values and the µ can be observed within the processing parameters evaluated. A comprehensive understanding of the connection between the µ and wear is crucial for enhancing the performance and extending the applicability of biomaterials fabricated by L-PBF.

3.2.2. Wear Resistance

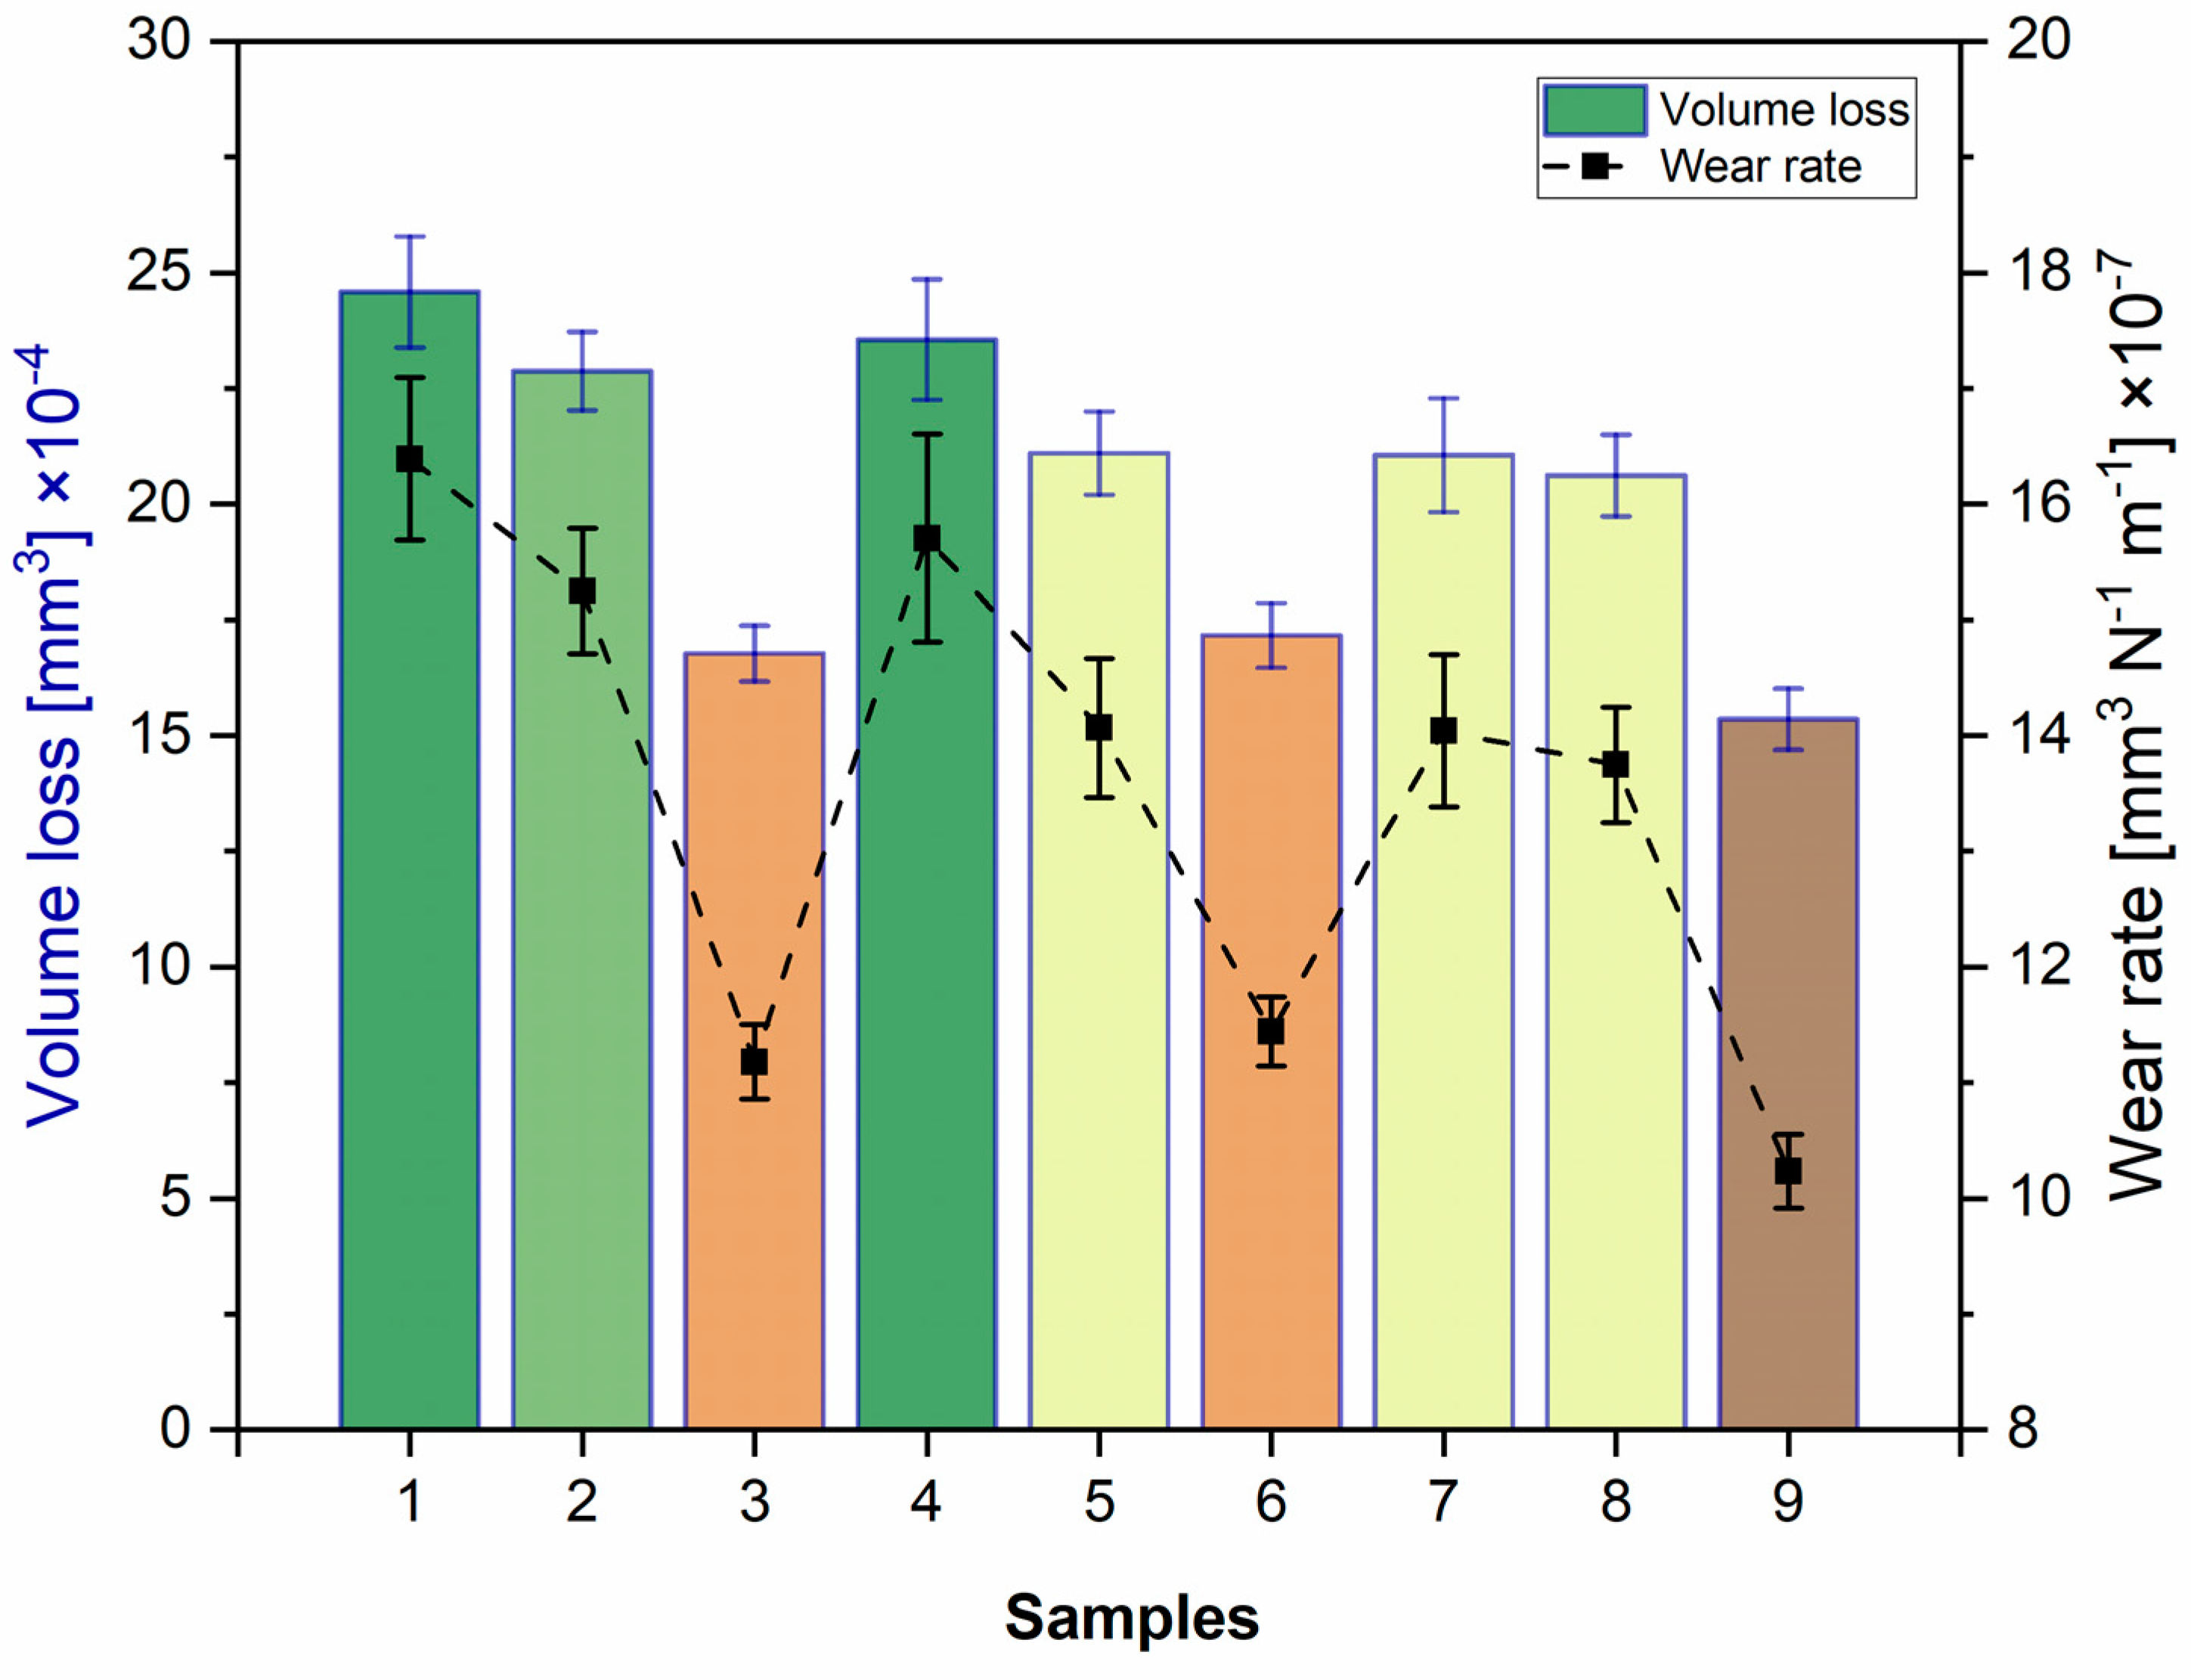
Figure 7 shows the volume loss and the calculated wear rate of the experimental design after the wear tests. Sample 1 exhibited the maximum material loss (24.56 × 10⁻⁴ mm3), while sample 9 suffered the lowest loss (15.35 × 10⁻⁴ mm3). The wear rate was determined using the Archard relationship [46], and the results showed that it varied slightly between 10 and 17 [mm3 N−1m−1] × 10−7 (Table 4). Samples 3, 6, and 9 displayed the lowest wear rate and corresponded to those with the highest porosity level (Table 2).
Figure 8 presents the three-dimensional (3D) surface morphology of the wear track of three representative additively manufactured 316L SS with different porosity levels: low (S9), medium (S6), and high (S3) porosity. Figure 8a exhibited the lowest porosity, with an almost constant wear depth. The wear depth reached a value of around 32 µm. The sample with intermediate porosity showed a reduction in the wear depth (19 µm); nevertheless, it maintained the homogeneity in the wear track. Figure 8c illustrates an irregular wear track where only a few zones exhibited wear marks. This behavior may be associated with the fact that as the material is expelled, the pores serve as a reservoir where the lost material is lodged, and consequently, the wear volume is reduced [16].

3.2.3. Mechanical Properties from Nanoindentation

Figure 9 presents the loading–unloading curve after the nanoindentation test, which is representative for testing biomaterials on the nanometer to micrometer scale. According to Oliver et al. [42,47], nanohardness (H) can be used as an indicator of wear resistance. Wear is associated with the capability to withstand severe plastic deformation and can be determined by the ratio between H3 and Er2. A higher H3/Er2 relationship reflects a superior wear resistance [48]. Table 5 summarizes the mechanical response of 316L SS on the nanometer scale. Since the material analyzed is the same, the results of H and Er do not significantly differ. Therefore, the H3/Er2 ratio is almost equal; consequently, no wear response can be obtained.

4. Discussion

4.1. The L-PBF Process-Induced Porosity

As seen in Figure 10, the high porosity level is associated with the processing parameters. When insufficient energy is applied to melt the powder bed completely, a lack of fusion occurs where the powder remains intact (Figure 10b). Increasing the volumetric energy density slightly melts the powder bed but does not entirely fuse the raw material. As reported by several authors [13,16,49,50,51], to achieve minimum porosity, an energy density higher than 90 [J mm−3] is recommended [45].
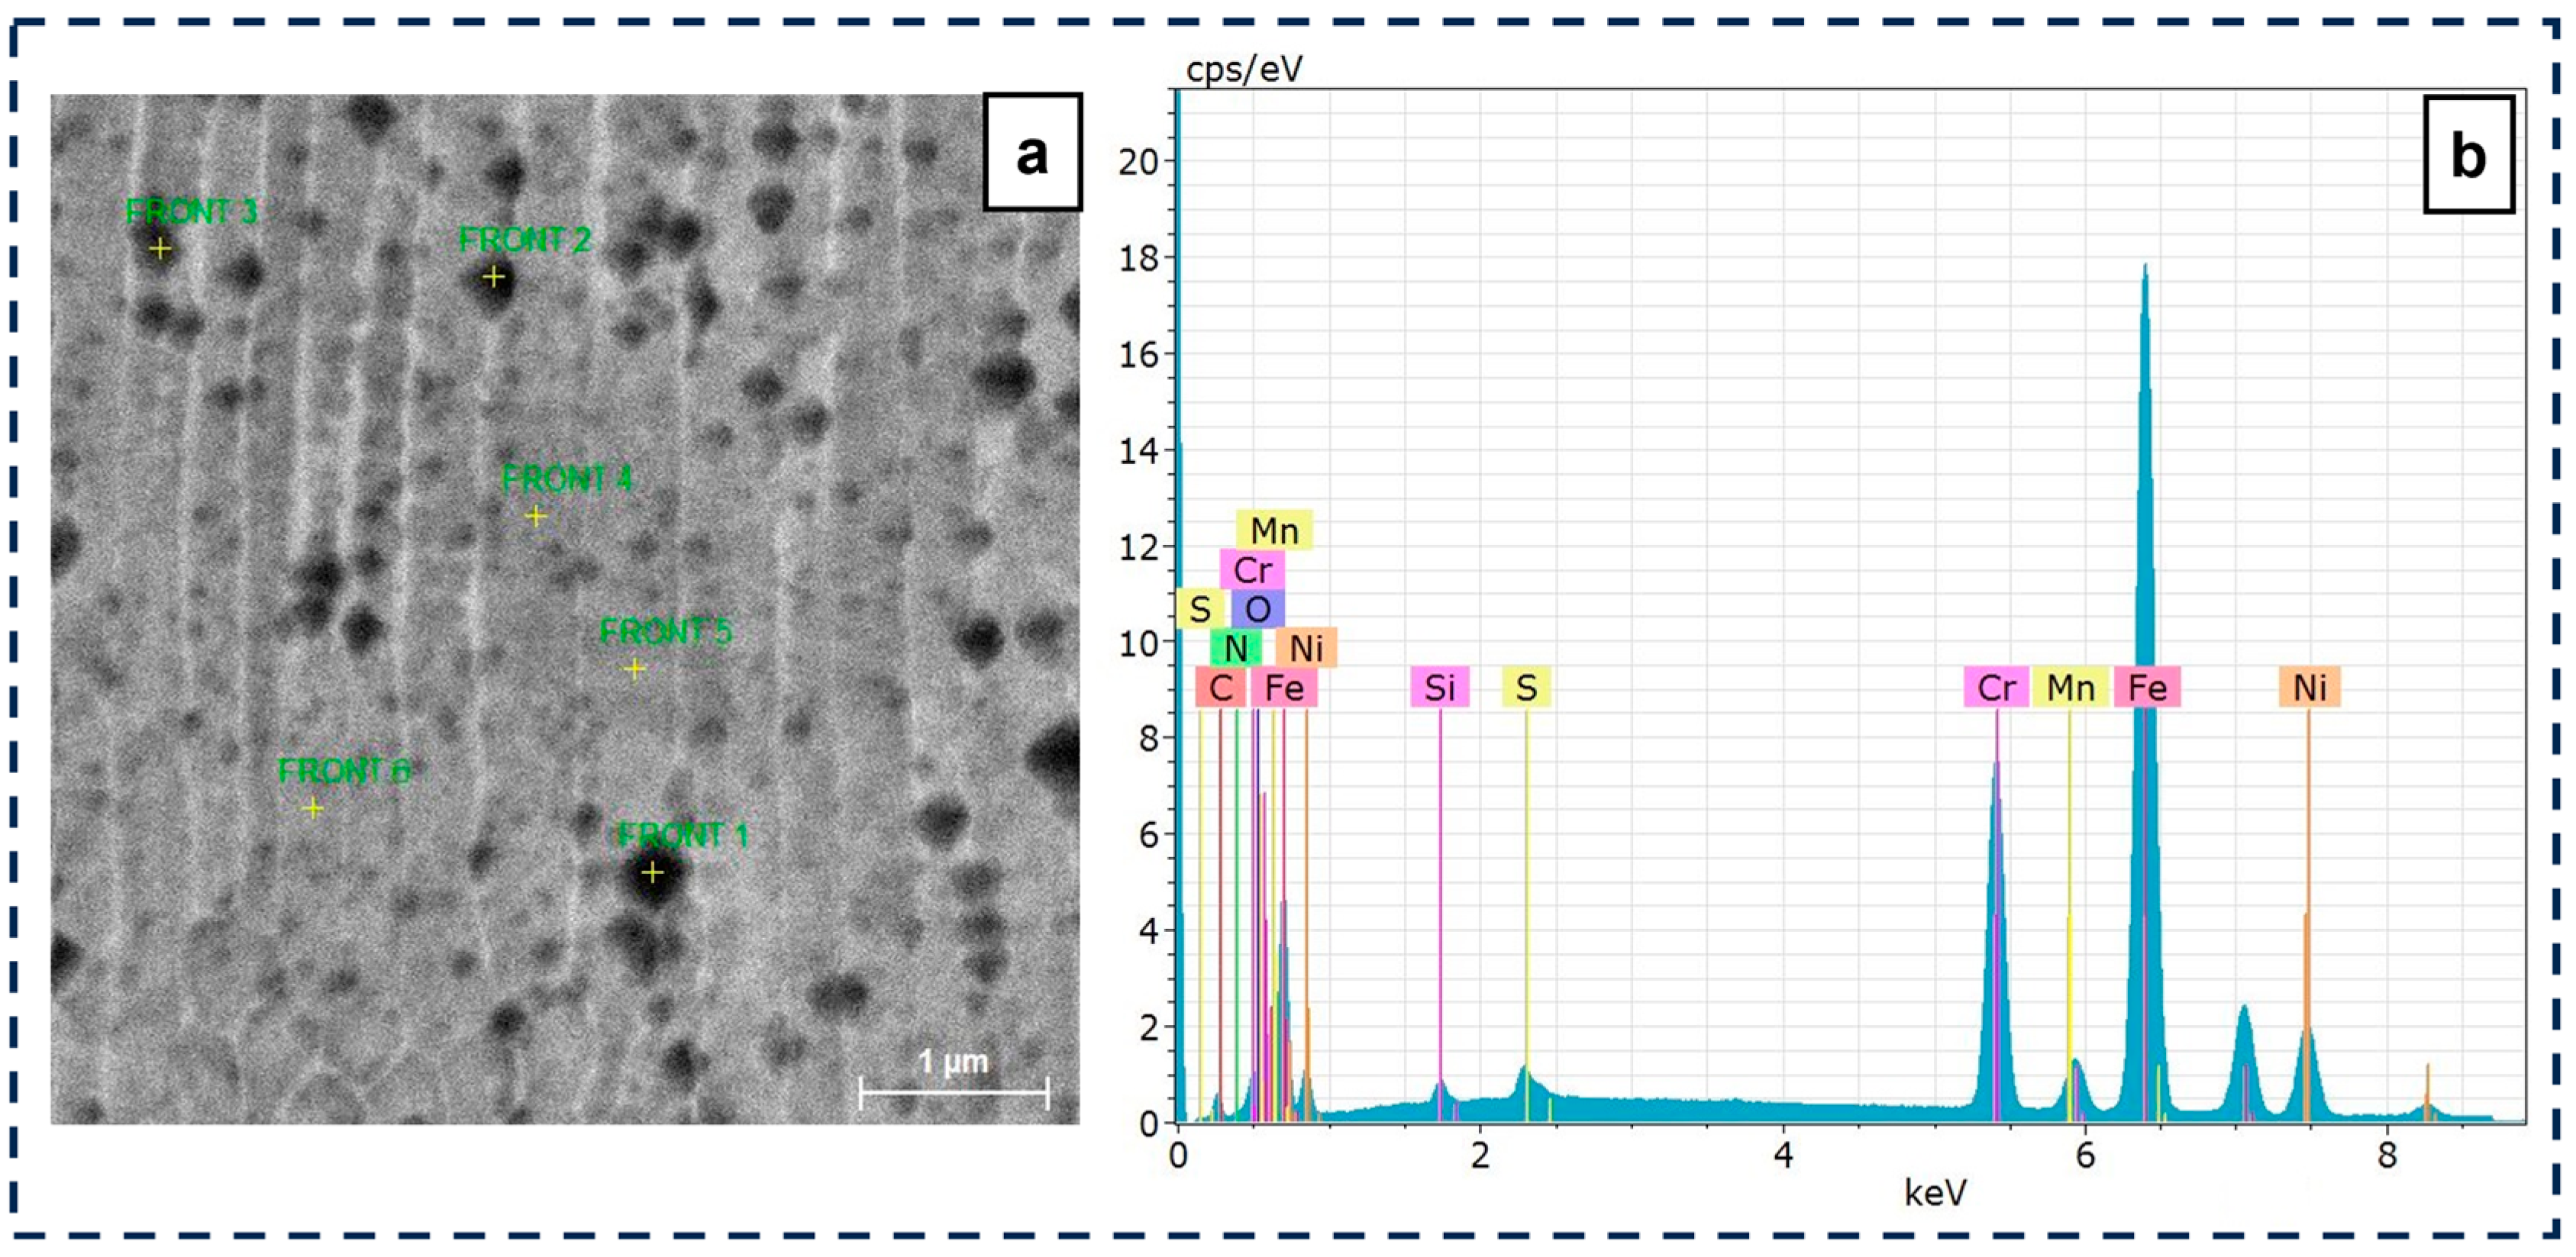
Figure 11 shows the columnar microstructure typical of laser-processed SS, where it is possible to distinguish microporosities [52]. The elemental composition measured on the external surface shows a considerable amount of carbon of around 6%, in addition to the typical values of Fe (66%), Cr (17%), Ni (10.5%), Mo (2.2%), and less than 1% of Si and Mn.
Finding a range of processing parameters is fundamental in L-PBF. As shown in Figure 10 and Figure 11, several porosity types appear during the AM process. While volumetric energy is crucial in avoiding a lack of fusion, microporosities cannot be controlled, as they depend on the raw material [7,23,53,54]. As shown in Figure 8, the level of porosity impacts wear resistance, the effect of which is discussed in the next section.

4.2. Porosity Effect on Tribology Properties

According to the experimental design, the dry dynamic coefficient of friction is not influenced by the processing parameters. The µ ranged from 0.122 to 0.151, which agrees with the reported results of conventional manufactured 316L SS [45,46]. A lower friction coefficient generally means less resistance to sliding and less energy dissipation as heat [25]. Thus, the porosity levels obtained for the range of parameters studied do not significantly affect friction.
Figure 12 shows how the level of porosity impacts the wear track. The sample with lower porosity presents a continuous wear track with an almost homogeneous wear depth. In the sample with intermediate porosity (Figure 12b), it is possible to distinguish areas where the wear track begins to fade due to the appearance of pores that interacted with the pin, thus modifying the wear mechanism. Finally, the wear track is irregular in the specimen with a high porosity level which altered the wear rate (Figure 12c).
Pores play an important role in representing the potential sites of the first microcracks forming and positively influencing the wear process by entrapping the wear debris and preventing the formation of large abrasive agglomerates. Figure 13 shows a trend between porosity level and wear rate. Lower wear losses were obtained when the porosity was higher than 7%.
The overall wear process during sliding is a complex interaction of several sub-mechanisms, e.g., abrasion, adhesion, fatigue, and delamination, each contributing to the overall wear behavior [55]. These sub-mechanisms often operate simultaneously, with their relative contributions depending on factors such as material properties, roughness, sliding speed, loads, and environmental conditions [56]. At a low porosity, adhesive wear prevailed due to the stronger surface interactions and minimal voids. As porosity increased to moderate levels, abrasive wear became dominant as voids weaken the material, allowing micro-cutting and plowing effects. At high porosity, fatigue wear and brittle fracture occurred due to stress concentrations around voids and a reduced structural integrity [2,7,34,36].
In this research, a large number of third bodies (or tribomaterial) were generated during the sliding wear test, of which only a fraction were actually ejected from the tribosystem. The rest may even act as solid lubricants, allowing for smaller rates of material loss. Nevertheless, as abrasive wear progresses, it can expose internal pores, which may then lead to delamination.
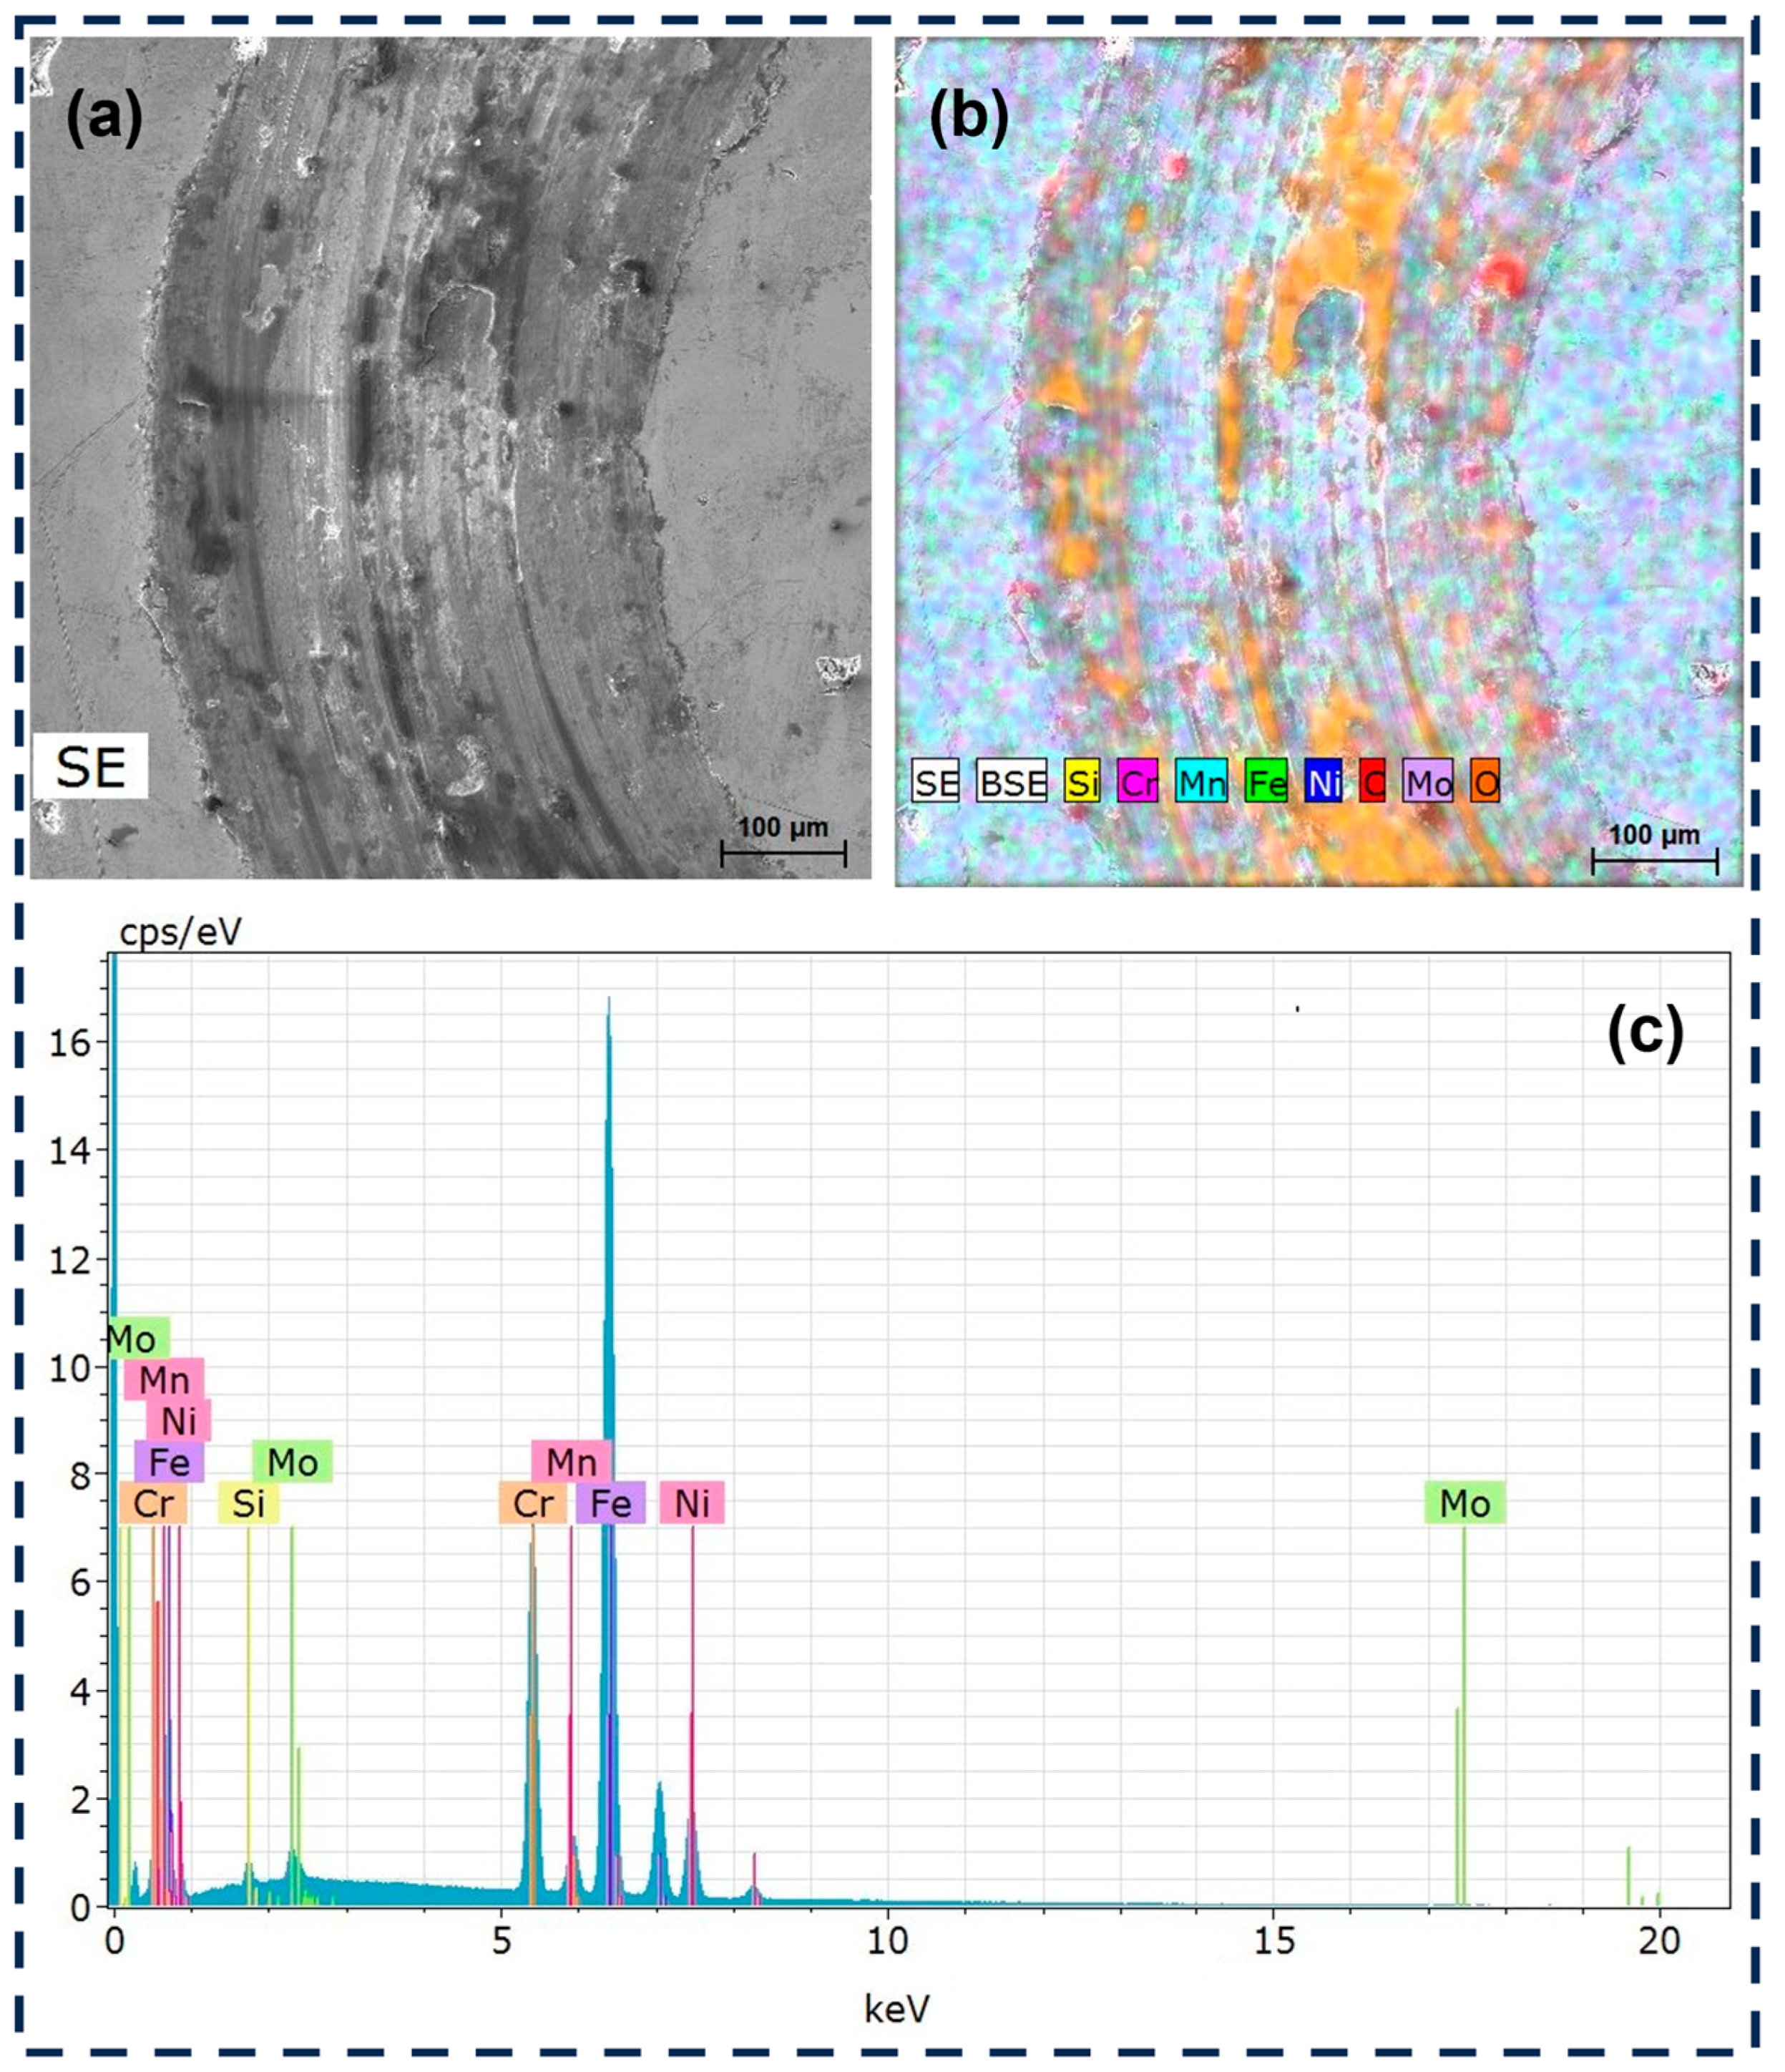
EDS analysis of the wear track (Figure 14) points toward mechanical mixing corresponding to a sub-mechanism of tribochemical reactions [40]. Material transfer, deduced from Figure 14b, indicates the adhesion of Si and O, which must have been generated during the rubbing of the deformed 316L SS against the Si3N4 pin. This would account for mechanical mixing and could protect surfaces if not removed by mechanically dominated mechanisms like abrasion. Figure 14b shows a high concentration of oxygen, indicating an oxidation process, and the oxide layer that formed may be protective. As the oxide layer is brittle, it can fracture and contribute to the wear process by generating abrasive particles.
On the other hand, delamination could also be overfolding. A particular form of microblogging is delamination which is related to surface fatigue, where pores influence crack initialization [57,58]. Nevertheless, subsurface analysis indicated that the primary wear mechanism is overfolding (a phenomenon related to abrasion).
As demonstrated throughout this study, the tribological response can be customized by controlling the porosity level. The most relevant application lies in the biomedical area for prosthesis design, since it would be possible to control the modulus of elasticity and thus reduce stress shielding. However, this behavior must be verified in a lubricated environment before being used in industrial applications.

5. Conclusions

The present research explored the effects of porosity resulting from different laser power and scanning speeds in L-PBF-processed 316L stainless steel on tribological performance. Based on microstructural analysis of the wear tracks produced on pin-on-disc testing, it can be concluded that:
  • A strong correlation exists between the variables of L-PBF processing and porosity, allowing for the tuning of the latter between 1.7 and 9.1% by selecting a suitable laser power and scanning speed. However, in this continuum of porosity, the choice of a working window should consider the possibility of the lack of fusion for combinations of low/high laser power and scanning speed values.
  • There is no evident correlation between porosity and the coefficient of friction; however, materials produced at the highest scanning speed (1100 mm/s) and characterized by higher porosity (>5.5%) tend to be more wear resistant in terms of wear rate, which can be attributed to the capacity of the pores to retain wear debris.
  • The primary wear mechanism in dry sliding against a harder material (Si3N4) is that of three-body abrasion, involving the physical phenomena of adhesion, delamination, oxidation, and tribochemical reactions. Further study of these phenomena is necessary for exploiting the inherent porosity of L-PBF processing to design wear-resistant 316L SS components.
  • This study offered a clear advancement in the comprehension of the porosity effect of tribological properties for biomedical prostheses design. However, verifying this behavior in a lubricated environment is necessary before it can be used in industrial applications.

Author Contributions

Conceptualization, G.O.B. and M.W.; methodology, G.O.B. and P.M.; software, G.O.B. and W.N.-P.; validation, G.O.B., M.W., P.M. and D.E.C.; formal analysis, G.O.B., I.L.F.-P. and M.W.; investigation, G.O.B. and I.L.F.-P.; resources, M.W., P.M. and D.E.C.; data curation, G.O.B. and W.N.-P.; writing—original draft preparation, G.O.B., E.C.-P. and W.N.-P.; writing—review and editing, G.O.B., W.N.-P. and E.C.-P.; visualization, G.O.B., I.L.F.-P. and E.C.-P.; supervision, M.W., P.M. and D.E.C.; project administration, G.O.B. and I.L.F.-P.; funding acquisition, G.O.B., M.W. and P.M. All authors have read and agreed to the published version of the manuscript.

Funding

This research was supported by the Secretaría de Educación Superior, Ciencia, Tecnología e Innovación (SENESCYT) [grant number ARSEQ-BEC-000329-2017]; Agencia Nacional de Investigación y Desarrollo (ANID) project: FONDEQUIP EQM 180081; and Universidad de las Fuerzas Armadas ESPE [grant number 2024-PIM-04].

Data Availability Statement

The original contributions presented in this study are included in the article. Further inquiries can be directed to the corresponding author.

Acknowledgments

The authors are grateful for financial support from SENESCYT; and Universidad de las Fuerzas Armadas ESPE, Proyectos de Investigación Aplicada 2024—Categoría Multidisciplinarios.

Conflicts of Interest

The authors declare no conflicts of interest.

References

  1. Haghdadi, N.; Laleh, M.; Moyle, M.; Primig, S. Additive manufacturing of steels: A review of achievements and challenges. J. Mater. Sci. 2021, 56, 64–107. [Google Scholar] [CrossRef]
  2. Kan, W.H.; Chiu, L.N.S.; Lim, C.V.S.; Zhu, Y.; Tian, Y.; Jiang, D.; Huang, A. A critical review on the effects of process-induced porosity on the mechanical properties of alloys fabricated by laser powder bed fusion. J. Mater. Sci. 2022, 57, 9818–9865. [Google Scholar] [CrossRef]
  3. Chowdhury, S.; Yadaiah, N.; Prakash, C.; Ramakrishna, S.; Dixit, S.; Gupta, L.R.; Buddhi, D. Laser powder bed fusion: A state-of-the-art review of the technology, materials, properties & defects, and numerical modelling. J. Mater. Res. Technol. 2022, 20, 2109–2172. [Google Scholar] [CrossRef]
  4. Charmi, A.; Falkenberg, R.; Ávila, L.; Mohr, G.; Sommer, K.; Ulbricht, A.; Sprengel, M.; Saliwan Neumann, R.; Skrotzki, B.; Evans, A. Mechanical anisotropy of additively manufactured stainless steel 316L: An experimental and numerical study. Mater. Sci. Eng. A 2021, 799, 140154. [Google Scholar] [CrossRef]
  5. Barrionuevo, G.O.; Ramos-Grez, J.A.; Walczak, M.; Sánchez-Sánchez, X.; Guerra, C.; Debut, A.; Haro, E. Microstructure simulation and experimental evaluation of the anisotropy of 316 L stainless steel manufactured by laser powder bed fusion. Rapid Prototyp. J. 2022, 29, 425–436. [Google Scholar] [CrossRef]
  6. Barrionuevo, G.O.; La Fé-Perdomo, I.; Cáceres-Brito, E.; Navas-Pinto, W. Tensile/Compressive Response of 316L Stainless Steel Fabricated by Additive Manufacturing Respuesta a la tensión / compresión del acero inoxidable 316L fabricado por manufactura aditiva. Ingenius 2024, 9–18. [Google Scholar] [CrossRef]
  7. AlFaify, A.; Hughes, J.; Ridgway, K. Controlling the porosity of 316L stainless steel parts manufactured via the powder bed fusion process. Rapid Prototyp. J. 2019, 25, 162–175. [Google Scholar] [CrossRef]
  8. Bartlett, J.L.; Jarama, A.; Jones, J.; Li, X. Prediction of microstructural defects in additive manufacturing from powder bed quality using digital image correlation. Mater. Sci. Eng. A 2020, 794, 140002. [Google Scholar] [CrossRef]
  9. Mukherjee, T.; DebRoy, T. Mitigation of lack of fusion defects in powder bed fusion additive manufacturing. J. Manuf. Process. 2018, 36, 442–449. [Google Scholar] [CrossRef]
  10. Barrionuevo, G.O.; Ramos-Grez, J.A.; Sánchez-Sánchez, X.; Zapata-Hidalgo, D.; Mullo, J.L.; Puma-Araujo, S.D. Influence of the Processing Parameters on the Microstructure and Mechanical Properties of 316L Stainless Steel Fabricated by Laser Powder Bed Fusion. J. Manuf. Mater. Process. 2024, 8, 35. [Google Scholar] [CrossRef]
  11. Jeyaprakash, N.; Saravana Kumar, M.; Yang, C.H.; Cheng, Y.; Radhika, N.; Sivasankaran, S. Effect of microstructural evolution during melt pool formation on nano-mechanical properties in LPBF based SS316L parts. J. Alloys Compd. 2024, 972, 172745. [Google Scholar] [CrossRef]
  12. Khorasani, A.M.; Gibson, I.; Ghasemi, A.H.; Ghaderi, A. A comprehensive study on variability of relative density in selective laser melting of Ti-6Al-4V. Virtual Phys. Prototyp. 2019, 14, 349–359. [Google Scholar] [CrossRef]
  13. Deng, Y.; Mao, Z.; Yang, N.; Niu, X.; Lu, X. Collaborative optimization of density and surface roughness of 316L stainless steel in selective laser melting. Materials 2020, 13, 1601. [Google Scholar] [CrossRef] [PubMed]
  14. Gatto, M.L.; Cerqueni, G.; Groppo, R.; Santecchia, E.; Tognoli, E.; Defanti, S.; Mattioli-Belmonte, M.; Mengucci, P. Improved biomechanical behavior of 316L graded scaffolds for bone tissue regeneration produced by laser powder bed fusion. J. Mech. Behav. Biomed. Mater. 2023, 144, 105989. [Google Scholar] [CrossRef] [PubMed]
  15. Rana, M.; Karmakar, S.; Bandyopadhyay, A.; Roychowdhury, A. Design and manufacturing of patient-specific Ti6Al4V implants with inhomogeneous porosity. J. Mech. Behav. Biomed. Mater. 2023, 143, 105925. [Google Scholar] [CrossRef] [PubMed]
  16. Orgeldinger, C.; Seynstahl, A.; Rosnitschek, T.; Tremmel, S. Surface Properties and Tribological Behavior of Additively Manufactured Components: A Systematic Review. Lubricants 2023, 11, 257. [Google Scholar] [CrossRef]
  17. Lerebours, A.; Demangel, C.; Dembinski, L.; Bouvier, S.; Rassineux, A.; Egles, C. Effect of the Residual Porosity of CoCrMo Bearing Parts Produced by Additive Manufacturing on Wear of Polyethylene. Biotribology 2020, 23, 1–26. [Google Scholar] [CrossRef]
  18. Kyun Sung, M.; Schwerin, M.; Badhe, Y.; Porter, D. Influence of topology optimization parameters on the mechanical response of an additively manufactured test structure. J. Mech. Behav. Biomed. Mater. 2023, 142, 105844. [Google Scholar] [CrossRef]
  19. Zhang, L.; Song, B.; Choi, S.K.; Shi, Y. A topology strategy to reduce stress shielding of additively manufactured porous metallic biomaterials. Int. J. Mech. Sci. 2021, 197, 106331. [Google Scholar] [CrossRef]
  20. Cortis, G.; Mileti, I.; Nalli, F.; Palermo, E.; Cortese, L. Additive manufacturing structural redesign of hip prostheses for stress-shielding reduction and improved functionality and safety. Mech. Mater. 2022, 165, 104173. [Google Scholar] [CrossRef]
  21. Liverani, E.; Rogati, G.; Pagani, S.; Brogini, S.; Fortunato, A.; Caravaggi, P. Mechanical interaction between additive-manufactured metal lattice structures and bone in compression: Implications for stress shielding of orthopaedic implants. J. Mech. Behav. Biomed. Mater. 2021, 121, 104608. [Google Scholar] [CrossRef] [PubMed]
  22. Barrionuevo, G.O.; Walczak, M.; Ramos-grez, J.; Sánchez-sánchez, X. Microhardness and wear resistance in materials manufactured by laser powder bed fusion: Machine learning approach for property prediction. CIRP J. Manuf. Sci. Technol. 2023, 43, 106–114. [Google Scholar] [CrossRef]
  23. Nudelis, N.; Mayr, P. A novel classification method for pores in laser powder bed fusion. Metals 2021, 11, 1912. [Google Scholar] [CrossRef]
  24. Yang, Y.; Zhu, Y.; Yang, H. Enhancing Wear Resistance of Selective Laser Melted Parts: Influence of Energy Density. J. Tribol. 2020, 142. [Google Scholar] [CrossRef]
  25. Yarin, A.L. Wetting for self-healing and electrowetting for additive manufacturing. Curr. Opin. Colloid Interface Sci. 2021, 51, 101378. [Google Scholar] [CrossRef]
  26. Al-Maharma, A.Y.; Patil, S.P.; Markert, B. Effects of porosity on the mechanical properties of additively manufactured components: A critical review. Mater. Res. Express 2020, 7, 122001. [Google Scholar] [CrossRef]
  27. Peta, K. Multiscale Wettability of Microtextured Irregular Surfaces. Materials 2024, 17, 5716. [Google Scholar] [CrossRef]
  28. Yang, Y.; Zhu, Y.; Khonsari, M.M.; Yang, H. Wear anisotropy of selective laser melted 316L stainless steel. Wear 2019, 428, 376–386. [Google Scholar] [CrossRef]
  29. Upadhyay, R.K.; Kumar, A. Scratch and wear resistance of additive manufactured 316L stainless steel sample fabricated by laser powder bed fusion technique. Wear 2020, 458, 203437. [Google Scholar] [CrossRef]
  30. Eliasu, A.; Duntu, S.H.; Hukpati, K.S.; Amegadzie, M.Y.; Agyapong, J.; Tetteh, F.; Czekanski, A.; Boakye-Yiadom, S. Effect of individual printing parameters on residual stress and tribological behaviour of 316L stainless steel fabricated with laser powder bed fusion (L-PBF). Int. J. Adv. Manuf. Technol. 2022, 119, 7041–7061. [Google Scholar] [CrossRef]
  31. Gençoğlu, U.; Kaya, G.; Ergüder, T.O.; Hacısalihoğlu, İ.; Yıldız, F. Investigation of the Structural and Tribological Properties of 316L Stainless Steel Manufactured Using Variable Production Parameters by Selective Laser Melting. J. Mater. Eng. Perform. 2022, 31, 3688–3703. [Google Scholar] [CrossRef]
  32. García-León, R.A.; Martínez-Trinidad, J.; Guevara-Morales, A.; Campos-Silva, I.; Figueroa-López, U. Wear Maps and Statistical Approach of AISI 316L Alloy under Dry Sliding Conditions. J. Mater. Eng. Perform. 2021, 30, 6175–6190. [Google Scholar] [CrossRef]
  33. Kumar, S. Sliding wear behavior of dedicated iron-based SLS materials. Int. J. Adv. Manuf. Technol. 2009, 43, 337–347. [Google Scholar] [CrossRef]
  34. Barrionuevo, G.O.; Walczak, M.; Ramos-grez, J.; Mendez, P.; Debut, A. Microstructure effect on sliding wear of 316L stainless steel selectively laser melted. Mater. Sci. Technol. 2024, 40, 466–478. [Google Scholar] [CrossRef]
  35. Efremenko, B.V.; Zurnadzhy, V.I.; Chabak, Y.G.; Efremenko, V.G.; Kudinova, K.V.; Mazur, V.A. A comparison study on the effect of counter ball material on sliding wear response of SLM-printed biomedical 316L steel. Mater. Today Proc. 2022, 66, 2587–2593. [Google Scholar] [CrossRef]
  36. Vishnu, V.; Prabhu, T.R.; Imam, M.; Vineesh, K.P. Experimental Investigation into the Dry Reciprocating Wear Behavior of Additively Manufactured Austenitic Stainless Steel (316L) Alloys. JOM 2024, 76, 3081–3098. [Google Scholar] [CrossRef]
  37. Mandev, Y.Z.; Mandev, E.; Yetim, A.F. Effects of Laser Powder Bed Fusion Process Parameters on Porosity, Liquid Retention, and Thermal and Surface Properties for 316L, CoCrW and Ti6Al4V Alloys. J. Mater. Eng. Perform. 2024. [Google Scholar] [CrossRef]
  38. Somasundaram, K.; Satheeshkumar, V. Investigations on tribological behavior under lubricated condition of post heat treated additively manufactured SS316L parts. Ind. Lubr. Tribol. 2024, 76, 1003–1014. [Google Scholar] [CrossRef]
  39. Chen, J.; Liu, H.; Xu, X.; Lu, Z.; Cui, T.; Jia, Y.; Que, Z. Effect of Post-Manufacturing Heat Treatment on Wear Performance of Laser Powder Bed Fusion 316L Stainless Steel Under Various Normal Loads. Met. Mater. Int. 2024. [Google Scholar] [CrossRef]
  40. Barrionuevo, G.O.; Calvopiña, H.; Debut, A.; Pérez-Salinas, C. Experimental and numerical investigation of sliding wear of heat-treated 316L stainless steel additively manufactured. J. Mater. Res. Technol. 2024, 33, 2692–2703. [Google Scholar] [CrossRef]
  41. Cole, M.E.; Stout, S.D.; Dominguez, V.M.; Agnew, A.M. Pore Extractor 2D: An ImageJ toolkit for quantifying cortical pore morphometry on histological bone images, with application to intraskeletal and regional patterning. Am. J. Biol. Anthropol. 2022, 179, 365–385. [Google Scholar] [CrossRef]
  42. Oliver, W.C.; Pharr, G.M. An improved technique for determining hardness and elastic modulus using load and displacement sensing indentation experiments. J. Mater. Res. 1992, 7, 1564–1583. [Google Scholar] [CrossRef]
  43. Li, J.; Hu, J.; Cao, L.; Wang, S.; Liu, H.; Zhou, Q. Multi-objective process parameters optimization of SLM using the ensemble of metamodels. J. Manuf. Process. 2021, 68, 198–209. [Google Scholar] [CrossRef]
  44. Yuan, W.; Chen, H.; Cheng, T.; Wei, Q. Effects of laser scanning speeds on different states of the molten pool during selective laser melting: Simulation and experiment. Mater. Des. 2020, 189, 108542. [Google Scholar] [CrossRef]
  45. La Fé-Perdomo, I.; Ramos-Grez, J.A.; Jeria, I.; Guerra, C.; Barrionuevo, G.O. Comparative analysis and experimental validation of statistical and machine learning-based regressors for modeling the surface roughness and mechanical properties of 316L stainless steel specimens produced by selective laser melting. J. Manuf. Process. 2022, 80, 666–682. [Google Scholar] [CrossRef]
  46. Archard, J.F. Contact and Rubbing of Flat Surfaces. J. Appl. Phys. 1953, 24, 981–988. [Google Scholar] [CrossRef]
  47. Oliver, W.C.; Pharr, G.M. Measurement of hardness and elastic modulus by instrumented indentation: Advances in understanding and refinements to methodology. J. Mater. Res. 2004, 19, 3–20. [Google Scholar] [CrossRef]
  48. Zhou, L.; Yuan, T.; Li, R.; Li, L. Two ways of evaluating the wear property of Ti-13Nb-13Zr fabricated by selective laser melting. Mater. Lett. 2019, 242, 9–12. [Google Scholar] [CrossRef]
  49. Shah, R.; Pai, N.; Rosenkranz, A.; Shirvani, K.; Marian, M. Tribological Behavior of Additively Manufactured Metal Components. J. Manuf. Mater. Process. 2022, 6, 138. [Google Scholar] [CrossRef]
  50. Koutiri, I.; Pessard, E.; Peyre, P.; Amlou, O.; De Terris, T. Influence of SLM process parameters on the surface finish, porosity rate and fatigue behavior of as-built Inconel 625 parts. J. Mater. Process. Technol. 2018, 255, 536–546. [Google Scholar] [CrossRef]
  51. Marini, D.; Corney, J.R. Concurrent optimization of process parameters and product design variables for near net shape manufacturing processes. J. Intell. Manuf. 2020, 32, 611–631. [Google Scholar] [CrossRef]
  52. Bahshwan, M.; Gee, M.; Nunn, J.; Myant, C.W.; Reddyhoff, T. In situ observation of anisotropic tribological contact evolution in 316L steel formed by selective laser melting. Wear 2022, 490, 204193. [Google Scholar] [CrossRef]
  53. Pokorný, P.; Václav, Š.; Petru, J.; Kritikos, M. Porosity analysis of additive manufactured parts using caq technology. Materials 2021, 14, 1142. [Google Scholar] [CrossRef] [PubMed]
  54. Sola, A.; Nouri, A. Microstructural porosity in additive manufacturing: The formation and detection of pores in metal parts fabricated by powder bed fusion. J. Adv. Manuf. Process. 2019, 1, e10021. [Google Scholar] [CrossRef]
  55. Fillot, N.; Iordanoff, I.; Berthier, Y. Wear modeling and the third body concept. Wear 2007, 262, 949–957. [Google Scholar] [CrossRef]
  56. Fischer, A.; Dudzinski, W.; Gleising, B.; Stemmer, P. Analyzing Mild- and Ultra-Mild Sliding Wear of Metallic Materials by Transmission Electron Microscopy. In Proceedings of the Advanced Analytical Methods in Tribology; Springer International Publishing: Berlin/Heidelberg, Germany, 2018; pp. 29–59. [Google Scholar]
  57. Nowell, D.; Nowell, S.C. A comparison of recent models for fatigue crack tip deformation. Theor. Appl. Fract. Mech. 2019, 103, 102299. [Google Scholar] [CrossRef]
  58. Madhukarϯ, S.; Harshith Reddy, B.R.; Kumar, G.A.; Naikϯ, R.P. A Study on Improvement of Fatigue Life of materials by Surface Coatings. Int. J. Curr. Eng. Technol. 2018, 8, 5–9. [Google Scholar] [CrossRef]
Figure 1. Schematic representation of the laser powder bed fusion process where the different types of porosity generated can be observed: section view (top) and top view (bottom).
Materials 18 00568 g001
Figure 2. OM images showing the porosity levels of the 316L stainless steel processed by L-PBF using varying scanning speeds and laser power.
Materials 18 00568 g002
Figure 3. Main effect plot of the laser power (P) and scanning speed (V) on the resulting mean porosity.
Materials 18 00568 g003
Figure 4. SEM image showing the pore morphology and distribution of the sample S3.
Materials 18 00568 g004
Figure 5. The effect of laser power and scanning speed on the resulting porosity (a) surface plot and (b) contour plot analysis.
Materials 18 00568 g005
Figure 6. Variation of friction coefficient for the experimental design.
Materials 18 00568 g006
Figure 7. Wear response, evaluation of volume loss, and wear rate.
Materials 18 00568 g007
Figure 8. The 3D morphology features of the wear track produced on 316L SS processed with different porosity levels: (a) low porosity (S9), (b) medium porosity (S6), and (c) high porosity (S3). Maximum depths: −31.754, −19.446, and −59.436 µm, respectively.
Materials 18 00568 g008
Figure 9. Representative nanoindentation response and OM of a sample with a low porosity level (Berkovich tip indenter).
Materials 18 00568 g009
Figure 10. (a) Sample with high porosity level; (b) porosity due to lack of fusion; and (c) porosity with partially melted powder bed.
Materials 18 00568 g010
Figure 11. (a) SEM micrograph of microporosity and (b) EDS analysis of the micropores.
Materials 18 00568 g011
Figure 12. Wear tracks of different porosity levels: (a) low porosity (S9), (b) medium porosity (S6), and (c) high porosity (S3).
Materials 18 00568 g012
Figure 13. Wear rate as a function of the porosity level of 316L stainless steel manufactured by L-PBF.
Materials 18 00568 g013
Figure 14. EDS analysis of the wear track: (a) SEM image, (b) elemental mapping, and (c) spectrum of the 316L SS.
Materials 18 00568 g014
Table 1. Processing parameters of the design of experiments.
FactorsLevels
−101
Laser power [W]120150180
Scanning speed [mm/s]7009001100
Table 2. Experimental factors and porosity responses. Values of porosity obtained using the Archimedes method and image analysis.
Sample IDPower
[W]
Speed
[mm/s]
Archimedes Porosity
[%]
Image Analysis Porosity
[%]
Average Shape Factor
S11207004.3 ± 0.51.161.12
S21209006.5 ± 0.11.213.15
S312011009.1 ± 1.23.022.63
S41507003.4 ± 0.41.241.28
S51509005.3 ± 0.41.481.43
S615011007.1 ± 1.40.321.13
S71807001.7 ± 0.10.211.18
S81809003.2 ± 0.50.252.09
S918011005.4 ± 0.30.472.31
Table 3. Analysis of variance of the porosity percentages.
SourceDfAdj SSAdj MSF-Valuep-Value
Model8121.3915.1721.340.00
Linear4119.8629.9742.150.00
P (W)246.0323.0132.370.00
V (mm/s)273.8436.9251.930.00
Two-Way Interactions41.530.380.540.71
P × V 41.530.380.540.71
Error1812.790.71
Total26134.19
Df: degrees of freedom, SS: sum of squares, MS: mean square, F- and p-values: statistics.
Table 4. Average tribological properties of 316L SS produced by L-PBF.
SampleFriction Coefficient
[-]
Wear Rate
[mm3 N−1 m−1] × 10−7
S10.137 ± 0.01816.39 ± 0.70
S20.146 ± 0.01115.25 ± 0.54
S30.132 ± 0.01211.18 ± 0.32
S40.137 ± 0.00915.71 ± 0.91
S50.129 ± 0.02214.06 ± 0.66
S60.132 ± 0.01311.44 ± 0.32
S70.133 ± 0.01014.04 ± 0.66
S80.138 ± 0.01113.75 ± 0.51
S90.146 ± 0.01610.23 ± 0.32
Table 5. Nanoindentation response of different porosity-level samples processed by L-PBF.
H (GPa)Er (GPa)H3/Er2
Low-porosity samples2.84 ± 0.039141.18 ± 2.480.00115
Medium-porosity samples2.81 ± 0.031145.22 ± 2.480.00105
High-porosity samples2.76 ± 0.019142.19 ± 6.240.00104
Disclaimer/Publisher’s Note: The statements, opinions and data contained in all publications are solely those of the individual author(s) and contributor(s) and not of MDPI and/or the editor(s). MDPI and/or the editor(s) disclaim responsibility for any injury to people or property resulting from any ideas, methods, instructions or products referred to in the content.